

Page 1

Page 2

English Edition
INSTRUCTIONS
Page 3
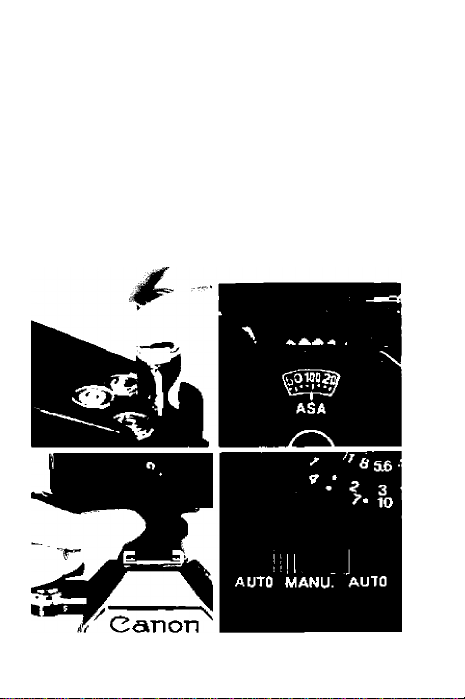
PICTORIAL OUTLINE FOR USING THE CAMERA
A
S e t t h e a p e r t u r e r i n g o f t h e l e n s t o
I the
"A"
mark. Z
')
Load the battery.
Set the ASA film speed.
Select a shutter speed.
Look into the viewfinder.
Compose the picture and focus.
Out of Focus
In Focus
Page 4
Page 5
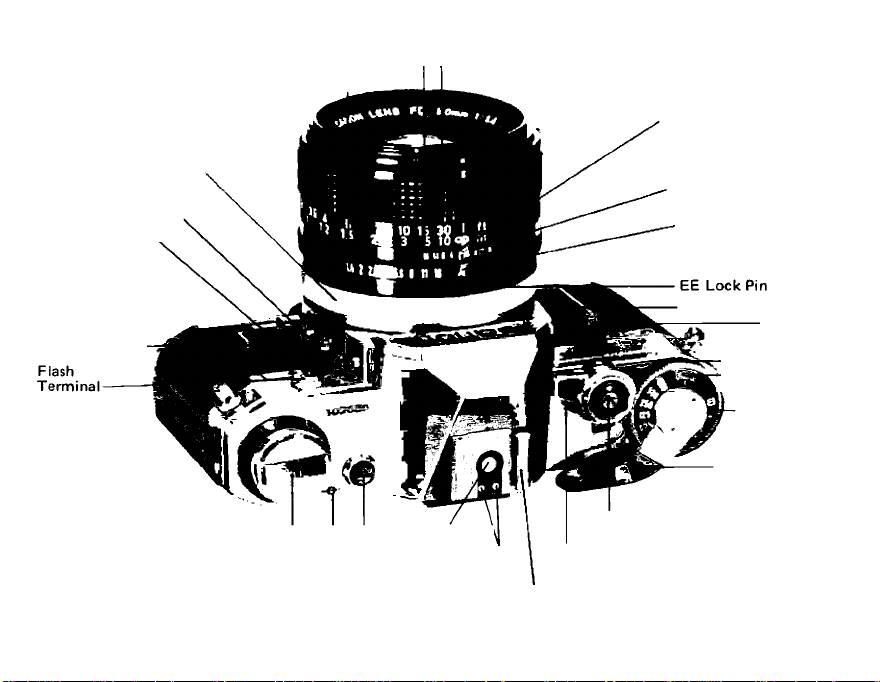
Distance Scale (in feet and meters) Focusing Ring
Bayonet Ring
Aperture Ring
Distance Index
Exposure Preview Switch
Stopped-Down Lever
Depth-of-Field Scale
A" Mark
Battery Chamber Cover
Backlight
Control Switch
Film Speed Set Ring
Film Advance Lever
Film Rewind Crank
Film Plane Indicator
Battery Check Button
While reading the instruction booklet, unfold this flap and the flap on the back cover to facilitate your
uhderstanding of the instructions.
Synchronization ’
Contact Automatic
Flash Contacts
Accessory Shoe
Shutter Release Button
Electronic Self-Timer Lever
(Shutter Release Lock)
Finger Grip
ASA Film Speed
Scale
Shutter Speed Dial
Page 6
Load the film.
Advance film; Check exposure.
Press the shutter button.
Салол frJtrefcerJ
Page 7
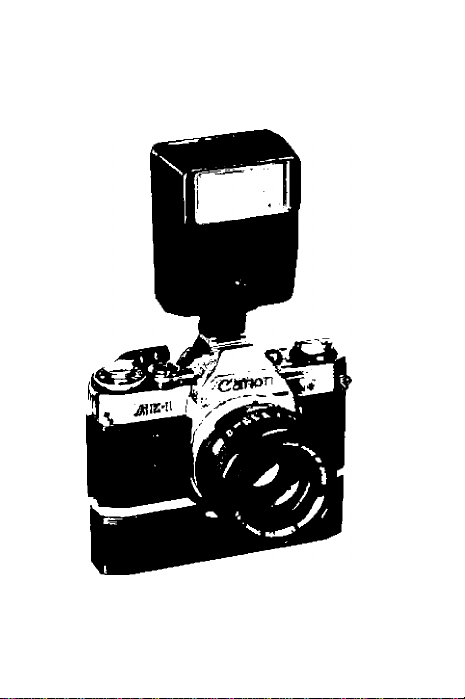
Photography with the Canon Speedlite
155 A
1. Load the batteries.
2. Set the ASA film speed.
3. Mount the Speedlite 155A on the AE-1
4. Turn the main switch on.
5. Set the AUTO/MANU. switch.
6. Focus and press the shutter button.
Page 8

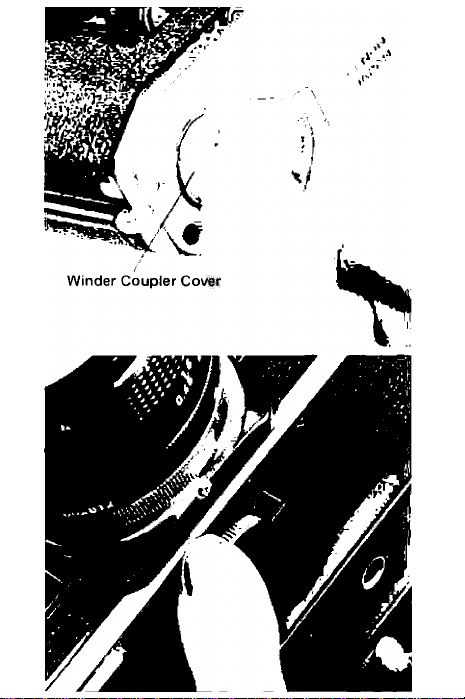
Photography with the Canon Power
Winder A
Remove the Battery Pack A.
1.
Load the batteries into the Battery Pack A.
2.
Attach the Battery Pack A to the Power
3.
Winder A.
Take off the winder coupler cover.
4.
Attach the Power Winder A to the AE-1.
5.
Turn the main switch on.
6.
Focus and press the shutter button.
7.
i^gp;
Page 9
Page 10

TABLE OF CONTENTS
SPECIFICATIONS.......................................8-11
PRELIMINARY PREPARATION .... 12
Mounting the Lens and Setting the
Aperture Ring to the "A" Mark
Loading the Battery and
Battery Check
Loading the Film and Setting
the ASA .....................................................17-20
OPERATION FOR
GENERAL PHOTOGRAPHY
Selecting the Shutter Speed
Focusing and Dioptric
Adjustment Lenses
Holding the Camera
Rewinding the Film
Double-Check Before Shooting
DETAILED OPERATION OF
THE AE-1 .......................................................35
Viewfinder Information and
Meter Sensitivity Pattern ................................37
AE Coupling Range and
Overexposure Warning Mark
Underexposure and
Coupling Range Warning LED Lamp ... 39
...........................................
...................................
......................................
.........................................
........................
14-16
..........................
..........................
27-28
.....................
.........................
13
23
25
31
33
34
38
Page 11

Stopped-Down Metering Index Mark
and Manual Aperture Control
"M" Signal .......................................................40
Effects of Changing the Shutter
Speed and the Aperture ............................41-42
Depth-of-Field ...........................................43-44
Using the Self-Timer
Shooting Against the Light and
Long Exposures ........................................47-48
Stopped-Down Metering
Lock for Manual Aperture Control . . 50-51
Lenses ......................................................53-56
ACCESSORIES, CARE OF THE CAMERA,
MAINTENANCE, AND MISCELLANEA 57
Canon Speedlite 155A 59
Flash Photography with the AE-1
Canon Power Winder A..................................61
Canon Data Back A
and Bellows FL ...............................................63
Other Accessories
Characteristics
Care and Storage of the Camera .... 71-72
Using the Camera in
Very Cold Conditions
.......................................
................................
..................
....................................
...........................................
.....................................
45
49
60
64-65
66-69
73
Page 12

SPECIFICATIONS
Type: 35mm SLR (Single-Lens-Reflex)
camera with electronically controlled AE
(Automatic Exposure) and focal plane
shutter.
Picture Sjze: 24 x 36mm
Interchangeable Lenses: Canon FD series
with full aperture metering and AE coupling.
Canon FL series with stopped-down
metering.
Standard Lenses: Canon FD 55mm f/1.2
S.S.C.
Canon FD 50mm f/1.4 S.S.C.
Canon FD 50mm f/1.8 S.C.
Lens Mount: Canon Breech-Lock mount.
Canon FD, FL and R lenses can be used.
Viewfinder: Fixed eye-level pentaprism.
Field of View: 93.5% vertical and 96%
horizontal coverage of the actual picture
area.
Magnification: 1:0.86 at infinity with a
standard 50mm lens.
Viewfinder Information: Split-image/mjcro-
prism rangefinder, aperture scale with
meter needle and stopped-down metering
Page 13

index mark which also serves as battery
charge level check mark. Besides, there are
two red zones at the top of the aperture
scale to warn of overexposure.
Below the aperture scale, a red warning
LED lamp blinks to indicate under
exposure.This lamp also indicates that the
selected shutter speed is outside the AE
coupling range with respect to the ASA
of the film being used.
Above the aperture scale, a manual
aperture control "M" signal (red LED)
blinks as a warning that the aperture
ring is not set at the "A" mark for AE
photography.
Viewfinder Attachments: Angle Finder A2
and B, Magnifier S, Dioptric Adjustment
Lens (10 kinds), and Eyecup S.
Mirror: Instant-return, large reflector mirror
with shock absorbing mechanism.
AE Mechanism: Shutter priority, electro
nically controlled AE metering system
incorporating two ICs and one LSI equi
pped with L (Integrated Injection Logic)
Light Metering System: TTL (ThroughThe-Lens) Central Emphasis Metering
Page 14

method employing a Silicon Photocell as
photosensitive element.
Exposure Meter Coupling Range: With ASA
100 film, EV1 (f/1.4 at one second) to
EV18 (f/16at 1/1000 second).
Film Speed Range: ASA 25 to ASA 3200.
Exposure Correction: By pressing the back
light control switch, exposure is corrcted
by the automatic opening of the dia
phragm 1.5 stops more on the aperture
scale than the actual setting.
Exposure Preview: The meter needle will
indicate in the viewfinder when the
shutter release button is depressed half
way or the exposure preview switch is
depressed.
Shutter: Cloth focal plane shutter with four
spindles. Shock and noise damping
mechanisms are incorporated. All shutter
speeds are electronically controlled.
Shutter Speeds: 1/1000, 1/500, 1/250,
1/125, 1/60, 1/30, 1/15, 1/8, 1/4, 1/2, 1,
2 (seconds) and B. X synchronization is
at 1/60 seconds.
Shutter Speed Dial: The shutter speed dial is
on the same axis as the film advance
Page 15

lever. The number 2 for two seconds is
marked in orange; other numbers as well
as X synchronization are in white.
There is a shutter dial guard to prevent
unintentional movement of the dial.
The ASA dial is located underneath
the shutter speed dial.
Shutter Release Button; It is a large, button
type magnetic release switch. Depressing
the shutter release button halfway
switches on the light metering circuit,
while full depression releases the shutter.
The shutter release button has a locking
device, besides a socket for the cable
release in the center.
Self-Timer; Electronically controlled self-
timer. After the self-timer lever is pushed
forward, the self-timer is activated by the
shutter release button. The self-timer
releases the shutter after a time lag of 10
seconds. A self-timer lamp (red LED)
blinks on and off to indicate when the
self-timer is in operation.
Stopping-Down the Lens: Stopping-down the
lens can be performed by pushing the
stopped-down lever after setting the
Page 16

aperture ring.
Power Source: One 6V silver oxide battery
Eveready No.544, UCAR No.544 JIS
4G13, or Mallory PX28) or alkaline man
ganese battery (Eveready No.537, UCAR
No.537, or Mallory 7K13). The battery
lasts approximately one year under
normal use.
Battery Check: Battery power level can be
checked by the meter needle in the
viewfinder when the battery check
button is pressed.
Flash Synchronization: X synchronization is
at 1/60 second.
M synchronization is at 1/30 second and
below.
Flash Terminal: The accessory shoe has a
direct flash contact and automatic flash
control contacts. On the front of the
camera body is the flash terminal, JIS-B
type for flash units with a cord. It has a
built-in protective rim to prevent elec
trical shock.
Automatic Flash: With the exclusive Canon
Speedlite 155A, the shutter speed and
aperture are automatically set. The
Page 17

amount of light is automatically con
trolled for correct flash exposure.
Back Cover: The camera's back cover has a
memo holder for your convenience. The
cover can be removed for attaching the
Canon Data Back A. To open, pull the
rewind crank up.
Film Loading: Easy film loading with multi
slot take-up spool.
Film Advance Lever: Single stroke with 120°
throw and 30° stand-off. The film can be
wound with several short strokes. The
Canon Power Winder A also can be
mounted for automatic winding of the
film.
Frame Counter: Additive type. Auto
matically resets when the back cover is
opened. While rewinding film, it counts
back the frame numbers.
Film Rewinding: Performed by pressing
the rewind button on the bottom and by
using the rewind crank on the top. The
rewind button is automatically reset
when the film is advanced with the film
advance lever.
Page 18

Safety Devices:
• The shutter does not drain battery
power when not released.
• The film cannot be wound while the
shutter is in operation.
Size: 141 x 87 x 47.5mm (5-9/16" x 3-7/16"
X 1-7/8") body only.
Weight: 590g (20-13/16 ozs.) body only.
790g (27-7/8 ozs.) with the 50mm
f/1.8 S.C. lens.
895g (31-9/16 ozs.) with the 50mm
f/1.4S.S.C. lens.
Subject to change without notice.
Page 19
Page 20

12
Page 21

PRELIMINARY PREPARATION
Attaching the Neckstrap
Attach the Canon AE-1's neckstrap by
threading it through the rings and adjusting it
to the desired length as indicated in the
photos. A case for a spare battery can be
attached to the neckstrap.
Handling the Lens Cap
The lens cap can be removed from the
front of the lens after pressing in the tabs on
both sides of the cap. The rear dust cover can
be removed by turning the bayonet ring in the
direction of the arrow. To attach the dust
cover, align its slot with the positioning pin
below the red dot of the bayonet ring, and
press it in. When the dust cover is removed,
the bayonet ring is locked.
For an explanation of how the lens
mechanisms function, see page 52.
Page 22

'i Mounting the Lens
I
Remove the body cap and mount the lens
onto the camera. The lens is mounted by
aligning the red dot of the body with the red
dot of the bayonet ring, and then turning the
bayonet ring clockwise, pressing gently until it
locks into position. Reverse the procedure to
dismount the lens.
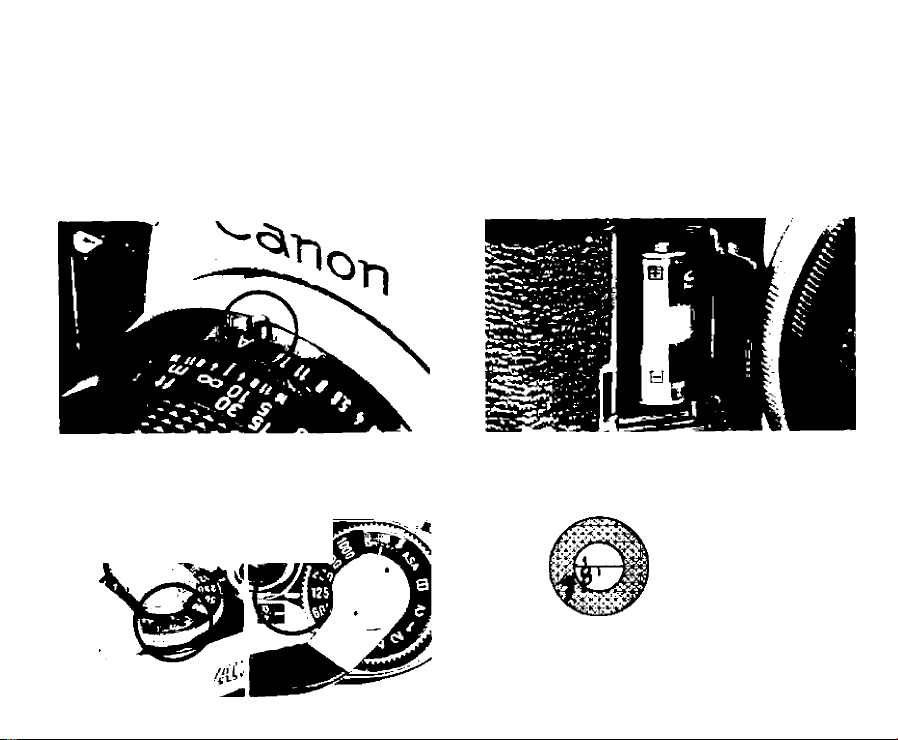
Setting the Aperture Ring to the
2
"A" Mark
The AE-1 delivers perfect AE photo
graphy when the aperture ring is set for
automatic exposure. The "A" mark on the
aperture ring should be set to the EE position.
Hold in the EE lock pin while turning the
aperture ring to the "A" mark. This can be
done either before or after the lens is
mounted on the camera.
Page 23

13
Page 24
14
Page 25

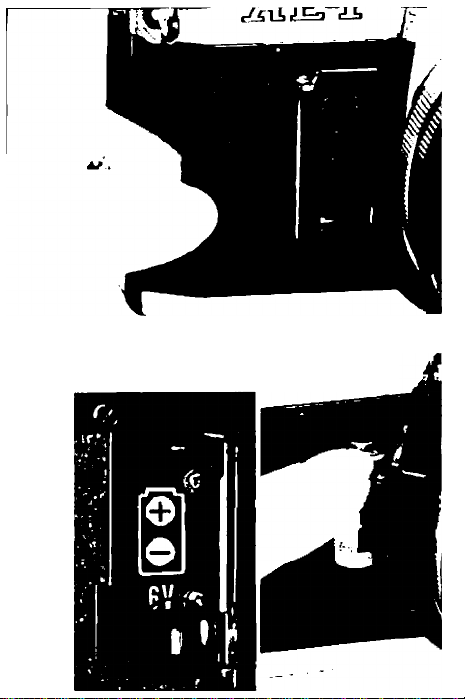
Loading the Battery
3
This camera will not function without
battery power. A 6V silver oxide battery is
loaded into the battery chamber after opening
the battery chamber cover. It can be opened
more easily by using the viewfinder cover that
is inserted into the accessory shoe.
Be careful to load the battery correctly
with the "+" side up as indicated in the
diagram. Load the battery by inserting first
the contact in the battery chamber.
The battery can be unloaded in a similar way
by pulling it out from the top. The battery
can be loaded and unloaded more easily
when the lens is dismounted. The battery
should last for approximately one year under
normal use. Refer to page 73 about the
details of the battery when the camera is used
in extremely cold conditions.
Page 26

Checking the Battery
4
Since the AE-1 is an electronically con
trolled camera, the shutter will not function
without sufficient battery power.
The battery requires checking in the
following circumstances:
1. When a new battery is loaded.
2. When the shutter does not function.
3. When long exposures are frequently
performed.
4. When the camera Is used very frequently.
5. When the camera is used after it has been
stored for a long period.
6. When the camera is used in extremely
cold conditions.
Usable Batteries
Silv er O xid e
Bat ter y (6 V )
Alk alin e M an ga n es e
Bat ter y (6 V)
Eve re ad y (UC A R) No .5 44
JIS 4G 1 3, M all or y P X 28
Eve re ad y (UC AR ) No .5 37
Ma llo ry 7K 13
Page 27

Alkaline Manganese
Battery
Silver Oxide Battery
15
Page 28
Page 29

How to Check the Battery
The charge level of the battery is checked
by pressing the battery check button on the
top of the camera Carefully watch the meter
needle in the viewfinder.
Press the battery check button and if the
meter needle in the viewfinder rests below the
index, power level is sufficient. If the meter
needle rests above the index, the power level
is insufficient. If this is the case, replace the
battery with a new one of the prescribed type.
When a new battery with full voltage is used,
the meter needle in the viewfinder indicates
close to the 2.8 f/stop.
When the battery power wanes, it takes more
time for the meter neelde to stop fluttering.
Because of the special circuit, the meter
needle's swing depends on the state of the
battery. The meter needle will rise as the
battery power wanes until it reaches the f/5.6
position where there is no longer any more
power. Press the battery check button until
the meter needle rests still.
When the battery is just about to fail, the
meter needle in the viewfinder rests close to
the index.
Page 30

Loading the Film
5
The Canon AE-1 uses color or black and
white film in standard 35mm cartridges.
Opening the Back Cover
To load a cartridge of film into the
camera, first open the camera's back cover.
Pull up the rewind crank and the back cover
will pop open. The back cover can be securely
closed simply by pressing it until it locks.
The Canon Data Back A, an accessory for
imprinting data such as the day, month and
year, can be attached to the AE-1 in place of
the back cover. (See page 63.)
How to Load the Film
Avoid direct sunlight when loading or
unloading the film.
Put the cartridge into the film cartridge
chamber and press down while rotating the
rewind knob until it drops securely into
position. The protruding part of the cartridge
should be on the bottom. Pull the film leader
across and insert the end into one slot of the
multi-slot take-up spool. Turn the film ad
vance lever and wind the film around the take-
Page 31

17
Page 32

18
Page 33

up spool making sure that the perforations of
the film are engaged in the teeth of the film
transport sprocket.
Then, make sure that there is no film
slack. In case there is, gently turn the film
rewind crank in the direction of the arrow to
obtain proper film tautness and the film
advance lever to ensure that the leader is
wound fully on to the take-up spool before
the camera back is closed.
When loading the film into the camera,
do not touch the shutter curtain, the film
rails or the pressure plate.
Closing the Back Cover
Close the back cover until it snaps shut.
Gently turn the film rewind crank clockwise in
the direction of the arrow to take up the film
slack. Then, advance the film a couple of
times pressing the shutter button until the
first exposure appears in the frame counter.
Page 34

Checking Film Winding
Operate the film advance lever while
watching the film rewind knob. If it rotates,
the film is properly loaded. If the rewind
knob does not rotate, open the back cover
and load the film again from the start.
Setting the ASA Film Speed
6
After loading the film, set the ASA film
speed according to the ASA speed of the film
in use. To set the ASA, first push the film
advance lever out to its 30° stand-off position
away from the camera body, then lift up the
ASA ring around the shutter dial and rotate it
in either direction until the proper number is
aligned with the green index mark. ASA is a
numerical rating of a film's sensitivity to light.
A higher ASA number indicates a faster film
which is more sensitive to light. On the other
hand, a lower ASA number indicates a slower
film which is less sensitive to light. The ASA
rating recommended by the manufacturer is
printed on the film box, e.g., ASA 100.
Page 35

19
Page 36

Page 37

The following ASA ratings can be set on
the camera. Figures in parentheses indicate
intermediate film speeds.
ASA25 50 100"^""-“'200‘?’".“’400
f500) (640) on«(1000) (1250).-«^1.2000) (2500)«
• • oUU * * ibUU * * *j^UU
Use of the Memo Holder
The memo holder on the camera's back
cover is useful for keeping data like film
speed, location, shooting. For example, after
tearing off the part of the film box which
specifies the type of the film being used, it
can be inserted into the memo holder as a
constant reminder.
Page 38

Film Advance and Shutter Release
Turn the film advance lever until it stops,
so the film will advance one frame all in one
motion. The shutter will cock, and the dia
phragm and mirror will be ready for the next
shutter release, while the frame counter
advances simultaneously to the next number.
By pushing the film advance lever lightly with
the tip of your thumb, it will open to its
30° stand-off position away from the camera
body for easy film advance.
While the film is advancing, the shutter will
not be released. Film winding can also be ac
complished by advancing the lever in short
strokes.
Canon has developed the Power Winder A
to be used with the AE-1 for automatic film
winding. It greatly increases the automation
and mobility of the AE-1. (See page 61.)
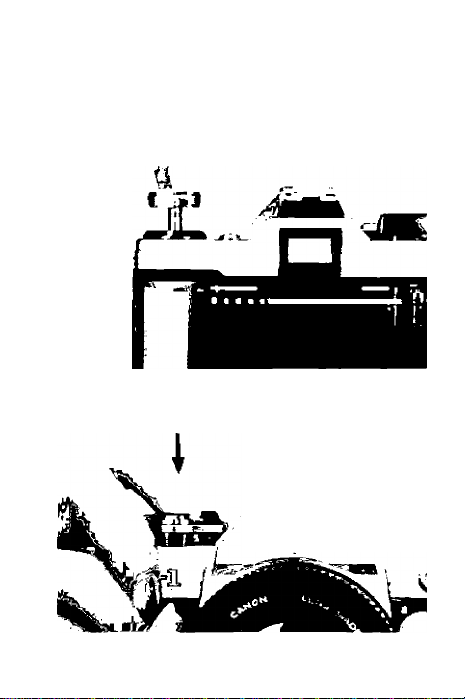
Page 39

Shutter Button Lock
Page 40

Shutter Button and Shutter Lock
The shutter release button is designed to
function as the main switch of the camera to
activate the AE meter and shutter operation.
The shutter has a magnetic release, so the
meter can be read by pressing the shutter
button halfway with light pressure. By de
pressing it further, the shutter will be released.
The magnetic release shutter button enables
faster metering for shooting in succession than
the mechanical release method does. There is
also less chance for camera shake.
When the shutter lock lever around the
22
Page 41

shutter release button is turned to the "L"
position, the shutter button will be locked to
prevent unintentional shutter release. Keep
the shutter release button locked while
carrying the camera to prevent film waste.
When the power level of the battery is
insufficient, a safety mechanism will keep the
shutter from being released.
Frame Counter
The frame counter is an additive type
which counts one frame every time the film
advance lever winds the film. When the
camera's back cover is opened, the frame
counter automatically resets itself to the "S"
position.
While rewinding film, the frame counter
counts back the frame numbers. The starting
position "S", 0, and the even numbers 2 to 38
are displayed by the counter. Numbers 20 and
36 are marked in orange to call your attention
to the end of film cartridges such as are today
commercially available. The frame counter
cannot count higher than 38.
Page 42

Operation for General Photography
The AE-1 is an Automatic Exposure
camera with a shutter speed priority system
which electronically controls the aperture
opening for the given shutter speed to ensure
the optimum exposure. Canon's shutter speed
priority system has been adopted by this
camera in the idea that a photograph is an
instant snatched from elapsing time.
The shutter speed priority system is ideal
for catching fast-moving subjects, especially at
the decisive moment.
Furthermore, the shutter speed priority
system allows you to control image blur at
will and to emphasize the movement of the
subject. For action or other such situations,
you can realize all photographic aspirations.
23
Page 43

Page 44

^ Setting the Shutter Speed
* The shutter dial controls the length of
time that light is allowed to reach the film. On
the shutter speed dial, shutter speeds from
1/1000 to "B" are marked in white, while the
2-second speed is marked in orange. Each
shutter speed gradation is twice or ap
proximately twice the preceding speed,
beginning with 1/1000 sec. (1000).
Thus, the light reaching the film at 1/250
second is half the light reaching it at 1/125.
The numbers on the shutter speed scale
represent the corresponding fraction of a
second (125= 1/125), with the exception of 1
and 2 (marked in orange) which stand for 1
and 2 seconds respectively.
The “B" setting is for long exposures. At
the "B" setting, the shutter remains open
while the shutter button is depressed and
closes when it is not depressed. See page 48
for more details concerning long exposures.
To set the shutter speed, rotate the dial in
either direction until the desired number
clicks into place next to the white index
mark. An in-between setting should not be
used, and the shutter speed dial cannot be
Page 45

rotated between "B" and "1000".
Brightness
Indoors
Outdoors
Mid-summer Beach• Snow-covered
Mountains
Shutter Speed
(Seconds)
l/30tol/60
l/125toi/250
1 / SOOto 1 / 1 000
Selecting the Shutter Speed
Shutter speed is determined in accord
ance with the brightness of the scene and the
speed with which the main subject is moving.
You can use the above table as a general guide
to help you select an appropriate shutter
25
Page 46

Overexposure
Warning Marks
Underexposure and
Coupling Range
Warning Lamp
speed when using a standard 50mm lens. For
indoor photography, with no special illumi
nation, choose 1/30 of a second and 1/60 of a
second in a brightly lit room.
For outdoor photography, select 1/125
second when cloudy and 1/250 second in
sunshine. To take pictures in particularly
bright sunshine such as at a beach in mid
summer or in snow-covered mountains, use
shutter speeds of 1 /500 sec. or 1 /1000 sec.
The above mentioned shutter speeds
apply when using a standard 50mm lens, but
it is necessary to choose faster shutter speeds
when using lenses of longer focal lengths
because they are more difficult to hold
steady. It is generally said that the shutter
speed figure should be greater than 1 divided
by the focal length of the lens in order to ob
tain sharp images.
For example, when using a 200mm tele
photo lens, shutter speed should be faster
26
Page 47

than 1/200 second, therefore the shutter
speed in this particular case should be set at
1/250 sec. Image blur can also arise if the
camera is not properly held. See page 31.
Reading the Exposure
2
This camera incorporates a magnetic
release system using an electromagnetic switch
to effectively perform instantaneous light
metering. The shutter release button activates
light metering and exposure in succession and
practically simultaneously.
This is a two-step shutter button. The
exposure can be confirmed by the meter
needle inside the viewfinder by pressing the
shutter button halfway.
When the meter needle inside the view
finder stays within the proper range and the
underexposure warning LED lamp below the
aperture scale inside the viewfinder does not
blink, the exposure is correct. See page 39
about the underexposure warning lamp.
When the underexposure warning lamp
inside the viewfinder blinks, or when the
meter needle moves into the upper over
exposure warning zone in red, the exposure is
incorrect. When this is the case, turn the
Page 48

shutter speed dial until the meter needle
inside the viewfinder moves into the proper
exposure range. To confirm this, turn the
shutter speed dial while looking into the
viewfinder and pressing the exposure pre
view switch at the same time. It is convenient
to turn the shutter speed dial with your
forefinger in order to swiftly cope with the
speed of fast moving subjects. When using
shutter speeds slower than 1/30 second,
the camera should be placed on a tripod to
avoid the possibility of camera shake.
Viewing and Focusing
3
Focusing is performed in the small round
area in the center of the viewfinder. The
smaller central circle is a split-image focusing
screen and around it is the microprism ring.
The split-image rangefinder ascertains that the
image is "in focus" when the image divided
horizontally in half matches and becomes
one complete image.
The microprism rangefinder presents a
clear and steady image when in focus. The
microprism conveys a broken, shimmering
Page 49

Out of Focus
In Focus
image when not accurately in focus. It is also
possible to focus with the matte screen
outside the smaller central area. You can
focus with either of these focusing aids as
you like, depending on the subject condition
and your preference.
27
Page 50

Accessories such as an eyecup, dioptric
adjustment lenses, angle finders, and mag
nifier can be attached to the viewfinder
eyepiece.
28
Page 51

Dioptric Adjustment Lenses
Dioptric adjustment lenses can be
attached by inserting them from above into
the grooves in the viewfinder eyepiece to
compensate for the individual eyesight. With
them, near-sighted or far-sighted persons can
perform photography without glasses.
The built-in eyepiece lens of the AE-1 has
—1 diopter. The following 10 kinds of
dioptric adjustment lenses are optional ac
cessories: •^3, -t2, -H.5, -H, -t-0.5, 0, -0.5,
—2, —3 and —4 (diopters).
One way of selecting the correct dioptric
adjustment lens for you is to select the one
that is the closest to your glasses in regard to
number of diopters. But, we propose that,
when you select the most appropriate dioptric
adjustment lens, you actually look into the
viewfinder through it after placing it over the
eyepiece.
Because the camera itself has —1 diopter,
the diopters of the lenses are recorded as the
real power when attached to the camera, thus
reflecting the power of the camera's
viewfinder.
Page 52

Angle Finder A2 and B
The angle finder is a magnifying glass
which can be attached from above into the
grooves of the viewfinder eyepiece. It rotates
90 degrees so that the image on the viewfinder
can be viewed directly from the side or above
whenever it is inconvenient or impossible to
look directly through the eyepiece. This is
very helpful in copying, close-ups, macro
photography, and photomicrography. There
are two types, the A2 whose image is reversed
as in a mirror, and the more advanced Angle
Finder B with the normal camera image.
Magnifier S
The Canon Magnifier S gives 2.5X magni
fication of the viewfinder center for precision
focusing in close-up work. The strength
can be adjusted to your eyesight within the
range of -t4 to -4 diopters.
The Magnifier S combined with its
adapter can be inserted into the grooves of the
viewfinder eyepiece. The adapter of the
Magnifier S is hinged to allow the magnifier
to swing upward from the eyepiece leaving the
whole screen image visible after focusing.
Page 53

29
Page 54

Page 55

Holding the Camera
Unlike the mechanical release system, the
magnetic release system of the Canon AE-1
electronically controls the shutter. The
shutter button moves with a very light touch
and its travel is very short. The shutter will be
released by lightly depressing the shutter
button so as to prevent camera shake. But,
unsteady holding of the camera will cause
camera shake in spite of the magnetic release
system.
Therefore, be sure to hold the camera
firmly. Rest the camera on your left palm and
grasp the lower part of the lens focusing ring
between your thumb and forefinger or middle
finger. Hold the right end of the camera
firmly, with your right thumb behind the tip
of the film advance lever and your right
forefinger on the shutter button, while the
other fingers hold the camera's finger grip.
To reduce camera shake, press your left
elbow strongly against your body and look
into the viewfinder steadying the camera
against the forehead. The right arm should be
relaxed while holding the camera.
Page 56

When you use comparatively slow shutter
speeds or when you use telephoto lenses, it is
advisable to lean against a wall, a tree trunk or
some fixed object for a steadier grip. The
above describes the fundamentals of how to
hold the camera. You may find yourself the
most appropriate grip for you and get ac
customed to it through constant practice.
31
Page 57

32
Page 58

Adapter A for T ripod
When using a lens of considerable overall
length, depending on the tripod being used, it
may be difficult to hold the adjustment in the
case of accidental bumping of the lens.
In such cases, the Canon Adapter A for
Tripod with a rubber matte should be placed
between the tripod and the camera for easier
handling.
Composition
Since the AE-1 has automatic exposure
control with shutter priority, you can con
centrate on the actual picture you are going to
take without worrying about exposure differ
ences that may occur with changing subjects.
Viewing is performed through the lens, and
there is no difference between the viewfinder
image and the image exposed on the film, as
opposed to the image provided by a separate
viewfinder which is affected by the parallax
between the viewfinder and the camera lens.
Page 59

Releasing the Shutter
The Canon AE-1's shutter button uses a
magnetic release system. The shutter button
travel is very short and activated by a very
gentle touch. When you press the shutter
button, try to squeeze the shutter button
gently with your finger. Avoid hitting or
pressing the shutter button suddenly par
ticularly when using slow shutter speeds,
otherwise blur may result.
At the moment of shooting, you should
hold your breath while the shutter button is
being pressed.
Rewinding the Film
When the film advance lever cannot
travel all the way to the end of its stroke, the
frame counter tells you that you have reached
the end of the film. You have to rewind the
film in its protective cartridge, before you can
remove it from the camera.
You must not open the camera before
rewinding the film. Since it is not protected,
any exposure to light will "fog" the film and
cause a drastic color shift and loss of picture
image.
Page 60

33
Page 61

To rewind the film, press in the small
rewind button on the bottom of the camera,
unfold the rewind crank and turn it in the
direction of the arrow on top of the rewind
crank. When the frame counter has reached
the "S" mark, you should stop rewinding.
Then pull up the rewind knob to open the
Double-Check Before Shooting
If you hurry to release the shutter, you
may make an unexpected error due to care
lessness.
The following points should be double
checked:
1s the aperture ring of the lens set
1
to the "A" mark?
Press in the EE lock pin while turning the
aperture ring to the "A" mark. This specific
setting is a requisite for beautiful color
pictures with automatic exposure. If you fail
to adjust the aperture ring to this setting
when appropriate, the correct automatic
exposure will not be obtained. When the
aperture ring of the lens is not set to the "A"
34
Page 62

camera back and lift the cartridge out.
If you stop rewinding the moment the
frame counter has reached the "S" mark, the
film will not be completely rewound into the
cartridge and the film leader may still be
outside the cartridge.
mark, the manual aperture control "M" signal
above the aperture scale In the viewfinder
flashes on and off as a warning that the
aperture ring is not set at the "A" mark. (See
page 40.) ®
Did you set the film speed properly?
2
It is necessary to set the film speed
properly according to the film in use in order
to obtain the correct exposure.
ls the film properly loaded?
3
You can use the rewind knob as an
indicator that the perforations of the film are
properly engaged on the sprocket and the film
is actually advancing. Every time you advance
the film, the rewind knob should turn.
Page 63

Detailed Operation of the AE-1
Up to this point you have been reading
about the fundamental principles of AE
photography. We ask you to continue reading
through the following, more detailed de
scription of AE photography for a fuller
understanding. This information will prove
helpful to you.
A silicon photocell is used as the photo
sensitive element in the camera. If you
compare the silicon photocell (SPC) with
other existing photosensitive elements, you
will find it covers a greater range of lighting
situations and allows for greater accuracy. In
order to provide the AE-1 with the best
possible magnetic release system. Canon de
veloped a special circuit for instantaneous
light metering. Due to this innovation, even in
place as dark as EV1 (at ASA 100, f/1.4, 1
sec.), metering can be performed in only
0.04 second.
35
Page 64

Page 65

Viewfinder Information
In keeping with Canon's
providing all relevant information in an easily
readable format, all information is displayed
on the right side of the viewfinder. The
diagram below indicates the information pro
vided and where it can be seen in the
viewfinder.
standard of
Meter Sensitivity Pattern
In a great variety of lighting situations, the
carefully designed Central Emphasis Metering
system simplifies problems to ensure that the
subject is correctly exposed.
Metering Range
TTL metering is possible with a f/1.4 lens
at ASA 100 from EV 1 (1 sec., f/1.4) to EV
18 (1/1000 sec., f/16).
37
Page 66

ASA Film Speed
25- -50
■ -100 1 tol/lOOOsec.
■ -200
■ -400 1/4 tol/lOdOsec,
• -800 1/8 tol/lOOOsec,
- -1600
■ -3200
Coupling Range
2 tol/lOOOsec,
1/2 tol/IOOOsec,
1/I5t61/I000sec.
l/30tol/i000sec.
38
Page 67

Shutter Speed and AE Coupling Range
The shutter speed and AE coupling range
are indicated in the table. If any combination
outside the coupling range is made, the
coupling range warning lamp will blink, as it
does when warning of underexposure. Since
the lamp serves a dual function, check that
the shutter speed is within the coupling range
before assuming that the light level is too low.
Overexposure Warning Mark
When the lighting of the subject is too
bright, the meter needle will rise into the red
zones of the aperture scale. The red area is
divided into two parts. The top part is a
warning for use with a lens having a minimum
aperture of f/22, while the bottom part is for
use with a f/16 minimum aperture lens.
When the meter needle enters the red
area, incease the shutter speed and correct the
exposure.
With the FD 100mm f/4 S.C. Macro lens,
which offers a minimum aperture of f/32
available, if you want to photograph at its
minimum aperture of f/32 and the meter
needle points to the red area, do the follow
Page 68

ing; Increase the shutter speed until the meter
needle indicates f/22 and then decrease the
shutter speed by one gradation so that the ex
posure will be correct.
Underexposure and
Coupling Range Warning LED Lamp
This lamp blinks on and off as a warning
of incorrect exposure. If you reduce the
shutter speed by turning the shutter speed dial
so the underexposure warning lamp will stop
blinking, the correct exposure will be
obtained.
Under dim light with a slow speed lens,
there is a case when the meter needle will
point at the aperture scale inside the view
finder although it will exceed the maximum
aperture of the lens. In this case, turn the
shutter speed dial to a slower setting so that
the underexposure warning lamp stops blink
ing.
For example, when you use an f/2.8 lens
and the meter needle exceeds the aperture
scale of f/2.8 inside the viewfinder, reduce the
shutter speed until the lamp stops flashing.
Page 69

When the shutter speed is set at "B"
(Bulb) and the shutter button is pressed
halfway, this warning lannp will also flash on
and off.
39
Page 70

Manual Aperture
Control "M" SignaP
Battery Check and
Stopped-Down
Metering Index Mark
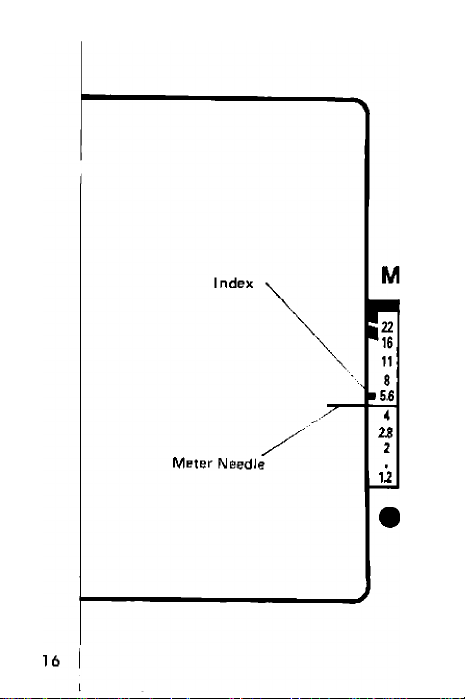
-M
40
Page 71

Battery Check and Stopped-Down
Metering Index Mark
This battery check index mark serves
also as the stopped-down metering index mark
for use with Canon FL lenses and other
similar manual lenses, when exposure measure
ment is performed with a stopped-down
diaphragm. (See page 49.)
Manual Aperture Control "M" Signal
(LED)
When the aperture ring is not set at the
"A" mark, you cannot get the correct ex
posure in AE photography. When the aperture
ring is set at any position other than the "A"
mark, the manual aperture control "M" signal
will blink as a warning. Also, when Canon FL
lenses. Bellows or the like are used, this
warning signal flashes on and off when ex
posure measurement is performed.
Page 72

Concerning the Exposure (Shutter Speed and Aperture Coupling)
In order to obtain the correct exposure, it
is necessary to correctly match the shutter
speed with the aperture. The shutter speed
and the aperture are the main factors in
controlling the amount of light which is
allowed to strike the film, and when they
change, the quality of the image upon the film
also changes.
Effects of Changing the Shutter Speed
1
The explanations below are pertinent to
photography with fast moving subjects or
when it is intended to convey the feeling of
movement in a photograph.
If, as in example A, the photo is taken at
a shutter speed of 1/250 sec., the movement
will be frozen.
If, as in example B, with the same
subject, the photo is taken at a speed of 1/60
sec. though the subject is somewhat blurred,
movement is well expressed. It is only a
matter of aesthetics as to which of these
photographs is the best.
Depending on the selection of the shutter
speed, you' can freely control the expression
of movement.
Page 73

i
î
41
Page 74

42
Page 75

Effects of Changing the Aperture
2
Because this camera is an AE camera with
shutter speed priority, when you change the
shutter speed, the aperture will also change.
If you change the speed by one gradation, the
aperture also changes the equivalent of one
gradation. Aperture changes have an effect
on the photographic expression as follows:
In example C, the aperture was set at
f/1.8 with the shutter speed dial adjusted be
fore shooting. In example D, a f/16 setting
was used to clearly demonstrate the dif
ference. In C, the chesspieces in the back
and front are blurred and only the chesspiece
in the center is in focus. In D, most of the
chesspieces are sharp and clear and only
those in the back are blurred. Thus, the lens
aperture controls the zone of sharpness in
the subject field which is observed in the
viewfinder or recorded on the film.
Aperture Priority Photography
After having given careful thought to the
results of aperture adjustments, when the
f/stop has been determined before shooting,
press the exposure preview switch while
looking into the viewfinder. Then turn the
Page 76

shutter speed dial until the meter needle on
the right of the viewfinder reaches the f/stop
desired.
Depth-of-Field
When a certain subject is brought into
focus, there is only a limited range in the
foreground and background of the subject
which can be kept clearly in focus. This zone
of sharpness in the subject field is depth-of-
field.
There are two methods of confirming the
extent of the depth of the field: by stopping
down the lens diaphragm or by reading a value
from the depth-of-field scale on the lens.
^ Confirming the Depth-of-Field by
I Stopping-Down the Lens Diaphragm
1. Wind the film and determine the aperture
required for the subject by metering, then set
the f/stop by turning the aperture ring after
disengaging the aperture ring from the "A"
mark.
2. Press the stopped-down lever until it
locks. Once locked, the depth-of-field can be
checked by looking into the viewfinder. Thus,
the extent of the depth-of-field can be seen
as the zone of sharpness in the subject field
Page 77

observed on the screen. When the stoppeddown lever's release button is pressed, full
aperture metering will be restored.
3. After having turned the aperture ring to
the maximum f/stop on the lens, reset it to
the "A" mark. Otherwise, you will not be able
to obtain the correct automatic exposure for
the next shot.
Stopping-down of the FD lenses should
only be done after advancing the film.
Should you not advance the film, the
stopping-down of the lens diaphragm would
43
Page 78

7 10 15 30
2 3 5 10
I I I I I I, I
18 111) 4
4 1111
2.6 4 5.6 8 11 16
only be possible up to the previous exposures
aperture. Also, when the aperture ring is set at
the "A" mark, the stopped-down lever cannot
be pressed.
Generally, the depth-of-field will become
deeper as the aperture becomes smaller, and
shallower as the aF>erture becomes larger. A
shorter focal length as well as a greater subject
distance will also deepen the depth-of-field.
Comparing an interchangeable 28mm lens
with a standard 50mm lens set at the same
f/stop, the 28mm lens's depth-of-field will be
greater. And when the photographic distance
44
Page 79

changes, the depth-of-field changes, too. For
example, if the same subject is photographed
from three and then from seven meters away,
the foreground and background of the subject
will be deeper at the greater distance.
Depth-of-Field Scale on the Lens
2
A depth-of-field scale is engraved on the
lens barrel, shown as a series of f/numbers on
each side of the distance index mark opposite
the distance scale. Focusing and depth-of-field
are so closely interrelated that the depthof-field scale is engraved together with the
distance scale.
You can tell the extent of depth-of-field
from the distance scale. For example, if you
use the camera with a standard 50mm lens
that is focused on a subject at medium dis
tance, say 3m with the aperture set at f/8,
the depth-of-field extends from 2.4m to 4.5m.
This tells you that with the 50mm lens
focused at 3m and the subject between 2.4m
and 4.5m the film image will be reasonably
sharp.
Page 80

Using the Self-Timer
Obvious uses for the self-timer are self-
portraits and the inclusion of the photo
grapher in the picture. The self-timer, though,
can also be used in place of a cable release
to release the shutter gently and smoothly in
close range work like photomicrography or
copying.
Push the electronic self-timer lever
forward, then press the shutter button, and
the shutter will be released 10 seconds later.
The camera memorizes the exposure value the
very instant the self-timer is activated by
pressing the shutter button. While the selftimer is in operation, the self-timer lamp
flashes on and off.
After you finish taking a picture, the
self-timer lever should be reset to its orignal
position. Otherwise, it will function again the
next time you press the shutter button.
Exposure will be automatically determined at
the instant the shutter button is pressed, and
not when the picture is actually taken. There
fore', avoid standing directly in front of the
lens when you press the shutter button as the
Page 81

AE control may miscalculate the proper ex
posure.
To prevent stray light from entering the
viewfinder from the rear and possibly affect
ing the meter reading, it is a good idea to
cover the eyepiece with the viewfinder cover
which is inserted into the accessory shoe. This
cover can be attached to the holder on the
viewfinder eyepiece. After doing so, press the
shutter button.
45
Page 82

¿
да
46
ifífe'
-
Page 83

Cancelling the Self-Timer Operation
If you should want to cancel the selftimer operation after having pressed the
shutter button, depress the battery check
button on the top side of the camera. Then,
the self-timer lamp stops blinking and the
self-timer operation will be cancelled.
If the battery check button is not de
pressed and the self-timer lever is returned to
its original position, the shutter will be re
leased.
Page 84

Shooting Against the Light with the
Backlight Control Switch
In most cases, the Canon AE-1's Central
Emphasis Metering system will give correct
exposure readings in AE photography. How
ever, you will occasionally encounter situ
ations in which normal AE photography
would not provide a correct exposure reading
of the main subject. For example, when you
photograph a person standing in a room with
a brightly lit window at his back, the subject
will be underexposed. In order to properly
expose the main subject, the backlight control
switch is provided. When it is held in as the
shutter is released, the aperture is automatical
ly opened up by one and a half f/stops more
than normal.
Page 85

47
Page 86

48
Page 87

Long Exposures and "B" (Bulb) Setting
When you need shutter speeds slower
than two seconds such as for shooting night
scenes or fireworks, set the shutter speed dial
at "B". Then, the shutter will remain open as
long as the shutter button is pressed. In long
exposures, it becomes essential to mount the
camera on a tripod and use a cable release
preferably with a lock to prevent camera
shake and attain best results.
A cable release with a locking device can
keep the shutter open even though the
operator leaves the cable release unattended.
Unlock the cable release when the shutter
should be closed.
Photography using the "B" setting will
accelerate battery consumption since it re
quires continuous battery power. When
necessary, the battery should be replaced with
a new one having a full charge.
Page 88

Stopped-Down Metering
When the AE-1 is used with Canon FD
lenses, photography can be performed with
through-the-lens (TTL) metering and with AE
coupling. However, with the Canon FL lenses
and most accessories such as bellows, ex
tension tubes, or a microscope adapter, it is
necessary to take a stopped-down meter
reading.
Stopping down the lens can be done by
pushing the stopped-down lever until it locks.
When the lens is stopped-down, press the
shutter button halfway or depress the ex
posure preview switch and adjust the aper
ture ring and/or shutter speed dial until the
meter needle inside the viewfinder is aligned
with the stopped-down metering index mark.
Press the shutter button and the photo
graph will be perfectly exposed. If the lens
should be mounted on the camera with the
stopped-down lever locked, correct exposure
will not be obtained. In this case, a red
warning mark by the stopped-down coupling
lever inside the camera body is visible. After
removing the lens, on the lower part of the
camera body, just below the mirror, this
Page 89

49
Page 90

stopped-down coupling lever becomes visible,
as does the red mark in the case described
above.
The FD lenses mounted on the AE-1
should always be used with full aperture
metering. Stopped-down metering will give
the wrong exposure.
50
Page 91

Manual Aperture Control
When accessories requiring manual
aperture control are used between the camera
body and a lens, lock the automatic aperture
lever in the manual position before mounting
the lens.
Lock for Manual Aperture Control (1)
For manual aperture control, push the
automatic aperture lever counterclockwise
I
until it stops and locks. When accessories such
as extension tubes are attached to a lens that
has been set for manual control, the dia
phragm blades of the lens open or close as the
aperture ring is turned. To revert from manual
control, reset the automatic aperture lever in
its original position.
Lock for Manual Aperture Control (2)
2
There are some FD lenses with the
manual lock lever requiring a different pro
cedure for manual control setting. With these
particular lenses, the automatic aperture lever
must be turned fully counterclockwise while
the manual lock lever is brought to the "L"
position. Once this has been done, when the
Page 92

lens is mounted on the camera, the diaphragm
blades will open or close by turning the
aperture ring. To revert from manual aperture
control, reset the manual lock lever at the
position of the white dot.
Lock for Manual Aperture Control
3
When Using the Macrophoto Coupler (3)
In close-up photography of high mag
nification with a lens reversed on the Macro-
photo Coupler, the automatic diaphragm
mechanism is not coupled. You must, there
fore, remember to close down the diaphragm
manually after having locked the automatic
aperture lever in the manual position as ex
plained above in (1) and (2). Then, fix the
Macrophoto Hood on the lens mount by
turning the bayonet ring.
When you are taking stopped-down meter
readings, the manual aperture control "M"
signal above the aperture scale inside the
viewfinder flashes on and off only when the
shutter release button is depressed halfway.
Page 93

Ч, сапогу ^ ,
51
Page 94

Lock pin Positioning Pin
52
Page 95

Changing the Lens
FD lenses incorporate a safety mechanism
to prevent the bayonet ring and the
diaphragm blades from moving when the lens
is not mounted on the camera. To bypass this
safety mechanism, press the lock pin in the
top recess of the bayonet mount while turning
the bayonet ring. Once this safety mechanism
has thus been cancelled, you can see the
diaphragm blades move when activated.
Since FD lenses have signal pins and
levers which couple with the camera body,
special care must be taken not to damage
them. One basic precaution is to always put
the lens down facing down whenever you
must change lenses.
The following lenses cannot be used with
the built-in meter because the extended rear
part of the lens will push in the lens speed
adjustment pin on the camera body:
FL 19mm f/3.5
FL 35mm f/2.5
FL 50mm f/1.8
FL 58mm f/1.2
R 35mm f/2.5
R 50mm f/1.8
R 100mm f/2
Page 96

Lens Signal.Coupling
Aperture Signal Lever
This lever transmits the actual f/stop to
the exposure meter. It is coupled to the
aperture ring just the same as when the
aperture ring is not set at the "A" mark.
Full Aperture Signal Pin
This pin transmits the signal corres
ponding to the lens at the full aperture
opening.
Automatic Aperture Lever
This lever closes down the aperture,
coupled with the stopped-down coupling
lever.
EE Switch Pin
This pin protrudes when the aperture ring
is locked at the "A" mark. In this position, it
transmits a signal for AE photography.
Reserved Pin
This pin is designed for use with ac
cessories that may be developed in the future.
Page 97

EE SvJitch Piri
Automatic
Aperture Lever
Full Aperture
Signal Pin
Aperture
Signal
Lever
53
Page 98

Film Plane Indicator
This mark is engraved on the top of the
camera between the film rewind crank and
the battery check button, just to the left of
the pentaprism, to indicate the exact position
of the film plane. The distance scale on the
lens shows subject distances measured from
the film plane indicator. This mark is not used
in general photography, but in close-ups and
macrophotography it is often used to obtain
the exact subject distance.
54
Page 99

Scales on the Lens Aperture Scale
The aperture of the lens is the opening of
the diaphragm blades, like the iris of the
human eye. It controls the amount of light
passing through the lens to the film surface.
The f/number is a numerical expression
of the effective aperture. It is obtained by
dividing the focal length of the lens by the
diameter of the effective aperture. When the
f/number is set one scale gradation higher, the
lens allows in half the light it would at the
previous gradation. Intermediate settings of
the aperture scale can be used, too. In some
lenses, the f/number setting one gradation
higher than the first f/number setting does not
necessarily allow onfy half the amount of light
of the previous setting through the lens to
expose the film as is the case at the other
settings. This should be taken into con
sideration when necessary.
The aperture ring usually has gradations
marked as follows, taking f/2 as a basic
unit:
Brightness
(f/stop)
Ratio
1.2 1.4« 2.8 4 5.6
; 1/2 1/4 1/8 1/16 1/32 1/64
11 16
Page 100

Distance Scale
The distance scale is for distances
measured from the film plane. This scale is
not generally used except for confirming the
depth-of-field, performing guide number
calculations in flash photography, or photo
graphing with infrared film.
Read one-digit distances in the middle of
the number marked on the scale. Two-digit
distances should be read at the point in the
middle of the two digits.
Depth-of-Field Scale
You can determine the depth-of-field by
checking the depth-of-field scale and the
distance scale on the lens barrel. Both are
closely interrelated.
 Loading...