

Page 1

ENGLISH
Canon
^^iver.
Getting Started Guide
Getting Started
F’reparations
Shooting Still Images
Viewing Still Images
Shooting Movies
Viewing Movies
Erasing
Printing
Downloading Images to a Computer
System Map
Ensure that you read the Safety Precautions (inside rear cover).
DiGiCIII ^ ExifPnnt
PictBtidge “f? BUBBLE JET canrimi
i;
» PRim 0||,Ecr
CEL-SG9HA21D
Page 2

Workflow and Reference Guides
The following guides are available. Refer to them as necessary according to the
flowchart below
: Contents of This Guide
i Check the package contents
——
o
Getting
Guide
Camera User Guide
Learning More
Getting Started
Guide
Direct Print User
Guide
Software Starter
Guide
Viewing the PDF Manuals
Adobe Reader must be installed to view the PDF Manuals. If this
software is not installed in your computer, access the following
web site and download the software.
http://www.adobe.com
Page 3

Checking the Package Contents
The following items are included in the package. If something is missing,
piease contact the retail outlet at which you purchased the product.
r-------------------------------------------------------------------------------------------'
o
D
(16MB)
Wrist Strap
WS-200
Camera
Interface Cable
IFC^OOPCU
I
AA Alkaline Batteries (x2) Memory Card
© o
AV Cable
AVC-DCSOO
D
Canon Digital Camera
Solution Disk
O User Guides
Getting Started Guide
a
You may not be able to achieve the full performance of this camera
with the included memory card
You can use SD memory cards, SDHC (SD High
Capacity) memory cards, MultiMediaCards, MMCpIus
cards and HC MMCpIus cards in this camera. These
cards are collectively referred to as memory cards in
this guide.
European Warranty
System (EWS) Booklet
Canon Digitai Camera
Manuals Disk
Page 4

Please Read
Test Shots
Before you try to photograph important subjects, we highly recommend that you
shoot several trial images to confirm that the camera is operating and being
operated correctly
Please note that Canon Inc., its subsidiaries and affiliates, and its distributors are
not liable for any consequential damages arising from any malfunction of a
camera or accessory, including memory cards, that results in the failure of an
image to be recorded or to be recorded in a way that is machine readable
Warning Against Copyright Infringement
Please note that Canon digital cameras are Intended for personal use and should
never be used in a manner that infringes upon or contravenes international or
domestic copyright laws and regulations. Please be advised that in certain cases
the copying of images from performances, exhibitions, or commercial properties
by means of a camera or other device may contravene copyright or other legal
rights even if the image was shot for personal use.
Warranty Limitations
For information on your camera's warranty, please refer to the Canon European
Warranty System (EWS) Booklet supplied with your camera.
For Canon Customer Support contacts, please see the European Warranty
System (EWS) Booklet.
Camera Body Temperature
If your camera Is used for prolonged periods, the camera body may become
warm. Please be aware of this and take care when operating the camera for an
extended period.
About the LCD Monitor
The LCD monitor is produced with extremely high-precision manufacturing
techniques More than 99 99% of the pixels operate to specification Less than
0.01% of the pixels may occasionally misfire or appear as red or black dots.
This has no effect on the recorded image and does not constitute a malfunction.
Video Format
Please set the camera's video signal format to the one used in your region before
using it with a TV monitor
Language Setting
Please see Setting the Display Language (p 9) to change the language setting.
Page 5

Getting Started
• Preparations (p. 4)
• Shooting Stiii Images (p. 10)
• Viewing Still Images (p. 13)
• Shooting iMovies (p. 14)
• Viewing Movies (p. 16)
• Erasing (p. 17)
• Printing (p. 18)
• Downioading Images to a Computer (p. 20)
• System Map (p. 28)
Page 6

4 I Preparations
Preparations
jiBiisi’fSili Jill j
■ Attaching the Wrist Strap
It is recommended to use the Wrist Strap to avoid dropping
during camera use.
|Tnstalling the batteries
1. Slide the battery cover lock in the direction of the arrow
(®) and hold it there while moving the entire cover in
the direction of the arrow (®) and opening it up in the
direction of the arrow (®).
Battery Cover Lock
....................
A I, jij.Bsai
Page 7

Preparations I 5
2. Install two batteries.
NeoativB end (-
3. Close the cover (®), and press downward as you slide
it until it ciicks into piace (®).
Page 8

Preparations
I Inserting the Memory Card
1 ■ Slide the battery cover lock in the direction of the arrow
(0) and hold it there while moving the entire cover in
the direction of the arrow (0) and opening it up in the
direction of the arrow (0).
Battery Cover Lock
r
2. Insert the memory card until its clicks into place.
Front
Write Protect Tab
(Only SD memory cards)
Confirm that the Write
Protect Tab is unlocked
(only SD memory cards)
Check the card for the
correct orientation
Page 9

Preparatkins
3. Close the cover (0), and press downward as you slide it until it clicks into place (®).
Ensure that the memory card is correctly oriented before
inserting it in the camera, inserting it backward may cause the
O
camera to fail to recognize the memory card or to maifunction.
■ To Remove the Memory Card
• Push the memory card with your finger until the memory card clicks
and then release it.
Page 10

8 I Preparations
I Setting the Date and Time
The Date/Time settings menu will appear the first time the power is
turned on. Set the date and time as shown in steps 3 and 4 in the
explanation below.
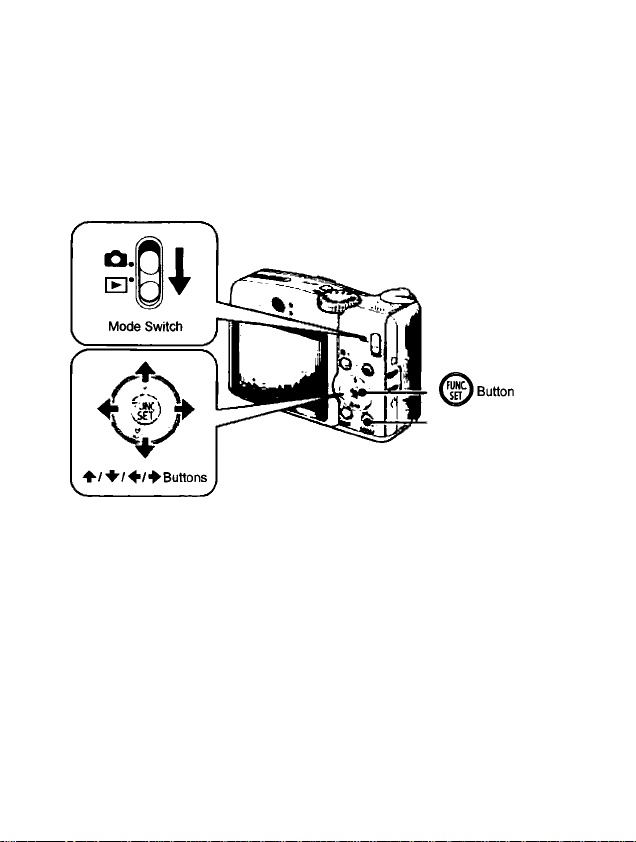
Power Button
♦/■♦■/♦/♦Buttons
(^ Button
1. Press the power button.
2. Select [Date/Time].
1. Press the O button.
2. Use the ■♦ or ♦ button to select
the [Ql (Set up)] menu.
3. Use the ♦ or ■♦ button to select
[Date/Time].
MENU
3. Select the year, month, day and time, and the display
order.
1. Use the ■♦ or ♦ button to select a
category.
2. Use the ♦ or ■♦ button to set the
value.
4. Press the button.
5a Press the O button.
Page 11
Preparations I 9
r=1 You can imprint the date and time you have set onto images.
I Setting the Display Language
You can change the language displayed in the LCD monitor menus
and messages.
Button
1. Set the mode switch to [E] (Playback).
2. Hold down the button and press the O button.
3a Use the 4^ or ^ button to select a language.
4. Press the button.
m
Page 12

10 Shooting Still Images
Shooting Still Images (№) Auto Mode)
DÌSR
1 ■ Press the power button.
• The start-up sound will play and the start-up image will display in
the LCD monitor.
• Pressing the power button again turns the power off.
2. Select a shooting mode.
1. Set the mode switch to Cl
(Shooting).
2. Set the mode dial to fJitto (Auto).
Button
3. Aim the camera at the subject.
Page 13

Shooting Still Images j 1 "I
4. Press the shutter button lightly (press halfway) to set the focus.
• When the camera focuses, it beeps
twice and the indicator lights green
(orange when the flash fires).
' AF frames will display in green on the
LCD monitor at the points of focus.
Without changing anything else, press the shutter button all the way (press fully) to shoot.
• The shutter sound will play once and
the image will record.
• The indicator will blink green and the “ ~
file will record to the memory card.
fn
______
^ Recording blinks green^ ^
Mute Setting
Pressing the DISP. button while switching on the camera power will
set the mute setting to [On] to silence all camera sounds except for
warning sounds. The setting can be changed with the [Mute] option in
the [Q| (Set up)] Menu.
Page 14

12 I Shooting Still Images
Reviewing an Image Right After
Shooting (Rec. Review)
Recorded images are displayed on the LCD monitor for approximately
■
2 seconds immediately after shooting.
Shutter Button
ra Button
You can also use the following methods to continue displaying the
image immediately after shooting so that you can check it.
• Keep the shutter button pressed fully.
• Press the button while the recorded image is
dispiayed.
Confirm that the operation sound beeps.
You can shoot by pressing the shutter button even when an image
is being displayed.
Page 15

Viewing still Images I 13
Viewing Still Images
Set the mode switch to [Zl (Playback).
• The last recorded image will display.
2. Use the 4 or ^ button to display the image you wish to
view.
• Use the •+ button to move to the
previous image and the ♦ button to
move to the next image,
• The images advance more quickly if
you keep the button pressed
continuously, but they will appear
coarse.
If you have replayed images, the last image viewed will display
(Resume Playback), If the memory card has been switched, or
the images on the memory card have been edited with a
computer, the newest image on the memory card appears.
Page 16

14 I Shooting Movies
Shooting Movies (D Standard Mode)
„ Press the power button.
Select a shooting mode.
1. Set the mode switch to A
(Shooting).
2. Set the mode dial to (Movie).
• Confirm that the camera is set to
n (Standard).
L Aim the camera at the subject.
Do not touch the microphone while
recording
Do not press any buttons other than the
shutter button The sound that buttons
make will be recorded in the movie.
Shutter Button
f MIcrophtv» Y
n—If ram
Page 17

Shooting Movies I 15
Press the shutter button lightly (press halfway) to set
the focus.
• An electronic beep will sound twice
and the Indicator will light green when ^
the camera focuses.
• The exposure, focus and white
balance are automatically set when
you press the button halfway.
5. Without changing anything else, press the shutter button all the way (press fully) to shoot.
• Recording starts.
' During the recording, the elapsed
recording time and [eRec.] will
display in the LCD monitor
6a Press the shutter button fully
again to stop recording.
• The indicator will blink green and the
data will be recorded onto the memory
card.
• Recording will stop automatically
when the maximum recording time
elapses, or the built-in memory or
memory card become full.
Elapsed time
■n ,
Recording: bllnhs green
Page 18

16 Viewing Movies
Viewing Movies
1 ■ Set the mode switch to [E] (Playback).
2. Use the 4 or 4 button to display a movie and press the
button.
• Images with a SDS icon are movies.
3. Use the 4 or 4 button to select J
□ (Play) and press the ^ button.
• The movie will start playing.
• if you press the FUNC./SET button
during playback, you can pause and
restart the movie.
' You can adjust the playback volume
with the
4
or 4 button.
-----------
Page 19

Erasing I 17
Erai№ifjj||
^Button
® Button
2. Use the 4 or 4 button to select an image to erase and
press the ^ button.
3. Confirm that [Erase] is selected and press the
button.
To exit instead of erasing, seiect
[Cancel]
Please note that erased images cannot be recovered. Exercise
adequate caution before erasing an image.
o
Page 20

18 Printing
Printing
WT,
I .
1. Connect the camera to a direct print compatible printer*''.
* Open the Camera’s terminal cover and insert the interface cable
all the way into the connector.
• See the printer’s user guide for connection instructions.
_ Canon Brand Printers _
SELPHY Series Compact
Photo Printers*^
i^«v Bulton
#
Inkjet Printers
*1 Since this camera uses a standard protocol (PictBridge), you can use it with other
PictBridge-compliant printers in addition to Canon-brand printers.
*2 You can also use the CP-10/CP-100/CP-200/CP-300.
Page 21

Printing I -19
2. Turn on the printer.
3. Set the camera’s mode switch to EEI (Playback) and
press the power button.
• The iDii<v button will light blue.
• A H, [3 or □ icon will appear in
the LCD monitor if the connection is
correct (the displayed icons differ
according to the connected printer).
will display for movies.
4. Use the 4 or ^ button to select an image to print and press the [Qi<v button.
• The iQi«v button will blink blue and printing will start.
After you finish printing, turn off the camera and the printer and
disconnect the interface cable.
1
Page 22

20 I Downloading Images to a Computer
Downloading Images to a Computer
Items to Prepare
• Camera and computer
• Canon Digital Camera Solution Disk supplied with the camera
• Interface cable supplied with the camera
System Requirements
Please install the software on a computer meeting the following
minimum requirements.
I Windows
os Windows Vista
Computer Model
CPU
RAM
Interface
Free Hard Disk
Space
Display
I Macintosh
OS Mac OS X {vIO 3-V10 4)
Computer Model The above OS should be pre-installed on computers with built-
CPU
RAM 256 MB or more
Interface USB
Free Hard Disk
Space
Display 1,024 X 768 pixels/32,000 Colors or better
Windows XP Service Pack 2
Windows 2000 Service Pack 4
The above OS should be pre-installed on computers with builtin USB ports.
Windows Vista Pentium 1.3 GHz or higher
Windows XP/Windows 2000 Pentium 500 MHz or higher
Windows Vista 512 MB or more
Windows XPAA/indows 2000 256 MB or more
USB
» Canon Utilities
- ZoomBrowser EX 200 MB or more
- PhotoStitch 40 MB or more
• Canon Camera TWAIN Driver25 MB or more
1,024 X 768 pixels/High Color (16 bit) or better
in USB ports.
PowerPC G3/G4/G5 or Intel Processor
• Canon Utilities
- ImageBrowser 300 MB or more
- PhotoStitch 50 MB or more
Page 23

Downloading Images to a Computer
I Preparing to Download Images
Ensure that you Install the software first before connecting the
camera to the computer.
Installing the software.
■ Windows
1. Place the Canon Digital Camera Solution Disk in the
computer's CD-ROM drive.
2. Click [Easy Installation].
Follow the onscreen messages to
proceed with the installation.
3. Click [Restart] or [Finish] once the
installation is complete.
When the installation is complete,
[Restart] or [Finish] will display. Click
the button that appears
4. Remove the CD-ROM from the
drive when your normal desktop
screen appears.
■ Macintosh
Double-click the 5 icon in the CDROM window. When the installer
panel appears, click [Install]. Follow
the onscreen instructions to
proceed.
DIGITAL CAMERA
I 21
Page 24

22 I Downloading Images to a Computer
2. Connecting the camera to a computer.
1. Connect the supplied interface cable to the computer's USB
port and to the camera's DIGITAL terminal.
• Open the Camera's terminal cover and insert the interface
cable all the way into the connector.
i
Preparing to downioad images to the computer.
1. Set the camera's mode switch to [El (Playback) and press
the power button.
Power Button
Always grasp the sides of the connector when disconnecting
the interface cable from the camera's DIGITAL terminal.
o
If the Digital Signature Not Found window appears, click [Yes].
The USB driver will automatically finish installing onto the
computer when you attach the camera and open a connection
Page 25

Downloading Images to a Computer I 23
I Windows
Select [Canon CameraWindow] and
click [OK],
If this Events dialog does not appear, click the [Start] menu and
select [All Programs] or [Programs], followed by [Canon
Utilities], [CameraWindow], [CameraWindow] and
[CameraWindow].
CameraWindow will display.
Preparations for downloading images are now finished. Please
proceed to the Downloading Images Using the Camera (Direct
Transfer) section (p. 25) (except Windows 2000).
With Windows 2000, you can download images using the
computer. Please refer to the Software Starter Guide for
details.
a
Page 26

24 I Downloading Images to a Computer
■ Macintosh
CameraWindow will appear when you establish a connection
between the camera and computer If it fails to appear, click the
[CameraWindow] icon on the Dock (the bar which appears at the
bottom of the desktop).
Preparations for
downloading images are now finished. Please proceed to the
Downloading Images Using the Camera (Direct Transfer) section
(p. 25).
1=1 Please refer to the Software Starter Guide regarding how to
I ”6 download images using the computer.
Page 27

Downloading Images to a Computer I 25
Downloading Images Using the Camera
(Direct Transfer)
Install the software before downloading images via the Direct
Transfer method for the first time (p. 21).
Use this method to download images using camera operations (except
Windows 2000).
Button
g All Images
New Images
E
DPOF Trans.
E
S
g
Images
Select & Transfer
Wallpaper
Transfers and saves all images to the
computer
Transfers and saves to the computer only the
images that have not been previously
transferred.
Transfers and saves to the computer only the
images with DPOF Transfer Order settings.
Transfers and saves single images to the
computer as you view and select them
Transfers and saves single images to the
computer as you view and select them The
transferred images as the background on the
computer desktop.
Page 28

26
I
Downk»dlng Imag9s to a Computer
1. Confirm that the Direct Transfer menu is dispiayed on the camera's LCD monitor.
• The button will light blue.
• Press the MENU button if the Direct
Transfer menu fails to appear.
E? D-'-r irr» iHsn
sele:! I 'rrs't'
G (tjliHPir
Diisd Transfer Menu
■ All Images/New Images/DPOF Trans. Images
2. Use the ♦ or ♦ button to select E, E or B and press
the button.
• The images will download. The
button will blink blue while
downloading is in progress.
• The display will return to the Direct
Transfer menu when the download is
complete.
• To cancel the download, press the
FUNC./SET button.
■ Select & Transfer/Wallpaper
2« Use the e or button to select!
(Of button.
3. Use the 4 or if button to select images to download and press the button.
• The images will download. The
button will blink blue while ^
downloading is in progress. ^ -
• Pressing the FUNC./SET button will ' - . —-
cancel a download in progress.
or E and press the
Page 29

Downloading Images to a Computer | 27
4a Press the O button after downloading finishes.
• You will return to the Direct Transfer menu.
Only JPEG images can be downloaded as wallpaper for a
computer.
The option selected with the iBi«v button is retained even when
the camera's power is turned off. The previous setting will be in
effect the next time the Direct Transfer menu is displayed. The
image selection screen will appear directly when the [Select &
Transfer] or the [Wallpaper] option was last selected.
Click ® at the bottom right of the window to close the CameraWindow
and the downloaded images will display on the computer
■ Windows
MENU ^
■ Macintosh
r
m
ZoomBrowser EX ImageBrowser
By default, images are saved on the computer in folders according to
the shooting date.
Page 30

System Map
28 I
System Map
Supplied with
Camera ^
rv
li
Î
AA Alkaline
Batteries (x2)
Battery and Charger Kit
CBK4-300*^
Waterproof Case
WP-DC16
Walarproaf Case
Weight WW-DC1
I Battery Charger CB«5AH/
CB-5AHE
lAA-size NiMH batteries NB-
3AH (x4)
NiMH Battery NB4-300 (set of 4
AA-size) also available separately
Interface Cable IFC-400PCU*
4—------------
Memory Card (1SMB)
d>
Canon Cbgita! Camera
Solution Orsti
AV Cable AVC-DC300'
AC Adapter Kit ACK800
I Compact Power Adapter
CA-PS800
I Power Cord
Page 31

System Map
I 29
Conversion Lens Adapter
LA-OC58G
Wide Converter
WC-DC58N
Q
Tele-converter
TC-DC58N
Close-up Lens
250D (58mm)
*1 Also available for purchase separately.
*2 See the user guide supplied with the printer for more information on the printer.
*3 This camera can also be connected to the CP-10/CP-100/CP-200/CP-300.
*4 See the user guide supplied with the inkjet printer for more information on the printer
and interface cables
*5 Not sold in some regions
Page 32

System Map
30 I
I Optional Accessories
The following camera accessories are sold separately.
Some accessories are not sold in some regions, or may no longer be
available.
■ Lenses, Lens Adapter
• Conversion Lens Adapter LA-DC58G
This adapter is required for mounting the wide converter, teie-
converter and ciose-up lens to the camera.
• Wide Converter WC-DC58N
Converts the focal distance of the body iens by a factor of
approximately 0.7 when attached.
• Tele-converter TC-DC58N
Converts the focal distance of the body lens by a factor of
approximately 1.75 when attached.
• Close-up Lens 250D (58mm)
i
A lens for shooting subjects at high magnifications.
■ Flash
• High-Power Flash HF-DC1
This attachable supplementary flash can be used to capture
photographic subjects that are too distant for the built-in flash to
illuminate.
■ Power Supplies
• AC Adapter Kit ACK800
This kit lets you power the camera from any standard household
power outlet. Recommended to power a camera for an extended
period of time or when connecting to a computer
• Battery and Charger Kit CBK4-300
This dedicated battery charger kit includes both a charger unit and
four rechargeabie AA-size NiMH (nickei metai hydride) batteries.
Convenient when taking or playing back large numbers of images.
• NiMH Battery NB4-300
A set of four rechargeable AA-size NiMH batteries. (This camera
requires two batteries.)
Page 33

System Map I 31
■ other Accessories
• SD Memory Card
SD Memory Cards are used to store images recorded by the camera.
Canon brand cards are available in 128 MB and 512 MB capacities.
• Interface Cable IFC-400PCU
Use this cable to connect the camera to a computer, Compact Photo
Printer (SELPHY series), or to an inkjet printer (refer to your inkjet
printer user guide).
• AV Cable AVC-DC300
Use this cable to connect the camera to a TV set.
• Waterproof Case WP-DC16
When you attach this waterproof case to the camera, you can use it
to take undenwater shots at depths of up to 40 meters (130 feet), and
of course it is ideal for taking worry-free pictures in the rain, at the
beach, or on the ski slopes.
I Direct Print Compatible Printers
Canon offers the following separately sold printers for use with the
camera. You can produce photo quality prints quickly and easily by
connecting them to the camera with a single cable and operating the
camera's controls.
• Compact Photo Printers (SELPHY series)
• Inkjet Printers
For more information, visit your nearest Canon retailer.
Use of genuine Canon accessories is recommended.
This product is designed to achieve excellent performance when used with
genuine Canon accessories. Canon shall not be liable for any damage to
№is product and/or accidents such as fire, etc., caused by the matfunction
of non-genuine Canon accessories (e.g., a leakage and/or explosion of a
battery pack). Please note that this warranty does not apply to repairs
arising out of the malfurrction of non-genuine Canon accessories, aldiough
you may request such repairs on a chargeable basis.
Page 34

32
European Union (and EEA) only
This symbol indicates that this product is not to be disposed of with your
household waste, according to the WEEE Directive (2002/96/EC) and your
national law. This product should be handed over to a designated collection
point, e g , on an authorized one-for-one basis when you buy a new similar
product or to an authorized collection site for recycling waste electrical and
electronic equipment (EEE). Improper handling of this type of waste could have a
possible negative impact on the environment and human health due to potentially
hazardous substances that are generally associated with EEE At the same time,
your cooperation in the correct disposal of this product will contribute to the
effective usage of natural resources For more information about where you can
drop off your waste equipment for recycling, please contact your local city office,
waste authority, approved WEEE scheme or your household waste disposal
service For more information regarding return and recycling of WEEE products,
please visit www.canon-eurQQe cam^envirunmenT
(EEA: Nonway, Iceland and Liechtenstein)
Page 35

Safety Precautions
Be sure to read, understand and follow the safety precautions below
when using the camera, in order to prevent injury, burns or electrical
shock to yourself and others.
Be sure to also read the safety precautions listed In the PDF
version of the Camera User Guide.
* aT-.
arnings
A.
Do not trigger the flash in close proximity to human or animai eyes.
Store this equipment out of the reach of children and infants.
Avoid dropping or subjecting the camera to severe impacts. Do not
touch the flash portion of the camera if it has been damaged.
Stop operating the equipment immediately if it emits smoke or
noxious fumes.
Do not handle the power cord if your hands are wet.
Do not use batteries which are not specified for this camera
The compact power adapter output terminals have been designed
exclusively for this equipment. Do not use them for other products.
PRINTED IN THE EU
©2007 CANON INC
Page 36

Great camera. Great shots.
What about the prints?
you can
Салол
Printing has never been easier Simply connect
your Canon digital camera to a Canon SELPHY
Compact Photo Printer, and create beautiful,
lab quality borderless photos in seconds.
Page 37

INCORPORATING OLDTIMER CAMERAS
OTC Ltd, 24 Market Place, Hatfield, Herts, ALIO OLN
Tel: 01707 273773 Fax: 01707 273774 Email: sales@otcworld.co.uk www.otcworld.co.uk
 Loading...