

Page 1
oiveunor
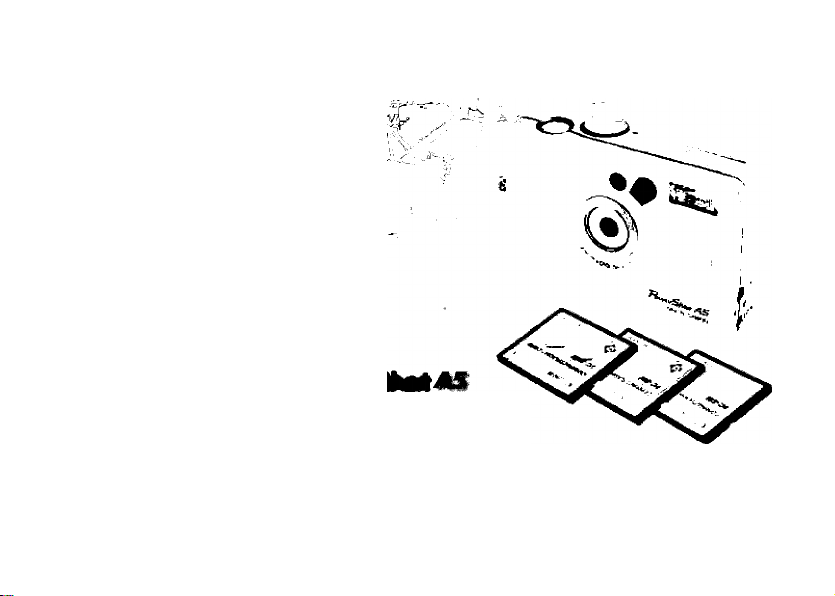
DIGITAL CAMERA
QuidtSlirt Quiete
Please read this guide before using of the PowerShot A5.
You will find instructions on how to use basic camera functions.
Canon
Page 2

IIntroduction
Thank you for purchasing a Canon PowerShot
A5, the easy-to-use, compact digital camera
with a large range of functions incorporated
into a card-sized body.
Please read this guide and the Reference
Guide to gain maximum benefit from the
high-quality digital imaging made possibie with
the PowerShot A5.
Please read the Handling and
Safety Precautions section of the
Reference Guide before attempt
ing to use the camera.
Copyright © 1998 Canon Inc All rights reserved.
Disclaimer
While every effort has been made to ensure that the
information contained in this manual is accurate and
complete, no liabiirty can be accepted for any errors or
omissions. Canon Inc. reserves the nght to change the
specifications of the hardware and software described
here in at any time without prior notice.
Page 3

No part of this manual may be reproduced, transmit
ted, transcribed, stored in a retrieval system, or
translated into any language in any form, by any
means without prior written permission of Canon Inc.
Canon Inc. makes no warranties for damages resulting
from corrupted or lost data due to a mistaken
operation or malfunction of the camera, the
CompactFlash™ cards (CF cards), personal computers,
peripheral devices or use of non-Canon CF cards.
Trademark Acknowledgement
Canon and PowerShot are trademarks of Canon Inc
Adobe and Adobe Photoshop are trademarks of Adobe
Systems Incorporated.
Apple, Macintosh and Power Macintosh are trademarks of
Apple Computer, Inc.
CompactFlash is a trademark of SanOisk Corporation.
IBM is a registered trademark of International Business
Machines Corporation.
Microsoft, Windows are registered trademarks of Microsoft
Corporation in the U.S. and other countries.
Ulead Systems, Inc. and Phofoimpact are trademarks of
Ulead Systems, Inc.
Other names and products not mentioned above may be
trademarks or registered trademarks of their respective
companies.
Page 4

IUnpacking
The camera is shipped with the items listed below. Please check your package now to confirm
that it is complete. Contact your camera distributor if anything is missing.
• PowerShot A5
• Wrist Strap WS-100
• Video Cable VC-100
• PC Interface Cable IFC-100PC
• Macintosh Interface Cable IFC-100MC
• Compact Power Adapter CA-PS100E
• AC Power Cord
• DC Coupler DR-100
• Battery Pack NB-5H
• Battery Case
• Button-sized CR2016 Lithium Battery
(fitted)
• CompactFlash™ Card
• PowerShot Solution CD-ROM
• PowerShot Solution Users Manual
• Ulead Photoimpact 4.0 CD-ROM
• Ulead Photoimpact 4.0 Users Manual
• Quick Start Guide (this publication)
• Reference Guide
• System Map
• Instructions for CF Card
• Instructions for Battery Pack
• Instructions for Compact Power Adapter
• Warranty Card for PowerShot AS
• Software license agreement
• Guarantee/Registration card
Page 5
I
Before You Start
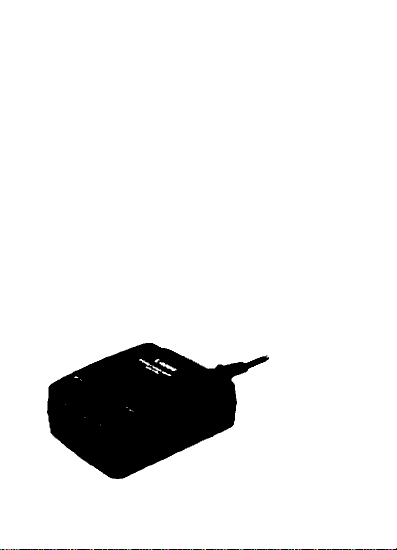
1. Charge the Battery Pack
Follow the instructions below to charge
Battery Pack NB-5H before installing it in the
camera.
1) Attach the AC Power Cord to the Compact
Power Adapter CA-PS100E and plug it into
a wall socket.
To AC Power Outlet
Compact Power Adapter
CA-PS100E
Page 6
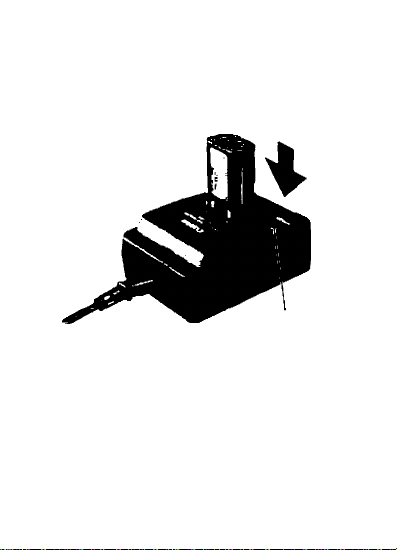
2) Place the battery pack into the compact
power adapter as shown below.
Battery Pack NB-5H
Charging Indicator
' While charging, the indicator on
the charger will flash green.
Once the battery pack has charged,
the indicator will stop flashing and
shine steadily.
A full charge takes approximately 90
minutes.
Page 7
1
Before You Start continued... 219
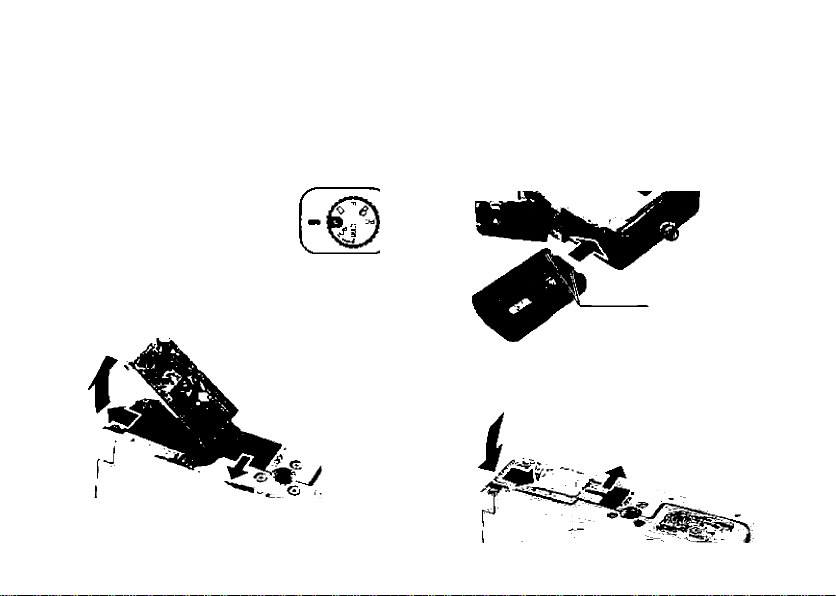
2. Install the Batteries into the Camera
The following describes how to insert
Battery Pack NB-5H into the camera.
1) Ensure that the Mode Dial is
turned to the L (lock)
position (power off).
2) Slide the battery cover lock to the release
position and open the battery cover.
3) Install Battery Pack NB-5H into the battery
chamber with the terminals oriented in
the direction shown below.
■v;-r
Battery Terminals
4) Close the battery cover and slide the
battery cover lock into the closed position.
Page 8

I
Before You Start continued... 319 __
I Check to make sure that the battery
cover lock is firmly in the lock
position. The camera will not operate
unless the battery cover lock Is
securecf.
' Remove the battery pack from the
camera whenever you will not use it
for an extended period. Do not
remove the button-sized lithium
battery because it is used as the
reserve power source for the date/
time settings.
' You can also use a 2CR5 Lithium
Battery (sold separately) instead of
Battery Pack NB-5H.
Page 9
' When removing Battery Pack NB-5H
from the camera, it is helpful to slip
your fingernail or fingertip into the
indent on the bottom of the battery
pack before you gently pull it out.
Indent
Page 10

Before You Start continued... 419
3. Using the Camera with an AC Power Source
To power the camera with an AC power
source, connect DC Coupler DR-100 to
Compact Power Adapter CA-PS100E as
shown below and replace Battery Pack NB5H with the other end of the DC coupler.
Cable Cover
• Please note that the compact power
adapter will not charge a battery pack
while in use as a DC power source for
the camera.
• The DC output indicator on the
compact power adapter will shine red
while in use as a DC power source for
the camera.
DC Coupler
DR-100
Compact Power
Adapter
CA-PSIOOE
DC Terminal
Page 11
Before You Start continued... 5/9 .
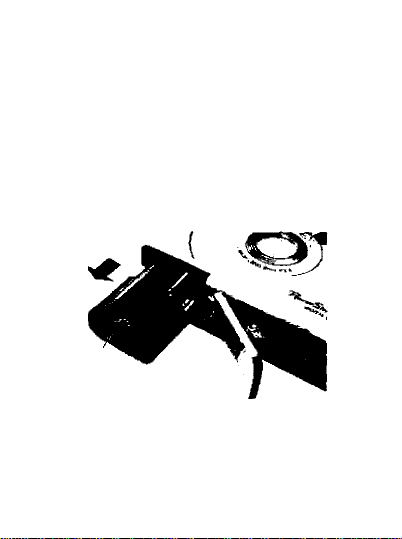
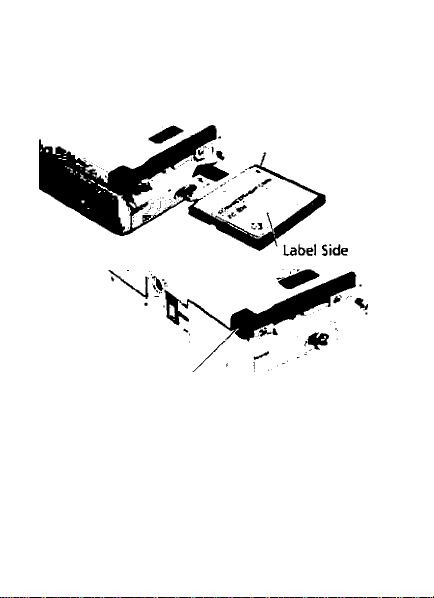
4. Inserting a CF Card
Follow the procedures below to insert a CF
card into the camera.
1) Slide the lock for the CF card slot cover to
the open position and open the cover.
2) As shown below, orient the card with its
label side facing up and insert it into the
slot until it is firmly seated.
8
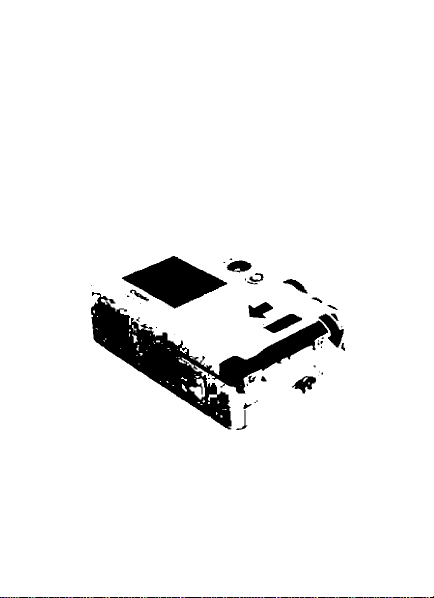
Page 12
Arrow Mark
The CF card eject
button will pop up
when a card is inserted.
Use this button to eject a card.
3) Close the CF card slot cover.
• The CF Card can only be fitted when
correctly oriented. Do not use undue
force to insert the CF Card.
Page 13

1Before You Start continued... 619
CF Cards and Image Capacities
Small/N Small/F Large/N Large/F CCD RAW
FC-4M 118
FC-8M 236 125
FC-15M 442 235 169 81 15
• Small (512 x 384 pixels); Large (1024 x 768 pixels);
CCD RAW (Uncompressed)
• N refers to Normal quality, F to Fine quality.
• Figures noted herein reflect standard shooting
conditions established by Canon.
• Actual totals may vary according to the characteris
tics of the photographic subject.
63 45 22
89 44
4
8
Page 14
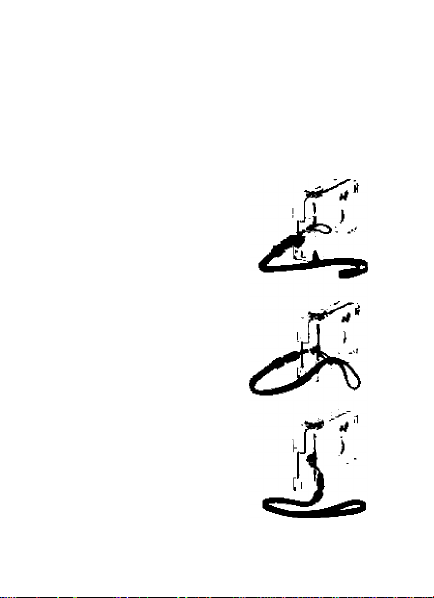
5. Fitting the Wrist Strap
A wrist strap is shipped with the camera.
Attach the strap to the camera as illustrated.
1) Insert the thin part of the
wrist strap through the
strap holder.
2) Insert the other end of
the wrist strap through
the loop of the thin part
that has been inserted
through the strap holder
in Step 1.
3) Pull the wrist strap
through the loop of the
thin part until the loop
slips over the plastic part
of the strap.
Page 15

1
Before You Start continued... 7/9
________________
6. Setting the menu language
You can change the language in which
messages are displayed.
SET Button I Buttons
10
MACRO/JUMP Button
LCD Panel
Page 16

1) Turn the Mode Dial to the PLAY position.
2) Press and hold the SET Button, then press
MACRO/JUMP Button to display the
Language Menu.
3) Use the +/- Buttons to move between
language selections and SET Button to
execute the selection.
Page 17

IBefore You Start continued... 819
7. Setting the Date and Time
Set the correct date and time with the
following procedures.
SET Button
% ^
MENU Button
.11
LCD Panel
+/- Buttons
^Mode Pi.Dial^
Page 18

1) Turn the Mode Dial to the □ (Auto)
position (Auto mode).
2) Press the MENU Button to display the Ree.
Menu.
11
Page 19

Before You Start continued... 919 _
3) Press the +/- Buttons to select [Setup].
Then press the SET Button to display the
Setup Menu.
4) Select the [Date/Time] with the +/- Buttons
and press the SET Button. The Date/Time
Menu will be displayed.
12
Page 20

5) Press the SET Button to move between
fields and the +/- Buttons to advance
values.
6) Once the settings are adjusted to your
satisfaction, press the MENU Button to
save your selection and exit.
7) Turn the Mode Dial to the L (Lock)
position to shut off the power.
Page 21

i
Taking Pictures
shutter Button Continuous/SeIf-Timer
MENU Button \ Button
LCD Button
LCD Panel
1) Turn the Mode Dial to the □ (Auto)
position (Auto mode).
2) Look through the viewfinder and frame
the subject.
Viewfinder
Page 22

3) Press the shutter button halfway and wait
until the beep sounds twice.
4) After the beeps, press the shutter button
all the way. A single beep will sound, the
picture will be taken and the indicator
beside the viewfinder will flash green
until the image is finished being stored
onto the CF card.
5) After the indicator goes off and the image
is stored, if you have finished taking
pictures, return the Mode Dial to the L
(Lock) position.
13
Page 23

Taking Pictures continued... 213
Two stage Shutter Button
• The camera features a two-stage
shutter button. Press the button
lightly (depress to the halfway point)
to activate the first stage, the focus
and auto exposure lock. Pressing
more firmly to the second stage will
activate the shutter, recording an
image.
To Preview an Image on the LCD
Before Shooting
• Check an image before taking the
picture by pressing the LCD button to
activate the LCD panel. Press the
button once again to turn off the
panel.
14
Page 24

Reviewing an Image After
Shooting
• You can review an image after taking
the picture without turning on the
LCD panel. Turn the Review function
on with the Menu feature and
continue to depress the shutter
button after a shot has been taken.
The image will display on the LCD
panel as long as you keep the shutter
button fully depressed.
Self-Timer
• To use the Self-Timer function, set the
Mode Dial to the □ (Auto) or P
(Program) position and press the
Continuous/Self-Timer Button. The 0
mark will show in the Display Panel.
The shutter will release 10 seconds
after the shutter button is pressed.
Page 25

Taking Pictures continued... 313
_______
About Power Save
• In the Auto and Program modes, the
lens cover will close and the camera
will automatically power down if left
for 3 minutes. Pressing any button
will switch the power back on. Please
refer to the Power Save sertion of the
Reference Guide for further detail on
activating or deactivating this
function.
Page 26

15
Page 27

I
Replaying Images
1. Replaying Images in Play Mode
To view single images on the LCD panel, set
the camera to the Play mode as shown
below.
+/- Buttons
MACRO/JUMP Button
LCD Panel
16
1) Turn the Mode Dial to the PLAY position.
2) Scroll through images by pressing the +/-
Buttons.
3) To quit, turn the Mode Dial to the L (Lock)
position.
Page 28

Replaying Images continued... 213 _
I
2. Replaying Images in Multi
To view groups of nine images on the LCD
panel, set the camera to the Multi mode as
shown below.
+/- Buttons
MACRO/JUMP Button
LCD Panel
Mode
1) Turn the Mode Dial to the MULTI position.
2) Select image (green frame) by pressing
the +/- Buttons.
Display the selected image at full size
by turning the Mode Dial to the PLAY
position.
To display the next or previous
images, press the Macro/Jump Button
and +/- Buttons. To return to normal
selection menu, press the MACRO/
JUMP Button again.
3) To quit, turn the Mode Dial to the L (Lock)
position.
17
Page 29

U Replaying Images continued... 313
_________
3. Displaying Images on a TV
To view your images on a TV, connect the
camera to the TV with the video cable
supplied.
TV video In
Video Cable
(Supplied)
1) Turn the Mode Dial to the L (Lock)
position and ensure that the TV power
switch is off.
18
Page 30

2) Insert one end of the video cable into the
camera's VIDEO terminal and the other
into the TV's Video In jack.
3) Turn the TV on and select the video
channel.
4) Turn the camera's Mode Dial to the PLAY
or MULTI position.
5) If an image appears in the camera's LCD
panel, press the LCD button.
Pressing the LCD button switches the
display between the television and the
camera's LCD panel.
6) Use the normal replay procedures as
described on the previous pages to view
the images.
Page 31

Retrieving Images .
1. Installing the Software
Install the software contained on the CDROMs.
Before you start installing the
software, read the software Quick
Start Guides supplied.
For a detailed explanation of how to
perform the installation, please
consult the Quick Installation Guide
included with the software.
Page 32

1) start the computer.
2) Place the CD in your CD-ROM drive.
Windows®
Follow the instructions displayed on-screen to
install the software.
Macintosh
Drag and drop the folders required from the
CD onto your hard disk.
To use Adobe Photoshop software
with a camera, you must copy the
Plug-In Module into Photoshop's
Import/Export folder in the Plug-Ins
folder.
3) Reboot the computer after the installation
completes.
19
Page 33

I
Retrieving Images continued... 218^
About the Software
The CD-ROMs shipped with the package
contain the following software. Install the
software from the CD-ROM onto your
computer as required.
• TWAIN Driver (Windows)
Driver software for acquiring images from a
PowerShot digital camera into a TWAINcompliant application program.
• Photoshop Plug-In Module (Macintosh)
A plug-in module that allows Adobe
Photoshop to acquire images from a
PowerShot digital camera.
• PhotoStitch (Windows/Macintosh)
A software program that makes it easy to
merge sequential pictures taken with the
20
Page 34

PowerShot A5's Stitch Assist mode into
large, high-quality panoramic scenes.
• SlideShowMaker (Windows)
A software program that draws upon the
PowerShot A5's slide show capabilities to
display images in compelling presentations.
• TimeTunnel (Macintosh)
A software program that enables you to
browse through your images on-screen in
chronological order.
• Ulead Photoimpact 4.0 (Windows)
A suite of Web-capable programs with
extensive image enhancement and file
management functions.
Page 35

Retrieving Images continued... 318^—
I
Software Requirements
Your computer system will need to meet one
of the following sets of requirements to run
the software.
PGAT Compatible Computers
CPU:
RAM:
Hard Disk: At least 1 SMB for TWAIN and
Monitor: 640 X 480 resolution or higher, 256
Operating System:
Ports: Serial port (RS232-C)
486 DX2/66 MHz or higher
(Pentium recommended)
24 MB or more
(32 MB or more recommended)
(32 MB or more recommended for
Windows NT)
145 MB for TWAIN and Photoimpact 4.0
colors or more (For screens 1024 x 768 or
more, 24 bit color display recommended)
Windows 95 or Windows NT 4.0
Page 36

• Macintosh Computers
CPU: 68LC040 or higher
Power Macintosh
RAM: 24 MB or more recommended
Hard Disk: 20 MB or more of free disk space
(50 MB or more recommended)
Monitor: 640 X 480 resolution or higher, 256
colors or more (For screens 1024 x 768 or
more, 24 bit color display recommended)
Operating System:
Mac OS 7.5.3 or higher
QuickTime 2.1 or higher
Ports: Serial port
• CD-ROM drive required for software installation.
Software for Windows 3.1 and
Macintosh 68K available on request.
21
Page 37

I
Retrieving Images continued...
2. Connecting to a Computer and Retrieving Images
Follow the procedures below to retrieve
camera images.
Before you connect the camera to a
computer, always off the computer
and turn the camera's Mode Dial to
the L (Lock) position.
• Windows •
Connect the camera to the PC's serial port
with the PC interface cable.
DIGITAL Terminal
\
'W
.4
Serial Port '
PCI nterf ace Cable ' ‘
22
Once the camera is attached to the compu
ter, follow the procedures below to load
images and save them to the computer.
1) Turn the computer on.
2) Start your TWAIN-compliant application
program.
3) Turn the camera's Mode Dial
to the PC position.
4) Select [Canon PowerShot] from your
I'
application's input device selection menu.
5) Start the TWAIN Driver from within your
application.
6) Use the TWAIN Driver to load the images
from the camera.
Page 38

1
Retrieving Images continued... 5/8
For nriofe information regarding your
TWAIN-compliant application
program or TWAIN Driver, refer to
their respective Help files or other
on-line guides.
____
Page 39

Macintosh *
Connect the camera to the Macintosh
modem or printer port with the Macintosh
interface cable.
Printer Port Modem Port
Macintosh Interface Cable
23
Page 40

I
Retrieving Images continued... 618—
Once the camera is attached to the computer,
follow the procedures to load images and save
them to the computer.
1) Turn the computer on.
2) Start the application program for which
you installed the Plug-In Module.
3) Turn the camera's Mode Dial
to the PC position.
4) Select [Canon PowerShot PPC...] or [Canon
PowerShot 68K...] from your application's
input device selection menu.
5) Start the Plug-In Module from within your
application.
24
Page 41

6) Use the Plug-In Module to load the images
from the camera.
' For more information regarding the
Plug-In Module and the application
program for which you installed it,
refer to their respective Quick Start
Guides, help files or other on-line
guides.
Page 42

Retrieving Images continued... 718.
3. Reading a CF Card with a PCMCIA (PC Card) Slot
If your computer is equipped with a PCMCIA
slot, also called a PC card slot, you can insert
a CF card directly into the slot with an
optional PCMCIA adapter.
Before you eject the CF card, always
off the computer and turn the
camera's Mode Dial to the L (Lock)
position.
1) Slide the lock of CF card slot cover to the
open position. Open the cover.
Lock
CF Card '
Slot Cover
2) Eject the CF card from the camera by
pushing the Eject button.
Eject Button
3) Place the CF card into the PCMCIA
adapter.
CF Card
PCMCIA Adapter
25
Page 43

I
J
Retrieving Images continued... 818
4) Insert the adapter into the PCMCIA slot.
5) Start the application software.
6) Select the PCMCIA slot as the image
source and acquire the images.
Please read the Quick Start Guides or
help for each software program for
detailed instructions on howto
acquire images.
26
Page 44

Erasing Images
Follow the procedures below to erase an
image on a CF card.
SET Button
MENU Button
LCD Panel
1) Turn the Mode Dial to the [PLAY] or
[MULTI] position.
+1- Buttons
Page 45

I
Erasing Images continued... 212
2) Press the MENU Button to display the
Play Menu.
3) Press the +/- Buttons to select [Erase],
and then press the SET Button
Page 46

4) If you chose [Single], press the +/- Buttons
to display the image you want to erase.
Press the SET Button to erase. If you chose
[All], all images will delete.
5) A confirmation message will be displayed.
Press the +/- Buttons to select [OK] and
press the SET Button.
If you want to caned the erase, select
[Cancel].
To display the previous menu, press
the MENU Button.
27
Page 47

I
1
Page 48

Page 49

Page 50

Page 51

 Loading...