


www.butkus.org/chinon
Canon Pellix
Camera Manual
posted 4-28-'03
For reference use on many Cannon manual focus and metering cameras.
This camera manual library is for reference and historical purposes, all rights reserved.
This page is copyright by mike@butkus.org, M. Butkus, N.J.
This page may not be sold or distributed without the expressed permission of the producer
I have no connection with Cannon Pellix Co., Japan
If you find this manual useful, how about a donation of $3 to: M. Butkus, 29 Lake Ave., High Bridge, NJ 08829-1701 and send your E-mail address too so I can thank you. Most other places would charge you $7.50 for a electronic copy or $18.00 for a hard to read Xerox copy.
This will allow me to continue to buy new manuals and maintain these pages. It'll make you feel better, won't it?
If you use Pay Pal, use the link below. Use the above address for a check, M.O. or cash.
To main Chinon/Ricoh manual site
We are highly gratified that you have selected the Canon PELLIX QL-- a wise choice that promises you many delightful years of photographic experiences.
Canon is recognized the world over as the foremost pioneer in the development of photographic equipment of the highest quality and performance.
Whether it is for the home, laboratory, or traveling, make the most of your opportunities!
Before Using...
It is important for you to thoroughly know and to get accustomed to handling the Canon PELLIX QL. Please read this instruction booklet carefully, and master the manipulations of the various parts completely. If you are thoroughly versed in the correct handling of the camera, you can get the maximum performance out of the Canon PELLIX QL to your greatest satisfaction.
Contents
Mercury Battery Loading : 8
Film Rewinding : 28
Film Winding : 10
Photography Using Self-timer and Eyepiece Shutter : 29
Shutter and Aperture Adjustment : 12
Flash Synchronization : 30
How to Use Built-in Exposure Meter : 16
Uses of Lenses : 31
Exposure Setting 1--Shutter Speed Priority Method : 18
Double Exposure : 36
Exposure Setting 2--F Stop Priority Method : 19
Filters : 37
Coupling Range of Built-in Exposure Meter ; 20
Proper Care of the Canon PELLIX QL : 38
Focusing : 21
Interchangeable Lenses and Accessories : 40
Holding the Camera : 23
Canon Booster : 43
Film Loading : 25

www.butkus.org/chinon
Technical Data
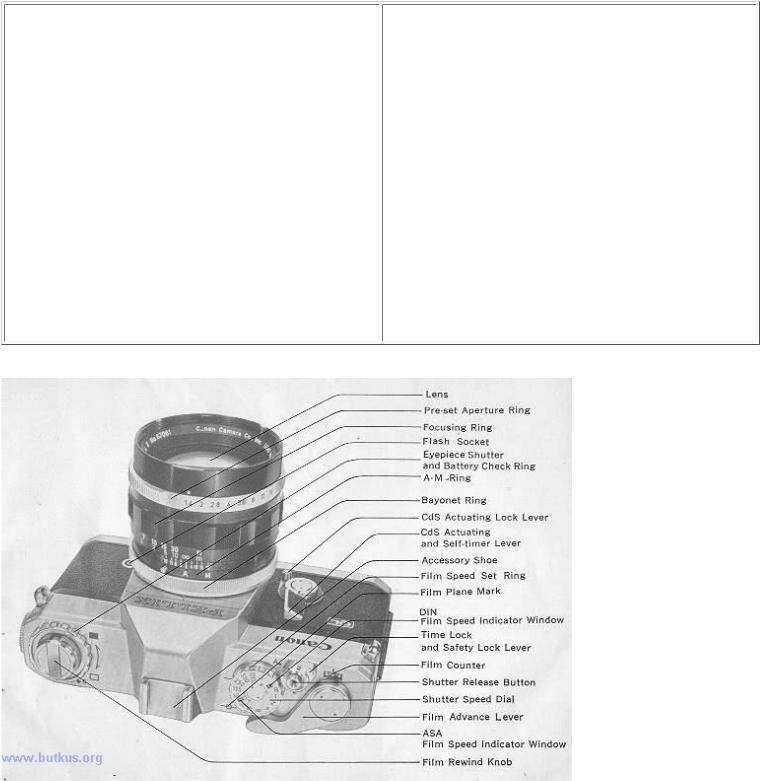
Type: 35mm single-lens reflex camera.
Viewfinder: Eye-level system using pentagonal prism. Waist Level Viewer 2 can be attached.
Focusing Glass: Highly efficient in resolving power, using Fresnel lens and built in prism screen rangefinder. Mirror: The Canon Pellicle Mirror, a half bans parent mirror.
Standard Lens: FL 50mm F 1.8, FL 50mm F1.411, FL 55mmFl.2, FLP 38mm F2.8 Aperture: Fully automatic pre-set aperture built in. Pre-set release possible. Shutter: 1/1000 -1 sec. and B (T) X single pivot dial focal plane shutter.
Exposure Meter: Built in. Zero-method CdS cell coupled to shutter dial and aperture setting. TTLM system. EVO.5(with ASA 100 film, F 1.2 at 1 sec.)-EV 18 (F 16 at 1/1000 sec.) one stage system. ASA 25 - 2000. Powered by one 1.3 V M 20 (# 625) mercury battery.
Photometry: Exposure meter functions with the CdS actuating lever. Continuous photometry is possible with the CdS actuating lock lever. Battery checker built in.
Measuring of Ultra-Low Illumination: EV 1.5 1/2 sec. -EV--4.5 30 sec. at F 1.2 can be measured with the attachment of the Canon Booster (auxiliary meter for extremely dim lighting).
Flash Synchronization: Synchronizing possible for FP and X contacts and FP class, M class MF class and speedlight. Self-timer: Built in. Time adjusting type.
Film Rewinding: Done by button and crank.
Film Advance Lever: Single operation 174° winding lever, possible to wind with several short strokes.
Film Loading: Back cover opening and closing, using only cartridge. The Canon developed QL mechanism makes possible simple and quick loading of film.
Interchangeable Lenses: Automatic pre set aperture type FL series lens system. Film Counter: Self-resetting type.
Size: 144x91x43mm (5~"x3%"xl~")
Weight: 755 grams (l lb. lO1/2oz.)--body only. Subject to alterations.


www.butkus.org/chinon
Mercury Battery Loading
Load the mercury battery into the battery compartment. The mercury battery powers the built in CdS exposure meter, and the meter will not function unless the battery is in position.
1.Press the finger against the battery cover and turn to the left to remove.
2.Face the central contact of the mercury 2 battery inwards and insert, then screw the cover back in.
èBefore insertion, clean mercury battery thoroughly with a dry cloth. Perspiration or finger marks may cause corrosion and may prove particularly harmful to center of contact. Un. clean battery may also damage the contact point of the camera.
èFor mercury battery, National M-ID or Toshiba TM-MC is used -equivalent to Mallory RM-625R, Eveready E625N, GE #625. Life of the battery in continuous use is approximately one year.
èWhen inserting, do not confuse the (+) ( - ) Not only will the meter fail to function in case of reverse insertion, but the cover cannot be screwed in properly.
èWhen not in use for a long period, remove the battery and keep in a dry place.
Battery Check
Check the mercury battery after loading it. Especially when loading a new battery, be sure to check the voltage.
1. Set the film speed graduation of the shutter dial at ASA 100 and set "X" et the index mark. Lift up the outer sensitivity ring of the shutter dial and turn. See page 16.
è An accurate check cannot be made if settings other than those mentioned above are used.
2.Turn the check ring on the outer side of the film rewind knob and set " C" at the index mark.
3.If the meter needle inside the viewfinder swings up to or over the c index, it means there is sufficient voltage. If the needle stays below the edge of the 0 index, voltage is insufficient and the battery must be replaced.
è In the Canon PELLIX QL, the electric current flows only when the CdS actuating lever is pressed.

Film Winding
1.The turning of the film advance lever cocks the shutter, film winding and aperture charging in one motion.
2.When the shutter button is pressed, the diaphragm simultaneously closes down to the pre-selected F stop and the shutter operates.
Immediately after the shutter operation, the advance lever is again in ready position.
èBe sure that the safety lock lever is set at "A".
èThe winding may be done by moving the lever with several short strokes.
èAfter loading the film, make another wind, since there is the possibility of the very first winding not catching.
èUnless the winding is completed, the shutter will not be actuated, even though the shutter button is pressed. In such a case, check the winding once more.
Film Counter
Each winding of film will advance the number of the film counter, indicating the number of pictures taken. When the back cover is opened, the indicator automatically returns to starting position " S ".
Safety Device for Shutter
When the safety lock lever around the shutter button is turned to " L" position, the shutter is locked and will not move. This device may be used when the camera is carried in a wound condition.
Attaching the Cable Release
A cable release can be attached to the shutter button. Even if the safety lock lever is at " L" position, the shutter will operate by using the release.
When using the cable release, be sure to close the eyepiece shutter before shooting. Refer to instructions on page 29.

www.butkus.org/chinon
Shutter and Aperture Adjustment
The shutter and aperture adjust the exposure with the shutter adjusting the exposure time and the aperture ad lusting the amount of light. The Canon PELLIX QL uses the zero-method coupled meter, and it is very simple to get the proper exposure.
Shutter Speed Dial
By revolving the dial, it is possible to adjust the speed by turning it to the necessary index number. The index on the dial shows the denominators of 1/1000 sec., 1/15 sec., etc.
èThe shutter speed dial does not revolve between the indexes "X" and "B".
èSet the index at the position where the click stop catches.
è"B" means bulb exposure. The shutter, which remains open during the pressing of the shutter button, is employed when making exposures of more than one second.
In case of " B" index, adjust it to the white dot just below the " B" index.
èWhen it is necessary to make a n exposure over an extended time, first set it at " B ". Keep the shutter button pressed, turn the time lock lever to indicator " L". In this case, even if the finger is removed, the exposure continues. When the lever is returned to "A", the shutter closes.
èTime exposure is possible also by using the lock-attached cable release.
èThe "X" index is used for synchronizing a speedlight. Although the shutter speed at "X" is 1/60 sec., actually it is equivalent to a very short exposure during the flash time of the speed light.
Lens Aperture
The adjustment of the quantity of light and depth-of-field are made by turning the pre-set aperture ring to adjust the desired F stop to the index.
è As the numerical value of the F stop gets larger, the amount of light reaching the film becomes correspondingly less. For each F stop the light is reduced one-half. Accordingly, when the aperture is increased by one index point, the exposure is doubled, and when it is increased by two index points the exposure is quadrupled.
èThe aperture ring can also be set to intermediate values.
èDepending on the lens, there are instances where there is no relation to the lightness being halved between the maximum diameter of the aperture and the next aperture reading.
èThe ratio between aperture and the amount of exposure, using F 2 as the basis, is as follows:
Lens Aperture
1.2 1.4 1.8 2 2.8 3.5 4 5.6 8 11 16 22
Exposure Ratio
3 2 1.25 1 1/2 1/3 1/4 1/8 1/16 1/32 1/64 1/128
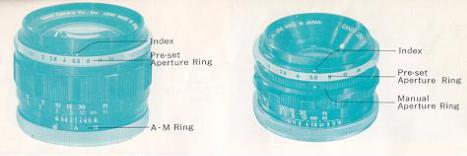
Pre-Set Aperture and Checking of Depth-of-Field
Lens with A-M Ring
1.Pre-Setting of Aperture: Set the A-M ring at "A". Then set the desired F stop on the pre-set aperture ring to the index. The diaphragm will close down to the pre-set F stop only for the instant that the shutter is released. Except for the instant that the shutter is released, the diaphragm will remain fully open.
2.Manually Operated Aperture: When the ~ A-M ring is set at "M" the diaphragm closes down to the pre-set F stop. In this way the depth-of-field at the time of shutter release can be checked. When the A-M ring is reset at "A" the diaphragm again returns to maximum opening.
Lens with Manual Aperture Ring
1.Pre-setting of aperture: Set the desired F stop on the pre-set aperture ring to the index. Then set the index of the manual aperture ring to this pre-set F stop. The diaphragm will close down to the pre-set F stop only for the instant that the shutter is released.
2.Manually Operated Aperture: When the ~ manual aperture ring is turned in the direction of closing down the diaphragm, after setting the desired F stop on the preset aperture ring to the index, the diaphragm will close down to the pre-set F stop and the depth-of- field can be checked. The manual aperture ring cannot be turned when set at maximum aperture opening.
è Refer to pages 34-35 concerning depth-of-field.
Relation Between the Pellicle Mirror, CdS, Diaphragm and Shutter
 Loading...