

Candy FCS602N-E Instruction manual
FORNI
ISTRUZIONI PER L’USO
OVENS
USER INSTRUCTIONS
HORNOS EMPOTRABLES
INSTRUCCIONES DE USO
OVEN
GEBRUIKSAANWIJZING
EINBAUBACKKÖFEN
BEDIENUNGSANLEITUNG
FOURS ENCASTRABLES
NOTICE D’EMPLOI ET D’INSTALLATION
FORNOS
MANUAL DE INSTRUÇÕES DE UTILIZAÇÃO
IT
GB
ES
NL
DE
FR
PT
PIEKARNIKI DO ZABUDOWY
INSTRUKJA OBSŁUGI
TROUBY
NÁVOD K OBSLUZE
NAVODILO ZA UPORABO
VEČNAMENSKE VGRADNE PEČICE
ФУРНИ
ИНСТРУКЦИИ ЗА ПОТРЕБИТЕЛЯ
PL
CZ
SI
BG
CANDY HOOVER GROUP S.R.L. • Via Privata Eden Fumagalli • 20047 Brugherio Milano Italy

CONTENUTO
Indicazioni Di Sicurezza
1. Avvertenze Generali
1.1 Dichiarazione Di Conformità
1.2 Informazioni Sulla Sicurezza
1.3 Installazione
1.4 Inserimento Del Mobile
1.5 Importante
1.6 Allacciamento Elettrico
Dotazione Del Forno (secondo Modello)1.7
2. Consıglı Utili
2.1 Griglie Forno - Sistema Di Arresto
2.2 La Cottura Al Grıll
2.3 Secondo Modello Led Vision
2. 4 Tempı Di Cottura
2. 5 Pulizia E Manutenzione
2. La Funzione 6 AQUACTIVA
2.7 Pulızıa E Manutenzıone
2. 8 Servizio Assistenza Clienti
3. Contamınutı
3.1 Uso Del Contaminuti
3.2 Uso Del Temporizzatore
3.3 Regolazione Ora
3.4 Timer Elettronico A Sfioramento
4. Istruzioni Per L’uso
5. Tabella Tempi Di Cottura
....................................................................................05
.....................................................................................05
...................................................................................06
.....................................................................................08
...................................................................04
.......................................................................05
..........................................................05
..........................................................05
....................................................................05
..................................................................05
............................................................................06
..........................................................06
............................................................................06
.................................................................06
..............................................................07
..................................................................07
............................................................07
.....................................................................08
..................................................................08
............................................................................08
.........................................................................09
...........................................................10-11
IT
.......................................05
.................................................06
......................................................08
INHOUDSOPGAVE
VEILIGHEIDSVOORSCHRIFTEN
1. Algemene Aanwijzingen
1.1 Lees Deze Handleiding Aandachtig
1.2 Veiligheıdsvoorschriften
1.3 Installatie
1.4 Inbouw Van De Oven
1.5 Belangrijk
1.6 Elektrische Aansluiting
1.7 Uitrustıng Van De Oven Afhankelijk Van Het Model
2. Nuttige Tips
2.1 Veiligheidssysteem Voor De Roosters
2.2 Grilleren
2.3 De U-cook Modellen
2.4 Afhankelijk Van Model:u-see
2.5 Zelfreinigende Ovenwanden
2.6 Aquactivafunctie
2.7 Schoonmaken En Onderhoud
2.8 Servıce Dienst
3. Kookwekker
3.1 Gebruik Van De Kookwekker
3.2 Gebruik Van De Tımer Met Uitschakelfunctie
3.3 De Juiste Tijd Instellen
3.4 Elektronische Programma's Gebruiken
4. Instructies Voor Het Gebruik Van De Oven
5. Baktijden En-temperaturen Voor Geventileerde Oven
.......................................................................................27
......................................................................27
.......................................................................................27
....................................................................................28
..........................................................................................28
............................................................................28
...............................................................................29
......................................................................................29
.......................................................26
..................................................................26
...............................................27
.................................................................27
..................................................................27
......................27
............................................28
...................................................................28
.........................................................28
..........................................................28
.......................................................28
.........................................................29
................................29
..................................................................29
.........................................29
................................30
NL
...............31
CONTENTS
Safety Instructions
1. General Warnings
1.1 Declaration Of Compliance
1.2 Safety Hints
1.3 Installation
1.4 Fitting The Oven Into The Kitchen Unit
1.5 Important
1.6 Connecting To The Power Supply
1.7 Oven Equipment (according To The Model)
2. Useful Tips
2.1 Shelf Safety System
2.2 Grilling
2.3 The U-Cook Models
2.4 U-See
2.5 Self-cleaning Oven With Catalytic
2.6 AQUACTIVA Function
2.7 Cleaning And Maintenance
2.8 Service Centre
3. Timer
3.1 Using The Minute Timer
3.2 Using The End Of Cooking Timer
3.3 Setting The Correct Time
3.4 Use Of The Electronic Programmer
4. Operating Instructions
5. Tables Of Cooking Times
...........................................................................................14
.............................................................................................14
................................................................................................15
.............................................................................12
............................................................................12
...........................................................13
....................................................................................13
.....................................................................................13
.........................................13
......................................................................................13
..................................................13
......................................................................................14
.....................................................................14
.....................................................................14
.................................................14
...........................................................14
............................................................14
..............................................................................15
.................................................................15
...................................................15
................................................................15
...............................................15
......................................................................16
............................................................17-18
CONTENIDO
Instruccıones Para Un Uso Seguro
1. Instrucciones Generales
1.1 Declaración De Conformidad
1.2 Información Sobre Seguridad
1.3 Instalación
1.4 Introducción Del Mueble
1.5 Importante
1.6 Conexión Eléctrica
1.7 Equipamiento Del Horno - Según El Modelo -
2. Consejos Útiles
2.1 Rejillas Horno - Sistema De Sujeción
2.2 La Coccıón Al Grill
2.3 Los Modelos U-cook
2.4 Segùn Modelos U-see
2.5 Horno Autolımpiante Catalítico
2.6 Función Aquactiva
2.7 Limpieza Y Mantenimiento
2.8 Asistencıa Técnica
3. Mınutero
3.1 Uso Del Mınutero
3.2 Uso Del Temporizador
3.3 Ajuste De La Hora
3.4 Temporizador Táctil
4. Instrucciones De Uso
5. Tablas De Tiempos De Cocción
...................................................................................20
.....................................................................................20
........................................................................20
................................................................................21
........................................................................21
..................................................................21
...................................................................21
.......................................................................21
.........................................................................22
.........................................................................................22
..........................................................................22
...................................................................22
........................................................................22
........................................................................22
....................................................................23
....................................................19
...............................................................19
.......................................................20
.......................................................20
................................................................20
............................................21
......................................................21
...........................................................22
...............................................24-25
GB
.................................13
ES
...............................20
INHALTSVERZEICHNIS
SICHERHEITSVORSCHRIFTEN
1. Allgemeine Hinweise
1.1 Konformitätserklärung:
1.2 Sicherheitshınweise
1.3 Installation
1.4 Einbau In Den Schrank
1.5 Wichtig
1.6 Elektrischer Anschluß
1.7 Ofenausstattung (je Nach Modell)
2. Einige Nützliche Hinweise
2.1. Kippgesicherte Gitterroste
2.2. Grillen
2.3 The U_cook Models
2.4 Beleuchtungssystem U-see - Je Nach Modell
2.5 Katalytisches Selbstreinigungsset
2.6 Aquactiva Funktion
2.7 Reinigung Und Wartung
2.8 Technischer Kundendienst
3. Minutenzähler
3.1 Minutenzähler
3.2 Benutzung Des Timers Für Backzeitende
3.3 Einstellung Der Richtigen Uhrzeit
3.4 Touch Timer
4. Bedienungsanleitung
5. Garzeiten
......................................................................................33
..........................................................................................33
...........................................................................................34
..................................................................................37-38
......................................................................33
......................................................................34
......................................................................34
...............................................................................35
................................................................................35
...................................................................................35
........................................................32
....................................................................32
..................................................................32
..................................................................33
....................................................................33
.................................................33
............................................................34
............................................................34
..............................34
.................................................34
................................................................34
............................................................35
.....................................35
.................................................35
....................................................................36
SOMMAIRE
CONSEILS DE SÉCURITÉ
1. Instructions Generales
1.1 Declaration De Conformité
1.2 Consignes De Securite
1.3 Installation
1.4 Mise En Place Du Four Dans Son Meuble
1.5 Important
1.6 Alimentation Electrique
1.7 Important
1.8 Equipement Du Four Equipement Different Selon Le Type De Four
2. Consignes Utiles
2.1 Grilles Du Four, Nouveau Système D’arrêt
2.2 La Cuısson Au Gril
2.3 Selon Modèle Le Pack U-cook
2.4 Selon Modèle U-see
2.5 Four Autonettoyant Par Catalyse
2.6 Fonction Aquactiva
2.7 Conseils De Nettoyage Et D’entretien
2.8 Assistance Technique
3. Minuteur
3.1 Utilisation Du Minuteur Sonore
3.2 Utilisation Du Mınuteur Coupe-circuit
3.3 Reglage De L'heure
3.4 Horloge À Commande Sensitive
4. Instructions Pour L’utilisation
5. Temps De Cuisson
.....................................................................................40
........................................................................................40
......................................................................................40
............................................................................41
..........................................................................................42
..............................................................39
....................................................................39
.............................................................39
...................................................................40
....................................40
..................................................................40
...................................41
.......................................................................41
.....................................................41
...................................................................41
..................................................41
........................................................................41
...........................................42
....................................................................42
......................................................42
.............................................42
.......................................................................42
....................................................42
......................................................43
....................................................................44-45
DE
FR
...40
1.1 DECLARATION OF COMPLIANCE
The parts of this appliance that may come into contact with foodstuffs
comply with the provisions of EEC Directive 89/109.
By placing the mark on this product, we are confirming compliance
to all relevant European safety, health and environmental requirements
which are applicable in legislation for this product.
When you have unpacked the oven, make sure that it has not been
damaged in any way. If you have any doubts at all, do not use it: contact a
professionally qualified person. Keep packing materials such as plastic
bags, polystyrene, or nails out of the reach of children because they are
dangerous for children.
1.2 SAFETY HINTS
•The oven must be used only for the purpose for which it was designed: it
must only be used for cooking food. Any other use, e.g. as a form of
heating, is an improper use of the oven and is therefore dangerous.
•The manufacturers cannot be held responsible for any damage caused
by improper, incorrect or unreasonable use. When using any electrical
appliance you must follow a few basic rules.
– Do not pull on the power cable to remove the plug from the socket.
– Do not touch the oven with wet or damp hands or feet.
– Do not use the oven unless you are wearing something on your feet.
– It is not generally a good idea to use adapters, multiple sockets for
several plugs and cable extensions.
– If the oven breaks down or develops a fault switch it off at the mains and
do not touch it.
•If the cable is at all damaged it must be replaced promptly.
When replacing the cable, follow these instructions. Remove the power
cable and replace it with one of the H05RRF, H05VV-F, H05V2V2-F type.
The cable must be able to bear the electrical current required by the oven.
Cable replacement must be carried out by properly qualified technicians.
The earthing cable (yellow-green) must be 10 mm longer than the power
cable.
Use only an approved service centre for repairs and ensure that only
original parts are used. If the above instructions are not adhered to the
manufacturers cannot guarantee the safety of the oven.
•Do not line the oven walls with aluminium foil or single-use
protection available from stores. Aluminium foil or any other
protection, in direct contact with the hot enamel, risks melting and
deteriorating the enamel of the insides.
1.3 INSTALLATION
Installation is the customer’s responsibility. The manufacturers have no
obligation to carry this out. If the assistance of the manufacturer is required
to rectify faults arising from incorrect installation, this assistance is not
covered by the guarantee.
The installation instructions for professionally qualified personal must be
followed. Incorrect installation may cause harm or injury to people,
animals or belongings. The manufacturer cannot be held responsible for
such harm or injury.
1.4 FITTING THE OVEN INTO THE KITCHEN UNIT
Fit the oven into the space provided in the kitchen unit; it may be fitted
underneath a work top or into an upright cupboard. Fix the oven in position
by screwing into place, using the four fixing holes in the frame. (Fig.on last
page).
To locate the fixing holes, open the oven door and look inside.To allow
adequate ventilation, the measurements and distances indicated in the
diagram on last page must be adhered to when fixing the oven.
Note: For ovens that are combined with a hob unit the instructions
contained in the manual for the hob unit must be followed.
1.5 IMPORTANT
If the oven is to work properly, the kitchen housing must be suitable. The
panels of the kitchen unit that are next to the oven must be made of a heat
resistant material. Ensure that the glues of units made of veneered wood
can withstand temperatures of at least 120 °C. Plastics or glues that
cannot withstand such temperatures will melt and deform the unit. Once
the oven has been lodged inside the unit, the electrical parts must be
completely insulated. This is a legal safety requirement. All guards must be
firmly fixed into place so that it is impossible to remove them without using
special tools.
Remove the back of the kitchen unit to ensure an adequate current of
air circulates around the oven. The hob must have a rear gap of at
least 45 mm.
1.6 CONNECTING TO THE POWER SUPPLY
Plug into the power supply. Ensure first that there is a third contact that
acts as earthing for the oven. The oven must be properly earthed.
If the model of oven is not fitted with a plug, fit a standard plug to the
power cable. It must be able to bear the power supply indicated on the
specifications plate. The earthing cable is yellowgreen. The plug must
be fitted by a properly qualified person. If the socket and the plug are
incompatible the socket must be changed by a properly qualified
person.A properly qualified person must also ensure that the power
cables can carry the current required to operate the oven.
An ON/OFF switch may also be connected to the power supply. The
connections must take account of the current supplied and must comply
with current legal requirements. The yellow-green earthing cable must
not be governed by the ON/OFF switch. The socket or the ON/OFF
switch used for connecting to the power supply must be easily
accessible when the oven has been installed.
Important: During installation, position the power cable in such a way
that it will not be subjected to temperatures of above 50°C at any point.
The oven complies with safety standards set by the regulatory bodies.
The oven is safe to use only if it has been adequately earthed in
compliance with current legal requirements on wiring safety. You must
ensure that the oven has been adequately earthed.
The manufacturers cannot be held responsible for any harm or
injury to persons, animals or belongings caused by failure to
properly earth the oven.
WARNING: the voltage and the supply frequency are showed on
the rating plate (fig. on last page).
The cabling and wiring system must be able to bear the maximum
electric power required by the oven. This is indicated on the
specifications plate. If you are in any doubt at all, use the services of a
professionally qualified person.
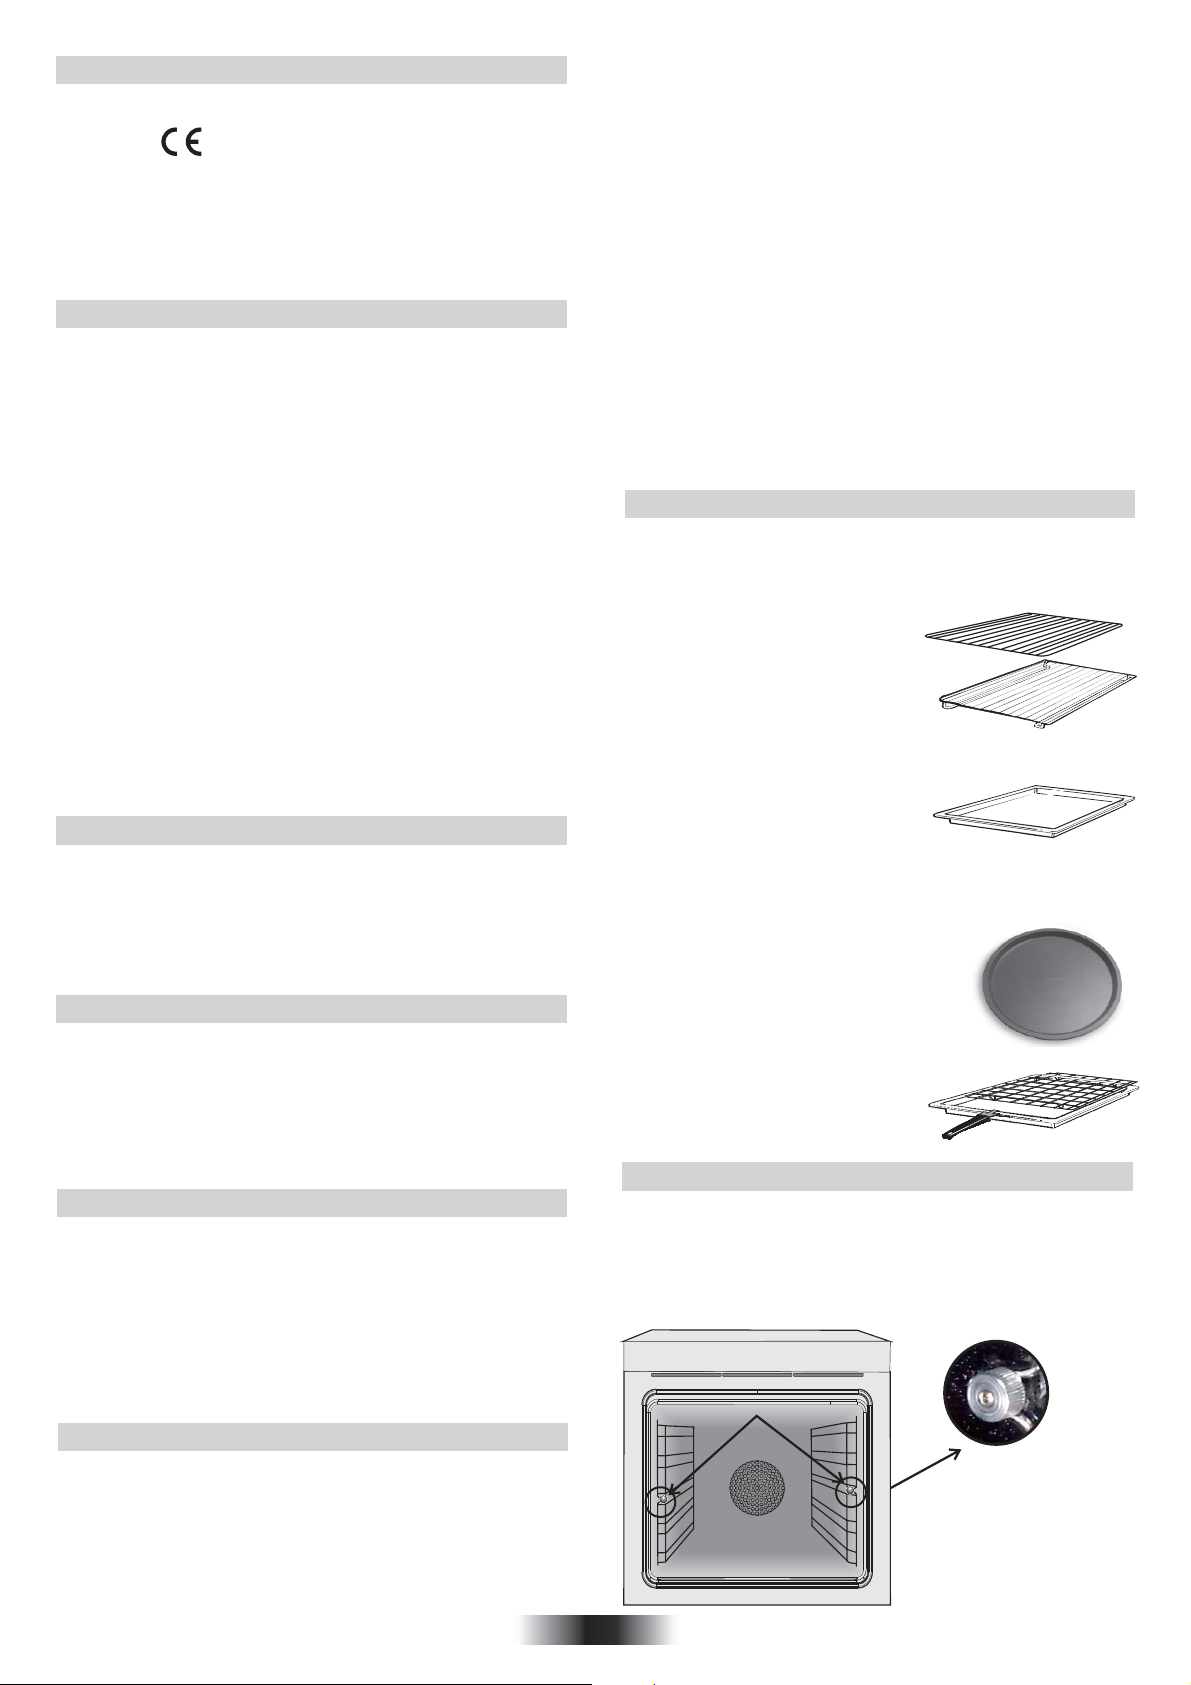
1.7 OVEN EQUIPMENT (according to the model)
It is necessary to do an initial cleaning of the equipment before the
first use of each of them.Wash them with a sponge. Rinse and dry
off.
The simple shelf can take moulds and
dishes.
The tray holder shelf is especially
good for grilling things. Use it with the
drip tray.
The special profile of the shelves
means they stay horizontal even when
pulled right out. There is no risk of a dish
sliding or spilling.
The drip tray catches the juices from
grilled foods. It is only used with the Grill,
Rotisserie, or Fan Assisted Grill ; remove
it from the oven for other cooking
methods.
Never use the drip tray as a roasting tray as this creates smoke and fat
will spatter your oven making it dirty.
The pizza set is designed for pizza cooking.
In order to obtain the best results the set
must be used together with Pizza function.
The tray holder
The tray holder shelf is ideal for grilling. Use it in
conjunction with the drip tray. A handle is
included to assist in moving the both
accessories safely. Do no leave the
handle inside the oven.
Removing and cleaning wire racks
1- Remove the knurled nuts by turning them counter clockwise.
2- Remove the wire racks by pulling them towards yourself.
3- To clean the wire racks either put them in the dishwasher or use
a wet sponge, ensuring that they are dried afterwards.
4- After the cleaning process install the wire racks in reverse order.
5- Replace the knurled nuts.
A
13 GB
 Loading...