

Page 1

USER INSTRUCTIONS
02
OVENS
EN
NOTICE D'EMPLOI ET D'INSTALLATION
12
DES FOURS ENCASTRABLES
FR
MANUALE D’ISTRUZIONI
22
FORNO
CANDY HOOVER GROUP S.R.L. • Via Privata Eden Fumagalli • 20047 Brugherio Milano Italy
IT
Page 2

Safety Indications
• WARNING:the applianceand accessibleparts becomehot duringuse.
Be carefulnot to touchany hot parts.
•WARNING: the accessible parts can become hot when the oven is in
use. Childrenmustbe kept atasafe distance.
•WARNING: ensure that the appliance is switched off before replacing
the bulb, toavoid thepossibilityofelectric shocks.
•WARNING:beforeinitiatingthe automatic cleaningcycle:
- Clean theovendoor;
- Removelarge or coarsefood residuesfromthe insideof theoven using
a damp sponge.Donotuse detergents;
- Removeall accessoriesand the sliding rackkit(wherepresent);
- Do notplaceteatowels
• In ovens with meat probe it is necessary, before making the cleaning
cycle, close the hole with the nut provided. Always close the hole with
the nut whenthemeatprobe is not used.
•Children under 8 must be kept at a safe distance from the appliance if
not continuouslysupervised.
•Children must not play with the appliance. The appliance can be used
by those aged 8 or over and by those with limited physical, sensorial or
mental capacities, without experience or knowledge of the product,
only if supervised or provided with instructionastotheoperation of the
appliance, in asafe waywith awareness of thepossiblerisks.
•Cleaning and maintenance should not be carried out by unsupervised
children.
•Do not use rough or abrasive materials or sharp metal scrapers to
clean the oven door glasses, as they can scratch the surface and cause
the glass toshatter.
•The oven must be switched off before removing the removable parts
and, aftercleaning,reassemblethem according the instructions.
•Only use themeatprobe recommendedfor this oven.
•Do not useasteamcleaner for cleaning operations.
• Connect a plug to the supply cable that is able to bear the voltage,
current and load indicated on the tag and having the earth contact. The
EN 02
Page 3

socket must be suitable for the load indicated on the tag and must be
having the earth contact connected and in operation. The earth
conductor is yellow-green in colour. This operation should be carried
out by a suitably qualified professional. In case of incompatibility
between the socketand theapplianceplug,aska qualified electrician to
substitute the socket with another suitable type. The plug and the
socket must be conformed to the current norms of the installation
country. Connection to the power source can also be made by placing
an omnipolar breaker between the appliance and the power source
that can bear the maximum connected load and that is in line with
current legislation. The yellow-green earth cable should not be
interrupted by the breaker. The socket or omnipolar breaker used for
the connection should be easily accessible when the appliance is
installed.
•The disconnection maybeachievedbyhaving the plug accessible or by
incorporating a switch in the fixed wiring in accordance with the wiring
rules.
•If the power cable is damaged, it must be substituted with a cable or
special bundle available from the manufacturer or by contacting the
customerservicedepartment.
•The type ofpowercable must be H05V2V2-F.
•Failure to comply with the above can compromise the safety of the
appliance and invalidatetheguarantee.
•Anyexcessofspilledmaterial should beremoved before cleaning.
•During the pyrolytic cleaning process, surfaces can heat up more than
usual, childrenmustthereforebekept at asafe distance.
•The appliance must not be installed behind a decorative door in order
toavoidoverheating.
•When you place the shelf inside, make sure that the stop is directed
upwardsand inthe back of the cavity.
The shelf mustbeinserted completely intothecavity
• WARNING: Do not linethe oven walls with aluminum foil or single-use
protectionavailable from stores.Aluminumfoiloranyotherprotection,
in direct contact with the hot enamel, riskmelting and deteriorating the
enamel of theinsides.
• WARNING:Never removetheovendoor seal.
EN 03
Page 4

Summary
General Instructions
5
Product Description
7
Use of the Oven
7
Oven Cleaning and Maintenance
9
1.1 Safety indications
1.2 Electrical safety
1.3 Recommendations
1.4 Installation
1.5 Waste management
1.6 Conformity declaration
2.1 Overview
2.2 Accessories
2.3 First use
3.1 Display description
3.2 Cooking modes
3.3 Using the minute timer
4.1 General notes on cleaning
4.2 Self-cleaning oven with catalytic
4.3 Maintenance
• Removal of the oven window
• Removal and cleaning of the glass
door
• Changing the bulb
Troubleshooting
11
5.1 F.A.Q.
EN 04
Page 5

1. General Instructions
We thank you for choosingone of ourproducts. Forthe
best results with your oven, you should read this
manual carefully and retain it for future reference.
Before installing the oven, take note of the serial
number so that you can giveit to customer service staff
if any repairs are required. Having removed the oven
from itspackaging, check thatit has notbeen damaged
during transportation. If you have doubts, do not use
the oven and refer to a qualified technician for advice.
Keep all of the packaging material (plastic bags,
polystyrene, nails) out of the reach of children. When
the oven is switched on for the first time, strong
smelling smoke can develop, whichis causedby the glue on theinsulation panels surrounding the oven
heating for the first time. This is absolutely normal and, if it occurs, you should wait for the smoke to
dissipate before putting food in the oven. The manufacturer accepts no responsibility in cases where
the instructions contained in thisdocument are notobserved.
NOTE: the oven functions, properties and accessories cited in this manual will vary, depending on the
model you have purchased.
1.1 Safety Indications
Only use the oven for its intended purpose, that is only for the cooking of foods; any other use, for
example as a heat source, is considered improper and therefore dangerous. The manufacturer cannot
be held responsibleforany damage resulting fromimproper,incorrector unreasonableusage.
The use ofany electrical applianceimplies theobservance ofsome fundamental rules:
- do notpull onthe powercable to disconnectthe plug fromthe socket;
- do nottouch the appliancewith wetor damphands orfeet;
- in generalthe use ofadaptors,multiple sockets and extensioncables isnot recommended;
- in caseof malfunction and/orpoor operation,switch off theappliance anddo nottamper with it.
1.2 Electrical Safety
ENSURE THAT AN ELECTRICIAN OR QUALIFIED TECHNICIAN MAKESTHE ELECTRICAL CONNECTIONS.
The powersupply to which the ovenis connected must conform with the lawsin forcein the country of
installation.The manufactureraccepts noresponsibility foranydamage causedby thefailure to observe
these instructions. The oven must be connected toan electrical supply with an earthed wall outlet or a
disconnector with multiple poles, depending on the laws in force in the country of installation. The
electrical supply should be protected with suitable fuses and the cables used must have a transverse
section that canensurecorrect supplyto theoven.
CONNECTION
The ovenis supplied with a powercable thatshould only be connected toan electricalsupply with 220240 Vac 50 Hz power between the phases or between the phase and neutral. Before the oven is
connectedto theelectrical supply, itis important to check:
- power voltage indicated onthe gauge;
- the settingof the disconnector.
The groundingwire connectedto the oven's earth terminal mustbe connectedto the earthterminal of
the power supply.
WARNING
Beforeconnecting the ovento thepowersupply,ask aqualified electrician tocheck thecontinuity of the
power supply's earth terminal. The manufacturer accepts no responsibility for any accidents or other
problems caused byfailure to connect the oven tothe earthterminal orby anearth connectionthat has
defectivecontinuity.
EN 05
Page 6

NOTE: as the oven couldrequire maintenance work, itis advisableto keep another wallsocket available
so that the oven can be connected to this if it is removed from the space in which it is installed. The
power cable must only be substituted by technical service staff or by technicians with equivalent
qualifications.
1.3 Recommendations
Aftereach useof the oven,a minimumof cleaningwill helpkeepthe oven perfectly clean.
Do not line the ovenwalls withaluminium foil orsingle-use protection available from stores. Aluminium
foil or any other protection, in direct contact with the hot enamel, risks melting and deteriorating the
enamel of the insides. In order to prevent excessive dirtying of your oven and the resulting strong
smokey smells, we recommend not using the oven at very high temperature. It is better to extend the
cooking time and lower the temperature alittle. In addition to the accessories supplied with the oven,
weadvise youonly use dishesand bakingmoulds resistant to veryhigh temperatures.
1.4 Installation
The manufacturers have no obligationto carry thisout. If the assistance ofthe manufacturer is required
to rectify faults arising from incorrect installation, this assistance is not covered by the guarantee. The
installation instructions for professionally qualified personnel must be followed. Incorrect installation
may cause harm or injury to people, animals or belongings. The manufacturer cannot be held
responsiblefor such harmor injury.
The oven can be located high in a column or under a worktop. Before fixing, you must ensure good
ventilation in the oven space to allow proper circulation of the fresh air required for cooling and
protectingthe internal parts. Make the openingsspecified onlast pageaccordingto thetype of fitting.
1.5 Waste management and environmental protection
This appliance is labelled in accordance with European Directive 2012/19/EU regarding
electric and electronic appliances (WEEE). The WEEE contain both polluting substances
(that can have a negative effect on the environment) and base elements (that can be
reused). Itis important that theWEEE undergospecific treatmentsto correctly remove and
dispose of the pollutants and recover all the materials. Individuals can play an important
role in ensuring that the WEEE do not become an environmental problem; it is essential to
followa fewbasic rules:
- the WEEEshould notbe treatedas domestic waste;
- the WEEE should be taken todedicated collection areas managed by the town council or a registered
company.
In many countries, domestic collections may be available for large WEEEs. When you buy a new
appliance, the old one can be returned tothe vendor whomust accept it free of charge as a one-off,as
long as theappliance isof anequivalent type andhas thesame functionsas thepurchasedappliance.
SAVINGAND RESPECTINGTHE ENVIRONMENT
Where possible,avoid pre-heating theoven andalways tryto fill it. Open theoven door as infrequently
as possible, because heat from the cavity disperses every time it is opened. For a significant energy
saving, switch off theoven between 5 and 10minutes before theplanned end ofthe cooking time, and
use the residualheat that theoven continues togenerate.Keep the sealsclean andin order, toavoidany
heat dispersal outside of the cavity. If you have an electric contract with an hourly tariff, the "delayed
cooking" programme makes energy saving more simple, moving the cooking process to start at the
reducedtariff time slot.
1.6 Declaration of compliance
The parts ofthis appliancethat may comeintocontact with foodstuffs comply withthe provisionsof EEC
Directive89/109.
By placing the mark on thisproduct, we are confirmingcompliance to allrelevantEuropean safety,
health and environmentalrequirements which areapplicable in legislationforthis product.
EN 06
Page 7

2. Product Description
2.1 Overview
1
4
5
3
6
2
2.2 Accessories
Drip pan
1
Collects the residuesthat drip duringthe cooking
of foods onthe grills.
1. Control panel
2. Shelf positions
(lateral wire grid if included)
3. Metal grill
4. Drip pan
5. Fan (behind the steel plate)
6. Oven door
Metal grill
2
Holds baking trays and plates.
2.3 First Use
PRELIMINARYCLEANING
Clean theoven before usingfor thefirst time. Wipe over externalsurfaces witha dampsoft cloth.Wash
all accessories and wipe inside the oven with a solution of hot water and washing up liquid. Set the
empty ovento the maximum temperature and leave on for about1 hour, thiswill removeany lingering
smells of newness.
3. Use of the Oven
3.1 Display description
EN 07
Page 8

3.2 Cooking Modes
Function
Dial
*
T °C
default
220
L3
200
210
T °C
range
50 ÷ 280
L1 ÷ L5
150 ÷ 220
50 ÷ 240
Function (Depens on the oven model)
LAMP: Turns on the oven light.
CONVENTIONAL COOKING: Both top and bottom heating elements are used.
Preheat theoven for aboutten minutes. This method is ideal for all traditional
roastingand baking.For seizingred meats, roast beef,leg oflamb, game,bread,
foilwrapped food (papillotes), flakypastry.Place the food andits dishon a shelf
in mid position.
GRILL : usethe grill withthe doorclosed.
The top heating element is used alone and you can adjust the temperature.
Five minutes preheating is required to get the elements red-hot. Success is
guaranteed for grills,kebabs andgratin dishes.White meatsshould beput ata
distance from the grill; the cooking time is longer, but the meat will be tastier.
You can put red meats and fish fillets on the shelf with the drip tray
underneath.The ovenhas twogrill positions:
Grill: 2140 W Barbecue: 3340 W
FANASSISTED GRILL: usethe turbo-grillwith thedoor closed.
The top heating element isused with thefan circulatingthe airinside theoven.
Preheating is necessary for red meats but not for white meats. Ideal for
cooking thick food items, whole pieces such as roast pork, poultry, etc. Place
the food to be grilled directly on the shelf centrally, at the middle level. Slide
the driptray underthe shelfto collect thejuices. Makesure thatthe food is not
tooclose tothe grill.Turnthe food overhalfway through cooking.
FAN COOKING: We recommend you use this method for poultry, pastries,fish
and vegetables. Heat penetratesinto the food better andboth thecooking and
preheating times are reduced. You can cook different foods at the same time
with or without the same preparation in one or more positions. This cooking
method gives evenheat distributionand the smellsare not mixed.
Allow about tenminutes extrawhen cookingfoods at thesame time.
*Tested in accordance with the CENELEC EN 60350-1 used for definition of energy class.
3.3 Using the minute timer
To set thecooking time,turn dialone complete revolutionand
then position the index to the required time. When the time
has lapsed, thesignal will ringfor a fewseconds.
EN 08
Page 9

4. Oven cleaning and maintenance
4.1 General notes on cleaning
The lifecycle ofthe appliancecan beextended throughregular cleaning.Waitfor the ovento cool before
carrying out manual cleaning operations.Never useabrasive detergents, steel wool or sharp objects for
cleaning, so as to not irreparably damage the enamelled parts. Use only water, soap or bleach-based
detergents(ammonia).
GLASS PARTS
It is advisable to clean the glass window with absorbent kitchen towel after every use of the oven. To
remove more obstinate stains, youcan use a detergent-soaked sponge, well wrung out, and then rinse
with water.
OVEN WINDOW SEAL
If dirty,the sealcan be cleanedwith aslightly damp sponge.
ACCESSORIES
Clean accessories with a wet, soapy sponge before rinsing and drying them: avoid using abrasive
detergents.
DRIP PAN
After using thegrill, removethe pan fromthe oven.Pour the hotfat into acontainer and washthe panin
hot water,using asponge andwashing-up liquid.
If greasy residues remain, immerse the panin water anddetergent. Alternatively,you can wash the pan
in the dishwasheror use acommercial oven detergent.Never puta dirty panback into the oven.
4.2 Self-cleaning oven with catalytic
Special self-cleaning panels covered in a micro-porous coating are available as optional extras for all
models. If theyare fitted, theovenno longerneeds to becleaned by hand.
The fat that is splattered onto the sides of the oven during roasting is eliminated by the microporous
coatingwhich breaks the fatdown bycatalysisand transformsit intogas.
Excessive splattering may nevertheless block the pores and therefore hinder self-cleaning. The selfcleaning capacity may be restored by switching on the empty oven to maximum for about 10-20
minutes.
Do not use abrasive products, metal cleaning wads, sharp objects, rough cloths, or chemical products
and detergents that maypermanently damage thecatalyticlining.
It is a good idea to usedeep roastingtraysto roast fatty foods such asjoints ofmeat etc.and to put a tray
underneath the grill to catch surplus fat.If the walls of the oven are so thickly coated in grease that the
catalytic lining is no longer effective remove surplus grease with a soft cloth or sponge soaked in hot
water.
The lining mustbe porous forself-cleaning tobe effective.
N.B.: All catalytic linings currently on the market have a working life of about 300 hours. They should
thereforebe replacedafter about 300hours.
4.3 Maintenance
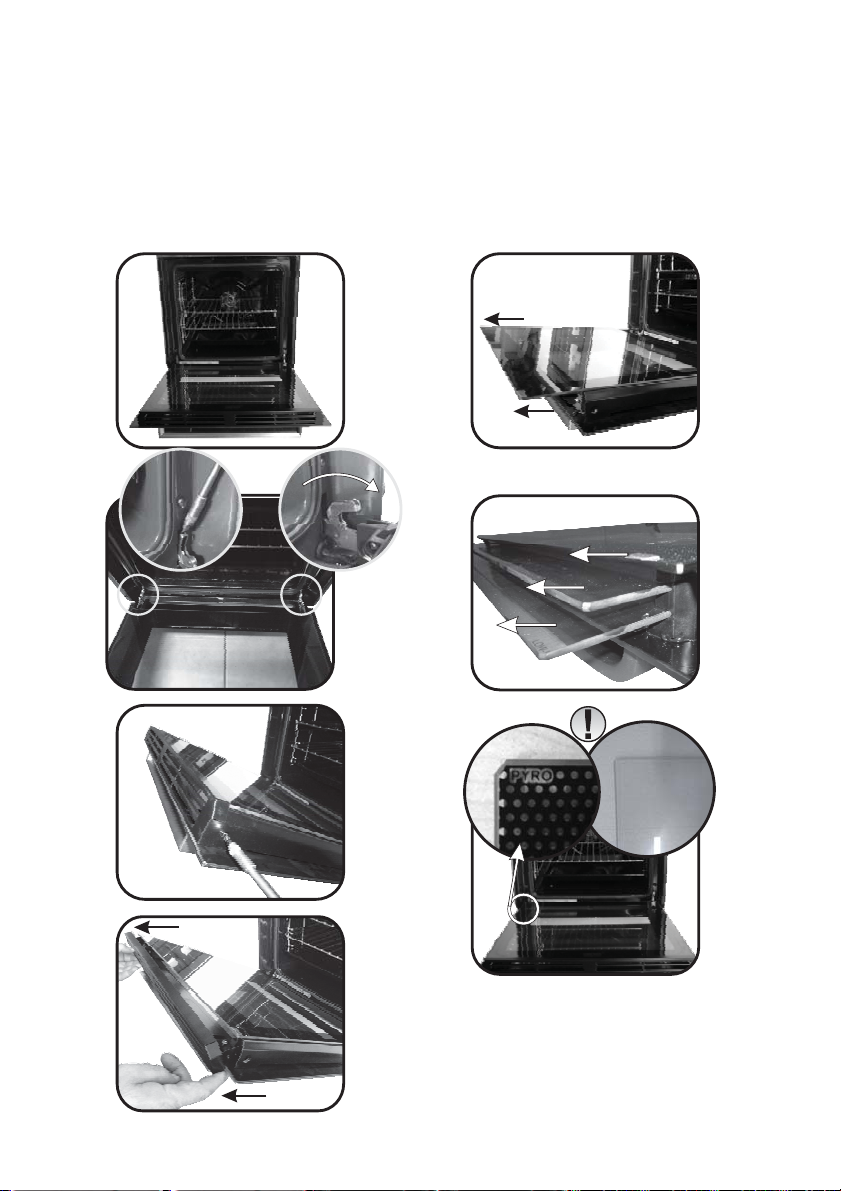
REMOVALOF THEOVEN WINDOW
1. Open thefront window.
2. Openthe clamps of the hingehousing on the right andleft side of the front windowby pushing them
downwards.
3. Replace thewindow by carryingout the procedurein reverse.
EN 09
Page 10
LOW-E
REMOVALAND CLEANINGOF THEGLASS DOOR
1. Open theoven door.
2.3.4. Lock thehinges, remove the screwsand removethe upper metalcover by pullingit upwards.
5.6. Remove the glass, carefully extracting it from the oven door (NB: in pyrolytic ovens, also remove
the second andthird glass (ifpresent)).
7. At theend of cleaningor substitution,reassemble theparts in reverse order.
On all glass, the indication"Pyro" must be legible and positioned on the left sideof thedoor,close to the
left-handlateral hinge. Inthis way, theprinted labelof thefirst glass willbe insidethe door.
1.
2.
3.
5.
6.
1
2
3
7.
4.
EN 10
Page 11

CHANGING THE BULB
1. Disconnect theoven from themains supply.
2. Undo theglass cover, unscrewthe bulband replaceit witha newbulb ofthe sametype.
3. Once thedefectivebulb isreplaced,replace theglass cover.
5. Troubleshooting
5.1 FAQ
PROBLEM POSSIBLE CAUSE SOLUTION
The oven does not heat up
The oven does not heat up
The oven does not heat up
The clock is not set Set the clock
The child lock is on
A cooking function and
temperature has not been set
Deactivate the child lock
Ensure that the necessary
settings are correct
EN 11
Page 12

Conseils De Sécurité
• AVERTISSEMENT: L'appareil et les parties accessibles deviennent
chauds pendant l'utilisation. Des précautions doivent être prises pour
éviterdetoucherles éléments chauffants.
• ATTENTION : les parties accessibles peuvent devenir très chaudes
quand le four est en marche. Les enfants doivent être tenus à une
distancedesécurité.
• Cet appareil n'est pas destiné à être utilisé par des personnes (y
compris les enfants) dont les capacités physiques, sensorielles ou
mentales sont réduites, ou ayant un manque d'expérience et de
connaissances, à moins qu'elles n'aient été formées à l'utilisation de
l'appareil,parunepersonne responsable de leur sécurité.
• Les enfantsne doivent jouer avecl'appareil.
• Le nettoyage et l'entretien par l'utilisateur ne doit pasêtrefait par des
enfantssans surveillance.
• En cours d'utilisation l'appareil devient chaud. Des précautions
doivent être prises pour éviter de toucher les éléments chauds à
l'intérieurdufour.
AVERTISSEMENT: Les parties accessibles peuvent devenir chaudes
pendantl'utilisation.Les jeunesenfants doiventêtretenus à l'écart.
• Ne pas utiliser de nettoyants abrasifs ou de racloirs métalliques
tranchantspournettoyer la vitredelaporte du four carilspeuventrayer
la surface,entrainantdesrisques d'explosion.
•Le four doit être éteint avant d'enlever la protection et après le
nettoyage,la protectiondoitêtre replacée en respectantles instructions.
• Utiliser seulement la sonde de température recommandée pour ce
four.
• Ne pasutiliserdenettoyantsvapeur pour le nettoyage.
• Brancher le câble d’alimentation sur une prise de courant qui
supporte le voltage; le courantetlachargesontindiquéssurl’étiquette
; vérifier la présence d’une mise à la terre. La prise d’alimentation doit
supporter la charge indiquée sur l’étiquette et être dotée d’une mise à
la terre en état de fonctionnement. Le conducteur de mise à la terre est
jaune et vert. Cette opération doit être exécutée par du personnel
qualifié. En cas d’incompatibilité entre la prise d’alimentationet la fiche
du câble de l’appareil, demander à un électricien professionnel de
FR 12
Page 13

remplacer la prise d’alimentation par un dispositif compatible. La fiche
du câble d’alimentation et la prise d’alimentation doivent être
conformes aux normes en vigueur dans le pays d’installation. Il est
possible de brancher l’appareil à la prise d’alimentation en installant un
disjoncteur multipolaire qui supporte la charge électrique maximale,
conformément aux lois en vigueur, entre l’appareil et la prise
d’alimentation. Le conducteur jaune et vert de mise à la terre ne doit
pas être bloqué par le disjoncteur. La prise d’alimentation ou le
disjoncteur multipolaire utilisé pour le branchement doit rester à tout
momentaccessiblelorsde l’installationdel’appareil.
•Le débranchement doit se faire en accédant à la prise d’alimentation
ou en prévoyant un interrupteur sur le circuit électrique fixe, conforme
aux normes électriques.
•Si le câbled’alimentation est endommagé, ildoit être remplacé par un
câble ou un faisceau de câbles spécial disponible auprès du fabriquant
ou en contactantleserviceaprès-vente.
•Le câbled’alimentationrequisest le H05V2V2-F.
•Le non-respect des consignes ci-dessus peut compromettre la
sécuritédel’appareil et annuler lagarantie.
•Tout produit déverséen quantitédoitêtreéliminé avantle nettoyage.
•Pendant le nettoyage à pyrolyse, les surfaces peuvent devenir
beaucoup plus chaude que d’habitude, les enfants doivent donc être
tenusàunedistance desécurité.
•Ne pas installerl’appareil derrière une porte décorative, pour éviter la
surchauffe.
•En introduisant le plateau dans le four, s’assurer que le stop est dirigé
verslehaut etau fond de la cavité.
Le plateaudoitcomplètement être insérédansla cavité
• AVERTISSEMENT : Ne tapissez pas les parois du four avec du papier
aluminium ou un autre matériau de protection jetable en vente dans le
commerce. Tout papier aluminium ou autre matériau de protection qui
entrerait au contact direct de l'émail chaud risquerait de fondre et de
détériorerl'émailintérieur du four.
• AVERTISSEMENT : Neretirez jamaislejointde laporte du four.
FR 13
Page 14

SOMMAIRE
Instructions Générales
15
Description du produit
17
Utilisation du Four
18
Nettoyage du four et
maintenance
19
1.1 Indications de sécurité
1.2 Sécurité électrique
1.3 Recommandations
1.4 Installation
1.5 La gestion des déchets et la
protection de l'environnement
1.6 Déclaration de conformité
2.1 Vue d'ensemble
2.2 Accessoires
2.3 Première utilisation
3.1 Description de l'affichage
3.2 Mode de cuisson
3.3 Utilisation du minuteur sonore
4.1 Remarques générales concernant
le nettoyage
4.2 Four autonettoyant par catalyse
4.3 Entretien
• Retrait de la porte du four
• Retrait et nettoyage des vitres
• Remplacement de l'ampoule
Dépannage
21
5.1 F.A.Q.
FR 14
Page 15

1. Instructions générales
Nous vous remercions d'avoir choisi un de nos produits.
Pour obtenir les meilleurs résultats avec votre four, vous
devez lire attentivement ce manuel et le conserver pour
toute consultation ultérieure. Avant d'installer le four,
notez le numéro de série, il vous sera demandé par le
support technique si des réparations sont nécessaires.
Après avoir enlevé le four de son emballage, vérifiez qu'il
n'a pas été endommagé pendant le transport. Si vous avez
des doutes, ne pas utiliser le four et se référer à un
technicien qualifié pour obtenir des conseils. Conservez
tous les matériaux d'emballage (sacs en plastique,
polystyrène, clous) hors dela portée desenfants.Lors de la
première utilisation du four, il peut se produire un dégagement de fumée âcre provoqué par le premier
échauffement de la colle des panneaux d’isolation enveloppant le four. Ce phénomène est normal. Attendez
que la fumée cesse avant de cuire des aliments. Le fabricant décline touteresponsabilité dans les cas où les
instructionscontenues dans leprésent document nesontpas respectées.
REMARQUE: lesfonctions dufour, lespropriétés etles accessoirescités dans ce manuel peuventvarier selon
les modèles.
1.1 Indications de sécurité
Utilisez uniquement le four à sa destination, qui est seulement pour la cuisson des aliments; toute autre
utilisation, parexemple comme une source de chaleur, estconsidérée commeimpropre et donc .dangereuse
Le fabricant ne peut être tenu responsable de tout dommage lié à une mauvaise utilisation ouà des
modificationstechniques duproduit.
L'utilisationde toutappareil électriqueimplique lerespect decertaines règles fondamentales:
- Ne pastirer sur lefil électriquepour débrancherla prise.
- Ne pastoucher l'appareil avecles mainsou lespieds mouillésou humides;
- En générall'utilisation d'adaptateurs,de prisesmultiples et derallongesest déconseillé;
- En casde dysfonctionnement et /ou demauvais fonctionnement, éteindre l'appareil et nepas y toucher.
1.2 Sécurité électrique
LE BRANCHEMENT ELECTRIQUE DOIT ÊTRE REALISE PAR UN INSTALLATEUR AGREE OU UN TECHNICIEN DE
QUALIFICATIONSIMILAIRE.
L'alimentation électrique à laquelle le four est connecté doit être conforme aux lois en vigueur dans le pays
d'installation. Le fabricant décline toute responsabilité pour tout dommage causé par le non respect de ces
instructions. Le fourdoit êtreraccordé à l'alimentationélectrique avecune prisemuralereliée àla terre oupar
l'intermédiaire d'un dispositif à coupure omnipolaire, selon les lois en vigueur dans le pays d'installation.
L'alimentationélectrique doitêtre protégée par des fusibles appropriéset lescâbles utilisésdoivent avoir une
section transversalequi peutassurerune alimentationnormale dufour.
CONNEXION
Le four estlivré avecun câbled’alimentation permettant leraccordement sous une tension électriquede 230
V entre lesphases ouentre phase etneutre. Le raccordement devra êtreeffectué après avoirvérifié:
- La tensiond'alimentationindiquée surle compteur;
- Le réglagedu disjoncteur.
Le filde protectiondu cordon(vert/jaune) reliéà la BorneTerre del’appareildoit êtrerelié àla Borne Terre de
l’installation.
ATTENTION
Fairevérifier lacontinuité dela terrede l’installation avant deprocéder auraccordement. Le fabricantdécline
toute responsabilité en cas d'accidents oud'autres problèmes qui pourraient survenirà l'usage d'unappareil
non relié àla terre, ourelié àune terredont lacontinuité seraitdéfectueuse.
REMARQUE: Le four peut nécessiter une opération de S.A.V. Aussi, placez la prise de courant de façon à
pouvoir brancher le four une fois sorti de sa niche. Câble d'alimentation: si le changement du câble
FR 15
Page 16

d'alimentations'avèrenécessaire, nousvous demandonsde faireréaliser cette opération parle service aprèsventeou unepersonne dequalificationsimilaire.
1.3 Recommandations
Après chaqueutilisation du four, réaliser un petit entretien quifavorisera le nettoyage parfait du four. Nepas
tapisser lesparois dufour avec desfeuilles enaluminium ou des protections jetables du commerce. Lafeuille
d'aluminium ou toute autre protection, en contact direct avec l'émail chauffé, risque de fondre et de
détériorer l'émail du moufle. Avant installation de l'appareil, il faut relever le numéro de série et le noter cidessous en casd'éventuelledemande d'intervention.
Afin d'éviter les salissures excessives de votre four ainsi que les fortes odeurs de fumée pouvant en résulter,
nous recommandons dene pasutiliser lefour àtrop forte température. Il estpréférablede
rallonger letemps de cuisson et de baisser la température. Nous vous conseillons de n'utiliser que des plats,
des moules àpâtisserie résistants à detrès hautes températures.
1.4 Installation
La miseen servicede l’appareilest à la chargede l’acheteur, le constructeur estdégagé de ce service.Les pannes
liées à une mauvaise installation ne seront pas couvertes par la garantie. Une mauvaise installation peut
provoquer des dommages aux personnes, aux animaux domestiques; dans ce cas la responsabilité du
constructeur ne peut être engagée. L'installation du four doit être réalisée par un installateur agréé ou un
technicien de qualification similaire. Le four peut être placé en hauteurdans une colonne ou enchâssé sousun
plan detravail. Avant sa fixation: il est indispensabled'assurer unebonne aérationdans la niched'encastrement
afin de permettre la bonne circulation de l'air frais nécessaire aurefroidissement et àla protection des organes
intérieurs.Pour cela,réaliser les ouverturesspécifiées selonle typed'encastrement(dernière page).
1.5 La gestion des déchets et la protection de l'environnement
Le présent appareil est marqué conformément à la directive 2012/19/UE relative aux déchets
d'équipementsélectriquesetélectroniques
(DEEE).LesDEEEcontiennentàlafoisdessubstancespolluantes(quipeuventavoirdesconséquences
négativessurl'environnement)etdesélémentsdebase(réutilisables).Ilestimportantdesoumettre
lesDEEEàdestraitementsspécifiques,envued'extraireetd'éliminerdefaçonappropriéetoutesles
substancespolluantes,puisderécupéreretrecyclertouslesmatériaux.
Chacunpeutjouerunrôleimportantquantàlaprotectiondel'environnementcontreles DEEE.Pour
atteindrecetobjectif,ilestimpératifdesuivrequelquesrèglesélémentaires:
•LesDEEEnedoiventpasêtretraitéscommedesdéchetsménagers.
•Ilsdoiventêtreremisauxpointsdecollecteappropriésgérésparlamunicipalitéoupardessociétésimmatriculées.
Dansplusieurspays,ilestpossibledecollecteràdomicilelesDEEEvolumineux.
•Lorsquevousachetezunnouvelappareil,vousdevezretournerl'ancienauvendeurquilerécupèregratuitement,
aucasparcas,àconditionquel'équipementsoitdetypeéquivalentetpossèdelesmêmesfonctionsqueceluifourni.
ÉCONOMIEETRESPECTDEL'ENVIRONNEMENT
Lorsquecelaestpossible,éviterlepréchauffagedufouretéviterdelefairetourneràvide.N'ouvrezlaportedu
fourquelorsquecelaestnécessaire,caril y adesdéperditionsdechaleur àchaquefoisqu'ilestouvert.Pour
uneéconomied'énergiesignificative,éteindrelefourentre5et10minutesavantlafindecuissonprévue,et
utiliserla chaleur quelefourcontinuedegénérer.Gardezlesjointspropresetenbonétat,pour évitertoute
déperditiond'énergie.Sivousavezuncontratélectriqueavecuntarifheurecreuse,leprogramme"cuisson
différée" peut vous faire réaliser des économies d'énergie en déplaçant le début du programme à un
intervalledetempsàtarifréduit.
FR 16
Page 17

1.6 Declaration De Conformité
Les parties de cet appareil pouvant êtreen contact avec des substances alimentaires sont conformes à
la prescription dela Dir.CEE 89/109.
En utilisant le symbole sur ceproduit, nousdéclarons surnotre propreresponsabilité quece produit
est conforme àtoutes les normesEuropéennes relatives à lasécurité, lasanté età l’environnement.
2. Description du produit
2.1. Vue d'ensemble
1
1. Panneau de commande
2. Positions des gradins
(gradins fils si inclus)
3. Grille métalique
4. Léchefrite
5. Ventilateur
(derrière la plaque d'acier)
6. Porte du four
Léchefrite
5
6
2.2. Accessoires
Grille métallique
1
4
2
3
2
La grille métallique sert de support aux plats.
Recueille le jus des grillades. Le lèche frite ne doit
pas être utilisépour les cuissonsautres queGrill et
grill pulsé (Il va provoquer un écran de
température entre le bas et le haut de la cavité).
Rien ne doitêtre posésur la sole dufour (risque de
déformation de l’émail). En casde non respectde
ces conseils, nous ne pourrons être tenu pour
responsable.
2.3 Première Utilisation
UN PREMIER NETTOYAGE doit être réalisé avant la première utilisation passer un chiffon doux et
humide sur les surfaces extérieures de l'appareil. Nettoyer avec une éponge additionnée de produit
lessiviel, les accessoires et l'intérieur du four. Rincer et sécher. Faire chauffer le four à vide une bonne
heure à la température maximale pour faire disparaître l'odeur du neuf. Pendant cette opération, bien
aérerla pièce.
FR 17
Page 18

3. Utilisation du Four
3.1 Description de l'affichage
3.2 Mode de cuisson
Bouton de
sélection
*
T °C
par défaut
220
50 ÷ 280
L3
200
150 ÷ 220
210 50 ÷ 240
T °C
range
L1 ÷ L5
Fonction (selon modèle)
L'AMPOULE: Allumage de l’éclairage du four
CONVECTION NATURELLE:
utilisationsimultanée dela résistancede soleet devoûte.
Préchauffer le four une dizaine de minutes. Idéale pour toutes les cuissons à
l'ancienne, poursaisir les viandesrouges, lesrosbifs, gigots, gibiers,le pain,les
papillotes,les feuilletages.Placer lemets àcuire àun niveaude gradin moyen.
GRIL: l'utilisation du grilloir se fait porte fermée. Unpréchauffage de 5 mins est
nécessaire pour le rougissement de la résistance. Succès assuré pour les
grillades, les brochettes etles gratins.Les viandes blanches doiventêtre écartées
du grilloir ; le temps de cuisson sera alors plus long, mais la viande sera plus
savoureuse.Les viandes rouges et filets de poissons peuvent être placéssur
la grille avecle platrécoltesauce glissédessous.
Le four adeux positionsde gril:
Gril: 2140 W Barbecue: 3340W
TURBO-GRIL: l'utilisation de la position turbo-gril se fait porte fermée. Un
préchauffageest nécessairepour lesviandes rougeset inutilepour lesviandes
blanches. Idéal pour les cuissons de volume épais, des pièces entières telles
que rôti deporc, volaillesetc... Placer lemets à cuiredirectementsur lagrille au
centre du four, à un niveau moyen. Glisser le récolte-sauce sous la grille de
façon à récupérer les graisses. S'assurer que le mets ne soit pas trop près du
grilloir.Retourner la pièceà cuire àmi-cuisson.
CHALEUR BRASSÉE: fonction recommandée pour les volailles, les pâtisseries,
les poissons, les légumes... La chaleur pénètre mieux à l'intérieur du mets à
cuire et réduit le temps de cuisson, ainsi que le temps de préchauffage. Vous
pouvez réaliser des cuissons combinées avec préparations identiques ou non
sur un ou deux gradins. Ce mode de cuisson assure en effet une répartition
homogène de lachaleur et nemélange pas lesodeurs.
Prévoirune dizainede minutesde plus,pour lacuisson combinée.
* Programme testé selon le CENELEC, norme européenne EN 60350-1 qui définit la classe énergétique.
FR 18
Page 19

3.3 Utilisation Du Minuteur Sonore
Pour sélectionnerle temps de cuisson tournez le bouton sur le
temps désiré. Dès que le temps de cuisson est écoulé une
sonneriere retentit. Il ne vous reste plus qu'à couper
manuellementle four.
4. Nettoyage du four et maintenance
4.1 Remarques générales sur le nettoyage
Le cycle de vie de l'appareil peut être étendu grâce à un nettoyage régulier. Attendez le refroidissement du
four avant de procéder à des opérations de nettoyage manuel. Ne jamais utiliser de détergents abrasifs, de
laine d'acier ou d'objets pointus pour le nettoyage, l'émail serait irrémédiablement abîmé. Utilisez
uniquementde l'eau,du savon oudes détergentsà based'eau deJavel (ammoniac).
PARTIEVITREE
Il estconseillé de nettoyer la vitre avec du papier absorbant après chaque utilisation du four. Pour enleverles
tachesplus tenaces,vous pouvezutiliser une épongeimbibée de détergent,puis rincerà l'eau.
JOINT DE LAPORTE
Si elle estsale, le jointpeut être nettoyéavec uneéponge légèrementhumide.
ACCESSOIRES
Nettoyer les accessoires avec une éponge et de l'eau savonneuse puis rincer. Eviter d'utiliser des détergents
abrasifs.
LECHEFRITE
Après l'utilisation de la grille, retirez le du four. Prendre soin de reverser les graisses (tièdes) danslêchefrite
l’évier. Laver et rincer le plat récolte-sauce dans de l’eau chaude, avec une éponge imbibée de produit
lessiviel. Si les résidus restent collés, le faire tremper dans de l’eau et un produit détergent.Il peut aussi être
nettoyédans un lave-vaisselleou avecun produitdu commerce.
Ne jamais replacerle plat récolte-sauce encrassé dansun four.
4.2 Four autonettoyant par catalyse
Les panneaux autonettoyantsà émailmicroporeux disponiblesen optionévite lenettoyage manuel dufour.
Pendant la cuisson les projections de graisse sont “l’absorbées” par les parois catalytiques. La graisse est
ensuite détruite paroxydationen devenantde lapoussière. Encas decuisson particulièrementgrasse, ilpeut
arrivér que la graisse bouche les pores de l’émail. Pour détruire un surplus de graisse mettez en
fonctionnementvotre four àvide surla positionmaximale detempératurependant environ 10à 20minutes.
Ne jamais utiliser de grattoir, de produitchimique pour nettoyer la catalyse. Utilisez plutôt del’eau chaude et
une éponge.
Si jamais vous cuisinez un plat très gras ou une viande au gril, utiliser un plat avec de grands rebords pour
limiterles projectionsde graisse.
La porosité dela catalyseest primordialepour vousassurer un nettoyageoptimal.
N.B.: Lespanneaux autonettoyants ontune duréede fonctionnementd’environ 300heures. En cas de baisse
d’efficacitéil est alors possiblede leschanger.
4.3 Entretien
RETRAIT DE LAPORTE DU FOUR
1. Ouvrezla porte.
2. Ouvrezles pinces du boîtierde charnière surle côté droitet gauche dela fenêtreavant enles poussant versle bas.
3. Replacezla porte enprocédant en sensinverse.
FR 19
Page 20

RETRAIT ET NETTOYAGEDES VITRES
LOW-E
1. Ouvrez laportedu four.
2.3.4. Bloquerles charnières,enlever lesvis et retirez lecouvercle métallique supérieur en letirant vers
le haut.
5.6. Retirez le verre, soigneusement dela portedu four(NB: dans les foursde pyrolyse,retirezl'extraire
égalementles deuxièmeet troisièmeverre (le caséchéant)).
7. A lafin dunettoyage, remonter lespièces dans l'ordreinverse.
Sur toutes les vitres, l'indication "Pyro" doit être lisible et positionnée sur le côté gauche de la porte, à
proximitéde lacharnière latéralegauche. Decette manière, l'étiquette impriméedu premierverre sera
à l'intérieur dela porte.
1.
5.
2.
3.
4.
6.
1
2
3
7.
FR 20
Page 21

REMPLACEMENT DE L'AMPOULE
1. Débranchez lefour dela prise.
2. Défaire lecouvercle enverre,dévisser l'ampouleet la remplacerpar une ampouledu mêmemodèle.
3. Une foisl'ampoule remplacée, remettrele couvercle en verre.
5. Dépannage
5.1 FAQ
PROBLEMES CAUSE POSSIBLE SOLUTION
Le four ne chauffe pas
Le four ne chauffe pas
Le four ne chauffe pas
L'horloge n'est pas réglée
La sécurité enfant est
activée
Les réglages nécessaires
ne sont pas imposés
FR 21
Réglez l'horloge
Désactiver la sécurité enfant
Assurez-vous que les
paramètres nécessaires
sont corrects
Page 22

Indicazioni di Sicurezza
• ATTENZIONE: l'apparecchio e le parti accessibili diventano calde
durantel'uso. Prestareattenzione a non toccarele parti calde.
• ATTENZIONE: le parti accessibili possono diventare molto calde
quando si utilizza il forno. I bambini devono essere tenuti a distanza di
sicurezza.
• L'apparecchio può essere usato da bambini dagli 8 anni in su e
persone con ridotte capacità fisiche, sensoriali o mentali o senza
esperienza e conoscenza del prodotto se supervisionate o dando loro
istruzioni riguardo al funzionamento dell'apparecchio in maniera sicura
e coscentedel rischiopossibile.
• I bambininondovrebberogiocarecon l'apparecchio.
• La pulizia e la manutenzione non dovrebbero essere fatte da bambini
senzasupervisione
• Durante l’uso l’apparecchio diventa molto caldo. Si dovrebbe fare
attenzionea nontoccare gli elementiriscaldanti all’internodel forno.
• ATTENZIONE: Le parti accessibili possono diventare molto calde
durantel’uso. I bambini dovrebberoessere tenuti a distanza.
• Non usare per la pulizia materiali ruvidi abrasivi o raschietti metallici
affilatiperpulireleportedi vetro del fornodatoche possonograffiarela
superficie e causarela frantumazionedelvetro.
• Spegnereilfornoprima dirimuovere lo schermo di protezionee, dopo
la pulizia, rimontarlosecondo le istruzioni.
• Usaresololasonda termicaraccomandataperquesto forno.
• Non utilizzareun pulitore a vapore.
• Collegare al cavo di alimentazione una spina dimensionata per la
tensione, la corrente e la potenza indicate nella targhetta e dotata del
contatto di terra. La presa deve essere dimensionata per la potenza
indicata sulla targhetta e deve avere il contatto di terra collegato e
funzionante. Il conduttore di terra è giallo-verde. Questa operazione
deve essere eseguita solo da un tecnico adeguatamente addestrato. In
caso di incompatibilità tra presa e spina dell'elettrodomestico,
richiedere ad un tecnico specializzato di sostituire la presa con un'altra
IT 22
Page 23

di tipo compatibile. La spina e la presa devono essere conformi alle
normative attuali del paese di installazione. Il collegamento alla rete di
alimentazione può essere effettuato anche collocando un interruttore
automaticoonnipolare tral'elettrodomesticoelarete di alimentazione,
in grado di supportare il carico massimo collegato, in linea con la
legislazione corrente. Il cavo di terra giallo-verde non deve essere
interrotto dall'interruttore automatico. La presa o l'interruttore
automatico onnipolare utilizzati per il collegamento devono essere
facilmente accessibili al momento del montaggio
dell'elettrodomestico.
• La disconnessione può essere eseguita con la spina accessibile o
aggiungendo un interruttore sul cablaggio fisso, nel rispetto delle
normativerelativeaicablaggi.
• Se il cavo di alimentazione si danneggia, deve essere sostituito con un
cavo o uno speciale fascio di cavi disponibile presso il produttore o
contattandoilreparto assistenzaalcliente.
• Il cavodi alimentazione deveesseredi tipo H05V2V2-F.
• Il mancato rispetto di quanto indicato sopra può compromettere la
sicurezzadell'elettrodomesticoerenderenullalagaranzia.
• Qualsiasi materiale fuoriuscito in eccesso deve essere tolto prima
della pulizia.
• Durante il processo di pulizia pirolitico, le superfici possono
surriscaldarsi più del normale: mantenere sempre i bambini a distanza
di sicurezza;
•L’elettrodomestico non deve essere installato dietro a una porta a
scopoornamentaleper evitarne il surriscaldamento.
• Quando si posiziona uno scaffale all’interno, accertarsi che il blocco
sia rivoltoversol’alto e nella parteposteriore dellaguida.
Lo scaffale deveessereinserito completamentenella guida
• AVVERTENZA: Non coprire le pareti del forno con fogli di alluminio o
protezioni monouso disponibili in commercio. I fogli di alluminio o le
altre protezioni, se a diretto contatto con lo smalto caldo, rischiano di
fondersie di danneggiare lo smalto internostesso.
• AVVERTENZA: Non toglieremai laguarnizione della porta del forno.
IT 23
Page 24

Riassunto
Avvertenze Generali
25
Descrizione del Prodotto
27
Utilizzo del Forno
28
Pulizia e Manutenzione del Forno
29
1.1 Suggerimenti sulla sicurezza
1.2 Sicurezza elettrica
1.3 Raccomandazioni
1.4 Installazione
1.5 Gestione dei rifiuti
1.6 Dichiarazione di conformità
2.1 Panoramica
2.2 Accessori
2.3 Primo utilizzo
3.1 Descrizione del display
3.2 Modalità di cottura
3.3 Uso del contaminuti
4.1.Note generiche di pulizia
4.2 Forno autopulente catalitico
4.3 Manutenzione
• Rimozione dello sportello del forno
• Rimozione e pulizia della porta in
vetro
• Sostituzione della lampadina
Risoluzione dei problemi
31
5.1 F.A.Q.
IT 24
Page 25

1. liIndicazioni generali
Vi ringraziamo per aver scelto uno dei nostri prodotti.
Per utilizzare il forno in modo ottimale è consigliabile
leggere con attenzione questo manuale e conservarlo
con cura per ogni ulteriore consultazione. Prima di
installare il forno, prendere nota del numero di serie in
modo da poterlocomunicare al personaledel servizio di
assistenza in caso di richiesta di intervento. Dopo aver
rimosso il forno dall’imballaggio, verificare che non
abbia subito danni durante il trasporto. In caso di
dubbi, non utilizzare il forno e richiedere l’assistenza di
un tecnico qualificato. Tenere tutto il materiale da
imballaggio (sacchetti di plastica, polistirolo, chiodi)
fuori dalla portata dei bambini. Alla prima accensione del forno può svilupparsi fumo di odore acre,
causatodal primo riscaldamento delcollante dei pannelli d’isolamento avvolgentiil forno: si trattadi un
fenomeno assolutamente normale e, in caso si verificasse, occorre attendere la cessazione del fumo
prima di introdurre le vivande. Il produttore declina ogni responsabilità in caso di mancata osservanza
delle istruzioni contenutein questodocumento.
NOTA: le funzioni, le proprietà e gli accessori dei forni citati in questo manuale possono variare a
secondadei modelli.
1.1 SicurezzaAvvertenze di
Utilizzare il forno solo per lo scopo per cui è stato progettato, ossia solo per la cottura di alimenti;
qualsiasi altro utilizzo, ad esempio come fonte di riscaldamento, è considerato improprio e quindi
pericoloso. Il costruttore non può essere considerato responsabile per eventuali danni derivanti da usi
impropri,erronei ed irragionevoli.
L’usodi unqualsiasi apparecchio elettricocomporta l’osservanza dialcune regolefondamentali:
- non tirareil cavodi alimentazioneper staccare laspina dellapresa di corrente;
- non toccarel’apparecchiocon manio piedibagnati oumidi;
- in generaleè sconsigliabile l’usodi adattatori,prese multiplee prolunghe;
- in casodi guasto e/ocattivofunzionamento dell’apparecchio,spegnerlo enon manometterlo.
1.2 Sicurezza Elettrica
ACCERTARSI CHE I COLLEGAMENTI ELETTRICI SIANO EFFETTUATI DA UN ELETTRICISTA O DA UN
TECNICOQUALIFICATO.
La rete di alimentazione alla quale si collega il forno deve rispettare le leggi in vigore nello stato in cui
viene installato. Il produttore non si assume responsabilità per danni causati dal mancato rispetto di
queste istruzioni. Il forno deve essere collegato ad una rete di alimentazione elettrica, con un'uscita a
parete con messa a terraoppure uninterruttore automatico multipolare,a secondadelle leggi in vigore
nello statoin cui viene installato.L'alimentazione elettrica deve essere protetta tramite appositi fusibili;
i cavi utilizzati devono avere una sezione trasversale in grado di garantire un'alimentazione corretta al
forno.
COLLEGAMENTO
Il forno è alimentato da un cavo che deve essere collegato unicamente ad una rete di alimentazione
elettrica da 220-240 Vac, 50 Hz tra le fasi o tra fase e neutro. Prima di collegare il forno alla rete di
alimentazioneelettrica, è importantecontrollare quanto segue:
- tensionedi alimentazioneriportata sull'indicatore;
- impostazione dell'interruttore automatico. Ilcavo di messa aterra collegato al morsetto di terra del
fornodeve esserea suavoltacollegato al morsetto di terradella retedi alimentazione.
ATTENZIONE
Prima di collegare il forno alla rete di alimentazione,chiedere ad un tecnico qualificato di controllare la
continuità del morsetto di terra della rete di alimentazione. Il produttore non si assume responsabilità
per incidenti o altri problemi causati dal mancato collegamento del forno al morsetto di terra o da un
IT 25
Page 26

collegamentodi terra concontinuità difettosa.
NOTA: considerando che il forno potrebbe richiedere attività di manutenzione, si consiglia di tenere a
disposizione un'altra presa a parete in modo da potere collegare a questa il forno se viene tolto dallo
spazio nel quale è montato. Il cavo di alimentazione deve essere sostituito unicamente da personale di
assistenzatecnico o datecnici con qualificheequivalenti.
1.3 Consigli
Dopo ogni utilizzo del forno, si consiglia di effettuare una rapida pulizia per mantenerlo sempre in
condizioni ottimali. Non rivestire le pareti del forno con pellicola di alluminio o protezione monouso
disponibili neisupermercati. La pellicola di alluminio ole eventualialtre protezioni, trovandosi adiretto
contattocon losmalto caldo,rischiano di fondersi e di danneggiare losmalto che si trova all'interno del
forno. Per evitare di sporcare eccessivamente il forno e causare odore di fumo acre, si consiglia di non
utilizzare il forno a temperature molto elevate. È meglio prolungare il tempo di cottura e abbassare
leggermente latemperatura. Oltre agli accessoriforniti conil forno,si consiglia di utilizzare solo piatti e
stampidi cotturaresistentialle temperatureelevate.
1.4 Installazione
Il produttore non è obbligato ad effettuarla. Se è necessaria l'assistenza del produttore per correggere
errori dovuti ad un'installazione non corretta, questo intervento in assistenza non è coperto da
garanzia. Le istruzioni di installazione destinate al personale professionalmente qualificato devono
essere rispettate. Un'installazione non corretta può causare lesioni o danni alle persone, agli animali o
alle cose. Ilproduttorenon si assumela responsabilitàper talilesioni odanni.
Il forno può essere posizionato in alto all'interno di una colonna o sotto un piano di lavoro. Prima del
fissaggio, è necessario garantire una corretta ventilazione nella zona del forno per permettere la
corretta circolazione dell'aria fresca necessaria per raffreddare e proteggere i componenti interni.
Praticarele aperturespecificate all'ultima paginaa seconda deltipo diinserimento.
1.5 Gestione dei rifiuti e rispetto dell’ambiente
Questo elettrodomestico dispone di contrassegno ai sensi della direttiva europea
2012/19/CE in materia di apparecchi elettrici ed elettronici (RAEE). I RAEE contengono sia
sostanze inquinanti (che possono avere un effetto negativo sull'ambiente) sia elementi
base (che possono essere riutilizzati). È importante che i RAEE siano sottoposti a
trattamenti specifici in modo da togliere e smaltire in modo corretto gli inquinanti e
recuperare tutti i materiali. Spetta ai singoli individui garantire che i RAEE non diventi un
problemaa livelloambientale. Esistonoalcune regolespecifiche da rispettare:
- i RAEEnon devono essere trattaticome rifiuti domestici;
- i RAEE devono essere portati nelle aree di smaltimento specifiche, gestite dai comuni o da società
autorizzate.
In molti stati, nel caso di RAEE di grandi dimensioni sono disponibili servizi di prelievo a domicilio.
Durante l'acquisto di un nuovoelettrodomestico, quellovecchio può essere restituito al venditore che
lo deve accettare gratuitamente in un'unica soluzione, a condizione che l'elettrodomestico sia di tipo
simile ed abbiale stessefunzioni diquello acquistato.
SALVATAGGIOE RISPETTO DELL'AMBIENTE
Cercare per quanto possibile di evitare ilpreriscaldamento ecercare di riempire sempreil forno.Aprire
la porta del forno il meno possibile, in quanto il calore del vano di cottura si disperde ogni volta che la
porta viene aperta. Per un buon risparmio di energia, spegnere il forno 5 e 10 minuti prima del tempo
previsto di cottura; utilizzare il calore residuo che il forno continua a generare. Mantenere pulite e in
buone condizioni le guarnizioni, per evitare di disperdere il calore all'esterno del vano di cottura. Se si
dispone di un contratto di fornitura di elettricità con tariffa oraria, il programma "cottura ritardata"
semplificail risparmioenergetico,facendoiniziare ilprocesso dicotturanel periodoa tariffa ridotta.
IT 26
Page 27

1.6 Dichiarazione di conformità
I componenti di questo elettrodomestico che possono entrare in contatto con sostanze alimentari
devonorispettare le disposizionidella direttiva CEE89/109.
Apponendo il marchio su questo prodotto, confermiamo la conformità a tutti i requisiti di legge
europeiin materia di sicurezza, salute etutela ambientale applicabiliper leggea questo prodotto.
2. Descrizione del Prodotto
2.1 Panoramica
1
1. Pannello comandi
2. Posizioni ripiani
4
5
3
6
2
2.2 Accessori )(a seconda del modello
Griglia metallica
1
(griglia laterale a rete se in dotazione)
3. Griglia metallica
4. Vaschetta raccogligocce
5. Ventola (dietro alla piastra in acciaio)
Porta forno6.
2
Vaschetta raccogligocce
Supporta vassoi e piastre di cottura.
Raccoglie i residui che gocciolano durante la
cottura del cibo sulle griglie.
2.3 Primo utilizzo
PULIZIA PRELIMINARE
Prima del primo utilizzo, pulire il forno. Ripulire le superfici esterne con un panno morbido e umido.
Lavare tutti gli accessori e ripulire l'interno del forno con una soluzione di acqua calda e liquido
detergente. Impostare il forno (vuoto) alla temperatura massima e lasciarlo in questa posizione per
circa1 ora, per toglierequalsiasi odore pungente di prodotto nuovo.
IT 27
Page 28

3. Utilizzo del Forno
3.1 Descrizione del display
3.2 Modalità di cottura
Manopola
commuta-
tore
T°
preimpos-
tata
Intervallo
di T°
LAMPADA: accende la luce interna.
Funzione (a seconda del modello)
*
* Programma di prova secondo CENELEC EN 60350-1 utilizzato per la definizione della classe energetica.
220
L3
200
210
50 ÷ 280
L1 ÷ L5
150 ÷ 220
50 ÷ 240
CONVEZIONE NATURALE: sono in funzione le resistenze superiore e inferiore.
È la cottura tradizionale, ottima per arrostire cosciotti, selvaggina, ideale per
biscotti,mele alforno eper rendere icibi moltocroccanti.
GRILL: Grigliatura tradizionale a porta chiusa: con questa funzione viene
inserita la resistenza del grill. Ottima nella cottura di carni di medio e piccolo
spessore (salsicce, costine,bacon).
GRILL + VENTOLA: l'utilizzo del turbo-grill richiede la porta chiusa. Utilizzando
la ventilazione e la resistenza grill contemporaneamente, si cuociono
perfettamentegrandi porzionidi cibo,come arrosti, pollame,ecc.
Mettere la griglia a metà del forno e posizionare la leccarda sotto di essa per
raccoglierei grassi. Assicurateviche ilcibo nonsia troppovicino algrill. Girarela
carne a metàcottura.
FORNO VENTILATO: l’aria calda viene ripartita sui diversi ripiani. E’ ideale per
cuocere contemporaneamente diversi tipi di cibo (carne, pesce), senza
miscelare sapori e odori. Cottura delicata - indicata per pan di spagna, torte
Margherita,pastasfoglia, ecc...
3.3 Uso del contaminuti
Per selezionare il tempo prescelto, ruotare la manopola di un
giro completo, quindi ritornare con l’indice nella posizione
corrispondente al tempo desiderato. Allo scadere del tempo,
entreràin azione lasuoneria peralcuni secondi.
IT 28
Page 29

4. Pulizia e manutenzione del forno
4.1 Note generiche di pulizia
La vita di servizio dell’apparecchiosi allungase questo viene pulito ad intervalliregolari. Attendereche il
forno si raffreddi prima di effettuare le operazioni di pulizia manuali. Non utilizzare mai detergenti
abrasivi, pagliette diferro o oggetti appuntiti per lapulizia, per non danneggiare inmodo irreparabile le
parti smaltate.Utilizzaresolo acqua,sapone odetergenti a basedi candeggina (ammoniaca).
PARTI IN VETRO
E’ consigliabile pulire lo sportello in vetro con carta assorbente da cucina dopo ogni utilizzo del forno.
Per rimuovere le macchiepiù ostinate, è possibile anche utilizzare una spugna imbevuta di detergente
ben strizzata e sciacquarecon acqua.
GUARNIZIONEDELLO SPORTELLO DELFORNO
Se sporca, laguarnizione può esserepulitacon unaspugna leggermente inumidita.
ACCESSORI
Pulire gli accessori con una spugna imbevuta con acqua e sapone, sciacquarli e asciugarli : evitare di
usaredetergenti abrasivi.
VASCHETTA DIGOCCIOLAMENTO
Dopo l’uso del grill, rimuovere la vaschettadal forno. Versare ilgrasso caldoin uncontenitore e lavarela
vaschettain acqua calda,utilizzando una spugnae deldetergente per piatti.
Se rimangono dei residui di grasso, immergere la vaschetta in acqua e detergente. In alternativa, è
possibile anche lavare la vaschetta nella lavastoviglie oppure utilizzare un detergente per forni di tipo
commerciale.Non reinseriremai unavaschettasporca nel forno.
4.2 Forno autopulente catalitico
Speciali pannelli autopulenti ricoperti da uno smalto a struttura microporosa, offerti come accessori
opzionaliper tuttii modelli,eliminano lapulizia manuale delforno.
I grassi proiettati sulle pareti durante la cottura, vengono decomposti dallo smalto, mediante un
processocatalitico di ossidazionee trasformati in prodottigassosi.
Schizzi eccessivi di grasso possono ostruire i pori e quindi impedire l’autopulizia. Tale caratteristicapuò
essere ripristinata mediante un riscaldamento per circa 10-20 minuti del forno vuoto impostando la
manopola forno incorrispondenza dellamassima temperatura.
Non usare prodotti abrasivi, pagliette metalliche, oggetti appuntiti, panni ruvidi, prodotti chimici o
detersiviche possonodanneggiare irrimediabilmentelo smalto.
Si consigliainoltre di utilizzare pentole a bordi altinel caso dicotture divivande particolarmentegrasse
(arrosti,ecc.) edi usarela leccardaquando siesegue la cottura al grill.
Qualora, per particolari condizioni di sporco, non fosse sufficiente l’azione precedente, si consiglia di
intervenireasportando i grassicon un pannomorbido oduna spugnainumiditi con acqua calda.
La porosità dellosmalto èfondamentaleper garantirel’azioneautopulente.
N.B.: Tutti i pannelli autopulenti in commercio hanno un’efficacia di rendimento di circa 300 ore di
funzionamentoforno. Dopo talelimite i pannellidovrebberoessere sostituiti.
4.3 Manutenzione
RIMOZIONE DELLO SPORTELLO DEL FORNO
1. Aprire losportello anteriore.
2. Aprire i morsetti dell’alloggiamento della cerniera sul lato destro e sinistro dello sportello anteriore,
premendoliverso il basso.
3. Installare nuovamente losportello eseguendola proceduraall’inverso.
IT 29
Page 30

RIMOZIONE E PULIZIADELLA PORTAIN VETRO
LOW-E
1. Aprile laporta del forno.
2.3.4. Bloccare le cerniere, rimuovere le viti e rimuovere la copertura metallica superiore tirandola
versol’alto.
5.6. Rimuovere il vetro, estraendolocon molta cura, dalla controporta delforno (NB: neiforni pirolitici,
rimuovereanche ilsecondo eterzo vetro (sepresente)).
7. Al terminedella pulizia osostituzione riassemblarele partinell’ordine opposto alla rimozione.
Su tutti i vetri, l’indicazione ”Low-E”deve essere correttamente leggibile e posizionata sullato sinistro
della porta, vicino alla cerniera laterale sinistra. In questo modo, l’etichetta stampata del primo vetro
rimarràinterna alla porta.
1.
5.
2.
3.
4.
6.
1
2
3
7.
IT 30
Page 31

SOSTITUZIONE DELLA LAMPADINA
1. Scollegare il fornoalla rete.
2. Allentare lacopertura invetro,svitarela lampadinae sostituirlacon una nuovadello stesso modello.
3. Una voltasostituitala lampadinadifettosa, riavvitare lacopertura invetro.
5. Risoluzione dei Problemi
5.1 FAQ
PROBLEMA POSSIBILE CAUSA SOLUZIONE
Il forno non si scalda
Il forno non si scalda
Il forno non si scalda
L’orologio non è impostato
Il blocco bambini è attivo
Le regolazioni necessarie
non sono impostate
IT 31
Impostare l’orologio
Disattivare il blocco bambini
Assicurarsi che le impostazioni
necessarie siano corrette
Page 32

INSTALLATION GB
INSTALLAZIONE IT
Opening/Ouverture/Apertura
460 mm x 15 mm
560 mm
INSTALLATION FR
550 mm
560 mm
590 mm
500 mm x 10 mm
560 mm x 45 mm
GB
If the oven does not have a cooling fan, create an
opening 460 mm x 15 mm
Si le four n’a pas de ventilateur de refroidissement,
FR
créer une ouverture 460 mm x 15 mm
IT
Se il forno non dispone di una ventola di
raffreddamento, lasciare uno spazio 460 mm x 15 mm
580 mm
545 mm
22 mm
GB
If the furniture is coverage with a bottom at the back part,
provide an opening for the power supply cable.
FR
Si le fond du meuble est doté d’un panneau de
595 mm
595 mm
fermeture, prévoyez un orifice pour le passage du câble
d’alimentation.
IT
Se il mobile ha un fondo posteriore, praticare un foro
per il passaggio del cavo di alimentazione.
mm
560
560
mm
mm
600
Opening/Ouverture/
Apertura
560 mm x 45 mm
Opening/Ouverture/
Apertura
500 mm x 10 mm
GB
The manufacturerwill notbe responsiblefor anyinaccuracy resultingfrom printingor transcripterrorscontainedin thisbrochure. We
reserve theright tocarry out modificationsto productsas required,including the interestsof consumption, withoutprejudice tothe
characteristicsrelating tosafetyor function.
FR
Le constructeur décline toute responsabilité concernant d'éventuelles Inexacltudes Imputables à des erreurs d'impression ou de
transcriptioncontenue danscette notice. Le constructeurse réserve ledroit de modifier lesproduits encas de nécessité, mêmedans
l'intérêtde l'utilisation, sans causerde préjudicesaux caractéristiquesde fonctionnementde sécuritédes appareils.
IT
Il produttore declina ogniresponsabilità per inesattezze contenutenel documentostampato per errori ditrascrizione contenutiino
questa brochure. Inoltre, si riserva il diritto di apportare modifiche al prodotto, nell'interesse dei consumatori, senza alcun
pregiudizioper lasua sicurezza funzionalità.o
05.2018 • REV.0 • 42827212
 Loading...