

Page 1

FORNI
ISTRUZIONI PER L'USO
02
IT
OVENS
USER INSTRUCTIONS
PEĆNICE
KORIŠTENJE PRIRUČNIK
PIEKARNIKI DO ZABUDOWY
INSTRUKJA OBSŁUGI
TROUBY
NÁVOD K OBSLUZE
PEČICE
NAVODILA ZA UPORABO
OVEN
GEBRUIKSAANWIJZING
RERNE
UPUTSTVA ZA UPOTREBU
CANDY HOOVER GROUP S.R.L. • Via Comolli 16 • 20861 Brugherio (MB) - Italy
EN
DE
PL
CZ
SL
BG
SRB
16
30
44
58
72
86
100
Page 2

Indicazioni di Sicurezza
• Durante la cottura l'umidità può condensarsi all'interno della cavità o sul
vetro della porta. È normale. Per ridurre questo effetto, attendere 10-15
minuti dopo l'accensione prima di mettere il cibo all'interno del forno. In
ogni caso, la condensa scompare quando il forno raggiunge la temperatura
di cottura.
• Cuocere le verdure in un contenitore con un coperchio invece di un
vassoio aperto.
• Evitare di lasciare il cibo all'interno del forno dopo la cottura per un
periodo superiore a 15/20 minuti.
• ATTENZIONE: l'apparecchio e le parti accessibili diventano calde durante
l'uso. Prestare attenzione a non toccare le parti calde.
• ATTENZIONE: le parti accessibili possono diventare molto calde quando
si utilizza il forno. I bambini devono essere tenuti a distanza di sicurezza.
• L'apparecchio può essere usato da bambini dagli 8 anni in su e persone
con ridotte capacità fisiche, sensoriali o mentali o senza esperienza e
conoscenza del prodotto se supervisionate o dando loro istruzioni
riguardo al funzionamento dell'apparecchio in maniera sicura e coscente
del rischio possibile.
• I bambini non dovrebbero giocare con l'apparecchio.
• La pulizia e la manutenzione non dovrebbero essere fatte da bambini
senza supervisione
• Durante l’uso l’apparecchio diventa molto caldo. Si dovrebbe fare
attenzione a non toccare gli elementi riscaldanti all’interno del forno.
• ATTENZIONE: Le parti accessibili possono diventare molto calde durante
l’uso. I bambini dovrebbero essere tenuti a distanza.
• Non usare per la pulizia materiali ruvidi abrasivi o raschietti metallici
affilati per pulire le porte di vetro del forno dato che possono graffiare la
superficie e causare la frantumazione del vetro.
• Spegnere il forno prima di rimuovere lo schermo di protezione e, dopo la
pulizia, rimontarlo secondo le istruzioni.
• Usare solo la sonda termica raccomandata per questo forno.
• Non utilizzare un pulitore a vapore.
• Collegare al cavo di alimentazione una spina dimensionata per la
tensione, la corrente e la potenza indicate nella targhetta e dotata del
contatto di terra. La presa deve essere dimensionata per la potenza
IT 02
Page 3

indicata sulla targhetta e deve avere il contatto di terra collegato e
funzionante. Il conduttore di terra è giallo-verde. Questa operazione deve
essere eseguita solo da un tecnico adeguatamente addestrato. In caso di
incompatibilità tra presa e spina dell'elettrodomestico, richiedere ad un
tecnico specializzato di sostituire la presa con un'altra di tipo compatibile.
La spina e la presa devono essere conformi alle normative attuali del paese
di installazione. Il collegamento alla rete di alimentazione può essere
effettuato anche collocando un interruttore automatico onnipolare tra
l'elettrodomestico e la rete di alimentazione, in grado di supportare il
carico massimo collegato, in linea con la legislazione corrente. Il cavo di
terra giallo-verde non deve essere interrotto dall'interruttore automatico.
La presa o l'interruttore automatico onnipolare utilizzati per il
collegamento devono essere facilmente accessibili al momento del
montaggio dell'elettrodomestico.
• La disconnessione può essere eseguita con la spina accessibile o
aggiungendo un interruttore sul cablaggio fisso, nel rispetto delle
normative relative ai cablaggi.
• Se il cavo di alimentazione si danneggia, deve essere sostituito con un
cavo o uno speciale fascio di cavi disponibile presso il produttore o
contattando il reparto assistenza al cliente.
• Il cavo di alimentazione deve essere di tipo H05V2V2-F.
• Il mancato rispetto di quanto indicato sopra può compromettere la
sicurezza dell'elettrodomestico e rendere nulla la garanzia.
• Qualsiasi materiale fuoriuscito in eccesso deve essere tolto prima della
pulizia.
• Durante il processo di pulizia pirolitico, le superfici possono surriscaldarsi
più del normale: mantenere sempre i bambini a distanza di sicurezza;
•L’elettrodomestico non deve essere installato dietro a una porta a scopo
ornamentale per evitarne il surriscaldamento.
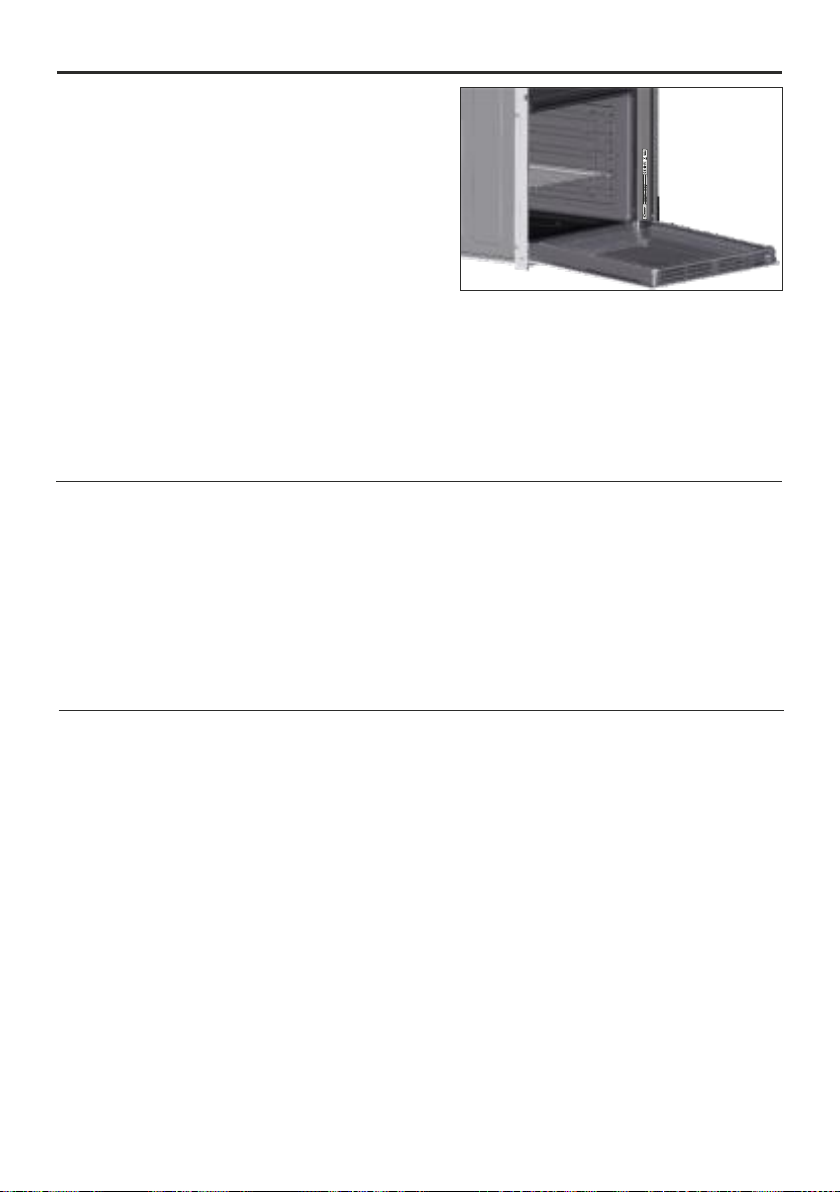
• Quando si posiziona uno scaffale all’interno, accertarsi che il blocco sia
rivolto verso l’alto e nella parte posteriore della guida.
Lo scaffale deve essere inserito completamente nella guida
• AVVERTENZA: Non coprire le pareti del forno con fogli di alluminio o
protezioni monouso disponibili in commercio. I fogli di alluminio o le altre
protezioni, se a diretto contatto con lo smalto caldo, rischiano di fondersi e
di danneggiare lo smalto interno stesso.
• AVVERTENZA: Non togliere mai la guarnizione della porta del forno.
• Il funzionamento dell'elettrodomestico alle frequenze nominali non
richiede alcuna operazione o impostazione.
IT 03
Page 4

Sommario
Avvertenze Generali
5
Descrizione del Prodotto
7
Utilizzo del Forno
8
Pulizia e Manutenzione del Forno
11
1.1 Suggerimenti sulla sicurezza
1.2 Sicurezza elettrica
1.3 Raccomandazioni
1.4 Installazione
1.5 Gestione dei rifiuti
1.6 Dichiarazione di conformità
2.1 Panoramica
2.2 Accessori
2.3 Primo utilizzo
3.1 Descrizione del display
3.2 Modalità di cottura
4.1. Note generiche di pulizia
4.2 Pirolisi
4.3 Funzione Aquactiva
4.4 Manutenzione
• Rimozione e pulizia delle griglie
• Rimozione dello sportello del forno
• Rimozione e pulizia della porta in
vetro
• Sostituzione della lampadina
Risoluzione dei problemi
15
Garanzie
15
5.1 F.A.Q.
IT 04
Page 5

1. Avvertenze Generali
Vi ringraziamo per aver scelto uno dei nostri prodotti.
Per utilizzare il forno in modo ottimale è consigliabile
leggere con attenzione questo manuale e conservarlo
con cura per ogni ulteriore consultazione. Prima di
installare il forno, prendere nota del numero di serie in
modo da poterlo comunicare al personale del servizio di
assistenza in caso di richiesta di intervento. Dopo aver
rimosso il forno dall’imballaggio, verificare che non
abbia subito danni durante il trasporto. In caso di
dubbi, non utilizzare il forno e richiedere l’assistenza di
un tecnico qualificato. Tenere tutto il materiale da
imballaggio (sacchetti di plastica, polistirolo, chiodi)
fuori dalla portata dei bambini. Alla prima accensione del forno può svilupparsi fumo di odore acre,
causato dal primo riscaldamento del collante dei pannelli d’isolamento avvolgenti il forno: si tratta di un
fenomeno assolutamente normale e, in caso si verificasse, occorre attendere la cessazione del fumo
prima di introdurre le vivande. Il produttore declina ogni responsabilità in caso di mancata osservanza
delle istruzioni contenute in questo documento.
NOTA: le funzioni, le proprietà e gli accessori dei forni citati in questo manuale possono variare a
seconda dei modelli.
1.1 Suggerimenti sulla Sicurezza
Utilizzare il forno solo per lo scopo per cui è stato progettato, ossia solo per la cottura di alimenti;
qualsiasi altro utilizzo, ad esempio come fonte di riscaldamento, è considerato improprio e quindi
pericoloso. Il costruttore non può essere considerato responsabile per eventuali danni derivanti da usi
impropri, erronei ed irragionevoli.
L’uso di un qualsiasi apparecchio elettrico comporta l’osservanza di alcune regole fondamentali:
- non tirare il cavo di alimentazione per staccare la spina della presa di corrente;
- non toccare l’apparecchio con mani o piedi bagnati o umidi;
- in generale è sconsigliabile l’uso di adattatori, prese multiple e prolunghe;
- in caso di guasto e/o cattivo funzionamento dell’apparecchio, spegnerlo e non manometterlo.
1.2 Sicurezza Elettrica
FARE EFFETTUARE I COLLEGAMENTI ELETTRICI AD UN’ELETTRICISTA O TECNICO QUALIFICATO.
La rete di alimentazione a cui viene collegato il forno deve essere conforme con le normative in vigore
nel paese di installazione. Il produttore declina ogni responsabilità per eventuali danni derivanti dalla
mancata osservanza di tali disposizioni. Il forno deve essere collegato alla rete elettrica tramite una
presa a muro con messa a terra o tramite un sezionatore con più poli, a seconda delle disposizioni in
vigore nel paese di installazione. La rete elettrica deve essere protetta mediante fusibili idonei e devono
essere utilizzati cavi con una sezione trasversale idonea a garantire una corretta alimentazione del
forno.
COLLEGAMENTO
Il forno viene fornito con un cavo di alimentazione che deve essere collegato solo a una rete elettrica con
una tensione di 230 VCA tra le fasi o tra la fase e il neutro. Prima di collegare il forno alla rete elettrica, è
indispensabile controllare:
- la tensione di alimentazione indicata sul misuratore;
- l’impostazione del sezionatore.
Il filo di messa a terra collegato al morsetto di terra del forno deve essere collegato al morsetto di terra
della rete elettrica.
ATTENZIONE
Prima di collegare il forno alla rete elettrica, far controllare la continuità della messa a terra della rete
elettrica ad un elettricista qualificato. Il produttore declina ogni responsabilità per eventuali incidenti o
altri problemi derivanti dal mancato collegamento a terra del forno o dal suo collegamento ad una
IT 05
Page 6
messa a terra con una continuità difettosa.
NOTA: poiché il forno potrebbe richiedere interventi di assistenza, è consigliabile prevedere la
disponibilità di un’ulteriore presa a muro a cui collegare il forno dopo che è stato rimosso dallo spazio in
cui è stato installato. Il cavo di alimentazione deve essere sostituito solo dal personale dell’assistenza
tecnica o da tecnici con qualifiche analoghe.
1.3 Raccomandazioni
Dopo l’uso sono sufficienti alcune semplici operazioni di pulizia per mantenere il forno perfettamente
pulito. Non rivestire le pareti del forno con fogli d’alluminio da cucina o fogli monouso commerciali,
perché potrebbero fondersi a contatto con le superfici in smalto caldo e danneggiare le superfici in
smalto all’interno del forno. Per evitare di sporcare eccessivamente il forno e prevenire la diffusione di
fumo maleodorante, è consigliabile non utilizzare il forno a temperature molto alte. E’ generalmente
preferibile imposta- re un tempo di cottura più lungo e utilizzare una temperatura più bassa. Oltre agli
accessori forniti con il forno, è consigliabile utilizzare piatti e teglie resistenti alle alte temperature.
1.4 Installazione
Il produttore non è obbligato ad occuparsi dell’installazione. Gli eventuali interventi di assistenza,
necessari per correggere problemi dovuti ad un’errata installazione, non sono coperti da garanzia.
L’installazione deve essere effettuata da un tecnico qualificato e in conformità con queste istruzio- ni.
Un’installazione impropria potrebbe causare infortuni alle persone, agli animali domestici o danni alle
attrezzature. Il produttore declina ogni responsabilità per eventuali lesioni o danni dovuti ad un’errata
installazione.
Il forno può essere installato sopra una colonna o sotto a un piano di lavoro. Prima di fissare in posizione
il forno, verificare che lo spazio attorno allo stesso sia sufficiente a garantire la circolazione del flusso di
aria fresco necessario a garantire il raffreddamento del forno e la sicurezza dei componenti interni.
Realizzare le aperture indicate nell’ultima pagina del manuale, a seconda del tipo di installazione.
1.5 Gestione dei rifiuti e rispetto dell’ambiente
Questo apparecchio è contrassegnato in conformità alla Direttiva europea 2012/19/EU
sulle apparecchiature elettriche ed elettroniche (WEEE). I WEEE contengono sia sostanze
inquinanti (che possono provocare conseguenze negative sull’ambiente) che componenti
di base (che possono essere riutilizzati). E’ importante che i WEEE siano soggetti a
trattamenti specifici per rimuovere e smaltire correttamente tutti gli inquinanti e
recuperare tutti i materiali. I singoli possono giocare un ruolo importante nell’assicurare
base:
- i WEEE non devono essere trattati come rifiuti domestici;
- i WEEE devono essere portati ai punti di raccolta appositi gestiti dal comune o da società registrate.
In molti paesi, per i WEEE di grandi dimensioni, potrebbe essere presente la raccolta domestica.
Quando si acquista un nuovo apparecchio, quello vecchio potrebbe essere restituito al rivenditore che
deve acquisirlo gratuitamente su base singola, sempre che l’apparecchio sia del tipo equivalente e
abbia le stesse funzioni di quello acquistato.
che i WEEE non diventino un problema ambientale; è essenziale seguire alcune regole di
RISPARMIARE E RISPETTARE L’AMBIENTE
Ove possibile, evitare di pre-riscaldare il forno e cercare sempre di riempirlo. Aprire la porta del forno
quanto necessario, perché vi sono dispersioni di calore ogni volta che viene aperta. Per risparmiare
molta energia sarà sufficiente spegnere il forno dai 5 ai 10 minuti prima della fine del tempo di cottura
pianificato, e servirsi del calore che il forno continua a generare. Tenere le guarnizioni pulite e in ordine,
per evitare eventuali dispersioni di energia. Se si dispone di un contratto di energia elettrica a tariffa
oraria, il programma “cottura ritardata” renderà più semplice il risparmio spostando l’avvio del
programma negli orari a tariffa ridotta.
IT 06
Page 7

1.6 Dichiarazione di conformità
Tutti i componenti di questo elettrodomestico destinati a venire a contatto con gli alimenti sono
conformi con le disposizioni della Direttiva CEE 89/109.
Apponendo la marcatura su questo prodotto, dichiariamo, sotto la nostra responsabilità, di
ottemperare a tutti i requisiti relativi alla tutela di sicurezza, salute e ambiente previsti dalla
legislazione europea in essere per questo prodotto.
2. Descrizione del Prodotto
2.1 Panoramica
1
1. Pannello di controllo
2. Posizioni ripiani (castelletto se previsto)
2.2 Accessori
3
5
4
6
2
3. Griglia metallica
4. Leccarda
5. Ventola (dietro alla piastra di acciaio)
6. Porta forno
Griglia metallica
1
Sostiene teglie e piatti.
Griglie a filo laterale
3
Griglia laterale se inclusa.
2
Leccarda
Raccoglie i residui che gocciolano durante la
cottura di alimenti con i grill.
IT 07
Page 8
2.3 Primo utilizzo
PULIZIA PRELIMINARE
Pulire sempre il forno prima di utilizzarlo per la prima volta. Pulire le superfici esterne con un panno
morbido leggermente inumidito.
Lavare tutti gli accessori e pulire l’interno del forno con del detergente per piatti ed acqua calda.
Verificare che il forno sia vuoto, impostare la temperatura massima e lasciarlo acceso per almeno 1 ora,
così da rimuovere tutti gli odori normalmente presenti nei forni nuovi.
3. Utilizzo del Forno
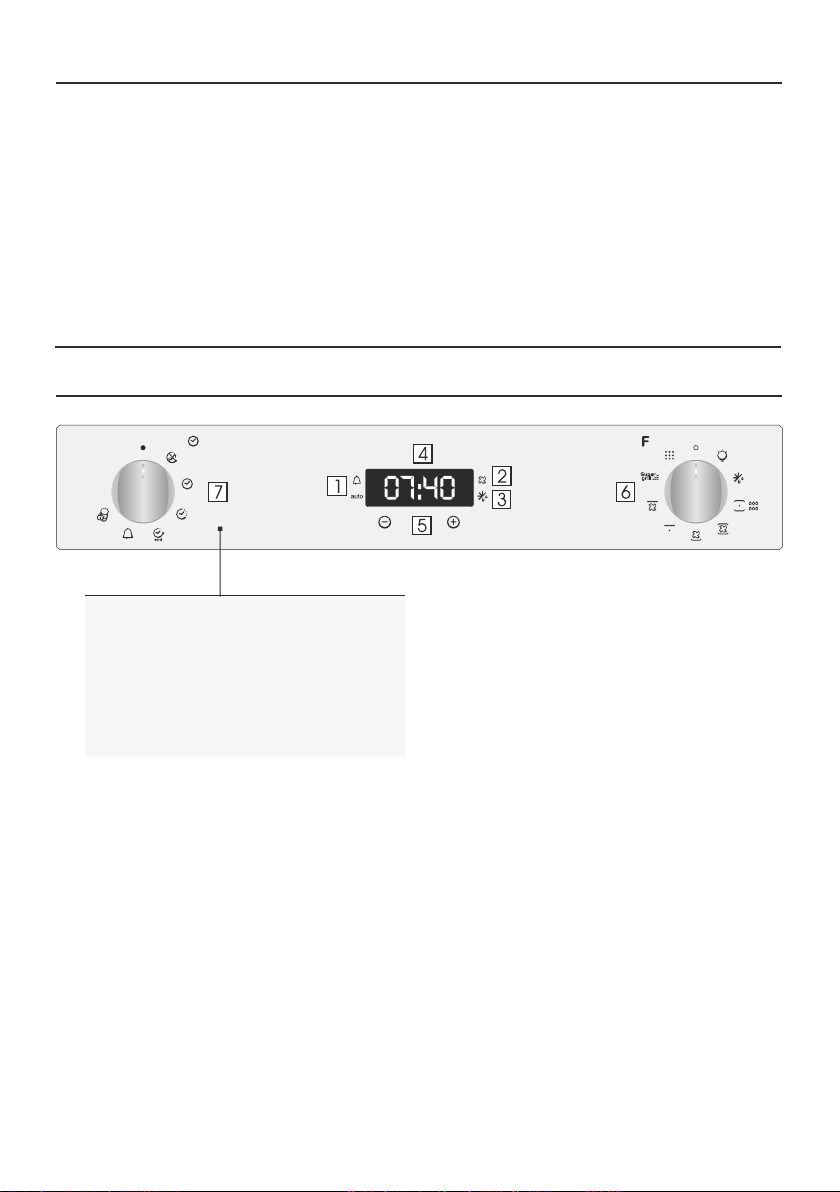
3.1 Descrizione del display
1. Timer/Modalità automatica
2. Funzione con ventola
3. Modalità scongelamento
4. Display per temperatura o orologio
5. Bottoni di regolazione
6. Manopola di selezione funzione
7. Manopola di selezione programmatore
ATTENZIONE!
La prima operazione da fare dopo l’installazione o
dopo l’interruzione di corrente è la regolazione
dell’ora (situazioni di questo tipo possono essere
riconosciute in quanto il display è acceso e
lampeggia 12:00).
200°-> Il Led “°” della temperatura lampeggia fino
a quando la temperatura visualizzata non è stata
raggiunta.
HOT -> Quando un programma è finito, se il forno
è ancora caldo, il display mostra “HOT”, in
alternanza con il tempo, anche se le manopole
sono posizionate su OFF.
IT 08
Page 9
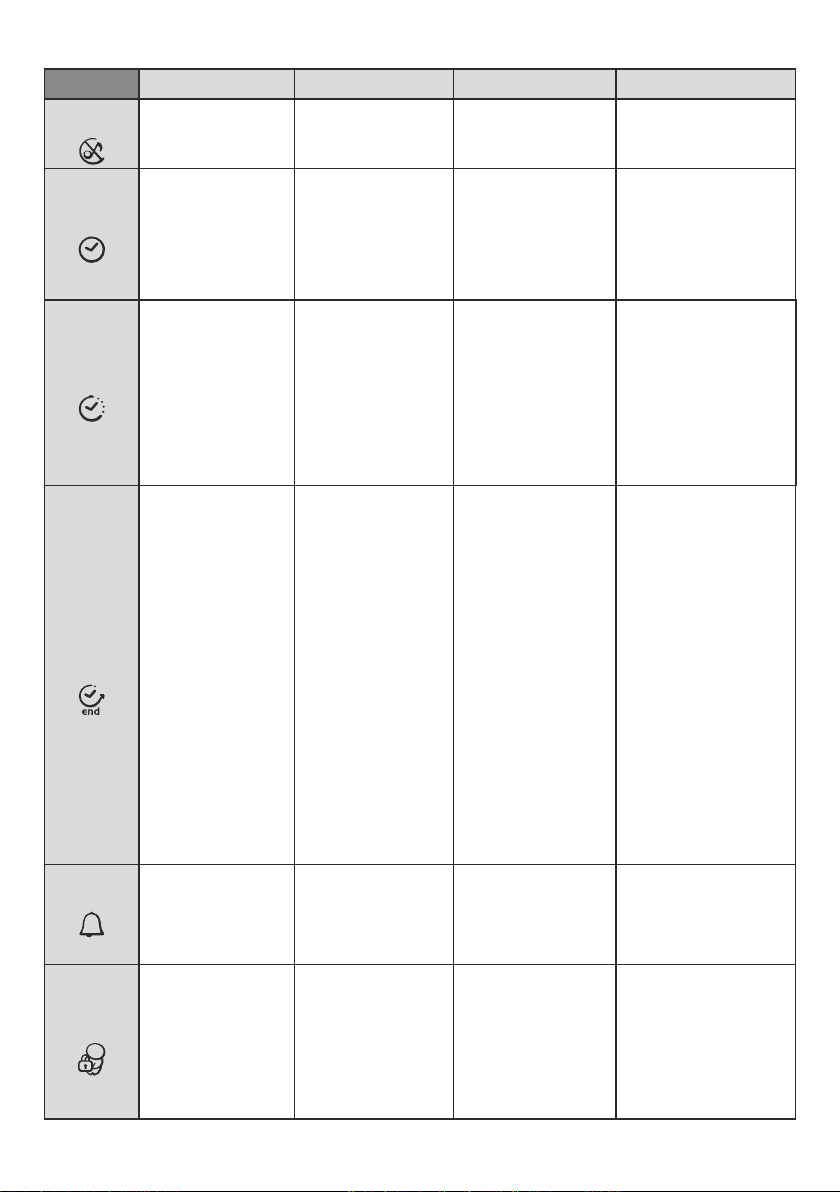
FUNZIONE COME SI ATTIVA COME SI DISATTIVA COSA FA A COSA SERVE
MODALITA'
SILENZIOSA
•Ruotare la manopola del
programmatoresulla
“Modalità Silenziosa”.
•Ruotare la manopola
sulla posizione Off.
•Permette di spegnere il
suono del timer.
•Questa funzione è
utilizzata per spegnere il
suono del timer.
IMPOSTAZIONE
DELL'OROLOGIO
DURATA
COTTURA
FINE
COTTURA
•Impostare la manopola
sulla posizione
“Impostazione
dell’orologio”.
•Usare i tasti “-” e “+” per
impostare l’ora.
•Selezionare una
funzione di cottura.
•Impostare la manopola
del programmatore sulla
durata di cottura.
•Regolare il tempo di
cottura utilizzando i tasti
“-” e “+”.
•Autodisplay si illumina.
•Selezionare una
funzione di cottura.
•Regolare la manopola
sulla posizione di Fine di
cottura.
•Regolare l’ora di fine
cottura utilizzando i tasti
“+” e “-”.
•Autodisplay si illumina.
•Ruotare la manopola
sulla posizione Off.
•Una volta che il tempo è
trascorso, il forno viene
a u t o m a t i c a m e n t e
disattivato. Per fermare la
cottura anticipatamente,
si deve impostare la
manopola delle funzioni
su Off, o regolare il
tempo di cottura su 00:00,
posizionando la manopola
sulla Durata di cottura e
utilizzando i tasti “-” “+”.
•Quando la cottura è
terminata, il forno si
spegne
automaticamente. Per
bloccare la cottura
anticipatamente, ruotare
la manopola delle
funzioni su Off.
•Permette di regolare l’ora
che appare sul display.
• Permette di regolare il
tempo di cottura.
Quando il tempo di cottura
è regolato, posizionare la
manopola su Off per
ritornare alla
visualizzazione dell’ora
attuale.
Per visualizzare l’ora
selezionata, posizionare il
selettore delle funzioni di
sinistra su Durata di cottura.
•Permette di
memorizzare l’ora di fine
cottura.
•Quando l’ora di fine
cottura è regolata, ruotare
il selettore di funzione su
Off per ritornare all’ora
attuale.
•Per vedere il tempo di
cottura selezionato,
ruotare il selettore di
funzione di sinistra sulla
posizione Fine di cottura.
•Questa funzione permette di
regolare l’ora utilizzando i tasti
“-” e “+”.
NOTA: impostare l’ora al
momento dell’installazione del
vostro forno o subito dopo
un’interruzione di corrente
(12:00 lampeggia sullo
schermo.
• Quando il tempo di
cottura è finito, la cottura si
arresta automaticamente e
l’allarme suona per qualche
secondo.
•Questa funzione è anche
utilizzata per le cotture che
possonoessere programmate
in anticipo.
•Ad esempio, il cibo
desiderato deve cuocere per
45 minuti e desidero che sia
pronto per le 12.30; in tal
caso: al termine della durata
impostata il forno si spegne
automaticamente ed avvisa
con un segnale sonoro.
Selezionare la funzione di
cottura desiderata. Impostare
la durata cottura a 45 minuti
(“-” “+”). Impostare la fine
cottura alle ore 12:30 (“-”
“+”). La cottura avrà
automaticamente inizio alle
11:45 (12:30 meno 45
minuti), all’ora impostata
come fine cottura il forno si
spegne automaticamente.
TIMER
BLOCCO
BAMBINO
•Regolare la manopola
del programmatore sulla
posizione Timer.
•Regolare il tempo di
cottura utilizzando i tasti
“+” e “-”.
•Regolare la manopola
del programmatore sulla
posizione Sicurezza
bambini.
•Premere sul tasto “+”
per 5 secondi.
•La sicurezza bambini è
in funzione quando sul
display appare STOP.
•Regolare il tempo su
00:00, posizionando la
manopola del programma-
tore sulla posizione Timer
e utilizzando i tasti “+” e “”.
•Riposizionare la
manopola sulla funzione
Sicurezza bambini e
premere il tasto “+” per 5
secondi.
•L’indicazione sul display
sparisce.
IT 09
•Questa funzione attiva un
allarme sonoro di qualche
secondo alla fine del
tempo impostato.
• Il forno non può essere
utilizzato.
• L’allarme sonoro funziona
indipendentemente dal fatto
che il forno sia acceso.
• Questa funzione è utile
quando ci sono dei bambini
in casa.
Page 10
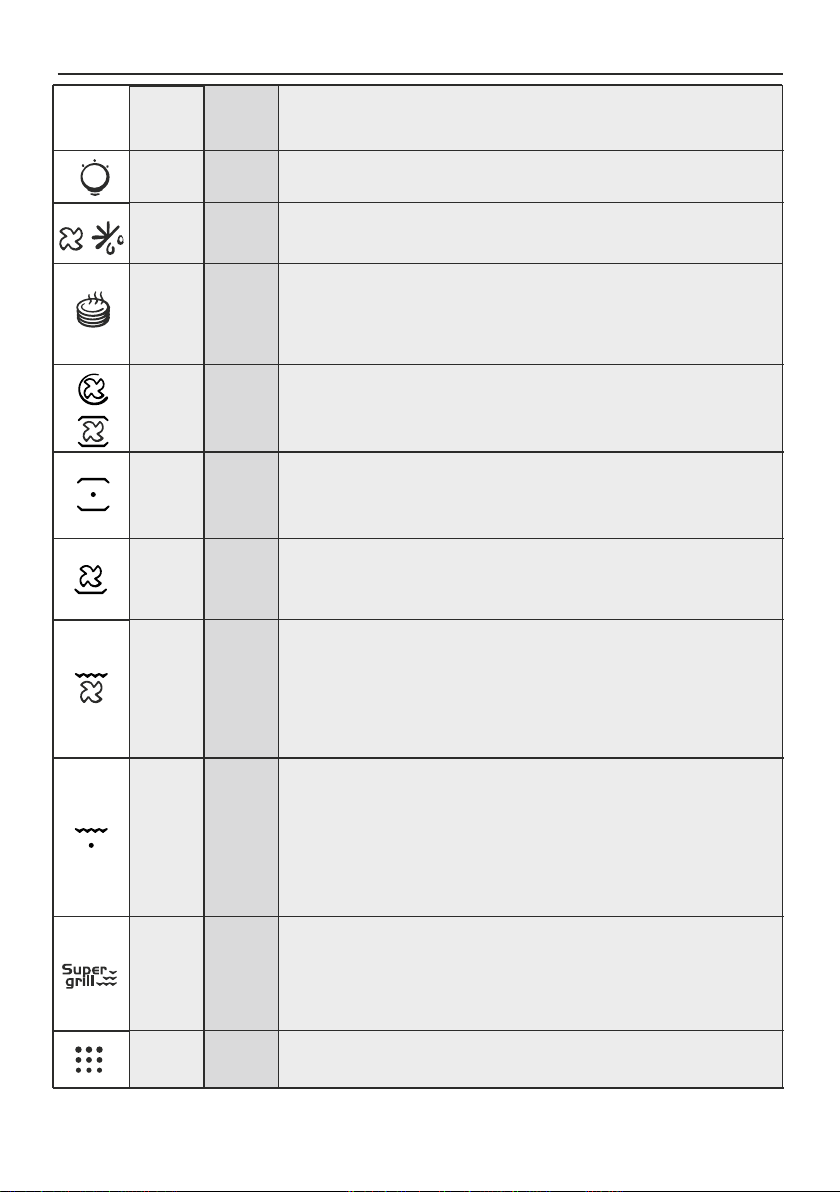
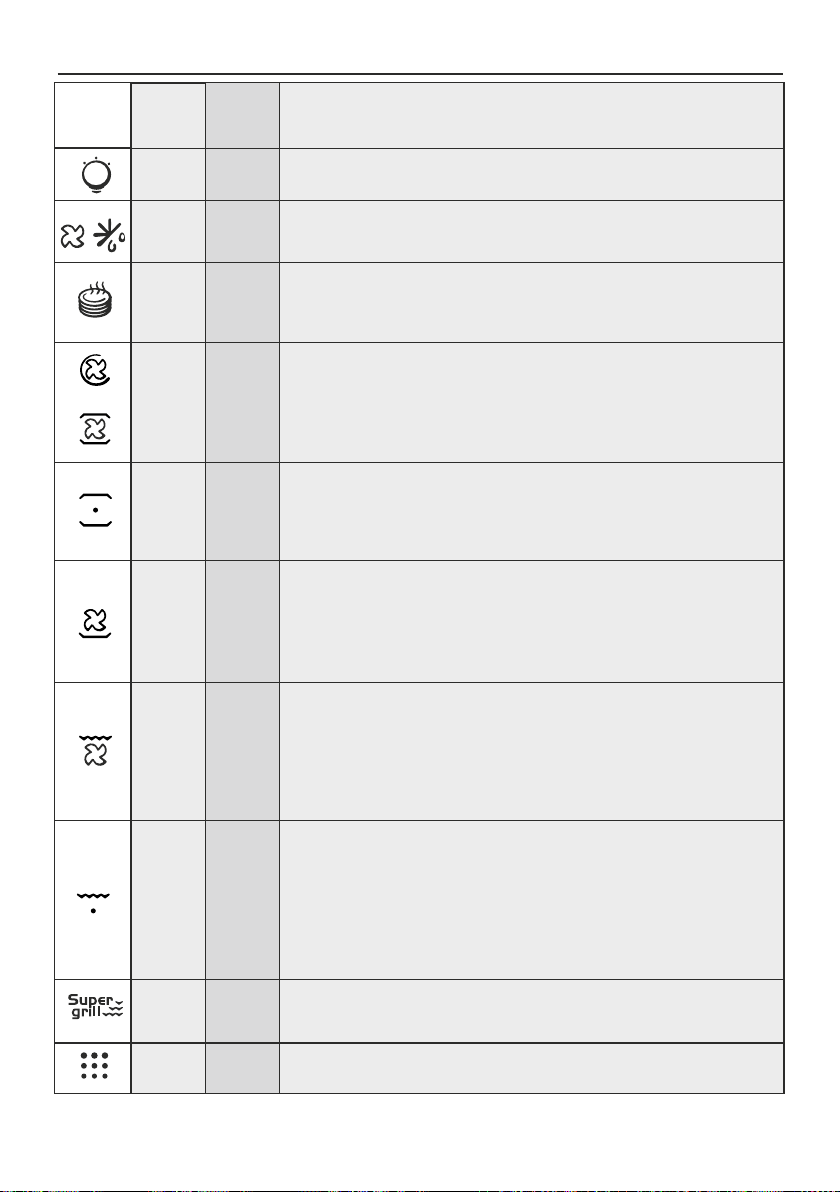
3.2 Modalità di cottura
Manopola
commuta-
tore
*
**
T°
preimpos-
tata
40
60 60 ÷ 60
180
210
220
210
200
150 ÷ 220
Intervallo
di T°
40 ÷ 40
50 ÷ 240
50 ÷ 240
50 ÷ 280
50 ÷ 230
Funzione (a seconda del modello)
LAMPADA: accende la luce interna.
SCONGELAMENTO: questa posizione permette di far circolare l’aria a
temperatura ambiente intorno al cibo surgelato facendolo così scongelare in
pochi minuti senza modificare od alterare il contenuto proteico.
RISCALDAMENTO: Questa modalità è quella consigliata per riscaldare alimenti
pre-cotti (che devono essere posizionati sul secondo ripiano in basso dall'alto)
o per scongelare pasta o pizza congelata (in questo caso è necessario utilizzare
il ripiano più basso).
La temperatura è preimpostata su 60°C e non può essere modificata.
FORNO VENTILATO: l’aria calda viene ripartita sui diversi ripiani. E’ ideale per
cuocere contemporaneamente diversi tipi di cibo (carne, pesce), senza
miscelare sapori e odori. Cottura delicata - indicata per pan di spagna, torte
Margherita, pasta sfoglia, ecc...
CONVEZIONE NATURALE: sono in funzione le resistenze superiore e inferiore.
È la cottura tradizionale, ottima per arrostire cosciotti, selvaggina, ideale per
biscotti, mele al forno e per rendere i cibi molto croccanti.
SUOLA VENTİLATA: adatta per cotture delicate (torte-soufflè).
GRILL + VENTOLA: l'utilizzo del turbo-grill richiede la porta chiusa. Utilizzando
la ventilazione e la resistenza grill contemporaneamente, si cuociono
perfettamente grandi porzioni di cibo, come arrosti, pollame, ecc.
Mettere la griglia a metà del forno e posizionare la leccarda sotto di essa per
raccogliere i grassi. Assicuratevi che il cibo non sia troppo vicino al grill. Girare la
carne a metà cottura.
GRILL: Grigliatura tradizionale a porta chiusa: con questa funzione viene
L3
L3
ECO
* Programma di prova secondo CENELEC EN 60350-1
** Programma di prova secondo CENELEC EN 60350-1 utilizzato per la definizione della classe energetica.
L1 ÷ L5
L1 ÷ L5
ECO÷SUPER
inserita la resistenza del grill. Ottima nella cottura di carni di medio e piccolo
spessore (salsicce, costine, bacon).
SUPER GRILL: il forno ha due posizioni del grill
Grill: 2200 W Grill Super: 3000 W
PIROLISI
IT 10
Page 11

4. Pulizia e manutenzione del forno
4.1 Note generiche di pulizia
La vita di servizio dell’apparecchio si allunga se questo viene pulito ad intervalli regolari. Attendere che il
forno si raffreddi prima di effettuare le operazioni di pulizia manuali. Non utilizzare mai detergenti
abrasivi, pagliette di ferro o oggetti appuntiti per lapulizia, per non danneggiare in modo irreparabile le
parti smaltate.Utilizzare solo acqua, sapone o detergenti a base di candeggina (ammoniaca).
PARTI IN VETRO
E’ consigliabile pulire lo sportello in vetro con carta assorbente da cucina dopo ogni utilizzo del forno.
Per rimuovere le macchie più ostinate, è possibile anche utilizzare una spugna imbevuta di detergente
ben strizzata e sciacquare con acqua.
GUARNIZIONE DELLO SPORTELLO DEL FORNO
Se sporca, la guarnizione può essere pulita con una spugna leggermente inumidita.
ACCESSORI
Pulire gli accessori con una spugna imbevuta con acqua e sapone, sciacquarli e asciugarli : evitare di
usare detergenti abrasivi.
VASCHETTA DI GOCCIOLAMENTO
Dopo l’uso del grill, rimuovere la vaschetta dal forno. Versare il grasso caldo in un contenitore e lavare la
vaschetta in acqua calda, utilizzando una spugna e del detergente per piatti.
Se rimangono dei residui di grasso, immergere la vaschetta in acqua e detergente. In alternativa, è
possibile anche lavare la vaschetta nella lavastoviglie oppure utilizzare un detergente per forni di tipo
commerciale. Non reinserire mai una vaschetta sporca nel forno.
4.2 Pirolisi
È possibile configurare il forno in modo che esegua automaticamente la pulizia. Le due opzioni
disponibili sono ECO e SUPER. **L'opzione può essere configurata solo sui forni dotati di tale funzione.
Il forno è dotato di un sistema di pulizia con pirolizzatore ad alta temperatura che distrugge i residui di
cibo. L'operazione viene eseguita automaticamente tramite il programmatore. I fumi risultanti vengono
“puliti” perché vengono convogliati attraverso un pirolizzatore che si avvia al momento dell'inizio della
cottura. Sullo sportello di questo tipo di forni, viene installata una chiusura di sicurezza, a causa del fatto
che il pirolizzatore lavora a temperature molto elevate. Il pirolizzatore può essere arrestato in qualsiasi
momento: tuttavia, non è possibile aprire lo sportello finché non scompare l'icona della chiusura di
sicurezza della porta.
NOTA: se il forno è posto sotto un piano cottura, non utilizzare i bruciatori a gas o le piastre elettriche
mentre il pirolizzatore è in funzione, per evitare che le piastre si surriscaldino eccessivamente. Sono
disponibili due CICLI PIROLITICI pre-programmati:
•CICLO PIROLITICO ECO: questo ciclo consente di pulire i forni moderatamente sporchi ed ha una durata
di 90 minuti.
•CICLO PIROLITICO SUPER: questo ciclo è indicato per i forni particolarmente sporchi ed ha una durata
di 120 minuti.
Non utilizzare detergenti commerciali per pulire i forni pirolitici. Suggerimento: l'esecuzione del ciclo
pirolitico al termine di un ciclo di cottura, consente di sfruttare il calore residuo e di risparmiare energia.
IT 11
Page 12

Prima di eseguire un ciclo pirolitico:
•Rimuovere tutti gli accessori dal forno perché non sono in grado di tollerare le temperature elevate
utilizzate durante il ciclo di pulizia pirolitico; in particolare rimuovere le griglie e il castelletto
(rimando al capitolo RIMOZIONE GRIGLIE E CASTELLETTO). Nei forni dotati di sonda carne è
necessario, prima di effettuare il ciclo di pulizia, chiudere il foro con il dado fornito in dotazione.
•Rimuovere tutte le tracce di grasso e le macchie estese che potrebbero richiedere troppo tempo
per essere rimosse. Questo tipo di macchie potrebbero incendiarsi a causa delle temperature
estremamente elevate del ciclo pirolitico.
•Chiudere lo sportello del forno.
•Se il forno è eccessivamente sporco, questo deve essere rimosso prima della pulizia.
• Pulire la porta del forno.
• Con una spugna umida togliere dall’interno del forno i residui più consistenti. Non usare
detergenti.
• Estrarre tutti gli accessori e il kit guide scorrevoli (se presente);
• Non lasciare strofinacci o presine sulla maniglia.
Utilizzo del ciclo pirolitico:
1 - Ruotare il selettore di funzione sulla posizione " ". Sul display, appare l’indicazione "ECO" o
"SUP". Il tempo preimpostato è 90min. e può essere variato da 90 min. (modalità Eco) a 120min.
(modalità Sup) attraverso il programmatore (tasti " +" o " -" ). Se il forno è molto sporco, è raccomandato
aumentare il tempo a 120min., se il forno è poco sporco ridurre il tempo per il ciclo di pulizia a 90 min.
2- È possibile differire l’ora di inizio del ciclo di pirolisi variando il tempo di fine attraverso il
programmatore.
3- Dopo pochi minuti, quando il forno ha raggiunto una temperatura alta, la porta si chiude
automaticamente. Il ciclo di pulizia pirolitica può essere fermato in qualunque momento riportando il
selettore di funzione su “0”.
4- Una volta che il ciclo di pulizia pirolitica è terminato, la pirolisi si spegnerà automaticamente. Sul
display apparirà l’indicazione " END" e, sino a quando la porta è bloccata, " 0 - - n "
5- Riportare il selettore di funzione su " 0 ", se la temperatura è ancora alta, l’indicazione " 0 - - n " appare
per informare che la porta è bloccata.
Utilizzo del ciclo pirolitico nei forni Touch Control:
1- Ruotare il selettore di funzione sulla posizione. Sul display, appare l’indicazione " ECO" o " SUP“
2- Il tempo preimpostato è 90 minuti e può essere variato da 90 min. (modalità Eco) a 120min.
(modalità Sup), attraverso il programmatore (tasti " +" o "-" ). Se il forno è molto sporco, è racco-
mandato aumentare il tempo a 120min., mentre se il forno è poco sporco ridurre il tempo per il ciclo di
pulizia a 90 min.
IT 12
Page 13

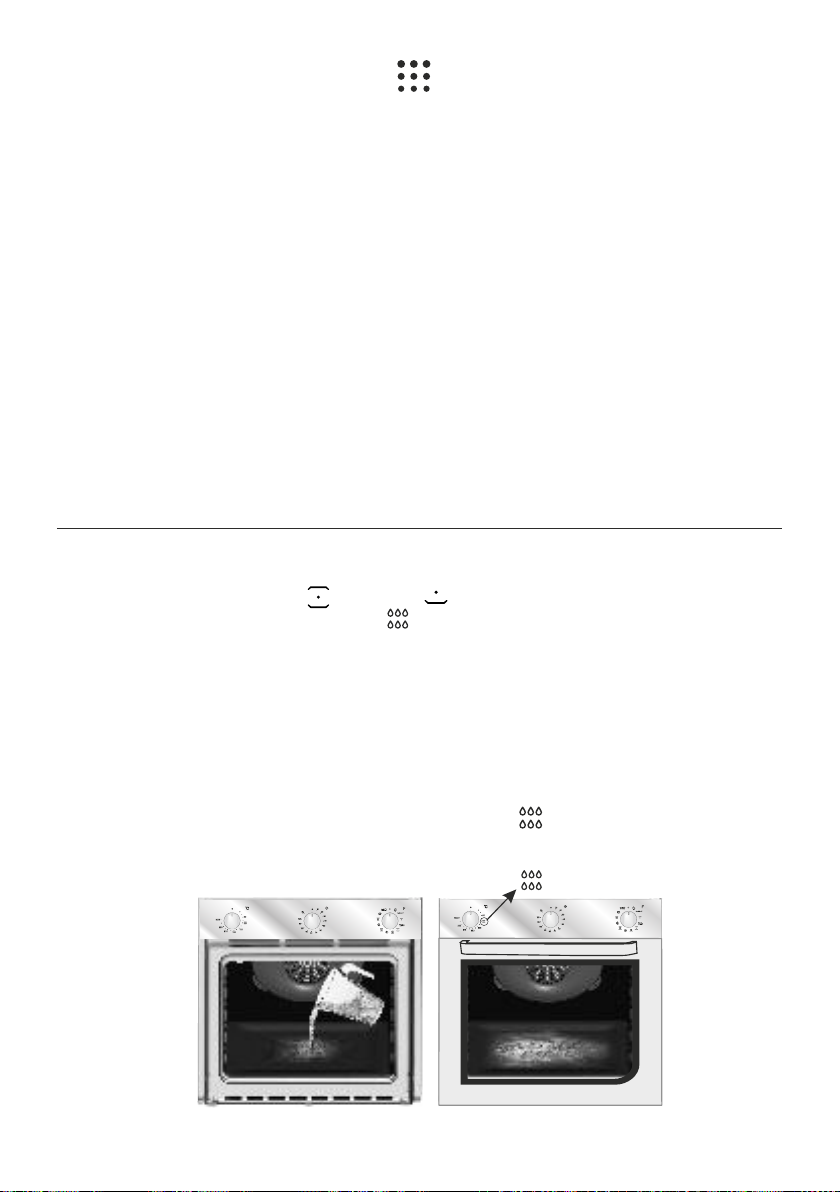
4.3 Funzione Aquactiva
La procedura di pulizia “AQUACTIVA” utilizza il vapore per facilitare la rimozione dal forno di grasso e di
pezzi di cibo rimasti.
1- Inserire 300 ml di acqua distillata o potabile nel contenitore dell’AQUACTIVA sul fondo del forno.
2- Impostare la funzione del forno su Statico ( ) o su Riscaldamento dal basso ( ).
3- Impostare la temperatura sull'icona AQUACTIVA ( ).
4- Lasciar funzionare l'elettrodomestico per 30 minuti.
5. Disattivare la macchina e lasciare che si raffreddi.
6- Una volta che il forno si è raffreddato, pulire la superficie interna del forno con uno straccio.
Attenzione: Assicurarsi che il forno sia freddo prima di toccarlo: c'è il rischio di scottarsi. Utilizzare
acqua distillata o potabile.
N.B.: In alcuni forni pirolitici con User
Interface Precò Touch, è presente la
funzione Aquactiva. Per attivarla
300 ml
impostare il selettore delle funzioni sul
simbolo AQUACTIVA ( ) e impostare
la temperatura del forno a 90°,
utilizzando i tasti di regolazione “-” e
“+”.
4.4 Manutenzione
RIMOZIONE E PULIZIA DELLE GRIGLIE
1. Svitare in senso antiorario i dadi zigrinati.
2. Rimuovere le griglie tirandole verso se stessi.
3. Pulire le griglie lavandole in lavastoviglie o con una spugna bagnata e asciugandole subito dopo.
4. Dopo aver pulito le griglie, installarle nuovamente, fissando i dadi zigrinati.
A
RIMOZIONE DELLO SPORTELLO DEL FORNO
1. Aprire lo sportello anteriore.
2. Aprire i morsetti dell’alloggiamento della cerniera sul lato destro e sinistro dello sportello anteriore,
premendoli verso il basso.
3. Installare nuovamente lo sportello eseguendo la procedura all’inverso.
IT 13
Page 14
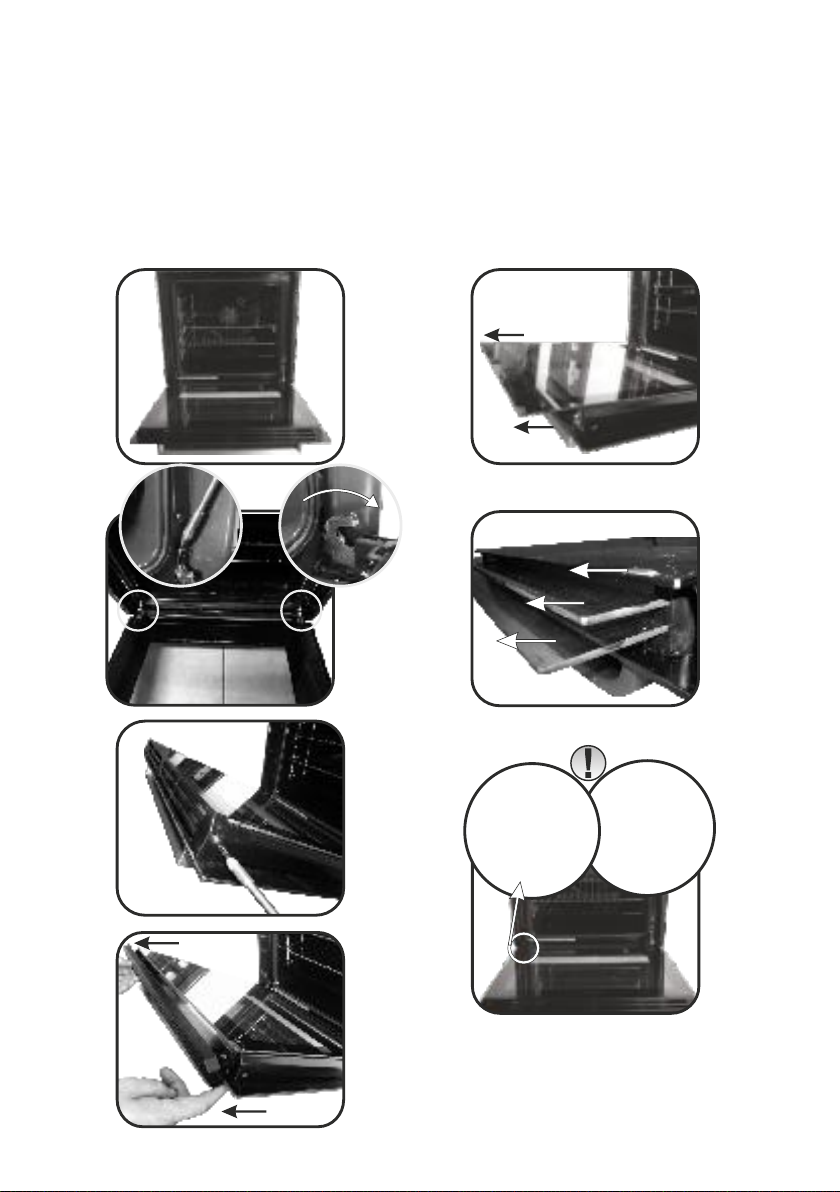
RIMOZIONE E PULIZIA DELLA PORTA IN VETRO
LOW-E
1. Aprile la porta del forno.
2.3.4. Bloccare le cerniere, rimuovere le viti e rimuovere la copertura metallica superiore tirandola
verso l’alto.
5.6. Rimuovere il vetro, estraendolo con molta cura, dalla controporta del forno (NB: nei forni pirolitici,
rimuovere anche il secondo e terzo vetro (se presente)).
7. Al termine della pulizia o sostituzione riassemblare le parti nell’ordine opposto alla rimozione.
Su tutti i vetri, l’indicazione ”Low-E” deve essere correttamente leggibile e posizionata sul lato sinistro
della porta, vicino alla cerniera laterale sinistra. In questo modo, l’etichetta stampata del primo vetro
rimarrà interna alla porta.
1.
5.
2.
3.
4.
6.
1
2
3
7.
IT 14
Page 15
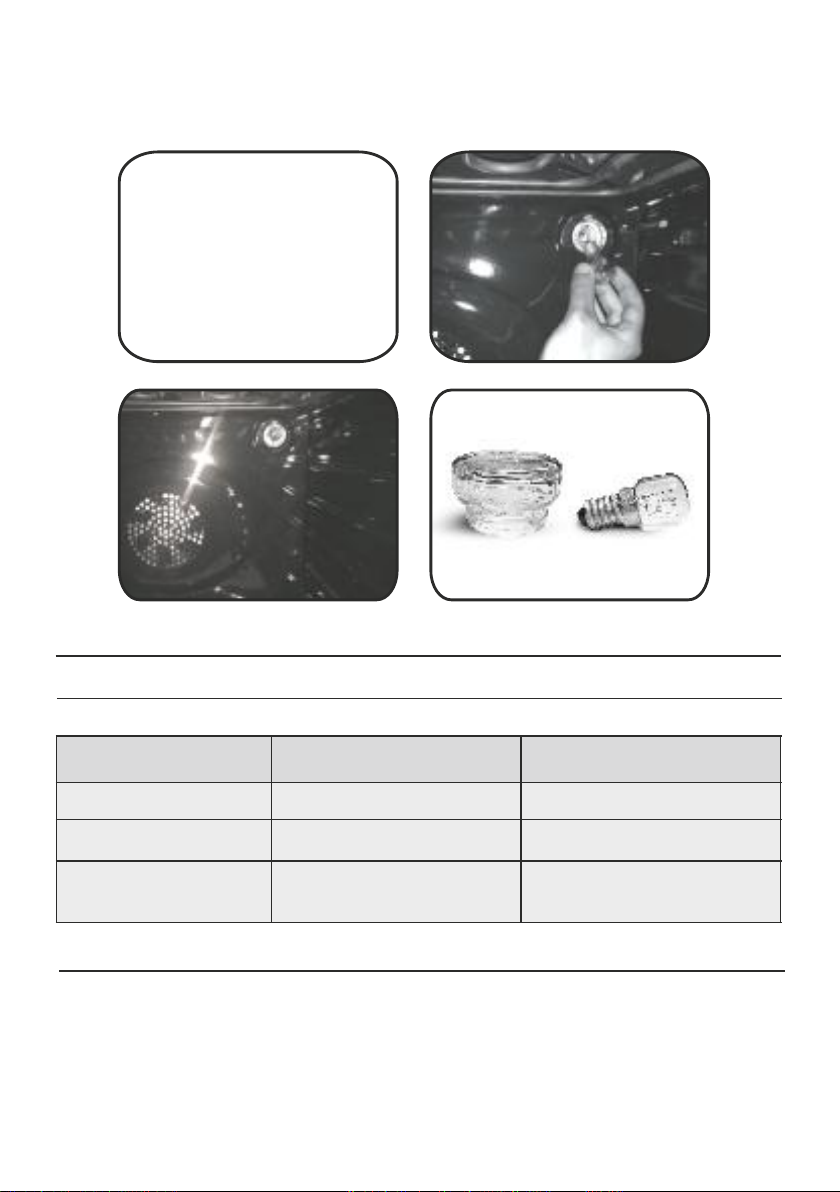
SOSTITUZIONE DELLA LAMPADINA
1. Scollegare il forno alla rete.
2. Allentare la copertura in vetro, svitare la lampadina e sostituirla con una nuova dello stesso modello.
3. Una volta sostituita la lampadina difettosa, riavvitare la copertura in vetro.
5. Risoluzione dei Problemi
5.1 FAQ
PROBLEMA POSSIBILE CAUSA SOLUZIONE
Il forno non si scalda
Il forno non si scalda
Il forno non si scalda
L’orologio non è impostato
Il blocco bambini è attivo
Le regolazioni necessarie
non sono impostate
Impostare l’orologio
Disattivare il blocco bambini
Assicurarsi che le impostazioni
necessarie siano corrette
6. Garanzie
Il prodotto è garantito, oltre che ai sensi di legge, alle condizioni e nei termini riportati sul certificato di
garanzia convenzionale inserito nel prodotto. Il certificato dovrà essere conservato e mostrato al nostro
Centro di Assistenza Tecnica Autorizzato, in caso di necessità, insieme allo scontrino comprovante
l'acquisto dell'elettrodomestico. Puoi consultare le condizioni di garanzia anche sul nostro sito internet.
Per ottenere assistenza compila l'apposito form on-line oppure contattaci al numero che trovi indicato
nella pagina di assistenza del nostro sito internet.
IT 15
Page 16

Safety Indications
• During cooking, moisture may condense inside the oven cavity or on
the glass of the door. This is a normal condition. To reduce this effect,
wait 10-15 minutes after turning on the power before putting food
inside the oven. In any case, the condensation disappears when the
oven reaches the cooking temperature.
• Cook the vegetables in a container with a lid instead of an open tray.
• Avoid leaving food inside the oven after cooking for more than 15/20
minutes.
• WARNING: the appliance and accessible parts become hot during use.
Be careful not to touch any hot parts.
• WARNING: the accessible parts can become hot when the oven is in
use. Children must be kept at a safe distance.
• WARNING: ensure that the appliance is switched off before replacing
the bulb, to avoid the possibility of electric shocks.
• WARNING: before initiating the automatic cleaning cycle:
- Clean the oven door;
- Remove large or coarse food residues from the inside of the oven using
a damp sponge. Do not use detergents;
- Remove all accessories and the sliding rack kit (where present);
- Do not place tea towels
• In ovens with meat probe it is necessary, before making the cleaning
cycle, close the hole with the nut provided. Always close the hole with
the nut when the meat probe is not used.
• Children under 8 must be kept at a safe distance from the appliance if
not continuously supervised.
• Children must not play with the appliance. The appliance can be used
by those aged 8 or over and by those with limited physical, sensorial or
mental capacities, without experience or knowledge of the product,
only if supervised or provided with instruction as to the operation of the
appliance, in a safe way with awareness of the possible risks.
• Cleaning and maintenance should not be carried out by unsupervised
children.
• Do not use rough or abrasive materials or sharp metal scrapers to
clean the oven door glasses, as they can scratch the surface and cause
the glass to shatter.
• The oven must be switched off before removing the removable parts
and, after cleaning, reassemble them according the instructions.
• Only use the meat probe recommended for this oven.
EN 16
Page 17

• Do not use a steam cleaner for cleaning operations.
• Connect a plug to the supply cable that is able to bear the voltage,
current and load indicated on the tag and having the earth contact. The
socket must be suitable for the load indicated on the tag and must be
having the earth contact connected and in operation. The earth
conductor is yellow-green in colour. This operation should be carried out
by a suitably qualified professional. In case of incompatibility between
the socket and the appliance plug, ask a qualified electrician to
substitute the socket with another suitable type. The plug and the
socket must be conformed to the current norms of the installation
country. Connection to the power source can also be made by placing an
omnipolar breaker between the appliance and the power source that
can bear the maximum connected load and that is in line with current
legislation. The yellow-green earth cable should not be interrupted by
the breaker. The socket or omnipolar breaker used for the connection s
hould be easily accessible when the appliance is installed.
• The disconnection may be achieved by having the plug accessible or
by incorporating a switch in the fixed wiring in accordance with the
wiring rules.
• If the power cable is damaged, it must be substituted with a cable or
special bundle available from the manufacturer or by contacting the
customer service department.
• The type of power cable must be H05V2V2-F.
• Failure to comply with the above can compromise the safety of the
appliance and invalidate the guarantee.
• Any excess of spilled material should be removed before cleaning.
• During the pyrolytic cleaning process, surfaces can heat up more than
usual, children must therefore be kept at a safe distance.
• The appliance must not be installed behind a decorative door in order
to avoid overheating.
• When you place the shelf inside, make sure that the stop is directed
upwards and in the back of the cavity.
The shelf must be inserted completely into the cavity
• WARNING: Do not line the oven walls with aluminum foil or single-use
protection available from stores. Aluminum foil or any other protection,
in direct contact with the hot enamel, risk melting and deteriorating the
enamel of the insides.
• WARNING: Never remove the oven door seal.
• No additional operation/setting is required in order to operate the
appliance at the rated frequencies.
EN 17
Page 18

Summary
General Instructions
19
Product Description
21
Use of the Oven
22
Oven Cleaning and Maintenance
25
1.1 Safety indications
1.2 Electrical safety
1.3 Recommendations
1.4 Installation
1.5 Waste management
1.6 Conformity declaration
2.1 Overview
2.2 Accessories
2.3 First use
3.1 Display description
3.2 Cooking modes
4.1 General notes on cleaning
4.2 Pyrolysis
4.3 Aquactiva Function
4.4 Maintenance
• Removal and cleaning of grills
• Removal of the oven window
• Removal and cleaning of the glass
door
• Changing the bulb
Troubleshooting
29
5.1 F.A.Q.
EN 18
Page 19
1. General Instructions
We thank you for choosing one of our products. For the
best results with your oven, you should read this
manual carefully and retain it for future reference.
Before installing the oven, take note of the serial
number so that you can give it to customer service staff
if any repairs are required. Having removed the oven
from its packaging, check that it has not been damaged
during transportation. If you have doubts, do not use
the oven and refer to a qualified technician for advice.
Keep all of the packaging material (plastic bags,
polystyrene, nails) out of the reach of children. When
the oven is switched on for the first time, strong
smelling smoke can develop, which is caused by the glue on the insulation panels surrounding the oven
heating for the first time. This is absolutely normal and, if it occurs, you should wait for the smoke to
dissipate before putting food in the oven. The manufacturer accepts no responsibility in cases where
the instructions contained in this document are not observed.
NOTE: the oven functions, properties and accessories cited in this manual will vary, depending on the
model you have purchased.
1.1 Safety Indications
Only use the oven for its intended purpose, that is only for the cooking of foods; any other use, for
example as a heat source, is considered improper and therefore dangerous. The manufacturer cannot
be held responsible for any damage resulting from improper, incorrect or unreasonable usage.
The use of any electrical appliance implies the observance of some fundamental rules:
- do not pull on the power cable to disconnect the plug from the socket;
- do not touch the appliance with wet or damp hands or feet;
- in general the use of adaptors, multiple sockets and extension cables is not recommended;
- in case of malfunction and/or poor operation, switch off the appliance and do not tamper with it.
1.2 Electrical Safety
ENSURE THAT AN ELECTRICIAN OR QUALIFIED TECHNICIAN MAKES THE ELECTRICAL CONNECTIONS.
The power supply to which the oven is connected must conform with the laws in force in the country of
installation. The manufacturer accepts no responsibility for any damage caused by the failure to observe
these instructions. The oven must be connected to an electrical supply with an earthed wall outlet or a
disconnector with multiple poles, depending on the laws in force in the country of installation. The
electrical supply should be protected with suitable fuses and the cables used must have a transverse
section that can ensure correct supply to the oven.
CONNECTION
The oven is supplied with a power cable that should only be connected to an electrical supply with 220240 Vac 50 Hz power between the phases or between the phase and neutral. Before the oven is
connected to the electrical supply, it is important to check:
- power voltage indicated on the gauge;
- the setting of the disconnector.
The grounding wire connected to the oven's earth terminal must be connected to the earth terminal of
the power supply.
WARNING
Before connecting the oven to the power supply, ask a qualified electrician to check the continuity of the
power supply's earth terminal. The manufacturer accepts no responsibility for any accidents or other
problems caused by failure to connect the oven to the earth terminal or by an earth connection that has
defective continuity.
EN 19
Page 20

NOTE: as the oven could require maintenance work, it is advisable to keep another wall socket available
so that the oven can be connected to this if it is removed from the space in which it is installed. The
power cable must only be substituted by technical service staff or by technicians with equivalent
qualifications.
1.3 Recommendations
After each use of the oven, a minimum of cleaning will help keep the oven perfectly clean.
Do not line the oven walls with aluminium foil or single-use protection available from stores. Aluminium
foil or any other protection, in direct contact with the hot enamel, risks melting and deteriorating the
enamel of the insides. In order to prevent excessive dirtying of your oven and the resulting strong
smokey smells, we recommend not using the oven at very high temperature. It is better to extend the
cooking time and lower the temperature a little. In addition to the accessories supplied with the oven,
we advise you only use dishes and baking moulds resistant to very high temperatures.
1.4 Installation
The manufacturers have no obligation to carry this out. If the assistance of the manufacturer is required
to rectify faults arising from incorrect installation, this assistance is not covered by the guarantee. The
installation instructions for professionally qualified personnel must be followed. Incorrect installation
may cause harm or injury to people, animals or belongings. The manufacturer cannot be held
responsible for such harm or injury.
The oven can be located high in a column or under a worktop. Before fixing, you must ensure good
ventilation in the oven space to allow proper circulation of the fresh air required for cooling and
protecting the internal parts. Make the openings specified on last page according to the type of fitting.
1.5 Waste management and environmental protection
This appliance is labelled in accordance with European Directive 2012/19/EU regarding
electric and electronic appliances (WEEE). The WEEE contain both polluting substances
(that can have a negative effect on the environment) and base elements (that can be
reused). It is important that the WEEE undergo specific treatments to correctly remove and
dispose of the pollutants and recover all the materials. Individuals can play an important
role in ensuring that the WEEE do not become an environmental problem; it is essential to
follow a few basic rules:
- the WEEE should not be treated as domestic waste;
- the WEEE should be taken to dedicated collection areas managed by the town council or a registered
company.
In many countries, domestic collections may be available for large WEEEs. When you buy a new
appliance, the old one can be returned to the vendor who must accept it free of charge as a one-off, as
long as the appliance is of an equivalent type and has the same functions as the purchased appliance.
SAVING AND RESPECTING THE ENVIRONMENT
Where possible, avoid pre-heating the oven and always try to fill it. Open the oven door as infrequently
as possible, because heat from the cavity disperses every time it is opened. For a significant energy
saving, switch off the oven between 5 and 10 minutes before the planned end of the cooking time, and
use the residual heat that the oven continues to generate. Keep the seals clean and in order, to avoid any
heat dispersal outside of the cavity. If you have an electric contract with an hourly tariff, the "delayed
cooking" programme makes energy saving more simple, moving the cooking process to start at the
reduced tariff time slot.
1.6 Declaration of compliance
The parts of this appliance that may come into contact with foodstuffs comply with the provisions of EEC
Directive 89/109.
By placing the mark on this product, we are confirming compliance to all relevant European safety,
health and environmental requirements which are applicable in legislation for this product.
EN 20
Page 21

2. Product Description
2.1 Overview
1
3
5
4
6
2.2 Accessories
Metal grill
1
1. Control panel
2
2. Shelf positions
(lateral wire grid if included)
3. Metal grill
4. Drip pan
5. Fan (behind the steel plate)
6. Oven door
2
Drip pan
Holds baking trays and plates.
Lateral wire grids
3
Lateral wire grid if included.
Collects the residues that drip during the cooking
of foods on the grills.
EN 21
Page 22

2.3 First Use
PRELIMINARY CLEANING
Clean the oven before using for the first time. Wipe over external surfaces with a damp soft cloth. Wash
all accessories and wipe inside the oven with a solution of hot water and washing up liquid. Set the
empty oven to the maximum temperature and leave on for about 1 hour, this will remove any lingering
smells of newness.
3. Use of the Oven
3.1 Display description
1. Timer/automatic mode
2. Fan function
3. Defrost mode
4. Temperature or clock display
5. LCD display adjustment controls
6. Function selector knob
7. Programme selector knob
WARNING!
The first operation to carry out after installation,
or after a power cut, is to set the time of day (a
power cut has occured if the display is flashing
12:00).
200°-> The temperature LED “°” flashes until the
displayed temperature is reached.
HOT -> When a programme finishes, if the oven is
still hot, the display shows "HOT", alternating with
the time, even if the knobs are positioned to OFF.
EN 22
Page 23
FUNCTION HOW TO ACTIVATE
SILENCE
MODE
THE TIME
COOKING
DURATION
END OF
• Rotate the left function
selector to the position
" Silence mode “
SET
• Rotate the left function
selector to the position
“Set the time”.
• Use the buttons " + " or
" - " to set the time
• Turn the right function
selector to a cooking
function
• Rotate the left function
selector to the position
"Cooking Time Duration”
• Set the time of cooking
by using buttons " + " and
" - "
• Lighting Auto appears
• Turn the right function
selector to a cooking
function
• Rotate the left function
selector to the position
"End of cooking"
• Set the end time of
cooking by using buttons
" + " and " - "
• Lighting Auto appears
COOKING
MINUTE
MINDER
CHILD
SAFETY
LOCK
• Turn the left function
selector to the position
Minute Minder.
• Set the time of cooking
by using buttons
“+”and “-”
• Turn the left function
selector to the position
Child lock.
• Press the button " + "
during 5 seconds
• Child lock is available
when " STOP " appears
on display
HOW TO
DEACTIVATE
• Rotate the function
selector to the position
OFF.
• Rotate the function
selector to the position
OFF.
•When the cooking time
has elapsed, the oven
switch off automatically
and the alarm rings for
few seconds To stop the
cooking functions early,
turn the function control
to OFF or set the time on
00.00; by rotating the
function selector to
Cooking Time Duration
and by using the buttons
" + " and " - “
• When the cooking time
has elapsed, the oven
switch off automatically.
• To stop the cooking
functions early, turn the
function control to OFF
• Set the time on 00.00 by
turning the left function
selector to the position
Minute Minder, and using
the button " - “
• Turn back the left
function selector to Child
lock and press button " +
" during 5 seconds.
• Indication STOP
disappears.
WHAT IT DOES WHY IT IS NEEDED
• Enables you to turn off
the sound of the minute
minder.
• Enables you to set the
time which appears on
the display
• It allows to preset the
cooking time required for
the recipe chosen.
• When the cooking time is
set, turn the function
selector toOFF to go back
to actual time.
• To view the cooking time
selected, turn the left
function selector to
Cooking Time duration.
• It allows to preset the end
of cooking time you want.
• When the cooking time is
set, turn the function
selector to OFF to go back
to actual time.
• To view the cooking time
selected, turn the left
function selector to End of
cooking Time
•Emits an audible signal
at the end of a set time.
•During operation, the
display shows the
remaining time.
• The oven cannot be used.
• To turn off the sound of the
minute minder
• To set the time
NB : Set the time when you
first install your oven or just
after a black out (the clock is
showing a pulsating 12.00)
• For cooking the desired
recipes.
•This function is normally
used with the COOKING
DURATION function
•For example, the desired
food needs to cook for 45
minutes and I want it to be
ready for 12.30; in this case:
at the end of the set time, the
oven automatically switches
off and an alarm sounds.
Select the desired cooking
function. Set the cooking
duration to 45 minutes (“-”
“+”). Set the end of cooking to
12:30 (“-” “+”). Cooking will
automatically begin at 11:45
(12:30 minus 45 minutes), at
the end of the set cooking
time, the oven will
automatically switch off.
WARNING: by setting only the
end of cooking time, and not
the cooking duration, the
oven will immediately switch
on and switch off at the end
of the set cooking time.
• Allow to use the oven as
alarm even if the oven is
switch off
• This function is useful
when there are children in
the house.
EN 23
Page 24
3.2 Cooking Modes
Function
Dial
*
**
T °C
default
40
60 60 ÷ 60
180
210
220
210
200
L3
T °C
range
40 ÷ 40
50 ÷ 240
50 ÷ 240
50 ÷ 280
50 ÷ 230
150 ÷ 220
L1 ÷ L5
Function (Depens on the oven model)
LAMP: Turns on the oven light.
DEFROST: When the dial is set to this position. The fan circulates air at room
temperature around the frozen food so that it defrosts in a few minutes
without the protein content of the food being changed or altered.
KEEP WARM: This is recommended to reheat precooked foodstuff, positioning
the shelf on the second level from top, or to defrost bread pizza or pastry by
positioning the shelf on the lower level. The temperature is preset in 60°C
constant, no regulation is possible.
FAN COOKING: We recommend you use this method for poultry, pastries, fish
and vegetables. Heat penetrates into the food better and both the cooking and
preheating times are reduced. You can cook different foods at the same time
with or without the same preparation in one or more positions. This cooking
method gives even heat distribution and the smells are not mixed.
Allow about ten minutes extra when cooking foods at the same time.
CONVENTIONAL COOKING: Both top and bottom heating elements are used.
Preheat the oven for about ten minutes. This method is ideal for all traditional
roasting and baking. For seizing red meats, roast beef, leg of lamb, game, bread,
foil wrapped food (papillotes), flaky pastry. Place the food and its dish on a shelf
in mid position.
FAN + LOWER ELEMENT: The bottom heating element is used with the fan
circulating the air inside the oven. This method is ideal for juicy fruit flans, tarts,
quiches and pâté.
It prevents food from drying and encourages rising in cakes, bread dough and
other bottom-cooked food.
Place the shelf in the bottom position.
FAN ASSISTED GRILL : use the turbo-grill with the door closed.
The top heating element is used with the fan circulating the air inside the oven.
Preheating is necessary for red meats but not for white meats. Ideal for
cooking thick food items, whole pieces such as roast pork, poultry, etc. Place
the food to be grilled directly on the shelf centrally, at the middle level. Slide
the drip tray under the shelf to collect the juices. Make sure that the food is not
too close to the grill. Turn the food over halfway through cooking.
GRILL : use the grill with the door closed.
The top heating element is used alone and you can adjust the temperature.
Five minutes preheating is required to get the elements red-hot. Success is
guaranteed for grills, kebabs and gratin dishes. White meats should be put at a
distance from the grill; the cooking time is longer, but the meat will be tastier.
You can put red meats and fish fillets on the shelf with the drip tray
underneath. The oven has two grill positions:
Grill: 2140 W Barbecue: 3340 W
L1 ÷ L5
L3
ECO
ECO÷SUPER
*Tested in accordance with the CENELEC EN 60350-1
**Tested in accordance with the CENELEC EN 60350-1 used for definition of energy class.
SUPER GRILL: the oven has two grill positions
Grill: 2200 W Grill Super: 3000 W
PYROLYSIS
EN 24
Page 25

4. Oven cleaning and maintenance
4.1 General notes on cleaning
The lifecycle of the appliance can be extended through regular cleaning. Wait for the oven to cool before
carrying out manual cleaning operations. Never use abrasive detergents, steel wool or sharp objects for
cleaning, so as to not irreparably damage the enamelled parts. Use only water, soap or bleach-based
detergents (ammonia).
GLASS PARTS
It is advisable to clean the glass window with absorbent kitchen towel after every use of the oven. To
remove more obstinate stains, you can use a detergent-soaked sponge, well wrung out, and then rinse
with water.
OVEN WINDOW SEAL
If dirty, the seal can be cleaned with a slightly damp sponge.
ACCESSORIES
Clean accessories with a wet, soapy sponge before rinsing and drying them: avoid using abrasive
detergents.
DRIP PAN
After using the grill, remove the pan from the oven. Pour the hot fat into a container and wash the pan in
hot water, using a sponge and washing-up liquid.
If greasy residues remain, immerse the pan in water and detergent. Alternatively, you can wash the pan
in the dishwasher or use a commercial oven detergent. Never put a dirty pan back into the oven.
4.2 Pyrolysis
The oven is equipped with a pyrolyser cleaning system, which destroys food residues at high
temperature. The operation is carried out automatically by means of the programmer. The resulting
fumes are rendered “clean” by passing over a Pyrolyser wich starts as soon as cooking begins. As very
high temperatures are required by the Pyrolyser, the oven door is fitted with a safety lock. The pyrolyser
can be stopped at any time. The door cannot be opened until the safety lock is displayed.
NOTE : If a hob has been fitted above the oven, never use the gas burners or the electric hot-plates while
the Pyrolyser is working, this will prevent the hob from overheating.
TWO PYROLYTIC CYCLE are pre-set:
ECO PYROCLEAN : Cleans a moderately stained oven. Operates for a period of 90 minutes.
SUPER PYROCLEAN : Cleans a heavily stained oven. Operates for a period of 120 minutes.
Never use commercially available cleaning products on a Pyrolytic oven!
Tip : Carrying out Pyrolytic cleaning immediately after cooking allows you to take advantage of residual
heat, thus saving energy.
Before executing a pyrolytic cycle:
•Remove all the accessories from the oven because they are not able to tolerate the high
temperatures used during the pyrolytic cleaning cycle ; in particular removing grids, side racks and
the telescopic guides (refer to the chapter REMOVING GRIDS AND SIDE RACKS) . In ovens with meat
probe it is necessary, before making the cleaning cycle , close the hole with the nut provided.
•Remove any large spillages or stains as it would take too long to destroy them. Also excessively
large amounts of grease could ignite when subject to the very high temperatures of the Pyrolytic
cycle.
•Close the oven door.
•Excess spillage must be removed before cleaning.
• Clean the oven door;
• Remove large or coarse food residues from the inside of the oven using a damp sponge. Do not use
detergents;
• Remove all accessories and the sliding rack kit (where present);
• Do not place tea towels.
EN 25
Page 26
Using the pyrolitic cycle:
1- Rotate the function selector to the position " ". On the display, appears the indication " ECO " or
" SUP ". The preset time is 90 min, this can be varied from 90min (Eco mode) to 120 min (Sup mode) via
the programmer (setting button " + " or " - "). If the oven is very dirty, it is recommend o increase the time
to 120 min, if the oven is moderately dirty reduce the cleaning cycle time to 90 min.
2- It is possible to defer the start time of the pyroclean cycle by changing the END time via the
programmer.
3- After few minutes, when the oven reaches a high temperature, the door locks automatically. The
pyroclean cycle can be stopped at any time by turning the function selector back to '0' (the word OFF will
be displayed for 3 seconds).
4 - Once the pyroclean cycle is finished, the pyrolysis will switch off automatically. On the display
appears the indication "END" until the door is locked then "0--n".
5- You can turn the function selector back to " 0 " but if the temperaure is still high, the "0--n " indication
appears to inform that the door is locked.
Use of the pyrolytic cycle in Touch Control ovens:
1- Rotate the function selector into position pyrolisys. The display will show either "ECO" or "SUP“
2- The pre-set time is 90 minutes but it can be varied from 90 min. (Eco mode) to 120 min. (Sup mode)
using the programmer (" +" or "-" key). If the oven is very dirty, the time should be increased to 120 min.,
while if the oven is only a slightly dirty, reduce the cleaning cycle to 90 min.
4.3 Aquactiva Function
The Aquactiva procedure uses steam to help remove remaining fat and food particles from the oven.
1. Pour 300 ml of water into the Aquactiva container at the bottom of the oven.
2. Set the oven function to Static ( )or Bottom ( )heater
3. Set the temperature to the Aquactiva icon
4. Allow the program to operate for 30 minutes.
5. After 30 minutes switch off the program and allow the oven to cool down.
6. When the appliance is cool, clean the inner surfaces of the oven with a cloth.
Warning:
Make sure that the appliance is cool before you touch it.
Care must be taken with all hot surfaces as there is a risk of burns. Use distilled or drinkable water.
N.B.: Certain pyrolytic ovens with the Precò Touch User Interface offer the Aquactiva function. To
activate it, set the function selector to the AQUACTIVA symbol ( ) and set the oven temperature
to 90°, using the “-” and “+” keys.
300 ml
EN 26
Page 27

4.4 Maintenance
REMOVAL AND CLEANING OF THE SIDE RACKS
1. Unscrew the bolt in an anti-clockwise direction.
2. Remove the side racks by pulling them towards you.
3. Clean the side racks in a dishwasher or with a wet sponge and then dry them immediately.
4. Having cleaned the side racks, put them back in and reinsert the bolts, ensuring that they are fully
tightened.
A
REMOVAL OF THE OVEN WINDOW
1. Open the front window.
2. Open the clamps of the hinge housing on the right and left side of the front window by pushing them
downwards.
3. Replace the window by carrying out the procedure in reverse.
EN 27
Page 28

REMOVAL AND CLEANING OF THE GLASS DOOR
LOW-E
1. Open the oven door.
2.3.4. Lock the hinges, remove the screws and remove the upper metal cover by pulling it upwards.
5.6. Remove the glass, carefully extracting it from the oven door (NB: in pyrolytic ovens, also remove
the second and third glass (if present)).
7. At the end of cleaning or substitution, reassemble the parts in reverse order.
On all glass, the indication "Pyro" must be legible and positioned on the left side of the door, close to the
left-hand lateral hinge. In this way, the printed label of the first glass will be inside the door.
1.
2.
3.
5.
6.
1
2
3
7.
4.
EN 28
Page 29

CHANGING THE BULB
1. Disconnect the oven from the mains supply.
2. Undo the glass cover, unscrew the bulb and replace it with a new bulb of the same type.
3. Once the defective bulb is replaced, replace the glass cover.
5. Troubleshooting
5.1 FAQ
PROBLEM POSSIBLE CAUSE SOLUTION
The oven does not heat up
The oven does not heat up
The oven does not heat up
The clock is not set Set the clock
The child lock is on
A cooking function and
temperature has not been set
Deactivate the child lock
Ensure that the necessary
settings are correct
EN 29
Page 30

Sicherheitshinweise
• Während des Garvorgangs kann Feuchtigkeit im Ofenraum oder auf
dem Glas der Tür kondensieren. Dies ist ein normaler Zustand. Um diesen
Effekt zu verringern, warten Sie 10-15 Minuten nach dem Einschalten des
Geräts, bevor Sie die Speisen in den Ofen stellen. In jedem Fall
verschwindet das Kondensat, wenn der Ofen die Gartemperatur erreicht
hat.
• Das Gemüse in einem Behälter mit Deckel anstelle einer offenen Schale
kochen.
• Vermeiden Sie es, Speisen nach dem Garvorgang länger als 15/20
Minuten im Ofen zu lassen.
• WARNUNG: Das Gerät und die zugänglichen Teile des Gerätes werden
während des Betriebs heiß. Das Berühren der heißen Geräteteile sollte
vermieden werden.
• ACHTUNG: Zugängliche Teile können heiß werden, wenn der Ofen in
Betrieb ist. Kinder fernhalten.
• Dieses Gerät ist nicht bestimmt zum Gebrauch durch Personen
(einschließlich Kindern) mit beeinträchtigten körperlichen, sensorischen
oder geistigen Fähigkeiten oder durch Personen, die keine entsprechenden
Erfahrungen oder Kenntnisse besitzen, es sei denn, sie werden beaufsichtigt
oder angewiesen durch eine Person, die für ihre Sicherheit verantwortlich
ist.
• Kinder dürfen nicht mit dem Gerät spielen.
• Die Reinigung und Wartung des Gerätes darf nicht durch Kinder ohne
Aufsicht durchgeführt werden.
• Während des Betriebs wird das Gerät heiß. Bitte vermeiden Sie die
Berührung der heißen Geräteteile.
WARNUNG: zugängliche Geräteteile werden während des Betriebs heiß.
Kinder sollten fern gehalten werden.
• Nutzen Sie keine scharfen oder scheuernden Reiniger oder scharfe
Metallreiniger um den Herd und das Glass zu reinigen, da dadurch Kratzer
auf der Oberfläche entstehen können.
• Der Ofen muss ausgeschaltet werden, bevor der Deckel zur Reinigung
entfernt wird. Anschließend den Deckel gemäß der Anweisungen wieder
montieren.
• Nutzen Sie nur die empfohlene Temperatureinstellung für den Ofen.
• Nutzen Sie kein Dampfreinigungsgerät zur Reinigung des Ofens.
• An die Zuleitung ist ein Stecker anzuschließen, der für die auf dem
Typenschild aufgeführte Spannung, Stromstärke und Last ausgelegt ist
und über einen Schutzkontakt verfügt. Die Steckdose muss für die auf
dem Typenschild aufgeführte Last ausgelegt und der Schutzkontakt
DE 30
Page 31

angeschlossen und in Betrieb sein. Der Schutzleiter ist gelb-grün gefärbt.
Dieser Vorgang darf nur von entsprechend qualifiziertem Fachpersonal
durchgeführt werden. Im Falle einer Inkompatibilität zwischen Steckdose
und Gerätestecker müssen Sie einen qualifizierten Elektriker bitten, die
Steckdose durch eine geeigneten Typ zu ersetzen. Stecker und Buchse
müssen zu den im Installationsland geltenden aktuellen Normen
konform sein. Zwischen Gerät und Stromquelle lässt sich auch ein
allpoliger Schutzschalter zwischenschalten, der für die maximale
Anschlussleistung ausgelegt ist und aktuelle gesetzliche Bestimmungen
einhält. Der gelb-grüne Schutzleiter darf durch den Schutzschalter nicht
unterbrochen werden. Bei der Geräteinstallation ist darauf zu achten,
dass die für den Anschluss verwendete Buchse bzw. der allpolige
Schutzschalter leicht zugänglich sind.
• Die Trennung von der Stromversorgung darf durch Herausziehen des
Steckers aus der Steckdose oder Auslösen eines gemäß gängiger
Verkabelungsnormen in die Festverdrahtung zwischengeschalteten
Schutzschalters erfolgen.
• Wenn das Netzkabel beschädigt ist, muss es durch ein Kabel bzw.
Spezialbündel ersetzt werden, das beim Hersteller erhältlich ist. Wenden
Sie sich dazu an den Kundendienst.
•Der Netzkabeltyp muss H05V2V2-F sein.
• Eine Nichteinhaltung der oben genannten Anweisungen kann die
Schutzfunktion des Geräts gefährden und zum Erlöschen der Garantie
führen.
• Überschüssiges verschüttetes Material ist vor dem Reinigen zu entfernen.
• Während des pyrolytischen Reinigungsvorgangs können sich Flächen
mehr als üblich erwärmen. Deswegen sind Kinder in einem sicheren
Abstand fernzuhalten.
• Zum Vermeiden von Überhitzung darf das Gerät nicht hinter einer
Verkleidungstür installiert werden.
• Beim Einschieben des Ofenrostes ist darauf zu achten, dass der
Anschlag nach oben und hinten Richtung Ofenraum zeigt.
Das Rost muss vollständig in den Ofenraum eingeschoben werden.
• WARNHINWEIS: Die Seitenwände des Ofens nicht mit Aluminium oder
Einweg-Schutz, wie er in Geschäften erhältlich ist, auskleiden.
Aluminiumfolie oder jeglicher andere Schutz, der in direkten Kontakt mit
der heißen Emaille kommt, kann Schmelzen und Verschleiß der Emaille
an den Innenseiten verursachen.
• WARNHINWEIS: Entfernen Sie niemals die Dichtung der Ofentür.
• Es ist kein zusätzlicher Vorgang oder eine andere Einrichtung
erforderlich, um das Gerät mit der angegebenen Spannung zu betreiben.
DE 31
Page 32

Zusammenfassung
Allgemeine Anweisungen
33
Produktbeschreibung
35
Betrieb des Backofens
36
Reinigung und Wartung des
Backofens
39
1.1 Sicherheitshinweise
1.2 Elektrische Sicherheit
1.3 Empfehlungen
1.4 Installation
1.5 Abfallentsorgung
1.6 Konformitätserklärung
2.1 Übersicht
2.2 Zubehör
2.3 Inbetriebnahme
3.1 Beschreibung der Anzeige
3.2 Funktionen zum Garen
4.1 Allgemeine Reinigungshinweise
4.2 Pyrolysefunktion
4.3 Aquactiva Funktion
4.4 Wartung
● Entfernen und Reinigen der
Führungsschienen
● Entfernen Des Backofenfensters
● Entfernen und Reinigen der Glastür
● Wechseln der glühbırne
Fehlerbehebung
43
5.1 Häufig gestellte Fragen
DE 32
Page 33

1. Allgemeine Anweisungen
Vielen Dank, dass Sie sich für eins unserer Produkte
entschieden haben. Damit Sie lange Freude mit Ihrem
Backofen haben, sollten Sie diese Bedienungsanleitung
sorgfältig durchlesen und zum Nachschlagen in der
Zukunft aufbewahren. Notieren Sie sich vor dem
Anschließen des Backofens die Seriennummer, sodass Sie
diese im Reparaturfall an den Kundendienst weitergeben
können. Den Backofen nach dem Auspacken auf mögliche
Transportschäden überprüfen. Im Zweifelsfall den Ofen
nicht in Betrieb nehmen und einen qualifizierten
Servicetechniker konsultieren. Verpackungsmaterial
(Plastiktüten, Styropor, Nägel usw.) außerhalb der
Reichweite von Kindern aufbewahren. Beim ersten
Einschalten des Backofens kann ein streng riechender Rauch entstehen.
Dieser kann beim ersten Erhitzen durch den Kleber auf den Dämmplatten hervorgerufen werden. Dies ist
bei der ersten Inbetriebnahme ein normaler Vorgang; es sollte jedoch abgewartet werden, bis der Rauch
sich verzogen hat, bis Lebensmittel in den Ofen geschoben werden. Der Hersteller übernimmt keine
Verantwortung in Fällen, wo die in diesem Dokument enthaltenen Anweisungen nicht beachtet werden.
HINWEIS: Die in diesem Handbuch erwähnten Funktionen, Eigenschaften und Zubehörteile können je
nach gekauftem Modell variieren.
1.1 Sicherheitshinweise
Den Backofen nur zum vorbestimmten Zweck, das heißt, für
anderen Verwendungsmöglichkeiten wie beispielsweise als Heizungsquelle gelten als unsachgemäß und
sind daher gefährlich. Der Hersteller übernimmt keine Haftung für Schäden, die aus einer falschen,
unsachgemäßen oder unverständlichen Verwendung hervor
Der Betrieb elektrischer Geräte erfordert die Einhaltung einig
- Das Gerät nicht am Stromkabel aus der Steckdose ziehen.
- Gerät nicht mit nassen oder feuchten Händen oder Füßen berühr
- Die Verwendung von Adaptern, Mehrfachsteckern und Verläng
- Bei einer Fehlfunktion beziehungsweise bei unzulänglichem
1.2 Elektrische Sicherheit
DER ANSCHLUSS AN DIE STROMQUELLE DARF NUR DURCH EINEN ELEKTRIKER ODER QUALIFIZIERTEN
TECHNIKER ERFOLGEN.
Die Stromquelle, an die der Backofen angeschlossen wird, muss den gesetzlichen Voraussetzungen des
Landes entsprechen. Der Hersteller übernimmt keine Haftung für Schäden, die aus der Nichtbefolgung
dieser Anweisungen entstehen. Der Backofen muss entsprechend der geltenden Gesetzgebung des Landes
an eine geerdete Wandsteckdose oder an einen allpoligen Trennschalter angeschlossen werden. Die
Stromquelle sollte durch entsprechende Sicherungen geschützt sein und die verwendeten Kabel müssen
einen Querschnitt aufweisen, der eine ordnungsgemäße Stromversorgung des Backofens gewährleistet.
ANSCHLUSS
Der Backofen wird mit einem Stromkabel geliefert, das an eine Stromquelle mit 220- 240 Vac 50 Hz
angeschlossen werden kann. Bevor der Backofen an die Stromquelle angeschlossen wird, muss Folgendes
überprüft werden:
- Spannung des Stromnetzes mit dem Messgerät;
- Beschaffenheit und Umfeld des Trennschalters.
Die mit der Erdungsklemme des Backofens verbundene Schutzleitung muss mit der Erdungsklemme der
Stromquelle verbunden werden.
WARNUNG
Vor dem Anschließen des Backofens an die Stromquelle einen qualifizierten Elektriker darum bitten, die
Kontinuität der Erdungsklemme an der Stromquelle zu überprüfen. Der Hersteller übernimmt keine
Verantwortung für Unfälle oder sonstige Probleme, die aus einem nicht sachgemäßen Anschluss des
Backofens an die Erdungsklemme oder an einen geerdeten Anschluss mit defekter Kontinuität entstehen
können.
DE 33
das Garen von Lebensmitteln einsetzen. Alle
gehen.
er Grundregeln:
en.
erungskabeln wird nicht empfohlen.
Betrieb Gerät ausschalten und nicht öffnen.
Page 34

HINWEIS: Für eine eventuelle Wartung des Ofens ist die Zugänglichkeit einer zweiten Wandsteckdose von
Vorteil, sodass er an diese angeschlossen werden kann, wenn er ausgebaut werden muss. Das Stromkabel
darf nur von qualifizierten Kundendiensttechnikern oder Elektrikern ausgetauscht werden.
1.3 Empfehlungen
Es empfiehlt sich, den Backofen nach jeder Verwendung grob zu reinigen.
Die Ofenwände nicht mit Aluminiumfolie oder sonstiger im Handel erhältlicher Einmalschutzfolie
auskleiden.
Gerät die Aluminiumfolie oder sonstige Schutzfolie mit der heißen Emaille in Berührung, so kann sie
schmelzen und die Qualität der Backofenbeschichtung beeinträchtigen. Es wird empfohlen, den Backofen
nicht bei sehr hohen Temperaturen zu betreiben, um eine übermäßige Verschmutzung und unangenehme
Rauch- und Geruchsentwicklung zu vermeiden. Es ist besser, bei niedrigerer Temperatur die Garzeit zu
erhöhen. Zusätzlich zum mitgelieferten Zubehör sollten nur temperatur- und hitzebeständige Backformen
und ofenfestes Geschirr verwendet werden.
1.4 Einbau und Installation
Der Hersteller ist nicht zur Installation verpflichtet. Wird das Eingreifen des Hersteller erforderlich, um
Fehler zu beheben, die aus einer falschen Installation hervorgehen, so erfolgt dieses nicht im Rahmen der
Gewährleistungsgarantie. Die Installationsanweisungen für qualifiziertes Fachpersonal müssen befolgt
werden. Eine falsche Installation kann Personen- oder Sachschäden hervorrufen. Für derartige Schäden
oder Verletzungen übernimmt der Hersteller keine Haftung.
Der Backofen kann oben in einem Einbauschrank oder unter der Arbeitsfläche eingebaut werden. Vor dem
Fixieren muss gewährleistet sein, dass im Backofenraum genügend Fischluft zirkulieren kann, um die
Kühlung und den Schutz der innenliegenden Teile zu gewährleisten. Je nach Einbauart die auf der letzten
Seite angegebenen Öffnungen vornehmen.
1.5 Entsorgung und Umweltschutz
Dieses Elektrohaushaltsgerät ist in Einklang mit der EU-Richtlinie 2012/19/EU über Elektround Elektronik-Altgeräte (WEEE) gekennzeichnet. Elektro- und Elektronik-Altgeräte enthalten
umweltschädigende Substanzen, aber auch Grundkomponenten, die wiederverwendet
werden können. Daher ist es wichtig, Elektro- und Elektronik-Altgeräte spezifisch zu entsorgen,
um alle schädlichen Substanzen zu entfernen und wiederverwendbare Teile zu recyceln.
Verbraucher leisten einen wichtigen Beitrag zur Gewährleistung, dass Elektro- und ElektronikAltgeräte nicht zu einem Umweltproblem werden. Halten Sie sich daher bitte an die folgenden
Grundregeln:
- Elektro- und Elektronik-Altgeräte dürfen nicht mit dem normalen Hausmüll entsorgt werden.
- Elektro-und Elektronik-Altgeräte müssen bei zugelassenen Sammelstellen abgegeben werden, die von
der Stadtverwaltung oder anderen zuständigen Stellen verwaltet werden.
In vielen Ländern wird für die Entsorgung großer Elektro- und Elektronik-Altgeräte ein Abholservice
angeboten. Beim Kauf eines neuen Geräts wird das alte möglicherweise vom Händler zurückgenommen,
der es kostenfrei entsorgt, sofern das neue Gerät von einem ähnlichen Typ ist und die gleiche Funktion
erfüllt wie das Altgerät.
MASSNAHMEN ZUM STROMSPAREN UND UMWELTSCHUTZ
Sofern möglich, das Vorheizen des Backofens vermeiden und seine Kapazität voll ausnutzen. Die
Backofentür so selten wie möglich öffnen, weil die Hitze aus dem Innenraum bei jedem Öffnen verloren
geht.
Für eine deutliche Energieersparnis den Backofen 5-10 Minuten vor dem Ende der Garzeit ausschalten und
mit der Restwärme zu Ende garen. Die Dichtungen sollten sauber und unversehrt bleiben, damit keine Hitze
aus dem Inneren verloren geht. Falls Sie einen Stromversorgungsvertrag mit wechselndem Stundentarif
haben, erleichtert das Programm der „verzögerten Startzeit“ das Stromsparen, indem der Anfang des
Garvorgangs in die Zeit verschoben wird, wo der günstigere Stromtarif gilt.
1.6 Konformitätserklärung
Die Teile dieses Geräts, die mit Lebensmitteln in Berührung kommen können, entsprechen der EURichtlinie 89/109.
Durch das Zeichen auf diesem Produkt wird seine Einhaltung aller geltenden Sicherheits-,
Gesundheits- und Umweltanforderungen bestätigt, die gesetzlich für dieses Produkt vorgeschrieben sind.
DE 34
Page 35

2. Produktbeschreibung
2.1 Übersicht
1
3
5
4
6
2.2 Zubehör
Backrost
1
1. Bedienfeld
2. Führungsschienen
2
(seitlicher Metallrost, falls enthalten)
3. Backrost
4. Fettpfanne/Backblech
5. Lüfter (hinter der Stahlabdeckung)
6. Backofentür
2
Fettpfanne
Hält Auflauf- und Backformen.
Seitliche Draht Gitter
3
Seitliche Drahtnetz wenn inbegriffen.
Fängt die beim Backen aus den Lebensmitteln
austretende Flüssigkeit auf.
DE 35
Page 36

2.3 Erste Inbetriebnahme
ERSTE REINIGUNG
Den Backofen vor der ersten Inbetriebnahme reinigen. Die Außenflächen mit einem feuchten, weichen
Tuch abwischen. Alle Zubehörteile spülen und den Backofen innen mit warmem Spülwasser
auswischen. Den leeren Backofen auf die Höchsttemperatur einstellen und etwa eine Stunde lang
anlassen, damit der neue Geruch verfliegt.
3. Betrieb des Backofens
3.1 Beschreibung der Anzeige
1. Timer/automatischer Modus
2. Lüfterfunktion
3. Auftaumodus
4. Temperatur- oder Uhranzeige
5. Bedienelemente für das LCD-Display
6. Funktionsauswahlknopf
7. Programmauswahlknopf
WARNUNG!
Im Anschluss an die Montage oder an einen
Stromausfall, muss die Uhrzeit eingestellt
werden (ein Stromausfall hat stattgefunden, falls
das Display mit der Anzeige „12:00“ blinkt).
200°-> Die Temperatur-LED “°” blinkt so lange,
bis die angezeigte Temperatur erreicht wurde.
HOT -> Wenn ein Programm abgeschlossen ist
und der Ofen weiterhin heiß ist, zeigt das Display
abwechselnd die Anzeige „HOT“ (HEISS) sowie
Uhrzeit a n , d i es e b e nfalls, w e nn d i e
Bedienelemente auf „OFF“ (AUS) stehen.
DE 36
Page 37

FUNKTION
LAUTLOS-
MODUS
ZEIT-
EINSTELLUNG
BACKDAUER
BACKZEI-
TENDE
MANUELLER
BETRIEB
KINDER-
SICHERUNG
EINSCHALTEN AUSSCHALTEN FUNKTION
• Drehen Sie den linken
Funktionswahlschalter
auf die Position „Silence
mode“ (Lautlos-Modus).
• Drehen Sie den linken
Funktionswahlschalter auf
die Position „Set the time“
(Zeiteinstellung).
• Verwenden Sie die Tasten
„+“ oder „-“, um die Zeit
einzustellen
•Drücken Sie den
mittleren Knopf zweimal
•Die Knöpfe "-" "+"
drücken, um die
erforderliche Backzeit
einzustellen.
•Alle Knöpfe loslassen.
•Stellen Sie die
Backfunktion mit dem
entsprechenden
Kontrollknebelfür die
Backfunktion.
•Drücken Sie den
mittleren Knopf dreimal
•Die Knöpfe "-" "+"
drücken,um den
Zeitpunkt zu wählen,
wenn Sie möchten,
dass der Ofen sich
abschaltet.
•Knöpfe loslassen.
•Wählen Sie die
Backfunktion mit dem
entsprechenden
Kontrollknebel für die
Backofenfunktion
•Drücken Sie den
mittleren Knopf einmal
•Die Knöpfe "-" "+"
drücken, um die
erforderliche Backzeit
einzustellen.
•Alle Knöpfe loslassen.
Die Kindersicherung wird
aktiviert wenn Sie
mindestens 5 Sekunden lang
die Taste Set (+) der
Kindersicherung auf dem
Display erscheint. Von diesem
Moment an ist die
Bedienung aller anderen
Funktionen gesperrt Display
zeigt STOP und die alternativ
voreingestellte Zeit.
• Drehen Sie den
Funktionswahlschalter
auf die Position „OFF“
(AUS).
• Drehen Sie den
Funktionswahlschalter
auf die Position
„OFF“ (AUS).
• Drücken Sie einen
Knopf, um das Signal zu
beenden.
Drücken Sie den
mittleren
Knopf, um zur Uhrunktion zu gelangen.
•Zum eingestellten
Zeitpunkt wird der Ofen
sich automatisch
abschalten.
•Wenn Sie den Ofen
manuell ausschalten
möchten, drehen Sie
den Knebel zur
Einstellung der
Ofenfunktion auf
Position O.
•Wenn die eingestellte
Backzeit abgelaufen ist,
wird ein akustisches
Signal aktiviert (dieser
Alarm hört von alleine
auf, nach er kann jedoch
sofort Bausgeschaltet
werden, wenn man auf
SELECT drückt).
Die Kindersicherung wird
deaktiviert wenn Sie
mindestens 5 Sekunden
lang die Taste Set (+)
gedrückt halten und bis
das auf dem Display
erlischt. Von diesem
Moment an ist die
Bedienung aller anderen
Funktionen aktiv.
• Hiermit können Sie
den minütlichen
Signalton stumm schalten.
• Dadurch lässt sich die
auf dem Display
angezeigte Zeit einstellen.
•Es ermöglicht Ihnen,die
für das gewählte Rezept
erforderl iche Backzeit
vorzu programmieren.
•Um die Restzei t zu
erfahren drücken Sie den
Knopf SELECT ZWEIMAL.
•Um die eingestellte Zeit
zu ändern, drücken Sie den
Knopf TIMER und nehmen
Sie die neue Einstellung
durch Betätigung der
Knöpfe "-" "+" vor.
•Es ermöglicht die
Einstellung der
Backendzeit.
•Um die voreingestellte
Zeit zu überprüfen,
Drücken Sie den
mittleren Knopf dreimal
•Um die voreingestellte
Zeit zu ändern, drücken
Sie den Knopf SELECT
und die Knöpfe "-" "+"
gleichzeitig.
•Aktiviert einen Alarm
am Ende der
eingestellten Backzeit.
•Während dessen zeigt
das Display die
verbleibende Zeit an.
DE 37
NÜTZLICH FÜR
• Deaktivieren des
minütlichen Signaltons.
• Für die Zeiteinstellung
Hinweis: Stellen Sie die Zeit
nach der erstmaligen
Montage Ihres Ofens oder
nach einem Stromausfall ein
(die Uhrzeit wird durch eine
blinkende „12:00“ dargestellt)
•Wenn die eingestellte Zeit
abgelaufen ist, schaltet sich
der Ofen automatisch
ab.Wenn Sie den
Backvorgang vorzeitig abbzw.unterbrechen möchten,
drehen Sie den Knebel zum
Auswählen der Ofenfunktion
bis zur Position O oder
stellen Sie die
programmierte Zeit auf 0.00
(Knöpfe SELECT und "-" "+"
•Diese Funktion wird
zusammen mit der Backdauer
benutzt. Z.B. Soll Ihre Speise 45
Minuten backen und um 12:30
fertig sein. Wählen Sie zuerst
die Backfunktion, dann
Backzeitdauer 45 Minuten
einstellen, dann Backzeitende
12:30 eingeben.
•Bei Erreichen der eingestellten
Backzeit schaltet sich der Ofen
automatisch ab und ein
akustisches Signal ertönt. Der
Backofen startet automatisch
um 11:45 (12:30 minus 45
Min.) und schaltet sich dann zu
der eingestellten Zeit ab.
ACHTUNG: Wenn nur die
Backendzeit, nicht jedoch die
Dauer der Backzeit eingestellt
worden ist, setzt sich der Ofen
sofort in Betrieb und schaltet
sich bei Erreichen der
eingestellten Backendzeit ab.
•Es ermöglicht Ihnen, das
Signal als
Erinnerungsfunktion zu
benutzen (auch wenn den
Ofen nicht zum Backen
verwendet wird)
Page 38

3.2 Touch timer
Funktion
*
**
T °C
40
L3
Bereich
40 ÷ 40
50 ÷ 240
50 ÷ 240
50 ÷ 280
50 ÷ 230
150 ÷ 220
L1 ÷ L5
standard
60 60 ÷ 60
180
210
220
210
200
T °C
LAMPE: Schaltet das Licht im Backofen an.
AUFTAUEN: Wenn die Auswahl auf diese Funktion eingestellt wird. Der Ventilator
wälzt die Luft bei Raumtemperatur um, sodass das Tiefkühlprodukt innerhalb
weniger Minuten aufgetaut wird, ohne dass sein Eiweißgehalt sich ändert.
Warm halten: Diese Funktion wird empfohlen um fertig gekochte Lebensmittel
wieder aufzuheizen. Dafür schieben Sie das Backblech von oben aus gesehen in die
2. Ebene. Um Brot oder Gebäck aufzutauen legen Sie das Backblech in die niedrigste
Ebene. Die Temperatur wird in 60 ° C voreingestellt. Eine Änderung ist nicht möglich.
UMLUFT: Diese Garmethode ist für die Zubereitung von Geflügel, Backwaren, Fisch und
Gemüse zu empfehlen. Die Hitze gelangt besser in das Lebensmittel und die Dauer zum
Garen und Vorheizen wird reduziert. Es lassen sich unterschiedliche Lebensmittel und
Rezepte gleichzeitig und auf mehreren Garebenen zubereiten. Diese Garmethode
sorgt für eine gleichmäßige Hitzeverteilung und Gerüche werden nicht vermischt.
Wenn mehrere Gerichte gleichzeitig zubereitet werden, ist eine zusätzliche Gardauer
von 10 Minuten erforderlich.
OBER-/UNTERHITZE: Es kommt das obere und untere Heizelement zum Einsatz.
Den Backofen etwa zehn Minuten lang vorheizen. Diese Methode eignet sich für alle
herkömmlichen Brat- und Backrezepte. Für rotes Fleisch, Roastbeef, Lammkeulen,
Wild, Folienrezepte, Blätterteig. Lebensmittel in feuerfestem Geschirr auf mittlerer
Schiene garen.
UMLUFT + UNTERHITZE: Das untere Heizelement wird zusammen mit dem
Ventilator gebraucht, der die Luft im Ofen umwälzt. Diese Garmethode ist ideal
für saftige Obstkuchen, Quiche und Pasteten.
Das Essen trocknet nicht aus, Kuchen, Brotteige und sonstige Rezepte mit
Unterhitze gehen gut auf. Auf unterster Schiene backen.
UMLUFT + GRILL: Turbogrill mit geschlossener Tür verwenden.
Das obere Heizelement wird zusammen mit dem Ventilator gebraucht, der die
Luft im Ofen umwälzt. Für rotes Fleisch ist Vorheizen erforderlich, für weißes
Fleisch nicht. Ideal zum Garen dicker Leben smittel am Stück wie
Schweinebraten, Geflügel usw. Grillgut in der Mitte des Ofens auf mittlerer
Schiene garen. Bratensaft mit der Fettpfanne auffangen. Darauf achten, dass sich
der Braten nicht zu nahe am Grill befindet. Nach der Hälfte der Garzeit wenden.
GRILL: Grill mit geschlossener Tür verwenden. Es wird nur das obere
Heizelement verwendet und die Temperatur kann eingestellt werden. Damit
die Heizelemente rot glühen ist eine Vorheizdauer von fünf Minuten
erforderlich. Grillgerichte, Kebab und Gratin gelingen garantiert. Weißes
Fleisch sollte mit Abstand zum Grill gegart werden; die Garzeit ist dann zwar
länger, aber das Fleisch bleibt schön saftig. Rotes Fleisch und Fischfilet kann auf
dem Rost mit der Fettpfanne darunter gegart werden. Der Backofen verfügt
über zwei Grillstufen:
Grill: 2140 W Barbecue: 3340 W
Function (Depens on the oven model)
L1 ÷ L5
L3
ECO
ECO÷SUPER
*Nach CENELEC EN 60350-1 zur Definition der Energieklasse geprüft.
Der Ofen hat zwei Positie Grill:
Grill 2200 W Super Grill : 3000 W
Pyro: Bei dieser Funktion wird die Reinigung im Inneren des Backofens
vorgenommen. Zwei Möglichkeiten zur Auswahl, ECO oder SUPER.
DE 38
Page 39

4. Reinigung und Wartung des Backofens
4.1 Allgemeine Reinigungshinweise
Die Lebensdauer des Geräts lässt sich durch eine regelmäßige Reinigung verlängern. Den Ofen vor der Reinigung
abkühlen lassen. Keine Scheuermittel, Stahlwolle oder scharfkantige Gegenstände für die Reinigung verwenden, um
die Emaillebeschichtung nicht zu beschädigen. Nur Wasser, Spülmittel oder Reinigungsmittel mit Bleiche
(Ammoniak) verwenden.
BESTANDTEILE AUS GLAS
Es empfiehlt sich, die Glastür nach jeder Verwendung des Backofens mit einem saugfähigen Küchentuch zu reinigen.
Hartnäckige Flecken können mit einem in Reinigungsmittel getränkten Schwamm gesäubert und mit klarem Wasser
abgewaschen werden.
DICHTUNG OFENTÜR
Schmutzige Dichtungen mit einem leicht angefeuchteten Schwamm reinigen.
ZUBEHÖR
Zubehörteile mit einem feuchten Reinigungsschwamm säubern, abwaschen und abtrocknen. Keine Scheuermittel
verwenden.
FETTPFANNE
Fettpfanne nach der Verwendung des Grills aus dem Ofen nehmen. Das heiße Fett abschütten (nicht in den Abfluss)
und Fettpfanne mit heißem Wasser und Spülmittel reinigen.
Hartnäckige Fettreste durch Einweichen in Spülwasser reinigen. Alternativ lässt sich die Fettpfanne auch in der
Spülmaschine oder mit einem herkömmlichen Backofenreiniger säubern. Schmutzige Fettpfanne nicht wieder
zurück in den Backofen schieben.
4.2 Pyrolysefunktion
Der Ofen ist mit einem Pyrolyse-Reinigungssystem ausgestattet, das Lebensmittelreste bei hohen
Temperaturen zersetzt. Diese Betriebsfunktion wird automatisch über die Programmiertaste ausgeführt. Die
entstehenden Dämpfe werden „gereinigt“, indem sie über einen Pyrolysator geführt werden, der gemeinsam
mit dem Backofenbetrieb startet. Aufgrund der sehr hohen Temperaturen, die vom Pyrolysator erfordert
werden, ist die Ofentür mit einer Sicherheitsverriegelung ausgestattet. Die Pyrolysefunktion lässt sich
jederzeit stoppen. Die Tür kann erst geöffnet werden, wenn die Sicherheitsverriegelung auf dem Display
angezeigt wird.
HINWEIS: Sollte ein Kochfeld über dem Ofen montiert worden sein, dürfen keine Gasbrenner oder
elektrischen Heizplatten verwendet werden, während die Pyrolysefunktion ausgeführt wird, da andernfalls
das Kochfeld überhitzen kann.
Es sind ZWEI PYROLYSEZYKLEN voreingestellt: ECO PYROCLEAN: Für die Reinigung eines mäßig verschmutzten
Ofens. Wird über einen Zeitraum von 90 min. ausgeführt. SUPER PYROCLEAN: Für die Reinigung eines stark
verschmutzten Ofens. Wird über einen Zeitraum von 120 min. ausgeführt. Niemals handelsübliche
Reinigungsmittel mit einem Pyrolyseofen verwenden!
Tipp: Durch die Ausführung der Pyrolysereinigung direkt im Anschluss an den Kochvorgang kann Restwärme
genutzt und somit Energie gespart werden.
Vor der Durchführung eines Pyrolysezyklus:
•Alle Zubehörteile aus dem Ofen entfernen, da diese nicht für die während der Pyrolyse- Reinigungszyklus
auftretenden hohen Temperaturen ausgelegt sind; insbesondere Gitterroste, Seitenablagen und
Teleskopführungen (bitte beziehen Sie sich auf das Kapitel „ENTFERNEN VON ROSTEN UND
SEITENABLAGEN). Bei Öfen mit Kerntemperaturfühler müssen die Öffnungen mithilfe der
bereitgestellten Mutter verschlossen werden, bevor der Reinigungszyklus ausgeführt wird.
•Entfernen Sie alle großen Verschüttungen oder Flecken, da deren Zersetzung zu lange dauern würde.
Darüber hinaus können sich große Mengen an Fett aufgrund der sehr hohen Temperaturen des
Pyrolysezyklus entzünden.
•Schließen Sie die Ofentür.
•Übermäßige Mengen an Verschüttungen müssen vor dem Reinigungsvorgang entfernt werden.
•Reinigen Sie die Ofentür;
•Entfernen Sie große oder grobe Lebensmittelreste aus dem Inneren des Ofens mit einem feuchten
Schwamm. Verwenden Sie keine Reinigungsmittel;
DE 39
Page 40

•Entfernen Sie alle Zubehörteile und das Schiebegestell (falls vorhanden);
•Platzieren Sie keine Geschirrtücher.
Verwenden des Pyrolysezyklus:
1- Drehen Sie den Funktionswahlschalter auf die Position „ “. Auf dem Display wird die Anzeige „ECO“
oder „SUP“ angezeigt. Die voreingestellte Zeit beträgt 90 min., diese lässt sich auf zwischen 90 min. (EcoModus) und 120 min. (Sup-Modus) über die Programmiertaste (Einstellknopf „+“ oder „-“) einstellen. Wenn
der Ofen sehr schmutzig ist, empfiehlt es sich, die Zeit auf 120 min. zu erhöhen; bei moderater
Verschmutzung, reduzieren Sie die Reinigungszykluszeit auf 90 min.
2- Es ist möglich, die Startzeit des Pyroclean-Zyklus durch Ändern der END-Zeit über die Programmiertaste zu
verschieben.
3- Nach wenigen Minuten, wenn der Ofen eine hohe Temperatur erreicht hat, verriegelt die Tür automatisch.
Der Pyroclean-Zyklus lässt sich jederzeit durch Zurückdrehen des Funktionswahlschalters auf die Position „0“
anhalten (OFF (AUS) wird für 3 Sekunden auf dem Display angezeigt).
4 - Sobald der Pyroclean-Zyklus abgeschlossen wurde, schaltet sich die Pyrolyse automatisch aus. Auf dem
Display wird die Anzeige „END“ (ENDE) solange angezeigt, wie die Tür verriegelt ist, anschließend „0--n“.
5- Sie können den Funktionswahlschalter zurück auf „0“ drehen, falls die Temperatur weiterhin hoch sein
sollte, wird die Anzeige „0--n“ zur Information darüber, dass die Tür verriegelt ist auf dem Display angezeigt.
Einsatz des Pyrolysezyklus bei Öfen mit Touch Control:
1- Drehen sie den Funktionswahlschalter auf die Pyrolyse-Position. Auf dem Display wird entweder die
Anzeige „ECO“ oder „SUP“ angezeigt
2- Die voreingestellte Zeit beträgt 90 min., diese lässt sich auf zwischen 90 min. (Eco-Modus) und 120 min.
(Sup-Modus) über die Programmiertaste (Taste „+“ oder „-“) einstellen. Wenn der Ofen sehr schmutzig ist,
empfiehlt es sich, die Zeit auf 120 min. zu erhöhen; bei moderater Verschmutzung, reduzieren Sie die
Reinigungszykluszeit auf 90 min.
4.3 Aquactiva Funktion
Mit der Aquactiva Funktion wird Dampf im Inneren des Backofens erzeugt um die restlichen Fettund Speisereste aus dem Backofen zu entfernen.
1. Gießen Sie 300 ml Wasser in den Behälter Aquactiva am Boden des Ofens ein.
2. Wählen Sie die Backofenfunktion auf Ober-/Unterhitze ( ) oder Unterhitze ( ).
3. Stellen Sie die Temperatur auf das Aquactiva Symbol ein .
4. Stellen Sie eine Zeit von 30 Minuten für das Programm ein.
5. Nach 30 Minuten schaltet das Programm ab. Lassen Sie den Ofen abkühlen.
6. Wenn das Gerät abgekühlt ist, reinigen Sie die Innenflächen des Backofens mit einem Tuch.
Achtung!
Vergewissern Sie sich, dass das Gerät abgekühlt ist bevor Sie es berühren. Achten Sie auf heiße
Oberflächen, da sie Verbrennungen verursachen können. Verwenden Sie destilliertes- oder
Trinkwasser.
300 ml
DE 40
Page 41

4.4 Wartung
ENTFERNEN UND REINIGEN DER SEITLICHEN FÜHRUNGSSCHIENEN
1. Schraube entgegen dem Uhrzeigersinn abschrauben.
2. Die seitlichen Führungsschienen herausziehen und aus dem Ofen nehmen.
3. In der Spülmaschine oder mit einem feuchten Schwamm säubern und sofort abtrocknen.
4. Die gereinigten Führungsschienen wieder einsetzen und mit den Schrauben sichern.
A
ENTFERNEN DES BACKOFENFENSTERS
1. Die Backofentür öffnen.
2. Die Klemmen am Scharniergehäuse rechts und links an der Scheibe nach unten drücken und öffnen.
3. Glasscheibe austauschen, indem die Schritte in umgekehrter Reihenfolge ausgeführt werden.
DE 41
Page 42

ENTFERNEN UND REINIGEN DER GLASTÜR
LOW-E
1. Die Backofentür öffnen.
2.3.4. Scharniere sperren, Schrauben entfernen und die obere Metallkappe nach oben abziehen.
5.6. Die Glasscheibe vorsichtig aus der Ofentür ziehen (Hinweis: Bei Backöfen mit PyrolyseReinigungsfunktion auch die zweite (falls vorhanden) und dritte Scheibe herausnehmen).
7. Nach der Reinigung oder dem Austausch der Scheibe, Einzelteile in umgekehrter Reihenfolge wieder
einbauen.
Bei allen Glasscheiben muss die Aufschrift „PYRO“ in der oberen linken Ecke, in der Nähe des linken
Scharniers, gut lesbar sein. Auf diese Weise wird sichergestellt, dass sich die Aufschrift auf der
Innenseite der ersten Scheibe befindet.
1.
2.
3.
5.
6.
1
2
3
7.
4.
DE 42
Page 43

WECHSELN DER GLÜHBIRNE
1. Den Backofen von der Stromversorgung trennen.
2. Glasabdeckung abnehmen, Glühbirne herausschrauben und durch eine neue vom selben Typ
ersetzen.
3. Nach dem Austausch der kaputten Glühbirne die Glasabdeckung wieder aufsetzen.
5. Fehlerbehebung
5.1 HÄUFIG GESTELLTE FRAGEN
STÖRUNG MÖGLICHE URSACHE LÖSUNG
Der Backofen wird nicht heiß.
Der Backofen wird nicht heiß.
Der Backofen wird nicht heiß.
Das Touch-Display reagiert nicht.
Die Uhr ist nicht eingestellt. Uhr einstellen.
Die Kindersicherung ist eingeschaltet.
Garfunktion und Temperatur
wurden nicht eingestellt.
Dampf und Kondenstropfen
auf dem Touch-Display.
Kindersicherung deaktivieren.
Prüfen, ob die nötigen
Einstellungen richtig sind.
Touch-Display mit einem
Mikrofasertuch abtrocknen.
DE 43
Page 44

Instrukcje Bezpieczeństwa
• Podczas gotowania wilgoć może skraplać się do komory piekarnika lub
na szybkę drzwiczek. Jest to zjawisko normalne. Aby je ograniczyć, należy
poczekać od 10 do 15 minut po włączeniu urządzenia, zanim żywność
zostanie umieszczona w piekarniku. Skropliny znikną, gdy piekarnik
osiągnie temperaturę pieczenia.
• Warzywa najlepiej piec w pojemniku z pokrywą zamiast otwartego
naczynia.
• Unikać pozostawiania żywności wewnątrz piekarnika po pieczeniu na
dłużej niż 15/20 minut.
• UWAGA: Podczas pracy urządzenie oraz jego elementy są gorące.
Należy zachowac ostrożność i nie dotykać gorących części.
• OSTRZEŻENIE: części łatwo dostępne mogą nagrzać się podczas
używania piekarnika. Dzieci powinny zachować bezpieczną odległość od
urządzenia.
• Dzieci w wieku powyżej 8 lat oraz ososby z ograniczeniami ruchowymi,
umysłowymi, czuciowymi lub nie posiadające odpowiedniej wiedzy lub
doświadczenia mogą obsługiwać urządzenie jedynie pod nadzorem lub
po przeszkoleniu odnośnie bezpiecznego uzykowania urządzenia i
związanych z tym zagrożeń.
• Dzieci nie mogą bawić się urządzeniem.
• Dzieci bez nadzoru nie mogą obsługiwac ani czyścić urządzenia.
• Podczas użytkowania urządzenie nagrzewa się. Należy zachowac
ostrożność i nie dotykać gorących części wewnątrz piekarnika.
UWAGA: dostępne części mogą być gorące podczas użytkowania. Dzieci
nie mogą zbliżać się do urządzenia.
• Do czyszczenia szyby drzwi piekarnika nie wolno stosować substancji
ściernych ani ostrych skrobaków gdyż mogą one porysować szkło i
spowodować jego stłuczenie.
• Wyłaczyć piekarnik przed usunięciem ekranu, po wyczyszczeniu
zamontować ekran zgodnie z instrukcją.
• Używać wyłacznie sondy cieplnej przeznaczonej do tego piekarnika.
• Nie stosować do czyszczenia urządzeń parowych.
• Podłączyć wtyczkę do kabla zasilającego odpowiedniego do
wymaganego napięcia, prądu i obciążenia wskazanego na tabliczce oraz
posiadającego styk uziemiający. Gniazdko musi być odpowiednie do
obciążenia wskazanego na tabliczce i musi posiadać podłączony oraz
działający styk uziemiający. Przewód uziemiający jest koloru żółtozielonego. Czynność tę powinien przeprowadzić odpowiednio
PL 44
Page 45

wykwalifikowany specjalista. W razie niekompatybilności pomiędzy
gniazdkiem a wtyczką urządzenia należy poprosić wykwalifikowanego
elektryka o wymianę gniazdka na inne odpowiedniego typu. Wtyczka
oraz gniazdko powinny być zgodne z obowiązującymi w danym kraju
przepisami w zakresie instalacji elektrycznej. Podłączenie do źródła
zasilania można wykonać również poprzez umieszczenie pomiędzy
urządzeniem a źródłem zasilania wielobiegunowego wyłącznika, który
wytrzyma maksymalne podłączone obciążenie i który będzie zgodny z
obowiązującymi przepisami. Żółto-zielony kabel uziemiający nie
powinien być przerwany przez ten wyłącznik. Gniazdko oraz wyłącznik
wielobiegunowy zastosowany do podłączenia powinien być po
zainstalowaniu urządzenia łatwo dostępny.
• Rozłączania można dokonywać dzięki dostępnej wtyczce lub
wbudowanemu przełącznikowi w stałym okablowaniu, zgodnie z
obowiązującymi przepisami w zakresie okablowania.
• Jeśli przewód zasilający jest uszkodzony, należy go zastąpić kablem lub
specjalną wiązką przewodów udostępnianą przez producenta lub
wskazaną po skontaktowaniu się z działem obsługi klientów.
• Kabel zasilający musi być typu H05V2V2-F.
• Nieprzestrzeganie powyższej wskazówki może zakłócić bezpieczeństwo
urządzenia i spowodować utratę gwarancji.
• Nadmiar rozlanych substancji należy usunąć przed czyszczeniem
urządzenia.
• W trakcie procesu czyszczenia pirolitycznego powierzchnie mogą być
bardziej gorące niż zwykle. Dzieci powinny zachować bezpieczną
odległość od urządzenia.
• Aby uniknąć przegrzewania się, urządzenia tego nie należy instalować
za panelem dekoracyjnym.
• W razie umieszczania we wnętrzu półki należy się upewnić, że
ogranicznik jest skierowany w górę i w stronę tylną komory.
Półka musi być włożona całkowicie do komory.
• OSTRZEŻENIE: Nie należy owijać ścian piekarnika folią aluminiową ani
jednorazową folią ochronną dostępną w sklepach. Folia aluminiowa lub
jakiekolwiek inne zabezpieczenie w bezpośrednim kontakcie z gorącą
emalią może ulec stopieniu, a emalia we wnętrzu piekarnika może
wówczas ulec pogorszeniu.
• OSTRZEŻENIE: Nie należy nigdy wyjmować uszczelki z drzwiczek piekarnika.
• Do obsługi urządzenia na częstotliwościach znamionowych nie jest
wymagane wykonanie żadnej dodatkowej operacji/ustawienia
PL 45
Page 46

Spis treści
Instrukcje ogólne
47
Opis produktu
49
Obsługa piekarnika
50
Czyszczenie i konserwacja
piekarnika
53
1.1 Wskazówki dotyczące bezpieczeństwa
1.2 Bezpieczeństwo elektryczne
1.3 Zalecenia
1.4 Instalacja
1.5 Zarządzanie odpadami
1.6 Deklaracja zgodności
2.1 Informacje ogólne
2.2 Akcesoria
2.3 Pierwsze użycie
3.1 Opis wyświetlacza
3.2 Tryby pieczenia
4.1 Ogólne informacje dotyczące czyszczenia
4.2 Czyszczenie pyrolityczne
4.3 Funkcja Aquactiva
4.4 Konserwacja
• Wyjmowanie szyby piekarnika
• Wyjmowanie i czyszczenie rusztów
• Wyjmowanie i czyszczenie drzwiczek
• Wymiana żarówki
Rozwiązywanie problemów
57
5.1 Często zadawane pytania
PL 46
Page 47

1. Instrukcje ogólne
Dziękujemy za wybór jednego z naszych produktów. Aby jak
najlepiej wykorzystywać posiadany piekarnik, zachęcamy do
uważnego przeczytania niniejszej instrukcji i starannego
przechowywania jej, aby móc z niej skorzystać w razie potrzeby
w przyszłości. Przed zainstalowaniem piekarnika należy
zanotować jego numer seryjny, aby móc podać go personelowi
biura obsługi klienta, gdyby wymagane były jakiekolwiek
naprawy. Po wyjęciu piekarnika z opakowania należy
sprawdzić, czy nie uległ on uszkodzeniu podczas transportu. W
razie jakichkolwiek wątpliwości nie należy korzystać z
piekarnika i zwrócić się do wykwalifikowanego technika w celu
uzyskania porady. Należy trzymać z dala od dzieci wszystkie
materiały opakowania (folie ochronne, styropian, kołki).
Podczas pierwszego uruchomienia piekarnika może z niego wydobyć się silny dym o nieprzyjemnym zapachu, który
jest spowodowany przez klej na panelach izolacyjnych wokół rozgrzewanego po raz pierwszy piekarnika.
Jest to zjawisko całkowicie normalne i należy wówczas poczekać, aż dym całkowicie się ulotni, przed umieszczeniem
żywności w piekarniku. Producent zrzeka się wszelkiej odpowiedzialności za sytuacje będące wynikiem
nieprzestrzegania instrukcji podanych w niniejszym dokumencie.
UWAGA: Wymienione w niniejszej instrukcji funkcje, właściwości i akcesoria piekarnika mogą być różne w zależności
od zakupionego modelu.
1.1 Wskazówki dotyczące bezpieczeństwa
Z piekarnika należy korzystać wyłącznie zgodnie z jego przeznaczeniem, czyli wyłącznie do pieczenia żywności;
wszelkie inne próby użytkowania, na przykład jako źródło ciepła, uważane są za niewłaściwe, a tym samym
niebezpieczne. Producent nie może ponosić odpowiedzialności za jakiekolwiek uszkodzenia będące skutkiem
nieprawidłowego, błędnego lub nierozsądnego użytkowania.
Obsługa jakiegokolwiek urządzenia elektrycznego wiąże się z koniecznością przestrzegania pewnych istotnych zasad:
- Nie ciągnąć za przewód zasilania w celu odłączenia go od gniazdka prądowego;
- Nie dotykać urządzenia mokrymi lub wilgotnymi dłońmi bądź stopami;
- Ogólnie rzecz biorąc, odradza się stosowania adapterów, gniazdek wielokrotnych i przedłużaczy;
- W razie usterki i/lub nieprawidłowego działania urządzenia należy je wyłączyć i nie naruszać go.
1.2 Bezpieczeństwo elektryczne
PRZYŁĄCZA ELEKTRYCZNE POWINNY ZOSTAĆ WYKONANE PRZEZ ELEKTRYKA LUB WYKWALIFIKOWANEGO
TECHNIKA. Sieć zasilająca, do której podłączany jest piekarnik, powinna być zgodna z przepisami obowiązującymi w
kraju jego instalacji. Producent zrzeka się wszelkiej odpowiedzialności za ewentualne uszkodzenia będące wynikiem
nieprzestrzegania takich przepisów. Piekarnik powinien być podłączony do sieci elektrycznej za pomocą gniazdka
ściennego z uziemieniem lub poprzez wielobiegunowy wyłącznik, w zależności od przepisów obowiązujących w kraju
instalacji. Zasilanie elektryczne powinno być zabezpieczone odpowiednimi bezpiecznikami i powinny być używane
przewody o przekroju poprzecznym, który zapewni prawidłowe zasilanie piekarnika.
PODŁĄCZANIE
Piekarnik jest dostarczany z kablem zasilającym, który powinien być podłączany wyłącznie do sieci elektrycznej o
napięciu 220-240 V AC pomiędzy fazami lub pomiędzy fazą i przewodem neutralnym. Przed podłączeniem piekarnika
do sieci elektrycznej należy sprawdzić:
- napięcie zasilania podane na mierniku;
- ustawienia wyłącznika.
Przewód uziemienia podłączony do zacisku uziemiającego piekarnika musi być podłączony do zacisku uziemiającego
sieci elektrycznej.
OSTRZEŻENIE
Przed podłączeniem piekarnika do sieci elektrycznej ciągłość uziemienia sieci elektrycznej powinien sprawdzić
wykwalifikowany elektryk. Producent zrzeka się wszelkiej odpowiedzialności za ewentualne wypadki lub inne
problemy wynikające z braku podłączenia piekarnika do uziemienia lub z powodu uziemienia o nieprawidłowej
ciągłości.
UWAGA: ponieważ piekarnik może wymagać czynności serwisowych, zaleca się przewidzieć dodatkowe
PL 47
Page 48

gniazdko ścienne, do którego będzie można później podłączyć piekarnik po wyjęciu go z miejsca, w
którym go zainstalowano. Przewód zasilający powinien być wymieniany wyłącznie przez personel
techniczno-serwisowy lub techników posiadających jednakowe kwalifikacje.
1.3 Zalecenia
Po każdym użyciu piekarnika kilka prostych czynności związanych z czyszczeniem go pozwoli utrzymać
piekarnik w idealnej czystości.
Nie zakrywaj ścian piekarnika papierem aluminiowym ani dostępnymi na rynku foliami jednorazowymi,
ponieważ w kontakcie z powierzchniami gorącej emalii mogłyby one stopić się i uszkodzić emaliowane
powierzchnie wewnątrz piekarnika. Aby zapobiec nadmiernemu brudzeniu się piekarnika i wydostawaniu się
z niego nieprzyjemnie pachnącego dymu, zaleca się nie używać piekarnika na najwyższych temperaturach.
Zwykle lepiej jest wydłużyć czas pieczenia i stosować niższą temperaturę. Poza akcesoriami dostarczanymi z
piekarnikiem zaleca się używać naczyń i form odpornych na wysokie temperatury.
1.4 Instalacja
Za instalację piekarnika odpowiedzialny jest użytkownik. Producent nie ma obowiązku wykonania
instalacji. Usterki spowodowane błędami instalacji nie podlegają warunkom gwarancji udzielanej przez
producenta. Instalacja powinna być powierzona wykwalifikowanym osobom i wykonana zgodnie z
zaleceniami producenta. Nieprawidłowa instalacja stwarza niebezpieczeństwo dla osób, zwierząt lub
rzeczy osobistych. Producent nie ponosi odpowiedzialności za tego typu szkody.
Zespół kuchenny, w którym ma być zainstalowany piekarnik, musi być wykonany z materiałów
odpornych na temperaturę przynajmniej 70ºC.
Piekarnik może być usytuowany na górze w szafce kuchennej lub pod blatem.
Przed zainstalowaniem piekarnika upewnij się, czy w miejscu instalacji zapewniona będzie dobra
wentylacja gwarantująca dopływ świeżego powietrza, niezbędnego do chłodzenia piekarnika i do
zabezpieczenia jego części wewnętrznych. W zależności od typu instalacji należy wykonać wycięcia
przedstawione na końcu instrukcji.
1.5 Gospodarka odpadami i ochrona środowiska
Urządzenie to jest oznaczone zgodnie z Dyrektywą Europejską 2012/19 / UE w sprawie zużytego
sprzętu elektrycznego i elektronicznego (WEEE). Zużyty sprzęt elektryczny i elektroniczny zawiera
zarówno substancje zanieczyszczające (o negatywnym oddziaływaniu na środowisko naturalne), jak
i podstawowe elementy (które można użytkować wielokrotnie). Ważne, aby zużyty sprzęt
elektryczny i elektroniczny poddawać specjalnej obróbce w celu bezpiecznego usunięcia i pozbycia
się wszystkich środków zanieczyszczających i odzyskania wszystkich surowców wtórnych.
sprzętu elektrycznego i elektronicznego na środowisko, ważne aby przestrzegać kilku podstawowych zasad:
• Zużyty sprzęt elektryczny i elektroniczny nie może być traktowany jako odpad komunalny.
• Zużyty sprzęt elektryczny i elektroniczny przekazuje się do właściwych punktów zbiórki prowadzonych przez
gminy lub koncesjonowane firmy. W wielu krajach, gdzie jest dużo zużytego sprzętu elektrycznego i
elektronicznego, odbiera się go z domów.
• gdy kupuje się nowe urządzenie, zużyte można zwrócić do sprzedawcy, który musi je przyjąć bezpłatnie, na
zasadzie zamiany jeden za jeden, o ile urządzenie to jest tego samego rodzaju i ma takie same funkcje, jak
urządzenie dostarczone
Poszczególne osoby odgrywają ważną rolę w zapobieganiu szkodliwemu oddziaływaniu zużytego
OSZCZĘDNOŚĆ ENERGII I POSZANOWANIE ŚRODOWISKA
Tam gdzie to możliwe, należy unikać wstępnego podgrzewania piekarnika i zawsze starać się go zapełnić. Jak
najrzadziej otwierać drzwiczki piekarnika, ponieważ za każdym razem, gdy zostaną otwarte z wnętrza ucieka
ciepło. W celu uzyskania znacznej oszczędności energii piekarnik należy wyłączyć na 5-10 minut przed
planowanym zakończeniem pieczenia, co pozwoli na wykorzystanie ciepła odpadowego, które nadal generuje
piekarnik. Uszczelki powinny być czyste i spełniać swoje zadanie, aby uniknąć wydostawania się ciepła poza
wnętrze piekarnika. Jeśli Twoja umowa z dostawcą energii opiera się na taryfie godzinowej, program
"opóźnionego startu" upraszcza oszczędzanie energii, uruchamiając proces pieczenia w czasie obowiązywania
niższej taryfy.
PL 48
Page 49

1.6 Deklaracja Zgodnoścı
Niniejsze urządzenie, w części przeznaczonej do kontaktu ze środkami spożywczymi spełnia wymagania
przepisów ustanowionych w Dyrektywie 89/109/EWG.
Poprzez umieszczenie oznaczenia na tym produkcie poświadczamy na własną odpowiedzialność
przestrzeganie wszystkich wymogów europejskich dotyczących bezpieczeństwa, ochrony zdrowia i
środowiska określonych w przepisach dla tego produktu.
2. Opis produktu
2.1 Informacje ogólne
1
1. Panel sterowania
3
5
4
6
2
2. Pozycje półek
(kratka boczna, zależnie od wyposażenia)
3. Metalowy ruszt
4. Taca na tłuszcz
5. Wentylator (za stalową płytą)
6. Drzwiczki piekarnika
2.2 Akcesoria (w zależności od modelu)
Metalowy ruszt
1
Podtrzymuje formy i naczynia.
Boczne drutu siatki
3
Boczne drutu siatki jeśli uwzględnione.
2
Gromadzi tłuszcz wyciekający z żywności
podczas pieczenia jej na ruszcie.
PL 49
Taca na tłuszcz
Page 50

2.3 Pierwsze Użycie
CZYSZCZENIE PRZED PIERWSZYM UŻYCIEM
Przed użyciem piekarnika po raz pierwszy należy:
•Wytrzeć powierzchnie zewnętrzne piekarnika miękką wilgotną szmatką.
•Umyć wszystkie elementy wyposażenia i wytrzeć wnętrze piekarnika używając roztworu gorącej wody i
płynu do zmywania naczyń.
•Ustawić pusty piekarnik na maksymalną temperaturę i pozostawić włączony przez około 1 godzinę, co
pozwoli usunąć zapach nowości. W tym czasie należy zapewnić dobrą wentylację pomieszczenia. oven with
a solution of hot water and washing up liquid. Set the empty oven to the maximum temperature and leave
on for about 1 hour, this will remove any lingering smells of newness.
3. Obsługa piekarnika
3.1 Opis wyświetlacza (w pełni dotykowy, piekarnik dwukomorowy)
OSTRZEŻENIE!
1. Wyłącznik czasowy/tryb automatyczny
2. Funkcja termoobiegu
3. Tryb rozmrażania
4. Wyświetlacz temperatury lub zegara
5. Elementy regulacji wyświetlacza LCD
6. Pokrętło wyboru funkcji
7. Pokrętło wyboru programu
Pierwszą czynnością, którą należy przeprowadzić
po instalacji lub po wyłączeniu zasilania, jest
ustawienie czasu (przerwa w zasilaniu nastąpiła,
jeśli wyświetlacz miga na godzinie 12:00).
200°-> Dioda temperatury „°” miga do momentu
osiągnięcia wyświetlanej temperatury.
HOT (GORĄCY) -> Gdy program zakończy się, jeśli
piekarnik jest jeszcze gorący, na wyświetlaczu
pojawi się napis „HOT” na przemian z godziną,
nawet jeśli pokrętła są ustawione w położeniu
OFF.
PL 50
Page 51

FUNKCJE
TRYB
WYCISZENIA
USTAWIANIE
GODZINY
CZAS TRAVAIA
PIECZENIA
JAK WŁĄCZYĆ JAK WYŁĄCZYĆ
• Obrócić lewym przełącznikiem funkcji w
położenie „Silence mode”
(Tryb wyciszenia)
• Obrócić lewym przełącznikiem funkcji w położenie „Set
the time” (Ustaw godzinę).
• Użyć przycisków „+” lub
„-” w celu ustawienia godziny
• Wcisnąć przycisk
środkowy (centralny) 2
razy
• Ustawić czas trwania
pieczenia przyciskiem
• Zwolnić przyciski "-"
"+"
• Wybrać funkcję za
pomocą pokrętła
wyboru funkcji
• Obrócić przełącznik
funkcji w położenie
OFF.
• Obrócić przełącznikiem
funkcji w położenie OFF.
• Po zakończeniu
ustawionego czasu
piekarnik sam się wyłączy.
• Jeśli trzeba wyłączyć
piekarnik wcześniej należy
obrócić pokrętło wyboru
funkcji na pozycję 0 lub
ustawić czas pieczenia na
0:00(przyciskami SELECT
"-" "+"
JAK DZİAŁA
• Umożliwia wyłączenie
dźwięku minutnika.
• Można w ten sposób
ustawić godzinę, która
pojawi się na wyświetlaczu.
• Pozwala ustawić czas
trwania pieczenia
• Aby pokazać czas
pozostały do końca
pieczenia należy wcisnąć
przycisk SELECT 2 Razy
• Aby zmienić czas
pozostały do końca
pieczenia należy wcisnąć
przycisk SELECET "-" "+"
DO CZEGO SŁUŻY
• Aby wyłączyć dźwięk
minutnika.
• Aby ustawić godzinę
UWAGA: Godzinę należy
ustawić, gdy instaluje się po
raz pierwszy piekarnik lub
tuż po awarii (zegar pokazuje
migającą godzinę 12:00)
• Aby wyłączyć sygnał (alarm)
wcisnąć jakikolwiek przycisk.
Aby przywrócić działanie
zegara wcisnąc przycisk
śrdkowy (centralny)
ZAKOŃCZENIE
PIECZENIA
MINUTNIK
ZABEZ-
PIECZENIE
PRZED
DZIEĆMI
•Wcisnąć przycisk
środkowy (centralny) 3 razy
• Ustawić godzinę
zakończenia pieczenia
przyciskami "-" "+"
• Zwolnić przyciski
• Wybrać funkcję pieczenia
za pomocą pokrętła
wyboru funkcji.
•Wcisnąć przycisk
środkowy (centralny) 1 raz
•Ustawić czas trwania
pieczenia wciskając
Przyciski "-" "+"
• Zwolnić przyciski.
•Zabezpieczenie
aktywuje się
przytrzymując przez
minimum 5 sekund pole
(+) Od tej chwili wszystkie
funkcje są zablokowane
wyświetlacz
naprzemiennie pokazuje
STOP i ustawiony czas.
• O ustawionej godzinie
piekarnik sam się wyłączy
• Jeśli trzeba go wyłączyć
wcześniej należy ustawić
pokrętło wyboru funkcji
na pozycję 0
• Po zakończeniu
ustawionego czasu,
funkcja sama się wyłączy i
rozlegnie się sygnał
dźwiękowy, który wyłączy
się po chwili. Aby
wyłączyć natychmiast
sygnał dźwiękowy należy
wcisnąć przycisk SELECT
•Zabezpieczenie wyłącza
się przytrzymując przez
minimum 5 sekund pole
(+) Od tej chwili
wszystkie funkcje
sterowania są
odblokowane.
PL 51
• Ustawia godzinę końca
pieczenia.
• Aby pokazać
zaprogramowaną godzinę
należy Wcisnąć przycisk
środkowy (centralny) 3
razy
• Aby zmienić
zaprogramowaną godzinę
wcisnąć przycisk SELECT+
"-" "+"
• Po zakończeniu
ustawionego czasu rozlega
się sygnał dźwiękowy
• Podczas pracy
wyświetlacz pokazuje
pozostały czas.
Zwykle używa się tej funkcji
razem z funkcją Czas trwania
pieczenia: np. potrawa ma się
piec przez 45 min. i chcemy,
żeby była gotowa o godz.
12:30. A zatem należy:
-Wybrać odpowiednią funkcję
pieczenia
-Ustawić czas trwania
pieczenia na 45 mm (Timer +
"-" "+")
• Po zakończeniu ustawionego
czasu piekarnik wyłączy się i
rozlegnie się sygnał dźwiękowy.
- Ustawić koniec pieczenia na
godz. 12:30 (END + "-" "+"
Pieczenie wyłączy się
automatycznie o godz. 11:45
(12:30 - 45 min.) O ustawionej
godzinie końca pieczenia
piekarnik automatycznie się
wyłączy.
UWAGA
Jeśli ustawimy tylko koniec
pieczenia, bez czasu trwania
pieczenia, piekarnik włączy się
natychmiast i wyłączy o
ustawionej godzinie.
• Pozwala na użycie
programatora jako budzika.
Można go używać przy
włączonym lub wyłączonym
piekarniku.
Page 52

3.2 Tryby pieczenia
Pokrętło
wyboru
funkcji
T°C
(ustawienie
domyślne)
40
60 60 ÷ 60
180
210
T°C
ustawienie
model z
termostatem
40 ÷ 40
50 ÷ 240
50 ÷ 240
Funkcja w zależności od modelu
PODGRZEWANIE CIEPŁYM POWIETRZEM
Funkcja ta zalecana jest do podgrzewania przygotowanych już potraw poprzez
umieszczenie ich na drugiej półce od góry lub do rozmrażania chleba, pizzy oraz ciast
umieszczając je na najniższym poziomie. Temperatura jest zaprogramowana na poziomie
60º C bez możliwości jej zmiany.
*
**
220
210
200
L3
L3
ECO
50 ÷ 280
50 ÷ 230
150 ÷ 220
L1 ÷ L5
L1 ÷ L5
ECO÷SUPER
EN 60350-1
PYRO - Wnętrze piekarnika czyści się samo. Do wyboru są dwa tryby pracy:
ECO i SUPER.
PL 52
Page 53

4. Czyszczenie i konserwacja piekarnika
4.1 Ogólne informacje dotyczące czyszczenia
Żywotność urządzenia będzie dłuższa, jeśli będzie ono regularnie czyszczone. Należy poczekać na
ochłodzenie się piekarnika przed wykonaniem czyszczenia ręcznego. Nie używać nigdy do czyszczenia
ściernych detergentów, myjek drucianych lub ostrych przedmiotów, aby nie uszkodzić w nieodwracalny
sposób elementów emaliowanych. Stosować wyłącznie wodę, mydło lub detergenty na bazie amoniaku.
ELEMENTY SZKLANE
Po każdym użyciu piekarnika zaleca się przeczyścić szybę drzwiczek papierowym ręcznikiem kuchennym.
Aby usunąć bardziej uciążliwe plamy, można również użyć gąbki zwilżonej detergentem, dobrze wyżętej
i przepłukać wodą.
USZCZELKA DRZWICZEK PIEKARNIKA
W razie zabrudzenia uszczelki drzwiczek piekarnika można ją wyczyścić delikatnie zwilżoną gąbką.
AKCESORIA
Akcesoria należy czyścić gąbką zwilżoną wodą i mydłem, przepłukać je i wysuszyć: unikać stosowania
ściernych detergentów.
TACA NA TŁUSZCZ
Po użyciu rusztu należy wyjąć tacę na tłuszcz z piekarnika. Wlać gorący tłuszcz do pojemnika i umyć tacę
gorącą wodą, posługując się gąbką i płynem do mycia naczyń.
W razie pozostałości tłuszczu należy zanurzyć tacę w pojemniku z wodą i detergentem. Ewentualnie
można również umyć tacę w zmywarce lub użyć dostępnych na rynku detergentów do piekarników.
Nigdy nie wkładać ponownie do piekarnika zabrudzonej tacy.
4.2 Czyszczenie pyrolityczne
Piekarnik wyposażony jest w system czyszczenia pyrolitycznego, który niszczy pozostałości żywności w
wysokiej temperaturze. Czynność ta wykonywana jest automatycznie przy użyciu programatora.
Powstające dymy są „oczyszczane”, kiedy przechodzą przez pirolizer, który uruchamia się tuż po rozpoczęciu
pieczenia. Ponieważ pirolizer wymaga bardzo wysokiej temperatury, drzwiczki piekarnika wyposażone są w
blokadę zabezpieczającą. Pirolizer można w dowolnym momencie wyłączyć. Drzwiczek nie można otworzyć,
dopóki wyświetlana jest blokada bezpieczeństwa.
UWAGA: Jeśli nad piekarnikiem zainstalowana jest płyta kuchenna, nigdy nie należy używać palników
gazowych lub ceramicznych płyt elektrycznych podczas działania pirolizera, co zapobiegnie przegrzaniu płyty.
Można wstępnie ustawić DWA CYKLE CZYSZCZENIA PYROLITYCZNEGO:
CZYSZCZENIE PYROLITYCZNE ECO: Czyści umiarkowanie zabrudzony piekarnik. Działa przez 90 minut.
CZYSZCZENIE PYROLITYCZNE SUPER: Czyści mocno zabrudzony piekarnik. Działa przez 120 minut. Nigdy nie
używaj dostępnych na rynku produktów czyszczących w piekarniku z pirolizerem!
Typ: Przeprowadzenie czyszczenia pyrolitycznego natychmiast po pieczeniu pozwala na wykorzystanie ciepła
resztkowego, co oszczędza energię.
Przed wykonaniem czyszczenia pyrolitycznego:
•Wyjąć wszystkie akcesoria z piekarnika, ponieważ nie są przystosowane do wysokich temperatur
stosowanych podczas cyklu czyszczenia pirolitycznego; w szczególności wyjąć kratki, ruszty i prowadnice
teleskopowe (patrz rozdział WYJĘCIE KRATEK I RUSZTÓW). W piekarnikach z sondą do pomiaru
temperatury mięsa przed wykonaniem cyklu czyszczenia należy zamknąć otwór za pomocą dostarczonej
nakrętki.
•Wyczyścić każde duże rozlane płyny lub plamy, ponieważ usunięcie ich zajmie dużo czasu. Ponadto zbyt
duże ilości tłuszczu mogą się zapalić, gdy zostaną poddane bardzo wysokim temperaturom w cyklu
pirolitycznym.
•Zamknąć drzwiczki piekarnika.
•Nadmiar rozlanych płynów musi być usunięty przed czyszczeniem.
•Czyszczenie drzwiczek piekarnika;
•Usunąć duże lub grube resztki żywności z wnętrza piekarnika, używając wilgotnej gąbki. Nie używać
detergentów;
PL 53
Page 54

•Wyjąć wszystkie akcesoria i zestaw przesuwnych rusztów (o ile występuje);
•Nie wkładać papierowych ręczników.
Stosowanie cyklu pirolitycznego:
1- Obrócić przełącznik funkcji w położenie „ ”. Na wyświetlaczu pojawi się wskazanie „ECO” lub „SUP”.
Wstępnie ustawiony czas to 90 min, może on być zmieniany w zakresie od 90 min (tryb Eco) do 120 min (tryb
Sup) za pomocą programatora (przycisk ustawienia „+” lub „-”). Jeśli piekarnik jest bardzo zabrudzony, zaleca
się zwiększenie czasu do 120 minut, jeśli piekarnik jest umiarkowanie brudny, skrócić czas cyklu czyszczenia
do 90 minut.
2- Możliwe jest opóźnienie czasu rozpoczęcia cyklu pirolitycznego poprzez zmianę czasu ZAKOŃCZENIA za
pomocą programatora.
3- Po kilku minutach, gdy piekarnik osiągnie wysoką temperaturę, drzwiczki zablokują się automatycznie. Cykl
pirolityczny można zatrzymać w dowolnym momencie przez obrócenie przełącznika funkcji z powrotem na
„0” (napis OFF będzie wyświetlany przez 3 sekundy).
4- Po zakończeniu cyklu pirolitycznego pirolizer wyłączy się automatycznie. Na wyświetlaczu wyświetlane jest
wskazanie „END” (Koniec), dopóki drzwiczki są zablokowane, a następnie „0--n”. 5- Można obrócić
przełącznik funkcji z powrotem w położenie „0”, ale jeśli temperatura jest nadal wysoka, pojawi się wskazanie
„0--n” aby poinformować, że drzwiczki są zablokowane.
Użycie cyklu pirolitycznego w piekarnikiem z dotykowym panelem sterowania:
1- Obrócić przełącznik funkcji w położenie czyszczenia pirolitycznego. Na wyświetlaczu pojawi się wskazanie
„ECO” lub „SUP”
2- Wstępnie ustawiony czas to 90 min, ale może być zmieniany w zakresie od 90 min (tryb Eco) do 120 min
(tryb Sup) przy użyciu programatora („+” lub „-”). Jeśli piekarnik jest bardzo brudny, czas powinien zostać
zwiększony do 120 minut, natomiast jeśli piekarnik jest jedynie lekko zabrudzony, zmniejszyć cykl czyszczenia
do 90 minut.
4.3 Funkcja Aquactiva
W funkcji Aquactiva zostaje wykorzystana para wodna, która pomaga usunąć tłuszcz i resztki potraw z
wnętrza piekarnika.
1. Wlać 300 ml wody do wgłębienia Aquactiva umieszczonego na dnie piekarnika.
2. Wybrać funkcję piekarnika Pieczenie Statyczne ( ) lub dolna ( ) grzałka
3. Ustawić temperaturę na symbolu Aquactiva
4. Uruchomić program na 30 min.
5. Po upływie 30 min wyłączyć piekarnik i zostawić do ostygnięcia.
6. Kiedy urządzenie jest zimne wyczyścić wnętrze piekarnika miękką ściereczką.
Ostrzeżenie: Przed dotknięciem urządzenia, upewnić się, że jest ono zimne. Należy zachować
ostrożność w przypadku wszystkich gorących powierzchni, ponieważ istnieje ryzyko poparzenia.
Używać wody destylowanej lub wody pitnej.
300 ml
PL 54
Page 55

4.4 Konserwacja
WYJMOWANIE I CZYSZCZENIE RUSZTÓW
1. Odkręć śrubę w kierunku przeciwnym do ruchu wskazówek zegara.
2. Wyjmij ruszty poprzez pociągnięcie ich do siebie.
3. Wyczyść ruszty w zmywarce lub za pomocą mokrej gąbki i od razu je wysusz.
4. Po wyczyszczeniu rusztów umieść je z powrotem w piekarniku i wkręć śruby, upewniając się o
prawidłowym ich dokręceniu.
A
WYJMOWANIE DRZWICZEK PIEKARNIKA
1. Otworzyć przednie drzwiczki.
2. Otworzyć zaciski gniazd zawiasów po prawej i lewej stronie drzwiczek przednich, naciskając je w dół.
3. Zainstalować drzwiczki na miejsce, wykonując powyższe czynności w odwrotnej kolejności.
PL 55
Page 56

REMOVAL AND CLEANING OF THE GLASS DOOR
LOW-E
1. Open the oven door.
2.3.4. Lock the hinges, remove the screws and remove the upper metal cover by pulling it upwards.
5.6. Remove the glass, carefully extracting it from the oven door (NB: in pyrolytic ovens, also remove the
second and third glass (if present)).
7. At the end of cleaning or substitution, reassemble the parts in reverse order.
On all glass, the indication "Pyro" must be legible and positioned on the left side of the door, close to the
left-hand lateral hinge. In this way, the printed label of the first glass will be inside the door.
1.
2.
3.
5.
6.
1
2
3
7.
4.
PL 56
Page 57

WYMIANA ŻARÓWKI
1. Odłączyć piekarnik od zasilania.
2. Odłączyć pokrywę szklaną, odkręcić żarówkę i wymienić ją na nową tego samego typu.
3. Po wymienieniu przepalonej żarówki włożyć na miejsce szklaną pokrywę.
5. Rozwiązywanie problemów
5.1 Często zadawane pytania
PROBLEM MOŻLIWA PRZYCZYNA ROZWIĄZANIE
Piekarnik nie rozgrzewa się
Piekarnik nie rozgrzewa się
Piekarnik nie rozgrzewa się
Zegar nie jest ustawiony Ustawić zegar
Włączona jest blokada dziecięca
Nie ustawiono funkcji pieczenia i
temperatury
Wyłączyć blokadę dziecięcą
Upewnić się, że wymagane
ustawienia są prawidłowe
PL 57
Page 58

Bezpečnostní pokyny
• Během vaření může ve vnitřním prostoru trouby nebo na skle dveří
docházet ke kondenzaci vlhkosti. Jedná se o normální stav. Chcete-li
tento efekt omezit, počkejte po zapnutí napájení 10–15 minut, než
vložíte jídlo do trouby. Kondenzace v každém případě zmizí, jakmile
trouba dosáhne teploty vaření.
• Vařte zeleninu v nádobě s víkem namísto otevřeného zásobníku.
• Nenechávejte jídlo uvnitř trouby po uvaření po dobu delší než 15–20
minut.
• UPOZORNĚNÍ: Spotřebič a jeho přístupné části se během použití
zahřívají. Nedotýkejte se topných prvků.
• UPOZORNĚNÍ: přístupné části se mohou při používání trouby zahřát.
Děti musejí být udržovány v bezpečné vzdálenosti.
• Tento spotřebič smí používat děti starší 8 let a osoby se sníženými
fyzickými, senzorickými nebo mentálními schopnostmi nebo bez
dostatečných zkušeností, pokud jsou pod dohledem a byly poučeny o
použití spotřebiče a možném riziku.
• Nedovolte dětem hrát si se spotřebičem.
• Čištění a údržbu nesmí provádět děti bez dohledu.
• Během použití se spotřebič zahřívá. Nedotýkejte se ohřevných prvků
uvnitř trouby.
UPOZORNĚNÍ: Přístupné části mohou být během provozu horké.
Udržujte děti mimo dosah spotřebiče.
• Nepoužívejte drsné čističe ani ostré kovové předměty k čištění skla
dvířek trouby, neboť můžete poškrábat povrch.
• Vypněte troubu před sejmutím ochrany a po očištění nasaďte ochranu
v souladu s pokyny.
• Používejte pouze tepelní sondu doporučenou pro tuto troubu.
• K čištění nepoužívejte vysokotlaké parní čističe.
• Připojte zástrčku k napájecímu kabelu, který je schopen vydržet
napětí, proud a zátěž uvedené na štítku a který je opatřen uzemňovacím
kontaktem. Zásuvka musí být vhodná pro zatížení uvedené na štítku a
musí mít zapojený a funkční uzemňovací kontakt. Uzemňovací vodič má
žlutozelenou barvu. Tuto operaci by měl provádět odborník s vhodnou
CZ 58
Page 59

kvalifikací. V případě neslučitelnosti mezi zásuvkou a zástrčkou
spotřebičů požádejte kvalifikovaného elektrikáře, aby zásuvku nahradil
jiným vhodným typem. Zástrčka i zásuvka musejí odpovídat platným
normám země instalace. Připojení k napájecímu zdroji lze provést také
tak, že mezi spotřebičem a zdrojem energie, který zvládne maximální
připojenou zátěž a který je v souladu se stávajícími právními předpisy, je
umístěn omnipolární vypínač. Žlutozelený uzemňovací kabel by neměl
být přerušen vypínačem. Zásuvka nebo omnipolární vypínač používaný
pro připojení by měl být při instalaci spotřebiče snadno přístupný.
• Odpojení lze zajistit přístupnou zástrčkou nebo začleněním spínače v
pevném zapojení v souladu s pravidly elektroinstalace.
• Pokud je napájecí kabel poškozen, musí být nahrazen kabelem nebo
speciálním svazkem, který je k dispozici u výrobce. Případně se obraťte
na zákaznický servis.
• Typ napájecího kabelu musí být H05V2V2-F.
• Nedodržení výše uvedených pokynů může ohrozit bezpečnost spotřebiče
a zneplatnit záruku.
• Před čištěním by měl být odstraněn veškerý přebytek rozlitého materiálu.
• Během procesu pyrolytického čištění se mohou povrchy zahřát více,
než je obvyklé, proto je nutné děti udržovat v bezpečné vzdálenosti.
• Spotřebič nesmí být instalován za ozdobnými dvířky, aby nedošlo k
přehřátí.
• Když umístíte polici uvnitř, ujistěte se, že zarážka směřuje nahoru a
dozadu do komory.
Police musí být zasunuta zcela do komory.
• VAROVÁNÍ: Nepotahujte stěny trouby alobalem ani jednorázovými
ochrannými produkty, které jsou k dostání v obchodech. Hliníková fólie
nebo jakákoli jiná ochrana způsobuje v přímém kontaktu se
smaltovaným povrchem riziko roztavení nebo poškození smaltovaného
povrchu uvnitř trouby.
• VAROVÁNÍ: V žádném případě neodstraňujte těsnění dveří trouby.
• K provozování spotřebiče při jmenovitých frekvencích nejsou nutné
žádné další úkony ani nastavování
CZ 59
Page 60

Shrnutí
Obecné pokyny
62
Popis výrobku
63
Použití trouby
64
Čištení a údržba trouby
67
1.1 Bezpečnostní pokyny
1.2 Elektrická bezpečnost
1.3 Doporučení
1.4 Instalace
1.5 Odpadové hospodárství a ochrana
životního prostredí
1.6 Prohlášení o shode
2.1 Prehled
2.2 Príslušenství
2.3 První použití
3.1 Popis displeje
3.2 Režimy varení
4.1 Obecné poznámky k čištení
4.2 Pyrolýza
4.3 Funkce Aquactiva
4.4 Údržba
• Demontáž a čištění bočnic
• Demontáž okna trouby
• Demontáž a čištění skleněných dvířek
• Výměna žárovky
Rešení potíží
71
5.1 Často Kladené Otázky
CZ 60
Page 61

1. Obecné pokyny
Děkujeme Vám, že jste si zvolili jeden z našich výrobků.
Pro dosažení nejlepších výsledků s troubou byste si měli
pečlivě přečíst tento návod a uschovat jej pro budoucí
použití. Před instalací trouby si poznamenejte výrobní
číslo, abyste jej mohli poskytnout pracovníkům
zákaznických služeb v případě nutnosti opravy. Po
vyjmutí trouby z obalu zkontrolujte, zda nedošlo během
přepravy k jejímu poškození. Máte-li pochybnosti,
troubu nepoužívejte a požádejte kvalifikovaného
technika o radu. Uchovávejte všechen obalový materiál
(plastové sáčky, polystyrén, hřebíky) mimo dosah dětí.
Při prvním zapnutí trouby se může linout silný
páchnoucí kouř, který je způsoben prvním ohřevem lepidla na izolačních deskách v troubě. To je
naprosto normální, a pokud k tomu dojde, je třeba počkat, než se kouř rozptýlí, a teprve poté vložit do
trouby pokrmy. Výrobce neponese žádnou odpovědnost v případech, kdy nebudou dodrženy pokyny
obsažené v tomto dokumentu.
POZNÁMKA: funkce, vlastnosti a doplňky trouby uváděné v tomto návodu se budou lišit v závislosti na
modelu, který jste zakoupili.
1.1 Bezpečnostní pokyny
Používejte troubu pouze ke stanovenému účelu, kterým je pečení potravin; jakékoliv jiné použití,
například jako zdroj tepla, je považováno za nevhodné a proto nebezpečné. Výrobce nemůže nést
odpovědnost za případné škody vzniklé nesprávným či nevhodným používáním.
Použití jakéhokoliv elektrického spotřebiče předpokládá dodržování některých základních pravidel:
- neodpojujte napájecí kabel ze zásuvky taháním;
- nedotýkejte se spotřebiče mokrýma nebo vlhkýma rukama či nohama;
- použití adaptérů, rozdvojek a prodlužovacích kabelů není zásadně doporučeno;
- v případě selhání nebo a/nebo špatné funkce vypněte spotřebič a nemanipulujte s ním.
1.2 Elektrická bezpečnost
ZAJISTĚTE, ABY ELEKTRICKÁ ZAPOJENÍ PROVÁDĚL ELEKTRIKÁŘ NEBO KVALIFIKOVANÝ TECHNIK.
Napájecí zdroj, ke kterému je trouba připojena, musí být v souladu s právními předpisy platnými v zemi
instalace.
Výrobce nenese žádnou zodpovědnost za případné škody způsobené nedodržením těchto pokynů.
Trouba musí být připojena k elektrické síti prostřednictvím uzemněné zásuvky nebo odpojovače s více
póly, v závislosti na právních
předpisech platných v zemi instalace. Elektrické napájení je třeba chránit vhodnými pojistkami a použité
kabely musístit správné napájení trouby.
ZAPOJENÍ
Trouba je dodávána s napájecím kabelem, který by měl být připojen pouze k elektrickému zdroji s
220–240 V AC 50 Hz mezi fázemi nebo mezi fází a nulovým vodičem. Pře připojením trouby k elektrické
síti je důležité zkontrolovat:
- napájecí napětí uvedené na voltmetru;
- nastavení odpojovače.
Uzemňovací vodič připojený k zemnicí svorce trouby musí být připojen k zemnící svorce napájecího
zdroje.
VAROVÁNÍ
Před připojením trouby k elektrické síti požádejte kvalifikovaného elektrikáře o kontrolu spojitosti
zemnicí svorky elektrického napájení. Výrobce nenese žádnou odpovědnost za nehody nebo jiné
problémy způsobené nepřipojením trouby k zemnící svorce nebo uzemněním, které má vadnou
spojitost.
CZ 61
Page 62

POZNÁMKA: protože trouba může vyžadovat údržbu, je vhodné mít k dispozici další elektrickou
zásuvku, ke které lze troubu připojit po vyjmutí z prostoru, ve kterém je nainstalována. Napájecí kabel
smí být nahrazen pouze servisním technikem nebo technikem s rovnocennou kvalifikací.
1.3 Doporučení
Po každém použití trouby napomůže minimální vyčištění udržet troubu v dokonalé čistotě.
Nevykládejte stěny trouby hliníkovou fólií nebo jednorázovou ochranou dostupnou ve specializovaných
prodejnách.
U hliníkové fólie nebo jakékoliv jiné ochrany hrozí při přímém kontaktu s horkým smaltem riziko tavení a
poškození vnitřního smaltu. Aby se zabránilo nadměrnému znečištění trouby a výsledným silným
kouřovým zápachům, doporučujeme nepoužívat troubu při velmi vysokých teplotách. Je lepší
prodloužit dobu pečení a mírně snížit teplotu. Vedle příslušenství dodávaného s troubou dop
oručujeme používat pouze nádobí a pečicí formy odolné proti velmi vysokým teplotám.
1.4 Instalace
Výrobci nemají žádnou povinnost provádět instalaci. Pokud je požadována pomoc výrobce k nápravě
škod způsobených nesprávnou instalací, na takovou pomoc se nevztahuje záruka. Je nutno dodržet
pokyny pro instalaci určené pro odborně vyškolené pracovníky. Nesprávná instalace může způsobit
újmu nebo zranění na osobách, zvířatech nebo věcech. Výrobce nemůže být za takové škody nebo
zranění zodpovědný.
Trouba může být umístěna ve výšce ve sloupci nebo pod pracovní deskou. Před upevněním je nutné
zajistit dobré větrání v prostoru pro troubu, které umožní řádnou cirkulaci čerstvého vzduchu
potřebného pro chlazení a ochranu vnitřních částí. Na základě typu upevnění vytvořte otvory popsané
na poslední straně.
1.5 Odpadové hospodárství a ochrana životního prostredí
Tento spotřebič je označen v souladu s evropskou směrnicí 2012/19/EU o odpadních
elektrických a elektronických zařízeních (OEEZ). OEEZ obsahují jak znečišťující látky (které
mohou mít negativní vliv na životní prostředí), tak i základní prvky (které mohou být znovu
použity). Je důležité, aby OEEZ podstoupily zvláštní zacházení pro správné odstranění a
likvidaci znečišťujících látek a obnovení všech materiálů. Jednotlivci mohou hrát
významnou roli při ochranně životního prostředí před OEEZ; je nutné dodržovat některá
základní pravidla:
- s odpadními elektrickými a elektronickými zařízeními se nesmí zacházet jako s domovním odpadem;
- OEEZ by měly být odvezeny do speciálních sběrných dvorů spravovaných místním úřadem nebo
registrovanou společností.
V mnoha zemích může být k dispozici vyzvednutí velkých OEEZ u zákazníka. Když koupíte nový spotřebič,
můžete starý odevzdat obchodníkovi, který musí bezplatně přijmout jeden starý spotřebič za jeden
nový prodaný spotřebič, pokud se jedná o ekvivalentní typ se stejnými funkcemi, jaké má nový
zakoupený spotřebič.
Šetrnost a ohleduplnost k životnímu prostředí Kdykoli je to možné, vyhněte se předehřátí trouby a vždy
se ji snažte naplnit. Otevírejte dvířka trouby co možná nejméně často, protože při každém otevření
uniká teplo z dutiny. Pro významnou úsporu energie vypněte troubu 5 až 10 minut před plánovaným
koncem doby pečení a využijte zbytkové teplo, které trouba nadále generuje. Udržujte těsnění v čistotě
a v pořádku, aby nedocházelo k unikání tepla z trouby. Máte-li hodinový tarif, program „zpožděné
pečení“ usnadňuje úspory energie přesunutím doby vaření na dobu s nižší sazbou.
1.6 Prohlášení o shode
Součásti tohoto spotřebiče, které mohou přicházet do kontaktu s potravinami, jsou ve shodě s
ustanoveními směrnice EHS 89/109.
Umístěním značky na tento produkt potvrzujeme shodu se všemi příslušnými evropskými
směrnicemi týkajícími se bezpečnosti, ochrany zdraví a ochrany životního prostředí, které lze použít pro
tento produkt.
CZ 62
Page 63

2. Popis výrobku
2.1 Prehled
5
6
2.2 Príslušenství
Kovový rošt
1
Drží pečicí plechy a talíře.
1
3
4
2
1. Ovládací panel
2. Polohy polic
(podélný drátěný rošt, je-li součástí dodávky)
3. Kovový rošt
4. Odkapávací plech
5. Ventilátor (za ocelovou deskou)
6. Dvířka trouby
2
Odkapávací plech
Shromažďuje zbytky, které odkapávají během
pečení potravin na roštech.
Boční drátěné mřížky
3
Boční drátěné mřížky Pokud zahrnuty.
CZ 63
Page 64

2.3 První použití
PŘEDBĚŽNÉ ČIŠTĚNÍ
Před prvním použitím troubu vyčistěte. Otřete vnější povrchy vlhkým měkkým hadříkem. Umyjte
všechna příslušenství a vytřete vnitřek trouby roztokem horké vody a promývací kapaliny. Nastavte
prázdnou troubu na maximální teplotu a ponechte ji zapnutou zhruba po dobu 1 hodiny. To odstraní
veškeré zápachy novosti.
3. Použití trouby
3.1 Popis displeje
1. Časovač / automatický režim
2. Funkce ventilátoru
3. Funkce odmrazování
4. Displej teploty nebo hodin
5. Ovládací prvky nastavení LCD displeje
6. Knoflík výběru funkcí
7. Knoflík výběru programu
UPOZORNĚNÍ
Prvním krokem, který je nutné po instalaci či po
výpadku proudu provést, je nastavení hodin (to, že
došlo k výpadku proudu, poznáte tak, že na displeji
bliká 12:00).
200°-> Na LED kontrolce teploty bliká „°“, dokud není
dosaženo zobrazené teploty.
HOT -> Když skončí nějaký program a trouba je stále
horká, na displeji se zobrazuje aktuální čas střídavě s
hlášením „HOT“, a to i v případě, že knoflíky jsou v
poloze „OFF“.
CZ 64
Page 65

FUNKCE
TICHÝ
REŽIM
NASTAVENÍ
ČASU
DOBA
PEČENÍ
KONEC
PEČENÍ
MINUTKA
DĚTSKÁ
POJISTKA
JAK AKTIVOVAT JAK VYPNOUT
• Levým knoflíkem
výběru funkcí otočte do
polohy „Silence Mode“.
• Levým knoflíkem
výběru funkcí otočte do
polohy „Set the Time“.
• K nastavení času
použijte knoflíky „+“
nebo „-“
• Stiskněte centrální
tlačítko 2 krát.
• Stisknutím tlačítka "-"
Nebo "+" nastavit délka
vaření požadované.
• Uvolněte všechna
tlačítka
• Nastavte funkci pečení
s funkce trouby voličem.
• Stiskněte centrální
tlačítko 3 krát.
• Stisknutím tlačítka "-"
"+" nastavit čas, kdy
Chcete troubu na
vypnout.
• Uvolněte tlačítka
• Nastavte funkci pečení
s funkce trouby volič.
• Stiskněte centrální
tlačítko 1 krát.
• Stisknutím tlačítka "-"
"+" nastavte požadovaný
čas.
• Uvolněte všechna
tlačítka.
• Dětský zámek Funkce
se aktivuje dotykem Set
(+) po dobu minimálně 5
sekund. Od tohoto
okamžiku se u všech
ostatních funkcích
uzamknou a na displeji
bude blikat STOP a
nastavení času .
• Knoflík výběru funkcí
nastavte do polohy
„OFF“.
• Knoflík výběru funkcí
nastavte do polohy
„OFF“.
• Je-li uplynutí doby
trouba se vypne
automaticky. Pokud byste
chcete zastavit vaření
dříve buď vypněte funkci
voliče 0, nebo nastavený
čas 0:00 (SELECT a "-" "+"
Tlačítka).
• v době stanovené,
trouba vypne. Chcete-li
přepnout off ručně,
troubu voličem funkcí
na Pozici O.
• Stiskněte středové
tlačítko Když nastavený
čas jako uplynulý zvukový
alarm je aktivován (tento
alarm bude zastavit na
jeho vlastní, nicméně to
může být okamžitě
zastaveno stisknutím
tlačítka) SELECT.
• Dětský zámek Funkce
je deaktivována dotykem
tlačítka Set (+) opět na
minimálně 5 sekund. Od
této chvíle jsou možnosti
všech funkcí volitelné
znovu.
CO TO DĚLÁ VÝHODY
• Umožňuje vypnutí
zvukové signalizace
minutovníku.
• Umožňuje vám
nastavit čas, jaký se
objeví na displeji.
• Umožňuje nastavení
vaření čas potřebný pro
vybrané receptury.
• Chcete-li zkontrolovat, jak
dlouho zůstane spustit
stisknutím SELECT Tlačítko
2 krát.
• Chcete-li změnit / změnit
přednastavený čas
stiskněte tlačítko SELECT a
"-" "+" tlačítka.
• Umožňuje nastavení konec pečení
• Chcete-li zkontrolovat
nastavený čas stiskněte
centrální tlačítko 3 krát
• Chcete-li změnit
nastavení Tlačítka času
stiskněte SELECT + "-"
„+".
• Zvuky alarmu na konec
nastaveného času.
Během procesu, displeji
se zobrazí zbývající čas.
• Pro vypnutí zvukové
signalizace minutovníku.
• Pro nastavení času
POZN.: Čas nastavujte po
první instalaci trouby nebo
těsně po výpadku proudu
(na hodinách bliká 12:00)
• Stiskněte jakékoli
tlačítko
pro zastavení signálu.
Stiskněte centrální
Tlačítko pro návrat do
hodiny funkce.
Tato funkce se obvykle
používá s "čas vaření" funkce.
Například pokud jídlo musí
být vařené po dobu 45 minut
a musí být připravena do
12:30, vyberte požadovanou
funkci, nastavte dobu vaření
na 45 minut a do konce doby
vaření až 12:30. Na konci
doby vaření nastavené, bude
trouba automaticky vypne a
zvukový alarm bude zvonit.
• Umožňuje použít troubu
jako budík (může být
aktivní buď při provozu
trouby nebo samostatně
(při provozu trouby)
CZ 65
Page 66

3.2 Režimy varení
*
**
Volič
funkc
T °C
výchozí
60 60 ÷ 60
180
210
220
210
200
40
L3
L3
ozmezí
40 ÷ 40
50 ÷ 240
50 ÷ 240
50 ÷ 280
50 ÷ 230
150 ÷ 220
L1 ÷ L5
L1 ÷ L5
T °C
SVĚTLO: Zapne světlo v troubě.
ROZMRAZOVÁNÍ: Je-li volič nastaven do této polohy. Ventilátor dmýchá
vzduch o pokojové teplotě kolem zmrzlého pokrmu a tak jej za několik minut
rozmrazí bez toho, aby se jakkoli změnil obsah proteinů v pokrmu.
Udržování tepla - Doporučujeme k ohřevu již hotových pokrmů, umístěním
roštu na druhou úroveň shora, nebo k rozmrazování chleba, pizzy nebo
moučníků umístěním roštu na nejspodnější úroveň. Teplota je konstantně
60°C, není možná změna.
PEČENÍ S VENTILÁTOREM: Doporučujeme používat tuto metodu pro drůbež,
těstoviny, ryby a zeleninu. Teplo proniká do pokrmu lépe a zkrátí se také doba
pečení a předehřevu. Můžete péct různé pokrmy zároveň se stejnou přípravou
nebo bez přípravy v jedné nebo více pozicích. Tato metoda pečení zajišťuje
rovnoměrnou distribuci tepla a zabraňuje smísení vůní.
Při současném pečení více pokrmů nastavte o deset minut delší dobu.
KONVENČNÍ PEČENÍ: Používají se současně horní i dolní topná tělesa.
Předehřívejte troubu po dobu zhruba deseti minut. Tato metoda je ideální pro
jakékoli tradiční pečení. Pro přípravu červeného masa, hovězí pečeně, jehněčí
kýty, zvěřiny, chleba, pokrmů ve fólii (papillotes), listového těsta. Umístěte
pokrm a jeho nádobu na roštu do střední polohy.
VENTILÁTOR + SPODNÍ OHŘEV: Spodní topné těleso se používá spolu s
ventilátorem dmýchajícím vzduch uvnitř trouby. Tato metoda je ideální pro
šťavnaté ovocné koláče, dortíky, quiche a paštiky.
Zabraňuje vysoušení pokrmu a podporuje kvašení v dortech, chlebovém těstu
a jiných pokrmech pečených zespodu. Umístěte rošt do dolní polohy.
GRIL S PODPOROU VENTILÁTORU: používejte turbo-gril se zavřenými dvířky.
Horní topné těleso se používá spolu s ventilátorem dmýchajícím vzduch uvnitř
trouby. Předehřev je nezbytný u tmavých mas, ale nikoli u bílých mas. Ideální
pro pečení pokrmů o velké tloušťce, celých kusů jako je pečené vepřové,
drůbež atd. Umístěte pokrm určený ke grilování přímo do středu roštu ve
střední poloze. Zasuňte pod rošt odkapávací plech pro zachycení šťáv. Zajistěte,
aby nebyl pokrm příliš blízko u grilu. V polovině pečení pokrm obraťte.
GRIL: používejte gril se zavřenými dvířky. Horní topné těleso se používá
samostatně a můžete upravovat teplotu.
Rozžhavení těles do ruda vyžaduje pět minut předehřívání. Úspěch je zaručen
pro grily, kebaby a pokrmy s kůrkou. Bílá masa se umísťují dále od grilu; doba
pečení je delší, ale maso bude chutnější. Tmavá masa a rybí filety můžete
pokládat na rošt nad odkapávací plech. Trouba má dvě polohy grilu:
Gril: 2140 W Barbecue: 3340 W
SUPER GRIL: Trouba má úrovně grilování
Gril: 2200 W Gril SUPER: 3000 W
Funkce (Závisí na modelu trouby)
ECO
ECO÷SUPER
* Testováno v souladu s normou CENELEC EN 60350-1, používanou k definování energetické třídy.
Pyrolýza - Péče o čistotu vnitřku trouby - máte na výběr jednu ze dvou
možností, a to ECO a SUPER.
CZ 66
Page 67

4. Čištení a údržba trouby
4.1 Obecné poznámky k čištení
Životnost spotřebiče můžete prodloužit prostřednictvím pravidelného čištění. Před prováděním
ručního čištění počkejte, až trouba vychladne. Nikdy nepoužívejte při čištění brusné mycí prostředky,
drátěnku nebo ostré předměty. Předejdete tak neopravitelnému poškození smaltovaných dílů.
Používejte pouze mycí prostředky na bázi vody, mýdla nebo bělidla (čpavek).
SKLENĚNÉ DÍLY
Doporučuje se čistit skleněné okno savou kuchyňskou utěrkou po každém použití trouby. Chcete-li
odstranit odolnější skvrny, můžete použít dobře vyždímanou houbu napuštěnou mycím prostředkem a
potom opláchnout vodou.
TĚSNĚNÍ OKNA TROUBY
Je-li těsnění znečištěné, můžete jej vyčistit mírně navlhčenou houbičkou.
PŘÍSLUŠENSTVÍ
Příslušenství vyčistěte před oplachováním a sušením mokrou mýdlovou houbičkou: vyvarujte se použití
abrazivních mycích prostředků.
ODKAPÁVACÍ PLECH
Po použití grilu vyjměte plech z trouby. Nalijte na plech horký tuk a umyjte jej v horké vodě pomocí
houbičky a prostředku na mytí nádobí.
Pokud stále ulpívají mastné skvrny, ponořte plech do vody a mycího prostředku. Alternativně můžete
plech umýt v myčce na nádobí nebo použít komerční saponát na trouby. Nikdy nedávejte znečištěný
plech zpět do trouby.
4.2 Pyrolyza
Trouba je vybavena pyrolytickým systémem čištění, jenž vysokou teplotou ničí zbytky potravin. Tato
funkce se provádí automaticky pomocí programátoru. Výsledné výpary jsou „vyčištěny“ tím, že projdou
pyrolyzérem, jenž se spustí ihned poté, co začne pečení. Vzhledem k tomu, že pyrolýza využívá velmi
vysokou teplotu, jsou dvířka trouby opatřeny bezpečnostním zámkem. Pyrolyzér lze kdykoliv zastavit.
Dvířka nelze otevřít, dokud je zobrazen bezpečnostní zámek.
POZNÁMKA: Pokud byl nad troubu osazen sporák, během pyrolýzy nikdy nepoužívejte plynové hořáky
nebo elektrické varné plotýnky. Nedojde tak k přehřátí sporáku.,
Jsou přednastaveny DVA PYROLYTICKÉ CYKLY:
ECO PYROCLEAN: Čistí mírně znečištěnou troubu. Trvá po dobu 90 minut. SUPER PYROCLEAN: Čistí
značně znečištěnou troubu. Trvá po dobu 120 minut. U trouby vybavené pyrolyzérem nikdy
nepoužívejte běžně dostupné čisticí přípravky!
Tip: Pokud pyrolýzu provedete ihned po přípravě jídla v troubě, budete moci využít zbytkového tepla v
ní, a tím ušetřit energii.
Před spuštěním pyrolytického cyklu:
Z trouby vyjměte veškeré příslušenství. To totiž nevydrží vysokou teplotu použitou při pyrolitickém
čisticím cyklu. Především z trouby vyjměte mřížky, postranní držáky a teleskopická vodítka (viz
kapitola VYJMUTÍ MŘÍŽEK A POSTRANNÍCH DRŽÁKŮ). U trub s jehlovým teploměrem je nutné před
spuštěním čisticího cyklu uzavřít otvor, a to maticí, která je součástí dodávky.
•Odstraňte veškeré velké zbytky jídla či skvrny - odstranit je by trvalo příliš dlouho. Nadměrné
množství tuku by se mohlo vznítit, pokud by bylo vystaveno vysokým teplotám, při nichž dochází
během cyklu pyrolýzy.
•Zavřete dvířka trouby.
•Před čištěním je nutno odstranit nadbytečné zbytky potravin.
•Vyčistěte dvířka trouby;
•Velké či hrubé zbytky jídla zevnitř trouby odstraňte pomocí navlhčené houbičky. Nepoužívejte
čisticí prostředky;
CZ 67
Page 68

•Vyjměte veškeré příslušenství a sadu výsuvných držáků (je-li jí trouba osazena);
•Nevkládejte utěrky na nádobí.
Použití pyrolytického cyklu:
1- Knoflík výběru funkcí nastavte do polohy „ “. Na displeji se objeví nápis „ECO“ nebo „SUP“.
Výchozí nastavení času je 90 minut, ale prostřednictvím programátoru (tlačítka nastavení „+“ nebo „-“)
je možné nastavit čas od 90 minut (režim ECO) do 120 minut (režim SUP). Je-li trouba silně znečištěná,
doporučujeme zvýšit čas na 120 minut; pokud je trouba středně znečištěná, snižte dobu čisticího cyklu
na 90 minut.
2- Start pyrolytického čisticího cyklu je možné odložit tak, že změníte čas konce (END) prostřednictvím
programátoru.
3- Po několika minutách, když trouba dosáhne vysoké teploty, se automaticky zamknou dvířka.
Pyrolytický cyklus může být kdykoli zastaven tak, že otočíte voličem funkcí zpět do pozice „0“ (na displeji
se na 3 sekundy objeví slovo OFF).
4- Po skončení pyrolytického cyklu se pyrolýza sama automaticky vypne. Po dobu, kdy jsou dvířka
zamknutá, bude na displeji zobrazeno „END“, poté se objeví „0--n“.
5- Můžete otočit voličem funkcí zpět do pozice „0“, ale pokud bude teplota stále vysoká, objeví se
„0—n“, což značí, že dvířka jsou zamčená.
Použití pyrolytického cyklu u trouby Touch Control:
1- Knoflík výběru funkcí nastavte do polohy pyrolýza. Na displeji se objeví buď nápis „ECO“, nebo „SUP“.
2- Výchozí nastavení času je 90 minut, ale prostřednictvím programátoru (tlačítka nastavení „+“ nebo „-
“) je možné nastavit čas od 90 minut (režim ECO) do 120 minut (režim SUP). Je-li trouba silně znečištěná,
je vhodné zvýšit čas na 120 minut; pokud je trouba středně znečištěná, snižte dobu čisticího cyklu na 90
minut.
4.3 Funkce Aquactiva
AQUACTIVA vytváří páru pro snadné odstraňování tuku a zbytků jídla z trouby.
1. Nalijte 300 ml vody do zásobníku AQUACTIVA na dně trouby.
2. Nastavte funkci trouby na Statický ( ) nebo Spodní ( ) ohřev.
3. Nastavte teplotu na ikonu AQUACTIVA
4. Nechte program běžet přibližně 30 minut.
5. Po 30 minutách vypněte program a nechte troubu vychladnout.
6. Po vychladnutí spotřebiče vyčistěte vnitřek trouby utěrkou.
Varování: Než budete manipulovat se spotřebičem, ujistěte se, zda vychladnul. Zvyšte pozornost u
všech horkých povrchů, neboť hrozí riziko popálení. Použijte destilovanou nebo pitnou vodu.
300 ml
CZ 68
Page 69

4.4 Údržba
DEMONTÁŽ A ČIŠTĚNÍ BOČNIC
1. Odšroubujte šroub proti směru hodin.
2. Vyjměte bočnice vytažením směrem k sobě.
3. Vyčistěte bočnice v myčce na nádobí nebo mokrou houbičkou a poté je ihned vysušte.
4. Po vyčištění dejte bočnice zpět, nasaďte zpět šrouby a pevně je utáhněte.
A
DEMONTÁŽ OKNA TROUBY
1. Otevřete čelní okno.
2. Otevřete svorky krytu závěsu na pravé a levé straně čelního okna stlačením směrem dolů.
3. Vraťte okno zpět provedením předchozího postupu v opačném pořadí kroků.
CZ 69
Page 70

DEMONTÁŽ A ČIŠTĚNÍ SKLENĚNÝCH DVÍŘEK
LOW-E
1. Otevřete dvířka trouby.
2.3.4. Zajistěte závěsy, vyšroubujte šrouby a demontujte horní kovový kryt vytažením směrem nahoru.
5.6. Vyjměte opatrně sklo ze dvířek trouby (Pozn: u pyrolytických trub vyjměte také druhé a třetí sklo
(jsou-li osazena)).
7. Na konci čištění nebo výměny díly znovu sestavte provedením kroků v opačném pořadí. U všech skel
musí být čitelný znak „Pyro“ umístěný na levé straně dvířek poblíž levého bočního závěsu. Tak bude
natištěný štítek prvního skla uvnitř dvířek.
1.
2.
3.
5.
6.
1
2
3
7.
4.
CZ 70
Page 71

VÝMĚNA ŽÁROVKY
1. Odpojte troubu od síťového přívodu.
2. Sejměte skleněný kryt, vyšroubujte žárovku a vyměňte ji za novou žárovku stejného typu.
3. Jakmile je vadná žárovka vyměněna, vraťte zpět skleněný kryt.
5. Rešení potíží
5.1 Často Kladené Otázky
PROBLÉM MOŽNÁ PŘÍČINA ŘEŠENÍ
Trouba se nezahřívá
Trouba se nezahřívá
Trouba se nezahřívá
Hodiny nejsou nastaveny Nastavte hodiny
Dětský zámek je aktivní
Funkce pečení a teplota
nebyly nastaveny
CZ 71
Deaktivujte dětský zámek
Přesvědčte se, že potřebná
nastavení jsou správná
Page 72

Varnostna Navodila
• Med kuhanjem lahko vlaga kondenzira znotraj odprtine pečice ali na
steklu vrat. To je normalno stanje. Za zmanjšanje tega učinka počakajte 1015 minut po vklopu napajanja, preden hrano vstavite v pečico. V vsakem
primeru kondenzacija izgine, ko pečica doseže temperaturo za kuhanje.
• Zelenjavo kuhajte v posodi s pokrovom, namesto na odprtem pekaču.
• Izogibajte se temu, da bi hrano puščali v pečici za več kot 15/20 minut
po kuhanju.
• OPOZORILO: Aparat in njegovi dostopni deli se med uporabo segrejejo.
Pazite, da se ne dotaknete grelcev!
• OPOZORILO: med delovanjem pečice, se njeni izpostavljeni deli lahko
zelo segrejejo. Zato poskrbite, da bodo tedaj otroci varno oddaljeni.
• Otroci, starejši od 8 let, ter osebe z zmanjšanimi fizičnimi, zaznavnimi
ali umskimi sposobnostmi ali pomanjkljivimi izkušnjami ter znanjem
lahko uporabljajo aparat le pod nadzorom oseb, ki so odgovorne za
njihovo varnost, in ki so jih seznanili z varno uporabo aparata ter le v
primeru, da razumejo tveganje, ki je s tem povezano.
• Otroci se ne smejo igrati z aparatom.
• Otroci lahko sodelujejo pri čiščenju in vzdrževalnih delih le pod nadzorom
odraslih.
POZOR: Dostopni deli se med uporabo zelo segrejejo. Pazite, da se
majhni otroci ne približajo!
• Ne uporabljajte grobih ali jedkih čistil ali ostrih kovinskih strgal za
čiščenje vrat pečice, saj bi lahko opraskali površino, zaradi takih poškodb
pa bi lahko steklo počilo.
• Pred odstranjevanjem zaščite morate pečico izklopiti; po čiščenju
zaščito namestite nazaj, kot je to pojasnjeno v navodilih za uporabo.
• Uporabljajte samo temperaturno sondo, ki je namenjena uporabi v tej
pečici.
• Pri čiščenju ne uporabljajte aparatov za čiščenje s paro.
• Vtikač napajalnega kabla priklopite v vtičnico, ki izpolnjuje zahteve
glede napetosti, toka in moči, ki so navedene na oznaki naprave,
vtičnica pa mora biti tudi ustrezno ozemljena. Vtičnica mora zagotavljati
ustrezno moč, ki je navedena na oznaki naprave, biti mora ozemljena in
SL 72
Page 73

v brezhibnem stanju. Kabel za ozemljitev je rumeno-zelene barve.
Priklop naprave mora izvesti ustrezno usposobljena oseba. Če vtičnica in
vtikač nista združljiva, naj ustrezno usposobljeni elektro-serviser
zamenja vtičnico s takšno, ki se bo prilegala vtikaču. Vtičnica in vtikač
morata izpolnjevati veljavne norme v državi, kjer bo naprava priklopljena
v omrežje. Priklop v električno omrežje je možno izvesti tudi tako, da je
napajanje urejeno preko ustrezne varovalke, vgrajene med napravo in vir
napajanja, ki zagotavlja, da obremenitev omrežja ne presega predpisane
zakonodaje. Rumeno-zelenega kabla ni dovoljeno prekinjati z varovalko.
Vtičnica ali varovalka, ki je vgrajena med vtičnico in napravo, morata po
namestitvi naprave ostati enostavno dostopni.
• Prekinitev napajanja mora biti možna bodisi z odklopom vtikača iz
vtičnice, oziroma preko dodatno vgrajenega stikala, nameščenega
skladno s pravili elektro-stroke.
• Če je napajalnik kabel poškodovan, ga je potrebno nadomestiti z novim
ali posebnim kablom, ki je na voljo pri proizvajalcu, lahko pa tudi
kontaktirate oddelek za podporo kupcem.
• Napajalni kabel mora biti vrste H05V2V2-F.
• Neupoštevanje zgornjih predpisov lahko negativno vpliva na varno
uporabo naprave ter izniči garancijo.
• Pred čiščenjem morate morebitne ostanke živil najprej odstraniti.
• Med postopkom pirolitskega čiščenja se površine naprave segrejejo
bolj kot običajno, zato se tedaj otroci ne smejo približevati.
• Naprave ni dovoljeno namestiti za dekorativnimi vrati, sicer lahko pride
do pregrevanja.
• Pri vstavljanju polic se prepričajte, da je zaustavljalnik na zadnji strani in
obrnjen navzgor.
Polico morate vstaviti do konca
• OPOZORILO: Na stene pečice nikoli ne nameščajte aluminijaste folije ali
zaščite za enkratno uporabo, ki je na voljo v trgovinah. Aluminijasta folija
ali katerakoli druga zaščita lahko ob neposrednem stiku z vročo
emajlirano oblogo povzroči, da se slednja stali ali poškoduje.
• OPOZORILO: Nikoli ne odstranjujte vratnega tesnila.
• Za delovanje aparata na nazivni frekvenci niso potrebne dodatne
operacije oz.
• K provozování spotřebiče při jmenovitých frekvencích nejsou nutné
žádné další úkony ani nastavování
SL 73
Page 74

Povzetek
Splošna Opozorila
75
Opis izdelka
77
Uporaba pečice
78
Oven cleaning and maintenance
81
1.1 Varnostni Indikacije
1.2 Electrical Safety
1.3 Priporočila
1.4 Namestitev In Priključitev
1.5 Ravnanje z odpadki in okoljske zaščita
1.6 Izjava O Skladnosti
2.1 Pregled
2.2 Dodatna oprema (odvisno od modela)
2.3 Prvo Upotreba
3.1 Opis zaslona (na dotik, dvojni predel)
3.2 Načini pečenja
4.1 General notes on cleaning
4.2 Piroliza
4.3 Funkcija Aquactiva
4.4 Vzdrževanje
• Odstranjevanje in čıščenje
stranskih nosilcev
• Odstranitev okna pečice
• Odstranitev in čiščenje steklenih vrat
• Zamenjava žarnice
Odpravljanje težav
85
5.1 Pogosto zastavljena vprašanja
SL 74
Page 75

1. Splošna Opozorila
Pozorno preberite navodila, da boste lahko izrabili vse
možnosti, ki vam jih ponuja pečica. Priporočamo, da
navodila za priključitev in uporabo shranite. Pred
vgradnjo pečice si zapišite serijsko številko, saj jo boste
po t re b ov a li , k o b os t e pot r eb o va l i po m o č
pooblaščenega servisa.
Ko dobite svojo novo pečico, se najprej prepričajte, da
med transportom ni prišlo do poškodb. Če je pečica
poškodovana, se takoj obrnite na prodajalca. Če niste
prepričani, se posvetujte s strokovnjakom. Odstranite
vso embalažo in jo odnesite na ustrezno odlagališče.
Pazite, da predvsem plastične vrečke, polistirol in žeblji
ne pridejo v roke majhnim otrokom.
Proizvajalec ne prevzema odgovornosti za morebitno škodo ali poškodbe, če ta navodila niso bila
upoštevana!
Opomba: Funkcije, lastnosti in oprema pečice, navedeni v tem priročniku, se lahko spreminjajo odvisno
od modela pečice.
1.1 Varnostni Indikacije
Pečico uporabljajte le za predvideni namen, ki je samo kuhanje živil; vsa druga uporaba, na primer kot vir
toplote, se šteje kot nepravilna in zato nevarna. Proizvajalec ne prevzema odgovornosti za morebitno
škodo, do katere pride zaradi nepravilne, neustrezne ali nerazumne uporabe.
Uporaba kakršne koli električne naprave pomeni spoštovanje nekaterih temeljnih pravil:
- Ne vlecite za napajalni kabel, da odstranite vtič iz vtičnice;
- Aparata se ne dotikajte z vlažnimi rokami ali nogami;
- Na splošno uporaba adapterjev, več vtičnic in podaljškov ni priporočljiva;
- V primeru okvare in/ali slabega delovanja, aparat izklopite in ga ne spreminjajte.
1.2 Electrical Safety
ZAGOTOVITE, DA ELEKTRIČNE POVEZAVE VZPOSTAVI ELEKTRIČAR ALI USPOSOBLJEN TEHNIK.
Napajanje, s katerim je povezana pečica, mora biti v skladu z zakoni, ki veljajo v državi namestitve.
Proizvajalec ne prevzema odgovornosti za škodo, ki nastane zaradi neupoštevanja teh navodil. Pečica
mora biti priključen na električno oskrbo z ozemljeno vtičnico ali odklopnikom z več poli, odvisno od
zakonov, ki veljajo v državi namestitve. Napajanje mora biti zaščiteno z ustreznimi varovalkami in
uporabljeni kabli morajo imeti prečni prerez, ki lahko zagotovi ustrezno napajanje pečice.
PRIKLJUČEVANJE
Pečica je dostavljena z napajalnim kablom, ki ga lahko povežete le z električnim napajanjem z 220- 240
Vac 50 Hz moči med fazami ali med fazo in nevtralnim vodom. Pred povezavo pečice z električnim
napajanjem, je pomembno, da preverite:
- Moč napetosti, ki je navedena na merilniku;
- Nastavitev odklopnika.
Ozemljitveni kabel priključen na ozemljitveni priključek pečice mora biti povezan z ozemljitvenim
priključkom napajanja.
OPOZORILO
Pred priključitvijo pečice na električno omrežje, se posvetujte z električarjem, da preverite kontinuiteto
oskrbe ozemljitvenega priključka napajanja. Proizvajalec ne prevzema odgovornosti za
morebitne nesreče ali druge težave, ki jih povzroči neupoštevanje povezave pečice na ozemljitveni
priključek ali ozemljeno povezavo, ki ima moteno kontinuiteto.
OPOMBA: Ker so na pečici lahko potrebna vzdrževalna dela je priporočljivo, da imate na voljo drugo
stensko vtičnico, da lahko pečico povežete z le-to, če jo odstranite iz prostora, v katerega je nameščena.
Napajalni kabel lahko zamenja samo osebje tehničnega servisa s kablom z enakovrednimi kvalifikacijami.
SL 75
Page 76

1.3 Priporočila
•Priporočamo, da po vsaki uporabi na hitro očistite pečico.
•Sten pečice ne oblagajte z alu-folijo ali v oblogami za enkratno uporabo, ki so na voljo v trgovinah, saj bi
se te snovi lahko stalile ob stiku z vročim emajlom, kar bi poškodovalo emajl.
•Ne nastavljajte previsoke temperature, saj se bo tako pečica manj umazala in se ne bo razvijal dim.
Bolje je, da nekoliko znižate temperaturo in podaljšate čas pečenja.
•Tablica s podatki je ob strani pečice.
• V pečici poleg priložene opreme uporabljajte samo ustrezne pekače, odporne na zelo visoke
temperature.
1.4 Namestitev In Priključitev
Za priključitev aparata in morebitno vgradnjo poskrbi kupec in ni odgovornost proizvajalca. Morebitni
posegi s strani pooblaščenega servisa niso vključeni v garancijo. Električna inštalacija, na katero bo aparat
priključen, mora biti urejena v skladu z veljavnimi lokalnimi predpisi in v skladu z navodili
proizvajalca, zato priporočamo, da vam električno inštalacijo pred priključitvijo aparata pregledajo
usposobljeni strokovnjaki. Morebitna napačna priključitev in namestitev lahko povzroči poškodbe oseb,
živali ali premoženja. Proizvajalec in prodajalec ne prevzemata odgovornosti za morebitne poškodbe oseb
in/ali nastalo materialno škodo, do katere bi prišlo zaradi napačne priključitve in/ali vgradnje aparata.
Dovoljena je vgradnja pečice pod delovni pult ali v nišo v visoki kuhinjski omarici. Zagotoviti morate
ustrezno kroženje zraka, ki je potrebno za hlajenje in zaščito delov v notranjosti. Upoštevajte mere, ki so
navedene na skici na zadnji strani teh navodil.
1.5 Ravnanje z odpadki in okoljske zaščita
Ta naprava je označena v skladu z določili Evropske direktive 2012/17/EU o odpadni
električni in elektronski opremi (OEEO). OEEO so tako snovi, ki onesnažujejo okolje (lahko
negativno učinkujejo na okolje) kot osnovni sestavni deli (ki jih je možno ponovno
uporabiti). Pomembno je pravilno ravnati z OEEO, da pravilno odstranimo in zavržemo vse
snovi, ki onesnažujejo, okolje, ter obnovimo in recikliramo vse materiale.
Kot posamezniki lahko pomembno vplivamo na to, da OEEO ne postane okoljska težava;
upoštevati moramo le nekaj osnovnih pravil:
• Z OEEO ne smemo ravnati kot z ostalimi hišnimi odpadki.
• OEEO moramo odnesti v ustrezne centre za zbiranje odpadkov, ki jih upravlja občina ali pooblaščeno
podjetje. V več državah imajo urejen prevzem večjih kosov OEEO na domu.
• Ob nakupu nove lahko staro napravo vrnemo prodajalcu, ki jo je dolžen brezplačno prevzeti na osnovi
ena za eno, če je oprema enake vrste in ima enake funkcije kot dobavljena.
PRIHRANEK NA ENERGIJI IN SPOŠTOVANJE DO OKOLJA
Če je le mogoče, se izognite predgrevanju pečice in pečico kar se da napolnite z živili. Vrata pečice
odpirajte kar se da poredko, saj ob vsakem odpiranju toplota uhaja iz pečice. Občutno boste prihranili na
energiji, če boste pečico izklopili 5 do 10 minut pred predvidenim koncem pečenja in izrabili preostanek
toplote, ki je še v pečici. Tesnila naj bodo vedno čista in nepoškodovana, da preprečite morebitno
uhajanje toplote iz pečice. Če imate na izbiro tudi časovna obdobja z nižjo ceno električne energije, s
pomočjo programa za zamik vklopa začetka pečenja enostavno prihranite, če pečenje zamaknete na
čas, ko je električna energija cenejša.
1.6 Izjava O Skladnosti
Deli aparata, ki prihajajo v stik z živili, so izdelani skladno z določili, navedenimi v direktivi 89/106.
Z oznako na tem proizvodu izjavljamo, na lastno odgovornost, da je proizvod skladen z vsemi
evropskimi zahtevami o varnosti, zdravju in varstvu okolja, ki se v zakonodaji nanašajo na ta izdelek.
SL 76
Page 77

2. Opis izdelka
2.1 Pregled
1
3
5
4
6
2
1. Krmilna plošča
2. Položaji police
(prečna žična rešetka, če je priložena)
3. Kovinska rešetka
4. Ponev
5. Ventilator (za jekleno ploščo)
6. Vrata pečice
2.2 Dodatna oprema (odvisno od modela)
2
Kovinska rešetka
1
Na rešetko postavite različne pekače.
Ponev
Globji pekač je namenjen lovljenju maščobe, ki
med peko na žaru.
Stranska žice mreže
3
Bočni žice mreže, če so vključeni.
SL 77
Page 78

2.3 Prvo Upotreba
Pred prvo uporabo pečico očistite.
• Obrišite vse zunanje površine z vlažno krpo.
• Operite vso opremo in obrišite notranjost pečice z raztopino vode in detergenta za pomivanje posode.
• Vklopite prazno pečico za približno 1 uro na najvišjo temperaturo, da odstranite vonj po novem. Pred
tem poskrbite za zračenje prostora!
3. Uporaba pečice
3.1 Opis zaslona (na dotik, dvojni predel)
1. Časovnik/samodejni način
2. Funkcija ventilatorja
3. Način odmrzovanja
4. Prikaz temperature ali časa
5. Upravljalni elementi nastavitve LCD zaslona
6. Tipka za izbiro funkcije
7. Gumb za izbiro programa
OPOZORILO
Prvi postopek, ki ga morate opraviti po
namestitvi ali po izpadu napajanja je, da
nastavite čas (izpad napajanja se je pojavil, če na
zaslonu utripa 12:00).
200°-> Temperatura LED “°” utripa, dokler ni
dosežena prikazana temperatura.
HOT -> Ko se program zaključi, če je pečica še
vroča, je na zaslonu prikazano »HOT« (VROČE),
izmenjujoče s časom, tudi če so gumbi v položaju
OFF (IZKLOP).
SL 78
Page 79

FUNKCIJA
TIHI NAČIN
NASTAVITE
ČAS
AKTIVIRANJE DEAKTIVIRANJE
• Levi gumb za izbiro
funkcije pečice obrnite
na »Silence mode« (Tihi
način)
• Obrnite levi gumb za
izbiro funkcije v položaj
»Set the time« (Nastavitev časa).
• Čas nastavite z
gumboma +«+ ali »-«.
• Gumb za izbiro
funkcije pečice obrnite
na položaj OFF (Izklop).
• Gumb za izbiro
funkcije pečice obrnite
na položaj OFF
(Izklop).
DELOVANJE NAMEN
• Omogoča izklop zvoka
minutnega opomnika.
• Omogoča nastavitev
časa, ki je prikazan na
zaslonu.
• Če želite izklopiti zvok
minutnega opomnika
• Za nastavitev časa
Opomba: Čas nastavite ob
prvem nameščanju pečice ali
po izpadu napajanja (ura
prikazuje utripajoč čas
12.00)
TRAJANJE
PEČENJA
KONEC
PEČENJA
ŠTEVEC
MINUT
ZAKLEPANJE
ZA VARNOST
OTROK
•2-krat pritisnite na
srednji gumb.
•S pomočjo tipk "-" or
"+" nastavite želeno
trajanje pečenja.
• Sprostite pritisk na vse
tipke Izberite funkcjio
pečenja s pomočjo
stikala za izbiranje funkcij
pečice.
•3-krat pritisnite na
srednjo tipko
• S pomočjo tipk "-" "+"
nastavite čas, ko želite,
da se pečica izklopi.
• Sprostite pritisk na vse
tipke
• Izberite funkcjio
pečenja s pomočjo
stikala za izbiranje
funkcij pečice
• 1-krat pritisnite na
srednji gumb S pomočjo
tipk "-" "+" nastavite
želeni čas Sprostite
pritisk na vse tipke
•Funkcijo Zaklepanja za
varnost otrok aktivirate tako,
da vsaj 5 sekund pritiskate
na tipko Set (+). Od tega
trenutka dalje so vse druge
funkcije zaklenjene, na
prikazovalniku pa izmenično
utripa STOP oz. nastavljeni
čas.
• Ko preteče nastavljeni
čas, se pečica samodejno
izklopi. Če želite
predčasno prekiniti
pečenje, ali obrnite
stikalo za izbiranje funkcij
na 0, ali pa nastavite čas
na 0:00 (s pomočjo tipke
SELECT in tipk "-" "+")
• Ob nastavljenem času
se pečica izklopi. Če
želite predčasno prekiniti
pečenje, ali obrnite
stikalo za izbiranje funkcij
na 0.
• Ko preteče nastavljeni
čas, se oglasi zvočni signal
(po določenem času sam
utihne, lahko pa ga
predčasno izklopite s
pritiskom na tipko SELECT.
• Funkcijo zaklepanja za
varnost otrok lahko
deaktivirate tako, da
ponovno vsaj 5 sekund
pritiskate na tipko Set (+). S
tem prekličete zaklepanje in
lahko ponovno izbirate vse
funkcije.
SL 79
• Omogoča, da nastavite
ustrezno trajanje pečenja
za izbrano jed.
• Če želite preveriti, koliko
časa je še ostalo do konca
pečenja, 2-krat pritisnite
na tipko SELECT.
• Če želite spremeniti
nastavljeno trajanje
pečenja, pritisnite tipko
SELECT in tipke "-" "+"
• Omogoča vam, da
določite čas izklopa
pečice.
• Če želite preveriti
nastavljeni čas za izklop
pečice, 3-krat pritisnite na
srednjo tipko.
• Če želite spremeniti
nastavljeni čas, pritisnite
tipko SELECT in tipke "-"
"+“
•Po preteku nastavljenega
časa se oglasi zvočni signal.
•Med odštevanjem je na
prikazovalniku prikazan čas
do izteka nastavljenega
časa.
• Zvočni signal izklopite s
pritiskom na katerokoli tipko.
S pritiskom na srednjo tipko
prikličete nazaj funkcijo ure.
•Ta funkcija se običajno
uporablja v kombinaciji s
funkcijo »trajanje pečenja«. Če
na primer želite, da se jed
peče 45 minut, radi pa bi, da
je gotova ob 12:30, enostavno
izberete želeno funkcijo,
nastavite čas za trajanje
pečenja na 45 minut, nato pa
še čas konec pečenja na 12:30.
Ob nastavljenem času za
izklop, se pečica samodejno
izklopi, na kar vas opozori
zvočni signal.
Pečenje se samodejno začne
ob 11:45 (12:30 minus 45
minut) in se nadaljuje do časa,
nastavljenega za konec
pečenja, nato pa se pečica
samodejno izklopi.
OPOZORILO.
Če nastavite samo čas za
KONEC PEČENJA, ne da bi
določili trajanje pečenja, se
pečica takoj vklopi in se nato
izklopi ob času, nastavljenem
za konec pečenja.
• Programsko uro na pečici
lahko uporabljate kot
običajno kuhinjsko uro
(aktivirate jo lahko ne glede
na to, če pečico uporabljate
ali ne).
Page 80

3.2 Načini pečenja
Funkcije
*
Privzeto
T °C
60 60 ÷ 60
180
210
220
210
40
Gumb
termost.
40 ÷ 40
50 ÷ 240
50 ÷ 240
50 ÷ 280
50 ÷ 230
Funkcije
Za prižiganje luči v pečici
Samodejno se aktivira tudi ventilator za hlajenje (modeli z ventilatorjem)
ODTALJEVANJE: Okoli živila kroži zrak sobne temperature; tako se živilo hitro
odtali z ohranjanjem vseh lastnosti živila.
Ohranjanje toplote: Ta način je primeren za pogrevanje kuhanih jedi. Jed
postavite na drugo višino šteto od zgoraj. Primeren je tudi za odtaljevanje
kruha, piz in peciva – živilo postavite na spodnjo višino. Prednastavljena je
temperatura 60°C, ki je ni mogoče spreminjati.
VENTILIRANA PEČICA : Delujeta oba grelca ter ventilator, tako da vroč zrak
kroži v pečici. Ta način priporočamo za peko perutnine, sladic, rib in zelenjave.
Enakomerna temperatura v notranjosti skrajša čas pečenja in predhodnega
segrevanja pečice. Naenkrat lahko pečete različne jedi; vonji se ne bodo
pomešali. Če pečete več jedi hkrati, pečenje podaljšajte za približno 10 minut.
ZGORNJI/SPODNJI GRELEC : Delujeta spodnji in zgornji grelec;ta funkcija je
primerna za tradicionalni način peke in jo priporočamo za peko krač,divjačine,
peciva, keksov, jabolk ter za vse jedi, ki jih želite hrustljavo zapeči.
VENTILATOR IN SPODNJI GRELEC (a): Pečico segreva spodnji grelec, vroč zrak
pa zahvaljujoč ventilatorju kroži v notranjosti pečice. Funkcija je namenjena
peki občutljivih jedi (pite - narastki). Jed se ne izsuši in bolje naraste, predvsem
to velja za kolače, kruh in druge jedi, ki se morajo segrevati od spodaj. Pekač
potisnite v spodnjo višino vodila.
ŽAR S KROŽENJEM ZRAKA (a): pri zaprtih vratih pečice. Grelec segreva zrak, ki
s pomočjo ventilatorja kroži okoli živila. Za rdeče meso je potrebno predhodno
**
*Testni program skladno s CENELEC EN 60350-1 za določanje energijskega razreda.
200
L3
L3
ECO
150 ÷ 220
L1 ÷ L5
L1 ÷ L5
ECO÷SUPER
ogrevanje pečice. Ta funkcija je primerna za peko debelejših kosov mesa, a
pazite, da živilo ni preblizu grelca. Ta način je primeren za tudi za peko večje
količine perutnine, klobas, rdečega mesa... Postavite živilo na sredino rešetke,
v srednji višini ter podstavite pekač za lovljenje maščobe. Na polovici
predvidenega časa pečenja živilo obrnite.
ŽAR : Pri zaprtih vratih pečice.Ta funkcija je primerna za peko tanjših kosov
mesa. Nastavljanje temperature ni mogoče. Najprej pečico segrevajte 5 minut,
nato postavite jed vanjo. Primerno za peko kebaba, mesa na žaru, gratiniranje ..
Belo meso naj bo od grelca bolj oddaljeno, peče se dlje časa, a bo bolj okusno.
Rdeče meso ali ribe pecite na rešetki, pod katero potisnete pekač za lovljenje
maščobe.
SUPER ŽAR :Na voljo sta dva položaja:
Žar: 2200 W, Super žar: 3000 W
PYRO : Pri pečicah s funkcijo pirolize se notranjost pečice očisti samodejno.
Na voljo sta možnosti ECO in SUPER.
SL 80
Page 81

4. Oven cleaning and maintenance
4.1 General notes on cleaning
Življenjski cikel aparata se lahko podaljša z rednim čiščenjem. Pred izvajanjem čiščenja počakajte, da se
pečica ohladi. Za čiščenje nikoli ne uporabljajte abrazivnih čistil, jeklene volne ali ostrih predmetov, saj
lahko nepopravljivo poškodujete emajlirane dele. Uporabljajte samo vodo, mila ali detergente na osnovi
belila (amoniak).
STEKLENI DELI
Priporočamo, da stekleno okno po vsaki uporabi pečice očistite z vpojno kuhinjsko brisačo. Če želite
odstraniti bolj trdovratne madeže, lahko uporabite dobro ožeto gobo, namočeno v detergent, in nato
sperite z vodo.
TESNILO OKNA PEČICE
Če je umazano, lahko tesnilo očistite z vlažno gobo.
DODATNA OPREMA
Pred spiranjem in sušenjem očistite dodatke z vlažno gobico z milom: izogibajte se uporabi abrazivnih
detergentov.
PONEV
Po uporabi žara odstranite ponev iz pečice. Prelijte vročo maščobo v posodo in z gobico ter sredstvom za
pomivanje posodo operite v vroči vodi. Če mastni ostanki niso odstranjeni, potopite posodo v vodo in
detergent. Alternativno lahko posodo pomijete v pomivalnem stroju ali pa uporabite komercialno čistilo
za pečice. Umazane posode nikoli ne postavite nazaj v pečico.
4.2 Piroliza
Pečica je opremljen s sistemom pirolitskega čiščenja,ki uniči ostanke hrane pri visoki temperaturi.
Postopek se izvaja samodejno s krmilnikom. Nastali plini se »očistijo« s prehajanjem preko naprave za
pirolizo, ki se zažene takoj, ko se začne kuhanje. Ker so za pirolizo potrebne zelo visoke temperature, so
vrata pečice opremljena z varnostno ključavnico. Pirolizo lahko kadarkoli ustavite.
Vrat ni možno odpreti, dokler se ne prikaže varnostna ključavnica.
OPOMBA: Če je nad pečico vgrajena kuhalna plošča, nikoli ne uporabljajte gorilnikov ali električnih plošč
med delovanjem pirolize, s tem boste kuhalno ploščo zaščitili pred pregrevanjem.
Prednastavljena sta DVA CIKLA PIROLIZE:
ECO PYROCLEAN : Očisti zmerno umazano pečico. Deluje v obdobju 90 minut. SUPER PYROCLEAN :
Očisti močno umazano pečico. Deluje v obdobju 120 minut. Pri pečici s pirolitskim čiščenjem nikoli ne
uporabljajte komercialno dostopnih čistilnih sredstev!
Nasvet: Izvajanje pirolitskega čiščenja takoj po kuhanju vam omogoča, da izkoristite preostalo toploto,
kar posledično pomeni prihranek energije.
Pred izvedbo pirolitskega cikla:
Odstranite vse dodatke iz pečice, saj ne prenašajo visoke temperature, ki se uporablja med ciklom
pirolitskega čiščenja; zlasti odstranjevanje rešetk, stranskih vodil in teleskopskih vodil (glejte
poglavje ODSTRANJEVANJE REŠETK IN STRANSKIH VODIL). Pri pečicah s sondo za meso, morate pred
ciklom čiščenja zapreti odprtino s priloženo matico.
• Odstranite vsa večja razlitja ali madeže, saj bi njihovo uničevanje trajalo predolgo. Pretirano velike
količine maščobe bi se tudi lahko vnele ob izpostavljenosti zelo visokim temperaturam cikla
pirolitskega čiščenja.
•Zaprite vrata pečice.
•Pred čiščenjem je treba odstraniti razlito tekočino.
•Čiščenje vrat pečice;
•Odstrani velike ali grobe ostanke hrane iz notranjosti pečice z vlažno gobico. Ne uporabljajte
detergentov;
SL 81
Page 82

•Odstranite vse dodatke in komplet drsnih vodil (če je nameščen);
•Ne postavljajte kuhinjskih krp.
Uporaba cikla pirolize:
1- Gumb za izbiro funkcije pečice obrnite na » «. Na zaslonu je prikazano »ECO« ali »SUP«.
Prenastavljen čas je 90 min, to ga lahko s krmilnikom spreminjate od 90 minut (Eco način) do 120 min
(Sup način) (gumb za nastavitev »+« ali »-«). Če je pečica zelo umazana, je priporočeno podaljšanje časa
na 120 minut, če je pečica zmerno umazana, skrajšajte cikel čiščenja na 90 min.
2- Začetni čas cikla pirolize lahko odložite s spremembo časa »END« (KONEC) s krmilnikom.
3- Po nekaj minutah, ko pečica doseže visoko temperaturo, se vrata samodejno zaklenejo. Cikel pirolize
lahko kadarkoli prekinete z obračanjem gumba za izbiro funkcije nazaj na »0« (za 3 sekunde bo prikazana
beseda »OFF« (IZKLOP)).
4 - Ko se cikel pirolize zaključi, se piroliza samodejno izključi. Na zaslonu je prikazano »END«, dokler so
vrata zaklenjena, in nato »0--n«.
5- Gumb za izbiro funkcije lahko obrnete nazaj na »0«, če je temperatura še vedno visoka, je prikazano
»0--n«, kar vas obvešča, da so vrata zaklenjena.
Uporaba cikla pirolize pri pečicah s krmiljenjem na dotik:
1- Obrnite gumb za izbiro funkcije v položaj za pirolizo. Na zaslonu se prikaže »ECO« ali »SUP«
2- Prenastavljen čas je 90 min, vendar se s krmilnikom lahko spreminja med 90 minut (Eco način) in 120
min (Sup način) (tipka »+« ali »-«). Če je pečica zelo umazana, bi čas morali podaljšati na 120 minut, če je
pečica zmerno umazana, skrajšajte cikel čiščenja na 90 min.
4.3 Funkcija Aquactiva
Postopek AQUACTIVA olajša odstranjevanje maščobe in ostankov živil iz pečice s pomočjo pare.
1. V posodo AQUACTIVA na dnu pečice vlijte 300 ml vode.
2. Izberite funkcijo pečice Statična ( ) pečica ali Gretje ( ) spodaj.
3. Temperaturo nastavite na ikono AQUACTIVA ( ).
4. Pečica naj deluje 30 minut.
5. Po 30 minutah izklopite pečico in počakajte, da se ohladi.
6. Ko je pečica hladna, s krpo obrišite površine v notranjosti.
Opozorilo: Preden se dotaknete pečice, se prepričajte, da se je ohladila. Dokler je pečica še vroča,
bodite zelo previdni, da se ne opečete. Za ta postopek uporabljajte destilirano ali pitno vodo.
300 ml
SL 82
Page 83

4.4 Vzdrževanje
ODSTRANJEVANJE IN ČIŠČENJE STRANSKIH NOSILCEV
1. Odvijte vijak v nasprotni smeri vrtenja urinega kazalca.
2. Odstranite stranske nosilce tako, da jih povlečete k sebi.
3. Očistite stranska stojala v pomivalnem stroju ali z mokro gobo in jih nato takoj posušite.
4. Ko stranske nosilce očistite, jih vstavite nazaj in znova vstavite vijake, zagotovite, da so v celoti priviti.
A
ODSTRANITEV OKNA PEČICE
1. Odprite sprednje okno.
2. Odprite spojke ohišja tečajev na desni in levi strani sprednjega okna tako, da jih potisnete navzdol.
3. Okno znova namestite z izvedbo postopka v obratnem vrstnem redu.
SL 83
Page 84

ODSTRANITEV IN ČIŠČENJE STEKLENIH VRAT
LOW-E
1. Odprite vrata pečice.
2.3.4. Zapahnite tečaje, odstranite vijake in odstranite zgornji kovinski pokrov tako, da ga povlečete
navzgor.
5.6. Odstranite steklo, pazljivo ga povlecite iz vrat pečice (opomba: v pirolitičnih pečicah odstranite tudi
drugo in tretje steklo (če je nameščeno)).
7. Ob koncu čiščenja ali zamenjave sestavite dele v obratnem vrstnem redu.
Na vseh steklih mora biti oznaka »Pyro« čitljiva in nameščena na levi strani vrat, v bližini levega
stranskega tečaja. Na ta način bo natisnjena etiketa prvega stekla bila na notranji strani vrat.
1.
2.
3.
5.
6.
1
2
3
7.
4.
SL 84
Page 85

ZAMENJAVA ŽARNICE
1. Pečico izključite iz napajanja.
2. Odvijte stekleni pokrov, odvijte žarnico in jo nadomestite z novo žarnico istega tipa.
3. Ko ste pokvarjeno žarnico zamenjali, znova namestite stekleni pokrov.
5. Odpravljanje težav
5.1 Pogosto zastavljena vprašanja
TEŽAVA MOŽNI VZROK REŠITEV
Pečica se ne segreje.
Pečica se ne segreje.
Pečica se ne segreje.
Ura ni nastavljena. Nastavite uro.
Varovalo za otroke je vklopljeno.
Funkcija kuhanja in
temperature ni določena.
SL 85
Izklopite varovalo za otroke.
Preverite, ali so nastavitve
pravilne.
Page 86

Техника На Безопасност
• По време на готвене влагата може да кондензира по вътрешността на
фурната или по стъклото на вратата. Това е нормално. За да се намали
този ефект, изчакайте 10-15 минути, след като включите захранването,
преди да поставите храната във фурната. Във всеки случай
кондензацията изчезва, когато фурната достигне температурата на
готвене.
• Гответе зеленчуците в съд с капак вместо в открита тава.
• Избягвайте да оставяте храна вътре във фурната след готвене за повече
от 15/20 минути.
• ПРЕДУПРЕЖДЕНИЕ: Битовият електроуред и неговите открити части, по
време на работа могат да се нагреят до висока температура. Бъдете
внимателни и не се докосвайте до тях.
• ПРЕДУПРЕЖДЕНИЕ: достъпните части могат да станат горещи, когато
фурната се използва. Децата трябва да бъдат държани на безопасно
разстояние.
• Този битов елекроуред може да се използва от деца п о-големи от 8
години, а също и oт хора с нарушени умствени или физически
възможности или, без необходимият опит, само когато са под
наблюдение и са инструктирани относно безопасното използване на
уреда и знаят за
съществуващите опасности.
• Не разрешавайте на деца да играят с фурната.
• Почистването и обслужване на битовият уред не трябва да се извършва
от деца без надзор. Възрастни.
• Битовият уред, по време на своята работа се нагрява до висока
температура. Бъдете внимателни и не докосвайте нагревателните
елементи, разположени във вътрешността на фурната.
• ПРЕДУПРЕЖДЕНИЕ : Битовият електроуред и неговите открити части, по
време на работа могат да се нагреята до висока температура. Не
разрешавайте до него да се докосват малки деца.
• Не използвайтез а почистване на стъклената повърхност на вратата
абразивни почистващи препарати и гъби с метални частици или
стъргалки. Те могат да надраскат повърхността, което да доведе до
напукване или дори счупване на стъклото.
• Преди да почистите фурната трябва да махнете решетката, при
задължително изключен уред. След почистването, поставете отново
решетката по начина описан в инструкциите.
• Използвайте само такъв температурен датчик, какъвто е препоръчан от
производителя.
• Не използвайте парочистачка при почистване на уреда
• Свържете щепсел към захранващия кабел, който е в състояние да
понесе напрежението, тока и натоварването, указани на табелката и има
BG 86
Page 87

контакт за заземяване. Щепселът трябва да е подходящ за товара,
посочен върху етикета и трябва да има свързан към заземяващ контакт,
който да работи. Заземяващият проводник е жълто-зелен на цвят. Тази
операция трябва да се извършва от квалифициран специалист. В случай
на несъвместимост между контакта и щепсела на уреда, попитайте
квалифициран електротехник, който да замени контакта с друг
подходящ тип. Щепселът и контактът трябва да отговарят на действащите
норми на държавата на инсталацията. Свързването към източника на
захранване може да се извърши и чрез поставяне на универсален
прекъсвач между уреда и източника на захранване, който може да
понесе максимално свързано натоварване и който е в съответствие с
действащото законодателство. Жълто-зеленият заземяваш кабел не
трябва да се прекъсва от прекъсвача. Гнездото или свръзката,
използвана за връзката, трябва да са лесно достъпни, когато уредът е
монтиран.
• Прекъсването на връзката може да се постигне чрез достъпност на
щепсела или чрез включване на превключвател в неподвижното
окабеляване в съответствие с правилата за окабеляване.
• Ако захранващият кабел е повреден, той трябва да бъде заменен с
кабел или специален пакет, предоставен от производителя, или като се
свържете с отдела за обслужване на клиенти.
• Видът на захранващия кабел трябва да е H05V2V2-F.
• Неспазването на горното може да застраши безопасността на уреда и
да обезсили гаранцията.
• Преди почистването трябва да се извади излишъкът от разлетия
материал.
• По време на пиролизния процес на почистване, повърхностите могат
да се нагреят повече от обичайното, поради това децата трябва да се
държат на безопасно разстояние.
• Уредът не трябва да се монтира зад декоративна врата, за да се избегне
прегряване.
• Когато поставите рафта вътре, уверете се, че стоперът е насочен нагоре
и в задната част на кухината.
Рафтът трябва да бъде пъхнат изцяло в кухината
• ПРЕДУПРЕЖДЕНИЕ: Не облицовайте стените на фурната с алуминиево
фолио или други материали за еднократна употреба, които се продават в
магазините. Когато влязат в пряк досег с нагорещения емайл, съществува
риск алуминиевото фолио и други подобни материали да се разтопят и
да повредят емайлираната вътрешна повърхност.
• ПРЕДУПРЕЖДЕНИЕ: Никога не сваляйте уплътнението на вратата на
фурната.
• Не е необходима допълнителна операция/настройка, за да се работи с
уреда при номиналните честоти.
BG 87
Page 88

Pезюме
Общи Мерки За Безопасност
89
Описание на продукта
91
Използване на фурната
92
Почистване и поддръжка на фурната
95
1.1 Инструкции за безопасност
1.2 Електрическа безопасност
1.3 Препоръки
1.4 Монтаж
1.5 Управление на отпадъците
и защита на околната среда
1.6 Декларация за съответствие
2.1 Общ изглед
2.2 Приспособления
2.3 Първа употреба
3.1 Описание на дисплея
3.2 Режими на готвене
4.1 Общи бележки по почистването
4.2 Пиролиза
4.3 AQUACTIVA функция
4.4 Поддръжка
• Изваждане и почистване на скарата
• Сваляне на прозореца на фурната
• Сваляне и почистване на стъклената
врата
• Смяна на крушката
Отстраняване на проблеми
99
5.1 ЧЗВ
BG 88
Page 89

1. Общи Мерки За Безопасност
Благодарим Ви, че избрахте един от нашите продукти. За
да имате възможно най-добър резултат при използването
на фурната, внимателно прочетете това ръководство.
Препоръчваме Ви да запазите настоящото ръководство за
монтаж и експлоатация и при нужда да се обръщате към
него.
Когато уредът е в експлоатация всички достъпни части са
горещи. Внивайте да не се докосвате до тези елементи.
При първият пуск на фурната, може да се усети неприятна
миризма. Това става защото изолационните елементи се
загряват за първи път. Това е абсолютно нормално и няма
повод за притеснение. Изчакайте уреда да изстине и го
забършете добре. След това е готов за нормална експлоатация.
Една фурна по своята същност на работа става много гореща. Особено стъклото на вратата на фурната.
1.1 Инструкции за безопасност
Използвайте фурната единствено по предназначение - само за приготвяне на храна. Всяка друга употреба,
например като източник на топлина, се смята за неправилна и следователно опасна. Производителят не носи
отговорност за щети, възникнали вследствие на неуместната, неправилната или неразумната употреба на
фурната.
Използването на всеки един електроуред предполага спазването на някои основни правила:
- Не изключвайте от контакта, като дърпате кабела.
- Не докосвайте уреда с мокри или влажни ръце или крака.
- Не се препоръчва използването на адаптери, разклонители и удължители.
В случай на повреда и/или не недобра работа, изключете уреда и не се опитвайте да го поправите сами.
1.2 Електрическа безопасност
УВЕРЕТЕ СЕ, ЧЕ СВЪРЗВАНЕТО НА ЕЛЕКТРИЧЕСКИТЕ КАБЕЛИ СЕ ИЗВЪРШВА ОТ ЕЛЕКТРОТЕХНИК
ИЛИ КВАЛИФИЦИРАН ТЕХНИК. Електрическата инсталация, към която е свързана фурната, трябва да
отговаря на изискванията на приложимото законодателство в страната, в която се ползва уредът.
Производителят не носи отговорност за щети, причинени от неспазването на тези указания. Фурната
трябва да бъде свързана към електрозахранване със заземено контактно гнездо или многополюсен
прекъсвач, в зависимост от приложимото законодателство в страната, в която се извършва монтажът.
Електрозахранващата инсталация трябва да бъде защитена с подходящи предпазители, а
използваните проводници трябва да имат напречно сечение, подходящо за провеждане на тока,
необходим за захранване на фурната.
СВЪРЗВАНЕ
Фурната е оборудвана със захранващ кабел, който трябва да се свърже единствено към източник 220 -
240 V AC 50 Hz между фазите или между фазата и нулата. Преди да свържете фурната към захранването,
е важно да извършите проверка на:
- стойностите на напрежението с фазомер и
- настройката на прекъсвача.
Заземяващият проводник, който е свързан към заземяваща клема на фурната, трябва да бъде свързан
към заземяващата клема на захранването.
ПРЕДУПРЕЖДЕНИЕ
Преди да свържете фурната към захранването, поискайте от квалифициран електротехник да провери
изправността на заземяващата клема на захранването. Производителят не носи отговорност за
инциденти или други проблеми, възникнали поради грешно заземяване и/или неизправности в
заземителните клеми.
ЗАБЕЛЕЖКА: Тъй като фурната може да се нуждае от поддръжка, препоръчително е да разполагате със
свободно контактно гнездо, в което да бъде включена, ако бъде преместена от мястото, на което е
монтирана. Захранващият кабел трябва да се подменя единствено от електротехник, занимаващ се с
поддръжка на електроуреди.
BG 89
Page 90

1.3 Препоръки
Почиствайте фурната след всяко ползване и така ще можете да я поддържате безупречно чиста.
Не облепвайте вътрешността на фурната с алуминиево фолио или защитно фолио за еднократна
употреба. При докосване до нагорещените емайлирани повърхности, алуминиевото фолио и други
видове защита, може да се разтопи и така да увреди емайла на вътрешните стени. За да предотвратите
прекомерно зацапване на фурната и дим със силен мирис, който се образува вследствие от това,
препоръчваме да не използвате фурната на много висока температура. По-добре е да удължите
времето за готвене, като намалите леко температурата. Освен предоставените заедно с фурната
приспособления, препоръчваме да използвате само тави и форми за печене, които имат повишена
топлоустойчивост.
1.4 Монтаж
Монтажът на фурната не е задължение на производителя. Ако е необходимо съдействието на
производителя за отстраняването на повреди, произтичащи от неправилен монтаж, това съдействие
не се покрива от гаранцията. Трябва да се следват указанията за монтаж, които са предназначени за
квалифицирани професионалисти. Неправилният монтаж може да причини материални щети или
наранявания на хора и животни. Производителят не носи отговорност за такива щети или
наранявания.
Фурната може да бъде разположена на високо място в колона или вградена под кухненски плот. Преди
да я монтирате, се уверете че в определеното за фурната пространство има добра вентилация и
безпрепятствен достъп на свеж въздух, който е необходим за охлаждането и защитата на вътрешните
елементи на фурната. Изработете отворите в съответствие с посочените на последната страница
спецификации в зависимост от начина на монтаж.
1.5 Управление на отпадъците и защита на околната среда
Този уред е маркиран съгласно европейска Директива 2012/19/EО за Отпадъци от
електрическо и електронно оборудване (WEEE). WEEE съдържа едновременно
замърсяващи субстанции (които могат да окажат отрицателно въздействие върху
околната среда) и основни компоненти (които могат да се използват повторно). Важно е
WEEE да бъдат обработени по специфични начини с огрлед правилното отстраняване и
изхвърлянето на всички замърсители и възвръщането и рециклиране на всички
материали.
проблем за околната среда; важно е да бъдат следвани някои основни правила:
• WEEE не трябва да бъдат третирани като домакински отпадъци.
• WEEE трябва да бъдат предавани в съответнтие събирателни пунктове, управлявани от общината или
регистрирани компании. В много държави, за големи WEEE, може да се предлага събиране от
домовете.
• когато купувате нов уред, старият може да бъде върнат на търговеца, който да го приберете
безплатно на база едно-към едно, докато оборудването е от същия тип има същите функции като
доставеното оборудване
СПЕСТЯВАНЕ НА ЕНЕРГИЯ И ОПАЗВАНЕ НА ОКОЛНАТА СРЕДА
Когато е възможно избягвайте предварителното загряване на фурната. По време на готвене отваряйте
вратата на фурната възможно най-малко, защото при всяко отваряне се губи топлина. За значителна
икономия на енергия изключете фурната 5 – 10 минути преди планираният край на времето за готвене
и използвайте остатъчната топлина, която фурната продължава да генерира. За да избегнете загуба на
топлина поддържайте чисти и в ред уплътненията на фурната. Ако имате различни тарифи за
електрическата енергия използвайте отложеният старт, за да стартирате готвенето на по-ниската
тарифа.
Отделните индивиди могат до окажат важна роля, осигурявайки, че WEEE няма да станат
1.6 Декларация за съответствие
Частите на този уред, които могат да влязат в контакт с храни, съответстват на разпоредбите на
Директива ЕИО 89/109.
Поставяйки и маркирайки този продукт, ние декларираме на наша отговорност, че той е в
съотвествие със всички Европейски изисквания за безопастност, здравни и екологични норми.
BG 90
Page 91

След като разопаковате фурната, уверете се, че тя не е била повредена по някакъв начин. Ако имате
някакви съмнения , не я използвайте: свържете се с квалифициран човек. Съхранявайте опаковъчните
материали като найлонови торбички, полистирол, или пирони извън обсега на деца, защото те са
опасни за тях.
2. Описание на продукта
2.1 Общ изглед
1
3
5
4
6
2.2 Приспособления
Метална скара
1
Служи за поставяне на тави и чинии.
Cтраничните телени мрежи
3
1. Панел за управление
2. Водачи (странична метална решетка,
ако е включена)
2
3. Метална скара
4. Тава за мазнини
5. Вентилатор (зад металната плоча)
6. Врата на фурната
2
Тава за мазнини
Служи за събиране на мазнината, която капе,
докато на скарата се готви храна.
Странично тел мрежата, ако е включен.
BG 91
Page 92

2.3 Първа употреба
ПРЕДВАРИТЕЛНО ПОЧИСТВАНЕ
Почистете фурната, преди да я използвате за пръв път. Забършете външните повърхности с
навлажнена мека кърпа. Измийте всички приспособления и забършете вътрешността на фурната
с разтвор на топла вода и препарат за миене. Включете фурната на максимална температура и я
оставете да работи около 1 час - така ще бъдат отстранени остатъчните миризми на “ново”.
3. Използване на фурната
3.1 Описание на дисплея
1. Таймер/автоматичен режим
2. Готвене с вентилатор
3. Режим за размразяване
4. Дисплей за температурата или часа
5. Бутони за настройка на LCD дисплея
6. Копче за избор на функция
7. Копче за избор на програма
ПРЕДУПРЕЖДЕНИЕ
Първото нещо, което трябва да направите
след монтажа или след прекъсване на
захранването, е да настроите часовника (ако е
имало п рекъ с в а не н а захра н в а н ето,
часовникът ще мига и ще показва 12:00).
200°-> Индикаторът за температурата “°” ще
мига, докато не бъде достигната зададената
температура.
HOT -> Когато някоя програма приключи, ако
фурната все още е гореща, на дисплея се
показва надписът "HOT", който се редува с
часа, дори копчетата да са в изключена
позиция.
BG 92
Page 93

Функция
ТИХ РЕЖИМ
Настройка
на часовника
Време за
готвене
Край на
готвенето
Как да активираме
• Завъртете копчето за
избор на функция
(вляво) до позицията за
тих режим.
• Завъртете копчето за
избор на функция
(вляво) до позицията за
настройка на часовника.
• Използвайте бутоните
" + " и " – ", за да
настроите часовника.
• Натиснете централния
бутон 2 пъти.
• Натиснете бутони "-"
или "+»
за да изберете
продължителност
• о с в о б о д ет е вс ич ки
бутони
•Изберете функция със
селектора
Как да изключите
• Завъртете копчето
за избор на функция
в изключена позиция.
• Завъртете копчето • Позволява да
за избор на функция
в изключена позиция.
• В зададеното време,
фурната ще се изключи.
За да изключите ръчно
фурната поставете
селектора в позиция O.
Какво прави
• Позволява да
изключите звуковия
сигнал за напомняне
настроите часовника,
който се показва на
дисплея.
• Позволява ви да
зададете края на времето
за готвене.
• За да проверите
предварително
зададеното време
натиснете
• централния бутон 3 пъти
За промяна настройките
SELECT + "-" "+"
За какво се използва
• За да изключите звуковия
сигнал за напомняне.
• За да настроите часовника.
ВАЖНО: Настройте
часовника, след като
монтирате фурната или след
спиране на тока (часовникът
мига и показва 12:00).
• Натиснете някой бутон
за да спрете сигнала.
Натиснете централния бутон
за да се върнете до
часовника.
Таймер
Заключване
•Натиснете централния
бутон 1 път
•Натиснете бутони "-" "+"
за да изберете време
•освободете всички
бутони
BG 93
• Аларма в края на времето.
• По време на работа
се показва ост. време
• Позволява да използвате
фурната като алармен
часовник (при включена и
изключена фурна).
Page 94

3.2 Режими на готвене
Селектор
функции
*
наc
Темп. °C по
подразби-
ране
40
60 60 ÷ 60
180
210
220
Термостат
селектор
40 ÷ 40
50 ÷ 240
50 ÷ 240
50 ÷ 280
LAMPADA: accende la luce interna.
Включва осветлението на фурната.
Това ще активира автоматично вентилатора за охлаждане (само при
модели, които го имат)
ПРИТОПЛЯНЕ: Препоръчва се за притопляне на вече сготвена храна –
поставете съда с храната на второто ниво отгоре надолу – или за размразяване
на хляб, пица или тестени изделия – поставете съда на най- долното ниво.
Температурата е фабрично настроена на 60°C и не може да се променя.
Готвене на вентилатор: Използват се долен и горен нагреватели заедно с
вентилатора, който циркулира въздуха вътре във фурната. Препоръчва се
за зеленчуци, риба и др. Топлината навлиза в храна подобре и времената
за претопляне и готвене се намаляват. Можете да приготвяте различни
храни едновременно. Този метод дава много добра дистрибуция на
топлината и миризмите не се смесват. Може да оставите около 10 мин
повече когато готвите повече от 1 ястие.
Натурална конвекция : Използват се долен и горен нагреватели.
Стандартна форма на печене. Идеална за печене на месо , печене на
бисквити. Прави храната вкусна и хрупкава
ФУНКЦИИ
210
50 ÷ 230
**
*Testado de acordo com a norma CENELEC EN 60650-1 utilizada para definição energética.
200
L3
L3
ECO
150 ÷ 220
L1 ÷ L5
L1 ÷ L5
ECO÷SUPER
Вентилатор и долен нагревател Идеална за деликатни ястия (пайове ,
суфлета )
Грил с вентилатор : Използвайте турбо грил със затворена врата.
Горен нагревател + вентилатор за циркулиране на въздуха във фурната.
Предварително нагряване е нужно само за червени меса. Поставете
храната на рафта на средното ниво. Сложете отдолу тавичката за мазнини
, за да събере отделeните сокове. Уверете се че храната не е прекалено
близо до грила. По средата на готвенето обърнете храната.
Грил : Използва се само горния нагревател и можете да настроите
температурата. 5 мин предварително нагряване са нужни за да загреете
добре елементите. Идеален за кебап. Белите меса трябва да се държат на
дистанция от грила. Времето за готвене е по-дълго но месото е по-вкусно.
Можете да слагате червените меса и риба на рафта с тавичката за
мазнини отдолу.
Супер грил : Фурнaта има 2 позиции на грила:
Grill : 2200 W Grill SUPER : 3000 W
ПИРОЛИЗА
BG 94
Page 95

4. Почистване и поддръжка на фурната
4.1 Общи бележки по почистването
Жизненият цикъл на този уред може да бъде удължен, като го почиствате редовно. Изчакайте
фурната да изстине, преди да извършвате ръчни дейности по почистването ѝ. Никога не използвайте
абразивни препарати, телени четки или остри предмети за почиствате, за да избегнете
непоправимо увреждане на емайлираните части. Използвайте само вода, сапун или препарати на
основа на белината (амонячни).
СТЪКЛЕНИ ЧАСТИ
Препоръчително е да почиствате стъкления прозорец с попиваща кухненска кърпа след всяко
ползване на фурната. За премахване на по-упорити петна можете да използвате напоена с препарат
гъба, която сте изцедили добре, и след това изплакнете с вода.
УПЛЪТНЕНИЕ НА ПРОЗОРЕЦА НА ФУРНАТА
Ако е зацапано, уплътнението може да бъде почистено с леко навлажнена гъба.
ПРИСПОСОБЛЕНИЯ
Почиствайте приспособленията с мокра насапунисана гъба, преди да ги изплакнете и подсушите.
Избягвайте използването на абразивни препарати.
ТАВА ЗА МАЗНИНИ
След като използвате скарата, извадете тавата за мазнини от фурната. Излейте горещата мазнина в
подходящ съд и измийте тавата с гореща вода, като използвате гъба и препарат за миене.
Ако останат неизмити мазни петна или натрупвания, накиснете тавата във вода с препарат. Можете
също така да измиете тавата в съдомиялна или да използвате препарат за почистване на фурни.
Никога не поставяйте тавата неизмита обратно във фурната.
4.2 Пиролиза
Фурната разполага с пиролитична система за почистване, която унищожава остатъците от храна с
нагряване до висока температура. Операцията се извършва автоматично и се избира от копчето за
програма. Отделяният при процеса дим се "пречиства", като преминава през пиролизатор, който се
включва веднага щом започне готвенето. Тъй като пиролизаторът изисква много висока
температура, вратата на фурната се заключва с оглед Вашата безопасност. Пиролизаторът може да
бъде спрян по всяко време. Вратата не може да бъде отворена, докато символът за заключване
свети.
ЗАБЕЛЕЖКА: Ако над фурната е монтиран плот за вграждане, никога не включвайте нито газовите,
нито електрическите котлони, докато пиролизаторът работи, защото в противен случай плотът ще
прегрее.
Предварително зададени са ДВА ПИРОЛИТИЧНИ ЦИКЪЛА:
ЕКО ПИРОЛИЗА – за почистване на средно замърсена фурна. Процедурата продължава 90 минути.
СУПЕР ПИРОЛИЗА – за почистване на силно замърсена фурна. Процедурата продължава 120 минути.
Никога не използвайте продавани в търговската мрежа препарати за почистване на пиролитична
фурна!
Съвет: Ако стартирате пиролитичното почистване веднага след приключване на готвенето, ще
можете да се възползвате от остатъчната топлина и така да спестите енергия.
Преди да включите пиролитично почистване:
Извадете от фурната всички приспособления, защото те не могат да издържат на високата
температура, при която се извършва пиролитичното почистване. По-конкретно извадете
скарата, страничните стойки и телескопичните водачи (вж. раздел "ИЗВАЖДАНЕ НА СКАРАТА И
СТРАНИЧНИТЕ СТОЙКИ"). При фурни с термометър за месо е необходимо, преди да стартирате
пиролитичното почистване, да затворите отвора с предоставената гайка.
• Отстранете разлети течности и по-големите петна, тъй като премахването им ще отнеме твърде
много време. Възможно е твърде големите количества мазнина да се възпламенят, когато бъдат
подложени на много високите температури на пиролитичното почистване.
• Затворете вратата на фурната.
• Преди почистване отстранете големите петна или разлети течности.
• Почистете вратата на фурната.
BG 95
Page 96

• Отстранете едрите остатъци от храна от вътрешността на фурната с влажна гъба. Не използвайте
почистващи препарати.
• Извадете всички приспособления и плъзгащата се стойка (ако има такава).
• Не използвайте кърпи за почистване на съдове.
Стартиране на пиролитичното почистване:
1- Завъртете копчето за избор на функция на позиция " ". На дисплея ще се изпише "ECO" или
"SUP". Фабрично зададената продължителност е 90 мин. Тя може да бъде променяна от 90 мин. (в
еко режим) до 120 мин. (в супер режим) от програматора (бутоните за настройка " + " и " – "). Ако
фурната е силно замърсена, препоръчваме да увеличите времето на 120 мин., а ако е средно
замърсена – да го намалите на 90 мин.
2- Възможно е да отложите началото на почистването, като промените времето за край (END) с
програматора.
3- След няколко минути, когато температурата във фурната се повиши, вратата ще се заключи
автоматично. Пиролитичното почистване може да бъде спряно по всяко време, като завъртите
копчето за избор на функция обратно на позиция "0" (на дисплея ще се изпише "OFF" за 3 секунди).
4- Когато почистването приключи, пиролизаторът ще се изключи автоматично. На дисплея ще се
появи надпис "END", който ще остане, докато вратата е заключена. След това ще се изпише "0--n".
5. Можете да завъртите копчето за избор на функция обратно на "0", но ако температурата
продължава да е висока, ще се появи надпис "0--n", за да укаже, че вратата е заключена.
Използване на пиролитичното почистване при фурни със сензорно управление:
1- Завъртете копчето за избор на функция на позицията за пиролиза. На дисплея ще се изпише "ECO"
или "SUP".
2- Фабрично зададената продължителност е 90 мин. Тя може да бъде променяна от 90 мин. (в еко
режим) до 120 мин. (в супер режим) от програматора (бутоните за настройка " + " и " – ").
Ако фурната е силно замърсена, препоръчваме да увеличите времето на 120 мин., а ако е леко
замърсена – да го намалите на 90 мин.
4.3 AQUACTIVA функция
Процедурата по Aquactiva използва пара, за да се подпомогне премахването на мазнини и
хранителни частици от фурната.
1. Излейте 300 мл вода в контейнера за Aquactiva на дъното на фурната.
2. Задайте функцията Static ( ) илиВойот ( ) нагряване.
3. Настройте температурата Aquactiva icon.
4. Оставете програмата да работи в продължение на 30 минути.
5. След 30 минути изключете програмата и да позволи на фурната да се охлади.
6. Когато уредът е истинал, почистете вътрешните повърхности на фурната с кърпа.
Предупреждение: Уверете се, че уредът е истинал, преди да го докоснете. Трябва да се внимава
с всички горещи повърхности, тъй като съществува риск от изгаряне. Използвайте дестилирана
или питейна вода.
300 ml
BG 96
Page 97

4.4 Поддръжка
СВАЛЯНЕ И ПОЧИСТВАНЕ НА СТРАНИЧНИТЕ СТОЙКИ
1. Развийте болтовете по посока обратна на часовниковата стрелка.
2. Свалете страничните стойки, като ги издърпате към себе си.
3. Измийте страничните стойки в съдомиялна или с мокра гъба и след това ги подсушете веднага.
4. След като почистите страничните стойки, поставете ги обратно и затегнете болтовете здраво.
A
СВАЛЯНЕ НА ПРОЗОРЕЦА НА ФУРНАТА
1. Отворете предния прозорец.
2. Отворете скобите на кутиите на пантите от дясната и лявата страна на предния прозорец, като
го натиснете надолу.
3. За да поставите прозореца обратно, изпълнете процедурата в обратен ред.
BG 97
Page 98

СВАЛЯНЕ И ПОЧИСТВАНЕ НА СТЪКЛЕНАТА ВРАТА
LOW-E
1. Отворете вратата на фурната.
2.3.4. Заключете пантите, развийте винтовете и свалете горния метален капак, като го издърпате
нагоре.
5.6. Извадете стъклото, като внимателно го издърпате от вратата на фурната (внимание: при
пиролитните фурни също така свалете и второто и третото стъкло, ако има такива).
7. Когато приключите с почистването или подмяната на стъклото, сглобете в обратен ред.
На всички стъкла надписът “Pyro” трябва да се вижда ясно и да се намира в лявата част на вратата,
близо до лявата странична панта. Така печатният етикет върху първото стъкло ще бъде вътре във
вратата.
1.
5.
2.
3.
4.
6.
1
2
3
7.
BG 98
Page 99

СМЯНА НА КРУШКАТА
1. Изключете фурната от захранването.
2. Свалете стъкления капак, развийте крушката и я подменете с нова от същия тип.
3. След като подмените изгорялата крушка, поставете обратно стъкления капак.
5. Отстраняване на проблеми
5.1 ЧЗВ
ПРОБЛЕМ ВЪЗМОЖНА ПРИЧИНА РЕШЕНИЕ
Фурната не загрява
Фурната не загрява
Фурната не загрява
Часовникът не е настроен Настройте часовника
Детското заключване е активирано
Не е избран режим на готвене или
не е зададена температура
Деактивирайте детското
заключване
Проверете дали сте
направили всички
необходими настройки
BG 99
Page 100

Bezbednosne Napomene
• Tokom kuvanja, vlaga se može kondenzovati u unutrašnjosti rerne ili
na staklu vrata. Takva situacija je normalna. Da ublažite ovaj efekat,
sačekajte 10-15 minuta nakon uključivanja pre nego što stavite hranu u
rernu. U svakom slučaju, kondenzacija nestaje kada rerna dostigne
temperaturu kuvanja.
• Kuvajte povrće u posudi s poklopcem umesto u otvorenoj tepsiji.
• Nemojte ostavljati hranu u rerni duže od 15/20 minuta nakon kuvanja.
• UPOZORENJE: tokom korišćenja, uređaj i njegovi dostupni delovi postaju
vrući. Budite oprezni i ne dirajte vruće delove.
• UPOZORENJE: držite decu dalje od aparata dok je uključen.
• Decu mlađu od 8 godina drižite dalje od uređaja, odnosno neka budu
pod stalnim nadzorom.
• Ovaj uređaj nije namenjen za upotrebu od strane osoba (uključujući i
malu djecu mlađu od 8 godina) sa smanjenim fizičkim ili mentalnim
sposobnostima, ali i osobama bez iskustva i znanja, osim ako ih koriste
uz nadzor osoba odgovornih za njihovu sigurnost ili od istih osoba
dobiju uputstvo za pravilno korišćenje uređaja.
• Pazite i nadzirite decu kako se ne bi igrala sa uređajem.
• Čišćenje i održavanje uređaja nemojte poveravati deci. Kada su u
blizini uređaja, deca moraju biti pod stalnim nadzorom.
UPOZORENJE: tokom korišćenja dostupni delovi postaju vrući. Budite
oprezni i ne dirajte vruće delove, a posebno pazite na decu i držite ih
dalje od uređaja.
• Za čišćenje staklenih vrata rerne nemojte koristiti gruba sredstva za
čišćenje ili oštre metalne predmete, jer mogu ostaviti trajna oštećenja
na staklu.
• Obavezno isključite rernu pre uklanjanja zaštite, kao nakon njenog
čišćenja. Zaštita mora biti ponovno nameštena u skladu sa uputstvom.
• Koristite isključivo temperaturnu sondu preporučenu za ovu rernu.
• Za čišćenje uređaja nikada nemojte koristiti uređaje na paru.
• Povežite kabal sa električnom mrežom koja ima kapacitet da izdrži
napon, snagu i uzemljenje navedeno na proizvodnoj nalepnici i
uputstvima. Utičnica mora imati kontakt za uzemljenje. Žica za
uzemljenje je zeleno-žute boje. Električno spajanje mora biti urađeno
od strane kvalifikovane osobe. U slučaju neslaganja utičnice i žice
aparata, molimo pitajte ovlašćenog električara da zameni utičnicu sa
adekvatnom koja će odgovarati. Utikač i utičnica moraju odgovarati
trenutnim normama instalacije u državi. Povezivanje na električnu
SRB 100
 Loading...