

Page 1
Max Pressure with Effective Pressure Maximum Motor Power Maximum Inlet Unit
Model Standard Lance w/Turbo Lance Capacity (Single Phase) Voltage Water Temperature Weight
Electric Pressure
Washer
Please read and save these instructions. Read carefully before attempting to assemble, install, operate or maintain the product described.
Protect yourself and others by observing all safety information. Failure to comply with instructions could result in personal injury and/or property damage! Retain instructions for future reference.
Specifications
PW1676 1300 psi 1750 psi 1.9 GPM 14.5 Amps 120 V 100˚F 39 lbs.
Installation Instructions
Assembly Instructions and Parts List PW1676
NOTE: REFER TO PRODUCT MANUAL FOR
ALL SAFETY INSTRUCTIONS
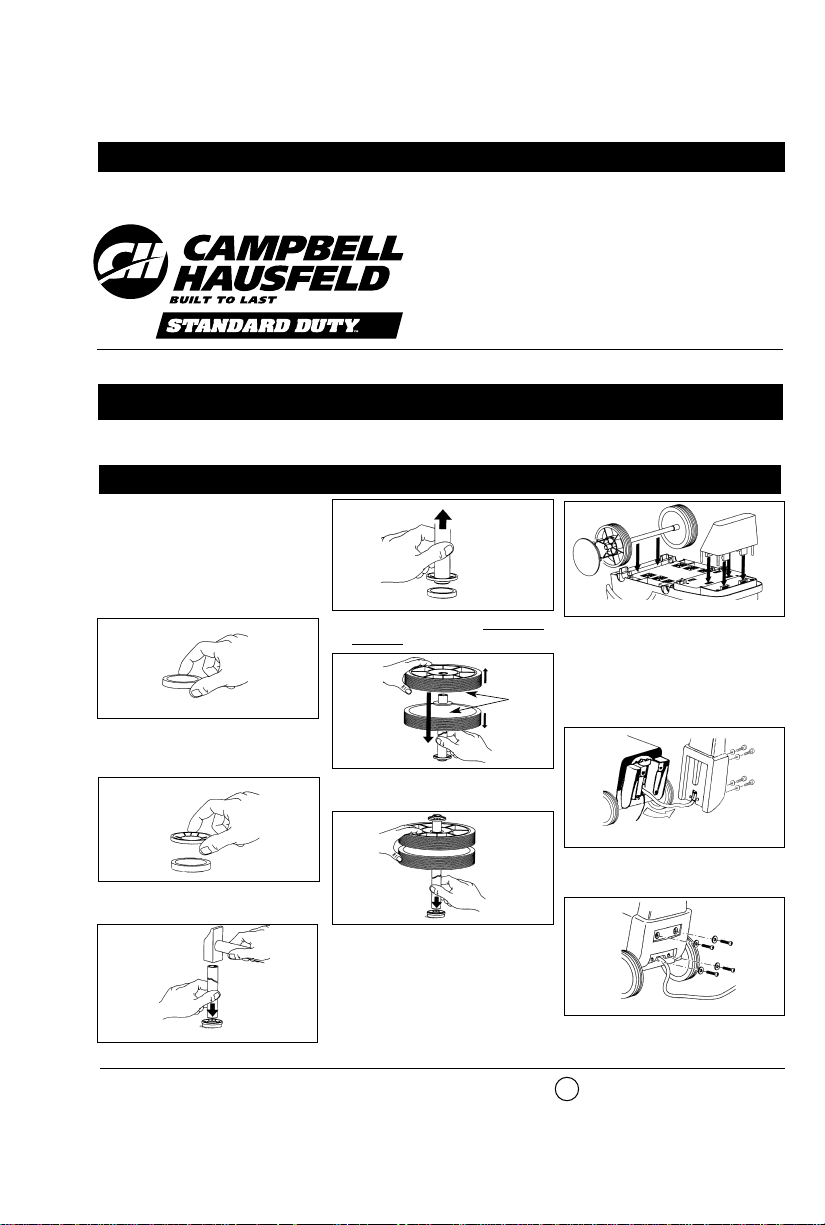
Tools Required for Installation:
● Flat Screwdriver
● Hammer/Mallet
● Adjustable Wrench
1. Set plastic spacer (included in parts
pack) on workbench (Figure 1).
2. Place “star shaped” retaining ring on
the spacer (tangs pointing down)
(Figure 2).
3. Tap the retaining ring onto the axle
(Figure 3 & 4).
4. Put both wheels on axle, solid sides
together (Figure 5).
5. Attach opposite ring in the same
manner (Figure 6).
6. Slide wheels out and snap axle into
place on the underside of body
(Figure 7).
7. Snap wheel covers on the wheel.
8. Attach foot to front of pressure
washer body (Figure 7).
9. Hook up chemical suction hose to the
tip on the bottom of the handle
(Figure 8).
10. Attach black handle with enclosed
screws and washers (Figure 9).
Figure 1
IN457000AV 4/00
© 2000 Campbell Hausfeld
For parts, product & service information
visit www.campbellhausfeld.com
Approved
#7P64
Figure 2
Figure 4
Figure 5
Figure 6
Figure 7
Figure 9
Figure 8
Figure 3
Solid
Sides
U
L
Page 2
Assembly Instructions and Parts List PW1676
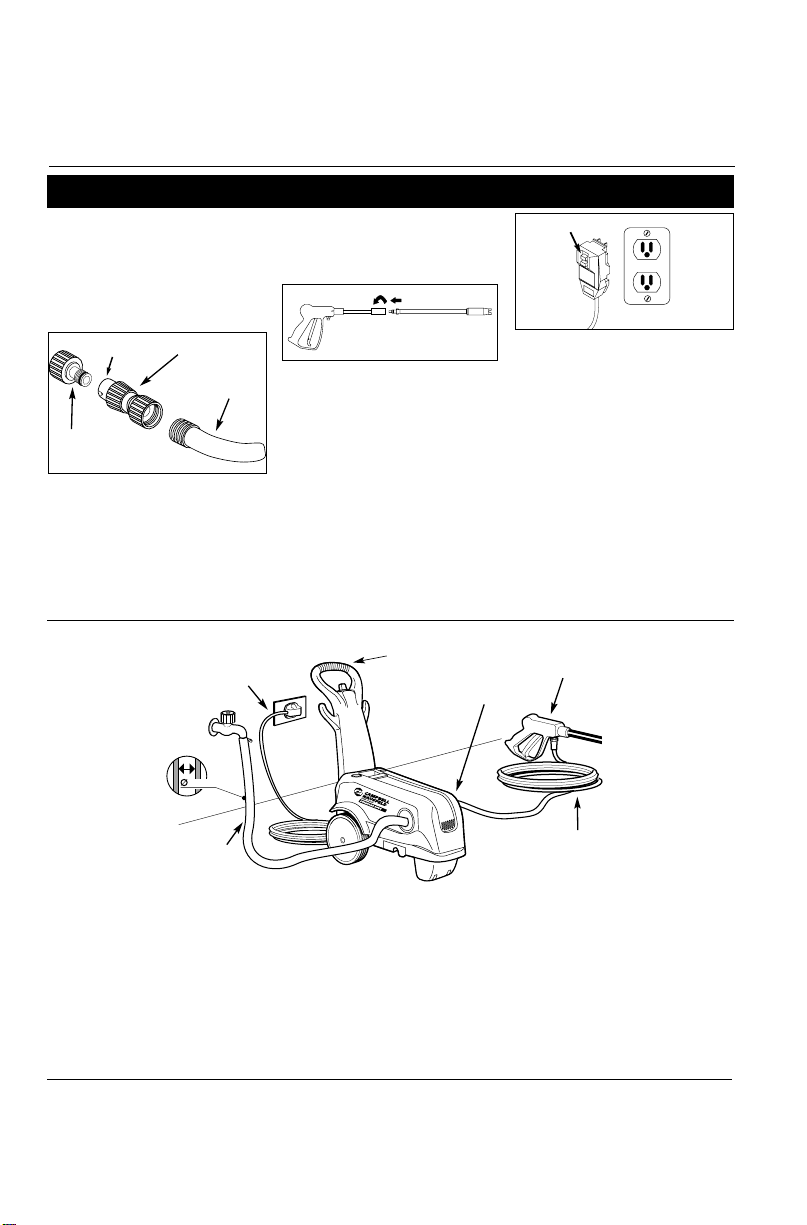
Garden Hose and System Connection
GARDEN HOSE CONNECTION
INSTRUCTIONS
1. Attach nipple adapter to inlet fitting on the unit (this may already
be attached to the pump).
2. Attach quick connect fitting to garden hose.
3. Pull side “A” of quick connect
fitting toward garden hose and
push onto nipple adapter.
4. Push side “A” of quick connect
fitting towards nipple adapter and
release.
www.campbellhausfeld.com
2
Figure 10 - Garden Hose Connection
Quick Connect Fitting
Garden
Hose
Nipple
Adapter
6. Turn water on.
7. Depress and hold the trigger on the
gun for one minute to release pressure and remove any air trapped in
the system.
8. Turn the “ON/OFF” switch to the
“ON” position.
NOTE: REFER TO PRODUCT MANUAL
FOR OPERATING INSTRUCTIONS
SYSTEM CONNECTION
1. Insert lance into the gun and turn
clockwise to positive stop as shown
in Figure 11.
2. Ensure that the power switch is in
the “OFF” position.
3. Attach the high pressure hose and
gun assembly to the unit.
4. Connect garden hose as explained
under Garden Hose Connection
Instructions.
5. Plug the power cord into a grounded 120V outlet and press the reset
button as shown in Figure 12. THIS
MUST BE DONE EACH TIME THE
UNIT IS PLUGGED INTO AN OUTLET.
Figure 11 - Gun/Lance Connection
Reset
Figure 12 - Grounded plug/reset button
Figure 13 - Connection Call-Outs
Outlet
Electrical Cord
with GFCI
High
Pressure
Hose
Gun
Garden
Hose
Handle/Detergent
Tank
"A"
13 mm
Page 3
Ref. Part
No. Description Number Qty.
For Replacement Parts,
Call 1-800-330-0712
Replacement Parts List
Please provide following information:
-Model number
-Serial number (if any)
-Part description and number as shown in
parts list
Address parts correspondence to:
The Campbell Group / Parts Dept.
100 Production Drive
Harrison, OH 45030 U.S.A.
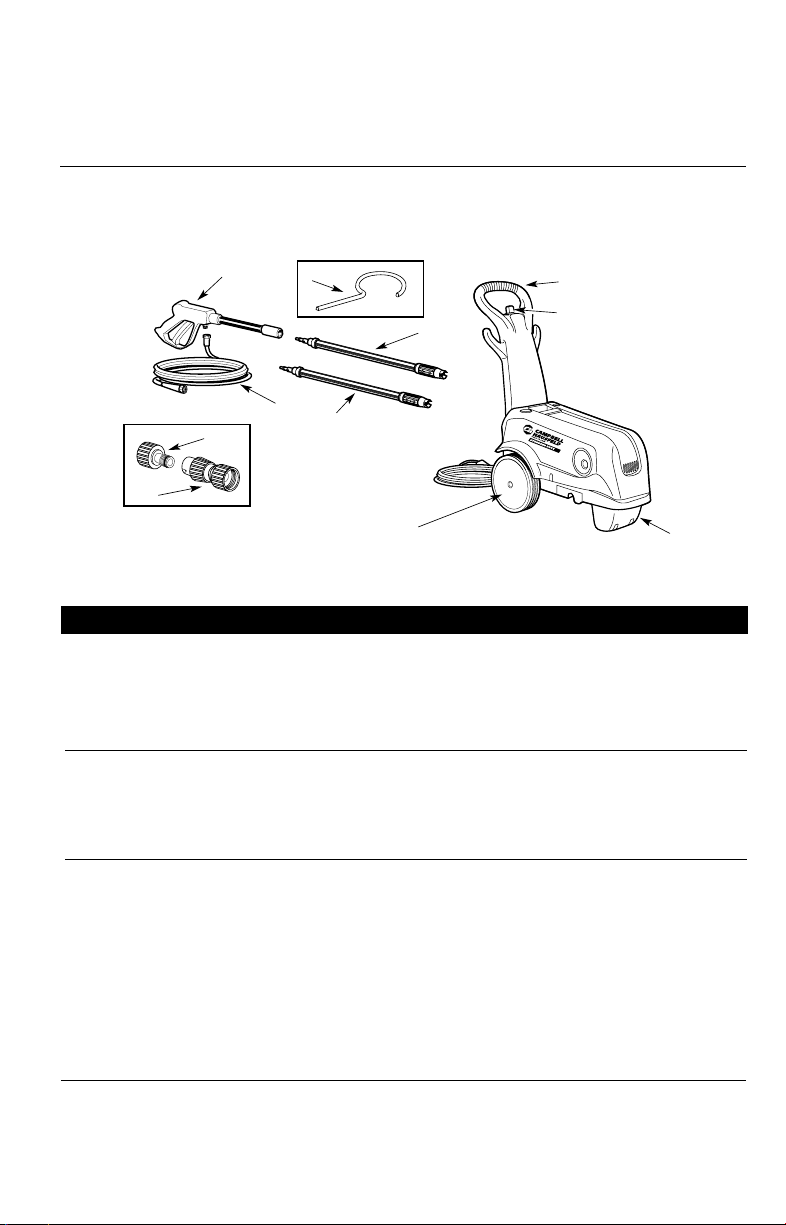
1 Adjustable Lance PM002951AV 1
2 Turbo Lance PM002961AV 1
3 Hose PM012902AV 1
4 Gun PM037201AV 1
5 Nipple Adapter PM022100AV 1
6 Quick Connect Fitting PM020600SV 1
7 Tip Cleaner PM008500AV 1
8 Detergent Tank PM059000SV 1
9 Hardware Pack (Upper Handle/Wheels/Front Foot) PM062200SV 1
10 Axle PM062400SV 1
11 Wheels PM059100SV 2
12 Wheel Covers PM059200SV 2
13 Front Foot PM059400AV 1
14 Cap, Detergent Tank PM060000SV 1
Assembly Instructions and Parts List
PW1676
www.campbellhausfeld.com
3
1
3
5
4
6
7
2
8
13
10, 11, & 12
14
Page 4

Pulvérisateur de
Lavage Électrique
S’il vous plaît lire et conserver ces instructions. Lire attentivement avant de monter, installer, utiliser ou de procéder à l’entretien du produit
décrit. Se protéger ainsi que les autres en observant toutes les instructions de sécurité, sinon, il y a risque de blessure et/ou dégâts matériels!
Conserver ces instructions comme référence.
Spécifications
PW1676 8964 kPa 12066 kPa 7,2 L/min 14.5 A 120 V 38º C 17,7 kg
Instructions D’Installation
Instructions de Montage et Liste de Pièces de Rechange PW1676
REMARQUE: SE RÉFÉRER AU MANUEL DU
PRODUIT POUR TOUTES LES INSTRUCTIONS
DE SÉCURITÉ
Pression Max avec Pression Efficace Capacité Puissance du Moteur Température Max. Poids du
Modèle Lance Standarde avec Lance Turbo Maximum (Monophasé) Tension d’Arrivée D’Eau Modèle
Outils requis pour l’installation:
● Tournevis à lame plate
● Marteau/maillet
● Clé à molette
1. Poser la rondelle d’espacement
(incluse dans le paquet de pièces) sur
l’établi (Figure 1).
2. Placer la bague de retenue en forme
“d’étoile” sur l’entretoise (queues
vers le bas) (Figure 2).
3. Tapper légèrement la bague de
retenue sur s’arbre (Figure 3 & 4).
7. Tapper légèrement les couvre-roues
sur la roue.
8. Fixer le pied à l’avant du corps du
pulvérisateur de lavage (Figure 7).
9. Brancher le tuyau d’aspiration de
produits chimiques au bout sur le
revers du manche (Figure 8).
10. Fixer le manche noir avec les vis et
rondelles comprises (Figure 9).
4. Placer les deux roues sur l’arbre,
côtés solides ensembles
(Figure 5).
5. Fixer la bague opposée pareillement
(Figure 6).
6. Glisser les roues à l’écart et tapper
l’arbre en place sur le dessous du
corps (Figure 7).
Figure 2
Figure 1
Figure 3
Figure 4
Figure 5
Figure 6
Figure 7
Figure 9
Figure 8
5Fr
Côtés
Solides
IN457000AV 4/00
© 2000 Campbell Hausfeld
Page 5

Figure 12. PROCÉDER À CETTE
ÉTAPE CHAQUE FOIS QUE LE
MODÈLE SOIT BRANCHÉ DANS UNE
PRISE DE COURANT.
6. Faire circuler l’eau.
7. Appuyer sur et tenir la gâchette du
pistolet pendant une minute afin
de dissiper la pression et d’enlever
l’air emprisonné dans le système.
8. Tourner l’interrupteur “ON” (en
marche).
REMARQUE: SE RÉFÉRER AU
MANUEL DU PRODUIT POUR LES
INSTRUCTIONS D’OPÉRATION
BRANCHEMENT DU SYSTÈME
1. Introduire la lance dans le pistolet
et tourner au sens des aiguilles
d’une montre à l’arrêt positif tel
qu’indiqué sur la Figure 11.
2. S’assurer que l’interrupteur soit
dans la position OFF (hors circuit).
3. Brancher le tuyau haute pression et
le montage de pistolet au modèle.
4. Brancher le tuyau d’arrosage selon
les directives: Instructions de
Branchement du Tuyau
d’Arrosage.
5. Brancher le cordon d’alimentation
dans une prise de courant de 120V
et appuyer sur le bouton de réenclenchement tel qu’indiqué sur la
Instructions de Montage et Liste de Pièces de Rechange PW1676
Branchement du Tuyau d’Arrosage et du Système
INSTRUCTIONS DE BRANCHEMENT
DU TUYAU D’ARROSAGE
1. Fixer le raccord intermédiaire au
raccord d’admission sur le modèle
(ceci pourrait déjà être fixé à la
pompe).
2. Brancher le raccord rapide au tuyau
d’arrosage.
3. Tirer le côté “A” du raccord rapide
vers le tuyau d’arrosage et le pousser sur le raccord intermédiaire.
4. Pousser le côté “A” du raccord rapide vers le raccordement intermédi-
aire et relâcher.
Figure 10 - Branchement de Tuyau
d’Arrosage
Raccord Rapide
Tuy au
d’Arrosage
Raccord
Intermédiaire
Figure 11 - Branchement de
Pistolet/Buse
Figure 12 - Prise mise à la terre et bouton de réenclenchement
Réenclenchement
Figure 13 - Raccordements
Sortie
Cordon
d’Alimentation
avec DDFT
Tuyau
Haute
Pression
Pistolet
Tuy au
d’Arrosage
6Fr
Manche/Réservoir
de Détergent
Reset
"A"
13 mm
Page 6

7. Calce las tapas de las ruedas en las
ruedas.
8. Conecte la pata en la parte delantera
de la hidrolavadora (Figura 7).
9. Conecte la manguera de succión de
químicos a la parte inferior del
mango (Figura 8).
10. Conecte el mango negro con los
tornillos y arandelas incluídos (Figura
9).
4. Conecte ambas ruedas al eje, , con
los lados sólidos juntos (Figura 5).
5. Conecte el anillo del otro lado del
mismo modo (Figura 6).
6. Deslice las ruedas hacia afuera y calce
el eje en la parte inferior de la
unidad (Figura 7).
Presión Máx Presión Efectiva Capacidad Potencia de Motor Temperatura Máxima Peso de
Modelo con Lanza Estándar con Lanza Turbo Máxima (Monofásico) Voltaje del Agua de Entrada la unidad
Hidrolavadora
Eléctrica
Sírvase leer y conservar estas instrucciones. Léalas cuidadosamente antes de intentar armar, instalar, operar o efectuar mantenimiento al producto descrito. Protéjase a sí mismo y a los demás observando toda la información de seguridad. ¡El no cumplir con las instrucciones podría
ocasionar lesiones personales y/o daños materiales! Conserve estas instrucciones para futura referencia.
Especificaciones
PW1676 89,64 bar 120,66 bar 7,2 L/min 14.5 A 120 V 38º C 17,7 kg
Instrucciones para la Instalación
Instrucciones de montaje y lista de piezas PW1676
NOTA:
LAS MEDIDAS DE SEGURIDAD SE
ENUMERAN EN EL MANUAL DEL
PRODUCTO
9Sp
Herramientas necesarias para instalar la
unidad:
● Desarmador plano
● Martillo
● Llave inglesa
1. Coloque el separador plástico (incluí-
do en el paquete de piezas) sobre la
mesa de trabajo (Figura 1).
2. Coloque el anillo “en forma de estrella” en el separador (con las aletas
hacia abajo) (Figura 2).
3. Instale el anillo de retensión en el eje
(Figuras 3 & 4).
Figura 9
Figura 8
Figura 7
Figura 2
Figura 1
Figura 3
Figura 4
Figura 5
Figura 6
Lados
Sólidos
IN457000AV 4/00
© 2000 Campbell Hausfeld
Page 7

Instrucciones de montaje y lista de piezas PW1676
Conexión de la Manguera de Jardin y del Sistema
INSTRUCCIONES DE CONEXION DE
LA MANGUERA DE JARDIN
1. Inserte el niple adaptador en la
conexión de entrada de la unidad
(es posible que ya esté conectado a
la bomba).
2. Fije el conector rápido en la
manguera de jardín.
3. Hale el extremo "A" del conector
rápido hacia la manguera de jardín
y conéctelo en el niple adaptador .
4. Empuje el extremo "A" del conector rápido hacia el niple adaptador,
y suéltelo.
CONEXION DEL SISTEMA
1. Inserte la lanza en la pistola y gírela
en el sentido de las agujas del reloj
hasta que llegue a su tope, como se
muestra en la figura 11.
2. Verifique que el interruptor esté en
la posición "OFF" ("APAGADO").
3. Conecte la manguera de alta presión y el ensamblaje de la pistola en
la unidad.
4. Conecte la manguera de jardín
según se explica en Instrucciones de
conexión de la manguera de jardín.
5. Conecte el
cordón eléctrico a un
tomacorriente de 120
V conectado
a tierra, y
presione el
botón de
reposición
como se
muestra en la figura 12. ESTO DEBE
HACERSE CADA VEZ QUE SE
CONECTE LA UNIDAD EN UN
TOMACORRIENTE.
6. Abra la llave del agua.
7. Presione el gatillo y manténgalo
presionado por 1 minuto para liberar la presión y remover el aire atrapado en el sistema.
8. Coloque el interruptor "ON/OFF"
(“ENCENDIDO/APAGADO”) en la
posición "ON" ("ENCENDIDO").
NOTA: LAS INSTRUCCIONES DE
FUNCIONAMIENTO SE ENUMERAN
EN EL MANUAL DEL PRODUCTO.
Figura 10 - Conexión de la manguera de
jardín
Conector rápido
Manguera de
jardín
Niple
Adaptador
Figura 11 - Conexión de la pistola y
lanza
Figura 12 - Enchufe
conectado a
tierra/botón de
reposición
Reposición
Figura 13 - Leyendas para la conexión
Tomacorrientes con dispositivo
de conexión a tierra contra
cortocircuitos
Manguera de
alta presión
Pistola
Manguera
de jardín
Salida
10 Sp
Mango/Tanque de
Detergente
Reset
"A"
13 mm
Page 8

Induction
Motor/Pump
Serviceable Parts
Replacement Parts List
Model PW167600AV & PW187600AV
For Replacement Parts, Call 1-800-237-0987
Please provide following information: Address parts correspondence to:
- Model number Campbell Group/Parts Department
- Serial number (if any) 100 Production Drive
- Part description and number as shown in parts list Harrison, OH 45030
Ref. Ref.
No. Description Part No. Qty. No. Description Part No. Qty.
1 On/off switch PM041900SV 1
2 Capacitor, 56 MF 250 V PM060200SV 1
3 Needle bearing kit PM041840SV 1
4 Piston kit (includes 3 pistons
and springs) PM058200SV 1
5 Detergent injector kit (includes
barb, spring, ball, and o-ring) PM064305SV 1
6 Piston body PM040600SV 1
7 Internal chemical injector PM062300SV 1
8 O-ring, high pressure, head PM041870SV 1
9 Kit, valve cap (includes 3 caps) PM064750SV 1
10 Valve, outlet (includes
3 valves/o-rings) PM064304SV 1
11 Head, manifold PM025200SV 1
12 Bolt, head (includes 1 bolt) PM025100SV 1
13 Inlet valve kit (includes
3 valves & 3 o-rings) PM064740SV 1
14 Seal, water (includes 3 seals) PM064730SV 1
15 Piston guide kit PM064720SV 1
16 Seal, oil (includes 3 seals) PM064710SV 1
17 Filter, suction PM014800SV 1
18 Unloader assembly PM058800SV 1
19 Unloader cap kit, (includes
cap and o-ring) PM035150SV 1
20 Power cord, 14 AWG, GFCI PM020900SV 1
21 O-ring, 85X2.5 PM008600SV 1
* 22 Motor assembly induction
PW167600AV PM222800SJ 1
PW187600AV PM222900SJ 1
IN170161AV 10/00
1
2
3
4
5
6
7
8
9
10
11
12
13
14
15
16
17
18
19
21
20
22
* Unit assembly maybe shipped if replacement motor is not available.
BUILT TO LAST
TM
 Loading...