


Installation................................................. |
.02 |
Additional information................................. |
04 |
General operations...................................... |
05 |
Radio operations......................................... |
09 |
CD/SD/MMC/USBOperations..................... |
11 |
MP3 WMAoverview..................................... |
14 |
RDS operation............................................. |
15 |
Specification................................................. |
16 |
Before playing discs..................................... |
17 |
Troubleshooting............................................ |
18 |
INSTALLATION
PRECAUTIONS
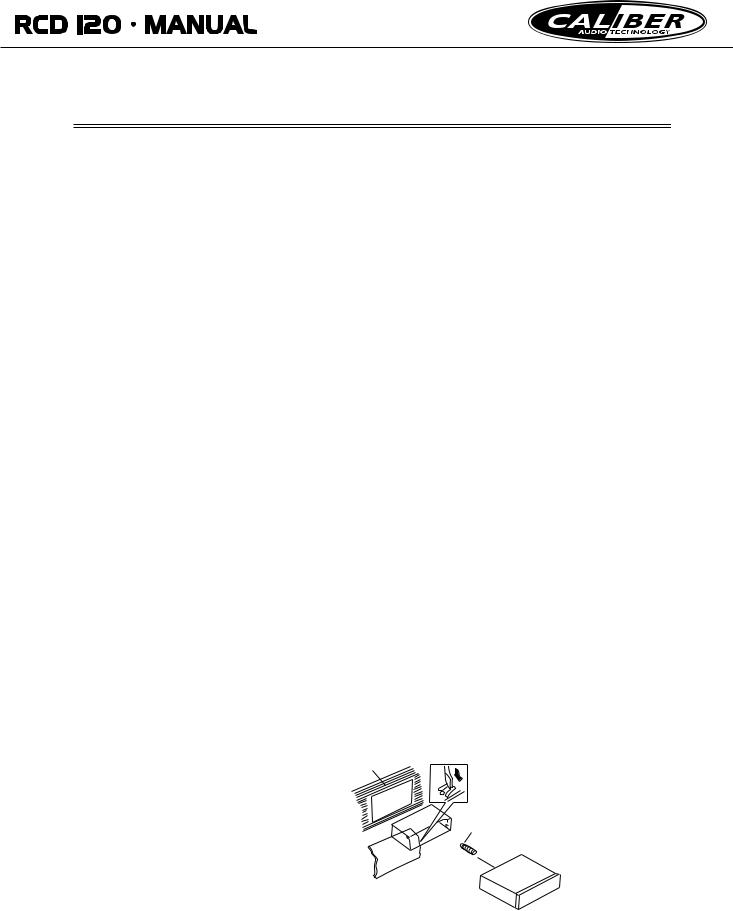
Choose the mounting location where the unit will not interfere with the normal drivingfunctionofthedriver.
Before finally installing the unit, connect the wiring temporarily and make sure itisallconnectedupproperlyandtheunitandthesystemworkproperly.
Use only the parts included with the unit to ensure proper installation. The use ofunauthorizedpartscancausemalfunctions.
Consult with your nearest dealer if installation requires the drilling of holes or othermodificationsofthevehicle.
Installtheunitwhereitdoesnotgetinthedriver'swayandcannotinjurethe passengerifthereisasuddenstop.Likeanemergencystop.
Ifinstallationangleexceeds30fromhorizontal,theunitmightnotgiveits optimumperformance.
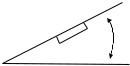 300
300
Avoidinstallingtheunitwhereitwouldbesubjecttohightemperature,such asfromdirectsunlight,orfromhotair,formtheheater,orwhereitwouldbe subjecttodust,dirtorexcessivevibration.Donotexposethisequipment torainormoisture.
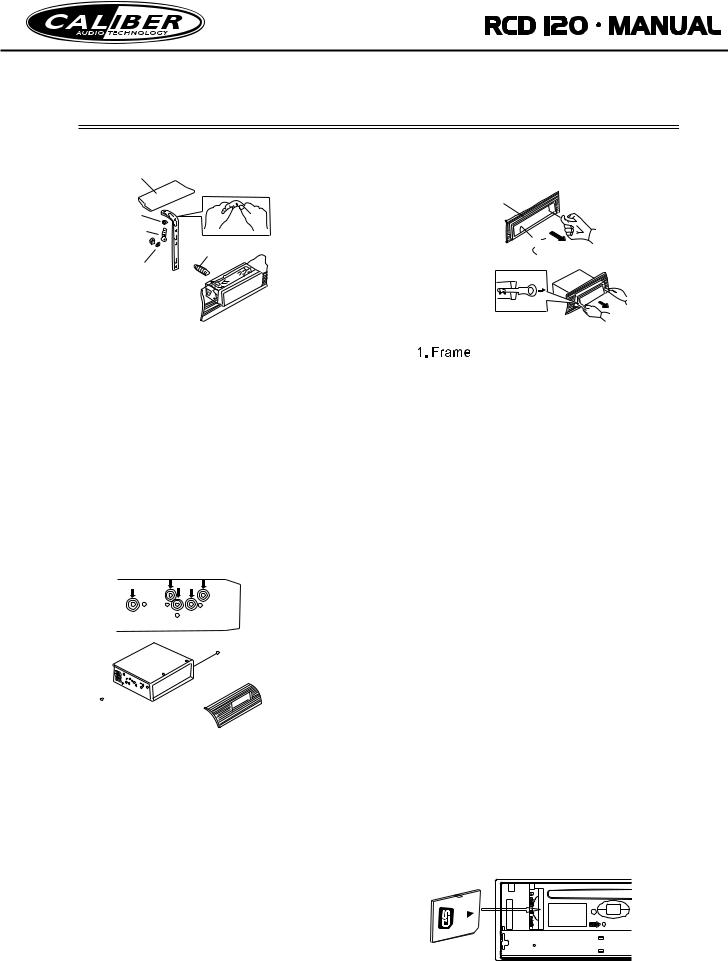
DIN FRONT-MOUNT (MethodA)
Installingtheunit
1.Dashboard |
|
|
2.Holder |
1 |
2 |
|
||
Afterinsertingtheholderinto |
|
|
thedashboard,selectthe |
|
|
appropriatetabaccordingto |
|
3 |
thethicknessofthedashboard |
|
|
materialandbendthem |
|
|
inwardstosecuretheholderin |
|
|
(Fig.1) |
|
|
place. |
|
(Fig.1) |
3.Screw
INSTALLATION
1
6
7
4
2
 5
5
3
(Fig.2)
1.Dashboard
2.Nut(5mm)
3.SpringWasher
4.Screw(5x25mm)
5.Screw
6.Strap
Besureto usethestrapto securetheback oftheunitin place.Thestrapcan be bentby handtothe desiredangle.
7.PlainWasher
 2
2
3
2 
INPUT THE SD CARD
The SD oblique angle keeps rightward exposure, put into the SD slot and press it again to eject.
Removing the unit
1
 2 3
2 3 
(Fig.3)
2.Insert fingers into the groove in the front of frame and pull out to remove the frame. (When reattaching the frame, point the side with a groove downwards and attach it.)
3.Lever
Insert the levers supplied with the unit into the grooves at both sides of the unit and shown in figure until they click. Pulling the levers makes possible to remove the unit from the dashboard.
Fasteningthe unit tothefactory radiomounting bracket:
1.Selecta positionwherethescrew holesofthebracketandthe
screwholes ofthemain unit becomealigned(arefitted),and tightenthescrews at2 places on eachside.Useeithertrussscrews (5x 5mm)orflushsurfacescrews (4 x5mm)
2.Screw
3.Dashboardor Console
DIN REAR-MOUNT (Method
Installation usingthescrewholeson thesidesof theunit

ADDITIONAL INFORMATION
RED |

 BLUE
BLUE
 REAR Rch LINE OUT
 REAR Lch LINE OUT
YELLOW 

BLACK
WHITE |
GREY |
WHITE/BLACK |
GREY/BLACK |
GREEN |
VIOLET |
GREEN/BLACK |
VIOLET/BLACK |

GENERAL OPERATIONS
FRONT PANEL LAYOUT |
|
|
|
|
|
|
|
||||||
2 |
3 |
4 |
5 |
|
|
|
6 |
|
|
|
10 |
9 |
1 |
|
|
|
DISP |
|
|
|
|
|
|
|
AMS |
|
|
|
MENU |
|
|
|
|
|
|
|
|
|
|
|
|
|
|
|
|
|
|
|
|
|
|
|
|
|
MODE |
|
|
|
MU |
|
|
|
|
|
|
|
BND |
|
|
|
|
|
|
1/ |
2/INT |
3/RPT |
4/RDM |
|
|
|
|
|
|
|
|
|
19 |
11 |
|
12 |
13 |
14 |
15 |
16 |
21 |
|
|
20 |
|
|
|
|
|
|
|
|
|
|
|
|
|
|
7 |
|
|
|
8 |
17 |
|
|
|
|
18 |
|
|
1. |
Power / Mode / Next/PreviousButton |
12. Intro&PresetButton2 |
|
2. |
ReleaseButton |
13.Repeat& Preset Button 3 |
|
14. Random &PresetButton4 |
|||
3. |
Menu / VolumeButton |
||
15.PresetButton5 |
|||
4. |
Mute Button |
||
16.PresetButton6 |
|||
5. |
DisplayButton |
||
17. Eject knob |
|||
6. |
LCDDisplay |
||
18. CD Slot |
|||
7. |
FlashingLED |
||
8. |
Reset Button |
19. USB connecter |
|
9. |
Band switch /ID3select |
20. SD/MMC Slot |
|
10.Automatically memorystoring |
21.AUXINJACK |
||
11.Play / Pause &PresetButton1 |
|
||
 Loading...