


 Loading...
20
User's Manual

Table of Contents
Getting Started................. |
4 |
Your Rider 20................................ |
4 |
Reset Rider 20.............................. |
5 |
Accessories................................... |
5 |
Status Icons.................................. |
5 |
Connect, Sync, and Charge......... |
6 |
Turn On/Off Rider 20................... |
6 |
Initial Setup.................................. |
6 |
Ride Your Bike with Rider 20!...... |
7 |
Manage Rider 20 Data via Your |
|
Computer...................................... |
7 |
Share Your Experience With |
|
Other Bikers................................. |
7 |
Exercise/Training.............. |
8 |
Display Information..................... |
8 |
Before You Start........................... |
9 |
Start/Pause/Stop Exercising....... |
9 |
Mark Lap..................................... |
10 |
View Exercise/Training Info....... |
10 |
Changing Modes........................ |
11 |
Training Settings............ |
12 |
Set Training................................ |
12 |
By Time........................................................... |
12 |
By Distance................................................... |
13 |
Set LAP Training.......................................... |
13 |
Select Bike.................................. |
14 |
Link Sensors............................... |
15 |
View Sensors Information....................... |
16 |
View Exercise/Training |
|
Record......................................... |
17 |
Clear Storage............................................... |
18 |
Other Settings................ |
19 |
Using Stopwatch........................ |
19 |
Time Settings............................. |
20 |
Auto Calibration by GPS.......................... |
20 |
Set Daylight Saving Time......................... |
21 |
Auto Scrolling............................ |
21 |
Turn GPS On/Off......................... |
22 |
Set Tone...................................... |
22 |
Appendix........................ |
23 |
Specifications............................. |
23 |
Battery Information................... |
24 |
Install Rider 20........................... |
25 |
Mount Rider 20 to the Bike..................... |
25 |
Install the Speed/Cadence |
|
Sensor (Optional)....................... |
26 |
Install Heart Rate Belt |
|
(Optional)................................... |
27 |
Wheel Size and |
|
Circumference............................ |
28 |
Screen Terminologies................ |
29 |
Basic Care For Your Rider 20...... |
29 |
2 Table of Contents

 WARNING
Always consult your physician before you begin or modify any training program. Please read the details in Warranty and Safety Information guide in the package.
Product Registration
Help us better support you by completing your device registration using Bryton Bridge. Go to http://support.brytonsport.com for more information.
Bryton Software
Go to http://brytonsport.com to download free software to upload your personal profile, tracks and analyze your data on the web.
ENGLISH
Getting Started 3
Getting Started
This section will guide you on the basic preparations before you start using your Rider 20.
Your Rider 20
 20
20
LAP
1 2 3
|
UP (p) |
|
DOWN (q) |
1 |
3 |
•Long press to turn the backlight on/ off.
•In meter view, short press to scroll upper screen page options.
•In Menu, short press to move up to scroll through menu options.
•In meter view, short press to scroll lower screen page options.
•In Menu, short press to move down to scroll through menu options.
2LAP (LAP)
•To turn off the device, short press to enter Menu and select “OFF(
 )”.
)”.
•Short press to access/leave menu.
•When riding and recording, short press to mark the lap.
•In Menu, short press to enter or confirm a selection.
4 Getting Started

Reset Rider 20
To reset the Rider 20, long press all three keys (p/LAP/q) at the same time.
Accessories
The Rider 20 comes with the following accessories:
•USB cable
•Bike mount
Optional items:
•Heart rate belt
•Speed/Cadence sensor
•Combo sensor
Status Icons
Icon |
Item |
Solid icon |
Flashing icon |
||||||
|
|
|
|
|
|
|
|
|
|
|
|
|
|
|
|
|
Bike icon |
Bike 1 |
- |
|
|
|
|
|
|
|
|
|
|
|
|
|
|
|
|
|
Bike 2 |
- |
|
|
|
|
|
|
|
|
|
||
|
|
|
|
|
|
|
|
|
|
|
|
|
|
|
|
|
Battery icon |
Battery level |
Battery charging |
|
|
|
|
|
|
|
|
|
|
|
|
|
|
|
|
|
- |
Battery low |
|
|
|
|
|
|
|
|
|
||
|
|
|
|
|
|
|
|
|
|
|
|
|
|
|
|
|
GPS icon |
GPS signal level |
Searching GPS signal |
|
|
|
|
|
|
|
|||
|
|
|
|
|
|
|
|||
|
|
|
|
|
|
|
|||
|
|
|
|
|
|
|
|
|
|
|
|
|
|
|
|
|
Record icon |
Memory full, must clear |
Recording in progress |
|
|
|
|
|
|
|
storage |
||
|
|
|
|
|
|
|
|
|
|
|
|
|
|
|
|
|
|
|
|
|
|
|
|
|
|
|
Heart rate monitor |
Linked with heart rate |
- |
|
|
|
|
|
|
|
icon |
monitor |
|
|
|
|
|
|
|
|
|
|
|
|
|
|
|
|
|
|
Cadence sensor |
Linked with cadence |
- |
|
|
|
|
|
|
|
icon |
sensor |
|
|
|
|
|
|
|
|
|
|
|
|
|
|
|
|
|
|
Speed sensor |
Linked with speed sensor |
- |
|
|
|
|
|
|
|
icon |
|
|
|
|
|
|
|
|
|
|
|
|
ENGLISH
Getting Started 5
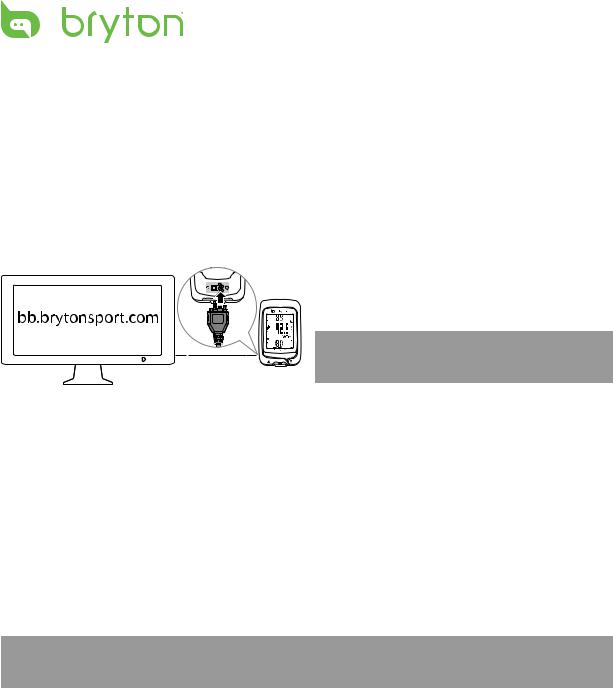
Connect, Sync, and Charge
Warning:
This product contains a lithium-ion battery. See the Warranty and Safety Information guide in the package for important battery safety information.
1.Connect Rider 20 to a PC using the supplied USB cable.
2.Download the Bryton Bridge 2 application at bb.brytonsport.com and sync with Rider 20.
reset
 20
20
LAP
Keep Rider 20 connected to the PC to charge the battery.
Use USB cable to connect to a PC.
NOTE: For first time use, charge the battery for at least 3 hours.
Turn On/Off Rider 20
To turn on Rider 20:
Short press LAP to turn on Rider 20.
To turn off Rider 20:
1.Short press LAP to enter Menu.
2.Short press p/qto select “OFF(


 )”.
)”.
3.Short press LAP to turn off the device.
NOTE: If Rider 20 is left idle for 10 minutes, it will automatically turn off.
Initial Setup
When turning Rider 20 on for the first time, the setup wizard appears on screen. Follow the instructions to complete setup.
1.Select the display language.
2.Select the unit of measurement.
3.Enter your “user profile”.
(It is recommended to input the data. The data accuracy will highly affect your training analysis.)
4.When FIND GPS appears, please go outdoors to acquire GPS signal.
If not possible to go outdoor, short press LAP to cancel acquiring request.
6 Getting Started

NOTE: If you want to change your profile, please connect your device to Brytonsport.com and change the setting via My Device -> Manage Device Data. Or go to SET > Others > Profile and change your settings.
Ride Your Bike with Rider 20!
•Free ride:
Enjoy the ride with Rider 20 mounted onto your bike.
•Start an exercise and record your data:
Short press LAP to enter Menu. Choose “START” and short press LAP to start recording the log.
•Start a training:
Short press LAP to enter Menu. Choose “SET > TRAIN” and short press LAP to select from the available training modes: riding time, distance, and LAP.
Manage Rider 20 Data via Your Computer
1.Connect your Rider 20 to your computer by using USB cable.
2.Install the Bryton Bridge 2 application. You can download the application at http://bb.brytonsport.com.
3.Follow the on-screen instructions to transfer data to your computer.
NOTE:
•After unplugging the Rider 20 from the USB, the Rider 20 will reset itself.
•Do not unplug the USB cable during the file transferring process. Otherwise, the files may be damaged or corrupted.
Share Your Experience With Other Bikers
To share your experiences and training result with other bikers around the world, visit http://www.brytonsport.com.
ENGLISH
Getting Started 7

Exercise/Training
Bicycling is one of the best types of exercise for your body. It helps you to burn your calories, lose weight, and increase your overall fitness. During exercise or training, Rider 20 allows you to measure and record your running activities and displays your current performance.
NOTE: Displayed information varies on exercise/training mode and user preference.
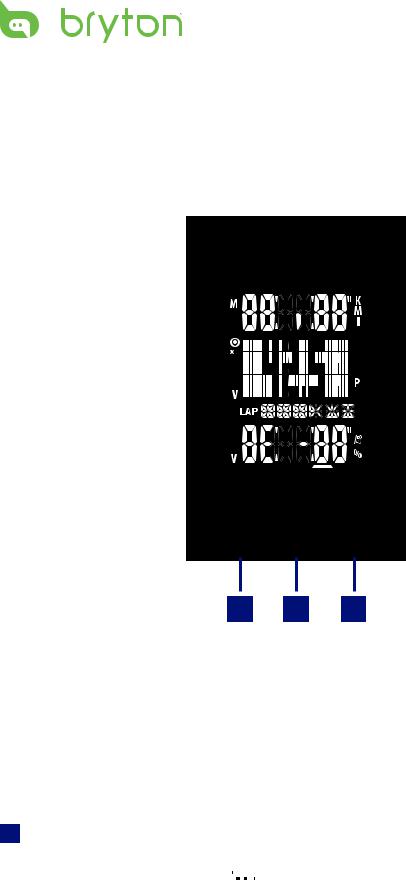
Display Information
A
Indicator |
|
|
|
|
|
|
|
Info screen |
|
|
|
|
|
|
|
|
|||
|
|
|
|
|
|
|
Display current speed > |
||
|
|
|
|
|
|||||
MA = Maximum |
|
|
|
||||||
|
|
|
Speed (Max) > Speed (Avg) |
||||||
AV = Average |
|
|
|
||||||
|
|
|
|
|
|||||
|
|
|
|
|
|
|
|
|
B |
|
|
|
|
|
|
|
|
|
|
During pairing process (with heart rate monitor/cadence sensor/speed sensor), the LED indicators (on the top of the icons) will blink. When the sensors are successfully linked to the device, the LED indicators will light on.
Upper screen (A)
Press pto switch information display:
Current time > Ride Time (A or B) > Cadence > Cadence (Avg) > Cadence (Max)
Lower screen (B)
Press qto switch information display:
Distance > Calories > ODO (A/B) > ODO (A+B) > Total Ride Time (A/B) > Total Ride Time (A+B) > Heart Rate > Heart Rate (Max) > Heart Rate (Avg)
NOTE: ODO (A/B), ODO (A+B), Total Ride Time (A/B), and Total Ride Time (A+B) data wiIl only be displayed after you have completed a training/exercise.
8 Exercise/Training

The table below provides a graphical indication on using the keys which will be used in later sections.
Keys |
Indication |
Short press p |
1 |
Short press LAP |
2 |
Short press q |
3 |
Long press LAP |
4 |
*no key press, only display changes |
|
Before You Start
• Link sensors (page 15), optional
Start/Pause/Stop Exercising
1.In the main screen, short press LAP to enter Menu.
2.Short press p/qto select START.
3.Short press LAP to start an activity.
4.To pause an activity, long press LAP. Press any key to resume.
5.To end the current activity, short press p/qto select STOP and short presss LAP.
Recording indicator |
|
|
|
|
|
|
|
|
Cadence sensor |
|
|
|
|
|
|
|
|
|
|||
|
|
|
|
|
indicator |
|||||
|
|
|
|
|||||||
GPS signal |
|
|
|
|
|
|
|
|
|
|
|
|
|
|
|
|
|
|
|||
HR sensor indicator |
Bike indicator |
|
NOTE: Please go outdoors to acquire GPS signal when you see “FIND GPS” on the screen.
ENGLISH
Exercise/Training 9
Loading...