

Page 1

Instruction Manual
Manual de instrucciones
Manuale d’istruzione
Page 2

“IMPORTANT SAFETY INSTRUCTIONS”
When using the sewing machine, basic safety precautions should always be followed, including the following:
“Read all instructions before using.”
D ANGER – To reduce the risk of electric shock:
1. The sewing machine should never be left unattended when plugged in. Always unplug this sewing machine from the electrical outlet
immediately after using and before cleaning.
2. Always unplug before changing the light bulb. Replace bulb with same type rated 15 watts.
WARNING – To reduce the risk of burns, fire, electric shock, or injury to persons:
1. Do not allow this machine to be used as a toy. Close attention is necessary when the sewing machine is used by or near children.
2. Use this sewing machine only for its intended use as described in this manual. Use only accessories recommended by the manufacturer as contained in this manual.
3. Never operate this se wing machine if it has a damaged cord or plug, if it is not working properly, if it has been dropped or damaged,
or dropped into water. Return the sewing machine to the nearest authorized dealer or service center for examination, repair , electrical or mechanical adjustment.
4. Never operate the sewing machine with any of the air openings blocked. Keep the ventilation openings of the sewing machine and
foot controller free from the accumulation of lint, dust and loose cloth.
5. Never drop or insert any object into any openings.
6. Do not use this machine outdoors.
7. Do not operate this machine where aerosol (spray) products are being used or where oxygen is being administered.
8. To disconnect, turn the main switch to the symbol “O” position which represents off, then remove plug from outlet.
9. Do not unplug by pulling on the cord. To unplug, grasp the plug and pull, not the cord.
10. Keep fingers away from all moving parts. Special care is required around the sewing machine needle.
11. Always use the proper needle plate. The wrong plate can cause the needle to break.
12. Do not use a bent needle.
13. Do not pull or push the fabric while stitching. It may deflect the needle causing it to break.
14. Switch the sewing machine to the off, symbol “O” position when making an y adjustments in the needle area, such as threading the
needle, changing the needle, threading the bobbin, or changing the presser foot.
15. Always unplug the sewing machine from the electrical outlet when removing covers, lubricating, or when making any other user
service adjustments mentioned in this instruction manual.
16. Appliance (220V – 240V) is provided with double insulation. Use only identical replacement parts. See instructions for Servicing
Double Insulated appliances.
17. This sewing machine is not intended for use by young children or infirm persons without supervision.
18. Young children should be supervised to ensure that they do not play with this sewing machine.
Servicing double-insulated products (220V – 240V)
In a double-insulated product, two systems of insulation are provided instead of grounding. No g rounding means is provided on a doubleinsulated product nor should a means for grounding be added to the product. Servicing a double-insulated product requires extreme care
and knowledge of the system and should only be done by qualified service personnel. Replacement parts for a double-insulated product
must be identical to those parts in the product.
The symbol is marked on the double-insulated product.
“SAVE THESE INSTRUCTIONS”
“This sewing machine is intended for household use.”
Page 3

“IMPORTANTES INSTRUCCIONES DE
SEGURIDAD”
Cuando se usa una máquina de coser, debe seguirse unas precauciones básicas y que se detallan a continuación.
“Leer todas las instrucciones antes de usarla”
PELIGRO – Para reducir el riesgo de una descarga eléctrica.
1. La máquina no debe dejarse nunca desatendida mientras esté conectada. Desconectar la máquina de la red cuando se termine de
usar y antes de limpiarla.
2. Desconectar la máquina de la red antes de cambiar la bombilla. Colocar una bombilla del mismo tipo con una potencia de 15 v atios.
CUIDADO – Para reducir el riesgo de quemaduras, fuego, descargas eléctricas o causar daño a las personas.
1. No usar la máquina como un juguete.
Hay que prestar atención si la máquina la usan los niños o se trabaja cerca de ellos.
2. Usar la máquina de coser solamente como se describe en este manual.
Usar únicamente los accesorios recomendados por el fabricante y que vienen especificados en este manual.
3. Nunca haga funcionar la máquina de coser si el cordón de alimentación o la clavija están deteriorados, si no funciona correctamente, si se ha caído o si se ha mojada. Entregar la máquina de coser al centro de servicio autorizado más cercano para que la
examinen, la reparen o hagan los ajustes eléctricos o mecánicos que correspondan.
4. No usar la máquina con los orificios de ventilación bloqueados. Mantener los orificios de ventilación de la máquina de coser y el
pedal sin acumulacíon de polvo. Suciedad y restos de tejido.
5. No introducir ni insertar objetos en los orificios de ventilación.
6. No usar al, aire libre.
7. No trabajar con la máquina si se estén utilizando productos aerosoles (spray) o en lugares donde se esté administrando oxígeno.
8. Para desconectar, girar el interruptor hasta la posición del símbolo “O” que representa off, luego desconectar el enchufe de la red.
9. No desconectar el enchufe tirando del cable. Para desconectar, tirar de la clavija, no del cable.
10. Mantener los dedos alejados de todas las partes movibles de la máquina. Tener un cuidado especial con la aguja.
11. Usar siempre la placa de agujas apropiada. Una placa de agujas impropia puede producir la rotura de la aguja.
12. No usar agujas despuntadas.
13. No presionar ni tirar del tejido mientras se está cosiendo. Esto podría doblar la aguja y romperla.
14. Situar el interruptor principal de la máquina en posición “O” cuando se realice algún ajuste en el área de la aguja como enhebrara,
cambiar la aguja, cambiar la canilla, cambiar la pata prensatelas y similares.
15. Desconectar siempre la máquina de la red eléctrica cuando se retiren las tapas, para lubricar, o cuando se realice algún otro tipo de
ajuste mecánico mencionado en el manual de instrucciones.
16. Se proporciona un aparato (220 V-240 V) con un doble aislamiento. Utilice únicamente repuestos originales. Vea las instrucciones
de aparatos de reparación de doble aislamiento.
REPARACIÓN DE PRODUCTOS DE DOBLE
AISLAMIENTO (220 V -240 V)
Un producto de doble aislamiento dispone de dos sistemas de aislamiento en lugar de una conexión a tierra. Se proporciona un dispositivo de no conexión a tierra en un producto de doble aislamiento. Por consiguiente, no debe incorporarse al producto un dispositivo de
conexión a tierra. La reparación de un producto de doble aislamiento requiere un especial cuidado y conocimiento del sistema y debe ser
realizado únicamente por personal de mantenimiento cualificado. Los repuestos de los productos de doble aislamiento deben ser originales.
El símbolo aparece marcado en productos de doble aislamiento.
“CONSERVE ESTE MANUAL DE
INSTRUCCIONES”
“Esta máquina de coser es para uso
doméstico”
Page 4

“IMPORTANTI ISTRUZIONI DI SICUREZZA”
Quando usate la macchina per cucire, rispettate sempre le precauzioni di sicurezza,
incluso quanto qui di seguito specificato.
“Leggete tutte le istruzioni prima dell’uso.”
PERICOLO – Per ridurre il rischio di shock elettrico.
1. La macchina per cucire non deve essere mai lasciata abbandonata quando la spina È inserita. Rimuovete sempre la spina della
macchina per cucire subito dopo avere finito di lavorare e prima di procedere alla sua pulizia.
2. Rimuovete sempre le spina della macchina per cucire prima di procedere alla sostituzione della lampadina. Usare una lampadina
dello stesso tipo da 15 watt.
ATTENZIONE – Per ridurre il rischio di bruciature, incendi, shock elettrico o danni alle persone.
1. Non permettete che venga usata come un giocattolo. Fare molta attenzione quando la macchina viene usata vicino a bambini.
2. Usate questa macchina per cucire solo per l’uso cui È destinata, come descritto all’interno del manuale. Usare solo accessori
consigliati dal produttore, come specificato qui di seguito.
3. Non usate mai questa macchina per cucire nel caso abbia la spina o il cavo di alimentazione danneggiata, se non do vesse funzionare bene, se fosse caduta o danneggiata, o caduta nell’acqua. Riportare la macchina per cucire al piu vicino rivenditore o centro
assistenza autorizzati per un esame, la riparazione, o la regolazione elettrica o meccanica.
4. Non usate la macchina per cucire con le aperture dell’aria bloccate. Mantenere le aperture di ventilazione della macchina per cucire
ed il reostato privi di fili, polvere o stoffa.
5. Non far cadere né inserire alcun oggetto in nessuna delle aperture.
6. Non usate la macchina all’aperto.
7. Non fate funzionare la macchina nel caso vengano usati prodotti aerosol (spray) o ossigeno.
8. Per scollegare, girate l’interruttore principale in posizione “O” (che significa OFF = spento), quindi toglieri la spina dalla presa di
corrente.
9. Non scollegate tirando il cavo. Per togliere la spina, tenete la spina stessa e non tirate il cavo.
10. Tenete le dita lontano da tutte le parti in movimento, specialmente attorno all’ago della macchina per cucire.
11. Usate sempre la placca appropriata all’ago in uso. Una placca sbagliata potrebbe provocare la rottura dell’ago.
12. Non usate aghi piegati.
13. Non tirate o spingete il tessuto mentre cucite, poiché ciò potrebbe far piegare l’ago e quindi romperlo.
14. Mettete l’interruttore della macchina su “O” quando eff ettuate regolazioni in prossimità dell’ago, come per esempio durante l’infilatura,
la sostituzione dell’ago, l’infilatura della spolina o la sostituzione del piedino premistoffa.
15. Staccate sempre la macchina per cucire dalla presa elettrica quando togliete i coperchi, la lubrificate o quando effettuate una delle
operazioni di manutenzione citate nel manuale d’istruzioni.
16. Gli apparecchi (220V - 240V) sono dotati di un doppio isolamento elettrico. Usate esclusivamente parti di ricambio identiche. V edere
le istruzioni per la Manutenzione di apparecchi a doppio isolamento elettrico.
Manutenzione di prodotti a doppio isolamento
elettrico (220V - 240V)
Gli apparecchi a doppio isolamento elettrico dispongono di due sistemi di isolamento al posto della messa a terra. Tali apparecchi non
sono dotati di alcun dispositivo di messa a terra e non dev ono essere equipaggiati con alcuno di questi dispositivi. La manutenzione degli
apparecchi a doppio isolamento richiede estrema cautela ed una conoscenza del sistema, e dovrà essere eseguita esclusivamente da
tecnici qualificati. Le parti di ricambio di un apparecchio a doppio isolamento elettrico devono essere identiche a quelle installate nel
prodotto.
Gli apparecchi a doppio isolamento elettrico sono contrassegnati dal simbolo .
“CONSERVATE QUESTE ISTRUZIONI”
“La presente macchina per cucire È destinata all’uso
domestico.”
Page 5

FOR USERS IN THE UK, EIRE, MALTA AND CYPRUS ONLY.
If your sewing machine is fitted with a 3 pin non-rewireable BS plug then please read the following.
IMPORTANT
If the available socket outlet is not suitable for the plug
supplied with this equipment, it should be cut off and
an appropriate three pin plug fitted. With alternative
plugs an approved fuse must be fitted in the plug.
NOTE: The plug severed from the main leads must
be destroyed as a plug with bared flexible cords is
hazardous if engaged in a live socket outlet. In the
event of replacing the plug fuse, use a fuse approved
by ASTA to BS 1362, i.e. carrying the
rating as marked on plug.
Always replace the fuse cover. Never use plugs with
the fuse cover removed.
WARNING: DO NOT CONNECT EITHER WIRE TO
THE EARTH TERMINAL WHICH IS MARKED WITH
THE LETTER ‘E’, BY THE EARTH SYMBOL
OR COLOURED GREEN OR YELLOW.
ASA
mark,
The wires in these main leads are coloured in accordance with the following code:
Blue Neutral
Brown Live
As the colours of the wiring in the main lead of this
appliance may not correspond with the coloured
markings identifying the terminals in your plug, proceed as follows:
The wire which is coloured blue must be connected
to the terminal which is marked with the letter ‘N’ or
coloured black or blue.
The wire which is coloured brown must be connected
to the terminal which is marked with the letter ‘L’ or
coloured red or brown.
Connecting Plugs and Main Power / Sewing Light Switch
1. Connect the three-prong plug into the machine.
2. Connect the electrical supply plug into a wall
outlet.
- When leaving the sewing machine unattended,
the main switch of the machine must be switched
off or the plug must be removed from the socket
outlet.
1
2
Turn on or off the switch for the main power and sewlight.
1 Turn on
2 Turn off
- When servicing the sewing machine, or when
removing covers or changing lamps, the machine or the electrical set must be disconnected
from the supply by removing the plug from the
socket outlet.
Page 6

CONTENTS
CONTENTS
KNOWING YOUR SEWING MACHINE
PRINCIPAL PARTS ............................................................. 1
ACCESSORIES .................................................................... 3
OPERATING YOUR SEWING MACHINE .......................... 5
Connecting Plugs....................................................... 5
Main Power and Sewing Light Switches .................... 6
Foot Controller .......................................................... 6
Inserting the Needle .................................................. 7
Checking the Needle ................................................. 7
Changing the Presser Foot ......................................... 8
Converting to Free-Arm Style.....................................9
Steadying the Machine .............................................. 9
VARIOUS CONTROLS ..................................................... 10
Pattern Selection Dial .............................................. 10
RECOMMENDED WIDTHS AND LENGTHS
FOR STITCHES ........................................................ 11
Stitch Length Dial .................................................... 20
Stretch Stitching....................................................... 21
Reverse Sewing Lever .............................................. 22
Drop Feed Lever (When the machine is equipped
with a drop feed lever)............................................. 22
THREADING THE MACHINE .......................................... 23
Winding the Bobbin ................................................ 23
Lower Threading ..................................................... 24
Upper (Needle) Threading ....................................... 25
Using the Needle Threader (when the machine is
equipped with a needle threader) ............................ 27
Quick Thread-setting System
FAST START BOBBIN (when the machine is
equipped with a quick thread-setting system) .......... 29
Drawing Up Lower Thread ...................................... 30
Twin-Needle Sewing................................................ 31
Thread Tension ........................................................ 32
CHART OF SEWING FABRICS, NEEDLES AND
THREAD COMBINATIONS ..................................... 34
STRAIGHT AND ZIGZAG STITCHING
Straight Stitching...................................................... 36
Zigzag Stitching....................................................... 39
BUTTONHOLE AND BUTTON SEWING
Making a Buttonhole (XL5030 and XL5020 only) .... 47
Making a Buttonhole (XL5010 only) ........................ 49
Buttonhole Fine Adjustment .................................... 52
Button Sewing ......................................................... 54
USING ATTACHMENTS AND APPLICATIONS
Zipper Inserting ....................................................... 56
Gathering ................................................................ 56
Darning ................................................................... 58
Appliques ................................................................ 59
Monogramming and Embroidering .......................... 60
MAINTENANCE
Changing the Bulb................................................... 62
Oiling...................................................................... 63
Cleaning.................................................................. 64
Performance Checklist............................................. 65
Repacking the Machine ........................................... 71
INDEX
SEWING MACHINE
KNOWING Y OUR
ZIGZAG STITCHING
STRAIGHT AND
BUILT-IN STITCHES
BUTTONHOLE AND
BUTTON SEWING
USING ATTACHMENTS
AND APPLICATIONS
BUILT-IN STITCHES
Blind Hem Stitching ................................................ 40
Shell Tuck Stitching ................................................. 41
Elastic Stitching ....................................................... 42
Scallop Stitching...................................................... 43
Overedge Stitching .................................................. 44
Feather Stitching...................................................... 45
Triple Zigzag Stretch Stitching.................................. 46
Decorative Stitching ................................................ 46
MAINTENANCE INDEX
Page 7

ÍNDICE DEL CONTENIDO
CONOZCA SU MÁQUINA DE COSER
ELEMENTOS PRINCIPALES ............................................ 2
ACCESORIOS ................................................................... 3
FUNCIONAMIENTO DE LA MÁQUINA DE COSER......... 5
Conexión de los enchufes ........................................ 5
Interruptor principal y de luz ..................................... 6
Pedal ........................................................................ 6
Inserción de la aguja ................................................ 7
Comprobación de la aguja........................................ 7
Cambio del prensatelas............................................ 8
Conversión en modalidad de brazo libre .................. 9
Para estabilizar la máquina ...................................... 9
DISTINTOS MANDOS ..................................................... 10
Selector de puntadas ............................................. 10
ANCHOS Y LARGOS DE PUNTADAS
RECOMENDADOS ................................................ 14
Selector de largo de puntada ................................. 20
Puntada elástica ..................................................... 21
Palanca de retroceso.............................................. 22
Palanca de alimentación de bajada
(cuando la máquina está equipada con una
palanca de alimentación de bajada)...................... 22
ENHEBRADO DE LA MÁQUINA .................................... 23
Bobinado de la canilla ............................................ 23
Enhebrado inferior .................................................. 24
Enhebrado superior (de la aguja) ........................... 26
Uso del enhebrador
(cuando la máquina está equipada con una
enhebradora de hilo) ............................................. 28
Sistema rápido de colocación del hilo
BOBINA DE INICIO RÁPIDO
(cuando la máquina está equipada con un sistema
rápido de colocación del hilo) ................................ 29
Para sacar el hilo de la canilla................................ 30
Costura con aguja doble......................................... 31
Tensión de los hilos ................................................ 33
TABLA DE COMBINACIONES ENTRE TEJIDOS,
AGUJAS Y HILOS .................................................. 34
OJALES Y COSTURA DE BOTONES
Para coser ojales (Solo XL5030 y XL5020)............ 48
Para coser ojales (Solo XL5010)............................49
Ajuste fino de los ojales..........................................53
Costura de botones ................................................ 55
USO DE ACCESORIOS Y APLICACIONES
Inserción de cremalleras ........................................ 57
Fruncido.................................................................. 57
Zurcido.................................................................... 58
Aplicaciones ........................................................... 59
Monogramas y bordados........................................ 60
MANTENIMIENTO
Cambio de la bombilla ............................................ 62
Engrasado .............................................................. 63
Limpieza ................................................................. 64
Listado de posibles incidencias .............................. 67
Embalaje de la máquina......................................... 71
ÍNDICE
PUNTADAS RECTAS Y ZIGZAG
Puntadas rectas...................................................... 36
Puntadas zigzag ..................................................... 39
PUNTADAS INCORPORADAS
Puntadas invisibles................................................. 40
Puntada alforza derefuerzo .................................... 41
Puntada elástica ..................................................... 42
Puntada festón ....................................................... 43
Puntada por encima de la orilla .............................. 44
Puntada pluma ....................................................... 45
Puntada triple zigzag elástica................................. 46
Puntada decorativa................................................. 46
Page 8

SOMMARIO
CONOSCERE LA MACCHINA DA CUCIRE
PARTI PRINCIPALI ................................................................. 2
ACCESSORI ..............................................................................3
FUNZIONAMENTO DELLA MACCHINA DA CUCIRE ...5
Collegamento elettrico .......................................................5
Interruttore principale e lampadina ....................................6
Reostato a pedale ...............................................................6
Inserimento dell’ago ..........................................................7
Controllo dell’ago ..............................................................7
Sostituzione del piedino premistoffa..................................8
Cucitura a braccio libero ....................................................9
Stabilizzazione della macchina ..........................................9
DISPOSITIVI DI CONTROLLO .......................................... 10
Selettore dei punti ............................................................ 10
AMPIEZZE E LUNGHEZZE DEI PUNTI
CONSIGLIATE ............................................................... 17
Selettore della lunghezza del punto .................................20
Cucitura con punti elastici ...............................................21
Leva di cucitura di ritorno................................................22
Leva abbassa-trasportatore
(se la macchina è equipaggiata con la leva abbassa-
trasportatore) ...................................................................22
PROCEDURE DI INFILATURA ..........................................23
Avvolgimento della spoletta.............................................23
Infilatura inferiore ............................................................24
Infilatura superiore (ago) .................................................26
Uso dell’infila-ago
(se la macchina è equipaggiata con un infilatore)............28
Sistema di infilatura rapido SPOLINA AD
AVVIAMENTO RAPIDO (se la macchina è equipaggiata
con un sistema rapido di posizionamento del filo) .......... 29
Raccolta del filo inferiore ................................................30
Cucitura con ago gemello ................................................31
Regolazione della tensione del filo ..................................33
TABELLA DELLE COMBINAZIONI DI TESSUTO,
AGO E FILO....................................................................35
ASOLE E BOTTONI
Esecuzione di asole (solo mod. XL5030 e XL5020) .......48
Esecuzione di asole (solo mod. XL5010) ........................ 49
Regolazione della densità dei punti dell’asola................. 53
Cucitura di bottoni ...........................................................55
GUARNIZIONI E APPLICAZIONI
Applicazione di cerniere .................................................. 57
Arricciature ...................................................................... 57
Rammendo .......................................................................58
Applicazioni.....................................................................59
Monogrammi e ricami .....................................................60
MANUTENZIONE
Sostituzione della lampadina ...........................................62
Lubrificazione ..................................................................63
Pulizia ..............................................................................64
Tabella di controllo del funzionamento ...........................69
Reimballaggio della macchina .........................................71
INDICE
CUCITURA CON PUNTO DIRITTO E ZIGZAG
Punto diritto .....................................................................36
Punto zigzag.....................................................................39
PUNTI INCORPORATI
Orli a punto invisibile ......................................................40
Punto orlo conchiglia .......................................................41
Punto elastico ...................................................................42
Punto smerlo ....................................................................43
Rifinitura a sopraggitto .................................................... 44
Punto a piuma ..................................................................45
Punto zigzag stretch triplo ...............................................46
Punto decorativo ..............................................................46
Page 9

5
A
3
4
6
2
1
0
8
7
○○○○○○○○○○○○○○○○○○○○○○○○○○○○○○○○○○○○○○○○○○○○○○○○○○○○○○○○○○○○○○○○○○○○○○○○○○○○○○○○○○○○○○○○○○○○○○○○
PRINCIPAL PARTS
1 Bobbin winding assembly
Winds the thread onto the bobbin to be used for the lower thread.
2 Spool pin
Holds the spool of thread.
3 Bobbin winding tension disc and thread guide
9
4 Thread take-up lever
5 Thread cutter
6 Upper tension control dial
Controls the tension of the upper thread.
7 Pattern selection dial
Turn in either direction to select the desired stitch.
8 Stitch length dial
Controls the length of the stitches.
9 Reverse sewing lever
Push for stitching in the reverse direction.
0 Buttonhole fine-adjustment screw
A Buttonhole lever (XL5030 and XL5020 only)
B Handle
C Balance wheel
T urn toward you (counter clockwise) to raise and lower the needle.
D Main power/sewing light switch
Turns the main power and sewing light on and off.
E Foot controller receptacle
Insert the foot controller plug for operation.
F Presser foot lever
Raises and lowers the presser foot.
G Foot controller
Used to control sewing speed start and stop.
CONTENTS
SEWING MACHINE
KNOWING Y OUR
ZIGZAG STITCHING
STRAIGHT AND
BUILT-IN STITCHES
G
C
D
E
F
B
BUTTONHOLE AND
BUTTON SEWING
USING ATTACHMENTS
AND APPLICATIONS
MAINTENANCE
1
INDEX
Page 10
ELEMENTOS PRINCIPALES
1 Porta bobinas
Hace bobina para la canilla que va a ser utilizada como hilo inferior.
2 Porta carretes
Soporta el carrete del hilo
3 Guía de hilos y disco de tensión de bobinado de la canilla
4 Palanca tirahilos
5 Cortador de hilo
6 Disco de control de la tensión superior
Controla la tensión del hilo superior.
7 Selector de puntadas
Gírelo en cualquier dirección para seleccionar la puntada deseada.
8 Selector de largo de puntada
Controla el largo de las puntadas.
9 Palanca de retroceso
Presione la palanca para que la puntada se realice en la dirección contraria.
: Tornillo de ajuste fino de los ojales
A Palanca del ojal (sólo XL5030 y XL5020)
B Asa
C Ruedecilla
Gírela hacia usted (en el sentido contrario de las manecillas de
un reloj) para levantar y bajar la aguja.
D Interruptor principal y de luz
Apaga y enciende la alimentación principal así como la luz de
costura.
E Conectar el pedal
Insertar la clavija del pedal para conectarlo.
F Palanca de elevación del prensatelas
Levanta y baja el prensatelas.
G Pedal
Sirve para controlar la velocidad de costura, el arranque y la parada.
○○○○○○○○○○○○○○○○○○○○○○○○○○○○○○○○○○○○○○○○○○○○○○○○○○○○○○○○○○○○○○○○○○○○○○○○○○○○○○○○○○○○○○○○○○○○○○○○
PARTI PRINCIPALI
1 Dispositivo di avvolgimento spoletta
Avvolge sulla spoletta il filo da impiegare come filo inferiore.
2 Porta-rocchetto
Sostiene il rocchetto di filo da cucito.
3 Disco di tensione avvolgimento spoletta e guidafilo
4 Leva tendifilo
5 Tagliafilo
6 Regolatore di tensione superiore
Consente di controllare la tensione del filo superiore
7 Selettore dei punti
Ruotarlo nei due sensi per selezionare il punto desiderato.
8 Selettore della lunghezza del punto
Consente di regolare la lunghezza del punto.
9 Leva di cucitura di ritorno
Premerla per eseguire cuciture a marcia indietro.
< Vite di regolazione fine dei punti asola
A Levetta dell’asola (solo mod. XL5030 e XL5020)
B Maniglia
C Volantino
Ruotarlo verso se stessi (in senso antiorario) per alzare e abbassare l’ago.
D Interruttore principale/luce area di lavoro
Accende e spegne la macchina da cucire e la luce dell’area di lavoro.
E Presa del reostato
Inserirvi la spina del reostato a pedale per mettere in funzione la macchina da cucire.
F Leva del piedino premistoffa
Permette di alzare ed abbassare il piedino premistoffa.
G Reostato a pedale
Consente di controllare la velocità di cucitura e di avviare ed arrestare la
macchina da cucire.
CONTENTS
SEWING MACHINE
KNOWING Y OUR
ZIGZAG STITCHING
STRAIGHT AND
BUILT-IN STITCHES
BUTTONHOLE AND
BUTTON SEWING
USING ATTACHMENTS
AND APPLICATIONS
MAINTENANCE
INDEX
2
Page 11
1 XA4911151 2 X59370-051
4 129583-001 5 X57521-001
7 X55467-051
3 X59375-051
6 X52800-050
8 130920-051
○○○○○○○○○○○○○○○○○○○○○○○○○○○○○○○○○○○○○○○○○○○○○○○○○○○○○○○○○○○○○○○○○○○○○○○○○○○○○○○○○○○○○○○○○○○○○○○○
ACCESSORIES
XL5030/5020
1 Buttonhole foot (1 pc.)
2 Zipper foot (1 pc.)
3 Button sewing foot (1 pc.)
4 Needle pack (regular single needle HA × 130) (3 pcs.)
5 Twin needle (1 pc.)
6 Bobbins (3 pcs.)
7 Screwdriver (1 pc.)
8 Extra spool pin (1 pc.)
9 Seam ripper
0 Darning plate (1pc.) (When the machine is not equipped with a
Drop Feed.)
Parts code for zigzag presser foot: 138135-052
Foot controller: X57319-051 (110/120V areas)
XA6422-021 (220/240V areas)
XA6412-021 (U.K.)
XA6414-021 (Australia, New Zealand)
The above accessories are stored in the accessory bag inside the extension table. These accessories have been designed to help complete
most sewing tasks.
CONTENTS
SEWING MACHINE
KNOWING Y OUR
ZIGZAG STITCHING
STRAIGHT AND
9 X54243-001
○○○○○○○○○○○○○○○○○○○○○○○○○○○○○○○○○○○○○○○○○○○○○○○○○○○○○○○○○○○○○○○
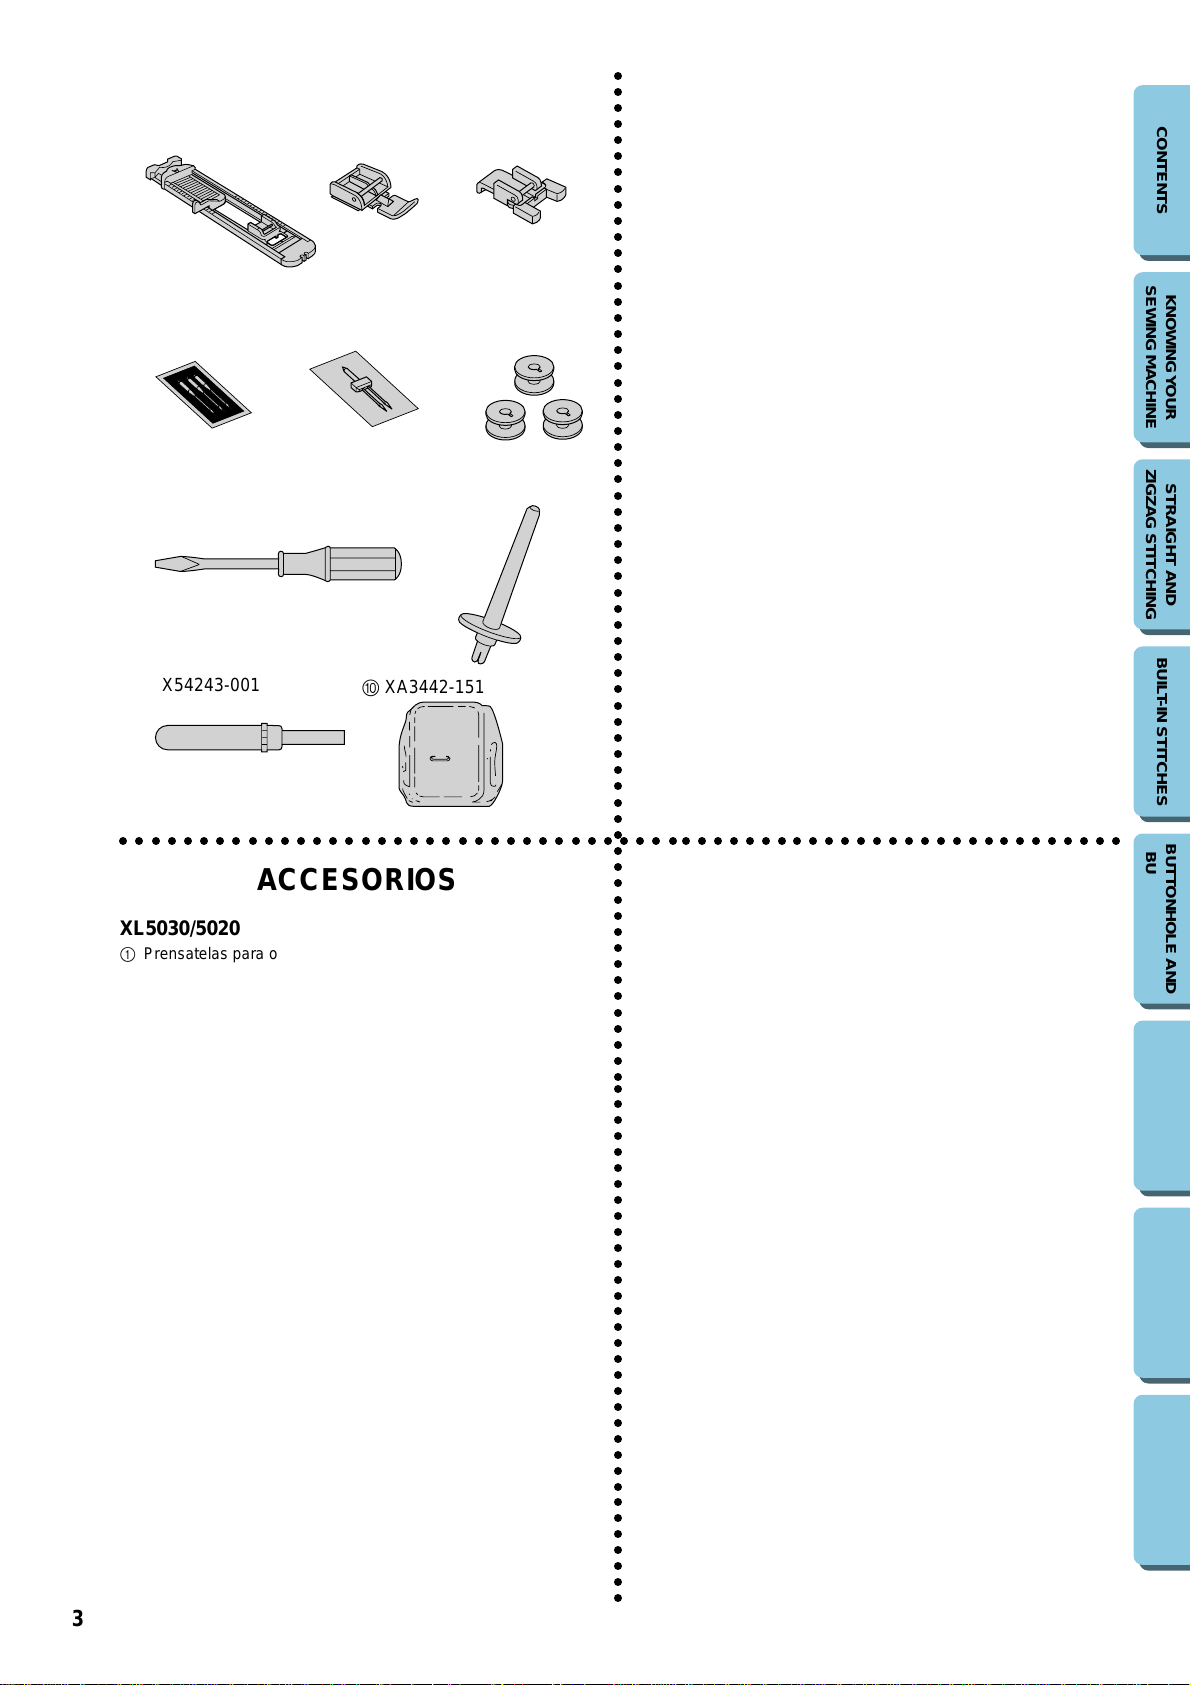
ACCESORIOS
XL5030/5020
1 Prensatelas para ojales (1 pza.)
2 Prensatelas cremalleras (1 pza.)
3 Prensatelas para costura de botones (1 pza.)
4 Paquete de agujas (agujas simples normales HA × 130) (3 pzas.)
5 Aguja doble (1 pza.)
6 Canilla (3 pzas.)
7 Destornillador (1 pza.)
8 Porta carretes extra (1 pza.)
9 Cortador especial
< Placa de zurcido (1 pza.) (cuando la máquina no está equipada
con alimentación de bajada)
Código del prensatelas para la puntada en zigzag: 138135-052
Pedal: X57319-051 (zona con 110/120 V)
XA6422-021 (zona con 220/240 V)
XA6412-021 (Reino Unido)
XA6414-021 (Australia, Nueva Zelanda)
Los accesorios mencionados arriba se encuentran en la bolsa de
accesorios, dentro del soporte de accesorios. Han sido concebidos
para poder realizar la mayoría de las operaciones de costura.
0 XA3442-151
ACCESSORI
XL5030/5020
1 Piedino per asole (1 pz.)
2 Piedino per cerniere (1 pz.)
3 Piedino per bottoni (1 pz.)
4 Confezione di aghi (ago singolo normale HA × 130) (3 pz.)
5 Ago gemello (1 pz.)
6 Spolette (3 pz.)
7 Cacciavite (1 pz.)
8 Porta-rocchetto ausiliario (1 pz.)
9 Taglia-asole
< Placca da rammendo (1 pz.) (se la macchina non è equipaggiata con la
leva abbassa-trasportatore)
Codice parte del piedino zigzag: 138135-052
Reostato: X57319-051 (paesi con corrente elettrica a 110/120V)
XA6422-021 (paesi con corrente elettrica a 220/240V)
XA6412-021 (Regno Unito)
XA6414-021 (Australia, Nuova Zelanda)
Gli accessori a corredo della macchina sono situati nell’apposita borsa all’interno del piano di lavoro. Essi sono stati studiati per consentire l’esecuzione della maggior parte dei lavori di cucito.
BUILT-IN STITCHES
BUTTONHOLE AND
BUTTON SEWING
USING ATTACHMENTS
AND APPLICATIONS
MAINTENANCE
3
INDEX
Page 12

1 X59369-251 2 X59370-051 3 X59375-051
4 129583-001 6 X52800-050
7 X55467-051
5 X57521-001
8 130920-051
○○○○○○○○○○○○○○○○○○○○○○○○○○○○○○○○○○○○○○○○○○○○○○○○○○○○○○○○○○○○○○○○○○○○○○○○○○○○○○○○○○○○○○○○○○○○○○○○
XL5010
1 Buttonhole foot (1 pc.)
2 Zipper foot (1 pc.)
3 Button sewing foot (1 pc.)
4 Needle pack (regular single needle HA × 130) (3 pcs.)
5 Twin needle (1pc.)
6 Bobbins (3 pcs.)
7 Screwdriver (1 pc.)
8 Extra spool pin (1pc.)
9 Seam ripper
0 Darning plate (1pc.) (When the machine is not equipped with a
Drop Feed.)
Parts code for zigzag presser foot: 138135-052
Foot controller: X57319-051 (110/120V areas)
The above accessories are stored in the accessory bag inside the extension table. These accessories have been designed to help complete
most sewing tasks.
XA6422-021 (220/240V areas)
XA6412-021 (U.K.)
XA6414-021 (Australia, New Zealand)
CONTENTS
SEWING MACHINE
KNOWING Y OUR
ZIGZAG STITCHING
STRAIGHT AND
9 X54243-001
○○○○○○○○○○○○○○○○○○○○○○○○○○○○○○○○○○○○○○○○○○○○○○○○○○○○○○○○○○○○○○○
XL5010
1 Prensatelas para ojales (1 pza.)
2 Prensatelas cremalleras (1 pza.)
3 Prensatelas para costura de botones (1 pza.)
4 Paquete de agujas (agujas simples normales HA × 130) (3 pzas.)
5 Aguja doble (1 pza.)
6 Canilla (3 pzas.)
7 Destornillador (1 pza.)
8 Porta carretes extra (1 pza.)
9 Cortador especial
< Placa de zurcido (1 pza.) (cuando la máquina no está equipada
con alimentación de bajada)
Código del prensatelas para la puntada en zigzag: 138135-052
Pedal: X57319-051 (zona con 110/120 V)
XA6422-021 (zona con 220/240 V)
XA6412-021 (Reino Unido)
XA6414-021 (Australia, Nueva Zelanda)
Los accesorios mencionados arriba se encuentran en la bolsa de
accesorios, dentro del soporte de accesorios. Han sido concebidos
para poder realizar la mayoría de las operaciones de costura.
0 XA3442-151
XL5010
1 Piedino per asole (1 pz.)
2 Piedino per cerniere (1 pz.)
3 Piedino per bottoni (1 pz.)
4 Confezione di aghi (ago singolo normale HA × 130) (3 pz.)
5 Ago gemello (1 pz.)
6 Spolette (3 pz.)
7 Cacciavite (1 pz.)
8 Porta-rocchetto ausiliario (1 pz.)
9 Taglia-asole
< Placca da rammendo (1 pz.) (se la macchina non è equipaggiata con la
leva abbassa-trasportatore)
Codice parte del piedino zigzag: 138135-052
Reostato: X57319-051 (paesi con corrente elettrica a 110/120V)
XA6422-021 (paesi con corrente elettrica a 220/240V)
XA6412-021 (Regno Unito)
XA6414-021 (Australia, Nuova Zelanda)
Gli accessori a corredo della macchina sono situati nell’apposita borsa all’interno del piano di lavoro. Essi sono stati studiati per consentire l’esecuzione della maggior parte dei lavori di cucito.
BUILT-IN STITCHES
BUTTONHOLE AND
BUTTON SEWING
USING ATTACHMENTS
AND APPLICATIONS
MAINTENANCE
4
INDEX
Page 13

○○○○○○○○○○○○○○○○○○○○○○○○○○○○○○○○○○○○○○○○○○○○○○○○○○○○○○○○○○○○○○○○○○○○○○○○○○○○○○○○○○○○○○○○○○○○○○○○
OPERATING YOUR SEWING
MACHINE
Connecting Plugs
1. Insert the foot controller plug, located between the foot controller
and the power supply plug on the cord, into the jack on the machine.
2. Insert the power supply plug into an electrical outlet.
CAUTION:
1. When changing the light bulb or when the sewing machine is not
in use, the power supply plug must be disconnected from the wall
socket to avoid electrical hazards.
CONTENTS
SEWING MACHINE
KNOWING Y OUR
ZIGZAG STITCHING
STRAIGHT AND
○○○○○○○○○○○○○○○○○○○○○○○○○○○○○○○○○○○○○○○○○○○○○○○○○○○○○○○○○○○○○○○
FUNCIONAMIENTO DE LA
MÁQUINA DE COSER
Conexión de los enchufes
1. Conecte el enchufe a la máquina, el cordón, se encuentra situado entre el pedal y el enchufe destinado a la alimentación de
corriente.
2. Conecte el enchufe de alimentación a una toma de corriente.
ATENCIÓN:
1. Cuando se cambia una aguja, la canilla o la bombilla de luz,
o cuando se deja la máquina sin funcionar, se recomienda
siempre retirar el enchufe de la toma de corriente para evitar
choques eléctricos.
FUNZIONAMENTO DELLA
MACCHINA DA CUCIRE
Collegamento elettrico
1. Identificare lungo il cavo la presa a tre poli collegata tra il reostato a
pedale e la spina di alimentazione e inserirla nella macchina.
2. Inserire la spina di alimentazione in una presa elettrica a muro.
ATTENZIONE:
1. Per evitare rischi di scosse elettriche o partenze accidentali della
macchina, si raccomanda di disinserire la spina di alimentazione
dalla presa elettrica prima di sostituire l’ago, la spouna o la lampadina oppure nei periodi di inattività della macchina.
BUILT-IN STITCHES
BUTTONHOLE AND
BUTTON SEWING
USING ATTACHMENTS
AND APPLICATIONS
MAINTENANCE
5
INDEX
Page 14
A
B
1
2
○○○○○○○○○○○○○○○○○○○○○○○○○○○○○○○○○○○○○○○○○○○○○○○○○○○○○○○○○○○○○○○○○○○○○○○○○○○○○○○○○○○○○○○○○○○○○○○○
Main Power and Sewing Light Switches
This switch turns the main power and sewing light on or off. (See fig.
A.)
1 Turn on (toward the “I” mark)
2 Turn off (toward the “O” mark)
Foot Controller
When the foot controller is depressed lightly, the machine will run at a
low speed. When the pressure on the foot controller is increased, the
machine’s speed will increase. When pressure on the foot controller is
released, the machine will stop. Care should be taken that nothing is
placed on the foot controller when the machine is not in use. (See fig.
B.)
CONTENTS
SEWING MACHINE
KNOWING Y OUR
ZIGZAG STITCHING
STRAIGHT AND
○○○○○○○○○○○○○○○○○○○○○○○○○○○○○○○○○○○○○○○○○○○○○○○○○○○○○○○○○○○○○○○
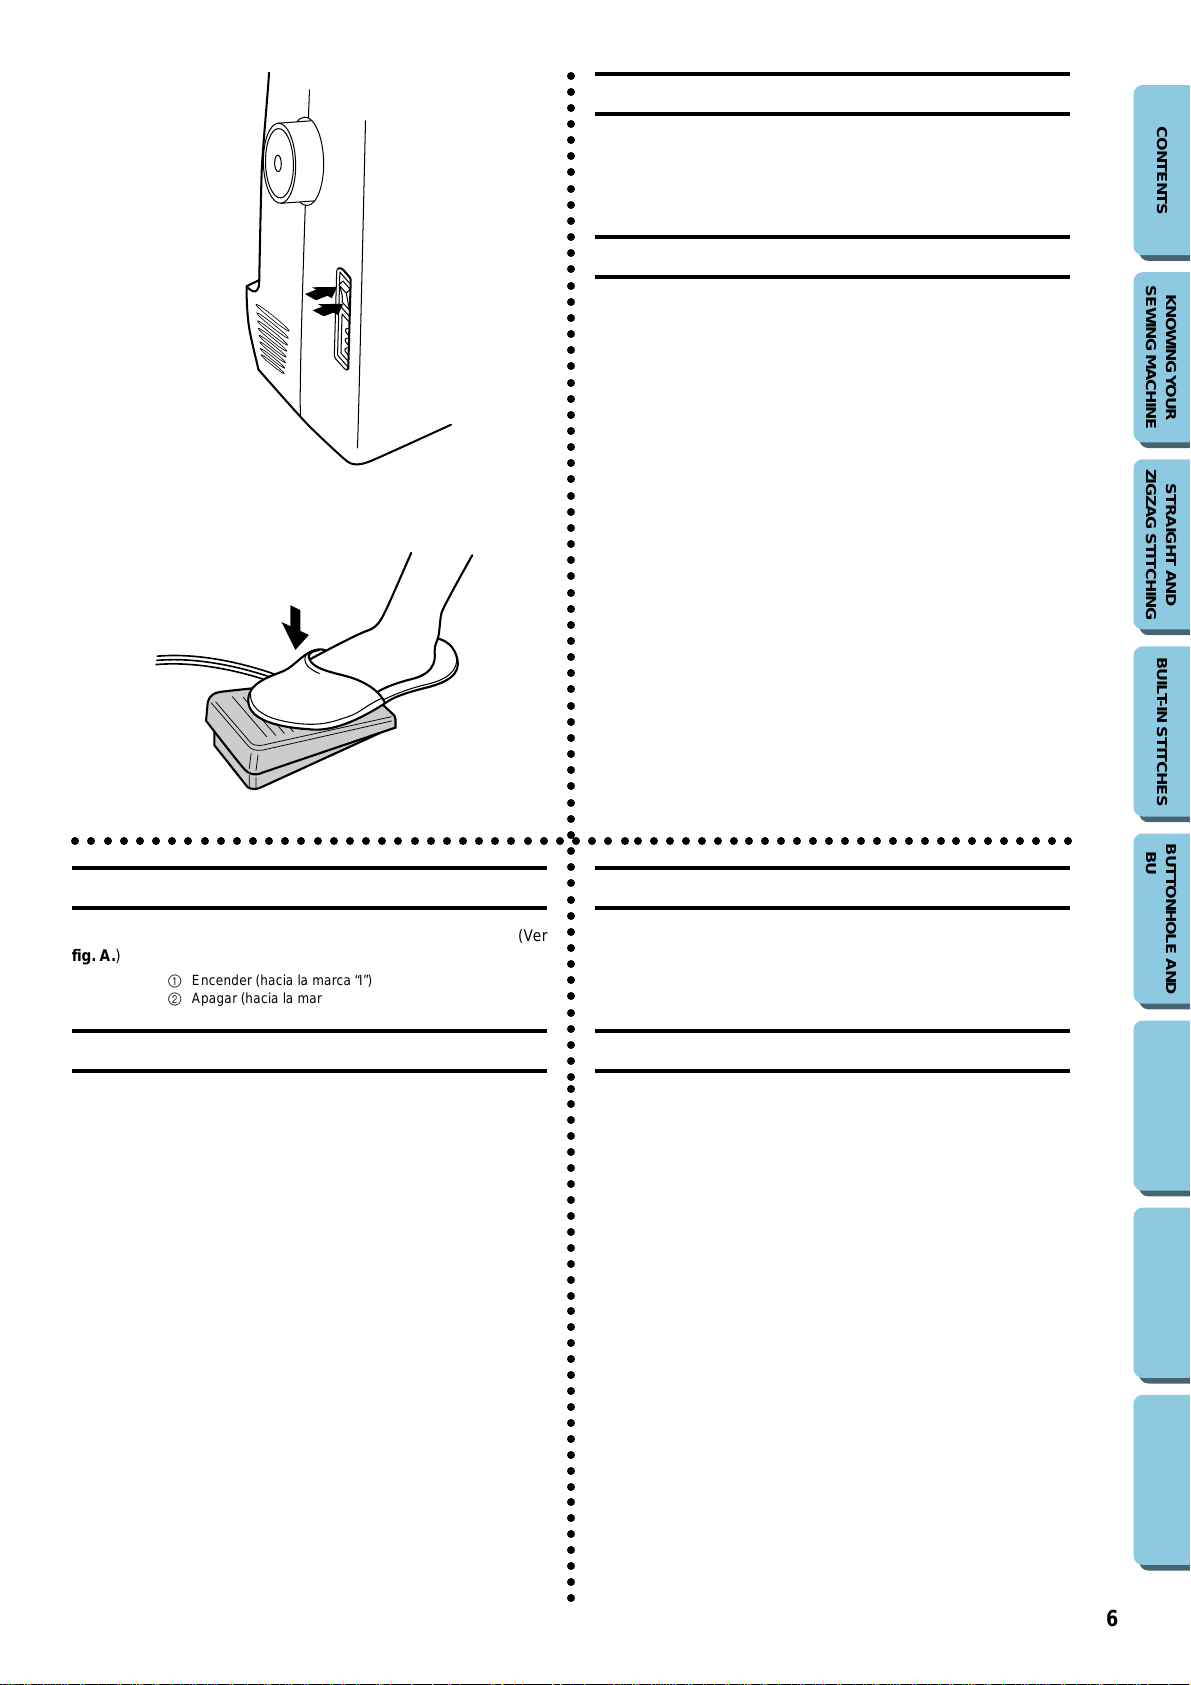
Interruptor principal y de luz
Este interruptor permite apagar y encender la máquina y la luz. (Ver
fig. A.)
1 Encender (hacia la marca “I”)
2 Apagar (hacia la marca “O”)
Pedal
Al presionar ligeramente el pedal, la máquina funcionará a baja velocidad. Al aumentar la presión, se incrementa también la v elocidad
de la máquina. Al soltar el pedal, la máquina se para. Asegúrese
siempre de no poner ningún objeto sobre el pedal cuando la máquina no se utilire. (Ver fig. B.)
Interruttore principale e lampadina
Questo interruttore accende e spegne sia la macchina che la lampadina. (V edi
fig. A.)
1 Acceso (verso il simbolo “I”)
2 Spento (verso il simbolo “O”)
Reostato a pedale
Premendo leggermente sul reostato, la macchina funzionerà a bassa velocità. Aumentando la pressione sul reostato, la velocità della macchina aumenterà. Sollevando il piede dal reostato, la macchina si fermerà. Si raccomanda di non appoggiare nessun oggetto sul reostato quando la macchina è
inattiva. (Vedi fig. B.)
BUILT-IN STITCHES
BUTTONHOLE AND
BUTTON SEWING
USING ATTACHMENTS
AND APPLICATIONS
MAINTENANCE
6
INDEX
Page 15

A
1 1
○○○○○○○○○○○○○○○○○○○○○○○○○○○○○○○○○○○○○○○○○○○○○○○○○○○○○○○○○○○○○○○○○○○○○○○○○○○○○○○○○○○○○○○○○○○○○○○○
Inserting the Needle
Turn power switch to “O”.
1. Remove the power supply plug from the electrical outlet.
2. Raise the needle bar to its highest position.
3. Lower the presser foot.
4. If a needle is already installed, remove it by loosening the needle
clamp with a coin and pulling the needle down. (See fig. A.)
5. With the flat side toward the back, insert the new needle as far as
possible up against the needle stopper.
6. Tighten the needle clamp.
1 Coin
CONTENTS
SEWING MACHINE
KNOWING Y OUR
Checking the Needle
B
○○○○○○○○○○○○○○○○○○○○○○○○○○○○○○○○○○○○○○○○○○○○○○○○○○○○○○○○○○○○○○○
Inserción de la aguja
Desenchufar la máquina, interruptor principale a “O”.
1. Retire el enchufe de alimentación de la toma de corriente.
2. Levante la barra de la aguja a su posición más alta.
3. Baje el prensatelas.
4. En caso de que ya esté una aguja instalada, retírela aflojando el
tornillo con una moneda y tirando hacia abajo. (Ver fig. A.)
5. Introduzca una nueva aguja con la parte plana hacia atrás, lo
más adentro posible hasta que llegue a su tope.
6. Vuelva a apretar el tornillo de la aguja.
1 Moneda
1. The sewing needle must always be straight and sharp for smooth
sewing.
2. To check if the needle is bent, place the flat side of the needle
down as shown in the illustration. (See fig. B.)
3. Replace the needle if it is bent or dull.
Inserimento dell’ago
Mettere l’interruttore principale su “O”.
1. Disinserire la spina di alimentazione dalla presa elettrica.
2. Far salire la barra dell’ago fino alla posizione più alta.
3. Abbassare il piedino premistoffa.
4. Se è già montato un ago, rimuoverlo allentando il morsetto dell’ago con
una moneta e tirando l’ago verso il basso. (Vedi fig. A.)
5. Con la parte piatta dell’ago rivolta indietro, inserire il nuovo ago spingendolo il più in alto possibile contro il ferma-ago.
6. Stringere il morsetto dell’ago.
1 Moneta
ZIGZAG STITCHING
STRAIGHT AND
BUILT-IN STITCHES
BUTTONHOLE AND
BUTTON SEWING
USING ATTACHMENTS
AND APPLICATIONS
Comprobación de la aguja
1. La aguja siempre ha de estar bien recta y afilada para un perfecto cosido.
2. Para comprobar que la aguja no está doblada, coloque la parte
plana de la aguja hacia abajo como se muestra en el dibujo . (Ver
fig. B.)
3. Cambie la aguja si está doblada o gastada.
7
MAINTENANCE
Controllo dell’ago
1. Per ottenere una cucitura perfetta, l’ago utilizzato deve essere sempre
ben diritto ed appuntito.
2. Per controllare se l’ago è piegato, appoggiarlo su un piano con la parte
piatta come illustrato dal disegno. (Vedi fig. B.)
3. Sostituire l’ago se risulta piegato o spuntato.
INDEX
Page 16

○○○○○○○○○○○○○○○○○○○○○○○○○○○○○○○○○○○○○○○○○○○○○○○○○○○○○○○○○○○○○○○○○○○○○○○○○○○○○○○○○○○○○○○○○○○○○○○○
Changing the Presser Foot
It may be necessary to change the presser foot according to your sewing needs.
SNAP-ON TYPE
Turn power switch to “O”.
1. Raise the needle to its highest position by turning the balance wheel
toward you (counterclockwise) and raise the presser foot lever.
2. Release the foot by raising the lever located at the back of the presser
foot holder assembly.
3. Place a different presser foot on the needle plate so that the bar on
the presser foot is in line with the slot in the presser foot holder.
4. Lower the presser foot lifter and fix the presser foot onto the holder .
If the presser foot is in the correct location, the bar should snap into
place.
CONTENTS
SEWING MACHINE
KNOWING Y OUR
ZIGZAG STITCHING
STRAIGHT AND
○○○○○○○○○○○○○○○○○○○○○○○○○○○○○○○○○○○○○○○○○○○○○○○○○○○○○○○○○○○○○○○
Cambio del prensatelas
Según sus necesidades de costura, puede ser necesario cambiar el
prensatelas.
Modelo a presión
Desenchufar la máquina, interruptor principale a “O”.
1. Levante la aguja a su posición más alta, girando la ruedecilla
hacia usted (en el sentido contrario al de las manecillas de un
reloj) y levante la palanca del prensatelas.
2. Suelte el prensatelas levantando la palanca que hay en la parte
trasera del soporte.
3. Coloque otro prensatelas en la placa de agujas de tal forma que
la barra del prensatelas quede alineada con la ranura del soporte
del prensatelas.
4. Baje la palanca del prensatelas y fije el prensatelas en el soporte. Si el prensatelas está bien colocado, la barra debe engancharse en su lugar correspondiente.
Sostituzione del piedino premistoffa
In base alle esigenze del lavoro da eseguire, può rendersi necessario sostituire il piedino premistoffa.
Piedino con innesto automatico
Mettere l’interruttore principale su “O”.
1. Far salire l’ago fino alla sua posizione più alta girando il volantino verso se stessi (in senso antiorario) e sollevare la lev a del piedino premistoffa.
2. Staccare il piedino premendo la levetta situata dietro al gruppo supporto
del piedino premistoffa.
3. Collocare il nuovo piedino premistoffa sulla placca dell’ago in modo
che il perno del piedino sia allineato alla scanalatura sul supporto del
piedino premistoffa.
4. Abbassare la leva del piedino premistoffa ed innestare il piedino nel
supporto. Se il piedino è applicato nella posizione corretta, il perno scatterà in posizione.
BUILT-IN STITCHES
BUTTONHOLE AND
BUTTON SEWING
USING ATTACHMENTS
AND APPLICATIONS
MAINTENANCE
8
INDEX
Page 17

A
1
B
○○○○○○○○○○○○○○○○○○○○○○○○○○○○○○○○○○○○○○○○○○○○○○○○○○○○○○○○○○○○○○○○○○○○○○○○○○○○○○○○○○○○○○○○○○○○○○○○
Converting to Free-Arm Style
Free-arm sewing is convenient for sewing tubular and hard-to-reach
areas on garments. To change your machine to the free-arm style, lift
up on the extension table and pull it out. (See fig. A.)
1 Lift the bottom of the extension table up toward you.
2 Pull the extension table out to remove it.
1 Extension table
Steadying the Machine
When the sewing machine is placed on an uneven surface, turn the
rubber cushion on the front right-hand side of the base plate to adjust
its height until the sewing machine is stable. (See fig. B.)
CONTENTS
SEWING MACHINE
KNOWING Y OUR
ZIGZAG STITCHING
STRAIGHT AND
○○○○○○○○○○○○○○○○○○○○○○○○○○○○○○○○○○○○○○○○○○○○○○○○○○○○○○○○○○○○○○○
Conversión en modalidad de brazo
libre
La costura con brazo libre es práctica para coser en redondo y en
partes del tejido de dificil acceso. Para transformar su máquina en
esa modalidad, sólo hace falta lev antar el soporte de los accesorios
y sacarlo tirando de él. (Ver fig. A.)
1 Levante la parte inferior del soporte de accesorios hacia usted.
2 Tíre hacia afuera para sacarlo.
1 Soporte de accesorios
L’utilizzo della macchina a braccio libero è ideale per eseguire cuciture di
tessuti tubolari e di parti di tessuto altrimenti difficili da raggiungere. Per
passare alla cucitura a braccio libero, sollevare il piano di lav oro ed estrarlo.
(V edi fig. A.)
1 Sollevare il fondo del piano di lavoro in fuori verso se stessi.
2 Estrarre il piano di lavoro tirandolo in fuori.
Cucitura a braccio libero
1 Piano di lavoro
BUILT-IN STITCHES
BUTTONHOLE AND
BUTTON SEWING
USING ATTACHMENTS
AND APPLICATIONS
MAINTENANCE
Para estabilizar la máquina
Si se instala la máquina de coser en una superficie desigual, puede
ajustar su altura girando el cojinete de goma que se encuentra en la
parte anterior izquierda de la placa de base hasta que la máquina
quede estable. (Ver fig. B.)
9
Stabilizzazione della macchina
Quando la macchina da cucire viene collocata su una superficie irregolare,
girare il cuscinetto di gomma posto davanti a sinistra sul fondo della macchina per regolarne l’altezza fino a rendere la macchina stabile. (Vedi
fig. B.)
INDEX
Page 18
○○○○○○○○○○○○○○○○○○○○○○○○○○○○○○○○○○○○○○○○○○○○○○○○○○○○○○○○○○○○○○○○○○○○○○○○○○○○○○○○○○○○○○○○○○○○○○○○
1
VARIOUS CONTROLS
Pattern Selection Dial
To select a stitch, simply turn the pattern selection dial in either direction. Stitch widths and lengths are shown on the following pages.
1 Pattern selection dial
NOTE:
Continuing to turn the pattern selection dial counterclockwise selects
each pattern in order until the last pattern (“17” on the XL5010, “17”
on the XL5020, and “21” on the XL5030) is selected, then returns to
the first pattern.
○○○○○○○○○○○○○○○○○○○○○○○○○○○○○○○○○○○○○○○○○○○○○○○○○○○○○○○○○○○○○○○
CONTENTS
SEWING MACHINE
KNOWING Y OUR
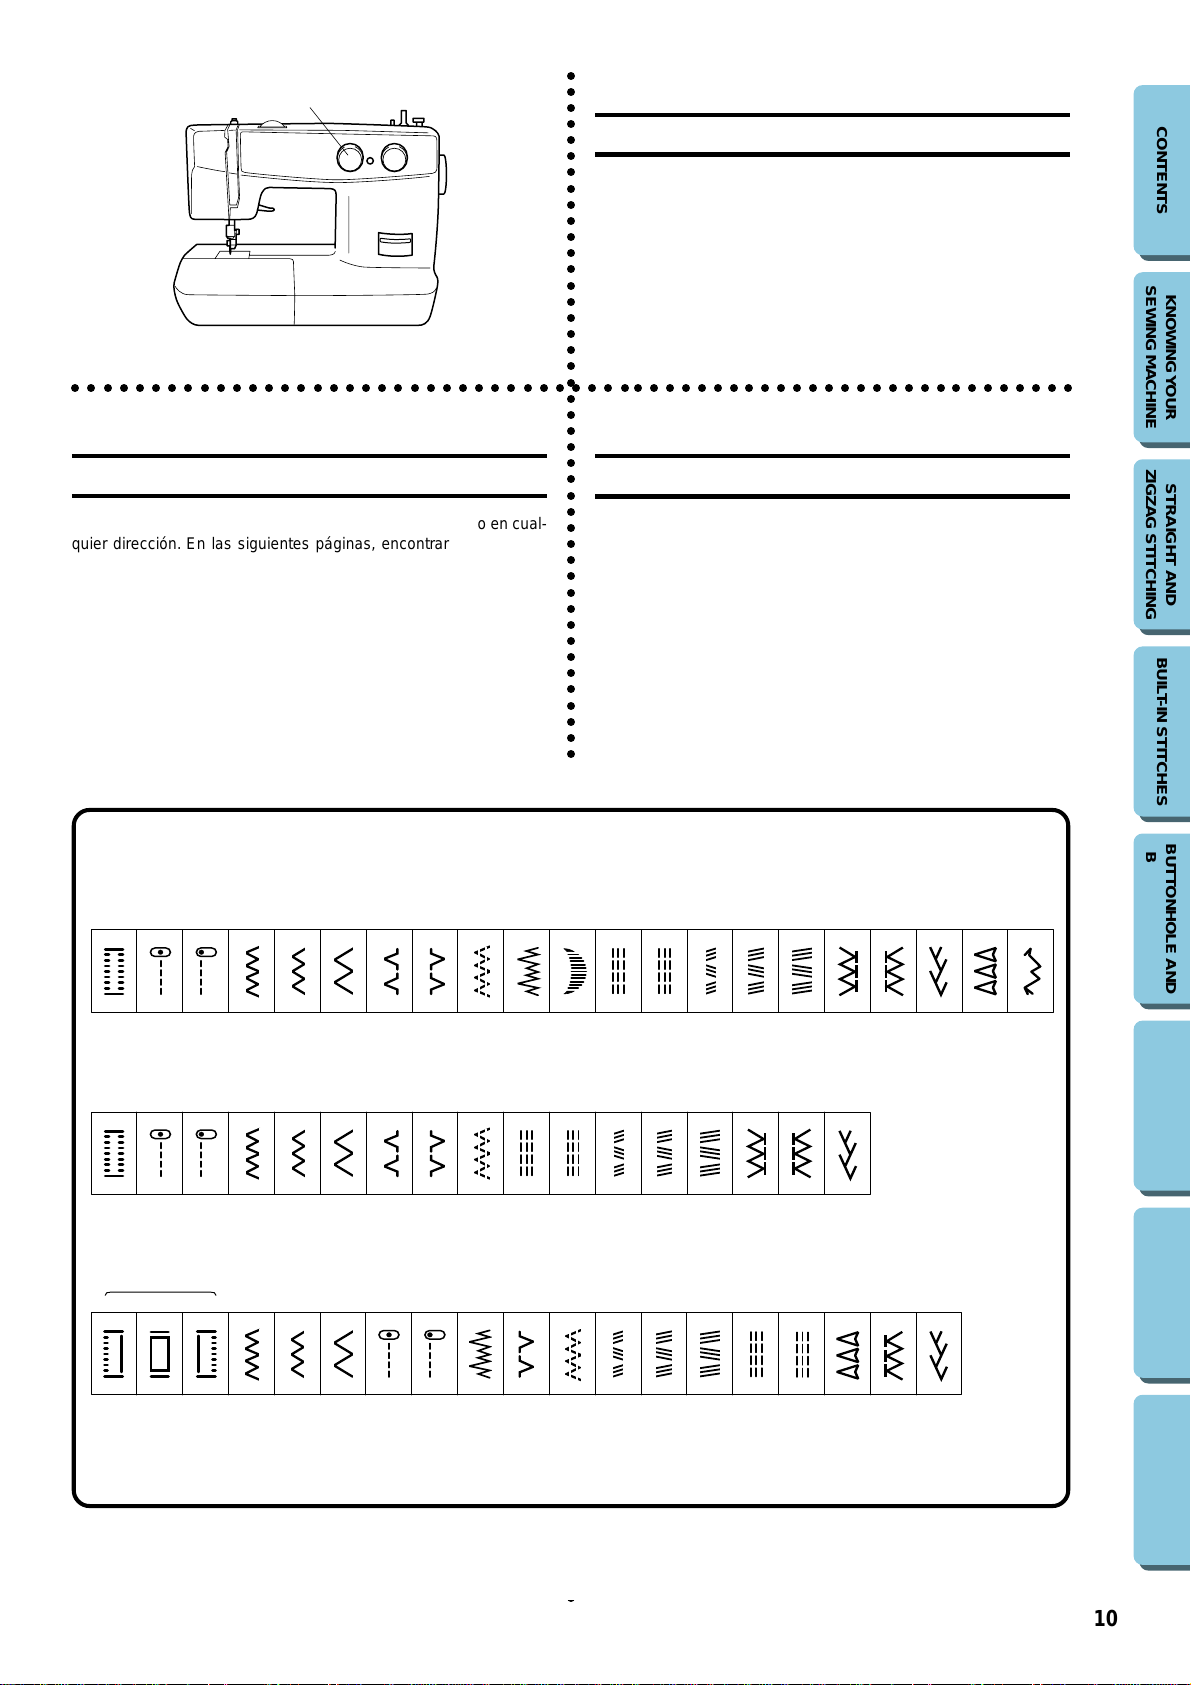
DISTINTOS MANDOS
Selector de puntadas
Para seleccionar una puntada, sólo hace falta gir ar el disco en cualquier dirección. En las siguientes páginas, encontrará los largos y
anchos de puntadas.
1 Selector de puntadas
NOTA:
Si continua girando el selector de puntadas en el sentido contrario a
las manecillas de un reloj, se selecciona cada puntada en orden
hasta que se seleccione la última puntada (“17” en XL5010, “17” en
XL5020, y “21” en XL5030) y luego vuelve a la primera puntada.
XL5030
1
2 3 4 5 6 7 8 9 10 11 12 13 14 15 16 17 18 19 20 21
DISPOSITIVI DI CONTROLLO
Selettore dei punti
Per selezionare un punto è sufficiente ruotare verso sinistra o destra il selettore
dei punti. Le pagine seguenti mostrano le ampiezze e le lunghezze dei vari
punti.
1 Selettore dei punti
NOTA:
Continuando a ruotare il selettore dei punti in senso antiorario, viene selezionato un punto dopo l’altro in sequenza finché il selettore non raggiunge
l’ultimo punto (“17” sul mod. XL5010, “17” sul mod. XL5020, e “21” sul
mod. XL5030) e quindi ritorna sul primo.
ZIGZAG STITCHING
STRAIGHT AND
BUILT-IN STITCHES
BUTTONHOLE AND
BUTTON SEWING
XL5020
1
2 3 4 5 6 7 8 9 10 11 12 13 14 15 16 17
XL5010
B
A/C1D234567891011121314151617
B
A
USING ATTACHMENTS
AND APPLICATIONS
MAINTENANCE
INDEX
10
Page 19
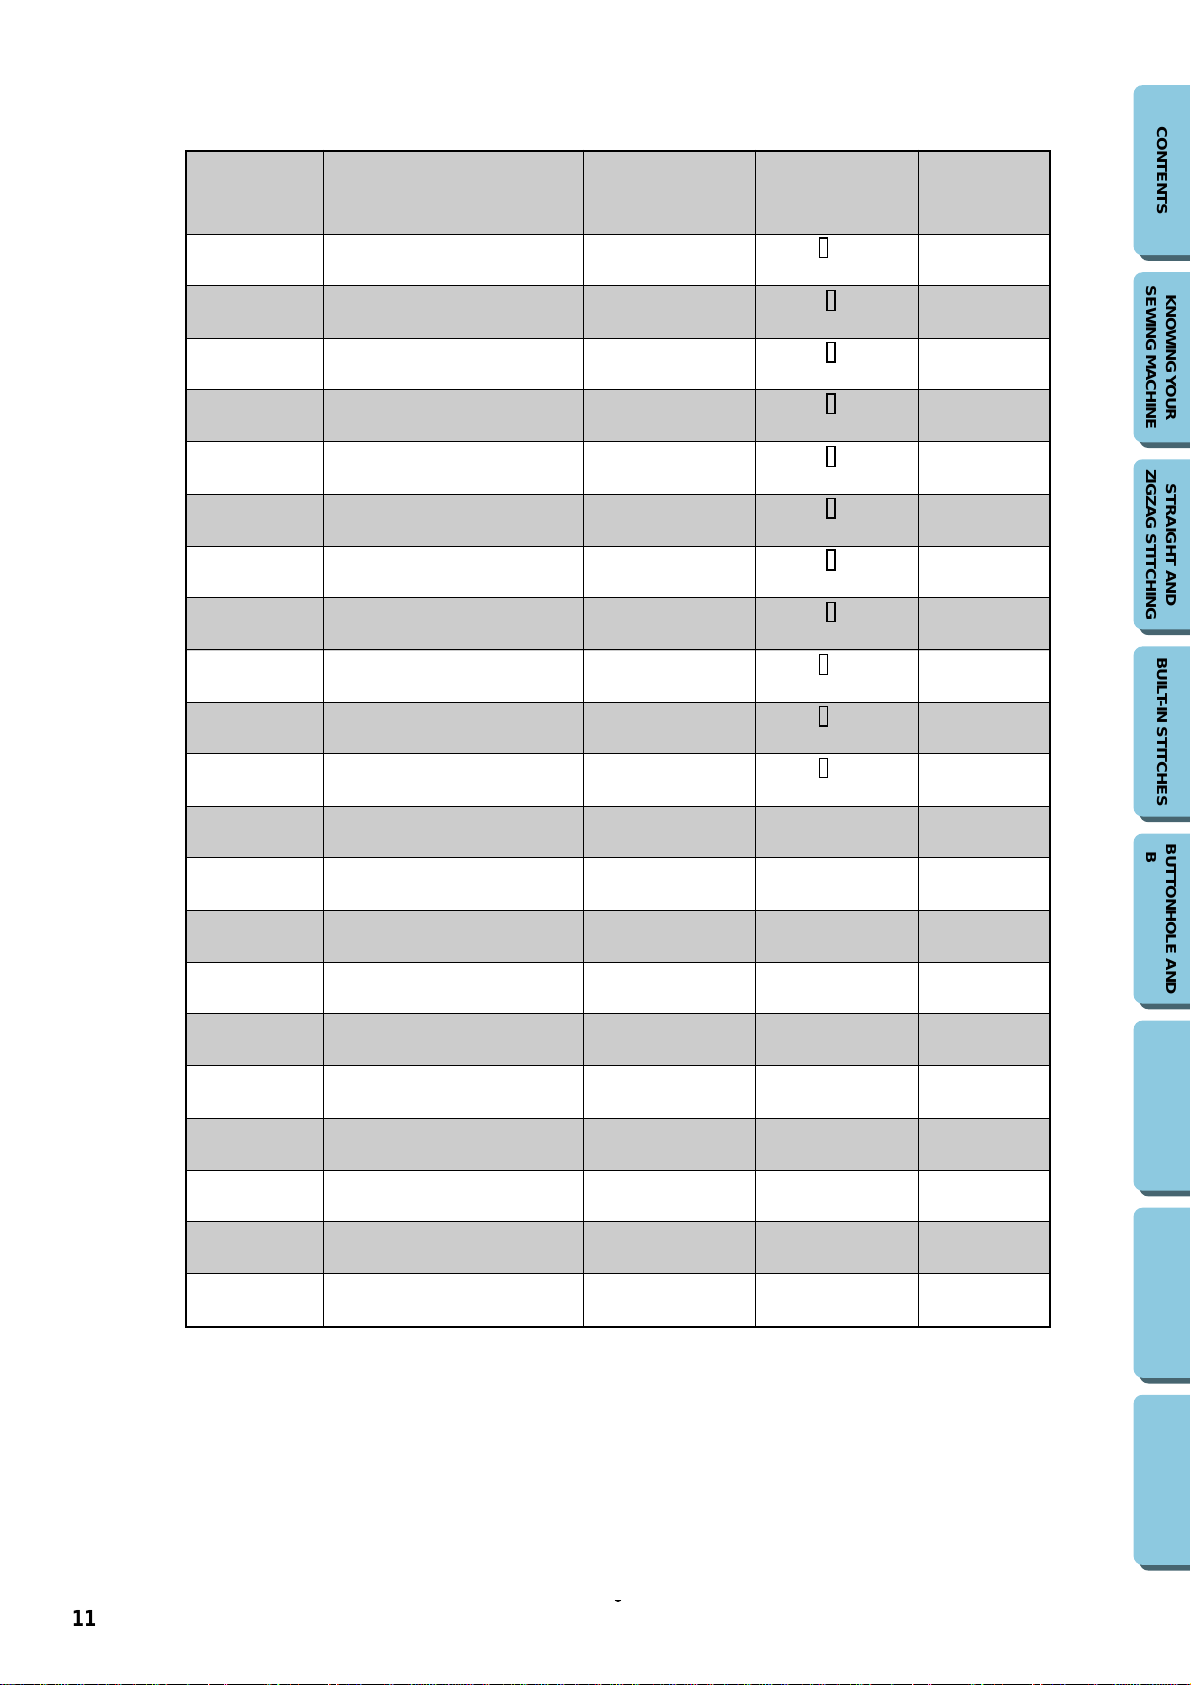
RECOMMENDED WIDTHS AND LENGTHS FOR STITCHES
○○○○○○○○○○○○○○○○○○○○○○○○○○○○○○○○○○○○○○○○○○○○○○○○○○○○○○○○○○○○○○○○○○○○○○○○○○○○○○○○○○○○○○○○○○○○○○○○
XL5030
PATTERN STITCH NAME PRESET WIDTH RECOMMENDED PAGE IN
[mm (inch)] LENGTH INSTRUCTIONS
[mm (inch)]
1 BUTTONHOLE 5 -1.5 47
(13/64) (1/64-1/16)
2 STRAIGHT STITCH – -4 36
(CENTER) (1/64-5/32)
3 STRAIGHT STITCH –
(LEFT) (1/64-5/32)
4 ZIGZAG STITCH 1.7
(1/16) (1/64-5/32)
5 ZIGZAG STITCH 3.5
(9/64) (1/64-5/32)
6 ZIGZAG STITCH 5
(13/64) (1/64-5/32)
7 BLIND HEM STITCH 3
(1/8) (1/64-5/64)
8 SHELL TUCK STITCH 5
(13/64) (1/64-1/8)
9 ELASTIC STITCH 5 -2.5 42
(13/64) (1/64-3/32)
10 STRETCH BLIND STITCH 5
(13/64) (1/64-1/16)
11 SCALLOP STITCH 5
(13/64) (1/64-1/16)
12 TRIPLE STRETCH STITCH – Fixed 36
(CENTER) 2.5 (3/32)
13 TRIPLE STRETCH STITCH – Fixed 36
(LEFT) 2.5 (3/32)
14
TRIPLE ZIGZAG STRETCH STITCH
1.7 Fixed 46
(1/16) 2.5 (3/32)
15
TRIPLE ZIGZAG STRETCH STITCH
3.5 Fixed 46
(9/64) 2.5 (3/32)
16
TRIPLE ZIGZAG STRETCH STITCH
5 Fixed 46
(13/64) 2.5 (3/32)
17 STRETCH OVERLOCK STITCH 3 Fixed 44
(1/8) 2.5 (3/32)
18 ELASTIC OVERLOCK STITCH 5 Fixed 44
(13/64) 2.5 (3/32)
19 FEATHER STITCH 5 Fixed 45
(13/64) 2.5 (3/32)
20 ARROW HEAD STITCH 5 Fixed 44
(13/64) 2.5 (3/32)
21 DECORATIVE STITCH 5 Fixed 46
(13/64) 2.5 (3/32)
-4 36
-4 39
-4 39
-4 39
-2 40
-3 41
-1.5 40
-1.5 43
CONTENTS
SEWING MACHINE
KNOWING Y OUR
ZIGZAG STITCHING
STRAIGHT AND
BUILT-IN STITCHES
BUTTONHOLE AND
BUTTON SEWING
USING ATTACHMENTS
AND APPLICATIONS
MAINTENANCE
11
INDEX
Page 20

○○○○○○○○○○○○○○○○○○○○○○○○○○○○○○○○○○○○○○○○○○○○○○○○○○○○○○○○○○○○○○○○○○○○○○○○○○○○○○○○○○○○○○○○○○○○○○○○
XL5020
PATTERN STITCH NAME PRESET WIDTH RECOMMENDED PAGE IN
[mm (inch)] LENGTH INSTRUCTIONS
[mm (inch)]
1 BUTTONHOLE 5 -1.5 47
(13/64) (1/64-1/16)
2 STRAIGHT STITCH –
(CENTER) (1/64-5/32)
3 STRAIGHT STITCH –
(LEFT) (1/64-5/32)
4 ZIGZAG STITCH 1.7
(1/16) (1/64-5/32)
5 ZIGZAG STITCH 3.5 -4 39
(9/64) (1/64-5/32)
6 ZIGZAG STITCH 5
(13/64) (1/64-5/32)
7 BLIND HEM STITCH 3
(1/8) (1/64-5/64)
8 SHELL TUCK STITCH 5
(13/64) (1/64-1/8)
9 ELASTIC STITCH 5
(13/64) (1/64-3/32)
10 TRIPLE STRETCH STITCH – Fixed 36
(CENTER) 2.5 (3/32)
11 TRIPLE STRETCH STITCH – Fixed 36
(LEFT) 2.5 (3/32)
12
TRIPLE ZIGZAG STRETCH STITCH
1.7 Fixed 46
(1/16) 2.5 (3/32)
13
TRIPLE ZIGZAG STRETCH STITCH
3.5 Fixed 46
(9/64) 2.5 (3/32)
14
TRIPLE ZIGZAG STRETCH STITCH
5 Fixed 46
(13/64) 2.5 (3/32)
15 STRETCH OVERLOCK STITCH 3 Fixed 44
(1/8) 2.5 (3/32)
16 ELASTIC OVERLOCK STITCH 5 Fixed 44
(13/64) 2.5 (3/32)
17 FEATHER STITCH 5 Fixed 45
(13/64) 2.5 (3/32)
-4 36
-4 36
-4 39
-4 39
-2 40
-3 41
-2.5 42
CONTENTS
SEWING MACHINE
KNOWING Y OUR
ZIGZAG STITCHING
STRAIGHT AND
BUILT-IN STITCHES
BUTTONHOLE AND
BUTTON SEWING
USING ATTACHMENTS
AND APPLICATIONS
12
MAINTENANCE
INDEX
Page 21

○○○○○○○○○○○○○○○○○○○○○○○○○○○○○○○○○○○○○○○○○○○○○○○○○○○○○○○○○○○○○○○○○○○○○○○○○○○○○○○○○○○○○○○○○○○○○○○○
XL5010
PATTERN STITCH NAME PRESET WIDTH RECOMMENDED PAGE IN
[mm (inch)] LENGTH INSTRUCTIONS
[mm (inch)]
1 (A-B-C-D) BUTTONHOLE 5 -1.5 49
(13/64) (1/64-1/16)
2 ZIGZAG STITCH 1.7 -4 39
(1/16) (1/64-5/32)
3 ZIGZAG STITCH 3.5 -4 39
(9/64) (1/64-5/32)
4 ZIGZAG STITCH 5
(13/64) (1/64-5/32)
5 STRAIGHT STITCH –
(CENTER) (1/64-5/32)
6 STRAIGHT STITCH –
(LEFT) (1/64-5/32)
7 STRETCH BLIND STITCH 5
(13/64) (1/64-1/16)
8 SHELL TUCK STITCH 5
(13/64) (1/64-1/8)
9 ELASTIC STITCH 5
(13/64) (1/64-3/32)
10
TRIPLE ZIGZAG STRETCH STITCH
1.7 Fixed 46
(1/16) 2.5 (3/32)
11
TRIPLE ZIGZAG STRETCH STITCH
3.5 Fixed 46
(9/64) 2.5 (3/32)
12
TRIPLE ZIGZAG STRETCH STITCH
5 Fixed 46
(13/64) 2.5 (3/32)
13 TRIPLE STRETCH STITCH – Fixed 36
(CENTER) 2.5 (3/32)
14 TRIPLE STRETCH STITCH – Fixed 36
(LEFT) 2.5 (3/32)
15 ARROWHEAD STITCH 5 Fixed 44
(13/64) 2.5 (3/32)
16 ELASTIC OVERLOCK STITCH 5 Fixed 44
(13/64) 2.5 (3/32)
17 FEATHER STITCH 5 Fixed 45
(13/64) 2.5 (3/32)
-4 39
-4 36
-4 36
-1.5 40
-3 41
-2.5 42
CONTENTS
SEWING MACHINE
KNOWING Y OUR
ZIGZAG STITCHING
STRAIGHT AND
BUILT-IN STITCHES
BUTTONHOLE AND
BUTTON SEWING
USING ATTACHMENTS
AND APPLICATIONS
13
MAINTENANCE
INDEX
Page 22

○○○○○○○○○○○○○○○○○○○○○○○○○○○○○○○○○○○○○○○○○○○○○○○○○○○○○○○○○○○○○○○○○○○○○○○○○○○○○○○○○○○○○○○○○○○○○○○○
ANCHOS Y LARGOS DE PUNTADAS RECOMENDADOS
XL5030
PUNTADA NOMBRE ANCHO LARGO PÁGINA DEL
PREAJUSTADO RECOMENDADO MANUAL
[mm (pulgadas)] [mm (pulgadas)]
1OJAL 5-1,5 48
(13/64) (1/64-1/16)
2 PUNTADA RECTA –
(CENTRO) (1/64-5/32)
3 PUNTADA RECTA –
(IZQUIRDA) (1/64-5/32)
4 PUNTADA ZIGZAG 1,7
(1/16) (1/64-5/32)
5 PUNTADA ZIGZAG 3,5 -4 39
(9/64) (1/64-5/32)
6 PUNTADA ZIGZAG 5
(13/64) (1/64-5/32)
7 PUNTADA INVISIBLE 3
(1/8) (1/64-5/64)
8 PUNTADA ALFORZA 5
DEREFUERZO (13/64) (1/64-1/8)
9 PUNT ADA ELÁSTICA 5 -2,5 42
(13/64) (1/64-3/32)
10 PESPUNTO INVISIBLE 5
(13/64) (1/64-1/16)
11 PUNTADA FESTÓN 5
(13/64) (1/64-1/16)
12 PUNTADA TRIPLE ELÁSTICA – Fija 36
(CENTRO) 2,5 (3/32)
13 PUNTADA TRIPLE ELÁSTICA – Fija 36
(IZQUIRDA) 2,5 (3/32)
14 PUNT AD A TRIPLE 1,7 Fija 46
ZIGZAG ELÁSTICA (1/16) 2,5 (3/32)
15 PUNT AD A TRIPLE 3,5 Fija 46
ZIGZAG ELÁSTICA (9/64) 2,5 (3/32)
16 PUNT AD A TRIPLE 5 Fija 46
ZIGZAG ELÁSTICA (13/64) 2,5 (3/32)
17 PUNTADA OVERLOCK 3 Fija 44
(1/8) 2,5 (3/32)
18 PUNTADA OVERLOCK 5 Fija 44
ELÁSTICA (13/64) 2,5 (3/32)
19 PUNTADA PLUMA 5 Fija 45
(13/64) 2,5 (3/32)
20
PUNTADA PUNTA DE FLECHA
5 Fija 44
(13/64) 2,5 (3/32)
21 PUNTADA DECORATIVA 5 Fija 46
(13/64) 2,5 (3/32)
-4 36
-4 36
-4 39
-4 39
-2 40
-3 41
-1,5 40
-1,5 43
CONTENTS
SEWING MACHINE
KNOWING Y OUR
ZIGZAG STITCHING
STRAIGHT AND
BUILT-IN STITCHES
BUTTONHOLE AND
BUTTON SEWING
USING ATTACHMENTS
AND APPLICATIONS
MAINTENANCE
14
INDEX
Page 23

○○○○○○○○○○○○○○○○○○○○○○○○○○○○○○○○○○○○○○○○○○○○○○○○○○○○○○○○○○○○○○○○○○○○○○○○○○○○○○○○○○○○○○○○○○○○○○○○
XL5020
PUNTADA NOMBRE ANCHO LARGO PÁGINA DEL
PREAJUSTADO RECOMENDADO MANUAL
[mm (pulgadas)] [mm (pulgadas)]
1OJAL 5-1,5 48
(13/64) (1/64-1/16)
2 PUNTADA RECTA –
(CENTRO) (1/64-5/32)
3 PUNTADA RECTA –
(IZQUIRDA) (1/64-5/32)
4 PUNTADA ZIGZAG 1,7
(1/16) (1/64-5/32)
5 PUNTADA ZIGZAG 3,5 -4 39
(9/64) (1/64-5/32)
6 PUNTADA ZIGZAG 5
(13/64) (1/64-5/32)
7 PUNTADA INVISIBLE 3
(1/8) (1/64-5/64)
8 PUNTADA ALFORZA 5
DEREFUERZO (13/64) (1/64-1/8)
9 PUNT ADA ELÁSTICA 5 -2,5 42
(13/64) (1/64-3/32)
10 PUNTADA TRIPLE ELÁSTICA – Fija 36
(CENTRO) 2,5 (3/32)
11 PUNTADA TRIPLE ELÁSTICA – Fija 36
(IZQUIRDA) 2,5 (3/32)
12 PUNT AD A TRIPLE 1,7 Fija 46
ZIGZAG ELÁSTICA (1/16) 2,5 (3/32)
13 PUNT AD A TRIPLE 3,5 Fija 46
ZIGZAG ELÁSTICA (9/64) 2,5 (3/32)
14 PUNT AD A TRIPLE 5 Fija 46
ZIGZAG ELÁSTICA (13/64) 2,5 (3/32)
15 PUNTADA OVERLOCK 3 Fija 44
(1/8) 2,5 (3/32)
16
PUNTADA OVERLOCK ELÁSTICA
5 Fija 44
(13/64) 2,5 (3/32)
17 PUNTADA PLUMA 5 Fija 45
(13/64) 2,5 (3/32)
-4 36
-4 36
-4 39
-4 39
-2 40
-3 41
CONTENTS
SEWING MACHINE
KNOWING Y OUR
ZIGZAG STITCHING
STRAIGHT AND
BUILT-IN STITCHES
BUTTONHOLE AND
BUTTON SEWING
USING ATTACHMENTS
AND APPLICATIONS
15
MAINTENANCE
INDEX
Page 24

○○○○○○○○○○○○○○○○○○○○○○○○○○○○○○○○○○○○○○○○○○○○○○○○○○○○○○○○○○○○○○○○○○○○○○○○○○○○○○○○○○○○○○○○○○○○○○○○
XL5010
PUNTADA NOMBRE ANCHO LARGO PÁGINA DEL
PREAJUSTADO RECOMENDADO MANUAL
[mm (pulgadas)] [mm (pulgadas)]
1 (A-B-C-D) OJAL 5 -1,5 49
(13/64) (1/64-1/16)
2 PUNTADA ZIGZAG 1,7 -4 39
(1/16) (1/64-5/32)
3 PUNTADA ZIGZAG 3,5 -4 39
(9/64) (1/64-5/32)
4 PUNTADA ZIGZAG 5
(13/64) (1/64-5/32)
5 PUNTADA RECTA –
(CENTRO) (1/64-5/32)
6 PUNTADA RECTA –
(IZQUIRDA) (1/64-5/32)
7 PUNTADA INVISIBLE 5
ELÁSTICA (13/64) (1/64-1/16)
8 PUNTADA ALFORZA 5
DEREFUERZO (13/64) (1/64-1/8)
9 PUNT ADA ELÁSTICA 5
(13/64) (1/64-3/32)
10 PUNTAD A TRIPLE 1,7 Fija 46
ZIGZAG ELÁSTICA (1/16) 2,5 (3/32)
11 PUNTAD A TRIPLE 3,5 Fija 46
ZIGZAG ELÁSTICA (9/64) 2,5 (3/32)
12 PUNTAD A TRIPLE 5 Fija 46
ZIGZAG ELÁSTICA (13/64) 2,5 (3/32)
13 PUNTADA TRIPLE ELÁSTICA – Fija 36
(CENTRO) 2,5 (3/32)
14 PUNTADA TRIPLE ELÁSTICA – Fija 36
(IZQUIRDA) 2,5 (3/32)
15
PUNTADA PUNTA DE FLECHA
5 Fija 44
(13/64) 2,5 (3/32)
16
PUNTADA OVERLOCK ELÁSTICA
5 Fija 44
(13/64) 2,5 (3/32)
17 PUNTADA PLUMA 5 Fija 45
(13/64) 2,5 (3/32)
-4 39
-4 36
-4 36
-1,5 40
-3 41
-2,5 42
CONTENTS
SEWING MACHINE
KNOWING Y OUR
ZIGZAG STITCHING
STRAIGHT AND
BUILT-IN STITCHES
BUTTONHOLE AND
BUTTON SEWING
USING ATTACHMENTS
AND APPLICATIONS
16
MAINTENANCE
INDEX
Page 25
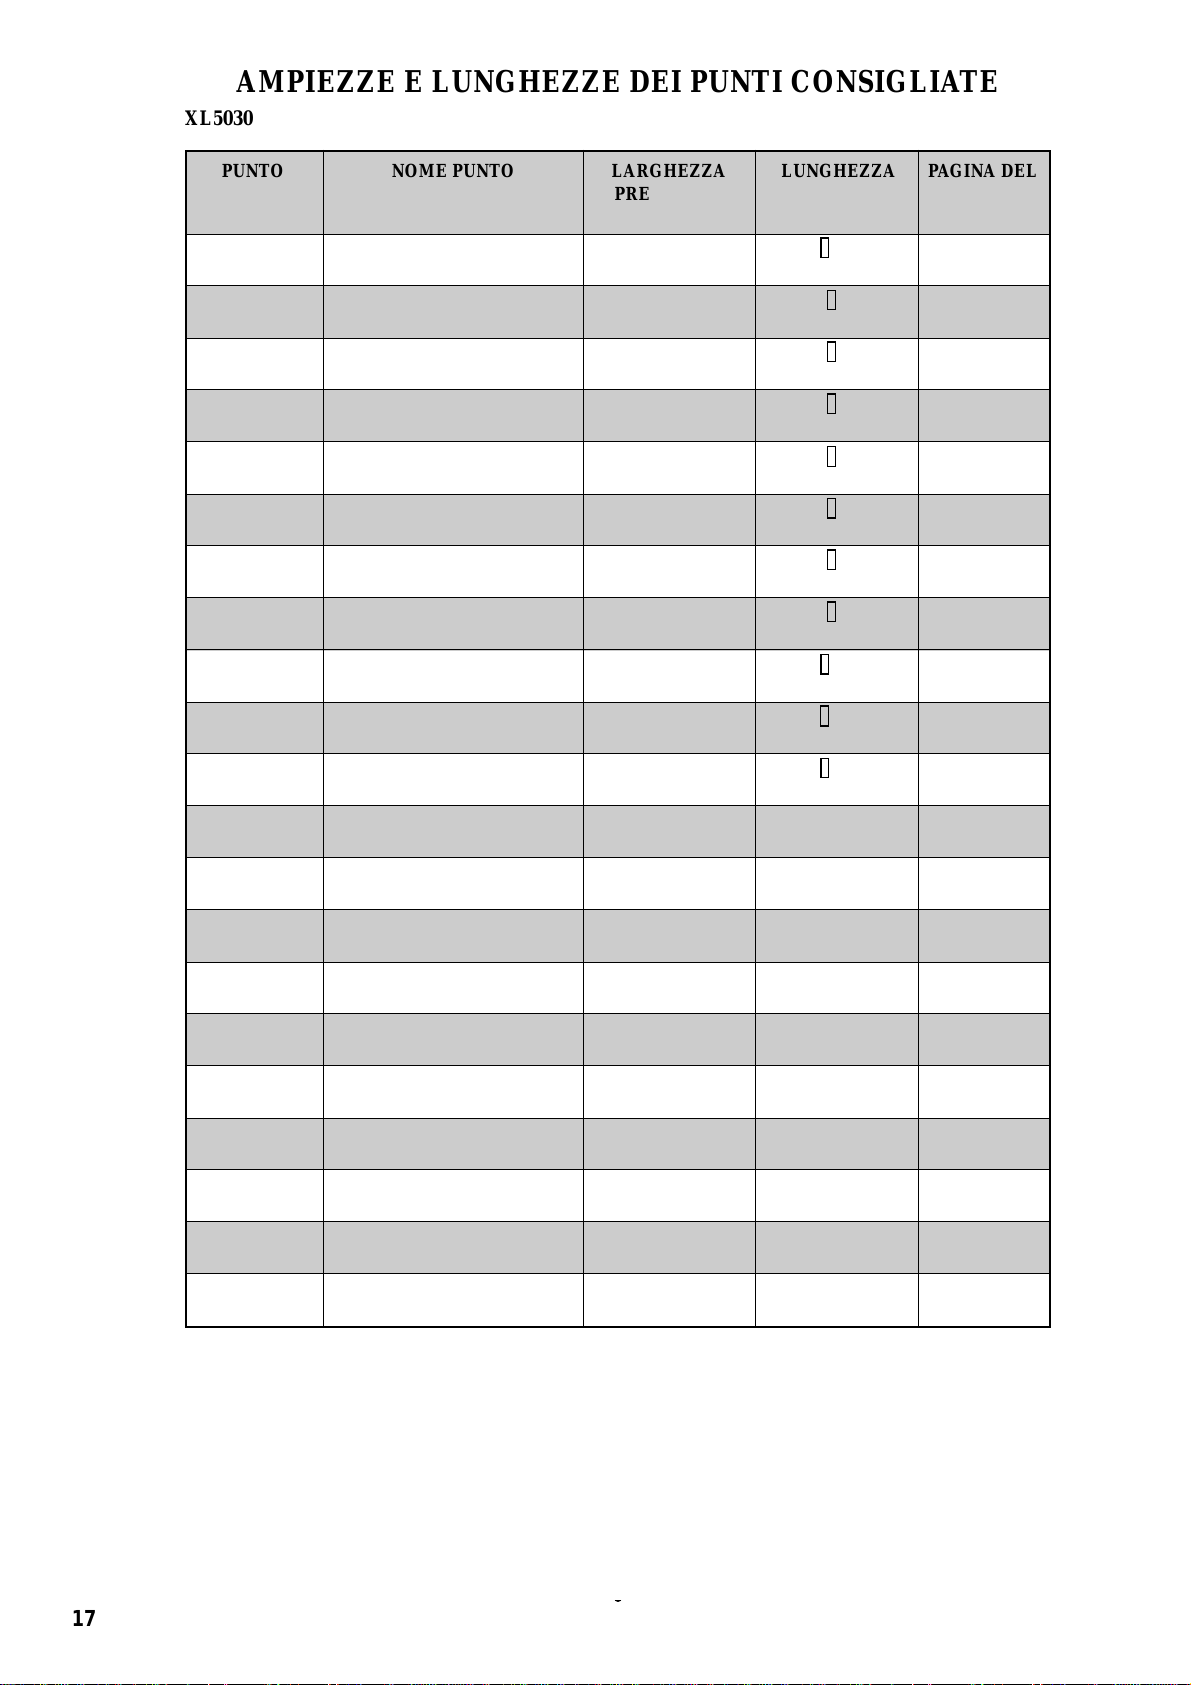
AMPIEZZE E LUNGHEZZE DEI PUNTI CONSIGLIATE
○○○○○○○○○○○○○○○○○○○○○○○○○○○○○○○○○○○○○○○○○○○○○○○○○○○○○○○○○○○○○○○○○○○○○○○○○○○○○○○○○○○○○○○○○○○○○○○○
XL5030
PUNTO NOME PUNTO LARGHEZZA LUNGHEZZA PAGINA DEL
PREFISSATA CONSIGLIATA MANUALE
[mm] [mm]
1 ASOLA 5 -1,5 48
(13/64) (1/64-1/16)
2 PUNTO DIRITTO –
(CENTRO) (1/64-5/32)
3 PUNTO DIRITTO –
(SINISTRO) (1/64-5/32)
4 PUNTO ZIGZAG 1,7
(1/16) (1/64-5/32)
5 PUNTO ZIGZAG 3,5 -4 39
(9/64) (1/64-5/32)
6 PUNTO ZIGZAG 5
(13/64) (1/64-5/32)
7 PUNTO ORLO INVISIBILE 3
(1/8) (1/64-5/64)
8 PUNTO ORLO CONCHIGLIA 5
(13/64) (1/64-1/8)
9 PUNTO ELASTICO 5 -2,5 42
(13/64) (1/64-3/32)
10 PUNTO STRETCH INVISIBILE 5
(13/64) (1/64-1/16)
11 PUNTO SMERLO 5
(13/64) (1/64-1/16)
12 PUNTO STRETCH TRIPLO – Fissa 36
(CENTRO) 2,5 (3/32)
13 PUNTO STRETCH TRIPLO – Fissa 36
(SINISTRO) 2,5 (3/32)
14 PUNTO ZIGZAG 1,7 Fissa 46
STRETCH TRIPLO (1/16) 2,5 (3/32)
15 PUNTO ZIGZAG 3,5 Fissa 46
STRETCH TRIPLO (9/64) 2,5 (3/32)
16 PUNTO ZIGZAG 5 Fissa 46
STRETCH TRIPLO (13/64) 2,5 (3/32)
17
PUNTO SOPRAGGITTO STRETCH
3 Fissa 44
(1/8) 2,5 (3/32)
18
PUNTO SOPRAGGITTO ELASTICO
5 Fissa 44
(13/64) 2,5 (3/32)
19 PUNTO A PIUMA 5 Fissa 45
(13/64) 2,5 (3/32)
20 PUNTO A FRECCIA 5 Fissa 44
(13/64) 2,5 (3/32)
21 PUNTO DECORATIVO 5 Fissa 46
(13/64) 2,5 (3/32)
-4 36
-4 36
-4 39
-4 39
-2 40
-3 41
-1,5 40
-1,5 43
CONTENTS
SEWING MACHINE
KNOWING Y OUR
ZIGZAG STITCHING
STRAIGHT AND
BUILT-IN STITCHES
BUTTONHOLE AND
BUTTON SEWING
USING ATTACHMENTS
AND APPLICATIONS
MAINTENANCE
17
INDEX
Page 26

○○○○○○○○○○○○○○○○○○○○○○○○○○○○○○○○○○○○○○○○○○○○○○○○○○○○○○○○○○○○○○○○○○○○○○○○○○○○○○○○○○○○○○○○○○○○○○○○
XL5020
PUNTO NOME PUNTO LARGHEZZA LUNGHEZZA PAGINA DEL
PREFISSATA CONSIGLIATA MANUALE
[mm] [mm]
1 ASOLA 5 -1,5 48
(13/64) (1/64-1/16)
2 PUNTO DIRITTO – -4 36
(CENTRO) (1/64-5/32)
3 PUNTO DIRITTO –
(SINISTRO) (1/64-5/32)
4 PUNTO ZIGZAG 1,7
(1/16) (1/64-5/32)
5 PUNTO ZIGZAG 3,5 -4 39
(9/64) (1/64-5/32)
6 PUNTO ZIGZAG 5
(13/64) (1/64-5/32)
7 PUNTO ORLO INVISIBILE 3
(1/8) (1/64-5/64)
8 PUNTO ORLO CONCHIGLIA 5
(13/64) (1/64-1/8)
9 PUNTO ELASTICO 5 -2,5 42
(13/64) (1/64-3/32)
10 PUNTO STRETCH TRIPLO – Fissa 36
(CENTRO) 2,5 (3/32)
11 PUNTO STRETCH TRIPLO – Fissa 36
(SINISTRO) 2,5 (3/32)
12 PUNTO ZIGZAG 1,7 Fissa 46
STRETCH TRIPLO (1/16) 2,5 (3/32)
13 PUNTO ZIGZAG 3,5 Fissa 46
STRETCH TRIPLO (9/64) 2,5 (3/32)
14 PUNTO ZIGZAG 5 Fissa 46
STRETCH TRIPLO (13/64) 2,5 (3/32)
15 PUNTO SOPRAGGITTO 3 Fissa 44
STRETCH (1/8) 2,5 (3/32)
16
PUNTO SOPRAGGITTO ELASTICO
5 Fissa 44
(13/64) 2,5 (3/32)
17 PUNTO A PIUMA 5 Fissa 45
(13/64) 2,5 (3/32)
-4 36
-4 39
-4 39
-2 40
-3 41
CONTENTS
SEWING MACHINE
KNOWING Y OUR
ZIGZAG STITCHING
STRAIGHT AND
BUILT-IN STITCHES
BUTTONHOLE AND
BUTTON SEWING
USING ATTACHMENTS
AND APPLICATIONS
18
MAINTENANCE
INDEX
Page 27

○○○○○○○○○○○○○○○○○○○○○○○○○○○○○○○○○○○○○○○○○○○○○○○○○○○○○○○○○○○○○○○○○○○○○○○○○○○○○○○○○○○○○○○○○○○○○○○○
XL5010
PUNTO NOME PUNTO LARGHEZZA LUNGHEZZA PAGINA DEL
PREFISSATA CONSIGLIATA MANUALE
[mm] [mm]
1 (A-B-C-D) ASOLA 5 -1,5 49
(13/64) (1/64-1/16)
2 PUNTO ZIGZAG 1,7 -4 39
(1/16) (1/64-5/32)
3 PUNTO ZIGZAG 3,5 -4 39
(9/64) (1/64-5/32)
4 PUNTO ZIGZAG 5
(13/64) (1/64-5/32)
5 PUNTO DIRITTO –
(CENTRO) (1/64-5/32)
6 PUNTO DIRITTO –
(SINISTRO) (1/64-5/32)
7 ORLO INVISIBILE ELASTICO 5
(13/64) (1/64-1/16)
8 PUNTO ORLO CONCHIGLIA 5
(13/64) (1/64-1/8)
9 PUNTO ELASTICO 5
(13/64) (1/64-3/32)
10 PUNTO ZIGZAG 1,7 Fissa 46
STRETCH TRIPLO (1/16) 2,5 (3/32)
11 PUNTO ZIGZAG 3,5 Fissa 46
STRETCH TRIPLO (9/64) 2,5 (3/32)
12 PUNTO ZIGZAG 5 Fissa 46
STRETCH TRIPLO (13/64) 2,5 (3/32)
13 PUNTO STRETCH TRIPLO – Fissa 36
(CENTRO) 2,5 (3/32)
14 PUNTO STRETCH TRIPLO – Fija 36
(SINISTRO) 2,5 (3/32)
15 PUNTO A FRECCIA 5 Fissa 44
(13/64) 2,5 (3/32)
16
PUNTO SOPRAGGITTO ELASTICO
5 Fissa 44
(13/64) 2,5 (3/32)
17 PUNTO A PIUMA 5 Fissa 45
(13/64) 2,5 (3/32)
-4 39
-4 36
-4 36
-1,5 40
-3 41
-2,5 42
CONTENTS
SEWING MACHINE
KNOWING Y OUR
ZIGZAG STITCHING
STRAIGHT AND
BUILT-IN STITCHES
BUTTONHOLE AND
BUTTON SEWING
USING ATTACHMENTS
AND APPLICATIONS
19
MAINTENANCE
INDEX
Page 28

1
23
0
1
2
–
SS
3
4
+
•
•
•
•
○○○○○○○○○○○○○○○○○○○○○○○○○○○○○○○○○○○○○○○○○○○○○○○○○○○○○○○○○○○○○○○○○○○○○○○○○○○○○○○○○○○○○○○○○○○○○○○○
Stitch Length Dial
Depending on your selected stitch, you may need to adjust the stitch
length for best results.
The numbers marked on the stitch length dial represent the length of
the stitch in millimeters (mm) (1/25").
THE HIGHER THE NUMBER, THE LONGER THE STITCH.
The “0” setting does not feed the material. This is used for sewing on
a button.
The “ ” area is used for making a Satin Stitch (a close zigzag stitch)
which can be used in making buttonholes and decorative stitches. The
position needed for making the Satin Stitch varies according to the
material and thread being used. To determine the exact dial position,
you should first test the stitch and length settings on a scrap of fabric to
observe the feeding of the material.
1 Stitch length
2 Shorter
3 Longer
CONTENTS
SEWING MACHINE
KNOWING Y OUR
ZIGZAG STITCHING
STRAIGHT AND
○○○○○○○○○○○○○○○○○○○○○○○○○○○○○○○○○○○○○○○○○○○○○○○○○○○○○○○○○○○○○○○
Selector de largo de puntada
Según la puntada seleccionada, puede ser necesario ajustar su largo para lograr mejores resultados.
Los números indicados en el selector representan el largo de las
puntadas en milímetros (1/25").
CUANTO MAYOR EL NÚMERO, MÁS LARGA LA PUNTADA.
El ajuste “0” no alimenta el tejido. Sirve para coser un botón.
La zona “ ” se usa para realizar puntadas de realce (una puntada
zigzag muy cerrada) que pueden servir para ojales o decoración. La
posición necesaria para realizar puntadas de realce varía dependiendo del tejido o hilo utilizados. P ar a determinar la posición exacta
del selector, conviene primero probar la puntada y los ajustes de
largo en un pedazo de tejido para ver cómo se alimenta el material.
1 Largo de puntada
2 Más corto
3 Más largo
Selettore della lunghezza del punto
A seconda del tipo di punto selezionato, potrebbe essere necessario regolarne la lunghezza per ottenere un risultato ottimale.
I numeri sul selettore indicano la lunghezza del punto in millimetri (mm).
PIÙ ALTO È IL NUMERO, PIÙ LUNGO SARÀ IL PUNTO.
Con la regolazione “0” il tessuto non viene alimentato dal trasportatore.
Questa regolazione è adatta per cuciture di bottoni.
L’area marcata “ ” sul selettore va utilizzata per eseguire un punto satin
(una successione di punti zigzag molto fitti) che può essere utilizzato per
eseguire asole e punti decorativi. La regolazione più idonea per il punto
satin varia in base al tipo di tessuto e di filo utilizzati. Per stabilire la posizione esatta del selettore, è bene provare prima il punto e la lunghezza scelta su un campione di stoffa per verificare il trasporto del tessuto.
1 Lunghezza del punto
2 Più corta
3 Più lunga
BUILT-IN STITCHES
BUTTONHOLE AND
BUTTON SEWING
USING ATTACHMENTS
AND APPLICATIONS
MAINTENANCE
20
INDEX
Page 29

A
B
0
–
SS
1
–
SS
+
4
3
•
•
•
•
+
2
•
3
•
•
•
4
1
2
3
○○○○○○○○○○○○○○○○○○○○○○○○○○○○○○○○○○○○○○○○○○○○○○○○○○○○○○○○○○○○○○○○○○○○○○○○○○○○○○○○○○○○○○○○○○○○○○○○
Stretch Stitching
Selecting a stretch stitch
Setting the stitch length dial to “SS” changes the selected pattern to a
stretch stitch. (See fig. A.)
Adjusting the stretch stitching
The sewing machine is adjusted during its production so that the stretch
stitching can be sewn at the standard position “SS”.
If different types of fabric or thread are used or the pattern does not
have the correct shape, turn the dial toward either “+” or “–” to adjust
the stitch. (See fig. B.)
1 Makes fine stitches
2 Standard position
3 Makes rough stitches
NOTE:
The dial cannot be turned past “· · · · + SS –”. Do not forcefully turn
the stitch length dial out of the allowable range.
CONTENTS
SEWING MACHINE
KNOWING Y OUR
ZIGZAG STITCHING
STRAIGHT AND
BUILT-IN STITCHES
○○○○○○○○○○○○○○○○○○○○○○○○○○○○○○○○○○○○○○○○○○○○○○○○○○○○○○○○○○○○○○○
Puntada elástica
Selección de la puntada elástica
Al establecer el selector del largo de puntada en la posición “SS”, la
puntada actualmente seleccionada cambia a la puntada elástica. (V er
fig. A.)
Ajuste de la puntada elástica
La máquina de coser se ajusta durante su producción de tal forma
que puede coser la puntada elástica en la posición estándar “SS”.
Si utiliza un tipo de hilo diferente al de fábrica o la puntada realizada
no tiene la forma correcta, gire el disco hacia la posición “+” o hacia
la posición “–” par a ajustar la puntada. (Ver fig. B.)
1 Realiza puntadas correctas
2 Posición estándar
3 Realiza puntadas defectuosas
NOTA:
No puede girar el disco después de la posición “· · · · + SS –”. No
Selezione di un punto elastico
Ruotando il selettore della lunghezza del punto su “SS” si seleziona un
punto elastico. (Vedi fig. A.)
Regolazione del punto elastico
La macchina da cucire viene regolata in fabbrica in modo da eseguire punti
elastici con il selettore sulla posizione standard “SS”.
Se si utilizzano tipi di stoffa o di filo diversi oppure se il punto non ha la
forma corretta, ruotare il selettore verso “+” o “–” per regolare il punto.
(Vedi fig. B.)
NOTA:
Non è possibile ruotare il selettore oltre “. . . . + SS –”. Non forzare il
selettore della lunghezza del punto oltre l’intervallo consentito.
Cucitura con punti elastici
1 Esegue punti fitti
2 Posizione standard
3 Esegue punti radi
intente forzar el selector del largo de puntada fuera del rango permitido.
BUTTONHOLE AND
BUTTON SEWING
USING ATTACHMENTS
AND APPLICATIONS
MAINTENANCE
21
INDEX
Page 30

A
○○○○○○○○○○○○○○○○○○○○○○○○○○○○○○○○○○○○○○○○○○○○○○○○○○○○○○○○○○○○○○○○○○○○○○○○○○○○○○○○○○○○○○○○○○○○○○○○
Reverse Sewing Lever
To sew in reverse, press down the reverse sewing lever as far as possible and hold it in that position while lightly stepping on the foot controller. To sew forward, release the reverse sewing lever. Reverse sewing is used for locking and reinforcing seams. (See fig. A.)
CONTENTS
SEWING MACHINE
KNOWING Y OUR
B
Drop Feed Lever (when the machine is
equipped with a drop feed lever)
Use the drop feed lever to raise or lower the feed dogs according to the
1
2
3
○○○○○○○○○○○○○○○○○○○○○○○○○○○○○○○○○○○○○○○○○○○○○○○○○○○○○○○○○○○○○○○
Palanca de retroceso
Para coser hacia atrás, baje completamente la palanca de retroceso
y manténgala en esa posición mientras presiona ligeramente el pedal. P ar a v olv er a coser hacia adelante, vuelv a a subir la palanca de
retroceso. La costura hacia atrás se usa para ter minar y reforzar
costuras. (Ver fig. A.)
job that is being done. When monogramming, embroidering, darning
or sewing on buttons, the feed dogs should be lowered so that the
garment will not be fed. (See fig. B.)
1 Drop feed lever
2 Up position: feed dog is down
3 Down position: feed dog is up
Leva di cucitura di ritorno
Per cucire a marcia indietro, spingere più a fondo possibile la leva di cucitura di ritorno e mantenerla in quella posizione premendo al tempo stesso
leggermente sul reostato. Per cucire a marcia avanti, rilasciare la leva di
cucitura di ritorno. La cucitura di ritorno serve a fissare e rinforzare le cuciture. (Vedi fig. A.)
ZIGZAG STITCHING
STRAIGHT AND
BUILT-IN STITCHES
BUTTONHOLE AND
BUTTON SEWING
USING ATTACHMENTS
AND APPLICATIONS
Palanca de alimentación de bajada
(cuando la máquina está equipada con
una palanca de alimentación de bajada)
Use la palanca de bajada para subir o bajar los dientes dependiendo
del trabajo efectuado. Para hacer monogramas, bordados, zurcidos
o para coser botones, es necesario bajar los alimentadores para
que no alimenten el tejido. (Ver fig. B.)
1 Palanca de alimentación de bajada
2 En posición arriba: los dientes hacia abajo
3 En posición baja: los dientes hacia arriba
Leva abbassa-trasportatore
(se la macchina è equipaggiata con la leva
abbassa-trasportatore)
Utilizzare la leva abbassa-trasportatore per sollev are o abbassare la griff a di
trasporto in base al lavoro da eseguire. Quando si devono eseguire monogrammi, lavori di ricamo, di rammendo o cuciture su bottoni, la griffa di
trasporto va abbassata in modo che l’indumento non venga alimentato dal
trasportatore. (Vedi fig. B.)
1 Leva abbassa-trasportatore
2 Posizione superiore: griffa di trasporto abbassata
3 Posizione inferiore: griffa di trasporto alzata
MAINTENANCE
INDEX
22
Page 31

1
3
4
2
○○○○○○○○○○○○○○○○○○○○○○○○○○○○○○○○○○○○○○○○○○○○○○○○○○○○○○○○○○○○○○○○○○○○○○○○○○○○○○○○○○○○○○○○○○○○○○○○
THREADING THE MACHINE
Winding the Bobbin
1. Place the spool of thread on the spool pin and pass the thread
around the bobbin winding tension disc.
1 Bobbin winding tension disc
2 Bobbin winding
2. Pass the end of the thread through the hole in the bobbin from the
inside.
3. While turning the bobbin clockwise, slide it over the bobbin winding shaft so that the shaft spring slides into the slit in the bobbin.
Then, slide the shaft to the right.
3 Spring
4 Slit
4. While holding the end of the thread, gently press on the foot controller to wind the thread around the bobbin a few times, then stop
the machine.
5. Trim the excess thread sticking out from the top of the bobbin and
continue winding the thread onto the bobbin by pressing down on
the foot controller.
NOTE:
The machine stops automatically when the bobbin is full.
6. When the machine stops, cut the thread, push the shaft to the left
and remove the full bobbin from the shaft.
CAUTION:
Although the needle bar does not move when the bobbin winding
shaft is slid toward the bobbin presser, the balance wheel will continue to turn. Therefore, do not touch the balance wheel while the
bobbin is being wound.
CONTENTS
SEWING MACHINE
KNOWING Y OUR
ZIGZAG STITCHING
STRAIGHT AND
BUILT-IN STITCHES
○○○○○○○○○○○○○○○○○○○○○○○○○○○○○○○○○○○○○○○○○○○○○○○○○○○○○○○○○○○○○○○
ENHEBRADO DE LA MÁQUINA
Bobinado de la canilla
1. Coloque un carrete de hilo en el portacarretes y pase el hilo por
el disco de tensión de bobinado de la canilla.
1 Disco de tensión de bobinado de la canilla
2 Bobinado de la canilla
2. Pase el extremo del hilo por el orificio de la canilla a partir del
interior.
3. Mientras gira la canilla en sentido de las manecillas de un reloj,
deslice el eje hacia el eje de bobinado de tal forma que el muelle
impulsor del eje se deslice dentro de la ranura de la canilla. Deslice el eje hacia la derecha.
3 Muelle
4 Ranura
4. Sujetando el extremo del hilo , presione suav emente el pedal para
que el hilo efectúe un par de vueltas alrededor de la canilla y
pare la máquina.
5. Deshaga el exceso de hilo arriba de la canilla. Siga bobinando el
hilo en la canilla presionando el pedal.
NOTA:
La máquina se para automáticamente cuando la canilla está llena.
6. Cuando la máquina se pare, corte el hilo, empuje el eje hacia la
izquierda y retire la canilla llena del eje.
ATENCIÓN:
Aunque la barra de la aguja no se desplace cuando el eje de
bobinado de la canilla se desliza hacia el apretador de la canilla,
la ruedecilla va a seguir girando y no puede ser tocada mientras la canilla está bobinando.
PROCEDURE DI INFILATURA
Avvolgimento della spoletta
1. Collocare il rocchetto di filo sul porta-rocchetto e far passare il filo intorno al disco di tensione avvolgimento spoletta.
1 Disco di tensione avvolgimento spoletta
2 Avvolgimento spoletta
2. Far passare l’estremità del filo attraverso la fessura della spoletta procedendo dall’interno.
3. Ruotando la spoletta in senso orario, inserirla sull’alberino di
avvolgimento in modo che la molla dell’alberino si innesti nella scanalatura della spoletta. Quindi spostare l’alberino verso destra.
3 Molla
4 Scanalatura
4. Tenendo l’estremità del filo, premere leggermente sul reostato per far
compiere al filo qualche giro intorno alla spoletta, quindi arrestare la
macchina.
5. Tagliare il filo in eccesso che fuoriesce al di sopra della spoletta e continuare ad avvolgere il filo intorno alla spoletta premendo sul reostato.
NOTA:
La macchina si arresta automaticamente quando la spoletta è piena.
6. Quando la macchina si è fermata, tagliare il filo, spingere l’alberino
verso sinistra ed estrarre la spoletta avvolta dall’alberino.
ATTENZIONE:
Quando l’alberino di avvolgimento spoletta è spostato verso il premispolina, la barra dell’ago non si muoverà, ma il volantino continuerà a
girare. Pertanto, evitare di toccare il volantino durante la fase di
avvolgimento della spoletta.
BUTTONHOLE AND
BUTTON SEWING
USING ATTACHMENTS
AND APPLICATIONS
MAINTENANCE
INDEX
23
Page 32

A B-1
12
B-2
C
24
B-3
3
○○○○○○○○○○○○○○○○○○○○○○○○○○○○○○○○○○○○○○○○○○○○○○○○○○○○○○○○○○○○○○○○○○○○○○○○○○○○○○○○○○○○○○○○○○○○○○○○
Lower Threading
Turn power switch to “O”.
1. Raise the needle to its highest position by turning the balance wheel
toward you (counterclockwise) and raise the presser foot lever.
2. Open the shuttle cover behind the extension table on the front of
the machine and remove the bobbin case by pulling its latch toward you and pulling it out from the shuttle race (fig. A).
3. Unwind about 10 cm (4") of thread from a full bobbin and insert
the bobbin into the bobbin case. (See fig. B-1.) Pull the trailing
thread into the slot, then down and to the left, as shown in fig. B-2,
until it enters the delivery eye under the tension spring (fig. B-3).
4. Holding the bobbin case by the latch, fully insert the bobbin case
into the shuttle race and release the latch. Make sure the bobbin
case finger fits into the notch at the top of the race as shown in fig.
C.
NOTE:
If the bobbin case is not properly placed back into the machine, it will
fall out from the shuttle immediately after starting to sew.
1 Bobbin case latch
2 Bobbin case finger
3 Tension spring
4 Notch
CONTENTS
SEWING MACHINE
KNOWING Y OUR
ZIGZAG STITCHING
STRAIGHT AND
○○○○○○○○○○○○○○○○○○○○○○○○○○○○○○○○○○○○○○○○○○○○○○○○○○○○○○○○○○○○○○○
Enhebrado inferior
Desenchufar la máquina, interruptor principale a “O”.
1. Levante la aguja a su posición más alta, girando la ruedecilla
hacia usted (en sentido contrario al de las manecillas de un reloj)
y levante la palanca del prensatelas.
2. Abra la tapa del soporte para accesorios, en la parte delantera
de la máquina, y retire el portacanillas de la máquina, tirando de
la uñeta metálica (pestillo) hacia usted y sacándola de la lanzadera (Ver fig. A.)
3. Tire unos 10 cm (4") de hilo de una canilla llena e inserte la canilla en el portacanillas. (Ver fig. B-1.) Tire del hilo suelto y páselo
por la hendidura, abajo y hacia la izquierda, tal como se indica en
la fig. B-2, hasta que el hilo pase por la abertura de salida debajo
del resorte de tensión. (fig. B-3)
4. Sujetando el portacanillas por la uñeta metálica, introdúzcalo en
la lanzadera y suelte el pestillo. Asegúrese de que la uñeta metálica del portacanillas se encaje en la hendidura en la parte superior de la anilla tal como se indica en la fig. C.
NOTA:
Si el portacanillas no se encuentra bien colocado en la máquina se
saldrá de la lanzadera inmediatamente después de empezar a coser.
1 Pestillo del portacanillas
2 Uñeta del portacanillas
3 Resorte de tensión
4 Hendidura
Mettere l’interruttore principale su “O”.
1. Far salire l’ago fino alla posizione più alta girando il volantino verso se
stessi (in senso antiorario) e sollevare la leva del piedino premistoffa.
2. Aprire lo sportello del crochet situato dietro al piano di lavoro estraibile
davanti alla macchina ed estrarre la capsula dal suo alloggiamento tirando verso se stessi il catenacciolo (fig. A).
3. Svolgere circa 10 cm di filo da una spoletta piena ed inserire la spoletta
nella capsula. (Vedi fig. B-1.) Infilare l’estremità del filo nella fessura,
tirando verso il basso e verso sinistra, come mostrato in fig. B-2, f inc hé
non fuoriesce dall’occhiello sotto la molla di tensione (fig. B-3).
4. Tenendo la capsula della spoletta per il catenacciolo, rimetterla nel suo
alloggiamento e far scattare il catenacciolo. Accertarsi che il beccuccio
della capsula combaci con l’intaglio posto sulla parte superiore
dell’alloggiamento come mostrato in fig. C.
NOTA:
Se la capsula della spoletta non è riapplicata correttamente nella macchina,
uscirà dal crochet non appena si inizia a cucire.
Infilatura inferiore
1 Catenacciolo della capsula della spoletta
2 Beccuccio della capsula della spoletta
3 Molla di tensione
4 Intaglio
BUILT-IN STITCHES
BUTTONHOLE AND
BUTTON SEWING
USING ATTACHMENTS
AND APPLICATIONS
MAINTENANCE
INDEX
24
Page 33

○○○○○○○○○○○○○○○○○○○○○○○○○○○○○○○○○○○○○○○○○○○○○○○○○○○○○○○○○○○○○○○○○○○○○○○○○○○○○○○○○○○○○○○○○○○○○○○○
A
4
2
3
4
3
1
2
1
CONTENTS
SEWING MACHINE
KNOWING Y OUR
ZIGZAG STITCHING
STRAIGHT AND
BUILT-IN STITCHES
D
5
E
○○○○○○○○○○○○○○○○○○○○○○○○○○○○○○
BUTTONHOLE AND
BUTTON SEWING
Upper (Needle) Threading
BC
Turn power switch to “O”.
1. Raise the presser foot lever and turn the balance wheel toward you
(counterclockwise) to raise the thread take-up lever to its highest
position.
5
2. Pull up the spool pin and place a spool of thread on it.
3. Pass the thread through guides. (See fig. A.)
1 Spool pin
2 Thread guide
3 Tension discs
4 Thread take-up lever
4. While holding the thread as shown in fig. B, C, pull it between the
tension discs.
5. Guide the thread to the back of the thread take-up lever and around
to the left (fig. D). Bring the thread through the slit by pulling it
toward you and into the eyelet.
5 Thread take-up lever
6. Bring the thread down and pass it behind the thread guide.
6 Thread guide
7. Thread the needle from front to back and pull out about 5 cm (2")
of thread as shown in fig. E.
NOTE:
Incorrectly feeding the thread may cause it to break, skip stitches or
wrinkle the fabric.
USING ATTACHMENTS
AND APPLICATIONS
MAINTENANCE
25
6
INDEX
Page 34

○○○○○○○○○○○○○○○○○○○○○○○○○○○○○○○○○○○○○○○○○○○○○○○○○○○○○○○○○○○○○○○○○○○○○○○○○○○○○○○○○○○○○○○○○○○○○○○○
4
3
2
1
A
5
2
4
3
5
CONTENTS
1
SEWING MACHINE
KNOWING Y OUR
ZIGZAG STITCHING
STRAIGHT AND
EDBC
6
BUILT-IN STITCHES
○○○○○○○○○○○○○○○○○○○○○○○○○○○○○○○○○○○○○○○○○○○○○○○○○○○○○○○○○○○○○○○
Enhebrado superior (de la aguja)
Desenchufar la máquina, interruptor principale a “O”.
1. Levante la palanca del prensatelas y gire la ruedecilla hacia usted (en el sentido contrario al de las manecillas de un reloj) para
subir la palanca tirahilos a su posición más alta.
2. Levante el porta carretes y coloque un carrete en él.
3. Pase el hilo a través de ambas guías. (Ver fig. A.)
1 Porta carretes
2 Guía hilo
3 Discos de tensión
4 Palanca tirahilos
4. Mientras sujeta el hilo tal como indica la fig. B, C, páselo por los
discos de tensión.
5. Guíe el hilo por detrás de la palanca tirahilos y por la izquierda
(fig. D). Lle ve el hilo por la r anura, tirándolo hacia usted y pasán-
dolo por el agujero.
5 Palanca tirahilos
6. Baje el hilo y páselo por detrás de la guía.
6 Guía
7. Enhebre la aguja de delante hacia atrás y saque unos 5 cm (2")
de hilo tal como indica la fig. E.
NOTA:
Si el hilo está mal enhebrado puede romperse, saltar puntadas o
fruncir el tejido.
Mettere l’interruttore principale su “O”.
1. Sollevare la leva del piedino premistoffa e girare il volantino verso se
stessi (in senso antiorario) per far salire la leva tendifilo fino alla posizione più alta.
2. Tirare verso l’alto il porta-rocchetto ed applicarvi un rocchetto di filo.
3. Far passare il filo attraverso entrambi i guidafilo. (Vedi fig. A.)
4. Reggendo il filo come mostrato in fig. B, C, tirarlo facendolo passare
fra i dischi di tensione.
5. Guidare il filo dietro la leva tendifilo facendolo passare intorno da sinistra (fig. D). Far passare il filo attraverso la scanalatura tirandolo verso
se stessi e facendolo entrare nell’occhiello.
6. Portare il filo verso il basso e farlo passare dietro il guidafilo.
7. Infilare l’ago dal davanti verso il retro e tirare circa 5 cm di filo come
mostrato in fig. E.
NOTA:
Se il filo non scorre in modo corretto, esso può spezzarsi, far saltare dei
punti o far arricciare la stoffa.
Infilatura superiore (ago)
1 Porta-rocchetto
2 Guidafilo
3 Dischi tensione
4 Leva tendifilo
5 Leva tendifilo
6 Guidafilo
BUTTONHOLE AND
BUTTON SEWING
USING ATTACHMENTS
AND APPLICATIONS
MAINTENANCE
26
INDEX
Page 35

1
2
2
6
4
3
1
5
6
7
○○○○○○○○○○○○○○○○○○○○○○○○○○○○○○○○○○○○○○○○○○○○○○○○○○○○○○○○○○○○○○○○○○○○○○○○○○○○○○○○○○○○○○○○○○○○○○○○
Using the Needle Threader
(when the machine is equipped with a
needle threader)
Turn power switch to “O”.
1. Lower the presser foot lever.
2. Turn the balance wheel toward you (counterclockwise) until the
bottom of the needle holder aligns with the bottom of the needlethreading-hook holder.
1 Needle holder
2 Needle threader lever
NOTE:
When using the needle threader, be sure to align the bottom of the
needle holder with the bottom of the holder for the needle-threading
hook before lowering the needle threader lever. Otherwise, the hook
may be damaged.
3. While lowering the needle threader lever , hook the thread onto the
guide.
4. Pull down the needle threader lever as much as possible, then rotate the lever toward the back of the machine (away from you).
Make sure that the hook passes through the eye of the needle and
grabs the thread.
• Hold the thread in front of the needle in order to make sure that the
hook grabs it.
1 Needle holder
2 Needle threader lever
3 Guide
4 Hook holder
5 Align
5. While lightly holding the thread, rotate the needle threader lever
toward the front of the machine (toward you). The hook will pull
the thread through the needle.
6 Hook
7 Thread
6. Raise the needle threader lever and pull out about 5 cm (2") of
thread through the needle toward the back of the sewing machine.
• Only use the needle threader with needle sizes #70 to #100. In
addition, refer to the CHART OF SEWING F ABRICS, NEEDLES AND
THREAD COMBINATIONS to check that the appropriate thread
and needle are being used. When using transparent nylon thread,
use needles of sizes #90 to #100.
CONTENTS
SEWING MACHINE
KNOWING Y OUR
ZIGZAG STITCHING
STRAIGHT AND
BUILT-IN STITCHES
BUTTONHOLE AND
BUTTON SEWING
USING ATTACHMENTS
AND APPLICATIONS
MAINTENANCE
INDEX
27
Page 36

○○○○○○○○○○○○○○○○○○○○○○○○○○○○○○○○○○○○○○○○○○○○○○○○○○○○○○○○○○○○○○○○○○○○○○○○○○○○○○○○○○○○○○○○○○○○○○○○
1
2
2
4
3
6
7
6
Uso del enhebrador
(cuando la máquina está equipada
con una enhebradora de hilo)
Desenchufar la máquina, interruptor principale a “O”.
1. Baje la palanca de la pata del prensatelas.
2. Gire la ruedecilla hacia usted (en el sentido contrario a las manecillas de un reloj) hasta que la parte inferior del soporte de la
aguja quede alineada a la parte inferior del soporte del gacho del
enhebrador.
1 Enhebrador
2 Palanca del enhebrador
NOTA:
Cuando use el enhebrador, asegúrese de alinear la parte inferior del
soporte de la aguja con la parte inferior del sopor te del gancho del
enhebrador antes de bajar la palanca del enhebrador. Si no lo hace,
puede dañar el gancho del enhebrador.
3. Al mismo tiempo que baja la palanca del enhebrador, enganche
el hilo en la guía.
4. Baje la palanca del enhebrador lo máximo posible y gírela hacia
la parte trasera de la máquina (en sentido contrario a usted). Asegúrese de que el gancho pase por el ojo de la aguja y enganche
el hilo.
• Sujete el hilo frente a la aguja para asegurarse de que quede
enganchado.
1 Enhebrador
2 Palanca del enhebrador
3 Guía
4 Soporte del gancho
5 Alineación
5. Al mismo tiempo que sujeta suavemente el hilo, gire la palanca
del enhebrador hacia la parte delantera de la máquina (hacia
usted). El gancho empujará el hilo a través de la aguja.
6 Gancho
7 Hilo
6. Levante la palanca del enhebrador y saque aproximadamente
5 cm (2") del hilo por la aguja hacia la parte posterior de la máquina de coser.
• Utilice únicamente el enhebrador con tamaños de aguja comprendidos entre n° 70 y n° 100. Para más información, consulte
el apartado TABLA DE COMBINACIONES ENTRE TEJIDOS,
AGUJAS Y HILOS para verificar que esté utilizando la aguja y el
hilo apropiado. Cuando utilice hilo de nylon transparente, utilice
agujas de tamaños comprendidos entre n° 90 y n° 100.
1
5
Uso dell’infila-ago (se la macchina è equi-
paggiata con un infilatore)
Mettere l’interruttore principale su “O”.
1. Abbassare la leva del piedino premistoffa.
2. Girare il volantino verso se stessi (in senso antiorario) finché la base del
supporto dell’ago non è allineata con la base del supporto dell’uncino
infila-ago.
1 Supporto ago
2 Leva dell’infila-ago
NOTA:
Quando si utilizza l’infila-ago, assicurarsi di allineare la base del supporto
dell’ago con la base del supporto dell’uncino infila-ago prima di abbassare
la leva dell’infila-ago. In caso contrario, l’uncino potrebbe danneggiarsi.
3. Abbassando la leva dell’infila-ago, agganciare il filo sulla guida.
4. Tirare il più possibile verso il basso la leva dell’infila-ago, quindi ruotare
la leva verso il retro della macchina (lontano da se stessi). Assicurarsi
che l’uncino passi attraverso la cruna dell’ago e afferri il filo.
• Reggere il filo davanti all’ago per far sì che l’uncino lo afferri.
1 Supporto ago
2 Leva dell’infila-ago
3 Guida
4 Supporto uncino
5 Allineare
5. Reggendo leggermente il filo, ruotare la leva dell’infila-ago v erso il davanti della macchina (verso se stessi). L’uncino tirerà il filo attraverso
l’ago.
6 Uncino
7 Filo
6. Sollevare la leva dell’infila-ago e tirare circa 5 cm di filo attr averso l’ago
verso il retro della macchina da cucire.
• Usare l’infila-ago solo con aghi di misura compresa tra 70 e 100. Consultare inoltre la TABELLA DELLE COMBINAZIONI DI TESSUTO,
AGO E FILO per verif icare che si stia utilizzando il filo e l’ago adatto.
Se si utilizza filo di nylon trasparente, usare aghi di misura compresa tra
90 e 100.
CONTENTS
SEWING MACHINE
KNOWING Y OUR
ZIGZAG STITCHING
STRAIGHT AND
BUILT-IN STITCHES
BUTTONHOLE AND
BUTTON SEWING
USING ATTACHMENTS
AND APPLICATIONS
MAINTENANCE
INDEX
28
Page 37

3
1
2
4
○○○○○○○○○○○○○○○○○○○○○○○○○○○○○○○○○○○○○○○○○○○○○○○○○○○○○○○○○○○○○○○○○○○○○○○○○○○○○○○○○○○○○○○○○○○○○○○○
Quick Thread-setting System
FAST START BOBBIN (when the machine
is equipped with a quick thread-setting
system)
This new system allows you to start sewing immediately after inserting
the bobbin without drawing up the lower thread. You can, however,
pull up the lower thread as explained on page 34 if you wish.
Turn power switch to “O”.
1. Hold the end of the bobbin thread and insert the bobbin case into
the shuttle.
1 Bobbin case
2 Shuttle
2. Close the shuttle cover while pulling the thread through the slit in
the cover.
3 Shuttle cover
4 Slit
3. Slide the thread down to the bottom of the slit, then pull it up and
cut it on the cutter to complete the lower threading.
4. Pull out about 15 cm (6") of the upper thread as usual, then pull it
between the toes of the presser foot and straight toward the back of
the machine.
5. Start sewing as usual. (It is not necessary to draw up the bobbin
thread.) (Refer to page 30)
CONTENTS
SEWING MACHINE
KNOWING Y OUR
ZIGZAG STITCHING
STRAIGHT AND
BUILT-IN STITCHES
○○○○○○○○○○○○○○○○○○○○○○○○○○○○○○○○○○○○○○○○○○○○○○○○○○○○○○○○○○○○○○○
Sistema rápido de colocación del hilo
BOBINA DE INICIO RÁPIDO (cuando
la máquina está equipada con un
sistema rápido de colocación del hilo)
Este nuevo sistema permite comenzar a coser de forma inmediata
después de insertar una bobina sin necesidad de sacar el hilo de la
canilla. No obstante, también puede sacar el hilo de la canilla tal
como se explica en la página 34.
Desenchufar la máquina, interruptor principale a “O”.
1. Sujete el extremo del hilo de la bobina e inserte el portabobina
en la lanzadera.
1 Portabobina
2 Lanzadera
2. Cierre la tapa de la lanzadera a la vez que tir a del hilo que pasa
a través de la ranura de la tapa.
3 Tapa de la lanzadera
4 Ranura
3. Deslice el hilo hacia abajo hasta el fondo de la ranur a y luego tire
del hilo hacia arriba y córtelo para completar la canilla.
4. Tire aproximadamente 15 cm (6") del hilo superior de la forma
habitual, luego tire de él entre los talones del prensatelas en dirección a la parte trasera de la máquina.
5. Comience a coser de la forma habitual. (No es necesario sacar el
hilo de la bobina) (consulte la página 30).
SPOLINA AD AVVIAMENTO RAPIDO
sistema rapido di posizionamento del filo)
Questo nuovo sistema consente di iniziare a cucire immediatamente dopo
l’inserimento della spoletta senza raccogliere il filo inferiore. Se lo si desidera, è possibile tuttavia tirare il filo inferiore come spiegato a pagina 35.
Mettere l’interruttore principale su “O”.
1. Reggere l’estremità del filo della spolina ed inserire la capsula della
spoletta nel crochet.
2. Chiudere lo sportello del crochet tirando al tempo stesso il filo attraverso la scanalatura nello sportello.
3. Far scorrere il filo in basso nella scanalatura, quindi tirarlo verso l’alto e
tagliarlo sul tagliafilo per completare l’infilatura inferiore.
4. Tirare circa 15 cm di filo superiore nel solito modo, quindi tirarlo attraverso le punte del piedino premistoffa in linea retta verso il retro della
macchina.
5. Iniziare a cucire come al solito (non è necessario raccogliere il filo della
spoletta). (vedere pagina 30)
Sistema di infilatura rapido
(se la macchina è equipaggiata con un
1 Capsula della spoletta
2 Crochet
3 Sportello crochet
4 Scanalatura
BUTTONHOLE AND
BUTTON SEWING
USING ATTACHMENTS
AND APPLICATIONS
MAINTENANCE
INDEX
29
Page 38

○○○○○○○○○○○○○○○○○○○○○○○○○○○○○○○○○○○○○○○○○○○○○○○○○○○○○○○○○○○○○○○○○○○○○○○○○○○○○○○○○○○○○○○○○○○○○○○○
Drawing Up Lower Thread
1. Raise the presser foot and the needle to their highest positions.
2. With your left hand, hold the end of the upper thread. With your
right hand, turn the balance wheel toward you (counterclockwise)
until the needle moves down and back up again to its highest position.
3. The upper thread should have caught the lower thread in a loop.
Pull the upper thread toward you and the lower thread will come
up from the bobbin in a large loop.
4. Pull out about 15 cm (6") of both threads and place them toward
the back of the machine straight behind the presser foot. The upper
thread should pass between the toes of the presser foot.
1 Upper thread
2 Lower thread loop
3 Lower thread
CONTENTS
SEWING MACHINE
KNOWING Y OUR
1
2
1
3
○○○○○○○○○○○○○○○○○○○○○○○○○○○○○○○○○○○○○○○○○○○○○○○○○○○○○○○○○○○○○○○
Para sacar el hilo de la canilla
1. Lev ante el prensatelas y la aguja a sus posiciones más elevadas .
2. Con la mano izquierda, sujete el extremo del hilo superior . Con la
mano derecha, gire la ruedecilla hacia usted (en el sentido contrario al de las manecillas de un reloj) hasta que la aguja vaya
hacia abajo y suba a su posición más alta.
3. El hilo superior debe haber enganchado el hilo inferior en un lanzo. Tire del hilo superior hacia usted y el hilo inferior saldrá de la
canilla en un amplio enlace.
4. Tire unos 15 cm (6") de ambos hilos y colóquelos hacia la parte
posterior de la máquina, justo detrás del prensatelas. El hilo superior debe pasar entre los salientes del prensatelas.
1 Hilo superior
2 Enlace del hilo inferior
3 Hilo inferior
1. Sollevare il piedino premistoffa e l’ago fino alla posizione più alta.
2. Reggere l’estremità del filo superiore con la mano sinistra. Con la mano
destra girare il volantino verso se stessi (in senso antiorario) finché l’ago
non scende e risale fino alla posizione più alta.
3. In questo modo il filo superiore afferrerà il filo inferiore formando un
cappio. Tirare il filo super iore verso se stessi in modo che il filo infer iore fuoriesca dalla spoletta in un ampio cappio.
4. Tirare circa 15 cm dei due fili e orientarli verso il retro della macchina
direttamente dietro il piedino premistoffa. Il filo superiore de ve passare
attraverso le punte del piedino premistoffa.
Raccolta del filo inferiore
1 Filo superiore
2 Cappio del filo inferiore
3 Filo inferiore
ZIGZAG STITCHING
STRAIGHT AND
BUILT-IN STITCHES
BUTTONHOLE AND
BUTTON SEWING
USING ATTACHMENTS
AND APPLICATIONS
MAINTENANCE
30
INDEX
Page 39

3
1
2
○○○○○○○○○○○○○○○○○○○○○○○○○○○○○○○○○○○○○○○○○○○○○○○○○○○○○○○○○○○○○○○○○○○○○○○○○○○○○○○○○○○○○○○○○○○○○○○○
Twin-Needle Sewing
Your sewing machine is designed for twin-needle sewing, which allows you to sew using two upper threads. You can use the same color
or two different colors of thread for decorative stitches.
Inserting The Twin Needle
Insert the twin needle in the same way that a single needle is inserted.
(Refer to page 7.) The flat side of the needle should be toward the back
and the rounded side should be toward you.
Setting The Extra Spool Pin
Place the extra vertical spool pin in the hole found on the top righthand side of the machine. Place the second spool of thread on this pin
as shown in fig. A.
1 Extra spool pin
Twin-Needle Threading
Each needle should be threaded separately.
1. Threading the Right Needle
Follow the same instructions for single-needle threading. See page
25 for more details.
2. Threading the Left Needle
Thread the left needle in the same way as the right needle was
threaded, but do not pass the thread through the thread guide above
the needle before passing it through the eye of the left needle as
shown in fig. B.
2 Right needle thread passes through the guide.
3 Left needle thread passes in front of the guide.
WARNING:
By using a twin needle, use only four patterns: the straight stitch (center
needle position), the triple stretch stitch (center needle position), the
most narrow zigzag stitch and most narrow triple zigzag stretch stitch.
Otherwise the needles may hit the needle plate causing the needle to
break.
CONTENTS
SEWING MACHINE
KNOWING Y OUR
ZIGZAG STITCHING
STRAIGHT AND
BUILT-IN STITCHES
○○○○○○○○○○○○○○○○○○○○○○○○○○○○○○○○○○○○○○○○○○○○○○○○○○○○○○○○○○○○○○○
Costura con aguja doble
Su máquina de coser ha sido concebida para poder utilizar una aguja
doble y permitir la costura con dos hilos superiores. Puede usar el mismo
color de hilo o dos hilos de colores distintos para puntadas decorativas.
Para introducir la aguja doble
Introdúzcala de la misma manera que una aguja simple (ver página
7). La parte plana de la aguja debe apuntar hacia la parte trasera
mientras que la parte inclinada debe apuntar hacia usted.
Para instalar el porta carretes extra
Coloque el porta carretes vertical extra en el orificio previsto arriba
de la máquina, en la parte derecha. Coloque el segundo carrete de
hilo en el eje tal como indica la fig. A.
1 Porta carretes extra
Enhebrado de la aguja doble
Cada una de las agujas debe ser enhebrada por separado.
1. Enhebrado de la aguja derecha.
Siga las mismas instrucciones que para el enhebrado de una
sola aguja. Consulte la página 26 para obtener más inf ormación.
2. Enhebrado de la aguja izquierda.
Enhebre la aguja izquierda de la misma manera que la aguja
derecha. Sin embargo, no hay que pasar el hilo por la guía que
se sitúa arriba de la aguja. Conviene pasarlo directamente por el
ojo de la aguja izquierda, tal como se muestra en la fig. B.
2 El hilo de la aguja derecha pasa por la guía
3 El hilo de la aguja izquierda pasa por delante de la guía.
ADVERTENCIA:
Cuando utilice una aguja doble, use únicamente cuatro puntadas: la puntada recta (posición central de la aguja), la puntada
triple elástica (posición central de la aguja), la puntada zigzag
más estrecha y la puntada triple zigzag elástica más estrecha.
De lo contrario, las agujas pueden chocar con la placa de agujas y romperse.
Su questa macchina da cucire è possibile montare un ago gemello, il che
consente di cucire contemporaneamente con due fili d’ago per eseguire punti
decorativi ad uno o due colori.
Inserimento dell’ago gemello
Per inserire l’ago gemello, procedere come per l’inserimento dell’ago singolo. (Vedere a pagina 7.) L’ago va posizionato con la parte piatta rivolta
indietro e la parte arrotondata rivolta verso se stessi.
Applicazione del porta-rocchetto ausiliario
Inserire il porta-rocchetto ausiliario nell’apposito foro situato in alto a destra sulla macchina e collocarvi il secondo rocchetto di filo come mostrato
in fig. A.
Infilatura dell’ago gemello
Infilare ogni ago separatamente.
1. Infilatura dell’ago destro
Seguire le stesse istruzioni relative all’inf ilatura dell’ago singolo. Vede-
re a pagina 26 per istruzioni più dettagliate.
2. Infilatura dell’ago sinistro
Infilare l’ago sinistro nello stesso modo dell’ago destro, ma senza far
passare il filo attraverso il guidafilo sopra l’ago pr ima di a v er lo inf ilato
nella cruna dell’ago sinistro come mostrato in fig. B.
AVVERTENZA:
Utilizzare l'ago gemello soltanto per: punto diritto (ago al centro), punto stretch triplo (ago al centro), lo zig-zag più stretto e lo punto zigzag
stretch triplo più stretto. In caso contrario, gli aghi possono colpire la
placca dell’ago e rompersi.
Cucitura con ago gemello
1 Porta-rocchetto ausiliario
2 Il filo dell’ago destro passa attraverso questa guida.
3 Il filo dell’ago sinistro passa davanti a questa guida.
31
BUTTONHOLE AND
BUTTON SEWING
USING ATTACHMENTS
AND APPLICATIONS
MAINTENANCE
INDEX
Page 40

2
2
2
2
C
2
2
1
1
1
1
1
1
○○○○○○○○○○○○○○○○○○○○○○○○○○○○○○○○○○○○○○○○○○○○○○○○○○○○○○○○○○○○○○○○○○○○○○○○○○○○○○○○○○○○○○○○○○○○○○○○
Thread Tension
A-1A
5
4
6
B-1B
5
4
6
Thread tension will affect the quality of your stitches. It may need to be
adjusted when you change fabric or thread type.
NOTE:
It is recommended that a test sample be made on a fabric scrap before
sewing on your project.
The basic thread tension setting is “5”.
Possible Problems and How To Correct Them
A Upper tension is too tight.
Locks appear on the surface of the fabric.
A-1 Upper tension control dial
Decrease the tension by turning the dial to a lower number.
B Upper tension is too loose.
Locks appear on the reverse side of the fabric.
B-1 Upper tension control dial
Increase the tension by turning the dial to a higher number.
1 Reverse
2 Surface
NOTE:
The lower thread tension has already been adjusted at the factory for
general use. For most sewing applications, no adjustment is needed.
When sewing with thin thread on thin fabrics, the thread tension cannot be adjusted adequately with the upper tension control dial. Therefore, the thread tension must be adjusted according to the procedure
described below.
C Lower tension is too loose.
Locks appear on the surface of the fabric.
Decrease the thread tension by turning the dial to a lower number.
If the result is still not satisfactory, then adjust the bobbin thread
tension as explained in C-1.
C-1 Bobbin
Increase the tension in the bobbin by turning the screw with a
small screwdriver in a clockwise direction. However, do not turn
the screw more than one full turn.
Remember to return the screw to its original setting before starting your next project.
D Correct tension
Correct tension is important since too much or too little tension
will weaken your seams or cause puckers in your fabric.
1 Reverse
2 Surface
CONTENTS
SEWING MACHINE
KNOWING Y OUR
ZIGZAG STITCHING
STRAIGHT AND
BUILT-IN STITCHES
BUTTONHOLE AND
BUTTON SEWING
USING ATTACHMENTS
AND APPLICATIONS
32
MAINTENANCE
INDEX
Page 41

Tensión de los hilos
La tensión de los hilos es muy importante para la calidad de las
puntadas y puede requerir un ajuste al cambiar de tejido o de hilo.
NOTA:
Le recomendamos que haga una prueba en un pedazo de tela antes
de empezar a coser con el tejido de trabajo.
El parámetro inicial de tensión del hilo es “5”.
Problemas posibles y sus soluciones
A El hilo superior está demasiado tirante
Aparecen bagas en la superficie del tejido.
A-1 Disco de control de la tensión superior
Disminuya la tensión al poner el disco en un número inferior.
B La tensión superior es insuficiente
Aparecen bagas en el revés del tejido.
B-1 Disco de control de la tensión superior
Aumente la tensión al poner el disco en un número superior.
1 Revés
2 Derecho
NOTA:
La tensión del hilo inferior ya se ha ajustado en fábrica para los usos
comunes. P or lo tanto , para la ma y oría de las costuras , no se requerirá ningún ajuste adicional.
Sin embargo, al coser con hilo delgado en tejidos finos, no se puede
ajustar correctamente la tensión del hilo mediante el disco de control
de la tensión superior. En estos casos, la tensión del hilo ha de ser
ajustada de acuerdo con el procedimiento descrito a continuación.
C La tensión del hilo inferior es insuficiente
Aparecen bagas en la superficie del tejido.
Disminuya la tensión del hilo girando el disco hacia un número
inferior. Si el resultado no le conviene aún, ajuste la tensión del
hilo de la canilla tal como se indica en la C-1.
C-1 Canilla
Aumente la tensión en la canilla girando el tornillo con un pequeño destornillador, en el sentido de las manecillas de un reloj. Pero no conviene dar más de una vuelta completa al tornillo.
No olvide volver a colocar el tornillo en su posición original antes de empezar otro tipo de costura.
D Tensión correcta
Es importante tener una tensión correcta dado que una tensión
insuficiente o demasiado tirante va a debilitar sus costuras o
fruncir el tejido.
1 Revés
2 Derecho
○○○○○○○○○○○○○○○○○○○○○○○○○○○○○○○○○○○○○○○○○○○○○○○○○○○○○○○○○○○○○○○○○○○○○○○○○○○○○○○○○○○○○○○○○○○○○○○○
Regolazione della tensione del filo
La tensione del filo influisce sulla qualità della cucitura. Quando si cambia
il tipo di tessuto e di filo con cui cucire, può essere necessario regolarla.
NOTA:
Si consiglia di eseguire delle cuciture di prova su un pezzo di stoff a prima di
procedere con il lavoro.
L’impostazione di base della tensione del filo è “5”.
Possibili problemi e come risolverli.
A La tensione superiore è troppo alta.
Il diritto del tessuto presenta degli arricciamenti.
A-1 Regolatore di tensione superiore
Ridurre la tensione ruotando il regolatore su un numero più basso.
B La tensione superiore è troppo lenta.
Il rovescio del tessuto presenta degli arricciamenti.
B-1 Regolatore di tensione superiore
Aumentare la tensione ruotando il regolatore su un numero più alto.
1 Rovescio
2 Diritto
NOTA:
La tensione del filo inferiore è già stata predefinita in fabbrica per un utilizzo generale. Per l’esecuzione della maggior parte delle applicazioni non è
necessaria quindi alcuna regolazione. Tutta via, quando si cuce con filo molto sottile su tessuti sottili, non è sufficiente regolare la tensione del filo
agendo soltanto sul regolatore di tensione superiore. Per questo, è possibile
regolare la tensione del filo come indicato di seguito.
C La tensione inferiore è troppo lenta.
Il diritto del tessuto presenta degli arricciamenti.
Ridurre la tensione del filo ruotando il regolatore su un numero più
basso. Se il risultato non è ancora soddisfacente, regolare la tensione
del filo della spoletta come spiegato al punto C-1.
C-1 Spoletta
Aumentare la tensione del filo della spoletta ruotando la vite di
regolazione in senso orario con un cacciavite piccolo. Tuttavia, non
far compiere alla vite più di un giro completo.
Ricordare di riportare la vite alla posizione originaria prima di iniziare un nuovo lavoro di cucito.
D Tensione corretta
Una tensione corretta è importante, perché una tensione troppo forte o
troppo lenta può indebolire le cuciture o arricciare il tessuto.
1 Rovescio
2 Diritto
CONTENTS
SEWING MACHINE
KNOWING Y OUR
ZIGZAG STITCHING
STRAIGHT AND
BUILT-IN STITCHES
BUTTONHOLE AND
BUTTON SEWING
USING ATTACHMENTS
AND APPLICATIONS
33
MAINTENANCE
INDEX
Page 42

CHART OF SEWING FABRICS, NEEDLES AND THREAD COMBINATIONS
○○○○○○○○○○○○○○○○○○○○○○○○○○○○○○○○○○○○○○○○○○○○○○○○○○○○○○○○○○○○○○○○○○○○○○○○○○○○○○○○○○○○○○○○○○○○○○○○
SEWING FABRICS NEEDLE SIZES THREAD SIZES
CONTENTS
VERY THIN
LIGHTWEIGHT
MEDIUM WEIGHT
HEAVYWEIGHT
KNITS
Fine tricot, Fine lace, Thin linen, Silk, Organza, Chiffon
Voile, Taffeta, Synthetics, Silk, Batiste
Cotton, Gingham, Poplin, Percale, Pique, Satin, Velvet,
Lightweight wool, Fine corduroy, Suitings, Linen,
Muslin
Denim, Gabardine, Tweed, Corduroy, Canvas, Duck
Single knit, Double knit, Jersey, Tricot
NOTE:
1. Select the correct needle and thread size from the above chart.
2. Use the same size thread for the upper (spool) and lower (bobbin) threads.
#70/10
#80/12
#90/14
(Supplied with your
machine.)
#100/16
#90/14
Cotton: 80
Synthetic
Fine Mercerized Cotton
Cotton: 60~80
Silk: “A”
Synthetic
Mercerized 50
Cotton: 50~60
Silk: “A”
Synthetic
Mercerized 50~60
Cotton: 40~50
Mercerized Heavy Duty
Cotton-Wrapped Polyester
SEWING MACHINE
KNOWING Y OUR
ZIGZAG STITCHING
STRAIGHT AND
BUILT-IN STITCHES
TABLA DE COMBINACIONES ENTRE TEJIDOS, AGUJAS Y HILOS
TEJIDOS TAMAÑO DE LA AGUJA TAMAÑO DEL HILO
Algodón: 80
MUY FINO
LIGERO
MEDIO
PESADO
PRENDAS DE PUNTO
Punto fino, Encaje fino, Lino fino, Seda, Tul, Gasa
Velo, Tafetán, Sintéticos, Seda, Batista
Algodón, Vichy, Popelín, Percal, Piqué, Satén,
Terciopelo, Lana ligera, Pana fina, Forros, Lino,
Muselina
Tejano, Gabardina, Tweed, Pana, Toldo, Dril
Prendas de punto simple, Prendas de punto doble,
Jersey , Tricot
n° 70/10
n° 80/12
n° 90/14
(Provista con su
máquina)
n° 100/16
n° 90/14
Sintético
Algodón fino
Algodón: 60/80
Seda: “A”
Sintético
Mercería 50
Algodón: 50/60
Seda: “A”
Sintético
Mercería 50/60
Algodón: 40/50
Hilo mercería gruesa
Poliester envuelto de algodón
BUTTONHOLE AND
BUTTON SEWING
USING ATTACHMENTS
AND APPLICATIONS
MAINTENANCE
NOTA:
1. Elija la aguja y el hilo correctos en la tabla de arriba.
2. Utilice el mismo tamaño de hilo para los hilos superior (carrete) e inferior (canilla).
INDEX
34
Page 43

○○○○○○○○○○○○○○○○○○○○○○○○○○○○○○○○○○○○○○○○○○○○○○○○○○○○○○○○○○○○○○○○○○○○○○○○○○○○○○○○○○○○○○○○○○○○○○○○
TABELLA DELLE COMBINAZIONI DI TESSUTO, AGO E FILO
TESSUTI AGO FILO
CONTENTS
DELICATI
LEGGERI
MEDIO PESANTI
PESANTI
MAGLIERIA
Tessuto a maglia sottile, pizzo leggero, lino sottile, seta,
organza, chiffon
Voile, taffettà, tessuti sintetici, seta, batista
Cotone, percallino, popeline, percalle, piqué, satinati,
velluto, lana leggera, velluto a coste leggero,
tessuto per confezioni, lino, mussola
Tessuto di cotone ritorto, gabardine, tweed, velluto a coste,
tela da canovaccio, tessuto per tendaggi
Maglia singola, maglia doppia, jersey, tessuto a maglia
#70/10
#80/12
#90/14
(Fornito con la macchina)
#100/16
#90/14
NOTA:
1. Prima di iniziare a cucire, consultare questa tabella per scegliere la misura corretta dell’ago e del filo.
2. Usare filo della stessa misura per il filo superiore (rocchetto) e quello inferiore (spoletta).
Cotone: 80
Filato sintetico
Filato fine mercerizzato
Cotone: 60~80
Seta: “A”
Filato sintetico
Filato mercerizzato 50
Cotone: 50~60
Seta: “A”
Filato sintetico
Filato mercerizzato 50~60
Cotone: 40~50
Filato grosso mercerizzato
Poliestere cotonato
SEWING MACHINE
KNOWING Y OUR
ZIGZAG STITCHING
STRAIGHT AND
BUILT-IN STITCHES
BUTTONHOLE AND
BUTTON SEWING
USING ATTACHMENTS
AND APPLICATIONS
MAINTENANCE
35
INDEX
Page 44

○○○○○○○○○○○○○○○○○○○○○○○○○○○○○○○○○○○○○○○○○○○○○○○○○○○○○○○○○○○○○○○○○○○○○○○○○○○○○○○○○○○○○○○○○○○○○○○○
Straight Stitching
XL5030 XL5020 XL5010
2 2 5 Straight Stitch (Center needle position)
3 3 6 Straight Stitch (Left needle position)
12 10 13 Triple Stretch Stitch (Center needle position)
13 11 14 Triple Stretch Stitch (Left needle position)
Starting Sewing
1. Turn the pattern selection dial to select the desired stitch. Set the
pattern selection dial to Straight Stitch or Triple Stretch Stitch for
the type of stitch required.
2. Raise the needle to its highest position and lift the presser foot lever .
3. Pull up the lower thread by turning the balance wheel toward you
(counterclockwise) and place both the upper and lower threads
behind the presser foot.
4. Place the fabric under the presser foot with the needle 1 cm (3/8")
from the edge of the fabric.
5. Lower the presser foot.
Backtacking
Reverse stitching is used to lock or reinforce the end of the stitch.
6. Press down on the reverse sewing lever as far as possible, then
lightly step on the foot controller. Sew 5 to 10 stitches in the reverse direction.
7. Release the reverse sewing lever and step down on the foot controller to start sewing in the forward direction.
Pattern Stitch Length
1-4
Fixed 2.5
CONTENTS
SEWING MACHINE
KNOWING Y OUR
ZIGZAG STITCHING
STRAIGHT AND
BUILT-IN STITCHES
○○○○○○○○○○○○○○○○○○○○○○○○○○○○○○○○○○○○○○○○○○○○○○○○○○○○○○○○○○○○○○○
Puntadas rectas
XL5030 XL5020 XL5010
2 2 5 Puntada recta (Aguja en el centro)
3 3 6 Puntada recta (Aguja a la izquierda)
12 10 13
13 11 14
Puntada triple elástica (Aguja en el centro)
Puntada triple elástica (Aguja a la izquierda)
Para empezar a coser
1. Gire el selector de puntadas para seleccionar la puntada deseada. Ponga dicho selector de puntadas en puntada recta o puntada triple elástica para el tipo de puntada deseado.
2. Levante la aguja a su posición más alta y levante la palanca del
prensatelas.
3. Saque el hilo inferior girando la ruedecilla hacia usted (en el sentido contrario a las manecillas de un reloj) y tire los hilos superior
e inferior hacia la parte trasera del prensatelas.
4. Coloque el tejido debajo del prensatelas con la aguja de 1 cm
(3/8") de la orilla del tejido.
5. Baje el prensatelas.
Retroceso
La puntada de retroceso se utiliza para finalizar una costura o reforzarla.
6. Baje la palanca de retroceso hasta el final y presione suav emente el pedal. Cosa de 5 a 10 puntadas en la dirección de retroceso .
7. Suelte la palanca de retroceso y pise el pedal para volv er a coser
Número de puntada
Largo de puntada
1-4
Fija 2,5
XL5030 XL5020 XL5010
2 2 5 Punto diritto (ago al centro)
3 3 6 Punto diritto (ago a sinistra)
12 10 13 Punto stretch triplo (ago al centro)
13 11 14 Punto stretch triplo (ago a sinistra)
Inizio della cucitura
1. Ruotare il selettore dei punti per selezionare il punto desiderato. Spostare il selettore dei punti sul punto diritto o punto stretch triplo in base
al tipo di punto richiesto.
2. Far salire l’ago fino alla posizione più alta e sollevare la lev a del piedino
premistoffa.
3. Tirare il filo inferiore girando il volantino verso se stessi (in senso
antiorario) e disporre insieme il filo superiore e quello inferiore dietro il
piedino premistoffa.
4. Stendere il tessuto sotto il piedino premistoffa con l’ago a circa 1 cm dal
bordo.
5. Abbassare il piedino premistoffa.
Cucitura di ritorno
La cucitura a marcia indietro serve a fissare o rinforzare la fine del punto.
6. Spingere più a fondo possibile la leva di cucitura di ritorno e premere
leggermente sul reostato. Cucire circa 5-10 punti a marcia indietro.
7. Rilasciare la leva di cucitura e premere sul reostato per iniziare a cucire
a marcia avanti.
Punto diritto
Punto Lunghezza
1-4
Fissa 2,5
hacia adelante.
BUTTONHOLE AND
BUTTON SEWING
USING ATTACHMENTS
AND APPLICATIONS
MAINTENANCE
INDEX
36
Page 45

A
B
○○○○○○○○○○○○○○○○○○○○○○○○○○○○○○○○○○○○○○○○○○○○○○○○○○○○○○○○○○○○○○○○○○○○○○○○○○○○○○○○○○○○○○○○○○○○○○○○
Changing Sewing Directions (fig. A)
1. Stop the machine at the point where you wish to change directions
with the needle still in the fabric.
2. Raise the presser foot and turn the fabric to line up its new direction using the needle as a turning point.
3. Lower the presser foot and start sewing in the new direction.
Finishing Sewing (fig. B)
1. Stitch to the end of the seam and stop.
2. Press down the reverse sewing lever, then lightly step on the foot
controller to stitch backward over the stitch for 1 cm (3/8") from its
end.
CONTENTS
SEWING MACHINE
KNOWING Y OUR
ZIGZAG STITCHING
STRAIGHT AND
○○○○○○○○○○○○○○○○○○○○○○○○○○○○○○○○○○○○○○○○○○○○○○○○○○○○○○○○○○○○○○○
Cambio de sentido de costura (fig. A)
1. Pare la máquina en donde quiera cambiar de dirección, con la
aguja picada en el tejido.
2. Levante el prensatelas y gire el tejido en la dirección que debe
seguir, usando la aguja como placa giratoria.
3. Baje el prensatelas y empiece a coser en la nueva dirección.
Para terminar las costuras (fig. B)
1. Cosa hasta el final de la costura y pare.
2. Apriete la palanca de retroceso y presione suavemente el pedal
para coser hacia atrás hasta 1 cm (3/8") de la orilla del tejido.
Cambio di direzione (fig. A)
1. Arrestare la macchina nel punto in cui si desidera cambiare la direzione
della cucitura lasciando l’ago nel tessuto.
2. Sollevare il piedino premistoffa e ruotare il tessuto intorno all’ago nella
direzione voluta.
3. Abbassare il piedino premistoffa e riprendere a cucire nella nuova direzione.
Fine della cucitura (fig. B)
1. Cucire fino al margine del tessuto e arrestare la macchina.
2. Spingere la leva di cucitura di ritorno e premere leggermente sul reostato
per cucire a marcia indietro per 1 cm dal margine del tessuto.
BUILT-IN STITCHES
BUTTONHOLE AND
BUTTON SEWING
USING ATTACHMENTS
AND APPLICATIONS
MAINTENANCE
37
INDEX
Page 46

1
○○○○○○○○○○○○○○○○○○○○○○○○○○○○○○○○○○○○○○○○○○○○○○○○○○○○○○○○○○○○○○○○○○○○○○○○○○○○○○○○○○○○○○○○○○○○○○○○
Removing the Material From the Machine
1. Stop the machine.
2. Raise the needle to its highest position and make sure that the thread
take-up lever is also in its highest position.
3. Lift the presser foot and pull the fabric out gently to the left side.
4. Cut both threads with the thread cutter located on the left side of
the face plate.
5. To prepare the machine for the next seam, pull about 10 cm (4") of
thread through the toes of the presser foot toward the back of the
machine.
1 Thread cutter
Topstitching and Stretch Materials
The Straight Stitch (“2” or “3” on the XL5030, “2” or “3” on the XL5020
and “5” or “6” on the XL5010) is used for topstitching and sewing
lightweight fabrics.
The T riple Stretch Stitch (“12” or “13” on the XL5030, “10” or “11” on
the XL5020, and “13” or “14” on the XL5010) is used for sewing stretch
fabrics.
CONTENTS
SEWING MACHINE
KNOWING Y OUR
ZIGZAG STITCHING
STRAIGHT AND
○○○○○○○○○○○○○○○○○○○○○○○○○○○○○○○○○○○○○○○○○○○○○○○○○○○○○○○○○○○○○○○
Para retirar el tejido de la máquina
1. Pare la máquina.
2. Levante la aguja a su posición más alta y asegúrese de que la
palanca tirahilos esté también en su posición más elevada.
3. Levante el prensatelas y saque suavemente el tejido por la izquierda.
4. Corte ambos hilos con el cortador que se encuentra en la parte
izquierda de la placa frontal.
5. Con el fin de dejar la máquina preparada para la próxima costura, tire unos 10 cm (4") del hilo inferior y páselo por los salientes
del prensatelas hacia la parte posterior de la máquina.
1 Cortador de hilos
Puntadas en derecho y tejidos elásticos
La puntada recta (“2” o “3” en el modelo XL5030, “2” o “3” en el modelo XL5020 y “5” o “6” en el modelo XL5010) se utiliza para puntadas en derecho y costura de tejidos ligeros.
La puntada triple elástica (“12” o “13” en el modelo XL5030, “10” u
“11” en el modelo XL5020 y “13” o “14” en el modelo XL5010) se
utiliza para costura de tejidos elásticos.
Rimozione del tessuto dalla macchina
1. Arrestare la macchina.
2. Far salire l’ago fino alla posizione più alta accertandosi che la leva
tendifilo sia salita anch’essa al punto più alto.
3. Alzare il piedino premistoffa ed estrarre il tessuto tirandolo delicatamente verso sinistra.
4. Tagliare entrambi i fili con il tagliafilo incorporato situato sul lato sinistro della placca frontale.
5. Per predisporre la macchina alla cucitura successiva, tirare circa 10 cm
di filo attraverso le punte del piedino premistoffa verso il retro della
macchina.
1 Tagliafilo
Cucitura esterna e tessuti elastici
Il punto diritto (“2” o “3” sul mod. XL5030, “2” o “3” sul mod. XL5020 e
“5” o “6” sul mod. XL5010) è utilizzato per impunture decorative e per
cuciture su tessuti leggeri.
Il punto stretch triplo (“12” o “13” sul mod. XL5030, “10” o “11” sul mod.
XL5020 e “13” o “14” sul mod. XL5010) è utilizzato per cuciture su tessuti
elastici.
BUILT-IN STITCHES
BUTTONHOLE AND
BUTTON SEWING
USING ATTACHMENTS
AND APPLICATIONS
MAINTENANCE
38
INDEX
Page 47

○○○○○○○○○○○○○○○○○○○○○○○○○○○○○○○○○○○○○○○○○○○○○○○○○○○○○○○○○○○○○○○○○○○○○○○○○○○○○○○○○○○○○○○○○○○○○○○○
Zigzag Stitching
XL5030 XL5020 XL5010
4 4 2 Zigzag Stitch Fixed 1.7
5 5 3 Zigzag Stitch -4 Fixed 3.5
6 6 4 Zigzag Stitch Fixed 5
Pattern Stitch Length Stitch Width
CONTENTS
ZIGZAG STITCH
Select the pattern number according to the desired stitch width you
require using the pattern selection dial. Then, select the stitch length.
It is recommended to sew using the Straight Stitch at the beginning and
end of the Zigzag Stitch.
SATIN STITCH
When the Zigzag Stitch length is set in the “ ” range, it produces a
satin stitch (a close zigzag stitch). The satin stitch can be used for making buttonholes and decorative stitches. Set the pattern selection dial
to the desired Zigzag Stitch and set the stitch length in the “ ” range.
○○○○○○○○○○○○○○○○○○○○○○○○○○○○○○○○○○○○○○○○○○○○○○○○○○○○○○○○○○○○○○○
SEWING MACHINE
KNOWING Y OUR
ZIGZAG STITCHING
STRAIGHT AND
BUILT-IN STITCHES
BUTTONHOLE AND
BUTTON SEWING
Puntadas zigzag
XL5030 XL5020 XL5010
4 4 2 Puntada zigzag Fija 1,7
5 5 3 Puntada zigzag -4 Fija 3,5
6 6 4 Puntada zigzag Fija 5
PUNTADA ZIGZAG
Seleccione el número de puntada de acuerdo con el ancho de la
puntada que requiera utilizando el selector del número de puntada.
Luego, seleccione el largo de puntada.
Se recomienda coser con puntada recta al principio y al final con
unas puntadas zigzag.
PUNTADA DE REALCE
Cuando se define el largo de la puntada en la parte “ ”, se coserán
las puntadas tupidas (puntada zigzag muy cerrada) que pueden servir para hacer ojales o como puntadas decorativas. Seleccione la
puntada zigzag. Luego ponga el largo de la puntada en la z ona “ ” .
Número de puntada
Largo de puntada
Ancho de puntada
Punto zigzag
XL5030 XL5020 XL5010
4 4 2 Punto zigzag Fissa 1,7
5 5 3 Punto zigzag -4 Fissa 3,5
6 6 4 Punto zigzag Fissa 5
PUNTO ZIGZAG
Selezionare il punto in base all’ampiezza desiderata ruotando il selettore
dei punti. Quindi selezionare la lunghezza del punto.
Si consiglia eseguire una cucitura con il punto diritto prima e dopo il punto
zigzag.
PUNTO SATIN
Quando la lunghezza del punto zigzag è impostata nell’area “ ”, si ottiene
un punto satin (una successione di punti zigzag molto fitti). Il punto satin
può essere utilizzato per eseguire asole e punti decorativi. Disporre il selettore
dei punti sul punto zigzag desiderato e ruotare il selettore della lunghezza
del punto sull’area “ ”.
Punto Lunghezza Ampiezza
USING ATTACHMENTS
AND APPLICATIONS
MAINTENANCE
INDEX
39
Page 48

A
C
B
D
○○○○○○○○○○○○○○○○○○○○○○○○○○○○○○○○○○○○○○○○○○○○○○○○○○○○○○○○○○○○○○○○○○○○○○○○○○○○○○○○○○○○○○○○○○○○○○○○
Blind Hem Stitching
XL5030 XL5020 XL5010
7 7 – Blind Hem Stitch -2 Fixed 5
10 – 7 Stretch Blind Stitch
The Blind Hem Stitch is used to finish the edge of a project, like the
bottom of a pair of pants, so that the stitch does not show. Use the
Blind Hem Stitch when sewing on non-stretch fabrics, and the Stretch
Blind Stitch for stretch fabrics.
1. Both the upper (spool) and lower (bobbin) threads should be the
same color as the fabric.
2. Fold back the fabric to the desired location of the hem as shown in
fig. A. Then, fold the edge of the fabric as in fig. B. Leave a 6 mm
(1/4") overlap at the edge.
3. Set the pattern selection dial to either the Blind Hem Stitch or Stretch
Blind Stitch and set the stitch length.
4. Sew on the fold as in fig. C.
5. When the fabric is unfolded you will have a blind hem. (See fig.
D.)
NOTE:
The Stretch Blind Stitch is useful for stretch fabrics.
Pattern Stitch Length Stitch Width
-1.5 Fixed 3.5
CONTENTS
SEWING MACHINE
KNOWING Y OUR
ZIGZAG STITCHING
STRAIGHT AND
BUILT-IN STITCHES
○○○○○○○○○○○○○○○○○○○○○○○○○○○○○○○○○○○○○○○○○○○○○○○○○○○○○○○○○○○○○○○
Puntadas invisibles
XL5030 XL5020 XL5010
7 7 – Puntada invisible -2 Fija 5
10 – 7 Pespunto invisible
La puntada invisible se usa para terminar la orilla de una confección,
tal como el borde inferior de unos pantalones, sin que se vean las
puntadas. Utilice la puntada invisible cuando vaya a coser un tejido
que no se estire y la pespunto invisible para los tejidos elásticos.
1. Ambas bobinas de hilo, superior e inferior, deben ser del mismo
color que el tejido.
2. Doble el tejido según la orilla que desee coser tal y como se
muestra en la fig. A. Luego, dé vuelta al tejido tal y como se
indica en la fig. B. Deje unos 6 mm(1/4") sin coser para cubrir la
costura.
3. Ponga el selector de puntadas en la puntada invisible o en la
pespunto invisible y ajuste el largo de puntada.
4. Cosa en el pliegue tal como se muestra en la fig. C.
5. Al desdoblar el tejido , tendrá un dobladillo con puntada invisible.
(V er fig. D.)
NOTA:
La pespunto invisible se recomienda para tejidos elásticos.
Número de puntada
Largo de puntada
-1,5 Fija 3,5
Ancho de puntada
XL5030 XL5020 XL5010
7 7 – Punto orlo invisibile -2 Fissa 5
10 – 7 Punto stretch invisibile
Il punto orlo invisibile permette di rifinire gli orli di indumenti, come ad
esempio il fondo di un paio di pantaloni, in modo che la cucitura non sia
visibile. Utilizzare il punto orlo invisibile per eseguire orli su tessuti non
elastici e il punto stretch invisibile su tessuti elastici.
1. Sia il filo superiore (rocchetto) che quello inferiore (spoletta) devono
essere dello stesso colore del tessuto.
2. Ripiegare in sotto il tessuto formando un orlo dell’altezza desiderata
come mostrato in fig. A. Quindi, piegare l’orlo come mostrato in fig. B,
formando una piega di 6 mm sull’orlo.
3. Disporre il selettore dei punti sul punto orlo invisibile od punto stretch
invisibile ed impostare la lunghezza del punto.
4. Cucire sulla piega come illustrato in fig. C.
5. Stendendo il tessuto si otterrà un orlo a punto invisibile. (Vedi fig. D.)
NOTA:
Il punto stretch invisibile è utile per cucire su tessuti elastici.
Orli a punto invisibile
Punto Lunghezza Ampiezza
-1,5 Fissa 3,5
BUTTONHOLE AND
BUTTON SEWING
USING ATTACHMENTS
AND APPLICATIONS
MAINTENANCE
40
INDEX
Page 49

○○○○○○○○○○○○○○○○○○○○○○○○○○○○○○○○○○○○○○○○○○○○○○○○○○○○○○○○○○○○○○○○○○○○○○○○○○○○○○○○○○○○○○○○○○○○○○○○
Shell Tuck Stitching
XL5030 XL5020 XL5010
8 8 8 Shell Tuck Stitch
The Shell Tuck Stitch can be used to sew a picot (lace-like) edge on
lightweight fabric.
1. Set the pattern selection dial to the Shell Tuck Stitch.
2. This stitch requires a tighter thread tension than normal.
3. Place the fabric under the presser foot so that it will be sewn along
the bias with the straight stitches sewn on the seamline and the
zigzag stitches sewn slightly over the folded edge.
4. Sew at a slow speed.
Pattern Stitch Length Stitch Width
-3 Fixed 5
CONTENTS
SEWING MACHINE
KNOWING Y OUR
ZIGZAG STITCHING
STRAIGHT AND
○○○○○○○○○○○○○○○○○○○○○○○○○○○○○○○○○○○○○○○○○○○○○○○○○○○○○○○○○○○○○○○
Puntada alforza derefuerzo
XL5030 XL5020 XL5010
888
La puntada alforza derefuerzo puede usarse para coser una puntilla
(como encaje) en un tejido fino.
1. Ponga el selector del número de puntadas en puntada alforza
derefuerzo.
2. Este trabajo requiere aumentar un poco más la tensión del hilo
que en condiciones normales.
3. Cosa el tejido en el sesgo, situándolo debajo del prensatelas de
tal forma que la puntada recta se cosa en líneas formando costu-
Número de puntada
Puntada alforza derefuerzo
Largo de puntada
-3 Fija 5
Ancho de puntada
XL5030 XL5020 XL5010
8 8 8 Punto orlo conchiglia
Il punto orlo conchiglia permette di eseguire bordi a picot (simili al merletto) su tessuti leggeri.
1. Disporre il selettore dei punti sul punto orlo conchiglia.
2. Questo punto richiede una tensione del filo più stretta del normale.
3. Cucire il tessuto di sbieco guidandolo sotto il piedino premistoffa in
modo che i punti diritti cadano sulla linea di cucitura e i punti zigzag
appena sopra la piega.
4. Cucire a bassa velocità.
Punto orlo conchiglia
Punto Lunghezza Ampiezza
-3 Fissa 5
ra y que las puntadas zigzag cosan las puntillas de los dobladillos.
4. Coser a velocidad lenta.
BUILT-IN STITCHES
BUTTONHOLE AND
BUTTON SEWING
USING ATTACHMENTS
AND APPLICATIONS
MAINTENANCE
41
INDEX
Page 50

A
B
C
○○○○○○○○○○○○○○○○○○○○○○○○○○○○○○○○○○○○○○○○○○○○○○○○○○○○○○○○○○○○○○○○○○○○○○○○○○○○○○○○○○○○○○○○○○○○○○○○
Elastic Stitching
XL5030 XL5020 XL5010
9 9 9 Elastic Stitch
The Elastic Stitch can be used in three different ways: to mend, to sew
elastic, or to join fabric. Each method is explained below.
Set the pattern selection dial to the Elastic Stitch.
Mending
1. Set the stitch length dial between “ ” and “2.5”.
2. Place the reinforcement fabric under the tear to be mended.
3. Following the line of the tear, sew using the Elastic Stitch as illustrated in fig. A.
Sewing Elastic
1. Place the elastic on the fabric.
2. As you sew, stretch the elastic both in the front and behind the
presser foot as shown in fig. B.
Joining Fabric
The Elastic Stitch can be used to join two pieces of fabric together and
is very effective when sewing knitted fabrics. If nylon thread is used,
the stitch will not be visible.
1. Place the edges of the two pieces of fabric together and center
them under the presser foot.
2. Sew them together using the Elastic Stitch taking care to keep the
two fabric edges close together as shown in fig. C.
Pattern Stitch Length Stitch Width
-2.5 Fixed 5
CONTENTS
SEWING MACHINE
KNOWING Y OUR
ZIGZAG STITCHING
STRAIGHT AND
BUILT-IN STITCHES
○○○○○○○○○○○○○○○○○○○○○○○○○○○○○○○○○○○○○○○○○○○○○○○○○○○○○○○○○○○○○○○
Puntada elástica
XL5030 XL5020 XL5010
9 9 9 Puntada elástica -2,5 Fija 5
Se puede usar la puntada elástica para tres operaciones: los remiendos, la inserción de gomas elásticas y como puntada de unión
para juntar dos tejidos.
Ponga el selector en puntada elástica
Cada una de estas operaciones se detalla a continuación.
Remiendos
1. Ponga el selector de largo de puntada entre “ ” y “2,5”.
2. Coloque una tela de refuerzo debajo de la parte a remendar.
3. Siguiendo la línea de la rasgadura, cosa con la puntada elástica
tal y como se muestra en la fig. A.
Inserción de gomas elásticas
1. Ponga la goma sobre el tejido.
2. A medida que esté cosiendo, estire el elástico tanto delante como
detrás del prensatelas tal y como se muestra en la fig. B.
Puntada de unión
La puntada elástica puede servir para unir dos trozos de tejido y
resulta muy eficaz para la costura de prendas de punto. Si se usa un
hilo de nylon, la puntada resultará invisible.
1. Junte las orillas de ambos trozos de tejido y céntrelas debajo del
prensatelas.
2. Cósalas juntas con la puntada elástica, teniendo sumo cuidado
en mantener las dos orillas de los tejidos muy juntas, tal como se
muestra en la fig. C.
Número de puntada
Largo de puntada
Ancho de puntada
XL5030 XL5020 XL5010
9 9 9 Punto elastico
Il punto elastico può essere utilizzato in tre applicazioni diverse: per rammendare, per cucire elastici o per eseguire giunture di tessuti. Queste tre
applicazioni sono descritte di seguito.
Disporre il selettore dei punti sul punto elastico.
Rammendo
1. Disporre il selettore della lunghezza del punto tra “ ” e “2,5”.
2. Applicare il tessuto di rinforzo sotto lo strappo da rammendare.
3. Seguendo il contorno dello strappo, cucire con il punto elastico come
illustrato in fig. A.
Cucitura di elastici
1. Applicare l’elastico sul tessuto.
2. Durante la cucitura, tenere teso l’elastico sia davanti che dietro il piedi-
no premistoffa, come mostrato in fig. B.
Giunture di tessuti
Il punto elastico può essere utilizzato per cucire insieme due pezzi di tessuto ed è molto efficace su tessuti a maglia. Usando il filo di n ylon, la cucitura
sarà invisibile.
1. Congiungere il bordi dei due tessuti e centrarli sotto il piedino
premistoffa.
2. Eseguire la cucitura con il punto elastico tenendo ben accostati i margini del tessuto come mostrato in fig. C.
Punto elastico
Punto Lunghezza Ampiezza
-2,5 Fissa 5
BUTTONHOLE AND
BUTTON SEWING
USING ATTACHMENTS
AND APPLICATIONS
MAINTENANCE
INDEX
42
Page 51

A
○○○○○○○○○○○○○○○○○○○○○○○○○○○○○○○○○○○○○○○○○○○○○○○○○○○○○○○○○○○○○○○○○○○○○○○○○○○○○○○○○○○○○○○○○○○○○○○○
Scallop Stitching
XL5030 XL5020 XL5010
11 – – Scallop Stitch
This machine automatically produces a Scallop Stitch which may be
used as decorative edging.
1. Set the pattern selection dial to the Scallop Stitch.
2. Sew the Scallop Stitch along the edge of the material.
3. If desired, trim around the scallop with scissors to create a scalloped edge. Be careful not to cut the thread. (See fig. A.)
Pattern Stitch Length Stitch Width
-1.5 Fixed 5
CONTENTS
SEWING MACHINE
KNOWING Y OUR
ZIGZAG STITCHING
STRAIGHT AND
○○○○○○○○○○○○○○○○○○○○○○○○○○○○○○○○○○○○○○○○○○○○○○○○○○○○○○○○○○○○○○○
Puntada festón
XL5030 XL5020 XL5010
11 – – Puntada festón -1,5 Fija 5
Esta máquina puede realizar automáticamente unas puntadas festón que pueden servir para decorar los bordes de la tela.
1. Ponga el selector de puntadas en puntadas festón.
2. Cosa las puntadas festón a lo largo del borde del tejido.
3. Si lo desea, corte el borde con tijeras, siguiendo las puntadas,
para crear un borde festonado . Sin embargo, tenga sumo cuidado en no cortar el hilo. (Ver fig. B.)
Número de puntada
Largo de puntada
Ancho de puntada
XL5030 XL5020 XL5010
11 – – Punto smerlo
Questa macchina produce automaticamente un punto smerlo che permette
di realizzare rifiniture decorative lungo le cuciture.
1. Disporre il selettore dei punti sul punto smerlo.
2. Cucire il punto smerlo lungo il bordo del tessuto.
3. Se desiderato, rifilare i margini delle cuciture con le forbici per ottenere
un bordo smerlato, facendo attenzione a non tagliare il filo. (Vedi fig.
A.)
Punto smerlo
Punto Lunghezza Ampiezza
-1,5 Fissa 5
BUILT-IN STITCHES
BUTTONHOLE AND
BUTTON SEWING
USING ATTACHMENTS
AND APPLICATIONS
MAINTENANCE
43
INDEX
Page 52

A
B
○○○○○○○○○○○○○○○○○○○○○○○○○○○○○○○○○○○○○○○○○○○○○○○○○○○○○○○○○○○○○○○○○○○○○○○○○○○○○○○○○○○○○○○○○○○○○○○○
Overedge Stitching
XL5030 XL5020 XL5010
17 15 – Stretch Overlock Stitch Fixed 3
18 16 16 Elastic Overlock Stitch Fixed 2.5
20 – 15 Arrow Head Stitch
These stitches are used to join together seams and finish them in one
step. The Elastic Overlock is useful when sewing stretch materials, while
the Arrow head Stitch is ideal for sewing the edge of a blanket.
1. Set the pattern selection dial to the Elastic Overlock, Stretch
Overlock or Arrow Head.
2. Position the fabric under the presser foot so that the seamline is
approximately 3 mm (1/8") to the left of the presser foot center. This
stitch works best with a seam allowance of approximately 6 mm
(1/4") as this allows the right side of the stitch to overlock the cut
edge of the fabric as shown in fig. A.
3. If the seam allowance is wider than the stitch pattern, trim away
any excess fabric after stitching.
A finished Elastic Overlock is shown in fig. B.
Pattern Stitch Length Stitch Width
Fixed 5
CONTENTS
SEWING MACHINE
KNOWING Y OUR
ZIGZAG STITCHING
STRAIGHT AND
○○○○○○○○○○○○○○○○○○○○○○○○○○○○○○○○○○○○○○○○○○○○○○○○○○○○○○○○○○○○○○○
Puntada por encima de la orilla
XL5030 XL5020 XL5010
17 15 –
18 16 16
20 – 15
Estas puntadas se usan para juntar costuras y acabarlas en una
sola operación. La puntada overlock elástica se utiliza en costuras
de tejidos elásticos, mientras que la puntada punta de flecha resulta
ideal para la costura de dobladillos de mantas.
1. Ponga el selector de puntadas en puntada overlock elástica,
pespunto overlock o puntada punta de flecha.
2. Coloque el tejido debajo del prensatelas para que la línea de
costura quede unos 3 mm (1/8") a la izquierda del centro del
prensatelas. Esta puntada da los mejores resultados con una tolerancia de costura de unos 6 mm (1/4") dado que así permite a
la parte derecha de la puntada enganchar la orilla cortada del
tejido tal y como se muestra en la fig. A.
3. Si la tolerancia de costura es más ancha que la puntada, corte
cualquier pedazo de tejido que sobre después de coser.
Número de puntada
Puntada overlock
Puntada overlock elástica
Puntada
punta de flecha
Largo de puntada
Fija 2,5
Ancho de puntada
Fija 3
Fija 5
XL5030 XL5020 XL5010
17 15 – Punto sopraggitto stretch Fissa 3
18 16 16 Punto sopraggitto elastico Fissa 2,5
20 – 15 Punto a freccia
Questi punti consentono di ottenere cuciture elastiche e contemporaneamente già rifinite con una sola operazione. Il sopraggitto elastico è utile per
cucire tessuti elastici, mentre il punto a freccia è ideale per cucire il bordo di
coperte.
1. Disporre il selettore dei punti sul sopraggitto elastico, sul sopraggitto
stretch o sul punto a freccia.
2. Stendere il tessuto sotto il piedino premistoffa in modo che la linea della
cucitura si trovi a circa 3 mm a sinistra dal centro del piedino. La distanza dal margine ottimale per eseguire questo punto è di circa
6 mm, che consente al lato destro del punto di sopraggittare adeguatamente il margine del tessuto, come mostrato in fig. A.
3. Nel caso la distanza dal margine sia più ampia dell’ampiezza del punto,
ritagliare il tessuto in eccesso al termine della cucitura.
La fig. B mostra una rifinitura eseguita con il sopraggitto elastico.
Rifinitura a sopraggitto
Punto Lunghezza Ampiezza
Fissa 5
En la fig. B puede ver una puntada overlock elástica.
BUILT-IN STITCHES
BUTTONHOLE AND
BUTTON SEWING
USING ATTACHMENTS
AND APPLICATIONS
MAINTENANCE
44
INDEX
Page 53

○○○○○○○○○○○○○○○○○○○○○○○○○○○○○○○○○○○○○○○○○○○○○○○○○○○○○○○○○○○○○○○○○○○○○○○○○○○○○○○○○○○○○○○○○○○○○○○○
Feather Stitching
XL5030 XL5020 XL5010
19 17 17 Feather Stitch Fixed 2.5 Fixed 5
Use the Feather Stitch as a decorative top stitch or when hemming
blankets, tablecloths or draperies or when embroidering.
1. Set the Pattern Selection Dial.
2. Place the fabric right side up and sew 1 cm (3/8") from the edge of
the fabric.
3. Trim close to the stitching.
The stitch will prevent the fabric from unravelling.
Pattern Stitch Length Stitch Width
CONTENTS
SEWING MACHINE
KNOWING Y OUR
ZIGZAG STITCHING
STRAIGHT AND
○○○○○○○○○○○○○○○○○○○○○○○○○○○○○○○○○○○○○○○○○○○○○○○○○○○○○○○○○○○○○○○
Puntada pluma
XL5030 XL5020 XL5010
19 17 17 Puntada pluma Fija 2,5 Fija 5
Utilice la puntada pluma como una puntada en derecho decorativa o
cuando tenga que hacer dobladillos en mantas, manteles o cortinas
o en trabajos de bordado.
1. Coloque el selector de puntadas.
2. Coloque el tejido con el lado derecho hacia arriba y cosa a una
distancia de 1 cm (3/8") del orillo del tejido.
3. Recorte cerca de la puntada.
La puntada evitará que el tejido se deshilache.
Puntada
Largo de puntada Ancho de puntada
XL5030 XL5020 XL5010
19 17 17 Punto a piuma Fissa 2,5 Fissa 5
Utilizzare il punto a piuma come finitura decorativa o per orlare coperte,
tovaglie o tendaggi, oppure per ricamare.
1. Disporre il selettore dei punti.
2. Mettere la stoffa rivolto con il diritto verso l'alto e cucire ad 1 cm dal
bordo della stoffa.
3. Tagliare vicino alla cucitura.
Questo punto impedisce alla stoffa di sfilacciarsi.
PUNTO A PIUMA
Punto Lunghezza Larghezza
BUILT-IN STITCHES
BUTTONHOLE AND
BUTTON SEWING
USING ATTACHMENTS
AND APPLICATIONS
MAINTENANCE
45
INDEX
Page 54

○○○○○○○○○○○○○○○○○○○○○○○○○○○○○○○○○○○○○○○○○○○○○○○○○○○○○○○○○○○○○○○○○○○○○○○○○○○○○○○○○○○○○○○○○○○○○○○○
Triple Zigzag Stretch Stitching
XL5030 XL5020 XL5010
14 12 10
15 13 11
16 14 12
This stitch can be used to sew heavyweight stretch fabrics wherever a
Zigzag Stitch would be used. The Triple Zigzag Stretch Stitch can also
be used as a decorative topstitch.
Set the pattern selection dial to the Triple Zigzag Stretch Stitch.
Pattern Stitch Length Stitch Width
Triple Zigzag Stretch Stitch
Triple Zigzag Stretch Stitch
Triple Zigzag Stretch Stitch
Fixed 2.5 Fixed 3.5
Fixed 1.7
Fixed 5
CONTENTS
SEWING MACHINE
KNOWING Y OUR
Decorative Stitching
XL5030 XL5020 XL5010
21 - - Decorative Stitch Fixed 2.5 Fixed 5
This stitch can be used for making decorative stitching.
○○○○○○○○○○○○○○○○○○○○○○○○○○○○○○○○○○○○○○○○○○○○○○○○○○○○○○○○○○○○○○○
Puntada triple zigzag elástica
XL5030 XL5020 XL5010
14 12 10
15 13 11
16 14 12
Esta puntada puede servir para coser materiales gruesos y pesados
siempre y cuando una puntada zigzag pueda utilizarse. La puntada
triple zigzag elástica también puede servir como puntada decorativa
en el derecho del tejido.
Número de puntada
Puntada triple zigzag elástica
Puntada triple zigzag elástica
Puntada triple zigzag elástica
Largo de puntada
Fija 2,5 Fija 3,5
Ancho de puntada
Fija 1,7
Fija 5
XL5030 XL5020 XL5010
14 12 10 Punto zigzag stretch triplo Fissa 1,7
15 13 11 Punto zigzag stretch triplo Fissa 2,5 Fissa 3,5
16 14 12 Punto zigzag stretch triplo Fissa 5
Questo punto può essere utilizzato per cucire su tessuti elastici pesanti nei
casi in cui è possibile utilizzare il punto zigzag. Il punto zigzag stretch triplo può essere utilizzato anche per eseguire cuciture esterne decorative.
Disporre il selettore dei punti sul punto zigzag stretch triplo.
Punto zigzag stretch triplo
Ponga el selector de puntadas en puntada triple zigzag elástica.
Pattern Stitch Length Stitch Width
Punto Lunghezza Ampiezza
ZIGZAG STITCHING
STRAIGHT AND
BUILT-IN STITCHES
BUTTONHOLE AND
BUTTON SEWING
USING ATTACHMENTS
AND APPLICATIONS
Puntada decorativa
XL5030 XL5020 XL5010
21 - - Puntada decorativa Fija 2,5 Fija 5
Esta puntada puede utilizarse para hacer puntadas decorativas.
Número de puntada
Largo de puntada Ancho de puntada
Punto decorativo
XL5030 XL5020 XL5010
21 - - Punto decorativo Fissa 2,5 Fissa 5
Questo punto può essere usato per eseguire punti decorativi.
Punto Lunghezza Ampiezza
MAINTENANCE
INDEX
46
Page 55

A
C
D
1
2
3
B
–
PUSH
3
24
4
○○○○○○○○○○○○○○○○○○○○○○○○○○○○○○○○○○○○○○○○○○○○○○○○○○○○○○○○○○○○○○○○○○○○○○○○○○○○○○○○○○○○○○○○○○○○○○○○
Making a Buttonhole
(XL5030 and XL5020 only)
XL5030 XL5020
11
NOTE:
1. It is recommended to practice making a buttonhole on a scrap piece
of fabric before attempting it on the actual garment.
2. When sewing buttonholes on thin fabrics, place stabilizer material
on the underside of the fabric.
Buttonhole-making is a simple process that provides reliable results.
Making a Buttonhole
1. Using tailor’s chalk, mark the position of the buttonhole on the
fabric.
2. Attach the buttonhole foot and set the pattern selection dial to “ ”.
3. Lower the presser foot aligning the marks on the foot with the marks
on the fabric as shown in fig. A. (The front bar tack will be sewn
first.)
4. Open the button plate and insert the button. (See fig. B.)
5. Lower the buttonhole lever and push it back slightly as in fig. C.
6. While gently holding the upper thread, start the machine.
7. Buttonhole stitching is done in the order shown in fig. D.
8. Stop the machine when the buttonhole is sewn.
Pattern Stitch Length Stitch Width Foot
Buttonhole
1 Align the marks on the foot with those on the fabric.
2 Starting mark on the fabric
3 Marks on the foot
4 Button plate
-1.5 Fixed 5
Buttonhole Foot
CONTENTS
SEWING MACHINE
KNOWING Y OUR
ZIGZAG STITCHING
STRAIGHT AND
BUILT-IN STITCHES
E
1
PUSH
PUSH
Making a Buttonhole on Stretch Fabrics (fig. E)
When sewing buttonholes on stretch fabric, place a gimp thread under
the buttonhole stitching.
1. Mark the position of the buttonhole on the fabric with tailor’s chalk,
attach the buttonhole foot, and set the pattern selection dial to “ ”.
2. Hook the gimp thread onto the back end of the buttonhole foot,
then bring the two gimp thread ends to the front of the foot, insert
them into the grooves and temporarily tie them there.
3. Lower the presser foot and start sewing.
* Set the stitch width to match the diameter of the gimp thread.
4. Once sewing is completed, gently pull the gimp thread to remove
any slack, then trim off the excess.
BUTTONHOLE AND
BUTTON SEWING
USING ATTACHMENTS
AND APPLICATIONS
MAINTENANCE
47
INDEX
Page 56

A
○○○○○○○○○○○○○○○○○○○○○○○○○○○○○○○○○○○○○○○○○○○○○○○○○○○○○○○○○○○○○○○○○○○○○○○○○○○○○○○○○○○○○○○○○○○○○○○○
CDB
1
2
–
4
3
E
PUSH
Para coser ojales
(Solo XL5030 y XL5020)
XL5030 XL5020
1 1 Ojal
NOTA:
1. Le recomendamos hacer una prueba de costura de ojales en un
2. Para hacer ojales en materiales finos, coloque un material esta-
La función de costura de ojales es un proceso simple que ofrece increíbles resultados.
Cosido del ojal
1. Con jaboncillo, marque la posición del ojal en el tejido.
2. Instale el prensatelas para ojales y ponga el selector de punta-
3. Baje el prensatelas para alinear las marcas de la pata con las
4. Abra la placa para botones e instale el botón. (Ver fig. B.)
5. Baje la palanca de la pata para ojales y vuelva a empujarla sua-
6. Sujete ligeramente el hilo superior y empiece a coser.
7. El cosido de ojal se hace en el orden que se muestra en la fig. D.
8. Pare la máquina cuando todos los remates estén terminados.
Cosido de ojales en tejidos elásticos (fig. E)
Cuando cosa ojales en tejidos elásticos, coloque un hilo de galón
debajo de la puntada del ojal.
1. Marque la posición del ojal en el tejido con un jaboncillo, instale
2. Enganche el hilo de galón en la parte trasera del prensatelas,
3. Baje el prensatelas y empiece a coser.
4. Una vez que se haya finalizado la costura, empuje suavemente
Número de puntada
pedazo de tela antes de empezar a hacerla en el tejido del trabajo.
bilizador debajo del tejido.
das en “ ”.
marcas del tejido, tal como se indica en la fig. A. (Se va a coser
primero el remate de la parte delantera del ojal).
vemente tal como se muestra en la fig. C.
1 Alinee las marcas en el prensatelas con las del tejido
2 Marca de inicio en el tejido
3 Marcas en el prensatelas
4 Placa para botones
el prensatelas y ponga el selector de puntada en “ ”.
luego lleve las dos terminaciones del hilo de galón a la parte
frontal del prensatelas, instálelos en las hendiduras y átelos temporalmente.
* Establezca el ancho de puntada de forma que coincida con el
diámetro del hilo de galón.
el hilo de galón para retirar cualquier parte suelta y luego recorte
los salientes.
Largo de puntada Ancho de puntada
-1,5 Fija 5
Prensatelas
Prensatelas
para ojales
3
24
PUSH
1
PUSH
Esecuzione di asole
(solo mod. XL5030 e XL5020)
XL5030 XL5020
1 1 Asola
NOTA:
1. Si consiglia esercitarsi nella cucitura delle asole su un campione di stoffa prima di realizzarle sull’indumento vero e proprio.
2. Quando si eseguono asole su tessuti sottili, applicare una tela di rinforzo sotto il tessuto.
Il procedimento per eseguire asole è semplice e garantisce ottimi risultati.
Esecuzione di un’asola
1. Marcare con un gessetto per sarti la posizione dell’asola sul tessuto.
2. Applicare il piedino per asole e disporre il selettore dei punti su “ ”.
3. Abbassare il piedino premistoffa allineando le guide del piedino con i
segni tracciati sul tessuto, come mostrato in fig. A. (La macchina eseguirà per prima la barretta frontale.)
4. Aprire la placca per bottoni ed inserire il bottone. (Vedi fig. B.)
5. Abbassare la levetta dell’asola e spingerla leggermente indietro come in
fig. C.
6. Tenendo delicatamente il filo superiore, avviare la macchina.
7. L’ordine di cucitura dei componenti dell’asola è mostrato in fig. D.
8. Al termine della cucitura dell’asola arrestare la macchina.
Esecuzione di un’asola su tessuti elastici (fig. E)
Quando si eseguono asole su tessuti elastici, applicare un cordoncino sotto
la cucitura dell’asola.
1. Marcare la posizione dell’asola sul tessuto con un gessetto per sarti,
applicare il piedino per asole e disporre il selettore dei punti su “ ”.
2. Agganciare il cordoncino all’estremità posteriore del piedino per asole,
portare davanti al piedino le due estremità del cordoncino, inserirle nelle scanalature e legarle temporaneamente in quella posizione.
3. Abbassare il piedino premistoffa e iniziare a cucire.
* Impostare l’ampiezza del punto in base al diametro del cordoncino.
4. Completata la cucitura, tirare delicatamente il cordoncino per rimuovere eventuali tratti allentati e tagliare la parte in eccesso.
Punto Lunghezza Ampiezza Piedino
-1,5 Fissa 5
1 Allineare le guide del piedino con i segni sul tessuto
2 Segno di inizio sul tessuto
3 Guide del piedino
4 Placca per bottoni
Piedino
per asole
CONTENTS
SEWING MACHINE
KNOWING Y OUR
ZIGZAG STITCHING
STRAIGHT AND
BUILT-IN STITCHES
BUTTONHOLE AND
BUTTON SEWING
USING ATTACHMENTS
AND APPLICATIONS
MAINTENANCE
INDEX
48
Page 57

1
○○○○○○○○○○○○○○○○○○○○○○○○○○○○○○○○○○○○○○○○○○○○○○○○○○○○○○○○○○○○○○○○○○○○○○○○○○○○○○○○○○○○○○○○○○○○○○○○
Making a Buttonhole
(XL5010 only)
XL5010 Pattern Stitch Length Stitch Width Foot
1(A-B-C-D)
NOTE:
1. It is recommended to practice making a buttonhole on a scrap piece
2. When sewing buttonholes on thin fabrics, place stabilizer material
Buttonhole-making is a simple process that provides reliable results.
Making a Buttonhole
1. Using tailor’s chalk, mark the position and length of the buttonhole
2. Attach the buttonhole foot, then slide the outside frame of the but-
3. The front bar tack will be sewn first. Place the fabric under the
Buttonhole -1.5 Fixed 5
of fabric before attempting it on the actual garment.
on the underside of the fabric.
on the fabric.
tonhole foot as far back as possible.
presser foot so that the center of the front bar tack mark is directly
under the center of the presser foot and aligned with the two red
lines as shown.
1 Front of chalk mark
Buttonhole Foot
CONTENTS
SEWING MACHINE
KNOWING Y OUR
ZIGZAG STITCHING
STRAIGHT AND
○○○○○○○○○○○○○○○○○○○○○○○○○○○○○○○○○○○○○○○○○○○○○○○○○○○○○○○○○○○○○○○○○○○○○○○○○○○○○○○○○○○○○○○○○○○○○○○○○○○○○○○○○○○○○○○○○○○○○○○○○○○○○○
Para coser ojales
(Solo XL5010)
XL5010 Número de puntada
1(A-B-C-D)
Ojal -1,5 Fija 5
NOTA:
1. Le recomendamos hacer una prueba de costura de ojales en un
pedazo de tela antes de empezar a hacerla en el tejido del trabajo.
2. Para hacer ojales en materiales finos, coloque un material estabilizador debajo del tejido.
La función de costura de ojales es un proceso simple que ofrece increíbles resultados.
Cosido del ojal
1. Con jaboncillo, marque la posición del ojal en el tejido.
2. Instale el prensatelas para ojales y luego deslice suav emente la
estructura exterior del prensatelas para ojales tan lejos como le
sea posible.
3. Se va a coser primero el remate de la parte delantera del ojal.
Coloque el tejido debajo del prensatelas para que el centro de la
marca del remate de la parte delantera esté directamente debajo
del centro del prensatelas y se alinee con las dos líneas rojas
como se muestra.
1 Marca del remate de la parte delantera.
Largo de puntada Ancho de puntada
Prensatelas
Prensatelas
para ojales
XL5010 Punto Lunghezza Ampiezza Piedino
1(A-B-C-D)
NOTA:
1. Si consiglia esercitarsi nella cucitura delle asole su un campione di stof-
2. Quando si eseguono asole su tessuti sottili, applicare una tela di rinfor-
Il procedimento per eseguire asole è semplice e garantisce ottimi risultati.
Esecuzione di un’asola
1. Marcare con un gessetto per sarti la posizione dell’asola sul tessuto.
2. Applicare il piedino per asole e spingere indietro più a fondo possibile il
3. La macchina eseguirà per prima la barretta frontale. Collocare il tessuto
Asola -1,5 Fissa 5
fa prima di realizzarle sull’indumento vero e proprio.
zo sotto il tessuto.
telaietto esterno del piedino.
sotto il piedino per asole in modo che il centro del segno della barretta
frontale si trovi direttamente sotto il centro del piedino e sia allineato
rispetto alle due linee rosse come mostrato.
Esecuzione di asole
(solo mod. XL5010)
Piedino
per asole
1 Lato frontale del segno di gesso
BUILT-IN STITCHES
BUTTONHOLE AND
BUTTON SEWING
USING ATTACHMENTS
AND APPLICATIONS
MAINTENANCE
INDEX
49
Page 58

MAKING A BUTTONHOLE
○○○○○○○○○○○○○○○○○○○○○○○○○○○○○○○○○○○○○○○○○○○○○○○○○○○○○○○○○○○○○○○○○○○○○○○○○○○○○○○○○○○○○○○○○○○○○○○○
Step Sewn Portion Pattern How to Sew
Step 1
(Front bar
tack)
A
A
A/C
C
1. Set the pattern selection dial to “A”.
2. Lower the presser foot and sew 5 to 6 stitches.
3. Stop the machine when the needle is at the left side of the stitches,
then raise the needle from the material.
CONTENTS
Step 2
(Left side)
Step 3
(Back bar
tack)
Step 4
(Right side)
B
B
1. Turn the pattern selection dial to “B”.
2. Sew the predetermined length of the tailor’s chalk line.
3. Stop the machine when the needle is at the left side of the stitch,
SEWING MACHINE
KNOWING Y OUR
then raise the needle.
C
A/C
C
A
D
1. Turn the pattern selection dial to “C” (same position as in step A).
2. Sew 5 to 6 stitches.
3. Stop the machine when the needle is at the right side of the stitch,
then raise the needle from the material.
1. Set the pattern selection dial to “D”.
2. Sew the right side until the needle reaches the stitches sewn in step
ZIGZAG STITCHING
STRAIGHT AND
1.
D
BUILT-IN STITCHES
PARA COSER OJALES
Pasos Parte Cosida
1er Paso
(Remate de
la parte
delantera)
2° Paso
(Lado
izquierdo)
3er Paso
(Remate de
la parte
trasera)
4° Paso
(Lado
derecho)
BUTTONHOLE AND
BUTTON SEWING
Número de puntada
A/C
A
C
A
B
B
1. Ponga el selector de puntada en “A”.
2. Baje el prensatelas y cosa de 5 a 6 puntadas.
3. Pare la máquina cuando la aguja esté a la izquierda de las puntadas, luego levante la aguja del tejido.
1. Gire el selector de puntada en “B”.
2. Cosa la línea del jaboncillo de la longitud predeterminada.
Como Coser
USING ATTACHMENTS
AND APPLICATIONS
3. Pare la máquina cuando la aguja esté a la izquierda de la puntada y luego levante la aguja.
C
A/C
C
A
D
1. Gire el selector de puntada en “C” (en la misma posición que en el
A paso ).
2. Cosa 5 ó 6 puntadas.
3. Pare la máquina cuando la aguja esté a la derecha de la puntada
y luego levante la aguja del tejido.
1. Ponga el selector de puntada en “D”.
2. Cosa la parte derecha hasta que la aguja llegue a las puntadas
MAINTENANCE
cosidas en el 1er Paso.
D
50
INDEX
Page 59

PROCEDIMENTO DI ESECUZIONE DI UN’ASOLA
○○○○○○○○○○○○○○○○○○○○○○○○○○○○○○○○○○○○○○○○○○○○○○○○○○○○○○○○○○○○○○○○○○○○○○○○○○○○○○○○○○○○○○○○○○○○○○○○
Fase Lato cucito Punto Come cucire
Fase 1
(barretta
frontale)
A
A
A/C
C
1. Disporre il selettore dei punti su “A”.
2. Abbassare il piedino per asole ed eseguire 5 o 6 punti.
3. Quando l’ago si trova a sinistra della cucitura, arrestare la macchina e
alzare l’ago dal tessuto.
CONTENTS
Fase 2
(lato sinistro)
Fase 3
(barretta
posteriore)
Fase 4
(lato destro)
B
B
1. Disporre il selettore dei punti su “B”.
2. Cucire per la lunghezza prestabilita della linea segnata col gesso.
3. Quando l’ago si trova a sinistra della cucitura, arrestare la macchina e
SEWING MACHINE
KNOWING Y OUR
alzare l’ago dal tessuto.
C
A/C
C
1. Disporre il selettore dei punti su “C” (stessa posizione della fase A).
2. Eseguire 5 o 6 punti.
3. Quando l’ago si trova a destra della cucitura, arrestare la macchina e
A
D
alzare l’ago dal tessuto.
1. Disporre il selettore dei punti su “D”.
2. Cucire il lato destro dell’asola finché l’ago non incontra la cucitura ese-
ZIGZAG STITCHING
STRAIGHT AND
guita nella fase 1.
D
BUILT-IN STITCHES
Securing the Stitching and Cutting the Buttonhole
1. T o secure the stitching, turn the material 90 ° counterclockwise and
sew straight stitches to the end of the front bar tack of the buttonhole.
2. Remove the material from the machine. It is recommended that
pins be placed across both bar tacks of the buttonhole as protection against cutting them.
3. Cut an opening in the middle of the buttonhole with a seam ripper .
BUTTONHOLE AND
BUTTON SEWING
Be careful not to cut through any stitches.
○○○○○○○○○○○○○○○○○○○○○○○○○○○○○○○○○○○○○○○○○○○○○○○○○○○○○○○○○○○○○○○
Para Completar las Puntadas y Cortar el Ojal
1. Para asegur ar las puntadas, gire el tejido 90 grados en el sentido
contrario a las manecillas del reloj y cosa unas puntadas rectas
hasta el final de la línea del remate de la parte delantera.
2. Retire el tejido de la máquina. Se recomienda colocar alfileres en
ambos remates del ojal para evitar el corte de los mismos.
3. Efectúe una apertura en el medio del ojal con el cortador espe-
Fissaggio della cucitura e apertura dell’asola
1. Per fissare i punti, ruotare il tessuto di 90° in senso antiorario e cucire
dei punti diritti fino alla fine della barretta frontale dell’asola.
2. Estrarre il tessuto dalla macchina. Si consiglia di infilare degli spilli
lungo le due barrette dell’asola per evitare di tagliare la cucitura.
3. Tagliare l’apertura al centro dell’asola con un taglia-asole facendo attenzione a non tagliare i punti.
cial que sirve para abrir costuras. Tenga cuidado en no cortar
ninguna puntada.
USING ATTACHMENTS
AND APPLICATIONS
MAINTENANCE
INDEX
51
Page 60

○○○○○○○○○○○○○○○○○○○○○○○○○○○○○○○○○○○○○○○○○○○○○○○○○○○○○○○○○○○○○○○○○○○○○○○○○○○○○○○○○○○○○○○○○○○○○○○○
1
Buttonhole Fine Adjustment
CONTENTS
If the stitching on the two sides of the buttonhole do not appear identical, the following adjustments can be made.
1. Set the Stitch Length Dial to “ ” and sew the buttonhole on a scrap
of fabric while observing how the material is fed.
2. If the right side of the buttonhole is too coarse or fine, adjust the
feeding of the material with the Stitch Length Dial.
2
34
0
1
2
–
SS
3
4
+
•
•
•
•
3. After obtaining a satisfactory feeding on the right side, stitch the
1 Right side
2 Stitch length
3 Shorter
4 Longer
5 In this case
SEWING MACHINE
KNOWING Y OUR
buttonhole and observe the feeding.
4. If the left side is too coarse or fine compared to the right side, adjust
5
the buttonhole fine adjustment screw as described below.
If the left side is too coarse, turn the screw with the enclosed screw-
ZIGZAG STITCHING
STRAIGHT AND
driver in the – direction. If the left side is too fine, turn the screw with
the enclosed screwdriver in the + direction.
This adjustment allows both sides of the buttonhole to appear identical.
0
1
2
–
SS
3
4
+
•
•
•
•
6 Stitch length dial
7 Buttonhole fine adjustment screw
8 Left side
9 In this case
BUILT-IN STITCHES
9
5
BUTTONHOLE AND
BUTTON SEWING
0
1
2
–
SS
3
4
+
•
•
•
•
7
6
USING ATTACHMENTS
AND APPLICATIONS
8
MAINTENANCE
9
52
INDEX
Page 61

Ajuste fino de los ojales
Si las puntadas en ambos lados del ojal no parecen ser idénticas, se
pueden hacer los siguientes ajustes.
1. Ponga el selector de puntadas en “ ” y cosa el ojal en un trozo de
tejido, observando cómo desplaza el tejido.
2 Si el lado derecho del ojal es demasiado grueso o fino, ajuste la
alimentación del tejido con el selector de largo de puntada.
1 Lado derecho
2 Largo de puntada
3 Más corto
4 Más largo
5 En este caso
3. Después de lograr una alimentación satisf actoria en el lado derecho, cosa el ojal y observe la alimentación.
4. Si el lado izquierdo es demasiado grueso o fino comparado con
el lado derecho, gire el tornillo de ajuste fino del ojal tal y como se
describe a continuación.
Si el lado izquierdo es demasiado grueso, gire el tornillo con el
destornillador en la dirección –.
Si el lado izquierdo es muy fino, gire el tornillo con el destornillador en la dirección +.
Este ajuste permite que ambos lados del ojal parezcan idénticos.
6 Dial de longitud de puntada
7 Tornillo de ajuste fino de ojal
8 Lado izquierdo
9 En este caso
○○○○○○○○○○○○○○○○○○○○○○○○○○○○○○○○○○○○○○○○○○○○○○○○○○○○○○○○○○○○○○○○○○○○○○○○○○○○○○○○○○○○○○○○○○○○○○○○
Regolazione della densità dei punti
dell’asola
Se la cucitura ai due lati dell’asola non appare identica, è possibile eseguire
le seguenti regolazioni.
1. Disporre il selettore della lunghezza del punto su “ ” e cucire l'asola su
un ritaglio di stoffa, osservando il modo in cui avviene il trasporto del
tessuto.
2. Se i punti del lato destro dell’asola sono troppo fitti o troppo radi, regolare il trasporto del tessuto agendo sul selettore della lunghezza del punto.
1 Lato destro
2 Lunghezza del punto
3 Più corto
4 Più lungo
5 Risultato
3. Una volta ottenuto un trasporto soddisfacente per il lato destro, cucire
l’asola e osservare il modo in cui avviene il trasporto del tessuto.
4. Se i punti del lato sinistro sono troppo fitti o troppo radi, girare la vite di
microregolazione dell’asola come descritto di seguito.
Se i punti del lato sinistro sono troppo fitti, con il caccia vite in dotazione girare la vite in direzione –.
Se i punti del lato sinistro sono troppo radi, con il cacciavite in dotazione girare la vite in direzione +.
Questa regolazione consente di ottenere una densità dei punti identica per
entrambi i lati dell’asola.
6 Selettore della lunghezza del punto
7 Vite di regolazione fine asola
8 Lato sinistro
9 Risultato
CONTENTS
SEWING MACHINE
KNOWING Y OUR
ZIGZAG STITCHING
STRAIGHT AND
BUILT-IN STITCHES
BUTTONHOLE AND
BUTTON SEWING
USING ATTACHMENTS
AND APPLICATIONS
MAINTENANCE
53
INDEX
Page 62

○○○○○○○○○○○○○○○○○○○○○○○○○○○○○○○○○○○○○○○○○○○○○○○○○○○○○○○○○○○○○○○○○○○○○○○○○○○○○○○○○○○○○○○○○○○○○○○○
Button Sewing
XL5030 XL5020 XL5010 Pattern Stitch Length Foot
4, 5, 6 4, 5, 6 2, 3, 4 Zigzag Stitch Any
1. Measure the distance between the holes and select the appropriate
pattern with the pattern selection dial.
Distance between holes Pattern
1.7 mm (1/16") 4 4 2
3.5 mm (9/64") 5 5 3
5 mm (13/64") 6 6 4
XL5030 XL5020 XL5010
2. Attach the button sewing foot.
3. Place the darning plate on the needle plate.
(When the machine is equipped with a drop feed lever, lower the
feed dogs by setting the drop feed lever to the up position.)
4. Place a button between the foot and the fabric and make sure that
the needle enters the holes without hitting the button. If it hits, see
step 1.
5. At a slow speed, sew approximately 10 stitches.
6. Remove the material from the machine. Cut the upper and lower
threads and tie the two threads at the back of the fabric.
Button
Sewing Foot
CONTENTS
SEWING MACHINE
KNOWING Y OUR
ZIGZAG STITCHING
STRAIGHT AND
BUILT-IN STITCHES
BUTTONHOLE AND
BUTTON SEWING
USING ATTACHMENTS
AND APPLICATIONS
MAINTENANCE
54
INDEX
Page 63

Costura de botones
XL5030 XL5020 XL5010 Número de puntada
4, 5, 6 4, 5, 6 2, 3, 4 Puntada zigzag Cualquiera
Largo de puntada
Prensatelas
Prensatelas para
botones
○○○○○○○○○○○○○○○○○○○○○○○○○○○○○○○○○○○○○○○○○○○○○○○○○○○○○○○○○○○○○○○○○○○○○○○○○○○○○○○○○○○○○○○○○○○○○○○○
Cucitura di bottoni
XL5030 XL5020 XL5010 Punto Lunghezza Piedino
4, 5, 6 4, 5, 6 2, 3, 4
Punto zigzag
Quella Piedino per
prescelta bottoni
CONTENTS
1. Mida la distancia entre los distintos agujeros del botón y seleccione el número de puntada apropiado mediante el selector de
puntada.
Distancia entre los agujeros Número de puntada
1,7 mm (1/16") 4 4 2
3,5 mm (9/64") 5 5 3
5 mm (13/64") 6 6 4
XL5030 XL5020 XL5010
2. Instale el prensatelas para el cosido de botones.
3. Coloque la placa de zurcido en la placa de la aguja.
(Cuando la máquina está equipada con una palanca de alimen-
tación de bajada, baje los ganchos de alimentación colocando la
palanca de alimentación de bajada en la posición hacia arriba).
4. Coloque un botón entre el prensatelas y el tejido, y asegúrese de
que la aguja pase por los agujeros sin picar el botón. Si golpea el
botón véase el 1er paso.
5. Cosa unas 10 puntadas a baja velocidad.
6. Retire el tejido de la máquina. Corte los hilos inferior y superior y
haga un nudo con ambos en el revés del tejido.
1. Misurare la distanza tra i fori del bottone e regolare l’ampiezza del
punto adatta mediante il selettore dei punti.
Distanza tra i fori Punto
1,7 mm (1/16") 4 4 2
3,5 mm (9/64") 5 5 3
5 mm (13/64") 6 6 4
XL5030 XL5020 XL5010
2. Applicare il piedino per bottoni.
3. Posizionare la placca da rammendo sulla placca dell’ago (se la macchina è equipaggiata con la leva abbassa-trasportatore, abbassare il trasportatore alzando la leva).
4. Inserire il bottone fra il piedino e il tessuto accertandosi che l’ago entri
nei fori senza colpire il bottone. Se il bottone viene colpito, vedere il
punto 1.
5. Eseguire circa 10 punti a bassa velocità.
6. Estrarre il tessuto dalla macchina. Tagliare il filo superiore e inferiore e
legare i capi sul rovescio del tessuto.
SEWING MACHINE
KNOWING Y OUR
ZIGZAG STITCHING
STRAIGHT AND
BUILT-IN STITCHES
BUTTONHOLE AND
BUTTON SEWING
USING ATTACHMENTS
AND APPLICATIONS
MAINTENANCE
55
INDEX
Page 64

A
B
1
3
2
○○○○○○○○○○○○○○○○○○○○○○○○○○○○○○○○○○○○○○○○○○○○○○○○○○○○○○○○○○○○○○○○○○○○○○○○○○○○○○○○○○○○○○○○○○○○○○○○
Zipper Inserting
XL5030 XL5020 XL5010
2 2 5 Straight Stitch 2-3 Zipper Foot
The zipper foot is used to sew various types of zippers and can easily
be positioned on the right or left side of the needle.
When sewing the right side of the zipper, attach the presser foot holder
to the left pin on the zipper foot. When sewing the left side of the
zipper, attach the presser foot holder to the right pin on the zipper foot.
(See fig. A.)
1. Set the pattern selection dial to the Straight Stitch. Set the stitch
length between “2” and “3”.
2. Lower the presser foot lever and attach the presser foot holder to
either the left or right pin on the zipper foot.
3. Fold the edge of the material 2 cm (3/4") and place the zipper under the folded portion.
4. Lower the needle into the notch on either the left or right side of the
zipper foot.
5. Sew from the bottom of the zipper toward the top on both sides.
The needle should be positioned on the zipper side of the foot for
best results. (See fig. B.)
6. To sew the opposite side of the zipper, release
the foot by raising the lever located at the back of the presser foot,
move the zipper foot to the other side of the zipper, and continue
sewing using the other side notch.
1 Zipper foot
2 Right pin for sewing the left side of the zipper
3 Left pin for sewing the right side of the zipper
Pattern Stitch Length Foot
CONTENTS
SEWING MACHINE
KNOWING Y OUR
ZIGZAG STITCHING
STRAIGHT AND
BUILT-IN STITCHES
Check for correct needle setting.
The wrong setting can cause the needle to break.
○○○○○○○○○○○○○○○○○○○○○○○○○○○○○○○○○○○○○○○○○○○○○○○○○○○○○○○○○○○○○○○
Gathering
XL5030 XL5020 XL5010
2, 3 2, 3 4, 5 Straight Stitch 4
Pattern Stitch Length
BUTTONHOLE AND
BUTTON SEWING
USING ATTACHMENTS
AND APPLICATIONS
MAINTENANCE
1. Set the pattern selection dial to the Straight Stitch.
2. Loosen the tension of the upper thread (to about “2”) so that the
lower thread lies on the underside of the material.
3. Sew a single row or multiple rows of straight stitches.
4. Pull the lower thread(s) to gather the material.
INDEX
56
Page 65

Inserción de cremalleras
XL5030 XL5020 XL5010
2 2 5 Puntada recta 2-3
Número de puntada
Largo de puntada
Prensatelas
Pata de cremallera
○○○○○○○○○○○○○○○○○○○○○○○○○○○○○○○○○○○○○○○○○○○○○○○○○○○○○○○○○○○○○○○○○○○○○○○○○○○○○○○○○○○○○○○○○○○○○○○○
Applicazione di cerniere
XL5030 XL5020 XL5010
2 2 5 Punto diritto 2-3
Punto Lunghezza Piedino
Piedino per cerniere
CONTENTS
La pata de cremallera sirve para coser varios tipos de cremalleras y
puede colocarse fácilmente hacia la izquierda o derecha de la aguja.
Cuando la cremallera se cose por el lado derecho, instale el soporte
del prensatelas en el eje izquierdo de la pata de cremalleras. Cuando la cremallera se cose por el lado izquierdo, instale el soporte del
prensatelas en el eje derecho de la pata de cremalleras. (V er fig. A.)
1. Ponga el selector de puntadas en puntada recta. Ajuste el largo
de puntada entre “2” y “3”.
2. Baje la palanca del prensatelas e instale el soporte del prensatelas
en el eje derecho o izquierdo de la pata de cremalleras.
3. Doble la orilla del tejido a 2 cm (3/4") y coloque la cremallera
debajo de la parte doblada.
4. Baje la aguja en la hendidura situada a la izquierda o derecha de
la pata de cremalleras.
5. Cosa a partir de la parte inferior de la cremallera hacia la parte
superior por ambos lados. Para mejores resultados, se debe colocar la aguja del lado de la pata y de la cremallera. (Ver fig. B.)
6. Para coser el lado opuesto de la cremaller a, suelte la pata lev antando la palanca situada en la parte posterior del prensatelas,
instale la pata en el otro lado de la cremallera y siga cosiendo,
pasando la aguja por la hendidura del otro lado.
1 Pata de cremallera
2 Eje derecho para coser la parte izquierda de la
cremallera
3 Eje izquierdo para coser la parte derecha de la
cremallera
Compruebe que la aguja se ha instalado correctamente.
La incorrecta instalación de la aguja puede provocar su ruptura.
Applicando il piedino per cerniere è possibile cucire vari tipi di cerniere;
questo piedino può essere montato con facilità a destra o a sinistra dell’ago.
Per cucire il lato destro della cerniera, innestare il supporto del piedino
premistoffa sul perno sinistro del piedino per cerniere. Per cucire il lato
sinistro della cerniera, innestare il supporto del piedino premistoffa sul perno destro del piedino per cerniere. (Vedi fig. A.)
1. Disporre il selettore dei punti sul punto diritto. Impostare la lunghezza
del punto tra “2” e “3”.
2. Abbassare la leva del piedino premistoffa e innestare il supporto del
piedino premistoffa sul perno sinistro o destro del piedino per cerniere.
3. Piegare di 2 cm il bordo del tessuto e disporre la cerniera sotto la piega.
4. Abbassare l’ago nell’intaglio a sinistra o a destra del piedino per cerniere.
5. Cucire procedendo dal basso della cerniera verso l’alto su entrambi i
lati. Per ottenere i risultati migliori, l’ago deve essere posizionato sul
lato della cerniera del piedino. (Vedi fig. B.)
6. Per cucire l’altro lato della cerniera, staccare il piedino sollevando la
leva situata dietro il piedino premistoff a, spostare il piedino per cerniere
sull’altro lato della cerniera e continuare a cucire utilizzando l’intaglio
opposto.
1 Piedino per cerniere
2 Perno destro per la cucitura del lato sinistro della cerniera
3 Perno sinistro per la cucitura del lato destro della cerniera
Controllare che l’ago sia nella posizione corretta.
Una posizione sbagliata può provocare la rottura dell’ago.
SEWING MACHINE
KNOWING Y OUR
ZIGZAG STITCHING
STRAIGHT AND
BUILT-IN STITCHES
BUTTONHOLE AND
BUTTON SEWING
○○○○○○○○○○○○○○○○○○○○○○○○○○○○○○○○○○○○○○○○○○○○○○○○○○○○○○○○○○○○○○○
Fruncido
XL5030 XL5020 XL5010
2, 3 2, 3 4, 5 Puntada recta 4
1. Ponga el selector de puntadas en puntada recta.
2. Suelte la tensión del hilo superior (aproximadamente “2”) para
que el hilo inferior se encuentre tirante en el revés del tejido.
3. Cosa una línea simple o varias de puntadas rectas.
4. Tire del o de los hilos para fruncir el tejido.
Número de puntada Largo de puntada
XL5030 XL5020 XL5010
2, 3 2, 3 4, 5 Punto diritto 4
1. Disporre il selettore dei punti sul punto diritto.
2. Allentare la tensione del filo superiore (a circa “2”) in modo che il filo
inferiore resti sul rovescio del tessuto.
3. Cucire una o più file di punti diritti.
4. Tirare il filo (o i fili) inferiore per arricciare il tessuto.
Arricciature
Punto Lunghezza
USING ATTACHMENTS
AND APPLICATIONS
MAINTENANCE
INDEX
57
Page 66

A
B
○○○○○○○○○○○○○○○○○○○○○○○○○○○○○○○○○○○○○○○○○○○○○○○○○○○○○○○○○○○○○○○○○○○○○○○○○○○○○○○○○○○○○○○○○○○○○○○○
Darning
XL5030 XL5020 XL5010
1 1 5 Straight Stitch Any
1. Place the darning plate on the needle plate as shown in fig. A.
1’. Lower the feed dogs by setting the drop feed lever to the up posi-
tion. (When the machine is equipped with a Drop Feed.)
2. Set the pattern selection dial to the Straight Stitch.
3. Place the portion to be darned under the presser foot together with
a fabric underlay for reinforcement.
4. Remove the presser foot and presser foot holder, then lower the
presser foot lifter.
5. Begin sewing alternating between gently drawing the work away
from you and pulling it toward you.
6. Repeat this motion until the portion to be darned is filled with par allel lines of stitching. (See fig. B.)
Pattern Stitch Length
CONTENTS
SEWING MACHINE
KNOWING Y OUR
ZIGZAG STITCHING
STRAIGHT AND
○○○○○○○○○○○○○○○○○○○○○○○○○○○○○○○○○○○○○○○○○○○○○○○○○○○○○○○○○○○○○○○
Zurcido
XL5030 XL5020 XL5010
1 1 5 Puntada recta Cualquiera
1. Coloque la placa de zurcido en la placa de la aguja tal y como se
muestra en la fig. A.
1’. Baje los alimentadores colocando la palanca en la posición ha-
cia arriba. (cuando la máquina está equipada con alimentación
de bajada).
2. Ponga el selector de puntada en puntada recta.
3. Ponga el tejido a zurcir debajo del prensatelas con una pieza de
tela de refuerzo debajo.
4. Retire el prensatelas y su soporte y luego bájelo.
5. Empiece a coser empujando y tirando alternativamente del tejido.
6. Repita la operación hasta que el zurcido se haya completado
creando unas cuantas líneas de puntadas paralelas. (Ver fig. B.)
Número de puntada
Largo de puntada
XL5030 XL5020 XL5010
1 1 5 Punto diritto Quella prescelta
1. Posizionare la placca da rammendo sulla placca dell’ago come illustra-
to nella fig. A.
1’. Abbassare il trasportatore spostando la leva abbassa-trasportatore verso
il basso. (se la macchina è equipaggiata con la leva abbassa-trasportatore)
2. Disporre il selettore dei punti sul punto diritto.
3. Applicare una tela di rinforzo sotto la parte da rammendare e disporre il
tutto sotto il piedino premistoffa.
4. Rimuovere il piedino premistoffa e il suo supporto e abbassare la leva
abbassa-trasportatore.
5. Iniziare a cucire spingendo e tirando leggermente il lavoro con movimento alternato.
6. Ripetere questo movimento finché la parte da rammendare non è coperta da una fitta serie di linee di punti paralleli. (Vedi fig. B.)
Rammendo
Punto Lunghezza
BUILT-IN STITCHES
BUTTONHOLE AND
BUTTON SEWING
USING ATTACHMENTS
AND APPLICATIONS
MAINTENANCE
58
INDEX
Page 67

○○○○○○○○○○○○○○○○○○○○○○○○○○○○○○○○○○○○○○○○○○○○○○○○○○○○○○○○○○○○○○○○○○○○○○○○○○○○○○○○○○○○○○○○○○○○○○○○
Appliques
XL5030 XL5020 XL5010
4 4 2 Zigzag Stitch Fixed 1.7
5 5 3 Zigzag Stitch -2 Fixed 3.5
6 6 4 Zigzag Stitch Fixed 5
An applique is created by cutting a contrasting piece of fabric into a
shape to be used as a decoration on a garment or project.
1. Baste the cut design to the fabric in the desired location.
2. Carefully sew around the edge of the cutout design using a Zigzag
Stitch with a fine stitch length.
3. Cut away the surplus fabric outside of the stitching.
4. Remove the basting, if necessary.
NOTE:
Make reinforcing straight stitches at the beginning and the end of the
stitching to secure.
Pattern Stitch Length Stitch Width
CONTENTS
SEWING MACHINE
KNOWING Y OUR
ZIGZAG STITCHING
STRAIGHT AND
○○○○○○○○○○○○○○○○○○○○○○○○○○○○○○○○○○○○○○○○○○○○○○○○○○○○○○○○○○○○○○○
Aplicaciones
XL5030 XL5020 XL5010
4 4 2 Puntada zigzag Fija 1,7
5 5 3 Puntada zigzag -2 Fija 3,5
6 6 4 Puntada zigzag Fija 5
Se crea una aplicación cuando se corta un pedazo de tejido que
haga contraste, para utilizarla como decoración en una prenda.
1. Hilvane la aplicación recortada al tejido, en el lugar deseado.
2. Cosa cuidadosamente los bordes del diseño con una puntada
zigzag en un largo de puntada fino.
3. Recorte el tejido sobrante que quede fuera de las puntadas.
4. Quite los hilvanes, si fuera necesario.
NOTA:
Haga unas puntadas rectas como refuerzo al principio y al final de
las puntadas para que no puedan deshacerse.
Número de puntada
Largo de puntada
Ancho de puntada
XL5030 XL5020 XL5010
4 4 2 Punto zigzag Fissa 1,7
5 5 3 Punto zigzag -2 Fissa 3,5
6 6 4 Punto zigzag Fissa 5
Un’applicazione si ottiene sagomando un pezzo di tessuto da inserire come
contrasto per creare una decorazione su un indumento o un lavoro di cucito
in genere.
1. Imbastire l’applicazione sul tessuto nella posizione desiderata.
2. Cucire accuratamente seguendo il contorno del motivo con un punto
zigzag a lunghezza molto corta.
3. Tagliare via il tessuto in eccesso esterno alla cucitura.
4. Se necessario, togliere l’imbastitura.
NOTA:
Fissare l’applicazione con cuciture di rinforzo con punto diritto all’inizio e
Applicazioni
Punto Lunghezza Ampiezza
alla fine della cucitura.
BUILT-IN STITCHES
BUTTONHOLE AND
BUTTON SEWING
USING ATTACHMENTS
AND APPLICATIONS
MAINTENANCE
59
INDEX
Page 68

○○○○○○○○○○○○○○○○○○○○○○○○○○○○○○○○○○○○○○○○○○○○○○○○○○○○○○○○○○○○○○○○○○○○○○○○○○○○○○○○○○○○○○○○○○○○○○○○
Monogramming and Embroidering
XL5030 XL5020 XL5010
4 4 2 Zigzag Stitch Fixed 1.7
5 5 3 Zigzag Stitch -2 Fixed 3.5 None
6 6 4 Zigzag Stitch Fixed 5
Preparing for Monogramming and Embroidering
1. Place the darning plate on the needle plate.
(When the machine is equipped with a drop feed lever, lower the
feed dogs by setting the drop feed lever to the up position.)
2. Set the pattern selection dial to the appropriate Zigzag Stitch.
3. Draw the lettering (for monogramming) or design (for embroidering) on the surface of the fabric.
4. Stretch the fabric between embroidery hoops as firmly as possible
with the reverse side of the fabric under the inside hoop.
5. Place the work under the needle and lower the presser bar with the
presser foot holder assembly removed.
6. Pull the lower thread up through the work at the starting position
by turning the balance wheel and make a few holding stitches.
7. Hold the hoop with the thumbs and forefingers of both hands while
pressing the fabric with the middle and third fingers and supporting
the outside of the hoop with your small fingers.
NOTE:
After sewing without feeding, prepare for the next seam by returning
the drop feed lever to the down position so that the feed dogs are
raised.
CAUTION:
Keep fingers away from moving parts, especially needles.
Pattern Stitch Length Stitch Width Foot
CONTENTS
SEWING MACHINE
KNOWING Y OUR
ZIGZAG STITCHING
STRAIGHT AND
BUILT-IN STITCHES
○○○○○○○○○○○○○○○○○○○○○○○○○○○○○○○○○○○○○○○○○○○○○○○○○○○○○○○○○○○○○○○
Monogramas y bordados
XL5030 XL5020 XL5010
442
553
664
Preparación para monogramas y bordados
1. Coloque la placa de zurcido en la placa de la aguja.
(Cuando la máquina está equipada con una palanca de alimen-
tación de bajada, baje los ganchos de alimentación colocando la
palanca de alimentación de bajada en la posición hacia arriba).
2. Ponga el selector de puntadas en la puntada zigzag apropiada.
3. Dibuje las letras (para monog ramas) o el diseño (para bordados)
en el derecho del tejido.
4. Estire el tejido en bastidor tanto como pueda y si es posible con
el revés abajo del circulo interior.
5. Coloque la tela debajo de la aguja y baje la barra del prensatelas
con su soporte.
6. Girando la ruedecilla, pase el hilo inferior por el trabajo y cosa
unas cuantas puntadas para asegurarlo.
7. Sujete el bastidor con el pulgar e índice de cada mano, presione
el tejido con los dedos medios y anulares y sostenga los exteriores del bastidor con los meñiques.
NOTA:
Después de haber cosido sin la alimentación, prepárese para la siguiente costura bajando la palanca para que se levanten los
alimentadores.
ATENCIÓN:
Mantenga los dedos alejados de las piezas móviles, especial-
Número de puntada
Puntada zigzag
Puntada zigzag
Puntada zigzag
Largo de puntada Ancho de puntada
Fija 1,7
-2 Fija 3,5
Fija 5
Prensatelas
Quitarlo, sin
prensatelas
XL5030 XL5020 XL5010
4 4 2 Punto zigzag Fissa 1,7
5 5 3 Punto zigzag -2 Fissa 3,5 Nessuno
6 6 4 Punto zigzag Fissa 5
Preparazione per la cucitura di monogrammi e ricami
1. Posizionare la placca da rammendo sulla placca dell’ago (se la macchina è equipaggiata con la leva abbassa-trasportatore, abbassare il trasportatore spostando la leva verso l’alto).
2. Ruotare il selettore dei punti sul punto zigzag appropriato.
3. Disegnare le lettere che comporranno il monogramma o il motivo ornamentale da rammendare sul diritto del tessuto.
4. Mettere il tessuto in un cerchietto da ricamo tenendolo ben teso, con il
rovescio del tessuto sotto al cerchietto interno.
5. Disporre il lavoro sotto l’ago e abbassare la barra di pressione a cui sarà
stato tolto in precedenza il supporto del piedino premistoffa.
6. Girando il volantino, tirare su il filo inferiore facendolo passare attraverso il lavoro nella posizione di inizio e cucire alcuni punti di fissaggio.
7. Usando entrambe le mani, tenere il cerchietto fra il pollice e l’indice e
nello stesso tempo premere il tessuto con il medio e l’anulare reggendo
con i mignoli il bordo esterno del cerchietto.
NOTA:
Dopo aver cucito senza trasporto, preparare la cucitura successiv a riportando la leva abbassa-trasportatore in posizione abbassata per alzare il trasportatore.
A TTENZIONE:
T enere le dita lontano dalle parti in movimento, in particolare dall’ago.
Monogrammi e ricami
Punto Lunghezza Ampiezza Piedino
mente de las agujas.
BUTTONHOLE AND
BUTTON SEWING
USING ATTACHMENTS
AND APPLICATIONS
MAINTENANCE
INDEX
60
Page 69

○○○○○○○○○○○○○○○○○○○○○○○○○○○○○○○○○○○○○○○○○○○○○○○○○○○○○○○○○○○○○○○○○○○○○○○○○○○○○○○○○○○○○○○○○○○○○○○○
Monogramming
1. Sew moving the hoop slowly along the lettering at a constant speed.
2. Secure with a few straight stitches at the end of the last letter.
Embroidering
1. Stitch the outline of the design by moving the embroidery hoop.
2. Fill in the design by alternating from the outline of the design to the
inside and from the inside to the outline until the design is completely filled in. Keep the stitching close together.
NOTE:
A long stitch is made by moving the embroidery hoop rapidly and a
short stitch is made by moving it slowly.
3. Secure with a few straight stitches at the end of the design.
CAUTION:
Keep fingers away from moving parts, especially needles.
CONTENTS
SEWING MACHINE
KNOWING Y OUR
ZIGZAG STITCHING
STRAIGHT AND
○○○○○○○○○○○○○○○○○○○○○○○○○○○○○○○○○○○○○○○○○○○○○○○○○○○○○○○○○○○○○○○
Monogramas
1. Cosa moviendo el bastidor lentamente por las letras, a una v elocidad constante.
2. Termine con unas puntadas rectas de seguridad al final de la
última letra.
Bordado
1. Remarque el contorno del diseño moviendo el bastidor de acuerdo con el dibujo.
2. Rellene el dibujo de puntadas adelantando alternativamente del
contorno hacia el interior y del interior hacia el exterior hasta que
el dibujo quede completamente cubierto de puntadas, teniendo
siempre cuidado en mantener las puntadas muy juntas.
NOTA:
Se pueden realizar puntadas largas al mover el bastidor rápidamente y puntadas cortas al moverlo lentamente.
3. Termine con unas puntadas rectas de seguridad al final del dibujo.
A TENCIÓN:
Mantenga los dedos alejados de las piezas móviles, especial-
Monogrammi
1. Cucire muovendo il cerchietto lentamente e a velocità costante seguendo il disegno del monogramma.
2. Terminata l’esecuzione dell’ultima lettera, fissare la cucitura con alcuni
punti diritti.
Ricami
1. Cucire il contorno del motivo muovendo il cerchietto da ricamo.
2. Riempire il motivo cucendo con movimento alternato dal contorno verso l’interno e dall’interno verso il bordo del contorno finché il motivo
non è completamente pieno. Cucire mantenendo le linee di punti ravvicinate.
NOTA:
Muovendo il cerchietto da ricamo velocemente si otterranno dei punti più
lunghi, mentre muovendolo lentamente verranno prodotti dei punti più corti.
3. Terminata l’esecuzione del motivo, fissare la cucitura con alcuni punti
diritti.
ATTENZIONE:
T enere le dita lontano dalle parti in movimento, in particolare dall’ago.
mente de las agujas.
BUILT-IN STITCHES
BUTTONHOLE AND
BUTTON SEWING
USING ATTACHMENTS
AND APPLICATIONS
MAINTENANCE
61
INDEX
Page 70

○○○○○○○○○○○○○○○○○○○○○○○○○○○○○○○○○○○○○○○○○○○○○○○○○○○○○○○○○○○○○○○○○○○○○○○○○○○○○○○○○○○○○○○○○○○○○○○○
A
1. Remove the power supply plug from the outlet.
2. Loosen the face plate screw as shown in fig. A.
3. Remove the face plate from the machine as illustrated in fig. B.
4. Replace the sewing light bulb. (See fig. C.)
NOTE:
Use only same type of bulb rated 15W.
B
5. Reattach the face plate and fasten the screw as shown in fig. D.
C
Changing the Bulb
1 Bulb
2 Loosen
3 Tighten
CONTENTS
SEWING MACHINE
KNOWING Y OUR
ZIGZAG STITCHING
STRAIGHT AND
1
2
3
○○○○○○○○○○○○○○○○○○○○○○○○○○○○○○○○○○○○○○○○○○○○○○○○○○○○○○○○○○○○○○○
Cambio de la bombilla
1. Desenchufe la máquina.
2. Afloje el tornillo de la cubierta de la máquina tal y como se indica
el fig. A.
3. Retire la cubierta de la máquina tal como se indica en la fig. B.
4. Cambie la bombilla tal como se muestra en la fig. C.
NOTA:
Utilice solamente un tipo de bombilla de 15 W.
5. V uelva a colocar la cubierta y apriete el tornillo tal como se indica
en la fig. D.
1 Bombilla
2 Aflojar
3 Apretar
D
Sostituzione della lampadina
1. Disinserire la spina di alimentazione dalla presa elettrica.
2. Allentare la vite della placca frontale come mostrato in fig. A.
3. Rimuovere la placca frontale dalla macchina come illustrato in fig. B.
4. Sostituire la lampadina. (Vedi fig. C.)
NOTA:
Usare esclusivamente una lampadina dello stesso tipo da 15W.
5. Rimontare la placca frontale e stringere la vite come mostrato in fig. D.
1 Lampadina
2 Allentare
3 Stringere
BUILT-IN STITCHES
BUTTONHOLE AND
BUTTON SEWING
USING ATTACHMENTS
AND APPLICATIONS
62
MAINTENANCE
INDEX
Page 71

○○○○○○○○○○○○○○○○○○○○○○○○○○○○○○○○○○○○○○○○○○○○○○○○○○○○○○○○○○○○○○○○○○○○○○○○○○○○○○○○○○○○○○○○○○○○○○○○
Oiling
1. Remove the power supply plug from the outlet.
2. Remove the needle plate and the face plate.
3. Put 2 to 3 drops of oil at each point indicated by the arrows.
4. Run the machine at a fast speed without thread installed for a short
time.
5. Be sure to wipe any excess oil off the machine.
NOTE:
The machine should be oiled once a week if it is used more than one
hour a day. If the machine is used more often, oil every day.
Sewing machine oil is available from your local sewing machine dealer
or service center.
CONTENTS
SEWING MACHINE
KNOWING Y OUR
ZIGZAG STITCHING
STRAIGHT AND
○○○○○○○○○○○○○○○○○○○○○○○○○○○○○○○○○○○○○○○○○○○○○○○○○○○○○○○○○○○○○○○
Engrasado
1. Desenchufe la máquina.
2. Retire la placa de aguja y la placa frontal.
3. Ponga 2 ó 3 gotas de aceite en cada uno de los puntos señalados por las flechas.
4. Después de lubricar la máquina, hágala funcionar rápidamente
un instante sin hilo.
5. Asegúrese de limpiar cualquier exceso de aceite de la máquina.
NOTA:
Lubrique la máquina una vez por semana si se usa más de una hora
diaria. Si se usa más a menudo, engrasarla cada día. Puede comprar aceite para máquina de coser a su representante o en el centro
técnico local.
1. Disinserire la spina di alimentazione dalla presa elettrica.
2. Rimuovere la placca dell’ago e la placca frontale.
3. Applicare 2 o 3 gocce di olio nei punti indicati dalle frecce.
4. Avviare brevemente la macchina ad alta velocità senza alcun filo.
5. Ricordarsi di asciugare dalla macchina l’olio in eccesso.
NOTA:
Lubrificare la macchina da cucire una volta alla settimana se si utilizza per
più di un’ora al giorno. Se si usa la macchina più spesso, lubrificarla ogni
giorno.
L ’olio per macchine da cucire è in vendita presso il proprio riv enditore locale o il centro di assistenza.
Lubrificazione
BUILT-IN STITCHES
BUTTONHOLE AND
BUTTON SEWING
USING ATTACHMENTS
AND APPLICATIONS
MAINTENANCE
63
INDEX
Page 72

A
1
2
3
B
5
4
1
1
C
○○○○○○○○○○○○○○○○○○○○○○○○○○○○○○○○○○○○○○○○○○○○○○○○○○○○○○○○○○○○○○○
○○○○○○○○○○○○○○○○○○○○○○○○○○○○○○○○○○○○○○○○○○○○○○○○○○○○○○○○○○○○○○○○○○○○○○○○○○○○○○○○○○○○○○○○○○○○○○○○
Cleaning
Removing the Shuttle Hook
1. Raise the needle to its highest position and remove the power supply plug from the outlet.
2. Remove the extension table and open the shuttle cover on the front
of the free arm.
3. Take out the bobbin case by opening its latch and pulling it out
from the shuttle race.
4. Slide the latch levers out from the retaining ring to remove it. (See
fig. A.)
5. Remove the hook by grasping its center post and pulling it out as
shown in fig. B.
NOTE:
When the needle is lowered, the shuttle hook cannot be removed.
Cleaning the Shuttle Race
1. Remove any accumulated lint and thread from the retaining ring,
hook, driver and race body with a brush.
2. A cloth dampened with machine oil should be used to wipe lint
from the shuttle race.
3. Clean the shuttle hook as described is step 2.
4. Reassemble and push the latch levers back to their previous positions holding the retaining ring in place with the notch at the top.
1 Retaining ring
2 Latch lever
3 Hook
4 Driver
5 Race body
Cleaning the Feed Dogs
1. Remove the needle plate using a coin to remove the screws.
2. Clean the upper part of the feed dogs and shuttle race body with a
brush.
CONTENTS
SEWING MACHINE
KNOWING Y OUR
ZIGZAG STITCHING
STRAIGHT AND
BUILT-IN STITCHES
BUTTONHOLE AND
BUTTON SEWING
Limpieza
Para sacar el gancho de la lanzadera
1. Levante la aguja a su posición más alta y apague la máquina.
2. Retire la tabla de extensión y abra la cubierta exterior de la lanzadera de la parte frontal del brazo libre.
3. Saque el portacanilla abriendo su uñeta metálica (pestillo) y retirándolo de la pista de la lanzadera.
4. Retire las palancas que sujetan el anillo retenedor y saque dicho
anillo. (Ver fig. A.)
5. Retire el gancho cogiéndolo de la barra central y sacándolo tal y
como se muestra en la fig. B.
NOTA:
No puede quitarse el gancho cuando la aguja está bajada.
Limpieza de la pista de la lanzadera
1. Quite los hilos y polvo acumulados en el anillo retenedor, gancho, impulsor y pista con un cepillo.
2. Limpie el polvo de la lanzadera con un trapo impregnado de aceite de máquina.
3. Limpie el gancho de la misma manera.
4. V uelva a juntar los elementos y coloque las palancas en sus posiciones previas para que mantengan el anillo retenedor en su
sitio con la hendidura hacia arriba.
1 Anillo retenedor
2 Palanca de la uñeta
3 Gancho
4 Impulsor
5 Pista de la lanzadera
Limpieza de los alimentadores
1.
Retire la placa de agujas con una moneda para aflojar los tornillos.
2. Limpie la parte superior de los alimentadores y el cuerpo de la
lanzadera con un cepillo.
Pulizia
Rimozione della capsula dal crochet
1. Far salire l’ago fino alla posizione più alta e disinserire la spina di alimentazione dalla presa elettrica.
2. Aprire lo sportello del crochet situato davanti al braccio libero.
3. Per togliere la capsula della spoletta, sbloccare il catenacciolo ed estrarre la capsula dal suo alloggiamento.
4. Per estrarre l’anello ferma-crochet, spingere in fuori le levette fermaanello. (Vedi fig. A.)
5. Estrarre il crochet prendendolo dal perno centrale e tirandolo come
mostrato in fig. B.
NOTA:
Il crochet non può essere estratto se l’ago è abbassato.
Pulizia della capsula
1. Togliere con uno spazzolino rimasugli di filo e polvere dall’anello ferma-crochet, dal crochet, dalla guida e dalla capsula.
2. Pulire con un panno morbido imbevuto di olio per macchina da cucire
l’interno dell’alloggiamento del crochet.
3. Pulire il crochet nello stesso modo indicato al punto 2.
4. Rimontare e spingere le levette ferma-anello nella posizione precedente
tenendo in posizione l’anello ferma-crochet con l’intaglio rivolto verso
l’alto.
1 Anello ferma-crochet
2 Levetta ferma-anello
3 Crochet
4 Guida
5 Corpo dell’alloggiamento
Pulizia delle griffe di trasporto
1. Rimuovere la placca dell’ago svitando le viti con una moneta.
2. Pulire con uno spazzolino i dentini del trasportatore e il corpo
dell’alloggiamento del crochet.
64
USING ATTACHMENTS
AND APPLICATIONS
MAINTENANCE
INDEX
Page 73

○○○○○○○○○○○○○○○○○○○○○○○○○○○○○○○○○○○○○○○○○○○○○○○○○○○○○○○○○○○○○○○○○○○○○○○○○○○○○○○○○○○○○○○○○○○○○○○○
Performance Checklist
Whenever sewing difficulties are encountered, review the section in this instruction manual that details the operation you are performing to make
sure you are correctly using the machine. If the problem continues, the following checklist may help you to improve the operation.
If you still have difficulties, contact your nearest service center.
CONTENTS
UPPER THREAD
BREAKS
Upper threading
is not correct.
▼ ▼ ▼ ▼ ▼
Page 25
No
▼
LOWER THREAD
BREAKS
Lower thread is
tangled.
Page 24
No
▼
SKIPPED
STITCHES
Needle is incor-
rectly inserted.
Page 7
No
LOOP IN SEAM
Thread tension is
incorrect.
Page 32
No
Bobbin is not
Upper thread is
tangled.
threaded properly
in the shuttle
Inferior needle is
used.
hook.
▼
Page 25
Upper thread
tension is too
tight.
▼
Page 32
No
▼
No
▼
Page 24
Lower thread
tension is too
tight.
▼
Page 32
No
No
▼
Page 7
No
▼▼
The combination
of needle size/
thread size/fabric
is incorrect.
▼
Page 34
No
▼▼▼ ▼
Spool of thread is
not correctly
installed.
Lower threading is
not correct.
Lint is clinging to
the bottom of the
needle plate.
FABRIC
PUCKERS
Thread tension is
too tight.
Page 32
Threading is not
correct.
▼
Pages 24–25
Wrong needle is
used.
▼
Page 7
The combination
of needle size/
thread size/fabric
is incorrect.
SEWING MACHINE
ZIGZAG STITCHING
No
▼▼
No
BUILT-IN STITCHES
▼
No
BUTTON SEWING
KNOWING Y OUR
STRAIGHT AND
BUTTONHOLE AND
▼
Page 25
No
▼
Needle is bent or
not sharp.
▼
Page 7
No
▼
The combination
of needle size/
thread size/fabric
is incorrect.
▼
Page 34
No
▼▼▼▼▼
▼
Page 24
No
▼
Page 64
No
▼
Threading is not
correct.
▼
Pages 24–25
No
CONTACT YOUR LOCAL SERVICE CENTER
▼
Page 34
No
USING ATTACHMENTS
AND APPLICATIONS
MAINTENANCE
INDEX
65
Page 74

○○○○○○○○○○○○○○○○○○○○○○○○○○○○○○○○○○○○○○○○○○○○○○○○○○○○○○○○○○○○○○○○○○○○○○○○○○○○○○○○○○○○○○○○○○○○○○○○
CONTENTS
FABRIC DOES
NOT FEED
PROPERLY
Stitch length
dial is set at no
feeding.
▼
Page 20
No
▼
The combination
of needle size/
thread size/fabric
is incorrect.
▼
Page 34
No
▼
Inferior needle is
used.
▼
Page 7
No
▼
Thread is tangled.
▼
Page 25
No
▼
Feed dogs are
lowered.
NEEDLE
BREAKS
Needle is not
correctly inserted.
▼
Page 7
No
▼
Inferior needle is
used.
▼
Page 7
No
▼
The combination
of needle size/
thread size/fabric
is incorrect.
▼
Page 34
No No
▼
Fabric is pulled
excessively. Let the
feed dogs move the
fabric. Do not pull
the fabric.
No
MACHINE IS
NOISY OR SLOW
Lint is clinging to
the bottom of the
MACHINE DOES
NOT START
Power supply plug
is removed from
needle plate.
▼
Page 64
No No
▼
Page 5
▼
Insufficient oiling.
▼
Page 63 Page 6
Main power switch
No
is turned off.
▼
Foot controller is
not used correctly.
▼
Page 6
The bobbin
winding shaft is
slid toward the
bobbin presser.
▼
Page 23
outlet.
▼
No
▼
▼
No
SEWING MACHINE
KNOWING Y OUR
ZIGZAG STITCHING
STRAIGHT AND
BUILT-IN STITCHES
BUTTONHOLE AND
BUTTON SEWING
USING ATTACHMENTS
AND APPLICATIONS
No
CONTACT YOUR LOCAL SERVICE CENTER
MAINTENANCE
▼▼▼▼
INDEX
66
Page 75

○○○○○○○○○○○○○○○○○○○○○○○○○○○○○○○○○○○○○○○○○○○○○○○○○○○○○○○○○○○○○○○○○○○○○○○○○○○○○○○○○○○○○○○○○○○○○○○○
Listado de posibles incidencias
Cada vez que se encuentre con dificultades al coser, vuelva a consultar la parte de este manual de instrucciones que detalla la operación que
está realizando, para comprobar que usa correctamente la máquina. Si el problema persiste, el siguiente listado le puede ayudar a mejorar el
funcionamiento.
Si a pesar de esto el problema persiste, póngase en contacto con el servicio técnico más cercano.
CONTENTS
ROTURA DEL
HILO SUPERIOR
El hilo superior
no está bien
enhebrado.
▼ ▼ ▼ ▼ ▼
Página 26
No
▼
ROTURA DEL
HILO INFERIOR
El hilo inferior
está enredado.
Página 24
▼
No
La canilla no está
El hilo superior
está enredado.
bien enhebrada
en el gancho de
la lanzadera.
▼
Página 26
No
▼
Página 24
No
▼
SALTO DE
PUNTADAS
La aguja está
mal colocada.
Página 7
Se está usando
una aguja
inferior .
▼
Página 7
No
No
▼▼
BAGAS EN LAS
PUNTADAS
La tensión de
los hilos no es
correcta.
Página 33
No
La combinación
El hilo superior
es demasiado
tirante.
El hilo inferior
es demasiado
tirante.
tamaño de aguja/
grueso de hilo/
tejido no es
correcta.
▼
Página 33
No
▼
El carrete está
mal colocado.
▼
Página 26
No
▼
La aguja está
doblada o gastada.
▼
Página 33
El hilo inferior
está mal
enhebrado.
▼
Página 24
No
▼▼ ▼
No
▼
Página 34
Hay polvo en el
fondo de la
placa de agujas.
▼
Página 64
El hilo no está
bien enhebrado.
No
No
▼
ARRUGAS EN EL
TEJIDO
Los hilos son
demasiado
tirantes.
Página 33
Los hilos no
están bien
enhebrados.
▼
Página 24, 26
El tamaño de la
aguja no
corresponde.
▼
Página 7
La combinación
tamaño de
aguja/grueso de
hilo/tejido no es
correcta.
▼
Página 34
SEWING MACHINE
ZIGZAG STITCHING
No
▼▼
No
BUILT-IN STITCHES
▼
No
BUTTON SEWING
No
AND APPLICATIONS
KNOWING Y OUR
STRAIGHT AND
BUTTONHOLE AND
USING ATTACHMENTS
67
▼
Página 7
No
▼
Página 24, 26
No
▼
La combinación
tamaño de
aguja/grueso de
hilo/tejido no es
correcta.
▼
Página 34
No
▼▼▼▼▼
PÓNGASE EN CONTACTO CON EL SERVICIO TÉCNICO LOCAL
MAINTENANCE
INDEX
Page 76

○○○○○○○○○○○○○○○○○○○○○○○○○○○○○○○○○○○○○○○○○○○○○○○○○○○○○○○○○○○○○○○○○○○○○○○○○○○○○○○○○○○○○○○○○○○○○○○○
CONTENTS
EL TEJIDO NO
ARRASTRA
BIEN
El selector de
largo de puntada
está puesto para
que el tejido no
arrastre.
▼
Página 20
▼
La combinación
tamaño de
aguja/grueso de
hilo/tejido no es
correcta.
▼
Página 34
▼
Se está usando
una aguja
inferior .
▼
Página 7
▼
El hilo está
enredado.
▼
Página 26
▼
Los
alimentadores
están bajados.
No
No
No
No
LA AGUJA SE
ROMPE
La aguja está
mal colocada.
▼
Página 7
▼
Se está usando
una aguja
inferior.
▼
Página 7
▼
La combinación
tamaño de
aguja/grueso de
hilo/tejido no es
correcta.
▼
Página 34
▼
Se tira del tejido
con demasiada
fuerza. Deje que
el arrastre lo
alimente solo. No
tire del tejido.
LA MÁQUINA
ES RUIDOSA O
FUNCIONA
LA MÁQUINA
NO ARRANCA
MUY DESPACIO
No
Hay polvo en la
placa de agujas.
▼
Página 64
▼
No No
Está
desenchufada.
▼
Página 5
▼
El interruptor
Falta de aceite.
principal está
apagado.
No
▼
Página 63 Página 6
No
▼
No
▼
No se usa bien
el pedal.
No No
▼
Página 6
▼
El eje del porta
bobinas se situa
en el pedal de
la bobina.
No
▼
Página 23
No
SEWING MACHINE
KNOWING Y OUR
ZIGZAG STITCHING
STRAIGHT AND
BUILT-IN STITCHES
BUTTONHOLE AND
BUTTON SEWING
USING ATTACHMENTS
AND APPLICATIONS
No
▼▼▼▼
PÓNGASE EN CONTACTO CON EL SERVICIO TÉCNICO LOCAL
MAINTENANCE
INDEX
68
Page 77

○○○○○○○○○○○○○○○○○○○○○○○○○○○○○○○○○○○○○○○○○○○○○○○○○○○○○○○○○○○○○○○○○○○○○○○○○○○○○○○○○○○○○○○○○○○○○○○○
Tabella di controllo del funzionamento
Ogni qualvolta si incontrano delle difficoltà nell’esecuzione del lavoro, rivedere la sezione del libretto di istruzioni che descrive l’operazione che si vuole
eseguire per assicurarsi che si sta usando la macchina in modo corretto. Se il problema persiste, la seguente tabella può essere di aiuto per risolvere l’inconveniente.
Se tuttavia si incontrano ancora delle difficoltà, rivolgersi al servizio di assistenza più vicino.
CONTENTS
IL FILO
SUPERIORE SI
ROMPE
L’infilatura
superiore non è
corretta.
▼
Pagina 26
No
▼
Il filo superiore è
aggrovigliato.
▼
Pagina 26
No
▼
La tensione del filo
superiore è troppo
stretta.
▼
Pagina 33
No
▼
IL FILO
INFERIORE SI
ROMPE
Il filo inferiore è
aggrovigliato.
▼
Pagina 24
No
▼
Il rocchetto non
è avvolto correttamente nel crochet.
▼
Pagina 24
No
▼
La tensione del filo
inferiore è troppo
stretta.
▼
Pagina 33
No
▼
PUNTI SALTATI
L’ago non è
montato
correttamente.
▼
Pagina 7
No
▼
Si sta usando un ago
di misura inferiore.
▼
Pagina 7
No
▼
La combinazione
fra ago, filo e
tessuto è errata.
▼
Pagina 35
No
▼
PUNTI LENTI
La tensione del filo
non è corretta.
▼ ▼
Pagina 33
No
ARRICCIAMENTO
DEL TESSUTO
La tensione del filo
è troppo stretta.
Pagina 33
No
▼
L’infilatura non è
corretta.
▼
Pagina 24, 26
No
▼
Si sta usando un
ago errato.
▼
Pagina 7
No
▼
SEWING MACHINE
KNOWING Y OUR
ZIGZAG STITCHING
STRAIGHT AND
BUILT-IN STITCHES
BUTTONHOLE AND
BUTTON SEWING
La capsula non è
inserita
correttamente.
▼
Pagina 26
L’ago è piegato o
spuntato.
▼
Pagina 7
La combinazione
fra ago, filo e
tessuto è errata.
▼
Página 35
La combinazione
fra ago, filo e
tessuto è errata.
▼
Pagina 35
▼
L’infilatura inferiore
No
Pagina 24
non è corretta.
▼
No
Il filo si sfilaccia
sotto la placca
dell’ago.
▼
Pagina 64
No
▼
L’infilatura non è
corretta.
No
▼
Pagina 24, 26
No
▼
No
▼
▼
▼
▼▼
RIVOLGERSI AL PROPRIO CENTRO DI ASSISTENZA
No
USING ATTACHMENTS
AND APPLICATIONS
MAINTENANCE
INDEX
69
Page 78

○○○○○○○○○○○○○○○○○○○○○○○○○○○○○○○○○○○○○○○○○○○○○○○○○○○○○○○○○○○○○○○○○○○○○○○○○○○○○○○○○○○○○○○○○○○○○○○○
CONTENTS
IL TESSUTO NON
VIENE TRASPOR-
TATO CORRET-
TAMENTE
Il selettore della
lunghezza del punto è
regolato sulla
posizione di
esclusione trasporto.
▼
Pagina 20
No
▼
La combinazione
fra ago, filo e
tessuto è errata.
▼
Pagina 35
No No
▼
Si sta usando un ago
di misura inferiore.
▼
Pagina 7
No
▼
Il filo è
aggrovigliato.
▼
Pagina 26
No
▼
Il trasportatore è
abbassato.
LA MACCHINA
L’AGO SI SPEZZA
È RUMOROSA
O LENTA
L’ago non è
montato corretta-
mente.
▼
Pagina 7
No
▼
Si sta usando un ago
di misura inferiore.
▼
Pagina 7 Pagina 63 Pagina 6
Il filo si sfilaccia
sotto la placca
dell’ago.
▼
Pagina 64
No No
▼
La lubrificazione è
insufficiente.
▼
No
LA MACCHINA
NON PARTE
La spina di
alimentazione è
staccata dalla presa.
▼
Pagina 5
L’interruttore
principale è spento.
▼
▼
La combinazione
fra ago, filo e
Il reostato non viene
premuto corretta-
tessuto è errata.
▼
Pagina 35
No
▼
Pagina 6
▼
Il tessuto viene tirato
eccessivamente.
Lasciare spostare il
tessuto dal trasportato-
L’alberino di
avvolgimento
spoletta è spostato
verso il premi-
re. Non tirare il tessuto.
No No
▼
Pagina 23
mente.
spoletta.
▼
▼
▼
No
No
SEWING MACHINE
KNOWING Y OUR
ZIGZAG STITCHING
STRAIGHT AND
BUILT-IN STITCHES
BUTTONHOLE AND
BUTTON SEWING
USING ATTACHMENTS
AND APPLICATIONS
No
▼
▼
▼
▼
RIVOLGERSI AL PROPRIO CENTRO DI ASSISTENZA
MAINTENANCE
INDEX
70
Page 79

○○○○○○○○○○○○○○○○○○○○○○○○○○○○○○○○○○○○○○○○○○○○○○○○○○○○○○○○○○○○○○○○○○○○○○○○○○○○○○○○○○○○○○○○○○○○○○○○
Repacking the Machine
Keep the carton and packing materials for future use. It may become
necessary to reship the sewing machine. Improper packing or improper
packing material could result in damage during shipping. Instructions
for repacking the machine are illustrated.
IMPORTANT
This packing material is designed to prevent damage in transit.
Save this packing material in the event it is needed to transport
this sewing machine.
CONTENTS
SEWING MACHINE
KNOWING Y OUR
ZIGZAG STITCHING
STRAIGHT AND
○○○○○○○○○○○○○○○○○○○○○○○○○○○○○○○○○○○○○○○○○○○○○○○○○○○○○○○○○○○○○○○
Embalaje de la máquina
Guarde la caja de cartón y el embalaje por si acaso necesita transportar la máquina en el futuro. Un embalaje inadecuado o con materiales inapropiados puede causarle daños a la máquina durante el
transporte. Para embalar la máquina correctamente, siga las instrucciones que se indican.
Conservare il cartone e il materiale d’imballaggio per usi futuri, nel caso si
debba trasportare la macchina da cucire. Un imballaggio improprio o l’uso
di materiale d’imballaggio inadatto possono danneggiare la macchina durante il trasporto. Seguire le istruzioni illustrate per un corretto imballaggio
della macchina.
Reimballaggio della macchina
BUILT-IN STITCHES
BUTTONHOLE AND
BUTTON SEWING
USING ATTACHMENTS
AND APPLICATIONS
MAINTENANCE
71
IMPORTANTE
El material de embalaje está diseñado para impedir daños
durante el transporte. Guárdelo siempre en caso de que tenga que volver a transportar la máquina.
IMPORTANTE
Questo materiale di imballaggio è stato studiato per proteggere la
macchina durante il trasporto. Conservare questo materiale nel caso
si debba trasportare la macchina da cucire.
INDEX
Page 80

Page
A
Accessories ......................................................................... 3
Appliques.......................................................................... 59
○○○○○○○○○○○○○○○○○○○○○○○○○○○○○○○○○○○○○○○○○○○○○○○○○○○○○○○○○○○○○○○○○○○○○○○○○○○○○○○○○○○○○○○○○○○○○○○○
Page
O
Oiling ............................................................................... 63
Overedge Stitching............................................................ 44
CONTENTS
B
Balancing the Machine ..................................................... 10
Blindhem Stitching............................................................40
Bobbin
Threading .......................................................... 24, 29
Winding .................................................................. 23
Bridging Stitch................................................................... 11
Buttonhole Sewing ...................................................... 47, 49
Buttonhole Fine Adjustment.............................................. 52
Button Sewing...................................................................54
C
Chart of Sewing Fabrics, Needles and Thread
Combinations.................................................................... 34
Cleaning ........................................................................... 64
Connecting Plugs ................................................................ 5
D
Darning............................................................................. 58
Drawing Up Lower Thread................................................ 30
Drop Feed Lever ............................................................... 22
E
Elastic Stitching................................................................. 42
Embroidering .................................................................... 60
F
Feed Dog
Cleaning..................................................................64
Lever ....................................................................... 22
Finishing a Seam ......................................................... 37–38
Foot Controller
Connecting................................................................5
Operating .................................................................. 6
Free-Arm Sewing................................................................. 9
G
Gathering..........................................................................56
L
Light Bulb Replacement .................................................... 62
Lower Threading ............................................................... 24
M
Main Power Switch............................................................. 6
Monogramming ................................................................ 60
N
Needle
Inspection.................................................................. 7
Replacement ............................................................. 7
Threading ................................................................ 25
Threader..................................................................27
P
Pattern Lengths.............................................................11–13
Pattern Selection Dial........................................................ 10
Pattern Widths .............................................................11–13
Performance Checklist ................................................ 65–66
Presser Foot Replacement ................................................... 8
Principal Parts ..................................................................... 1
Q
Quick Thread-setting System............................................. 29
R
Repacking ......................................................................... 71
Reverse Sewing Lever........................................................ 22
S
Scallop Stitching ............................................................... 43
Sewing Direction .............................................................. 37
Sewing Light
Bulb Replacement ................................................... 62
Switch ....................................................................... 6
Shell Tuck Stitching ........................................................... 41
Shuttle Hook Removal ...................................................... 64
Shuttle Race Cleaning ....................................................... 64
Spool Installing ................................................................. 25
Steadying the Machine........................................................9
Stitch Length Dial.............................................................. 20
Straight Stitching ............................................................... 36
Stretch Blind Stitching ....................................................... 40
Stretch Material Sewing..................................................... 38
Stretch Overlock (Left)....................................................... 44
Stretch Overlock (Right) .................................................... 44
Stretch Stitching ................................................................ 21
T
Threading
Bobbin .............................................................. 24, 29
Needle .............................................................. 25, 27
Thread Tension.................................................................. 32
Topstitching....................................................................... 38
Triple Stretch Stitching....................................................... 36
Triple Zigzag Stretch Stitching ........................................... 46
Troubleshooting .......................................................... 65–66
Twin-Needle Sewing ......................................................... 31
U
Upper Tension Control Dial .............................................. 32
Upper Threading............................................................... 25
W
Winding the Bobbin.......................................................... 23
Z
Zigzag Stitching ................................................................ 39
Zipper Inserting................................................................. 56
SEWING MACHINE
KNOWING Y OUR
ZIGZAG STITCHING
STRAIGHT AND
BUILT-IN STITCHES
BUTTONHOLE AND
BUTTON SEWING
USING ATTACHMENTS
AND APPLICATIONS
MAINTENANCE
INDEX
72
Page 81

Página
A
Accesorios ......................................................................... 3
Aguja
Cambio ..................................................................... 7
Enhebrado .............................................................. 26
Enhebrador.............................................................28
Verificación ............................................................... 7
Ajuste fino de los ojales ................................................... 53
Alimentador
Limpieza ................................................................. 64
Palanca................................................................... 22
Anchos de puntadas ...................................................14-16
Aplicaciones ..................................................................... 59
B
Bobina
Canilla..................................................................... 23
Hilos.................................................................. 24, 29
Bobinado de la canilla ...................................................... 23
Bombilla
Cambio de la bombilla ............................................ 62
Interruptor de luz ...................................................... 6
Bordados..........................................................................60
C
Cambio de la bombilla...................................................... 62
Cambio del prensatelas ..................................................... 8
Conexión de los enchufes..................................................5
Costura con aguja doble .................................................. 31
Costura de botones.......................................................... 55
Costura de ojales ........................................................ 48-49
Costura de tejidos elásticos ............................................. 38
○○○○○○○○○○○○○○○○○○○○○○○○○○○○○○○○○○○○○○○○○○○○○○○○○○○○○○○○○○○○○○○○○○○○○○○○○○○○○○○○○○○○○○○○○○○○○○○○
Página
L
Largos de puntadas ....................................................11-13
Limpieza........................................................................... 64
Limpieza de la pista de la lanzadera,............................... 64
Listado de posibles incidencias................................... 65-66
Localización y reparación de averías..........................65-66
M
Modalidad de brazo libre.................................................... 9
Monogamas ..................................................................... 60
P
Palanca de alimentación de bajada ................................. 22
Palanca de retroceso ....................................................... 22
Para sacar el garfio de la lanzadera,................................ 64
Para sacar el hilo de la canilla ......................................... 30
Para terminar las costuras .......................................... 37-38
Pedal
Conexión .................................................................. 5
Uso ........................................................................... 6
Puntada alforza derefuerzo.............................................. 41
Puntada de enlace ........................................................... 11
Puntada elástica......................................................... 21, 42
Puntada festón ................................................................. 43
Puntada invisible elástica................................................. 40
Puntada overlock ............................................................. 44
Puntada por encima de la orilla ....................................... 44
Puntada recta................................................................... 36
Puntada triple zigzag elástica .......................................... 46
Puntada zigzag ................................................................ 39
Puntadas en derecho ....................................................... 38
Puntadas invisibles .......................................................... 40
D
Disco de control de la tensión superior ............................ 33
E
Elementos principales ........................................................ 1
Embalaje .......................................................................... 71
Engrasado........................................................................63
Enhebrado........................................................................ 26
Estabilizando la máquina ................................................... 9
F
Fruncido ........................................................................... 57
H
Hilo inferior ....................................................................... 24
Hilo superior..................................................................... 26
Hilos
Aguja ................................................................ 26, 28
Bobina .............................................................. 24, 29
I
Inserción de cremalleras .................................................. 56
Interruptor principal ............................................................ 6
S
Selector de largo de puntada ........................................... 20
Selector de puntadas ....................................................... 10
Selector del ancho de puntada ........................................ 20
Sentido de costura ........................................................... 37
Sistema rápido de colocación del hilo.............................. 29
T
Tabla de combinaciones entre tejidos, agujas e hilos ...... 34
Tensión de la aguja .......................................................... 32
Triple recta ....................................................................... 36
Z
Zurcido ............................................................................. 58
73
Page 82

Pagina
A
Accessori ......................................................................................3
Ago
Controllo ............................................................................7
Infilatore...........................................................................28
Infilatura...........................................................................26
Sostituzione........................................................................ 7
Ampiezza dei punti............................................................... 17-19
Applicazione di cerniere.............................................................57
Applicazioni ...............................................................................59
Arricciature.................................................................................57
Asole..................................................................................... 48-49
Avvolgimento della spoletta .......................................................23
B
Bottoni ........................................................................................55
C
Collegamento elettrico..................................................................5
Cucitura a braccio libero ..............................................................9
Cucitura con ago gemello ...........................................................31
Cucitura con punti elastici ..........................................................21
Cucitura su tessuti elastici .......................................................... 38
Cuciture esterne ..........................................................................38
D
Direzione di cucitura ..................................................................37
F
Fine della cucitura ................................................................ 37-38
I
Infilatura
Ago ............................................................................26, 28
Spoletta ......................................................................24, 29
Infilatura inferiore ......................................................................24
Infilatura superiore .....................................................................26
Installazione del rocchetto ..........................................................26
Interruttore principale ...................................................................6
L
Leva abbassa-trasportatore .........................................................22
Leva di cucitura di ritorno .......................................................... 22
Lubrificazione.............................................................................63
Luce area di lavoro
Interruttore ......................................................................... 6
Sostituzione della lampadina ........................................... 62
Lunghezze dei punti ............................................................. 17-19
○○○○○○○○○○○○○○○○○○○○○○○○○○○○○○○○○○○○○○○○○○○○○○○○○○○○○○○○○○○○○○○○○○○○○○○○○○○○○○○○○○○○○○○○○○○○○○○○
Pagina
P
Parti principali .............................................................................. 2
Pulizia .........................................................................................64
Pulizia della capsula ................................................................... 64
Punto diritto ................................................................................36
Punto diritto triplo ......................................................................36
Punto elastico .............................................................................42
Punto orlo conchiglia.................................................................. 41
Punto smerlo ...............................................................................43
Punto sovrapposto ......................................................................17
Punto zigzag ...............................................................................39
Punto zigzag stretch triplo ..........................................................46
R
Raccolta del filo inferiore ...........................................................30
Rammendo.................................................................................. 58
Regolatore di tensione superiore ................................................33
Regolazione della densità dei punti dell’asola ...........................53
Reimballaggio ............................................................................71
Reostato
Collegamento .....................................................................5
Uso .....................................................................................6
Ricamo........................................................................................ 60
Rifinitura a sopraggitto...............................................................44
Rimozione della capsula dal crochet ..........................................64
Risoluzione dei problemi...................................................... 69-70
S
Selettore dei punti....................................................................... 10
Selettore della lunghezza del punto ............................................20
Sistema di infilatura rapido ........................................................29
Sopraggitto elastico .................................................................... 44
Sostituzione del piedino premistoffa ............................................8
Sostituzione della lampadina ......................................................62
Spoletta
Avvolgimento................................................................... 23
Infilatura.....................................................................24, 29
Stabilizzazione della macchina.....................................................9
T
TABELLA DELLE COMBINAZIONI DI TESSUTO,
AGO E FILO ..............................................................................35
Tabella di controllo del funzionamento ................................ 69-70
Tensione del filo .........................................................................33
Trasportatore
Leva..................................................................................22
Pulizia ..............................................................................64
M
Monogrammi ..............................................................................60
O
Orli a punto orlo invisibile..........................................................40
74
Page 83

ENGLISH
ESPAÑOL
ITALIANO
885-447
194447-011
Printed in China
 Loading...