

Brother RJ4040Z1 User Manual

USER’S GUIDE
RJ-4030
RJ-4040
Before using this printer, be sure to read this User's
Guide.
We suggest that you keep this manual in a handy
place for future reference.
Version 0
US ENG

Introduction
Note
Thank you for purchasing the Brother RuggedJet RJ-4030/RJ-4040 mobile printer. The
RJ-4030/RJ-4040 (hereafter referred to as “the printer”) is a mobile thermal printer. Be sure to
read the User’s Guide, Product Safety Guide, Quick Reference Guide, Software User’s Guide and
Network User’s Guide (RJ-4040 only) before using the printer. We suggest that you keep these
documents in a handy place for future reference.
Symbols Used in This Document
The following symbols are used throughout this document.
This symbol indicates information or directions that should be followed. Ignoring them
may result in damage, or failed operations.
This symbol indicates notes that provide information or directions that can help you better
understand and use the product more efficiently.
About This Document
This document (PDF) is included on the CD-ROM.
If using Adobe® Reader® to view this document on a computer, the cursor changes to when
the cursor is placed on a link. Click the link to open the corresponding page. For information
®
about using Adobe
Reader®, see the help file included with Adobe® Reader®.
i

Table of Contents
1 Setting Up the Printer 1
General Description...............................................................................................1
Connecting the Printer to External Power.............................................................. 2
Connecting to an AC Power Outlet (Optional).................................................2
Connecting to a DC Power Outlet (Optional)...................................................2
Using the Rechargeable Li-ion Battery (Optional) .................................................3
Installing the Rechargeable Li-ion Battery.......................................................3
Charging the Rechargeable Li-ion Battery ...................................................... 3
Tips on Using the Rechargeable Li-ion Battery...............................................4
Inserting the RD Roll..............................................................................................5
Cutting Roll Paper ...........................................................................................7
Attaching the Belt Clip ........................................................................................... 7
Installing the Printer Driver and the Software for RJ-4030 ....................................8
Installing the Printer Driver and the Software for RJ-4040 ..................................10
Before You Begin .......................................................................................... 10
Infrastructure Mode ....................................................................................... 11
Choosing Your Wireless Install Method.........................................................11
Installation Procedure (Using USB Cable/Wireless Network) .......................12
One Push Configuration Using WPS and Installation....................................16
Web Based Management (web browser) ...................................................... 19
Uninstalling the Printer Driver .............................................................................. 19
Connecting the Computer and Printer ................................................................. 21
USB Connection ............................................................................................ 21
Bluetooth Connection (RJ-4030 Only)...........................................................21
Wi-Fi Connection (RJ-4040 only) ..................................................................22
Serial Cable Connection................................................................................22
2 Using the Printer 23
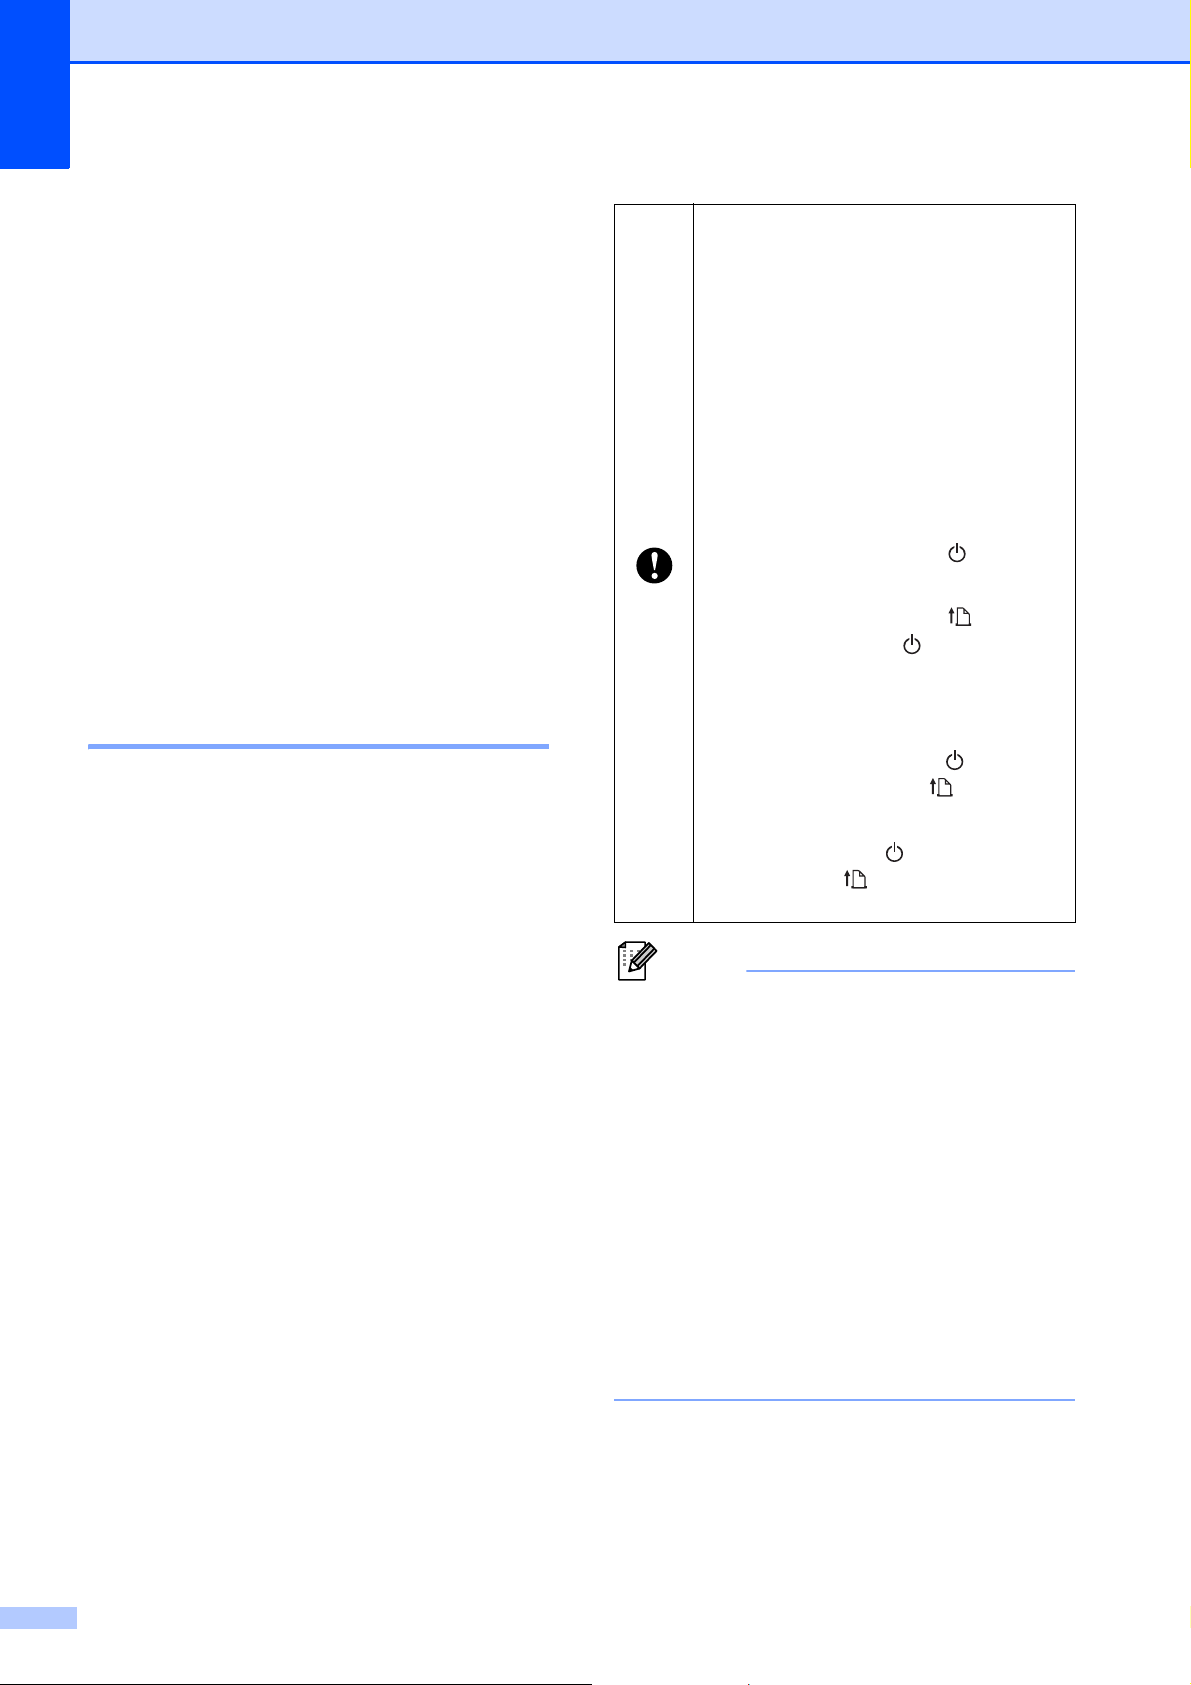
Operation Panel................................................................................................... 23
Button Functions............................................................................................ 24
Indicators ....................................................................................................... 25
Printing Solutions ................................................................................................. 26
Printing ................................................................................................................ 26
Making Prints Lighter or Darker..................................................................... 27
Printer Driver Options .......................................................................................... 27
Setting Paper Size ............................................................................................... 28
Distributing Paper Formats..................................................................................30
Distributing only paper formats......................................................................30
Distributing paper formats bundled with the installer.....................................30
3 RJ Utility 31
Overview.............................................................................................................. 31
Using the RJ Utility .............................................................................................. 31
Before Using the RJ Utility............................................................................. 31
Starting the RJ Utility ..................................................................................... 31
How to Use the RJ Utility............................................................................... 31
Parameters .................................................................................................... 32
ii

4 Network Setting Tool (RJ-4040 only) 37
Overview .............................................................................................................. 37
Using the Network Setting Tool ........................................................................... 37
Starting the Network Setting Tool.................................................................. 37
Changing the Communications Settings .......................................................39
Applying Setting Changes to Multiple Printers ..............................................39
Menu Bar .......................................................................................................40
Connected Printer’s Status............................................................................42
Network Settings ...........................................................................................42
5 Other Functions 44
Mass Storage.......................................................................................................44
Description..................................................................................................... 44
Using the Mass Storage Feature...................................................................44
JPEG Printing ...................................................................................................... 45
6 Maintaining the Printer 46
Print Head Maintenance ...................................................................................... 46
Roller Maintenance ..............................................................................................46
Paper Outlet Maintenance...................................................................................47
7 Reference 48
Indicators .............................................................................................................48
Indicator Warnings ............................................................................................... 50
Printing the Printer Set-up Information ................................................................51
8 Troubleshooting 52
Overview .............................................................................................................. 52
9 Technical Information 56
Product Specifications .........................................................................................56
iii

1
1
2
3
4
56
7
8
9
10
11
12
13
14
15
16
17
Setting Up the Printer 1
General Description 1
Front 1
1AC/DC connector
2 Serial port
3USB port
4 Cover open lever
5 RD Roll compartment cover
6 Paper outlet
7 (Power) button
8 (Feed)button
9 POWER indicator
10 STATUS indicator
11 BATT (Battery) indicator
12 (Bluetooth) indicator (RJ-4030)/
(Wi-Fi) indicator (RJ-4040)
13 Bluetooth button (RJ-4030)/
Wi-Fi button (RJ-4040)
14 Belt hook
15 Battery cover
1
Back 1
16 Battery cover latch
17 Battery compartment
1

Chapter 1
Note
Note
1
2
1
Connecting the Printer to External Power
Connecting to an AC Power Outlet (Optional) 1
Connect the printer to a nearby AC power
outlet to power the printer or charge the
rechargeable battery using AC power.
a Connect the AC adapter to the printer.
b Connect the AC power cord to the AC
adapter.
c Connect the AC power cord to a nearby
AC power outlet (100 - 240 VAC,
50 - 60 Hz).
Connecting to a DC Power
1
Outlet (Optional) 1
Connect the printer to your vehicle’s 12 V DC
power outlet (cigarette lighter, etc.) to power
the printer or charge the rechargeable battery
using the vehicle’s DC power.
a Connect the Car adapter to the vehicle’s
12 V DC power outlet.
b Connect the Car adapter to the printer.
c Turn on the vehicle’s power, and then
press and hold the (Power) button of
the printer to turn it on.
1 AC adapter
2 AC power cord
The AC adapter and AC power cord are
optional accessories. When purchasing,
purchase the adapter and power cord
appropriate for the region where the
printer will be used.
2
1 Car adapter
• The Car adapter is an optional accessory.
• The voltage supplied by a vehicle
fluctuates. The printing speed may differ
depending on the supplied voltage.

Setting Up the Printer
Note
1
2
Using the Rechargeable Li-ion Battery (Optional)
Installing the Rechargeable Li-ion Battery 1
a Open the battery cover by pressing the
cover latch.
c Insert the battery into the battery
compartment.
1
1
1 Battery cover
2 Cover latch
b Swing the cover open and remove it.
d Confirm that the hooks on the edge of
the battery cover are inserted correctly,
and then reattach the cover.
The voltage supplied by the rechargeable
Li-ion battery fluctuates. The printing
speed may also fluctuate depending on
the voltage.
Removing the Rechargeable Li-ion Battery
Remove the battery cover and the
rechargeable Li-ion battery, and then
reattach the battery cover.
Charging the Rechargeable Li-ion Battery 1
1
The rechargeable Li-ion battery can be
charged while it is inserted in the printer.
Perform the following procedure to charge
the rechargeable Li-ion battery.
3

Chapter 1
Note
1
• Before using the rechargeable Li-ion
battery, use the following procedure to
charge it.
• Up to 360 minutes is needed to fully
charge a rechargeable Li-ion battery.
Stopping Rechargeable Li-ion Battery Charging
To stop rechargeable Li-ion battery from
charging, disconnect the AC power cord or
Car adapter from the battery’s AC/DC
connector.
1
• You can print about 2,000 labels (when
connected by USB, and using a new, fully
charged battery.) Tested using Brother’s
print test data (7% coverage 46 inches)
at 73.4F (23C).
a Make sure that the printer is turned off.
If the printer is turned on, press and hold
the (Power) button to turn it off.
b Make sure that the rechargeable Li-ion
battery is installed in the printer.
c Use the AC adapter and AC power cord
to connect the printer to an AC power
outlet, or use the Car adapter to connect
the printer to a DC power outlet.
The BATT (battery) indicator light is
orange when the printer is charging.
When the rechargeable Li-ion battery is
fully charged, the BATT (battery)
indicator light turns off.
Tips on Using the Rechargeable Li-ion Battery 1
Charge the rechargeable Li-ion battery
before use. Do not use it before it is
charged.
Darker prints discharge the rechargeable
Li-ion battery faster than lighter prints.
Adjust the print density setting in the
printer driver’s dialog box or in the RJ
Utility (see Print Density uu page 32).
The rechargeable Li-ion battery charging
can take place in 32F-104F (0C-40C)
environments. Charge the rechargeable
Li-ion battery in an environment in this
temperature range. If the surrounding
temperature is out of this range, the
rechargeable Li-ion battery will not be
charged, and the battery indicator will
remain lit.
If the printer is used when both the
rechargeable Li-ion battery is installed
and the AC adapter or Car adapter is
connected, the battery indicator may turn
off and charging may stop even if the
rechargeable Li-ion battery has not been
fully charged.
1 BATT (battery) indicator
4
When charging the rechargeable Li-ion
battery while the Car adapter is
connected, the amount of voltage required
to fully charge the rechargeable Li-ion
battery may not be supplied by the DC
power outlet. When 360 minutes (max.)
have passed since charging started, the
battery indicator turns off and charging
stops even if the rechargeable Li-ion
battery has not been fully charged.

Setting Up the Printer
1
2
3
2
Rechargeable Li-ion Battery Characteristics
Understanding the properties of the
rechargeable Li-ion battery will allow you to
optimize its usage.
Using or storing the rechargeable Li-ion
battery in a location exposed to high or low
temperatures may accelerate its
deterioration. In particular, using a
rechargeable Li-ion battery with a high
charge (charged 90% or more) in a
location exposed to high temperatures will
considerably accelerate battery
deterioration.
Using the printer while the rechargeable
Li-ion battery is installed and charging
may accelerate the battery’s deterioration.
If using the printer when the rechargeable
Li-ion battery is installed, disconnect the
AC adapter or Car adapter.
1
Inserting the RD Roll 1
a Press and hold the (Power) button to
turn the printer off.
Turn and hold the cover open lever, and
open the RD Roll compartment cover.
1
If the printer will not be used for a long
period of time, remove the rechargeable
Li-ion battery from the printer when its
charge is 50% or less, and then store the
battery in a cool place away from direct
sunlight.
If the rechargeable Li-ion battery will not
be used for a long period of time, we
recommend charging it every 6 months.
For other precautions, refer to the
instruction manual included with the
rechargeable Li-ion battery.
b While pushing the adjuster lock in the
direction of the arrow, move it to the left
or right. Because the roll guide will also
move, adjust the roll guide to match the
width of the paper using the scale
engraved on the inside of the printer.
1Adjuster lock
2 Roll guide
3 Scale
5

Chapter 1
Note
5
4
c Insert an RD Roll into the RD Roll
compartment upside down with the
labels feeding from the bottom as
shown.
d Align the RD Roll with the guide lines.
4 Guide lines
5Tear bar
e Close the RD Roll compartment by
pressing on the center of the cover.
Make sure that the roll guide is
properly positioned to prevent the
RD Roll from moving sideways.
If the RD Roll is not inserted
correctly, the printer will not print on
the correct side of the paper or label.
When printing on die cut labels, set
the roll guide so that there is
0.08 inches (2 mm) of space on
both sides (0.16 inches (4 mm)
total) of the scale.
Example: When using a 4-inch wide
(101.6 mm) label, set the roll guide
to a width of 4.16 inches
(105.6 mm).
f Press and hold the (Power) button to
turn the printer on.
When using die cut label, press the
(Feed) button after inserting the RD
Roll. The printer will position the label to
the correct starting position.
Use genuine Brother media.
6

Setting Up the Printer
2
1
Cutting Roll Paper 1
Roll paper can be cut using the printer's tear
bar. Pull one edge of the ejected paper up
and toward the other edge diagonally.
The tear bar is sharp. To avoid injury, do
not touch the tear bar.
Attaching the Belt Clip 1
When using the printer outside the office, you
can attach the included belt clip to the printer
and secure the belt clip to your belt.
a Secure the Phillips-head screws to the
rear of the printer as shown.
1
1 Belt clip
2 Phillips screw
b Attach the clip to your belt.
7

Chapter 1
Note
Make sure that the screw is
tightened securely. There is a risk of
injury if the screw is loose and the
printer falls.
Make sure that the belt clip is
attached securely to the printer.
There is a risk of injury if the belt clip
is not attached securely and the
printer falls.
Make sure that the belt clip is
attached securely to the wearer's
belt. There is a risk of injury if the
belt clip is not attached securely and
the printer falls.
Installing the Printer Driver and the Software for RJ-4030
The procedure for installing the software
varies depending on the OS of the computer.
Installation procedure is subject to change
without notice.
Make sure that you are logged on with
Administrator rights.
This section explains how to install P-touch
Editor 5.0, the printer driver, P-touch Update
Software and the Printer Setting Tool using
the Standard Installation option.
Windows
a Insert the installer CD-ROM into your
®
7 is used in the following example.
CD-ROM drive. If the model name
screen appears, choose your printer. If
the language screen appears, choose
your language.
1
If the CD-ROM menu is not displayed
automatically, open the files on the
CD-ROM and double click [Start.exe].
b Click [Standard Installation].
1
2
3
4
8

Note
• Installation items:
Note
1 Standard Installation
Installs P-touch Editor 5.0, printer
driver, P-touch Update Software,
Printer Setting Tool.
2 User’s Guide
Displays the User’s Guide, Software
User’s Guide.
3 Custom Installation
Individually installs P-touch Editor 5.0,
printer driver, P-touch Update
Software, Printer Setting Tool.
4 Brother Support
Displays the link to Brother Developer
Center and Brother Solutions Center.
• You can use the Printer Setting Tool to
configure various printer settings when
the printer is connected to the computer
via USB.
Note that the printer driver must be
installed on the computer in order to
configure the printer.
c Read the license agreement and click
[Agree] if you agree with the terms and
conditions.
Setting Up the Printer
e When instructed, connect the printer to
the computer to finish the printer driver
installation.
f When the screen for the online user
registration is displayed, click [OK] or
[Cancel].
If you choose [OK], you will go to the
online user registration page before
finishing the installation
(recommended).
If you choose [Cancel], installation
continues.
g Click [Finish].
The software installation is now
complete.
1
d Click [Install] to start the installation and
follow the on-screen instructions.
When you are asked to restart the
computer, choose [Restart] and click
[Finish].
9
Chapter 1
Note
Installing the Printer Driver and the Software for RJ-4040
The RJ-4040 printer driver and software can
be installed using the following methods:
USB cable connection
Wireless network connection
When using a wireless network, please read
from Before You Begin below to Choosing
Your Wireless Install Method.
When using a USB cable, please read from
Installation Procedure (Using USB
Cable/Wireless Network) uu page 12.
Before You Begin 1
First you must configure the wireless network
settings of your printer to communicate with
your network access point/router. After the
printer is configured to communicate with
your access point/router, computers on your
network will have access to the printer. To
use the printer from these computers, you will
need to install the drivers and software. The
following steps will guide you through the
configuration and installation process.
If you are going to connect the
printer to your network, we
recommend that you contact your
1
system administrator prior to
installation. You must know your
wireless network settings before
you proceed with this installation.
If you have previously configured
the printer's wireless settings, you
must reset the network settings
before you can configure the
wireless settings again.
1 Press and hold the (Power)
button to turn the printer off.
2 Press and hold the (Feed)
button and the (Power) button
until the POWER, STATUS and
BATTERY indicators start
blinking in orange.
3 While pressing the (Power)
button, press the (Feed)
button once.
4 Release the (Power) button
and the (Feed) button at the
same time.
To achieve optimum results with normal
everyday document printing, use the
printer as close to the network access
point/router as possible with minimal
obstructions. Large objects and walls
between the two devices as well as
interference from other electronic devices
can affect the data transfer speed of your
documents.
Due to these factors, wireless may not be
the best method of connection for all types
of documents and applications.
The maximum processing speed is
possible when using USB.
10

Setting Up the Printer
Note
Note
2
5
4
3
1
Infrastructure Mode 1
1 Access point/router
2 Your printer
3 Wireless capable computer connected to
the access point/router
4 Wired computer connected to the access
point/router
5 Smartphone
It is recommended that you use a computer
wirelessly connected to your network for this
method.
You need to temporarily use a USB
cable (optional) during
configuration.
®
If you are using Windows
using a network cable to connect
your computer with your wireless
access point/router, you need to
know the SSID and Network Key of
your WLAN access point/router
before you proceed. Please print out
the following “MEMO” and write
down your wireless network settings
in the area below.
Please do not contact Brother
Customer Service for assistance
without the wireless security
information. We cannot assist you in
locating your network security
settings.
XP or
1
Choosing Your Wireless Install Method 1
The following instructions will offer two
methods for installing your printer in a
wireless network environment. Choose the
method you prefer for your environment.
To set up your printer in any other wireless
environment, refer to the Network User’s
Guide.
Configuration using the Installer CD-ROM and temporarily using a USB cable
MEMO 1
Item Setting
SSID (Network Name)
Network Key (Security
Key/Encryption Key)
* The Network Key may also be described as
the Password, Security Key or Encryption
Key.
• If you do not know this information (SSID
and Network Key), you cannot continue
the wireless setup.
1
• How can I find this information (SSID and
Network Key)?
1 Refer to the documentation provided
with your WLAN access point/router.
2 The initial network name could be the
manufacturer's name or the model
name.
11

Chapter 1
Note
Note
3 If you do not know the security
information, please consult the router
manufacturer, your system
administrator, or internet provider.
One push configuration using WPS 1
If your WLAN access point/router supports
automatic wireless (one-push) setup (WPS),
you can also choose this method.
Now, go on to the installation procedure.
If you choose "Configuration using the
Installer CD-ROM and temporarily using a
USB cable", go to the next section
Installation Procedure (Using USB
Cable/Wireless Network).
Windows
®
7 is used in the following example.
a Insert the installer CD-ROM into your
CD-ROM drive. If the model name
screen appears, choose your printer. If
the language screen appears, choose
your language
If the CD-ROM menu is not displayed
automatically, open the files on the
CD-ROM and double click [Start.exe].
b Click [Standard Installation].
1
2
3
4
5
If you choose "One push configuration
using WPS", go to One Push
Configuration Using WPS and Installation
uu page 16.
Installation Procedure (Using USB Cable/Wireless Network)1
The procedure for installing the software
varies depending on the OS of the computer.
The installation procedure is subject to
change without notice.
Make sure that you are logged on with
Administrator rights.
This section explains how to install P-touch
Editor 5.0, the printer driver, P-touch Update
Software and the Printer Setting Tool using
the Standard Installation option.
• Installation items:
1 Standard Installation
Installs P-touch Editor 5.0, printer
driver, P-touch Update Software,
Printer Setting Tool.
2 User’s Guide
Displays the User’s Guide, Software
User’s Guide, Network User’s Guide.
3 Custom Installation
Individually installs P-touch Editor 5.0,
printer driver, P-touch Update
Software, Printer Setting Tool.
4 Utility Installation
Installs BRAdmin Light utility.
12

5 Brother Support
Note
Setting Up the Printer
Displays the link to Brother Developer
Center, Brother Solutions Center.
• You can use the Printer Setting Tool to
configure various printer settings when
the printer is connected to the computer
via USB.
Note that the printer driver must be
installed on the computer in order to
configure the printer.
c Read the license agreement and click
[Agree] if you agree with the terms and
conditions.
d Click [Install] to start the installation and
follow the on-screen instructions.
e When the following screen appears,
choose your connection method and
click [Next].
Connection method:
1 Local Connection (USB)
2 Wireless Network Connection
When configuring multiple printers for
wireless network connection:
After using a USB connection to install the
drivers and the Printer Setting Tool on the
computer, you can use the Network
Setting Tool to easily configure network
settings for multiple printers.
If you choose [Wireless Network
Connection], move on to For
Wireless Network Users
uu page 13.
If you choose [Local Connection
(USB)] as your connection method,
move on to For USB Users
uu page 16.
For Wireless Network Users 1
a When the [Firewall/AntiVirus
detected] screen appears, choose
[Change the Firewall port settings to
enable network connection and
continue with the installation.
(Recommended)] and click [Next].
If you are not using the Windows
Firewall allow access using UDP ports
137 and 161.
®
1
13
Chapter 1
Note
Note
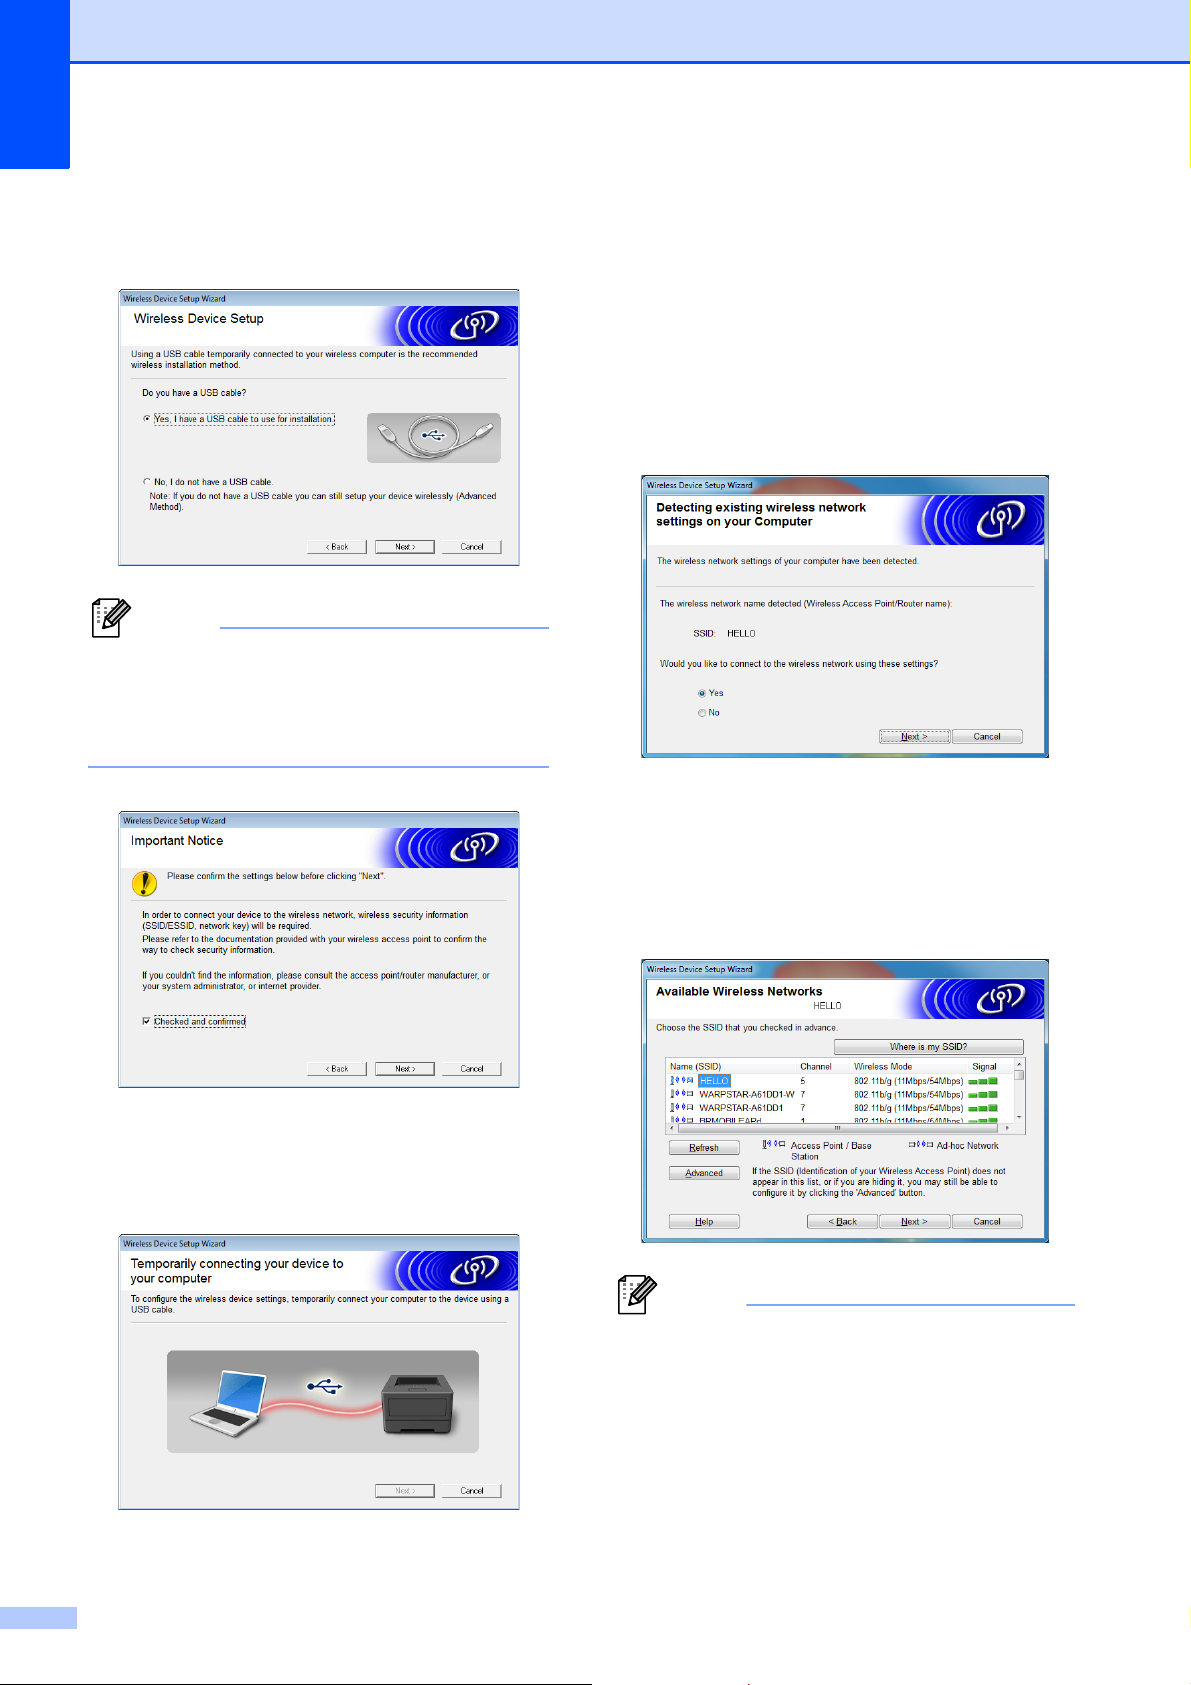
b Choose [Yes, I have a USB cable to
use for installation], and then click
[Next].
If the [Important Notice] screen appears,
read the notice. Check the box after you
confirm the SSID and Network Key, and
then click [Next].
d Do one of the following:
If the Installation confirmation screen
appears, check the box and click
[Next], then go to e.
Otherwise, go to f.
e Check [Yes] if you want to connect with
the listed SSID. Click [Next] and go to
h.
f The wizard will search for wireless
networks available from your printer.
Choose the SSID that you noted in
MEMO uu page 11 and then click
[Next].
c Temporarily connect the USB cable
(optional) directly to the computer and
the printer.
14
• If the list is blank, check that the access
point is turned on and is broadcasting the
SSID, and then see if the printer and the
access point are within range for wireless
communication.
Then, click [Refresh].

Setting Up the Printer
Note
Note
Note
• If your access point is set to not broadcast
the SSID, you can enter the SSID
manually by clicking the [Advanced]
button. Follow the on-screen instructions
for entering the [Name (SSID)], and then
click [Next].
g Enter the [Network Key] you noted in
MEMO uu page 11 and then click
[Next].
• If you want to manually assign an IP
address to the printer, click [Change IP
Address] and enter an IP address that is
compatible with your network.
• If the wireless setup failure screen
appears, click [Retry].
i Disconnect the USB cable connecting
the computer and the printer and then
click [Next].
Wireless setup is now complete.
Go on to j to install the printer driver
and the software.
j Choose the printer from the list, and
then click [Next].
1
If your network is not configured for
authentication and encryption, the
[ATTENTION!] screen will appear. To
continue configuration, click [OK] and go
to h.
h Confirm the wireless network settings
and then click [Next]. The settings will
be sent to your printer.
• The settings will remain unchanged if you
click [Cancel].
• If your wireless settings fail, the [Wireless
Device Setup Wizard] screen appears.
Follow the on-screen instructions to
complete the wireless configuration.
• If you are using WEP but your printer is
not found, make sure you entered the
WEP key correctly.
k Follow the on-screen instructions to
complete setup.
DO NOT cancel any of the screens
during the installation. It may take a few
seconds for all screens to appear.
15
 Loading...