

Page 1
Quick Setup Guide
QL-710W/720NW
Be sure to read and understand this guide before using the machine. We
recommend that you keep this guide nearby for future reference.
Not all models are available in all countries.
www.brother.com
ENG
Page 2

Thank you for purchasing the Brother QL-710W/720NW.
This guide briefly describes the steps to start using the Brother QL-710W/720NW.
See the User’s Guide for details. The User’s Guide can be found in the Manuals folder of
the included CD-ROM.
We strongly recommend that you read this guide carefully before using the Brother
QL-710W/720NW, and then keep it nearby for future reference.
We provide service & support for users who register their products on our website.
We recommend that you take this opportunity to register with us by visiting us at:
Online User Registration
http://register.eu.brother.com/
Online Support Page
http://solutions.brother.com/
NOTE: It is also possible to access the above sites from the online user registration
window of the included CD-ROM. We look forward to your registration.
Declaration of Conformity Europe only
We, BROTHER INDUSTRIES, LTD.
declares that the product
Product Name: Label Printer
Model Number: QL-710W/720NW
is in compliance with the essential requirements and other relevant provisions of Directives
1999/5/EC, 2009/125/EC.
The Declaration of Conformity (DoC) is on our website. Please go to http://solutions.brother.com →
choose region (eg. Europe) → choose country → choose your model → choose “Manuals” →
choose Declaration of Conformity (* select Language when required).
15-1, Naeshiro-cho, Mizuho-ku,
Nagoya, 467-8561, Japan
®
International ENERGY STAR
The purpose of the International ENERGY STAR
Compliance Statement
®
Program is
to promote the development and popularization of energyefficient office equipment.
As an ENERGY STAR
determined that this product meets the ENERGY STAR
®
Partner, Brother Industries, Ltd. has
®
guidelines for energy efficiency.
IMPORTANT NOTE
This product is approved for use in the country of purchase only. Do not use this product outside the country of purchase as it may violate the wireless telecommunication and power regulations of that country.
This product supports Windows
Mac OS X 10.5.8 - 10.7.
®
Windows
Windows
Windows Vista
Windows
Windows Server
Windows Server
Windows Server
Windows Server
XP in this document represents Windows® XP Professional and Windows® XP Home Edition. In addition,
®
XP in this document does not represent Windows® XP x64 Edition.
®
in this document represents all editions of Windows Vista®.
®
7 in this document represents all editions of Windows® 7.
®
2003 in this document represents Windows Server® 2003, Windows Server® 2003 R2. In addition,
®
2003 in this document does not represent Windows Server® 2003 x64 Edition.
®
2008 in this document represents all editions of Windows Server® 2008 and
®
2008 R2.
®
XP/Windows Vista®/Windows® 7/Windows Server® 2003/Windows Server® 2008/
Page 3

Contents
Contents ••••••••••••••••••••••••••••••••••••••••••••••••••••••••••••••••••••••••• 1
General Information ••••••••••••••••••••••••••••••••••••••••••••••••••••••••••• 2
To use the machine safely ••••••••••••••••••••••••••••••••••••••••••••••••••• 3
General Precautions •••••••••••••••••••••••••••••••••••••••••••••••••••••••••••••••••••• 5
1 Unpacking the QL-710W/720NW••••••••••••••••••••••••••••••••••••••••••• 7
2 Parts Description••••••••••••••••••••••••••••••••••••••••••••••••••••••••••••••• 8
Main Printing Unit•••••••••••••••••••••••••••••••••••••••••••••••••••••••••••••••••••••••• 8
3 Connecting the Power Supply••••••••••••••••••••••••••••••••••••••••••••••• 8
4 Setting the DK Roll •••••••••••••••••••••••••••••••••••••••••••••••••••••••••••• 9
5 Installing the Software •••••••••••••••••••••••••••••••••••••••••••••••••••••••• 10
For USB interface users (Windows®)•••••••••••••••••••••••••••••••••••••••••••••••• 11
For USB interface users (Macintosh)•••••••••••••••••••••••••••••••••••••••••••••••• 13
For wired network interface users (Windows
For wired network interface users (Macintosh) (QL-720NW only) ••••••••••••• 18
For wireless network interface users •••••••••••••••••••••••••••••••••••••••••••••••• 20
For Windows
For Macintosh users •••••••••••••••••••••••••••••••••••••••••••••••••••••••••••••••••••• 28
®
users •••••••••••••••••••••••••••••••••••••••••••••••••••••••••••••••••••• 23
6 Installing and using other software ••••••••••••••••••••••••••••••••••••••••• 31
BRAdmin Light (Windows®) ••••••••••••••••••••••••••••••••••••••••••••••••••••••••••• 31
BRAdmin Light (Macintosh) ••••••••••••••••••••••••••••••••••••••••••••••••••••••••••• 32
P-touch Editor Lite LAN (Windows
®
7 Start P-touch Editor Help••••••••••••••••••••••••••••••••••••••••••••••••••••• 34
For Windows®•••••••••••••••••••••••••••••••••••••••••••••••••••••••••••••••••••••••••••• 34
For Macintosh •••••••••••••••••••••••••••••••••••••••••••••••••••••••••••••••••••••••••••• 35
®
) (QL-720NW only) ••••••••••••• 15
) •••••••••••••••••••••••••••••••••••••••••••••••• 33
1
Page 4

2
General Information
Compilation and Publication Notice
Under the supervision of Brother Industries Ltd., this guide has been compiled and published,
covering the latest product’s descriptions and specifications.
The contents of this guide and the specifications of this product are subject to change without
notice.
Brother reserves the right to make changes without notice in the specifications and materials
contained herein and shall not be responsible for any damages (including consequential)
caused by reliance on the materials presented, including but not limited to typographical and
other errors relating to the publication.
The screen images in this guide may differ depending on your OS or printer.
© 2012 Brother Industries, Ltd. All rights reserved.
Trademarks
The Brother logo is a registered trademark of Brother Industries, Ltd.
Brother is a registered trademark of Brother Industries, Ltd.
Microsoft, Windows Vista, Windows Server and Windows are either registered trademarks or
trademarks of Microsoft Corp. in the United States and/or other countries.
Apple, Macintosh, Mac OS, iPhone, iPod touch, iPad and Safari are trademarks of Apple Inc.,
registered in the United States and other countries.
Wi-Fi and Wi-Fi Alliance are registered trademarks of the Wi-Fi Alliance.
Wi-Fi Protected Setup, WPA, and WPA2 are marks of the Wi-Fi Alliance.
Android is a trademark of Google Inc.
The names of other software or products used in this document are trademarks or registered
trademarks of the respective companies that developed them.
Each owner whose software title is mentioned in this document has a Software Licence
Agreement specific to its proprietary programs.
Any trade names and product names of companies appearing on Brother products, related
documents and any other materials are all trademarks or registered trademarks of those
respective companies.
Symbols Used in this Guide
The symbols used throughout this guide are as follows:
This symbol shows information or directions that should be followed. If ignored, this may
result in injury, damage or failure to operate.
This symbol shows information or directions that can help you better understand and use
the machine more efficiently.
Open Source Licensing Remarks
This product includes open-source software.
Please see Open Source Licensing Remarks and Copyright information on the supplied
CD-ROM.
(For Windows
(For Macintosh) Double-click the CD-ROM icon on your desktop. Then double-click the
Utilities icon. Licence.rtf will appear.
®
) “X:\Licence.txt” (where X is your drive letter).
Page 5
To use the machine safely
Read and understand all of these instructions and save them for later reference. Follow all
warnings and instructions marked on the product.
Indicates a potentially hazardous situation which, if the product is handled
WARNING
CAUTION
The symbols used in the manuals for this product are as follows:
Action NOT allowed. DO NOT disassemble the product.
DO NOT splash the product with or
immerse the product in water.
Mandatory action. Unplugging.
Alerts to the possibility of electrical
shock.
To use the machine safely
Follow these guidelines to avoid fire, electric shock, or other damage.
The Machine
Do not use the printer in special
environments, such as near medical
equipment. Electromagnetic waves
may cause the medical equipment to
malfunction.
Users with heart pacemakers should move
away from the machine if they sense any
abnormalities.
Dispose of plastic bags correctly and keep
away from babies and children. Do not
wear or play with plastic bags.
Unplug the power cord immediately
and stop using the machine if you notice
any abnormal odour, heat, smoke,
discolouration, deformation or anything
unusual whilst the machine is on.
without following the warnings and instructions, could result in death or serious
injuries.
Indicates a potentially hazardous situation which, if the product is handled
without following warnings and instructions, may result in minor or moderate
injuries, and/or property damage.
DO NOT touch a specified part of the
product.
WARNING
Do not disassemble the machine.
For inspection, adjustment and repair
of the machine, contact the retail outlet
where the machine was purchased or your
local authorised service centre.
Do not drop, hit or cause any damage
to the machine.
Do not place the machine in a location
where it could get wet, such as a kitchen,
bathroom, or near a humidifier. Doing so
could cause an electrical shock or fire.
Do not allow any liquids to come into
contact with the machine.
3
Page 6

4
WARNING
Do not use the machine with foreign
objects in it. Do not drop any metal objects
such as paper clips and staples into the
machine. If water or any foreign objects
should enter the machine, unplug the
power cord from the electric outlet and
remove the foreign object. If necessary,
contact the retail outlet where the machine
was purchased or your local authorised
service centre.
Do not allow organic solvents (benzene,
paint thinner, nail polish remover,
deodoriser, etc.) to come into contact with
the machine and its connecting cables.
Doing so may cause the equipment to
deform or dissolve, and there may be a risk
of electrical shock or fire.
Do not touch the machine during a severe
thunderstorm, as this may result in
electrical shock.
Follow these guidelines to avoid fire, electric shock, or other damage.
Power Cord
Use only the authorised power source
(220 - 240V AC) for the machine.
Use only the power cord included with the
machine.
Do not handle the power cord or plug if
your hands are wet.
Do not overload the electrical outlet with
too many appliances or plug the power
cord into a damaged electrical outlet.
Do not cut, damage, alter or place heavy
objects on the power cord.
Regularly remove the power plug from
the electrical outlet, and clean the base of
the pins and between the pins. If you leave
the power plug in the electrical outlet
for an extended period of time, dust will
accumulate at the base of the power plug
pins. This could cause a short circuit that
may result in a fire.
Make sure to turn off the machine and
remove the power cord from the electrical
outlet when cleaning the machine. Failure
to do so could cause an electrical shock or
fire.
To avoid possible fire or electrical shock,
never disassemble the machine or allow it
to get wet.
Do not use paint thinner, benzene, alcohol
or any other organic solvents to clean the
machine. Doing so may cause damage to
the surface finish. Use a soft, dry cloth to
clean the machine.
Do not put any heavy objects or objects
containing water on top of the machine.
If water or any foreign object enters the
machine, contact the retail outlet where
the machine was purchased or your local
authorised service centre. If you continue
to use the machine with water or a foreign
object in the machine, the machine may be
damaged or personal injury could result.
Do not use the power cord if it is damaged.
Ensure the power cord is correctly inserted
into the electrical outlet.
Do not pull the power cord when removing
the power plug from the electrical outlet.
Doing so could cause an electrical shock
or fire.
Do not bend, break or damage the cord in
any way, as it may result in an electrical
shock, fire or a machine malfunction.
Do not use an extension cord, as this may
result in a fire, electrical shock, or damage
to the machine.
Page 7
CAUTION
Follow these guidelines to avoid fire, electric shock, or other damage.
The Machine
The machine may malfunction if left near a television, radio, etc. Do not use the machine
near any machine that can cause electromagnetic interference.
Ensure that small children do not put their fingers in the moving parts or openings of the
machine.
The electrical outlet should be close to the machine and be easily accessible.
Do not touch the cutter. Personal injury could result.
When the machine is not being used, store it out of the reach of children. In addition, do not
allow children to put machine parts or labels in their mouths. If any object has been
swallowed, seek medical attention.
Do not place the machine in areas exposed to direct sunlight, near heaters or other hot
appliances, or in any area exposed to extremely high or low temperatures, high humidity
or excessive dust. Doing so could cause the machine to malfunction.
Do not hold or lift the machine by the DK Roll cover. The cover could come off and the
machine could fall and become damaged.
Do not hold the machine with only one hand. The machine may slip out of your hand.
Make sure of the correct orientation and procedure when attaching the various cables and
optional products. In addition, use only the specified cables and optional products. Failure
to do so could cause a fire or personal injury. Follow the instructions in the manual to
correctly attach the equipment.
Do not remove the labels (labels indicating operations, product number, etc.) attached to
the machine.
Power Cord
If the machine will not be used for an extended period, remove the power cord from the
electrical outlet.
Cutter
Do not touch the blade of the cutter.
Do not open the top cover when the cutter is operating.
Installation/Storage
Put the machine on a flat, stable surface
such as a desk.
Do not put any heavy objects on top of the
machine.
5
General Precautions
The Machine
•
The machine is a precision machine. Do not drop, hit or cause any damage to the machine.
• Do not lift the machine by the DK Roll compartment cover. The cover could come off and the
machine could fall and become damaged.
• Do not insert any objects into or block the label output slot, USB port, Serial port or LAN port.
• Use only the interface cable (USB cable) included with the machine.
• When not in use for an extended period, remove the DK Roll from the machine.
• Do not attempt to print labels while the DK Roll cover is open.
Page 8

6
DK Roll (DK Label and DK Tape)
•
Use only genuine Brother accessories and supplies (with , marks). Do not use any
unauthorised accessories or supplies.
• If the label is attached to a wet, dirty, or oily surface, it may peel off easily. Before applying the
label, clean the surface to which the label will be applied.
• DK Rolls use thermal paper or film that can fade in colour or peel off surfaces if exposed to
ultraviolet light, wind or rain.
• Do not expose the DK Rolls to direct sunlight, high temperatures, high humidity, or dust. Store
in a cool, dark place. Use the DK Rolls soon after opening the package.
• Scratching the printed surface of the label with your finger nails or metal objects, or touching
the printed surface with hands dampened by water or sweat can cause the colour to change
or fade.
• Do not apply labels to any persons, animals, or plants. In addition, never apply labels to public
or private property without permission.
• As the end of the DK Roll is designed to not adhere to the label spool, the last label may not
be cut properly. If this happens, remove the remaining labels, insert a new DK Roll, and reprint
the last label.
Note: To account for this, the number of DK Labels included on each DK Roll may be more
than indicated on the package.
• When a label is removed after being applied to a surface, a portion of the label may remain.
• Prior to using CD/DVD labels, be sure to follow the instructions in your CD/DVD player’s
instruction guide regarding applying CD/DVD labels.
• Do not use CD/DVD labels in a slot loading CD/DVD player, for example a CD player in a car
where the CD is slid into a slot in the CD player.
• Do not peel off the CD/DVD label once it is applied to the CD/DVD, a thin surface layer may
come off, resulting in damage to the disk.
• Do not apply CD/DVD labels to CD/DVD disks designed for use with ink jet printers. Labels
peel off these disks easily and using disks with peeled labels can result in loss or damage
of data.
• When applying CD/DVD labels, use the applicator included with the CD/DVD label rolls.
Failure to do so could cause damage to the CD/DVD player.
• Users shall take full responsibility for applying CD/DVD labels. Brother accepts no
responsibility for any loss or damage of data caused by the inappropriate use of CD/DVD
labels.
• Be careful not to drop the DK Roll.
• DK Rolls use thermal paper and thermal film. Both the label and print will fade with sunlight
and heat. Do not use DK Rolls for outdoor use that requires durability.
• Depending on the area, material, and environmental conditions, the label may unpeel or
become irremovable, or the colour of the label may change or be transferred to other
objects. Before applying the label, check the environmental conditions and the material.
Test the label by affixing a small piece of it to an inconspicuous area of the intended surface.
CD-ROM and Software
•
Do not scratch or subject the CD-ROM to high or low temperatures.
• Do not put heavy objects on the CD-ROM or apply force to the CD-ROM.
• The software contained on the CD-ROM is meant for use with this machine only. See the
Licence on the CD-ROM for details. This software may be installed on multiple computers
for use in an office, etc.
Page 9
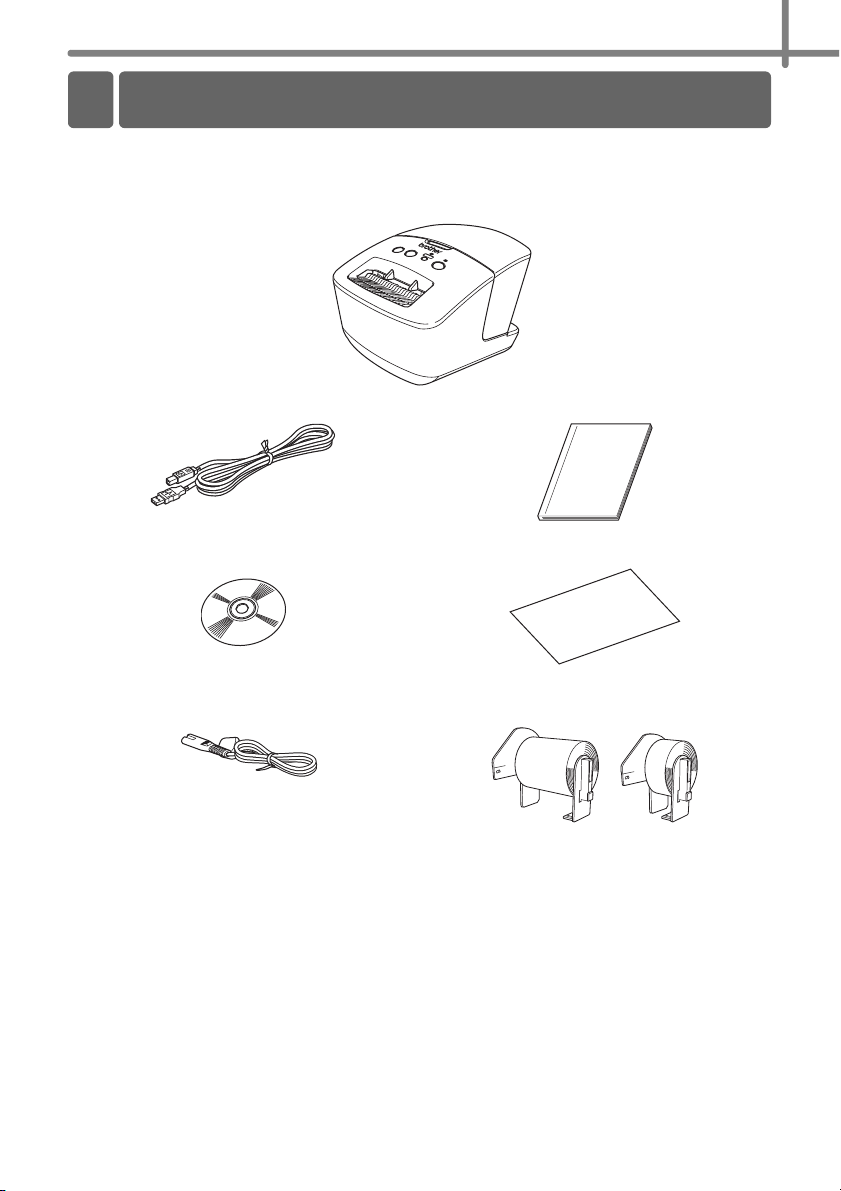
1 Unpacking the QL-710W/720NW
Check that the package contains the following before using the printer. If any item is missing
or damaged, contact your Brother dealer.
QL-710W/720NW
USB cable Quick Setup Guide
CD-ROM DK Label & Tape Guide
7
AC Power cord
The plug may differ by country.
DK Roll (Starter roll)
The Brother QL-710W/720NW includes two
starter rolls:
• One starter roll of DK Die-cut Standard Address
Labels (100 labels).
• One starter roll of DK Continuous Durable Tape
(62 mm x 8 m).
Page 10
8
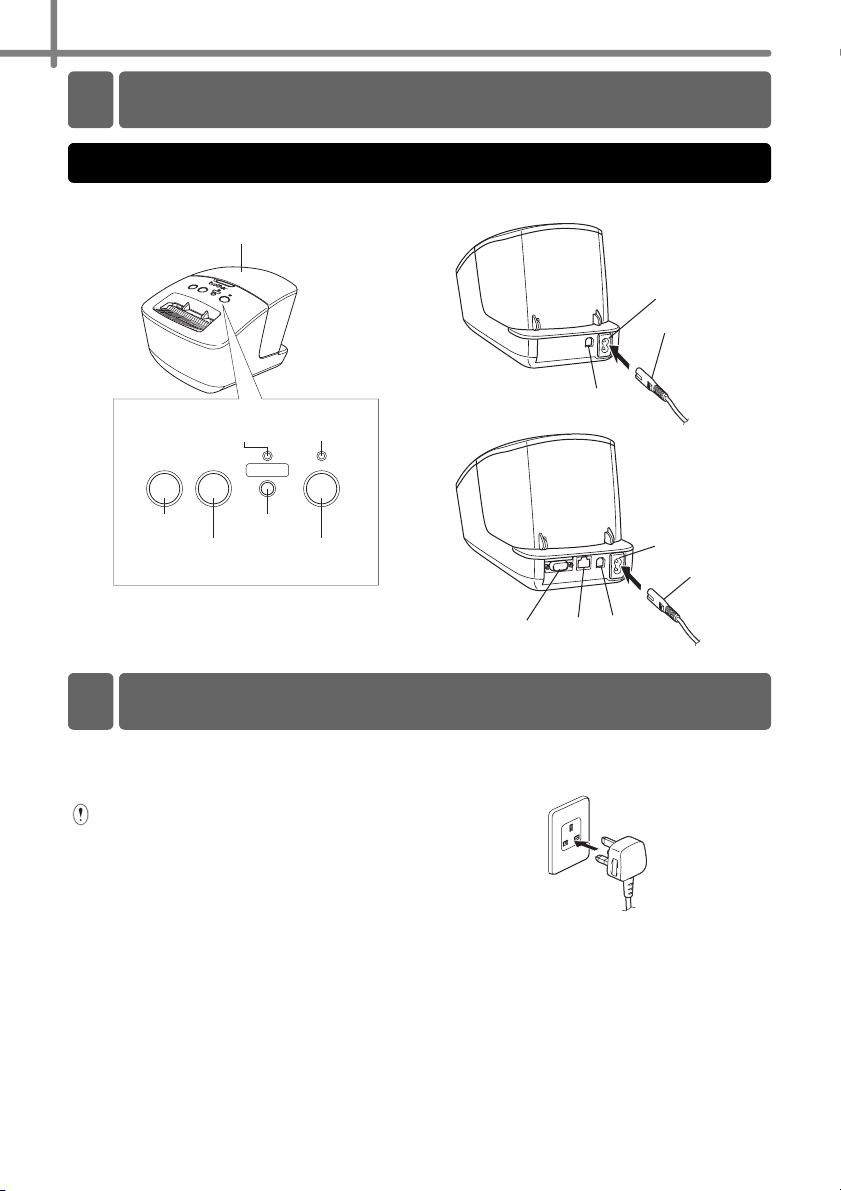
2 Parts Description
Main Printing Unit
Front Rear
DK Roll compartment cover
Wi-Fi
button
Status
lamp
ON/OFF
button
Wi-Fi
lamp
Feed
button
Cut
button
When the Wi-Fi lamp is lit, wired network connections
are disabled.
USB port
LAN portSerial port
<QL-710W>
Power port
Power cord
<QL-720NW>
Power port
Power cord
USB port
3 Connecting the Power Supply
Connect the power cord to the QL-710W/
720NW and then plug the power cord into
an electrical outlet.
• Check that the electrical outlet is
220 - 240 V AC before plugging the
power cord.
• Unplug the power cord from the
electrical outlet after you have finished
using the QL-710W/720NW.
• Do not pull the power cord when
unplugging it from the electrical outlet.
The wire in the power cord may become
damaged.
• Do not connect the QL-710W/720NW to
the computer until directed to do so
when installing the printer driver.
The plug may differ by country.
Page 11
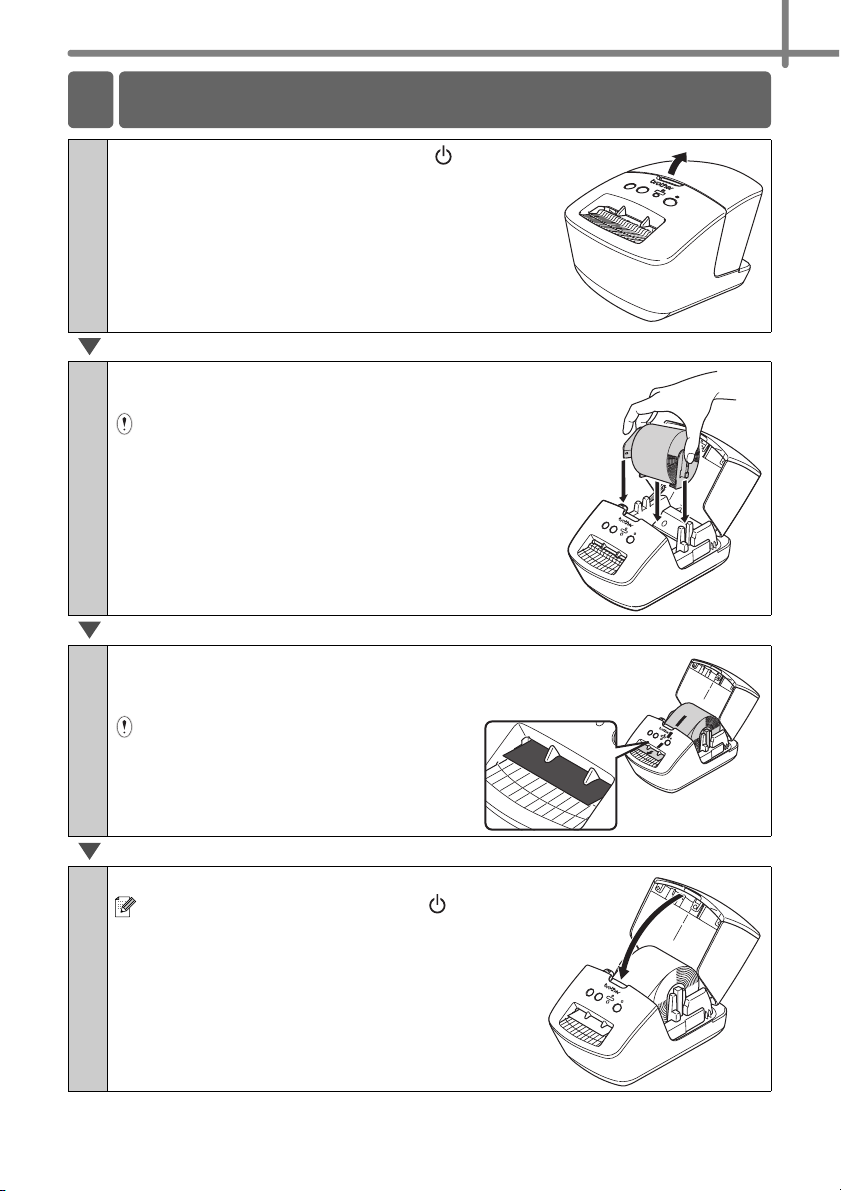
4 Setting the DK Roll
Press and hold the ON/OFF button ( ) to turn
1
the QL-710W/720NW off. Hold the Brother
QL-710W/720NW by the front of the machine,
and firmly lift the DK Roll compartment cover to
open the cover.
Put the spool into the spool guides in the DK Roll
2
compartment.
• Make sure that the spool arms are inserted firmly
in the spool guides on the left and right.
• Insert the spool with the DK Roll into the spool
guide located on the right hand side of the Brother
QL-710W/720NW.
9
Thread the end of the DK Roll into the
3
slot until it aligns with the area shown
on the right.
Align the end of the roll with the upright
edge of the label output slot.
Close the DK Roll compartment cover.
4
When you press the ON/OFF button ( ) to turn
the Brother QL-710W/720NW on, the end of the
DK Die-cut Label is aligned automatically.
Page 12
10
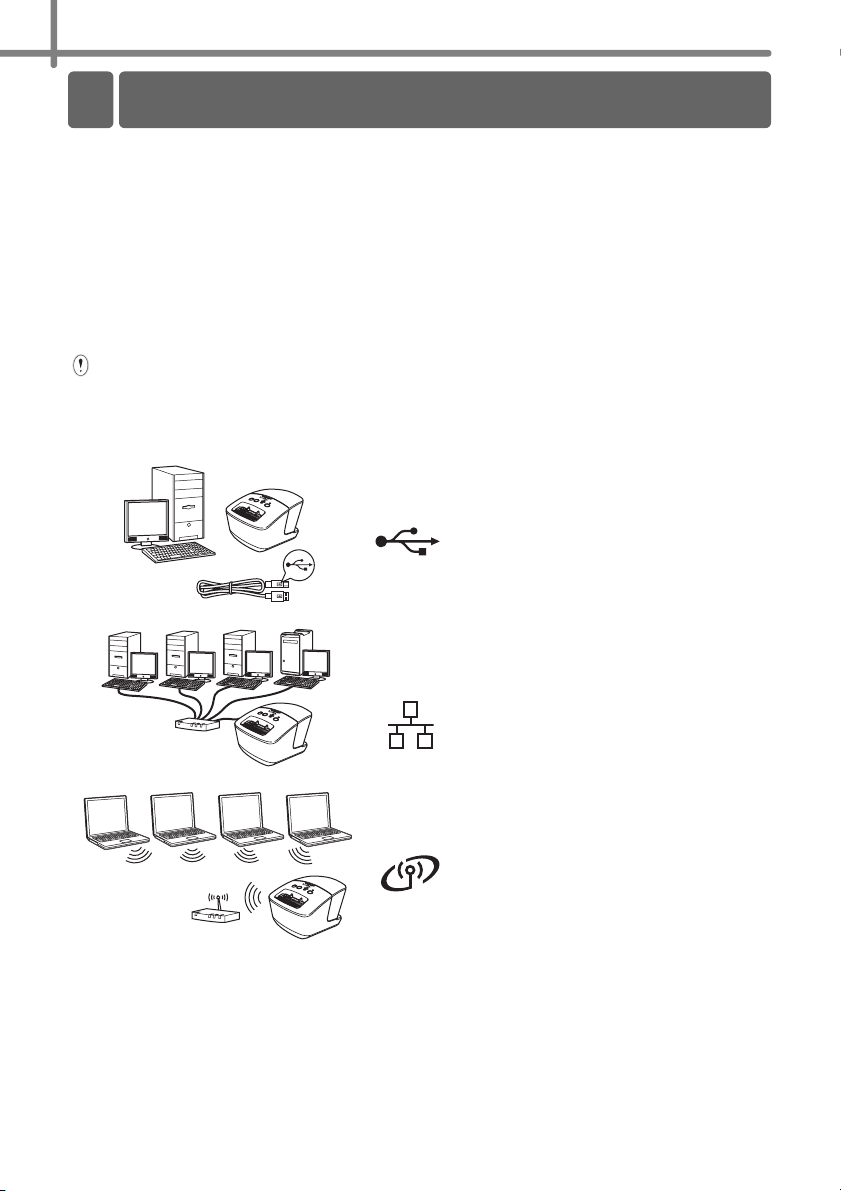
5 Installing the Software
This section explains how to install P-touch Editor 5.0, the printer driver, P-touch Update
Software and Printer Setting Tool using the Standard Installation option.
The procedure for installing the software varies depending on the OS of the computer.
The screens may differ depending on your operating system.
In the following steps, you will see QL-XXX. Read “XXX” as your printer name. The printer
names in the following screens may differ from your purchased printer name.
The screens displayed may differ between the QL-710W and QL-720NW. The screens of the
QL-720NW are used in the explanations in this manual.
Installation procedure is subject to change without notice.
If your computer does not have a CD-ROM drive you can download the latest
drivers, manuals and utilities for your model from the Brother Solutions Center at
http://solutions.brother.com/. Some software applications included on the CD-ROM
may not be available as a download.
For USB interface cable
Windows®, go to page 11
Macintosh, go to page 13
For Wired Network
(QL-720NW only)
Windows®, go to page 15
Macintosh, go to page 18
For Wireless Network
Windows® and Macintosh,
go to page 20
Page 13

11
For USB interface users (Windows
Before you install
Make sure that your computer is ON and
you are logged on with Administrator rights.
• DO NOT connect the USB cable yet.
• If there are any programs running,
close them.
Installing the software for USB
interface cable
Insert the installer CD-ROM
1
into your CD-ROM drive. If the
model name screen appears,
choose your printer. If the
language screen appears,
choose your language.
If the CD-ROM menu is not
displayed automatically, open
the files on the CD-ROM and
double click [Start.exe].
2
®
)
Click [Standard Installation].
1
2
3
4
5
Installation items:
1
Standard Installation
Installs P-touch Editor 5.0,
P-touch Address Book,
P-touch Update Software,
Printer Setting Tool, User’s
Guide and Printer Driver.
2
User’s Guides
Displays the User’s Guide,
Software User’s Guide and
Network User’s Guide.
3
Custom Installation
Individually installs P-touch
Editor 5.0, P-touch Address
Book, P-touch Update
Software, Printer Setting
Tool, Printer Driver, User’s
Guide and P-touch Editor
Lite LAN.
4
Network Utility
Installs BRAdmin Light utility.
5
Brother Support
Displays the link to Brother
Solutions Center.
• You can use the Printer Setting
Tool to configure various
printer settings when the
printer is connected to the
computer via USB.
Note that the printer driver
must be installed on the
computer in order to configure
the printer.
• P-touch Address Book is not
supported in some languages.
Page 14

12
Read the licence agreement
3
and click [Agree] if you agree
with the terms and conditions.
Click [Install] to start the
4
installation and follow the
on-screen instructions.
For Windows Vista® and
Windows
Account Control screen
appears, click Allow or Yes.
Choose Local Connection
5
(USB), and then click [Next].
The installation continues.
The QL-710W does not support
wired network connections
(Ethernet).
®
7, when the User
When the screen for the online
7
user registration is displayed,
click [OK] or [Cancel].
• If you choose [OK], you will go to
the online user registration page
before finishing the installation
(recommended).
• If you choose [Cancel], installation
continues.
Click [Finish].
8
The software installation is now
complete.
When you are asked to restart
the computer, click [Restart].
When instructed, connect the
6
printer to finish the printer
driver installation.
Page 15

For USB interface users (Macintosh)
13
Before you install
Make sure your machine is connected
to the power and your Macintosh is ON.
You must be logged on with Administrator
rights.
Connect the USB cable
If you are connecting the printer to
Macintosh via a USB hub, it may not
be detected correctly. If so, connect
the printer directly to the USB port on
Macintosh.
Installing the software for USB
interface cable
Insert the installer CD-ROM
1
into your CD-ROM drive.
Double-click the Start
2
Here OSX icon to install.
Available items:
1
Start Here OSX
Installs P-touch Editor 5.0,
P-touch Update Software
and the Printer Driver.
2
Utilities
Includes BRAdmin Light and
the Wireless Device Setup
Wizard.
3
Documentation
Includes the User’s Guide,
Software User’s Guide and
Network User’s Guide.
4
Brother Support
Displays the link to On-Line
Registration and Brother
Solutions Center.
Follow the on-screen
3
instructions.
After the installation
4
is completed, press the
ON/OFF button ( ) of the
machine to turn on the power.
Click [Apple menu] - [System
5
Preferences], and click Print &
Fax (Mac OS X 10.5.8 - 10.6)/
Print & Scan (Mac OS X 10.7).
Then click .
Page 16

14
Click . Choose Brother
6
QL-XXX from the list and
click [Add] to add the printer
to the Print & Fax
(Mac OS X 10.5.8 - 10.6)/
Print & Scan (Mac OS X 10.7).
When the screen returns to the
7
Print & Fax/Print & Scan
screen, check that Brother
QL-XXX is added, and close
the Print & Fax/Print & Scan
screen.
Now you can use the machine.
The installation of software is now
complete.
Page 17

For wired network interface users (Windows®) (QL-720NW only)
15
Before you install
Make sure that your computer is ON and
you are logged on with Administrator rights.
If there are any programs running,
close them.
Connect the network cable and
press the ON/OFF button ( )
of the machine to turn on the
power
Confirm that the Wi-Fi lamp of the
printer is not lit.
Installing the software for wired
network
Insert the installer CD-ROM
1
into your CD-ROM drive. If the
model name screen appears,
choose your printer. If the
language screen appears,
choose your language.
If the CD-ROM menu is not
displayed automatically, open
the files on the CD-ROM and
double click [Start.exe].
Click [Standard Installation].
2
1
2
3
4
5
Installation items:
1
Standard Installation
Installs P-touch Editor 5.0,
P-touch Address Book,
P-touch Update Software,
Printer Setting Tool, User’s
Guide and Printer Driver.
2
User’s Guides
Displays the User’s Guide,
Software User’s Guide and
Network User’s Guide.
3
Custom Installation
Individually installs P-touch
Editor 5.0, P-touch Address
Book, P-touch Update
Software, Printer Setting
Tool, Printer Driver, User’s
Guide and P-touch Editor
Lite LAN.
4
Network Utility
Installs BRAdmin Light utility.
5
Brother Support
Displays the link to Brother
Solutions Center.
• You can use the Printer Setting
Tool to configure various
printer settings when the
printer is connected to the
computer via USB.
Note that the printer driver
must be installed on the
computer in order to configure
the printer.
• P-touch Address Book is not
supported in some languages.
Read the licence agreement
3
and click [Agree] if you agree
with the terms and conditions.
Page 18

16
Click [Install] to start the
4
installation and follow the
on-screen instructions.
For Windows Vista® and
Windows
Account Control screen
appears, click Allow or Yes.
Choose Wired Network
5
Connection (Ethernet),
®
7, when the User
and then click [Next].
Follow the on-screen instructions
to check the cable and lamp status,
and then click [Next].
Choose Brother Peer-to-Peer
6
Network Printer
(recommended) or Network
Shared Printer, and then click
[Next].
When this screen appears,
7
choose Change the Firewall
port settings to enable
network connection and
continue with the
installation. (Recommended)
and click [Next].
If you are not using the Windows®
Firewall allow access using UDP
ports 137 and 161.
• Choose your machine from the list,
and then click [Next].
The following step describes the
operation when Peer-to-Peer is
selected.
For details on Network Shared
Printer connections please
see Brother Solutions Center
http://solutions.brother.com/
• If your machine is not found
over the network, the following
screen will appear.
Confirm your settings by following
the on-screen instructions.
Page 19

The installation of the Brother
8
drivers will automatically start.
The installation screens
appear one after another.
DO NOT cancel any of the
screens during the installation.
It may take a few seconds for
all screens to appear.
For Windows Vista
Windows
Windows
appears, click the check box
and click [Install] to complete
the installation.
When the screen for the online
9
user registration is displayed,
®
7, when the
®
Security screen
®
click [OK] or [Cancel].
• If you choose [OK], you will go to
the online user registration page
before finishing the installation
(recommended).
• If you choose [Cancel], installation
continues.
Click [Finish].
10
The software installation is now
complete.
When you are asked to restart
the computer, click [Restart].
17
and
Page 20

18
For wired network interface users (Macintosh) (QL-720NW only)
Before you install
Make sure that your computer is ON and
you are logged on with Administrator
rights.
Connect the network cable and
press the ON/OFF button ( ) of
the machine to turn on the
power
Confirm that the Wi-Fi lamp of the
printer is not lit.
Installing the software for wired
network
Insert the installer CD-ROM
1
into your CD-ROM drive.
Double-click the Start
2
Here OSX icon to install.
Available items:
1
Start Here OSX
Installs P-touch Editor 5.0,
P-touch Update Software
and the Printer Driver.
2
Utilities
Includes BRAdmin Light and
the Wireless Device Setup
Wizard.
3
Documentation
Includes the User’s Guide,
Software User’s Guide and
Network User’s Guide.
4
Brother Support
Displays the link to On-Line
Registration and Brother
Solutions Center.
Follow the on-screen
3
instructions.
Click [Apple menu] -
4
[System Preferences],
and click Print & Fax
(10.5.8 - 10.6)/Print & Scan
(10.7). Then click .
Page 21

19
For Simple Network
Configuration
Choose Brother QL-XXX from
5
the list and click [Add] to add
the printer.
Now, go to 6.
For Manual Network
Configuration
Choose IP at the top of the
5
screen. Select LPD as the
protocol. Enter the IP address
of the printer into the Address
box. Choose Brother QL-XXX
from the list and click [Add] to
add the printer.
When the screen returns to the
6
Print & Fax/Print & Scan
screen, check that
Brother QL-XXX is added,
and close the Print & Fax/
Print & Scan screen.
Now you can use the machine.
Use BRAdmin Light to change the
IP address. See page 31.
When specifying the Queue
name, use the value
BRNxxxxxxxxxxxx where
xxxxxxxxxxxx is the Ethernet
address.
Page 22

20
For wireless network interface users
Before You Begin
First you must configure the wireless
network settings of your printer to
communicate with your network access
point/router. After the printer is configured
to communicate with your access point/
router, computers on your network will
have access to the printer. To use the
printer from these computers, you will need
to install the drivers and software. The
following steps will guide you through the
configuration and installation process.
• If you are going to connect the printer
to your network, we recommend that
you contact your system
administrator prior to installation. You
must know your wireless network
settings before you proceed with this
installation.
• If you have previously configured the
printer’s wireless settings, you must
reset the network settings before you
can configure the wireless settings
again.
1 Turn the power OFF.
2 Press and hold the Cut button
while holding down the ON/OFF
button. The Wi-Fi lamp starts
flashing green and the Status
lamp lights orange.
3 Press the Cut button twice while
holding down the ON/OFF button.
The Wi-Fi lamp lights green and
the Status lamp lights orange.
To achieve optimum results with
normal everyday document printing,
use the printer as close to the network
access point/router as possible with
minimal obstructions. Large objects
and walls between the two devices
as well as interference from other
electronic devices can affect the data
transfer speed of your documents.
Due to these factors, wireless may
not be the best method of connection
for all types of documents and
applications. The maximum
processing speed is possible when
using USB.
Infrastructure Mode
The following instructions are for
infrastructure mode (connected to a
computer through an access point/router).
5
1
4
2
3
1 Access point/router
2Your printer
3 Wireless capable computer connected to the
access point/router
4 Wired computer connected to the access point/
router
5 Smartphone
Choosing Your Wireless Install
Method
The following instructions will offer two
methods for installing your printer in a
wireless network environment. Choose the
method you prefer for your environment.
To set up your printer in any other
wireless environment, refer to the
Network User’s Guide.
Method 1
Configuration using the Installer
CD-ROM and temporarily using
a USB cable
It is recommended that you use a
computer wirelessly connected to your
network for this method.
Page 23

21
• You need to temporarily use a USB
cable during configuration.
• If you are using Windows
®
XP or
using a network cable to connect
your computer with your wireless
access point/router, you need to
know the SSID and Network Key of
your WLAN access point/router
before you proceed. Please write
down your wireless network settings
in the area below.
• Please do not contact Brother
Customer Service for assistance
without the wireless security
information. We cannot assist you in
locating your network security
settings.
MEMO
Item Setting
SSID
(Network Name)
Network Key
(Security Key/
Encryption Key)
* The Network Key may also be described
as the Password, Security Key or
Encryption Key.
Method 2
One push configuration using WPS
and configuration using the Installer
CD-ROM
If your WLAN access point/router supports
automatic wireless (one-push) setup
(WPS), you can also choose this method.
• If you do not know this information
(SSID and Network Key), you cannot
continue the wireless setup.
• How can I find this information (SSID
and Network Key)?
1 Refer to the documentation
provided with your WLAN access
point/router.
2 The initial network name could be
the manufacturer’s name or the
model name.
3 If you do not know the security
information, please consult the
router manufacturer, your system
administrator, or internet provider.
Page 24

22
Now, go on to the installation procedure
This section explains the procedures for installation using the applicable method.
The installation procedures are as follows:
For Windows® users, go to page 23
For Macintosh users, go to page 28
Step 1
Step 2
Step 3
Step 4
Step 5
Step 6
Step 7
Step 8
Method 1:
Configuration
using the Installer
CD-ROM and
temporarily using
USB cable
Step 9-1 (page. )
(page 25)
Step 10-1
Step 11-1
Step 12-1
Step 13-1
Step 14-1
Step 15-1
Method 2:
One push
using WPS and
configuration
using the Installer
CD-ROM
Step 9-2 (page. )
(page 26)
Step 10-2
Step 11-2
Step 12-2
Method 1:
Configuration
using the Installer
CD-ROM and
temporarily using
USB cable
Step 4-1 (page. )
(page 28)
Step 5-1
Step 6-1
Step 7-1
Step 8-1
Step 9 (page.XX)
Step 10
Step 11
Step 12
Step 13
Step 1
Step 2
Step 3
Method 2:
One push
using WPS and
configuration
using the Installer
CD-ROM
Step 4-2 (page. )
Step 5-2
Step 6-2
Step 7-2
(page 30)
(page 29)
(page 27)
Step 16 (page. )
Step 17
Step 18
Step 19
• Make sure that you are logged on with Administrator rights.
• When the printer is on an Enterprise Wireless Network, connect the printer via USB and
configure its wireless settings. You can also use the Network Setting Tool to configure
these settings once you have installed the printer driver.
For information about the Network Setting Tool, see Network Setting Tool in the Network
User’s Guide.
Page 25

For Windows® users
23
Insert the installer CD-ROM
1
into your CD-ROM drive. If the
model name screen appears,
choose your printer. If the
language screen appears,
choose your language.
If the CD-ROM menu is not
displayed automatically, open
the files on the CD-ROM and
double click [Start.exe].
Click [Standard Installation].
2
1
2
3
4
5
Installation items:
1
Standard Installation
Installs P-touch Editor 5.0,
P-touch Address Book,
P-touch Update Software,
Printer Setting Tool, User’s
Guide and Printer Driver.
2
User’s Guides
Displays the User’s Guide,
Software User’s Guide and
Network User’s Guide.
3
Custom Installation
Individually installs P-touch
Editor 5.0, P-touch Address
Book, P-touch Update
Software, Printer Setting
Tool, Printer Driver, User’s
Guide and P-touch Editor
Lite LAN.
4
Network Utility
Installs BRAdmin Light utility.
5
Brother Support
Displays the link to Brother
Solutions Center.
• You can use the Printer Setting
Tool to configure various
printer settings when the
printer is connected to the
computer via USB.
Note that the printer driver
must be installed on the
computer in order to configure
the printer.
• P-touch Address Book is not
supported in some languages.
Read the licence agreement
3
and click [Agree] if you agree
with the terms and conditions.
Page 26

24
Click [Install] to start the
4
installation and follow the
on-screen instructions.
For Windows Vista® and
Windows
Account Control screen
appears, click [Allow] or [Yes].
Choose Wireless Network
5
Connection, and then click
[Next].
The QL-710W does not support
wired network connections
(Ethernet).
Choose Brother Peer-to-Peer
6
Network Printer
(recommended) or Network
Shared Printer, and then click
[Next].
®
7, when the User
When this screen appears,
7
choose Change the Firewall
port settings to enable
network connection and
continue with the
installation. (Recommended)
and click [Next].
The following step describes the
operation when Peer-to-Peer is
selected.
For details on Network Shared
Printer connections please
see Brother Solutions Center
http://solutions.brother.com/
Page 27

25
When using “Method 1:
8
Configuration using the
Installer CD-ROM and
temporarily using a USB
cable”, choose Yes, I have a
USB cable to use for
installation, and then click
[Next]. Go to 9-1. When using
“Method 2: One push
configuration using WPS and
configuration using the Installer
CD-ROM”, choose No, I do
not have a USB cable, and
then click [Next]. Go to 9-2.
If the Important Notice screen
appears, read the notice. Check
the box after you confirm the
SSID and Network Key, and
then click [Next].
For Method 1 users
Temporarily connect the USB
9-1
cable directly to the computer
and the printer.
Do one of the following:
10-1
• If the Installation confirmation
screen appears, check the box and
click [Next], then go to
• Otherwise, go to
Check [Yes] if you want to
11-1
connect with the listed SSID.
Click [Next] and go to 14-1
12-1.
11-1.
.
Go to
9-1. Go to 9-2.
Page 28

26
The wizard will search for
12-1
wireless networks available
from your printer. Choose
the SSID that you noted in
MEMO Î page 21 and then
click [Next].
• If the list is blank, check that
the access point is turned on
and is broadcasting the SSID,
and then see if the printer and
the access point are within
range for wireless
communication.
Then, click [Refresh].
• If your access point is set to not
broadcast the SSID, you can
enter the SSID manually by
clicking the [Advanced]
button. Follow the on-screen
instructions for entering the
Name (SSID), and then click
[Next].
Enter the Network Key you
13-1
noted in MEMO Î page 21
and then click [Next].
Confirm the wireless network
14-1
settings and then click [Next].
The settings will be sent to
your printer.
• The settings will remain
unchanged if you click
[Cancel].
• If you want to manually assign
an IP address to the printer,
click [Change IP Address]
and enter an IP address that is
compatible with your network.
• If the wireless setup failure
screen appears, click [Retry].
Disconnect the USB cable
15-1
connecting the computer and
the printer and then click [Next].
Wireless setup is now
complete. Go on to 16 to
install the printer driver and the
software.
For Method 2 users
Confirm that your WLAN
9-2
access point/router has the
WPS symbol.
If your network is not configured
for authentication and encryption,
the ATTENTION! screen will
appear. To continue
configuration, click [OK] and go
to
14-1.
Place your printer within range
10-2
of your WPS access point/
router. The range may differ
depending on your
environment. Refer to the
instructions provided with your
access point/router.
Page 29

27
Turn on your printer and press
11-2
and hold the Wi-Fi button until
the (Wi-Fi) indicator
starts blinking in green.
Press the WPS button on your
12-2
WLAN access point/router.
When the configuration is
completed, the
(Wi-Fi) indicator on
your printer lights in green.
Wireless setup is now
complete. Go on to 16.
Choose the printer from the
16
list, and then click [Next].
• If your wireless settings fail,
the [Wireless Device Setup
Wizard] screen appears.
Follow the on-screen
instructions to complete the
wireless configuration.
• If you are using WEP but your
printer is not found, make sure
you entered the WEP key
correctly.
When the screen for the online
18
user registration is displayed,
click [OK] or [Cancel].
• If you choose [OK], you will go
to the online user registration
page before finishing the
installation (recommended).
• If you choose [Cancel],
installation continues.
Click [Finish].
19
The software installation is now
complete.
Turn the power of the printer
OFF, and then ON again.
When you are asked to restart
the computer, click [Restart].
Depending on your security settings,
a Windows
software window may appear when
using the printer or its software. Please
allow or permit the installer to continue.
®
Security or antivirus
The installation of the Brother
17
drivers will automatically start.
The installation screens
appear one after another.
DO NOT cancel any of the
screens during the installation.
It may take a few seconds for
all screens to appear.
For Windows Vista
Windows
Windows
appears, click the check box
and click [Install] to complete
the installation.
®
7, when the
®
Security screen
®
and
Page 30

28
For Macintosh users
Insert the installer CD-ROM
1
into your CD-ROM drive.
Double-click the Wireless
2
Device Setup Wizard icon
in the Utilities folder.
When using “Method 1:
3
Configuration using the
Installer CD-ROM and
temporarily using a USB
cable”, choose Yes, I have
a USB cable to use for
installation, and then click
[Next]. Go to 4-1.
When using “Method 2: One
push configuration using WPS
and configuration using the
Installer CD-ROM”, choose
No, I do not have a USB
cable, and then click [Next].
Go to 4-2.
For Method 1 users
Temporarily connect the USB
4-1
cable directly to the computer
and the printer, and then click
[Next].
The wizard will search for
5-1
wireless networks available
from your printer. Choose
the SSID that you noted in
MEMO Î page 21 and then
click [Next].
If the Important Notice screen
appears, read the notice. Check
the box after you confirm the
SSID and Network Key, and
then click [Next]/[Finish].
Go to
4-1. Go to 4-2.
• If the list is blank, check that
the access point is turned on
and is broadcasting the SSID,
and then see if the printer and
the access point are within
range for wireless
communication.
Then, click [Refresh].
• If your access point is set to not
broadcast the SSID, you can
enter the SSID manually by
clicking the [Advanced]
button. Follow the on-screen
instructions for entering the
Name (SSID), and then click
[Next].
Page 31

29
Enter the Network Key you
6-1
noted in MEMO Î page 21
and then click [Next].
If your network is not configured
for authentication and
encryption, the ATTENTION!
screen will appear. To continue
configuration, click [OK] and go
to
7-1.
Confirm the wireless network
7-1
settings and then click [Next].
The settings will be sent to
your printer.
• The settings will remain
unchanged if you click
[Cancel].
• If you want to manually assign
an IP address to the printer,
click [Change IP Address]
and enter an IP address that is
compatible with your network.
• If the wireless setup failure
screen appears, click [Retry].
For Method 2 users
Confirm that your WLAN
4-2
access point/router has the
WPS symbol.
Place your printer within range
5-2
of your WPS access point/
router. The range may differ
depending on your
environment. Refer to the
instructions provided with your
access point/router.
Turn on your printer and press
6-2
and hold the Wi-Fi button until
the (Wi-Fi) indicator
starts blinking in green.
Press the WPS button on
7-2
your WLAN access point/
router. When the configuration
is completed, the
your printer lights in green.
Wireless setup is now
complete. Go on to 9 to install
the printer driver and the
software.
(Wi-Fi) indicator on
Disconnect the USB cable
8-1
connecting the computer and
the printer and then click
[Finish].
Wireless setup is now complete.
Go on to 9 to install the printer
driver and the software.
Page 32

30
Double-click the Start
9
Here OSX icon to install.
Available items:
1
Start Here OSX
Installs P-touch Editor 5.0,
P-touch Update Software
and the Printer Driver.
2
Utilities
Includes BRAdmin Light and
the Wireless Device Setup
Wizard.
3
Documentation
Includes the User’s Guide,
Software User’s Guide and
Network User’s Guide.
4
Brother Support
Displays the link to On-Line
Registration and Brother
Solutions Center.
Follow the on-screen
10
instructions.
Click [Apple menu] -
11
[System Preferences],
and click Print & Fax
(10.5.8 - 10.6)/Print & Scan
(10.7). Then click .
For Simple Network
Configuration
Choose Brother QL-XXX from
12
the list and click [Add] to add
the printer.
Now, go to 13.
For Manual Network
Configuration
Choose IP at the top of the
12
screen. Select LPD as the
protocol. Enter the IP address
of the printer into the Address
box. Choose Brother QL-XXX
from the list and click [Add] to
add the printer.
When specifying the Queue
name, use the value
BRNxxxxxxxxxxxx where
xxxxxxxxxxxx is the Ethernet
address.
When the screen returns to the
13
Print & Fax/Print & Scan
screen, check that Brother
QL-XXX was added, and close
the Print & Fax/Print & Scan
screen.
Now you can use the machine.
Turn the power of the printer
OFF, and then ON again.
Page 33

6 Installing and using other software
This section explains how to install BRAdmin Light and P-touch Editor Lite LAN.
BRAdmin Light (Windows®)
31
Installing the BRAdmin Light
configuration utility
Click [Network Utility].
1
2
This screen is the same screen
as you see when you insert the
CD-ROM.
Click [BRAdmin Light] and
follow the onscreen
instructions.
If the Windows® Firewall is
enabled on your PC, the
message “Do you wish to add
this application to the list of
exceptions?” appears. Check
your PC environment and
choose [Yes] or [No].
Setting your IP address, Subnet
Mask and Gateway using
BRAdmin Light
Click [Start] - [All Programs] -
1
[Brother] - [BRAdmin Light] [BRAdmin Light].
BRAdmin Light will search for new
devices automatically.
If you have a DHCP/BOOTP/
RARP server in your network,
you don’t have to do the
following operation. Because
the print server will automatically
obtain its IP address.
Double-click the unconfigured
2
device.
The default password is
“access”.
Page 34

32
Choose STATIC for the Boot
3
Method.
Enter the IP Address, Subnet
Mask and Gateway, and then
click [OK].
BRAdmin Light (Macintosh)
Starting the BRAdmin Light
configuration utility
BRAdmin Light is not installed.
Since the software is in the Utilities folder
of the CD, run it directly from the CD or run
it after manually copying it to a location of
your choice.
Setting your IP Address, Subnet
Mask and Gateway using
BRAdmin Light
Click [Library] - [Printers] -
1
[Brother] - [P-touch Utilities] [BRAdmin Light.jar].
BRAdmin Light will search for new
devices automatically.
The address information will be
4
saved to the printer.
If you require more advanced printer
management, use the latest Brother
BRAdmin Professional utility version
that is available as a download from
http://solutions.brother.com
Double-click the unconfigured
2
device.
The default password is
“access”.
Choose STATIC for the Boot
3
Method.
Enter the IP Address, Subnet Mask
and Gateway, and then click [OK].
If you have a DHCP/BOOTP/
RARP server in your network,
you don’t have to do the
following operation, as the print
server will automatically obtain
its IP address.
The address information will be
4
saved to the printer.
Page 35

P-touch Editor Lite LAN (Windows®)
Installing P-touch Editor
Lite LAN
P-touch Editor Lite LAN is a basic version
of a label-editing tool.
• In order for P-touch Editor Lite LAN to
be used, the IP address of this printer
must be correctly specified.
The IP address can be specified
with a utility such as BRAdmin Light,
which can be installed from
[Network Utility] on the CD-ROM.
For details on using this utility,
refer to “Setting the IP address and
subnet mask” in the “Network User’s
Guide” (PDF).
• On a network where the IP address is
automatically assigned, (for example
with DHCP), the IP address is
automatically assigned when the
printer is connected to the network,
therefore the printer can be used
immediately. However, since the IP
address may change dynamically, we
recommend specifying a static IP
address when P-touch Editor Lite
LAN is being used. For details,
contact your network administrator.
• Specify the settings after consulting
with your network administrator.
33
Start the computer and put the
1
CD-ROM into the CD-ROM
drive.
If it does not start up
automatically, open the files on
the CD-ROM and double click
on “Start.exe”.
Click [Custom Installation].
2
Click [P-touch Editor
3
Lite LAN].
Follow the on-screen
4
instructions.
The PteLiteLAN folder is created.
This completes the installation.
See the Software User’s Guide
(PDF) for information on using
P-touch Editor Lite LAN.
Page 36

34
7 Start P-touch Editor Help
This section explains how to start P-touch Editor Help for Windows® and Macintosh.
For Windows
The following is the example for Windows Vista
may differ from your printer name.
Start from Start ( ) button
To start P-touch Editor Help, click the
Start ( ) button on the task bar, point to
[All Programs].
Click [Brother P-touch] and
[P-touch Editor 5.0 Help].
Start from New/Open dialog
When you start the P-touch Editor 5.0 and the New/
Open dialog box appears, click Help - How To
If you click “Check for update” (shown in red on the right),
you can check if the latest P-touch Editor is available or not
on the web site.
Start from P-touch Editor
Click Help menu and choose P-touch Editor Help.
®
®
. The printer names in the following screens
.
Professional Mode
Express Mode
Start from Snap mode
Right click the mouse and choose P-touch Editor
Help.
Page 37

For Macintosh
The following is the example for Mac OS X 10.7. The printer names in the following screens
may differ from your printer name.
Start from New/Open dialog
When you start the P-touch Editor 5.0 and the New/
Open dialog box appears, click Help - How To.
Start from P-touch Editor
Click Help menu and choose P-touch Editor Help.
Start from Snap mode
Click the mouse with the control key held and select
P-touch Editor Help.
35
Page 38

Printed in China
LB9651001
 Loading...