

Page 1
BROTHER QL-500/550/650TD/1050/1050N
Software User's Guide
IntroductionCreating Labels (For Windows)Creating Labels (For Macintosh)Appendix
QL-500
QL-650TD
QL-550 QL-1050/1050N
1
Page 2

Contents
Contents . . . . . . . . . . . . . . . . . . . . . . . . . . . . . . . . . . . . . . . . . . . . . . . . . . . . . . . . . . . . . . . . . . . . . . . . . . . . . . . . . . . .2
Introduction . . . . . . . . . . . . . . . . . . . . . . . . . . . . . . . . . . . . . . . . . . . . . . . . . . . . . . . . . . . . . . . . . . . . . . . . . . . . . . . .4
About This Manual .........................................................................................................4
Manual Structure ...........................................................................................................4
Symbols Used in this Manual ........................................................................................4
Creating Labels (For Windows) . . . . . . . . . . . . . . . . . . . . . . . . . . . . . . . . . . . . . . . . . . . . . . . . . . . . . . . . . . . .5
Label Creation Overview ................................................................................................... 5
From Label Creation to Printing ..................................................................................... 5
How to Use P-touch Editor ................................................................................................7
Starting P-touch Editor ..................................................................................................7
Creating an Address Label ............................................................................................ 9
Printing a Label ............................................................................................................ 10
Saving a Label ............................................................................................................. 11
Opening a Label File ...................................................................................................11
Creating Different Types of Labels .............................................................................. 12
Using the P-touch Editor Help .....................................................................................13
Creating Labels Efficiently ........................................................................................... 15
Creating Labels with Other Applications ......................................................................26
How to Use the P-touch Address Book ...........................................................................33
Starting the P-touch Address Book ............................................................................. 33
Creating a New Contact .............................................................................................. 35
Importing the Contact Data ..........................................................................................36
Editing the Contact Data ..............................................................................................37
Printing the Label ......................................................................................................... 38
How to Use P-touch Transfer Manager & P-touch Library .............................................. 39
Starting up P-touch Transfer Manager ........................................................................ 39
Transferring label templates from the PC to the printer ...............................................41
Backing up label templates ..........................................................................................44
Changing printer settings from the PC ........................................................................ 45
Starting up the P-touch Library .................................................................................... 46
Searching labels .......................................................................................................... 47
Introduction
Creating Labels (For Windows)Creating Labels (For Macintosh)Appendix
Creating Labels (For Macintosh) . . . . . . . . . . . . . . . . . . . . . . . . . . . . . . . . . . . . . . . . . . . . . . . . . . . . . . . . 48
Overview ......................................................................................................................... 48
Procedure for Creating and Printing Labels ................................................................ 48
Using the P-touch Editor ................................................................................................. 50
Starting the P-touch Editor ..........................................................................................50
Creating an Address Label .......................................................................................... 53
Printing the Label ......................................................................................................... 54
2
Page 3

How to use the User's Guide (HTML Manual) ............................................................. 56
Appendix . . . . . . . . . . . . . . . . . . . . . . . . . . . . . . . . . . . . . . . . . . . . . . . . . . . . . . . . . . . . . . . . . . . . . . . . . . . . . . . . . 58
Sharing the printer ..........................................................................................................58
Using this printer as a Shared Printer ..........................................................................58
Using the PS-9000 Print Server (sold separately) .......................................................58
Controlling with the ESC/P Commands .......................................................................... 59
Available Commands ................................................................................................... 59
Serial Cables ............................................................................................................... 59
Printing Directly from Other Applications ........................................................................ 60
Installing the Printer Driver .......................................................................................... 60
Printing from Other Applications .................................................................................. 62
Uninstalling the Software ................................................................................................ 63
For Windows ................................................................................................................ 63
For Macintosh .............................................................................................................. 64
Specifications .................................................................................................................. 66
Product Specifications .................................................................................................66
Operating Environment ................................................................................................67
IntroductionCreating Labels (For Windows)Creating Labels (For Macintosh)Appendix
3
Page 4
Introduction
Congratulations on purchasing a Brother QL-series label printer.
The Brother QL-500/QL-550/QL-650TD/QL-1050/QL-1050N label printer (hereafter referred to as "the
printer") enables you to quickly and easily print custom labels created with the label software, P-touch Editor.
With the Brother QL-650TD, you can also create and print labels directly from the label printer which is
connected to a PC.
About This Manual
This manual is a "PDF manual" contained on the included CD-ROM.
In this manual, when the mouse pointer changes to you can just click to jump to the corresponding
pages.
For the basic functions of Adobe
Manual Structure
The following manuals are provided to help you use the printer properly and extensively.
Make sure to read them before using the printer.
®
Reader, refer to the Adobe® Reader Help files.
IntroductionCreating Labels (For Windows)Creating Labels (For Macintosh)Appendix
Setup & Operation Guide (Quick Start Guide)
Read this guide before reading the Software User's Guide (this manual).
The guide includes information you should read before using the printer, such as general precautions for use,
installation and setting up of the main unit, and how to create/print labels using just the printer (Brother QL650TD only).
Also included is information describing how to install the accompanying software to connect the printer to a
PC, and maintenance/troubleshooting of the printer.
Software User's Guide (this manual)
This manual describes how to create labels using the P-touch Editor software that has been installed on a PC
connected to the printer.
• If you use Windows®, this manual can be can be viewed from the P-touch Setup application when it is
run from the CD-ROM.
After installing this manual on your PC, you can also view it from the Start menu.
• If you use a Macintosh
®
, refer to the PDF files in the [Manuals] folder on the CD-ROM.
Symbols Used in this Manual
The symbols used throughout this guide are as follows:
This symbol indicates information or directions that should be followed. If ignored, the result may be
injury, damage, or failed operations.
This symbol indicates information or directions that can help you better understand and use the printer
more efficiently.
About This Manual
4
Page 5

Creating Labels (For Windows)
Label Creation Overview
This section describes the general procedure for creating labels using the printer.
For detailed step-by-step instructions, refer to the related pages or Help files.
From Label Creation to Printing
1 Choose the type of label you want to create.
Label images
IntroductionCreating Labels (For Windows)Creating Labels (For Macintosh)Appendix
2 Prepare the appropriate DK Roll for the label you want to create.
The printer comes with sample roll. (Other rolls can be purchased separately.)
Check the appropriate DK Roll for the label
you will create.
Î
Setup & Operation Guide or Quick Start Guide
From Label Creation to Printing
5
Î
Setup & Operation Guide or Quick Start Guide
Install the DK Roll.
Page 6
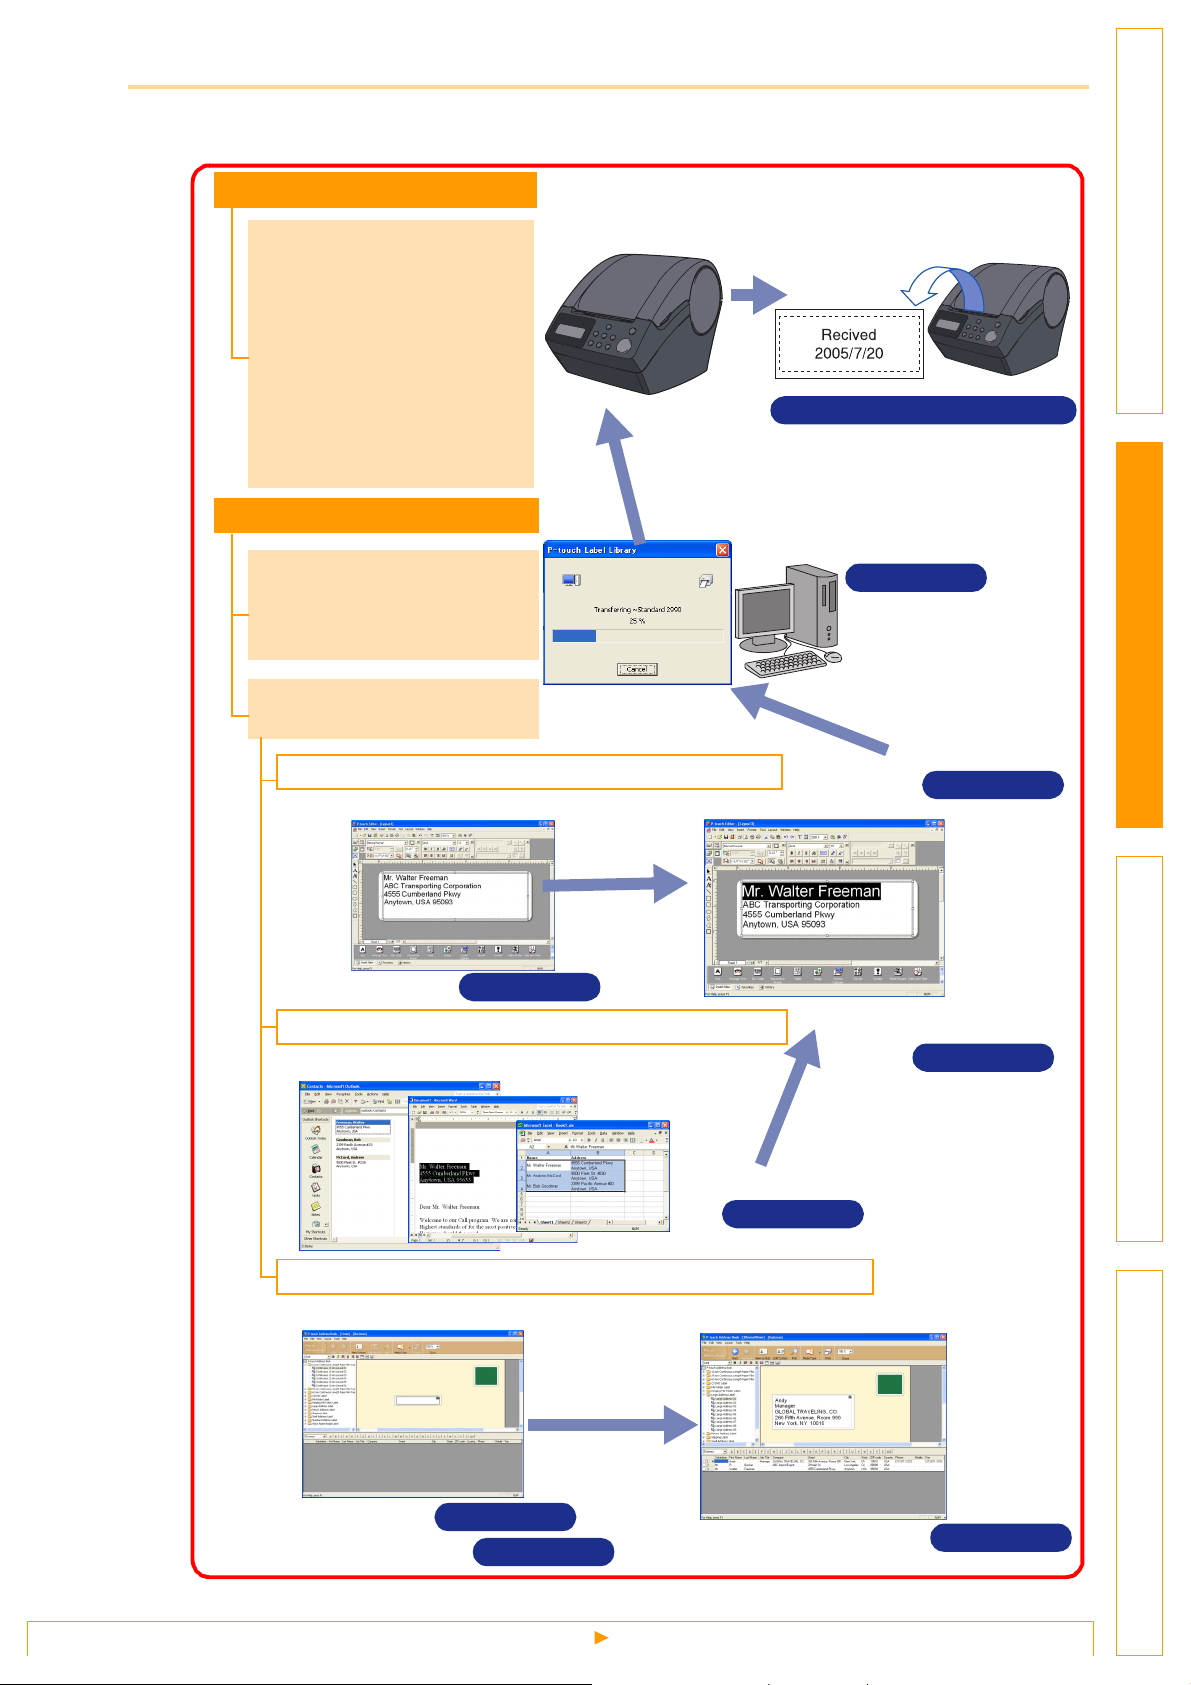
3 Create and print the label.
Select your preferred method: printing labels directly from the printer, or print from a PC.
Printing directly
Create and print a label
using just the printer.
(Brother QL-650TD only)
The QL-1050 can also
transfer templates, but it
cannot select templates
with machine side
operation. So use the
ESC/P command, which
can transfer templates.
Printing using the PC
After creating a template
with your PC, create and
print the label using the
printer.
Create and print the label
using a PC.
Create and print a label using P-touch Editor.
P-touch Editor
Select a template
Transfer
P-touch Editor
Print
ÎSetup & Operation Guide
P-touch Transfer Manager
ÎPage 39
Create a template
ÎPage 39
IntroductionCreating Labels (For Windows)Creating Labels (For Macintosh)Appendix
Enter the text
ÎPage 9
Use an application from another manufacturer.
Microsoft
®
Word/Excel/Outlook® Add-In functions
Import the text
ÎPage 26
Create and print a label using P-touch Address Book.
P-touch Address Book
Enter the text
Import the text
ÎPage 35
ÎPage 36
P-touch Address Book
Edit the label
ÎPage 7
Edit the label
ÎPage 37
From Label Creation to Printing
6
Page 7
How to Use P-touch Editor
This section explains the procedure for creating various kinds of labels using P-touch Editor.
Starting P-touch Editor
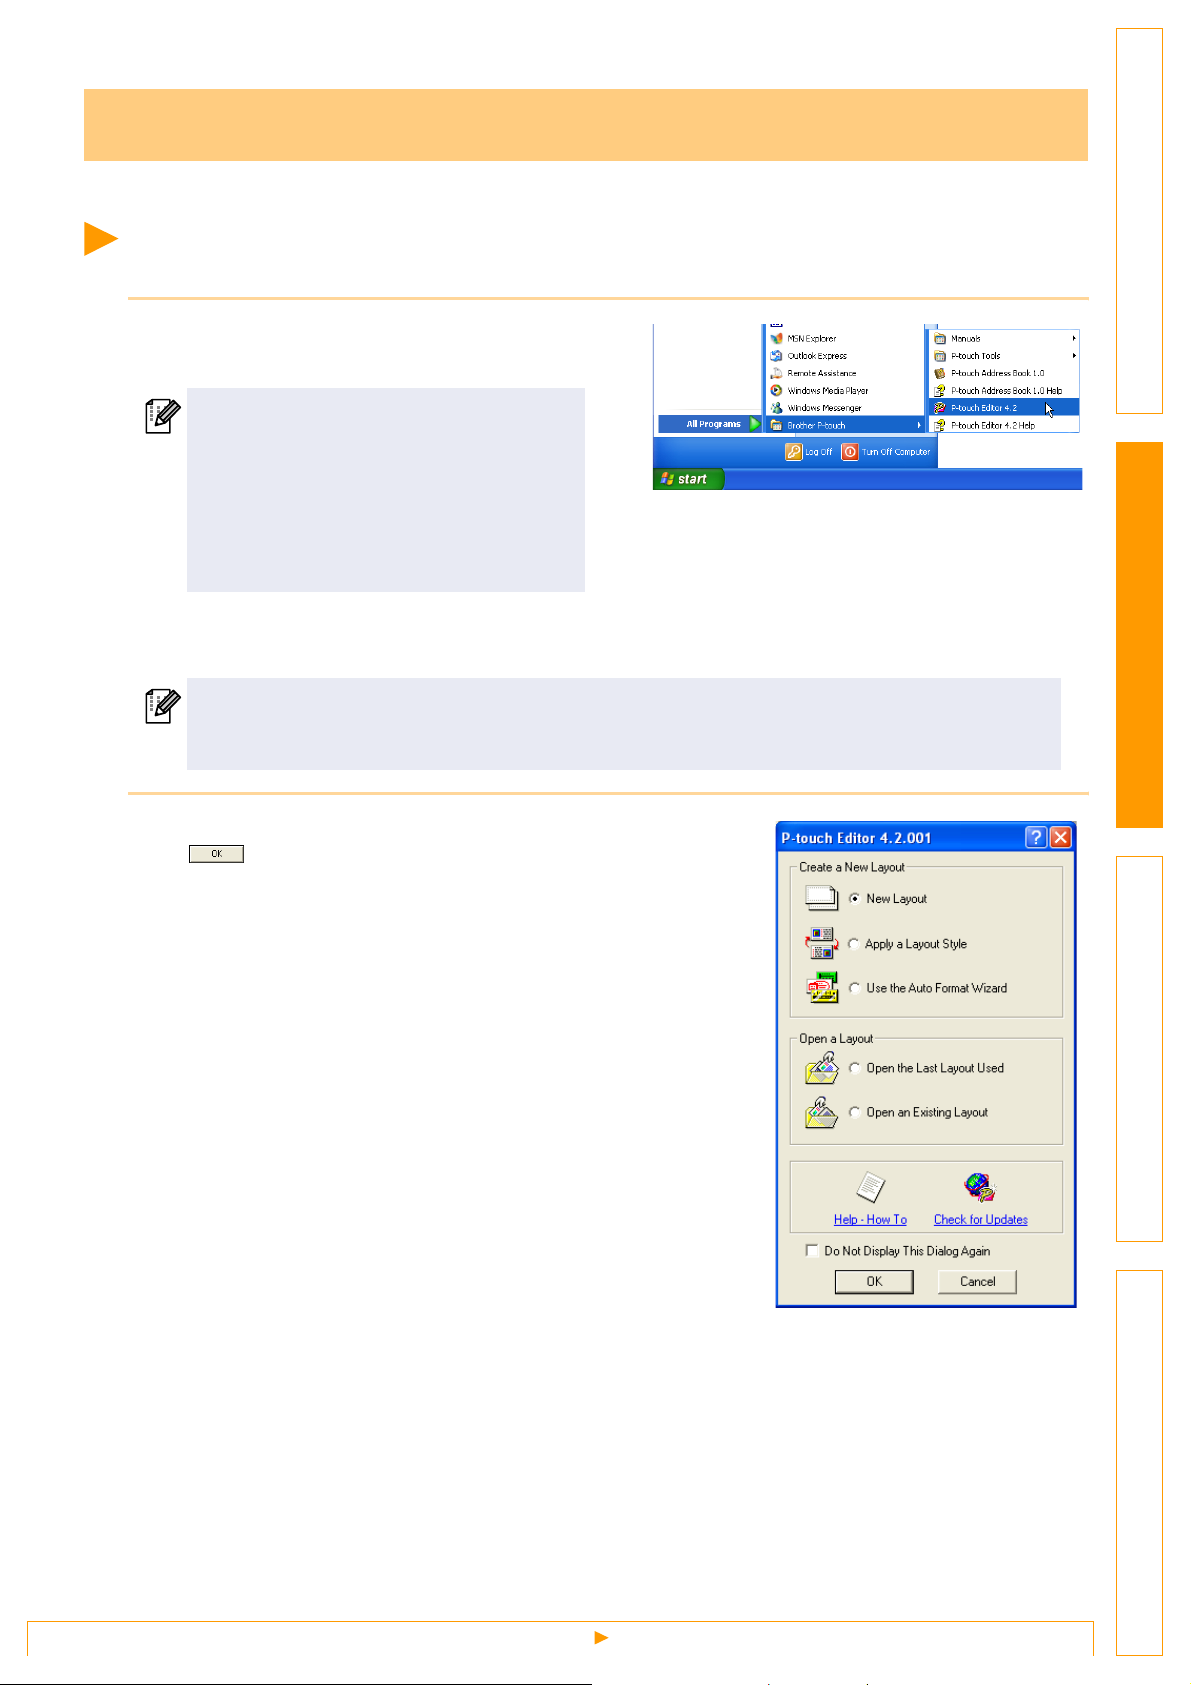
1 Click [Start]-[All Programs (Programs)]-
[Brother P-touch]-[P-touch Editor 4.2].
You can also start the P-touch Editor using
the following methods (only if you created
the shortcut during installation):
• Double-click the shortcut icon on the
desktop.
• Click the shortcut icon on the Quick
Launcher bar.
When the P-touch Editor is launched, the [Startup] dialog box appears, allowing you to select whether
you want to create a new label layout or open an existing label.
To specify how the P-touch Editor works when it starts, click [Tool]-[Options] to display the
[Options] dialog box. In the [General] tab, you can choose the setting in the [Operations] list box
in the [Startup Settings]. Normally, select [Display Startup Dialog Box].
IntroductionCreating Labels (For Windows)Creating Labels (For Macintosh)Appendix
2 Select an option in the [Startup] dialog box and click
.
• When you select [New layout] , [Apply a Layout Style], or [Open
the Last Layout Used], the layout window appears.
• When you select [Use the Auto Format Wizard], the [Auto
Format Wizard] appears. This dialog box allows you to create a
layout by choosing an existing template.
• When you select [Open an Existing Layout], the [Open] dialog
box appears. You can use a previously saved layout. Refer to
Î"Opening a Label File" on page 11.
• When you select [Help-How To], the P-touch Editor Help
appears.
The Help files allow you to learn step by step how to create a
label layout.
• When you select [Check for Updates] with a PC connected to
the Internet, you will be taken to the Brother Solutions Center.
Use this Brother Solutions Center to check for the latest
software downloads and FAQs.
Starting P-touch Editor
7
Page 8
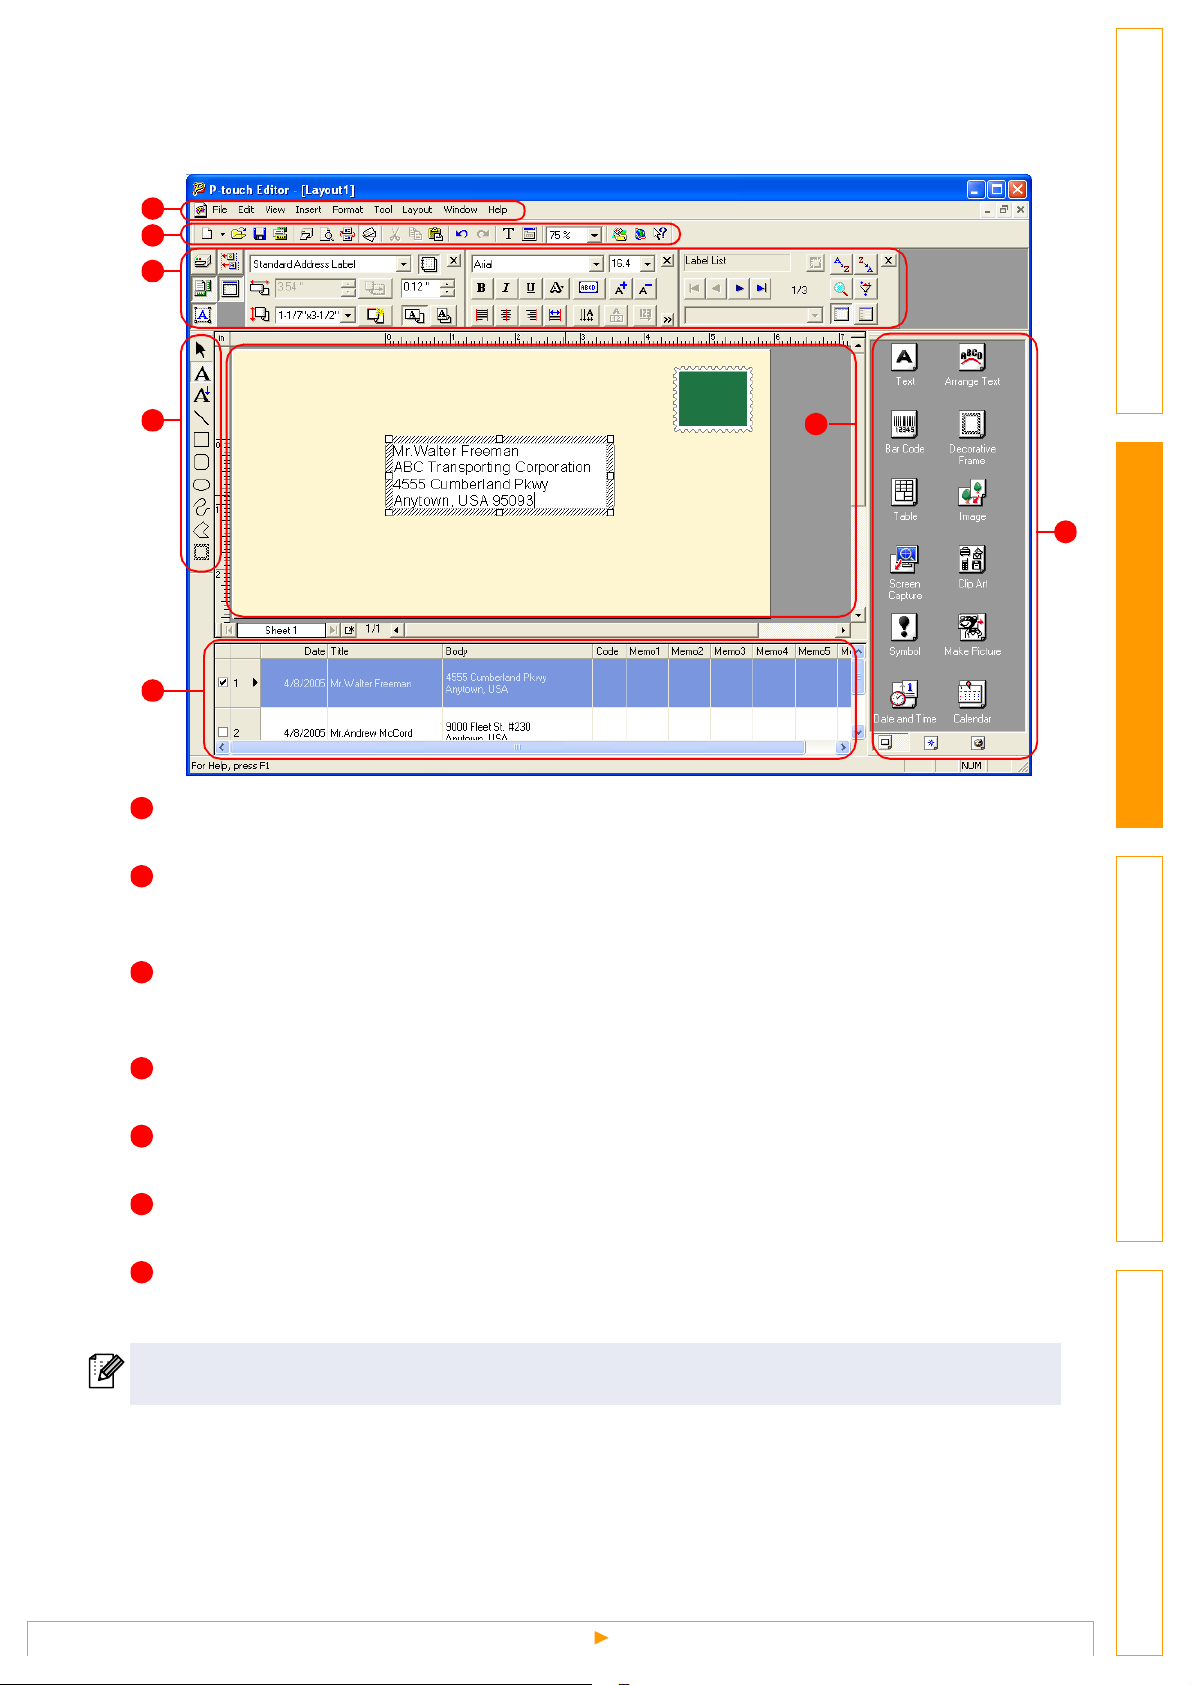
Layout window
The layout window consists of the following seven sections:
1
2
3
IntroductionCreating Labels (For Windows)Creating Labels (For Macintosh)Appendix
4
7
1
Menu
Commands are categorized under each menu (File, Edit, View, and Insert) by function.
2
Standard toolbar
A group of frequently used commands (New Layout, Open, Save, Auto Format, etc.) are provided in this
toolbar.
3
Property dock
The property dock contains the Print, Page, Text, Layout, and Database property boxes. Click on the
buttons at the left of the dock to show/hide the corresponding property box.
5
6
4
Draw toolbar
Provides tools for selecting an object, entering text, drawing graphics, and so on.
5
Layout work area
The layout work area is used to display and edit objects.
6
Object dock
Using the object dock, you can easily insert and format text, barcodes, frames, tables, figures, etc.
7
Label list/Database window
Displays a database or a label list.
The [View] menu allows you to show/hide the toolbars, docks, and windows.
Starting P-touch Editor
8
Page 9
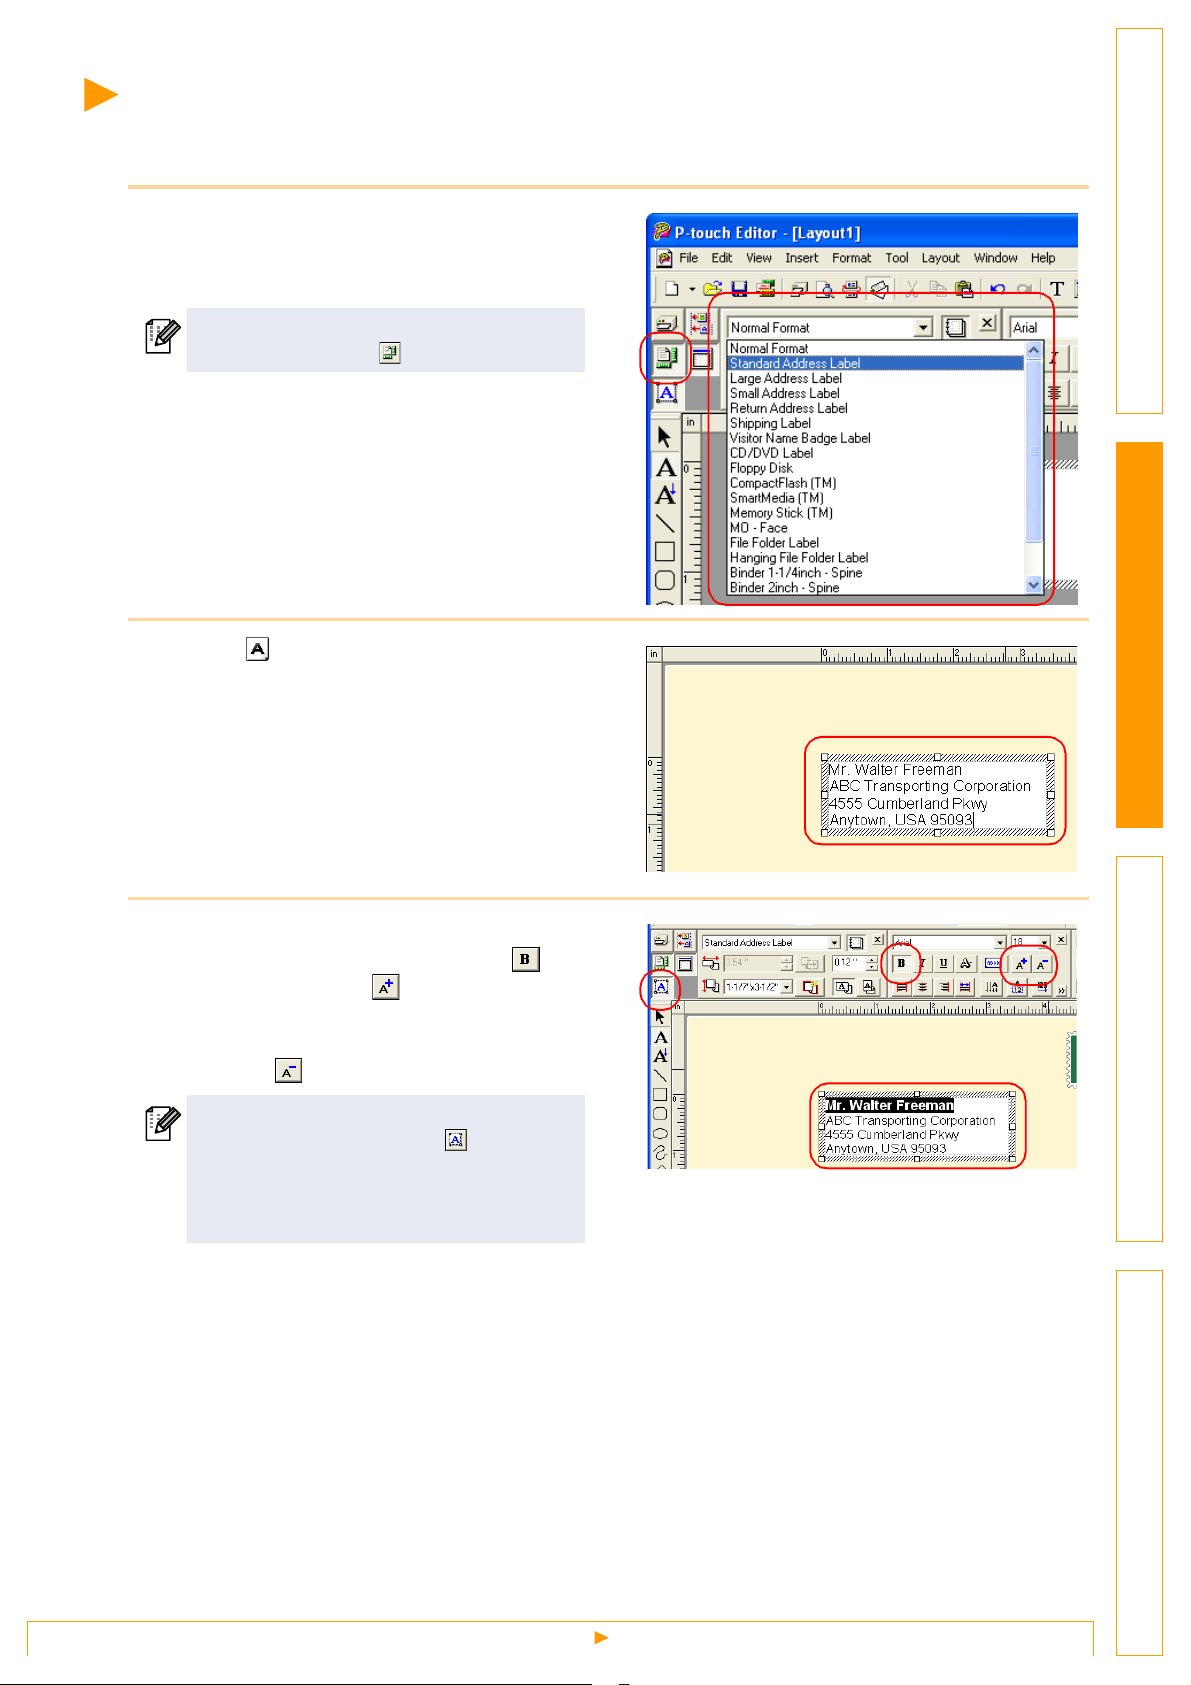
Creating an Address Label
This section describes the process of creating an address label.
1 In the Page properties box, select
[Standard Address Label] from the [Label
Format] list box.
If the Page property box is not shown in the
Property dock, click to display the box.
• The label format in the layout work area changes
to Standard Address Label.
• The tape length and width settings are
automatically set to the size of a standard
address label.
2 Click (Text) in the Object dock and type
in the name and address.
IntroductionCreating Labels (For Windows)Creating Labels (For Macintosh)Appendix
3 Adjust the font size.
Select the name and apply the bold ( ) and
scaled-up font size ( ) settings using the Text
property box.
Select the address and apply the scaled-down
font size ( ) setting.
• When the Text property box is not shown
in the Property dock, click to display
the box.
• Changes made in the Text property box
will be applied only to the selected text.
Now you are ready to print your label.
For detailed information on how to print, refer to Î"Printing a Label" on next page.
Creating an Address Label
9
Page 10
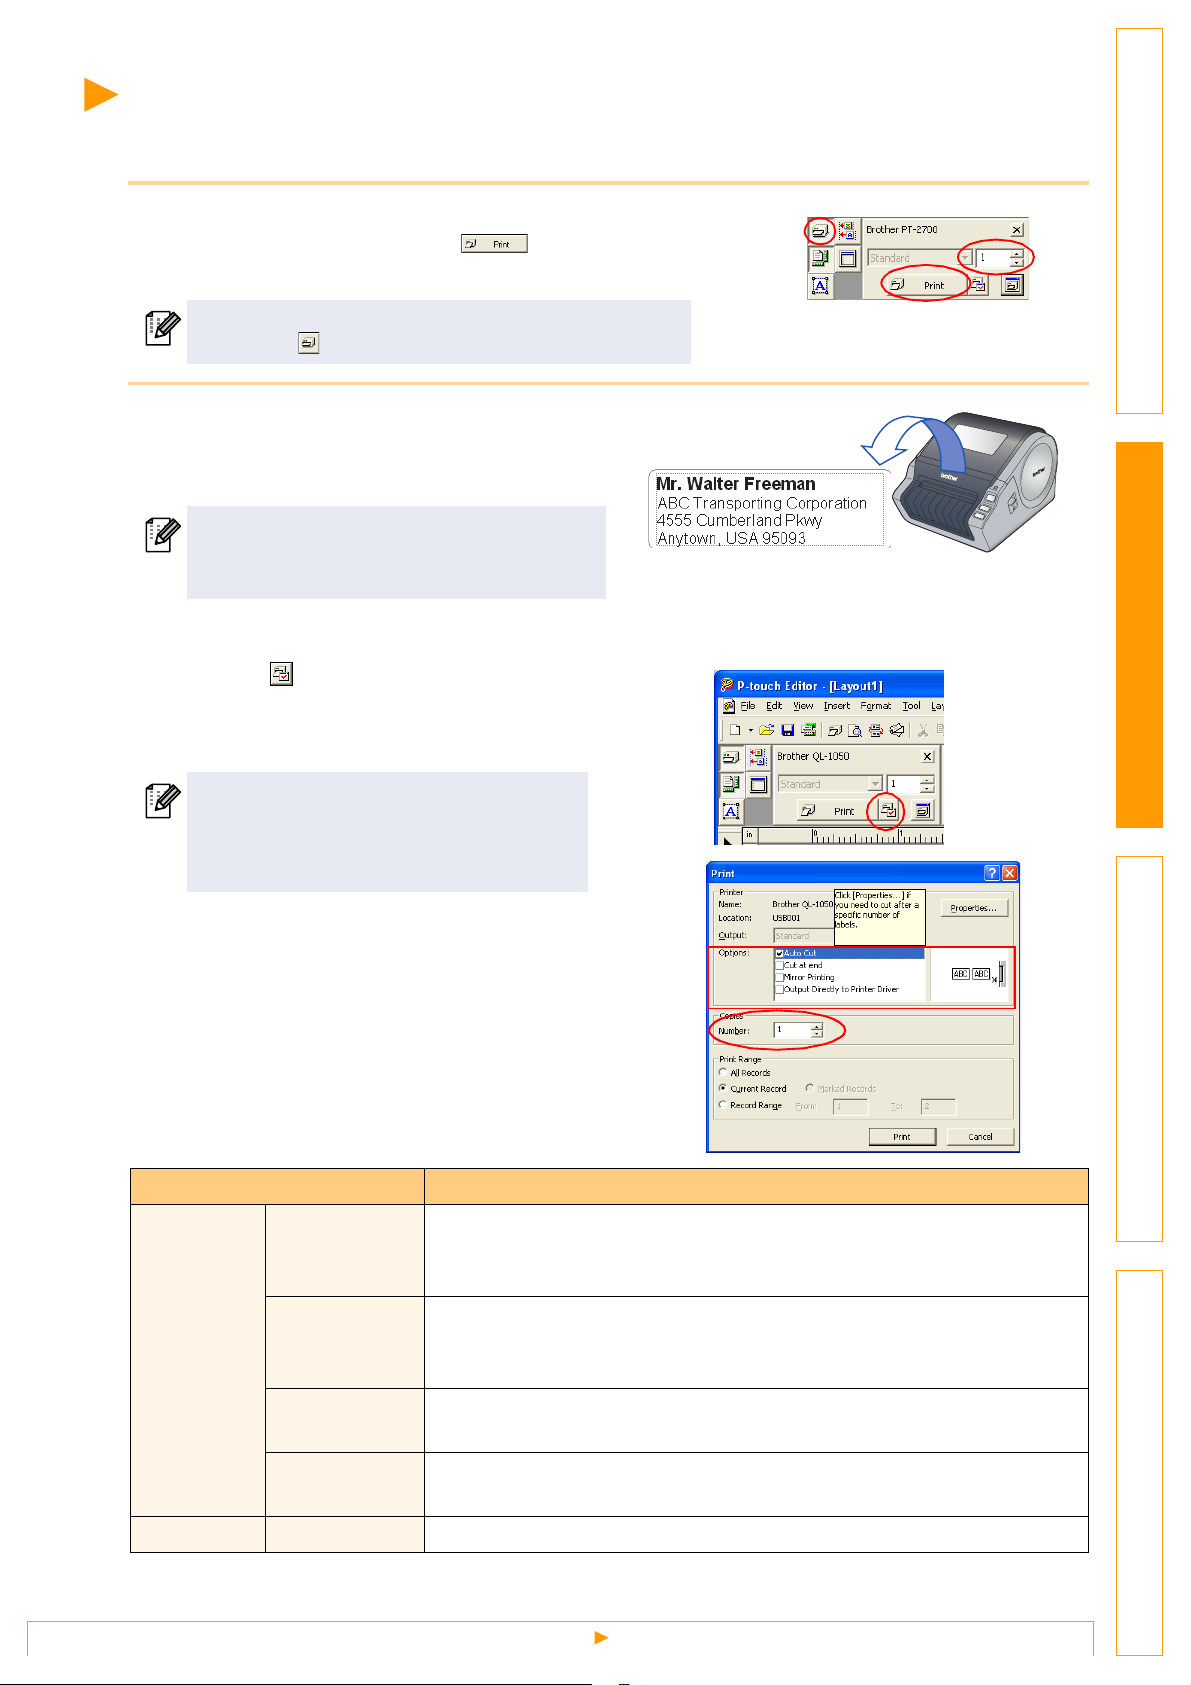
Printing a Label
This section explains the procedure for printing a label you have created.
1 In the Print property box, set the number of copies to
be printed to [1] and click .
The label is printed.
If the Print property box is not shown in the Property
dock, click to display the box.
2 Cut off the printed label using the Cut
button or the Cut lever (Brother QL-500) of
the printer.
In the [Print] dialog box, if [Auto Cut] is
checked in [Options], the printed labels will be
automatically cut. (Not available for QL-500)
Print Options and label cutting
When you click in the Print property box, the [Print]
dialog box appears.
This dialog box allows you to set the print options and
the number of copies.
You can set the number of labels between
cuts with the Option tab in the Print dialog
box displayed when you click the
Properties button. (QL-1050/1050N only)
IntroductionCreating Labels (For Windows)Creating Labels (For Macintosh)Appendix
Setting Description
Auto Cut
(QL-550/650TD/
1050/1050N)
Cut at end
Options
Copies Number Used to specify the number of copies to be printed.
(QL-650TD/
1050/1050N)
Mirror Printing
Output directly
to Printer Driver
When this check box is checked, each label will be automatically cut.
When this check box is not checked, labels won't be automatically cut after
printing. Press the Cut button in the printer to cut.
When multiple labels are printed, only cuts after the final label is printed.
When this check box is checked, labels will be printed so they can be seen
when looking through a window.
For normal use, this check box should be checked.
10
Printing a Label
Page 11
By clicking in the [Print] dialog box, you can select more detailed settings.
For example, you can specify that priority be given to printing quality or printing speed when printing
labels.
When you print labels that require higher quality, such as barcode labels, select [Give priority to print
quality].
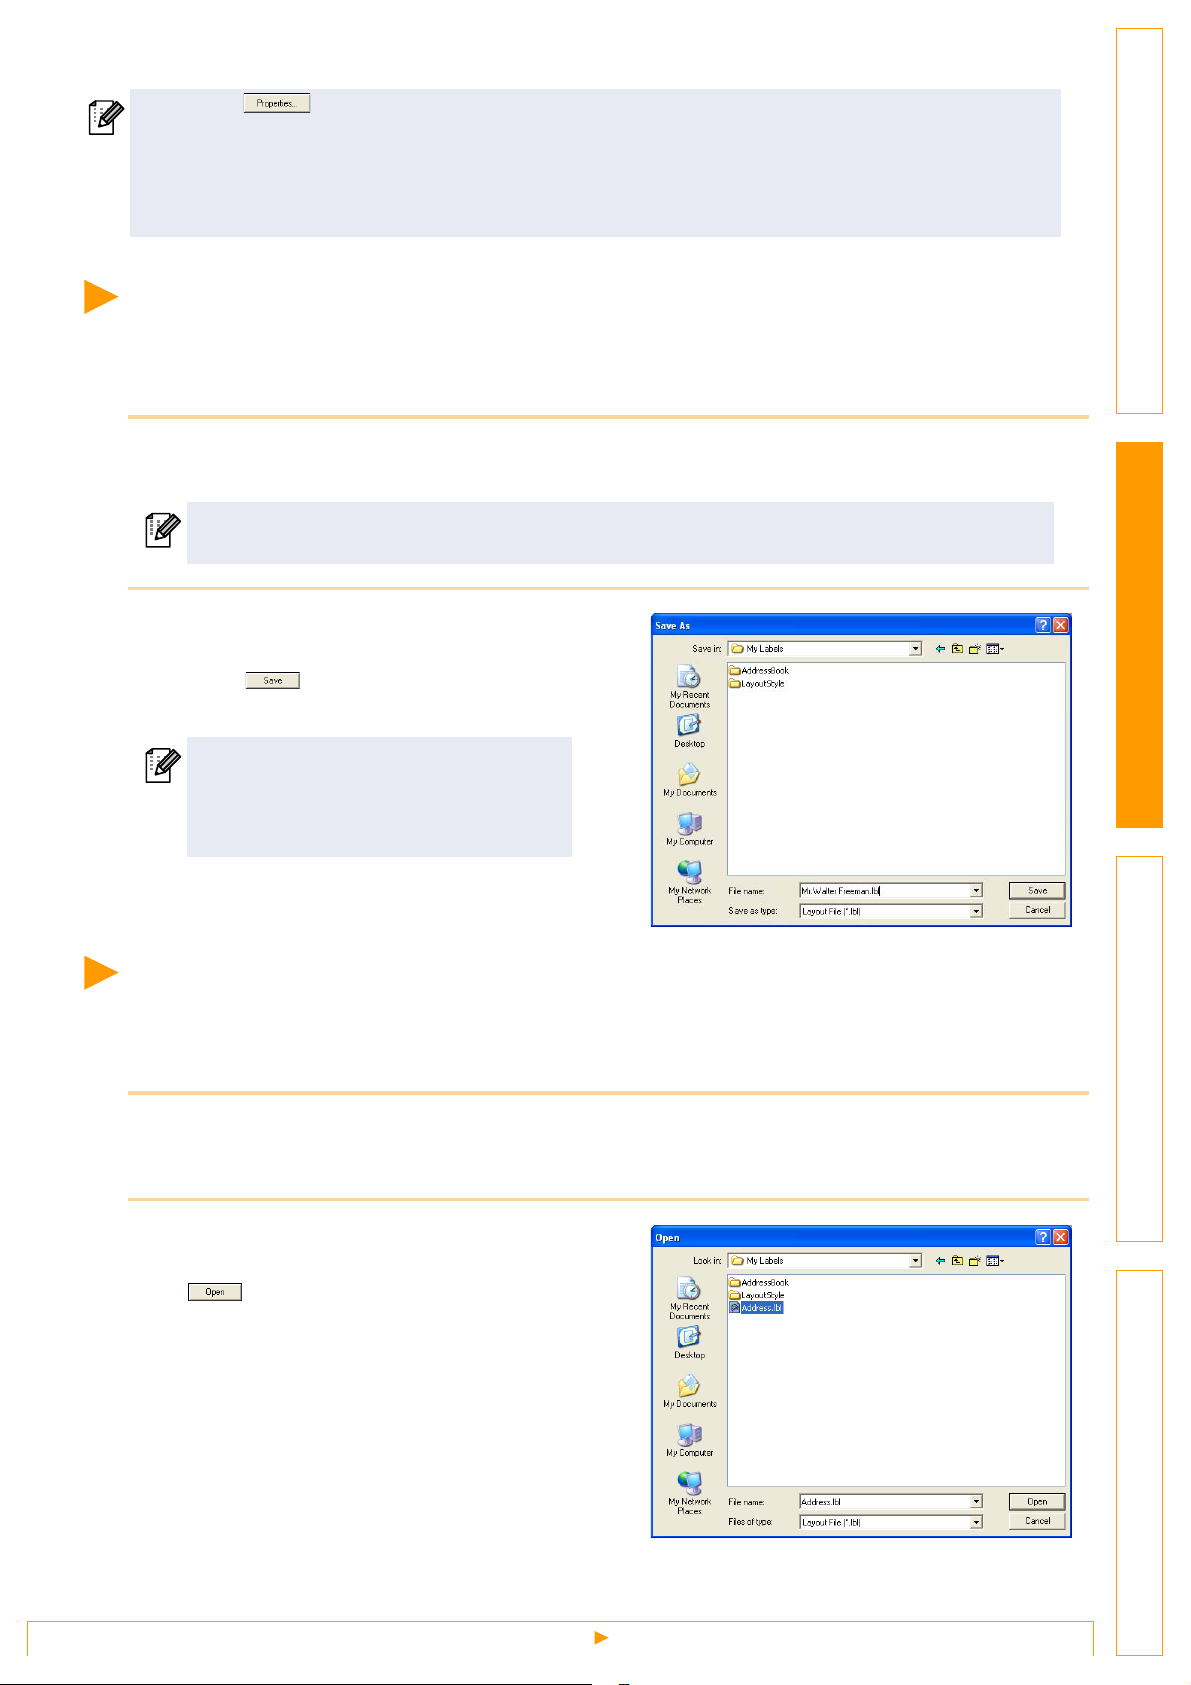
Saving a Label
You can save a label you have created in a file for later use. This section explains the procedure for saving a
label you have created.
1 Click [File]-[Save As].
The [Save As] dialog box appears.
If the same file already exists, changes are saved to the existing file.
2 Select the folder where you want to save
the file, enter the [File name], and then
click .
The file is saved in the folder you have specified.
IntroductionCreating Labels (For Windows)Creating Labels (For Macintosh)Appendix
You can enter up to 255 characters for the
[File name], the following characters are
not allowed:
/ \ > < * ? " | :
Opening a Label File
To use a label you have saved, open the label file. This section describes the procedure for opening
the label file.
1 Click [File]-[Open].
The [Open] dialog box appears.
2 Select the folder containing the file you
want to open, select the file, and click the
.
In the layout window, the label layout from the
selected file is displayed.
11
Saving a Label
Page 12
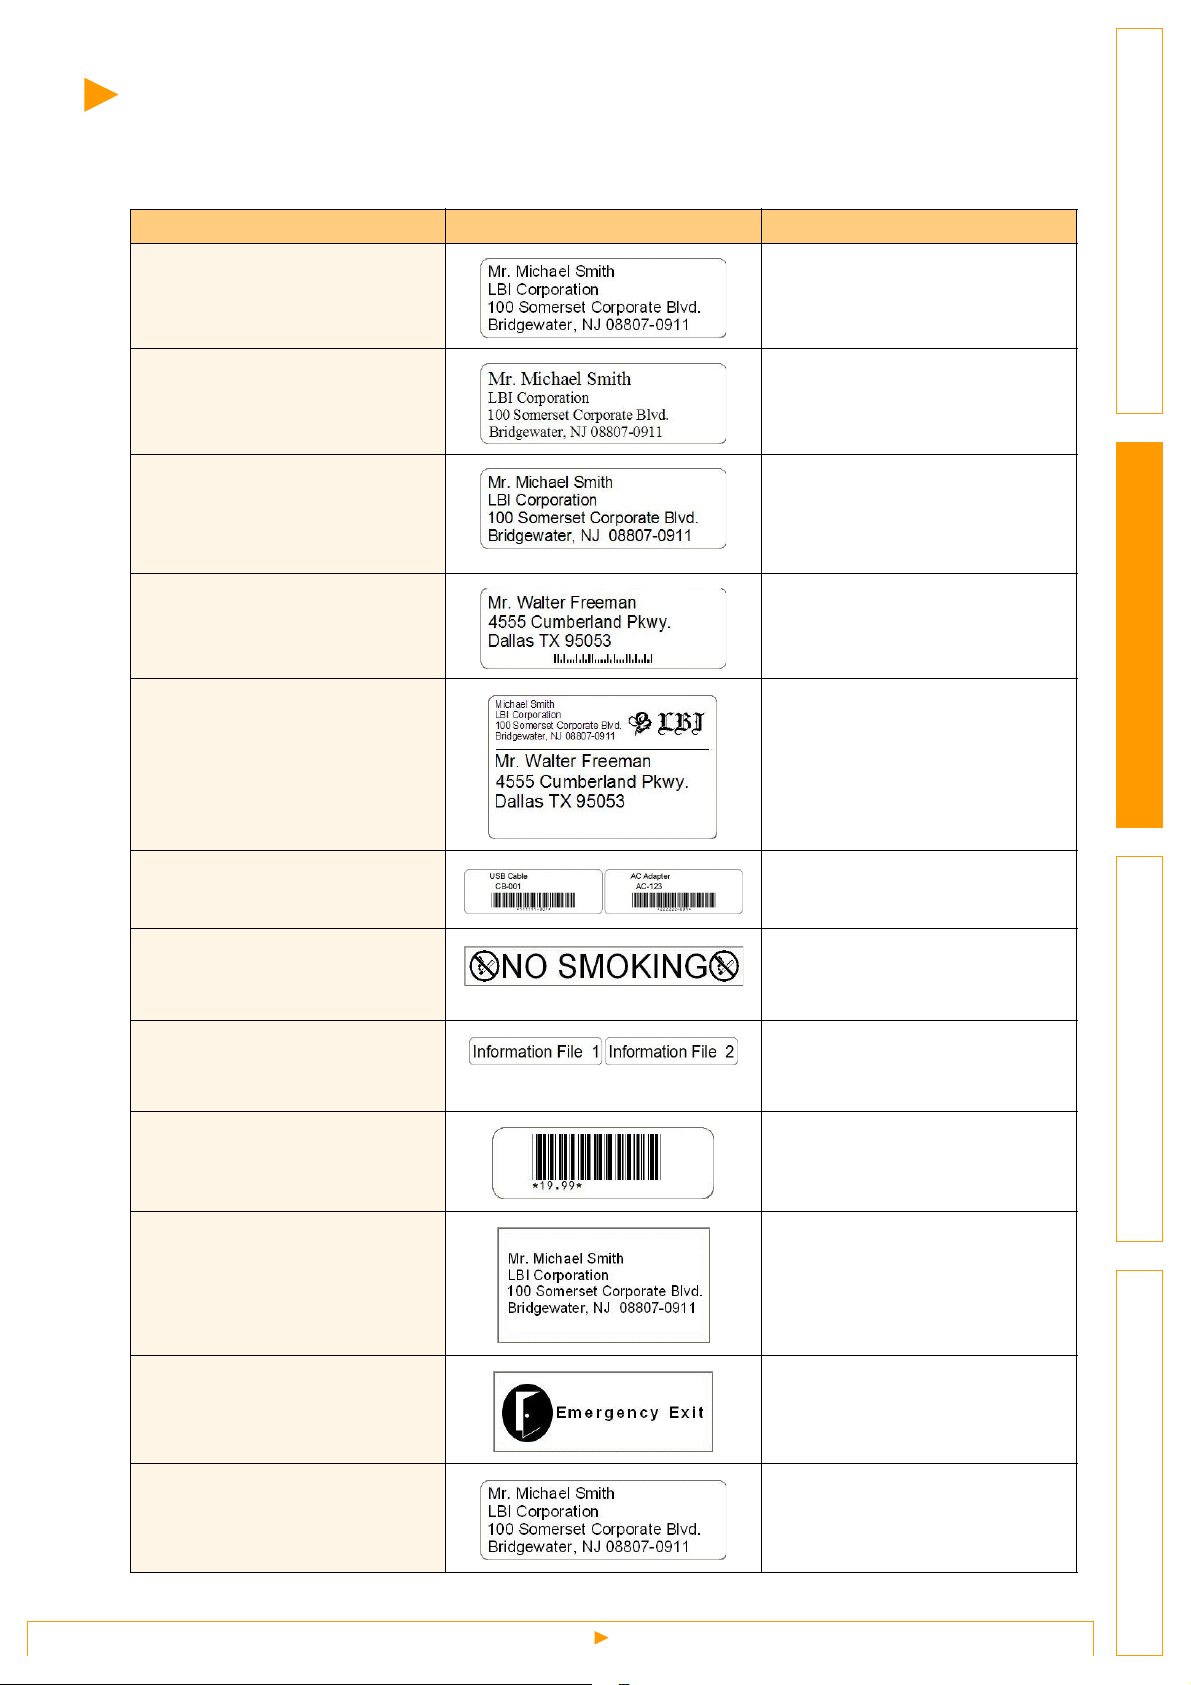
Creating Different Types of Labels
The following are examples of the labels that can be created using various functions of the P-touch Editor.
Refer to the Creating Labels section in the P-touch Editor Help for further details.
Help Section Sample Label Process
1: Making an address label with
P-touch Editor
2: Changing the text properties
of an address label
3: Making an address label by
using an Add-in
4: Making a label by using the
label list
5: Using layout styles to create
labels
•Printing
• Saving a layout
• Changing the font size and style
• Adjusting text, images and other
objects
Using add-ins
•Microsoft
•Microsoft
•Microsoft
®
Word
®
Excel
®
Outlook
®
• Saving to the label list
• Using label list to create a new
layout
• Choosing/Changing the default
layout style
• Editing and saving a layout style
IntroductionCreating Labels (For Windows)Creating Labels (For Macintosh)Appendix
6: Making a label by using a
database
7: Making a banner or sign with
continuous length tape
8: Making sequential labels
using the Numbering
function
9: Using P-touch Editor to
make a label that contains a
bar code
10: Making address labels with
continuous length tape
11: Making a label by using the
Auto Format feature
• Using / Connecting an
Microsoft
®
Excel file
• Specifying the label length or
using auto setting
• Inserting clip art illustrations
• Specifying the field to increment
(numbering field)
•Printing
• Selecting a protocol
• Using tape as vertical direction
• Using the Auto Format function
12: Making a label by using the
P-touch Library
12
• Using the P-touch Library
Creating Different Types of Labels
Page 13
Using the P-touch Editor Help
The P-touch Editor Help offers detailed information on available features and explains on how to use the Ptouch Editor.
Opening the Help files
1 Starting P-touch Editor
Refer to Î"Starting P-touch Editor" on page 7.
The layout window appears.
2 Click [Help]-[P-touch Editor Help].
Or, press the [F1] key on the keyboard.
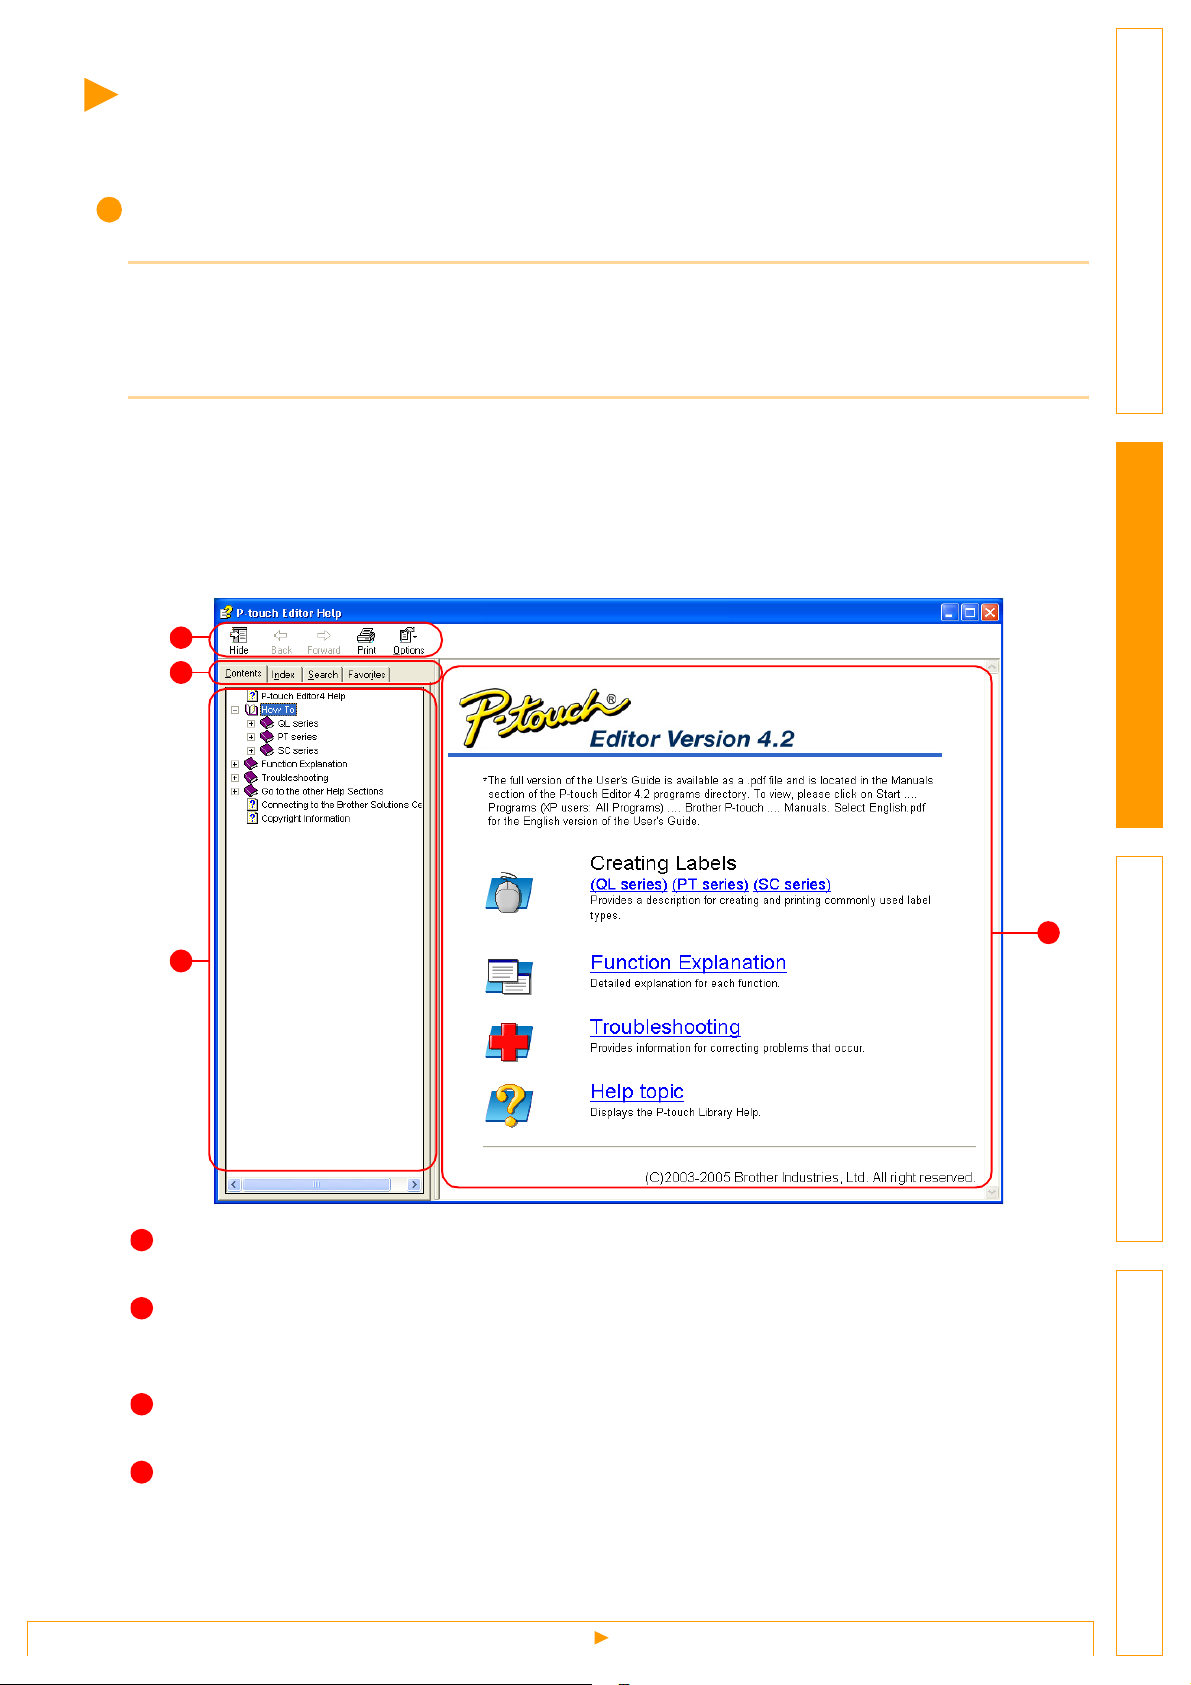
The [P-touch Editor4 Help] window appears.
P-touch Editor Help window
1
2
IntroductionCreating Labels (For Windows)Creating Labels (For Macintosh)Appendix
3
1
To ol bar
A group of icons that allows quick and easy access to the Help.
2
Ta bs
Using four different ways ([Contents], [Index], [Search], and [Favorites]), you can search the information in
the P-touch Editor Help.
3
Menu
Displays the information for the tab you chose.
4
Topic Area
Displays the description for the item you chose.
4
13
Using the P-touch Editor Help
Page 14
Printing a Help description
The information given in P-touch Editor Help can be printed. Use your normal printer to print the P-touch
Editor Help information.
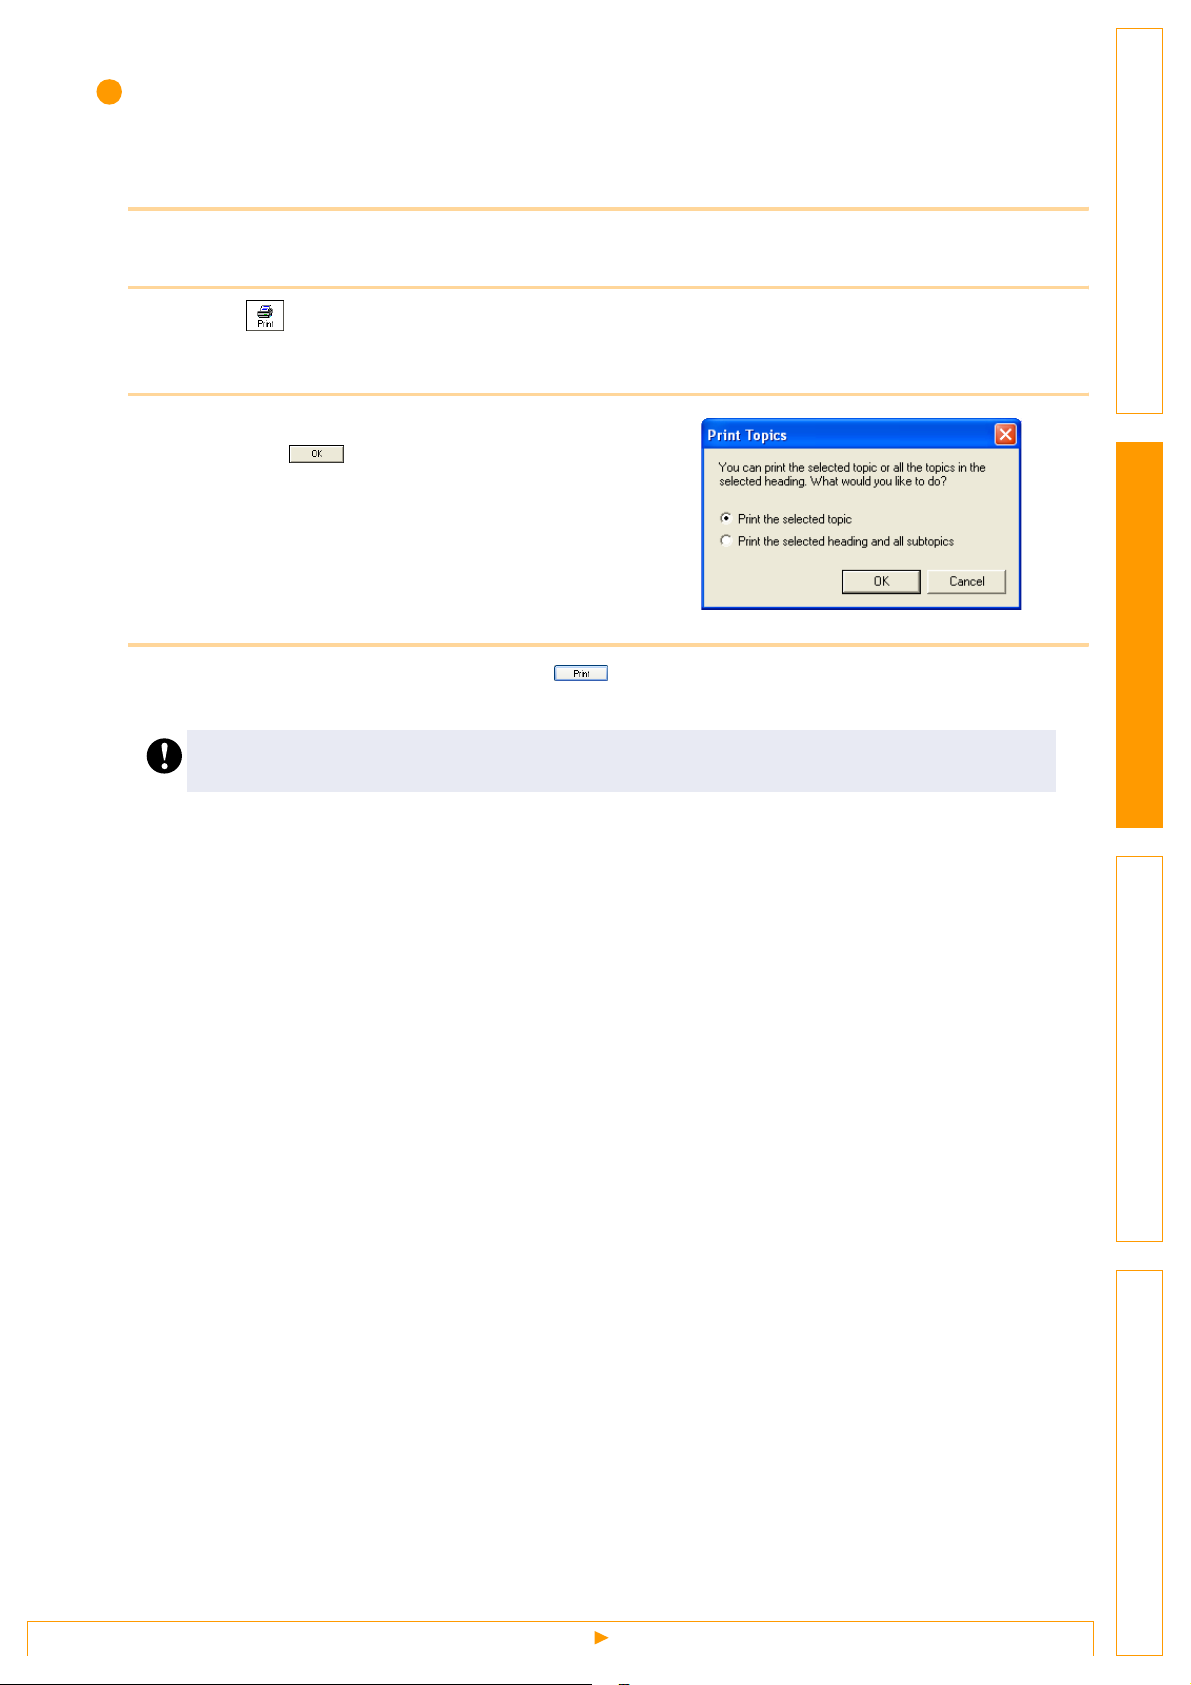
1 In the [Contents] tab, select any topic you want to print.
2 Click on the Toolbar.
The [Print Topics] dialog box appears.
3 Select the range of topics to be printed,
and click .
The [Print] dialog box appears.
4 Specify the [Printer] item and click .
The Help information is printed.
IntroductionCreating Labels (For Windows)Creating Labels (For Macintosh)Appendix
Select a normal printer that supports general paper sizes, such as Letter.
14
Using the P-touch Editor Help
Page 15
Creating Labels Efficiently
To create labels efficiently, you can utilize the Label List and Database functions of P-touch Editor. Since
labels can be automatically created from a database or label log, you can create many labels quickly and
easily if you specify the label layout beforehand.
The label list function allows you to create a data log by directly entering text into the label list window of the
P-touch Editor. The log can also be edited (added, deleted, or modified). The list is saved together with the
labels to allow you to use it again.
The database function is used to import information from an existing database created by another application.
For detailed information on the database function, refer to Î"Using external database files" on page 23.
• The label list can be exported only in the CSV format.
• Supported database file formats are: mdb (Microsoft
• To create labels using the Add-In function of the P-touch Editor in any other application, refer to
Î"Creating Labels with Other Applications" on page 26.
®
Access ), xls (Microsoft® Excel), csv, and txt.
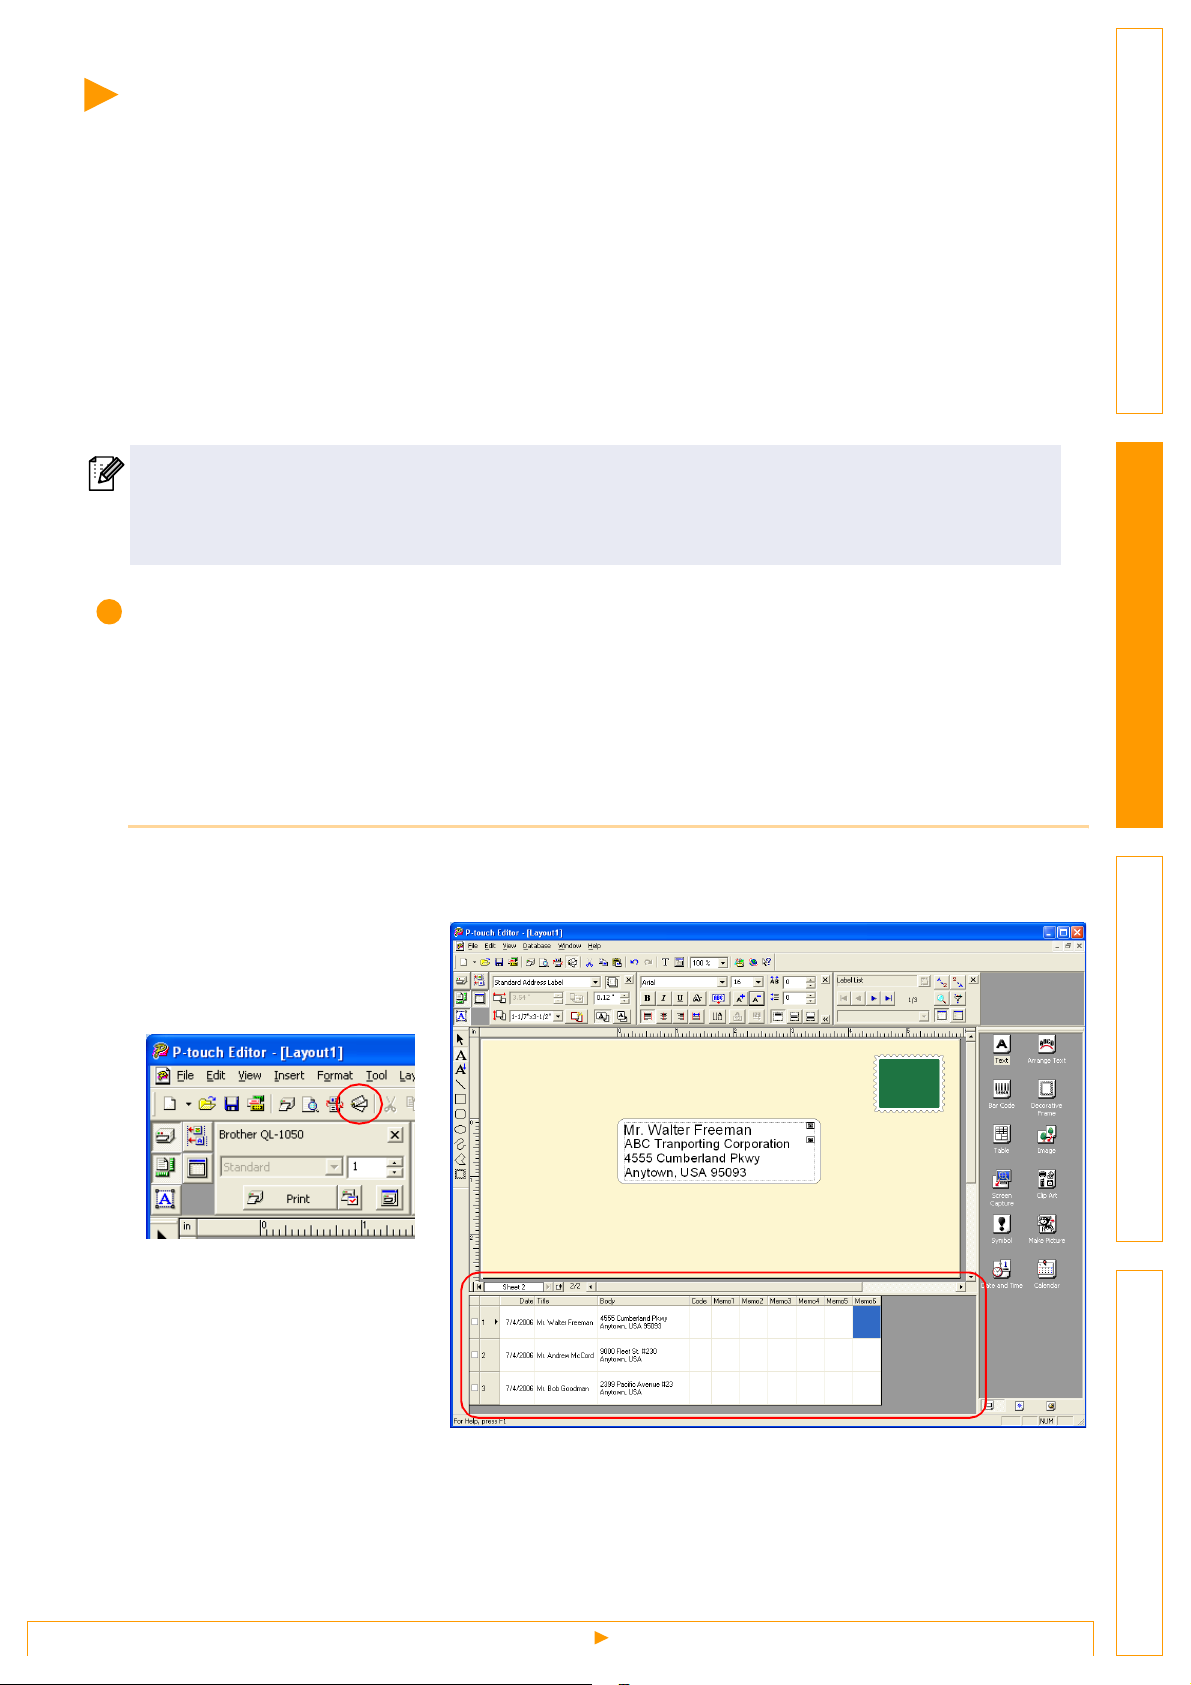
Using the Label List
Using the following example, this section describes the procedure for creating address labels by directly
entering text into the label list.
First, create a new layout by referring to Î"Creating an Address Label" on page 9 and choose the label size.
Opening the Label List
IntroductionCreating Labels (For Windows)Creating Labels (For Macintosh)Appendix
1 Click [File]-[Database]-[Label List].
The Label List/Database window appears.
15
Creating Labels Efficiently
Page 16
Switching the Label List view
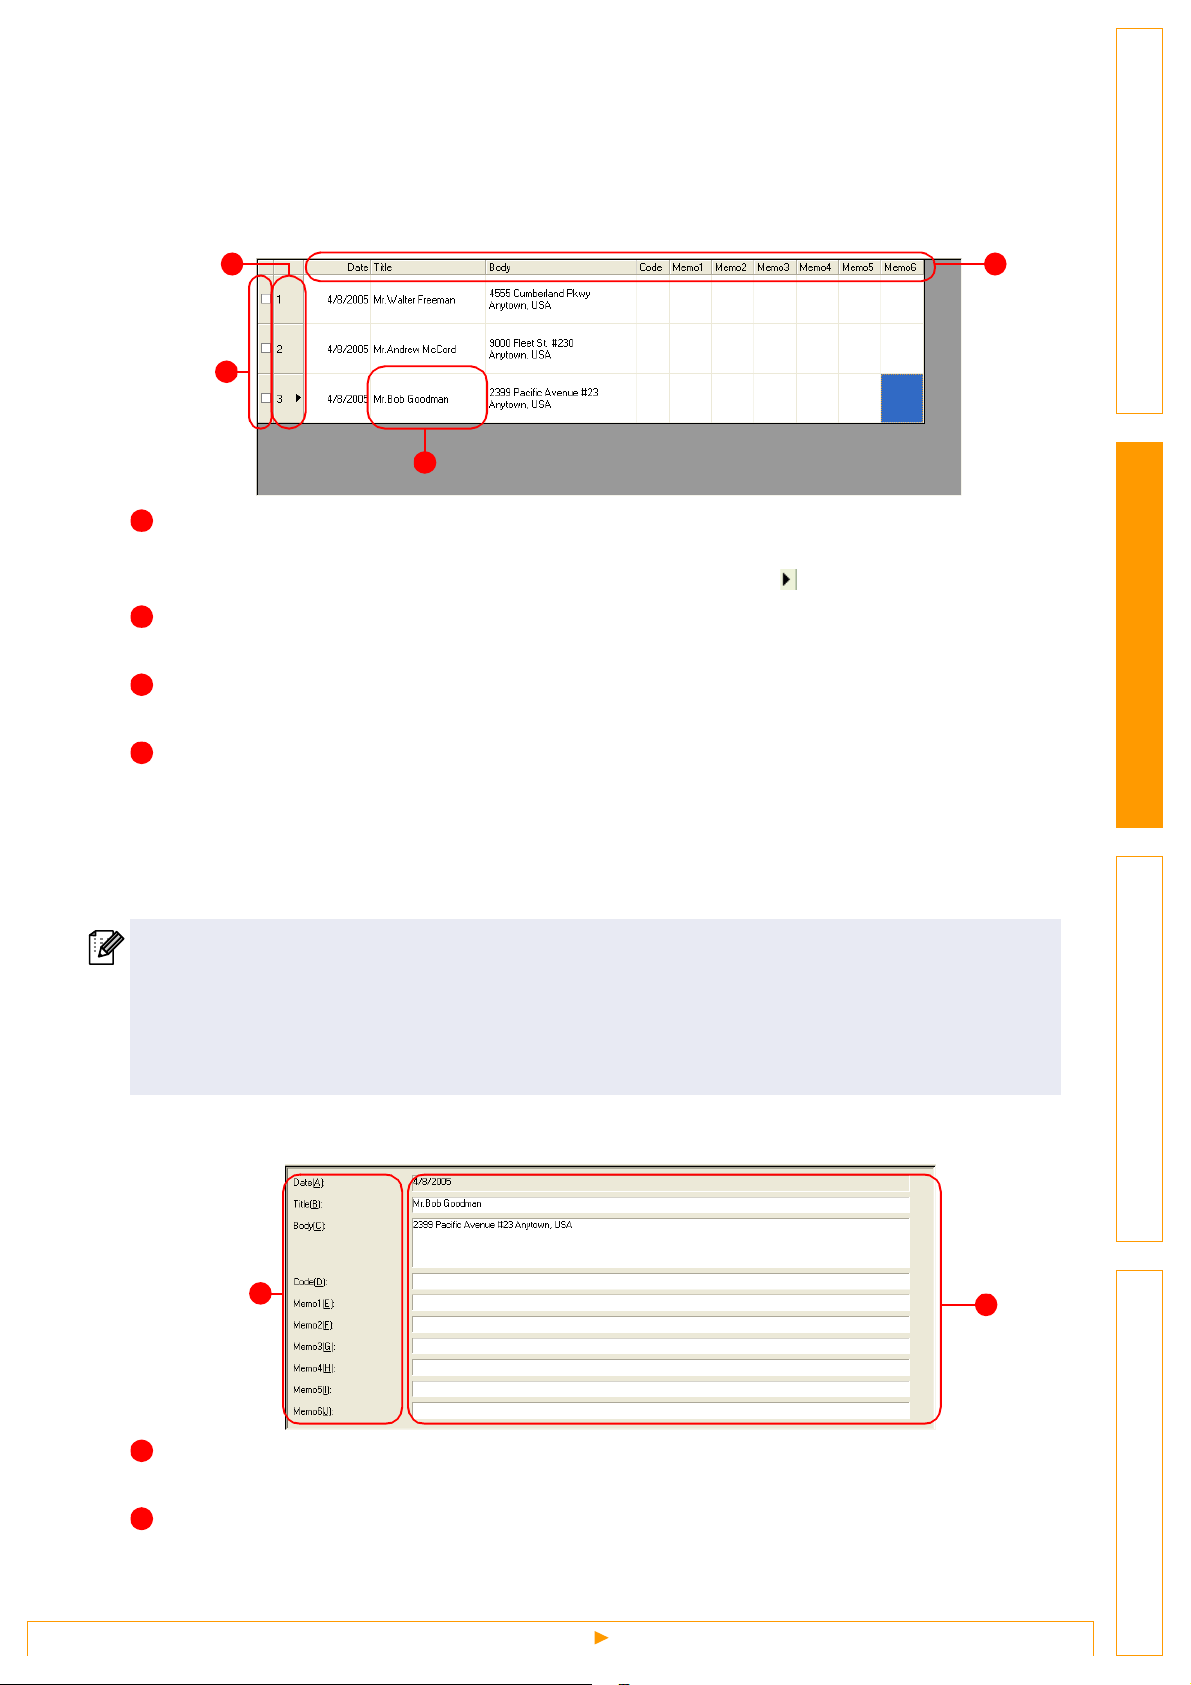
There are two ways to display the Label List/Database window: Record View and Form View. To change the
view, right-click in the Label List/Database window, and select either Record View or Form View.
Record View
This view displays the list information.
1
4
3
1
Record selector
Clicking the record selector allows you to select a record.
The selected record is highlighted. The active record is indicated by a mark.
2
Field selector
Displays the field names.
3
Cell
Displays the field information for each field in a record.
4
Record check mark
Records with a mark can be printed.
Once fields are linked to a label layout, the corresponding data from the database automatically appears in
the label when a record is selected.
To change what you see on the label, select another record.
2
IntroductionCreating Labels (For Windows)Creating Labels (For Macintosh)Appendix
• The font used in the record view can be changed by choosing a different setting in the [Database] tab
in the [Options] dialog box.
Click [Tool]-[Options] in the menu to open the [Options] dialog box. (If [Tool] is not displayed, click on
the layout work area once.)
• The height of a record can be adjusted by dragging the record divider line in the record selector column.
Similarly, the width of a field can be adjusted by dragging the field divider line in the field selector row.
Form View
Displays the data for the current record in a form.
1
1
Field name
Displays the field names.
2
2
Field data
Displays the field information for the record selected in the record selector.
16
Creating Labels Efficiently
Page 17
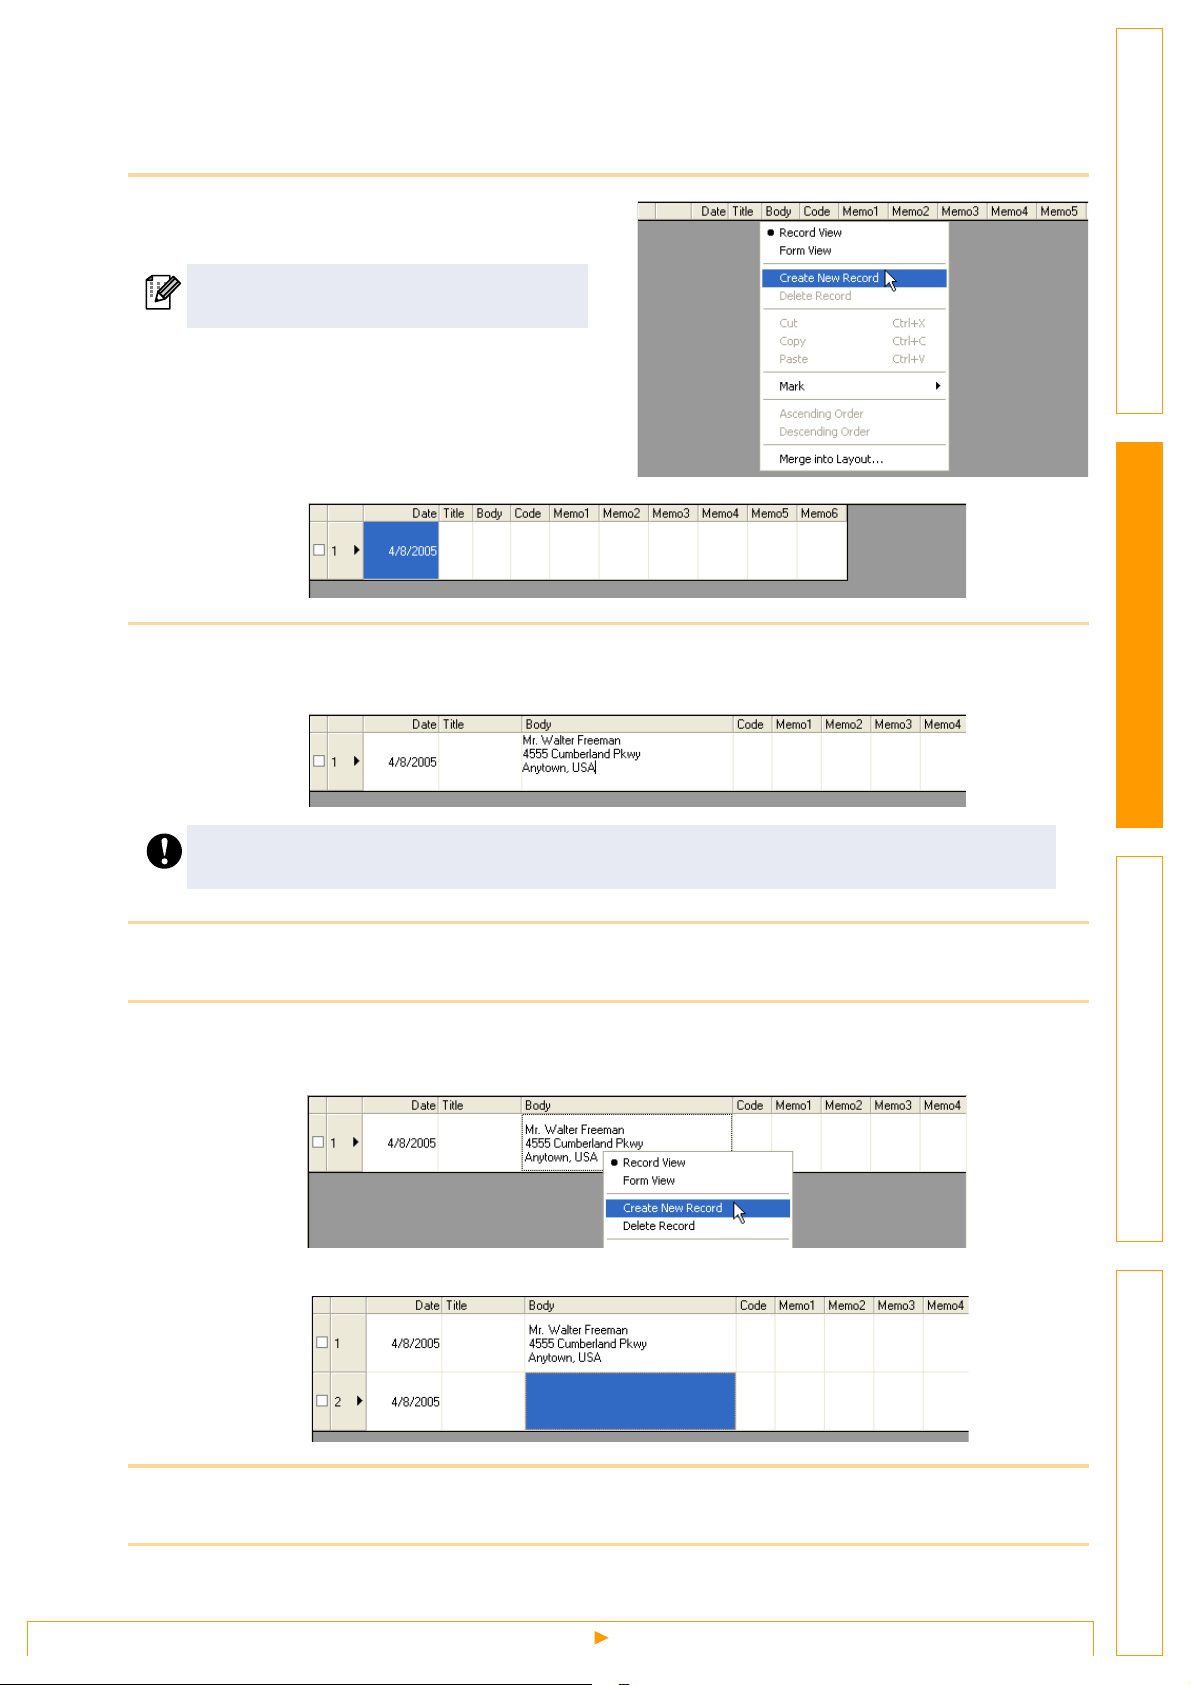
Entering data
In the following example, type an address and a name in the Body field.
1 Right-click in the Label List/Database
window, and click [Create New Record].
You can also display the menu by rightclicking on the record selector.
A new record is added to the list.
2 Double-click in the [Body] field to place the cursor in the field, and type in the address
and name.
IntroductionCreating Labels (For Windows)Creating Labels (For Macintosh)Appendix
• To enter a new line in a cell, hold down the [Ctrl] key and press the [Enter] key.
• The field name cannot be modified.
3 Repeat Step 1 to enter the data for all the fields you need.
4 To add another new record, right-click in the Label List/Database window and click
[Create New Record].
A new record is added to the list.
5 Enter data, such as the name and address, for the new record.
6 To add more records, repeat Steps 4 and 5 above.
17
Creating Labels Efficiently
Page 18
Layout Styles
The Layout Style function allows you to create labels using label list information in a simple way.
What is a Layout Style?
• The Layout Style function lets you use a variety of saved label layouts easily.
• You can also save new layouts you have created, and later recall them quickly and easily.
When is it useful to use a Layout Style?
• You can easily create labels by simply selecting a layout style and typing text in the P-touch Editor Layout
window.
• With the Merge Fields function, you can quickly create and print labels by dropping a dragged data from the
Label List or a database.
Changing the Layout Style for each DK Roll
A default layout style can be specified for each type of DK Roll.
Default layout styles have been preset. You may make changes to the default styles by following the
procedure below:
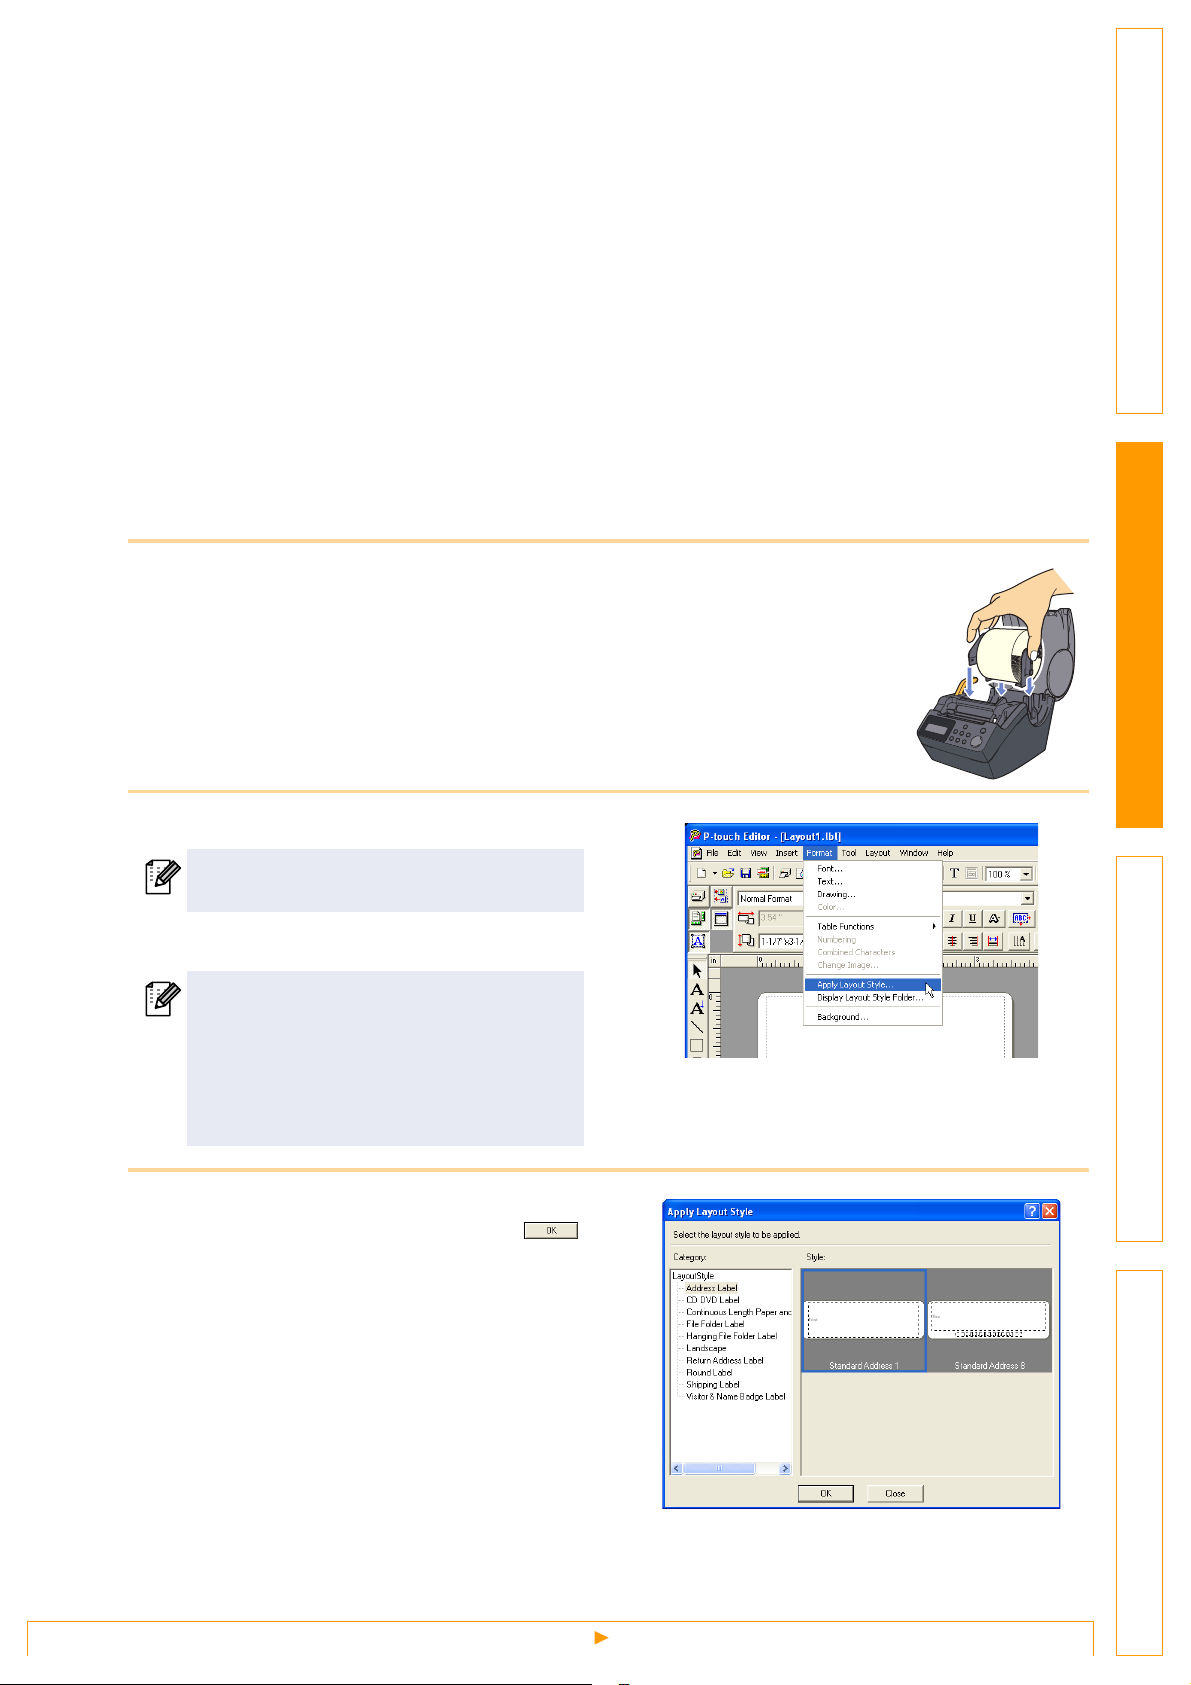
1 Choose the DK Roll for the layout style you want to change, and
insert it in the printer.
2 Click [Format] -[Apply Layout Style].
IntroductionCreating Labels (For Windows)Creating Labels (For Macintosh)Appendix
If [Format] is not displayed, click on the
layout work area once.
The [Apply Layout Style] dialog box appears.
• The layout style that is currently the
default is surrounded with a frame.
• If your desired layout style is not listed,
create a new layout style.
• Refer to the following section "Using a
Layout Style to create labels".
3 For the inserted DK Roll, click the layout
style you want to use, and click .
Now the default layout style for the DK Roll
installed in the printer has been set.
18
Creating Labels Efficiently
Page 19
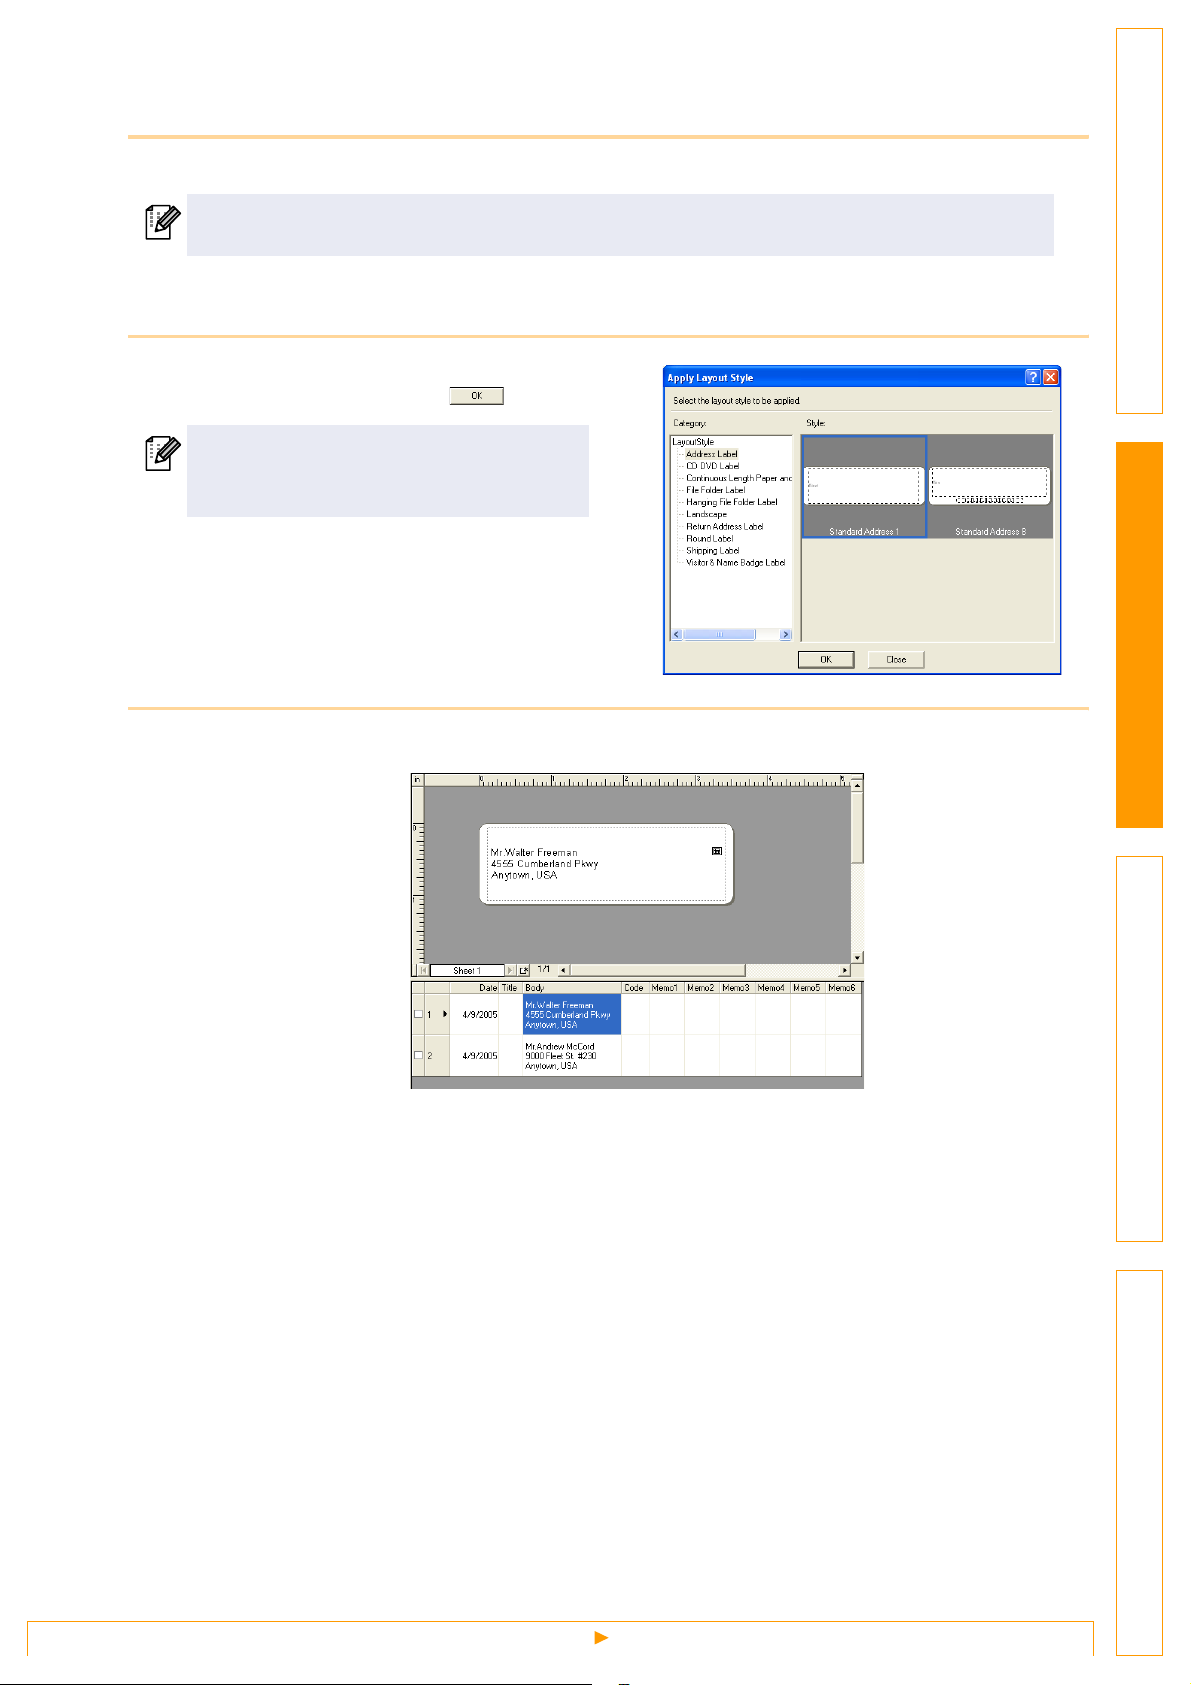
Using a Layout Style to create labels
1 With the Label List/Database window displayed, click [Format]-[Apply Layout Style].
If [Format] is not displayed, click on the layout work area once.
The [Apply Layout Style] dialog box appears.
2 Select a layout suitable for the label you
want to create, and click .
Every DK Roll has its own default layout.
The layout style for that DK Roll is
automatically saved as the default setting.
IntroductionCreating Labels (For Windows)Creating Labels (For Macintosh)Appendix
3 Return to the Layout window to check the labels.
19
Creating Labels Efficiently
Page 20
Creating and registering a new Layout Style
When there is no layout style appropriate for the label you want to create, you can create a new layout style.
You can then save it as a new layout style for later use.
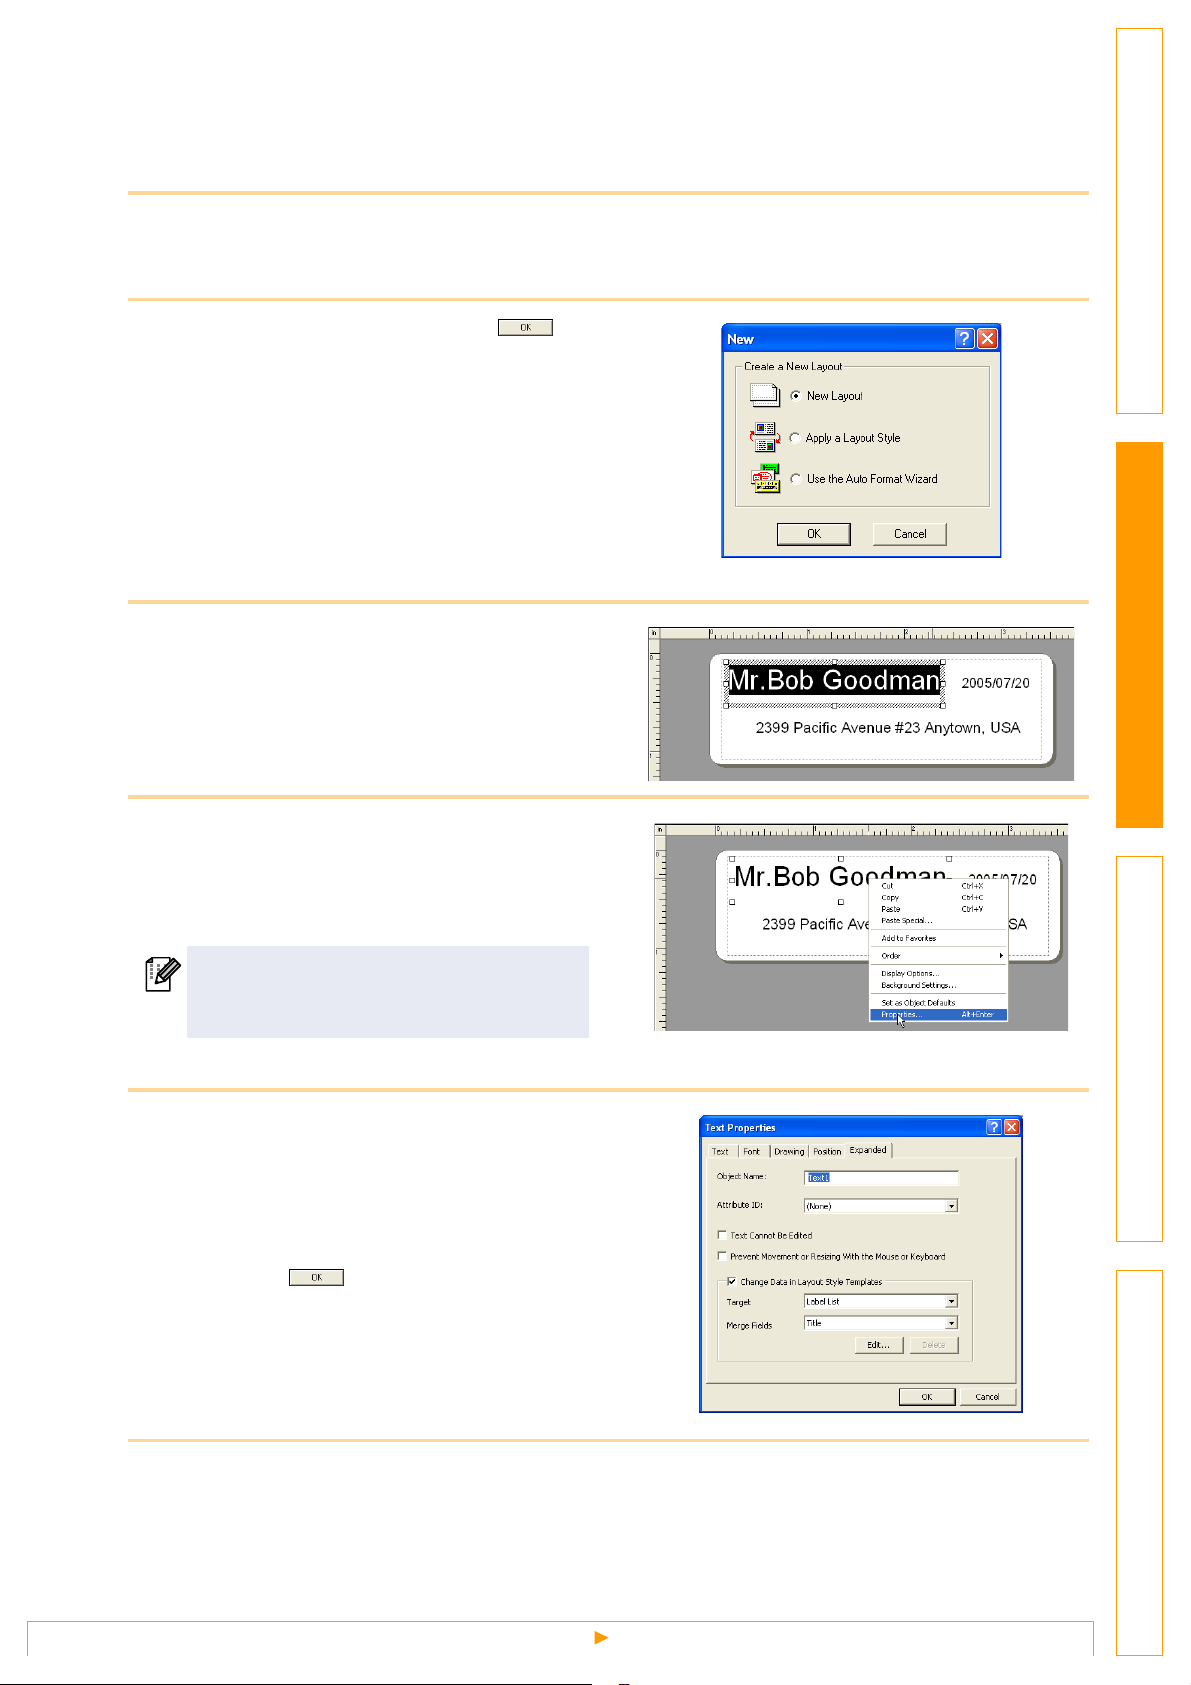
1 Click [File]-[New].
The [New] dialog box appears.
2 Click [New Layout], and click .
3 Create a text object and adjust its position
or format.
IntroductionCreating Labels (For Windows)Creating Labels (For Macintosh)Appendix
4 Right-click on the created text object and
select [Properties] from the menu
displayed.
The [Text Properties] dialog box appears.
The [Text Properties] dialog box also
appears when you double-click the created
text object.
5 Click the [Expanded] tab and check the
[Change Data in Layout Style Template]
check box.
Select [Label List] in [Target], select a field
(such as [Title]) map from the label list,
and click .
6 Repeat Steps 4 and 5 for every text object you have created.
20
Creating Labels Efficiently
Page 21
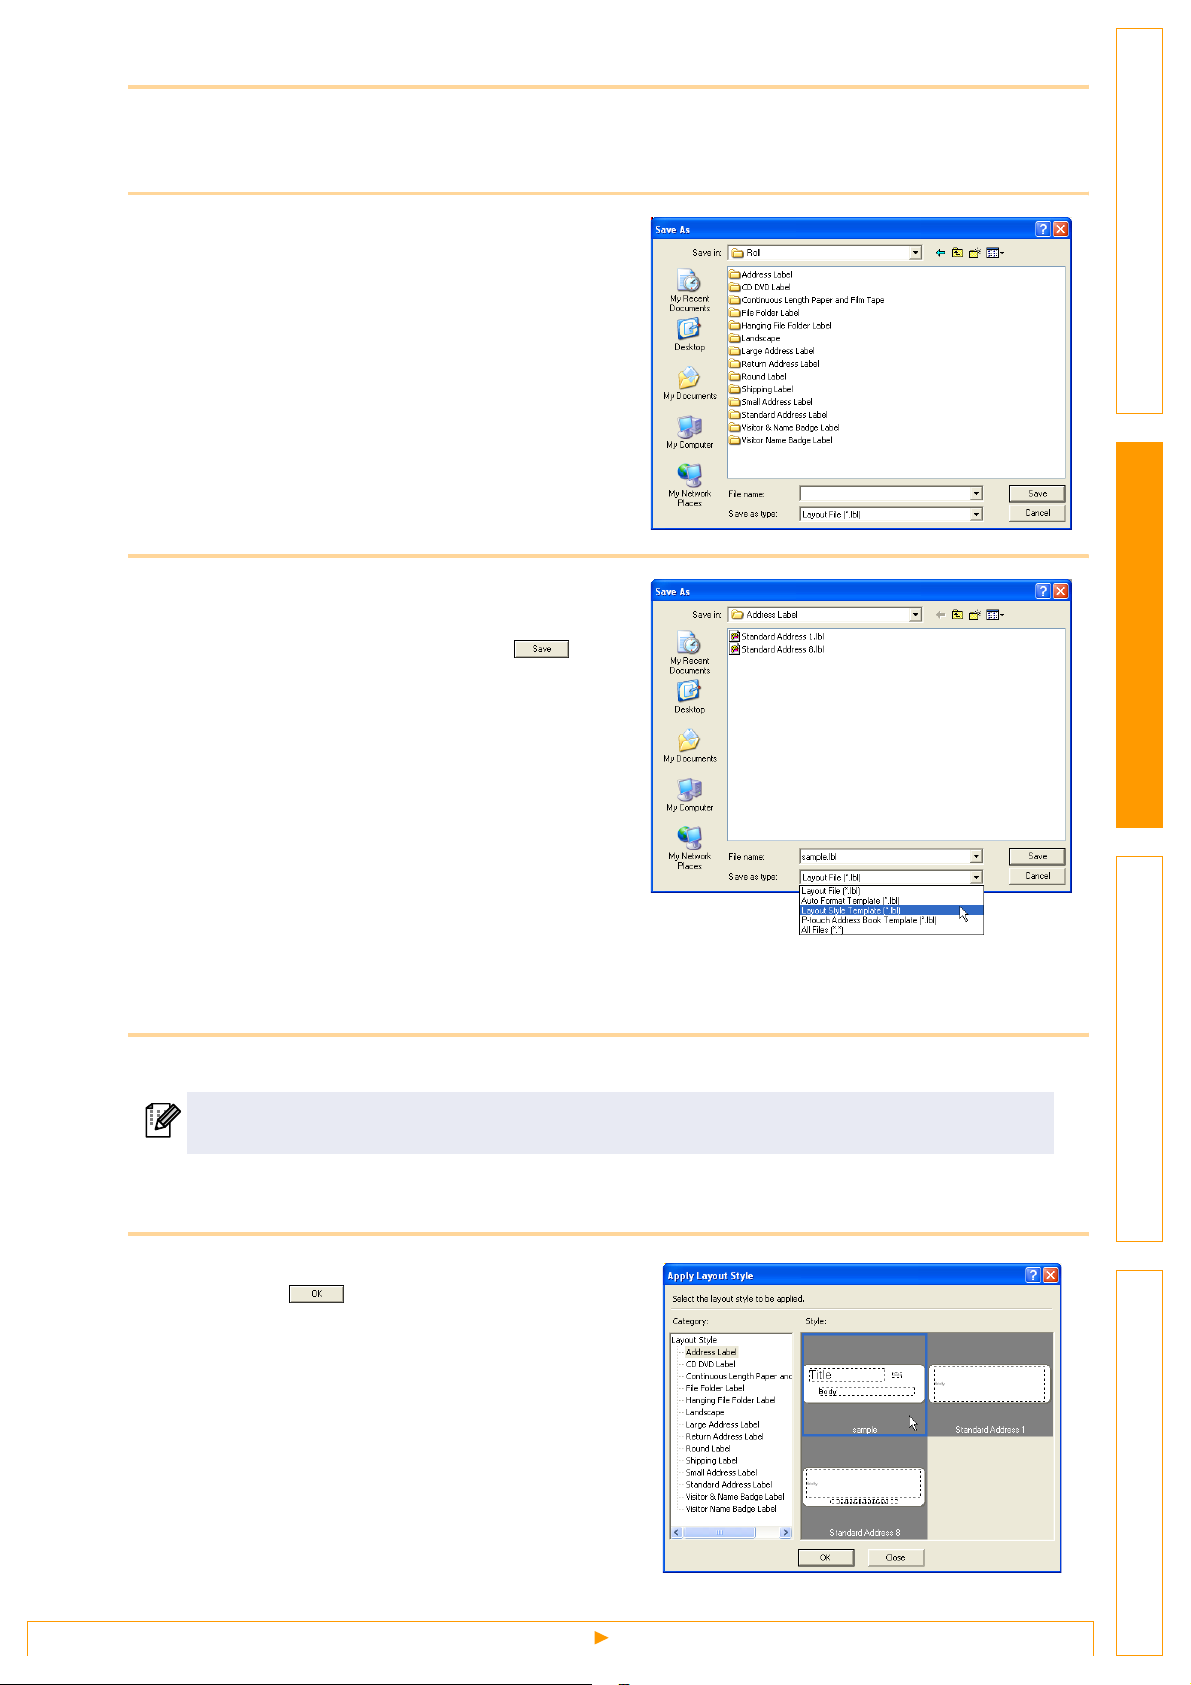
7 Click [File]-[Save As].
The [Save As] dialog box appears.
8 Move to the folder in which you want to
save the label layout.
9 From the [Save As] type pull down, select
[Layout Style Template].
Enter the [File name] and click .
The layout style you have created is now saved.
At this point, the new style has not yet been
applied to the label list information.
You need to apply the created layout style.
IntroductionCreating Labels (For Windows)Creating Labels (For Macintosh)Appendix
10 With the Label List/Database window displayed, click [Format]-[Apply Layout Style].
When [Format] is not displayed, click on the layout work area once now saved.
The [Apply Layout Style] dialog box appears.
11 Select the layout style you have created,
and click .
The label list information and layout are now
updated.
21
Creating Labels Efficiently
Page 22

Printing labels from the Label List
1 Click in the Print properties.
The [Print] dialog box appears.
2 Choose the Print Options.
Refer to Î"Print Options and label cutting" on
page 10.
3 In [Print Range], specify the records to be printed.
Print Range setting Details
All Records Prints all records in the database or Label List.
Current Record Prints the record currently displayed.
Marked Records Prints the records marked in the database or Label List.
Record Range
Prints the records designated by the range specified in the From and To
boxes.
IntroductionCreating Labels (For Windows)Creating Labels (For Macintosh)Appendix
4 Click .
The labels are printed.
• When you select any record in the database or label list and click on the standard toolbar, the
selected record can be printed instantly.
• Selecting records while holding down the [Ctrl] key allows you to select multiple non-contiguous
records.
22
Creating Labels Efficiently
Page 23

Using external database files
This section describes the procedure for creating barcode labels with a database.
The following example uses a Microsoft
The supported database file formats are: mdb (Microsoft® Access®), xls (Microsoft® Excel), csv, and txt.
®
Excel file as a database.
1 Prepare a database file.
The following example uses a file (.xls) created
with Microsoft
®
Excel, as shown right.
2 Start the P-touch Editor and specify the
label size.
In this example, specify [1-1/7"x3-1/2"] for the
Tape Width box in the Page properties.
IntroductionCreating Labels (For Windows)Creating Labels (For Macintosh)Appendix
3 Click [File]-[Database]-[Connect].
The [Open Database] dialog box appears.
4 Select the Microsoft
prepared and click .
The [Select Database Editing Mode] dialog box
appears.
If the file you use has multiple sheets, the
[Table Selection] dialog box appears.
Select the sheet you want to use.
®
Excel file you have
23
Creating Labels Efficiently
Page 24

5 Specify how the file will be opened, and
click .
The Database window appears.
• Connect as read-only.
Used to print the original data.
The data cannot be edited.
• Create a copy that can be edited.
Allows you to update the database. The original database will not be changed.
• Connect to original file and allow editing.
Allows you to update the original database. Cell types may be changed, and special settings such as
macros may disappear.
6 Click [Part Name] (one of the field names
in the Database window) to select it, and
drag and drop it anywhere in the layout
work area.
The pop-up menu appears.
IntroductionCreating Labels (For Windows)Creating Labels (For Macintosh)Appendix
7 Click [Text].
The database content appears in the layout work
area as text-based data.
Change the font, style and format of the text
as needed.
8 Repeat Steps 6 and 7 to display the [Model Name] data similarly.
9 Click [Part Code] (one of the field names in
the Database window) to select it, and
drag and drop it anywhere in the layout
work area.
The pop-up menu appears.
24
Creating Labels Efficiently
Page 25

10 Select [Bar Code].
The database content is merged into the layout
work area as bar code data.
Change the format and settings of the bar
code as needed.
11 Click in the Print properties.
The [Print] dialog box appears.
If you want to print just the label shown in
the layout work area, click in the
Print properties.
12 In [Print Range], select [All Records] and
click .
IntroductionCreating Labels (For Windows)Creating Labels (For Macintosh)Appendix
13 All the labels are printed, using the database information.
25
Creating Labels Efficiently
Page 26

Creating Labels with Other Applications
When installing the software, if you select the Add-In function, a P-touch tool will be automatically installed
onto the Microsoft
installed on your PC.)
In each application, by selecting the text you want to print and clicking on the P-touch icon, you can create
and print labels quickly and easily.
• The Add-In function supports the following applications:
Microsoft
2000/2002/2003
• After the Add-In function is installed into
Microsoft
[Security Warning] dialog box may appear when
starting these applications, depending on the
application's security settings. If this dialog box
appears, check the [Always trust macros from this
source] checkbox, and click on [Enable Macros].
For details on security settings, refer to the Help
files for the application.
®
Word, Excel, and Outlook® tool bar. (If Microsoft® Word, Excel, Outlook® are already
®
Word 97/2000/2002/2003, Microsoft® Excel 97/2000/2002/2003, and Microsoft® Outlook®
®
Word, Excel, or Outlook®, the
IntroductionCreating Labels (For Windows)Creating Labels (For Macintosh)Appendix
Add-In settings
To register or cancel the Add-In function, after the software installation, use the Add-In settings.
1 Click [Start]-[All Programs(Programs)]-
[Brother P-touch]-[P-touch Tools]-
[P-touch Editor 4.2 Add-Ins Utility].
The [Brother P-touch Add-In Settings] dialog box
appears.
2
Click on the checkboxes for the
applications in which the Add-In function is
to be used, and turn off the checkboxes for
the others.
[Apply] is used to specify what action is taken
when the (Add-In button) is pressed in each
application.
• Add-In Preview : Displays the Add-In
Preview.
• P-touch Editor : Starts P-touch Editor,
enabling edit operations.
• Print Immediately : Prints the label.
Before running this program, close the
Word, Excel and Outlook
®
programs.
26
Creating Labels with Other Applications
Page 27

Microsoft Word
With the Add-In function, you can directly copy the text selected in Microsoft® Word to a label layout.
Creating labels using Microsoft Word
1 Open a Microsoft
®
Word document and
select the text you want to print.
2
1
2 On the Microsoft
The Add-In Preview window appears.
In the Add-In Preview window, the imported text is displayed in the preset layout style.
®
Word standard toolbar, click .
IntroductionCreating Labels (For Windows)Creating Labels (For Macintosh)Appendix
Toolbar in the Add-In Preview window
Icon Button name Function
Print button Prints labels.
Print Settings button
Check Media button Checks the size of the DK Roll.
Paper Settings button Used to select the paper.
Select Layout button
Allows you to display the [Print] and [Printer Setup] dialog
boxes using the menu displayed with a click on this button.
The [Apply Layout Style] dialog box appears. Allows you
to choose a different layout style.
27
Creating Labels with Other Applications
Page 28

Icon Button name Function
Zoom controls
Edit button
Help button Opens the P-touch Editor Help files.
Exit button Exits the Add-In Preview window.
Record buttons
Record in Label check
box
• For details on how to automatically add the selected text to a label list, refer to "How to add the
Microsoft
• If Microsoft
won't be able to use the Add-In function in Microsoft
Microsoft
®
Word text to a label list" described below.
®
Outlook® is running and Microsoft® Word is selected as the standard editor, you
®
Word.
Used to zoom in or zoom out on the label layout, or to
select the magnification using the pull-down list.
Used to edit the currently displayed label with the P-touch
Editor.
When multiple records are selected, displays the first
record ( ), previous record ( ), next record ( ), or
last record ( ).
The figures between the buttons show the "current record
number/total number of records".
When this check box is turned on, the selected text is
added to a label list.
®
Word. Exit Microsoft® Outlook® and restart
IntroductionCreating Labels (For Windows)Creating Labels (For Macintosh)Appendix
3 Click .
The labels are printed.
If you want to edit or customize the text or label layout, click .
This operation opens the P-touch Editor layout window, which allows you to edit labels.
How to add the Microsoft Word text to a label list
If you want to register the text in the label list, check the [Record In Label List] check box in the Add-In
Preview window. New records are automatically created in the label list and the selected text is added to
each field shown below:
Selected text Added field
Date of creation Date field
The first line Title field
All lines including the first line Body field
Detected ZIP/Postal code Code field
28
Creating Labels with Other Applications
Page 29

Microsoft Excel
With the Add-In function, you can directly copy text selected in Microsoft® Excel to a label layout.
Creating labels using Microsoft Excel
1 Open a Microsoft
select the cells that contain the text you
want to include on the label.
2 On the Microsoft
The [Brother P-touch Import Setup] dialog box appears.
®
Excel worksheet and
®
Excel standard toolbar, click .
3 In [Label Layout], make adjustments to
the line feed in the cells and click .
[Label Layout] enables you to change the
way a label will be done its layout. When
you select any listed item in the [Fields] box
and click , a new field is added to
the [Label Layout] box.
You can enter spaces, line feeds, commas,
and characters for each cell and print them
on a label.
You can also preview the layout in the
[Label Preview] box.
IntroductionCreating Labels (For Windows)Creating Labels (For Macintosh)Appendix
The Add-In Preview window appears.
29
Creating Labels with Other Applications
Page 30

• For details on how to automatically add the selected text to a label list, refer to "How to add the
Microsoft
• For details on the Toolbar of the Add-In Preview window, refer to Î"Toolbar in the Add-In
Preview window" on page 27.
• If you want to include the data into the Code field of the label list, select [Text Imported Into the
"Code" Field of the Label List] in the [Brother P-touch Import Setup] dialog box.
• When multiple records are selected in Excel, use the buttons to show the other lines.
®
Excel text to a label list" described below.
4 Click .
The labels are printed.
To edit or customize the text or label layout, click .
This operation opens the P-touch Editor layout window, which allows you to edit labels.
How to add the Microsoft Excel text to a label list
If you want to register the text in the label list, check the [Record In Label List] check box in the Add-In
Preview window. New records are automatically created and the selected text is added to each field as
shown below:
Selected text Added field
Date of creation Date field
IntroductionCreating Labels (For Windows)Creating Labels (For Macintosh)Appendix
The first line in the text that is specified in the Label
Layout
All lines including the first line in text specified in the
Label Layout
Content of cell specified in [Text Imported Into the
"code" Field of the Label List]
Title field
Body field
Code field
30
Creating Labels with Other Applications
Page 31

Microsoft Outlook
With the Add-In function, you can directly copy the text selected in Microsoft® Outlook® to a label layout.
Items you can import are: Contacts, Calendar items, Deleted Items, Drafts, Inbox, Journal, Notes (text in the
Notes dialog box is not available), Outbox, Sent Items and Tasks windows.
Creating labels using the Contacts data in Microsoft Outlook
1 Open the Microsoft
and select the Contact information you
want to include.
In Microsoft® Outlook®, you can include not
only the Contact data but also the text in a
message, as you can do in Microsoft
Word.
®
Outlook® Contacts
®
IntroductionCreating Labels (For Windows)Creating Labels (For Macintosh)Appendix
2 On the Microsoft
The Add-In Preview window appears.
In the Add-In Preview window, the selected text is displayed in the preset layout style.
• For details on how to automatically add the selected text to the label list, refer to "How to add
the Microsoft
• For details on the Toolbar of the Add-In Preview window, refer to Î"Toolbar in the Add-In
Preview window" on page 27.
®
Outlook® standard toolbar, click .
®
Outlook® text to a label list" described below.
3 Click .
The labels are printed.
To edit or customize the text or label layout, click .
This operation opens the P-touch Editor layout window, which allows you to edit labels.
31
Creating Labels with Other Applications
Page 32

How to add the Microsoft Outlook text to a label list
If you want to register the text in the label list, check the [Record In Label List] check box in the Add-In
Preview window. New records are automatically created in the label list and the selected text is added to
each field as shown below:
When importing data from the Contacts window:
Name of Contact item Added field
Date of creation Date field
Contacts Full Name Title field
Contacts Full Name and Contacts Address when the
[This is the mailing address] check box is on
Contacts Company and Job Title when the contact's
address is "Business"
Body field
Body field
Contacts ZIP/Postal code Code field
When importing other than Contact information:
Selected text Added field
Date of creation Date field
The first line Title field
All lines including the first line Body field
IntroductionCreating Labels (For Windows)Creating Labels (For Macintosh)Appendix
It is not possible to start several P-touch Editors by using P-touch Add-In function.
32
Creating Labels with Other Applications
Page 33

How to Use the P-touch Address Book
This section describes the procedure for creating labels from contacts efficiently using the P-touch Address
Book.
Starting the P-touch Address Book
1 Click [Start]-[All Programs(Programs)]-
[Brother P-touch]-[P-touch Address Book
1.0] .
You can also start the P-touch Address
Book using the following methods: (Only if
you created the shortcut during installation)
• Double-click the shortcut icon on the
desktop.
• Click the shortcut icon on the Quick
Launcher bar.
When the P-touch Address Book is launched, the [Startup] dialog box appears, letting you make
settings to create new contacts, import CSV format data or Outlook
®
contacts, and so on.
2 In the [Startup] dialog box, specify how
the P-touch Address Book works and
click .
The layout window appears.
• When [Create a New Contact] is selected, the
layout window appears.
• When [Import Contacts from a CSV File] or
[Import Contacts from Outlook] is selected, you
can import contacts in other formats. Refer to
Î"Importing the Contact Data" on page 36.
• Click to open the P-touch Address
Book Help files.
The P-touch Address Book Help offers detailed information on available features and explains how to
use the P-touch Address Book.
IntroductionCreating Labels (For Windows)Creating Labels (For Macintosh)Appendix
33
Starting the P-touch Address Book
Page 34

Layout window
The layout window consists of the following eight sections:
1
2
3
IntroductionCreating Labels (For Windows)Creating Labels (For Macintosh)Appendix
4
6
8
1
Menu bar
Commands are categorized under each menu (File, Edit, View, and Insert) by function.
2
Standard toolbar
A group of frequently used commands (such as New Contact, Edit Contact, Find, Print, etc.) are provided
in this toolbar.
3
Text toolbar
Used to adjust text attributes such as font size and alignment.
5
7
4
Layout style selection view
Displays layout styles stored in the folder you selected.
5
Layout work area
This area is used to display or edit a layout that uses the layout style selected in the layout style selection
view.
6
Contact list combo box
Displays the contact list that is currently specified. You can choose from [Personal], [Business], [Other1],
[Other2], and [Other3].
7
Index tab
You can search within the field selected in Record View. Click [Tool]-[Sort] to open the [Sort] dialog box,
and specify the field to be searched using [Key1].
8
Record View
The Contacts data are displayed in each field. The data can be also edited (added, deleted, or modified).
34
Starting the P-touch Address Book
Page 35

Creating a New Contact
This section explains how to create a new contact.
1 Click [File]-[New Contact]. Or, click .
The [New Contact] dialog box appears.
2 Enter data for each item.
IntroductionCreating Labels (For Windows)Creating Labels (For Macintosh)Appendix
1
2
1
New Contact form toolbar
The following commands are categorized in the menu:
Icon Button name Function
Previous Displays the previous contact.
Next Displays the next contact.
New Contact Displays the New Contact form window for a new contact.
Delete Contact Deletes the contact that is currently selected.
Allows you to insert an image for a contact.
The following file types are supported:
• Bitmap (*.bmp, *.dib)
• JPEG file (*.jpg, *.jpeg)
Image
• TIFF file (uncompressed)(*.tif )
• GIF file (*.gif )
• Icon (*.ico)
• Windows Meta File(*.wmf, *.emf)(*Image adjustment is not
allowed.)
• PNG file (*.png)
2
Contact form
Used to enter each item such as name, address, phone number, company information, and E-mail
for the new contact.
3 Click .
Save and Close Saves the contact and closes the [New Contact] dialog box.
35
Creating a New Contact
Page 36

Importing the Contact Data
The CSV format files and Outlook® Contacts data can be imported and used as P-touch Address Book
contacts.
Importing the contact data in CSV format
1 Click [File]-[Import]-[CSV File].
The [Open] dialog box appears.
2 Select a file to be imported and click
.
The [Stop Signal Replacement] dialog box
appears.
IntroductionCreating Labels (For Windows)Creating Labels (For Macintosh)Appendix
3 Select [Original File Conversion Stop
signal] and click .
When the [Make Field Name the First] is
checked, the first line shows the field
names.
The [Fields to Import] dialog box appears.
4 Assign [CSV/Outlook Fields] to [Address
Book Fields] and click .
Every CSV file field is imported, even if the
same field is not included in the Address
Book contact.
The Contact data are displayed in Record View.
36
Importing the Contact Data
Page 37

Importing the Outlook contact data
1 Click [File]-[Import]-[Outlook Contacts].
The [Fields to Import] dialog box appears.
2 Assign [CSV/Outlook Fields] to [Address
Book Fields] and click .
Every Outlook® Contacts field is imported,
even if the same field is not included in the
Address Book contact.
The Contact data are displayed in Record View.
IntroductionCreating Labels (For Windows)Creating Labels (For Macintosh)Appendix
Editing the Contact Data
This section explains how to edit the contact data.
1 Click [File]-[Edit Contact]. Or, click .
The [Edit Contact] dialog box appears.
2 Edit the data in each item.
For details on the Toolbar of the New
Contact form, refer to Î"Creating a New
Contact" on page 35.
3 Click .
37
Editing the Contact Data
Page 38

Printing the Label
This section explains how to print a created label.
1 Click .
The labels are printed.
2 Cut off the printed label using the Cut
button or the Cut lever (Brother QL-500) of
the printer.
In the [Print] dialog box, if [Auto Cut] is
checked in [Options], the printed labels will
be automatically cut (Not available for QL-
500).
Print Options and label cutting
Clicking [File]-[Print] will open the [Print] dialog box.
This dialog box allows you to set the print options and
the number of copies.
You can set the number of labels between
cuts with the Option tab in the Print dialog
box displayed when you click the
Properties button (QL-1050/1050N only).
IntroductionCreating Labels (For Windows)Creating Labels (For Macintosh)Appendix
Settings Details
Auto Cut
(QL-550/650TD/
1050/1050N)
Cut at end
Options
Copies Number Used to specify the number of copies to be printed.
Print Range
(QL-650TD/
1050/1050N)
Mirror Printing
Output Directly
Printer Driver
All Records Prints all contacts in shown in the Record View.
Current Contact Prints the contact that is currently displayed.
Marked
Contacts
Contact Range
When this check box is checked, labels will be automatically cut.
When this check box is not checked, labels won't be automatically cut after
printing.
Press the Cut button in the printer to cut them, as needed.
When multiple labels are printed, only cuts after the final label is printed.
When this check box is checked, labels will be flipped horizontally and
printed.
Check this check box for normal use.
Prints the contacts marked in the Record View.
Check the check box at the left end of the field to mark the contact.
Prints the contacts designated by the range specified in the From and To
boxes.
38
Printing the Label
Page 39

How to Use P-touch Transfer Manager & P-touch Library
The P-touch Transfer Manager is basically for the QL-650TD.The QL-1050 can also transfer templates, but it
cannot select templates with machine side operation. So use the ESC/P command, which can transfer templates.
P-touch Library: This application allows you to manage P-touch label templates and other data on the PC. You can print a
label from the P-touch Library using the printer.
P-touch Transfer Manager: This application can transfer label template data and other data managed with the P-touch
Library to the printer main unit and can make backups of data transferred to the printer main unit.
Starting up P-touch Transfer Manager
1 Click the [Start] button, then select [All programs (Programs)]-[Brother P-touch]-[P-
touch Tools]-[P-touch Transfer Manager 2.0].
P-touch Transfer Manager starts up.
Layout window
1
2
3
IntroductionCreating Labels (For Windows)Creating Labels (For Macintosh)Appendix
5
4
6
1
Menu
Commands are categorized into each menu (File, Edit, View, Tool, and Help) by function.
2
To o l b ar
There are icons for frequently used commands. Click on one to execute its command.
3
Selecting the printer model (Only for P-touch Transfer Manager)
Select the printer model to send data to. When you select a printer, only the data that can be sent to the
selected printer is displayed in the list view.
4
Folder view
Displays a list of folders. When you select any folder, the data in the folder selected is displayed in the list
view on the right.
5
List view
The data in the selected folder is displayed.
6
Preview
The label templates selected in the list view are displayed as a preview.
39
Starting up P-touch Transfer Manager
Page 40

Explanations of the Icons
Icon Button name Function
Transfer
(Only for P-touch
Transfer Manager)
Backup
(Only for P-touch
Transfer Manager)
Open Edits the selected data.
Print
(Only for P-touch
Library)
Printer Settings
(Only for P-touch
Transfer Manager)
Search Searches the data managed with the P-touch Library.
Display Style Changes the file display format.
Transfers the label templates and other data on your PC
to the printer.
Backups the data you have transferred to the Brother Ptouch printer using the P-touch Transfer Manager.
Prints the selected label template with the printer.
Makes the settings related to the printer.
IntroductionCreating Labels (For Windows)Creating Labels (For Macintosh)Appendix
Folder view
1
2
3
4
5
6
7
8
1
P-touch Library
Manages P-touch label templates, Bitmap format images,
and CSV data etc.
2
All Contents
Displays the data managed with the P-touch Library. You can
also make new folders for organizing the data.
3
Filter
Displays all the data currently managed with the P-touch
Library in a type-by-type list.
4
Recycle Bin
Data deleted from the P-touch Library is moved here.
5
Search Results
The search results are displayed.
6
Transfer Manager
Transfers PC data to the printer. This is only displayed when
P-touch Transfer Manager is started.
7
Configurations
Data transferred to the PC is saved here. You can make new
folders for organizing the data.
8
Backups
Saves data backed up from the printer.
40
Starting up P-touch Transfer Manager
Page 41

Transferring label templates from the PC to the printer
1 Select the printer to transfer data to.
Before transferring data, check that the PC and
the printer are correctly connected with a USB
cable and that the printer power is On.
2 Right click the [Configurations folder],
then select [New] and create a new folder.
Here, as an example, we create the folder
"Transfer".
IntroductionCreating Labels (For Windows)Creating Labels (For Macintosh)Appendix
3 Drag the transfer data to the folder you
just made.
Drag the transfer data from All contents or from
Layouts or some other folder under Filter.
When transferring multiple sets of data, move all
the transfer data to the folder you made.
The data that can be transferred depends on
your printer model. For details, refer to your
printer's manual.
4 Key Assign numbers are automatically
assigned to transfer data within the folder
you made in previous step.
To change a number, right click the data name in
the list view, then select key assign number.
•
Key Assign is necessary for transfer of data other
than message texts.
•
If you change the Key Assign number used for
data already transferred to the printer main unit, it
is overwritten. You can check the Key Assign
number used for data already transferred to
printer by backing up the data as explained in
"Backing up label templates" (Page 44).
•
You can click the data name for transfer data and
change to a new name. Depending on your printer
model, there may be restrictions on the number of
characters that can be used in a data name.
41
Transferring label templates from the PC to the printer
Page 42

5 Select the data or folder you want to
transfer,then click .
The transfer confirmation message is displayed.
6 Click [Yes].
The data in the folder selected with the folder
view is transferred to the printer.
If you have selected specific data in the list
view, only that selected data is transferred
to the printer.
IntroductionCreating Labels (For Windows)Creating Labels (For Macintosh)Appendix
42
Transferring label templates from the PC to the printer
Page 43

Creating and transferring a new message (QL-650TD only)
1 Select the QL-650TD Configurations folder or any folder under it.
2 Right click, then select [New Message].
The message file [Edit] dialog box is displayed.
3 Select the number for the message to
create or edit.
IntroductionCreating Labels (For Windows)Creating Labels (For Macintosh)Appendix
4 Input the display text and print text, then
click [Save As].
A screen is displayed for specifying where to
save the message file in the PC. Change storage
location or revise the message file name as
necessary.
A maximum of 10 messages can be stored in the
message file. Only 1 message file can be sent to
1 unit of QL-650TD, so to correct a message,
double-click on the existing message file, open the
[Message] dialog box and make the correction.
5 Select the message text or its folder you
want to transfer, then click .
The transfer confirmation message is displayed.
Before transferring a message, check that the PC
and the printer are correctly connected with a
USB cable and that the printer power is On.
6 Click [Yes].
The message data is transferred to the printer.
43
Transferring label templates from the PC to the printer
Page 44

Backing up label templates
This transfers label templates and other data in the printer to the PC.
• Backed up data can not be edited on the PC.
• For some printer model specifications, it may not be possible to retransfer backed-up data to a
printer of a different model than the one the data was originally backed up from.
1 Connect the PC and the printer by cable and switch on the printer power.
The printer model name is displayed in the folder view.
If you select a printer model name in folder view, the current data transferred to computer is displayed.
2 Select the printer to back up from, then
click .
The backup confirmation message is displayed.
IntroductionCreating Labels (For Windows)Creating Labels (For Macintosh)Appendix
3 Click [Yes].
New folder with a name containing the date is
created under printer folder, and all the printer's
data is transferred to that new folder.
Deleting all the printer data
1 Connect the PC and the printer by cable and switch On the printer power.
The printer model name is displayed in the folder view.
2 Right click the printer, then select [All
Delete].
The confirmation message is displayed.
3 Click [Yes].
All data in the printer is erased.
44
Backing up label templates
Page 45

Changing printer settings from the PC
1 Connect the PC and the printer by cable and switch on the printer power.
The printer model name is displayed in the folder view.
2 Select the printer, then click .
The [Printer Settings] dialog box is displayed.
3 Change settings as necessary.
The items that can be set depend on the printer model.
Settings Details
IntroductionCreating Labels (For Windows)Creating Labels (For Macintosh)Appendix
Preset Template Sets whether or not to display templates preset in the printer.
Cut Option Sets options for cutting labels.
Transfers the PC's date and time or any date and time you want to the
Current Date/Current Time
Menu Key Lock Locks the menu keys.
Language Sets the language displayed on the LCD display.
Unit Selects the unit (inch/mm) used for display on the LCD display.
LCD Contrast Sets the contrast of the LCD display.
printer to set its date and time. You can also select the date and time
format.
4 Click [Set].
The setting is reflected on the printer.
When you click [Get], the current printer settings are read in and displayed in the dialog box.
45
Changing printer settings from the PC
Page 46

Starting up the P-touch Library
You can start up the P-touch Library and edit and print labels.
You can not transfer data or back up data from the printer by using the P-touch Library. To transfer
or back up data, select the View menu [Mode]-[P-touch Transfer Manager] to switch to the P-touch
Transfer Manager.
1 Click the [Start] button, then select [All programs (Programs)]-[Brother P-touch]-[P-
touch Tools]-[P-touch Library 2.0].
The P-touch Library starts up.
Opening and editing data
1 Select the data you want to edit, then click
.
The application associated with the data is
opened and you can edit the data.
IntroductionCreating Labels (For Windows)Creating Labels (For Macintosh)Appendix
The application that starts up depends on
the data. For example, for a P-touch
template, P-touch Editor starts up.
Printing labels
1 Select the label templates you want to
print, then click .
The label is printed by the connected printer.
46
Starting up the P-touch Library
Page 47

Searching labels
You can search label templates registered in the P-touch Library.
1 Click .
The [Search] dialog box is displayed.
2 Check the items to be used as search conditions and set the search items.
The search items that can be set are as follows.
Settings Details
This sets the method for combining multiple search items. If you select AND, files
Multiple Parameters
File Name Inputs the data name to search for.
are searched for that satisfy all the conditions. If you select OR, files are searched
for that satisfy any one of the conditions.
IntroductionCreating Labels (For Windows)Creating Labels (For Macintosh)Appendix
Type Selects the data type to search for.
Location Sets the folder where the data to search through is stored.
Size Sets the data size to search for.
Date Sets the date and time of on which the data to search for was last modified.
3 Click [Begin Search].
The search is started and the search results are
displayed.
• The search results can be checked in the Search Results folder view.
• You can register the data in the P-touch Library by dragging and dropping to All contents folder
or its list view. To have label templates created with P-touch Editor automatically registered in
the P-touch Library, use the following method.
1. From the P-touch Editor menu, select [Tool]-[Option].
2. In the [Option] dialog box [General] tab, click [Registration Settings].
3. Select which timing to register label templates created with P-touch Editor, then click [OK].
47
Searching labels
Page 48

Creating Labels (For
Macintosh)
Overview
This section describes the general procedure for creating labels using the printer.
Refer to the sections indicated for details related to each operation, or to the "User’s Guide (HTML Manual)".
Refer to "How to use the User's Guide (HTML Manual)" on page 56 for how to use the "User’s Guide (HTML
Manual)".
Procedure for Creating and Printing Labels
1 Choose the label you want to create.
Label Samples
IntroductionCreating Labels (For Windows)Creating Labels (For Macintosh)Appendix
2 Select the appropriate DK Roll for the label you are creating.
A sample DK Roll is supplied with this printer. (Other types of rolls are sold separately.)
Select the appropriate DK Roll for the label you are creating.
Î
Setup & Operation Guide or Quick Start Guide
Î
Setup & Operation Guide or Quick Start Guide
Insert the DK Roll.
48
Procedure for Creating and Printing Labels
Page 49

3 Create and print the label.
Choose a method for creating and printing the label: using only the printer, or creating the text using an
application on the computer.
P-touch Editor
Entering text
The template downloading feature, Add-In feature and P-touch Address Book are only available
for Windows
®
.
ÎPage 53
P-touch Editor
Creating labels
ÎPage 53
IntroductionCreating Labels (For Windows)Creating Labels (For Macintosh)Appendix
49
Procedure for Creating and Printing Labels
Page 50

Using the P-touch Editor
This section describes to create a wide range of labels using the P-touch Editor.
This section gives an overview of the P-touch Editor. Refer to the "User’s Guide (HTML Manual)" for
details.
Starting the P-touch Editor
1 Double-click the [Applications] folder of the drive, where the P-touch Editor is installed.
The [Applications] window is displayed.
2 Double-click the [P-touch Editor 3.2] folder.
3 Double-click .
If the Alias has been created, double-click the Alias.
IntroductionCreating Labels (For Windows)Creating Labels (For Macintosh)Appendix
The Layout Window is displayed.
50
Starting the P-touch Editor
Page 51

Layout Window
The layout window has the following six features.
1
2
3
1
Draw Toolbar
Provides tools for selecting objects, entering text and drawing graphics.
IntroductionCreating Labels (For Windows)Creating Labels (For Macintosh)Appendix
4
65
2
Print Toolbar
Provides print preview display, print setting, auto formatting and enlarging/reducing display features.
3
Database Toolbar
Provides tools for database features.
4
Layout Window
Displays the objects inserted for editing.
5
Object Dock
The object dock is used to quickly insert and arrange text, bar codes, frames, tables and graphics.
Icon Name Function
Bar code Sets bar codes.
Clip Art Brings up a wide range of illustrations.
Arrange Text Changes the shape of the text.
Make Picture Makes an illustration by arranging pictures.
Image Brings up saved illustrations and photographs.
Date/Time/Calender
Merge Database Field Creates a database field.
Displays the date and time as a character, or displays
calendar.
51
Starting the P-touch Editor
Page 52

6
Property Dock
Page property, font property, layout property, text property are available.
Click the buttons on the property dock to display and close the property box.
Property Name Function
IntroductionCreating Labels (For Windows)Creating Labels (For Macintosh)Appendix
Page Properties
Sets the size and the orientation
of the label.
Font Properties Sets font, size and text style.
Layout Properties
Sets an arrangement of
character strings and figures.
Text Properties Sets alignment and line spacing.
52
Starting the P-touch Editor
Page 53

Creating an Address Label
This section describes the process of creating an address label on Mac OS® X 10.3.9 as an example.
1 Click on in the Property dock.
The page properties box is displayed.
2 Select "Standard Address Label".
• The label format in the layout window changes to
Standard Address Label.
• The length and width of the tape are set
according to the size of the Standard Address
Label.
3 Click on in the Draw toolbar and enter
the name and address.
IntroductionCreating Labels (For Windows)Creating Labels (For Macintosh)Appendix
4 Click on in the property dock.
The font properties box is displayed.
5 Adjust the font size.
Choose the name and change the bold setting
( ) and font size in the Text properties box.
The settings changed in the text properties
box are applied only to the selected text.
The label should now be ready for printing.
Refer to Î"Printing the Label" on next page for
how to print the labels.
53
Creating an Address Label
Page 54

Printing the Label
This section describes the printing process for a created label.
1 Click on in the print bar.
A dialog for print settings is displayed.
2 Select "1" for Copies in the print properties box and then click .
The label is printed.
IntroductionCreating Labels (For Windows)Creating Labels (For Macintosh)Appendix
3 Cut off the printed label using the CUT
button or the CUT lever (Brother QL-500).
If there is a printing error, an error sign
appears on the printer icon in the dock.
Click the printer icon and click the utility
button in the printer status monitor to
display the error information.
Printing Options
A wide variety of options may be selected in the print dialog box.
A dialog for each setting is displayed after [Copies and Printing Page] is clicked and the item to be changed is
selected.
Copies & Pages
Copies: Selects the number of copies to be printed.
54
Printing the Label
Page 55

Roll Setting
Settings Details
Length Specifies the length of the tape.
Margin Specifies the left and right margins of the tape.
IntroductionCreating Labels (For Windows)Creating Labels (For Macintosh)Appendix
Auto Tape cut (other than the
QL-500)
Cut at every xx labels
(QL-1050/1050N)
Cut at end (QL-650TD/1050/
1050N)
Mirror Printing
Give Priority to
print speed
Quality
Give priority to
print quality
When checked, the printed labels are automatically cut after printing.
You can also set the number of labels between cuts.
When unchecked, the printed labels are not automatically cut after printing.
Cut the label by pressing the CUT button.
When multiple labels are printed, only cuts after the final label is printed.
Prints a mirror image of the label. Use this option to create labels that can
be applied to the inner surface of glass, etc. Use clear tape when creating
such labels.
Use this option to give priority to printing speed.
Use this option to give priority to print quality.
Halftone/Color
Specifies halftone, brightness and contrast.
P-touch Editor
Numbering: Specifies the increment when numbering
the labels (serial numbers).
55
Printing the Label
Page 56

Summary
Displays the list of print settings.
How to use the User's Guide (HTML Manual)
The CD-ROM supplied with this printer contains the User's Guide (HTML Manual), which describes how to
use the P-touch Editor.
The User’s Guide (HTML Manual) may be viewed from the CD-ROM or by installing the contents of the CDROM onto your Macintosh
®
.
IntroductionCreating Labels (For Windows)Creating Labels (For Macintosh)Appendix
The displayed window will differ depending on the OS.
Installing the User's Guide (HTML Manual)
1 Double-click the [Mac OS X] folder in the [QL-series] folder on the CD-ROM.
2 Double-click the [User’s Guide] folder.
3 Double-click the icon .
If the [MAIN.HTM] icon is double-clicked at this point, the file on the CD-ROM may be viewed.
The installation window is displayed.
4 Follow the instructions displayed on the screen and install the folder.
The "User’s Guide (HTML Manual)" is installed.
Opening the User's Guide (HTML Manual)
1 Double-click the [main.htm] icon in the [User’s Guide] folder of the [P-touchEditor 3.2]
installed on the drive.
The browser is launched and the "Main Window" of the "User’s Guide (HTML Manual)" is displayed.
56
How to use the User's Guide (HTML Manual)
Page 57

User’s Guide (HTML Manual) Window
Main Window
1
2
1
Main Menu
Operation methods are classified by function. When clicked, the description window is displayed. When
[Index] is clicked, a list of keywords is displayed and a search can be made using a keyword.
IntroductionCreating Labels (For Windows)Creating Labels (For Macintosh)Appendix
2
Contents
The contents of each menu are classified by item. When clicked, a description window is displayed.
Main Window
3
4
5
3
Menu
The operation methods are classified by function. When clicked, a description window is displayed.
4
Detailed Item
The items for each menu are displayed.
5
Description Window
The operation methods for the selected items are displayed.
57
How to use the User's Guide (HTML Manual)
Page 58

Appendix
Sharing the printer
Using this printer as a Shared Printer
The Brother QL-Series can be shared by multiple personal computers on a network.
To share the Brother QL-
Series
, connect the Brother QL-
Series
to a computer and set it to be a shared device.
Network hub
IntroductionCreating Labels (For Windows)Creating Labels (For Macintosh)Appendix
Brother QL-
The settings for sharing a printer vary according to the operating system running on the personal computer,
and the network environment.
Series
Network cable
USB cable
Using the PS-9000 Print Server (sold separately)
The Brother QL-Series can also be used as a network printer by connecting it to the PS-9000 print server
(sold separately) designed exclusively for label printers.
Providing secure and reliable management of your P-touch network, the PS-9000 is your solution to connecting
multiple users to a single P-touch electronic labeling system. The PS-9000 is a USB print server solution for Ptouch systems in a 10BASE-T/100BASE-TX network environment.
Network hub
PS-9000
Brother QL-
For PS-9000 setup details, refer to the instruction manual for the PS-9000 print server.
The PS-9000 comes packed with the QL-1050N.
Series
Network cable
USB cable
58
Using this printer as a Shared Printer
Page 59

Controlling with the ESC/P Commands
Brother QL-650TD/
1050/1050N Only
Fonts and several bar codes are embedded within this printer. You can send commands to print embedded
characters and bar codes.
Descriptions in this section apply only to the functions provided by the
Brother QL-650TD/1050/1050N.
Available Commands
Commands available are P-touch proprietary commands based on ESC/P.
For details, refer to the "Command Reference" included in the CD-ROM.
([CD Drive]:\Doc\Technical)
Serial Cables
The pin assignments for the serial cables (RS-232C cables) which can be used with this printer are shown in
the table below. You can purchase the cables at an electronics store. Do not use cables exceeding 3 meters
in length.
Brother QL-650TD/1050 side PC side
(D-sub female, lock screw #4-40 inch screw) (D-Sub9P female)
Signal
Name
Pin
Number
Pin Assignments
Pin
Number
Signal
Name
IntroductionCreating Labels (For Windows)Creating Labels (For Macintosh)Appendix
DCD 1 1 DCD
RXD 2 2 RXD
TXD 3 3 TXD
DTR 4 4 DTR
GND 5 5 GND
DSR 6 6 DSR
RTS 7 7 RTS
CTS 8 8 CTS
RI 9 9 RI
• It is not possible to connect RS-232C cable and USB cable to the printer at the same time and use it.
Connect only one cable which is used to communicate with the printer.
• The RS-232C serial connector part of this equipment is not Limited Power Source.
59
Available Commands
Page 60

Printing Directly from Other Applications
You can use this printer to print directly from most Windows® application, by installing the printer driver.
Because the paper size for this printer is different from other regular printers, you may not be able to print
even after installing the driver and application software, unless the application software allows the proper
label size to be set
Installing the Printer Driver
1 From [Control Panel], open [Printers and Faxes (Printers)].
For details, refer to Windows® Help.
2 Select "Brother QL-500/550/650TD/1050/
1050N", and click [File]-[Printing
Preferences].
The [Printer Properties] dialog box appears.
IntroductionCreating Labels (For Windows)Creating Labels (For Macintosh)Appendix
3 Select each item and click .
• [Paper] Tab
This tab is used to set the Format and Width.
You can change the Label Format or create a
new Label Format from the Label format
definitions dialog box which appears by clicking
.
Set the format name ("Name") and size
("Width", "Length", and "Feed"), and click
.
60
Installing the Printer Driver
Page 61

• [Graphics] Tab
You can set "Halftones", "Brightness", and
"Contrast" in this tab.
• [Option] Tab
You can set "Auto cut" with number of labels
between cuts, "Mirror Printing", "Cut at end",
and "Unit" in this tab.
The cutting options will vary according to the
model.
IntroductionCreating Labels (For Windows)Creating Labels (For Macintosh)Appendix
4 Close the [Printers and Faxes (Printers)] window.
61
Installing the Printer Driver
Page 62

Printing from Other Applications
We will use Microsoft® Word as an example.
1 Click [File]-[Print].
The [Print] dialog box appears.
2 Select "Brother QL-500/550/650TD/1050/
1050N".
You can change the settings of the Printer Driver
from the [Printer Properties] dialog box which
appears by clicking .
IntroductionCreating Labels (For Windows)Creating Labels (For Macintosh)Appendix
3 Click , and close the [Print] dialog box.
4 Click [File]-[Print Settings].
The [Page Setup] dialog box appears.
5 Click the [Paper] tab, and select the paper
size that you want to print.
You can also select the Label Format that you
have added in ÎPage 60.
Set page margins in the [Margins] tab as well.
6 Click .
The size of the Microsoft® Word window is adjusted to the paper size that you have just selected. Edit
the document as needed.
7 Click [File]-[Print].
The [Print] dialog box appears.
8 Click .
The specified labels are printed.
62
Printing from Other Applications
Page 63

Uninstalling the Software
This section describes how to uninstall the software and printer driver from the personal computer.
For Windows
Uninstalling the P-touch Editor
1 Click [Start]-[Settings]-[Control Panel]-[Add or Remove Programs].
The [Add or Remove Programs] dialog appears.
2 Select "Brother P-touch Editor 4.2", and
click .
The [Confirm Uninstall] dialog box appears.
IntroductionCreating Labels (For Windows)Creating Labels (For Macintosh)Appendix
3 Click .
The uninstall operation starts. After the software
and printer driver are removed from your
computer, the [Maintenance Complete] dialog
box appears.
4 Click .
5 Close the [Add or Remove Programs] dialog.
P-touch Editor has been uninstalled.
The P-touch Address Book, and Software User's Guide (PDF Manual) can also be uninstalled by
following this procedure.
63
For Windows
Page 64

Uninstalling the Printer Driver
1 Turn off the Brother QL-500/550/650TD/1050/1050N.
2 From [Control Panel], open the [Printers and Faxes (Printers)] window.
For details, refer to Windows® Help.
3 Select "Brother QL-500/550/650TD/1050/
1050N", and click [File]-[Delete].
4 Close the [Printers and Faxes (Printers)] window.
The printer driver has been uninstalled.
IntroductionCreating Labels (For Windows)Creating Labels (For Macintosh)Appendix
For Macintosh
Uninstalling the P-touch Editor
1
On the drive where the P-touch Editor is installed, double-click the [Applications]
folder-[P-touch Editor 3.2] folder-[Uninstall P-touch] folder-[UninstallPtEditor.command].
[Terminal] window appears, and then uninstall
operation starts.
Administrator rights is required for uninstall
operation.
In case [Terminal] window doesn't appear by
double-clicking the [ UninstallPtEditor.command],
right click (or control key + click) the
[UninstallPtEditor.command], context menu
appears. Open with the [terminal] window from
context menu.
64
For Macintosh
Page 65

2 Click .
3 Delete [Applications]-[P-touch Editor 3.2] folder.
Before delete the [P-touch Editor 3.2] folder, please check if any necessary file is saved in it.
P-touch Editor has been uninstalled.
Uninstalling the Printer Driver
IntroductionCreating Labels (For Windows)Creating Labels (For Macintosh)Appendix
1 Turn off the Brother QL-500/550/650TD/1050/1050N.
2 Double-click the drive where Mac OS
[Utility (Utilities)]-[Printer Setup Utility (Print Center)].
The [Printer List] dialog box appears.
®
X is installed, and double-click [Applications]-
3 Select "Brother QL-500/550/650TD/1050/
1050N", and click (Delete).
4 Close the [Printer List] dialog box.
The printer driver has been uninstalled.
65
For Macintosh
Page 66

Specifications
Product Specifications
Items
Display LED lamp (green)
Printing method Direct thermal printing via thermal head
Printing speed
Printing
Buttons
Interface USB port USB, Serial (RS-232C)
Power source 120V AC 60Hz 0.8A 120V AC 60Hz 1.7A 120V AC 60Hz 1.8A
Dimensions
Weight
Cutter
Network Option (PS-9000)
Print head 300 dpi/720 dot 300 dpi/1296 dot
Maximum
Printing Width
Minimum
printing length
Brother QL-500/550 Brother QL-650TD Brother QL-1050
Max. 3.5 inch (90 mm)/
sec, Max. 50 labels/min.
(address label)
2.3 inch (59 mm) 3.9 inch (98.6 mm)
1 inch (25.4 mm)
ON/OFF button ( )
FEED button
CUT button (Brother QL550 only)
5.7 (W) × 7.6 (D) × 5.9
(H) inch
146 (W) × 196 (D) × 152
(H) mm
Approx. 2.8 lb (1.3 kg)
(Without DK Rolls)
Automatic cutter (Brother
QL-550)
Manual cutter (Brother
QL-500)
Specifications
LED lamp (green)
LCD (16 digits × 2 rows
(5 × 7 dot/character))
Max. 3.5 inch (90 mm)/
sec, Max. 56 labels/min.
(address label)
ON/OFF button ( )
FEED button, CUT
button
PRINT button, MENU
button
CANCEL button, OK
button
UP button ( ), DOWN
button( )
5.7 (W) × 7.6 (D) × 5.9
(H) inch
146 (W) × 196 (D) × 152
(H) mm
Approx. 2.8 lb (1.3 kg)
(Without DK Rolls)
Automatic cutter Durable automatic cutter
LED lamp (green, red,
orange)
Max. 4.3 inch (110 mm)/
sec, Max. 69 labels/min.
(address label)
ON/OFF button ( )
FEED button
CUT button
6.6 (W) × 8.6 (D) × 5.8
(H) inch
170 (W) × 220 (D) ×
147.5 (H) mm
Approx. 3.7 lb (1.7 kg)
(Without DK Rolls)
PS-9000 Bundle (Brother
QL-1050N)
IntroductionCreating Labels (For Windows)Creating Labels (For Macintosh)Appendix
66
Product Specifications
Page 67

Operating Environment
Specifications
*1
USB port (USB Spec. 1.1 or 2.0 protocol)
Serial (RS-232C)
*3
USB port (USB Spec. 1.1 or 2.0 protocol)
*4
*4
OS
Interface
Hard
Drive
Memory
Monitor
Items
Windows
Macintosh
Windows
Macintosh
Windows
Macintosh
Windows
Macintosh
Windows
Macintosh
Brother QL-500/550 Brother QL-650TD Brother QL-1050
®
®
®
Windows® 2000 Professional/XP
Mac OS 10.1-10.4.7(PowerPC); OS 10.4.4-10.4.7(Intel)
USB port (USB Spec. 1.1
or 2.0 protocol)
®
USB port (USB Spec. 1.1
or 2.0 protocol)
®
®
®
®
®
®
Over 70 MB of available space
Over 100 MB of available space
Windows® 2000 Professional/XP: More than 128 MB
More than 64 MB
SVGA, high color or higher graphics card
More than 256 colors
Other CD-ROM drive
Operating Temperature 50°F to 95°F (10°C to 35°C)
Operating Humidity 20% to 80% (without condensation)
*1 The PC should meet Microsoft®’s recommendations for the OS installed.
*2 PS-9000 does not support Mac. So QL-1050N is not used in Mac environment.
*3 The RS-232C interface is required when printing with ESC/P commands.
*4 Required available space when installing the software with all of the options.
*2
IntroductionCreating Labels (For Windows)Creating Labels (For Macintosh)Appendix
67
Operating Environment
 Loading...