

Page 1
brother.
Page 2

! ' .:()!• •'III •'/
rai
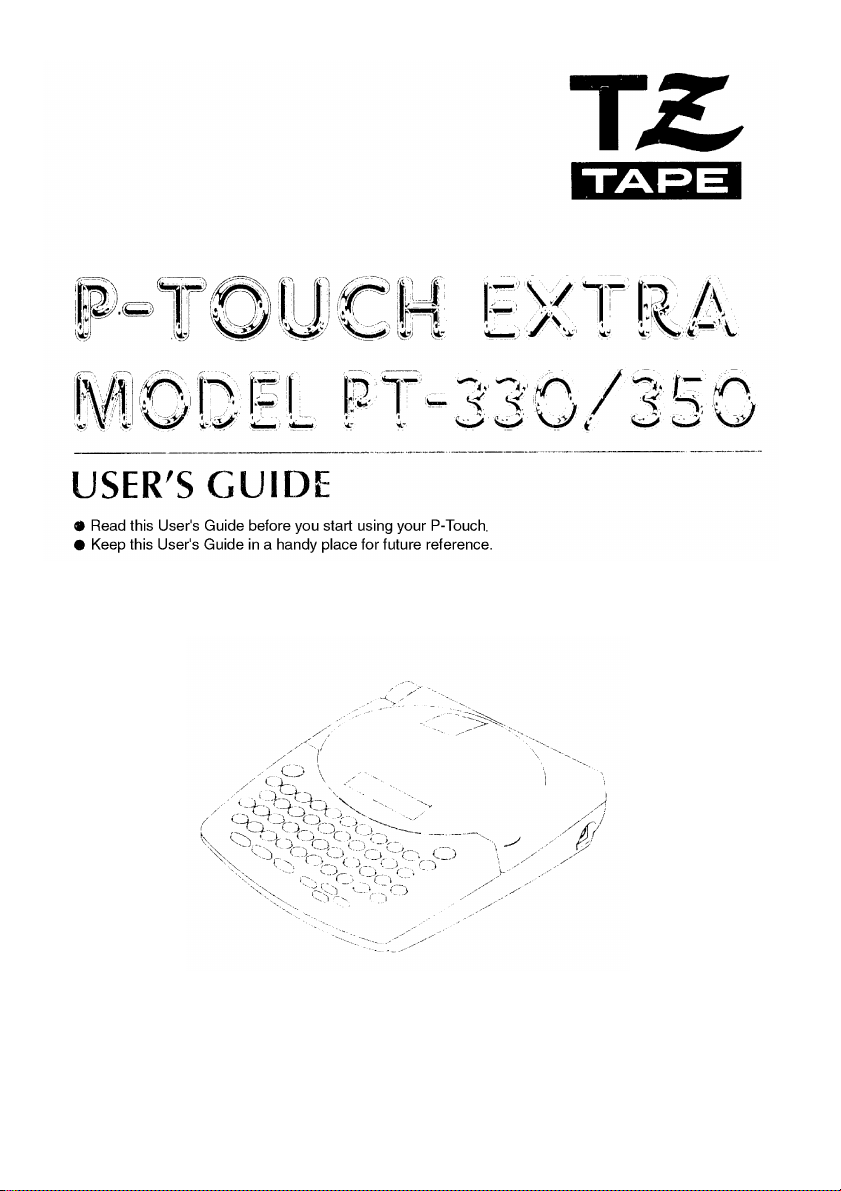
Thank you for purchasing the P-Touch 330/350!
Your new P-Touch will allow you to design and create labels and stamps for any applica
tion. Its versatility enables you to create custom labels by choosing from different frame
designs, and character sizes and styles. In addition, the five tape widths (1/4" (6 mm),
3/8" (9 mm), 1/2" (12 mm), 3/4" (18 mm) and 1" (24 mm)) and variety of tape colors allow
you to print personalized labels, useful for color-coded filing. With the Stamp function, you
can quickly and easily make stamps for reusable pre-inked stamp holders.
You no longer have to worry about urgent tasks that require professional printing. In the
office, the factory, the lab and the home, the quality and performance of the P-Touch 330/
350 makes it an extremely practical machine.
Finally, as you may want to refer to this User's Guide occasionally, we suggest that you
keep it in a handy place.
FCC NOTICE
This equipment has been tested and found to comply with the limits for a
Class B digital device, pursuant to Part 15 of the FCC Rules. These limits are
designed to provide reasonable protection against harmful interference in a
residential installation. This equipment generates, uses, and can radiate ra
dio frequency energy and, if not installed and used in accordance with the
instructions, may cause harmful interference to radio communications.
However, there is no guarantee that interference will not occur in a partic
ular installation. If this equipment does cause harmful interference to radio
or television reception, which can be determined by turning the equipment
off and on, the user is encouraged to try to correct the interference by one
or more of the following measures:
- Reorient or relocate the receiving antenna
-Increase the separation between the equipment and receiver.
-Connect the equipment into an outlet on a circuit different from
that to which the receiver is connected.
-Consult the dealer or an experienced radio/television technician
for help.
Patent numbers and patent publication numbers which are related to this
product are as below:
USP4839742
USP4927278
USP4976558
USP4983058
USP5009530
USP5069557
USP5120147
Page 3

CONTENTS
Getting Started
GENERAL DESCRIPTION...........................................................................................2
GENERAL PRECAUTIONS..........................................................................................4
BATTERIES..................................................................................................................5
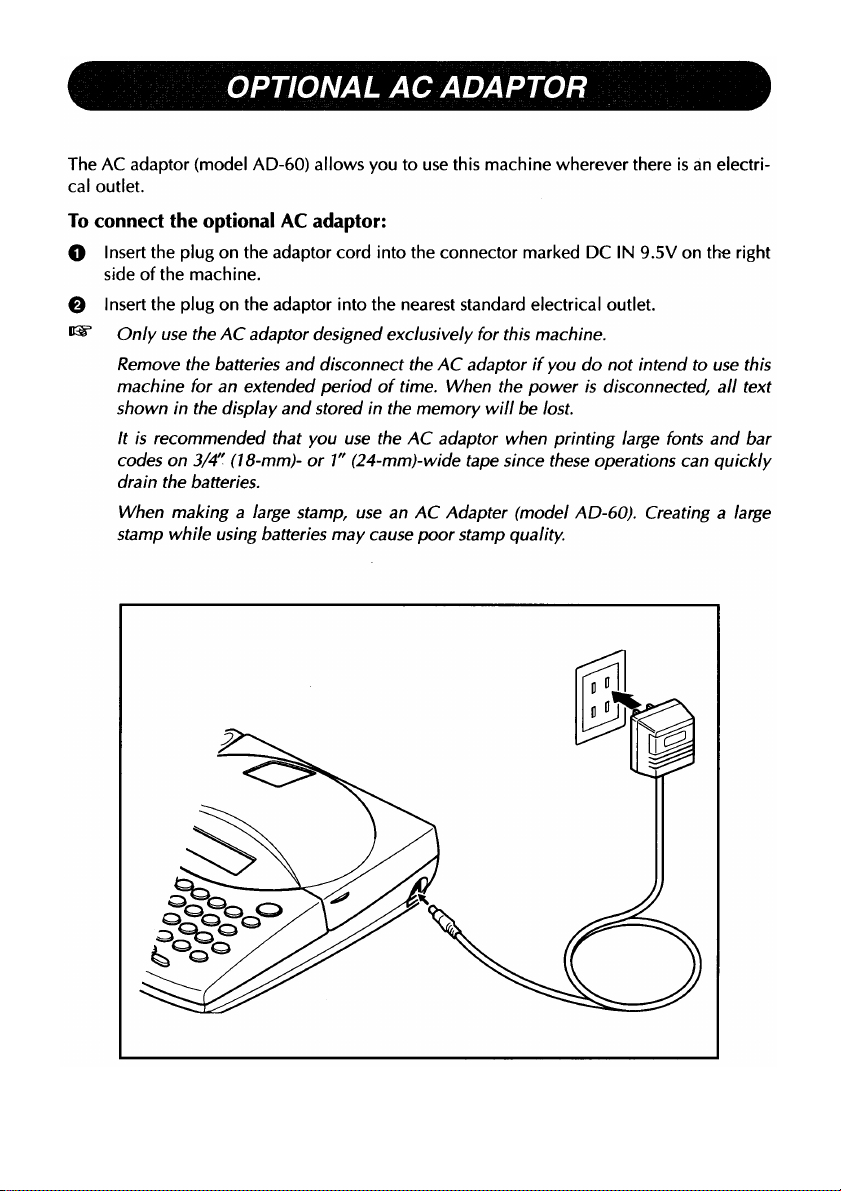
OPTIONAL AC ADAPTOR...........................................................................................6
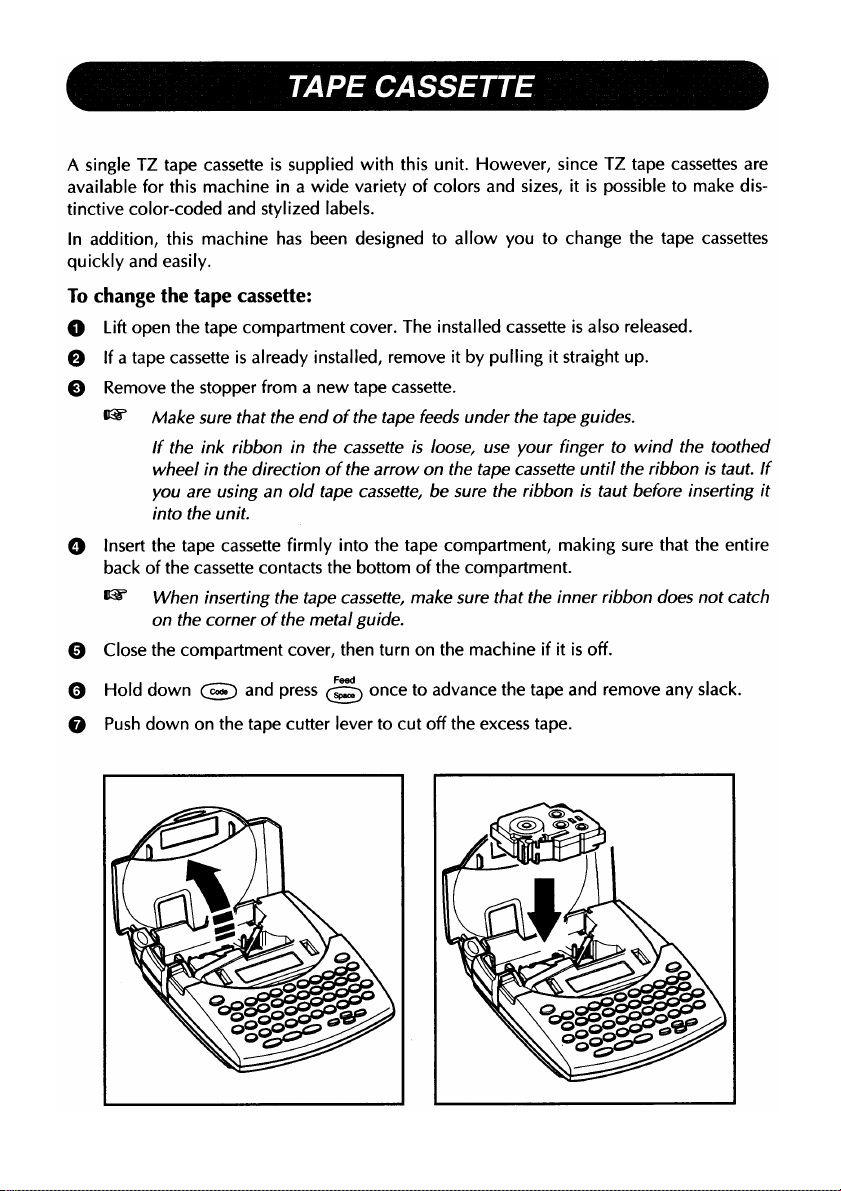
TAPE CASSETTE.........................................................................................................7
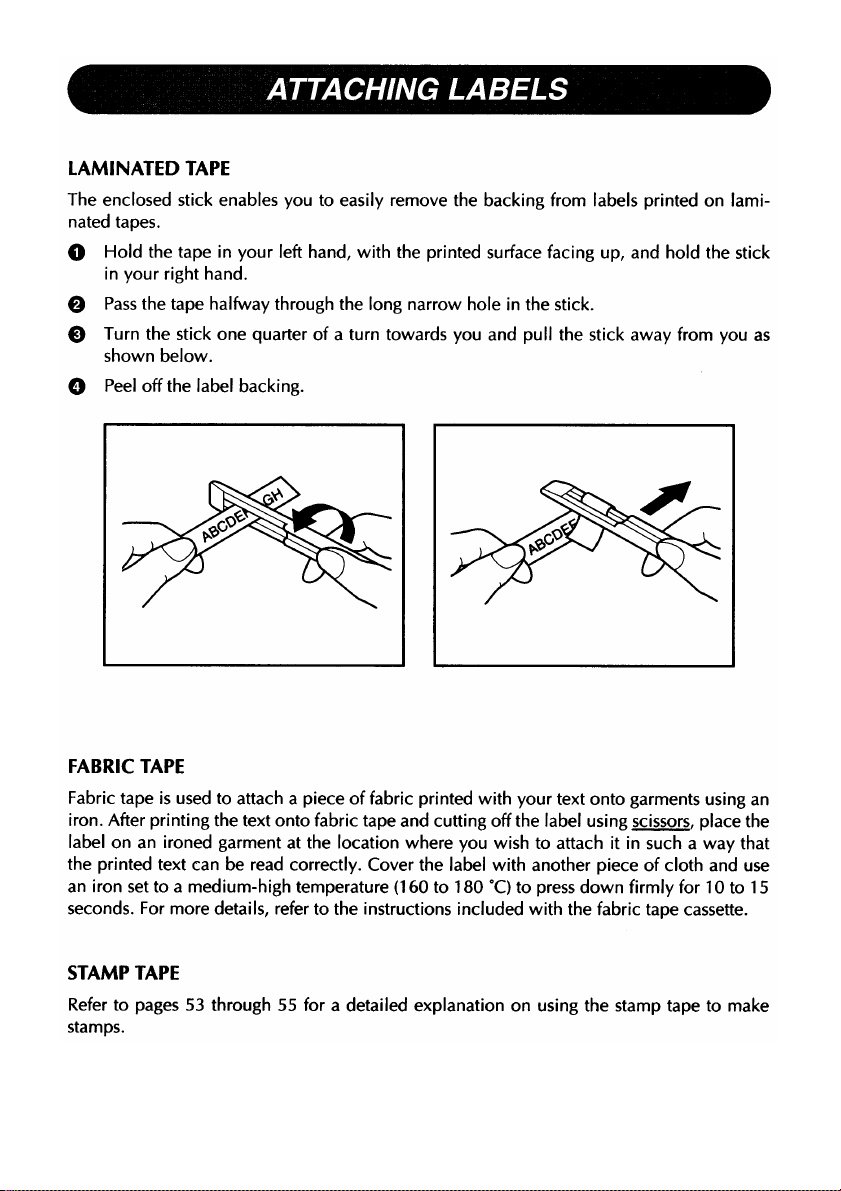
ATTACHING LABELS...................................................................................................8
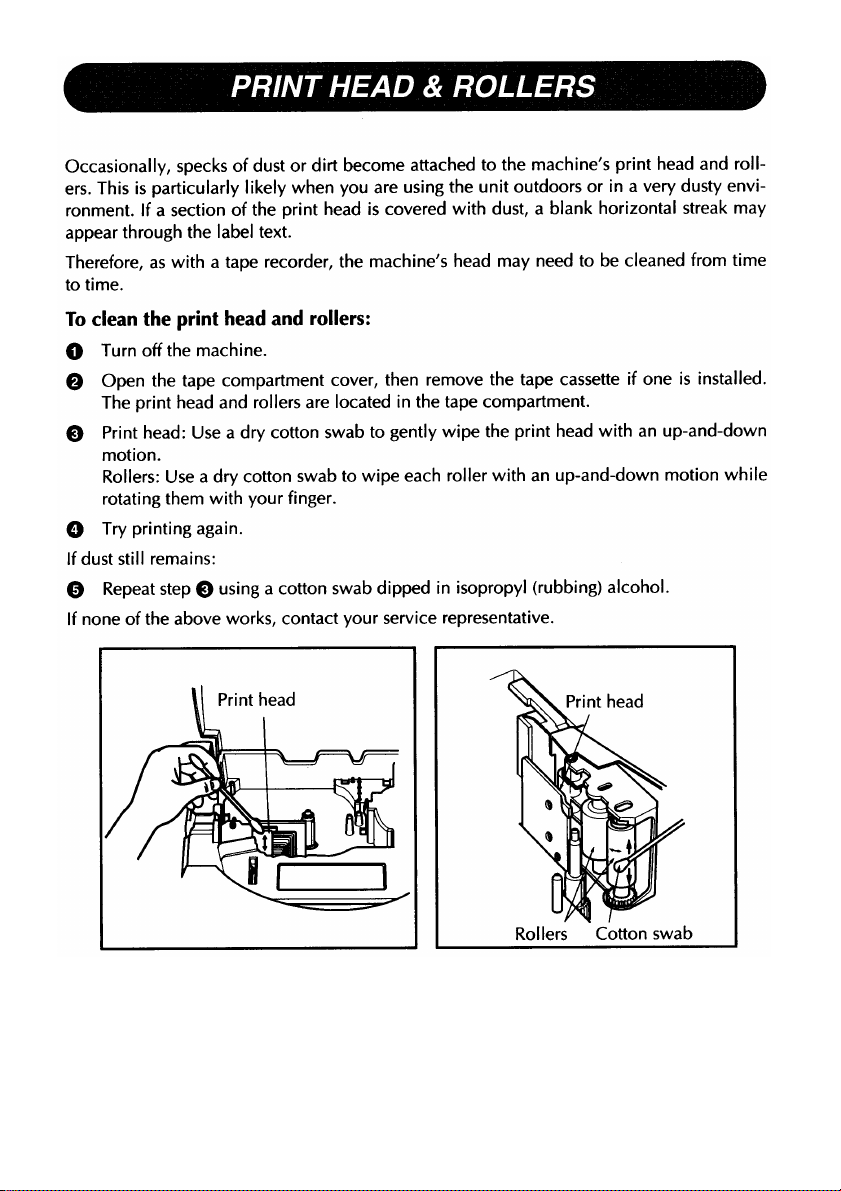
PRINT HEAD & ROLLERS...........................................................................................9
Learning the Ropes
DOOR LABEL EXAMPLE...........................................................................................12
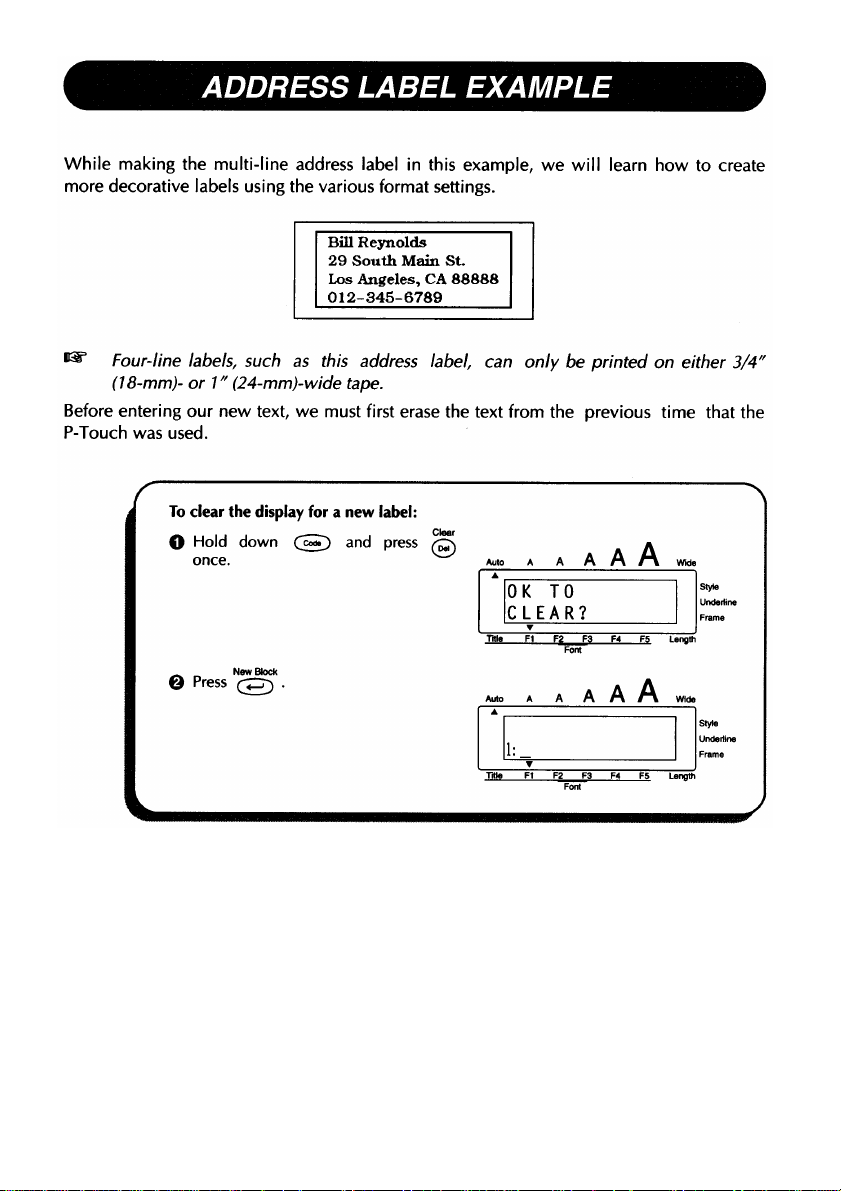
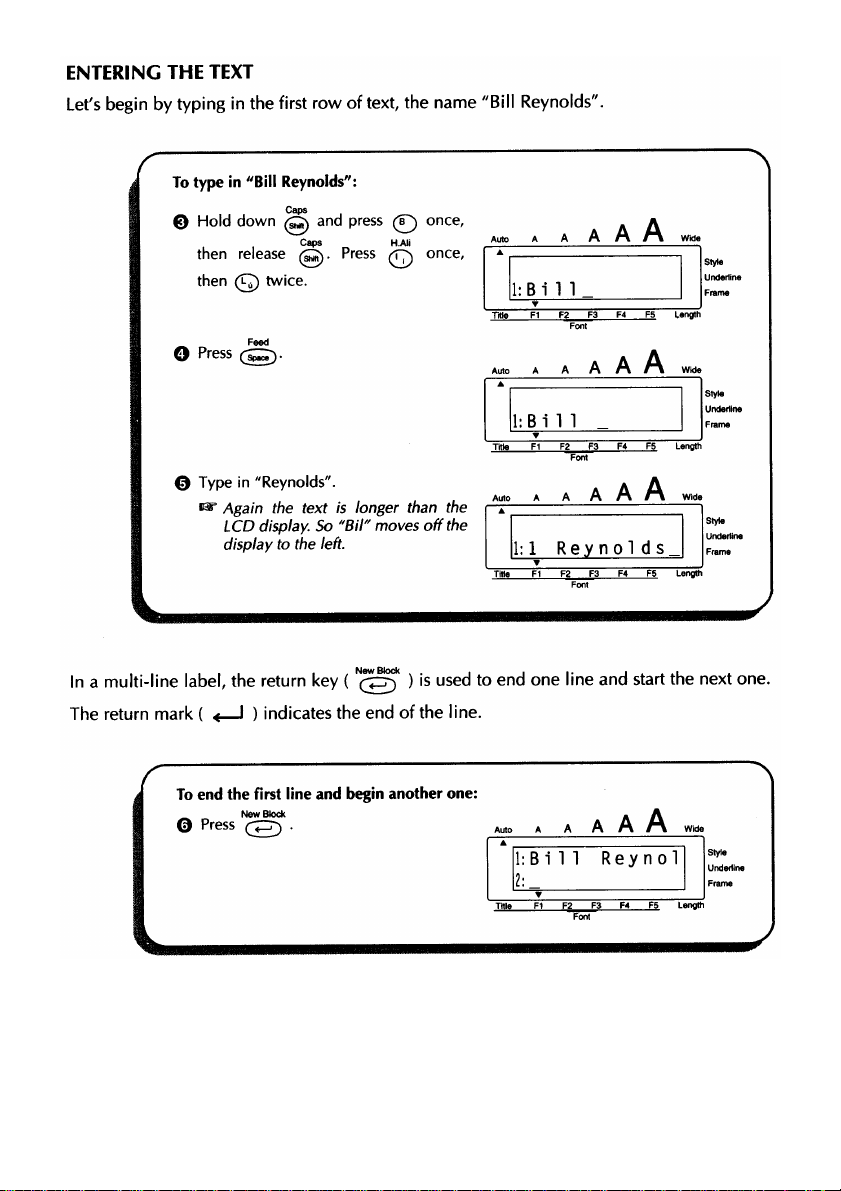
ADDRESS LABEL EXAMPLE....................................................................................15
VIDEO CASSETTE LABEL........................................................................................21
For Your Information
POWER KEY..............................................................................................................28
CURSOR KEYS..........................................................................................................29
CODE, ALT & SHIFT KEYS.......................................................................................31
SPACE KEY................................................................................................................34
RETURN KEY............................................................................................................35
NEW BLOCK FUNCTION
DELETE KEY..............................................................................................................39
LINE OUT FUNCTION...............................................................................................42
CLEAR FUNCTION....................................................................................................43
COMPOSITE CHARACTER KEYS............................................................................44
ACCENT FUNCTION..................................................................................................46
SYMBOL FUNCTION.................................................................................................48
LENGTH FUNCTION..................................................................................................50
STAMP FUNCTION....................................................................................................53
SIZE & WIDE FUNCTIONS........................................................................................56
STYLE FUNCTION.....................................................................................................59
UNDERLINE FUNCTION...........................................................................................63
FONT FUNCTION......................................................................................................64
FRAME FUNCTION....................................................................................................67
TAPE FUNCTION.......................................................................................................69
HORIZONTAL ALIGNMENT FUNCTION
VERTICAL PRINTING FUNCTION
MIRROR PRINTING FUNCTION
BAR CODE FUNCTION.............................................................................................74
PRINT KEY & FEED FUNCTION...............................................................................77
NUMBERING FUNCTION..........................................................................................78
REPEAT PRINTING FUNCTION...............................................................................81
CALENDAR FUNCTION........................................................................................... 83
MEMORY FUNCTIONS..............................................................................................85
TROUBLESHOOTING................................................................................................88
ERROR MESSAGE LIST
SPECIFICATIONS......................................................................................................94
ACCESSORIES..........................................................................................................95
..........................................................................................
..................................................................
............................................................................
...............................................................................
...........................................................................................
38
71
72
73
89
Page 4

Page 5
Page 6
3
Page 7

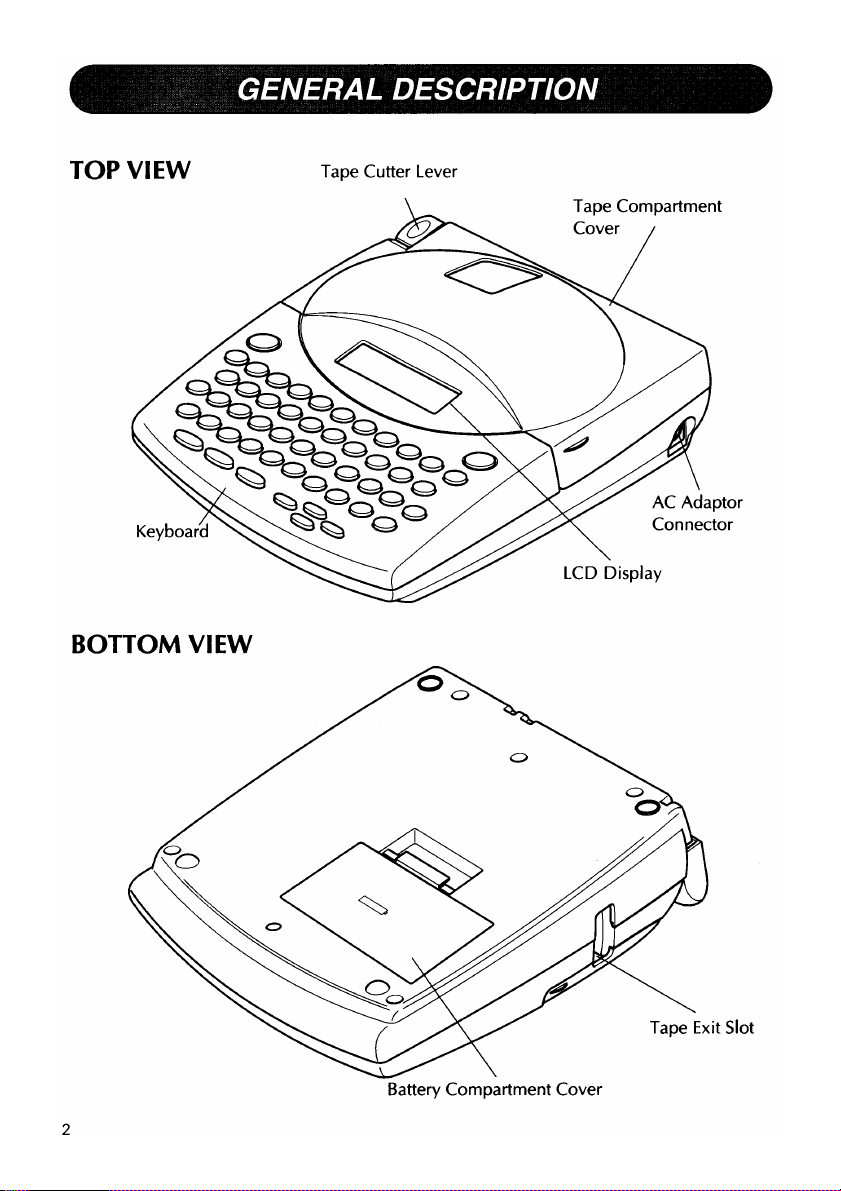
GENERAL PRECAUTIONS
Use only Brother TZ tapes with this machine. Do not use tapes that do not have the 3S:
mark.
Do not pull on the tape being fed from the P-Touch. This may damage the tape cassette.
Avoid using the machine in extremely dusty places. Keep it out of both direct sunlight
and rain.
Do not expose the machine to high temperatures or high humidity. Never leave it on the
dashboard or in the back of your car.
Do not leave any rubber or vinyl on the machine for an extended period of time. Doing
so may cause staining.
Do not clean the machine with alcohol or other organic solvents. Use a soft, dry cloth
only.
Do not put any foreign objects onto or into the machine.
To avoid injuries, do not touch the cutter's edge.
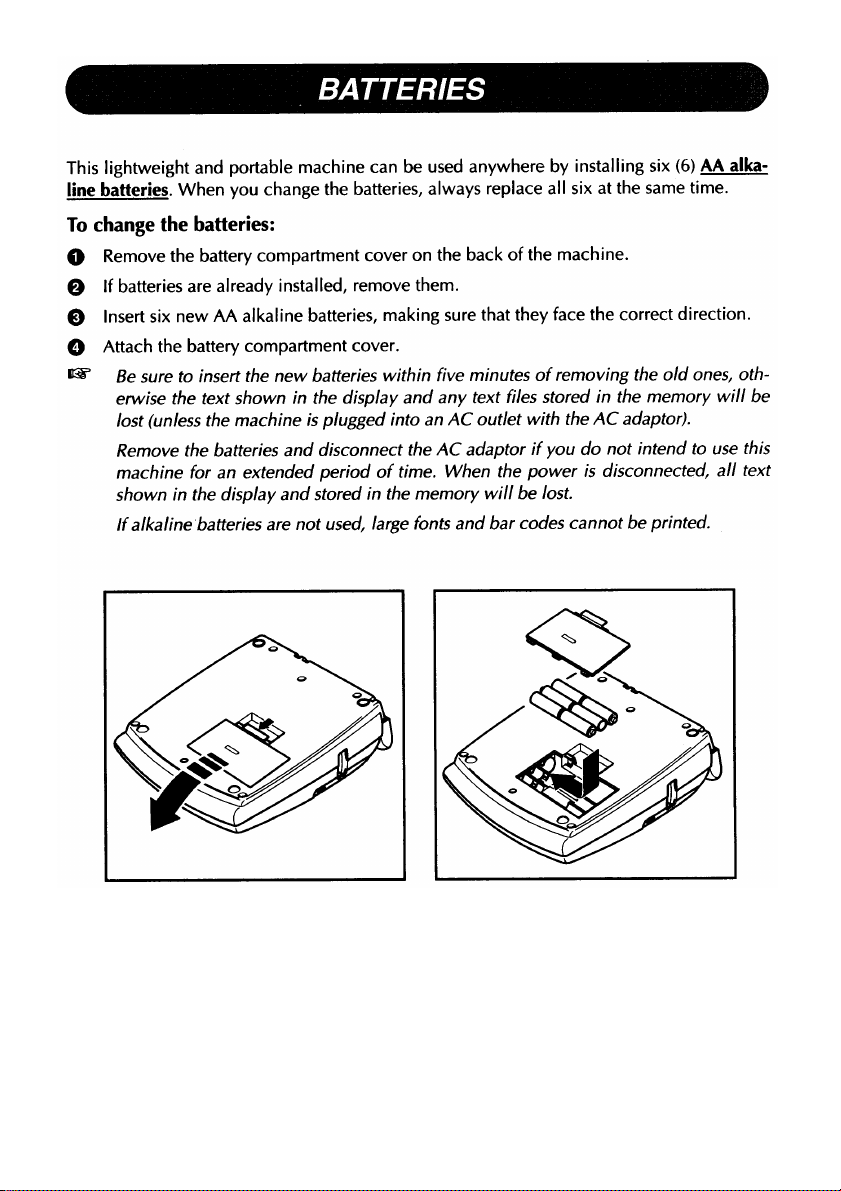
When inserting new batteries, be sure to do so within five minutes of removing the old
ones, otherwise all text files will be lost (unless the machine is plugged into an AC outlet
with the AC adaptor).
Use only the AC adaptor (model AD-60) designed exclusively for this machine. Use of
any other adaptor will void the warranty.
Do not try to disassemble the AC adaptor.
When the machine is not being used for a long period of time and it is not necessary to
keep the text files stored in the memory, disconnect the AC adaptor, and remove the
batteries to prevent them from leaking and damaging the machine.
When the AC adaptor is plugged into the machine, unplugging the adaptor from the AC
outlet can delete all text files in the memory, even though batteries are installed.
Use six AA alkaline batteries in this machine.
4
Page 8
5
Page 9
6
Page 10
7
Page 11
8
Page 12
9
Page 13

10
Page 14

Learning
the Ropes
y
Page 15

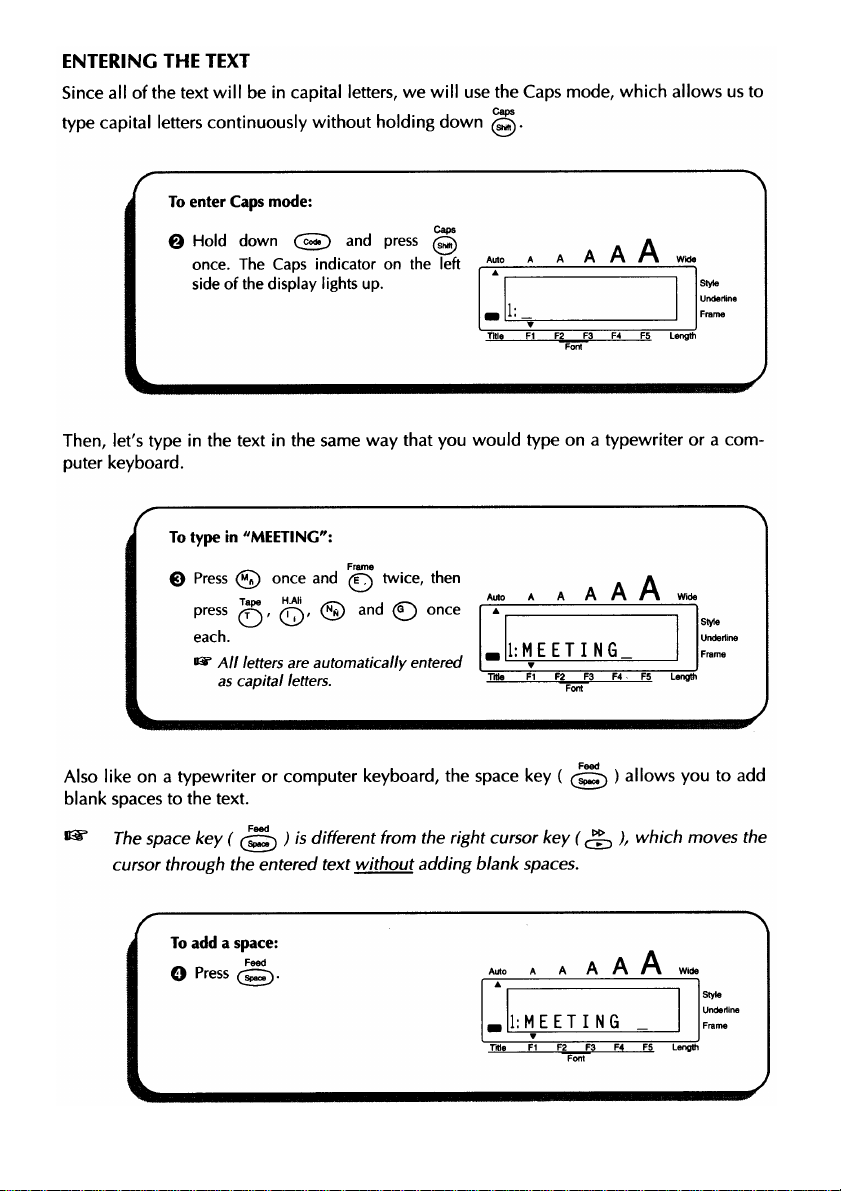
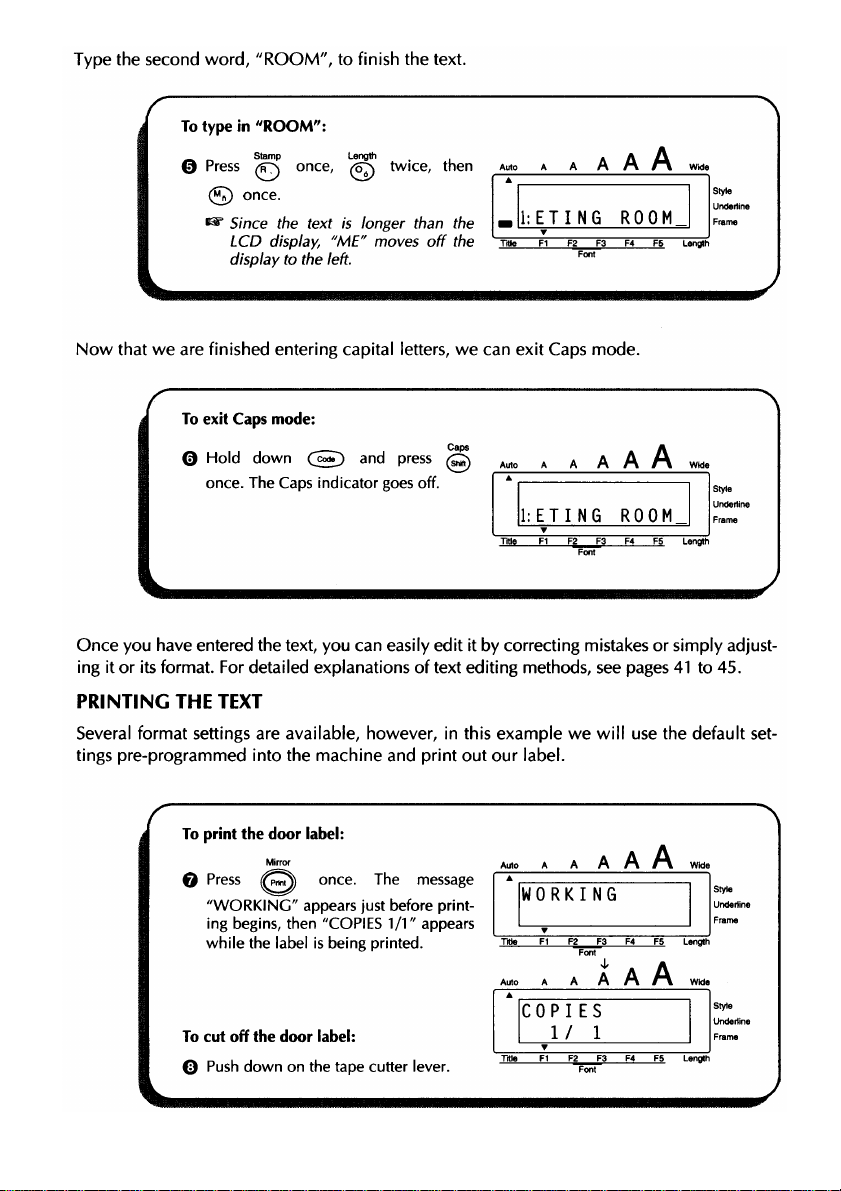
DOOR LABEL EXAMPLE
After you have inserted the batteries and the enclosed tape cassette as explained in the pre
vious section, let's practice using some of the basic functions of your P-Touch 330/350. We
must first begin by turning on the power to the machine.
To turn on the machine:
O Press in the top right-hand cor
ner of the keyboard.
A A
Styto
Underitne
Frame
The underline in the LCD display is called the "cursor". It is like a pointer which shows
your current position and lets you select characters in your text.
The text you create may sometimes be longer than the 11 characters that the LCD display
can show at one time. Therefore, the cursor can be moved to show other parts of the text.
Pressing the left cursor key ( ) moves the cursor to left so that the left side of the text
can be seen and pressing the right cursor key () moves the cursor to the right so that
the right side of the text can be seen.
Some format settings are shown by the triangles and squares above and below the display.
The default settings (the selected settings when the power is turned on for the very first time)
have been pre-programmed into the machine and represent the most common settings for
labels. However, you can design your own label to have any format that you wish. Detailed
explanations of the formats can be found on pages 56 through 73.
Now, let's enter the text for our first example, the simple door label shown below.
The label in this example was made using the enclosed 1/2" (12-mm)-wide tape.
12
Page 16
13
Page 17
14
Page 18
15
Page 19
16
Page 20

17
Page 21
18
Page 22
19
Page 23

20
Page 24

21
Page 25
22
Page 26
23
Page 27
24
Page 28
25
Page 29

26
Page 30

For Your
Information
Page 31

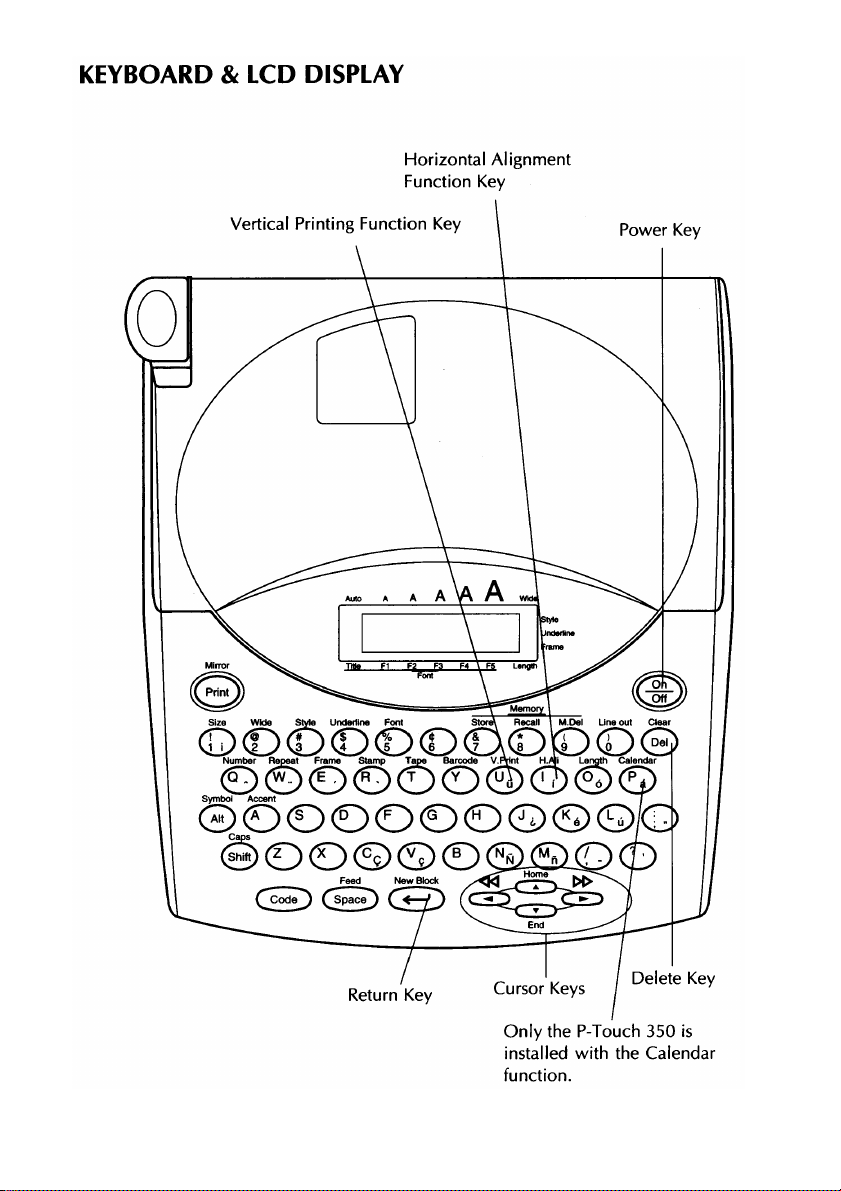
POWER KEY
The power key ( (^p) ) is located in the top right-hand corner of the keyboard. If batteries
have been installed or the machine has been plugged in using the optional AC adaptor, the
previous session's information is displayed when the machine is turned on. This feature
allows you to stop work on a label, turn off the machine, and return to it later without hav
ing to re-enter the text.
The machine will automatically turn off if no key is pressed within 5 minutes. The
machine's internal memory stores the current session's information and displays it when
you turn on the machine again.
To turn on the machine:
• Press The previous session's information appears in the LCD display.
To turn off the machine:
• Press The current session's information is stored in the internal memory.
28
Page 32

CURSOR KEYS
The machine's LCD display shows two rows of 11 characters; however, the text that you
create can be up to 255 characters long. You can review and edit your text by using the
cursor keys to move the cursor so that different parts are shown in the display.
LEFT CURSOR KEY
To move the cursor one character to the left:
• Press once.
To move the cursor several characters to the left:
• Hold down until the cursor moves to the desired position.
To move the cursor to the beginning of the current line:
• Hold down and press ■
To move the cursor to the beginning of the current text block:
• Hold down 0) and press chd •
I®“ If the cursor is at the beginning of a text block, it will move to the beginning of
the previous block.
RIGHT CURSOR KEY
To move the cursor one character to the right:
• Press once.
To move the cursor several characters to the right:
• Hold down until the cursor moves to the desired position.
To move the cursor to the end of the current line:
• Hold down and press
To move the cursor to the beginning of the following text block:
• Hold down ^ and press
If the cursor is in the last text block, it will move to the end of the text.
29
Page 33

UP CURSOR KEY
To move the cursor up to the previous line:
• Press once.
If the cursor is in the first line of text, it will move to the beginning of the line.
To move the cursor up several lines:
• Hold down until the cursor moves to the desired position.
To move the cursor to the beginning of the entire text:
• Hold down and press
DOWN CURSOR KEY
To move the cursor down to the following line:
• Press once.
If the cursor is in the last line of text, it will move to the end of the line.
To move the cursor down several lines:
• Hold down until the cursor moves to the desired position.
To move the cursor to the end of the entire text:
• Hold down and press
30
Page 34

31
Page 35

32
Page 36

33
Page 37

34
Page 38

RETURN KEY
Like on a typewriter or word processor, this machine's return key ( ) is used to end a
line of text and start another one. When you have finished entering one line, press the
return key to make a new line and move the cursor to it.
A block can only contain one text line when a Title font is used. If you press
when a Title font is selected, the error message "FIXED SIZE!" will appear.
A single block can only contain a maximum of four text lines. If you press
when the cursor is located on the fourth line, the error message "4 LINE LIMIT!" will
appear.
Maximum Number
Tape Widths
Of Lines That Can
Be Printed
1/4” (6 mm)
3/8” (9 mm)
1/2” (12 mm)
3/4” (18 mm)
1”(24 mm)
1
2
2
4
4
The return key can also be used to apply a selected item (e.g., add a symbol or accented
character to the text) or to begin printing the set number of labels.
Some questions asking you to confirm a command may appear on the LCD display, espe
cially when the function that you have chosen will delete or affect files. In these cases,
pressing is like answering "yes". To answer "no", press ^. Refer to DELETE KEY on
page 39.
Nqw 0lock
35
Page 39

36
Page 40

37
Page 41

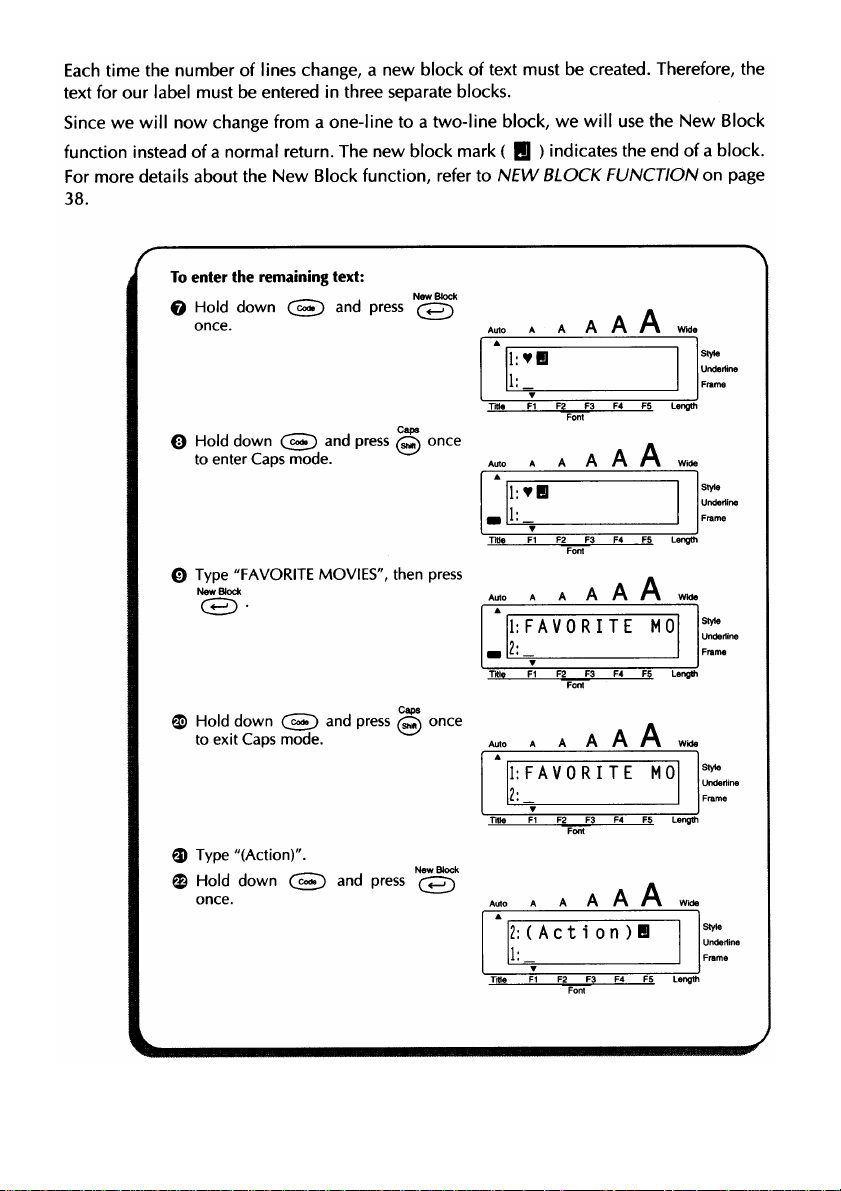
NEW BLOCK FUNCTION
Whenever the number of lines in a section of the label changes, a new block must be cre
ated.
A single label can only contain a maximum of five blocks. If the cursor is located in
the fifth block when is held down and /5 pressed, the error message "5
BLOCK LIMIT" will appear.
If the cursor is positioned in the middle of a text block when is held down and
Now 0lock
is pressed, the block splits into two and the character to the left of the cursor's
current position becomes the end of the block.
To add a new block:
• Hold down Cc^ and press ^(^7^ once. The new block mark ( Q ) appears to indi
cate the end of the block.
CT39
To add a new block:
A A
A A
Style
l:K’s Garden
TWe FI F2 F3 F4 FS Length
Font
Underline
Frame
Hold down Cc¡^ and press
once.
Title FI F2 F3 F4 F5 Length
38
A A
A A
l:K’s GardenH
1
:
Font
Style
Underline
Frame
Page 42

DELETE KEY
The delete key ( ^ ) allows you to remove characters to the left of the cursor's current
position. It differs from the left cursor key ( ), which only moves the cursor without
deleting any characters.
The delete key can also be used to quit most functions and return to the previous display
without changing the text.
The delete key cannot be used to quit the Bar code function. Hold down (^¡) and
press to quit the Bar code function.
Some questions asking you to confirm a command may appear on the LCD display, espe
cially when the function that you have chosen will delete or affect files. In these cases,
pressing ^ is like answering "no". To answer "yes", press . Refer to RETURN KEY
on page 35.
To delete one character:
o Press ^ or ^ to position the cursor below the character immediately to
the right of the character that you wish to delete.
„ Clear
Press /Oi once.
© Press 0
To delete a sequence of characters:
O Press c^r c^/ or to position the cursor below the character immediately to
the right of the last character that you wish to delete.
O Hold down 0 until all of the characters that you wish to delete are deleted.
39
Page 43

40
Page 44

41
Page 45

42
Page 46

43
Page 47

COMPOSITE CHARACTER KEYS
When writing in other languages, composite characters, which consist of a letter and a dia
critical mark, are often used. This machine can also display and print these characters. The
diacritical marks available are ",", ", and '.
Several composite characters can be found on the key tops. Characters such as u, and h
can be entered using . Before inputting a composite character as described below,
check whether it is already available as a keytop character.
The following diacritical mark and letter combinations are available:
Symbol 1111
Diacritical Marks
-
■■
'
'
Letters Which Can
Be Combined
AElOUaeiou
AElOUaeiou
AElOUaeiou
AElOUaeiou
To type m a composite character:
O Holddown and press the key ( (^ , (^ , or ) of the desired diacritical
Symbol Number Repeat Frame Stamp , , , , , . i
mark. The diacritical mark is added to the text. The Alt indicator on the left side of the
display lights up while (2) is held down.
Symbol
0 Press the key of the letter that you wish to combine with the diacritical mark. The letter
and the diacritical mark flash alternately within the text.
If the letter of the key that you pressed cannot be combined with the diacritical
mark (see the above table), the letter is added to the text instead of the diacritical
mark.
44
Page 48

45
Page 49

ACCENT FUNCTION
The Accent function can also be used to add accented characters to your text. Many of
these characters either can be entered using the composite character keys or can be found
on the keys and typed in using @ . Refer to COMPOSITE CHARACTER KEYS on pages 44
and 45.
The accented characters are grouped according to the capital or small letter that they are
combined with. The following accented characters are available:
Symbol
Letters
To type in an accented character:
Hold down (c^ and press . The message "a - u / A - U?" appears on the display.
o
Press the key of the letter in the desired accented character.
o
^ If you wish to type in a capital letter, hold down ^ while pressing the letter
key.
Accented Characters Letters
a
A
c
C
e
E
i
ä ä ä ä ä ae
ДДДДД/E
9
Q
e e e ee 0
EE^§E
I i 1 i U
Accented Characters
1
n
N
0
u
1 i 11
n
N
ö 6 ö ö ö
ЦЦЦЦЦ
ь ь ь ь
ÜÜÜÜ
O Press or until the desired accented character flashes.
O Press . The letter and the accent flash alternately with the text.
If you wish to type in a sequence of accented characters, hold down while
pressing Continue adding accented characters to your text by selecting
them, then holding down (c^ while pressing . Press just ^/fer the
last character in the sequence is chosen.
Bloch Now Bloch
46
Page 50

47
Page 51

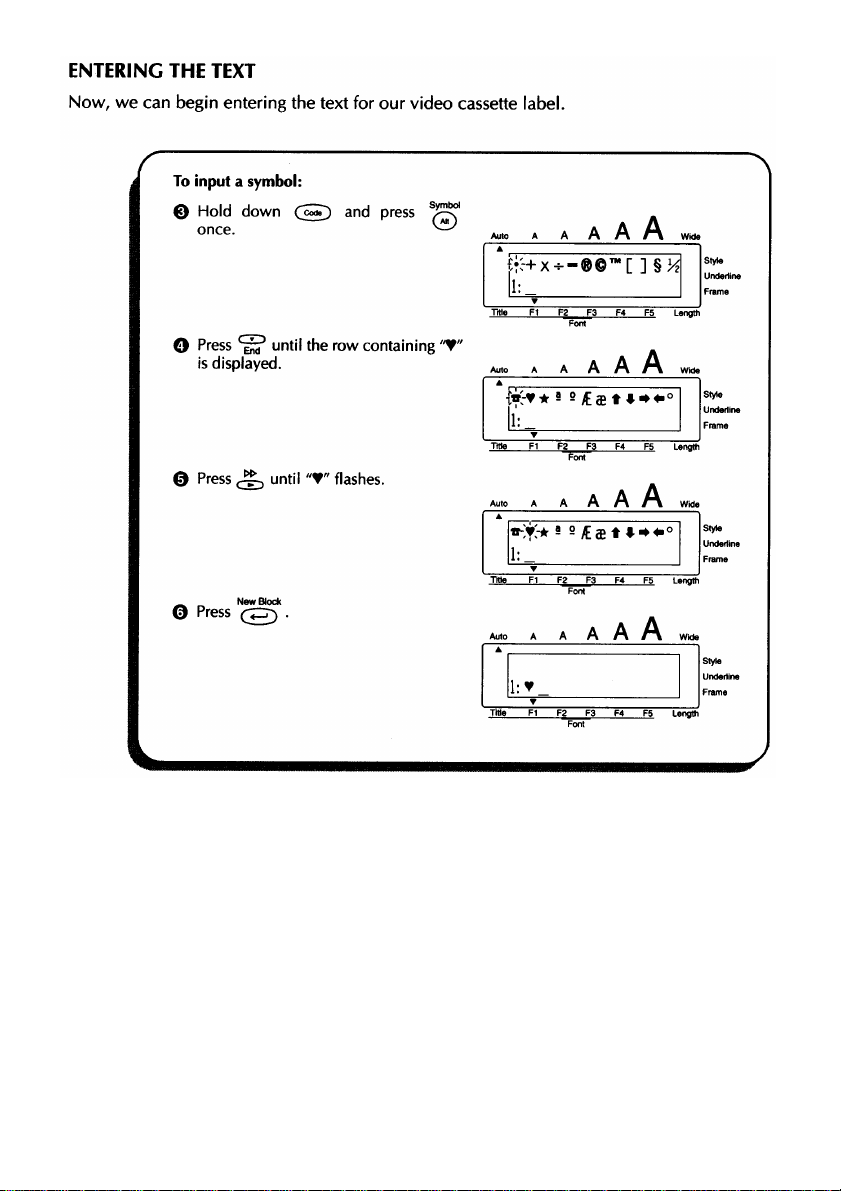
SYMBOL FUNCTION
In addition to the letters, symbols and numerals on the key tops, there are 126 additional
marks available with the Symbol function.
The following symbols are available:
•
X
To type in a symbol:
O Hold down and press . A row of symbols appear in the display.
+
©
© ®
1 2
0 1 2
№
f
&
® A
©
o
★
3 4
/
s
o
fa
9
a Q
0 ®
3 4
X
9
a
#
=
5 6 7
f
H
(56
® ©
/E
ae
® © ®
5 6 7
0
a,
<#
is
(P
0
TM
t
8
s
ff
V
©
[ ] §
©
®
-
9
8
9
B
m
*
m
i,
r
9c
±
+
- +
n
tit
0
0
±
J*
p
A
H
O Press ^ or to display different rows of symbols and press or until the
desired symbol flashes.
Now 3lock
O Press . The symbol appears in the text.
If you wish to type in a sequence of symbols, hold down while pressing
■ Continue adding symbols to your text by selecting them, then holding
down while pressing . p^ess just after the last symbol in the
sequence is chosen.
48
Page 52

49
Page 53

LENGTH FUNCTION
When the Length function is first selected, the length of the text and both margins is briefly
displayed. With this function, you can set the label length between 1.5" (3.8 cm) and 10.0"
(25.4 cm), choose from seven different preset lengths, or select AUTO, which automatically
adjusts the label length to fit your text.
The default Length setting is AUTO. If any setting other than AUTO is selected, the Length
indicator below the display lights up.
The following preset lengths are also available:
AUTO
T
i
VCR VMS
^5.5" (14.0 cm))
VCR 8mm
^2.8" (7.3 cm))
i
FLOPPY3.5"
(2.7" (6.9 cm))
AUDIO
(3.1" (8.0 cm))
SLIDE
(T .6" (4.2 cm))
FILE LONG
(7.2" (18.3 cm))
i
FILE SHORT
(3.7" (9.4 cm))
<
----
> number setting
To set the length of the label:
O Hold down (c^ and press once. The length of the current label briefly appears
in the display.
O Press or to select either AUTO, which allows you to choose from preset
lengths, or the number setting, which allows you enter a specific length.
To change the setting from a preset length to a number setting, select AUTO first.
50
Page 54

0 Press O'" to select the desired setting.
To change the units (inches or centimeters) that the lengths are displayed in,
select the number setting, then press until the desired units are displayed.
To change the number values in 1" (1.0 cm) steps, hold down either or
then release the key when the desired setting is displayed.
The default setting (AUTO with a default length of 4.0' (10.2 cm)) can be
selected by pressing .
Food
O Press to apply the selected Length setting to the text.
The Length indicator lights up if any setting other than AUTO is selected.
To select the FLOPPY3.5" setting:
O Hold down Cc^ and press .
Length
LENGTH inch
Title F1 F2 F3 F4 F5 Length
LENGTH tn.Qh
Title FI F2 F3 F4 FS Length
Font
A A A
Font
A A
10.0
-'10.0
Style
Underline
Frame
Style
Underline
Frame
O Press to select the AUTO setting.
A A
LE^NGTH , , i,nc h
4 ÀU T Ò. . . .. . . .. ' ' >
Title F1 F2 F3 F4 FS Length
"Font
0 Press or until the A A A
FLOPPY3.5" setting is displayed. ^
LE,NGTH , , i,nch
FLOPPYs'. V”
Title FI F2 F3 F4 FS Length
Forrt
O Press
NowBlock
Style
Underline
Frame
Style
Underline
Fran>e
51
Page 55

52
Page 56

STAMP FUNCTION
The Stamp function allows you to quickly and easily create your own stamp stencil films for
customized stamps. Select this function to automatically center the text and adjust the tape
length and margins to a perfect format for the pre-inked stamp film holders. Since the stamp
holder is reusable, just make a new stamp stencil film and replace the one in the holder.
To make a stamp:
O Type in your text, then insert a stamp film cassette in the tape compartment.
^ Be sure to install a 3/4" (18-mm)- or 1" (24-mm)-wide stamp film cassette.
When making a large stamp, use an AC Adapter (model AD-60). Creating a large
stamp while using batteries may cause poor stamp quality.
O Hold down and press once. The message "STAMP FORMAT" appears in
the display.
O Press . The text is formatted for a stamp: centered within the preset message area
with the tape length and margins automatically adjusted.
O Press
to carve the text out of the stamp stencil film.
0 Push down on the tape cutter lever, remove the backing paper from the stamp stencil
film and affix it to the ink pad of a stamp film holder.
To cut a stamp:
O Enter the text and insert a stamp film cassette in the tape compartment.
o Hold down and press
© Press
New Block
stamp
A A A A
STAMP FORMAT
Title FI F2 F3 F4 F5 Length
Title FI F2 F3 F4 F5 Length
Font
A A
A A
1: J . S m i t h J
2:1234 Main S
Font
Style
Underline
Frame
Style
Underline
Frame
53
Page 57

54
Page 58

55
Page 59

SIZE & WIDE FUNCTIONS
The character size can be adjusted using both the Size and Wide functions. Since the char
acter size that can be used depends on the width of the tape, the following table shows the
character sizes that can be used with each tape width.
Tape Widths
1/4” (6 mm)
3/8” (9 mm)
1/2” (12 mm)
3/4” (18 mm)
1”(24 mm)
The default Size setting is AUTO and the default Wide setting is OFF. The currently selected
Size and Wide settings are always shown by the indicators above the display.
With the AUTO Size setting, the machine compares your text with the width of the installed
tape and automatically adjusts the characters to the largest possible size. However, five
other point sizes are also available and each can be printed in wide characters.
Size
Settings
(in points)
10
Wide function OFF
ABC
Sizes (in points)
10, 13
10, 13, 19
10, 13, 19
10, 13, 19, 26, 38
10, 13, 19, 26, 38
Wide function ON
ABC
13
19
56
ABC
ABC
ABO
ABC
Page 60

Size
Settings
(in points)
Wide function OFF
Wide function ON
26
38
To change the Size setting:
O Hold down Cc^ and press ^ once. The currently selected Size setting appears in
the display.
^ The indicators above the display also show the current Size setting.
O Keep held down and continue pressing ^ until the desired setting appears in
the display and is shown by the indicators above the display.
ABC
ABC
ABC
ABC
0 Release to apply the selected Size setting to all of the characters in the text.
CTBS
To select the 26 point Size setting:
O Hold down and press
A A A A
SIZE
AUTO
Title FI F2 F3 F4 F5 Length
O Keep CS) down and continue
pressing until the 26 Size setting is
displayed.
A A
Font
A A
SIZE
26
Title FI F2 F3 F4 F5 Length
Font
e Release
Style
Underline
Frame
Style
Underline
Frame
57
Page 61

58
Page 62

STYLE FUNCTION
You can choose from twelve different character styles to apply to your text.
I®” Characters printed using the smaller sizes may be difficult to read if certain Style set
tings (e.g., I+SHADOW) are selected.
The following Style settings are available:
NORMAL ITALIC
BOLD l+BOLD (italic & bold)
OUTLINE l+OUTLINE (italic & outline)
SOLID l+SOLID (italic & shadow)
SHADOW I+SHADOW (italic & shadow)
O+SHADOW (outline & shadow) l+O+SHADOW (italic & outline & shadow)
The default Style setting is NORMAL. If any setting other than NORMAL is selected, the
Style indicator on the right side of the display lights up.
Refer to Reference at the end of this section for samples of the available settings.
To change the Style setting:
Hold down and press ^ once. The currently selected Style setting appears in
o
the display.
Keep held down and continue pressing ^ until the desired setting appears in
o
the display.
Release to apply the selected Style setting to all of the characters in the text.
o
I®* The Style indicator lights up if any setting other than NORMAL is selected.
To select the I+SHADOW Style setting:
O Hold down and press
sty
(D
STYLE
NORMAL
Title FI F2 F3 F4 F5
Font
A A
Style
Underline
Frame
59
Page 63

O Keep held down and continue
pressing until the l+SHADOW
Style setting is displayed.
0
Release Cc^.
A A
STYLE
I+SHADOW
THIe FI F2 F3 F4 FS Length
Font
A A
style
Underline
Frame
Font
Settings
HELSINKI
BRUSSELS
BERMUDA*
TITLE
SAN DIEGO
TITLE
CALGARY
TITLE
FLORIDA
TITLE
ISTANBUL*
Style Settings
NORMAL BOLD
abc
abc
aJtc
ABC
abc
abc
ABC
9i‘BC
ABC ABC
ABC
ABC
OUTLINE
©lb©
SOLID
abc
©Ib© abc
m(^ AlC
ABC
ABC
TITLE
U.S.* ABC
These fonts are only available on the P-Touch 350.
60
ABC
me ABC
Page 64

Font
Settings
SHADOW
Style Settings
O+SHADOW ITALIC
l+BOLD
HELSINKI
BRUSSELS
BERMUDA*
TITLE
SAN DIEGO
TITLE
CALGARY
TITLE
FLORIDA
TITLE
ISTANBUL*
TITLE
U.S.* A5C
abc
abo
ilJji;
nib©
sib©
iliB®
m<s
ABC
abc atx)
abc
ABC
JiiSC
abc
ABC
ASC
ABC ABC
AB<
ABC
ABC
ABC
61
Page 65

Font
Settings
Style Settings
l+OUTLINE l+SOLID
l+SHADOW l+O+SHADOW
HELSINKI
BRUSSELS
BERMUDA*
TITLE
SAN DIEGO
TITLE
CALGARY MBC
TITLE
FLORIDA
TITLE
ISTANBUL*
TITLE
U.S.*
&ib© abc
m(s AB€
¿^(D©
m<s
ABC
abc
ABQ
MB€
ABC ABC
abc at©
Bibo
AJJC
Aua
aU'A
Am
A]©©
mb©
ABC
*: These fonts are only available on the P-Touch 350.
62
Page 66

UNDERLINE FUNCTION
You can emphasize your text by crossing it out or underlining it.
The default Underline setting is OFF; however, two other settings are also available. If any
setting other than OFF is selected, the Underline indicator on the right side of the display
lights up.
ON
STRIKEOUT
ABC
To change the Underline setting:
O Hold down (c^ and press once. The currently selected Underline setting
appears in the display.
O Keep held down and continue pressing until the desired setting appears in
the display.
0 Release to apply the selected Underline setting to all of the characters in the text.
^ The Underline indicator lights up if any setting other than OFF is selected.
@03
To select the ON Underline setting:
O Hold down and press
© Keep Cc^dQ held down and continue
pressing until the ON setting is
displayed.
0 Release Cc^.
UNDERLINE
OFF
F1 F2 F3 F4 FS Length
UNDERLINE
ON
F1 F2 F3 F4 F5 Length
A A
Style
Underline
Frame
Font
A A
Style
Underline
Frame
Font
63
Page 67

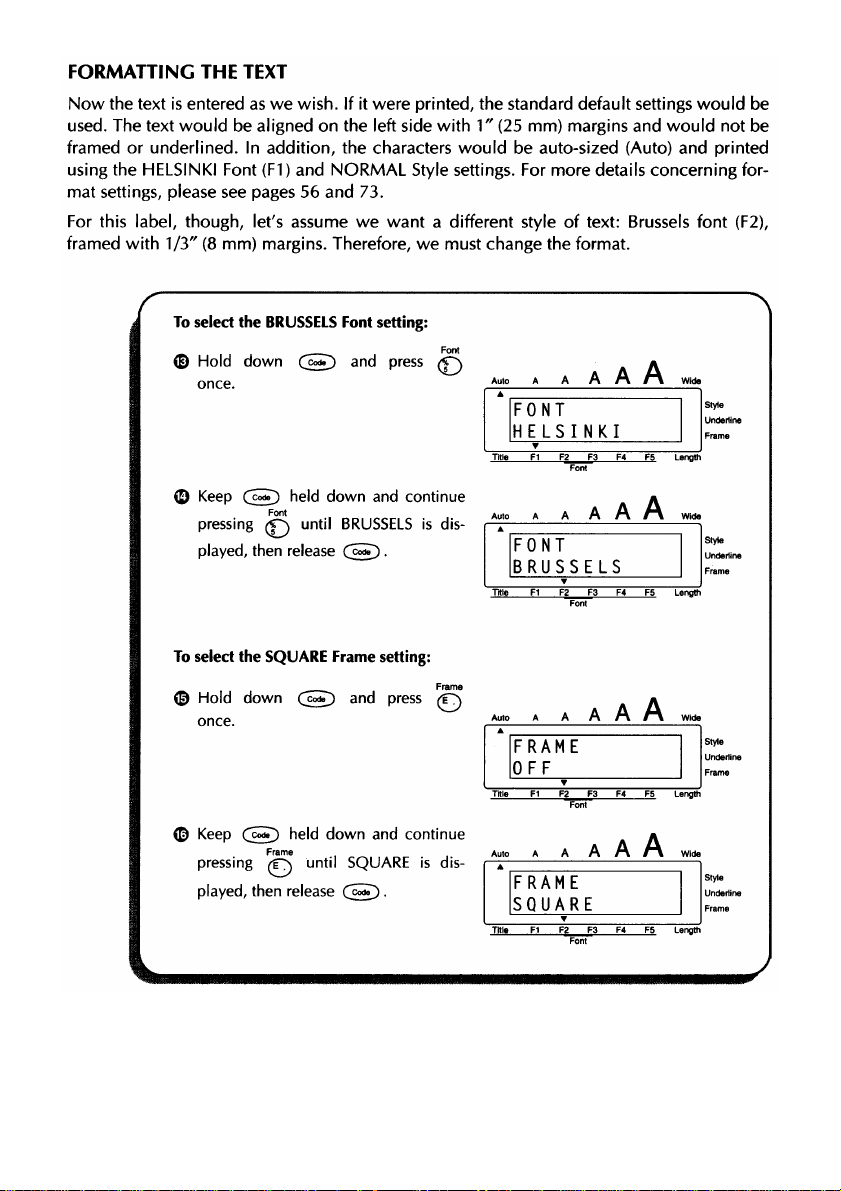
FONT FUNCTION
With the Font function, you can choose from a variety of fonts for your text.
The following Font settings are available on the PT-330:
HELSINKI, BRUSSELS, TITLE SAN DIEGO, TITLE CALGARY and TITLE FLORIDA
The following Font settings are available on the PT-350:
HELSINKI, BRUSSELS, BERMUDA, TITLE SAN DIEGO, TITLE CALGARY, TITLE FLOR
IDA, TITLE ISTANBUL and TITLE U.S.
The default Font setting is HELSINKI. The currently selected Font setting is always shown by
the Font indicators below the display.
The TITLE fonts are only available if the text consists of only one line and if 1/2"
(12-mm)-, 3/4" (18-mm)- or 1" (24-mm)-wide tape is installed. In addition, the text
will only be printed in capital letters and cannot be printed vertically or with other
character sizes.
Refer to Reference at the end of this section for samples of the available settings.
To change the Font setting:
O Hold down and press once. The currently selected Font setting appears in
the display.
The Font indicators below the display also show the current Font setting.
O Keep held down and continue pressing until the desired setting appears in
the display and is shown by the Font indicators.
O Release to apply the selected Font setting to all of the characters in the text.
4Sil!#
64
To select the TITLE FLORIDA Font setting:
• Hold down Cc^dQ and press
A A
FONT
HELSINKI
Title F1 F2 F3 F4 FS Length
A
A
Style
Uoctertíne
Frame
Font
Page 68

© Keep held down and continue
pressing until the TITLE FLORIDA Auto a a A
Font setting is displayed. TITLE
e Release ÇSjT).
Font .
FLORIDA
TWe F1 F2 F3 F4 F5 Lerigth
———
A A
Styte
Undertine
Frame
Font
Settings
HELSINKI
BRUSSELS
BERMUDA
TITLE
SAN DIEGO
Font Samples
abc
abc
aSc
ABC
Display Indicators
PT-330 PT-350
F1 F1
F2
Not avail
able on
the PT330
Title F3 Title F1
F2
F3
65
Page 69

Font
Settings
Font Samples
Display Indicators
PT-330 PT-350
TITLE
CALGARY
TITLE
FLORIDA ABC
TITLE
ISTANBUL
TITLE
U.S.
iA<BC
ABC
ABC
Title F4 Title F2
Title F5 Title F3
Not avail
able on
the PT-
330
Not avail
able on
the PT-
330
Title F4
Title F5
66
Page 70

FRAME FUNCTION
With the Frame function, you can choose from various frames and highlights to design a
more decorative or emphasized label.
The following Frame settings are available on the PT-330:
OFF, SQUARE, ROUND, DOT, CANDY, POINTING, NAME PLATE
The following Frame settings are available on the PT-350:
OFF, SQUARE, ROUND, DOT, DIAMOND, SLANT, CANDY, POINTING, NAME
PLATE, DOG, MOVIE FILM, DINOSAUR, TELEPHONE, HANDS, WINDOW, BANNER
The default Frame setting is OFF; however, other settings are also available. If any setting
other than OFF is selected, the Frame indicator on the right side of the display lights up.
Refer to Reference at the end of this section for samples of the available settings.
To change the Frame setting:
o Hold down cs> and press ^ once. The currently selected Frame setting appears in
the display.
O Keep held down and continue pressing ^ until the desired setting appears in
the display.
o Release to apply the selected Frame setting to the entire text.
The Frame indicator lights up if any setting other than OFF is selected.
To select the CANDY Frame setting:
O Hold down and press
^^ Frame
once.
0 Keep C^) held down and continue
pressing until the CANDY Frame
Frame
setting is displayed.
© Release .
FRAME
OFF
FI F2 F3 F4 F5 Length
FRAME
CANDY
Title FI F2 F3 F4 F5 Length
A
A
Style
Underline
Frame
Font
A
A
Style
Undet1ir>e
Frame
Font
67
Page 71

68
Page 72

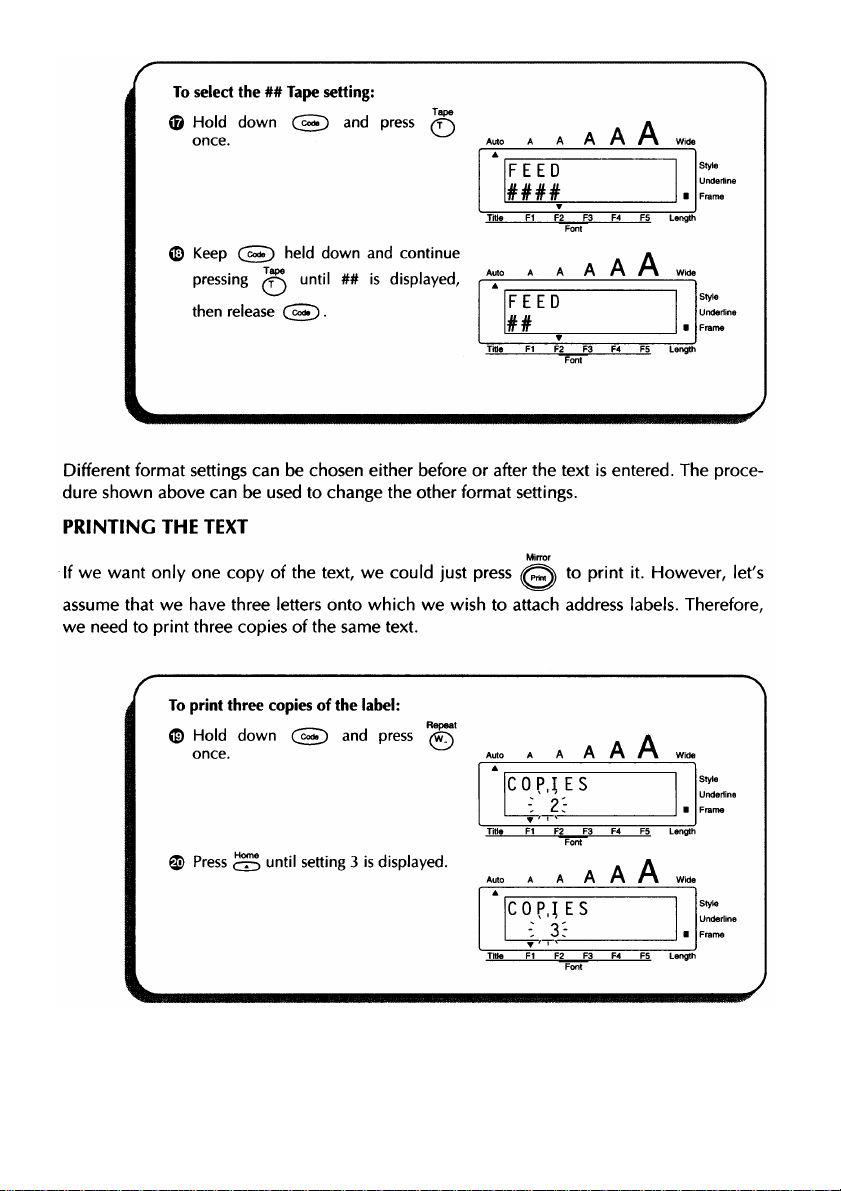
TAPE FUNCTION
The Tape function allows you to adjust the size of the margins on the left and right sides of
your text.
The default Tape setting is ####; however, four other settings are also available.
####
(25 mm
margins)
ABC
(no margins)
(4 mm
margins)
##
(8 mm
margins)
###
(12 mm
margins)
I®* If an instant-lettering (rub-on) or iron-on tape cassette is installed, the text will be
printed with 1" (25 mm) margins, even if a different Tape setting is selected.
After printing a label using the - Tape setting, hold down and press once
to feed the tape before pushing down on the tape cutter lever to cut it. Otherwise
some of the printed characters may be cut off.
After printing using the #, ## or ### Tape settings, push down on the tape cutter lever
to cut off the label, then use scissors to cut along the printed dots (:) to center the text
within the label.
To change the Tape setting:
O Hold down and press ^ once. The currently selected Tape setting appears in
the display.
ABC
ABC
ABC
ABC
O Keep CSdQ held down and continue pressing ^ until the desired setting appears in
the display.
O Release to apply the selected Tape setting to the entire text.
69
Page 73

70
Page 74

HORIZONTAL ALIGNMENT FUNCTION
You can choose to align the characters in each text block in one of four ways. In addition, if
the Length function was used to set the length of the label, the blocks will align within the
label according to the selected Horizontal Alignment setting.
The default Horizontal Alignment setting is LEFT; however, three other settings are also
available.
AB
LEFT
CDE
FG
AB
CENTER
CDE
FG
To change the Horizontal Alignment setting:
RIGHT
JUSTIFY
AB
CDE
FG
A B
CDE
F G
O Hold down Cc^ and press ^ once. The currently selected Horizontal Alignment
setting appears in the display.
O Keep held down and continue pressing ^ until the desired setting appears in
the display.
o Release CS) to apply the selected Horizontal Alignment setting to the entire text.
man
To select the RIGHT Horizontal Alignment setting:
_
_____
_
O Hold down Cc^ and press Auto a a A A M
0 Keep held down and continue
pressing until the RIGHT Horizon
H.AH , , . Auto A A A
tal Alignment setting is displayed.
0
Release C^D-
H.AIi . A
H .ALIGNMENT
LEFT
Title FI F2 F3 F4 F5 Length
Font
A A
H . ALI GNMENT
RIGHT
Titia FI F2 F3 F4 F5 Length
Font
Style
Underline
Frame
Style
Underline
Frame
71
Page 75

VERTICAL PRINTING FUNCTION
This function allows you to print the characters in your text vertically along the length of
your label.
The default Vertical Printing setting is OFF.
ON
< OQ O
__ _ IMirror
To change the Vertical Printing setting:
O Hold down and press once. The currently selected Vertical Printing setting
O Keep Cc^ held down and continue pressing ^ until the desired setting appears in
© Release to apply the selected Vertical Printing setting to the entire text.
milsj
(Q) is pressed while the Vertical Printing function is set to ON and a TITLE font is
selected, the text is printed horizontally.
appears in the display.
the display.
To select the ON Vertical Printing setting:
O Hold down and press
A A
A A
VERTICAL
OFF
Title FI F2 F3 F4 FS Length
Font
Style
UrKtorTme
Frame
© Keep held down and continue
pressing ^ until the ON setting is
displayed.
V Prirrt
VERTICAL
ON
Title FI F2 F3 F4 FS Length
A A
Font
A A
Style
Underfine
Frame
e Release
72
Page 76

MIRROR PRINTING FUNCTION
With this function, you can print your text so that the characters can be read from the adhe
sive side of the tape. If mirror-printed labels are attached to glass, such as in a showroom or
some other clear material, they can be read correctly from the opposite side.
When using the Mirror Printing function, the text should be printed on clear tape.
The default Mirror Printing setting is OFF.
ON
08A
To change the Mirror Printing setting:
O Hold down and press once. The currently selected Mirror Printing setting
appears in the display.
O Keep held down and continue pressing until the desired setting appears in
the display.
O Release to apply the selected Mirror Printing setting to the entire text.
_____ Mirror
Mirror _
To select the ON Mirror Printing setting:
O Hold down and press
(( Prtnt^
once.
0 Keep CS) down and continue
pressing until the ON setting is
Mirror Auto A A A
displayed.
e Release .
Mirror
A A
MIRROR
OFF
TMe F1 F2 F3 F4 F5 Length
MIRROR
ON
Title F1 F2 F3 F4 FS Ungth
A A
Style
Underline
Frame
Font
A A
Style
UrKlertine
Frame
Font
73
Page 77

BAR CODE FUNCTION
The Bar Code function, which enables bar codes to be printed as part of labels, is one of
this machine's most advanced features.
This section will explain how to enter a bar code into your text. It is not intended as a
comprehensive introduction to the concept of bar coding. For more detailed informa
tion, please consult one of the many reference books available.
Since this machine is not specifically designed for special bar code label making,
some bar code readers may not be able to read the labels.
Print bar codes with black ink on a white background.
Four different parameters enable you to create custom bar codes.
PARAMETER SETTINGS
PROTOCOL CODE 39,1-2/5, EAN13, EAN8,
UPC-A, UPC-E*, CODABAR*
*: Only available on the P-Touch 350.
WIDTH (bar code width)
UNDER#S (numbers printed below bar code)
CHECK DIG. (check digit)
The default settings are CODE 39 PROTOCOL, LARGE WIDTH, ON UNDER#S and OFF
CHECK DIG.
We recommend printing bar codes using the #### Tape setting and the LARGE bar
code width. Bar codes printed using a smaller Tape setting or a SMALL bar code
width may be difficult to read.
To use the Bar Code function:
O Hold down and press once.
If the cursor was located below the right bar code mark, the current bar code data
will be displayed.
A label can only contain a maximum of five bar codes. If five bar codes have already
been entered when Cc^ is held down and is pressed, the error message "5
BARS LIMIT" will appear.
To quit the Bar Code function without making any changes, hold down Cc^ and
Barcode
press .
LARGE, SMALL
ON, OFF
OFF, ON
O Enter or edit the bar code data.
To change the bar code parameter settings:
o Press
To display the bar code data without changing the parameter settings, press ^.
O Press or until the parameter that you wish to change appears.
0 Press
74
or until the desired setting is displayed.
Page 78

O Repeat steps 4 and 5 until all parameters are set as you wish.
_ New Block
O Press (^¿7^ .
To add a special character to the bar code data:
O Press or until the cursor is below the character immediately to the right of the
position where you want to add the special character.
O Hold down and press .
0 Press ^ or ^ until the desired special character is displayed.
^ The following special characters can only be entered when using protocols
CODE 39 or CODABAR.
Symbol
1
2
Character
+
$
0 Press to add the selected special character to the bar code data.
To add the bar code to your text:
0 Press .
New Stock
To add a bar code to the label:
_
O Hold down CS) and press
once.
______ Barcode
A A
A A
CODE 39 t
ntte F1 F2 F3 F4 F5 Length
0 Press cS-
Font
A A
A A
pb,qto,qql ^
-X 0 D E 3 9[-
Title FI F2 F3 F4 F5 Length
© Press or until the CHECK
DIG. parameter is displayed.
A A
Font
A A
DIG
X F F:
Title FI F2 F3 F4 F5 Length
Font
Style
Underline
Frame
Style
Underline
Frame
Style
Underline
Frame
75
Page 79

76
Page 80

PRINT KEY & FEED FUNCTION
After you have entered your text and chosen the desired format settings, you are ready to
print.
To print a label:
® P'"6ss once. The message "WORKING" appears in the display just before printing
To feed the tape:
• Hold down snd press once. 1 -1/6" (28 mm) of tape is fed out.
To cut the tape:
• Push down on the tape cutter lever.
Mirror
begins, then "COPIES 1/1" is displayed.
After printing using the - Tape setting, hold down and press once to feed
the tape before cutting it, otherwise some of the printed characters may be cut off.
■ ^ Feed
In order to prevent damaging the tape, do not try to cut it while printing or feeding.
Pushing down on the tape cutter lever too far may break it.
To make a label using the - Tape setting:
O Press once.
Mirror
A A
WORKING
A A
Style
Urxtortine
Frame
O Hold down and press once.
0
Push down on the tape cutter lever.
Auto A A A A A
COPIES
1/ 1
TWe FI F2 F3 F4 F5 Ler>gth
4.
Style
Underlie
Frame
Forrt
77
Page 81

NUMBERING FUNCTION
This function can be used to print a number of copies of the same text while increasing cer
tain characters (letters or numbers) with each printed label.
To use the Numbering function:
O Press c^, or to position the cursor below the first character (letter or
number) that you wish to include in the numbering field.
O Hold down and press once. The message "SELECT FIELD" appears in the
display and the first character of the numbering field flashes.
o Press or until all characters that you wish to include in the field flash.
Up to five characters can be selected for the numbering field. If more than five
are selected, the error message "WRONG SELECT!" appears in the display.
A numbering field must be located entirely within one line of text of a single
block.
O Press . The message "NUMBER" appears in the display.
O Press or to select the number of labels that you wish to print.
O Press to begin printing the labels. The message "WORKING" appears in the dis
play just before printing begins, then the number of each copy is displayed while it is
being printed.
I®" Letters and numbers simply increase as shown below:
0
1 -> ..
A B ... ^ Z
->
a
AO
Spaces (shown as underlines (_) in the example below) can be used to adjust the
space between characters or to control the number of digits printed:
b
-> A1 -> ..
_A -»
0 ^
. -»
9 0
-» A
... -> 2
->
. -> A9 BO
-> _Z
99
O Push down on the tape cutter lever to cut the tape, then use scissors to cut along the
printed dots to separate the labels.
-> ...
a
AA
0
I® After printing using the - Tape setting, hold down (c^ and press (g) once to
feed the tape before cutting it, otherwise some of the printed characters may be
cut off.
78
Page 82

79
Page 83

80
Page 84

REPEAT PRINTING FUNCTION
This function allows you to print up to 99 copies of the same text.
To use the Repeat Printing function:
Hold down and press once. The message "COPIES" appears in the display.
o
Press or to select the number of labels that you wish to print.
o
Press to begin printing the labels. The message "WORKING" appears in the dis
o
or
New Block
play just before printing begins, then the number of each copy is displayed while it is
being printed.
Push down on the tape cutter lever to cut the tape, then use scissors to cut along the
printed dots to separate the labels.
I®’ After printing using the - Tape setting, hold down Cc^ and press (^) once to
feed the tape before cutting it, otherwise some of the printed characters may be
cut off.
mu
To print three copies of a label:
O Hold down and press
A A A A
COP.i ES
2:
THIe F1 F2 F3 F4 F5 Length
0 Press or until setting 3 is dis
played.
ntte F1 F2 F3 F4 F5 Length
Font
A A A A
C0P,i ES
3:-
Font
Style
Underline
Frame
Style
UrKlertine
Frame
81
Page 85

82
Page 86

CALENDAR FUNCTION
(This function is only available on the PT-350.)
The Calendar function allows you to print out a calendar of any month or year from 1901 to
2099.
^ Calendars should be printed on 3/4" (18-mm)- or 1" (24-mm)-wide tape.
To use the Calendar function:
111
_
_____ I Calendar
O Hold down Cc^ and press once.
If text has already been entered, the message "OK TO CLEAR TEXT BUFFER?"
appears in the display. To continue using the Calendar function, press . All
character and label formats except the Tape, Frame and Mirror Printing settings
return to their default settings.
Now 0lock
O Press or to select either YEAR or MONTH.
o Use the number keys to enter the desired year or month. To print the calendar of an
entire year, only enter the year. To print the calendar of only one month, enter both the
year and the month.
If a year is entered, but "0" is entered for the MONTH setting, the calendar for
the entire year is printed.
O Press to print the label. The message "WORKING" appears in the display just
before printing begins, then "COPIES 1/1" is displayed.
n®* The calendars are printed using the selected Tape, Frame and Mirror Printing set
tings.
A A
? ?
Pood
Style
Underline
Frame
After printing using the - Tape setting, hold down and press once to
feed the tape before cutting it, otherwise some of the printed characters may be
cut off.
To print a calendar of August 1997:
^
_____
O Hold down and press
once.
Calendai
A A
Y E A R
MONTH
i ? ?' V-
Trtle F1 F2 F3 F4 F5 Length
Font^
83
Page 87

84
Page 88

MEMORY FUNCTIONS
You can use the memory to store frequently used text. These text files remain in the mem
ory, even after the Clear function is used to remove all characters from the display.
When each file is stored, it is given a number to make recalling easier. Up to 99 text files
and as many as 2,000 characters can be stored in the memory. Since a copy of the stored
text file is recalled when the Recall function is used, it can be edited or printed without
changing the original file. When a file is no longer needed or more space is needed, you
can use the M.Del function to delete it.
To store a text file:
O Hold down and press .
O Press or to choose a file number between 0 and 99.
If a text file has already been stored under the selected file number, you can see
the rest of the file by pressing or .
0 Press to save the file so that it can be recalled at any time.
^ If WO text files which contain less than 2,000 characters have already been
stored, the message "OVERWRITE?" appears in the display. If this occurs, an
existing text file must be deleted before the new one can be stored.
If a file is already stored under the selected number, the message "OVERWRITE?"
appears in the display and you must decide whether or not to overwrite it (delete
it and store the new one).
To overwrite the stored file with the new one:
• Press to store the new file under the selected number and delete the previously
stored one.
To quit the Store function without storing your text, press ^ or hold down
and press ^.
To recall a text file:
O Hold down and press (£). The number and the first characters of the most
recently stored or recalled file are displayed.
0 Press or until the file you want to recall is displayed.
To scan through the text file that is displayed, press or •
_ New Block
0 Press (^¿17) .
^ If no text has been entered in the display, the file is now recalled. If some text has
already been entered in the display, "JOINING" appears and you must decide
whether you want to join or overwrite the display text with the recalled file.
85
Page 89

To join the recalled file with the display text:
o Press s or until "ON" is displayed.
If you choose "OFF", the stored text file will be recalled to overwrite the display
text.
O Press • The stored text file is recalled and inserted in a new block at the cursor's
position.
To quit the Recall function without recalling the text file, press ^ or hold down
_
______ , Recall
CW) and press
To delete a text file:
O Hold down and press ^.
O Press ^ or until the file that you want to delete is displayed.
To scan through the text file that is displayed, press or (—
O Press . The message "OK TO CLEAR?" is displayed.
O Press to delete the file that was displayed.
4939
To store text in file number 8:
O Hold down Cc^ and press
Recall
ST.QRE
[-: o:-]
Title FI F2 F3 F4 F5 Length
A A
A A
Font
style
Underline
Frame
O Press or S? until file number 8 is Auto a a A
displayed.
ST.QRE
E 8:-]
Titte FI F2 FS F4 FS Length
© Press •
86
new 0IOCK
A A
Style
Underline
Frame
Font
Page 90

87
Page 91

TROUBLESHOOTING
Problem Remedy
1. The display stays blank after you
have turned on the machine.
2. The machine does not print or the
printed characters are blurred.
3. The printed characters are not
formed properly.
4. A blank horizontal line appears
through the printed label.
5. Striped tape appears.
• Check that the AC adaptor is connected
correctly.
• If you are using alkaline batteries, check
that they are correctly inserted.
• If the batteries are low, replace them.
• Check that the tape cassette has been
inserted properly.
• If the tape cassette is empty, replace it
with a new one.
• Make sure that the tape cassette cover
has been closed.
• If you are using alkaline batteries, they
may be low. Try using the AC adaptor.
• There may be some dust on the print
head. Remove the tape cassette and use
a dry cotton swab to gently wipe the
print head (see page 9) with an up-anddown motion.
• If dust still remains, dip the cotton swab
in isopropyl (rubbing) alcohol and gen
tly wipe the print head again.
• You have reached the end of the tape.
Replace the tape cassette with a new
one.
6. The machine has "locked up" (i.e. it
does not respond when a key is
pressed).
88
• Turn off the machine, then while hold
ing down and turn the
machine back on. The text and formats
in the display and all text files stored in
the memory are erased.
Page 92

ERROR MESSAGE LIST
4 DIGIT
MIN.
4 LINE
LIMIT!
Error
Message
Cause
• This message appears
when less than the mini
mum four digits are
entered in a bar code.
• This message appears if
four lines already exist
when you press or
if you try to join a text file
recalled from the mem
ory to the current mes
sage, causing the block
to exceed the four line
limit.
• This message appears if
the cursor is positioned at
the beginning of a block
when you press to
Naw RInok
join two blocks, result
ing in a block containing
a total of more than four
lines.
Remedy
• Enter a minimum of four
digits before pressing
NswBlocK
cs-
• Limit the number of lines
in the current block to
, , New Block
four and press .
• Adjust the total number of
lines in the two blocks so
that they will have no
more than four lines after
they are joined, otherwise
do not try to join the two
blocks.
5 BARS
LIMIT!
• This message appears if
five bar codes already
exist when you press
Barcode . ,
or if you try to join
a text file recalled from
the memory to the cur
rent message, causing the
number of bar codes to
exceed the five bar limit.
• Limit the number of bar
codes in the text message
to five.
89
Page 93

Error
Message
Cause
Remedy
5 BLOCK
LIMIT!
ABCD AT
BEGIN&END
BATTERIES
WEAK!
BUFFER
EMPTY!
• This message appears if
five blocks already exist
when you press or
if you try to join a text file
recalled from the memory
to the current message,
causing the message to
exceed the five block
limit.
• This message appears
when the CODABAR bar
code protocol is used, but
a letter between A and D
has not been entered at
the beginning and end of
the bar code.
• This message appears
when the installed alka
line batteries become
weak.
• This message appears if
you press some function
keys, but no text has been
entered in the display.
• Limit the number of
blocks in the text message
to five.
• Enter a letter between A
and D at the beginning
and end of the bar code.
• Replace the batteries or
use the AC adaptor.
• Enter some text before
starting the function.
• This message appears if
• Enter text before printing.
you try to print, but no
text has been entered in
the display.
• This message appears if
• Enter text before storing.
you try to store a message
as a text file, but no text
has been entered in the
display.
90
Page 94

Error
Message
Cause
Remedy
BUFFER
FULL!
CAN'T
HERE!
• This message appears if
you try to enter a charac
ter, symbol, bar code
return, new block or
space when 255 charac
ters have already been
entered in the display.
• This message appears if
you try to join a text file
recalled from the memory
to the current message
when the display is
already full.
• This message appears if a
character, symbol, space,
return or new block is
entered while the cursor
is located in a bar code
field.
• This message appears if a
text file is recalled and
joined to the current mes
sage while the cursor is
located in a bar code field.
• Delete some existing text
so that more text can be
entered.
• Delete some of the text
before joining the
recalled file to the current
message.
• Move the cursor or
delete the bar code field
before entering the char
acter, symbol, return or
new block.
• Move the cursor or
delete the bar code field
before recalling the text
file.
CHANGE
ADAPTOR
FIXED SIZE!
• This message appears if a
high-voltage adaptor is
being used.
• This message appears if
IS pressed while a
Title font is selected.
• This message appears if
a 1/4" (6-mm)- or 3/8"
(9-mm)-wide tape is
installed while a Title
font is selected.
• This message appears if
you try to change the
character size while a
Title font is selected.
• Remove the high-voltage
adaptor and connect the
adaptor designed exclu
sively for this machine.
• Change the font.
• Insert a tape cassette that
is wide enough for Title
font text to be printed on
it.
• Since the size is fixed, do
not change it.
91
Page 95

Error
Message
Cause
Remedy
INPUT
WHOLE CODE
INVAL.
CHRS!
LENGTH
LIMIT!
LINE
LIMIT!
MEMORY
FULL!
• This message appears if
the set number of digits
are not entered while
inputting the bar code
data.
• This message appears if
any characters other than
letters and numbers are
selected in the numbering
field.
• This message appears if a
character, bar code,
space, return or new
block is entered, causing
the text to exceed the one
meter limit.
• This message appears if
the number of lines in the
text is greater than the
maximum number of
lines possible for the
installed tape.
• This machine can store
about 2,000 characters in
its memory. This message
appears when you try to
store a message that is too
large to fit in the available
memory space.
• Input the correct number
of digits or change the
number of digits set in the
bar code parameters.
• Only select letters and
numbers in the number
ing field.
• Delete some of the text or
reduce the character size.
• Reduce the number of
lines or install a tape of
greater width.
• Stop trying to store the
message or delete an
unwanted file to make
room for the new one.
92
NO
FILES!
NO
TAPE!
• This message appears if
you try to recall or delete
a text file from the mem
ory when none are cur
rently stored.
• This message appears if
you try to print a label or
feed the tape when a tape
cassette is not installed.
• Store a text file first.
• Install a tape cassette and
try again.
Page 96

Error
Message
Cause
Remedy
RAM
PROBLEM!
REPLACE
BATTERIES!
ROM
PROBLEM!
SYSTEM
ERROR!
TEXT
TOO HIGH!
TEXT
TOO LONG!
• This message appears if
there is a problem with
the machine's random
access memory.
• This message appears
when the installed alka
line batteries are about to
run out.
• This message appears
when there is a problem
with the machine's read
only memory.
• This message appears if
there is a problem with
the machine's software.
• This message appears if
the size of the text is
larger than the width of
the installed tape.
• This message appears if
the length of the text is
longer than the label
length that has been set.
• Contact your service rep
resentative.
• Replace the batteries or
use the AC adaptor.
• Contact your service rep
resentative.
• Contact your service rep
resentative.
• Reduce the size of the
characters or install a tape
of greater width.
• Delete some of the text,
reduce the character
width or increase the pre
set label length.
WRONG SELECT
• This message appears if
more than five characters
are selected as the num
bering field.
• Limit the numbering field
to five characters.
93
Page 97

HARDWARE
Input Device:
LCD:
Print Tape:
Power Supply:
Print Head:
SPECIFICATIONS
Keyboard - 51 keys
7x5 dots
12 characters x 2 line
19 indicators
Pressure-sensitive, adhesive-based
26' 3" (8 m) long
Five widths available:
1/4"
3/8"
1/2"
3/4"
Six AA alkaline batteries (AM3, LR6) or optional AC adaptor
Auto power-off if no key is pressed for 5 minutes
128 dot / 180 dpi
1 "
(6 mm)
(9 mm)
(12 mm)
(18 mm)
(24 mm)
Dimensions:
Weight:
SOFTWARE
Buffer Size:
Memory Size:
Character Size:
Character Fonts:
Print Styles:
94
7" (W) X 8 1/16" (D) X 2 23/63" (H)
(178 X 205 X 60 mm)
24.5 oz. (700 g) (without a tape cassette and batteries
installed)
Maximum 255 characters
Single line -1 m
Maximum four lines
Maximum five blocks
2,000 characters
Five sizes (10, 13, 19, 26 and 38 points) + AUTO
All are available in normal and WIDE
PT-330: Five built-in typefaces
PT-350: Eight built-in typefaces
Normal, Bold, Outline, Solid, Shadow, Outline + Shadow
(all can be combined with Italic)
Page 98

95
Page 99

Stock No.
Description
1/4" (6mm) laminated tapes
TZ-111
TZ-211
TZ-315
Black Characters on Clear Adhesive
Black Characters on White Adhesive
White Characters on Black Adhesive
Special tapes
Stock No.
TZ-SE4
TZ-FA3
Black characters on 3/4" (18 mm) Security Adhesive
Blue characters on 1/2" (12 mm) Fabric Adhesive
Description
STAMP KIT
Stock No.
SK-LB
SK-MB
SH-LB
SH-MB
Stamp Making Kit for Large Black
Stamp Making Kit for Medium Black
Additional Stamper for Large Black
Additional Stamper for Medium Black
Description
OPTIONS
Stock No.
Description
AD-60 AC Adapter for PT-330/350
QTY/
PACKAGE
1
1
1
QTY/
PACKAGE
1
1
QTY/
PACKAGE
1
1
1
1
QTY/
PACKAGE
1
PRICE
$12.95
$14.95
$17.95
PRICE
$29.95
$24.95
PRICE
$39.95
$37.95
$27.95
$24.95
PRICE
$24.95
96
Page 100

SUPPLIES ORDER FORM
Dear Customer:
Please send this order form along with proper payment to the address below. Visa card, MasterCard, American Express or
Discover card hoiders: Call 1-888-879-3232 toll-free anytime or fax your completed order fomi to 1-800-947-1445.
Stock No.
Name:
Address:
City:
State/Zip:
Daytime Phone:
SEND ORDER FORM TO:
Brother International Corp.
Attn: Consumer Accessory Div.
P.O. Box 341332
Bartlett, TN38184-1332
Description
Price
Accessory Subtotal:
AZ, CA, CO, CT, FL, GA, IL, LA, MA, MD,
Ml, MN, MO, NC, NJ, NV, NY, OH, PA, TN,
TX, VA, WA
residents add applicable sales tax A.
Shipping/Handing Options
Please choose one:
• Standard ($5.00)
• 2nd day air freight ($8.75)
Mandatory for all deliveries
outside of the continental U.S.
(Alaska, Hawaii, Puerto Rico,
Virgin Islands & Canada)
• All other overseas orders ($25.00)
TOTAL DUE (US dollars)
Quantity
Total
Method of payment (Check one)
( ) Visa ( ) MasterCard ( ) Discover ( ) American Express ( ) Check/Money Order
Account Number
Expiration Date
Signature
_________________________
__________________________
* Prices subject to change without notice.
 Loading...