

Page 1
OPERATION MANUAL
MANUAL DE INSTRUCCIONES
®
Page 2

"IMPORTANT SAFETY INSTRUCTIONS"
When using the sewing machine, basic safety precautions should always be followed,
including the following:
"Read all instructions before using."
DANGER – To reduce the risk of electric shock:
1. The sewing machine should never be left unattended when plugged in. Always unplug this sewing machine
from the electrical outlet immediately after using and before cleaning.
2. Always unplug before relamping.
Replace bulb with same type rated 12 volts 5 watts (for Models PS-2500, PS-2400, PS-2300, STAR 140E,
STAR 130E, STAR 120E).
Replace bulb with same type rated 15 watts (for Models PS-2200, STAR 110).
WARNING – To reduce the risk of burns, fire, electric shock, or injury to persons:
1. Do not allow this machine to be used as a toy. Close attention is necessary when the sewing machine is used
by or near children.
2. Use this sewing machine only for its intended use as described in this manual. Use only accessories
recommended by the manufacturer as contained in this manual.
3. Never operate this sewing machine if it has a damaged cord or plug, is not working properly, has been
dropped or damaged, or has been dropped into water. Return the sewing machine to the nearest authorized
dealer or service center for examination, repair, electrical or mechanical adjustment.
4. Never operate the sewing machine with any air openings blocked. Keep ventilation openings of the sewing
machine and foot controller free from the accumulation of lint, dust, and loose cloth.
5. Never drop or insert any object into any opening.
6. Do not use outdoors.
7. Do not operate where aerosol (spray) products are being used or where oxygen is being administered.
8. To disconnect, turn the main switch to the symbol “O” position which represents off, then remove plug from
outlet.
9. Do not unplug by pulling on cord. To unplug, grasp the plug, not the cord.
10. Keep fingers away from all moving parts. Special care is required around the sewing machine needle.
11. Always use the proper needle plate. The wrong plate can cause the needle to break.
12. Do not use bent needles.
13. Do not pull or push fabric while stitching. It may deflect the needle causing it to break.
14. Switch the sewing machine to the OFF position, symbol “O” position when making any adjustments in the
needle area, such as threading needle, changing needle, threading bobbin, or changing the presser foot, and
the like.
15. Always unplug the sewing machine from the electrical outlet when removing covers, lubricating, or when
making any of the user service adjustments mentioned in the instruction manual.
16. The sewing machine is not intended for use by young children or infirm persons without supervision.
17. Young children should be supervised to ensure that do not play with the sewing machine.
"SAVE THESE INSTRUCTIONS"
"This sewing machine is intended for household use."
Page 3

“IMPORTANTES INSTRUCCIONES DE
SEGURIDAD”
Cuando se usa una máquina de coser, debe seguirse unas precauciones básicas y
que vienen incluidas a continuación.
“Leer las instrucciones antes de usar”
PELIGRO – Para reducir el riesgo de una descarga eléctrica.
1. La máquina no debe dejarse nunca desatendida mientras esté conectada. Desconectar la máquina
de la red eléctrica inmediatamente después de su uso y antes de limpiarla.
2. Antes de cambiar la bombilla, asegúrese siempre de que la máquina de coser está apagada.
Cambie la bombilla por otra del mismo tipo de 12 V y 5 W (para los modelos PS-2500, PS-2400, PS-2300,
STAR 140E, STAR 130E y STAR 120E).
Cambie la bombilla por otra del mismo tipo de 15 W (para los modelos PS-2200, STAR 110).
CUIDADO – Para reducir el riesgo de quemaduras, fuego, descargas eléctricas o causar
daños a personas.
1. No usar la máquina como un juguete.
Prestar atención si fuese necesario cuando la máquina está siendo usada por niños o cerca de ellos.
2. Usar la máquina de coser solamente como se describe en este manual.
Usar únicamente los accesorios recomendados por el fabricante y que vienen especificados en este
manual.
3. Nunca haga funcionar la máquina de coser si el cordón de alimentación o la clavija están deteriorados, si
no funciona correctamente, si se ha caído o si estuvo mojada. Entregar la máquina de coser al centro de
servicio autorizado más cercano para que la examinen, la reparen o hagan los ajustes eléctricos o
mecánicos que correspondan.
4. No usar la máquina con los orificios de ventilación bloqueados. Mantener los orificios de ventilación
de la máquina de coser y el pedal sin acumulacíon de povo. Suciedad y restos de tejido.
5. No introducir no insertar objetos en los orificios de ventilación.
6. No usar al, aire libre.
7. No usar mientras se estén utilizando productos aerosoles (spray) o en lugares donde se esté administrando
oxígeno.
8. Para desconectar, girar el interruptor hasta la posición del símbolo “O” que representa off, luego desconectar
el enchufe de la red.
9. Nunca desconectar el enchufe tirando del cable. Para desconectar la máquina, tirar de la clavija y no del
cable.
10. Mantener los dedos alejados de todas las partes movibles de la máquina. Tener un cuidado especial
con la aguja.
11. Usar siempre la placa de agujas apropiada. Una placa de agujas impropia puede producir la rotura
de la aguja.
12. No usar agujas torcidas.
13. No presionar ni tirar del tejido mientras se está cosiendo. Esto podría doblar la aguja y romperla.
14. Apagar la máquina de coser, poniendo el interruptor principal en la posición cerrada (en “O”) cuando quiera
realizar algún ajuste en el área de la aguja tal como enhebrar la aguja, cambiarla, bobinar la canilla, cambiar
el prensatelas y operaciones similares.
15. Desconectar siempre la máquina de la red eléctrica cuando se retiren las tapas, para lubricar, o cuando
quiera realizar algún tipo de ajuste mecánico tal como mencionado en el manual de instrucciones.
16. La máquina de coser no está pensada para el uso de los niños o personas enfermas sin supervisión.
17. Evite que los niños jueguen con la máquina de coser.
“CONSERVE ESTE MANUAL DE INSTRUCCIONES”
“Esta máquina de coser es para uso doméstico”
Page 4
FOR USERS IN UK, EIRE, MALTA AND CYPRUS ONLY.
If your sewing machine is fitted with a 3 pin non-rewireable BS plug then please read the following.
IMPORTANT (in the United Kingdom)
Main supply (AC 230/240V~, 50Hz)
DO NOT cut off the mains plug from equipment. If the
plug fitted is not suitable for the power point in your
home or the cable is too short to reach a power point,
then obtain an appropriate safety approved extension lead or consult your dealer.
BE SURE to replace the fuse only with an identical
approved type, as originally fitted and to replace the
fuse cover.
If none the less the mains plug is cut off ensure to
remove the fuse and dispose of the plug immediately, to avoid a possible shock hazard by inadvertent connection to the main supply.
IMPORTANT (in the other countries)
If the available socket outlet is not suitable for the
plug supplied with this equipment, it should be cut off
and an appropriate three pin plug fitted. With alternative plugs an approved fuse must be fitted in the plug.
NOTE: The plug severed from the main leads must
be destroyed as a plug with bared flexible cords is
hazardous if engaged in a live socket outlet. In the
event of replacing the plug fuse, use a fuse approved
by ASTA to BS 1362, i.e. carrying the
rating as marked on plug.
ASA
mark,
Always replace the fuse cover. Never use plugs with
the fuse cover removed.
WARNING: DO NOT CONNECT EITHER WIRE TO
THE EARTH TERMINAL WHICH IS MARKED WITH
THE LETTER ‘E’, BY THE EARTH SYMBOL
OR COLOURED GREEN OR YELLOW.
The wires in these main leads are coloured in accordance with the following code:
Blue Neutral
Brown Live
As the colours of the wiring in the mains lead of this
appliance may not correspond with the coloured
markings identifying the terminals in your plug, proceed as follows:
The wire which is coloured blue must be connected
to the terminal which is marked with the letter ‘N’ or
coloured black or blue.
The wire which is coloured brown must be connected
to the terminal which is marked with the letter ‘L’ or
coloured red or brown.
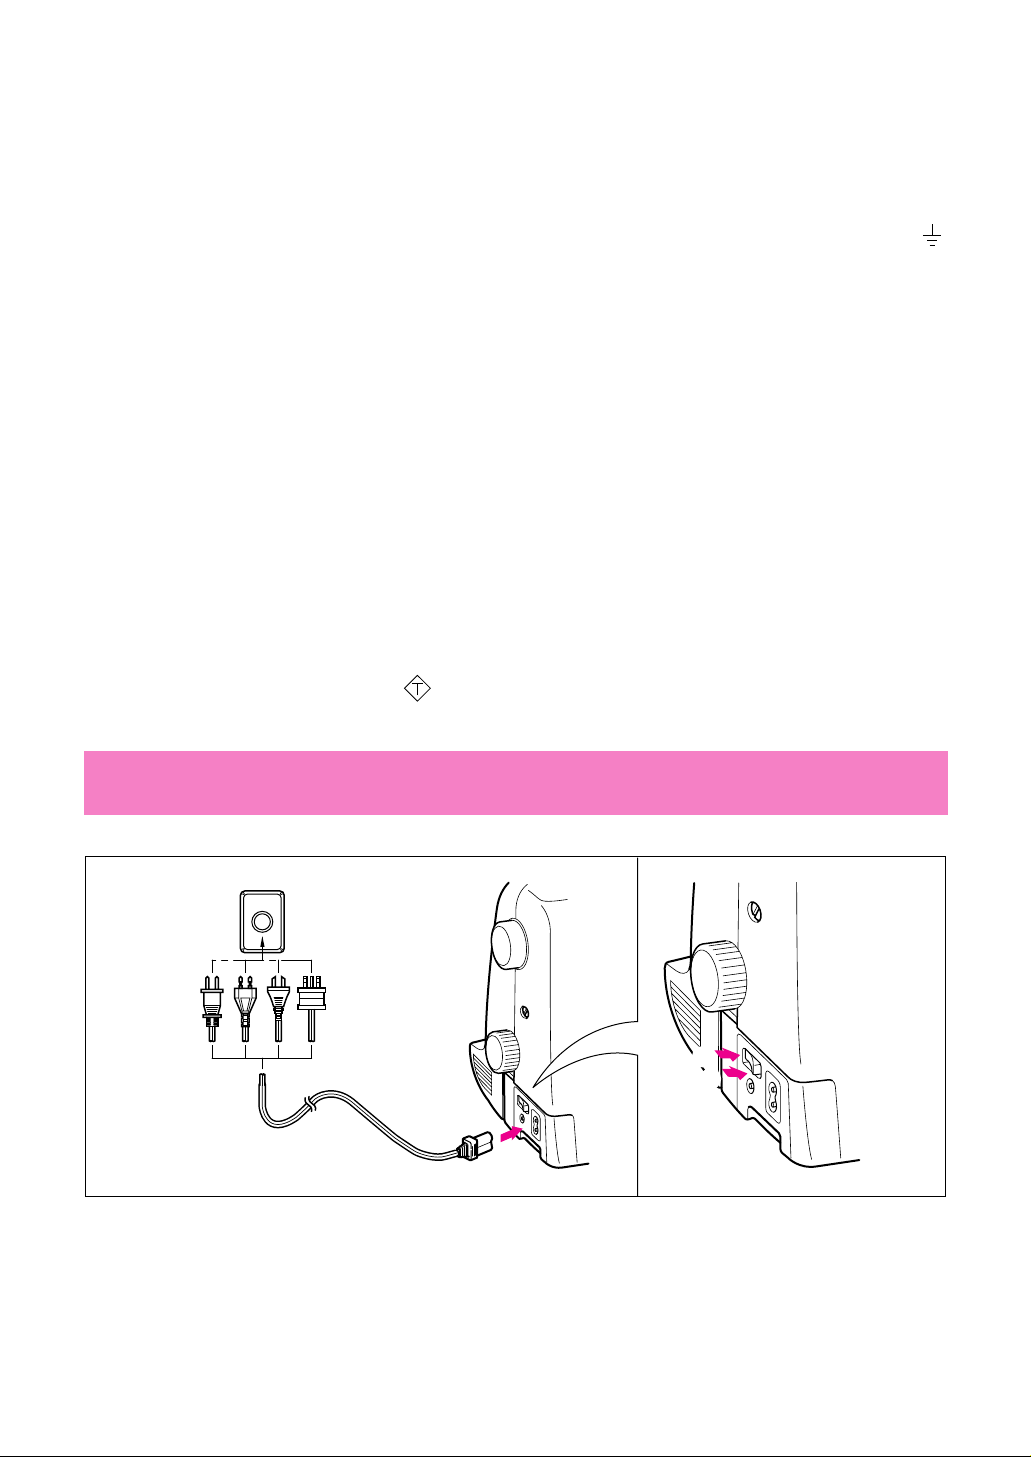
Connecting Plugs and Main Power / Sewing Light Switch
( Model PS-2500, PS-2400, PS-2300 STAR140E, STAR130E, STAR120E )
2
1
Page 5
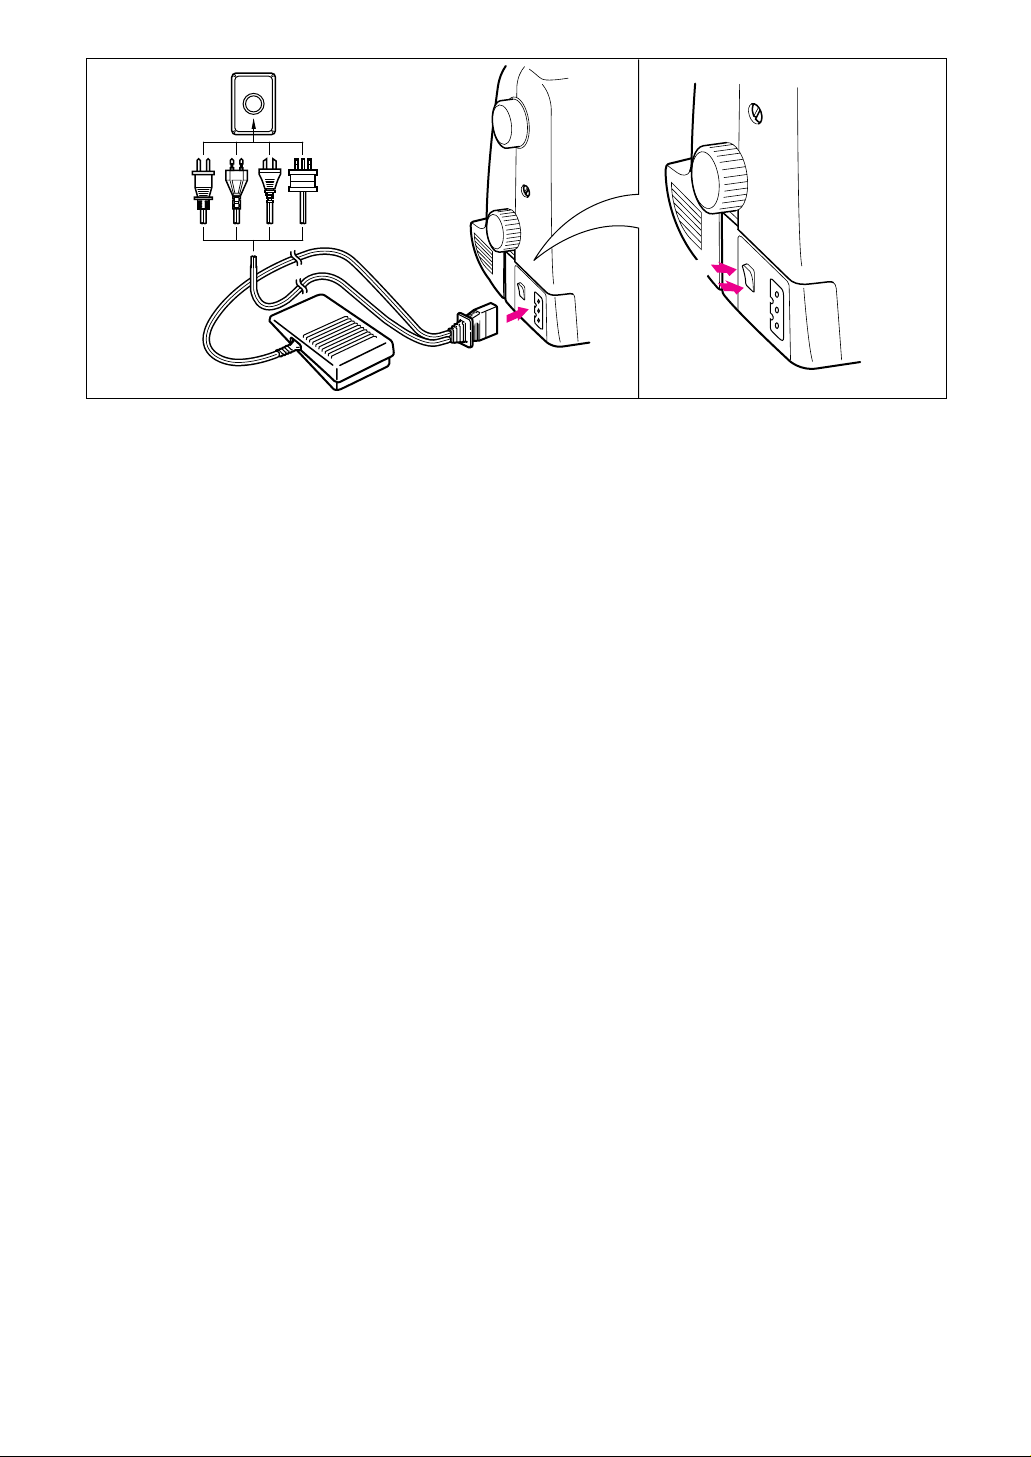
(Model PS-2200, STAR110)
1
2
1. Connect the power cord or three-prong plug into
the machine.
2. Connect the electrical supply plug into a wall
outlet.
- When leaving the sewing machine unattended,
the main switch of the machine must be switched
off or the plug must be removed from the socket
outlet.
Turn on or off the switch for the main power and sewlight.
1 Turn on
2 Turn off
- When servicing the sewing machine, or when
removing covers or changing lamps, the machine or the electrical set must be disconnected
from the supply by removing the plug from the
socket outlet.
Page 6

TABLE OF CONTENTS
KNOWING YOUR SEWING MACHINE
Principal parts ..................................................... 1
Principal parts ..................................................... 3
Accessories ......................................................... 5
OPTIONAL ACCESSORIES ............................... 6
OPERATING YOUR SEWING MACHINE .......... 7
Connecting Plugs ...................................... 7
Main Power and Sewing Light Switches ... 8
Foot Controller ........................................... 8
Replacing the Needle ................................ 9
Checking the Needle ................................. 9
Changing the Presser Foot...................... 10
Extension Table (Accessories) ................ 10
VARIOUS CONTROLS ..................................... 11
Pattern Selection Dial .............................. 11
RECOMMENDED WIDTHS AND
LENGTHS FOR STITCHES .................... 12
Stitch Length Dial .................................... 14
Stitch Width Dial ...................................... 15
Reverse Sewing Button ........................... 16
Drop Feed Lever...................................... 17
Start/stop Button ...................................... 18
Speed Range Control Lever .................... 19
Automatic Thread Cutter ......................... 20
Converting to Free-arm Style .................. 21
THREADING THE MACHINE ........................... 22
Winding the Bobbin ................................. 22
Lower Threading...................................... 25
Upper Threading...................................... 26
Using Needle Threader ........................... 28
Manually Drawing Up Lower Thread ....... 29
Twin Needle Sewing ................................ 30
Thread Tension Control ........................... 31
Thread Tension ....................................... 32
RELATIVE CHART OF SEWING FABRICS,
NEEDLES AND THREADS............................... 34
BUTTONHOLE AND BUTTON SEWING
Making a Buttonhole ................................ 51
Odd-shaped buttons that
do not fit into the button holder plate ....... 53
Buttonhole Fine Adjustment .................... 54
Button Sewing ......................................... 57
USING ATTACHMENTS AND APPLICATIONS
Zipper Insertion........................................ 58
Gathering ................................................. 59
Darning .................................................... 59
Appliques ................................................. 60
Monogramming and Embroidering .......... 61
OPTIONAL ACCESSORIES
Using the Walking Foot ........................... 63
Using the Spring-action Quilting Foot ...... 65
Using the 1/4" Seam Guide Foot ............. 67
MAINTENANCE
Changing the Bulb ................................... 68
Cleaning .................................................. 70
Automatic Thread Cutting ........................ 72
Correcting a Problem with
the Automatic Thread Cutter ................... 73
Performance Checklist ............................ 75
Repacking the Machine..................................... 82
INDEX
STRAIGHT AND ZIGZAG STITCHING
Straight Stitching ..................................... 36
Zigzag Stitching ....................................... 40
BUILT-IN STITCHES
Blind Hem Stitching ................................. 41
Shell Tuck Stitching ................................. 42
Elastic Stitching ....................................... 43
Double Action Stitching ........................... 44
Scallop Stitching ...................................... 45
Decorative Stitching................................. 46
Patchwork ................................................ 47
Overedge Stitching .................................. 48
Feather Stitching ..................................... 49
Triple Zigzag Stretch Stitching................. 50
Page 7

INDICE
CONOZCA SU MÁQUINA DE COSER
Elementos principales ......................................... 1
Elementos principales ......................................... 3
Accesorios........................................................... 5
Funcionamiento de la máquina de coser ............ 7
Conexión de los enchufes ......................... 7
Interruptor principal y de luz ...................... 8
Pedal ......................................................... 8
Cambio de la aguja.................................... 9
Verificación de la aguja ............................. 9
Cambio del prensatelas ........................... 10
Soporte de accesorios
Distintos mandos............................................... 11
Selector de puntadas .............................. 11
Anchos y largos recomendados para cada
puntada.................................................... 13
Selector de largo de puntada .................. 14
Selector de ancho de puntada ................ 15
Pulsador de retroceso ............................. 16
Palanca de los alimentadores ................. 17
Pulsador de puesta en marcha/parada ... 18
Palanca de control de zona de velocidad . 19
Cortahilos automático .............................. 20
Conversión en modalidad de brazo libre ...
Enhebrado de la máquina ................................. 22
Bobinado de la canilla ............................. 22
Enhebrado inferior ................................... 25
Enhebrado superior ................................. 26
Uso del enhebrador ................................. 28
Levantar manualmente el hilo inferior ..... 29
Costura con aguja doble ......................... 29
Control de la tensión de los hilos ............ 31
Tensión de los hilos ................................. 32
Tabla de relación entre tejidos, hilos y agujas .. 35
(mesita extensible) ...
10
21
OJALES Y COSTURA DE BOTONES
Para coser ojales ..................................... 51
Botones con formas extrañas que no
caben en el soporte del botón ................. 53
Ajuste fino de los ojales ........................... 54
Costura de botones ................................. 57
USO DE ACCESORIOS Y APLICACIONES
Inserción de cremalleras ......................... 58
Fruncido................................................... 59
Zurcido..................................................... 59
Aplicaciones ............................................ 60
Monogramas y bordados ......................... 61
ACCESORIOS OPCIONALES
Utilización del pie caminante ................... 63
Utilización del prensatelas
enguatador accionado por muelle ........... 65
MANTENIMIENTO
Cambio de la bombilla ............................. 68
Limpieza .................................................. 70
Cortahilos automático .............................. 72
Corrección de problemas en el
cortahilos automático............................... 73
Listado de posibles incidencias ............... 75
Embalaje de la máquina .......................... 82
ÍNDICE
PUNTADAS RECTAS Y ZIGZAG
Puntadas rectas....................................... 36
Puntadas zigzag ...................................... 40
PUNTADAS INCORPORADAS
Puntadas invisibles .................................. 41
Puntada ondas ........................................ 42
Puntada elástica ...................................... 43
Puntada de acción doble ......................... 44
Ondas decorativas................................... 45
Puntadas decorativas .............................. 46
Patchwork ................................................ 47
Puntada por encima de la orilla ............... 48
Puntada pluma ........................................ 49
Triple puntada zigzag elástica ................. 50
Page 8
CONOZCA SU MÁQUINA DE COSER
Model PS-2500, PS-2400, PS-2300
STAR140E, STAR130E, STAR120E
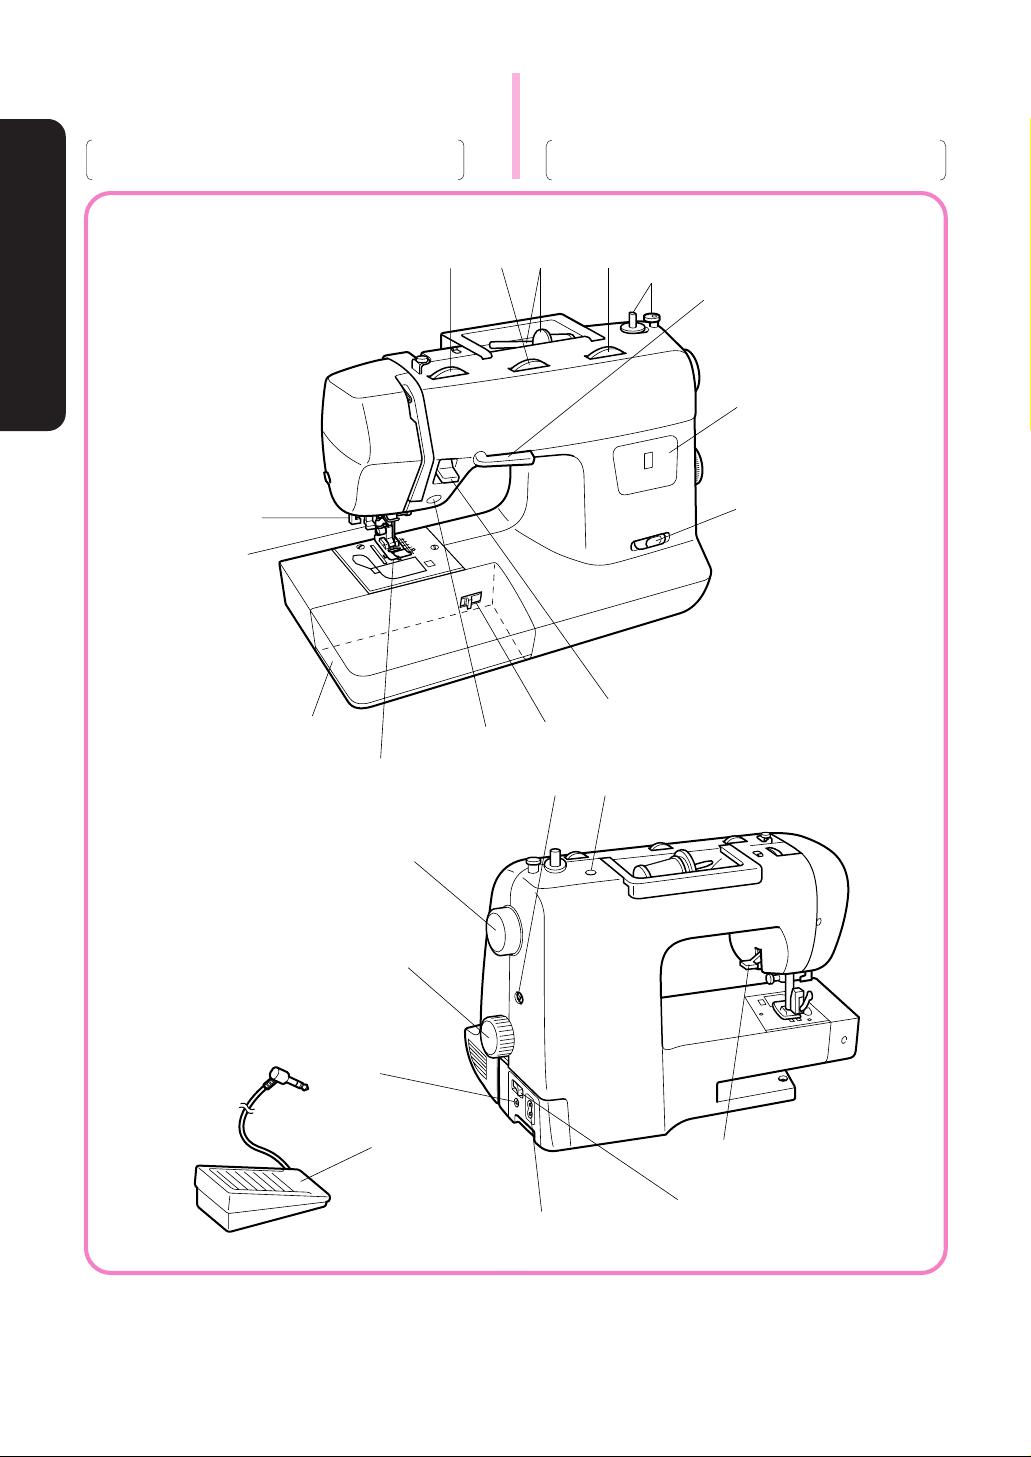
KNOWING YOUR SEWING MACHINE
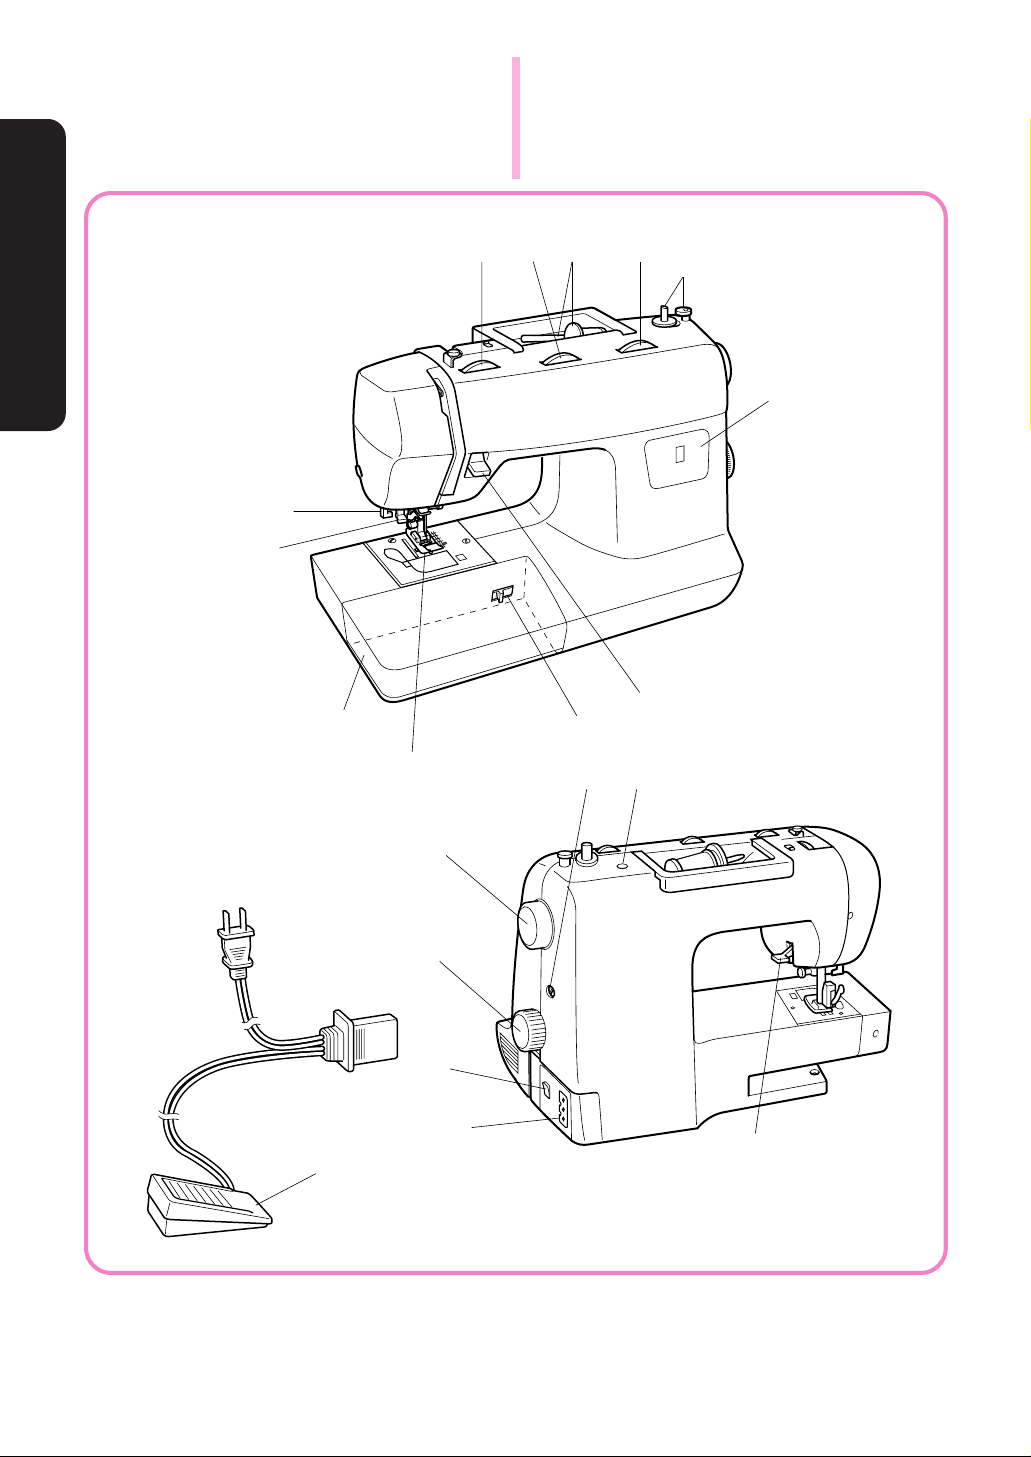
Principal parts
Elementos principales
Modelos PS-2500, PS-2400, PS-2300,
STAR 140E, STAR 130E y STAR 120E
6
J
7
I
5 2
8
34
H
E G
1
M
F
0
9
1
C
N
L
A
K
B
D
Page 9

1 BOBBIN WINDER DEVICE
Winds the thread onto the bobbin to be used for
the lower thread.
2 STITCH LENGTH DIAL
Controls the length of the stitches.
3 SPOOL PIN AND SPOOL HOLDER
4 STITCH WIDTH DIAL
Controls the stitch width.
5 UPPER TENSION CONTROL DIAL
Controls the tension of the upper thread.
6 NEEDLE THREADER
7 EXTENSION TABLE & ACCESSORIES COM-
PARTMENT
8 START/STOP BUTTON
Touch to start or stop machine.
9 REVERSE SEWING BUTTON
Push for stitching in the reverse direction.
0 SPEED RANGE CONTROL LEVER
Controls the speed range.
A PATTERN SELECTION DIAL
Turn any direction to select the stitch you need.
B MAIN SWITCH
Turn on/off the main power/sewing light switch.
C CONTROLLER JACK
Insert for foot controller operation.
D POWER CORD PLUG
Connect machine to power supply.
E BUTTONHOLE FINE ADJUSTMENT SCREW
F PATTERN INDICATION WINDOW
Shows the stitch number to be performed.
G HOLE FOR VERTICAL SPOOL PIN
Used to hold a second spool of thread for twin
needle sewing.
H DROP FEED LEVER
I ZIGZAG PRESSER FOOT
J BUTTONHOLE LEVER
K PRESSER FOOT LEVER
L PULLEY/HAND WHEEL
M “AUTOMATIC THREAD CUTTER” LEVER
refer to page 20.
(Model PS-2500, STAR 140E)
N FOOT CONTROLLER
Used to control sewing speed/start and stop.
1
Dispositivo de bobinado de la canilla
Hace bobina para la canilla que va a ser utilizada
como hilo inferior.
2
Selector de largo de puntada
Controla el largo de las puntadas.
3
Eje del carrete y porta carretes
4
Selector de ancho de puntada
Controla el ancho de las puntadas.
5
Disco de control de la tensión superior
Controla la tensión del hilo superior.
6
Enhebrador de agujas
7
Soporte de accesorios y compartimento de
accesorios
8
Botón de puesta en marcha/parada
Apriete el botón para poner la máquina en marcha o pararla.
9
Pulsador de retroceso
Apriete el pulsador para coser hacia atrás.
0
Palanca de control del rango de velocidad
Controla el rango de velocidad.
A
Selector de puntadas
Gírelo en cualquier sentido para seleccionar la
puntada deseada.
B
Interruptor principal
Enciende o apaga la máquina así como la luz de
costura.
C
Conectador del pedal
Inserte la clavija del pedal para que éste funcione.
D
Clavija del cordón de alimentación
Permite conectar la máquina a una toma de
corriente.
E
Tornillo de ajuste fino de los ojales
F
INDICADOR DE PUNTADA
Muestra el número de puntada que se debe
realizar.
G
Orifico para el porta carretes vertical
Sirve para poner un segundo carrete de hilo, para
coser con una aguja doble.
H
PALANCA DE ALIMENTADORES
I
PRENSATELAS ZIGZAG
J
PALANCA DE OJALES
K
PALANCA DEL PRENSATELAS
L
RUEDA MANUAL/POLEA
M
PALANCA "CORTAHILOS AUTOMÁTICO".
VÉASE PÁG. 20 (MODELO PS-2500, STAR 140E)
N
PEDAL
Se utiliza para controlar la velocidad, el inicio y el
final del cosido.
CONOZCA SU MÁQUINA DE COSER
KNOWING YOUR SEWING MACHINE
2
Page 10
CONOZCA SU MÁQUINA DE COSER
(Model PS-2200, STAR110)
KNOWING YOUR SEWING MACHINE
Principal parts
Elementos principales
(Modelo PS-2200, STAR110)
6
H
7
G
5 2
34
F
B D
1
C
8
3
E
9
J
0
A
I
Page 11

1 BOBBIN WINDER DEVICE
Winds the thread onto the bobbin to be used for
the lower thread.
2 STITCH LENGTH DIAL
Controls the length of the stitches.
3 SPOOL PIN AND SPOOL HOLDER
4 STITCH WIDTH DIAL
Controls the stitch width.
5 UPPER TENSION CONTROL DIAL
Controls the tension of the upper thread.
6 NEEDLE THREADER
7 EXTENSION TABLE & ACCESSORIES COM-
PARTMENT
8 REVERSE SEWING BUTTON
Push for stitching in the reverse direction.
9 PATTERN SELECTION DIAL
Turn in either direction to select the desired stitch.
0 MAIN POWER/SEWING LIGHT SWITCH
Turn on/off the main power/sewing light switch.
A FOOT CONTROLLER RECEPTACLE
Insert the foot controller plug for operation
B BUTTONHOLE FINE ADJUSTMENT SCREW
C PATTERN INDICATION WINDOW
Shows the stitch number to be performed.
D HOLE FOR VERTICAL SPOOL PIN
Used to hold a second spool of thread for twin
needle sewing.
E FOOT CONTROLLER
Used to control sewing speed/start and stop.
F DROP FEED LEVER
G ZIGZAG PRESSER FOOT
H BUTTONHOLE LEVER
I PRESSER FOOT LEVER
J PULLEY/HAND WHEEL
Dispositivo de bobinado de la canilla
1
Hace bobina para la canilla que va a ser utilizada
como hilo inferior.
2
Selector de largo de puntada
Controla el largo de las puntadas.
3
Eje del carrete y porta carretes
4
Selector de ancho de puntada
Controla el ancho de las puntadas.
5
Disco de control de la tensión superior
Controla la tensión del hilo superior.
6
Enhebrador de agujas
7
Soporte de accesorios y compartimento de
accesorios
8
PULSADOR DE RETROCESO
Apriete el pulsador para coser hacia atrás.
9
SELECTOR DE PUNTADAS
Gírelo en cualquier sentido para seleccionar la
puntada deseada.
0
INTERRUPTOR PRINCIPAL/LUZ DE COSIDO
Encienda/apague el interruptor principal/luz de
cosido
A
RECEPTÁCULO DEL PEDAL
Inserte la clavija del pedal para que éste funcione.
B
TORNILLO DE AJUSTE FINO DE LOS OJALES
C
INDICADOR DE PUNTADA
Muestra el número de puntada que se debe
realizar.
D
ORIFICIO PARA EL PORTABOBINAS
VERTICAL
Sirve para poner un segundo carrete de hilo para
coser con una aguja doble.
E
PEDAL
Se utiliza para controlar la velocidad, el inicio y el
final del cosido.
F
PALANCA DE ALIMENTADORES
G
PRENSATELAS ZIGZAG
Sirve para poner un segundo carrete de hilo, para
coser con una aguja doble.
H
PALANCA DE OJALES
I
PALANCA DEL PRENSATELAS
J
RUEDA MANUAL/POLEA
CONOZCA SU MÁQUINA DE COSER
KNOWING YOUR SEWING MACHINE
4
Page 12
KNOWING YOUR SEWING MACHINE
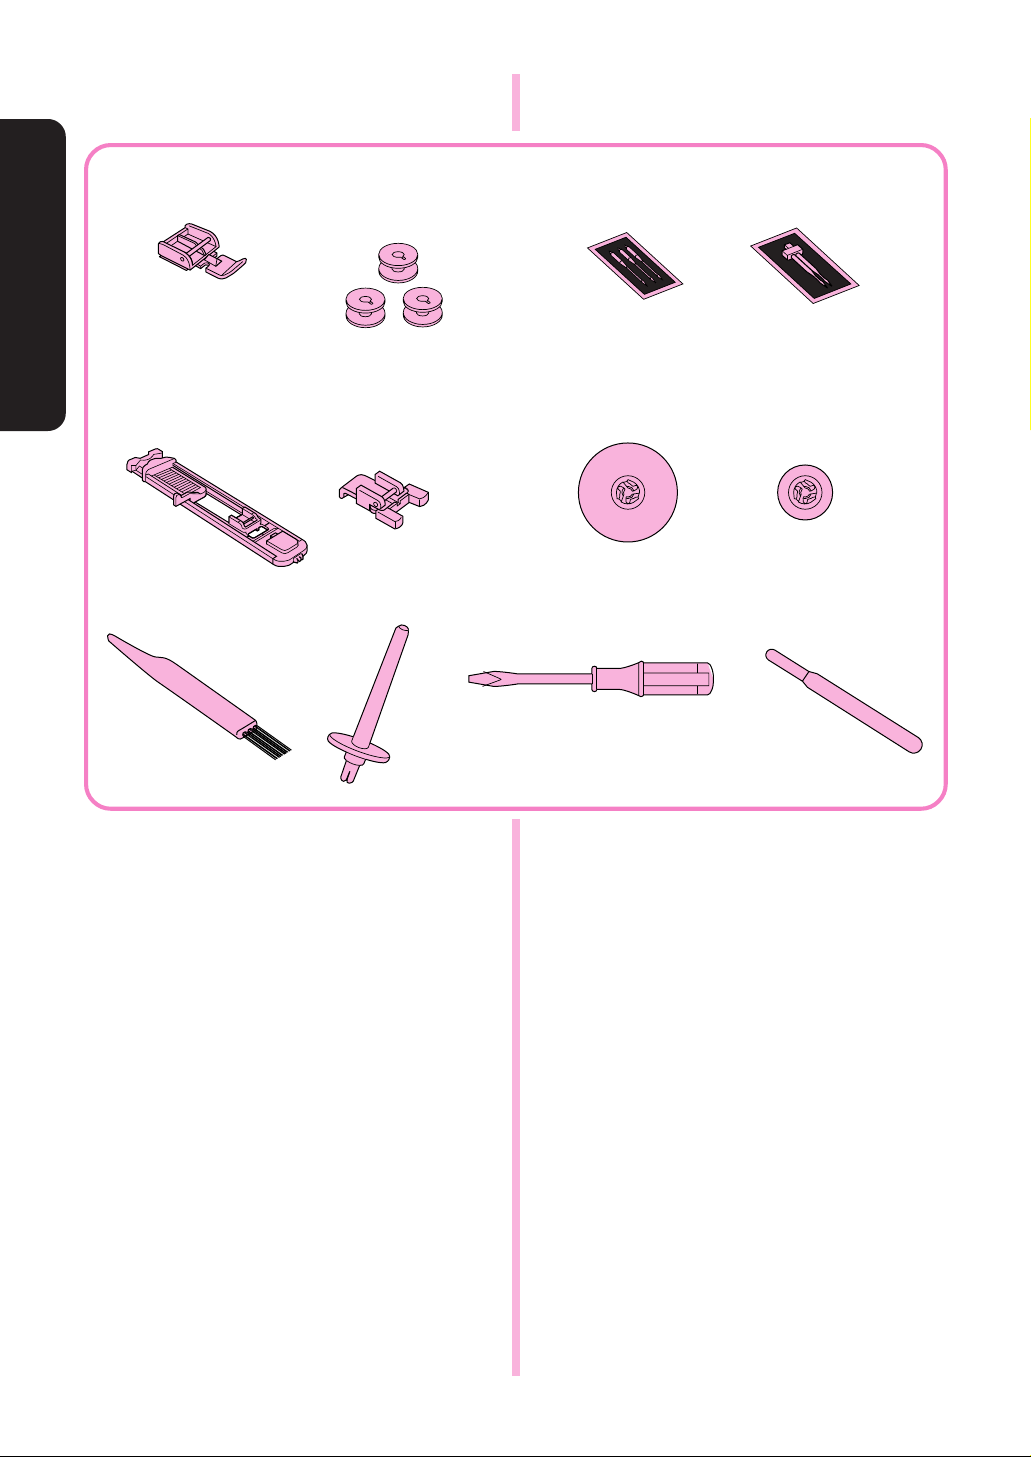
Accessories
CONOZCA SU MÁQUINA DE COSER
Accesorios
1 X59370-051
5 XA4973-051
9 X59476-051
2 XA3811-051
XA3812-052
6 X59375-051
0 130920-051
3 X57117-051 4 X59296-001
7 130012-053
A X55467-051
8 130013-053
B X54243-001
1 Zipper Foot (1 pc.)
2 Bobbin (3 pcs.) XA3811-051 (For U.S.A)
XA3812-052
Replacements (10-piece set)
3 Needle Pack (Regular Single Needle No. 14)
(3 pcs.)
4 Twin Needle (1 pc.)
5 Buttonhole Foot (1 pc.)
6 Button Sewing Foot (1 pc.)
7 Spool Holder (Large) (1 pc.)
8 Spool Holder (Small) (1 pc.)
9 Brush (1 pc.)
0 Extra Spool Pin (1 pc.)
A Screwdriver (1 pc.)
B Seam Ripper (1 pc.)
(For other countries)
5
1
Pata de cremalleras (1 pza)
2
Canilla (3 pzas) XA 3811-051 (para EE UU)
XA 3812-052
Recambios
3
Paquete de agujas (agujas simples normales
No 14) (3 pzas)
4
Aguja doble (1 pza)
5
Prensatelas para ojales (1 pza)
6
Prensatelas para la costura de botones (1 pza)
7
Tope para carretes (grande) (1 pza)
8
Tope para carretes (pequeño) (1 pza)
9
Cepillo (1 pza)
0
Porta carretes extra (1 pza)
A
Destornillador (1 pza)
B
Cortador para abrir costuras (1 pza)
(para otros países)
(paquete de 10 piezas)
Page 13
Parts Code for Zigzag Presser Foot: XA5530-051
Model PS-2500, PS-2400, PS-2300
STAR140E, STAR130E STAR120E
Foot Controller: Model N5V
Parts Code: XA3931051
Note (For U.S.A. only)
This foot controller can be used for sewing machine
Models PS-2500, PS-2400, PS-2300.
(Model PS-2200, STAR110)
Foot Controller: Model N
Parts Code: J00360051 (110/120V Area)
J00016051 (220/240V Area)
J00492051 (U.K.)
J00921051 (Australia, New Zealand)
J00478051 (110/220V Dual Ara)
Note (For U.S.A. only)
Foot Controller: Model N
Parts Code: J00360051 (110/120V Area)
This foot controller can be used for sewing machine
Model PS-2200.
The above accessories are stored in the extension
table. These accessories have been designed to
help complete most sewing tasks.
Código del prensatelas para la puntada
zigzag:XA5530-051
Modelos PS-2500, PS-2400, PS-2300,
STAR 140E, STAR 130E y STAR 120E
Pedal: modelo N5V
Código: XA3931051
Nota (sólo para EE UU)
Este pedal puede utilizarse para los modelos de
máquinas de coser PS-2500, PS-2400 y PS- 2300.
(Modelos PS-2200 y STAR 10)
Pedal: modelo N
Códigos: J00360051 (110/120 V Área)
J00016051 (220/240 V Área)
J00492051 (RU)
J00921051 (Australia y Nueva Zelanda)
J00478051 (110/220 V Área Dual)
Nota (sólo para EE UU)
Pedal: modelo N
Código: J00360051 (110/120 V)
Este pedal puede utilizarse para el modelo de
máquina de coser PS-2200.
Los accesorios anteriores están almacenados en la
mesa extensible. Han sido diseñados para ayudar
en la realización de la mayoría de tareas de cosido.
CONOZCA SU MÁQUINA DE COSER
KNOWING YOUR SEWING MACHINE
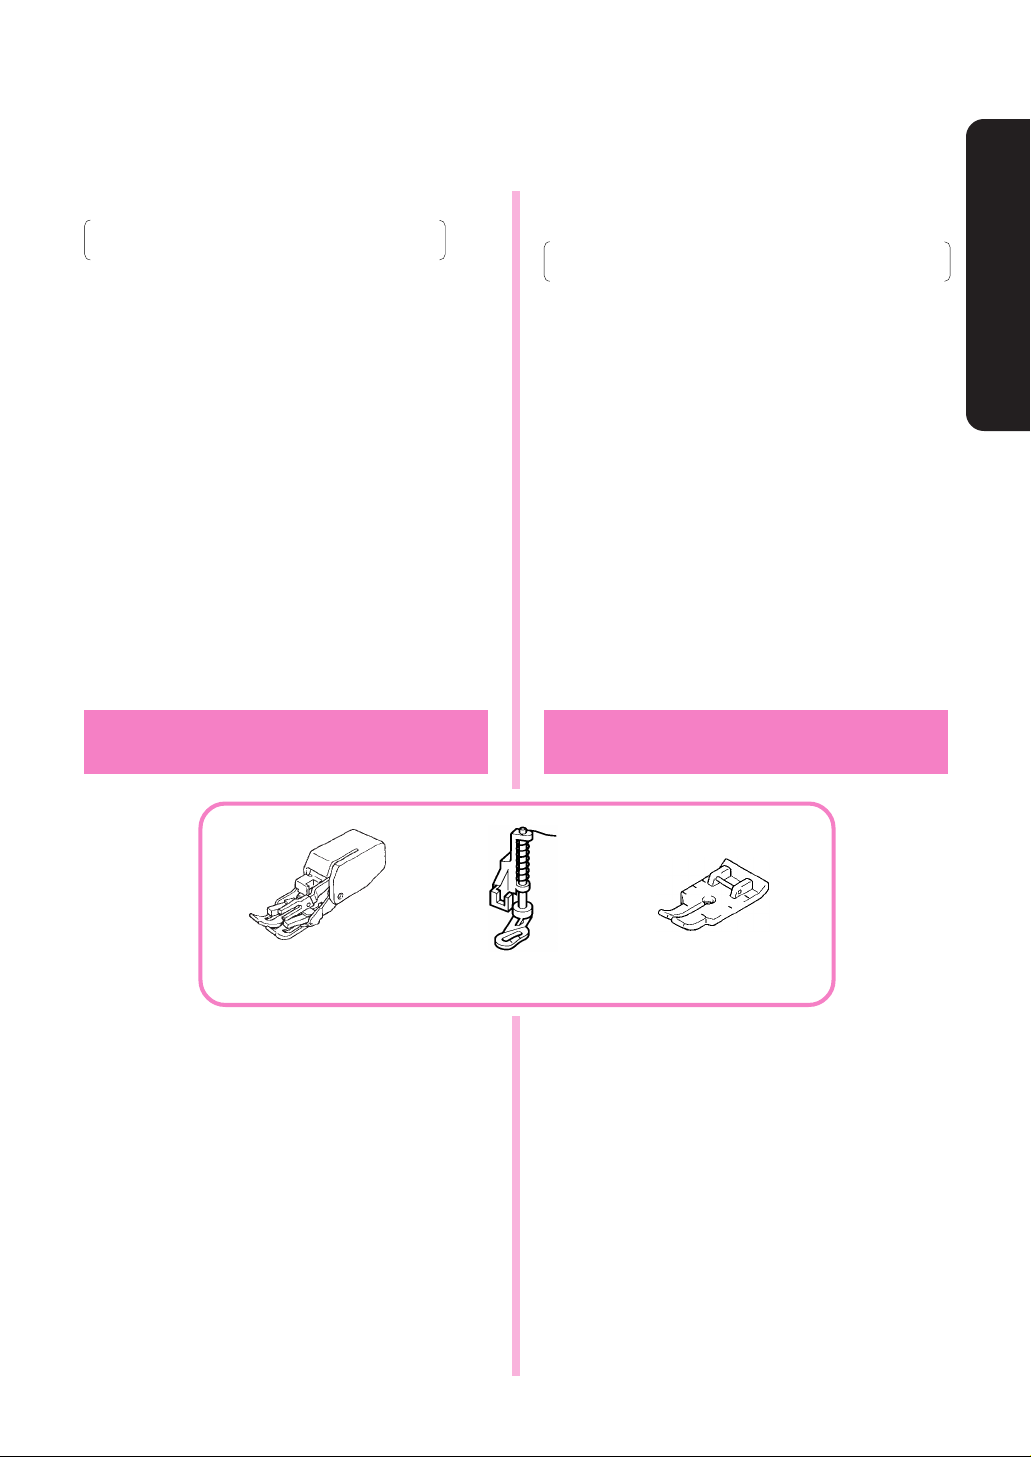
OPTIONAL ACCESSORIES
1 184987-001
1 Walking foot
2 Springaction Quilting foot
X81021-001 (For U.S.A)
X81021-002
3 1/4" Seam guide foot
X80980-001 (For U.S.A)
X80980-002
NOTE:
The contents of accessories depend on models.
(For other countries)
(For other countries)
ACCESORIOS OPCIONALES
2
Pie caminante
1
2
Prensatelas enguatador
3
Pie guía para costuras de 1/4"
NOTA:
El contenido de los accesorios depende del modelo.
3
X81021-001 (para EEUU)
X81021-002
X80980-001 (For U.S.A)
X80980-002
(para otros países)
(For other countríes)
6
Page 14
OPERATING YOUR
SEWING MACHINE
KNOWING YOUR SEWING MACHINE
CONOZCA SU MÁQUINA DE COSER
Funcionamiento de la
máquina de coser
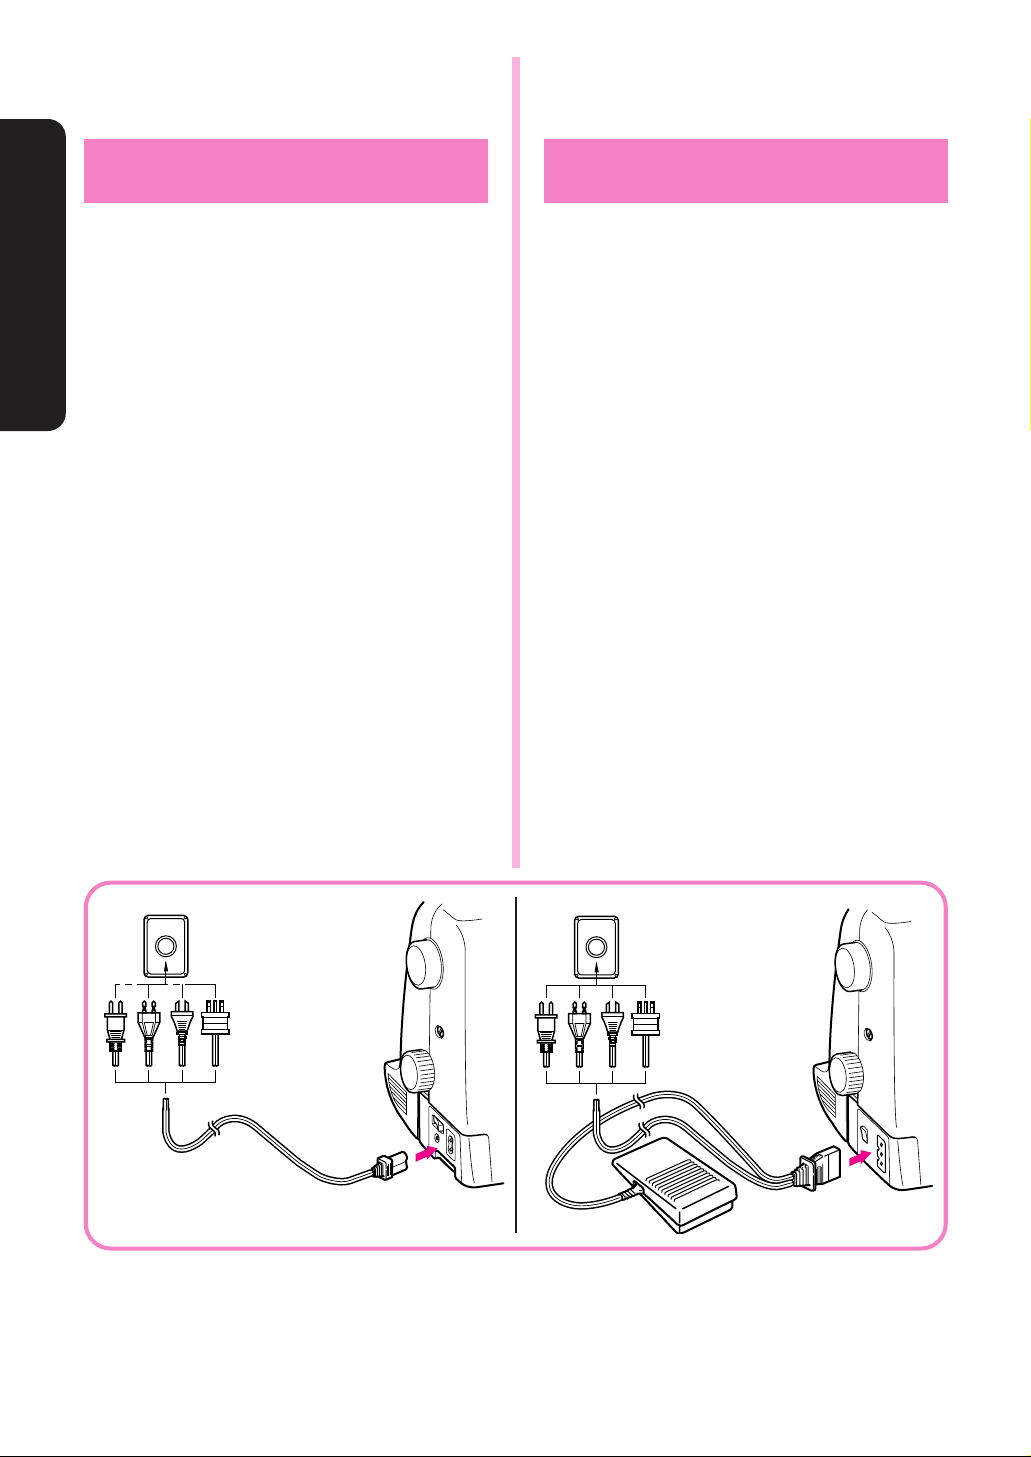
Connecting Plugs
1. Connect the power cord plug into the machine.
2. Connect the power supply plug into a wall outlet.
CAUTION
1. When changing the needle, bobbin or light
bulb or when the sewing machine is not in
use, it is recommended that the power supply
plug be disconnected from the wall socket to
avoid electrical hazards.
2. For U.S.A. only
This appliance has a polarized plug (one blade
wider than the other). To reduce the risk of
electric shock, this plug is intended to fit in a
polarized outlet only one way. If the plug does
not fit fully in the outlet, reverse the plug.
If it still does not fit, contact a qualified electrician to install the proper outlet. Do not modify
the plug in any way.
Conexión de los enchufes
1. Conecte la clavija del cordón de alimentación a la
máquina.
2. Conecte el enchufe de alimentación a una toma
de corriente.
ATENCION:
1. Cuando se cambia una aguja, la canilla o la
bombilla de luz, o cuando se deja la máquina
sin funcionar, se recomienda siempre retirar
el enchufe de la toma de corriente para evitar
choques eléctricos.
2. Sólo para EE UU
Esta máquina está provista de un enchufe
polarizado (un borne más ancho que el otro).
Como medida de seguridad, existe una sola
manera de introducir el enchufe en la toma de
corriente. Si no puede introducir el enchufe a
fondo en la toma de corriente, cambie de lado
el enchufe. Si sigue sin poderlo introducir,
póngase en contacto con un electricista
cualificado para que le instale una toma de
corriente adecuada. No intente modificar el
enchufe.
7
Page 15
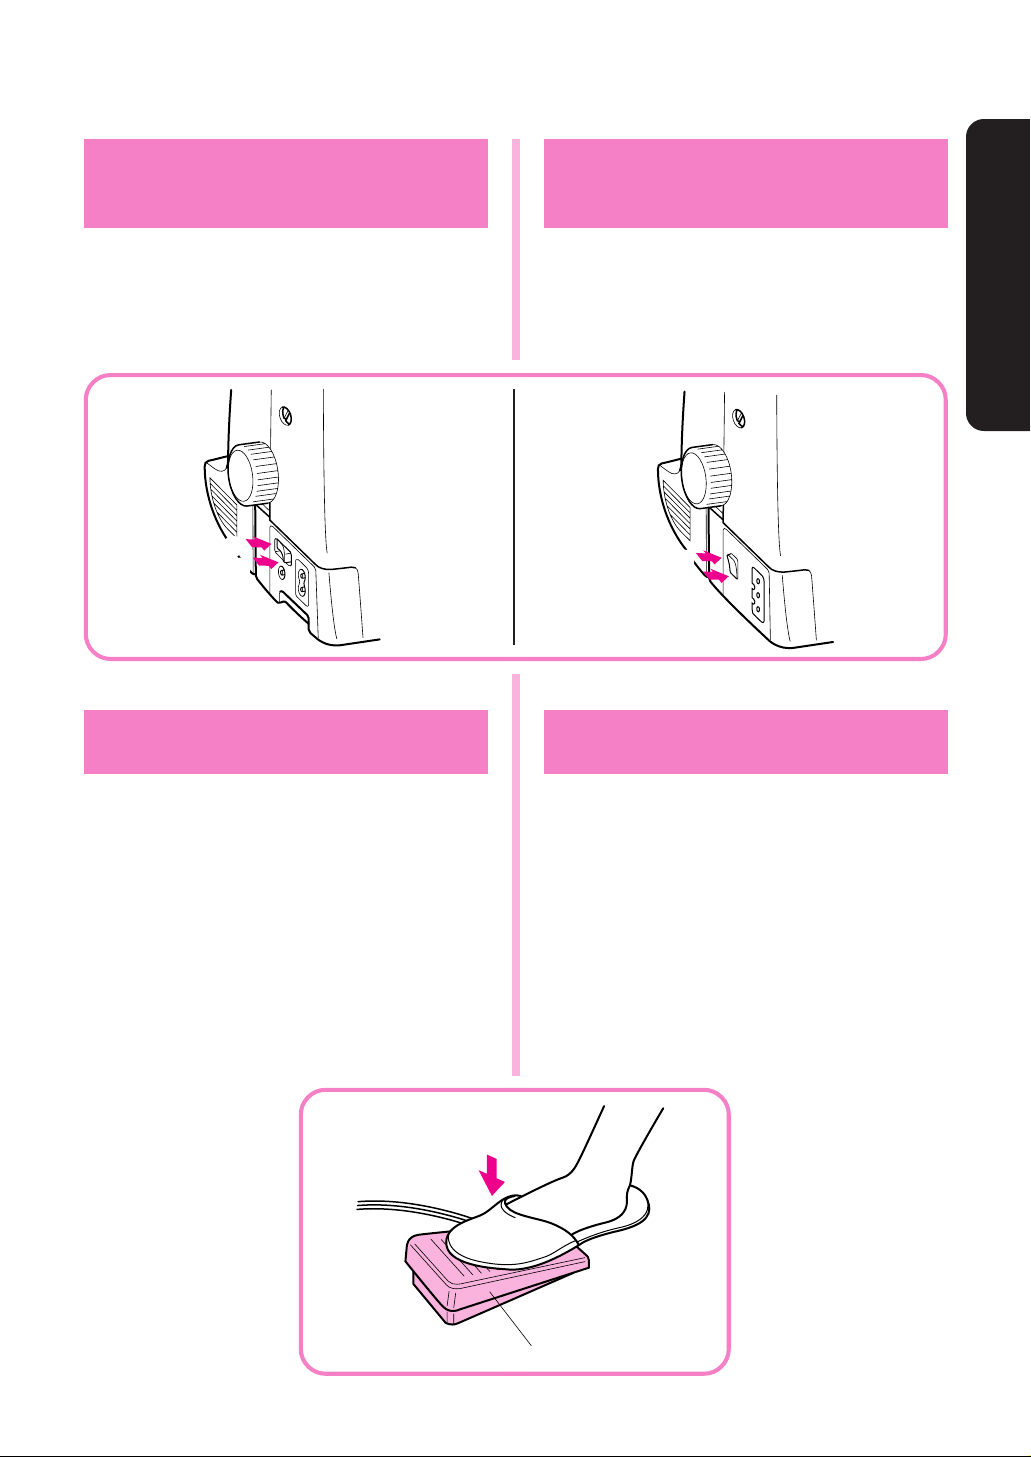
Main Power and Sewing
Light Switches
Interruptor principal
y de luz
This switch turns the main power and sewing light on
or off.
1 Turn on (toward the “I” mark)
2 Turn off (toward the “O” mark)
2
1
Foot Controller
When the foot controller is depressed lightly, the
machine will run at a low speed. When the pressure
on the foot controller is increased, the machine’s
speed will increase. When pressure on the foot
controller is released, the machine will stop. Care
should be taken that nothing is placed on the foot
controller when the machine is not in use.
1 Foot controller
Este interruptor permite apagar y encender la má-
quina y la luz.
1
Encender (hacia la marca “I”)
2
Apagar (hacia la marca “O”)
1
2
Pedal
Al presionar ligeramente el pedal, la máquina funcionará a baja velocidad. Al aumentar la presión, se
incrementa también la velocidad de la máquina. Al
soltar el pedal, la máquina se para. Asegúrese
siempre de no poner ningún objeto sobre el pedal
cuando la máquina no esté utilizada.
1
Pedal
CONOZCA SU MÁQUINA DE COSER
KNOWING YOUR SEWING MACHINE
1
8
Page 16
KNOWING YOUR SEWING MACHINE
CONOZCA SU MÁQUINA DE COSER
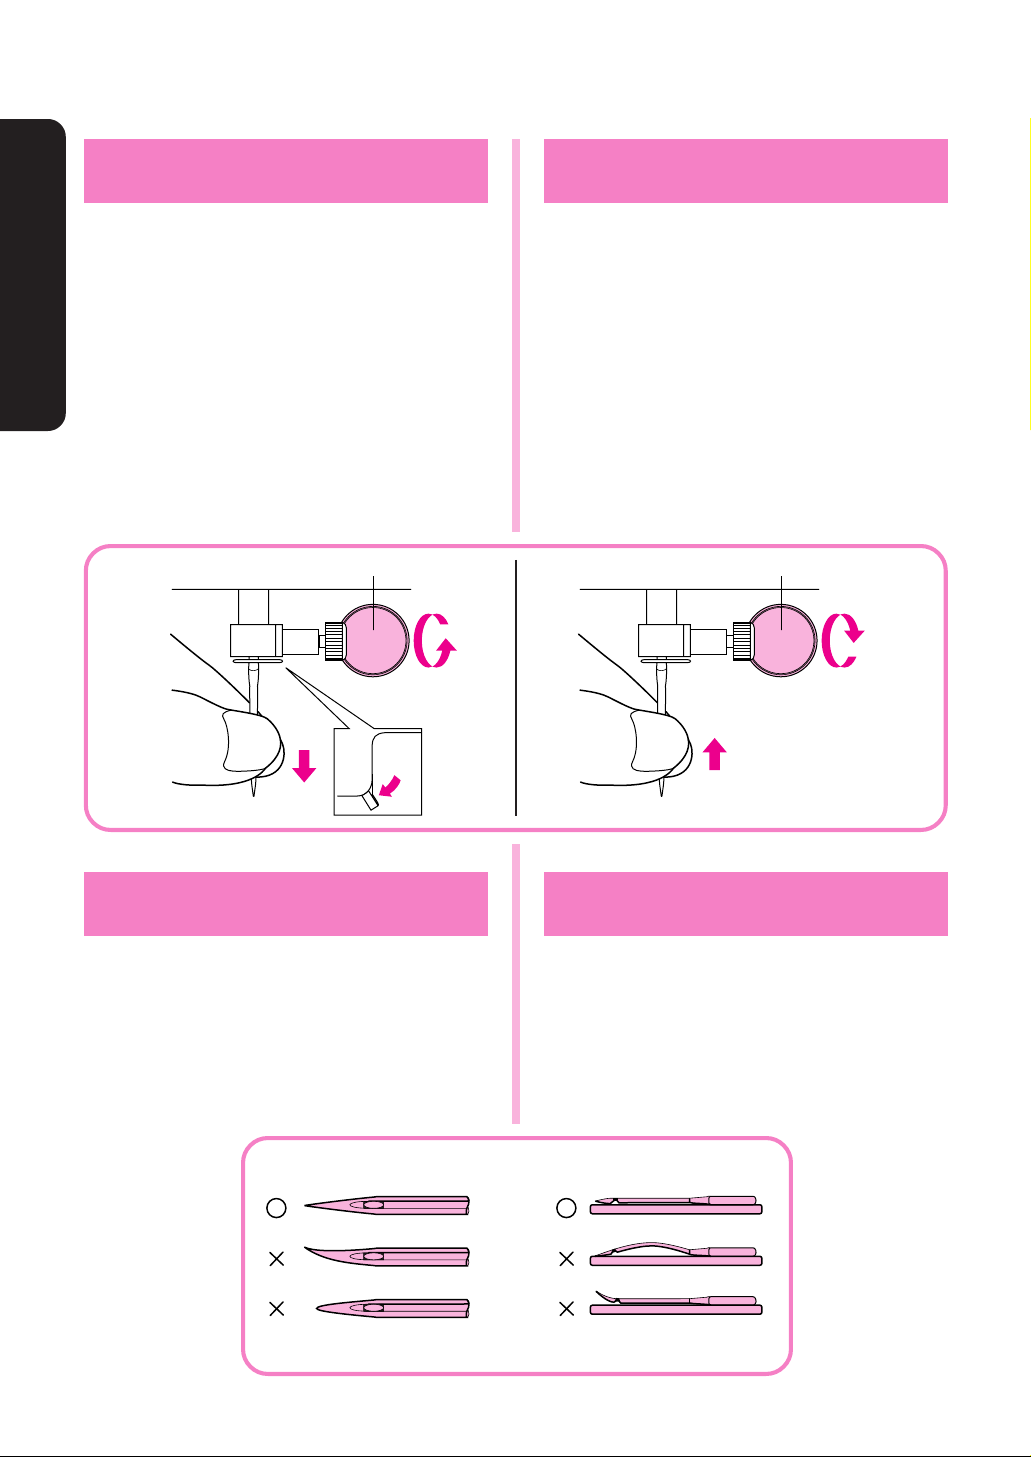
Replacing the Needle
1. Remove the power supply plug from the outlet.
2. Raise the needle bar to its highest position.
3. Lower the presser foot.
4. Remove the needle by loosening the needle
clamp.
5. Insert a different needle as far as possible up
against the needle stopper with its flat side facing
the back.
6. Tighten the needle clamp.
1 Use a coin or screw driver
1
Cambio de la aguja
1. Retire el enchufe de alimentación de la toma de
corriente.
2. Levante la barra de la aguja a su posición más
alta.
3. Baje el prensatelas.
4. Retire la aguja, aflojando la abrazadera de la
aguja.
5. Introduzca otra aguja, con la parte redonda cara
a usted. Hay que meterla lo más adentro posible
hasta que toque arriba con el pasador.
6. Vuelva a apretar el tornillo de la aguja.
1
Utilice una moneda o un destornillador
1
Checking the Needle
1. The sewing needle must always be straight and
sharp for smooth sewing.
2. To check if the needle is bent, place the flat side
of the needle down as shown in the illustration.
3. Replace the needle if it is bent or dull.
9
Verificación de la aguja
1. La aguja de costura siempre debe estar bien
recta y afilada para una buena costura.
2. Para averiguar si la aguja no está doblada, coloque la parte plana de la aguja hacia abajo como
muestra el dibujo.
3. Cambie la aguja si está doblada o gastada.
Page 17
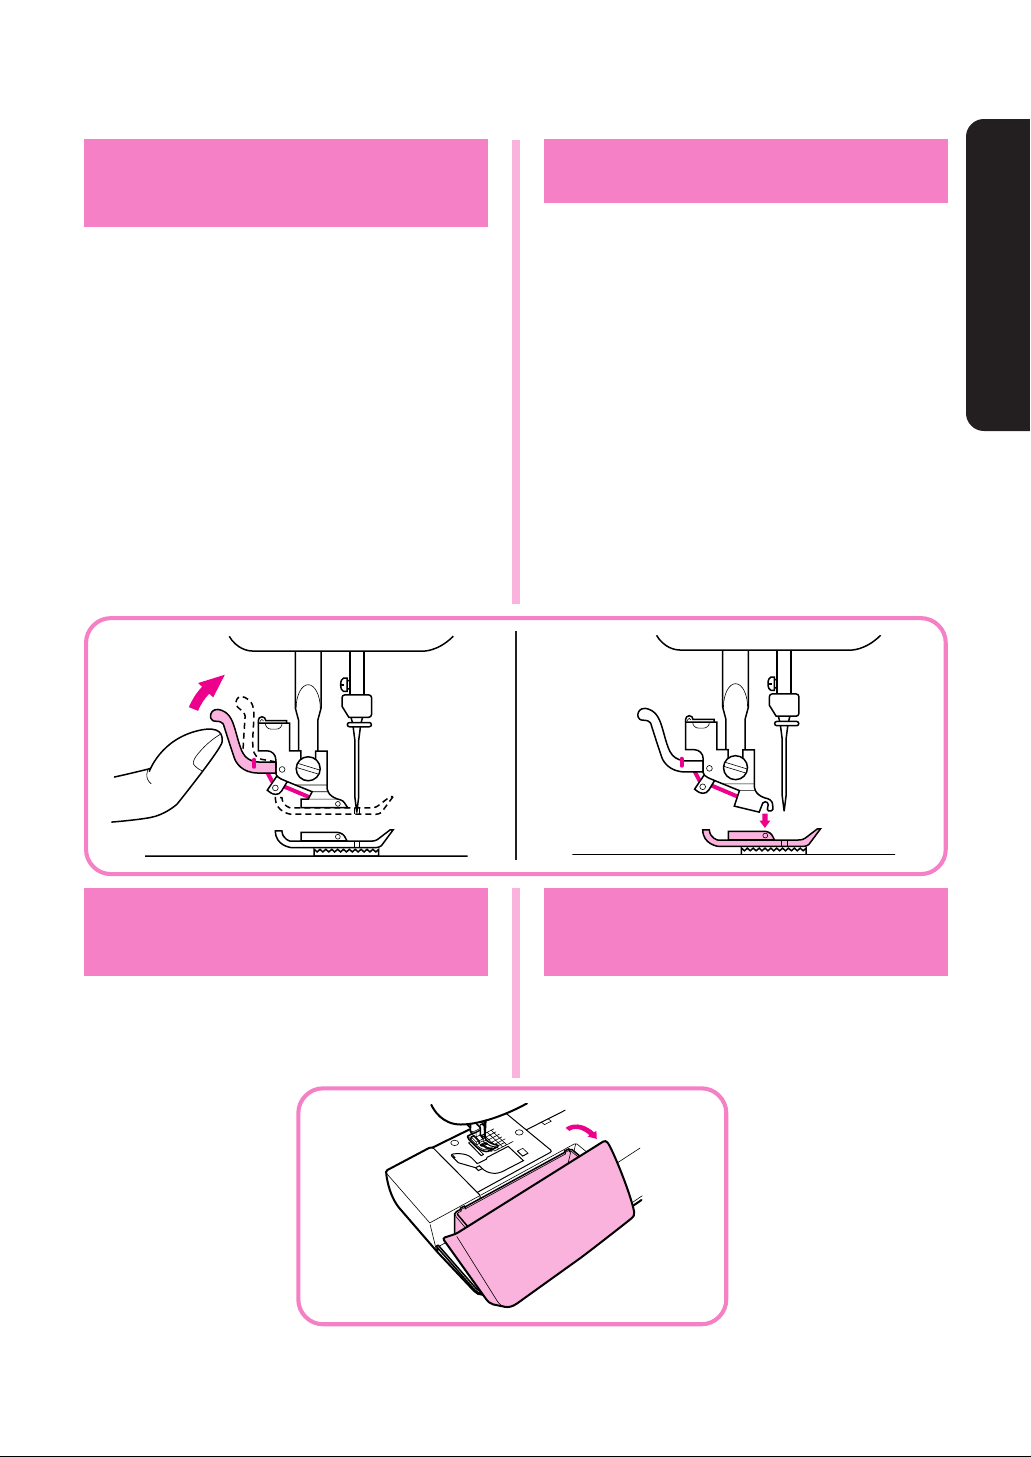
Changing the Presser
Foot
Cambio del prensatelas
It may be necessary to change the presser foot
according to your sewing needs.
SNAP-ON TYPE
1. Raise the needle to its highest position by turning
the balance wheel toward you (counter clockwise) and raise the presser foot lever.
2. Release the foot by raising the lever located at the
back of the holder.
3. Place a different presser foot on the needle plate
so that the bar on the presser foot is in line with the
slot on the shank.
4. Lower the presser foot lever and fix the presser
foot onto the shank. If the presser foot is in the
correct location, the bar should snap in.
Según sus necesidades de costura, puede ser necesario cambiar el prensatelas.
Tipo de enganche de golpe
1. Levante la aguja a su posición más alta, girando
la ruedecilla hacia usted (en el sentido contrario
al de las manecillas de un reloj) y levante la
palanca del prensatelas.
2. Suelte el prensatelas levantando la palanca que
hay en la parte trasera del soporte.
3. Coloque otro prensatelas en la placa de agujas
de tal forma que la barra del prensatelas quede
alineada con la ranura del soporte.
4. Baje la palanca del prensatelas y fije el prensatelas
en el soporte. Si el prensatelas está bien colocado, la barra debe engancharse de golpe.
CONOZCA SU MÁQUINA DE COSER
KNOWING YOUR SEWING MACHINE
Extension Table
(Accessories)
The accessories are stored in a compartment under
the extension table cover, which can be opened by
flipping it toward you.
Soporte de accesorios
(mesita extensible)
Los accesorios están almacenados en un
compartimiento situado debajo de la tapa de la mesa
extensible. Para abrir la tapa, tire de ella hacia usted.
10
Page 18

VARIOUS CONTROLS
3
KNOWING YOUR SEWING MACHINE
CONOZCA SU MÁQUINA DE COSER
Distintos mandos
Pattern Selection Dial
To select a stitch, simply turn the Pattern Selection
Dial, located on the right side of the machine. The
Pattern Selection Dial may be turned in either direction. The following page shows the recommended
range of stitch lengths and widths.
1 Pattern selection dial
2 Pattern number
The stitches that are available depend on the Stitch
Length Dial setting. If the Stitch Length Dial is set
between 0 and 4, any of the stitches in the top row
can be selected. If the Stitch Length Dial is set to SS,
any of the stitches in the bottom row can be selected.
3 Stitch length dial
3
1
2
12345678910111213141516171819
PS-2500
PS-2400
STAR140E
STAR130E
20 21 22 23 24 25 26 27 28 29 30 31 32 33 34 35 36 37
Selector de puntadas
Para seleccionar una puntada, sólo hace falta girar
el selector de puntadas, situado en la derecha de la
máquina. Este selector se puede girar en cualquier
sentido. En la página siguiente, se indican las zonas
recomendadas de largos y anchos de puntadas.
1
Selector de puntadas
2
Número de puntada
Las puntadas disponibles dependen de la posición
del selector de largo de puntada. Si está situado
entre 0 y 4, pueden seleccionarse todas las puntadas
que aparecen en la fila superior. Si está situado en
SS, pueden seleccionarse todas las puntadas que
aparecen en la fila inferior.
3
Selector de largo de puntada
2
1
3
4
0
3
SS
1234567891011121314
PS-2300
STAR120E
15 16 17 18 19 20 21 22 23 24 25 26 27
1234567891011
PS-2200
STAR110
12 13 14 15 16 17 18 19 20 21
NOTE:
Since the Pattern Selection Dial is not a continuous
dial, it cannot be turned directly from the last stitch to
the first one or from the first stitch to the last one. To
select the first stitch when the last one is displayed or
to select the last stitch when the first one is displayed,
turn the Pattern Selection Dial in the opposite direction
until the desired stitch is displayed.
11
NOTA:
El selector de puntada no es un selector continuo, y,
por tanto, no puede girarse directamente desde la
última puntada hasta la primera o viceversa. Para
seleccionar la primera puntada cuando está
seleccionada la última, o viceversa, gire el selector
de puntada en sentido opuesto hasta que aparezca
la puntada deseada.
Page 19
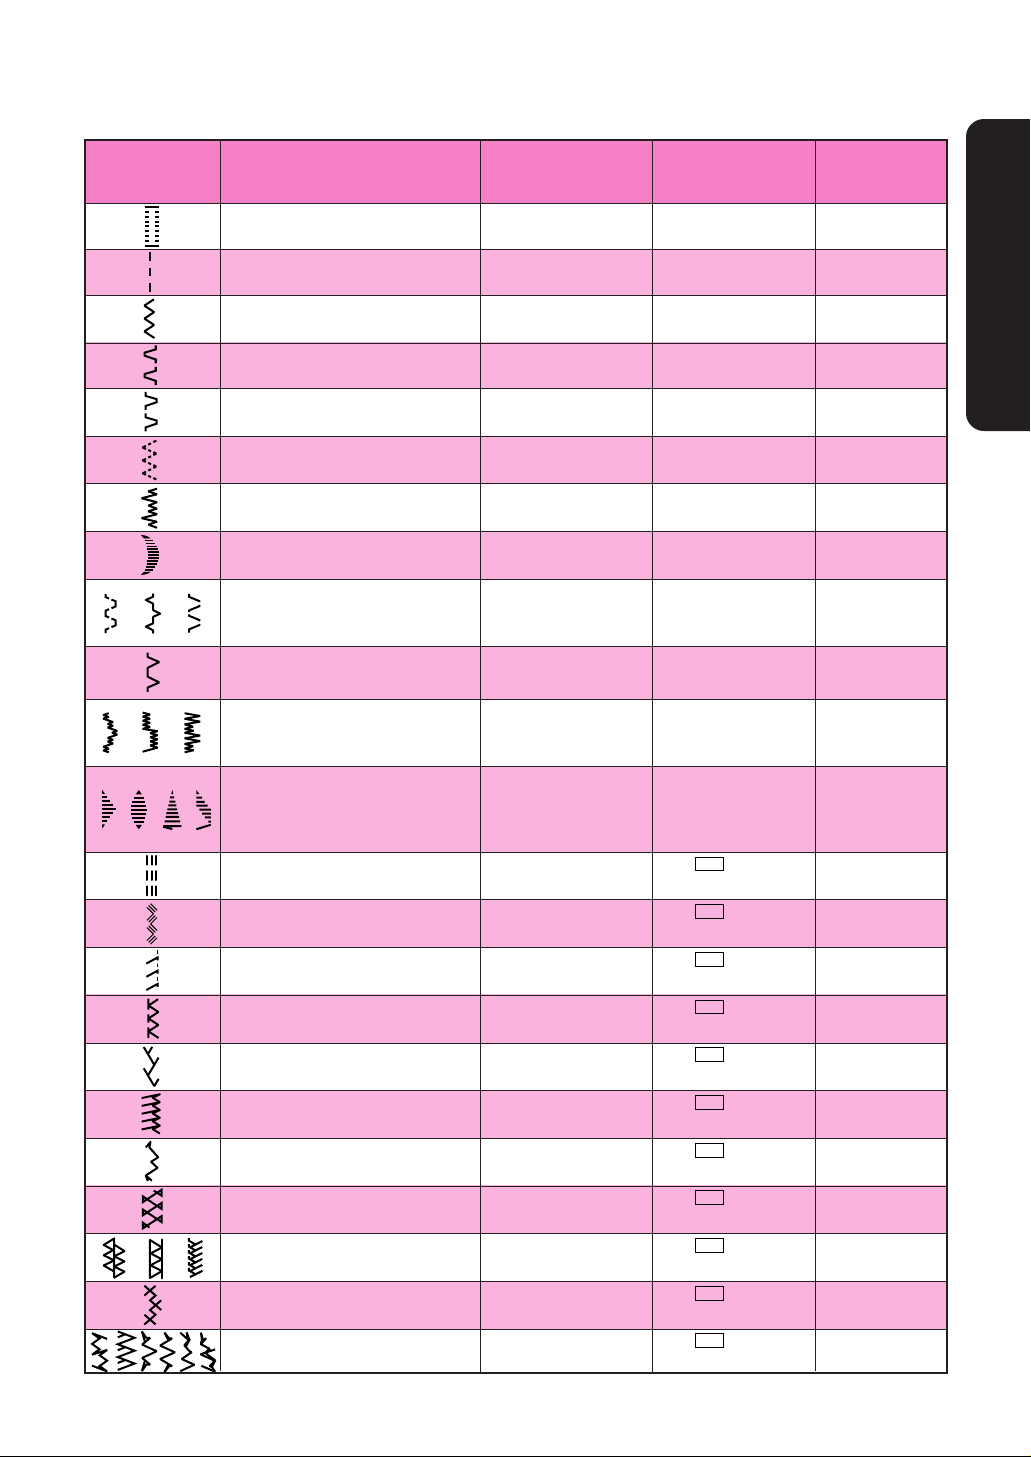
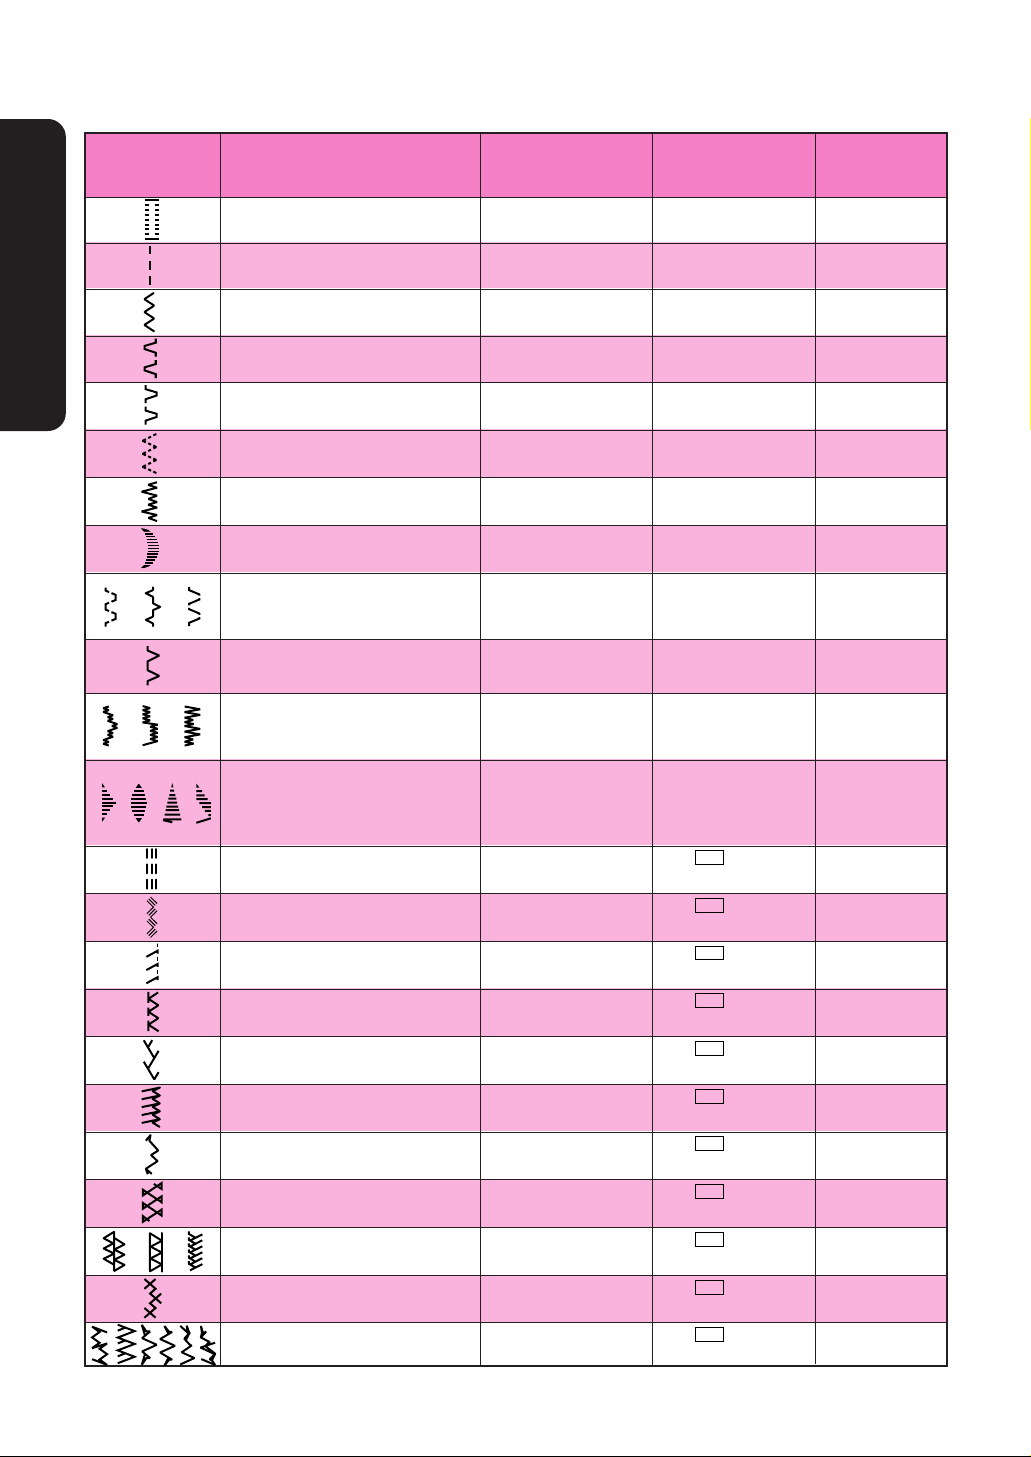
RECOMMENDED WIDTHS AND LENGTHS FOR STITCHES
PATTERN
STITCH NAME
RECOMMENDED WIDTH
[mm(inch)]
RECOMMENDED
LENGTH [mm(inch)]
1-STEP AUTOMATIC 3-5 (Dial 4~6) F-1.5
BUTTONHOLE (1/8-13/64) (1/64-1/16)
STRAIGHT STITCH
ZIGZAG STITCH
BLIND HEM STITCH
SHELL TUCK STITCH
ELASTIC STITCH
STRETCH BLIND STITCH
SCALLOP STITCH
DOUBLE ACTION STITCH
BRIDGING STITCH
RAMPART STITCH
ELASTIC SHELL TUCK STITCH
LIGHTNING STITCH
SQUARE STITCH
DECORATIVE STITCH
6 1-4
(1/4) (3/64-5/32)
0-5 F-4
(0-13/64) (1/64-5/32)
3-6 F-2
(1/8-1/4) (1/64-5/64)
3-6 F-3
(1/8-1/4) (1/64-1/8)
3-6 F-2.5
(1/8-1/4) (1/64-3/32)
3-6 F-1.5
(1/8-1/4) (1/64-1/16)
3-6 F-1.5
(1/8-1/4) (1/64-1/16)
3-6 F-3
(1/8-1/4) (1/64-1/8)
3-6 F-3
(1/8-1/4) (1/64-1/8)
6 F-1
(1/4) (1/64-3/64)
TRIANGLE STITCH
BEAD STITCH 3-6 F-1
ARROW HEAD STITCH (1/8-1/4) (1/64-3/64)
PARALLELOGRAM STITCH
TRIPLE STRETCH STITCH
6
(1/4) 2.5 (3/32)
TRIPLE ZIGZAG STRETCH 3-6
SS
SS
STITCH (1/8-1/4) 2.5 (3/32)
SLANT OVERLOCK STITCH
ELASTIC OVERLOCK STITCH
FEATHER STITCH
COMB STITCH
DECORATIVE STITCH
FAGOTING STITCH
DECORATIVE STITCH
LINK STITCH
DECORATIVE STITCH
3-6
(1/8-1/4) 2.5 (3/32)
3-6
(1/8-1/4) 2.5 (3/32)
3-6
(1/8-1/4) 2.5 (3/32)
3-6
(1/8-1/4) 2.5 (3/32)
6
(1/4) 2.5 (3/32)
3-6
(1/4) 2.5 (3/32)
6
(1/8-1/4) 2.5 (3/32) 44
3-6
(1/8-1/4) 2.5 (3/32)
6
(1/4) 2.5 (3/32)
SS
SS
SS
SS
SS
SS
SS
SS
SS
INSTRUCTION
MANUAL PAGE
46
36
40
41
42
43
41
45
44
48
46
46
Fixed
Fixed
Fixed
Fixed
Fixed
Fixed
Fixed
Fixed
36
50
48
48
49
48
46
47
Fixed 46
Fixed
Fixed
47
46
12
ÁQUINA DE COSER
CONOZCA SU M
KNOWING YOUR SEWING MACHINE
Page 20
Anchos y largos recomendados para cada puntada
KNOWING YOUR SEWING MACHINE
CONOZCA SU M
PUTADA
OJAL AUTOMÁTICO DE 3-5 (Dial 4~6) F-1.5
ÁQUINA DE COSER
PUNTADA INVISIBLE ELÁSTICA
PUNTADA DE ACCIÓN DOBLE
PUNTADA ONDAS ABIERTAS
PUNTADA ONDAS ELÁSTICAS
PUNTADA ESCALERA
PUNTADA FESTÓN DOBLE
PUNTADA DECORATIVA
PUNTADA TRIÁNGULO
PUNTADA FESTÓN DOBLE 3-6 F-1
PUNTADA PARALELOGRAMO
TRIPLE PUNTADA PESPUNTO
PUNTADA OVERLOCK ESTRECHA
PUNTADA OVERLOCK ELÁSTICA
PUNTADA DECORATIVA
PUNTADA FAGOTING
PUNTADA DECORATIVA
PUNTADA DECORATIVA
NOMBRE
ANCHO
RECOMENDADO EN
mm (pulgadas)
LARGO
RECOMENDADO EN
mm (pulgadas)
1 PASO (1/8-13/64) (1/64-1/16)
PUNTADA RECTA
PUNTADA ZIGZAG
PUNTADA INVISIBLE
PUNTADA ONDAS
PUNTADA ELÁSTICA
6 1-4
(1/4) (3/64-5/32)
0-5 F-4
(0-13/64) (1/64-5/32)
3-6 F-2
(1/8-1/4) (1/64-5/64)
3-6 F-3
(1/8-1/4) (1/64-1/8)
3-6 F-2.5
(1/8-1/4) (1/64-3/32)
3-6 F-1.5
(1/8-1/4) (1/64-1/16)
PUNTADA FESTÓN
PUNTADA PUENTE
3-6 F-1.5
(1/8-1/4) (1/64-1/16)
3-6 F-3
(1/8-1/4) (1/64-1/8)
3-6 F-3
(1/8-1/4) (1/64-1/8)
6 F-1
(1/4) (1/64-3/64)
PUNTADA FLECHA (1/8-1/4) (1/64-3/64)
6
SS
Fixed
(1/4) 2.5 (3/32)
SS
TRIPLE PUNTADA 3-6
Fixed
ZIGZAG ELÁSTICA (1/8-1/4) 2.5 (3/32)
3-6
SS
Fixed
(1/8-1/4) 2.5 (3/32)
3-6
SS
Fixed
(1/8-1/4) 2.5 (3/32)
PUNTADA PLUMA
PUNTADA PEINE
3-6
(1/8-1/4) 2.5 (3/32)
3-6
(1/8-1/4) 2.5 (3/32)
6
SS
SS
SS
Fixed
Fixed
Fixed
(1/4) 2.5 (3/32)
3-6
SS
Fixed
(1/4) 2.5 (3/32)
6
SS
Fixed 46
(1/8-1/4) 2.5 (3/32) 44
SS
SS
Fixed
Fixed
PUNTADA DE UNIÓN
3-6
(1/8-1/4) 2.5 (3/32)
6
(1/4) 2.5 (3/32)
PÁGINA DEL
MANUAL
51
36
40
41
42
43
41
45
44
48
46
46
36
50
48
48
49
48
46
47
47
46
13
Page 21
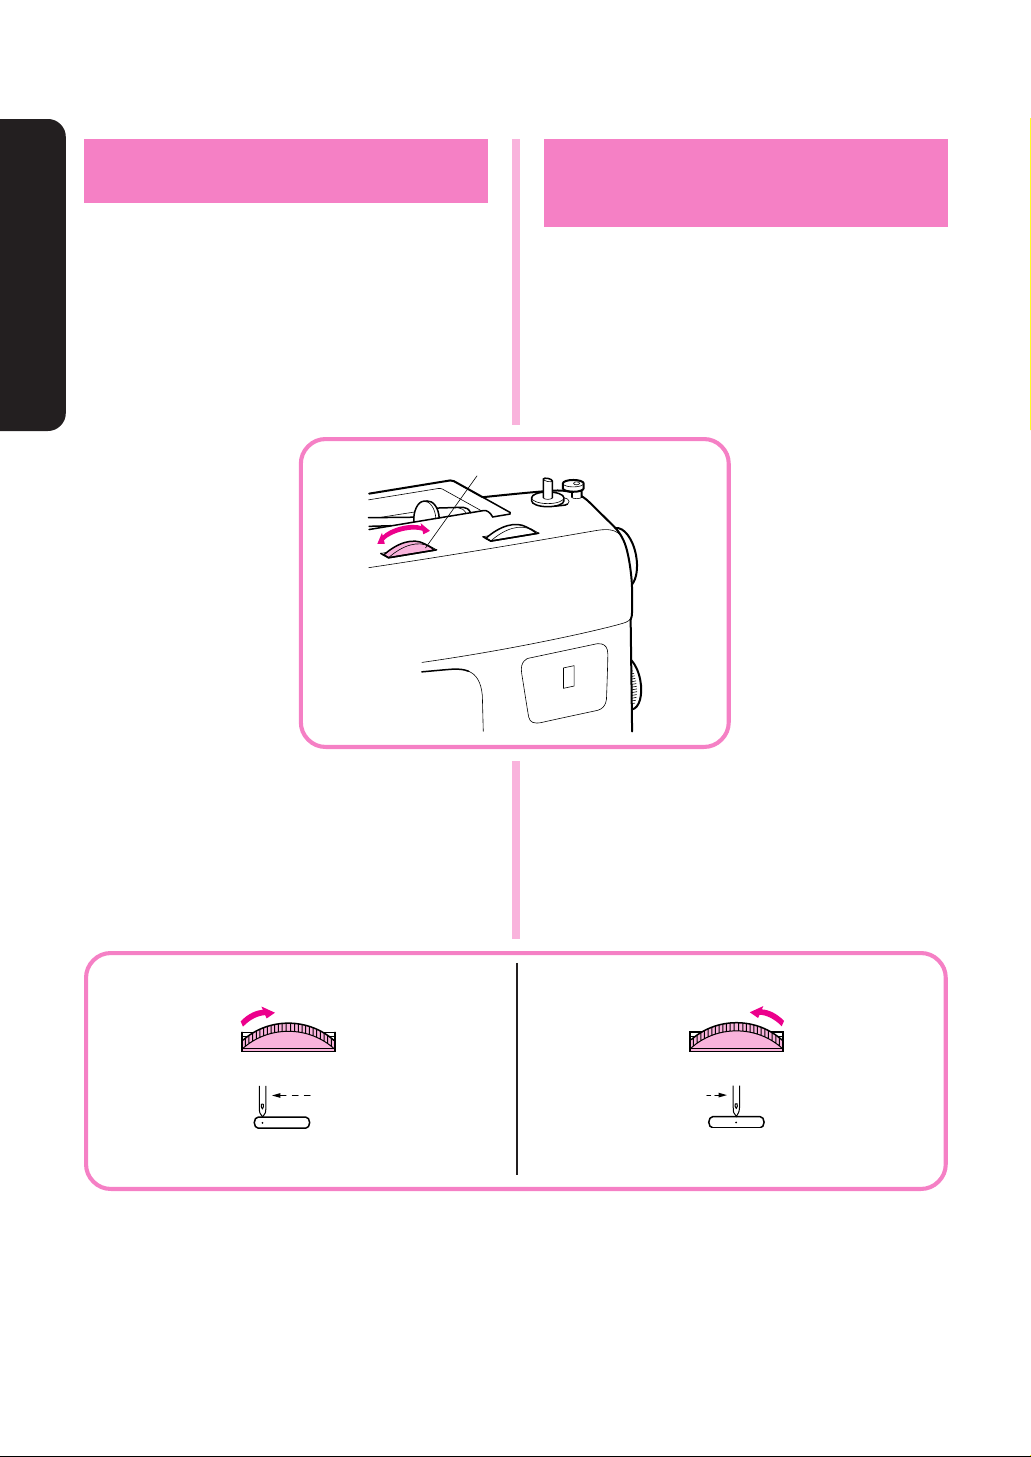
Stitch Length Dial
1
Selector de largo de
puntada
Depending on your selected stitch, you may need to
adjust the stitch length for best results.
The numbers marked on the Stitch Length Dial
represent the length of the stitch in millimeters (mm).
THE HIGHER THE NUMBER, THE LONGER THE
STITCH.
The “O” setting does not feed the material. This is
used for sewing on a button.
The “F” area is used for making a Satin Stitch (a
dense zigzag stitch) which can be used in making
buttonholes and decorative stitches. The position
needed for making the Satin Stitch varies according
to the material and thread being used. To determine
the exact dial position, you should first test the stitch
and length settings on a scrap of fabric to observe the
feeding of the material.
1 Stitch length dial
2 Length
3 Fine → SS
4 Coarse
Según la puntada seleccionada, puede ser necesario ajustar su largo para lograr mejores resultados.
Los números indicados en el disco representan el
largo de las puntadas en milímetros.
CUANTO MAS ALTO EL NUMERO, MAS LARGA
LA PUNTADA.
El ajuste “O” no alimenta el tejido. Sirve para coser
un botón.
La zona "F" se usa para realizar bordados de realce
(una puntada densa en zigzag), que puede servir
para coser ojales o como puntadas decorativas. La
posición necesaria para realizar puntadas de realce
varia dependiendo del tejido e hilo utilizados. Para
determinar la posición exacta del botón, conviene
primero probar la puntada y los ajustes de largo en
un pedazo de tejido para ver como se alimenta el
material.
1
Selector de largo de puntada
2
Largo
3
Fina → SS
4
Más largo
2
ÁQUINA DE COSER
CONOZCA SU M
KNOWING YOUR SEWING MACHINE
Turn the dial to the left past “O” for the
SS
position.
34
2
3
4 3 2 1 - F - O ...................
1
SS
Para colocarse en la posición SS , gire el selector
hacia la izquierda más allá de "O".
14
Page 22
KNOWING YOUR SEWING MACHINE
CONOZCA SU M
ÁQUINA DE COSER
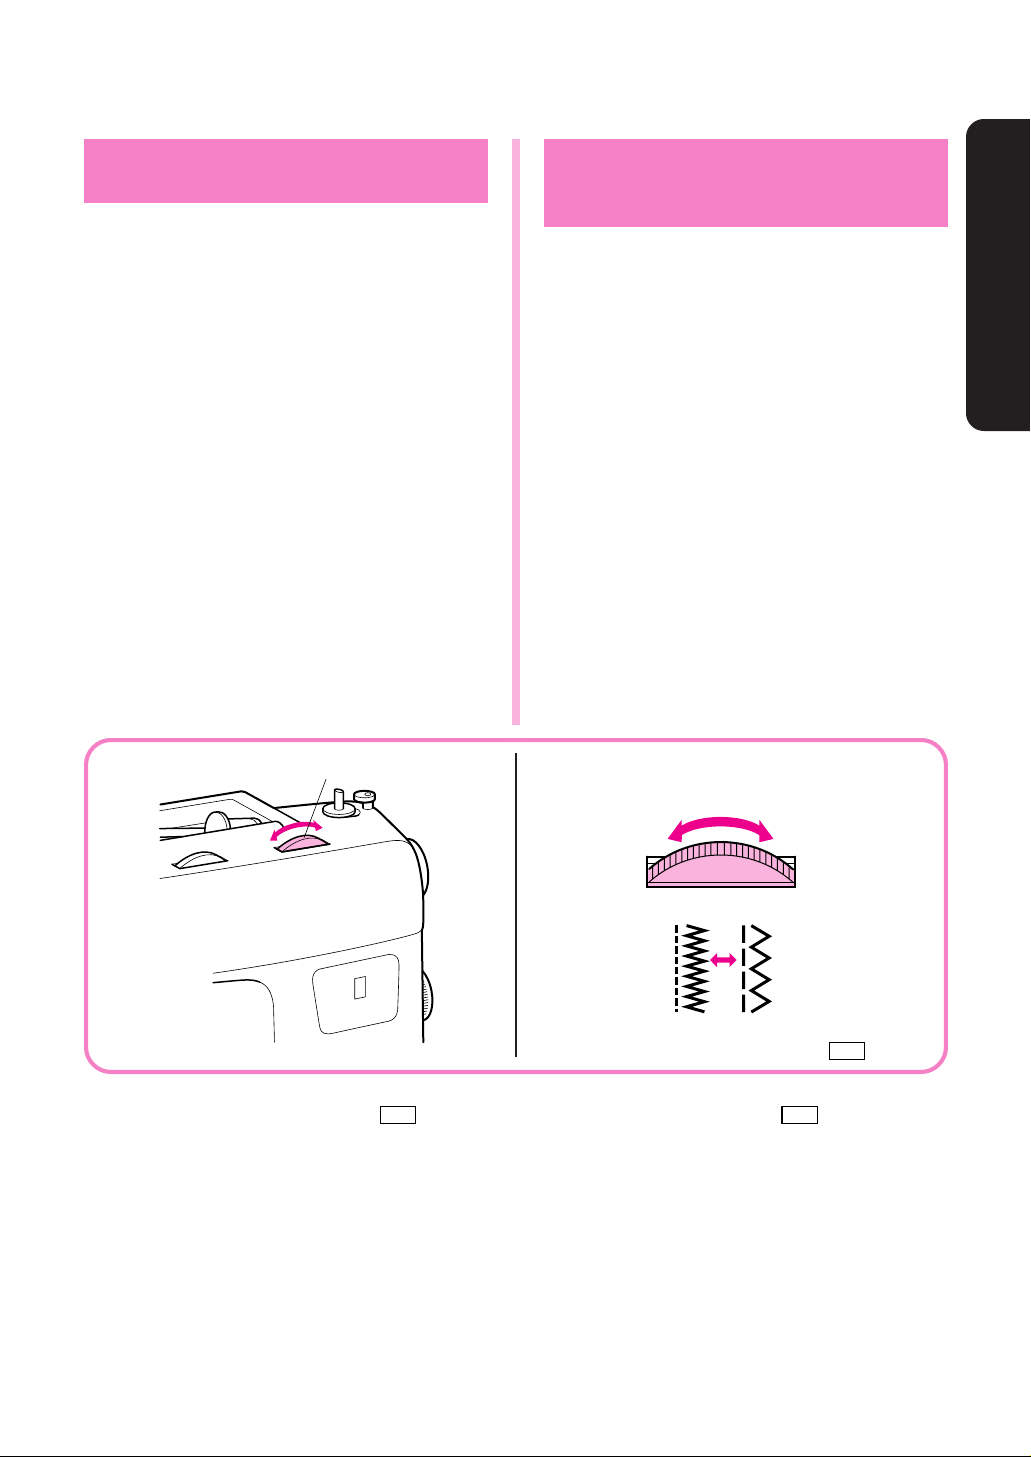
Depending on the stitch selected, you may need to
adjust the stitch width.
The numbers marked on the dial represent the stitch
width.
THE HIGHER THE NUMBER, THE WIDER THE
STITCH.
1 Stitch width dial
Stitch Width Dial
1
Selector de ancho de
puntada
Según el modelo de puntada seleccionado, se necesitará o no ajustar el ancho de puntada.
Los números indicados en el selector representan el
ancho de las puntadas.
A MAYOR NUMERO SELECCIONADO, MAYOR
ANCHO DE PUNTADA.
1
Selector de ancho de
puntada
NOTE:
When you choose the Straight Stitch or the Triple
Stretch Stitch you can change the needle position
from left to center.
6
5
NOTA:
Cuando elige la puntada recta o la triple puntada
elástica, es posible cambiar la posición de la aguja
de izquierda a derecha.
0
1
15
Page 23
Reverse Sewing Button
Pulsador de retroceso
To sew in reverse, push the Reverse Sewing Button
in as far as possible and hold in that position while
pressing lightly on the foot pedal. To sew forward,
release the Reverse Sewing Button. The machine
will then sew forward. Reverse sewing is used for
back tacking and reinforcing seams.
Model PS-2500, PS-2400, PS-2300
STAR140E, STAR130E, STAR120E
When the foot controller is depressed, push this
button and hold it. Then, the machine will sew at
ordinary speed in reverse.
When the button is released, the machine will sew
forward.
When the foot controller is not depressed, push this
button and hold it, the machine will sew slowly in
reverse sewing.
1 Reverse sewing button
Para coser hacia atrás, apriete a fondo el pulsador
de retroceso y manténgalo en esa posición mientras
presiona ligeramente el pedal. Para volver a coser
hacia adelante, suelte el pulsador. La costura hacia
atrás se usa para remates y para reforzar las costuras.
Modelos PS-2500, PS-2400, PS-2300,
STAR 140E, STAR 130E y STAR 120E
Mientras presiona el pedal, apriete el pulsador y
manténgalo apretado. La máquina coserá a velocidad
normal y al revés.
Al soltar el pulsador, la máquina va a volver a coser
hacia adelante.
Si aprieta el pulsador y lo mantiene apretado sin
presionar el pedal, la máquina va a coser despacio
hacia atrás.
1
Pulsador de retroceso
ÁQUINA DE COSER
CONOZCA SU M
KNOWING YOUR SEWING MACHINE
1
16
Page 24
KNOWING YOUR SEWING MACHINE
CONOZCA SU M
ÁQUINA DE COSER
Use the Drop Feed Lever to raise or lower the feed
dogs according to the job that is being done. When
monogramming, embroidering, darning or sewing
on buttons, the feed dogs should be lowered. (The
garment will not be fed.)
NOTE:
When raising or lowering the feed dogs, move the
Drop Feed Lever as far as possible to the appropriate
side. Since the feed dogs can not be lowered using
the Drop Feed Lever immediately after they are
raised, turn the balance wheel toward you once and
after the feed dogs are raised, lower them using the
Drop Feed Lever.
Drop Feed Lever
1 Drop feed lever
2 Down position
3 Up position
Palanca de los
alimentadores
Utilice la palanca de los alimentadores para levantar
o bajar los dientes de los alimentadores de conformidad con el trabajo a realizar. Para monogramas,
bordados, zurcidos o para la costura de botones, los
alimentadores deben ser bajados (para que el tejido
no se alimente).
NOTA:
Al subir o bajar los alimentadores, conviene desplazar la palanca de los alimentadores lo más posible
hacia la posición deseada. Dado que los
alimentadores no pueden ser bajados con la palanca inmediatamente después de su subida, gire primero la ruedecilla hacia usted y, cuando los
alimentadores se encuentren subidos, bájelos con
la palanca arriba mencionada.
1
Palanca de los alimentadores
2
Posición baja
3
Posición alta
17
32 1
Page 25
Model PS-2500, PS-2400, PS-2300
STAR140E, STAR130E, STAR120E
Modelos PS-2500, PS-2400, PS-2300,
STAR 140E, STAR 130E y STAR 120E
START/STOP Button
Pressing the “START/STOP” Button once starts the
sewing machine; pressing the button again stops the
machine.
(Model PS-2500, STAR140E)
The button lights up in green when the sewing
machine is ready to start sewing and while
sewing. If the machine is not ready to start
sewing, the button lights up in red. While the
bobbin is being wound (the bobbin winder shaft
is moved to the right), the button lights up in
orange.
• The machine sews at a slow speed when sewing
with the button held down.
• With automatic thread cutter model, the needle
stops in its lowest position when sewing stops.
• Without automatic thread cutter model, the nee-
dle stops in its highest position when sewing
stops.
1 START/STOP button
Pulsador de puesta en
marcha/parada
Presione una vez el pulsador de puesta en marcha/
parada para conectar la máquina de coser; presione
el botón otra vez para pararla.
(Modelos PS-2500 y STAR140E)
El pulsador emitirá una luz verde cuando la
máquina de coser esté lista para coser y durante
el trabajo. Si la máquina no está lista para coser,
el pulsador emitirá una luz roja. Cuando la
canilla se está bobinando (el eje de hacer canilla
se desplaza a la derecha), el pulsador emite una
luz naranja).
• La máquina cose a baja velocidad si se cose con
el pulsador apretado hacia abajo.
• Con el modelo de cortahilos automático, la aguja
se detiene en su posición más baja cuando se
deja de coser.
• Sin el modelo de cortahilos automático, la aguja
se detiene en su posición más elevada cuando se
deja de coser.
1
Pulsador de puesta en marcha/parada
ÁQUINA DE COSER
CONOZCA SU M
KNOWING YOUR SEWING MACHINE
* The sewing machine will not start sewing if the
Presser Foot Lever is raised.
Be sure to lower the Presser Foot Lever before
sewing.
1
1
* La máquina de coser no empezará a coser si la
palanca del prensatelas está levantada.
Asegúrese de bajar la palanca del prensatelas
antes de coser.
18
Page 26
1
Model PS-2500, PS-2400, PS-2300
KNOWING YOUR SEWING MACHINE
CONOZCA SU M
STAR140E, STAR130E, STAR120E
Modelos PS-2500, PS-2400, PS-2300,
STAR 140E, STAR 130E y STAR 120E
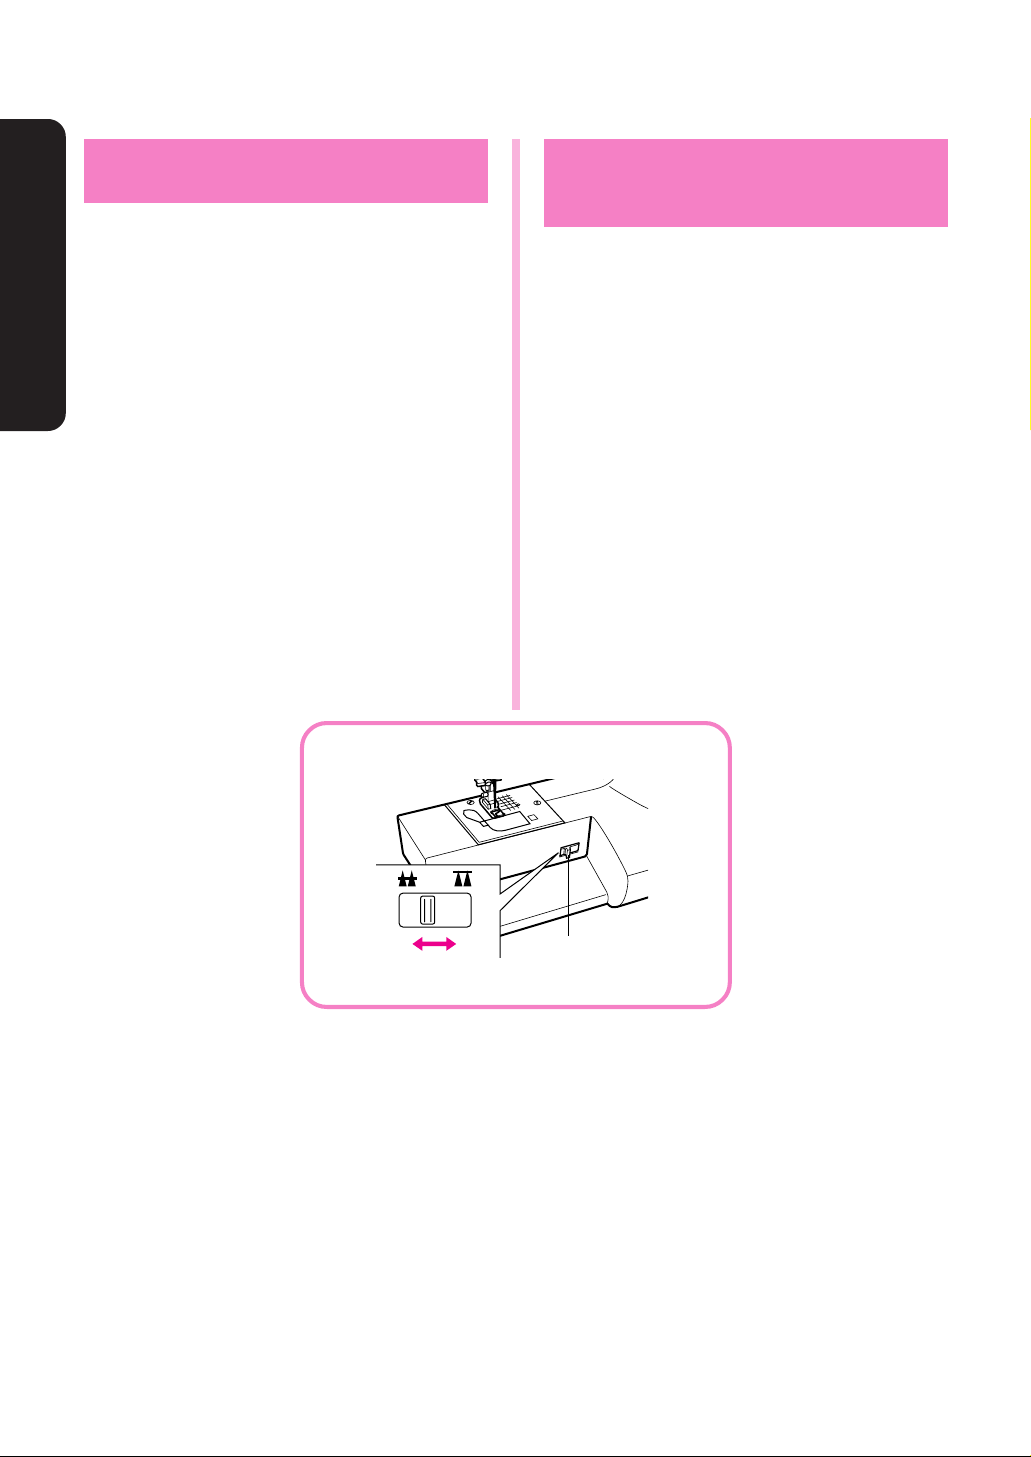
Speed Range Control Lever
ÁQUINA DE COSER
Controls the speed range.
In case the foot controller is used, you can control
maximum speed by the speed range control lever.
The control lever should be set at right (fastest)
position for normal usage with foot controller.
1 Speed range control lever
Palanca de control de
zona de velocidad
Controla la zona de velocidad.
Si se usa el pedal, se puede controlar una velocidad
máxima gracias a la palanca de control de zona de
velocidad.
La palanca debe estar puesta a la derecha (velocidad más rápida) para un uso normal del pedal.
1
Palanca de control de la zona de velocidad
19
Page 27
(Model PS-2500, STAR140E)
(Modelo PS-2500, STAR140E)
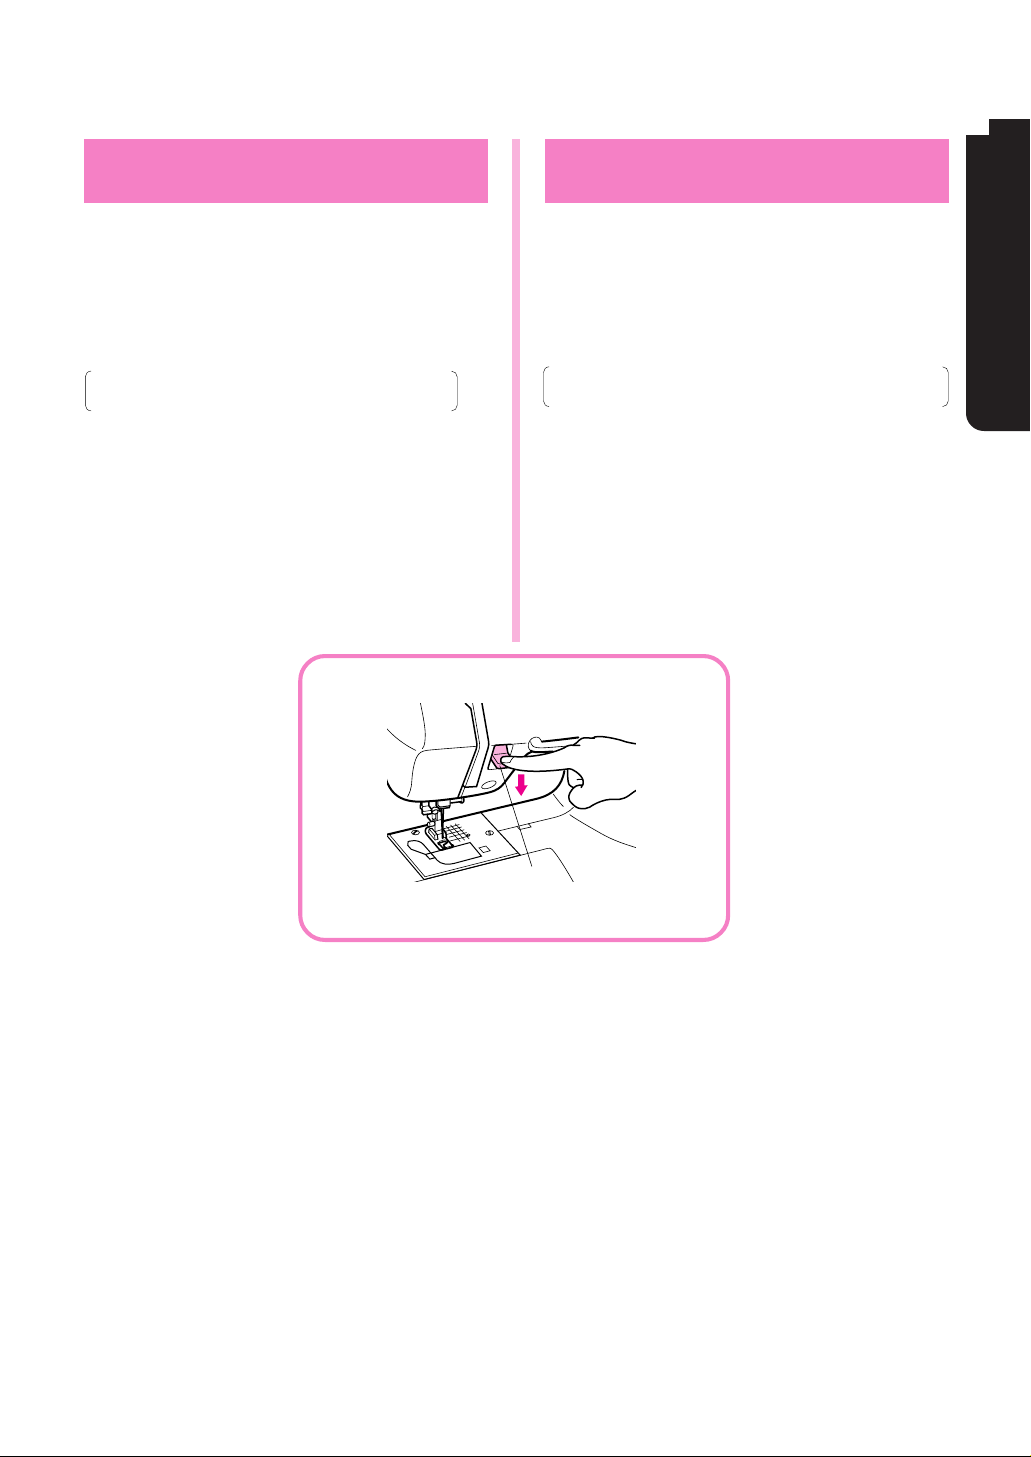
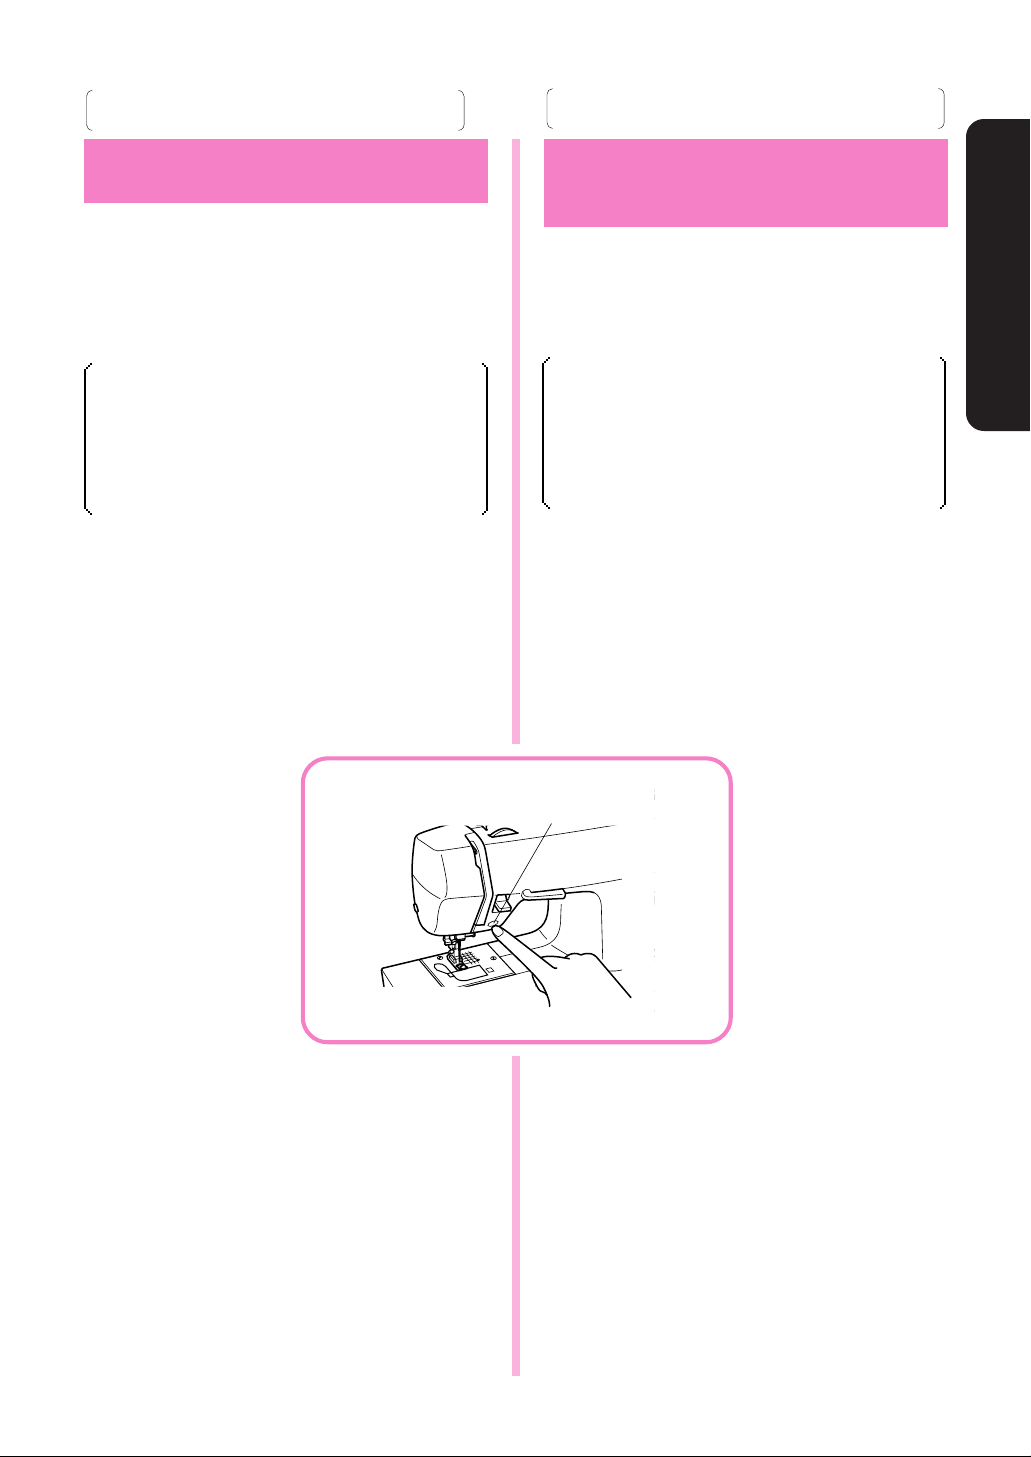
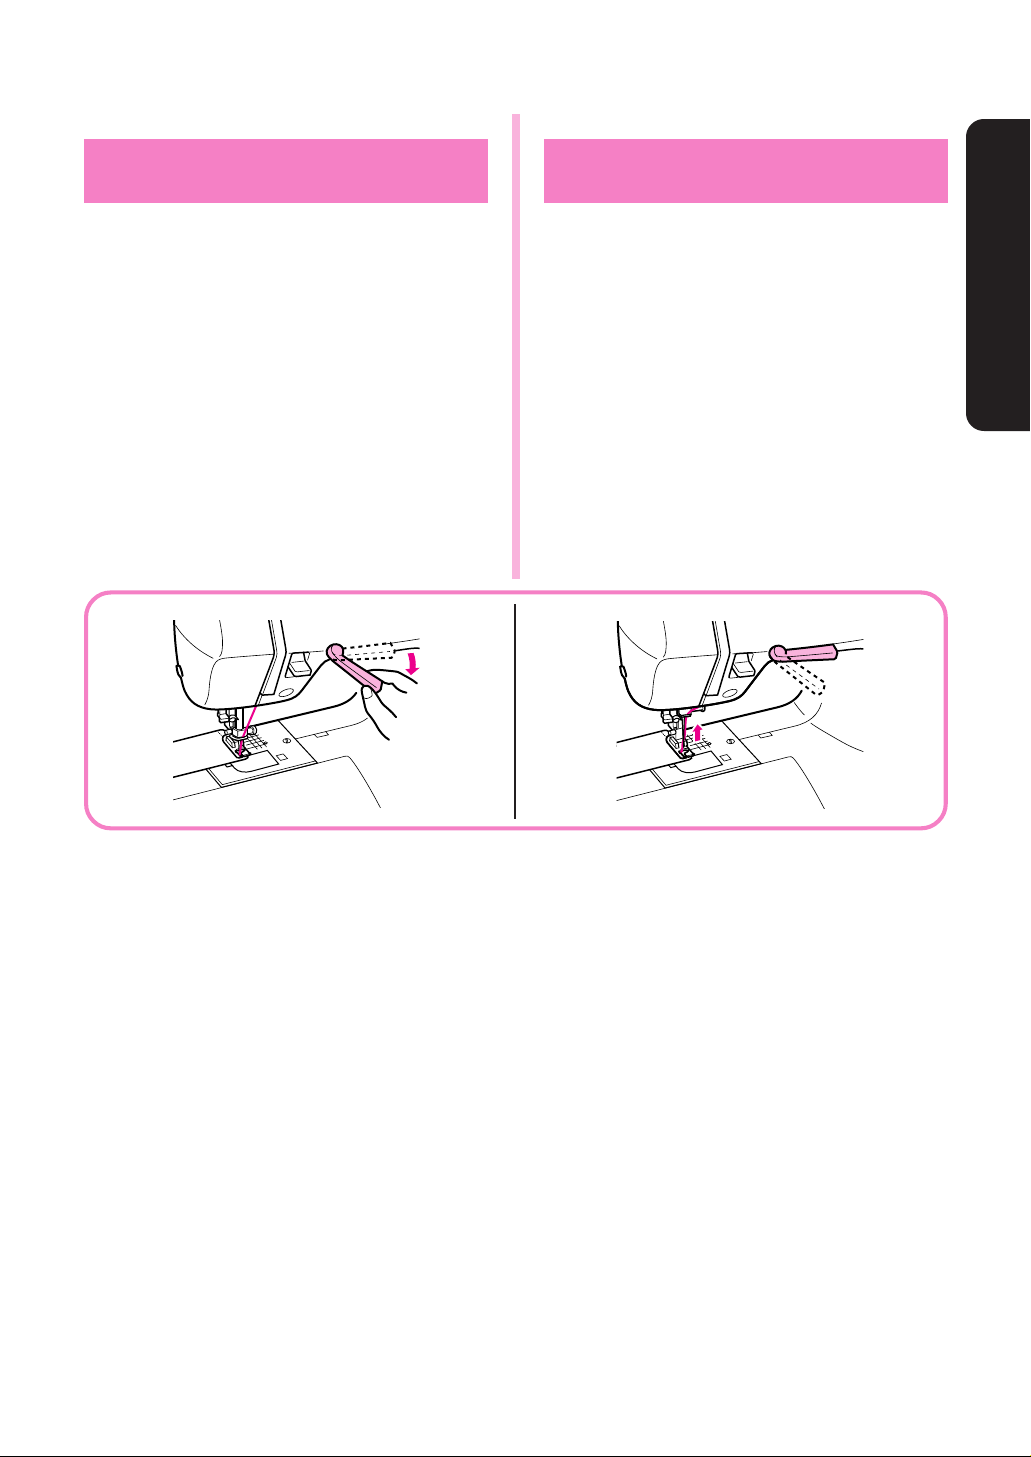
Automatic Thread Cutter
Use the Thread Cutter Lever to cut the threads.
1. After finishing sewing, move the needle to its
lowest position, pull the Thread Cutter Lever
down as far as possible, then release it.
NOTE:
Do not operate the Thread Cutter Lever while sewing
or when there is no fabric in the sewing machine.
Threads may become tangled or other problem may
be incurred.
2. After the threads are cut, the needle moves up
and the Thread Cutter Lever returns to its original
position.
Cortahilos automático
Utilice la palanca del cortahilos para cortar los hilos.
1. Al terminar de coser, desplace la aguja hasta su
posición más baja, empuje hacia abajo y a fondo
la palanca del cortahilos y suéltela.
NOTA:
No toque la palanca del cortahilos mientras esté
cosiendo o si no hay tejido en la máquina de coser,
ya que podrían enredarse los hilos o podrían surgir
otros problemas.
2. Una vez cortados los hilos, la aguja se desplaza
hacia arriba y la palanca del cortahilos vuelve a su
posición original.
CONOZCA SU MÁQUINA DE COSER
KNOWING YOUR SEWING MACHINE
20
Page 28

KNOWING YOUR SEWING MACHINE
CONOZCA SU MÁQUINA DE COSER
* During twin needle sewing and when sewing with
thread thicker than #30 or with nylon, metallic and
other specialty threads, cut the threads with the
thread cutter on the left side of the machine.
* After the threads are cut using the Thread Cutter
Lever, you can continue sewing without drawing
up the lower thread.
* The automatic thread cutter cannot be used when
the needle or presser foot are raised or the bobbin
winder shaft is moved to the right.
* Refer to “Automatic Thread Cutting” on page 72
if the threads become tangled or cannot be cut or
if any other problems occur while using the automatic thread cutter.
* Si cose con aguja doble o con una aguja cuyo
grosor supera el #30 o con hilos de nylon metálico
u otros hilos especiales, corte los hilos con el
cortahilos situado en el lado izquierdo de la
máquina.
* Una vez cortados los hilos con la palanca del
cortahilos, puede seguir cosiendo sin levantar el
hilo inferior.
* El cortahilos automático no puede utilizarse
cuando la aguja o el prensatelas están levantados,
o si el eje de hacer canilla se ha desplazado a la
derecha.
* Si los hilos se enredan, si no puede cortarlos o si
aparece cualquier otro problema al utilizar el
cortahilos automático, consulte la sección
"Cortahilos automático" (pág. 72).
Converting to
Free-arm Style
Free-arm sewing is convenient for sewing tubular
and hard-to-reach areas on a garment. To change
your machine to the free-arm style, simply lift out the
extension table.
1
Slide the extension table to the left.
1 Extension table
Conversión en modalidad
de brazo libre
La costura con brazo libre es práctica para coser
zonas tubulares y difíciles de acceso en los tejidos.
Para transformar su máquina en esa modalidad,
sólo hace falta levantar el soporte de los accesorios
y sacarlo.
1
Levante el soporte de accesorios.
2
Deslícelo hacia la izquierda para sacarlo.
1
Soporte de accesorios
1
21
Page 29

THREADING
Enhebrado de la
THE MACHINE
Winding the Bobbin
1. Place the spool of thread on the spool pin. The
thread end should come from the bottom front of
the spool. The spool holder closest to the thread
spool size should be used to hold the spool
securely on the spool pin. The spool cap should
be pushed on as far as it will go. Pass the thread
through the thread guide as shown following the
dotted line on the machine.
Hold the thread with both hands when passing it
through the guide.
1 Spool holder
2 Spool
3 Spool pin
4 Thread
A
máquina
Bobinado de la canilla
1. Coloque el carrete de hilo en el portabobinas. El
final del hilo debe proceder de la parte inferior del
carrete. Debe utilizar el soporte de carrete que
más se acerque al tamaño del carrete de hilo para
que el carrete quede bien sujeto en el
portabobinas. La tapa del carrete debe empujarse
a fondo. Pase el hilo a través de la guía-hilos,
siguiendo la línea discontinua dibujada en la
máquina.
A
Sujete el hilo con las dos manos para pasarlo a
través de la guía.
1
Soporte del carrete
2
Carrete
3
Portabobinas
4
Hilo
1
2
CONOZCA SU MÁQUINA DE COSER
KNOWING YOUR SEWING MACHINE
4
3
22
Page 30

KNOWING YOUR SEWING MACHINE
CONOZCA SU MÁQUINA DE COSER
2. Place the bobbin on the bobbin winder shaft.
Push the bobbin winder shaft to the right.
2. Coloque la canilla en el eje de hacer canilla.
Empuje el eje de hacer canilla hacia la derecha.
1 Spring on the shaft
2 Groove of the bobbin
* Align the groove of the bobbin with the spring on
the shaft.
3. Wind the thread clockwise around the bobbin four
or five times, pass the end of the thread through
the slit in the bobbin winder seat, and then pull the
thread in the direction shown in the illustration.
Use the cutter to cut the thread.
3 Bobbin winder seat
2
1
1
2
1
Resorte del eje
2
Surco de la canilla
* Alinee el surco de la canilla con el resorte del eje.
3. Dé cuatro o cinco vueltas de hilo alrededor de la
canilla en el sentido de las agujas del reloj, pase
el final del hilo a través de la ranura de la base del
girador de la canilla y empuje el hilo en la dirección
que indica el dibujo.
Corte el hilo con el cortador.
3
Base del girador de la canilla
1
2
3
3
23
Page 31

Model PS-2500, PS-2400, PS-2300
STAR140E, STAR130E, STAR120E
4. Slide the speed range control lever to its maximum (as far to the right as possible).
5. Push the “START/STOP” button. The machine
will stop automatically when the bobbin is full.
6. After the bobbin has stopped moving, push the
“START/STOP” button to stop the machine.
7. Cut the thread, slide the bobbin winder shaft to the
left and remove the bobbin.
(Model PS-2200, STAR110)
4. Step down on the foot controller to start sewing.
5. After the machine stops automatically when the
bobbin is full, take your foot off of the foot controller.
6. Cut the thread, slide the bobbin winder shaft to the
left and remove the bobbin.
NOTE:
Immediately after winding the bobbin, it is normal to
hear the sound of the clutch engaging when beginning to sew or manually turning the balance wheel.
Modelos PS-2500, PS-2400, PS-2300,
STAR 140E, STAR 130E y STAR 120E
4. Deslice la palanca del control de velocidad hacia
la derecha y a fondo (velocidad máxima).
5. Presione el pulsador de puesta en marcha/parada.
La máquina se parará automáticamente cuando
la canilla esté llena.
6. Cuando la canilla se haya detenido, presione el
pulsador de puesta en marcha/parada para
desconectar la máquina.
7. Corte el hilo, deslice el eje de hacer canilla hacia
la izquierda y retire la canilla.
(Modelos PS-2200 y STAR110)
4. Pise el pedal para comenzar a coser.
5. Cuando la máquina se detenga automáticamente
porque la canilla está llena, retire el pie del pedal.
6. Corte el hilo, deslice el eje de hacer canilla hacia
la izquierda y retire la canilla.
NOTA:
Inmediatamente después de bobinar la canilla, si
empieza a coser o gira la polea, normalmente oirá el
sonido del encaje del embrague.
CONOZCA SU MÁQUINA DE COSER
KNOWING YOUR SEWING MACHINE
CAUTION
Be sure to use the specified bobbin.
Replacement part code
XA3811-051 (For U.S.A)
XA3812-052 (For other countries)
Using a different bobbin may result in injuries or
damage.
PRECAUCIÓN
Asegúrese de que utiliza la canilla especificada.
Código de la pieza de recambio
XA3811-051 (para EE UU)
XA3812-052
Utilizar una canilla diferente puede provocar lesiones
o averías.
(para los demás países)
24
Page 32

KNOWING YOUR SEWING MACHINE
CONOZCA SU MÁQUINA DE COSER
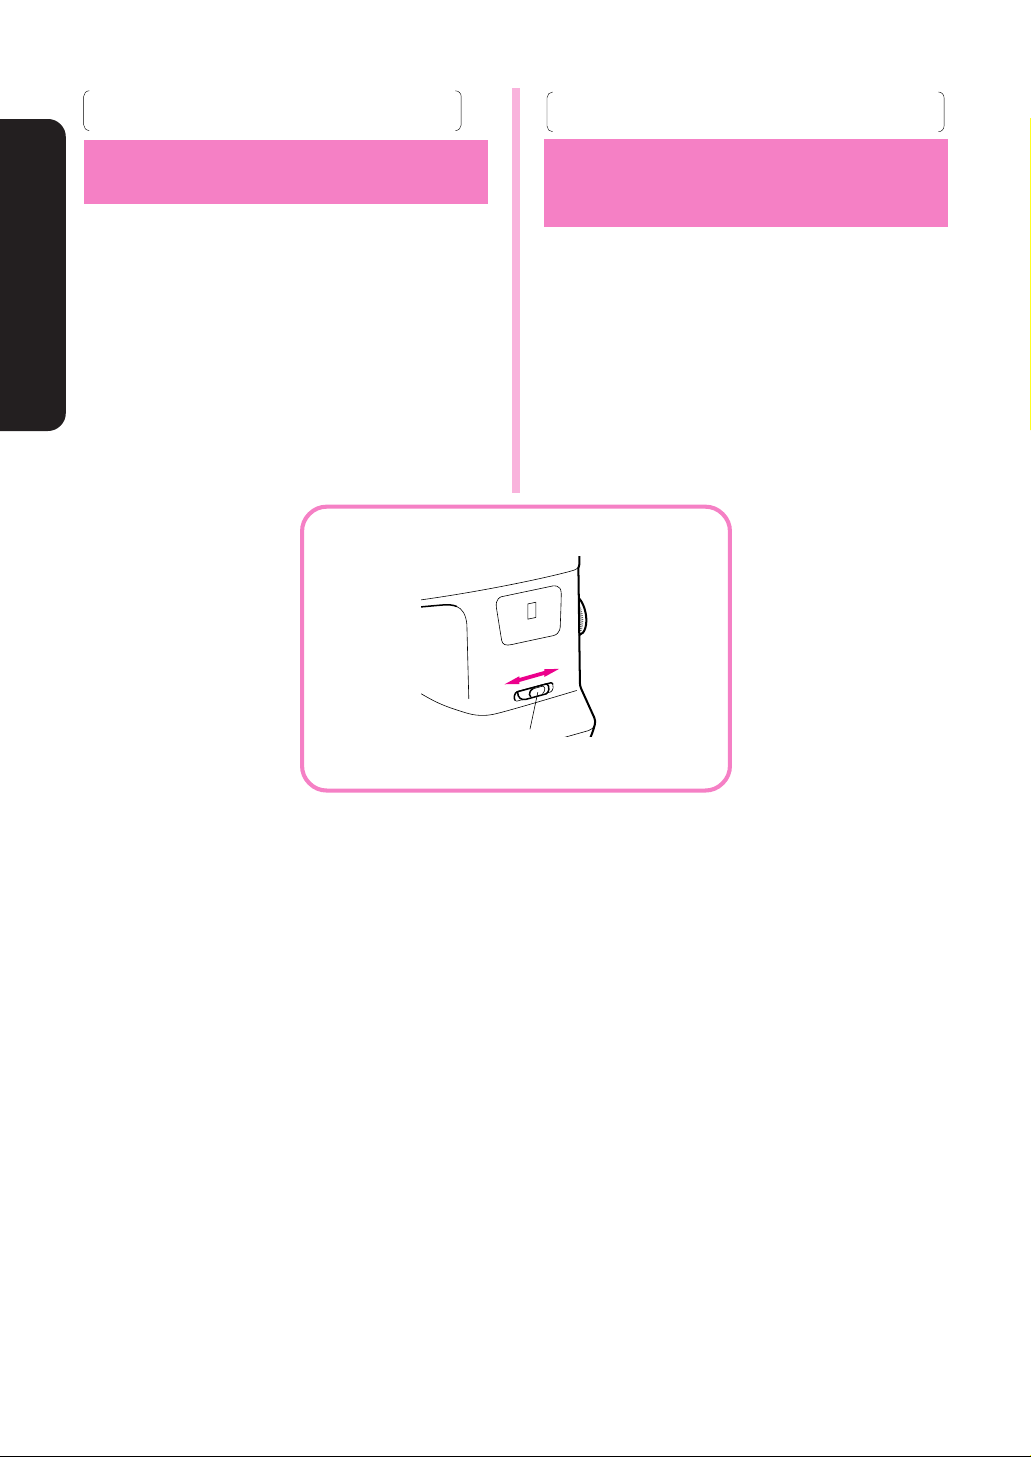
Lower Threading
1. Raise the needle to its highest position by turning
the balance wheel toward you (counterclockwise)
and raise the presser foot lever.
2. Slide the button and open the cover.
1 Slide button
2 Cover
3. Insert bobbin and deliver thread end through the
slit, then pull the thread to cut.
NOTE:
Check that the direction of winding follows the illustration.
Enhebrado inferior
1. Levante la aguja a su posición más alta, girando
la ruedecilla hacia usted (en el sentido contrario
al de las manecillas de un reloj) y levante la
palanca del prensatelas.
2. Deslice el botón y abra la tapa.
1
Deslizar el botón
2
Tapa
12
3. Introduzca la canilla y pase el cabo del hilo por la
ranura. Luego, tire del hilo para cortarlo.
NOTA:
Asegúrese de que el sentido de bobinado corresponda al de la ilustración.
4. Install the needle plate cover onto the needle plate.
* You can begin sewing immediately without draw-
ing up the bobbin thread.
25
4. Instale la tapa en la placa de agujas.
2
1
* Puede empezar a coser inmediatamente, sin
necesidad de levantar el hilo de la bobina.
Page 33

Upper Threading
Enhebrado superior
1. Raise the presser foot using the Presser Foot
Lever.
2. Raise the needle to its highest position by turning
the balance wheel toward you (counterclockwise).
1 Presser foot lever
3. Place a spool of thread on the horizontal spool pin
and press a spool holder onto the spool pin to hold
the thread spool firmly in place.
The thread end should come from the bottom
front of the spool.
NOTE:
Choose an appropriate spool holder according to the
type and diameter of the spool being used. The
diameter of the spool holder should be just larger
than that of the spool itself.
1. Levante el prensatelas con la palanca correspondiente.
2. Levante la aguja a su posición más alta, girando
la ruedecilla hacia usted (en el sentido contrario
al de las manecillas de un reloj).
1
Palanca del prensatelas
1
3. Coloque un carrete de hilo en el portabobinas
horizontal previsto y manténgalo firmemente con
el fleje para que no se mueva.
El final del hilo debe proceder de la parte inferior del
carrete.
NOTA:
Elija un tope de tamaño adecuado en función del tipo
y diámetro del carrete utilizado. El diámetro del tope
debe ser ligeramente superior al del carrete.
CONOZCA SU MÁQUINA DE COSER
KNOWING YOUR SEWING MACHINE
26
26
Page 34

KNOWING YOUR SEWING MACHINE
CONOZCA SU MÁQUINA DE COSER
4. Deliver the upper thread as shown in this diagram.
1
The upper thread shutter opens when the Presser
Foot Lever is raised.
1 Upper thread shutter
4. Enhebre el hilo superior tal como indica el
diagrama.
1
El obturador de hilo superior se abre cuando se
levanta la palanca del prensatelas.
1
Obturador de hilo superior.
1
4
5
5. Make sure to guide the thread through the thread
take-up lever from the right to the left.
2 Thread take-up lever
6. Place thread behind the guide above the needle.
1
2
3
5. Asegúrese de guiar el hilo por la palanca tirahilos,
de la derecha a la izquierda.
2
Palanca tirahilos
6. Coloque el hilo detrás de la guía, arriba de la aguja.
2
NOTE:
The upper thread shutter makes sure that the upper
thread is fed correctly. The upper thread shutter
does not operate if the thread take-up is lowered. Be
sure to raise the Presser Foot Lever and the thread
take-up before feeding the upper thread.
Incorrectly feeding the thread may cause sewing
problems.
27
NOTA:
El obturador de hilo superior asegura que el hilo
superior se cargue correctamente. No funciona si el
tirahilos está bajado. Asegúrese de levantar la
palanca del prensatelas y el tirahilos antes de cargar
el hilo superior.
Si carga incorrectamente el hilo, pueden surgir
problemas al coser.
Page 35

Using Needle Threader
Uso del enhebrador
The needle threader can be used to thread the
needle more easily.
1. Lower the presser foot lever.
Lower the threader slightly and position the thread
under the guide.
1 Needle threader
2 Guide
2. Move the threader to its lowest position and guide
the thread under the hook which passes through
the eye of the needle.
3 Hook
1
2
Se puede usar el enhebrador para enhebrar la aguja
más facilmente.
1. Bajar la palanca de la pata prensatelas.
Bajar en enhebrador suavemente y colocar el hilo
bajo la guía.
1
Enhebrador
2
Guía
2. Mover el enhebrador hasta su posición más baja
y guiar el hilo por debajo del gancho que pasa por
el ojo de la aguja.
3
Gancho
3
CONOZCA SU MÁQUINA DE COSER
KNOWING YOUR SEWING MACHINE
3. Release the threader and the thread at the same
time.
This causes the threader to deliver the thread
through the eye of the needle.
4. Pull out about 10 cm (4") of thread through the
needle.
NOTE:
Some needle/thread combinations will not work with
the needle threader. See page 34.
3. Soltar el enhebrador y el hilo al mismo tiempo.
Esto provocará que el hilo salga por el ojo de la
aguja.
4. Sacar unos 10 cm (4") de hilo por la aguja.
NOTA:
Con algunas combinaciones de hilo-aguja, no puede utilizarse el enhebrador. Ver página 35.
28
Page 36

KNOWING YOUR SEWING MACHINE
CONOZCA SU MÁQUINA DE COSER
Manually Drawing Up
Lower Thread
When sewing gathers or darts, the lower thread can
be manually drawn up so that it will have some
excess.
1. Pass the thread along the groove in the direction
of the arrow, and leave it there without cutting it.
1 Shuttle
• The bobbin cover should still be removed.
2. While lightly holding the end of the lower thread,
slowly turn the balance wheel once by hand to
raise the needle.
1
Levantar manualmente el
hilo inferior
Al coser fruncidos o pinzas, puede levantar
manualmente el hilo inferior para que haya un cierto
exceso de hilo.
1. Pase el hilo por la ranura siguiendo la dirección
de la flecha y déjelo ahí sin cortarlo.
1
Lanzadera
• La tapa de la canilla no debe estar colocada.
2. Coja con suavidad el final del hilo inferior y dé una
vuelta con la mano a la ruedecilla para levantar la
aguja.
3. Pull on the upper thread to draw up the lower
thread.
4. Pull out about 10 cm (4") of both threads and
place them toward the back of the machine under
the presser foot.
* If the threads are cut using the automatic thread
cutter after installing the bobbin, you can start
sewing without drawing up the lower thread.
2 Upper thread
3 Lower thread
29
3. Tire del hilo superior para levantar el hilo inferior.
4. Saque unos 10 cm de ambos hilos y colóquelos
en dirección a la parte trasera de la máquina,
debajo del prensatelas.
* Si corta los hilos con el cortahilos automático tras
colocar la canilla, puede empezar a coser sin
levantar el hilo inferior.
2
Hilo superior
3
Hilo inferior
2
3
Page 37

Twin Needle Sewing
Costura con aguja doble
Your sewing machine is designed for twin needle
sewing, which allows you to sew with two top threads.
You can use the same color or two different colors of
thread for making decorative stitches. Any of the
patterns, except the buttonhole pattern, can be sewn
with the twin needle. When using the Straight Stitch,
the Stitch Width Dial should be set so that the needle
is in the center position (between 2 and 3). However,
when other patterns are used, set the Stitch Width
Dial between 0 and 3. See page 15 for details on
adjusting the Stitch Width Dial.
CAUTION:
When sewing with the twin needle, be sure the Stitch
Width Dial is not set above 3 since this may cause the
needle to hit the needle plate and break.
INSERTING THE TWIN NEEDLE
Insert in the same way a single needle is inserted
(refer to page 9). The flat side of the needle should
face toward the back and the rounded side should
face toward you.
PLACING THE EXTRA SPOOL PIN
Place the vertical spool pin in the hole found on top
of the machine near the horizontal spool pin. Place
the second spool of thread onto the vertical spool pin
as shown in fig. A.
TWIN NEEDLE THREADING
Each needle should be threaded separately.
1. Threading the Right Needle
Follow the same instructions for single needle
threading using the thread from the spool on the
extra spool pin. See page 26 for more details.
2. Threading the Left Needle
Thread the left needle in the same manner that
the right needle was threaded, but do not pass the
thread through the thread guide above the needle
before passing it through the eye of the left needle
as shown below in fig. B.
1
Right needle thread passes through this guide.
2
Left needle thread passes in front of this guide.
Su máquina de coser ha sido concebida para poder
utilizar una aguja doble y permitir la costura con dos
hilos superiores. Puede usar el mismo color de hilo
o dos hilos de colores distintos para puntadas decorativas. La aguja doble permite coser cualquiera de
los patrones, exceptuando él para hacer ojales. Sin
embargo, cuando selecciona la puntada recta, el
selector de ancho de puntada debe estar ajustado
de tal forma que la aguja se encuentre en la posición
central (entre 2 y 3). Para los otros modelos de
puntadas, dicho selector puede estar ajustado entre
0 y 3. Véase la página 15 para mayores detalles
sobre el ajuste del selector de ancho de puntada.
ATENCION:
Al coser con una aguja doble, debe asegurarse que el
selector de ancho de puntada no está ajustado en un
valor superior a 3 ya que en esas circunstancias, la
aguja podría golpear la placa de agujas y romperse.
Para introducir la aguja doble
Introdúzcala de la misma manera que una aguja
simple (véase página 9). La parte plana de la aguja
debe estar cara hacia atrás mientras que la parte
redonda está cara a usted.
Colocado el eje de carrete suplementario
Coloque el eje de carrete vertical en el orificio
previsto arriba de la máquina, cerca del eje horizontal. Instale el segundo carrete de hilo en el eje
vertical, tal como ilustrado en la fig. A.
Enhebrado de la aguja doble
Cada una de las agujas debe ser enhebrada por
separado.
1. Enhebrado de la aguja derecha
Observe las mismas instrucciones que para el
enhebrado de una sola aguja, pero utilizando el
hilo del carrete colocado en el porta carretes
extra. (véase página 26 para mayores detalles al
respecto).
2. Enhebrado de la aguja izquierda
Enhebre la aguja izquierda de la misma manera
que la aguja derecha. Sin embargo, no hay que
pasar el hilo por la guía que se sitúa arriba de la
aguja. Conviene pasarlo directamente por el ojo
de la aguja izquierda, tal como ilustrado arriba en
la fig. B.
1
El hilo de la aguja derecha pasa por la guía.
2
El hilo de la aguja izquierda pasa delante de la guía.
CONOZCA SU MÁQUINA DE COSER
KNOWING YOUR SEWING MACHINE
A
NOTE: (Model PS-2500, STAR140E)
When sewing with the twin needle, do not use the
automatic thread cutter.
B
1
2
NOTA: (Modelo PS-2500, STAR140E)
Al coser con aguja doble, no utilice el cortahilos
automático.
30
Page 38

Model PS-2500, PS-2400, PS-2300
KNOWING YOUR SEWING MACHINE
CONOZCA SU MÁQUINA DE COSER
STAR140E, STAR130E, STAR120E
Modelos PS-2500, PS-2400, PS-2300,
STAR 140E, STAR 130E y STAR 120E
Thread Tension Control
* Set the Upper Tension Control Dial within [3~5]
for the most appropriate tension for normal sewing.
Adjust the Upper Tension Control Dial to the
correct tension for the type of thread and fabric
being used.
When using a fine stitch length, for example to sew
satin stitches or buttonholes, use a slightly loose
upper thread tension to produce more beautiful
stitches.
1 Reverse
2 Surface
Control de la tensión de los hilos
* Sitúe el disco de control de tensión superior entre
[3~5] si desea una tensión para costura normal.
Sitúe el disco de control de tensión superior en la
tensión correcta para el tipo de hilo y tejido que
está utilizando.
Si utiliza un largo de puntada fina, por ejemplo para
coser bordados de realce u ojales, disminuya un
poco la tensión del hilo superior para conseguir
puntadas más bonitas.
1
Revés
2
Derecho
4
3
5
1
2
If you require tighter or looser upper thread tensions
for special fabrics or sewing procedures such as
gathering and shell tucks, adjust the tension by
turning the upper tension dial.
To tighten the upper thread tension, adjust the dial to
a higher number. Locks appear on the surface of the
fabric.
To loosen the upper thread tension, adjust the dial to
a lower number. Locks appear on the reverse side of
the fabric.
1 Reverse
2 Surface
4
3
5
1
2
Si se requiere una tensión más tirante o más floja del
hilo superior para trabajar con ciertos tejidos especiales o para costuras tales como el fruncido o la
puntada ondas, ajuste la tensión girando el disco de
tensión superior.
Para aumentar la tensión del hilo superior, seleccione
un valor elevado. Aparecerán bagas en la superficie
del tejido.
Para disminuir la tensión del hilo superior, seleccione
un valor pequeño. Aparecerán bagas en el revés del
tejido.
1
Revés
2
Derecho
4
3
5
1
2
31
Page 39

(Model PS-2200, STAR110)
(Modelo PS-2200, STAR110)
Thread Tension
Thread tension will affect the quality of your stitches.
It may need to be adjusted when you change fabric
or thread type.
NOTE:
It is recommended that a test sample be made on a
fabric scrap before sewing on your project.
Possible misadjustments and their results.
Upper tension is too tight.
Locks appear on the surface of the fabric.
Upper Tension Control Dial
Decrease the tension by turning the dial to a
lower number.
1
2
Tensión de los hilos
La tensión de los hilos afectará la calidad de las
puntadas: puede requerir cierto ajuste cuando cambia de tejido o hilo.
NOTA:
Le recomendamos hacer una prueba en un pedazo
de tela antes de empezar a coser en el tejido de
trabajo.
Ajustes erróneos posibles y sus resultados
El hilo superior es demasiado tirante
Aparecen bagas en la superficie del tejido.
Disco de control de la tensión superior
Disminuya la tensión al poner el disco en un
número inferior.
4
3
5
ÁQUINA DE COSER
CONOZCA SU M
KNOWING YOUR SEWING MACHINE
Upper tension is too loose.
Locks appear on the reverse side of the fabric.
Upper Tension Control Dial
Increase the tension by turning the dial to a
higher number.
1 Reverse
2 Surface
1
2
La tensión del hilo superior es insuficiente
Aparecen bagas en el revés del tejido.
Disco de control de la tensión superior
Aumente la tensión al poner el disco en un
número superior.
1
Revés
2
Derecho
4
3
5
32
Page 40

KNOWING YOUR SEWING MACHINE
CONOZCA SU M
ÁQUINA DE COSER
Correct tension
Correct tension is important since too much or
too little tension will weaken your seams or
cause puckers on your fabric.
1 Reverse
2 Surface
Tensión correcta
Es ecesario tener una tensión correcta dado que
una tensión insuficiente o demasiado fuerte va a
debilitar sus costuras o fruncir el tejido.
1
Revés
2
Derecho
1
2
33
Page 41

RELATIVE CHART OF SEWING FABRICS,
NEEDLES AND THREADS
SEWING FABRICS NEEDLE SIZE THREAD SIZES
VERY THIN
LIGHT WEIGHT
MEDIUM WEIGHT
HEAVY WEIGHT
KNITS
NOTE:
1. Select the correct needle and thread size from the above chart.
2. Use the same size thread for the upper and lower threads (spool and bobbin).
Fine Tricot, Fine Lace, Thin Linen,
Silk, Organza, Chiffon
Voile, Taffeta, Synthetics, Silk,
Batiste
Cotton, Gingham, Poplin, Percale,
Pique, Satin, Velvet, Lightweight
Wool, Fine Corduroy, Suitings,
Linen, Muslin
Denim, Gabardine, Tweed,
Corduroy, Canvas, Duck
Single Knit, Double Knit, Jersey,
Tricot
9 Synthetic
11
14
(Supplied with
your machine)
16
Ball point 14 Cotton Wrapped Polyester
Cotton: 80
Fine Mercerized Cotton
Cotton: 60~80
Silk: “A”
Synthetic
Mercerized 50
Cotton: 50~60
Silk: “A”
Synthetic
Mercerized 50~60
Cotton: 40~50
Mercerized Heavy Duty
ÁQUINA DE COSER
CONOZCA SU M
KNOWING YOUR SEWING MACHINE
34
Page 42

Tabla de relación entre tejidos, hilos y agujas
KNOWING YOUR SEWING MACHINE
CONOZCA SU M
Tejidos Tamaño de aguja Tamaño de hilo
ÁQUINA DE COSER
Muy fino
Ligero
Medio
Pesado
Prendas de punto
NOTA:
1. Elija la aguja y el hilo correctos en la tabla arriba.
2. Utilice el mismo tamaño de hilo para los hilos superior e inferior (carrete y canilla).
Punto fino, Encaje fino, Lino fino,
Seda, Tul, Gasa
Velo, Tafetán, Sintéticos, Seda,
Batista
Algodón, Guinga, Popelina, Percal,
Piqué, Satén, Terciopelo, Lana ligera, Pana fina, Forros, Lino, Muselina
Tejano, Gabardina, Tweed, Pana,
Toldo, Dril
Prendas de punto simple, Prendas
de punto doble, Jersey, Tricot
9
11
14
(provista con su
máquina)
16
de bola 14
Algodón: 80
Sintético
Algodón Mercería fina.
Algodón: 60~80
Seda: “A”
Sintético
Mercería 50.
Algodón: 50~60
Seda “A”
Sintético
Mercerized 50~60
Algodón: 40~50
Hilo Mercería gruesa.
Poliester envuelto de algodón
35
Page 43

Straight Stitching
Puntadas rectas
Pattern Stitch Length Stitch Width
(Straight Stitch) 1-4
6
(Triple Stretch Stitch) Fixed 2.5
Starting Sewing
1. Turn the Pattern Selection Dial to show your
desired stitch in the Pattern Indication Window.
Setting the Pattern Selection Dial to Straight
Stitch or Triple Stretch Stitch is required.
2. Raise the needle to its highest position and lift the
presser foot lever.
3. Pull the upper thread toward the back of the
presser foot.
4. Place the fabric under the presser foot and position the needle 1 cm (3/8") from the edge of the
fabric.
5. Lower the presser foot.
6. To backtack, push down the Reverse Sewing
Button as far as possible. Reverse sewing is used
for locking the end of seams and where reinforcement is needed.
7. Release the Reverse Sewing Button and start
sewing in the forward direction by applying pressure to the foot controller.
Modelo de puntada
(Puntada recta) 1-4
(Triple puntada pespunto)
Para empezar a coser
1. Gire el selector de puntada hasta que la puntada
que desea aparezca en el indicador de puntada.
Es necesario situar el selector de puntada en
puntada recta o en triple puntada pespunte.
2. Levante la aguja a su posición más alta y levante
la palanca del prensatelas.
3. Tire el hilo superior hacia la parte de atrás del
prensatelas.
4. Coloque el tejido debajo del prensatelas y
posicione la aguja a 1 cm (3/8") de la orilla del
tejido.
5. Baje el prensatelas.
6. Para retroceder, baje a fondo el pulsador de
retroceso. El retroceso sirve para finalizar una
costura o reforzarla cuando sea necesario.
7. Suelte el pulsador de retroceso y vuelva a coser
hacia adelante, presionando el pedal.
Largo de puntada
Fija 2,5
Ancho de puntada
6
PUNTADAS RECTAS Y ZIGZAG
STRAIGHT AND ZIGZAG STITCHING
36
Page 44

Changing Sewing Direction
1. Stop the machine at the point where you wish to
change direction with the needle still in the fabric.
2. Raise the presser foot and turn the fabric to line up
its new direction using the needle as a turning
point.
3. Lower the presser foot and start sewing in the new
direction.
STRAIGHT AND ZIGZAG STITCHING
PUNTADAS RECTAS Y ZIGZAG
Cambio de sentido de costura
1. Pare la máquina donde quiera cambiar de sentido, con la aguja picada en el tejido.
2. Levante el prensatelas y gire el tejido en la
dirección que debe seguir, usando la aguja como
placa giratoria.
3. Baje el prensatelas y empiece a coser en la nueva
dirección tal como ilustrado.
Finishing Sewing
Reverse stitching is used to lock the threads at the
end of the seam or wherever reinforcement is needed.
1. Stitch to the end of the seam and stop.
2. Push the Reverse Sewing Button and stitch backwards for 1 cm (3/8") from the end of the fabric.
Para terminar las costuras
La puntada de retroceso se usa para trabar los hilos
al final de una costura o en cualquier punto donde
sea necesario reforzar la costura.
1. Cosa hasta el final de la costura y pare.
2. Apriete el pulsador de retroceso y cosa hacia
atrás sobre 1 cm (3/8") a partir de la orilla del
tejido.
37
Page 45

Removing the Material from the Machine
1. Stop the machine.
2. Raise the needle to its highest position and make
sure that the thread take-up lever is also in its
highest position (Model PS-2200, STAR110).
3. Lift the presser foot and pull the fabric out gently
to the left side.
4. Cut both threads with the thread cutter located on
the left side of the machine.
1 Thread cutter
5. To prepare the machine for the next seam, pull
about 10 cm (4") of thread through the toes of the
presser foot toward the back of the machine.
1
Para retirar el tejido de la máquina
1. Pare la máquina.
2. Levante al máximo la aguja y asegúrese de que
la palanca del tirahilos también está en su posición
más elevada (Modelos PS-2200 y STAR110).
3. Levante el prensatelas y saque suavemente el
tejido por la izquierda.
4. Corte ambos hilos con el cortador ubicado en la
parte izquierda de la máquina.
1
Cortador de hilos
5. Con el fin de dejar la máquina preparada para la
próxima costura, tire unos 10 cm (4") del hilo
inferior y páselo por los salientes del prensatelas
hacia la parte posterior de la máquina.
PUNTADAS RECTAS Y ZIGZAG
STRAIGHT AND ZIGZAG STITCHING
(Model PS-2500, STAR140E)
1. Press the “START/STOP” Button again. The needle stops in its lowest position.
2. When you are finished sewing, pull the Thread
Cutter Lever down until the needle starts to move.
After the threads are cut, the needle moves up
and the Thread Cutter Lever returns to its original
position.
NOTE:
Do not operate the Thread Cutter Lever while sewing
or when there is no fabric in the sewing machine.
Threads may become tangled or some other problem may be incurred.
2 Fabric
2
(Modelo PS-2500, STAR140E)
1. Presione de nuevo el pulsador de puesta en
marcha/parada. La aguja se detiene en su posición
más baja.
2. Cuando termine de coser, baje la palanca del
cortahilos hasta que la aguja empiece a moverse.
Una vez cortados los hilos, la aguja se desplaza
hacia arriba y la palanca del cortahilos vuelve a su
posición inicial.
NOTA:
No presione la palanca del cortahilos mientras cose
o si no hay tejido en la máquina de coser, ya que
podrían enredarse los hilos o podría surgir otro
problema.
2
Tejido
38
Page 46

* During twin needle sewing and when sewing with
thread thicker than #30 or with nylon, metallic and
other specialty threads, cut the threads with the
thread cutter on the left side of the machine.
* After the threads are cut using the Thread Cutter
Lever, you can continue sewing without drawing
up the lower thread.
* The automatic thread cutter cannot be used when
the needle or presser foot are raised or the bobbin
winder shaft is moved to the right.
* Refer to “Automatic Thread Cutting” on page 72
if the threads become tangled or cannot be cut or
STRAIGHT AND ZIGZAG STITCHING
PUNTADAS RECTAS Y ZIGZAG
if any other problems occur while using the automatic thread cutter.
3. After the needle has completely stopped moving,
raise the Presser Foot Lever and remove the
fabric.
* Si cose con aguja doble o con una aguja cuyo
grosor supera el (symbol) 30, o con hilos de
nylon, metálicos u otros hilos especiales, corte
los hilos con el cortahilos situado en el lado
izquierdo de la máquina.
* Una vez cortados los hilos con la palanca del
cortahilos, puede seguir cosiendo sin levantar el
hilo inferior.
* El cortahilos automático no podrá utilizarse cuando
la aguja o el prensatelas estén levantados, o si el
eje de hacer canilla se ha desplazado a la derecha.
* Si los hilos se enredan, si no puede cortarlos o si
aparece cualquier otro problema al utilizar el
cortahilos automático, consulte la sección
"Cortahilos automático" (pág. 72).
3. Cuando la aguja esté totalmente quieta, levante
la palanca del prensatelas y retire el tejido.
Top Stitching and Stretch Materials
Straight Stitch is used for top stitching and sewing
lightweight fabrics.
Triple Stretch Stitch is used for stretch fabrics.
Puntadas en derecho y tejidos elásticos
La puntada recta sirve para la costura superior y
para la costura de tejidos ligeros.
La puntada de triple pespunte se usa para los tejidos
elásticos.
39
Page 47

Zigzag Stitching
Puntadas zigzag
Pattern Stitch Length Stitch Width
(Zigzag Stitch) F-4 0-5
ZIGZAG STITCH
Select the Zigzag Stitch using the Pattern Selection
Dial. Then, select the Stitch Length and the Stitch
Width.
It is recommended to sew using the Straight Stitch at
the beginning and end of the Zigzag Stitches.
(This acts as a reinforcement stitch.)
SATIN STITCH
When the Zigzag Stitch length is set in the “F” range,
it produces a Satin Stitch (a dense Zigzag Stitch).
The Satin Stitch can be used for making buttonholes
and decorative stitches. Select the Zigzag Stitch,
then set the stitch length in the “F” range and set the
desired stitch width.
When sewing a satin stitch, use a slightly loose upper
thread tension to produce more beautiful stitches.
Modelo de puntada
(Puntada zigzag) F-4 0-5
Puntadas zigzag
Seleccione la puntada zigzag con el selector de
puntadas. Luego, elija el largo y ancho de la puntada.
Se recomienda coser siempre unas puntadas rectas
al principio y al final de una costura de puntadas
zigzag.
(Actúa como puntada de refuerzo).
Puntada de realce
Cuando se define el largo de la puntada en la parte
“F”, se coserán puntadas tupidas (puntada zigzag
muy cerradas) que pueden servir para hacer ojales
o como puntadas decorativas. Seleccione la puntada zigzag y luego coloque el selector de largo de
puntada en la zona “F” y ajuste el ancho deseado.
Al coser bordados de realce, disminuya ligeramente
la tensión del hilo superior y conseguirá puntadas
más bonitas.
Largo de puntada
Ancho de puntada
PUNTADAS RECTAS Y ZIGZAG
STRAIGHT AND ZIGZAG STITCHING
40
Page 48

Blind Hem Stitching
Puntadas invisibles
Pattern Stitch Length Stitch Width
(Blind Hem Stitch) F-2
(Stretch Blind Stitch) F-1.5
The Blind Hem Stitch is used to finish the edge of a
project like the hem of a pair of pants without the
stitch showing. Use the Blind Hem Stitch for any nonstretch fabrics and the Stretch Blind Stitch for stretch
fabrics.
PUNTADAS INCORPORADAS
1. Both the threads should be the same color as the
BUILT-IN STITCHES
fabric.
2. Fold back the fabric to the desired location of the
hem as shown in fig. A. Then, fold the edge of the
fabric as in fig. B. Leave a 6 mm (1/4") overlap at
the edge.
3. Set the Pattern Selection Dial to either 4 or 7 and
set the stitch length and width.
4. Sew on the fold as in fig. C.
5. When the fabric is unfolded you will have a Blind
Stitch hem as shown in fig. D.
NOTE:
The Stretch Blind Stitch is useful for stretch fabrics.
3-6
Modelo de puntada
(Puntada invisible) F-2
(Puntada invisible elástica)
La puntada de dobladillo invisible sirve para terminar
la orilla de una prenda, tal como el borde inferior de
los pantalones, sin que se vea la costura. Utilice la
puntada de dobladillo invisible para todos los tejidos
que no sean elásticos y la puntada invisible elástica
para los tejidos elásticos.
1. Ambos hilos deben ser del mismo color que el
tejido.
2. Doble el tejido según la orilla que desee hacer tal
como ilustra la fig. A. Luego, dele la vuelta tal
como indica la fig. B. Deje unos 6 mm (1/4") sin
coser para esconderlos.
3. Ponga el selector de puntada en 4 ó 7 y ajuste el
largo y ancho de la puntada.
4. Cosa en el pliegue tal como muestra la fig. C.
5. Al desdoblar el tejido, tendrá un dobladillo con
puntada invisible tal como lo muestra la fig. D.
NOTA:
La puntada elástica invisible (Puntada invisible elástica) se recomienda para tejidos elásticos.
Largo de puntada
F-1,5
Ancho de puntada
3-6
41
ABCD
Page 49

Shell Tuck Stitching
Puntada ondas
Pattern Stitch Length Stitch Width
(Shell Tuck Stitch) F-3 3-6
The Shell Tuck Stitch can be used to sew a picot
(lace like) edge on a lightweight fabric.
1. Set the Pattern Selection Dial to Shell Tuck Stitch.
2. Sew the fabric on the bias, placing it under the
presser foot so that the straight stitches are sewn
on the seamline and the zigzag stitches are sewn
slightly over the folded edge.
3. This stitch requires a tighter thread tension than
normal.
4. Sew at a slow speed.
Modelo de puntada
(Puntada ondas) F-3 3-6
La puntada ondas puede usarse para coser una
puntilla (como encaje) en un tejido fino.
1. Ponga el selector de puntada en la puntada
ondas.
2. Cosa el tejido en el sesgo, situándolo debajo del
prensatelas de tal forma que la puntada recta se
cosa en líneas formando costura y que las puntadas zigzag cosan las puntillas de los dobladillos.
3. Este trabajo requiere aumentar un poco más la
tensión de hilo que en condiciones normales.
4. Coser a velocidad lenta.
Largo de puntada
Ancho de puntada
42
BUILT-IN STITCHES
PUNTADAS INCORPORADAS
Page 50

Elastic Stitching
Puntada elástica
Pattern Stitch Length Stitch Width
(Elastic Stitch) F-2.5 3-6
The Elastic Stitch can be used for 3 functions:
mending, sewing elastic or joining fabric. Each is
explained below.
Set the Pattern Selection Dial to Elastic Stitch.
MENDING
1. Set the Stitch Length Dial between F and 2.5 and
set the Stitch Width Dial between 3 and 6.
2. Place the reinforcement fabric under area to be
mended.
3. Following the line of the tear, sew using the
Elastic Stitch as illustrated in fig. A.
SEWING ELASTIC
1. Place the elastic on the fabric.
2. As you sew, stretch the elastic both in the front
and behind the presser foot as shown in fig. B.
JOINING FABRIC
PUNTADAS INCORPORADAS
The Elastic Stitch can be used to join two pieces of
fabric together and is very effective when sewing
knitted fabrics. When nylon thread is used, the stitch
BUILT-IN STITCHES
will not be visible.
1. Place the edge of the two pieces of fabric together
and center them under the presser foot.
2. Sew them together using the Elastic Stitch taking
care to keep the two fabric edges close together
as shown in fig. C.
Modelo de puntada
(Puntada elástica) F-2,5 3-6
Se puede usar la puntada elástica para tres operaciones: los remiendos, la inserción de gomas elásti-
cas y como puntada de unión para juntar dos tejidos.
Ponga el selector de puntadas en la puntada elásti-
ca.
REMIENDOS
1. Ajuste el selector de largo de puntada entre F y
2,5 y el selector de ancho entre 3 y 6.
2. Coloque la tela de refuerzo debajo de la zona a
rematar.
3. Siguiendo la línea de la rasgadura, cosa con la
puntada elástica tal como ilustrado en la fig. A.
INSERCION DE GOMAS ELASTICAS
1. Ponga la goma sobre el tejido.
2. A medida que esté cosiendo, estire el elástico
tanto delante como detrás del prensatelas tal
como se muestra en la fig. B.
PUNTADA DE UNION
La puntada elástica puede servir para unir dos
trozos de tejido y resulta muy eficiente para la
costura de prendas de punto. Si se usa un hilo de
nilón, la puntada resultará invisible.
1. Junte las orillas de ambos trozos de tejido y
céntrelas debajo del prensatelas.
2. Cosalas juntas con la puntada elástica, teniendo
sumo cuidado en mantener las dos orillas de los
tejidos muy juntas, tal como se aprecia en la fig.
C.
Largo de puntada
Ancho de puntada
A B C
43
Page 51

Double Action Stitching
Puntada de acción doble
Pattern Stitch Length Stitch Width
(Double Action Stitch) F-3 3-6
(Bridging Stitch) F-3 3-6
(Rampart Stitch) F-3 3-6
(Decorative Stitch) 6
This stitch is used for joining two pieces of fabric, for
example, when making patchwork.
Set the Pattern Selection Dial to Double Action
Stitch.
Modelo de puntada
(Puntada de acción doble)
(Puntada puente) F-3 3-6
(Puntada ondas abieatas)
(
Puntada
decorativa) 6
Esta puntada se usa para unir piezas de tejido o
realizar trabajos como el patchwork.
Coloque el selector de puntadas en la puntada de
acción doble o de unión.
Largo de puntada
F-3 3-5
F-3 3-6
Ancho de puntada
44
BUILT-IN STITCHES
PUNTADAS INCORPORADAS
Page 52

Scallop Stitching
Ondas decorativas
Pattern Stitch Length Stitch Width
(Scallop Stitch) F-1.5 3-6
This machine automatically produces a Scallop
Stitch which may be used as a decorative edging.
1. Set the Pattern Selection Dial to Scallop Stitch.
2. Sew the Scallop Stitch along the edge of the
material.
3. If desired, trim around the scallop with scissors to
create a scalloped edge. Be careful not to cut the
thread.
PUNTADAS INCORPORADAS
BUILT-IN STITCHES
Modelo de puntada
(Puntada festón) F-1,5 3-6
Esta máquina puede realizar automáticamente unas
ondas decorativas que pueden servir para decorar
los bordes de la tela.
1. Coloque el selector de puntadas en la puntada
festón.
2. Cosa las ondas decorativas a lo largo del borde
del material.
3. Si lo desea, corte el borde con tijeras, siguiendo
las ondas para crear un borde festonado. Sin
embargo, tenga sumo cuidado en no cortar el
hilo.
Largo de puntada
Ancho de puntada
45
Page 53

Decorative Stitching
Puntadas decorativas
Pattern Stitch Length Stitch Width
(Lightning Stitch) 6
(Square Stitch) 6
(Decorative Stitch) 6
(Triangle Stitch) F-1 3-6
(Bead Stitch) 3-6
(Arrow Head Stitch) 3-6
(Parallelogram Stitch) 3-6
(Decorative Stitch)
6
These stitches can be used for making decorative
top stitching and for smocking.
Set the Pattern Selection Dial to Lightning Stitch or
Bead Stitch or etc.
Modelo de puntada
(Puntada escalera) 6
(Puntada festón doble) 6
(
Puntada
decorativa) 6
(
Puntada
triángulo) F-1 6
(
Puntada
festón doble) 3-6
(
Puntada
flecha) 3-6
(
Puntada
paralelogramo) 3-6
(
Puntada
decorativa)
Largo de puntada
Ancho de puntada
6
Estas puntadas pueden utilizarse para hacer
puntadas decorativas en los bordes y para smocking.
Coloque el selector de puntadas en la puntada de
escalera o en la puntada de festón doble.
46
BUILT-IN STITCHES
PUNTADAS INCORPORADAS
Page 54

Patchwork
Patchwork
Pattern Stitch Length Stitch Width
(Link Stitch)
(Fagoting Stitch)
These stitches are used to join two pieces of fabric
while leaving a space between their edges.
1. Fold over the edges of the two pieces of fabric for
the hem and baste the edges to a thin piece of
paper leaving a small space between them.
2. Set the Pattern Selection Dial to Link Stitch or
Fagoting Stitch.
3. Stitch along the edge, pulling both threads slightly
when beginning to sew.
• Use thicker than normal threads for sewing.
4. After sewing, remove the basting and the paper.
Finish by tying knots on the reverse side at the
beginning and the end of the seams.
1 First needle drop
PUNTADAS INCORPORADAS
3-6
Modelo de puntada
(Puntada de unión)
(Puntada fagoting)
Estas puntadas sirven para juntar dos piezas de
tejido dejando un espacio entre las dos orillas.
1. Doble las orillas de las dos piezas de tejido para
el dobladillo e hilvánelas a un papel fino dejando
un pequeño espacio entre ambas piezas.
2. Sitúe el selector de puntada en puntada de unión
o puntada fagoting.
3. Cosa a lo largo de las orillas, tirando ligeramente
de ambos hilos al comienzo.
•
Use hilos más gruesos de lo normal.
4. Después de coser, quite los hilvanes y el papel.
Anude los cabos de los hilos del comienzo y final
de la costura por el revés.
1
Primer pespunto de la aguja.
Largo de puntada
Ancho de puntada
3-6
BUILT-IN STITCHES
47
1
1.5 mm
Page 55

Overedge Stitching
Puntada por encima de la
orilla
Pattern Stitch Length Stitch Width
(Comb Stitch)
(Slant Overlock Stitch)
(Elastic Overlock Stitch)
(Elastic Shell Tuck Stitch)
These stitches are used to join together seams and
finish them in one operation. The Elastic Overlock
Stitche is useful when sewing stretch materials.
1. Set the Pattern Selection Dial to Comb Stitch,
Elastic Overlock Stitch or Elastic Shell Tuck Stitch.
2. Position the fabric under the presser foot so that
the seamline (or arrowhead point) is approximately 3 mm (1/8") to the left of the center of the
presser foot. This stitch works best with a seam
allowance of approximately 6 mm (1/4") as this
allows the right (zigzag) side of the stitch to
overlock the cut edge of the fabric as shown in
fig. A.
3. If the seam allowance is wider than the stitch
pattern, trim away any excess fabric after stitching.
A finished Elastic Overlock Stitch is shown in fig. B.
When sewing the Slant Overlock Stitch, position the
fabric so that its edge is on the left of the needle. (See
fig. C)
F-3
3-6
Modelo de puntada
(Puntada peine)
(Puntada overlock estrecha)
(Puntada overlock elástica)
(Puntada ondas elástica)
Estas puntadas se usan para juntar costuras y
acabarlas en una sola operación. La puntada overlock
elástica es ideal para coser tejidos elásticos.
1. Sitúe el selector de puntada en puntada peine,
puntada overlock elástica o puntada ondas
elástica.
2. Coloque el tejido debajo del prensatelas para que
la línea de costura (con la puntada de flecha)
quede unos 3 mm (1/8") a la izquierda del centro
del prensatelas. Esta puntada da los mejores
resultados con una tolerancia de costura de unos
6 mm (1/4") dado que así permite a la parte
derecha (zigzag) de la puntada enganchar la
orilla cortada del tejido tal como ilustrado en la fig.
A.
3. Si la tolerancia de costura es más ancha que la
puntada, corte cualquier pedazo de tejido que
sobre después de coser.
En la fig. B, puede ver una puntada overlock elástica
acabada.
Cuando cosa la puntada overlock estrecha, ponga el
tejido de forma que su borde quede a la izquierda de
la aguja. (Ver la fig. C)
Largo de puntada
F-3
Ancho de puntada
3-5
BUILT-IN STITCHES
AB C
PUNTADAS INCORPORADAS
48
Page 56

Feather Stitching
Puntada pluma
Pattern Stitch Length Stitch Width
(Feather Stitch) 3-6
Use the Feather Stitch as a decorative top stitch or
when hemming blankets, tablecloths or draperies or
when embroidering.
1. Set the Pattern Selection Dial to Feather Stitch.
2. Place the fabric right side up and sew 1 cm (3/8")
from the edge of the fabric.
3. Trim close to the stitching.
This stitch will prevent the fabric from unravelling.
PUNTADAS INCORPORADAS
Modelo de puntada
(Puntada pluma) 3-6
La puntada pluma puede usarse como puntada de
tope decorativo o para el dobladillo de frazadas,
manteles, cortinas o bien para bordado.
1. Coloque el selector de puntadas en la puntada
pluma.
2. Coloque el tejido con el derecho arriba y cosa 1
cm (3/8") a partir de la orilla.
3. Corte el tejido cerca de las puntadas.
Esta puntada impedirá que el tejido se deshilache.
Largo de puntada
Ancho de puntada
BUILT-IN STITCHES
49
Page 57

Triple Zigzag Stretch
Stitching
Triple puntada zigzag
elástica
Pattern Stitch Length Stitch Width
(Triple Zigzag Stretch Stitch)
This stitch can be used to sew heavyweight stretch
fabrics wherever a Zigzag Stitch could be used. The
Triple Zigzag Stretch Stitch can also be used as a
decorative top stitch.
Set the Pattern Selection Dial to Triple Zigzag Stretch
Stitch.
3-6
Modelo de puntada
(Triple puntada zigzag elástica)
Esta puntada puede servir para coser materiales
gruesos y pesados siempre y cuando una puntada
zigzag pueda utilizarse. Esta puntada elástica de
triple pespunto o puntada festón triple también puede servir como puntada decorativa en el derecho del
tejido.
Coloque el selector de puntadas en la triple puntada
zigzag elástica.
Largo de puntada
Ancho de puntada
3-6
50
BUILT-IN STITCHES
PUNTADAS INCORPORADAS
Page 58

Making a Buttonhole
Para coser ojales
Pattern Stitch Length Stitch Width Foot
F-1.5 4-6 Buttonhole foot
NOTE:
1. It is recommended to practice making a buttonhole on a scrap piece of fabric before attempting
it on the actual garment.
2. When making buttonholes on soft fabrics, place a
stabilizer material on the underside of the fabric.
One-step automatic buttonhole-making is a simple process that provides reliable results.
MAKING A BUTTONHOLE
1. Using tailor’s chalk, mark the position of the
buttonhole on the fabric.
2. Set the Pattern Selection Dial to Buttonhole.
NOTE:
Set the Stitch Width Dial to “Max” for a buttonhole
with an actual width of 5 mm or to “4” for a 3-mmwidth buttonhole.
3. Attach the buttonhole foot, pull open the button
holder and insert a button. (See fig. B)
* The size of the buttonhole is determined by the
button inserted into the button holder.
4. Align the red line on the presser foot with the mark
on the fabric, then lower the Presser Foot Lever.
Be sure to pass the thread under the presser foot
and pull it toward you. (See fig. C)
Modelo de Largo de Ancho de Prensatelas
puntada puntada puntada
F-1,5 4-6
NOTA:
1. Le recomendamos hacer una prueba de costura
de ojales en un pedazo de tela antes de empezar
a hacerla en el tejido de trabajo.
2. Para hacer ojales en materiales muy finos, coloque un material estabilizador debajo del tejido.
La función de costura automática de ojales en
una sola operación es un proceso simple que
ofrece increíbles resultados.
COSIDO DEL OJAL
1. Con jaboncillo, marque la posición del ojal en el
tejido.
2. Sitúe el selector de puntada en ojales.
NOTA:
Sitúe el selector de ancho de puntada en "Max" para
coser ojales con una anchura real de 5 mm, o en "4"
para ojales de 3 mm de anchura.
3. Coloque el prensatelas para ojales, tire del soporte
del botón hasta abrirlo e inserte un botón (véase
fig. B).
* El botón insertado en el soporte del botón
determina el tamaño del ojal.
4. Alinee la línea roja del prensatelas con la marca
del tejido y baje la palanca del prensatelas.
Asegúrese de pasar el hilo por debajo del
prensatelas y tire de él hacia usted (véase fig. C).
Prensatelas
para ojales
BUTTONHOLE AND BUTTON SEWING
OJALES Y COSTURA DE BOTONES
51
Page 59

NOTE:
Do not lower the Presser Foot Lever while pushing in
the area of the presser foot marked a in fig.C.
Otherwise the buttonhole will not be sewn with the
correct size.
1 Do not close this gap.
2 Align the lines on the presser foot.
A
NOTA:
No baje la palanca del prensatelas mientras esté
presionando la zona del prensatelas marcada como
a
en la figura C, ya que cosería un ojal de tamaño
incorrecto.
1
Permita este espacio.
2
Alinee las líneas en el prensatelas.
1
A
2
5. Pull down the buttonhole lever to its lowest position, then lightly push it toward the back of the
machine. (See fig. D)
1 Button holder
2 Mark on fabric
3 Line on presser foot
B
1
D
5. Coloque la palanca del prensatelas en su posición
más baja y empújela suavemente hacia la parte
trasera de la máquina (véase fig. D).
1
Prensatelas
2
Marca en el tejido
3
Línea en el prensatelas
C
2
3
a
52
OJALES Y COSTURA DE BOTONES
BUTTONHOLE AND BUTTON SEWING
Page 60

6. Hold the upper thread and press the “START/
STOP” Button.
7. After stitches 1, 2, 3 and 4 are automatically
sewn, stop the sewing machine.
6. Coja el hilo superior y presione el pulsador de
puesta en marcha/parada.
7. Después de que las puntadas
hayan cosido automáticamente, pare la máquina
de coser.
1, 2, 3
y 4 se
3
24
1
Odd-shaped buttons that
do not fit into the button
holder plate
Add the button diameter to its thickness, then set the
buttonhole presser foot scale to this measurement.
The distance in the scale between two lines of the
BUTTONHOLE AND BUTTON SEWING
OJALES Y COSTURA DE BOTONES
same length is 0.5 cm (13/64").
Example:
For a button with a diameter of 1.5 cm (19/32") and
a thickness of 1 cm (3/8"), the scale should be set at
2.5 cm (1").
2
Botones con formas
extrañas que no caben en
el soporte del botón
1
4
5
Añada el diámetro del botón a su grosor y coloque la
escala del prensatelas de ojales en esta medida. La
distancia entre dos líneas de igual longitud de la
escala es de 0,5 cm. (13/64")
Ejemplo:
Para un botón cuyo diámetro es de 1,5 cm (19/32")
y de 1 cm de grosor (3/8"), la escala debe situarse en
2,5 cm (1").
3
6
1 Thickness [1 cm (3/8")]
2 Diameter [1.5 cm (19/32")]
3 Button holder plate
4 Scale
5 Diameter + thickness [2.5 cm (1")]
6 0.5 cm (13/64")
53
1
Grosor (1 cm (3/8"))
2
Diámetro (1,5 cm (19/32"))
3
Soporte del botón
4
Escala
5
Diámetro + grosor (2,5 cm (1"))
6
0,5 cm (13/64")
Page 61

SECURING THE STITCHING AND CUTTING THE
BUTTONHOLE
1. To secure the stitching, turn the material 90
degrees counterclockwise and sew Straight
Stitches to the end of the front bar tack of the
buttonhole.
2. Remove the material from the machine. It is
recommended that pins be placed across both
ends of the buttonhole as protection against cutting the stitches.
3. Cut an opening in the middle of the buttonhole
with a seam ripper tool. Be careful not to cut
through any stitches.
Para completar las puntadas y cortar el ojal
1. Para asegurar las puntadas, gire el tejido a 90
grados en el sentido contrario al de las manecillas
de un reloj y cosa unas Puntadas Rectas hasta el
final de la línea del remate de la parte delantera.
2. Retire el tejido de la máquina. Se recomienda
colocar alfileres en ambos extremos del ojal para
evitar el corte de las puntadas.
3. Corte una apertura en el medio del ojal con el
cortador especial que sirve para abrir costuras.
Tenga cuidado en no cortar ninguna puntada.
Buttonhole Fine
Adjustment
If the stitching on the two sides of the buttonhole do
not appear uniform, the following adjustments can
be made.
1. Set the Stitch Length Dial at “F~1” and stitch the
right side of the buttonhole on a scrap of fabric
while observing how the material is fed.
2. If the right side of the buttonhole is too coarse or
fine, adjust the feeding of the material with the
Stitch Length Dial.
Ajuste fino de los ojales
Si las puntadas en ambos lados del ojal no parecen
ser uniformes, se pueden hacer los siguientes ajustes.
1. Sitúe el selector de largo de puntada en
"F(symbol)1" y cosa la parte derecha del ojal en
un pedazo de tejido, vigilando la alimentación del
tejido.
2. Si la parte derecha del ojal es demasiado gruesa
o fina, ajuste la alimentación del tejido con el
selector de largo de puntada.
54
OJALES Y COSTURA DE BOTONES
BUTTONHOLE AND BUTTON SEWING
Page 62

1 Right row
6
+ – + –
99
2 STITCH LENGTH
3 Shorter
4 Longer
5 Adjusted stitch
1
Lado derecho
2
Largo de puntada
3
Más corto
4
Más largo
5
En caso que
1
2
34
F
3. After obtaining a satisfactory feeding on the right
side, stitch the left side of the buttonhole and
observe the feeding.
4. If the left side is too coarse or fine compared to the
right side, adjust the buttonhole fine adjustment
screw as described below.
If the left side is too coarse, turn the screw with
the enclosed large screwdriver in the – direction.
If the left side is too fine, turn the screw with the
enclosed large screwdriver in the + direction.
This adjustment allows both sides of the buttonhole
to appear uniform.
6 Stitch length dial
7 Buttonhole fine adjusting screw
8 Right row
9 Adjusted stitch
5
F
3. Una vez obtenida una buena alimentación en el
lado derecho, cosa la parte izquierda del ojal y
vigile la alimentación.
4. Si la parte izquierda es demasiado gruesa o fina
respecto a la derecha, ajuste el tornillo de ajuste
fino del ojal, tal como se describe a continuación.
Si la parte derecha es demasiada gruesa, con el
destornillador grande incluido, gire el tornillo en
el sentido del –. Si la parte derecha es demasiada
fina, gire dicho tornillo en el sentido del +.
Este ajuste permite que ambos lados del ojal parezcan uniformes.
6
Dial de longitud de puntada
7
Tornillo de ajuste fino de ojal
8
Lado derecho
9
Puntada ajustada
F
5
BUTTONHOLE AND BUTTON SEWING
OJALES Y COSTURA DE BOTONES
55
8
7
Page 63

When the buttonhole is not sewn correctly:
There are two different procedures for correcting buttonhole sewing, depending on which part
of the buttonhole is not sewn correctly.
Correction Procedure 1 (See fig. A)
1. Raise the Presser Foot Lever, then remove the
fabric and all of the sewn thread.
2. Pull the buttonhole lever slightly toward you.
3. Sew about 10 stitches with no fabric in the machine.
4. Place the fabric under the presser foot again, then
lightly push the buttonhole lever toward the back
of the machine and sew the buttonhole from the
beginning.
Correction Procedure 2 (See fig. B)
1. Raise the Presser Foot Lever, then remove the
fabric and all of the sewn thread.
2. Place the fabric under the presser foot again, then
lightly push the buttonhole lever toward the back
of the machine and sew the buttonhole from the
beginning.
Ojales mal cosidos:
Existen dos procedimientos diferentes para
corregir el cosido de los ojales, en función de la
parte del ojal que se ha cosido de forma
incorrecta.
Procedimiento de corrección 1 (Véase fig. A)
1. Levante la palanca del prensatelas, y retire el
tejido y todo el hilo cosido.
2. Tire ligeramente hacia usted de la palanca de
ojales.
3. Cosa unas 10 puntadas sin tejido.
4. Vuelva a colocar el tejido debajo del prensatelas,
presione ligeramente la palanca de ojales hacia
la parte trasera de la máquina y cosa el ojal desde
el principio.
Procedimiento de corrección 2 (véase fig. B)
1. Levante la palanca del prensatelas y retire el tejido
y todo el hilo cosido.
2. Vuelva a colocar le tejido debajo del prensatelas,
presione ligeramente la palanca de ojales hacia
la parte trasera de la máquina y cosa el ojal desde
el principio.
AB
NOTE:
If the buttonhole lever is pushed toward the back of
the machine while sewing any stitch other than a
buttonhole, the buttonhole feed will be used and the
stitch will not be sewn correctly.
If the buttonhole lever is accidentally pushed toward
the back of the machine, lightly pull the buttonhole
lever slightly toward you, sew about 10 stitches with
no fabric in the machine, then raise the buttonhole
lever.
NOTA:
Si se empuja hacia la parte posterior de la máquina
la palanca de ojales al coser una puntada que no sea
un ojal, entrará en acción la alimentación de ojales
y la puntada no se coserá correctamente.
Si ello sucede por accidente, tire ligeramente hacia
usted de la palanca de ojales, cosa unas 10 puntadas
sin tejido y levante la palanca de ojales.
56
OJALES Y COSTURA DE BOTONES
BUTTONHOLE AND BUTTON SEWING
Page 64

Button Sewing
Costura de botones
Pattern Stitch Length Stitch Width Foot
F Less than 5
1. Measure the distance between the holes and set
the appropriate stitch width using the Stitch Width
Dial. For example, if the distance between the
holes is 1.5 mm, set the stitch width to 1.5.
2. Change the foot to the button sewing foot.
3. Lower the feed dogs by setting the Drop Feed
Lever to the Down Position as shown on page 17.
4. Place a button between the foot and the fabric and
make sure that the needle enters the holes without hitting the button. If it hits see Step 1.
5. At a slow speed, sew approximately 10 stitches.
6. Remove the material from the machine. Cut the
upper and lower threads and tie both threads at
the back of the material.
Button
Sewing Foot
Modelo de Largo de Ancho de Prensatelas
puntada puntada puntada
F Cualquiera
1. Mida la distancia entre los orificios y ajuste el
ancho de puntada correspondiente con el selector
adecuado. Por ejemplo, si la distancia es de 1,5
mm, ajuste el ancho de puntada en 1,5.
2. Cambie el prensatelas por uno para botones.
3. Baje los dientes de los alimentadores poniendo
su palanca en la posición baja, tal como se indica
en la página 17.
4. Coloque un botón entre el prensatelas y el tejido
y asegúrese de que la aguja pase por los agujeros sin picar el botón. Si golpea el botón, véase el
punto 1.
5. Cosa unas 10 puntadas a baja velocidad.
6. Retire el tejido de la máquina. Corte los hilos
inferior y superior y haga un nudo con ambos en
el revés del tejido.
Prensatelas
para botones
BUTTONHOLE AND BUTTON SEWING
OJALES Y COSTURA DE BOTONES
57
Page 65

Zipper Insertion
3
Inserción de cremalleras
Pattern Stitch Length Stitch Width Foot
2-3 0 Zipper Foot
The zipper foot is used to sew various types of
zippers and can easily be positioned to the right or
left side of the needle.
When sewing the right side of the zipper, attach the
shank to the left pin of the zipper foot. When sewing
the left side of the zipper, attach the shank to the right
pin of the zipper foot. (See fig. A)
1. Set the Pattern Selection Dial to Straight Stitch.
Set the Stitch Length between 2 and 3.
Set the Stitch Width 0.
2. Lower the presser foot lever and fix either the left
or right pin of the zipper foot onto the shank.
3. Fold the edge of the material 2 cm (3/4") and place
the zipper under the folded portion.
4. Lower the needle into the notch located either on
the left or right side of the zipper foot.
5. Sew from the bottom of the zipper toward the top
on both sides. The needle should be positioned
on the zipper side of the foot for best results. (See
fig. B)
6. To sew the opposite side of the zipper, release
the foot by pressing the button located at the back
of the presser foot, install the zipper foot on the
other side of the zipper and continue sewing
using the other side notch.
1 Zipper foot
2 Right pin for sewing the left side of the
zipper
3 Left pin for sewing the right side of the
zipper
Modelo de Largo de Ancho de Prensatelas
puntada puntada puntada
2-3 0
La pata de cremalleras sirve para coser varios tipos
de cremalleras y puede colocarse fácilmente hacia
la izquierda o derecha de la aguja.
Cuando la cremallera se cose por el lado derecho,
instale la pata deslizándola hacia la izquierda. Cuando se cose la cremallera por el lado izquierdo, instale
la pata deslizándola hacia la derecha, tal como lo
muestra la fig. A.
1. Coloque el selector de puntadas en la puntada
recta. Ajuste el largo de puntada entre 2 y 3.
Sitúe el ancho de punzada en 0.
2. Baje la palanca del prensatelas y coloque el eje
izquierdo o derecho de la pata de cremalleras en
la zanca.
3. Doble la orilla del tejido a 2 cm (3/4") y coloque la
cremallera debajo de la parte doblada.
4. Baje la aguja en la hendidura situada a la izquierda o derecha de la pata de cremalleras.
5. Cuesa a partir de la parte inferior de la cremallera
hacia la parte superior, por ambos lados. Para
mejores resultados, se debe colocar la aguja del
lado de la pata y de la cremallera. Véase fig. B
para mayores detalles.
6. Para coser el lado opuesto de la cremallera,
suelte la pata al apretar el botón situado en su
parte posterior, instale la pata en el otro lado de
la cremallera y siga cosiendo, pasando la aguja
por la hendidura del otro lado.
1
Pata de cremalleras
2
Eje derecho para coser la parte izquierda
de la cremallera
3
Eje izquierdo para coser la parte derecha
de la cremallera
Pata de cremalleras
USO DE ACCESORIOS Y APLICACIONES
USING ATTACHMENTS AND APPLICATIONS
AB
1
2
58
Page 66

USING ATTACHMENTS AND APPLICATIONS
USO DE ACCESORIOS Y APLICACIONES
Gathering
Pattern Stitch Length
2
1. Set the Pattern Selection Dial to Straight Stitch.
2. Loosen the tension of the upper thread so that the
lower thread lies on the underside of the material.
3. Sew a single row or multiple rows of Straight
Stitch(es).
4. Pull the lower thread(s) to gather the material.
Fruncido
Modelo de puntada Largo de puntada
2
1. Coloque el selector de puntadas en la puntada
recta.
2. Suelte la tensión del hilo superior para que el hilo
inferior se encuentre tirante en el revés del tejido.
3. Cosa una línea simple o varias líneas de puntadas rectas.
4. Tire del o de los hilos inferiores para fruncir el
tejido.
Darning
Pattern Stitch Length Feed Dog
Any Down position
1. Lower the feed dogs by setting the Drop Feed
Lever to the Down Position as shown on page 17.
2. Set the Pattern Selection Dial to Straight Stitch.
3. Place the portion to be darned under the presser
foot together with a fabric on for reinforcement.
4. Lower the presser foot.
5. Begin sewing alternating between gently drawing
the work away from you and pulling it toward you.
59
Zurcido
Modelo de puntada
1. Baje los alimentadores poniendo la palanca correspondiente en la posición baja tal como se
explica en la página 17.
2. Coloque el selector de puntadas en la puntada
recta.
3. Ponga la parte de tejido que se debe zurcir debajo
del prensatelas, con un tejido de refuerzo.
4. Baje el prensatelas.
5. Empiece a coser empujando y tirando alternativamente del tejido. Cuando la placa de zurcir está
puesta en la máquina, los sobre el tejido.
Largo de puntada Alimentadores
Cualquiera Bajados
Page 67

6. Repeat this motion until the portion to be darned
is filled with parallel lines of stitching.
6. Repita esta operación hasta que el zurcido se
haya completado, creando unas cuantas líneas
de puntadas paralelas.
USO DE ACCESORIOS Y APLICACIONES
USING ATTACHMENTS AND APPLICATIONS
Appliques
Pattern Stitch Length
F-2
An applique is created by cutting a contrasting piece
of fabric into a shape to be used as a decoration on
a garment or project.
1. Baste the cut design to the fabric in the location
where desired.
2. Carefully sew around the edge of the cutout
design with a Zigzag Stitch in the fine stitch
length.
3. Cut away the surplus fabric outside of the stitching.
4. Remove the basting, if necessary.
NOTE:
Make reinforcing Straight Stitches at the beginning
and the end of the stitching to secure.
Aplicaciones
Modelo de puntada
Si queremos colocar un aplique de piel etc. que haga
contraste, para utilizarla como decoración en una
prenda.
1. Hilvane la aplicación recortada al tejido, en donde
desee ponerla.
2. Cosa cuidadosamente los bordes del diseño con
una puntada zigzag en un largo de puntada fino.
3. Recorte el tejido sobrante que quede fuera del
pespunte.
4. Quite los hilvanes, si fuera necesario.
NOTA:
Haga unas puntadas rectas como refuerzo al principio y al final de las puntadas para que no puedan
deshacerse.
Largo de puntada
F-2
60
Page 68

USING ATTACHMENTS AND APPLICATIONS
USO DE ACCESORIOS Y APLICACIONES
Monogramming and
Embroidering
Pattern Stitch Length Stitch Width Foot
Any Any None
PREPARING FOR MONOGRAMMING AND EMBROIDERING
1. Lower the feed dogs by setting the Drop Feed
Lever to the Down Position as shown on page 17.
2. Set the Pattern Selection Dial to the appropriate
Zigzag Stitch setting.
3. Draw the lettering (for monogramming) or design
(for embroidering) on the surface of the fabric.
4. Stretch the fabric between embroidery hoops as
firmly as possible with the underside of the fabric
on the bottom of the inside hoop.
5. Place the work under the needle and lower the
presser bar with the foot removed.
6. Pull the lower thread up through the work at the
starting position by turning the balance wheel and
make a few holding stitches.
7. Grip the hoop with the thumb and forefingers of
both hands while pressing the fabric with the
middle and third fingers and supporting the outside of the hoop with your smaller fingers.
Monogramas y bordados
Modelo de Largo de Ancho de Prensatelas
puntada puntada puntada
Cualquiera Cualquiera
Preparación para monogramas y bordados
1. Baje los alimentadores poniendo la palanca correspondiente en la posición baja tal como se
explica en la página 17.
2. Ponga el selector de puntadas en la puntada
zigzag apropiada.
3. Dibuje las letras (para monogramas) o el diseño
(para bordados) en el derecho del tejido.
4. Estire el tejido en el bastidor tanto como pueda y
si es posible con el revés abajo del círculo interior.
5. Coloque la tela debajo de la aguja y baje la barra
del prensatelas, aunque no haya ningún
prensatelas puesto.
6. Girando la ruedecilla, pase el hilo inferior por el
trabajo y cosa unas cuantas puntadas para asegurarlo.
7. Sujete el bastidor con el pulgar e índice de cada
mano, presione el tejido con los dedos medios y
anulares y aguante los exteriores del bastidor con
los meñiques.
Quitarlo, sin
prensatelas
61
Page 69

MONOGRAMMING
1. Sew, moving the hoop slowly along the lettering
at a constant speed.
2. Secure with a few straight stitches at the end of
the last letter.
Monogramas
1. Cosa moviendo el bastidor lentamente por las
letras, a una velocidad constante.
2. Termine con unas puntadas rectas de seguridad
al final de la última letra.
USO DE ACCESORIOS Y APLICACIONES
USING ATTACHMENTS AND APPLICATIONS
EMBROIDERING
1. Stitch the outline of the design by moving the
embroidery hoop.
2. Fill in the design alternating from the outline of the
design to the inside and from the inside to the
edge of the outline until the design is completely
filled in. Keep the stitching close together.
NOTE:
A long stitch is made by moving the embroidery hoop
rapidly and a short stitch is made by moving it slowly.
3. Secure with a few Straight Stitches at the end of
the design.
Bordado
1. Remarque el contorno del diseño, moviendo el
bastidor de acuerdo con el dibujo.
2. Rellene el motivo de puntadas, adelantando alternativamente del contorno hacia el interior y del
interior hacia la orilla del contorno hasta que el
motivo quede completamente cubierto de puntadas, teniendo siempre cuidado en mantener las
puntadas muy juntas.
NOTA:
Se pueden realizar puntadas largas al mover el
bastidor rápidamente y puntadas cortas al moverlo
lentamente.
3. Termine con unas puntadas rectas de seguridad
al final del dibujo.
62
Page 70

USING ATTACHMENTS AND APPLICATIONS
USO DE ACCESORIOS Y APLICACIONES
OPTIONAL ACCESSORIES
Using the Walking Foot
Pattern Stitch Length Stitch Width
(Straight Stitch)
(Zigzag Stitch) 0-5
This foot is very useful for sewing materials such as
vinyl cloth, synthetic leather, thin leather, etc. These
materials are difficult to feed when sewing the walking foot prevents such materials from crumpling,
slipping or sticking between presser foot and material due to even feeding of upper and lower materials.
Note:
You can not use this foot for sewing other patterns,
(STRAIGHT and ZIGZAG STITCH)
1. Remove the power supply plug from the outlet.
2. Raise the needle and the presser foot.
3. Loosen the presser foot screw to remove the
presser foot holder. (See fig. A)
4. Attach the forked section of the connecting lever
to the needle clamp, install the walking foot to the
presser bar. (See fig B)
5. Lower the presser foot lever and then tighten the
accessory presser bar holder fixing screw. (See
fig.C)
1 Use a coin or screwdriver
1-4
0
ACCESORIOS OPCIONALES
Utilización del pie caminante
Modelo de puntada
(Puntada recta)
(Puntada zigazg) 0-5
Este pie resulta muy útil para coser materiales como
la tela de vinilo, el cuero sintético, cuero fino etc. Es
complicado alimentar la máquina con estos
materiales, y el pie caminante impide que se arruguen,
que resbalen o que queden trabados en el prensatelas
al coser al mismo tiempo los materiales superior e
inferior.
NOTA:
Sólo puede utilizar este pie para coser puntadas
rectas y puntadas zigzag.
1. Retire el enchufe de la toma de corriente.
2. Levante la aguja y el prensatelas.
3. Afloje el tornillo del prensatelas para retirar el
soporte del prensatelas (véase fig. A).
4. Sujete la horquilla de la palanca de conexión a la
abrazadera de la aguja e instale el pie caminante
en la barra prensadora (véase fig. B).
5. Baje la palanca del prensatelas y apriete el tornillo
de fijación del soporte de la barra prensadora
accesoria (véase fig. C).
Largo de puntada
1-4
Ancho de puntada
0
PARTS NAME
A Forked part of operation lever
B Presser bar holder
63
B
A
1
Utilice una moneda o un destornillador
DENOMINACIÓN DE LAS PARTES
A
1
A
Horquilla de la palanca de operaciones.
B
Soporte de la barra prensadora.
Page 71

B
C
USO DE ACCESORIOS Y APLICACIONES
USING ATTACHMENTS AND APPLICATIONS
NOTE:
Please sew in slow to medium speed.
Nota:
Cosa a una velocidad entre baja y media.
64
Page 72

USING ATTACHMENTS AND APPLICATIONS
USO DE ACCESORIOS Y APLICACIONES
OPTIONAL ACCESSORIES
ACCESORIOS OPCIONALES
Using the Spring-action
Quilting Foot
Pattern Stitch Length Stitch Width Feed Dog
Any 0 (center)
The Spring -action Quilting Foot is useful for darning
and freemotion machine quilting.
1. Remove the power supply plug from the outlet.
2. Raise the needle and the presser foot.
3. Loosen the presser foot screw to remove the
presser foot holder. (See fig.A)
4. Attach the quilting foot, making sure that part
indicated by A in the illustration attaches onto
the needle clamp screw, then lower the Presser
Foot Lever and tighten the presser foot screw.
* Be sure that the needle clamp screw is firmly
tightened. (See fig.B)
1 Use a coin screwdriver.
2 Presser Foot Screw
3 Needle clamp screw
Down position
Utilización del prensatelas
enguatador accionado por muelle
Modelo de Largo de Ancho de
puntada puntada puntada
Cualquiera 0 (centro) Posición baja
El prensatelas enguatador accionado por muelle
sirve para zurcir y para coser acolchados con libertad
de movimiento de la máquina.
1. Retire el enchufe de la toma de corriente.
2. Levante la aguja y el prensatelas.
3. Afloje el tornillo del prensatelas y retire el soporte
del prensatelas (véase fig. A).
4. Coloque el prensatelas enguatador y asegúrese
de que la parte indicada como
queda sujeta al tornillo de la abrazadera de la
aguja. Baje la palanca del prensatelas y apriete
el tornillo del prensatelas.
* Asegúrese de que el tornillo de la abrazadera de
la aguja está bien apretado (véase fig. B).
1
Utilice una moneda o un destornillador
2
Tornillo del prensatelas
3
Tornillo de la abrazadera de la aguja
Alimentadores
A
en el dibujo
A
1
5. Lower the feed dogs by setting the Drop Feed
Lever to the Down Position as shown on page 17.
6. Set the Pattern Selection Dial to Straight Stitch.
B
A
2
3
5. Afloje los alimentadores situando la palanca de
los alimentadores en posición baja, tal como
aparece en la página 17.
6. Sitúe el selector de puntada en puntada recta.
65
Page 73

* Before starting to sew, draw the quilting design
on the fabric.
* Antes de empezar a coser, dibuje el acolchado
en el tejido.
7. Use both hands to keep the fabric firmly stretched
and move the fabric to sew over the drawn
design. (See fig. C)
A Quilting design (Line)
8. The stitch length depends on how quickly the
fabric is moved and on the machine’s sewing
speed. Sew slowly and move the fabric at a
constant speed to sew uniform stitches. (See fig.
D)
Model PS-2500, PS-2400, PS-2300
STAR140E, STAR130E, STAR120E
C
A
7. Sujete firmemente el tejido con las dos manos,
manténgalo estirado y cósalo siguiendo el dibujo
(véase fig. C).
A
Dibujo del acolchado (línea)
8. El largo de puntada depende de la velocidad con
que se mueve el tejido y de la velocidad de cosido
de la máquina. Cosa lentamente y mueva el
tejido a una velocidad constante para conseguir
unas puntadas uniformes (véase fig. D).
Modelos PS-2500, PS-2400, PS-2300,
STAR 140E, STAR 130E y STAR 120E
D
USO DE ACCESORIOS Y APLICACIONES
USING ATTACHMENTS AND APPLICATIONS
66
Page 74

USING ATTACHMENTS AND APPLICATIONS
1
6
7
USO DE ACCESORIOS Y APLICACIONES
OPTIONAL ACCESSORIES
Using the 1/4" Seam Guide Foot
Pattern Stitch Length Stitch Width
(Straight Stitch) 2-2.5 0 (center)
The 1/4" Seam Guide Foot is used to sew fixed seam
allowance 6.4 mm (1/4") when piecing together a
quilt. (See fig.A)
1. Set the Pattern Selection Dial to Straight Stitch.
Set the Stitch Length between 2 and 2.5.
Set the Stitch Width 0.
2. Change the foot to the 1/4 Seam Guide foot.
1 Seam allowance (1/4", 6.4mm)
3. Position the presser foot over the fabric and sew
as shown in fig. B and C.
A
El pie-guía para costuras se utiliza para coser
costuras con una anchura fija de 6,4 mm (1/4") al
juntar las partes de un acolchado (véase fig. A).
1. Sitúe el selector de puntadas en puntada recta.
2. Coloque el pie-guía para costuras.
3. Coloque el prensatelas sobre el tejido, y cosa tal
ACCESORIOS OPCIONALES
Utilización del pie-guía para costuras
Modelo de puntada
(Puntada recta) 2-2.5 0(centro)
Sitúe el selector de largo de puntada entre 2 y 2,5.
Sitúe el ancho de puntada en 0.
1
Anchura de la costura (1/4", 6,4 mm)
como se indica en las figuras B y C.
Largo de puntada
Ancho de puntada
B C
• Achieve leaving an accurate seam allowance.
(See fig.B)
2 Beginnig of stitching.
3 Align this mark with edge of fabric.
4 End of stitching
5 Align this mark with edge of fabric.
• Quickly stitch together a quilt. (See fig.C)
6 Top of fabric.
7 Sean (1/8", 3.2mm)
2
4
3
5
67
• Para hacer una anchura de la costura correcta.
2
Principio de la puntada
3
Alinee esta marca con el borde del tejido.
4
Final de la puntada
5
Alinee esta marca con el borde del tejido.
• Cosido rápido de un acolchado.
6
Parte superior del tejido.
7
Costura (1/8", 3,2 mm)
Page 75

Changing the Bulb
Cambio de la bombilla
1. Remove the power supply plug from the outlet.
2. Loosen the screw on the reverse side of sewing
head as shown in fig. A.
3. Remove the face plate from the machine as
illustrated in fig. A.
A
Model PS-2500, PS-2400, PS-2300
STAR140E, STAR130E, STAR120E
4. Replace the sewing light bulb. (See fig. B)
1 Bulb
2 Pull out
3 Push in
5. Reattach the face plate and fasten the screw as
shown in fig. C.
1. Desenchufe la máquina.
2. Afloje el tornillo de la cubierta de la máquina, tal
como se indica en la fig. A.
3. Retire la cubierta de la máquina tal como se
indica en la fig. B.
Modelo PS-2500, PS-2400, PS-2300
STAR140E, STAR130E, STAR120E
4. Cambie la bombilla tal como se muestra en la fig.
C.
1
Bombilla
2
Tirar
3
Presionar
5. Vuelva a colocar la cubierta y apriete el tornillo tal
como indica la fig. D.
MAINTENANCE
MANTENIMIENTO
BC
2
3
1
68
Page 76

(Model PS-2200, STAR110)
4. Replace the sewing light bulb. (See fig. B)
5. Reattach the face plate and fasten the screw as
shown in fig. C.
BC
MANTENIMIENTO
MAINTENANCE
1 Bulb
2 Loosen
3 Tighten
(Modelo PS-2200, STAR110E)
4. Cambie la bombilla tal como se muestra en la fig.
B.
1
Bombilla
2
Aflojar
3
Apretar
5. Vuelva a colocar la cubierta y apriete el tornillo tal
como indica la fig. C.
69
Page 77

Cleaning
Limpieza
1. Remove the power supply plug from the outlet.
2. Raise the needle and the presser foot.
3. Loosen the presser foot screw and the needle
clamp screw to remove the presser foot holder
and the needle. (See fig. A)
4. Slide the needle plate to the right to remove it.
(See fig. B)
1 Use a coin or screwdriver.
1. Retire la clavija de la toma de corriente.
2. Levante la aguja y el prensatelas.
3. Suelte el tornillo del prensatelas y el tornillo de
ajuste de la aguja para sacar el soporte del
prensatelas y la aguja. Véase fig. A.
4. Deslice la placa de agujas hacia la derecha para
retirarla (véase fig. B).
1
Utilice una moneda o un destornillador
AB
1
1
MAINTENANCE
MANTENIMIENTO
5. Turn the balance wheel toward you until the notch
on the shuttle race aligns with the hook of the
shuttle hook as shown in the illustration.
2 Notch on shuttle race
3 Hook of shuttle hook
5. Gire la ruedecilla hacia usted hasta que la muesca
en la pista de la lanzadera quede alineada con el
gancho de la lanzadera, tal como se indica en el
dibujo.
2
Muesca en la pista de la lanzadera
3
Gancho de la lanzadera
23
70
Page 78

6. Remove the shuttle hook. (See fig. C)
7. Clean out lint and dust.
* Use soft fabric to clean the shuttle hook. DO
NOT oil the shuttle hook or shuttle race. (See
fig. D)
* DO NOT OIL.
CD
MANTENIMIENTO
MAINTENANCE
4 Shuttle hook
5 Shuttle race
6. Retire el garfio de la lanzadera. Véase fig. C.
7. Limpie el polvo y las suciedades.
* Utilice un trapo suave para limpiar el garfio de
la lanzadera. NO ENGRASE el garfio de la
lanzadera o la pista. Véase fig. D.
4
Garfio de la lanzadera
5
Pista de la lanzadera
* NO LUBRICAR
4
8. Assemble the shuttle hook first then the needle
plate.
When installing the shuttle hook, be sure that the
notch on the shuttle race is in the same position
that it was when the shuttle hook was removed
and that the projection on the shuttle hook aligns
with the spring.
Install the needle plate by sliding it to the left (the
reverse of its removal procedure).
6 Notch on shuttle race
7 Projection
8 Spring
5
8. Monte el gancho de la lanzadera, y a continuación
la placa de agujas.
Al instalar el gancho de la lanzadera, asegúrese
de que la muesca que hay en la pista de la
lanzadera sigue en la misma posición en que
estaba cuando se retiró el gancho de la lanzadera,
y asegúrese de que la proyección sobre el gancho
de la lanzadera está alineada con el muelle.
Coloque la placa de agujas deslizándola hacia la
izquierda (en el sentido opuesto a cuando la
retiró).
6
Muesca en la pista de la lanzadera
7
Proyección
8
Muelle
6
71
7
8
Page 79

Automatic Thread Cutting
Cortahilos automático
(Model PS-2500, STAR140E)
NOTE:
Do not operate the Thread Cutter Lever while sewing
or when there is no fabric in the sewing machine.
Threads may become tangled or other problems
may be incurred.
* When sewing with thread thicker than #30 or with
nylon, metallic and other specialty threads, cut
the threads with the thread cutter on the left side
of the machine. Sewing without cutting the threads
or with a needle thread that is too short may cause
the threads to become tangled.
* Normally, the Thread Cutter Lever will move up
and the sewing machine will stop operating after
the threads are cut. However, the Thread Cutter
Lever may stay down when certain threads and
fabrics are used. If this occurs, slightly turning the
balance wheel will allow the lever to move up.
Starting to sew with the Thread Cutter Lever
down will cause it to move up; and a problem may
occur.
* Depending on the type of thread and fabric used,
the needle may stay down near the needle plate
after the threads are cut. This is not a malfunction.
If this prevents the fabric from being removed
from the machine, slightly turn the balance wheel
away from you and raise the needle.
* Do not operate the Thread Cutter Lever when
sewing with the twin needle. The threads may
become tangled. During twin needle sewing, always cut the threads with the thread cutter on the
left side of the machine.
If the Thread Cutter Lever stays down and the
sewing machine cannot be used, raise the Thread
Cutter Lever and check for the conditions mentioned
on page 72. If the Thread Cutter Lever stays down,
turn the balance wheel to raise the needle and raise
the Thread Cutter Lever to its original position.
(Modelo PS-2500, STAR140E)
NOTA:
No accione la palanca del cortahilos mientras cose
o si no hay tejido en la máquina. Ello podría causar
problemas, como por ejemplo un enredo en los
hilos.
* Al coser con hilos de un grosor superior a # 30 o
con hilo de nylon, metálico u otros hilos especiales,
corte los hilos con el cortahilos situado en la parte
izquierda de la máquina. Si cose sin cortar los
hilos o con una aguja demasiado corta, corre el
riesgo de que se enreden los hilos.
* Normalmente, después de cortar los hilos la
palanca del cortahilos se levantará y la máquina
de coser se desconectará. Sin embargo, para
algunos hilos o tejidos, puede que la palanca del
cortahilos no se levante. En tal caso, gire
ligeramente la ruedecilla para levantar la palanca.
Si empieza a coser con la palanca del cortahilos
bajada, ésta se levantará, pero esta operación
puede ocasionar problemas.
* En función del tipo de hilo o de tejido que utilice,
la aguja puede permanecer bajada al lado de la
placa de agujas después de cortar los hilos. No
se trata de un problema en el funcionamiento. Si
ello impide que se pueda retirar el tejido de la
máquina, gire ligeramente la ruedecilla en
dirección opuesta a usted y levante la aguja.
* No accione la palanca del cortahilos mientras
cose con aguja doble, ya que podrían enredarse
los hilos. Al coser con aguja doble, corte siempre
los hilos con el cortahilos situado en la parte
izquierda de la máquina.
Si la palanca del cortahilos permanece bajada y no
puede utilizar la máquina de coser, levante la palanca
y compruebe que se cumplen las condiciones
indicadas en la página 72. Si la palanca del cortahilos
permanece bajada, gire la ruedecilla para levantar la
aguja y lleve la palanca del cortahilos a su posición
original.
MAINTENANCE
MANTENIMIENTO
72
Page 80

(Model PS-2500, STAR140E)
(Modelo PS-2500, STAR140E)
Correcting a Problem with
the Automatic Thread Cutter
CAUTION:
Be sure to unplug the power supply cord in order to
reduce the risk of injuries or electric shock.
1. Turn off the main power supply.
2. Raise the Presser Foot Lever and slightly turn the
hand wheel either toward or away from you so
that the tangled thread and the fabric can be
removed.
3. Turn the hand wheel toward you to raise the
MANTENIMIENTO
MAINTENANCE
thread take-up to its highest position. If the bobbin
holder has moved over the bobbin, move it to the
left.
4. Remove the bobbin, then feed the lower thread
again from the beginning.
1 Hand wheel
2 Bobbin holder
1
Corrección de problemas en
el cortahilos automático
PRECAUCIÓN:
Asegúrese de que el cable de corriente está
desconectado, para reducir el riesgo de lesiones o
calambres.
1. Apague el interruptor principal.
2. Levante la palanca del prensatelas y gire
ligeramente la rueda manual hacia ambos lados
para retirar el hilo enredado y el tejido.
1
Rueda manual
3. Gire la rueda manual en dirección a usted para
levantar el tirahilos hasta su posición más elevada.
Si el soporte de la canilla se ha colocado encima
de la canilla, desplácelo a la izquierda.
2
Soporte de la canilla
4. Retire la canilla y cargue de nuevo el hilo inferior
desde el principio.
2
If the threads become tangled again or cannot be cut
with the automatic thread cutter, even after performing the operation explained above, it may be possible that the threads are tangled under the needle
plate. Clean the needle plate and shuttle as explained below.
73
Si tras realizar la operación anterior vuelven a
enredarse los hilos o si no puede cortarlos con el
cortahilos automático, ello puede deberse a que los
hilos están enredados debajo de la placa de agujas.
Limpie la placa de agujas y la lanzadera tal como se
explica a continuación.
Page 81

5. Turn off the main power supply.
6. Raise the Presser Foot Lever and remove the
fabric as explained in step 2 above. If the fabric
cannot be removed, cut the thread on the back of
the fabric with scissors and remove the fabric.
7. Remove the presser foot holder, needle and
needle plate as explained in “Cleaning” on page
65.
8. Use tweezers to remove thread and dust from
around the moving cutter.
* Sewing with thread and dust under the needle
plate will prevent the moving cutter from operating properly and prevent the threads from being
cut.
3 Moving cutter
9. Turn the hand wheel toward you and move the
moving cutter and bobbin holder to the left again.
* Starting to sew with the moving cutter at the right
will cause the threads to become tangled again.
4 Bobbin holder
10. Attach the needle plate.
11. Install the bobbin, then feed the lower thread
again from the beginning.
3
5. Apague el interruptor principal.
6. Levante la palanca del prensatelas y retire el
tejido, tal como se explica en el paso 2. Si no
puede retirar el tejido, corte el hilo del final del
tejido con unas tijeras y retire el tejido.
7. Retire el soporte del prensatelas, la aguja y la
placa de agujas, tal como se explica en la sección
"Limpieza", en la página 65.
8. Utilice unas pinzas para retirar el hilo y el polvo
acumulados alrededor del cortador móvil.
* Los hilos y el polvo acumulados debajo de la
placa de agujas impiden que el cortador móvil
funcione correctamente, y por tanto no permiten
cortar los hilos.
3
Cortador móvil
9. Gire la rueda manual hacia usted y desplace de
nuevo el cortador móvil y el soporte de la canilla
hacia la izquierda.
* Si empieza a coser con el cortador móvil situado
a la derecha, los hilos volverán a enredarse.
4
Soporte de la canilla
10. Coloque la placa de agujas.
11. Instale la canilla y cargue el hilo inferior desde el
principio.
MAINTENANCE
MANTENIMIENTO
4
74
Page 82

Performance Checklist
Listado de posibles
incidencias
Whenever sewing difficulties are encountered, review the section in this instruction manual that details
the operation you are performing to make sure you
are correctly using the machine. If the problem
continues, the following check list may help you to
improve the operation.
If you still have difficulties, contact your nearest
authorized service center.
MANTENIMIENTO
MAINTENANCE
Cada vez que encuentre dificultades al coser, vuelva
a consultar la parte de este manual de instrucciones
que detalla la operación que está realizando, para
comprobar que usa correctamente la máquina. Si el
problema persiste, el siguiente listado le puede
ayudar a mejorar el funcionamiento.
Si persiste el problema a pesar de estas medidas,
póngase en contacto con el servicio técnico autorizado más cercano.
75
Page 83

PERFORMANCE CHECK LIST
UPPER THREAD
BREAKS
Upper thread is
not correctly
installed.
▼
Page 26
No
▼
Upper thread is
tangled.
▼
Page 26
No
▼
Upper thread
tension is too
tight.
▼
Page 31
No
▼
Spool of thread is
not correctly
installed.
LOWER THREAD
BREAKS
Lower thread is
tangled.
▼
Page 25
No
▼
Bobbin is not
threaded properly
in the shuttle
hook.
▼
Page 25
No
SKIPPED
STITCHES
Needle is incor-
rectly inserted.
▼
Page 9
No
▼
Inferior needle is
used.
▼
Page 9
No
▼
The combination
of needle size/
thread size/fabric
is incorrect.
▼
Page 34
No
▼
Lint is clinging to
the bottom of the
needle plate.
LOOP IN SEAM
Thread tension is
incorrect.
▼ ▼
Page 31
No
FABRIC
PUCKERS
Thread tension is
too tight.
Page 31
No
▼
Threading is not
correct.
▼
Page 26
No
▼
Wrong needle is
used.
▼
Page 9
No
▼
The combination
of needle size/
thread size/fabric
is incorrect.
MAINTENANCE
MANTENIMIENTO
▼
Page 22
No
▼
Needle is bent or
not sharp.
▼
Page 9
No
▼
The combination
of needle size/
thread size/fabric
is incorrect.
▼
Page 34
No
▼
▼
Page 65
No
▼
Threading is not
correct.
▼
Page 26
▼
No
▼
▼
CONTACT YOUR LOCAL SERVICE CENTER
▼
Page 34
No
▼
76
Page 84

LISTADO DE POSIBLES INCIDENCIAS
ROTURA DEL
HILO SUPERIOR
El hilo superior no
está bien enhe-
brado
▼
Página 26
MANTENIMIENTO
El hilo superior
MAINTENANCE
está enredado
▼
Página 26
El hilo superior es
demasiado tirante
▼
Página 31
El carrete está
mal colocado
▼
Página 22
La aguja está
doblada o
gastada
▼
Página 9
La combinación
tamaño de aguja/
grueso de hilo/
tejido no es
correcta
▼
Página 35
PONGASE EN CONTACTO CON EL SERVICIO TECNICO LOCAL
ROTURA DEL
HILO INFERIOR
El hilo inferior
está enredado
No
▼
▼
Página 25
No
▼
La canilla no está
bien enhebrada
en el garfio
No
▼
▼
Página 25
No
SALTO DE
PUNTADAS
La aguja está mal
colocada
▼
Página 9
No
▼
Se está usando
una aguja inferior
▼
Página 9
No
▼
BAGAS EN LAS
PUNTADAS
La tensión de los
hilos no es
correcta
▼ ▼
Página 31
No
ARRUGAS EN
EL TEJIDO
La tensión de los
hilos es demasia-
da fuerte
Página 31
No
▼
Los hilos no
están bien
enhebrados
▼
Página 26
No
▼
La combinación
tamaño de aguja/
grueso de hilo/
tejido no es
El tamaño de la
aguja no corres-
ponde
correcta
No
▼
▼
Página 35
No
▼
▼
Página 9
No
▼
La combinación
Hay polvo en el
fondo de la placa
de agujas
tamaño de aguja/
grueso de hilo/
tejido no es
correcta
No
▼
▼
Página 65
No
▼
▼
Página 35
No
El hilo no está
bien enhebrado
No
▼
▼
Página 26
No
No
▼
▼
▼
▼
▼
77
Page 85

PERFORMANCE CHECK LIST
FABRIC DOES
NOT FEED
PROPERLY
Stitch Length
Dial is set at no
feeding. ("0")
▼
Page 14
No
▼
The combination
of needle size/
thread size/fabric
is incorrect.
▼
Page 34
No
▼
Inferior needle
is used.
▼
Page 9
No
▼
Thread is tangled.
▼
Page 26
No
▼
Drop feed lever is
in down position.
▼
Page 17
No
▼
The buttonhole
lever is pushed
toward the back of
the machine.
NEEDLE
BREAKS
Needle is not
correctly inserted.
▼
Page 9
No
▼
Inferior needle is
used.
▼
Page 9
No
▼
The combination
of needle size/
thread size/fabric
is incorrect.
▼
Page 34
No No
▼
Fabric is pulled
excessively. Let the
feed dogs move the
fabric. Do not pull
the fabric.
No
MACHINE IS
NOISY OR SLOW
Lint is clinging to
the bottom of the
needle plate.
▼ ▼
Page 70
No No
MACHINE DOES
NOT START
Power supply plug
is removed from
outlet.
Page 7
▼
Main power switch
is turned off.
▼
Page 8
No
▼
The bobbin winder
shaft is slid to the
right.
▼
Page 22
▼
Foot controller is
not used correctly.
▼
Page 8
No
▼
Presser foot is not
lowered.
(PS-2500, PS-2400,
PS-2300, STAR140E,
STAR130E, STAR120E)
▼
Page 18, 36
No
MAINTENANCE
MANTENIMIENTO
▼
No
Page 56
▼
▼
▼
CONTACT YOUR LOCAL SERVICE CENTER
▼
78
Page 86

LISTADO DE POSIBLES INCIDENCIAS
EL TEJIDO NO
ARRASTRA BIEN
El selector de largo
de puntada está
puesto para que el
tejido no alimente
▼
Página 14
La combinación
MANTENIMIENTO
tamaño de aguja/
MAINTENANCE
grueso de hilo/
tejido no es
correcta
▼
Página 35
Se está usando
una aguja inferior
▼
Página 9
El hilo está
enredado
▼
Página 26
La palanca de los
alimentadores
está en la
posición baja
▼
Página 17
La palanca de
ojales está colocada
hacia atrás.
▼
Página
PONGASE EN CONTACTO CON EL SERVICIO TECNICO LOCAL
LA AGUJA SE
No
▼
Página 9
Se está usando
una aguja inferior
No No
▼
Página 9 Página 8
La combinación
tamaño de aguja/
grueso de hilo/
No
▼
Página 35
Se tira del tejido con
demasiada fuerza.
Deje que el arrastre
lo aliment solos. No
No
▼
No
No
56
▼
ROMPE
La aguja está
mal colocada
▼
▼
▼
▼
tejido no es
correcta
▼
▼
tire del tejido.
▼
LA MAQUINA ES
FUNCIONA MUY
Hay polvo en la
placa de agujas
No
Página 70
No
No
RUIDOSA O
LA MAQUINA NO
DESPACIO
▼ ▼
No No
Página 7
El eje de bobina-
do de la canilla
hacia la derecha
Página 22
No se usa bien el
Página 8
El prensatelas no está
(PS-2500, PS-2400,
PS-2300, STAR140E,
STAR130E, STAR120E)
Página 18, 36
▼
ARRANCA
Está
desenchufada
▼
El interruptor
principal está
apagado
▼
▼
está deslizado
▼
▼
pedal
▼
▼
bajado.
▼
▼
No
No
No
No
79
Page 87

(Model PS-2500,STAR140E)
AUTOMATIC
THREAD CUT-
TER DOES NOT
WORK
The Thread
Cutter Lever is not
pulled down as far
as possible.
▼
Page 20
No
▼
The Presser Foot
Lever is not
lowered.
▼
Page 21
No
▼
The needle is
above the needle
plate.
▼
Page 21
No
▼
The Thread Cutter
Lever is lowered while
the bobbin winder
shaft is still moved to
the right.
▼
Page 24
No
▼
The threads are
tangled.
THREADS
CANNOT BE CUT
WITH AUTOMATIC
THREAD CUTTER
Nylon or another
specialty thread
is being used.
▼
Page 21
No
▼
The threads are
tangled.
▼
Page 73
No
NEEDLE THREAD IS
TOO SHORT AFTER
THE THREADS ARE
CUT
Nylon or another
specialty thread is
being used.
▼
Page 21
No
▼
The spool is not
correctly installed.
▼
Page 26
No
▼
The Thread
Cutter Lever is
operated while
sewing.
▼
Page 21
No
MAINTENANCE
MANTENIMIENTO
▼
Page 73
No
▼▼
▼
IF THE PROBLEM CANNOT BE SOLVED, CONTACT
YOUR LOCAL SERVICE CENTER
80
Page 88

(Modelo PS-2500,STAR140E)
CORTAHILOS
AUTOMÁTICO
NO FUNCIONA
La palanca del
cortahilos no está
bajada al máximo.
▼
Page 20
MANTENIMIENTO
MAINTENANCE
La palanca del
prensatelas no
está bajada.
▼
Page 21
La aguja está
debajo de la
placa de agujas.
▼
Page 21
La palanca del
cortahilos está bajada
pero el eje de hacer
canilla sigue desplazado
a la derecha.
▼
Page 24
Los hilos están
enredados.
EL
NO SE PUEDEN
CORTAR LOS HILOS
CON EL CORTAHILOS
AUTOMÁTICO
Se está utilizando
nylon u otro hilo
especial.
No
▼
▼
Page 21
No
▼
Los hilos están
enredados.
No
▼
▼
Page 73
No
EL HILO DE LA AGUJA HA
QUEDADO DEMASIADO
CORTO TRAS CORTAR
LOS HILOS
Se está utilizando
nylon u otro hilo
especial.
▼
Page 21
No
▼
El carrete no está
bien instalado.
▼
Page 26
No
▼
Se está accionando
la palanca del
cortahilos mientras
se cose.
No
▼
▼
Page 21
No
No
▼
▼
Page 73
No
▼
▼
▼
SI NO PUEDE RESOLVER EL PROBLEMA, PÓNGASE
EN CONTACTO CON EL SERVICIO TÉCNICO LOCAL
81
Page 89

Repacking the Machine
Embalaje de la máquina
Keep the carton and packing materials for future use.
It may become necessary to reship the sewing
machine. Improper packing or improper packing
material could result in damage during shipping.
Instructions for repacking the machine are illustrated
below.
Guarde la caja de cartón y el embalaje por si acaso
necesita transportar la máquina en el futuro. Un
embalaje inadecuado o con materiales inapropiados
puede causarle daños a la máquina durante el
transporte. Para embalar la máquina correctamente, sírvase seguir las instrucciones que se ilustran
continuación.
MAINTENANCE
MANTENIMIENTO
IMPORTANT
This packing material is designed to prevent
damage in transit. Save this packing material in
the event it is needed to transport this sewing
machine.
IMPORTANTE
El material de embalaje está diseñado para
prevenir daños durante el transporte. Guárdelo
siempre en caso de que tenga que volver a
transportar la máquina.
82
Page 90

ÍNDICE
INDEX
Page
A
Accessories ......................................................... 5
Applique ............................................................ 60
Arrow Head Stitch ............................................. 46
B
Bead Stitch ........................................................ 46
Blind Hem Stitch................................................ 41
Bridging Stitch ................................................... 44
Buttonhole ......................................................... 51
Buttonhole Fine Adjustment .............................. 54
Button Sewing ................................................... 57
C
Changing Presser Foot ..................................... 10
Changing the Bulb ............................................ 68
Changing the Needle .......................................... 9
Cleaning ............................................................ 70
Comb Stitch....................................................... 48
Connecting Plugs ................................................ 7
D
Darning.............................................................. 59
Decorative Stitch ................................... 44, 45, 46
Double Action Stitch .......................................... 44
Drop Feed Lever ............................................... 17
E
Elastic Shell Tuck Stitch .................................... 48
Elastic Stitch...................................................... 43
Elastic Overlock Stitch ...................................... 48
Embroidering ..................................................... 61
F
Fagoting Stitch .................................................. 47
Feather Stitch .................................................... 49
Foot Controller .................................................... 8
Free-arm Style .................................................. 21
G
Gathering .......................................................... 59
L
Lightning Stitch.................................................. 46
Link Stitch .......................................................... 47
Lower Threading ............................................... 25
M
Main Power Switch.............................................. 8
Monogramming ................................................. 61
N
Needle
Replacement ............................................. 9
Inspection .................................................. 9
Página
A
Accesorios.......................................................... 3
Aguja
Cambio ...................................................... 6
Verificación ................................................ 6
Ajuste fino de los ojales .................................... 48
Aplicaciones ...................................................... 53
B
Bobinado de la canilla ....................................... 23
Bombilla
Cambio .................................................... 56
Interruptor .................................................. 5
Bordado............................................................. 54
Botón de puesta en marcha/parada .................. 22
C
Cambio de prensatelas ....................................... 7
Cambio de la bombilla de luz ............................ 56
Cambio de la aguja ............................................. 6
Conexión de los enchufes ................................... 4
Control automático de la tensión de los hilos ... 30
Costura con dos agujas .................................... 29
Costura de botones ........................................... 50
Costura de tejidos, hilos y agujas ..................... 32
Costura por encima de la orilla ......................... 43
E
Elementos principales ......................................... 1
Embalaje ........................................................... 63
Enhebrado inferior............................................. 25
Enhebrado superior........................................... 26
F
Fruncido ............................................................ 52
G
Guía de localización de errores .................. 60, 62
I
Inserción de cremalleras ................................... 51
Interruptor principal ............................................. 5
83
Page 91

Page
O
Overedging........................................................ 48
P
Parallelogram Stitch .......................................... 46
Patchwork ......................................................... 47
Pattern Selection Dial ........................................ 11
Performance Checklist ...................................... 76
Principal Parts ..................................................... 1
R
Rampart Stitch .................................................. 44
Relative Chart of Sewing Fabrics, Needles and
Threads ............................................................. 34
Repacking ......................................................... 82
Reverse Sewing Button..................................... 16
S
Scallop Stitch .................................................... 45
Sewing Light
Switch ........................................................ 8
Light Bulb Replacement .......................... 68
Shell Tuck Stitch ............................................... 42
Shuttle Hook Removal ...................................... 70
Shuttle Race Cleaning ...................................... 70
Slant Overlock Stitch ......................................... 48
Speed Range Control Lever ............................. 19
Square Stitch..................................................... 46
Start/stop Button ............................................... 18
Stitch Length Dial .............................................. 14
Stitch Width Dial ................................................ 15
Straight Stitch .................................................... 36
Stretch Blind Stitch ............................................ 41
T
Thread Tension Control .................................... 31
Triangle Stitch ................................................... 46
Triple Stretch Stitch ........................................... 36
Triple Zigzag Stretch Stitch ............................... 50
Troubleshooting ................................................ 75
Twin Needle Sewing ......................................... 30
U
Upper Threading ............................................... 26
Using Needle Threader ..................................... 28
W
Winding the Bobbin ........................................... 22
Z
Zigzag Stitch ..................................................... 40
Zipper Insertion ................................................. 58
Página
L
Limpieza ............................................................ 57
Limpieza de la pista de la lanzadera ................. 57
Listado de posibles incidencias ........................ 58
M
Modalidad brazo libre ........................................ 23
Monogramas ..................................................... 54
O
Ojales ................................................................ 46
P
Palanca de control del rango de velocidad ....... 22
Palanca de los alimentadores ........................... 21
Patchwork ......................................................... 42
Pedal ................................................................... 5
Pulsador de retroceso ....................................... 20
Puntada de acción doble .................................. 40
Puntada de triple pespunte ............................... 33
Puntada de unión .............................................. 42
Puntada elástica................................................ 39
Puntada escalera .............................................. 41
Puntada fagoting ............................................... 42
Puntada festón .................................................. 40
Puntada feston doble ........................................ 41
Puntada flecha .................................................. 43
Puntada hojas ................................................... 42
Puntada invisible ............................................... 37
Puntada invisible elástica .................................. 37
Puntada ondas .................................................. 38
Puntada overlock elástica ................................. 43
Puntada overlock estrecha ............................... 43
Puntada peine ................................................... 43
Puntada pluma .................................................. 44
Puntada recta .................................................... 33
Puntada zigzag ................................................. 36
S
Sacar el garfio de la lanzadera ......................... 57
Selector de ancho de puntada .......................... 19
Selector de largo de puntadas .......................... 18
Selector de puntadas .......................................... 8
T
Triple puntada zigzag elástica .......................... 45
U
Utilización del enhebrador de agujas ................ 28
Z
Zurcido .............................................................. 52
INDEX
ÍNDICE
84
Page 92

Page
O
Overedging........................................................ 48
P
Parallelogram Stitch .......................................... 46
Patchwork ......................................................... 47
Pattern Selection Dial........................................ 11
Performance Checklist ...................................... 76
Principal Parts ..................................................... 1
R
Rampart Stitch .................................................. 44
Relative Chart of Sewing Fabrics, Needles and
Threads ............................................................. 34
Repacking ......................................................... 82
Reverse Sewing Button..................................... 16
S
Scallop Stitch .................................................... 45
Sewing Light
Switch ........................................................ 8
Light Bulb Replacement .......................... 68
Shell Tuck Stitch ............................................... 42
Shuttle Hook Removal ...................................... 70
Shuttle Race Cleaning ...................................... 70
Slant Overlock Stitch ......................................... 48
Speed Range Control Lever ............................. 19
Square Stitch..................................................... 46
Start/stop Button ............................................... 18
Stitch Length Dial .............................................. 14
Stitch Width Dial ................................................ 15
Straight Stitch .................................................... 36
Stretch Blind Stitch ............................................ 41
T
Thread Tension Control .................................... 31
Triangle Stitch ................................................... 46
Triple Stretch Stitch ........................................... 36
Triple Zigzag Stretch Stitch ............................... 50
Troubleshooting ................................................ 75
Twin Needle Sewing ......................................... 30
U
Upper Threading ............................................... 26
Using Needle Threader ..................................... 28
W
Winding the Bobbin ........................................... 22
Z
Zigzag Stitch ..................................................... 40
Zipper Insertion ................................................. 58
Página
L
Limpieza ............................................................ 57
Limpieza de la pista de la lanzadera ................. 57
Listado de posibles incidencias ........................ 58
M
Modalidad brazo libre ........................................ 23
Monogramas ..................................................... 54
O
Ojales ................................................................ 46
P
Palanca de control del rango de velocidad ....... 22
Palanca de los alimentadores ........................... 21
Patchwork ......................................................... 42
Pedal ................................................................... 5
Pulsador de retroceso ....................................... 20
Puntada de acción doble .................................. 40
Puntada de triple pespunte ............................... 33
Puntada de unión .............................................. 42
Puntada elástica................................................ 39
Puntada escalera .............................................. 41
Puntada fagoting ............................................... 42
Puntada festón .................................................. 40
Puntada feston doble ........................................ 41
Puntada flecha .................................................. 43
Puntada hojas ................................................... 42
Puntada invisible ............................................... 37
Puntada invisible elástica .................................. 37
Puntada ondas .................................................. 38
Puntada overlock elástica ................................. 43
Puntada overlock estrecha ............................... 43
Puntada peine ................................................... 43
Puntada pluma .................................................. 44
Puntada recta .................................................... 33
Puntada zigzag ................................................. 36
S
Sacar el garfio de la lanzadera ......................... 57
Selector de ancho de puntada .......................... 19
Selector de largo de puntadas .......................... 18
Selector de puntadas .......................................... 8
T
Triple puntada zigzag elástica .......................... 45
U
Utilización del enhebrador de agujas ................ 28
Z
Zurcido .............................................................. 52
Page 93

ENGLISH
SPANISH
194377-011
Printed in Taiwan
 Loading...