

Page 1
Embroidery Machine
PR-650
Operation Manual
Product Code: 884-T05
Page 2

Trademarks
FlashFX® is a registered trademark of Datalight, Inc.
FlashFX
U.S.Patent Office 5,860,082/6,260,156
FlashFX
Datalight
Copyright 1989-2007 Datalight, Inc., All Rights Reserved
Video powered by Mobiclip™ encoding and playback technology.
®
Copyright 1998-2007 Datalight, Inc.
®
Pro™ is a trademark of Datalight, Inc.
®
is a registered trademark of Datalight, Inc.
IMPORTANT:
READ BEFORE DOWNLOADING, COPYING, INSTALLING OR USING.
By downloading, copying, installing or using the software you agree to this license. If
you do not agree to this license, do not download, install, copy or use the software.
Intel License Agreement For Open Source Computer Vision Library
Copyright © 2000, Intel Corporation, all rights reserved. Third party copyrights are property of their respective owners.
Redistribution and use in source and binary forms, with or without modification, are permitted
provided that the following conditions are met:
• Redistribution’s of source code must retain the above copyright notice, this list of conditions
and the following disclaimer.
• Redistribution’s in binary form must reproduce the above copyright notice, this list of
conditions and the following disclaimer in the documentation and/or other materials provided
with the distribution.
• The name of Intel Corporation may not be used to endorse or promote products derived from
this software without specific prior written permission.
This software is provided by the copyright holders and contributors “as is” and any express or
implied warranties, including, but not limited to, the implied warranties of merchantability and
fitness for a particular purpose are disclaimed. In no event shall Intel or contributors be liable for
any direct, indirect, incidental, special, exemplary, or consequential damages (including, but not
limited to, procurement of substitute goods or services; loss of use, data, or profits; or business
interruption) however caused and on any theory of liability, whether in contract, strict liability, or
tort (including negligence or otherwise) arising in any way out of the use of this software, even if
advised of the possibility of such damage.
All information provided related to future Intel products and plans is preliminary and subject to change at any time,
without notice.
Page 3

———————————————————————————————————————————————————————————————————————————————————
Introduction
Thank you for purchasing this embroidery machine. Before using this machine, carefully read the
“Important Safety Instructions”, and then study this manual for the correct operation of the
various functions.
In addition, after you have finished reading this manual, store it where it can quickly be accessed
for future reference.
IMPORTANT SAFETY INSTRUCTIONS
Please read these safety instructions before attempting to use the machine.
DANGER - To reduce the risk of electric shock:
1Always unplug the machine from the electrical outlet immediately after using, when cleaning,
when making any user servicing adjustments mentioned in this manual, or if you are leaving
the machine unattended.
WARNING - To reduce the risk of burns, fire, electric shock, or injury to persons:
2Always unplug the machine from the electrical outlet when lubricating it or when making any
other user servicing adjustments mentioned in the operation manual.
• To unplug the machine, switch the machine to the symbol “O” position to turn it off, then
grasp the plug and pull it out of the electrical outlet. Do not pull on the cord.
• Plug the machine directly into the electrical outlet. Do not use an extension cord.
• Always unplug your machine if the power is cut.
3Never operate this machine if it has a damaged cord or plug, if it is not working properly, if it
has been dropped or damaged, or water is spilled on the unit. Return the machine to the
nearest authorized dealer or service center for examination, repair, electrical or mechanical
adjustment.
• To avoid electric shock or fire; do not use a damaged power supply plug or loose electrical
outlet, and ensure that the power supply plug is fully inserted and secure.
• While the machine is stored or in use if you notice anything unusual, such as an odor, heat,
discoloration or deformation, stop using the machine immediately and unplug the power
cord.
• When transporting the machine, be sure to lift it from the bottom positions. Lifting the
machine by any other part may damage the machine or result in the machine falling, which
could cause injuries.
• When lifting the machine, be careful not to make any sudden or careless movements,
otherwise you may injure your back or knees.
• While the machine is being transported, be careful not to touch the operation panel, thread
guides or any other part, otherwise injuries may result.
Introduction 1
Page 4

—————————————————————————————————————————————————————————————————————————————————
——
4Always keep your work area clear:
• Never operate the machine with any air openings blocked. Keep ventilation openings of the
machine free from the build up of lint, dust, and loose cloth.
• Do not use extension cords. Plug the machine directly into the electrical outlet.
• Never drop or insert any object into any opening.
• Keep fingers out of all machine openings, such as near the carriage, otherwise injuries may
result.
• Do not operate where aerosol (spray) products are being used or where oxygen is being
administered.
• Do not use the machine near a heat source, such as a stove or iron; otherwise, the machine,
power cord or garment being sewn may ignite, resulting in fire or an electric shock.
• Do not use this machine near an open flame; the movement of the embroidery frame could
cause the garment being sewn to catch fire.
• Do not place this machine on an unstable surface, such as an unsteady or slanted table,
otherwise the machine may fall, resulting in injuries.
5Special care is required when sewing:
• Always pay close attention to the needle. Do not use bent or damaged needles.
• Keep fingers away from all moving parts. Special care is required around the machine needle.
• While the machine is in operation, keep your hands away from the needle bar case and all
moving parts near the needle bar case, otherwise injuries may result.
• Switch the machine to the symbol “O” position to turn it off when making any adjustments in
the needle area, such as changing the needle.
• Do not use a damaged or incorrect needle plate, as it could cause the needle to break.
6This machine is not a toy:
• Your close attention is necessary when the machine is used by or near children.
• This machine is not intended for use by young children or infirm persons without supervision.
• Young children should be supervised to ensure that they do not play with this machine.
• Do not use the included scissors or seam ripper in any other way than how they are intended.
In addition, when opening a hole with the seam ripper, do not place your hands or fingers in
the cutting path, otherwise injuries may result if the seam ripper slips.
• The plastic bag that this machine was supplied in should be kept out of the reach of children
or disposed of. Never allow children to play with the bag due to the danger of suffocation.
• Do not use outdoors.
2
Page 5

———————————————————————————————————————————————————————————————————————————————————
7For a longer service life:
• When storing this machine, avoid direct sunlight and high humidity locations. Do not use or
store the machine near a space heater, iron, halogen lamp, or other hot objects.
• Use only neutral soaps or detergents to clean the case. Benzene, thinner, and scouring
powders can damage the case and machine, and should never be used.
• Always consult the operation manual when replacing or installing any assemblies, needle, or
other parts to assure correct installation.
8For repair or adjustment:
• Do not try to disassemble, repair or alter this machine in any way, otherwise a fire, electric
shock or injuries may result.
• If the light unit is damaged, it must be replaced by an authorized dealer.
• In the event a malfunction occurs or adjustment is required, first follow the troubleshooting
table in the back of the operation manual to inspect and adjust the machine yourself. If the
problem persists, please consult your local authorized Brother dealer.
Use this machine only for its intended use as described in the manual.
Use accessories recommended by the manufacturer as contained in this manual.
Use only the interface cable (USB cable) included with this machine.
Use only a mouse designed specifically for this machine.
The contents of this manual and specifications of this product are subject to change
without notice.
For additional product information and updates, visit our website at www.brother.com
SAVE THESE INSTRUCTIONS
This machine is intended for household use.
IMPORTANT SAFETY INSTRUCTIONS 3
Page 6

—————————————————————————————————————————————————————————————————————————————————
——
FOR USERS IN THE UK, EIRE, MALTA
AND CYPRUS ONLY
IMPORTANT
• In the event of replacing the plug fuse, use a fuse approved by ASTA to BS 1362, i.e. carrying
the mark, rating as marked on plug.
• Always replace the fuse cover. Never use plugs with the fuse cover omitted.
• If the available electrical outlet is not suitable for the plug supplied with this equipment, you
should contact your authorized dealer to obtain the correct lead.
FOR USERS IN AC INPUT 220-240V
COUNTRIES AND MEXICO
This appliance is not intended for use by persons (including children) with reduced physical,
sensory or mental capabilities, or lack of experience and knowledge, unless they have been given
supervision or instruction concerning use of the appliance by a person responsible for their safety.
Children should be supervised to ensure that they do not play with the appliance.
4
Page 7

———————————————————————————————————————————————————————————————————————————————————
Federal Communications Commission (FCC) Declaration of
Conformity (For USA Only)
Responsible Party: Brother International Corporation
100 Somerset Corporate Boulevard
Bridgewater, NJ 08807-0911 USA
TEL : (908) 704-1700
declares that the product
Product Name: Brother Embroidery Machine
Model Number: PR-650
complies with Part 15 of the FCC Rules. Operation is subject to the following two conditions: (1)
this device may not cause harmful interference, and (2) this device must accept any interference
received, including interference that may cause undesired operation.
This equipment has been tested and found to comply with the limits for a Class B digital device,
pursuant to Part 15 of the FCC Rules. These limits are designed to provide reasonable protection
against harmful interference in a residential installation. This equipment generates, uses, and can
radiate radio frequency energy and, if not installed and used in accordance with the instructions,
may cause harmful interference to radio communications. However, there is no guarantee that
interference will not occur in a particular installation. If this equipment does cause harmful
interference to radio or television reception, which can be determined by turning the equipment
off and on, the user is encouraged to try to correct the interference by one or more of the
following measures:
• Reorient or relocate the receiving antenna.
• Increase the separation between the equipment and receiver.
• Connect the equipment into an outlet on a circuit different from that to which the receiver is
connected.
• Consult the dealer or an experienced radio/TV technician for help.
• The included interface cable should be used in order to ensure compliance with the limits for
a Class B digital device.
• Changes or modifications not expressly approved by Brother Industries, Ltd. could void the
user’s authority to operate the equipment.
IMPORTANT SAFETY INSTRUCTIONS 5
Page 8

—————————————————————————————————————————————————————————————————————————————————
——
License Agreement
The enclosed machine includes data, software and/or documentation (collectively “CONTENT”)
that are proprietary products of Brother Industries, Ltd. (“BROTHER”). BY USING THE
CONTENT, THE CUSTOMER ACCEPTS THE TERMS AND CONDITIONS OF THIS AGREEMENT.
BROTHER retains ownership of all rights to CONTENT and to the copies of the CONTENT
included in this package. The CONTENT are licensed (not sold) to you (“CUSTOMER”) under the
terms and conditions of this Agreement.
CUSTOMER is licensed to:
• Use the CONTENT in combination with an embroidery machine to create embroidery.
• Use the CONTENT in combination with an embroidery machine that CUSTOMER owns or
uses, provided that the CONTENT is not used on more than one embroidery machine at a
time.
Except as otherwise provided herein, CUSTOMER may not:
• Allow more than one copy of the CONTENT to be available for use at any one time.
• Reproduce, modify, publish, distribute, sell, rent, sublicense or otherwise make available to
others CONTENT.
• Distribute, rent, sublicense, lease, sell, transfer or assign the media card or CONTENT.
• Decompile, disassemble or otherwise reverse engineer the CONTENT or assist others to do
the same.
• Alter, translate, modify or adapt the CONTENT or any part thereof for business, commercial
or industrial purposes.
• Sell or otherwise distribute the EMBROIDERY created by use of the CONTENT, WHICH
ORIGINALLY BEARS CERTAIN COPYRIGHT NOTICE UNDER THE NAME OF ANY THIRD
PARTIES OTHER THAN BROTHER (e.g. “©DISNEY”).
BROTHER retains all rights not expressly granted to CUSTOMER herein.
Nothing in this agreement constitutes a waiver of the rights of BROTHER under any law. This
agreement shall be governed by the laws of Japan.
Please direct all inquiries concerning this Agreement in writing by regular mail, to Brother
Industries, Ltd., 1-1-1 Kawagishi, Mizuho-ku, Nagoya 467-8562, Japan, Attention: P&H company
Sales and Marketing Dept.
6
Page 9
———————————————————————————————————————————————————————————————————————————————————
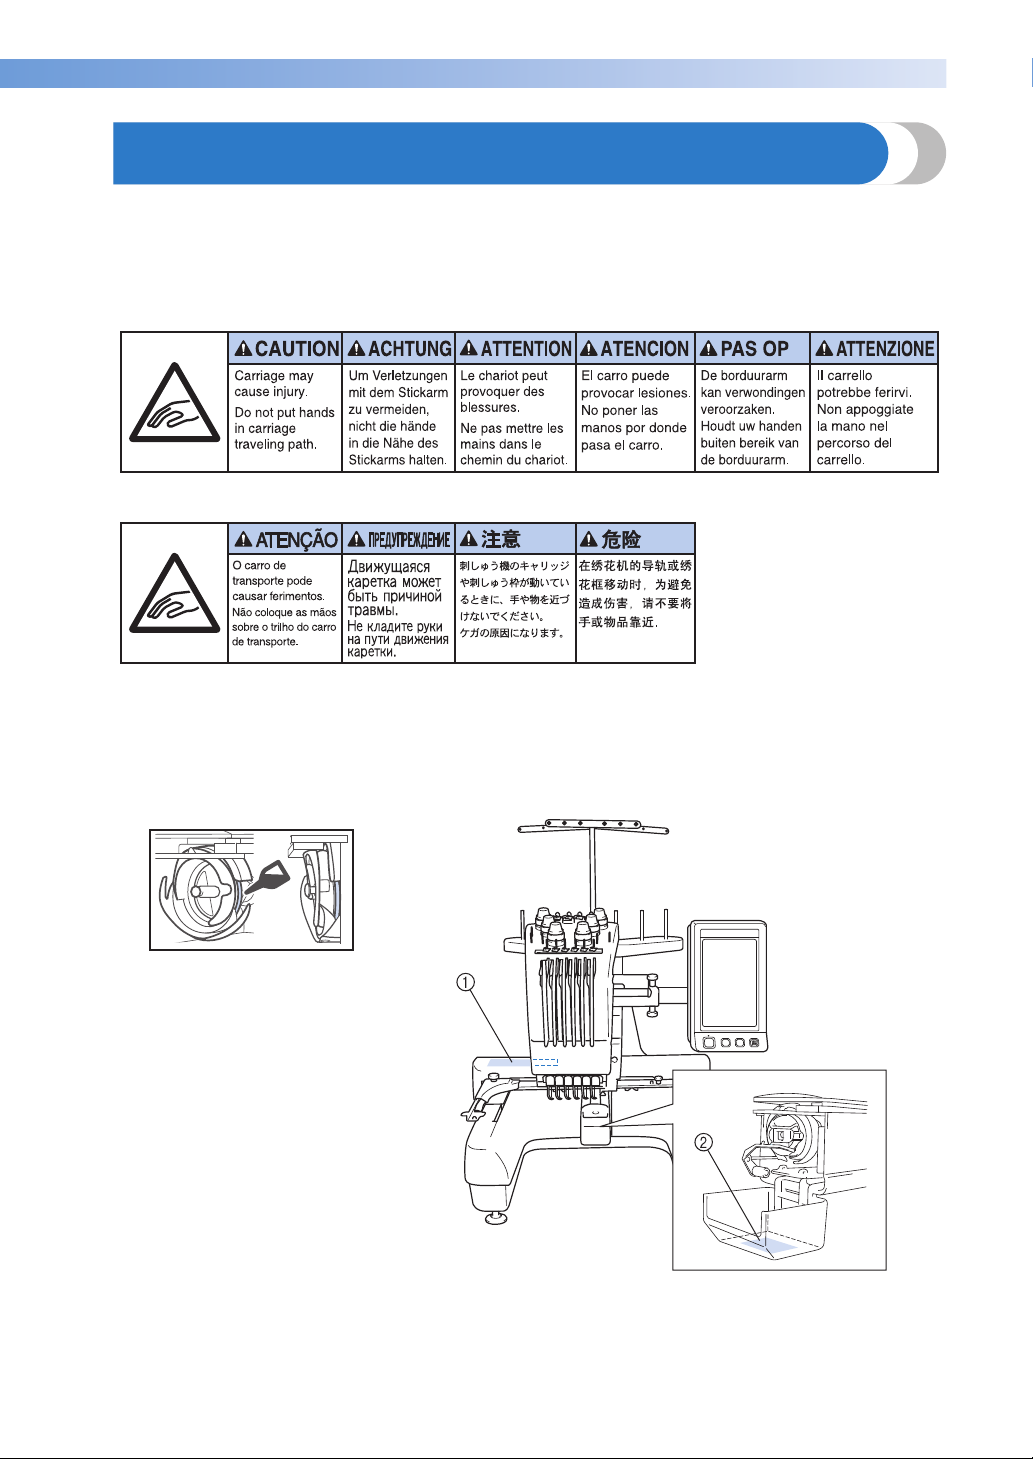
Warning Labels
The following warning labels are on the machine.
Be sure to observe the precautions described in the labels.
1
2
Please put a drop of oil onto the hook
once a day before use.
Label locations
Warning Labels 7
Page 10

—————————————————————————————————————————————————————————————————————————————————
——
Memo
1
Machine Structure and Features
The thread colors assigned to the needle bars are
Six-needle machine
embroidering
Your machine has six needles, each threaded with
a different color of thread. It can sew embroidery
patterns that contain several colors by
automatically selecting the appropriate needle for
each color.
The mechanism that moves the needles up and
down is called the needle bar, and the needle bars
are in the needle bar case. The needle bars are
named from right to left: needle bar 1, needle bar 2,
needle bar 3, needle bar 4, needle bar 5, and
needle bar 6.
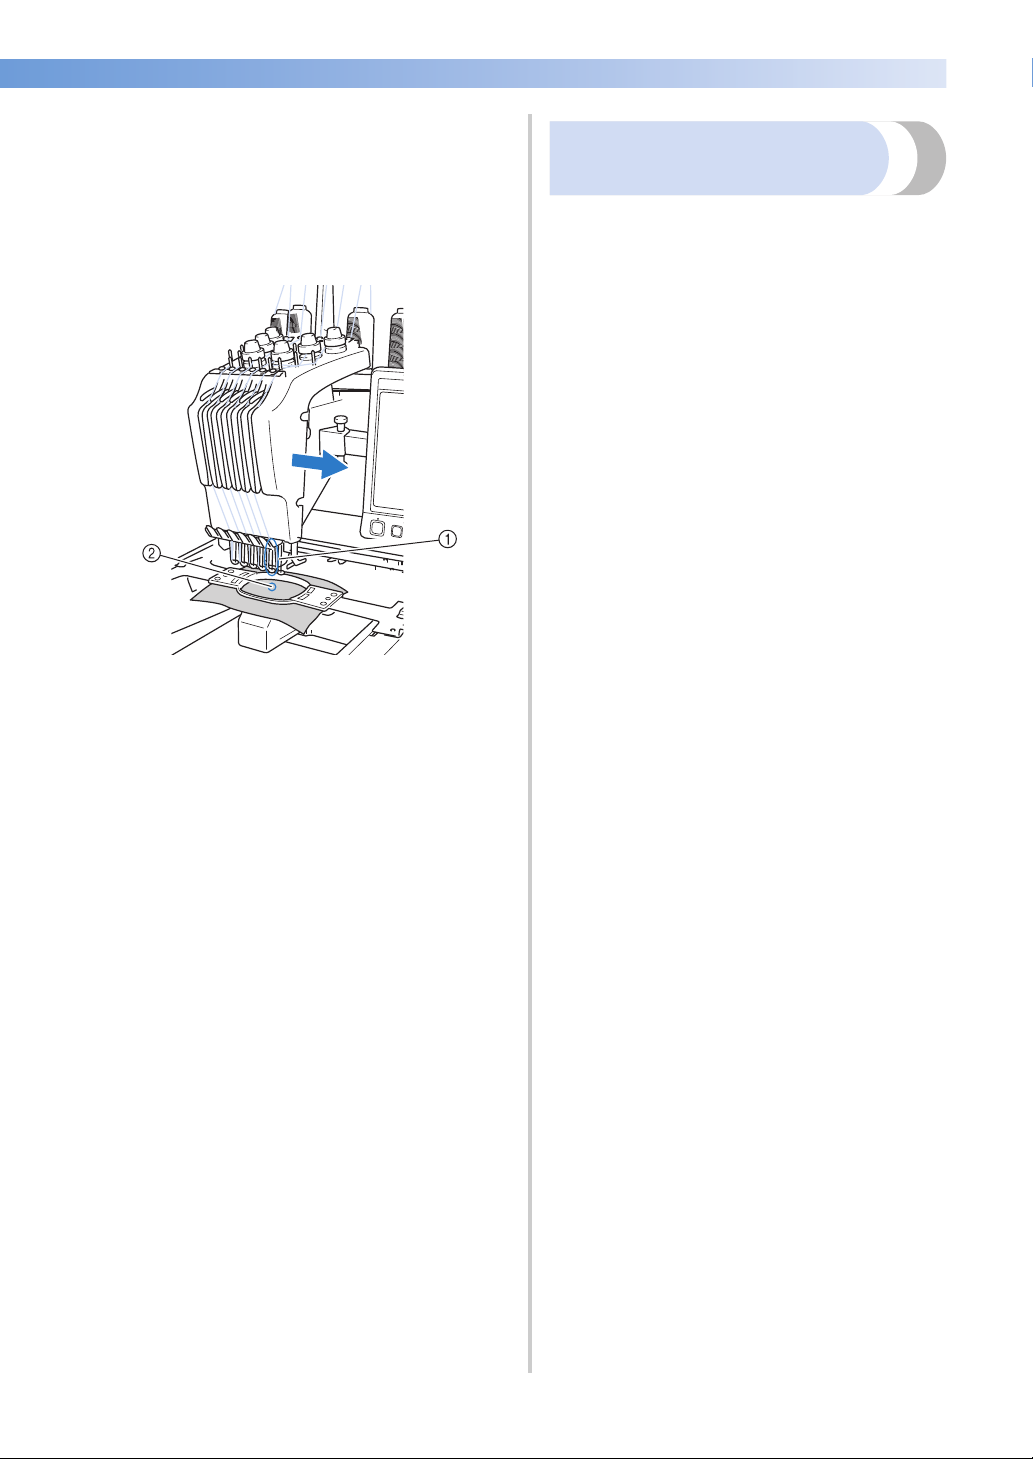
listed on the screen. Thread the needle bars as
indicated.
1 The threads threaded on the needle bars are
indicated as shown here.
1 Needle bar 1
2 Needle 1
3 Needle bar case
The machine automatically assigns a thread color
to each needle. If a needle is already threaded by a
color that will be used on the next pattern the
machine will assign the color to that needle,
reducing the number of thread spool changes. This
also means that the machine does not always
assign colors according to the needle number, it
assigns colors based on the currently threaded
colors.
● Sewing is not necessarily performed in the
order of the needle bar numbers.
The spool pins, thread tension knobs, thread takeup levers and thread paths, mentioned when
threading the upper thread, are different according
to their corresponding needle bar number.
8
Page 11
———————————————————————————————————————————————————————————————————————————————————
Not all six needles can be used to sew at the same
time. Only one needle is moved to the
embroidering position at a time. According to the
sewing order, the needle bar case is moved to the
left and right so that the needle bar and needle
thread with the required color can be moved to the
embroidering position.
1 Needle at the embroidering position
The needle is positioned over the hole in the
needle plate 2.
When starting the machine, the presser foot is
automatically lowered. The embroidery is sewn
and thread is pulled away from the material when
thread trimming and when changing thread colors
(moving to the different needles to be sewn within
the embroidery). When sewing is finished, the
machine stops. If the pattern uses seven or more
thread colors, the machine will stop when it is
necessary for the thread spools to be changed, and
the corresponding instructions appear on the LCD.
Differences with single-needle
machines
■ Can sew embroidery patterns using six or less
colors without the need to replace the thread
spools
With single-needle machines, the thread spool
must be changed and the machine must be
threaded each time a different thread color is
used. With this machine, it is not necessary to
change the thread spool or rethread the machine
with embroidery patterns containing six or less
colors. If total colors are less than 6 colors, and
if total color change is more than 7 times,
machine will come back to the needle that the
machine is already used and sew the same color
again automatically.
■ Automatic sewing reduces sewing time
Except to change the thread spools with patterns
containing seven or more colors, once the
machine is started, it continues to operate
automatically, from lowering the presser foot to
performing the specified operations at the
starting and end positions in addition to
changing the thread colors. Since the machine
can change threads and finish stitching, sewing
time is reduced.
■ Automatically pulls and holds the thread tails to
the under side of fabric at the beginning and
end of stitching
Since the machine automatically pulls the upper
thread under the fabric at the beginning of a
color, and pulls the upper thread from the fabric
at the time of thread trimming, you don’t need to
deal with the upper thread tail at all.
■ Automatically moves the embroidery frame to
the embroidering position
With a single-needle machine, in most cases,
the embroidery pattern is centered in the frame
and the fabric must be correctly positioned
within the embroidery frame with the center of
the desired embroidering position aligned with
the center of the embroidery frame. However,
with this machine, the embroidery frame is
moved to determine the embroidering position,
making it easier to sew the pattern at any place
in the frame. In addition, the embroidering
position can be freely determined after the fabric
is hooped and the embroidery frame is attached
to the machine, regardless of how the fabric is
positioned in the embroidery frame.
Machine Structure and Features 9
Page 12
—————————————————————————————————————————————————————————————————————————————————
——
■ Expanded thread color display feature enables
Other features
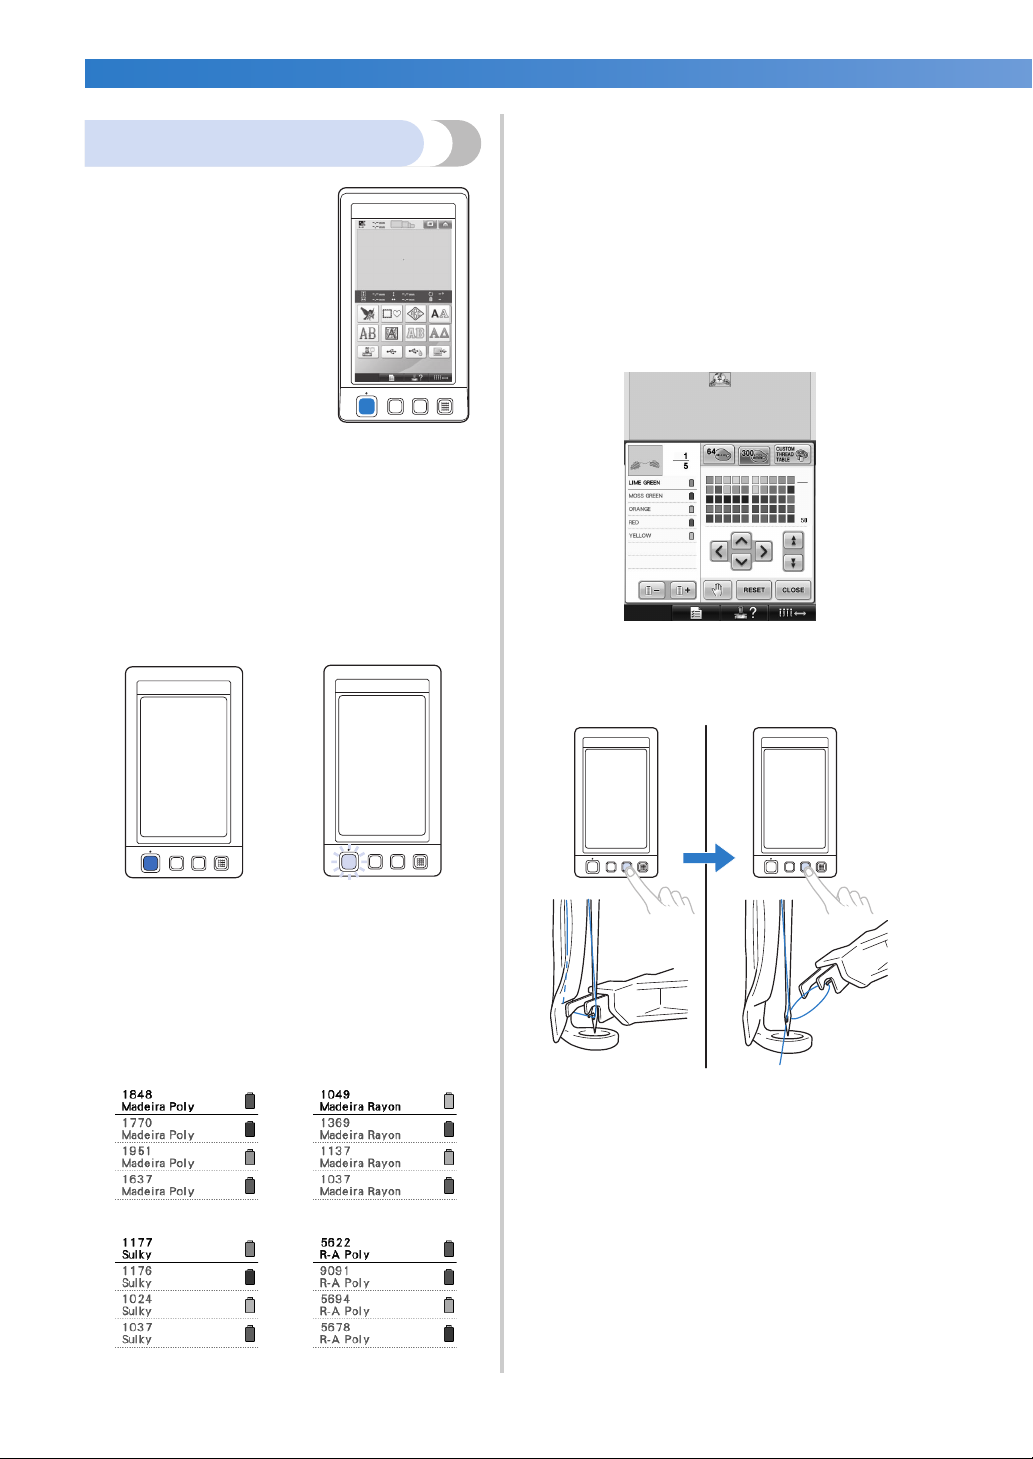
■ Easy-to-read and easy-touse LCD
Equipped with a large
color LCD, the colors of
an embroidery pattern can
be previewed in a nearly
realistic image. In
addition, since the LCD is
a touch panel, the keys
that are displayed can be
touched to easily perform
operations.
■ Safety mechanism
The machine is equipped with a locking
mechanism that helps prevent injuries from
accidental operation. The machine can only be
started after the machine is unlocked. The color
of the start/stop button changes to inform you of
whether or not the machine is locked.
Lit in red Flashing in green
colors to be displayed as realistic true color
The colors and thread color numbers are stored
in the machine’s memory. From this thread color
library, you can select colors to create your own
color thread table. If the pattern colors are
changed using this table, the pattern can be
displayed with only the thread colors that you
have. In addition, the embroidery pattern can be
displayed as it would appear after it is
embroidered.
■ Automatic needle-threading mechanism
Using the automatic needle-threading
mechanism, the needle can easily be threaded.
The machine is locked.
■ Wide selection of built-in thread color
information
The thread color information for manufacturers’
threads is available, making it easy to choose the
appropriate thread color.
The machine can be
started.
10
Page 13

———————————————————————————————————————————————————————————————————————————————————
■ USB port available as standard equipment
By connecting a computer to the machine using
the included USB cable, embroidery patterns
can be transferred from the computer. Refer to
“Computer (USB)” on page 156.
If the machine is positioned at a distance that the
USB cable does not reach the computer,
embroidery patterns can be transferred from the
computer by temporarily saving them on USB
media, which is then connected to the machine.
Refer to “USB media” on page 160.
Available features
Designs with a maximum size of 200 mm (H) ×
300 mm (W) (7-7/8 inches (H) × 11-3/4 inches (W))
can be embroidered. If the optional cap frame is
used, embroidery can be sewn on caps.
■ Various built-in patterns
In addition to the many built-in character
patterns, embroidery patterns and frame
patterns, using optional embroidery cards
greatly expands this machine’s pattern library.
■ Embroidery pattern editing
Lettering and embroidery patterns can be
combined or a text arrangement can be
specified to arrange the patterns.
The machine can also be set to repeatedly sew
the same pattern.
■ Moving or threading a selected needle bar at
any time
When selecting, editing or embroidering a
pattern, any one of the needle bars can be
selected at any time to be threaded or moved to
the embroidering position.
Touch to open the needle move
screen, then select the needle bar number that
you want to move or thread. (Refer to “Moving
and threading a selected needle bar” on
page 61.)
Machine Structure and Features 11
Page 14

—————————————————————————————————————————————————————————————————————————————————
——
Manual Structure
This manual is constructed as described below.
Read before use
Chapter 1: Getting Ready
The setup of the embroidery machine and the
various preparations required before starting to sew
are described in this chapter.
Chapter 2: Embroidering Tutorial
This chapter describes the basic embroidering
operations in order—from turning on the machine
and sewing a pattern to finishing sewing. Follow
the steps of the tutorial to embroider a pattern and
master the operation of this embroidery machine.
Chapter 3: Other Basic Procedures
This chapter provides explanations on operations
other than those described in chapter 2, such as
sewing a pattern with seven or more colors, and
other necessary operations, for example, changing
the needle.
Read when additional
information is required
Chapter 4: Embroidering Settings
This chapter contains descriptions on the various
embroidering settings, which make editing patterns
simple.
Chapter 5: Selecting/Editing/Saving Patterns
This chapter provides details on selecting, editing
and saving embroidery patterns.
Chapter 6: Basic Settings and Help Feature
This chapter contains descriptions on the use of the
settings key, the machine operations key and the
help key. Details on changing the basic embroidery
machine settings and viewing operations on the
LCD will be provided.
Chapter 7: Appendix
This chapter provides descriptions of techniques for
various embroidering operations, pointers for
creating beautiful embroidery, and details on
maintenance procedures and corrective measures
that should be taken when a problem occurs.
Searching for information
■ Searching the manual
By title
Check the descriptions at the left for the contents
of each chapter, and then check the table of
contents.
For basic operations, refer to the list of titles on
the first page of chapter 2. Find the appropriate
page by using the thumbtabs on the right edge of
the pages.
By keyword
Search the index at the end of this manual. Look
for the desired keyword, and then refer to the
page that is indicated.
By screen
Descriptions of the keys and other information
that appear in the main LCD screens are
provided in the tables on pages 70 to 78. For
details, refer to the page that is indicated.
By condition
Various possible conditions and the
corresponding operations are described on
page 79. For details, refer to the page that is
indicated.
■ Searching the machine
This machine is equipped with a help feature.
Learning how to perform an operation
Touch the machine operations guide key, and
then check for the desired information. For
details on using the machine operations guide
key, refer to page 206.
12
Page 15

———————————————————————————————————————————————————————————————————————————————————
Contents
Introduction .....................................................................................................................1
IMPORTANT SAFETY INSTRUCTIONS ............................................................................ 1
License Agreement ...........................................................................................................6
Warning Labels................................................................................................................. 7
Machine Structure and Features.......................................................................................8
Six-needle machine embroidering ................................................................................................................ 8
Differences with single-needle machines ...................................................................................................... 9
Other features............................................................................................................................................. 10
Available features ....................................................................................................................................... 11
Manual Structure............................................................................................................12
Read before use.......................................................................................................................................... 12
Read when additional information is required ............................................................................................ 12
Searching for information ........................................................................................................................... 12
GETTING READY 19
Names of Machine Parts and Their Functions ................................................................20
Front view .................................................................................................................................................. 20
Right-side/rear view.................................................................................................................................... 21
Operation panel ......................................................................................................................................... 21
Accessories.....................................................................................................................22
Included accessories................................................................................................................................... 22
Optional accessories................................................................................................................................... 23
Setting Up the Machine..................................................................................................24
Setup and transporting precautions............................................................................................................. 24
Setup location............................................................................................................................................. 25
Setting up the machine ............................................................................................................................... 26
Adjusting the operation panel position........................................................................................................ 27
Preparing the thread guide assembly........................................................................................................... 28
Positioning the spool stand ......................................................................................................................... 29
Attaching the embroidery frame holder....................................................................................................... 29
EMBROIDERING TUTORIAL 31
Operating Precautions....................................................................................................32
Power supply precautions........................................................................................................................... 32
Needle precautions..................................................................................................................................... 33
Checking the needle................................................................................................................................... 33
Bobbin precautions..................................................................................................................................... 33
Upper thread recommendations ................................................................................................................. 34
Fabric recommendations ............................................................................................................................ 34
Display recommendations .......................................................................................................................... 34
Basic Procedures ............................................................................................................ 35
Installing the Bobbin ...................................................................................................... 36
Removing the bobbin case.......................................................................................................................... 36
Installing the bobbin ................................................................................................................................... 36
Installing the bobbin case ........................................................................................................................... 37
Turning ON the Machine ............................................................................................... 38
Understanding the screens.......................................................................................................................... 39
Screen overview ......................................................................................................................................... 40
Selecting an Embroidery Pattern .................................................................................... 42
Selecting an embroidery pattern ................................................................................................................. 43
Editing the Embroidery Pattern.......................................................................................44
Continuing to the embroidering settings screen........................................................................................... 44
Specifying Embroidering Setting..................................................................................... 45
Previewing the Image .....................................................................................................46
Checking a preview image.......................................................................................................................... 46
Contents 13
Page 16

—————————————————————————————————————————————————————————————————————————————————
——
Hooping the Fabric in the Embroidery Frame.................................................................47
Hooping the fabric in the embroidery frame................................................................................................ 47
Attaching the Embroidery Frame to the Machine ...........................................................49
Attaching the embroidery frame.................................................................................................................. 49
Checking the Embroidery Area.......................................................................................51
Temporarily stopping to check the area....................................................................................................... 51
Continuing to the embroidering screen ....................................................................................................... 52
Upper Threading ............................................................................................................53
Checking the needle bars and thread colors................................................................................................ 53
Upper threading..........................................................................................................................................55
Threading the needle .................................................................................................................................. 59
Sewing the Embroidery...................................................................................................63
Starting embroidering..................................................................................................................................63
Stopping embroidering................................................................................................................................65
Checking the Thread Tension .........................................................................................67
Removing the Embroidery Frame and Fabric..................................................................68
Removing the embroidery frame ................................................................................................................. 68
Removing the fabric....................................................................................................................................68
Turning OFF the Machine...............................................................................................69
Screen Quick Reference Guide ......................................................................................70
Key displays................................................................................................................................................70
Common screen controls ............................................................................................................................ 70
Understanding the pattern type selection screen ......................................................................................... 71
Understanding the pattern list screen .......................................................................................................... 72
Understanding the pattern editing screen.................................................................................................... 73
Understanding the embroidering settings screen .........................................................................................75
Understanding the embroidering screen......................................................................................................77
When You Have a Question, This May Help You ...........................................................79
TECHNICAL TERMS:...................................................................................................................................79
PATTERNS: .................................................................................................................................................79
EMBROIDERING: ....................................................................................................................................... 79
USB connectivity ........................................................................................................................................80
OTHER BASIC PROCEDURES 85
Changing the Needle ......................................................................................................86
Replacing the needle................................................................................................................................... 86
Correctly Using the Embroidery Frames.........................................................................88
Embroidery frame types and applications.................................................................................................... 88
Attaching Iron-On Stabilizer (Backing) to Fabric ...........................................................90
Hooping the Fabric.........................................................................................................91
Hooping the fabric in the extra-large and large embroidery frames ............................................................. 91
Using the embroidery sheet.........................................................................................................................92
Large/small pieces of fabric......................................................................................................................... 93
Embroidery Frame Position and Movement....................................................................94
Changing the Embroidering Position ..............................................................................96
Adjusting the angle ..................................................................................................................................... 97
Switching the Thread Colors on the Screen..................................................................100
Embroidering a Pattern Containing Seven or More Colors ...........................................101
Checking if thread spool changes are necessary ........................................................................................ 101
Changing the Thread Spools with Designs of Seven or More Colors ........................... 103
Change thread spools message .................................................................................................................. 103
Easily changing the thread spools.............................................................................................................. 104
If the Thread Breaks or the Bobbin Thread Runs Out While Embroidering ................. 105
If the upper thread breaks.......................................................................................................................... 105
If the bobbin thread breaks or runs out......................................................................................................106
Embroidering From the Beginning or Middle of the Pattern ........................................ 108
Resume Embroidering After Turning Off the Machine..................................................110
14
Page 17

———————————————————————————————————————————————————————————————————————————————————
Adjusting the Thread Tension.......................................................................................112
Adjusting the tension of the bobbin thread................................................................................................ 112
Adjusting the tension of the upper thread.................................................................................................. 113
EMBROIDERING SETTINGS 115
Basting Embroidery ...................................................................................................... 116
Creating an Appliqué Piece ..........................................................................................117
Creating an appliqué piece....................................................................................................................... 117
Using a frame pattern for the outline......................................................................................................... 120
Automatic Lock Stitch Setting ...................................................................................... 122
Starting/Ending Position Settings..................................................................................123
Repeatedly sewing a pattern along a diagonal .......................................................................................... 124
Embroidering linked characters................................................................................................................. 125
Maximum Sewing Speed Setting...................................................................................127
Setting the Machine to Stop at Color Changes .............................................................128
Stopping the machine at the next color change......................................................................................... 128
Specifying pause locations before embroidering ....................................................................................... 128
Temporary Needle Bar Setting ..................................................................................... 130
Uninterrupted embroidering (using a single color) .................................................................................... 131
Reserved Needle Bar Settings ....................................................................................... 132
SELECTING/EDITING/SAVING PATTERNS 135
Precautions...................................................................................................................136
Concerning embroidery data .................................................................................................................... 136
Concerning optional embroidery cards..................................................................................................... 138
Concerning USB media ............................................................................................................................ 139
Selecting an Embroidery Pattern .................................................................................. 140
General pattern selection.......................................................................................................................... 140
Embroidery patterns.................................................................................................................................. 141
Frame patterns.......................................................................................................................................... 141
Monogram and frame designs................................................................................................................... 142
Alphabet patterns...................................................................................................................................... 145
Floral alphabet patterns ............................................................................................................................ 148
Renaissance alphabet patterns .................................................................................................................. 149
Appliqué alphabet.................................................................................................................................... 150
Greek alphabet patterns............................................................................................................................ 151
Embroidery patterns stored in the machine memory.................................................................................. 151
Embroidery cards (optional)...................................................................................................................... 152
Computer (USB)........................................................................................................................................ 156
USB media ............................................................................................................................................... 160
Editing the Embroidery Pattern (Pattern Editing Screen) .............................................. 162
Combining patterns .................................................................................................................................. 162
Selecting the pattern to be edited.............................................................................................................. 163
Moving a pattern ...................................................................................................................................... 163
Flipping a pattern horizontally.................................................................................................................. 164
Changing the size of a pattern................................................................................................................... 164
Rotating a pattern ..................................................................................................................................... 166
Changing the text arrangement of a character........................................................................................... 167
Changing the character spacing................................................................................................................ 167
Separating combined character patterns ................................................................................................... 168
Trimming the threads between characters................................................................................................. 169
Changing the thread density (only for some character and frame patterns)................................................ 170
Specifying multi-color text........................................................................................................................ 170
Changing the colors of the pattern ............................................................................................................ 171
Designing repeated patterns...................................................................................................................... 172
Creating a custom thread table ................................................................................................................. 176
Choosing a color from the custom thread table ......................................................................................... 179
Duplicating a pattern ................................................................................................................................ 180
Deleting a pattern..................................................................................................................................... 180
Editing the Embroidery Pattern (Embroidering Settings Screen) .................................. 181
Rotating the entire pattern......................................................................................................................... 181
Contents 15
Page 18

—————————————————————————————————————————————————————————————————————————————————
——
Editing a Combined Pattern..........................................................................................182
Saving Embroidery Patterns..........................................................................................187
Machine’s memory ...................................................................................................................................187
If the embroidery pattern cannot be saved................................................................................................. 187
USB media................................................................................................................................................ 189
Computer (USB)........................................................................................................................................ 190
BASIC SETTINGS AND HELP FEATURE 193
Using the Settings Key ..................................................................................................194
Understanding the settings screen ............................................................................................................. 194
Changing the display guides......................................................................................................................196
Changing the thread color information......................................................................................................197
Specifying the thumbnail size....................................................................................................................198
Changing the background colors of the embroidery patterns or thumbnails............................................... 199
Specifying jumpstitch trimming / “DST” jump codes for trimming.............................................................199
Deleting short stitches...............................................................................................................................201
Specifying the remaining length of thread ................................................................................................. 201
Changing the screen saver settings ............................................................................................................ 201
Turning “ON” or “OFF” the sewing light................................................................................................... 203
Changing the speaker volume ................................................................................................................... 204
Specifying thread sensor............................................................................................................................ 204
Changing the pointer shape when a USB mouse is used............................................................................205
Changing the units of measurements ......................................................................................................... 205
Changing the language..............................................................................................................................205
Using the Machine Operations Guide Key ...................................................................206
APPENDIX 209
Appliqué Sewing...........................................................................................................210
Sewing appliqué patterns .......................................................................................................................... 210
Using a frame pattern to create appliqués (1) ............................................................................................ 211
Using a frame pattern to create appliqués (2) ............................................................................................ 212
Sewing Large-size (Split) Embroidery Patterns..............................................................214
Helpful Tips for the Operation of the Machine ............................................................217
Checking the thread tension of built-in patterns ........................................................................................ 217
Sewing a pattern aligned with a mark on the fabric...................................................................................218
Color thread table.....................................................................................................................................220
Colors of Tajima (.dst) embroidery data..................................................................................................... 220
Creating Beautiful Embroidery .....................................................................................221
Threads..................................................................................................................................................... 221
Stabilizers (backing) ..................................................................................................................................221
Hooping techniques..................................................................................................................................222
Fabric/stabilizer compatibility chart ..........................................................................................................223
OPTIONAL ACCESSORIES 224
Attaching an optional embroidery frame for industrial embroidery machines ............ 224
Using the Optional Cap Frame .....................................................................................225
Cap frame and its accessories....................................................................................................................225
Types of caps ............................................................................................................................................226
Fabric precautions.....................................................................................................................................227
Preparing to use the cap frame.................................................................................................................. 227
Attaching the cap frame ............................................................................................................................ 232
Installing the embroidery frame holder...................................................................................................... 237
Additional digitizing information............................................................................................................... 238
Using the Optional Bobbin Winder ..............................................................................240
Precautions ...............................................................................................................................................240
Optional bobbin winder and its accessories .............................................................................................. 240
Setting up the optional bobbin winder ......................................................................................................241
Connecting the AC adapter ....................................................................................................................... 241
Winding the bobbin ..................................................................................................................................242
Maintenance.................................................................................................................245
Cleaning the LCD......................................................................................................................................245
16
Page 19

———————————————————————————————————————————————————————————————————————————————————
Cleaning the machine surface................................................................................................................... 245
Cleaning the hook .................................................................................................................................... 245
Cleaning around the needle plate ............................................................................................................. 246
Cleaning the bobbin case ......................................................................................................................... 247
Cleaning the thread paths of the upper threads ......................................................................................... 248
Oiling the machine................................................................................................................................... 250
About the maintenance message............................................................................................................... 251
Troubleshooting ........................................................................................................... 252
On-screen troubleshooting ....................................................................................................................... 252
Troubleshooting........................................................................................................................................ 253
Error messages.......................................................................................................................................... 261
If the machine does not respond when a key is pressed ............................................................................ 269
Specifications ...............................................................................................................270
Embroidery machine specifications........................................................................................................... 270
Upgrading Your Machine’s Software............................................................................271
Upgrade procedure using USB media....................................................................................................... 271
Upgrade procedure using computer.......................................................................................................... 272
Index ............................................................................................................................273
Contents 17
Page 20

—————————————————————————————————————————————————————————————————————————————————
——
18
Page 21

1
GETTING READY
After unpacking the machine, first refer to “Accessories” on page 22, and check that
all listed accessories are included. After checking that all accessories are included, the
embroidery machine can be set up.
The setup of the machine and the various preparations required before starting to sew
are described in this chapter.
Names of Machine Parts and Their Functions .........................................................20
Front view ...........................................................................................................20
Right-side/rear view ............................................................................................. 21
Operation panel ..................................................................................................21
Accessories.............................................................................................................. 22
Included accessories............................................................................................22
Optional accessories............................................................................................23
Setting Up the Machine...........................................................................................24
Setup and transporting precautions......................................................................24
Setup location......................................................................................................25
Setting up the machine ........................................................................................26
Adjusting the operation panel position.................................................................27
Preparing the thread guide assembly....................................................................28
Positioning the spool stand ..................................................................................29
Attaching the embroidery frame holder................................................................29
Page 22
GETTING READY ——————————————————————————————————————————————————————————————————————
——
Names of Machine Parts and Their Functions
The names of the various parts of the sewing machine and their functions are described below. Before using
the sewing machine, carefully read these descriptions to learn the names of the machine parts.
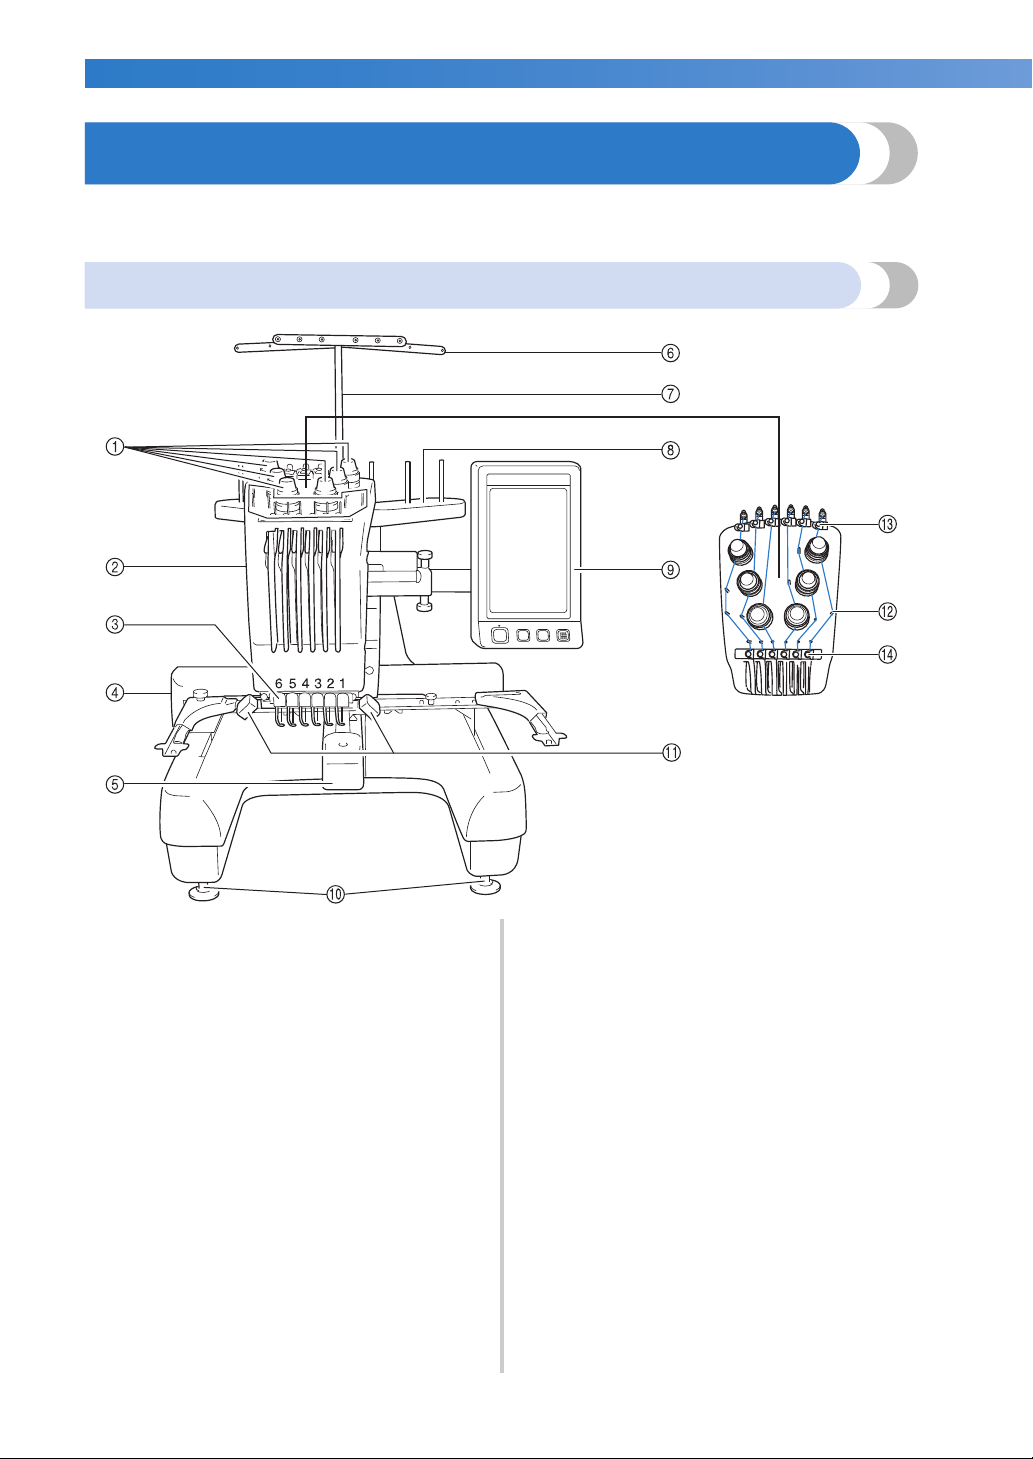
Front view
1 Thread tension knobs
Adjust the tension of the thread.
2 Needle bar case
Moves to the left and right to move the needle to the
embroidering position.
3 Lower thread guide
4 Carriage
Attach the embroidery frame to the carriage. When the
machine is turned on or when the machine is
embroidering, the carriage moves forward, backward,
left and right.
5 Hook cover/Hook
Open the hook cover, and then insert the bobbin case
into the hook.
6 Thread guide
20
7 Thread guide assembly support
8 Spool stand
Put 6 thread spools to embroider.
9 Operation panel
0 Feet
Use the feet to adjust the height of the legs.
A Sewing light
The sewing light can be turned on or off from the
settings screen. Refer to page 203.
B Thread guide pins
C Upper thread guide
D Middle thread guide
Page 23
———————————————————————————————————————————————————————————————————————————————————
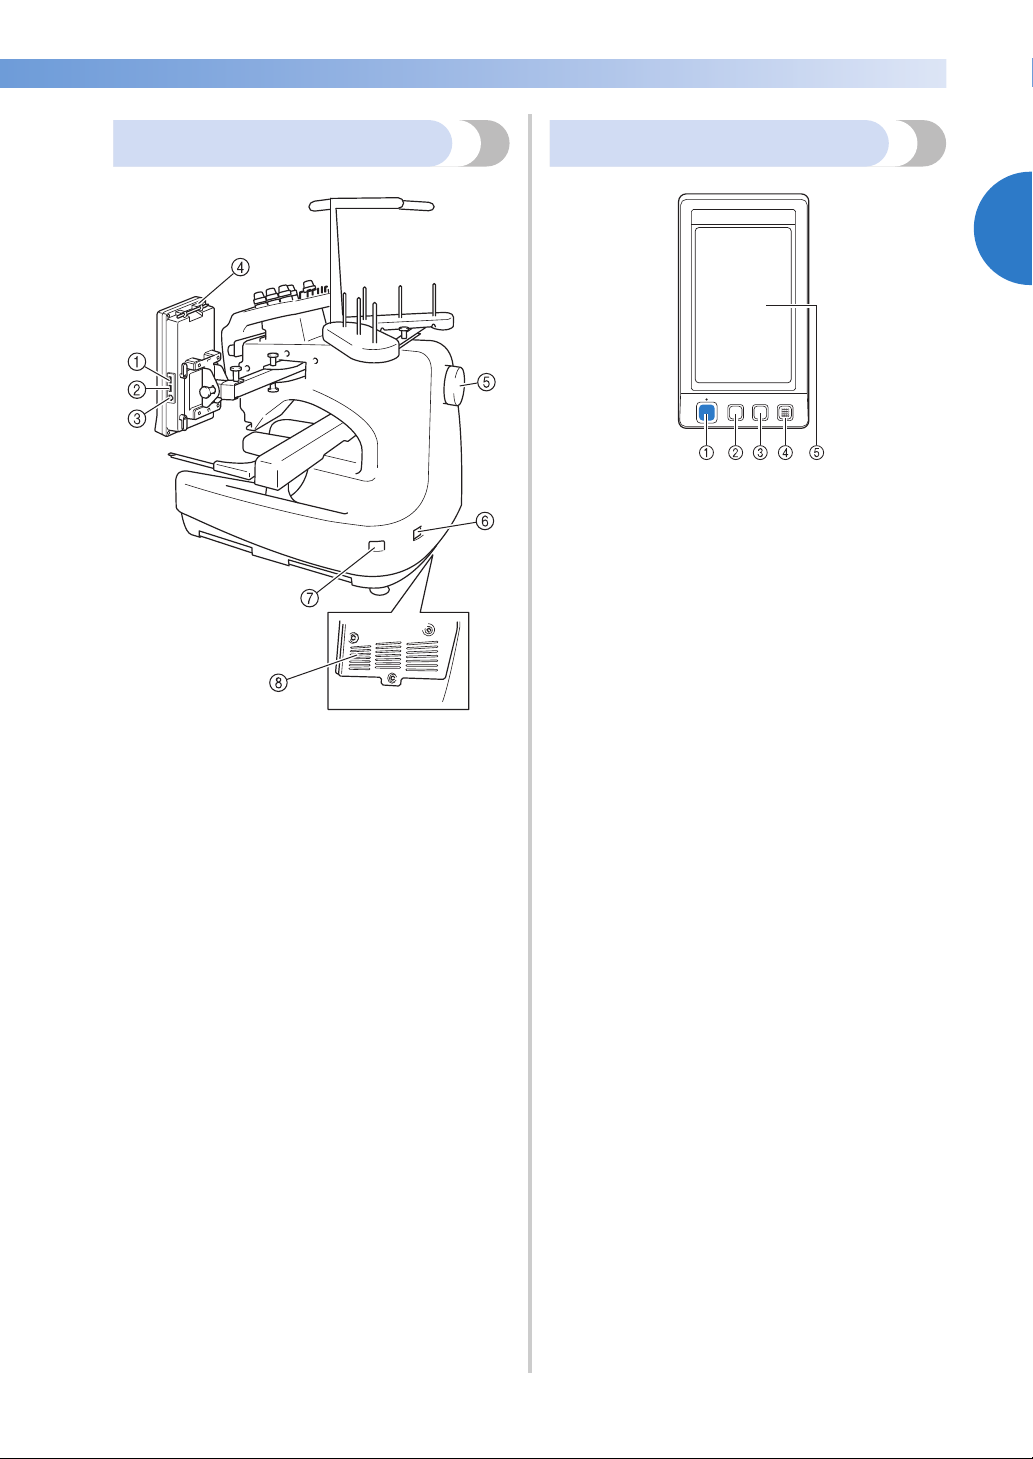
Right-side/rear view
Bottom
1 Primary (top) USB port for media
In order to send patterns from/to USB media, plug the
USB media directly into the USB port.
2 USB port for mouse
3 USB port for computer
In order to import/export patterns between a computer
and the machine, plug the USB cable into the USB
port.
4 Touch pen holder
Use the touch pen holder to hold the touch pen when
not in use.
5 Handwheel
Rotate the handwheel to move the needle up and
down. Be sure to rotate the handwheel toward the
LCD panel (counterclockwise).
6 Power supply plug
Insert the plug on the power supply cord into the
power supply plug.
7 Main power switch
Use the main power switch to turn the machine ON (I)
and OFF (
8 Ventilation slots
{).
Operation panel
1 Start/Stop button
Press the start/stop button to start or stop the machine.
The lighting status and color of the button changes
depending on the operation condition of the machine.
Lit in red : When the machine cannot
Flashing in
green
Lit in green : While the machine is sewing
Off : When the machine is turned
2 Thread trimming button
Press the thread trimming button to trim both the
upper and the bobbin threads.
3 Automatic needle-threading button
Press the automatic needle threading button to thread
the needle.
4 Speaker
5 LCD (touch panel)
Touch the keys that appear on the touch panel to
select and edit patterns and confirm various
information.
start sewing
:
When the machine can start
sewing
off
1
Names of Machine Parts and Their Functions 21
Page 24

GETTING READY ———————————————————————————————————————————————————————————————————————
——
Accessories
The accessories listed below are included with this machine. Make sure to use the accessories designed for
this machine.
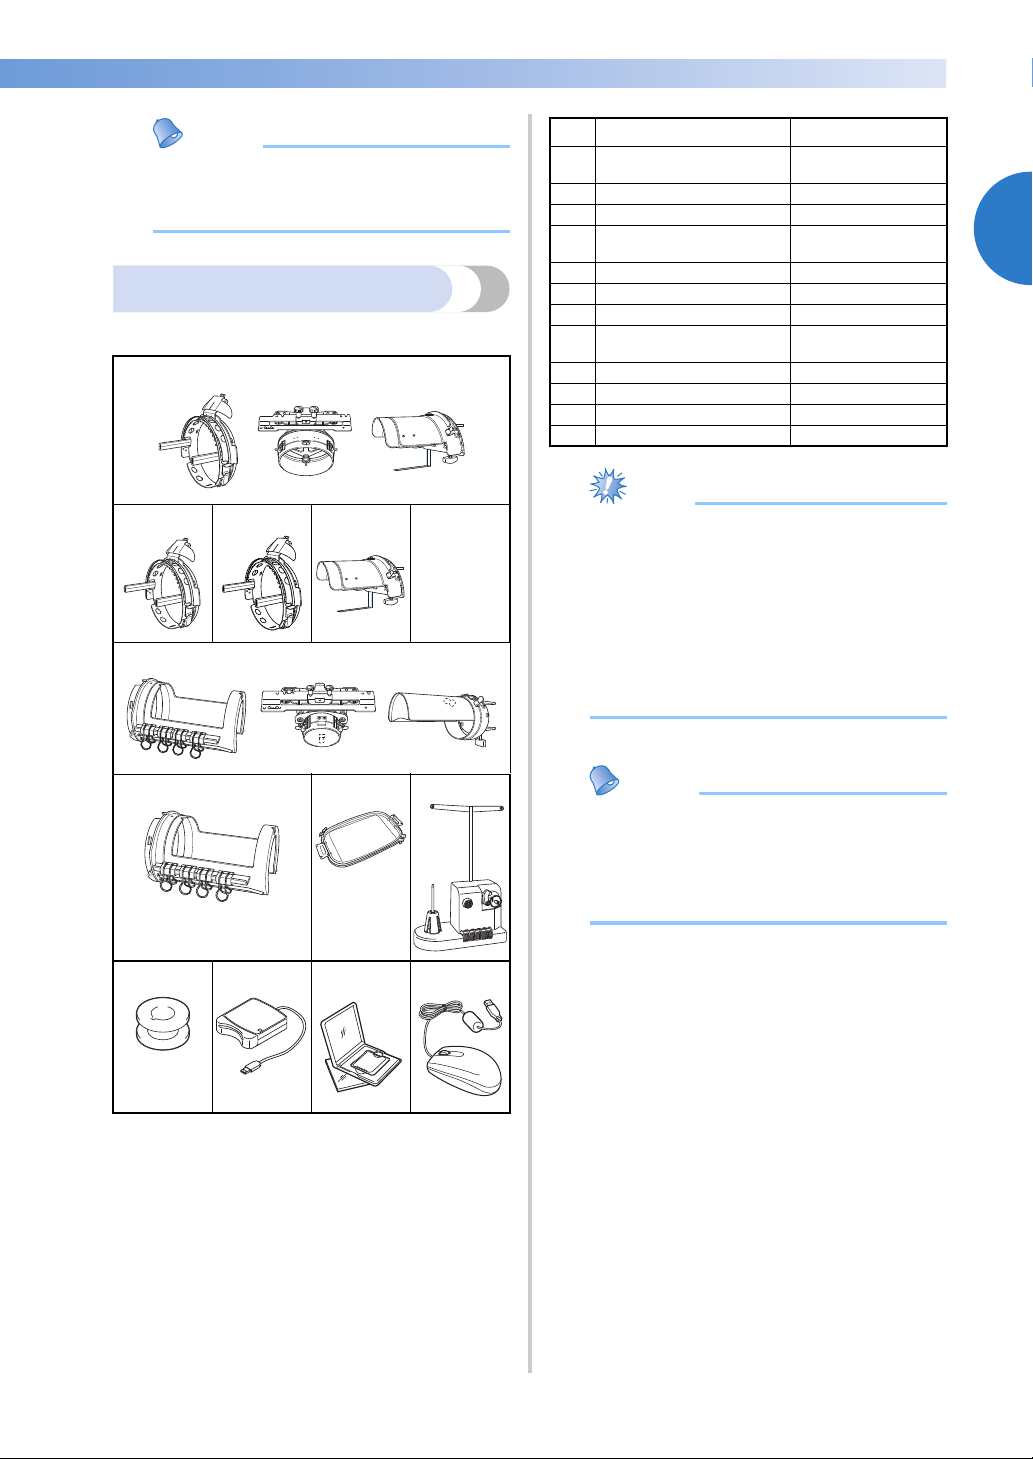
Included accessories
After opening the box, check that the following accessories are included. If any item is missing or damaged,
contact your authorized dealer.
1. 2. 3. 4. 5. 6. 7. 8. 9.
10. 11. 12. 13. 14. 15. 16. 17. 18.
19. 20. 21. 22. 23. 24. 25. 26.
27. 28. 29. 30. 31. 32. 33.
No. Part Name Part Code
1 Accessory case XC6482-051
2 Needle set × 2 PRHA1BR11
3 Prewound bobbin × 6 XC6368-051
4 Spool net × 6 S34455-000
5 Seam ripper X54243-051
6 Scissors XC1807-121
7 Tweezers XC6542-051
8 Touch pen XA9940-051
9 Needle changing tool (Threader) XC4957-051
10 Needle plate spacer XC6499-151
11 Phillips screwdriver XC6543-051
12 Standard screwdriver X55468-051
13 Allen screwdriver XC5159-051
14 Offset screwdriver XC6545-051
15 Disc-shaped screwdriver XC1074-051
16 Wrench 13 × 10 XC6159-051
17 Oiler XZ0206-051
18 Cleaning brush X59476-051
19 Weight XC5974-151
20 USB cable XD1851-051
No. Part Name Part Code
Embroidery frame (extra large)
21
200 mm (H) × 300 mm (W) (7-7/8
inches (H) × 11- 3/4 inches (W))
Embroidery frame (large) 130 mm
22
(H) × 180 mm (W) (5-1/8 inches
(H) × 7-1/8 inches (W))
Embroidery frame (medium) 100
23
mm (H) × 100 mm (W) (4 inches
(H) × 4 inches (W))
Embroidery frame (small) 40 mm
24
(H) × 60 mm (W) (1-1/2 inches (H)
× 2-3/8 inches (W))
Embroidery sheet (extra large) 200
25
mm (H) × 300 mm (W) (7-7/8
inches (H) × 11-3/4 inches (W))
Embroidery sheet (large) 130 mm
26
(H) × 180 mm (W) (5-1/8 inches
(H) × 7-1/8 inches (W))
Embroidery sheet (medium) 100
27
mm (H) × 100 mm (W) (4 inches
(H) × 4 inches (W))
Embroidery sheet (small) 40 mm
28
(H) × 60 mm (W) (1-1/2 inches (H)
× 2-3/8 inches (W))
29 Operation manual This manual
30 Quick reference guide XE6282-001
31 Spool mat × 6 XC7134-051
32 Spool cap × 6 130012-054
33 Card reader holder XE6620-001
PRH300
PRH180
PRH100
PRH60
XC5704-051
XC5721-051
XC5759-051
XC5761-051
22
Page 25
———————————————————————————————————————————————————————————————————————————————————
Memo
Note
Memo
No. Part Name Part Code
Advanced cap frame 2 set
● The included touch pen can be stored in
the touch pen holder on the back of the
operation panel. Refer to page 21.
Optional accessories
The following are available as optional accessories.
1.
1
(Refer to page 225.)
2 Advanced cap frame 2 PRCFH3
3 Advanced cap frame PRCFH2
Mounting jig
4
(Refer to page 225.)
5 Cylinder frame set PRCL1
6 Cylinder frame PRCLH1
7 Flat frame PRF300
Bobbin winder set
8
(Refer to page 240.)
9 Metal bobbin 100376-053
10 Embroidery card reader SAECR1
11 Embroidery card –
12 USB mouse XE5334-001
PRCF3
PRCFJ2
PRBW1
1
2. 3. 4.
5.
6. 7. 8.
9. 10. 11. 12.
● The part code may vary depending on the
country/area where the machine was
purchased.
● Embroidery cards sold overseas are not
compatible with this embroidery machine.
● Visit your nearest authorized dealer for a
complete listing of optional accessories
and embroidery cards available for your
machine.
● Always use accessories recommended for
this machine.
● All specifications are correct at the time of
printing. Please be aware that some
specifications may change without notice.
Accessories 23
Page 26
GETTING READY ——————————————————————————————————————————————————————————————————————
——
Setting Up the Machine
The procedures for setting up the machine are described below. If the machine is not set up correctly, it may
shake or produce loud noises and the embroidery will not be sewn correctly. An optional sewing stand is
also available.
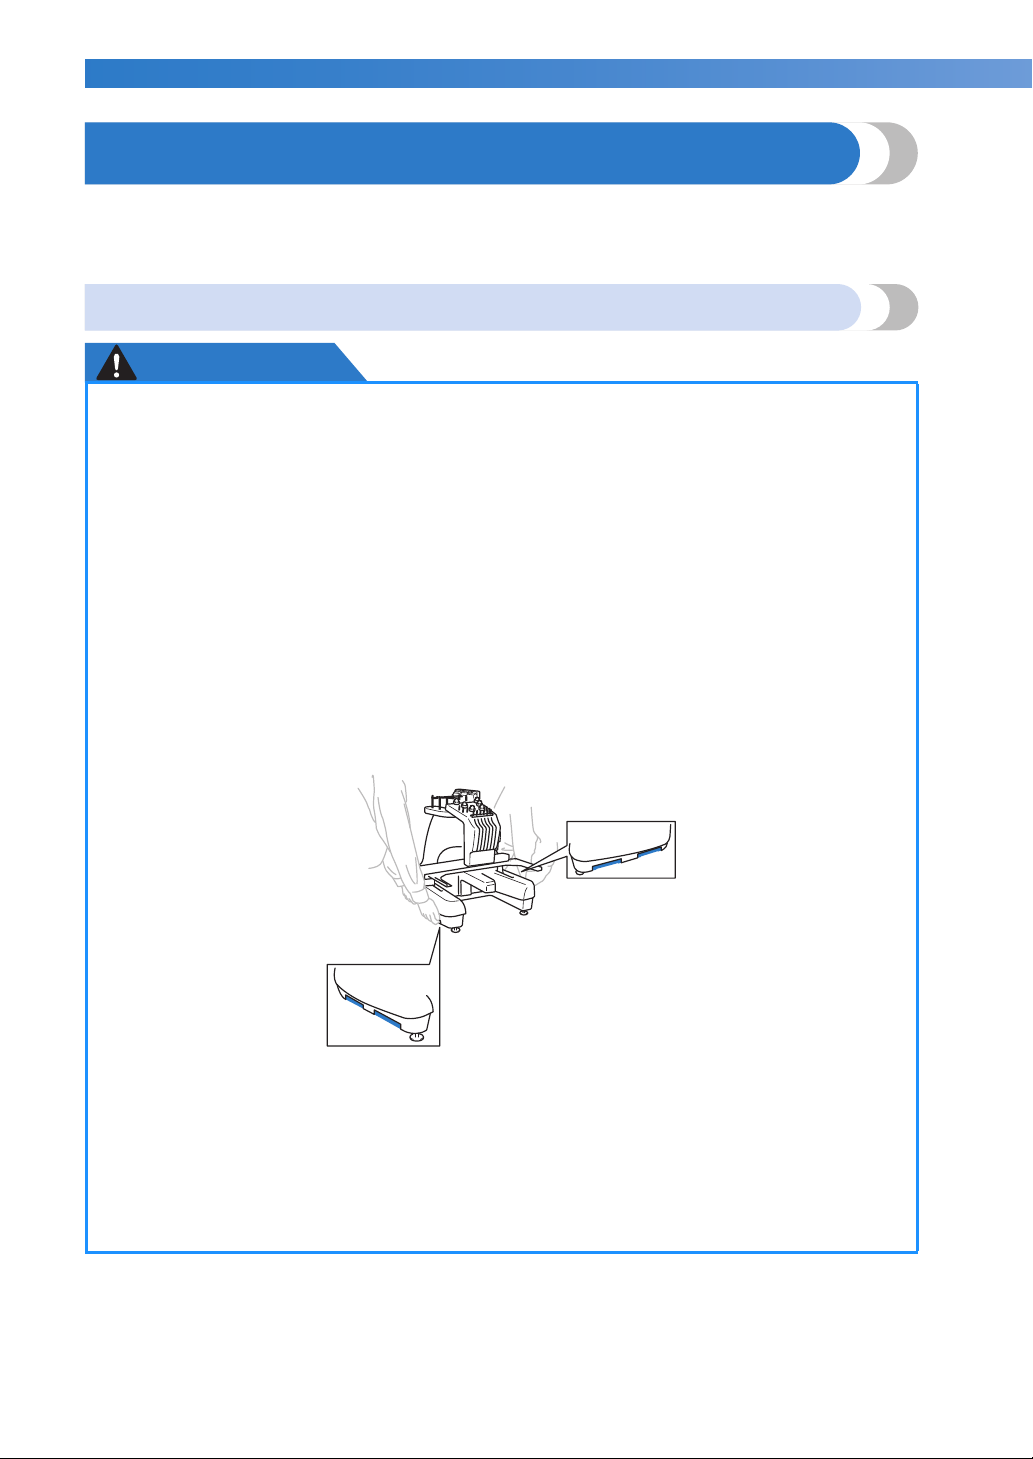
Setup and transporting precautions
CAUTION
● The temperature of the operating environment should be between 5 °C (40 °F) and 40 °C
(104 °F). If the machine is operated in an environment that is either too cold or too hot,
the machine may malfunction.
● Do not use the machine in a location where it will be exposed to direct sunlight,
otherwise the machine may malfunction.
● Set up the machine with it’s four adjustable feet completely in contact with the desk or
table, so that the machine is level.
● Do not put anything under the embroidery machine that could block the ventilation slots
found on the rear underside of the machine, in order to avoid the possibility of the
machine’s motor overheating, resulting in a fire or in damage to the machine.
● The machine weight is approximately 37 kg (81 lb). The transporting or setting up of the
embroidery machine should be performed by two people.
● When transporting the machine, be sure to lift it from the bottom at the indicated
positions by two people. Lifting the machine from any other area may damage the
machine or result in the machine falling, which could cause injuries.
● When lightning occurs, turn off the machine and unplug the power supply cord. Lightning
may cause the machine to malfunction.
● Do not plug in the power supply cord until setup of the machine is completed, otherwise
injuries may result if the start/stop button is accidentally pressed and the machine starts
sewing.
● When lubricating the machine, wear protective eyeglasses and gloves to prevent the oil or
grease from getting into your eyes or on your skin. Do not put the oil or grease into your
mouth. Keep the oil and grease out of the reach of children.
24
Page 27
———————————————————————————————————————————————————————————————————————————————————
Note
Setup location
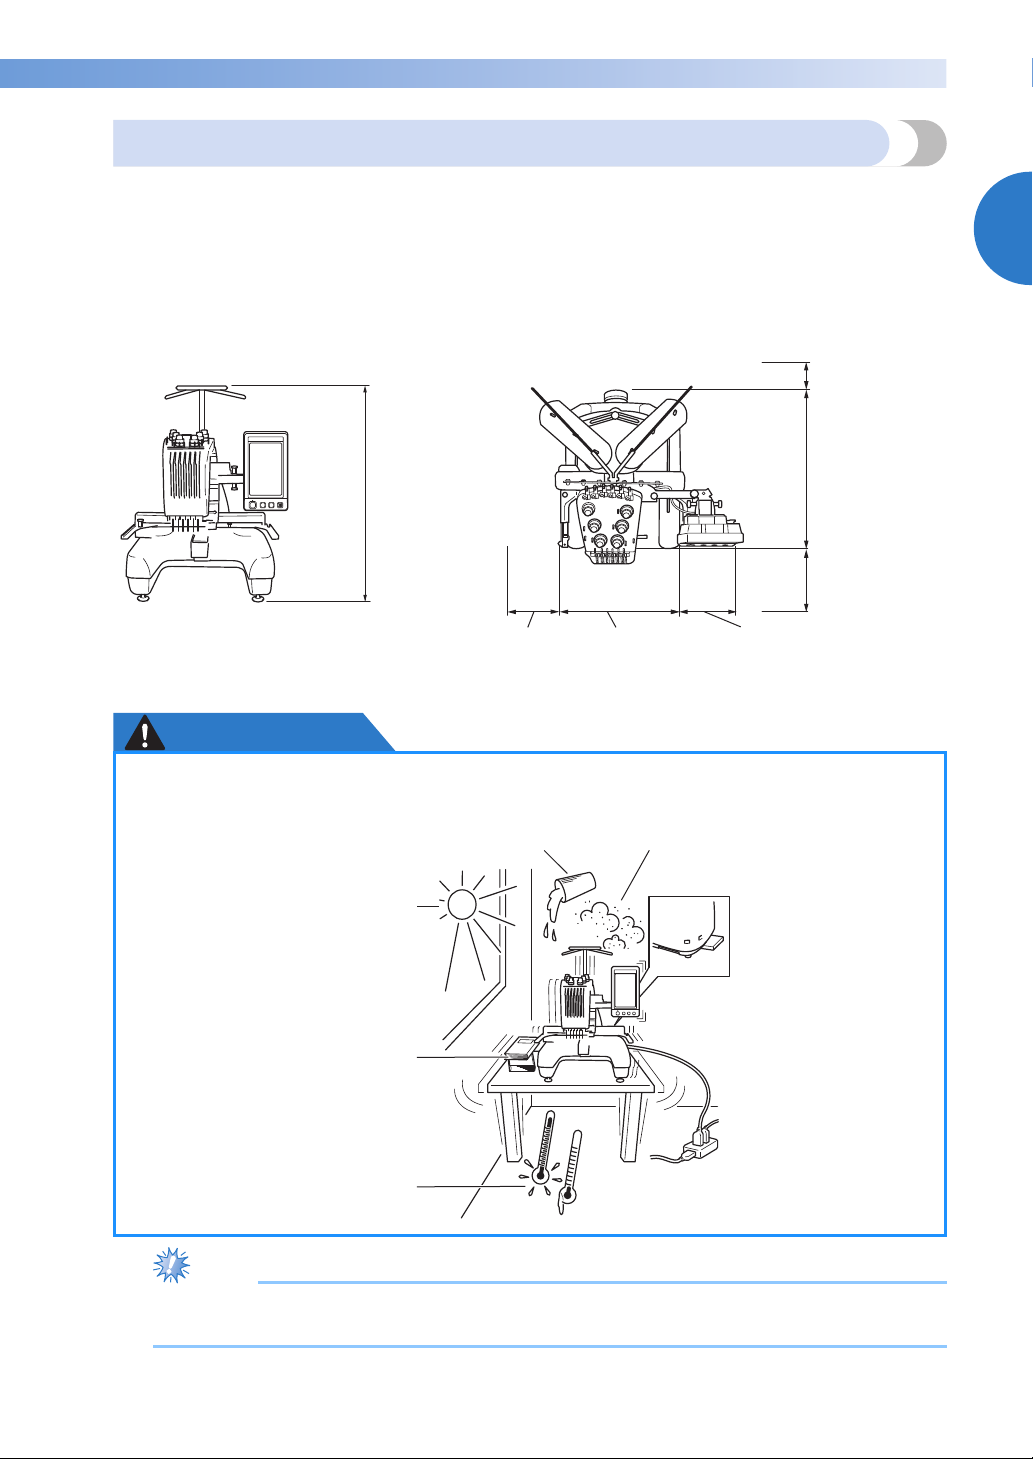
Setup the machine in a location that meets the following requirements.
• Position machine more than 50 mm (2 inches) from the wall
• Allow sufficient space around the machine
• Place no objects within the moving range of the embroidery frame
• Set-up machine near an electrical outlet
• Use a level and stable surface, such as a desk
• Use a surface that can support the weight of the machine (about 37 kg (81 lb))
• Allow open space around the ventilation slots found on the rear underside of the machine
More than
50 mm
(2 inches)
1
770 mm
(30-5/16
inches)
More than
250 mm
(9-7/8 inches)
512 mm
(20-5/32 inches)
More than
250 mm
(9-7/8 inches)
589 mm
(23-3/16 inches)
More than
350 mm
(13-3/4 inches)
CAUTION
● In order to prevent malfunctions or damage, do not set up the machine in a location
exposed to the following conditions.
Liquids, such as water Extreme dust
Direct sunlight
Blocked ventilation slots
Insufficient space
An unstable surface
Objects within the moving range of
the embroidery frame
Connection to extension
cords or multiple
Extremely high or extremely low
temperatures. The operating
environment should be between
5 °C (40 °F) and 40 °C (104°F).
adapters
● For your safety: Since the machine weighs approximately 37 kg (81 lb), do not set it up on an
unstable table or desk.
Setting Up the Machine 25
Page 28
GETTING READY ——————————————————————————————————————————————————————————————————————
——
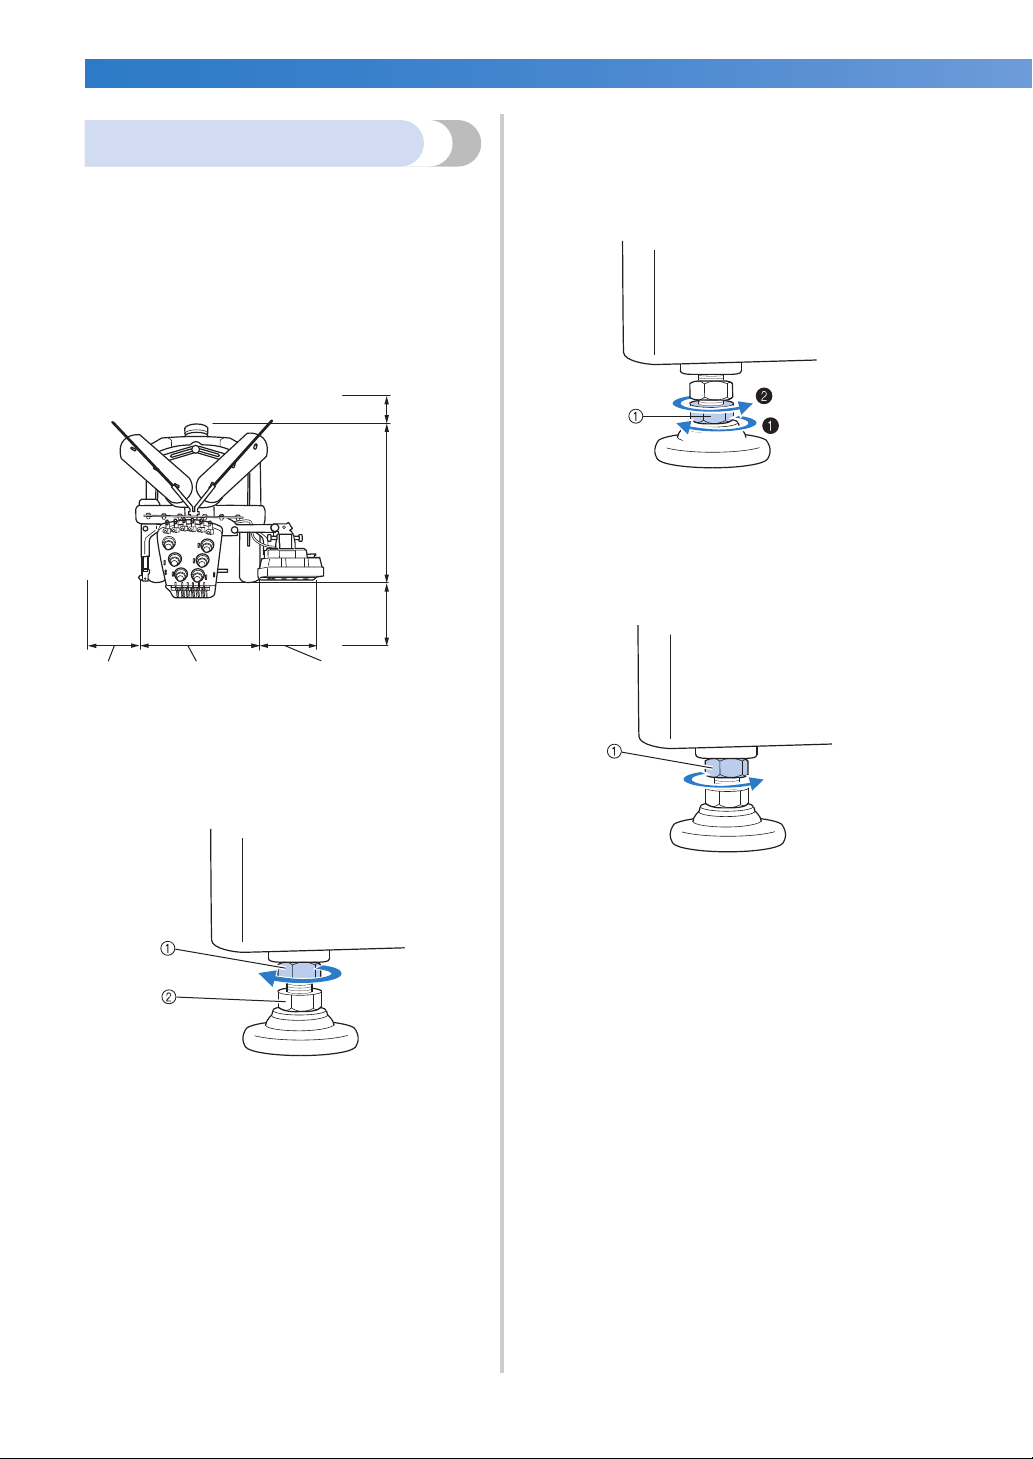
Use the included wrench to turn the
4
Setting up the machine
adjustable foot nut on the foot.
Turning the nut in direction 1 lengthens the
When setting up the machine, adjust the legs so
that the machine is steady.
leg; turning the nut in direction 2 shortens
the leg.
Make sure that all packing tape affixed to the
1
machine is peeled off and that all packing
material is removed.
Set up the machine while making sure that
2
there is sufficient space around it.
More than
50 mm
(2 inches)
More than
250 mm
(9-7/8 inches)
512 mm
(20-5/32 inches)
More than
250 mm
(9-7/8 inches)
Adjust the legs so that the machine is steady.
3
Use the included wrench to loosen the lock
nut on the leg that you wish to adjust.
589 mm
(23-3/16
inches)
More than
350 mm
(13-3/4 inches)
1 Adjustable foot nut
• Adjust all four legs so that they securely
contact the desk or table.
After adjusting the legs to the desired length,
5
use the included wrench to tighten the nuts.
1 Lock nut
Press down on each corner of the
6
embroidery machine to check that it is
stable.
If it is still unstable, perform steps
5 again to adjust the legs.
3 through
1 Lock nut
2 Adjustable foot nut
X The foot can be turned.
26
Page 29
———————————————————————————————————————————————————————————————————————————————————
Note
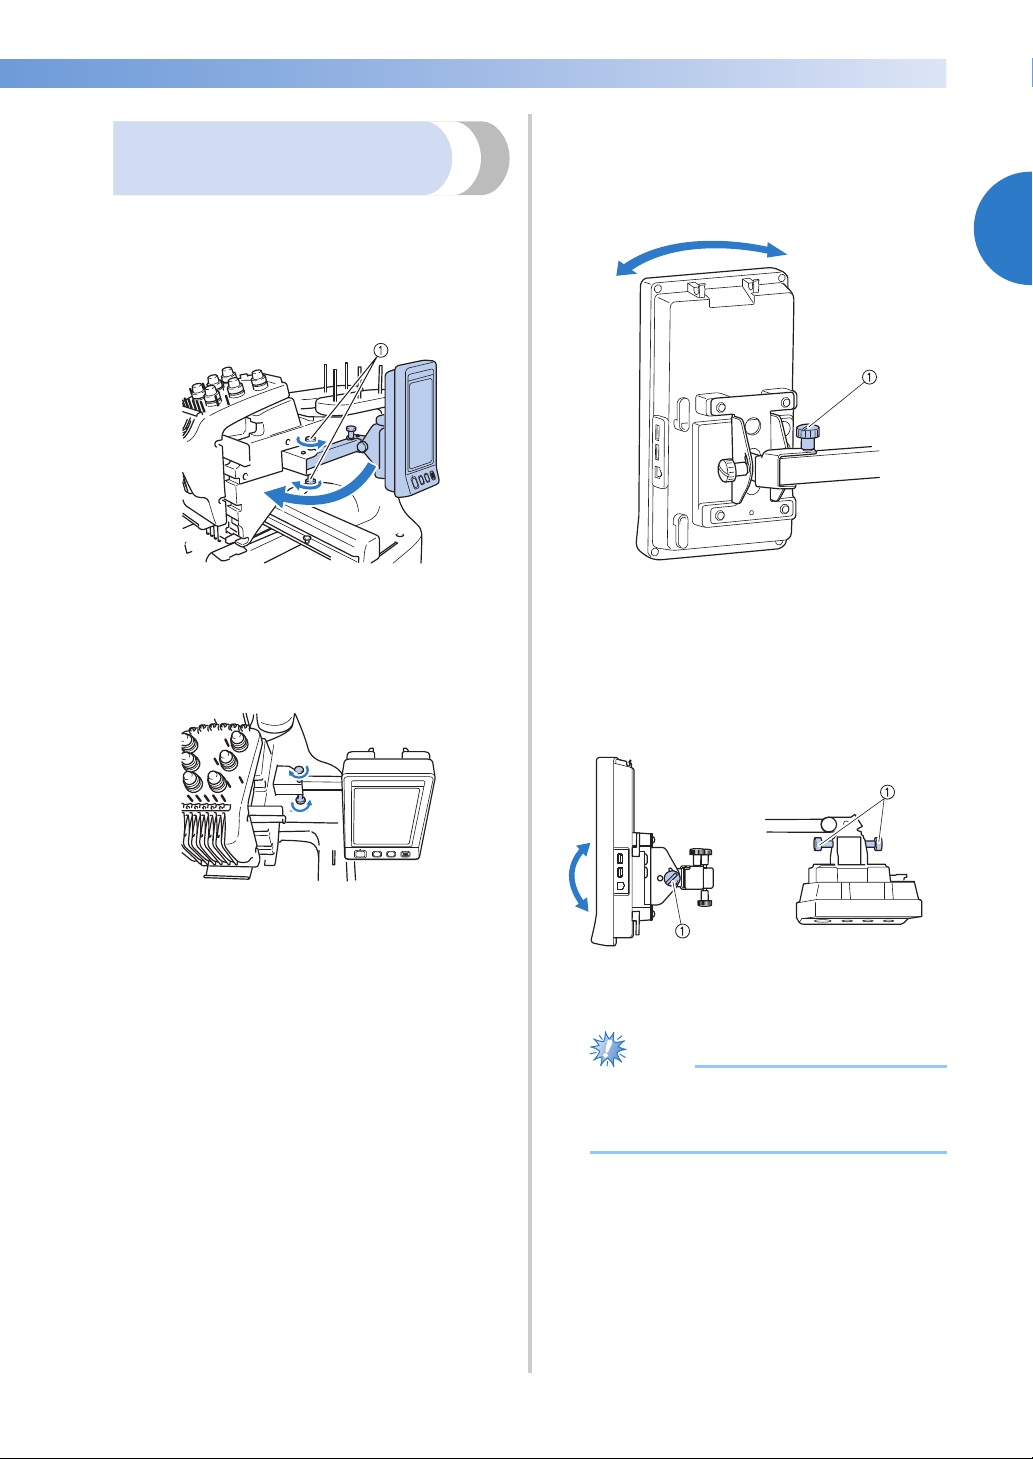
Adjust the orientation of the operation
3
Adjusting the operation
panel position
Adjust the orientation and angle of the operation
panel so it can easily be operated.
Loosen 2 thumb screws to bring the
1
operation panel forward.
panel.
Loosen the thumb screw, adjust the operation
panel to an easy-to-view orientation, and
then tighten the thumb screw.
1
1 Thumb screws
Adjust the operation panel to an easy-to-
2
operate position, and then tighten the thumb
screws.
1 Thumb screw
Adjust the angle of the operation panel.
4
Loosen the 2 thumb screws behind the
operation panel, adjust the operation panel to
an easy-to-view angle, and then tighten the
thumb screws.
(Side view) (Top view)
1 Thumb screws
● Using the disc-shaped screwdriver
included, loosen and firmly tighten the
five thumb screws.
Setting Up the Machine 27
Page 30
GETTING READY ——————————————————————————————————————————————————————————————————————
——
Note
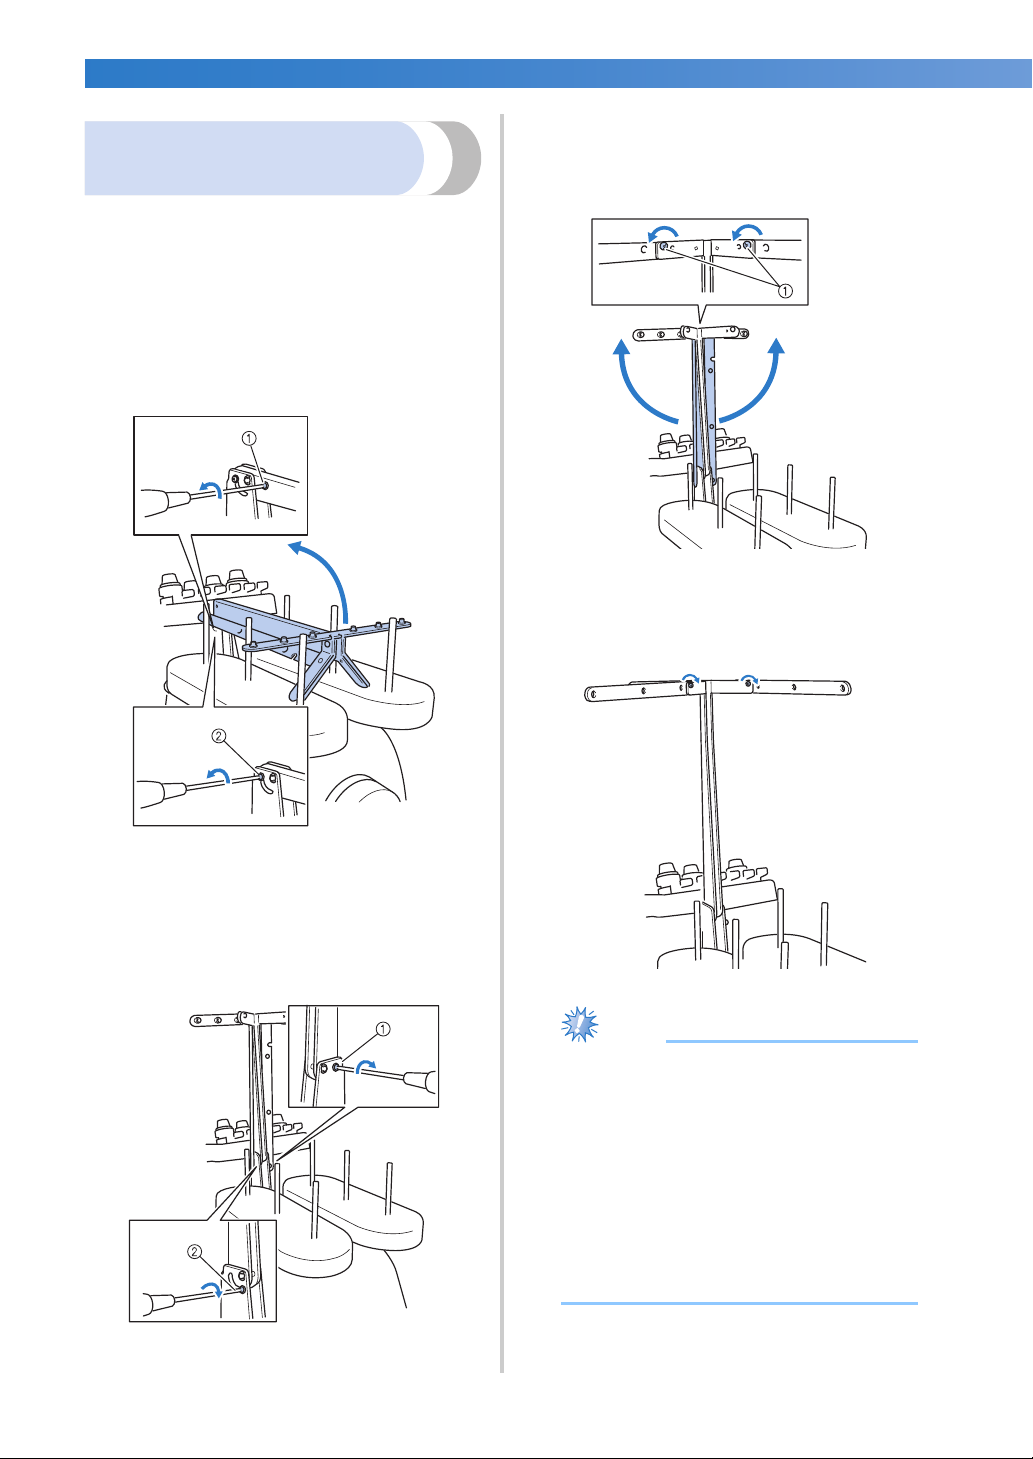
Using the Phillips screwdriver, loosen the
3
Preparing the thread guide
assembly
screws on the left and right sides of the
thread guide assembly and lift up the thread
guide so that it is level.
Raise the thread guide assembly. Locate the
included Phillips screwdriver.
Using the Phillips screwdriver, loosen the
1
screws on the left side of the thread guide
assembly support so that the thread guide
assembly can be raised.
Remove screw 1, and then turn screw 2 three or
four times to loosen it.
1 Loosen Screws
Tighten the screws on the left and right sides
4
of the thread guide assembly.
1 Remove the screw.
2 Turn the screw three or four times to loosen it.
Raise thread guide into position and tighten
2
screw 2 on the left. Insert screw 1 into
right side of the thread guide assembly
support and tighten.
1 Insert screw and tighten.
2 Tighten screw.
28
● If the screws are not loosened enough, it
may not be easy to move the thread guide
assembly support and the thread guide.
Do not apply extreme force when moving
the thread guide assembly support and the
thread guide. Be sure that the screws are
loosened well enough before moving
these parts.
● Be sure to tighten each screw well enough
that the thread guide assembly support
and the thread guide are secured.
Page 31

———————————————————————————————————————————————————————————————————————————————————
Positioning the spool stand
Secure the spool stand in the embroidering
position.
Loosen the thumb screw, and then open up
1
the spool stand to the left and right.
1 Thumb screw
2 Spool stand
After the spool stand is fully opened up,
2
tighten the thumb screw.
Attaching the embroidery
frame holder
Attach the embroidery frame holder to the carriage.
Remove the two thumb screws of the
1
embroidery frame holder.
1 Thumb screws
Align the holes in the embroidery frame
2
holder with the pins on the frame-mounting
plate of the carriage.
1
X Secure the spool stand in the opened
position.
1 Pins on the frame-mounting plate
2 Holes in the embroidery frame holder
Setting Up the Machine 29
Page 32

GETTING READY ——————————————————————————————————————————————————————————————————————
——
Note
Secure the embroidery frame holder with
3
the two thumb screws removed in step
1 Thumb screws
1.
● Using the disc-shaped screwdriver
included, firmly tighten the thumb screws.
This completes the preparation of the machine.
30
Page 33

2
Installing the Bobbin
Turning ON the Machine
Selecting an Embroidery Pattern
Editing the Embroidery Pattern
Specifying Embroidering Setting
Previewing the Image
Hooping the Fabric in the Embroidery Frame
Attaching the Embroidery Frame to the
Machine
Checking the Embroidery Area
Upper Threading
Sewing the Embroidery
Checking the Thread Tension
Removing the Embroidery Frame and Fabric
Turning OFF the Machine
1
2
3
4
5
6
7
8
9
10
11
12
13
14
EMBROIDERING TUTORIAL
This chapter describes the basic embroidering operations in order—from turning on
the machine and sewing a pattern to finishing sewing. Follow the steps of the tutorial
to embroider a pattern and master the operation of this embroidery machine.
Operating Precautions ............................................................................................ 32
Basic Procedures .....................................................................................................35
Screen Quick Reference Guide ...............................................................................70
When You Have a Question, This May Help You....................................................79
Page 34

EMBROIDERING TUTORIAL ————————————————————————————————————————————————————————————————
——
Operating Precautions
The necessary points to ensure the correct operation of this machine are described below.
Power supply precautions
Be sure to observe the following precautions concerning the power supply.
WARNING
● Use only regular household electricity for the power source. Using other power sources
may result in fire, electric shock, or damage to the machine.
● Make sure that the plugs on the power supply cord are firmly inserted into the electrical
outlet and the power supply cord receptacle on the machine.
● Do not insert the plug on the power supply cord into an electrical outlet that is in poor
condition.
● If any of the following occur, turn off the embroidery machine and unplug the power
supply cord, otherwise a fire, an electric shock or damage to the machine may result.
• When you are away from the machine.
• After using the machine.
• If a power outage occurs while the machine is being operated.
• If the machine is not operating properly, for example, when there is a loose or cut connection.
• During electrical storms.
CAUTION
● Use only the power supply cord included with this machine.
● Do not plug this machine in with extension cords or multi-plug adapters with many other
appliances plugged into them, otherwise a fire or an electric shock may result.
● Do not plug in or unplug the power supply cord with wet hands, otherwise an electric
shock may result.
● When unplugging the power supply cord, be sure to first turn off the machine, and then
grasp the plug when unplugging the cord. Pulling on the cord may damage it or result in a
fire or an electric shock.
● Do not allow the power supply cord to be cut, damaged, modified, forcefully bent, pulled,
twisted, or bundled. In addition, do not place heavy objects on the cord or expose it to
heat, otherwise damage to the cord, fire or an electric shock may result. If the power
supply cord or its plug is damaged, stop using the machine, and then take the machine to
your authorized dealer for repairs before continuing use.
● If the machine is not to be used for a long period of time, unplug the power supply cord,
otherwise a fire may result.
● When leaving the machine unattended, either the main switch of the machine should be
turned to OFF or the plug must be removed from the socket-outlet.
● When servicing the machine or when removing covers, the machine must be unplugged.
● For U.S.A only
This appliance has a polarized plug (one blade wider than the other). To reduce the risk of
electrical shock, this plug is intended to fit in a polarized outlet only one way.
If the plug does not fit fully in the outlet, reverse the plug. If it still does not fit, contact a
qualified electrician to install the proper outlet. Do not modify the plug in any way.
32
Page 35

———————————————————————————————————————————————————————————————————————————————————
COATS
Polyester
L
Needle precautions
Be sure to observe the following precautions concerning the correct choice of needle for your machine.
CAUTION
● Your machine is designed to use household embroidery needles. The factory
recommended needle is “HAX 130 EBBR” (Organ). Schmetz needles 130/705 H-E may be
used as a substitute. Use of any other needles may break the needle or thread or damage
the needle-threading mechanism or result in injuries.
● Never use bent needles. Bent needles can easily break, possibly resulting in injuries.
Checking the needle
Sewing with a bent needle is extremely dangerous since the needle may break while the machine is
operating.
Place the flat side of the needle on a flat surface and check that the distance between the needle and the flat
surface is even. If the needle is bent or the tip of the needle is broken, replace the needle with a new one.
(Refer to “Changing the Needle” on page 86.)
■ Good needle ■ Bad needle
If the distance between the needle and
the flat surface is not even, the needle is
bent. Do not use a bent needle.
2
1 Flat side
2 Needle type marking
3 Flat surface
Bobbin precautions
Be sure to observe the following precautions concerning the bobbin.
CAUTION
● Only use prewound bobbin (COATS “L” type/TRU-SEW
POLYESTER “Filaments”) or bobbins designed specifically for
this machine. Use of any other bobbin may result in injuries or
damage to the machine.
● Use a bobbin thread that has been correctly wound, otherwise
the needle may break or the thread tension will be incorrect.
● When winding a bobbin, only use optional bobbin winder (refer
to page 240) and metal bobbins (Part code: 100376-053).
● When winding the bobbin, be sure to use cotton or spun polyester bobbin thread
(between 74 dtex/2 and 100 dtex/2).
Operating Precautions 33
Page 36

EMBROIDERING TUTORIAL ———————————————————————————————————————————————————————————————
——
Note
Note
Note
Note
Upper thread recommendations
Be sure to observe the following recommendations concerning the upper thread.
● It is recommended that rayon or polyester embroidery thread be used (120 den x 2 / 135 dtex x 2 /
40 weight (in Americas and Europe) / #50 (in Japan)).
Fabric recommendations
Be sure to observe the following recommendations concerning the fabric.
● Your machine can embroider fabric that is up to 1 mm (3/8 inch) thick. If thicker fabric is
sewn, the needle may bend or break.
● When embroidering overlapping stitches, it is difficult for the needle to penetrate the
fabric, possibly resulting in the needle bending or breaking.
● Attach stabilizers to thin or stretch fabrics. (Refer to “Attaching Iron-On Stabilizer
(Backing) to Fabric” on page 90 for information.)
● When embroidering large pieces of fabric, make sure that the fabric is not caught in the
carriage.
Display recommendations
Be sure to observe the following recommendations concerning the use of the operation panel display.
● Only touch the display with your finger or included touch pen. Do not use a mechanical
pencil, screwdriver or any other hard or sharp object. In addition, do not apply extreme
pressure to the display screen, otherwise damage to the display screen may result.
• The display may be dark immediately after the embroidery machine is turned on. This is a
normal characteristic of the backlight and is not a sign of a malfunction. After
approximately 10 minutes, the display should reach its normal level of brightness.
• If you are not directly facing the operation panel display, the colors may be distorted or
the display may be difficult to read. This is a normal characteristic of the display and is not
a malfunction. Be sure to sit in front of the display while using it. (Refer to “Adjusting the
operation panel position” on page 27, if adjusting is necessary.)
34
Page 37

———————————————————————————————————————————————————————————————————————————————————
Basic Procedures
Basic embroidering procedures are described below.
Check the overall procedure below, before operating the embroidery machine.
Tutorial
Step
1 Install the bobbin. p. 36 p.33
2 Turn on the machine. p. 38 p.32, 34
3 Select an embroidery pattern. p. 42
4 Edit the embroidery pattern. p. 44
5 Specify the embroidering settings. p. 45
6 Check the previewed image. p. 46
7 Hoop the fabric in the embroidery frame. p. 47 p. 34
8 Attach the embroidery frame to the machine. p. 49
9 Check the embroidery area. p. 51
10 Thread the upper threads. p. 53 p.34
Unlock the machine, then press the start/stop button to start
embroidering.
11
(Once embroidering is completed, the machine automatically
stops.)
12 Check the thread tension. p. 67
Operation
Reference
Page
p. 63
Operating
Procedure
Reference
Page
2
Remove the embroidery frame, and then remove the fabric from
13
the frame.
14 Turn off the machine. p. 69
The operations to embroider the pattern are described on the following pages.
Although embroidering can continue without the pattern being edited or embroidering settings being
specified, refer to page 162 for details on editing the patterns, and refer to page 115 for details on specifying
embroidering settings.
Descriptions of the keys and other information that appear in the main LCD screens are provided in the
tables on pages 70 to 78. Use these tables for quick reference.
The various operating precautions that must be observed during the basic procedures are provided on pages
32 to 34. These precautions must be strictly observed in order for the machine to function properly. Make
sure to read these precautions.
p. 68
Basic Procedures 35
Page 38

EMBROIDERING TUTORIAL ———————————————————————————————————————————————————————————————
——
Note
Memo
Note
Memo
1. Installing the Bobbin
When the machine is purchased, only the bobbin case is installed in the hook. Insert a bobbin wound with
bobbin thread for embroidering. For precautions concerning the bobbin, refer to page 33.
Grab the bobbin case latch, and remove the
3
bobbin case.
● The machine does not indicate how much
bobbin thread is remaining. Before starting
to embroider make sure that there is
enough bobbin thread for the pattern.
● Make sure to clean the bobbin case every
time the bobbin is changed. For details on
cleaning the bobbin case, refer to
“Cleaning the bobbin case” on page 247.
Removing the bobbin case
Open the hook cover.
1
Pull the hook cover toward you.
1 Latch
■ Oiling the machine
After removing the bobbin case, apply oil to the
machine. The race should be oiled. For details
on oiling the machine, refer to “Oiling the
machine” on page 250.
Pull the thread picker toward you.
2
1 Thread Picker
To gain access to the bobbin case easily, pull
the thread picker toward front.
● Thread picker is a device that is used to
hold the thread when beginning to sew or
when trimming the thread.
CAUTION
● The thread picker can only be moved
within a certain range. Do not pull it
with extreme force.
● Put a drop of oil onto the hook once a day
before use.
Installing the bobbin
● This embroidery machine is not equipped
with a bobbin-winder. Use pre-wound (L
type) bobbins.
● The optional bobbin winder (stand-alone
type) and optional metal bobbins can also
be used. (Refer to page 23, 240.)
36
Page 39

———————————————————————————————————————————————————————————————————————————————————
Note
Insert the bobbin into the bobbin case.
1
● Check that the thread winds off the bobbin
clockwise as shown in the illustration. If
the bobbin is installed with the thread
winding off in the opposite direction, the
embroidery will not be sewn correctly.
Pass the thread through the thread slit and
2
under the tension-adjusting spring.
Installing the bobbin case
Insert the bobbin case into the hook.
1
Insert the bobbin case while aligning the tab
on the bobbin case with the notch in the
hook, as shown in the illustration.
1 Tab
2 Notch
Fully insert the bobbin case until it snaps
2
into place.
2
3
1 Thread slit
2 Tension-adjusting spring
Pull the thread about 50 mm (2 inches)
through the opening in the tension-adjusting
spring.
1 About 50 mm (2 inches).
Close the hook cover.
3
Installing the Bobbin 37
Page 40

EMBROIDERING TUTORIAL ———————————————————————————————————————————————————————————————
——
Memo
2. Turning ON the Machine
Connect the power supply cord, and then turn on the embroidery machine. For precautions concerning the
power supply, refer to page 32.
Plug the power supply cord into the
1
machine.
Insert the plug of the power supply cord into
2
a household electrical outlet.
Touch .
5
X The pattern type selection screen appears,
and the start/stop button lights up in red.
The carriage moves to its initial position.
6
• If the number 1 needle bar is not already at
the embroidering position, the needle bar
case moves and the number 1 needle bar
moves to the embroidering position.
CAUTION
● Make sure to keep your hands and
other items away from the carriage, in
order to prevent any injuries.
Switch on the main power switch on the
3
back of the machine to “I”.
X The LCD screen comes on.
When the machine is turned on, the opening
4
movie is played. Touch anywhere on the
screen to display the message below.
38
● If the machine is turned off in the middle
of embroidering, the machine will
automatically save the design position
when turned on again. At that time, you
will be asked if you wish to continue
embroidering or begin a new operation.
(Refer to “Resume Embroidering After
Turning Off the Machine” on page 110.)
Page 41

———————————————————————————————————————————————————————————————————————————————————
6
5
1
4
3
2
Understanding the screens
When the machine is turned on and is touched, the pattern type selection screen appears. The
operations described below will be entered using the operation panel. For precautions concerning the use of
the touch panel, refer to page 34.
2
No. Display Key Name Function
1 Home key
2
3
4
5
6 Settings key
* The keys in the table above appear and can be used in most of the screens described later in this manual.
Pattern display
area
Embroidering
area line
Machine
operations guide
key
Needle bar move
key
Touch this key to cancel all operations previously
performed and return to the initial pattern group
selection screen.
This area displays the selected pattern. p. 196
Shows the embroidering area for the extra-large
embroidery frame. The embroidery frame indications,
the grid lines and other display settings can be specified
from the machine settings screen.
Touch this key to check a machine operation. p.206
Touch this key to move or thread a selected needle bar.
This key is available in any screen.
Touch this key to change the embroidery machine
settings.
Reference
Page
p. 196
p. 61
p. 194
Turning ON the Machine 39
Page 42

EMBROIDERING TUTORIAL ———————————————————————————————————————————————————————————————
——
1
21
21
21
Screen overview
The basic operation flow is shown below.
In the pattern type selection screen, select a
pattern type. (Refer to page 42, 71.)
In the pattern editing screen, edit the pattern.
(Refer to page 44, 73.)
1 Touch this key to continue to the pattern
editing screen after at least one pattern has
been selected. This key is not available unless a
pattern has been previously selected.
In the pattern list screen, select the pattern.
(Refer to page 42, 72.)
1 Touch this key to return to the pattern type
selection screen.
2 Touch this key to continue to the pattern
editing screen.
1 Touch this key to return to the pattern type
selection screen and add another pattern.
2 Touch this key to continue to the embroidering
settings screen.
In the embroidering settings screen, if it is a
combined pattern, edit the entire pattern,
specify the embroidering settings and check
the embroidery area. (Refer to page 45, 75.)
1 Touch this key to return to the pattern editing
screen.
2 Touch this key to continue to the embroidering
screen.
40
Page 43

———————————————————————————————————————————————————————————————————————————————————
1
2
In the embroidering screen, check the thread
colors assigned to the needle bars, and then
install the upper threads. Touch to
unlock the machine so that the start/stop
button starts flashing in green. The embroidery
machine is now ready to begin sewing. After
the embroidery is sewn, the embroidering
settings screen appears. (Refer to page 53,
77.)
2
1 Touch this key to return to the embroidering
settings screen.
2 Unlock key
Turning ON the Machine 41
Page 44

EMBROIDERING TUTORIAL ———————————————————————————————————————————————————————————————
——
1
2
1
3. Selecting an Embroidery Pattern
As an example, we will select the pattern shown at the right, on the last page
of the embroidery patterns.
In the pattern type selection screen, select a pattern
category (type).
Pattern type selection screen (For details on the
keys and other information on the screen, refer to
page 71.)
In the pattern list screen, search for the desired
pattern, and then touch the key for the pattern.
Pattern list screen (For details on the keys and
other information on the screen, refer to page 72.)
1 Pattern type keys
■ Checking a preview image from the pattern selection screen
Touch to preview the image prior to selecting.
Touch to return to the pattern selection screen.
42
1 Displays a preview image.
2 Pattern keys
Page 45

———————————————————————————————————————————————————————————————————————————————————
1
3
2
4
2
4
3
1
Touch the desired pattern.
Selecting an embroidery pattern
We will select a floral on the second page.
Touch to select the embroidery
1
patterns category.
3
For this example, touch .
2
X The pattern list screen appears.
Touch (previous) or (next) until the
2
desired page is displayed.
• To select a pattern group other than the
embroidery patterns, touch
1 Return key
The pattern type selection screen appears.
2 Current page number
3 Total number of pages
4 Scroll key
Touch (previous) or (next) to
move one page at a time, or touch
anywhere on the bar to jump ahead for
additional pages.
X The selected pattern appears in the pattern
display area.
• After a pattern is selected, the following
appear:
1 Vertical length of the pattern
2 Horizontal width of the pattern
3 Number of thread color changes
and the keys indicated by 4, which can be
used to change the pattern size or change
the text arrangement of a character. The
functions that can be used differ depending
on the type of pattern that is selected.
(Refer to “Changing the size of a pattern”
on page 164.)
• If the wrong pattern was selected or you
wish to select a different pattern, touch the
desired pattern.
Touch to display the next screen.
4
This confirms the pattern selection.
X The pattern editing screen appears.
Selecting an Embroidery Pattern 43
Page 46

EMBROIDERING TUTORIAL ———————————————————————————————————————————————————————————————
——
Memo
5
1
3
4
8
6
7
2
4. Editing the Embroidery Pattern
From this screen, the pattern can be edited.
Pattern editing screen (For details on the keys and other information on the screen, refer to page 73.)
Continuing to the embroidering
settings screen
Press .
1
X The embroidering settings screen is
displayed.
1 Shows the size of the embroidery pattern
currently displayed in the pattern display area.
The top value shows the height and the bottom
value shows the width. If the embroidery
pattern consists of multiple patterns that have
been combined, the size of the entire pattern,
including all patterns, is shown.
2 Highlights the sizes of embroidery frames that
can be used to sew the currently selected
embroidery pattern.
● If the embroidery frame holder is not
attached to the machine, the embroidering
area will not display the correct frame
size. (Refer to page 49.)
3 Shows the size of the currently selected
embroidery pattern.
The top value shows the height and the bottom
value shows the width.
4 Touch to edit the pattern.
5 Touch this key to delete the pattern, for
example, if the wrong pattern was selected. No
pattern is selected and the pattern type selection
screen appears.
6 Displays a preview image.
7 Shows the number of thread color changes for
the currently selected embroidery pattern
8 Continues to the next screen.
In this example, we will not edit the pattern.
Without performing any editing operations,
continue to the next screen.
44
Page 47

———————————————————————————————————————————————————————————————————————————————————
Memo
1
2
7
4
5
6
8
3
5. Specifying Embroidering Setting
From this screen, the entire pattern can be edited and embroidering settings can be specified. In addition,
the embroidering position can be checked and a pattern can be saved for later use.
Embroidering settings screen (For details on the keys and other information on the screen, refer to page 75.)
● If the embroidery frame is not positioned
correctly when continuing to the
embroidering settings screen, the
embroidery frame is moved to the correct
position at the same time that the
embroidering settings screen is displayed.
(Refer to “Moving to the correct position”
on page 95.)
2
1 Displays a preview image.
2 Touch to edit the pattern.
3 Returns to the pattern editing screen.
4 In the embroidering settings screen, the
embroidery frame guide in the pattern display
area indicates the size of the installed
embroidery frame.
5 Touch these keys to specify how the pattern will
be embroidered.
6 Touch to store the pattern in memory.
7 Continues to the next screen
8 Touch to check the embroidering area.
In this example, we will not specify any of the
embroidering settings. Continue with the next
operation.
Specifying Embroidering Setting 45
Page 48

EMBROIDERING TUTORIAL ———————————————————————————————————————————————————————————————
——
Memo
Memo
1 2
6. Previewing the Image
You can view an image of the completed pattern within the embroidery frame.
Touch to display only the pattern
Checking a preview image
Display the preview image to check that the
embroidery will be sewn as desired.
Touch .
1
X The preview image is displayed.
2
(without the embroidery frame) so that it
fills the screen.
Touch again to display the pattern
3
with the embroidery frame.
Touch to return to the previous
4
screen.
1 Touch these keys to display the pattern in the
various sizes of embroidery frames. The
embroidery frames that appear in white on gray
keys can be selected.
2 Touch this key to display an enlarged view of
the pattern.
● A preview image in a landscape
orientation cannot be rotated to a portrait
orientation, even if there is space at the
top and bottom.
46
● The embroidery can be sewn while the
preview image is displayed in the
embroidering screen. If the preview image
is displayed in any screen other than the
embroidering screen, the embroidery
cannot be sewn.
Page 49

———————————————————————————————————————————————————————————————————————————————————
Note
Memo
Note
7. Hooping the Fabric in the Embroidery Frame
After selecting the pattern to be embroidered, check which embroidery frames can be used to sew the
pattern. Select the appropriate frame, and hoop the fabric and stabilizer in the embroidery frame.
(Refer to “Attaching Iron-On Stabilizer (Backing) to Fabric” on page 90.) For precautions concerning the
fabric, refer to page 34.
Icon Name
● If the fabric is not taut, the pattern may be
misaligned or the fabric may pucker.
Follow the procedure described below to
firmly stretch the fabric in the embroidery
frame so that the fabric is not loose. In
addition, be sure to work on a level
surface when putting the fabric in the
embroidery frame.
(7-7/8 inches (H) × 11-3/4 inches (W))
(5-1/8 inches (H) × 7-1/8 inches (W))
Embroidering area
Extra-large embroidery frame
200 mm (H) × 300 mm (W)
Large embroidery frame
130 mm (H) × 180 mm (W)
2
Hooping the fabric in the
embroidery frame
Select an embroidery frame.
1
From the sizes of embroidery frames
indicated in the screen, select the embroidery
frame that you wish to use.
Embroidery frames that can be used appear
darker ( ) embroidery frames that cannot
be used appear lighter ( ).
● If the embroidery frame holder is not
attached to the machine, the embroidering
area will not display the correct frame
size. (Refer to page 49.)
Medium embroidery frame
100 mm (H) × 100 mm (W)
(4 inches (H) × 4 inches (W))
Small embroidery frame
40 mm (H) × 60 mm (W)
(1-1/2 inches (H) × 2-3/8 inches (W))
CAUTION
If embroidery frames other than the
●
four included frames are used, the
embroidery frame may hit the presser
foot and damage the machine, or cause
injury to the user.
● The embroidery frame indicators show all
embroidery frame sizes in which the
embroidery pattern can be sewn. Be sure
to use an embroidery frame of the most
suitable size. If the embroidery frame that
is too large is used, the pattern may be
misaligned or the fabric may pucker.
(Refer to “Correctly Using the Embroidery
Frames” on page 88.)
■ Embroidery frame types
There are four sizes of embroidery frames
included with this machine. For details on the
uses for each frame, refer to “Correctly Using the
Embroidery Frames” on page 88.
Hooping the Fabric in the Embroidery Frame 47
Page 50

EMBROIDERING TUTORIAL ———————————————————————————————————————————————————————————————
——
Memo
■ Hooping fabric in the small embroidery frame
The procedure for hooping fabric in the small
embroidery frame is described below.
The same procedure is used to hoop the fabric in
the medium embroidery frame.
For details on hooping fabric in the large
embroidery frame and the extra-large
embroidery frame, refer to “Hooping the Fabric”
on page 91.
Loosen the screw on the outer frame.
2
1 Screw
Place the fabric with the right side up on top
3
of the outer frame.
Securely tighten the screw, and then check
6
that the fabric is taut.
• After stretching the fabric, lightly tapping it
should produce a drum-like sound.
• Firmly clamp together the inner and outer
frames so that the bottom of the inner
frame is lower than the bottom of the outer
frame.
1 Inner frame
2 Outer frame
3 Bottom of inner frame
• The outer frame does not have a front or
back side. Either side can be used as the
front.
Press the inner frame into the outer frame.
4
• Be sure that there are no wrinkles in the
fabric after it is stretched in the embroidery
frame.
Lightly tighten the screw, and then pull the
5
edges of the fabric.
• Using the included disc-shaped
screwdriver, firmly tighten the screw.
1 Disc-shaped screwdriver
The amount that the fabric is stretched and the use
of stabilizer material differ depending on the type
of fabric being embroidered. Try various methods
to achieve the best embroidering results. (Refer to
“Hooping techniques” on page 222.)
● This embroidery machine can also be used
with the optional cap frames. (Refer to
“Using the Optional Cap Frame” on
page 225.)
48
Page 51

———————————————————————————————————————————————————————————————————————————————————
Note
8. Attaching the Embroidery Frame to the Machine
After hooping the fabric in the embroidery frame, attach the frame to the embroidery machine.
CAUTION
●
If the embroidery frame is not correctly attached it may hit the presser foot and damage
the machine, or cause injury to the user.
● When attaching the embroidery frame, make sure that the start/stop button is lit in red. If
the start/stop button is flashing in green, the embroidery machine may start sewing. If the
embroidery machine accidentally starts operating, injuries may result.
● When attaching the embroidery frame, make sure that the embroidery frame does not hit
any other part of the embroidery machine.
● Before attaching the embroidery frame, check that there is enough thread in the bobbin.
Attaching the embroidery frame
Adjust the width of the embroidery frame holder to the size of the embroidery frame, and then attach the
embroidery frame to the machine. As an example, the procedure for attaching the small embroidery frame is
described below.
Loosen the two thumb screws on the
1
embroidery frame holder.
If the screw is too tight, please use the
included disc-shaped screwdriver.
2
1 Left arm of embroidery frame holder
Move the arm of the embroidery frame holder
to the left or right to adjust it to the size of the
embroidery frame.
2 Clip on embroidery frame holder.
Insert the embroidery frame into the clips on the
embroidery frame holder.
3 Positioning pin
4 Holes
5 Positioning slots
1 Left arm
2 Thumb screws
X The left arm of the embroidery frame
holder can be moved.
• Only loosen the thumb screws a maximum
of 2 turns counterclockwise. Do not
remove the screw.
Attaching the Embroidery Frame to the Machine 49
Page 52

EMBROIDERING TUTORIAL ———————————————————————————————————————————————————————————————
——
Note
Note
Move the left arm to align the screw on the
2
right side with the mark for the embroidery
frame to be installed, and then tighten the
thumb screws.
For this example, align with mark 5.
1 Mark for extra-large embroidery frame
2 Mark for large embroidery frame
3 Mark for medium embroidery frame
4 Mark for embroidery frame for industrial
embroidery machines*
5 Mark for small embroidery frame
6 Align the screw with the mark.
* When using embroidery frames for industrial
embroidery machines, the machine does not
recognize the embroidery area of the frame. Be
sure to use the trial sewing function to check
that the pattern fits within the embroidery area.
If an embroidery frame for an industrial
embroidery machine is installed, the right arm
of the embroidery frame holder must also move.
For details, refer to page 224.
Hold the embroidery frame level, and then
3
simultaneously align both the left and right
mounts with the embroidery frame holder
clips.
• The inner frame should be on top.
● If the outer frame is on top, as shown
below, the embroidery frame is incorrectly
attached.
Insert the embroidery frame until it snaps
4
into place.
● Please firmly tighten the two thumb screws
with included disc-shaped screwdriver. The
machine will recognize the wrong frame
size, if the two screws are not tightened.
X The embroidery frame holder is ready for
the embroidery frame to be attached.
50
1 Make sure that the pins on the left and right arms
of the embroidery frame holder fit into the
positioning slot and hole on the embroidery
frame.
Page 53

———————————————————————————————————————————————————————————————————————————————————
12
9. Checking the Embroidery Area
Check the embroidery area to make sure that the embroidery will be sewn in the desired location and will
not be misaligned and that the embroidery frame will not hit the presser foot.
If the embroidery frame is not correctly positioned, it moves to the correct position, and then the
embroidering position is indicated.
Touch .
1
Temporarily stopping to
check the area
The embroidery frame can be temporarily stopped
at a desired position or the checking of the
embroidering area can be stopped.
When the embroidery frame moves to the
1
desired position, touch
X The embroidery frame stops moving, and
the next screen appears.
again.
2
X The presser foot is lowered and the
embroidery frame moves to show the
embroidery area.
The corners of the octagon showing the
2
embroidery area for the pattern are
indicated by changing direction.
Carefully watch the movement of the
embroidery frame and check that the
embroidery is sewn in the desired location
and that the embroidery frame does not hit
the presser foot.
1 Touch to continue moving the frame.
2 Touch to stop checking the embroidering area.
To continue moving the embroidery frame,
2
touch . To stop checking the
embroidering area, touch .
Checking the Embroidery Area 51
Page 54

EMBROIDERING TUTORIAL ———————————————————————————————————————————————————————————————
——
Continuing to the
embroidering screen
After finishing the necessary operations in the
embroidering settings screen, continue to the
embroidering screen.
Touch .
1
X The embroidering screen appears.
52
Page 55

———————————————————————————————————————————————————————————————————————————————————
Memo
7
3
4
9
0A
8
2
1
5
6
B
10. Upper Threading
Check the embroidering screen for information on which needle bars should be threaded with which thread
colors, and then thread the upper threads.
Checking the needle bars and thread colors
In the embroidering settings screen, touch to display the embroidering screen and the message
instructing that the needle bars be threaded (that the thread spools from the previous time be changed).
Check the thread colors in this screen.
Embroidering screen (For details on the keys and other information on the screen, refer to page 77.)
2
1 Thread information for the first needle bar
2 Thread information for the second needle bar
3 Thread information for the third needle bar
4 Thread information for the fourth needle bar
5 Thread information for the fifth needle bar
6 Thread information for the sixth needle bar
7 If no thread color name is displayed, that
needle bar has not been used.
If a thread color had been assigned to the
needle bar on a previously sewn design, the
needle bar will show the previously assigned
color.
8 Change thread spools message. (Refer to
page 103.)
This message appears when it is necessary for
the thread spools to be changed. If 9
is not touched to close the message,
embroidering cannot continue.
● The thread information for the thread
spool to be changed appears framed in
red.
0 Thread color
A Needle bar number
B Thread color name or number
Thread with the color name that appears beside
each needle bar number is threaded on that needle
bar. For the screen shown
1: Lime green
2: Moss green
3: Orange
4: Red
5: Yellow
If there is no name beside the needle bar number,
that needle bar is not used. For this example,
needle bar 6 is not used.
Upper Threading 53
Page 56

EMBROIDERING TUTORIAL ———————————————————————————————————————————————————————————————
——
5
2
3
6
1
2
4
Touch .
1
X The screen indicating that the spools be changed is closed.
• In addition to checking the thread colors, information such as the number of stitches and the sewing
time can be checked and various embroidering settings can be specified in the embroidering screen.
1 Shows the number of thread color changes, the
number of stitches, the embroidering time and
the length of time until the spools will need to
be changed.
2 Use these keys to specify various embroidering
settings or to return to the embroidering settings
screen.
3 Shows the embroidering order for the thread
colors.
4 Indicates the needle bar number where the
thread color at the left is assigned.
5 To start the machine, touch this key to unlock
the machine, and then press the start/stop
button.
6 Touch a key to move the selected needle bar to
the sewing position. Use when threading the
needle with the automatic needle-threading
mechanism.
CAUTION
● When (unlock key) in the embroidering screen is touched, the start/stop button
begins flashing in green and the embroidery machine can start sewing. If the upper
threading is being performed or the needle is being threaded, be careful that the
embroidery machine is not accidentally started, otherwise injuries may result.
54
Page 57

———————————————————————————————————————————————————————————————————————————————————
Note
Memo
Upper threading
Use embroidery thread to thread the needle bars in order, starting with needle bar 1.
Touch →
(refer to page 206).
→ → in order to view a video of the operation on the LCD
CAUTION
● When threading the upper thread, carefully follow the instructions. If the upper threading
is not performing correctly, the thread may break or become tangled, causing the needle
to bend or break.
2
● It is recommended that rayon or polyester
embroidery thread be used (120 den/2,
135 dtex/2, 40 weight (in Americas and
Europe), #50 (in Japan)).
● The path that the embroidery machine
should be threaded is indicated by a line
on the machine. Be sure to thread the
machine as indicated.
Upper Threading 55
Page 58

EMBROIDERING TUTORIAL ———————————————————————————————————————————————————————————————
——
The numbers indicate the thread path for each of the numbered needle bars. Be very careful to correctly
thread the needle bars.
Place on spool pin 1 the spool of thread with
1
the color (lime green) specified for needle
bar 1.
• Make sure that the spool stand is opened in
the shape of a V.
• When using small spools of thread, be sure
to place the included spool mat on the
spool pin before placing the spool on the
pin.
• Use spool cap on all spools of thread
shorter than the height of the spool pin.
Pass the thread through the number 1 hole
2
in the thread guide just above the spool, and
then pass the thread through the number 1
hole in the thread guide toward the front of
the machine.
1 Number 1 hole in the thread guide above the
spool
2 Number 1 hole in the thread guide toward the
front of the machine
56
1 Spool mat
2 Small spool
3 Spool cap
Page 59

———————————————————————————————————————————————————————————————————————————————————
Note
2
Pass the thread through the hole in the
3
number 1 upper thread guide.
Pass the thread toward you from the inside of
the thread guide.
1 Hole in upper thread guide
Pass the thread through the number 1 upper
4
thread guide.
Hold the thread with both hands, and then
pass it under the guide from the right.
Wind the thread clockwise once around the
5
number 1 thread tension disc.
1 Thread tension disc
• Make sure that the thread is securely
caught in the thread tension disc and
passed correct thread guide pins. (See left
illustration at top of page.)
1 Upper thread guide
● All thread tension discs are threaded in
clockwise direction.
1 Pass around here.
Upper Threading 57
Page 60

EMBROIDERING TUTORIAL ———————————————————————————————————————————————————————————————
——
Pass the thread along the thread path
6
indicated on the machine, and then pass it
under the number 1 middle thread guide
plate.
1 Middle thread guide
2 Thread guide pin
• The path from the upper thread guide
around the thread tension disc and to the
middle thread guide (steps 5 through 6)
differs depending on the spool number.
Passing the thread from the left to the right
through the thread guide pins is designed
to prevent the thread from becoming
tangled. Thread each needle bar as shown
in the illustration on page 57.
Pass the thread down through the slot to the
8
lower thread guide, and then through the
hole in the number 1 lower thread guide.
1 Hole in lower thread guide
Use the included threader to pass the thread
9
into the number 1 needle bar thread guide.
Pass the thread along the number 1 slot to
7
pass it through the number 1 take-up lever
hole from right to left.
1 Thread take-up lever
1 Needle bar thread guide
2 Needle changing tool (Threader)
58
Page 61

———————————————————————————————————————————————————————————————————————————————————
Note
Note
Threading the needle
Use the automatic needle-threading mechanism to
thread the needle.
Touch →
in order to view a video of the operation on
the LCD (refer to page 206).
Press the automatic needle-threading
1
button.
→ →
● To avoid damage, the automatic needlethreading mechanism may return to the
back position when you turn the
handwheel.
● The automatic needle-threading
mechanism can thread one needle at the
sewing position. When this mechanism is
used, be sure that the needle bar that you
want to thread is positioned as the sewing
position, otherwise the automatic needlethreading mechanism cannot be used at
the particular needle. If the needle bar is
not at the sewing position, move it there.
(Refer to page 61.)
Pull out about 150 mm (6 inches) of thread.
2
Allow thread to relax and eliminate any
stress on the thread. Then, as shown in the
illustration, pass the thread under the fork of
the automatic needle-threading mechanism
from the right, and then catch the thread
with the hook that passes through the eye of
the needle.
2
X The hook on the automatic needle-
threading mechanism passes through the
eye of the needle.
CAUTION
● If the needle is not fully inserted, the
hook of the automatic needle-threading
mechanism will not pass through the
eye of the needle during automatic
needle threading, and the hook may
bend or the needle cannot be threaded.
● If the hook of the automatic needle-
threading mechanism is bent or
damaged, contact your authorized
dealer.
● While the hook of the automatic
needle-threading mechanism is passed
through the eye of the needle, do not
rotate the handwheel, otherwise the
automatic needle-threading mechanism
may be damaged.
1 Hook
2 Fork
● When catching the thread with the hook,
be careful that the thread does not become
loose.
Upper Threading 59
Page 62

EMBROIDERING TUTORIAL ———————————————————————————————————————————————————————————————
——
Note
Pass the thread under the guide on the
3
presser foot.
1 Guide on presser foot
2 Notch in guide on presser foot
• Make sure that the thread securely passes
through the notch in the guide on the
presser foot.
Securely pass the thread through the groove
4
in the thread cutter, and then lightly pull the
thread to cut it.
Press the automatic needle-threading
5
button.
• The threader moves back away from the
needle. The thread is pulled through the
needle eye.
• The wiper comes out and catches the
thread between the needle and the
threader.
• The threader goes back to the original
home position.
1 Groove in thread cutter
● If the thread is not correctly passed
through the groove in the thread cutter,
the message “Wiper error” appears and
the needle cannot be threaded. Be sure to
securely pass the thread through the
groove.
● If enough thread is not pulled out, the
thread cannot be pulled through the
thread cutter.
This completes the upper threading for
needle bar 1.
Thread the remaining needle bars in the same
way. Note : If the needle bar to be threaded is
not moved to the embroidering position, the
needle cannot be threaded with the
automatic needle-threading mechanism. For
the remaining needle bars, perform the
following operation to move the needle bar
to the embroidering position before trying to
thread the needle.
60
Page 63

———————————————————————————————————————————————————————————————————————————————————
Memo
■ Moving and threading a selected needle bar
You can move and thread a selected needle bar
to the embroidering position at any time.
Touch .
1
X The needle bar move screen appears.
Touch the key for the needle bar that you
2
wish to move or thread.
Press the automatic needle-threading button
3
while the needle bar move screen appears.
Touch to return to the previous
4
screen.
● In the embroidering screen, a blue frame
appears around the thread information
box of the selected needle bar.
2
X The selected needle bar moves to the
embroidering position.
Upper Threading 61
Page 64

EMBROIDERING TUTORIAL ———————————————————————————————————————————————————————————————
——
Note
Memo
■ Moving the needle bar to be threaded to the
embroidering position
You can move the needle bar in the
embroidering screen.
Touch the key for the needle bar that you
1
wish to thread.
X The selected needle bar moves to the
embroidering position.
● If the thread is not taut, it may come out of
the thread tension disc. After upper
threading is finished, check again to make
sure that the thread is correctly passed into
the thread tension disc. (Refer to step
5
on page 57.)
■ Using the spool net
When using metallic thread or any other strong
thread, place the included spool net over the
spool before sewing.
If the spool net is too long, fold it once to match
the size of the spool before placing it over the
spool.
It may be necessary to adjust thread tension
when using the spool net.
1 Spool net
2 Thread
● When changing one of the upper thread
colors, it is easy to re-thread by cutting the
thread currently being used between the
spool and the thread guide above the
spool. Place the new spool on the spool
pin and tie the end of the new thread to
the end of the previous thread. Then pull
the thread through to the needle. (Refer to
page 104.)
62
Page 65

———————————————————————————————————————————————————————————————————————————————————
Note
11. Sewing the Embroidery
Now, the embroidery machine is ready to begin sewing.
When the machine starts sewing, the presser foot is automatically lowered, the necessary thread trimming
operations at the end of stitching are performed, the threads are changed as necessary while the embroidery
is sewn, and the machine stops when the end of the stitching is reached.
CAUTION
●
For safety reasons, the embroidery machine must not be left unattended while it is sewing.
● While the machine is in operation, pay special attention to the needle location. In
addition, keep your hands away from all moving parts such as the needle, needle bar case,
thread take-up lever and carriage, otherwise injuries may result.
■ Locking mechanism
For safety reasons, this embroidery machine is equipped with a locking function.
Normally, the embroidery machine is locked (it cannot start sewing). Unless the machine is unlocked, it
cannot start sewing. If the embroidery machine is not started within 10 seconds after unlocking it, it
automatically returns to being locked.
The start/stop button shows whether or not the embroidery machine is locked. If the start/stop button
lights up in red, the machine is locked. If the start/stop button flashes in green, the machine is unlocked.
X The start/stop button begins flashing in
Starting embroidering
green and the embroidery machine can be
started.
2
● Make sure that there are no objects within
the moving area of the embroidery frame.
If the embroidery frame hits another
object, the pattern may become
misaligned.
Touch to unlock the embroidery
1
machine.
• If the start/stop button is not pressed within
10 seconds after unlocking the embroidery
machine, the machine becomes locked
again.
Sewing the Embroidery 63
Page 66

EMBROIDERING TUTORIAL ———————————————————————————————————————————————————————————————
——
1
2
Press the start/stop button.
2
Press the start/stop button while it is flashing
in green. If the start/stop button returns to
being lit in red, perform this procedure again
from step
1.
X The start/stop button lights up in green and
begins sewing the first color.
After sewing of the first color is finished, the
3
machine automatically stops and trims the
thread. The needle bar case moves to the
2nd color position and sewing of the second
color begins.
X The thread color display in the screen
continues to the second color, and the
thread information for the second needle
bar is surrounded by the blue frame.
1 The thread color for the needle bar that is
currently being used for sewing or will soon be
used for sewing appears at the top of the thread
color sequence display. The remaining thread
colors are listed in the sewing order, starting
from the top.
2 A blue frame appears around the thread
information box of the needle bar currently
being selected.
• While the embroidery machine is sewing,
the point being sewn is indicated by the
green crosshairs in the pattern display area.
In addition, the number of stitches and the
time count up.
This continues until the last color is sewn,
4
and the embroidery machine automatically
stops.
X The embroidering settings screen
reappears.
X The start/stop button lights up in red.
• No thread trimming operations at the
beginning of stitching and at the end of
stitching are necessary.
64
Page 67

———————————————————————————————————————————————————————————————————————————————————
Note
Memo
■ Continuing embroidering
To sew the same pattern again, touch .
X The embroidering screen appears so the
same pattern can be sewn again.
To select a new pattern, touch .
Stopping embroidering
The machine can be stopped during sewing.
■ Temporarily pausing
Press the start/stop button.
1
2
X The pattern type selection screen appears.
● Automatic Lock stitching can be set so that
it is sewn at the beginning of the
embroidery, when starting to sew after
changing thread colors, and when
trimming the thread. (Refer to “Automatic
Lock Stitch Setting” on page 122.)
● The sewing speed can be changed, even
while the pattern is being sewn. (Refer to
“Maximum Sewing Speed Setting” on
page 127.)
X The machine stops and the start/stop
button lights up in red.
• The thread is not trimmed.
• To continue sewing, after checking that the
upper thread is taut, touch the unlock key,
and then press the start/stop button.
● If the Reserve Stop key is touched while
embroidery is being sewn, the machine
stops before sewing for the next color
begins. (Refer to “Stopping the machine at
the next color change” on page 128.)
● Before starting to sew, the machine can be
set to stop at any thread color change.
(Refer to “Specifying pause locations
before embroidering” on page 128.)
Sewing the Embroidery 65
Page 68

EMBROIDERING TUTORIAL ———————————————————————————————————————————————————————————————
——
Memo
■ Resume sewing after the machine was turned
off
Press the start/stop button.
1
X The embroidery machine stops and the
start/stop button lights up in red.
• The thread is not trimmed.
Touch to unlock the embroidery
2
machine.
Press the thread trimming button.
3
Set the main power switch to “{”.
4
X The embroidery machine is turned off and
the display and the start/stop button
indicator go off.
• Sewing can resume after the embroidery
machine is turned on again. Back up
several stitches to overlap the stitching. For
details, refer to “Resume Embroidering
After Turning Off the Machine” on
page 110.
● The machine can be stopped at any time,
even while it is embroidering; however, if
the machine is stopped when the thread
color is changed, it is not necessary to go
back through the stitching when
embroidering is continued. The machine
can be set to stop when the thread color is
changed. (For details, refer to “Specifying
pause locations before embroidering” on
page 128.)
X The bobbin and upper threads are
trimmed.
• Before turning off the embroidery machine,
be sure to trim the threads.
66
■ If the thread breaks while sewing
If a problem occurs while sewing, such as if the
thread breaks, the machine stops automatically.
Re-thread the broken thread, back up several
stitches, and then continue sewing. For details,
refer to “If the Thread Breaks or the Bobbin
Thread Runs Out While Embroidering” on
page 105.
Page 69

———————————————————————————————————————————————————————————————————————————————————
Note
Memo
12. Checking the Thread Tension
Check the embroidery to see if it was sewn with the correct thread tension. If the thread tension is not
adjusted correctly, the stitching may be uneven or there may be puckering in the fabric.
■ Correct thread tension
From the wrong side of the fabric, the bobbin
thread should be about one third of the stitch
width.
Tighten the tension dial by turning the dial
clockwise.
1 Right side
2 Wrong side
If the embroidery appears as shown below, the
thread tension is incorrect. Correct the thread
tension.
1 Right side
2 Wrong side
The tension of the upper thread is too tight,
resulting in the lower thread being visible from
the right side of the fabric.
For details on adjusting the thread tension, refer
to “Adjusting the Thread Tension” on page 112.
● In this tutorial, the thread tension was
checked after embroidering was finished.
However, normally, embroidering should
be temporarily paused and the thread
tension should be checked after the first
100 stitches of each color sewn with each
needle bar.
● The resulting embroidery may not appear
as expected, due to the type or thickness
of the fabric being sewn or to the type of
stabilizer material used. Be sure to sew a
trial embroidery before sewing on your
project.
2
Loosen the tension dial by turning the dial
counterclockwise.
1 Right side
2 Wrong side
The tension of the upper thread is too loose,
resulting in a loose upper thread, loose thread
locks or loops appearing on the right side of the
fabric.
● In the built-in embroidery patterns, one
pattern is used for checking the thread
tension. For details, refer to “Checking the
thread tension of built-in patterns” on
page 217.
Checking the Thread Tension 67
Page 70

EMBROIDERING TUTORIAL ———————————————————————————————————————————————————————————————
——
13. Removing the Embroidery Frame and Fabric
After sewing is finished, remove the embroidery frame, and then remove the fabric from the frame.
Pull off the embroidery frame toward you.
Removing the embroidery
frame
CAUTION
●
When removing the embroidery frame,
make sure that the start/stop button is
lit in red. If the start/stop button is
flashing in green, the machine may start
sewing. If the machine accidentally
starts operating, injuries may result.
● When removing the embroidery frame,
be careful that the embroidery frame
does not hit any other part of the
machine.
● Do not lift up the embroidery frame
holder with extreme force, otherwise it
may be damaged.
2
Removing the fabric
Loosen the outer frame screw.
1
With both hands, grab the left and right sides
1
of the arms of the embroidery frame holder,
and then slightly lift up the frame.
The pins on the arms of the embroidery frame
holder should come out of the holes in the
sides of embroidery frame.
X If the screw was tightened using a disc-
shaped screwdriver, use the included discshaped screwdriver to loosen it.
Remove the outer frame, and then remove
2
the fabric.
68
Page 71

———————————————————————————————————————————————————————————————————————————————————
Note
Memo
14. Turning OFF the Machine
After all embroidery is finished, turn off the machine.
Set the main power switch to “{”.
1
● If the machine is turned off while it is
sewing, embroidering can continue when
the machine is turned on again. (Refer to
“Resume Embroidering After Turning Off
the Machine” on page 110.)
2
X The embroidery machine is turned off and
the display and the start/stop button
indicator goes off.
Unplug the power supply cord from the
2
electrical outlet.
Grasp the plug when unplugging the power
supply cord.
If necessary, unplug the power supply cord
3
from the machine.
Store the power supply cord in a safe place.
Turned off while
embroidering
Ð
Turned on
Ð
After the opening movie
Ð
● If a power outage occurs while the
embroidery machine is being operated,
turn off the embroidery machine and
unplug the power supply cord. When
restarting the embroidery machine, follow
the necessary procedure to correctly
operate the machine. (Refer to “Turning
ON the Machine” on page 38.)
Turning OFF the Machine 69
Page 72

EMBROIDERING TUTORIAL ———————————————————————————————————————————————————————————————
——
4
6
5
1
2
3
Screen Quick Reference Guide
Descriptions of the keys and other information that appear in the screens are provided in the tables below.
Key displays
The appearances of the keys have the following meanings.
(Normal color display) : This key is not selected, but can be selected.
(Dark-colored display) : This key is selected.
(Gray display) : This key cannot be selected.
Common screen controls
The keys described below, except for the settings key, appear in all screens and can always be used.
However, the settings key cannot be used in the embroidering screen.
Key Name
2
Embroidering
area line
Display
Function Page
Shows the
embroidering area for
the extra-large
embroidery frame.
The embroidery frame
indications, the grid
lines and other display
settings can be
specified from the
machine settings
screen.
p. 196
No.
3
Machine
operations
4
5
6
guide key
Settings key
Home key
Needle bar
move key
1
Display
Key Name
Pattern
display area
Function Page
This area displays the
selected pattern.
No.
70
Touch this key to
check a machine
operation.
Touch this key to
change the
embroidery machine
settings.
Touch this key to
cancel all operations
previously performed
and return to the
initial pattern group
selection screen.
Touch this key to
move or thread a
selected needle bar.
This key is available
in any screen.
p.206
p.194
p. 61
Page 73

———————————————————————————————————————————————————————————————————————————————————
B
A
6
5
1
2
0
3
4
8
7
9
Understanding the pattern type selection screen
In this screen, select a pattern category (type).
Display
No.
6
7
Key Name
Alphabet
key
Appliqué
alphabet
key
Function Page
Uppercase and
lowercase letters,
numbers, symbols
and accented
characters from 25
fonts can be selected
in small, medium
and large sizes.
Alphabet appliqué
patterns, which are
available in small,
medium and large
sizes.
Built-in patterns
p. 145
p. 150
2
8
Greek
alphabet
key
Display
No.
Key Name
1
Embroidery
pattern key
2
Frame
pattern key
3
Floral
alphabet
key
4
Renaissance
alphabet
key
5
Monogram
and frame
key
Function Page
The embroidery
pattern for a design
can be selected.
12 stitch types can
be combined with
10 frame shapes,
such as a circle and
a square.
Alphabet patterns
designed with
flowers decorating
large uppercase
letters (130 mm (H)
× 80 mm (W)).
Built-in patterns
Renaissance-style
characters designed
in a 50 mm × 50 mm
square.
Monogram designs
can be created by
combining two or
three letters.
p. 141
p. 141
p. 148
p. 149
p. 142
9
Computer
0
USB media
Embroidery
A
B
(USB) key
keys
patterns
stored in
the
machine
memory
key
Edit key
Greek uppercase
letters.
By using the included
USB cable to connect a
computer to the
embroidery machine,
patterns can be recalled
from the computer.
Recall patterns from
USB media.
Recalls patterns stored
in the machine’s
memory.
This key is not
displayed unless a
pattern is selected.
Touch this key to quit
trying to add another
pattern from the pattern
type selection screen.
Return to the pattern
editing screen.
p. 151
p. 156
p. 160
p. 151
p. 162
Screen Quick Reference Guide 71
Page 74

EMBROIDERING TUTORIAL ———————————————————————————————————————————————————————————————
——
1
C
7
6
2
0
3
8
4
9
B
A
5
Understanding the pattern list screen
In this screen, select the pattern.
Display
No.
7
Key Name
Page
Function Page
Shows the number of
the currently displayed
page and the total
number of pages.
No.
1
2
3
Display
Key Name
Size
(vertical)
Size
(horizontal)
Pattern keys
Function Page
Shows the vertical
length of the currently
selected embroidery
pattern.
Shows the horizontal
width of the currently
selected embroidery
pattern.
An image of the pattern
appears on the key.
Touch the image to
select the pattern.
p. 140
8
Previous
display the previous
page.
p. 140
page key
Touch this key to
9
Next page
Touch this key to
display the next page.
p. 140
key
Allows the size of the
0
Size key
currently selected
embroidery pattern to
be changed.
p. 146
Touch this key to
A
Array key
change the
configuration of a
character pattern.
p. 148
Touch this key to check
B
Check key
the entered text for a
character pattern.
p.147
Touch after selecting
the pattern. The
C
Set key
selection of the pattern
is confirmed and the
pattern editing screen
p. 140
appears.
* Some patterns cannot be edited with 0 or A.
Touch to leave the
currently selected
pattern category and
4
Return key
choose a different
category. Returns to the
pattern type selection
p. 140
screen.
5
Preview key
Displays an image of
the pattern that is to be
embroidered so it can
be previewed.
p.46
Shows the number of
6
Number of
thread color
72
thread color for the
currently selected
embroidery pattern.
Page 75

———————————————————————————————————————————————————————————————————————————————————
2
D
A
3
B
6
C
7
1
4
5
0
9
8
Understanding the pattern editing screen
In this screen, the pattern can be edited.
Display
No.
5
6
7
Preview key
Key Name
Delete key
Add key
Function Page
Deletes the pattern. If
touched, the pattern
being edited is deleted.
Adds a pattern. If
touched, the pattern
group selection screen
appears.
Displays an image of
the pattern so that it can
be previewed.
p.180
p.162
p.46
2
Distance
8
from center
distance that the pattern
being edited is moved.
p.163
(vertical)
Shows the horizontal
Shows the vertical
Distance
9
from center
distance that the pattern
being edited is moved.
p.163
(horizontal)
Display
No.
Key Name
Function Page
Shows the size of the
0
Rotation
angle
embroidery pattern
currently displayed in
the pattern display area.
The top value shows
A
Number of
thread color
the height and the
bottom value shows the
1
Pattern size
width. If the
embroidery pattern
consists of multiple
patterns that have been
combined, the size of
the entire pattern,
including all patterns, is
2
Embroidery
frame
indicators
3
Size
(vertical)
shown.
Shows the sizes of
embroidery frames that
can be used to sew the
embroidery pattern
currently displayed in
the pattern display area.
Shows the vertical
length of the pattern
that is being edited.
p. 47
B
Positioning
C
D
Edit End key
keys
Pattern
selection
keys
Shows the rotation
angle that the pattern
being edited is rotated.
Shows the total number
of thread color for the
pattern that is being
edited.
Moves the sewing
position of the pattern
that is being edited in
the direction of the
arrow. (If is
touched, the sewing
position is moved to the
center of the
embroidering area.)
Selects the pattern that
is being edited when
the embroidery pattern
consists of multiple
patterns that have been
combined.
Finish editing and
continues to the
embroidering settings
screen.
p.166
p.163
p.163
p.44
4
Size
(horizontal)
width of the pattern that
is being edited.
Shows the horizontal
Screen Quick Reference Guide 73
Page 76

EMBROIDERING TUTORIAL ———————————————————————————————————————————————————————————————
——
6
2
5
3
1
8
7
4
A
9
0
Display
No.
Key Name
Function Page
No.
1
2
3
4
Display
Key Name
Rotate key
Size key
Multi Color
key
Array key
Function Page
Rotates the pattern that
is being edited.
Changes the size of the
pattern that is being
edited.
Enables the thread
color of each character
in an alphabet pattern
to be changed; can
only be used when an
alphabet is selected.
Changes the
orientation of the
characters in the
alphabet pattern that is
being edited.
p.166
p.164
p.170
p.167
8
Horizontal
mirror image
9
Density key
0
Thread trim
setting key
A
Spacing key
key
Flips the pattern being
edited horizontally.
Changes the density of
the pattern that is
being edited; can only
be used if an alphabet
or frame pattern is
selected.
Automatically trim any
excess thread jumps
within the letters of
alphabet pattern.
Changes the spacing
between the characters
in the alphabet pattern
that is being edited.
p.164
p.170
p.169
p.167
5
thread color
Change
Changes the color of
the pattern.
p.171
key
6
Border key
7 Duplicates the pattern. p.180
Duplicate
key
Makes and edits a
repeating pattern.
p.172
74
Page 77

———————————————————————————————————————————————————————————————————————————————————
4
5
1
2
6
3
7
Understanding the embroidering settings screen
From this screen, the entire pattern can be edited and embroidering settings can be specified. In addition,
the embroidering position can be checked and a pattern can be saved for later use.
Display
No.
4
5
Key Name
Distance
from center
(vertical)
Distance
from center
(horizontal)
Function Page
Shows the vertical
distance that the pattern
being combined/edited
is moved.
Shows the horizontal
distance that the pattern
being combined/edited
is moved.
p. 96
p. 96
2
6
Rotation
angle
Number of
7
thread color
changes
Display
No.
Key Name
1
Pattern size
2
Combined/
edited
pattern size
3
Embroidery
frame
indicators
Function Page
Shows the size of the
embroidery pattern
currently displayed in
the pattern display area.
The top value shows
the height and the
bottom value shows the
width. If the
embroidery pattern
consists of multiple
patterns that have been
combined, the size of
the entire pattern,
including all patterns, is
shown.
Shows the overall size
(vertical and
horizontal ) of the
entire combined
pattern.
Shows the sizes of
embroidery frames that
can be used to sew the
embroidery pattern
currently displayed in
the pattern display area.
p.163
p. 47
Shows the rotation
angle that the pattern
being edited is rotated.
Shows the total number
of thread color for the
pattern that is being
edited.
p. 97,
p. 181
Screen Quick Reference Guide 75
Page 78

EMBROIDERING TUTORIAL ———————————————————————————————————————————————————————————————
——
3
6
5
2
9
A
B
7
0
8
4
1
Display
No.
Key Name
Function Page
Displays an image of
7
Preview key
the pattern that is to be
embroidered so it can
be previewed.
p.46
Moves the sewing
position of the whole
pattern in the direction
8
Positioning
keys
of the arrow. (If is
touched, the sewing
position is moved to the
center of the
p.96
embroidering area.)
Specifies the needle
9
position key
Starting/
ending
position at the
beginning of sewing
and at the end.
p.123
Moves the embroidery
frame so that the
embroidering position
can be checked.
Save a pattern in the
machine’s memory,
USB media or a
computer.
Finish all operations in
the embroidering
settings screen and
continues to the
embroidering screen.
p.51
p.187
p.52
No.
1
Display
Key Name
Embroidery
appliqué
key
Function Page
Makes an appliqué
piece from a desired
pattern. The outline for
the appliqué piece is
sewn around the
pattern.
When stabilizer
material is not affixed
p. 117
0
Trial sewing
A
B
Sewing key
key
Memory
key
to the fabric, sew
2
Embroidery
basting key
basting stitches along
the outline of the
pattern to minimize
shrinkage of the
stitching and
p. 116
• The functions and operations for the
preview key 7 is the same in both the
pattern editing screen and the
embroidering settings screen.
misaligned patterns.
Rotates the entire
3
Rotate key
embroidery pattern
when it consists of
multiple patterns that
have been combined.
p. 97,
p. 181
Specifies that automatic
4
Lock
stitching
(end) key
lock stitch is sewn
when the thread is
trimmed.
p.122
Specifies that automatic
lock stitch is sewn at
5
Lock
stitching
(beginning)
6
76
key
Edit key
the beginning of the
pattern and at the
beginning of sewing
after thread trimming.
Touch to return to the
pattern editing screen.
p.122
Page 79

———————————————————————————————————————————————————————————————————————————————————
3
4
6
2
5
7
8
1
Understanding the embroidering screen
From this screen, the total number of thread colors and the sewing time can be checked, the needle bar
settings can be specified, and the needle placement forward or backward can be done.
No.
5
6
7
No.
1
2
3
4
Display
Key Name
Sewing order
Time until the
spools must be
replaced
Region display
Thread color
sequence
display
Function Page
The bottom value
shows the total
number of thread
color in the pattern
and the top value
shows the thread
color that is
currently being
sewn.
If the pattern
contains seven or
more colors, the
amount of time until
the spools need to
be changed is
shown.
Shows the part of the
pattern that will be
sewn with the thread
color shown first in
the thread color
sequence display.
Shows the order for
the thread color
changes. During
embroidering, this
display scrolls so
that the color of the
thread currently
being sewn appears
at the top.
8
p. 101
Display
Key Name
Spool change
indicator
Needle bar
number
Stitch count
Sewing time
Function Page
This red line
indicator shows
when the thread
spools will need to
be changed. The
thread spools will
need to be changed
at the point between
the two thread
colors where the
indicator is
displayed.
Indicates the needle
bar number where
the thread color at
the left is assigned.
The bottom value
shows the total
number of stitches in
the pattern and the
top value shows
how many stitches
have already been
sewn.
The bottom value
shows the total
amount of time
required to sew the
pattern and the top
value shows how
much time has
already passed
sewing.
p. 102
2
Screen Quick Reference Guide 77
Page 80

EMBROIDERING TUTORIAL ———————————————————————————————————————————————————————————————
——
Memo
1
4
7
2
8
5
3
6
No.
Display
Key Name
Function Page
Touch a key to move
the needle bar
position to the
selected needle bar
number. Use when
Needle bar
key
6
threading the needle
with the automatic
needle-threading
mechanism.
Shows the color and
the thread color
name (number) for
Thread color
set up display
the thread on the
needle bar indicated
p.53
on the key. Thread
the machine as
indicated here.
Moves the needle
forward or backward
through the
stitching. Use this
key in the following
situations:
● If the thread
breaks or runs out
while
embroidering
● To restart sewing
from the
beginning
● To continue
sewing after the
machine was
turned off
Specifies the
maximum sewing
speed.
p.105
p.127
No.
1
2
3
4
Display
Key Name
Reserve Stop
key
Temporary
needle bar
settings key
Switch spool
key
Return key
Function Page
While sewing
embroidery, touch
this key for the
machine to stop
prior to the next
color beginning.
Enables the needle
bar settings to
manually be
specified.
Change the needle
bar settings from the
screen without
changing the thread
spools on the
machine. Touch this
key only before
starting to
embroider.
Touch this key to
quit sewing and
return to the
embroidering
settings screen.
p. 128
p. 130
p.100
7
Forward/
Backward
stitch key
8
Maximum
sewing speed
key
● The thread color numbers in the thread
color sequence display and the thread
color set up display can be changed, for
example, to the color name or the thread
color number for other brands. (Refer to
“Changing the thread color information”
on page 197.)
Unlocks the
machine so it can
start sewing within
5
Unlock key
10 seconds. When
this key is touched,
the start/stop button
flashes in green.
p.63
78
Page 81

———————————————————————————————————————————————————————————————————————————————————
When You Have a Question, This May Help You
TECHNICAL TERMS:
■ DST
This is the extension of Tajima data file (*.dst)
that is one of the data formats of embroidery
patterns. Tajima data does not contain color
information, therefore the embroidery machine
automatically assigns colors when a Tajima
(.dst) file is loaded. (Refer to page 220.)
■ Needle number
The needles are numbered from right to left. The
far right needle is number 1 needle. (Refer to
page 8.)
■ Needle at the “embroidering position”
This is the needle that is placed above the
needle hole in the needle plate. The needle bar
case is moved to position that particular needle
with the next thread color to the “embroidering
position”.
Also when using the needle threader, the needle
that is going to be threaded should be moved to
the “embroidering position”. (Refer to page 61
and page 62.)
PATTERNS:
Following patterns can be processed by the
machine to embroider.
- Embroidery data with *.pes, *.phc or *.dst
format.
Use USB media to transfer the data to the
machine.
Using the USB cable, the data can be transferred
from the PC to the machine.
- Optional embroidery cards
- Embroidery patterns created by digitizing
software program
- The patterns saved on USB media by the
machine
EMBROIDERING:
■ Customize the embroidery colors
- Use the thread color function by selecting
either 64 colors or 300 colors, or by setting
the custom thread color table on the pattern
editing screen. For more details, see
page 176 and page 179.
- Use the “Temporary needle bar setting”
function by selecting the key on the
“embroidering” screen. More details please
see the page 130.
■ Resume an unfinished pattern from the last
time the machine was switched off.
- The machine remembers the pattern and the
position even after turning off the power. And
the machine can resume the embroidery
when the machine turns on again. (Refer to
“Resume Embroidering After Turning Off the
Machine” on page 110.)
2
1 Needle
2 Needle hole in the needle plate
■ Wiper
This is the mechanism for pulling the thread.
The wiper pulls the thread when the needle
threader is used.
The wiper also pulls the thread from the material
when the machine trims the thread. This makes
trimming threads after embroidering unnecessary. (Refer to page 60.)
When You Have a Question, This May Help You 79
Page 82

EMBROIDERING TUTORIAL ———————————————————————————————————————————————————————————————
——
Note
■ Getting false thread breakage error
- Check that the position of the upper thread is
USB connectivity
under the upper thread guide plates. (Refer to
page 56.)
- Check that the position of the upper thread is
around the thread tension disc. (Refer to
You can perform many functions using the USB
ports on the machine. Connect the appropriate
devices according to the feature of each ports.
page 57.)
1 Primary (top) USB port for media or card
Reader/USB card writer module* (USB2.0)
* If you have purchased the PE-DESIGN Ver5 or
later, PE-DESIGN Lite or PED-BASIC, you can
1 Upper thread guide plates
2 Thread tension disc
■ Thread tension changed suddenly
- Thread is caught on a rough edge of the spool
plug the included USB card writer module into
the machine as an embroidery card reader, and
recall patterns.
2 USB port for mouse (USB1.1)
3 USB port for computer
of upper thread.
- Upper thread is caught under the spool of
thread.
- The thread dust or lint is gathered under the
bobbin’s tension spring.
■ The frame came out from the carriage
Make sure that the positioning pins are placed
into the frame’s positioning slot and hole. (Refer
to page 49.)
● The processing speed may vary by port
selection and quantity of data.
● Do not insert anything other than USB
media into the USB media port.
Otherwise, the USB media drive may be
damaged.
To insure proper registration of pattern for
embroidery, turning off the machine and turning
it back on will allow the embroidery arm to reset
it’s registration points.
■ Cancel the current design and start again
Select the “Home” key on the upper right of the
screen. The pattern and all information will be
deleted. (Refer to page 70.)
■ Using USB media or embroidery card Reader/
USB card writer module*
When sending or reading patterns using the USB
media or the embroidery card Reader/USB card
writer module*, connect the device to the
primary (top) USB port.
The primary (top) USB port processes the data
faster than the other ports.
* If you have purchased the PE-DESIGN Ver5 or
later, PE-DESIGN Lite or PED-BASIC, you can
plug the included USB card writer module into
the machine as an embroidery card reader, and
recall patterns.
80
Page 83

———————————————————————————————————————————————————————————————————————————————————
Note
Memo
Note
■ Connecting the machine to the computer
Using the included USB cable, the sewing
machine can be connected to your computer.
1 Primary (top) USB port
2 Embroidery card Reader/USB card writer
module* or USB media
2
● Two USB media cannot be used with this
machine at the same time. If two USB
media are inserted, only the USB media
inserted first is detected.
● Use only an embroidery card reader
designed for this machine. Using an
unauthorized embroidery card reader may
cause your machine to operate
incorrectly.
● Embroidery patterns cannot be saved from
the machine to an embroidery card
inserted into a connected USB card writer
module.
● USB media is widely used, however some
USB media may not be usable with this
machine. Please visit our website for more
details.
● Depending on the type of USB media
being used, either directly plug the USB
device into the machine’s USB port or
plug the USB media Reader/Writer into the
machine’s USB port.
● You can plug the optional embroidery
card Reader/USB card writer module* into
the primary (top) or center port, when the
mouse is not connected.
● You can plug a USB media into the center
port, but the primary (top) USB port
processes the data faster. It is
recommended to use the primary (top)
USB port.
1 USB port for computer
2 USB cable connector
● The connectors on the USB cable can only
be inserted into a port in one direction. If it
is difficult to insert the connector, do not
insert it with force. Check the orientation
of the connector.
● For details on the position of the USB port
on the computer (or USB hub), refer to the
instruction manual for the corresponding
equipment.
When You Have a Question, This May Help You 81
Page 84

EMBROIDERING TUTORIAL ———————————————————————————————————————————————————————————————
——
Note
Memo
1
■ Using a USB mouse
The USB mouse, connected to the sewing
machine, can be used to perform a variety of
operations in the screens.
Connect a USB mouse to the USB 1.1 port
marked with . You can also connect a USB
mouse to the other USB port (USB 2.0).
1 USB port for mouse
2 USB mouse
● Do not perform operations with the mouse
at the same time that you are touching the
screen with your finger or the included
touch pen.
● A USB mouse can be connected or
disconnected at any time.
● Only the left mouse button and its wheel
can be used to perform operations. No
other buttons can be used.
● The mouse pointer does not appear in the
screen saver.
■ Clicking a key
When the mouse is connected, the pointer
appears on the screen. Move the mouse to
position the pointer over the desired key, and
then click the left mouse button.
● Double-clicking has no effect.
1 Pointer
82
Page 85

———————————————————————————————————————————————————————————————————————————————————
Memo
■ Changing pages
Rotate the mouse wheel to switch through the
tabs of the pattern selection screens.
● If page numbers and a vertical scroll bar
for additional pages are displayed, rotate
the mouse wheel or click the left mouse
button with the pointer on / to
display the previous or next page.
2
When You Have a Question, This May Help You 83
Page 86

EMBROIDERING TUTORIAL ———————————————————————————————————————————————————————————————
——
■ Changing the size
Refer to “Changing the size of a pattern” on
page 164.
Touch .
1
Change the size of the pattern.
2
• Rotate the mouse wheel away from you to
shrink the pattern in the same way as when
is touched.
• Rotate the mouse wheel toward you to
enlarge the pattern in the same way as
when is touched.
■ Rotating the pattern
Refer to “Adjusting the angle” on page 97 and
“Rotating a pattern” on page 166.
Touch .
1
Rotate the pattern.
2
• Rotate the mouse wheel away from you to
rotate the pattern 10 degrees to the left in
the same way as when is touched.
• Rotate the mouse wheel toward you to
rotate the pattern 10 degrees to the right in
the same way as when is touched.
84
Page 87

3
OTHER BASIC PROCEDURES
This chapter provides explanations on operations other than those described in
chapter 2, such as sewing a pattern with seven or more colors, changing the needles
and changing thread spools.
Changing the Needle...............................................................................................86
Replacing the needle ...........................................................................................86
Correctly Using the Embroidery Frames..................................................................88
Embroidery frame types and applications.............................................................88
Attaching Iron-On Stabilizer (Backing) to Fabric ....................................................90
Hooping the Fabric .................................................................................................91
Hooping the fabric in the extra-large and large embroidery frames ......................91
Using the embroidery sheet ................................................................................. 92
Large/small pieces of fabric..................................................................................93
Embroidery Frame Position and Movement.............................................................94
Changing the Embroidering Position .......................................................................96
Adjusting the angle ..............................................................................................97
Switching the Thread Colors on the Screen...........................................................100
Embroidering a Pattern Containing Seven or More Colors ....................................101
Checking if thread spool changes are necessary.................................................101
Changing the Thread Spools with Designs of Seven or More Colors .....................103
Change thread spools message ..........................................................................103
Easily changing the thread spools ......................................................................104
If the Thread Breaks or the Bobbin Thread Runs Out While Embroidering ...........105
If the upper thread breaks ..................................................................................105
If the bobbin thread breaks or runs out ..............................................................106
Embroidering From the Beginning or Middle of the Pattern ..................................108
Resume Embroidering After Turning Off the Machine ..........................................110
Adjusting the Thread Tension................................................................................112
Adjusting the tension of the bobbin thread.........................................................112
Adjusting the tension of the upper thread...........................................................113
Page 88

OTHER BASIC PROCEDURES ———————————————————————————————————————————————————————————————
——
Note
Changing the Needle
If the needle is bent or the tip of the needle is broken, replace the needle with a new one. Use the included
Allen screw driver to replace the needle with one that is designed specifically for this machine and that
passes the test described in “Checking the needle” on page 33.
• Do not apply extreme force when
Replacing the needle
Turn off the embroidery machine.
1
loosening or tightening the needle set
screw, otherwise the machine may be
damaged.
CAUTION
● Be sure to turn off the embroidery
machine before replacing the needle,
otherwise injuries may result if the
machine starts sewing.
Loosen the needle set screw and remove the
2
needle.
Hold the needle with your left hand, and then
hold the Allen screw driver in your right hand
and turn the needle set screw
counterclockwise.
With the flat side of the needle toward the
3
back of the machine, insert the needle all the
way up until it touches the needle bar
stopper.
Pass the needle through the hole in the
presser foot, and then use the needle
changing tool to lift up the needle.
1 Needle bar stopper
2 Needle
3 Flat side of needle
4 Needle changing tool
● Be sure to use the included Allen screw
driver to replace the needle, otherwise too
much force may be applied to the needle,
causing it to break.
86
Page 89

———————————————————————————————————————————————————————————————————————————————————
Hold the needle changing tool and press the
end of the needle changing tool 1 in to
extend the needle-mounting clamp 2. Attach
the clamp to the needle, and then release the
pressed area to clamp the needle. To
unclamp the needle, press 1 again.
1 End of the needle changing tool
2 Needle mounting clamp
While holding the needle in place with your
4
left hand, tighten the needle set screw.
Use the Allen screw driver to turn the needle
set screw clockwise.
3
CAUTION
● Be sure to insert the needle all the way
up until it touches the needle bar
stopper and securely tighten the needle
set screw with the Allen screw driver,
otherwise the needle may break or the
machine may be damaged.
● If the needle is not fully inserted, the
hook of the automatic needle-threading
mechanism will not pass through the
eye of the needle during automatic
needle threading, and the hook may
bend or the needle cannot be threaded.
● If the hook of the automatic needle-
threading mechanism is bent or
damaged, contact your authorized
dealer.
Changing the Needle 87
Page 90

OTHER BASIC PROCEDURES ———————————————————————————————————————————————————————————————
——
Correctly Using the Embroidery Frames
The various types of embroidery frames and their uses are described below. In addition to the included
embroidery frames, the optional cap frame can be used with this embroidery machine.
CAUTION
● Only use embroidery frames of the sizes indicated in the screen, otherwise the
embroidery frame may hit the presser foot, which may result in injuries.
Embroidery frame types and applications
Embroidery type Embroidering area Usage Reference
Extra-large embroidery
frame
200 mm (H) × 300 mm (W)
(7-7/8 inches (H) × 11-3/4
inches (W))
Use when embroidering
connecting characters or
patterns, combined patterns or
large embroidery patterns.
(Refer to “Hooping
the Fabric” on
page 91.)
Large embroidery frame 130 mm (H) × 180 mm (W)
Medium embroidery
frame
Small embroidery frame 40 mm (H) × 60 mm (W)
Cap frame (optional)
<Advanced type 2> 60 mm (H) × 130 mm (W)
<Advanced type> 50 mm (H) × 130 mm (W)
(5-1/8 inches (H) × 7-1/8
inches (W))
100 mm (H) × 100 mm (W)
(4 inches (H) × 4 inches
(W))
(1-1/2 inches (H) × 2-3/8
inches (W))
(2-3/8 inches (H) × 5-1/8
inches (W))
(2 inches (H) × 5-1/8
inches (W))
Use when embroidering
patterns with a size less than
130 mm (H) × 180 mm (W) (51/8 inches (H) × 7-1/8 inches
(W))
Use when embroidering
standard-sized patterns.
Use when embroidering smallsized patterns, such as
nametags.
Use when embroidering caps.
Baseball (golf) caps, tulip hats
and bucket hats can be
embroidered with these frames.
These frames cannot be used
with hats having a front area of
50 mm (2 inches) or less, such
as sun visors and children’s hats.
In addition, these cannot be
used with hats that have a brim
longer than 80 mm (3-1/8
inches).
(Refer to “Hooping
the Fabric in the
Embroidery Frame”
on page 47.)
(For details on
attaching this frame,
refer to “Using the
Optional Cap
Frame” on
page 225.)
Visit your nearest
authorized dealer.
88
Page 91

———————————————————————————————————————————————————————————————————————————————————
Note
Embroidery type Embroidering area Usage Reference
Cylinder frame
(optional)
80 mm (H) × 90 mm (W)
(3 inches (H) × 3-1/2
inches (W))
Use when embroidering tubular
and curved fabric, such as shirt
sleeves and trousers.
Visit your nearest
authorized dealer.
Flat frame (optional) 200 mm (H) × 300 mm (W)
(7-7/8 inches (H) × 11-3/4
inches (W))
● The embroidery frame indicators show all embroidery frame sizes in which the embroidery pattern
can be sewn. Be sure to use an embroidery frame of the most suitable size. If the embroidery frame
that is too large is used, the pattern may be misaligned or the fabric may pucker.
Use when embroidering jackets
and other thick garments.
Visit your nearest
authorized dealer.
3
Correctly Using the Embroidery Frames 89
Page 92

OTHER BASIC PROCEDURES ———————————————————————————————————————————————————————————————
——
Note
Memo
Attaching Iron-On Stabilizer (Backing) to Fabric
In order to prevent shrinkage of the stitching or misaligned patterns, we recommend that iron-on stabilizer
(backing) be used for embroidering.
CAUTION
● When embroidering on thin or stretch fabrics, fabrics with a coarse weave or fabrics that
easily allow the stitching to shrink, be sure to use iron-on stabilizer (backing) for
embroidering. If iron-on stabilizer (backing) is not used while embroidering, the needle
may bend or break or the pattern may become misaligned.
Using a steam iron, affix the iron-on
1
stabilizer (backing) to the back of the fabric.
● Use a piece of iron-on stabilizer (backing)
that is larger than the embroidery frame.
When framing the fabric in the embroidery
frame, be sure that the stabilizer (backing)
is clamped on all edges in order to prevent
wrinkles in the fabric.
1 Adhesive side of iron-on stabilizer (backing)
2 Fabric (wrong side)
• When embroidering fabric that should not
be ironed or when embroidering an area
that is difficult to iron, hoop a layer of the
iron-on stabilizer (backing) under the fabric
in the embroidery frame without ironing it.
1 Area of embroidery frame
2 Iron-on stabilizer (backing)
● When embroidering thin fabrics, such as
organza or lawn, use a water-soluble
stabilizer (backing). Water-soluble
stabilizers dissolve when washed,
allowing you to create beautiful
embroidery that is not stiff.
● When embroidering fabric with a nap,
such as towels or corduroy, hoop a layer
of iron-on stabilizer (backing) under the
fabric in the embroidery frame without
ironing it.
● For other uses of stabilizer (backing), refer
to “Stabilizers (backing)” on page 221.
90
Page 93

———————————————————————————————————————————————————————————————————————————————————
Memo
Hooping the Fabric
Hooping the fabric in the extra-large and large embroidery frames
Loosen the screw on the outer frame.
1
1 Screw
Place the fabric with right side up on top of
2
the outer frame.
• The outer frame does not have a front or
back side. Either side can be used as the
front.
Press the inner frame into the outer frame.
3
First insert the inner frame at the corner with
the screw A, next insert the nearby one
corner B, and then insert the opposite corner
C. Then insert the opposite corner of non
screw corner D.
and then lightly pull the fabric in the
direction indicated by arrow D and insert
corner D.
• Be sure that there are no wrinkles in the
fabric after it is stretched in the embroidery
frame.
While stretching the fabric even more,
4
securely tighten the screw so that the fabric
is taut.
• After stretching the fabric, lightly tapping it
should produce a drum-like sound.
• Firmly clamp together the inner and outer
frames so that their tops are even.
1 Outer frame
2 Inner frame
3 Right side of fabric
4 Top of inner and outer frames are even
• Using the included disc-shaped
screwdriver, firmly tighten the screw.
3
First, align the inner and outer frames at the
corner with the screw A. Then, while lightly
pulling the fabric in the direction indicated
by arrow B so that the fabric is taut, insert
the inner frame at corner B. In the same way,
lightly pull the fabric in the direction
indicated by arrow C and insert corner C,
1 Disc-shaped screwdriver
● To correctly frame the fabric in the
embroidery frame, we recommend using a
flat surface.
Hooping the Fabric 91
Page 94

OTHER BASIC PROCEDURES ———————————————————————————————————————————————————————————————
——
Press the inner frame into the outer frame.
4
Using the embroidery sheet
Remove the embroidery sheet.
In order to hoop the fabric so that the pattern will
be sewn in the correct position, use the guidelines
on the embroidery sheet to accurately stretch the
fabric in the frame.
With a fabric marker, mark the area of the
1
fabric you want to embroider.
Place the embroidery sheet on the inner
2
frame. Align the guidelines on the
embroidery sheet with the marks that you
drew on the fabric.
1 Guidelines
2 Inner frame
Gently stretch the fabric, so that there are
3
no folds or wrinkles.
92
Page 95

———————————————————————————————————————————————————————————————————————————————————
■ Embroidering the corner of fabric
Large/small pieces of fabric
This section provides information on embroidering
fabric that is either much larger or much smaller
than the embroidery frame.
■ Embroidering large pieces of fabric or heavy
clothing
When embroidering large pieces of fabric or
heavy pieces of clothing, use a clothespin or
binder clip to fasten the excess fabric to the
embroidery frame so that it does not hang down
from the frame. Embroidering with excess fabric
hanging down from the embroidery frame may
prevent the frame from moving properly and
may result in a misaligned pattern.
• Use a clothespin or binder clip to fasten the
excess fabric to the embroidery frame.
■ Embroidering small pieces of fabric
When embroidering pieces of fabric that are
smaller than the embroidery frame, use spray
fabric adhesive to attach the fabric to stabilizer
(backing) hooped in the embroidery frame. With
fabrics where you do not wish to use spray
adhesive, baste the fabric to the stabilizer
(backing).
When embroidering the corner of a piece of
fabric, use spray fabric adhesive to attach the
corner of the fabric to stabilizer (backing), and
then hoop the stabilizer (backing) in the
embroidery frame. With fabrics where you do
not wish to use spray adhesive, baste the fabric
to the stabilizer (backing).
1 Fabric
2 Stabilizer (backing)
■ Embroidering narrow pieces of fabric, such as
ribbon
When embroidering narrow pieces of fabric, use
spray fabric adhesive to attach the fabric to
stabilizer (backing), and then hoop the stabilizer
(backing) in the embroidery frame. With fabrics
where you do not wish to use spray adhesive,
clamp both ends of the fabric, together with the
stabilizer (backing), in the embroidery frame.
3
1 Fabric
2 Stabilizer (backing)
1 Ribbon
2 Stabilizer (backing)
Hooping the Fabric 93
Page 96

OTHER BASIC PROCEDURES ———————————————————————————————————————————————————————————————
——
Embroidery Frame Position and Movement
The following provides information concerning the embroidery frame when operating the embroidery
machine.
■ Embroidery frames that cannot be used for
embroidering
As explained on page 47, the embroidery frame
indicators at the top of the screen show the
embroidery frames that can be used to sew the
currently selected pattern.
Embroidery frames with an embroidering area
smaller than the pattern cannot be used. In
addition, the embroidery frame cannot be used
if the embroidery is smaller than the
embroidering area but is positioned so that it
extends out of the embroidering area of the
frame.
Embroidery frames with an embroidering area
smaller than the pattern
A message indicating that the embroidery frame
be replaced may appear even if no embroidery
frame is installed.
The embroidery machine detects which
embroidery frame is installed according to the
position of the left arm of the embroidery frame
holder. Therefore, the embroidery frame size is
determined by the position of the left arm, even
if the embroidery frame is not actually installed.
In addition, if the embroidery frame holder is not
installed, the embroidery machine determines
that the cap frame (optional) is installed.
Patterns that extend out of the embroidering
area of the frame
In either of these cases, a message appears on
the embroidery machine, warning that the
embroidery frame must be changed.
94
Page 97

———————————————————————————————————————————————————————————————————————————————————
■ Moving to the correct position
If the center of the embroidery frame is at the
needle drop point in the embroidering area, the
embroidery frame is correctly positioned, in
other words, at the starting position before
embroidering.
If the embroidery frame is changed, the next
frame that is installed will not be correctly
positioned.
For example, if the extra-large embroidery frame
is replaced with the small frame, the following
will occur.
• The embroidery frame is replaced while the
embroidering settings screen or
embroidering screen is displayed, and then
the key for checking the embroidering area,
for moving the embroidery frame, or for
starting embroidering is touched.
The embroidery frame will move.
Since the embroidery frame is moved to the
correct position and paused, touch the
desired key again.
If the pattern extends out of the embroidering
area for the frame after the frame is moved, a
message appears, indicating that the
embroidery frame should be replaced. Either
replace the embroidery frame or return to the
pattern editing screen and adjust the pattern
size or embroidering position.
3
1 Center of embroidery frame at the correct position
2 Needle position when the embroidery frame is
replaced
In order to correct the misalignment of this
embroidery frame, the embroidery frame
automatically moves to the correct position
when any of the following are performed.
• The embroidery machine is turned on.
The embroidery frame will move.
• The embroidering settings screen is
displayed.
The embroidery frame will not move if it is
correctly positioned.
If the pattern extends out of the embroidering
area for the frame, a message appears,
indicating that the embroidery frame should
be replaced. Either replace the embroidery
frame or return to the pattern editing screen
and move the embroidering position.
Embroidery Frame Position and Movement 95
Page 98

OTHER BASIC PROCEDURES ———————————————————————————————————————————————————————————————
——
12
Changing the Embroidering Position
When the embroidery machine is purchased, it was adjusted so that the beginning of the stitching was from
the center of the pattern. Therefore, move the frame and adjust the embroidering position so that the center
of the pattern aligns with the needle drop point at the sewing position. In addition, the angle of the entire
pattern can be adjusted if the fabric cannot be hooped evenly within the embroidery frame and the pattern is
positioned at an angle on the fabric.
Touch , , , , , ,
1
and in the embroidering settings
screen.
Move the embroidery frame so that the
needle drop point is at the center of the area
where you wish to embroider.
X The embroidery frame moves in the
opposite direction of the arrow.
X The pattern in the pattern display area
moves in the same direction of the arrow.
• Touch to move the embroidery frame
back to its original position (where the
center of the embroidery frame is aligned
with the needle drop point at the sewing
position).
The pattern can also be moved by dragging it.
If a USB mouse is connected, move the
mouse to position the pointer on the desired
pattern, and then while holding in the left
mouse button, drag the pattern. The pattern
can also be dragged by selecting it directly in
the screen with your finger or the touch pen.
1 Shows the vertical distance moved
2 Shows the horizontal distance moved
96
Page 99

———————————————————————————————————————————————————————————————————————————————————
Note
■ Finding the sewing position
By locking the needle bar (securing the needle
and presser foot in the down position), the
needle drop point can easily be seen.
As shown in the illustration, insert the Allen
1
screwdriver into the hole in the needle
clamp to slowly lower the needle bar down
till needle bar stops then clicks into the lock
position.
● Make sure that the needle is not lowered
beyond the positioning click into the
fabric.
■ Unlocking the needle bar
Display the embroidering screen, and then
1
touch the key for any needle bar other than
the one that is locked.
X The needle bar is unlocked.
3
X The needle and presser foot are locked in
the down position.
Touch the arrow keys in the embroidery
2
settings screen to move the embroidery
frame so that the needle drop point is at the
center of the area where you wish to
embroider.
• With a USB mouse, your finger or the
touch pen, drag the pattern to move it.
• When specifying the starting of stitching,
align the needle drop point with the point
specified as the starting of stitching. (For
details on specifying the starting/ending of
stitching, refer to page 123.)
Adjusting the angle
Depending on the type of fabric being
embroidered, it may not be possible to stretch the
fabric in the embroidery frame at the desired angle.
In this case, adjust the angle of the pattern so that it
is correctly positioned on the fabric.
Touch .
1
The screen shown below appears.
Changing the Embroidering Position 97
Page 100

OTHER BASIC PROCEDURES ———————————————————————————————————————————————————————————————
——
2
9
8
3
7
1
6
5
4
1
Touch the keys to adjust the pattern to the
2
desired angle.
Each touch of a key rotates the pattern.
Example: Original angle
1 Rotates 1 degree to the right
2 Rotates 10 degrees to the right
3 Rotates 90 degrees to the right
4 Rotates 90 degrees to the left
5 Rotates 10 degrees to the left
6 Rotates 1 degree to the left
7 Touch this key to close this screen.
8 Moves the pattern in the direction of the arrow
on the key.
9 Touch this key to return the pattern to its
original angle.
1 Shows the angle of the pattern after a key is
touched to change it.
• To return the pattern to its original angle,
touch .
If necessary, touch the arrow keys to adjust
3
the position of the pattern.
For more details, refer to page 96.
If necessary, touch and then touch
4
to check the embroidering area.
For more details, refer to page 51.
After making the desired changes, touch
5
.
The embroidering settings screen appears again.
98
 Loading...