

Page 1

j
If /
(m I
CONTENTS
Chapfer i fjTrii)rjUCTiON
Chapter 2 iNCT'ALi,.AT'iON
CtiapterS FAX SETTiCGS
Ghapiar 4 OMA:ChlL:N PRCifhirAMMINu
f Piapter S BAttiC rctx OPCRATtON
Chaptnr ti TEL itPST'jCF^ Ä L:TAAKi2FlPrX:)NF OFT4TAT'iilN
C!'.apier 7 ADVANCTIO FAX OPC-tA ^iON
CLiapter S MESRACA:; CRNTFR
Cthapter 9 MIABAGE CLAT'Gfl r>ftO
CiiapteriO PRiNllNa ABj''OnTS ArCT LCLrü
Chapierl 1 IMf'OFLiAN'T INFcjBMA'i!F)N
Chaptaria MAFFTENAFAXI AND F|ti5iPiLIT|CCH':J‘INfi
ECPILX
::AB'-C;tFCA'tlOr-iO
Page 2

FAX-270MC is Available
in CANADA only
Page 3

liable of Contents
Introduction Using This Manual
Finding Information................................................................................. 1
Test Sheet Procedures (USA only)...............................................................1
About Fax Machines............................................................................... 2
Fax Tones and Handshake
Control Panel Overview
Installation Caution
.........................................................................................................
Packing List
Choosing a Location
Assembly
Load the recording paper
Connect the handset................................................................................. 8
Connect the power cord
Connect the telephone line.........................................................................9
Attach the document support...................................................................... 9
Special Line Considerations
Roll Over Phone Lines.........................................................................9
TWo-Line Phone System
Converting Telephone Wall Outlets.................................................... 10
Installing Fax Machine, External Tfvo-Line TAD, and Tvo-Line Telephone
Multi-Line Connections (PBX)
Custom Features on Your Phone Line
Connecting an External Telephone Answering Device (TAD)
Sequence...................................................................................... 12
Connections.................................................................................. 13
Outgoing Message (OGM).................................................................. 14
Connecting an External Telephone..........................................................^..14
......................................................................................... 6
......................................................................................... i
If you are installing tlie machine to work with a PBX:............................12
..............................................................................
.......................................................................
...................................................................
........................................................................... 7
.........................................................................
............................................................................
.....................................................................
...............................................................
.................................................................
........................................................
.........................
1
2
3
5
......
7
7
8
9
10
....................
11
12
12
10
S&igs Fax Settings...................................................................................... 15
Setting Dialing Mode (Tone/Pulse)
Setting Date and Time.............................................................................15
Setting Station ID................................................................................... l
Entering Text....................................................................................... l
inserting spaces........................................................................... 17
............................................................
15
6
6
Page 4

iililiiif
iliililillliililii
" ;S; W.r^-iB'i ;;i:-
itiliiliilHI
Iliii
Oii^Screen
ffogranu^
Basic Fax
Opeiration
Making corrections
...........................................................................
Repeating letters...............................................................................17
Special characters and symbols............................................................ 17
Storing One Touch Dial Numbers
..............................................................
One Touch Dialing............................................................................20
Storing Speed Dial Numbers.....................................................................20
Speed Dialing............................................................................... 21
Changing One Touch and Speed Dial Numbers............................................. 21
Setting Number Groups for Broadcasting.....................................................21
Setting Beeper Level
Temporar)' Memory Backup Storage
..............................................................................
..........................................................
User-Friendly Programming............................................................23
Function Mode...................................................................................... 23
Aiternating Dispiays
Function Selection Table
..............................................................................
.........................................................................
24
Sending Faxes ............................................................................... 29
Before you begin.................................................................................. 29
Contrast Setting..................................................................................... 30
Manual Transmission..............................................................................30
Automatic Transmission.......................................................................... 31
Manual and Automatic Fax Redial
.............................................................
Receiving Faxes.................................................................................31
Select Answer Mode...............................................................................31
Record Fax/Tel Outgoing Announcement (F/T OGM)
...............................
Easy Receive........................................................................................ 33
To seiect or change your Answer Mode
Setting Message Center Mode to ON
Setting Ring Delay
...............................................................................
..........................................................
..............................................
34
Setting F/T Ring Time.............................................................................34
Speaker Volume.................................................................................... 35
Ring Volume........................................................................................ 35
Smoothing........................................................................................... 35
17
18
22
22
24
31
32
33
34
IBj^bration
Making Voice Calls......................................................................... 37
Manual Dialing
Answering Calls with the Speakerphone
One Touch Dialing
.....................................................................................
................................................
........................................
'.........................................38
37
Speed Dialing....................................................................................... 38
Hold.................................................................................................. 38
Pause.................................................................................................. 38
Tone/Pulse........................................................................................... 39
■ Searching Telephone Index......................................................................39
37
Page 5

tllillfiilSi
Advanced
Fa^ Operation
Sending Faxes ....................................................................................4l
Quick Scan Fax Transmission....................................................................4l
Daily Timer..........................................................................................42
Delayed Transmission............................................................................. 42
Interrupting Timer and Poll Waiting
Canceling a Delayed Fax
.........................................................................
........................................................... 42
Broadcasting....................................................................................... 43
Overseas Mode.................................................................................... 43
Error Re-Transmit.................................................................................. 44
Composing Electronic Cover Page
.............................................................
Always Send Cover Page......................................................................... 45
Temporary Page
....................................................................................
Printing a Cover Page............................................................................. 46
Call Reservation.................................................................................... 46
Print Call Back Message.......................................................................... 47
Next-Fax Reservation
.............................................................................
Multiple Resolution Transmission.............................................................. 47
Receiving Faxes
.................................................................................
Remote Operation.................................................................................. 48
For F/T (Fax/Tel) Mode Only.............................................................. 48
Changing Remote Codes.....................................................................48
To change Remote Codes................................................................ 48
Distinctive Ringing................................................................................ 49
Registering the distinctive ringing phone number
..................................
Caller ID..............................................................................................50
Clearing Caller ID Information
Polling
....
........................................................................................... 51
............................................................
Setup to Poll Another Fax.................................................................. 51
Setup to Be Polled (Poll Waiting)
.........................................................
Delayed Polling.............................................................................. 52
Setting Up Polled Waiting with Quick-Scan
............................................
Copy Functions..................................................................................... 53
Multiple Copies................................................................................53
43
44
45
47
48
49
51
52
53
Center
Message Center Mode ................................................................
Flexible Memory Settings........................................................................ 55
Setting Message Storage.......................................................................... 56
Incoming Recording Monitor
...................................................................
Recording Message Center Outgoing Message...............................................57
Listening to Outgoing Messages (OGM)
Erasing Outgoing Messages (OGM)
.................................................
......................................................
Activating Message Center Mode...............................................................58
Setting Toll Saver
..................................................................................
55
56
57
57
58
Page 6

il■¡i*íiiïîS
iliiiililllilïillillilliiliiïllilllliilliïlllifiiillliïlillillliiiiilllliiliiliiliii
Message Indicator.................................................................................. 58
Plajdng Voice Messages and Memos
Backup Printing Option...........................................................................
Printing a Fax Message............................................................................
Erasing Messages...................................................................................
To erase voice messages individually
To erase messages all at once...........................................................
Setting Maximum Time for Incoming Messages
Recording a Conversation....................................................................... 6l
Recording a Memo.................................................................................6l
Paging/Fax Forwarding............................................................................6l
Programming Paging Number.............................................................. 62
Programming a Fax Forwarding Number................................................ 62
Voice Alarm.........................................................................................
Setting Voice Alarm..........................................................................
Remote Retrieval............................................................................. 64
Changing Remote Access Code
Using Remote Access Code...................................................................... 64
Remote Message Center Commands...........................................................65
Listen to Voice Messages................................................................65
Record a Memo
Erase All Messages
Play/Record Outgoing Message........................................................ 65
Change Paging/Fax Forwarding Setting..............................................
Retrieve a Fax..............................................................................
Change Answer Mode....................................................................
Exit Remote Operation...................................................................
Retrieving Memory Status List and Fax Ménagés
Changing Fax Forwarding Number
............................................................................
.......................................................................
.........................................................
..................................................
............................................6l
...........
....................................................
..........................................
............................................................
58
59
59
60
60
60
63
63
64
65
65
66
66
66
66
67
67
Üfe$$age
Center Pro
Message Center Pro......................................................................... 69
Recording First Level OGM.....................................................................
Playing First Level OGM....................................................................70
Erasing First Level OGM....................................................................70
Recording Second Level OGM................................................................ 71
Playing Second Level OGM............................................................... 71
Erasing Second Level OGM................................................................71
Personal Mailbox...................................................................................72
Recording Personal Mailbox OGM/Password
Playing Personal Mailbox Messages
Erasing Personal Mailbox Messages
To erase an individual message.........................................................73
To erase all messages
Recording Memo in Personal Mailbox...................................................
...................................................................
......................................................
...................................................
........................................
72
...73
73
69
72
74
Page 7

tiilliilSililiiili
Printing
Reports
and Lists
Important
Information
Maintenance and
Troubleshooting
mamammswirn
ilMIUMi
Remote Retrieval of Pei-sonal Mailbox Messages...........................................74
Recording Voice Infomiation in Memor)^ Box..............................................74
Playing Voice Message in Memory Box...................................................... 75
Erasing Voice Memoiy Box......................................................................
Tbrning On Message Center Pro
................................................................
Fax Machine Activity........................................................................77
To print a report.................................................................................... 78
Activity Report Interval........................................................................... 78
Transmission Verification (Xmit) Report..................................................... 78
Standard Telephone and FCC Notices ...........................................79
These notices are in effect on models sold and used in the United States...............79
MRNING....................................................................................... 81
Important Safet)^ Instructions............................................................. 82
Fax-Back®“ S)'stem
.............................................................................
85
Brother Home Page................................................................................ 85
Brother Bulletin Board............................................................................ 85
Other Problems
.....................................................................................
Condensed Print and Horizontal Streaks;
Top and Bottom of Sentences Cut Off................................................ 89
Copies and Received Faxes are Blank Pages
Cover Page Comment Al^vays Prints “Please Call” When Printing Report
........................................
..
Dialing Does Not Work.................................................................. 90
Enabling/Disabling Anti-Curl Check Sheet (ACS).................................90
Fax Machine Does Not Answer When Called
No Dial Tone on the Handset
...........................................................
.....................................
90
Poor Transmitting Qualih’.............................................................. 90
Vertical Black Lines When Receiving
Vertical Black Lines When Sending
................................................90
..................................................
91
Ring Change in F/T Mode...............................................................91
Transmission Verification Report Prints “Result: NG”
...........................
91
Sending a Call to the Fax Machine.................................................... 91
Fax Machine Doesn’t Have Dial Tone
...............................................
91
Fax “Hears” Voice as CNG Tone...................................................... 91
For Customer Service................................................................... 92
To Order Brother Accessories
..........................................................
92
75
76
89
89
89
90
Index ................................................................................................ 93
For Missing Link (option) Users......................................................96
Specifications.................................................................................... 98
Page 8

Page 9
C H A P t E R b N E
Using This Manual
Thank you for purchasing a Brother fax machine. This fax machine has been
designed to be simple to use, with LCD screen prompts to guide you through
functions. However, you can use your fax machine to its fullest potential by taking
a few minutes to read this manual.
See
Station ID
p. 16
Additionally, your fax machine has a Help Key. Press ¡Help/Q.Scan| to print a list of
basic operational steps and functions.
Finding Inffomiation
All chapter headings and subheadings are listed in the Table of Contents. You will
be able to find information about a specific feature or function by checking the
Index at the back of this manual. Also,throughout this manual, you’ll see special
symbols alerting you to important information, cross-references, and warnings.
Illustrations of some screen displays also help you choose the correct key-presses.
Test Sheet Procedures (USA only)
After programming your Station ID, please fill out the TEST SHEET included with
your fax machine and fax it to Brother’s Automated Fax Response System as your
first transmission. This will verify that your fax machine is properly installed.
When this document is received a confirmation sheet will be sent back to your
machine. Be sure to set up your Station ID.
USA:
Fax 1-908-469-4547
_________________________
____________
Page 10

iillJiitiiiiiiil
About Fax Machines
If you’re a first-time fax machine user, fax operation might seem a little
mysterious. You’ll soon get used to the unusual fax tones on your phone line, and
be able to send and receive faxes easily.
Fax Tones and Handshake
when someone is sending a fax, the fax machine sends fax calling tones, (CNG
tones) — soft, intermittent beeps at 4-second intervals. You’ll hear them when
you dial and press S, and they continue for 30 seconds after dialing. During
that time, the sending machine must begin the “handshake” with the receiving
machine. Each time you use automatic procedures to send a fax, you are sending
CNG tones over the phone line. You’ll soon learn to listen for these soft beeps each
time you answer a phone on your fax line, so you can know if you are receiving a
fax message.
The receiving fax responds with fax receiving tones — loud, chirping sounds. A
receiving fax chirps for 40 seconds over the phone line, and the screen displays
“RECEIVE.” If your machine is set to the FAX ONLY Mode, it will answer every call
automatically with fax receiving tones. Even if the other party hangs up, your fax
machine continues to send the “chirps” for 40 seconds, and the screen continues
to display “RECEDT:.” To cancel the receiving mode, press H.
When your fax machine is in FAX/TEL (F/T), it answers and plays your F/T
Outgoing Aonouncement (OGM). In the F/T OGM, you'll need to tell callers
when to call back, since they cannot leave a voice message in F/T mode, or to
enter the Remote Activation Code (preset to ^ 5 1) to send a fax, See page 32 to
learn how to record the F/T OGM.
The fax “handshake" is the time in which the sending machine’s CNG tones and
the receiving machines “chirps" overlap. This must be for at least two to four
seconds, so the fax machines can understand how each is sending and. receiving
the fax. The handshake cannot begin until the call is answered, and the CNG
tones only last for 30 seconds after the number is dialed. Therefore, it’s important
for the receiving machine to answer the call in as few rings as possible.
When you have an external telephone answering device (TAD) on your fax line,
your TAD will determine the number of rings before the call is answered. Pay special
attention to the directions in the Installation chapter for connecting a TAD to your
fax machine.
Page 11
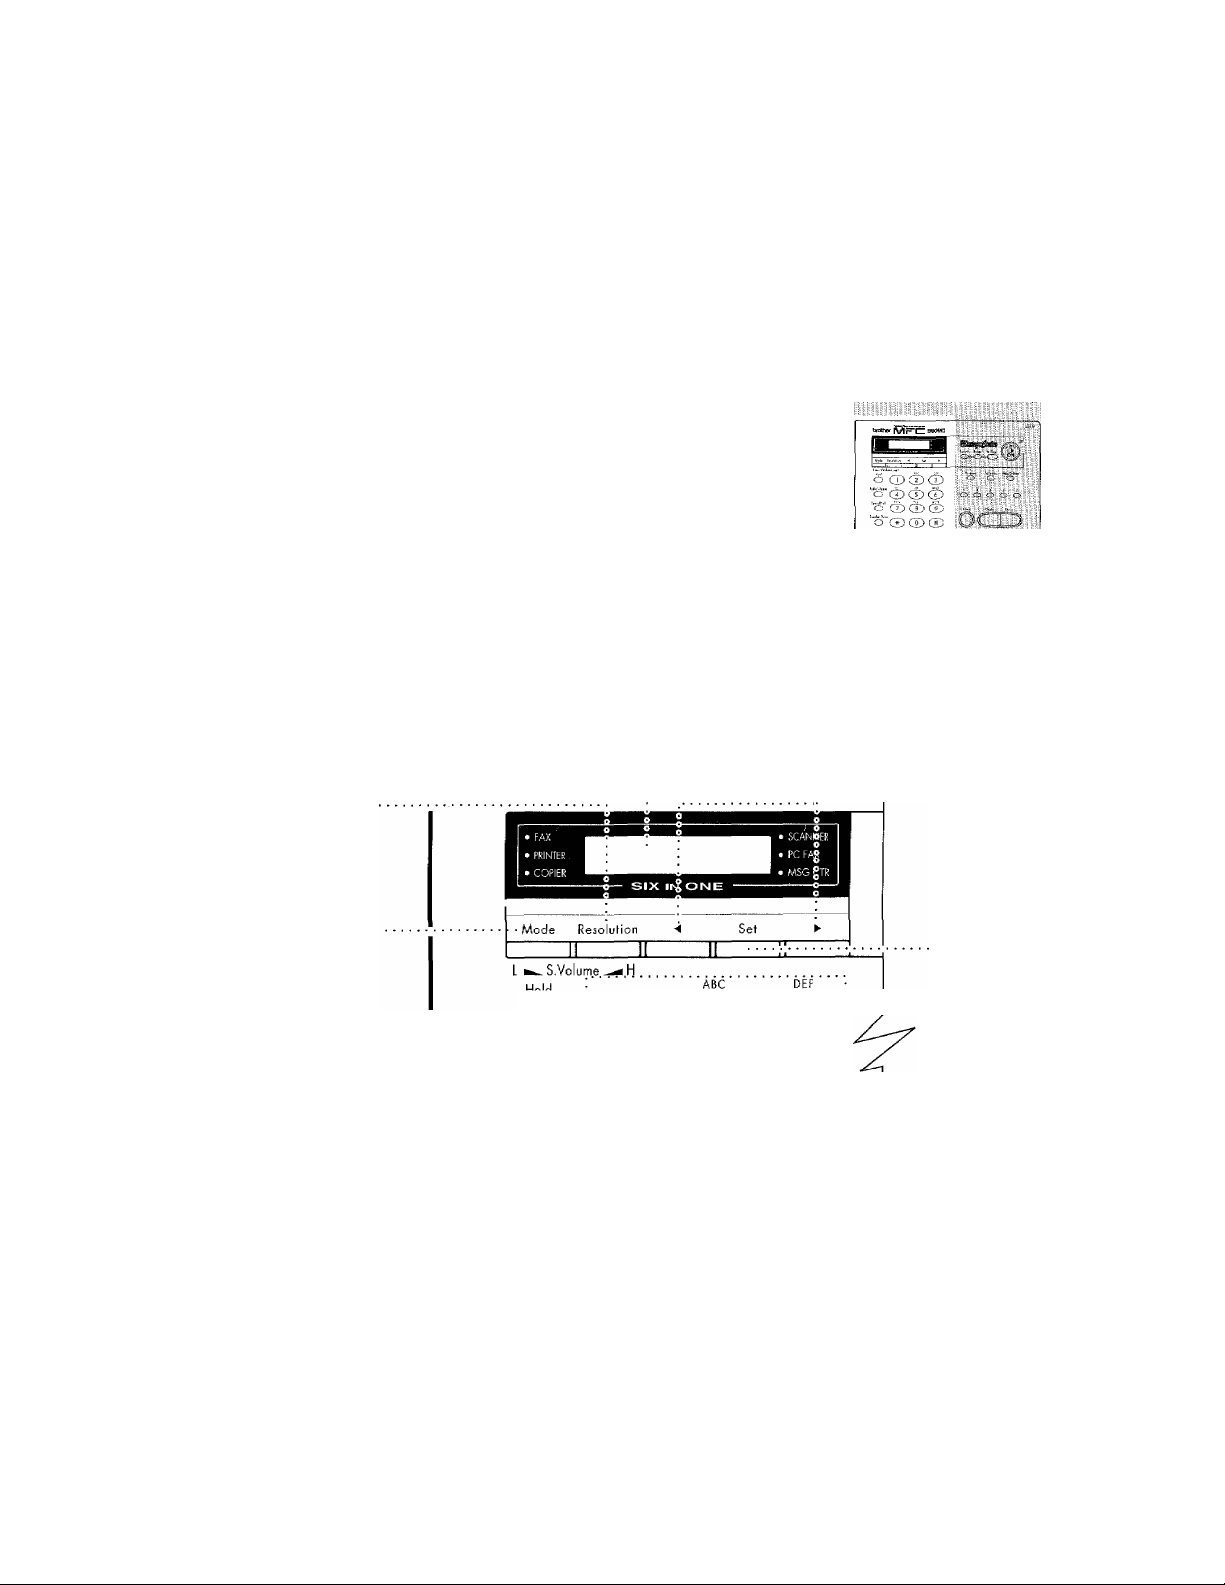
Control Panel Overview
Section of Control Panel Detailed on this Page
Resolution
Sets the resolution
when you send a
Fax. Also, you can
press to increase
speaker volume
during a call us
ing Speakerphone
or while playing a
message.
Mode
Use to select how
fax machine will
handle incoming
calls, Also, you can
press to decrease
speaker volume
during a call us
ing Speakerphone
or while playing a
message.
Hold
Ints you put calls
on hold.
Redial / Pause
Re-dials the last
number called.
Also inserts a
pause in autodial
numbers.
Speed Dial
Lets you dial
stored phone
numbers by press
ing a two-digit
mimhint'
Liquid Crystal Display
LCD displays messages to
help you set up and oper
ate your fax machine.
Sthbima i'Tmu lti-rj nction center
4 (Left Arrow)
^ (Right Arrow)
Moves the LCD cursor
to the left or right.
brother U ^ 390MC
o i© CD CD;
hal/Pauae : :
O © D ®:
peed Dial i
o © © ®i
o © ® ®:
Speaker Phone
Lets you speak to
the person at the
odier end and dial
telephone and fax
numbers without
lifting the handset.
Number Keys
Dials phone and fax
numbers, and can
be used as a key
board for entering
information into
the fax machine.
Set
Stores a function
setting into the fax
machine.
Page 12
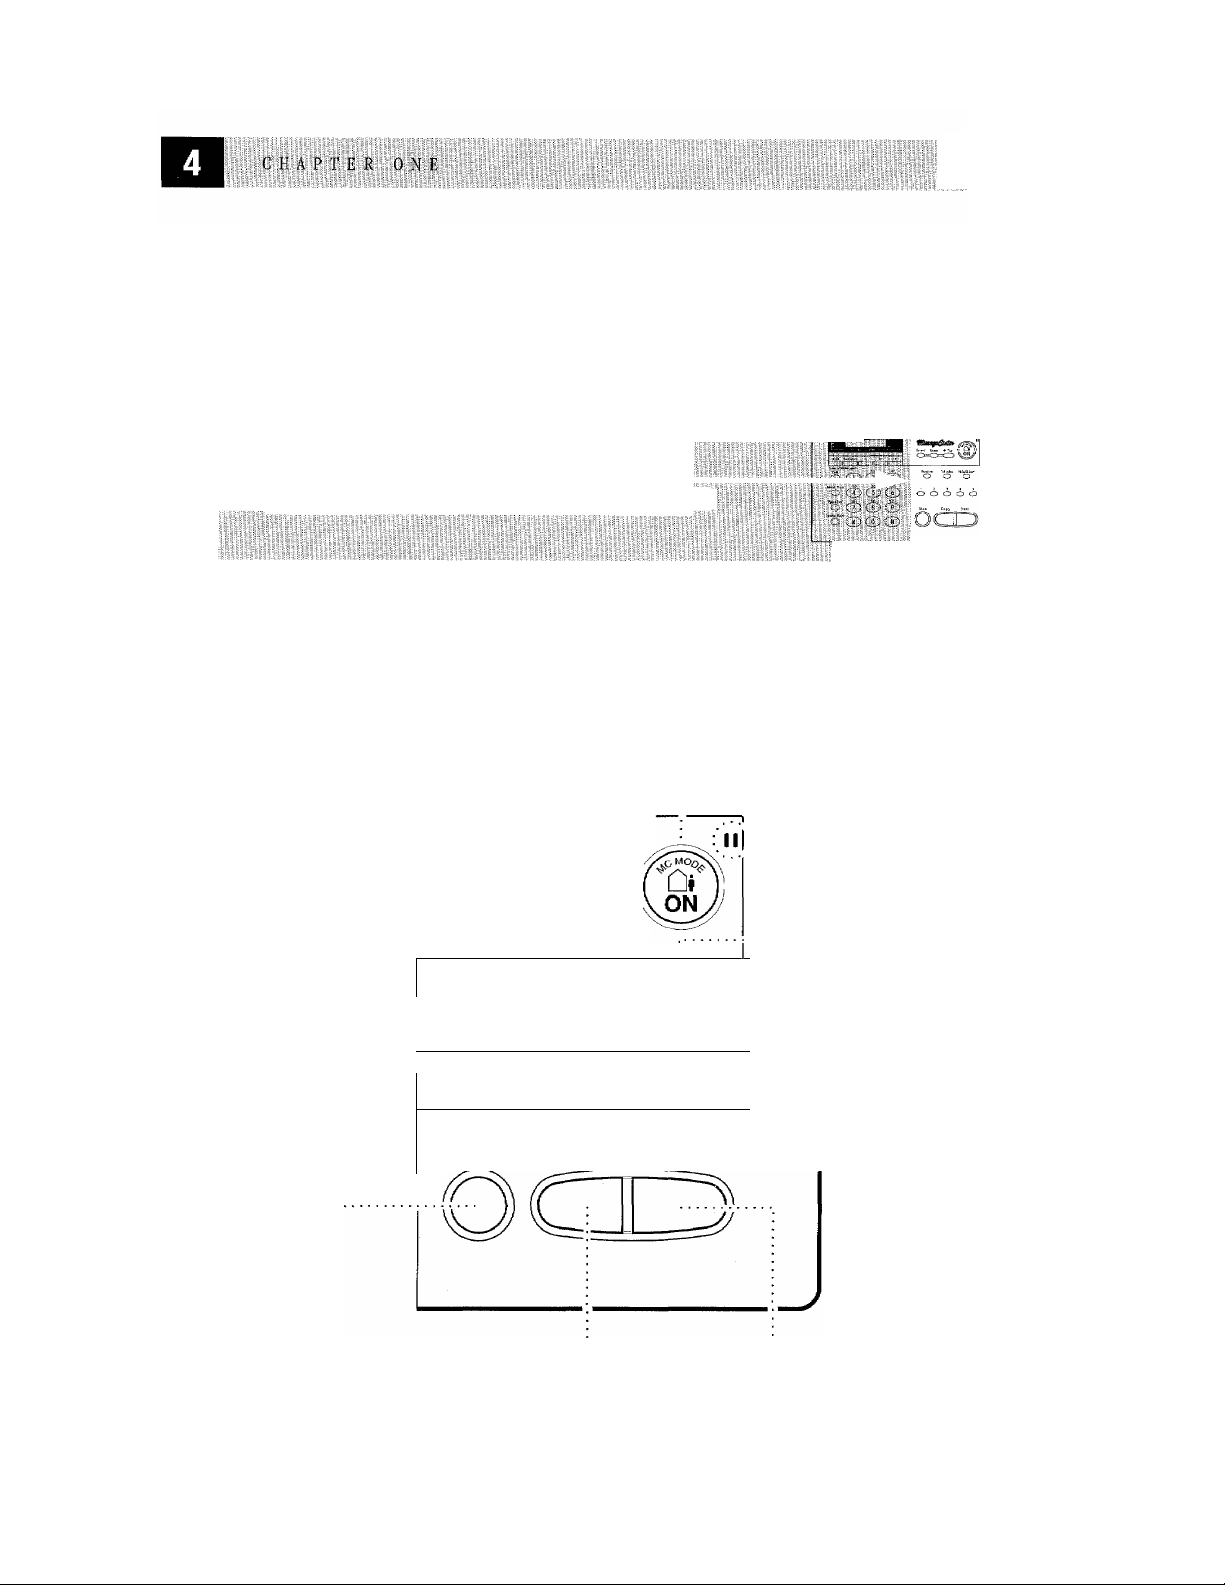
Control Panel Overview
iiiiïiiilîili
as0i«ssi»
lillli
Section of Control Panel Detailed on this Page
Message Indicator Light
Reminds you that you
have voice or fax messag
es in the memojT)'.
Record
Lets you record
Outgoing Message
(OGM), memos
and telephone
calls, and store in- _
formation for Mes
sie Center Pro
features.
Erase
Lets you delete
voice messages,
fax messages or all
messages.
Function
Lets you access the
function and pro- '
gramming mode.
Stop
Stops a fax, can
cels an operation,
or exits from func
tion mode.
Play
Lets you listen to voice
messages and outgoing
messages, and print fax
messages stored in mem-
OH0
Record Erase • Play |
Function
...........
o
......................
: 1 2
:0 O o O O:
Stop Copy Start
Tel-index Hoi p/Q.Scar
O
3 4 5 ;
MC MODE
Lets you activate
Message Center.
A4 8.5"
o
'iliii
II
..
Microphone
Picks up your
voice when you
speak to another
party using Speak
er Phone.
Help/Q.Scan
Prints a quick ref
erence Help List.
Also, lets you take
advantage of memor\f transmission.
Tei-index
■ Lets you look up
numbers stored in
the dialing
memoiy.
One Touch
Dial Keys
These five keys
give you instant
access to previ
ously stored
phone numbers.
Copy
Makes a copy.
Start
Starts an opera
tion, such as send
ing a fax.
Page 13

c H A: P T E o
Caution
Iit$tallatioii
1
Never install telephone wiring during a lightning storm.
2
We recommend that this product be used with a surge protection device to
protect the product against lightning storms.
3
Never install a telephone j ack in a wet location unless the j ack is specifically
designed for a wet location.
4
Never tonch telephone wires or terminals that are not insulated unless the
telephone line has been disconnected at the netw'ork interface.
5
Use caution when installing or modifying telephone lines.
'6 Avoid using a telephone (other than a cordless type) during an electrical
storm. There may be a remote risk of electric shock from lightning.
7
Do not use the telephone to report a gas leak in the vicinit>^ of the leak,
I# For PLUGGABLE EQUIPMEN'k the socket-outlet should be installed near the
equipment and should be easily accessible.
Page 14

Packing List
Make sure you have the following items.
Items marked with * are for MFC-370MC/390MC only.
Document support
Page 15

ffliliiïiilill
Choosing
Place your fax machine on a fiat, stable surface, such as a desk. Select a place
that is free of vibration and shocks. Locate the fax machine near a telephone jack
and a standard, grounded power outlet.
Avoid placing your fax machine in a high-traffic area. Do not place near heaters,
air conditioners, water, chemicals, or refrigerators. Do not expose the fax machine
to direct sunlight, excessive heat, moisture, or dust. Do not connect your fax
machine to electrical outlets controlled by wall switches or automatic timers.
Disruption of power can wipe out information in the unit’s memory. Do not
connect your fax machine to electrical outlets on the same circuit as large
appliances or other equipment that might disrupt the power supply. Avoid
interference sources, such as speakers or the base units of cordless phones.
Assembly
a
Location
See
Instructions
printed
inside
paper bin
Load the recording paper
1
Lift u p the co ver b y p laci ng your fin ger in t he g roov e un der the arro w in the
front center of the cover, and lift up.
Pull the release lever (blue) on the print head unit so that you can lift it up
and remove the recording paper.
Remove the three pieces of protective paper
4 Take the new roll of recording paper out of its wrapper. If you are replacing a
roll, you must remove any paper remaining in the machine.
¡S- Insert the new recording paper into the paper bin, with the paper feeding
from the bottom of the roll.
6
Insert the edge of the paper into the slot between the roller and the plate.
Feed the paper through until you can see it come out the front of the
machine. Keep the paper stretched tightly.
7
Push the release lever (blue) down, then close the cover.
Page 16
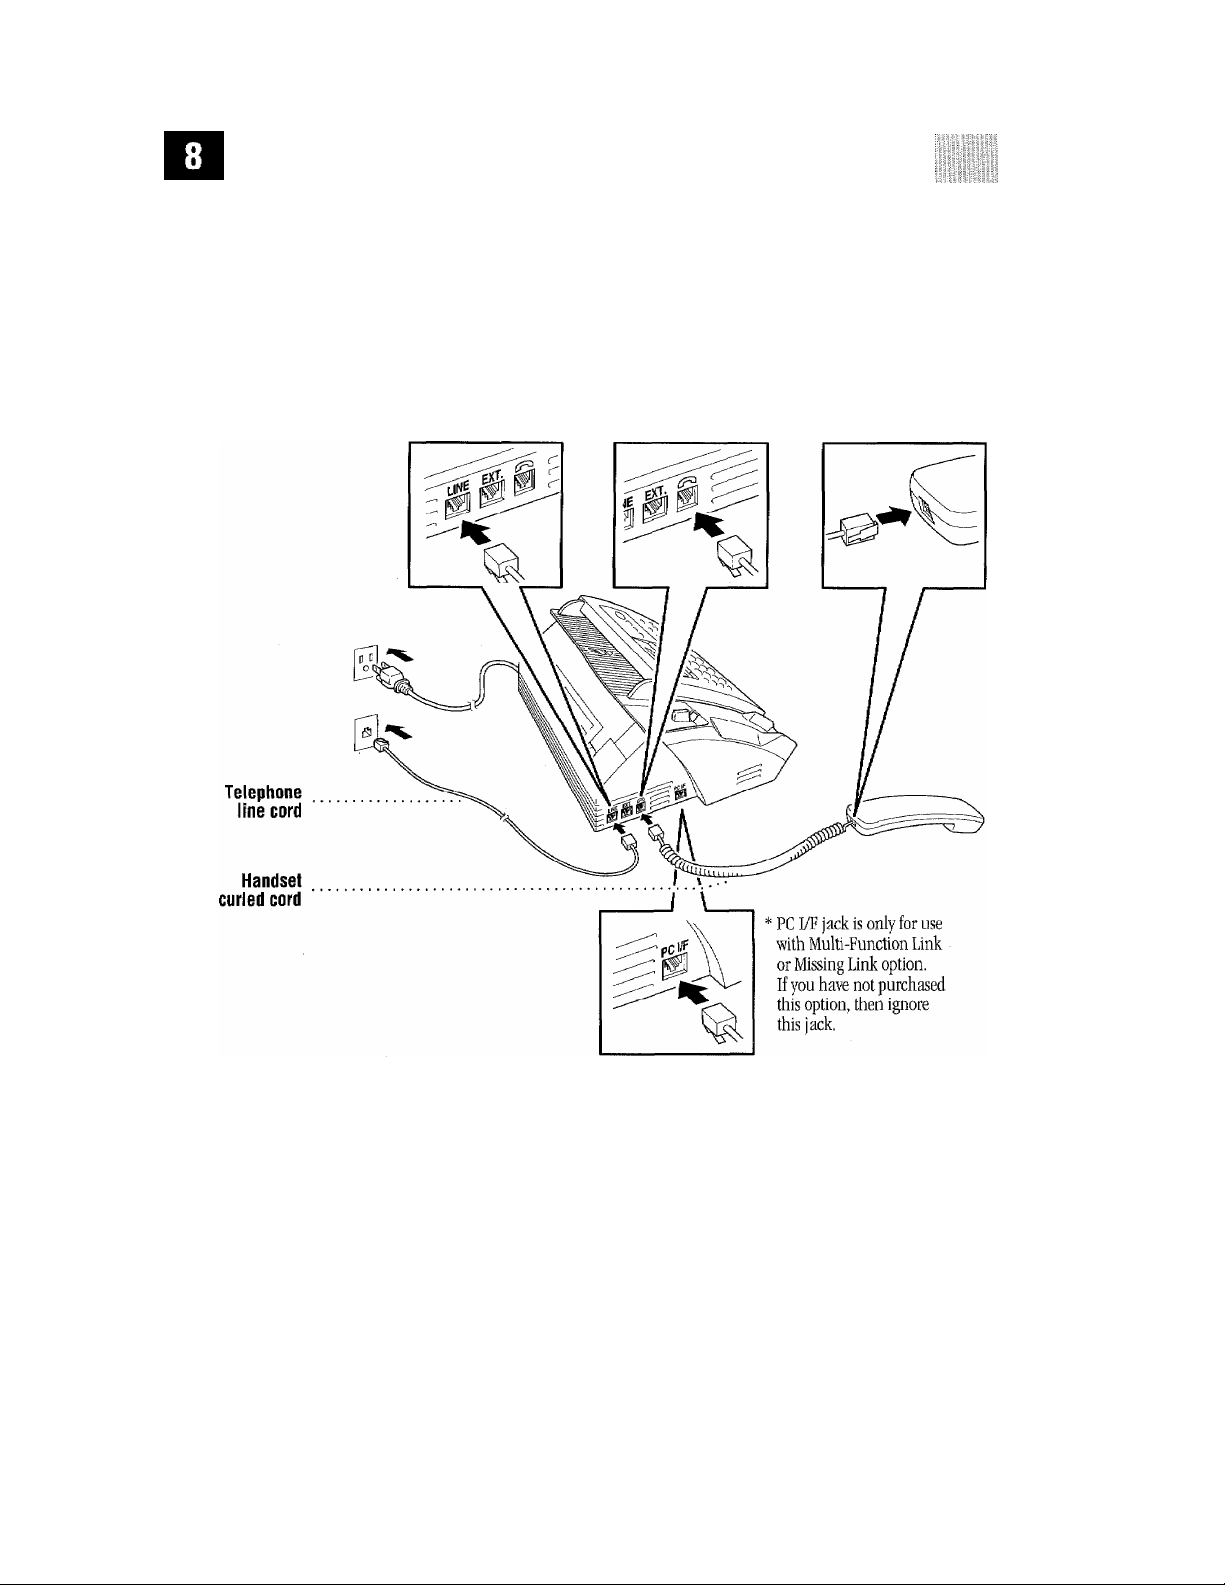
Connect the handset
Connect the curled handset cord to the bottom of the handset and the side of the
fax machine
Connect the power cord
When you connect the power, your fax machine cuts the fax paper automatically,
and the screen displays 01/01 00:00. After you connect the power cord, the battery
will take a few days to charge enough to provide backup power for Message Center
memory.
NOTICE: 1)
machine is grounded through the power outlet, you can protect yourself from
potentially hazardous electrical conditions on the telephone network by keeping
the power to your fax machine on when you connect it to a telephone line.
This fax must be grounded using a 3-prong plug.
2)
Since the
Page 17
1. I. A r [ 0 N
Similarly, you can protect yourself when you want to move your machine, by
disconnecting the telephone line first, and then the power cord.
power surges can damage this product! We recommend that you use a quality
surge protection device on the AC power line as well as on the telephone line, or
unplug the lines during a lightning storm.
3)
Lightning and
Document
support
Connect the telephone line
Connect one end of the telephone line cord to the jack labeled
of the fax machine. Connect the other end to a modular wall jack,
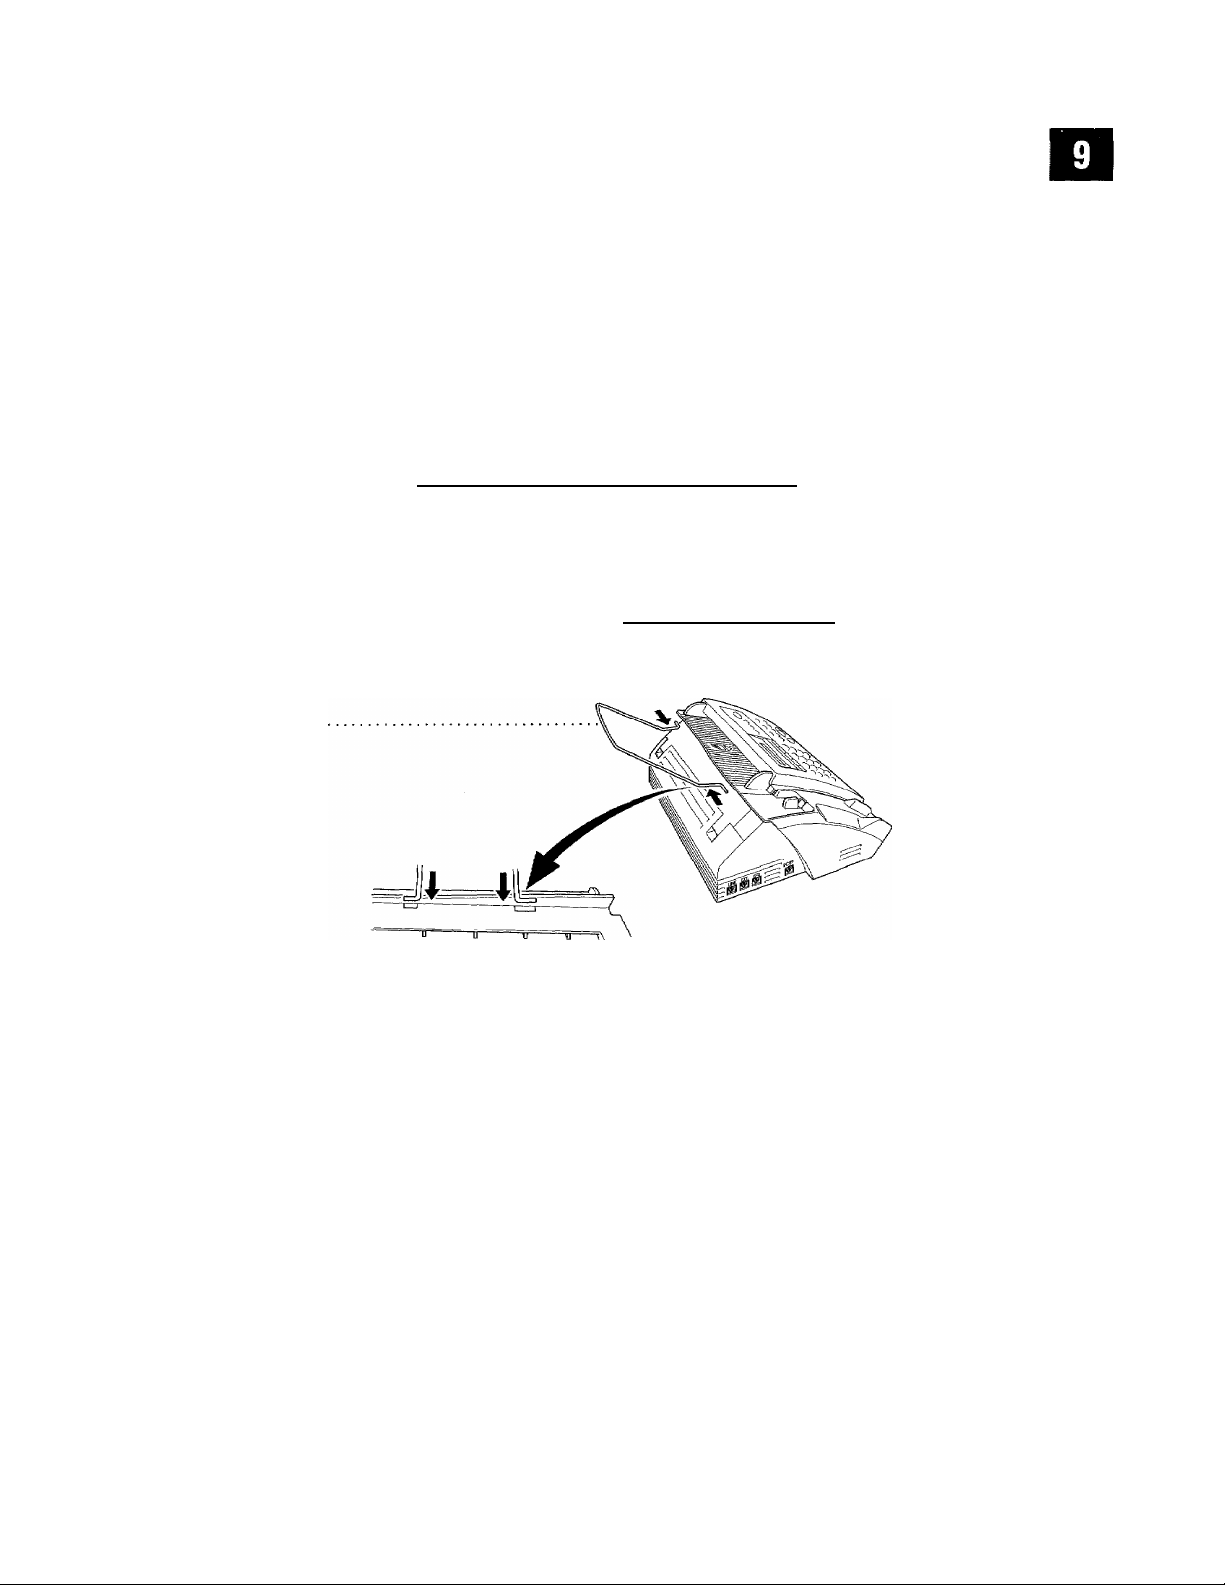
Attach the document support
Attach the document support as shown in the illustration below.
___________________
LINE
on the back
________________
Special Line Considerations
Roll Over Phone Lines
A roll over phone system is a group of two or more separate telephone lines that
pass incoming calls to each other if they are busy The calls are usually passed
down or “rolled over” to the next available phone line in a preset order.
Your fax machine can work in a roll over system as long as it is the last number
in the sequence, so the call cannot roll away Do not put the fax machine on any
of the other numbers; when the other lines are busy and a second fax call is
received, the fax call is transferred to a line that does not have a fax machine.
Your fax machine will work best on a dedicated line.
Page 18

Two-Line Phone System
A Avo-line phone system is nothing more than two separate phone numbers on
the same wall outlet. The two phone numbers can be on separate jacks (RJl 1) or
combined into one jack (RJl4). Your fax machine must be plugged into an RJl 1
jack. RJll and RJ14 jacks maybe equal in size and appearance and both may
contain 4 wires (black, red, green, yellow). To test the type of jack, plug in a
two-line phone and see if it can access both lines. If it can, you must separate the
line for your fax machine.
Converting Telephone Wall Outlets
There are three ways to convert to an RJl 1 receptacle. The first two ways may
require assistance from the telephone company. You can change the wall outlets
from one RJ14 jack to tw^o RJl 1 jacks, Or, you can have an RJll wall outlet
installed and slave or jump one of the phone number’s to it.
The third way is the easiest: Buy a triplex adapter. You can plug a triplex adapter
into an RJl4 outlet, It separates the wires into two separate RJll jacks (Line 1,
Line 2) and a third RJl4 jack (Lines 1 and 2). Plug the fax machine into Line 2
of the triplex adapter.
RJ14
RJ11
RJ14
Triplex Adapter
^IT
LI
L2 L1+L2
] c
Installing Fax Machine, External TWo-Line TAD,
and TWo-Line Telephone
When you are installing an
and a two-line telephone, your fax machine must be isolated on one line at both
the wall jack and at the TAD. The most common connection is to put the fax
machine on Line 2. The back of the two-line TAD must have two telephone jacks:
one labeled LI or L1/L2, and the other labeled L2. You will need at least three
telephone line cords, the one that came with your fax machine and two for your
external two-line TAD. You will need a fourth line cord if you add a two-line
external
two-line telephone answering device (TAD)
Page 19

iS,s„si«s3iss«3i««gSH®HSMisHaMH*naHHWiSIMBMiiiWM^^^
telephone.
' Place the two-line TAD and the two-line telephone next to your fax machine.
::i2" Plug one end of the telephone line cord for your fax machine into the T.2
jack of the triplex adapter. Plug the other end into the
side of the fax machine.
3
Plug one end of the first telephone line cord for your TAD into the LI j ack of
the triplex adapter. Plug the other end into the LI or L1/L2 jack of the
hvn-line TAD.
4
Plug one end of the second telephone line cord for your TAD into the L2 jack
of the two-line TAD, Plug the other end into the EXT. jack on the left side of
the fax machine.
LINE
jack on the left
See
Fax Only
Mode
31
Two Line External TAD
You can keep two-line telephones on other wall outlets as always. There are two
ways to add a two-line telephone to the fax machine’s wall outlet. You can plug
the telephone line cord from the two-line telephone into the L14-L2 jack of the
triplex adapter. Or, you can plug the two-line telephone into the TEL jack of the
two-line TAD.
Fax Machine
Multi-Line Connections (PBX)_______________
Most offices use a central telephone system. While it is oftpn relatively simple to
connect the machine to a key system or a PBX (Private Branch Exchange), we
suggest that you contact the company that installed your telephone system and
ask them to connect the fax machine for you. It is advisable to have a separate
line for the fax machine. You can then leave the machine in FAX ONLY Mode to
receive faxes any time of day or night.
Page 20

iilliliiliililBliililililB^^^^^^
If the fax machine is to be connected to a multi-line system, ask your installer to
connect the unit to the last line on the system. This prevents the unit from being
activated each time a telephone call is received.
As Mth all fax units, this machine must be connected to a two wire system. If your line
has more than two Mres, proper connection of the fax machine cannot be made.
If you are installing the machine to work with a PBX:
1
It is not guaranteed that the unit will operate correctly under all circum
stances with a PBX. Any cases of difficulty should be reported first to the
company that handles your PBX.
2
See
Fax Only
Mode
p.31
If all incoming calls will be answered by a switchboard operator, it is
recommended that the Answer Mode be set to MANUAL, All incoming calls
should initially be regarded as telephone calls.
1^^ The unit may be used with either pulse or tone dialing telephone service.
äWii
i|ÍÍ
See Fax
Handshake
p.2
Custom Features on Your Phone Line
If you have Call Waiting, Ring Master, Voice Mail, an answering service, alarm
system or any other custom feature on your telephone line, it may create a
problem in the operation of your fax machine.
Connecting an External Telephone Answering Device (TAP)
Sequence
Your fax machine has a built-in answering system, but you might choose to
connect an additional answering system. When you have an
the same telephone line as the fax machine, the TAD answers all calls. The fax
machine “listens” for fax calling (CNG) tones. If it heare them, the fax machine
takes over the call and receives the fax. If it doesn’t hear CNG tones, the fax
machine lets the TAD continue playing your outgoing message so your caller can
leave you a voice message.
The TAD must answer within 4 rings (the recommended setting is 2 rings), The
fax machine cannot hear CNG tones until the TAD has answered the call, and
with 4 rings there are only 8-10 seconds of CNG tones left for the fax “hand
shake.” Make sure you carefully follow instmctions in this manual for recording
your outgoing message. Do not use a “toll-saver” ring setting on the TAD.
external
TAD on
Page 21
iliiiilliiiillllilllliiiliilililiiiliililiiiliiililiiliiiiiiliiiiiil
Do not connect a TAD elsewhere on the same phone line — your fax machine
and TAD will both tr)? to control the line.
iiiliilllllllllll
See Message
Storage
p. 56
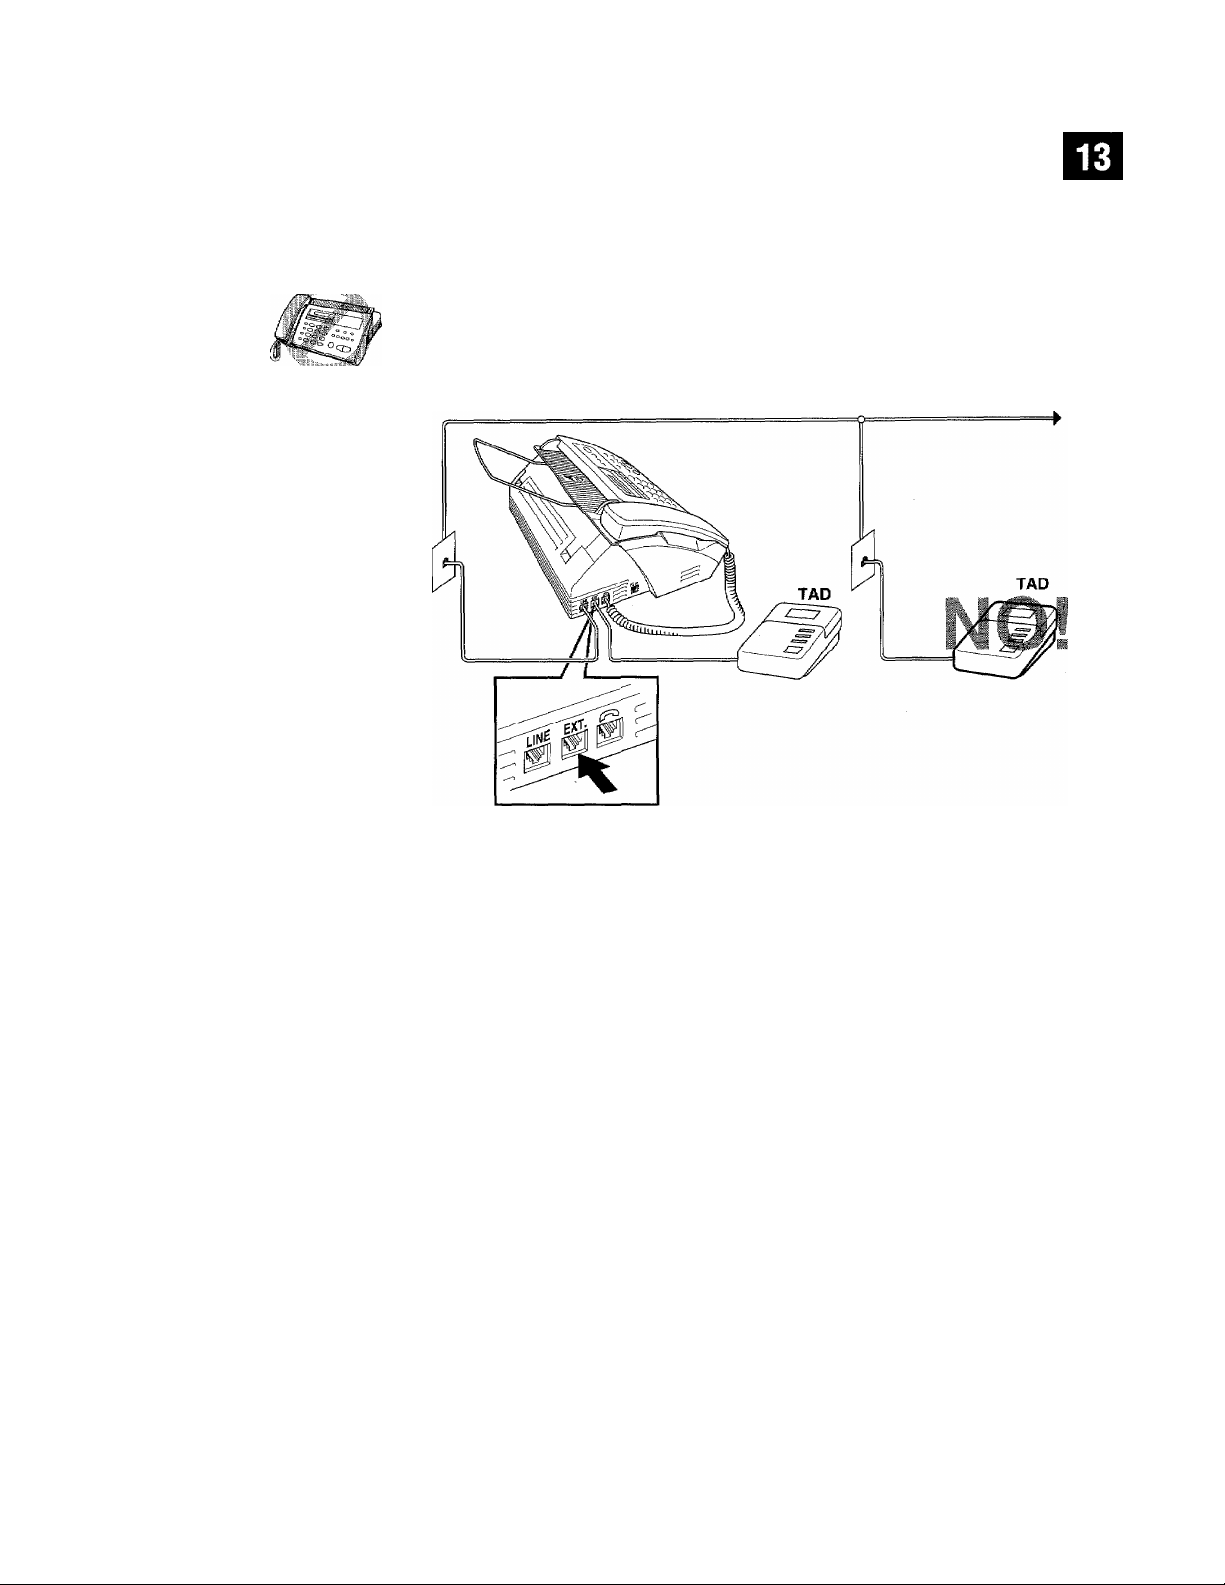
Connections
The external TAD must be plugged into the left side of the fax machine, into the
j ack iabeled EXT. Your fax machine cannot work properly if you plug the TAD into
a wall jack.
1
Plug the telephone line cord from the wail jack into the left side of the fax
machine, in the jack labeled LINE.
2
Plug the telephone line cord from your TAD into the left side of the fax
machine, in the jack labeled EXT. (Make sure this cord is connected to the
TAD at the TAD's telephone line jack, and not its telephone set jack.)
I3’ Press until the screen displays
:i4‘ Set Message Storage to
Set your external TAD to 4 rings or less. (The fax machine’s Ring Delay
setting does not apply).
6 Set the TAD to answer calls,
7
Record the outgoing message (see below).
^
VOICE: EXT mode.
Page 22

itlllllillliitillili
jilllliiglilllipKy
IlililiSMI: Mlilli j| liliililil i liill iilii j||||||ii:6ltli'
IMiiiliittiiiiifiiiiiilfiiilliii
ilitliifiiiiiiiiiiiiiiiiiiiiiiHliiii
Outgoing Message (OGM)
Timing is important in recording this message. The message sets up the ways to
handle both manual and automatic fax reception.
1
Record 5 seconds of silence at the beginning of your message. (This allows
your fax machine time to listen for the fax CNG tones of automatic
transmissions before they stop.)
2
Limit your speaking to 20 seconds.
See
Easy Receive
p-33
3
End your 20-second message by giving your Remote Activation Code for
people sending manual faxes. For example:
“After the beep, leave a message or send a fax by pressing * 5 1.”
Connecting an External Telephone
Your fax machine is equipped with a handset that you can use as a regular
phone. However, you can also connect a separate telephone (or telephone
answering device) directly to your fax machine.
Connect the modular plug on the telephone’s line cord to the jack labeled
on the left side of the fax machine.
Whenever this phone (or TAD) is in use, the screen displays “EXT, TEL IN USE,”
and, if the fax handset is lifted, an alarm sounds. To disconnect the call on the
external phone and switch to the fax, press [Speder Phone j.
EXT.
Page 23

C H A P T E R T H R E E
Fax
Sellings
Fax Settings
Setting Dialing Mode (Tone/Pulse)
Your fax machine comes set to accommodate tone (multi-frequenq') dialing service. If
you have pulse (rotan?) dialing service, you need to change the dialing mode.
I Press |Funciion|. [T|, Q]. The screen prompts you to select TONE or PULSE.
[QTRLING^tDNE
I P IRLI Ha;PULSE
Use IT] or 0 to select dialing mode.
2
Press when the screen displays the dialing mode you want.
3
Press
D
Setting Date and Time
Your fax machine displays the date and time, and prints it on every fax you send.
In the event of a power failure, the fax machine maintains date and time
information for about one hour. All other settings remain unaffected.
t
Press
[FunctionI, [7], Q]
lEHTER
2
Enter the last two digits of the year. The screen displays your entiy, then
prompts you to enter the month.
• The screen prompts you to enter the year.
Page 24

See
Composing
Electronic
Cover Page
p, 44
HililillllllilillilllllilllililiiiMiliiliiiillllilililiSllllliili
Enter two digits for the month (for example, enter 09 for Septembei; or 10 for
October). The screen displays your entry, then prompts you to enter
the day.
Ifiillfiillllliiliii
Enter two digits for the day (for example, 06). The screen displays your entrj^,
then prompts you to set the time.
fmim
Enter the time in 24-hour format (for example, enter 15:25 for 3:25 PM).
Wait two seconds,
Press H. The screen now displays the date and time you set, and displays it
whenever the fax machine is standing by.
3
Setting Station ID
You can store your name, fax number, and telephone number to be printed on the
fax Cover Page, and on all fax pages.
Press |Futiition|, [7], [T|. The screen prompts you to enter your fax number.
1
laiBMii
Enter your fax number (up to 20 digits). The screen displays your entn^.
2
Press The screen prompts you to enter your telephone number.
3
ilMlifiiiiiiliiii
Enter your telephone number (up to 20 digits). If your telephone number
4
and fax number are the same, enter the same number again.
Press The screen prompts you to enter your name or your company name.
5
6
Use the keypad to enter your name. (You can use the chart on page 17 to
help you enter letters.)
7
Press @ to confirm.
3 Press (^. The screen returns to the date and time.
Entering Text
When you are setting certain functions, such as the Station ID, you may need to
enter text into the fax machine. Most number keys have three or four letters
printed above them. The keys for 0, #, and * don’t have printed letters because
they are used for special characters.
Page 25

ilililiiliiiiiliilllliilB ^ “ '■''' ‘ ^^
By pressing the appropriate number key the correct number of times, you can
access the character vou want.
Press Key
s
a
a
a
a
a
a
a
one time
A B
D
G
J
M
P
T
w X Y Z
two times three times four times
C
E
H
K L
N
Q
u
F
I
0
R S
V
Inserting spaces
If you want to enter a blank space, press [►] twice.
Making corrections
If you entered a letter incorrectly and want to change it, press B to move the
cursor past the letters that are correct. Then press H; all letters to the right of
the cursor are deleted. Re-enter the correct text and/or digits.
Repeating letters
If you need to enter a character assigned to the same key as the previous
character, press B to move the cursor to the right.
Special characters and symbols
Press ^ for (space)
Press # for :;< = >? @ [] ^ _
Press 0 for AEOUAgEEO
Page 26

lilSiii
iiiftlffliiilll
NOTICE:
any person to use a computer or electronic device to send any message via a
telephone fax machine unless such messages clearly contain, in a margin at the
top or bottom of each transmitted page, or on the first page of the transmission,
the date and time it is sent and an identification of the busine^ or other entity or
other individual sending the message and the telephone number of the sending
machines or such business, other entity, or individual.
In order to program this information into your fax machine, you should
complete the steps described on page 15 and 16.
The telephone number you enter is used only for Call Back Message and
Cover Page features.
If you do not enter a fax number, no additional information can be entered.
To enter a space, press [3-
If your Station ID has already been programmed, the screen prompts “1” to
make a change, or “2” to exit without changing.
The Telephone Consumer Protection Act of 1991 makes it unlawful for
Storing One Touch Dial Numbers
You can store 5 fax/phone numbers that you can dial by pressing one key. You
can also store names with these numbers. When you press a One Touch dial
location, the screen displays the name or number as the call is dialed.
One Touch key’s are not the dial pad keys. Ttjey are the 5 keys (number 1-5)
located to the right of the dial pad.
Press |Funciionl(~4l,rn.
!;2 Press the One Touch key where you want to store a number (Key Q] is
pre-programmed for Brother Fax-Back^”^'' System. You can override it if you
wish.) The screen displays the location you selected.
3
Enter a number (up to 20 digits). If you want to enter a pause in the
dialing sequence (to wait for an “outside line,” for example), press
(Rediol/Pausel as you’re entering digits. You can enter only one pause in each
AUTO DIAL number. Pressing [Redial/Pausel enters a 3-5-second pause when the
number is dialed, and a dash appears on the screen.
4
Press 0. The screen prompts you to enter a name for this number.
I HFlME: I
Page 27

5
Use the keypad to enter the name (up to 15 characters). You can use the
chart on page 17 to help you enter letters —
Step 7 to store the number without a name.
6
Press 5^. The screen prompts you to select the h^e of number this is. Use
Q] or [0 to select the hpe you want.
OR
— Press g| and go to
FAX
TEL
F/T
CHAIN
7
Press
8
Return to Step 2 to store another One Touch number —
to exit.
When you dial an AUTO DIAL number, the screen displays the name you’ve
stored, or, if you haven’t stored a name, the number you’ve stored.
If you need to store a pause longer than 3.5 seconds, please call Brother Customer
Service at 1-800-284-4329 in the USA, or 1-800-853-6660 from within Canada.
You can use chain dialing to store long dialing sequences. For example, to store
9 1 201 555 1234 987 65 4321,
first part as a Chain type number (this tells the system that the dialing sequence is
not complete).
a fax only number
a telephone (voice) number
both a fax and voice number
a number (usually an access code) for chain dialing.
(^.
OR
divide the number into 2 parts. Store the
— Press S
CHAIN —9 1 201 555 1234
The last part must be a One Touch number stored as any of the other following 3
types:
FAX or F/T or TEL — 987 65 4321
Now, when you dial, just press the two keys (one after the other, in order) where
you’ve stored the two parts of the number.
If you are using Chain Dialing with a credit card number, do not send an
electronic cover page. The credit card number will appear on it.
Page 28

One Touch Dialing
Pick up the handset —
When you hear a dial tone, press the One Touch key of the location you
want to call,
If you try to use a One Touch location with no number stored in it, you hear a
warning sound, and the screen displays “NOT REGISTERED.” The display
returns to normal after 2 seconds.
storing Speed Dial Numbers
You can store 50 Speed Dial number’s, which you dial by pressing only three keys.
Even if you lose electrical power, numbers stored in memon^ will not be lost.
■| Press iFutiitionj. [4], d]. The screen prompts you to enter a location,
OR
— Press
[Speaker Phone].
_________________
I S P EE D- D I F I L ? t_ I
2
Use the keypad to enter a 2-digit location (01 - 50). The screen displays your
entry, then prompts you to enter the number you’re storing.
AmBi
E N T ER
SET
)
3
Enter the number (up to 20 digits),
4
Press
6 Press
7
The screen prompts you to select the type of number this is. Use
8 Press [§[1.
9 Return to Step 2 to store another Speed Dial number —
0.
The screen now prompts you to store a name with this number.
Use the keypad to enter the name. You can use the chart on page 17 to help
you enter letters —
without a name.
select the type you want.
FAX
TEL
F/T
CHAIN
to exit.
a fas number
a telephone (voice) number
both a fax and telephone number
a number (usually an access code) for chain dialing.
OR
— Press S and go to Step 7 to store the number
|T)
or
[0
OR
— Press H
to
Page 29

|j№|l|jli:il
■HIH
SililiSiSMBilliiliR
Speed Dialing
It'
Pick up the handset —
2
When you hear a dial tone, press
Speed Dial number.
OR
— Press
[Speed Dial),
[Speaker Phone).
then press the two-digit
Changing One Touch and Speed Dial Numbers
If you
try
to store a One Touch or Speed Dial number in a location where a
number is already stored, the screen displays the current naiue stored there, then
prompts you to either
1. CHANGE — OR -- 2. EXIT.
1
Press
Q]
to change the number stored, or press
change.
2
If you want to erase the number, press H when the cursor is to the far left
of the digits.
[T)
to exit without making a
See
Storing One
Touch
Numbers
p. 18
and
Storing
Speed Dial
Numbers
p. 20
3 If you want to change a digit, use [7] or 0 to position the cursor under the
digit you want to change, then press 1^.
4 Enter a new number, and press (S^.
5
Follow the directions from Step
Speed Dial Numbers.
5
in Storing One Touch Numbers or Storing
Setting Number Groups
for Broadcasting
Number Groups allow you to send the same fax message to miany fax numbers by
pressing only one One Touch key (Broadcasting).
fax number as a One Touch or Speed Dial number.
them into a Number Group. Each Number Group uses a One Touch key. Finally,
you can have up to 5 small Number Groups, or you can assign up to 54 numbers
to one large Group. You can use the same stored number in several groups.
You'll be able to give each Number Group a name up to 15 characters long.
1 Press I Function I. [4l, in. The screen displays
1 ShSE^'UP ' SROUI
First,
Then,
dUCH
you'll need to store each
you can combine
Page 30

C ll
I> T [] i; }■; i'
2
Select a One Touch key to be the Group Number. (For example, press one
touch location 2 for group 2.)
3
After two seconds, use the ke)^ad to enter the group number (for example,
press
{J}
for group 2.
liililiSiiiliiiiliiiililllii
SETUP GROUP ;; GO
4 Use the keypad to enter the One Touch or Speed Dial numbers in this group.
For example, enter fflilJS, (S1[0[|], HSlil]- Enter a [#) before
Speed Dial locations; enter a [*) before One Touch locations.
,5
Press @. The screen prompts you to enter a name.
I HFi M E
C
I ENTER: li- ^ SET
6 Use the keypad and the chart on pages 16-17 to enter a name for the group
(for example, NEW CLIENTS).
Ililf
HiSlii
I
P- Press
Press to exit.
You can print a list of ail One Touch and Speed Dial numbers. See Chapter 10,
"Printing Lists and Reports."
Setting Beeper Level
You can set the beeper to LOW, HIGH or OFF. The machine comes set to LOW.
When the beeper is set to LOW or HIGH, the fax machine beeps even^ time you
press a key or make an error, and at the end of fax sending or receiving.
1 Press |Function|,(T|. in.
2 Press n or n) to select your setting.
3
When the screen displays the setting you want, press 0.
4
Press H to exit.
Temporary Memory Backup Storage
All settings in the SET AUTO DIAL, USER OPTIONS, TEL OPTIONS, and SETUP
SYSTEM functions are stored permanently and will be retained even in the event
of a power failure.
Page 31

CHAPTER POUR
OiiScreen
Programmili^
Uset-Friendly Programming
See
Using This
Manual p. 1
We have designed your fax machine with on-screen programming and a Help key.
User-friendly programming helps you take full advantage of all the functions
your fax machine has to offer.
Since your fax programming is done on the LCD, we created step-by-step on
screen prompts to help you program your fax machine. All you need to do is
follow the prompts as they guide you through the function menu selections and
programming options and settings.
Function Mode
You can access the function mode by pressing iFunUionl. When you enter the
function mode, your fax machine displays a list of Level One Functions from
which you can choose. These function options appear one after the other on the
display. Select an option by pressing @ when the option appears on the LCD.
You can “scroll” more quickly through options by pressing (T|. When the screen
displays your selection, press 0.
If you want to exit the Function Mode, press W.
Page 32

iiiiiililli
I' 0 r; R
Alternating Displays
When you see alternating displays, the LCD sometimes alternates between the
currently selected option, and a help message giving brief instructions about how
to proceed. The display you'll probably see most often is shown below, showing
you, when you place a document in the feeder, that you can dial a number and
send a fax, or you can make a copy
[ F RKi! J'dU ■■ r ^ SThtRT
C
iCDP'Tr PRiESS PQP
Function Selection Table
If you have a basic understanding of how to program a fax machine, you can
perform most of the programming settings without the Owner’s Manual. To help
you understand the function selections, options, and settings that are found in
your fax programs, use the Function Selection Table below.
Function
1. TIMER
2. POLLING
c«
3. CALL RESERVE
4. CONTRAST
5. RESOLUTION
6. OVERSEAS MODE
7. COVERPAGE
Description
Send documents later.
Retrieve faxes from another
machine.
You can send a fax, then speak.
Change lightness or darkness
of fax you're sending.
Allows you to change resolution
page by page.
Adjusts for sometimes difficult
overseas transmissions.
Automaticaily sends coverpage
you program.
Factory Set More Info
-
OFF
OFF
AUTO
STANDARD
OFF
OFF
p. 42
p.51
p. 46
p. 30
p.47
p. 43
p. 45
Page 33

aulii
iìiii
ttiii
liliSISiSiiif
i/.v>--.:;.;.:,:b ••.; b'. :-' -. ;:• I. ::•• :'::
:.va • ■••' b : '.a:; i'-r.-.- U'
iliillPliSiiilBIliilllilM
liBwiftiiiiaiiiii
-lauB-riiaiK lauiiB iU if lUli ;B-i
. .< n 0 « . ,v
Function
PQ
o
u
1. ACT. REPORT
5«
2. ALL DIAL
3. TEL. INDEX
2
4. COWR PAGE
5. CALL BACK MSG
6. USER OPTIONS
s
7. XMIT REPORT
8. MEMORY STATUS
9. CALLER ID
1. ONE-TOUCH DIAL
Q
2. SPEED-DIAL
I
H
3. SETUP GROUPS
c»
Description
Factory Set More Info
Cancel a timed or polled job.
Print lists and reports of activity;
(Details in Chapter 10)
1
^ OFF
1
Dial numbers stored in memory
USER DEFINED p. 18
by pressing only one key.
Dial numbers stored in memoryi-
pressing only 3 keys.
Set up a group number
for broadcasting
1
i
1 P-77
1 p.77
p. 43
p. 77
p.77
p. 77
p.77
p.77
p.77
p. 77
p. 20
p,21
1. SMOOTHING
C<1
O
2. BEEPER
£
3. COYERPGON/OFF
©
M
c/3
U>
4. ERROR RE-TX
lÀ
Enhance the appearance of
ON
incoming faxes.
Adjust volume level of beeper.
Send automatic coverpage
LOW
OFF
with comment.
Resend a fax if an error occurs.
1
OFF
p. 35
1 P-22
p. 45
p. 44
Page 34

UlAI^TKii M)
Si« M m is s 1 I i;M Si«
iiiiMiilllliittill
ililiillilil
Function
1. TONE/PULSE
2. RING DELAY
3. SPEAKER VOLUME
czi
4. ICM REC, MONITR
O
N-4
£
5. F/r RING TIME
o
nJ
6. RING VOLUME
's©
7. DISTINCTIVE
8. CALLER ID
1. DATE/TIME
2. DAILY TIMER
3. INTERVAL
!/5
4. STATION ID
Sft
5. REMOTE CODE
6. EASY RECEIVE
7, SET COVERPAGE
(8.MF LINK)
Description
Select dialing mode,
Number of rings before machine
Factory Set
TONE
2
answers in F/T or FAX ONIY
mode.
Adjust speaker volume.
LOW
Adjust volume of
incoming mesage.
Sets the time for “double-ring”
LOW
20
in F/T mode.
Adjust volume of ringer.
Use with phone company
MEDIUM
OFF
distinctive ringing service
to register ring pattern
Mth fax machine.
View last 30 Caller IDs
stored in memoiy
Enter date and time for LCD
01/01/1997 OftOO
display and to print on
transmissions.
Send delayed jobs at the same
00:00'
time every day.
Select the interval of time
OFF
beh^'een activity reports.
Program name, fax number,
and telephone number to
appear on each transmitted page.
Enter code to activate or
ONe=51,#51)
deactivate machine from a
remote location.
Receive fax messages without
OK
pressing Start key.
Register your own tan
custom comments
Fax Receive Only/ PC Primary/
PC Primary
PC Receive Only
More Info
p.l5
p. 34
p.35
p. 56
p.34
p.35
p.49
p.50
p. 15
p. 42
p.78
p. l6
p. 48
p. 33
p. 44
MultiFunction
Link or
Missing link
manual
Page 35

iiillii
IBI
iSiiiSliliiSliiliii
Function
1. MSG STORAGE
2. BACKUP PRINT
o
3. FAX FWD/PAGING
5«
4. REMOTE ACCESS
5. ICM MAX. TIME
6. OGM
H
s«
7. TOIL SANER
GO
O
1, MSG CTR PRO
g
2. OGM
U
3. MAIL BOX
e
№)
4. VOICE INFO
GO
C\
s
Description
Factor)^ Set
More Info
Select if rnemoiy will store fax,
voice or both.
Select if fax prints memorv' backup
FAX:0EFA'0ICE:0N
ON
Set fax to forward fax/message OFF
Set code for retrieving messages
159*
Set length of incoming message 30 seconds
Select/record outgoing message MSG CTR OGM
Set to ring t\\1ce when messages
are waiting
Select On or Off
OFF
OFF p.76
Record outgoing announcements
for Level 1 and Level 2
Set up personal mailboxes
(up to 5)
Store the voice information
User Defined
for each Voice-on-Demand
p. 56
p. 59
p. 6l
p. 64
p. 6l
p. 57
p. 58
p. 69
p.72
p.74
p.42
Page 36

г ч р ’Í i; и р Í11 к
Page 37

CHA ^ V E
lisie Fax
Sending Faxes
Before you begin:
Documents must be between 5.8 and 8.5 inches wide, and 5.9 and 23.7
inches long. Your fax machine can only scan an image 8.2 inches wide,
regardless of how wide the paper is.
Make sure you insert documents
Adjust the paper guides to fit the width of your document.
Paper guides
The automatic document feeder (ADF) can hold up to 10 pages, feeding each
one individually through the fax machine. Use standard (20 lb.) paper when
using the ADF; if you're using heavier paper, feed each sheet individually to
prevent paper jams.
face down, top edge first.
Page 38

liíiiiiliiiiliitiiii
||||i|||j||j|||||
EosiHHjIliltlIlliiiliilliiiliililiii
LKH ssBBiSHSCf *5
iliiliiii
Press
I Resolution
I (before you send the fax) to select the resolution for the
document you’re sending,
iillili
íb";;;;;-
Standard
Fine
— suitable for most typed documents.
— good for small print; transmits a little slower than standai’d
resolution.
Super Fine
— good for small print or artwork; transmite slower than fine
resolution,
Photo
— use when document has varying shades of gray; slowest
transmission time.
DO NOT
paper clips, paste or tape attached.
use curled, wrinkled, folded, or ripped paper, or paper with staples
DO NOT
use cardboard, newspaper, or
fabric.
Make sure documents written with ink are completely dn?,
Contrast Setting
If your document is very' light or veiy dark, you might want to set the contrast
accordingly.
Insert the document, face down, in the feeder
Press [Function!, in, i~4l,
W-
Use 0] or H to select AUTO, S.LIGHT, or S.DARK,
See
One Touch
p. 18
}:# When the screen displays your selection, press [^.
Press H to exit.
¡6^ Enter a fax number and press to send a fax — OR — Press fC^ to
make a copy.
Manual Transmission
Manual transmission lets you hear the dial tone, ringing, and fax chirps before
sending the fax.
Insert the document face down in the feeder
=2 Pick up the handset and listen for a dial tone —
and listen for a dial tone.
3
Enter the fax number you want to call (you can enter the digits using the
keypad, or you can enter a One Touch or Speed Dial number or you can
call from the Tel-Index).
OR
— Press iSpenker Phone]
Page 39

iifi!
silH&i
ilB
See
Speed Dial
p. 20
4
when you hear the fax tone, press [^.
5
If you’re using the handset, hang up.
Automatic lyansmission
This is the easiest way to send a fax.
or press
but the fax machine is sending them over the phone line.
M ” Insert the document face down in the feeder
i;i2 Enter the fax number from One Touch or Speed Dial or Tel-Index.
¡Speaker Phonej
Press i^.
When you follow the steps below, you won’t hear any tones,
IMPORTANT:
Do
not
pick up the handset
Manual and Automatic Fax Redial
If you ’re sending a fax majiually
the number.
If you ’re sejiding a fax automatically,
and will automatically redial up to three times,
and the line is busy press
the machine will detect if the line is busy
|Redial/Pause|
to retry
Receiving Faxes
See
Distinctive
Ringing
P^49
Select Answer Mode
Manual
Distinctive Ringing.
Fax Only
You cannot receive a voice call, but you can dial out and make a voice call.
F/T
prints the fax. if the call is not a fax, it signals you with a double ring (ring-ring),
different from the phone company ringing, to alert you to pick up the call. It
plays your F/T OGM, in which you should instruct new callers how to send a fax.
If you select this setting, you’ll need to set the Ring Delay and F/T Ring Time
features (on the following pages). If you have extension phones on the same line
as the fax machine, set Ring Delay to 4,
— You must answer all calls yourself. You can use this mode with
— The fax machine automatically answers even^ call as a fax call.
— The fax machine automatically answers every call. If the call is a fax, it
Page 40

Curr0nt
Answer Mode
lilliiiililiiil
MSG CTR — This fax machine provides you with a built-in digital message
center for fax and voice. When you set the machine to answer calls, it will record
up to 99 messages. For more infomiation about Message Center (MSG CTR)
operation, please see Chapter 8.
FRX: FAX ONLY
F/ T: FAX/TEL
MHL : manual
Mode
_ _ _ _ _ _ __ _
11
_ _
IL_ n
MC: MSGCTR
_ _
N
See
Recording
Message
Center
Outgoing
Message
p. 57
Record Fax/Tel Outgoing Announcement
(F/T OGM)
This is the announcement played by your fax machine (not an external TAD)
when someone calls and your machine is set to F/T mode. Although callers hear
your announcement, they cannot leave a message. To erase the announcement,
follow the directions on page 57, "Erasing Outgoing Message."
■j Press iFunciionj, [1], H], The screen prompts you to choose F/T OGM or MSG
CTR OGM.
Press (T) or |T) to select F/T OGM.
2
Press 0.
3
Press iRecordL then pick up the handset to record a message.
4
Replace the handset. Your OGM is played.
5
Press S to exit,
6
Page 41

See Remote
Operation
p.48
Easy Receive
When you use this feature, you don’t have to press (5^ when you answer a fax
call and hear calling beeps. Just hold the handset and wait a few seconds, When
you see "RECEIVE” on the fax screen or when you hear “chirps” through the
handset of an extension phone connected to another wall jack, just replace the
handset, and the fax machine does the rest. Selecting
receive fax calls automatically, even if you lift the handset of an extension phone.
Selecting
the fax machine or on a phone or TAD connected to the fax machine. Selecting
OFF
by pressing [*] in B if you are not at the fax machine.
In case Easy Receive does not work, because of a poor phone line connection, just
press or press the Activation Code @ n [Ti.
SEMI
means you’ll have to activate the fax machine yourself, by pressing H or
Press I Function
lets the fax machine receive the call only if you’ve answered it at
L [7], in.
ON
allows the machine to
2 Use B or (T) to select
3
Press 0 when screen displays your selection.
4 Press H to exit.
If you’ve set the feature to
connect a fax call when you lift the extension phone handset, press @ n BAt the fax machine, lift the handset and press
To select or change your Answer Mode
Press
[Model.
The screen displays your current selection.
ON, SEMI,
ON,
but your fax machine doesn’t automatically
or
OFF.
llliililliiiiliiiiiiMIliilli
MFINURL
lilltillill
2
Continue to press
screen returns to the date and time display, along with your new Answer
Mode setting.
If you’re changing Answer Mode while in another operation, the screen returns to
the current operation display.
[Mode]
until your new selection appears. After 2 seconds, the
Page 42

Setting Message Center Mode to ON
If you set Message Center Mode to ON, it overrides your Answer Mode setting.
Pressing ® repeatedly alternately turns the Message Center ON and OFE When
Message Center Mode is OFF, the button light is off.
Press t|J), The button light goes on, and the screen displays
.
:HC:::MSa::;C:TR|
Setting Ring Delay
See
Toll Saver
p.58
See Remote
Codes p. 48
The Ring Delay setting determines the number of times the fax machine rings
before it answers. If you have extension phones on the same line as the fax
machine, set the Ring Delay to 4.
t Press iFunctionj, |Tl, [Tl.
2
Press [2 or [Q to select how many times the line rings before the fax
machine answers (00 - 04). If you select 00, the line doesn’t ring at all.
i# Press @ when the screen displays your selection.
# Press W to exit.
Setting F/T Ring Time
You need to determine how long the fax machine will send you its special double
ring when you have a voice call. This ringing happens
from the phone company. Only the fax machine rings, for 10,20, 30, or 60
seconds; no other phones on the same line ring the special double ring. However,
you can answer the call on any phone on the same line as the fax machine.
"1 Press iFunctionL |T], [1].
2
Press 3] or [T] to select how long the fax machine wall ring to alert you that
you have a voice call.
________________________
after
the initial ringing
3
Press @ when the screen displays your selection.
[ Rl N(i TIM El
4
Press H to exit.
Now, when a call comes in and the machine is set to F/T Mode, all phones on this
line will ring the number of times you selected in Ring Delay.
You can let the fax machine pick up and detect if it’s a fax or voice call. If it’s a
fax call, the machine prints the fax. If it’s a voice call, the machine signals you
with a double ring for the length of time you selected in F/T Ring Time.
Page 43

itiisH:
;|§||||||||||||||^
Even if the caller hangs up during the double ringing, the fax machine continues
for the set time, If you don’t pick up during the ring time, the fax machine begins
sending a fax tone, even if the caller is still on the line.
Speaker Volume
You can set the volume of the fax machine speaker.
Press |function|,r6l,(T].
!J2^ Press [3 or B to select your volume setting
¡3 ■ Press S when the screen displays your selection.
Press H to exit.
Even if you select OFF, the sounds you hear after pressing
LOW, To increase speaker volume during a call or message playback, press
¡Resolution!;
to decrease volume, press
______________________________
(OFF, IX>W, MEDIUM, orHIGH).
[Speaker Phone]
|Mode|.
remain on
Ring Volume__________________________________
You can select how loudly, or if, the fax machine rings.
[i- Press [Funciionj, [6],[6]-
Press B or B to select OFF;
;3 Press 0 when the screen displays your selection.
Press W to exit.
Even if you select OFF, the ring volume will remain on LOW in F/T mode, and on
LOW in Gall Reservation and Distinctive Ringing (if they’re set to ON).
Um,
MEDIUM, or HIGH.
Smoothing
When activated, this feature enhances the appearance of incoming faxes by
“smoothing" lines. It takes no longer to receive faxes in this setting, which comes
set to ON.
You cannot use “smoothing" for outgoing faxes, or for printing lists and reports.
Press
I Function],
2 Press B or B to choose ON or OFF
1:3^^ Press
i# Press H to exit.
BjB -
Page 44

Page 45

C H A R S I X
iilWone&
iMiHeriihone
iice
eranone
) Operation
Making Voice Caiis
You can use your fax machine to make voice telephone calls, by dialing manually
or by using One Touch or Speed Dial memoiy. You can use the handset or the
Speakerphone to make and receive calls. The Speakerphone allows you to operate
the phone handsfree, or allows more than one person in the room to participate
in a two-way phone conversation. When using the Speakerphone, make sure to
speak clearly and close to the microphone.
Manual Dialing
Manual dialing is simply pressing all of the digits of the phone number.
1
Pick up the handset —
OR
— Press
[Speaker Phone].
2
When you hear a dial tone, dial the call, using the keypad.
3 You can switch from handset to speakerphone by pressing
replacing the handset. You can sMtch from speakerphone to handset by
lifting the handset.
To hang up, replace the handset —
Answering Calls with the Speakerphone
when the phone rings, instead of lifting the handset, press
clearly, toward the microphone. To end the call, press
OR
— Press
[Speaker Phone],
[Speaker Phone].
[Speaker Phone
[Speaker Phone],
then
j. Speak
Page 46

ipiiiiiiiiiiiiii
If you have a bad telephone line connection, the other part}' might hear your
voice echoed during the call. Hang up and
One Touch Dialing
try
the call again.
See
One Touch
p. 18
See
Speed Dial
p. 21
Pick up the handset —
[2 When you hear a dial tone, press the One Touch key of the location you want
to call.
13 To hang up, replace the handset —
If you trv' to use a One Touch location with no number stored in it, you hear
a warning sound, and screen displays “NOT REGISTERED.” The display
returns to normal after 2 seconds.
OR
— Press
[Speaker Phone |.
OR
— Press
[Speoker Phone |
Speed Dialing
1
Pick up the handset —
2
When you hear a dial tone, press
Speed Dial number,
3
To hang up, replace the handset —
OR —
Press
[Speaker Phone |.
[Speed Diai|,
OR
— Press
then press the teo-digit
[Speaker Phonej
Hold
Press [Ho!^ to put a call on Hold.
You can put down the handset without disconnecting the call.
® Pick up the fax machine handset or pre^ [Speaker Photrel to release the call from
Hold. Picking up an extension handset
will
not release the call from Hold.
Pause
Press
jRedial/Pausej
to insert a 3.5 second pause between numbers.
Page 47

Tone/Pulse
If you have pulse dialing service, but need to send tone signals (for telephone
banking, for example), follow the directions below. If you have touch tone service,
you do not need this feature to send tone signals.
Ji- Lift the handset.
El2 Press [#]. Any digits dialed after this send tone signals.
33" When you hang up, the fax machine returns to pulse dialing service.
Searching Telephone Index
See
One Touch
and
Speed Dial
p. 18-21
You can search for names you have stored in One Touch and Speed Dial
memories. Names are stored alphabetically.
“I Press |Tel-indexL then enter the firet letter of the name you're looking for.
2
Press
\J]
or [0 to search the memoiy.
3
When the screen displays the name you w^ant to call, pick up the handset or
press
ISpeqker Phone],
4
Press to begin dialing.
5
When the call is over, hang up, or press
[Speaker Phone]
to cancel the call.
Page 48

Ш1 с ïl АТ>Т E R ■ S>I X.
Page 49

c
II
Jlliilllliillll-
AcMuiced
F# Operation
Sending Faxes
V E N
Quick Scan Fax TVansmission
You can scan a fax into the machine's memor\' to be sent as soon as the scan is
complete. This way, you don’t have to wait for the entire fax to be transmitted
before you retrieve your original.
if you get a "iMEMORY FULL" message while scanning the first page of a fax, press
H to cancel the scan. If you get a "MEMORY FULL" message while scanning in
a subsequent page, you'll have the option to press to transmit the pages
scanned so far, or to press H to cancel the Quick Scan operation.
*1 Insert the document in the feeder.
2 Press
3
Enter the fax number.
4
Press to begin scanning the document into memory. Once the scan is
|Help/Q.Scgn|,
complete, the fax machine dials the call.
The screen indicates how much memory is available.
________________
Page 50

liliiilliiillilii
m
Daily Timer
You can use this function to send a fax at a set time eveiy day. The setting stays
the same until you change it.
Press
iFunclion).
0-
Use the keypad to enter the time in 24-hour format (for example, enter 19:45
for 7:45 PM).
3
Wait 2 seconds, then press to exit.
(Tl, IT].
Delayed Tyansmission
You can use this function to send a fax up to 24 hour’s later.
Insert the document in the feeder
i2 You can press
fax normally.
3
Press
4
Enter the time you want the fax to be sent, in 24-hour format (for example,
enter 19:45 for 7:45 PM).
5 Wait two seconds (the screen will display “1. TIMER”), then press H, The
screen prompts you to enter the fax number and press the (Sirtl key.
|Help/Q.Scan|
[FunctionL fTI, HI.
to use memory transmission, or you can send your
ENTEFT N0 » ; ]^
^1 PEE SS 9 TRRT
Enter the fax number; and press (^. The fax machine will wait until the
time you have entered to send the fax,
Interrupting Timer and Poll Waiting
You can send a fax now, even if you have the machine set to send a fax later, or if
you have it set for Poll Waiting. However, you cannot use automatic redial or the
function mode.
Press
|Function|, [T|.
Wait 2 seconds, then remove the documents that are waiting in the feeder.
■■
1 IHSEFrr DGCUPIENT 1
Place the document you want to send now in the feeder.
Enter the number for the fax you want to send now.
Press [ffil.
Page 51

r A \ 0 I’ !■ :
6
After the transmission is finished, return the first document to the feeder.
7
Press
|Func!ion|,
[o] to restore the timer.
See
Setting
Number
Groups for
Broadcasting
p.21
Canceling a Delayed Fax
You can cancel tasks you’ve scheduled using the timer.
|||n Press
I# Press 0 when the screen displays the job yon want to cancel.
I®» Press Q] to cancel —
[Functionj,
waiting, the screen displays "NO JOB WAITING."
(T|. Any waiting jobs appear on the display If nothing is
[ 2 » CRHCEL JOB
OR
— Press
___________________
3
[f]
to exit without canceling.
Broadcasting
Using the numbers you have stored in One Touch and Speed Dial memory, you
can "broadcast" faxes automatically to a maximum of 54 different locations in a
few simple steps. You cannot broadcast to a number that has not been stored in
memor)'.
Insert the document in the feeder.
1
Press
2
3
|Help/Q.Scan|,
Enter the One Touch and Speed Dial number’s (one after the other) or Group
Number you have stored.
Press The fax machine stores the document in memory, then transmits
it to all the numbers you entered. If the line is busy, the machine will re-tr)'.
The screen displays how much memory is available.
See
Sending
Faxes
p.29
Press at any time to cancel the process.
Overseas Mode
After you send a fax using this feature, the feature turns itself off.
# insert document.
Press
[Functionl,
® Press (Tj or (Tj to select this mode.
i;4' Press (§t) when the screen displays your selection.
15 Press [StopI to exit.
1® Follow basic procedures to send fax.
Q], (T).
[ 6» 0UERSE RS T1QDE 1
Page 52

rif i-
■liillllllllllHillSiiiililS
Error Re-TVansmit
Sometimes there is noise or interference on the phone line, which makes it
difficult for your fax machine to transmit a fax. You can set the fax machine to
automatically re-transmit (re-Lx).
2
1
Press
Press [T) or [B to select
3
Press @ when the screen displays your selection.
iFunction], |T], [Tl.
ON
or
OFF.
See
One Touch
and
Speed Dial
p. 18-21
See
Station ID
p. 16
4 Press
fStop]
to exit.
Composing Electronic Cover Page
1 Your cover page includes the name/number stored in the One Touch or
Speed Dial memory. If you’re dialing manually, the name is left blank.
2
The cover page indicates the fax is from your Station ID, and the number of
pages you’re sending. If you have CoverPage ON, the number of pages
remains blank.
3
You can select a comment to include on your cover page.
J
I 2.PLERSE gfiLL I
iiiliilliiifi:
; 4YCD
4
Instead of using one of the comments above, you can enter up to two
customized messages, each 27 characters long. Use the chart on page 17 to
help enter characters.
•Press I Function!, (Tj, [T].
■iFIDEHd
• Use Q] or [B to choose position 5 or 6 for your customized comment.
• Press 0.
• Use the keypad to enter your customized comment.
• Press [^.
• Press H to exit.
Page 53

'smSSMitSMsS
Always Send Cover Page
You can set the machine to pri nt a cover page whenever you send a fax. The
number of p ages in you r fa x is not incl ud ed wh en y ou use t his set ting .
Press IFvnctionl. [5], (T].
1
Press [T] or 0 to select.
2
I
COUE RPft StEr dM
3
Press ® when the screen displays your selection. (If you select
coverpage is always sent when you send a fax.)
4
If you selected
possible selections. (You can select a custom comment, instead.)
ON,
you must select a comment. Use [3 or [0 to view
j
ON,
a
Iliililiiiiiiiliiiiiiii
[ 2 ;,
Itiiliiiii
5 Press S when the screen displays your selection.
6
Press H to exit. Now, whenever you insert a document in the feeder, the
screen displays '’CO\TiRPAGE ON" before prompting you to dial.
Temporary Page
You can set the fax to send a cover page with a particular document. This cover
page will include the number of pages in your document.
Insert the document in the feeder.
1
Press iFunctionj, m, [T1.
2
Press E) or [0 to select
3
Press S when the screen displays your selection.
4
Press [0 or [0 to view comment selections.
5
ON
(or
OFF).
[ililiMilEliilillMlIiilliili
|2.PLE ASE CRLL
15. URB EHIT
|;:4 . CONE Tffl E MT V BL X ^
Press
(Set)
6
Enter two digits to indicate the number of pages you are sending (enter d]
7
O to leave number o f pages b lank ).
when the screen displays your selection.
j
Page 54

Wait 2 seconds, then press H.
® Enter the fax number you’re calling.
10 Press (^.
Printing a Cover Page
Before printing a cover page, make sure the Station ID is set up. See page l6.
1 Press iFunctionL [3], |T].
2
Press [^. Your fax machine prints a copy of your cover page for you.
Call Reservation
You can send a fax and let the other party knoiA*' that you want to speak to him
after the fax transmission is complete. The other fax machine will ring as if it
were receiving a telephone call; if the other party picks up the handset, your fax
machine will ring. Lift the handset to have a conversation.
If you set Call Reservation and Call Back message to ON, your fax machine leaves
a message if the other party' does not answer.
Insert the document in the feeder
2
Press iFunctionl, Q], [U. The screen displays the current setting for Cail
Reservation.
RESERUELT
[Ci‘U...L RESERUET0FE
Press (5 or B to select ON (or OFF).
Press @ when the screen displays your selection. The screen displays the
current setting for Call Back Message.
[cm
UHL l LUiLtK TUr r
[ CjTLL BRCk != ON
Press 2] or [3 to select ON or OFF.
ig- Press H when the screen displays your selection.
;i7 ' Press S. The screen prompts you to enter the fax number you want to call,
ig Enter the fax number, and press ^tartj.
If you’ve set Call Reservation to ON, pick up your handset if the fax machine
rings.
j
Page 55

You cannot use auto redial with Call Reseiwation. You cannot use Call
Reservation with Delayed Transmission or with Polling, You must register your
Station ID number to set Gall Back Message to ON.
Print Call Back Message
etf"' Press
¡2 Press (S|.
¡Funcfionl
S], UJ.
Next-Fax Reservation
Even if your fax is receiving another fax, you can set your machine to send your
fax next. This way you don’t have to wait for it to finish sending or receiving the
other fax. You can dial this fax call manuall)^ or by using Redial, One Touch,
Speed Dial, or Chain dialing. (When you use One Touch and Speed Dial, only the
meinoiy location — not the name of the person you’re calling — is displayed.)
1 Insert the documents in the feeder. If necessan-, press iResolution| to adjust
resolution,
12 Enter the fax number
Press [St^.
Press 0. The screen displays
1HERT-F
5
To cancel the reser\'ation, remove the documents and press H.
You can’t use tins feature if there is a document waiting in the feeder (possibly for
Delayed Transmission or Poll Waiting), or when the timer has been interrupted.
RESERUD^
Multiple Resolution Transmission
Use this feature to select separate resolution settings for each page of the fax
you’re sending. This could be useful if you’re sending a fax with photos and
letters, or some pages with small print and others with normal print. Resolution
settings return to STANDARD after the fax is sent.
insert documents in
2 Use U) or [0 to select resolution for page 1, then press 0.
2^ Repeat Step 2 for subsequent pages. Press H when you’re finished.
i4^ Enter the fax number you 're calling, and press (^.
feeder, then
press I
Function
j (T|, [J].
Page 56

iliSiiifiWiiilMIfi
Receiving Faxes
Remote Operation
See
F/TRing
Time
See
Easy Receive
P^55
If you answer a fax call on an extension phone, yon can make your fax machine
take over by using the Activation Code, When you press the Activation Code
O S [Tl> the fax machine starts to receive a fax.
If the fax machine answers a voice call and double-rings for you to take over, use
the Deactivation Code to take the call at an extension phone.
If you answer a call, and no one is on the line, assume you’re receiving a fax. At
the fax machine phone, press [5^, then hang up. At an exiension phone, press
@ (U [B) wait for fax receiving tones (chirps), then hang up. (Your caller will
have to press to send the fax.)
For F/T (Fax/Tel) Mode Only
when the machine is in F/T mode, it will use the F/T Ring Time (double ringing)
to alert you to a voice call. If you’re at the fax machine you can lift the handset to
answer.
If you’re at an extension phone, you’ll need to lift the handset during the F/T
Ring Time and press (#] (Xl [D between the double rings. If no one is on the
line, or if someone wants to send you a fax, send the call back to the fax machine
by pressing [¥] S S'
Changing Remote Codes
Remote Codes might not work with some telephone systems. The preset Activation
Code is [¥] [X HI- The preset Deactivation Code isffl [XID.
If you are always disconnected when accessing your TAD remotely, tiy^ changing
the Activation Code from |T) D] to [#) [5] [#) and the Deactivation Code
from
[S [B Q]
To change Remote Codes
1 Press iFunctionL [t],
2
Press Q] or [3 to select ON or OFF.
3
Press @ when the screen displays the setting you want.
to
[X S S-
[I]-
(^; :Ehi DTE;
Page 57

4
If you want to, enter a new Remote Activation Code, then wait 2 seconds.
iBiiiiiiiiiMiMiiiimiM
5
If you want to, enter a new Remote Deactivation Code, then wait 2 seconds.
mm
6 Press W to exit.
1
Distinctive Ringing
This fax machine feature lets you use the Distinctive Ringing subscriber service
offered by some telephone companies, which allows you to have several telephone
numbers on one phone line. Each phone number has its own Distinctive Ringing
pattern, so you know which phone number is ringing. This is one way you can
have a separate phone number for your fax machine.
Your fax machine has a Distinctive Ringing function, allowing you to
dedicate one phone number just for receiving faxes. You’ll need to follow the
directions below to “register” the Distinctive Ringing pattern, so your fax
machine can recognize its incoming calls,
person standing by on another line to help you with Step 6 of
this registration.
You can change or cancel the Distinctive Ringing pattern at any time. You can
switch it off temporarily, then turn it back on. When you get a new fax number,
make sure you reset this function.
You will need another
You can register only one Distinctive Ringing pattern with the fax machine. Some
ringing patterns cannot be registered.
■ The fax machine will answer only calls to its registered number.
■ To have your TAD answer only the main number, the fax machine must be in
iManual Mode.
■ In F/T Mode or FAX ONLY, the fax machine will answer all numbers on the
phone line.
Registering the Distinctive Ringing phone number
1
Disconnect the fas machine from any TAD or telephone company voice mail.
Set the fax machine to MANUAL mode.
2
Have someone ready to call the Distinctive Ringing number
you’re assigning the fax machine.
Page 58

Press
[Function),
^
Press 0] or [3 to select the SET Mode.
Press 0.
Press The screen displays
6
m, [7].
[ D -''R bET i'lUDIE
Now, another person must call the fax number.
If you want to exit this programming, press Settings
remain unchanged.
When the fax machine rings, listen for tlie ring pattern, and make sure it’s
the one you want for the fax machine.
If it is, wait until the screen displays
[RICK UP
8
Lift the fax machine handset and press (St^. The screen displays
"REGISTERED. " (If the incorrect distinctive ringing number was called,
press to cancel.)
9 Hangup.
Once you’ve registered the Distinctive Ringing number in your fax machine, you
can turn this feature
selecting
ON
or
ON
OFF
or
OFF.
I
u
To change the setting, follow steps 1 to 4 above,
Caller ID
The Caller ID feature of this machine lets you use the Caller ID subscriber service
offered by many local phone companies. This service provides you, by means of
the screen display, the name or telephone number of your caller as the line rings.
After two rings, the screen displays the telephone number of your caller (or name,
if available). Once you pick up the handset, the Caller ID information disappears
from the screen, but the call information remains stored in the Caller ID memoiy.
■ You will see the first l6 characters of the number or name.
■ OUT-OF-AREA display means call originates outside your Caller ID service area.
See
Printing
Reports and
Lists
p. 77
■ PRIVATE CALL display means the caller has intentionally blocked
transmission of information.
■ CALL PICKUP display remains on screen when no Caller ID information was
transmitted.
If both the name and number are received, the screen displays only the name.
You can print a list of Caller ID information received by your fax machine.
Page 59

iliiiiliiiililiiiiiiliiiiiliijili
Caller ID seiTice varies with different carriers. Call your local phone company to
determine what kind of service is available in your area.
Caller ID memory stores information for up to thirty' calls; when the thirty'-first
call comes in, information about tlie first call is erased. You can scroll through
Caller ID information to review those calls made to your fax machine.
Press
[Funciionl.
12 Press 0. The screen displays the number of the most recent call, and the
call information.
:i3" Press Q] or [B to scroll through the Caller ID memory.
14^ Press to exit.
fj], f¥].
Clearing Caller ID Information
Press
|Erase|
when the screen displays the Caller ID information you want to erase.
Polling
Polling is the process of retrieving faxes from another fax machine, You can use
your fax machine to “poll” other machines, or you can have someone poll your
machine.
All parties involved in polling need to set up their fax machines to accommodate
polling. When someone polls your machine to receive a fax, they pay for the call;
if you poll someone’s fax machine to receive a fax, you pay for the call.
Some fax machines do not respond to the polling function.
Setup to Poll Another Fax
li-
Make sure no document is in the feeder.
2^' Press
;3- Wait 2 seconds.
^5" Press 0] or [B to choose
3 Press 0.
[FunciionL m. [T1.
' The screen displays
[POLLIHGY GFF
ON.
Press B.
The screen prompts you to enter the fax number you want to poll, and then
to press S-
j.
Page 60

ENTER FR:=< no.
8 Enter the fax number you are polling.
9 Press [^.
Setup to Be Polled (Poll Waiting)
Place document in feeder.
1
Press IFundionj,
2
Wait 2 seconds.
3
The screen displays
4
[T],
|T|.
See
interrupting
Timer and
Poll Waiting
p. 42
I POEL I N0:;;PQEF
Press 2] or U) to choose ON.
5
Press 0.
6
Press The screen prompts you to press [^.
7
B Press iStguj and wait for the fax to be polled.
1
Delayed Polling
You can set your fax machine to begin polling at a later time. Once you set this
feature, you will need to use the Interrupting Timer to send a fax.
Make sure no document is in the feeder.
Press [FunctionI, [T], [2].
Wait 2 seconds.
The screen displays
iRaLUINGrQEF
4
Press 2] or (T| to choose ON.
5 Press
B Press Q]. The screen prompts you to enter tlie time you want to begin polling.
7
Enter the time (in 24-honr format) you want to begin polling. For example,
enter 21;45 for 9:45 PM.
Page 61

8
Wait 2 seconds, then press H. The screen prompts you to enter the fax
number you are polling.
C
IPR ESS STAR T KE yKI-
9 Enter the fax number (you can use One Touch or Speed Dial, or dial
manually).
10 Press fSt^. The fax machine makes the polling call at the time you entered.
Setting Up Polled Waiting with Quick-Scan
See
Resolution
p. 30
Before pressing press
document in the memory. If you use
documents into the memory, they will not be erased automatically after they are
polled. To erase them you must use the Cancel Job function. (See page 43.)
|Help/Q.Scpn|
so you can store your polled waiting
|Help/Q.Scan|
to place the Polled Waiting
Copy Functions
Your fax machine cannot scan an)thing closer than one-eighth inch from the
edge of the paper. Set the resolution to
1
Place document face down in the feeder.
2
Press (You can press [C^ again for faster response — otherwise,
copying begins in about 5 seconds.)
Do not pull on the paper while copying is in progress.
Muitiple Copies
You can make muitiple copies using your fax machine, and. you can choose
whether the copies will be
page 2, etc.) or
SORTED
STACKED
(collated).
S.FINE
or
PHOTO.
(all copies of page I, then all copies of
t
Place the document face down in the feeder, then press
. 2
Enter two digits for the number (up to 99) of copies you want. For example,
press ® [3] for three copies.
3 Press [Co^.
4
Use 0 or [E to select
5
Press [^. Make sure you frequently empty the receiving tray.
STACK
or
SORT.
(^.
Page 62

If you get a "Memoiy Full" message and you selected STACK, press S. If you
selected SORT, press or press
Page 63

C H A P T E R E I G H T
Center
Message Center Mode
Message Center Mode allows you to store incoming fax and voice messages in a
flexible memor)^. The memor}' stores up to 15 minutes of voice messages, or up to
20 pages of fax memort'. Any voice or fax mess^e can be retrieved remotely.
Memory^ is shared betw'een fax and voice messages, which are stored on a "firstcome, first-sensed” basis,
Outsoifts.
Message
^ou must record an outgoing message In order to use the Message Center Mode.
p.57
Flexible Memory Settings
Message Center Mode offers you six flexible memoiy'' settings, so that you can
decide which kinds of messages you want to receive.
1. FAX:ON VOICEiON Both voice and fax messages are stored. You can use
the Fax Forwarding or Paging features and retrieve
voice and fax messages remotely.
2. FAX:ON VOICEiEXT You need an external answering machine connected to
the EXT jack for this setting. Fax messages are stored
in the message center memory, but voice messages are
stored in your external answering machine, Retrieve
messages from the external answering machine.
3. FAXrON VOICEiOFF All memoir is used to store fax messages— no voice
messages will be stored.
Page 64

:■ ;y: ^ i i ^i n.:’:: ;
4.
FAX:OFF VOICE:ON
innnnn'^nn
All memory is used to store voice messages — no fax
messages will be stored, Incoming faxes will print on
paper. You can use the Paging feature, and retrieve
messages remotely.
IHMiiiMiiliaiiliiiliiliiililiii^^^
an:n:::nQ;;:iHa;n:a:-rinn^
illllllllllll
5. FAXiOFF VOICE:EXT
6
. FAX:OFF VOICEiOFF
You need an external answering machine connected
to the EXT jack for this setting. Incoming faxes are
not stored in memory, but will print on paper. Voice
messages are stored in the external answering machine.
Incoming faxes are not stored in memory, but will
print on paper. Voice calls are not stored in memon?
Choose this setting if you want to use only the
features of Message Center Pro (see pages 69-76).
Setting Message Storage
Selec t the sett ing fr om th e des cri ptio ns above .
1
Press IFunc iio nl. [si. m. The scr een pr ompts you to cho ose a fax se ttin g.
FAX :OFF
^LO ELEC T
2
Press 0] or [B to select
3
Press S. The screen prompts you to choose a VOICE setting.
ON
or
OFF.
2 m:
9
4 Press
: .5 Press S when the screen displays your selection.
6
0]
or
0]
to select your setting from the list above.
Press W to exit.
Incoming Recording Monitor
This feature lets you adjust the speaker volume for voice messages you monitor as
they come in. You can select
monitor
OFF
so you will not hear messages as they come in.
PresslFunctionLrB.rB.
1-
Use
0]
or B to select
® Press @ when the screen displays your selection.
Press to exit.
LOW, MEDIUM,
LOW, MEDIUM, HIGH,
or
HIGH,
or you can turn the
or
OFF.
Page 65

iifiili:
n C F. N T
«iis|i|
Recording Message Center Outgoing Message
Recording the Message Center Outgoing Message (MSG CTR OGM) is the second
step you need to follow before you can turn on the Message Center, Make sure
your OGM is less than 20 seconds long.
See
Record
Fax/Tel
Outgoing
p^32
1 Press
iFunctionL [U, [6],
The screen prompts you to choose an OGM.
D
2
Press
Q] or (Tito
reach
[ htsa CTR cTgFT
This is the only setting you can select if you want to turn the Message Center on.
•3
Press®,
4
Press iRetordf then pick up the handset to record a message.
For example:
Hello. We are unable to take your call at this time.
D
Please leave a message after the signal If you ivish to sm%d a fax, please
press '’^51, waitfor fax tones, then the start button on your machine.
5
Replace the handset. The Message Center plays your OGM.
6 Press to exit.
Listening to Outgoing Message (OGM)
1 Press |Functionl.r8l'[T|.
2
Press 0] or [E to select MSG CTR OGM or F/T OGM.
, 3
Press ® when the screen displays your selection.
4
Press to hear the
5
Press to exit.
OGM.
Adjust volume by pressing
iModej
or
[Resolufionl.
Erasing Outgoing Message (OGM)
%
Press
IFunctionL [11,
2
Press
3
Press ® when the screen displays your selection.
4
Press
: 5 Press Q] to erase the OGM — OR — Press |T) to exit without erasing.
.6 Press to exit.
0]
or [E to select MSG CTR OGM or F/T OGM.
[Erasel.
fil.
Page 66

See
Setting
Message
Center Mode
to ON
p34
Activating Message Center Mode
Press and hold (J) until the screen displays
r ~
M L- !1 U !" h! •
Setting Toll Saver
When you set the toll saver feature, the fax machine answer’s after 4 rings if yon
don 1.
have messages, and after 2 rings if you
you call the fax machine, if it rings 3 times, you know you have no messages, and
can hang up, avoiding any toll charge.
do
have messages. This way, when
See
Ring Delay
p. 34
When Toll Saver is ON, it overrides your Ring Delay setting. Toll Saver must be
off for the machine to operate using your Ring Delay setting.
if* Press
¡3 Press ® when the screen displays your selection.
|Function|.
Press 0] or [►] to select Toll Saver On or Toll Saver OFF.
Pre^ to exit.
[yi,[T],
Message Indicator
Message light flashes when you have voice messages and/or faxes waiting for your
review. Once you listen to the message or print the fax, the light stops flashing.
The LCD screen displays the total number of voice (including memos) and/or fax
messages stored in Message Center memor)'.
C
I HR IL . B O H: 1
Playing Voice Messages and Memos
Follow the steps below to listen to voice messages and memos.
1
Press Ifl^. Adjust volume by press
I Mode)
or
[Resolution!.
All messages and memos are played in the order they were recorded. The
display shows the number of the current message, and the total number of
messages.
If Caller ID information was received, the machine beeps during the message
and displays the Caller ID information for one second.
During playback, the screen displays the time and date the message was
recorded.
Page 67

2
Use 2] to repeat a message. Use 0 during a message to return to the
previous message. Use 0 to skip to the next message.
3
Press H to exit.
Backup Printing Option
When you choose
messages are stored in the available raemorj^ for retrieval. To print a backup copy
automatically, turn this option on.
Press [Funciionl, 3], [2]. The screen prompts you to select a setting,
2
Press 0 or 0 to display
3 Press H when the screen displays your selected setting.
...4
Press M to exit.
FAX: ON
ABmmp №
ON
in the Message Center mode, all incoming fax
or
OFF,
Printing a Fax Message
Once you print a new fax message stored in memory, it is erased from the memory
automatically.
Press [3^. After two seconds, the machine begins to play voice messages.
12 After playing voice messages, the display asks if you want to print fax
messages that are in the memory. There is no display message if there are no
faxes.
ll.YES 2.HO
3
To print the faxes in memory, press 0
— OR —
Press 0 to exit wathout printing.
b
Page 68

ITSliiBiilllillllSlIllBlilililllllii
from memory. You must erase all of them (or none of them). If you choose to
erase all fax messages, the fax machine will print any previously unprinted fax
messages before erasing them from memory.
You can erase voice messages and memos individually, or all at once.
To erase voice messages individually
iilil
:: ; bvi V::;:; b/; b:;;;; ;.bbb: rb Y:? i
Erasing Messages
If you have more than one fax message, you cannot erase only one fax message
See
Voice Alarm
p. 63
1
Press After two seconds, the machine beeps and begins message
playback. Each message is preceded by one long beep, and followed by two
short beeps,
2
To erase a specific message, press I
beeps, or while the message is playing. The screen prompts
[2Ef:(fiSE'YTi-YI:S;.l''
( 1 ,,:№S 2 . NO:
3
Press (T) to erase the message
— OR —
Press
\J]
to cancel.
4
Press H to exit.
To erase messages all at once
1 Press
lErasej.
The screen prompts you to choose what kind of messages you
want to erase.
Vl SELECt V
Erase
| immediately after the two short
1SG? )
)
1
1 CE? ]
2
Press Q] or [3 to select erasing all voice messages
messages (FAX), or all messages — both voice and fax — (MSG).
3
Press 53-
4
Press U) to erase
— OR —
Press [2] to cancel.
(VOICE),
ail document
Page 69

A c i-: i: i; \ r i; n
Setting Maximum Time for incoming Messages
Your fax machine comes set to receive voice and fax messages up to 30 seconds
long. You can change this setting to any length from 20 seconds to 60 seconds, in
5-second increments. This setting also applies to the Personal Mailbox ICM,
Memo, and Voice Alarm,
1 Press
[FunctionI,
jl], [T). The screen prompts you to select a maximum time.
^[TdESSR0E 30 SEC'^^
Press 0] or [E to select the maximum time setting for incoming messages.
Press |5[] when the screen displays your setting.
Press H to exit.
Recording a Conversation
You can record a telephone conversation by pressing
tion. Your recording can be as long as the Incoming Message Maximum Time.
You and the other party will hear a beep every 15 seconds while recording. You
cannot record a conversation using the Speakephone.
[Record]
during the conversa
Recording a Memo
A memo is stored and played as a voice message,
ii-
Press
[Record].
12^ When the display prompts you to pick up the handset, speak into the handset
to record your memo.
3
Press or replace the handset when you’re finished.
Paging/Fax Forwarding
You cannot use Paging and Fax Forwarding at the same time.
Page 70

Programming Paging Number
iiiii
When Paging is set to
programmed, and dials your Personal Identification Number (PIN) when
connected, to activate your pager and let you know you have a fax or voice
message in the Message Center memory^
Press
iFunciionf [3, [!]■
i:£ Press H or [►] until the screen displays
3
Press The screen prompts you to enter your pager number.
4
Enter your pager phone number (up to 20 digits) followed by g) g. Do
not include the area code if it is the same as that of your fax machine.
example,,
5 Press 0.
6 If your pager requires a PIN, enter the PIN, press g, press
your fax machine telephone number, then press [S [#]
— OR —
If you do not need a PIN, press
your fax machine, then press
ON,
your fax machine dials the pager number you’ve
[ P FlG INtB
^1 EHTER iS: SET
|Redial/Pause|,
g [5]-
For example,
]
:)
For
|Rediol/Pause|,
For example,
enter the telephone number of
[Redial/Pause|(T|[T|rd]
enter
7
Press S-
8 Press to exit.
You cannot change a Paging number or PIN remotely,
Programming a Fax Forwarding Number
When Fax Forw^arding is set to
phone number you’ve programmed, and forwm’ds any faxes you’ve received,
It
Press
[FunctionL fsl, fT].
Press 0] or [3 until the screen displays
[ F0 Ri ,ti RR D
3
Press 0, The screen prompts you to enter the number of the fax machine
where faxes will be forwarded.
ON,
your fax machine dials the fax machine
j
Page 71

:: y ;■ = 'i"y ly -Jti i rt S( i
[
Fmt
rUL!£Jd
Vf irijT
1EHTER ^ SET
:4 Enter the forwarding number (up to 20 digits).
iiS^ Press
16 Press H to exit.
b
Voice Alarm
The Voice Alarm allows you to record a message on the fax machine and have it
played back at a time you specify. These messages are not included in your voice
message (VOICE) count. When the scheduled day and time arrives, the machine
beeps and plays the recorded message. Eepeat the message by pressing
to stop Voice Alarm playback,
\J}.
Press
See
Setting
Maximum
Time for
Incoming
Messages
p. 61
Setting Voice Aiarm
1 Press
2
After 2 seconds, the screen displays
3
4
5
® When the display prompts you to pick up the handset, record your message.
9
iFunctionl. (Retordl.
you will not be able to continue.
Press Q] or [E to select a day,
Press S when the screen displays your selection.
Enter the time in 24-hour format (for example, enter 20:30 for 8:30 PM).
After two seconds, the screen displays
{FREm RECOm K
Press
jRecordl.
Your message can be as long as your setting for Incoming Message Maxi
mum Time.
Press or replace the handset.
If you don’t press
[.J r 'i i
SELECT
[Record]
within 2 seconds of
mn
[Functionl.
)
The Voice Alarm does not play while you are sending or receiving a fax, or wlien
Message Center functions are operating. You can enter up to 15 minutes of Voice
Alarm messages.
Page 72

Remote Retrieval
You can call your machine from any touch tone phone (or remote Group 3 fax
machine) and use a Remote Access Code and other button presses to retrieve voice
(and fax) messages. You can also program and change some settings for your
Message Center.
Changing Remote Access Code
Enter your Remote Access Code when the fax machine picks up your call, so you
can access features remotely. The access code is preset to 159*? but you can
change this,
Press
1
2
4
iFunctionL
Enter a three-digit number from 000 to 999? then You must end the
Remote Access Code with Do not use the same digits that appear in your
Remote Activation or Deactivation Code (page 48) , or Personal Mailbox Codes.
Wait 2 seconds.
Press to exit.
[Ц, (T[.
______________
Using Remote Access Code
1 Dial your fax machine phone number from a touch tone phone.
2
When your fax machine answers and beeps, immediately enter your Remote
Access Code.
3 The fax machine signals the kinds of messages received:
1 long beep — Fax message(s)
2
long beeps — Yoice message (s)
3 long beeps — Fax and Voice message(s)
No beeps — no mess^es.
4
The fax machine then prompts you with two short beeps to enter a
command. If you wait longer than 30 seconds to enter a command, the
machine hangs up. If you enter an invalid command, the machine beeps
three times.
- Press (D [o] to reset the machine when you finish.
:0- Hangup.
Page 73

Illiiiliiiiiliiliiliiii
If your fax machine is set to MAiNUAL, you can access the Message Center by
waiting 20 rings, then entering the Remote Access Code within 30 seconds.
Remote Message Center Commands
Follow the commands below to access Message Center features remotely. When
you call the message center and enter your Remote Access Code, the system will
beep once to indicate there are new messages, or three times to indicate there are
no new messages. If the system beeps once, press Q] to check for fax messages, or
press (U to check for voice messages.
Listen to Voice Messages
Press 0 Q]
then to
Repeat a message before it ends
Skip to the next message
Record a Memo
Press [9] [2].
Wait for the beep, then speak.
— Press
— Press H].
[2],
then to
Stop recording
Erase All Messages
Press d] [U. If you hear three beeps, all messages have not yet been heard, and
the system will not erase.
Play/Record Outgoing Message
Press d] [4].
— Press
[9]
then to
Play Message Center OGM
— Press BQ]
Play F/T OGM
Record new Message Center OGM
long beep. Press d] to stop recording.
Record new F/T OGM
d] to stop recording.
— Press [Dd]
— Press
dJEl,
— Press
then speak after the long beep. Press
[HQ],
then speak after the
Page 74

Change Paging/Fax Forwarding Setting
Press
(Tl[r|.
then to
«Him
'ftirn feature off —
Enter Fax Forwarding —
Enter P^ng —
Program Fax Forward Number —
List (see page 67).
Confirm Fax Forward Number —
Retrieve a Fax
Press |T] (T)
then to
Print a Memory Status List—
Retrieve all faxes —
Retrieve specific fax —
press
[o]|T|
Erase all fax messages —
Change Answer Mode
Press
Press
Q]
Press
[2]
{J}
Press Q]
Press
d] (T||T|
Press [U, then enter number of the fax message, the
Press (T]
press(T), then retrieve Memory Status
Press [1].
Press 5] U!
thenfor
Message Center
Fax/Telephone (F/T) —
Fax Only —
Exit Remote Operation
Press [E [o]
— Press GD
Press [I].
Press (H
Page 75

Retrieving Memory Status List
and Fax Messages
You can retrieve the Memoiy Status List from a remote fax machine, and sec if
you have any fax messages stored in Message Center Memon^. You can then use
this list to retrieve specific fax messages.
Dial your fax machine telephone number.
1
When you hear the beep, immediately enter your Remote Access Code.
2
When you hear 2 short beeps, press [5 [3 OD-
3
When you hear the fax tones, press ¡^. (Don’t hang up if you also want to
4
retrieve messages; if you just want to check the list, hang up after you press
The remote fax machine prints the Memory Status List.
5
When you hear 2 beeps, press B [3 S], then enter the two-digit number of
6
the fax message you want to retrieve (for example, enter B B for message
2). To print all fax messages, press B B.
When you hear the fax tones, press (StS).
7
Hang up the phone you’re using.
8
The remote fax machine prints the fax messages.
9
Changing Fax Forwarding Number
■ 1 Dial your fax machine number,
2
When you hear the beep, immediately enter your Remote Access Code.
3
When you hear 2 short beeps, enter
4
Enter the new telephone number of the fax machine where you want yonr
fax messages foiwarded. You cannot use B) and [#) as dial numbers. Use
¡3 to enter a dialing pause between digits.
5 Press
6
7
8
9
to Hangup.
[MI after
When you
When you hear fax tones, press
The remote fax machine prints the Memors' Status List so you can check that
the new fonvarding number is correct.
If the new number is correct, press
— OR —
If the newmumber is incorrect, enter B B Œ) to
you
enter the
hear the tvn beeps, press B [3 B.
B B B
new number.
[^.
Do not hang up the handset.
B B B
•
after the 2 beeps
return to Step
4.
Page 76

Page 77

G H APT E R N IN E
iHeisage
Center Pro
Message Center Pro
Message Center Pro provides you with Personal Mailbox and \bice-on-Demand.
Up to five Personal Mailboxes are available. Voice-on-Demand stores voice
messages for someone calling you. The Message Center Pro has up to 99 Voiceon-Demand memoiy boxes.
See
Remote
Activation
Code
p.48
Your outgoing message (OGM) should inform callers that during or after the
initial (first level) announcement, they can press [o] [T) [¥] access the
announcement for Personal Mailboxes, or [J] for 'Voice-on-Demand. This
first-level outgoing message should also let callers know they can leave a message
or send a fax by entering the Remote Activation Code.
The second-level OGMs should tell callers the names of messages stored in Voiceon-Demand memoiy, and the names of people assigned Personal Mailboxes.
Recording First Level OGM___________________
This is the announcement all callers will hear. In this announcement, you need
to tell callers how to select the option for Personal Mailbox (press [o] Q] [¥)) or
Vhice-on-Demand (press
callers that after the beep they can leave a voice message, or they can send a fax
by pressing @ [E HI-
[O] [2]
@). This outgoing message should also tell
Page 78

;if i Press iFunttion], d], |T|. The screen prompts you to select an OGM.
^(' SELE Ci 4 S: 3E
# Use H or (I) to display
Press The screen prompts
MSG CTR PRO.
PHQ^ :
'; -1>^
[ R E C ■ •••' E R R S E P L R V'?
4
Press iRecordL then pick up the handset. Record a message no longer than 20
seconds,
5 Hang up. The machine plays back the fii'st level OGM.
Playing First Level OGM
“[
Press!
Functionl, Q], 2]. The screen prompts you to select an OGxM
2
Use E or B to display
3
Press The screen prompts
MSG CTR PRO,
tREC--ERj'TSE>-in...RY?
I4f' Press Adjust the volume by pressing (Model or [Resolutionl.
Erasing First Level OGM
Press (Functionl, E, 2- The screen prompts you to select an OGM.
#
Use B or (B to display
^3' Press @. The screen prompts
4
Press lErosel,
\T].
MSG CTR PRO.
rRE i:U- ’ERR Sl!E --PL RV? 2-
Page 79

tillliiltiiilliiiiliiliii
[‘ R O
Recording Second Level OGM
After callers have pressed [B Q] ® for Per’sonal Mailbox, or |T| H] ® for
\hice-on-Demand, they will need to hear more instructions from you in the
second level OGM. Make sure you tell caller’s the memor\^ box numbers of specific
voice messages (2 3 2 4 2 5 etc.) and the names and mailbox numbers (0
1^- 05^= ) for personal mailboxes.
“f Press fFunctionl, [T],®. The screen prompts you to select an OGM.
2
Use H or B to display
3
Press 0. The screen prompts
( REC/'ERffSE/Pl.fl¥? n
4
Press I
5 Hang up. The machine plays back the selected second level OGM.
Record!,
seconds.
MAIL BOX
then pick up the handset. Record a message no longer than
or
VOICE ON DEMAND.
20
Playing Second Level OGM
1 Press
2
Use B or B to display
3
Press 0. The screen prompts
4 Press H. Adjust the volume by pressing [Model or
[Functiont
( REC /ERf tSET PLRy 'f
Press H to exit.
IB, [?]• The screen prompts you to select an OGM.
MAIL BOX
or
VOICE ON DEMAND.
[Resolutionl.
Erasing Second Level OGM
“f Press
(Function!,
2
Use B or B to display
3
Press 0. The screen prompts
4
Press [S], (T).
5 Press to exit.
B, ® ■ The screen prompts you to select an OGM.
MAIL BOX
( R E C: .-” E R R P L FT r ?
or
VOICE ON DEMAND.
Page 80

Ijlilliliiijllltliil
Personal Mailbox
Callers can enter a confidential fax or voice message into one of five personal
mailboxes, Each mailbox is accessed by a pre-determined password, to help
protect the privacy of multiple fax machine users. The same password is
necessary to retrieve these messages remotely.
Recording Personal Mailbox
OGM/Password
Press
jFunctionl.
® Press 0. The screen prompts you to select a mailbox number
3
Press S or H to display your selected mailbox number,
4
Press 0 when the screen displays the selected mailbox. The screen then
prompts you to enter a 4-digit password.
[J], (3].
SELECT 4 > a SETl^
5
Enter the 4-digit code you want to use as your password.
¡ig- Press (Recordl, then pick up the handset.
iif = Record an OGM (no longer than 20 seconds) that informs users they can
send a fax or voice message.
8 Replace the handset. The machine plays back your OGM.
Playing Personal Mailbox Messages
The screen displays whether it has received any messages. If any mailboxes
contain messages, the screen will alternately display the numbers of those
mailboxes, with how many VOICE and FAX messages the machine has received.
To listen to voice messages in your mailbox, or to print faxes in your mailbox,
you will need your 4-digit password.
ii|- Press №y|.
^
Within two seconds, press one of the One Touch key for the selected mailbox,
Mailboxes 01 to 05 are assigned to One Touch keys 1 to 5 respectively
i:3 Enter your 4-digit password.
Press 0. The machine plays back voice messages stored in the mailbox,
then prints faxes stored in the mailbox.
Page 81

Erasing Personal Mailbox Messages
You can erase voice messages individually or all at once. You cannot erase fax
messages individually.
See
Recording
Personal
Mailbox
OGM/
Password
p. 72
To erase an individual message
¿t- Press HS2' Within two seconds, press one of the One Ibuch key for the selected mailbox.
Mailboxes 01 to 05 are assigned to One Touch keys 1 to 5 respectively.
Enter your 4-digit password,
|4" Press S. The machine begins to play back messages. Each message is
preceded by one long beep and foliowed by two short beeps.
5
Press immediately after the two short beeps, or w^hile a message is
playing to erase it. The screen prompts
ERHSE lYHd'S ; ME:'biV
^[ivYES 2 VH0
8 Press Q] to clear
—OR —
Press [T) to exit without erasing.
To erase all messages
Press [Er^.
1^2 ‘ Within two seconds, press one of the One Touch key for the selected mailbox.
Mailboxes 01 to 05 are assigned to One Touch keys 1 to 5 respectively
Enter your 4-digit password.
:i4- Press
¡5 Press 5] or [3 to select VOICE (erase all voice messages), FAX (erase all
fax messages), or MSG (erase all messages).
i;8 Press @ when the screen displays your selection.
Press [D to erase
— OR —
Press d] to exit vdthout erasing.
Page 82

See
Recording
Personal
Mailbox
OGM/
Password
p. 72
:iyyr;^::H
liililliill
Hliii:!
liilMiMS
liiiiilMiii;:
Recording Memo in Personal Mailbox
Press
[RscordI,
Within two seconds, press one of the One Touch key for the selected mailbox.
Mailboxes 01 to 05 are assigned to One Touch keys 1 to 5 respectively.
3
Pick up the handset and record your memo (no longer than 20 seconds).
4
Replace the handset or press [^.
Remote Retrieval of Personal Mailbox Messages
ill- Dial your fax machine number
During the Message Center Pro OGM (first level), immediately enter ll] Q]
® to access Personal Mailbox.
3
When you hear second level OGM, enter your Personal Mailbox number (01*
-05 ^).
4
when you hear your Personal Mailbox OGM, enter your 4-digit password. If
there are no messages, the line will disconnect. If there are messages, you
will hear the voice messages begin to play. Press Q] to replay a message
while
it
is playing. Press
playback. Press
If there are fax me^ages, you will hear the fax tone after the voice messages.
¡J]
to
skip a message. Press to stop message
to erase all messages.
See
Setting
Maximum
Time for
Incoming
Messages
p. 61
18 Press on the fax machine from which you are calling.
7
Replace the handset.
Recording Voice Information
in Memory Box_____________________________
:f: - Press
2 - Press @. The screen prompts you to enter a Voice Memory Box number.
3
Enter a memoiy box number (01-99) •
4
Press S. The screen prompts
5
Press
6 Replace the handset. The machine plays back your message.
[FunctionI. [T], [4].
t.JQ I CEI NU
]
I R E C v- 1 !M « i; Fj S E/ F d- . .R ' T^
iRecordj,
Incoming Maximum Message Time you’ve set.
then pick up the handset. Record a message up to the
Page 83

C. P. N T 1.‘ E P R 0
1
To leave another message, Start at Step 3.
^8 Press W to exit.
Playing Voice iMessage in Memory Box
1
Press
2
Press 0, The screen prompts you to enter a Voice Memory Box number.
3 Enter a memory box number (00-99) •
4
Press i^. The screen prompts
5
Press
[FunclionL [E, S -
(E:ECx- ERRSE. -pLRV? )■
H.
The machine plays the message stored in the selected memory box.
Adjust volume by pressing
¡Model
or
|Resoluiion|.
Erasing Voice Memory Box
1
Press
2
Press 0. The screen prompts you to enter a Voice Memory Box number.
3
Enter a memory box number (00-99) •
4
Press 0. The screen prompts
5 Press
iFunctionl,
\J],
¡n.
lUQIGE
[Efosej,
Q] to erase the voice message stored in the selected memor)^ box,
Page 84

iiiimiii
ilillliililBlIi
nliSSKiiiili;i|ffll!ilSBi3:i;iiiCi;iiM||B|iH|iiiiii|:||Hiii}|iiii|||ifiM|i||||;i;KjK
flirning On Message Center Pro
This is the final step to turn on Message Center Pro. You must have already
stored information in Pei’sonal Mailboxes, or in Voice-on-Demand memor)^ boxes.
You must have recorded a first level and a second level OGM.
1 Press
2 Press 0. The screen prompts you to select
■3 Use Q] or Ui to select
4
Press @ when the screen displays your selection.
5 Press H to exit.
iFundionL
[9],
[T|.
ON
or
OFF.
ON
or
______________
OFF.
Page 85

C H A P t E R :, T E N
Piipitlll
lists
Fax Machine Activity
You can print the following lists and reports:
HL- r.« kcr
aL.L:I:;D:IRL.:-^
(iL,
r..
' : 9 r
COUE RPR0 E:
■4:
; ■ !-'i'
RRL L ; l::tRBK MSB
tiili
KHl'T
m
HETIPR Y ST RTUS ;
(B. ,
1
REPORT
■ 1 Activity Report lists information
about the last 30 incoming and
outgoing faxes. TX means Transmit;
RX means Receive.
' Lists names and numbers stored in
One Touch and Speed Dial memor\^,
in numerical order.
: ' ALL DIAL list (above), alphabetically.
) Check cover page format.
:;:) Check Call Back Message format.
Lists setUngs for USER OPTIONS,
TEL OPTIONS, SETUP SYSTEM.,
SETUP MSG CTR, CALLER ID.
:; ) Choose if Transmission Verification
Report is printed after all faxes sent.
^; Lists summary information and
amount of occupied memory.
(:9 ;. iililiiiililiifliiliiii
: ■ Lists Caller ID names/numbers, and
time and date of call.
Page 86

iiiliKlilililiiliiiiililiilliiiBIflliiiiiiiiiililttilililiffliiiliiiii
To print a report
1
Press I
2
Enter the number (see list above) of the report you want to print. For
3
Press
Function [
example, press [I] to print the TEL-INDEX.
in.
_____________
Activity Report Interval
You can set the fax machine to print activih' reports at specific intervals (6, 12,2 4
hours, 2,4 , or 7 days). If you set the interval to OFF, you can print the report by
following the steps in the previous section.
1
Press
[Function),
Press 5] or [►] to choose your setting. If you choose 7 days, the screen
prompts you to choose a day at which to begin the 7-day countdown,
When the screen displays the setting you want, press
Enter the time to begin printing, in 24-hour format. (For example, enter
19:45 for 7:45 PM).
Wait 2 seconds.
5
Press H to exit.
6
[7], [T). The screen displays the current interval setting.
[ RCT- RF-’ T. ^ OF- F
j
Tyansmissioti Verification (Xmit) Report
You can use the Xmit Report as proof that you sent a fax. This report lists the
name or fax number of the receiving party, the time and date of transmission,
and if the transmission was successful.
When the feature is
error during transmission. If the report indicates NG, send the document again.
If the report indicates you should check the readabilit}^ of certain pages, resend
those pages.
When the feature is
1 Press
2
Press [3 or 3 to select
3
Press iMl.
4 Press H to exit.
iFunttionj, fTj, [7].
OFF,
the report is printed automatically only if there’s an
ON,
the report is printed with every fax you send.
ON
or
OFF.
Page 87

C H A P T E R E L E V E N
In^ortaii
Information
StandanI Talephone and FCC Notices
These notices are in effect on models
sold and used in the United States.
This equipment is hearing aid compatible.
When programming emergency numbers and/or making test calls to emergency
numbers;
■ Remain on the line and briefly explain to the dispatcher the reason for the
call before hanging up.
■ Perform such activities in the off-peak hours, such as early morning or
late evening.
This equipment complies with Part 68 of FCC Rules. On the rear panel of this
equipment is a label that contains, among other information, the FCC Registra
tion Number and Ringer Equivalence Number (REN) for this equipment. You
must, upon request, provide this information to your telephone company.
You may safely connect this equipment to the telephone network by means of a
standard modular jack, USOC RJllC.
An FCC compliant telephone cord with a modular plug is provided with this
equipment. This equipment is designed to be connected to the telephone network
or premises wiring using a compatible modular jack that is Part 68 compliant.
See the Installation section of this manual for details.
Page 88

3
ililHil
The REN is useful to determine the quantity of devices you may connect to your
telephone line and still have those devices ring when your telephone number is
called. In most, but not all areas, the sum of the RENs of all devices connected to
one line should not exceed five (5). To be certain of the number of devices you
may connect to your line, as determined by the REN, you should contact your
local telephone company to determine the maximum REN for your calling area.
If your fax damages the telephone network, the telephone company may discon
tinue your service temporaiily. If possible, they will notif)^ you in advance. But if
advanced notice is not practical, you will be notified as soon as possible. You will
be informed of your right to file a complaint with the FCC.
Your telephone company may make changes to its facilities, equipment, opera
tions or procedures that could affect the proper functioning of your equipment. If
they do, you will be notified in advance to give you an opportunity to maintain
uninterrupted telephone service.
If you experience trouble with this fax machine, please contact the
manufacturer’s authorized service agency for information on obtaining service or
repair. The telephone company may ask that you disconnect this equipment from
the network until the problem has been corrected or until you are sure that the
equipment is not malfunctioning.
If you are not able to solve a problem with your fax machine, contact Brother at
USA: 1-800-284-4329
(voice)
1-908-271-1937
From within Canada: 1-800-853-6660
1-514-685-4898
From within Montreal: 1-514-685-6464
(fax)
(voice) 8 AM-8 PM EST
(fax)
(voice)
Page 89

iilli
liil
ill;
llliWiil
s ;• S i: ii :i
:íУ^•í::íís::í:?■í:S:íí!í::fГfí:5®
iliiiilliiii
illi■lll■llll!l■■l■^^
iiiiiiiiiiiiiiiiSiiiiiiiliiiiiiiililiiliiiiiiliiiiilliliiiHlii
A
WARNING
For protection against the risk of electrical shock, always disconnect all cables
from the wall outlet before servicing, modifying or installing the equipment.
This equipment may not be used on coin service lines provided by the telephone
company or connected to party lines.
This equipment has been tested and found to comply with the limits for a Class B
digital device, pursuant to Part 15 of the FCC Rules. These limits are designed to
provide reasonable protection against harmful interference in a residential
installation. This equipment generates, uses, and can radiate radio frequency
energy and, if not installed and used in accordance with the instnictions, may
cause harmful interference to radio communications. Flowever, there is no
guarantee that interference will not occur in a particular installation. If this
equipment does cause harmful interference to radio or television reception, which
can be determined by turning the equipment off and on, the user is encouraged to
try to correct the interference by one or more of the following measures:
■ Reorient or relocate the receiving antenna.
■ Increase the separation between the fax equipment and the receiver.
■ Connect the fax equipment on a separate circuit.
■ Consult with the dealer or an experienced radio/T\' technician for help.
Brother cannot accept any financial or other responsibilities that may be the
result of your use of this information, including direct, special or consequential
darar^es. There are no warranties extended or granted by this document.
The serial number may be found on the label affixed to the back of the unit. For
your convenience, note the number below and retain this Owner’s Manual to
serve as a permanent record of your purchase, in the event of a theft or fire, or for
future reference.
MODEL NO. FAX 270MC/290MC/MFC 370MC/390MC
SERIAL NUMBER
NAME OF DEALER
DATE OF PURCHASE
Page 90

■ y il.;.! i; i: 4; j V;:n ! 'ii;
lliiliiil
mmui
■ hls iJi
-iivi-'V lii-;-:x'.vii r;
iilii
ttiL..
ÎMi*
Important Safety Instructions
(i- Read ali of these instructions.
12 Save them for later reference.
3
Follow all warnings and instructions marked on the product.
Ill
Unplug this product from the wall outlet before cleaning. Do not use liquid
or aerosol cleaners. Use a damp cloth for cleaning.
5
Do not use this product near water.
6
Do not place this product on an unstable cart, stand, or table. The product
may fall, causing serious damage to the product.
7
Slots and openings in the cabinet and the back or bottom are provided for
ventilation; to ensure reliable operation of the product and to protect it from
overheating, these openings must not be blocked or covered. The openings
should never be blocked by placing the product on a bed, sofa, rug, or other
similar surface. This product should never be placed near or over a radiator
or heater. This product should never be placed in a built-in installation
unless proper ventilation is provided.
8 This product should be operated from the type of power source indicated on
the label. If you are not sure of the type of power available, consult with your
dealer or local power company.
19- This product is equipped with a 3-wire grounding type plug, a plug having a
third (grounding) pin. This plug will fit into only a grounding-type power
outlet. This is a safety feature. If you are unable to insert the plug into the
outlet, contact your electrician to replace your obsolete outlet. Do not defeat
the purpose of the grounding-type plug.
10
Do not allow anything to rest on the power cord. Do not place this product
where peopie can walk on the cord.
11
If an extension cord is used with this product, make sure that the total
ampere ratings on the products plugged into the extension cord do not
exceed the extension cord ampere rating. Also, make sure that the total of all
products plugged into the wall outlet does not exceed 15 amperes (USA only).
12
Do not place anything in front of the machine that will block received faxes.
Do not place anything in the path of received faxes.
13
Do not touch a document during printing.
Page 91

iilljilillilililjiililiiilli
Never push objects of any kind into this product through cabinet slots, since
they may touch dangerous voltage points or short out parts resulting in a risk
of fire or electric shock. Never spill liquid of any kind on the product.
Do not attempt to semce this product yourself, as opening or removing
covers may expose you to dangerous voltage points and/or other risks, and
may void your warranh' Refer all servicing to Authorized Semce Personnel.
A list of Authorized Service Centers has been included for your convenience,
or you may contact the following Customer Semce Numbers for your nearest
Authorized Service Center:
USA:
1-800-284-4329 {yoicQ)
1-908-271-1937 {bsO
From within Canada:
From within Montreal:
1-514-685-6464
1-800-521-2846
1-800-853-6660
1-514-685-4898
(voice)
(Fax-Bacli/''System)
(voice) 8 AM-8 PM EST
(fax)
Unplug this product from the wall outlet and refer servicing to Authorized
Service Personnel under the following conditions:
A
\Xdien the power cord is damaged or frayed.
B
If liquid has been spilled into the product.
C
If the product has been exposed to rain or water.
D
If the product does not operate normally when the operating instructions
are followed. Adjust only those controls that are covered by the operating
instructions. Improper adjustment of other controls may result in
damage and will often require extensive work by a qualified technician
to restore the product to normal operation.
E
If the product has been dropped or the cabinet has been damaged,
F
If the product exhibits a distinct change in performance, indicating a
need for service.
To protect your product against power surges, we recommend the use of a
power protection device (Surge Protector).
Page 92

tlíli
llliîü
lilliiili
iiïiiiiiïi
Page 93

C H A P T E R T W E L V E
jHaintenance and Troubleshooting
Fax-Back^** System
Brother Customer Service has installed an easy-to-use Fax-Back^M System, so you
can get instant answers to common technical questions and product information
for all Brother products. This system is available 24 hours a day 7 days a week.
You can use the system to send faxes to any fax machine, not just the one from
which you are calling.
If you can't resolve difficult' with your fax machine using this manual, call
1-800-521-2846
instructions about using the system, and an index of Fax-Back subjects.
(USA only), and follow the voice prompts to receive faxed
Brother Home Page
Visit the Internet Brother Home Page on the World Wide Web at
http'J/www, brothencom.
Brother Bulletin Board
Brother’s Bulletin Board Number is
USA:
From within Canada:
1-514-685-2040
1-714-859-2610
Page 94

Ill
You may occasionally encounter a problem with your fax machine or telephone
line, If this happens, your fax machine often identifies the problem and displays
an error message. The list below explains the most common error messages.
If you need additional help, call the Brother Fax-Back®^^ System at
1-800-521-2846 (mkonU).
I GLE -RN UF'-‘ SChNNER 1
The scanner is dirt>'; clean the white bar and the glass under the bar.
Front cover
[ CimH., ERROR
A poor quality phone line resulted in a communications error, Try the call again.
fTitONNEGTIQN Fail. I
You have requested a polling call from another party, but the other fax machine is
not in Poll Waiting mode.
[ CuUER OPEf-l
The cover is not completely closed.
rCl iTTE Fty J?UT
The fax paper is jammed in the cutter,
it Unplug the power cord,
:2 Open the cover
¡3^ Pull the blue release lever on the print head unit and raise it.
]
Page 95

:4’ Use scissors to cut off the wrinkled portion of the paper
:|i Pull the wrinkled paper out from the front or rear side.
® Plug in the power cord.
¡7^ Load the fax paper again, and push the blue release lever down.
Close the cover.
Front cover
( DISCCiHHEC'T'ED
The otlier parW has disconnected during a call or fax. T
DOCL.SI1 E;NI JRM
The documents were not inserted or fed properly, or were too long,
it Open the cover
j:2 Pull the documents toward the front of the fax machine, in the same
direction they were feeding.
8
*' Close the cover
J
17
calling the other party.
J
Page 96

IHRCHIHE ERROR
and
^mss mop KE'-i^
Contact Brother Customer Service at
USA: 1-800-284-4329
From within Canada: 1-800-853-6660
From within Montreal: 1-514-685-6464
j
(voice)
(voice) 8 AM-8 PM EST
(voice)
I NO RESPOMSE---BUST~)
The number you called does not answer or is busy. You may also have reached a
number not connected to a fax. Check the number and call again.
I HOT
. R EG IS TE RE D: ' :
You’ve tried accessing a One Touch or Speed Dial location Mth no number assigned
to it. See page 18 for information about storing One Touch or Speed Dial numbers.
1
IFBRER ROLL EriPI'^
The paper roll is emph; follow the instructions in Installation to replace the
paper roll.
FR U LT I
The recording head has overheated. Unplug the machine and wait 30 minutes
for it to cool,
(PRINr ER J RH
The fax paper is jammed in the printer.
ft ' Unplug the power cord,
f2 Open the cover by lifting it at the grooves.
Pull the blue release lever on the print head unit and raise it.
' Use scissors to cut off the wrinkled portion of the paper
fS" Pull the wrinkled paper out from the front or rear side.
Plug in the power cord.
jj- Load the fax paper again, and push the blue release lever down. Close
the cover.
Page 97

I SCSNHER: ERRpg:^^^
Try’ cleaning the white bar and the glass under the bar. If you still get a scanner
error, contact Brother Customer Service at
USA: 1-800-284-4329
From within Canada: 1-800-853-6660
From within Montreal: 1-514-685-6464
other Problems
Condensed Print and Horizontal Streaks;
Top and Bottom of Sentences Cut Off
(voice)
(voice) 8 AM-8 PM EST
(voice)
You probably had a bad connection, with static or interference on the phone line.
Use your fax machine to make a copy. If the copy is okay, then the problem was
with the phone line.
Copies and Received Faxes are Blank Pages
The roll of recording paper is upside down, or you are not using thermal fax
paper. Scratch both sides of the thermal fax paper; one side should result in a
black or gray line where you scratched. Place this side down in the fax machine.
Cover Page Comment Always Prints “Please Call”
When Printing Report
The report is only a sample of the format, and always prints “Please Call.” The
comment you programmed appears at the receiving fax machine.
Page 98

Dialing Does Not Work
Check for a dial tone.
Change TONE/PULSE setting (see “Fax Settings”).
Check all line cord connections, and make sure the curled handset cord is not in
the EXT jack.
Check power cord connection.
Send a manual fax (press
receiving tones before pressing
Enabilng/Disabllng Anti-Curl Check Sheet (ACS)
¡Speaker Phone
j or lift handset), and wait to hear fax
[Stohl.
Although the factory setting of Anti-Curl Check Sheet feature is OFF, you can
check the status of your fax machine’s Anti-Curl (ACS) feature by printing an
Anti-Curl Check Sheet.
Press Q] and [3 at the same time to print an ACS Check Sheet.
Press Q] and [|] at the same time to discontinue printing ACS Check Sheet.
Fax Machine Does Not Answer When Called
Make sure the fax machine is not in MANUAL mode.
Make sure it is in the correct receiving mode for your setup (either FAX ONLY, F/T
or TAD). Check for dial tone. If possible, call your fax machine to hear if it chirps.
No Dial Tone on the Handset
Press
[Speaker Phone
[. If you hear no dial tone, check telephone line cord connec
tions at the fax machine and wall jack.
Poor Transmitting Quality
Tr\' changing your resolution to FINE or SUPERFINE (see “Sending Faxes”).
Tr)' cleaning the white pressure bar of the scanner and the glass under the bar
(see p. 86).
Vertical Black Lines When Receiving
The sender's scanner may be dirt)'. Ask the sender to make a copy to see if the
problem is with the sending machine.
Page 99

See
For F/T Mode
Only
^ 31
Vertical Black Lines When Sending
Use your fax machine to make a copy. If the copy shows the same problem, the
scanner area is dirty. Lift the front cover and check the document path. Clean the
scanner’s white pressure bar and the glass under the bar using isopropyl alcohol
and a lint-free cloth.
Ring Change in F/T Mode
If the fax machine double-rings (short-short) after the normal rings from the
telephone company and you have the fax machine set to F/T Mode, your fax
machine is signaling you to take over a call. Pick up the fax machine handset
and speak, or from an extension phone, press #51 to take the call.
Transmission Verification Report Prints “Result: NG”
Usually this means there is temporaiy noise or static on the phone line. Tiy sending
the fax again. You might want to try sending the fax to another fax machine to see if
the problem is with your machine or the machine receiving your fax.
Sending a Call to the Fax Machine
If you have answered the fax handset, press S, and hang up immediately.
If you are on another phone, press your three-digit Remote Activation Code
(the factory setting is ^ 51. Wait to hear your fax machine chirp (about 3
seconds), then hangup.
Fax Machine Doesn't Have Dial Tone
Make sure that all line and power cord connections are in place. Check the back
of the set, as well as wall outlets and jacks.
Make sure the telephone line cord for the fax machine is plugged into the
LINE
jack, and not into the E5CT jack.
Check your phone line. Plug another telephone into the jack you he using for the
fax machine. If the other phone doesn’t work, the problem is with your telephone
line. Contact your local phone company to report the problem.
Fax “Hears” Voice as CNG Tone
If your fax machine is set to Easy Receive On, and it answers voice calls by trying
to receive a fax, tiy turning Easy Receive Off.
Page 100

HiiiiHiiiiiiiiiiaiiiiiiiiiiiiiiiiiii^^
For Customer Service
USA:
From within Canada:
From within Montreal: 1-514-685-6464
To Order Brother Accessories
If you have a Visa, MasterCard, Discover or American Express credit card, you can
order accessories directly from Brother.
USA: 1-888-879-3232
From within Canada: 1-800-668-2768
1-908-271-4329
1-800-284-1937
(voice)
(fax)
1-800-853-6660 (Yoice)
1-514-685-4898
1-800-947-1445
(fax)
(voice)
(voice)
(fax)
(voice)
8AM-8PMEST
 Loading...