

Page 1
Reference Guide
Brief explanations for routine operations
HL-L6400DW
HL-L6400DWT
Brother recommends keeping this guide next to your Brother machine for quick reference.
Online User's Guide
This Reference Guide contains basic instructions
and information for your Brother machine.
For more advanced instructions and information,
see the Online User's Guide at
solutions.brother.com/manuals
Page 2

User's Guides and Where to Find Them
Which Guide? What's in It? Where Is It?
Product Safety Guide Read this Guide first. Please read the Safety
Instructions before you set up your machine.
See this Guide for trademarks and legal
limitations.
Quick Setup Guide Follow the instructions for setting up your
machine, and installing the drivers and
software for the operating system and
connection type you are using.
Reference Guide Learn the basic operations and basic
machine maintenance. See troubleshooting
tips.
Online User's Guide This guide includes the additional contents of
the Reference Guide.
In addition to information about the Print
operations, useful information is included
about using the machine on a network.
Web Connect Guide This Guide provides useful information about
accessing Internet services from the Brother
machine, as well as downloading images and
printing data.
AirPrint Guide This Guide provides information for using
AirPrint to print from OS X v10.8.5 or later
and your iPhone, iPod touch, iPad, or other
iOS device to your Brother machine without
installing a printer driver.
Printed / In the box
Printed / In the box
Printed / In the box
HTML and PDF file /
Brother Solutions
Center
1
PDF file / Brother
Solutions Center
1
PDF file / Brother
Solutions Center
1
Google Cloud Print Guide This Guide provides details about how to use
Google Cloud Print™ services for printing
over the Internet.
Mobile Print/Scan Guide
for Brother iPrint&Scan
This Guide provides useful information about
printing from your mobile device when
connected to a Wi-Fi® network.
1
Visit solutions.brother.com/manuals.
PDF file / Brother
Solutions Center
PDF file / Brother
Solutions Center
1
1
1
Page 3
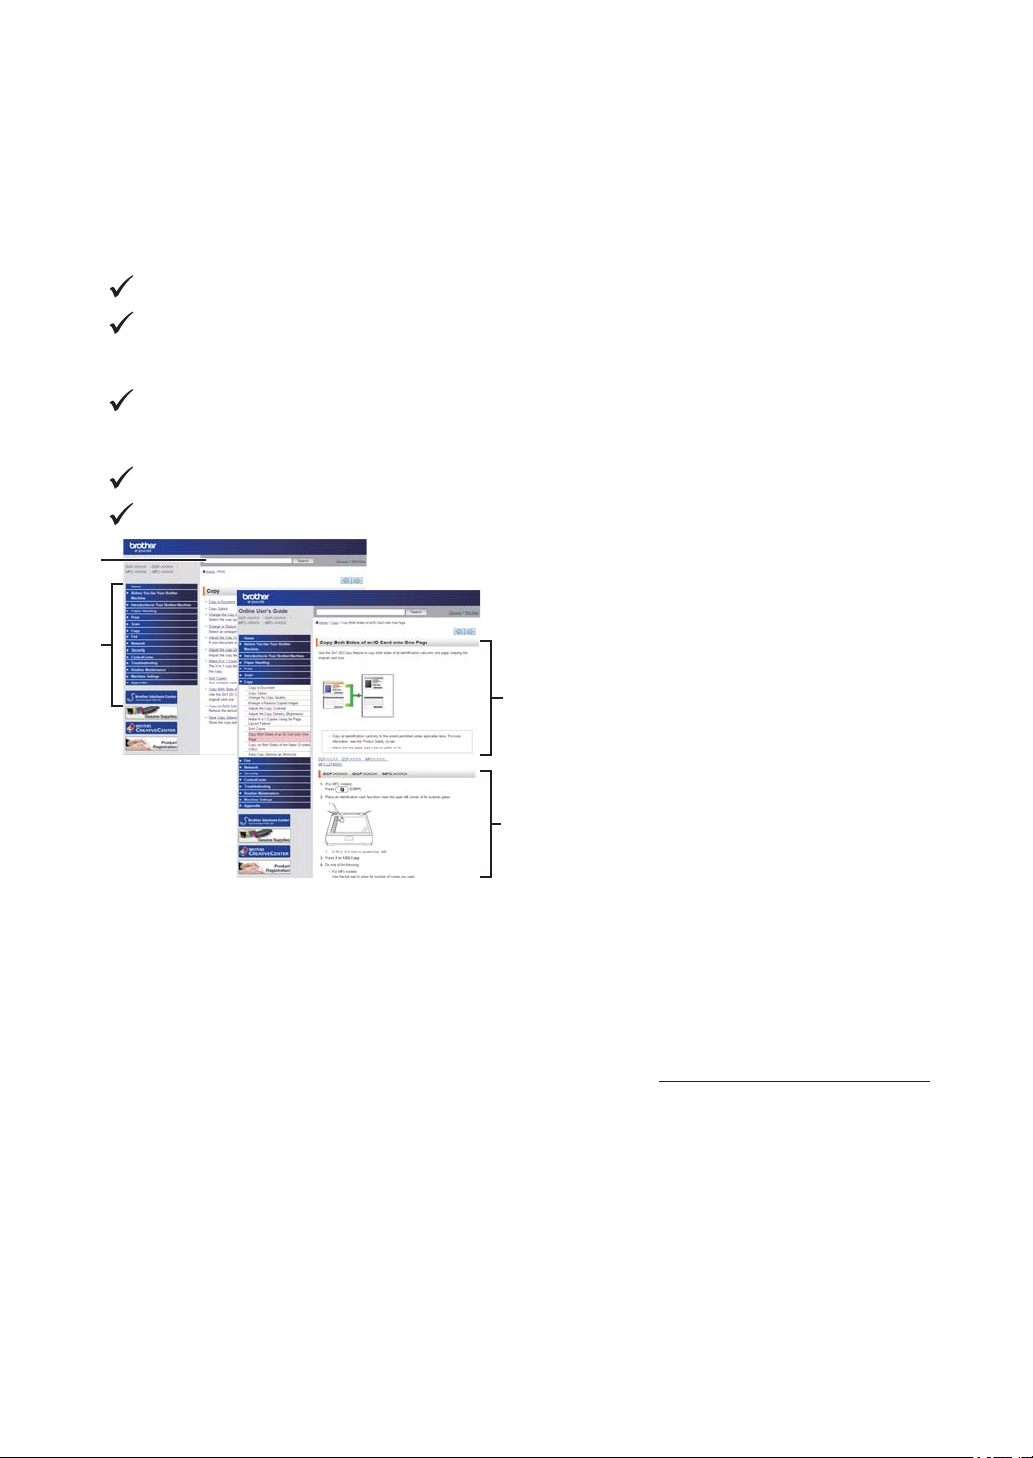
The Online User's Guide Helps You Get the Most
1
2
3
4
Out of Your Machine
We hope that you find this guide helpful. To learn more about your machine's features, please
take a look at our Online User's Guide. It offers:
Quicker Navigation!
Search box
Navigation index in a separate panel
Comprehensive!
Every topic in one guide
Simplified Layout!
Provides step-by-step instructions
Feature summary at the top of the page
1. Search Box
2. Navigation
3. Summary
4. Step-by-Step Instructions
To View Online User's Guides
To view the Online User's Guide and other available guides, visit solutions.brother.com/manuals.
(Windows®)
You can also access your machine's guides using Brother Utilities. The Brother Utilities tool is
included in the standard installation and, when installed, you can find it either as a shortcut on
your desktop, or from the Windows® Start menu.
2
Page 4
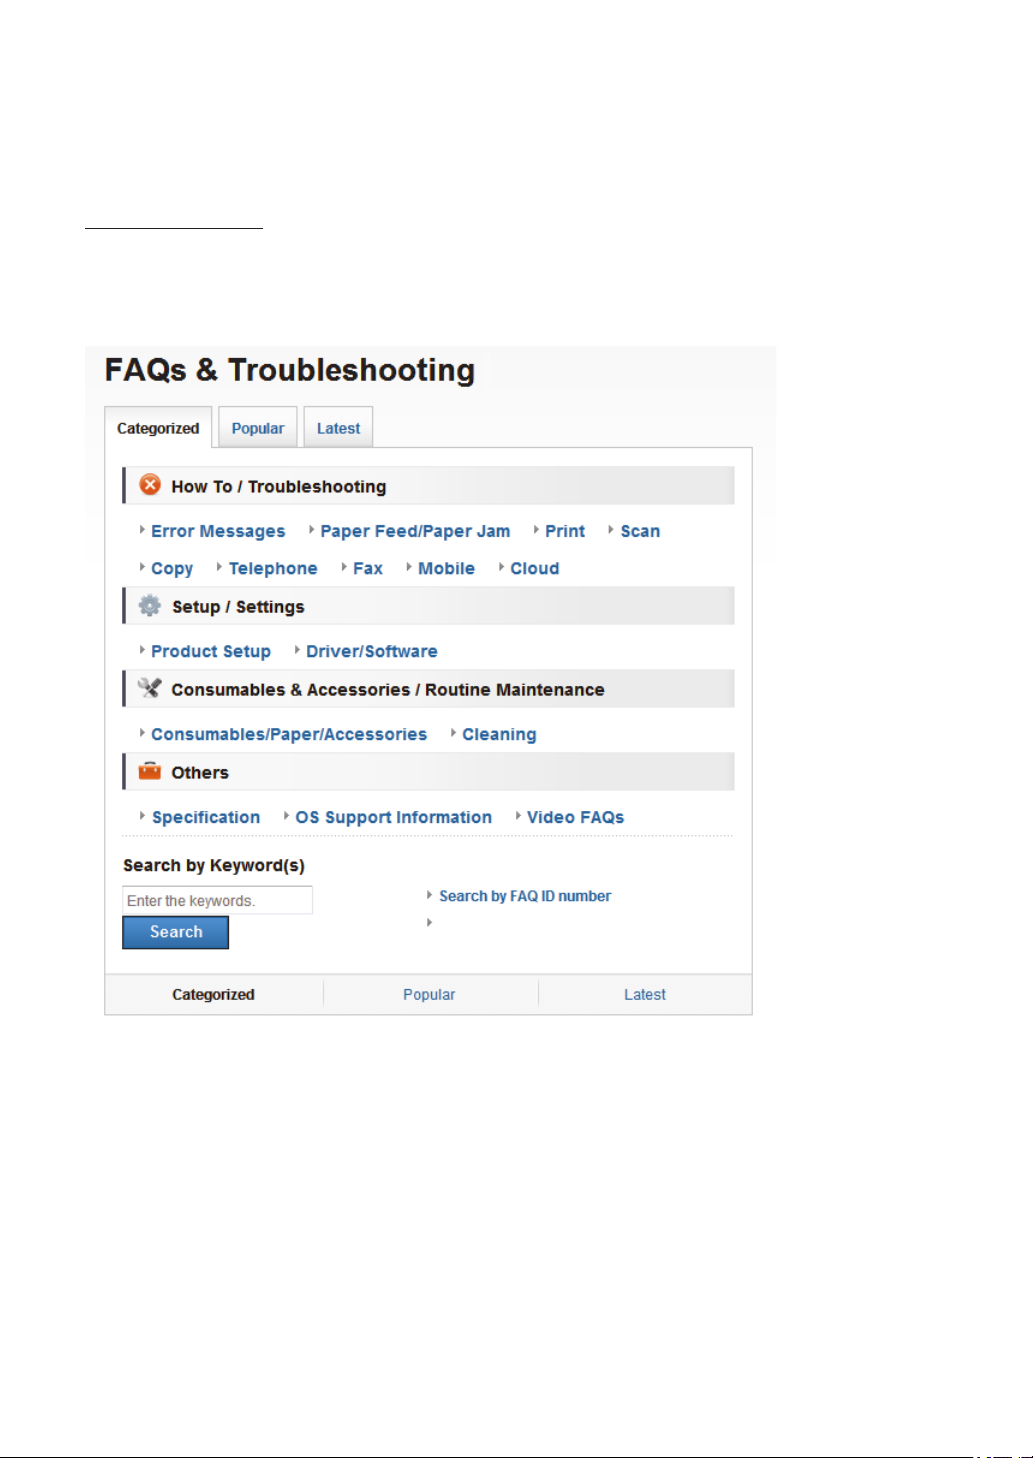
Questions or Problems? Please Take a Look at our FAQs, Solutions, and Videos Online.
Go to your model's FAQs & Troubleshooting page on the Brother Solutions Center at
support.brother.com.
• Provides several ways to search!
• Displays related questions for more information
• Receives regular updates based on customer feedback
Since the Brother Solutions Center is updated regularly, this screen is subject to change without
notice.
3
Page 5
1
2
3
4
General Information
1
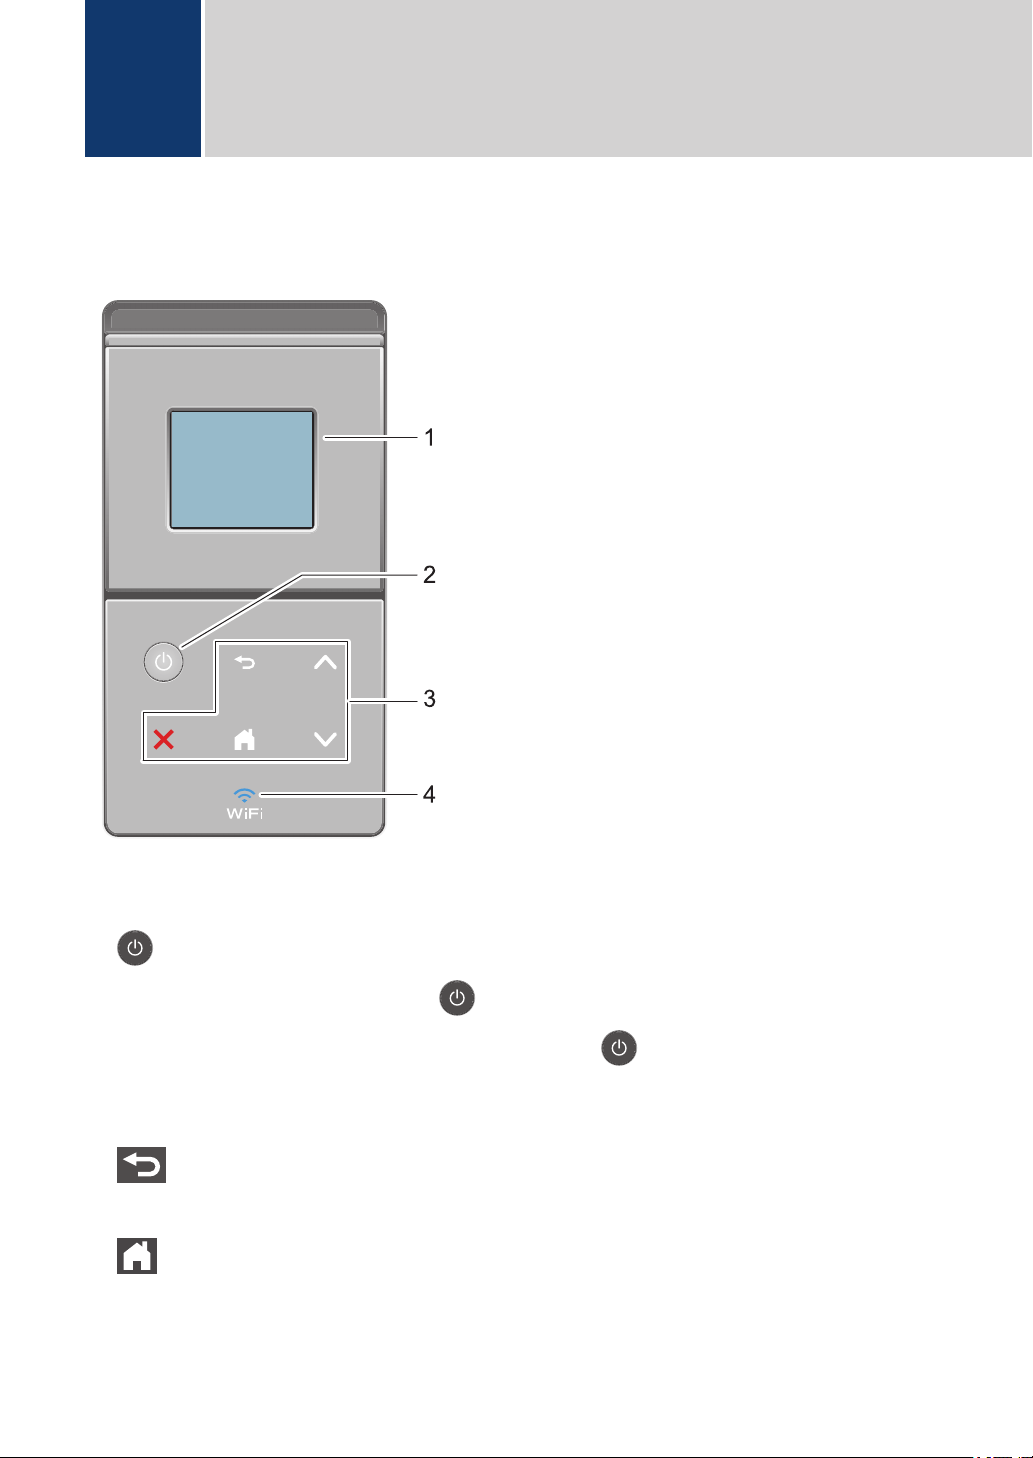
Control Panel Overview
The control panel may vary depending on your model.
1. Touchscreen Liquid Crystal Display (LCD)
Access menus and options by pressing them on the Touchscreen.
2. Power On/Off
• Turn on the machine by pressing .
• Turn off the machine by pressing and holding down . The LCD displays [Shutting
Down] for a few seconds before going off.
3. Touchpanel
(Back)
Press to go back to the previous menu.
(Home)
• Press to return to the Home screen.
• While the machine is in Sleep Mode, the Home icon blinks.
4
Page 6

(Cancel)
• Press to cancel an operation (available when lit).
• Press to cancel a programmed print job and clear it from the machine’s memory. To
cancel multiple print jobs, hold down until the LCD displays [Cancel All Jobs].
or
Press to display the previous or next page.
4. (WiFi)
(For infrastructure mode)
When the WiFi light is on, your Brother machine is connected to a wireless access point.
When the WiFi light blinks, the wireless connection is down, or your machine is in the process
of connecting to a wireless access point.
(For Ad-Hoc mode)
The WiFi LED is always off.
1
General Information
5
Page 7
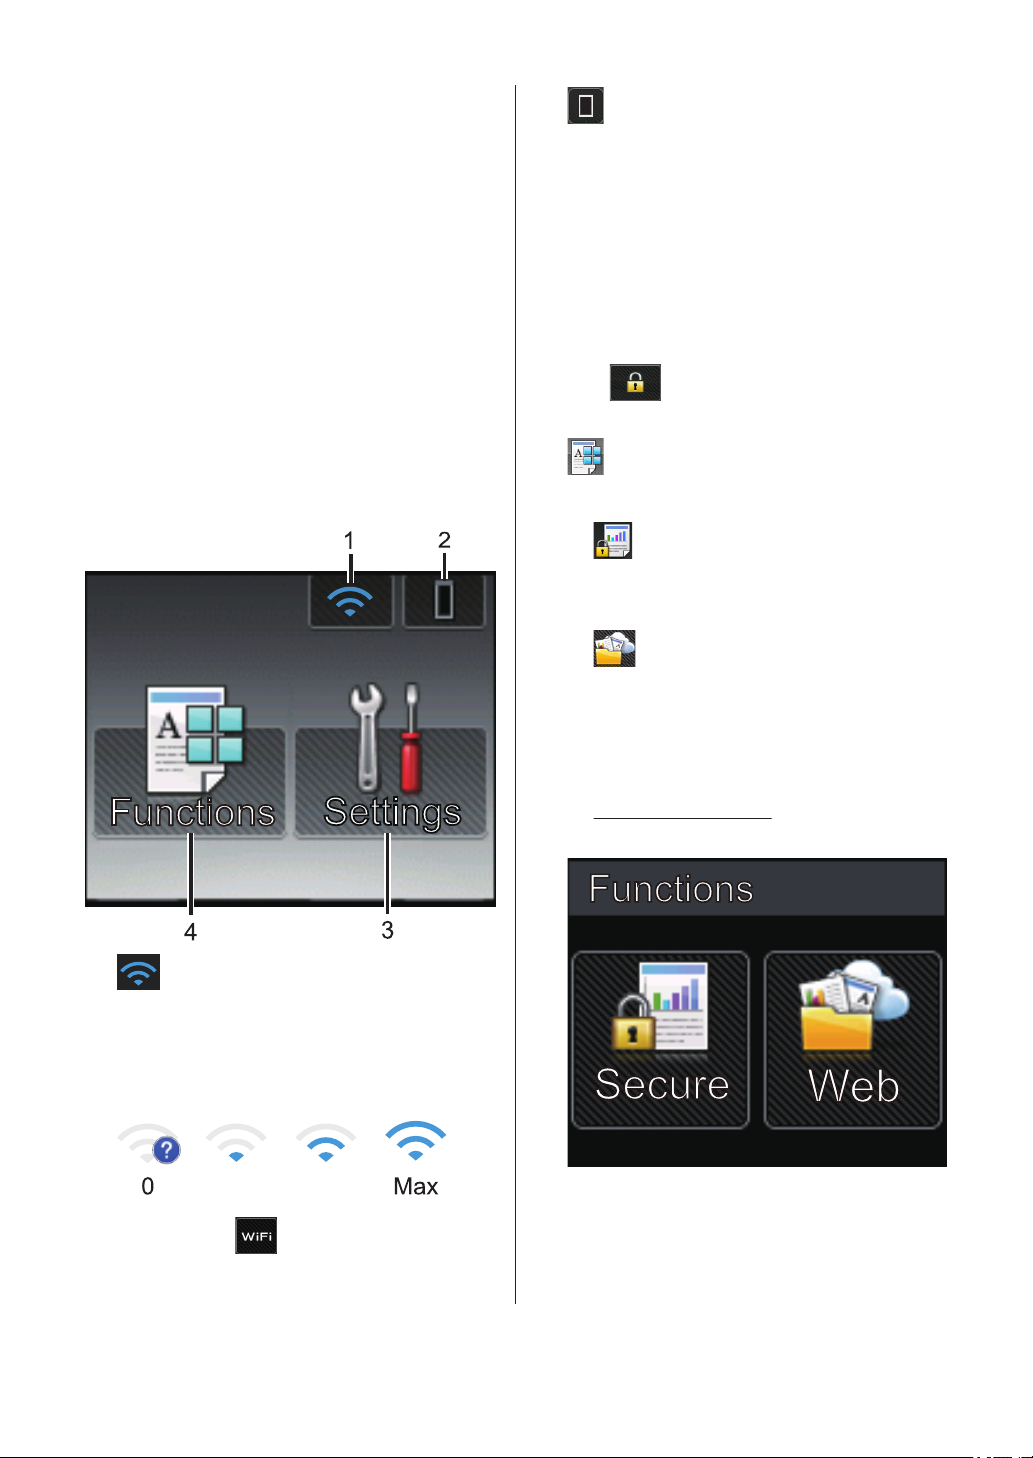
Touchscreen LCD
0 Max
2. (Toner)
Overview
From the Home screen, you can access the
Wi‑Fi setup, Toner level, Settings, and
Functions screen.
The Home screen displays the machine’s
status when the machine is idle. This screen
is also called the Ready Mode screen. When
displayed, this screen indicates that your
machine is ready for the next command.
If Active Directory® Authentication or LDAP
Authentication is enabled, the machine's
control panel will be locked.
The available features vary depending on
your model.
Displays the remaining toner life. Press to
access the [Toner] menu.
3. [Settings]
Press to access the [Settings] menu.
Use the Settings menu to access all of
your Brother machine's settings.
If Setting Lock has been turned on, a lock
icon
unlock the machine to change settings.
4. [Functions]
Press to access the Functions screen.
• [Secure]
Press to access the Secure Print
option.
• [Web]
Press to connect the Brother machine
to an Internet service. For more
information, see the Web Connect
Guide. Go to your model's Manuals
page on the Brother Solutions Center at
support.brother.com to download the
guide.
appears on the LCD. You must
1. (Wireless Status )
If you are using a wireless connection, a
four-level indicator in the Home screen
displays the current wireless signal
strength.
• If you see at the top on the
screen, press it to configure wireless
settings.
6
Page 8

Warning icon
The warning icon appears when there
is an error or maintenance message; press
to view it, and then press to
return to Ready Mode.
1
General Information
7
Page 9

Access Brother Utilities (Windows®)
Brother Utilities is an application launcher
that offers convenient access to all Brother
applications installed on your computer.
Do one of the following:
1
• (Windows® XP, Windows Vista®,
Windows® 7, Windows Server® 2003,
Windows Server® 2008 and Windows
Server® 2008 R2)
Select your machine (where XXXX is
2
the name of your model).
Click (Start) > All Programs >
Brother > Brother Utilities.
• (Windows® 8 and Windows Server
2012)
Tap or click
either on the Start screen or the
desktop.
• (Windows® 8.1 and Windows
Server® 2012 R2)
Move your mouse to the lower left
corner of the Start screen and click
(if you are using a touch-based
device, swipe up from the bottom of
the Start screen to bring up the Apps
screen).
When the Apps screen appears, tap
or click (Brother Utilities).
(Brother Utilities)
Choose the operation you want to use.
3
®
8
Page 10
2
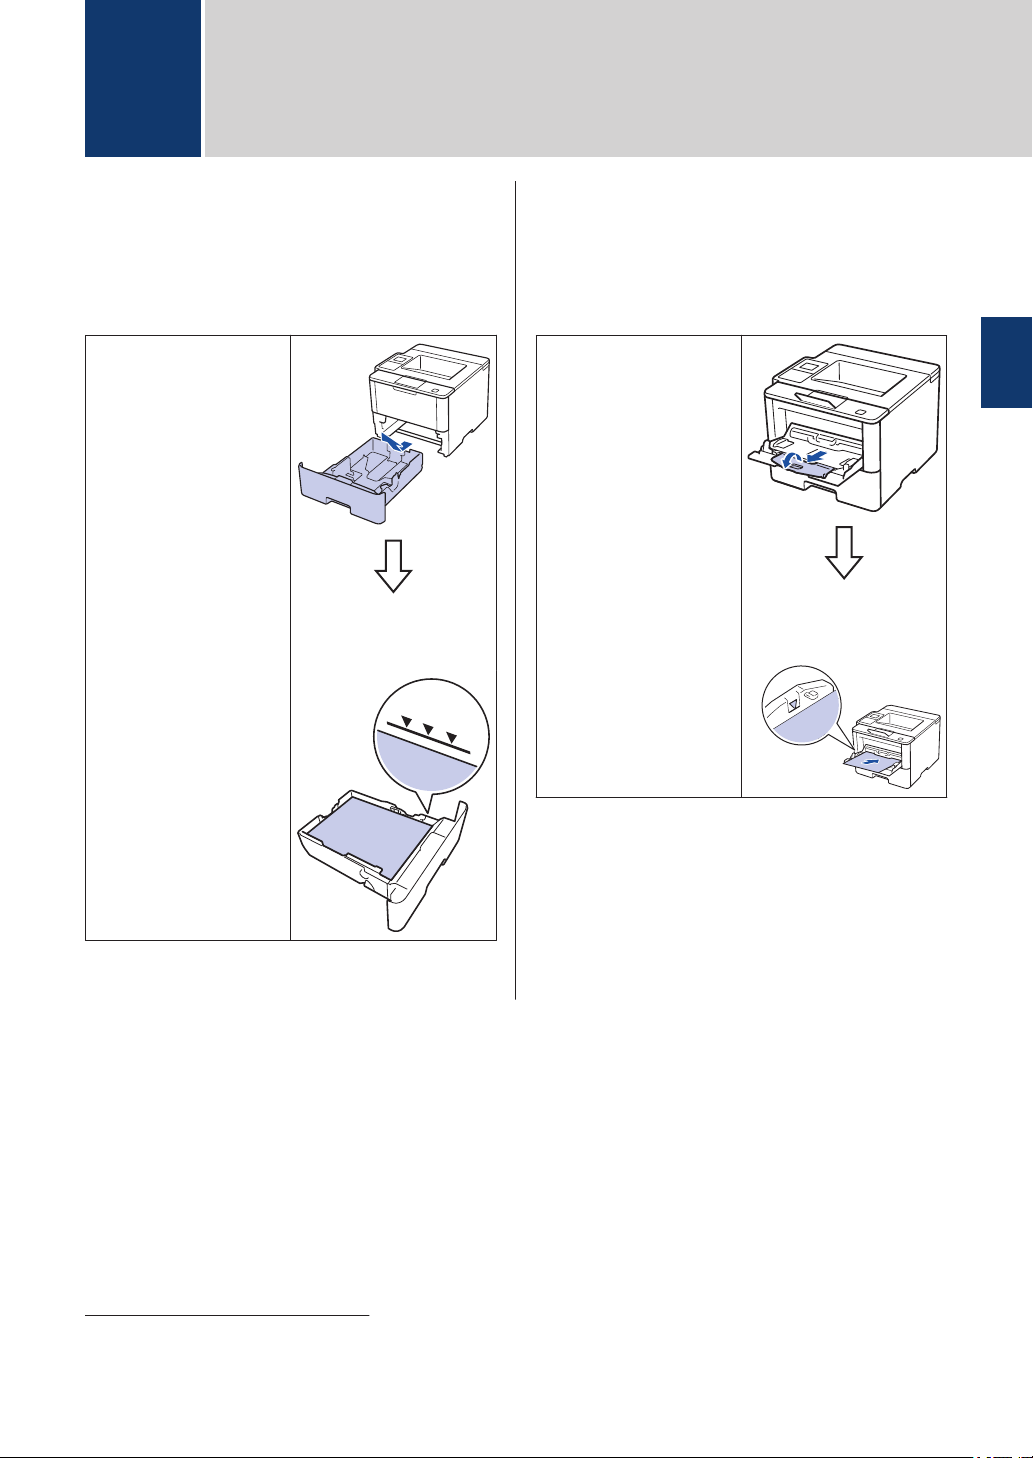
Load Paper
Load Paper in the Paper Tray
Use the paper tray when printing on the
following media:
Plain paper
Thin paper
Recycled paper
Letterhead
Colored paper
Thick paper
1
• Adjust the guides
• Fan the paper
Load Paper in the Multipurpose Tray (MP Tray)
Use the MP tray when printing on the
following media:
Plain paper
Thin paper
Recycled paper
Bond paper
Letterhead
Colored paper
Thick paper
Labels
Envelopes
2
2
2
• Adjust the guides
• Fan the paper
2
Load Paper
For more information, see the Online User's
Guide: Load and Print Using the
Multi‑purpose Tray (MP Tray).
For more information, see the Online User's
Guide: Load and Print Using the Paper Tray.
1
Open the back cover (face up output tray) before printing to let the printed paper exit onto the face up output tray.
2
Open the back cover (face up output tray) before printing to let the printed paper exit onto the face up output tray.
9
Page 11

3
Print from Your Computer
Print a Document (Macintosh)
For printing instructions, see the Online User's
Guide: Print from Your Computer (Macintosh).
Print a Document (Windows®)
Select the print command in your
1
application.
Select Brother XXX-XXXX (where
2
XXXX is the name of your model).
Click Print.
3
Complete your print operation.
4
For more information, see the Online
User's Guide: Print from Your Computer
(Windows®).
Print More Than One Page
on a Single Sheet of Paper
(N in 1) (Windows®)
Select the print command in your
1
application.
Select Brother XXX-XXXX (where
2
XXXX is the name of your model), and
then click the printing properties or
preferences button.
The printer driver window appears.
Click the Multiple Page drop-down list
3
and select the 2 in 1, 4 in 1, 9 in 1, 16
in 1, or 25 in 1 option.
Click OK.
4
Complete your print operation.
5
10
Page 12

Troubleshooting
A
Use this section to resolve problems you may encounter when using your Brother machine.
Identify the Problem
Even if there seems to be a problem with your machine, you can correct most problems yourself.
First, check the following:
• The machine's power cord is connected correctly and the machine's power is on.
• All of the machine's orange protective parts have been removed.
• (For network models) The access point (for wireless network), router, or hub is turned on and
its link indicator is blinking.
• Paper is inserted correctly in the paper tray.
• The interface cables are securely connected to the machine and the computer.
• Check the LCD or the machine's status in Brother Status Monitor on your computer.
Find the Error Find the Solution
A
Troubleshooting
Using the Status Monitor
• Double-click the icon in the task tray.
• (Windows®) If you select the Load Status
Monitor on Startup check box, the Status
Monitor will launch automatically each time
you start your computer.
• A green icon indicates the normal stand-by
condition.
• A yellow icon indicates a warning.
• A red icon indicates an error has occurred.
• A gray icon indicates the machine is
offline.
• Click the Troubleshooting button to
access Brother's troubleshooting website.
11
Page 13

Find the Error Find the Solution
Using the LCD 1. Follow the messages on the LCD.
2. See the instructions in the following table.
3. If you cannot resolve the error, see the
Online User's Guide: Error and
Maintenance Messages or see: FAQs &
Troubleshooting on the Brother Solutions
Center at
support.brother.com.
Error and Maintenance Messages
(HL-L6400DW/HL-L6400DWT)
If the LCD displays errors and your Android™ device supports the NFC feature, touch your
device to the NFC logo on your Brother machine to access the Brother Solutions Center and
browse the latest FAQs from your device. (Your mobile telephone provider's message and
data rates may apply.)
Make sure the NFC settings of both your Brother machine and your Android™ device are set
to On.
The most common error and maintenance messages are shown in the table.
Error Message Cause Action
Cartridge Error
The toner cartridge is not
installed correctly.
Remove the toner cartridge and drum
unit assembly. Take out the toner
cartridge, and put it back in the drum
unit again. Reinstall the toner
cartridge and drum unit assembly in
the machine.
If the problem continues, contact
Brother Customer Service or your
local Brother dealer.
12
Page 14

Error Message Cause Action
Drum !
Jam 2-sided
The corona wire on the
drum unit must be cleaned.
The drum unit or the toner
cartridge and drum unit
assembly is not installed
correctly.
The paper is jammed in the
2-sided tray or inside the
back cover.
Clean the corona wire on the drum
unit.
See the Online User's Guide: Clean
the Corona Wire.
If the problem continues, replace the
drum unit with a new one.
Remove the drum unit, remove the
toner cartridge from the drum unit,
and put the toner cartridge back into
the drum unit. Reinstall the drum unit
in the machine.
Remove the 2-sided tray and open
the back cover to pull out all jammed
paper.
A
Troubleshooting
Jam Inside
Jam Mailbox
Jam MP Tray
Jam Rear
Jam Tray1
Jam Tray2
Jam Tray3
Jam Tray4
No Drum Unit
The paper is jammed inside
the machine.
The paper is jammed in the
Mailbox unit.
The paper is jammed in the
MP tray.
The paper is jammed in the
back of the machine.
The paper is jammed in the
indicated paper tray.
The drum unit is not
installed correctly.
Open the front cover, remove the
toner cartridge and drum unit
assembly, and pull out all jammed
paper. Close the front cover.
Remove all jammed paper from the
Mailbox unit as shown on the LCD.
Remove all jammed paper from in
and around the MP tray. Press
Retry.
Open the fuser cover and remove all
jammed paper. Close the fuser cover.
Pull out the paper tray and remove all
jammed paper as shown in the
animation on the LCD.
Reinstall the toner cartridge and drum
unit assembly.
13
Page 15

Error Message Cause Action
No Paper
No Paper Fed T1
No Paper Fed T2
No Paper Fed T3
No Paper Fed T4
No Paper MP
No Paper T1
No Paper T2
No Paper T3
No Paper T4
The machine is out of
paper, or paper is not
loaded correctly in the
paper tray.
The machine failed to feed
paper from the indicated
paper tray.
The MP tray is out of paper,
or paper is not loaded
correctly in the MP tray.
The machine failed to feed
paper from the indicated
paper tray.
• Refill paper in the paper tray. Make
sure the paper guides are set to
the correct size.
• If paper is in the tray, remove it and
load it again. Make sure the paper
guides are set to the correct size.
• Do not overfill the paper tray.
Pull out the paper tray indicated on
the LCD and remove all jammed
paper.
Do one of the following:
• Refill paper in the MP tray. Make
sure the paper guides are set to
the correct size.
• If paper is in the tray, remove it and
load it again. Make sure the paper
guides are set to the correct size.
Do one of the following:
• Refill paper in the paper tray
indicated on the LCD. Make sure
the paper guides are set to the
correct size.
• If paper is in the tray, remove it and
load it again. Make sure the paper
guides are set to the correct size.
• Do not overfill the paper tray.
No Toner
Output Tray Full
Replace Toner
Supplies
Drum End Soon
The toner cartridge or the
toner cartridge and drum
unit assembly is not
installed correctly.
The output paper tray is full. Remove printed paper from output
The toner cartridge is at the
end of its life. The machine
stops all print operations.
The drum unit is near the
end of its life.
Remove the toner cartridge and drum
unit assembly. Remove the toner
cartridge from the drum unit, and
reinstall the toner cartridge back in
the drum unit. Reinstall the toner
cartridge and drum unit assembly
back in the machine. If the problem
continues, replace the toner cartridge
with a new one.
tray indicated on the LCD.
Replace the toner cartridge with a
new one.
Order a new drum unit before the
LCD displays Replace Drum.
14
Page 16

Error Message Cause Action
Supplies
Replace Drum
Supplies
Toner Low
It is time to replace the
drum unit.
The drum unit counter was
not reset when a new drum
was installed.
If the LCD displays this
message, you can still print.
The toner cartridge is near
the end of its life.
Replace the drum unit with a new
one.
Reset the drum unit counter.
See the instructions included with the
new drum unit.
Order a new toner cartridge now so
you have it ready when the LCD
displays Replace Toner.
A
Troubleshooting
15
Page 17

Paper Jams
2
1
3
4
5
An error message indicates where the paper is stuck in your machine.
Error messages:
1. Jam Mail Box (When the optional mail box is installed.)
2. Jam Rear
3. Jam 2-sided
4. Jam Tray
5. Jam Inside
Solutions for Wireless Connection
If you cannot connect your Brother machine to the wireless network, see the following:
• Online User's Guide: Print the WLAN Report
• Quick Setup Guide: Alternate wireless configuration method
16
Page 18

Appendix
B
How to Enter Text on Your Brother Machine
When text is required, a keyboard appears on your machine's LCD.
• The characters may differ depending on your country.
• The keyboard layout may differ depending on the operation you perform.
B
• Press to cycle between letters, numbers and special characters.
• To move the cursor to the left or right, press d or c.
Inserting spaces
• To enter a space, press
Making corrections
• If you entered a character incorrectly and want to change it, press d or c to move the cursor to
the incorrect character and press . Enter the correct character.
• To insert a character, press d or c to move the cursor to the correct place, and then enter the
character.
• Press for each character you want to erase, or press and hold to erase all the
characters.
twice to choose special characters, then press the space button.
Appendix
17
Page 19

Print Using Your Mobile Device
Brother iPrint&Scan allows you to use features of your Brother machine directly from your mobile
device, without using a computer. Download the Mobile Print/Scan Guide for Brother iPrint&Scan
at: solutions.brother.com/manuals.
18
Page 20

Supplies
When the time comes to replace supplies, such as the toner or drum, an error message will
appear on your machine's control panel or in the Status Monitor. For more information about the
supplies for your machine, visit http://www.brother.com/original/index.html or contact your local
Brother reseller.
The toner cartridge and drum unit are two separate parts.
Supply Items Supply order No. Approximate Life
Applicable Models
(Page Yield)
Toner
Cartridge
Drum Unit DR-890 Approximately
1
Approximate cartridge yield is declared in accordance with ISO/IEC 19752.
2
Letter or A4 size 1-sided pages
3
Approximately 50,000 pages based on 3 pages per job and 30,000 pages based on 1 page per job [A4/letter simplex
pages]. The number of pages may be affected due to a variety of factors including but not limited to media type and
media size.
Standard Toner:
TN-820
High Yield Toner:
TN-850
Super High Yield Toner:
TN-880
Ultra High Yield Toner:
TN-890
Approximately
3,000 pages
Approximately
8,000 pages
Approximately
12,000 pages
Approximately
20,000 pages
50,000 pages
HL-L6400DW/HL-L6400DWT
1 2
HL-L6400DW/HL-L6400DWT
1 2
HL-L6400DW/HL-L6400DWT
1 2
HL-L6400DW/HL-L6400DWT
1 2
HL-L6400DW/HL-L6400DWT
3
B
Appendix
If you are using Windows®, double-click the Brother CreativeCenter icon on your desktop
to access our FREE website designed as a resource to help you easily create and print
customized materials for business and home use with photos, text and creativity.
Macintosh users can access Brother CreativeCenter at this web address:
http://www.brother.com/creativecenter
19
Page 21

Brother International Corporation
200 Crossing Boulevard
P.O. Box 6911
Bridgewater, NJ 08807-0911 USA
Brother International Corporation (Canada) Ltd.
1 rue Hôtel de Ville,
Dollard-des-Ormeaux, QC, Canada H9B 3H6
Visit us on the World Wide Web
www.brother.com
These machines are approved for use in the country of purchase only. Local Brother
companies or their dealers will support only machines purchased in their own countries.
D0051L001-00
USA/CAN
Version 0
 Loading...