

Page 1
Brother Laser Printer
HL-5130
HL-5140
HL-5150D
HL-5170DN
User's Guide
For visually-impaired users
You can read this manual with Screen Reader ‘text-to-speech’
software.
You must set up the hardware and install the driver before you can use the printer.
Please use the Quick Setup Guide to set up the printer. You can find a printed copy in the box.
Please read this User’s Guide thoroughly before you use t he pri nter. Keep the CD-ROM in a
convenient place so you can use it quickly if you need to .
Please visit our web site at http://solut ions.brother.com
Asked Questions (FAQs), Product Support and Technical Que stions, and the latest Driver Updates
and Utilities.
where you can get answers to Frequently
Version 0
Page 2
Laser printer
HL-5100 series
User's Guide
Definitions of warnings, cautions, and notes
We use the following terms throughout this User’s Guide:
You must follow these warnings to prevent possi ble personal injury.
You must follow these instructions to make sure you use the pri nter properly and do not damage it.
Remember these useful tips when you use the printer.
I
Page 3
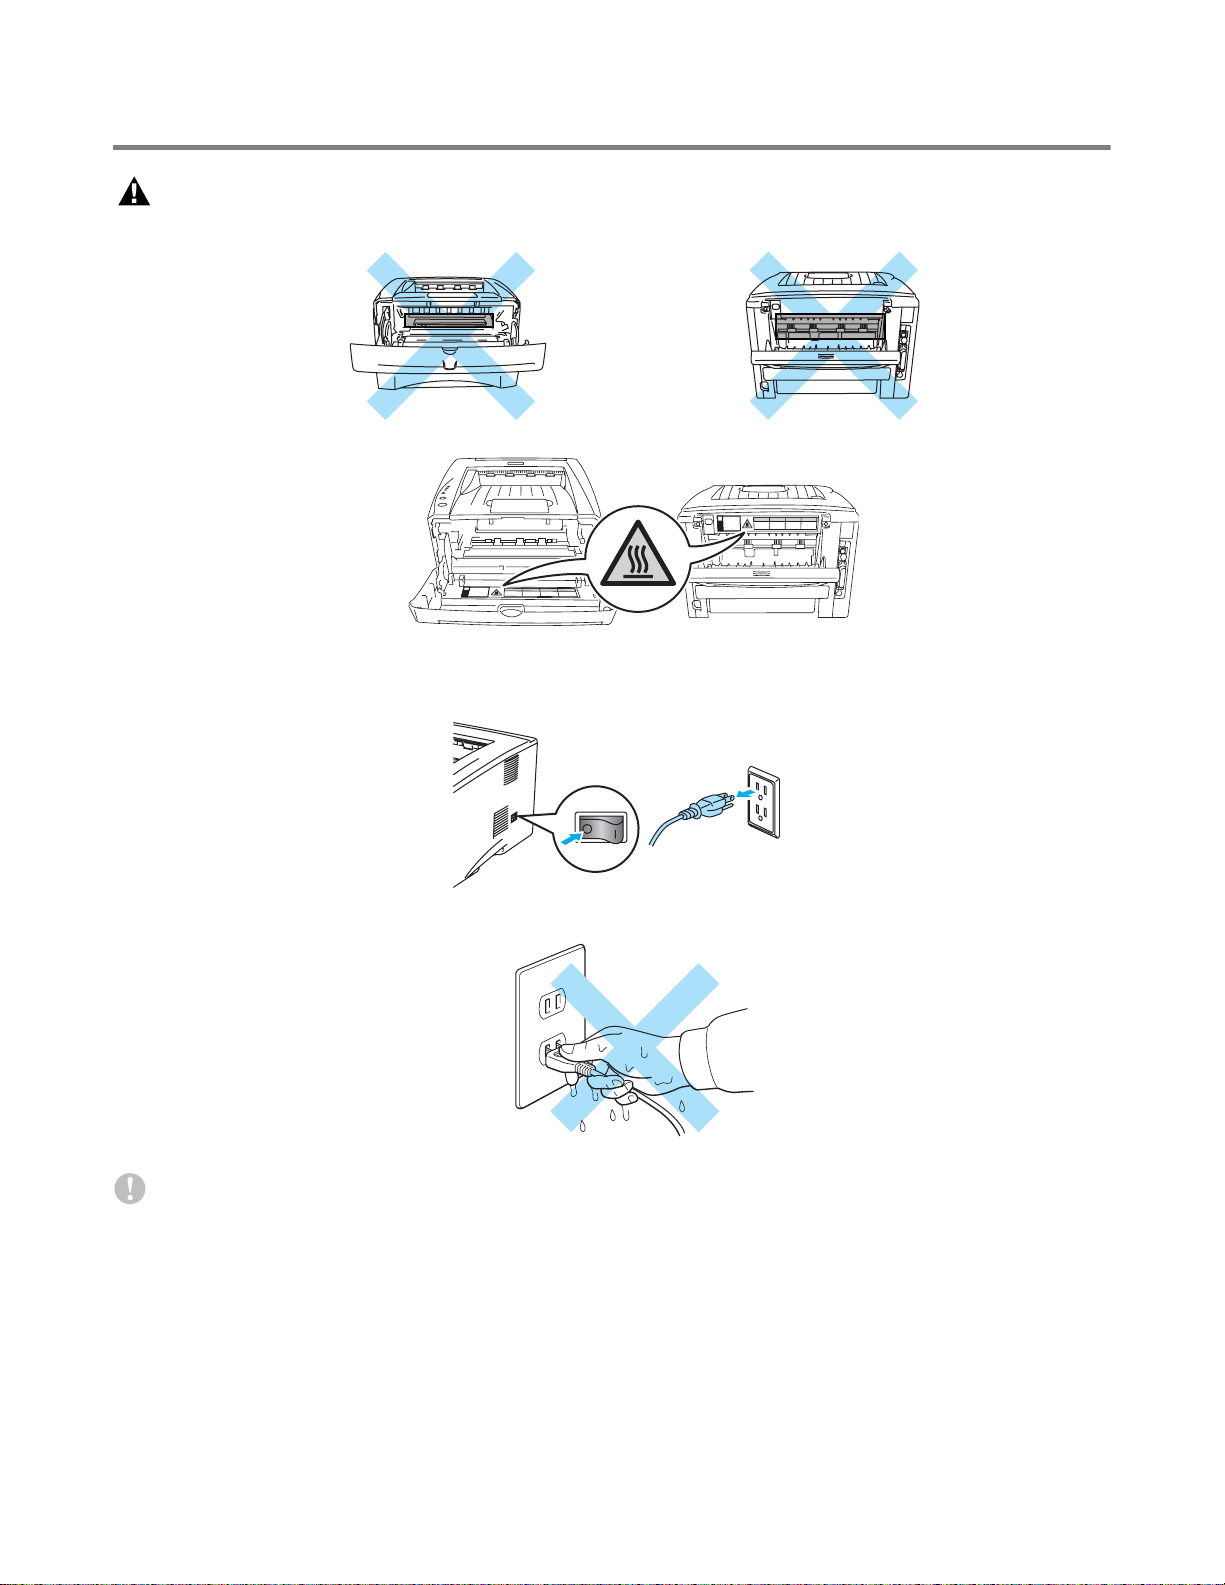
To use the printer safely
After you have just u sed the pri nt er, s ome par ts insi de the pri nter wi ll b e ex treme ly hot . When yo u
open the front or back cover of the pr in ter, never tou ch t he sh aded parts shown in the il lust rat ions
below.
There are high voltage electrodes i nside the printer. Befor e you clean the printer, clear a paper jam
or replace parts, make sure you have turned off the power switch and unplugged the printer from
the AC power outlet.
Do not handle the plug with wet hands - it might give you an electrical shock.
Caution
Use water or neutral detergents f or cleaning. Cleaning with volatil e liquids such as thinner or benzene
will damage the surface of the printer.
Do not use cleaning materials that contain ammonia. They will damage the printer and the toner
cartridge.
II
Page 4

Trademarks
The Brother logo is a registered trademark of Brother Indust ries, Ltd.
®
Apple, the Apple Logo, Macintosh
and other countries, and TrueType
Epson is a registered trademark and FX-80 and FX-850 are trademarks of Seiko Epson Corporat ion.
Hewlett Packard is a register ed tr ademark and HP LaserJet 6P, 6L, 5P, 5L, 4, 4L 4 P, I II, I IIP , II , and I IP
are trademarks of Hewlett-Packard Company.
IBM, IBM PC, and Proprinter are register ed trademarks of Internati onal Business Machines Corpora tion.
®
Microsoft
, MS-DOS®, Windows® and Windows NT® are registered trademarks of Microsoft Corporation
in the U.S. and other countries.
®
PostScript
NERGY STAR is a U.S. registered mark.
E
and PostScript® 3TM are trademarks of Adobe Systems Incorporated.
All other terms and brand and product names mentioned i n this User’s Guide are regi stered trademarks
of their respective companies.
Compilation and Publication Notice
Under the supervision of Brother Industr ies Ltd., this manual has been compiled and published, covering
the latest product’s descriptions and specifications.
and RendezvousTM are registered trademarks in the United States
®
is a trademark of Apple Computer, Inc.
The contents of this manual and the specifications of this product are subject to change without notice.
Brother reserves the right to make changes without notice i n the specifi cations and materials contain ed
herein and shall not be responsible for any damages (including consequential) caused by reliance on
the materials presented, including but not limited to typographical and other errors relating to the
publication.
©2003 Brother Industries Ltd.
Shipment of the Printer
If for any reason you must ship your Printer, carefu lly package the Printer to avoid any damage during
transit. We recommend that you save and use the original packagi ng. The Printer should also be
adequately insured with the carrier.
III
Page 5

Table of Contents
1
About this printer .................................................................................................................................... 1-1
What is in the box? .......................................................................................................................1-1
Interface cable ....................................................................................................................1-1
Front view ...............................................................................................................................1-2
Back view ...............................................................................................................................1-3
Positioning the printer ................................................................................................................... 1-4
Power supply .......................................................................................................................... 1-4
Environment ........................................................................................................................... 1-4
What kind of paper can I use? ......................................................................................................1-5
Type and size of paper ...........................................................................................................1-5
Recommended paper .............................. ....... ...... ...... ....... ...... ....... ...... ....... ........................... 1-6
Printable area .........................................................................................................................1-7
Printing methods ........................................................................................................................... 1-8
Printing on plain paper ............................................................................................................1-8
Printing on plain paper from the paper tray ........................................................................ 1-8
Printing on plain paper from the manual feed tray (For HL-5130 and HL-5140) .............. 1-12
Printing on plain paper from the multi-purpose tray (MP tray) (For HL-5150D and HL-5170DN)
1-14
Printing on thicker paper and card stock .............................................................................. 1-17
Printing on thicker paper and card stock from the manual feed tray
(For HL-5130 and HL-5140) .........................................................................................1-17
Printing on thicker paper and card stock from the multi-purpose tray (MP tray)
(For HL-5150D and HL-5170DN) ................................................................................. 1-20
Printing on envelopes ........................................................................................................... 1-24
Types of envelopes to avoid .............................................................................................1-24
Printing on envelopes from the manual feed tray (For HL-5130 and HL-5140) ............... 1-25
Printing on envelopes from the MP tray (For HL-5150D and HL-5170DN) ...................... 1-29
Printing on transparencies .................................................................................................... 1-33
Printing on transparencies from the paper tray ................................................................ 1-33
Printing on transparencies from the manual feed tray (For HL-5130 and HL-5140) ........ 1-36
Printing on transparencies from the MP tray (For HL-5150D and HL-5170DN) ............... 1-39
Duplex Printing ........................................................................................................................... 1-43
Guidelines for printing on both sides of the paper ............................................................1-43
Printing on both sides of the paper (manual duplex printing) ............................................... 1-43
Manual duplex printing from the paper tray ...................................................................... 1-43
Manual duplex printing from the manual feed tray (For HL-5130 and HL-5140) ..............1-44
Manual duplex printing from the multi-purpose tray (For HL-5150D and HL-5170DN) ....1-45
Printing on both sides of the paper (automatic duplex printing) ...........................................1-47
Guidelines for automatic duplex printing .......................................................................... 1-47
2
Driver and software ................................................................................................................................2-1
Printer driver .................................................................................................................................2-1
For Windows
For Macintosh
For Windows
Features in the PCL printer driver ...................................................................................... 2-2
Features in the PS printer driver ......................................................................................2-11
For Macintosh
Software ..................................................................................................................................... 2-20
Software for Networks ..........................................................................................................2-20
BRAdmin Professional ..................................................................................................... 2-20
Driver Deployment Wizard ...............................................................................................2-20
Web BRAdmin ........... ....... ...... ....................................... ...... ....... ...... ....... ...... ....... ...... ...... 2-20
Automatic Emulation Selection ............................................................................................. 2-21
®
95/98/Me, Windows NT® 4.0 and Windows® 2000/XP ............................... 2-1
® ....................................................................................................................................................................... 2-1
® ..................................... ............................... .......................... .................................................................................. 2-2
® ............................ ............................................................... ................................................................................ 2-17
IV
Page 6

3
Control panel ........................................................................................................................................... 3-1
Service call indications ........................................................................................................... 3-5
Control panel buttons .................................... ....... ...... ....................................... ...... ....... .... ..........3-7
Print a test page .....................................................................................................................3-8
Using control panel button .................................................................................................. 3-8
Using the printer driver .......................................................................................................3-8
Printer Settings ....................................................................................................................... 3-9
Using the control panel button ............................................................................................ 3-9
Using the printer driver .......................................................................................................3-9
Print fonts (Not available for HL-5130) .................................................................................3-10
Using the control panel button .......................................................................................... 3-10
Using the printer driver (Not available for HL-5130) ......................................................... 3-10
Network factory default setting (For HL-5170DN) ................................................................ 3-11
Disabling the APIPA protocol (For HL-5170DN) ................................................................... 3-11
4
Options ....................................................................................................................................................4-1
DIMM ............................................................................................................................................4-1
Installing additional memory ...................................................................................................4-2
Lower tray unit (LT-5000) (Not available for HL-5130) .................................................................4-4
Print server (NC-2100p) ............................................................................................................... 4-5
5
Routine maintenance .................................. ....... ...... ....... ...... ...... ....... ...... ...............................................5-1
Toner cartridge ................................................................. ....... ...... ....... ...... ....... ...... ....... ..............5-2
Toner Low message ...............................................................................................................5-2
Toner Empty message ........................................................................................................... 5-3
Replacing the toner cartridge .................................................................................................5-3
Drum unit ............................. ....... ...... ....... ...... ....... ...... ....................................... ...... .....................5-8
Change Drum message .....................................................................................................5-8
Replacing the drum unit ..........................................................................................................5-9
Cleaning ..................................................................................................................................... 5-12
Replacing periodic maintenance parts ....................................................................................... 5-13
6
Troubleshooting ...................................................................................................................................... 6-1
Identifying your problem ............................................................................................................... 6-1
Error messages in the status monitor ...........................................................................................6-2
....................................... .......................... ......................... .......................... ..................................6-3
....................................... .......................... ......................... .......................... ..................................6-3
Error message printouts ............................................................................................................... 6-3
Paper handling .............................................................................................................................6-5
Paper jams and how to clear them ...............................................................................................6-6
Other problems ...........................................................................................................................6-11
For Macintosh
Improving the print quality ....................................................................................................6-11
Solving print problems ................................................................................................................ 6-17
7
Appendix ..................................................................................................................................................A-1
Printer specifications ....................................................................................................................A-1
Important information for choosing your paper .............................................................................A-6
8
Appendix (For Europe and Other Countries) .......................................................................................B-1
Brother Numbers ..........................................................................................................................B-1
Important information: Regulations ...............................................................................................B-2
Radio interference (220 to 240 volt model only) .....................................................................B-2
International ENERGY STAR
IEC 60825 specification (220 to 240 volt model only) ............................................................B-3
IMPORTANT - For Your Safety ..................... ....... ...... ....................................... ...... ....... ...... ....... .B-4
®
with USB ..................................................................................................... 6-11
®
Compliance Statement ..........................................................B-2
V
Page 7

Geräuschemission / Acoustic noise emission (for Germany only) .....................................B-4
Wiring information (for UK) .................................................................................................B-5
9
Appendix (For USA and Canada) ..........................................................................................................C-1
Brother Numbers ..........................................................................................................................C-1
Register your product .............................................................................................................C-1
Frequently asked questions (FAQs) .......................................................................................C-1
Customer Service ...................................................................................................................C-1
Service center locator (USA only) ..........................................................................................C-2
Service center locations (Canada only) ..................................................................................C-2
Brother fax back system (USA only) .......................................................................................C-2
Important information: Regulations ...............................................................................................C-3
Federal Communications Commission (FCC) Declaration of Conformity (For USA) .............C-3
Industry Canada Compliance Statement (For Canada) .........................................................C-4
International ENERGY STAR
Laser Notices ................................................................................................................................C-5
Laser Safety (100 to 120 volt model only) ..............................................................................C-5
FDA Regulations (100 to 120 volt model only) .......................................................................C-5
IMPORTANT - For Your Safety ..................... ....... ...... ....................................... ...... ....... ...... ....... .C-6
Disconnect device ..............................................................................................................C-6
Caution for LAN connection ...............................................................................................C-6
10
INDEX .................... ........................................................... .........................................................................I-1
®
Compliance Statement ..........................................................C-4
VI
Page 8
\
About this printer
1
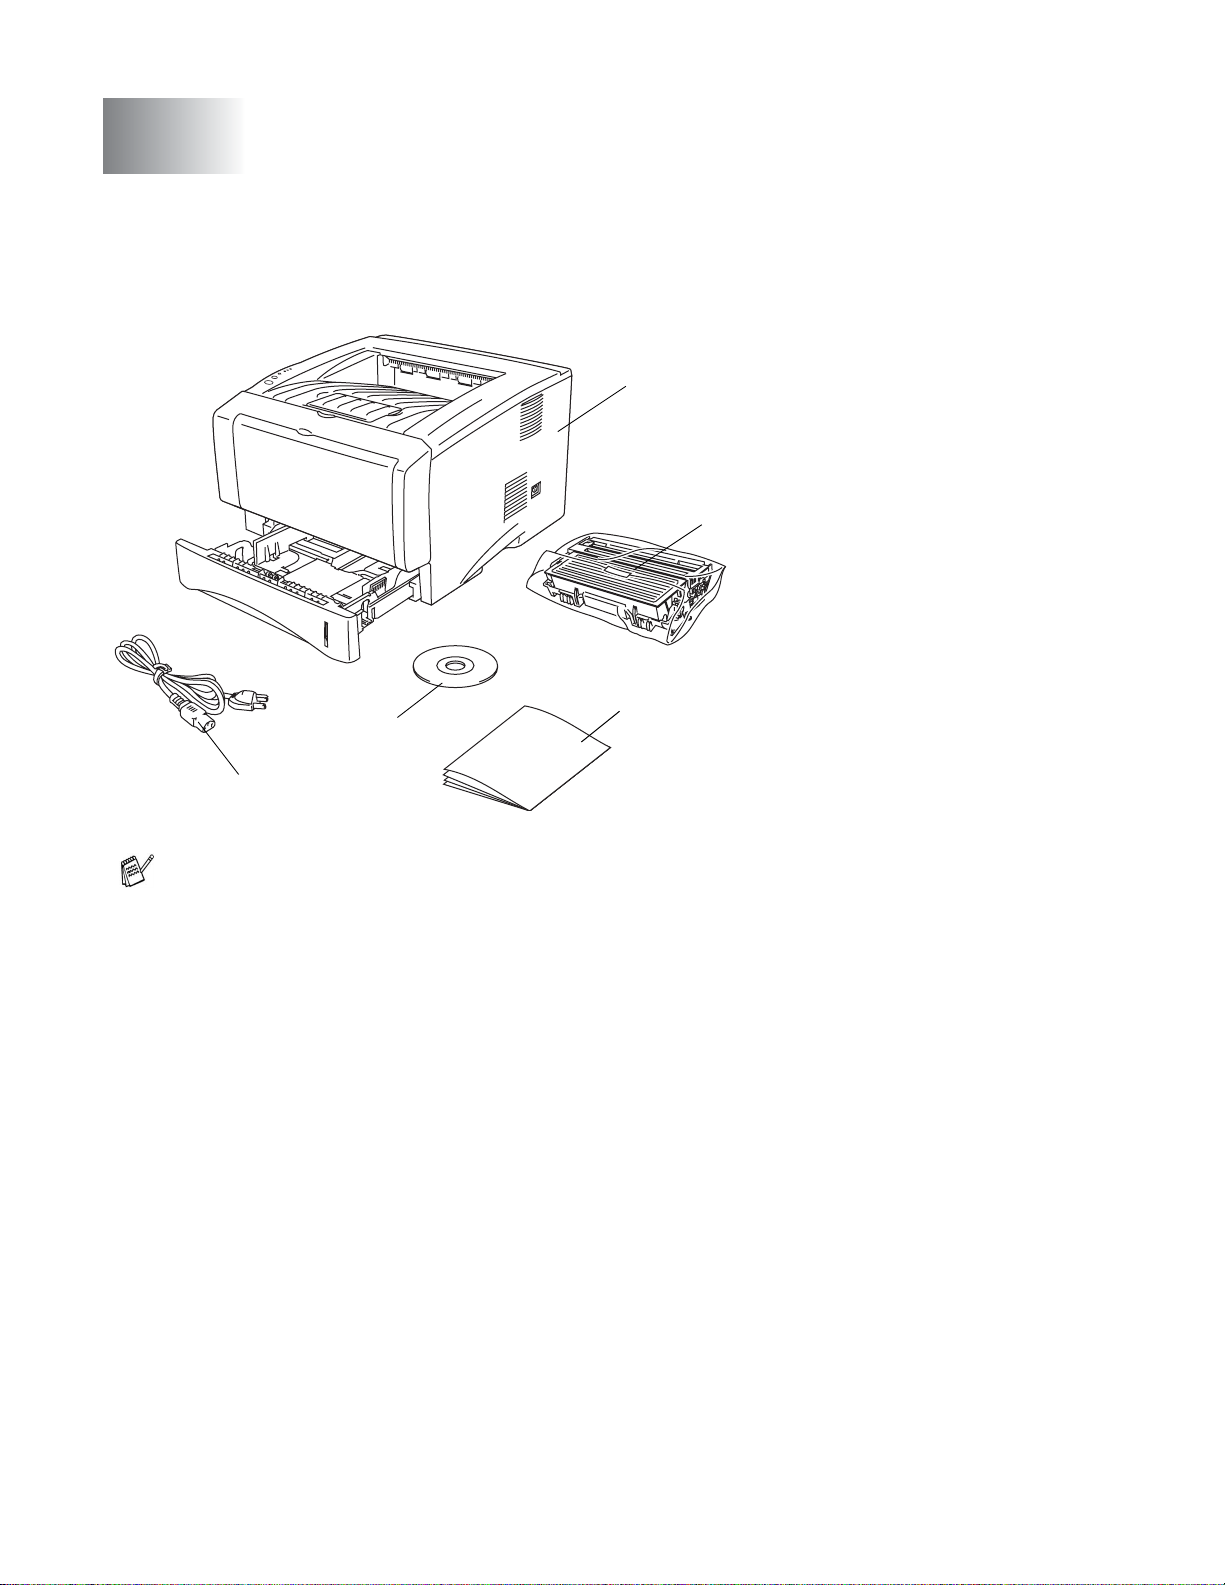
What is in the box?
When you unpack the printer, check to see that you have all of the following parts.
1
1
2
Printer
2
Drum unit and
toner cartridge assembly
3
Quick Setup Guide
4
CD-ROM
5
AC power cord
Components may differ from one
country to another.
3
4
5
The power cord may be slightly different than the one in the figure above, dependi ng on which
country the printer was bought in.
Interface cable
■ An interface cable is not a standard accessory.
■ Some computers have a USB and a parallel po rt. Pl ease buy the appr opriat e cable f or the int erf ace
you are going to use.
■ Most parallel cables support bi-directi onal communication, but some might have an incompat ible pin
assignment or may not be IEEE 1284-compliant.
■ It is recommended to use a Parallel interface cable or USB interface cabl e that is no longer than 6
feet (2 meters).
■ When you use a USB cable, make sure that you connect it to the USB connector of your PC.
■ Please make sure that you use a Hi-Speed USB 2.0 certified cable if your comput er uses a Hi-Speed
USB 2.0 interface.
■ Do not connect the USB cable to a non-powered hub or a Mac
®
keyboard.
1 - 1 ABOUT THIS PRINTER
Page 9
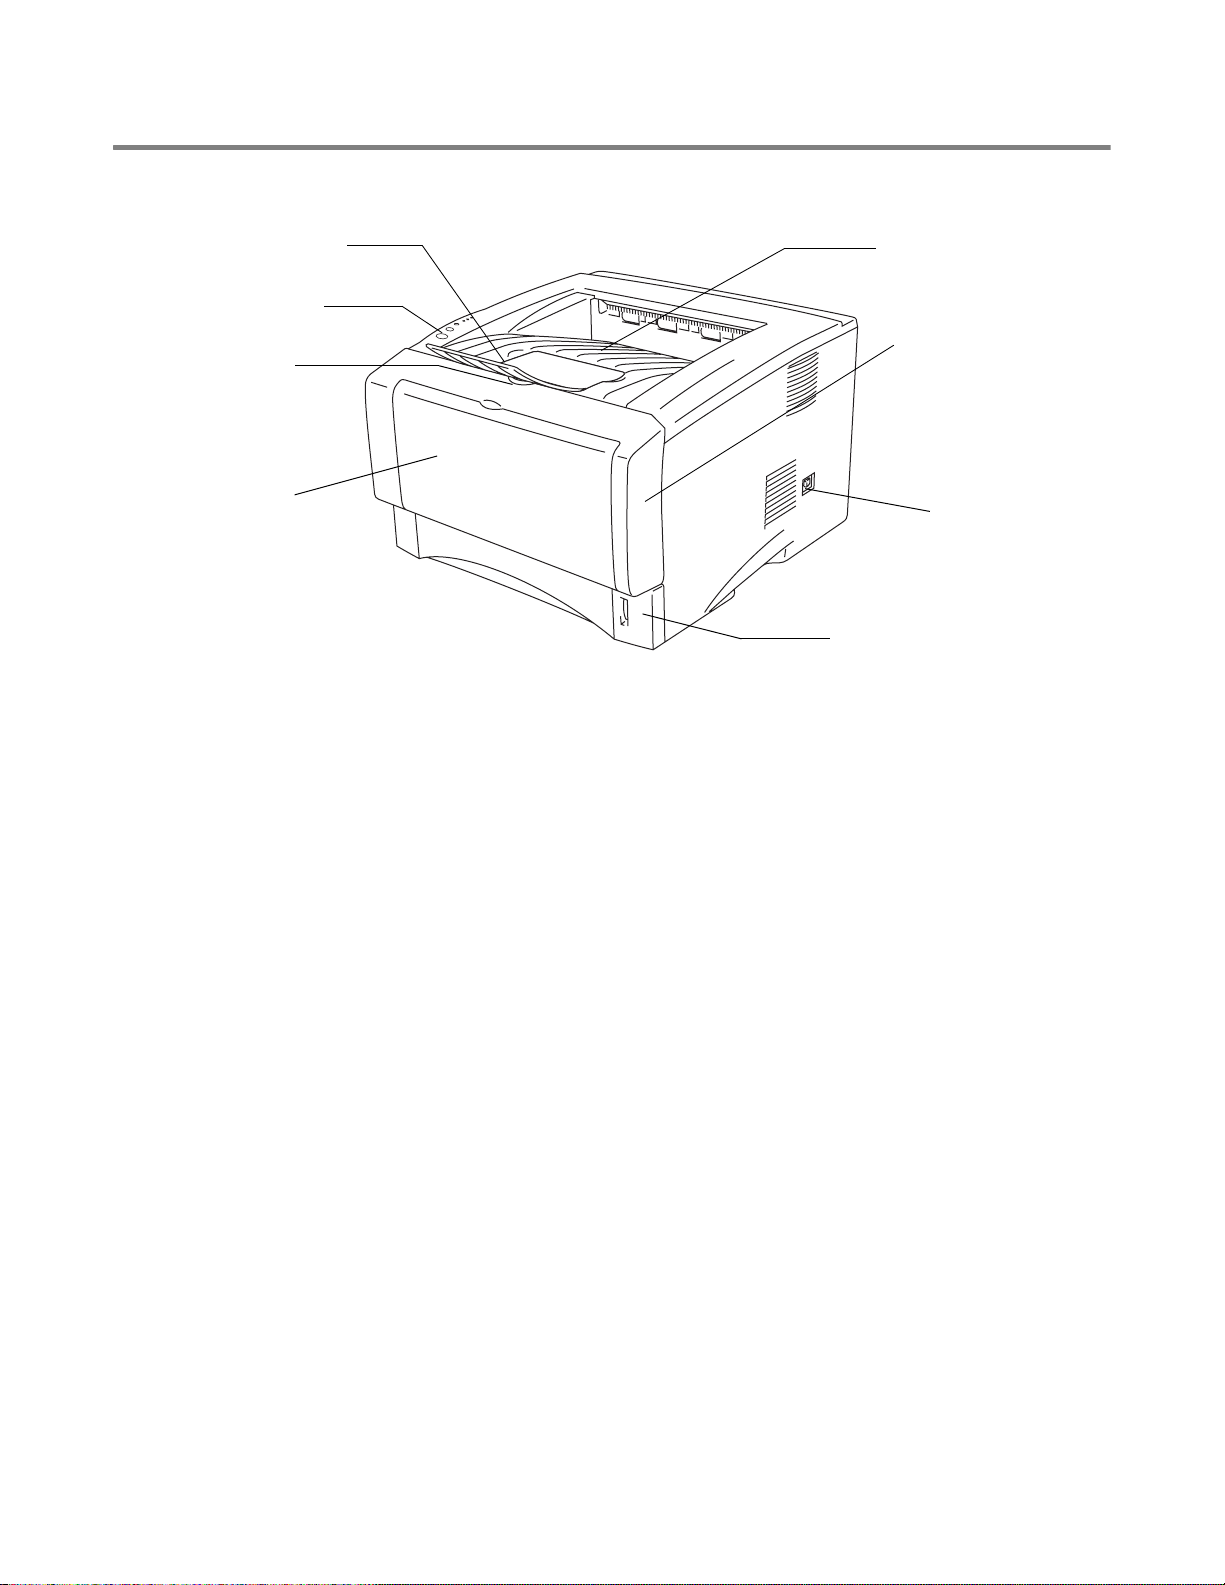
Front view
Front View*
1
2
3
4
Figure 1-1
1
Face-down Output Tray Support Flap (Support Flap)
2
Control Panel
3
Front Cover Release Button
4
(HL-5130 and HL-5140) Manual Feed Tray
(HL-5150D and HL-5170DN) Multi-purpose Tray (MP Tray)
5
Paper Tray
6
Power Switch
7
Front Cover
8
Face-down Output Tray
* The printer illustration is based on HL-5150D and HL-5170DN.
8
7
6
5
ABOUT THIS PRINTER 1 - 2
Page 10
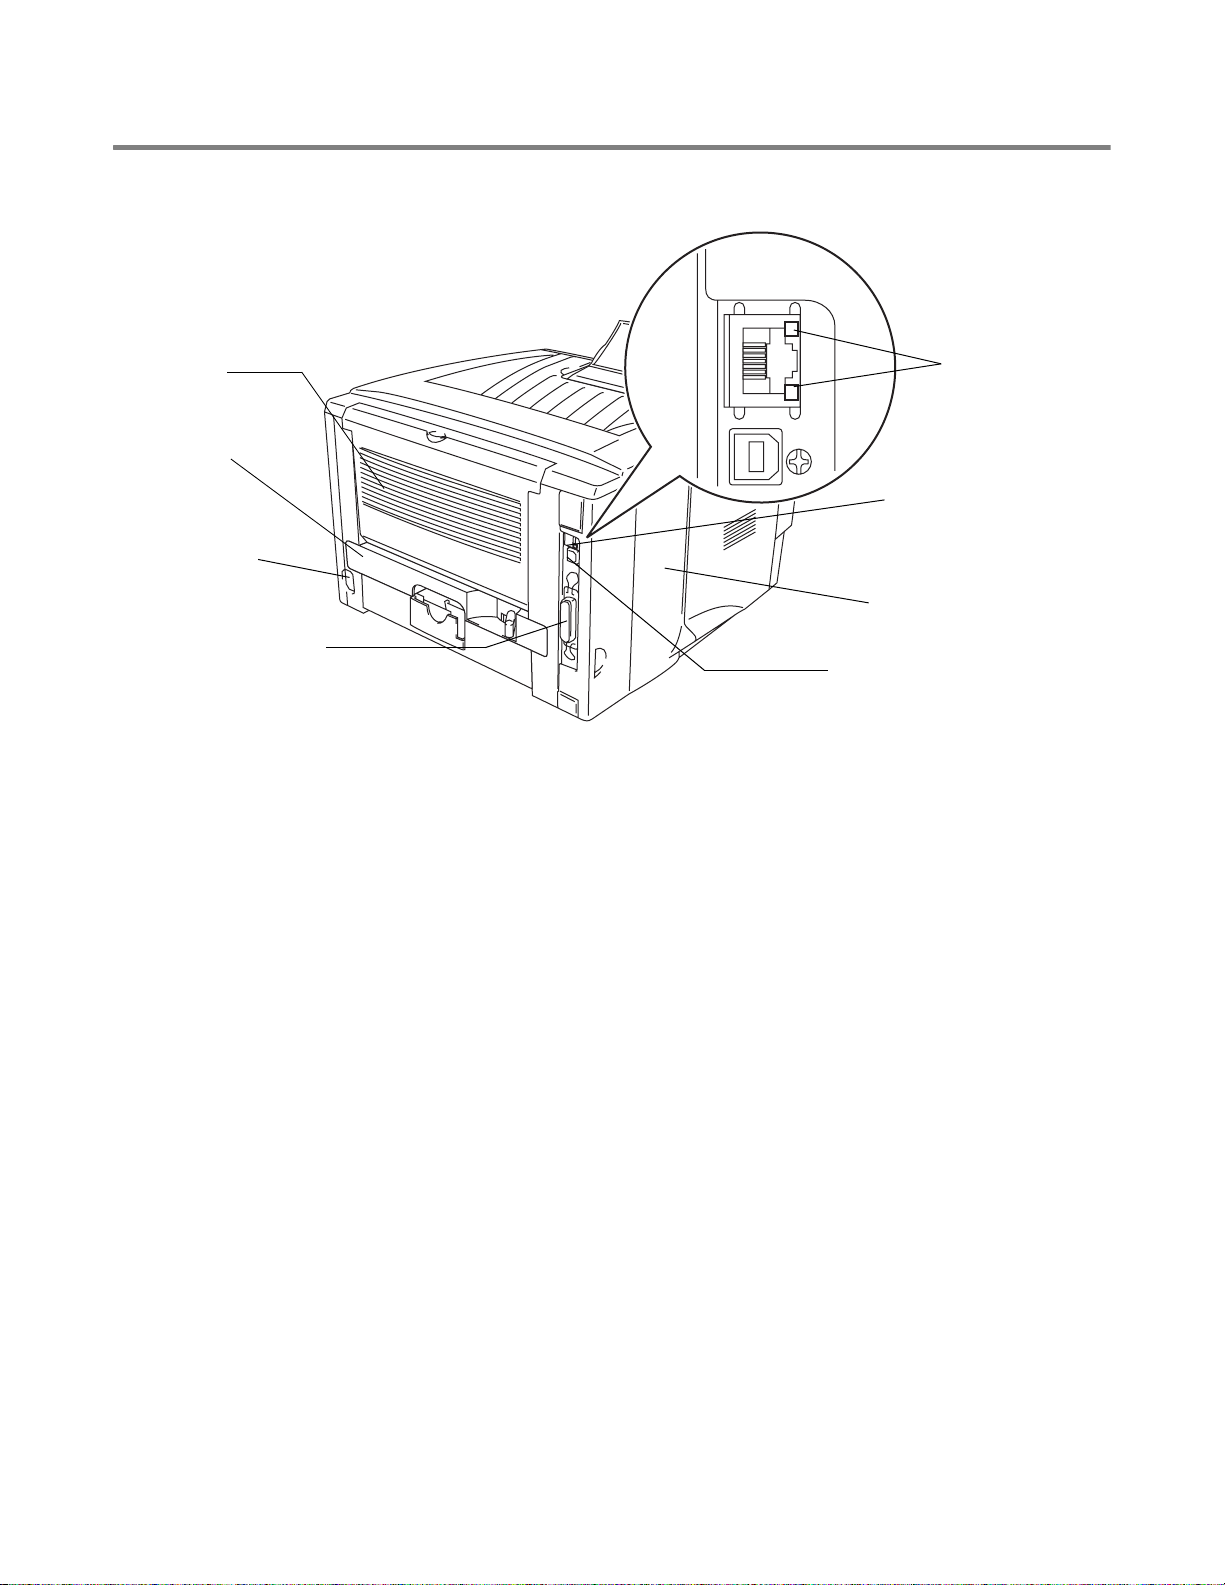
Back view
Back view*
1
2
3
4
Figure 1-2
1
Face-up Output Tray
2
Duplex Tray (For HL-5150D and HL-5170DN)
3
AC Power Connector
4
Parallel Interface Connector
5
USB Interface Connector
6
Side Cover
7
(HL-5170DN) 10/100BASE-TX Port
8
(HL-5170DN) LED (Light-emitting Diode)
* The printer illustration is based on HL-5170DN.
8
7
6
5
1 - 3 ABOUT THIS PRINTER
Page 11

Positioning the printer
Please read the following before you use the printer.
Power supply
Use the printer within the recommended power range.
Power source: USA and Canada: AC 110 to 120 V, 50/60 Hz
Europe and Australia: AC 220 to 240 V, 50/60 Hz
The power cord, including extensions, should be no longer than 5 meters (16½ feet).
Do not share the same power circuit with other high-power appli ances, such as an air conditioner, copier,
shredder and so on. If you cannot avoid using the printer with these applia nces, we recommend that you
use a voltage transformer or a high-frequency noise filter.
Use a voltage regulator if the power source is not stable.
Environment
■ Make sure that the power outlet is near the machine and is easy to get to so that, if there is an
emergency, it can be easily unplugged.
■ Only use the printer within the following ranges of temperature and humidity:
Temperature: 10 °C to 32.5 °C (50 °F to 90.5 °F)
Humidity: 20% to 80% (without condensation)
■ The printer should be used in a well-ventilated room.
■ Put the printer on a flat, horizontal surface.
■ Keep the printer clean. Do not put the printer in a dusty place.
■ Do not put the printer where th e ventilation hole of the pr inter is blocked. Keep a gap of app roximately
100 mm (4 in.) between the ventilation hole and the wall.
■ Do not put the printer in direct sunlight. If you have to put it near a window, use a blind or a heavy
curtain to protect the printer from direct sunlight.
■ Do not put the printer near devices that contain magnets or generate magnet ic fields.
■ Do not subject the printer to strong physic al shocks or vibrations.
■ Do not expose the printer to open flames or salty or corrosive gasses.
■ Do not put objects on top of the printer.
■ Do not put the printer near an air conditioner.
■ Keep the printer horizontal when you carry it.
ABOUT THIS PRINTER 1 - 4
Page 12
What kind of paper can I use?
Type and size of paper
The printer loads paper from the install ed pap er tray, manual feed tray or optional lower tray unit.
The names for the paper trays in the printer driver and this Guide are as follows:
Paper tray Tray 1
Manual feed tray Manual (HL-5130 and HL-5140)
Multi-purpose tray (MP tray) MP Tray (HL-5150D and HL-5170DN)
Optional lower tray unit Tray 2 (Not available for HL-5130)
While looking at this page on the CD- ROM, you can jump to the page for each printing method by clicking
L in the table.
Media type Tray 1 Manual
feed tray
Plain paper
60 g/m2 to 105 g/m2
(16 to 28 lb)
LLLLPlain paper
MP tray Tray 2 Select the Media type from the
printer driver
Recycled paper LLLL
Bond pape r LL Bond paper
Thick paper
105 g/m2 to 161 g/m2
(28 to 43 lb)
Transparency L
Up to 10 sheets
A4 or Letter
Labels L
Envelopes LL
LL Thick paper or Thicker paper
L
A4 or Letter
A4 or Letter
L
Up to 10 sheets
A4 or Letter
L
A4 or Letter
Transparencies
Thicker paper
Envelopes
Up to 3 envelopes
Envelopes - Thin
Envelopes - Thick
Card stock LL Thick paper or Thicker paper
Tray 1 Manual feed tray MP tray Tray 2
Paper size A4, Letter, Legal, B5
(ISO), Executive,
A5, A6, B6
Number of sheets 250 sheets
(80 g/m
2
or 21 lb)
Width: 69.9 to 215.9
mm (2.75 to 8.5 in.)
Length: 116 to
406.4 mm
(4.57 to 16 in.)
Width: 69.9 to 215.9
mm (2.75 to 8.5 in.)
Length: 116 to
406.4 mm
(4.57 to 16 in.)
Single sheet 50 sheets
(80 g/m2 or 21 lb)
A4, Letter, Legal, B5
(ISO), Executive, A5
250 sheets
(80 g/m2 or 21 lb)
1 - 5 ABOUT THIS PRINTER
Page 13

Recommended paper
Europe USA
Plain paper Xerox Premier 80 g/m
Xerox Business 80 g/m
Modo DATACOPY 80 g/m
IGEPA X-Press 80 g/m
Recycled paper Xerox Recycled Supreme 80 g/m
2
2
2
2
2
Transparency 3M CG3300 3M CG 3300
Labels Avery laser label L7163 Avery laser label #5160
■ Before you buy a lot of paper, please test some to make sure that the paper is suitable.
■ Use paper that is made for plain-paper copying.
■ Use paper that is 75 to 90 g/m
2
(20 to 24 lb).
■ Use neutral paper. Do not use acidic or alkaline paper.
■ Use long-grain paper.
■ Use paper with a moisture content of approximately 5%.
■ This printer can use recycled paper that meets the DIN 19309 specification.
Caution
Xerox 4200DP 20 lb
Hammermill Laser Paper 24 lb
Do not use ink jet paper, or it may cause a paper jam and damage your printer.
To help you choose which paper to use with this printer, see Important information for choosing your
paper on page A-6.
ABOUT THIS PRINTER 1 - 6
Page 14
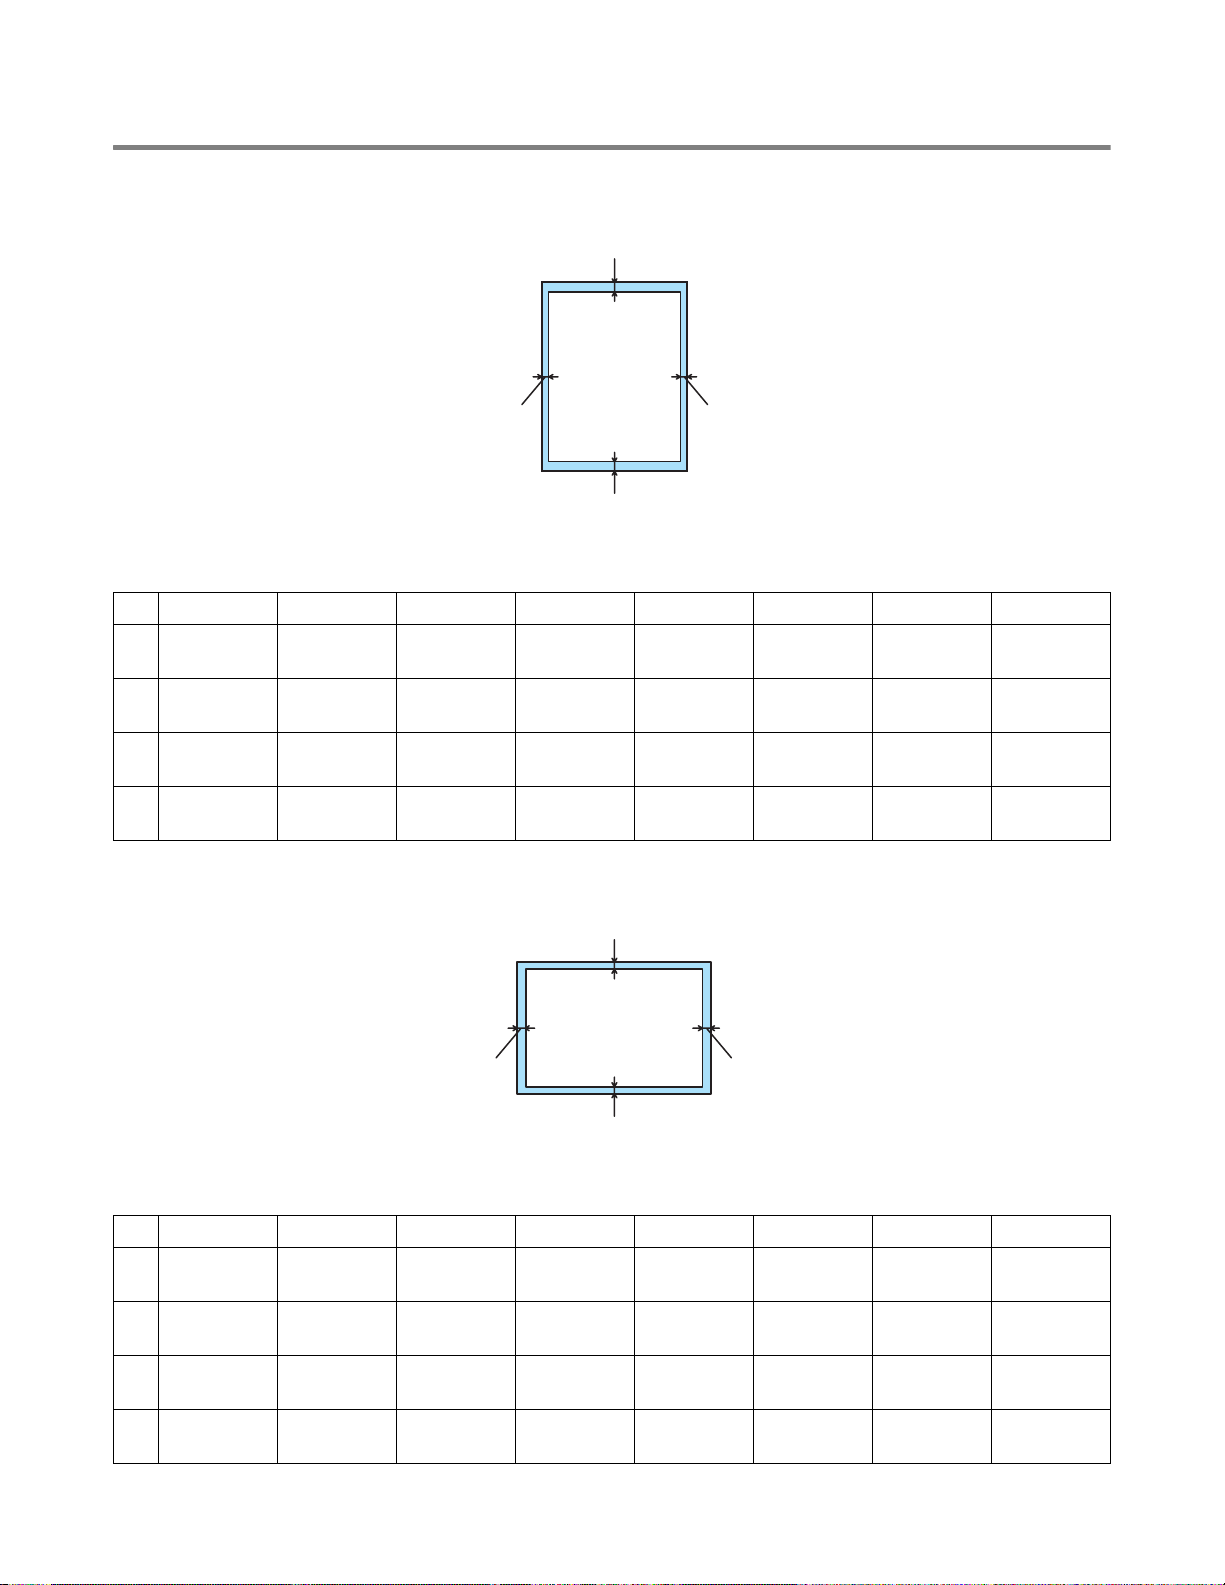
Printable area
When using PCL emulation, the edges of the paper that cannot be printed on are shown bel ow.
Portrait
1
2
4
3
Figure 1-3
A4 Letter Legal B5 (ISO) Executive A5 A6 B6
1
2
3
4
4.2 mm
(0.17 in.)
6.01 mm
(0.24 in.)
4.2 mm
(0.17 in.)
6.01 mm
(0.24 in.)
4.2 mm
(0.17 in.)
6.35 mm
(0.25 in.)
4.2 mm
(0.17 in.)
6.35 mm
(0.25 in.)
4.2 mm
(0.17 in.)
6.35 mm
(0.25 in.)
4.2 mm
(0.17 in.)
6.35 mm
(0.25 in.)
4.2 mm
(0.17 in.)
6.01 mm
(0.24 in.)
4.2 mm
(0.17 in.)
6.01 mm
(0.24 in.)
4.2 mm
(0.17 in.)
6.35 mm
(0.25 in.)
4.2 mm
(0.17 in.)
6.35 mm
(0.25 in.)
4.2 mm
(0.17 in.)
6.01 mm
(0.24 in.)
4.2 mm
(0.17 in.)
6.01 mm
(0.24 in.)
4.2 mm
(0.17 in.)
6.01 mm
(0.24 in.)
4.2 mm
(0.17 in.)
6.01 mm
(0.24 in.)
Landscape
1
4.2 mm
(0.17 in.)
6.01 mm
(0.24 in.)
4.2 mm
(0.17 in.)
6.01 mm
(0.24 in.)
2
4
3
Figure 1-4
A4 Letter Legal B5 (ISO) Executive A5 A6 B6
4.2 mm
1
(0.17 in.)
5.0 mm
2
(0.19 in.)
4.2 mm
3
(0.17 in.)
5.0 mm
4
(0.19 in.)
1 - 7 ABOUT THIS PRINTER
4.2 mm
(0.17 in.)
5.08 mm
(0.2 in.)
4.2 mm
(0.17 in.)
5.08 mm
(0.2 in.)
4.2 mm
(0.17 in.)
5.08 mm
(0.2 in.)
4.2 mm
(0.17 in.)
5.08 mm
(0.2 in.)
4.2 mm
(0.17 in.)
5.0 mm
(0.19 in.)
4.2 mm
(0.17 in.)
5.0 mm
(0.19 in.)
4.2 mm
(0.17 in.)
5.08 mm
(0.2 in.)
4.2 mm
(0.17 in.)
5.08 mm
(0.2 in.)
4.2 mm
(0.17 in.)
5.0 mm
(0.19 in.)
4.2 mm
(0.17 in.)
5.0 mm
(0.19 in.)
4.2 mm
(0.17 in.)
5.0 mm
(0.19 in.)
4.2 mm
(0.17 in.)
5.0 mm
(0.19 in.)
4.2 mm
(0.17 in.)
5.0 mm
(0.19 in.)
4.2 mm
(0.17 in.)
5.0 mm
(0.19 in.)
Page 15
Printing methods
Printing on plain paper
You can print on plain paper from the paper tr ay or manual feed tray. For t he paper you want to use, see
What kind of paper can I use? on page 1-5.
Printing on plain paper from the paper tray
Illustrations in this section are based on HL-5150D and HL-5170DN.
1
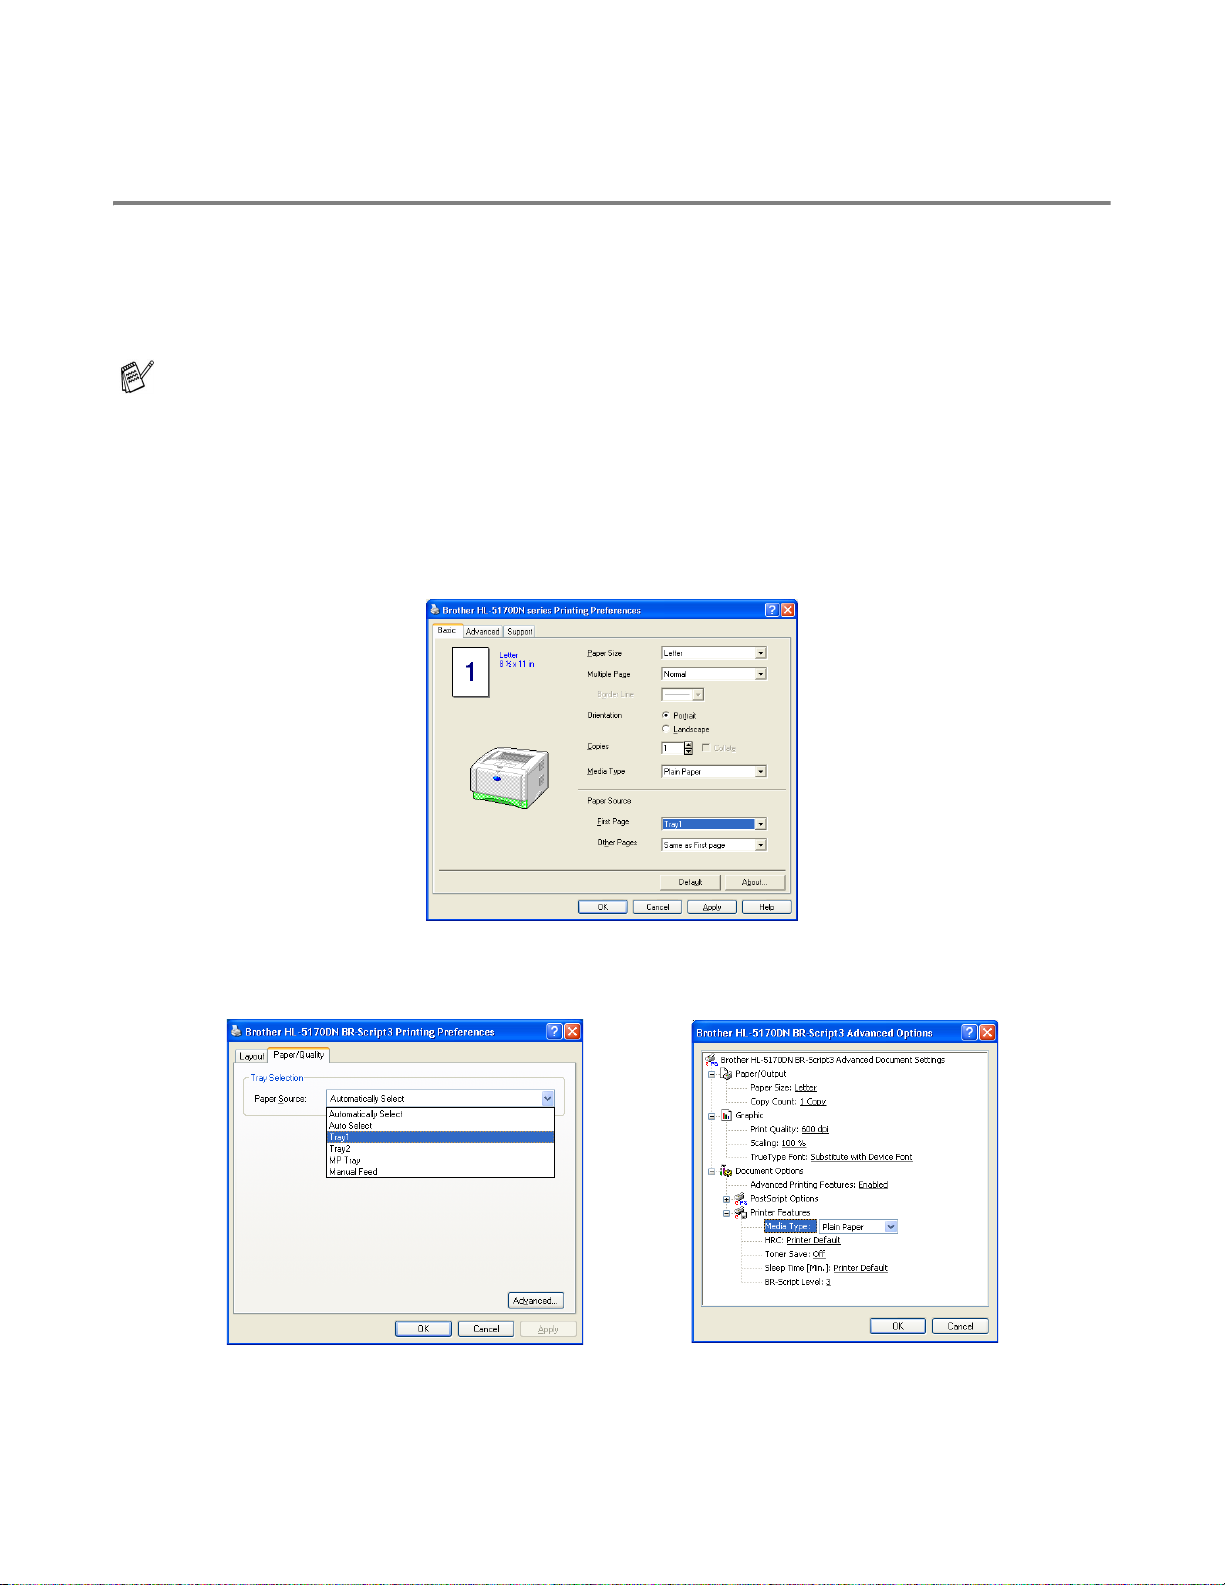
Select the Paper Size, Media Type, Paper Source, and other settings in the printer drive r.
Media Type: Plain Paper
Paper Source: Tray1
PCL driver
PS driver (For HL-5150D and HL-5170DN)
ABOUT THIS PRINTER 1 - 8
Page 16
2
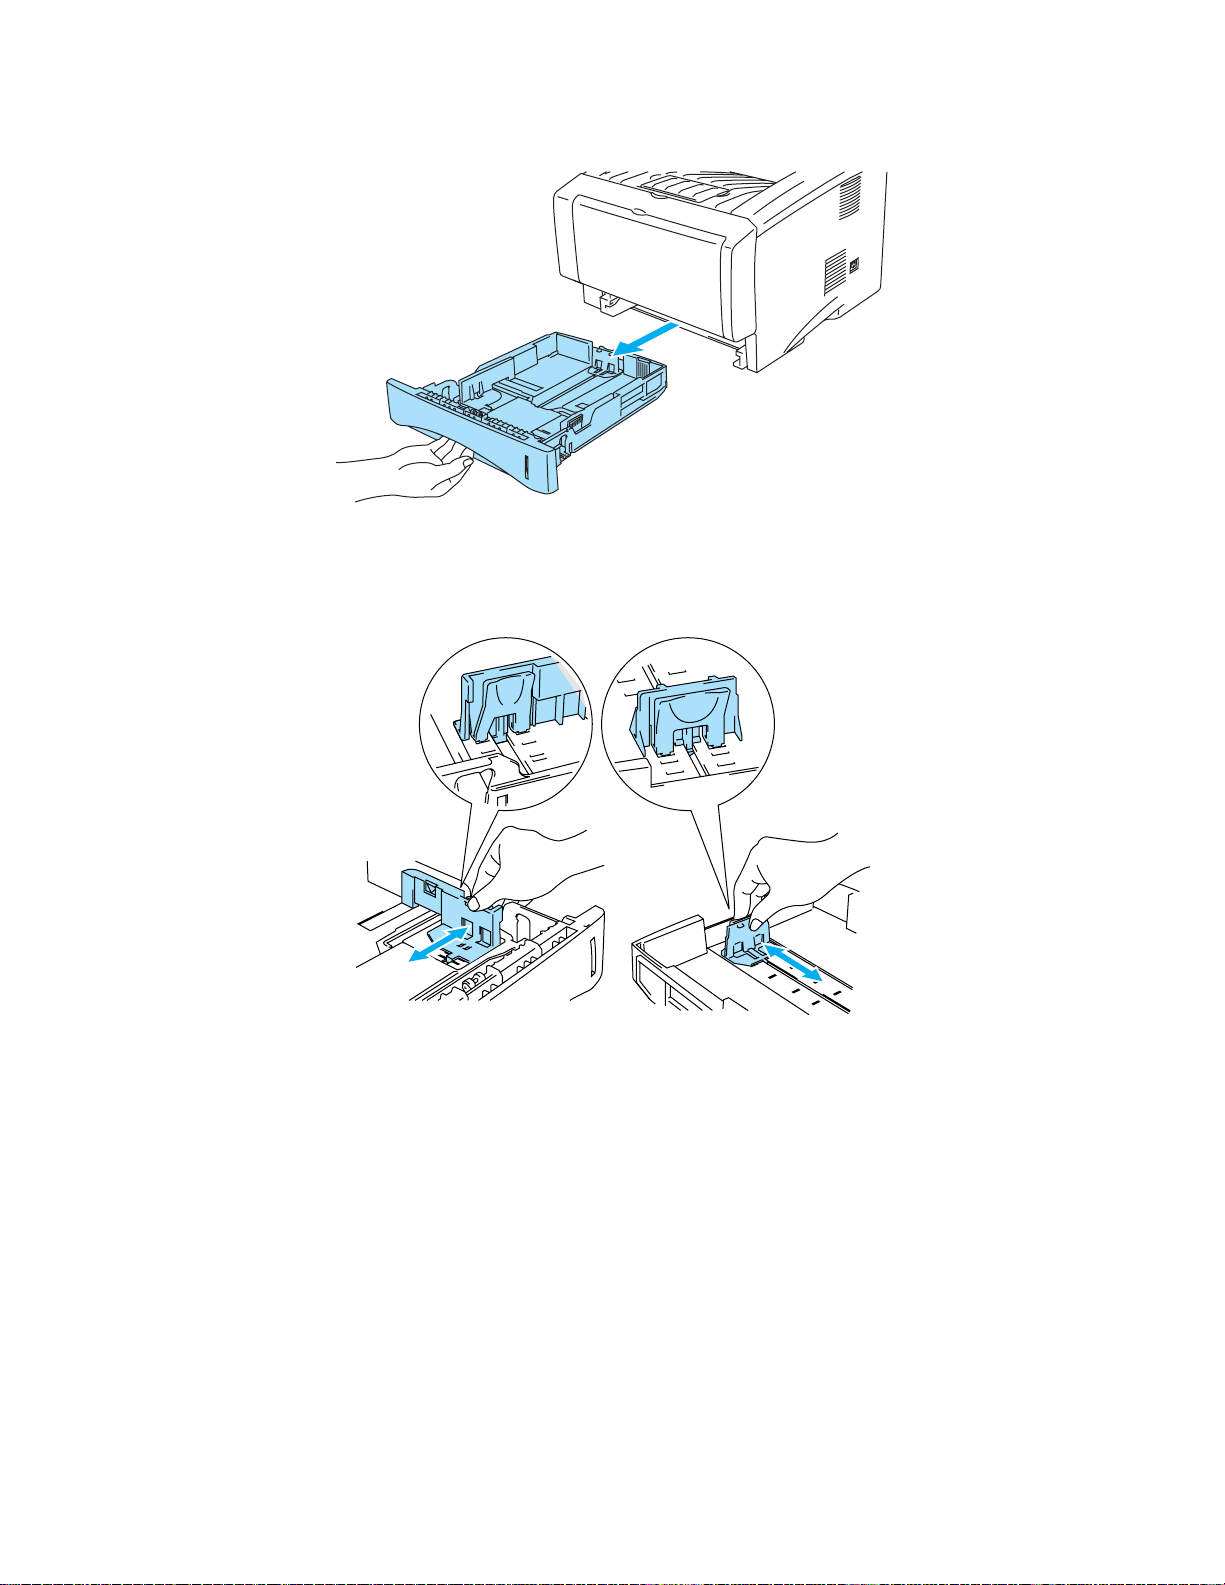
Pull the paper tray completely out of the printer.
Figure 1-5
3
While pressing the blue paper-guide release lever, slide the paper guides to fit the paper size.
Check that the guides are firmly in the slots.
1 - 9 ABOUT THIS PRINTER
Figure 1-6
Page 17
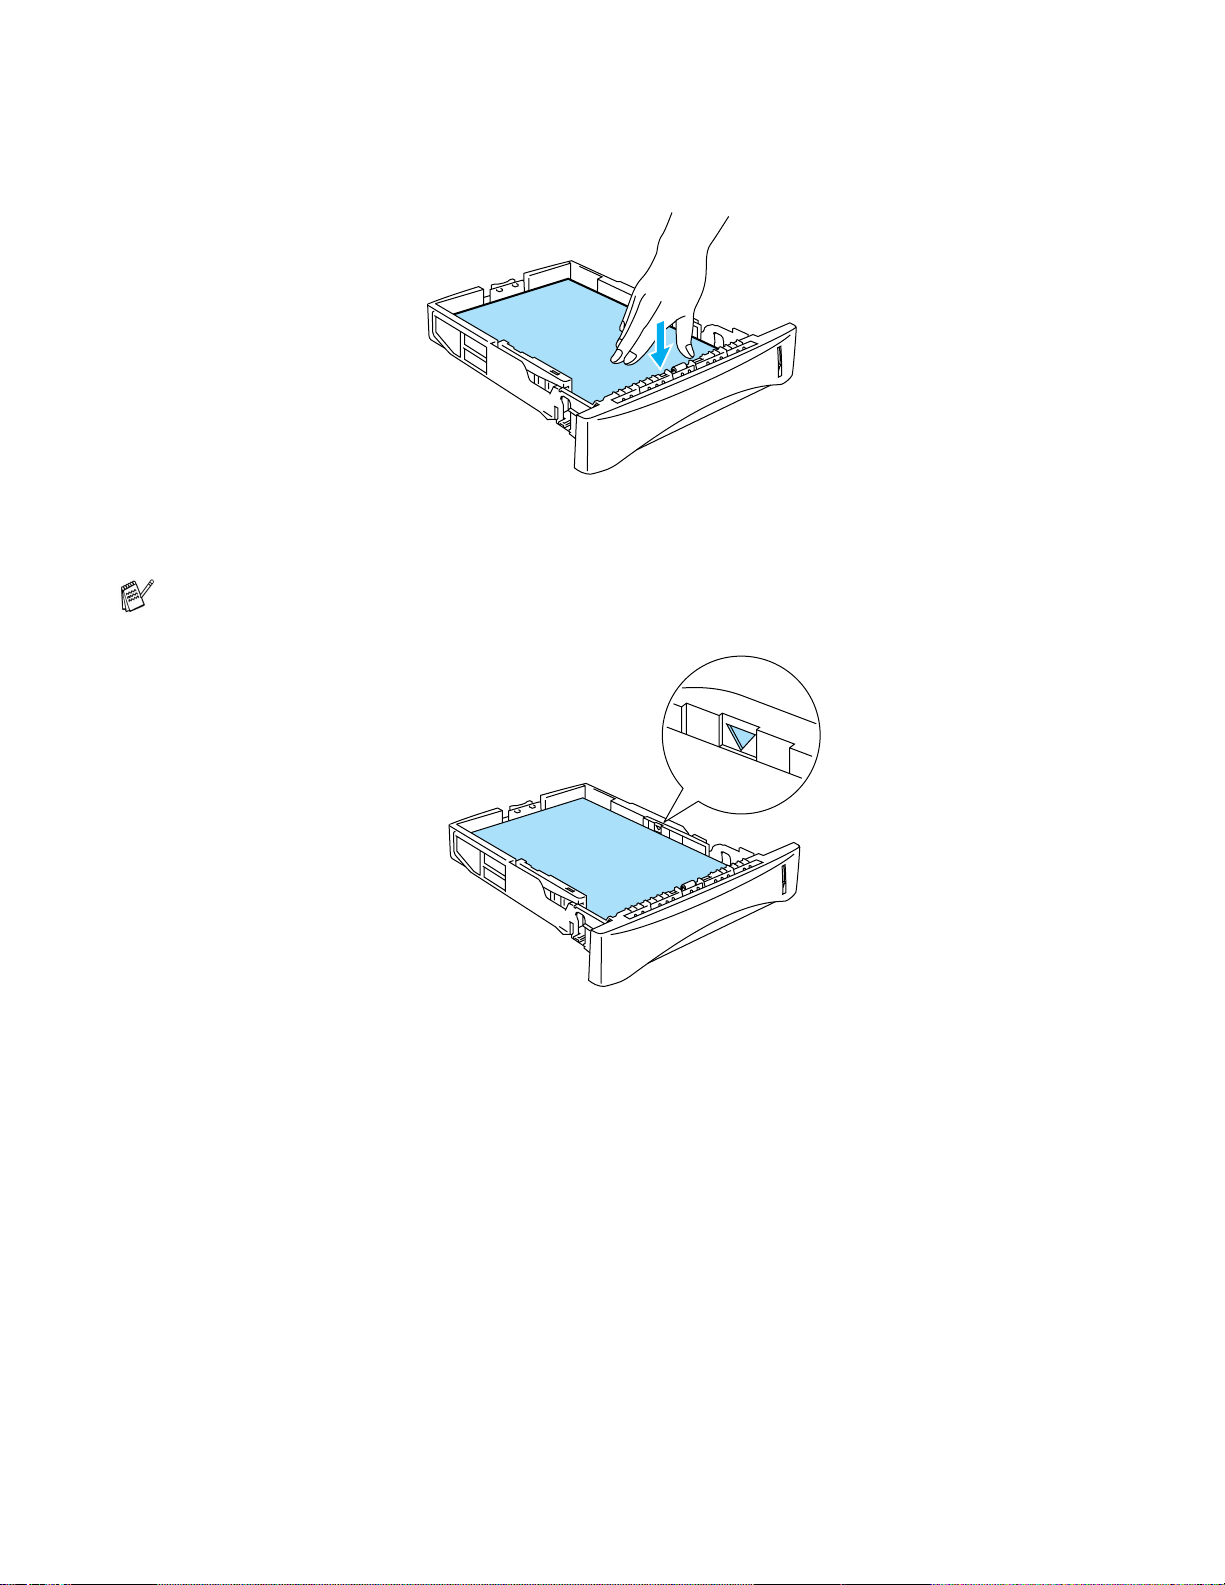
4
Put paper in the tray. Check that the paper is flat in the tray at all four corners.
Figure 1-7
Do not put more than 250 sheets of paper (80 g/m2 or 21 lb) in the tray, or paper jams may occur.
Check that paper is below the maximum paper mark (▼).
Figure 1-8
When you use pre-printed paper, put the si de that is goin g to be printed on ( blank side) f ace down,
with the top of the paper at the front of the tray.
5
Put the paper tray firmly back in the printer. Check that it is inserted fully into the printer.
ABOUT THIS PRINTER 1 - 10
Page 18
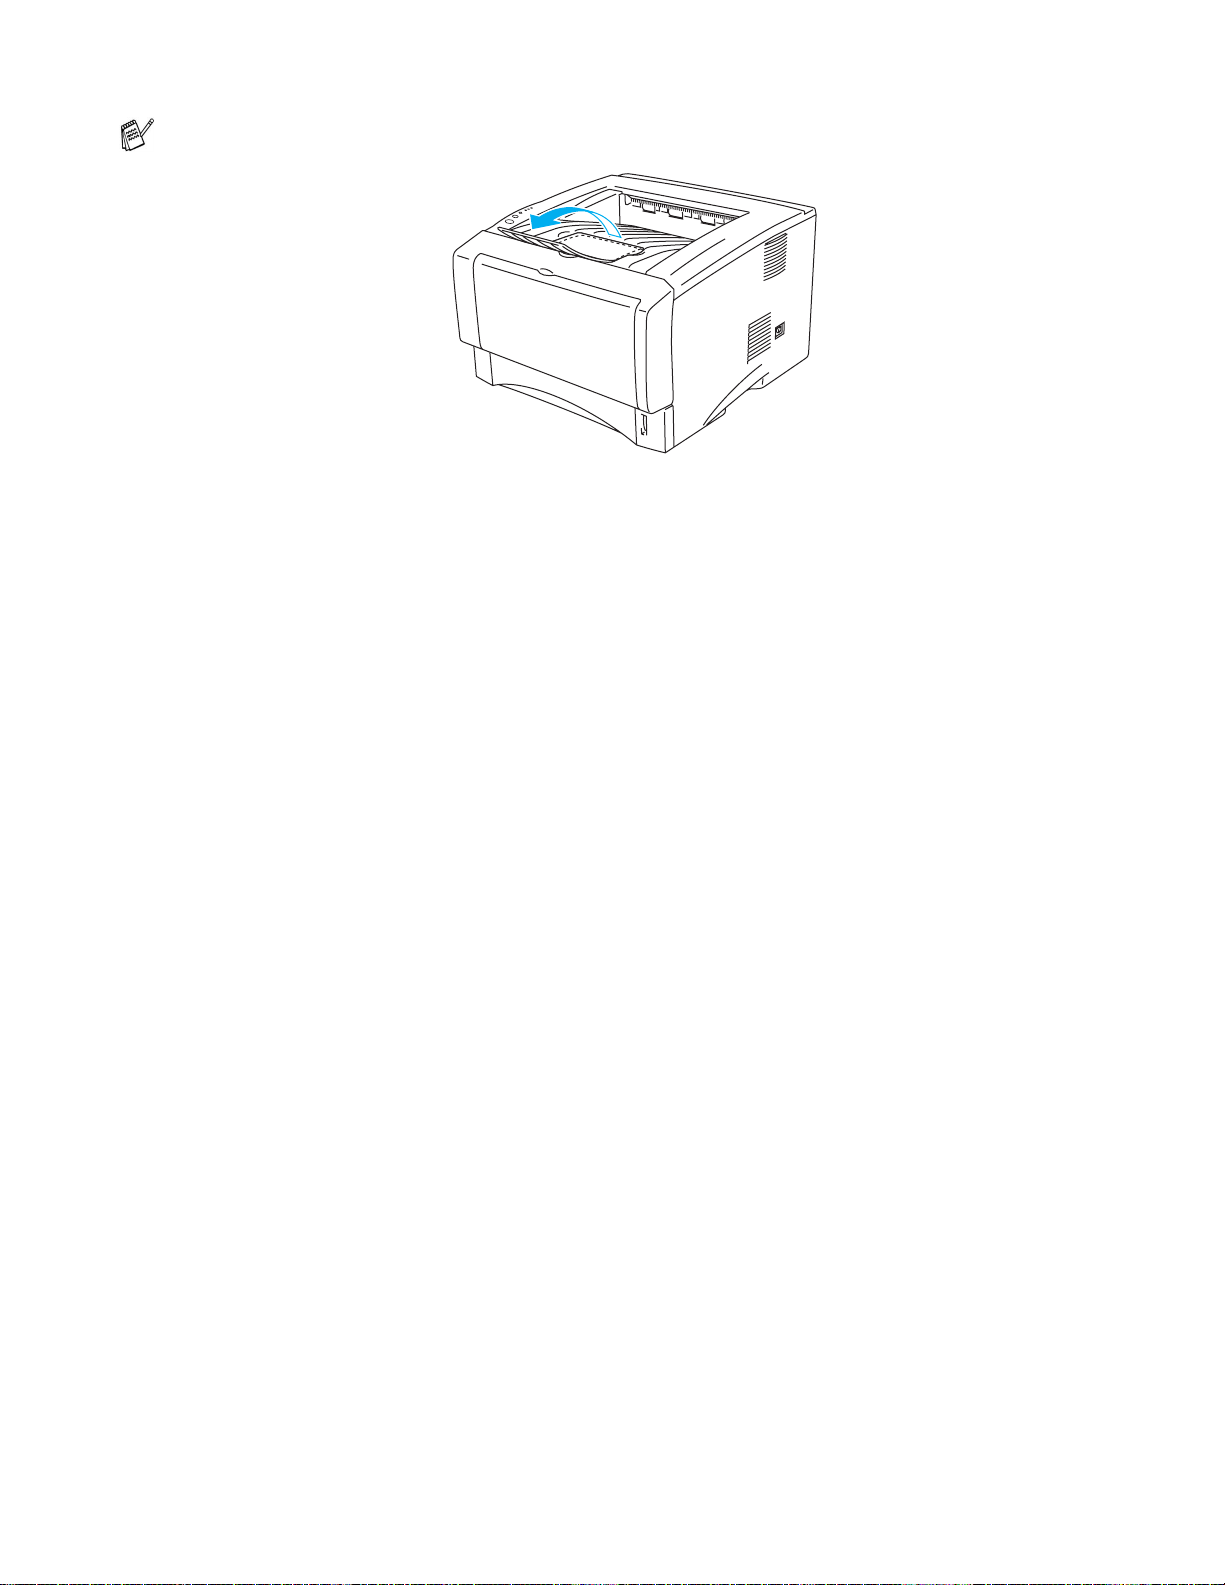
Pull up the output tray support flap to prevent paper from sliding off the face-down output tray.
Figure 1-9
If you choose not to pull out the output tray support flap, we recommend that you remove printed
pages immediately after they come out of the printer.
6
Send the print data to the printer.
1 - 11 ABOUT THIS PRINTER
Page 19
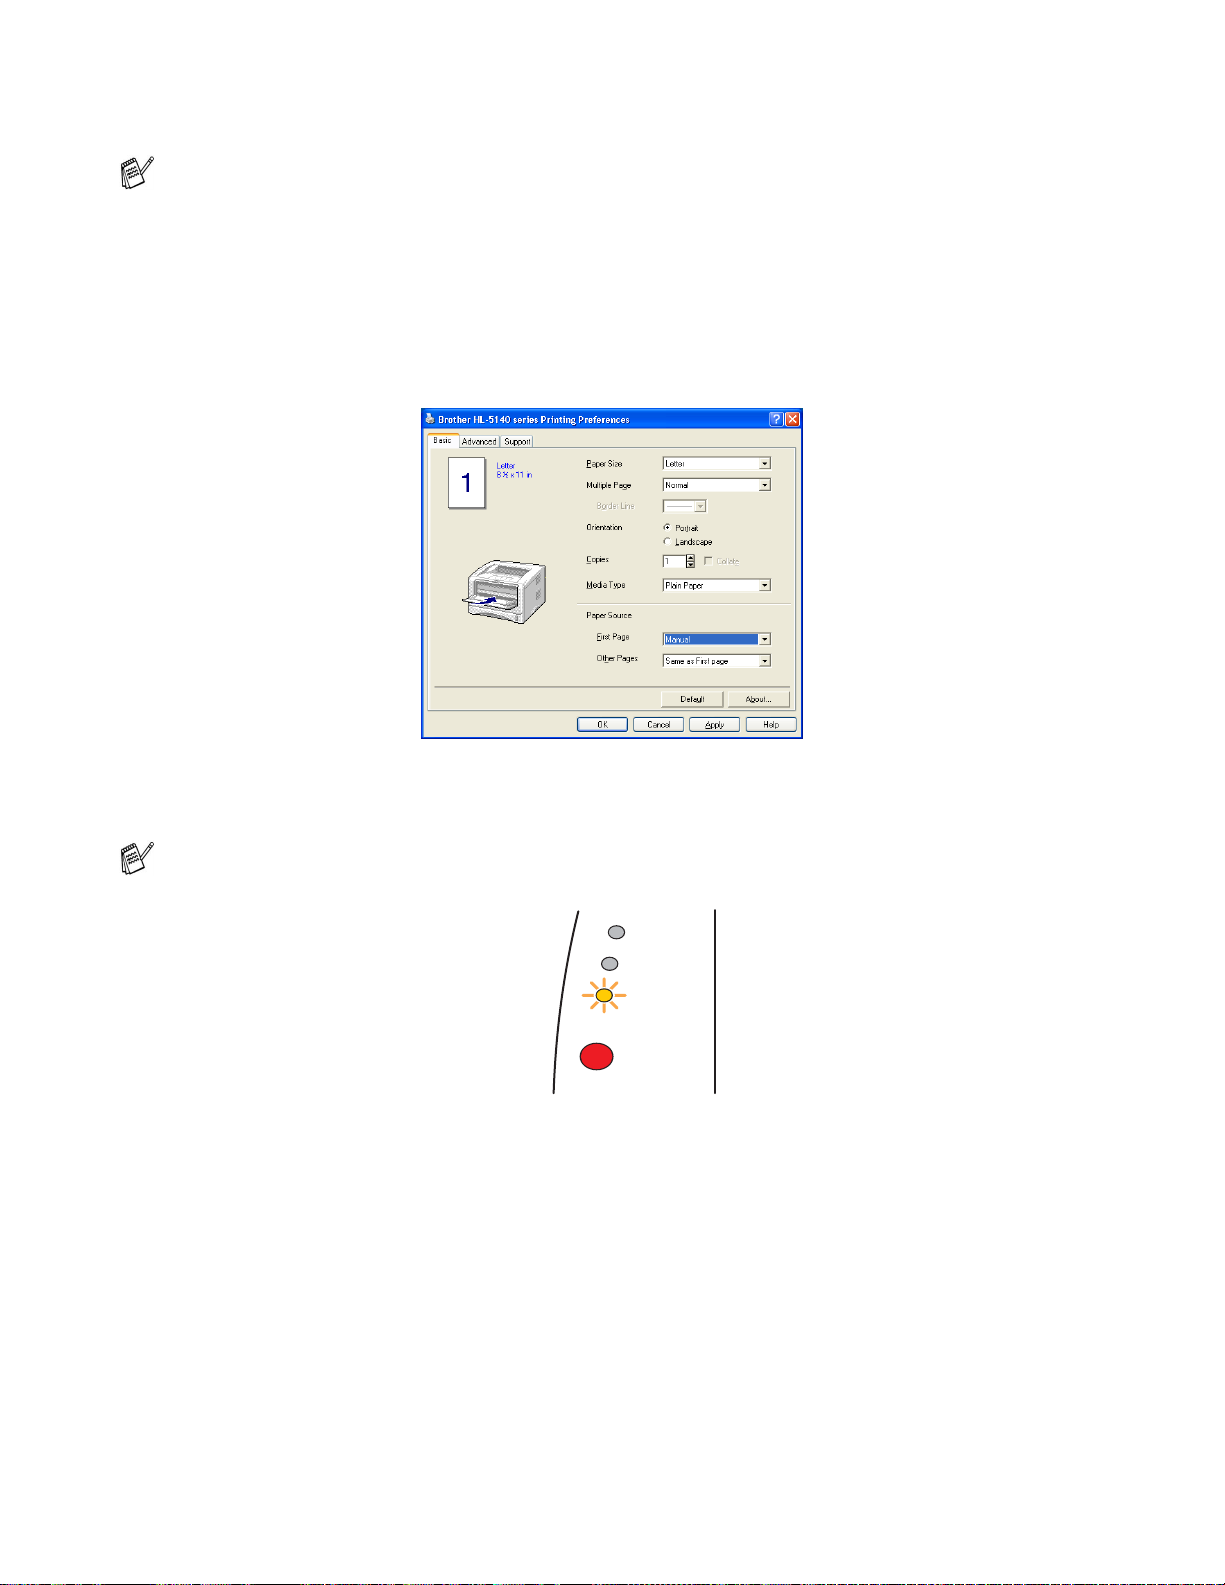
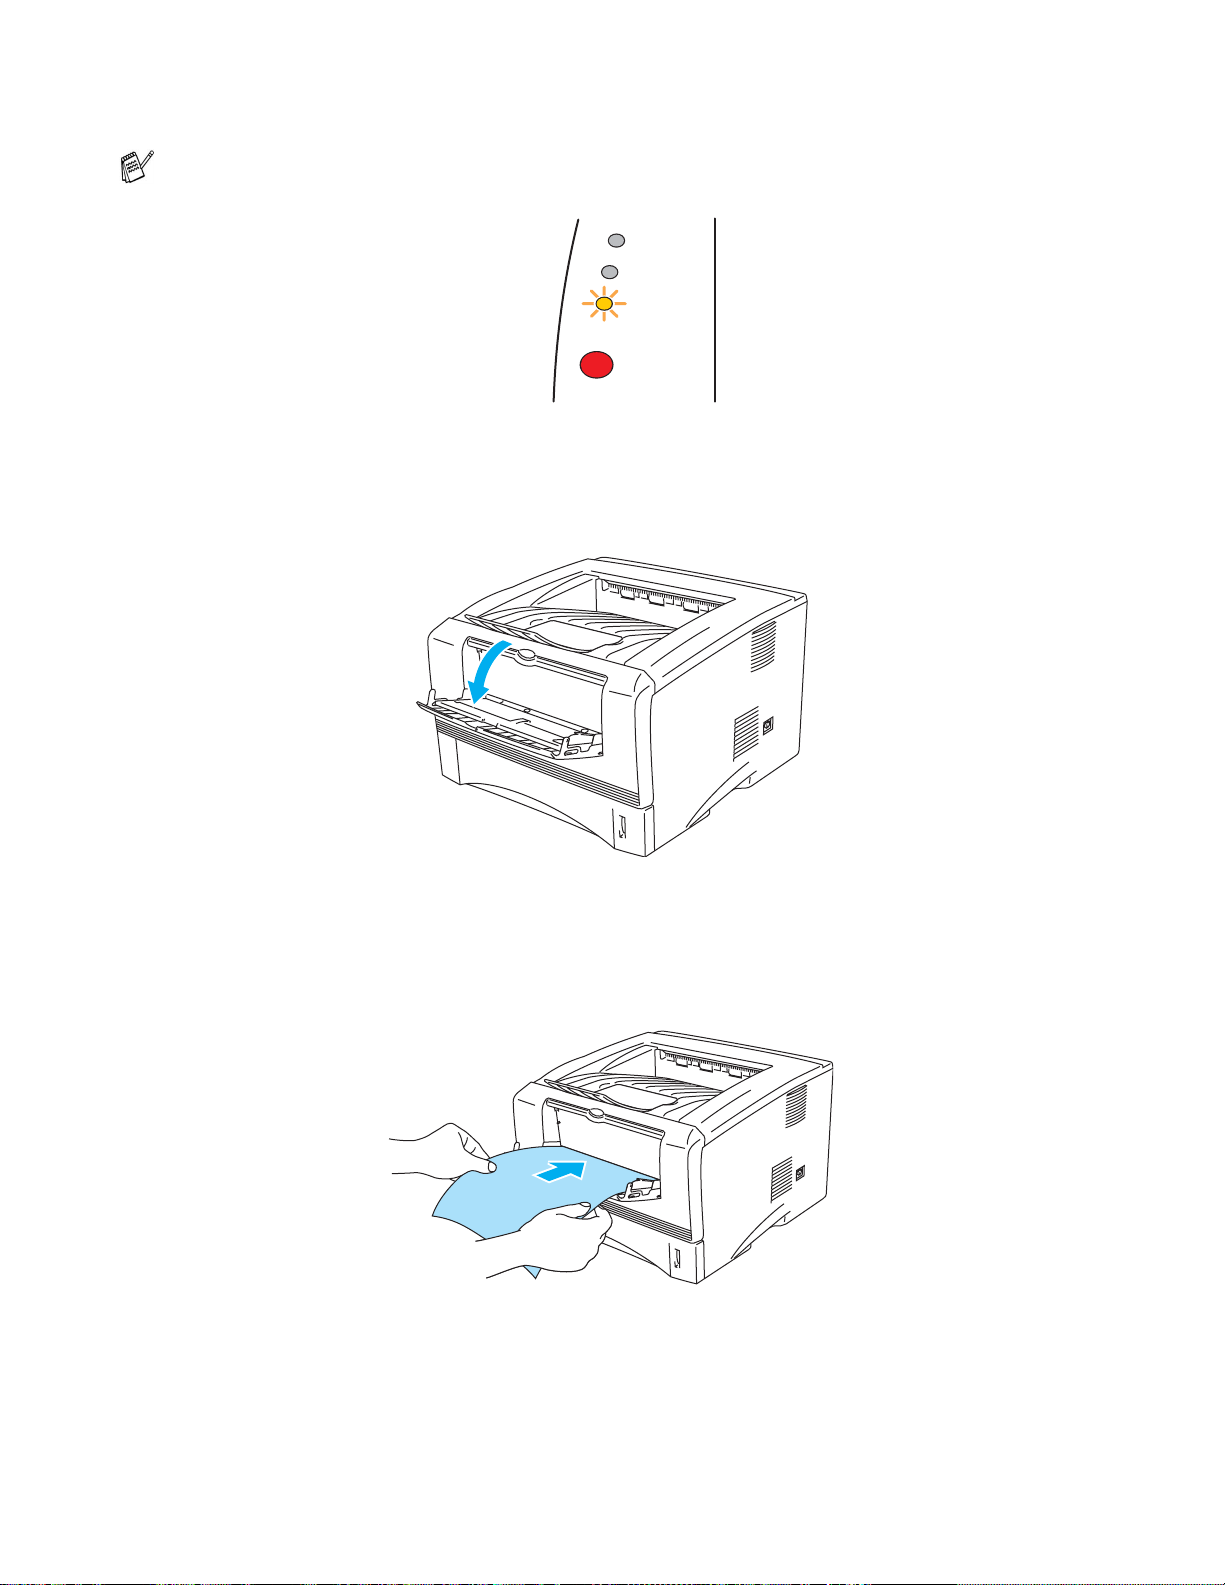
Printing on plain paper from the manual feed tray (For HL-5130 and HL-5140)
The printer automatically turns on the Manual Feed mode when you put paper in the manual feed
tray.
1
Select the Paper Size, Media Type, Paper Source, and other settings in the printer drive r.
Media Type: Plain Paper
Paper Source: Manual
PCL driver
2
Send the print data to the printer.
A NO PAPER message is shown in the Status Monitor and indicated by the control panel LEDs until
you put a sheet of paper in the manual feed tray.
Toner
Drum
Paper
Status
Figure 1-10
ABOUT THIS PRINTER 1 - 12
Page 20

3
Open the manual feed tray. Slide the paper guides to fit the paper size.
Figure 1-11
4
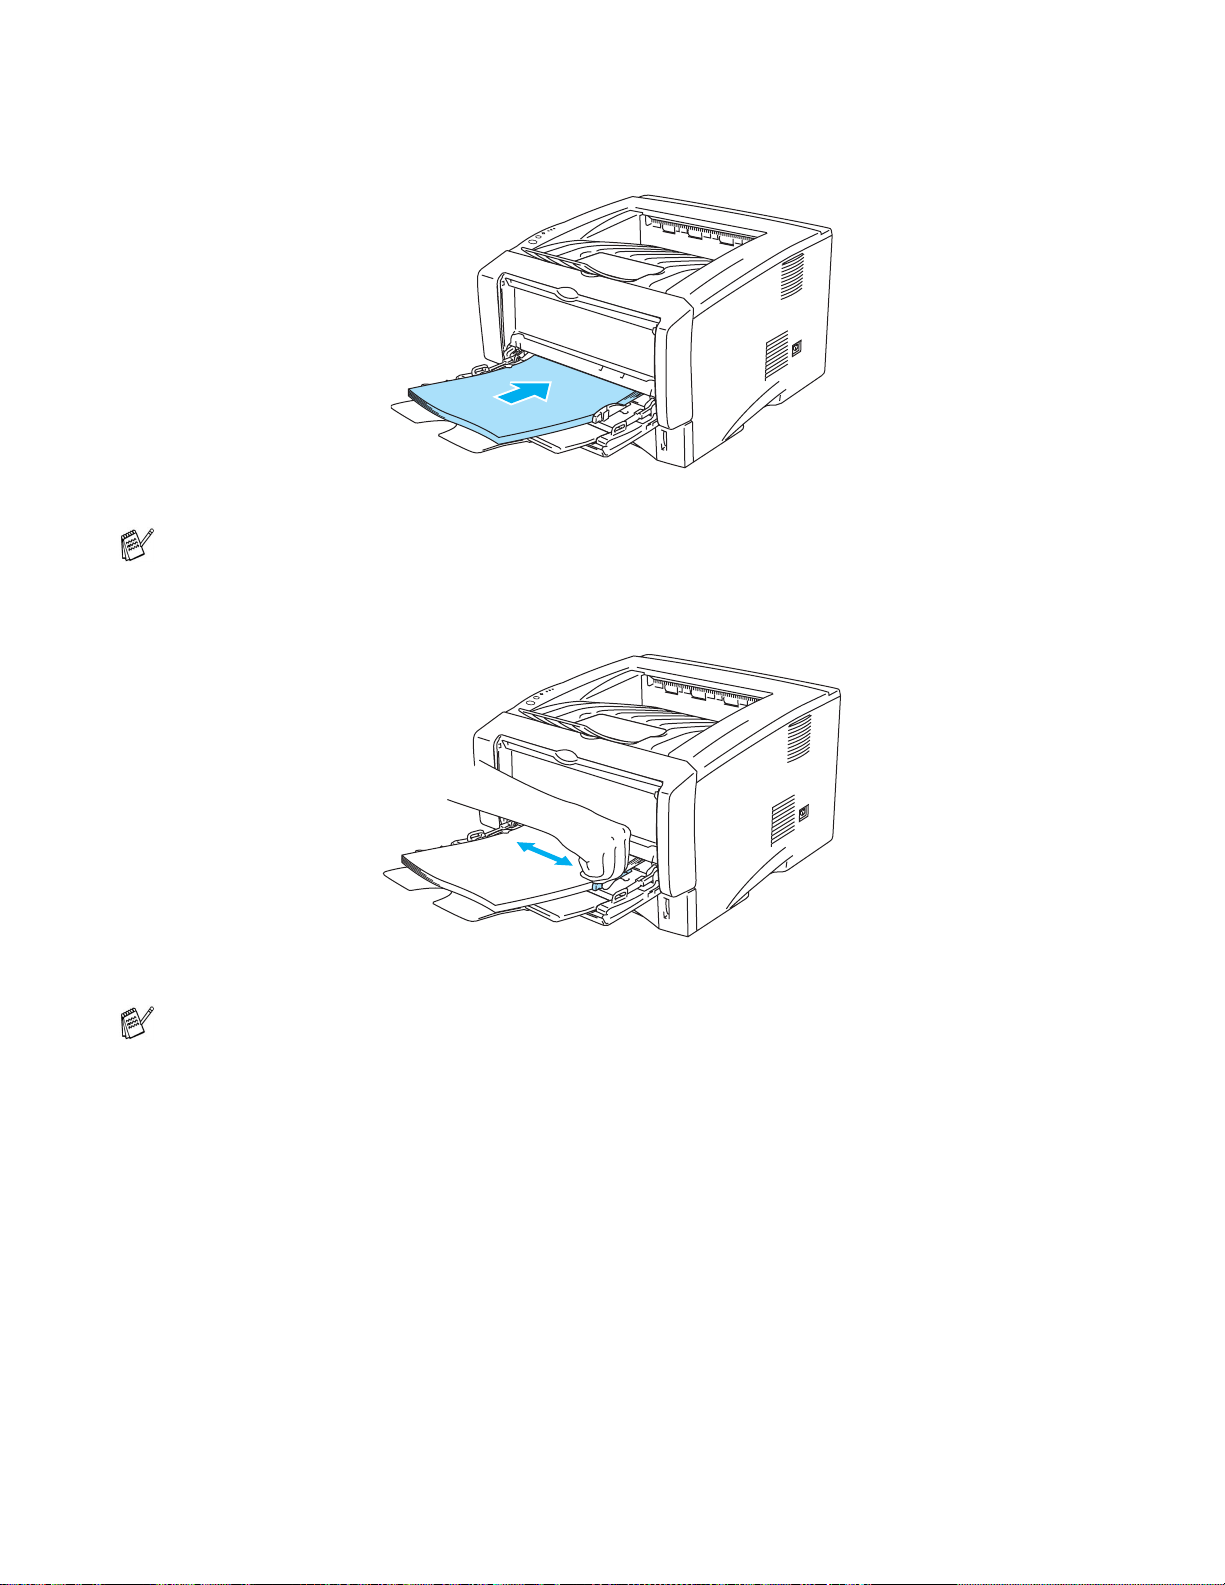
Using both hands put paper in the manual feed tray until the front edge of the paper touches the
paper feed roller. Hold the paper in this pos ition until the printer a utomatically f eeds the paper i n for
a short distance, and then let go of the paper.
Figure 1-12
■ Make sure that the paper is straight and in the proper posit ion on the manual feed tray. If it is
not, the paper may not be fed properly, resulting in a skewed prin tout or a paper jam.
■ Do not put more than one piece of paper in the manual feed tray at the same time, or it may
cause a jam.
■ If you put any Media (paper , transpar ency and so on) in the manual feed tray befo re the pri nter
is in the Ready state, the media may be ejected without being print ed on.
5
After the printed page comes out of the printer, put in the next sheet of paper as in Step 4 above.
Repeat for each page that you want to print.
1 - 13 ABOUT THIS PRINTER
Page 21
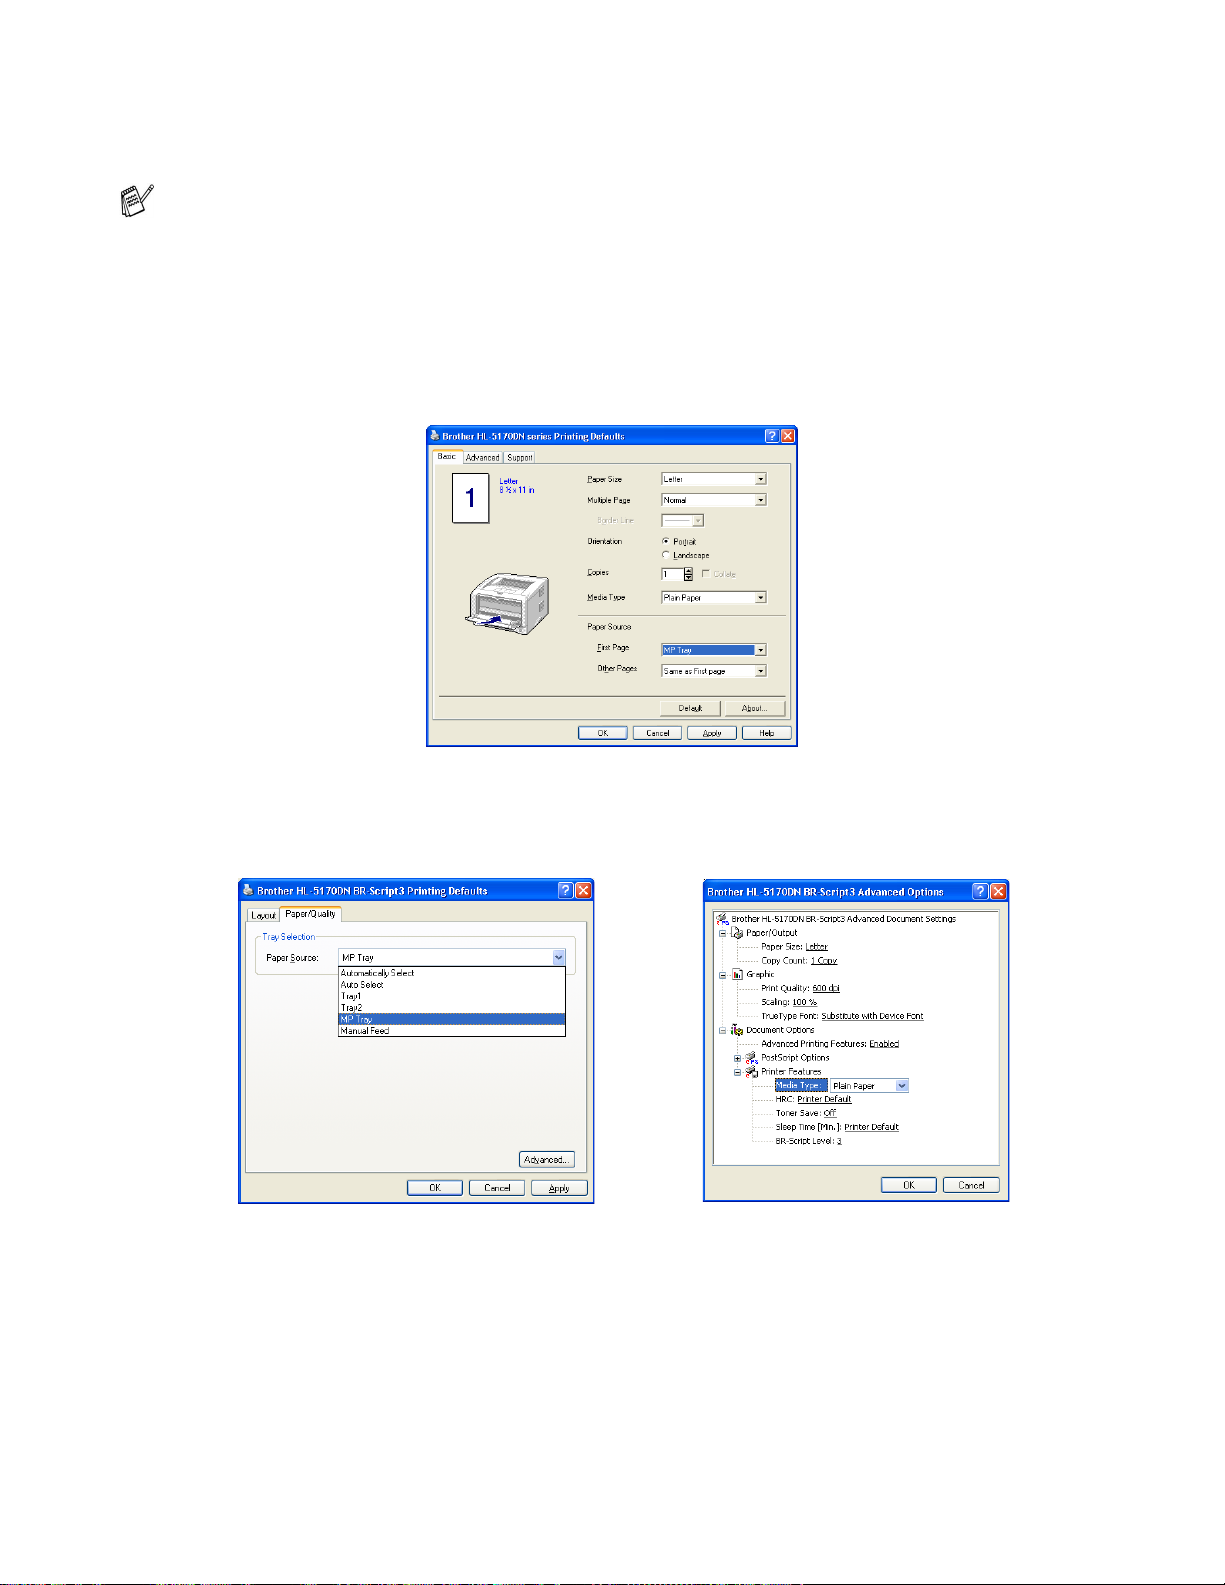
Printing on plain paper from the multi-purpose tray (MP tray) (For HL-5150D and HL-5170DN)
The printer automatically turns on the MP Tray mode when you put paper in the multi- purpose tr ay.
1
Select the Paper Size, Media Type, Paper Source, and other settings in the printer drive r.
Media Type: Plain Paper
Paper Source: MP Tray
PCL driver
PS driver
ABOUT THIS PRINTER 1 - 14
Page 22
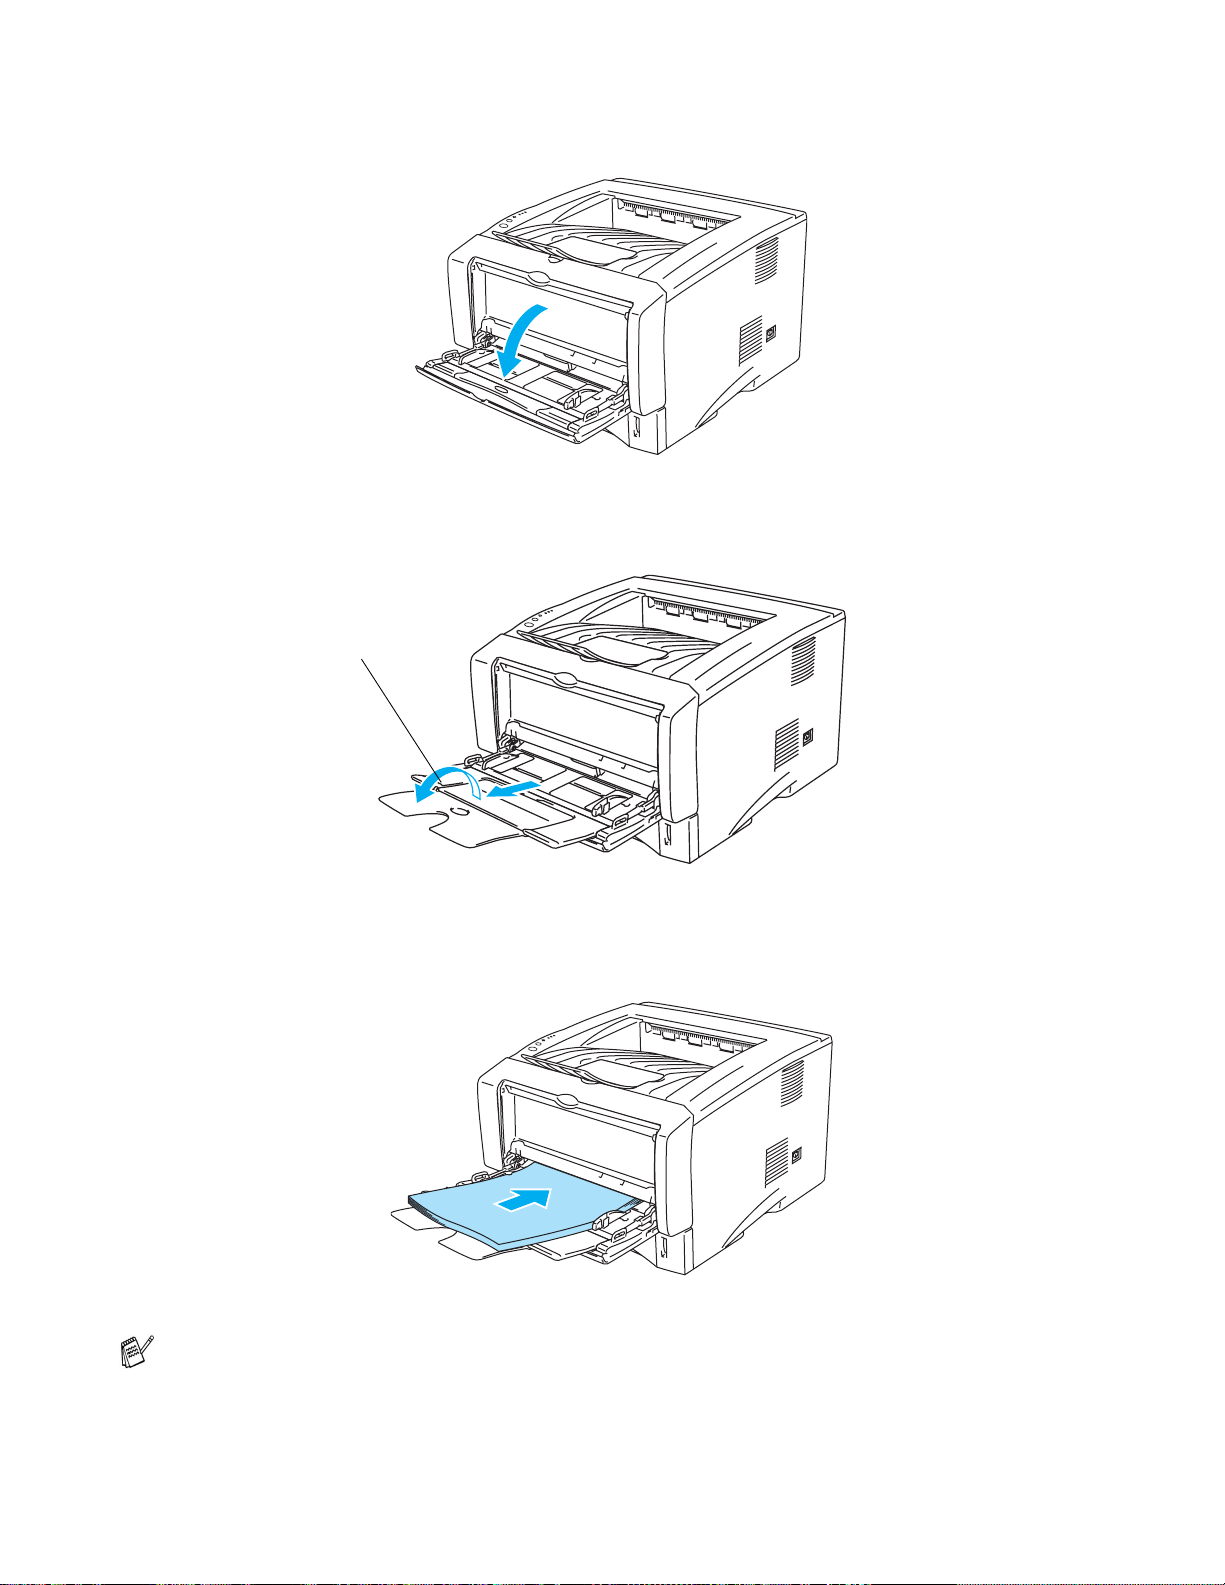
2
Open the MP tray and lower it gently.
3
Pull out the MP tray support flap.
MP tray support flap
Figure 1-13
Figure 1-14
4
When putting paper in the MP tray, make sur e it touches the back of the tray and remains under the
maximum paper height guides on both sides of the tray.
Figure 1-15
Make sure that the paper is straight and in t he prop er posit ion on the MP tray. I f it is not , t he paper
may not be fed properly, resulting in a skewed printout or a paper jam.
1 - 15 ABOUT THIS PRINTER
Page 23
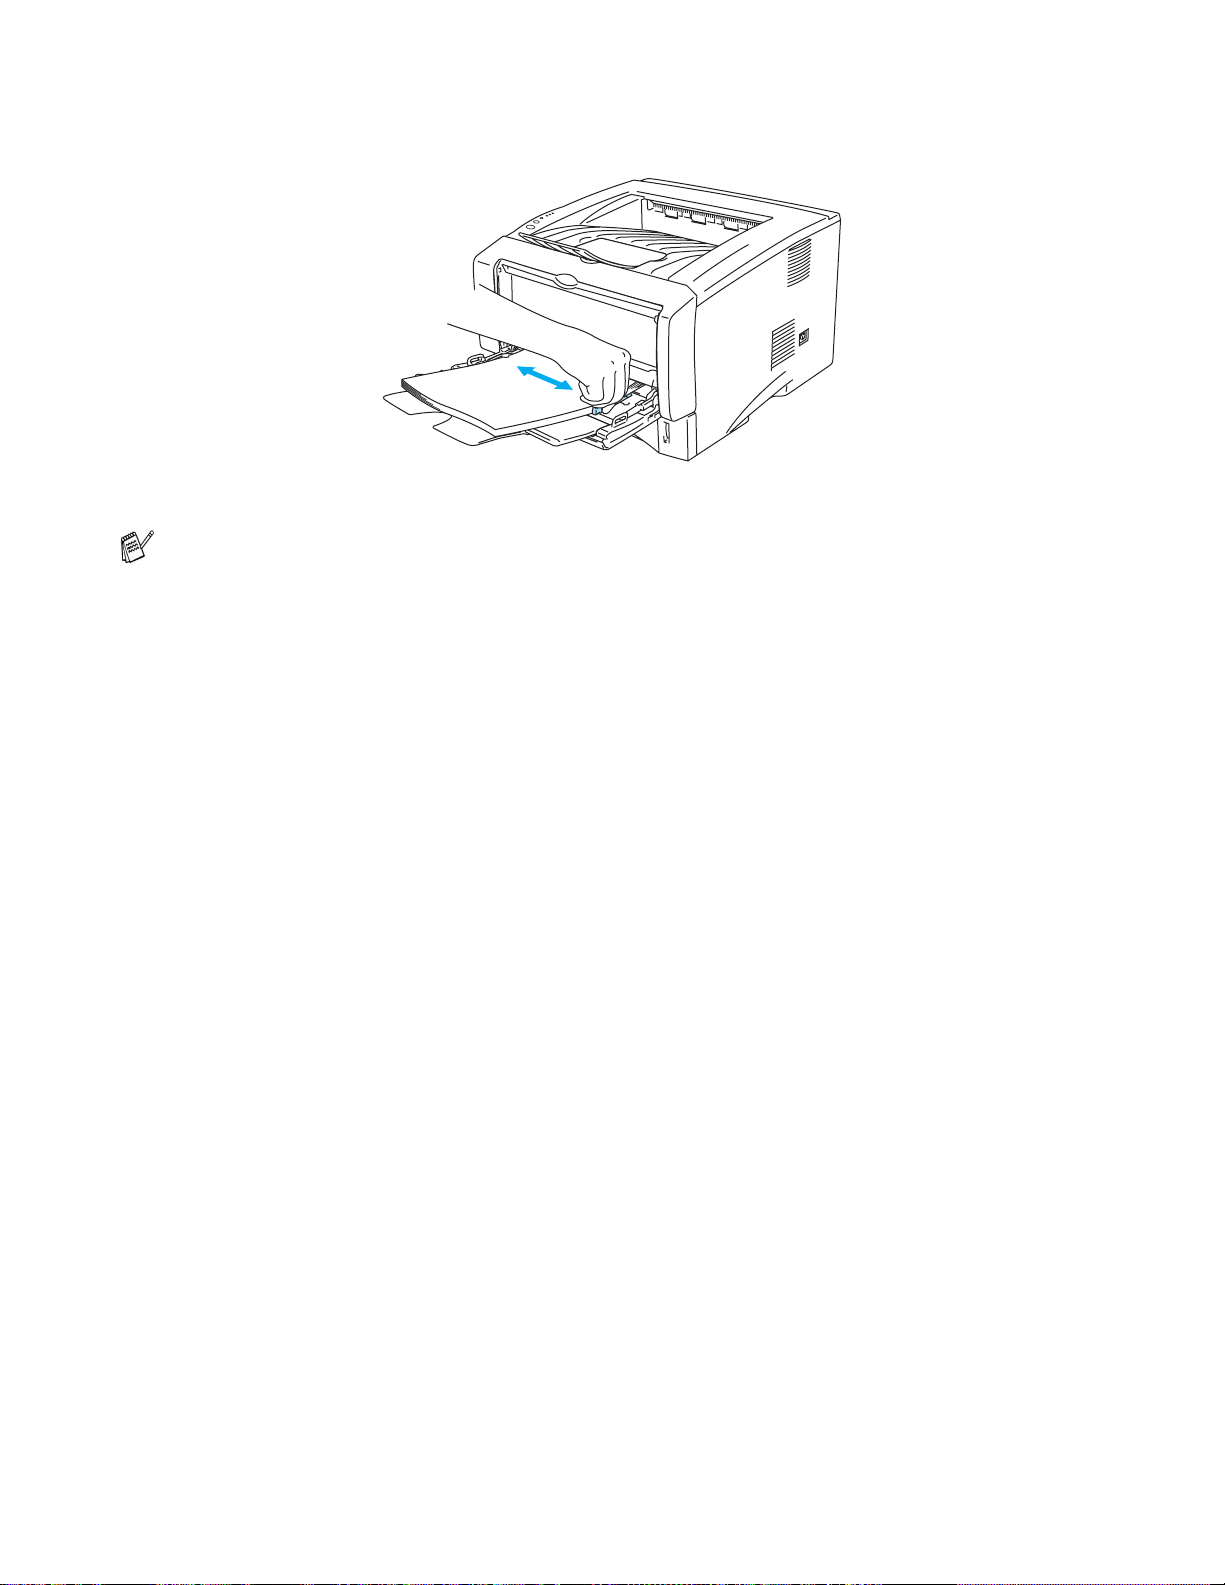
5
While pressing the paper-guide release lever, slide the paper guide to fit the paper size.
Figure 1-16
When you put paper in the MP tray, please remember the following:
■ The side to be printed on must be face up.
■ During printing, the inside tray ri ses to feed paper into the printer.
■ Put the leading edge (top of the paper) in first and push it gently into the tray.
■ The top of the paper stack must be under the maximum paper height guides that are on both
sides of the tray.
6
Send the print data to the printer.
ABOUT THIS PRINTER 1 - 16
Page 24

Printing on thick er pa pe r an d card stock
When the face-up output tray i s pulled down, the print er has a st raight paper path from th e manual feed
tray or the MP tray through to the back of the printer. Use this paper fee d and output method when you
want to print on thicker paper or card stock.
When you select the paper you want to use, see What kind of paper can I use? on page 1-5.
Printing on thicker paper and card stock from the manual feed tray (For HL-5130 and HL-5140)
1
Select the Paper Size, Media Type, Paper Source, and other settings in the printer drive r.
Media Type: Thick paper or Thicker paper
Paper Source: Manual
PCL driver
2
Open the face-up output tray.
1 - 17 ABOUT THIS PRINTER
Figure 1-17
Page 25
3
Send the print data to the printer.
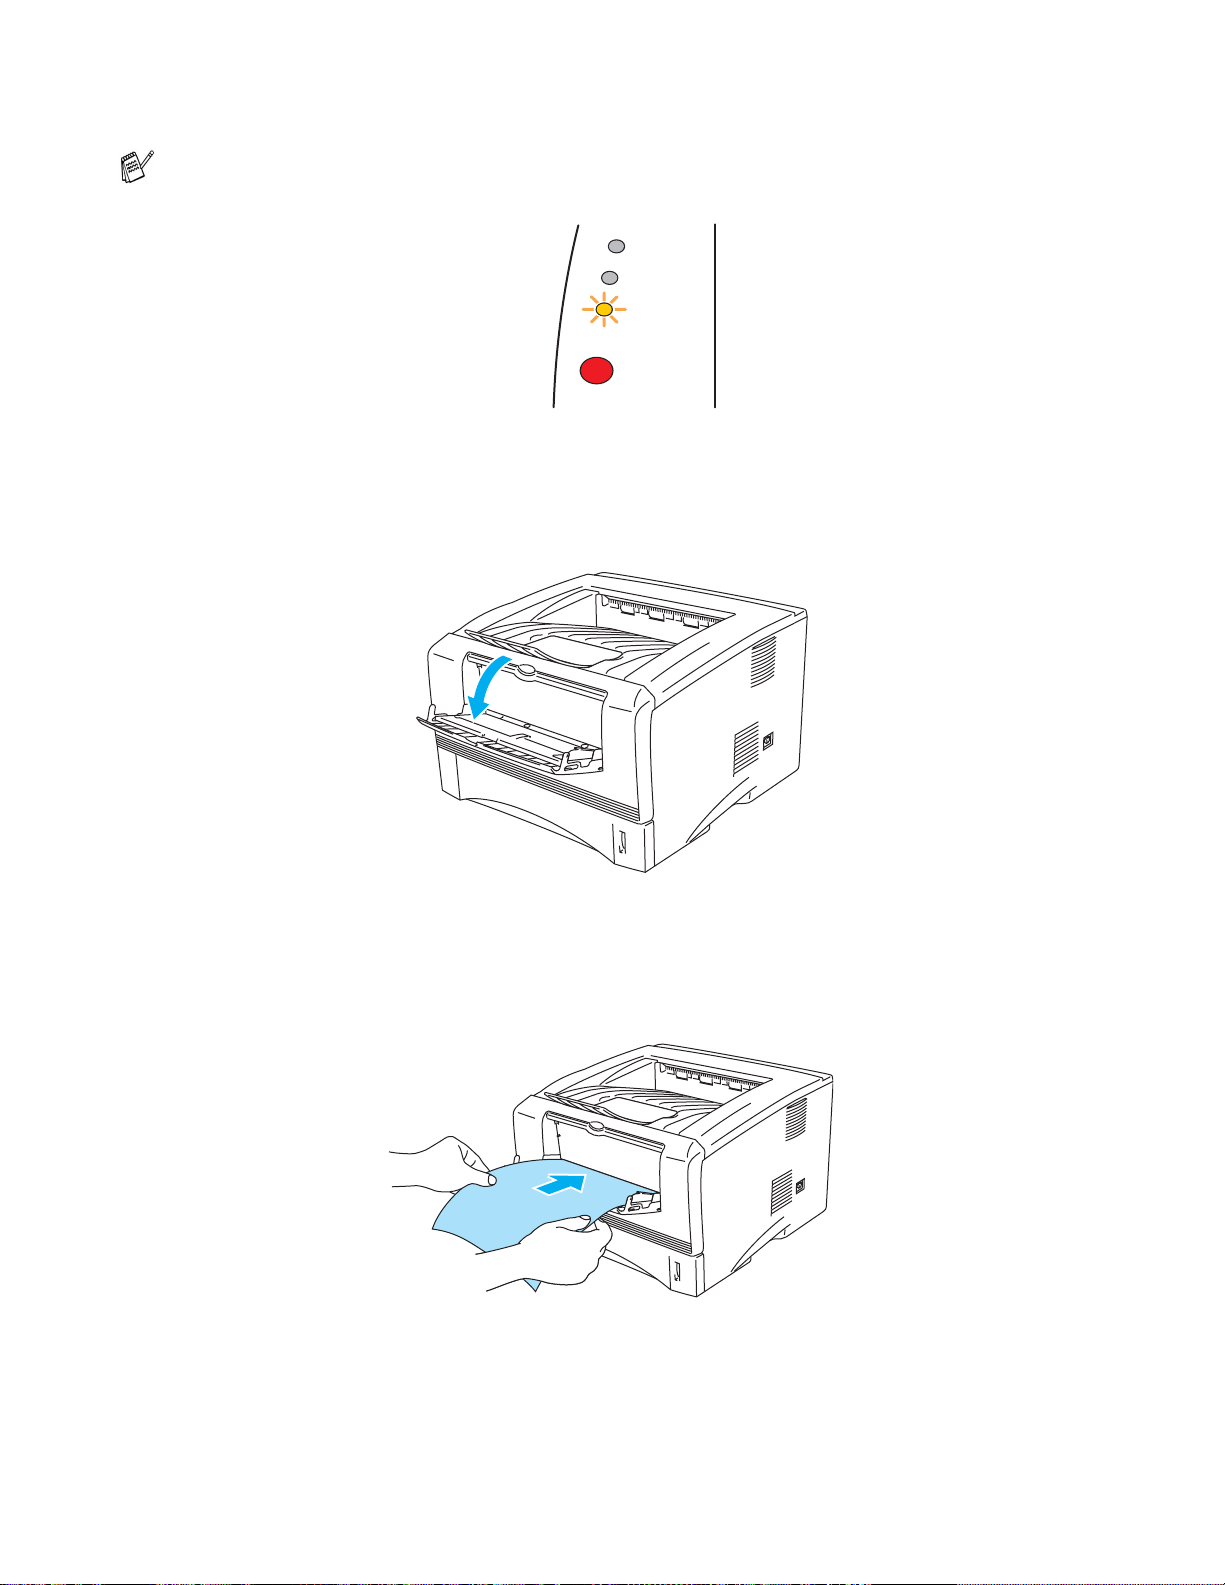
A NO PAPER status is shown by the control panel LEDs until you put a sheet of paper in the manual
feed tray.
Toner
Drum
Paper
Status
Figure 1-18
4
Open the manual feed tray. Slide the paper guides to fit the paper size.
Figure 1-19
5
Using both hands put the paper in the manu al feed tray until the front edge of the paper t ouches the
paper feed roller. Hold the paper in this pos ition until the printer a utomatically f eeds the paper i n for
a short distance, and then let go of the paper.
Figure 1-20
ABOUT THIS PRINTER 1 - 18
Page 26
■ Make sure that the paper is strai ght and in the proper pos ition in the manual feed t ray. If it is not,
the paper may not be fed properly, resulting in a skewed printout or a paper jam.
■ Do not put more than one piece of paper in the manual feed tray at the same time, or it may
cause a jam.
■ If you put any Media (paper , transpar ency and so on) in the manual feed tray befo re the pri nter
is in the Ready state, the media may be ejected without being print ed on.
6
After the printed page comes out of the printer, put in the next sheet of paper as in Step 5 above.
Repeat for each page that you want to print.
7
Close the face-up output tray.
Caution
Remove each sheet immediately after printing. Stac king the sheets may cause a paper jam or the
paper to curl.
Figure 1-21
1 - 19 ABOUT THIS PRINTER
Page 27
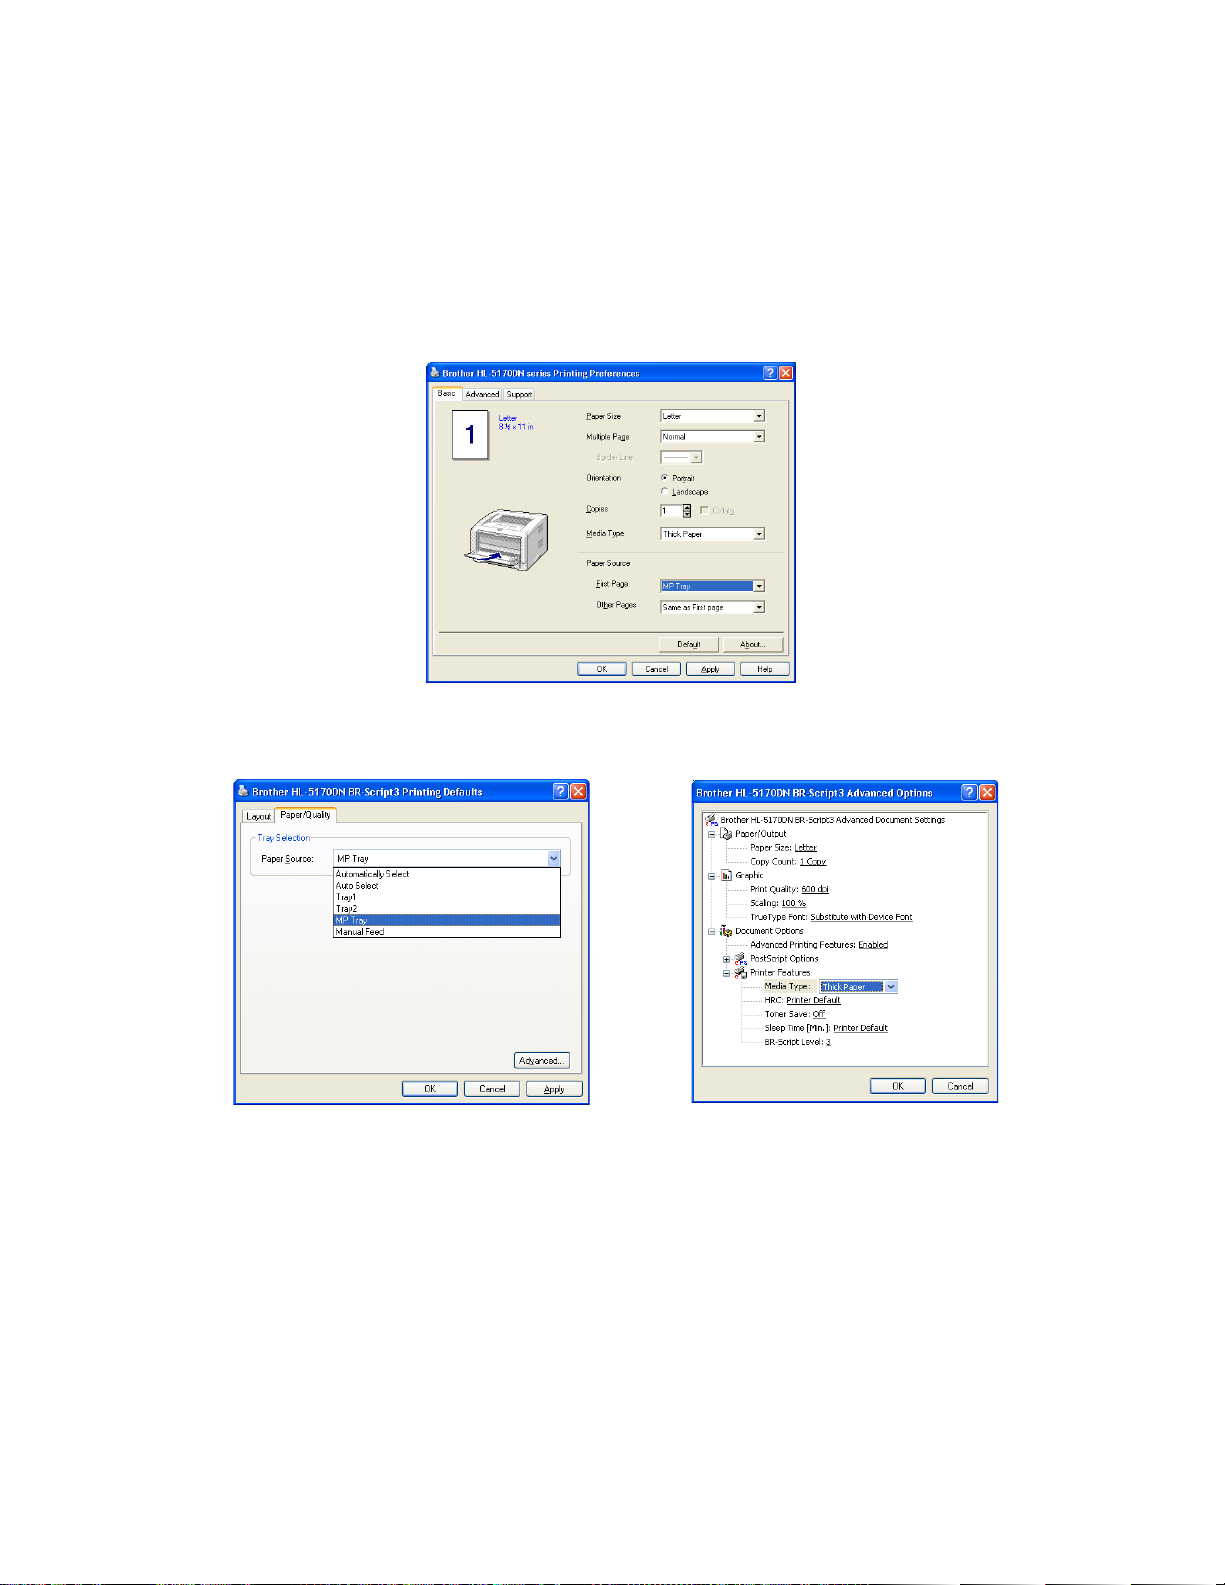
Printing on thicker paper and card stock from the multi-purpose tray (MP tray) (For HL-5150D and HL-5170DN)
1
Select the Paper Size, Media Type, Paper Source, and other settings in the printer drive r.
Media Type: Thick paper or Thicker paper
Paper Source: MP Tray
PCL driver
PS driver
ABOUT THIS PRINTER 1 - 20
Page 28
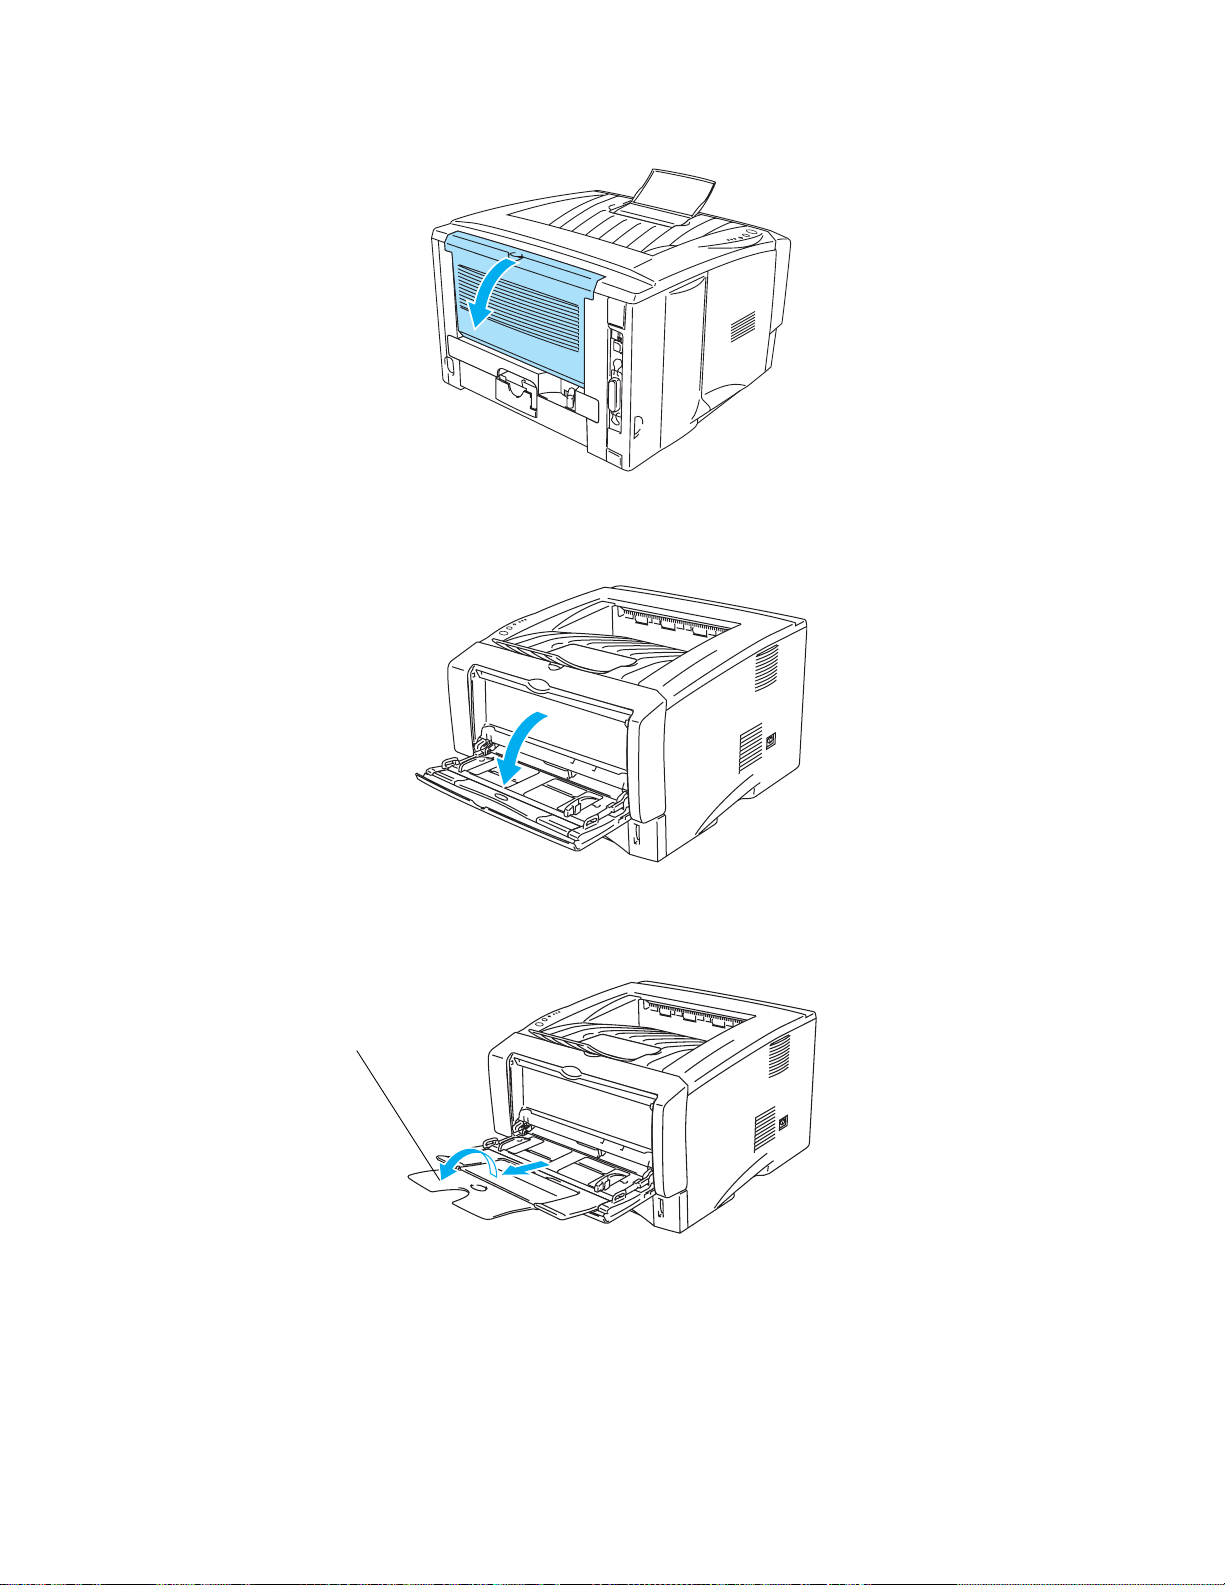
2
Open the face-up output tray, and then pull out the face-up output tray support if necessary.
Figure 1-22
3
Open the MP tray and lower it gently.
4
Pull out the MP tray support flap.
MP tray support flap
Figure 1-23
Figure 1-24
1 - 21 ABOUT THIS PRINTER
Page 29
5
When putting paper in the MP tray, make sur e it touches the back of the tray and remains under the
maximum paper height guides on both sides of the tray.
Figure 1-25
Make sure that the paper is straight and in the proper position in the MP tray. If it is not, the paper
may not be fed properly, resulting in a skewed printout or a paper jam.
6
While pressing the paper-guide release lever, slide the paper guide to fit the paper size.
Figure 1-26
When you put paper in the MP tray, please remember the following;
■ During printing, the inside tray ri ses to feed paper into the printer.
■ The side to be printed on must be face up.
■ Put the leading edge (top of the paper) in first and push it gently into the tray.
■ The top of the paper stack must be under the maximum paper height guides that are on both
sides of the tray.
7
Send the print data to the printer.
8
Close the face-up output tray.
ABOUT THIS PRINTER 1 - 22
Page 30
Caution
Remove each sheet immediately after printing. Stac king the sheets may cause a paper jam or the
paper to curl.
Figure 1-27
1 - 23 ABOUT THIS PRINTER
Page 31

Printing on en velopes
Types of envelopes to avoid
Do not use envelopes:
■ that are damaged, curled, wrinkled, or an usual shape
■ that are extremely shiny or textured
■ with clasps, snaps or tie strings
■ with self-adhesive closures
■ that are of a baggy construction
■ that are not sharply creased
■ that are embossed (have raised writing on them)
■ that were previously printed by a laser pri nter
■ that are pre-printed on the inside
■ that cannot be arranged when put in a pile
■ that are made of paper that weighs more than the paper weight specifications for the printer
■ that have been badly made, with edges that are not straight or consi stently square or
■ with windows, holes, cutouts or perforations
Figure 1-28
IF YOU USE ANY OF THE TYPES OF ENVELOPES LISTED ABOVE, THEY MAY DAMAGE YOUR
PRINTER. THIS DAMAGE IS NOT COVERED UNDER ANY BROTHER WARRANTY OR SERVICE
AGREEMENT.
■ Before you print envelopes, you must ‘fan’ the stack to avoid paper jams and misfeeds.
■ Do not put different types of paper i n the paper tray at the same time because it may cause paper
jams or misfeeds.
■ Do not print envelopes using duplex printi ng.
■ For proper printing, you must choose the same paper size from your software applic ation as the
paper in the tray.
■ See What kind of paper can I use? on page 1-5.
Most envelopes will be suitable for your printer. However, some envelopes will have feed and
print-quality proble ms because of the way they have been made. A suitable envelope should have edges
with straight, well-creased fold s and the leadi ng edge should not be thicker than two pieces of paper.
The envelope should lie flat and not be of baggy or flimsy const ruction. You should buy quality envel opes
from a supplier who understands th at you wil l be using t he envelopes in a laser printer. Before you print
a lot of envelopes, test one to make sure that the print results are what you want.
Brother will not recommend a particular envelope becaus e envelope manufacturers may change
the envelope specificati ons. You are responsible for the quality and performance of the envelopes
you use.
ABOUT THIS PRINTER 1 - 24
Page 32

Printing on envelopes from the manual feed tray (For HL-5130 and HL-5140)
The printer has a straight pape r path from the manual feed tray to the back of the pri nter. Use this paper
feed and output method when you want to print envelopes.
The printer automatically turns on the Manual Feed mode when you put paper in the manual feed
tray.
1
Select the Paper Size, Media Type, Paper Source, and other settings in the printer drive r.
Media Type: Envelopes
Paper Source: Manual
PCL driver
2
Open the face-up output tray.
Figure 1-29
1 - 25 ABOUT THIS PRINTER
Page 33

3
Send the print data to the printer.
A NO PAPER status is shown by the control panel LEDs until you put a sheet of paper in the manual
feed tray.
Toner
Drum
Paper
Status
Figure 1-30
4
Open the manual feed tray. Slide the paper guides to fit the envelope size.
Figure 1-31
ABOUT THIS PRINTER 1 - 26
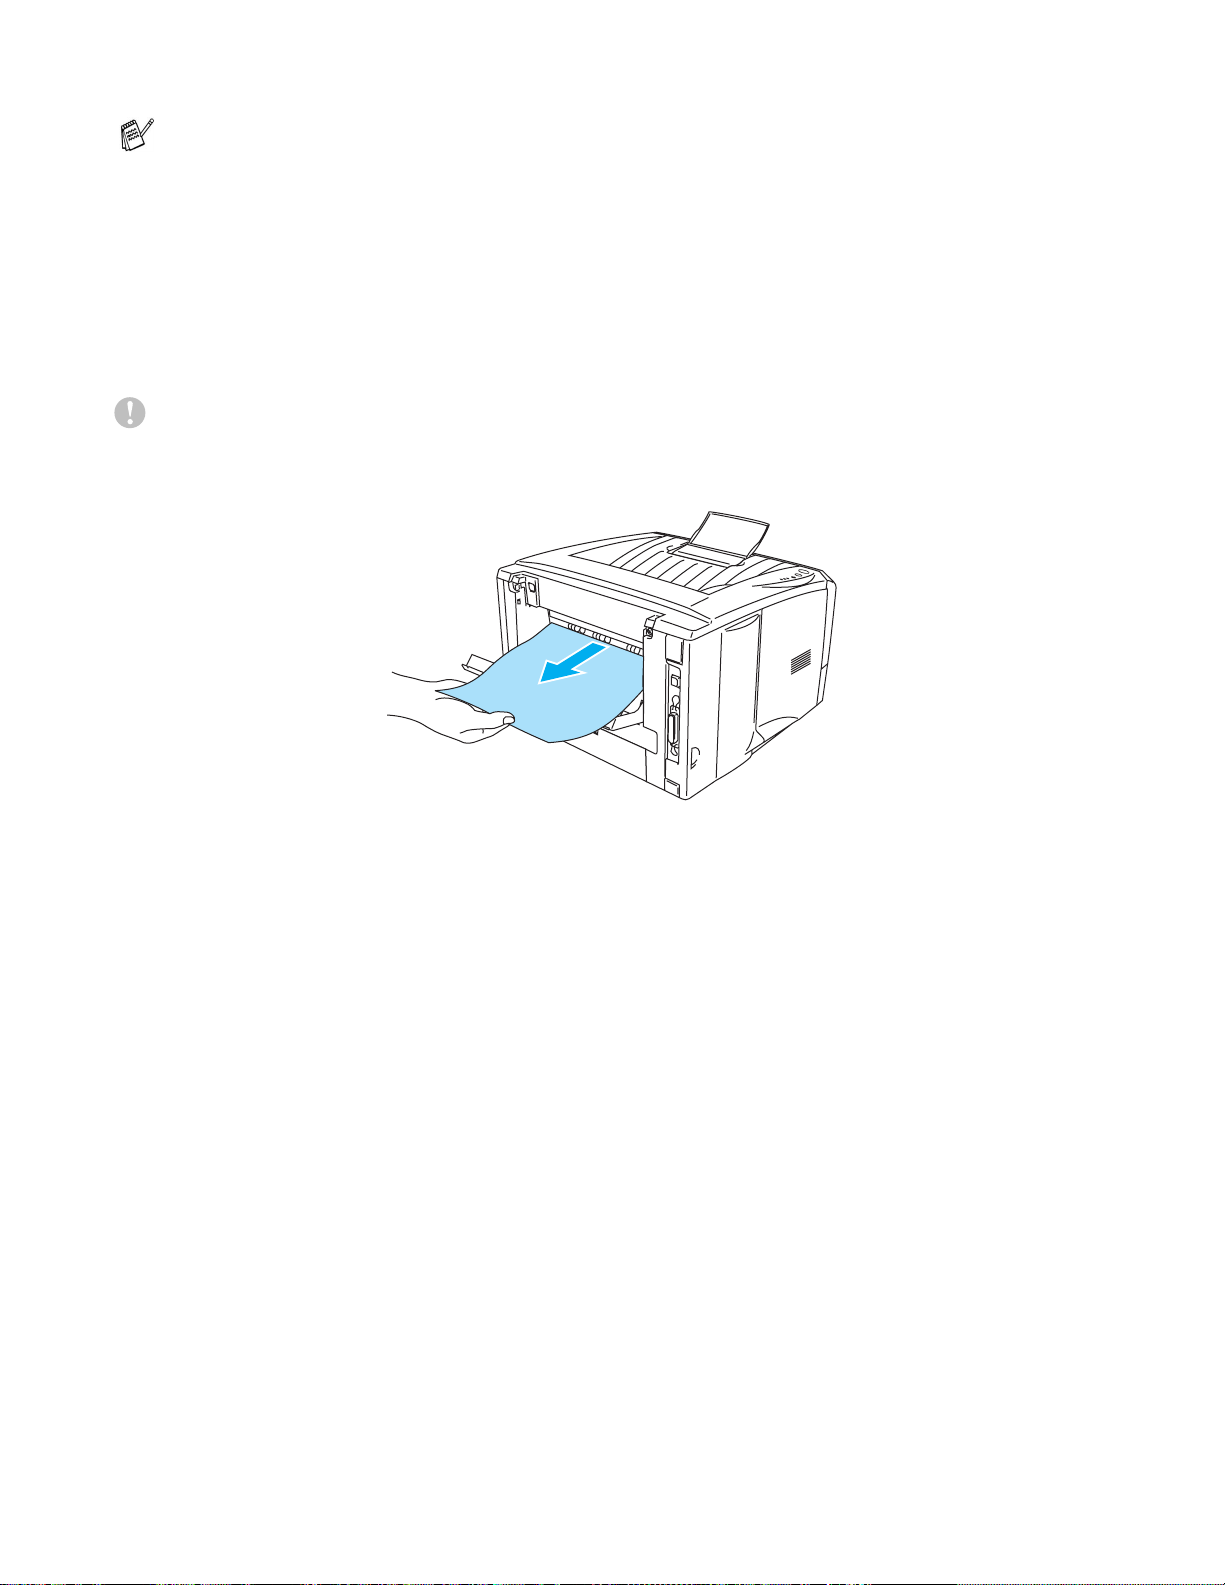
Page 34

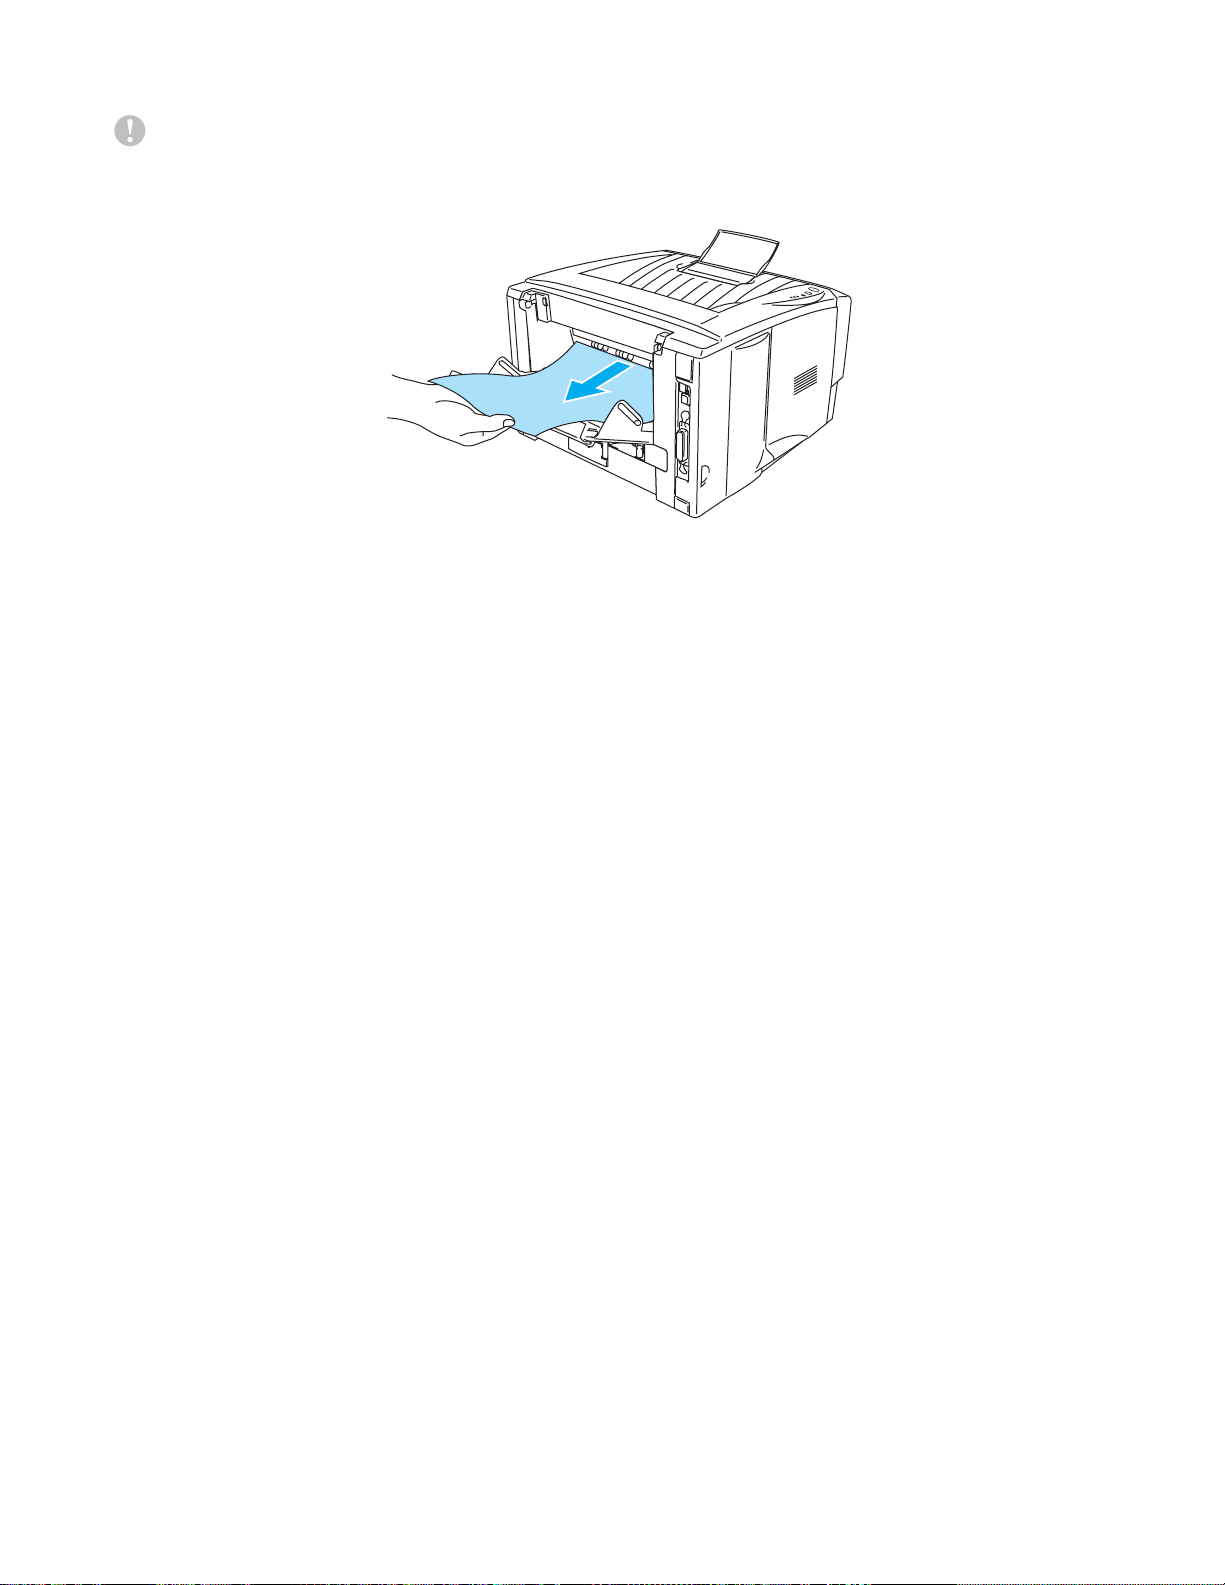
Envelopes that have been creased after they have been pri nted:
At the back of the printer, open the fac e-up out put tr ay and push down the blue t abs at the left and
right hand sides (as shown in the figure below). When you have finished printing your envelopes,
close the face-up output tray to reset the two blu e tabs back to their original position.
Figure 1-32
5
Using both hands put the envelope in the manual feed tray until the front edge of the envel ope
touches the paper feed roll er. Hold the envel ope in this po sition unti l the printer aut omatically f eeds
it in for a short distance, and then let go of the envelope.
Figure 1-33
1 - 27 ABOUT THIS PRINTER
Page 35

■ Make sure the envelope is straight as you insert it sideways in the manual feed tray. If it is not,
the envelope may not be fed properly, resulting in a skewed printout or a jam.
■ Do not put more than one envelope in the manual feed tray at the same time, or it may cause a
jam.
■ Put the envelope in the manual feed tray with the side to be printed face up.
■ If you put any Media (paper , transpar ency and so on) in the manual feed tray befo re the pri nter
is in the Ready state, the media may be ejected without being print ed on.
6
After the printed envelope comes out of the printer, the printer will wait until you put in the next
envelope. Repeat Step 5 for each envelope you want to print.
7
After you finish the print job, close the face-up output tray.
■ Envelope joints that are sealed by the manufacturer should be secure.
■ All sides should be properly folded without wrinkles or creases.
ABOUT THIS PRINTER 1 - 28
Page 36

Printing on envelopes from the MP tray (For HL-5150D and HL-5170DN)
The printer has a straight paper path from the MP tray to the back of the printer. Use this paper feed and
output method when you want to print envelopes.
The printer automatically turns on the MP Tray mode when you put paper in the MP tray.
1
Select the Paper Size, Media Type, Paper Source, and other settings in the printer drive r.
Media Type: Envelopes
Paper Source: MP Tray
PCL driver
PS driver
1 - 29 ABOUT THIS PRINTER
Page 37

2
Open the face-up output tray, and then pull out the face-up output tray support if necessary.
Figure 1-34
3
Open the MP tray and lower it gently.
4
Pull out the MP tray support flap.
MP tray support flap
Figure 1-35
Figure 1-36
ABOUT THIS PRINTER 1 - 30
Page 38

Envelopes that have been creased after they have been pri nted:
At the back of the printer, open the fac e-up out put tr ay and push down the blue t abs at the left and
right hand sides (as shown in the figure below). When you have finished printing your envelopes,
close the face-up output tray to reset the two blu e tabs back to their original position.
Figure 1-37
5
Put envelopes in the MP tray so that they touch the back of the tray and remain under the maximum
paper height guides on both sides of the tray. Do not put more than 3 envelopes in the MP tray at
any one time, or it may cause a jam.
Figure 1-38
Make sure that the envelopes are neatly stacked and in the proper posit ion in the MP tray. If they
are not, the envelopes may not be fed properly, resulting in a skewed printout or a jam.
1 - 31 ABOUT THIS PRINTER
Page 39

6
Press and slide the paper-width guide to fit the envelope size.
Figure 1-39
DL size double-flap envelopes
■ If the DL size double flap envelope is creased after prin ting, go to the Basic tab, select Paper
Size and then select DL Long Edge. Put a new DL size double-f lap envelope in the MP tray with
the longest edge of the envelope in first, then print again.
When you put envelopes in the MP tray, please remember the following;
■ During printing, the inside tray ri ses to feed envelopes into the printer.
■ The side to be printed on must be face up.
■ Put the right side edge of the envelope in first and push it gently into the tray.
■ The top of the envelope stack mus t be under the maximum paper he ight guides that ar e on both
sides of the tray.
7
Send the print data to the printer.
8
After you finish the print job, close the face-up output tray.
■ If envelopes get smudged during printing, in the print er driver select MP Tray as the Paper
Source for a straight paper path. Then, set the Media Type to Thick Paper or Thicker Paper
to increase the fixing t emperature. To adjust the pri nt density setting, s ee Density adjustment on
page 2-8.
■ Envelope joints that are sealed by the manufacturer should be secure.
■ All sides should be properly folded without any wrinkles or creases.
ABOUT THIS PRINTER 1 - 32
Page 40

Printing on transparencies
You can print on transparencies from the paper tray, manual feed tray or MP tray.
Printing on transparencies from the paper tray
■ Do not put more than 10 transparencies in the paper tray.
■ Illustrations in this secti on are based on HL-5150D and HL-5170DN.
1
Select the Paper Size, Media Type, Paper Source, and other settings in the printer drive r.
Media Type: Transparencies
Paper Source: Tray1
PCL driver
PS driver (For HL-5150D and HL-5170DN)
1 - 33 ABOUT THIS PRINTER
Page 41

2
Pull the paper tray completely out of the printer.
Figure 1-40
3
While pressing the blue paper-guide release levers, slide the paper guides to fit the transparency
size. Check that the guides are firmly in the slots.
Figure 1-41
4
Put transparencies in the tray. Chec k that the transparencies are flat and bel ow the maximum paper
mark (▼). Do not put more than 10 transparenci es in the tray at any one ti me, or it may cause a jam.
Figure 1-42
ABOUT THIS PRINTER 1 - 34
Page 42

5
Put the paper tray firmly back in the printer.
Pull out the support flap to prevent transparenci es from sliding off the face-down ouput tray.
Figure 1-43
6
Send the print data to the printer.
Caution
Remove each transparency immediately.
Figure 1-44
1 - 35 ABOUT THIS PRINTER
Page 43

Printing on transparencies from the manual feed tray (For HL-5130 and HL-5140)
When the face-up output tray is open, the printer has a straigh t paper path from the manual feed t ray to
the face-up output tray.
1
Select the Paper Size, Media Type, Paper Source, and other settings in the printer drive r.
Media Type: Transparencies
Paper Source: Manual
PCL driver
2
Open the face-up output tray.
Figure 1-45
ABOUT THIS PRINTER 1 - 36
Page 44
3
Send the print data to the printer
A NO PAPER status is shown by the control panel LEDs unti l you put a transparency in the manual
feed tray.
Toner
Drum
Paper
Status
Figure 1-46
4
Open the manual feed tray. Slide the paper guides to the transparency size.
Figure 1-47
5
Using both hands put the transparency in the man ual feed tray until its front edge t ouches the paper
feed roller. Hold the tr ansparency in th is position until the prin ter automaticall y feeds it in f or a short
distance, and then let go of the transparen cy.
Figure 1-48
1 - 37 ABOUT THIS PRINTER
Page 45

■ Make sure that the transparency is straight and in the proper position on the manual feed tray.
If it is not, the transparency may not be fed properly, resulting in a skewed printout or a jam.
■ Do not put more than one transparency in the manual feed tr ay at the same time, or it may cause
a jam.
■ If you put any Media (paper , transpar ency and so on) in the manual feed tray befo re the pri nter
is in the Ready state, the media may be ejected without being print ed on.
6
After the printed transparency comes out of the printer, put in the next transparency as described
in Step 5 on page 1-37. Repeat for each transparency that you want to print.
7
After you finish the print job, close the face-up output tray.
Caution
Remove each transparency immediately after printing. Stacking the printed transparencies may cause
a paper jam or the transparency to curl.
ABOUT THIS PRINTER 1 - 38
Page 46

Printing on transparencies from the MP tray (For HL-5150D and HL-5170DN)
When the face-up output tray is open, the pr inter has a st raight paper pat h from the MP tray to the back
of the printer.
1
Select the Paper Size, Media Type, Paper Source, and other settings in the printer drive r.
Media Type: Transparencies
Paper Source: MP Tray
PCL driver
PS driver
1 - 39 ABOUT THIS PRINTER
Page 47
2
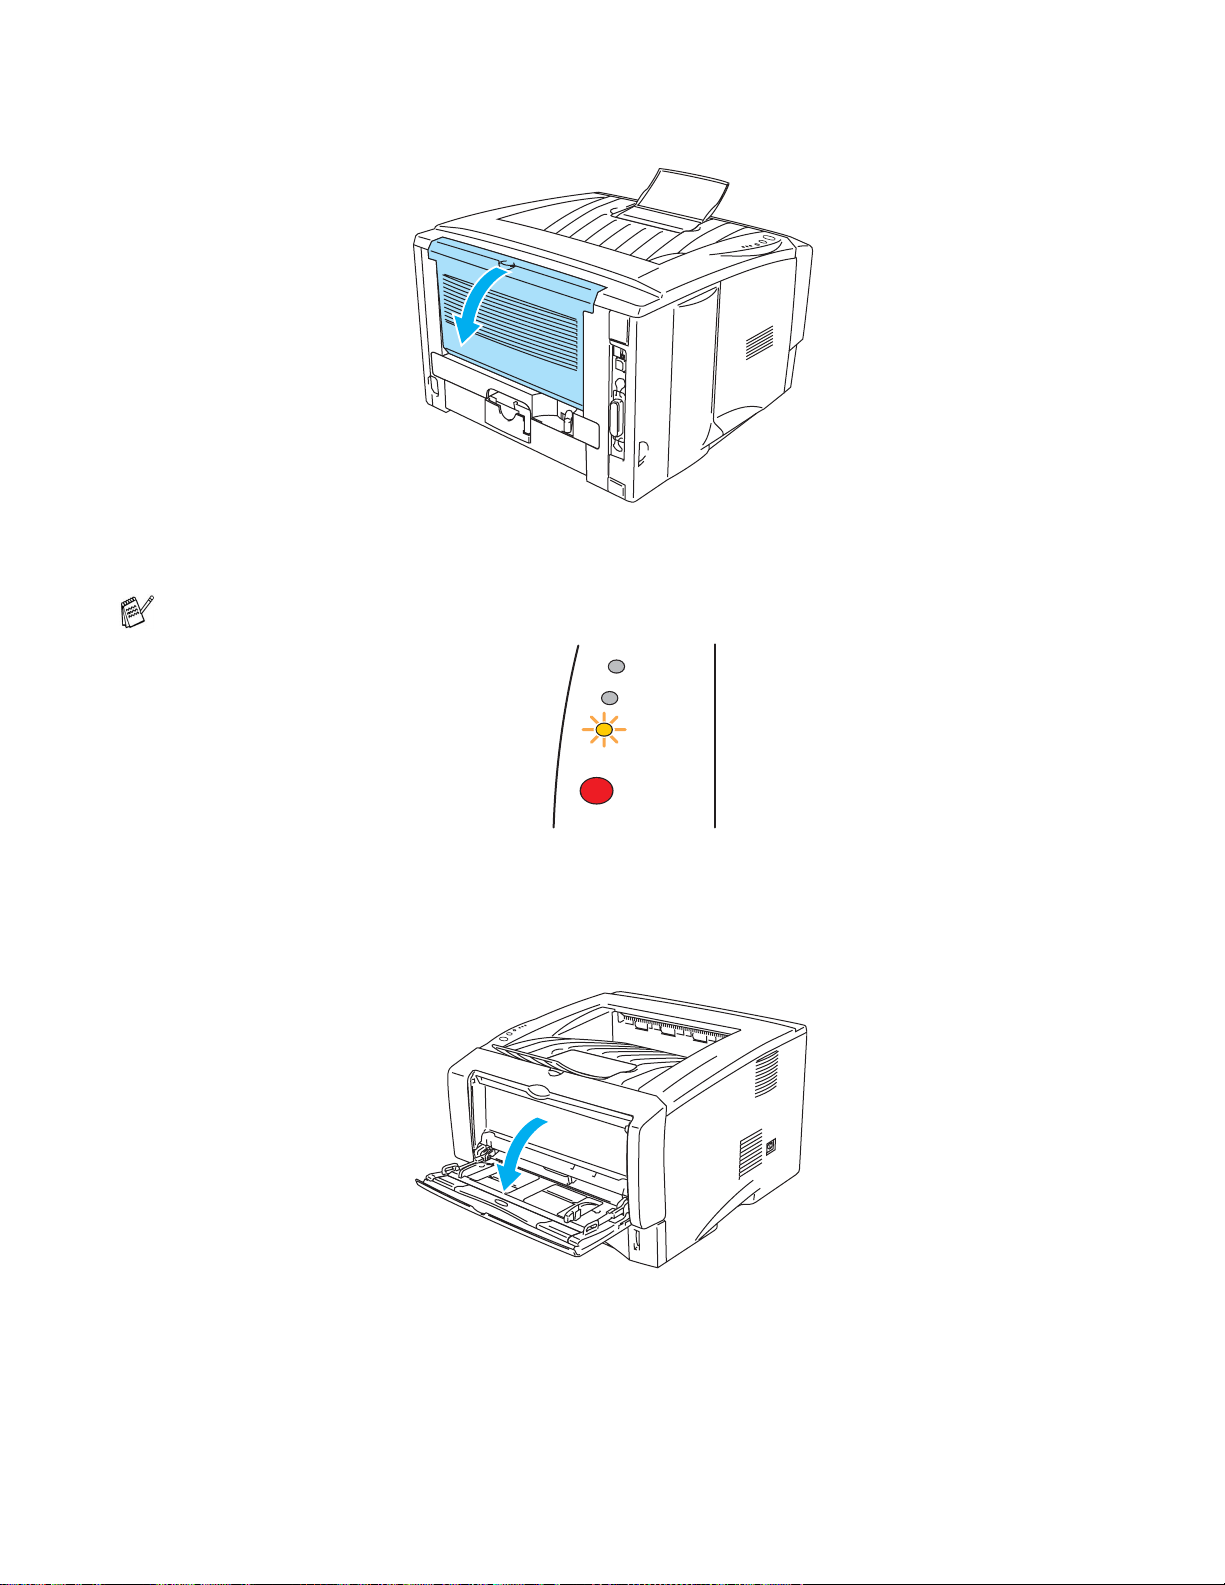
Open the face-up output tray.
Figure 1-49
3
Send the print data to the printer.
A NO PAPER status is shown by the control panel LEDs until you put a trans parency in the MP tray.
Toner
Drum
Paper
4
Open the MP tray and lower it gently.
Status
Figure 1-50
Figure 1-51
ABOUT THIS PRINTER 1 - 40
Page 48

5
Pull out the MP tray support flap.
Figure 1-52
6
When putting transparencies in the MP tray , make sure they tou ch t he back of t he t ray and r emain
under the maximum paper height guides on both sides of the tray. Do not put more than 10
transparencies in the MP tray at any one time, or it may cause a jam.
Figure 1-53
Make sure that the transparen cie s are st rai ght and in th e proper positi on in the MP tr ay. If t hey a re
not, the transparencies may not be fed properly, resulting in a skewed printout or a jam.
7
While pressing the paper-guide release lever, slide the paper guide to fit the transparency size.
Figure 1-54
1 - 41 ABOUT THIS PRINTER
Page 49

When you put transparencies in the MP tray, please remember the following:
■ The side to be printed on must be face up.
■ Put the leading edge (top of the transparencies) in f ir st and push it gently into the tray.
■ The top of the transparency stack must be under the maxi mum paper height guides t hat are on
both sides of the tray.
8
After you finish printing, close the face-up output tray.
Caution
Remove each transparency immediately after print ing. Stacking the printed transparencies may
cause a paper jam or the transparency to curl.
ABOUT THIS PRINTER 1 - 42
Page 50

Duplex Printing
The supplied PCL printer drivers for Windows® 95/98/Me, Windows NT® 4.0, Windows® 2000/XP, Mac
®
OS
8.6 to 9.2 and Mac OS® X 10.1 or later all enable duplex print ing. For more infor mation about how
to choose the settings, see the Help text in the printer driver.
Guidelines for printing on both sides of the paper
■ If the paper is thin, it may wrinkle.
■ If paper is curled, straighten it and then put it back in the paper tray.
■ You should use regular paper. Do not use bond paper.
■ If the paper is not feeding properly, it may be curled. Remov e the paper and straighten it.
Printing on both sides of the paper (manual duplex printing)
The PS driver does not support manual duplex printing.
Manual duplex printing from the paper tray
1
Choose the Manual Duplex printing mode you need from the Advanced tab.
2
The printer will automatically print all the even-numbered pages on one side of the paper first.
3
Remove the printed even-numbered pages from the out put tray and put them back in the paper tr ay,
placing the paper with the side to be printed on (blank side) face down. Foll ow the instructions on
the computer screen.
Figure 1-55
4
The printer will now automatically print all the odd-numbered pages on the other side of the paper.
When you put paper in the paper tray, first empty the tray then put the printed page in it, with the
printed side face up. (Do not add the printed pages to the top of the stack of unprinted paper.)
1 - 43 ABOUT THIS PRINTER
Page 51

Manual duplex printing from the manual feed tray (For HL-5130 and HL-5140)
Caution
■ Before you put the sheets back in the manual feed tray, you will have to st raighten them, or you
may get paper jams.
■ You should not use very thin or very thick paper.
■ When you use the manual duplex function, it is possible that there may be paper jams or poor
print quality. If there is a paper jam, see Paper jams and how to clear t hem on page 6-6.
1
Choose the Manual Duplex printing mode from the Advanced tab, and from the Basic tab select
the Paper Source to be Manual feed.
2
Using both hands put the paper in the manual feed tray with the side to be printed on first fa cing up.
Follow the instructions on the computer screen. Repeat this step until you have printed all the
even-numbered pages.
Figure 1-56
3
Remove the printed even-numbered pages from the output tray and put them in the same order
back into the manual feed tr ay. Place the paper with the side that is goi ng to be printed on (t he blank
side) face up. Follow the instructi ons on the computer screen.
Figure 1-57
4
Repeat Step 3 until you have printed all the odd-numbered pages on the other side of the paper.
ABOUT THIS PRINTER 1 - 44
Page 52

Manual duplex printing from the multi-purpose tray (For HL-5150D and HL-5170DN)
Caution
■ Before putting the sheets back in the MP tray, you will have to straighten them, or you may get
paper jams.
■ You should not use very thin or very thick paper.
■ When you use the manual duplex function, it is possible that there may be paper jams or poor
print quality. If there is a paper jam, see Paper jams and how to clear t hem on page 6-6.
1
Choose the Manual Duplex printing mode from the Advanced tab, and from the Basic tab select
the Paper Source to be MP Tray feed.
2
Using both hands put the paper in the MP tray with the side to be printed on first facing up. Follow
the instructions on the computer screen. Repeat thi s step until you have printed all the
even-numbered pages.
Figure 1-58
3
Remove the printed even-numbered pages from the output tray and put them in the same order
back into the MP tray. Place the paper with the side that is going to be printed on (the blank side)
face up. Follow the instructions on the computer screen.
Figure 1-59
4
Repeat Step 3 until you have printed all the odd-numbered pages on the other side of the paper.
1 - 45 ABOUT THIS PRINTER
Page 53

Paper orientation for manual duplex printing
The printer prints the second page first.
If you print 10 pages on 5 sheets of paper, it will print page 2 then page 1 on the first sheet of paper.
It will print page 4 then page 3 on the second sheet of paper.
It will print page 6 then page 5 on the third sheet of paper, and so on.
When doing manual duplex printing, the paper must be put in the paper tray in the following way:
■ For the manual feed tray or the multi-purpose (MP) tray:
Put the side to be printed on first, face-up, with the leading edge (top) of the paper in first.
To print the second side, put the paper face down, with the leading edge (top) of the paper in first.
If letterhead paper is used, this would be put in with the heading face down, and in first.
To print the second side, put the heading face up and in first.
■ For the upper paper tray and the optional lower tray (tray1 or tray2):
Put the side to be printed on first, face down, with the leading edge (top) of the paper at the front of
the tray.
To print the second side, put the paper face up, with the leadi ng edge (top) of the paper at the front
of the tray.
If letterhead paper is used, this would be put in the paper tray wi th the heading face up, and at the
front of the tray.
To print the second page, put the heading face down and at the front of the tray.
For Thicker paper that has curled once the first side has been printe d on, and you cannot fe ed the
paper for the second time from manual feed tray or MP tray to allow the other side of the paper to
be printed on:
At the back of the printer, open the face- up output tr ay and push d own the blu e tabs on the l eft and
right hand sides (as shown in th e figure below). When you have fi nished pri nting, close t he face-up
output tray to reset the two blue tabs back to their original position.
Figure 1-60
ABOUT THIS PRINTER 1 - 46
Page 54

Printing on both sides of the paper (automatic duple x printing)
This section is for HL-5150D and HL-5170DN.
Guidelines for automatic duplex printing
■ Use A4, Letter or Legal size plain paper.
■ If paper is curled, straighten it and then put it back in the paper tray.
■ You should use regular paper. Do not use bond paper or thin paper if possible.
■ When you use the duplex printing function, the printing qual ity becomes worse or paper jam may
occur under some circumstances. If t he paper jam occurs, see Paper jams and how to clear t hem on
page 6-6.
1
Load paper into the paper tray or MP tray.
2
Make sure the lever on the Duplex tray is set for the proper paper size.
Letter or Legal size
A4 size
Figure 1-61
1 - 47 ABOUT THIS PRINTER
Page 55

3
Open the Properties dialog box in the printer drive r. In the Advanced tab select Duplex Printing
mode, check Duplex, and make sure that Use Duplex tr ay has been selected. Select Duplex Type
and set Binding Offset if you need, and then click the OK but ton. The printer will print on both sides
of the paper automatically.
PCL driver
PS driver
ABOUT THIS PRINTER 1 - 48
Page 56

2
Driver and software
Printer driver
A printer driver is software that translates data from the format used by a computer to the format that a
particular printer needs. Typi cally, this format is a printer command language or page descr iption
language.
The printer drivers for the following operating syst ems are on the CD-ROM that we have supplied. You
can also download the latest printer driver from the Brother Solutions Center at
http://solutions.brother.com
You can see the operations and detailed information in the Install Software section of the supplied
CD-ROM.
For Windows® 95/98/Me, Windows NT® 4.0 and Windows® 2000/XP
■ PCL (Hewlett-Packard LaserJet laser printer) compatible driver
■ BR-Script (PostScript
®
3 language emulation) driver (HL-5150D and HL-5170DN)
For Macintosh®
■ Brother Laser driver for Macintosh
■ BR-Script (PostScript®3 language emulation) driver. (HL-5150D and HL-5170DN)
PCL Driver PS Driver
Windows
Windows NT
Windows® 98/Me
Windows
Windows
Mac OS® 8.6 to 9.2
Mac OS
®
95
®
4.0
®
2000
®
XP
®
X 10.1 to 10.2
®
L
L
L
(For HL-5150D and HL-5170 D N)
(For HL-5150D and HL-5170 D N)
(For HL-5150D and HL-5170 D N)
L
L
L
2 - 1 DRIVER AND SOFTWARE
Page 57

You can change the following printer settings when you print from your computer.
■ Paper Size
■ Multiple Page
■ Orientation
■ Copies
■ Media Type
■ Paper Source
■ Resolution
■ Toner Save Mode
■ Duplex Printing (Manual Duplex printing
*1*2*3
*1*2
*2
*1*2
*1*2
*1*2
*1*2*3
*1*2
*2*4
*1*2
*1*2*3*4
*1*2
*1*2
■ Water mark
■ Job Spooling
■ Quick Print Setup
■ Sleep Time
■ Status Monitor
■ Macro
■ Administrator
■ Insert Command/File
■ Page Protection
■ Print Date & Time
■ Density adjustment
■ HRC
*2
■ True Type Mode
■ Auto Detect
*1
These settings are not available with the BR-script dr iver.(HL-5150D and HL-5170DN)
*2
These settings are not available with Brother Laser for Macintosh®.
*3
These settings are not available with Windows NT® 4.0 and Windows® 2000/XP.
*4
These settings are not available for HL-5130.
*5
This setting is not available for HL-5130 and HL-5140.
*1*2
/ Duplex Printing with Duplex tray*5)
DRIVER AND SOFTWARE 2 - 2
Page 58

For Windows®
Features in the PCL printer driver
You can download the latest printer driver or get other information by accessing the Brother Solutions
Center at http://solutions.brother.com
You can also change settings by cli cking the illustration on the le ft side of the Basic tab in the Properties
dialog box.
For more information, please see the Help text in the printer driver.
The screens in this section are from Windows® XP. The screens on your PC wi ll vary depend ing on
your Operating System.
Basic tab
If you are using Windows NT® 4.0, Windows® 2000 or XP, you can access the Basic t ab by clicking
Printing Preferences... in the General tab of the Printer Proper ties screen.
1
Select the Paper Size, Multiple Page, Orientation and so on.
2
Select the Paper Source and so on.
1
2
2 - 3 DRIVER AND SOFTWARE
Page 59

Advanced tab
If you are using Windows NT® 4.0, Windows® 2000 or XP, you can access the Advanced tab by
clicking Printing Preferences... in the General tab of the Printer Properties scr een.
123 45
Change the tab settings by clicking the following icons:
1
Print Quality
2
Duplex Printing
3
Watermark
4
Page Setting
5
Device Options
Print Quality
Select the resolution, toner save and print settings or gray printing setting.
Resolution
You can change the resolution as follows:
■ HQ 1200
■ 600 dpi
■ 300 dpi
DRIVER AND SOFTWARE 2 - 4
Page 60

Toner Save Mode
You can save running costs by turning on the toner save mode, which reduces the print density.
Print Setting
You can manually change the brightness, contrast and other settings.
■ Auto (For Windows
®
95/98/Me users only)
You can automatically print with the most suitable pri nt setting by selecting the Auto button.
■ Manual (For Windows
®
95/98/Me users only)
You can change the settings manually by selecting the manual button and ticking the sett ing
button.
■ Use Printer Halftone (For Windows NT
®
4.0, Windows® 2000/XP users only)
You can print, using the printer setting by sele cting the Use printer Halftone button.
■ Use System Halftone (For Windows NT
®
4.0, Windows® 2000/XP users only)
You can manually change the brightness, contrast and other set tings by selecting the Use
system Halftone button and ticking the setting button.
■ Improve gray printing (For Windows NT
®
4.0, Windows® 2000/XP users only)
You can improve the image quality of shaded areas by ticking the Improve gray printing check
box. If you print with this setting, the print speed may be slower depending on the print data.
Duplex Printing
■ Manual Duplex
If you select the Manual Duplex button, the dial og box for t he manual duplex settings appears.
Six types of manual duplex binding directi ons are available for each orientation.
■ Duplex Tray (For HL-5150D and HL-5170DN)
If you select the Duplex Tray button, the dialog box for the duplex settings appears.
Six types of duplex binding directions are available for each orientation, automatic ally.
■ Binding Offset
If you check the Binding Offset option, you can also specify the offs et value of the binding side
in inches or millimeters.
■ Booklet Printing (For HL-5150D and HL-5170DN)
When you want to print a bookl et, use this f unction. To make the Booklet, f old the printed pages
down the middle. When using the booklet printing function, please note that the paper size,
orientation, source and other setti ngs must remain unchanged for the whole document.
Watermark
You can place a watermarked logo or text into your documents.
When you use a bitmap file as a watermark, you can change the size of the watermark and place it
anywhere you like on the page.
When you use text as a watermark, you can change the font, darkness and angle settings.
Page Setting
You can change the print image scaling and select Mirror / Reverse print options.
2 - 5 DRIVER AND SOFTWARE
Page 61

Device Options
You can set the following Printer Function modes in this tab:
(You can jump to the page for each Printer Function by clicking the function name in the list below.)
■ Job Spooling
■ Quick Print Setup
■ Sleep Time
■ Status Monitor
■ Macro (For HL-5140, HL-5150D and HL-5170DN)
■ Administrator (For Windows
■ Insert Command/File (For HL-5140, 5150D and 5170DN: For Windows
®
95/98/Me users only)
®
95/98/Me users only)
■ Page Protection
■ Print Date & Time
■ Density adjustment
■ HRC (High Resolution Control)*
■ TrueType Mode (For HL-5140, HL-5150D and HL-5170DN)*
The Printer Function list may differ depending on the model.
* If you are using Windows® 95, 98 or Me, you can change settings of HRC and TrueType Mode in
Print Setting in the Print Quality option of the Advanced tab.
DRIVER AND SOFTWARE 2 - 6
Page 62

Job Spooling
The printer saves data that you want to reprint.
You can reprint a document without sending the dat a again from your PC. To reprint press and hold down
the Go button until all four LEDs are lit and then release the Go button.
If you want to prevent ot her people from printing your da ta using t he Reprint func tion, clear the Use
Reprint check box in the job spooling settings.
Quick Print Setup
You can turn the Quick Print Setup function ON or OFF. A small selection window appears on your
computer. This will then let you make changes to the settings of the fol lowing functions:
■ Multiple Page
■ Duplex Printing
■ Toner Save Mode
■ Paper Source
■ Media Type
Sleep Time
When the printer does not receive dat a for a certain period of t ime (timeout), it enters sl eep mode. Sleep
mode acts as though the pri nter was turned off. The default timeout is 5 mi nutes. When Intelligent Sleep
Mode is selected, it is automatically adjusted to the most suitable time-out setting depending on the
frequency of your printer use. While the print er is in sleep mode, all t he LEDs are off, but the print er can
still receive data f rom the computer. Receiving a pr int file or document automatic ally wakes up the print er
to start printing. Pressing one of the button s wil l al so wake up the pri nter.
Sleep mode can be turned off. To turn sleep mode off, go to the Advanced tab, se lect Device Options
and then select Sleep Time. Double click t he word Sleep Time in the Sle ep Time screen, this will allow
the Sleep Time Off function to appear, click Sleep Time Off to stop the printer going into sleep mode.
The Sleep Time Off function can be hidden by double cl icki ng the wor d Sleep Ti me in the Sleep Time
screen again. We recommend that you keep Sleep mode on for power saving.
Status Monitor
This reports the printer status (any errors that may happen with the printer) when printing. The default
setting for the Status Monitor i s off. If you woul d like to turn t he status monitor on, go the Advanced tab,
select Device options and then select Status monitor.
Macro (For HL-5140, HL-5150D and HL-5170DN)
You can save a page of a document as a macro to the printer memory. Moreover, you can execute the
saved macro - in other words, you can use the saved macro as an overlay on any document. This will
save time and increase printing speed for often used information such as forms, company logos, letter
head formats or invoices.
2 - 7 DRIVER AND SOFTWARE
Page 63

Administrator (For Windows® 95/98/Me users only)
Administrators have the authority to limit the Number of copies, Scaling setting and Watermark setting
functions.
■ Password
Enter the password into this box.
■ Set Password
Click here to change the password.
■ COPY LOCK
Lock the copy pages selection to prevent multiple copy pri nting.
■ WATERMARK LOCK
Lock the current settings of the Watermark option to prevent changes being made.
■ SCALING LOCK
Lock the scaling setting as shown below.
1 in 1
100%
Insert Command/File (For HL-5140, 5150D and 5170DN: For Windows
®
95/98/Me users only)
This option allows data to be inserted into a print j ob.
Using this function allows you to do the following.
■ Insert a print file or tiff format file into a print job.
■ Insert a text string into a print job.
■ Insert a macro, which is saved in printer memory, into a print job.
Page Protection
‘Page Protection’ refers to a se tting that reser ves additional memor y for the creation of full page ima ges.
Selections are AUTO, OFF, Printer Default, LTR (Let ter-size paper), A4 or LGL (legal-size-paper).
The page protection feature allows the printer to create the full page image to be printed in memory
before physically moving the paper through the print e r. When the image is very complicated and the
printer has to wait to process the image before printing, use this function.
Print Date & Time
Date: Specifies the format of the date.
Time: Specifies the format of the time.
Density adjustment
Increase or decrease the print density.
DRIVER AND SOFTWARE 2 - 8
Page 64

HRC
This option allows you to change the HRC setting on your Brother HL-5100 seri es printer. HRC is a
special function that offers improved print quality of characters and graphics that conventional laser
printers cannot attain with resolutions of 300 or 600 dpi.
■ Printer Default: The setting will match that of the pri n ter.
■ Light
■ Medium
■ Dark.
■ Off: Turn HRC off
TrueType Mode (For HL-5140, HL-5150D and HL-5170DN)
TrueType fonts may be sent to your printer in one of the followin g ways:
■ Download as TrueType (For HL-5150D and HL-5170DN)
■ Download as Bit Image
■ Print as Graphics
2 - 9 DRIVER AND SOFTWARE
Page 65

Accessories tab
When you install the optional lower tr ay unit, you can add it and select its settings in the Accessories
tab as follows.
1
2
3
1
You can manually add and remove the options that are installed on the printer. Tray settings will
match the installed options.
2
Paper Source Setting
This feature recognizes the paper size in each paper tray.
3
Auto detection of printer options (For HL-5140, HL-5150D and HL-5170DN)
The Auto Detect function finds the currently installed devices and shows the available settings in
the printer driver. When you click the Auto Detect button, options that are installed on the printer
will be listed. You can manually add or remove options.
Auto Detect function may not be available under certain printer conditions.
DRIVER AND SOFTWARE 2 - 10
Page 66

Support tab
If you are using Windows NT® 4.0, Windows® 2000 or XP, you can access the Support tab by
clicking Printing Preferences... in the General tab of the Printer Properties screen.
■ You can download the latest driver or by accessing the Brother Soluti ons Center at
http://solutions.brother.com
■ You can see the printer driver version .
■ You can check the current driver settings.
■ You can print the printer settings page and the inter nal fonts list. (The internal fonts list is not available
for HL-5130.)
2 - 11 DRIVER AND SOFTWARE
Page 67

Features in the PS printer driver
This section is for HL-5150D and HL-5170DN.
You can download the latest driver by accessing the Brother Solutions Center at
http://solutions.brother.com
For more information, please see the Help text in the printer driver.
The screens in this section are from Windows® XP.
The screens on your PC will vary depending on your Operating System.
Ports tab
Select the port where your printer is connected or the path to the network printer you are using.
DRIVER AND SOFTWARE 2 - 12
Page 68

Device Settings tab
Select the options you installed.
2 - 13 DRIVER AND SOFTWARE
Page 69

Layout tab
If you are using Windows NT® 4.0, Windows® 2000 or XP, you can access the Layout tab by
clicking Printing Preferences... in the General tab of the Printer BR-Script3 Properties screen.
You can change the Layout setting by selecting the setting in the Orientation, Page Order and Page
Per Sheet.
DRIVER AND SOFTWARE 2 - 14
Page 70

Paper / Quality tab
Select the Paper Source.
2 - 15 DRIVER AND SOFTWARE
Page 71

Advanced options
If you are using Windows NT® 4.0, Windows® 2000 or XP, you can access the Advanced Options
tab by clicking Advanced... button in the Layout tab or the Paper / Quali ty tab.
1
2
3
1
Select the Paper Size and Copy Count.
2
Set the Print Quality, Scaling and TrueType Font setting.
3
You can change settings by selecting the setting in the Printer Features list:
■ Media Type
■ Toner Save
■ Sleep Time
■ BR-Script Level
Toner Save
You can save running costs by turning on the Toner Save setting, which reduces the print density.
Sleep Time
When the printer does not receive dat a for a certain period of t ime (timeout), it enters sl eep mode. Sleep
mode acts as though the pri nter was turned off. The default timeout is 5 mi nutes. When Intelligent Sleep
Mode is selected, it is automatically adjusted to the most suitable time-out setting depending on the
frequency of your printer use. While the printer is in sleep mode, the LED is off, but the printer can still
receive data from the computer. Recei ving a print fil e or document automat ically wakes up the p rinter to
start printing. Pressing the GO button will also wake up the printer.
Sleep mode can be turned off. To turn sleep mode off, go to the Advanced tab, se lect Device Options
and then select Sleep Time. Double click t he word Sleep Time in the Sle ep Time screen, this will allow
the Sleep Time Off function to appear, click Sleep Time Off to stop the printer going into sleep mode.
The Sleep Time Off function can be hidden by double cl icki ng the wor d Sleep Ti me in the Sleep Time
screen again. We recommend that you keep Sleep mode on to save power.
DRIVER AND SOFTWARE 2 - 16
Page 72

For Macintosh®
This printer supports Mac OS® 8.6 to 9.2 and Mac OS® X 10.1 to 10.2.
You can download the latest driver by accessing the Brother Solutions Center at
http://solutions.brother.com
The screens in this section are from Mac OS® X 10.1
The screens on your Macintosh
Page setup
You can set the Paper size, Orientation and Scale.
Brother Laser driver / PS driver
®
will vary depending on your Operating System.
Layout
Set the Layout, Pages per Sheet and other settings.
Brother Laser driver / PS driver
Pages per sheet: Select how many pages will appear on each side of the paper.
Layout direction: When you specify the Pages per sheet, you can also speci fy the dire ction of the
layout.
Border: If you want to add a border, use this function.
Print on Both Sides: When you want to print on both sides of the paper, use this function.
2 - 17 DRIVER AND SOFTWARE
Page 73

Specific settings
Set the Media Type, Resolution, Toner Save, and other settings.
Brother Laser driver
PS driver
You can change settings by selecting the setting in the Printer Features list:
■ Media Type
■ Resolution
■ Toner Save
■ Sleep Time (For PS driver only)
Resolution
You can change the resolution as follows:
■ 300 dpi
■ 600 dpi
■ HQ 1200 dpi
DRIVER AND SOFTWARE 2 - 18
Page 74

Toner Save
You can save running costs by turning on the Toner Save setting, which reduces the print density.
Sleep Time
When the printer does not receive dat a for a certain period of t ime (timeout), it enters sl eep mode. Sleep
mode acts as though the pri nter was turned off. The default timeout is 5 mi nutes. When Intelligent Sleep
Mode is selected, it is automatically adjusted to the most suitable time-out setting depending on the
frequency of your printer use. While the printer is in sleep mode, the LED is off, but the printer can still
receive data from the computer. Recei ving a print fil e or document automat ically wakes up the p rinter to
start printing. Pressing the GO button will also wake up the printer.
Sleep mode can be turned off. To turn sleep mode off, go to the Advanced tab, se lect Device Options
and then select Sleep Time. Double click t he word Sleep Time in the Sle ep Time screen, this will allow
the Sleep Time Off function to appear, click Sleep Time Off to stop the printer going into sleep mode.
The Sleep Time Off function can be hidden by double cl icki ng the wor d Sleep Ti me in the Sleep Time
screen again. We recommend that you keep Sleep mode on to save power.
2 - 19 DRIVER AND SOFTWARE
Page 75

Software
This section is for Windows®.
Software for Networks
This section is for HL-5170DN.
BRAdmin Professional
The BRAdmin Professional software is a util ity for ma naging your Brot her network enabl ed printer s that
are running under Windows
®
95/98/Me, Windows NT® 4.0 and Windows® 2000/XP.
It allows you to easily configure and check the status of your printer on the network.
Driver Deployment Wizard
This installer includes the Windows® PCL driver and Brother network port driver (LPR and NetBIOS).
The administrator should set up the IP address, Gateway and Subnet with BRAdmin Professional befor e
using this software.
If the administrator then installs the printer driver and port driver using thi s software, the administrator
can save the file to t he f ile server or send the fil e by E-mail to use rs. The n, each u ser ju st clic ks that f ile
to have the printer driver, port driver, IP address, and so on, automatically copied to their PC.
Web BRAdmin
The Web BRAdmin software is designed to manage all LAN/WAN Brother net work connected devices.
By installing the Web BRAdmin server software on a computer running IIS*, Administra tors wit h a Web
browser can connect to the Web BRAdmin server, which then communicates with the device itself.
Unlike the BRAdmin Professional software - which is designed for Windows
BRAdmin server software can b e accessed from any client computer with a web browser that supports
Java 2.
You can download the Web BRAdmin software from our web site at
http://solutions.brother.com/webbradmin
®
systems only - the Web
IIS* = Internet Informati on Server 4.0 or 5.0
Web BRAdmin and Internet Information Server 4.0 is supported on the following operating systems:
®
■ Windows NT
4.0 Server
Web BRAdmin and Internet Information Server 5.0 is supported on the following operating systems:
■ Windows
■ Windows
■ Windows
■ Windows
®
2000 Professional
®
2000 Server
®
2000 Advanced Server
®
XP Professional
DRIVER AND SOFTWARE 2 - 20
Page 76

Automatic Emulation Se lection
This section is for HL-5150D and HL-5170DN.
This printer has an Automatic Emulation Selection feature. When the printer receives data from the
computer, it automatically chooses the emulation mode. This feature has been set at the f actory to ON.
The printer can choose from the following combinations:
Setting 1 (default
HP LaserJet HP LaserJet
BR-Script 3 BR-Script 3
EPSON FX-850 IBM ProPrinter XL
)
Setting 2
2 - 21 DRIVER AND SOFTWARE
Page 77

3
Control panel
This section refers to the four Light Emit ting Di odes (L EDs) (Toner, Drum, Paper, Status) and the two
control panel buttons (Job Cancel, Go) on the control panel.
Figure 3-1
The LED indications shown in the table below are used in the illustrati ons in this chapter.
LED is off
or or
or
When the power switch is off or the printer is in Sleep mode, all the LEDs are off.
or
LED is on
LED is blinking
CONTROL PANEL 3 - 1
Page 78

LED
Toner
Drum
Paper
Status
Figure 3-2
Toner
Drum
Paper
Status
Printer status
Sleep mode
The power switch is off or the printer is in Sleep mode. Pressing the Go button
wakes up the printer from Sleep mode to Ready mode.
Warming up
The printer is warming up.
Figure 3-3
Toner
Drum
Paper
Status
Figure 3-4
Toner
Drum
Paper
Status
Ready to print
The printer is ready to print.
Receiving data
The printer is either receiving data from the computer, processing data in
memory or printing the data.
Figure 3-5
3 - 2 CONTROL PANEL
Page 79

LED
Toner
Drum
Paper
Status
Figure 3-6
Toner
Printer status
Data remaining in memory
Print data remains in the printer memory. If the Status LED is on for a long time
and nothing has printed, press the Go button to print the remaining data.
Toner low
Indicates that the toner cartridge is nearly empty. Purchase a new toner
cartridge and have it ready for when Toner Empty is indicated.
Drum
Paper
Status
Figure 3-7
Toner
Drum
Paper
Status
Figure 3-8
Toner
The Toner LED alternates turning on for 2 seconds and off for 3 seconds.
Toner empty
Replace the toner cartridge with a new one. See Replacing the toner cartridge
on page 5-3.
Drum unit near end of life
The drum unit is near the end of its life. We recommend that you obtain a new
drum unit to replace the current one. See Replacing the drum unit on page 5-9.
Drum
Paper
Status
Figure 3-9
The Drum LED alternates turning on for 2 seconds and off for 3 seconds.
CONTROL PANEL 3 - 3
Page 80

LED
Toner
Drum
Paper
Status
Figure 3-10
Toner
Drum
Paper
Printer status
Paper jam
Clear the paper jam. See Paper jams and how to clear them on page 6-6. If the
printer does not start printing, press the Go button.
No paper
Put paper in the printer. See Printing on plain paper in Chapter 1. Then press the
Go button.
Misfeed
Put the paper back in properly, and then press the Go button. The printer will
start printing again.
Duplex Size Error (For HL-5150D and HL-5170DN)
Press the Go button. Specify the printable paper size. The paper size you can
use for Duplex printing is A4, Letter or Legal.
No Duplex Tray (For HL-5150D and HL-5170DN)
Install the Duplex tray into the printer.
Duplex Lever Error (For HL-5150D and HL-5170DN)
Move the Duplex lever to the correct position.
Front Cover Open
Close the front cover of the printer.
Jam Clear Cover Open
Close the jam clear cover of the printer. See page 6-9.
Face up Open (For HL-5150D and HL-5170DN: When you use the duplex
printing function)
Close the face-up output tray of the printer.
Status
Figure 3-11
3 - 4 CONTROL PANEL
Page 81

Service call indications
If there is an error that cannot be cleared by th e user, the printer will show t hat a service call is needed
by lighting up all the LEDs as shown in Figure 3-12.
Toner
Drum
Paper
Status
Figure 3-12
If you see the service call indication above, follow the steps below:
1
Take out the DIMM (Dual Inline Memory Module) from your printer, if you have a DIMM installed.
2
Turn off the power switch, wait a few seconds, and then turn it back on and try to pri nt again.
If you cannot clear the error and see the same service call indication after turning the printer back on,
call your dealer or a Brother authorized service representative.
When you press the Go and the Job Cancel buttons together, the LEDs will light up with one of the
combinations shown in Table 1. See Table 1: LED indicati ons while pressing Go and Job Cancel on page
3-6 to identify the error.
For example, the LED indication below shows a fixing unit failu re.
Toner
Drum
Paper
Status
Figure 3-13
CONTROL PANEL 3 - 5
Page 82

Table 1: LED indications while pressing Go and Job Cancel
LEDs Fixing unit
failure*
1
Laser unit
failure
Main motor
failure
Main PCB
failure
Engine PCB
failure
DIMM failure
Toner
Drum
Paper
Status
Make a note of the indication and report the error status to your dealer or a Brother authorized service
representative by referring to the above table.
Make sure that the front cover is fully closed before you report a service call.
1
*
If this error occurs, turn the power switch off, wait a few seconds, and then turn it on again.
Leave the printer for 10 minutes with the power on. If the error occurs again, consult your dealer or
Brother authorized service representative.
3 - 6 CONTROL PANEL
Page 83

Control panel buttons
The control panel buttons have the following functions:
Cancel printing
If you press the Job Cancel button while printing, the printer wil l immediatel y stop prin ting and will then
eject the paper.
Wake-up
If the printer is in Sleep mode, press the Go or Job Cancel button to wake the printer up and go to the
Ready state.
Form feed
If the yellow Status LED is on, press the Go button. The printe r will print any data that is lef t in the printer
memory.
Error recovery
If there is an error , the print er will rec over automatical ly from some er rors. If an error is not automaticall y
cleared, press the Go button to clear the error, and then continue to use the printer.
Reprint
If you want to reprint a document that has just been printed, you can do this by pressing and holding
down the Go button until all four LEDs are lit and then release the Go button.
CONTROL PANEL 3 - 7
Page 84

Print a test page
You can use the Go button or the printer driver to print a test page.
Using control panel button
1
Turn off the printer.
2
Make sure that the front cover is closed and the power cord is plugged in.
3
Hold down the Go button as you turn on the power switch. All the LEDs light up and then go off
again. Keep the Go button pressed down until the Toner LED comes on. When the Toner LED
comes on, release the Go button.
4
Press the Go button again. The printer will print a test page.
Using the printer driver
If you are using Brother’s Windows® PCL printer driver, click the Print Test Page button. It is in the
General tab of the Windows
®
printer driver.
3 - 8 CONTROL PANEL
Page 85

Printer Settings
You can print the current settings using the control panel button or printer driver.
Using the control panel button
1
Make sure that the front cover is closed and the power cord is plugged in.
2
Turn on the printer and wait until the printer is in the Ready state.
3
Press the Go button three times. The printer will print the current printer settings.
Using the printer driver
If you are using Brother’s Windows® PCL printer driver, you can print the current printer settings by
clicking the Print Settings button in the Support tab.
CONTROL PANEL 3 - 9
Page 86

Print fonts (Not available for HL-5130)
You can print a list of the internal fonts using the control panel button or printer driver.
Using the control panel button
1
Turn off the printer.
2
Make sure that the front cover is closed and the power cord is plugged in.
3
Hold down the Go button as you turn on the power switch. All the LEDs light up and then go off
again. Keep the Go button pressed down until the Toner LED comes on. When the Toner LED
comes on, release the Go button.
4
Press and hold the Go button again until the Drum LED comes on.
5
When the Drum LED comes on, release the Go button. The printer will print a list of the internal
fonts.
Using the printer driver (Not available for HL-5130)
If you are using Brother’s Wi ndows® PCL printer driver, yo u can print a list of the internal fo nts by clicking
the Print Fonts button in the Support tab.
3 - 10 CONTROL PANEL
Page 87

Network factory default setting (For HL-5170DN)
If you wish to reset the print server back to its default factory settings (resetting all information such as
the password and IP address information), pleas e foll ow these steps:
1
Turn off the printer.
2
Make sure that the front cover is closed and the power cord is plugged in.
3
Hold down the Go button as yo u turn on the power switch. All t he LEDs will light up. Keep the but ton
pressed down until the Toner LED comes on. When the Toner LED comes on, release the Go
button.
4
Hold down the Go button and keep it pressed down until the yellow Status LED comes on. When
the Status LED comes on, release the Go button.
5
When all the LEDs light up again , the pri nt er wil l star t warm ing up. The pri nt s erver has been r eset
to its default factory settings.
Disabling the APIPA protocol (For HL-5170DN)
If you wish to automatically disable the APIPA protocol, please follow these steps:
1
Turn off the printer.
2
Make sure that the front cover is closed and the power cord is plugged in.
3
Hold down the Go button as yo u turn on the power switch. All t he LEDs will light up. Keep the but ton
pressed down until the Toner LED comes on. When the Toner LED comes on, release the Go
button.
4
Hold down the Go button and keep it pressed down until the green Status LED comes on. When
the Status LED comes on, release the Go button.
■ For more information on APIPA, see the Network User’s Guide or visit
http://solutions.brother.com
■ You can also disable the APIPA pr otocol using EWS, BRAdmin Professio nal or Web BRAdmin.
CONTROL PANEL 3 - 11
Page 88

4
Options
This printer has the foll o wing optional accessories. You can incr ease the capabilities of the pri nter with
these items. Click the symbol L in the table to see the information for each item.
Model DIMM Lower tray unit Print server
HL-5130 N/A N/A L
HL-5140 LLL
HL-5150D LLL
HL-5170DN LLStandard
DIMM
We recommend that you expand the printer memory to avoid any memory full errors.
For HL-5140 and HL-5150D
This printer has 16 MB of standard memory and a slot for optional addi tional memory. The memory can
be expanded up to a total of 144 MB by installing a commercially available DIMM (Dual In-li ne Memory
Module).
For HL-5170DN
This printer has 32 MB of standard memory and a slot for optional addi tional memory. The memory can
be expanded up to a total of 160 MB by installing a commercially available DIMM (Dual In-li ne Memory
Module).
The following DIMM size can be installed:
■ 16 MB
■ 32 MB
■ 64 MB
■ 128 MB
For more information, visit Techworks web site at www.t echworks.com
In general, DIMM must have the following specifications:
Type
CAS Latency
Clock Frequency
Capacity
Height
Parity
DRAM Type
TECHWORKS
TECHWORKS
TECHWORKS
TECHWORKS
100 pin and 32 bit output
2 or 3
66MHz or more
16, 32, 64 MB or 128 MB
35 mm (1.4 inch es) or less
NONE
SDRAM 4 Bank
12456-0001
12457-0001
12458-0001
12459-0001
4 - 1 OPTIONS
Page 89

■ Additional memory is useful and may be necessary if you are using the Page Protection functi on.
(For HL-5170DN)
■ You have to expand the printer memory by adding a DIMM to use the FTP/IPP protocol.
Installing additional memory
1
Turn off the printer power switch, and then unplug the printer. Disconnect the interface cable from
the printe r.
Figure 4-1
Caution
Make sure you turn the printer OFF before you install or remove the DIMM.
2
Remove the side cover. Use a coin to loosen the two screws, and then remove the metal plate.
Figure 4-2 Figure 4-3
3
Unpack the DIMM and hold it by the edges.
Caution
DIMM boards can be damaged by even a small amount of s tatic electricity. Do not touch the me mory
chips or the board s urface. Wear an an tistatic wrist strap when you install or remove the board. If you
do not have an antistatic wrist strap, frequently touch the bare metal on the printer.
OPTIONS 4 - 2
Page 90

4
Hold the DIMM by the side edges. Line up th e notches on the DIMM with the DIMM slot . (Check that
the locks on each side of the DIMM slot are open or facing outwards.)
Figure 4-4
5
Press the DIMM straight into the slot (pres s fi rmly). Make sure the locks on each si de of the DIMM
click into place. (To remove a DIMM, you must release the locks.)
6
Put the metal plate back on and secure the metal plate with the two screws.
7
Put the side cover back on.
8
Reconnect the interface cable (printer cable) to your computer. Plug the printer back in, and then
turn on the printer power switch.
To check that you have installed the DIMM cor rectly, print the pr inter settings by using t he selection
in the driver and check the printout to make sure it shows the addit ional memory. See Printer
Settings and Print fonts in Chapter 3.
4 - 3 OPTIONS
Page 91

Lower tray unit (LT-5000) (Not available for HL-5130)
The lower tray unit is an optional device that can hold extra paper . It can hold a maximum of 250 sheets
of paper (80 g/m
If you want to buy an optional lower tray unit, call the dealer you bought the printer from or Brother
Customer Service.
To install the lower tray unit, please see the instructions supplied with the lo we r tray unit.
2
or 21 lb).
Figure 4-5
OPTIONS 4 - 4
Page 92

Print server (NC-2100p) (For HL-5130, HL-5140 and HL-5150D)
An optional network print serve r (NC-2100p) allows y ou to c onnect to yo ur net work thr ough the paral l el
interface.
■ NC-2100p: TCP/IP, NetBEUI and AppleTalk* protocols
■ Superior network and printer management:
■ BRAdmin Professional Windows
■ SNMP MIB I and MIB II over IP or IPX
■ Remote console management via TELNET.
■ Embedded web server support.
■ Flash memory for easy updating of firmware.
* For HL-5150D.
HL-5170DN already has a built-in 10/100BASE-TX Ethernet Print Server.
®
-based Management utility.
4 - 5 OPTIONS
Page 93

5
Routine maintenance
You will need to replace certain parts and clean the printer regularly.
You can see the maintenance video in the Maintenance Tutorial section of the CD-ROM we have
provided with the printer.
1
2
3
4
5
6
1
You can see how to replace the toner cartridge.
2
You can see how to replace the drum unit.
3
You can see how to clean the scanner window.
4
You can see how to clean the corona wire in the drum unit.
5
You can see how to clean the surface of the OPC in the drum unit.
6
You can see how to clean the scanner window and the corona wire in the drum unit.
7
You can see how to clean the corona wire in the drum unit.
These instructions are also included i n Im proving the print quality on page 6-11.
7
ROUTINE MAINTENANCE 5 - 1
Page 94

Toner cartridge
A new toner cartridge contains eno ugh toner to print up to 3,5 00 (standard cartridge) or up t o 6,700 (high
yield cartridge) A4 or Letter-size single-sided pages at 5% coverage.
■ The amount of toner used var ies according to what is printed on the page a nd the print density
setting.
■ The more that is printed, the more toner will be used.
■ If you change the print density setting for lighter or darker printing, the amount of tone r that is
used will change.
■ Wait to unpack the toner cartridge until immediately before you install it in the printer.
Toner Low message
Toner
Drum
Paper
Status
The Toner LED alternates turning on for 2 seconds and off for 3 seconds.
Figure 5-1
If the LED shows this message, the toner cartridge has nearly run out of toner. Buy a new toner cartr idge
and have it ready before you get a Toner Empty message. To put in the toner cartridge, see Replacing
the toner cartridge on page 5-3.
Toner LED will blink continuously if the toner cartridge is nearly empty.
5 - 2 ROUTINE MAINTENANCE
Page 95

Toner Empty message
If the LED shows the message below, the pri nter has run out of toner or the toner is not evenly distributed
inside the cartridge.
Toner
Drum
Paper
Status
Figure 5-2
Replacing the toner cartridge
To ensure high quality printing, make sure you use quality toner ca rtridges. When you want to buy
toner cartridges, call the dealer you bought the printer from or Brother Customer Service.
We recommend that you clean the printer when you replace the toner cartridge. See Cleaning on
page 5-12.
1
Press the cover release button and then open the front cover of the printer.
Figure 5-3
ROUTINE MAINTENANCE 5 - 3
Page 96

2
Pull out the drum unit assembly (drum unit with toner cartridge).
Figure 5-4
Caution
■ We recommend that you place the drum unit and toner cartridge assembly on a piece of
disposable paper or cloth in case you accidentally spill or scatter toner.
■ To prevent damage to the printer from static electricity, do not touch the electrodes shown in
Figure 5-5.
Figure 5-5
3
Push down the blue lock lever and take the toner cartridge out of the drum unit.
Figure 5-6
Caution
Handle the toner cartridge careful ly. If toner scatters on your hands or clothes, immediately wipe or
wash it off with cold water.
■ Be sure to seal up the toner cartridge tightly so that toner powder does not spill out of the
cartridge.
■ Discard the used toner cartridge according to local regulations, keeping it separate fro m
domestic waste. If you have questions, call your local waste disposal office.
5 - 4 ROUTINE MAINTENANCE
Page 97

4
Unpack the new toner cartridge. Hold the cartridge l evel with both hands and gently rock it from si de
to side five or six times to spread the toner evenly insi de the cartridge.
Figure 5-7
Caution
■ Wait to unpack the toner cartridge until immediately before you put it in the printer. If toner
cartridges are left unpacked for a long time the toner life will be shortened.
■ If an unpacked drum unit is put in direct sunlight or room light, the unit may be damaged.
■ Brother strongly recommends that you do not ref ill the toner c artridge provided with your print er.
We also strongly recommend that you continue t o use only Genuine Brother Brand replacement
toner cartridges. Using or attempting to use potentially incompatible toner and/or to ner
cartridges in your printer may cause damag e to the pri n ter itself and/or it may result in
unsatisfactory print quality. Our warranty coverage does not apply to any problem that was
caused by the use of unauthorized third party toner and toner cartridges. To protect your
investment and guarantee your print quality please continue to replace consumed toner
cartridges with only Genuine Brother Branded Supplies.
■ Printing with a third- party toner or third-part y toner cartridge may reduce not only t he print quality
but also the quality and life of the printer itself. It may also cause serious damage to the
performance and life of a drum unit. Warranty coverage does not apply to problems caused by
the use of third-party toner or thir d-party toner cartridges.
5
Pull off the protective cover.
Figure 5-8
ROUTINE MAINTENANCE 5 - 5
Page 98

Caution
Put the toner cartridge in the dr um unit immediat ely after you have removed the protecti ve cover. Do
not touch the shaded parts shown in Figure 5-9 and Figure 5-10 to preve n t any degradation to the
print quality.
Figure 5-9 Figure 5-10
6
Put the new toner cartridge firmly into the drum unit you hear it lock into place. If you put it in
properly, the lock lever will lift automatically.
Figure 5-11
Caution
Make sure you insert the toner cartridge properly or it may separate from the drum unit.
5 - 6 ROUTINE MAINTENANCE
Page 99

7
Clean the primary corona wire inside the drum unit by gently sl iding the blue tab from right to left
and left to right several t imes. Return the tab t o the home po sition (▲) bef ore you put th e drum unit
back in the printer. If you do not, printed pages may have a vertical stripe.
Figure 5-12
8
Put the drum unit assembly back in the printer. Close the front cover of the printer.
Figure 5-13
ROUTINE MAINTENANCE 5 - 7
Page 100

Drum unit
This printer can print up to 20,000 pages* with one drum unit.
*
At 5% print coverage (A4 or Letter size). The actual number of printed pages will vary depending on
the average type of print job and paper.
■ There are many factors that determine the actual drum life, such as the temperature, humidity,
type of paper, type of toner used, number of pages per print job and so on. Under ideal
conditions, the average drum life is est imated at up to 20,000 pages. The actual number of
pages that your drum will pr int may be significant ly less than this estimate. Because we ha ve no
control over the many factors that determine the act ual drum life, we cannot guarantee a
minimum number of pages that will be printed by your drum.
■ For best performance, use only genuine Brother toner. The printer should be used only in a
clean, dust-free environment with adequate ventilation.
■ Printing with a third-par ty drum unit may reduce n ot only the print quality but also the quality and
life of the printer itself. Warr anty coverage does not apply to problems caused by the use of
third-party drum unit.
Change Drum message
If the LED shows the message below, it means the drum unit is near the end of its life. We recommend
that you replace the drum unit with a new one before there is a noticeable deterioration in the print
quality.
Toner
Drum
Paper
Status
Figure 5-14
Caution
■ While removing the drum unit, handle it carefully because it may contain toner.
■ Every time you replace the drum unit, you should clean the inside of the printer. See Cleaning
on page 5-12.
5 - 8 ROUTINE MAINTENANCE
 Loading...