

Page 1
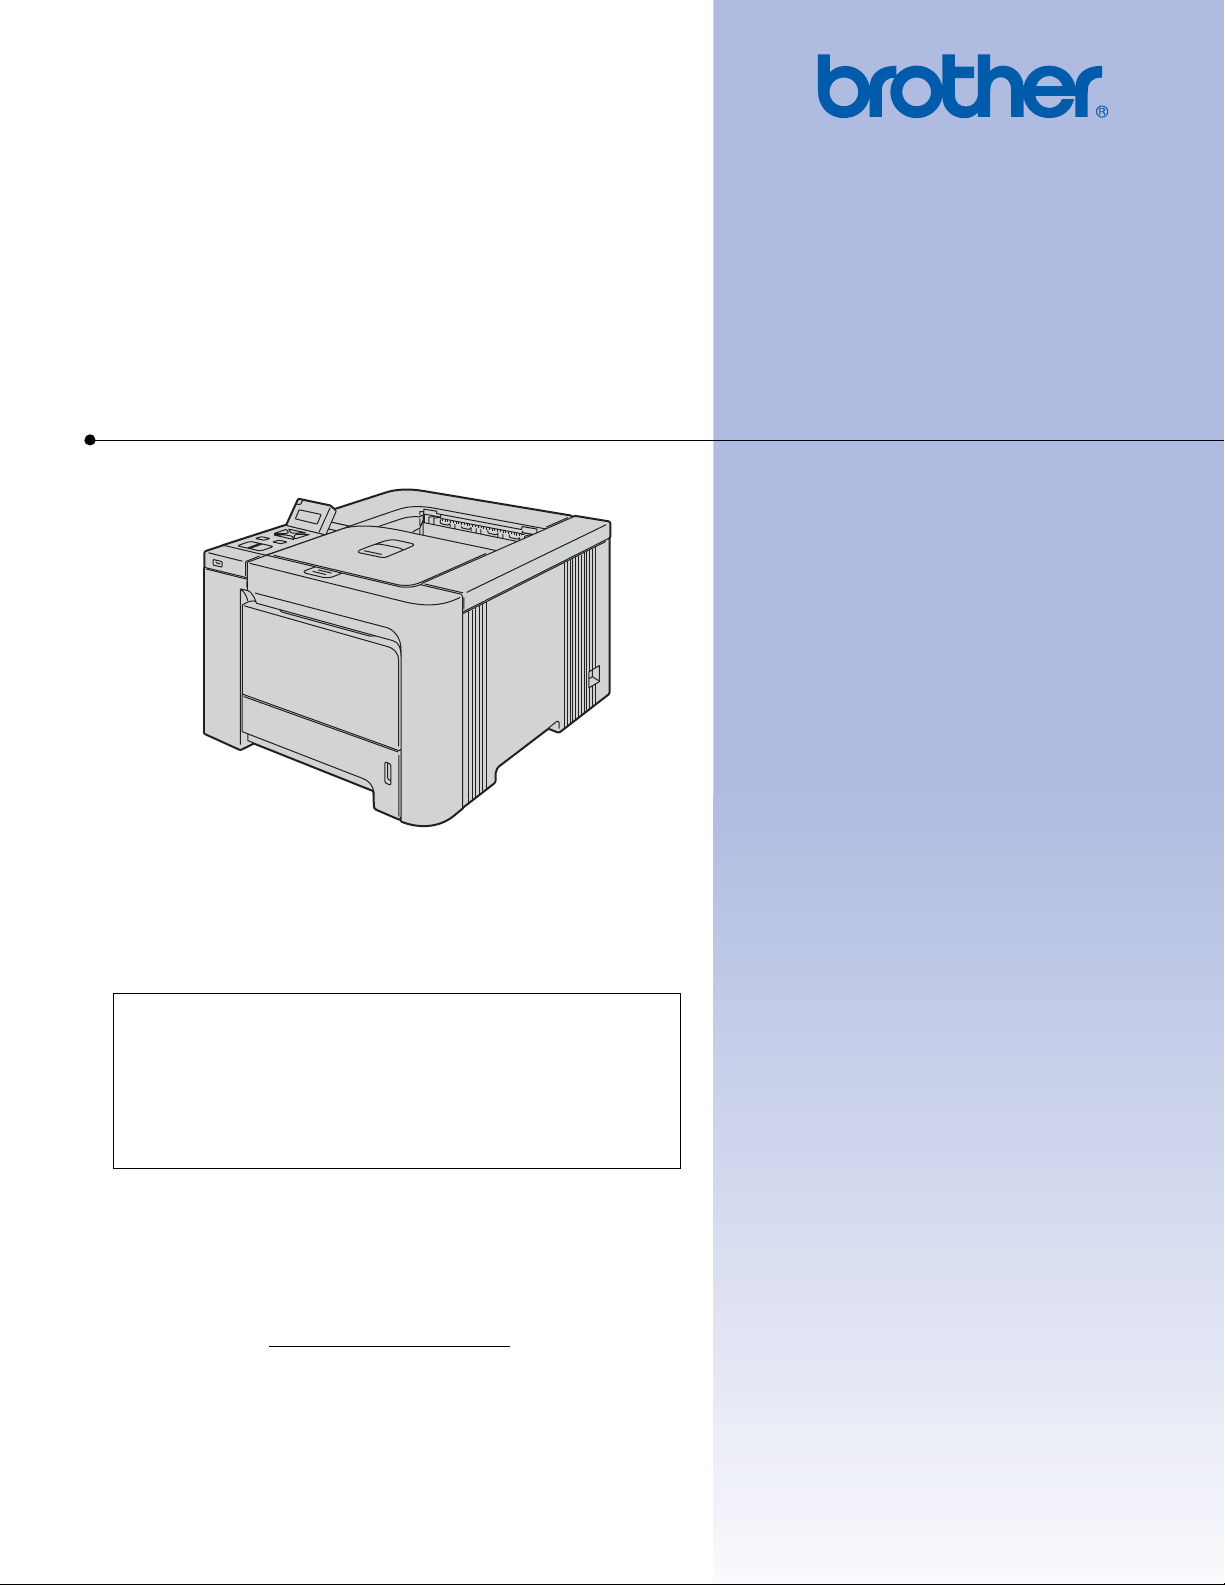
Brother Laser Printer
USER’S GUIDE
HL-4040CN
HL-4050CDN
HL-4070CDW
For visually-impaired users
You can read this manual with Screen
Reader ‘text-to-speech’ software.
You must set up the hardware and install the driver before you can use the printer.
Please use the Quick Setup Guide to set up the printer. You can find a printed copy in the box .
Please read this User’s Guide thoroughly before you use the printer. Keep the CD-ROM in a convenient place so you
can use it quickly if you need to.
Please visit us at http://solutions.brother.com
utilities, and answers to frequently asked questions (FAQs) and technical questions.
Note: Not all models are available in all countries.
where you can get product support, the latest driver updates and
Version B
EN-US
Page 2
Using this guide
Symbols used in this guide
We use the following icons throughout this User’s Guide:
Warnings tell you what to do to prevent possible personal injury.
Electrical Hazard icons alert you to a possible electrical shock.
Hot Surface icons warn you not to touch machine parts that are hot.
Cautions specify procedures you must follow or avoid to prevent possible damage to the
printer or other objects.
Improper Setup icons alert you to devices and operations that are not compatible with the
printer.
Notes tell you how you should respond to a situation that may arise or give tips about how
the operation works with other features.
i
Page 3
Safety precautions
To use the printer safely
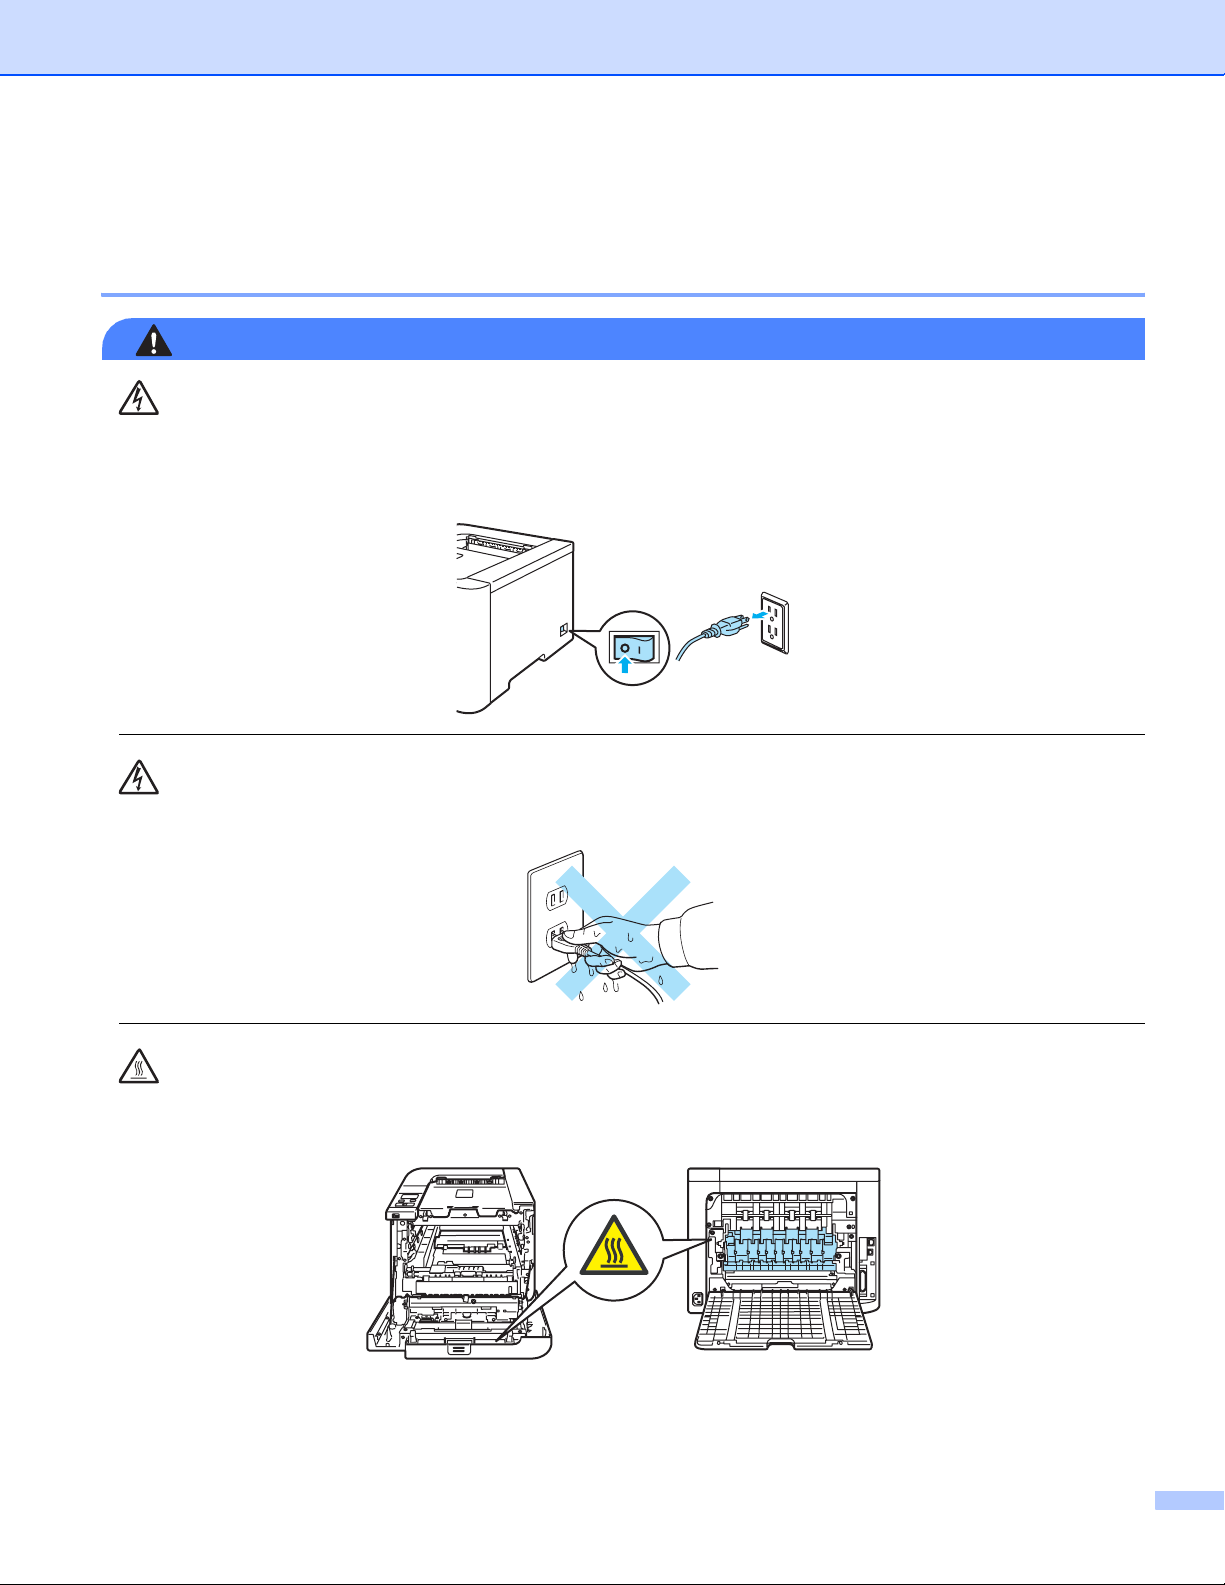
WARNING
There are high voltage electrodes inside the printer. Before you clean the inside of the printer or replace
parts, make sure that you have turned off the power switch and unplugged the printer from the AC power
outlet.
DO NOT handle the plug with wet hands. Doing this might cause an electrical shock.
The fuser unit becomes extremely hot during operation. Wait until it has cooled down sufficiently before
replacing consumable items. DO NOT remove or damage the caution label located on or around the fuser.
ii
Page 4
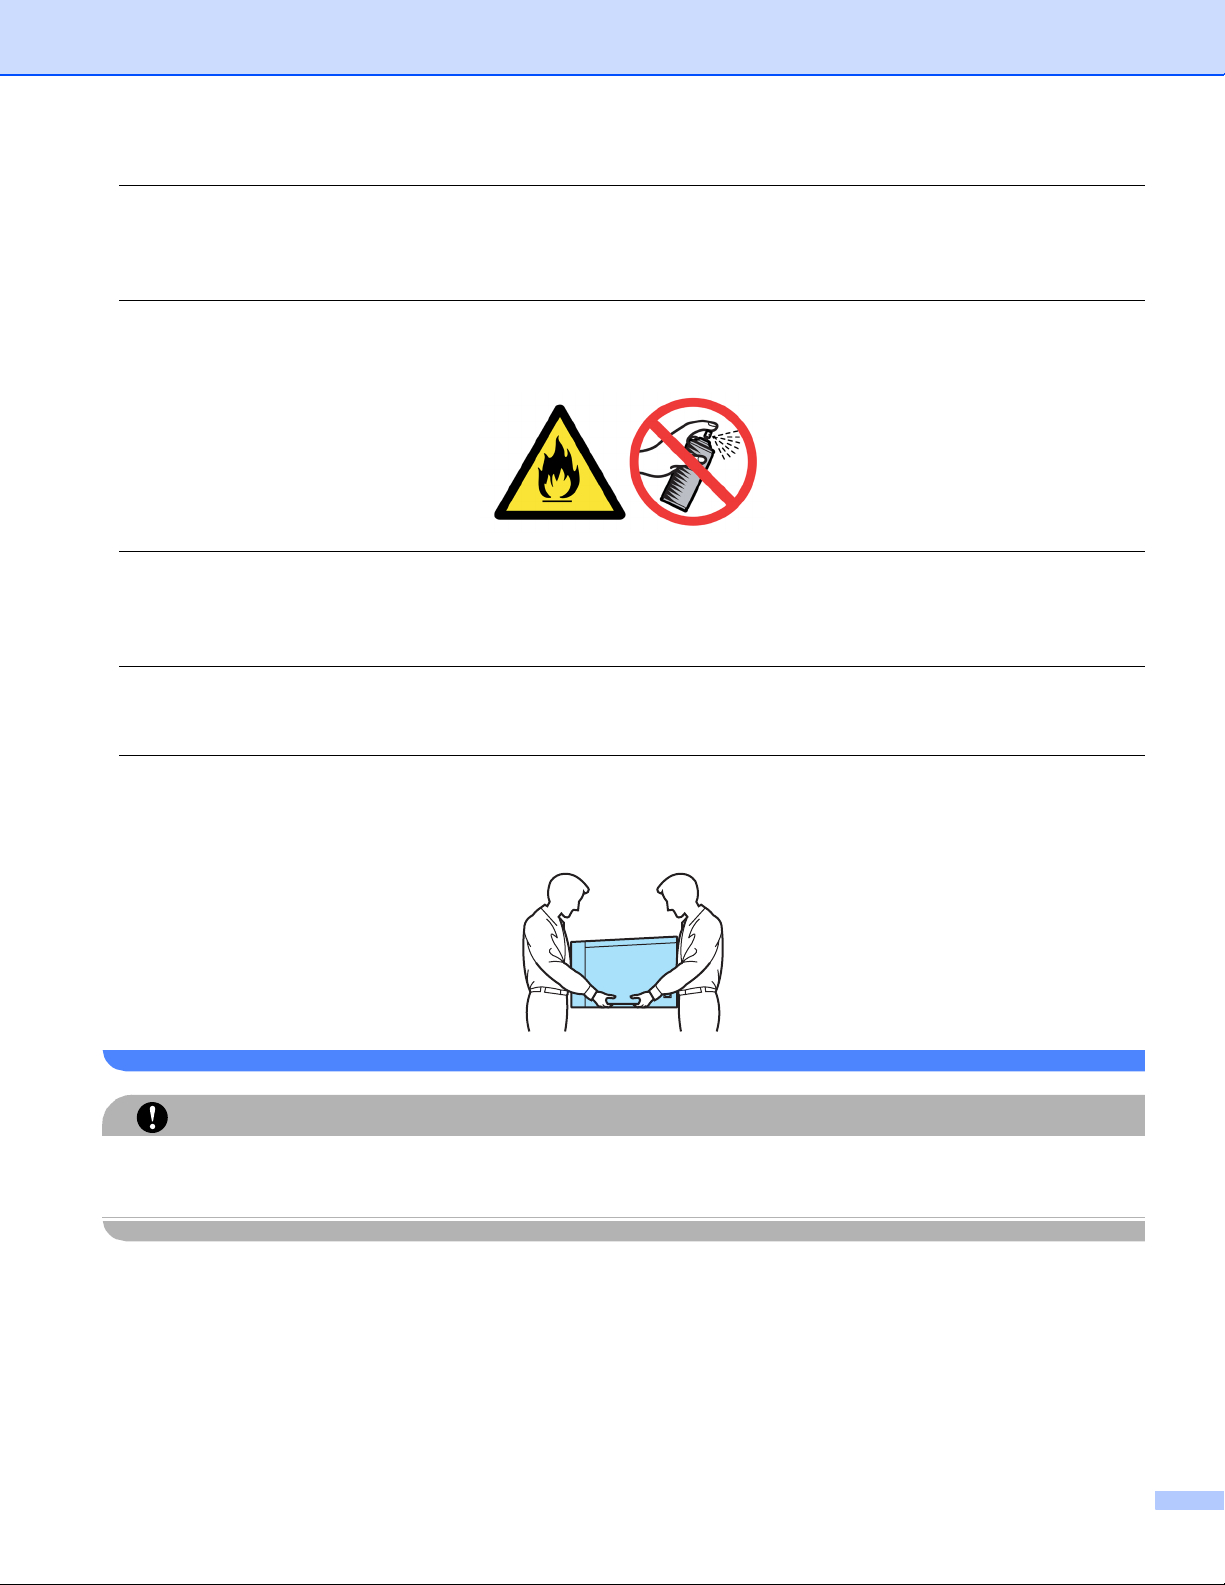
DO NOT use a vacuum cleaner to clean up scattered toner. Doing this might cause the toner dust to ignite
inside the vacuum cleaner, potentially starting a fire. Carefully clean the toner dust with a dry, lint-free cloth
and dispose of it according to local regulations.
DO NOT use flammable substances or any type of spray to clean the inside or outside of the machine.
Doing this may cause a fire or electrical shock.
If the printer becomes hot, blows smoke, or generates an obscure odor, immediately turn off the power
switch and unplug the printer from the AC power outlet. Call your Brother dealer or Brother Customer
Service.
If metal objects, water or other liquids get inside the printer, immediately turn off the power switch and
unplug the printer from the AC power outlet. Call your Brother dealer or Brother Customer Service.
This printer is heavy and weighs approximately 64.2 lb (29.1 kg). To prevent injuries when moving or lifting
this printer, make sure to use at least two people. Be careful not to pinch your fingers when you set the
printer back down.
CAUTION
Lightning and power surges can damage this product! We recommend that you use a quality surge
protection device on the AC power line, or unplug the printer during a lightning storm.
iii
Page 5

Trademarks
The Brother logo is a registered trademark of Brother Industries, Ltd.
Apple, the Apple Logo, Macintosh and TrueType are registered trademarks of Apple Computer, Inc in the
United States and other countries.
Hewlett Packard is a registered trademark and HP LaserJet 6P, 6L, 5P, 5L, 4, 4L 4P, III, IIIP, II, and IIP are
trademarks of Hewlett-Packard Company.
Microsoft, MS-DOS, Windows are registered trademarks of Microsoft Corporation in the U.S. and other
countries.
Windows Vista is a trade mark of Microsoft Corporation.
PostScript and PostScript 3 are trademarks of Adobe Systems Incorporated.
ENERGY STAR is a U.S. registered mark.
Citrix and MetaFrame are registered trademarks of Citrix Systems, Inc. in the United States.
SuSE is a registered trade mark of SuSE Linux AG.
RED HAT is a registered trade mark of Red Hat. Inc.
Mandrake is a registered trade mark of Mandrake Soft SA.
Intel, Intel Xeon and Pentium are trademarks or registered trademarks of Intel Corporation.
AMD, AMD Athlon, AMD Opteron and combinations thereof, are trademarks of Advanced Micro Devices, Inc.
PictBridge is a trademark.
Java and all Java-based trademarks and logos are trademarks or registered trademarks of
Sun Microsystems, Inc. in the United States and other countries.
Each company whose software title is mentioned in this manual has a Software License Agreement specific
to its proprietary programs.
All other terms and brand and product names mentioned in this User’s Guide are registered trademarks of
their respective companies.
Compilation and Publication Notice
Under the supervision of Brother Industries Ltd., this manual has been compiled and published, covering the
latest product’s descriptions and specifications.
The contents of this manual and the specifications of this product are subject to change without notice.
Brother reserves the right to make changes without notice in the specifications and materials contained
herein and shall not be responsible for any damages (including consequential) caused by reliance on the
materials presented, including but not limited to typographical and other errors relating to the publication.
© 2007 Brother Industries Ltd.
Shipment of the Printer
If for any reason you must ship your printer, carefully package the printer to avoid any damage during transit.
We recommend that you save and use the original packaging. The printer should also be adequately insured
with the carrier.
iv
Page 6

Table of Contents
1 About this Printer 1
Carton components ...................................................................................................................................1
Interface cable.....................................................................................................................................2
Front view............................................................................................................................................3
Back view ............................................................................................................................................4
Positioning the printer................................................................................................................................5
Power supply .......................................................................................................................................5
Environment ........................................................................................................................................5
2 Printing Methods 6
About paper ...............................................................................................................................................6
Type and size of paper........................................................................................................................6
Recommended paper..........................................................................................................................7
Unprintable area..................................................................................................................................9
Printing methods......................................................................................................................................10
Printing on plain paper.......................................................................................................................10
Printing on thick paper, labels and envelopes ...................................................................................17
Duplex printing.........................................................................................................................................21
Guidelines for printing on both sides of the paper .............................................................................21
Manual duplex printing ......................................................................................................................21
Automatic duplex printing (HL-4050CDN/HL-4070CDW only) ..........................................................24
Booklet printing (for Windows
Printing photos from a digital camera ......................................................................................................26
PictBridge requirements....................................................................................................................26
Setting your digital camera................................................................................................................26
Printing images ..................................................................................................................................27
Connecting a camera as a storage device ........................................................................................28
DPOF printing....................................................................................................................................28
Printing data from a USB flash memory drive with direct print ................................................................29
Supported file formats .......................................................................................................................29
Creating a PRN or PostScript® 3™ (HL-4050CDN / HL-4070CDW only) file for direct printing .......29
Printing data directly from the USB flash memory drive....................................................................30
®
printer driver) ...................................................................................25
3 Driver and Software 33
Printer driver ............................................................................................................................................33
Features in the printer driver (for Windows
Using the custom monochrome printer driver (for Windows
Using the BR-Script3 printer driver
(PostScript
Features in the printer driver (for Macintosh
Using the BR-Script3 printer driver
(Post Script
Installing the BR-Script3 printer driver ..............................................................................................61
Uninstalling the printer driver...................................................................................................................64
Printer driver for Windows
Printer driver for Macintosh
Software ..................................................................................................................................................66
®
3™ language emulation for Windows®) (HL-4050CDN/HL-4070CDW only)...........47
®
3™ language emulation for Macintosh®) (HL-4050CDN / HL-4070CDW only) ..............61
®
and Windows Vista™ and Windows Server® 2003...............................64
®
.............................................................................................................65
®
) ....................................................................................36
®
) ..................................................................................54
®
) ..........................................................46
v
Page 7

Software for networks .......................................................................................................................66
About emulation modes.....................................................................................................................67
Automatic emulation selection (HL-4050CDN / HL-4070CDW only) .................................................67
Automatic interface selection.............................................................................................................67
4 Control Panel 68
Control panel ...........................................................................................................................................68
Buttons ...................................................................................................................................................69
Go......................................................................................................................................................69
Cancel ...............................................................................................................................................69
Reprint...............................................................................................................................................70
+ or - button.......................................................................................................................................70
Back...................................................................................................................................................70
OK .....................................................................................................................................................70
LEDs........................................................................................................................................................71
LCD .........................................................................................................................................................71
Back light ...........................................................................................................................................71
LCD messages..................................................................................................................................72
Reprinting documents........................................................................................................................73
Using the control panel LCD menu....................................................................................................76
Menu table.........................................................................................................................................77
Default settings..................................................................................................................................88
Calibration .........................................................................................................................................89
Auto Registration...............................................................................................................................90
Manual Registration...........................................................................................................................91
5 Options 92
Lower tray (LT-100CL) (HL-4050CDN / HL-4070CDW only)...................................................................92
SO-DIMM.................................................................................................................................................93
SO-DIMM types .................................................................................................................................93
Installing extra memory .....................................................................................................................94
6 Routine Maintenance 96
Replacing the consumable items.............................................................................................................96
Toner cartridges ................................................................................................................................98
Drum unit .........................................................................................................................................105
Belt unit............................................................................................................................................111
Waste toner box ..............................................................................................................................116
Cleaning ................................................................................................................................................122
Cleaning the outside of the printer...................................................................................................122
Cleaning the inside of the scanner windows ...................................................................................123
Cleaning the corona wires .....................................................................................................................127
Cleaning the drum unit...........................................................................................................................132
Shipping the printer................................................................................................................................134
Repacking Instructions ....................................................................................................................134
7 Troubleshooting 142
Identifying your problem ........................................................................................................................142
LCD messages ......................................................................................................................................143
vi
Page 8

Paper handling ......................................................................................................................................146
Paper jams and how to clear them ........................................................................................................147
Jam MP Tray (paper jam in the MP tray).........................................................................................148
Jam Tray 1 / Tray 2 (paper jam inside the paper tray) ....................................................................148
Jam Duplex (paper jam underneath the standard paper tray (tray 1) or in the fuser unit)
(HL-4050CDN / HL-4070CDW only)............................................................................................150
Jam Rear (paper jam behind the back cover) .................................................................................153
Jam Inside (paper jam inside the printer) ........................................................................................156
Improving the print quality......................................................................................................................160
Solving print problems...........................................................................................................................169
Network problems..................................................................................................................................169
Other problems......................................................................................................................................169
For Macintosh
Printing from DOS ..........................................................................................................................170
BR-Script 3 (HL-4050CDN / HL-4070CDW only) ............................................................................170
®
with USB................................................................................................................170
A Appendix 171
Printer specifications..............................................................................................................................171
Engine .............................................................................................................................................171
Controller.........................................................................................................................................172
Software ..........................................................................................................................................173
Direct Print feature...........................................................................................................................173
Control panel ...................................................................................................................................173
Paper handling ................................................................................................................................174
Media specifications ........................................................................................................................174
Supplies ...........................................................................................................................................175
Dimensions / weights.......................................................................................................................175
Other................................................................................................................................................175
Computer requirements...................................................................................................................176
Important information for choosing your paper................................................................................177
Symbol and character sets ....................................................................................................................180
How to use the Web Based Management (web browser) ...............................................................180
Symbol and character sets list.........................................................................................................180
Quick reference for bar code control commands...................................................................................182
Print bar codes or expanded characters..........................................................................................182
B Appendix (for Europe and Other Countries) 189
Brother numbers....................................................................................................................................189
Important information: regulations .........................................................................................................190
Radio interference (220 to 240 volt model only)..............................................................................190
International ENERGY STAR
IEC 60825-1 specification (220 to 240 volt model only) ..................................................................190
Internal laser radiation.....................................................................................................................191
IMPORTANT - for your safety .........................................................................................................192
EC Declaration of Conformity..........................................................................................................193
®
Compliance Statement (For HL-4050CDN / HL-4070CDW only) ..190
C Appendix (for USA and Canada) 194
Brother numbers....................................................................................................................................194
Important information: regulations .........................................................................................................197
Federal Communications Commission (FCC) Declaration of Conformity (USA only) .....................197
vii
Page 9

Industry Canada Compliance Statement (Canada only) .................................................................198
International ENERGY STAR
®
Compliance Statement (For HL-4050CDN / HL-4070CDW only) ..198
Laser notices .........................................................................................................................................199
Laser safety (110 to 120 volt model only)........................................................................................199
FDA regulations (110 to 120 volt model only) .................................................................................199
Internal laser radiation.....................................................................................................................199
IMPORTANT - for your safety .........................................................................................................200
DIndex 201
viii
Page 10
1
About this Printer 1
Carton components 1
1
WARNING
This printer is heavy and weights roughly 29.1kg (64.2 lb). To prevent injuries when moving or lifting this
printer, make sure to use at least two people.
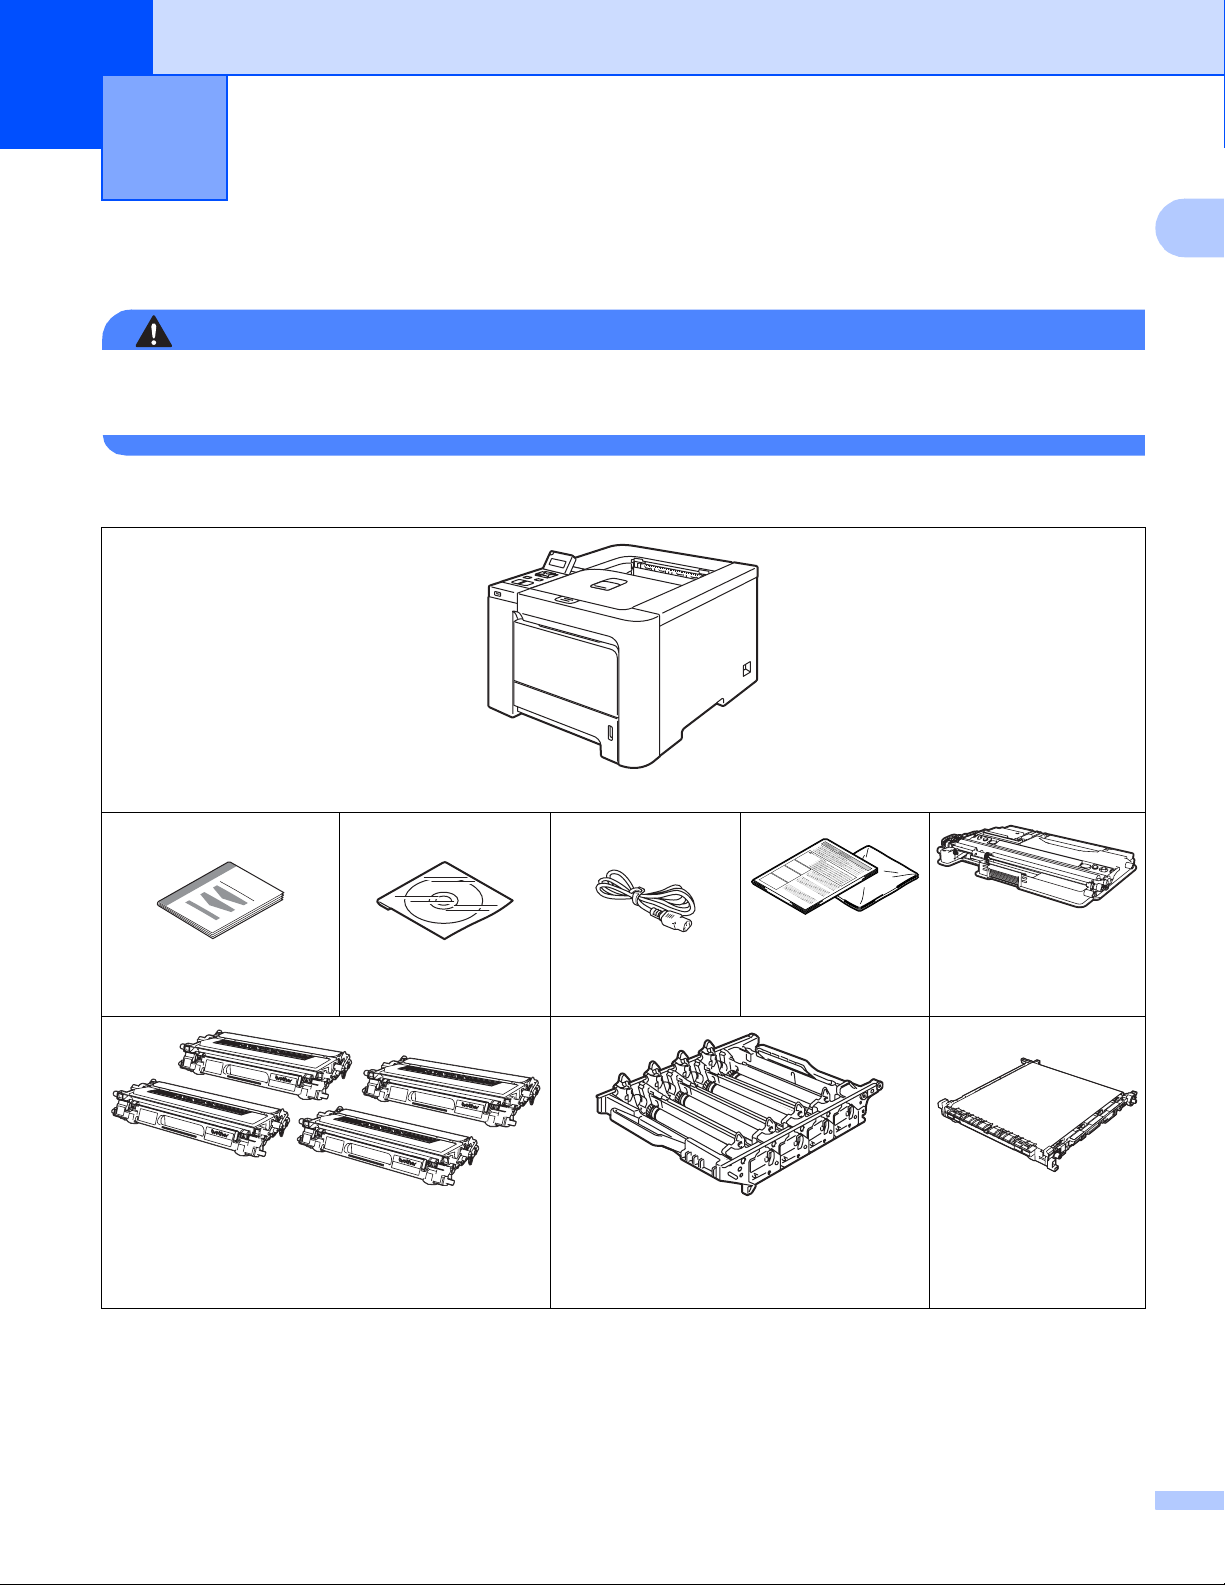
When you unpack the printer, make sure that you have all of the following parts.
Printer
Quick Setup Guide
CD-ROM
Toner cartridges
(Black, Cyan, Magenta and Yellow)
Order No. TN-110C,TN-110M,TN-110Y,TN-110BK
TN-115C,TN-115M,TN-115Y,TN-115BK
AC power cord
Drum unit
(pre-installed)
Order No. DR-110CL
Insertion sheet
and Plastic bag
for repacking
Waste toner box
(pre-installed)
Order No. WT-100CL
Belt unit
(pre-installed)
Order No. BU-100CL
1
Page 11

About this Printer
Interface cable 1
The interface cable is not a standard accessory. Buy the appropriate cable for the interface you are going to
use.
USB cable
Do not use a USB interface cable that is longer than 6 feet (2.0 meters).
®
Do not connect the USB cable to a non-powered hub or a Macintosh
Make sure that you connect it to the USB connector of your computer.
Third party USB ports are not supported for Macintosh®.
Parallel cable (HL-4050CDN / HL-4070CDW only)
Do not use a parallel interface cable that is longer than 6 feet (2.0 meters).
Use a shielded interface cable that is IEEE 1284-compliant.
Network cable
Use a straight-through Category5 (or greater) twisted-pair cable for 10BASE-T or 100BASE-TX Fast
Ethernet Network.
keyboard.
1
2
Page 12
About this Printer
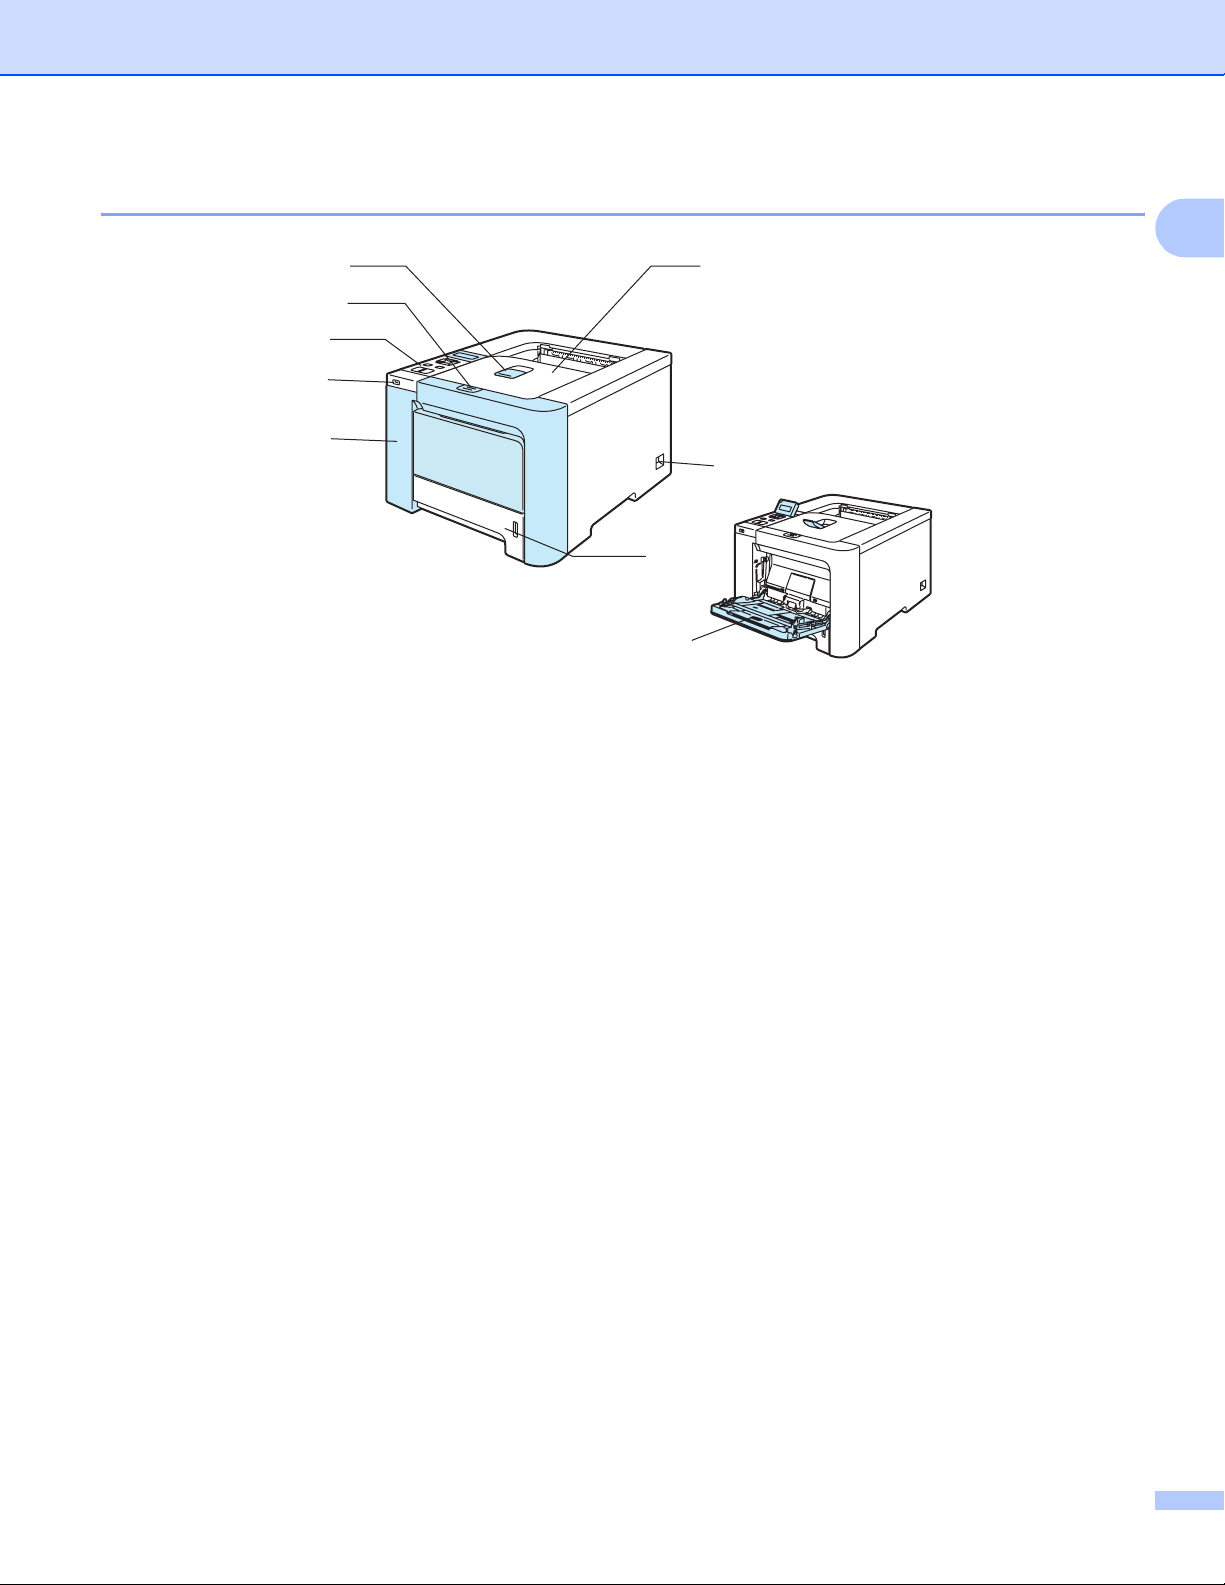
Front view 1
1
2
3
4
5
1 Face-down output tray support flap (support flap)
2 Front cover release button
3 Control panel
1
4 USB direct interface
1
8
7
6
9
5 Front cover
6 Paper tray
7 Power switch
8 Face-down output tray
9 Multi-purpose tray (MP tray)
1
You can adjust the angle of the LCD display by tilting it up or down.
3
Page 13
About this Printer
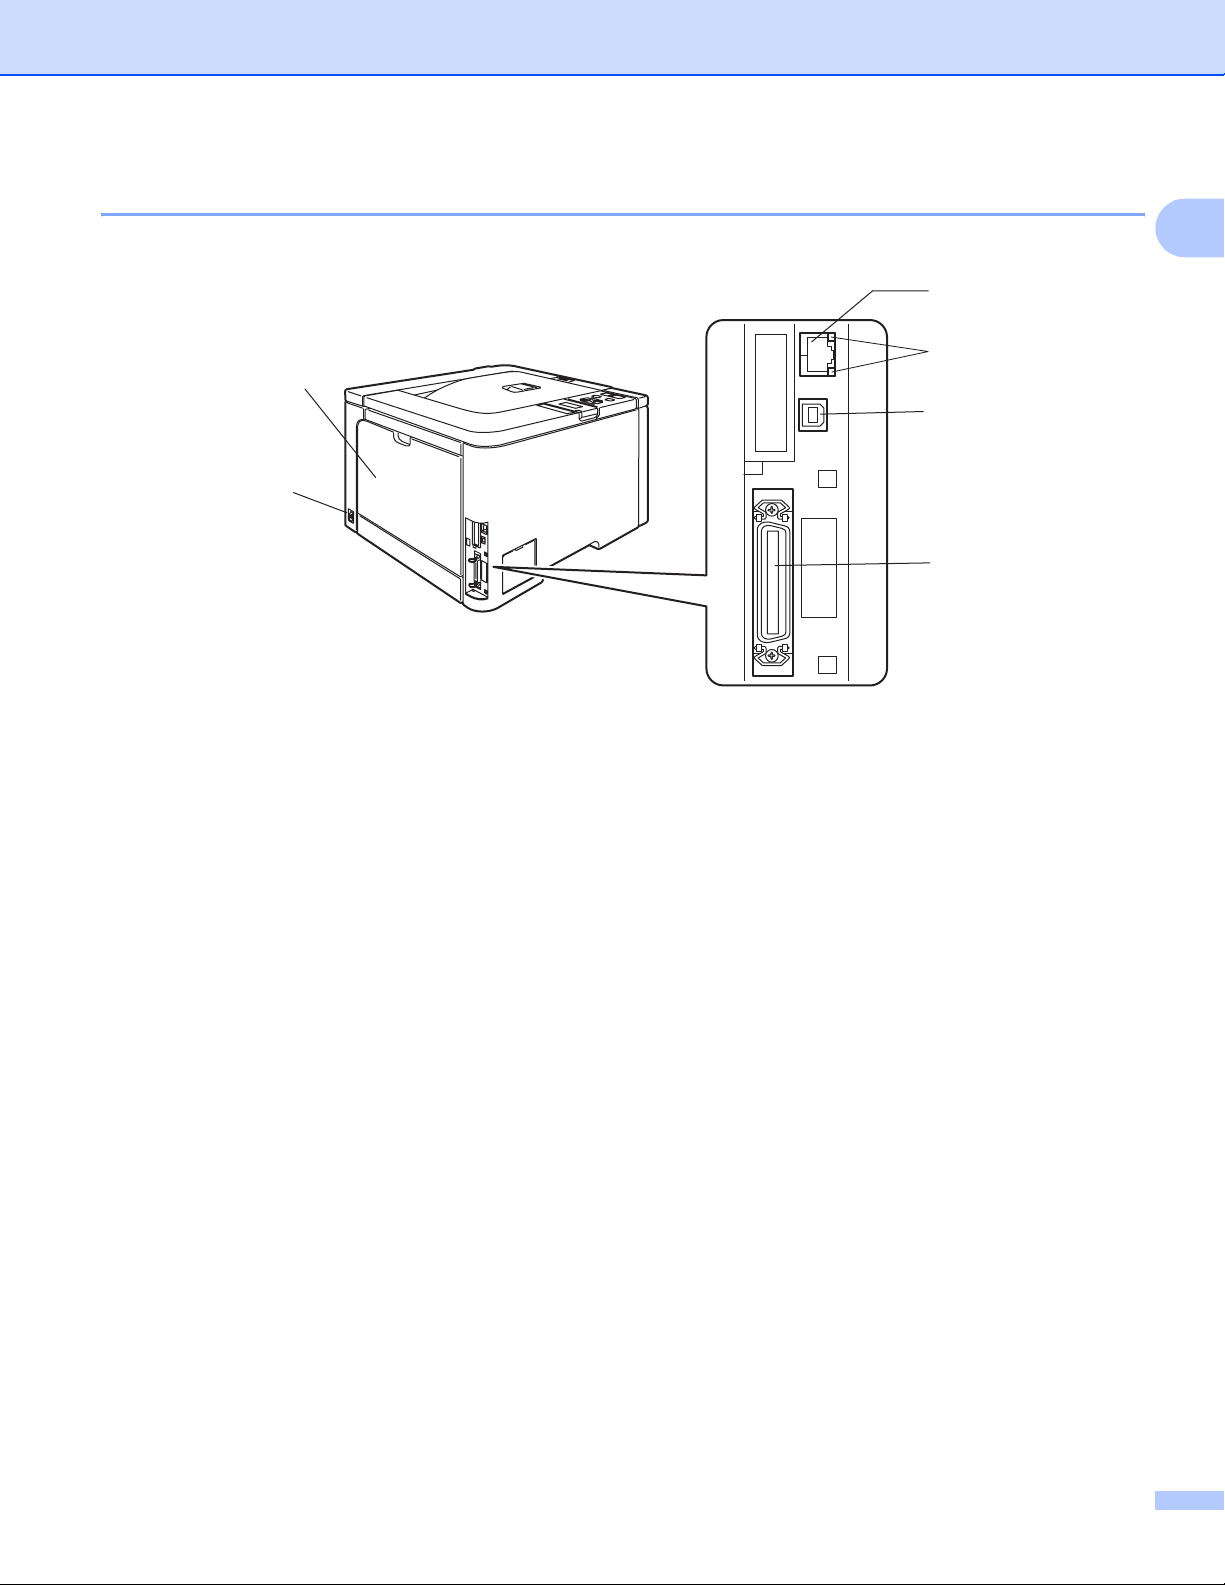
Back view 1
The printer illustration is based on HL-4070CDW.
1
2
1 Back cover
2 AC power connector
3 Parallel interface connector (HL-4050CDN / HL-4070CDW only)
1
6
5
4
3
4 USB interface connector
5 Network Activity LEDs (Light Emitting Diodes)
6 10BASE-T / 100BASE-TX port
4
Page 14

About this Printer
Positioning the printer 1
Read the following before you use the printer.
Power supply 1
Use the printer within the recommended power range.
Power source: USA and Canada: AC 110 to 120 V, 50/60 Hz
Europe and Australia: AC 220 to 240 V, 50/60 Hz
The power cord, including extensions, should be no longer than 5 meters (16.5 feet).
Do not share the same power circuit with other high-powered appliances, such as an air conditioner, copier,
shredder and so on. If you cannot avoid using the printer with these appliances, we recommend that you use
a voltage transformer or a high-frequency noise filter.
Use a voltage regulator if the power source is not stable.
Environment 1
1
Put your printer on a flat, stable surface such as a desk that is free of vibration and shocks.
Put the printer near an AC power outlet, so that it can be easily unplugged from the AC power outlet if there
is an emergency.
Only use the printer within the following ranges of temperature and humidity:
Temperature: 10 °C to 32.5 °C (50 °F to 90.5 °F)
Humidity: 20% to 80% (without condensation)
Use the printer in a well-ventilated room.
DO NOT put the printer where the ventilation hole of the printer is blocked. Keep a gap of roughly 100 mm
(4 in.) between the ventilation hole and the wall.
DO NOT expose the printer to direct sunlight, excessive heat, moisture, or dust.
DO NOT put the printer near devices that contain magnets or produce magnetic fields.
DO NOT expose the printer to open/naked flames or salty or corrosive gasses.
DO NOT put objects on top of the printer.
DO NOT put the printer near heaters, air conditioners, water, chemicals or refrigerators.
Keep the printer horizontal when you carry it. To prevent injuries when moving or lifting this printer, make
sure to use at least two people.
5
Page 15
2
Printing Methods 2
About paper 2
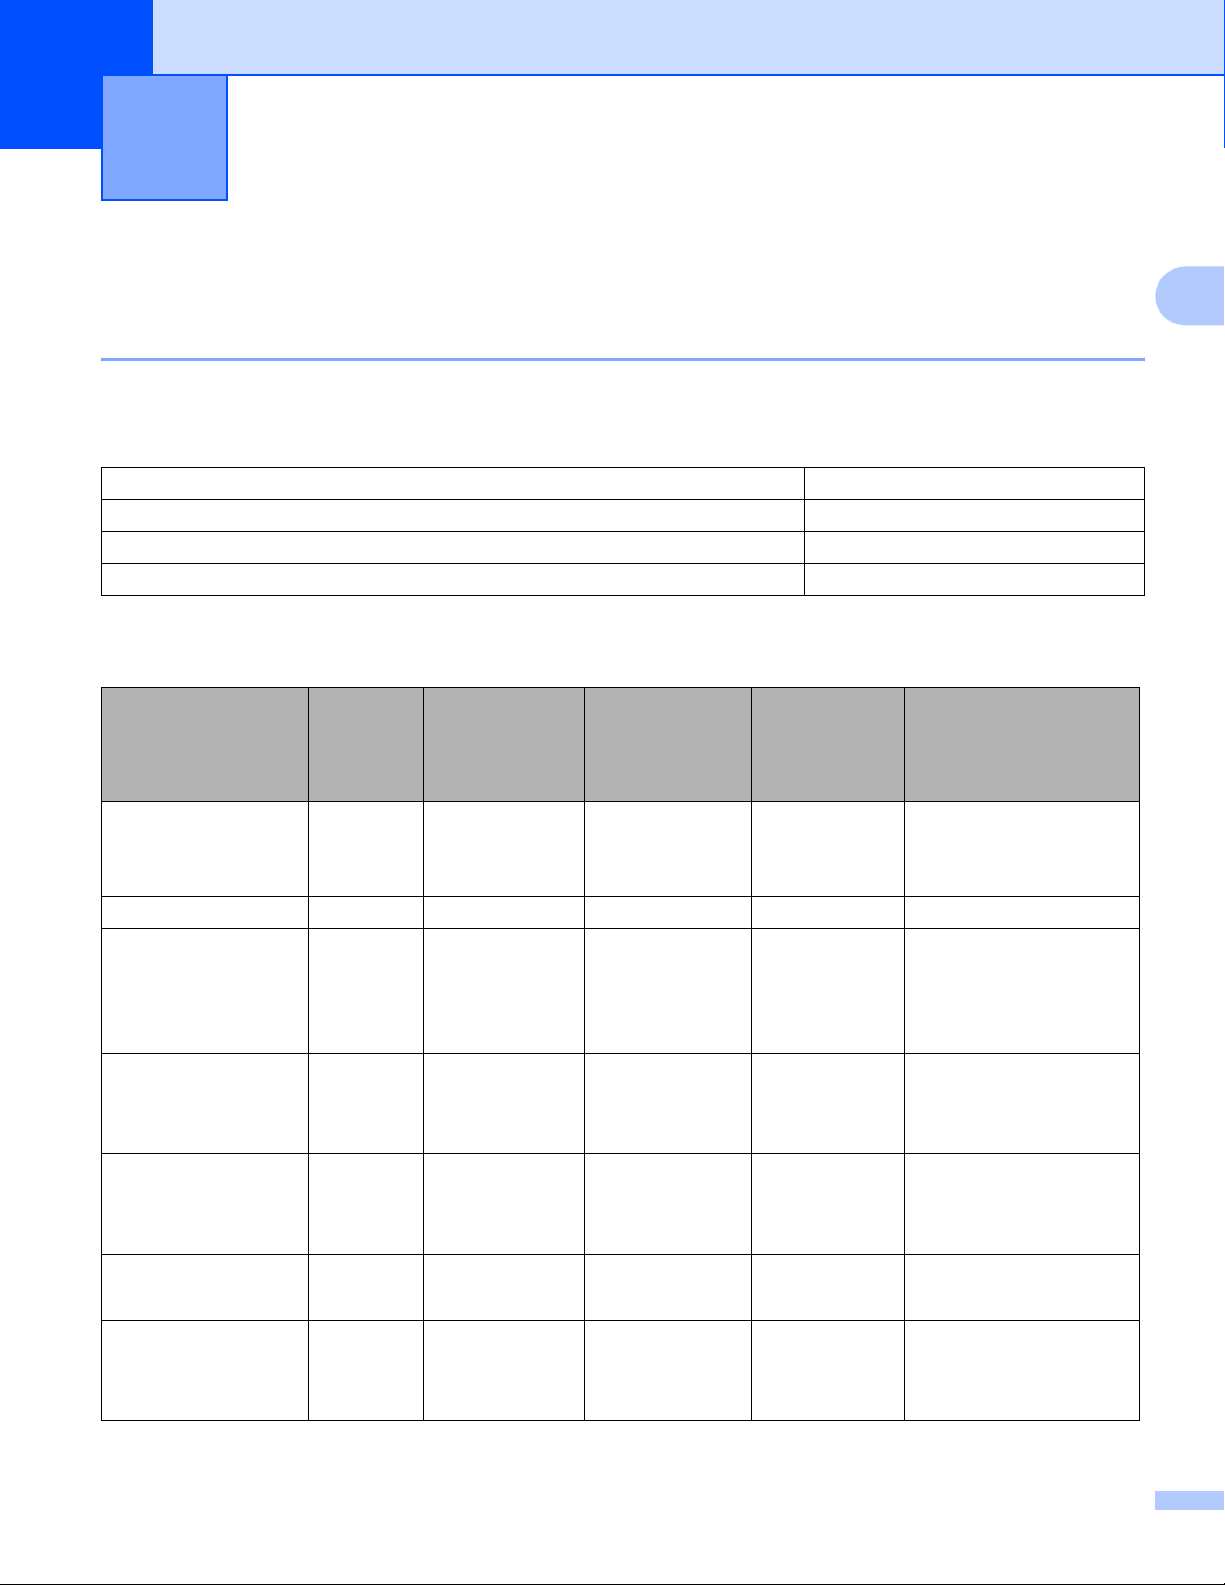
Type and size of paper 2
The printer loads paper from the installed paper tray or the multi-purpose tray.
The names for the paper trays in the printer driver and this guide are as follows:
Paper tray Tray 1
Multi-purpose tray MP Tray
Optional lower tray unit (HL-4050CDN / HL-4070CDW only) Tray 2
Duplex unit for automatic duplex printing (HL-4050CDN / HL-4070CDW only) DX
When looking at this page on the CD-ROM, you can jump to the page for each printing method by clicking p
in the table.
2
Media type Tray 1 Tray 2
(HL-4050CDN/
HL-4070CDW
only)
Plain paper
2
75 g/m
(20 to 28 lb)
Recycled paper pp p pRecycled Paper
Bond paper
Rough paper–
60 g/m
(16 to 43 lb)
Thin paper
60 g/m
75 g/m
Thick paper
105 g/m
163 g/m
Labels p
Envelopes
to 105 g/m2
2
to 163 g/m2
2
to
2
(16 to 20 lb)
2
to
2
(28 to 43 lb)
pp p p
pp p p
MP Tray DX
(HL-4050CDN/
HL-4070CDW
only)
p
2
2
43 lb)
p
to
(16 to
60 g/m
161 g/m
A4 or Letter
Choose the media type
from the printer driver
Plain Paper
Bond Paper
Thin Paper
Thick Paper or Thicker
Paper
Label
Envelopes
p
Env. Thin
Env. Thick
6
Page 16
Printing Methods
Tray 1 Tray 2
Paper size A4, Letter, Legal,
B5 (ISO), Executive,
A5, A6, B6 (ISO),
Folio, Post Card
(HL-4050CDN/
HL-4070CDW only)
A4, Letter, Legal,
B5 (ISO), Executive,
A5, B6 (ISO), Folio
MP Tray DX
(HL-4050CDN/
HL-4070CDW only)
Width: 69.9 to
Letter, Legal, Folio
215.9 mm (2.75 to
8.5 in.)
Length: 116 to
406.4 mm (4.57 to
16 in.)
Number of sheets
(80 g/m
2
/ 20 lb)
250 sheets 500 sheets 50 sheets
Recommended paper 2
Europe USA
Plain paper
Xerox Premier 80 g/m
Xerox Business 80 g/m
Recycled paper
Xerox Recycled Supreme 80 g/m
Labels Avery laser label L7163 Avery laser labels white #5160
Envelope Antalis River series (DL) Columbian #138 (COM10)
2
2
2
Xerox 4200DP 20 lb
Hammermill Laser Print (24 lb=90g/m2)
N/A
2
Before you buy a lot of paper, test a small quantity to make sure that the paper is suitable.
Use paper that is made for plain-paper copying.
Use paper that is 75 to 90 g/m2 (20 to 24 lb).
Use neutral paper. Do not use acidic or alkaline paper.
Use long-grain paper.
Use paper with a moisture content of approximately 5%.
This printer can use recycled paper that meets DIN 19309 specifications.
CAUTION
DO NOT use ink jet paper because it may cause a paper jam or damage your printer.
Note
If you use paper that is not recommended, a paper jam or misfeed may occur in the printer.
(To help you choose which paper to use with this printer, see Important information for choosing your
paper on page 177.)
7
Page 17
Printing Methods
Types of envelopes 2
Most envelopes will be suitable for your printer. However, some envelopes may have feed and print quality
problems due to the way they have been made. A suitable envelope should have edges with straight, wellcreased folds and the leading edge should not be thicker than two pieces of paper. The envelope should lie
flat and not be of baggy or flimsy construction. You should buy quality envelopes from a supplier who
understands that you will be using the envelopes in a laser printer. Before you print a lot of envelopes, test
one to make sure that the print results are what you want.
Brother does not recommend a particular envelope because envelope manufacturers may change the
envelope specifications. You are responsible for the quality and performance of the envelopes you use.
Do not use damaged, curled, wrinkled, irregularly shaped, extremely shiny or textured envelopes.
Do not use envelopes with clasps, snaps, tie strings, self-adhesive components, windows, holes, cutouts
or perforations.
Do not use envelopes that are of a baggy construction, not sharply creased, embossed (have raised
writing on them) or pre-printed on the inside.
Do not use envelopes that were previously printed by a laser printer.
Do not use envelopes that cannot be arranged when put in a pile.
Do not use envelopes that are made of paper that weighs more than the paper weight specifications for
the printer.
2
Do not use envelopes that have been badly made, with edges that are not straight or consistently square.
If you use any of the types of envelopes listed above, they may damage your printer. This damage is not
covered under any Brother warranty or service agreement.
Note
• Do not put different types of paper in the paper tray at the same time because it may cause paper jams or
misfeeds.
• Do not print envelopes using duplex printing.
• You must choose the same paper size from your application as the paper in the tray.
8
Page 18
Printing Methods
Unprintable area 2
The area of the paper that cannot be printed on is shown in the table below:
Portrait Landscape
1
24
24
3
Windows® Printer Driver Macintosh® printer
driver
1 4.23 mm (0.16 in.) 4.32 mm (0.17 in.)
2 4.23 mm (0.16 in.) 4.32 mm (0.17 in.)
3 4.23 mm (0.16 in.) 4.32 mm (0.17 in.)
4 4.23 mm (0.16 in.) 4.32 mm (0.17 in.)
BRScript Driver for Windows® and Macintosh®
(HL-4050CDN/HL-4070CDW only)
2
1
3
9
Page 19
Printing Methods
Printing methods 2
Printing on plain paper 2
Printing on plain paper from Tray 1, 2 2
(For the recommended paper to use, see About paper on page 6.)
a Choose the following from the printer driver:
Paper Size ............................ (1)
Media Type ...........................(2)
Paper Source .......................(3)
and any other settings.
Windows
®
printer driver
1
2
2
3
10
Page 20
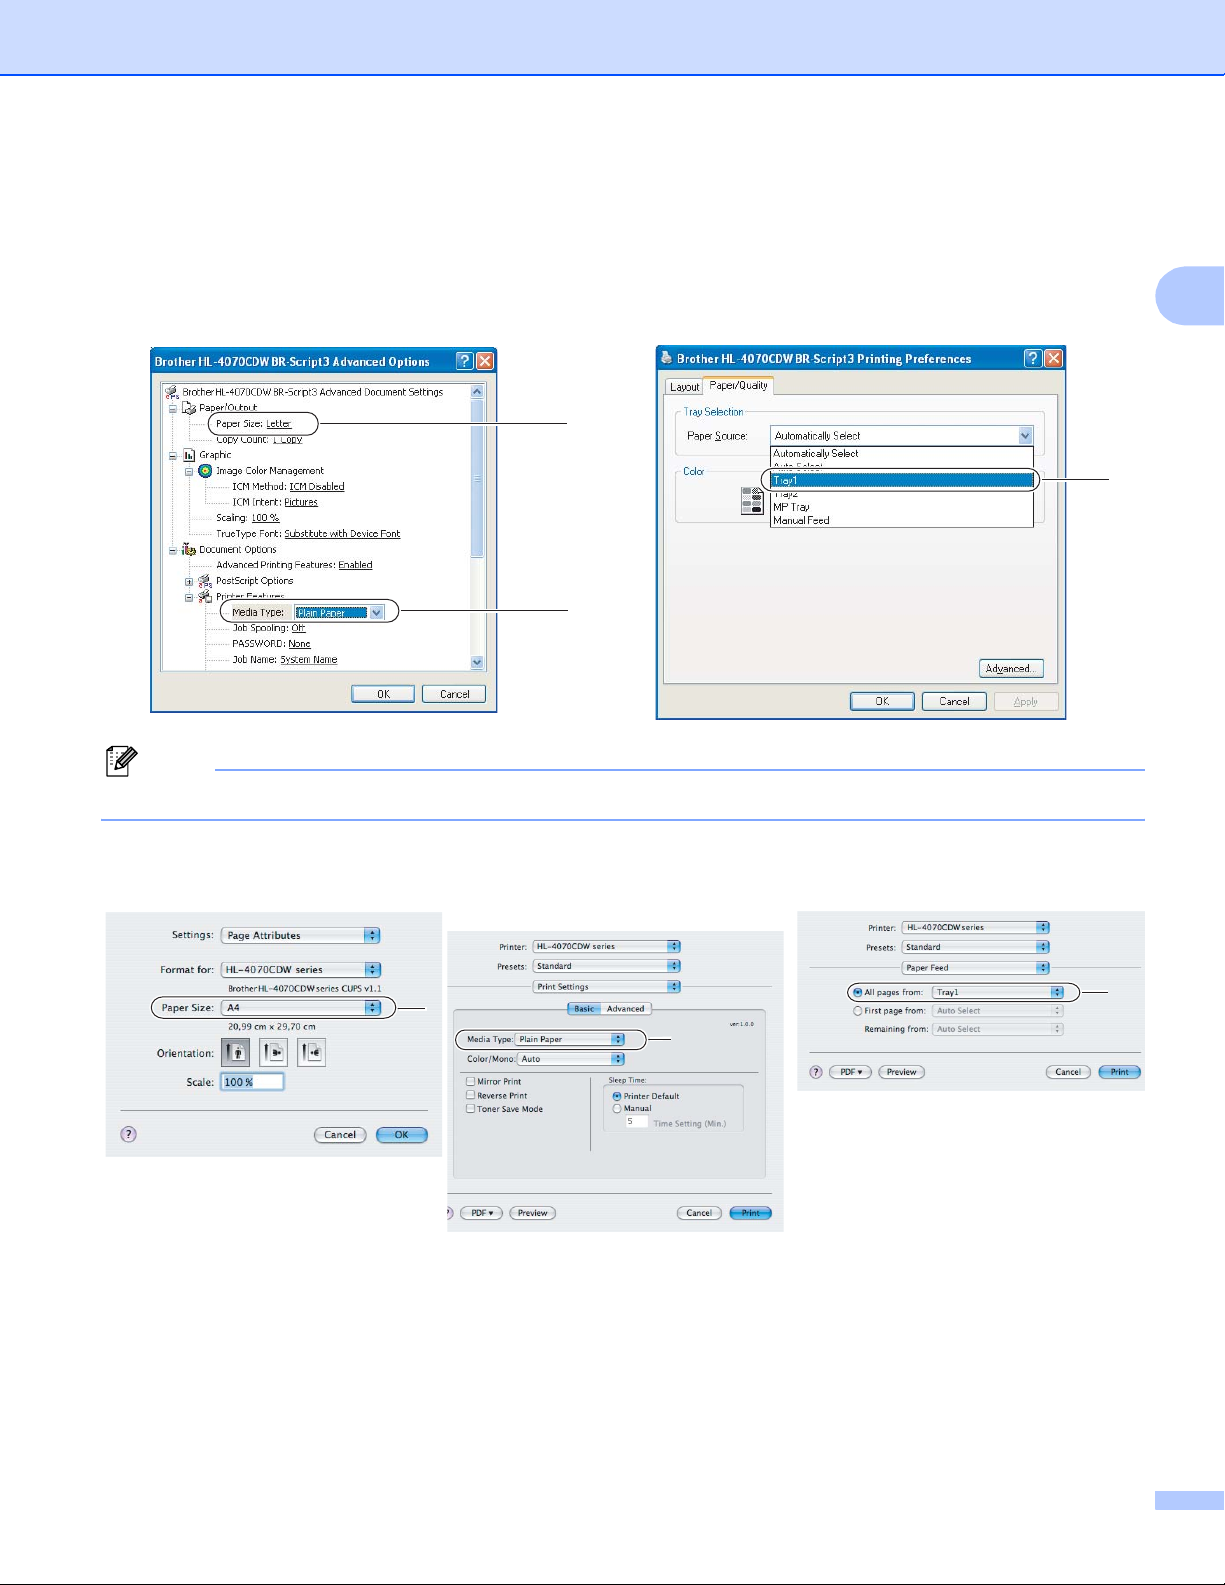
BR-Script printer driver for Windows® (HL-4050CDN / HL-4070CDW only)
Paper Size ........................ (1)
Media Type ......................(2)
Paper Source ...................(3)
1
2
Printing Methods
2
3
Note
To use the BR-Script printer driver you must install the driver using the Custom Install from the CD-ROM.
Macintosh® printer driver
1
2
3
11
Page 21
Printing Methods
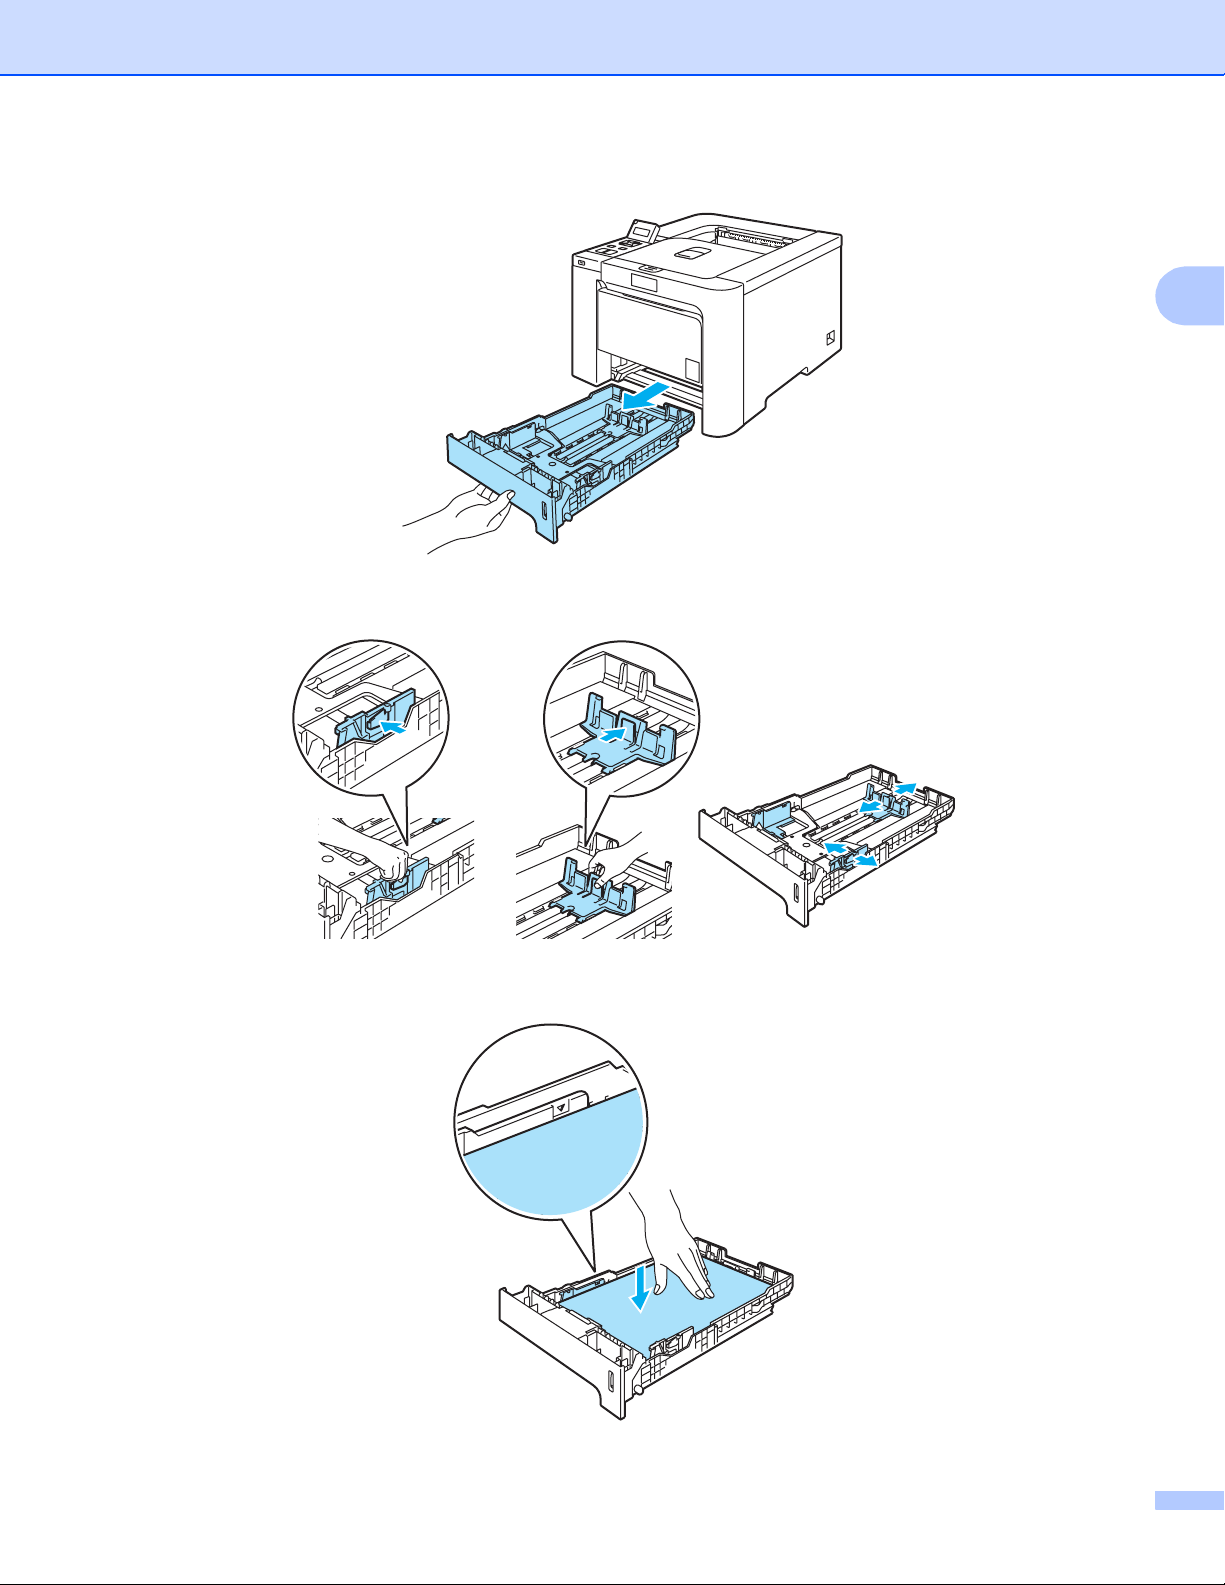
b Pull the paper tray completely out of the printer.
c While pressing the green paper-guide release lever, slide the paper guides to fit the paper size. Make
sure that the guides are firmly in the slots.
2
d Put paper in the tray, and make sure that the paper is below the maximum paper mark (b). The side to
be printed on must be face down.
12
Page 22
Printing Methods
e Put the paper tray firmly back in the printer. Make sure that it is completely inserted into the printer.
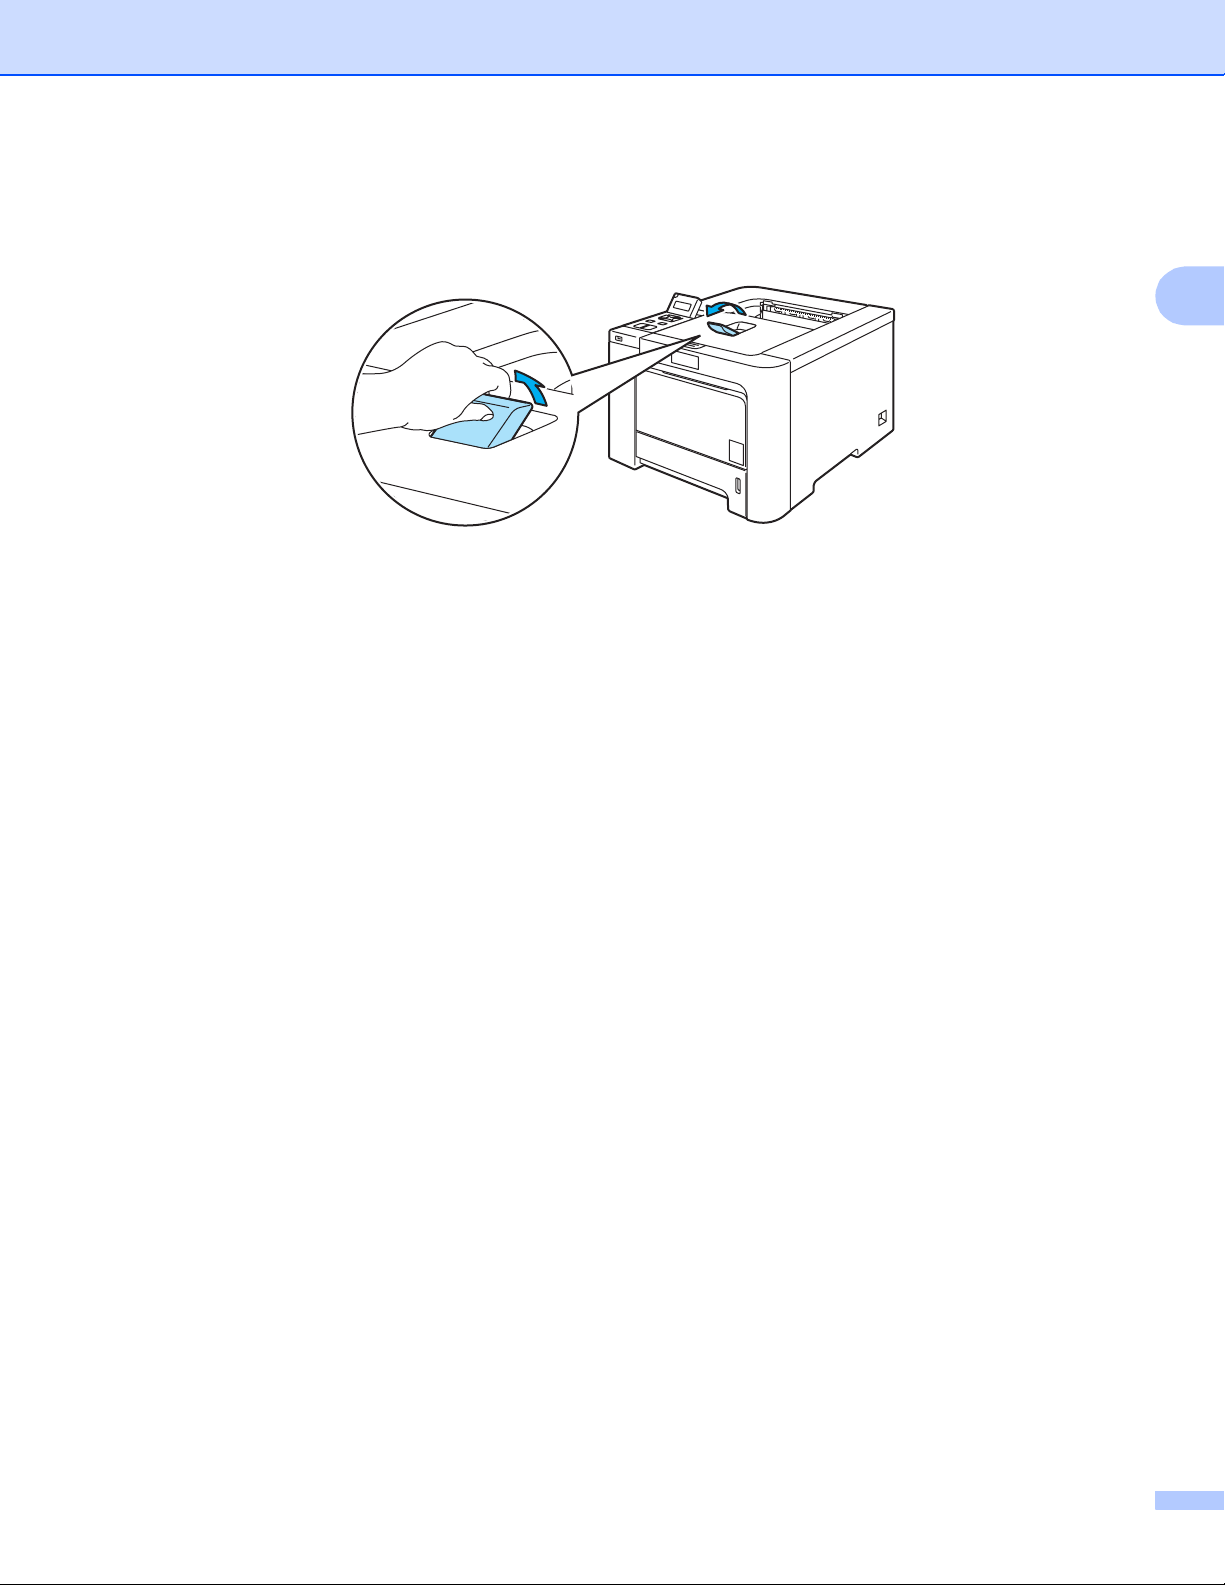
f Lift up the support flap to prevent paper from sliding off the face-down output tray, or remove each page
as soon as it comes out of the printer.
g Send the print data to the printer.
2
13
Page 23
Printing Methods
Printing on plain paper or bond paper from the MP tray 2
(For the recommended paper to use, see About paper on page 6.)
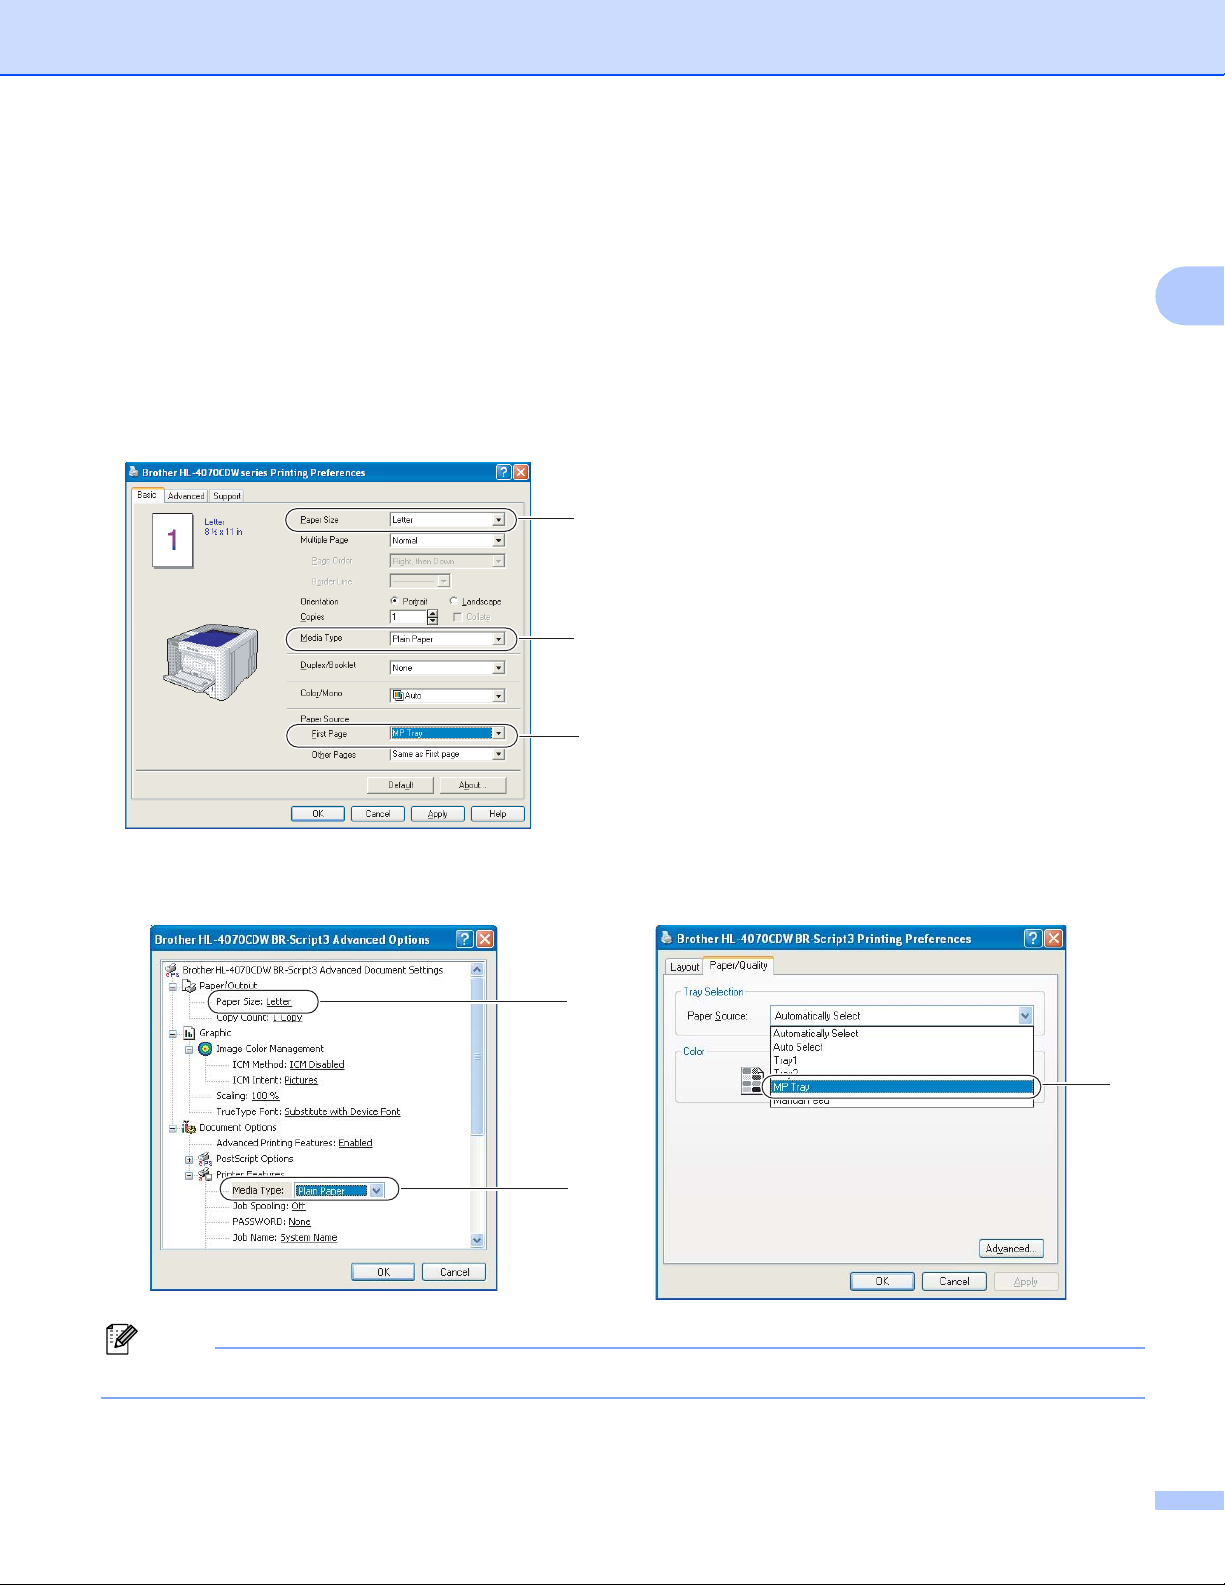
a Choose the following from the printer driver:
Paper Size ............................ (1)
Media Type ...........................(2)
Paper Source .......................(3)
and any other settings.
Windows
®
printer driver
1
2
2
3
BR-Script printer driver (HL-4050CDN / HL-4070CDW only)
1
2
3
Note
To use the BR-Script printer driver you must install the driver using the Custom Install from the CD-ROM.
14
Page 24
Macintosh® printer driver
Paper Size ........................ (1)
Media Type ......................(2)
Paper Source ...................(3)
Printing Methods
2
1
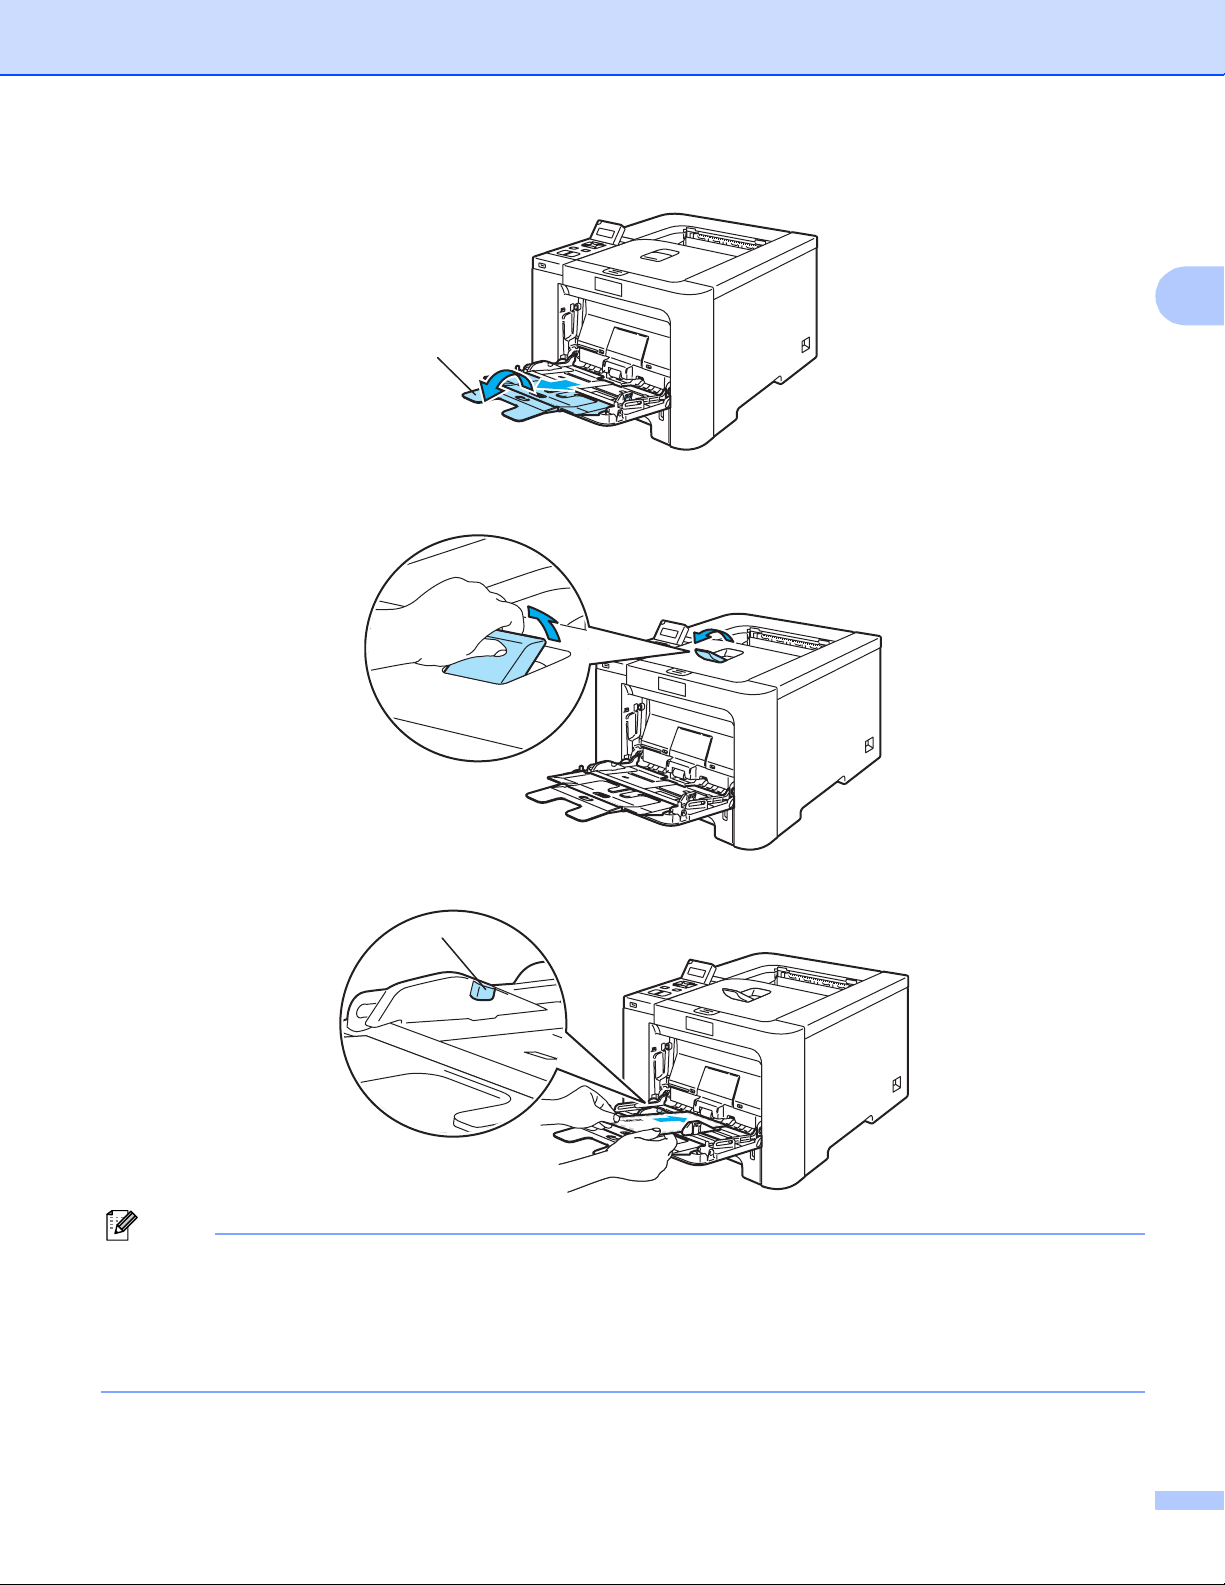
b Open the MP tray and lower it gently.
3
2
c Pull out the MP tray support and unfold the flap (1).
1
15
Page 25
Printing Methods
d Lift up the support flap to prevent paper from sliding off the face-down output tray, or remove each page
as soon as it comes out of the printer.
e Put paper in the MP tray. Make sure that the paper stays under the maximum paper mark (1). The side
to be printed on must be face up with the leading edge (top of the paper) in first.
1
2
f While pressing the paper-guide release lever, slide the paper guide to fit the paper size.
g Send the print data to the printer.
16
Page 26
Printing Methods
Printing on thick paper, labels and envelopes 2
(For the recommended paper to use, see About paper on page 6 and Types of envelopes on page 8.)
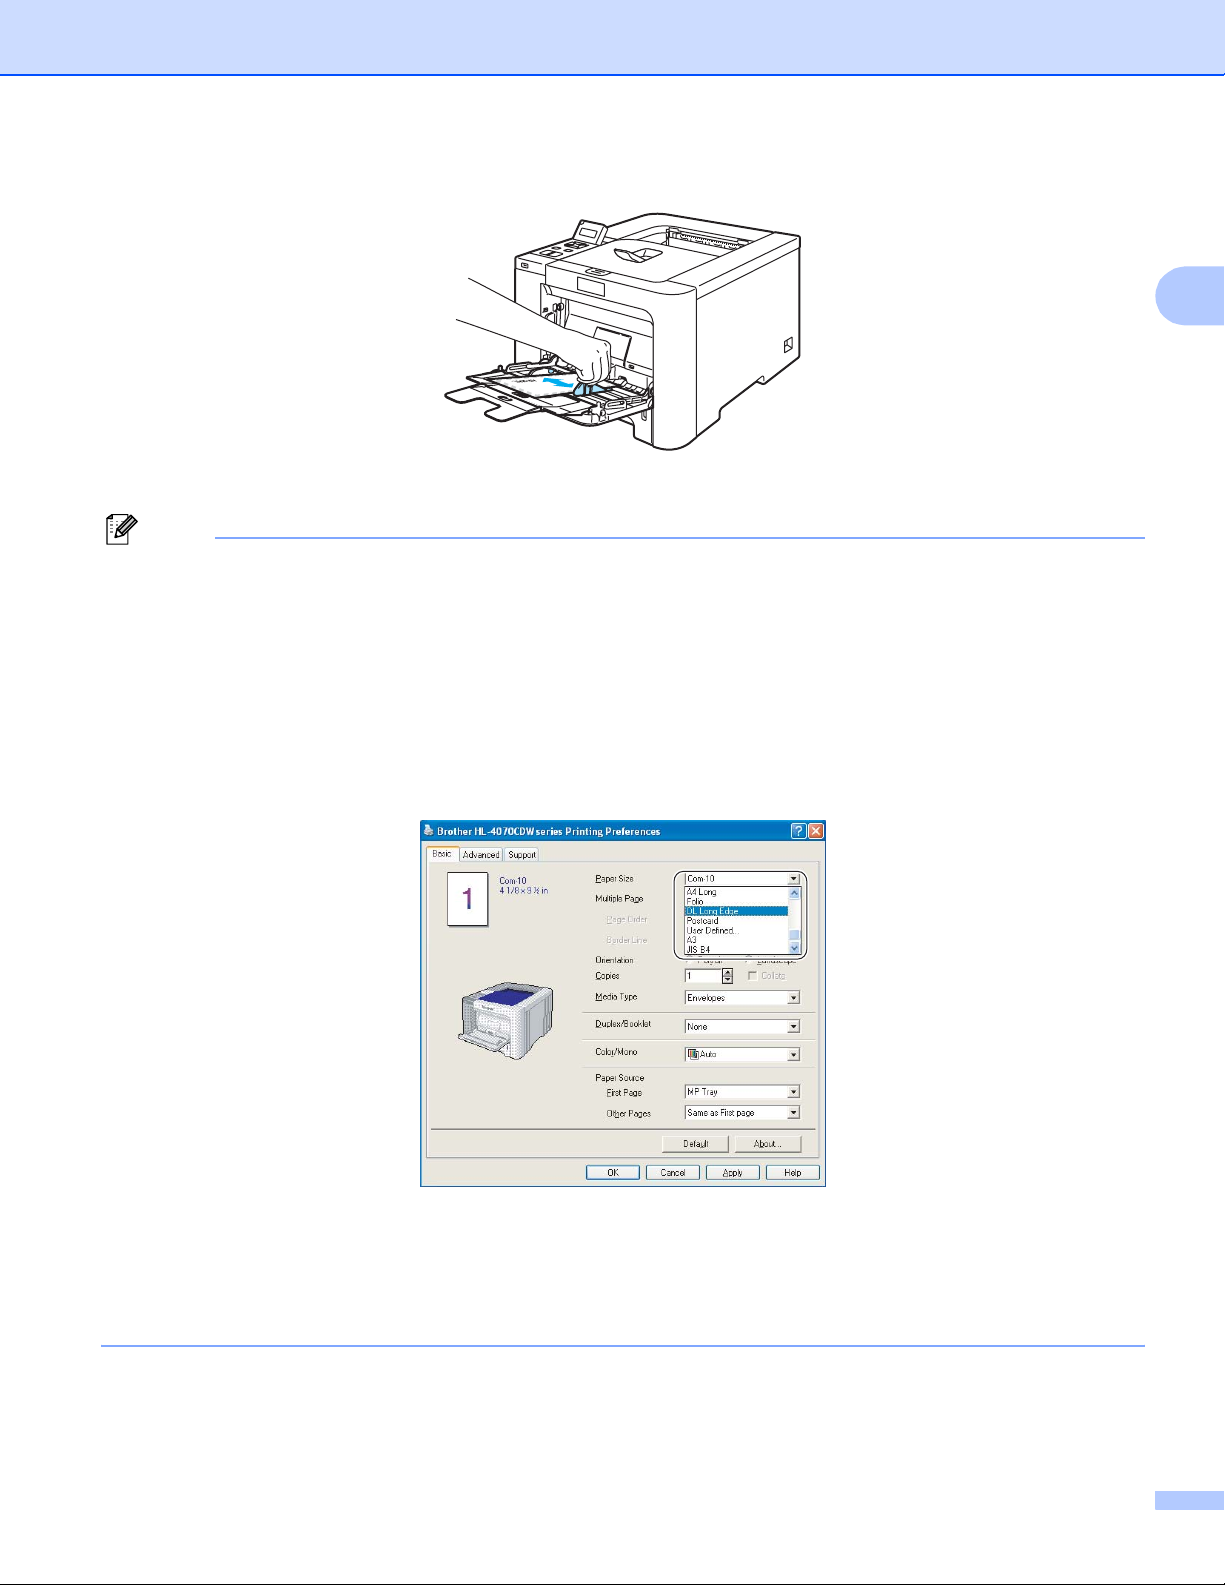
a Choose the following from the printer driver:
Paper Size ............................ (1)
Media Type ...........................(2)
Paper Source .......................(3)
and any other settings.
Windows
®
printer driver
2
1
2
3
BR-Script printer driver (HL-4050CDN / HL-4070CDW only)
1
2
3
17
Page 27
Printing Methods
Note
• To use the BR-Script printer driver you must install the driver using the Custom Install from the
CD-ROM.
• When you use Envelope #10, choose Com-10 for the Paper Size.
• For other envelopes which are not listed in the printer driver, such as Envelope #9 or Envelope C6,
choose User Defined... (For more information on envelope sizes, see Paper size on page 179.)
Macintosh® printer driver
Paper Size ........................ (1)
Media Type ......................(2)
Paper Source ...................(3)
1
2
2
3
Note
For other envelopes which are not listed in the printer driver, such as Envelope #9 or Envelope C6, choose
Custom Page Sizes. (For more information on envelope sizes, see Paper size on page 179.)
b Open the MP tray and lower it gently.
18
Page 28
Printing Methods
c Pull out the MP tray support and unfold the flap (1).
1
d Lift up the support flap to prevent paper from sliding off the face-down output tray, or remove each page
as soon as it comes out of the printer.
2
e Put paper in the MP tray. Make sure that the paper stays under the maximum paper mark (1).
1
Note
• Do not put more than 3 envelopes in the MP tray.
• Envelope joints that are sealed by the manufacturer should be secure.
• The side to be printed on must be face up.
• All sides of the envelope should be properly folded without wrinkles or creases.
19
Page 29
Printing Methods
f While pressing the paper-guide release lever, slide the paper guide to fit the paper size.
g Send the print data to the printer.
Note
• Remove each sheet or envelope at once after printing. Stacking the sheets or envelopes may cause the
paper to jam or curl.
• If envelopes get smudged during printing set the Media Type to Thick Paper or Thicker Paper to
increase the fixing temperature.
• If the envelope is creased after they are printed, see Improving the print quality on page 160.
®
• (For Windows
in Paper Size, from the Basic tab. Put a new DL size double-flap envelope in the MP tray with the longest
edge of the envelope in first, then print again.
users) If DL size double flap envelopes are creased after printing, choose DL Long Edge
2
• When you put paper in the MP tray, remember the following:
• Put the leading edge (top of the paper) in first and push it gently into the tray.
• Make sure that the paper is straight and in the proper position in the MP tray. If it is not, the paper may
not be fed properly, resulting in a skewed printout or a paper jam.
20
Page 30

Printing Methods
Duplex printing 2
The supplied printer drivers for Windows® 2000/XP/XP Professional x64 Edition, Windows Vista™, Windows
®
Server
For more information about how to choose the settings, see the Help text in the printer driver.
Guidelines for printing on both sides of the paper 2
If the paper is thin, it may wrinkle.
If paper is curled, straighten it and then put it back in the paper tray or the MP tray.
If the paper is not feeding properly, it may be curled. Remove the paper and straighten it.
When you use the manual duplex function, it is possible that there may be paper jams or poor print quality.
• The screens in this section are from Windows
2003/Windows Server® 2003 x64 Edition and Mac OS® X 10.2.4 or greater all enable duplex printing.
(If there is a paper jam, see Paper jams and how to clear them on page 147. If you have a print quality
problem, see Improving the print quality on page 160.)
Note
®
XP. The screens on your computer may vary depending
on your operating system.
2
• Use Letter, Legal or Folio size paper when you use the automatic duplex printing function.
• Make sure that the back cover is closed.
• Make sure that the paper tray is completely inserted into the printer.
• If paper is curled, straighten it and then put it back in the paper tray.
• You should use plain paper, recycled paper or thin paper. Do not use bond paper.
Manual duplex printing 2
The BR-Script printer driver (PostScript® 3™ emulation) does not support manual duplex printing.
If you are using the Macintosh
®
Printer Driver, see Duplex Printing on page 56.
Manual duplex printing from the paper tray 2
a In the printer driver choose the Advanced tab, click the Duplex icon, and then choose the
Manual Duplex printing mode, and from the Basic tab choose the Paper Source to be Tray1.
b Send the data to the printer.
The printer will automatically print all the even-numbered pages on one side of the paper first.
21
Page 31

Printing Methods
c Remove the printed even-numbered pages from the output tray and put them back in the paper tray with
the side to be printed on (blank side) face down. Follow the instructions on the computer screen.
d The printer will now automatically print all the odd-numbered pages on the other side of the paper.
Note
• If you choose the Paper Source to be Auto Select, put the printed even-numbered pages in the MP tray.
2
• When you put paper in the paper tray, first empty the tray. Next, put the printed pages in the tray, with the
printed side face up. (Do not add the printed pages to the top of a stack of unprinted paper.)
Manual duplex printing from the MP tray 2
Note
Before putting the sheets back in the MP tray, you will have to straighten them, or you may get paper jams.
a In the printer driver choose the Advanced tab, click the Duplex icon, then choose the Manual Duplex
printing mode, and then from the Basic tab choose the Paper Source to be MP Tray.
b Put the paper in the MP tray with the side to be printed on first facing up. Follow the instructions on the
computer screen. Repeat this step until you have printed all the even-numbered pages.
22
Page 32

Printing Methods
c Remove the printed even-numbered pages from the output tray and then, in the same order, put them
back into the MP tray. Put the paper with the side to be printed on (the blank side) face up. Follow the
instructions on the computer screen.
d The printer will now automatically print all the odd-numbered pages on the other side of the paper.
Paper orientation for manual duplex printing 2
The printer prints the second page first.
If you print 10 pages on 5 sheets of paper, it will print page 2 and then page 1 on the first sheet of paper. It
will print page 4 and then page 3 on the second sheet of paper. It will print page 6 and then page 5 on the
third sheet of paper, and so on.
2
When doing manual duplex printing, the paper must be put in the paper tray in the following way:
For the paper tray:
• Put the side to be printed on face down with the leading edge (top) of the paper at the front of the tray.
• To print on the second side, put the paper face up, with the leading edge (top) of the paper at the front
of the tray.
• If letterhead paper is used, put the paper in the tray with the heading face up at the front of the tray.
• To print on the second side, put the heading face down at the front of the tray.
For the multi-purpose tray (MP tray):
• Put the side to be printed on face up with the leading edge (top) of the paper in first.
• To print on the second side, put the paper face down, with the leading edge (top) of the paper in first.
• If letterhead paper is used, put it in with the heading face down and in first.
• To print on the second side, put the heading face up and in first.
23
Page 33

Printing Methods
Automatic duplex printing (HL-4050CDN/HL-4070CDW only) 2
If you are using the Macintosh® Printer Driver, see Duplex Printing on page 56.
a Put paper in the paper tray or MP tray.
b For the Windows
1 Open the Properties dialog box in the printer driver.
2 From the General tab, click the Printing Preferences icon.
3 From the Advanced tab, click the Duplex icon.
4 Make sure that Use Duplex Unit has been chosen.
5 Click OK. The printer will print on both sides of the paper automatically.
®
printer driver
2
For the BR-Script printer driver
1 Open the Properties dialog box in the printer driver.
2 From the General tab, click the Printing Preferences icon.
3 From the Layout tab, choose Orientation, Print on Both Sides (Duplex) and Page Order.
24
Page 34

Printing Methods
4 Click OK. The printer will print on both sides of the paper automatically.
Booklet printing (for Windows® printer driver) 2
a Put paper in the paper tray or MP tray.
2
b Open the Properties dialog box in the printer driver.
c From the General tab, choose the Printing Preferences icon.
d From the Advanced tab, click the Duplex icon, then choose Duplex and Use Duplex Unit
(HL-4050CDN / HL-4070CDW only) or Manual Duplex, and then choose Booklet Printing.
e Click OK.
25
Page 35

Printing Methods
Printing photos from a digital camera 2
Your Brother printer supports the PictBridge standard, allowing you to connect to and print photos directly
from any PictBridge compatible digital camera. Even if your camera is not in PictBridge mode or does not
support PictBridge, you can still print photos from a digital camera in Mass storage mode. See Connecting a
camera as a storage device on page 28.
PictBridge requirements 2
The machine and the digital camera must be connected using a suitable USB cable.
The image file must be taken with the digital camera you want to connect to the printer.
Setting your digital camera 2
2
Make sure your camera is in PictBridge mode. The following PictBridge settings may be available from the
LCD of your PictBridge compatible camera. Depending on your camera some of these setting may not be
available.
Copies
Qualities
Paper Size
Date Print
File Name Print
Layout
You can also set the following PictBridge settings by using the control panel.
Menu Submenu Options
PictBridge
Paper Tray Tray Use Auto*/ MP Only / Tray1 Only / Tray2 Only See Paper
Paper Size
Orientation Portrait* / Landscape
Date & Time
File Name
Print Quality
Duplex
(HL-4050CDN/
HL-4070CDW only)
1
1
1
Letter*/ A4 / B5 / A5 / B6 / A6 See
Off* /On
Off* / On
1
Normal* / Fine
Off*/ On (Long Bind) / On(Short Bind)
PictBridge on page 86
Tray on page 78
1
These menu selections are also set by your camera. Camera settings are prioritized as long as your camera is not set to use the Printer Settings
(Default settings).
26
Page 36

Printing Methods
Note
The names and availability of each setting depends on the specification of your camera.
Please refer to the documentation supplied with your camera for more detailed information on changing
PictBridge settings.
Printing images 2
a Make sure that your camera is turned off. Connect your camera to the USB direct interface (1) on the
front of the printer using a suitable USB cable.
1
2
b Turn on the camera.
When the printer has recognized the camera, the LCD shows the following message:
Camera Connected
c Set your camera to print an image. Set the number of copies if you are asked.
When the printer starts printing a photo, the LCD will show Printing.
Note
Please refer to the documentation supplied with your camera for detailed operations how to print using
PictBridge.
DO NOT remove the digital camera from the USB direct interface until the printer has finished printing.
CAUTION
27
Page 37

Printing Methods
Connecting a camera as a storage device 2
Even if your camera is not in PictBridge mode, or does not support PictBridge, you can connect your camera
as a normal storage device. This enables you to print photos from your camera. Follow the steps for Printing
data directly from the USB flash memory drive on page 30.
(If you would like to print photos in PictBridge mode, see Setting your digital camera on page 26.)
Note
The name of the storage mode and operation differs among digital cameras. Please refer to the
documentation supplied with your camera for detailed information, such as how to switch from PictBridge
mode to mass storage mode.
DPOF printing 2
DPOF stands for Digital Print Order Format.
Major digital camera manufacturers (Canon Inc., Eastman Kodak Company, Fuji Photo Film Co. Ltd.,
Matsushita Electric Industrial Co. Ltd. and Sony Corporation) created this standard to make it easier to print
images from a digital camera.
2
If your digital camera supports DPOF printing, you will be able to choose on the digital camera display the
images and number of copies you want to print.
The following DPOF settings are available:
1 in 1 printing
Copies
28
Page 38

Printing Methods
Printing data from a USB flash memory drive with direct print2
With the Direct Print feature, you do not need a computer to print data. You can print by just plugging your
USB flash memory drive into the printer´s USB direct interface.
Note
There might be some USB flash memory drives that will not work with the printer.
Supported file formats 2
Direct print supports the following file formats:
PDF version1.6
JPEG
Exif+JPEG
PRN (created by HL-4040CN, HL-4050CDN or HL-4070CDW printer driver)
TIFF (scanned by all MFC or DCP Brother models)
PostScript
1
The data including JBIG2 image file, JPEG2000 image file and layered files are not supported.
1
®
3™(created by the HL-4050CDN or HL-4070CDW BRScript3 printer driver)
2
Creating a PRN or PostScript® 3™ (HL-4050CDN / HL-4070CDW only) file for direct printing 2
Note
The screens in this section may vary depending on your application and operating system.
a From the menu bar of an application, click File, then Print.
b Choose HL-4040CN, HL-4050CDN or HL-4070CDW (1) and check the Print to file box (2). Click Print.
1
2
29
Page 39

Printing Methods
c Choose the folder you want to save the file to and enter the file name if you are prompted to. If you are
prompted for a file name only, you can also specify the folder you want to save the file in by entering the
directory name. For example:
C:\Temp\FileName.prn
If you have a USB flash memory drive connected to your computer, you can save the file directly to the
USB flash memory drive.
Printing data directly from the USB flash memory drive 2
a Connect your USB flash memory drive to the USB Direct Interface (1) on the front of the printer.
When the printer has recognized the USB flash memory drive, the LCD shows the following message.
Checking device
Please wait
h
Direct Print
1./XXXX.FOLDER1
1
2
b The folder names or the file names will be shown on the LCD. Press the + or - button to choose the folder
name or file name and press OK. If you do not need to change the current default settings, press Go and
go to Step d.
Direct Print
3.XXXX.PDF
30
Page 40

Printing Methods
Note
• The file names will be shown after you choose a folder and press OK. If you want to choose a file in another
folder, press back to return to the folder name. And then press the + or - button to choose a different folder.
Direct Print
1./XXXX.FOLDER1
h
/XXXX.FOLDER1
3.XXXX.PDF
Press OK.
Direct Print
1./XXXX.FOLDER1
g
/XXXX.folder1
3.XXXX.PDF
Press Back.
• If you want to print an index of the files, choose Index Print. The Index Print selection can be found
after you scroll down through all the file names. Press OK or Go.
Direct Print
Index Print
If your files are in a folder, choose the folder and then scroll down to Index Print.
• File names containing more than 8 characters will appear on the LCD as the first 6 characters of the file
name followed by a tilde mark (~) and a number. For example, "HOLIDAY2007.JPG" would appear as
"HOLIDA~1.JPG".
• Only the following characters can be displayed on the LCD:
ABCDEFGHIJKLMNOPQRSTUVWXYZ0123456789$%' `-@{}~!#()&_^
c Choose the following settings.
Press the + or - button to choose each option. Press OK to go to the next setting.
Pressing Back allows you to return to the previous setting.
2
Print File Set
k
Paper Size
q
Print File Set
Multiple Page
q
Print File Set
Orientation
q
Print File Set
Duplex
Print File Set
Media Type
q
k
Press Go when you have finished.
Print File Set
PDF Option
q
Print File Set
Print Quality
q
Print File Set
Output Color
q
Print File Set
Tray Use
q
Print File Set
Collate
31
Page 41

Printing Methods
Note
You can change the default settings for Direct Print by using the control panel when the printer is not in
the Direct Print mode.
Menu Sub menu
Options
1
Paper Tray Tray Use Auto*/MP Only/Tray1 Only/Tray2 Only See Paper
Duplex
Off*/On(Long Bind)/On(Short Bind)
Tray on page 78
(HL-4050CDN /
HL-4070CDW only)
Print Menu Output Color Auto*/Color/Mono See Print
Menu on page 80
Direct Print Paper Size Letter*/Legal/A4/Executive/JIS B5/B5/A5
/B6/A6/A4Long/Folio
See Direct
Print on page 85
Media Type Plain Paper*/Thick Paper/Thicker
Paper/Thin Paper/Recycled Paper/Bond
Paper
Multiple Page 1in1*/2in1/4in1/9in1/16in1/25in1/
1in2×2pages/1in3×3pages/1in4×4pages/
1in5×5pages
Orientation Portrait*/
Landscape
Print Quality Normal*/Fine
PDF Option Document*/Document&Stamps/Document&M
arkup
Index Print Simple*/Details
1
The de fault settings are shown in Bold with an asterisk.
d Press the + or - button to enter the number of copies you want. Press OK or Go.
Copies
= 1
h
Direct Print
Printing
2
CAUTION
DO NOT remove the USB flash memory from the USB direct interface until the printer has finished printing.
32
Page 42

3
Driver and Software 3
Printer driver 3
A printer driver is software that translates data from the format used by a computer to the format that a
particular printer needs. Typically, this format is page description language (PDL).
®
The printer drivers for the supported versions of Windows
supplied or on the Brother Solutions Center at http://solutions.brother.com. Install the drivers by following the
Quick Setup Guide. The latest printer driver can be downloaded from the Brother Solutions Center at
http://solutions.brother.com.
(If you want to uninstall the printer driver, see Uninstalling the printer driver on page 64.)
®
For Windows
3
Windows® printer driver (the most suitable printer driver for this product)
®
BR-Script (PostScript
1
Install the driver using the Custom Install from the CD-ROM.
3™ language emulation) printer driver (HL-4050CDN / HL-4070CDW only)
and Macintosh® are on the CD-ROM we have
1
3
For Macintosh
®
Macintosh® printer driver (the most suitable printer driver for this product)
BR-Script (PostScript
1
To install the driver, see Installing the BR-Script3 printer driver o n pa ge 61.
For Linux
12
®
3™ language emulation) printer driver (HL-4050CDN / HL-4070CDW only)
LPR printer driver
CUPS printer driver
1
Download the printer driver for Linux from http://solutions.brother.com or a link on the CD-ROM we have supplied.
2
Depending on Linux distributions, the driver may not be available.
Note
• For more information about Linux printer driver, visit us at http://solutions.brother.com
• The printer driver for Linux may be released after the initial release of this product.
3
1
3
.
33
Page 43

Driver and Software
Windows® printer
driver
BR-Script printer
driver
Macintosh®
Printer Driver
LPR / CUPS
printer driver
(HL-4050CDN/
HL-4070CDW
only)
Windows
Windows
Windows
®
2000 Professional
®
XP Home Edition
®
XP Professional
pp
pp
pp
Windows Vista™ pp
Windows Server
Windows
®
®
2003
XP Professional
x64 Edition
Windows Server
®
2003 x 64
Edition
®
Mac OS
X 10.2.4 or greater
Linux (Mandrake, Red Hat,
SuSE Linux, Debian)
1
Download the printer driver from http://solutions.brother.com or a link o n the supplied CD-ROM.
If you download from a link on CD-ROM, click Install Other D rivers or U tilities , then click For Linux users on the screen menu. Access to
internet is required.
1
pp
pp
pp
pp
p
1
3
34
Page 44

You can change the following printer settings when you print from your computer.
Paper Size
Multiple Page
Orientation
Copies
Media Type
Paper Source
Print Quality
Color Mode
1
Duplex printing (Manual Duplex printing
Watermark
12
/ Duplex printing with Duplex Unit3)
Scaling
Job Spooling
Toner Save Mode
Quick Print Setup
12
Driver and Software
3
Sleep Time
Administrator
Print Setting
Header-Footer Print
Color Calibration
1
These settings are not available with the BR-script printer driver for Windows®.
2
These settings are not available with the Macintosh® printer driver a nd the BR-Script printe r driv er for Macintosh®.
3
This setting is not available for HL-4040CN.
12
12
12
12
35
Page 45

Driver and Software
Features in the printer driver (for Windows®) 3
(For more information, see the Help text in the printer driver.)
Note
®
• The screens in this section are from Windows
your operating system.
• If you are using Windows
Printing Preferences dialog box by clicking Printing Preferences... in the General tab of the
Printer Properties dialog box.
®
2000, XP, Windows Vista™ or Windows Server® 2003, you can access the
Basic tab 3
You can also change settings by clicking the illustration on the left side of the Basic tab.
XP. The screens on your computer will vary depending on
3
1
2
3
4
a Choose the Paper Size, Multiple Page, Orientation, Copies and Media Type (1).
b (HL-4050CDN / HL-4070CDW only) Choose the Duplex/Booklet setting (2).
c Choose the Color/Mono setting (3).
d Choose the Paper Source (4).
e Click OK to apply your chosen settings.
To return to the default settings, click Default, then OK.
36
Page 46

Driver and Software
Paper Size 3
From the drop-down box choose the Paper Size you are using.
Multiple Page 3
The Multiple Page selection can reduce the image size of a page allowing multiple pages to be printed on
one sheet of paper or enlarging the image size for printing one page on multiple sheets of paper.
Page Order 3
When N in 1 option is selected, the page order can be selected from the drop-down list.
Border Line 3
3
When printing multiple pages on one sheet with the Multiple Page feature you can choose to have a solid
border, dash border or no border around each page on the sheet.
Orientation 3
Orientation selects the position of how your document will be printed (Portrait or Landscape).
Copies 3
The copies selection sets the number of copies that will be printed.
Collate 3
With the Collate check box selected, one complete copy of your document will be printed and then repeated
for the number of copies you selected. If the Collate check box is not selected, then each page will be printed
for all the copies selected before the next page of the document is printed.
37
Page 47

Driver and Software
Media Type 3
You can use the following types of media in your printer. For the best print quality, select the type of media
that you wish to use.
Plain Paper Thin Paper Thick Paper Thicker Paper Bond Paper Envelopes
Env. Thick Env. Thin Recycled Paper Postcard Label
Note
• When using ordinary plain paper (19 to 25 lb) choose Plain Paper. When using heavier weight paper,
envelopes or rough paper choose Thick Paper or Thicker Paper. For bond paper, choose Bond Paper.
• When you use envelopes, choose Envelopes. If the toner is not fixed to the envelope correctly when
Envelopes has been selected, choose Env. Thick. If the envelope is crumpled when Envelopes has
been selected, choose Env.Thin.
Duplex / Booklet (HL-4050CDN / HL-4070CDW only) 3
When you want to print a booklet or do duplex printing, use this function, and then from the Advanced tab,
choose a Duplex Type (See Duplex printing on page 21).
Color/Mono 3
You can change the Color/Mono settings as follows:
Color
When your document contains color and you want to print it in color, select this mode.
Mono
Select this mode if your document has only black and grayscale text and/or objects. If your document
contains color, selecting Mono mode prints your document in 256 levels of gray.
3
Auto
The printer checks the content of your documents for color. If color is detected, it prints in color. If no color
content is detected, it prints in monochrome.
Note
If the Cyan, Magenta or Yellow toner runs out, choosing Mono will allow you to keep printing as long as
the Black toner does not run out.
Paper Source 3
You can choose Auto Select, Tray1, MP Tray or Manual and specify separate trays for printing the first page
and for printing from the second page onwards.
38
Page 48

Driver and Software
Advanced tab 3
12 34 5
3
Change the tab settings by clicking one of the following icons:
Print Quality (1)
Duplex (2)
Watermark (3)
Page Setting (4)
Device Options (5)
Print Quality 3
Print Quality
You can choose the following print quality settings.
•Normal
600×600 dpi. Recommended for ordinary printing. Good print quality with reasonable print speeds.
•Fine
2400 dpi class. The finest print mode. Use this mode to print precise images such as photographs.
Since the print data is much larger than in normal mode, processing time / data transfer time and
printing time will be longer.
Note
The print speed will change depending on what print quality setting you choose. Higher print quality takes
longer to print, while lower print quality takes less time to print.
39
Page 49

Color Mode
The following options are available in Color Matching mode:
•Normal
This is the Default color mode.
• Vivid
The color of all elements are adjusted to become a more vivid color.
•Auto
The printer driver automatically selects the Color Mode type.
• None
Improve Gray Color
You can improve the image quality of a shaded area.
Enhance Black Printing
If a black graphic cannot be printed correctly, choose this setting.
Import
Driver and Software
3
You can adjust the print configuration of a particular image by clicking setting. When you have finished
adjusting the image parameters, such as brightness and contrast, you can import those settings as a print
configuration file. Use the Export function to create a print configuration file from the current settings.
Export
You can adjust the print configuration of a particular image by clicking setting. When you have finished
adjusting the image parameters, such as brightness and contrast, you can export those settings as a print
configuration file. Use the Import function to load a previously exported configuration file.
Duplex Printing 3
Use Duplex Unit (HL-4050CDN / HL-4070CDW only)
Check the Duplex box and then choose Use Duplex Unit. In this mode, the printer prints on both sides
of the paper automatically. There are six types of duplex binding directions available for each orientation.
Manual Duplex
Check the Duplex box and choose Manual Duplex. In this mode, the printer prints all the even numbered
pages first. Then the printer driver will stop and show the instructions required to re-install the paper. When
you click OK the odd numbered pages will be printed. There are six types of manual duplex binding
directions available for each orientation.
Booklet Printing
When you want to print a booklet, use this function. To make the Booklet, fold the printed pages down the
middle.
Binding Offset
If you check the Binding Offset option, you can also specify the offset for binding in inches or millimeters.
40
Page 50

Driver and Software
Watermark 3
You can put a logo or text into your documents as a watermark.
You can choose one of the preset watermarks, or you can use a bitmap file or text file that you have created.
When you use a bitmap file as a watermark, you can change the size of the watermark and put it anywhere
you like on the page.
When you use text as a watermark, you can change the font, color and angle settings.
Page Setting 3
You can change the print image scaling and choose Mirror/Reverse print options.
Device Options 3
3
You can set the following in Printer Function:
Job Spooling
Toner Save Mode
Quick Print Setup
Sleep Time
Administrator
Print Setting
Header-Footer Print
Color Calibration
41
Page 51

Driver and Software
Job Spooling
The printer keeps the print job sent to it in memory.
You can reprint a document without sending the data again from your computer (except for secure
printing):
• Last Job Reprint: Reprints the last job
• Secure Print: Secure documents are documents that are password protected when they are sent to the
machine. Only the people who know the password will be able to print them. Since the documents are
secured at the machine, you must enter the password using the control panel of the machine to print
them.
If you want to create a secure print job, check the Use Reprint box and then check the Secure Print
box. Enter a password in the password box and click OK.
(For more information about the Reprint function, see Reprinting documents on page 73.)
Note
If you want to prevent other people from printing your data using the reprint function, uncheck the
Use Reprint check box in the job spooling settings.
Toner Save Mode
You can conserve toner using this feature. When you set Toner Save Mode to On, print appears lighter.
The default setting is Off.
Note
We do not recommend Toner Save Mode for printing photo or gray scale images.
Quick Print Setup
This feature allows you to quickly choose driver settings by clicking a tasktray icon.
3
You can turn the quick print setting on or off. By placing a check in the selection boxes for the following
functions you can choose which will be available in the quick print setting.
• Multiple Page
• Manual Duplex (HL-4040CN only)
• Duplex (HL-4050CDN / HL-4070CDW only)
• Toner Save Mode
• Paper Source
• Media Type
• Color/Mono
Sleep Time
When the printer does not receive data for a certain period of time, it enters sleep mode. In sleep mode,
the printer acts as though it were turned off. When you choose Printer Default the timeout setting will be
5 minutes. Intelligent Sleep Mode automatically adjusts to the most suitable timeout setting depending on
the frequency of your printer use. While the printer is in sleep mode, all the LEDs are off, but the printer
can still receive data. Receiving a print file or document or pressing Go will automatically wake up the
printer to start printing.
42
Page 52

Administrator
Administrators have the authority to limit access to functions such as scaling and watermark.
• Password
Enter the password into this box.
• Set Password
Click here to change the password.
• Copies Lock
Lock the copy pages selection to prevent multiple copy printing.
• Multiple Page & Scaling Lock
Lock the scaling setting and multiple page setting.
• Color/Mono Lock
Lock the Color/Mono settings as Mono to prevent color printing.
• Watermark Lock
Lock the current settings of the Watermark option to prevent changes being made.
Driver and Software
3
Print Setting
• Improve pattern printing
Select this option if printed fills and patterns are different from the patterns and fills you see on your
computer.
• Improve Thin Line
You can improve the image quality of thin lines.
Header-Footer Print
When this feature is enabled, it will print the date and time on your document from your computer’s system
clock and the PC login user name or the text you entered. By clicking Setting, you can customize the
information.
• ID Print
If you select Login User Name, your PC login user name will print. If you select Custom and enter the
text in the Custom edit box, the text you entered will print.
Color Calibration
The output density of each color may vary depending on the temperature and humidity of the environment
the machine is in. This setting helps you to improve color density by letting the printer driver use the color
calibration data stored in your printer.
• Get device data
If you click this button, the printer driver will attempt to get the color calibration data from your printer.
• Use calibration data
If the driver successfully gets the calibration data, the driver will automatically check this box. Remove
the check mark if you do not want to use the data.
43
Page 53

Driver and Software
Accessories tab 3
When you install the optional accessories, you can add and choose their settings in the Accessories tab as
follows.
1
2
3
4
3
Available Options (1)
You can manually add and remove the options that are installed on the printer. Tray settings will match
the installed options.
Paper Source Setting (2)
This feature recognizes the paper size set from the control panel menu for each paper tray.
Serial No. (3)
By clicking Auto Detect, the printer driver will probe the printer and display its serial number. If it fails to
receive the information, the screen will display "---------".
Auto Detect (4)
The Auto Detect function finds the currently installed optional devices and serial No. and then shows the
available settings in the printer driver. When you click Auto Detect, options that are installed on the printer
will be listed in Available Options (1). You can manually add or remove the options by choosing an
optional device you want to add or remove, and then clicking Add or Remove.
Note
The Auto Detect function is not available under the following printer conditions:
• The printer power switch is off.
• The printer is in an error state.
• The printer is in a network shared environment.
• The cable is not connected to the printer correctly.
44
Page 54

Driver and Software
Support tab 3
1
2
3
3
Brother Solutions Center (1)
The Brother Solutions Center (http://solutions.brother.com
) is a web site offering information about your
Brother product including FAQs (Frequently Asked Questions), User’s Guides, driver updates and tips for
using your printer.
Printer Settings (2)
This will print the pages that show how the internal settings of the printer have been configured.
Check Setting... (3)
You can check the current driver settings.
45
Page 55

Driver and Software
Using the custom monochrome printer driver (for Windows®) 3
You can install a windows® printer driver that will restrict printing to monochrome only.
®
If you want to install the Windows
Install Printer Driver selection on the menu screen of the supplied CD-ROM. After accepting the software
license and the initial installation screens, follow the steps below when the Select Components screen
appears.
a Choose PCL Driver and any other Components you wish to install and click the Settings button.
printer driver that will restricted color printing, choose Custom setup from
3
Note
If you are using the HL-4040CN, the PCL driver will automatically be selected.
b Check the Enable box for Restrict Color Printing and enter a password in the Password box and
Confirm Password box. Then click OK.
Note
• The password must be between 5 and 25 characters.
• You can unlock the restrict color printing setting by using the Color/Mono Lock feature of the printer
driver. (See the Administrator selection of Device Options on page 41.) To unlock the driver for color
printing, you will need the password you set at step b.
46
Page 56

Driver and Software
Using the BR-Script3 printer driver
®
(PostScript
3™ language emulation for Windows®)
(HL-4050CDN/HL-4070CDW only) 3
(For more information, see the Help text in the printer driver.)
Note
• To use the BR-Script3 printer driver you must install the driver using the Custom Install from the CD-ROM.
• The screens in this section are from Windows
®
XP. The screens on your computer may vary depending
on your operating system.
Device Settings tab 3
Choose the options you have installed.
3
47
Page 57

Driver and Software
Printing Preferences 3
Note
®
If you are using Windows
Printing Preferences dialog box by clicking Printing Preferences... in the General tab of the
Brother HL-4050CDN(HL-4070CDW) BR-Script3 Properties dialog box.
Layout tab
You can change the layout setting by choosing the settings for Orientation,
Print on Both Sides (Duplex), Page Order and Page Per Sheet.
2000, XP, Windows Vista™ or Windows Server® 2003, you can access the
3
• Orientation
Orientation selects the position of how your document will be printed. (Portrait, Landscape or Rotated
Landscape)
• Print on Both Sides
If you want to do duplex printing. choose Flip on short or Flip on Long Edge.
• Page Order
Specifies the order in which the pages of your document will be printed. Front to Back prints the
document so that page 1 is on top of the stack. Back to Front prints the document so that page 1 is on
the bottom of the stack.
48
Page 58

Paper/Quality tab
Choose the Paper Source and Color.
• Paper Source
You can choose Auto Select, Tray1, MP tray or Manual Feed.
• Color
Driver and Software
3
Choose how to print color graphics either Black and White or Color.
49
Page 59

Driver and Software
Advanced options 3
1
2
a Choose the Paper Size and Copy Count (1).
3
Paper Size
From the drop-down box choose the Paper Size you are using.
Copy Count
The copy selection sets the number of copies that will be printed.
b Set the Image Color Management, Scaling and TrueType Font settings (2).
Image Color Management
Specifies how to print your color graphics.
• If you don’t want to enable Image Color Management, click ICM Disabled.
• If you want the calculations for color matching to be performed on the host computer before it
sends the document to the printer, click ICM Handled by Host System.
• If you want the calculations for color matching to be performed on your printer, click ICM Handled
by Printer using printer calibration.
Scaling
Specifies whether to reduce or enlarge documents, and by what percentage.
TrueType Font
Specifies the TrueType font options. Click Substitute with Device Font (the default) to use
equivalent printer fonts for printing documents that contain TrueType fonts. This will permit faster
printing; however, you might lose special characters not supported by the printer font. Click
Download as Softfont to download TrueType fonts for printing instead of using printer fonts.
50
Page 60

c You can change settings by choosing a setting in the Printer Features list (3):
3
Media Type
Driver and Software
3
You can use the following types of media in your printer. For the best print quality, select the type of
media that you wish to use.
Plain Paper Thin Paper Thick Paper Thicker Paper Bond Paper Envelopes
Env. Thick Env. Thin Recycled Paper Postcard Label
Job Spooling
Secure Print allows you to secure documents that are password protected when they are sent to the
printer. Only the people who know the password will be able to print them. Since the documents are
secured at the printer, you must enter the password using the control panel of the printer. The secured
document must have a Password and Job Name.
(For more information about the Reprint function, see Reprinting documents on page 73.)
Password
Choose the password for your secured document that you send to the machine from the drop-down
box.
Job Name
Choose the Job name from the drop-down list for your secured document.
51
Page 61

Driver and Software
Print Quality
You can choose the following print quality settings.
•Normal
600 dpi class. Recommended for ordinary printing. Good print quality with good print speeds.
•Fine
2400 dpi class. The finest print mode. Use this mode to print precise images such as photographs.
Since the print data is much larger than in normal mode, processing time, data transfer time and
printing time will be longer.
Toner Save
You can conserve toner using this feature. When you set Toner Save Mode to On, print appears
lighter. The default setting is Off.
Note
We do not recommend Toner Save for printing Photo or Gray Scale images.
Color/Mono
You can choose the following color mode:
3
• Color
The device will print all pages in full color mode.
•Mono
Selecting Mono mode prints your documents in grayscale.
Note
If the Cyan, Magenta or Yellow toner runs out, choosing Mono will allow you to keep printing as long as
the Black toner does not run out.
Gamma Correction
You can adjust the brightness of your printed document compared to the image on the screen.
Color Mode
The following options are available in Color Matching mode:
•Normal
This is the Default color mode.
•Vivid
The color of all elements are adjusted to become a more vivid color.
Improve Gray Color
You can improve the image of a shaded area.
Enhance Black Printing
If a black graphic cannot print correctly, choose this setting.
52
Page 62

Driver and Software
Halftone Screen Lock
Stops other applications from modifying the Halftone settings. The default setting is On.
High Quality Image Printing
You can get high quality image printing. If you set High Quality Image Printing to On, the printing
speed will be slower.
BR-Script Level
You can change the BR-script emulation language level. Choose a level from the drop-down list.
Ports tab 3
Choose the port where your printer is connected or the path to the network printer you are using.
3
53
Page 63

Driver and Software
Features in the printer driver (for Macintosh®) 3
This printer supports Mac OS® X 10.2.4 or greater.
Note
The screens in this section are from Mac OS
on your operating system.
Page Setup 3
You can set the Paper Size, Orientation and Scale.
®
X 10.4. The screens on your Macintosh® will vary depending
3
Copies & Pages 3
You can set the Copies and Pages.
54
Page 64

Driver and Software
Cover Page (for Mac OS® X 10.4) 3
You can make the following cover page settings:
Print Cover Page
If you want to add a cover page to your document, use this function.
Cover Page Type
Choose a template for the cover page.
3
Billing Info
If you want to add the billing information to the cover page, enter text in the Billing Info box.
Layout 3
Pages per Sheet
Choose how many pages will appear on each side of the paper.
Layout Direction
When you specify the pages per sheet, you can also specify the direction of the layout.
Border
If you want to add a border, use this function.
55
Page 65

Driver and Software
Job Spooling 3
The printer keeps the last print job sent to it in memory.
You can reprint a document without sending the data again from your computer (except for secure printing).
Last Job Reprint: Reprint the last job
Secure Print: Secure documents are documents that are password protected when they are sent to the
printer. Only the people who know the password will be able to print them. Since the documents are
secured at the printer, you must enter the password using the control panel of the machine to print them.
3
If you want to create a secure print job, check the Use Reprint box and then choose the Secure Print.
Enter a user name, job name and password, then click Print.
(For more information about the Reprint function, see Reprinting documents on page 73.)
Note
If you want to prevent other people from printing your data using the reprint function, uncheck the
Use Reprint check box in the job spooling settings.
Duplex Printing 3
Use duplex unit (HL-4050CDN / HL-4070CDW only)
• For Mac OS
Select Layout.
Choose Long-edged binding or Short-edged binding in Two-Sided.
®
X 10.3 or greater
56
Page 66

Driver and Software
• For Mac OS® X 10.2
Select Duplex.
Check the Duplex check box. Choose Use Duplex Unit and then Choose Flip on Long Edge or
Flip on Short Edge.
Manual duplex (for Mac OS® X 10.3 or greater)
Select Paper Handling.
3
Choose Odd numbered pages and print, and then choose Even numbered pages and print.
57
Page 67

Driver and Software
Print Settings 3
You can change settings by choosing a setting in the Print Settings list:
Basic tab
Media Type
3
You can change the media type to one of the following:
• Plain Paper
• Thin Paper
• Thick Paper
• Thicker Paper
• Bond Paper
• Recycled Paper
• Envelopes
• Env. Thick
• Env. Thin
• Postcard
• Label
58
Page 68
Driver and Software
Color/Mono
You can change the Color/Mono settings as follows:
•Color
When your document contains color and you want to print it in color, select this mode.
•Mono
Select this mode if your document has only black and grayscale text and/or objects. Mono mode makes
the print processing speed faster than color mode. If your document contains color, selecting Mono
mode prints your document in 256 levels of gray.
•Auto
The printer checks the content of your documents for color. If color is detected, it prints in color. If no
color content is detected, it prints in monochrome. The total printing speed may become slower.
Note
If the Cyan, Magenta or Yellow toner runs out, choosing Mono will allow you to keep printing as long as
the Black toner does not run out.
Mirror Print
3
Check Mirror Print to reverse the data from left to right.
Reverse Print
Check Reverse Print to reverse the data from up to down.
Toner Save Mode
You can conserve toner using this feature. When you set Toner Save Mode to On, print appears lighter.
The default setting is Off.
Note
We do not recommend Toner Save for printing Photo or Gray Scale images.
Sleep Time
When the printer does not receive data for a certain period of time, it enters sleep mode. In sleep mode,
the printer acts as though it were turned off. The default setting for timeout is 5 minutes. If you want to
change the sleep time, choose Manual and then enter the time in the text box on the driver.
While the printer is in sleep mode, the LCD light is off, but the printer can still receive data. Receiving a
print file or document or pressing one of the buttons will automatically wake up the printer to start printing
59
Page 69

Advanced tab
Print Quality
You can change the print quality as follows:
•Normal
Driver and Software
3
600 x 600 dpi. Recommended mode for ordinary printouts. Good print quality with reasonable printing
speed.
•Fine
2400 dpi class. The finest print mode. Use this mode to print precise images such as photographs.
Since the print data is much larger than in normal mode, processing time / data transfer time and
printing time will be longer.
Color Mode
You can change the color mode as follows:
•Normal
This is the Default color mode.
• Vivid
The color of all elements are adjusted to become a more vivid color.
Improve Gray Color
You can improve the image quality of shaded areas by ticking the Improve Gray Color check box.
Enhance Black Printing
If a black graphic cannot be printed correctly, choose this setting.
60
Page 70

Driver and Software
Using the BR-Script3 printer driver (Post Script® 3™ language emulation for Macintosh®) (HL-4050CDN / HL-4070CDW only)
Note
• To use the BR-Script3 printer driver on a Network, see the Network User’s Guide on the CD-ROM.
• To use the BR-Script3 printer driver, you need to set the Emulation to BR-Script3 by using the control
panel before connecting the interface cable. (See Menu table on page 77.)
Installing the BR-Script3 printer driver 3
You need to install the BR-Script3 printer driver using the following instructions.
Note
If you use a USB cable, only one printer driver per printer can be registered in the Printer Setup Utility (Print
Center for Mac OS® X 10.2 users). Before installing the BR-Script3 printer driver, delete from the Printer
list any other Brother drivers that are for the same printer.
a From the Go menu Choose Applications.
3
3
b Open the Utilities folder.
61
Page 71

Driver and Software
c Open the Printer Setup Utility icon. For Mac OS
d Click Add.
®
X 10.2 x users, open the Print Center icon.
3
For Mac OS® X 10.2.4 to 10.3 users, go to e.
®
For Mac OS
e Choose USB.
X 10.4 or greater users, go to f.
62
Page 72

Driver and Software
f Choose the model name and make sure that Brother in Printer Model (Print Using) and the model name
which shows BR-Script in Model Name (Model) are selected, and then click Add.
®
For Mac OS
For Mac OS® X 10.4 or greater users:
X 10.2.4 to 10.3 users:
3
g From the Printer Setup Utility menu, choose Quit Printer Setup Utility.
63
Page 73

Driver and Software
Uninstalling the printer driver 3
You can uninstall the printer driver that you have installed with the following steps.
Note
• This is not available if you installed the printer driver from the Windows Add a printer function.
• After uninstalling, we recommend that you restart your computer to remove files that were in use during
the uninstall.
Printer driver for Windows® and Windows Vista™ and Windows Server® 2003 3
For Windows® XP/XP Professional x64 Edition and Windows Vista™ and
®
Windows Server
2003/Server® 2003 x64 Edition 3
a Click the Start button, point to All Programs and then to your printer name.
b Click UnInstall.
c Follow the instructions on the screen.
®
For Windows
2000 3
a Click the Start button, point to Programs and then to your printer name.
b Click UnInstall.
c Follow the instructions on the screen.
3
64
Page 74

Driver and Software
Printer driver for Macintosh
For Mac OS® X 10.2 3
a Disconnect the USB cable between the Macintosh
b Restart the Macintosh
®
.
®
®
and your printer.
c Log on as an ‘Administrator’.
d Run the Printer Center (from the Go menu, choose Applications, Utilities), then choose the printer
you want to remove and remove it by clicking the Delete button.
e Drag the CLaser06 folder (from the Macintosh HD (Startup Disk), choose Library, Printers, Brother)
into the Trash and then empty the Trash.
f Restart the Macintosh
®
For Mac OS
X 10.3 or greater 3
a Disconnect the USB cable between the Macintosh
b Restart the Macintosh
®
.
®
and your printer.
®
.
3
3
c Log on as an ‘Administrator’.
d Run the Printer Setup Utility (from the Go menu, choose Applications, Utilities), then choose the
printer you want to remove and remove it by clicking the Delete button.
e Restart the Macintosh
®
.
65
Page 75

Driver and Software
Software 3
Software for networks 3
BRAdmin Light 3
BRAdmin Light is a utility for initial setup of Brother network connected devices. This utility can search for
Brother products on your network, view the status and configure basic network settings, such as IP address.
The BRAdmin Light utility is available for Windows® 2000/XP and Windows Vista™ and Windows Server®
2003, Mac OS® X 10.2.4 or greater computers. For installing BRAdmin Light, please see the Quick Setup
Guide we provided with the printer. For Macintosh® users, BRAdmin Light will be installed automatically
when you install the printer driver. If you have already installed the printer driver, you do not have to install it
again.
For more information on BRAdmin Light, visit us at http://solutions.brother.com
.
BRAdmin Professional (for Windows®) 3
BRAdmin Professional is a utility for more advanced management of network connected Brother devices.
This utility can search for Brother products on your network, view the status and configure the network
settings from a computer running the Windows® system. BRAdmin Professional has additional features from
BRAdmin Light.
For more information and downloading, visit us at http://solutions.brother.com
.
Driver Deployment Wizard (for Windows®) 3
This installer includes the Windows® printer driver and Brother network port driver (LPR). If the administrator
installs the printer driver and port driver using this application, the administrator can save the file to the file
server or send the file by E-mail to users. Then, each user just clicks that file to have the printer driver, port
driver, IP address, and so on, automatically copied to their computer.
3
Web BRAdmin (for Windows®) 3
Web BRAdmin is a utility for managing network connected Brother devices. This utility can search for Brother
products on your network, view the status and configure the network settings. Unlike BRAdmin Professional,
which is designed for Windows® only, the Web BRAdmin server utility can be accessed from any client PC
with a Web Based Management (Web browser) that supports JRE (Java Runtime Environment). By installing
the Web BRAdmin server utility on a PC running IIS 1, administrators with a Web Based Management (Web
browser) can connect to the Web BRAdmin server, which then communicates with the device itself.
For more information and downloading, visit us at http://solutions.brother.com
1
Internet Information Serve r 4.0 or Inte rnet Informa tion Service 5.0 / 5.1 / 6.0 / 7.0
.
66
Page 76

Driver and Software
About emulation modes 3
This printer has the following emulation modes. You can change the setting by using the control panel or Web
Based Management (Web browser).
HP LaserJet Mode
The HP LaserJet mode (or HP mode) is the emulation mode in which this printer supports the PCL5C and
®
PCL6 language of the Hewlett-Packard
laser printer. Using this mode will allow your printer to run at its best with those applications.
BR-Script 3 Mode (HL-4050CDN / HL-4070CDW only)
BR-Script is an original Brother page description language and a PostScript® language emulation
interpreter. This printer supports level 3. The BR-Script interpreter of this printer allows you to control text
and graphics on pages.
For technical information about PostScript
• Adobe Systems Incorporated. PostScript
Professional, 1999. ISBN: 0-201-37922-8
• Adobe Systems Incorporated. PostScript
1988. ISBN: 0-201-14396-8
• Adobe Systems Incorporated. PostScript
Professional, 1985. ISBN: 0-201-10179-3
LaserJet laser printer. Many applications support this type of
®
commands, see the following manuals:
®
Language Reference, 3rd edition. Addison-Wesley
®
Language Program Design. Addison-Wesley Professional,
®
Language Tutorial and Cookbook. Addison-Wesley
3
Automatic emulation selection (HL-4050CDN / HL-4070CDW only) 3
This printer has an automatic emulation selection feature that is turned on by default. This lets it automatically
change the emulation mode to suit the type of data it receives.
You can change the setting by using the control panel or Web Based Management (Web browser).
Automatic interface selection 3
This printer has an automatic interface selection feature that is turned on by default. This lets it automatically
change the interface to IEEE 1284 parallel (HL-4050CDN / HL-4070CDW only), USB, or Ethernet depending
on which interface is receiving data.
Since the default setting is on for the automatic interface selection mode, simply connect the interface cable
to the printer. Always turn off both your computer and printer when connecting or disconnecting the cable.
Auto Interface selection can take a few seconds to work. If you only use one interface it would be advisable
to select that interface; use the control panel to access the General Setup menu, choose Interface and
then choose Select. If only one interface is chosen, the printer will allocate the entire input buffer to that
interface.
67
Page 77

4
Control Panel 4
Control panel 4
This printer has one back lit liquid crystal display (LCD), eight buttons and two Light Emitting Diodes (LEDs)
on the control panel. The display can show various messages with up to 16 characters in each of the two
rows.
4
68
Page 78

Control Panel
Buttons 4
You can control the basic printer operations and change various printer settings with eight buttons (Go,
Cancel, Reprint, +, -, Back, OK, Direct Print).
button Operations
Go Clear error messages.
Pause and continue printing.
Cancel Stop and cancel the printing job in progress.
Exit from the control panel menu, Reprint menu or Direct Print menu.
Reprint Choose the Reprint menu.
+ Scroll backward through menus and the available options.
Enter numbers and increase the number.
- Scroll forward through menus and the available options.
Enter numbers and decrease the number.
Back Go back one level in the menu structure.
OK Choose the control panel menu.
4
Set the chosen menus and settings.
Direct Print Switch to Direct Print mode when USB flash memory is inserted into the USB direct
interface.
Go 4
You can pause printing by pressing Go. Pressing Go again restarts the print job. During a pause, the printer
is offline.
Pressing Go allows you to choose the displayed option in the last menu level. After changing a setting, the
printer returns to the Ready state.
If Data remains in the printer memory pressing Go will print that remaining data.
You can clear some error indications by pressing Go. Follow the control panel instructions or see
Troubleshooting on page 142 to clear all other errors.
Note
• The options you have chosen are shown with an asterisk at the end of the display. Since the asterisk
shows what you have chosen, you can easily see the current settings as you look through the LCD.
• If the printer is in Pause mode and you do not want to print the data left, press Cancel. Once the job has
been canceled, the printer will return to the Ready state.
Cancel 4
You can cancel the processing or printing of data by pressing Cancel. The LCD shows Cancel printing.
until the job is canceled. After canceling the job, the printer returns to the Ready state. Pressing Cancel will
exit the control panel menu and return the printer to the Ready state.
69
Page 79

Control Panel
Reprint 4
If you want to reprint a document that has just been printed, press Reprint.
You can reprint when the printer is in the Ready state.
(For details, see Reprinting documents on page 73.)
+ or - button 4
Moving through menus on the LCD 4
Pressing the + or - button when the printer is in the Ready state, takes it offline and the LCD will show the
control panel menu.
Press to scroll through the menus and options. Press the button until you see the setting you want.
Entering numbers 4
You can enter numbers in two ways. You can press the + or - button to move up or down one number at a
time, or you can hold down the + or - button to move faster. When you see the number you want, press OK.
4
Back 4
Pressing Back when the printer is in the Ready state takes it offline, and the LCD will show the control panel
menu.
Pressing Back allows you to return to the previous level from the current menu level.
Back also allows you to choose the previous digit while setting numbers.
When you choose a setting and it does not have an asterisk (OK was not pressed), Back allows you to return
to the previous menu level with the original setting unchanged.
OK 4
Pressing OK when the printer is in the Ready state takes it offline, and the LCD will show the control panel
menu.
Pressing OK allows you to choose the displayed menu or option. After changing a setting, the LCD shows
Accepted and then the printer returns to the previous menu level.
Note
The options you have chosen are shown with an asterisk at the end of the display. Since the asterisk
shows what you have chosen, you can easily see the current settings as you look through the LCD.
70
Page 80

Control Panel
LEDs 4
The LEDs are lights which show the printer status.
Data LED (Yellow)
LED indication Meaning
On Data is in the printer memory.
Blinking Receiving or processing data.
Off No remaining data in the memory.
Direct Print LED (Blue)
LED indication Meaning
On USB flash memory or PictBridge digital camera is inserted into the USB direct
interface.
Off USB flash memory or PictBridge digital camera is not inserted into the USB
direct interface.
4
LCD 4
The LCD shows the current printer status. When you use the control panel keys, the LCD will change.
If there are any problems, the LCD will show the error message, maintenance message or call service
message so you will know that you need to take action. (For more information about these messages, see
LCD messages on page 143.)
Back light 4
Light Meaning
Off The printer is off or in sleep status.
Green (General) Ready to print
Printing
Warming up
Red (Error) There is a problem with the printer.
Orange (Setting) Choosing a menu (Control panel menu, Reprint menu or Direct Print menu)
Pause
71
Page 81

Control Panel
LCD messages 4
The message on the LCD shows the current printer status during normal operation.
Ready
o o n o
The four o marks (also n, n=blinking o) indicate the Black (K), Yellow (Y), Magenta (M), Cyan (C) toner
cartridges from left to right.
The o marks indicate the status of the toner in the toner cartridges. When the o mark blinks (n), the indicated
toner is nearly empty. When toner becomes empty, the o indicator disappears completely.
The mark indicates the wireless signal strength with four levels. ( means no signal, means weak,
means middle, and means strong.) (HL-4070CDW only)
When an error has occurred, the type of error is displayed on the first line of the LCD message as shown
below.
The message on the second line shows information for clearing the error.
Cover is open
Close the Front Cover
Printer status messages 4
The following table shows the printer status messages during normal operation:
Printer Status Message Meaning
Cooling Down The printer is cooling down.
Job Cancel Canceling the job.
Ignore Data Printer is ignoring data processed using the PS driver.
Pause The printer has suspended its operations. Press Go to start the printer again.
Please Wait The printer is warming up.
The printer is carrying out the calibration process.
Printing Printing.
Ready Ready to print.
Sleep In Sleep state.
4
72
Page 82

Control Panel
Reprinting documents 4
Reprinting the last job 4
You can reprint the data from the last print job without sending it from the computer again.
Note
•If the Reprint setting is set to Off on the control panel and you press Reprint, the LCD shows
No Data Stored for a short time.
• If you want to cancel reprinting, press Cancel.
• If the printer does not have enough memory to spool the print job data, it will not print the document.
• Pressing the - or + button makes the number of reprint copies decrease or increase. You can choose
between 1 and 999 Copies.
• For more information about the settings in the printer driver, see Device Options on page 41.
• After turning the power switch off, the last job data will be deleted.
How to reprint the last job 4
4
a Make sure that the Reprint setting is On by using the buttons on the control panel to enter the General
Setup menu.
Note
If you print with the printer driver we have supplied with the printer, the settings for Job Spooling in the
printer driver will take priority over the settings made on the control panel. (For more information, see
Device Options on page 41.)
b Press Reprint.
c Press OK.
Reprint Menu
Last Job
d Press the + or - button to choose Print. Press OK.
Last Job
Print
e Press the + button twice to enter the number of copies you want.
Last Job
Copies =3
f Press OK or Go.
Printing
Last Job
Print
h
73
Page 83

Control Panel
Note
• Pressing the + or - key makes the number of reprint copies increase or decrease. You can choose between
1 and 999 Copies.
• If you wait 30 seconds to continue the control panel operation, the LCD leaves the Reprint setting
automatically.
Printing Secure data 4
Secure data
Secure documents are protected by a password and only those people who know the password will be
able to print the document. The printer will not print the document when you send it for printing. To print
the document, you must use the control panel of the printer (with the password). Secure data will be
deleted after printing once.
When the area to spool data is full, the earliest data is automatically deleted first. The order of deleting data
is not connected to the order of reprinting.
If you want to delete the spooled data, you can carry out this operation using the control panel or the webbased management application.
Note
• The secure data will be deleted when the printer is turned off.
• For more information about the settings in the printer driver and how to create secure data, see Device
®
Options on page 41 (For Windows
BR-Script printer driver) or Job Spooling on page 56 (For Macintosh
printer driver), Advanced options on page 50 (For Windows®
®
printer driver).
How to print Secure data 4
a Press Reprint.
b Press the + or - button to choose Secure Print. Press OK.
Reprint Menu
Secure Print
4
c Press the + or - button to choose the user name. Press OK.
User
XXXXXX
d Press the + or - button to choose the job. Press OK.
Job
XXXXXX.doc
e Press the + or - button to enter your password. Press OK.
XXXXXX.doc
Password: XXXX
74
Page 84

Control Panel
Note
If you wait 30 seconds to continue the control panel operation, the LCD leaves the Reprint setting
automatically.
f Press the + or - button to choose Print. Press OK.
XXXXXX.doc
Print
g Press the + or - button to enter the number of copies you want. Press OK or Go.
XXXXXX.doc
Copies =1
h
Printing
When there is no last job data or secure data in memory 4
If the printer does not have reprint data in the memory and you press Reprint, the LCD will show
No Data Stored.
4
Deleting the last job 4
Choose Delete in step d on How to reprint the last job on page 73.
Deleting secure data 4
Choose the user name and the job you want to delete in steps a to e, and then choose Delete in step f
on How to print Secure data on page 74-75.
Canceling the reprint job (reprinting and printing secure data) 4
If you want to cancel the current reprint job, press Cancel. Cancel also allows you to cancel a paused reprint
job.
75
Page 85

Control Panel
Using the control panel LCD menu 4
When you use the Menu keys (+, -, OK or Back), remember the following basic steps:
If no control panel operations are performed for 30 seconds, the LCD automatically returns to Ready.
When you press OK to choose a setting, Accepted appears on the second line of the LCD. After that, the
LCD returns to the previous menu level.
When you press Go to choose a setting, Accepted appears on the second line of the LCD. After that, the
LCD returns to the Ready state.
After changing the status or a setting, pressing Back before you press OK will cause the LCD to return to
the previous menu level with the original settings unchanged.
There are two ways to input numbers. You can press the + or - key to scroll up or down one number at a
time, or you can hold down the + or - key to scroll faster. The blinking number is the one that you can
change.
For example: If you only use Tray 1 to print from, change the Tray Use setting to Tray 1 Only, as follows. 4
a Press any of the Menu buttons (+, -, OK or Back) to take the printer offline.
Ready
4
h
Select ab or OK
Machine Info.
b Press the + or - button to choose Paper Tray.
Select ab or OK
Paper Tray
c Press OK to move to the next menu level.
Paper Tray
Tray Use
d Press the + or - button to choose Tray1 Only.
Tray Use
Tray1 Only
e Press OK or Go.
Accepted appears on the second line of the LCD.
Tray Use
Accepted
76
Page 86

Control Panel
Menu table 4
There are nine menus. For more information about the selections available in each menu, see the tables
below.
Note
The control panel LCD names for the paper trays are as follows.
• Standard paper tray: Tray1
• Multi-purpose tray: MP
• Optional lower tray: Tray2
Machine Info.
Submenu Menu Selections Descriptions
Print Settings Prints the Printer Settings page.
Test Print Prints the test page.
Demo Print Prints the demonstration sheet.
Print Font Prints the font list and samples.
Serial No. Shows the printer serial number.
Version Main Version Shows the main firmware version.
Sub Version Shows the sub firmware version.
Engine Version Shows the engine firmware version.
RAM Size Shows the size of memory in this printer.
Page Count Total Shows the current total printed pages.
Color Shows the current total color printed pages.
Monochrome Shows the current total monochrome printed
pages.
Image Count Black(K) Shows the amount of images produced by the
black color.
Cyan(C) Shows the amount of images produced by the cyan
color.
Magenta(M) Shows the amount of images produced by the
magenta color.
Yellow(Y) Shows the amount of images produced by the
yellow color.
Drum Count Shows the current total pages printed for drum unit.
4
77
Page 87

Machine Info. (continued)
Submenu Menu Selections Descriptions
Parts Life Drum Life Shows the remaining life for the drum unit.
Belt Life Shows the remaining life for the belt unit.
PF KitMP Life Shows the pages left to print with the PF kit MP.
PF Kit1 Life Shows the pages left to print with the PF kit 1.
Reset Parts Life
(Appears only when
replacement parts have been
changed)
PF Kit2 Life
(HL-4050CDN/HL-4070CDW
only)
Fuser Life Shows the pages left to print with the fuser unit.
Laser Life Shows the pages left to print with the laser unit.
Drum Unit Resets the drum unit life. Appears when you
Belt Unit Resets the belt unit life. Appears when you replace
PF KitMP Resets the PF kitMP parts life. Appears when you
PF Kit1 Resets the PF kit1 parts life. Appears when you
PF Kit2
(HL-4050CDN/HL-4070CDW
only)
Shows the pages left to print with the PF kit 2.
replace the drum unit.
the belt unit.
replace the PF KitMP.
replace the PF Kit1.
Resets the PF kit2 parts life. Appears when you
replace the PF Kit2.
Control Panel
4
Paper Tray
Submenu Options Descriptions
Tray Use <HL-4040CN only>
Auto*/MP Only/Tray1 Only
<HL-4050CDN/HL-4070CDW
only>
(For no Tray2 installed)
Auto*/MP Only/Tray1 Only
(For Tray2 installed)
Auto*/MP Only/Tray1 Only/
Tray2 Only
Manual Feed Off*/On Chooses whether to feed paper manually.
The default settings are shown in Bold with an asterisk.
Chooses the tray that will be used.
78
Page 88

Control Panel
Paper Tray (continued)
Submenu Options Descriptions
Priority <HL-4040CN only>
MP>T1*/T1>MP
<HL-4050CDN/HL-4070CDW
only>
(For no Tray2 installed)
MP>T1*/T1>MP
(For Tray2 installed)
MP>T1>T2*/MP>T2>T1>/T1>T2
>MP/T2>T1>MP/T1>T2/T2>T1
/T1>MP>T2/T2>MP>T1
MP First Off*/On Chooses whether to feed paper from the MP tray as
Duplex
(HL-4050CDN/
HL-4070CDW only)
MP Size Any*/Letter/Legal/A4... Choose the size of paper you put in the MP tray.
Tray1 Size Any*/Letter/Legal/A4... Choose the size of paper you loaded in the
Tray2 Size
(HL-4050CDN/
HL-4070CDW only)
Off*/On(Long Bind)/
On(Short Bind)
Any*/Letter/Legal/A4... Choose the size of paper you loaded in the optional
When Tray Use is chosen as Auto: Chooses the
order in which the printer uses the paper trays that
contain paper of the same size.
a priority.
Chooses whether to automatically print on both
sides of the paper.
standard paper tray.
lower tray.
4
The default settings are shown in Bold with an asterisk.
General Setup
Submenu Menu Selections Options Descriptions
Local Language English*/Français... Changes the LCD language for your
country.
Ecology Sleep Time 0/1/2/3/4/5*.../ 240 Min Sets the time to return to Power Save
mode.
Toner Save On/Off* Increases the page yield of the toner
cartridge.
Panel Control Button Repeat 0.1*/0.4/0.6/0.8/1.0/1.4
/1.8/2.0 Sec
Message Scroll Level 1*/Level 2.../
Level 10
LCD Contrast -nnonn+ Adjusts the contrast of the LCD.
Auto Online On*/Off Return to Ready state automatically.
The default settings are shown in Bold with an asterisk.
Sets the time for the LCD message to
change when holding the + or button at intervals.
Sets the time in seconds that an LCD
message will scroll across the LCD.
From Level 1=0.2 sec to Level
10=2.0 sec.
79
Page 89

Control Panel
General Setup (continued)
Submenu Menu Selections Options Descriptions
Setting Lock Off*/On Turns the lock panel settings On or
Off using the password.
Reprint On*/Off Turns the reprint settings On or Off.
Interface Select <HL-4040CN only>
Auto*/USB/Network
<HL-4050CDN/
HL-4070CDW only>
Auto*/Parallel/USB/
Network
Auto IF Time 1/2/3/4/5*.../99 (sec) You need to set the time-out period
Input Buffer Level 1/2/3/4*.../7 Increases or decreases the input
Inputprime
(HL-4050CDN/
HL-4070CDW only)
Off*/On Turns the inputprime of parallel On or
Choose the interface you use.
for the auto interface selection.
buffer capacity.
Off.
4
The default settings are shown in Bold with an asterisk.
Print Menu
Submenu Menu Selections Options Descriptions
Emulation
(HL-4050CDN/
HL-4070CDW only)
Auto Continue Off*/On Choose whether to automatically
Output Color Auto*/Color/Mono Set the output color.
Media Type Plain Paper*/Thick
Paper Letter*/Legal/A4/
Copies 1*/2.../999 Sets the number of printed pages.
Orientation
Auto*/HP LaserJet/
BR-Script
Paper/Thicker Paper/Th
in Paper/Recycled
Paper/Bond Paper/Envel
opes/Env.Thin/Env.Thic
k/PostCard/Label
Executive/Com-10/DL/JI
SB5/B5/A5/B6/A6/Monarc
h/C5/A4Long/Folio/DL L/
PostCard
Portrait*/Landscape This printer can print pages in portrait
Choose the emulation mode you use.
clear the removable error.
Sets the type of paper.
Sets the size of paper.
or landscape orientation.
The default settings are shown in Bold with an asterisk.
80
Page 90

Control Panel
Print Menu (continued)
Submenu Menu Selections Options Descriptions
Print Position X Offset -500/-499.../0*.../499/
500Dots
Y Offset -50/-49.../0*.../499/
500Dots
Auto FF Off*/On Allows you to print the remaining
HP LaserJet Font No. I000.../I059*.../I071
Font Pitch 0.44/10*.../99.99
Font Point 4.00/12*.../999.75
Symbol Set PC-8*... Sets the symbol set or the character
Table Print Prints code table.
Auto LF Off*/On ON: CR i CR+LF,OFF: CR i CR
Auto CR Off*/On ON: LFiLF+CR, FFiFF+CR, or
Auto WRAP Off*/On Chooses whether a line feed and
Auto SKIP On*/Off Chooses whether a line feed and
Left Margin #### Sets the left margin at column 0 to 70
Right Margin #### Sets the right margin at column 10 to
Top Margin #### Sets the top margin at a distance
Bottom Margin #### Sets the bottom margin at a distance
Lines #### Sets the number of lines on each
Moves the print start position (at the
top-left corner of pages) horizontally
up to -500 (left) to +500 (right) dots in
300 dpi.
Moves the print start position (at the
top-left corner of pages) vertically up
to -50 (up) to +500 (down) dots in
300 dpi.
data without pressing Go.
set.
VT i VT+CR OFF: LF i LF, FF i
FF, or VT i VT
carriage return will happen when the
printer reaches the right margin.
carriage return will happen when the
printer position reaches the bottom
margin.
columns at 10 cpi.
80 columns at 10 cpi.
from the top edge of the paper: 0,
0.33, 0.5, 1.0, 1.5 or 2.0. The default
setting is 0.5.
from the bottom edge of the paper 0, 0.33, 0.5, 1.0, 1.5 or 2.0. The
default setting is 0.5.
page from 5 to 128 lines.
4
The default settings are shown in Bold with an asterisk.
81
Page 91

Print Menu (continued)
Submenu Menu Selections Options Descriptions
BR-Script
(HL-4050CDN/
HL-4070CDW only)
The default settings are shown in Bold with an asterisk.
Error Print On*/Off
CAPT Off*/On
Control Panel
LAN for HL-4040CN/HL-4050CDN users
Submenu Menu Selections Options Descriptions
TCP/IP BOOT Method Auto*/Static/RARP/BOOTP
/DHCP
IP Address ###.###.###.###
(000.000.000.000)*
Subnet Mask ###.###.###.###
(000.000.000.000)*
Gateway ###.###.###.###
(000.000.000.000)*
IP Boot Tries # (3*)
APIPA On*/Off Automatically allocates the IP
IPv6 On/Off*
Ethernet Auto*/100B-FD/100B-HD/
10B-FD/10B-HD
Factory Reset Restores all network settings of the internal print server to default.
The default settings are shown in Bold with an asterisk.
Choose the IP method that best suits
your needs.
Enter the IP address.
1
Enter the Subnet mask.
1
Enter the Gateway address.
address from the link-local address
range.
1
Chooses Ethernet link mode.
4
1
On connectio n to the network, if the machine 's 'BOOT Method' is 'Auto ' the machine will a ttempt to automatically set the IP address and Subnet
Mask from a boot serve r such as DHCP or BOOTP. If a boot serve r cannot be found, an APIPA IP address will be allocated, such as 169. 254.
[001-254]. [000-255]. If the 'BOOT Method' of the machine is set to 'Static' you will need to manually enter an IP address from the machine 's control
panel.
82
Page 92

LAN for HL-4070CDW users
Submenu 1 Submenu 2 Menu Selections Options Descriptions
Wired TCP/IP BOOT Method Auto*/Static/RARP/BOOTP
/DHCP
IP Address ###.###.###.###
(000.000.000.000)*
Subnet Mask ###.###.###.###
(000.000.000.000)*
Gateway ###.###.###.###
(000.000.000.000)*
IP Boot Tries # (3*)
APIPA On*/Off Automatically allocates the IP
IPv6 On/Off*
Ethernet Auto*/100B-FD/100B-HD/
10B-FD/10B-HD
Set to
Restores wired network settings of the internal print server to default.
Default
Wired
On*/Off Chooses Ethernet link mode.
Enable
WLAN TCP/IP BOOT Method Auto*/Static/RARP/BOOTP
/DHCP
IP Address ###.###.###.###
(000.000.000.000)*
Subnet Mask ###.###.###.###
(000.000.000.000)*
Gateway ###.###.###.###
(000.000.000.000)*
IP Boot Tries # (3*)
APIPA On*/Off Automatically allocates the IP
IPv6 On/Off*
Setup WLAN Setup Wizard
SecureEasySetup
Choose the IP method that best
suits your needs.
Enter the IP address.
1
Enter the Subnet mask.
1
Enter the Gateway address.
address from the link-local
address range.
Chooses Ethernet link mode.
Choose the IP method that best
suits your needs.
Enter the IP address.
1
Enter the Subnet mask.
1
Enter the Gateway address.
address from the link-local
address range.
Control Panel
4
1
1
The default settings are shown in Bold with an asterisk.
83
Page 93

Control Panel
LAN for HL-4070CDW users (continued)
Submenu 1 Submenu 2 Menu Selections Options Descriptions
WLAN
Status
Set to
Default
WLAN
Enable
Factory
Restores all network settings of the internal print server to default.
Reset
The default settings are shown in Bold with an asterisk.
1
On connectio n to the network, if the machine's 'IP METHOD' is 'AUTO' the ma chine will atte mpt to automatica lly set the IP a ddress and Subnet
Mask from a boot serve r such as DHCP or BOOTP. If a boot serve r cannot be found an APIPA IP address will be allocated, such as
169.254.[001-254].[000-255]. If the 'IP METHOD' of the machine is set to 'STATIC' you will need to manually enter an IP address from the
ma ch in e's co ntrol pa ne l.
Status
Signal
SSID (Shows SSID [uses a maximum of 32 digits and characters 0-9,
a-z and A-Z in ASCII values])
Comm. Mode AD-HOC*/Infrastructure Shows the current
Communication Mode.
Restores wired network settings of the internal print server to default.
On/Off* Chooses Ethernet link mode.
4
Reset Menu
Display Shows Description
Reset Printer Resets the printer and restores all printer settings (including command settings) to settings
you have previously made with the control panel buttons.
Factory Reset Resets the printer and restores the printer settings (including command settings) to the
default settings.
Color Correction
Submenu Menu Selections Options Descriptions
ColorCalibration Calibrate Carry out calibration to revise the
colors.
Reset Set the calibration parameters back
to the default settings.
Auto Regist. Registration Adjusts the print position of each
color automatically.
Frequency Low/Medium*/High/Off Sets the interval time you want to
carry out the auto registration.
The default settings are shown in Bold with an asterisk.
84
Page 94

Control Panel
Color Correction (continued)
Submenu Menu Selections Options Descriptions
Manual Regist. Print Chart Prints the chart to manually check
the registration of the colors.
Set Registration 1 Magenta Left
2 Cyan Left
3 Yellow Left
4 Magenta Center
5 Cyan Center
6 Yellow Center
7 Magenta Right
8 Cyan Right
9 Yellow Right
The default settings are shown in Bold with an asterisk.
Enter the correction value on the
chart you printed from the Print
Chart.
Direct Print
Submenu Menu Selections Options Descriptions
Paper Size Letter*/Legal/A4/
Executive/JIS B5/B5/A5/
B6/A6/A4Long/Folio
Media Type Plain Paper*/Thick
Paper/Thicker Paper/
Thin Paper/Recycled
Paper/Bond Paper
Multiple Page 1in1*/2in1/4in1/9in1/
16in1/25in1
1in2×2pages
1in3×3pages
1in4×4pages
1in5×5pages
Orientation Portrait*/Landscape This printer can print pages in portrait
Collate On*/Off
Print Quality Normal*/Fine
PDF Option Document*
Document&Stamps
Document&Markup
Index Print Simple*/Details Sets the format of the index for direct
Sets the size of paper for direct print.
Sets the type of paper for direct print.
Sets the pattern if you want to print
multiple pages on a single sheet or
one page on multiple sheets.
or landscape orientation.
Set the information you want to add
to the document.
print. If you choose Details,
printing time will be longer. (See
Printing data from a USB flash
memory drive with direct
print on page 29.)
4
The default settings are shown in Bold with an asterisk.
85
Page 95

Control Panel
PictBridge
Submenu Menu Selections Options Descriptions
Paper Size Letter*/A4/B5/A5/B6/A6 Sets the size of paper for PictBridge.
Orientation <For Letter,A4,B5>
Portrait*/Landscape
<For A5,B6,A6>
Portrait/Landscape*
Date&Time Off*/On Prints the date and time.
File Name Off*/On Prints the file name.
Print Quality Normal*/Fine
The default settings are shown in Bold with an asterisk.
This printer can print pages in portrait
or landscape orientation for
PictBridge.
4
86
Page 96

Control Panel
Example of changing a menu setting 4
Setting IP address
a Press the + or - button to choose LAN (and to display each setting shown below).
Select ab or OK
Machine Info.
Select ab or OK
LAN
b Press OK.
LAN
TCP / IP
c Press OK.
TCP / IP
BOOT Method
d Press the - button.
TCP / IP
IP Address
h
4
e Press OK.
The last digit in the first part of the number is blinking.
IP Address
192.0.0.192
f Press the + or - button to increase or decrease the number.
Press OK to go to the next number.
IP Address
123.0.0.192
g Repeat this process until you have set your IP address.
IP Address
123.45.67.89
h Press OK or Go to finish the IP address.
IP Address
Accepted
87
Page 97

Control Panel
Default settings 4
The printer settings have been set at the factory before shipment. They are called default settings (see Menu
table on page 77). Although you can run the printer with these default settings unchanged, you can tailor the
printer with user settings.
Note
Changing the user settings does not affect the default settings. You cannot modify the preset default
settings.
The changed user settings can be restored to the default settings with the Reset Menu. See Menu
table on page 77.
Note
• The emulation mode affects the setting.
• If you change Interface, Language, Reprint, Set Registration, then performing a factory reset
will not revert those settings back to the original factory default settings. Page counter can never be
changed.
4
Network default settings 4
If you want to reset the print server back to its default settings (resetting all information such as the password
and IP address information), follow these steps:
a Press the + or - key to choose LAN. Press OK.
Select ab or OK
Machine Info.
Select ab or OK
LAN
b Press the + or - key to choose Factory Reset. Press OK.
LAN
Factory Reset
c Press OK again.
Factory Reset
OK?
h
88
Page 98

Control Panel
Calibration 4
The output density for each color may vary depending on the environment the machine is in such as
temperature and humidity. Calibration helps you to improve the color density.
a Press the + or - key to choose Color Correction. Press OK.
Select ab or OK
Machine Info.
Select ab or OK
Color Correction
b Press OK.
Color Correction
ColorCalibration
c Press OK.
ColorCalibration
Calibrate
h
4
d Press OK again.
Calibrate
OK?
You can reset the calibration parameters back to those set at the factory.
a Press the + or - key to choose Color Correction. Press OK.
Select ab or OK
Machine Info.
h
Select ab or OK
Color Correction
b Press OK.
Color Correction
ColorCalibration
c Press the + or - key to choose Reset. Press OK.
ColorCalibration
Reset
d Press OK again.
Reset
OK?
89
Page 99

Control Panel
Auto Registration 4
Registration 4
You can adjust the print position of each color automatically.
a Press the + or - key to choose Color Correction. Press OK.
Select ab or OK
Machine Info.
Select ab or OK
Color Correction
b Press the + or - key to choose Auto Regist.. Press OK.
Color Correction
Auto Regist.
c Press OK.
Auto Regist.
Registration
h
4
d Press OK again.
Registration
OK?
Frequency 4
You can set how often the auto registration occurs.
a Press the + or - key to choose Color Correction. Press OK.
Select ab or OK
Machine Info.
h
Select ab or OK
Color Correction
b Press the + or - key to choose Auto Regist.. Press OK.
Color Correction
Auto Regist.
c Press the + or - key to choose Frequency. Press OK.
Auto Regist.
Frequency
d Press the + or - key to choose Low, Medium, High or Off. Press OK.
90
Page 100

Control Panel
Manual Registration 4
Print Chart 4
You can print the color registration chart to manually check the registration of the colors.
a Press the + or - key to choose Color Correction. Press OK.
Select ab or OK
Machine Info.
Select ab or OK
Color Correction
b Press the + or - key to choose Manual Regist.. Press OK.
Color Correction
Manual Regist.
c Press OK.
Manual Regist.
Print Chart
h
4
Set Registration 4
You can correct the color registration manually.
a Press the + or - key to choose Color Correction. Press OK.
Select ab or OK
Machine Info.
h
Select ab or OK
Color Correction
b Press the + or - key to choose Manual Regist.. Press OK.
Color Correction
Manual Regist.
c Press the + or - key to choose Set Registration. Press OK again.
Manual Regist.
Set Registration
d To set the color registration, follow the instruction on Color Registration Chart.
e Press OK.
91
 Loading...