

Page 1
1600/1650
USER’S GUIDE
USER’S GUIDE
GUÍA DE USUARIO
GUÍA DE USUARIO
• Read this User’s Guide before you start using your P-touch.
• Keep this User’s Guide in a handy place for future reference.
• Antes de usar su equipo por primera vez, lea cuidadosamente esta guía de usuario.
• Guarde esta guía de usuario para futuras referencias.
Page 2

Introduction
Thank you for purchasing this P-touch!
With your new P-touch, select from a variety of character styles, sizes and frames to
design practical custom labels for any need. In addition, the selection of pre-formatted
label types allows you to quickly and easily label patch panels, cables, connectors and
other components.
With this P-touch, you can print legible, long-lasting labels in no time. The quality and
performance of this P-touch make it an extremely practical machine in the plant or in the
field.
Although this P-touch is easy to use, we suggest that you read this User’s Guide
carefully before starting, and then keep this manual nearby for future reference.
Federal Communications Commission (FCC) Declaration of Conformity (For USA Only)
Responsible Party : Brother International Corporation
declares that the product
Product Name : Brother Label Printer P-touch
Model Number : PT-1600/1650
complies with Part 15 of the FCC Rules. Operation is subject to the following two conditions: (1) this device may not
cause harmful interference, and (2) this device must accept any interference received,including interference that may
cause undesired operation.
This equipment has been tested and found to comply with the limits for a Class B digital device, pursuant to
Part 15 of the FCC Rules. These limits are designed to provide reasonable protection against harmful interference in a residential installation. This equipment generates, uses, and can radiate radio frequency energy and,
if not installed and used in accordance with the instructions, may cause harmful interference to radio communications. However, there is no guarantee that interference will not occur in a particular installation. If this
equipment does cause harmful interference to radio or television reception, which can be determined by turning the equipment off and on, the user is encouraged to try to correct the interference by one or more of the following measures:
- Reorient or relocate the receiving antenna
- Increase the separation between the equipment and receiver.
- Connect the equipment into an outlet on a circuit different from that to which the receiver is connected.
- Consult the dealer or an experienced radio/TV technician for help.
- The enclosed interface cable should be used in order to ensure compliance with the limits for a Class B digital
device.
- Changes or modifications not expressly approved by Brother Industries, Ltd. could void the user’s authority
to operate the equipment.
Patent numbers and patent publication numbers which are related to this product are as below:
USP4839742 USP4976558 USP5009530 USP5120147
USP4927278 USP4983058 USP5069557
100 Somerset Corporate Boulevard
Bridgewater, NJ 08807-0911 USA
TEL : (908) 704-1700
Page 3

CONTENTS
Brother® 90 Days/One Year Limited Warranty and Replacement
Service
(For USA Only) ............................................................................. iv
Important Information ..................................................................vi
1. Getting Started ..............................................................1
General Description ......................................................................1
Top view & bottom view ............................................................................... 1
Keyboard & LCD display ............................................................................. 2
General Precautions ......................................................................4
Batteries & Tape Cassettes .............................................................5
Installing batteries and a tape cassette ......................................................... 5
Cleaning ........................................................................................8
Cleaning the print head, rollers and tape cutter .......................................... 8
Optional AC Adapter .....................................................................9
Connecting the AC adapter ...........................................................................9
Turning the P-touch On/Off ..........................................................9
2. Label Type Modes ........................................................10
Selecting a Label Type Mode .......................................................10
Normal and Vertical Modes .........................................................10
Rotate Mode and Rotate & Repeat Mode .....................................11
Flag Mode ....................................................................................12
Port & Panel Modes .....................................................................13
3. Basic Functions ............................................................15
Performing Basic Operations .......................................................15
Choosing functions, parameters, settings and groups ................................15
Choosing the default setting .......................................................................15
Confirming a choice ....................................................................................15
Cancelling a choice .................................................................................... 15
Inputting Label Data ....................................................................16
Entering and editing text ............................................................................. 16
Entering an accented character ..................................................................18
Entering a bar code .................................................................................... 19
Entering a symbol .......................................................................................21
i
Page 4

Formatting the Label ....................................................................24
Specifying a label length ............................................................................. 24
Specifying a margin size .............................................................................24
Framing the text .......................................................................................... 25
Specifying the character size ...................................................................... 26
Specifying the character width ...................................................................27
Specifying the character style .....................................................................28
Using the pre-formatted Auto Format templates ........................................ 30
Printing Labels .............................................................................31
Previewing the label layout ........................................................................ 31
Feeding tape ............................................................................................... 31
Printing a label ........................................................................................... 31
Using special printing functions ................................................................. 32
Storing and Recalling Files ...........................................................36
Storing label text ......................................................................................... 36
Recalling text that has been stored ............................................................. 37
Deleting text that has been stored ............................................................... 37
4. Machine Adjustments ..................................................38
Selecting how tape is fed and cut ................................................................38
Adjusting the display contrast ..................................................................... 38
Setting the Auto Reduction function ............................................................39
Calibrating the label length ........................................................................ 39
Specifying if the PERSONAL symbol category is continually updated ...... 40
Changing the units of measure ...................................................................40
Changing the language ...............................................................................40
Displaying version information .................................................................. 40
5. Using P-touch With a Computer (for PT-1650 only) ...41
Installing the Software & Printer Driver ......................................42
Before installation .......................................................................................42
Installing the P-touch Editor 3.2 software .................................................. 43
Installing the USB printer driver ................................................................ 44
Reading the User’s Guide ............................................................46
Using P-touch Editor 3.2 ..............................................................47
Starting up P-touch Editor 3.2 ....................................................................48
Displaying the Properties ........................................................................... 48
Entering text ................................................................................................49
Notes on usage ............................................................................................ 49
Transferring Data To/From a Computer ......................................50
ii
Page 5

Entering Transfer mode ..............................................................................50
Downloading data to the P-touch ............................................................... 51
Adding a user-defined character image to the text ..................................... 52
Using template data .................................................................................... 52
Using downloaded database data ............................................................... 54
Backing up/restoring P-touch data ............................................................. 57
6. Appendix .....................................................................58
Troubleshooting ...........................................................................58
Error Message List ........................................................................59
Machine Specifications ................................................................63
Hardware .................................................................................................... 63
Software ...................................................................................................... 63
Accessories (For USA Only) .........................................................64
Index ...........................................................................................67
Contact Information (For USA Only) ...........................................70
iii
Page 6

Brother® 90 Days/One Year Limited Warranty and Replacement Service
(For USA Only)
Who is covered:
• This limited warranty (“warranty”) is given only to
the original end-use/retail purchaser (referred to in
this warranty as “Original Purchaser”) of the
accompanying product, consumables and
accessories (collectively referred to in this
warranty as “this Product”).
• If you purchased a product from someone other
than an authorized Brother reseller in the United
States or if the product was used (including but not
limited to floor models or refurbished product),
prior to your purchase you are not the Original
Purchaser and the product that you purchased is
not covered by this warranty.
What is covered:
• This Product includes a Machine and Consumable
and Accessory Items. Consumable and Accessory
Items include but are not limited to label cassettes,
cutters, stamps, power adapters, cases and
batteries.
• Except as otherwise provided herein, Brother
warrants that the Machine and the accompanying
Consumable and Accessory Items will be free
from defects in materials and workmanship, when
used under normal conditions.
• This warranty applies only to products purchased
and used in the United States. For products
purchased in, but used outside, the United States,
this warranty covers only warranty service within
the United States (and does not include shipping
outside the United States).
What is the length of the Warranty Period(s):
• Machines have a two-stage warranty: 90 days from
the original purchase date and an additional
warranty up to one year from the original purchase
date.
• Consumable and Accessories Items accompanying
the Machine have a one-stage warranty: 90 Days
from the original purchase date.
What is NOT covered:
This warranty does not cover:
(1) Physical damage to this Product;
(2) Damage caused by improper installation, improper
or abnormal use, misuse, neglect or accident
(including but not limited to transporting this
Product without the proper preparation and/or
packaging);
(3) Damage caused by another device or software
used with this Product (including but not limited to
damage resulting from use of non Brother
parts and Consumable and Accessory Items);
(4) Consumable and Accessory Items that expired in
accordance with a rated life; and,
(5) Problems arising from other than defects in
materials or workmanship.
This limited warranty is VOID if this Product has been
altered or modified in any way (including but not
limited to attempted warranty repair without
authorization from Brother and/or alteration/removal
of the serial number).
®
-brand
What to do if you think your Product is eligible for
warranty service:
Report your issue to either our Customer Service
Hotline at 1-877-478-6824
Service Center within the applicable warranty
period
. Supply Brother or the Brother Authorized
Service Center with a copy of your dated bill of sale
showing that this Product was purchased within the
U.S. For the name of local Brother Authorized Service
Center(s), call 1-800-521-2846.
What Brother will ask you to do:
After contacting Brother or a Brother Authorized
Service Center, you may be required to deliver (by
hand if you prefer) or send the Product properly
packaged, freight prepaid, to the Authorized Service
Center together with a photocopy of your bill of sale.
You are responsible for the cost of shipping,
packing product, and insurance (if you desire). You
are also responsible for loss or damage to this
Product in shipping.
What Brother will do:
First 90 Days
Machine and/or accompanying Consumable and
Accessory Item(s) is covered by this warranty and
you first reported the problem to Brother or an
Authorized Service Center within 90 days from the
date of original purchase, Brother or its Authorized
Service Center will repair or replace the Machine and/
or accompanying Consumable and Accessory Item(s)
at no charge to you for parts or labor. The decision as
to whether to repair or replace the Machine and/or
accompanying Consumable and Accessory Item(s) is
made by Brother in its sole discreti on. Brother reserves
the right to supply a refurbished or remanufactured
replacement Machine and/or accompanying
Consumable and Accessory Item(s) and use
refurbished parts provided such replacement products
conform to the manufacturer’s specifications for new
product/parts. The repaired or replacement Machine
and/or accompanying Consumable and Accessory
Item(s) will be returned to you freight prepaid or made
available for you to pick up at a conveniently located
Authorized Service Center.
: If th e problem reported concerning your
or a Brother Authorized
if
iv
Page 7

Brother® 90 Days/One Year Limited Warranty and Replacement Service
(For USA Only)
91st day to 1 year:
If the problem reported concerning your Machine is
covered by this warranty and
problem after 90 days, but before 1 year from the date
of original purchase, Brother will furnish, free of
charge (excluding labor charges), replacement part(s)
for those part(s) of the Machine determined by Brother
or its Authorized Service Center to be defective. You
will be responsible for all labor charges associated
with repairs made after the first 90 days from
original purchase. After 90 days from the original
purchase date, accompanying Consumable and
Accessory Items are no longer covered by this
warranty. If the Machine and/or accompanying
Consumable and Accessory Item(s) are not covered by
this warranty (either stage), you will be charged for
shipping the Machine and/or accompanying
Consumable and Accessory Item(s) back to you
The foregoing are your sole (i.e., only) an d exclusive
remedies under this warranty.
What happens when Brother elects to replace your
Machine:
If you have delivered the Machine to an Authorized
Service Center, the Authorized Service Center will
provide you with a replacement Machine after
receiving one from Brother. If you are dealing directly
with Brother, Brother will send to you a replacement
Machine with the understanding that you will, after
receipt of the replacement Machine, supply the
required proof of purchase information, together with
the Machine that Brother agreed to replace. You are
then expected to pack the Machine that Brother agreed
to replace in the package from the replacement
Machine and return it to Brother using the air bill
supplied by Bro ther in accordance with the instru ctions
provided by Bro ther. Since you will be in possession of
two machines, Brother will require that you provide a
valid major credit card number. Brother will issue a
hold against the credit card account number that you
provide until Brother receives your original Product
and determines that your original Product is entitled to
warranty coverage. Your credit card will be charged up
to the cost of a new Product only if:
(i) you do not return your original Product to Brother
within five (5) business days; (ii) the problems of your
original Product are not covered by the limited
warranty; (iii) the proper packaging instructions are
not followed and has caused damage to the product; or
(iv) the warranty period on your original Product has
expired or has not been sufficiently validated with a
copy of the proof of purchase (bill of sale). The
replacement Machine you receive (even if refurbished
or remanufactured) will be covered by the balance of
the limited warranty period remaining on the original
Product, plus an additional thirty (30) days. You will
keep the replacement Machine that is sent to you and
your original Machine shall become the property of
Brother. Retain your original acces sory i tems and a
copy of the return air bill, signed by the courier.
if you first reported the
.
Limitations:
Brother is not responsible for damage to or loss of any
equipment, media, programs or data related to the use
of this Product. Except for that repair or replacement as
described above, Brother shall not be liable for any
direct, indirect, incidental or consequential damages or
specific relief. Because some states do not allow the
exclusion or limitation of consequential or incidental
damages, the above limitation may not apply to you.
THIS WARRANTY IS GIVEN IN LIEU OF ALL
OTHER WARRANTIES, WRITTEN OR ORAL,
WHETHER EXPRESSED BY AFFIRMATION,
PROMISE, DESCRIPTION, DRAWING, MODEL
OR SAMPLE. ANY AND ALL WARRANTIES
OTHER THAN THIS ONE, WHETHER EXPRESS
OR IMPLIED, INCLUDING IMPLIED
WARRANTIES OF MERCHANTABILITY AND
FITNESS FOR A PARTICULAR PURPOSE, ARE
HEREBY DISCLAIMED.
• This Limited Warranty is the only warranty that
Brother is giving for this Product. It is the final
expression and the exclusive and only statement of
Brother’s obligations to you. It replaces all other
agreements and understandings that you may have
with Brother or its representatives.
• This warranty gives you certain rights and you
may also have other rights that may vary from state
to state.
• This Limited Warranty (and Brother’s obligation
to you) may not be changed in any way unless you
and Brother sign the same piece of paper in which
we (1) refer to this Product and your bill of sale
date, (2) describe the change to this warranty and
(3) agree to make that change.
Important:
We recommend that you keep all original packing
materials, in the event that you ship this product.
v
Page 8

Important Information
Should you have questions, or need information about
your Brother Product, we have a variety of support
options for you to choose from:
USA-Customer Service:
Customer Service
877-478-6824 (voice)
Customer Service
901-379-1210 (fax)
Automated Faxback
800-521-2846
World Wide Web
www.brother.com
Supplies / Accessories
www.brothermall.com
or 888-879-3232
BROTHER INTERNATIONAL CORPORATION
100 SOMERSET CORPORATE BLVD.
BRIDGEWATER, NEW JERSEY 08807-09 11
Please record your model and serial number and your
date and location of Purchase below for your records.
Keep this information with your proof of purchase (bill
of sale) in case your Product requires service.
Model #
Serial #
Date of purchase:
Store where purchased:
Location of store:
Important: We recommend that you keep all original
packing materials, in the event you ship this product.
Don’t stand in line at the post office or worry about lost mail. Visit us on-line at
Save Time - Register On-Line!
www.registermybrother.com
Your product will immediately be registered in our database and you can be on your way!
Also, while you're there, look for contests and other exciting information!
vi
Page 9
Getting Started
1
1
General Description
Top view & bottom view
Top view
Tape cutter button
Keyboard
Getting Started
Displa y
Back cover
Battery compartment
Tape cassette compartment
USB port
(for PT-1650 only)
AC adapter connector
Cassette release lever
Print head
Tape exit slot
Bottom view
1
Page 10
Keyboard & LCD display
PT-1600
E
F
G
H
Q
P
O
N
162345
1 Left text alignment (page 29)
2 Center text alignment (page 29)
3 Right text alignment (page 29)
4 Justified text alignment
(page 29)
5 Bold text style (page 28)
6 Outline text style (page 28)
7 Italic text style (page 28)
8 Frame (page 25)
9 Low battery (page 6)
0 Block number (page 17)
A Label Type setting (page 10)
B Width setting (page 27)
C Size setting (pages 26 & 27)
D Length setting (page 24)
7
0
A
BC
D
E Caps mode (page 16)
F Insert mode (page 17)
G Shift mode (page 16)
H Code mode (page 16)
I Power key (page 9)
J Backspace key
(pages 15 & 18)
K Arrow keys (page 15)
L Return key (pages 15 & 17)
M Global format key (pages 26)
N Auto Format keys (page 30)
O Feed key (page 31)
P Print key (page 31)
Q Label Type (page 10)
8
9
I
J
K
L
M
2
Page 11
PT-1650
162
34 5
7
E
F
G
H
Q
P
O
N
1 Left text alignment (page 29)
2 Center text alignment (page 29)
3 Right text alignment (page 29)
4 Justified text alignment
(page 29)
5 Bold text style (page 28)
6 Outline text style (page 28)
7 Italic text style (page 28)
8 Frame (page 25)
9 Low battery (page 6)
0 Block number (page 17)
A Label Type setting (page 10)
B Width setting (page 27)
C Size setting (pages 26 & 27)
D Length setting (page 24)
0
A
BC
D
E Caps mode (page 16)
F Insert mode (page 17)
G Shift mode (page 16)
H Code mode (page 16)
I Power key (page 9)
J Backspace key
(pages 15 & 18)
K Arrow keys (page 15)
L Return key (pages 15 & 17)
M Global format key (pages 26)
N PF keys (page 30)
O Feed key (page 31)
P Print key (page 31)
Q Label Type (page 10)
Getting Started
8
9
I
J
K
L
M
3
Page 12

General Precautions
●
Use only Brother TZ tapes with this machine. Do not use tapes that do not
have the mark.
Do not pull on the tape being fed from the P-touch, otherwise the tape cassette may
●
be damaged.
Avoid using the machine in extremely dusty places. Keep it out of both direct
●
sunlight and rain.
Do not expose the machine to extremely high temperatures or high humidity.
●
Never leave it on the dashboard or in the back of your car.
Do not store tape cassettes where they would be exposed to direct sunlight, high
●
humidity or dust.
Do not leave any rubber or vinyl on the machine for an extended period of time,
●
otherwise the machine may be stained.
Do not clean the machine with alcohol or other organic solvents. Only use a soft, dry cloth.
●
Do not put any foreign objects into or heavy objects on the machine.
●
To avoid injuries, do not touch the cutter’s edge.
●
Use only the AC adapter designed exclusively for this machine. Use of any other
●
adapter will void the warranty.
Do not try to disassemble the AC adapter.
●
When the machine is not to be used for a long period of time, disconnect the AC adapter,
●
and remove the batteries to prevent them from leaking and damaging the machine.
Use six AA alkaline or rechargeable (Ni-Cd or Ni-MH) batteries.
●
Never try to disassemble the P-touch.
●
It is recommended that you use the USB cable supplied with the P-touch. Should another
●
USB cable need to be used, ensure it is of high quality construction (for PT-1650 only).
IBM® and PC-DOS® are trademarks of International Business Machines, Inc (for
●
PT-1650 only).
Microsoft® and Windows® are registered trademarks of Microsoft Corp. in the US
●
and other countries (for PT-1650 only).
All other software and product names mentioned are trademarks of registered
●
trademarks of their respective companies (for PT-1650 only).
Portions of the graphics filter software are based in part on the work of the
●
Independent JPEG group (for PT-1650 only).
4
Page 13
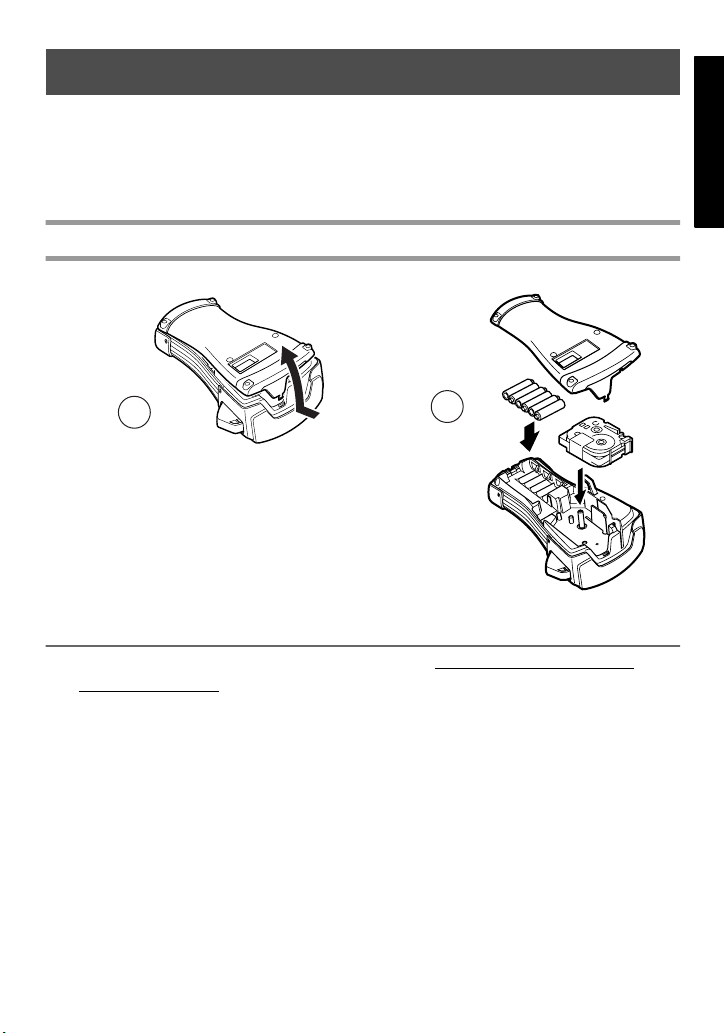
Batteries & Tape Cassettes
This machine has been designed to allow you to change the batteries and tape cassettes
quickly and easily. With batteries installed, this compact and portable machine can be
used anywhere. TZ tape cassettes are available for this machine in a wide variety of
types, colors and sizes, enabling you to make distinctive color-coded and stylized labels.
Installing batteries and a tape cassette
Getting Started
1
2
Notes on batteries
This P-touch requires six AA-size batteries. Rechargeable (Ni-Cd or
☞
Ni-MH) batteries can be used instead of six alkaline batteries.
The rechargeable batteries cannot be recharged by leaving them in the P-touch with the
☞
AC adapter connected. Instead, recharge the batteries by using a battery charger
designed specifically for the type of batteries used. For more details on the rechargeable
batteries, refer to the instructions provided with them.
Do not use any of the following, otherwise battery leakage or damage may occur.
☞
• Manganese batteries
• A combination of new and used batteries
• A combination of batteries of different types (alkaline, Ni-Cd and Ni-MH),
different manufacturers or different models
• A combination of recharged and uncharged batteries
5
Page 14
☞
Make sure that the batteries are inserted so that their poles point in the correct direction.
With batteries installed, the P-touch determines the remaining battery charge during
printing and feeding. If a low battery charge is detected, the low battery indicator ())
comes on. When this occurs, be sure to replace the batteries. The low battery indicator
may not come on in some operating conditions.
☞
Before replacing the batteries, make sure that the P-touch is turned off. In addition, when
replacing the batteries, insert the new ones within five minutes of removing the old ones,
otherwise the text shown in the display and any text stored in the memory will be lost.
☞
If you do not intend to use this P-touch for an extended period of time, remove the
batteries. When the power is disconnected, all text shown in the display and stored in the
memory will be lost.
☞
Since the enclosed batteries begin discharging from the time that the unit is shipped from
the factory, their life span may not meet specifications, depending on when the unit is
put into use.
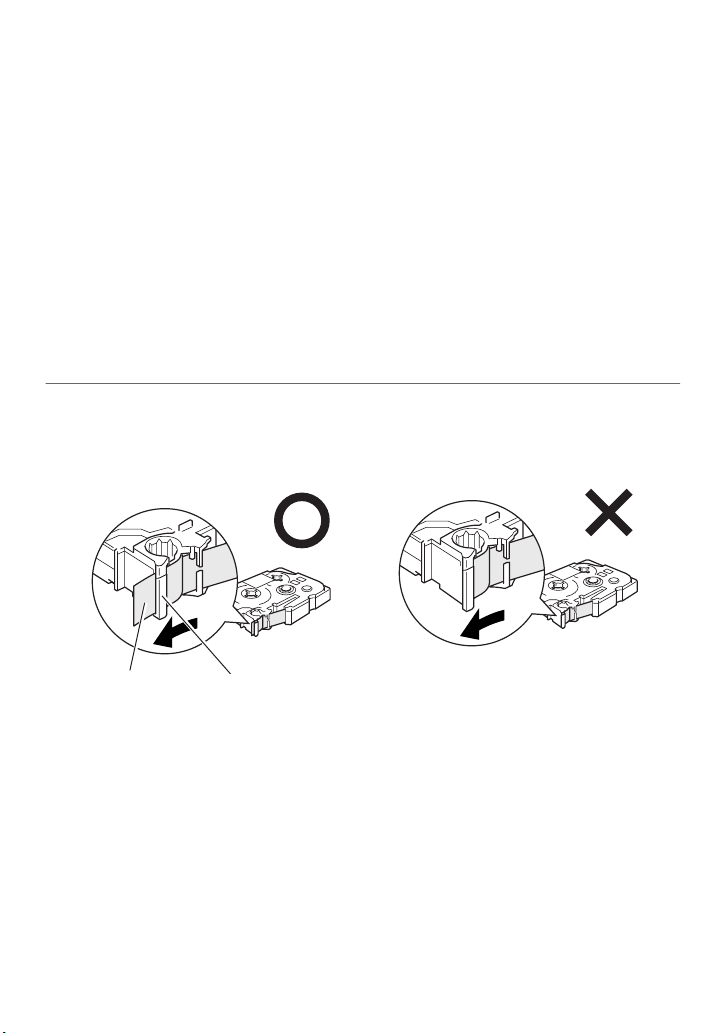
Notes on tape cassettes
☞
Before installing the tape cassette, make sure that the end of the tape feeds under the tape
guides. If the tape cassette to be installed has an ink ribbon and the ink ribbon is loose,
use your finger to wind the toothed wheel in the direction of the arrow on the cassette
until there is no slack in the ribbon.
End of the tape Tape guides
☞
When inserting the tape cassette, make sure that the inner ribbon does not catch on the
corner of the metal guide.
☞
After installing a tape cassette, press f once to remove any slack in the tape, and then
press in on the tape cutter button to cut off the excess tape.
☞
Always cut off the tape before removing it from the machine. If the tape is pulled on
before being cut off, the tape cassette may be damaged.
6
Page 15
Extra Strength Adhesive Tape
☞
For textured, rough, or slippery surface, we recommend using Extra Strength Adhesive
Tape.
☞
Although the instruction sheet included with the Extra Strength Adhesive
Tape cassette recommends cutting the tape with scissors, the tape cutter
that this P-touch is equipped with is able to cut Extra Strength Adhesive
Tape.
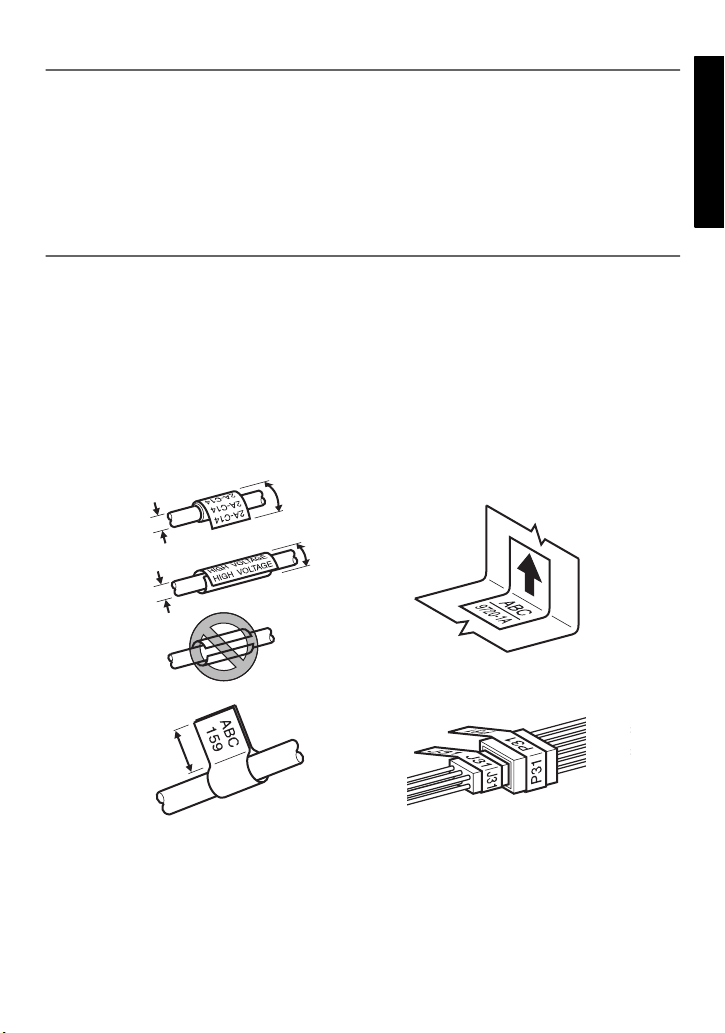
Flexible ID Tape
☞
For applications that require more flexible labels, such as around sharp bends and
cylindrical objects, we recommend using Flexible ID Tape.
☞
Labels made with Flexible ID Tape are not designed for use as electrical insulation.
☞
When wrapping labels around cylindrical objects, the diameter of the object should be at
least 1/8
Type mode should be used. In addition, the overlapping ends of the label or the label flag
should be at least 3/16
☞
The label may peel off cylindrical objects if the object is bent after the label is affixed.
(3 mm), otherwise the label should be wrapped as a flag and the FLAG Label
"
(5 mm).
"
Overlap > 5 mm
Diameter > 3 mm
Overlap > 5 mm
Diameter > 3 mm
Getting Started
Flag > 5 mm
7
Page 16
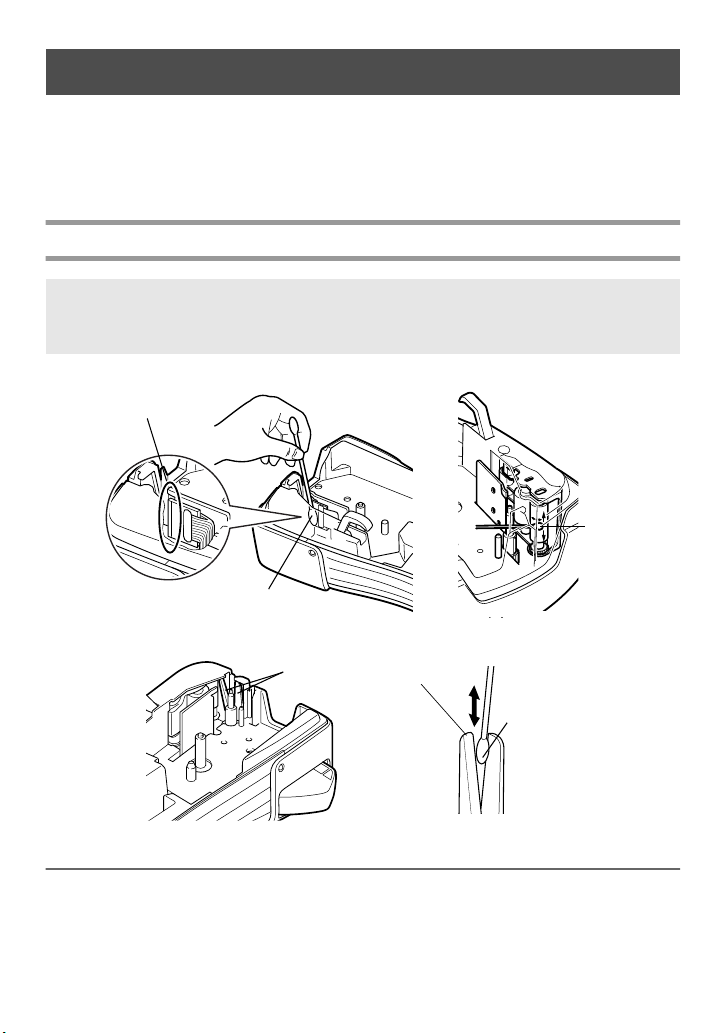
Cleaning
Occasionally, certain parts of the P-touch may need to be cleaned. Dust or dirt may
become attached to the P-touch’s print head and rollers, particularly when the unit is
used outdoors or in a very dusty environment. With use, the tape cutter may become
covered with adhesive, making it difficult to cut the tape.
Cleaning the print head, rollers and tape cutter
☞
Before cleaning the print head and rollers, press o to turn off the P-touch, and then
remove the batteries and disconnect the optional AC adapter.
☞
Be extremely careful not to touch the cutter blades with your fingers.
Print head
Dry Cotton swab
Dry Cotton swab
Tape cutter blades
Tape cutter blades
Dry cotton swab
Notes on cleaning the print head & rollers
☞
If a blank horizontal streak appears through the label text, clean the machine’s print
head.
☞
The print head can be cleaned more easily if the optional print head cleaning cassette
(TZ-CL4) is used.
8
Page 17
Notes on cleaning the tape cutter
☞
If the tape cannot be cut correctly, clean the tape cutter blades.
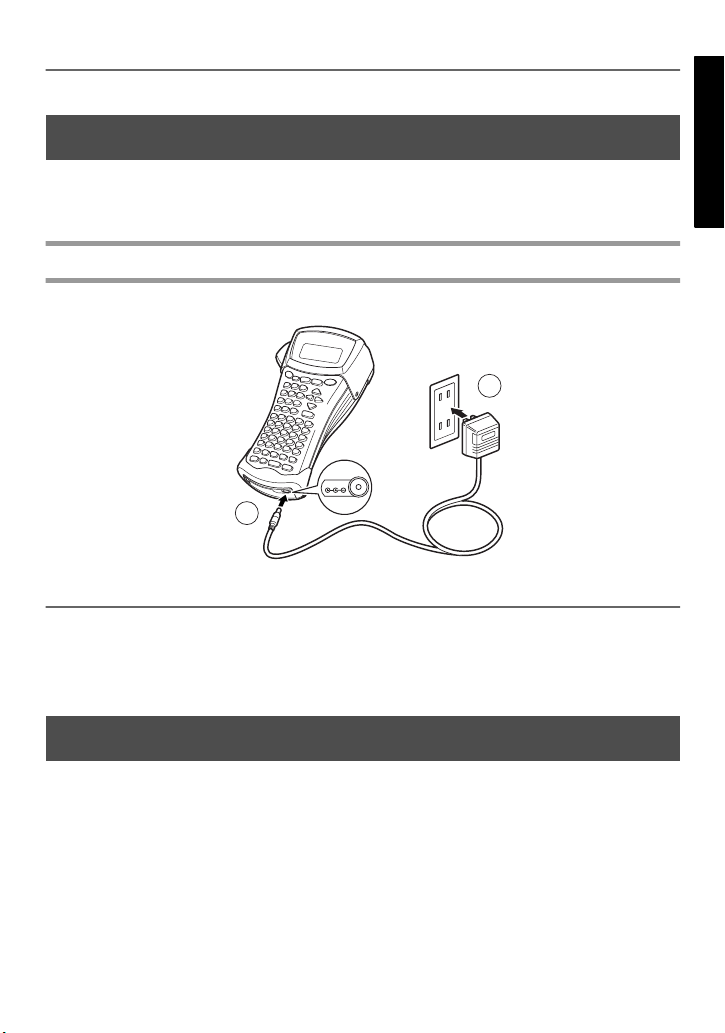
Optional AC Adapter
When printing a large number of labels or labels that contain a large amount of text, it may be
useful to connect the P-touch to a standard electrical outlet using the optional AC adapter.
Connecting the AC adapter
2
DC IN 9.5V
1
Notes on the AC adapter
☞
Only use the AC adapter designed exclusively for this machine.
☞
Disconnect the AC adapter if you do not intend to use this P-touch for an extended
period of time. When the power is disconnected, all text shown in the display and stored
in the memory will be lost.
Turning the P-touch On/Off
Getting Started
Press o to turn on or turn off the P-touch.
If batteries are installed or the P-touch has remained plugged in using the AC adapter,
the previous session’s text is displayed when the P-touch is turned on again. This feature
allows you to stop work on a label, turn off the machine, and return to it later without
having to re-enter the text.
Regardless of whether the P-touch is being operated from batteries or the AC adapter,
the machine will automatically turn off if no key is pressed or no operation is performed
for 5 minutes.
9
Page 18

Label Type Modes
2
2
Selecting a Label Type Mode
Pressing a allows you to select one of the two regular modes for designing and printing
your own custom labels, or any of the six special modes available for printing labels preformatted for identifying patch panels, cables, connectors and other components.
Press a.
1
Press u or d (or continue pressing a) until the desired mode is
2
displayed. (For details on each Label Type mode, refer to the sections below.)
Press n to apply the selected Label Type mode.
3
•If NORMAL or VERTICAL was selected, continue entering the label text as
described in chapter 3, Basic Functions.
•If ROTATE, ROT-REP, PORT, PANEL, or FLAG was selected, continue
with the following steps.
Press l or r until the desired parameter is displayed.
4
Press u or d until the desired setting is displayed (or use the number keys
5
to type in the desired setting).
Press n to apply the selected settings.
6
Type the text for each label in a separate text block.
7
Print the labels.
8
• To print a single copy of each label, press p.
• To print multiple copies or several copies while increasing certain characters, or to
print using any other special printing function, press
your options. (For details, refer to
Using special printing functions
, then a and choose
g
on page 32.)
Normal and Vertical Modes
Labels printed using the Normal and Vertical Label Type
modes can be formatted and printed to fit any need.
10
NORMAL
ABCDE
VERTICAL
A
B
C
E
D
Page 19
After selecting the Label Type mode NORMAL or VERTICAL, the label text can be
entered, formatted, printed and cut as usual. With the Normal Label Type mode, the
entered text is printed horizontally along the label. With the Vertical Label Type mode,
the entered text is printed vertically along the label.
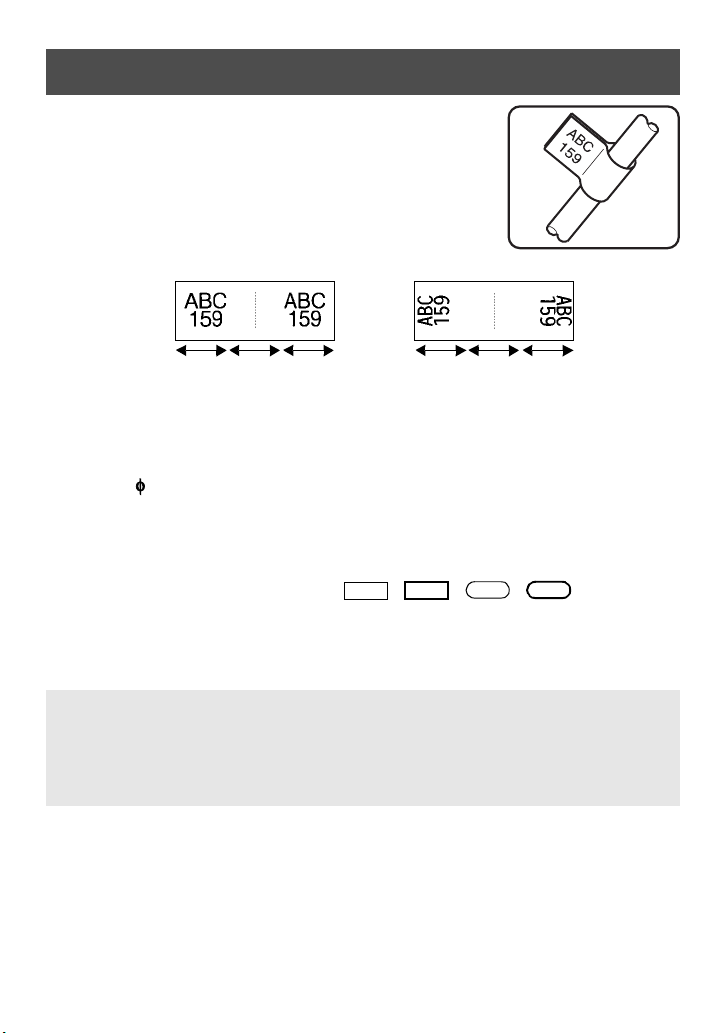
Rotate Mode and Rotate & Repeat Mode
Labels printed using these Label Type modes can be wrapped
around cables and wires to mark them. With both of these
modes, the text is rotated 90° counterclockwise and each text
block printed on a separate label as shown below. With the
Rotate & Repeat mode, the text is printed repeatedly along
the length of the label so that it can easily be read from any
angle.
Rotate
Label Type Modes
Rotate
&
Repeat
Block length
Block length
Block lengthBlock length
Block lengthBlock length
After selecting the ROTATE or ROT-REP Label Type mode, specify the length of
each label and a frame style if desired.
●
BLK LEN. (block length): 0.80" to 8.00" (20 to 200 mm)
Default: 1.20" (30 mm)
●
FRAME: OFF, , , ,
1 2
3 4
Default: OFF
A single block of text can contain a maximum of 7 text lines, and with the ROT-REP
☞
Label Type mode, only the text lines that fit within the label are printed.
For labels to be attached to cables and wires, we recommend using Flexible ID Tape.
☞
When wrapping Flexible ID Tape around cylindrical objects, the diameter of the
object should be at least 1/8" (3 mm), otherwise the FLAG Label Type mode should
be used. In addition, the overlapping ends of the label or the flag length should be at
least 3/16" (5 mm).
11
Page 20
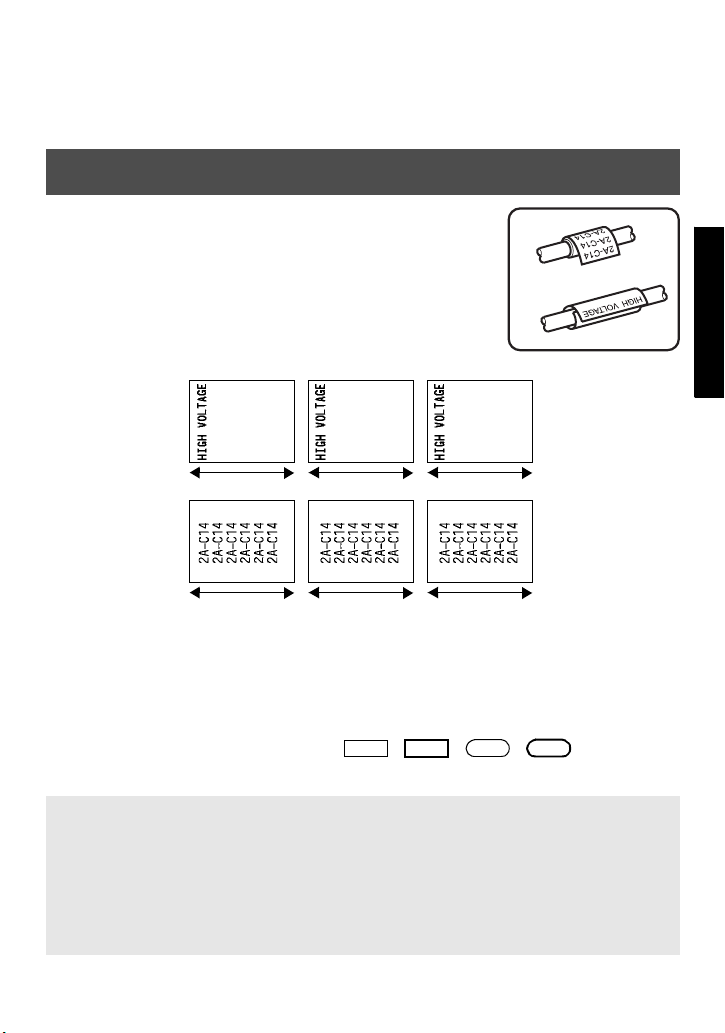
Flag Mode
Labels printed using this Label Type mode can be wrapped
around cable or wire with the ends stuck together to form a
flag. With the FLAG Label Type mode, each block of text is
printed at both ends of separate labels. The length of the
unprinted part of this label is equal to the circumference of
the cable or wire. In addition, the text can be printed
horizontally or rotated 90°.
ROTATE
set to
OFF
Flag
length
Flag
diameter
Flag
length
ROTATE
set to
ON
Flag
length
Flag
diameter
Flag
length
After selecting the FLAG Label Type mode, specify the length and diameter of the flag,
a frame style if desired, and whether or not to rotate the text.
●
FLAG (flag diameter): 0.00" to 4.00" (0 to 100 mm)
Default: 0.25" (7 mm)
●
FLAG LEN (flag length): 0.40" to 8.00" (10 to 200 mm)
Default: 1.20" (30 mm)
●
FRAME: OFF, , , ,
1 2
3 4
Default: OFF
●
ROTATE: OFF, ON
Default: OFF
A single block of text can contain a maximum of 7 text lines.
☞
For labels to be attached to cables and wires, we recommend using Flexible ID Tape.
☞
To wrap Flexible ID Tape around cylindrical objects, use the FLAG Label Type
mode when the diameter of the object is less than 1/8" (3 mm). In addition, the flag
length should be at least 3/16" (5 mm).
12
Page 21
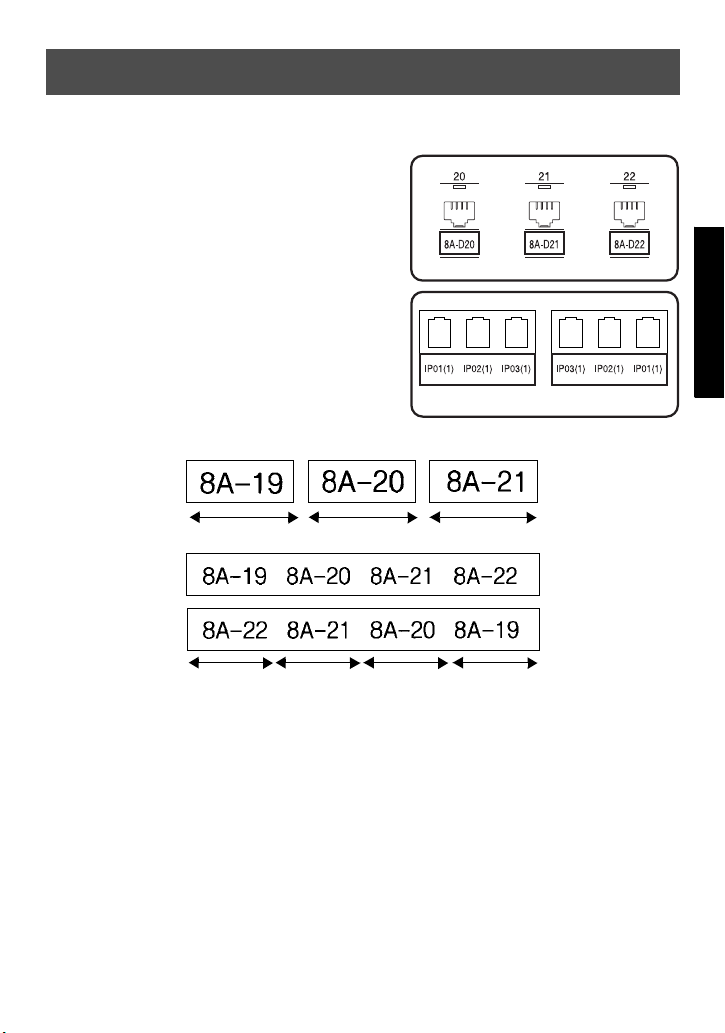
Port & Panel Modes
Labels printed using these Label Type modes can be used to identify various
components or panels.
With the Port Label Type mode, each block of
the text is printed on a separate label, making
these labels useful for identifying different
components or ports that are not equally spaced.
With the
Label Type mode, all blocks of
Panel
the text are evenly spaced on a single label,
making this label useful for a row of equally
spaced switches, fuses or connectors on a patch
panel. In addition, the text blocks can be printed
in the order that they were typed in or in the
FRONT REVERSE
opposite order.
Port
Block length
Block length
Panel
(PRINT set
to FRONT)
Panel
(PRINT set
to REVERSE)
Block length Block length
Block length Block lengthBlock length
After selecting the PORT or PANEL Label Type mode, specify the length of each text
block or label, and select a frame style if desired. For the PANEL Label Type mode,
select whether the text blocks are printed in the order that they were typed in or in the
reverse order.
Label Type Modes
13
Page 22
●
BLK LEN. (block length): * For the PORT Label Type mode:
0.80" to 8.00" (20 to 200 mm)
Default: 1.20" (30 mm)
* For the PANEL Label Type mode:
0.25" to 8.00" (6 to 200 mm)
Default: 1.20" (30 mm)
●
FRAME: * For the PORT Label Type mode:
OFF, 1 , 2 , 3 , 4
Default: OFF
* For the PANEL Label Type mode:
OFF, 1 , 2 , 3 ,
4 , 5 , 6 ,
7 , 8 , 9
Default: OFF
●
PRINT (print order): FRONT, REVERSE
Default: FRONT
For these types of labels, we recommend using Extra Strength Adhesive Tape.
☞
The PRINT parameter is only available with the PANEL Label Type mode.
☞
By using the Numbering function with the PANEL Label Type mode, a single label
☞
containing multiple blocks of ascending characters can easily be created, for example,
to label patch panels as shown above. (For details on the Numbering function, refer to
Printing multiple copies with incremental characters on page 32.)
14
Page 23

Basic Functions
3
3
Performing Basic Operations
Choosing functions, parameters, settings and groups
If “WX” appears, press l to select the previous item or r to select the next
●
item.
S
If “
●
Choosing the default setting
●
” appears, press u to select the previous item or d to select the next
T
item.
To select the default setting of a function or parameter, press e.
Confirming a choice
To select an item from a list, to apply a selected setting, or to answer “yes”, press
●
n.
Cancelling a choice
To quit a function and return to the previous display without changing the text, or
●
to answer “no”, press b.
Basic Functio ns
15
Page 24

Inputting Label Data
Entering and editing text
Entering characters
To type a lowercase letter, a number, a comma or a period, simply press the key for
●
that character.
To type an uppercase letter, press h to enter Shift mode, and then press the
●
applicable letter.
To type uppercase letters continuously, press g, then h to enter Caps mode,
●
and then type.
To exit Shift mode without typing a letter, press h.
☞
To exit Caps mode, press g, then h.
☞
To type a lowercase letter in Caps mode, press h, then the applicable letter.
☞
Entering spaces
To add a blank space to the text, press e.
●
Moving the cursor
Move the cursor in order to review and edit the text, or you can select the various
functions and settings.
To move the cursor left, right, up or down, press l, r, u or d.
●
To move the cursor to the beginning of the current line of text, press g, then
●
l.
To move the cursor to the end of the current line of text, press g, then r.
●
To move the cursor to the beginning of the entered text, press g, then u.
●
To move the cursor to the end of the entered text, press g, then d.
●
To move the cursor several characters or lines at once, hold down l, r, u or
☞
d.
16
Page 25
Adding a new line of text
To end the current line of text and start a new one, press n. “ ” appears at the
●
end of the line.
The number of text lines that can be printed depends on the width of the tape.
☞
Tape Width
1/4" (6 mm) 2
3/8" (9 mm) 2
1/2" (12 mm) 3
3/4" (18 mm) 5
1" (24 mm) 7
The line number on the display indicates the line number of the text block.
☞
Maximum Number of
Lines That Can Be Printed
Adding a new text block
To create a new text block so that one section of the text can have a different
●
number of lines than another, press g, then n. “ ” appears at the end of
the block.
For example, text entered as shown below, will be printed as follows.
R
R
2:456
R
1:ABC_
---- -- 1 NORMAL 2
A single label can only contain a maximum of fifty text blocks.
☞
The number of the block that the cursor is in is indicated at the bottom of the display.
☞
All texts blocks have the same formatting features.
☞
While trying to print a large amount of data at one time, some outputted labels may be
☞
blank. For example, when printing 50 records, the maximum number of characters
that can be printed at one time is limited to approximately 200.
Basic Functio ns
Inserting text
To insert the text that you type at the cursor’s current position, make sure that the
●
Insert indicator is displayed. Otherwise, press i to enter Insert mode.
To replace the text at the cursor’s current position instead of inserting it, press i
●
to exit Insert mode.
17
Page 26
Deleting text
To remove characters to the left of the cursor’s current position, press b until
●
all of the characters that you wish to delete are removed.
To delete all of the text:
●
Press g, then b.
1
Press u or d to select either TEXT ONLY (to erase just the text) or
2
TEXT&FORMAT (to erase all of the text and return all formatting functions
to their default settings).
Press n.
3
Entering an accented character
There are various accented characters available with the Accent function.
The following accented characters are available.
Letter
Accented Characters
0 1 2 3 4 5 0 1 2 3 4 5
Letter
Accented Characters
A АБДВГЖ a а б д в г ж
CÇ c ç
~
E ÈÉËÊ e èéëê
E
~
e
I ÍÏÎ i íï î
NÑ n ñ
O ÓÖÔÕ o ó ö ô õ
U ÙÚÜÛ u ù ú ü û
Press g, then s. The message “ACCENT a-u/A-U?” appears.
1
Press the key of the letter in the desired accented character until the desired
2
character is selected.
Add the accented character(s) to the text.
3
• To add a single accented character or the last one in a series, skip to step
• To add a series of accented characters to the text, press g, then n.
For each additional accented character, repeat steps 2 and 3.
4
Press n.
5
18
5
.
Page 27
☞
To type in an uppercase accented character, press h (or press g, then h to
enter Caps mode) before pressing the letter key.
☞
An accented character can also be selected by typing in the corresponding code from
” to the text.
the table above. For example, typing “A2”, then pressing n adds “
Ä
Entering a bar code
The Bar Code function allows bar codes to be printed as part of labels.
☞
Since this machine is not specifically designed for special bar code label-making,
some bar code readers may not be able to read the labels.
☞
Bar code readers may not be able to read bar codes printed with certain ink colors on
certain label tape colors. For best results, print barcode labels in black on white tape.
In addition, the various bar code parameters enable you to create more customized bar
codes.
Parameter Settings
PROTOCOL
WIDTH
(bar width)
(numbers printed below bar code)
UNDER#
CHECK DIGIT OFF, ON
CODE 39, I-2/5, EAN13, EAN8, UPC-A,
UPC-E, CODABAR, EAN128, CODE128
MEDIUM, SMALL, LARGE
ON, OFF
Basic Functio ns
☞
The CHECK DIGIT parameter is only available with the CODE 39, I-2/5 and
CODABAR protocols.
Setting bar code parameters
Press g, then c.
1
Press l or r until the parameter that you wish to change is displayed.
2
Press u or d until the desired setting is displayed.
3
Repeat steps 2 and 3 until all parameters are set as you wish.
4
Press n.
5
19
Page 28
Entering bar code data
Press c.
1
Type in the new bar code data or edit the old data.
2
Press n to add the bar code to the text.
3
☞
To add special characters to the bar code data (only with protocols CODE39,
CODABAR, EAN128 or CODE128), position the cursor below the character
immediately to the right of where you wish to add the special character, and then
press s. Press u or d until the desired special character is displayed, and
then press n to add the character to the data. (Refer to the tables below for a list
of the special characters that are available.)
☞
To change the data or WID TH or UNDER# parameter settings of a bar code that has
already been added to the text, position the cursor below the bar code mark ( ), and
then press g, then c.
The following special characters can only be added to bar codes created using protocol
CODE39 or CODABAR.
CODE39 CODABAR
Symbol
Character
0
1.5+ 1$4.
2(SPACE)6 % 2 : 5 +
3$
Symbol
–
Character
4/ 0
Symbol
Character
Symbol
–
Character
3/
20
Page 29
The following special characters can only be added to bar codes created using protocols
EAN128 and CODE128.
Symbol
Character
Symbol
Character
Symbol
Character
Symbol
Character
0 (SPACE) 18 < 36 BEL 54 EM
1!19=37BS55SUB
2”20>38HT56ESC
3#21?39LF57{
4$22@40VT58FS
5%23[41FF59|
6&24\42CR60GS
7’25]43SO61}
8(26^44SI62RS
9 )27_45DLE63
10 * 28 NUL 46 DC1 64 US
11 + 29 47 DC2 65 DEL
12 , 30 SOH 48 DC3 66 FNC3
13 – 31 STX 49 DC4 67 FNC2
14 . 32 ETX 50 NAK 68 FNC4
15 / 33 EOT 51 SYN 69 FNC1
16 : 34 ENQ 52 ETB
17 ; 35 ACK 53 CAN
Entering a symbol
Basic Functio ns
There are 147 symbols and pictures available with the Symbol function.
Press s. The last category used is displayed.
1
Press u or d to select the desired category.
2
Press l or r until the desired symbol is selected.
3
Add the symbol(s) to the text.
4
• To add a single symbol or the last one in a series, skip to step
• To add a series of symbols to the text, press g, then n.
For each additional symbol, repeat steps 2 through 4.
5
6
.
21
Page 30
Press n.
6
☞
A symbol can also be selected by typing in the corresponding code from the table
below. For example, typing “A02”, then pressing n adds “?” to the text.
☞
Some symbols are printed in color on the keypad. To use a symbol on a key, press
g to enter Code mode, and then press the key for the symbol.
The following symbols are available.
Category
Symbols
A
PUNCTUATION
B
BUSINESS
C
MATHEMATICS
D
BRACKET
E
ARROW
F
UNIT
G
INTERNATIONAL
CHARACTERS
00 01 02 03 04 05 06 07 08 09
10 11 12 13 14 15 16 17
®©
00 01 02 03 04 05
00 01 02 03 04 05 06
00 01 02 03 04 05 06 07
00 01 02 03 04 05 06 07 08 09
00 01 02 03 04 05 06 07 08
00 01 02 03 04 05 06 07 08 09
10 11 12 13 14
™
22
Page 31

Category
Symbols
H
NUMBER
I
PICTOGRAPH
J
ELECTRICAL /
ELECTRONIC
K
PROHIBITION
L
WARNING
M
COMMUNICATIONS
N
OTHERS
Z
PERSONAL
CATEGORY
12131
00 01 02 03 04 05 06 07
00 01 02 03 04 05
00 01 02 03 04 05 06 07 08 09
10 11 12 13 14 15 16 17 18 19
20 21 22 23 24 25 26 27 28 29
30 31 32 33
40 41 42
00 01 02
00 01 02 03 04 05 06
00 01 02
00 01 02 03
01
4
2
34 35 36 37 38 39
2
1
*A maximum of 16 most recently selected symbols are
automatically saved in the PERSONAL symbol category.
Basic Functio ns
23
Page 32

☞
Once the PERSONAL symbol category becomes full, newly selected symbols will
overwrite older ones unless the Symbol Save function is set to OFF
. (Refer to
Specifying if the PERSONAL symbol category is continually updated on page 40.)
Formatting the Label
Specifying a label length
The length of the label can be specified as follows.
Press g, then A.
1
Press l or r until LENGTH is displayed.
2
Press u or d until the desired label length is
3
displayed (or use the number keys to type in the
desired setting).
Press n.
4
Specifying a margin size
The size of the margins for the left and right sides of the text can be specified.
Press g, then A.
1
Press l or r until MARGIN is displayed.
2
0.30" to 39.00" (6 to 999 mm)
Press u or d until the desired margin
3
setting is displayed (or use the number keys to
margine type in the desired setting).
Press n.
4
24
0.10" to 4.00" (2 to 99 mm)
Page 33

Framing the text
Press g, then B.
1
Press u or d until the desired frame setting is displayed.
2
Press n. The selected setting is applied to the entire text.
3
The following frame styles are available.
Frame
Setting
18
29
310
411
512
613
714
Sample
Frame
Setting
Sample
Basic Functio ns
25
Page 34

Specifying the character size
The character size can be specified for all text in the label or only for the text in the line
that the cursor is in.
☞
With the default character size setting AUTO, the largest possible text size is
automatically selected depending on the width of the installed tape and the number of
lines in the text.
Formatting the character size of all text
Press t.
1
Press l or r until GLB SIZE is displayed.
2
Press u or d until the desired character size setting is displayed.
3
Press n. The selected setting is applied to the entire text.
4
Formatting the character size of a line
Move the cursor to the line of text whose size you wish to change.
1
Press g, then E.
2
Press u or d until the desired character size setting is displayed.
3
Press n. The selected setting is only applied to the text line that the cursor is
4
positioned in.
☞
Since the text sizes that can be printed depends on the width of the tape, the following
table shows the maximum text size that can be used with each tape width.
Tape Width Maximum Text Size
1/4" (6 mm) 12 points (3 mm)
3/8" (9 mm) 18 points (4 mm)
1/2" (12 mm) 24 points (6 mm)
3/4" (18 mm) 36 points (9 mm)
1" (24 mm) 48 points (12 mm)
☞
With the AUTO setting selected and the text in a block consisting of just one line of
only uppercase letters (and no accented letters), the text is printed slightly larger than
the maximum possible for the tape width.
26
Page 35

Specifying the character width
Formatting the width of all text
Press t.
1
Press l or r until GLB WIDE is displayed.
2
Press u or d until the desired character width setting is displayed.
3
Press n. The selected setting is applied to the entire text.
4
Formatting the width of a line
Move the cursor to the line of text whose character width you wish to change.
1
Press g, then E.
2
Press l or r until WIDTH is displayed.
3
Press u or d until the desired character width setting is displayed.
4
Press n. The selected setting is only applied to the text line that the cursor is
5
positioned in.
The following width sizes are available for each text size as shown.
Basic Functio ns
Widt h
Size
12 mm
(48 points)
9 mm
(36 points)
6 mm
(24 points)
4 mm
(18 points)
3 mm
(12 points)
2 mm
(9 points)
1 mm
(6 points)
NORMAL NARROW MINIMUM WIDE
27
Page 36

Specifying the character style
Formatting the character style of all text
Press t.
1
Press l or r until GLB STYL is displayed.
2
Press u or d until the desired character style setting is displayed.
3
Press n. The selected setting is applied to the entire text.
4
Formatting the character style of a line
Move the cursor to the line of text whose character style you wish to change.
1
Press g, then D.
2
Press u or d until the desired character style setting is displayed.
3
Press n. The selected setting is only applied to the text line that the cursor is
4
positioned in.
The following text styles are available.
28
Style
Setting
Sample
Style
Setting
NORMAL ITALIC
BOLD
OUTLINE
I+BOLD
(italic &
bold)
I+OUTL
(italic &
outline)
Sample
Page 37

Specifying the alignment for all lines in the text
Press t.
1
Press l or r until ALIGN is displayed.
2
Press u or d until the desired setting is displayed.
3
Press n. The selected setting is applied to the entire text.
4
The following alignment settings are available.
LEFT CENTER RIGHT JUSTIFY
Basic Functio ns
29
Page 38

Using the pre-formatted Auto Format templates
Various pre-formatted label templates are available, enabling you to quickly and easily
create labels for a variety of applications—from identifying the contents of boxes and
file folders to labelling equipment and making name badges and ID tags. After simply
selecting one of the ten label templates, type text into each of its fields, and then the label
is ready to be printed.
The following label templates are available.
Key
1
2
3
4
5
6
7
8
9
0
Template
Name
BIN BOX
ASSET1
ASSET2
ASSET3
ASSET4
ID LABEL
SIGN
BADGE
FILING
IC CHIP
Tape Width
Label Length
×
2.75"
3/4"
×
(18 mm
×
3.30"
1"
×
(24 mm
×
3.15"
1"
×
(24 mm
×
1.60"
1"
×
(24 mm
×
2.20"
1"
×
(24 mm
×
2.75"
1"
×
(24 mm
×
4.00"
1"
×
(24 mm
×
4.00"
3/4"
×
(18 mm
×
3.50"
1/2"
×
(12 mm
×
1.00"
3/8"
×
25 mm)
(9 mm
69 mm)
83 mm)
79 mm)
41 mm)
55 mm)
69 mm)
101 mm)
101 mm)
88 mm)
Template Fields Sample
1 SYMBOL? 2 TEXT1?
3 TEXT2 ?
4 BAR CODE?
1 TEXT1 ? 2 TEXT2?
3 BAR CODE?
1 TEXT?
2 BAR CODE?
1 TEXT?
2 BAR CODE?
1 TEXT1 ? 2 TEXT2?
3 TEXT3 ? 4 TEXT4?
5 TEXT5 ?
1 TEXT1 ? 2 TEXT2?
3 TEXT3 ?
1 SYMBOL? 2 TEXT1?
3 TEXT2 ?
1 NAME?
2 COMPANY?
1 TITLE?
2 SUBTITLE?
1 TEXT1 ? 2 TEXT2?
Press g, then the number key where the template that you wish to use is
1
assigned.
Press n. The first field for the selected template is displayed.
2
30
Page 39

Press u or d to display each field, and then type in the text.
3
To print a single copy, press p.
4
•
To print multiple copies, several copies while increasing certain characters, or a
•
mirror image of the text, press g, then a. (For details, refer to Using
special printing functions on page 32.)
Accented characters (page 18), symbols (page 21) and bar codes (page 19) can be
☞
entered in the template fields.
To quit using the template, display the last field, and then press n . The Auto
☞
Format menu appears. Press u or d until EXIT appears, and then press n .
Printing Labels
Previewing the label layout
The Preview function allows you to see a sample of the layout of the text.
To use the print preview, press g, then p. The length of the current label is
●
indicated in the lower-left corner of the display.
To scroll the print preview left or right, press l or r.
☞
To return to the text, press n or b.
☞
Feeding tape
Basic Functio ns
To feed out 1" (23 mm) of tape, press f. The message “FEED” is displayed.
●
Press f to feed out any leftover printed tape after pressing o to quit printing.
☞
Printing a label
To print out a label, press p. The message “WORKING”, then “COPIES”
●
followed by the number of the label being printed is displayed.
To quit printing, press o to turn off the P-touch.
☞
31
Page 40

Using special printing functions
Various special printing functions are available that enable you to print multiple copies
of labels, print several copies while incrementing the values of certain characters, print
specific sections of label text, or print label text as a mirror image.
Printing multiple copies of a label
The Repeat Printing function allows you to print up to 99
copies of the same text.
ABC
Press g, then a.
1
ABC
Press l or r until COPIES is displayed.
2
Press u or d until the desired number of copies
3
is displayed (or use the number keys to type in the
desired setting).
Press n (or p). START appears in the Print Option menu.
4
Press n (or p) to begin printing the specified number of copies. The
5
number of each copy is displayed while it is being printed.
☞
If the Cut function is set to 1 or 3, the message “CUT TAPE TO CONTINUE”
appears after each label is printed. Press the tape cutter button to cut off the label and
continue printing.
☞
Be sure to cut the tape within 5 minutes from the time that the message appears.
☞
For the different options available for cutting the tape, refer to Selecting how tape is
fed and cut on page 38.
☞
To specify settings for additional Print Option functions, instead of continuing with
5
, press u or d until CONTINUE is displayed in the Print Option
step
menu, and then press n.
ABC
Printing multiple copies with incremental characters
The Numbering function can be used to print several copies of
the same text while incrementing the values of certain
characters (letters, numbers or bar code data) after each label is
printed. This type of automatic incrementation is very useful
when printing serial number labels, production control labels
or other labels requiring ascending codes.
Press g, then a.
1
32
2A-C16
ABC
2A-C15
2A-C14
Page 41

Press l or r until NUMBER is displayed.
2
Press u or d until the desired number of copies is displayed (or use the
3
number keys to type in the desired setting).
Press n. The message “START?” appears. (To specify only the character at
4
the cursor’s current position as the numbering field, press p, and then skip to
step
.)
9
Press u, d, l or r until the first character that you wish to include in
5
the numbering field is flashing.
Press n. The message “END?” appears.
6
Press u, d, l or r until the last character that you wish to include in
7
the numbering field is flashing.
Press n. START appears in the Print Option menu.
8
Press n (or p) to begin printing the specified number of labels. The
9
number of each copy is displayed while it is being printed.
☞
If the Cut function is set to 1 or 3, the message “CUT TAPE TO CONTINUE”
appears after each label is printed. Press the tape cutter button to cut off the label and
continue printing.
☞
Be sure to cut the tape within 5 minutes from the time that the message appears.
☞
For the different options available for cutting the tape, refer to Selecting how tape is
fed and cut on page 38.
☞
Letters and numbers increase as shown below.
Î1Î
0
ÎBÎ
A
ÎbÎ
a
ÎA1Î
A0
...9Î0
...ZÎA
...zÎa
...A9ÎB0Î...
Î
Î
Î
...
...
...
Spaces (shown as underlines “_” in the examples below) can be used to adjust the
space between characters or to control the number of digits that are printed.
ÎAAÎ
_Z
Î10Î
_9
Î
1_9
☞
Only one numbering field can be selected from any text.
☞
A numbering field must be located entirely within one line of text of a single block.
☞
A maximum of five characters can be selected for the numbering field.
☞
If you include a non-alphanumeric character such as a symbol in the numbering field,
...ZZÎAAÎ...
...99Î00Î...
2_0Î...9_9Î0_0Î...
only the letters and numbers in the numbering field will be increased when the labels
are printed, or just one label will be printed if the field only contains a nonalphanumeric character.
Basic Functio ns
33
Page 42

☞
To specify settings for additional Print Option functions, instead of continuing with
9
, press u or d until CONTINUE is displayed in the Print Option
step
menu, and then press n.
☞
If a bar code is selected as the numbering field in step 5, skip steps 6 and 7,
8
and continue with step
.
Printing a range of text blocks
The Block Printing function enables you to select the range of
text blocks to print.
Press g, then a.
1
Press l or r until the first number in the range
2
displayed below BLOCK NO. is flashing.
Press u or d until the desired block number is
3
displayed (or use the number keys to type in the desired setting).
Press r so that the second number in the range displayed below BLOCK NO.
4
is flashing.
Press u or d until the desired block number is displayed (or use the
5
number keys to type in the desired setting).
Press n (or p). START appears in the Print Option menu.
6
Press n (or p) to begin printing the specified number of labels. The
7
number of each copy is displayed while it is being printed.
LM
NOP
QR
NOP
QR
ST
UVWX
☞
To specify settings for additional Print Option functions, instead of continuing with
7
, press u or d until CONTINUE is displayed in the Print Option
step
menu, and then press n.
Printing mirrored labels
This function prints your label so that the text can be read
from the adhesive side of the tape. If mirror-printed labels are
attached to glass or some other transparent material, they can
be read correctly from the opposite side.
Press g, then a.
1
Press l or r until MIRROR is displayed.
2
ABC
ABC
34
OFF
ON
Page 43

Press u or d until ON is displayed.
3
Press n (or p). START appears in the Print Option menu.
4
Press n (or p) to begin printing the specified number of labels. The
5
number of each copy is displayed while it is being printed.
☞
When using the Mirror Printing function, the text should be printed on clear tape.
☞
To specify settings for additional Print Option functions, instead of continuing with
5
, press u or d until CONTINUE is displayed in the Print Option
step
menu, and then press n.
Combining special printing functions
Many of the special printing functions can be combined,
depending on various conditions, such as which Label Type
mode is selected or whether a template is being used. For
example, by combining the operations for the Repeat Printing
function and the Numbering function to print two copies of a
label with “1” selected as the numbering field and three
increments, the labels shown above will be printed.
☞
For details on the various special printing functions, refer to the corresponding
section above.
A-1
A-1
A-2
A-2
A-3
A-3
Basic Functio ns
35
Page 44

Storing and Recalling Files
Frequently used label text along with its formatting can be stored in the memory and
easily recalled so that it can be edited and quickly printed. When each text file is stored,
it is given a number to make recalling it easier. Up to 10 text files or approximately
2,000 characters can be stored in the memory.
Since a copy of the stored text file is recalled when the Recall function is used, the text
can be edited or printed without changing the originally stored file. When a file is no
longer needed or more space is necessary, the Clear function can be used to delete text
files.
Storing label text
Press m.
1
Press u or d until STORE is displayed.
2
Press n.
3
Press u or d until the file number where you wish to store the text is
4
displayed.
Press n.
5
☞
If the maximum number of characters has already been stored, the error message
“MEMORY FULL!” appears in the display. If this occurs, an existing text file must
be deleted before the new one can be stored.
☞
If a file is already stored under the selected file number, the message
“OVERWRITE?” appears in the display. To overwrite the stored file with the new
one, press n. To go back and choose another file number without overwriting the
text file, press b, and then select a different file number.
36
Page 45

Recalling text that has been stored
Press m.
1
Press u or d until RECALL is displayed.
2
Press n.
3
Press u or d until the file number containing the text that you wish to
4
recall is displayed.
Press n. Any text previously entered in the display is erased and the text
5
stored under the selected file number is recalled into the display.
☞
To view other parts of the selected text file, press l or r.
Deleting text that has been stored
Press m.
1
Press u or d until CLEAR is displayed.
2
Press n.
3
Press u or d until the file number containing the text that you wish to
4
delete is displayed.
Select the file(s) to be deleted.
5
• To delete a single file, skip to step
• To select multiple files, press e. The current file number is highlighted.
Continue selecting text files by repeating step
files that you wish to delete are selected.
• To delete all files, press g, then e.
6
.
, then pressing e until all
4
Basic Functio ns
Press n. The message “OK TO CLEAR?” (or “CLEAR ALL?” if all files
6
were selected) appears.
Press n. The text stored in the selected files is deleted.
7
☞
If you do not wish to delete the selected text file(s), press b instead of n in
7
.
step
☞
To view other parts of the selected text file, press l or r.
☞
To remove a text file from those that are to be deleted, display the text file, and then
press e so that the file number is no longer highlighted.
37
Page 46

Machine Adjustments
4
4
Various functions are available for changing and adjusting the operation of the P-touch.
Selecting how tape is fed and cut
The Cut function enables you to specify how the tape is fed out after it is printed. The
settings of the Cut function consist of combinations of two different cut methods:
cut-pause (where the machine stops printing so the label can be cut) and chain printing
(where the last copy is not fed out to be cut, reducing the amount of tape that is wasted).
Chain printing is an economical function designed to help eliminate “wasted tape”
at the beginning of labels. Without chain printing, the excess from the previous printing
session is cut before the first label in the current session is printed. However, if a setting
using chain printing is selected, the last label in the previous session remains in the
machine (is not fed out), so that the next label can be printed without wasting tape. When
the last label is printed, press f to feed the chain of labels, and then press the tape
cutter button to cut it.
The following settings are available: (The default setting is 1.)
1
(cut-pause: no chain printing)
2
(no cut-pause; no chain
printing)
Press g, then Z.
1
Press l or r until CUT is displayed.
2
Press u or d until the desired setting is displayed, and then press n.
3
☞
After printing with the Cut function set to 3 or 4, press f to feed the tape, and then
press the tape cutter button to cut it.
3
(cut-pause; chain printing)
4
(no cut-pause; chain printing)
Adjusting the display contrast
The display can be made lighter or darker by selecting a setting between -2 and +2. (The
default setting is 0.) Select a higher value to increase the contrast (make the display darker).
Select a lower value to decrease the contrast (make the display lighter).
38
Page 47

Press g, then Z.
1
Press l or r until CONTRAST is displayed.
2
Press u or d until the desired setting is displayed, and then press n.
3
Setting the Auto Reduction function
With the Auto Reduction function, you can select whether the text width (TEXT
WIDTH) or the text size (TEXT SIZE) will be reduced if text that is set to the AUTO
Size setting is too large for the specified label length. (The default setting is TEXT
SIZE.)
Press g, then Z.
1
Press l or r until AUTO REDUCTION is displayed.
2
Press u or d until the desired setting is displayed, and then press n.
3
If TEXT SIZE is selected and more text is added, the character size is
reduced so the text fits within the specified label length.
If TEXT WIDTH is selected and more text is added, the character width is
reduced so the text fits within the specified label length.
However, after the character width is reduced to MINIMUM, the character
size will be reduced so the text fits within the specified label length.
Calibrating the label length
If the length of the printed label does not correspond to the length specified with the
Length function, the printed label length can be recalibrated with the Length Adjust
function by selecting a setting between -1 and +3. (The default setting is 0.)
Press g, then Z.
1
Press l or r until LENGTH ADJUST is displayed.
2
Press u or d until the desired setting is displayed, and then press n.
3
Machine Adjustments
39
Page 48

Specifying if the PERSONAL symbol category is continually updated
You can specify whether symbols continue to be added to the
(with the older symbols deleted) when the category becomes full (
added after the
1
2
3
PERSONAL
Press g, then Z.
Press l or r until SYMBOL SAVE is displayed.
Press u or d until the desired setting is displayed, and then press n.
symbol category becomes full (
PERSONAL
ON
). (The default setting is ON.)
OFF
symbol category
) or symbols are no longer
Changing the units of measure
The units used for displaying measurements can be set to millimeters (mm) or inches
(inch). (The default setting is inch.)
Press g, then Z.
1
Press l or r until UNITS is displayed.
2
Press u or d until the desired setting is displayed, and then press n.
3
Changing the language
The language of the menus, settings and messages can be changed by selecting
ENGLISH or FRANÇAIS. (The default setting is ENGLISH.)
Press g, then Z.
1
Press l or r until LANGUAGE is displayed.
2
Press u or d until the desired setting is displayed, and then press n.
3
Displaying version information
This function can be used to display the version information for the P-touch software
and built-in symbol set.
Press g, then Z.
1
Press l or r until VERSION INFO is displayed.
2
Press u or d until the desired version information is displayed.
3
Press n to exit Setup mode.
4
40
Page 49

Using P-touch With a Computer
5
5
(for PT-1650 only)
This P-touch is equipped with a USB port, allowing you to connect it to a computer
running Microsoft
which is installed together with the printer driver, Transfer Manager and Backup
Manager.
●
P-touch Editor 3.2 is a label-designing software that provides additional
illustration and layout features enabling you to design more elaborate label
templates and create databases. Once these label templates and databases have
been created, they can be downloaded to the P-touch, where they can be used to
print labels.
●
Transfer Manager is used to download data created on the computer to this
portable P-touch, so that it can be used anywhere you go to create labels. The
following types of data can be downloaded to the P-touch.
• Label templates created with P-touch Editor allow you to expand the P-touch’s
capabilities to create customized labels.
• Databases created with P-touch Editor or in the *.csv format provide you with
convenient access to large amounts of data (for example, customer lists and
inventory), which can be used to print labels.
• User-defined character images in the *.bmp format can be used to enhance
labels with characters that are not available on the P-touch.
●
Backup Manager allows you to back up the following types of data from the
P-touch onto the computer, and restore this data to the P-touch in case the P-touch
data is lost.
• Label templates
• Database
• User-defined character images
• Label files stored in the P-touch memory
®
Windows®. The enclosed CD-ROM contains P-touch Editor 3.2,
☞
The P-touch Editor software and the printer driver must be installed before the
P-touch is connected to the computer or turned on.
Only use the enclosed USB interface cable to connect the P-touch to the computer.
☞
A single computer cannot be connected to multiple P-touch machines at the same time.
☞
☞
Although the P-touch can be connected to the computer through a USB
connection, label layouts created in P-touch Editor cannot be printed directly
from the application.
Using P-touch With a
Computer (for PT-1650 only)
41
Page 50

Installing the Software & Printer Driver
The P-touch Editor 3.2 software, provided on the enclosed CD-ROM, includes a variety
of more complex functions for printing bar codes and images, enabling you to design
just about any label that you can imagine. With this application, the printer driver must
also be installed in order for the application to communicate with the P-touch.
☞
Although the P-touch can be connected to the computer through a USB
connection, label layouts created in P-touch Editor cannot be printed directly
from the application.
Before installation
Check that your system configuration meets the following requirements.
Computer IBM PC/AT or compatible
Operating system
Processor
Memo ry
Hard disk free space At least 20 MB (100 MB for a full installation)
Monitor 800 x 600 dpi (SVGA)/High Color or higher
USB port Available
CD-ROM drive Avail able
☞
For installation on Windows® 2000, administrator privileges are required. In
addition, transferring data requires power user or administrator privileges. This
software cannot be operated in Users groups. In addition, this software is not
compatible with the Windows
☞
With Windows® XP, transferring data and installation is only possible from an
account with administrator privileges.
Microsoft® Windows® 98, 98 SE, Me, 2000 Professional, XP
Professional or XP Home Edition
Pentium 166 MHz or higher (XP Professional and XP Home Edition:
Pentium 300 MHz or higher)
At least 64 MB (XP Professional and XP Home Edition: 128 MB or
higher)
®
2000 Server operating system.
42
Page 51

Installing the P-touch Editor 3.2 software
☞
Do not connect the P-touch to the computer until you are instructed to.
☞
We strongly recommend closing all Windows applications before installing this software.
Insert the enclosed CD-ROM into the computer’s CD-ROM drive. The InstallShield® Wizard
1
for installing the P-touch Editor software starts up, and then the “Welcome” dialog box appears.
☞
If the InstallShield® Wizard does not automatically start up:
First, double-click “My Computer” on the desktop, and then double-click the CD-ROM
drive containing the CD-ROM. (For Windows
menu, and then double-click the CD-ROM drive containing the CD-ROM.)
Then, double-click “Setup.exe” to display the dialog box.
Carefully read the contents of the “Welcome” dialog box, and then click “Next ”
2
to continue. The “User Information” dialog box appears.
Type the necessary information into the appropriate boxes, and then click “Next”.
3
A dialog box appears, asking for confirmation of the entered information.
Click “Yes” to register the entered information. The “Setup Type” dialog box appears.
4
Select the installation method, and then click “Next”.
5
If “Custom” is selected, clicking “Next” will display a dialog box that allows you
to select which options to install.
After P-touch Editor is installed, a dialog box appears, allowing you to select
whether or not to install the printer driver.
®
XP, click “My Computer” in the Start
Click “Yes”. The first Driver Setup dialog box appears, informing you that the
6
P-touch printer driver will be installed.
Continue with the procedure in Installing the USB printer driver on page 44.
7
When installation of P-touch Editor is finished, a dialog box appears, allowing
8
you to upgrade P-touch Editor 3.2 so that it will be compatible with Access 2000.
To upgrade P-touch Editor 3.2 for Access 2000, click “Yes”, and then follow the
instructions that appear.
☞
If a dialog box appears, indicating that the installation is finished and suggesting that
the computer be restarted, select the option for restarting the computer, click “Finish”
to restart the computer, and then remove the CD-ROM from the CD-ROM drive.
☞
To uninstall the P-touch Editor 3.2 software, double-click “Add/Remove Programs”
(“Add or Remove Programs” in Windows
®
XP) in the Control Panel window, and
then follow the instructions that appear.
Using P-touch With a
Computer (for PT-1650 only)
43
Page 52

Installing the USB printer driver
☞
Do not connect the P-touch to the computer until you are instructed to do so,
otherwise the printer driver may not be installed correctly.
With Windows® 98, 98 SE, Me or 2000:
When the dialog box appears, informing you that the P-touch printer driver will
1
be installed, click “Next”. A dialog box appears, instructing you to connect the
P-touch to the computer.
Connect the P-touch to the computer
2
using the enclosed USB interface cable,
and then hold down g and press
o to turn on the P-touch in
Transfer mode. A dialog box appears,
indicating that the printer driver has
been installed.
Click “Finish”.
3
☞
If a dialog box appears, indicating that the installation is finished and suggesting that
the computer be restarted, select the option for restarting the computer, click “Finish”
to restart the computer, and then remove the CD-ROM from the CD-ROM drive.
®
With Windows
☞
A message appears, informing you that the printer driver has passed Brother’s own
XP:
compatibility tests and that “Continue Anyway” should be pressed if a warning
message appears. Click “OK”
USB interface cable
When the dialog box appears, informing you that the P-touch printer driver will
1
be installed, click “Next”. A dialog box appears, instructing you to connect the
P-touch to the computer.
Connect the P-touch to the computer
2
USB interface cable
using the enclosed USB interface cable,
and then hold down g and press
o to turn on the P-touch in
Transfer mode. The first “Found New
Hardware Wizard” dialog box appears.
44
Page 53

Select “Install the software
3
automatically (Recommended)”, and
then click “Next”. A dialog box
appears, warning that the software has
not passed Windows
Click “Continue Anyway” to continue
4
®
Logo testing.
with the installation. A “Found New
Hardware Wizard” dialog box appears,
indicating that the Found New
Hardware Wizard has finished installing the printer driver for the P-touch.
☞
If a “Driver Setup” dialog box appears,
indicating that the printer driver has been
installed, click “Finish”.
Click “Finish”. A dialog box appears, indicating that the installation is finished.
5
Select “Yes, I want to restart my computer now.” (or “Yes, restart immediately”
6
if the printer driver was installed separately), click “Finish” to restart the
computer, and then remove the CD-ROM from the computer.
☞
To uninstall the printer driver, start up the installer on the CD-ROM, click the Driver
button in the dialog box that appeared, and then select the desired option and follow
the instructions that appear.
45
Using P-touch With a
Computer (for PT-1650 only)
Page 54

Reading the User’s Guide
The P-touch Editor User’s Guide can be viewed either by inserting the CD-ROM into
the drive each time you wish to refer to it or by installing it onto your computer so that it
is quickly available at any time. Since the User’s Guide is an HTML document, a
browser is needed to read it.
To view the User’s Guide from the CD-ROM:
Start up Windows® Explorer.
1
Select the CD-ROM drive.
2
Double-click the Ptouch folder
3
Double-click the Manual folder
4
Double-click “Main.htm”.
5
To view the User’s Guide installed on the hard disk:
Click “Start” in the taskbar to display the Start menu.
1
Point to “Programs”.
2
Point to “P-touch Editor 3.2”.
3
Click “The User’s Guide P-touch Editor 3.2”.
4
46
Page 55

Using P-touch Editor 3.2
P-touch Editor 3.2 makes it easy for anyone to design and print more complex labels for
almost any need imaginable.
Notes on creating templates
Since some P-touch Editor 3.2 functions are not available with the P-touch machine,
keep the following points in mind when using P-touch Editor 3.2 to create templates.
☞
Since only the Helsinki font is available on the P-touch machine, the font used to print
the text may be different from the font selected for the template in P-touch Editor. In
addition, since the size of all text on the P-touch machine is set to AUTO, the text size
may automatically be reduced.
☞
Although character styles can be applied to individual characters with P-touch Editor,
styles can only be applied to a line of text with the P-touch machine. In addition, some
character styles are not available on the P-touch machine.
☞
Defferently from P-touch Editor, the P-touch machine cannot print underline or strikeout.
☞
Only the first 999 lines of a database linked to a template is read by the P-touch machine.
☞
Only the first line of text typed into a database field is read by the P-touch machine.
Therefore, if you wish to print from a database with more than one line of text, create the
template and database with separate fields for each line of text.
☞
Some characters available with P-touch Editor are not available with the P-touch machine.
☞
Bar codes specified with settings not compatible with the P-touch bar codes settings will
not print correctly.
☞
A template created with P-touch Editor should have a fixed length with a maximum of 39" (1 m).
☞
The template and database should be created so that no more than approximately 500
characters per label will be printed.
☞
Fields that extend out of the print area may not print completely.
☞
A numbering field specified with P-touch Editor will not transfer and is not compatible
with the Numbering function on the P-touch machine.
☞
Backgrounds specified with P-touch Editor are not compatible with the P-touch machine.
☞
Time and date objects using the “At Printing” setting on P-touch Editor will not be printed.
☞
The printed label may differ from the image that appears in the Preview area of Transfer
Manager.
☞
If the number or order of fields in a database are changed and only the database (*.csv
file) is transferred to update it, the database may not link correctly with the template. In
addition, the first line of data in the transferred file must be recognized by the P-touch
machine as “field names”, otherwise the database cannot be used to print.
☞
A P-touch Editor layout that uses the split printing function (enlarging the label and
printing it on 2 or more labels) cannot be transferred.
☞
The length of the label set with P-touch Editor and the label length setting on the P-touch
may be slightly different as a result of the P-touch’s computational margin of error.
Using P-touch With a
Computer (for PT-1650 only)
47
Page 56

Starting up P-touch Editor 3.2
Click “Start” in the taskbar to display the Start menu.
1
Point to “Programs”.
2
Point to “P-touch Editor 3.2”.
3
Click “P-touch Editor 3.2”.
4
When P-touch Editor is started, the following window is displayed.
Menu bar
Standard toolbar
Property dock
Layout ar ea
Print area
Draw toolbar
Object dock
Status bar
Displaying the Properties
Title bar
Rulers
Cursor
☞
Although the screens shown in the following explanations are for Windows
SE and Me, the operations for Windows
®
2000 and XP are the same unless
®
specifically mentioned.
The desired Properties can be displayed by clicking the icon in the property dock.
Page Properties icon
Font Properties icon
Layout Properties icon
Text Properties icon
Database Properties
icon
Page Properties ( )
When the P-touch is selected as the printer:
Click this button to
hide the Propert ies.
48
98, 98
Page 57

Entering text
☞
Although the screens shown in the following explanations are for Windows
SE and Me, the operations for Windows
®
2000 and XP are the same unless
®
specifically mentioned.
Click (Text button) on the draw toolbar.
1
Text can be typed in, and the pointer changes from (selection pointer) to
(I-beam pointer).
Move the I-beam pointer to the position in the layout area where you wish to type
2
in text, and then click the left mouse button. The cursor flashes in the layout area
to indicate that you can now type in text.
Use the computer keyboard to type in the text.
3
To create a new line of text, press the keyboard’s Enter key.
4
☞
With P-touch Editor 3.2, text is always typed in using the insert mode. The overwrite
mode cannot be used to type in text.
☞
To change the font and text size, click the appropriate icon in the property dock, and
then select the desired settings from the Properties that appear.
☞
For details, refer to Reading the User’s Guide on page 46.
Notes on usage
Bar codes
Keep the following points in mind when using P-touch Editor 3.2 to print bar codes.
• Bar code readers may not be able to read bar codes printed with certain ink colors
on certain label tape colors.
• Be sure to test the bar code reader to make sure that it can read printed bar
codes in the environment where you plan to use them.
• The bar codes protocols that can be used are limited to those available with the
P-touch. Refer to page 19 for a list of the available bar code protocols.
98, 98
49
Using P-touch With a
Computer (for PT-1650 only)
Page 58

Databases
Keep the following points in mind when using the database functions of P-touch
Editor 3.2.
For general details, refer to the User’s Guide supplied on the P-touch Editor 3.2
☞
CD-ROM.
• The database function of P-touch Editor 3.2 uses database files that are
compatible with Microsoft Access 97. By upgrading P-touch Editor 3.2 using a
program available on the CD-ROM, P-touch Editor will become compatible
with Access 2000. If P-touch Editor 3.2 has not been updated to Access 2000
during installation, refer to the Readme file located at Ptouch\Editor\Ac2k on
the CD-ROM, and start up the program.
• P-touch Editor 3.2 can import files other than .mdb files, such as .csv files.
Files saved as .csv files with an application such as Microsoft Excel can be
used with P-touch Editor. Refer to the User’s Guide supplied on the P-touch
Editor 3.2 CD-ROM for more details.
• Using a function available with Microsoft Access 97, Excel files can be linked
to .mdb files. With this function, data changed in Excel is automatically
updated with P-touch Editor.
Transferring Data To/From a Computer
A template, database or a user-defined character image (character not available on the
P-touch) can be transferred from the computer and assigned to a PF key on the P-touch.
Entering Transfer mode
Hold down g and press o to turn on
●
the P-touch in Transfer mode.
To exit Transfer mode, press o to turn off the P-touch.
☞
Be sure not to turn off the P-touch while data is being set to it, otherwise the data
☞
will be lost.
Regardless of whether the P-touch is being operated from batteries or the AC
☞
adapter, the machine will automatically turn off if no key is pressed or no
operation is performed for 5 minutes.
50
Page 59

Downloading data to the P-touch
Although the P-touch can be connected to the computer through a USB
☞
connection, label layouts created in P-touch Editor cannot be printed directly
from the application.
Make sure that the P-touch is in Transfer mode. (For more details, refer to
1
Entering Transfer mode on page 50.)
• For downloading a template or database to the P-touch, start P-touch Editor
2
3.2. and open the template (and database) file.
• Click [Transfer Template] command on the [File] menu to convert the layout
file to a P-touch template format and start up Transfer Manager.
For a user-defined character image,
3
point to “Programs” on the Start menu,
point to “P-touch Editor 3.2”, and then
click “Transfer Manager”.
From the File List, select the data that
4
you wish to transfer.
If the desired data is not listed in the File List, click “Modify Folder”. In the “Browse
☞
For Folder” dialog box that appears, select the folder containing the desired data, and
then click “OK”.
For each template or a user-defined character image that you want transferred,
5
click “Change PF Key Mapping”, and then select the PF key where you wish to
assign the data.
Click “Start” to begin transferring the data. A dialog box appears, indicating that
6
the data is being transferred.
When the message “The transfer was completed successfully.” appears, click
7
“OK”.
On the P-touch, press o to exit Transfer mode and turn off the P-touch.
8
Using P-touch With a
Computer (for PT-1650 only)
51
Page 60

The P-touch can only contain one database at a time. However, the database can be
☞
replaced or updated.
When data is downloaded to a PF key, it replaces the preset template initially
☞
available on the P-touch. To restore the initial templates, use Transfer Manager to
download the *. pd3. files from the folder located at \etc\Transfer in the P-touch
Editor folder.
Only one character image or template can be assigned to a PF key. If a character
☞
image or template is already assigned to a PF key, the previous data is erased when a
different character image or template is transferred.
Only the files that are selected will be transferred. To transfer more than one file at
☞
the same time, hold down the keyboard’s Ctrl key, and then click the name of each
file that you wish to transfer.
To stop transferring the data, click “Cancel” in the dialog box that appears during
☞
transfer.
Adding a user-defined character image to the text
If a user-defined character image (a bitmap character not usually available on the
P-touch) is assigned to a PF key, that character can be added to any label that you create
on the P-touch.
Press g, then the applicable PF key.
●
The character is added to the text at the
cursor’s position.
Only a monochrome bitmap (*.bmp) file can be transferred to the P-touch.
☞
A high-resolution file can be cut from a file with the specifications described above.
☞
The downloaded image is automatically resized to the width of the tape being used.
☞
R
R
1: ABC IMPORT/EX
---- -- 1 NORMAL 1
Using template data
A label layout created with P-touch Editor (*.lbl file) can be downloaded to the P-touch,
where it can be used as a template for printing labels. The templates can be printed using
text either from a database or text directly typed in.
When a database (*.mdb file created with P-touch Editor 3.2 or *.csv file) is downloaded
to the P-touch, data from selected records can be added to labels either using a template
linked to the database or using a new template. In addition, the database data can be
searched to find specific records.
52
Page 61

☞
The P-touch can only contain one database at a time. However, the database can be
replaced or updated.
Using a template not linked to a database
Using a template not linked to a database is the same as using any of the preset Auto
Format templates. For details on using Auto Format templates, refer to Using the pre-
formatted Auto Format templates on page 30.
Using a template linked to a database
A single record or a range of records in the database linked to the template can be printed.
Press g, then the PF key where the template that you wish to use is assigned.
1
Press n. The database data is displayed.
2
To select a single database record to be printed in the template:
Press u or d to highlight the
3
desired record, and then press n.
To edit any text in the record, press
4
u or d to display the text, and
then type in the new text.
Press p.
5
To select a range of database records to be printed in the template:
Press u or d to highlight a record, and then press n.
3
M
R
NO.:[Part Nam]
NO
1:
AC adapter
Press g, then a. The message “CLEAR TEXT & PRINT DATABASE?”
4
appears.
Press n.
5
Press l or r until RECORD NO. is displayed, and then specify the desired
6
range of records.
Press n (or p). START appears in the Print Option menu.
7
Press n (or p) to begin printing the labels using the specified range of
8
records.
Using P-touch With a
Computer (for PT-1650 only)
53
Page 62

☞
If the Cut function is set to 1 or 3, the message “CUT TAPE TO CONTINUE”
appears after each label is printed. Press the tape cutter button to cut off the label and
continue printing.
☞
Be sure to cut the tape within 5 minutes from the time that the message appears.
☞
For the different options available for cutting the tape, refer to Selecting how tape is
fed and cut on page 38.
☞
To search for a specific record while the database data is displayed (in step 2
above), refer to Searching the database on page 56.
☞
To view other fields in the record selected in step 3, press l or r.
☞
When editing data as described in step 4 of the procedure for printing a single
database record, the database remains unchanged. When printing a range of database
records, the text cannot be edited.
☞
To specify settings for additional Print Option functions, instead of continuing with
8
, press u or d until CONTINUE is displayed in the Print Option
step
menu, and then press n. (Refer to Printing multiple copies of a label on
page 32 and Printing mirrored labels on page 34.)
☞
To quit using the template, display the last field, and then press n . The template
menu appears. Press u or d until EXIT appears, and then press n .
☞
While trying to print a large amount of data at one time, some outputted labels may be
blank. For example, when printing 50 records, the maximum number of characters
that can be printed at one time is limited to approximately 200.
Using downloaded database data
Either an *.mdb database, created with P-touch Editor 3.2, or a database converted to a
*.csv file can be transferred to the P-touch. The database data can be used either with a
template or added to a label created on the P-touch without using a template.
Adding database data to a label
Move the cursor to place in the text where you wish to add the database data.
1
Press g , then i.
2
Press u or d until the record containing the desired data is flashing.
3
Press l or r until the desired data is flashing.
4
Press n. The selected data is added to the label text.
5
☞
To search for a specific record, refer to Searching the database on page 56.
54
Page 63

Using database data in a Label Type mode
This function enables you to select the range of database fields to print.
Press a, and then select the Label Type mode as described in chapter 2.
1
Press g, then a. The message “CLEAR TEXT & PRINT DATABASE?”
2
appears.
Press n.
3
Press l or r until RECORD NO. is displayed, and then specify the desired
4
range of records.
Press l or r until FIELD NO. is displayed, and then specify the desired
5
range of record fields.
Press n (or p). START appears in the Print Option menu.
6
Press n (or p) to begin printing the labels using the specified range of
7
records.
☞
If label text has been typed in, you will be asked to choose either TEXT PRINT or
DATA PRINT when g, then a is pressed. At this time, select DATA
PRINT. If TEXT PRINT is selected, the special printing functions for printing
multiple copies of labels (refer to page 32), printing multiple copies with incremental
characters (refer to page 32), printing a range of text blocks (refer to page 34), or
printing the label text as a mirror image (refer to page 34) are available.
☞
To specify settings for additional Print Option functions, instead of continuing with
7
, press u or d until CONTINUE is displayed in the Print Option
step
menu, and then press n. (Refer to Printing multiple copies of a label on
page 32 and Printing mirrored labels on page 34.)
☞
While trying to print a large amount of data at one time, some outputted labels may be
blank. For example, when printing 50 records, the maximum number of characters
that can be printed at one time is limited to approximately 200.
55
Using P-touch With a
Computer (for PT-1650 only)
Page 64

Searching the database
While selecting a database record to be used in a template or while selecting a database
record whose data is to be added to a label, the database can be searched for records
containing specific characters or records with a specific number.
To search the database for a record containing specific characters:
Press g and e until the search
1
screen is displayed.
Type in the characters that you wish to
2
search for.
Press n. The first record after the currently selected one that contains the
3
entered characters appears.
To display a record with a specific number:
Press g and e until the jump
1
screen is displayed.
Press u or d until the desired
2
record number is displayed, or use the
number keys to type in the desired
number.
Press n. The record with the specified record number appears.
3
R
SEARCH CHARA.
[ ]
R
JUMP RECORD NO.
L
1
M
56
Page 65

Backing up/restoring P-touch data
Backup Manager, which was installed with P-touch Editor 3.2, enables you to save the
following types of data from the P-touch onto the computer as a backup in case the
P-touch data is lost. In addition, the data backed up onto the computer can be restored
onto the P-touch
• Label templates
• Database
• User-defined character images
• Label files stored in the P-touch memory
Make sure that the P-touch is in Transfer mode. (For more details, refer to
1
Entering Transfer mode on page 50.)
On the Start menu, point to “Programs”,
2
point to “P-touch Editor 3.2”, and then
click “Backup Manager”.
To back up P-touch data onto the
3
computer, click the Printer
and then click “Update List”.
To restore P-touch data backed up on
the computer, click the PC
tab.
From the File List, select the data that you wish to back up or restore.
4
Click “Start”. A dialog box appears, indicating that the data is being transferred.
5
When the message “The transfer was completed successfully.” appears, click
6
“OK”.
.
→ PC tab,
→ Printer
☞
Only the selected data will be backed up or restored. To select more than one file,
hold down the keyboard’s Ctrl key, and then click the names of the desired files.
☞
To select all data, click “Select All”.
☞
To stop transferring the data, click “Cancel” in the dialog box that appears during
transfer.
☞
To restore data to a different PF key, click “Change PF Key Mapping” on the PC →
Printer tab, and then select the PF key where you wish to assign the data.
☞
Only one character image or template can be restored to a PF key. If a character
image or template is already assigned to a PF key, the previous data is erased when a
different character image or template is transferred.
Using P-touch With a
Computer (for PT-1650 only)
57
Page 66

Appendix
6
6
Troubleshooting
Problem Solution
The display stays blank after you
1
have turned on the machine.
The machine does not print or the
2
printed characters are blurred.
The text files that you stored in
3
the memory are no longer there.
The printed characters are not
4
formed properly.
A blank horizontal line appears
5
through the printed label.
Striped tape appears.
6
The P-touch has “locked up” (i.e.,
7
nothing happens when a key is
pressed).
• Check that the AC adapter
(model AD-60) is connected
correctly.
• If you are using batteries, check
that they are correctly inserted.
• If the batteries are low, replace
them with new ones.
• Check that the back cover has
been properly attached.
• If the tape cassette is empty,
replace it with a new one.
• If the batteries are low, replace
them with new ones.
• If you are using batteries, they
may have a low charge. Try using
the AC adapter or replace the
batteries with new ones.
• Clean the print head as explained
on Cleaning the print head,
rollers and tape cutter on page 8.
• You have reached the end of the
tape. Replace the tape cassette
with a new one.
• Turn off the P-touch, and then
while holding down g and
R, turn the machine back on.
The machine will restore, but the
text and formats shown in the
display and all text files stored in
the memory are erased.
58
Page 67

Error Message List
Error Message Caus e Solution
• Cancel the Numbering
• Limit the number of text
• Limit the number of lines in
• Adjust the number of lines
• Limit the number of text
• Type in some text before
• Delete some existing text
• Change the tape cassette
• Replace the batteries with
• If rechargeable batteries are
1 BLOCK LIMIT!
7 LINE LIMIT!
50 LINE LIMIT
REACHED!
BUFFER EMPTY!
BUFFER FULL!
CASSETTE
CHANGED!
CHECK
BATTERIES!
• This message appears if you
try to use the Numbering
function when multiple
blocks of text have been
entered with the PANEL
Label Type mode selected.
• This message appears if 7
lines have already been
entered in a text block when
you press
• This message appears if you
delete , causing the
number of lines in a block to
exceed the 7-line limit.
• This message appears if 50
text blocks have already
been entered when you press
n
.
g, then n.
• This message appears if no
text has been typed in when
you try to print or Preview
function.
• This message appears if you try
to add a character, a space, a
new line, a new block, a
symbol, an accented character
or a bar code after the
maximum numbe r of characters
has already been entered.
• This message appears if the
tape cassette was changed
while the P-touch paused for
the tape to be cut.
• This message appears if a
combination of new and
used batteries, a combination
of batteries of different types
(alkaline, Ni-Cd and NiMH), manufacturers or
models, or a combination of
recharged and uncharged
batteries have been installed.
function.
blocks to 1.
a text block to 7.
so that the block will not
have more than 7 lines.
blocks to 50.
trying to perform any of
these operations.
before trying to add any
more.
back again.
six new AA batteries of the
same type.
installed, recharge all
batteries.
Appendix
59
Page 68

Error Message Caus e Solution
CHECK SETTING IN
LABEL TYPE MODE!
On 3/4" (18 mm) tape:
CHECK THE NUMBER
OF LINES! 5 MAX
On 1/2" (12 mm) tape:
CHECK THE NUMBER
OF LINES! 3 MAX
On 3/3" (9 mm) and 1/4" (6
mm) tape:
• This message appears if you
try to change the settings for
the Length function or
Frame function after a Label
Type mode with a preset
label length or frame has
already been selected.
• This message appears if you
try to print or use the
Preview function when the
number of lines in the text is
greater than the maximum
possible for the installed
tape.
• Select a different Label
Type mode.
• Reduce the number of lines
or install a wider tape.
CHECK THE NUMBER
OF LINES! 2 MAX
• Select less than 1000 copies.
• Release the tape cutter
button. If
press
printed tape.
• If the problem cannot be
corrected, contact your
service representative.
• Change the Label Type
mode or use a tall userdefined character image.
• Input the correct number of
digit s or change the bar code
protocol.
CHOOSE COPIES
LESS THAN 1000!
CUTTER ERROR!
IMAGE CHARACTER
SIZE ERROR!
(for PT-1650 only)
INPUT WHOLE
CODE!
• This message appears if
more than 1000 copies were
selected with the Print
Option functions.
• Note the number of copies
plus the number of
sequential labels cannot
exceed 1000.
• This message appears if the
tape cutter button was
pressed in when
pressed or the tape was
being fed.
• This message appears if a
wide user-defined character
image is entered when the
Vertical Label Type mode
is selected.
• This message appears if the
required number of digits is not
entered in the bar code data.
p was
p was pressed,
f to feed out any
60
Page 69

Error Message Caus e Solution
INPUT ABCD AT
BEGIN & END!
INSERT 1" TAPE
INSERT 24mm TAPE
INSERT 3/4" TAPE
INSERT 18mm TAPE
INSERT 1/2" TAPE
INSERT 12mm TAPE
INSERT 3/8" TAPE
INSERT 9mm TAPE
INSERT 1/4" TAPE
INSERT 6mm TAPE
LENGTH LIMIT!
MEMORY FULL!
• This message appears if a
letter between A and D has not
been entered at the beginning
and end of the bar code data
when the
CODABAR
protocol is selected.
• This message appears if a 1"
(24-mm)-wide tape cassette
is not installed when
printing an Auto Format
template created for 1"
(24-mm)-wide tape.
• This message appears if a
3/4" (18-mm)-wide tape
cassette is not installed when
printing an Auto Format
template created for 3/4"
(18-mm)-wide tape.
• This message appears if a
1/2" (12-mm)-wide tape
cassette is not installed when
printing an Auto Format
template created for 1/2"
(12-mm)-wide tape.
• This message appears if a
3/8" (9-mm)-wide tape
cassette is not installed when
printing an Auto Format
template created for 3/8"
(9-mm)-wide tape.
• This message appears if a
1/4" (6-mm)-wide tape
cassette is not installed when
printing an Auto Format
template created for 1/4"
(6-mm)-wide tape.
• This message appears if you
try to print or use the
Preview function when the
length of the text is greater
than the 3' 1/3" (1 m) limit.
• This message appears if you
try to store a text file after
approximately 2000
characters have already been
stored in the memory.
• Enter a letter between A and
D at the beginning and end
of the bar code data.
• Install a 1" (24-mm)-wide
tape cassette.
• Install a 3/4" (18-mm)-wide
tape cassette.
• Install a 1/2" (12-mm)-wide
tape cassette.
• Install a 3/8" (9-mm)-wide
tape cassette.
• Install a 1/4" (6-mm)-wide
tape cassette.
• Delete some of the text.
• Delete an unwanted file to
make space for the new one.
Appendix
61
Page 70

Error Message Caus e Solution
MIN 4 DIGITS!
NO FILES!
NO DATABASE OR
INCORRECT FORMAT
(for PT-1650 only)
NO TAPE!
RECORD NOT
FOUND!
(for PT-1650 only)
TEXT TOO HIGH!
XX BLOCK
TEXT TOO LONG!
TEXT TOO LONG!
XX BLOCK
VALUE OUT OF
RANGE!
• This message appears if less
than the minimum four
digits are entered as the bar
code data.
• This message appears if no
files are stored in the
memory when you try to
recall or delete one.
• This message appears if no
database has been
downloaded to the P-touch
when you press
.
i
• This message appears if no
tape cassette is installed
when you try to feed the
tape, print or use the
Preview function.
• This message appears when
the specified text or record
number cannot be found in
the database.
• This message appears if the
size of the text is larger than
the width of the installed
tape.
• This message appears if the
length of the text is longer
than the label length that has
been set with the Length
function.
• This message appears if you
try to print a label that is
longer than the specified
block length.
• This message appears if the
value entered while setting
the
Margin, Length
Block Length
within the allowable range.
• This message appears if the
specified characters cannot
be found in the database.
• This message appears if the
values for the blocks, records
or fields to be printed is not
within the allowable range.
, then
g
, and
function is not
• Enter a minimum of four
digits before pressing
n.
• Store a text file before trying
to recall or delete one.
• Download a database.
• Install a tape cassette and try
again.
• Try searching for different
text or a different record
number.
• Reduce the size of the
characters, install a tape with
a greater width, or select the
AUTO
•Press
longer label length.
• Select a longer block length.
• Type in a value that is within
the allowable range.
text size setting.
A, and then select a
62
Page 71

Machine Specifications
Hardware
Power supply: Six AA alkaline batteries or
Input device: Keyboard (56 keys)
LCD: 48
Print tape: TZ tape is available in the following five widths:
Print head: 18.1 mm (height)/180 dpi (resolution)
Tape cutter: Manual cutter
Dimensions: With tape cutter button: 5 1/4" (W)
Weight: 1.36 lb. (615 g)
Six AA rechargeable batteries or
AC adapter (model AD-60)
×
132 dots
+ Caps and other indicators
1/4" (6 mm)
3/8" (9 mm)
1/2" (12 mm)
3/4" (18 mm)
1" (24 mm)
(133 mm (W) × 239 mm (D) × 87 mm (H))
Without tape cutter button: 4 1/2" (W) × 9 7/16" (D) × 3 7/16" (H)
(116 mm (W)
×
239 mm (D) × 87 mm (H))
× 9 7/16" (D) × 3 7/16" (H)
Appendix
Software
Character
fonts:
Character
sizes:
Character
styles:
Buffer size: Maximum 512 characters
Memory size: Approximately 2000 characters
1 built-in font (Helsinki)
AUTO plus 7 point sizes (1, 2, 3, 4, 6, 9 and 12 mm (6, 9, 12,
18, 24, 36 and 48 points))
Normal, Bold, Outline, Italic, Italic + Bold, and Italic +
Outline
Maximum 7 lines
Maximum 50 blocks
63
Page 72

Accessories
(For USA Only)
The following supplies and accessories are available for your P-touch machine and can
be ordered directly from Brother should your retailer not stock them.
StockNo. Description Price
Extra Strength Adh esive Tapes:
Super Adhesive Strength: laminated tapes with twice the adhesive strength ideal for textured surfaces and
harsh environments
TZ-S111 Black on Clear 1/4" (6mm) $15.99
TZ-S121 Black on Clear 3/8" (9mm) $17.99
TZ-S131 Black on Clear 1/2" (12mm) $18.99
TZ-S135 White on Clear 1/2" (12mm) $18.99
TZ-S141 Black on Clear 3/4" (18mm) $21.99
TZ-S145 White on Clear 3/4" (18mm) $21.99
TZ-S151 Black on Clear 1" (24mm) $25.99
TZ-S155 White on Clear 1" (24mm) $25.99
TZ-S211 Black on White 1/4" (6mm) $15.99
TZ-S221 Black on White 3/8" (9mm) $17.99
TZ-S231 Black on White 1/2" (12mm) $18.99
TZ-S241 Black on White 3/4" (18mm) $21.99
TZ-S251 Black on White 1" (24mm) $25.99
TZ-S611 Black on Yellow 1/4" (6mm) $15.99
TZ-S621 Black on Yellow 3/8" (9mm) $17.99
TZ-S631 Black on Yellow 1/2" (12mm) $18.99
TZ-S641 Black on Yellow 3/4" (18mm) $21.99
TZ-S651 Black on Yellow 1" (24mm) $25.99
TZ-S941 Black on Matte Silver 3/4" (18mm) $25.99
TZ-S951 Black on Matte Silver 1" (24mm) $27.99
Flexible ID Tapes:
Special Adhesive for Ben ding, Wrapping & Flagging
TZ-FX231 Black on White 1/2" (12mm) $18.99
TZ-FX241 Black on White 3/4" (18mm) $21.99
TZ-FX251 Black on White 1" (24mm) $25.99
Tamper Evident Tapes:
Security Pattern Appears If Removed
TZ-SE4 3/4" (18mm) Black on White Security (tamper-evident)
Fabric Iron-On Tapes:
TZ-FA3 1/2" (12mm) Navy Blue on White Fabric Iron-on Tape-9.8ft. tape
Print Head Cleaning Cassette:
TZ-CL4 3/4" (18mm) Print head cassette- approx. 100uses $20.99
Tape - leaves a checkerboard pattern when removed
length
$29.99
$24.99
64
Page 73

Standard Laminated Tapes (cont.)
StockNo. Description Price
1" (24mm)-wide laminated tapes
TZ-151 Black on Clear $22.99
TZ-251 Black on White $23.99
TZ-252 Red on White $23.99
TZ-354 Gold on Black $26.99
TZ-355 White on Black $26.99
TZ-451 Black on Red $23.99
TZ-651 Black on Yellow $23.99
TZ-B51 Black on Fluorescent Orange - 16.4ft. tape length $28.99
3/4" (18mm)-wide laminated tapes
TZ-141 Black on Clear $18.99
TZ-145 White on Clear $20.99
TZ-241 Black on White $20.99
TZ-242 Red on White $20.99
TZ-243 Blue on White $20.99
TZ-344 Gold on Black $23.99
TZ-345 White on Black $23.99
TZ-441 Black on Red $20.99
TZ-541 Black on Blue $20.99
TZ-545 White on Blue $23.99
TZ-641 Black on Yellow $20.99
TZ-741 Black on Green $20.99
TZ-B41 Black on Fluorescent Orange - 16.4ft. tape length $24.99
TZ-M41 Black on Clear Matte Finish $20.99
TZ-WB41 Black on Bugs Bunny Pattern $23.99
TZ-WS41 Black on Sylvester & Tweety Pattern $23.99
TZ-WT41 Black on Tazmanian Devil Pattern $23.99
1/2" (12mm)-wide laminated tapes
TZ-131 Black on Clear $16.99
TZ-135 White on Clear $17.99
TZ-231 Black on White $17.99
TZ-232 Red on White $17.99
TZ-334 Gold on Black $20.99
TZ-335 White on Black $20.99
TZ-631 Black on Yellow $17.99
3/8" (9mm)-wide laminated tapes
TZ-121 Black on Clear $14.99
TZ-221 Black on White $16.99
TZ-325 White on Black $18.99
TZ-421 Black on Red $16.99
1/4" (6mm)-wide laminated tapes
TZ-111 Black on Clear $12.99
TZ-211 Black on White $14.99
TZ-315 White on Black $17.99
Appendix
65
Page 74

*all tapes are 26.2' long unless otherwise noted
StockNo. Description Price
Options
XXXXX Carrying Case XXXX
There are 4 easy ways
to order
directly from Brother.
1. Call us Toll Free
2. Visit us on line at www.brothermall.com and use a major credit card.
3. Complete the order form (on the reverse side) and fax it to us
1-800-947-1445
4. Complete the order form (on the reverse side) and mail it to us
directed.
If you haven’t already returned your machine warranty card, take a few
at 1-888-879-3232 and use a major credit card.
at
as
minutes to register at www.registermybrother.com
66
Page 75

Index
A
AC adapter ...................................... 9
Accent function............................. 18
alignment ...................................... 29
arrow keys....................... 2, 3, 15, 16
Auto Format function .................... 30
Auto Format keys ............................ 2
Auto Reduction function ............... 39
B
backspace key................. 2, 3, 15, 18
Backup Manager ........................... 57
bar code
special characters ...................... 20
Bar Code function ......................... 19
batteries .......................................... 5
block number.............................. 2, 3
block range ................................... 34
bold text style ................................ 28
indicator .................................. 2, 3
C
cancelling ..................................... 15
Caps indicator ............................. 2, 3
Caps mode .................................... 16
center text alignment ..................... 29
indicator .................................. 2, 3
chain printing................................ 38
character
size............................................ 26
style........................................... 28
width ......................................... 27
choosing ....................................... 15
default setting ............................ 15
cleaning
print head .................................... 8
rollers .......................................... 8
tape cutter ................................... 8
Clear function ............................... 18
Code indicator ............................ 2, 3
confirming..................................... 15
Contrast function ........................... 38
copies ........................................... 32
cursor ............................................ 16
Cut function .................................. 38
cut-pause ...................................... 38
D
database record range ................... 53
databases ................................ 53, 54
Label Type mode....................... 55
searching................................... 56
default setting................................ 15
deleting
memory files.............................. 37
text ............................................ 18
display ............................................ 2
contrast ..................................... 38
E
error messages............................... 59
Extra Strength Adhesive Tape .......... 7
F
Feed key................................ 2, 3, 31
Flag mode ..................................... 12
Flexible ID Tape.............................. 7
Format key ........................ 26, 27, 28
formatting.......................... 26, 27, 28
Frame function .............................. 25
frame indicator............................ 2, 3
G
global format key ........................ 2, 3
global formatting
character size ............................ 26
67
Page 76

character style ........................... 28
character width ......................... 27
I
indicators ........................................ 2
block number .......................... 2, 3
bold text style .......................... 2, 3
Caps ........................................ 2, 3
center text alignment ............... 2, 3
Code ....................................... 2, 3
frame ....................................... 2, 3
Insert ....................................... 2, 3
italic text style ......................... 2, 3
justified text alignment ............ 2, 3
Label Type setting.................... 2, 3
left text alignment.................... 2, 3
length ...................................... 2, 3
low battery .............................. 2, 3
outline text style ...................... 2, 3
right text alignment.................. 2, 3
Shift ......................................... 2, 3
size.......................................... 2, 3
width ....................................... 2, 3
Insert indicator ............................ 2, 3
Insert key....................................... 17
installing
printer driver ............................. 44
P-touch Editor............................ 42
italic text style ............................... 28
indicator .................................. 2, 3
J
justified text alignment .................. 29
indicator .................................. 2, 3
K
keyboard ......................................... 2
L
label margins................................. 24
Label Type key ............................ 2, 3
Label Type mode........................... 10
databases................................... 55
Label Type setting indicator......... 2, 3
language ....................................... 40
LCD display .................................... 2
left text alignment.......................... 29
indicator.................................. 2, 3
length adjustment .......................... 39
Length function ............................. 24
length indicator ........................... 2, 3
local formatting
character size ............................ 26
character style ........................... 28
character width ......................... 27
locked up ...................................... 58
low battery indicator ................... 2, 3
lowercase letters............................ 16
M
Margin function............................. 24
measurements ............................... 40
Memory key .................................. 36
mirror printing ............................... 34
N
New Block function ...................... 17
Normal mode................................ 10
Numbering function ...................... 32
numbers ........................................ 16
O
outline text style ............................ 28
indicator.................................. 2, 3
P
Panel mode ................................... 13
PERSONAL symbol category ......... 23
setup ......................................... 40
PF keys............................................ 3
Port Block mode............................ 13
Port mode ..................................... 13
power key ............................... 2, 3, 9
preview ......................................... 31
68
Page 77

print head........................................ 8
Print key ................................ 2, 3, 31
printer driver
installing.................................... 44
printing
database record range ............... 53
text block range ......................... 34
problems ....................................... 58
P-touch Editor
installing.................................... 42
starting ...................................... 47
template .................................... 52
User’s Guide ............................. 46
R
recalling ........................................ 37
Repeat Printing function ................ 32
restoring ........................................ 57
return key........................ 2, 3, 15, 17
right text alignment ....................... 29
indicator .................................. 2, 3
rollers.............................................. 8
Rotate & Repeat mode................... 11
Rotate mode .................................. 11
cutter........................................... 8
templates
Auto Format .............................. 30
P-touch Editor............................ 52
text
alignment .................................. 29
size............................................ 26
size adjustment.......................... 39
style........................................... 28
width......................................... 27
width adjustment....................... 39
Transfer Manager .......................... 51
Transfer mode ............................... 50
troubleshooting ............................. 58
U
units .............................................. 40
uppercase letters ........................... 16
USB connection ............................ 44
user-defined character image ........ 52
V
version .......................................... 40
Vertical mode................................ 10
S
searching....................................... 56
selecting.................................. 15, 16
default setting ............................ 15
Setup key ...................................... 38
Shift indicator .............................. 2, 3
Shift mode..................................... 16
size ............................................... 26
indicator .................................. 2, 3
Space key................................ 15, 16
storing ........................................... 36
style .............................................. 28
Symbol key ................................... 21
T
tape
cassettes ...................................... 5
W
width............................................. 27
indicator.................................. 2, 3
69
Page 78

Contact Information
(For USA Only)
Service Center Locations
If you need a local service center, please call 1-800-284-HELP (4357)
to locate the authorized service center closest to you.
Service centers do not provide operational assistance. See “Operational Assistance”.
Note: Be sure to call the Service Center before your visit.
Operational Assistance
For technical and operational assistance you may call Brother Customer Service at:
Voice 1-877-4-PTouch, or Fax 1-901-379-1210
Assistance on the Internet
For product information and downloading the latest drivers: http://www.brother.com
For purchasing accessories and certain Brother products: http://www.brothermall.com
Accessories and Supplies
To order Brother accessories or supplies by Visa, MasterCard, Discover or American Express,
you may call toll tree 1-888-879-3232, or complete the order form in your user’s guide and
For purchasing accessories on the Internet: http://www.brothermall.com
To order by mail or pay by check, please complete the accessory order form and mail it along
fax both sides of the form to 1-800-947-1445.
with payment to:
Brother International Corporation
Attn: Consumer Accessory Division
P.O. Box 341332
Bartlett, TN 38184-1332
Fax-Back System
Brother Customer Service has installed an easy-to-use Fax-Back System so you can get
instant answers to common technical questions and product information for all Brother products.
This system is available 24 hours a day, 7 days a week. You can use the system to send the
information to any fax machine, not just the one you are calling from.
Please call 1-800-521-2846 and follow the voice prompts to receive faxed instructions on how
70
to use the system and an index of Fax-Back subjects.
Page 79

P-TOUCH ACCESSORY ORDER FORM
(For USA Only)
Dear Customer:
This order form is provided for your convenience should your retailer not stock the item(s)
needed. To order by mail, send this completed form along with proper payment to the address
below OR credit card holders: call toll-free 1-888-879-3232, fax completed order form to
1-800-947-1445, or visit our web site at http://www
.brothermall.com. Please refer to the
Accessories listing in your User’s Guide for stock no. and price.
Stock # Description Quantity Price
To complete the Order Form:
1. Review the reverse side of this form and
select the desired items.
2. Complete the form above, indicating the
quantity of each item.
3. Total the columns and enter the total on the
“Supply/Accessory Subtotal” line.
4. Add the appropriate Sales Tax and Shipping/
Handling Charge.
5. Clearly print your name and address in the
space below.
6. Place your order
a. Call toll free anytime 1-888-879-3232
b. Order on line at www.brothermall.com
c. Fax completed form to 1-800-947-1445
d. Mail completed form along with proper
payment to
BROTHER INTERNATIONAL CORP.
Attn: Consumer Accessory Div.
P.O.Box 341332
Bartlett, TN 38184-1332
Name:
Address: ( ) Check/Money Order ( ) American Express
City:
State: Account Number
Zip: Expiration Date
Daytime Phone #: Signature
Daytime Fax #:
Email:
Your Model Number:
Prices subject to change without notice.All prices quoted in US Dollars.
Supply / Accessory Subtotal: $
AZ, CA, CO, CT, FL, GA, IL, LA,
MA, MD, MI, MN, MO, NC, NJ,
NV, NY, OH, PA, TN, TX, VA, WA, WI
residents add applicable sales tax: $
Shipping and Handling Options $
Please choose one:
•Standard Freight:
•Continental U.S. ($5.75)
Alaska and Hawaii ($8.75)
GU, PR, VI ($15.75)
•2nd Day Air Freight
(Continental U.S. only): $8.75
•Overnight Delivery
(Continental U.S. only): $14.75
TOTAL DUE $
No C.O.D. orders
Method of Payment (check one)
( ) Visa ( ) Master Card ( ) Discover
Billing Address (if different from shipping address at left)
Page 80

Page 81

P-TOUCH ACCESSORY ORDER FORM
(For USA Only)
Dear Customer:
This order form is provided for your convenience should your retailer not stock the item(s)
needed. To order by mail, send this completed form along with proper payment to the address
below OR credit card holders: call toll-free 1-888-879-3232, fax completed order form to
1-800-947-1445, or visit our web site at http://www
.brothermall.com. Please refer to the
Accessories listing in your User’s Guide for stock no. and price.
Stock # Description Quantity Price
To complete the Order Form:
1. Review the reverse side of this form and
select the desired items.
2. Complete the form above, indicating the
quantity of each item.
3. Total the columns and enter the total on the
“Supply/Accessory Subtotal” line.
4. Add the appropriate Sales Tax and Shipping/
Handling Charge.
5. Clearly print your name and address in the
space below.
6. Place your order
a. Call toll free anytime 1-888-879-3232
b. Order on line at www.brothermall.com
c. Fax completed form to 1-800-947-1445
d. Mail completed form along with proper
payment to
BROTHER INTERNATIONAL CORP.
Attn: Consumer Accessory Div.
P.O.Box 341332
Bartlett, TN 38184-1332
Name:
Address: ( ) Check/Money Order ( ) American Express
City:
State: Account Number
Zip: Expiration Date
Daytime Phone #: Signature
Daytime Fax #:
Email:
Your Model Number:
Prices subject to change without notice.All prices quoted in US Dollars.
Supply / Accessory Subtotal: $
AZ, CA, CO, CT, FL, GA, IL, LA,
MA, MD, MI, MN, MO, NC, NJ,
NV, NY, OH, PA, TN, TX, VA, WA, WI
residents add applicable sales tax: $
Shipping and Handling Options $
Please choose one:
•Standard Freight:
•Continental U.S. ($5.75)
Alaska and Hawaii ($8.75)
GU, PR, VI ($15.75)
•2nd Day Air Freight
(Continental U.S. only): $8.75
•Overnight Delivery
(Continental U.S. only): $14.75
TOTAL DUE $
No C.O.D. orders
Method of Payment (check one)
( ) Visa ( ) Master Card ( ) Discover
Billing Address (if different from shipping address at left)
Page 82

Page 83

GUÍA DE USUARIO
Page 84

Introducción
Gracias por adquirir esta P-touch.
Con ella podrá elegir entre una serie de estilos de caracteres, tamaños y marcos para diseñar
prácticas etiquetas personalizadas que responden a cualquier necesidad. Además,
seleccionando tipos de etiquetas preformateadas podrá etiquetar, con rapidez y facilidad,
paneles de conexiones, cables, conectores y otros componentes.
Con esta P-touch puede imprimir etiquetas legibles y duraderas en un instante. Su calidad y
rendimiento hacen de ella un aparato muy práctico para usar en planta o en la calle.
Aunque es muy sencilla, le sugerimos que antes de empezar a usarla lea esta Guía del usuario
con detenimiento, y que la tenga siempre a mano para futuras consultas.
Declaración de cumplimiento con la Comisión Federal de Comunicaciones (FCC) (sólo para EE.UU.)
Parte responsable : Brother International Corporation
declara que el producto
Nombre del producto : Impresora de etiquetas P-touch de Brother
Número de modelo : PT-1600/1650
cumple la Parte 15 de las Normas FCC. El funcionamiento está sujeto a las dos condiciones siguientes: (1) este
dispositivo no puede causar interferencias perjudiciales y (2) este dispositivo debe aceptar cualquier interferencia que
reciba, incluso interferencias que puedan dar lugar a un funcionamiento no deseado.
Este equipo ha sido probado y se ha determinado que cumple los límites correspondientes a un dispositivo
digital de Clase B, conforme a la Parte 15 de las Normas FCC. Dichos límites están diseñados para ofrecer una
protección razonable contra interferencias perjudiciales en una instalación residencial. Este equipo genera, usa
y puede radiar energía de radiofrecuencia; si no se instala y se usa de acuerdo con las instrucciones, puede
causar interferencias perjudiciales a las comunicaciones por radio. Sin embargo, no existe ninguna garantía de
que no puedan producirse interferencias en una determinada instalación. En el caso de que este equipo cause
interferencias perjudiciales a la recepción de emisiones de radio o televisión, cosa que puede determinar
apagando y encendiendo el equipo, el usuario puede intentar corregir dichas interferencias recurriendo a una o
más de las medidas siguientes:
- Reorientar o reubicar la antena receptora.
- Aumentar la separación entre el equipo y el receptor.
- Conectar el equipo a una toma de corriente que se encuentre en un circuito distinto de aquél al que está
conectado el receptor.
- Consultar al distribuidor o a un técnico de radiotelevisión con experiencia.
- Debe usarse el cable de interfaz incluido a fin de asegurarse de que se cumplen los límites correspondientes a
un dispositivo digital de Clase B.
- Cualquier cambio o modificación que no cuente con la aprobación expresa de Brother Industries, Ltd. podría
anular la autorización del usuario para manejar el equipo.
Estos son los números de patente y de publicación de patente relacionados con este producto:
USP4839742 USP4976558 USP5009530 USP5120147
USP4927278 USP4983058 USP5069557
100 Somerset Corporate Boulevard
Bridgewater, NJ 08807-0911 EE.UU.
TEL : (908) 704-1700
Page 85

ÍNDICE
1. Para empezar ................................................................1
Descripción general .......................................................................1
Vista superior y vista inferior ....................................................................... 1
Teclado y visualizador de LCD .................................................................... 2
Precauciones generales ..................................................................4
Pilas y casetes de cinta .................................................................. 5
Instalación de las pilas y el casete de cinta .................................................. 5
Limpieza ........................................................................................8
Limpieza del cabezal de impresión, rodillos y cortador de la cinta .............8
Adaptador de CA opcional ............................................................9
Conexión del adaptador de CA .....................................................................9
Conexión/desconexión de la P-touch ............................................ 9
2. Modos de tipo de etiqueta ...........................................10
Selección de un modo de tipo de etiqueta ................................... 10
Modos Normal y Vertical ............................................................10
Modos Girar (ROTATE) y Girar y repetir (ROT-REP) ................... 11
Modo Bandera (FLAG) .................................................................12
Modos Puerto (PORT) y Panel (PANEL) .......................................13
3. Funciones básicas ........................................................15
Cómo realizar las operaciones básicas ........................................15
Elección de funciones, parámetros, ajustes y grupos ................................. 15
Elección del ajuste predeterminado ........................................................... 15
Confirmación de una elección .................................................................... 15
Cancelación de una elección ...................................................................... 15
Introducción de los datos de la etiqueta ......................................16
Introducción y modificación de texto .......................................................... 16
Introducción de un carácter acentuado ......................................................18
Introducción de un código de barras .......................................................... 19
Introducción de un símbolo ........................................................................ 21
Cómo formatear la etiqueta .........................................................24
Definición de la longitud de la etiqueta ......................................................24
Definición de un tamaño de margen ........................................................... 24
Cómo enmarcar el texto .............................................................................. 25
i
Page 86

Definición del tamaño de los caracteres .................................................... 26
Definición de la anchura de los caracteres ................................................ 27
Definición del estilo de los caracteres ........................................................ 28
Uso de las plantillas de formato automático .............................................. 30
Impresión de etiquetas ................................................................31
Vista preliminar de la maquetación de la etiqueta .....................................31
Avance de la cinta ....................................................................................... 31
Impresión de una etiqueta ...........................................................................31
Uso de funciones de impresión especiales .................................................. 32
Almacenamiento e invocación de archivos ..................................36
Almacenamiento de texto de etiquetas ........................................................36
Invocación de texto previamente almacenado ............................................37
Borrado de texto almacenado .....................................................................37
4. Ajustes de la máquina ..................................................38
Selección de la forma de avance y corte de la cinta ...................................38
Ajuste del contraste del visualizador .......................................................... 38
Ajuste de la función de reducción automática ............................................ 39
Calibración de la longitud de la etiqueta ................................................... 39
Definición de la actualización continua de la categoría de símbolos
PERSONAL .................................................................................................40
Cambio de las unidades de medida ............................................................ 40
Cambio del idioma ...................................................................................... 40
Visualización de información sobre la versión ...........................................40
5. Uso de la P-touch con un PC(sólo para PT-1650) ........41
Instalación de los programas y del controlador de impresión ......42
Antes de la instalación ................................................................................ 42
Instalación del programa P-touch Editor 3.2 .............................................43
Instalación del controlador de impresión USB .......................................... 44
Para leer la Guía del usuario ....................................................... 46
Uso de P-touch Editor 3.2 ............................................................47
Para iniciar P-touch Editor 3.2 .................................................................. 48
Para ver las propiedades ............................................................................ 48
Introducción de texto .................................................................................. 49
Observaciones acerca del uso ....................................................................49
Transferencia de datos a/desde un PC .........................................50
Para entrar en el modo Transfer ................................................................ 50
Descarga de datos a la P-touch .................................................................. 51
Para agregar al texto una imagen de carácter definida por el usuario .....52
ii
Page 87

Uso de los datos de plantilla .......................................................................52
Uso de los datos de la base de datos descargada .......................................54
Cómo hacer una copia de seguridad de los datos de la P-touch y
restaurarlos .................................................................................................57
6. Apéndice .....................................................................58
Solución de problemas ................................................................58
Lista de mensajes de error ...........................................................59
Características técnicas de la máquina ........................................ 63
Hardware .................................................................................................... 63
Software ...................................................................................................... 63
Accesorios (sólo para EE.UU.) .....................................................64
Índice alfabético ..........................................................................67
Información de contacto (sólo para EE.UU.) ...............................70
iii
Page 88

iv
Page 89

Para empezar
1
1
Descripción general
Vista superior y vista inferior
Vista
Botón del cortador
de la cinta
Teclado
Puerto USB
(sólo para PT-1650)
Cubierta posterior
Compartimento de las pilas
Para empezar
Visualizador
Conector del adaptador de CA
Palanca de liberación del casete
Compartimento del casete de cinta
Cabezal de impresión
Ranura de salida de la cinta
Vista inferior
1
Page 90

Teclado y visualizador de LCD
PT-1600
E
F
G
H
Q
P
O
N
1 Alineación del texto a la izquierda
(página 29)
2 Alineación del texto centrada
(página 29)
3 Alineación del texto a la derecha
(página 29)
4 Alineación del texto justificada
(página 29)
5 Estilo de texto negrilla (página 28)
6 Estilo de texto perfilado (página 28)
7 Estilo de texto cursiva (página 28)
8 Marco (página 25)
9 Pilas gastadas (página 6)
0 Número de bloque (página 17)
A Ajuste de tipo de etiqueta (página 10)
B Ajuste de anchura (página 27)
C Ajuste de tamaño (páginas 26 y 27)
162345
D
7
0
A
BC
D Ajuste de longitud (página 24)
E Modo de mayúsculas continuas
(página 16)
F Modo de inserción (página 17)
G Modo de mayúscula individual
(página 16)
H Modo de código (página 16)
I Tecla de alimentación (página 9)
J Tecla de retroceso (páginas 15 y 18)
K Teclas de flechas (página 15)
L Tecla de retorno (páginas 15 y 17)
M Tecla de formato global (página 26)
N Teclas de formato automático
(página 30)
O Tecla de avance (página 31)
P Tecla de impresión (página 31)
Q Tipo de etiqueta (página 10)
8
9
I
J
K
L
M
2
Page 91

PT-1650
162
34 5
7
E
F
G
H
Q
P
O
N
1 Alineación del texto a la izquierda
(página 29)
2 Alineación del texto centrada
(página 29)
3 Alineación del texto a la derecha
(página 29)
4 Alineación del texto justificada
(página 29)
5 Estilo de texto negrilla (página 28)
6 Estilo de texto perfilado (página 28)
7 Estilo de texto cursiva (página 28)
8 Marco (página 25)
9 Pilas gastadas (página 6)
0 Número de bloque (página 17)
A Ajuste de tipo de etiqueta (página 10)
B Ajuste de anchura (página 27)
C Ajuste de tamaño (páginas 26 y 27)
0
A
BC
D
D Ajuste de longitud (página 24)
E Modo de mayúsculas continuas
(página 16)
F Modo de inserción (página 17)
G Modo de mayúscula individual
(página 16)
H Modo de código (página 16)
I Tecla de alimentación (página 9)
J Tecla de retroceso (páginas 15 y 18)
K Teclas de flechas (página 15)
L Tecla de retorno (páginas 15 y 17)
M Tecla de formato global (página 26)
N Teclas PF (página 30)
O Tecla de avance (página 31)
P Tecla de impresión (página 31)
Q Tipo de etiqueta (página 10)
8
Para empezar
9
I
J
K
L
M
3
Page 92

Precauciones generales
●
Emplee sólo cintas TZ Brother con esta máquina. No emplee cintas que no
tengan la marca .
No tire de la cinta que avanza desde la P-touch. Podría dañar el casete.
●
No utilice la máquina en lugares muy polvorientos. Manténgala alejada de la luz
●
solar directa y de la lluvia.
No exponga la máquina a temperaturas o humedad muy altas. No la deje nunca
●
sobre el tablero de instrumentos ni en la parte trasera del automóvil.
No guarde los casetes de cinta en lugares expuestos a la luz solar directa, a una
●
humedad elevada o al polvo.
No deje nada que sea de goma o vinilo encima de la máquina durante períodos
●
prolongados. Podría producir manchas.
No limpie la máquina con alcohol ni con otros disolventes orgánicos. Emplee
●
solamente un paño suave y seco.
No ponga ningún objeto extraño dentro de la máquina, ni ningún objeto pesado encima.
●
Para evitar daños, no toque el borde de la cuchilla.
●
Emplee sólo el adaptador de CA diseñado exclusivamente para esta máquina. El
●
empleo de otro cancelaría la garantía.
No intente desmontar el adaptador de CA.
●
Cuando la máquina no se vaya a utilizar durante períodos prolongados, desenchufe
●
el adaptador de CA y saque las pilas para evitar fugas que puedan dañar la máquina.
Emplee seis pilas alcalinas o recargables (Ni-Cd o Ni-MH) de tamaño AA.
●
Nunca intente desmontar la P-touch.
●
Es recomendable utilizar el cable USB que se entrega con la unidad P-touch. Si
●
tiene que utilizar otro cable USB, asegúrese de que es de buena calidad (sólo para
PT-1650).
IBM® y PC-DOS® son marcas comerciales de International Business Machines,
●
Inc(sólo para PT-1650).
Microsoft® y Windows® son marcas registradas de Microsoft Corp. en EE.UU. y
●
en otros países (sólo para PT-1650).
Todos los demás nombres de software y productos mencionados son marcas
●
comerciales o marcas registradas de sus respectivas compañías (sólo para PT-1650).
Algunos fragmentos del software de filtro de gráficos están basados parcialmente
●
en el trabajo del Grupo Independiente JPEG (sólo para PT-1650).
4
Page 93

Pilas y casetes de cinta
Esta máquina ha sido diseñada para permitirle cambiar las pilas y los casetes de cinta
con rapidez y facilidad. Con pilas instaladas, esta máquina compacta y portátil puede
utilizarse en cualquier lugar. Existen para esta máquina una amplia gama de casetes de
cinta TZ de distintos tipos, colores y tamaños, que permiten crear etiquetas diferentes
codificadas por colores o tamaños.
Instalación de las pilas y el casete de cinta
Para empezar
1
2
Observaciones acerca de las pilas
Esta P-touch requiere seis pilas de tamaño AA. Pueden usarse pilas
☞
recargables (Ni-Cd o Ni-MH) en lugar de 6 pilas alcalinas.
Las pilas recargables no se pueden cargar dejándolas en la P-touch con el adaptador de
☞
CA conectado. Cárguelas con un cargador diseñado específicamente para el tipo de pilas
utilizado. Para más detalles acerca de las pilas recargables, consulte las instrucciones
suministradas con ellas.
A fin de evitar fugas o daños a la máquina, absténgase de utilizar estos tipos de pilas:
☞
• Pilas de manganeso
• Una combinación de pilas nuevas y usadas
• Una combinación de pilas de diferentes tipos (alcalinas, Ni-Cd y Ni-MH), de
diferentes fabricantes o de diferentes modelos
• Una combinación de pilas recargadas y sin recargar
5
Page 94

☞
Asegúrese de insertar las pilas de forma que sus polos queden orientados en la dirección
correcta.Con las pilas instaladas, la P-touch determina cuánta carga queda durante la
impresión y el avance de la cinta. Si detecta que queda poca, se encenderá el indicador
de pilas gastadas ()). Cuando esto suceda, cambie las pilas. En determinadas
condiciones de funcionamiento, es posible que el indicador de pilas gastadas no se
encienda.
☞
Antes de cambiar las pilas, compruebe que la unidad P-touch está apagada. Además, al
cambiar las pilas, inserte las nuevas antes de que transcurran cinco minutos de haber
extraído las viejas; de lo contrario, el texto visualizado en la pantalla y cualquier texto
almacenado en la memoria se perderán.
☞
Si prevé que no va a utilizar la P-touch durante un período prolongado, extraiga las pilas.
Cuando se desconecta la máquina, se pierden el texto que se muestra en la pantalla y el
que está almacenado en la memoria.
☞
Dado que las pilas que se incluyen empiezan a descargarse desde el mismo momento en
que la unidad sale de fábrica, es posible que su duración no cumpla las especificaciones,
dependiendo de cuándo se empiece a usar la unidad.
Observaciones acerca de los casetes de cinta
☞
Antes de instalar el casete de cinta, cerciórese de que el extremo de la cinta avanza por
debajo de las guías. Si el casete de cinta que va a instalar tiene una cinta entintadora y
que está floja, haga girar la rueda dentada con el dedo, en el sentido de la flecha del
casete, hasta tensarla.
Extremo de la cinta Guías de la cinta
☞
Cuando inserte el casete de cinta, asegúrese de que la cinta interior no se enganche en el
ángulo de la guía metálica.
☞
Después de instalar un casete de cinta, pulse f una vez para tensarla y, a continuación,
pulse el botón del cortador para cortar la que sobre.
☞
Corte siempre la cinta antes de sacarla de la máquina. Si tira de la cinta antes de cortarla,
puede dañar el casete.
6
Page 95

Cinta con fuerza adhesiva extra
☞
Para superficies con textura, rugosas o resbaladizas, se recomienda usar cinta con fuerza
adhesiva extra.
☞
Aunque en la hoja de instrucciones que acompaña al casete de cinta con
fuerza adhesiva extra se recomienda cortarla con tijeras, el cortador de
esta P-touch es capaz de cortar este tipo de cinta.
Cinta de identificación flexible
☞
Para aquellas aplicaciones que requieran etiquetas más flexibles (por ejemplo, para
pegarlas sobre curvas pronunciadas o en torno a objetos cilíndricos), se recomienda usar
cinta de identificación flexible.
☞
Las etiquetas creadas con cinta de identificación flexible no están diseñadas para servir
como aislante eléctrico.
☞
Cuando pegue etiquetas en torno a objetos cilíndricos, el diámetro del objeto debe ser,
como mínimo, de 1/8
utilice el modo de tipo de etiqueta FLAG. Además, los extremos solapados de la
etiqueta o la bandera deben tener un mínimo de 3/16
☞
Si se curva el objeto cilíndrico después de pegar la etiqueta, es posible que esta se
despegue.
Diámetro > 3 mm
" (3 mm); si es menor, pegue la etiqueta en forma de bandera y
" (5 mm).
Solapamiento > 5 mm
Para empezar
Diámetro > 3 mm
Bandera > 5 mm
Solapamiento > 5 mm
7
Page 96

Limpieza
e
Es posible que, de vez en cuando, haya que limpiar ciertas partes de la P-touch. Puede
que se adhiera polvo o suciedad al cabezal de impresión y a los rodillos de la P-touch,
especialmente si se emplea la unidad en exteriores o en lugares con mucho polvo. Con el
uso, el cortador puede recubrirse de adhesivo, haciendo difícil cortar la cinta.
Limpieza del cabezal de impresión, rodillos y cortador de la cinta
☞
Antes de limpiar el cabezal de impresión y los rodillos, pulse o para desconectar la
P-touch y, a continuación, extraiga las pilas y desenchufe el adaptador de CA opcional.
☞
Tenga mucho cuidado de no tocar las cuchillas del cortador con los dedos.
Cabezal de impresión
Palillo c on punta
de algodón
seco
Palillo con punta de algodón seco
Cuchillas del c ortador
de la cinta
Cuchillas del cortador
de la cinta
Palillo con punta d
algodón seco
Observaciones acerca de la limpieza del cabezal de impresión y de los rodillos
☞
Si aparece una franja horizontal en blanco en el texto de la etiqueta, limpie el cabezal de
impresión de la máquina.
☞
Será más fácil limpiar el cabezal de impresión si se emplea el casete de limpieza
opcional (TZ-CL4).
8
Page 97

Observaciones acerca de la limpieza del cortador de la cinta
☞
Si observa que la cinta no se corta bien, limpie las cuchillas del cortador.
Adaptador de CA opcional
Cuando vaya a imprimir muchas etiquetas, o bien etiquetas que contengan gran cantidad de texto, puede
ser conveniente conectar la P-touch a una toma eléctrica normal mediante el adaptador de CA opcional.
Conexión del adaptador de CA
2
DC IN 9.5V
1
Observaciones acerca del adaptador de CA
☞
Emplee sólo el adaptador de CA diseñado exclusivamente para esta máquina.
☞
Si prevé que no va a utilizar la P-touch durante un período prolongado, desconecte el
adaptador de CA. Cuando se desconecta la máquina, se pierden el texto que se muestra
en la pantalla y el que está almacenado en la memoria.
Conexión/desconexión de la P-touch
Para empezar
Pulse o para encender o apagar la P-touch.
Si la P-touch tiene pilas instaladas o ha estado enchufada mediante el adaptador de CA,
cuando se vuelva a encender se visualizará el texto de la sesión anterior. Esta característica
le permite interrumpir la creación de una etiqueta, desconectar la máquina y posteriormente
reanudar el trabajo en la misma etiqueta sin tener que volver a introducir el texto.
Tanto si la P-touch está funcionando a pilas como si está conectada al adaptador de CA,
se apagará automáticamente cuando transcurran 5 minutos sin que se pulse ninguna tecla
ni se realice ninguna operación.
9
Page 98

Modos de tipo de etiqueta
2
2
Selección de un modo de tipo de etiqueta
Presionando a, podrá seleccionar uno de los dos modos normales de diseño e
impresión de etiquetas personalizadas, o cualquiera de los seis modos especiales
disponibles para imprimir etiquetas preformateadas para la identificación de paneles de
conexiones, cables, conectores y otros componentes.
Pulse a.
1
Pulse u o d (o siga pulsando a) hasta que se visualice el modo
2
deseado. (Para obtener más información sobre cada modo de tipo de etiqueta,
consulte las secciones siguientes.)
Pulse n para aplicar el modo de tipo de etiqueta seleccionado.
3
• Si ha seleccionado NORMAL o VERTICAL, siga escribiendo el texto de la
etiqueta como se describe en capítulo 3, Funciones básicas.
• Si ha seleccionado
Pulse l o r hasta que se visualice el parámetro deseado.
4
Pulse u o d hasta que se visualice el ajuste deseado (o utilice las teclas
5
numéricas para escribirlo).
Pulse n para aplicar los ajustes seleccionados.
6
Escriba el texto de cada etiqueta en un bloque de texto diferente.
7
Imprima las etiquetas.
8
• Para imprimir una sola copia de cada etiqueta, presione p.
• Para imprimir múltiples copias o varias copias con ciertos caracteres que se
incrementan, o bien para imprimir usando cualquier otra función de impresión
especial, presione
información, consulte
ROTATE, ROT-REP, PORT, PANEL
y luego a y elija sus opciones. (Para obtener más
g
Uso de funciones de impresión especiales
o
, siga estos pasos.
FLAG
en la página 32.)
Modos Normal y Vertical
Con los modos Normal y Vertical se pueden
formatear e imprimir etiquetas para todas las
necesidades.
10
NORMAL
ABCDE
VERTICAL
A
B
C
E
D
Page 99

Después de seleccionar el modo de tipo de etiqueta NORMAL o VERTICAL, el texto
de la etiqueta puede escribirse, formatearse, imprimirse y cortarse de la manera habitual.
Con el modo de tipo de etiqueta Normal, el texto introducido se imprime
horizontalmente a lo largo de la etiqueta. Con el modo de tipo de etiqueta Vertical, el
texto introducido se imprime verticalmente a lo largo de la etiqueta.
Modos Girar (ROTATE) y Girar y repetir (ROT-REP)
Las etiquetas impresas usando estos modos de tipo de
etiqueta se pueden enrollar en torno a hilos y cables para
identificarlos. Con estos dos modelos el texto gira 90° hacia
la izquierda y cada bloque de texto se imprime en una
etiqueta diferente, como se muestra a continuación. Con el
modo Girar y repetir, el texto se imprime repetidamente a lo
largo de la etiqueta, a fin de que se pueda leer fácilmente
desde cualquier ángulo.
Girar
Longitud de bloqueLongitud de bloque Longitud de bloque
Girar
&
repetir
Modos de tipo de etiqueta
Longitud de bloque
Longitud de bloque
Después de seleccionar el modo de tipo de etiqueta
Longitud de bloque
ROTATE
o
ROT-REP
longitud de cada etiqueta y, si lo desea, un estilo de marco.
●
BLK LEN. (longitud del bloque): 0,80" a 8,00" (20 a 200 mm)
Valor predeterminado: 1,20" (30 mm)
●
FRAME (marco): OFF, , , ,
1 2
3 4
Valor predeterminado: OFF
Un bloque puede contener 7 líneas de texto como máximo y, con el modo de tipo de
☞
etiqueta
ROT-REP
Para aquellas etiquetas que vayan a pegarse a hilos o cables, se recomienda usar cinta de
☞
, sólo se imprimirán las líneas de texto que quepan en la etiqueta.
identificación flexible. Cuando enrolle cinta de identificación flexible en torno a objetos
cilíndricos, el diámetro del objeto debe ser, como mínimo, de 1/8" (3 mm); si es menor,
utilice el modo de tipo de etiqueta
(bandera). Además, los extremos solapados de
FLAG
la etiqueta o la longitud de la bandera deben tener un mínimo de 3/16" (5 mm).
, defina la
11
Page 100

Modo Bandera (FLAG)
Las etiquetas impresas usando este modo de tipo de etiqueta se
pueden enrollar en torno a hilos o cables pegando los extremos
entre sí para formar una bandera. Con el modo
bloque de texto se imprime en ambos extremos de etiquetas
diferentes. La longitud de la parte no impresa de esta etiqueta es
igual a la circunferencia del hilo o cable. Además, el texto se
puede imprimir horizontalmente o con un giro de 90°.
FLAG
, cada
ROTATE
ajustado
a
OFF
Longitud
Diámetro
bandera
Longitud
bandera
bandera
Después de seleccionar el modo de tipo de etiqueta
ROTATE
ajustado
a
ON
Longitud
Diámetro
bandera
Longitud
bandera
bandera
, defina la longitud y el diámetro
FLAG
de la bandera, un estilo de marco si lo desea, y si el texto debe girarse o no.
●
FLAG (diámetro de la bandera): 0,00" a 4,00" (0 a 100 mm)
Valor predeterminado: 0,25" (7 mm)
●
FLAG LEN (longitud de la bandera): 0,40" a 8,00" (10 a 200 mm)
Valor predeterminado: 1,20" (30 mm)
●
FRAME (marco): OFF, , , ,
1 2
3 4
Valor predeterminado: OFF
●
ROTATE (girar): OFF, ON
Valor predeterminado: OFF
Un bloque puede contener 7 líneas de texto como máximo.
☞
Para aquellas etiquetas que vayan a pegarse a hilos o cables, se recomienda usar cinta
☞
de identificación flexible. Para enrollar cinta de identificación flexible en torno a
objetos cilíndricos, utilice el modo de tipo de etiqueta FLAG (bandera) si el diámetro
del objeto es inferior a 1/8" (3 mm). Además, la longitud de la bandera debe tener un
mínimo de 3/16" (5 mm).
12
 Loading...