

Page 1

SOFTWARE
USER’S GUIDE
DCP-8080DN
DCP-8085DN
MFC-8480DN
MFC-8890DW
Not all models are available in all
countries.
Version 0
USA
Page 2

Trademarks
The Brother logo is a registered trademark of Brother Industries, Ltd.
Brother is a registered trademark of Brother Industries, Ltd.
Multi-Function Link is a registered trademark of Brother International Corporation.
Windows Vista is either a registered trademark or a trademark of Microsoft Corporation in the United States
and other countries.
Microsoft, Windows, Windows Server and Internet Explorer are registered trademarks of Microsoft
Corporation in the United States and/or other countries.
Apple, Macintosh, Safari and True Type are registered trademarks of Apple Inc. registered in the United
States and other countries.
HP, Hewlett-Packard, Jetdirect and PCL are registered trademarks of Hewlett-Packard Company.
PostScript is a registered trademark and PostScript 3 is a trademark of Adobe Systems Incorporated.
Epson is a registered trademark and FX-80 and FX-850 are trademarks of Seiko Epson Corporation.
IBM and Proprinter are either registered trademarks of International Business Machines Corporation in the
United States and/or other countries.
Nuance, the Nuance logo, PaperPort and ScanSoft are trademarks or registered trademarks of Nuance
Communications, Inc. or its affiliates in the United States and/or other countries.
Presto! PageManager is a registered trademark of NewSoft Technology Corporation.
Each company whose software title is mentioned in this manual has a Software License Agreement specific
to its proprietary programs.
All other trademarks are property of their respective companies.
i
Page 3

Table of Contents
Section I Windows
®
1Printing 2
Using the Brother printer driver..................................................................................................................2
Printing a document...................................................................................................................................3
Duplex printing...........................................................................................................................................4
Guidelines for printing on both sides of the paper ...............................................................................4
Automatic duplex printing ....................................................................................................................4
Manual duplex printing ........................................................................................................................4
Simultaneous scanning, printing and faxing ..............................................................................................4
Printer operation keys................................................................................................................................5
Job Cancel...........................................................................................................................................5
Secure Key..........................................................................................................................................5
Printer Emulation Support ...................................................................................................................6
Printing the Internal Font List...............................................................................................................7
Printing the Print Configuration List .....................................................................................................7
Test Print .............................................................................................................................................7
Duplex .................................................................................................................................................8
Restoring default printer settings.........................................................................................................8
Status Monitor............................................................................................................................................9
Monitoring the machine’s status ..........................................................................................................9
Printer driver settings...............................................................................................................................10
Features in the Windows
Basic tab..................................................................................................................................................11
Paper Size .........................................................................................................................................12
Orientation .........................................................................................................................................12
Copies ...............................................................................................................................................12
Media Type........................................................................................................................................12
Resolution..........................................................................................................................................13
Print Settings .....................................................................................................................................13
Multiple Page.....................................................................................................................................13
Duplex / Booklet ................................................................................................................................14
Paper Source ....................................................................................................................................16
Advanced tab...........................................................................................................................................17
Use Watermark..................................................................................................................................19
Watermark Settings ...........................................................................................................................19
Header-Footer Print...........................................................................................................................21
Toner Save Mode ..............................................................................................................................21
Secure Print.......................................................................................................................................21
Administrator .....................................................................................................................................22
User Authentication ...........................................................................................................................22
Other Print Options............................................................................................................................23
Accessories tab .......................................................................................................................................24
Support ....................................................................................................................................................26
Features in the BR-Script (PostScript
Printing Preferences ..........................................................................................................................28
Advanced options ..............................................................................................................................30
Ports tab ...........................................................................................................................................32
®
printer driver..................................................................................................11
®
3™ language emulation) printer driver ......................................28
ii
Page 4

2 Scanning 33
Scanning a document using the TWAIN driver........................................................................................33
Scanning a document into the PC .....................................................................................................33
Pre-Scanning to crop a portion you want to scan..............................................................................35
Settings in the Scanner Setup dialog box..........................................................................................36
Scanning a document using the WIA driver (Windows
WIA compliant ...................................................................................................................................40
Scanning a document into the PC .....................................................................................................40
Pre-Scanning to crop a portion you want to scan using the scanner glass .......................................42
Scanning a document using the WIA driver (Windows Photo Gallery and Windows Fax and Scan)......45
Scanning a document into the PC .....................................................................................................45
Pre-Scanning to crop a portion you want to scan using the scanner glass .......................................46
Using the Scan key (For USB or Parallel cable users) ............................................................................48
Scan to USB ......................................................................................................................................49
Scan to E-mail ...................................................................................................................................52
Scan to Image ...................................................................................................................................52
Scan to OCR .....................................................................................................................................53
Scan to File........................................................................................................................................54
Using ScanSoft™ PaperPort™ 11SE with OCR by NUANCE™.............................................................55
Viewing items ....................................................................................................................................56
Organizing your items in folders ........................................................................................................57
Quick links to other applications ........................................................................................................57
ScanSoft™ PaperPort™ 11SE with OCR lets you convert image text into text you can edit............57
Importing items from other applications.............................................................................................58
Exporting items into other formats.....................................................................................................58
Uninstalling ScanSoft™ PaperPort™ 11SE with OCR......................................................................58
®
XP/Windows Vista®)........................................40
3 ControlCenter3 59
Using ControlCenter3 ..............................................................................................................................59
Switching the user interface ..............................................................................................................61
Turning the Auto Load feature off......................................................................................................61
SCAN.......................................................................................................................................................62
File type.............................................................................................................................................63
Image (example: Microsoft
OCR (Word Processing program) .....................................................................................................65
E-mail ................................................................................................................................................66
File.....................................................................................................................................................67
CUSTOM SCAN .....................................................................................................................................68
File type.............................................................................................................................................69
Customizing a user-defined button....................................................................................................70
COPY ......................................................................................................................................................75
PC-FAX (MFC models only) ....................................................................................................................77
Send ..................................................................................................................................................78
Receive/View Received.....................................................................................................................78
Address Book ....................................................................................................................................79
Setup .................................................................................................................................................79
DEVICE SETTING...................................................................................................................................80
Remote Setup (MFC models only) ....................................................................................................81
Quick-Dial (MFC models only)...........................................................................................................82
Status Monitor ...................................................................................................................................82
User’s Guide......................................................................................................................................83
®
Paint)....................................................................................................63
iii
Page 5

4 Network Scanning (For models with built-in network) 84
Before using Network Scanning ..............................................................................................................84
Network license .................................................................................................................................84
Configuring Network Scanning ..........................................................................................................85
Using the Scan key..................................................................................................................................88
Scan to E-mail (PC)...........................................................................................................................88
Scan to E-mail (E-mail Server) (MFC-8890DW only) ........................................................................89
Scan to Image ...................................................................................................................................91
Scan to OCR .....................................................................................................................................92
Scan to File........................................................................................................................................93
Scan to FTP.......................................................................................................................................94
Scan to Network ................................................................................................................................97
How to set a new default for the file size
(For Scan to E-mail (E-mail server), Scan to FTP and Scan to Network) ...................................100
How to set a new default for the Duplex Scan mode (For Scan to E-mail (E-mail server) only) .....100
5 Remote Setup (MFC models only) 101
Remote Setup........................................................................................................................................101
6 Brother PC-FAX Software (MFC models only) 103
PC-FAX sending....................................................................................................................................103
Setting up user information..............................................................................................................103
Sending setup..................................................................................................................................104
Setting up a cover page...................................................................................................................105
Entering cover page information......................................................................................................106
Sending a file as a PC-FAX using the Facsimile style user interface ..............................................106
Sending a file as a PC-FAX using the Simple style user interface ..................................................107
Address Book ........................................................................................................................................109
Brother Address Book .....................................................................................................................110
Setting up a member in the Address Book ......................................................................................110
Speed Dial setup .............................................................................................................................111
Setting up a group for broadcasting ................................................................................................112
Editing member information.............................................................................................................112
Deleting a member or group............................................................................................................112
Exporting the Address Book ............................................................................................................113
Importing to the Address Book ........................................................................................................114
PC-FAX receiving ..................................................................................................................................116
Enabling PC-FAX Receiving software on your machine .................................................................117
Running the PC-FAX Receiving software on your PC.....................................................................117
Setting up your PC ..........................................................................................................................118
Configuring the Network PC-FAX Receiving Settings .....................................................................119
Viewing new PC-FAX messages.....................................................................................................120
7 Firewall settings (For Network users) 121
Before using the Brother software .........................................................................................................121
Windows
Windows Vista
®
XP SP2 ..........................................................................................................................121
®
...............................................................................................................................123
iv
Page 6

Section II Apple® Macintosh
®
8 Printing and Faxing 127
Printer operation key..............................................................................................................................127
Job Cancel.......................................................................................................................................127
Secure Key .....................................................................................................................................127
Printer Emulation Support ...............................................................................................................128
Printing the Internal Font List...........................................................................................................129
Printing the Print Configuration List .................................................................................................129
Test Print .........................................................................................................................................129
Duplex .............................................................................................................................................130
Restoring default printer settings.....................................................................................................130
Status Monitor........................................................................................................................................131
Updating the machine’s status ........................................................................................................131
Hiding or showing the window .........................................................................................................131
Quitting the window .........................................................................................................................132
Web Based Management (Network Connection Only)....................................................................132
Features in the printer driver (Macintosh
Choosing page setup options..........................................................................................................133
Choosing printing options ................................................................................................................134
Cover Page (Mac OS
®
X 10.4.x or greater) ....................................................................................135
Paper Feed......................................................................................................................................135
Layout..............................................................................................................................................136
Secure Print.....................................................................................................................................137
Print Settings ...................................................................................................................................138
Removing the Printer driver for Macintosh
Using the BR-Script3 Driver
(Post Script
®
3™ language emulation printer driver)..........................................................................143
Features in the BR-Script (PostScript
Page Setup......................................................................................................................................149
Choosing page setup options..........................................................................................................149
Cover Page (Mac OS
®
X 10.4.x or greater) ....................................................................................151
Layout..............................................................................................................................................151
Secure Print (Mac OS
®
X 10.5.x only) ............................................................................................153
Printer Features...............................................................................................................................154
Sending a fax (MFC models only) .........................................................................................................158
Macintosh
®
.....................................................................................................................................158
Drag a vCard from the Mac OS
(Mac OS
Using Mac OS
®
X 10.3.9 to 10.4.x)......................................................................................................161
®
X 10.5.x Addresses panel .....................................................................................162
®
)............................................................................................133
®
..........................................................................................142
®
3™ language emulation) printer driver ....................................149
®
X Address Book application
9 Scanning 164
Scanning from a Macintosh®.................................................................................................................164
Scanning an image into your Macintosh
Scanning a duplex document ..........................................................................................................165
Pre-Scanning an image...................................................................................................................166
Settings in the Scanner window ......................................................................................................167
®
.......................................................................................164
v
Page 7

Using the Scan key (For USB cable users) ...........................................................................................171
Scan to USB ....................................................................................................................................172
Scan to E-mail .................................................................................................................................175
Scan to Image .................................................................................................................................175
Scan to OCR ...................................................................................................................................176
Scan to File......................................................................................................................................177
Using Presto!
®
PageManager®.............................................................................................................178
Features ..........................................................................................................................................178
System requirements for Presto!
®
PageManager®.........................................................................178
NewSoft Technical Support .............................................................................................................178
10 ControlCenter2 181
Using ControlCenter2 ............................................................................................................................181
Turning the AutoLoad feature off.....................................................................................................181
SCAN.....................................................................................................................................................183
File types .........................................................................................................................................184
Image (example: Apple
OCR (word processing application).................................................................................................186
E-mail ..............................................................................................................................................187
File...................................................................................................................................................188
CUSTOM SCAN ....................................................................................................................................189
File types .........................................................................................................................................190
User-defined button .........................................................................................................................190
Scan to Image .................................................................................................................................191
Scan to OCR ...................................................................................................................................192
Scan to E-mail .................................................................................................................................193
Scan to File......................................................................................................................................194
COPY / PC-FAX (PC-FAX is on MFC models only) ..............................................................................195
DEVICE SETTINGS ..............................................................................................................................197
Remote Setup (MFC models only) ..................................................................................................197
Quick-Dial (MFC models only).........................................................................................................198
Status Monitor .................................................................................................................................198
®
Preview) ..................................................................................................184
11 Network Scanning 199
Before using Network Scanning ............................................................................................................199
Configuring network scanning .........................................................................................................199
Using the Scan key................................................................................................................................201
Scan to E-mail (PC).........................................................................................................................201
Scan to E-mail (E-mail server, MFC-8890DW only) ........................................................................202
Scan to Image .................................................................................................................................204
Scan to OCR ...................................................................................................................................205
Scan to File......................................................................................................................................206
Scan to FTP.....................................................................................................................................207
Scan to Network ..............................................................................................................................211
How to set a new default for the file size
(For Scan to E-mail (E-mail server), Scan to FTP, Scan to Network) .........................................214
How to set a new default for the Duplex Scan mode (For Scan to E-mail (E-mail server) only) .....214
vi
Page 8

12 Remote Setup 215
Remote Setup (MFC models only) ........................................................................................................215
A Index 217
vii
Page 9

Section I
Windows
Printing 2
Scanning 33
ControlCenter3 59
Network Scanning (For models with built-in network) 84
Remote Setup (MFC models only) 101
Brother PC-FAX Software (MFC models only) 103
Firewall settings (For Network users) 121
®
I
Page 10

1
Note
• The screens in this section are from Windows
operating system.
• If your PC is protected by a firewall, and is unable to print, you may need to configure the firewall settings
to allow communication through port number 137. (See Firewall settings (For Network users)
on page 121.)
Printing 1
®
XP. Screens on your PC may vary depending on your
Using the Brother printer driver 1
A printer driver is software that translates data from the format used by a PC into the format needed by a
particular printer, using a printer command language or page description language.
The printer drivers are on the CD-ROM we have supplied. Install the drivers by following the Quick Setup
Guide. The latest printer driver can also be downloaded from the Brother Solutions Center at:
http://solutions.brother.com
Windows® Printing
The dedicated printer drivers for Microsoft
®
Windows Vista
with your Brother device. You can install them easily into your Windows
The drivers support our unique compression mode to enhance printing speed in Windows
allows you to set various printer settings, including economy printing mode and custom paper size.
1
Windows Server® 2003 and Windows Server® 2008 are available for network printing only.
/Windows Server® 20031 /Windows Server® 20081 are available on the CD-ROM supplied
®
Windows® 2000 Professional/XP/XP Professional x64 Edition/
®
system using our installer program.
®
applications, and
1
2
Page 11

Printing
Printing a document 1
When the machine receives data from your computer, it begins printing by picking up paper from the paper
tray. The paper tray can feed many types of paper and envelopes. (See the User’s Guide for information
about the Paper Tray and Recommended paper.)
a From your application, choose the Print command.
If any other printer drivers are installed on your computer, choose Brother MFC-XXXX or DCP-XXXX
Printer* as your printer driver from the Print or Print Settings menu in your software application, and then
click OK to begin printing.
*(Where XXXX is your model name. If you are using a LAN cable or a parallel cable to connect your
machine then LAN or LPT will be in the printer driver name.)
Note
(Macintosh
®
) See Features in the printer driver (Macintosh®) on page 133.
b Your computer sends the data to the machine.
c When the machine finishes printing all the data, the LCD shows the machine status.
Note
You can choose the paper size and orientation in your application software.
If your application software does not support your custom paper size, choose the next largest paper size.
Then adjust the print area by changing the right and left margins in your application software.
1
3
Page 12

Printing
Duplex printing 1
The supplied printer driver supports duplex printing.
Guidelines for printing on both sides of the paper 1
If the paper is thin, it may wrinkle.
If paper is curled, turn over the stack, straighten it and then put it back in the paper tray or the Manual Feed
Slot.
If the paper is not feeding properly, it may be curled. Remove the paper, straighten it and turn over the
stack.
When you use the manual duplex function, it is possible that there may be paper jams or poor print quality.
If there is a paper jam, see Paper jams in the User’s Guide. If you have a print quality problem, see
Improving the print quality in the User’s Guide.
Automatic duplex printing 1
Use A4, Letter, Legal or Folio size paper when you use the automatic duplex printing function.
Make sure that the back cover is closed.
Make sure that the duplex tray is installed correctly in the printer.
If paper is curled, straighten it and then put it back in the paper tray.
1
Use regular paper or thin paper. DO NOT use bond paper.
Manual duplex printing 1
The machine prints all the even-numbered pages on one side of the paper first. Then, the Windows® driver
instructs you (with a pop-up message) to reinsert the paper. Before reinserting the paper, straighten it well,
or you may get a paper jam. Very thin or thick paper is not recommended.
Simultaneous scanning, printing and faxing 1
Your machine can print from your computer while sending or receiving a fax in memory, or while scanning a
document into the computer. Fax sending will not be stopped during PC printing. However, when the machine
is copying or receiving a fax on paper, it pauses the PC printing operation, and then continues printing when
copying or fax receiving has finished.
4
Page 13
Printing
Printer operation keys 1
Job Cancel 1
To cancel the current print job, press Job Cancel. You can clear the data that is left in the printer memory by
pressing Job Cancel. To cancel multiple print jobs, hold down this key until the LCD shows
Job Cancel (All).
Secure Key 1
Secured data is password protected. Only those people who know the password will be able to print the
secured data. The machine will not print secure data until the password is entered. After the document is
printed, the data will be cleared from the memory. To use this function, you need to set your password in the
printer driver dialog box. If you turn the power switch Off, the secured data saved in memory will be cleared.
1
a Press Secure/Direct.
Note
If the LCD displays No Data Stored, there is no secured data in the memory.
b Press a or b to choose the user name. Press OK. The LCD displays the secured jobs list for that name.
c Press a or b to choose the job. Press OK. Enter your four-digit password and press OK.
d To print the data, press a or b to choose Print, press OK and then enter the number of copies you want.
Press OK.
The machine prints the data.
To delete the secured data, press a or b to choose Delete. Press OK.
Note
• Make sure there are no USB Flash memory drive inserted.
• After you print the secured data, it will be cleared from memory.
5
Page 14

Printing
Printer Emulation Support 1
Your machine will receive print commands in a printer job language or emulation. Different operating systems
and applications will send the print commands in different languages. Your machine can receive print
commands in a variety of emulations and has an automatic emulation selection feature. When the machine
receives data from the computer, it automatically chooses the emulation mode. The default setting is Auto.
Your machine has the following emulation modes. You can change the setting by using the control panel or
a web browser.
HP LaserJet Mode
The HP LaserJet mode (or HP mode) is the emulation mode in which this printer supports the PCL6
language of a Hewlett-Packard
®
LaserJet laser printer. Many applications support this type of laser printer.
Using this mode will allow your printer to run at its best with those applications.
BR-Script 3 Mode
BR-Script is an original Brother page description language and a PostScript
®
interpreter. This printer supports PostScript
3™. The BR-Script interpreter of this printer allows you to
®
language emulation
control text and graphics on the page.
®
For technical information about PostScript
• Adobe Systems Incorporated. PostScript
commands, see the following manuals:
®
Language Reference, 3rd edition. Addison-Wesley
Professional, 1999. ISBN: 0-201-37922-8
®
• Adobe Systems Incorporated. PostScript
Language Program Design. Addison-Wesley Professional,
1988. ISBN: 0-201-14396-8
®
• Adobe Systems Incorporated. PostScript
Language Tutorial and Cookbook. Addison-Wesley
Professional, 1985. ISBN: 0-201-10179-3
1
EPSON FX-850 and IBM Proprinter XL Mode
The EPSON FX-850 and IBM Proprinter XL modes are the emulation modes that this printer supports to
meet the industry-standard for dot matrix printers. Some applications support these dot matrix printer
emulations. Use these emulation modes so your printer will work well when printing from those types of
applications.
Setting the Emulation mode 1
a For MFC models, press Menu, 4, 1.
For DCP models, press Menu, 3, 1.
b Press a or b to choose Auto(EPSON), Auto(IBM), HP LaserJet, BR-Script 3, Epson FX-850
or IBM Proprinter. Press OK.
c Press Stop/Exit.
Note
We recommend that you set the emulation setting with your application software or network server. If the
setting does not work properly, choose the required emulation mode manually using the control panel
buttons of the machine.
6
Page 15

Printing
Printing the Internal Font List 1
You can print a list of the machine’s internal (or resident) fonts to see how each font looks before you choose
it.
a For MFC models, press Menu, 4, 2, 1.
For DCP models, press Menu, 3, 2, 1.
b Press a or b to choose 1.HP LaserJet or 2.BR-Script 3. Press OK.
c Press Start. The machine prints the list.
d Press Stop/Exit.
Printing the Print Configuration List 1
You can print a list of current printer settings.
a For MFC models, press Menu, 4, 2, 2.
For DCP models, press Menu, 3, 2, 2.
b Press Start. The machine prints the settings.
c Press Stop/Exit.
1
Test Print 1
If you are having problems with print quality, you can do a test print.
a For MFC models, press Menu, 4, 2, 3.
For DCP models, press Menu, 3, 2, 3.
b Press Start.
c Press Stop/Exit.
Note
If the problem appears on the printout, see Improving the print quality in the User’s Guide.
7
Page 16

Printing
Duplex 1
You can choose whether you want to automatically print on both sides of the paper. The setting in the printer
driver will take priority over the setting made on the control panel.
a For MFC models, press Menu, 4, 3.
For DCP models, press Menu, 3, 3.
b Press a or b to choose Off, On(Long Edge) or On(Short Edge). Press OK.
c Press Stop/Exit.
Restoring default printer settings 1
You can return the machine’s printer settings to the factory settings. Fonts and macros loaded to the
machine’s memory will be cleared.
a For MFC models, press Menu, 4, 4.
For DCP-8085DN, press Menu, 3, 4.
For DCP-8080DN, press Menu, 3, 3.
b To restore the default settings, press a or b to choose 1.Reset. Press OK.
To exit without making a change press a or b to, choose 2.Exit. Press OK
c Press Stop/Exit.
1
8
Page 17
Printing
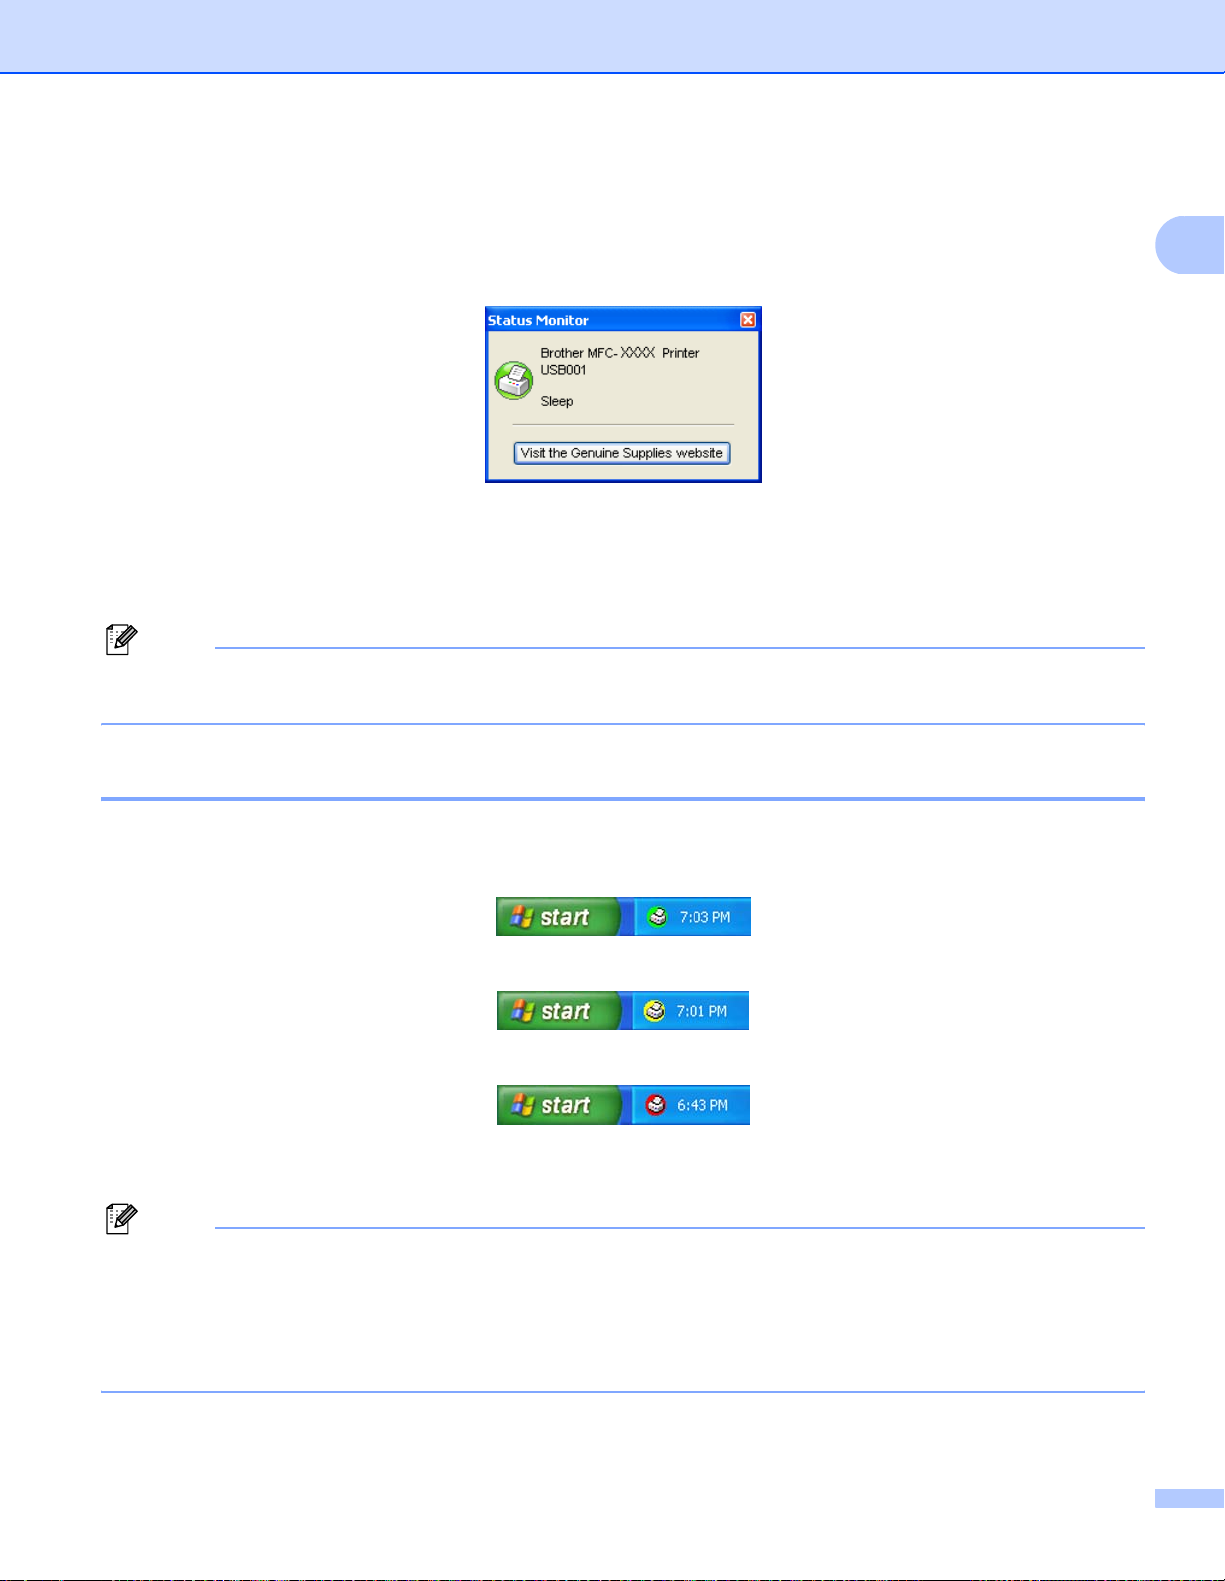
Status Monitor 1
The Status Monitor utility is a configurable software tool for monitoring the status of one or more devices,
allowing you to get immediate notification of error messages such as paper empty or paper jam.
You can check the device status at anytime by double-clicking the icon in the tasktray or by choosing
Status Monitor located in Start/All Programs/Brother/MFC-XXXX (or DCP-XXXX) on your PC.
There is also a link to the Brother Genuine Supplies website. Click Visit the Genuine Supplies website
button for more information on Brother genuine supplies.
Note
For more information about using the Status Monitor software, right-click the Status Monitor icon and
choose Help.
Monitoring the machine’s status 1
1
The Status Monitor icon will change color depending on the machine status.
A green icon indicates the normal stand-by condition.
A yellow icon indicates a warning.
A red icon indicates a printing error has occurred.
There are two locations where you can display the Status Monitor on your PC - in the tasktray or on the
desktop.
Note
• You can check the device status at anytime by double-clicking the icon in the tasktray or selecting the
Status Monitor located in the Start/All Programs/Brother/MFC-XXXX (or DCP-XXXX) on your
computer.
• For more information about using the Status Monitor software, right click the Status Monitor icon and
choose Help.
9
Page 18

Printing
Printer driver settings 1
Note
(Macintosh
®
) See Printing and Faxing on page 127.
You can change the following printer settings when you print from your computer.
Paper Size
Orientation
Copies
Media Type
Resolution
Print Settings
Multiple Page
Duplex / Booklet
Paper Source
Scaling
1
Reverse Print
Use Watermark
Header-Footer Print
1
1
1
Toner Save Mode
Secure Print
Administrator
User Authentication
Macro
1
1
1
1
Density Adjustment
Improve Print Output
1
These settings are not available with the BR-script printer driver for Windows®.
10
Page 19
Printing
Features in the Windows® printer driver 1
For more information, see the Help text in the printer driver.
Note
• The screens in this section are from Windows
operating system.
• You can access the Printing Preferences dialog box by clicking Printing Preferences... in the General
tab of the Printer Properties dialog box.
®
XP. The screens on your PC will vary depending on your
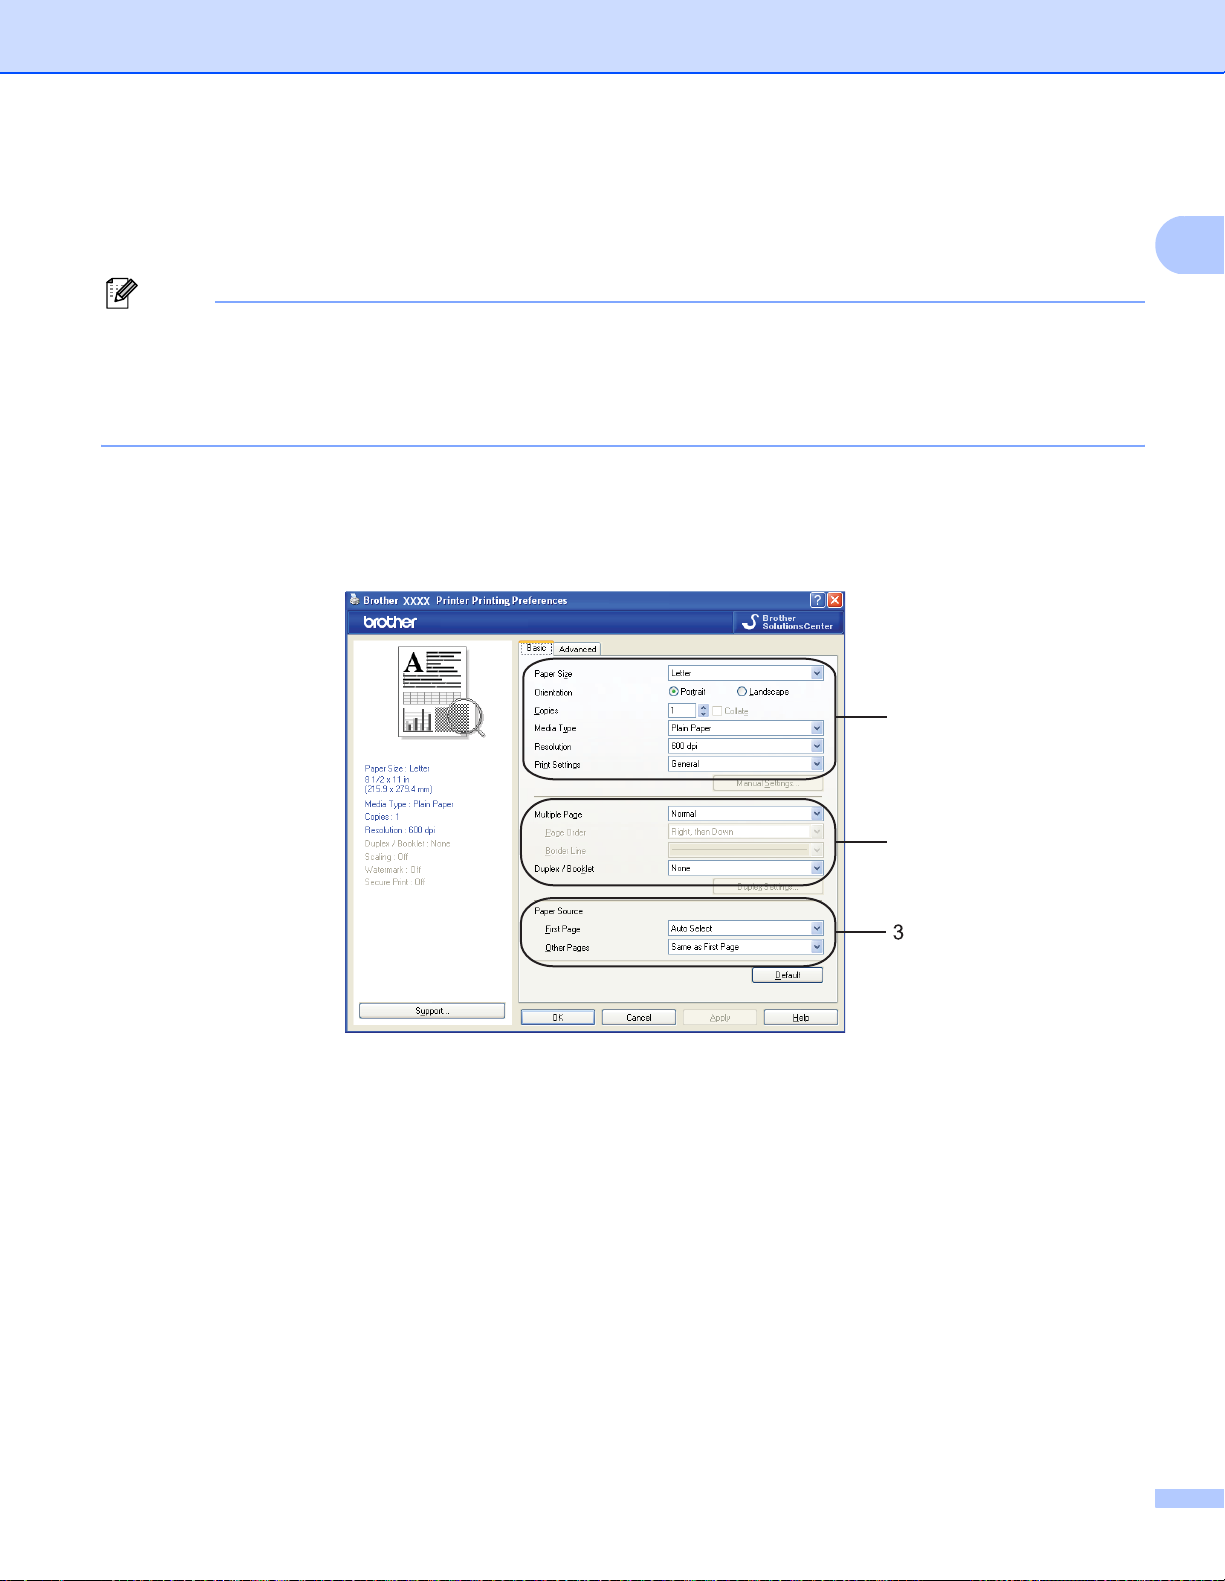
Basic tab 1
You can also change settings by clicking the illustration on the left side of the Basic tab.
1
1
2
a Choose the Paper Size, Orientation, Copies, Media Type, Resolution and Print Settings (1).
b Choose the Multiple Page and Duplex / Booklet setting (2).
c Choose the Paper Source (3).
d Click OK to apply your chosen settings.
To return to the default settings, click Default, then OK.
11
Page 20
Printing
Paper Size 1
From the drop-down menu choose the Paper Size you are using.
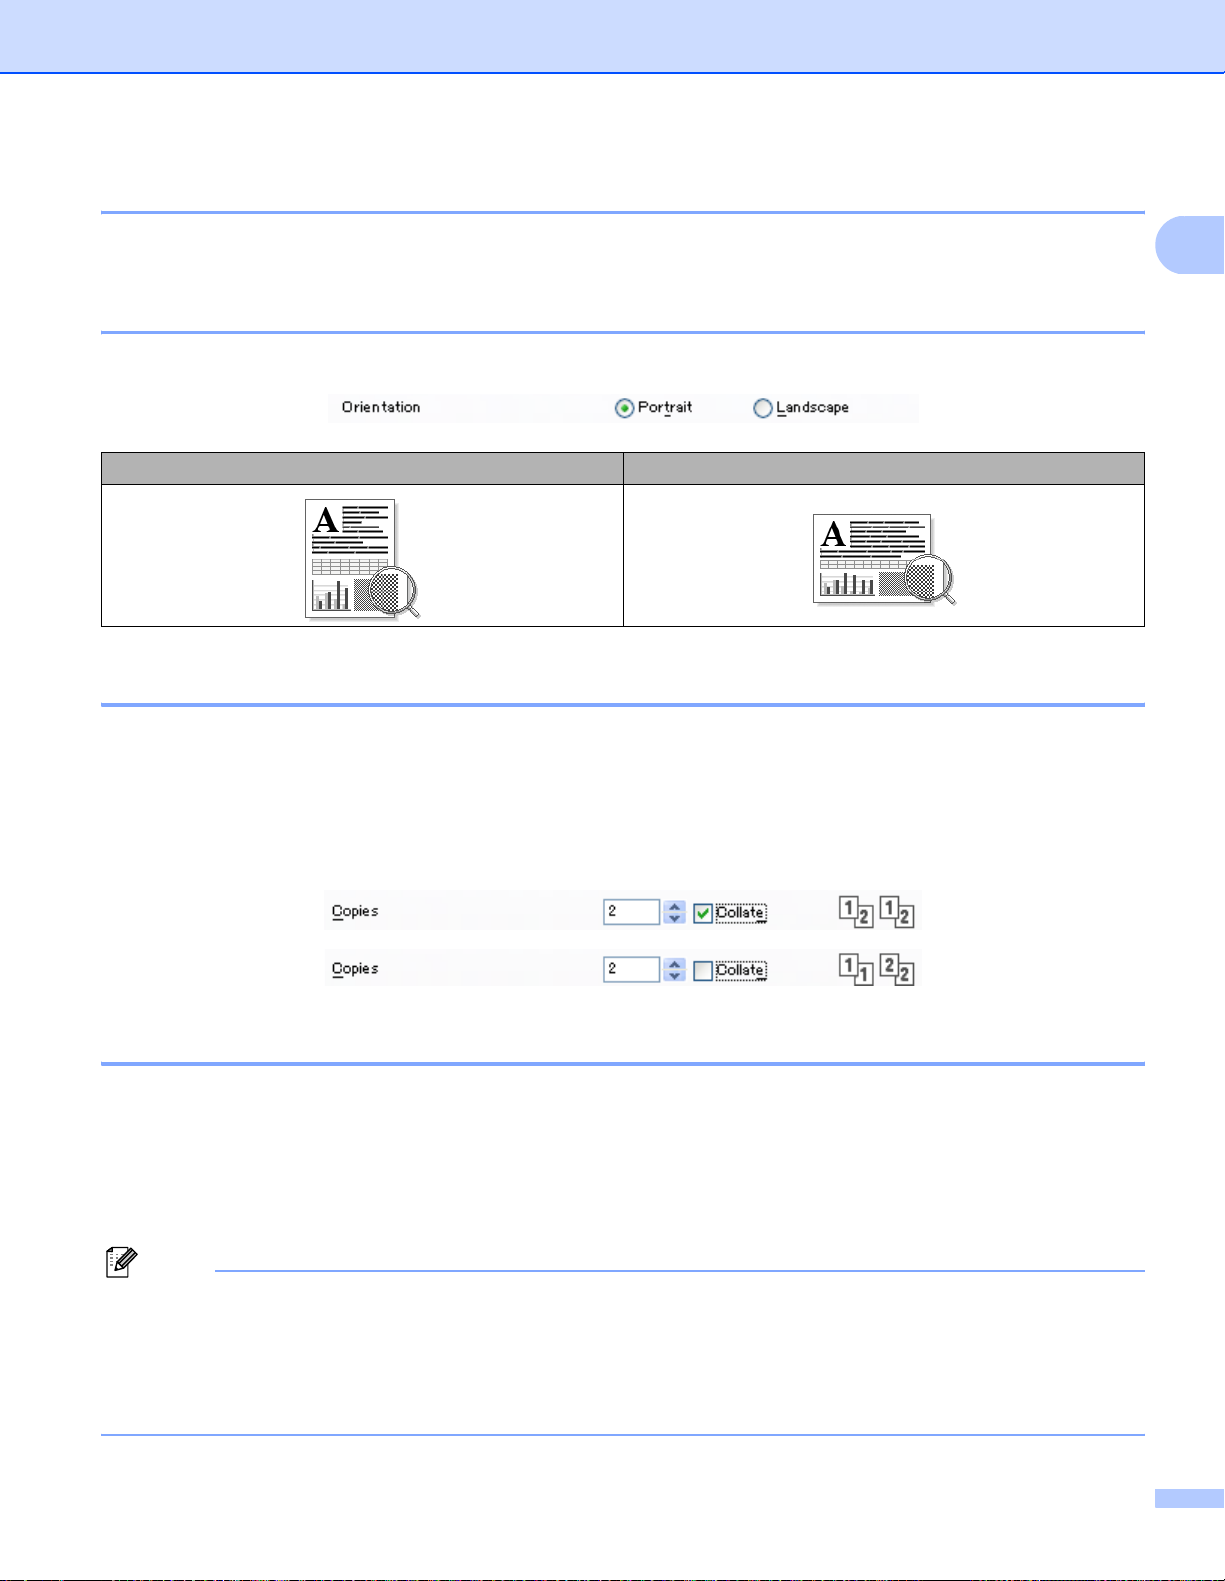
Orientation 1
Orientation selects the position of how your document will be printed (Portrait or Landscape).
Portrait (Vertical) Landscape (Horizontal)
Copies 1
The copies selection sets the number of copies that will be printed.
Collate
With the Collate check box selected, one complete copy of your document will be printed and then
repeated for the number of copies you selected. If the Collate check box is not selected, then each page
will be printed for all the copies selected before the next page of the document is printed.
1
Media Type 1
You can use the following types of media in your machine. For the best print quality, select the type of media
that you wish to use.
Plain Paper Thin Paper Thick Paper Thicker Paper Bond Paper Transparencies
Envelopes Env. Thick Env. Thin Recycled Paper
Note
• When using ordinary plain paper choose Plain Paper. When using heavier weight paper, envelopes or
rough paper choose Thick Paper or Thicker Paper. For bond paper, choose Bond Paper.
• When you use envelopes, choose Envelopes. If the toner is not fixed to the envelope correctly when
Envelopes has been selected, choose Env. Thick. If the envelope is crumpled when Envelopes has
been selected, choose Env.Thin. (See the User’s Guide for information about printing on envelopes.)
12
Page 21
Printing
Resolution 1
You can change the resolution as follows:
300 dpi
600 dpi
HQ 1200
1200 dpi
Note
If you use the high quality 1200 dpi setting (1200 x 1200 dpi) the print speed will be slower.
Print Settings 1
You can manually change the print setting.
General
This is a printing mode for general printing of documents.
Graphics
This is the best mode for printing documents that contain graphics.
Office Document
This is the best mode for printing office documents that include both tables and text.
1
Text
This is the best mode for printing text documents.
Manual
You can change the settings manually by choosing Manual and clicking the Manual Settings... button.
You can set brightness, contrast and other settings.
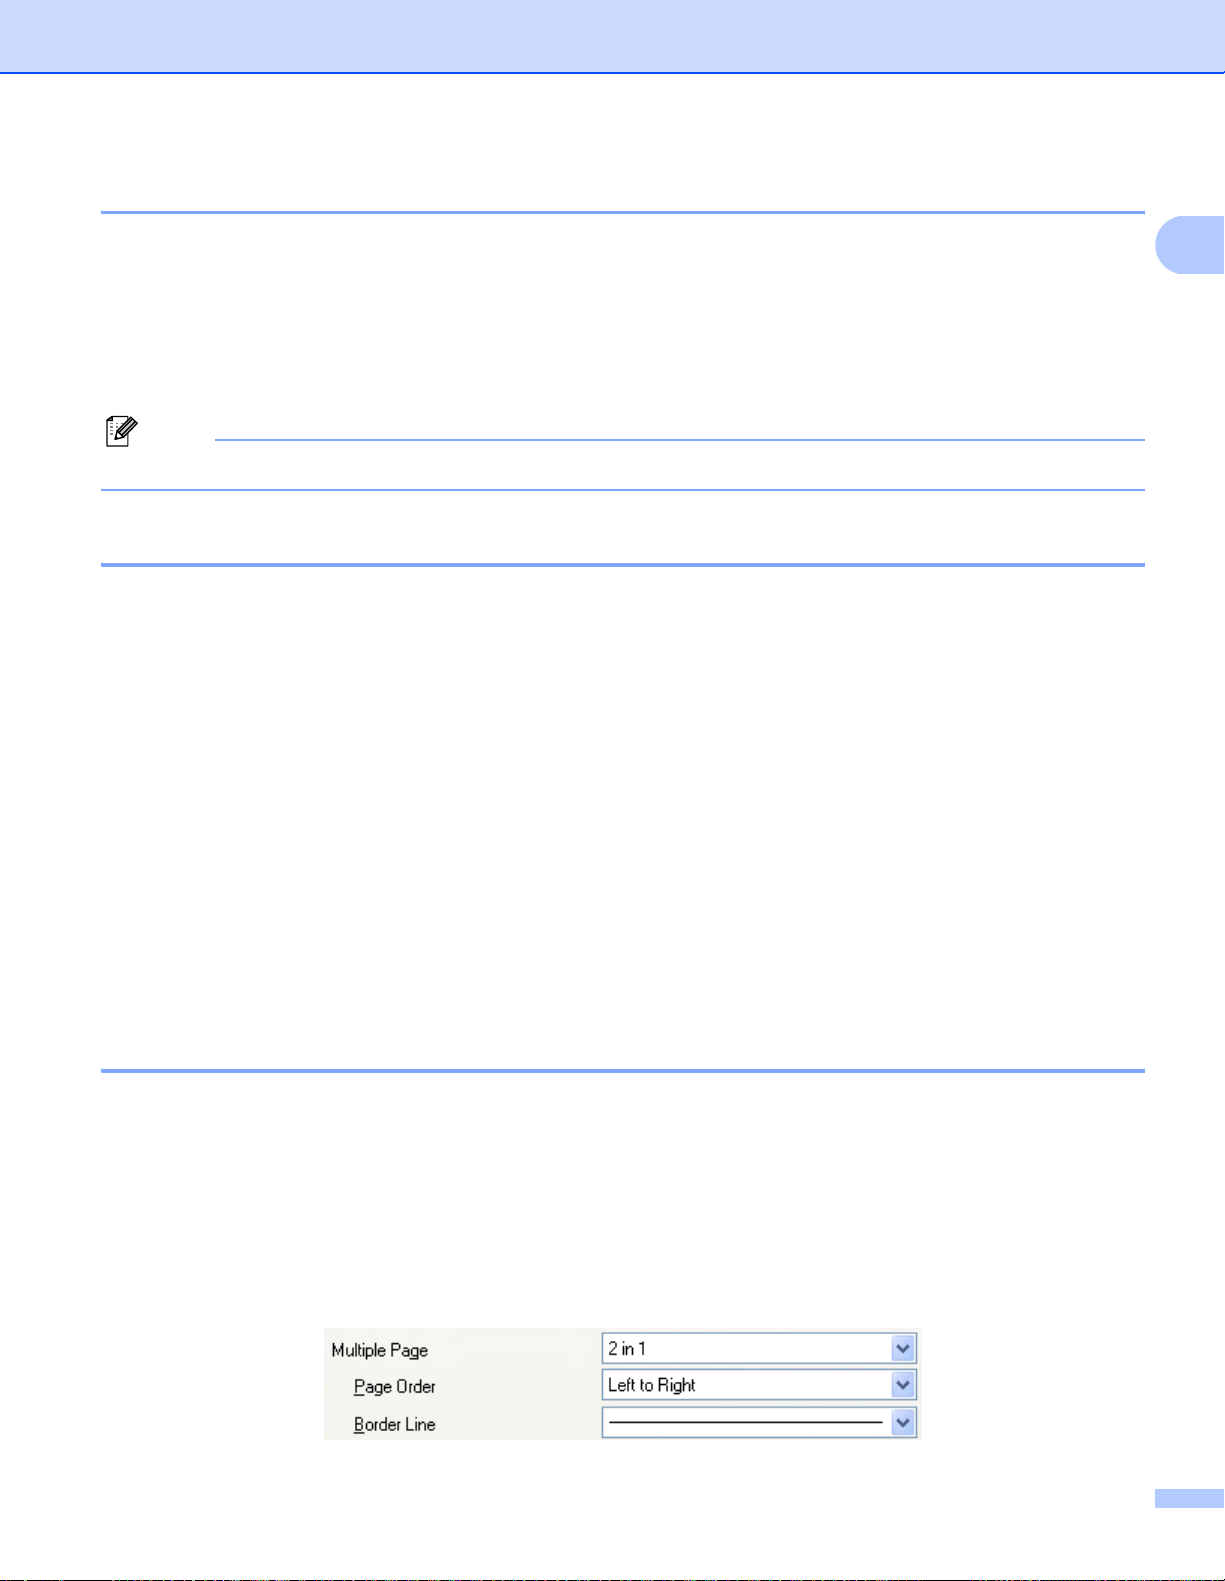
Multiple Page 1
The Multiple Page selection can reduce the image size of a page allowing multiple pages to be printed on
one sheet of paper or enlarge the image size for printing one page on multiple sheets of paper.
Page Order
When N in 1 option is selected, the page order can be selected from the drop-down list.
Border Line
When printing multiple pages on one sheet with the Multiple Page feature you can choose to have a solid
border, dash border or no border around each page on the sheet.
13
Page 22

Printing
Duplex / Booklet 1
a Put paper in the paper tray or MP tray.
b (Windows printer driver)
1 Open the Properties dialog box in the printer driver.
2 From the General tab, click the Printing Preferences icon.
3 From the Duplex/Booklet dropdown list in the Basic tab, choose Duplex.
4 Click Duplex Settings....
5 Make sure that Use Duplex Unit has been chosen.
6 Click OK. The printer will print on both sides of the paper automatically.
(BR-Script printer driver)
1 Open the Properties dialog box in the printer driver.
2 From the General tab, click the Printing Preferences icon.
3 From the Layout tab, choose Orientation, Print on Both Sides and Page Order.
4 Click OK. The printer will print on both sides of the paper automatically.
1
None
Disable duplex printing.
14
Page 23
Duplex
When you want to do duplex printing, use this function.
If you choose Duplex and click Duplex Settings... button, you can set the following settings.
• Duplex Mode
• Use Duplex Unit
In this mode, the printer prints on both sides of the paper automatically.
• Manual Duplex
In this mode, the printer prints all the even numbered pages first. Then the printer driver will stop and
show the instructions required to re-install the paper. When you click OK the odd numbered pages
will be printed.
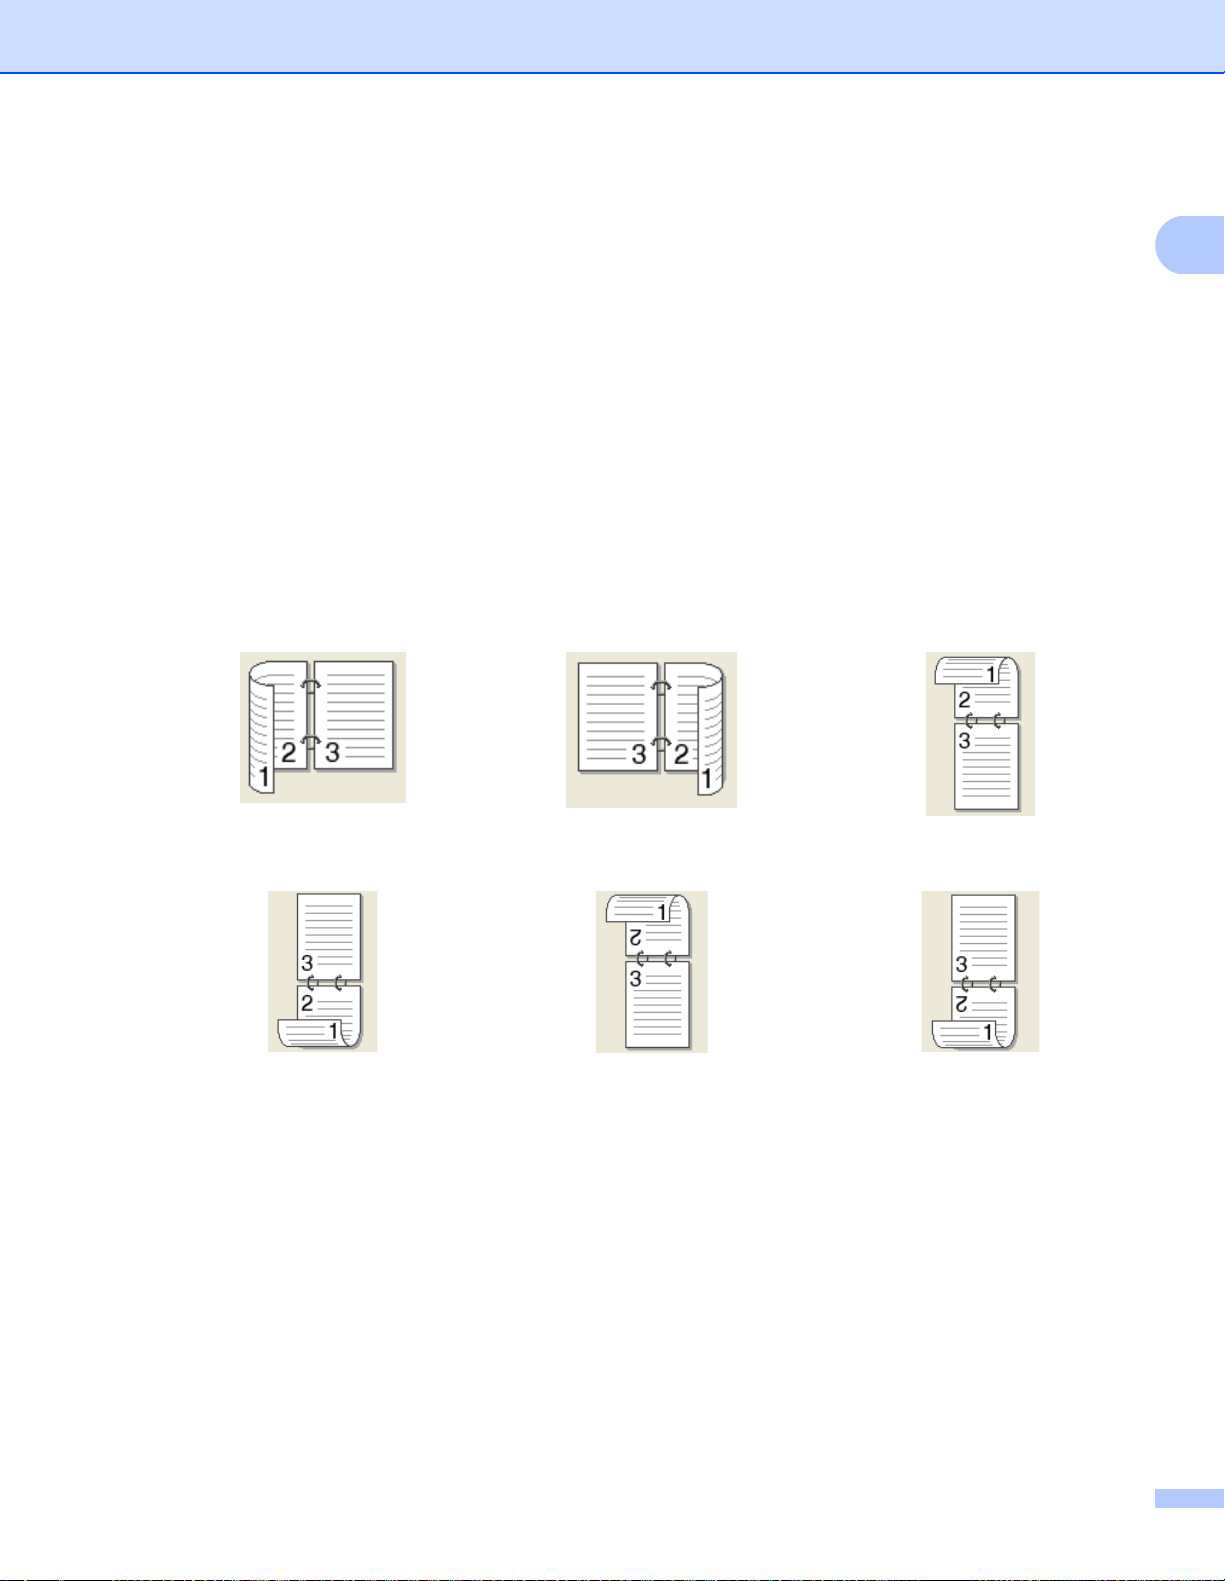
• Duplex Type
There are six types of duplex binding directions available for each orientation.
Flip on Left Edge Flip on Right Edge Flip on Top Edge
Printing
1
Flip on Bottom Edge Flip on Top Edge
(No Reverse)
Flip on Bottom Edge
(No Reverse)
• Binding Offset
If you check the Binding Offset option, you can also specify the offset for binding in inches or
millimeters.
15
Page 24
Printing
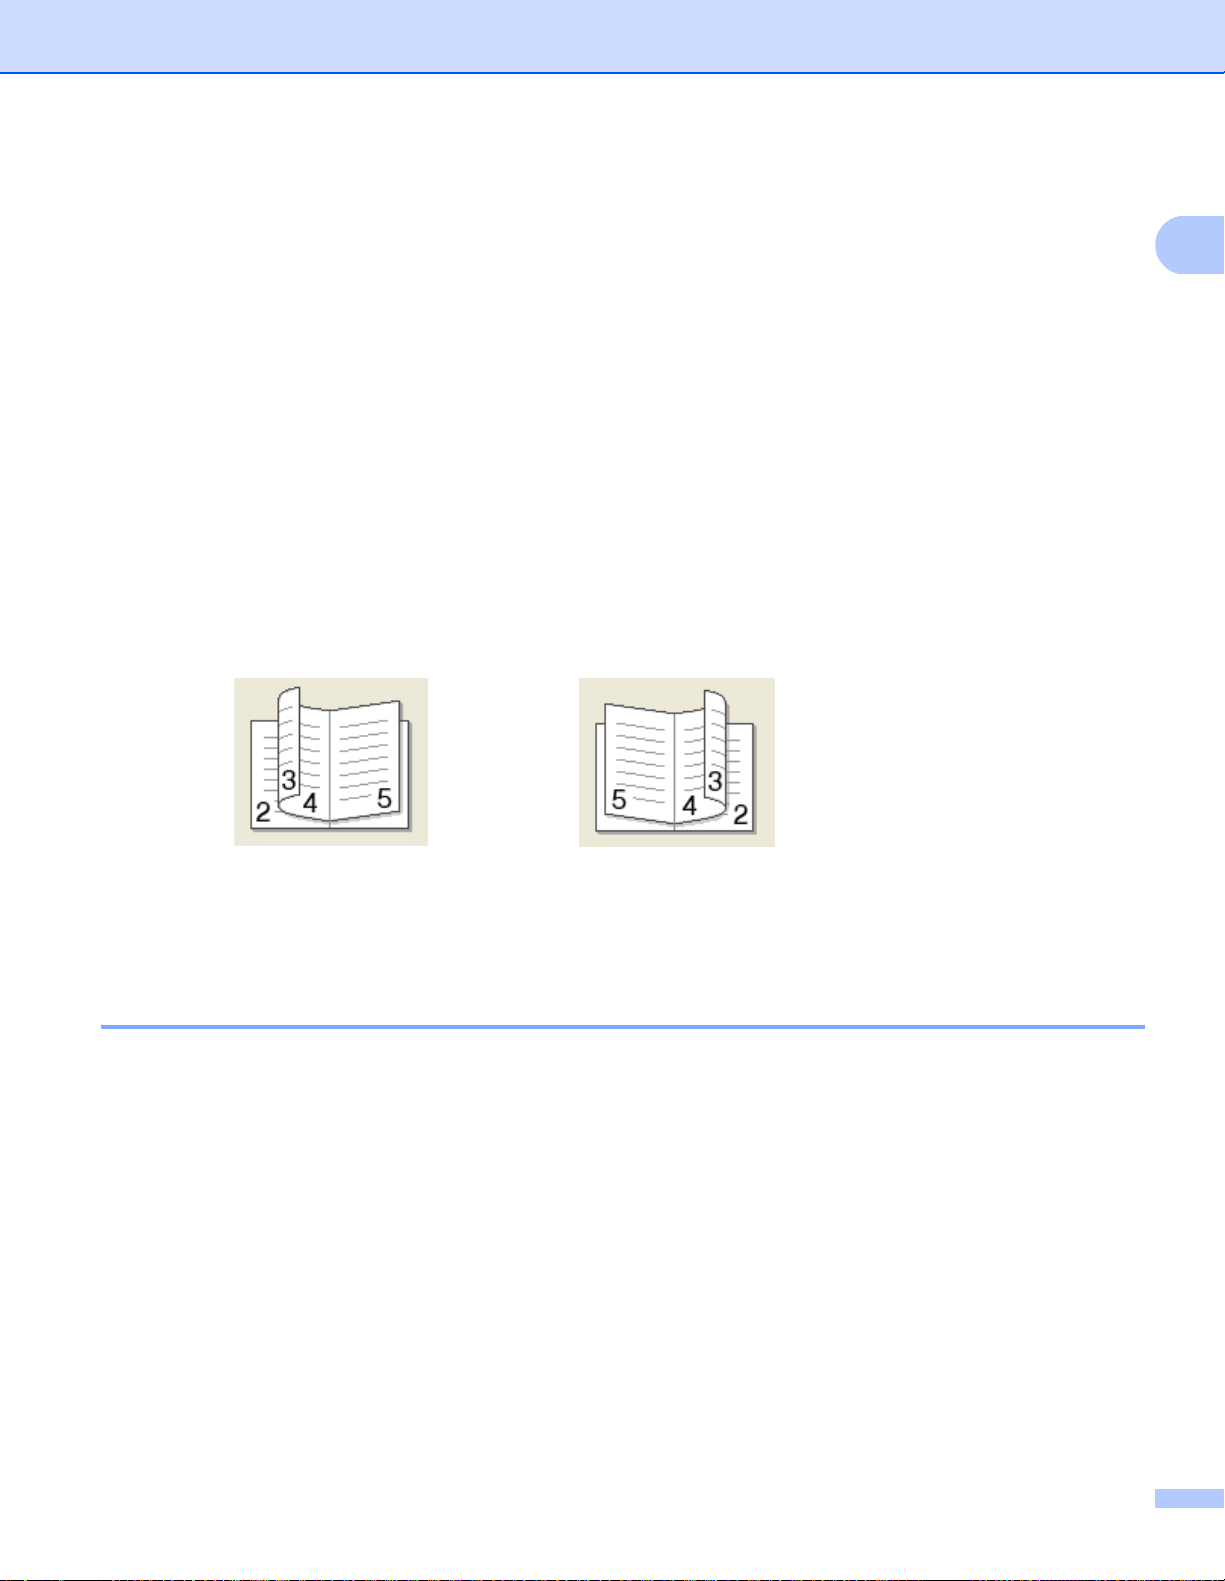
Booklet
When you want to do print a booklet, use this function. To make a booklet, fold the printed pages down in
the middle.
If you choose Booklet and click Duplex Settings... button, you can set the following settings.
• Duplex Mode
• Use Duplex Unit
In this mode, the printer prints on both sides of the paper automatically.
• Manual Duplex
In this mode, the printer prints all the even numbered pages first. Then the printer driver will stop and
show the instructions required to re-install the paper. When you click OK the odd numbered pages
will be printed.
• Duplex Type
There are two types of duplex binding directions available for each orientation.
Flip on Left Edge Flip on Right Edge
1
• Binding Offset
If you check the Binding Offset option, you can also specify the offset for binding in inches or
millimeters.
Paper Source 1
You can choose Auto Select, Tray1, Tray21, MP Tray or Manual and specify separate trays for printing the
first page and for printing from the second page onwards.
1
Available if the optional tray is installed.
16
Page 25
Printing
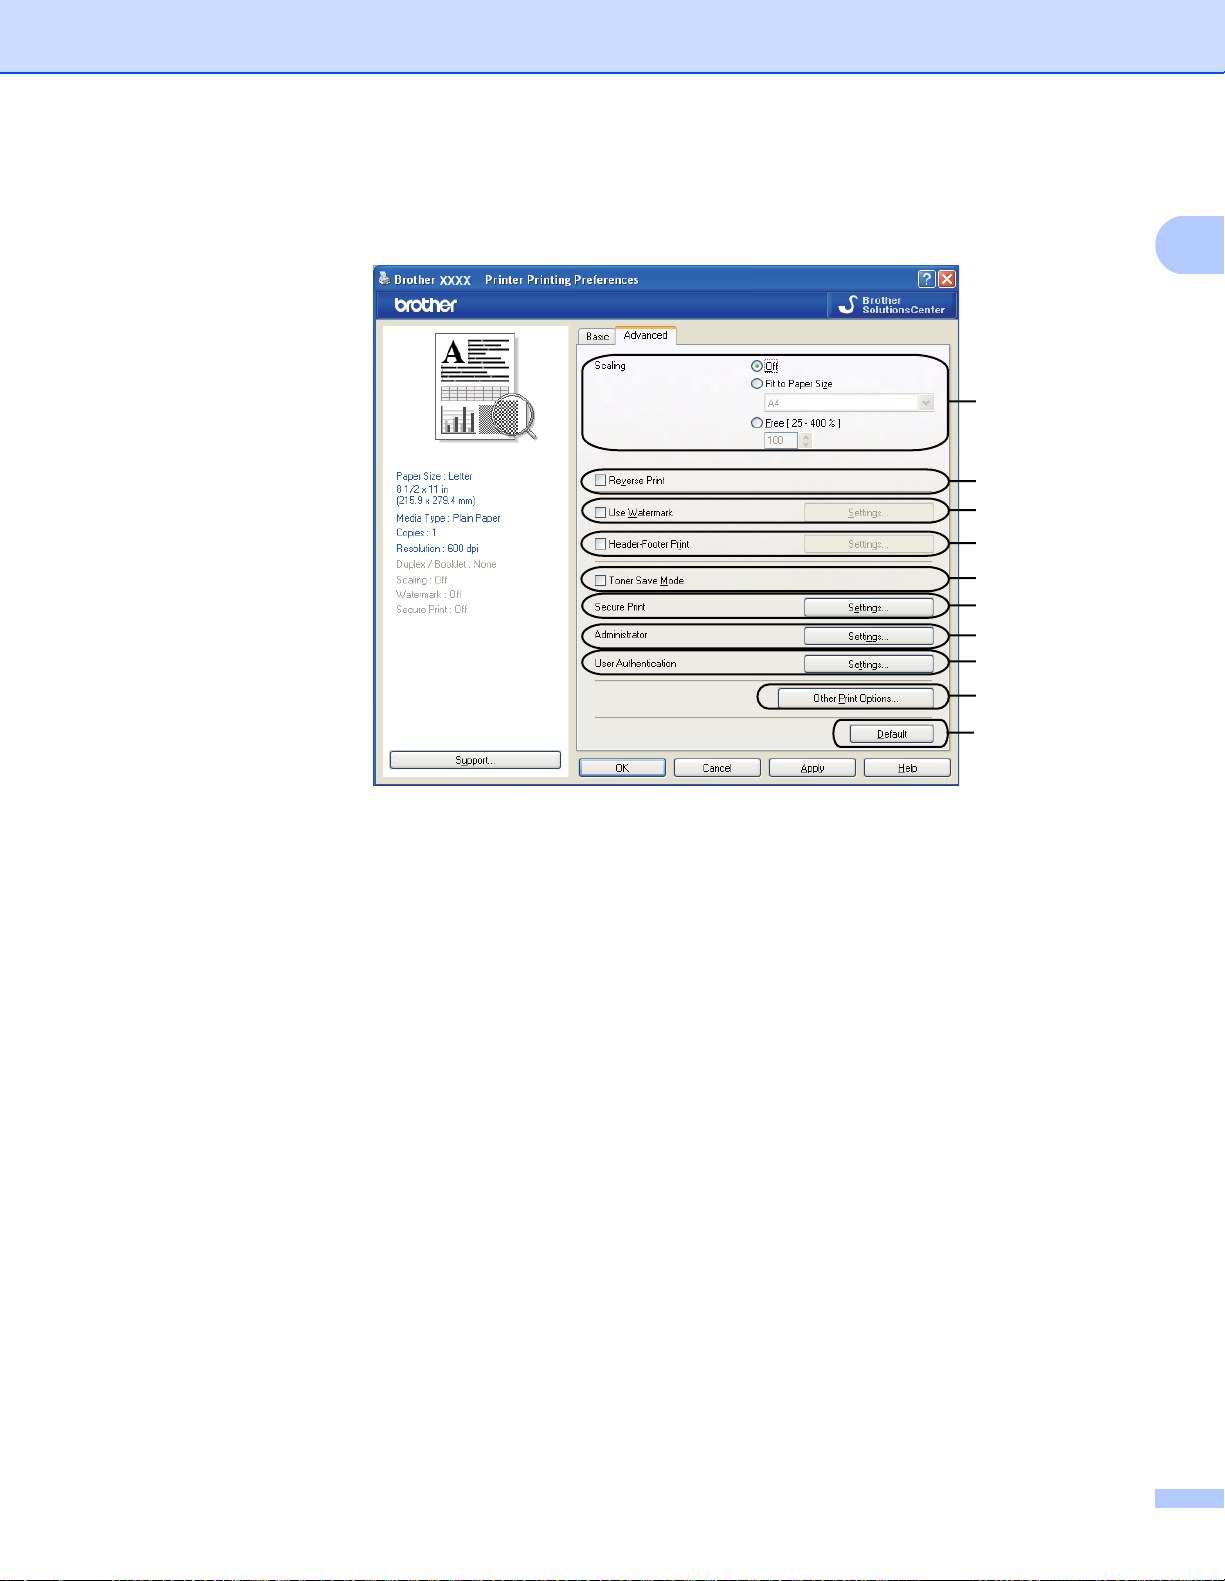
Advanced tab 1
Change the tab settings by clicking one of the appropriate icons:
1
Scaling (1)
Reverse Print (2)
Use Watermark (3)
Header-Footer Print (4)
Toner Save Mode (5)
Secure Print (6)
Administrator (7)
User Authentication (8)
Other Print Options (9)
Default (10)
a Choose the Scaling setting (1).
Check Off if you want to print the document as it appears on your screen.
Check Fit to Paper Size if you want to enlarge or reduce the document to fit the paper size.
Check Free if you want to change the size.
b Check Reverse Print to reverse the data from up to down (2).
17
Page 26

Printing
c You can print a logo or text onto your document as a Watermark (3). You can choose one of the preset
Watermarks, or you can use a bitmap or text file that you have created.
d You can print the date and time on your document from your computer's system clock. You can choose
to restrict printing by PC login user name or ID number and name (4) (see Secure Function Lock 2.0 in
the Network Users Guide).
e You can save running costs by reducing the print density (5).
f You can protect your document using a password (6).
g You can limit access to functions such as scaling and watermark (7). To use this function, you need to
have administrator privileges.
h You can enter your ID and PIN number when you are restricted from PC print by the Secure Function
Lock feature (8).
i Click Other Print Options to set more printer functions (9).
j If you want to return the settings to the default, click Default (10).
1
18
Page 27
Printing
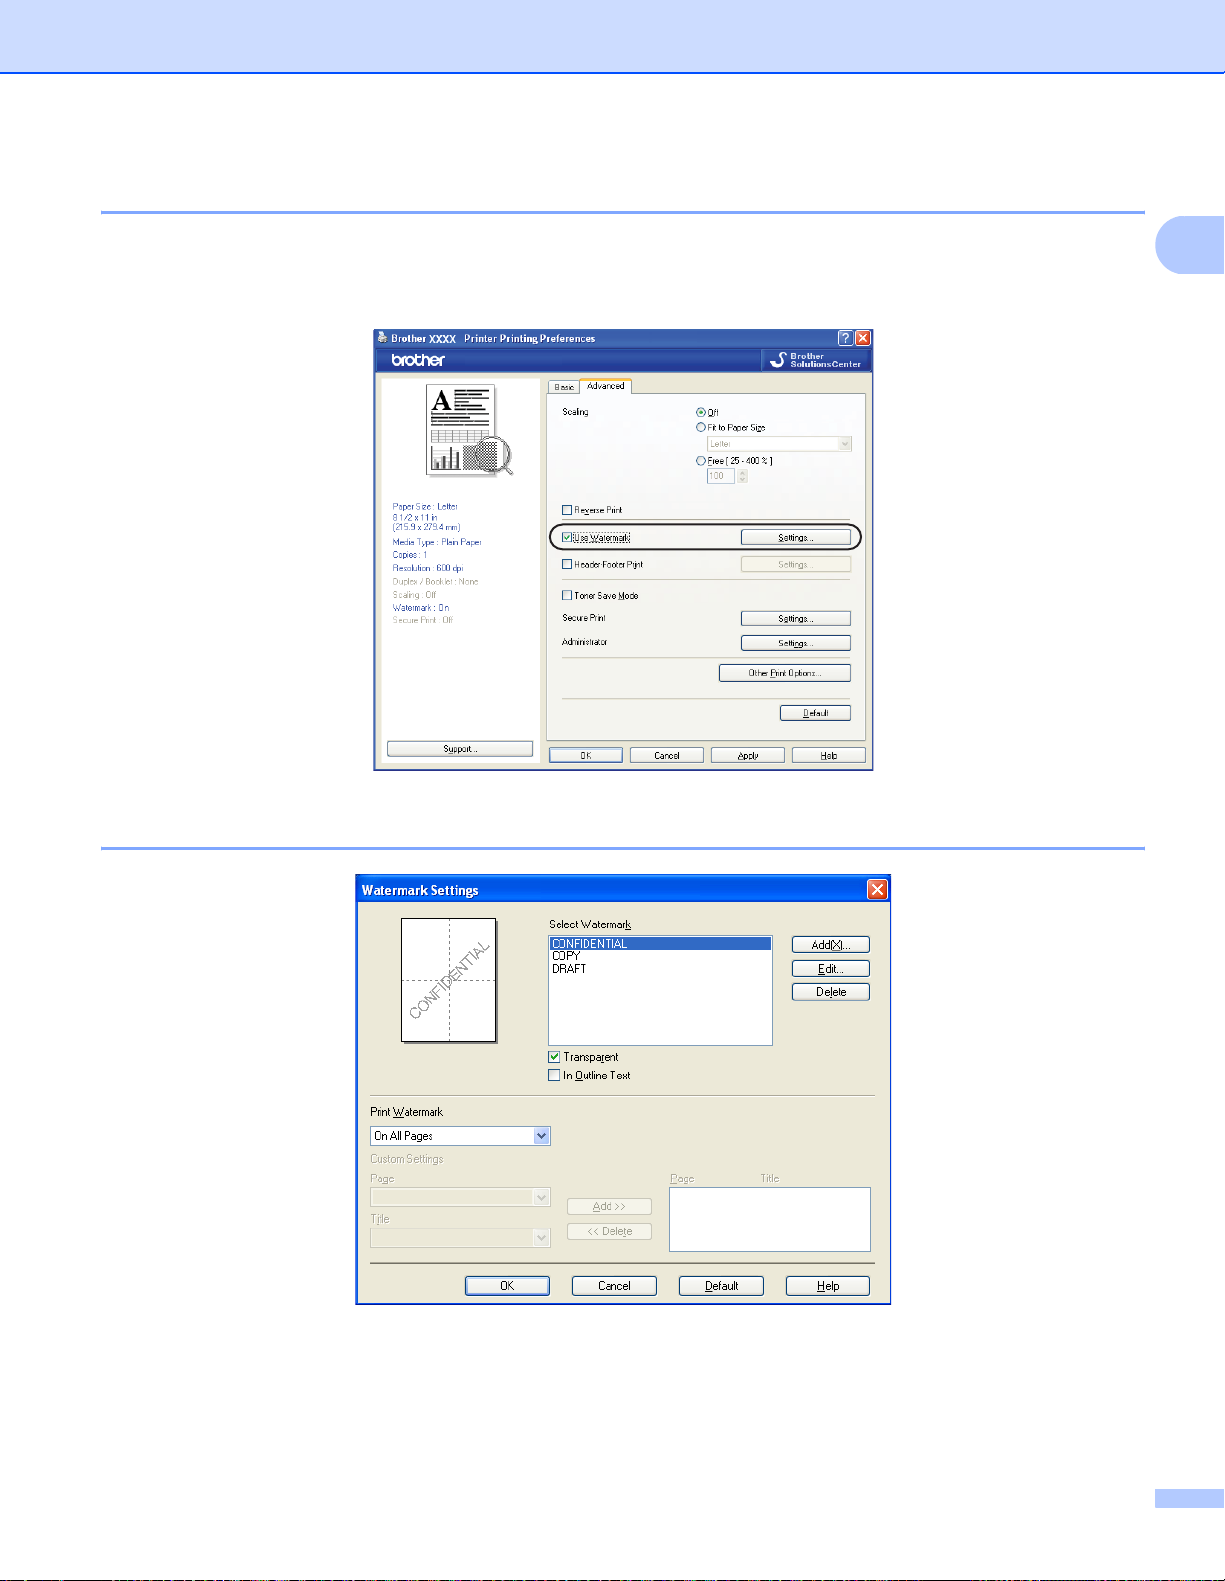
Use Watermark 1
You can put a logo or text into your document as a watermark. You can choose one of the preset Watermarks,
or you can use a bitmap file that you have created. Check Use Watermark and then click the Settings...
button.
1
Watermark Settings 1
19
Page 28
Printing
Transparent 1
Check Transparent to print the watermarked image in the background of your document. If this feature is not
checked then the watermark will be printed on top of your document.
In Outline Text 1
Check In Outline Text if you only want to print an outline of the watermark. It is available when you choose
a text watermark.
Print Watermark 1
You can print the watermark in any of the following ways.
On All Pages
On first page only
From second page
Custom
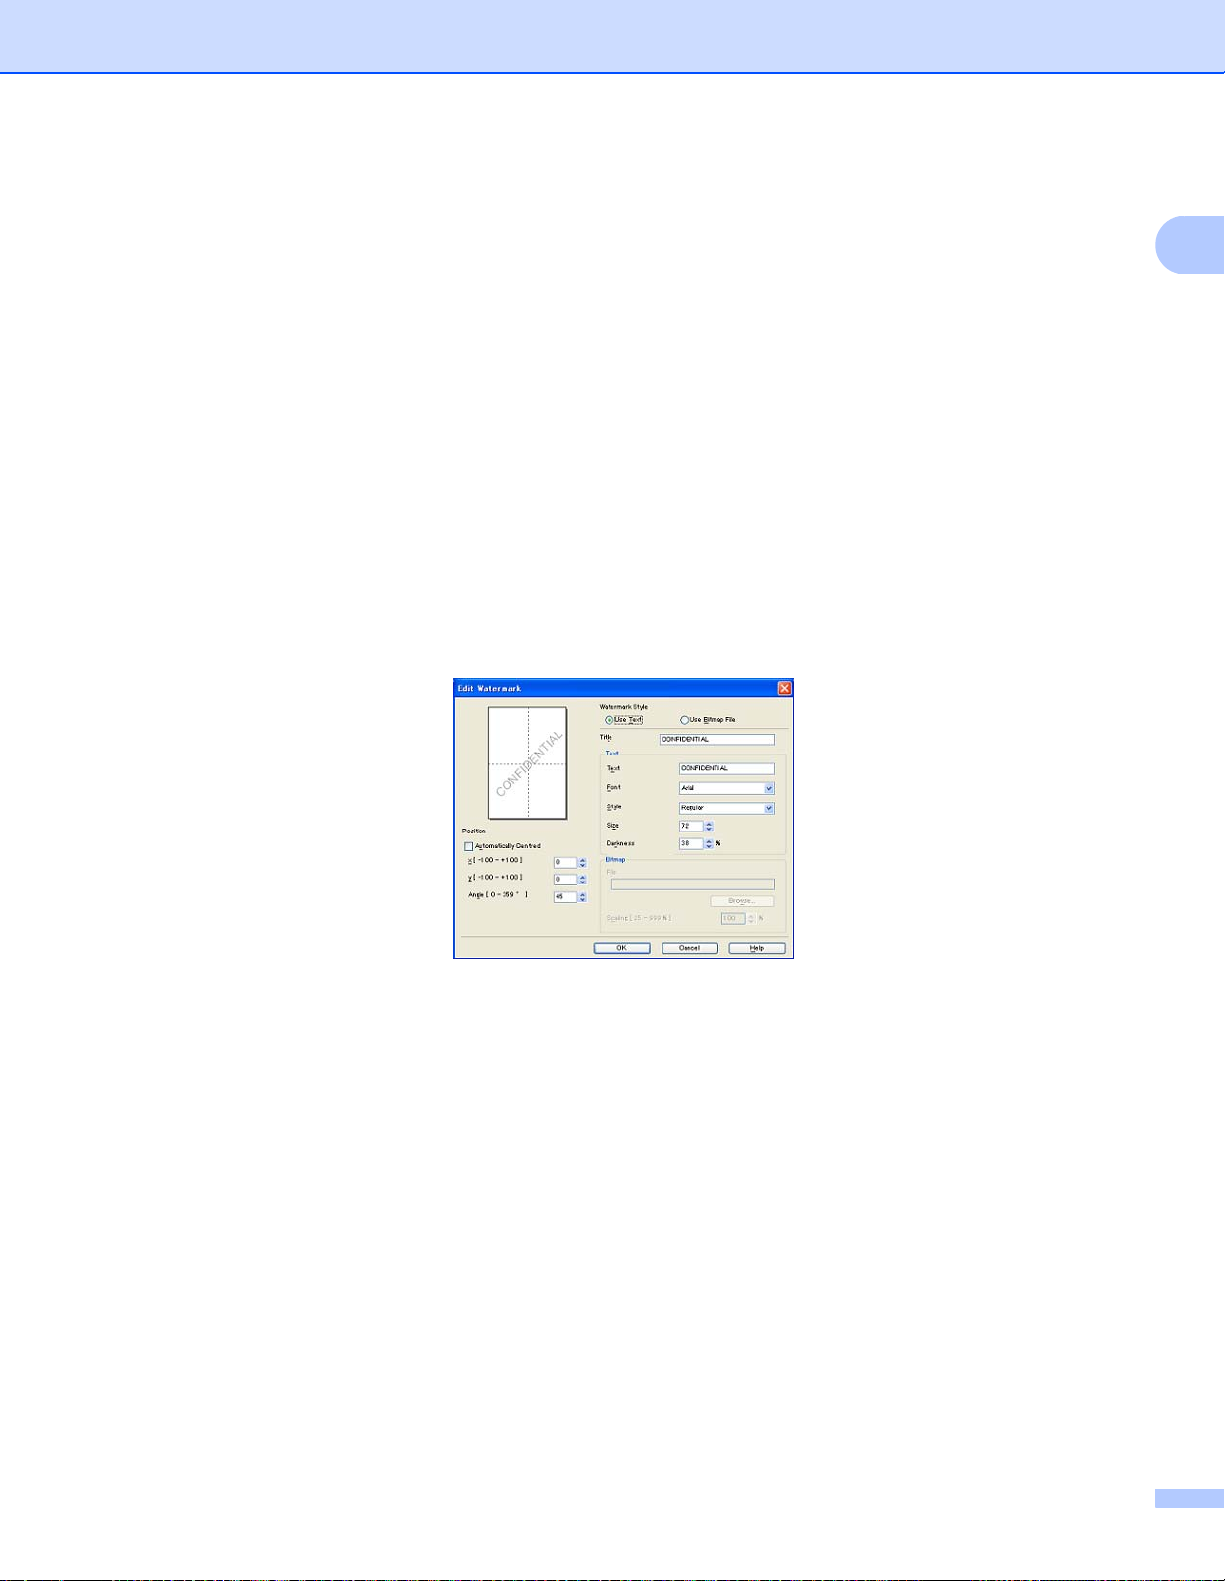
Click the Edit button to change the watermark settings.
1
You can change the watermark’s size and position on the page by selecting the watermark, and clicking the
Edit button. If you want to add a new watermark, click the Add button, and then choose Use Text or
Use Bitmap File in the Watermark Style.
Title
Enter a title you like in the field.
Text
Enter your Watermark Text into the Text box, and then choose the Font, Style, Size and Darkness.
Bitmap
Enter the file name and location of your bitmap image in the File box, or click Browse to search for the
file. You can also set the scaling size of the image.
Position
Use this setting if you want to control the position of the watermark on the page.
20
1
Page 29

Printing
Header-Footer Print 1
When this feature is enabled, it will print the date and time on your document from your computer’s system
clock and the PC login user name or the text you entered. By clicking Settings..., you can customize the
information.
ID Print
If you select Login User Name, your PC login user name will be printed. If you select Custom and enter
the text in the Custom edit box, the text you entered will be printed.
Toner Save Mode 1
You can save running costs by turning on the Toner Save Mode, which reduces the print density (your prints
appear lighter).
Note
• We do not recommend Toner Save Mode for printing photo or gray scale images.
• Toner Save Mode is not available for HQ 1200 and 1200 dpi resolution.
Secure Print 1
Secure documents are documents that are password protected when they are sent to the machine. Only the
people who know the password will be able to print them. Since the documents are secured at the machine,
you must enter the password using the control panel of the machine to print them.
1
To send a secured document:
a Click Settings... of the Secure Print and check Secure Print.
b Enter your password and click OK.
c To print secured documents, you must enter your password from the control panel of the machine. (See
Secure Key on page 5.)
Note
Printing multiple copies is not available when Secure Print is set to on.
To delete a secured document:
You need to use the control panel of the machine to delete a secured document. (See Secure Key on page 5.)
21
Page 30

Printing
Administrator 1
Administrators have the authority to limit access to functions such as scaling and watermark.
Password
Enter the password into this box.
Set Password
Click here to change the password.
Copies Lock
Set the copy pages selection to one to prevent multiple copy printing.
Multiple Page & Scaling Lock
Lock the scaling and multiple page setting to prevent changes being made.
Watermark Lock
1
Lock the current settings of the Watermark option to prevent changes being made.
Header-Footer Print Lock
Lock the current settings of the Header-Footer Print option to prevent changes being made.
User Authentication 1
If you are restricted from PC Print by the Secure Function Lock feature, you need to set your ID and PIN
number in the User Authentication dialog box.
Click Settings... of the User Authentication and enter your ID and PIN number. If your PC login name is
registered to Secure Function Lock, you can check the Use PC Login Name box instead of entering your ID
and PIN number.
Note
• If you want to see information about your ID such as the status of the restricted features and the number
of remaining pages you are allowed to print, click Verify. The Authentication result dialog box will
appear.
• If you want to make the Verify dialog box appear each time you print,
check Show print status before printing.
• If you want to enter your ID and PIN number each time you print,
check Enter ID Name/PIN for each print job.
22
Page 31

Printing
Other Print Options 1
You can set the following in Printer Function:
Macro
Density Adjustment
Improve Print Output
Macro 1
You can save a page of a document as a macro to printer memory. You can also execute the saved macro
(you can use the saved macro as an overlay on any document). This will save time and increase printing
speed for often used information such as forms, company logos, letterhead formats or invoices.
Density Adjustment 1
Increase or decrease the print density.
Note
The Density Adjustment is not available when you set the resolution to HQ1200.
Improve Print Output 1
This feature allows you to improve a print quality problem.
Reduce Paper Curl
1
If you choose this setting, the paper curl may be reduced. If you are printing only a few pages, you do not
need to choose this setting. We recommend that you change the printer driver setting in Media Type to a
thin setting. (For more information about reducing paper curl, see Improving the print quality in the User’s
Guide.)
Improve Toner Fixing
If you choose this setting, the toner fixing on paper may be improved. If this selection does not improve
the situation enough, select Thicker paper in the Media type settings.
23
Page 32

Printing
Accessories tab 1
Note
From the Start menu, select Control Panel and then Printers and Faxes. Right-click the
Brother MFC-XXXX Printer (Brother DCP-XXXX Printer) icon and select Properties to access the
Accessories tab.
1
Printers for Windows® 2000 users.
When you install optional accessories, you can add and choose their settings in the Accessories tab as
follows.
1
Available Options (1)
You can manually add and remove the options that are installed on the printer. Tray settings will match
the installed options.
Paper Source Setting (2)
This feature shows the current paper size for each paper tray.
Serial No. (3)
By clicking Auto Detect, the printer driver will query the printer and display its serial number. If it fails to
receive the information, the screen will display "---------".
24
Page 33

Printing
Auto Detect (4)
The Auto Detect function finds the currently installed optional devices and shows the available settings in
the printer driver. When you click Auto Detect, options that are installed on the printer will be listed in
Available Options (1). You can manually add or remove the options by choosing an optional device you
want to add or remove, and then clicking Add or Remove.
Note
The Auto Detect function is not available under the following printer conditions:
• The printer power switch is off.
• The printer is in an error state.
• The printer is in a network shared environment.
• The cable is not connected to the printer correctly.
1
25
Page 34

Printing
Support 1
Click Support... in the Printing Preferences dialog box.
1
1
2
3
4
5
6
Brother Solutions Center (1)
The Brother Solutions Center (http://solutions.brother.com
) is a web site offering information about your
Brother product including FAQs (Frequently Asked Questions), User’s Guides, driver updates and tips for
using your printer.
Genuine Supplies Website... (2)
You can visit our web site for original/genuine Brother supplies by clicking this button.
26
Page 35

Print Settings (3)
This will print pages showing the configuration of the printer's internal settings.
Print Fonts (4)
This will print pages showing the internal fonts of the printer.
Check Setting...(5)
You can check the current driver settings.
About... (6)
This will show the list of the printer driver files and version information.
Printing
1
27
Page 36

Features in the BR-Script (PostScript® 3™ language
Printing
emulation) printer driver 1
For more information, see the Help text in the printer driver.
Note
The screens in this section are from Windows
operating system.
Printing Preferences 1
Note
You can access the Printing Preferences dialog box by clicking Printing Preferences... in the General
tab of the Brother MFC-XXXX BR-Script3 Properties (or Brother DCP-XXXX BR-Script3 Properties)
dialog box.
Layout tab
You can change the layout setting by choosing the settings for Orientation, Print on Both Sides
(Duplex), Page Order and Pages Per Sheet.
®
XP. The screens on your PC may vary depending on your
1
• Orientation
Orientation selects the position of how your document will be printed.
(Portrait, Landscape or Rotated Landscape)
• Print on Both Sides
If you want to do duplex printing, choose Flip on Short Edge or Flip on Long Edge.
28
Page 37

• Page Order
Specifies the order in which the pages of your document will be printed. Front to Back prints the
document so that page 1 is on top of the stack. Back to Front prints the document so that page 1 is on
the bottom of the stack.
• Pages Per Sheet
Choose how many pages will appear on each side of the paper.
Paper/Quality tab
Choose the Paper Source.
Printing
1
• Paper Source
You can choose Automatically Select, Auto Select, Tray1, Tray2
1
Available if the optional tray is installed.
1
, MP Tray or Manual Feed.
• Automatically Select
This setting will automatically pull paper from any paper source (tray or manual feed slot) that has a
paper size defined in the printer driver that matches your document.
• Auto Select
This setting will automatically pull paper from any paper source (tray or manual feed slot) that has a
paper size defined in the machine that matches your document.
• Tray1
This setting will pull paper from Tray1.
• Tray2
This setting will pull paper from Tray2. (Available if the optional tray is installed.)
• MP Tray
This setting will pull paper from the MP Tray. The paper size needs to match the defined paper size.
29
Page 38

Printing
Advanced options 1
You can access the Advanced options by clicking the Advanced... button on the Layout tab or
Paper/Quality tab.
a Choose the Paper Size and Copy Count (1).
Paper Size
From the drop-down box choose the Paper Size you are using.
1
Copy Count
The copy selection sets the number of copies that will be printed.
b Set the Scaling and TrueType Font settings (2).
Scaling
Specifies whether to reduce or enlarge documents, and by what percentage.
TrueType Font
Specifies the TrueType font options. Click Substitute with Device Font (the default) to use
equivalent printer fonts for printing documents that contain TrueType fonts. This will permit faster
printing; however, you might lose special characters not supported by the printer font. Click
Download as Softfont to download TrueType fonts for printing instead of using printer fonts.
30
Page 39

c You can change settings by choosing the setting in the Printer Features list (3):
Print Quality
Specifies the print resolution.
Printing
1
Media Type
You can use the following types of media in your machine. For the best print quality, select the type
of media that you wish to use.
Plain Paper Thin Paper Thick Paper Thicker Paper Bond Paper
Transparencies Envelopes Env. Thick Env. Thin Recycled Paper
Secure Print
Secure Print allows you to secure documents that are password protected when they are sent to the
machine. Only the people who know the password will be able to print them. Since the documents are
secured at the machine, you must enter the password using the control panel of the machine. The
secured document must have a Password and Job Name. The default setting is Off.
Password
Choose the password for your secured document that you send to the machine from the drop-down
box.
Job Name
Choose the Job name from the drop-down list for your secured document that you sent to the
machine.
Toner Save
You can conserve toner using this feature. When you set Toner Save Mode to On, your prints appear
lighter. The default setting is Off.
Note
We do not recommend Toner Save to On for printing photo or gray scale images.
31
Page 40

Halftone Screen Lock
Stops other applications from modifying the Halftone settings. The default setting is on.
High Quality Image Printing
You can increase the quality of image printing. If you set High Quality Image Printing to On, the
printing speed will be slower.
Improve Print Output
This feature allows you to improve a print quality problem.
• Reduce Paper Curl
If you choose this setting, the paper curl may be reduced.
If you are printing only a few pages, you do not need to choose this setting. Change the printer
driver setting in Media Type to a thin setting. (For more information about reducing paper curl, see
Improving the print quality in the User’s Guide.)
• Improve Toner Fixing
If you choose this setting, the toner fixing on paper may be improved. If this selection does not
improve the situation enough, select Thicker paper in Media type settings.
Density Adjustment
Printing
1
Increase or decrease the print density.
Note
The Density Adjustment is not available when you set the Print Quality to HQ 1200.
Ports tab 1
If you want to change the port where your printer is connected or the path to the network printer you are using,
choose or add the port you want to use.
32
Page 41

2
The scanning operations and drivers will be different depending on your operating system. The machine uses
a TWAIN compliant driver for scanning documents from your applications.
(Windows
Two scanner drivers are installed. A TWAIN compliant scanner driver (See Scanning a document using
the TWAIN driver on page 33) and a Windows
document using the WIA driver (Windows
Windows
Note
• For ScanSoft™ PaperPort™ 11SE, see Using ScanSoft™ PaperPort™ 11SE with OCR by NUANCE™
on page 55.
• If your PC is protected by a firewall, and is unable to network scan, you may need to configure the firewall
settings to allow communication through port number 54925 and 137. (See Firewall settings (For Network
users) on page 121.)
Scanning 2
®
XP/ Windows Vista®)
®
Imaging Acquisition (WIA) driver (See Scanning a
®
XP/Windows Vista®) on page 40).
®
XP and Windows Vista® users can choose either one of the two when you scan documents.
2
Scanning a document using the TWAIN driver 2
The Brother MFL-Pro Suite software includes a TWAIN compliant scanner driver. TWAIN drivers meet the
standard universal protocol for communicating between scanners and applications. This means that you can
not only scan images directly into the PaperPort™ 11SE viewer that Brother included with your machine, but
you can also scan images directly into hundreds of other software applications that support TWAIN scanning.
These applications include popular programs like Adobe® Photoshop®, Adobe® PageMaker®, CorelDraw®
and many more.
Scanning a document into the PC 2
There are two ways in which you can scan a whole page. You can either use the ADF (automatic document
feeder) or the scanner glass.
a Load your document.
b Start the ScanSoft™ PaperPort™ 11SE software that was installed during the MFL-Pro Suite installation
to scan a document.
Note
The instructions for scanning in this Guide are for when you use ScanSoft™ PaperPort™ 11SE. The
scanning steps may vary when using other software applications.
c Click File, then Scan or Get Photo.... You can also click the Scan or Get Photo button.
The Scan or Get Photo panel appears on the left side of the screen.
d Click the Select button.
33
Page 42

e Choose the scanner you are using from the Available Scanners list.
Note
Choose TWAIN:TW-Brother MFC-XXXX (TWAIN:TW-Brother DCP-XXXX),
TWAIN:TW-Brother MFC-XXXX LPT (TWAIN:TW-Brother DCP-XXXX LPT) or
TWAIN:TW-Brother MFC-XXXX LAN (TWAIN:TW-Brother DCP-XXXX LAN).
f Check the Display scanner dialog box on the Scan or Get Photo panel.
g Click Scan.
The Scanner Setup dialog box appears.
h Adjust the following settings, if needed, in the Scanner Setup dialog box:
Scan (Image Type) (1)
Resolution (2)
Scan Type (3)
Reduce Noise (4)
Brightness (5)
Scanning
2
Contrast (6)
Document Size (7)
Duplex(two-sided) Scanning (8)
(Not available for the DCP-8080DN and MFC-8480DN)
34
Page 43

Scanning
i Click Start.
When scanning is finished, click Cancel to return to the PaperPort™ 11SE window.
Note
• After you select a document size, you can adjust the scanning area further by clicking the left mouse button
and dragging it. This is required when you want to crop an image when scanning. (See Pre-Scanning to
crop a portion you want to scan on page 35)
• For models that support duplex scanning
You cannot adjust the scanning area.
You cannot use legal size paper for duplex scanning.
You cannot use the PreScan button to preview an image.
Pre-Scanning to crop a portion you want to scan 2
You can preview your image and crop unwanted portions before scanning by using the PreScan button.
When you are satisfied with the preview, click the Start button in the Scanner Setup dialog box to scan the
image.
2
a Follow the steps from a to g of Scanning a document into the PC on page 33.
b Choose the settings for Scan (Image Type), Resolution, Scan Type, Brightness, Contrast and
Document Size, as needed.
Note
Pre-Scanning is not available if you choose Duplex(two-sided) Scanning.
c Click PreScan.
The whole image is scanned into the PC and appears in the Scanning Area (1) of the Scanner Setup
dialog box.
1
35
Page 44

d Press and hold down the left mouse button and drag it over the portion you want to scan.
1
1 Scanning area
Note
You can enlarge the image using the icon, and then use the icon to restore the image to its
original size.
e Load your document again.
Scanning
2
Note
Skip this step if you loaded the document on the scanner glass in step a.
f Click Start.
This time only the chosen area of the document appears in the PaperPort™ 11SE window (or your
application window).
g In the PaperPort™ 11SE window, use the options available to refine the image.
Settings in the Scanner Setup dialog box 2
Image Type 2
Choose the output image type from Photo, Web or Text. Resolution and Scan Type will be altered for each
default setting.
The default settings are listed in the table below:
Image Type Resolution Scan Type
Photo Use for scanning photo images. 300 × 300 dpi 24-bit color
Web Use for attaching the scanned image to web pages. 100 × 100 dpi 24-bit color
Text Use for scanning text documents. 200 × 200 dpi Black & White
36
Page 45

Scanning
Resolution 2
You can choose a scanning resolution from the Resolution drop-down list. Higher resolutions take more
memory and transfer time, but produce a finer scanned image. The following table shows the resolutions you
can choose and the available colors.
Resolution Black & White/
Gray (Error Diffusion)
100 × 100 dpi Yes Yes Yes
150 × 150 dpi Yes Yes Yes
200 × 200 dpi Yes Yes Yes
300 × 300 dpi Yes Yes Yes
400 × 400 dpi Yes Yes Yes
600 × 600 dpi Yes Yes Yes
1200 × 1200 dpi Yes No Yes
2400 × 2400 dpi Yes No Yes
4800 × 4800 dpi Yes No Yes
9600 × 9600 dpi Yes No Yes
19200 × 19200 dpi Yes No Yes
256 Color True Gray/24 bit Color
2
Scan Type 2
Black & White
Use for text or line art.
Gray (Error Diffusion)
Use for photographic images or graphics. (Error Diffusion is a method for creating simulated gray images
without using true gray dots. Black dots are put in a specific pattern to give the appearance of gray.)
True Gray
Use for photographic images or graphics. This mode is more exact because it uses up to 256 shades of
gray.
256 Color
Uses up to 256 colors to scan the image.
24 bit Color
Uses up to 16.8 million colors to scan the image.
Although using 24 bit Color creates an image with the most accurate color, the image file will be about
three times larger than a file created with 256 Color. It requires the most memory and has the longest
transfer time.
Reduce Noise 2
You can reduce noise of scanned images. When noise appears in scanned images or prints of the scanned
image, this setting can reduce the noise.
37
Page 46

Scanning
Note
The Reduce noise setting is only available when 24 bit Color is chosen and the Resolution is set to 300
× 300 dpi, 400 × 400 dpi or 600 × 600 dpi.
Brightness 2
Adjust the setting (-50 to 50) to get the best image. The default value is 0, representing an average.
You can set the Brightness level by dragging the slide bar to the right or left to lighten or darken the image.
You can also enter a value in the box to set the level.
If the scanned image is too light, set a lower Brightness level and scan the document again. If the image is
too dark, set a higher Brightness level and scan the document again.
Note
The Brightness setting is only available when Black & White, Gray (Error Diffusion) or True Gray is
chosen.
Contrast 2
2
You can increase or decrease the Contrast level by moving the slide bar to the left or right. An increase
emphasizes dark and light areas of the image, while a decrease reveals more detail in gray areas. You can
also enter a value in the box to set the Contrast.
Note
The Contrast setting is only available when Gray (Error Diffusion) or True Gray is chosen.
When scanning photographs or other images for use in a word processor or other graphics application, try
different settings for the contrast and resolution to see which setting best suits your needs.
Document Size 2
Choose one of the following sizes:
A4 8.3 x 11.7 in (210 × 297 mm)
JIS B5 7.2 x 10.1 in (182 × 257 mm)
Letter 8 1/2 × 11 in (215.9 x 279.4 mm)
Legal 8 1/2 × 14 in (215.9 x 355.6 mm)
A5 5.8 × 8.3 in (148 x 210 mm)
Executive 7 1/4 × 10 1/2 in (184.1 x 266.7 mm)
Business Card 3.5 x 2.4 in (90 x 60 mm)
To scan business cards, choose the Business Card size, and then place the business card face down in
the center of the left hand side of the scanner glass, as indicated by the document guidelines.
Photo 4 × 6 in (10 x 15 cm)
Index Card 5 × 8 in (127 x 203.2 mm)
Photo L 3.5 × 5 in (89 x 127 mm)
38
Page 47

Photo 2L 5 × 7 in (13 x 18 cm)
Postcard 1 3.9 x 5.8 in (100 x 148 mm)
Postcard 2 (Double) 5.8 x 7.9 in (148 x 200 mm)
Scanning
Custom
If you choose Custom as the size, the Custom Document Size dialog box appears.
Enter the Name, Width and Height for the document.
You can choose ‘mm’ or ‘inch’ as the unit for Width and Height.
Note
• You can see the actual paper size you chose on the screen.
2
• Width: shows the width of scanning area
• Height: shows the height of scanning area
• Data Size: shows the rough data size in Bitmap format. The size will be different for other file formats
such as JPEG.
• User adjustable from 0.35 x 0.35 in to 8.5 x 14 in or 8.9 x 8.9 mm to 215.9 x 355.6 mm
39
Page 48

Scanning
Scanning a document using the WIA driver (Windows® XP/Windows Vista®) 2
WIA compliant 2
For Windows® XP/Windows Vista® you can choose Windows® Image Acquisition (WIA) for scanning images
from the machine. You can scan images directly into the PaperPort™ 11SE viewer that Brother included with
your machine or you can scan images directly into any other application that supports WIA or TWAIN
scanning.
Note
• Windows
• Duplex Scan is not available for legal size paper.
®
2000/XP do not support Duplex Scan in the WIA driver.
Scanning a document into the PC 2
There are two ways in which you can scan a whole page. You can either use the ADF (automatic document
feeder) or the scanner glass.
If you want to scan and then crop a portion of a page after pre-scanning the document, you need to use the
scanner glass. (See Pre-Scanning to crop a portion you want to scan using the scanner glass on page 42.)
a Load your document.
b Start the ScanSoft™ PaperPort™ 11SE software that was installed during the MFL-Pro Suite installation
to scan a document.
2
Note
The instructions for scanning in this Guide are for when you use ScanSoft™ PaperPort™ 11SE. The
scanning steps may vary when using other software applications.
c Click File, then Scan or Get Photo.... You can also click the Scan or Get Photo button.
The Scan or Get Photo panel appears on the left side of the screen.
d Click Select button.
e Choose the scanner you are using from the Available Scanners list.
Note
Choose WIA:Brother MFC-XXXX (WIA:Brother DCP-XXXX), WIA:Brother MFC-XXXX LPT
(WIA:Brother DCP-XXXX LPT) or WIA:Brother MFC-XXXX LAN (WIA:Brother DCP-XXXX LAN).
f Check the Display scanner dialog box on the Scan or Get Photo panel.
g Click Scan.
The Scanner Setup dialog box appears.
40
Page 49

h Adjust the following settings, if needed, in the Scanner Setup dialog box:
Scanning
1
2
3
4
1 Paper source
2 Picture type
3 Adjust the quality of the scanned picture
4 Page size
i Choose Document Feeder from the Paper source drop-down list (1).
j Choose the picture type (2).
k Choose the Paper size from the drop-down list (4).
2
l If you need advanced settings, click Adjust the quality of the scanned picture (3). You can choose
Brightness, Contrast, Resolution and Picture type from Advanced Properties. Click OK after you
choose a setting.
41
Page 50

Scanning
Note
The scanner resolution can be set as high as 1200 dpi.
For resolutions greater than 1200 dpi, use the Scanner Utility. (See Scanner Utility on page 43.)
m Click the Scan button in the Scan dialog box.
The machine starts scanning the document.
Pre-Scanning to crop a portion you want to scan using the scanner glass 2
The Preview button is used to preview an image for cropping any unwanted portions from the image. When
you are satisfied with the preview, click the Scan button in the Scan dialog box to scan the image.
a Follow the steps from a to g of Scanning a document into the PC on page 40.
b Choose Flatbed in the Paper source drop-down list (1).
2
1
2
3
1 Paper source
2 Picture type
3 Adjust the quality of the scanned picture
4 Scanning area
c Choose the picture type (2).
d Click Preview.
The whole image is scanned into the PC and appears in the scanning area (4).
4
42
Page 51

Scanning
e Press and hold down the left mouse button and drag it over the portion you want to scan.
f If you need advanced settings, click Adjust the quality of the scanned picture (3). You can choose
Brightness, Contrast, Resolution and Picture type from Advanced Properties. Click OK after you
choose a setting.
2
g Click the Scan button in the Scan dialog box.
The machine starts scanning the document.
This time only the chosen area of the document appears in the PaperPort™ 11SE window (or your
application window).
Scanner Utility 2
The Scanner Utility is used for configuring the WIA scanner driver for resolutions greater than 1200 dpi and
for changing the paper size. If you want to set Legal size as the default size, use this utility to change the
setting. You must restart your PC for the new settings to take effect.
43
Page 52

Scanning
Running the utility
You can run the utility by choosing the Scanner Utility located in the
Start/All Programs/Brother/MFC-XXXX (or DCP-XXXX) (where XXXX is your model name)/
Scanner Settings/Scanner Utility.
Note
If you scan the document at a resolution greater than 1200 dpi, the file size may be very large. Make sure
that you have enough memory and hard disk space for the size of the file you are trying to scan. If you do
not have enough memory or hard disk space then your PC may freeze and you could lose your file.
2
Note
(Windows Vista
®
) The User Account Controlscreen appears, do the following.
• For users who have administrator rights: Click Allow.
• For users who do not have administrator rights: Enter the administrator password and click OK.
44
Page 53

Scanning
Scanning a document using the WIA driver (Windows Photo Gallery and Windows Fax and Scan) 2
Scanning a document into the PC 2
There are two ways in which you can scan a whole page. You can either use the ADF (automatic document
feeder) or the scanner glass.
If you want to scan and then crop a portion of a page after pre-scanning the document, you need to use the
scanner glass. (See Pre-Scanning to crop a portion you want to scan using the scanner glass on page 46.)
Note
• Duplex Scan is not supported by the DCP-8080DN and MFC-8480DN.
• Duplex Scan is not available for legal size paper.
a Load your document.
b Open your software application to scan the document.
c Do one of the following:
(Windows Photo Gallery)
Click File, then Import from Camera or Scanner....
(Windows Fax and Scan)
Click File, New, then Scan....
2
d Choose the scanner you want to use.
e Click Import.
The Scan dialog box appears.
45
Page 54

f Adjust the following settings, if needed, in the Scanner dialog box.
Scanning
1Profile
2Source
3 Paper size
4 Color format
5 File type
6 Resolution
7 Brightness
1
2
3
4
5
6
7
8
2
8Contrast
Note
The scanner resolution can be set as high as 1200 dpi.
For resolutions greater than 1200 dpi, use the Scanner Utility.
g Click the Scan button in the Scan dialog box.
The machine starts scanning the document.
Pre-Scanning to crop a portion you want to scan using the scanner glass 2
The Preview button is used to preview an image for cropping any unwanted portions from the image. When
you are satisfied with the preview, click the Scan button in the Scan dialog box to scan the image.
a Follow the steps from a to e of Scanning a document into the PC on page 45.
b Put the document face down on the scanner glass.
46
Page 55

Scanning
c ChooseFlatbed in the Source drop-down list. Adjust the following settings, if needed, in the Scanner
dialog box.
1Profile
2Source
3 Color format
4 File type
5 Resolution
6 Brightness
7Contrast
8 Scanning area
1
2
3
4
5
6
7
8
2
d Click Preview.
The whole image is scanned into the PC and appears in the scanning area (8).
e Press and hold down the left mouse button and drag it over the portion you want to scan.
f Click the Scan button in the Scan dialog box.
The machine starts scanning the document.
This time only the chosen area of the document appears in your application window.
47
Page 56

Scanning
Using the Scan key (For USB or Parallel cable users) 2
Note
If you use the Scan key when connected to a network, see Network Scanning (For models with built-in
network) on page 84.
You can use (Scan) on the control panel to scan documents into your word processing, graphics or
E-mail applications or a folder on your PC.
Before you can use (Scan) on the control panel, you have to install the Brother MFL-Pro suite and
connect the machine to your PC. If you installed the MFL-Pro Suite from the included CD-ROM then the
correct drivers and ControlCenter3 are installed. Scanning by (Scan) follows the configuration on
Device Button tab of ControlCenter3. (See SCAN on page 62.) For details about how to configure the scan
settings of the ControlCenter3 buttons and to launch the application of your choice using (Scan), see
Using ControlCenter3 on page 59.
Note
• If you want to scan a document using the duplex scanning feature, you need to put the document in the
ADF and then choose 2sided (L)edge or 2sided (S)edge depending on your document layout.
• Choose your document layout from following table:
2
Portrait Landscape LCD Message
Front Back Front Back
Front Back Front Back
Document Layout Table
• Duplex scan is not supported by the DCP-8080DN and MFC-8480DN.
• Duplex scan is available from the ADF only.
• Duplex scan is not available for legal size paper.
• The XPS file format is available for Windows Vista
®
or when using applications which support XML Paper
Specification files.
(L)edge
(Long edge)
(S)edge
(Short edge)
48
Page 57

Scanning
Scan to USB 2
You can scan black and white and color documents directly to a USB Flash memory drive. Black and white
documents will be stored in the TIFF (*.TIF), PDF (*.PDF) or Secure PDF (*.PDF) file formats. Color
documents may be stored in JPEG (*.JPG), PDF (*.PDF), Secure PDF (*.PDF) or XPS (*.XPS) file formats.
The default File names are based on the current date. You can change the color, quality and file name.
Resolution File Format Options
Color 100 dpi JPEG / PDF / Secure PDF / XPS
Color 200 dpi JPEG / PDF / Secure PDF / XPS
Color 300 dpi JPEG / PDF / Secure PDF / XPS
Color 600 dpi JPEG / PDF / Secure PDF / XPS
Gray 100 dpi JPEG / PDF / Secure PDF / XPS
Gray 200 dpi JPEG / PDF / Secure PDF / XPS
Gray 300 dpi JPEG / PDF / Secure PDF / XPS
B&W 200 dpi TIFF / PDF / Secure PDF
B&W 200x100 dpi TIFF / PDF / Secure PDF
2
a Put a USB Flash memory drive into your machine.
b Load your document.
c Press (Scan).
d Press a or b to choose Scan to USB.
Press OK.
If your machine does not support Duplex Scan, go to step f.
If your machine supports Duplex Scan, go to step e.
e Press a or b to choose 1sided, 2sided (L)edge or 2sided (S)edge.
Press OK.
f Choose one of the options below.
To change the setting, choose Change Setting. Press OK and go to step g.
To start scanning with the settings you set in the Function Menu (For MFC models, Menu, 5, 2 and
For DCP models, Menu, 4, 2), choose Start Scan. Press OK and go to step j.
g Press a or b to choose the quality you want.
Press OK.
49
Page 58

Scanning
h Press a or b to choose the file type you want.
Press OK.
Note
• If you choose color in the resolution setting, you cannot choose TIFF.
• If you choose black and white in the resolution setting, you cannot choose JPEG.
• If you chose Secure PDF, the machine will ask you to enter the password before it starts scanning.
i The file name is set automatically. However, you can create a name of your choice using the dial pad.
You can only change the first 6 digits of the file name.
Press OK.
Note
Press Clear/Back to delete the letters you entered.
j Press Start to start scanning.
CAUTION
The LCD shows Scanning while reading the data. DO NOT unplug the power cord or remove the USB
Flash memory drive from the machine while it is reading the data. You could lose your data or damage the
USB Flash memory drive.
2
Changing the default file size 2
You can set your own default setting for the file size. For a higher quality scan, choose the large file size. For
a smaller file size, choose the small file size.
a Press Menu, 1.
b Press a or b to choose Document Scan. Press OK.
c Press a or b to choose File Size. Press OK.
d Press a or b to choose 1.Color or 2.Gray. Press OK.
e Press a or b to choose Small, Middle or Large. Press OK.
f Press Stop/Exit.
Note
You cannot choose the file size when you scan a document in black and white. Black and white documents
will be stored in the TIFF file format and the data will not be compressed.
50
Page 59

Scanning
Changing the default resolution and file type 2
a For MFC models, press Menu, 5, 2, 1.
For DCP models, press Menu, 4, 2, 1.
b Press a or b to choose Color 100 dpi, Color 200 dpi, Color 300 dpi or Color 600 dpi,
Gray 100 dpi, Gray 200 dpi, Gray 300 dpi, B&W 200 dpi or B&W 200x100 dpi.
Press OK.
c Do one of the following:
For black and white file format:
Press a or b to choose PDF, Secure PDF or TIFF.
Press OK.
For Color or Gray file format:
Press a or b to choose PDF, Secure PDF, JPEG or XPS.
Press OK.
d Press Stop/Exit.
Changing the default file name 2
a For MFC models, press Menu, 5, 2, 2.
For DCP models, press Menu, 4, 2, 2.
b Enter the file name (up to 6 characters.)
Press OK.
2
Note
You cannot use a space for the first character.
c Press Stop/Exit.
Understanding the Error Messages 2
Once you are familiar with the types of errors that can occur while you are using the Scan to USB, you can
easily identify and troubleshoot any problems.
Protected Device
This message will appear if the protect switch of the USB Flash memory drive is on.
Rename the File
This message will appear if there is already a file on the USB Flash memory drive with the same name as
the file you are trying to save.
Too Many Files
This message will appear if there are too many files stored on the USB Flash memory drive.
Unusable Device
This message will appear if your USB Flash memory drive is not supported by your Brother machine.
51
Page 60

Scanning
Scan to E-mail 2
You can scan either a black and white or color document into your E-mail application as a file attachment.
You can change the scan configuration. (See E-mail on page 66.)
a Load your document.
b Press (Scan).
c Press a or b to choose Scan to PC.
Press OK.
d Press a or b to choose E-mail.
Press OK.
If your machine does not support Duplex Scan, go to step f.
If your machine supports Duplex Scan, go to step e.
e Press a or b to choose 1sided, 2sided (L)edge or 2sided (S)edge.
Press OK.
f Press Start.
The machine starts scanning the document, creates a file attachment, and launches your E-mail
application, displaying the new message waiting to be addressed.
Note
• If you want the scanned data in color, choose color in scan type on the Device Button tab of the
ControlCenter3 configuration. If you want the scanned data in black and white, choose black and white in
scan type on the Device Button tab of the ControlCenter3 configuration. (See SCAN on page 62.)
2
• If you want to change the default file size for JPEG, PDF or Secure PDF, choose your preferred rate by
moving the scroll bar on the Device Button tab of the ControlCenter3 configuration.
Scan to Image 2
You can scan either a black and white or color document into your graphics application for viewing and
®
editing. You can change the scan configuration. (See Image (example: Microsoft
Paint) on page 63.)
a Load your document.
b Press (Scan).
c Press a or b to choose Scan to PC.
Press OK.
d Press a or b to choose Image.
Press OK.
If your machine does not support Duplex Scan, go to step f.
If your machine supports Duplex Scan, go to step e.
52
Page 61

Scanning
e Press a or b to choose 1sided, 2sided (L)edge or 2sided (S)edge.
Press OK.
f Press Start.
The machine starts the scanning process.
Note
• If you want the scanned data in color, choose color in scan type on the Device Button tab of the
ControlCenter3 configuration. If you want the scanned data in black and white, choose black and white in
scan type on the Device Button tab of the ControlCenter3 configuration. (See SCAN on page 62.)
• If you want to change the default file size for JPEG, PDF or Secure PDF, choose your preferred rate by
moving the scroll bar on the Device Button tab of the ControlCenter3 configuration.
Scan to OCR 2
If your document is text, you can have it converted by ScanSoft™ PaperPort™ 11SE OCR to an editable text
file and then have the result displayed in your word processing application for viewing and editing. You can
change the (Scan) configuration. (See OCR (Word Processing program) on page 65.)
2
a Load your document.
b Press (Scan).
c Press a or b to choose Scan to PC.
Press OK.
d Press a or b to choose OCR.
Press OK.
If your machine does not support Duplex Scan, go to step f.
If your machine supports Duplex Scan, go to step e.
e Press a or b to choose 1sided, 2sided (L)edge or 2sided (S)edge.
Press OK.
f Press Start.
The machine starts the scanning process.
Note
If you want the scanned data in color, choose color in scan type on the Device Button tab of the
ControlCenter3 configuration. If you want the scanned data in black and white, choose black and white in
scan type on the Device Button tab of the ControlCenter3 configuration. (See SCAN on page 62.)
53
Page 62

Scanning
Scan to File 2
You can scan a black and white or a color document into your PC and save it as a file in a folder of your
choice. The file type and specific folder are based on the settings you have chosen in the Scan to File screen
of ControlCenter3. (See File on page 67.)
a Load your document.
b Press (Scan).
c Press a or b to choose Scan to PC.
Press OK.
d Press a or b to choose File.
Press OK.
If your machine does not support Duplex Scan, go to step f.
If your machine supports Duplex Scan, go to step e.
e Press a or b to choose 1sided, 2sided (L)edge or 2sided (S)edge.
Press OK.
2
f Press Start.
The machine starts the scanning process.
Note
• If you want the scanned data in color, choose color in scan type on the Device Button tab of the
ControlCenter3 configuration. If you want the scanned data in black and white, choose black and white in
scan type on the Device Button tab of the ControlCenter3 configuration. (See SCAN on page 62.)
• If you would like to display the folder window after scanning the document, select Show Folder on the
Device Button tab of the ControlCenter3 configuration. (See SCAN on page 62.)
• If you would like to change the file name of scanned documents, enter the file name in File Name section
on the Device Button tab of the ControlCenter3 configuration. To change the machine’s Scan key
settings, right-click the each ControlCenter buttons, click ControlCenter Configuration and click the
Device Button tab.
• If you want to change the default file size for JPEG, PDF or Secure PDF, choose your preferred rate by
moving the scroll bar on the Device Button tab of the ControlCenter3 configuration.
54
Page 63

Scanning
Using ScanSoft™ PaperPort™ 11SE with OCR by NUANCE™2
Note
®
only.
®
2000 (SP4 or greater), XP (SP2 or greater), XP
ScanSoft™ PaperPort™ 11SE supports Windows
Professional x64 Edition and Windows Vista
ScanSoft™ PaperPort™ 11SE for Brother is a document management application. You can use PaperPort™
11SE to view scanned documents.
PaperPort™ 11SE has a sophisticated, yet easy-to-use filing system that will help you organize your graphics
and text documents. It allows you to mix or ‘stack’ documents of different formats for printing, faxing or filing.
2
This chapter only introduces the basic functions of the software. For more details, see the ScanSoft™
Getting Started Guide. To view the complete ScanSoft™ PaperPort™ 11SE Getting Started Guide,
choose Help from PaperPort™ 11SE menu bar and click Getting Started Guide. When you install MFL-Pro
Suite, ScanSoft™ PaperPort™ 11SE for Brother is installed automatically. You can access ScanSoft™
PaperPort™ 11SE through the ScanSoft™ PaperPort™ SE program group located in
Start/All Programs/ScanSoft PaperPort 11 on your PC.
55
Page 64

Scanning
Viewing items 2
ScanSoft™ PaperPort™ 11SE gives several ways to view items:
Desktop View displays the item in the chosen folder with a thumbnail (a small graphic that shows each item
in a desktop or folder) or an icon.
You can see both PaperPort™ 11SE items (MAX files) and non-PaperPort™ 11SE items (files created using
other applications).
All graphical files (PaperPort™ 11SE's *.max and other files) will be displayed and include an icon that
indicates the application that the specific file type is associated or created with. Non-graphical files are
indicated by a small rectangular thumbnail and are not displayed as actual images.
2
Page Thumbnails displays a close-up of a single page. You can open a PaperPort™ 11SE item by double-
clicking its icon or the thumbnail in Desktop View.
As long as you have the appropriate application on your PC to display it, you can also open a non-
PaperPort™ SE item by double-clicking it.
56
Page 65

Scanning
Organizing your items in folders 2
PaperPort™ 11SE has an easy-to-use filing system for organizing your items. The filing system consists of
folders and items that you choose to view in Desktop View. An item can be a PaperPort™ 11SE item or a
non-PaperPort™ 11SE item:
Folders are arranged in a ‘tree’ structure in the Folder View. You use this section to choose folders and
view their items in Desktop View.
You can simply drag and drop an item onto a folder. When the folder is highlighted, release the mouse
button and the item is stored in that folder.
Folders can be ‘nested’—that is, stored in other folders.
When you double-click a folder, its contents (both PaperPort™ 11SE MAX files and non PaperPort™
11SE files) appear on the Desktop.
You can also use Windows
®
Explorer to manage the folders and items shown in Desktop View.
Quick links to other applications 2
ScanSoft™ PaperPort™ 11SE automatically recognizes many other applications on your PC and creates a
‘working link’ to them.
2
The bar at the bottom of the PaperPort™ 11SE desktop shows which programs you can use with PaperPort™
11SE.
To send an item from PaperPort™ 11SE to another program, simply drag and drop the item from the
PaperPort™ 11SE desktop to the program icon on the Send To bar. PaperPort™ 11SE automatically
converts the item to the preferred format.
If PaperPort™ 11SE does not automatically recognize one of the applications on your PC, you can manually
create a link using the New Program Link command.
ScanSoft™ PaperPort™ 11SE with OCR lets you convert image text into text you can edit 2
ScanSoft™ PaperPort™ 11SE can quickly convert a text document image into text that you can edit with a
word processing application.
PaperPort™ 11SE uses the optical character recognition software (OCR), which comes with PaperPort™
11SE. PaperPort™ 11SE can use your preferred OCR application if it is already on your PC. You can convert
the entire item, or by using the Copy Text command, you can choose only a portion of the text to convert.
Dragging an item onto a word-processing link icon starts PaperPort™ 11SE’s built-in OCR application, or you
can use your own OCR application.
57
Page 66

Scanning
Importing items from other applications 2
As well as scanning items, you can bring items into PaperPort™ 11SE in a variety of ways and convert them
to PaperPort™ 11SE (MAX) files in several different ways:
Print to the Desktop View from another application, such as Microsoft
Import files saved in other file formats, such as Windows
(TIFF).
®
Bitmap (BMP) or Tagged Image File Format
®
Excel.
Exporting items into other formats 2
You can export or save PaperPort™ 11SE items in several popular file formats, such as BMP, JPEG, TIFF
or PDF.
Exporting an image file 2
a Click File, then Save As in the PaperPort™ 11SE window.
The Save ‘XXXXX’ as dialog box is displayed.
2
b Choose the drive and folder where you want to store the file.
c Enter the new file name and choose the file type.
d Click Save to save your file, or Cancel to return to PaperPort™ 11SE without saving it.
Uninstalling ScanSoft™ PaperPort™ 11SE with OCR 2
(Windows® 2000 Professional) 2
a Click the Start button, Settings, Control Panel, then Add/Remove Programs.
b Choose ScanSoft PaperPort 11 from the list and click Change or Remove.
(Windows® XP) 2
a Click the Start button, Control Panel, Add or Remove Programs, and click the
Change or Remove Programs icon.
b Choose ScanSoft PaperPort 11 from the list and click Change or Remove.
(Windows Vista®) 2
a Click the Start button, Control Panel, Programs and Programs and Features.
b Choose ScanSoft PaperPort 11 from the list and click Uninstall.
58
Page 67

3
Note
• The features available to you in ControlCenter3 may vary depending on the model number of your
machine.
• Duplex Scan is not supported by the DCP-8080DN and MFC-8480DN.
• Duplex Scan is not available for legal size paper.
ControlCenter3 3
Using ControlCenter3 3
ControlCenter3 is a software utility that lets you quickly and easily access your often used applications. Using
ControlCenter3 eliminates the need to manually launch specific applications. ControlCenter3 has the
following operations:
a Scan directly to a file, E-mail, word processor or graphics application of your choice. (1)
b Access to the Custom Scan settings. Custom Scan buttons let you configure a button to meet your own
application needs. (2)
3
c Access the Copy features available via your PC. (3)
d Access the ‘PC-FAX’ applications available for your device. (4)
e Access the settings available to configure your device. (5)
f You can choose which machine ControlCenter3 will connect with from the Model drop-down list. (6)
g You can also open the configuration window for each function and a link to the
Brother Solutions Center by clicking the Configuration button. (7)
59
Page 68

ControlCenter3
Modern 3
Classic 3
3
Note
• To be able to choose another connected model from the Model drop-down list, you must have the
MFL-Pro Suite Software installed on your PC for that model.
®
• For the Modern user interface, you need to install Adobe
Flash® Player 8 or greater. If you do not have
Flash Player 8 or greater, you will be prompted so you can download the latest Flash Player.
60
Page 69

ControlCenter3
Switching the user interface 3
You can choose the Modern or Classic user interface for ControlCenter3.
a To switch the user interface, click Configuration button and select SETUP then SKIN SELECT.
b From the SKIN SELECT dialog, you can choose your preferred user interface.
Turning the Auto Load feature off 3
Once you start ControlCenter3 from the Start menu, the icon will appear on the tasktray. You can open the
ControlCenter3 window by double-clicking the icon.
3
If you do not want ControlCenter3 to run automatically each time you start your PC:
a Right-click the ControlCenter3 icon in the tasktray , and choose Preferences.
The ControlCenter3 preference window appears.
b Uncheck Start ControlCenter on computer startup.
c Click OK to close the window.
61
Page 70

ControlCenter3
SCAN 3
There are four scan options: Scan to Image, Scan to OCR, Scan to E-mail and Scan to File.
Image (Default: Microsoft
Lets you scan a page directly into any graphic viewer/editor application. You can choose the destination
application, such as Microsoft
editing application on your PC.
OCR (Default: Microsoft
Lets you scan a page or document, automatically run the OCR application and put text (not a graphic
image) into a word processing application. You can choose the target word processing application, such
®
as Microsoft
Notepad, Microsoft® Word, Corel® WordPerfect® or any word processing application on
your PC.
E-mail (Default: your default E-mail software)
Lets you scan a page or document directly into an E-mail application as a standard attachment. You can
choose the file type and resolution for the attachment.
File
®
Paint)
®
Paint, Corel® Paint Shop Pro®, Adobe® Photoshop®, or any kind of image
®
Notepad)
3
Lets you scan directly to a disk file. You can change the file type and destination folder, as needed.
ControlCenter3 gives you the ability to configure the hardware Scan key on your machine and the
ControlCenter3 Software button for each scan feature. To configure the hardware Scan key on your machine
choose the Device Button tab (right-click each ControlCenter button and click
ControlCenter Configuration) in the configuration menu for each of the SCAN buttons. To configure the
Software button in ControlCenter3 choose the Software Button tab (right-click each ControlCenter button
and click ControlCenter Configuration) in the configuration menu for each of the SCAN buttons.
62
Page 71

ControlCenter3
File type 3
You can choose from the following list of file types when saving to a folder.
Windows Bitmap (*.bmp)
JPEG (*.jpg)
TIFF (*.tif)
TIFF Multi-Page (*.tif)
Portable Network Graphics (*.png)
PDF (*.pdf)
Secure PDF (*.pdf)
XML Paper Specification (*.xps)
Note
• The XML Paper Specification is available for Windows Vista
XML Paper Specification files.
• If you set the file type to TIFF or TIFF Multi-Page, you can choose “Uncompressed” or “Compressed”.
®
or when using applications which support
3
Image (example: Microsoft® Paint) 3
The Scan to Image feature lets you scan an image directly into your graphics application for image editing.
To change the default settings, right-click the Image button, click ControlCenter Configuration and click the
Software Button tab.
If you want to scan and then crop a portion of a page after pre-scanning the document, check the
Show Scanner Interface box.
If you want to scan a duplex document, check Duplex(two-sided) Scanning and choose
Long-edge binding or Short-edge binding. (Not available for the DCP-8080DN and MFC-8480DN)
Change the other settings, if needed.
63
Page 72

ControlCenter3
To change the destination application, choose the correct application from the Target Application drop-
down list. You can add an application to the list by clicking the Add button.
Enter the Application Name (up to 30 characters) and the Application Location. You can also find the
application location by clicking the icon. Choose File Type from the drop-down list.
You can delete an application that you have added by clicking the Delete button in the Software Button tab.
3
Note
This function is also available for Scan to E-mail and Scan to OCR. The window may vary depending on
the function.
If you choose Secure PDF from the File Type list, click the icon to open the Set PDF Password dialog
box. Enter your password in the Password and Re-type Password box and then click OK. After the
password is saved it will be automatically be saved with your document the next time you scan to a Secure
PDF. If you want to change it, click the icon and set the new password.
Note
Secure PDF is also available for Scan to E-mail and Scan to File.
64
Page 73

ControlCenter3
OCR (Word Processing program) 3
Scan to OCR scans a document and converts it into text. This text can be edited using your favorite word
processing software.
To configure Scan to OCR, right-click the OCR button, click ControlCenter Configuration and click the
Software Button tab.
3
To change the word processing application, choose the destination word processing application from the
Target Application drop-down list. You can add an application to the list by clicking the Add button. To
delete an application, click the Delete button in the Software Button tab.
If you want to scan and then crop a portion of a page after pre-scanning the document, check the
Show Scanner Interface box.
If you want to scan a duplex document, check Duplex(two-sided) Scanning and choose
Long-edge binding or Short-edge binding. (Not available for the DCP-8080DN and MFC-8480DN)
You can also configure the other settings for Scan to OCR.
65
Page 74

ControlCenter3
E-mail 3
Scan to E-mail lets you scan a document to your default E-mail application, so you can send the scanned
job as an attachment. To change the default E-mail application or attachment file type, right-click the E-mail
button, click ControlCenter Configuration and click the Software Button tab.
3
To change the E-mail application, choose your preferred E-mail application from the E-mail Application
1
drop-down list. You can add an application to the list by clicking the Add button
. To delete an application,
click the Delete button.
1
When you first start ControlCenter3 a default list of compatible E-mail applications will appear in the drop-down list. If you are having trouble using
a custom application with ControlCenter3 you should choose an application from the list.
You can also change the other settings used to create the file attachments.
If you want to scan and then crop a portion of a page after pre-scanning the document, check the
Show Scanner Interface box.
If you want to scan a duplex document, check Duplex(two-sided) Scanning and choose
Long-edge binding or Short-edge binding. (Not available for the DCP-8080DN and MFC-8480DN)
66
Page 75

ControlCenter3
File 3
The Scan to File button lets you scan an image to a folder on your hard disk in one of the file types shown
in the file attachment list. To configure the file type, folder and file name, right-click the File button, click
ControlCenter Configuration and click the Software Button tab.
3
You can change the File Name. Enter the file name you want to use for the document (up to 100 characters)
in the File Name box. File name will be the file name you registered, current date and sequential number.
Choose the file type for the saved image from the File Type drop-down list. You can save the file to the default
folder shown in the Destination Folder, or choose your preferred folder by clicking the icon.
To display where the scanned image is saved when scanning is finished, check the Show Folder box. To let
you specify the destination of the scanned image every time you scan, check the Show Save As window
box.
If you want to scan and then crop a portion of a page after pre-scanning the document, check the
Show Scanner Interface box.
If you want to scan a duplex document, check Duplex(two-sided) Scanning and choose
Long-edge binding or Short-edge binding. (Not available for the DCP-8080DN and MFC-8480DN)
67
Page 76

ControlCenter3
CUSTOM SCAN 3
The Custom Scan option lets you create your own scan options.
For Modern interface users, place the mouse pointer over the d and click Custom.
To configure a button, right-click the appropriate button and click ControlCenter Configuration. There are
four options: Scan to Image, Scan to OCR, Scan to E-mail and Scan to File.
Scan to Image
Lets you scan a page directly into any image viewer/editor software. You can choose any image editor
application on your PC.
Scan to OCR
Converts scanned documents into editable text files. You can choose the destination application for the
editable text.
Scan to E-mail
Attaches the scanned images to an E-mail message. You can also choose the file attachment type and
create a quick send list of E-mail addresses chosen from your E-mail address book.
Scan to File
3
Lets you save a scanned image to any folder on a local or network hard disk. You can also choose the file
type to be used.
68
Page 77

ControlCenter3
Modern 3
Classic 3
3
File type 3
You can choose from the following list of file types when saving to a folder.
Windows Bitmap (*.bmp)
JPEG (*.jpg)
TIFF (*.tif)
TIFF Multi-Page (*.tif)
Portable Network Graphics (*.png)
PDF (*.pdf)
Secure PDF (*.pdf)
XML Paper Specification (*.xps)
Note
• The XML Paper Specification is available for Windows Vista
XML Paper Specification files.
• If you set the file type to TIFF or TIFF Multi-Page, you can choose “Uncompressed” or “Compressed”.
®
or when using applications which support
69
Page 78

ControlCenter3
Customizing a user-defined button 3
To configure a button, right-click the button, then click the ControlCenter Configuration button to see the
configuration window.
Scan to Image 3
General tab
To create the button name, enter a name in the Please enter a name for the Custom Button text field
(up to 30 characters).
Choose the type of scan from the Scan Action field.
Settings tab
Choose the Target Application, File Type, Resolution, Scan Type, Document Size,
Duplex(two-sided) Scanning (if necessary), Show Scanner Interface, Brightness and Contrast
settings.
3
70
Page 79

ControlCenter3
If you choose Secure PDF from the File Type list, click the icon to open the Set PDF Password dialog
box. Enter your password in the Password and Re-type Password box and then click OK. After the
password is saved it will be automatically be saved with your document the next time you scan to a Secure
PDF. If you want to change it, click the icon and set the new password.
Note
Secure PDF is also available for Scan to E-mail and Scan to File.
3
71
Page 80

ControlCenter3
Scan to OCR 3
General tab
To create the button name, enter a name in the Please enter a name for the Custom Button text field
(up to 30 characters).
Choose the type of scan from the Scan Action field.
3
Settings tab
Choose the Target Application, File Type, OCR Software, OCR Language, Resolution, Scan Type,
Document Size, Duplex(two-sided) Scanning (if necessary), Brightness and Contrast settings.
72
Page 81

ControlCenter3
Scan to E-mail 3
General tab
To create the button name, enter a name in the Please enter a name for the Custom Button text field
(up to 30 characters).
Choose the type of scan from the Scan Action field.
3
Settings tab
Choose the E-mail Application, File Type, Resolution, Scan Type, Document Size,
Duplex(two-sided) Scanning (if necessary), Brightness and Contrast settings.
73
Page 82

ControlCenter3
Scan to File 3
General tab
To create the button name, enter a name in the Please enter a name for the Custom Button text field
(up to 30 characters).
Choose the type of scan from the Scan Action field.
3
Settings tab
Choose the file format from the File Type drop-down list. Save the file to the default folder which is shown
in the Destination Folder box or choose your preferred folder by clicking the icon. Check
Show Folder to show where the scanned image is saved after scanning. Check Show Save As window
to specify the destination of the scanned image after every scan.
Choose the Resolution, Scan Type, Document Size, Duplex(two-sided) Scanning (if necessary),
Brightness and Contrast settings and enter the file name if you want to change.
74
Page 83

ControlCenter3
COPY 3
Lets you use the PC and any printer driver for enhanced copy operations. You can scan a page on the
machine and print copies using any of the features of the machine’s printer driver, or you can direct the copy
output to any standard printer driver installed on the PC including network printers.
You can configure your preferred settings on up to four buttons.
The Copy1 to Copy4 buttons can be customized to let you use advanced copy functions such as N in 1
printing.
To use the Copy buttons, configure the printer driver by right-clicking the button and choosing the
ControlCenter Configuration.
3
Enter a name in Please enter a name for the Copy Button text field (up to 30 characters) and choose
Copy Ratio.
Choose the Resolution, Scan Type, Document Size, Duplex(two-sided) Scanning (if necessary),
Show Scanner Interface, Brightness and Contrast settings to be used.
If you want to scan a duplex document, check Duplex(two-sided) Scanning and choose
Long-edge binding or Short-edge binding. (Not available for the DCP-8080DN and MFC-8480DN)
Before finishing the Copy button configuration, choose the Printer Name. To display the printer driver
settings, click the Print Options... button and then Properties... button.
In the printer driver settings dialog box, you can choose advanced settings for printing.
75
Page 84

Note
You must configure each of the copy buttons before they can be used.
ControlCenter3
3
76
Page 85

ControlCenter3
PC-FAX (MFC models only) 3
The PC-FAX option lets you send and receive faxes. You can also configure the address book and change
some general machine settings.
These buttons are for sending or receiving faxes using the Brother PC-FAX application.
Send
Lets you scan a page or document and automatically send the image as a fax from the PC using the
Brother PC-FAX software. (See PC-FAX sending on page 103.)
Receive
By clicking this button, the PC-FAX receive software is activated and your PC starts receiving fax data from
your Brother machine. After activating the PC-FAX option, the icon name changes to View Received
which when clicked will open an application and display the received faxes. Before using the PC-FAX
Receive option, you must select the PC-FAX Receive option from the control panel menu of the Brother
machine. (See PC-FAX receiving on page 116.)
Address Book
Lets you open the Brother PC-FAX address book. (See Brother Address Book on page 110.)
3
Setup
Lets you configure the PC-FAX sending settings. (See Sending setup on page 104.)
Note
PC-FAX supports Black and white faxing only.
77
Page 86

ControlCenter3
Send 3
The Send button lets you scan a document and automatically send the image as a fax from the PC using the
Brother PC-FAX software. (See PC-FAX sending on page 103.)
To change the Send settings, right-click the Send button and click ControlCenter Configuration. You can
change the Resolution, Scan Type, Document Size, Show Scanner Interface, Brightness and Contrast
settings.
3
If you want to scan a duplex document, check Duplex(two-sided) Scanning and choose
Long-edge binding or Short-edge binding. (Not available for the DCP-8080DN and MFC-8480DN)
Receive/View Received 3
The Brother PC-FAX Receiving software option lets you view and store your faxes on your PC. It is
automatically installed when you install the MFL-Pro Suite.
By clicking the Receive button, the PC-FAX receiving function is activated and starts to receive fax data from
your Brother machine. Before you use the PC-FAX Receive function, you must select the PC-FAX Receive
option from the control panel menu of the Brother machine. (See Enabling PC-FAX Receiving software on
your machine on page 117.)
To configure the PC-FAX Receive software, see Setting up your PC on page 118.
78
Page 87

ControlCenter3
When the PC-FAX receiving software is running, you can open the viewer application with the
View Received button. (PaperPort™ 11SE)
Note
You can also activate the PC-FAX receiving software from the start menu. (See Running the PC-FAX
Receiving software on your PC on page 117.)
Address Book 3
3
The Address Book button lets you add, amend or delete contacts from your address book. To edit this
address book, click the Address Book button to open the dialog box. (See Brother Address Book
on page 110.)
Setup 3
By clicking the Setup button, you can configure the user settings of the PC-FAX application.
(See Setting up user information on page 103.)
79
Page 88

ControlCenter3
DEVICE SETTING 3
You can configure or check the machine settings.
Remote Setup (MFC models only)
Lets you open the Remote Setup Program. (See Remote Setup on page 101.)
Quick-Dial (MFC models only)
Lets you open the Set Quick-Dial window of Remote Setup. (See Remote Setup on page 101.)
Status Monitor
Allows you to open the Status Monitor Utility. (See Status Monitor on page 9.)
User’s Guide
Lets you view the User’s Guide, the Software User’s Guide and the Network User’s Guide.
3
80
Page 89

ControlCenter3
Remote Setup (MFC models only) 3
The Remote Setup button lets you open the Remote Setup Program window to configure most machine and
network setting menus.
Note
For details, see Remote Setup on page 101.
3
81
Page 90

ControlCenter3
Quick-Dial (MFC models only) 3
The Quick-Dial button lets you open the Address Book window in the Remote Setup Program. You can then
easily register or change the Quick-Dial numbers from your PC.
3
Status Monitor 3
The Status Monitor button allows you to monitor the status of one or more devices, allowing you to get
immediate notification of errors such as paper empty or paper jam. (See Status Monitor on page 9.)
82
Page 91

ControlCenter3
User’s Guide 3
The User’s Guide button lets you view the Software User’s Guide and the Network User’s Guide in HTML
format.
3
83
Page 92

Network Scanning
4
To use the machine as a network scanner, the machine must be configured with a TCP/IP address. You can
set or change the address settings from the control panel (See Control Panel Setup in the Network User’s
Guide) or by using the BRAdmin Professional software. If you installed the machine following the instructions
for a network user in the Quick Setup Guide then the machine should already be configured for your network.
Note
• For network scanning, a maximum of 25 clients can be connected to one machine on a network. For
example, if 30 clients try to connect at a time, 5 of those clients will not be shown on the LCD.
• If your PC is protected by a firewall and is unable to network scan, you may need to configure the firewall
settings to allow communication through port number 54925 and 137. (See Before using the Brother
software on page 121.)
(For models with built-in network)
Before using Network Scanning 4
Network license 4
4
4
This product includes a PC license for up to 5 Users.
This license supports the installation of the MFL-Pro Software Suite including ScanSoft™ PaperPort™ 11SE
on up to 5 PCs on the network.
If you want to use more than 5 PCs with ScanSoft™ PaperPort™ 11SE installed, please buy the Brother NL-5
pack which is a multiple PC license agreement pack for up to 5 additional users. To buy the NL-5 pack,
contact your Brother dealer or Brother customer service.
84
Page 93

Network Scanning (For models with built-in network)
Configuring Network Scanning 4
If you are using a different machine than the one that was originally registered to your PC during the
installation of MFL-Pro Suite software (see the Quick Setup Guide), follow the steps below.
a (Windows
(Windows
®
2000) Click the Start button, Settings, Control Panel, then Scanners and Cameras.
®
XP) Click the Start button, Control Panel, Printers and Other Hardware, then
Scanners and Cameras (or Control Panel, Scanners and Cameras).
®
(Windows Vista
Scanner and Cameras.
) Click the Start button, Control Panel, Hardware and Sound, then
b Do one of the following:
(Windows
(Windows
®
2000) Select your Brother machine from the list and click Properties.
®
XP) Right-click the Scanner Device icon and choose Properties.
4
The Network Scanner Properties dialog box appears.
(Windows Vista
®
) Click the Properties button.
85
Page 94

Network Scanning (For models with built-in network)
Note
(Windows Vista
®
) When the User Account Control screen appears, do the following.
• For users who have administrator rights: Click Continue.
• For users who do not have administrator rights: Enter the administrator password and click OK.
4
c Click the Network Setting tab and choose the appropriate connection method.
Specify your machine by address
Enter the IP address of the machine in IP Address, and then click Apply.
86
Page 95

Network Scanning (For models with built-in network)
Specify your machine by name 4
1 Enter the machine node name in Node Name, or click Browse and choose the device you want to
use.
2 Click OK.
d Click the Scan To Button tab and enter your PC name in the Display Name field. The machine’s LCD
displays the name you enter. The default setting is your PC name. You can enter any name that you like
(Max. 15 characters).
4
e If you want to avoid receiving unwanted documents, enter a 4-digit PIN number in the Pin number and
Retype Pin number field. To send data to a PC protected by a PIN number, the LCD prompts you to
enter the PIN number before the document can be scanned and sent to the PC. (See Using the Scan
key on page 88.)
87
Page 96

Network Scanning (For models with built-in network)
Using the Scan key 4
Note
• If you want to scan a document using the duplex scanning feature, you need to put the document in the
ADF and then choose 2sided (L)edge or 2sided (S)edge depending on your document layout.
• Choose your document layout from following table:
Portrait Landscape LCD Message
Front Back Front Back
Front Back Front Back
(L)edge
(Long edge)
(S)edge
(Short edge)
4
Document Layout Table
• Duplex scan is not supported by the DCP-8080DN and MFC-8480DN.
• Duplex scan is available from the ADF only.
• Duplex scan is not available for legal size paper.
• The XPS file format is available for Windows Vista
®
or when using applications which support XML Paper
Specification files.
Scan to E-mail (PC) 4
When you choose Scan to E-mail (PC) your document will be scanned and sent directly to the PC you
designated on your network. ControlCenter3 will activate the default E-mail application on the designated PC.
You can scan and send a black and white or color document from the PC as an attachment.
You can change the scan configuration. (See E-mail on page 66.)
a Load your document.
b Press (Scan).
c Press a or b to choose Scan to PC.
Press OK.
88
Page 97

Network Scanning (For models with built-in network)
d Press a or b to choose E-mail.
Press OK.
If your machine does not support Duplex Scan, go to step f.
If your machine supports Duplex Scan, go to step e.
e Press a or b to choose 1sided, 2sided (L)edge or 2sided (S)edge.
Press OK.
f Press a or b to choose the destination PC you want to use for E-mailing your document.
Press OK.
If the LCD prompts you to enter a PIN number, enter the 4-digit PIN number for the destination PC on
the control panel.
Press OK.
g Press Start.
The machine starts the scanning process.
Note
If you want to change the default file size, choose your preferred rate by moving the scroll bar on the
Device Button tab of the ControlCenter3 configuration.
4
Scan to E-mail (E-mail Server) (MFC-8890DW only) 4
When you choose Scan to E-mail (E-mail Server) you can scan a black and white or color document and send
it directly to an E-mail address from the machine. You can choose PDF, Secure PDF or TIFF for Black and
White and PDF, Secure PDF, XPS or JPEG for color or gray.
Note
Scan to E-mail (E-mail Server) requires SMTP/POP3 mail server support. (See the Network User’s Guide
on the CD-ROM.)
a Load your document.
b Press (Scan).
c Press a or b to choose Scan to E-mail.
Press OK.
d Press a or b to choose 1sided, 2sided (L)edge or 2sided (S)edge.
Press OK.
e Press a or b to choose Change Setting.
Press OK.
If you don’t have to change the quality, press a or b to choose Enter Address.
Press OK and then go to step i.
89
Page 98

Network Scanning (For models with built-in network)
f Press a or b to choose Color 100 dpi, Color 200 dpi, Color 300 dpi,Color 600 dpi,
Gray 100 dpi, Gray 200 dpi, Gray 300 dpi, B&W 200 dpi or B&W 200x100 dpi.
Press OK.
If you chose Color 100 dpi, Color 200 dpi, Color 300 dpi, Color 600 dpi,
Gray 100 dpi, Gray 200 dpi or Gray 300 dpi, go to step g.
If you chose B&W 200 dpi or B&W 200x100 dpi, go to step h.
g Press a or b to choose PDF, Secure PDF, JPEG or XPS.
Press OK and go to step i.
h Press a or b to choose PDF, Secure PDF or TIFF.
Press OK and go to step i.
Note
If you chose Secure PDF, the machine will ask you to enter the password before it starts scanning.
i The LCD prompts you to enter an address. Enter the destination E-mail address from the dial pad or use
the One-Touch key or Speed Dial number.
Press Start.
The machine will start the scanner process.
Note
• If your network supports the LDAP protocol you can search for stored E-mail addresses on your server.
(See Chapter 12 in the Network User’s Guide.)
• You can store the scan resolution (Scan Profile) for each stored E-mail address in a One-Touch or SpeedDial number. (See Dialing & Storing numbers in Chapter 8 of the User’s Guide.)
Using One-Touch or Speed-Dial number 4
You can also scan a document directly to an address you registered in a One-Touch or Speed-Dial number.
When you scan the document, the settings you registered with the One-Touch or Speed-Dial will be used for
the quality and the file type. Only One-Touch or Speed Dials with an E-mail address registered can be used
when you scan data using One-Touch or Speed-Dial. (I-Fax addresses are not available for use.)
4
a Load your document.
b Press (Scan).
c Choose One-Touch or Speed-Dial number.
If your machine supports Duplex Scan and you want to scan both sides of your document, press Duplex.
d Press Start. The machine starts the scanning process.
Note
You can store the scan resolution (Scan Profile) for each stored E-mail address in a One-Touch or SpeedDial number. (See Dialling and storing numbers in Chapter 8 of the User’s Guide.)
90
Page 99

Network Scanning (For models with built-in network)
Scan to Image 4
When you choose Scan to Image, your document will be scanned and sent directly to the PC you designated
on your network. ControlCenter3 will activate the default graphics application on the designated PC. You can
®
change the Scan configuration. (See Image (example: Microsoft
Paint) on page 63.)
a Load your document.
b Press (Scan).
c Press a or b to choose Scan to PC.
Press OK.
d Press a or b to choose Image.
Press OK.
If your machine does not support Duplex Scan, go to step f.
If your machine supports Duplex Scan, go to step e.
e Press a or b to choose 1sided, 2sided (L)edge or 2sided (S)edge.
Press OK.
f Press a or b to choose the destination PC you want to send to.
Press OK.
If the LCD prompts you to enter a PIN number, enter the 4-digit PIN number for the destination PC on
the control panel.
Press OK.
g Press Start.
The machine starts the scanning process.
Note
• If you want the scanned data in color, choose color in scan type on the Device Button tab of the
ControlCenter3 configuration. If you want the scanned data in black and white, choose black and white in
scan type on the Device Button tab of the ControlCenter3 configuration. (See SCAN on page 62.)
4
• If you want to change the default file size, choose your preferred rate by moving the scroll bar on the
Device Button tab of the ControlCenter3 configuration.
91
Page 100

Network Scanning (For models with built-in network)
Scan to OCR 4
When you choose Scan to OCR, your document will be scanned and sent directly to the PC you designated
on your network. ControlCenter3 will activate ScanSoft™ PaperPort™ 11SE OCR and convert your
document into text for viewing and editing from a word processing application on the designated PC. You can
change the Scan configuration. (See OCR (Word Processing program) on page 65.)
a Load your document.
b Press (Scan).
c Press a or b to choose Scan to PC.
Press OK.
d Press a or b to choose OCR.
Press OK.
If your machine does not support Duplex Scan, go to step f.
If your machine supports Duplex Scan, go to step e.
e Press a or b to choose 1sided, 2sided (L)edge or 2sided (S)edge.
Press OK.
4
f Press a or b to choose the destination PC you want to send to.
Press OK.
If the LCD prompts you to enter a PIN number, enter the 4-digit PIN number for the destination PC on
the control panel.
Press OK.
g Press Start.
The machine starts the scanning process.
Note
If you want the scanned data in color, choose color in scan type on the Device Button tab of the
ControlCenter3 configuration. If you want the scanned data in black and white, choose black and white in
scan type on the Device Button tab of the ControlCenter3 configuration. (See SCAN on page 62.)
92
 Loading...