

Page 1
USER’S GUIDE
DCP-4020C
Page 2

Compilation and Publication Notice
Under the supervision of Brother Industries Ltd., this manual has
been compiled and published, covering the latest product
descriptions and specifications.
The contents of this manual and the specifications of this product are
subject to change without notice.
Brother reserves the right to make changes without notice in the
specifications and materials contained herein and shall not be
responsible for any damages (including consequential) caused by
reliance on the materials presented, including but not limited to
typographical and other errors relating to the publication.
i
Page 3
ii
Page 4

Safety Precautions
To Use the DCP Safely
Save these instructions for later reference.
WARNING
There are high voltage
electrodes inside the DCP.
Before you clean the DCP or
clear a paper jam, make sure
you have unplugged the power
cord from the power outlet.
To prevent injuries, be careful
not to put your hands on the
edge of the DCP under the
scanner cover.
Do not handle the plug with wet
hands. Doing this might cause
an electrical shock.
To prevent injuries, be careful
not to put your fingers in the
area shown in the illustration.
iii
Page 5

WARNING
■ Install equipment with a power cord near a socket-outlet that is
easily accessible.
Caution
■ Lightning and power surges can damage this product! We
recommend that you use a quality surge protection device on the
AC power line, or unplug the line during a lightning storm.
■ Do not use this product near appliances that use water, in a wet
basement or near a swimming pool.
iv
Page 6
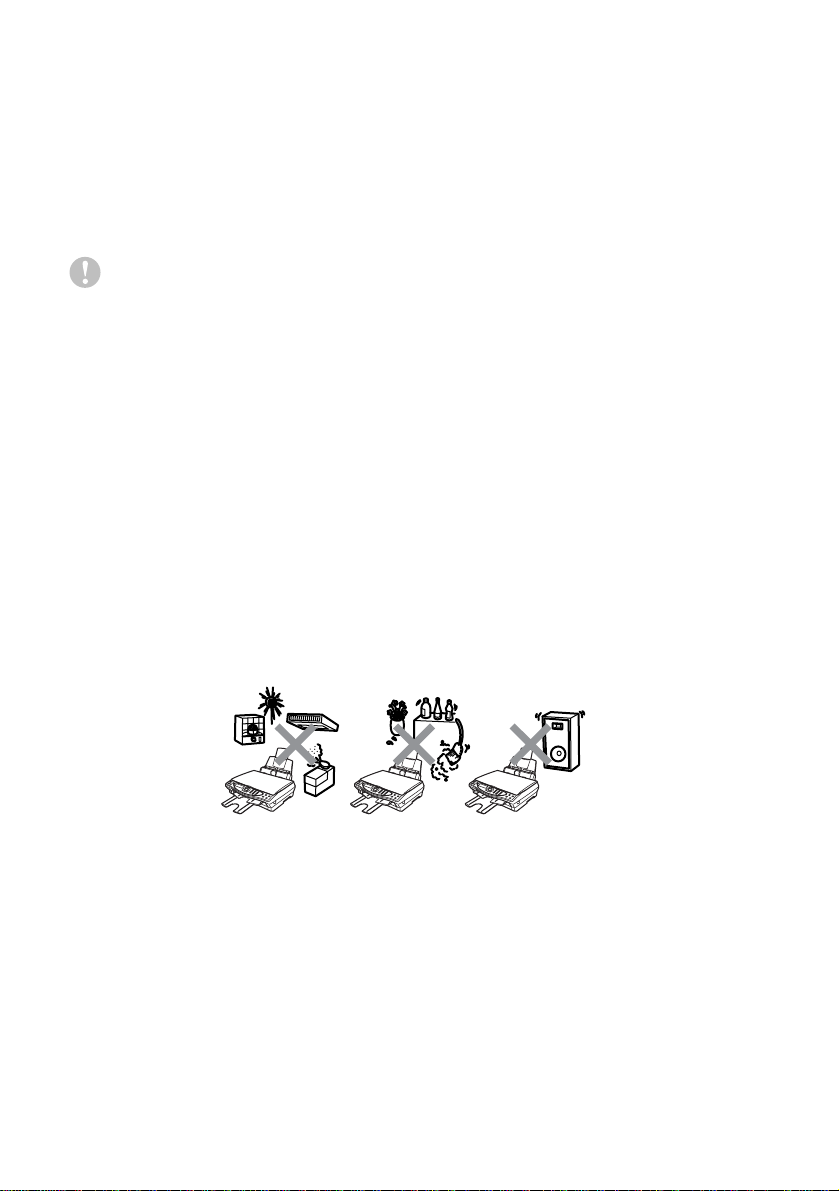
Choosing a Location
Place your DCP on a flat, stable surface that is free of vibration and
shocks, such as a desk. Put the DCP near a standard grounded
power outlet. Choose a location where the temperature remains
between 10° and 35°C.
Caution
■ Avoid placing your DCP in a high-traffic area.
■ Do not place near heaters, air conditioners, water, chemicals, or
refrigerators.
■ Do not expose the DCP to direct sunlight, excessive heat,
moisture, or dust.
■ Do not connect your DCP to electrical outlets controlled by wall
switches or automatic timers.
■ Disruption of power can wipe out information in the DCP’s
memory.
■ Do not connect your DCP to electrical outlets on the same circuit
as large appliances or other Equipment that might disrupt the
power supply.
■ Avoid interference sources, such as speakers or the base units
of cordless phones.
v
Page 7

Table of Contents
1
2
3
Introduction .................................. ........................................ 1-1
Using this Guide ...............................................................1-1
Finding information.....................................................1-1
Symbols used in this Guide........................................1-1
DCP Part Names and Functions ................................1-2
DCP-4020C control panel overview ................................1-6
Paper ....................................... ....................................... .......2-1
About paper......................................................................2-1
Handling and using special paper ..............................2-1
Recommended paper.............................................2-2
Paper capacity of the Paper Tray ..........................2-2
Paper specifications for the Paper Tray ................2-3
Paper capacity of the Output Paper Support .........2-3
Printable area............................................................. 2-5
How to load paper and envelopes..............................2-6
To load paper or other media.................................2-6
To load glossy paper..............................................2-7
To load envelopes..................................................2-8
On-Screen Programming ....................................................3-1
User-friendly programming...............................................3-1
Menu table..................................................................3-1
Memory Storage.........................................................3-1
Navigation key..................................................................3-2
4
Initial setup ...........................................................................4-1
Getting started..................................................................4-1
Setting the Paper Type...............................................4-1
Setting the Date and Time..........................................4-2
Setting the Beeper Volume.........................................4-3
Setting the LCD Contrast............................................4-3
Power Save................................................................4-4
Printing reports ................................................................. 4-5
Printing reports............. ....................................... ... ....4-5
To print a report......................................................4-5
vi
Page 8

5
Making copies ......................................................................5-1
Using the DCP as a copier ...............................................5-1
Single or multiple copies.............................................5-2
Out of memory message ............................................5-2
Using Copy Options key (Temporary Settings) ................5-3
No. of Copies..........................................................5-5
Quality ....................................................................5-5
Enlarge/Reduce......................................................5-6
Paper Type.............................................................5-7
Paper Size..............................................................5-8
Brightness...............................................................5-8
Page Layout ...........................................................5-9
Changing the default copy settings.................................5-11
Copy Quality...................... ...................................... .5-12
Brightness.................................................................5-12
Contrast....................................................................5-12
Colour Adjustment....................................................5-13
Legal limitations..............................................................5-14
6
Walk-Up PhotoCapture Center™ .........................................6-1
Introduction.......................................................................6-1
PhotoCapture Center
Basic flow....................................................... ... ................6-2
Getting started ..................................................................6-3
Printing the Index (Thumbnails)........................................6-6
Printing images.................................................................6-7
Changing the settings for printing images ........................6-8
Menu selections....................................... ... ................6-9
Number of Copies...................................................6-9
Paper Type.............................................................6-9
Paper and Print Size.............................................6-10
Print Quality..........................................................6-13
Brightness.............................................................6-13
Colour Enhancement............................................6-14
DPOF printing....... ... ....................................... ..........6-14
Changing the default settings .........................................6-16
Print Quality..............................................................6-17
Print Size ..................................................................6-17
Brightness.................................................................6-17
Contrast....................................................................6-18
Colour Enhancement................................................6-18
Understanding the Error Messages..........................6-20
Using PhotoCapture Center
Using PhotoCapture Center
™
requirements.....................6-1
™
from your PC...................6-21
™
for scanning originals......6-21
vii
Page 9

7
Using the DCP as a printer .................................................7-1
Using the Brother DCP-4020C printer driver....................7-1
Features ...........................................................................7-1
Choosing the right type of paper ......................................7-2
How to print your document..............................................7-2
Simultaneous printing...................... .................................7-3
Clearing data from the memory........................................7-3
Checking the Print Quality............................ ....................7-3
8
Printer driver settings ..................... ... ................................. 8-1
Printer driver settings........................................................8-1
How to access the printer driver settings..........................8-1
Basic tab...........................................................................8-2
Media Type.................................................................8-3
Quality ........................................................................8-4
Bi-Directional Printing.................................................8-5
Paper Size..................................................................8-6
Page Layout ............................................................... 8-7
Border Line.............................................................8-7
Orientation..................................................................8-7
Copies ........................................................................8-8
Collate ....................................................................8-8
Reverse Order........................................................8-8
Near Edge Print..........................................................8-8
Advanced tab....................................................................8-9
Colour.......................................................................8-10
Colour/Greyscale..................................................8-10
Image Type ........................................... ... ............8-10
Custom Image Type.............................................8-11
Halftone Pattern ...................................................8-12
Colour Enhancement............................................ 8-13
Scaling......................................................................8-15
Watermark............................................................8-16
In background........... ............................................8-16
In Outline Text (Windows® 2000 Professional/XP Only)
Print Watermark ...................................................8-16
Watermark Style................................................... 8-17
Device Options.........................................................8-18
Print Date & Time.................................................8-19
Quick Print Setup ........ ....................................... .. 8-20
Support tab...............................................................8-21
Brother Solutions Center......................................8-21
Web Update .........................................................8-21
Check Setting.......................................................8-21
.8-16
viii
Page 10

9
How to scan using Windows® .............................................9-1
Scanning a document
(For Windows
®
98/98SE/Me and
2000 Professional).........................................................9-2
TWAIN compliant........................................ ................9-2
How to access the Scanner........................................9-3
Scanning a document into the PC..............................9-4
Scanning a whole page..........................................9-4
PreScanning to crop a portion you want to scan....9-5
Settings in the Scanner window..................................9-7
Scan (Image Type).................................................9-7
Resolution...............................................................9-7
Scan Type .............................................. .... ............9-8
Brightness...............................................................9-8
Contrast..................................................................9-8
Document Size.......................................................9-9
Scanning a document
(For Windows
®
XP only)..............................................9-11
WIA compliant...........................................................9-11
How to access the scanner.......................................9-11
Scanning a document...........................................9-12
PreScanning to crop a portion you want to scan..9-13
Brother Scanner Utility..........................................9-15
Using the scan key .........................................................9-16
Scan to E-mail ................................ ..........................9-17
Scan Image ....................................... ... ....................9-17
Scan/OCR.................................................................9-18
Scan to File....... ....................................... ... ..............9-18
Scan to Card..... ....................................... .................9-19
Changing the default colour file format.................9-20
Entering text .........................................................9-21
Inserting spaces ........ .... ...................................... .9-21
Making corrections ...............................................9-22
Repeating letters ..................................................9-22
Special characters and symbols ..........................9-22
Using ScanSoft
®
PaperPort® and TextBridge® OCR......9-23
Viewing items............................................................9-24
Organizing your items in folders...............................9-25
Quick links to other applications...............................9-25
ScanSoft
®
TextBridge® OCR lets you convert
image text in to text you can edit..........................9-26
You can Import items from other applications..........9-26
You can Export items in other formats......................9-27
Exporting an image file.........................................9-27
ix
Page 11

10
Using the Brother Control Center for Windows® 98/
98SE/Me/2000 Professional 10-1
Brother MFL-Pro Control Center ....................................10-1
AutoLoad the Brother Control Center........ ... ............10-2
How to turn off AutoLoad..........................................10-2
Brother Control Center features .....................................10-3
Auto Configuration..................................... ...............10-3
Scan to key operations....... .... ..................................10-4
Scan to File.....................................................................10-5
To access Scan to File Configuration screen........... 10-5
Scanner settings.......................................................10-5
Destination folder......................................................10-6
Scan to E-mail ................................................................10-7
To access Scan to E-mail Configuration screen.......10-7
Scanner settings.......................................................10-8
E-mail application............ ... ...................................... 10-8
Send to Options........................................................10-9
Scan to OCR (Word Processor) ................................... 10-10
To access Scan to OCR Configuration screen.......10-10
Scanner settings.....................................................10-11
Word Processor......................................................10-11
Scan to Image ..............................................................10-13
To access Scan to Image Configuration screen.....10-13
Scanner settings.....................................................10-13
Target Application...................................................10-14
11
Using the Windows® Based Brother SmartUI
Control Center 11-1
Brother SmartUI Control Center .....................................11-1
AutoLoad the Brother Control Center........ ... ............11-2
How to turn off Auto Load.........................................11-3
Brother Control Center features .....................................11-4
Auto Configuration..................................... ...............11-5
Hardware Section: Changing the Scan to Button
Configuration...............................................................11-6
Scan To E-mail.......... ...................................... .........11-7
Scan To File .............................................................11-8
Scan To Image................... ...................................... 11-9
Scan To OCR.................. ....................................... 11-11
Software Section ... ....................................... ................11-13
Scan .......................................................................11-14
Copy.......................................................................11-15
Custom...................................................................11-15
Scan to File...................................................................11-16
x
Page 12

Scan to E-mail ..............................................................11-18
File attachments.....................................................11-20
Scanner settings....... .......................... ............ ........11-21
Scan to OCR (Word Processing program) ...................11-22
Scan to Graphics application
(exam pl e : Mi c ro so ft Paint)............. ....... ... ..................11-24
Copy.......................................................................11-26
Custom: User-def ined buttons....................... .............. .11-28
Customizing a user-d efined button........... .. .. .. ........11-29
1. Select the Scan Action................................... 11-29
2. Select Configura tion for the Scan Type... .. .. .. .11-30
3. Select Scan Settings......................................11-34
12
13
Using the Photo C a pture Center™ from you r PC .............12-1
Introduction.....................................................................12-1
®
Using ArcSoft
PhotoPrinter® 4.......................... .. ... .12-3
Overview of basic steps..................................................12-3
Using your DCP with a Macintosh® ..................................13-1
®
Setting up your USB-equipped Apple
™
G4, iMac
or iBook™ with Mac OS 8.6-9.2 or
Macintosh® G3,
Mac OS X 10.1/10.2.1 or greater .................................13-1
®
Using the Brother printer driver with your Apple
®
Macintosh
(OS 8.6-9.2)..............................................13-2
Using the Brother Print er Driver with Your Apple
®
Macintosh
(OS X 10.1/10.2.1 or greater)..... .. .. ..........13-4
®
Choosing page setup options.............................. .. ...13-4
Printing a document.................................................. 13-5
Choosing printing options.........................................13-6
Using the Brother TWAIN sca nner dri v er with your
®
Macintosh
(For Mac OS 8.6-9.2 and OS X 10.2.1 or
greater)........................................................................13-7
Accessing the scanner........... .. .. .. .......................... ...13 -7
®
Scanning an image into your Macintosh
................. 13-8
Scanning a whole page ........... ............ .............. ...13-8
PreScanning an image .............................................13-9
Settings in the Scanner window..............................13-10
Image..................................................................13-10
Scanning Area....................................................13-12
Business Card Size............................................ 13-12
Adjusti ng th e Ima g e....... ..................... ... .............13-13
Color Syn c Dia l o g............ ............................ .. .........13-14
Scanner P ro file............................ .. ... ....... .. .........13-15
™
Using the PhotoCapture Center
from a Macintosh®...13-16
xiii
Page 13

Using ArcSoft® PhotoPrinter® 4....................................13-18
Overview of basic steps..........................................13-18
14
15
S
Important information ....................................................... 14-1
Important safety instructions........................................... 14-1
Trademarks ....................................................................14-3
IMPORTANT-For Your Safety........................................14-4
IT Power System (For Norway Only)..............................14-4
Troubleshooting and routine maintenance .....................15-1
Troubleshooting..............................................................15-1
Error Messages........................................................15-1
Printer Jam or Paper Jam.........................................15-3
If you are having difficulty with your DCP.................15-6
How to improve print quality ...........................................15-8
Cleaning the print head ............................................15-8
Print Quality Check...................................................15-8
Checking the ink volume ....................................... .... ... 15-12
Packing and shipping the DCP.....................................15-13
Routine maintenance....................................................15-16
Cleaning the scanner..............................................15-16
Replacing the ink cartridges...................................15-17
Specifications ......................................................................S-1
Product description...........................................................S-1
General.............................................................................S-1
Print media .......................................................................S-2
Copy.................................................................................S-2
Photo Capture Center ............................................... .......S-2
Scanner ...........................................................................S-3
Printer ..............................................................................S-3
Interface............................................................................S-3
Computer Requirements . ... ....................................... .......S-4
Consumable Items............................................................S-4
16
Index ......................................................................................I-1
xii
Page 14

1
Introduction
Using this Guide
Thank you for buying a Brother DCP. This DCP is simple to use, with
LCD screen instructions to guide you through programming it. You
can make the most of your DCP by taking a few minutes to read this
Guide.
Finding information
All the chapter headings and sub-headings are listed in the Table of
Contents. You will be able to find information about a specific feature
or operation by checking the Index at the back of this Guide.
Symbols used in this Guide
Throughout this Guide you’ll see special symbols alerting you to
important warnings, notes and actions. To make things clearer and
to help you press the correct keys, we have used special fonts and
added some of the messages that will appear in the LCD.
Bold Bold typeface identifies specific keys on the DCP
control panel.
Italics Italicized typeface emphasizes an important point
or refers you to a related topic.
COURIER NEW
Warnings inform you what to do to avoid possible personal
injury or damage to the machine.
Notes tell you how you should respond to a situation that may
arise or give tips about how the current operation works with
other features.
Improper Setup alerts you to devices and operations that are not
compatible with the DCP.
Courier New type face identifies the messages on
the LCD of the DCP.
INTRODUCTION 1 - 1
Page 15
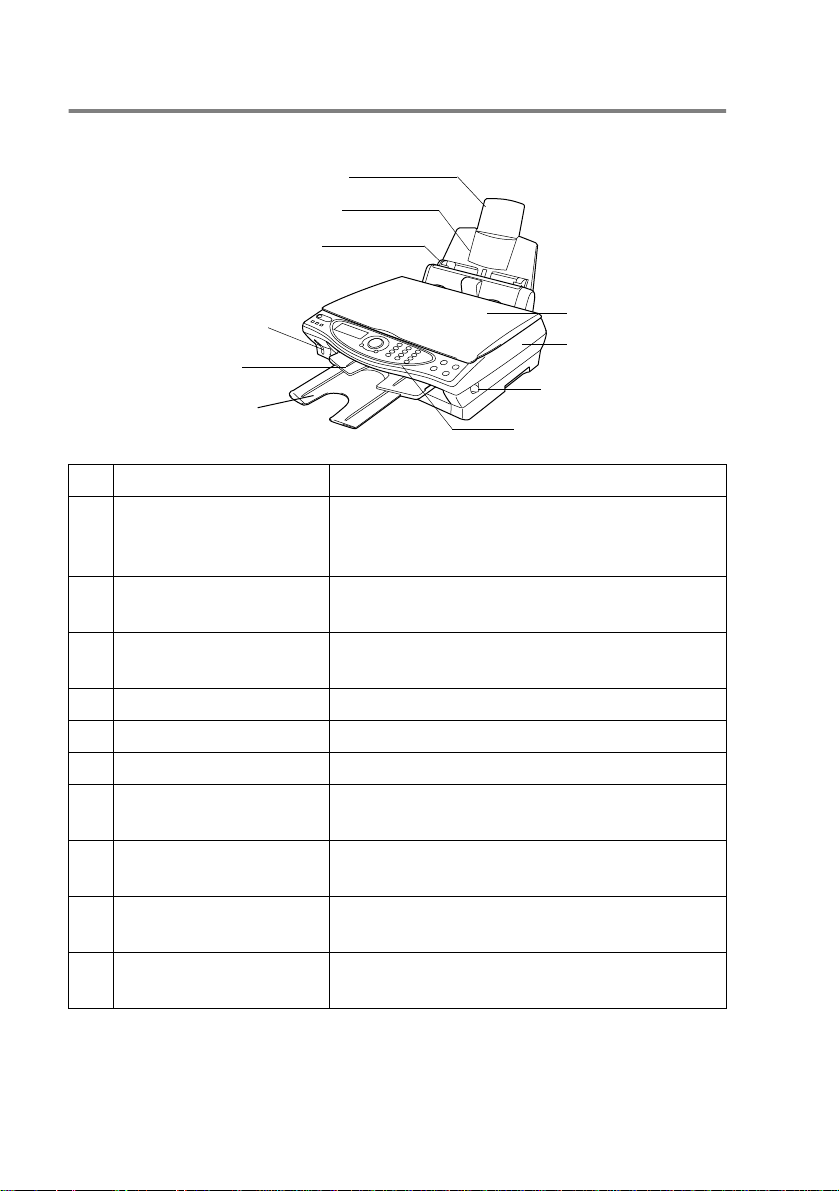
DCP Part Names and Functions
■ Front view
6
Paper Support
5
Paper Tray
4
Paper Guide
3
PhotoCapture
2
Output Paper Support
1
Output Paper Support Extension
No.
Name Description
™
Media Slots
1 Output Paper Support
Extension
Pull the paper support extension towards
you, doing so prevents the paper from
7
Document Cover
8
Scanner Cover
9
Scanner Cover
Release Lever
10
Control Panel
falling off the output paper support.
2 Output Paper Support The printed paper exits the machine and
stacks onto the Output Paper Support.
3 PhotoCapture
Slots
Media
Insert your Media Card into the appropriate
slot to print a digital photo.
™
4 Paper Guide Press and slide it to fit the paper width.
5 Paper Tray Load paper here.
6 Paper Support Unfold to support paper.
7 Document Cover Open to place the original on the scanner
glass.
8 Scanner Cover This cover opens to enable you to install an
ink cartridge or to remove jammed paper.
9 Scanner Cover
Pull to open the Scanner Cover.
Release Lever
10 Control Panel Use the keys and display to control the
DCP.
1 - 2 INTRODUCTION
Page 16
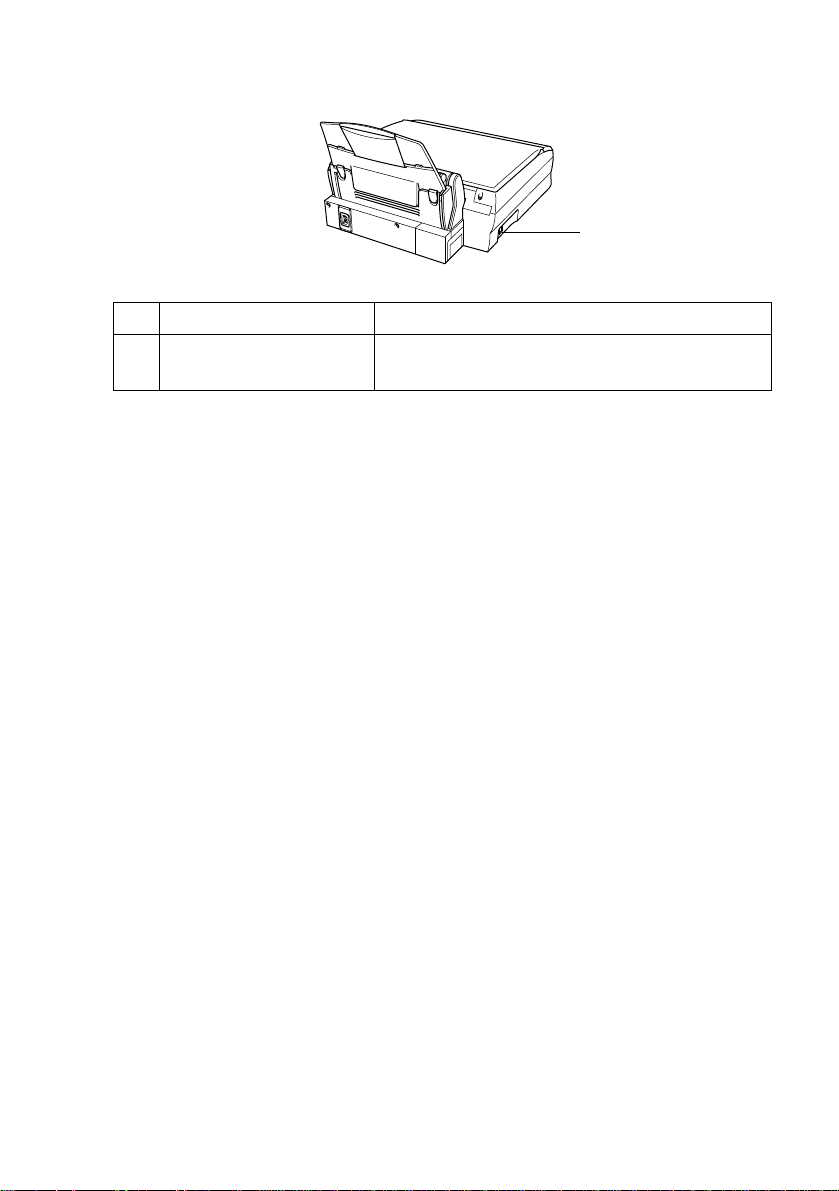
■ Rear View
No.
Name Description
11 USB Interface
Connector
11
USB Interface
Connector
Connect the USB Cable here.
INTRODUCTION 1 - 3
Page 17
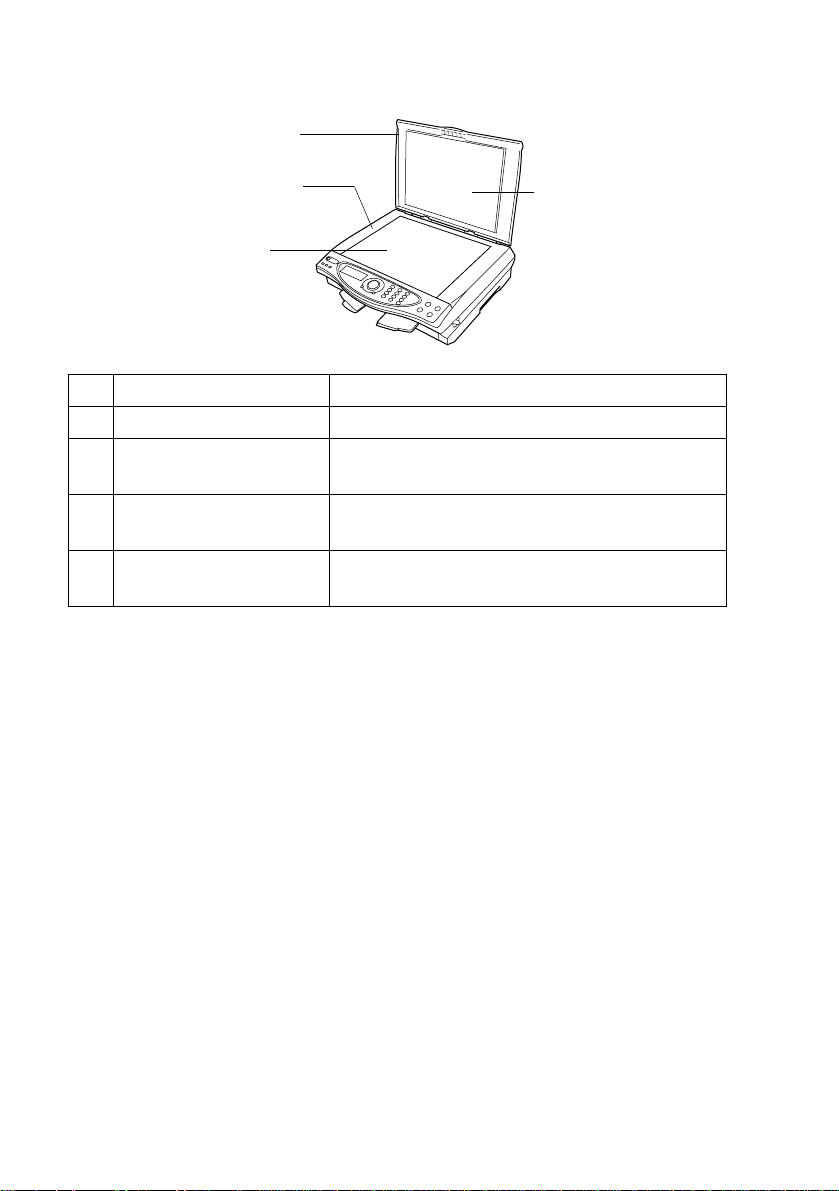
■ Internal View (Document Cover Open)
14
Document Cover
13
Document Guidelines
12
Scanner Glass
No.
Name Description
12 Scanner Glass Put the original to be scanned here.
13 Document Guidelines Use to center the original on the scanner
glass.
14 Document Cover Open to place the original on the scanner
glass.
15 White Film For good quality copying and scanning, the
white film needs to be kept clean.
15
White Film
1 - 4 INTRODUCTION
Page 18
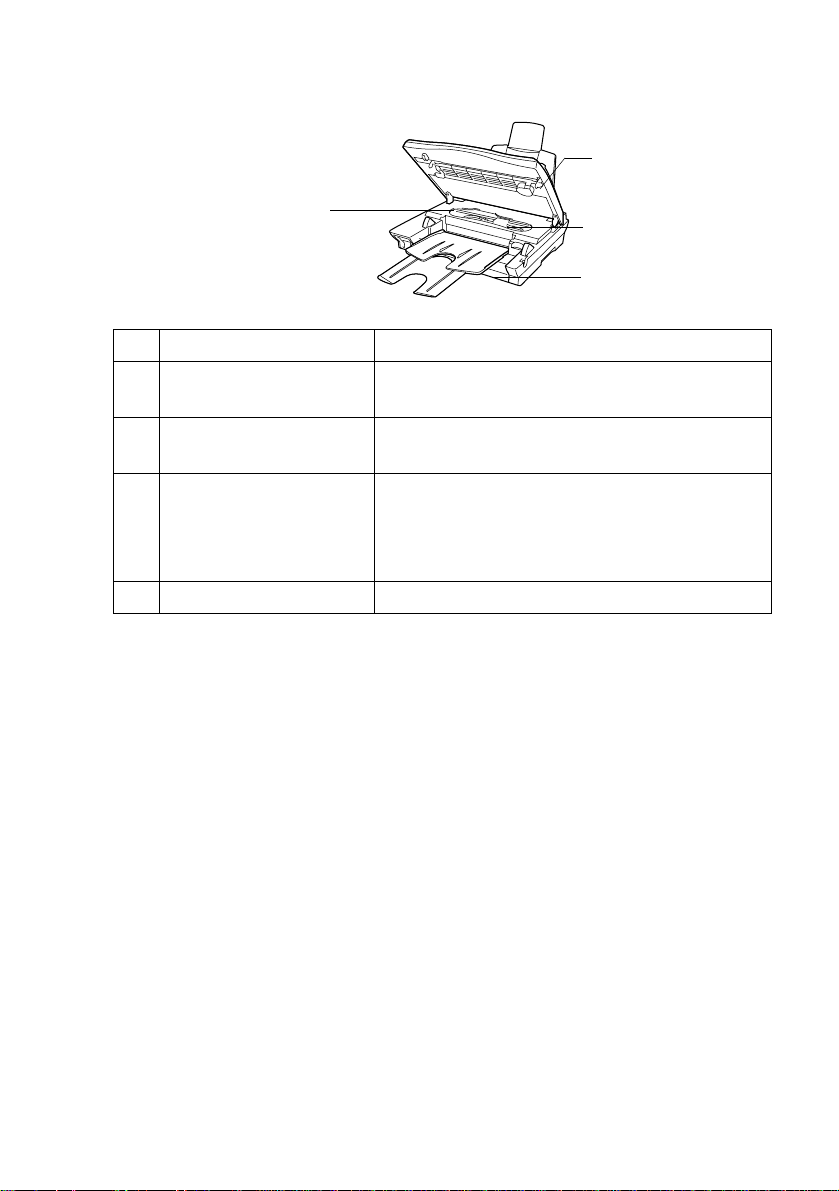
■ Internal View (Scanner Cover Open)
17
Scanner Cover
16
Machine Window
No.
Name Description
16 Machine Window Use to remove small paper jammed inside
the DCP without pulling the tube.
17 Scanner Cover Open to install ink cartridges or remove
jammed paper.
18 Tube These tubes transfer the ink to the print
heads.
Pulling the tube can cause damage to the
DCP.
19 Ink Cartridge Cover Open to install the ink cartridges.
18
Tube
19
Ink Cartridge Cover
INTRODUCTION 1 - 5
Page 19

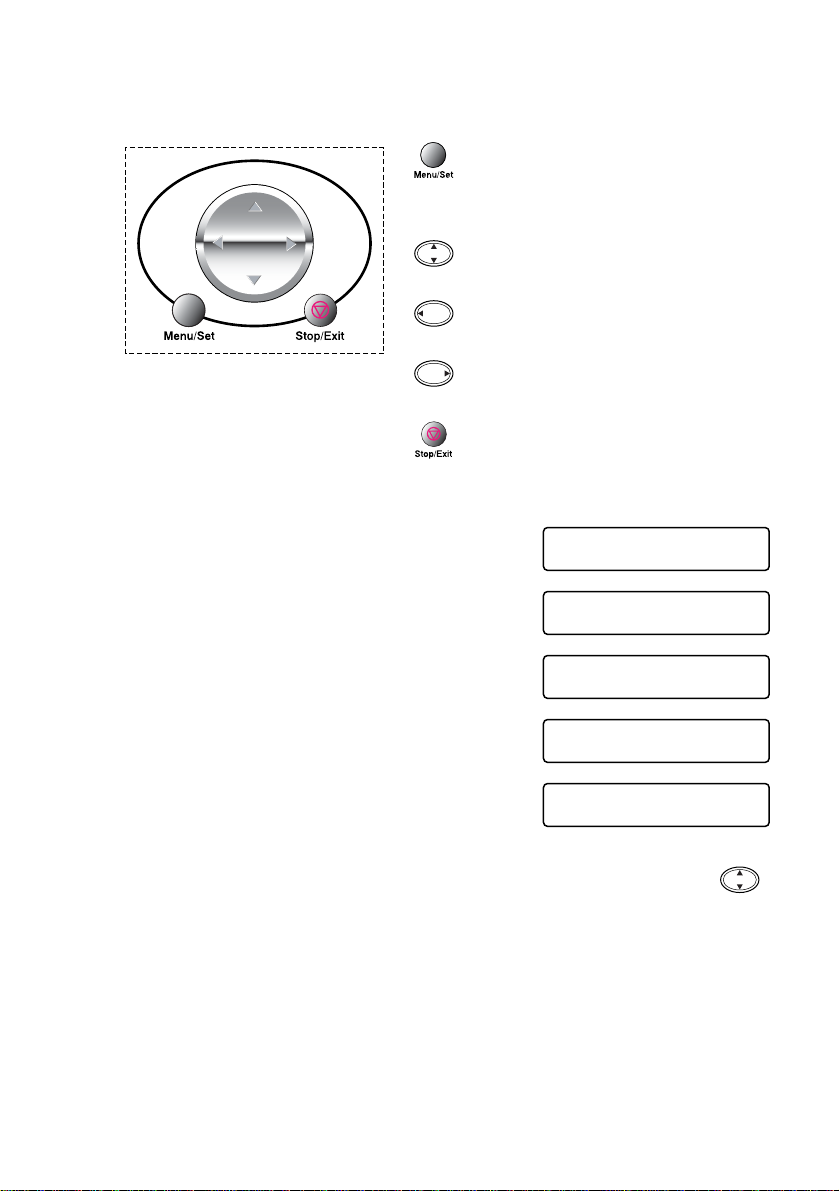
DCP-4020C control panel overview
4
321
On/Off
1
Let’s you turn the DCP on or off.
Liquid Crystal Display (LCD)
2
Displays messages on the screen to
help you to set up and use your
DCP.
Navigation key:
3
Menu/Set
Lets you access the Menu to
program and store your settings in
the DCP.
Press to scroll forward or backward
to a menu selection.
Press to scroll through the menus
and options.
Stop/Exit
Press this key to cancel a copy
operation and exits from menu.
1 - 6 INTRODUCTION
Page 20
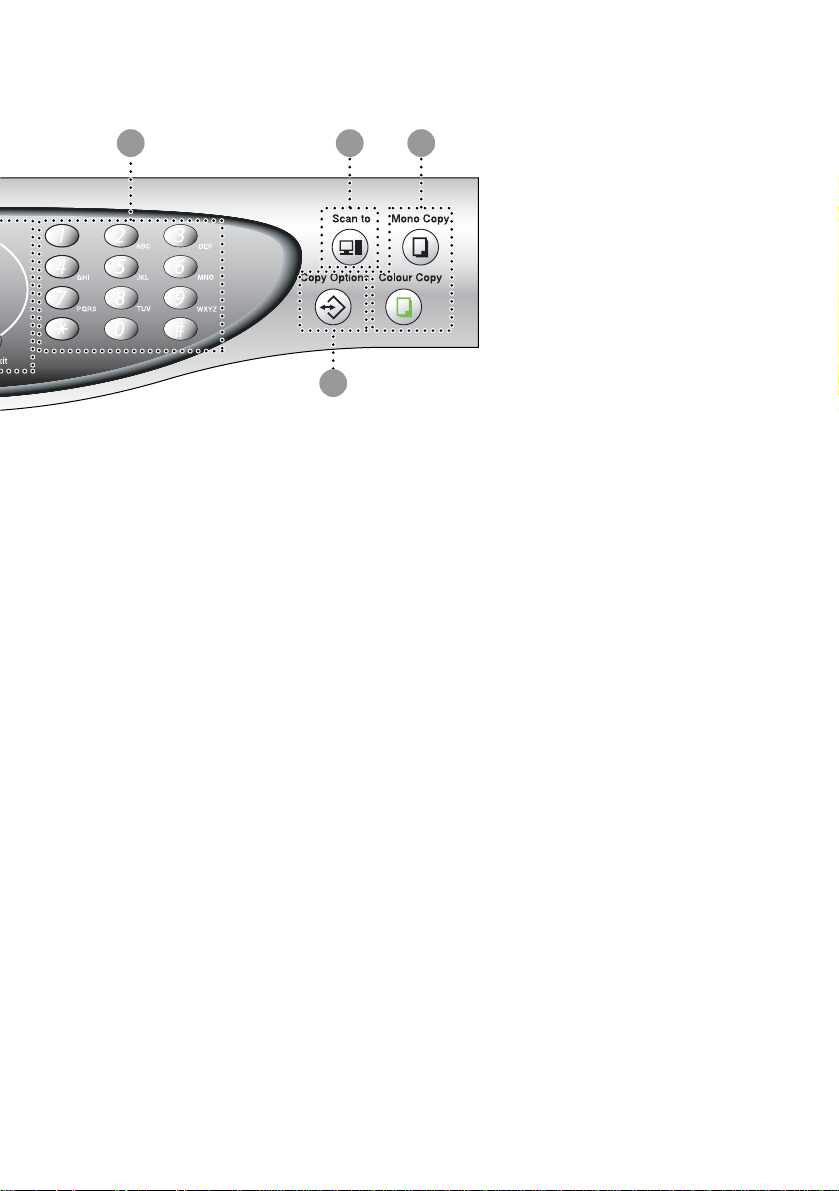
65 7
8
PhotoCapture Centre™ keys:
4
Print Index
Press to print the Index of the Media
Card (Thumbnails).
Options
You can quickly and easily select
temporary settings for
PhotoCapture Center
Print Image
Press to print an individual image.
Numeric keys
5
Use the numeric keys to enter the
number of multiple copies (99
maximum) and choose menus and
functions in the function menu.
™
.
Scan key:
6
Scan to
Lets you scan the next original and
select the destination in your
computer (such as a word
processing, graphics or E-mail
application, a Media card or a folder
on your computer.)
Copy keys:
7
Mono Copy
Makes a black and white copy.
Colour Copy
Makes a full colour copy.
Copy Options
8
You can quickly and easily select
temporary settings for copying.
INTRODUCTION 1 - 7
Page 21

2
Paper
About paper
The print quality of your document can be affected by the kind of
paper you use in the DCP.
To ensure the best print quality for the settings you’ve chosen,
always set the Paper Type to match the type of paper you load.
You can use plain paper, inkjet paper (coated paper), glossy paper,
transparencies and envelopes.
We recommend testing various paper types before purchasin g large
quantities.
For best results, use the recommended paper.
When you print on inkjet paper (coated paper), transparencies
and glossy paper, be sure to select the proper media in the
“Basic” tab in the printer driver.
Also avoid stacking by removing each page after it exits the
machine to avoid smudging.
Handling and using special paper
■ Store paper in its original packaging, and keep it sealed. Keep the
paper flat and away from moisture, direct sunlight and heat.
■ The coated side of glossy paper is shiny. Avoid touching the
shiny (coated) side. Load glossy paper with the shiny side facing
up toward you.
■ Avoid touching either side of transparencies, because they
absorb water and perspiration easily, and this may cause
decreased output quality. Transparencies designed for laser
printers/copiers may stain your next document. Use only
recommended transparencies.
2 - 1 PAPER
Page 22

Recommended paper
The output quality depends on the paper type and paper brand.
Visit us at http://solutions.brother.com
and check the latest
recommendations for paper that can be used with the
DCP-4020C.
Paper capacity of the Paper Tray
Paper Type Paper Size Number of sheets
Plain Paper
(Cut Sheet)
A4, A5, Letter,
Executive
100 of 80 g/m
up to 10 mm
Legal 50 of 80 g/m
Inkjet Paper A4 20
Glossy Paper A4 20
Transparencies A4 10
Envelopes DL, COM-10, C5,
10
Monarch
Postcard 101.6 x 152.4 (mm) 30
Index Card 127 x 203.2 (mm) 30
2
2
PAPER 2 - 2
Page 23

Paper specifications for the Paper Tray
Cut Sheet Paper
Weight
Thickness Plain Paper / Inkjet Paper: 0.08 to 0.15 mm
Plain Paper / Inkjet Paper: 64 to 120 g/m
Glossy Paper: Up to 150 g/m
Post card: Up to 170 g/m
Index card: Up to 120 g/m
2
2
2
Glossy Paper: Up to 0.18 mm
Envelopes: Up to 0.52 mm
Post card: Up to 0.23 mm
Index card: Up to 0.15 mm
Paper capacity of the Output Paper Support
Output Paper
Support
Up to 30 sheets of 80 g/m
(Transparencies and glossy paper must be
picked up from the output paper support one
page at a time to avoid smudging.)
2
2
2 - 3 PAPER
Page 24

Do not use paper or envelopes:
■ that are damaged, curled, wrinkled, or irregularly shaped
2 mm or
longer
2 mm or
longer
■ that are extremely shiny or highly textured
■ that were previously printed by a printer
■ that cannot be arranged uniformly when stacked
■ that are made with a short grain
Do not use envelopes:
■ that are of a baggy construction
■ that are embossed (have raised writing on them)
■ that have clasps on them
■ that are not sharply creased
■ that are preprinted on the inside
2 mm or
longer
PAPER 2 - 4
Page 25
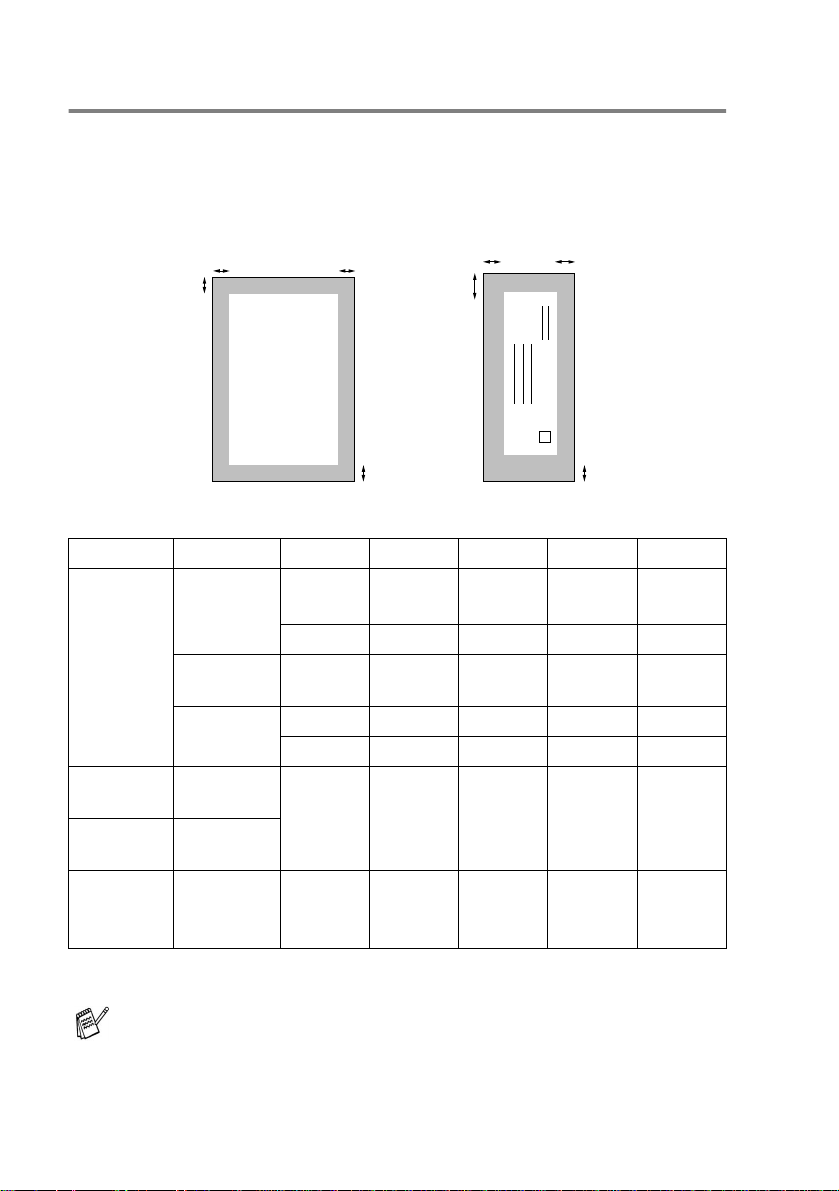
Printable area
The printable area depends on the settings in the application you are
using. The figures below show the unprintable areas on cut sheet
paper and envelopes.
EnvelopesCut Sheet Paper
34
1
34
1
2
■ unprintable area
1
Paper Paper Size
Cut Sheet A4, Letter Printer 3 mm
Copy 3 mm 3 mm 3 mm 3 mm
Executive,
Legal
A5 Copy 3 mm 3 mm 3 mm 3 mm
Post Card 101.6 x
152.4 mm
Index Card 127 x 203.2
mm
Envelopes DL,C5,
COM10,
Monarch
Printer 3 mm 3 mm 3 mm 3 mm
Printer 3 mm 3 mm 3 mm 3 mm
Printer 3 mm
Printer 3 mm 3 mm 3 mm 3 mm
Top
(0.5 mm)*
(0.5 mm)*
2
3 mm
1
(0.5 mm)*
3 mm
1
(0.5 mm)*
Bottom
1
1
2
3
Left
3 mm
(0.5 mm)*
3 mm
(0.5 mm)*
4
3 mm
1
(0.5 mm)*
3 mm
1
(0.5 mm)*
Right
*1 When you set the Near Edge feature to ON in the printer driver.
Printable area depends on the Printer driver setting.
The figures above are approximate and the printable area may
vary depending on the type of cut sheet paper you are using.
1
1
2 - 5 PAPER
Page 26
How to load paper and envelopes
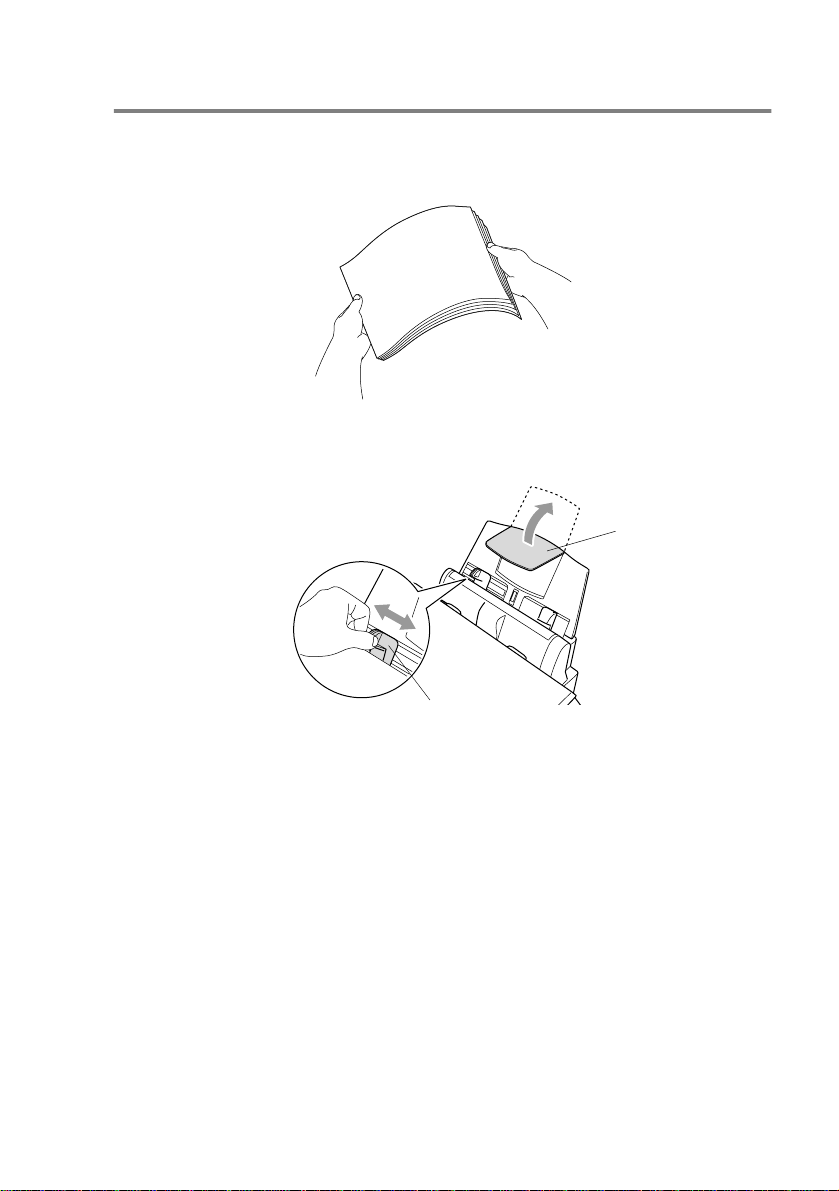
To load paper or other media
Fan the stack of paper well to avoid paper jams and mis-feeds.
1
Unfold the paper support, and press and slide the paper guide
2
to fit the paper width.
Paper Support
Paper Guide
PAPER 2 - 6
Page 27
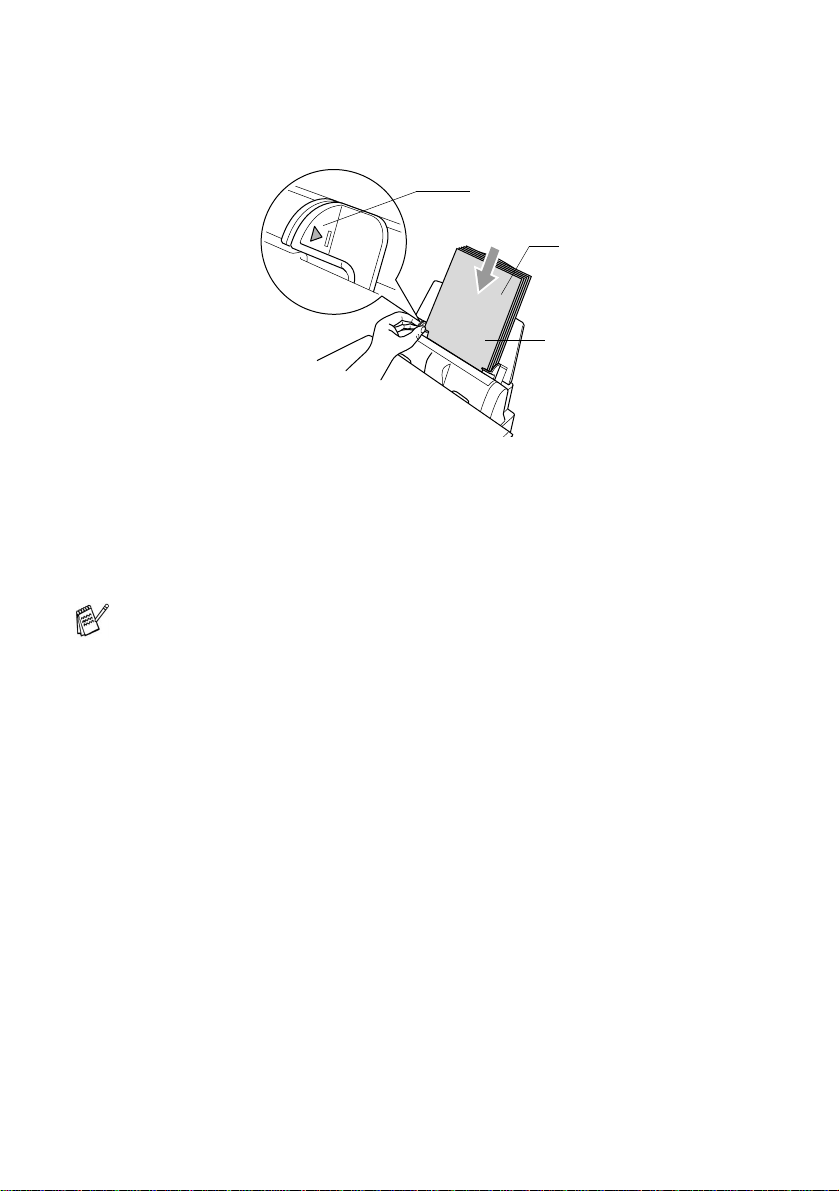
Gently insert the paper.
3
Make sure the print side is towards you and the paper is below
the maximum paper mark.
Maximum Paper Mark
Print Side
Paper
To load glossy paper
Fan the stack of glossy paper well.
1
Put a sheet of plain paper in the paper tray first, and then put the
2
stack of glossy paper on top of it.
If the glossy sheets are ‘double-feeding’, put one sheet in the
paper tray at a time.
2 - 7 PAPER
Page 28
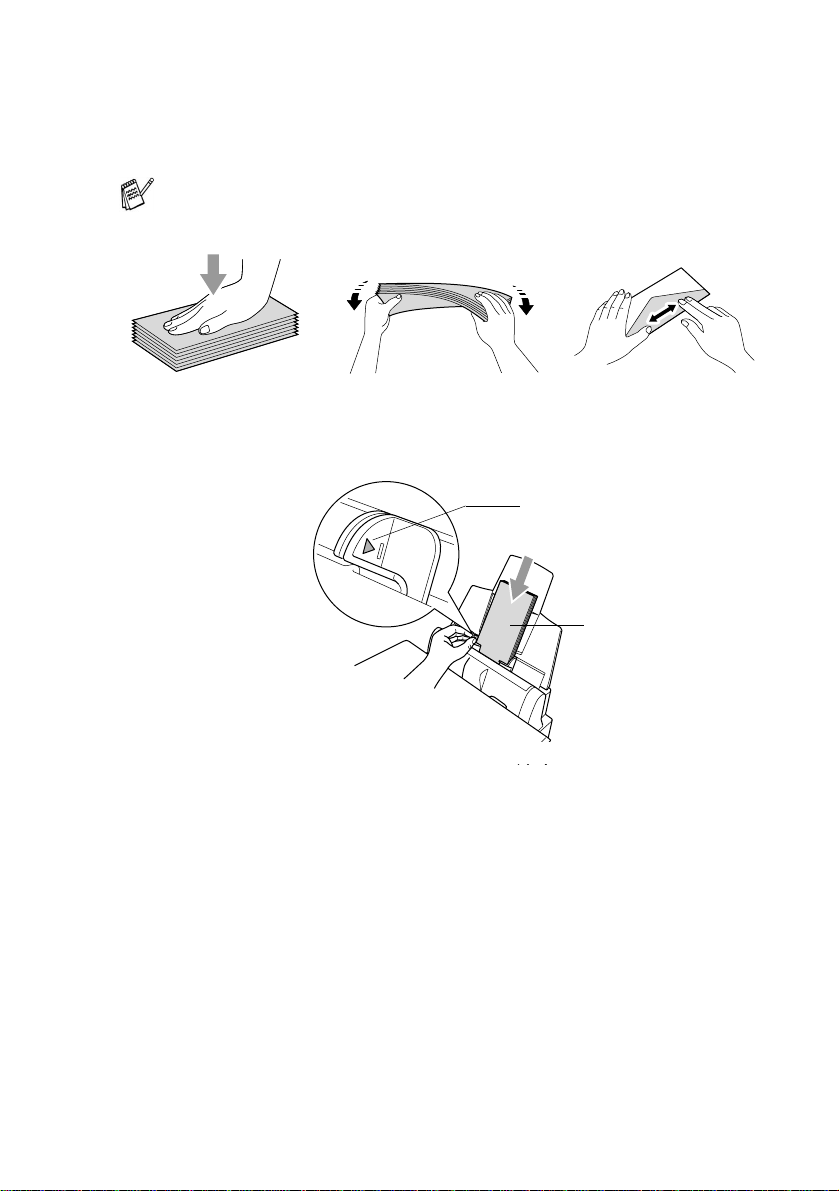
To load envelopes
Before loading, press the corners and sides of the envelopes to
1
make them as flat as possible.
If the envelopes are ‘double-feeding’, put one envelope in the
paper tray at a time.
Press and slide the paper guide to fit the width of the envelopes.
2
Insert them into the paper tray with the address side toward you
and pointed in the direction below.
Maximum Paper Mark
Print Side
PAPER 2 - 8
Page 29

3
On-Screen Programming
User-friendly programming
Your DCP is designed to be easy to use with LCD on-screen
programming using the navigation key. User-friendly programming
helps you take full advantage of all the menu selections your DCP
has to offer.
Since your programming is done on the LCD, we have created
step-by-step on screen instructions to help you program your DCP.
All you need to do is follow the instructions as they guide you through
the menu selections and programming options.
Menu table
You can probably program your machine without the User’s Guide.
But to help you understand the menu selections and options that are
found in the DCP programs, use the Menu table on page 3-4.
You can program your DCP by pressing
the menu numbers.
For example to set PAPER TYPE to GLOSSY:
Press
Press
Menu/Set, 1, 1
Menu/Set
and to select GLOSSY.
.
Menu/Set
followed by
Memory Storage
If there is a power failure, you will not lose your menu settings
because they are stored permanently. Temporary settings (such as
Contrast and so on) will be lost. You may also have to reset the date
and time.
3 - 1 ON-SCREEN PROGRAMMING
Page 30
Navigation key
*Access the menu
*Go to the next menu level
*Accept an option
*Scroll through the current
menu level
*Go back to the previous
menu level
*Go forward to the next
menu level
*Exit the menu
You can access the menu mode by pressing
When you enter the menu, the LCD scrolls.
Press
—OR—
Press
—OR—
Press
—OR—
Press
—OR—
Press
—OR—
You can scroll more quickly through each
menu level by pressing the arrow for the direction you want on .
Then set an option by pressing
on the LCD.
Then the LCD shows the next menu level.
for General Setup menu
1
for Copy menu
2
for PhotoCapture menu
3
for Maintenance menu
4
for Print Reports menu
5
Menu/Set
Menu/Set
SELECT ↑ ↓ & SET
1.GENERAL SETUP
SELECT ↑ ↓ & SET
2.COPY
SELECT ↑ ↓ & SET
3.PHOTOCAPTURE
SELECT ↑ ↓ & SET
4.MAINTENANCE
SELECT ↑ ↓ & SET
5.PRINT REPORTS
when that option appears
.
ON-SCREEN PROGRAMMING 3 - 2
Page 31

Press to scroll to your next menu selection.
Press
Menu/Set
.
When you finish setting an option, the LCD shows ACCEPTED.
Use to scroll backward if you passed your choices or want
to save keystrokes.
The current setting is always the option without a “?”.
3 - 3 ON-SCREEN PROGRAMMING
Page 32

Press the Menu numbers.
(ex. Press 1, 1 for)
Paper Type
—OR—
select select
Main Menu Submenu Menu
.
1
GENERAL
SETUP
1.PAPER TYPE
2.DATE/TIME
3.VOLUME 1.BEEPER HIGH
4.LCD
CONTRAST
5.POWER SAVE
0.LOCAL
LANGUAGE
(Not available for
UK machines)
(For Czech,
Hungarian and
Polish)
0.LOCAL
LANGUAGE
(Not available for
UK machines)
(For
Norwegian,
Swedish and
Finnish)
Selections
—
— — Sets the date and
—- +
—
—
—
to
accept
to
accept
Options Descriptions Page
PLAIN
INKJET
GLOSSY
(
4-COLOUR
3-COLOUR
TRANSPARENCY
MED
LOW
OFF
- +
-
- +
- +
ON
OFF
CZECH
HUNGARIAN
POLISH
ENGLISH
NORWEGIAN
SWEDISH
DANISH
FINNISH
ENGLISH
Sets the type of
paper in the paper
tray.
or
)
time.
Adjusts the volume
level of the beeper.
Adjusts the contrast
of LCD.
+
Power save mode. 4-4
Allows you to change
the LCD language.
Allows you to change
the LCD language.
to
exit
4-1
4-2
4-3
4-3
See
Quick
Setup
Guide
See
Quick
Setup
Guide
The factory settings are shown in Bold.
ON-SCREEN PROGRAMMING 3 - 4
Page 33

Press the Menu numbers.
(ex. Press 1, 1 for)
Paper Type
—OR—
select select
Main Menu Submenu Menu
2.COPY 1.QUALITY
2.BRIGHTNESS
3.CONTRAST
4.COLOUR
ADJUST
Selections
—
—- +
—- +
1.RED R:
2.GREEN G:
3.BLUE B:
to
accept
to
accept
Options Descriptions Page
NORMAL
BEST
FAST
- +
-
- +
- +
- +
-
- +
- +
- +
- +
R:
R:
-
- +
R:
- +
R:
- +
- +
G:
G:
-
- +
G:
- +
G:
- +
- +
B:
B:
-
- +
B:
- +
B:
Selects the copy
quality.
Adjusts the
brightness
+
Adjusts the contrast. 5-12
+
Adjusts the amount
of Red in copies.
+
Adjusts the amount
of Green in copies.
+
Adjusts the amount
of Blue in copies.
+
to
exit
5-12
5-12
5-13
The factory settings are shown in Bold.
3 - 5 ON-SCREEN PROGRAMMING
Page 34

Press the Menu numbers.
(ex. Press 1, 1 for)
Paper Type
—OR—
select select
Main Menu Submenu Menu
.
3
PHOTOCAPTURE
1.PRINT
QUALITY
2.PRINT SIZE
3.BRIGHTNESS
4.CONTRAST
5.COLOUR
ENHANCE
Selections
—
—
—- +
—- +
ON
OFF
to
accept
to
accept
Options Descriptions Page
NORMAL
FINE
PHOTO
(13 X 9 CM)
(15 X 10 CM)
(18 X 13 CM)
(20 X 25 CM)
- +
-
- +
- +
- +
-
- +
- +
1.WHITE
BALANCE
- +
- +
-
- +
- +
2.
SHARPNESS
- +
- +
-
- +
- +
3.COLOUR
DENSITY
- +
- +
-
- +
- +
Selects the print
quality.
Selects the print size 6-17
Adjusts the
brightness.
+
Adjusts the contrast. 6-18
+
Adjusts the hue of the
white areas.
+
Enhances the detail
of the image.
+
Adjusts the total
amount of colour in
the image.
+
to
exit
6-17
6-17
6-18
The factory settings are shown in Bold.
ON-SCREEN PROGRAMMING 3 - 6
Page 35

Press the Menu numbers.
(ex. Press 1, 1 for)
Paper Type
—OR—
select select
Main Menu Submenu Menu
3.PHOTOCAPTURE
(Continued)
4.MAINTENANCE
5.PRINT
REPORTS
6.SCAN TO
CARD
1.TEST PRINT
2.CLEANING
3.INK VOLUME
1.HELP
.
2
SYSTEM
SETUP
Selections
—
— — You can print a test
—
—
— — You can print lists &
——
to
accept
to
accept
Options Descriptions Page
PDF
JPEG
BLACK/CYAN
YELLOW/MAGENTA
ALL
BLACK
CYAN
YELLOW
MAGENTA
Selects the default
file format for colour
scanning.
sample page to
check the print
quality and adjust the
Vertical Alignment.
You can select to
clean two colours or
all 4 colours.
You can check the
ink volume that is left
in the cartridge.
reports.
to
exit
9-19
15-8
15-8
15-12
4-5
The factory settings are shown in Bold.
3 - 7 ON-SCREEN PROGRAMMING
Page 36

4
Initial setup
Getting started
Setting the Paper Type
To get the best print quality, set the DCP for the type of paper you
are using.
Press
1
Press to select PLAIN, INKJET,
2
GLOSSY or TRANSPARENCY.
Press
If you selected GLOSSY, press to select
3
GLOSSY:4-COLOUR or GLOSSY:3-COLOUR.
Press
The print quality of black ink varies depending on the kind of
glossy paper you are using. Black ink is used when you select
GLOSSY:4-COLOUR. If the glossy paper you are using repels
the black ink, select GLOSSY:3-COLOUR, which simulates black
ink by combining the three ink colours.
Menu/Set, 1, 1
Menu/Set
Menu/Set
.
.
.
GENERAL SETUP
1.PAPER TYPE
Press
4
The DCP ejects paper with printed surfaces face up onto the
paper tray in the front of the machine. When you use
transparencies or glossy paper, remove each sheet immediately
to prevent smudging or paper jams.
Stop/Exit
.
INITIAL SETUP 4 - 1
Page 37

Setting the Date and Time
If there is a power failure, you may have to reset the date and time.
All other settings will not be affected.
Press
1
Enter the last two digits of the year.
2
Press
Enter two digits for the month.
3
Press
(For example, enter 09 for
September, or 10 for October.)
Enter two digits for the day.
4
Press
(For example, enter 06).
Enter the time in 24-Hour format.
5
Press
(For example, enter 15:25 for 3:25 P.M.)
Press
6
whenever the DCP is in Standby mode.
Menu/Set, 1, 2
Menu/Set
Menu/Set
Menu/Set
Menu/Set
Stop/Exit
.
.
.
.
.
. The LCD now shows the date and time
GENERAL SETUP
2.DATE/TIME
DATE/TIME
YEAR:20XX
DATE/TIME
MONTH:XX
DATE/TIME
DAY:XX
DATE/TIME
TIME:XX:XX
4 - 2 INITIAL SETUP
Page 38

Setting the Beeper Volume
You can change the beeper volume. When the beeper is on, the DCP
beeps every time you press a key or make a mistake.
Press
1
(LOW, MED, HIGH or OFF)
Press to select your option.
2
Press
3
Press
4
Menu/Set, 1, 3, 1
Menu/Set
Stop/Exit
.
.
.
VOLUME
1.BEEPER
Setting the LCD Contrast
You can adjust the LCD contrast for a sharper and more vivid
display. If you are having difficulty seeing the LCD from your position,
we recommend the following contrast settings for improved viewing.
1
2
3
Press
Press
—OR—
Press
Press
Press
Menu/Set, 1, 4
to increase the contrast.
to decrease the contrast.
Menu/Set
Stop/Exit
.
.
.
GENERAL SETUP
4.LCD CONTRAST
SELECT ↑ ↓ & SET
-+
SELECT ↑ ↓ & SET
-+
SELECT ↑ ↓ & SET
-+
INITIAL SETUP 4 - 3
Page 39

Power Save
Setting Power Save Mode reduces power consumption by turning off
the CPU etc. inside the machine. If Power Save Mode is switched
ON, when the machine is idle for approximately 10 minutes, it drops
into power save mode automatically.
The machine will display SLEEP instead of the date and time.
Press
1
Press to select ON (or OFF).
2
Press
Press
3
Menu/Set, 1, 5
Menu/Set
Stop/Exit
.
.
.
GENERAL SETUP
5.POWER SAVE
4 - 4 INITIAL SETUP
Page 40

Printing reports
Printing reports
Two reports are available:
PRINT REPORTS
1.HELP
PRINT REPORTS
2.SYSTEM SETUP
Prints the Help List so you can see at-a-glance
how to quickly program your DCP.
Lists your latest default settings for
GENERAL SETUP.
To print a report
Press
1
Press to select the report you
2
want.
Press
—OR—
Enter the number of the report you want to print.
For example, press
Press
3
Menu/Set, 5
Menu/Set
Mono Copy
.
.
to print the Help List.
1
or
Colour Copy
SELECT ↑ ↓ & SET
5.PRINT REPORTS
.
INITIAL SETUP 4 - 5
Page 41

5
Making copies
Using the DCP as a copier
Your DCP allows you to make high-quality photocopies and
transparencies. Copies can be in black and white or full colour.
Always make sure you have paper in the paper tray before making
copies. Do not pull on the paper while copying is in progress.
Copy Keys
Copy Options
Key
5 - 1 MAKING COPIES
Page 42

Single or multiple copies
You can make multiple copies using the scanner glass. Use the
Options
(Temporary Settings) on page 5-3.)
1
2
3
4
key to choose more settings. (See Using Copy Options key
Lift the Document Cover.
Place Originals Face Down
on the Scanner Glass
Document
Guidelines
Using the document guidelines on the left, center the original
face down on the scanner glass and close the document cover.
Using the dial pad, enter the number of copies you want (up to
99).
For example, press
Press
The DCP will start scanning the original.
Mono Copy
for 38 copies.
3 8
or
Colour Copy
.
Out of memory message
Copy
If the memory becomes full before you are
making copies, the LCD will show this
message:
If the OUT OF MEMORY message appears, press
cancel. You will need to clear some jobs from the memory before you
can continue.
OUT OF MEMORY
PLAIN NORMAL
Stop/Exit
MAKING COPIES 5 - 2
to
Page 43

Using Copy Options key (Temporary Settings)
When you want to change the settings only for the next copy, use the
Copy Options
Copy Options Key
You can use different combinations. For example, if you want to copy
a photograph on glossy paper with best print quality, press
Copy Options
the Paper Type setting.
key.
to select BEST in the Quality setting and GLOSSY in
5 - 3 MAKING COPIES
Page 44

Press
Copy
Options
Menu Selections Options Factory
Setting
select select
QUALITY FAST/NORMAL/BEST NORMAL 5-5
ENLARGE/REDUCE 25%/50%/78%/94%/
100%/104%/150%/
200%/400%/MANUAL
PAPER TYPE PLAIN/INK JET/
GLOSSY (4-COLOUR
or 3-COLOUR)/
TRANSPARENCY
PAPER SIZE A4/10(W)×15(H)CM A4 5-8
BRIGHTNESS - + - + 5-8
PAGE LAYOUT OFF(1 IN 1)/
2 IN 1/4 IN 1/
POSTER
NO. OF COPIES:01 NO. OF COPIES:01
(01-99)
100% 5-6
PLAIN 5-7
OFF
(1 IN 1)
01 5-5
Page
5-9
After you finish choosing settings using
the
Copy Options
key, the LCD shows:
PRESS COPY OR
FOR NEXT OPT.
↑ ↓
Press to select more settings.
—OR—
Press
Mono Copy
or
Colour Copy
if you’re finished choosing settings.
These settings are temporary, and the DCP returns to its default
settings 60 seconds after it finishes copying. If you want to reuse
these temporary settings, you must start copying the next
original on the scanner glass before the 60 seconds expire.
MAKING COPIES 5 - 4
Page 45

No. of Copies
Place the original face down on the scanner glass.
1
Press
2
select NO. OF COPIES:01.
Press the number of copies using
3
the dial pad.
Press
To start copying now, press
—OR—
Press for more settings.
Copy Options
Menu/Set
.
and to
Mono Copy
or
Colour Copy
Quality
Place the original face down on the scanner glass.
1
Press
2
select QUALITY.
Press
Press to select NORMAL, FAST or BEST.
3
Press
To start copying now, press
4
—OR—
Press for more settings.
Copy Options
Menu/Set
Menu/Set
and to
.
.
Mono Copy
SELECT ↑ ↓ & SET
NO. OF COPIES:01
.
QUALITY
NORMAL
or
Colour Copy
.
NORMAL Recommended mode for ordinary printouts. Good
copy quality with adequate copy speed.
FAST Fast copy speed and lowest ink consumption. Use
FAST to save time (documents to be proof-read,
large documents or many copies).
BEST Use this mode to copy precise images such as
photographs. BEST uses the highest resolution and
slowest speed.
5 - 5 MAKING COPIES
Page 46

Enlarge/Reduce
You can select the following enlargement or reduction ratios.
MANUAL allows you to enter a ratio from 25% to 400%.
Press
and
to select
ENLARGE/REDUCE
1
2
3
4
Copy Options
Place the original face down on the scanner glass.
Press
select ENLARGE/REDUCE.
Press
Press to select the enlargement or reduction ratio you want.
Press
—OR—
You can select MANUAL and press
Use the dial pad to enter an enlargement or reduction ratio from
25% to 400%.
Press
(For example, press
Press
—OR—
Press for more settings.
Copy Options
Menu/Set
Menu/Set
Menu/Set
Mono Copy
25%
50%
78%
94%
100%
104%
150%
200%
400%
MANUAL
and to
.
.
.
to enter 53%.)
5 3
or
Colour Copy
ENLARGE/REDUCE
100%
Menu/Set
.
.
Special Copy Options (2in1, 4in1 or Poster) are not available
with Enlarge/Reduce.
MAKING COPIES 5 - 6
Page 47

Paper Type
You can change the paper type only for the next copy. Select the
type of media that you are using to get the best print quality.
Place the original face down on the scanner glass.
1
Press
2
Press
Press to select the type of paper you are using (PLAIN,
3
INKJET, GLOSSY or TRANSPARENCY).
Press
If you selected GLOSSY, press to select
4
GLOSSY:4-COLOUR or GLOSSY:3-COLOUR.
Press
The print quality of black ink depends on the type of glossy
paper you are using. Black ink is used when you select
GLOSSY:4-COLOUR. If the glossy paper you are using repels
the black ink, select GLOSSY:3-COLOUR, which simulates black
ink by combining the three ink colours.
Copy Options
Menu/Set
Menu/Set
Menu/Set
and to select PAPER TYPE.
.
.
.
Press
5
—OR—
Press for more settings.
You can change the default Paper Type setting at any time.
(See Setting the Paper Type on page 4-1.)
5 - 7 MAKING COPIES
Colour Copy
(or
Mono Copy
).
Page 48

Paper Size
You can change the paper size setting only for the next copy.
You can copy only on A4 and Post Card (10X15) paper.
Place the original face down on the scanner glass.
1
Press
2
Press
Press to select the size of paper you are using
3
(A4 or 10(W)×15(H)CM).
Press
Press
4
—OR—
Press for more settings.
Copy Options
Menu/Set
Menu/Set
Mono Copy
and to select PAPER SIZE.
.
.
or
Colour Copy
.
Brightness
You can adjust the copy brightness to make copies darker or lighter.
Place the original face down on the scanner glass.
1
Press
2
select BRIGHTNESS.
Press
Press to make a lighter copy.
3
—OR—
Press to make a darker copy.
Press
Press
4
—OR—
Press for more settings.
Copy Options
Menu/Set
Menu/Set
Mono Copy
and to
.
.
or
Colour Copy
BRIGHTNESS
- +
.
MAKING COPIES 5 - 8
Page 49

Page Layout
You can save paper by copying either two or four pages onto one
page, or you can make a poster size copy.
Place the original face down on the scanner glass.
1
Press
2
Press
Press to select 2 IN 1, 4 IN 1, POSTER
3
(or OFF (1 IN 1)).
Press
Press
4
The DCP starts scanning the first page.
If you selected 2 IN 1 or 4 IN 1 in
5
Step 3, insert the next page onto the
scanner glass.
Press
Repeat Step 5 for each page of the original.
After all the pages of the original have been scanned,
6
press
2 in 1
Copy Options
Menu/Set
Menu/Set
Mono Copy
Menu/Set
Mono Copy
and to select PAGE LAYOUT.
.
.
or
Colour Copy
.
or
Colour Copy
.
NEXT:PRESS SET
END:PRESS COPY
to end.
5 - 9 MAKING COPIES
Page 50

4 in 1
Poster
You can make a poster
size copy of a
photograph.
For 2 in 1 or 4 in 1 copies, you cannot change the enlargement
or reduction ratio or print on glossy paper.
For colour 2 in 1 or 4 in 1 copies, you can use A4 size paper.
You cannot make more than one copy.
For poster copies, you cannot make more than one copy or use
the Enlarge/Reduce setting.
MAKING COPIES 5 - 10
Page 51

Changing the default copy settings
You can adjust the copy settings that are shown in the chart. These
settings will stay until you change them again.
Submenu Menu Selections Options Factory Settings
1.QUALITY — NORMAL
BEST
FAST
2.BRIGHTNESS —- +
- +
- +
- +
- +
3.CONTRAST —- +
- +
- +
- +
- +
4.COLOUR ADJUST 1.RED R: - +
R: - +
R: - +
R: - +
R: - +
2.GREEN G: - +
G: - +
G: - +
G: - +
G: - +
3.BLUE B: - +
B: - +
B: - +
B: - +
B: - +
NORMAL
- +
- +
R: - +
G: - +
B: - +
5 - 11 MAKING COPIES
Page 52

Copy Quality
Press
1
Press to select NORMAL, BEST
2
or FAST.
Press
Press
3
Menu/Set, 2, 1
Menu/Set
Stop/Exit
.
COPY
1.QUALITY
.
.
Brightness
Press
1
Press to make a lighter copy.
2
—OR—
Press to make a darker copy.
Press
Press
3
Menu/Set, 2, 2
Menu/Set
Stop/Exit
.
COPY
2.BRIGHTNESS
.
.
Contrast
You can change the contrast to help an image look sharper an d more
vivid.
Press
1
Press to increase the contrast.
2
—OR—
Press to decrease the contrast.
Press
Press
3
Menu/Set, 2, 3
Menu/Set
Stop/Exit
.
COPY
3.CONTRAST
.
.
MAKING COPIES 5 - 12
Page 53

Colour Adjustment
Press
1
Press to select RED, GREEN or
2
BLUE.
Press
Press to increase the colour saturation.
3
—OR—
Press to decrease the colour saturation.
Press
Return to Step 2 to select the next colour.
4
—OR—
Press
Menu/Set, 2, 4
Menu/Set
Menu/Set
Stop/Exit
.
.
.
.
COPY
4.COLOUR ADJUST
5 - 13 MAKING COPIES
Page 54

Legal limitations
Colour reproductions of certain documents are illegal and may result
in either criminal or civil liability. This memorandum is intended to be
a guide rather than a complete listing of every possible prohibition . In
case of doubt, we suggest that you check with counsel as to any
particular questionable documents.
The following are examples of documents which should not be
copied:
■ Paper money
■ Bonds or other certificates of indebtedness
■ Certificates of Deposit
■ Armed Forces Service or Draft papers.
■ Passports
■ Postage Stamps (cancelled or uncancelled)
■ Immigration Papers
■ Welfare documents.
■ Cheques or Drafts drawn by Governmental Agencies.
■ Identification Documents, badges or insignias.
■ Licences and Certificates of Title to motor vehicles.
Copyrighted works cannot be copied. Sections of a copyrighted work
can be copied for ‘fair use.’ Multiple copies would indicate improper
use.
Works of art should be considered the equivalent of copyrighted
works.
MAKING COPIES 5 - 14
Page 55

6
Walk-Up PhotoCapture
Center
Introduction
™
Your Brother DCP includes three media drives (slots) to use with
popular digital camera media: CompactFlash
Memory Stick
CompactFlash
The PhotoCapture Center
your digital camera at high resolution to get photo quality printing.
®
.
®
SmartMedia
™
feature lets you print digital photos from
®
®
, SmartMedia® and
Memory Stick
®
PhotoCapture Center™ requirements
To avoid error conditions, please remember:
■ The DPOF file on the media card must be in a valid format.
■ The image file extension must be .JPG (Other image file
extensions .JPEG, .TIF, .GIF and so on will not be recognized).
™
■ Walk-up PhotoCaputure Center
separately from PhotoCapture Center
(Simultaneous operation is not available.)
■ IBM Microdrive
■ The DCP can read up to 999 files in a media card.
■ Use only Smart media cards with a 3.3 voltage.
™
is not compatible with the DCP.
printing must be performed
™
operations using the PC.
When printing the INDEX or IMAGE, the PhotoCapture Center™
will print all the valid images, even if one or more images have
been corrupted. A portion of the corrupted image may be printed.
6 - 1 WALK-UP PHOTOCAPTURE CENTER
™
Page 56

Basic flow
Insert the media card firmly into the media drive (slot).
1
(See Getting started on page 6-3.)
Print the index (Thumbnails) of all the images on your media
2
card by pressing Print Index. The images will be numbered.
(See Printing the Index (Thumbnails) on page 6-6.)
To print the images, press Print Image.
3
(See Printing images on page 6-7.)
You can change the settings for printing images, such as the number
of Copies, Paper Type, Paper & Print Size, Print Quality, Brightness
and Colour Enhancement by pressing Options key.
(See Changing the settings for printing images on page 6-8.)
WALK-UP PHOTOCAPTURE CENTER™ 6 - 2
Page 57

Getting started
There are separate slots on your DCP, for a CompactFlash
card, a SmartMedia® card and a Memory Stick®.
Use only Smart media cards with a 3.3 voltage.
The left slot is for a CompactFlash® Card, the middle slot is for a
®
Memory Stick
and the right is for a SmartMedia® Card.
Firmly insert the card into the appropriate slot.
CompactFlash
®
®
SmartMedia
6 - 3 WALK-UP PHOTOCAPTURE CENTER
®
Memory Stick
™
®
Page 58

Media Card Indicator Lights:
■ LED light is ON, the media card is inserted properly.
■ LED is OFF, the media card is not properly inserted.
■ LED is BLINKING, the media card is being read or written to.
Do NOT unplug the power cord or remove the media card from
the media drive (slot) while the DCP is reading or writing to the
card (LED is blinking). You will loose your data or damage
the card.
WALK-UP PHOTOCAPTURE CENTER™ 6 - 4
Page 59

The DCP can only read one Media card at a time so do not insert
more than one card. The settings that you want to use with the card
will be kept until you take out the media card from the drive (slot),
print images or press
Insert the media card firmly into the media drive (slot).
1
When you insert your media card
2
into the proper slot, the LCD shows.
The media active message will be shown for 60 seconds and
then the display will return to standby mode.
Even in that case, you can enter the Photo Capture mode by
pressing
Photo Capture
Stop/Exit
.
C.FLASH ACTIVE
Press PhotoCapture for ---
.
Press
3
The LCD shows:
(See Changing the settings for
printing images on page 6-8.)
Options
.
CHANGE SETTINGS
NO. OF COPIES:01
6 - 5 WALK-UP PHOTOCAPTURE CENTER
™
Page 60

Printing the Index (Thumbnails)
The PhotoCapture Center™ assigns numbers for images (such as
No.1, No.2, No.3, and so on).
It does not recognize any other numbers or file names that your
digital camera or PC have used to identify the pictures. You can print
a thumbnail page (Index page with 6 or 4 images per line). This will
show all the pictures on the media card.
Make sure you inserted the media card. (See page 6-3.)
1
Press
Press to select
2
6 IMAGES/LINE or
4 IMAGES/LINE.
Press
Print Index
Menu/Set
.
PRINT INDEX
6 IMAGES/LINE
.
Index Index
4 Images/line 6 Images/line
Press
3
Print time for 4 Images/line will be slower than 6 Images/line, but
the quality is better. To print an image, see the next page.
Colour Copy
to start printing.
WALK-UP PHOTOCAPTURE CENTER™ 6 - 6
Page 61

Printing images
Before you can print an individual image, you have to know the
image number.
Print the Index first.
(See Printing the Index (Thumbnails) on page 6-6.)
Make sure you inserted the media
1
card. (See page 6-3.)
Press
Use the dial pad to enter the image
2
number that you want to be printed
from the Index page (Thumbnails).
Press
Repeat this step until you have entered all the image numbers
that you want to print.
You can enter all the numbers at one time by using the key for
a comma or the
(For example, Enter
No.6. Enter
After you have selected all the
3
image numbers.
Press
The LCD shows:
To print, press
4
—OR—
To change settings, press
(See Changing the settings for printing images on page 6-8.)
Print Image
Menu/Set
1#5
Menu/Set
.
.
key for hyphen.
#
136
to print images No.1 to No.5).
twice.
Colour Copy
- to print images No.1, No.3 and
.
Options
ENTER & SET KEY
IMG:
ENTER & SET KEY
IMG:1,3,6
PRESS COLOUR CPY
FOR PRINTING
.
6 - 7 WALK-UP PHOTOCAPTURE CENTER
™
Page 62

Changing the settings for printing images
You can change the settings for the number of Copies, Paper Type,
Paper & Print Size, Print Quality, Brightness and Colour
Enhancement only for the next printed image.
Menu Selections Options (1) Options (2) Factory
Setting
NO. OF COPIES: XX— 01-99 01 6-9
PAPER TYPE PLAIN — PLAIN 6-9
INK JET
GLOSSY
TRANSPARENCY —
PAPER&PRINT
SIZE
PRINT QUALITY NORMAL — FINE 6-13
BRIGHTNESS - + — - + 6-13
COLOUR ENHANCE ON — OFF 6-14
A4 PRINT SIZE
10(W)X15(H)CM ORIENTATION
FINE
PHOTO
- +
- +
- +
- +
OFF
GLOSSY:4-COLOUR
GLOSSY:3-COLOUR
A4 6-10
13X9CM
15X10CM
18X13CM
20X25CM
LANDSCAPE
PORTRAIT
LANDSCAPE
Page
WALK-UP PHOTOCAPTURE CENTER™ 6 - 8
Page 63

Menu selections
Make sure you have entered the image number that you want to
be printed. (See page 6-7.)
Number of Copies
Press to select NO. OF COPIES:01.
5
Press
Use the dial pad to enter the number of copies you want.
6
Press
Press
7
—OR—
Press for more settings.
Menu/Set
Menu/Set
Colour Copy
Paper Type
Press to select PAPER TYPE.
5
Press
Press to select the type of paper you are using,
6
(PLAIN, INK JET, GLOSSY or TRANSPARENCY).
Press
If you selected GLOSSY, press to select
7
GLOSSY:4-COLOUR or GLOSSY:3-COLOUR.
Press
Menu/Set
Menu/Set
Menu/Set
.
.
to print.
.
.
.
The print quality of black ink depends on the type of glossy
paper you are using. Black ink is used when you select
4-COLOUR.
If the glossy paper you are using repels the black ink, select
3-COLOUR, which simulates black ink by combining the three
ink colours.
Press
8
—OR—
Press for more settings.
6 - 9 WALK-UP PHOTOCAPTURE CENTER
Colour Copy
to print.
™
Page 64

Paper and Print Size
Make sure you have done Steps 1 to 4 on page 6-7.
Press to select PAPER&PRINT SIZE.
5
Press
Press to select the size of the paper you are using
6
(A4 or 10(W)X15(H)CM).
Press
If you select A4, press to select the print size
7
Press
Printed Position
Menu/Set
Menu/Set
Menu/Set
.
.
, and go to Step 11.
1
13X9CM
—OR—
If you selected 10(W)X15(H)CM for PRINT SIZE, go to Step 8.
2
15X10CM
3
18X13CM
4
20X25CM
WALK-UP PHOTOCAPTURE CENTER™ 6 - 10
Page 65

Load the post card with the top edge down and print side is
8
towards you.
Print side
Check the printed thumbnail image on the index sheet.
9
Index
Landscape image Portrait image
Some images taken by some cameras have the orientation
information.
6 - 11 WALK-UP PHOTOCAPTURE CENTER
™
Page 66

Press to select LANDSCAPE or PORTRAIT.
10
Press
The result of the output (10 (W) x 15 (H) cm)
Menu/Set
Portrait Image
Landscape Image
.
LANDSCAPE PORTRAIT
Press
11
—OR—
Press for more settings.
Colour Copy
to print.
WALK-UP PHOTOCAPTURE CENTER™ 6 - 12
Page 67

Print Quality
Press to select PRINT QUALITY.
5
Press
Press to select NORMAL, FINE or PHOTO.
6
Press
Menu/Set
Menu/Set
NORMAL Recommended mode for ordinary printouts. Good print quality
FINE Better print quality than normal and faster copy speed than
PHOTO Use this mode to print precise images such as photographs.
.
.
with adequate print speed.
PHOTO.
PHOTO uses the highest resolution and slowest speed.
Press
7
—OR—
Press for more settings.
Colour Copy
to print.
Brightness
Make sure you have done Steps 1 to 4 on page 6-7.
Press to select BRIGHTNESS.
5
Press
Press to make a lighter print.
6
—OR—
Press to make a darker print.
Press
Press
7
—OR—
Press for more settings.
Menu/Set
Menu/Set
Colour Copy
.
.
to print.
6 - 13 WALK-UP PHOTOCAPTURE CENTER
™
Page 68

Colour Enhancement
You can turn on the colour enhancement feature to print more vivid
images.
If you want to customize the White Balance, Sharpness or
Colour Density, press
on page 6-18.)
Press to select COLOUR ENHANCE.
5
Press
Press to select ON (or OFF).
6
Press
Press
7
—OR—
Press for more settings.
■ The PhotoCapture Center
■ The PhotoCapture Center
Menu/Set
Menu/Set
Colour Copy
White printing and Enlargement/Reduction is not available
when using this feature.
when you take out the media card, print images or press
Stop/Exit
Menu/Set, 3, 5
.
.
to print.
.
. (See Colour Enhancement
™
prints only in colour. Black &
™
returns to its default setting
DPOF printing
DPOF stands for Digital Print Order Format.
Major Digital Camera manufacturers (Canon Inc., Eastman Kodak
Company, Fuji Photo Film Co. Ltd. and Matsushita Electric Industrial
Co., Ltd. and Sony Corporation.) created this standard to make it
easier to print images from a digital camera.
If your digital camera supports DPOF printing, you will be able to
select on the Digital Camera display the images and number of
copies you want to print.
When the memory card (CompactFlash
®
) with DPOF information is put into your DCP, you can print the
Stick
selected image easily.
WALK-UP PHOTOCAPTURE CENTER™ 6 - 14
®
, SmartMedia® or Memory
Page 69

Insert your media card into the
1
appropriate drive (slot).
The media active message will be shown for 60 seconds and
then the display will return to standby mode.
C.FLASH ACTIVE
Press Photo Capture key ---
Press
2
If there is a DPOF file on the card,
3
the LCD shows:
Press 1 to select 1.YES.
4
If you want to print an Index (thumbnails) or choose the images
and their print options now, select 2.NO.
Press
5
Print Image
Colour Copy
.
DPOF PRINT
1.YES 2.NO
PRESS COLOUR CPY
FOR PRINTING
to print.
6 - 15 WALK-UP PHOTOCAPTURE CENTER
™
Page 70

Changing the default settings
You can adjust the Print Quality, Print Size, Brightness, Contrast,
Colour Enhance and Scan to Card settings, that are shown in the
chart. These settings will remain set until you change them again.
Press
Menu/Set, 3
to change. (See details on the following pages.)
Submenu Menu
1.PRINT QUALITY
.
2
PRINT SIZE
3
.
BRIGHTNESS
4.CONTRAST
5.COLOUR
ENHANCE
.
6
SCAN TO CARD
(See
How to scan
®
using Windows
page 9-1.)
on
, followed by the number of the setting you want
Selections
—
—
—- +—- +
—- +—- +
ON 1.WHITE BALANCE
OFF
—
Options (1) Options (2) Factory Settings
NORMAL
FINE
PHOTO
13×9CM
15×10CM
18×13CM
20×25CM
- +
- +
- +
- +
- +
- +
- +
- +
2.SHARPNESS
3.COLOUR
DENSITY
——
PDF
JPEG
—
—
- + (- +)
- +
- +
- +
- +
- + (- +)
- +
- +
- +
- +
- + (- +)
- +
- +
- +
- +
—
FINE
15×10CM
OFF
PDF
WALK-UP PHOTOCAPTURE CENTER™ 6 - 16
Page 71

Print Quality
Press
1
Press to select
2
PHOTO
Press
Press
3
Menu/Set, 3, 1
.
Menu/Set
Stop/Exit
.
NORMAL, FINE
.
.
Print Size
Press
1
Press to select
2
15×10CM, 18×13CM
Press
Press
3
Menu/Set, 3, 2
Menu/Set
Stop/Exit
or
.
.
.
13×9CM
20×25CM
Brightness
Press
1
Press to make a lighter print.
2
—OR—
Press to make a darker print.
Press
Press
3
Menu/Set, 3, 3
Menu/Set
Stop/Exit
.
.
.
PHOTOCAPTURE
or
,
.
1.PRINT QUALITY
PHOTOCAPTURE
2.PRINT SIZE
PHOTOCAPTURE
3.BRIGHTNESS
6 - 17 WALK-UP PHOTOCAPTURE CENTER
™
Page 72

Contrast
You can choose the contrast setting. More Contrast will make an
image look sharper and more vivid.
Press
1
Press to increase the contrast.
2
—OR—
Press to decrease the contrast.
Press
Press
3
Menu/Set, 3, 4
Menu/Set
Stop/Exit
.
.
.
PHOTOCAPTURE
4.CONTRAST
Colour Enhancement
Press
1
Press to select ON (or OFF).
2
Press
If you select ON, you can customize the White Balance,
Sharpness or Colour Density.
If you selected ON,
3
Press to select WHITE BALANCE.
Press
—OR—
To skip the White Balance.
Press to select SHARPNESS or COLOUR DENSITY.
Menu/Set, 3, 5
Menu/Set
Menu/Set
.
.
.
PHOTOCAPTURE
5.COLOUR ENHANCE
WALK-UP PHOTOCAPTURE CENTER™ 6 - 18
Page 73

Press to adjust the degree of White Balance.
4
Press
Repeat Step 4 and Step 5 to adjust the degree of Sharpness
5
and Colour Density.
—OR—
Press
■ White Balance
This setting adjusts the hue of the white areas of an image.
Lighting, Camera settings and other influences will effect the
appearance of white. The white areas of a picture may be slightly
pink, yellow or some other colour. By using this adjustment you
can correct this effect and bring the white areas back to pure
white.
■ Sharpness
This setting enhances the detail of an image. It is similar to
adjusting the fine focus on a camera. If the image is not in true
focus and you cannot see the fine details of the picture, then
adjust the sharpness.
■ Colour Density
This setting adjusts the total amount of colour in the image. You
can increase or decrease the amount of colour in an image to
improve a washed out or weak picture.
Menu/Set
Stop/Exit
.
.
6 - 19 WALK-UP PHOTOCAPTURE CENTER
™
Page 74

Understanding the Error Messages
Once you are familiar with the types of errors that can occur while
™
you’re using the PhotoCapture Center
, you can easily identify and
troubleshoot any difficulties.
When an error message appears on the LCD, the DCP will beep to
get your attention.
This message will appear if you insert a media card
MEDIA ERROR
—
that is either bad or not formatted, or when there is a problem with
the media drive. To clear this error, take out the media card.
NO FILE
This message will appear if you select PHOTOCAPTURE
—
and the media card in the drive (slot) does not contain a .JPG file.
OUT OF MEMORY
This message will appear if you are working with
—
images that are too large for the DCP’s memory.
WALK-UP PHOTOCAPTURE CENTER™ 6 - 20
Page 75

Using PhotoCapture Center™ from your PC
You can access the media card that is in the media drive (slot) of the
DCP from your PC.
See Using PhotoCapture Center
PhotoCapture Center
PhotoCapture Center
™
from your PC on page 12-1 and Using the
™
from a Macintosh® on page 13-16.)
™
from your PC. (See Using the
Using PhotoCapture Center™ for scanning originals
You can scan the originals into a media card. (See Scan to Card on
page 9-19.)
6 - 21 WALK-UP PHOTOCAPTURE CENTER
™
Page 76

7
Using the DCP as a printer
Using the Brother DCP-4020C printer driver
A Printer Driver is software that translates data from the format used
by a computer into the format required by a particular printer, using
a printer command language or page description language.
The printer drivers are on the CD-ROM we have supplied. Install the
drivers first by following the Quick Setup Guide. Also, the latest printer
driver can be downloaded from the Brother Solutions Center at:
http://solutions.brother.com
http://www.brother-uk.com
Features
This DCP offers many features you’ll find in a high quality ink jet
printer.
Using Fast mode, you can print up to 11
Fast Printing Speed
pages per minute in full colour, and up to 13 pages per minute in
black.
Brilliant High Quality Output
resolution on glossy paper gives you highest resolution output.
Beautiful Elaborate Output
printing, Colour Enhancement technology and other features to get
high quality printouts.
Low Running Cost
ink, you will only have to replace the cartridge that’s empty.
Universal Serial Bus Interface provides fast communication
—
USB
with your computer.
Straight Paper Path
Plain paper, inkjet paper, glossy paper, transparencies and
envelopes. Use the appropriate type of paper to avoid paper jams.
For complete information about what kinds of paper to use with the
DCP, please see Paper on page 2-1.
—
Printing at 2400 x 1200 dpi
—
You can use 2 in 1, Watermark
—
Whenever you run out of a particular colour
—
The DCP can print on many types of paper.
—
USING THE DCP AS A PRINTER 7 - 1
Page 77

Choosing the right type of paper
To get high quality printing using your DCP, it’s very important to
select the right type of paper. Be sure to read Chapter 2 Paper in this
Guide before you select and purchase paper for the DCP.
How to print your document
When the DCP receives data from your computer, it begins printing
by picking up paper from the paper tray. The paper tray can feed
many types of paper and envelopes.
From your computer select the Print command.
1
If your computer is also connected to any other printers, select
Brother DCP-4020C USB Printer as your printer driver from
the Print or Print Settings menu in your software application, and
then click on OK to begin printing.
Your computer sends a print command and data to the DCP.
2
The LCD shows RECEIVING DATA.
When the DCP finishes printing all the data, the display will
3
return to standby mode.
You can select the paper size, and orientation in your
application software.
If your application software does not support your custom paper size,
select the next larger paper size.
Then adjust the print area by changing the right and left margins in
your application software.
7 - 2 USING THE DCP AS A PRINTER
Page 78

Simultaneous printing
Your DCP can print from your computer while scanning a document
into the computer. However, when the DCP is copying, it pauses the
PC printing operation, and resumes when copying is complete.
Clearing data from the memory
If the LCD shows DATA REMAINS, you can clear the data that is left
in the printer memory by pressing
Stop/Exit
.
Checking the Print Quality
If you want to check the print quality and find out how to improve it,
See How to improve print quality on page 15-8.
USING THE DCP AS A PRINTER 7 - 3
Page 79

8
Printer driver settings
(Windows® Only)
Printer driver settings
You can change the following printer settings when you print from
your computer:
■ Media Type/Quality (Speed)
■ Page Layout
■ Near Edge Print
■ Colour Matching/Halftone Pattern
■ Colour Enhancement
■ Scaling
■ Watermark
■ Print Date & Time
■ Quick Print Setup
How to access the printer driver settings
Select Print from the File menu in your application software.
1
Select Brother DCP-4020C USB Printer as your printer and
2
click Properties. The Brother DCP-4020C USB Printer dialog
box will appear.
The way you access the printer driver settings depends on your
operating system and software applications.
The screens shown in this section are from Windows® 98
Second Edition. The screens on your Computer may vary
depending on your Windows Operating System.
8 - 1 PRINTER DRIVER SETTINGS
Page 80

Basic tab
*
Select the Media Type and Quality.
1
Select the Paper Size, Page Layout, Border Line (if any),
2
Orientation, number of Copies, the page order and Near Edge
Print.
Click the Apply button to apply your selected settings.
3
To return to the default settings, click the Default button, then
click the Apply button.
1*
2*
3*
* This area shows the current settings of Quality, Paper Size,
Page Layout, Orientation, Collate/Reverse Order and Near
Edge Print and Colour/Greyscale.
PRINTER DRIVER SETTINGS 8 - 2
Page 81

Media Type
To achieve the best print results, the media being printed on should
be selected in the driver. The DCP changes the way it prints,
depending on the selected media type.
Plain Paper
Inkjet Paper
Glossy Paper (4 colour)
Glossy Paper (3 colour)
Transparencies
The print quality of black ink depends on the type of glossy
paper you are using. Black ink is used when you select Glossy
Paper (4 colour). If the glossy paper you are using repels the
black ink, select Glossy Paper (3 colour), which simulates black
ink by combining the three ink colours.
8 - 3 PRINTER DRIVER SETTINGS
Page 82

Quality
The quality selection allows you to choose the print resolution you
want for your document. Print quality and speed are related. The
higher the quality the longer it will take to print the document. The
quality selections that are available will vary depending on the media
type you select.
■ Photo: 2400 x 1200 dpi. Use this mode to print precise images
such as photographs. This is the highest resolution and slowest
speed.
■ S.Fine (Super Fine): 1200 x 1200 dpi. Use this mode to print
precise text and photographs. Since the print data is much larger
than normal mode, the processing time, data transfer time and
print time will be longer.
■ Fine: 600 x 600 dpi. Better print quality than Normal mode and
faster print speed than Super Fine.
■ Normal: 600 x 300 dpi. Good print quality with typical print speed.
■ Fast: 600 x 150 dpi. The fastest print mode and the lowest ink
consumption. Use this mode to print large volume documents or
a document for proofing.
Media Type Colour/
Greyscale
Plain Paper Colour/
Greyscale
Inkjet Paper Colour Fine, S.Fine, Photo
Greyscale Fine, S.Fine, Photo
Glossy Paper (4 or 3 colour) Colour S.Fine, Photo
Greyscale S.Fine, Photo
Transparencies Colour/
Greyscale
Print Quality Selection
Fast, Normal, Fine, S.Fine
Fine, S.Fine
The factory settings are shown in bold.
PRINTER DRIVER SETTINGS 8 - 4
Page 83

Bi-Directional Printing
When Bi-Directional Printing is selected, the print heads print in
both directions and offer faster print speeds. When not selected, the
print heads will only print in one direction to provide higher quality
printouts.
8 - 5 PRINTER DRIVER SETTINGS
Page 84

Paper Size
The Paper Size selection provides a large selection of standard
paper sizes. If you wish, you can create a custom size ranging from
89 x 127 mm to 216 x 355.6 mm. From the drop-down box, select the
Paper Size you are using.
You can enter custom size by selecting User Defined. Select the
proper paper thickness to improve the quality of your output.
PRINTER DRIVER SETTINGS 8 - 6
Page 85

Page Layout
The Page Layout selection can reduce the image size of a page
allowing multiple pages to be printed on one sheet of paper or
enlarging the image size for printing one page on multiple sheets of
paper. If you are using Windows
®
98/98SE/Me, the 4 in 1 layout is
not available.
Border Line
When printing multiple pages on one sheet with the Page Layout
feature, you can choose to have a solid border, dashed border or no
border around each page on the sheet.
Orientation
Orientation selects the position of how your document will be printed
(Portrait or Landscape).
Portrait (Vertical) Landscape (Horizontal)
8 - 7 PRINTER DRIVER SETTINGS
Page 86

Copies
The Copies selection sets the number of copies that will be printed
(1 to 999).
Collate
With the Collate check box selected, one complete copy of your
document will be printed and then repeated for the number of copies
you selected. If the Collate check box is not selected, then each
page will be printed for all the copies selected before the next page
of the document is printed.
Reverse Order
Reverse Order prints the pages of your document in the opposite
order.
Near Edge Print
Near Edge Print feature expands the printable area at the edge of
the paper up to 0.5 mm. Print time will be slightly slower. Available
for Letter, A4, Postcard and Index Card paper.
Not available for transparencies.
PRINTER DRIVER SETTINGS 8 - 8
Page 87

Advanced tab
1 2 3 4
To return to the default settings, click the Default button.
Change the tab settings by selecting one of the following icons:
1.Colour
2.Scaling
3.Watermark
4.Device Options
8 - 9 PRINTER DRIVER SETTINGS
Page 88

Colour
Colour/Greyscale
This selection allows a colour document to be printed in black and
white using grey scale.
Image Type
The printer driver will select the most suitable colour matching and
half tone method, depending on your image type. Generally, text and
business graphics are printed vividly and photographic images are
printed softly.
■ Auto: The printer driver automatically selects the image type.
■ Photo: Select this mode for photographic images.
■ Graphics: Select this mode for documents that contain text or
business graphics (charts or clip art).
■ Custom: If you want to select the colour matching and halftone
method, manually select this mode.
PRINTER DRIVER SETTINGS 8 - 10
Page 89

Custom Image Type
You can select the colour matching method manually. Select the
best one for your document.
Match Monitor
Colour is adjusted to get the closest colour match to the PC
monitor.
■ Natural: Suitable for photographic images. The colour is
adjusted to print a more natural colour.
■ Vivid: Suitable for business graphics such as charts, graphics
and text. The colour is adjusted to give more vivid colour.
8 - 11 PRINTER DRIVER SETTINGS
Page 90

Halftone Pattern
The DCP can use two methods (Diffusion or Dither) to arrange
where to place dots to express halftones. There are some predefined
patterns set for this and you can select which one to use for your
document. Select the appropriate method.
■ Diffusion: Dots are placed at random to create the halftones.
This method of printing is more suitable for printing photographs
that have delicate shades and graphics.
■ Dither: Dots are arranged in a pre-defined pattern to make
halftones. This type of printing is more suitable to printing
graphics that have definite colour boundaries or for printing
charts such as business charts.
Some halftone settings cannot be selected with certain
combinations of Media Type and Quality selections.
PRINTER DRIVER SETTINGS 8 - 12
Page 91

Colour Enhancement
Selecting Colour Enhancement enables the Colour Enhancement
feature. This feature analyzes your image to improve quality
sharpness, white balance and colour density. This process may take
several minutes depending on the size of the image and the
specifications of your computer.
■ Colour Density
This setting adjusts the total amount of colour in the image. You
can increase or decrease the amount of colour in an image to
improve a washed out or weak picture.
8 - 13 PRINTER DRIVER SETTINGS
Page 92

■ White Balance
This setting adjusts the hue of the white areas of an image.
Lighting, camera settings and other influences will effect the
appearance of white. The white areas of a picture may be slightly
pink, yellow or some other colour. By using this adjustment you
can correct this effect and bring the white areas back to pure white.
■
Sharpness
This setting enhances the detail of an image. It is simila r to adjusting
the fine focus on a camera. If the image is not in true focus and you
cannot see the fine details of the picture, then adjust the sharpness.
■ Auto Image Enhance
This setting allows individual adjustment of picture settings to
improve the printed image and analyzes data from surrounding or
neighboring pixels in the original.
■ Brightness
This setting adjusts the brightness of the whole image. To darken
or lighten the image move the scroll bar to the left or right.
■ Contrast
This setting adjusts the contrast of an image. This will make
darker areas darker and lighter areas lighter. Increase the
contrast when you want an image to be clearer. Decrease the
contrast when you want an image to be more subdued.
■ Red
Increases the intensity of the Red colour to make the image more
red.
■ Green
Increase the intensity of the Green colour to make the image
more green.
■ Blue
Increase the intensity of the Blue colour to make the image more
blue.
PRINTER DRIVER SETTINGS 8 - 14
Page 93

Scaling
You can change the print size of your document with the Scaling
feature.
■ Check Off if you want to print the document as it appears on your
screen.
■ Check Fit to Paper Size, if your document has an unusual size,
or if you have only the standard size paper.
■ Check Free if you want to reduce the size.
■ Check Mirror Print to reverse the data from left to right.
8 - 15 PRINTER DRIVER SETTINGS
Page 94

Watermark
You can place a logo or text into your document as a Watermark.
You can select one of the preset Watermarks, or you can use a
bitmap file or text file that you have created.
Check Use Watermark, and then select the watermark you want to
use.
In background
Check In background with the Watermark to print the watermark
image in the background of your document. If this feature is not
checked then the Watermark will be printed on top of your document.
In Outline Text (Windows® 2000 Professional/XP Only)
Check In Outline Text if you only wa nt to print an outline of the watermark.
Print Watermark
The Print Watermark feature offers the following print choices:
■ On all pages
■ On first page only
■ From second page
■ Custom
PRINTER DRIVER SETTINGS 8 - 16
Page 95

Watermark Style
You can change the Watermark’s size and position on the page by
selecting the Watermark, and clicking the Edit button. If you want to
add a new Watermark, click the New button, and then select Text or
Bitmap in the Watermark Style.
■ Watermark Text
Enter your Watermark text into the Text Box, and th en select the
Font, Size, Colour and Style.
■ Watermark Bitmap
Enter the file name and location of your bitmap image in the File
box, or Browse for the file location. You can also set the scaling
size of the image.
■ Position
This setting offers you the control for where the Watermark is to
be positioned on the page.
8 - 17 PRINTER DRIVER SETTINGS
Page 96

Device Options
Lets you set the following Printer Functions:
PRINTER DRIVER SETTINGS 8 - 18
Page 97

Print Date & Time
When enabled the Print Date and Time feature will print the date
and time on your document from your computer’s system clock.
Click the Setting button to change the Date and Time format, and
the Position and Font. To include a background with the Date and
Time, select Opaque. When Opaque is selected, you can click on
the Colour button to change the colour of the Date and Time
background.
The Date and Time in the selection box shows the format that will
be printed. The actual Date and Time printed on your document
is automatically retrieved from the settings of your computer.
8 - 19 PRINTER DRIVER SETTINGS
Page 98

Quick Print Setup
The Quick Print Setup feature allows you to quickly select driver
settings. To view the settings, simply click your mouse button on the
task tray icon. This feature can be set to ON or OFF from the Device
Options.
PRINTER DRIVER SETTINGS 8 - 20
Page 99

Support tab
The Support Tab provides driver version and setting information. In
addition there are links to the Brother Solutions Center and the
Driver Update Web sites.
Click the Support tab to display the following screen:
Brother Solutions Center
The Brother Solutions Center is a Web site offering information
about your Brother product including FAQs (Frequently Asked
Questions), User Guides, Driver Updates and Tips for using your
machine.
Web Update
Web Update checks the Brother web site for updated drivers, and
automatically downloads and updates the printer driver on your
computer.
Check Setting
The Check Setting selection displays a list of your current driver
settings.
8 - 21 PRINTER DRIVER SETTINGS
Page 100

9
How to scan using
Windows
The scanning operations and drivers will be different depending
on your operating system.
For Windows
The DCP uses a TWAIN Compliant driver for scanning
documents from your applications. (See Scanning a document
(For Windows
9-2 and TWAIN compliant on page 9-2.)
For Windows
Use Windows
documents. (See Scanning a document (For Windows
only) on page 9-11.)
For ScanSoft®, PaperPort® and TextBridge® OCR
(See Using ScanSoft® PaperPort® and TextBridge® OCR on
page 9-23.)
®
98/98SE/Me and 2000 Professional
®
98/98SE/Me and 2000 Professional) on page
®
XP
®
Imaging Acquisition (WIA) for scanning
®
®
XP
HOW TO SCAN USING WINDOWS® 9 - 1
 Loading...