

Page 1
WARNING
NOTE
NOTE
Quick Setup Guide ADS-2000e / ADS-2500 We
ADS-2000e
Start Here
ADS-2500We
Thank you for choosing Brother. Your support is important to us and we value your business. Your Brother product
is engineered and manufactured to the highest standards to deliver reliable performance, day in and day out.
Please read the Product Safety Guide before you set up your machine.
Unless otherwise specified, illustrations in this guide show the ADS-2500We.
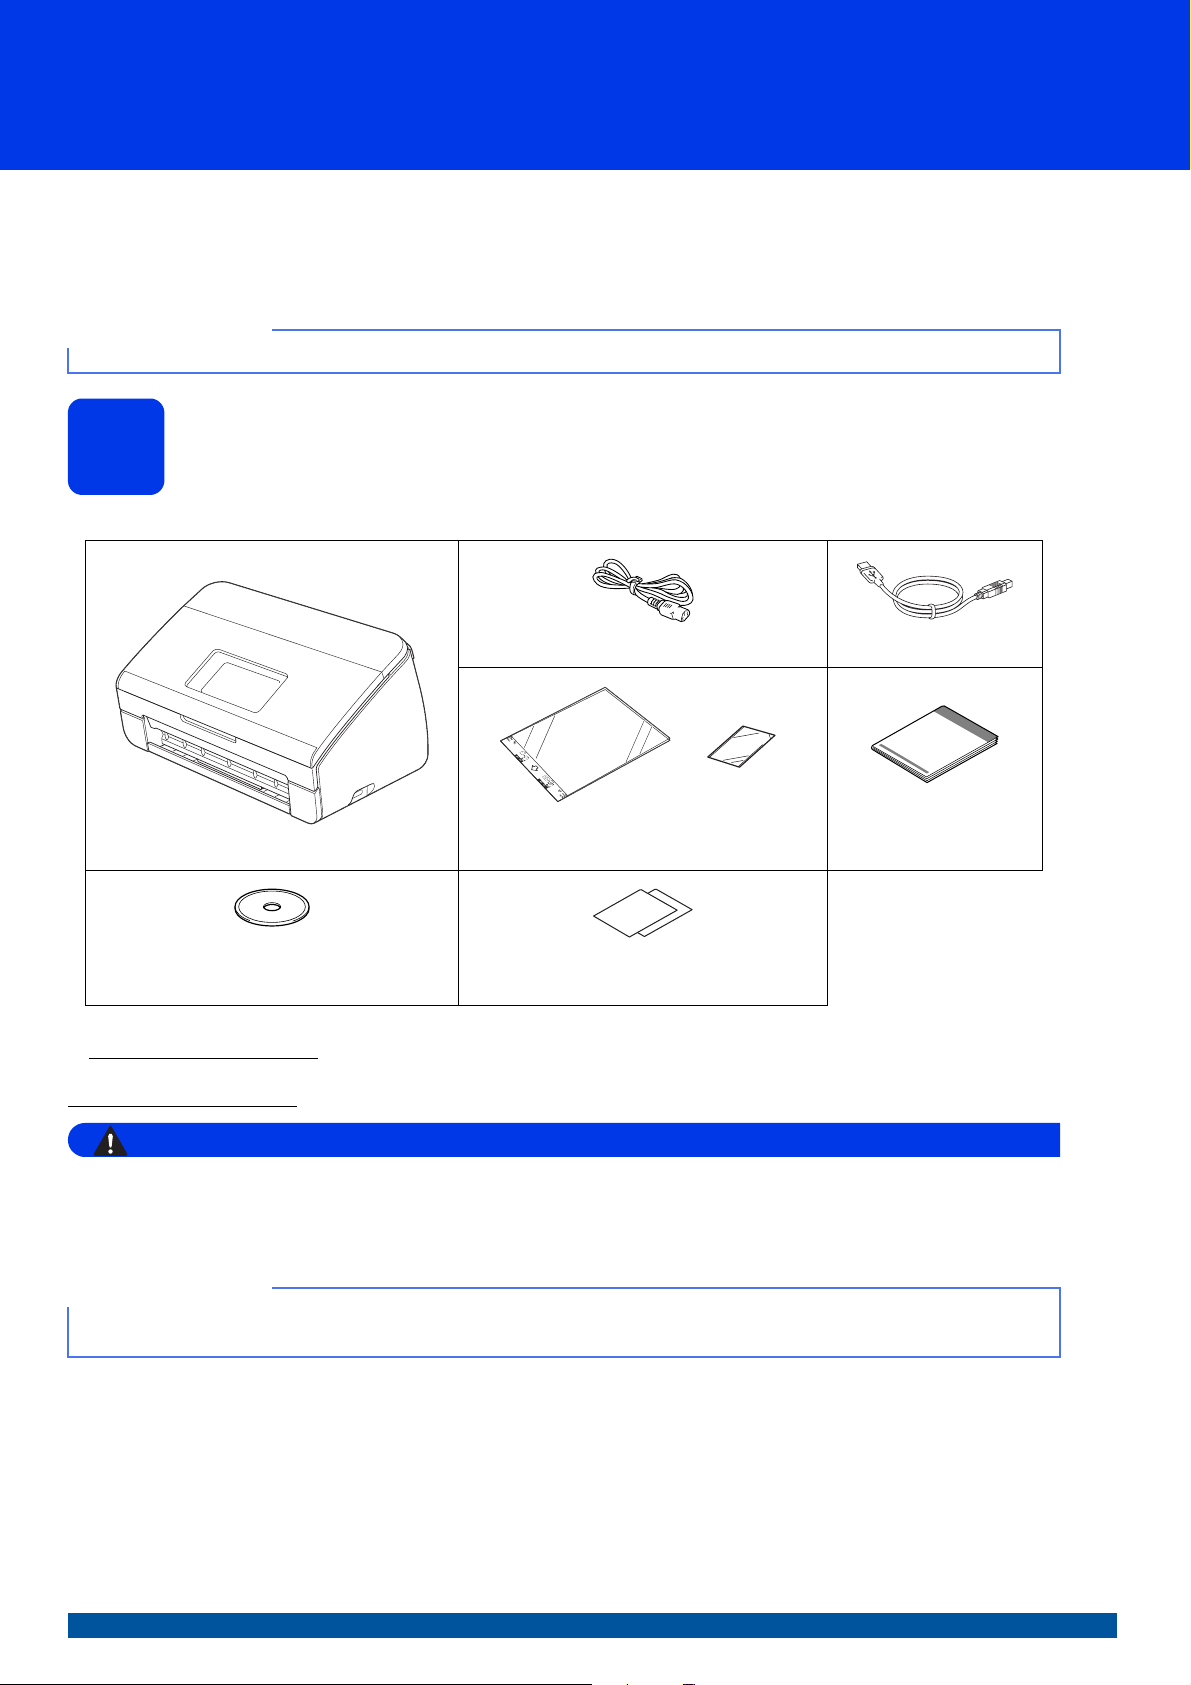
Unpack the machine and check the components
1
The components included in the box may differ depending on your country.
AC Power Cord
USB Interface Cable
Carrier Sheet/
Plastic Card Carrier Sheet
DVD-ROM
You can download the User’s Guide and Network User’s Guide for your model from the Brother Solutions Center
at http://support.brother.com
contain drivers for your operating system, or you want to download manuals and utilities, visit your model page at
http://support.brother.com
• This product was packaged in a plastic bag. To avoid suffocation, keep plastic bags away from babies
and children. Do not use the bag in cribs, beds, carriages, or play pens. The bag is not a toy.
• Use only the AC power cord supplied with this product.
• We recommend saving the original packaging in case you must ship your machine.
• Use the supplied USB cable if you want to connect the machine to a computer.
. If your computer does not have a DVD-ROM drive, the supplied DVD-ROM does not
Product Registration Sheet (USA only)
Warranty Card (USA only)
Quick Setup Guide
Product Safety Guide
a Remove the protective tape and film covering the machine and the LCD or Control Panel.
b Make sure you have all the components.
USA/CAN Version 0
1
Page 2
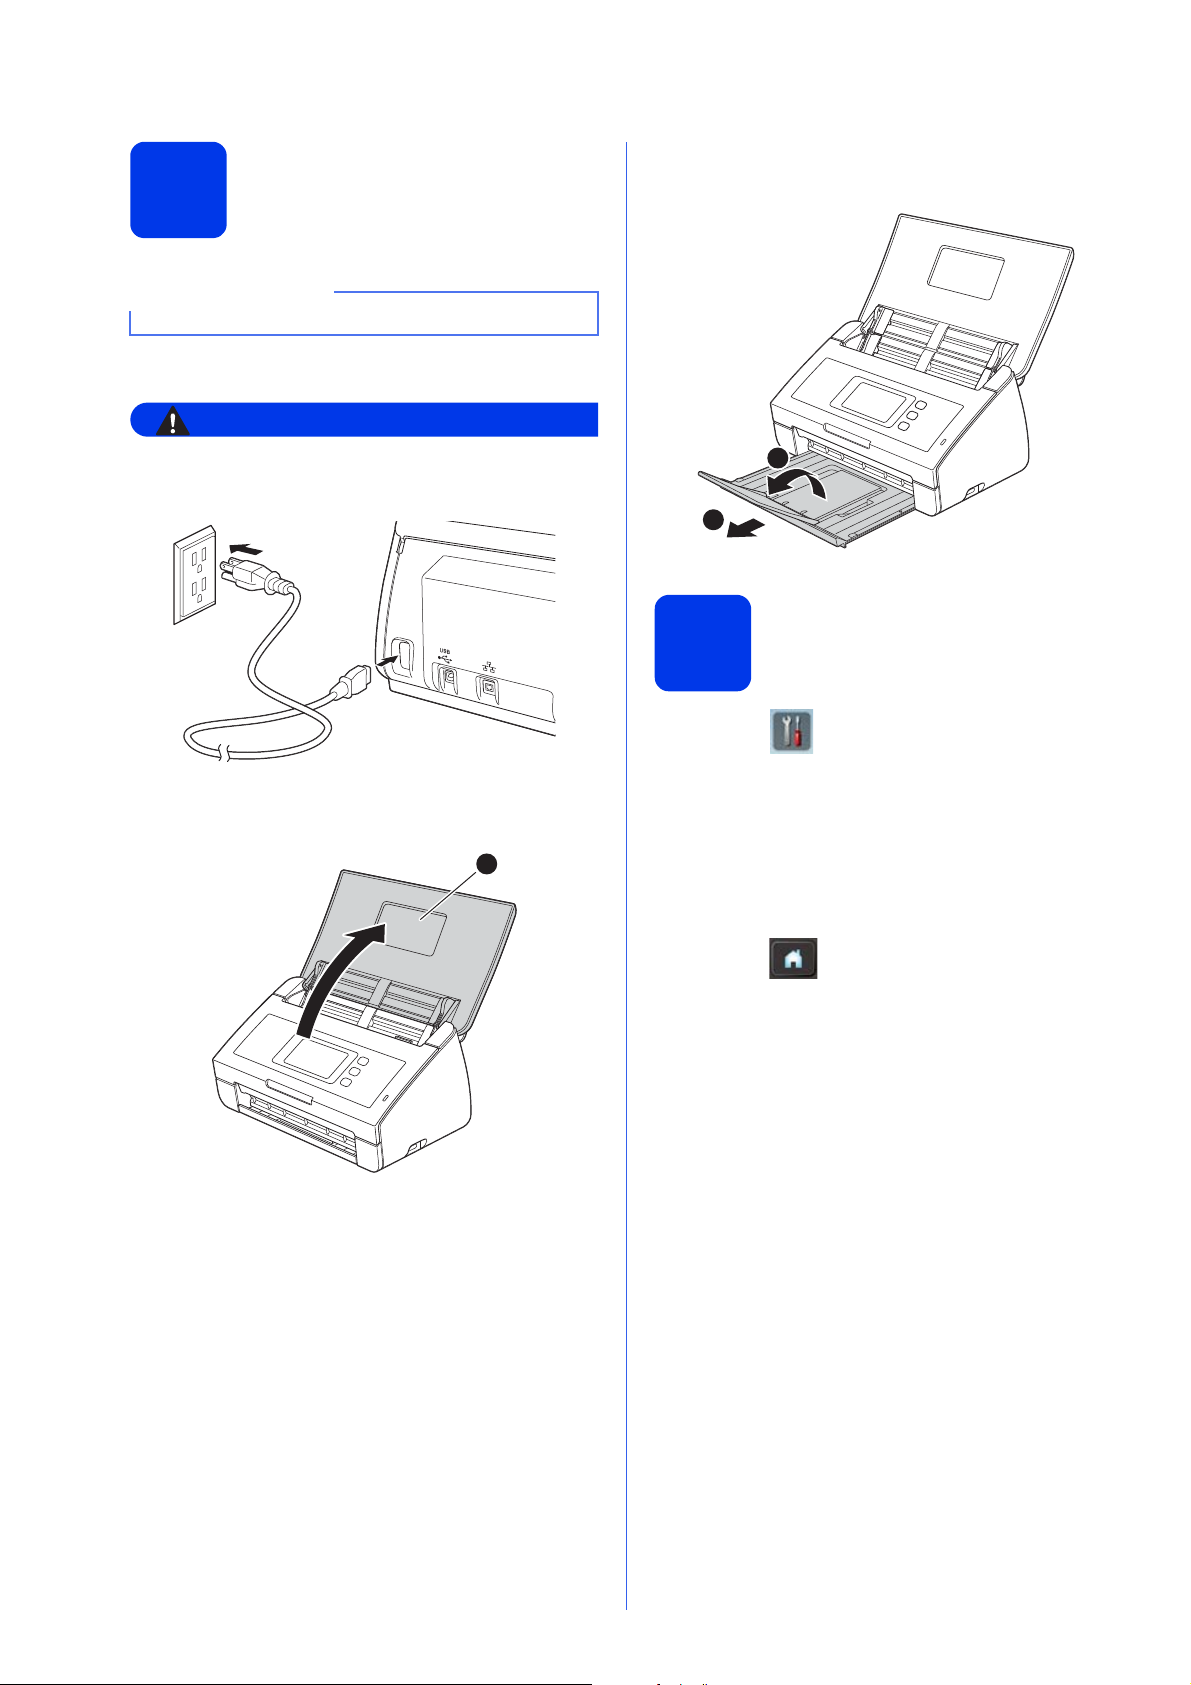
Connect the power cord
WARNING
IMPORTANT
2
DO NOT CONNECT THE USB CABLE YET.
a Connect the power cord.
c Pull the Output Tray out of the machine 1, and
then unfold the Document Stopper 2.
The machine must be fitted with a three prong
grounded plug.
b Open the Top Cover 1.
1
2
1
Choose your language
(if needed)
3
(ADS-2500We only)
a Press .
b Press a or b to display Initial Setup.
Press Initial Setup.
c Press Local Language.
d Press a or b to display your language.
Press your language.
e Press .
2
Page 3
4
NOTE
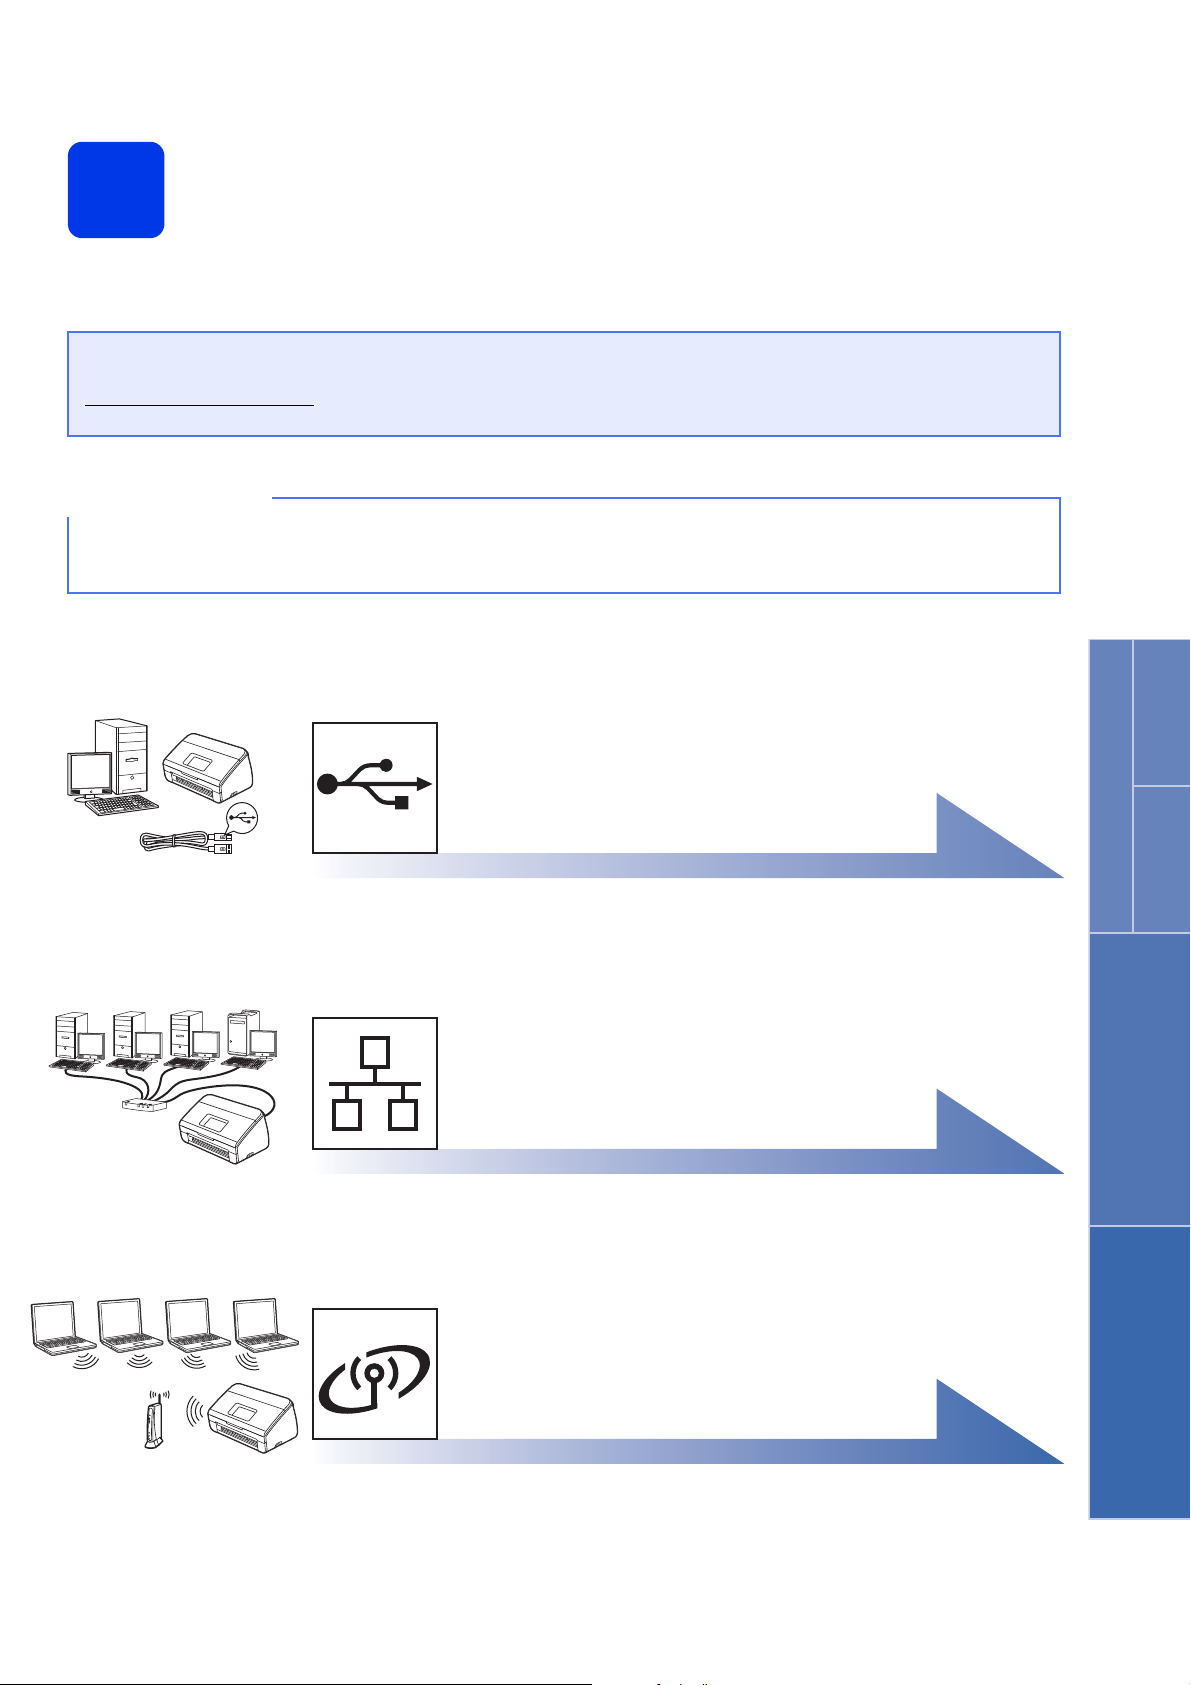
Choose your connection type
These installation instructions are for Windows®XP Home, XP Professional, Windows Vista®, Windows®7,
Windows
If your computer does not have a DVD-ROM drive or the supplied DVD-ROM does not contain drivers for your
operating system, or you want to download manuals and utilities, visit your model page at
http://support.brother.com
download.
Windows® 8 users: If the Brother manuals are in PDF format, use Adobe® Reader® to open them. If Adobe®
Reader
association for PDF.
®
8, and OS X v10.7.5, 10.8.x and 10.9.x.
. Some software applications included on the DVD-ROM may not be available as a
®
is installed on your computer but you cannot open the files in Adobe® Reader®, change the file
For USB interface cable
Windows®, go to page 4
Macintosh, go to page 6
Windows
USB
®
Macintosh
For Wired Network
(ADS-2500We only)
Go to page 8
For Wireless Network
(ADS-2500We only)
Go to page 12
Wired Network
Wireless Network
3
Page 4
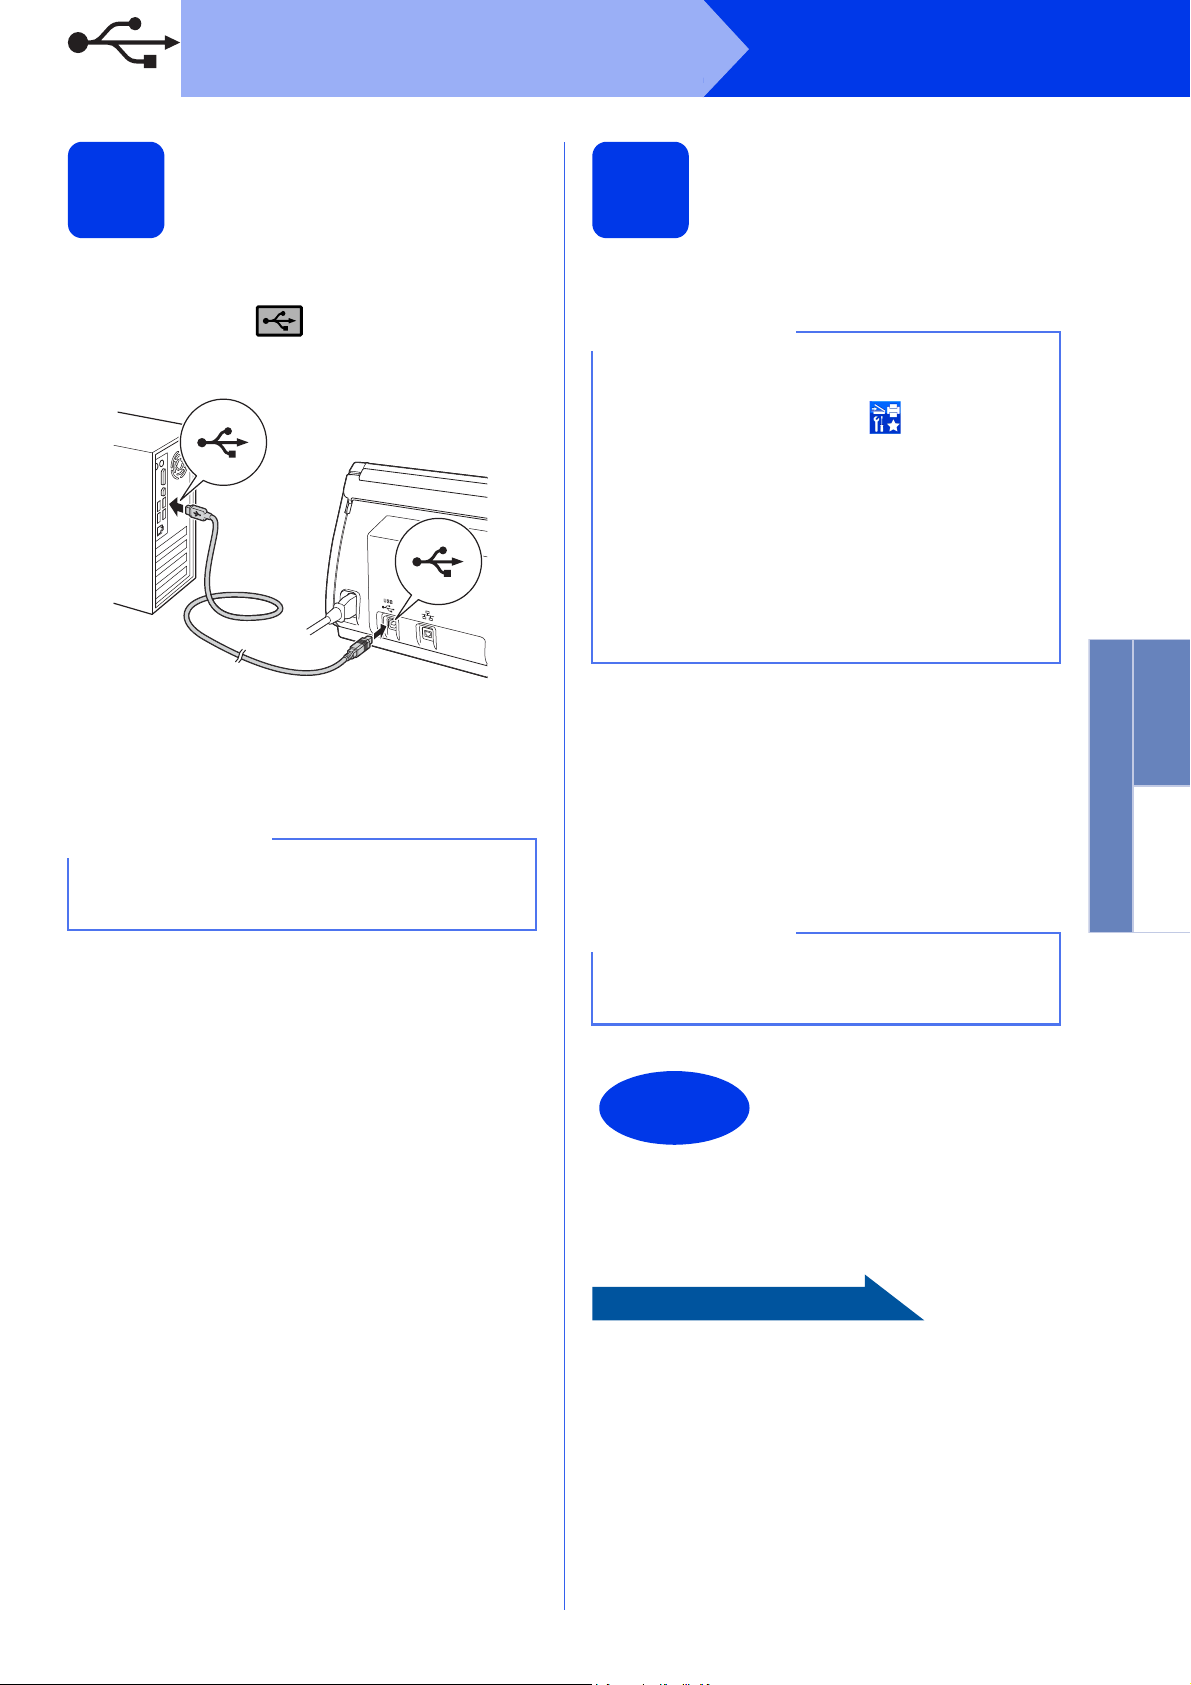
USB
NOTE
NOTE
NOTE
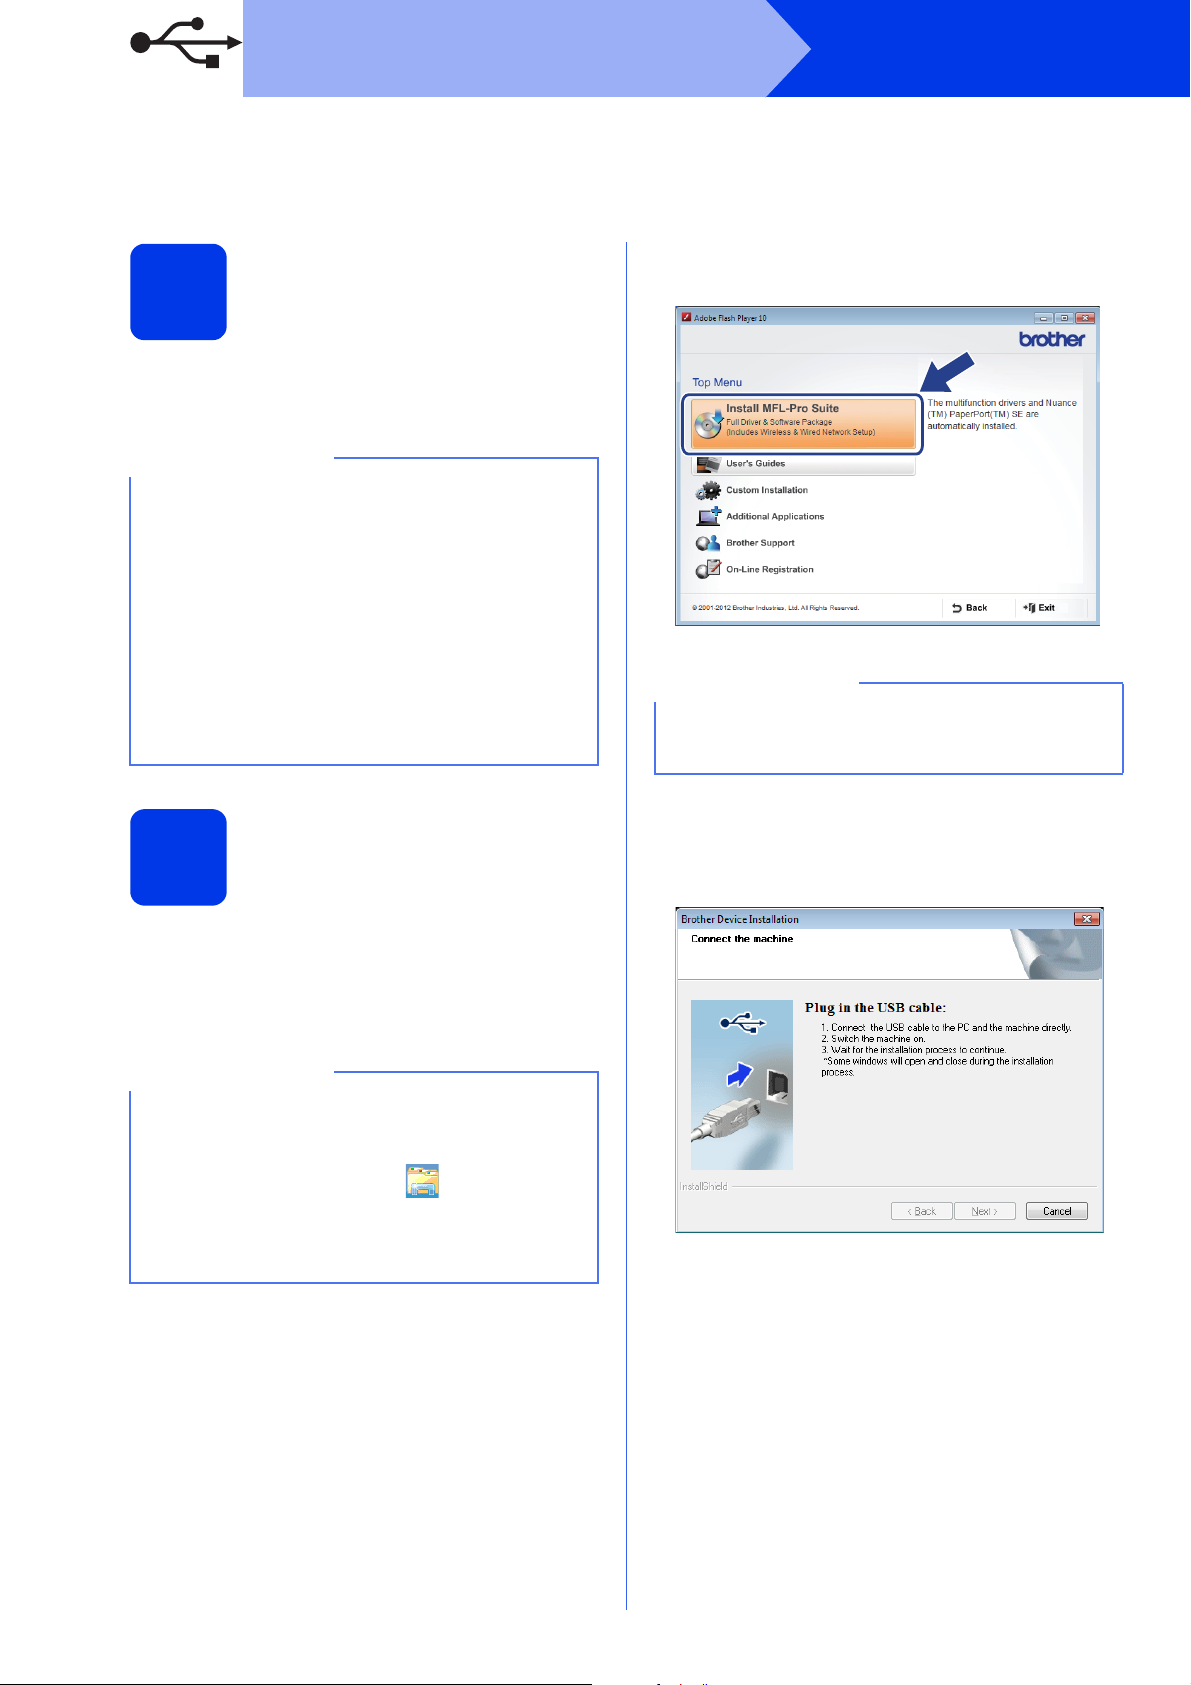
For Windows® USB interface users
(Windows®XP Home/XP Professional/Windows Vista®/Windows®7/Windows®8)
b Click Install MFL-Pro Suite, and then click
Before you install
Yes if you accept the license agreements.
5
Make sure that your computer and your Brother
machine are ON.
• DO NOT CONNECT THE USB CABLE YET.
• If there are any programs running, close them.
• The screens may differ depending on your
operating system.
• The DVD-ROM includes Nuance™
PaperPort™12SE. This software supports
Windows
Professional (SP3 or greater), Windows Vista
(SP2 or greater), Windows
Windows
Service Pack before installing MFL-Pro Suite.
®
XP Home (SP3 or greater), XP
®
®
8. Update to the latest Windows®
7 and
®
For Windows Vista®, Windows®7 and
Windows
screen appears, click Allow or Yes.
®
8, when the User Account Control
Windows
®
Install MFL-Pro Suite
6
a Put the DVD-ROM into your DVD-ROM drive. If
the model name screen appears, choose your
machine. If the language screen appears,
choose your language.
• If the Brother screen does not appear
automatically, go to Computer
(My Computer).
(For Windows
icon on the taskbar, and then go to Computer.)
• Double-click the DVD-ROM icon, and then
double-click start.exe.
®
8: click the (File Explorer)
c Choose Local Connection (USB), and then
click Next.
d Follow the on-screen instructions.
4
Page 5
USB
Now go to
NOTE
NOTE
NOTE
Finish
Windows
®
Connect the USB cable
7
a Connect the USB cable to the USB port
marked with a symbol on the back of
your machine. Connect the other end of the
cable to your computer.
b The installation will continue automatically.
The installation screens appear one after
another.
DO NOT cancel any of the screens during the
installation. It may take a few seconds for all
screens to appear.
Finish and restart
8
a Click Finish to restart your computer.
• If an error message appears during the
software installation, run the Installation
Diagnostics, double-click (Brother
Utilities) on the desktop, and then click the
drop-down list and select your model name
(if not already selected). Click Tools in the left
navigation bar.
• Depending on your security settings, a
Windows
window may appear when using the machine
or its software. Please click Allow or Permit
the window to continue.
b The following screens will appear:
• When the Software Update Setting screen
• When the Brother Product Research and
®
Security or antivirus software
appears, choose the software update setting
you want and click OK.
Support Program screen appears, select
your preference and follow the on-screen
instructions.
Windows
USB
®
Macintosh
c When the On-Line Registration screen is
displayed, make your selection and follow the
on-screen instructions.
Internet access is required for the software
update and the Brother Product Research and
Support Program.
The installation is now
complete and it is time to
do a test scan. See Test
Scan (Scan to PC) on
page 21.
To install optional applications:
Page 19
5
Page 6
USB
NOTE
NOTE
NOTE
For Macintosh USB interface users
(OS X v10.7.5, 10.8.x and 10.9.x)
Macintosh
Before you install
5
Make sure that your Macintosh and your Brother
machine are ON.
OS X v10.6.x users must upgrade to
OS X v10.7.5 - 10.9.x.
Connect the USB cable
6
• DO NOT connect the machine to a USB port on
a keyboard or a non-powered USB hub.
• Connect the machine directly to your
Macintosh.
Install MFL-Pro Suite
7
a Download the full driver and software package
from the Brother Solutions Center
(http://support.brother.com/
-> Select your country.
-> Select your language.
-> Click Downloads, navigate to your product
page, then select your OS.
For help identifying your OS, click the link How to
identify your Operating System (OS).
b Double-click the Start Here OSX icon to install.
If the model name screen appears, choose
your machine.
).
Connect the USB cable to the USB port marked with
a symbol on the back of your machine. Connect
the other end of the cable to your computer.
c Choose Local Connection (USB), and then
click Next. Follow the on-screen instructions.
d After the installation, the Brother software will
search for the Brother device. This will take a
few moments to complete.
6
Page 7

USB
Now go to
Finish
e Choose your machine from the list, and then
click Next.
The installation is now
complete and it is time to
do a test scan. See Test
Scan (Scan to PC) on
page 21.
To install optional applications:
Macintosh
Windows
Page 20
USB
®
Macintosh
7
Page 8

Wired Network (ADS-2500We only)
Now go to
Now go to
NOTE
USB
NOTE
Finish
NOTE
NOTE
Connect the network
5
a Make sure that your computer and your Brother
If there are any programs running, close them.
b You will find the Ethernet port marked with a
cable
machine are ON.
Windows
For Mobile device users:
• Download and install Brother iPrint&Scan
(Android™/iOS/Windows
mobile device’s application download site.
• To download the User’s Guide for the
application you are using (Brother
iPrint&Scan), visit the Brother Solutions Center
at http://support.brother.com
on your model’s page.
®
Phone) from your
and click Manuals
®
symbol on the back of the machine as
shown below. Remove the protective cap and
connect the network cable to the Ethernet port.
c Connect the cable to your network.
The installation is now
complete and it is time to
do a test scan.
For Windows® users:
• For Windows®XP Home/XP Professional/
Windows Vista
• The screens may differ depending on your
operating system.
• The DVD-ROM includes Nuance™
PaperPort™12SE. This software supports
Windows
Professional (SP3 or greater), Windows Vista
(SP2 or greater), Windows
Windows
Service Pack before installing MFL-Pro Suite.
®
/Windows®7/Windows® 8
®
XP Home (SP3 or greater), XP
®
®
8. Update to the latest Windows®
7 and
®
Page 9
For Macintosh users:
OS X v10.6.x users, upgrade to
OS X v10.7.5 - 10.9.x.
Page 11
8
Page 9

Wired Network (ADS-2500We only)
NOTE
NOTE
IMPORTANT
Install MFL-Pro Suite
6
a Put the supplied DVD-ROM into your
DVD-ROM drive. If the model name screen
appears, choose your machine. If the language
screen appears, choose your language.
• If the Brother screen does not appear
automatically, go to Computer (My
Computer).
(For Windows
icon on the taskbar, and then go to Computer.)
• Double-click the DVD-ROM icon, and then
double-click start.exe.
b The DVD-ROM Top Menu will appear. Click
Install MFL-Pro Suite and click Yes if you
accept the license agreements. Follow the
on-screen instructions.
®
8: click the (File Explorer)
Windows
®
d When this screen appears, choose Change
the Firewall port settings to enable network
connection and continue with the
installation. (Recommended) and click Next.
e The installation of the Brother drivers will
automatically start. The installation screens
appear one after another.
DO NOT cancel any of the screens during the
installation. It may take a few seconds for all
screens to appear.
For Windows Vista®, Windows®7 and
Windows
screen appears, click Allow or Yes.
®
8, when the User Account Control
c Choose Wired Network Connection
(Ethernet), and then click Next.
f When the On-Line Registration screen
appears, make your selection and follow the
on-screen instructions.
Windows
Wired Network
®
Macintosh
9
Page 10

Wired Network (ADS-2500We only)
Now go to
NOTE
Finish
Finish and restart
7
a Click Finish to restart your computer.
b The following screens will appear.
• When the Software Update Setting screen
appears, choose the software update setting
you want and click OK.
• When the Brother Product Research &
Support Program starts up, follow the
on-screen instructions.
Internet access is required for the software
update and the Brother Product Research &
Support Program.
Windows
®
The installation is now
complete and it is time to
do a test scan. See Test
Scan (Scan to PC) on
page 21.
To install optional applications:
Page 19
10
Page 11

Wired Network (ADS-2500We only)
Now go to
NOTE
NOTE
Finish
Install MFL-Pro Suite
6
a Download the full driver and software package
from the Brother Solutions Center
(http://support.brother.com/
-> Select your country.
-> Select your language.
-> Click Downloads, navigate to your product
page, then select your OS.
For help identifying your OS, click the link How to
identify your Operating System (OS).
b Double-click the Start Here OSX icon to install.
If the model name screen appears, choose
your machine.
).
Macintosh
e Choose your machine from the list, and then
click Next.
• If your machine is not found over the network,
confirm your network settings.
• You can find your machine’s MAC Address
(Ethernet Address) and IP Address from the
control panel of the machine.
• If this screen appears, enter a name for your
Macintosh up to 15 characters long, and then
click Next.
c Choose Wired Network Connection
(Ethernet), and then click Next. Follow the
on-screen instructions.
d After the installation, the Brother software will
search for the Brother device. This will take a
few moments to complete.
The name you enter will appear on the
machine’s LCD when you choose a scan
option. (For more information, see Scan from
the Control Panel of the Machine in the User’s
Guide.)
The installation is now
complete and it is time to
do a test scan. See Test
Scan (Scan to PC) on
page 21.
To install optional applications:
Page 20
Windows
Wired Network
®
Macintosh
11
Page 12

For Wireless Network Users (ADS-2500We only)
Now go to
Now go to
For wireless network interface users
Choose your wireless setup method
5
The following instructions offer two methods for setting up your Brother machine on a wireless network. If you want
to scan using your mobile devices only, select method b. Otherwise, select method a.
a Setup using the driver and a USB cable (Windows
• We recommend using a computer wirelessly connected to your network for this method.
• You will need to use a USB cable temporarily during configuration.
®
and Macintosh)
b Setup using your Brother machine
• Use this method if you want to scan using your mobile devices only.
• If you want to scan using your computer, use method a.
page 13
12
page 16
Page 13

For Wireless Network Users (ADS-2500We only)
Now go to
Now go to
NOTE
NOTE
Setup using the
DVD-ROM and USB cable
6
For Macintosh Users:
For Macintosh installation, download the full
driver and software package from the
Brother Solutions Center
(http://support.brother.com/
downloading the file on your Macintosh,
double-click “Start Here OSX”. Select
“Wireless” installation and follow the
“Wireless Device Setup” instructions on your
computer screen. When setup is complete, go
to step g on page 15.
For Windows® Users:
(Windows® and Macintosh)
). After
a Put the DVD-ROM into your DVD-ROM drive. If
the model name screen appears, choose your
machine. If the language screen appears,
choose your language.
c Choose Wireless Network Connection, and
then click Next.
d When the Firewall/AntiVirus detected screen
appears, choose Change the Firewall port
settings to enable network connection and
continue with the installation.
(Recommended) and click Next.
e Follow the on-screen instructions to set up the
Brother machine.
f Your machine will now try to connect to your
wireless network. It may take a few minutes.
• If the Brother screen does not appear
automatically, go to Computer
(My Computer).
(For Windows
icon on the taskbar, and then go to Computer.)
• Double-click the DVD-ROM icon, and then
double-click start.exe.
®
8: click the (File Explorer)
b Click Install MFL-Pro Suite and click Yes if
you accept the license agreements.
Wireless setup is now complete.
The Wi-Fi light on the Control Panel
lights up, indicating that the machine’s
Network I/F is set to WLAN.
To install MFL-Pro Suite
For Windows® users:
Step g on page 14
For Macintosh users:
Step g on page 15
Wireless Network
• For Windows Vista®, Windows®7 and
Windows
screen appears, click Allow or Yes.
• Click Yes if you accept the license agreements.
®
8, when the User Account Control
13
Page 14

For Wireless Network Users (ADS-2500We only)
Now go to
NOTE
NOTE
NOTE
NOTE
Finish
g Choose your machine from the list, and then
click Next.
• If your machine is not found over the network,
confirm your settings by following the
on-screen instructions.
• If you are using WEP and the LCD displays
Connected but your machine is not found on
the network, make sure you entered the WEP
key correctly. The WEP key is case-sensitive.
h The installation of the Brother drivers will
automatically start. The installation screens
appear one after another.
If an error message appears during the software
installation, run the Installation Diagnostics,
double-click (Brother Utilities) on the
desktop, and then click the drop-down list and
select your model name (if not already selected).
Click Tools in the left navigation bar.
b The following screens will appear:
• When the Software Update Setting screen
appears, choose the software update setting
you want and click OK.
• When the Brother Product Research and
Support Program starts up, follow the
on-screen instructions.
• Internet access is required for the software
update and the Brother Product Research and
Support Program.
• When you install MFL-Pro Suite, Brother Help
will also be installed automatically. Launch
Brother Help by clicking
in the system tray. Click to
access the Brother Solutions Center.
• DO NOT cancel any of the screens during the
installation. It may take a few seconds for all
screens to appear.
• If the Windows Security screen appears,
select the check box and click Install to
complete the installation correctly.
i When the On-Line Registration screen
appears, make your selection and follow the
on-screen instructions.
Finish and restart
7
a Click Finish to restart your computer.
The installation is now
complete and it is time to
do a test scan. See Test
Scan (Scan to PC) on
page 21.
To install optional applications:
Page 19
14
Page 15

Wireless Network (ADS-2500We only)
Now go to
NOTE
NOTE
Finish
g Choose your machine from the list, and then
click Next.
If your wireless settings fail, the Wireless Device
Setup Wizard screen appears. Follow the
on-screen instructions to complete the wireless
configuration.
Macintosh
• You can display your machine’s MAC Address
(Ethernet Address) and IP Address using the
machine’s LCD.
To find the MAC Address, press
(Settings) > Network > WLAN >
MAC Address.
To find the IP Address, press
(Settings) > Network > WLAN >
TCP/IP > IP Address.
• If the Setup Network “Scan to” name screen
appears, type a name for your Macintosh (up to
15 characters), and then click Next.
h The installation of the Brother drivers will
automatically start. Please wait for the software
to install.
The name you type will appear on the LCD of
the machine when you choose a scan option.
For more information, see Scan from the
Control Panel of the Machine in the User’s
Guide.
The installation is now
complete and it is time to
do a test scan. See Test
Scan (Scan to PC) on
page 21.
To install optional applications:
Windows
Wireless Network
Page 20
®
Macintosh
15
Page 16

7
NOTE
NOTE
For Wireless Network Users (ADS-2500We only)
f This feature will automatically detect which
Setup using your Brother
machine
mode (WPS or AOSS™) your wireless access
point/router uses and try to connect to your
wireless network.
a Place the Brother machine within range of your
wireless access point/router. The range may
differ depending on your environment. Refer to
the instructions provided with your wireless
access point/router.
b If your wireless access point/router has the
WPS or AOSS™ symbol as shown below, go
to d. If not, go to c.
c On the machine's LCD, press
(Settings) > Network > WLAN >
Setup Wizard. Follow the instruction on the
LCD. Then go to g.
d On the machine’s LCD, press
(Settings) > Network > WLAN >
WPS/AOSS.
When Enable WLAN? appears, press Yes to
accept.
g If your wireless device is connected
successfully, the LCD will display the message
Connected until you press OK.
If the connection failes, the LCD will display an
error code. Make a note of the error code, see
Troubleshooting on page 17, and then correct
the error.
Wireless setup is now complete.
The Wi-Fi light on the Control Panel
lights up, indicating that the machine’s
Network I/F is set to WLAN.
• Connect your mobile device to a wireless
access point/router using a Wi-Fi connection.
• Download and install Brother iPrint&Scan
(Android™/iOS/Windows
mobile device’s application download site.
• To download the User’s Guide for the
application you are using (Brother
iPrint&Scan), visit the Brother Solutions Center
at http://support.brother.com
on your model’s page.
®
Phone) from your
and click Manuals
• If you do not start WPS/AOSS from the
machine’s LCD a few seconds after pressing
the WPS or AOSS™ button on your wireless
access point/router, the connection may fail.
• If your wireless access point/router supports
WPS and you want to configure your machine
using the PIN (Personal Identification Number)
Method, see Configuration using the PIN
Method of WPS (Wi-Fi Protected Setup) in the
Network User’s Guide.
e When the LCD instructs you to start WPS or
AOSS™, press the WPS or AOSS™ button on
your wireless access point/router (for more
information, see the instructions provided with
your wireless access point/router).
Press OK on your Brother machine's LCD
16
Page 17

For Wireless Network Users (ADS-2500We only)
Troubleshooting
If you need assistance during setup and want to contact Brother Customer Service, make sure you
have your SSID (Network Name) and Network Key ready. We cannot assist you in locating this
information.
How can I find the wireless security information (SSID* and Network Key**)?
1) Check the documentation provided with your wireless access point/router.
2) The default SSID could be the manufacturer’s name or the model name.
3) If you do not know the security information, please consult the router manufacturer, your system
administrator, or your Internet provider.
* If the WLAN access point/router is not broadcasting the SSID, the SSID will not automatically be detected.
You must manually enter the SSID name. See Configuring your machine when the SSID is not broadcasting
in the Network User’s Guide.
**The Network Key may also be described as the Password, Security Key, or Encryption Key.
Error Codes
If the LCD displays an error code, locate code in the table that follows and use the recommended solution to
correct the error.
Error Code Recommended Solutions
The wireless setting is not activated.
Turn the wireless setting to ON:
TS-01
TS-02
1. On your machine, press (Settings) > Network > WLAN > Setup Wizard.
2. When Enable WLAN? is displayed, press Yes.
This will start the wireless setup wizard.
The wireless access point/router cannot be detected.
1. Check the following:
- Make sure that the wireless access point/router is powered on.
- Move your machine to an obstruction-free area, or closer to the wireless access
point/router.
- Temporarily place your machine within about 3.3 feet (one meter) from the wireless
access point when you are configuring the wireless settings.
- If your wireless access point/router is using MAC address filtering, confirm that the
Brother machine’s MAC address is allowed in the filter.
2. If you manually entered the SSID and security information (SSID/authentication
method/encryption method/Network Key), the information may be incorrect.
Wireless Network
TS-03
Confirm the SSID and security information and re-enter the correct information as
necessary. See How can I find the wireless security information (SSID* and Network
Key**)? on page 17.
The wireless network and security setting you entered may be incorrect.
Confirm the wireless network settings. See How can I find the wireless security information
(SSID* and Network Key**)? on page 17.
Confirm that the entered or selected SSID/authentication method/encryption
method/UserID/Userpass are correct.
17
Page 18

For Wireless Network Users (ADS-2500We only)
Error Code Recommended Solutions
The Authentication/Encryption methods used by the selected wireless access point/router
are not supported by your machine.
For infrastructure mode, change the authentication and encryption methods of the wireless
access point/router. Your machine supports the following authentication methods:
Authentication Method Encryption Method
TKIP
AES
WEP
TS-04
WPA-Personal
WPA2-Personal AES
Open
Shared key WEP
If your problem is not solved, the SSID or network settings you entered may be incorrect.
Confirm the wireless network settings. See How can I find the wireless security information
(SSID* and Network Key**)? on page 17.
For ad-hoc mode, change the authentication and encryption methods of your computer for
the wireless setting. Your machine supports Open authentication method only, with
optional WEP encryption.
None (without encryption)
TS-05
TS-06
TS-07
The security information (SSID/Network Key) is incorrect.
Confirm the SSID and security information (Network Key). See How can I find the wireless
security information (SSID* and Network Key**)? on page 17.
If your router uses WEP encryption, enter the key used as the first WEP key. Your Brother
machine supports the use of the first WEP key only.
The wireless security information (Authentication method/Encryption method/Network
Key) is incorrect.
Confirm the wireless security information (Authentication method/Encryption method/
Network Key) using the Authentication Method table in error TS-04. See How can I find the
wireless security information (SSID* and Network Key**)? on page 17.
If your router uses WEP encryption, enter the key used as the first WEP key. Your Brother
machine supports the use of the first WEP key only.
The machine cannot detect a wireless access point/router that has WPS or AOSS™ enabled.
To configure your wireless settings using WPS or AOSS™, you must operate both your
machine and the wireless access point/router.
Confirm that your wireless access point/router supports WPS or AOSS™, and try starting
from step 7 on page 16 again.
If you do not know how to operate your wireless access point/router
using WPS or AOSS™, see the documentation provided with your
wireless access point/router, ask the manufacturer of your wireless
access point/router, or ask your network administrator.
18
TS-08
TS-20
Two or more wireless access points that have WPS or AOSS™ enabled are detected.
Confirm that only one wireless access point/router within range has the WPS or AOSS™
method active and try again.
To avoid interference from other access points, after a few minutes, try again starting from
step 7 on page 16.
The machine is still trying to connect to your wireless network. Please wait a few minutes,
and then check the WLAN status.
Page 19

Install Optional Applications
NOTE
Finish
Install optional
applications
1
(Windows
NewSoft Presto! BizCard 6
Presto! BizCard lets you manage the information from
scanned business cards, such as names, companies,
mailing addresses, phone/fax numbers and e-mail
addresses on your computer. Simply scan or import
your business cards, and Presto! BizCard
automatically saves the data and image for each
card. Different viewing modes are available for easy
searching, editing, creating, and sorting.
Nuance PDF Converter Professional 8
Nuance PDF Converter Professional 8 offers a
variety of features for handling PDF files. It can unlock
and open PDF files for viewing, editing, annotation
and re-assembly.
Enter the Nuance serial number that is shown on
the MFL-Pro Suite DVD-ROM sleeve when
installing Nuance PDF Converter Professional 8.
®
users)
a Reinsert the DVD-ROM or double-click the
start.exe program. If the model name screen
appears, choose your machine. If the language
screen appears, choose your language.
b The DVD-ROM Top Menu will appear. Click
Additional Applications.
d When installation is complete, click Back to go
back to the Additional Applications screen
and install other applications.
To exit, click Exit.
• To start NewSoft Presto! BizCard 6, do one of
the following:
- Windows
Windows
Programs > NewSoft > Presto! BizCard 6.
- Windows
lower right corner of your desktop. When the
menu bar appears, click (Start) and
then click (Presto! BizCard 6).
• To start Nuance PDF Converter Professional 8,
do one of the following:
- Windows
Windows
Programs > Nuance PDF Converter
Professional 8 > PDF Converter
Professional.
- Windows
lower right corner of your desktop. When the
menu bar appears, click Start and then click
®
XP, Windows Vista® and
®
7 users: Click (Start) > All
®
8 users: Move your mouse to the
®
XP, Windows Vista® and
®
7 users: Click (Start) > All
®
8 users: Move your mouse to the
(PDF Converter Professional).
c Click the button for the application you want to
install. (These applications available may differ
depending on your country.)
The installation is now
complete.
19
Page 20

Install Optional Applications
Finish
Install optional
applications
1
NewSoft Presto! BizCard 6
Presto! BizCard lets you manage the information from
scanned business cards, such as names, companies,
mailing addresses, phone/fax numbers and e-mail
addresses on your computer. Simply scan or import
your business cards, and Presto! BizCard
automatically saves the data and image for each
card. Different viewing modes are available for easy
searching, editing, creating, and sorting.
Presto! PageManager
Presto! PageManager adds Optical Character
Recognition (OCR) capability to Brother
ControlCenter2. For mode detail about
ControlCenter2, See Scan Using ControlCenter2
(Macintosh) in the User's Guide. OCR allows you to
scan a document and convert its contents to text, so
that you can edit the text using the word processing
application of your choice. You can also scan, share
and organize photos and documents using Presto!
PageManager.
(Macintosh users)
b Click the button for the application you want to
install. (These applications available may differ
depending on your country.)
The installation is now
complete.
a Double-click the Brother Support icon to
install. The Brother Support window will
appear.
20
Page 21

Test Scan (Scan to PC)
NOTE
Finish
Scan your document
1
e Press to PC.
f Swipe left or right to select to File and then
press OK.
Your Brother scanner offers various scanning
methods (see the User’s Guide). With the following
Scan to File feature, you can scan and save
documents as PDF files.
To scan documents and configure various settings,
please ensure you have installed the driver and
connected the machine to your computer by following
the instructions in this guide.
a Confirm that the machine is connected to your
computer.
b Load your document.
g Select the destination computer you want to
save to.
h Press Start. The machine starts to feed and
scan your document.
i The scanned data is saved in PDF format
destination folder on the computer that is
connected to the machine.
The test scan is now
complete.
When you load multiple documents, position the
documents so that the leading edges are aligned
at a slight angle in the feed direction.
• ADS-2000e users, go to c.
• ADS-2500We users, go to d.
c Press (Scan to PC key). The machine
starts to feed and scan your document. Go to i.
d Swipe left or right, or press d or c to display
Scan 1.
21
Page 22

User’s Guides and where to find them
NOTE
Download your Brother machine's User's Guides from the Brother Solutions Center.
http://support.brother.com/
and:
-> Select your country.
-> Select your language.
-> Click Manuals, navigate to your product page, then click on the User's Guide(s) you want.
For help identifying your model name, click the link: How to identify your model name.
Which manual? What’s in it?
Quick Setup Guide
(This book)
User’s Guide Learn the Scan operations, learn how to perform routine maintenance, and see
Network User’s Guide
(ADS-2500We only)
Web Connect Guide
(ADS-2500We only)
Mobile Print/Scan Guide
for Brother iPrint&Scan
(ADS-2500We only)
Brother Image Viewer
Guide for Android™
Brother ScanViewer
Guide for iOS/OS X
Follow the instructions for setting up your machine and installing the drivers and
software for the operating system and connection type you are using.
This Guide also includes the Safety Instructions before you set up your machine.
Read the instructions first.
troubleshooting tips.
This Guide provides useful information about network settings and security settings
using the Brother machine. You can also find supported protocol information for your
machine and detailed troubleshooting tips.
This Guide provides useful information about accessing internet services from the
Brother machine, as well as downloading images and uploading files directly from
internet services.
This Guide provides useful information about scanning from your Brother machine to
your mobile device when connected to a Wi-Fi network. For more information on
Printing using this app to devices supporting print refer to the guide.
This Guide provides useful information about using your Android™ mobile device to
view and edit documents that were scanned by a Brother machine.
This Guide provides useful information about using your iOS device or Macintosh
computer to view and edit documents that were scanned by a Brother machine and
saved to iCloud.
If you cannot download these User's Guides from the Brother Solutions Center and want to request
a printed copy of any guide, call our customer service center (USA only)
1-877-BROTHER (1-877-276-8437)
22
Page 23

Visit us on the World Wide Web
http://www.brother.com/
www.brotherearth.com
 Loading...