

Page 1
User’s Guide ADS-2000e/ADS-2500We
ADS-2000e
ADS-2500We
Version A
USA
Page 2

Brother Numbers
IMPORTANT
NOTE
For technical help, you must call the country where you bought the machine. Calls must be made from
within that country.
Register Your Product
By registering your product with Brother International Corporation, you will be recorded as the original owner
of the product. Your registration with Brother:
may serve as confirmation of the purchase date of your product should you lose your receipt;
may support an insurance claim by you in the event of product loss covered by insurance; and,
will help us notify you of enhancements to your product and special offers.
Complete and fax the Brother Warranty Registration And Test Sheet or, for your convenience and most
efficient way to register your new product, register on-line at
http://www.brother.com/registration
FAQs (frequently asked questions)
The Brother Solutions Center is our one-stop resource for all your Brother machine needs. You can download
the latest software documents and utilities, read FAQs and troubleshooting tips, and learn how to get the most
from your Brother product.
http://support.brother.com
• You can check here for Brother driver updates.
• To keep your machine performance up to date, check here for the latest firmware upgrade.
i
Page 3

For Customer Service
In USA: 1-877-BROTHER (1-877-276-8437)
1-901-379-1215 (fax)
In Canada: http://www.brother.ca/support
If you have comments or suggestions, write us at:
In USA: Printer Customer Support
Brother International Corporation
200 Crossing Boulevard
Bridgewater, NJ 08807-0911
In Canada: Brother International Corporation (Canada), Ltd.
Customer Experience Team
1, rue Hotel de Ville Dollard-des-Ormeaux, PQ, Canada H9B 3H6
Service center locator (USA only)
For the location of a Brother authorized service center, call 1-877-BROTHER (1-877-276-8437) or visit us
on-line at http://www.brother-usa.com/service
Service center locations (Canada only)
For the location of a Brother authorized service center, visit us at http://www.brother.ca/support
Internet addresses
Brother Global Web Site: http://www.brother.com
For Frequently Asked Questions (FAQs), Product Support and Technical Questions, Driver Updates and Utilities, and
User’s Guides: http://support.brother.com
For Brother Accessories & Supplies:
In USA: http://www.brothermall.com
In Canada: http://www.brother.ca
ii
Page 4

User’s Guides and where do I find them?
Which manual? What’s in it? Where is it?
Quick Setup Guide
Product Safety Guide
User’s Guide Learn the Scan operations and security features,
Network User’s Guide
(ADS-2500We only)
Web Connect Guide
(ADS-2500We only)
Mobile Print/Scan Guide for
Brother iPrint&Scan
(ADS-2500We only)
Brother Image Viewer Guide for
Android™
Brother ScanViewer Guide for
iOS/OS X
Follow the instructions for setting up your machine
and installing the drivers and software for the
operating system and connection type you are using.
This Guide also includes the Safety Instructions
before you set up your machine. Read the
instructions first.
learn how to perform routine maintenance, and see
troubleshooting tips.
This Guide provides useful information about
Ethernet network settings and security settings using
the Brother machine. You can also find supported
protocol information for your machine and detailed
troubleshooting tips.
This Guide provides useful information about
accessing internet services from the Brother
machine, as well as downloading images and
uploading files directly from internet services.
This Guide provides useful information about
scanning from your Brother machine to your mobile
device when connected to a Wi-Fi network. For more
information on Printing using this app to devices
supporting print refer to the guide.
This Guide provides useful information about using
your Android™ mobile device to view and edit
documents that were scanned by a Brother machine.
This Guide provides useful information about using
your iOS device or Macintosh computer to view and
edit documents that were scanned by a Brother
machine and saved to iCloud.
Printed / In the box
PDF file / Brother
Solutions Center
PDF file / Brother
Solutions Center
PDF file / Brother
Solutions Center
PDF file / Brother
Solutions Center
PDF file / Brother
Solutions Center
PDF file / Brother
Solutions Center
1
1
1
1
1
1
1
Visit us at http://support.brother.com
iii
Page 5

Getting Started
Features Applications What Can I Do?
Scan to PC Scan to Image ControlCenter4
(Windows
ControlCenter2
(Macintosh)
Scan to OCR Scan your document and
®
)
Scan your document directly
into a graphics application for
image editing.
convert it to text. This text can
be edited using your favorite
word processing software.
Where Should I Go for More
Information?
For scanning from the Control
Panel of the machine:
Save Scanned Documents on
Your Computer on page 120
For scanning from
ControlCenter4 (Windows
Home Mode: Basic Scan
on page 50
Advanced Mode: Basic Scan
on page 58
For scanning from
ControlCenter2 (Macintosh):
Scan to Image on page 74
For scanning from the Control
Panel of the machine:
Save Scanned Documents on
Your Computer on page 120
®
):
For scanning from
ControlCenter4 (Windows
Home Mode: Basic Scan
on page 50
Advanced Mode: Basic Scan
on page 58
For scanning from
ControlCenter2 (Macintosh):
Scan to OCR on page 75
®
):
iv
Page 6

Scan to PC
(continued)
Features Applications What Can I Do?
Scan to email ControlCenter4
(Windows
®
ControlCenter2
(Macintosh)
Scan your document to your
default email application, so
)
you can send the scanned job
as an attachment.
(continued)
Where Should I Go for More
Information?
For scanning from the Control
Panel of the machine:
Save Scanned Documents on
Your Computer on page 120
Scan to File Scan your document and save
it to a folder on your hard disk
in one of the file types shown
in the file type list. If you want
to scan your document as a
PDF file, select this method.
For scanning from
ControlCenter4 (Windows
®
):
Home Mode: Basic Scan
on page 50
Advanced Mode: Basic Scan
on page 58
For scanning from
ControlCenter2 (Macintosh):
Scan to E-mail on page 76
For scanning from the Control
Panel of the machine:
Save Scanned Documents on
Your Computer on page 120
For scanning from
ControlCenter4 (Windows
®
):
Home Mode: Basic Scan
on page 50
Advanced Mode: Basic Scan
on page 58
For scanning from
ControlCenter2 (Macintosh):
Scan to File on page 77
v
Page 7

Scan to PC
(continued)
Features Applications What Can I Do?
Scan Business
Cards
NewSoft Presto!
BizCard 6
(Windows
®
Macintosh)
Use the NewSoft Presto!
BizCard 6 application included
in the Brother MFL-Pro
and
software suite for scanning
business cards.
Scan Using the
TWAIN/WIA/
®
ISIS
Driver for
Windows
®
Users
Applications
supporting
TWAIN/WIA/ISIS
driver such as:
Nuance™
PaperPort™
12SE
Windows
®
Fax
and Scan
Windows
®
Photo Gallery
Captiva
®
QuickScan™
Pro
Use the Nuance™
PaperPort
™
12SE application
included in the Brother MFL
software suite, or other
applications supporting TWAIN
or WIA specifications, for
scanning.
You can also use the free trial
version of Captiva
®
QuickScan™ Pro, or other
applications supporting ISIS
specifications, for scanning.
Before scanning using the
®
ISIS
applications, you must
install the ISIS
®
scanner
driver.
Scan Using the
TWAIN/ICA
Driver for
Macintosh Users
Applications
supporting
TWAIN/ICA
driver such as:
Presto!
PageManager
Apple Image
Capture
Use the Presto! PageManager
application included in the
Brother MFL-Pro software
suite, or other applications
supporting TWAIN
specifications, for scanning.
After installing the Brother
MFL-Pro software suite, you
can also use the Apple Image
Capture application for
scanning.
WS Scan
(Windows
®
users only)
(ADS-2500We
only)
Windows
and Scan
Windows
Photo Gallery
®
Fax
®
Scan your document by using
the Web Services protocol.
The Web Services protocol
enables you to scan over the
network using your machine
and a computer running
Windows Vista
Windows
Windows
®
(SP2 or later),
®
7, Windows® 8 or
®
8.1.
Where Should I Go for More
Information?
Use NewSoft Presto! BizCard 6
(Windows
®
) on page 108
Use NewSoft Presto! BizCard 6
(Macintosh) on page 118
For scanning using the
TWAIN/WIA driver:
-
Pro
Scan Using Nuance™
PaperPort™ 12SE or Other
Windows
®
Applications
on page 96
For scanning using the ISIS
driver:
®
Scan Using Captiva
QuickScan™ Pro or ISIS
Applications (Windows
on page 119
For scanning using the TWAIN
driver:
Scan Using Presto!
PageManager or TWAIN
Applications (Macintosh)
on page 109
For scanning using the ICA driver:
Scan Using Apple Image Capture
(ICA Driver) on page 114
For installing drivers:
Install Drivers Used for
Scanning via Web Services
(Windows Vista
Windows
®
®
, Windows® 7,
8, Windows® 8.1)
in the Network User’s Guide
For scanning from the Control
Panel of the machine:
Scan Using Web Services
(Windows Vista
Windows
Windows
®
®
®
SP2 or Later,
7, Windows® 8 and
8.1) (ADS-2500We)
on page 138
®
®
®
®
)
vi
Page 8

Scan from
the Control
Panel of the
Machine
Features Applications What Can I Do?
Scan to USB — Scan your document and save
the scanned image on a USB
flash drive. You can configure
the settings on the control
panel of the machine.
Scan to FTP
(ADS-2500We
only)
Scan to Network
(Windows
®
users only)
Scan your document directly
to an FTP server on your local
network, or on the internet.
Scan your document directly
to a shared folder on your local
network, or on the internet.
(ADS-2500We
only)
Scan to email
Server
(ADS-2500We
only)
— Scan your document and send
it directly to an email address
from the machine. In addition,
because this feature can
assign an email address to the
machine, you can use the
machine to send documents
over your local network or the
internet to computers or other
Internet Fax machines.
Scan to Web
(ADS-2500We
only)
Scan your document and
upload it directly to Web
Services, such as Evernote,
Dropbox, Box and OneDrive,
without using a computer.
Where Should I Go for More
Information?
Save Scanned Documents on a
USB Flash Drive on page 123
Scan Documents to an FTP
Server (ADS-2500We only)
on page 128
Scan Documents to a Shared
Folder / Network Location
(Windows
®
) (ADS-2500We only)
on page 134
Send Scanned Documents
Directly to an Email Address
(ADS-2500We only) on page 140
Web Connect Guide
vii
Page 9

From
Mobile
Devices
Features Applications What Can I Do?
Scan
Documents
(Brother
iPrint&Scan)
Brother
iPrint&Scan
Scan your document directly
from your Android™ devices,
iOS devices, and Windows
Phone without using a
computer.
You can download and install
Brother iPrint&Scan from the
View or Edit
Scanned Data
(iOS/OS X)
(ADS-2500We
only)
Brother
ScanViewer
Google Play, App Store, or
Windows
Use your iOS device or
Macintosh computer to view
and edit images and
documents that were scanned
by a Brother machine and
®
Phone Store.
saved to iCloud.
You can download and install
Brother ScanViewer from the
App Store.
View or Edit
Scanned Data
(Android™)
(ADS-2500We
only)
Brother Image
Viewer
Use your Android™ mobile
device to view and edit
documents that were scanned
by a Brother machine.
You can download and install
Brother Image Viewer from
the Google Play.
Where Should I Go for More
Information?
Mobile Print/Scan Guide for
Brother iPrint&Scan
®
Brother ScanViewer Guide for
iOS/OS X
Brother Image Viewer Guide for
Android™
viii
Page 10

Table of Contents
1 General Information 1
Using the Documentation ..........................................................................................................................1
Symbols and Conventions Used in the Documentation ......................................................................1
About This Machine ...................................................................................................................................2
Control Panel Overview (ADS-2000e) .......................................................................................................3
Control Panel Overview (ADS-2500We)....................................................................................................4
Touchscreen LCD................................................................................................................................5
Basic LCD Operations .........................................................................................................................8
General Setup (ADS-2000e)......................................................................................................................9
Set Sleep Mode ...................................................................................................................................9
Select Your Language .......................................................................................................................11
Reduced Noise Mode ........................................................................................................................13
General Setup (ADS-2500We) ................................................................................................................14
Set the Backlight Brightness..............................................................................................................14
Set the Dim Timer for the Backlight...................................................................................................14
Set the Home Screen ........................................................................................................................14
Select Your Language ......................................................................................................................15
Memory Storage ................................................................................................................................15
Beep Volume .....................................................................................................................................15
Automatic Daylight Saving Time........................................................................................................16
Sleep Mode .......................................................................................................................................16
Power Down Mode ............................................................................................................................17
Multifeed Detection............................................................................................................................17
Reduced Noise Mode ........................................................................................................................18
Setting Lock.......................................................................................................................................18
Set the Password ..............................................................................................................................19
Change the Password .......................................................................................................................19
Turn Setting Lock On/Off...................................................................................................................20
User Restriction Functions ................................................................................................................21
2 Document Specifications 24
Acceptable Documents............................................................................................................................24
Unacceptable Documents........................................................................................................................26
Carrier Sheet Recommendations ............................................................................................................27
Notes for Using Carrier Sheets................................................................................................................28
3 Scan Preparation 29
Set Up Your Scanner...............................................................................................................................29
Load Documents......................................................................................................................................30
Standard-size Documents .................................................................................................................30
Business Cards and Plastic Cards ....................................................................................................32
Documents Longer than Standard-size .............................................................................................33
Documents not printed on standard-size paper.................................................................................34
Documents with Facing Pages ..........................................................................................................35
Receipts, Clippings, Photos, and Other Documents .........................................................................35
ix
Page 11

4 Prepare Your Network 37
Before Scanning ......................................................................................................................................37
Before Network Scanning (ADS-2500We only) .......................................................................................38
Network License (Windows
Configure Network Scanning for Windows
Configure Network Scanning for Macintosh ......................................................................................42
Launch the BRAdmin Utility (Windows
®
)............................................................................................................38
®
......................................................................................38
®
) ..........................................................................................45
5 Scan Using Your Computer 46
Change the ControlCenter4 User Interface (Windows®).........................................................................46
Scan Using ControlCenter4 in Home Mode (Windows
®
) ........................................................................50
Basic Scan.........................................................................................................................................50
Scan Documents Using the Carrier Sheet.........................................................................................51
Scan Plastic Cards ............................................................................................................................53
Scan to an Office File ........................................................................................................................55
Scan Business Cards ........................................................................................................................56
Scan Using ControlCenter4 in Advanced Mode (Windows
®
)..................................................................58
Basic Scan.........................................................................................................................................58
Change a Scan Button’s Default Settings .........................................................................................59
Scan Using the Carrier Sheet............................................................................................................59
Scan Plastic Cards ............................................................................................................................60
Scan to an Office File ........................................................................................................................62
Scan Business Cards ........................................................................................................................63
Create a Custom Tab (ControlCenter4 Advanced Mode) (Windows
®
) ...................................................65
Create a Custom Tab ........................................................................................................................65
Create a Custom Button in a Custom Tab.........................................................................................66
Change Scan Settings (ControlCenter4) (Windows
®
).............................................................................67
Scan Using ControlCenter2 (Macintosh) .................................................................................................73
Scan to Image ...................................................................................................................................74
Scan to OCR .....................................................................................................................................75
Scan to E-mail ...................................................................................................................................76
Scan to File........................................................................................................................................77
Change a Scan Button’s Default Settings .........................................................................................78
Scan Specific and Irregular Sized Documents Using the Carrier Sheet............................................78
Scan Plastic Cards ............................................................................................................................80
Scan to an Office File ........................................................................................................................82
Scan Business Cards ........................................................................................................................83
Register Your Favorite Scan Settings Using ControlCenter2 (Macintosh) ..............................................85
User-defined Button...........................................................................................................................86
Change Scan Settings (ControlCenter2) (Macintosh) .............................................................................89
Scan Using Nuance™ PaperPort™ 12SE or Other Windows
Scan Using Nuance™ PaperPort™ 12SE.........................................................................................96
Scan Using Windows
®
Photo Gallery or Windows® Fax and Scan................................................106
Use Nuance PDF Converter Professional 8 (Windows
Installing Nuance PDF Converter Professional 8 ............................................................................107
Use NewSoft Presto! BizCard 6 (Windows
®
) ........................................................................................108
®
Applications ..........................................96
®
)......................................................................107
Installing NewSoft Presto! BizCard 6...............................................................................................108
Scan Using Presto! PageManager or TWAIN Applications (Macintosh) ...............................................109
Installing Presto! PageManager ......................................................................................................109
Scan Using Presto! PageManager ..................................................................................................109
TWAIN Driver Settings ....................................................................................................................111
x
Page 12

Scan Using Apple Image Capture (ICA Driver) .....................................................................................114
Scan Using Apple Image Capture ...................................................................................................114
ICA Driver Settings ..........................................................................................................................116
Select your machine from Print & Fax or Print & Scan ....................................................................117
Use NewSoft Presto! BizCard 6 (Macintosh) .........................................................................................118
Installing NewSoft Presto! BizCard 6...............................................................................................118
Scan Using Captiva
Installing ISIS
®
QuickScan™ Pro or ISIS® Applications (Windows®).........................................119
®
Scanner and Captiva® QuickScan™ Pro ..............................................................119
6 Scan Using the Control Panel 120
Save Scanned Documents on Your Computer......................................................................................120
Save Scanned Documents on a USB Flash Drive.................................................................................123
Save Scanned Documents on Mobile Devices................................................................................126
Scan Documents to an FTP Server (ADS-2500We only) ......................................................................128
Start Web Based Management .......................................................................................................128
Configure the FTP Default Settings.................................................................................................130
Scan Using FTP Server Profiles......................................................................................................133
Scan Documents to a Shared Folder / Network Location (Windows
Configure the Scan to Network Default Settings .............................................................................135
Scan Using Scan to Network Profiles..............................................................................................137
Scan Using Web Services (Windows Vista
and Windows
®
8.1) (ADS-2500We) ...................................................................................................138
®
SP2 or Later, Windows® 7, Windows® 8
Configuring Settings for Scanning ...................................................................................................138
Send Scanned Documents Directly to an Email Address (ADS-2500We only) .....................................140
Select an email Address from the Address Book ............................................................................140
Enter an email Address Manually....................................................................................................141
Set Up the Address Book (ADS-2500We only) .....................................................................................142
Register an email Address ..............................................................................................................142
Change an email Address ...............................................................................................................142
Delete an email Address .................................................................................................................143
Set Up a Group................................................................................................................................144
Change a Group .............................................................................................................................144
Delete a Group ................................................................................................................................145
Upload Scanned Documents to the Web (ADS-2500We only)..............................................................146
Change Scan to PC Settings (Windows
®
) ............................................................................................147
Change Scan to PC Settings (Macintosh) .............................................................................................154
Scanner Shortcuts (ADS-2500We only) ................................................................................................160
Add a Shortcut.................................................................................................................................160
Edit, Rename or Delete a Shortcut..................................................................................................161
®
) (ADS-2500We only) ................134
7 Managing the Machine from Your Computer 162
Monitor the Machine’s Status from Your Computer (Windows®) ..........................................................162
Error Notifications ............................................................................................................................163
Status Monitor Indicators.................................................................................................................163
Monitor the Machine’s Status from Your Computer (Macintosh) ...........................................................164
Turn the AutoLoad Feature On/Off (ControlCenter2) ......................................................................166
Set Up the Brother Machine from Your Computer.................................................................................167
xi
Page 13

8 Routine Maintenance 171
Clean the Outside of the Machine .........................................................................................................171
Clean the Scanner.................................................................................................................................173
Replace Supplies...................................................................................................................................179
Part Names, Numbers, and Life Cycles ..........................................................................................179
Check Supplies Replacement Cycle (ADS-2000e) .........................................................................181
Check Supplies Replacement Cycle (ADS-2500We) ......................................................................182
Replace the Separation Pad............................................................................................................183
Replace the Pick-up Roller ..............................................................................................................185
Reset the Usage Counters (ADS-2000e) ........................................................................................188
Reset the Usage Counters (ADS-2500We).....................................................................................189
Packing and Shipping the Machine .......................................................................................................190
9 Troubleshooting 192
Identify Your Problem ............................................................................................................................192
Error and Maintenance Messages.........................................................................................................192
Document Jam ................................................................................................................................195
Long Paper Jam ..............................................................................................................................197
Troubleshooting .....................................................................................................................................198
If you are having difficulty with your machine ..................................................................................198
Machine Information ..............................................................................................................................204
Check the Serial Number (ADS-2000e) ..........................................................................................204
Check the Serial Number (ADS-2500We) .......................................................................................205
WLAN Enable/Disable (ADS-2500We only) ....................................................................................206
Reset Functions...............................................................................................................................206
Reset the Machine (ADS-2500We only)..........................................................................................206
A Specifications 207
General..................................................................................................................................................207
Scanner .................................................................................................................................................209
Direct Scan Feature (Scan to USB).......................................................................................................209
Interfaces...............................................................................................................................................210
Network (ADS-2500We only).................................................................................................................210
Computer Requirements........................................................................................................................211
B Appendix 212
Entering Text (ADS-2500We only) ........................................................................................................212
Inserting spaces .............................................................................................................................212
Making corrections ..........................................................................................................................212
LED Indications (ADS-2000e only) ........................................................................................................213
Service Call Indications ...................................................................................................................221
C Index 223
xii
Page 14
1
NOTE
General Information 1
Using the Documentation 1
Thank you for buying a Brother machine! Reading the documentation will help you make the most of your
machine.
Symbols and Conventions Used in the Documentation 1
The following symbols and conventions are used throughout the documentation.
1
CAUTION
IMPORTANT
NOTE
Bold Bold typeface identifies keys on the machine control panel or computer screen.
Italics Italicized typeface emphasizes an important point or refers you to a related topic.
Courier New
(ADS-2500We only)
• Unless otherwise specified, screens and illustrations in this guide show the ADS-2500We.
• Unless otherwise specified, the screens in this manual are from Windows
on your computer may vary depending on your operating system.
CAUTION indicates a potentially hazardous situation which, if not avoided, may
result in minor or moderate injuries.
IMPORTANT indicates a potentially hazardous situation which, if not avoided, may
result in damage to property or loss of product functionality.
Notes tell you how you should respond to a situation that may arise or give tips about
how the operation works with other features.
Text in Courier New font identifies messages on the LCD of the machine.
®
7 and OS X v10.7.5. Screens
1
Page 15
General Information
1
2
4
5
6
7
8
9
10
11
12
13
3
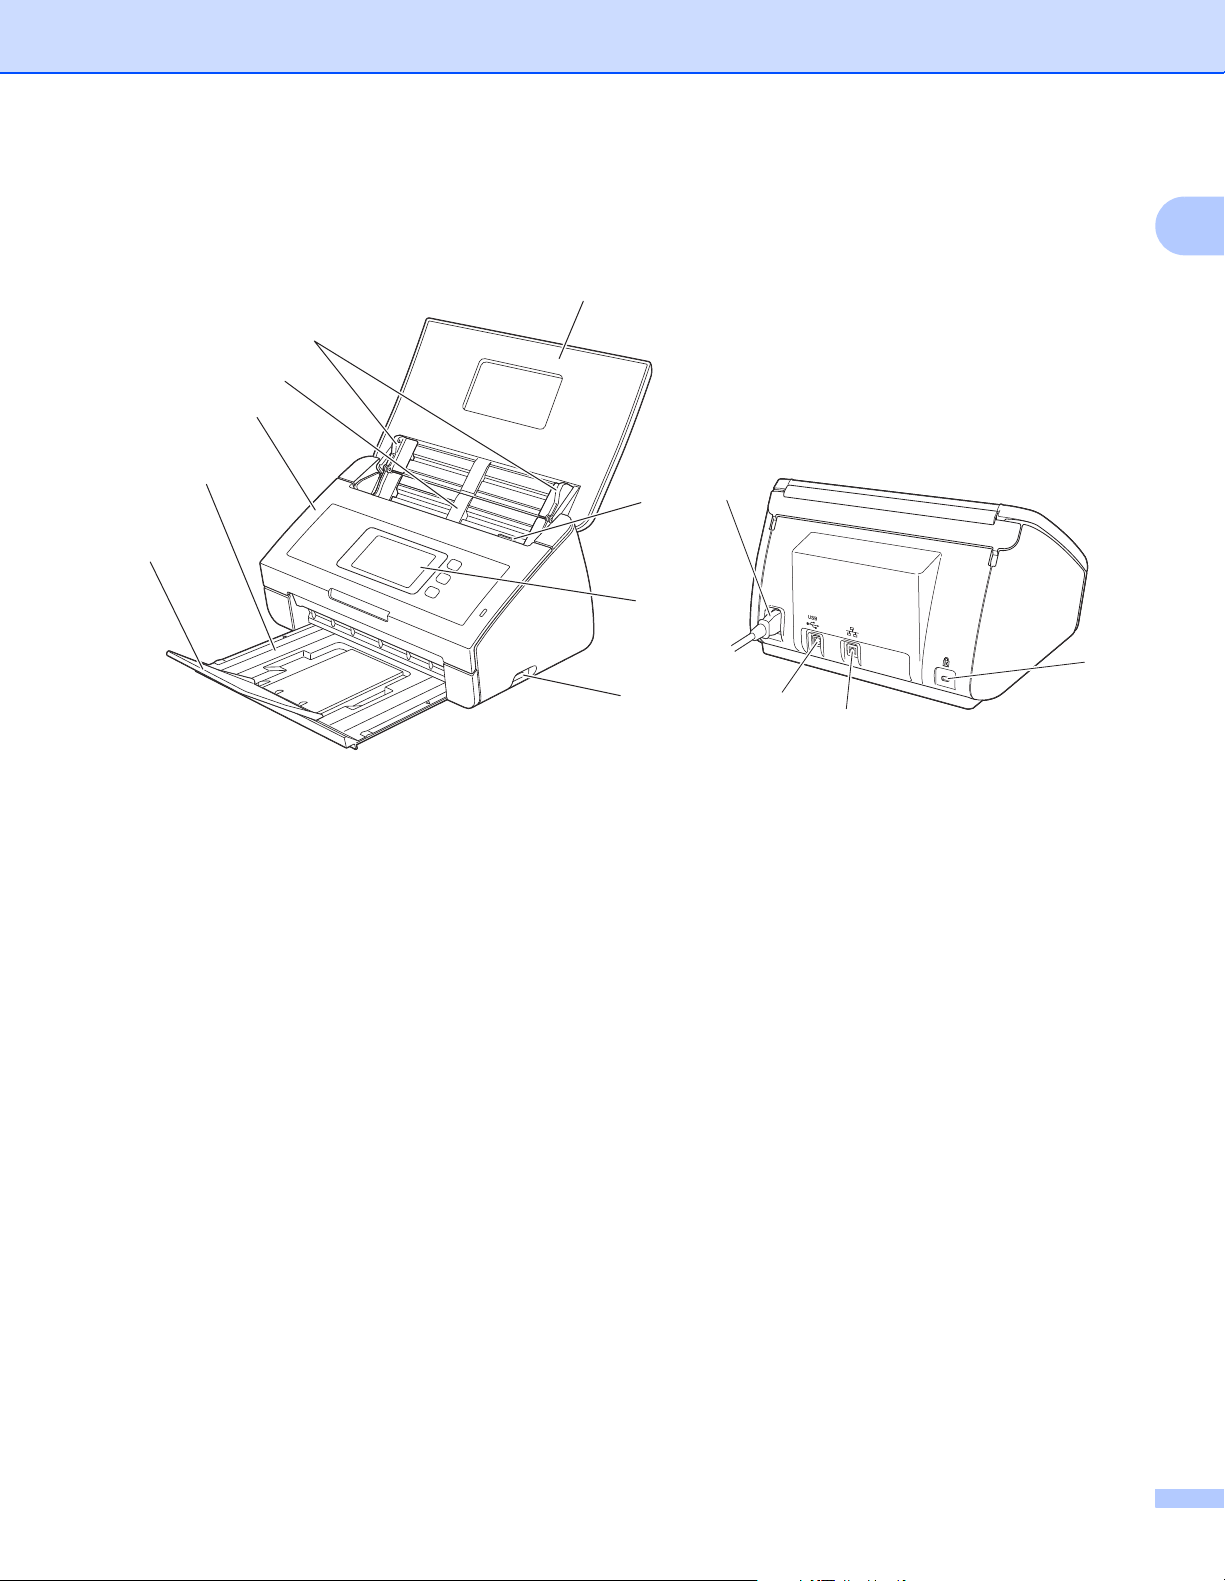
About This Machine 1
1
1 Top Cover
Turn on your machine by opening the Top Cover.
2 Document Guides
3 Automatic Document Feeder (ADF)
4 Front Cover
5 Output Tray
6 Document Stopper
7 USB port
8 Control Panel (ADS-2500We only)
9 Cover Release Lever
10 AC Power Connector
11 USB Connector
12 LAN Connector (ADS-2500We only)
13 Kensington Security Slot
2
Page 16
General Information
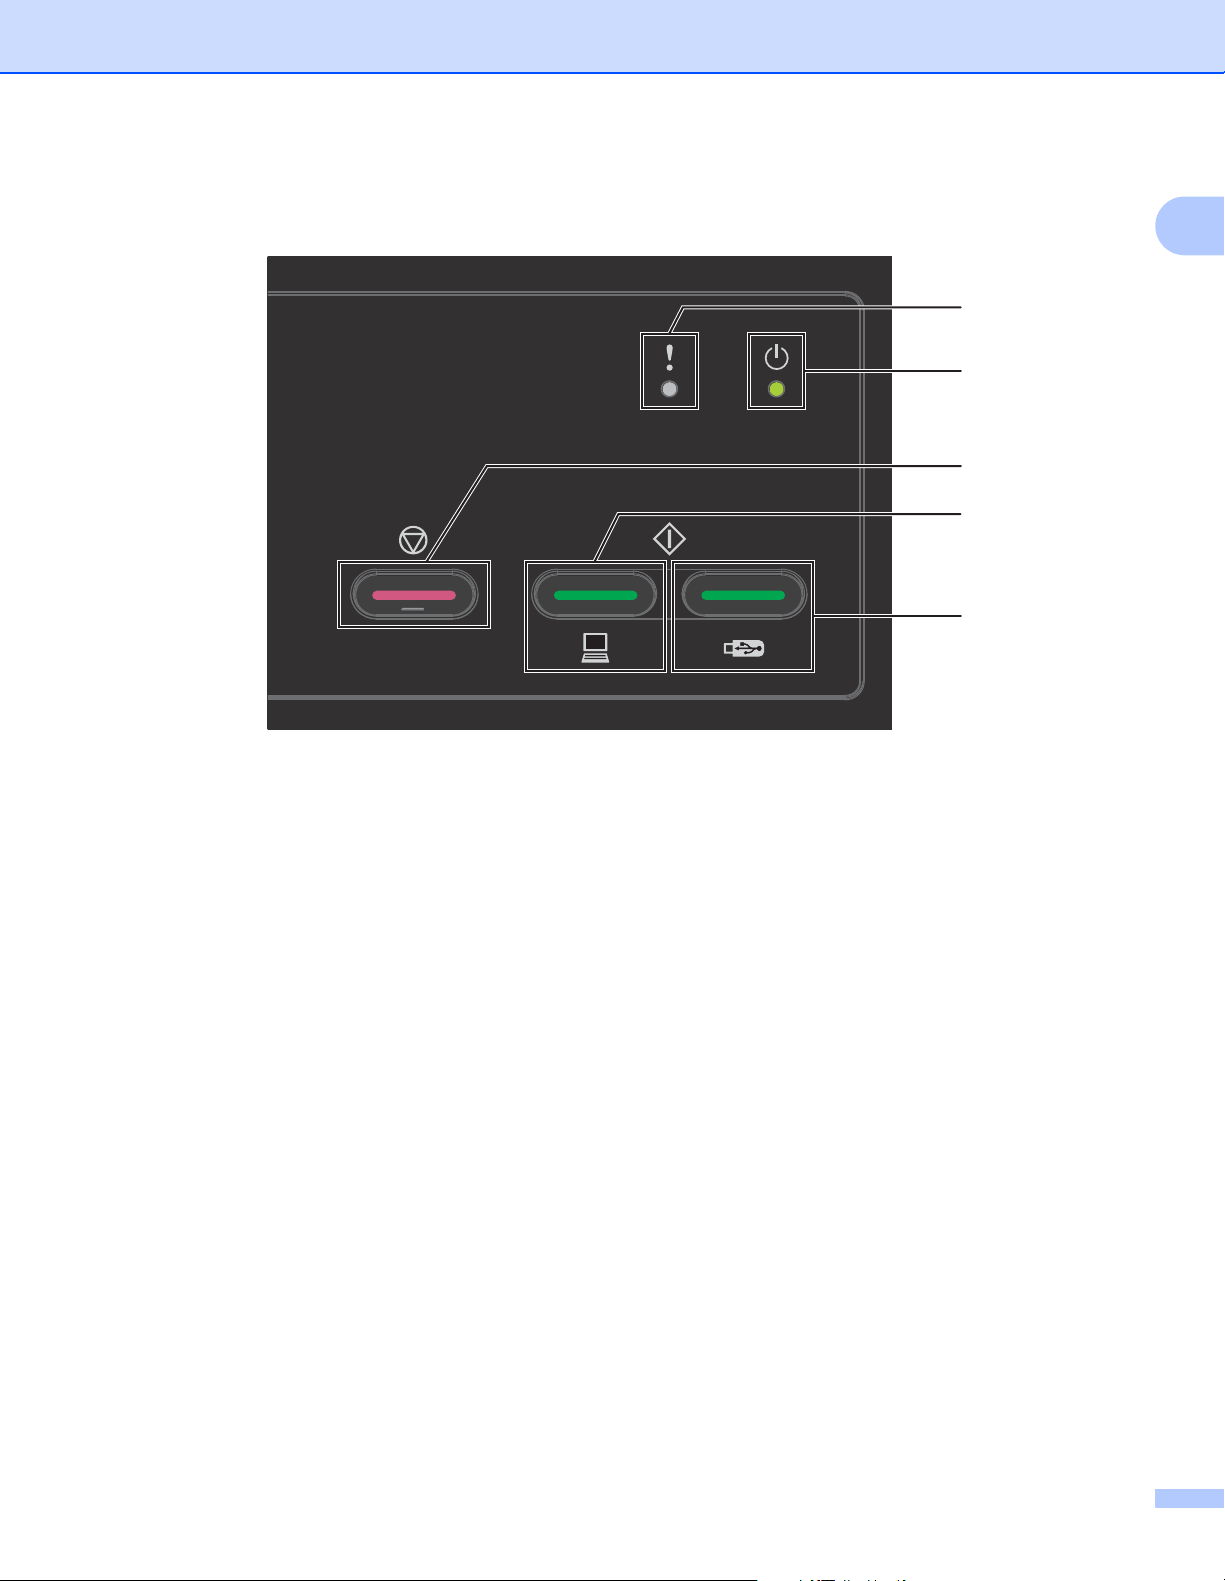
Control Panel Overview (ADS-2000e) 1
1
2
3
4
5
1
1 Error Indicator (with LED)
The Error Indicator indicates that the machine is in an error state, see LED Indications (ADS-2000e only)
on page 213.
2 Power Indicator (with LED)
The Power Indicator blinks depending on the status of the machine.
3 Stop button
Press the Stop button to:
- Job Cancel
- Wake-up
- Error Recovery
- Disconnect Remote Setup
4 Scan to PC button (with LED)
Press the Scan to PC button to:
- Scan to PC
- Wake-up
5 Scan to USB button (with LED)
Press the Scan USB button to:
- Scan to USB
- Wake-up
3
Page 17
General Information
1234
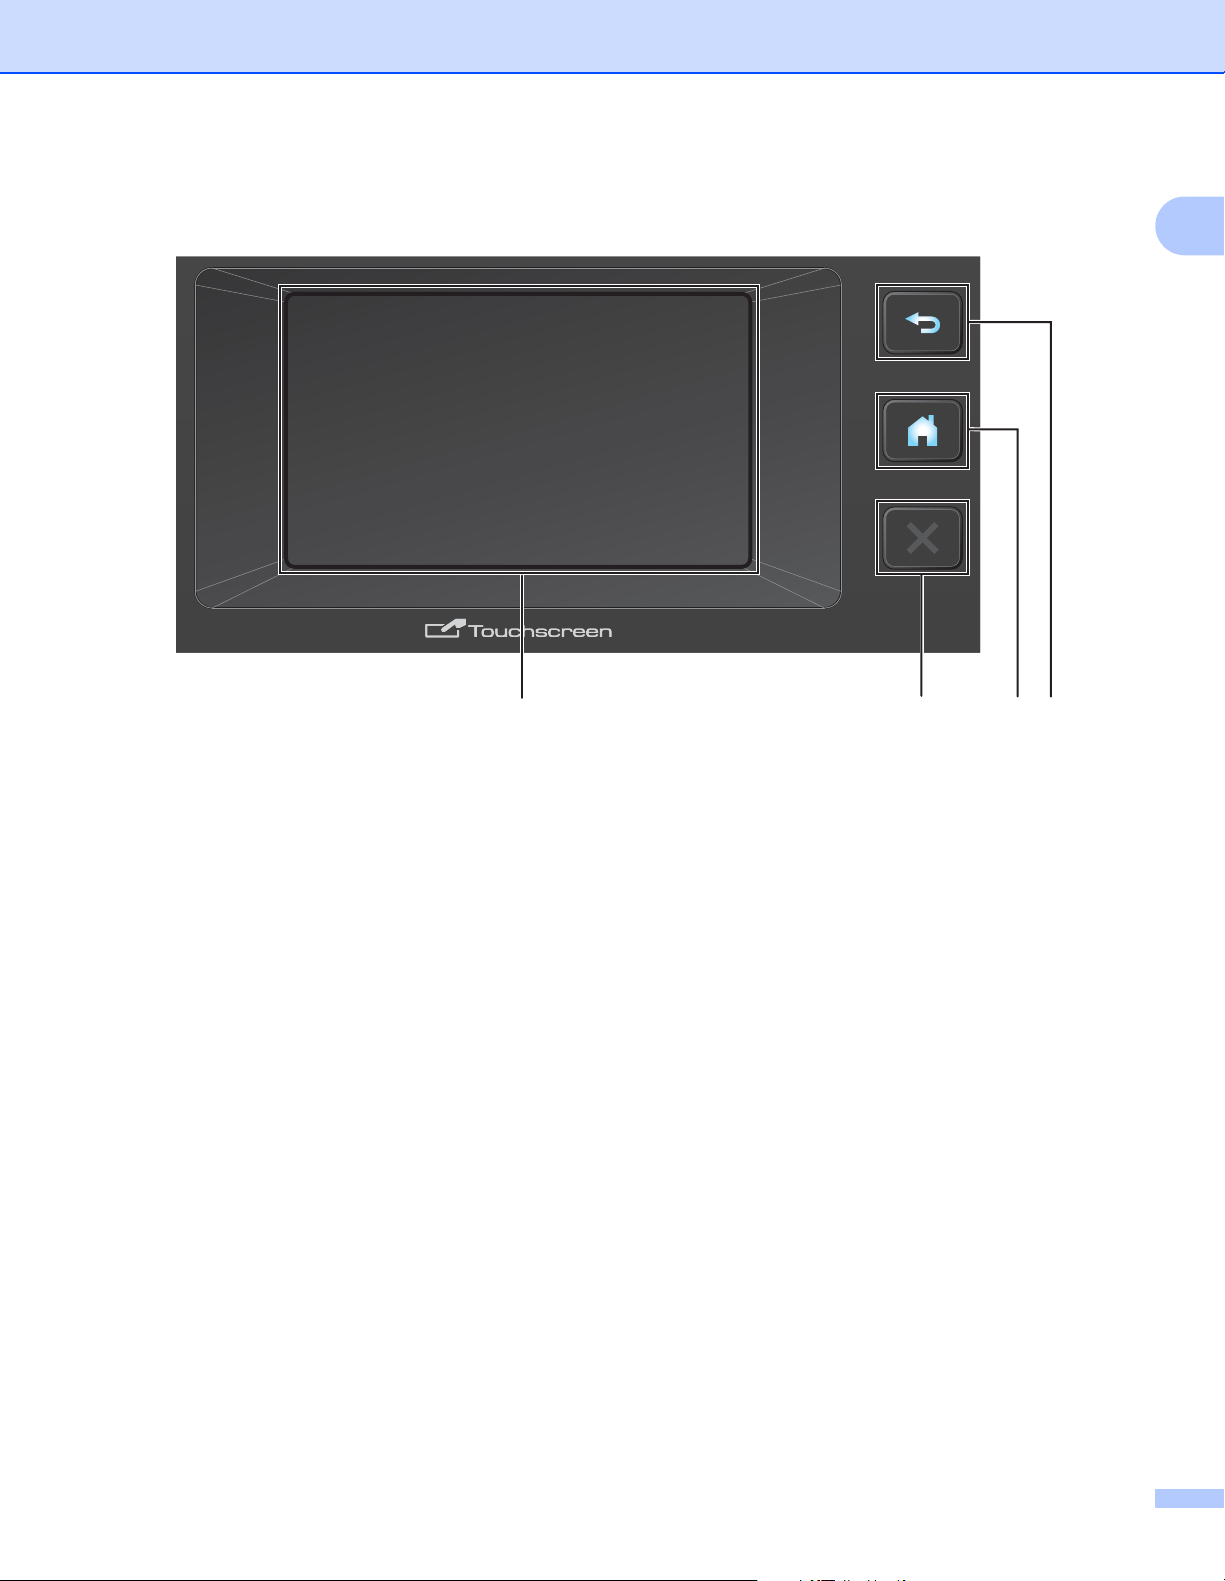
Control Panel Overview (ADS-2500We) 1
1
1 Back Button
Press to go back to the previous screen or menu. The Back button does not light up when it is unavailable.
2 Home Button
Press to return to the Home Screen and Ready Mode. The Home button does not light up when it is
unavailable.
3 Stop Button
Press to stop or cancel your current action and return to Ready Mode. The Stop button does not light up
when it is unavailable.
4 Touchscreen LCD
Access the menus and options by pressing the Touchscreen.
4
Page 18
General Information
Touchscreen LCD 1
Change the Home Screen by swiping left or right, or pressing d or c on the LCD. You can set a default Home
screen if needed. See Set the Home Screen on page 14.
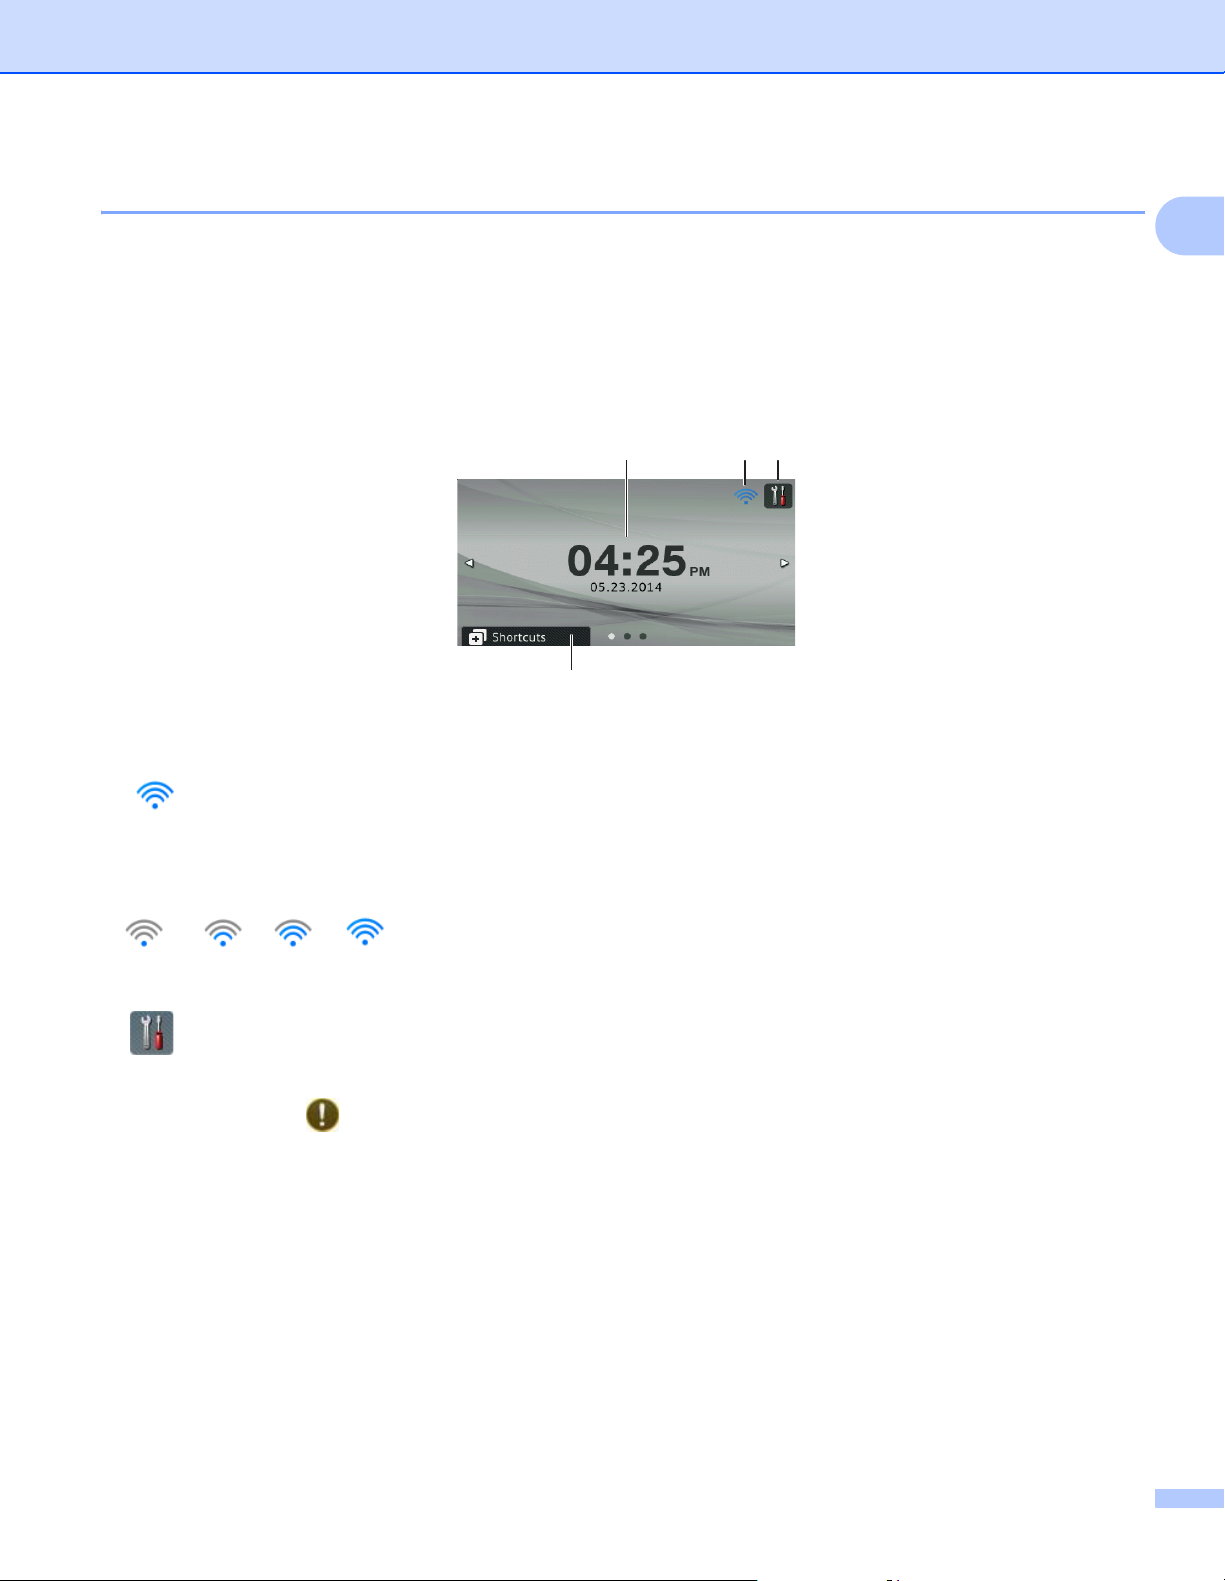
Clock Mode 1
The LCD displays Clock Mode when the machine is idle. Clock Mode displays the date, time and current
machine status.
231
4
1
1 Date and Time
Current date and current time.
2
When WLAN is enabled, a four-level indicator shows the current wireless signal strength if you are using
a wireless connection.
0Max
3
Press to access all settings.
The information icon appears on the Touchscreen when there is an error or maintenance message. For
more information, see Error and Maintenance Messages on page 192.
5
Page 19
General Information
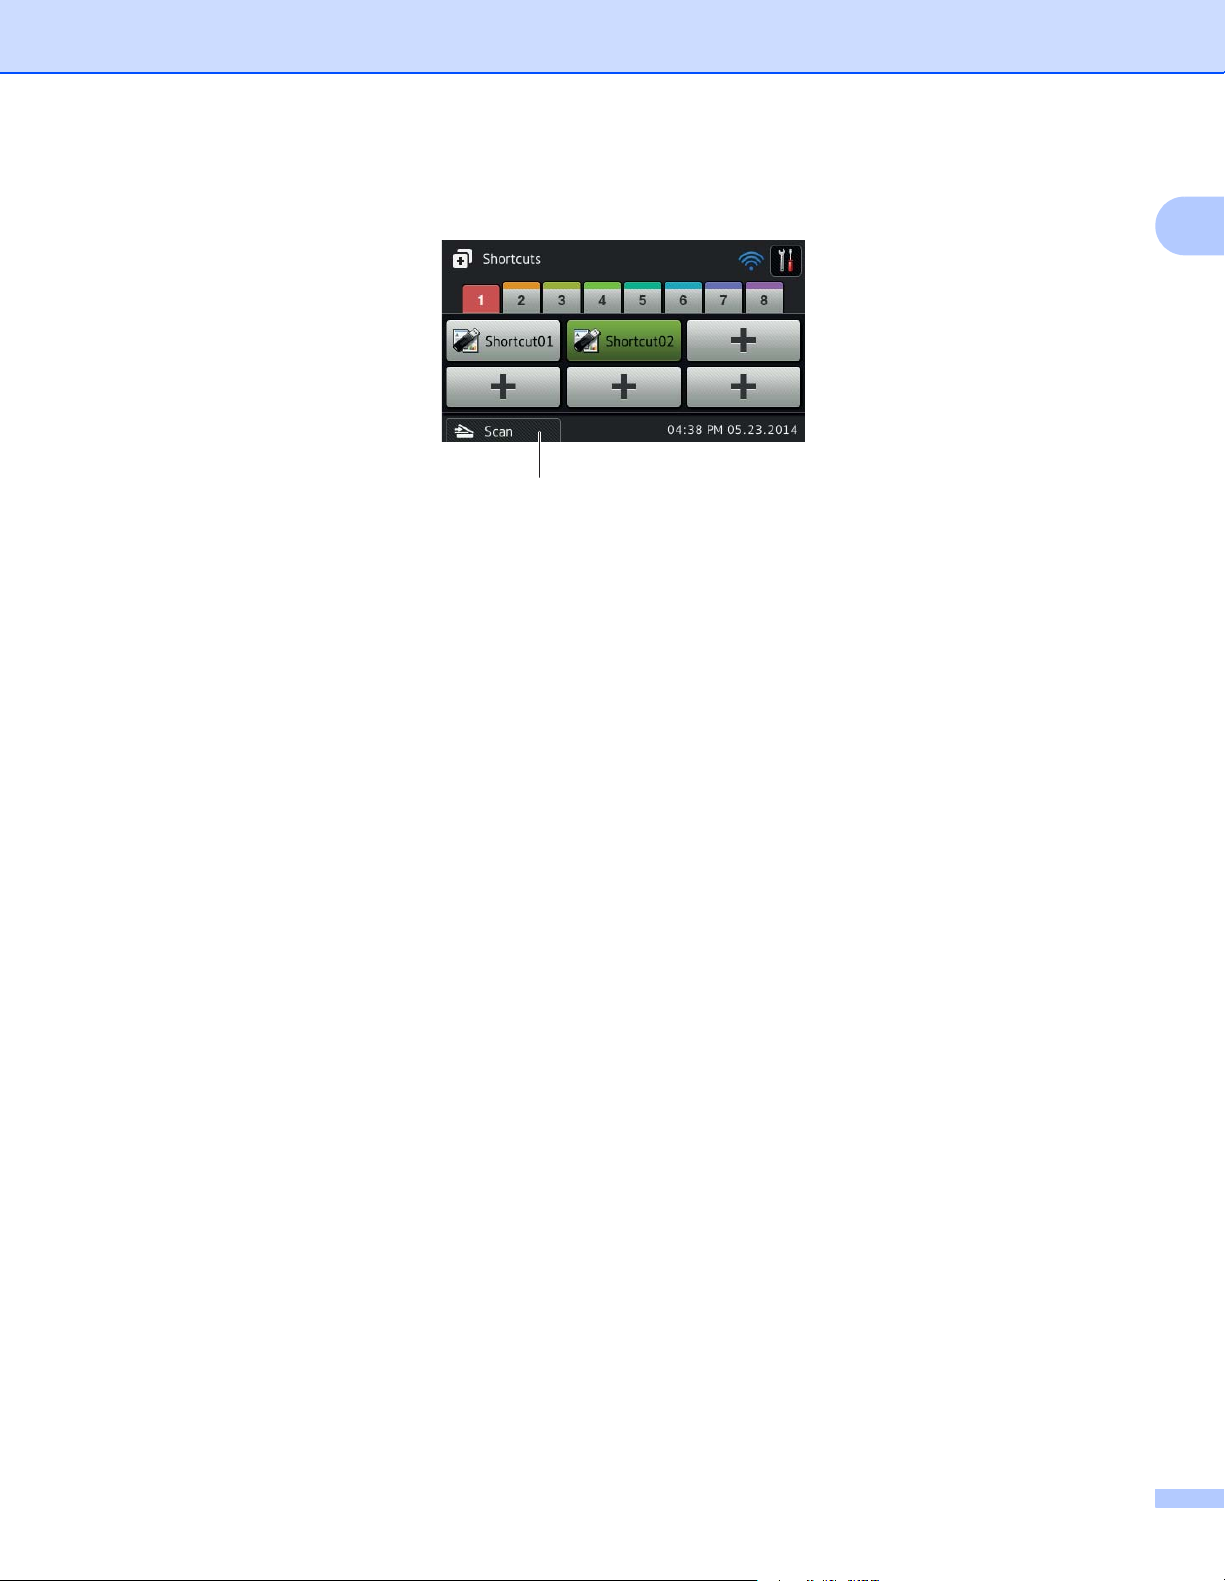
5
4 Shortcuts
Press to set up shortcuts. Once you have set up shortcuts, press to view all of your shortcut options.
5 Scan
Press to access the Scan Mode.
1
6
Page 20
General Information
NOTE
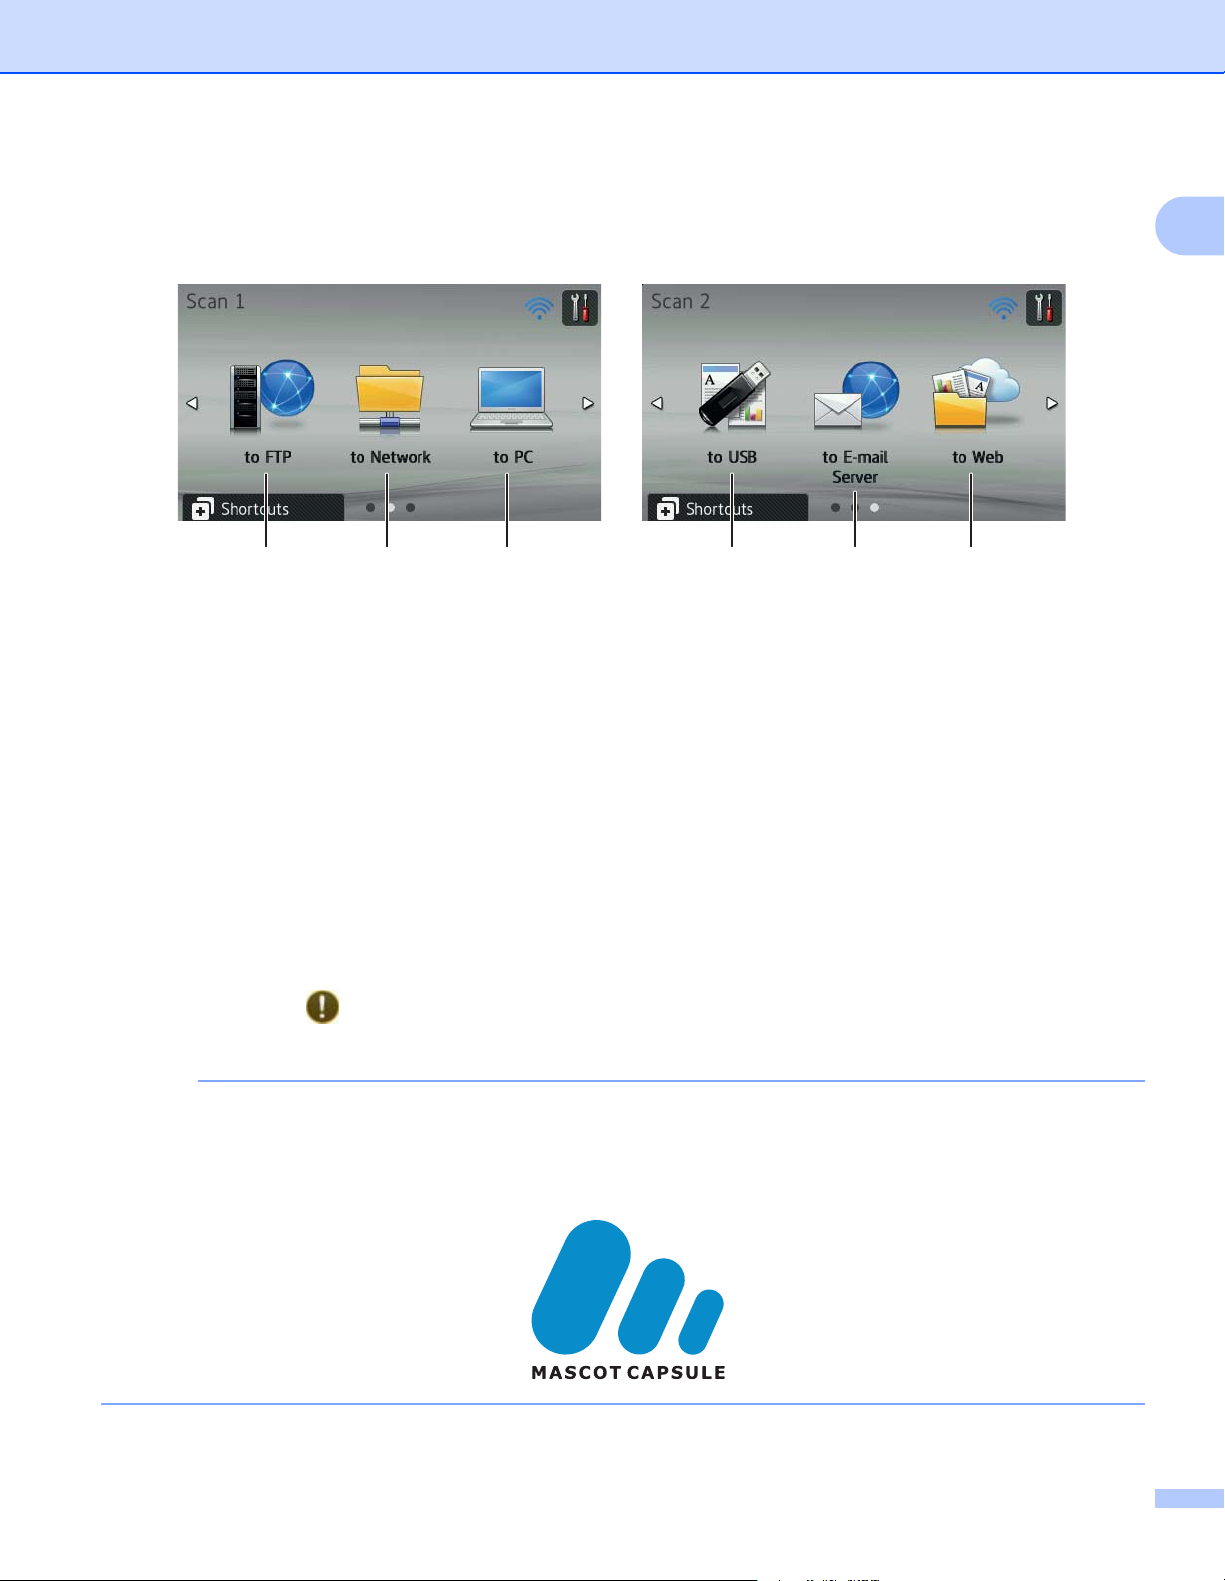
Scan Mode 1
The LCD displays the current machine status when the machine is idle.
Scan 1 Scan 2
231 456
1 to FTP
Press to access the Scan to FTP function.
2 to Network
Press to access the Scan to Network function.
3 to PC
Press to access the Scan to PC function.
4 to USB
Press to access the Scan to USB function.
1
5 to E-mail Server
Press to access the Scan to E-mail Server function.
6 to Web
Press to access the Scan to Web function.
The information icon appears on the Touchscreen when there is an error or maintenance message. For
details, see Error and Maintenance Messages on page 192.
• This product adopts the font of ARPHIC TECHNOLOGY CO., LTD.
• MascotCapsule UI Framework and MascotCapsule Tangiblet developed by HI CORPORATION are used.
MascotCapsule is a registered trademark of HI CORPORATION in Japan.
7
Page 21
General Information
IMPORTANT
NOTE
Basic LCD Operations 1
To operate the LCD, use your finger to press the icon or option you want. To display and access all menus
or options, swipe left or right, or press a or b to scroll through them.
DO NOT press the LCD with a sharp object, such as a pen or stylus. It may damage the machine.
The following example shows how to change a machine setting. In this example, the Document Size setting
in Scan to USB is changed to Auto.
1 Swipe left or right, or press d or c to display Scan 2.
2 Press to USB.
3 Press Options.
4 Press a or b to display Document Size.
5 Press Document Size.
6 Press a or b to display Auto.
1
7 Press Auto.
Press to go back to the previous screen or menu.
8
Page 22
General Information
General Setup (ADS-2000e) 1
Set Sleep Mode 1
1 Start the ControlCenter application.
Windows
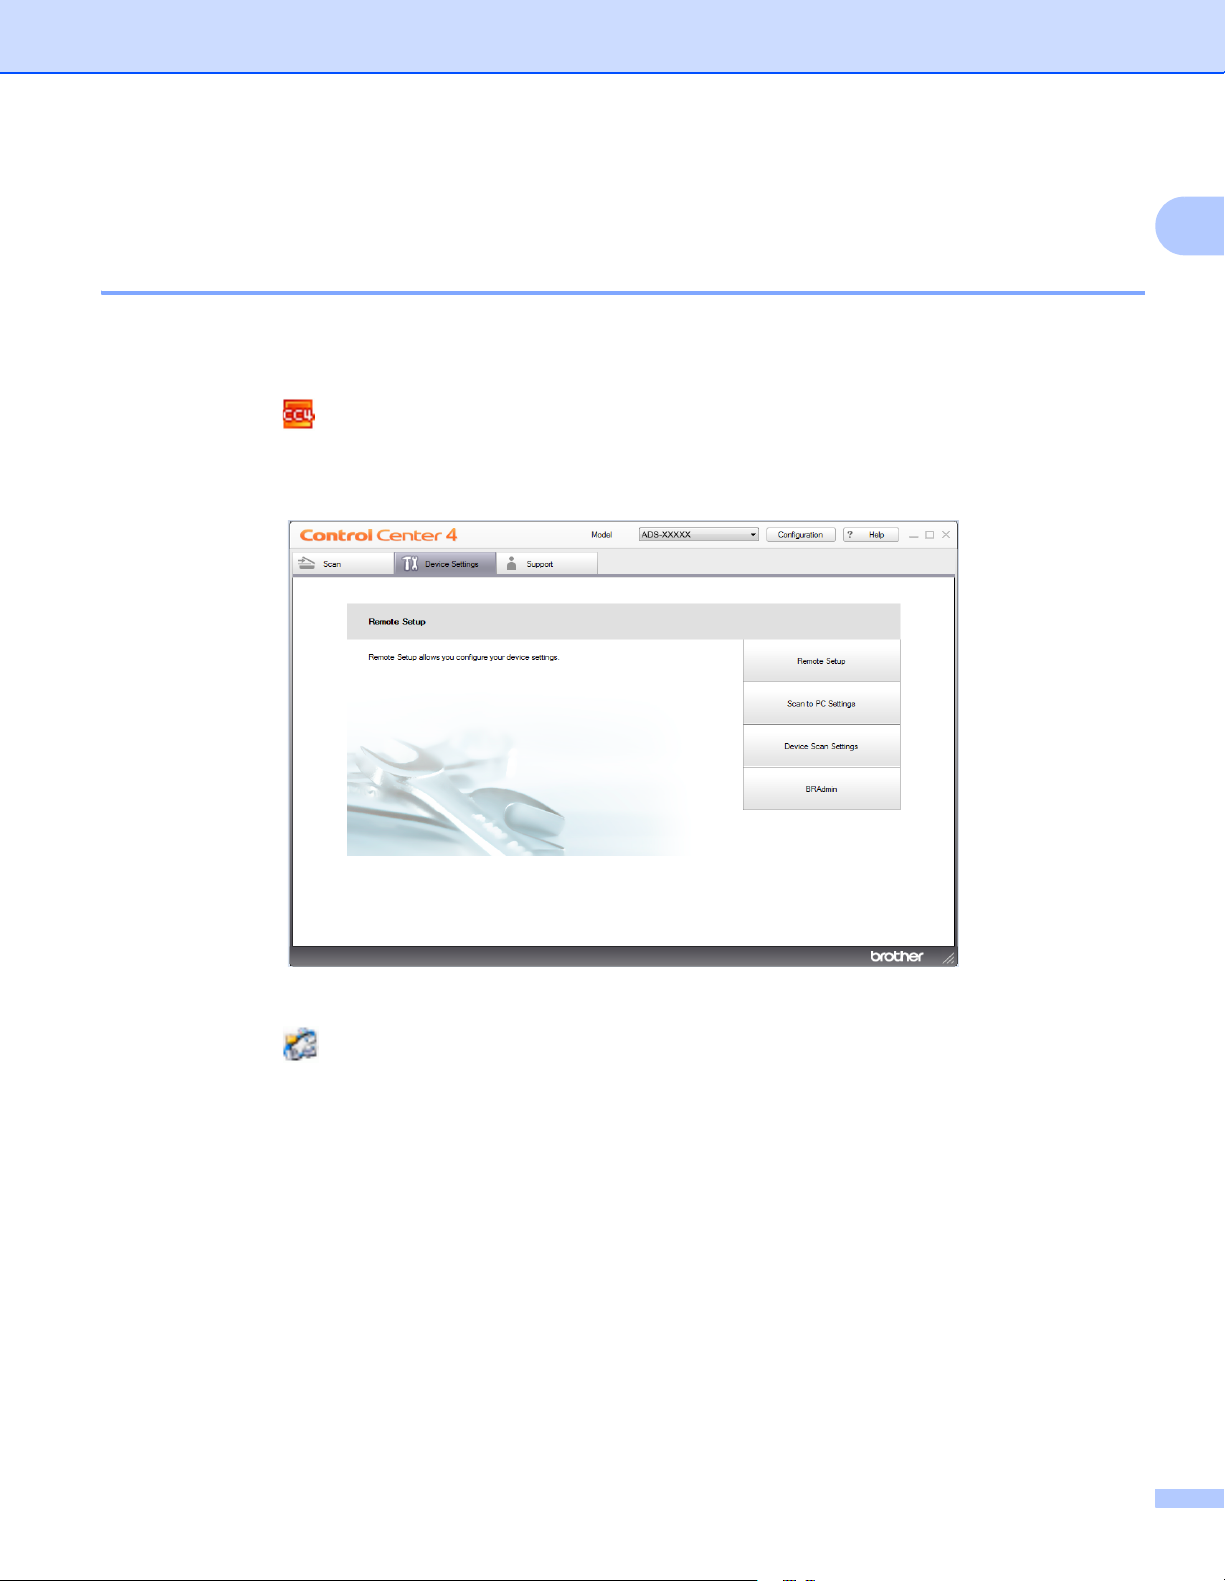
1 Click the (ControlCenter4) icon in the task tray and then select Open from the menu.
The ControlCenter4 window appears.
2 Click the Device Settings tab (the example below uses Home Mode).
®
1
Macintosh
1 Click the (ControlCenter2) icon in the Dock.
The ControlCenter2 window appears.
9
Page 23

General Information
NOTE
2 Click the DEVICE SETTINGS tab.
2 Click the Remote Setup button. The Remote Setup window appears.
For more information about Remote Setup, see Set Up the Brother Machine from Your Computer
on page 167.
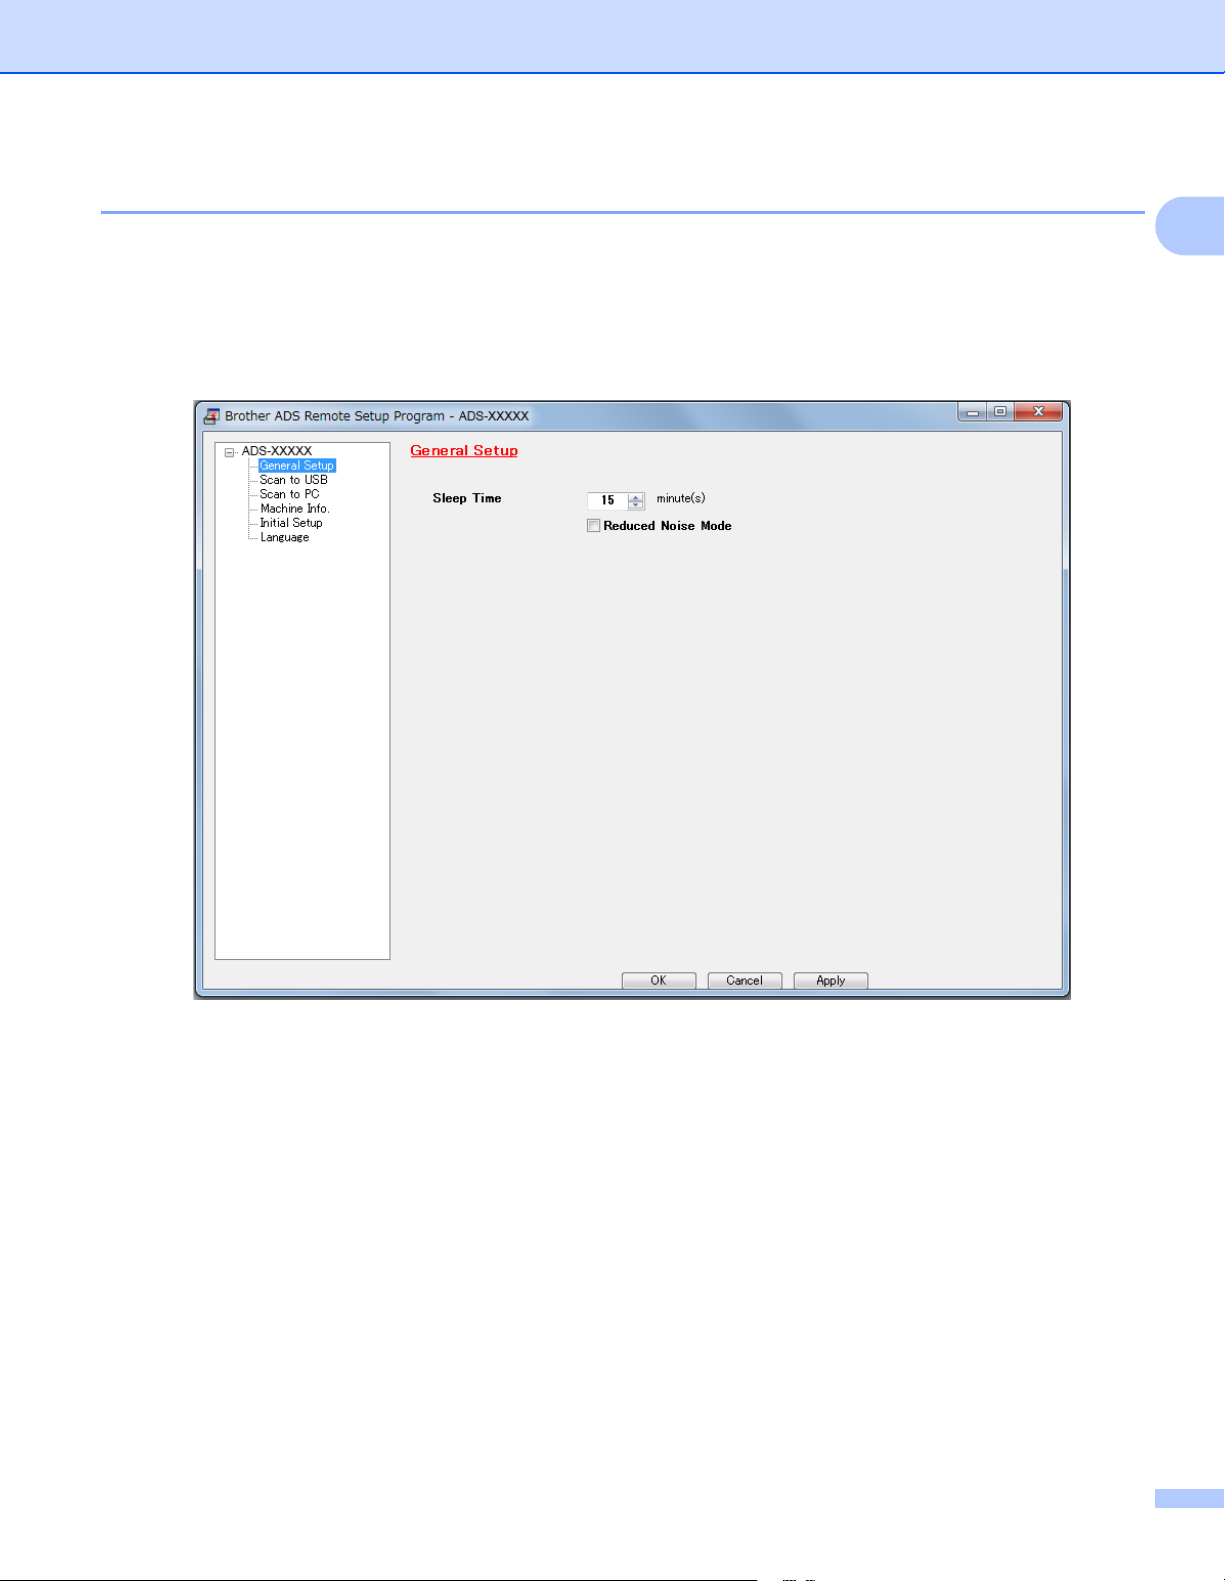
3 Select General Setup in the folder tree (the example below uses Windows
®
).
1
4 Select how long the machine must be idle before it goes into Sleep Mode.
To exit Sleep Mode, do one of the following:
• Press any key.
• Open the Top Cover.
• Load your document.
5 Click OK.
10
Page 24
General Information
Select Your Language 1
1 Start the ControlCenter application.
Windows
1 Click the (ControlCenter4) icon in the task tray and then select Open from the menu.
The ControlCenter4 window appears.
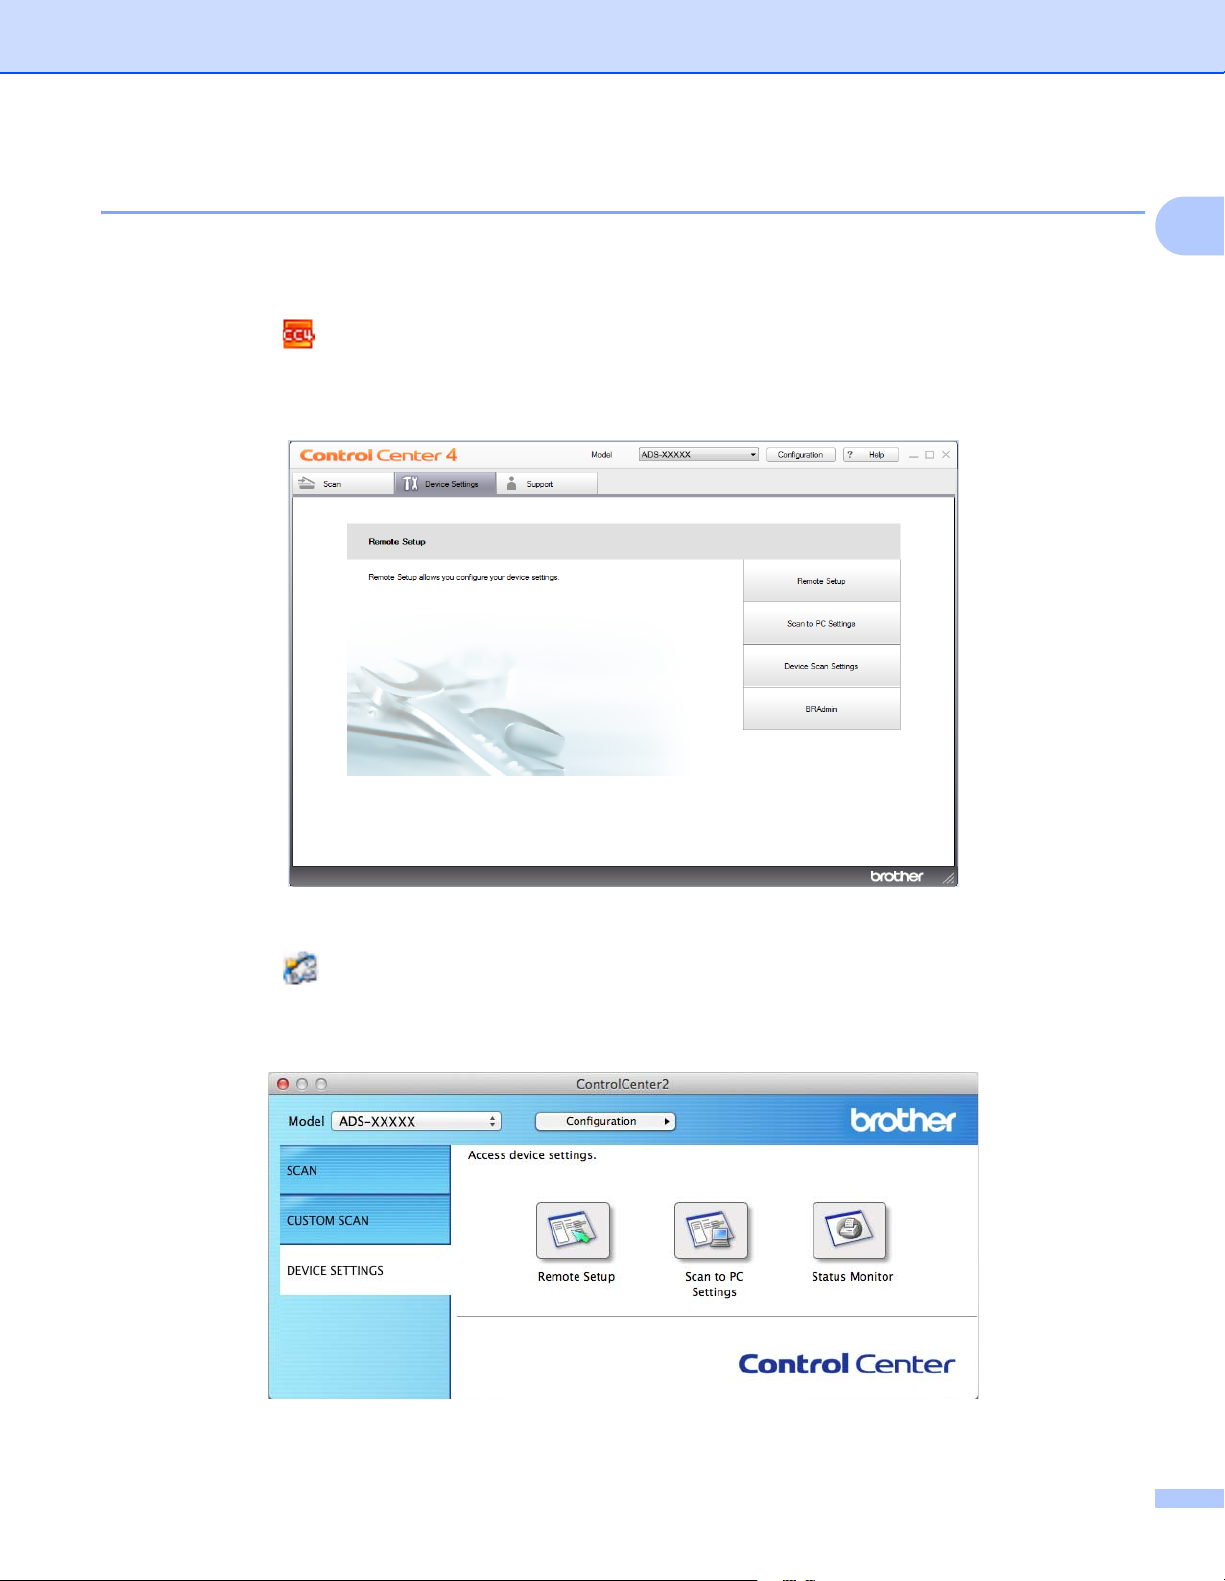
2 Click the Device Settings tab (the example below uses Home Mode).
®
1
Macintosh
1 Click the (ControlCenter2) icon in the Dock.
The ControlCenter2 window appears.
2 Click the DEVICE SETTINGS tab.
2 Click the Remote Setup button. The Remote Setup window appears.
11
Page 25
General Information
NOTE
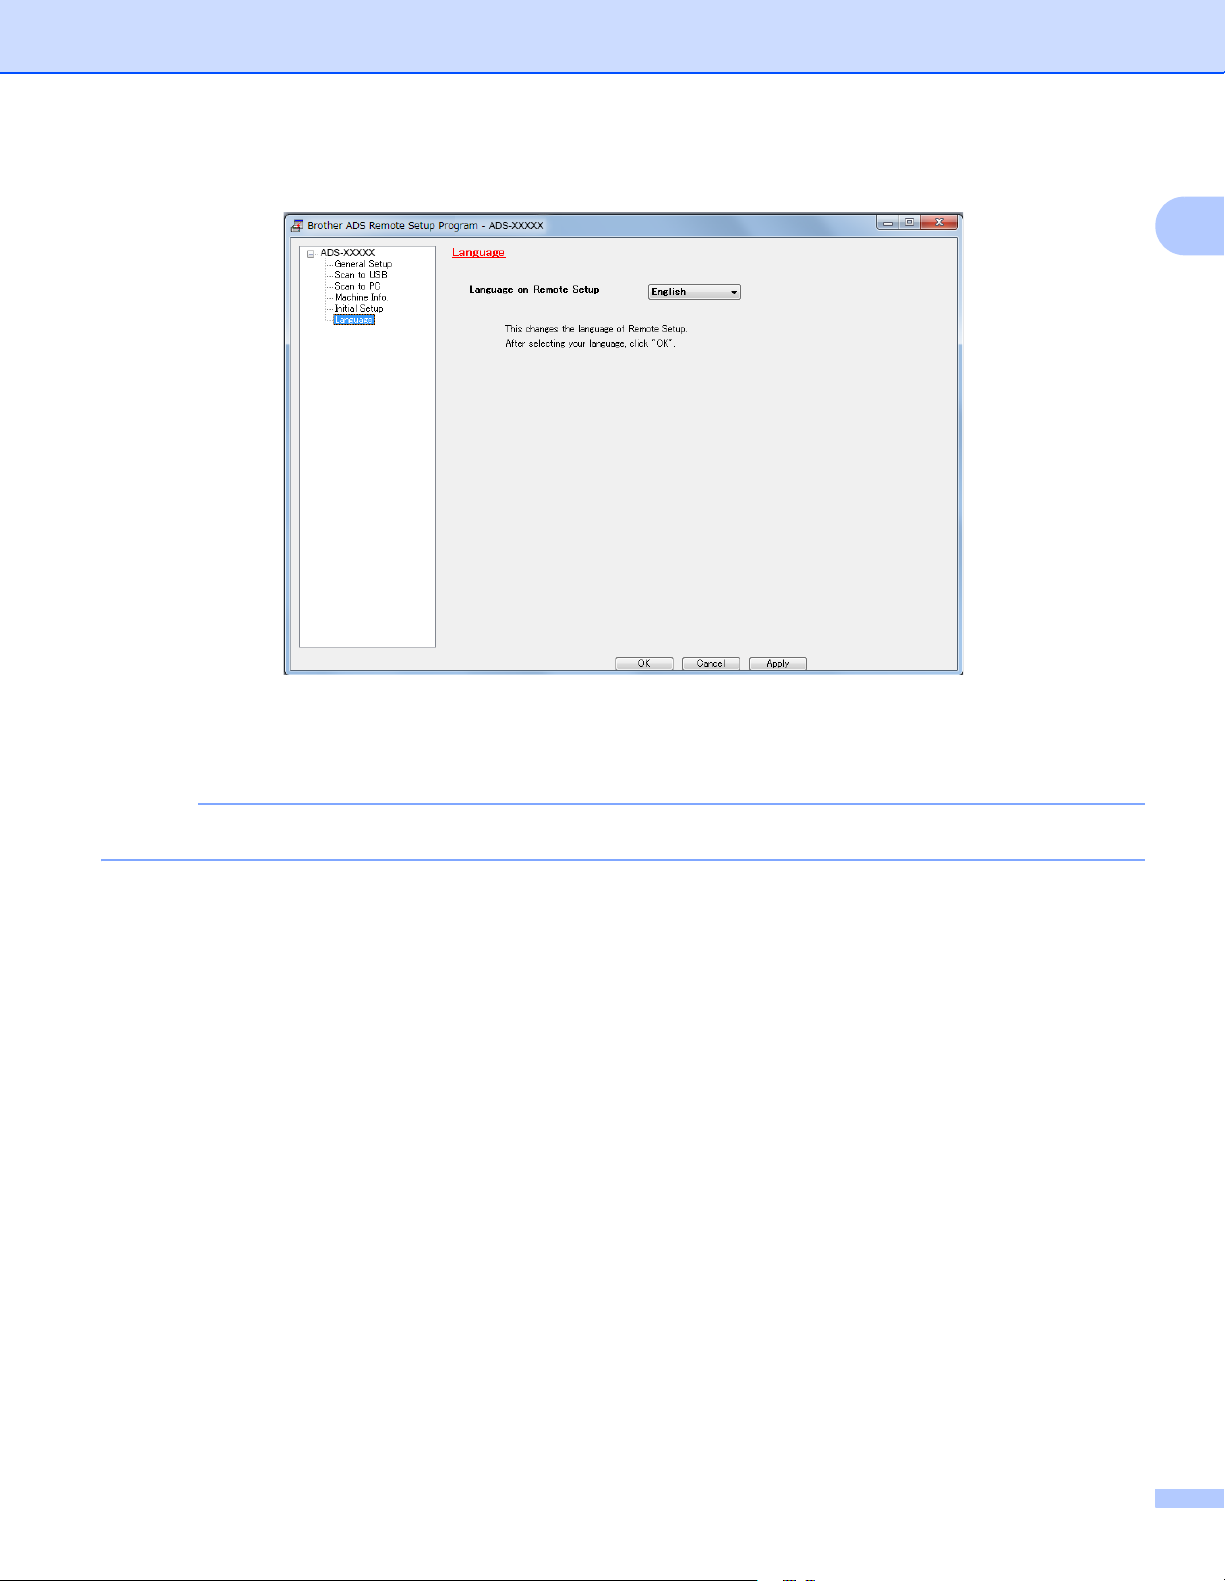
3 Select Language in the folder tree (the example below uses Windows
®
4 Select a language from the Language on Remote Setup drop-down list.
5 Click OK.
).
1
You must close the Remote Setup window to save the language change.
12
Page 26
General Information
Reduced Noise Mode 1
Select the Reduced Noise Mode check box in Remote Setup to reduce acoustic noise while scanning.
Reducing noise may slow scan speed.
1
To start Remote Setup, see Set Up the Brother Machine from Your Computer on page 167 (the example
below uses Windows
®
).
13
Page 27

General Information
General Setup (ADS-2500We) 1
Set the Backlight Brightness 1
You can adjust the brightness of the LCD backlight. If you are having difficulty reading the LCD, try changing
the brightness setting.
1 Press .
2 Press General Setup.
3 Press LCD Settings.
4 Press Backlight.
5 Press Light, Med or Dark.
6 Press .
Set the Dim Timer for the Backlight 1
1
You can set how long the LCD backlight stays on after the Ready Screen is shown.
1 Press .
2 Press General Setup.
3 Press LCD Settings.
4 Press Dim Timer.
5 Press Off, 10Secs, 20Secs or 30Secs.
6 Press .
Set the Home Screen 1
You can set the Home Screen as Clock, Scan 1-2 or Shortcut 1-8.
For examples of these screens, see Touchscreen LCD on page 5.
When the machine is idle or you press , the machine will go back to the Home Screen that you have set.
1 Press .
2 Press General Setup.
3 Press Button Settings.
4 Press Home Button Settings.
5 Press Clock, Scan 1-2 or Shortcut 1-8.
6 Press .
14
Page 28
General Information
Select Your Language 1
1 Press .
2 Press a or b to display Initial Setup.
Press Initial Setup.
3 Press Local Language.
4 Press a or b to display your language.
Press your language.
5 Press .
Memory Storage 1
Your menu settings are stored permanently and, in the event of a power failure, will not be lost. Temporary
settings will be lost. If you have chosen Set New Default for your Scan to USB and Scan to E-mail Server
preferred settings, those settings will not be lost. Also, during a power failure, the machine will retain the date
and time for approximately 24 hours.
1
Beep Volume 1
When the Beep setting is On, the machine will beep when you press a key or make a mistake.
You can choose a range of beep volume levels from Low to High, or choose Off.
1 Press .
2 Press General Setup.
3 Press Volume.
4 Press Beep.
5 Press Low, Med, High or Off.
6 Press .
15
Page 29
General Information
Automatic Daylight Saving Time 1
You can set the machine to change the time automatically for daylight saving time. The time will be adjusted
forward one hour in the spring and adjusted backward one hour in the autumn. Make sure you have set the
correct date and time in the Date & Time settings.
The factory setting is Off, therefore, you will have to change the Automatic Daylight Saving Time setting to
On as follows.
1 Press .
2 Press a or b to display Initial Setup.
3 Press Initial Setup.
4 Press Date & Time.
5 Press Auto Daylight.
6 Press On (or Off).
7 Press .
1
Sleep Mode 1
You can enter how long the machine must remain idle (the maximum setting is 90 Mins and the default
setting is 15 Mins) before it enters Sleep Mode. The timer will restart if any operation is carried out on the
machine. If a wireless network is enabled, the machine will not enter Sleep Mode. To disable the wireless
network, see WLAN Enable/Disable (ADS-2500We only) on page 206.
1 Press .
2 Press General Setup.
3 Press Ecology.
4 Press Sleep Time.
5 Enter the length of time the machine is idle before entering Sleep Mode.
6 Press OK.
7 Press .
16
Page 30
General Information
NOTE
Power Down Mode 1
Power Down Mode is the lowest power consumption mode. If the machine is in Sleep Mode for four hours,
it will go into Power Down Mode automatically. To wake the machine, do one of the following:
Open the Top Cover.
Press .
Load your document.
Multifeed Detection 1
Multifeed is that multiple pages were fed at the same time. When this feature is set to On, the machine will
detect a multifeed error. When this function detects a multifeed, confirm that the data scanned before the
multifeed has been saved, and then start scanning again at the next page or the beginning of the document.
(Scan to USB only)
If you selected JPEG as the file type, your Brother machine will save all data scanned before the multifeed
error occurred.
1 Press .
1
2 Press General Setup.
3 Press a or b to display Multifeed Detection.
4 Press Multifeed Detection.
5 Press On (or Off).
6 Press .
17
Page 31

General Information
Reduced Noise Mode 1
Select the Reduced Noise Mode check box in Remote Setup to reduce acoustic noise while scanning.
Reducing noise may slow scan speed.
To start Remote Setup, see Set Up the Brother Machine from Your Computer on page 167 (the example
below uses Windows
®
).
1
Setting Lock 1
Setting Lock lets you set a password to stop other people from accidentally changing your machine settings.
Make a careful note of your password. If you forget your password, you will have to reset all of the passwords
stored in the machine.
While Setting Lock is On, you cannot change the following settings without a password:
General Setup
Shortcut Settings
Network
Machine Info.
Initial Setup
Save as Shortcut in all Scan-to actions
18
Page 32

General Information
Set New Default and Factory Reset in to USB
Address Book, Set New Default and Factory Reset in to E-mail Server
Set the Password 1
1 Press .
2 Press General Setup.
3 Press a or b to display Security.
4 Press Security.
5 Press Setting Lock.
6 Enter a four-digit number for the password using numbers 0-9.
Press OK.
7 Re-enter your password when the LCD displays Verify:.
Press OK.
8 Press .
Change the Password 1
1
1 Press .
2 Press General Setup.
3 Press a or b to display Security.
4 Press Security.
5 Press Setting Lock.
6 Press Set Password.
7 Enter your existing four-digit password.
Press OK.
8 Enter a new four-digit number as the password.
Press OK.
9 Re-enter your new password when the LCD displays Verify:.
Press OK.
0 Press .
19
Page 33

General Information
Turn Setting Lock On/Off 1
If you enter the wrong password when performing the following procedure, the LCD will display
Wrong Password. Re-enter the correct password.
Turn Setting Lock On 1
1 Press .
2 Press General Setup.
3 Press a or b to display Security.
4 Press Security.
5 Press Setting Lock.
6 Press Lock OffiOn.
7 The LCD prompts you to enter your four-digit password. Enter the password.
Press OK.
1
Turn Setting Lock Off 1
1 Press .
2 The LCD prompts you to enter your four-digit password. Enter the password.
Press OK.
3 Press .
20
Page 34

General Information
NOTE
User Restriction Functions 1
You can set the following two functions:
Secure Function Lock
Secure Function Lock restricts scan functions and Web Connect functions based on user permissions.
Active Directory Authentication
Active Directory Authentication restricts the use of your Brother machine. If Active Directory Authentication
is enabled, the machine’s control panel will be locked. You cannot change the machine’s settings until you
enter a User ID, domain name and password.
You cannot use both Secure Function Lock and Active Directory Authentication at the same time.
The following settings can be available when Secure Function Lock or Active Directory Authentication
is on.
Function available
Active Directory
Restrict
Setting on the LCD ---- -
Remote Setup ---- -
Web Based Management Yes Yes Yes Yes Yes
Scan to PC (From the PC) Yes Yes - Yes Yes
Scan to PC (from the LCD) Yes - - Yes Yes
Scan to FTP Yes - - Yes Yes
Scan to Network Yes - - Yes Yes
Scan to EmailServer Yes - - Yes Yes
Scan to USB Yes - Yes - Yes
Scan to Web Yes - Yes Yes -
iPrint&Scan Yes Yes - Yes Yes
Authentication
Login Logout Scan:
Clear
Secure Function Lock
2
Scan to USB:
Clear
1
Web Connect
Upload:
Clear
1
1
The available functions can be managed depending on the Login ID you set.
2
The function restricts the scan functions other than Scan to USB and Scan to Web.
1 Start Web Based Management.
1 Start your web browser.
21
Page 35

General Information
NOTE
NOTE
2 Type “http://machine’s IP address/” into your browser (where “machine’s IP address” is the
machine’s IP address).
For example:
http://192.168.1.2/
• If you are using a Domain Name System or enable a NetBIOS name, you can enter another name such
as “SharedScanner” instead of the IP address.
• For example:
http://SharedScanner/
If you enable a NetBIOS name, you can also use the node name.
• For example:
http://brwxxxxxxxxxxxx/
You can find the NetBIOS name on the LCD, under Node Name.
• For Macintosh users, access the Web Based Management System by clicking the machine icon on the
Status Monitor screen. For more information, see the Monitor the Machine’s Status from Your Computer
(Macintosh) on page 164.
2 When the Web Based management screen appears, click the Administrator tab.
In the left navigation bar, click User Restriction Function.
1
3 Do one of the following:
Click Secure Function Lock, and then click Submit. Go to 4.
Click Active Directory Authentication, and then click Submit. Go to 5.
4 In the left navigation bar, click Secure Function Lock to configure the settings.
For more information, see Configure Secure Function Lock in the Network User’s Guide.
Once you set Secure Function Lock, a Public Mode icon appears on your machine’s LCD.
Press the Public Mode icon to change the user, based on the settings you changed in Web Based
Management.
If you don’t touch the LCD within one minute, the LCD reverts to Public Mode automatically.
22
Page 36

General Information
NOTE
5 In the left navigation bar, click Active Directory Authentication to configure the settings.
For more information, see Configure Active Directory Authentication in the Network User’s Guide.
Once you set Active Directory Authentication, the following screen appears on your machine’s LCD.
Enter your Brother machine’s Domain, User ID and Password.
Once you connect Active Directory Server, the following screen appears on your machine’s LCD.
1
If you don’t touch the LCD within one minute, the LCD reverts to logoff screen automatically.
23
Page 37

2
NOTE
Document Specifications 2
Acceptable Documents 2
Do not load documents that contain multiple page thicknesses, paper qualities, etc.
Standard Paper Length 2.76 to 14 in. (70 to 355.6 mm)
Width 2.0 to 8.5 in. (51 to 215.9 mm)
Weight 14 to 29 lb (52 to 110 g/m
Thickness 3 to 5 mil (0.08 to 0.12 mm)
To scan thinner documents, use the Carrier Sheet.
Maximum Number of Pages Total thickness of no more than 0.2 in. (5 mm), no more than
50 sheets
Standard Paper Size A4 8.3 × 11.7 in. (210 × 297 mm)
A5 5.8 × 8.3 in. (148 × 210 mm)
A6 4.1 × 5.8 in. (105 × 148 mm)
A7 2.9 × 4.1 in. (74 × 105 mm)
A8 2.0 × 2.9 in. (52 × 74 mm)
B5 7.2 × 10.1 in. (182 × 257 mm)
B6 5.0 × 7.2 in. (128 × 182 mm)
B7 3.6 × 5.0 in. (91 × 128 mm)
B8 2.5 × 3.6 in. (64 × 91 mm)
Legal 8 1/2 × 14 in. (215.9 × 355.6 mm)
Letter 8.5 × 11 in. (215.9 × 279.4 mm)
2
)
2
Thick Paper Length 2.76 to 5.8 in. (70 to 147 mm)
Width 2.0 to 5.8 in. (51 to 147 mm)
Weight 29 to 53 lb (110 to 200 g/m
Thickness 5 to 10 mil (0.12 to 0.25 mm)
Maximum Number of Pages Total thickness of no more than 0.2 in. (5 mm) and no more
than 25 sheets
2
)
24
Page 38

Document Specifications
NOTE
NOTE
NOTE
Long Paper Length 14 to 34.0 in. (355.6 to 863 mm)
Width 2.0 to 8.5 in. (51 to 215.9 mm)
Weight 14 to 29 lb (52 to 110 g/m
2
)
Thickness 3 to 5 mil (0.08 to 0.12 mm)
To scan thinner documents, use the Carrier Sheet.
Maximum Number of Pages 1 page
To scan a document between 14 to 34.0 in. (355.6 to 863 mm), select Long Paper as Scan Size or
Document Size in the settings dialog box.
2
Plastic Card
(Non-embossed
Card Only)
Size (ISO) 3.37 × 2.13 × 0.03 in. (85.6 × 54.0 × 0.76 mm)
Material Plastic (PET)
Type Plastic card such as driver’s license or store card
Thickness 10 to 30 mil (0.25 to 0.76 mm)
Maximum Number of Pages 1 page
A plastic card can be scanned and saved to your computer as an image file. Select the Plastic Card Mode
check box in the settings dialog box.
Carrier Sheet Thickness Total thickness of no more than 0.6 mm (one 0.3 mm document
plus the Carrier Sheet)
Maximum Number of Pages 1 page
A Carrier Sheet can be used when saving the scanned image to your computer. The Carrier Sheet cannot
be used when scanning to a USB flash drive. Select the Carrier Sheet Mode check box in the setting
dialog box.
25
Page 39

Document Specifications
IMPORTANT
Unacceptable Documents 2
Documents with a carbon sheet attached
Documents written in pencil
Documents of uneven thickness, such as envelopes
Documents with large wrinkles or curls
Bent or damaged documents
Documents that use tracing paper
Documents that use coated paper
Photographs (photographic paper)
Documents printed on perforated paper
Documents printed on unusually-shaped paper (not square or rectangle)
Documents with photos, notes, or stickers affixed to them
Documents that use carbonless paper
Documents that use loose-leaf paper or any paper with holes in it
Documents with paper clips or staples
Documents with wet ink
Fabrics, metallic sheets, or overhead projector sheets
Glossy or mirrored media
Documents that exceed recommended thicknesses
2
If you use any of the Unacceptable Documents and damage your Brother machine, it may not be covered
under warranty.
26
Page 40

Document Specifications
CAUTION
IMPORTANT
Carrier Sheet Recommendations 2
Documents with a carbon sheet attached
Documents written in pencil
Documents narrower than 2.0 in. (51 mm) wide
Documents shorter than 2.76 in. (70 mm) long
Pages thinner than 3 mil (0.08 mm)
Documents of uneven thickness, such as envelopes
Documents with large wrinkles or curls
Bent or damaged documents
Documents that use tracing paper
Documents that use coated paper
Photographs (photographic paper)
Documents printed on perforated paper
Documents printed on unusually-shaped paper (not square or rectangle)
Documents with photos, notes, or stickers affixed to them
Documents that use carbonless paper
Documents that use loose-leaf paper or any paper with holes in it
To avoid cutting yourself, do not slide or scrape your hand or fingers along the edge of the Carrier Sheet.
2
• To avoid warping, do not place the Carrier Sheet in direct sunlight or in an area subject to high
temperatures and high humidity. Do not store the Carrier Sheet horizontally with a large object placed on
top of it.
• To avoid damaging the Carrier Sheet, do not bend or pull it. If the Carrier Sheet becomes damaged, it may
not be able to be used correctly for scanning, and should not be used.
27
Page 41

Document Specifications
IMPORTANT
Notes for Using Carrier Sheets 2
To avoid document jams, do not load the Carrier Sheet upside down. Refer to the instructions printed on
the Carrier Sheet itself for more information or see Load Documents on page 30.
To avoid document jams, do not put several small documents into the Carrier Sheet at the same time.
Insert only one document into the Carrier Sheet at a time.
Do not write on the Carrier Sheet, as the writing may be seen in scanned documents. If the Carrier Sheet
becomes dirty, wipe it with a dry cloth.
Do not leave documents in the Carrier Sheet for extended periods of time, as the printing on the
documents may bleed through onto the Carrier Sheet.
If you use any of the Unacceptable Documents and damage your Brother machine, it may not be covered
under warranty.
2
28
Page 42

3
a
Scan Preparation 3
Set Up Your Scanner 3
1 Open the Top Cover a.
3
2 Pull the Output Tray a out of the machine and then unfold the Document Stopper s.
2
1
29
Page 43

Scan Preparation
IMPORTANT
Load Documents 3
The Automatic Document Feeder (ADF) can hold up to 50 pages and feeds each sheet individually. Use 20 lb
2
(80 g/m
) paper and always fan the pages before placing them in the ADF.
• Make sure documents with ink or correction fluid are completely dry.
• DO NOT pull on the document while it is feeding.
• DO NOT use paper that is curled, wrinkled, folded, ripped, stapled, paper clipped, pasted or taped.
• DO NOT use cardboard or fabric.
Standard-size Documents 3
1 Adjust the Document Guides a to fit the width of your document.
a
3
2 Fan the pages several times along both the long edge and the short edge.
30
Page 44

Scan Preparation
3 Align the edges of the pages.
4 Position the pages so that the leading edges are aligned at a slight angle in the feed direction.
3
5 Place your document, face down, top edge first in the ADF between the Guides until you feel it touch
the inside of the machine gently.
31
Page 45

Scan Preparation
NOTE
Business Cards and Plastic Cards 3
1 Adjust the Document Guides a to fit the width of your document.
a
2 Place your card, face down, top edge first, and lengthwise in the ADF between the Guides until you
feel it touch the inside of the machine.
3
• Load only one plastic card at a time.
• Certain types of plastic cards may be scratched when scanned. To prevent damage to the card,
we recommend using the Plastic Card Carrier sheet.
32
Page 46

Scan Preparation
NOTE
Documents Longer than Standard-size 3
Make sure documents with ink or correction fluid are completely dry.
1 Adjust the Document Guides a to fit the width of your document.
a
3
2 Place your document, face down, top edge first in the ADF between the Guides until you feel it touch
the inside of the machine.
• Load only one document at a time.
• Support the document with your hand if the document is longer than the Top Cover.
33
Page 47

Scan Preparation
NOTE
Documents not printed on standard-size paper 3
Make sure documents with ink or correction fluid are completely dry.
1 Fold your document in half and insert it into the Carrier Sheet.
3
Set the document in the center of the Carrier Sheet and align the top of the document with the top of the
Carrier Sheet.
2 Adjust the Document Guides a to fit the width of the Carrier Sheet.
a
34
Page 48

Scan Preparation
NOTE
3 Place the Carrier Sheet in the ADF between the Guides until you feel it touch the inside of the machine.
To reduce the white space in the center of a scanned page, be sure to position the folded edge of the
original document close to the edge of the Carrier Sheet.
3
Documents with Facing Pages 3
Follow the steps of Documents not printed on standard-size paper on page 34.
Receipts, Clippings, Photos, and Other Documents 3
Make sure documents with ink or correction fluid are completely dry.
1 Insert the document into the Carrier Sheet.
35
Page 49

Scan Preparation
NOTE
• Set the document in the center of the Carrier Sheet and align the top of the document with the top of the
Carrier Sheet.
• You can fold the receipt in two places so that it overlaps and then insert it into the Receipt Carrier Sheet
if the receipt is longer than the Receipt Carrier Sheet.
2 Adjust the Document Guides a to fit the width of the Carrier Sheet.
a
3
3 Place the Carrier Sheet in the ADF between the Guides until you feel it touch the inside of the machine.
36
Page 50

4
Prepare Your Network 4
Before Scanning 4
Before scanning, confirm the following:
Make sure you have installed the Brother software (MFL-Pro Suite) by following the steps in the Quick
Setup Guide.
If your Brother machine is connected via cable, make sure that the interface cable is physically secure.
4
37
Page 51

Prepare Your Network
Before Network Scanning (ADS-2500We only) 4
Network License (Windows®) 4
This product includes a computer license for up to two users.
This license supports the installation of the MFL-Pro Suite software including Nuance™ PaperPort™ 12SE
on up to two computers on the network.
Configure Network Scanning for Windows
If you are using a different machine than the one that was originally registered to your computer during the
installation of MFL-Pro Suite software, follow the steps below.
®
1 Click (Brother Utilities) on your desktop, and then click the drop-down list and select your model
name (if not already selected). Click SCAN in the left navigation bar, and then click Scanners and
Cameras.
2 Do one of the following:
Windows
Right-click the Scanner Device icon and choose Properties.
The Network Scanner Properties dialog box appears.
Windows Vista
Click the Properties button.
®
XP
®
, Windows® 7, Windows® 8 and Windows® 8.1
4
4
38
Page 52

Prepare Your Network
NOTE
(Windows Vista®, Windows® 7, Windows® 8 and Windows® 8.1)
If the User Account Control screen appears, do the following:
• For users who have administrator rights: Click Continue or Yes.
• For users who do not have administrator rights: Type the administrator password and click OK or Yes.
4
39
Page 53

Prepare Your Network
3 Click the Network Setting tab and choose the appropriate connection method.
4
Specify your machine by address
Type the IP address of the machine in IP Address, and then click Apply or OK.
Specify your machine by name
1 Type the machine node name in Node Name, or click Browse and choose the machine you want
to use.
2 Click OK.
4
40
Page 54

Prepare Your Network
4 Click the Scan To Button tab and type your computer name in the Display Name field. The machine’s
LCD displays the name you enter. The default setting is your computer name. You can enter any name
that you like.
4
5 To avoid receiving unwanted documents, type a four-digit PIN in the Pin number and
Retype Pin number fields.
If you send scan data to a computer protected by a PIN, the machine’s LCD prompts you to enter the
PIN before the document can be scanned and sent to the computer.
41
Page 55

Prepare Your Network
Configure Network Scanning for Macintosh 4
If you followed the network installation steps in the Quick Setup Guide, your Brother machine was added to
your network automatically. Otherwise, add it to your network using ControlCenter2.
To use the machine as a network scanner, the machine must be configured with a TCP/IP address. You can
set or change the address settings from the Control Panel.
1 Click the (ControlCenter2) icon in the Dock.
The ControlCenter2 window appears.
4
42
Page 56

Prepare Your Network
2 Select Other from the Model pop-up menu.
The Device Selector window appears.
4
3 Click the + button. The setting window appears.
4 Select your machine from the list and then click Add.
43
Page 57

Prepare Your Network
NOTE
NOTE
You can also select your machine by entering the IP address. Click IP and then specify your machine by
IP address.
4
5 Click Add.
While specifying your machine’s IP address, you can also configure Scan Key Setting.
Select the Scan Key Setting check box to set the following options:
• To scan from the machine’s Control Panel to your computer, type your computer’s name in the
Display Name field. The name you type will appear as a destination option on your machine’s LCD.
• To avoid receiving unwanted scanned documents, select the Enable PIN code protection check box,
type your PIN in the PIN code field, and retype it in the Verify field.
44
Page 58

Prepare Your Network
NOTE
Launch the BRAdmin Utility (Windows®) 4
If you have installed BRAdmin Light or BRAdmin Professional 3, the BRAdmin button lets you open the
BRAdmin Light or BRAdmin Professional 3 utility.
The BRAdmin Light utility is designed for initial setup of Brother network-connected devices. It can also
search for Brother products in a TCP/IP environment, view the status and configure basic network settings,
such as the IP address. For information about installing BRAdmin Light from the supplied DVD-ROM, see the
Network User’s Guide.
If you require more advanced machine management, use the latest version of BRAdmin Professional 3 utility
that is available as a download from http://support.brother.com
1 Click the (ControlCenter4) icon in the task tray and then select Open from the menu.
The ControlCenter4 window appears.
2 Click the Device Settings tab.
3 Click BRAdmin. The BRAdmin Light or BRAdmin Professional 3 utility dialog box appears.
If you have installed both BRAdmin Light and BRAdmin Professional, ControlCenter4 will launch BRAdmin
Professional 3.
4
45
Page 59

5
Scan Using Your Computer 5
Change the ControlCenter4 User Interface (Windows®) 5
ControlCenter4 is a software utility that lets you quickly and easily access your frequently-used applications.
Using ControlCenter4 eliminates the need to manually launch specific applications.
ControlCenter4 also controls the settings for the to PC button on your Brother machine. For information
about how to configure the settings for the to PC button on the machine, see Change Scan to PC Settings
(Windows
ControlCenter4 has two operation modes: Home Mode and Advanced Mode. You can change the mode at
any time.
Home Mode
Lets you access your machine’s main functions.
®
) on page 147.
5
5
1
2
3
4
1 Document Type option
Click to select a document type.
2 Custom Settings button
Click to configure scan settings.
3 Scan Size drop-down list
Click to select a scan size.
4 Scan button
Click to start scanning.
5 Image viewer
Click to display a scanned image.
6
7
8
9
10
46
Page 60

Scan Using Your Computer
6 Save button
Click to save a scanned image to a folder on your hard disk in one of the file types shown in the file type
list.
7 Print button
Click to print the scanned document on your printer.
8 Open with an Application button
Click to scan an image directly into your graphics application for image editing.
9 Send E-mail button
Click to scan a document to your default email application.
10 OCR button
Click to scan a document and convert it to text.
Advanced Mode
Gives you more control over the details of your machine’s functions. You can customize one-button scan
actions to meet your scanning needs.
1 2 3 4 5
5
1 Image button
Click to scan a document directly into any graphic viewer/editor application.
2 OCR button
Click to scan a document and convert it to text.
3 E-mail button
Click to scan a document to your default email application.
4 File button
Click to save a scanned image to a folder on your hard disk in one of the file types shown in the file type
list.
5 Print button
Click to print the scanned document on your printer.
47
Page 61

Scan Using Your Computer
NOTE
To change ControlCenter4’s operation mode:
1 Click the (ControlCenter4) icon in the task tray and then select Open from the menu.
The ControlCenter4 window appears.
5
If the icon is not displayed in the task tray,
click (Brother Utilities) on your desktop, and then click the drop-down list and select your model
name (if not already selected). Click SCAN in the left navigation bar, and then click ControlCenter4.
2 Click Configuration and then select Mode Select.
48
Page 62

Scan Using Your Computer
3 Select Home Mode or Advanced Mode, and then click OK.
5
49
Page 63

Scan Using Your Computer
NOTE
NOTE
Scan Using ControlCenter4 in Home Mode (Windows®) 5
There are five scan options: Save, Print, Open with an Application, Send E-mail and OCR.
This section briefly introduces the Scan tab function. For more details of each function, click (Help).
Basic Scan 5
1 Select the Document Type and Scan Size for your document.
2 Click (Scan).
3 Confirm and edit (if needed) the scanned image in the image viewer.
4 Click one of the following:
For (Save)
Select your Destination Folder and other settings. Click OK.
The image will be saved in your chosen folder.
5
For (Print)
Select your printer from the drop-down list, configure the printer settings, and then click OK.
The scanned document will print.
For (Open with an Application)
Select the application from the drop-down list, and then click OK.
The image appears in the application you have chosen.
If you have installed the Evernote application in your computer, you can select Evernote from the dropdown and then click OK to upload the scanned data to Evernote directly.
For (Send E-mail)
Configure the attached file settings, and then click OK.
Your default email application will open and the image will be attached to a new email.
For (OCR)
Configure the OCR settings, and then click OK.
The application you have chosen will open with the converted text data.
To use OCR, Nuance™ PaperPort™ 12SE must be installed on your computer.
50
Page 64

Scan Using Your Computer
NOTE
NOTE
Scan Documents Using the Carrier Sheet 5
1 Load your document into the Carrier Sheet and load the Carrier Sheet into your machine (see Receipts,
Clippings, Photos, and Other Documents on page 35).
Load only one Carrier Sheet at a time.
2 Click the (ControlCenter4) icon in the task tray and then select Open from the menu.
The ControlCenter4 window appears.
If the icon is not displayed in the task tray,
click (Brother Utilities) on your desktop, and then click the drop-down list and select your model
name (if not already selected). Click SCAN in the left navigation bar, and then click ControlCenter4.
3 Click the Scan tab.
5
51
Page 65

Scan Using Your Computer
NOTE
4 Select Custom in the Document Type drop-down list and then click the Custom Settings button.
The Custom Scan Settings dialog box appears.
5 Select the Carrier Sheet Mode check box.
5
6 Configure other settings if needed (see Change Scan Settings (ControlCenter4) (Windows
on page 67).
®
)
7 Select a scan size other than Auto from the Scan Size drop-down list.
8 Click the (Scan) button. The machine starts scanning, and then the Scanning Completed dialog
box appears and display the number of scanned pages. The scanned image appears in the image
viewer.
If the Scanning Completed dialog box does not appear and you want to display the number of scanned
pages, select the Display Scanning Results check box.
9 Do one of the following:
Click the (Save) button to save the scanned data. See Basic Scan on page 50.
Click the (Print) button to print the scanned data. See Basic Scan on page 50.
Click the (Open with an Application) button to open the scanned data in another application.
See Basic Scan on page 50.
Click the (Send E-mail) button to attach the scanned data to an email. See Basic Scan
on page 50.
Click the (OCR) button to scan to an editable text file. See Basic Scan on page 50.
52
Page 66

Scan Using Your Computer
NOTE
Scan Plastic Cards 5
1 Load a plastic card (see Business Cards and Plastic Cards on page 32).
Load only one plastic card at a time.
2 Click the (ControlCenter4) icon in the task tray and then select Open from the menu.
The ControlCenter4 window appears.
3 Click the Scan tab.
5
4 Select Custom in the Document Type drop-down list, and then click the Custom Settings button.
The Custom Scan Settings dialog box appears.
5 Select the Plastic Card Mode check box.
6 Configure other settings if needed (see Change Scan Settings (ControlCenter4) (Windows
on page 67).
®
)
53
Page 67

Scan Using Your Computer
NOTE
NOTE
7 Click the (Scan) button. The machine starts scanning, and then the Scanning Completed dialog
box appears. The scanned image appears in the image viewer.
If the Scanning Completed dialog box does not appear and you want to display the number of scanned
pages, select the Display Scanning Results check box.
8 Do one of the following:
Click the (Save) button to save the scanned data. See Basic Scan on page 50.
Click the (Print) button to to print the scanned data. See Basic Scan on page 50.
Click the (Open with an Application) button to open the scanned data in another application.
See Basic Scan on page 50.
Click the (Send E-mail) button to attach the scanned data to an email. See Basic Scan
on page 50.
Click the (OCR) button to scan to an editable text file. See Basic Scan on page 50.
5
Plastic Card Mode automatically uses these settings:
Resolution: 600 x 600 dpi
Scan Size: 2 in 1 (Auto)
2-sided Scanning: On (Short-edge binding)
Auto Deskew: Off
Multifeed Detection: Off
Auto Image Rotation: Off
Original Layout Scan Result
54
Page 68

Scan Using Your Computer
NOTE
Scan to an Office File 5
Your machine can convert scanned data to a Microsoft® Word file or a Microsoft® PowerPoint® file. The OCR
language is same as the language selected when you installed the ControlCenter4. In order to use this
feature, your Brother machine must be connected to a network that has access to the Internet through
a wireless or Ethernet connection.
1 Load your document (see Standard-size Documents on page 30).
2 Click the (ControlCenter4) icon in the task tray and then select Open from the menu.
The ControlCenter4 window appears.
3 Click the Scan tab.
4 Select the document type.
5 Change the size of your document, if needed.
5
6 Configure other settings if needed (see Change Scan Settings (ControlCenter4) (Windows
on page 67).
®
)
7 Click the (Scan) button. The machine starts scanning, and then the Scanning Completed dialog
box appears and display the number of scanned pages. The scanned image appears in the image
viewer.
If the Scanning Completed dialog box does not appear and you want to display the number of scanned
pages, select the Display Scanning Results check box.
8 Click (Save) or (Send E-mail). The setting dialog box appears.
55
Page 69

Scan Using Your Computer
NOTE
9 Click the File Type drop-down list, and then select the Microsoft Office Word (*.docx) or Microsoft
Office PowerPoint (*.pptx) option.
0 Click OK. If a message dialog box regarding the Internet connection appears, read the information and
click OK.
Scan Business Cards 5
1 Load your document (see Business Cards and Plastic Cards on page 32).
2 Click the (ControlCenter4) icon in the task tray and then select Open from the menu.
The ControlCenter4 window appears.
3 Click the Scan tab.
5
4 Select the document type.
5 Select Business Card from the Scan Size drop-down list.
6 Configure other settings if needed (see Change Scan Settings (ControlCenter4) (Windows
on page 67).
®
)
7 Click the (Scan) button. The machine starts scanning, and then the Scanning Completed dialog
box appears and display the number of scanned pages. The scanned image appears in the image
viewer.
If the Scanning Completed dialog box does not appear and you want to display the number of scanned
pages, select the Display Scanning Results check box.
56
Page 70

Scan Using Your Computer
8 Click (Open with an Application). The Open with an Application dialog box appears.
9 Select BizCard MFC Application from the Target Application drop-down list, and then click OK. The
scanned data will be opened in the BizCard 6 application.
0 Edit and save the scanned date using BizCard 6.
5
57
Page 71

Scan Using Your Computer
NOTE
Scan Using ControlCenter4 in Advanced Mode (Windows®) 5
There are five scan options available in Advanced Mode: Image, OCR, E-mail, File and Print.
This section briefly introduces the Scan tab function. For details of each function, click (Help).
Basic Scan 5
1 Click the Scan tab.
2 Click one of the following:
For (Image)
Select the application from the drop-down list and click Scan.
The image appears in the application you have chosen.
For (OCR)
Configure the OCR settings and click Scan.
The application you have chosen will open with the converted text data.
For (E-mail)
Configure the attached file settings and click Scan.
Your default email application will open and the image will be attached to a new email.
For (File)
Select your Scan Location and other settings. Click Scan.
The image will be saved in your chosen folder.
For (Print)
Select your printer from the drop-down list, configure the printer settings, and then click Scan.
5
The scanned document will print.
• (For Image and OCR)
If you have installed the Evernote application in your computer, you can select Evernote from the dropdown list and then click OK to upload the scanned data to Evernote directly.
• (For OCR)
Nuance™ PaperPort™ 12SE must be installed on your computer.
58
Page 72

Scan Using Your Computer
NOTE
Change a Scan Button’s Default Settings 5
1 Right-click the button that you want to configure and click Button settings. The settings dialog box
appears.
2 Choose the settings for File Type, Resolution, Scan Type, Document Size, Brightness, Contrast,
Continuous Scanning and 2-sided Scanning as needed.
3 Click OK. The new settings will be used as the default settings.
Scan Using the Carrier Sheet 5
1 Load your document into the Carrier Sheet and load the Carrier Sheet into your machine (see Receipts,
Clippings, Photos, and Other Documents on page 35).
Load only one Carrier Sheet at a time.
2 Click the (ControlCenter4) icon in the task tray and then select Open from the menu.
The ControlCenter4 window appears.
5
3 Select the Scan tab.
59
Page 73

Scan Using Your Computer
NOTE
NOTE
4 Click the button you want to use ( (Image), (OCR), (E-mail), (File) or (Print)). The
setting dialog box will appear (the example below uses Image).
5
5 Check the Carrier Sheet Mode check box.
6 Select a document size other than Auto from the Document Size drop-down list.
7 Change other settings if needed (see Change Scan Settings (ControlCenter4) (Windows
®
) on page 67).
8 Click the Scan button.
The machine starts scanning.
Check the Don’t show me again. check box to not show the setting dialog box again.
Scan Plastic Cards 5
1 Load a plastic card (see Business Cards and Plastic Cards on page 32).
Load only one plastic card at a time.
2 Click the (ControlCenter4) icon in the task tray and then select Open from the menu.
The ControlCenter4 window appears.
60
Page 74

Scan Using Your Computer
3 Click the Scan tab.
4 Click the button you want to use ( (Image), (OCR), (E-mail), (File), or (Print)). The
setting dialog box appears (the example below uses Image).
5
5 Select the Plastic Card Mode check box.
6 Change other settings if needed (see Change Scan Settings (ControlCenter4) (Windows
7 Click the Scan button.
The machine starts scanning.
®
) on page 67).
61
Page 75

Scan Using Your Computer
NOTE
• Select the Don’t show me again. check box not to show the setting dialog box again.
• Plastic Card Mode automatically uses these settings:
Resolution: 600 x 600 dpi
Document Size: 2 in 1 (Auto)
2-sided Scanning: On (Short-edge binding)
Auto Deskew: Off
Auto Image Rotation: Off
Multifeed Detection: Off
Original Layout Scan Result
Scan to an Office File 5
Your machine can convert scanned data to a Microsoft® Word file or a Microsoft® PowerPoint® file on your
selected Folder or SharePoint. The OCR language is same as the language selected when you installed the
ControlCenter4. In order to use this feature, your Brother machine must be connected to a network that has
access to the Internet through a wireless or Ethernet connection.
1 Load your document (see Standard-size Documents on page 30).
2 Click the (ControlCenter4) icon in the task tray and then select Open from the menu.
The ControlCenter4 window appears.
5
3 Click the Scan tab.
62
Page 76

Scan Using Your Computer
4 Click (E-mail) or (File). The setting dialog box appears (the example below uses E-mail).
5 Click the File Type drop-down list, and then select the Microsoft Office Word (*.docx) or Microsoft
Office PowerPoint (*.pptx) option.
5
6 Change other settings if needed (see Change Scan Settings (ControlCenter4) (Windows
®
) on page 67).
7 Click Scan. If a message dialog box regarding the Internet connection appears, read the information and
click OK.
Scan Business Cards 5
1 Load your document (see Business Cards and Plastic Cards on page 32).
2 Click the (ControlCenter4) icon in the task tray and then select Open from the menu.
The ControlCenter4 window appears.
3 Click the Scan tab.
63
Page 77

Scan Using Your Computer
4 Click (Image). The setting dialog box appears.
5
5 Select BizCard MFC Application from the Target Application drop-down list.
6 Change other settings if needed (see Change Scan Settings (ControlCenter4) (Windows
7 Click Scan. The scanned data will be opened in the BizCard 6 application.
8 Edit and save the scanned date using BizCard 6.
®
) on page 67).
64
Page 78

Scan Using Your Computer
NOTE
Create a Custom Tab (ControlCenter4 Advanced Mode) (Windows®) 5
You can create up to three customized tabs that include up to five customized buttons with your preferred
settings.
Create a Custom Tab 5
1 Click the (ControlCenter4) icon in the task tray and then select Open from the menu.
The ControlCenter4 window appears.
5
2 Click Configuration and then select Create custom tab. You can also create a custom tab by right-
clicking the tab area and selecting Create custom tab. A custom tab will be created.
3 If you want to change the name of custom tab, right-click the custom tab and select
Rename custom tab.
You can also change the name of the custom tab by clicking Configuration and then
Rename custom tab.
65
Page 79

Scan Using Your Computer
NOTE
NOTE
Create a Custom Button in a Custom Tab 5
1 Create a Custom tab. See Create a Custom Tab on page 65.
2 Right-click on the new Custom tab, and select Create custom button. Select a button you want to
create from the menu. The settings dialog box appears.
5
You can also copy a custom button by selecting Copy custom button from the menu that appears when
you right-click on the Custom tab.
3 Type the button name and change the settings if needed. Click OK.
(The setting options vary depending on the button you creat.)
You can change or remove the tab, button, or settings you created. Click Configuration and continue as
prompted.
66
Page 80

Scan Using Your Computer
NOTE
Change Scan Settings (ControlCenter4) (Windows®) 5
The following settings can be changed.
Setting Description Applicable Feature
Image OCR E-mail File Print
File Type Select the file type you want to use for the scanned data.
• To save the document as a password-protected
PDF, select Secure PDF (*.pdf) from the File Type
drop-down list, click the (Set PDF Password)
button, and enter the password (Image, E-mail and
File only).
• Searchable PDF is a file format that includes the text
data layer over a scanned image. This layer allows
you to search the text on the image data. The OCR
language setting must be set to match the language
you want to make the searchable PDF for.
• To save the document as a searchable PDF, select
Searchable PDF (*.pdf) from the File Type
drop-down list.
• To save the document as a searchable PDF,
Nuance™ PaperPort™ 12SE must be installed on
your computer.
• To save the document as a high compression PDF,
select 300x300dpi from the Resolution
drop-down list, High Compression PDF (*.pdf)
from the File Type drop-down list and True Gray or
24bit Color from the Scan Type drop-down list.
• To save Microsoft Office Word (*.docx) or Microsoft
Office PowerPoint (*.pptx), select E-mail or File.
Target
Application
OCR
Language
Printer Name Select the printer you want to use to print the scanned
File Name Click the Change button for Image, OCR or E-mail.
Print Options Click the Print Options button to configure the printer
Show Save
As Window
Select the destination application including Nuance™
PaperPort™ 12SE, Presto! BizCard 6 and Evernote
from the drop-down list.
Set to match the language of the scanned document’s
text.
data.
Enter a prefix for the file name if needed. Click Insert
Date in File Name if needed.
settings.
If you want to specify the destination of the scanned
image every time you scan, select the
Show Save As Window check box.
YesYesYesYes-
Yes Yes - - -
-Yes---
----Yes
YesYesYesYes-
----Yes
---Yes-
5
67
Page 81

Scan Using Your Computer
NOTE
Setting Description Applicable Feature
Image OCR E-mail File Print
Destination
File Path
Click the Change button and then the folder icon to
change the folder you would like to save your scanned
YesYesYes- -
document to.
Scan
Location
Select one of the Scan Locations:
• Folder
---Yes-
Click the folder icon and browse to the folder you
would like to save your scanned document to.
Check Show Folder to automatically display
the destination folder after scanning.
• SharePoint
Write the URL address you would like to save your
scanned document to. Click Connection Test to
confirm the destination.
File size Adjust the File size by moving the slider to the right or
Yes- YesYes-
left.
5
File size can be adjusted depending on your
selected File Type.
Resolution Select a scanning resolution from the Resolution drop-
down list. Higher resolutions take more memory and
transfer time, but produce a finer scanned image.
Scan Type Select from several color depth options for scanned
images.
Black & White
Use for text or line art images.
Gray (Error Diffusion)
Use for photographic images or graphics. (Error
Diffusion is a method for creating simulated gray images
without using true gray dots. Black dots are put in a
specific pattern to give a gray appearance.)
True Gray
Use for photographic images or graphics. This mode is
more exact due to using up to 256 shades of gray.
24bit Color
Uses up to 16.8 million colors to scan the image.
Although using 24bit Color creates an image with the
most accurate color reproduction, it requires the most
memory and has the longest transfer time.
Auto
Automatically selects suitable colors for your
document.
1
YesYesYesYesYes
YesYesYesYesYes
1
Depending upon the condition of the original document, this function may not work properly.
68
Page 82

Scan Using Your Computer
NOTE
Setting Description Applicable Feature
Image OCR E-mail File Print
Document
Size
Document size is set to Auto by default. You can scan
documents of any size without making any adjustments
to Document Size.
1
For faster scan speeds, you can
Yes Yes Yes Yes Yes
select the exact size of your document from the
Document Size drop-down list.
• If you select a 1 to 2 document size, the scanned
image will be divided into two documents that are
half the size of the setting. If you select 1to2(A4),
the scanned image will be divided into two A5-size
documents.
• To do 1 to 2 scanning, unselect the
Auto Image Rotation check box in the
Advanced Settings dialog box.
• If you select a 2 in 1 document size, two scanned
images will be combined into one document.
• You can select Long Paper when you configure the
settings as following:
• Auto Deskew: Off
5
• 2-sided Scanning: Off
• Each Long Paper option can scan a large document
up to following:
Long Paper (Normal Width) 8 1/2 in (215.9 mm):
81/2× 34.0 in. (215.9 × 863.0 mm)
Long Paper (Narrow Width) 4 1/4 in (107.9 mm):
41/4× 34.0 in. (107.9 × 863.0 mm)
Brightness Adjust the setting (-50 to 50) to get the best image. The
default value of 0 represents an average and is usually
suitable for most images. You can set the Brightness
level by dragging the slider to the right or left to lighten
or darken the image. You can also enter a value in the
box to set the level. If the scanned image is too light, set
a lower Brightness level and scan the document again.
If the image is too dark, set a higher Brightness level
and scan the document again.
1
Depending upon the condition of the original document, this function may not work properly.
Yes Yes Yes Yes Yes
69
Page 83

Scan Using Your Computer
NOTE
NOTE
Setting Description Applicable Feature
Image OCR E-mail File Print
Contrast Adjust the setting (-50 to 50) to get the best image. The
Yes Yes Yes Yes Yes
default value of 0 represents an average and is usually
suitable for most images. You can increase or decrease
the contrast level by moving the slider to the right or left.
An increase emphasizes dark and light areas of the
image, while a decrease reveals more details in gray
areas. You can also enter a value in the box to set the
Contrast.
Continuous
Scanning
2-sided
Scanning
The Contrast setting is only available when setting
Scan Type to Auto, Gray (Error Diffusion),
True Gray or 24bit Color.
Scan multiple pages. After the page is scanned, you can
select to continue scanning or finish. Using this method,
you can scan more pages than the maximum capacity
of the ADF.
If you select this box, the machine scans both sides
of the document. When using the automatic 2-sided
(duplex) scan feature, you must select
Long-edge binding or Short-edge binding depending
on the layout of your original to make sure that the data
file created appears correctly in the scanned document.
The 2-sided (duplex) scanning feature is available
with lengths up to Legal size.
5
Yes Yes Yes Yes Yes
Yes Yes Yes Yes Yes
70
Page 84

Scan Using Your Computer
NOTE
NOTE
Setting Description Applicable Feature
Image OCR E-mail File Print
Carrier Sheet
Mode
Scan the following document types using the Carrier
Sheet. For this mode, you can select any setting other
Yes Yes Yes Yes Yes
than Auto from the Document Size drop-down list.
Large-sized Documents (A3, B4 and Ledger)
Fold the document in half and insert it in the Carrier
Sheet for 2-sided (duplex) scanning, then both front
and back pages will be combined into a single page.
Select 2 in 1(A4) for an A3 document, 2 in 1(B5) for
a B4 document or 2 in 1(Letter) for a Ledger
document from the Document Size drop-down list.
Important documents (photos, contracts)
Thin paper (receipts)
Irregular-shaped paper (clippings)
• Load only one Carrier Sheet at a time.
• Set the document in the center of the Carrier Sheet
and align the top of the document with the top of the
Carrier Sheet.
Plastic Card
Mode
Scan cards, such as driver’s licenses or insurance
cards, using these automatic settings:
Yes Yes Yes Yes Yes
Resolution: 600x600dpi
5
Document Size: 2 in 1 (Auto)
2-sided Scanning: On (Short-edge binding)
Auto Deskew: Off
Auto Image Rotation: Off
Multifeed Detection: Off
• If you want to scan a plastic card with different
settings, set Plastic Card Mode to off and
Resolution to 600 dpi.
• Load only one plastic card at a time.
Default Restore all settings to their factory default values. Yes Yes Yes Yes Yes
71
Page 85

Scan Using Your Computer
You can configure more settings in the Advanced Settings dialog box. Click the Advanced Settings button.
Setting Description Applicable Feature
Image OCR E-mail File Print
Auto Deskew Corrects the skew (within 5 degrees) of the scanned
Auto Image
Rotation
Bleed
Through
Prevention/
Remove
1
data.
Changes the direction of the document based on the
text orientation.
1
Prevents bleedthrough on a two-sided document, and
also allows you to remove the base color of documents
such as newspapers to make the scanned data more
recognizable.
1
Background
Color
Skip Blank
Page
Multifeed
Detection
Removes blank pages of the document from the
scanning results.
1
Uses a ultrasonic sensor to detect when a multifeed has
occurred. When this function detects a multifeed,
confirm that the data scanned before the multifeed has
been saved, and then start scanning again at the next
page or the beginning of the document.
Display
Scanning
Shows the numbers of total pages saved and blank
pages skipped on your computer screen.
Results
Yes Yes Yes Yes Yes
Yes Yes Yes Yes Yes
Yes Yes Yes Yes Yes
Yes Yes Yes Yes Yes
Yes Yes Yes Yes Yes
Yes Yes Yes Yes Yes
5
1
Depending upon the condition of the original document, this function may not work properly.
72
Page 86

Scan Using Your Computer
Scan Using ControlCenter2 (Macintosh) 5
ControlCenter2 is a software utility that lets you quickly and easily access your frequently-used applications.
Using ControlCenter2 eliminates the need to manually launch specific applications.
There are four scan options: Scan to Image, Scan to OCR, Scan to E-mail and Scan to File.
Image (Default: Apple Preview)
Lets you scan a page directly into any graphic viewer/editor application. You can choose the destination
application, such as Adobe
®
Photoshop® or any kind of image editing application on your computer.
OCR (Default: Apple TextEdit)
Lets you scan a page or document, automatically run the OCR application and put text (not a graphic
image) into a word processing application. You can choose the target word processing application, such
as Microsoft
®
Word or any word processing application on your computer. You must install Presto!
PageManager on your computer. For installation information, see Scan Using Presto! PageManager or
TWAIN Applications (Macintosh) on page 109.
E-mail (Default: your default email software)
Lets you scan a page or document directly into an email application as a standard attachment. You can
choose the file type and resolution for the attachment.
File
Lets you scan directly to a disk file. You can change the file type and destination folder, as needed.
ControlCenter2 gives you the ability to configure the hardware to PC button on your machine and the
ControlCenter2 software button for each scan feature. To configure the hardware to PC button on your
machine choose the Device Button tab in the configuration menu for each of the SCAN buttons. To configure
the software button in ControlCenter2 choose the Software Button tab in the configuration menu for each of
the SCAN buttons.
To start ControlCenter2, click the (ControlCenter2) icon in the Dock.
5
If the (ControlCenter2) icon is not displayed in the Dock, in the Finder menu bar, click Go >
Applications > Brother, and then double-click the (ControlCenter2) icon.
The (ControlCenter2) icon appears in the Dock.
73
Page 87

Scan Using Your Computer
NOTE
Scan to Image 5
The Scan to Image feature lets you scan an image directly into your graphics application for image editing.
This example uses the Apple Preview application.
1 Click the SCAN tab.
2 Click (Image).
The Scan to Image dialog box appears.
5
3 Configure the scan settings, if needed.
To scan a 2-sided document, select the 2-sided Scanning check box and choose
Long-edge binding or Short-edge binding.
To change the application that you want to use, choose the appropriate application from the
Target Application pop-up menu. You can add an application to the list by clicking Add. If you want
to delete an application, click Delete.
4 Click Start Scanning.
Your default application will start and display the image.
If you choose Secure PDF (*.pdf) from the File Type list, the Set PDF Password dialog box appears.
Enter your password in the Password and Re-type Password boxes, and then click OK. You can also
choose Secure PDF (*.pdf) for Scan to E-mail and Scan to File.
74
Page 88

Scan Using Your Computer
NOTE
Scan to OCR 5
The Scan to OCR feature lets you convert the graphic page image data into text that can be edited by any
word processing application. You can change the default word processing application.
Presto! PageManager must be installed on your computer.
1 Click the SCAN tab.
2 Click (OCR).
The Scan to OCR dialog box appears.
5
3 Configure the scan settings, if needed.
To scan a 2-sided document, select the 2-sided Scanning check box and choose
Long-edge binding or Short-edge binding.
To change the word processing application that you want to use, choose the appropriate application
from the Target Application pop-up menu. You can add an application to the list by clicking Add. If
you want to delete an application, click Delete.
4 Click Start Scanning.
Your default word processing application will start and display the converted text data.
75
Page 89

Scan Using Your Computer
NOTE
Scan to E-mail 5
The Scan to E-mail feature lets you scan a document to your default email application so you can send the
scanned document as an attachment.
1 Click the SCAN tab.
2 Click (E-mail).
The Scan to E-mail dialog box appears.
5
3 Configure the scan settings, if needed.
To scan a 2-sided document, select the 2-sided Scanning check box and choose
Long-edge binding or Short-edge binding.
To change the email application that you want to use, choose the appropriate application from the
E-mail Application pop-up menu. You can add an application to the list by clicking Add
1
. If you want
to delete an application, click Delete.
1
When you first start ControlCenter2, a default list of compatible email applications appears in the pop-up menu. If you are having trouble
using a custom application with ControlCenter2, you should choose an application from the list.
4 Click Start Scanning.
Your default email application will start and the image will be attached to a new email.
The Scan to E-mail feature does not support Webmail services. Use the Scan to Image or Scan to File
feature to scan a document or picture, and then attach the file of the scanned data to message.
76
Page 90

Scan Using Your Computer
Scan to File 5
The Scan to File feature lets you scan an image to a folder on your hard disk in a supported file format. This
feature allows you to easily archive your paper documents.
1 Click the SCAN tab.
2 Click (File).
The Scan to File dialog box appears.
5
3 Configure the scan settings, if needed.
To scan a 2-sided document, select the 2-sided Scanning check box and choose
Long-edge binding or Short-edge binding.
To change the file name, enter the file name you want to use for the document (up to 100 characters)
in the File Name box. The file name will be the file name you entered plus the current date and a
sequential number.
Choose the file type for the saved image from the File Type pop-up menu. You can save the file to
the default folder, or choose your preferred folder by clicking Browse.
To show where the scanned image is saved when scanning is finished, select the Show Folder
check box. If you want to specify the destination of the scanned image every time, select the
Show Save As window check box.
4 Click Start Scanning.
The image will be saved in the folder you have chosen.
77
Page 91

Scan Using Your Computer
NOTE
NOTE
Change a Scan Button’s Default Settings 5
1 Hold down the Control key on your keyboard, and then click the ControlCenter2 scan button that you
want to change. When the menu appears, click Software Button or Device Button. The settings dialog
box appears.
2 Choose the settings for File Type, Scan Type, Document Size, Brightness, Contrast,
2-sided Scanning and Continuous Scanning as needed.
3 Click OK. The new settings will be used as the default settings.
Scan Specific and Irregular Sized Documents Using the Carrier Sheet 5
1 Load the Carrier Sheet (see Receipts, Clippings, Photos, and Other Documents on page 35).
Load only one Carrier Sheet at a time.
2 Click the (ControlCenter2) icon in the Dock.
The ControlCenter2 window appears.
5
If the (ControlCenter2) icon is not displayed in the Dock, in the Finder menu bar,
click Go > Applications > Brother, and then double-click the (ControlCenter2) icon.
The (ControlCenter2) icon appears in the Dock.
78
Page 92

Scan Using Your Computer
3 Click the SCAN tab, and then click the button for the Scan-to action you want to change (Image, OCR,
E-mail, or File). The settings dialog box appears (the example below uses Image).
5
4 Select the Carrier Sheet Mode check box.
5 Select a document size other than Auto from the Document Size pop-up menu.
6 Change other settings if needed (see Change Scan Settings (ControlCenter2) (Macintosh) on page 89).
7 Click Start Scanning.
Your default application will start and display the image.
79
Page 93

Scan Using Your Computer
NOTE
Scan Plastic Cards 5
1 Load a plastic card (see Business Cards and Plastic Cards on page 32).
Load only one plastic card at a time.
2 Click the (ControlCenter2) icon in the Dock.
The ControlCenter2 window appears.
5
3 Click the SCAN tab, and then click the button for the Scan-to action you want to change (Image, OCR,
E-mail, or File). The settings dialog box appears (the example below uses Image).
4 Click the Plastic Card Mode check box.
80
Page 94

Scan Using Your Computer
NOTE
5 Change other settings if needed (see Change Scan Settings (ControlCenter2) (Macintosh) on page 89).
6 Click Start Scanning.
Your default application will start and display the image.
• Click the Don’t show me again. check box not to show the setting dialog box again.
• Plastic Card Mode automatically uses these settings:
Resolution: 600 x 600 dpi
Document Size: 2 in 1 (Auto)
2-sided Scanning: On (Short-edge binding)
Auto Deskew: On
Auto Image Rotation: Off
Multifeed Detection: Off
Original Layout Scan Result
5
81
Page 95

Scan Using Your Computer
Scan to an Office File 5
Your machine can convert scanned data to a Microsoft® Word file or a Microsoft® PowerPoint® file. In order
to use this feature, your Brother machine must be connected to a network that has access to the Internet
through a wireless or Ethernet connection.
1 Load your document (see Standard-size Documents on page 30).
2 Click the (ControlCenter2) icon in the Dock.
The ControlCenter2 window appears.
5
3 Click the SCAN tab.
4 Click the E-mail or File button. The settings dialog box appears (the example below uses E-mail).
82
Page 96

Scan Using Your Computer
5 Click the File Type pop-up menu, and then select the Microsoft Office Word (*.docx) or Microsoft
Office PowerPoint (*.pptx) option. If a message dialog box regarding the Internet connection appears,
read the information and click OK.
6 Change other settings if needed (see Change Scan Settings (ControlCenter2) (Macintosh) on page 89).
7 Click Start Scanning.
Scan Business Cards 5
1 Load your document (see Business Cards and Plastic Cards on page 32).
2 Click the (ControlCenter2) icon in the Dock.
The ControlCenter2 window appears.
3 Click the SCAN tab.
5
83
Page 97

Scan Using Your Computer
4 Click the Image button. The settings dialog box appears.
5
5 Select BizCard 6 from the Target Application pop-up menu.
6 Change other settings if needed (see Change Scan Settings (ControlCenter2) (Macintosh) on page 89).
7 Click Start Scanning. The scanned data will be opened in the BizCard 6 application.
8 Edit and save the scanned date using BizCard 6.
84
Page 98

Scan Using Your Computer
Register Your Favorite Scan Settings Using ControlCenter2 (Macintosh) 5
There are four buttons which you can configure to fit your scanning needs.
To customize a button, click the button while holding down the Control key, and the configuration window
appears. There are four scan functions: Scan to Image, Scan to OCR, Scan to E-mail and Scan to File.
Scan to Image
Lets you scan a page directly into any image viewer/editor software. You can choose any image editor
application on your computer as a destination.
Scan to OCR
Converts scanned documents into editable text files. You can choose the destination application for the
editable text. You must install Presto! PageManager on your computer. For installation information see
Scan Using Presto! PageManager or TWAIN Applications (Macintosh) on page 109.
Scan to E-mail
Attaches the scanned images to an email message. You can also choose the file attachment type and
create a quick send list of email addresses chosen from your email address book.
Scan to File
Lets you save a scanned image to any folder on a local or network hard disk. You can also choose the file
type to be used.
5
85
Page 99

Scan Using Your Computer
User-defined Button 5
To customize a button, click the button while holding down the Control key, and the configuration window
appears. Follow these guidelines for button configuration.
Scan to Image/OCR/E-mail/File 5
General tab
Enter a name in Name for Custom (up to 30 characters) to create the button name.
Choose the type of scan from the Scan Action selections.
5
86
Page 100

Scan Using Your Computer
NOTE
NOTE
Settings tab (Scan to Image/OCR/ E-mail)
Choose the Target Application, File Type, Resolution, Scan Type, Document Size and 2-sided
Scanning settings.
The Scan to E-mail feature does not support Webmail services. Use the Scan to Image or Scan to File
feature to scan a document or picture, and then attach the file of the scanned data to an email message.
5
If you choose Secure PDF (*.pdf) from the File Type list, the Set PDF Password dialog box appears.
Enter your password in the Password and Re-type Password box and then click OK.
Secure PDF (*.pdf) is available for Scan to Image, Scan to E-mail and Scan to File.
87
 Loading...