

Page 1

Section III
Copy III
Making copies 86
Page 2
13
Making copies 13
How to copy 13
Entering Copy mode 13
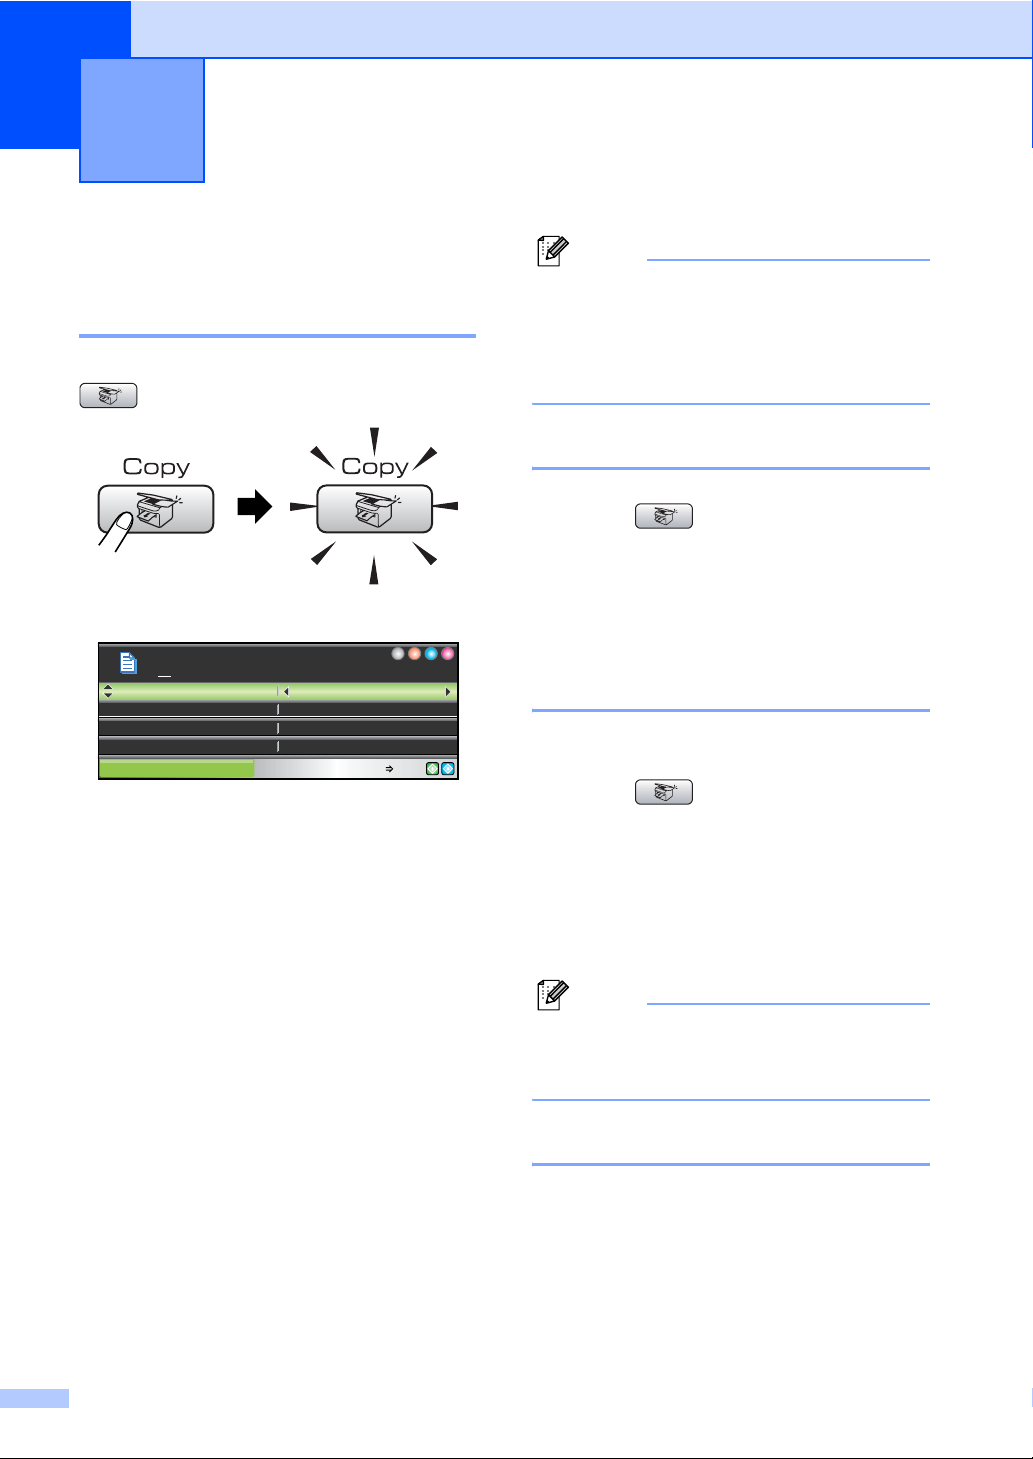
When you want to make a copy, press
(Copy) to illuminate it in green.
The LCD shows:
01
Quality
Copy Copy Start Press
1 No of Copies
You can enter the number of copies you want
by using the dial pad.
Press a or b to scroll through the Copy key
options.
Normal
100%Enlarge/Reduce
Plain PaperPaper Type
LetterPaper Size
Note
The default setting is Fax mode. You can
change the amount of time that the
machine stays in Copy mode after the last
copy operation. (See Mode
Timer on page 22.)
Making a single copy 13
a Press (Copy).
b Load your document.
(See Loading documents on page 10.)
c Press Black Start or Color Start.
Making multiple copies 13
You can make up to 99 copies.
a Press (Copy).
b Load your document.
(See Loading documents on page 10.)
c Enter the number of copies you want.
Quality (See page 87.)
Enlarge/Reduce (See page 87.)
Paper Type (See page 90.)
Paper Size (See page 90.)
Brightness (See page 89.)
Contrast (See page 90.)
Color Adjust (See page 90.)
Stack/Sort (See page 89.)
Page Layout (See page 88.)
Set New Default (See page 91.)
Factory Reset (See page 91.)
When the option you want is highlighted,
press OK.
86
d Press Black Start or Color Start.
Note
To sort the copies, press a or b to choose
Stack/Sort. (See Sorting copies using
the ADF on page 89.)
Stop copying 13
To stop copying, press Stop/Exit.
Page 3
Making copies
Copy settings 13
You can change the copy settings temporarily
for the next copy.
These settings are temporary, and the
machine returns to its default settings
1 minute after copying, unless you have set
the Mode Timer to 30 seconds or less. (See
Mode Timer on page 22.)
If you have finished choosing settings, press
Black Start or Color Start.
If you want to choose more settings, press a
or b.
Note
You can save some of the settings that
you use most often by setting them as
default. These settings will stay until you
change them again. (See Setting your
changes as the new default on page 91.)
Changing copy quality 13
You can choose from a range of quality. The
factory setting is Normal.
Fast
Fast copy speed and lowest amount of ink
used. Use to save time printing
documents to be proof-read, large
documents or many copies.
Normal
Normal is the recommended mode for
ordinary printouts. This produces good
copy quality with good copy speed.
Best
Use best mode to copy precise images
such as photographs. This provides the
highest resolution and slowest speed.
a Press (Copy).
b Load your document.
c Enter the number of copies you want.
d Press a or b to choose Quality.
e Press d or c to choose Fast, Normal or
Best.
Press OK.
f If you do not want to change additional
settings, press Black Start or
Color Start.
Enlarging or reducing the
image copied 13
You can choose an enlargement or reduction
ratio.
a Press (Copy).
b Load your document.
c Enter the number of copies you want.
13
87
Page 4

Chapter 13
d Press a or b to choose
Enlarge/Reduce.
Press OK.
e Do one of the following:
Press d or c to choose the
enlargement or reduction ratio you
want. Press OK.
Press d or c to choose
Custom(25-400%)and then enter
an enlargement or reduction ratio
from 25% to 400%. Press OK.
(For example, press 53 to enter
53%.)
50%
69% A4iA5
78% LGLiLTR
83% LGLiA4
93% A4iLTR
97% LTRiA4
100%
104% EXEiLTR
142% A5iA4
186% 4"x6"iLTR
198% 4"x6"iA4
200%
Custom(25-400%)
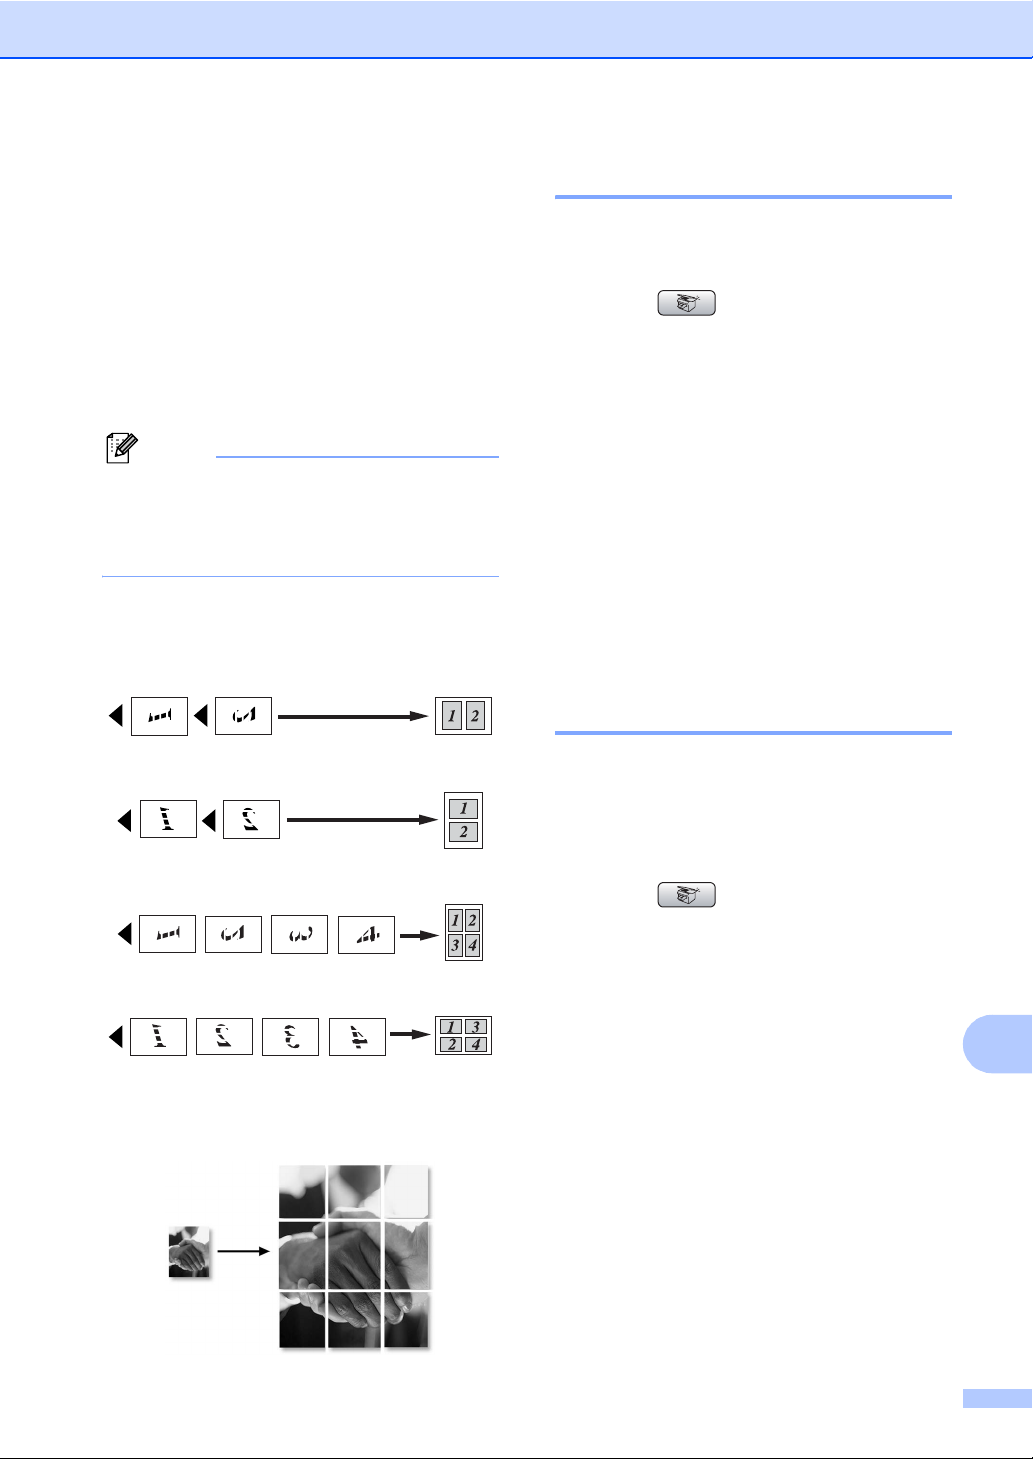
Making N in 1 copies or a
poster (page layout) 13
The N in 1 copy feature can help you save
paper by letting you copy two or four pages
onto one printed page.
You can also produce a poster. When you
use the poster feature your machine divides
your document into sections, then enlarges
the sections so you can assemble them into a
poster. If you want to print a poster, use the
scanner glass.
Important
Please make sure paper size is set to
Letter or A4.
You cannot use the Enlarge/Reduce
setting with the N in 1 and Poster features.
If you are producing multiple color copies,
N in 1 copy is not available.
((P)) means Portrait and ((L)) means
Landscape.
You can only make one poster copy at a
time.
a Press (Copy).
b Load your document.
c Enter the number of copies you want.
f If you do not want to change additional
settings, press Black Start or
Color Start.
Note
Page Layout Options are not available
with Enlarge/Reduce.
88
d Press a or b to choose Page Layout.
Press OK.
e Press d or c to choose Off (1in1),
2in1 (P), 2in1 (L), 4in1 (P),
4in1 (L) or Poster (3x3).
Press OK.
f If you do not want to change additional
settings, press Black Start or
Color Start to scan the page.
If you are making a poster or placed the
document in the ADF, the machine
scans the pages and starts printing.
If you are using the scanner glass, go
to step g.
Page 5
Making copies
g After the machine scans the page, press
1 to scan the next page.
h Place the next page on the scanner
glass.
Press OK.
Repeat steps g and h for each page of
the layout.
i After all the pages have been scanned,
press 2 to finish.
Note
If photo paper has been chosen in the
Paper Type setting for N in 1 copies, the
machine will print the images as if Plain
paper had been chosen.
Place your document face down in the
direction shown below.
2 in 1 (P)
Sorting copies using the ADF13
You can sort multiple copies. Pages will be
stacked in the order 123, 123, 123, and so on.
a Press (Copy).
b Load your document.
c Enter the number of copies you want.
d Press a or b to choose Stack/Sort.
Press OK.
e Press d or c to choose Sort.
Press OK.
f If you do not want to change additional
settings, press Black Start or
Color Start.
Adjusting Brightness,
Contrast and Color 13
2 in 1 (L)
4 in 1 (P)
4 in 1 (L)
Poster (3 x 3)
You can make a poster size copy of a
photograph.
Brightness 13
You can adjust the copy brightness to make
copies darker or lighter.
a Press (Copy).
b Load your document.
c Enter the number of copies you want.
d Press a or b to choose Brightness.
e Press d to make a darker copy or press
c to make a lighter copy.
Press OK.
f If you do not want to change additional
settings, press Black Start or
Color Start.
13
89
Page 6

Chapter 13
Contrast 13
You can adjust the copy contrast to help an
image look sharper and more vivid.
a Press (Copy).
b Load your document.
c Enter the number of copies you want.
d Press a or b to choose Contrast.
e Press c to increase the contrast or press
d to decrease the contrast.
Press OK.
f If you do not want to change additional
settings, press Black Start or
Color Start.
Color Saturation 13
a Press (Copy).
Paper Options 13
Paper Type 13
If you are copying on special paper, set the
machine for the type of paper you are using to
get the best print quality.
a Press (Copy).
b Load your document.
c Enter the number of copies you want.
d Press a or b to choose Paper Type.
e Press d or c to choose Plain Paper,
Inkjet Paper, Brother Photo,
Other Photo or Transparency.
Press OK.
f If you do not want to change additional
settings, press Black Start or
Color Start.
b Load your document.
c Enter the number of copies you want.
d Press a or b to choose RED Adjust,
GREEN Adjust or BLUE Adjust.
Press OK.
e Press c to increase the color saturation,
or press d to decrease the color
saturation.
Press OK.
f Do one of the following:
If you want to change the saturation
for another color, go to step d.
If you want to change additional
settings, press a or b to choose
Exit.
Press OK.
If you do not want to change
additional settings, press
Black Start or Color Start.
Paper Size 13
If copying on paper other than Letter size, you
will need to change the paper size setting.
You can copy only on Letter, Legal, A4, A5 or
Photo [4 in. (W) × 6 in. (H) or 10 cm (W) ×
15 cm (H)] paper.
a Press (Copy).
b Load your document.
c Enter the number of copies you want.
d Press a or b to choose Paper Size.
e Press d or c to choose Letter, Legal,
A4, A5 or 4"x6".
Press OK.
f If you do not want to change additional
settings, press Black Start or
Color Start.
90
Page 7

Making copies
Setting your changes as the
new default 13
You can save the copy settings for Quality,
Paper Type, Brightness, Contrast and
Color Adjust that you use most often by
setting them the default settings. These
settings will stay until you change them again.
a Press (Copy).
b Press a or b to choose your new setting.
Press OK.
Repeat this step for each setting you
want to change.
c After changing the last setting, press
a or b to choose Set New Default.
Press OK.
d Press 1 to choose Yes.
e Press Stop/Exit.
‘Out of Memory’
message 13
If the Out of Memory message appears
while scanning documents, press Stop/Exit
to cancel or Black Start or Color Start to
copy the scanned pages.
You will need to clear some jobs from the
memory before you can continue.
To free up extra memory, do the following:
Turn off Advanced Fax Operation. (See
Turning off Advanced Fax
Operations on page 76.)
Print the faxes that are in the memory.
(See Printing a fax from the
memory on page 44.)
When you get an Out of Memory
message, you may be able to make copies if
you first print incoming faxes in the memory to
restore the memory to 100%.
Restoring all settings to the
factory settings 13
You can restore all the settings you have
changed to the factory settings. These
settings will stay until you change them again.
a Press (Copy).
b Press a or b to choose
Factory Reset.
Press OK.
c Press 1 to choose Yes.
d Press Stop/Exit.
13
91
Page 8

Chapter 13
92
Page 9

Section IV
Walk-up Photo Printing
PhotoCapture Center®: Printing photos from a
memory card or USB Flash memory drive
Printing photos from a camera 110
94
IV
Page 10
PhotoCapture Center®: Printing
14
photos from a memory card or
USB Flash memory drive
PhotoCapture Center®
Operations
Printing from a memory card
or USB Flash memory drive
without a PC 14
Even if your machine is not connected to your
computer, you can print photos directly from
digital camera media or a USB Flash memory
drive. (See Print Images on page 97.)
Scanning to a memory cards
or USB Flash memory drive
without a PC 14
14
Using a memory card or USB
14
Flash memory drive 14
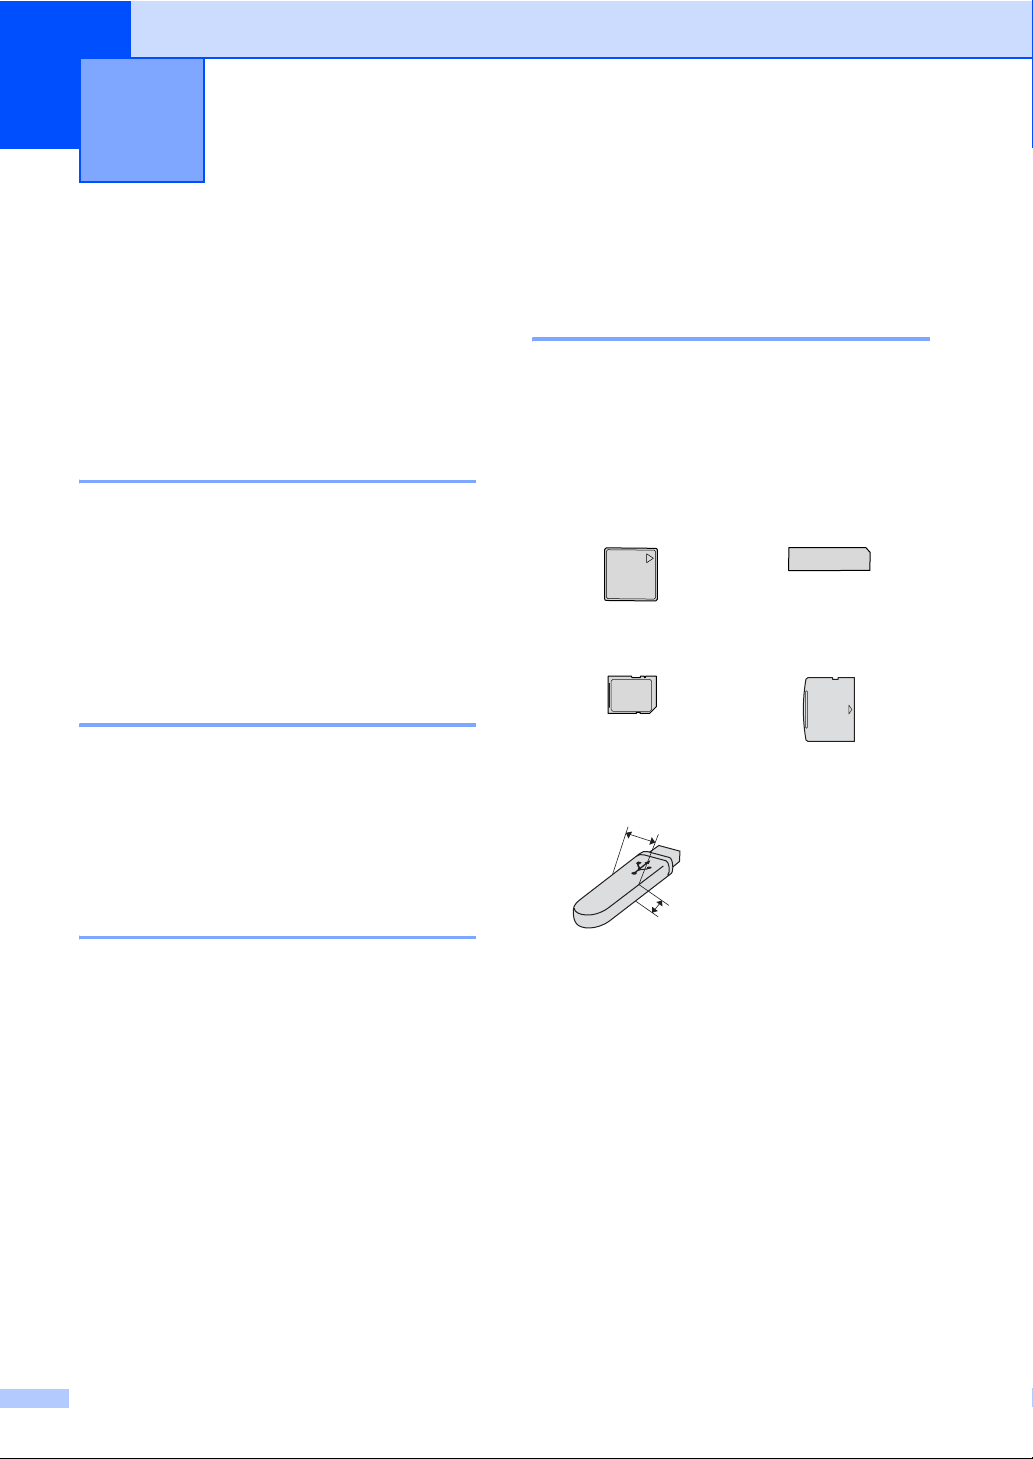
Your Brother machine has media drives
(slots) for use with popular digital camera
media: CompactFlash
Memory Stick Pro™, SecureDigital™,
MultiMediaCard™, xD-Picture Card™ and
USB Flash memory drives.
CompactFlash
®
, Memory Stick®,
®
Memory Stick Pro™
Memory Stick
®
You can scan documents and save them
directly to a memory card or USB Flash
memory drive. (See Scan to a memory card
or USB Flash memory drive on page 108.)
Using PhotoCapture Center®
from your computer 14
You can access a memory card or USB Flash
memory drive that is inserted in the front of
the machine from your PC.
(See PhotoCapture Center
Remote Setup & PhotoCapture Center
Macintosh
the CD-ROM.)
®
in the Software User's Guide on
®
for Windows® or
®
™ for
SecureDigital™
MultiMediaCard™
22 mm or less
11 mm or less
USB Flash memory
drive
miniSD™ can be used with a miniSD™
adapter.
Memory Stick Duo™ can be used with a
Memory Stick Duo™ adapter.
Memory Stick Pro Duo™ can be used with
a Memory Stick Pro Duo™ adapter.
Adapters are not included with the
machine. Contact a third party supplier for
adapters.
The PhotoCapture Center
print digital photos from your digital camera at
high resolution to get photo quality printing.
xD-Picture Card™
®
feature lets you
94
Page 11

PhotoCapture Center®: Printing photos from a memory card or USB Flash memory drive
Memory cards or a USB Flash
memory drive folder structure14
To avoid errors, remember the following
points:
The image file extension must be .JPG
(Other image file extensions like .JPEG,
.TIF, .GIF and so on will not be
recognized).
Walk-up PhotoCapture Center
must be performed separately from
PhotoCapture Center
the PC. (Simultaneous operation is not
available.)
IBM Microdrive™ is not compatible with
the machine.
The machine can read up to 999 files on a
memory card or USB Flash memory drive.
CompactFlash
This product supports xD-Picture Card™
Type M / Type H (Large Capacity).
®
operations using
®
Type II is not supported.
®
printing
When a digital camera formats a memory
card it creates a special folder into which it
copies image data. If you need to modify
the image data stored on a memory card
with your PC, we recommend that you do
not modify the folder structure created by
the digital camera. When saving new or
modified image files to the memory card
we also recommend you use the same
folder your digital camera uses. If the data
is not saved to the same folder, the
machine may not be able to read the file or
print the image.
(USB Flash memory drive users)
This machine supports USB Flash
memory drives that has been formatted by
Windows
®
.
The DPOF file on the memory cards must
be in a valid format. (See DPOF
printing on page 103.)
Please be aware of the following:
When printing the INDEX or IMAGE, the
PhotoCapture Center
valid images, even if one or more images
have been corrupted. The corrupted
image will not be printed.
(memory card users)
Your machine is designed to read memory
cards that have been formatted by a digital
camera.
®
will print all the
14
95
Page 12

Chapter 14
Getting started 14
Firmly put a memory card or USB Flash
memory drive into the proper slot.
1 2 3 4
1 USB Flash memory drive
2 CompactFlash
3 SecureDigital™, MultiMediaCard™
4 Memory Stick
5 xD-Picture Card™
CAUTION
The USB direct interface supports only a
USB Flash memory drive, a PictBridge
compatible camera, or a digital camera that
uses the USB mass storage standard. Any
other USB devices are not supported.
®
®
, Memory Stick Pro™
5
PhotoCapture light is off, the memory
card or USB Flash memory drive is not
properly inserted.
PhotoCapture light is blinking, memory
card or USB Flash memory drive is being
read or written to.
CAUTION
DO NOT unplug the power cord or remove
the media from the media drive (slot) or
USB direct interface while the machine is
reading or writing to the media (the
PhotoCapture key is blinking). You will
lose your data or damage the card.
The machine can only read one device at a
time so do not put more than one media in the
slot.
PhotoCapture key lights:
PhotoCapture light is on, the memory
card or USB Flash memory drive is
properly inserted.
96
Page 13

PhotoCapture Center®: Printing photos from a memory card or USB Flash memory drive
Entering PhotoCapture mode 14
After you insert the memory card or USB
Flash memory drive, press the
(PhotoCapture) key to illuminate it in
green and display the PhotoCapture options
on the LCD.
The LCD shows:
View Photo(s)
Print Index
Print Photos
Photo Effects
PHOTO
Press a or b to scroll through the
PhotoCapture key options.
View Photo(s) (See page 97.)
Print Index (See page 98.)
Print Photos (See page 98.)
Photo Effects (See page 99.)
Search by Date (See page 101.)
Print All Photos (See page 102.)
Slide show (See page 102.)
Trimming (See page 103.)
Note
If your digital camera supports DPOF
printing, see DPOF printing on page 103.
When the option you want is highlighted,
press OK.
View photos on the
LCD and select the
images you want to
print.
Select & Press
OK
Print Images 14
View Photo(s) 14
You can preview your photos on the LCD
before you print them. If your photos are large
files there may be a delay before each photo
is displayed on the LCD.
a Make sure you have put a memory card
or USB Flash memory drive in the
proper slot.
Press (PhotoCapture).
b Press a or b to choose
View Photo(s).
Press OK.
c Press d or c to choose your photo.
Note
Instead of scrolling through your photos,
you can use the dial pad to enter the
number of the image from the index page.
(See Print Index
(Thumbnails) on page 98.)
d Press a or b to increase or decrease the
number of copies.
e Repeat step c and step d until you
have chosen all the photos.
Note
Press Clear/Back to go back to the
previous level.
f After you have chosen all the photos, do
one of the following:
14
Press OK and change the print
settings. (See page 104.)
If you do not want to change any
settings, press Color Start to print.
97
Page 14

Chapter 14
Print Index (Thumbnails) 14
The PhotoCapture Center® assigns numbers for
images (such as No.1, No.2, No.3, and so on).
The PhotoCapture Center® does not
recognize any other numbers or file names
that your digital camera or PC has used to
identify the pictures. You can print a
thumbnail page (Index page with 5 images
per line). This will show all the pictures on the
memory card.
a Make sure you have put the memory
card or USB Flash memory drive in the
proper slot.
Press (PhotoCapture).
b Press a or b to choose Print Index.
Press OK.
c Press a or b to choose the paper
settings, Paper Type or Paper Size.
Do one of the following.
If you chose Paper Type, press OK
and press d or c to choose the type
of paper you are using,
Plain Paper, Inkjet Paper,
Brother Photo or Other Photo.
Press OK.
If you chose Paper Size, press OK
and press d or c to choose the paper
size you are using, Letter or A4.
Press OK.
If you do not want to change the
paper settings, go to d
d Press Color Start to print.
Print Photos 14
Before you can print an individual image, you
have to know the image number.
a Make sure you have put a memory card
or USB Flash memory drive in the
proper slot.
Press (PhotoCapture).
b Print the Index. (See Print Index
(Thumbnails) on page 98.)
c Press a or b to choose Print Photos.
Press OK.
d Enter the image number that you want to
print from the Index page (Thumbnails).
Press OK.
e Repeat step d until you have entered
all the image numbers that you want to
print.
Note
You can enter all the numbers at one time
by using the l key for a comma or the #
key for a hyphen. For example, Enter 1, l,
3, l, 6 to print images No.1, No.3 and
No.6. Enter 1, #, 5 to print images No.1 to
No.5.
f After you have chosen all the image
numbers, press OK again.
g Enter the number of copies you want
using the dial pad.
h Do one of the following:
Change the print settings. (See
page 104.)
If you do not want to change any
settings, press Color Start to print.
98
Page 15

PhotoCapture Center®: Printing photos from a memory card or USB Flash memory drive
Photo Effects 14
You can edit and add effects to your photos
and view them on the LCD before printing.
Note
• After adding each effect, you can enlarge
the view of the image by pressing l. To go
back to the original size, press l again.
• The Photo Effects feature is supported by
technology from Reallusion, Inc.
Auto Correct 14
Auto Correct is available for most photos. The
machine decides the suitable effect for your
photo.
a Make sure you have put a memory card
or USB Flash memory drive in the
proper slot.
Press (PhotoCapture).
b Press a or b to choose
Photo Effects.
Press OK.
Enhance Skin-Tone 14
Enhance Skin-Tone is best used for adjusting
portrait photographs. It detects human skin
color in your photos and adjust the image.
a Make sure you have put a memory card
or USB Flash memory drive in the
proper slot.
Press (PhotoCapture).
b Press a or b to choose
Photo Effects.
Press OK.
c Press d or c to choose your photo.
Press OK.
d Press a or b to choose
Enhance Skin-Tone.
Press OK.
Note
You can also adjust the effect level
manually, by pressing a or b.
e Press OK and a or b to increase or
decrease the number of copies.
c Press d or c to choose your photo.
Press OK.
d Press a or b to choose Auto Correct.
Press OK.
e Press OK and a or b to increase or
decrease the number of copies.
f Do one of the following.
Press OK and change the print
settings. (See page 104.)
If you do not want to change any
settings, press Color Start to print.
Note
If Remove Red-Eye appears on the LCD,
press # to remove red-eye from your
photo.
f Do one of the following.
Press OK and change the print
settings. (See page 104.)
If you do not want to change any
settings, press Color Start to print.
Enhance Scenery 14
Enhance Scenery is best used for adjusting
landscape photographs. It highlights green
and blue of your photo, so that the landscape
looks more sharp and vivid.
a Make sure you have put the memory
card or USB Flash memory drive in the
proper slot.
Press (PhotoCapture).
b Press a or b to choose
Photo Effects.
Press OK.
99
14
Page 16

Chapter 14
c Press d or c to choose your photo.
Press OK.
d Press a or b to choose
Enhance Scenery.
Press OK.
Note
You can also adjust the effect level
manually, by pressing a or b.
e Press OK and a or b to increase or
decrease the number of copies.
f Do one of the following.
Press OK and change the print
settings. (See page 104.)
If you do not want to change any
settings, press Color Start to print.
Remove Red-Eye 14
The machine detects eyes in your photos and
will remove red-eye from your photo.
Note
There are some cases when red-eye may
not be removed.
• When the face is too small.
When Remove Red-Eye is
successful, the photo after effect is
shown. The adjusted part is shown in
a red frame.
When Remove Red-Eye is
unsuccessful,
Unable to Detect Red-Eye is
shown.
e Press a to try Remove Red-Eye once
again.
When Remove Red-Eye is
successful, the photo after effect is
shown. The adjusted part is shown in
a red frame.
When Remove Red-Eye is
unsuccessful,
Unable to Detect Red-Eye is
shown.
f Press OK and a or b to increase or
decrease the number of copies.
g Do one of the following.
Press OK and change the print
settings. (See page 104.)
If you do not want to change any
settings, press Color Start to print.
• When the face is turning too far up,
down, left or right.
a Make sure you have put a memory card
or USB Flash memory drive in the
proper slot.
Press (PhotoCapture).
b Press a or b to choose
Photo Effects.
Press OK.
c Press d or c to choose your photo.
Press OK.
d Press a or b to choose
Remove Red-Eye.
Press OK.
100
Monochrome 14
You can convert your photo to black & white.
a Make sure you have put a memory card
or USB Flash memory drive in the
proper slot.
Press (PhotoCapture).
b Press a or b to choose
Photo Effects.
Press OK.
c Press d or c to choose your photo.
Press OK.
d Press a or b to choose Monochrome.
Press OK.
Page 17

PhotoCapture Center®: Printing photos from a memory card or USB Flash memory drive
e Press OK and a or b to increase or
decrease the number of copies.
f Do one of the following.
Press OK and change the print
settings. (See page 104.)
If you do not want to change any
settings, press Color Start to print.
Sepia 14
You can convert the color of your photo to
sepia.
a Make sure you have put a memory card
or USB Flash memory drive in the
proper slot.
Press (PhotoCapture).
b Press a or b to choose
Photo Effects.
Press OK.
c Press d or c to choose your photo.
Press OK.
d Press a or b to choose Sepia.
Press OK.
e Press OK and a or b to increase or
decrease the number of copies.
f Do one of the following.
Press OK and change the print
settings. (See page 104.)
If you do not want to change any
settings, press Color Start to print.
Search by Date 14
You can find your photos based on date.
a Make sure you have put a memory card
or USB Flash memory drive in the
proper slot.
Press (PhotoCapture).
b Press a or b to choose
Search by Date.
Press OK.
c Press a or b to choose the date that you
want to search from.
Press OK.
d Press d or c to choose your photo.
Note
You can view photos with other dates by
pressing d or c continuously. Press d to
view an older photo and c to view a newer
photo.
e Press a or b to increase or decrease the
number of copies.
f Repeat step d and step e until you
have chosen all your photos.
g After you have chosen all your photos,
do one of the following:
Press OK and change the print
settings. (See page 104.)
If you do not want to change any
settings, press Color Start to print.
101
14
Page 18

Chapter 14
Print All Photos 14
You can print all the photos on your memory
card.
a Make sure you have put a memory card
or USB Flash memory drive in the
proper slot.
Press (PhotoCapture).
b Press a or b to choose
Print All Photos.
Press OK.
c Enter the number of copies you want
using the dial pad.
d Do one of the following:
Change the print settings. (See
page 104.)
If you do not want to change any
settings, press Color Start to print.
Slide show 14
You can view all your photos on the LCD
using Slide show. You can also choose a
photo during the operation.
a Make sure you have put a memory card
or USB Flash memory drive in the
proper slot.
Press (PhotoCapture).
b Press a or b to choose Slide show.
Press OK.
c Press Stop/Exit to finish Slide show.
Printing a photo during a Slide show 14
a Press OK to stop at one image while
Slide show is operating.
b Press a or b to increase or decrease the
number of copies.
c Do one of the following:
Press OK and change the print
settings. (See page 104.)
102
If you do not want to change any
settings, press Color Start to print.
Page 19

PhotoCapture Center®: Printing photos from a memory card or USB Flash memory drive
Trimming 14
You can trim your photo and print a part of the
image.
Note
If your photo is very small or an irregular
shape you may not be able to trim the
photo. The LCD will display
Image Too Small. or
Image Too Long..
a Make sure you have put a memory card
or USB Flash memory drive in the
proper slot.
Press (PhotoCapture).
b Press a or b to choose Trimming.
Press OK.
c Press d or c to choose your photo.
Press OK.
d Adjust the red frame on your photo.
The part inside of the red frame will be
printed.
DPOF printing 14
DPOF stands for Digital Print Order Format.
Major digital camera manufacturers (Canon
Inc., Eastman Kodak Company, Fuji Photo
Film Co. Ltd., Matsushita Electric Industrial
Co. Ltd. and Sony Corporation) created this
standard to make it easier to print images
from a digital camera.
If your digital camera supports DPOF
printing, you will be able to choose on the
digital camera display the images and
number of copies you want to print.
When the memory card (CompactFlash
Memory Stick
SecureDigital™ with DPOF information is put
into your machine, you can print the chosen
image easily.
®
, Memory Stick Pro™,
®
,
a Make sure you have put a memory card
in the proper slot.
Press (PhotoCapture). The
machine will ask you if you want to use
DPOF setting.
Press l or # to enlarge or reduce the
frame size.
Press each arrow key to move the
position of the frame.
Press 0 to rotate the frame.
Press OK when you have finished
the frame setting.
e Press a or b to increase or decrease the
number of copies.
f Do one of the following:
Press OK and change the print
settings. (See page 104.)
If you do not want to change any
settings, press Color Start to print.
b Press 1 to choose Yes.
c Do one of the following:
Change the print settings. (See
page 104.)
If you do not want to change any
settings, press Color Start to print.
14
103
Page 20

Chapter 14
PhotoCapture Center® print settings 14
You can change the print settings temporarily for the next printing.
These settings are temporary, and the machine returns to its default settings 3 minutes after
printing, unless you have set the Mode Timer to 2 minutes or less. (See Mode Timer on page 22).
Note
You can save the print settings you use most often by setting them as default. (See Setting
your changes as the new default on page 107.)
Print Settings
Print Quality
Paper Type
Paper Size
Brightness
PHOTO
Photo
Other Photo
4"x6"
0
Print Start Press
1 No. of prints
(For View Photo(s), Search by Date, Slide Show)
You can see the total number of photos that will be printed.
(For Print All Photos, Print Photos, Photo Effects, Trimming)
You can see the number of copies of each photo that will be printed.
(For DPOF printing) This does not appear.
0001
1
Menu Selections Options 1 Options 2 Page
Print Quality
Normal/Photo — 105
(Does not appear for
DPOF printing)
Paper Type Plain Paper/Inkjet Paper/Br
— 105
other Photo/Other Photo
Paper Size Letter/A4/4"x 6"/5"x 7" (When A4 or Letter is chosen)
105
4"x 3"/5"x 3.5"/6"x 4"/7"x
5"/8"x 6"/Max. Size
Brightness
(Does not appear
Dark Light
— 106
when
Photo Effects is
chosen.)
Contrast
— 106
(Does not appear
when
Photo Effects is
chosen.)
104
Page 21

PhotoCapture Center®: Printing photos from a memory card or USB Flash memory drive
Menu Selections Options 1 Options 2 Page
True2Life
(Does not appear
when
Photo Effects is
chosen.)
Cropping On/Off — 107
Borderless On/Off — 107
Set New Default Yes/No — 107
Factory Reset Yes/No — 107
On/Off
White Balance
Sharpness
Color Density
Exit
— 106
Print Quality 14
a Press a or b to choose
Print Quality.
b Press d or c to choose Normal or
Photo.
Press OK.
c If you do not want to change additional
settings, press Color Start to print.
Paper options 14
Paper Type 14
a Press a or b to choose Paper Type.
b Press d or c to choose the paper size
you are using, Plain Paper,
Inkjet Paper, Brother Photo or
Other Photo.
Press OK.
c If you do not want to change additional
settings, press Color Start to print.
Paper and print size 14
a Press a or b to choose Paper Size.
b Press d or c to choose the paper size
you are using, Letter, 4"x 6",
5"x 7" or A4.
Press OK.
c If you chose Letter or A4, press a or b to
choose the Print Size.
d Press d or c to choose the options.
Example: Printed Position for Letter paper
1
4"x 3"
4
7"x 5"
2
5"x 3.5"
5
8"x 6"
3
6"x 4"
6
Max. Size
14
e If you do not want to change additional
settings, press Color Start to print.
105
Page 22

Chapter 14
Adjusting Brightness,
Contrast and Color 14
Brightness 14
a Press a or b to choose Brightness.
b Press d to make a darker print or press
c to make a lighter print.
Press OK.
c If you do not want to change additional
settings, press Color Start to print.
Contrast 14
You can choose the contrast setting. More
contrast will make an image look sharper and
more vivid.
a Press a or b to choose Contrast.
b Press c to increase the contrast or press
d to decrease the contrast.
Press OK.
c If you do not want to change additional
settings, press Color Start to print.
Color Enhancement (True2Life®) 14
You can turn on the color enhancement
(True2Life
images. Printing time will be slower.
®
) feature to print more vivid
a Press a or b to choose True2Life.
Press OK.
b Do one of the following:
If you want to customize the White
Balance, Sharpness or Color
Density, press d or c to choose On,
and then go to step c.
If you do not want to customize,
press d or c to choose Off.
c Press a or b to choose
White Balance, Sharpness or
Color Density.
d Press d or c to adjust the degree of the
setting.
Press OK.
e Do one of the following:
If you want to customize another
color enhancement, press a or b to
choose another option.
If you want to change other settings,
press a or b to choose Exit, and
then press OK.
f If you do not want to change additional
settings, press Color Start to print.
Note
• White Balance
This setting adjusts the hue of the white
areas of an image. Lighting, camera
settings and other influences will effect the
appearance of white. The white areas of a
picture may be slightly pink, yellow or
some other color. By using this setting,
you can correct that effect and bring the
white areas back to pure white.
• Sharpness
This setting enhances the detail of an
image, similar to adjusting the fine focus
on a camera. If the image is not in true
focus and you cannot see the fine details
of the picture, then adjust the sharpness.
• Color Density
This setting adjusts the total amount of
color in the image. You can increase or
decrease the amount of color in an image
to improve a washed out or weak picture.
106
Press OK and then go to step f.
Page 23

PhotoCapture Center®: Printing photos from a memory card or USB Flash memory drive
Cropping 14
If your photo is too long or wide to fit the
available space on your chosen layout, part
of the image will automatically be cropped.
The factory setting is On. If you want to print
the whole image, turn this setting to Off.
a Press a or b to choose Cropping.
b Press d or c to choose Off (or On).
Press OK.
c If you do not want to change additional
settings, press Color Start to print.
Cropping: On
Cropping: Off 14
14
Setting your changes as the
new default 14
You can save the print settings you use most
often by setting them as the default settings.
These settings will stay until you change
them again.
a Press a or b to choose your new setting.
Press OK.
Repeat this step for each setting you
want to change.
b After changing the last setting, press a
or b to choose Set New Default.
Press OK.
c Press 1 to choose Yes.
d Press Stop/Exit.
Restoring all settings to the
factory settings 14
Borderless printing 14
This feature expands the printable area to the
edges of the paper. Printing time will be
slightly slower.
a Press a or b to choose Borderless.
b Press d or c to choose Off (or On).
Press OK.
c If you do not want to change additional
settings, press Color Start to print.
You can restore all the settings you have
changed to the factory settings. These
settings will stay until you change them again.
a Press a or b to choose
Factory Reset.
Press OK.
b Press 1 to choose Yes.
c Press Stop/Exit.
14
107
Page 24

Chapter 14
Sca n to Imag e
Sca n to OCR
Sca n to File
Sca n to E-ma il
Sca n a docum en t int o
you r E- mail
app li ca tion
as a fi le
att ac hm ent.
Sca n to Medi a
Scan to a memory card
or USB Flash memory
drive
Entering Scan mode 14
When you want to scan to a memory card or
USB Flash memory drive, press
(Scan).
The LCD shows:
Scan to E-mail
Scan to Image
Scan to OCR
Scan to File
Scan to Media
SCAN
Press a or b to choose Scan to Media.
Press OK.
If you are not connected to your computer
only the Scan to Media selection will appear
on the LCD.
(See Scanning for Windows
in the Software User’s Guide on the CD-ROM
for details about the other menu options.)
How to scan to a memory card
or USB Flash memory drive 14
You can scan black & white and color
documents into a memory card or USB Flash
memory drive. Black & white documents will
be stored in PDF (*.PDF) or TIFF file formats
(*.TIF). Color documents may be stored in
PDF (*.PDF) or JPEG (*.JPG) file formats.
The factory setting is 150dpi Color and the
default file format is PDF. File names default
to the current date that you set using the
control panel keys. (For details, see Quick
Setup Guide.) For example, the fifth image
scanned on July 1, 2007 would be named
07010705.PDF. You can change the color
and quality.
108
Scan a document into
your E-mail
application
as a file
attachment.
Select & Press
®
or Macintosh®
OK
Quality Selectable File
Format
14
Color 150dpi JPEG / PDF
Color 300dpi JPEG / PDF
Color 600dpi JPEG / PDF
B/W 200x100dpi TIFF / PDF
B/W 200dpi TIFF / PDF
a Insert a CompactFlash
®
Stick
, Memory Stick Pro™,
®
, Memory
SecureDigital™, MultiMediaCard™, xDPicture Card™ or USB Flash memory
drive into your machine.
WARNING
Do not take out the memory card while
PhotoCapture is blinking to avoid
damaging the card or data stored on the
card.
b Load your document.
c Press (Scan).
d Press a or b to choose
Scan to Media.
Press OK.
e Do one of the following.
To change the quality, go to step f.
Press Black Start or Color Start to
start scanning without changing
additional settings.
f Press a or b to choose Color 150dpi,
Color 300dpi, Color 600dpi, B/W
200x100dpi or B/W 200dpi.
Press OK.
g Do one of the following.
To change the file type, go to step h.
Press Black Start or Color Start to
start scanning without changing
additional settings.
Page 25

PhotoCapture Center®: Printing photos from a memory card or USB Flash memory drive
h Press a or b to choose JPEG, PDF or
TIFF.
Press OK.
Note
• If you chose color in the resolution setting,
you cannot choose TIFF.
• If you chose black & white in the resolution
setting, you cannot choose JPEG.
i Do one of the following.
To change the file name, go to
step j.
Press Black Start or Color Start to
start scanning without changing
additional settings.
j The file name is set automatically
however, you can set a name of your
choice using the dial pad. You can only
change the first 6 digits.
Press OK.
Note
Press Clear/Back to delete the current
name.
k Press Black Start or Color Start.
Understanding the
Error Messages 14
Once you are familiar with the types of errors
that can occur while you are using
PhotoCapture Center
identify and troubleshoot any problems.
Hub is Unusable.
This message will appear if a Hub or USB
Flash memory drive with a Hub has been
put into the USB direct interface.
Media Error
This message will appear if you put in a
memory card that is either bad or not
formatted, or when there is a problem with
the media drive. To clear this error, take
out the memory card.
No File
This message will appear if you try to
access a memory card or USB Flash
memory drive in the drive (slot) that does
not contain a .JPG file.
Out of Memory
This message will appear if you are
working with images that are too large for
the machine's memory. This message will
also appear when a memory card or USB
Flash memory drive you are using does
not have enough space available for the
scanned document.
®
, you can easily
Media is Full.
This message will appear if you are trying
to save more than 999 files in a memory
card or USB Flash memory drive.
Unusable Device
This message will appear if a USB device
or USB Flash memory drive that is not
supported has been connected to the USB
direct interface. For more information, visit
us at http://solutions.brother.com
message will also appear if you connect a
broken device to the USB direct interface.
. This
14
109
Page 26

15
Printing photos from a camera 15
Printing photos
directly from a
PictBridge camera
Your Brother machine supports the
PictBridge standard, allowing you to connect
to and print photos directly from any
PictBridge compatible digital camera.
If your camera is using the USB Mass
Storage standard, you can also print photos
from a digital camera without PictBridge. See
Printing photos directly from a digital camera
(without PictBridge) on page 112
PictBridge requirements 15
To avoid errors, remember the following
points:
The machine and the digital camera must
be connected using a suitable USB cable.
The image file extension must be .JPG
(other image file extensions like .JPEG,
.TIF, .GIF and so on will not be
recognized).
PhotoCapture Center
available when using the PictBridge
feature.
®
operations are not
Camera Menu
Selections
15
Paper Size Letter, A4, 4"×6", Printer
Paper Type Plain Paper, Glossy Paper,
Layout Borderless: On, Borderless:
DPOF setting
Print Quality Normal, Fine, Printer Settings
Color
Enhancement
1
See DPOF printing on page 111 for more details.
2
If your camera is set to use the Printer Settings
(Default setting), the machine will print your photo
using the following settings.
Settings Options
Paper Size 4"×6"
Paper Type Glossy Paper
Layout Borderless: On
Print Quality Fine
Color Enhancement Off
When your camera does not have any
menu selections, this setting is also used.
The names and availability of each setting
depends on the specification of your
camera.
Options
Settings (Default setting)
Inkjet Paper, Printer Settings
(Default setting)
Off, Printer Settings (Default
setting)
1
-
(Default setting)
On, Off, Printer Settings
(Default setting)
2
2
2
2
2
Setting your digital camera 15
Make sure your camera is in PictBridge
mode. The following PictBridge settings may
be available from the LCD of your PictBridge
compatible camera.
Depending on your camera some of these
settings may not be available.
110
Please refer to the documentation supplied
with your camera for more detailed
information on changing PictBridge settings.
Page 27

Printing photos from a camera
Printing Images 15
Note
Remove any memory cards or USB Flash
memory drive from the machine before
connecting a digital camera.
a Make sure that your camera is turned
off. Connect your camera to the USB
direct interface (1) on the machine using
the USB cable.
1
DPOF printing 15
DPOF stands for Digital Print Order Format.
Major digital camera manufacturers (Canon
Inc., Eastman Kodak Company, Fuji Photo
Film Co. Ltd., Matsushita Electric Industrial
Co. Ltd. and Sony Corporation) created this
standard to make it easier to print images
from a digital camera.
If your digital camera supports DPOF
printing, you will be able to choose on the
digital camera display the images and
number of copies you want to print.
1 USB direct interface
b Turn on the camera.
When the machine has recognized the
camera, the LCD shows
Camera Connected.
c Choose the photo you want to print
following the instructions from your
camera.
When the machine starts printing a
photo, the LCD will show Printing.
To prevent damage to your machine, do not
connect any device other than a digital
camera or USB Flash memory drive to the
USB direct interface.
WARNING
15
111
Page 28

Chapter 15
Printing photos
directly from a digital
camera (without
PictBridge)
If your camera is using the USB Mass
Storage standard, you can connect your
camera in storage mode. This enables you to
print photos from your camera.
If you would like to print photos in PictBridge
mode, see Printing photos directly from a
PictBridge camera on page 110.
Note
The name, availability and operation differ
among digital cameras. Please refer to the
documentation supplied with your camera
for detailed information, such as how to
switch from PictBridge mode to mass
storage mode.
Printing Images 15
a Make sure that your camera is turned
off. Connect your camera to the USB
direct interface (1) on the machine using
the USB cable.
15
1
1 USB direct interface
b Turn on the camera.
For print settings, see Print
Images on page 97
c Follow the steps in Print
Images on page 97.
Note
Remove any memory cards or USB Flash
memory drive from the machine before
connecting a digital camera.
To prevent damage to your machine, do not
connect any device other than a digital
camera or USB Flash memory drive to the
USB direct interface.
WARNING
112
Page 29

Understanding the
Error Messages 15
Once you are familiar with the types of errors
that can occur while you are using PictBridge,
you can easily identify and troubleshoot any
problems.
Out of Memory
This message will appear if you are
working with images that are too large for
the machine's memory.
Unusable Device
This message will appear if you connect a
camera which is not in PictBridge mode
nor using the USB Mass Storage
standard. This message will also appear if
you connect a broken device to the USB
direct interface.
Printing photos from a camera
For more detailed solutions see Error
messages on page 136.
15
113
Page 30

Chapter 15
114
Page 31

Section V
Software V
Software and Network features 116
Page 32

16
Software and Network features 16
The CD-ROM includes the Software User’s Guide and
Network User’s Guide for features available when
connected to a computer (for example, printing and
scanning). These guides have easy to use links that,
when clicked, will take you directly to a particular section.
You can find information on these features:
Printing
Scanning
®
ControlCenter3 (for Windows
ControlCenter2 (for Macintosh
Remote Setup
Faxing from your computer
®
PhotoCapture Center
Network Printing
Network Scanning
Wireless Network Users (MFC-685CW
and MFC-885CW only)
How to read HTML User’s Guide
This is a quick reference for using the HTML
User’s Guide.
®
(For Windows
)
)
®
)
Note
If you have not installed the software, see
Viewing Documentation on page 2.
a From the Start menu, point to Brother,
MFC-XXXX (where XXXX is your model
number) from the programs group, then
click User’s Guides in HTML format.
c Click the heading you would like to view
from the list at the left of the window.
(For Macintosh®)
a Make sure your Macintosh
on. Insert the Brother CD-ROM into your
CD-ROM drive.
®
is turned
b Double-click the Documentation icon.
c Double-click your language folder, and
then double-click the top page file.
d Click SOFTWARE USER’S GUIDE (or
NETWORK USER’S GUIDE) in the top
menu, and then click the heading you
would like to read from the list at the left
of the window.
b Click SOFTWARE USER’S GUIDE (or
NETWORK USER’S GUIDE) from the
top menu.
116
 Loading...