


i-Convert®
Portable Document and Photo Scanner
Scan receiPts, letters, reciPes, pHOtoS and more
Table of contents
Warnings |
and Cautions . . . . . . . . . . . . . . . . . . . . . . . . . . . . . . . . . . . . . . . . . . . . . . . . . . . . . . . . |
.2 |
Location |
of Parts and Controls . . . . . . . . . . . . . . . . . . . . . . . . . . . . . . . . . . . . . . . . . . . . . . . . . |
3 |
LCD Screen Icons . . . . . . . . . . . . . . . . . . . . . . . . . . . . . . . . . . . . . . . . . . . . . . . . . . . . . . . . . . . . . |
.4 |
|
Included Accessories . . . . . . . . . . . . . . . . . . . . . . . . . . . . . . . . . . . . . . . . . . . . . . . . . . . . . . . . . . |
.4 |
|
Installing the Battery. . . . . . . . . . . . . . . . . . . . . . . . . . . . . . . . . . . . . . . . . . . . . . . . . . . . . . . . . . . |
.5 |
|
Formatting Your microSD Card . . . . . . . . . . . . . . . . . . . . . . . . . . . . . . . . . . . . . . . . . . . . . . . . . |
.5 |
|
Calibrating the Scanner . . . . . . . . . . . . . . . . . . . . . . . . . . . . . . . . . . . . . . . . . . . . . . . . . . . . . . . . |
6 |
|
Setting the Resolution .. .. .. .. .. .. .. .. .. .. .. .. .. .. .. .. .. .. .. .. .. .. .. .. .. .. .. .. .. .. .. .. .. .. .. .. .. .. .. .. .. .. .. .. .. .. .. .. .. .. .. .. .. .. .. .. .. |
6 |
|
Setting the Time and Date . . . . . . . . . . . . . . . . . . . . . . . . . . . . . . . . . . . . . . . . . . . . . . . . . . . . . |
.7 |
|
Setting the Scan Mode . . . . . . . . . . . . . . . . . . . . . . . . . . . . . . . . . . . . . . . . . . . . . . . . . . . . . . . . |
8 |
|
Scanning . . . . . . . . . . . . . . . . . . . . . . . . . . . . . . . . . . . . . . . . . . . . . . . . . . . . . . . . . . . . . . . . . . . . . |
8 |
|
Viewing Your Scans . . . . . . . . . . . . . . . . . . . . . . . . . . . . . . . . . . . . . . . . . . . . . . . . . . . . . . . . . . . . |
9 |
|
Viewing the Scan’s Date and Time Created . . . . . . . . . . . . . . . . . . . . . . . . . . . . . . . . . . . . . . |
9 |
|
Editing and Saving After Scanning . . . . . . . . . . . . . . . . . . . . . . . . . . . . . . . . . . . . . . . . . . . . . 11
Specifications . . . . . . . . . . . . . . . . . . . . . . . . . . . . . . . . . . . . . . . . . . . . . . . . . . . . . . . . . . . . . . . . 12
Computer System Minimum Requirements . . . . . . . . . . . . . . . . . . . . . . . . . . . . . . . . . . . . . 14
Troubleshooting . . . . . . . . . . . . . . . . . . . . . . . . . . . . . . . . . . . . . . . . . . . . . . . . . . . . . . . . . . . . . . 15
Warranty . . . . . . . . . . . . . . . . . . . . . . . . . . . . . . . . . . . . . . . . . . . . . . . . . . . . . . . . . . . . . . . . . . . . . 17
1
BATTERY PRECaUTIONS
•Dispose of the old batteries properly.. Do not dispose of the old batteries in a fire..
•Do not leave the batteries where a child or pet could play with or swallow them.. If the batteries are swallowed, contact a physician immediately..
•The batteries may explode if mistreated.. Do not attempt to recharge or disassemble the batteries..
•Use only fresh batteries of the required size and type.. Do not mix old and new batteries, different types of batteries, or rechargeable batteries of different capacities..
Save these instructions
2
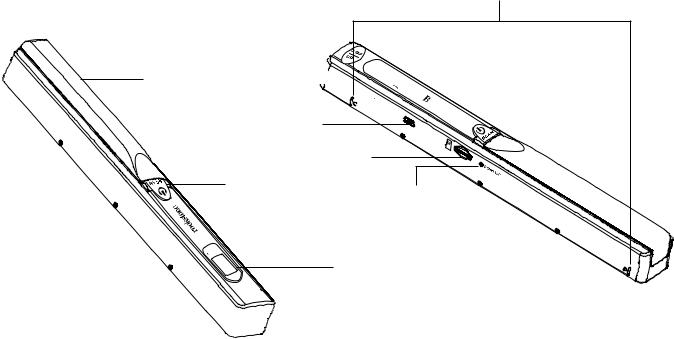
Location of parts and controls
1. |
Battery Door |
7. |
Scan LED Indicator |
2. |
Power/Scan Button |
8. |
Time Set Button |
3. |
Error LED Indicator |
9. |
USB Port |
4. |
LCD Screen |
10. |
microSD Card Slot |
5. |
DPI Resolution Button |
11. |
Format Button |
6. |
C/BW Button |
12. |
Scan Guides |
|
|
|
12 |
1 
 9 8
9 8


10
2
11
7 


 3
3
4 6 

 5
5
3

LCD screen icons
1.Selected Effect Indicator (Color/Mono [Black and White])
2.microSD Card Indicator
3.Battery Indicator
4.Selected Resolution Indicator (High 600dpi/Low 300dpi)
5.Scan Count/Time/Date Indicator
1
2
5
3
4
Included accessories
1. |
Scanner |
4. |
Mini USB Cable |
2. |
White Balance Calibration Sheet |
5. |
Software CD |
3. |
Lens Cleaning Cloth |
6. |
Scanner Drawstring Bag |
4
Installing the batTerY
1.Slide open and remove the BATTERY DOOR and insert 2 AA alkaline batteries according to the polarity indicators inside the compartment..
2.Replace the BATTERY DOOR and slide closed..
Note: The BAtterY INDICatOR on the Led screen will reveal if the batteries need to be replaced.
FormatTIng your microsd card
Important: The microSD card must be formatted before scanning. Note: All content on the microSD card will be erased during formatting.
1.With the Scanner off, insert a microSD card (not included) into the microSD CARD SLOT on the Scanner until it has clicked into place..
Note: Do not force the microSD card into place. Forcing the card may damage the microSD card or the scanner. See the diagram on the scanner to insert the microSD card correctly.
2..Turn the Scanner on by pressing the POWER/SCAN button for 2 seconds..
3..Using a thin, blunt object, press the FORMAT button once.. An “F” will show on the LCD screen..
4..Press the POWER/SCAN button once to begin formatting the microSD card..
5..The microSD CARD INDICATOR will blink until the formatting process is complete..
5
 Loading...