

Broan SmartSense SMSC110, SmartSense SMSC080 Instructions Manual

MODELS SMSC080 • SMSC110
CONTROL
Broan SmartSense® Intelligent Ventilation Controllers
READ AND SAVE THESE INSTRUCTIONS
Page 1
WARNING
TO REDUCE THE RISK OF FIRE, ELECTRIC SHOCK, OR INJURY TO PERSONS,
OBSERVE THE FOLLOWING:
1. Use this unit only in the manner intended by the manufacturer.
If you have questions, contact the manufacturer at the address or
telephone number listed in the warranty.
2. Before servicing or cleaning unit, switch power off at service panel
and lock the service disconnecting means to prevent power from
being switched on accidentally. When the service disconnecting
means cannot be locked, securely fasten a prominent warning
device, such as a tag, to the service panel.
3. Installation work and electrical wiring must be done by a qualified
person(s) in accordance with all applicable codes and standards,
including fire-rated construction codes and standards.
4. Sufficient air is needed for proper combustion and exhausting
of gases through the flue (chimney) of fuel burning equipment
to prevent backdrafting. Follow the heating equipment
manufacturer’s guideline and safety standards such as those
published by the National Fire Protection Association (NFPA),
and the American Society for Heating, Refrigeration and Air
Conditioning Engineers (ASHRAE), and the local code authorities.
5. When cutting or drilling into wall or ceiling, do not damage
electrical wiring and other hidden utilities.
6. This unit must be grounded.
7. Do not connect this product as a load on a fan speed control or
light dimmer.
8. Read and understand entire instructions before proceeding with
installation.
WARRANTY
Broan-NuTone warrants to the original consumer purchaser of its products that such products
will be free from defects in materials or workmanship for a period of one year from the date of
original purchase. THERE ARE NO OTHER WARRANTIES, EXPRESS OR IMPLIED, INCLUDING, BUT
NOT LIMITED TO, IMPLIED WARRANTIES OF MERCHANTABILITY OR FITNESS FOR A PARTICULAR
PURPOSE.
During this one-year period, Broan-NuTone will, at its option, repair or replace, without charge,
any product or part which is found to be defective under normal use and service.
THIS WARRANTY DOES NOT EXTEND TO FLUORESCENT LAMP STARTERS, TUBES, AND FUSES.
This warranty does not cover (a) normal maintenance and service or (b) any products or parts
which have been subject to misuse, negligence, accident, improper maintenance or repair
(other than by Broan-NuTone), faulty installation or installation contrary to recommended
installation instructions.
The duration of an implied warranty is limited to the one-year period as specified for the
express warranty. Some states do not allow limitation on how long an implied warranty lasts,
so the above limitation may not apply to you.
BROAN-NUTONE’S OBLIGATION TO REPAIR OR REPLACE, AT BROAN-NUTONE’S OPTION, SHALL
BE THE PURCHASER’S SOLE AND EXCLUSIVE REMEDY UNDER THIS WARRANTY. BROAN-NUTONE
SHALL NOT BE LIABLE FOR INCIDENTAL, CONSEQUENTIAL OR SPECIAL DAMAGES ARISING OUT
OF OR IN CONNECTION WITH PRODUCT USE OR PERFORMANCE. Some states do not allow the
exclusion or limitation of incidental or consequential damages, so the above limitation may
not apply to you.
This warranty gives you specific legal rights, and you may also have other rights, which vary
from state to state. This warranty supersedes all prior warranties.
To qualify for warranty service, you must (a) notify Broan-NuTone at the address or telephone
number below, (b) give the model number and part identification and (c) describe the nature of
any defect in the product or part. At the time of requesting warranty service, you must present
evidence of the original purchase date.
Broan-NuTone LLC Hartford, Wisconsin www.broan.com 800-558-1711
BROAN-NUTONE ONE YEAR LIMITED WARRANTY
INSTALLATION
LINE
Black
LINE
Black
FAN
MASTER
or SLAVE
LOAD
Red
BLACK
POWER
LINE
(GFCI
protected
if required)
GROUND
Bare
Copper
NEUTRAL
White
GROUND
Bare
Copper
NEUTRAL
GROUND
Green
White
WHITE
Install controls and wire them as shown. Use following guidelines:
• IMPORTANT:
QTXE080 Ultra Silent™ fan must be wired to SMSC080
SmartSense® control.
QTXE110 Ultra Silent™ fan must be wired to SMSC110
SmartSense® control.
• Useminimum75°Cratedelectricalwiring.
• Except for required neutral wire, these controls install like
normal switches. Make sure electrician knows each control
location must have a neutral wire. Neutral wire at switch
locations may be code requirement or regular practice in
installation municipality; but unless explicitly specified,
electrician might not install it.
• Specify deep device electrical boxes where controls will be
installed. These controls fit in most North American electrical
boxes; however, deep boxes provide extra working space which
eases installation. Labor cost savings can offset higher box
costs, which is usually less than a dollar over standard depth
boxes. Use boxes that have 18 cu. in. minimum volume and
are at least 1-1/2 in. deep.
• Allcontrolsmustbegroundedusingattachedgroundwire.

CONTROL OPERATION
MODELS SMSC080 • SMSC110
Page 2
HOW SYSTEM WORKS
Broan SmartSense® system is design to provide recommended
ventilation for desirable indoor air quality. Related ventilation
requirements of *ANSI/ASHRAE Standard 62, “Ventilation for
Acceptable Indoor Air Quality” are fulfilled when this system is
installed accordingly. Ventilation level, which is based on home
square footage and number of bedrooms, is easily set during
installation. Power outages do not affect settings, since they are
stored in power independent (nonvolatile) memory. Energy usage
is optimized by monitoring fan on-time and adjusting automatic
ventilation as needed. Indoor air quality is provided 24-hours a
day, 7-days a week.
A single Broan SmartSense® system is powerful enough to fulfill
ventilation rates for larger homes; however, it is recommended
to use multiple installations for homes with multiple bathrooms.
Multiple installations provide distributed ventilation throughout
the home. Multiple installations are linked and communicate
through home’s normal power circuits to form an indoor air quality
network. In typical multiple installations, Master control is located
in master bathroom. Broan and Best by Broan LinkLogic™ enabled
range hoods and LinkLogic™ enabled electric dampers can be
linked with SmartSense® so their indoor air quality ventilation
contribution is included.
Additional features, which are turned off at factory, include
Vacation, Disabled, Automatic-Off, and Delayed-Off modes.
Vacation mode temporarily disables system until Master fan is
manually turned on. Disabled mode removes fan from automatic
ventilation usage. Disabled mode does not affect manual operation
and its ventilation is credited toward system level requirement, but
Broan SmartSense® will not turn it on for automatic ventilation.
If fan is manually left on, Automatic-Off turns it off after 60-minutes.
Delayed-Off turns fan off after 20-minutes from when Off paddle is
pressed. Fan can be immediately turned off by pressing Off paddle
twice.
* American National Standards Institute / American Society of Heating,
Refrigerating and Air-Conditioning Engineers
HOW LED WORKS
LED works differently in Run and Program/Feature Selection
modes.
Run Mode: LED is off when fan is off. LED is on when fan is on
manual ventilation; turned on by pressing On paddle. LED turns
on briefly every second (fast-blink) when fan is on automatic
ventilation; turned on by Broan SmartSense®.
Program/Feature Selection Mode: LED turns on and off every second
(slow-blink) when system is in Program or Feature Selection mode.
LED is off when Feature associated with pressed paddle is off.
LED is on when Feature associated with pressed paddle is on.
INDOOR AIR QUALITY NETWORK
A single Broan SmartSense® system is powerful enough to fulfill
ventilation rates for larger homes; however, it is recommended
to use multiple installations for homes with multiple bathrooms.
Multiple installations provide distributed ventilation throughout
the home.
Multiple installations communicate through a home’s electrical
power circuits to form an indoor air quality network. Communication
pathways are called links. For optimum link performance, wire
multiple installations to the same electrical circuit. If installation
on the same electrical circuit is not possible then try to keep
multiple installations on the same electrical phase. If multiple
installations are connected to different electrical phases, have an
electrician install an SMSCPLR Broan SmartSense® Phase Coupler
near circuit breaker panel.
Multiple installations can operate independently; although, it is
recommended to link them together as an indoor air quality network.
If single system is installed or independent system operation is
desired, proceed with “How To Set System Level” section.
One Broan SmartSense® control is selected as system Master during
set up. Any control can be selected as system Master, but typically
master bathroom control is chosen. All controls are factory set as
system Masters; therefore, installations will operate as independent
systems at factory set system level after installation if following set
up is not done.
One Master control can link up to 10 Broan SmartSense® and
LinkLogic™ devices. SmartSense® controls that are linked to
Master control are called Slaves.
HOW TO LINK SMARTSENSE® SYSTEM
1. Unless another control is designated and clearly marked on
frame, under decorative plate, or documented on this instruction
sheet as Master control, go to master bathroom control.
2. Put Master control in Program mode; press and hold SET button
for 3-seconds (a beep should be heard) then release it.
Note: In order to help with single person installation, Master
control will wait 6-minutes in Program mode for Slave link.
3. LED should be turning on and off every second (slow-blink); if it
isn’t then repeat step 2.
4. Go to first control to link as a Slave.
5. Press and hold SET button for 3-seconds (a beep should be
heard) then release it.
6. Fan and LED should turn on after Slave’s SET button is released.
Note: At same time Slave turns on, Master fan turns on.
7. Press and release Slave’s Off paddle to manually turn fan off.
8. If there are more Slave installations then go to next control and
repeat steps 5 through 8; otherwise continue with next step.
Note: In order to help with single person installation,
Master control will remain in Program mode for 6-minutes after
last Slave is linked.
9. When all Slaves are linked, exit Master Program mode; go to
Master control, press and release SET button.
10. Master LED will fast-blink to indicate system level (see HOW
TO SET SYSTEM LEVEL, steps 9-12) and then remain on
steady, since fan is on. This action confirms Program mode
exit.
11. Press and release Master’s Off paddle to turn off LED and fan.
MODELS SMSC080 • SMSC110
HOW TO SET SYSTEM LEVEL
Installer, homeowner, or building science expert may adjust Broan
SmartSense® ventilation system level.
1. System Level is only set in Master control. If home has more than
one installation then locate Master control; it is usually in master
bathroom or it should be clearly marked or documented.
2. Circle, mark or highlight System Level in Table A using home’s
square footage and number of bedrooms.
Note: Building science experts may calculate different rate based
on air infiltration measurements.
3. Circle, mark or highlight same System Level in Table B.
4. If home’s System Level is 30 then next steps are not necessary,
since System Level is set at factory to 30.
5. Put Master control in Program mode; press and hold SET button
for 3-seconds and then release it.
6. LED should be turning on and off every second (slow-blink); if it
is not then repeat step 5.
7. Press and release (tap) On paddle number of times from Table B.
If you tap On paddle too many times, tap Off paddle and System
Level will be reduced once for each Off paddle tap.
In order to reset System Level to 30, immediately after entering
Program mode (Steps 5-6), tap On paddle only once and then tap
Off paddle only once.
If you lose On paddle counts, tap Off paddle 9 times or more then
tap On paddle twice; System Level will be at 30; proceed with On
paddle taps from Table B.
8. Exit Program mode; press and release SET button.
9. After exiting Program mode, LED will fast-blink a number of
times.
LED will fast-blink the same number of times in three sets with a
slight pause in between each set.
10. Count number of times LED fast-blinks in a set.
11. Compare number of times LED fast-blinks in a set to number for
System Level in Table B.
12. If they are the same then System Level is set accordingly;
otherwise, re-adjust System Level starting with step 5.
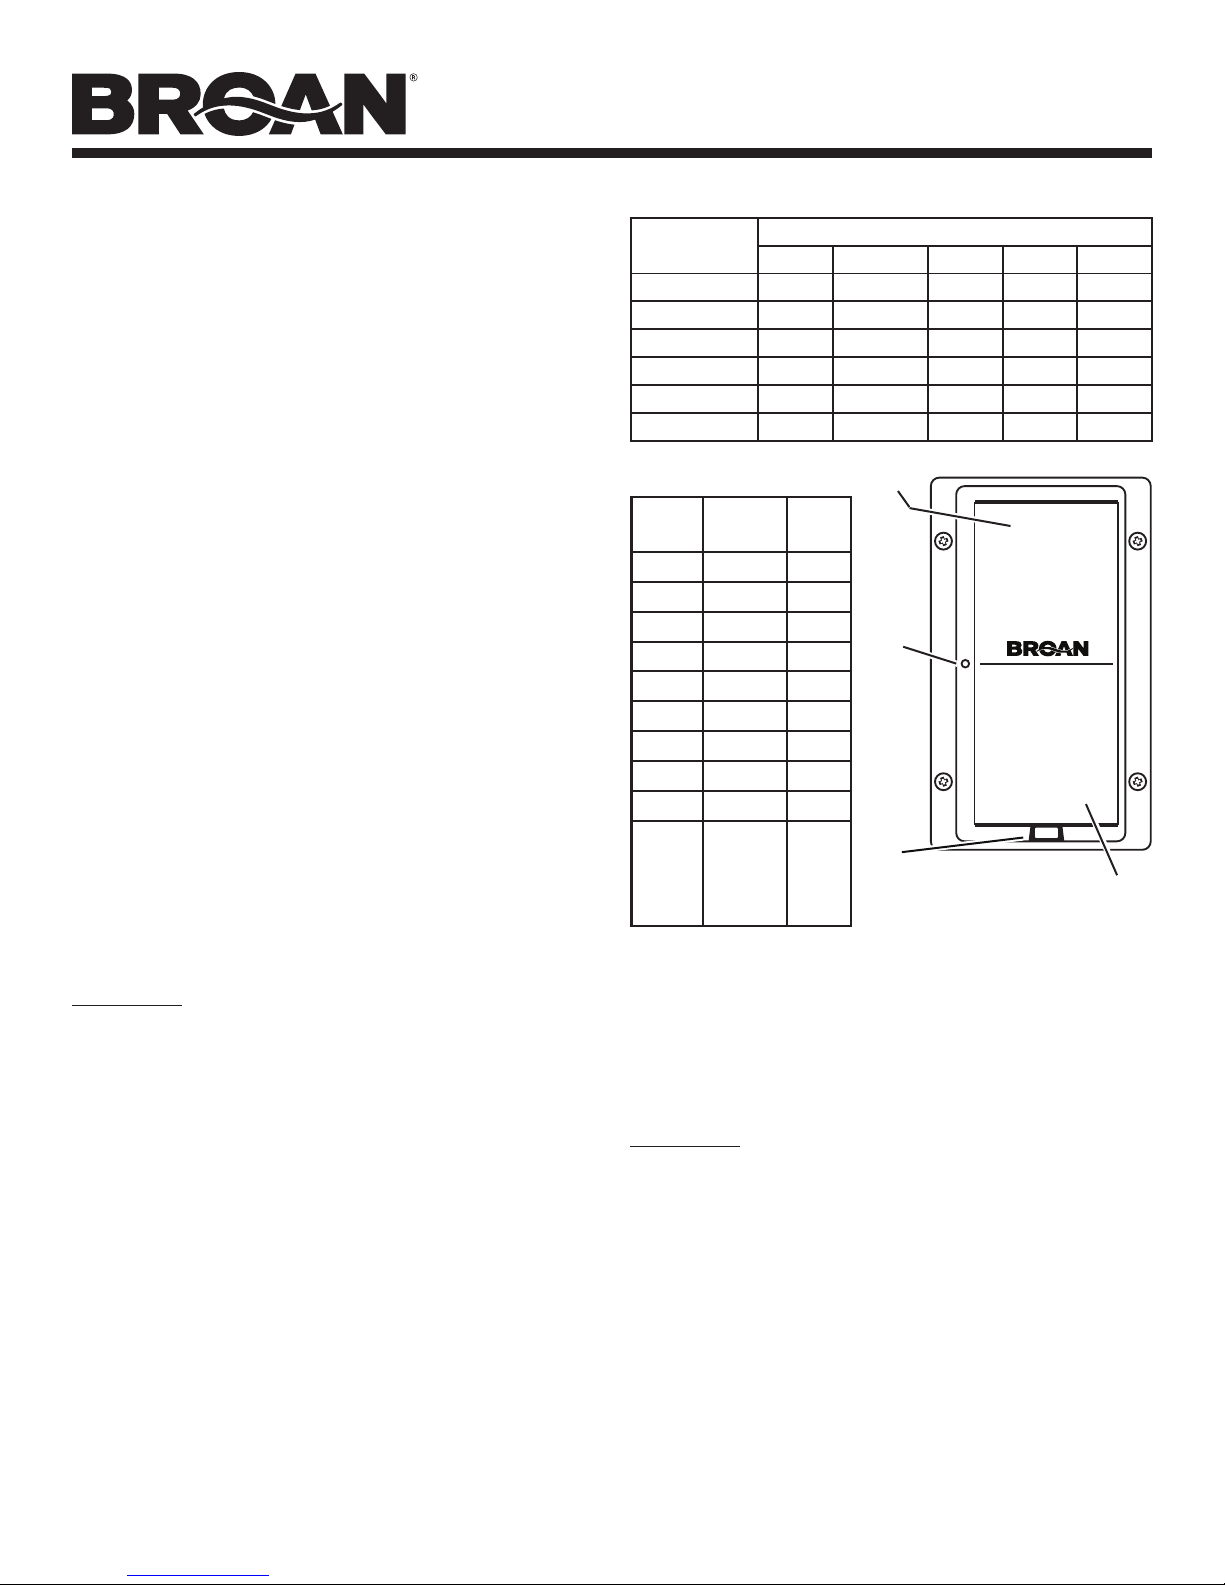
TABLE A
Floor Area (ft2)
< 1500
_
1501 - 3000
3001 - 4500
4501 - 6000
6001 - 7500
> 7500
TABLE B
System
Level
0 - 1 2 - 3 4 - 5 6 - 7 > 7
30 45 60 75 90
45 60 75 90 105
60 75 90 105 120
75 90 105 120 135
90 105 120 135 150
105 120 135 150 165
ON PADDLE
ON
Taps
Fast
Blinks
165 9 11
150 8 10
135 7 9
120 6 8
LED
105 5 7
90 4 6
75 3 5
60 2 4
45 1 3
30 ON &
OFF or
OFF 9x
2
SET
button
& ON 2x
Bedrooms
Page 3
Push to
turn ON
SmartSense
Push to
turn OFF
®
®
OFF
PADDLE
FEATURES
Vacation Mode
Used only with Master control. Temporarily disables Broan
SmartSense® system. Master control will not automatically turn
on its fan or any other system fan. After Feature Selection mode
exit, Vacation mode is cancelled when Master control On paddle is
pressed.
To activate Vacation Mode:
1. Make sure fan and LED are off: Press and release OFF PADDLE.
2. Put control in Feature Selection mode: Press and hold ON
PADDLE (approximately 10 seconds, a beep should be heard)
until LED turns on and off every second (slow blink).
3. Release ON PADDLE.
4. Press and hold ON PADDLE:
a. If LED is off when ON PADDLE is held on then Vacation
mode is off.
b. If LED is on when ON PADDLE is held on then Vacation
mode is on.
5. Release ON PADDLE.
6. Press and release ON PADDLE to toggle Vacation mode status:
a. If Vacation mode was off then it will be turned on.
b. If Vacation mode was on then it will be turned off.
7. Repeat steps 4 through 6 to review and set desired Vacation
mode status.
8. Press and release SET button to exit Feature Selection mode.
9. Fan and LED will turn on for 1 to 2 seconds and then turn off,
which indicates Vacation mode has been set.
Note: Vacation mode is turned off when master control is manually
turned on and off; therefore, make sure no one touches master
control after Vacation mode is turned on.
Disabled Mode
Excludes fan from automatic ventilation usage. Does not affect
manual operation and its ventilation is credited toward system
level accumulation. Master control will not turn it on for automatic
ventilation requirement fulfillment. If Master control is put in
Disabled mode, it will not turn on any fans for automatic ventilation
and recommended indoor air quality ventilation level is not assured.
To activate Disabled Mode:
1. Make sure fan and LED are off: Press and release OFF PADDLE.
2. Put control in Feature Selection mode: Press and hold ON
PADDLE (approximately 10 seconds, a beep should be heard)
until LED turns on and off every second (slow blink).
3. Release ON PADDLE.
4. Press and hold OFF PADDLE:
a. If LED is off when OFF PADDLE is held on then Disabled
mode is off.
b. If LED is on when OFF PADDLE is held on then Disabled
mode is on.

MODELS SMSC080 • SMSC110
Page 4
5. Release OFF PADDLE.
6. Press and release OFF PADDLE to toggle Disabled mode status:
a. If Disabled mode was off then it will be turned on.
b. If Disabled mode was on then it will be turned off.
7. Repeat steps 4 through 6 to review and set desired Disabled
mode status.
8. Press and release SET button to exit Feature Selection mode.
9. Fan and LED will turn on for 1 to 2 seconds and then turn off,
which indicates Disabled mode has been set.
Automatic-Off Mode
Automatically turns fan off 60-minutes after it was manually turned
on.
To activate Automatic-Off mode:
1. Make sure fan and LED are off: Press and release OFF PADDLE.
2. Put control in Feature Selection mode: Press and hold OFF
PADDLE (approximately 10 seconds, a beep should be heard)
until LED turns on and off every second (slow blink).
3. Release OFF PADDLE.
4. Press and hold ON PADDLE:
a. If LED is off when ON PADDLE is held on then Automatic-
Off mode is off.
b. If LED is on when ON PADDLE is held on then Automatic-
Off mode is on.
5. Release ON PADDLE.
6. Press and release ON PADDLE to toggle Automatic-Off mode
status.
a. If Automatic-Off mode was off then it will be turned on.
b. If Automatic-Off mode was on then it will be turned off.
7. Repeat steps 4 through 6 to review and set desired AutomaticOff mode status.
8. Press and release SET button to exit Feature Selection mode.
9. Fan and LED will turn on for 1 to 2 seconds and then turn off,
which indicates Disabled mode has been set.
SYSTEM LEVEL VENTILATION RATE ADJUSTMENT
Used for California Title 24 and ASHRAE 62.2. compliance based
on actual, field-measured air flow rates.
Use following procedure to determine adjusted SmartSense system level or use simple, fill-in blanks website application at: www.
broan.com, search: smartsense, select model SSQTXE080 or
SSQTXE110, select tab CA Airflow Calculator.
1. Calculate ventilation rate using ASHRAE 62.2 formula 4.1a for
single-family buildings or formula 4.2a for multifamily buildings:
Q = (0.01 × A) + [7.5 × (N + 1)] (4.1a);
Q = (0.03 × A) + [7.5 × (N + 1)] (4.2a);
Where:
Q is ventilation rate in cfm;
A is floor area of residence in square-feet;
N is number of bedrooms, but not less than 1.
2. Measure actual air flow (cfm) of each installed fan.
3. Calculated adjustment factor using the following formula:
K = (88 × N
Where:
K is adjustment factor (unit less);
CFM80 is the lowest air flow of 80 cfm fans measured in step 2;
CFM
is the lowest air flow of 110 cfm fans measured in step
110
2;
N80 is number of 80 cfm fans in system;
N
is number of 110 cfm fans in system;
110
N
is total number of fans in system (N
TOTAL
4. Calculate adjusted ventilation rate: Q’ = Q × K.
5. Set SmartSense master’s system level equal to or greater than
Q’.
) ÷ [(1.1 × N80 × CFM80) + (0.8 × N
TOTAL
= N80 + N
TOTAL
× CFM
110
110
110
).
)];
Delayed-Off Mode
Turns fan off 20-minutes after Off paddle was pressed once. In
order to turn fan off immediately, press Off paddle twice.
To activate Delayed-Off mode:
1. Make sure fan and LED are off: Press and release OFF PADDLE.
2. Put control in Feature Selection mode: Press and hold OFF
PADDLE (approximately 10 seconds, a beep should be heard)
until LED turns on and off every second (slow blink).
3. Release OFF PADDLE.
4. Press and hold OFF PADDLE:
a. If LED is off when OFF PADDLE is held on then Delayed-Off
mode is off.
b. If LED is on when OFF PADDLE is held on then Delayed-Off
mode is on.
5. Release OFF PADDLE.
6. Press and release OFF PADDLE to toggle Delayed-Off mode
status.
a. If Delayed-Off mode was off then it will be turned on.
b. If Delayed-Off mode was on then it will be turned off.
7. Repeat steps 4 through 6 to review and set desired Delayed-Off
mode status.
8. Press and release SET button to exit Feature Selection mode.
9. Fan and LED will turn on for 1 to 2 seconds and then turn off,
which indicates Disabled mode has been set.
 Loading...