


JARO

Mobiler LED Strahler · Stativ LED Strahler
Mobile LED Light · Tripod LED Light
Projecteur LED mobile et compact ·
Projecteur LED sur pied télescopique
JARO
A Bedienungsanleitung. . . . . . . . . . . . . . . . . . . . . . . . . . . . . . . . . . . . . 4
D Operating instructions
. . . . . . . . . . . . . . . . . . . . . . . . . . . . . . . . . . . 7
G Mode d‘emploi
. . . . . . . . . . . . . . . . . . . . . . . . . . . . . . . . . . . . . . . . . . . . . . 10
M Gebruikshandleiding
. . . . . . . . . . . . . . . . . . . . . . . . . . . . . . . . . . . . . 13
J Istruzioni per l’uso
. . . . . . . . . . . . . . . . . . . . . . . . . . . . . . . . . . . . . . . . . 16
S Bruksanvisning
. . . . . . . . . . . . . . . . . . . . . . . . . . . . . . . . . . . . . . . . . . . . . 19
E Manual de instrucciones
. . . . . . . . . . . . . . . . . . . . . . . . . . . . . . . . . 22
N Instrukcja obsługi
. . . . . . . . . . . . . . . . . . . . . . . . . . . . . . . . . . . . . . . . . . 25
B Návod k obsluze
. . . . . . . . . . . . . . . . . . . . . . . . . . . . . . . . . . . . . . . . . . . . 28
I Kezelési útmutató
. . . . . . . . . . . . . . . . . . . . . . . . . . . . . . . . . . . . . . . . . . 31
T Kullanım kılavuzu
. . . . . . . . . . . . . . . . . . . . . . . . . . . . . . . . . . . . . . . . . . 34
F Käyttöohje
. . . . . . . . . . . . . . . . . . . . . . . . . . . . . . . . . . . . . . . . . . . . . . . . . . . . 37
H Οδηγίε χρήση
. . . . . . . . . . . . . . . . . . . . . . . . . . . . . . . . . . . . . . . . . . . . . 40
P
. . . . . . . . . . . . . . . . . . . . . . . 43
O Manual de instruções
. . . . . . . . . . . . . . . . . . . . . . . . . . . . . . . . . . . . . 46
C Kasutusjuhend
. . . . . . . . . . . . . . . . . . . . . . . . . . . . . . . . . . . . . . . . . . . . . . 49
R Návod na používanie
. . . . . . . . . . . . . . . . . . . . . . . . . . . . . . . . . . . . . 52
Q Navodila za uporabo
. . . . . . . . . . . . . . . . . . . . . . . . . . . . . . . . . . . . . . 55
L Lietošanas instrukcija
. . . . . . . . . . . . . . . . . . . . . . . . . . . . . . . . . . . . 58
K Naudojimo instrukcija
. . . . . . . . . . . . . . . . . . . . . . . . . . . . . . . . . . . . 61
18P083 Mobiler_Stativ LED Strahler Jaro 180904.indd 1 04.09.2018 16:38:26
2
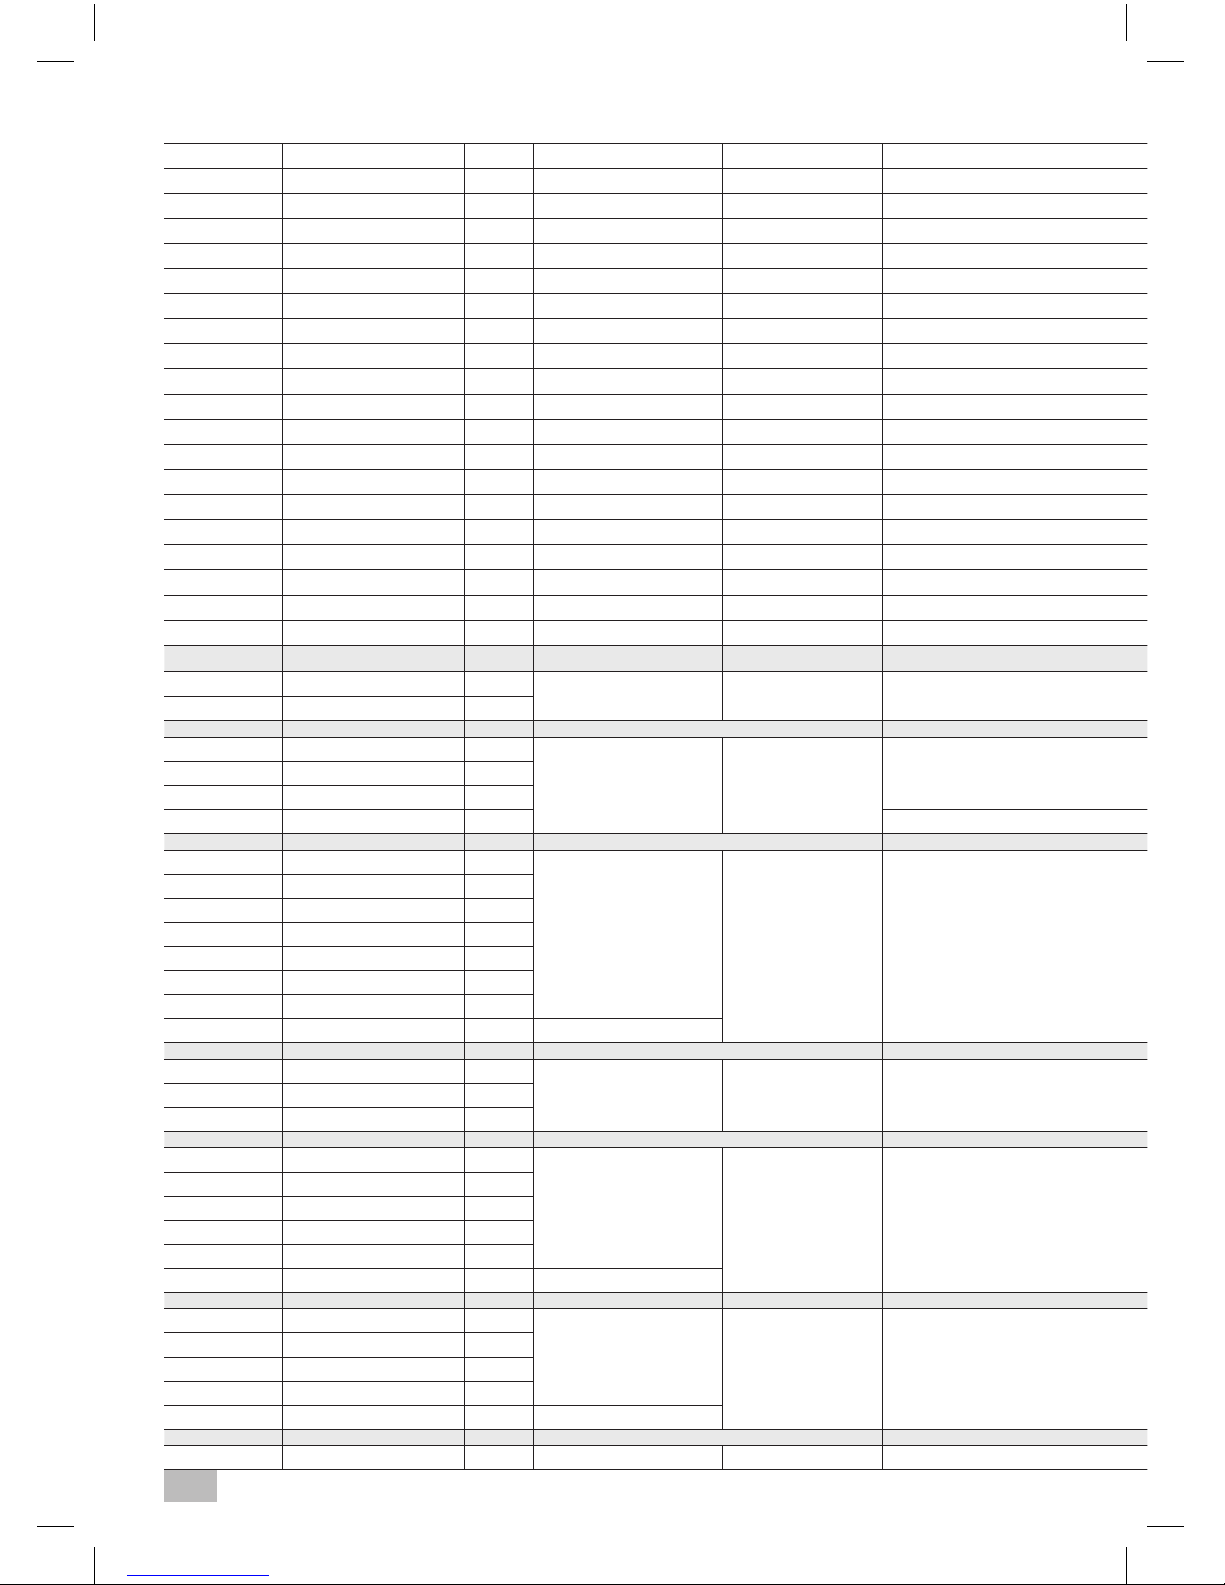
A Ty p
Netzstecker Stativ Nennleistung Strom max. Leistungsfaktor
Maße Schutzabdeckung Gewicht max. projizierte Fläche Maße
D Model
Mains plug Tripod Electrical Power Current max. Power factor
Protective cover dimensions Weight max. projected area Dimensions
G Type
Fiche secteur Pied Puissance nominale Courant max. Facteur de puissance
Dimensions couvercle de protection Poids Surface de projection maximale Dimensions
M Type
Netstekker Statief Nominaal vermogen Max. stroom Capaciteitsfactor
Afmetingen veiligheidsplaat Gewicht Maximale projectieoppervlakte Afmetingen
J Modello
Spina Stativo Potenza Flusso luminoso Fattore di potenza
Dimensioni copertura protettiva Peso Massima supercie proiettata Dimensioni
S Ty p
Nätkontakt Stativ Märkeekt Max. Ström Eektfaktor
Mått på skyddshölje Vikt Maximal projektionsyta Mått
E Tipo
Adaptador de red Trípode Potencia nominal Strom max. Factor de potencia
Dimensiones de la cubierta protectora Peso Área rea máxima proyectada Dimensión
N Ty p
Wtyczka sieciowa Statyw Moc znamionowa Prąd maks. Współczynnik mocy
Wymiary obudowy ochronnej Ciężar Maks, powierzchnia oświetlana Wymiary
B Ty p
Síťová zástrčka Stojan Jmenovitý výkon Proud max. Výkonový faktor
Rozměry ochranného krytu Hmotnost Maximální plocha projekce Rozměry
I Típus
Hálózati csatlakozó dugó Állvány Névleges teljesítmény Áram max. Teljesítménytényező
Védőfedél méretei Súly Maximális bevilágított felület Méretek
T Ty p
Elektrik şi Ayaklık Nominal güç Akım maks. Güç faktörü
Koruyucu kapağın ölçüleri Ağırlık Azami aydınlatma alanı Ölçüler
F Tyyppi
Verkkopistoke Jalka Nimellisteho Suurin virta Tehokerroin
Suojuksen koko Paino Suurin heijastava alue Mitat
H Τύπος
Φις Τρίποδο Ονομαστική ισχύς Μέγ. ηλεκτρικό ρεύμα Συντελεστής ισχύος
Διαστάσεις προστατευτικού καλύμματος Βάρος Mέγιστη επιφάνεια φωτισμού Διαστάσεις
P Ти п
Сетевой штекер Штатив Номинальная мощность Макс. сила тока Коэффициент мощности
Размеры защитное покрытие Вес Максимальная проецируемая площадь Размеры
O Tipo
Ficha elétrica Tripé Potência nominal Corrente máxima Fator de potência
Dimensões da tampa de proteção Peso Área rea máxima projectada Dimensões
C Tüüp
Toitepistik Statiiv Nimivõimsus Max voolupinge Võimsustegur
Kaitsekatte mõõtmed Kaal Maksimaalne valgustatav pindala Mõõtmed
R Ty p
Sieťová zástrčka Stojan Nominálny výkon Prúd max. Výkonový faktor
Rozmery ochranného krytu Hmotnosť Maximálna plocha projekcie Rozmery
Q Tip
Vtičnica Stativ Nazivna moč Maksimalna napetost Faktor moči
Mere zaščite Tež a Maksimalna projicirana površina Mere
K Modelis
Tinklo kištukas Stovas Vardinė galia Maks. srovė Galios koecientas
Apsauginio gaubto matmenys Svoris Maksimalus projekcinis plotas Matmenys
L Tips
Kontaktdakša Statīvs Nominālā jauda Maks. strāva Jaudas faktors
Aizsargstikla izmēri Svars Maksimāli apgaismotais laukums Izmēri
W A
JARO 1000 M Schuko
10 0,08 > 0,5
113,6 x 89,6 x 4
JARO 1002 M CH
JARO 2000 M Schuko
20 0,16
> 0,5
153,6 x 121,6 x 4
JARO 2000 T Schuko x
JARO 2003 M GB
JARO 2003 CM CEE > 0,9
JARO 3000 M Schuko
30
0,17 > 0,5
202,8 x 160,8 x 4
JARO 3000 T Schuko x
JARO 3003 M GB
JARO 3003 T GB x
JARO 3003 CM CEE
JARO 3003 CT CEE x
JARO 3002 M CH
JARO 3012 M CH 30 – 3000K
JARO 4000 T Schuko x
2 x 20 2 x 0,16 > 0,9
153,6 x 121,6 x 4
JARO 4003 T GB x
JARO 4003 CT CEE x
JARO 5000 M Schuko
50
0,25 > 0,9
213,2 x 161,2 x 4
JARO 5000 T Schuko x
JARO 5003 M GB
JARO 5003 CM CEE
JARO 5002 M CH
JARO 5012 M CH 50 – 3000K
JARO 7000 M Schuko
80
0,5 > 0,9
248,8 x 171,8 x 5
JARO 7003 M GB
JARO 7003 CM CEE
JARO 7002 M CH
JARO 7012 M CH 80 – 3000K
18P083 Mobiler_Stativ LED Strahler Jaro 180904.indd 2 04.09.2018 16:38:26

3
Maße Schutzabdeckung Gewicht max. projizierte Fläche Maße
Protective cover dimensions Weight max. projected area Dimensions
Dimensions couvercle de protection Poids Surface de projection maximale Dimensions
Afmetingen veiligheidsplaat Gewicht Maximale projectieoppervlakte Afmetingen
Dimensioni copertura protettiva Peso Massima supercie proiettata Dimensioni
Mått på skyddshölje Vikt Maximal projektionsyta Mått
Dimensiones de la cubierta protectora Peso Área rea máxima proyectada Dimensión
Wymiary obudowy ochronnej Ciężar Maks, powierzchnia oświetlana Wymiary
Rozměry ochranného krytu Hmotnost Maximální plocha projekce Rozměry
Védőfedél méretei Súly Maximális bevilágított felület Méretek
Koruyucu kapağın ölçüleri Ağırlık Azami aydınlatma alanı Ölçüler
Suojuksen koko Paino Suurin heijastava alue Mitat
Διαστάσεις προστατευτικού καλύμματος Βάρος Mέγιστη επιφάνεια φωτισμού Διαστάσεις
Размеры защитное покрытие Вес Максимальная проецируемая площадь Размеры
Dimensões da tampa de proteção Peso Área rea máxima projectada Dimensões
Kaitsekatte mõõtmed Kaal Maksimaalne valgustatav pindala Mõõtmed
Rozmery ochranného krytu Hmotnosť Maximálna plocha projekcie Rozmery
Mere zaščite Tež a Maksimalna projicirana površina Mere
Apsauginio gaubto matmenys Svoris Maksimalus projekcinis plotas Matmenys
Aizsargstikla izmēri Svars Maksimāli apgaismotais laukums Izmēri
mm kg cm² mm
113,6 x 89,6 x 4
1,06 411,96 206,5 x 130,5 x 199,5
1,34 411,96 206,5 x 130,5 x 199,5
153,6 x 121,6 x 4
1,33 579,47 244,5 x 138,5 x 237
3,43 341,3 920 x 55 x 1801,5
1,33 579,47 244,5 x 138,5 x 237
1,33 579,47 244,5 x 138,5 x 237
202,8 x 160,8 x 4
2,34 878,63 303,5 x 163 x 289,5
4,4 594,2 1160 x 62 x 1780
2,34 878,63 303,5 x 163 x 289,5
4,4 594,2 1160 x 62 x 1780
2,34 878,63 303,5 x 163 x 289,5
4,4 594,2 1160 x 62 x 1780
2,59 878,63 303,5 x 163 x 289,5
2,59 878,63 303,5 x 163 x 289,5
153,6 x 121,6 x 4
4,32 2x341,3 1070 x 55 x 1627,5
4,32 2x341,3 1070 x 55 x 1627,5
4,32 2x341,3 1070 x 55 x 1627,5
213,2 x 161,2 x 4
3,03 1030,39 334 x 170,5 x 308,5
4,839 769,7 1160 x 75 x 1816,5
3,03 1030,39 334 x 170,5 x 308,5
3,03 1030,39 334 x 170,5 x 308,5
3,03 1030,39 334 x 170,5 x 308,5
3,03 1030,39 334 x 170,5 x 308,5
248,8 x 171,8 x 5
4,68 1400 402 x 204 x 340
4,68 1400 402 x 204 x 340
4,68 1400 402 x 204 x 340
4,68 1400 402 x 204 x 340
4,68 1400 402 x 204 x 340
18P083 Mobiler_Stativ LED Strahler Jaro 180904.indd 3 04.09.2018 16:38:26

4
A Bedienungsanleitung
Mobiler LED Strahler / Stativ LED Strahler
JARO
Achtung: Lesen Sie vor dem Gebrauch des Strahlers diese Gebrauchsanweisung bitte aufmerk-
sam durch und bewahren Sie sie anschließend gut auf!
TECHNISCHE DATEN
Schutzklasse: I
Schutzart: IP 65
Nennspannung 230 V Versionen: 220-240 V~ 50/60 Hz
Nennspannung 110 V Versionen: 100-130 V~ 50/60 Hz
Anschlussleitung: H07RN-F 3G1,0
Leistungsfaktor: siehe Tabelle (Seite 2)
Diese LED-Strahler sind für Beleuchtungszwecke im Innen- und Außenbereich geeignet.
BEDIENUNG
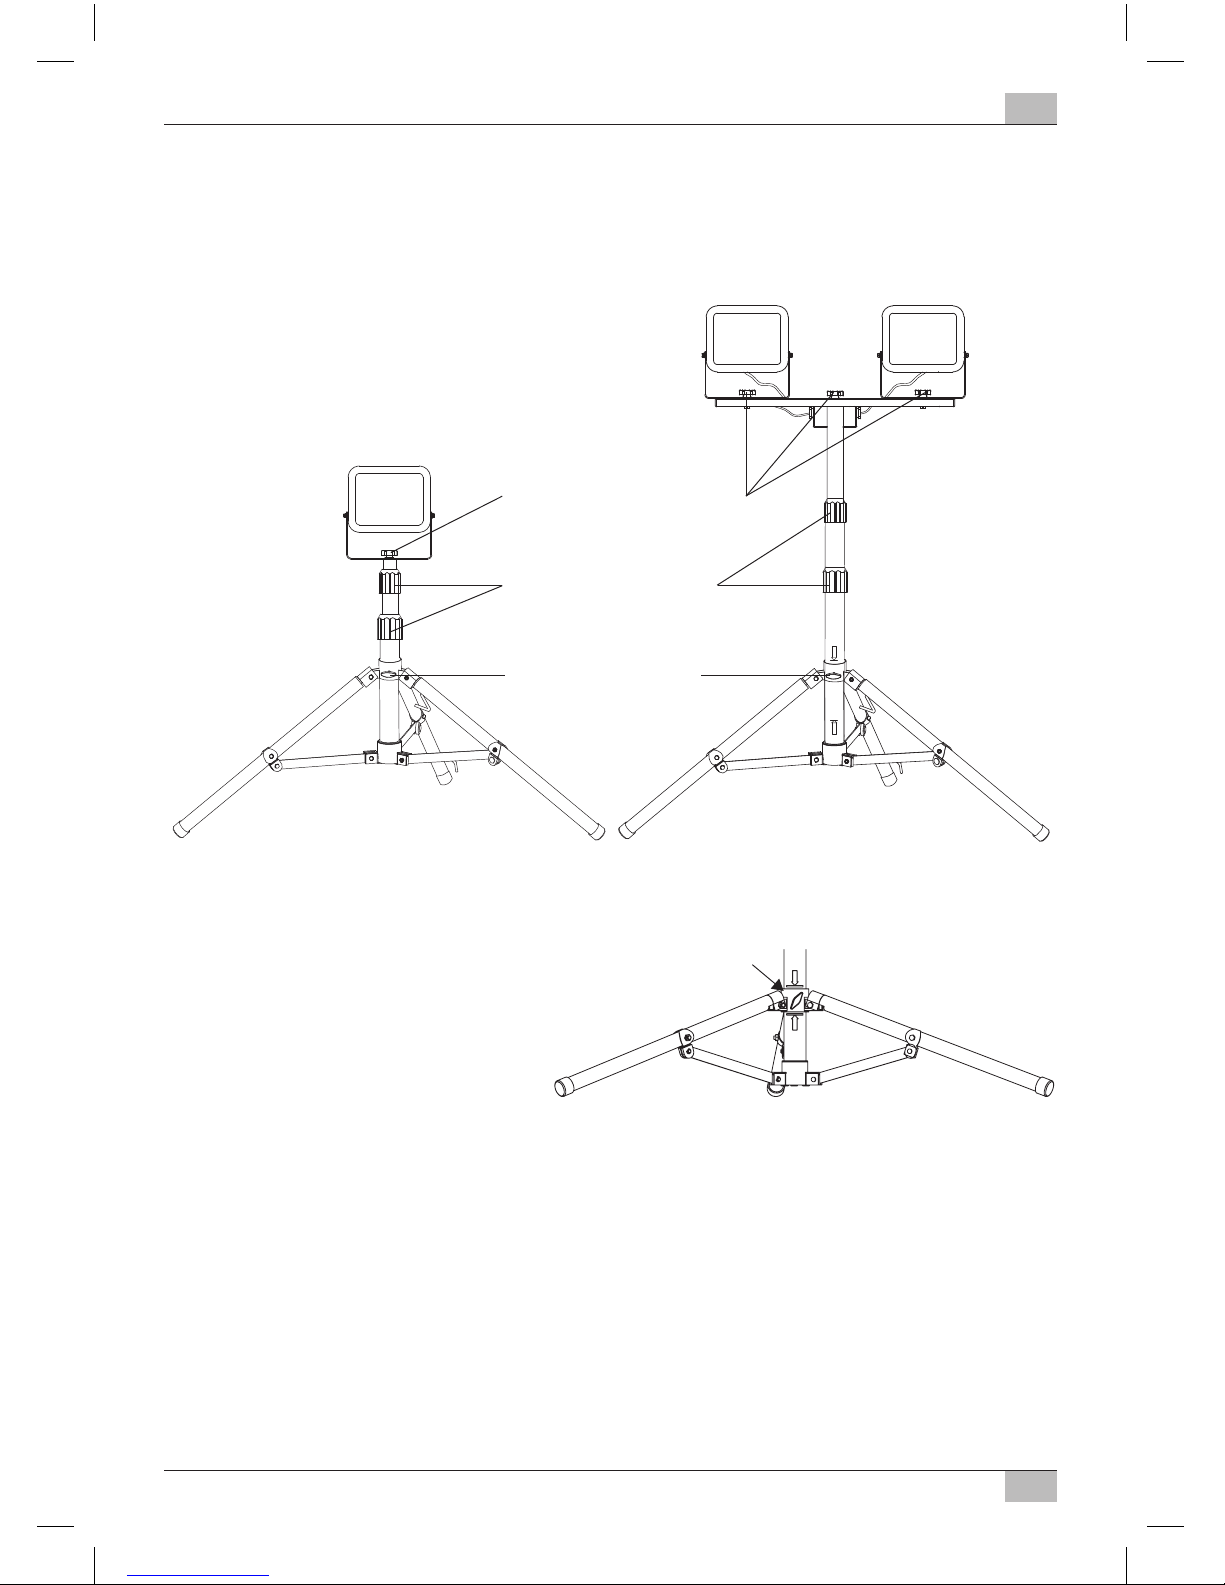
Stellen Sie den Strahler auf eine trockene, ebene Fläche. Der Neigungswinkel des Strahlers lässt
sich einstellen. Dazu den seitlichen Schnellspanner lösen, den Leuchtenkopf in die gewünschte
Position drehen und den Schnellspanner dann wieder festziehen.
Schnellspanner
Gestell
Tragegri
BEDIENUNG
STATIV LED STRAHLER
Die Strahler mit der Typbezeichnung „T“ werden mit Stativ geliefert.
Achten Sie dabei unbedingt auf eine ausreichende Standfestigkeit des Stativs und eine feste
Montage des Strahlers.
18P083 Mobiler_Stativ LED Strahler Jaro 180904.indd 4 04.09.2018 16:38:27
5
JARO Bedienungsanleitung
A
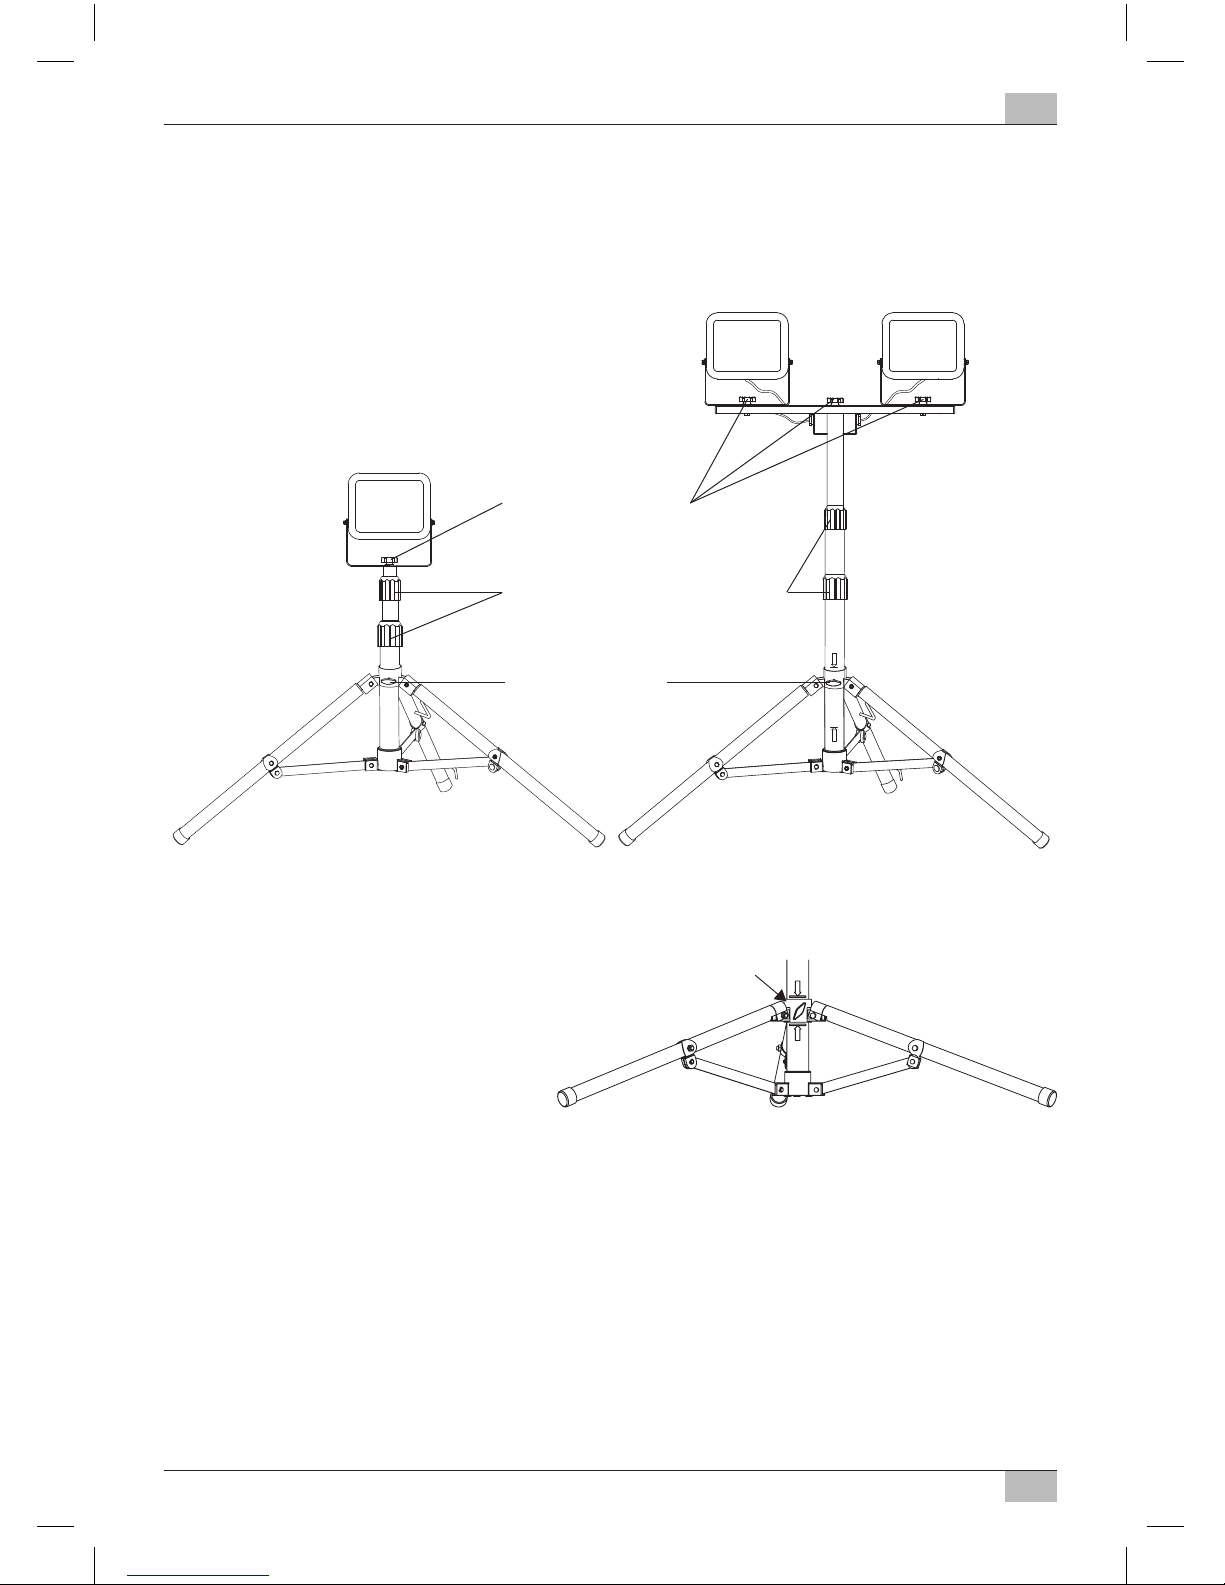
A Befestigungsschraube
B Rohrspannmuttern
C Feststellschraube
Stativ für Einzelstrahler 20 W: ausziehbar von 75 cm bis 160 cm
Stativ für Einzelstrahler 30/50 W: ausziehbar von 86 cm bis 152 cm
Stativ für Doppelstrahler 2 x 20 W: ausziehbar von 82 cm bis 142 cm
MONTAGE DES LED STRAHLERS AUF DEM STATIV
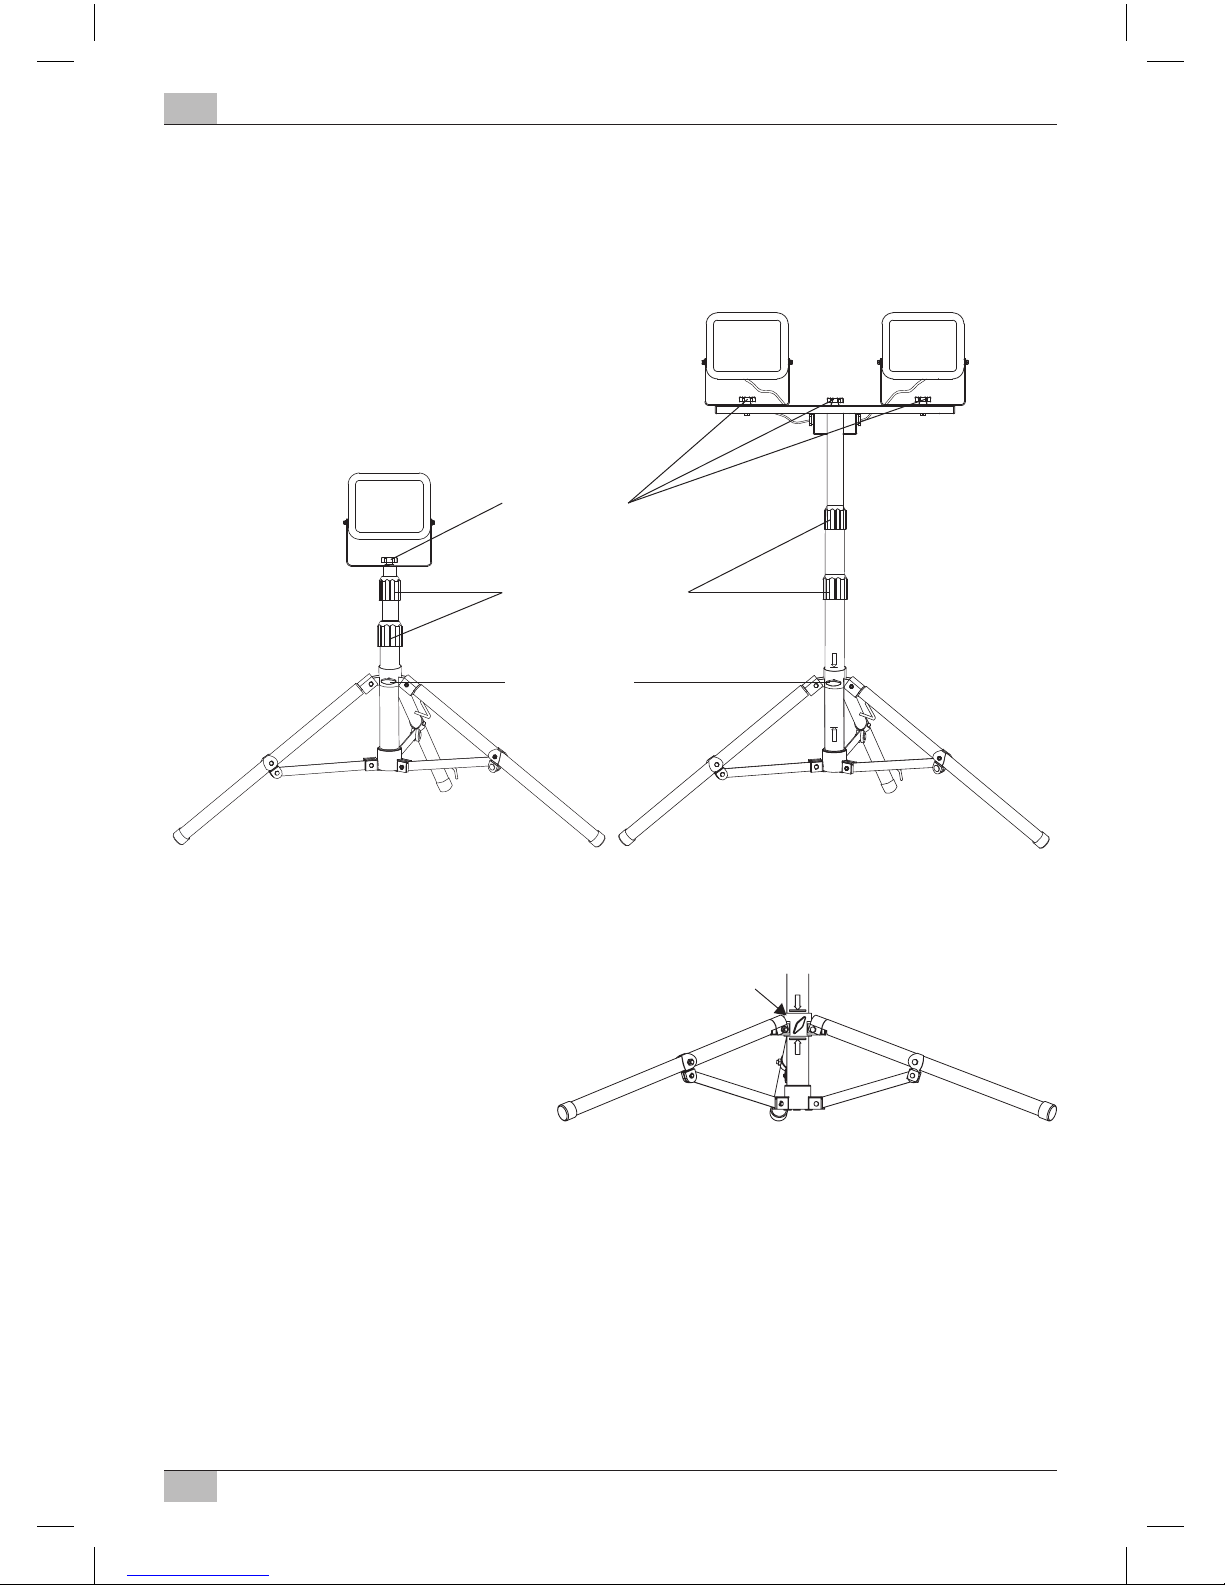
Feststellschraube (C) lösen. Die Standfüße vollständig ausklappen.
Anschließend die Feststellschraube (C) wieder anziehen.
Auf dem Rohr benden sich zwei Pfeile. Diese
markieren den Bereich, wo sich die Fußhalterung (1)
benden muss, um eine ausreichende Stabilität
des Stativs sicherzustellen. Stellen Sie daher
sicher, dass sich die Fußhalterung (1) im
Bereich zwischen den Pfeilen bendet.
Den LED-Strahler mit Hilfe der Befestigungsschraube (A) am mittleren Loch des Befestigungsbügels auf dem Stativ befestigen.
Um die Stativhöhe zu ändern, lösen Sie die Rohrspannmutter (B). Das Stativ bis zur gewünschten
Höhe ausziehen und die Rohrspannmuttern (B) wieder anziehen.
SICHERHEITSHINWEISE
1. Überprüfen Sie vor jedem Gebrauch den Strahler und die Netzanschlussleitung auf
etwaige Beschädigungen. Benutzen Sie Ihren Strahler niemals, wenn Sie irgendwelche
Beschädigungen feststellen.
Vorsicht! Ein beschädigter Strahler oder eine beschädigte Netzanschlussleitung bedeuten
Lebensgefahr durch elektrischen Schlag!
1
18P083 Mobiler_Stativ LED Strahler Jaro 180904.indd 5 04.09.2018 16:38:28

6
A
Bedienungsanleitung
JARO
2. Die äußere exible Leitung dieser Leuchte kann nicht ausgetauscht werden; falls die Leitung
beschädigt ist, muss die Leuchte verschrottet werden.
3. Der Strahler muss ordnungsgemäß geerdet werden.
4. Der Strahler darf ohne alle ordnungsgemäß angebrachten Dichtungsringe nicht benutzt
werden!
5. LED-Strahler sind extrem hell. Bitte niemals direkt in das Licht schauen.
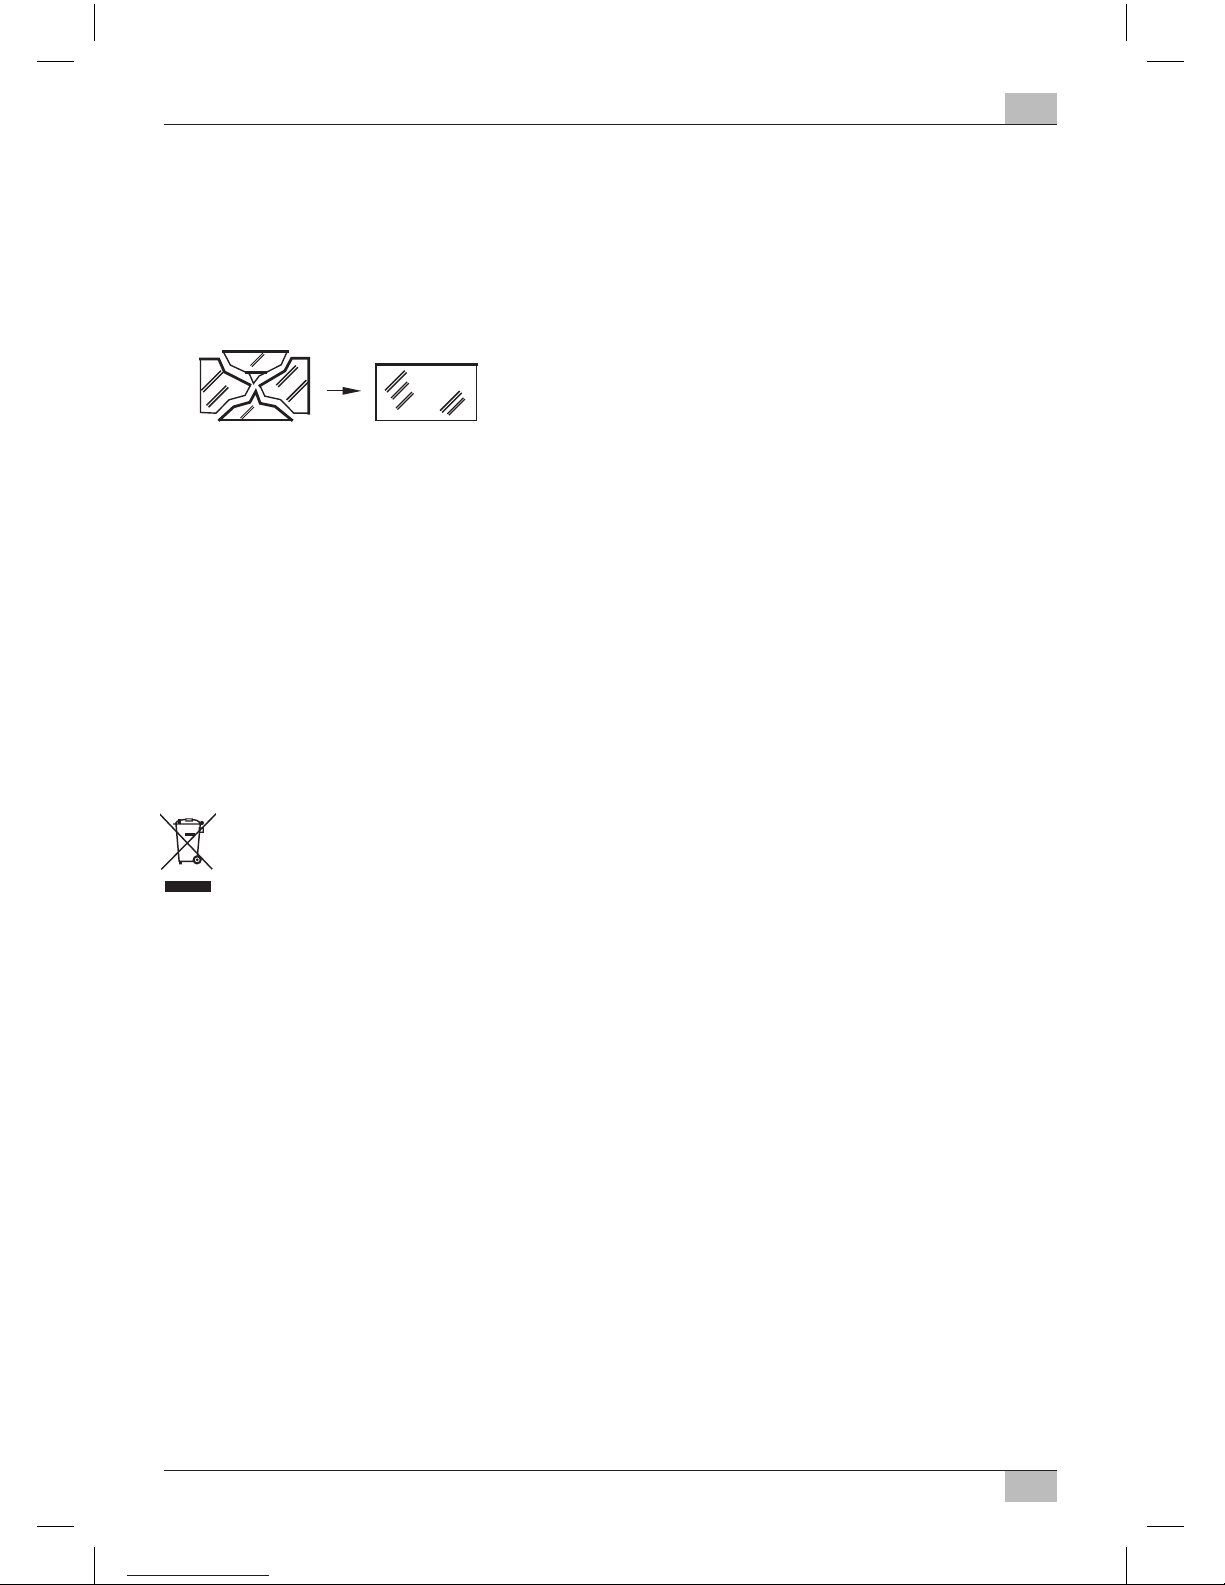
6. Eine zerstörte Schutzabdeckung muss vor weiterer Benutzung des Strahlers durch eine
Original Brennenstuhl Schutzabdeckung ersetzt werden.
7. Stellen Sie sicher, dass der Strahler einen sicheren und stabilen Stand hat.
Achten Sie darauf, dass das Kabel nicht gequetscht oder anderweitig beschädigt wird.
8. Halten Sie Kinder von dem Strahler fern. Kinder können die Gefahr durch den elektrischen
Strom nicht einschätzen.
WARTUNG
Die Lichtquelle dieser Leuchte ist nicht ersetzbar; wenn die Lichtquelle ihr Lebensdauerende
erreicht hat, ist die gesamte Leuchte zu ersetzen.
REINIGUNG
Verwenden Sie keine Lösungsmittel, ätzende Reinigungsmittel oder ähnliches. Benutzen Sie zur
Reinigung nur ein trockenes oder leicht angefeuchtetes Tuch.
ENTSORGUNG
Elektrogeräte umweltgerecht entsorgen!
Elektrogeräte gehören nicht in den Hausmüll!
Gemäß Europäischer Richtlinie 2012/19/EU über Elektro- und Elektronikaltgeräte müssen
verbrauchte Elektrogeräte getrennt gesammelt und einer umweltgerechten Wiederverwertung zugeführt werden.
Möglichkeiten zur Entsorgung des ausgedienten Geräts erfahren Sie bei Ihrer Gemeindeoder Stadtverwaltung.
KONFORMITÄTSERKLÄRUNG
Die Konformitätserklärung ist beim Hersteller hinterlegt.
Adressen
Hugo Brennenstuhl GmbH & Co. KG
Seestraße 1 – 3 · D-72074 Tübingen
H. Brennenstuhl S.A.S.
4 rue de Bruxelles ∙ F-67170 Bernolsheim
lectra-t ag
Blegistrasse 13 · CH-6340 Baar
www.brennenstuhl.com
18P083 Mobiler_Stativ LED Strahler Jaro 180904.indd 6 04.09.2018 16:38:28

7
D Operating Instructions
Mobile LED Light / Tripod LED Light
JARO
Note: Before use of the oodlight, please carefully read the operating instructions and store them
at a proper location!
TECHNICAL DATA
Protection class: I
IP class: IP 65
Nominal voltage 230 V versions: 220-240 V~ 50/60 Hz
Nominal voltage 110 V versions: 100-130 V~ 50/60 Hz
Connection line: H07RN-F 3G1,0
Power factor: see table (page 2)
These LED oodlights are suitable for indoor and outdoor lighting purposes.
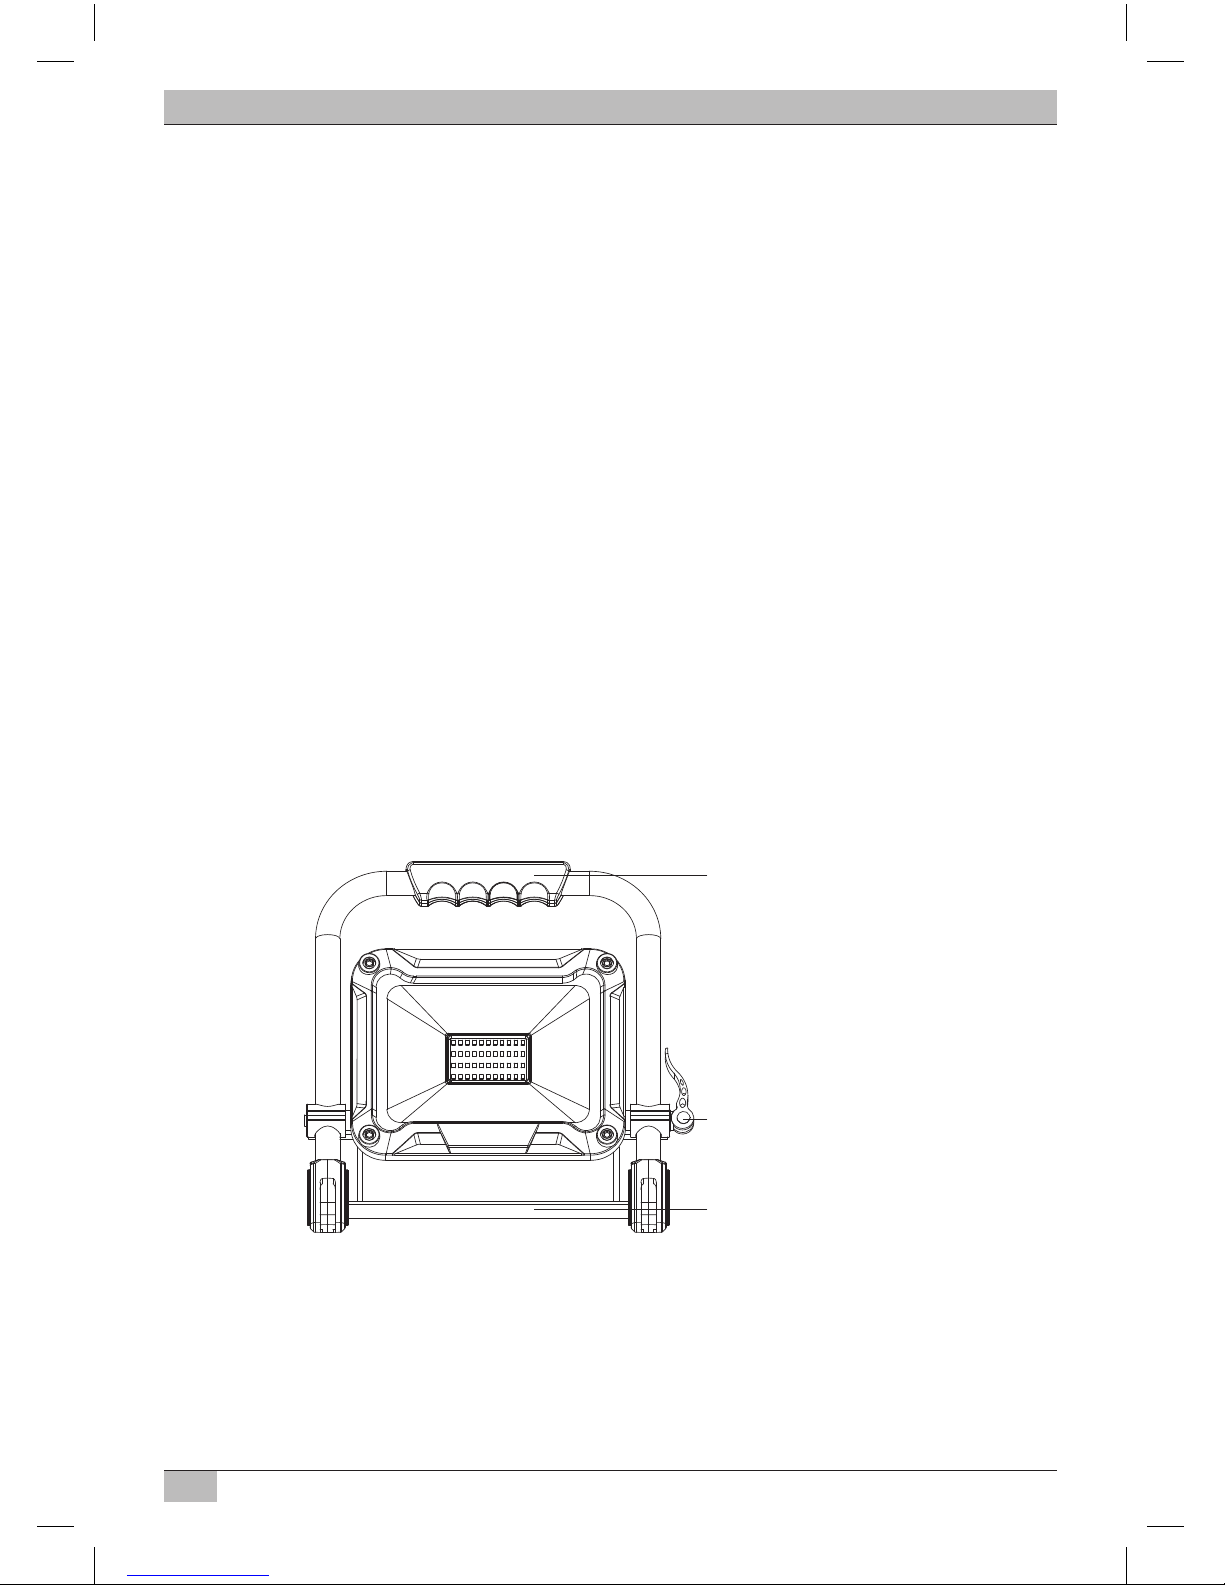
OPERATION
Place the oodlight on a dry and level surface. The inclination of the oodlight is adjustable. To do
so, loosen the lateral quick release, turn the lamp head into the desired position and lock the quick
release again.
Quick-release lever
Framework
Carry handle
OPERATION
TRIPOD, LED FLOODLIGHT
The oodlight with type designation “T” is supplied with tripod.
In this connection, you must imperatively ensure sucient stability of the tripod and rm
assembly of the oodlight.
18P083 Mobiler_Stativ LED Strahler Jaro 180904.indd 7 04.09.2018 16:38:28

8
D
Operating Instructions
JARO
Tripod for individual oodlight 20 W: extendible from 75 cm to 160 cm
Tripod for individual oodlight 30/50 W: extendible from 86 cm to 152 cm
Tripod for double oodlight 2 x 20 W: extendible from 82 cm to 142 cm
ASSEMBLY OF THE LED FLOODLIGHT ON THE TRIPOD
Loosen the locking screw (C). Fold out the feet completely.
Afterwards, re-tighten the locking screw (C).
There are two arrows at the tube. These mark the area
where the ring of the feet (1) have to be placed
to ensure sucient stability of the tripod. The
refore make sure that the ring of the feet (1)
matches insides the arrows area.
Fasten the LED oodlight by means of the locking screw (A) at the central hole of the fastening
bracket on the tripod.
To change the tripod height, loosen the tube nuts (B). Extend the tripod up to the desired height
and re-tighten the tube nuts (B).
SAFETY INFORMATION
1. Before use, always check the oodlight and the power supply line for any possible damage.
Never use the oodlight in case of any damage.
Caution! In case of a damaged oodlight or a damaged power supply line there will be a risk
of fatal injury from electrical current!
A Mounting screw
B Tube nuts
C Locking screw
1
18P083 Mobiler_Stativ LED Strahler Jaro 180904.indd 8 04.09.2018 16:38:29
9
JARO Operating Instructions
D
2. The external exible cable or cord of this luminaire cannot be replaced. If the cord is
damaged, the luminaire should be destroyed.
3. The oodlight must be grounded properly.
4. The oodlight must not be used without properly attached sealing rings!
5. LED oodlights are extremely bright. Please never look directly into the light.
6. If the protective cover is broken, it should be replaced by an original Brennenstuhl protective
cover before further use of the oodlight.
7. Make sure that the oodlight has a safe and stable position.
Make sure that the cables are not crushed or damaged otherwise.
8. Keep the oodlight away from children. Children are not aware of the risks imposed by
electric current.
MAINTENANCE
The light source of this lamp cannot be replaced; if the light source has reached the end of its
service life, the entire lamp has to be replaced.
CLEANING
Do not use solvents, caustic cleaning agents or similar products. Only use a dry or slightly
moistened cloth for cleaning.
DISPOSAL
Dispose of electric appliances in an environmentally friendly manner!
Electric appliances must not be disposed of in household waste!
The European Directive 2012/19/EU on Waste Electrical and Electronic Equipment
rules that used electric appliances should be collected separately and recycled in an
environmentally friendly manner.
For possibilities of disposal of the used appliance, please contact your local or municipal
administration.
DECLARATION OF CONFORMITY
The declaration of conformity is stored at the manufacturer’s.
Addresses
Hugo Brennenstuhl GmbH & Co. KG
Seestraße 1 – 3 · D - 72074 Tübingen
H. Brennenstuhl S.A.S.
4 rue de Bruxelles ∙ F - 67170 Bernolsheim
lectra-t ag
Blegistrasse 13 · CH - 6340 Baar
www.brennenstuhl.com
18P083 Mobiler_Stativ LED Strahler Jaro 180904.indd 9 04.09.2018 16:38:29

10
Verrouillage rapide
Support
Poignée de transport
G Mode d’emploi
Projecteur LED portable /
Projecteur LED avec pied télescopique
JARO
Attention : Veuillez lire attentivement le présent mode d’emploi avant utilisation du projecteur et
conservez-le ensuite soigneusement.
CARACTÉRISTIQUES TECHNIQUES
Classe de protection : I
Indice de protection : IP 65
Tension nominale des modèles 230 V : 220-240 V~ 50/60 Hz
Tension nominale des modèles 110 V : 100-130 V~ 50/60 Hz
Câble de raccordement : H07RN-F 3G1,0
Facteur de puissance : voir tableau (page 2)
Ces projecteurs LED conviennent pour un éclairage en intérieur et en extérieur.
UTILISATION
Placez le projecteur sur une surface sèche et plane. Le projecteur est réglable avec blocage dans la
position choisie. Pour ce faire, desserrez le verrouillage rapide, régler le projecteur dans la position
souhaitée et resserrez le verrouillage rapide.
UTILISATION
PROJECTEUR LED AVEC PIED TELESCOPIQUE
Les projecteurs portant la désignation « T » sont fournis avec un pied télescopique.
Assurez-vous impérativement de la stabilité du pied télescopique et du bon montage du
projecteur.
18P083 Mobiler_Stativ LED Strahler Jaro 180904.indd 10 04.09.2018 16:38:29

11
JARO Mode d’emploi
G
Pied télescopique pour projecteur individuel 20 W : extensible de 75 cm à 160 cm
Pied télescopique pour projecteur individuel 30/50 W : extensible de 86 cm à 152 cm
Pied télescopique pour projecteur double 2 x 20 W : extensible de 82 cm à 142 cm
MONTAGE DES PROJECTEURS LED SUR LE PIED TELESCOPIQUE
Desserrez la vis de xation (C). Dépliez intégralement les pieds.
Resserrez ensuite la vis de xation (C).
Il y a deux èches sur le tube. Celles-ci marquent la
zone où la xation du pied (1) doit être placé
pour assurer une stabilité parfaite du trépied.
Assurez-vous que la xation du pied (1)
se trouve dans la zone située
entre les èches.
À l’aide de la vis de xation (A), xez le projecteur LED sur le pas de vis situé au sommet du tube
du pied télescopique.
Pour modier la hauteur du pied télescopique, desserrez les bagues de serrage (B). Réglez le pied
télescopique jusqu’à la hauteur souhaitée et resserrez les bagues de serrage (B).
CONSIGNES DE SÉCURITÉ
1. Avant chaque utilisation, vériez que le projecteur et le câble de raccordement ne présentent
aucun signe de détérioration. N’utilisez jamais le projecteur si l’appareil est endommagé.
Attention ! Un projecteur ou un câble de raccordement endommagé peut constituer un
danger de mort par électrocution.
A Vis de xation
B Bagues de serrage
C Vis de xation
1
18P083 Mobiler_Stativ LED Strahler Jaro 180904.indd 11 04.09.2018 16:38:29

12
G
Mode d’emploi
JARO
2. Le câble souple extérieur de cette lampe ne peut pas être remplacé. Si le câble est
endommagé, la lampe doit être mise au rebut.
3. Le projecteur doit être relié à la terre de manière réglementaire.
4. Le projecteur ne doit pas être utilisé sans joint d’étanchéité monté de manière réglementaire !
5. Les projecteurs LED sont extrêmement clairs. Ne regardez jamais directement dans le
faisceau lumineux.
6. Si la vitre de sécurité est endommagée, veuillez la remplacer par une pièce de rechange
d’origine Brennenstuhl avant d’utiliser le projecteur.
7. Assurez-vous que le projecteur est posé de manière sécurisée et stable.
Veillez à ce que le câble ne soit pas coincé ou n’ait subi aucune détérioration.
8. Tenez le projecteur hors de portée des enfants. Les enfants ne mesurent pas le risque
présenté par le courant électrique.
MAINTENANCE
La source lumineuse de cette lampe n’est pas remplaçable. Lorsque la source lumineuse a atteint
la n de sa durée de vie, remplacez l’intégralité de la lampe.
NETTOYAGE
N’utilisez aucun solvant, produit de nettoyage abrasif ou autres produits similaires. Pour le
nettoyage, utilisez uniquement un chion sec ou légèrement humide.
MISE AU REBUT
Les appareils électriques doivent être mis au rebut conformément aux normes
environnementales !
Les appareils électriques ne doivent pas être jetés dans les ordures ménagères.
Conformément à la directive européenne 2012/19/UE concernant les appareils électriques
et électroniques, les appareils électriques usagés doivent être collectés séparément dans
un bac à recyclage écologique.
Pour connaître les solutions de mise au rebut d’un appareil usagé, adressez-vous à votre
administration locale ou communale.
DÉCLARATION DE CONFORMITÉ
La déclaration de conformité est disponible auprès du fabricant.
Adresses
Hugo Brennenstuhl GmbH & Co. KG
Seestraße 1 – 3 · D-72074 Tübingen
H. Brennenstuhl S.A.S.
4 rue de Bruxelles ∙ F-67170 Bernolsheim
lectra-t ag
Blegistrasse 13 · CH-6340 Baar
www.brennenstuhl.com
18P083 Mobiler_Stativ LED Strahler Jaro 180904.indd 12 04.09.2018 16:38:30

13
M Gebruikshandleiding
Mobiele LED-werklamp /
Statief LED-werklamp
JARO
Opgelet: Lees voordat u de werklamp gebruikt deze handleiding zorgvuldig door en bewaar ze!
TECHNISCHE GEGEVENS
Beschermingsgraad: I
Veiligheidsklasse: IP 65
Nominale spanning versie 230 V: 220-240 V~ 50/60 Hz
Nominale spanning versie 110 V: 100-130 V~ 50/60 Hz
Netkabel: H07RN-F 3G1,0
Vermogensfactor: zie tabel (pag. 2)
Deze krachtige LED-werklamp is geschikt als verlichting binnen- en buitenshuis.
BEDIENING
Plaats de lamp op een droog, een oppervlak. De verlichtingshoek van de lamp kan worden
aangepast. Ontgrendel daartoe de laterale klemmen, draai de kop van de lamp in de gewenste
positie en vergrendel de klemmen weer.
Klemmen
Frame
Handvat
BEDIENING
STATIEF LED-WERKLAMP
De lampen met typeaanduiding “T” worden met samen met een statief geleverd.
Zorg er daarbij voor dat het statief stabiel genoeg staat en dat de lamp stevig bevestigd is.
18P083 Mobiler_Stativ LED Strahler Jaro 180904.indd 13 04.09.2018 16:38:30

14
M
Gebruikshandleiding
JARO
Statief voor individuele werklampen 20 W: uittrekbaar van 75 cm tot 160 cm
Statief voor individuele werklampen 30/50 W: uittrekbaar van 86 cm tot 152 cm
Statief voor dubbele werklampen 2 x 20 W: uittrekbaar van 82 cm tot 142 cm
DE LED-WERKLAMP OP HET STATIEF MONTEREN
Draag de borgschroef (C) los. De voet volledig openklappen.
Draai de schroef (C) weer vast.
Er staan twee pijlen op de buis. Deze geven het
gebied aan waar de voetsteun (1) zich moet
bevinden om voldoende stabiliteit van het
statief te garanderen. Let er daarom op
dat de voetsteun (1) zich tussen de
pijlen bevindt.
Bevestig de LED-werklamp op het statief met behulp van de bevestigingsschroef (A) in het
middelste schroefgat van de bevestigingsbeugel.
Om de hoogte van het statief te wijzigen, draait u de borgmoeren (B) los. Trek het statief tot de
gewenst hoogte eruit en draai de borgmoeren (b) weer vast.
VEILIGHEIDSINSTRUCTIE
1. Controleer vóór elk gebruik de werklamp en het netsnoer op schade. Gebruik de werklamp
nooit wanneer u enige schade opmerkt.
Voorzichtig! Een beschadigde lamp of voedingskabel kunnen een elektrische schok
veroorzaken en zijn levensgevaarlijk!
A Bevestigingsschroef
B Borgmoeren
C Borgschroef
1
18P083 Mobiler_Stativ LED Strahler Jaro 180904.indd 14 04.09.2018 16:38:30

15
JARO Gebruikshandleiding
M
2. De buitenste exibele kabel van deze lamp kan niet vervangen worden; indien de kabel
beschadigd is, moet de lamp weggegooid worden.
3. De schijnwerper dient correct geaard te worden.
4. De schijnwerper mag niet gebruikt worden zonder dat alle afdichtingsringen juist bevestigd
zijn!
5. LED-Schijnwerpers zijn extreem helder. Alstublieft nooit direct in het licht kijken.
6. Een beschadigde beschermingsplaat dient voor verder gebruik van de schijnwerper door een
originele Brennenstuhl beschermingsplaat vervangen te worden.
7. Controleer of het de werklamp veilig en stabiel staat.
Zorg ervoor dat de kabel niet geklemd raakt of op een andere manier beschadigd raakt.
8. Houd de werklamp buiten het bereik van kinderen. Kinderen kunnen het gevaar van
elektrische stroom niet inschatten.
ONDERHOUD
De lichtbron van deze werklamp kan niet worden vervangen. Wanneer de levensduur van de
lichtbron vervallen is, moet de volledige werklamp worden vervangen.
REINIGING
Gebruik geen oplosmiddelen, bijtende reinigingsmiddelen of gelijksoortige middelen. Gebruik
voor het schoonmaken van de lamp alleen een droge of licht bevochtigde doek.
AFVOER AFVAL
Elektrische apparaten milieuvriendelijk afvoeren!
Elektrische apparaten behoren niet bij het huisvuil!
Volgens Europese Richtlijn 2012/19/EU betreende elektrische en elektronische
apparatuur moeten afgedankte elektrische apparaten gescheiden worden ingezameld en
naar een milieuvriendelijk recyclebedrijf afgevoerd worden.
Over mogelijkheden voor het afvoeren van afgedankte apparaten kunt u informatie
vragen bij uw gemeente of stadsbestuur.
CONFORMITEITSVERKLARING
De conformiteitsverklaring is beschikbaar bij de fabrikant.
Adressen
Hugo Brennenstuhl GmbH & Co. KG
Seestraße 1 – 3 · D-72074 Tübingen
H. Brennenstuhl S.A.S.
4 rue de Bruxelles · F-67170 Bernolsheim
lectra-t ag
Blegistrasse 13 · CH-6340 Baar
www.brennenstuhl.com
18P083 Mobiler_Stativ LED Strahler Jaro 180904.indd 15 04.09.2018 16:38:30
16
J Istruzioni per l’uso
Faretto LED mobile /
Faretto LED con treppiede
JARO
Attenzione: si prega di leggere attentamente le presenti istruzioni per l’uso prima di utilizzare il
faretto e di conservarle con cura!
DATI TECNICI
Classe di protezione: I
Grado di protezione: IP 65
Versioni tensione nominale 230 V: 220-240 V~ 50/60 Hz
Versioni tensione nominale 110 V: 100-130 V~ 50/60 Hz
Cavo di collegamento: H07RN-F 3G1,0
Fattore di potenza: vedi tabella (pagina 2)
Questo faretto LED è idoneo ai ni dell’illuminazione in ambienti interni ed esterni.
UTILIZZO
Collocare il faretto su una supercie asciutta e piana. È possibile regolare l’inclinazione del
faretto. Per farlo, allentare il tenditore rapido laterale, ruotare la testa della lampada nella
posizione desiderata e riserrare saldamente il tenditore rapido.
Tenditore rapido
Telaio
Maniglia
UTILIZZO
FARETTO LED CON TREPPIEDE
Il faretto con la denominazione del tipo “T” viene fornito con il treppiede.
Si prega di assicurarsi assolutamente che il treppiede sia stabile e il faretto sia stato montato
saldamente.
18P083 Mobiler_Stativ LED Strahler Jaro 180904.indd 16 04.09.2018 16:38:30
17
JARO Istruzioni per l’uso
J
Treppiede per faretto singolo 20 W: estraibile da 75 cm no a 160 cm
Treppiede per faretto singolo 30/50 W: estraibile da 86 cm no a 152 cm
Treppiede per faretto doppio 2 x 20 W: estraibile da 82 cm no a 142 cm
MONTAGGIO DEL FARETTO LED SUL TREPPIEDE
Allentare la vite di arresto (C). Aprire completamente i piedini di appoggio.
Riavvitare inne la vite di arresto (C).
Sul tubo si trovano due frecce che contrassegnano
la zona in cui si deve trovare il supporto (1) per
garantire una suciente stabilità dello stativo.
Accertarsi, quindi, che il supporto (1) si trovi
nella zona compresa tra le frecce.
Fissare il faretto LED al treppiede con l’ausilio della vite di serraggio (A) tramite il foro centrale del
morsetto di serraggio.
Per modicare l’altezza del treppiede, allentare i dadi di serraggio del tubo (B). Estrarre il
treppiede no a raggiungere l’altezza desiderata e riavvitare i dadi di serraggio del tubo (B).
AVVERTENZE PER LA SICUREZZA
1. Prima di ogni uso vericare che il faretto e il cavo di collegamento elettrico non siano
danneggiati. Non utilizzare mai il faretto qualora si riscontrino danneggiamenti.
Attenzione! Un faretto o un cavo di collegamento elettrico danneggiati comportano un
pericolo di morte per scossa elettrica!
A Vite di serraggio
B Dado di serraggio del tubo
C Vite di arresto
1
18P083 Mobiler_Stativ LED Strahler Jaro 180904.indd 17 04.09.2018 16:38:31

18
J
Istruzioni per l’uso
JARO
2. Il cavo essibile esterno di questa lampada non può essere sostituito; qualora sia
danneggiato, la lampada deve essere rottamata.
3. È necessario eseguire la messa a terra del faretto in modo conforme.
4. Non è possibile utilizzare il faretto senza aver debitamente installato tutti gli anelli di tenuta.
5. I faretti LED sono estremamente luminosi. Si prega di non guardare mai direttamente nel
usso di luce.
6. Se la copertura protettiva è rotta, essa deve essere sostituita con una copertura protettiva
originale Brennenstuhl prima di proseguire con l’utilizzo del faretto.
7. Assicurarsi che il faretto sia posizionato in modo sicuro e stabile.
Vericare che il cavo non sia schiacciato o danneggiato da altri elementi.
8. Tenere il faretto lontano dalla portata dei bambini. I bambini non sono in grado di valutare il
pericolo derivante dalle scosse elettriche.
MANUTENZIONE
La fonte luminosa di questa lampada non è sostituibile; al termine della vita della fonte luminosa
è necessario sostituire l’intera lampada.
PULIZIA
Non utilizzare solventi, detergenti abrasivi o simili. Per la pulizia utilizzare solo un panno asciutto
o leggermente umido.
SMALTIMENTO
Smaltire gli elettrodomestici nel rispetto dell’ambiente!
Non gettare gli elettrodomestici tra i riuti domestici!
Ai sensi della direttiva europea 2012/19/UE concernente i riuti di apparecchiature
elettriche ed elettroniche, è necessario eettuare la raccolta dierenziata degli
elettrodomestici usati e sottoporli ad uno smaltimento ecocompatibile.
Contattare la propria amministrazione comunale o cittadina per maggiori informazioni
riguardo lo smaltimento di apparecchi non più utilizzabili.
DICHIARAZIONE DI CONFORMITÀ
La dichiarazione di conformità è depositata presso il produttore.
Indirizzi
Hugo Brennenstuhl GmbH & Co. KG
Seestraße 1 – 3 · D-72074 Tubinga
H. Brennenstuhl S.A.S.
4 rue de Bruxelles · F-67170 Bernolsheim
lectra-t ag
Blegistrasse 13 · CH-6340 Baar
www.brennenstuhl.com
18P083 Mobiler_Stativ LED Strahler Jaro 180904.indd 18 04.09.2018 16:38:31

19
S Bruksanvisning
Mobil LED-strålkastare /
LED-strålkastare med stativ
JARO
Obs: Innan du börjar använda den här strålkastaren ska du noggrant läsa igenom den här
bruksanvisningen och därefter förvara den på en säker och lättillgänglig plats!
TEKNISK SPECIFIKATION
Skyddsklass: I
Skyddstyp: IP 65
Nominell spänning 230 V-versioner: 220-240 V~ 50/60 Hz
Nominell spänning 110 V-versioner: 100-130 V~ 50/60 Hz
Anslutningskabel: H07RN-F 3G1,0
Eektfaktor: se tabellen (sidan 2)
Den här LED-strålkastaren är avsedd att användas för inomhus- och utomhusbelysning.
ANVÄNDNING
Placera strålkastaren mot ett torrt och jämnt underlag. Det är möjligt att ställa in lampans
lutningsvinkel. Lossa på den sidoliggande snabbspännanordningen, vrid lamphuvudet till önskat
läge och dra sedan tillbaka snabbspännanordningen.
Snabbspännanordningen
Stativ
Bärhandtag
ANVÄNDNING
STATIVFÖRSEDD LED-STRÅLKASTARE
Lampor med typbeteckningen ”T” levereras med stativ.
Se till att stativet är tillräckligt stadigt för en fast montering av lampan.
18P083 Mobiler_Stativ LED Strahler Jaro 180904.indd 19 04.09.2018 16:38:31
20
S
Bruksanvisning
JARO
Stativ för enkel strålkastare 20 W: utdragbar från 75 cm till 160 cm
Stativ för enkel strålkastare 30/50 W: utdragbar från 86 cm till 152 cm
Stativ för dubbel strålkastare 2 x 20 W: utdragbar från 82 cm till 142 cm
MONTERING AV DEN STATIVFÖRSEDDA LED-STRÅLKASATREN
Lossa på ställskruven (C). Fäll helt och hållet ut stativfötterna.
Dra sedan tillbaka ställskruven (C).
Det nns två pilar på röret. Med hjälp av dessa
märks det område ut där fotfästet (1) måste
placeras för att säkerställa att stativet står
tillräckligt stabilt. Kontrollera därför att
fotfästet (1) är placerat i området
mellan de båda pilarna.
Fäst LED-lampan med hjälp av fästskruven (A) i fästbygelns mittenhål på stativet.
Lossa på rörfästmuttern för att justera stativet (B). Dras ut stativet till önskad höjd och dra tillbaka
rörfästmuttern (B).
SÄKERHETSANVISNINGAR
1. Innan du använder strålkastaren ska du alltid kontrollera om det nns några skador på
nätkopplingskabeln. Använd under inga omständigheter strålkastaren vid någon typ av
skada.
Varning! Om strålkastaren är eller nätkopplingskabeln är skadad riskerar man att få en elstöt!
A Fästskruv
B Rörfästmutterar
C Ställskruv
1
18P083 Mobiler_Stativ LED Strahler Jaro 180904.indd 20 04.09.2018 16:38:32
 Loading...