


Bravilor Bonamat GTBSH-001, GTBSH-002, GTBSH-003, GTBSH-004, GTBTH-001 User guide
...2 


Thermal Brewer Aurora
EN Operator manual
<![endif]>700.403.712C (EN)
GTBSH-001 GTBSH-002 GTBSH-003 GTBSH-004 GTBTH-001 GTBTH-002 GTBTH-003 GTBTH-004
GTBSL-001 GTBSL-002 GTBSL-003 GTBSL-004 GTBSH-005 GTBTL-001 GTBTL-002 GTBTL-003 GTBTL-004
www.bravilor.com
|
English |
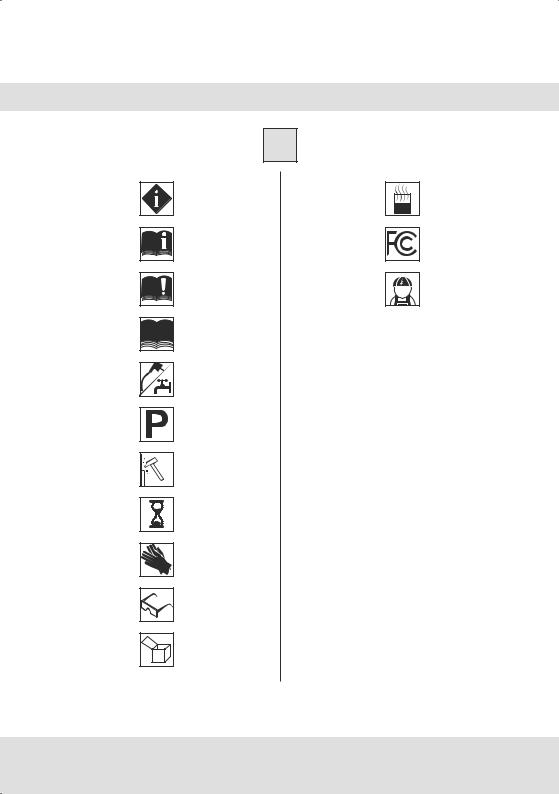
Information |
Hot liquid |
Table of contents |
FCC and IC Declarations |
Safety regulations |
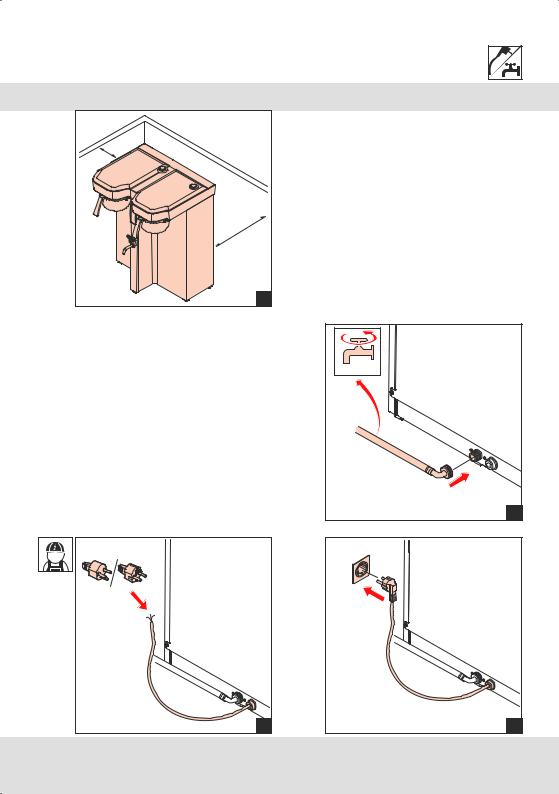
Authorised electrician |
1 User manual |
|
Installation |
|
Programming |
|
Descaling |
|
Wait |
|
Safety gloves |
|
Safety goggles |
|
Accessories |
|
Please read the enclosed Safety Manual carefully.
If the Safety Manual is missing, please visit www.bravilor.com.
2

|
|
|
|
|
|
|
|
|
|
|
|
|
|
|
|
|
|
|
|
|
|
|
|
|
|
|
|
|
|
|
|
|
|
|
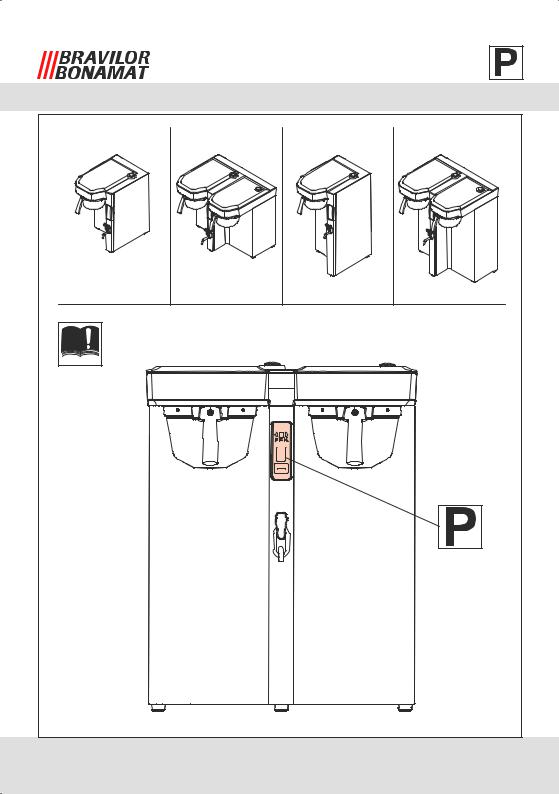
Aurora Single Low |
Aurora Twin Low |
|||
Aurora Single High |
Aurora Twin High |
3

4
7
9
53
65
5

6

7 |
|
|
|
|
1 |
• Waterpressure 0,2-1 MPa (29-145 psi) |
||||
• |
Minimum waterflow: |
|
|
|
|
• |
TB Aurora Single |
= |
1,7 gal/min |
|
• |
|
|
6,4 L./min |
|
TB Aurora Twin |
= |
2,2 gal/min |
|
|
|
|
|
8,3 L./min |
3 |
0.2-1 MPa |
2 |
4 |
8
M |
START |
STOP |
9 |
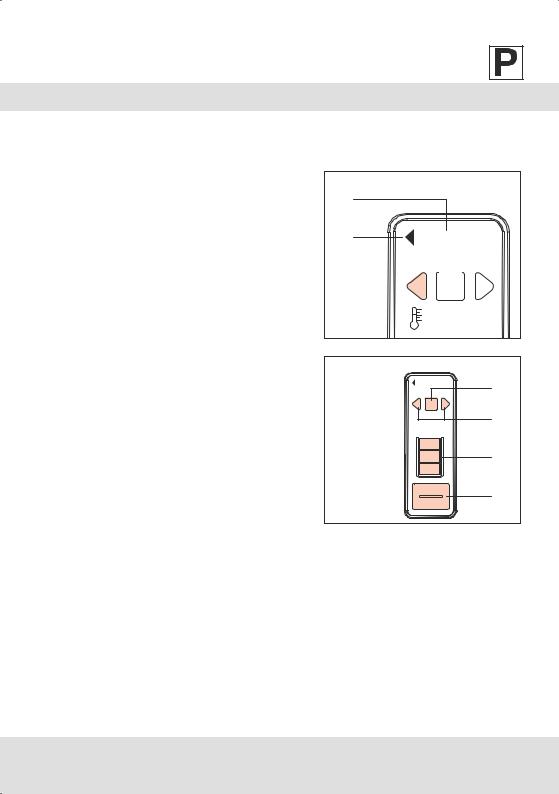
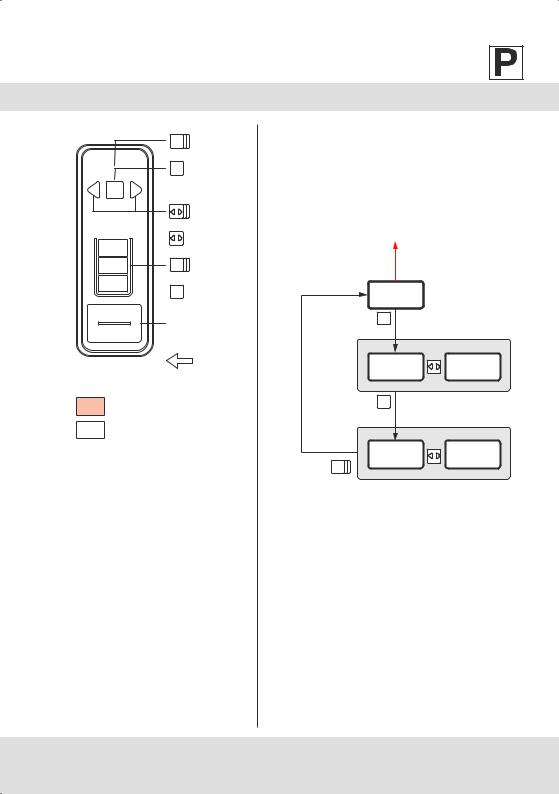
DISPLAY
The display helps to communicate with the machine, with buttons and a text window.
Text window
The text window (1) can show:
•menus
•items in the menu
•settings
•commands
•automatic procedures
If you have the twin machine, the black arrow (2) indicates whether you operate the left or the right brewer.
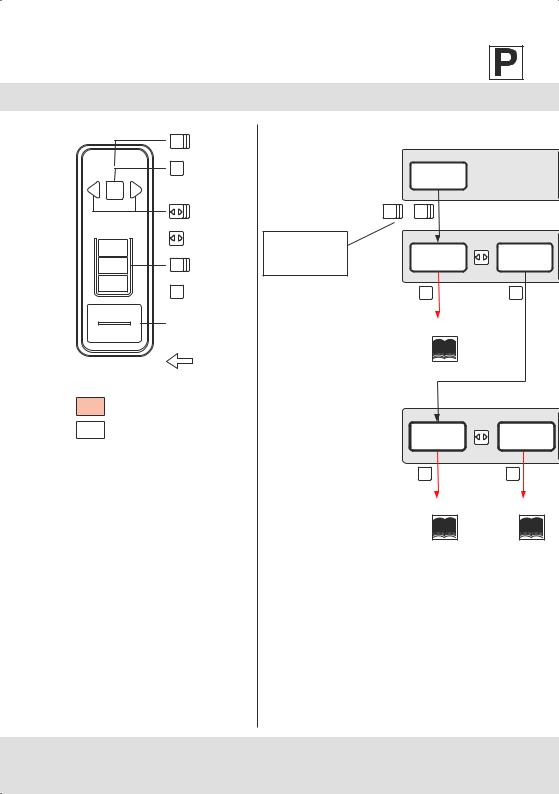
Buttons
With the buttons you can navigate through the menus of the machine.
1.MENU button
2.LEFT/RIGHT button
3.VOLUME button
4.START/STOP
1 |
|
2 |
ready |
|
“recipe x” |
|
M |
ready |
1 |
|
“recipe x” |
||
M |
|
|
|
2 |
|
|
3 |
|
START |
4 |
|
STOP |
||
|
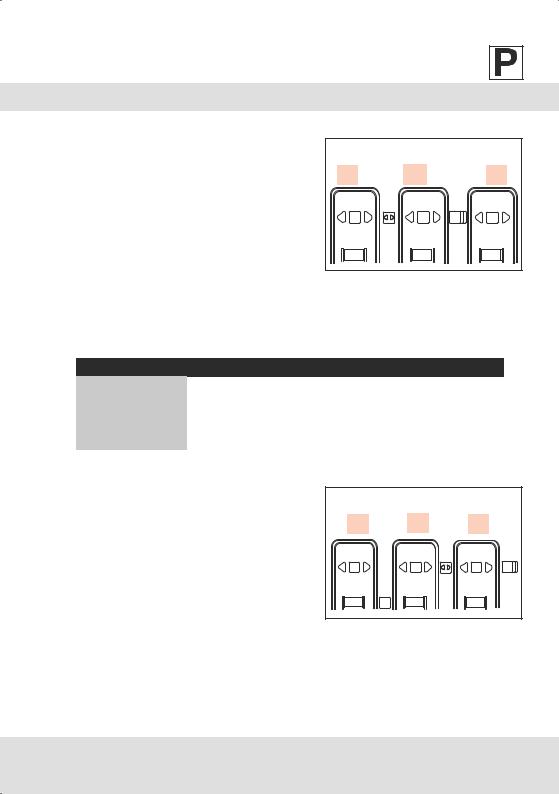
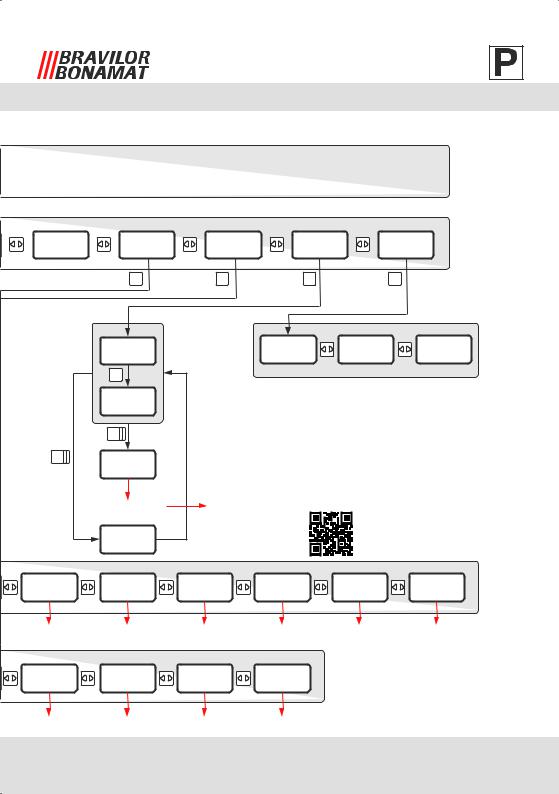
Menus
The basic operation has menus for:
•the selection of the recipe
•how to change the amount of coffee you brew
•start or stop the machine
In the operator menus, you can define your preferences. In the menus you can:
•build, change, download or upload recipes
•change the setting of the temperature, calendar, time, machines
•change the setting of the programs of the machine, such as:
◦◦ |
Eco |
◦◦ |
Water filter |
◦◦ |
Descaling |
◦◦ |
Cleaning |
10
Navigation
Touch the buttons for navigation.
Two different ways of touching the button are defined in this manual:
•Press a button: briefly touch the button.
•Hold a button: touch the button for at least 1 seconds.
Each different way of touching a button results in a different action in the display navigation.
Button Commands
|
M |
1. |
|
x x x x x x |
M |
2. |
|
x x x x x x |
|||
|
|
||
M |
|
|
|
|
|
3. |
|
|
|
4. |
|
|
V |
5. |
|
START |
|
6. |
|
|
7. |
||
|
|
||
STOP |
|
8. |
Autom.
1.Hold the MENU button 1 second to confirm a choice in a menu level.
2.Press the MENU button briefly to proceed to the next menu level.
3.Hold the LEFT/RIGHT button to switch brewer (only in a TWIN version).
4.Press the LEFT/RIGHT button briefly to scroll through the options of the menu level.
5.Press the VOLUME button briefly to change the volume you brew.
6.Hold the START/STOP button to start brewing.
7.Hold or press the START/STOP button to abort the brewing process.
8.Press the START/STOP button briefly to go back one menu level.
Automatic procedures
White arrows in the scheme indicate automatic procedures, performed by the machine.
11
How to use letters and numbers in the
display
You can enter text in the menus of the machine, such as the date or a name for a recipe. This text will appear in the text window on the display. When the machine allows you to enter text, the text window will show this: [#]##
The indicator [ ] shows the position that you can change. Use the LEFT/RIGHT button to scroll to the uppercase character that you want on the first position. Press the MENU button to confirm. The indicator [ ] will automatically move to the next position: R[#]#
Sets
The display offers 4 sets of characters:
[#]## |
[R]## |
|
R[#]# |
[#]## |
[R]## |
|
R[#]# |
M |
M |
M |
M |
Set |
Character |
||
Uppercase |
A B C D E F G H I J K L M N O P Q R S T U V W X Y Z ’ ’ |
||
Lowercase |
a b c d e f g h i j k l m n o p q r s t u v w x y z ’ ’ |
||
Numbers & symbols |
0 |
1 2 3 4 |
5 6 7 8 9 ! , / : ; ' ¿ ? - @ % ° ( ) ’ ’ |
Specific characters |
à |
á â ã ä |
å æ ç è é ê ë ì í î ï ð ñ ò ó ô õ ö ø ß ù ú û ü ý ÿ ’ ’ |
Press the VOLUME button to change to the next set of character.
How to change from lowercase characters
to UPPERCASE characters
The default text starts with an uppercase character at the first position in the text window, and then continuous in lowercase: R[a]#
Press the VOLUME button 3 times, to change to UPPERCASE characters. R[A]#
Scroll with the LEFT/RIGHT button to a character. R[E]#
R[a]# R[A]# R[E]#
R[a]# |
R[A]# |
R[E]# |
|
M |
M |
M |
M |
|
3x |
|
|
|
V |
|
|
Press the MENU button to confirm your choice. The indicator [ ] will automatically move to the next position: RE[#]
The next position will automatically display an UPPERCASE character. If you want to use a lowercase character for this position, press the VOLUME button 1 time.
12

How to enter a special characters
The current set of character that you use, determines how you can change to the special character set.
Press the VOLUME button 3 times if you were using the uppercase character set. Press the VOLUME button 2 times if you were using the lowercase character set.
Press the VOLUME button 1 time if you were using the numbers and signs character set.
How to enter a space in the text line
Scroll with the LEFT/RIGHT button to last position in the set of character, until the display shows ’ ’. Recipe[’ ’]
Press the MENU button to confirm your choice.
The indicator [ ] will automatically move to the next position: Recipe [#]
Recipe[#] |
Recipe[’ |
’] |
Recipe [#] |
Recipe[#] |
Recipe[’ |
’] |
Recipe [#] |
M |
M |
M |
M |
How to move to the right postion in the
text line
If you want to change a single character in a text line, you can move the [ ] indicator to the position of the character you want change. By default, the [ ] indicator starts at the first position in the text line.
[R]ecipe 15
Press the MENU button to move the [ ] indicator one step. Repeat this action, until the [ ] indicator is at the position of the character you want to change. Recipe [1]5
[R]ecipe 15 Recipe [1]5 Recipe 2[5]
[R]ecipe 15 |
|
Recipe [1]5 |
Recipe 2[5] |
M |
M |
M |
M |
Use the LEFT/RIGHT button to scroll to the character that you want on this position. Hold the
MENU button to confirm. The indicator [ ] will automatically move to the next position: Recipe 2[5]
13
|
M |
Hold |
|
x x x x x x |
M |
Press |
|
x x x x x x |
|||
|
|
||
M |
|
|
|
|
|
Hold |
|
|
|
Press |
|
|
V |
Hold |
|
|
V |
Press |
|
START |
Press to go |
||
|
|||
STOP |
1 step back |
||
Autom.
Twin versions
Optional or for low versions only
” xx ” Fixed value
[ xx ] You can change this value
Hold both buttons at the same time
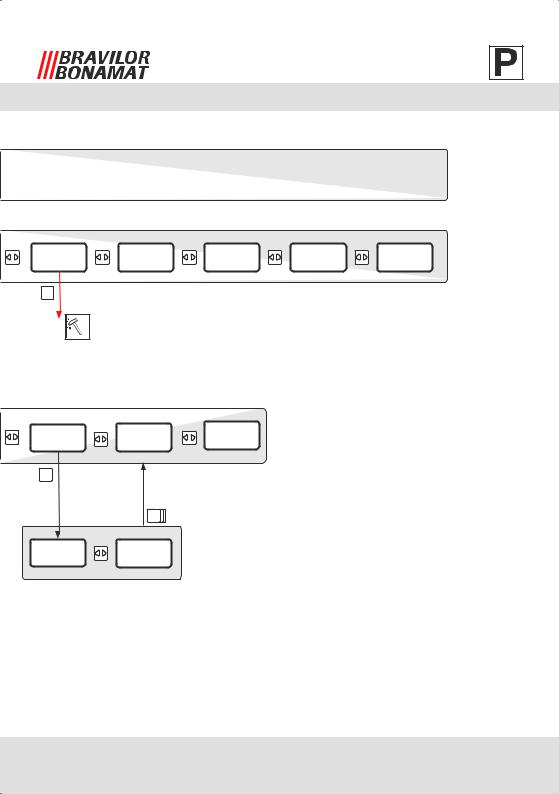
ready
M + V
info |
counters |
M |
M |
1.03 |
|
See |
1 |
total |
day |
counters |
counters |
MM
1.011.02
See 1 |
See 1 |
14
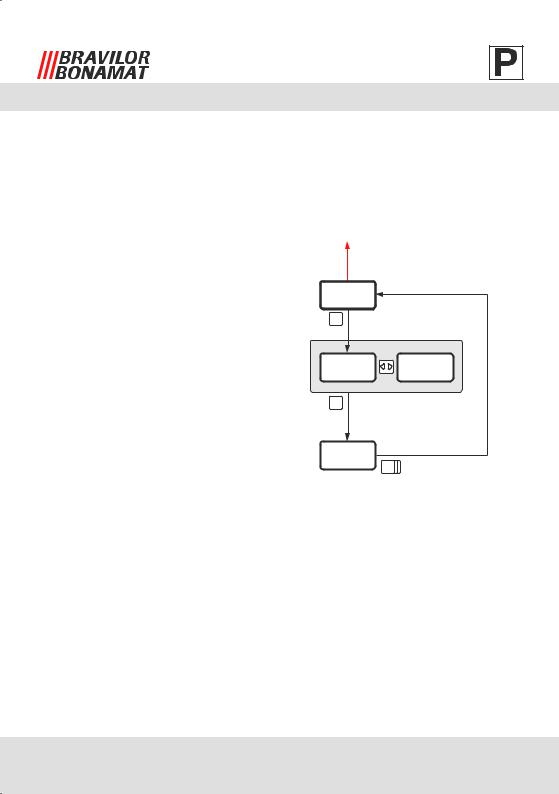
2 Operator menu: 1/2
descale |
recipe |
settings |
service |
contact |
menu
M
See
wfilter vol |
wfilter age |
desc count |
#### gal |
### days |
#### gal |
M
38,647 mm M
clear |
clear |
[no] |
[yes] |
15

|
M |
Hold |
|
x x x x x x |
M |
Press |
|
x x x x x x |
|||
|
|
||
M |
|
|
|
|
|
Hold |
|
|
|
Press |
|
|
V |
Hold |
|
|
V |
Press |
|
START |
Press to go |
||
|
|||
STOP |
1 step back |
||
Autom.
Twin versions
Optional or for low versions only
” xx ” Fixed value
[ xx ] You can change this value
ready
M |
+ V |
|
Hold both |
info |
counters |
buttons at the |
|
|
same time |
|
|
eco |
wfilter |
descale |
settings |
settings |
settings |
2.08 |
2.09 |
2.10 |
select |
delete |
edit |
recipes |
recipes |
recipe |
2.01 |
2.02 |
2.03 |
16
2 Operator menu: 2/2
descale |
recipe |
settings |
service |
contact |
|
menu |
|||||
|
|
|
|
||
|
M |
M |
M |
M |
|
code? |
|
contact |
contact |
contact |
|
[0]000 |
|
”info 1” |
”info 2” |
”info 3” |
|
M |
|
|
|
|
|
code |
|
|
|
|
|
0[0]00 |
|
|
|
|
|
M |
|
|
|
|
M |
code |
|
|
|
|
|
OK |
|
|
|
|
|
Service menu |
|
Distributor |
|
|
|
code |
|
|
|
|
|
invalid |
|
|
|
|
clean |
language |
unit |
time |
download |
upload |
settings |
settings |
settings |
settings |
settings |
settings |
2.11 |
2.12 |
2.13 |
2.14 |
2.15 |
2.16 |
build |
program |
download |
upload |
|
|
recipe |
recipe |
recipe |
recipe |
|
|
2.04 |
2.05 |
2.06 |
2.07 |
|
|
17
|
M |
Hold |
|
x x x x x x |
M |
Press |
|
x x x x x x |
|||
|
|
||
M |
|
|
|
|
|
Hold |
|
|
|
Press |
|
|
V |
Hold |
|
|
V |
Press |
|
START |
Press to go |
||
|
|||
STOP |
1 step back |
||
Autom.
Twin versions
Optional or for low versions only
” xx ” Fixed value
[ xx ] You can change this value
2.01 Select recipe menu
See 2.2 Operator menu 2/2
select recipes
M
|
select |
select |
|
[recipe x] |
[recipe y] |
|
M |
|
|
enable |
disable |
M |
”recipe x” |
”recipe x” |
|
|
18
2.02 Delete recipe menu
See 2.2 Operator menu 2/2
delete recipes
M
delete |
delete |
[recipe x] |
[recipe y] |
M |
|
delete |
|
”recipe x” |
M |
|
19

|
M |
Hold |
|
x x x x x x |
M |
Press |
|
x x x x x x |
|||
|
|
||
M |
|
|
|
|
|
Hold |
|
|
|
Press |
|
|
V |
Hold |
|
|
V |
Press |
|
START |
Press to go |
||
|
|||
STOP |
1 step back |
||
Autom.
Twin versions
Optional or for low versions only
” xx ” Fixed value
[ xx ] You can change this value
See 2 Operator menu 2/2
edit recipe
M
select |
select |
[recipe x] |
[recipe y] |
M |
|
name |
temp |
”recipe x” |
##°F |
M |
M |
name |
temp |
[r]ecipe x |
[#]#°F |
M |
M |
M |
|
name |
temp |
r[e]cipe x |
#[#]°F |
M |
|
volume |
volume |
|
1 / 2 / 3 |
|
M |
total |
% loss |
### fl. oz |
## |
See 2/3 |
See 2/3 |
20
2.03 Edit recipe menu: 1/3
CW bypass |
airpot |
volume |
|
|
|
”on” |
”off” |
1 / 2 / 3 / 4 |
|
|
|
M |
M |
M |
|
|
|
CW bypass |
CW bypass |
M |
|
|
|
[on] |
[off] |
|
|
|
|
airpot |
airpot |
|
|
|
|
[off] |
[on] |
|
|
|
|
|
|
M |
|
|
|
volume |
|
|
|
|
|
4 |
|
|
|
|
|
|
|
|
pb2 prog |
pb3 prog |
|
|
|
|
”off” |
”off” |
|
bypass spd |
preinfusion |
pb1 prog |
pb2 prog |
pb3 prog |
afterdrip |
”low” |
”on” |
”recipe x” |
”on” |
”on” |
XXX s |
|
preinfusion |
|
|
|
|
|
”off” |
|
|
|
|
See 2/3 |
See 2/3 |
See 3/3 |
See 3/3 |
See 3/3 |
See 3/3 |
21
 Loading...