


ELECTRONIC HAND MIXER
OWNER’S MANUAL
Model EP524H
120V., 60Hz., 1.1 Amps.
USA: EURO-PRO OPERATING LLC |
Canada: EURO-PRO OPERATING LLC |
94 Main Mill Street, Door 16 |
4400 Bois Franc |
Plattsburg, NY 12901 |
St. Laurent, QC H4S 1A7 |
Tel.: 1 (800) 798-7398
COPYRIGHT© EURO-PRO OPERATING LLC 2006

IMPORTANT SAFETY INSTRUCTIONS
When using electrical appliances, basic safety precautions should always be followed, including the following:
1. |
Read all instructions. |
11. |
Do not leave appliance unattended |
|
2. |
To protect against risk of electrical |
12. |
while in use. |
|
|
shock, do not immerse power cord, |
Do not use outdoors. |
||
|
plug or mixer in water or any other |
13. |
Do not let cord hang over the edge |
|
3. |
liquid. |
|
of the table, counter or touch hot |
|
Remove any accessories from mixer |
14. |
surfaces. |
||
4. |
before washing them. |
Do not place on or near a hot gas or |
||
Close supervision is necessary when |
15. |
electric burner, or in a heated oven. |
||
|
any appliance is used by or near |
Do not use appliance for other than |
||
5. |
children. |
16. |
intended household use. |
|
Unplug mixer from outlet when not in |
The mixer is designed for intermittent |
|||
|
use, before putting on or taking off |
|
use, it can be run for up to 6 minutes |
|
|
accessories, and before cleaning the |
|
on settings 1-3 without interruption, |
|
6. |
appliance. |
|
and up to 4 minutes on settings 4-6. |
|
Do not operate any appliance with a |
|
Do not use for more than 30 seconds |
||
|
damaged cord or plug, or after the |
|
on settings 7-9 or boost. Allow the |
|
|
appliance malfunctions, has been |
17. |
motor to cool afterwards. |
|
|
dropped or damaged in any manner. |
To avoid injury by accidentally |
||
|
Return the appliance to EURO-PRO |
|
switching on the appliance when |
|
|
Operating LLC for examination, repair |
|
inserting the beaters, dough hooks or |
|
7. |
or adjustment. See warranty. |
|
whisk attachments, always reduce to |
|
Flashing red light indicates ready to |
|
speed setting “0“ or press the soft |
||
|
operate. Avoid contact with moving |
|
touch control “OFF”, and unplug the |
|
|
parts at all times. Keep hands, hair, |
|
appliance before assembling or |
|
|
clothing, as well as spatulas and other |
|
disassembling. |
|
|
utensils away from beaters during |
Note: An extension cord may be used if you |
||
|
operation to prevent personal injury |
|||
|
and/or damage to the mixer. |
are careful in its use: |
||
8. |
The use of accessory attachments not |
1. |
The electrical rating of the extension |
|
|
recommended by the appliance |
|
cord should be at least as great as the |
|
|
manufacturer may cause injuries. |
|
electrical rating of the appliance. |
|
9. |
Remove beaters and dough hooks |
|
||
2. |
An extension cord with the power |
|||
10. |
from mixer before cleaning. |
|||
Make sure that the power cord is |
|
cord must be arranged so that it will |
||
|
positioned safely so that nobody trips |
|
not drape over the countertop or |
|
|
or gets tangled in it. |
|
tabletop where they can be pulled on |
|
|
|
|
by children or tripped over |
|
accidentally.
This appliance has a polarized plug (one blade is wider than the other). To reduce the risk of electric shock, this plug is intended to fit into a polarized outlet only one way. If the plug does not fit fully into the outlet, reverse the plug. If it still does not fit, contact a qualified electrician. Do not attempt to modify the plug in any way.
SAVE THESE INSTRUCTIONS
FOR HOUSEHOLD USE ONLY
1 |
Rev. 05/06 |
Modèle
EP524H
GARANTIE LIMITÉE UN (1) AN
EURO-PRO Operating LLC garantit ce produit contre les défauts de pièces et main d'oeuvre pour une période d'un (1) an à compter de la date d'achat originale lorsqu'il est utilisé dans le cadre d’un usage normal domestique, conforme aux conditions, aux exclusions et aux exceptions suivantes.
Si votre appareil ne fonctionne pas correctement alors qu'il est utilisé dans des conditions normales d’un usage domestique pendant la période de garantie, retournez l'appareil et les accessoires au complet, port payé, à :
États-Unis: EURO-PRO Operating LLC., 94 Main Mill Street, Door 16, Plattsburgh, N.Y., 12901 Canada: EURO-PRO Operating LLC., 4400 Bois Franc, St Laurent, Québec H4S 1A7
Si EURO-PRO reconnaît que l’appareil présente un défaut de pièce ou de main-d’oeuvre, EURO-PRO le réparera ou le remplacera gratuitement. Un justificatif de la date d'achat doit être inclus. *
La responsabilité d’EURO-PRO Operating LLC n’est limitée qu’au coût de la réparation ou du remplacement de l'appareil, à notre discrétion. Cette garantie ne couvre pas l’usure normale des pièces et ne s’applique pas aux appareils altérés ou qui ont été utilisés à des fins commerciales. Cette garantie limitée exclut les dommages causés par la mauvaise utilisation, l’abus, la manipulation négligente ainsi que les dommages liés à un emballage inadéquat ou à une mauvaise manutention en transit. Cette garantie ne couvre pas les dommages ou les défauts provoqués par ou résultant du transport ou de réparations, de maintenance ou de modifications du produit ou de n’importe laquelle de ses pièces, réalisées par un personnel de réparation non agréé par EURO-PRO Operating LLC.
Cette garantie couvre l’acheteur initial du produit et exclut toutes autres garanties légales et/ou conventionnelles. La responsabilité de EURO-PRO Operating LLC, le cas échéant, est limitée aux obligations spécifiques assumées expressément selon les termes de la garantie limitée. En aucun cas EURO-PRO Operating LLC ne sera tenue responsable de dommages circonstanciels ou conséquents ou de toute autre nature. Certains États/Provinces n’autorisent pas l’exclusion ou limitation de dommages circonstanciels ou conséquents, auquel cas cette disposition ne s’appliquerait pas.
Cette garantie vous donne des droits légaux spécifiques, et vous pouvez également jouir d’autres droits, lesquels peuvent varier selon les États ou les Provinces.
*Important : Emballez soigneusement l’appareil pour éviter tout dommage pendant le transport. Assurez-vous d’y inclure un justificatif de la date d’achat et d’y apposer une étiquette avant l’emballage portant vos nom, adresse complète et numéro de téléphone ainsi qu’une note précisant l’information relative à l’achat, le numéro du modèle et le problème rencontré avec l'appareil. Nous vous recommandons d’assurer le paquet (car les dommages pendant le transport ne sont pas couverts par votre garantie). Indiquez sur l’extérieur du paquet « À L’ATTENTION DU SERVICE CLIENTÈLE ». Nous nous efforçons constamment d’améliorer nos produits, les spécifications contenues dans ce document sont donc susceptibles de changer sans avis préalable.
CARTE D’ENREGISTREMENT DU PRODUIT
Merci de remplir et de nous poster la carte d’enregistrement de produit dans les 10 jours après l’achat. L’enregistrement nous permettra de vous contacter dans le cas de la découverte d’un défaut concernant le produit. En nous retournant cette carte, vous reconnaissez avoir lu et compris les instructions d’utilisation et les avertissements qui les accompagnent.
RETOURNER À:
EURO-PRO Operating LLC, 94 Main Mill Street, Door 16, Plattsburgh, NY 12901
EP524H
____________________________________________________________________________
Modèle de l’appareil
____________________________________________________________________________
Date d’achat Nom de la boutique
____________________________________________________________________________
Nom du propriétaire
____________________________________________________________________________
Adresse |
Ville |
État |
Code Postal |
Imprimé en Chine |
|
26 |
|
DIRECTIVES IMPORTANTES
TOUJOURS |
NE JAMAIS |
TOUJOURS s’assurer que vos mains sont sèches |
NE JAMAIS mettre les mains dans le bol quand le |
avant de manipuler la fiche ou de mettre l’appareil en |
batteur est en marche. |
marche. TOUJOURS tenir la fiche en rembobinant le |
|
cordon. |
|
|
|
TOUJOURS débrancher l’appareil de la prise |
NE JAMAIS utiliser cet appareil à l’extérieur. NE |
électrique s’il n'est pas utilisé ou en retirant les |
JAMAIS utiliser l’appareil pour un usage autre que |
accessoires et avant de nettoyer. |
celui pour lequel il a été conçu. Cet appareil est |
|
conçu uniquement pour être utilisé à l'intérieur. |
TOUJOURS retirer les fouets mélangeurs/crochets |
NE JAMAIS mélanger des ingrédients consistants |
pétrisseurs/fouet du batteur avant de les laver. |
pour plus de 30 secondes sans fermer l’appareil et |
|
remuer les ingrédients pour reprendre ensuite. |
TOUJOURS éviter le contact avec les pièces mobiles |
NE JAMAIS utiliser de détergents puissants, |
quand l’appareil est en marche. Garder les cheveux, |
abrasifs ou caustiques pour nettoyer cet appareil. |
les vêtements, et autres ustensiles éloignés du fouet |
NE JAMAIS laisser les enfants utiliser cet appareil |
mélangeur/crochets pétrisseurs lors du |
sans supervision. |
fonctionnement. |
|
|
NE JAMAIS laisser l’appareil fonctionner sans |
|
surveillance. NE JAMAIS éjecter les accessoires |
|
lorsque l’appareil est en marche. |
|
NE JAMAIS laisser le cordon d’alimentation |
|
pendre au bout d'un comptoir ou d'une table, ou |
|
encore entrer en contact avec des surfaces |
|
chaudes ou s’emmêler. NE JAMAIS dépasser la |
|
marque rouge du cordon en le tirant, |
|
|
Conseils pour l’utilisation des réglages de vitesse du batteur à main
|
DURÉE MAXIMALE SUGGÉRÉE |
|
|
VITESSE |
DE FONCTIONNEMENT |
USAGES |
|
(SPEED) |
ININTERROMPU |
||
SUGGÉRÉS |
|||
RÉGLAGE |
(avec les fouets mélangeurs et |
||
|
|||
|
les crochets pétrisseurs) |
|
|
|
|
|
|
“0” |
— |
— |
|
“1” |
6 minutes |
• Mélange lent |
|
|
|
• Démarrage du processus de mélange |
|
“2” |
6 minutes |
• Remuer les liquides dans les ingrédients secs |
|
|
|
ou les ingrédients secs dans les liquides. |
|
“3” |
6 minutes |
• Mélange de la pâte à crêpe |
|
“4” |
4 minutes |
• Mélange d'ingrédients consistants, p.ex. la pâte |
|
|
|
à biscuit |
|
“5” |
4 minutes |
• Mélange de muffins ou pain éclair |
|
|
|
• Purée de pomme de terre |
|
“6” |
4 minutes |
• Mélange de pain à la farine de maïs |
|
|
|
• Mélange de beurre et sucre |
|
|
|
• Mélange de glaçages |
|
|
|
|
|
“7” |
30 secondes |
• Terminer le mélange de gâteau et autres pâtes |
|
|
|
• Crème fouettée ou mousse |
|
“8” |
30 secondes |
• Battre les blancs d’oeuf |
|
“9” |
30 secondes |
• Battre une meringue |
|
|
|
|
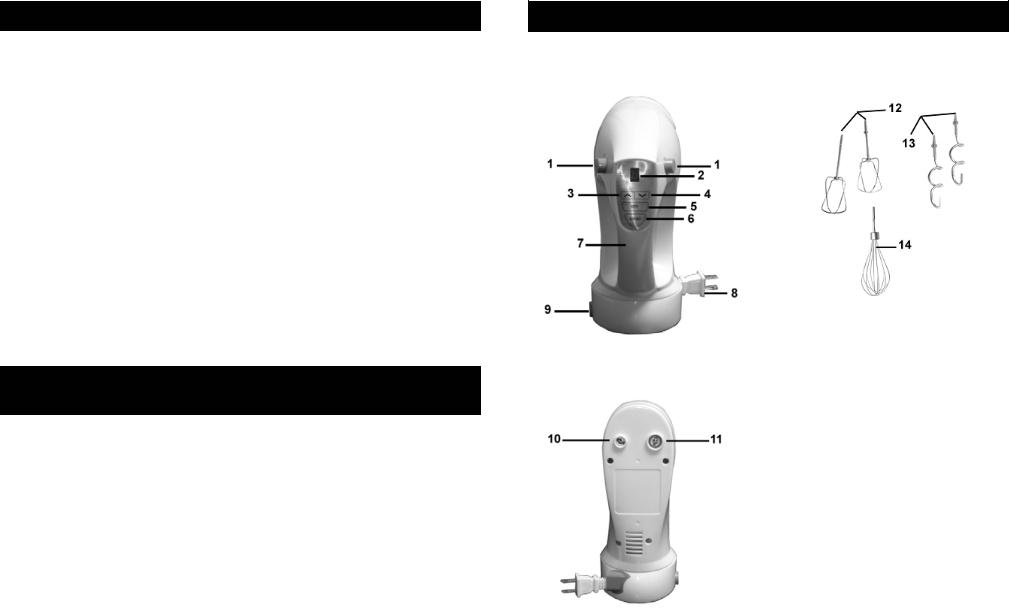
GETTING TO KNOW YOUR HAND MIXER
TOP VIEW |
|
ACCESSORIES |
|
|
|
|
1. |
Beater Eject Button |
|
2. |
Digital Display (Red LED) |
BOTTOM |
3. |
Speed Increase |
VIEW |
|
(Soft touch control) |
|
4. |
Speed Decrease |
|
|
(Soft touch control) |
|
5. |
Power Off |
|
|
(Soft touch control) |
|
6. |
Boost |
|
|
(Soft touch control) |
|
7. |
Handle |
|
8. |
Retractable Power Cord |
|
9. |
Cord Rewind Button |
|
10. |
Small Beater Opening |
|
11. |
Large Beater Opening |
|
12. |
Beater (x 2) |
|
13. |
Dough Hook (x 2) |
|
14. |
Whisk |
|
15. |
Storage Bag (not shown) |
Technical Specifications
Voltage: |
120V., 60Hz. |
Power: |
1.1 Amps |
* Illustrations may differ from actual product.
25 |
2 |

Before Using Your Hand Mixer
1.Read all of the instructions included in this manual.
2.Remove all packing materials.
3.Make sure that the hand mixer is off and unplugged. Wash all the accessories in lukewarm, soapy water (see “Cleaning and Maintenance Instructions”).
4.Thoroughly dry all accessories and re-assemble the hand mixer. Plug hand mixer into outlet and you are ready to use your new Bravetti Platinum Pro Hand Mixer.
WARNING: To avoid injury when inserting or removing beaters or dough hooks, always push the soft touch control “OFF” and then unplug the unit.
CAUTION: When rewinding the cord, always hold the plug to avoid cord whiplash.
WARNING: Never operate the appliance without all the parts in place. Make sure that all parts are properly assembled.
WARNING: DO NOT IMMERSE UNIT IN WATER
OR ANY OTHER LIQUID.
WARNING: ALWAYS avoid contact with moving parts while unit is in operation. Keep hands, hair, clothing, and other utensils away from beater/dough hooks/whisk during operation. Failure to do so could result in serious injury.
Directives d’entretien et nettoyage
ATTENTION: TOUJOURS éviter le contact avec les pièces mobiles quand l’appareil est en marche. Gardez les cheveux, les vêtements, et autres ustensiles éloignés des fouets mélangeurs/crochets pétrisseurs lors du fonctionnement. Omettre de le faire pourrait provoquer des blessures sérieuses.
ATTENTION: Pour éviter les blessures en insérant ou retirant les fouets mélangeurs ou les crochets pétrisseurs, toujours enfoncer la touche électronique « ARRÊT » et débrancher ensuite l’appareil.
ATTENTION: En rembobinant le cordon, toujours tenir la fiche afin d’éviter un coup de fouet.
ATTENTION: NE PAS PLONGER L’APPAREIL DANS
L’EAU OU TOUT AUTRE LIQUIDE.
•Assurez-vous que le batteur à main est éteint et débranché avant de retirer et nettoyer les accessoires.
•Lavez les fouets mélangeurs, les crochets pétrisseurs et le fouet dans l’eau tiède et savonneuse. Les fouets mélangeurs, les crochets pétrisseurs et le fouet sont aussi au lave-vaisselle.
•Essuyez l’extérieur du batteur à main à l’aide d’un chiffon humide et polissez avec un chiffon doux sec.
NE JAMAIS IMMERGER LE BATTEUR À MAIN LA FICHE OU LE CORDON D’ALIMENTATION DANS L’EAU OU AUTRE LIQUIDE.
•Enlevez l’excès de particules d’aliments du cordon d’alimentation à l’aide d’un chiffon sec.
•Afin de faciliter le nettoyage, retirez les batteurs mélangeurs et les crochets pétrisseurs immédiatement après leur utilisation. Asséchez avec un chiffon doux et propre.
•NE PAS UTILISER DE TAMPONS À RÉCURER MÉTALLIQUES,DE DÉTERGENTS FORTS OU DES NETTOYANTS ABRASIFS POUR NETTOYER LES FOUETS, LES CROCHETS PÉTRISSEURS OU LE FOUET, OU L’APPAREIL, AFIN D’EMPÊCHER QUE LE FINI NE SOIT ENDOMMAGÉ.
•Une fois que le batteur à main est nettoyé et asséché et qu’il peut être rangé, appuyez sur le bouton de rembobinage tout en tenant la fiche afin que le cordon puisse facilement se rembobiner.
Attention: NE PAS exercer une force excessive en tirant le cordon d’alimentation ou vous endommagerez la fonction de rembobinage et annulerez la garantie. En rembobinant, toujours tenir la fiche afin d’éviter un coup de fouet. NE PAS dépasser la marque rouge du cordon en le tirant.
3 |
24 |
Consignes d’utilisation
ATTENTION: TOUJOURS éviter le contact avec les pièces mobiles quand l’appareil est en marche. Gardez les cheveux, les vêtements, et autres ustensiles éloignés des fouets mélangeurs/crochets pétrisseurs lors du fonctionnement. Omettre de le faire pourrait provoquer des blessures sérieuses.
•Pour retirer les accessoires, procédez aux étapes suivantes :
1.Éteignez le batteur et débranchez de la source d’alimentation.
2.À l’aide du pouce et de l’index, appuyez simultanément sur les boutons d’éjection des accessoires. (Figure 5). Ceci ne fonctionnera que si le batteur à main est éteint. NE PAS tenter d'éjecter les fouets mélangeurs/fouet/crochets pétrisseurs si l’appareil est en marche.
Boutons d’éjection des accessoires
Fig. 5
•Pour rembobiner le cordon d’alimentation, appuyez sur le bouton rembobiner.
Attention: En rembobinant, toujours tenir la fiche afin d’éviter un coup de fouet du cordon.
Operating Instructions
WARNING: ALWAYS avoid contact with moving parts while unit is in operation. Keep hands, hair, clothing, as other utensils away from beater/dough hooks/whisk during operation. Failure to do so could result in serious injury.
Selecting the Attachment
There are three (3) different attachments for the hand mixer:
1.Beaters: Use for liquid mixes such as creams, combining dry ingredients, confectionery dough, etc.
2.Dough hooks: Use for light doughs.
Do not attempt to mix heavy bread doughs.
3.Whisk: Used to beat air into mixtures such as egg whites, yolks, or cream.
How to Operate the Hand Mixer
•Before plugging in the hand mixer, fit the desired attachment required for the mixing operation to be carried out.
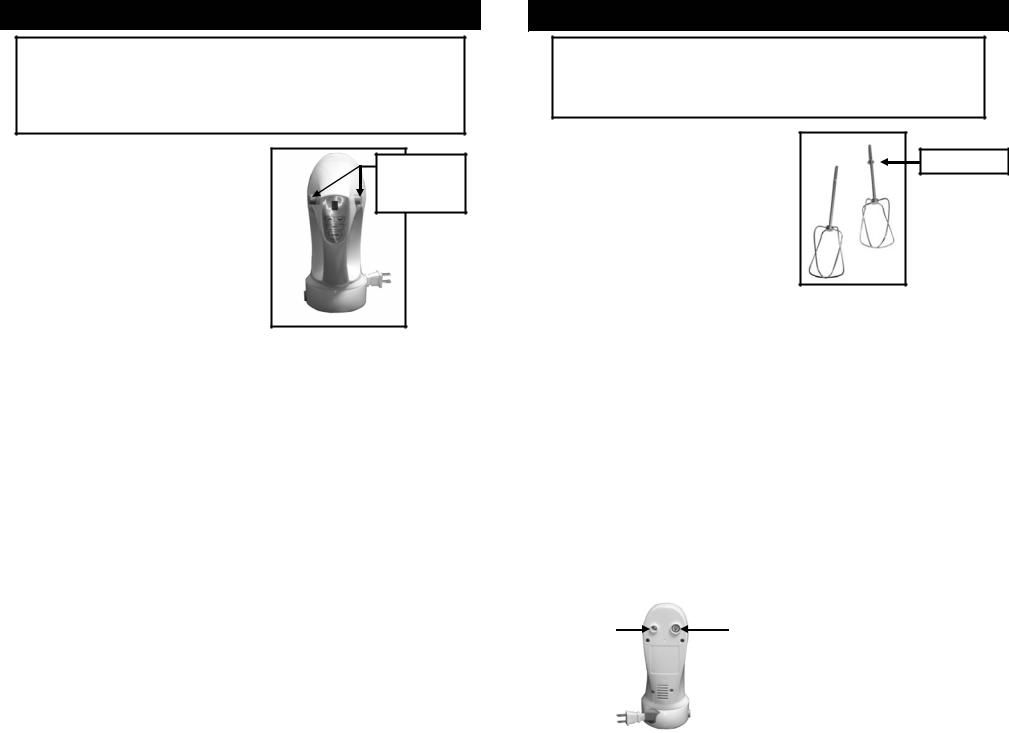
•To attach accessories, perform the following steps:
1.Select the attachment according to the type of mixing required. Make sure that the mixer is turned off and unplugged from power source before inserting or removing beaters, whisk, or dough hooks.
2.If using beaters or dough hooks, insert stem end of beaters (one at a time) into the small and large beater openings in the mixer. (Fig.
1)Insert the beater with the locator ring (Fig. 2) in the large beater opening. The ring on the beater or dough hook must sit below the surface of the mixer housing.
|
|
|
|
Small |
|
Large |
|
Beater |
|
Beater |
|
Opening |
|
Opening |
|
|
|
|
|
Fig. 1
Locator Ring |
Fig. 2
3.To ease the inserting of the beaters, a slight twisting motion will aid in engaging the beater drive tabs. Install the second beater or dough hook in the same manner as above. When they are fully fitted and in place you will hear a click.
If using the whisk, hold whisk at stem end and insert into one of the holes until it clicks into place. DO
NOT PUSH WHISK IN FROM THE WIRE END AS WIRES MAY BE DAMAGED.
Warning: Never operate the appliance without all the parts in place. Make sure that all parts are properly assembled.
•Once you have inserted the desired attachment, hold the mixer by the handle with one hand and with the other hand gently pull the power cord from the main unit and plug it in.
Caution: DO NOT pull with excessive force on the power cord or you will damage the rewinding feature and void the warranty. When rewinding, always hold the plug to avoid cord whiplash. DO NOT pull power cord out past the red marking on the cord.
23 |
4 |
 Loading...