

Page 1
MultiQuick 7
Stapled booklet, 148 x 210 mm, 12 pages (incl. 8 pages cover), 1/1c = black – Print Spec J 92194885
Type 4199
www.braunhousehold.com
www.braunhousehold.co.kr
Hand blender
Page 2

English 6
9
De’Longhi Braun Household GmbH
Carl-Ulrich-Straße 4
63263 Neu-Isenburg/Germany
5722112484/11.16
UK/ Korea
Page 3
6
7
8a 8b
9
10
1
2
3
4
ca
hchc
ca
5
350 ml 500 ml
MQ 700
MQ 725
MQ 735
MQ 736
A
1
2
B
click!
4
1
2
1
2
Page 4
C
9
2.1.
a
b
3.
c
hchc
4.
5.
1
2
d
10
click!
a
b
c
ca
ca
6.
7.
8.
d
D
Parmesan
1cm
speed
max.
100g10100g
hchc
ca
ca
4
sec.
max.
300g 200g 200g30g 20 200g 300g 350g
sec.
20-30 20-30 8 x120 20
1cm
15
10g
5
50g
25
ml
7
80g1080g5100g90g+
5
5
15 25 30
1045
Page 5

E
ca
ca
ca
hchc
ca
5
Page 6

English
Our products are engineered to meet the highest
standards of quality, functionality and design.
We hope you thoroughly enjoy your new Braun
appliance.
Before use
Please read the use instructions carefully and
completely before using the appliance.
Caution
•
The blades are very sharp!
To avoid injuries, please handle
blades with utmost care.
•
Care shall be taken when handling
the sharp cutting blades, emptying
the bowl and during cleaning.
•
This appliance can be used by persons with reduced physical, sensory
or mental capabilities or lack of experience and knowledge if they have
been given supervision or instruction
concerning use of the appliance in a
safe way and if they understand the
hazards involved.
•
Children shall not play with the appliance.
•
This appliance shall not be used by
children.
•
Children shall be kept away from the
appliance and its mains cord.
•
Cleaning and user maintenance shall
not be made by children without
supervision.
•
Always unplug or switch off the appliance when it is left unattended and
before assembling, disassembling,
cleaning and storing.
•
If the supply cord is damaged, it must
be replaced by the manufacturer, its
service agent or similarly qualified
persons in order to avoid a hazard.
•
Before plugging into a socket, check
whether your voltage corresponds
with the voltage printed on the bottom
of the appliance.
6
•
This appliance is designed for household use only and for processing normal household quantities.
•
Do not use any part in the microwave.
•
Cleaning of the appliance should
follow the instruction in the relevant
section.
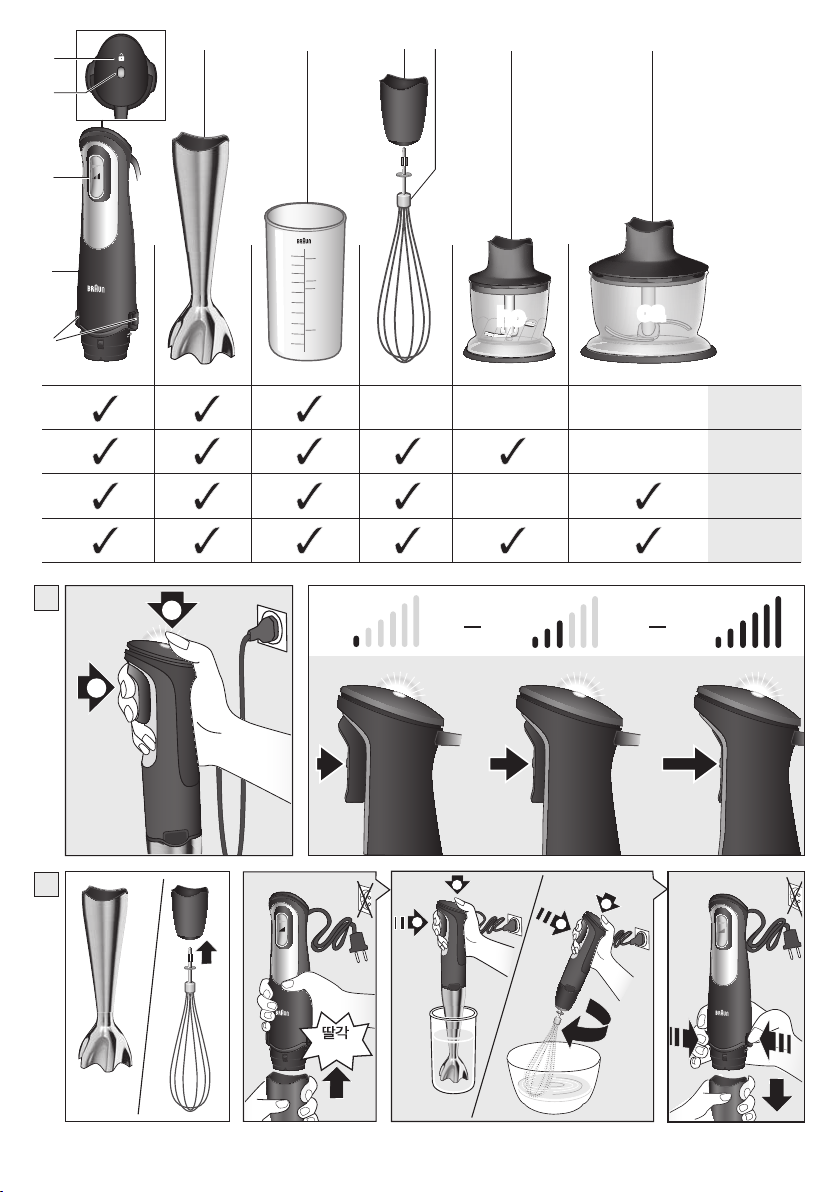
Description (see table on p. 2)
1 Safety button
2 Pilot light
3 Smartspeed switch / variable speeds
4 Motor part
5 Release buttons
6 Blender shaft
7 Beaker with lid
8 a Gear box
b Whisk
9 Chopper «hc»
a Lid
b Blade
c Chopper bowl
d Anti-slip ring
10 Chopper «ca»
a Lid (with gear)
b Blade
c Chopper bowl
d Anti-slip ring
Please clean all parts before using for the first time
(see «Cleaning» / fig. E).
Pilot light
The pilot light (2) shows the status of the appliance,
when it is connected to an electrical outlet.
Pilot light Appliance/operating status
Red flashing Appliance is ready for use
Green Appliance is released (safety
Red Appliance is overheated. Let it
button is pressed) and can be
switched on
cool down. It is ready for use again
when the pilot light flashes red
Smartspeed technology
Smartspeed switch for variable
speeds
One squeeze, all speeds. The more you press, the
higher the speed (fig A.). The higher the speed, the
faster and finer the blending and chopping results.
Page 7

One handed operation: the Smartspeed switch (3)
allows you to turn on the motor part and control the
speed with one hand.
How to use the appliance
First use: Remove the transportation lock from the
motor part (4) by pulling it at the red strap.
Switching on (see p. 2/fig. A)
The appliance has a safety button. To safely switch
it on, follow these points:
1. First press the safety button (1) with your thumb
and hold. The pilot light will light up permanently
green.
2. Then directly press the Smartspeed switch (3)
according to the desired speed.
If the Smartspeed switch is not pressed within
5 seconds, the appliance cannot be switched on
for safety reasons.
The pilot light flashes red.
In order to switch the appliance on, release all
switches and start again with step 1.
3. During operation you do not have to keep the
safety button pressed.
Hand blender (see p. 2/fig. B)
The hand blender is perfectly suited for preparing
dips, sauces, soups, mayonnaise and baby food as
well as for mixing drinks and milk shakes.
For best blending results use highest speed.
• Click the motor part (4) onto the blender shaft (6).
• Position the hand blender deep in a beaker or
bowl. Then switch the appliance on as described
above.
• After use, unplug and press the release buttons
(5) to detach the motor part.
When blending directly in the saucepan while cooking, remove the pan from the stove first to avoid
splashing of the boiling liquid (risk of scalding!).
Recipe example: Mayonnaise
250 g oil (e.g. sunflower oil),
1 egg and 1 extra egg yolk,
1–2 tbsp. vinegar (approx. 15 g),
salt and pepper to taste
Place all ingredients (at room temperature) into the
beaker in the a.m. order. Place the hand blender on
the bottom of the beaker. Operate the hand blender
at maximum speed, keep it in this position until the
oil starts emulsifying. Then without switching off
slowly raise the shaft to the top of the mixture and
back down to incorporate the rest of the oil.
Processing time: from 1 minute (for salad) up to 2
minutes for more stiffness (e.g. for dip).
Whisk (see p. 2/fig. B)
Use the whisk only for whipping cream, beating egg
whites and mixing sponges and ready-mix desserts.
• Insert the whisk (8b) into the whisk gear box (8a)
then click the motor part (4) onto the gear box.
• Place the whisk in a bowl and only then switch the
appliance on.
• After use, unplug and press the release buttons (5)
to detach the motor part. Then pull the whisk out
of the gear box.
Tips for best results
• Use a medium-sized bowl.
• Move the whisk clockwise, holding it slightly
inclined.
• Whipped cream (max. 400 ml chilled cream, min.
30% fat content, 4–8 °C): Start with low speed
(light pressure on the switch) and increase the
speed (more pressure on switch) while whipping.
• Beaten egg whites (max. 4 eggs): Start with a
medium speed (half way pressure on switch) and
increase the speed (more pressure on switch)
while beating.
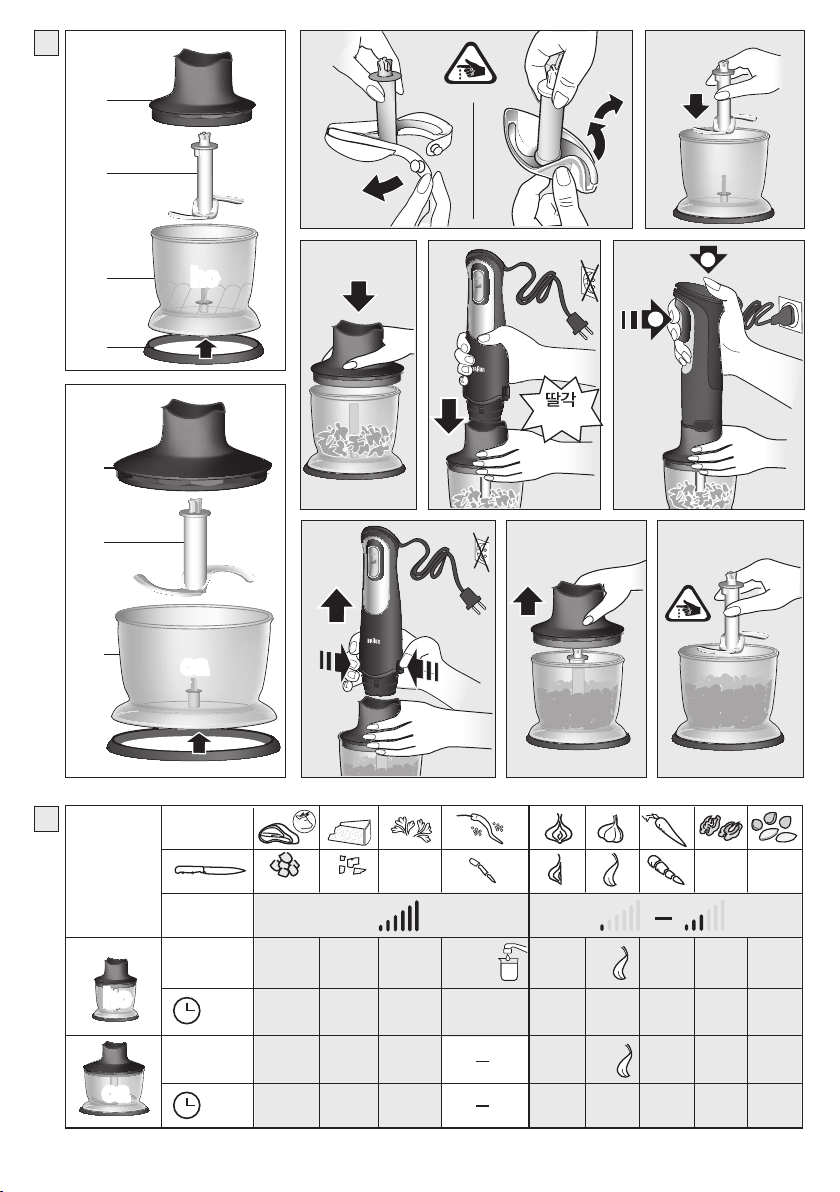
Choppers (see p. 3/fig. C)
The choppers (9) and (10) are perfectly suited for
chopping meat, hard cheese, onions, herbs, garlic,
carrots, nuts, almonds etc.
Always chop hard foods at full speed (e.g. parmesan,
chocolate).
For best results, see processing table D. Maximum
operation time for the «hc» chopper: 2 minutes.
Do not chop extremely hard food, such as ice cubes,
nutmeg, coffee beans or grains.
Before chopping …
• pre-cut meat, cheese, onions, garlic, carrots
• remove stems from herbs, shell nuts
• remove bones, tendons and gristle from meat
• always make sure that the anti-slip ring (9d/10d)
is attached to the chopper bowl
Caution: The blade (9b/10b) is very sharp! Always
hold it by the upper plastic part and handle it
carefully.
1. Carefully remove the plastic cover from the
blade.
2. Place the blade on the centre pin of the chopper
bowl (9c, 10c). Press it down and give it a turn so
that it locks.
3. Fill the chopper with food and put on the lid
(9a/10a).
4. Click the motor part onto the lid.
7
Page 8

5. To operate the chopper switch the appliance on.
During processing, hold the motor part with one
hand and the chopper bowl with the other.
6. After use, unplug and press the release buttons (5)
to detach the motor part.
7. Remove the lid.
8. Carefully take out the blade before you remove
the processed food from the chopper bowl. To
remove the blade, slightly turn it then pull it off.
Recipe example: Vanilla-Honey-Prunes (as a
pancake stuffing or spread)
• Fill the «hc» chopper bowl with 60 g creamy
honey and 50 g prunes.
• Chop 10 seconds at maximum speed (fully press
the Smartspeed button).
• Add 30 ml water (vanilla-flavoured).
• Resume chopping for another 3 seconds.
Cleaning (see p. 4/fig. E)
Clean the motor part and the whisk gear box (8a)
with a damp cloth only. Clean the lid (10a) of the
«ca» chopper only under running water. Do not
place it in the dishwasher. All other parts can be
cleaned in a dishwasher.
You may remove the anti-slip rings from the chopper
bowls for extra thorough cleaning.
Please clean the knifes after usage and let them
dry. Do not leave them in contact with water or salty
food over a longer time.
When processing foods with a high pigment content
(e.g. carrots), the plastic parts of the appliance
may become discoloured. Wipe these parts with
vegetable oil before cleaning them.
Please do not dispose of the product in the
household waste at the end of its useful life.
Disposal can take place at a Braun Service
Centre or at appropriate collection points
provided in your country.
Accessories
(can be bought individually, not available in every
country)
MQ 10: Whisk for whipping cream, egg-whites,
MQ 20: 350 ml compact chopper to chop
MQ 30: 500 ml chopper to chop carrots, meat,
MQ 40: 1250 ml chopper to chop, mix, blend
MQ 70: Compact kitchen machine accessory
Both the design specifications and these user
instructions are subject to change without notice.
8
ready-mix desserts
herbs, onions, garlic, chillies, nuts etc.
onions, etc.
and crush ice
(1500 ml) to chop, mix, slice, shred and
knead.
Page 9

2
9
Page 10

2
2
10
2
Page 11

4
1250
11
Page 12

 Loading...