


MultiQuick 7
Type HB701AI
Register your product
www.braunhousehold.com/register
Hand blender

English 7
16
© Copyright 2019. All rights reserved
De’Longhi Braun Household GmbH
Carl-Ulrich-Straße 4
63263 Neu-Isenburg/Germany
572211448 4/12.20
MQ7075x-7077x-7085x-7087x GB AUNZ GCC
UK/AR
2

4 5
2
1
1
click!
1
6a
7*
a
2
8*
A
3
220-240V˜ 50/60 Hz 850-1000W
9
a
a
b
hchc
c
d
350 ml
b
fpfp
1500 ml
6b
certain models only
*
c
d
e
f
g
b
c
(i)
h
(ii)
(iii)*
j
i
k*
B
click!
1
click!
3
1
2

C
hchc
350 ml
2
D
max.
speed
sec.
1
1
click!
Parmesan
2 cm 2 cm
100g 50g10g
90g +
25
ml
15 45 555
7 80g 80g 100g
10 5 10
4
fpfp
1500 ml
1
2
2
1
2
click!
1
1
click!
1
Parmesan
2
2 cm2 cm2 cm
max.
700g 500g 500g500g30g 30 500g 500g 500g
400g
speed
sec.
E
15-30 30-60 102020
20
15 25 30-60
1
2
45-60
2
1
fpfp
1500 ml
click!
5
click!

2
F
speed
1
1
Parmesan
2
1
hchc
fpfp
fpfp
6

English
Our products are engineered to meet the highest
standards of quality, functionality and design. We
hope you thoroughly enjoy your new Braun
appliance.
Before Use
Please read the user instructions carefully and
completely before using the appliance and retain
for future reference. Remove all packaging and
labels and dispose them appropriately.
•
This appliance is designed for
household use only and for processing normal household quantities. Do
not use the appliance for any purpose other than the intended use
described in the user manual. Any
misuse may cause potential injury.
•
Do not use any part in the microwave.
•
Please clean all parts before first use
or as required, following the instructions in the Care and Cleaning section.
Caution
•
The blades are very sharp! To
avoid injuries, please handle
blades with utmost care.
•
Care shall be taken when handling
the sharp cutting blades, emptying
the bowl and during cleaning.
•
This appliance can be used by
persons with reduced physical,
sensory or mental capabilities or lack
of experience and knowledge if they
have been given supervision or
instruction concerning use of the
appliance in a safe way and if they
understand the hazards involved.
•
Children shall not play with the
appliance.
•
This appliance shall not be used by
children.
•
Children shall be kept away from the
appliance and its mains cord.
•
If the supply cord is damaged, it must
be replaced by the manufacturer, its
service agent or similarly qualified
persons in order to avoid a hazard.
•
Always switch off and unplug the
appliance when it is left unattended
and before assembling, disassembling, cleaning and storing.
•
Before plugging into a socket, check
whether your voltage corresponds
with the voltage printed on the
bottom of the appliance.
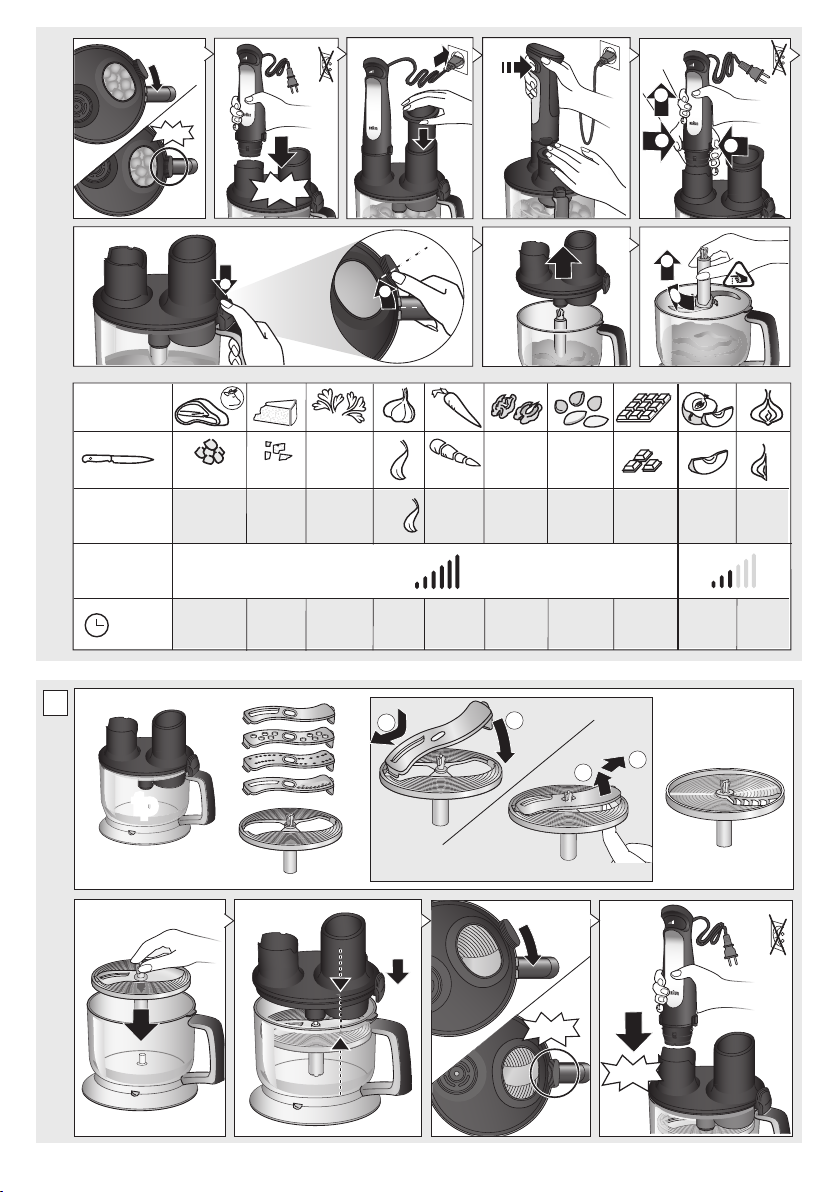
Parts and Accessories
1 Smartspeed switch / variable speeds
2 Motor part
3 EasyClick Plus release buttons
4 ActiveBlade shaft
5 Beaker
6 Whisk accessory
a Gearbox
b Whisk
7 Puree accessory
a Gearbox
b Puree shaft
c Paddle
8 350 ml chopper accessory «hc»
a Lid
b Chopping blade
c Chopper bowl
d Anti-slip rubber ring
9 1500 ml food processor accessory «fp»
a Lid (with gear)
b Coupling for motor part
c Pusher
d Feed tube
e Lid latch
f Food processor bowl
g Anti-slip rubber ring
h Chopping blade
i kneading hook
j Insert holder
(i) Slicing insert (coarse)
(ii) Shredding inserts (fine, coarse)
(iii) Julienne insert
k French fry disc
How to Use the Appliance
Smartspeed Switch for
Variable Speeds
One squeeze, all speeds. The more you press, the
higher the speed. The higher the speed, the faster
and finer the blending and chopping results.
One handed operation: the Smartspeed switch (1)
7

allows you to turn on the appliance and control the
speed with one hand.
ActiveBlade Shaft (A)
The hand blender is equipped with an ActiveBlade
shaft, which enables the knife extend to the bottom
of the bell. The adjustment is made automatically
by pressure required in blending tasks, especially
suited to mix hard foods e.g raw fruits and
vegetables.
It is also perfectly suited for preparing dips, sauces,
salad dressings, soups, baby food, as well as
drinks, smoothies and milkshakes.
For best results, use the highest speed.
Assembly and Operation
• Attach the ActiveBlade shaft (4) to the motor part
until it clicks.
• Place the ActiveBlade shaft into the mixture to be
blended. Then switch the appliance on as
described above.
• Blend ingredients to the desired consistency
using a gentle up-and-down motion. Depending
on the pressure applied, the ActiveBlade shaft will
depress and blade will extend.
• After use, unplug the hand blender and press the
EasyClick Plus release buttons (3) to detach the
ActiveBlade shaft.
Caution
• Do not let liquids or ingredients overlap the green
line of the ActiveBlade shaft.
• If using the appliance to purée hot food in a
saucepan or pot, remove the saucepan or pot
from the heat source and ensure the liquid is not
boiling. Allow hot food to cool slightly to avoid risk
of scalding.
• Do not let the hand blender sit in a hot pan on the
cooktop when not in use.
• Do not scratch the ActiveBlade shaft over the
bottom of pans and pots.
• Do not operate continuously for longer than 1
minute.
• Let the appliance cool down for 3 minutes before
you continue processing.
Recipe Example: Mayonnaise
250 g oil (e.g. sunflower oil)
1 egg and 1 extra egg yolk
1–2 tbsp. Vinegar
Salt and pepper to taste
• Place all ingredients (at room temperature) into
the beaker in the order as above.
• Place the hand blender at the bottom of the
beaker. Blend at maximum speed until the oil
starts emulsifying.
• With the hand blender still running, slowly raise
the shaft to the top of the mixture and back down
to incorporate the rest of the oil.
8
NOTE: Processing time: approx. 1 minute for
salads and up to 2 minutes for a thicker
mayonnaise (e.g. for dip).
Whisk Accessory (A)
Use the whisk only for whipping cream, beating egg
whites, making sponge cakes and ready-mix
desserts.
Assembly and Operation
• Attach the whisk (6b) to the gearbox (6a).
• Align the motor part with the assembled whisk
accessory and push the pieces together until
they click.
• After use, unplug and press the EasyClick Plus
release buttons to detach the motor part. Then
pull the whisk out of the gearbox.
• Do not operate continuously for longer than 3
minutes.
• Let the appliance cool down for 3 minutes before
you continue processing.
Tips for Best Results
• Move the whisk clockwise while holding it at a
slight incline.
• To prevent splattering, start slowly and use the
whisk accessory in deep containers or pans.
• Place the whisk in a bowl and only then switch the
appliance on.
• Always ensure the whisk and mixing bowl are
completely clean and free of fat before whisking
egg whites. Only whip up to 4 egg whites.
Recipe Example: Whipped Cream
400 ml chilled cream (min. 30% fat content, 4 - 8 °C)
• Start with low speed (light pressure on the switch)
and increase the speed (more pressure on
switch) while whipping.
• Always use fresh chilled cream to achieve greater
and more stable volume when whisking.
Puree Accessory (B)
The puree accessory can be used to mash cooked
vegetables and fruits such as potatoes, sweet
potatoes, tomatoes, plums and apples.
Before Use
• Do not mash hard or uncooked food, as this may
damage the unit.
• Peel and remove any stones or hard parts; cook
and drain then mash the fruit/vegetable.
Assembly and Operation
• Fit the gearbox (7a) to the shaft (7b) by turning in
a clockwise direction until it locks into place.
• Turn the puree accessory upside down and fit
the paddle (7c) over the central hub and turn

counter- clockwise to locate. (If the gearbox is
not fitted properly, then the paddle will not secure
in place).
• Align the assembled puree accessory with the
motor part and click the two parts together.
Plug in.
• Dip the puree accessory into the ingredients and
switch on the appliance.
• Using a gentle up and down motion, move the
puree accessory through the ingredients until the
desired texture is achieved.
• Release the Smartspeed switch and ensure the
puree accessory has completely stopped turning
before removing it from the food.
• After use, unplug the appliance. Remove the
paddle (7c) by turning clockwise.
• Press the EasyClick Plus release buttons to
detach the puree accessory from the motor part.
Separate the gearbox from the shaft by turning
counterclockwise.
Caution
• Never use the puree accessory in a saucepan
over direct heat.
• Always remove the saucepan from the heat and
allow to cool slightly.
• Sit the saucepan or bowl on a stable, flat surface,
and support it with your free hand.
• Do not tap the puree accessory on the side of the
cooking vessel during or after use. Use a spatula
to scrape excess food away.
• For best results when mashing never fill a
saucepan or bowl more than half full with food.
• Do not process more than one batch without
interruption.
• Do not operate continuously for longer than 1
minute.
• Let the appliance cool down for 4 minutes before
you continue processing.
operation time for the «hc» chopper: 1 minute for
large amounts of wet ingredients, 30 seconds for
dry or hard ingredients.
NOTE: leave an interval of at least 3 minutes before
operating again (To prevent faults). Immediately
stop processing when motor speed decreases and/
or strong vibrations occur.
Refer to the Processing Guide C for maximum
quantities, recommended times and speeds.
Before Use
• Pre-cut foods into small pieces for easier
chopping.
• Remove any bones, tendons and gristle from
meat to help prevent damage to the blades.
• Make sure the anti-slip rubber ring (8d) is
attached to the bottom of the chopper bowl.
Assembly and Operation
• Carefully remove the plastic cover from the blade.
• The blade (8b) is very sharp! Always hold it by the
upper plastic part and handle it carefully.
• Place the blade on the center pin of the chopper
bowl (8c). Press it down and give it a turn so that
it locks into place.
• Fill the chopper with food and put on the lid (8a).
• Align the chopper with the motor part (2) and
click together.
• To operate the chopper, switch on the appliance.
During processing, hold the motor part with one
hand and the chopper bowl with the other.
• Always chop harder foods (e.g. parmesan
cheese) at full speed.
• When chopping is complete, unplug and press
the EasyClick Plus release buttons (3) to detach
the motor part.
• Lift the lid up. Carefully take out the blade before
pouring out the contents of the bowl. To remove
the blade slightly turn it then pull it off.
Recipe Example: Mashed Potatoes
1 kg cooked potatoes
200 ml warm milk
• Place the potatoes in a bowl and mash for 30
seconds (3/4 way on the Smartspeed switch).
• Add the milk. Resume mashing for another 30
seconds.
Chopper Accessory (C)
The chopper (8) is perfectly suited for chopping
hard cheese, onions, herbs, garlic, vegetables,
bread, crackers, nuts and for preparing small
portions of baby purée.
Use the «hc» chopper (8) for fine results. It is not
suitable for meat.
For «hc» chopper do not exceed the quantity of
ingredients higher than max line. Maximum
Caution
• Do not use the chopper accessory (8) to process
extremely hard foods, such as unshelled nuts, ice
cubes, coffee beans, grains, or hard spices e.g.
nutmeg. Processing these foods could damage
the blades.
• If using the appliance to puree hot food ensure
the liquid is not boiling. Allow hot food to cool
slightly to avoid risk of scalding.
• Never place the chopper bowls in the microwave
oven.
«hc» Recipe example: Honey-Prunes (as a pancake
stuffing or spread)
50 g prunes
75 g creamy honey
70ml water (vanilla-flavoured)
• Fill the «hc» chopper bowl with prunes and
creamy honey.
• Store at 3 °C in refrigerator for 24 hours.
• Add 70 ml water (vanilla-flavoured).
9

• Chop 1.5 seconds at maximum speed (fully press
the Smartspeed switch).
Food Processor Accessory
The food processor accessory (9) can be used for:
• Chopping, blending and mixing light batter;
• kneading dough (based on max. 250 g flour);
• slicing, shredding and making French fries.
Chopping (D)
Using the blade (9h) you can chop meat, hard
cheese, onions, herbs, garlic, vegetables, bread,
crackers, and nuts.
Refer to the Processing Guide D for maximum
quantities, recommended times and speeds.
Before Use
• Pre-cut foods into small pieces for easier
chopping.
• Remove any bones, cartilage, tendons and
gristle from meat to help prevent damage to the
blades.
• Remove stems from herbs, shell nuts.
• Make sure the anti-slip rubber ring (9g) is
attached to the bottom of the food processor
bowl.
Assembly and Operation
• Carefully remove the plastic cover from the
blade.
• The blade (9h) is very sharp! Always hold it by the
upper plastic part and handle it carefully.
• Place the blade on the center pin of the bowl (9f).
Press it down and give it a turn so that it locks into
place.
• Fill the bowl with food. Attach the lid (9a) to the
bowl with the latch (9e) positioned to the right of
the bowl handle and align with marks.
• To lock the lid, turn it clockwise so that the latch
engages with a click.
• Insert the motor part (2) into the coupling (9b)
until it locks.
• Plug in the appliance and insert the pusher (9c) in
the feed tube (9d).
• To operate the food processor, switch on the
appliance. During processing, hold the motor
part with one hand and the food processor bowl
on the handle.
• When chopping is complete, unplug and press
the EasyClick Plus release buttons (3) to detach
the motor part.
• Press the lid latch (9e) and hold it. Turn the lid
(9a) counter-clockwise to unlatch it.
• Lift the lid up. Carefully take out the blade before
pouring out the contents of the bowl. To remove
and unlock the blade, slightly turn it then pull it off.
Caution
• Do not use the food processor accessory to chop
extremely hard foods, such as unshelled nuts, ice
cubes, coffee beans, grains or hard spices e.g.
10
nutmeg. Processing these foods could damage
the blades.
• Never place the food processor bowl in the
microwave oven.
Using the blade (9h), you may also mix light batter
like a pancake batter or a cake mixture based on up
to 250 g of flour.
Recipe Example: Pancake Batter
375 ml milk
250 g plain flour
2 eggs
• Pour milk into the bowl, then add flour and finally
the eggs.
• Using full speed, mix the batter until smooth.
Kneading Dough (D)
Figure F also applies for the use of the kneading
hook (9i). The kneading hook is ideal for kneading
different dough types such as yeast or pastry.
Assembly and Operation
• Place the kneading hook on the center pin of the
bowl (9f). Press it down and give it a turn so that it
locks into place.
• Fill the bowl with flour (max. 250 g), then add the
other ingredients except the liquids.
• Turn the appliance on with ¾ way pressure on the
Smartspeed switch.
• Add liquids through the feed tube while the motor
is running.
NOTE: Maximum kneading time: 1 minute – then
allow the motor to cool down for 10 minutes.
Recipe Example: Pizza dough
250 g plain flour
½ tsp salt
½ tsp dried yeast
5 tbsp olive oil
150 ml water (lukewarm)
• Put all ingredients except water into the bowl and
start kneading.
• Add water through the feed tube while the motor
is running.
Recipe Example: Sweet Pastry
250 g plain flour
170 g unsalted butter (cold/hard, small pieces)
80 g sugar
1 vanilla sugar
1 small egg
1 pinch salt
• Put butter and sugar into the bowl and start
kneading. For good results use cold butter.
• Add flour and the rest of the ingredients.
• Dough will become too soft from over kneading.
Stop kneading shortly after dough has formed a
ball.
• Cool down the dough in the refrigerator for half
an hour before proceeding.
Slicing / Shredding / Julienne / French Fry (E)
Use the slicing insert (i) to slice raw fruit and
vegetables into slices; e.g. cucumbers, onions,

mushrooms, apples, carrots, radishes, potatoes,
zucchini and cabbage.
Use the fine and coarse shredding inserts (ii) to
shred foods such as apples, carrots, potatoes,
beetroot, cabbage, cheese (soft to medium).
Use the julienne insert (iii) to cut fruit and vegetable
into julienne.
Use the French fry disc (9k) to prepare french fries.
Refer to the Processing Guide E for recommended
speeds.
Assembly and Operation
• For slicing and shredding place an insert into the
insert holder (9j) and snap into position. Place the
assembled insert holder or French fry disc on the
center pin of the bowl and give it a turn so that it
locks into place.
• Attach the lid to the bowl with the latch positioned
to the right of the bowl handle.
• To lock the lid, turn it clockwise so that the latch
engages with a click.
• Insert the motor part into the coupling until it locks.
• Plug in the appliance and insert the food to be
processed into the feed tube.
• For best French fry results, place 3-4 potatoes
(depending on the size) in the feed tube of the lid
while the motor is switched off.
• Switch the appliance on to operate. Never
reach into the feed tube when the appliance is
switched on. Always use the pusher to feed in
food.
• After use, unplug and press the EasyClick Plus
release buttons to detach the motor part.
• Press the lid latch and hold it. Turn the lid
counter-clockwise to unlatch it.
• Lift the lid up. Carefully take out insert holder or
French fry disc before pouring out the contents of
the bowl. To remove the insert holder or French
fry disc, slightly turn it then pull it off.
• To remove an insert, push it up at the one end that
protrudes at the bottom side of the insert holder.
Care and Cleaning (F)
• Always clean the hand blender and the suitable
accessories thoroughly for first use and after
every use with water and detergent.
• Unplug hand blender before cleaning.
• Do not immerse the motor part (2) or gearboxes
(6a, 7a) in water or any other liquid. Clean with a
damp cloth only.
• The lid (10a) can be rinsed under running water.
Do not immerse in water, nor place in a
dishwasher.
• All other parts can be cleaned in a dishwasher.
Do not use abrasive cleaners that could scratch
the surface.
• You may remove the anti-slip rubber rings from
the bottom of the bowls for an extra thorough
clean.
• When processing foods with high pigment
content (e.g. carrots), the accessories may
become discolored. Wipe these parts with
vegetable oil before cleaning them.
Warranty and Service
For detailed information see separate warranty and
service leaflet or visit www.braunhousehold.com.
Both the design specifications and these user
instructions are subject to change without notice.
Please do not dispose of the product in the
household waste at the end of its useful life.
Disposal can take place at appropriate
collection points provided in your country.
Materials and accessories coming into
contact with food conform to EEC
regulation 1935/2004.
Troubleshooting Guide
Problem Potential causes Solution
Hand blender does not operate. No power Check appliance is plugged in.
Check the fuse /circuit breaker in
your home. If none of the above
contact Braun Service.
11

(F) ﻒﻴﻈﻨﺘﻟاو ﺔﻳﺎﻋﺮﻟا
ﺪﻴﺟ ﺔﺒﺳﺎﻨﻤﻟا تﺎﻘﺤﻠﻤﻟاو يوﺪﻴﻟا طﻼﺨﻟا ﺎًﻤﺋاد ﻒّﻈﻧ
ً
• ماﺪﺨﺘﺳﻻا ﺪﻨﻋ ا
.تﺎﻔﻈﻨﻤﻟاو ءﺎﻤﻟﺎﺑ ماﺪﺨﺘﺳا ﻞﻛ ﺪﻌﺑو ةﺮﻣ لوﻷ
•.ﻒﻴﻈﻨﺘﻟا ﻞﺒﻗ يوﺪﻴﻟا طﻼﺨﻟا ﻦﻋ ﺔﻗﺎﻄﻟا ﻞﺼﻓا
• ﻒﻈﻧ .ﺮﺧآ ﻞﺋﺎﺳ يأ ﻲﻓ وأ ءﺎﻤﻟا ﻲﻓ (2) رﻮﺗﻮﻤﻟا ءﺰﺟ ﺮﻤﻐﺗ ﻻ
.ﻂﻘﻓ ﺔﻠﻠﺒﻣ شﺎﻤﻗ ﺔﻌﻄﻗ ماﺪﺨﺘﺳﺎﺑ
•ﻻو ،ءﺎﻤﻟﺎﺑ هﺮﻤﻐﺗ ﻻ .يرﺎﺠﻟا ءﺎﻤﻟا ﺖﺤﺗ (9a) ءﺎﻄﻐﻟا ﻒﻄﺷ ﻦﻜﻤﻳ
•.قﺎﺒﻃأ ﺔﻟﺎﺴﻏ ﻲﻓ ﻪﻌﻀﺗ
•تﺎﻔﻈﻨﻤﻟا مﺪﺨﺘﺴﺗ ﻻ .قﺎﺒﻃﻷا ﺔﻟﺎﺴﻏ ﻲﻓ ءاﺰﺟﻷا ﻲﻗﺎﺑ ﻒﻴﻈﻨﺗ ﻦﻜﻤﻳ
•.ﺢﻄﺴﻟا شﺪﺨﺗ نأ ﻦﻜﻤﻳ ﻲﺘﻟا ﺔﻄﺷﺎﻜﻟا
•ﺎﻬﻔﻴﻈﻨﺘﻟ ءﺎﻋﻮﻟا ﻞﻔﺳأ ﻦﻣ ﺔﻘﻟﺰﻨﻤﻟا ﺔﻴﻃﺎﻄﻤﻟا تﺎﻘﻠﺤﻟا ﺔﻟازإ ﻚﻨﻜﻤﻳ
•.ﻞﻀﻓأ ﺔﻘﻳﺮﻄﺑ
ءاﺰﺟﻷا هﺬﻫ ﻦﻫدا .ﺔﻘﺤﻠﻤﻟا ةﺰﻬﺟﻷا نﻮﻟ لوﺰﻳ ﺪﻘﻓ ،(رﺰﺠﻟا :لﺎﺜﻤﻟا
.ﺎﻬﻠﺴﻏ ﻞﺒﻗ تاوﺮﻀﺧ ﺖﻳﺰﺑ
ﺔﻣﺪﺨﻟاو نﺎﻤﻀﻟا
وأ ﺔﻠﺼﻔﻨﻤﻟا ﺔﻣﺪﺨﻟاو نﺎﻤﻀﻟا ةﺮﺸﻧ ﺮﻈﻧا ،ﺔﻴﻠﻴﺼﻔﺗ تﺎﻣﻮﻠﻌﻣ ﻰﻠﻋ لﻮﺼﺤﻠﻟ
.www.braunhousehold.com ةرﺎﻳﺰﺑ ﻞﻀﻔﺗ
نود ﺮﻴﻴﻐﺘﻠﻟ هﺬﻫ مﺪﺨﺘﺴﻤﻟا تﺎﻤﻴﻠﻌﺗو ﻢﻴﻤﺼﺘﻟا تﺎﻔﺻاﻮﻣ ﻦﻣ ﻞﻛ ﻊﻀﺨﺗ
.ﻖﺒﺴﻣ رﺎﻌﺷإ
ﺪﻨﻋ ﺔﻴﻟﺰﻨﻤﻟا تﺎﻔﻠﺨﻤﻟا ﻦﻤﺿ ﺞﺘﻨﻤﻟا ﻦﻣ ﺺﻠﺨﺘﻟا مﺪﻋ ﻰﺟﺮﻳ
ﻦﻣ ﺺﻠﺨﺘﻟا ﻢﺘﻳ نأ ﻦﻜﻤﻳ .ماﺪﺨﺘﺳﻼﻟ ﺔﻴﺣﻼﺼﻟا ةﺮﺘﻓ ﺔﻳﺎﻬﻧ
تﺎﻣﺪﺧ ﺰﻛﺮﻣ ﻲﻓ زﺎﻬﺠﻟا Braun ﻊﻴﻤﺠﺘﻟا طﺎﻘﻧ ﻲﻓ وأ
.ﻚﺘﻟود ﺎﻫﺮﻓﻮﺗ ﻲﺘﻟا ﺔﺒﺳﺎﻨﻤﻟا
• ﻞﻴﺒﺳ ﻰﻠﻋ) ﺔﻐﺒﺼﻟا ﻦﻣ ةﺮﻴﺒﻛ ﺔﻴﻤﻛ ماﺪﺨﺘﺳﺎﺑ مﺎﻌﻄﻟا ﺮﻴﻀﺤﺗ ﺪﻨﻋ
12
ﺎﻬﺣﻼﺻإو ءﺎﻄﺧﻷا فﺎﺸﻜﺘﺳا ﻞﻴﻟد
ﺔﻠﻜﺸﻤﻟا ﺔﻠﻤﺘﺤﻤﻟا بﺎﺒﺳﻷا ﻞﺤﻟا
.ﻞﻤﻌﻳ ﻻ يوﺪﻴﻟا طﻼﺨﻟا ﺔﻴﺋﺎﺑﺮﻬﻛ ﺔﻗﺎﻃ ﺪﺟﻮﺗ ﻻ .ءﺎﺑﺮﻬﻜﻟﺎﺑ زﺎﻬﺠﻟا ﻞﻴﺻﻮﺗ ﻦﻣ ﻖﻘﺤﺗ
.ﻚﻟﺰﻨﻣ ﻲﻓ ةﺮﺋاﺪﻟا ﻊﻃﺎﻗ/ﺮﻬﺼﻨﻤﻟا ﻦﻣ ﻖﻘﺤﺗ
ﻰﻠﻋ ﻞﺼﺗﺎﻓ ،ﺎًﻌﻔﻧ ﻖﺒﺳ ﺎﻤﻣ ءﻲﺷ يأ ِﺪﺠُﻳ ﻢﻟ اذإ
.Braun ﺔﻣﺪﺧ

نﻮﺘﻳز ﺖﻳز ﻖﻋﻼﻣ 5
(ﺮﺗﺎﻓ) ءﺎﻣ ﻲﻠﻠﻣ 150
•.ﻦﺠﻌﻟا أﺪﺑاو ءﺎﻋﻮﻟا ﻞﺧاد ءﺎﻤﻟا ءﺎﻨﺜﺘﺳﺎﺑ تﺎﻧﻮﻜﻤﻟا ﻊﻴﻤﺟ ﻊﺿ
•.رﻮﺗﻮﻤﻟا ﻞﻴﻐﺸﺗ ءﺎﻨﺛأ ﺔﻳﺬﻐﺘﻟا بﻮﺒﻧأ لﻼﺧ ﻦﻣ هﺎﻴﻤﻟا ﻒﺿأ
ةﻮﻠﺤﻟا ﺮﺋﺎﻄﻔﻟا :ﺔﻔﺻﻮﻟ لﺎﺜﻣ
يدﺎﻋ ﻖﻴﻗد ماﺮﺟ
250
(ةﺮﻴﻐﺻ ﻊﻄﻗ ،ﺔﺒﻠﺻ/ةﺪﻤﺠﻣ ﺔﺤﻠﻤﻣ ﺮﻴﻏ ةﺪﺑز ماﺮﺟ 170
ﺮﻜﺳ ماﺮﺟ 80
ﺎﻴﻠﻴﻧﺎﻓ ﺮﻜﺳ 1
ةﺮﻴﻐﺻ ﺔﻀﻴﺑ 1
ﻊﺑﺎﺻﻷا فاﺮﻃﺄﺑ ﺢﻠﻣ ﺔﺻﺮَﻗ 1
• ﺞﺋﺎﺘﻧ ﻰﻠﻋ لﻮﺼﺤﻠﻟ .ﻦﺠﻌﻟا أﺪﺑاو ءﺎﻋﻮﻟا ﻞﺧاد ﺮﻜﺴﻟاو ةﺪﺑﺰﻟا ﻊﺿ
.ةﺪﻤﺠﻣ ةﺪﺑز مﺪﺨﺘﺳا ،ةﺪﻴﺟ
•.تﺎﻧﻮﻜﻤﻟا ﻲﻗﺎﺑو ﻖﻴﻗﺪﻟا ﻒﺿأ
ﺪﺟ ﺔﻤﻋﺎﻧ ﺔﻨﻴﺠﻌﻟا ﺢﺒﺼﺘﺳ
ً
• ةﺮﺘﻓ ﺪﻌﺑ ﻦﺠﻌﻟا ﻒﻗوأ .ﻦﺠﻌﻟا لﻼﺧ ﻦﻣ ا
.ةﺮﻛ ﻰﻟإ ﺔﻨﻴﺠﻌﻟا ﻞﻜﺸﺗ ﻦﻣ ةﺮﻴﺼﻗ
•.ﺔﻌﺑﺎﺘﻤﻟا ﻞﺒﻗ ﺔﻋﺎﺳ ﻒﺼﻧ ةﺪﻤﻟ ﺔﺟﻼﺜﻟا ﻲﻓ دﺮﺒﻳ ﻦﻴﺠﻌﻟا كﺮﺗا
(E) ﺔﻴﻠﻘﻤﻟا ﺎﻃﺎﻄﺒﻟا ﻊﺑﺎﺻأ / نﺎﻴﻟﻮﺟ / ﻊﻴﻄﻘﺘﻟا / ﺢﺋاﺮﺸﻟا
ﺔﺟزﺎﻄﻟا تاوﺮﻀﺨﻟاو ﻪﻛاﻮﻔﻟا ﻊﻴﻄﻘﺘﻟ (i) ﺢﺋاﺮﺷ ﻰﻟإ ﻊﻴﻄﻘﺘﻟا ةادأ مﺪﺨﺘﺳا
ﻞﺠﻔﻟاو رﺰﺠﻟاو حﺎﻔﺘﻟاو باﺮﻐﻟا ﺶﻴﻋو ﻞﺼﺒﻟاو رﺎﻴﺨﻟا ﻞﺜﻣ ﺢﺋاﺮﺷ ﻰﻟإ
.ﺐﻧﺮﻜﻟاو ﺔﺳﻮﻜﻟاو ﺲﻃﺎﻄﺒﻟاو
حﺎﻔﺘﻟا ﻞﺜﻣ ﺔﻤﻌﻃﻷا ﻊﻴﻄﻘﺘﻟ (ii) ﺔﻨﺸﺨﻟاو ﺔﻤﻋﺎﻨﻟا ﻊﻴﻄﻘﺘﻟا تاودأ مﺪﺨﺘﺳا
.(ﻂﺳﻮﺘﻣ ﻰﻟإ ﻦﻴﻟ) ﻦﺒﺠﻟاو ﺐَﻧْﺮَﻜﻟاو رﺪﻨﻤﺸﻟاو ﺎﻃﺎﻄﺒﻟاو رﺰﺠﻟاو
.نﺎﻴﻟﻮﺟ ﻰﻟإ تاوﺮﻀﺨﻟاو ﺔﻬﻛﺎﻔﻟا ﻊﻄﻘﻟ (iii) نﺎﻴﻟﻮﺟ ةادأ مﺪﺨﺘﺳا
.ﺔﻴﻠﻘﻤﻟا ﺎﻃﺎﻄﺒﻟا ﻊﺑﺎﺻأ داﺪﻋﻹ (9k) ﺔﻴﻠﻘﻤﻟا ﺎﻃﺎﻄﺒﻟا ﻊﻴﻄﻘﺗ صﺮﻗ مﺪﺨﺘﺳا
.ﺎﻬﺑ ﻰﺻﻮُﻤﻟا تﺎﻋﺮﺴﻠﻟ و ﺮﻴﻀﺤﺘﻟا ﻞﻴﻟد ﻊﺟار
ﻞﻴﻐﺸﺘﻟاو ﻊﻴﻤﺠﺘﻟا
ﻤﻟا ﻞﻣﺎﺣ ﻞﺧاد ﻖﺤﻠُﻣ ﻲﻌﺿ ،ﻊﻴﻄﻘﺘﻟاو ﺢﺋاﺮﺸﻟا ﻰﻠﻋ لﻮﺼﺤﻠﻟ
ُ
• (9j) ﻖﺤﻠ
ﻊﻴﻄﻘﺗ صﺮﻗ وأ ﻊﻤّﺠُﻤﻟا ﻖﺤﻠُﻤﻟا ﻞﻣﺎﺣ ﻲﻌﺿ .ﺎﻬﻧﺎﻜﻣ ﻲﻓ ﺎﻬﻴﻘﺒﻃأو
.ﺎﻬﻧﺎﻜﻣ ﻲﻓ ﺎﻬﻨﻴﻣﺄﺗ ﻢﺘﻳ ﻰﺘﺣ ﺎﻬﻴﻔﻟو ءﺎﻋﻮﻟا ﻒﺼﺘﻨﻣ ﻲﻓ ﺔﻴﻠﻘﻤﻟا ﺎﻃﺎﻄﺒﻟا
•.ءﺎﻋﻮﻟا ﺾﺒﻘﻣ ﻦﻴﻤﻳ دﻮﺟﻮﻤﻟا جﻻﺰﻤﻟﺎﺑ ءﺎﻋﻮﻟا ﻰﻠﻋأ ءﺎﻄﻐﻟا ﺖﺒﺛ
• ﻊﻤﺴﺗو جﻻﺰﻤﻟا ﻞﺧﺪﻳ ﻲﺘﺣ ﺔﻋﺎﺴﻟا برﺎﻘﻋ هﺎﺠﺗا ﻲﻓ ﻪﻔﻟ ،ءﺎﻄﻐﻟا قﻼﻏﻹ
.ةﺮﻘﻧ تﻮﺻ
•.ﻪﻨﻴﻣﺄﺗ ﻢﺘﻳ ﻰﺘﺣ ﺔﻠﺻﻮﻟا ﻲﻓ رﻮﺗﻮﻤﻟا ءﺰﺟ ﻞﺧدأ
• بﻮﺒﻧأ ﻲﻓ هﺮﻴﻀﺤﺗ بﻮﻠﻄﻤﻟا مﺎﻌﻄﻟا ﻊﺿو ءﺎﺑﺮﻬﻜﻟا ﺲﺑﺎﻘﺑ زﺎﻬﺠﻟا ﻞﺻو
.ﺔﻳﺬﻐﺘﻟا
• 3-4 ﻊﺿ ،ﺔﻴﻠﻘﻤﻟا ﺎﻃﺎﻄﺒﻟا ﻊﺑﺎﺻﻷ ﺞﺋﺎﺘﻧ ﻞﻀﻓأ ﻰﻠﻋ لﻮﺼﺤﻠﻟ تﺎﻃﺎﻄﺑ
.رﻮﺗﻮﻤﻟا ﻞﻴﻐﺸﺗ فﺎﻘﻳإ ءﺎﻨﺛأ ءﺎﻄﻐﻠﻟ ﺔﻳﺬﻐﺘﻟا بﻮﺒﻧأ ﻲﻓ (ﻢﺠﺤﻟا ﺐﺴﺣ)
• ﻞﻴﻐﺸﺗ ءﺎﻨﺛأ ﺔﻳﺬﻐﺘﻟا بﻮﺒﻧأ ﺲﻤﻠﺗ ﻻ .ﻞﻴﻐﺸﺘﻟا ﻊﺿو ﻰﻠﻋ زﺎﻬﺠﻟا ﻞﻐﺷ
.مﺎﻌﻄﻟﺎﺑ ﻪﻤﻴﻘﻠﺘﻟ ﺎًﻤﺋاد ﻊﻓاﺪﻟا مﺪﺨﺘﺳا .زﺎﻬﺠﻟا
•ﻢﺴﺟ ﻞﺼﻔﻟ ﺮﻳﺮﺤﺘﻟا رارزأ ﻰﻠﻋ ﻂﻐﺿاو ﺔﻗﺎﻄﻟا ﻞﺼﻓا ،ماﺪﺨﺘﺳﻻا ﺪﻌﺑو
•.رﻮﺗﻮﻤﻟا
• ﺮﻳﺮﺤﺘﻟا رارزأ ﻰﻠﻋ ﻲﻄﻐﺿاو ﺔﻗﺎﻄﻟا ﻲﻠﺼﻓا ،ماﺪﺨﺘﺳﻻا ﺪﻌﺑو
.رﻮﺗﻮﻤﻟا ءﺰﺟ ﻞﺼﻔﻟ EasyClick Plus
• ﺔﻋﺎﺴﻟا هﺎﺠﺗا ﺲﻜﻋ ءﺎﻄﻐﻟا ﻒﻟ .ﻪﻜﺴﻣاو ءﺎﻄﻐﻟا جﻻﺰﻣ ﻰﻠﻋ ﻂﻐﺿا
.ﻪﻠﺼﻔﻟ
• ﺎﻃﺎﻄﺒﻟا ﻊﻴﻄﻘﺗ صﺮﻗ وأ ةادﻷا ﻞﻣﺎﺣ جاﺮﺧﺈﺑ ﻢﻗ .ﻰﻠﻋﻷ ءﺎﻄﻐﻟا ﻊﻓرا
وأ ةادﻷا ﻞﻣﺎﺣ ﺔﻟازﻹ .ءﺎﻋﻮﻟا ﻦﻣ تﺎﻳﻮﺘﺤﻤﻟا ﺐﻜﺳ ﻞﺒﻗ صﺮﺤﺑ ﺔﻴﻠﻘﻤﻟا
.ﻪﺒﺤﺳا ﻢﺛ ﻒﻄﻠﺑ ﻪﻔﻠﺑ ﻢﻗ ،ﺔﻴﻠﻘﻤﻟا ﺎﻃﺎﻄﺒﻟا ﻊﻴﻄﻘﺗ صﺮﻗ
.ةادﻷا ﻞﻣﺎﺣ
.صﺮﺤﺑ ﻪﻣﺪﺨﺘﺳاو يﻮﻠﻌﻟا ﻲﻜﻴﺘﺳﻼﺒﻟا
.ﺎﻬﻧﺎﻜﻣ ﻲﻓ ﺎﻬﻨﻴﻣﺄﺗ ﻢﺘﻳ ﻰﺘﺣ
.تﺎﻣﻼﻌﻟا ﻊﻣ ﻪﺗاذﺎﺤﻤﺑ ﻢﻗو ءﺎﻋﻮﻟا ﺾﺒﻘﻣ ﻦﻴﻤﻳ ﻲﻓ دﻮﺟﻮﻤﻟا
ﺗ ﻰﺘﺣ (9b) ﺔﻠﺻﻮﻟا ﻲﻓ (2) رﻮﺗﻮﻤﻟا ءﺰﺟ ﻞﺧدأ
ُ
.ﺾﺒﻘﻤﻟا ﻦﻣ مﺎﻌﻄﻟا ﺮﻴﻀﺤﺗ زﺎﻬﺟ ءﺎﻋوو ةﺪﺣاو ﺪﻴﺑ رﻮﺗﻮﻤﻟا ءﺰﺟ
.رﻮﺗﻮﻤﻟا ءﺰﺟ ﻞﺼﻔﻟ (3) EasyClick Plus
ﻴﺴﻜﻋ (9a) ءﺎﻄﻐﻟا ﻒﻟ .ﻪﻜﺴﻣاو (9e) ءﺎﻄﻐﻟا جﻻﺰﻣ ﻰﻠﻋ ﻂﻐﺿا
ً
.ﺎﻬﺒﺤﺳا ﻢﺛ ًﻼﻴﻠﻗ ﺎﻬﻔﻟ ،ﺎﻬﻨﻴﻣﺄﺗ ءﺎﻐﻟإو ةﺮﻔﺸﻟا ﺔﻟازﻹ .ءﺎﻋﻮﻟا
بﻮﺒﺤﻟا وأ ةﻮﻬﻘﻟا بﻮﺒﺣ وأ ﺞﻠﺜﻟا تﺎﺒﻌﻜﻣ وأ ﺮﺸﻘﻤﻟا ﺮﻴﻏ قﺪﻨﺒﻟا ﻞﺜﻣ
ﺔﻤﻌﻃﻷا هﺬﻫ ﺮﻴﻀﺤﺗ يدﺆﻳ ﺪﻗ .ﺐﻴﱢﻄﻟا ُزﻮَﺟ ﻞﺜﻣ ﺔﻳﻮﻘﻟا بﺎﺸﻋﻷا وأ
ﺪﺑأ مﺎﻌﻄﻟا ﺮﻴﻀﺤﺗ زﺎﻬﺟ ءﺎﻋو ﻊﻀﺗ ﻻ
ً
ﻦﻴﺠﻋ ﻞﺜﻣ ﻒﻴﻔﺨﻟا ﻦﻴﺠﻌﻟا ﻂﻠﺧ ﺎًﻀﻳأ ﻚﻨﻜﻤﻳ ،(9h) ةﺮﻔﺸﻟا ماﺪﺨﺘﺳﺎﺑ
.ماﺮﺟ 052 ﻦﻋ ﺪﻳﺰﺗ ﻻ ﻖﻴﻗد ﺔﻴﻤﻜﺑ ﻚﻴﻜﻟا ﻂﻴﻠﺧ وأ ﻚﻴﻛ نﺎﺒﻟا
ﻚﻴﻛ نﺎﺒﻟا ﺔﻨﻴﺠﻋ :ﺔﻔﺻﻮﻟ لﺎﺜﻣ
ﺮﻴﺧأو ﻖﻴﻗﺪﻟا ﻒﺿأ ﻢﺛ ،ءﺎﻋﻮﻟا ﻲﻓ ﺐﻴﻠﺤﻟا ﺐﻜﺳا
ً
فﺎﻄﺧ ﺮﺒﺘﻌُﻳ .(9i) ﻦﺠﻌﻟا فﺎﻄﺧ ماﺪﺨﺘﺳا ﻰﻠﻋ ﺎًﻀﻳأ ه ﻞﻜﺸﻟا ﻖﺒﻄﻨﻳ
.ﺮﺋﺎﻄﻔﻟا وأ ةﺮﻴﻤﺨﻟا ﻞﺜﻣ ﺔﻔﻠﺘﺨﻤﻟا ﻒﻴﻔﺨﻟا ﻦﺠﻌﻟا عاﻮﻧﻷ ﺎًﻴﻟﺎﺜﻣ ﻦﺠﻌﻟا
.ﻪﻧﺎﻜﻣ ﻲﻓ ﻪﻨﻴﻣﺄﺗ ﻢﺘﻳ ﻰﺘﺣ ﻪﻔﻠﺑ ﻢﻗو
ٍ
ﺪﺤﻛ ماﺮﺟ 250 نزﻮﺑ) ﻖﻴﻗﺪﻟﺎﺑ ءﺎﻋﻮﻟا ﻸﻣا
.ﻞﺋاﻮﺴﻟا ءﺎﻨﺜﺘﺳﺎﺑ ىﺮﺧﻷا
دﺮﺒﻳ رﻮﺗﻮﻤﻟا كﺮﺗا ﻢﺛ - ةﺪﺣاو ﺔﻘﻴﻗد :ﻮﻫ ﻦﺠﻌﻠﻟ ﻦﻣز ﻰﺼﻗأ :ﺔﻈﺣﻼﻣ
اﺰﺘﻴﺒﻟا ﺔﻨﻴﺠﻋ :ﺔﻔﺻﻮﻟ لﺎﺜﻣ
• ﺐﻧﺎﺟ ﻞﻔﺳأ ﺊﺗﺎﻨﻟا فﺮﻄﻟا ﻰﻟإ ﻞﺼﺗ ﻰﺘﺣ ﻰﻠﻋﻸﻟ ﻪﻌﻓدا ،ةادأ ﺔﻟازﻹ
ﺔﻓﺎﺟ ةﺮﻴﻤﺧ مﺎﻌﻃ ﺔﻘﻌﻠﻣ ½
ﻞﻴﻐﺸﺘﻟاو ﻊﻴﻤﺠﺘﻟا
•.صﺮﺤﺑ ةﺮﻔﺸﻟا ﻦﻣ ﻲﻗاﻮﻟا ءﺎﻄﻐﻟا لزأ
ﺗ
ُ
• ﺎﻬﻔﻠﺑ ﻢﻗو ﻞﻔﺳﻷا ﻲﻓ ﺎﻬﻴﻠﻋ ﻂﻐﺿا .(9f) ءﺎﻋﻮﻟا ﻒﺼﺘﻨﻣ ﻲﻓ ةﺮﻔﺸﻟا ﻊﺿ
• (9e) جﻻﺰﻤﻟا ﻊﻣ ءﺎﻋﻮﻟﺎﺑ (9a) ءﺎﻄﻐﻟا ﺖﺒﺛ .مﺎﻌﻄﻟﺎﺑ ءﺎﻋﻮﻟا ﻸﻣا
• ﻊﻤﺴﺗو جﻻﺰﻤﻟا ﻞﺧﺪﻳ ﻲﺘﺣ ﺔﻋﺎﺴﻟا برﺎﻘﻋ هﺎﺠﺗا ﻲﻓ ﻪﻔﻟ ،ءﺎﻄﻐﻟا قﻼﻏﻹ
.ةﺮﻘﻧ تﻮﺻ
•.(9e) ﺔﻳﺬﻐﺘﻟا بﻮﺒﻧأ ﻲﻓ (9a) ﻊﻓاﺪﻟا ﻞﺧدأو زﺎﻬﺠﻟا ﻞﺻو
• ﻚﺴﻣا ،ﺮﻴﻀﺤﺘﻟا ءﺎﻨﺛأ .زﺎﻬﺠﻟا ﻞﻴﻐﺸﺘﺑ ﻢﻗ ،مﺎﻌﻄﻟا ﺮﻴﻀﺤﺗ زﺎﻬﺟ ﻞﻴﻐﺸﺘﻟ
• ﺮﻳﺮﺤﺘﻟا رارزأ ﻰﻠﻋ ﻂﻐﺿاو ﺔﻗﺎﻄﻟا ﻞﺼﻓا ،مﺮﻔﻟا لﺎﻤﺘﻛا ﺪﻨﻋ
• ﺎ
.ﻪﻠﺼﻔﻟ
• ﻦﻣ تﺎﻳﻮﺘﺤﻤﻟا ﺐﻜﺳ ﻞﺒﻗ صﺮﺤﺑ ةﺮﻔﺸﻟا جاﺮﺧﺈﺑ ﻢﻗ ﻰﻠﻋأ ءﺎﻄﻐﻟا ﻊﻓرا
ﺮﻳﺬﺤﺗ
• ،ﺔﻳﺎﻐﻠﻟ ﺔﺒﻠﺼﻟا ﺔﻤﻌﻃﻷا مﺮﻔﻟ مﺎﻌﻄﻟا ﺮﻴﻀﺤﺗ زﺎﻬﺟ ﻖﺤﻠﻣ مﺪﺨﺘﺴﺗ ﻻ
.تاﺮﻔﺸﻟا ﻒﻠﺗ ﻰﻟإ
•.ﻒﻳووﺮﻜﻴﻤﻟا نﺮﻓ ﻲﻓ ا
ﺐﻴﻠﺣ ﻲﻠﻠﻣ 375
يدﺎﻋ ﻖﻴﻗد ماﺮﺟ 250
نﺎﺘﻀﻴﺑ
• .نﺎﺘﻀﻴﺒﻟا ا
•.ﺔﻨﻴﻟ ﺢﺒﺼﺗ ﻰﺘﺣ ﺔﻨﻴﺠﻌﻟا ﻂﻠﺧا ،ﺔﻠﻣﺎﻜﻟا ﺔﻋﺮﺴﻟا ماﺪﺨﺘﺳﺎﺑ
ﻦﺠﻌﻟا ﺔﻴﻠﻤﻋ (D)
ﻞﻴﻐﺸﺘﻟاو ﻊﻴﻤﺠﺘﻟا
• ﻞﻔﺳﻷا ﻲﻓ ﻪﻴﻠﻋ ﻂﻐﺿا .(9f) ءﺎﻋﻮﻟا ﻒﺼﺘﻨﻣ ﻲﻓ ﻦﺠﻌﻟا فﺎﻄﺧ ﻊﺿ
• تﺎﻧﻮﻜﻤﻟا ﻒﺿأ ﻢﺛ (ﻰﺼﻗأ
•.ﻲﻛﺬﻟا ﺔﻋﺮﺴﻟا حﺎﺘﻔﻣ ﻰﻠﻋ ﺔﻄﻐﺿ ¾ لﻼﺧ ﻦﻣ زﺎﻬﺠﻟا ﻞﻴﻐﺸﺘﺑ ﻢﻗ
•.رﻮﺗﻮﻤﻟا ﻞﻴﻐﺸﺗ ءﺎﻨﺛأ ﺔﻳﺬﻐﺘﻟا بﻮﺒﻧأ لﻼﺧ ﻦﻣ ﻞﺋاﻮﺴﻟا ﻒﺿأ
.ﻖﺋﺎﻗد 10 ةﺪﻤﻟ
يدﺎﻋ ﻖﻴﻗد ماﺮﺟ 250
ﺢﻠﻣ ﺔﻘﻌﻠﻣ ½
13
• ءﺰﺠﻟا ﻦﻣ ﻻإ ةﺮﻔﺸﻟا ﻚﺴﻤﺗ ﻻ !ﺔﻳﺎﻐﻠﻟ ةدﺎﺣ (9h) ةﺮﻔﺸﻟا ﺮﺒﺘﻌ
•.ﻖﻠﻐ

.صﺮﺤﺑ ﺎﻬﻣﺪﺨﺘﺳاو يﻮﻠﻌﻟا ﻲﻜﻴﺘﺳﻼﺒﻟا
• ﻞﻔﺳﻷا ﻲﻓ ﻪﻴﻠﻋ ﻂﻐﺿا .(8c) ﺔﻣﺮﻔﻤﻟا ءﺎﻋو ﻒﺼﺘﻨﻣ ﻲﻓ ةﺮﻔﺸﻟا ﻊﺿ
.ﻪﻧﺎﻜﻣ ﻲﻓ ﻪﻨﻴﻣﺄﺗ ﻢﺘﻳ ﻰﺘﺣ ﻪﻔﻠﺑ ﻢﻗو
•.(8a) ءﺎﻄﻐﻟا ﻪﻴﻠﻋ ﻊﺿو مﺎﻌﻄﻟﺎﺑ ﺔﻣﺮﻔﻤﻟا ﻸﻣا
ﻌﻣ ﺎﻤﻬﻄﻐﺿاو (2) رﻮﺗﻮﻤﻟا ءﺰﺟ ﻊﻣ ﺔﻣﺮﻔﻤﻟا ةاذﺎﺤﻤﺑ ﻢﻗ
ً
•.ﺎ
• رﻮﺗﻮﻤﻟا ءﺰﺟ ﻚﺴﻣا ،ﺮﻴﻀﺤﺘﻟا ءﺎﻨﺛأ .زﺎﻬﺠﻟا ﻞﻴﻐﺸﺘﺑ ﻢﻗ ،ﺔﻣﺮﻔﻤﻟا ﻞﻴﻐﺸﺘﻟ
.ىﺮﺧﻷا ﺪﻴﻟﺎﺑ ﺔﻣﺮﻔﻤﻟا ءﺎﻋوو ةﺪﺣاو ﺪﻴﺑ
ﻤﺋاد ﺔﺒﻠﺼﻟا ﺔﻤﻌﻃﻷا مﺮﻔﺑ ﻢﻗ
ً
•.(ناﺰﻴﻣرﺎﺒﻟا ﺔﻨﺒﺟ ﻞﺜﻣ) ﺔﻠﻣﺎﻜﻟا ﺔﻋﺮﺴﻟﺎﺑ ﺎ
• ﺮﻳﺮﺤﺘﻟا رارزأ ﻰﻠﻋ ﻂﻐﺿاو ﺔﻗﺎﻄﻟا ﻞﺼﻓا ،مﺮﻔﻟا لﺎﻤﺘﻛا ﺪﻨﻋ
.رﻮﺗﻮﻤﻟا ءﺰﺟ ﻞﺼﻔﻟ (3) EasyClick Plus
• ﻦﻣ تﺎﻳﻮﺘﺤﻤﻟا ﺐﻜﺳ ﻞﺒﻗ صﺮﺤﺑ ةﺮﻔﺸﻟا جاﺮﺧﺈﺑ ﻢﻗ .ﻰﻠﻋﻷ ءﺎﻄﻐﻟا ﻊﻓرا
.ﺎﻬﺒﺤﺳا ﻢﺛ ًﻼﻴﻠﻗ ﺎﻬﻔﻟ ،ةﺮﻔﺸﻟا ﺔﻟازﻹ .ءﺎﻋﻮﻟا
ﺮﻳﺬﺤﺗ
• ﺔﻤﻌﻃﻷا ﺮﻴﻀﺤﺘﻟ ﻊﻴﻄﻘﺘﻟا تاﺮﻔﺷ ﻊﻣ (8) ﺔﻣﺮﻔﻤﻟا ﻖﺤﻠﻣ مﺪﺨﺘﺴﺗ ﻻ
بﻮﺒﺣ وأ ﺞﻠﺜﻟا تﺎﺒﻌﻜﻣ وأ ﺮﺸﻘﻤﻟا ﺮﻴﻏ قﺪﻨﺒﻟا ﻞﺜﻣ ﺔﻳﺎﻐﻠﻟ ﺔﺒﻠﺼﻟا
يدﺆﻳ ﺪﻗ .ﺐﻴﱢﻄﻟا ُزﻮَﺟ ﻞﺜﻣ ﺔﻳﻮﻘﻟا بﺎﺸﻋﻷا وأ بﻮﺒﺤﻟا وأ ةﻮﻬﻘﻟا
.تاﺮﻔﺸﻟا ﻒﻠﺗ ﻰﻟإ ﺔﻤﻌﻃﻷا هﺬﻫ ﺮﻴﻀﺤﺗ
• ﻻ ﻞﺋﺎﺴﻟا نأ ﻦﻣ ﺪﻛﺄﺘﻓ ،ﻦﺧﺎﺳ مﺎﻌﻃ سﺮﻬﻟ زﺎﻬﺠﻟا مﺪﺨﺘﺴﺗ ﺖﻨﻛ اذإ
قﺮﺤﻠﻟ ضﺮﻌﺘﻟا ةﺮﻃﺎﺨﻣ ﺐﻨﺠﺘﻟ ًﻼﻴﻠﻗ دﺮﺒﻳ ﻦﺧﺎﺴﻟا مﺎﻌﻄﻟا كﺮﺗا .ﻲﻠﻐﻳ
ﺪﺑأ ﺔﻣﺮﻔﻤﻟا ﺔﻴﻋوأ ﻊﻀﺗ ﻻ
ً
•.ﻒﻳووﺮﻜﻴﻤﻟا نﺮﻓ ﻲﻓ ا
(ةدوﺮﻔﻣ «hc» وأ ﺔﻃﻮﻐﻀﻣ ةﻼﺤﻣ ﺮﺋﺎﻄﻓ ﻞﺜﻣ) ﺔﻴﺳارﻷا ﻞﺴﻋ :ﺔﻔﺻﻮﻟ لﺎﺜﻣ
ﺔﻴﺳارأ ماﺮﺟ 50
ﻲﻤﻳﺮﻜﻟا ﻞﺴﻌﻟا ماﺮﺟ 75
(ﻼﻴﻧﺎﻔﻟا ﺔﻬﻜﻨﺑ) ءﺎﻣ ﻲﻠﻠﻣ 70
•.ﻲﻤﻳﺮﻜﻟا ﻞﺴﻌﻟاو ﺔﻴﺳارﻷﺎﺑ «ch» ﺔﻣﺮﻔﻤﻟا ءﺎﻋو ﻸﻣا
•24 ةﺪﻤﻟ ﺔﺟﻼﺜﻟا ﻲﻓ ﺔﻳﻮﺌﻣ تﺎﺟرد 3 ﻎﻠﺒﺗ ةراﺮﺣ ﺔﺟرد ﻲﻓ نﺰﺨ
ﺗ
ُ
.ﺔﻋﺎﺳ
•.(ﻼﻴﻧﺎﻔﻟا ﺔﻬﻜﻨﺑ) ءﺎﻣ ﻲﻠﻠﻣ 70 ﻒﺿأ
•حﺎﺘﻔﻣ ﻰﻠﻋ ﺔﻠﻣﺎﻛ ﺔﻄﻐﺿ) .ﺔﻋﺮﺳ ﻰﺼﻗﺄﺑ ﻲﻧاﻮﺛ 1,5 ةﺪﻤﻟ ﻂﻠﺨﻟﺎﺑ ﻢﻗ
.(ﻲﻛﺬﻟا ﺔﻋﺮﺴﻟا
.مﺎﻌﻄﻟا ﻦﻣ ﻪﺘﻟازإ ﻞﺒﻗ ناروﺪﻟا ﻦﻋ ﺎًﻣﺎﻤﺗ
• ﻪﻔﻟ ﻖﻳﺮﻃ ﻦﻋ (7c) ﺐﻠﻘﻤﻟا ﻚﻔﺑ ﻢﻗ .زﺎﻬﺠﻟا ﻞﺼﻔﺑ ﻢﻗ ،ماﺪﺨﺘﺳﻻا ﺪﻌﺑ
.ﺔﻋﺎﺴﻟا برﺎﻘﻋ هﺎﺠﺗا ﻲﻓ
• ﻦﻣ سﺮﻬﻟا ﻖﺤﻠﻣ ﻞﺼﻔﻟ EasyClick Plus ﺮﻳﺮﺤﺘﻟا رارزأ ﻰﻠﻋ ﻂﻐﺿا
ﻪﻔﻟ ﻖﻳﺮﻃ ﻦﻋ دﻮﻤﻌﻟا ﻦﻣ ﺔﻋﺮﺴﻟا سوﺮﺗ ﺔﺒﻠﻋ ﻞﺼﻓا .رﻮﺗﻮﻤﻟا ءﺰﺟ
.ﺔﻋﺎﺴﻟا برﺎﻘﻋ هﺎﺠﺗا ﺲﻜﻋ
ﺮﻳﺬﺤﺗ
•.ةﺮﺷﺎﺒﻣ رﺎﻧ ﻰﻠﻋ ةﺮﺠﻨﻃ ﻲﻓ سﺮﻬﻟا ﻖﺤﻠﻣ مﺪﺨﺘﺴﺗ ﻻ
ﻤﺋاد ةﺮﺠﻨﻄﻟا ﻊﻓرا
ٍ
ﻮﺘﺴﻣ ﺢﻄﺳو ﺮﻘﺘﺴﻣ نﺎﻜﻣ ﻰﻠﻋ ءﺎﻋﻮﻟا وأ ةﺮﺠﻨﻄﻟا ﻊﺿ
ً
•. ًﻼﻴﻠﻗ دﺮﺒﺘﻟ ﺎﻬﻛﺮﺗاو رﺎﻨﻟا ﻰﻠﻋ ﻦﻣ ﺎ
• ﻦﻣ ﻪﻤﻋﺪﺑ ﻢﻗو
.ةﺮﺤﻟا كﺪﻴﺑ ﻪﻜﺴﻣ لﻼﺧ
• .هﺪﻌﺑ وأ ماﺪﺨﺘﺳﻻا ءﺎﻨﺛأ ﻲﻬﻄﻟا ءﺎﻧإ ﺐﻧﺎﺠﺑ سﺮﻬﻟا ﻖﺤﻠﻣ كﺮﺘﺗ ﻻ
.ﺪﺋاﺰﻟا مﺎﻌﻄﻟا عﺰﻨﻟ ﻦﻴﻜﺳ مﺪﺨﺘﺳا
• ﺮﺜﻛﻷ ءﺎﻋﻮﻟا وأ ةﺮﺠﻨﻄﻟا ﻸﻤﺗ ﻻ ،سﺮﻬﻟا ﺪﻨﻋ ﺞﺋﺎﺘﻨﻟا ﻞﻀﻓأ ﻰﻠﻋ لﻮﺼﺤﻠﻟ
.مﺎﻌﻄﻟﺎﺑ ﺎﻬﻔﺼﻧ ﻦﻣ
•.ﻒﻗﻮﺗ نوﺪﺑ ةﺪﺣاو ﺔﻌﻓد ﻦﻣ ﺮﺜﻛأ ﺮﻴﻀﺤﺘﺑ ﻢﻘﺗ ﻻ
•.ﺔﻘﻴﻗد 1 ﻦﻣ ﺮﺜﻛﻷ ﺮﻤﺘﺴﻣ ﻞﻜﺸﺑ زﺎﻬﺠﻟا ﻞﻐﺸﺗ ﻻ
•.ﺮﻴﻀﺤﺘﻟا راﺮﻤﺘﺳا ﻞﺒﻗ ﻖﺋﺎﻗد 4 ةﺪﻤﻟ دﺮﺒﻳ زﺎﻬﺠﻟا كﺮﺗا
ﺔﺳوﺮﻬﻣ ﺎﻃﺎﻄﺑ :ﺔﻔﺻﻮﻟ لﺎﺜﻣ
ﺔﺧﻮﺒﻄﻣ ﺎﻃﺎﻄﺑ ﻢﺠﻛ 1
ﺊﻓاد ﺐﻴﻠﺣ ﻲﻠﻠﻣ 200
(ﻲﻛﺬﻟا ﺔﻋﺮﺴﻟا حﺎﺘﻔﻣ
• ﻰﻠﻋ ﺔﻄﻐﺿ 3/4) ﺔﻴﻧﺎﺛ 30 ةﺪﻤﻟ سﺮﻬﻟﺎﺑ ﻢﻗو ءﺎﻋو ﻲﻓ ﺎﻃﺎﻄﺒﻟا ﻊﺿ
•.ىﺮﺧأ ﺔﻴﻧﺎﺛ 30 ةﺪﻤﻟ سﺮﻬﻟا ﻊﺑﺎﺗ .ﺐﻴﻠﺤﻟا ﻒﺿأ
(C) ﺔﻣﺮﻔﻤﻟا ﻖﺤﻠﻣ
مﻮﺜﻟاو بﺎﺸﻋﻷاو ﻞﺼﺒﻟاو ﺐﻠﺼﻟا ﻦﺒﺠﻟا مﺮﻔﻟ ﻞﻀﻓﻷا ﻲﻫ (8) ﺔﻣﺮﻔﻤﻟا ﺪﻌُﺗ
ﻦﻣ ةﺮﻴﻐﺻ تﺎﻴﻤﻛ داﺪﻋإ ﻦﻋ ًﻼﻀﻓ قﺪﻨﺒﻟاو تاﺮﺴﻜﻤﻟاو ﺰﺒﺨﻟاو تاوﺮﻀﺨﻟاو
.لﺎﻔﻃﻷا ﻪﻳرﻮﺑ
مﺎﻌﻄﻟا ﺮﻴﻀﺤﺗ زﺎﻬﺟ ﻖﺤﻠﻣ
:ﻲﻓ (9) مﺎﻌﻄﻟا ﺮﻴﻀﺤﺗ زﺎﻬﺟ ﻖﺤﻠﻣ ماﺪﺨﺘﺳا ﻦﻜﻤُﻳ
ﻞﺼﺒﻟاو ﺐﻠﺼﻟا ﻦﺒﺠﻟاو ﻢﺤﻠﻟا مﺮﻓ ﻚﻨﻜﻤﻳ (9h) ةﺮﻔﺸﻟا ماﺪﺨﺘﺳﺎﺑ
.قﺪﻨﺒﻟاو تاﺮﺴﻜﻤﻟاو ﺰﺒﺨﻟاو تاوﺮﻀﺨﻟاو مﻮﺜﻟاو بﺎﺸﻋﻷاو
ﺎﻬﺑ ﻰﺻﻮُﻤﻟا ﺔﻴﻨﻣﺰﻟا تاﺮﺘﻔﻟاو تﺎﻴﻤﻜﻟا ﻰﺼﻗﻷ ه ﺮﻴﻀﺤﺘﻟا ﻞﻴﻟد ﻊﺟار
ﻘﺒﺴﻣ مﺎﻌﻄﻟا ﻊﻴﻄﻘﺘﺑ ﻢﻗ
ً
.مﺎﻌﻄﻟا ﺮﻴﻀﺤﺗ زﺎﻬﺟ
14
•ﻒﻴﻔﺨﻟا ﻦﻴﺠﻌﻟا ﻂﻠﺧو ﻂﻠﺨﻟاو مﺮﻔﻟا
•؛(ﻖﻴﻗد ماﺮﺟ 250 ﺔﻌﺳ ﻰﺼﻗﺄﺑ) ﻦﺠﻌﻟا ﺔﻴﻠﻤﻋ
•.ﺔﻴﻠﻘﻤﻟا ﺎﻃﺎﻄﺒﻟا ﻊﺑﺎﺻأ ﻊﻨﺻو ﻊﻴﻄﻘﺘﻟاو ﺢﺋاﺮﺸﻟا
(D) مﺮﻔﻟا
.تﺎﻋﺮﺴﻟاو
ماﺪﺨﺘﺳﻻا ﻞﺒﻗ
•.ﻞﻬﺳأ ﻊﻴﻄﻘﺘﻟ ةﺮﻴﻐﺻ ﻊﻄﻗ ﻰﻟإ ﺎ
• تاﺮﻔﺸﻟا ﺔﻳﺎﻤﺣ ﻲﻓ ﺪﻋﺎﺴﺘﻟ ﻢﺤﻠﻟا ﻦﻣ ﻒﻳرﺎﻀﻏو ﺔﺠﺴﻧأو مﺎﻈﻋ ﺔﻳأ لزأ
.ﻒﻠﺘﻟا ﻦﻣ
•.ىﻮﻨﻟاو رﻮﺸﻘﻟاو بﺎﺸﻋﻷا ﻦﻣ نﺎﻘﻴﺴﻟا لزأ
ﺖﺴﻴﻟ ﺎﻬﻨﻜﻟو .ةﺪﻴﺟ ﺞﺋﺎﺘﻧ ﻰﻠﻋ لﻮﺼﺤﻠﻟ (8) «hc» ﺔﻣﺮﻔﻤﻟا مﺪﺨﺘﺳا
ﺔﻣﺮﻔﻤﻠﻟ ﻰﺼﻗﻷا ﺪﺤﻟا ﻦﻣ ﻰﻠﻋأ تﺎﻧﻮﻜﻤﻟا ﺔﻴﻤﻛ زوﺎﺠﺗ مﺪﻋ ﻦﻣ ﺪﻛﺄﺗ
تﺎﻴﻤﻜﻠﻟ ةﺪﺣاو ﺔﻘﻴﻗد :ﻮﻫ «hc» ﺔﻣﺮﻔﻤﻠﻟ ﻞﻴﻐﺸﺗ ﻦﻣز ﻰﺼﻗأ .«hc»
.ﺔﺒﻠﺼﻟا وأ ﺔﻓﺎﺠﻟا تﺎﻧﻮﻜﻤﻠﻟ ﺔﻴﻧﺎﺛ 30 ،ﺔﺒﻃﺮﻟا تﺎﻧﻮﻜﻤﻟا ﻦﻣ ةﺮﻴﺒﻜﻟا
ىﺮﺧأ ةﺮﻣ ﻞﻴﻐﺸﺘﻟا ﻞﺒﻗ ﻖﺋﺎﻗد 3 ﻦﻋ ﻞﻘﻳ ﻻ ﺎًﻴﻨﻣز ًﻼﺻﺎﻓ كﺮﺗا :ﺔﻈﺣﻼﻣ
ﺔﻋﺮﺳ ضﺎﻔﺨﻧا ﺪﻨﻋ ﺮﻴﻀﺤﺘﻠﻟ يرﻮﻔﻟا فﺎﻘﻳﻹا .(لﺎﻄﻋأ يأ ثوﺪﺣ ﻊﻨﻤﻟ)
.ﺔﻳﻮﻗ تازاﺰﺘﻫا ثوﺪﺣ ﺪﻨﻋ وأ/و رﻮﺗﻮﻤﻟا
ﺎﻬﺑ ﻰﺻﻮُﻤﻟا ﺔﻴﻨﻣﺰﻟا تاﺮﺘﻔﻟاو تﺎﻴﻤﻜﻟا ﻰﺼﻗﻷ د ﺮﻴﻀﺤﺘﻟا ﻞﻴﻟد ﻊﺟار
ﻘﺒﺴﻣ مﺎﻌﻄﻟا ﻊﻴﻄﻘﺘﺑ ﻢﻗ
ً
• ءﺎﻋو ﻞﻔﺳأ (9g) قﻻﺰﻧﻼﻟ ﺔﻌﻧﺎﻤﻟا ﺔﻴﻃﺎﻄﻤﻟا ﺔﻘﻠﺤﻟا قﺎﻓرإ ﻦﻣ ﺪﻛﺄﺗ
.مﻮﺤﻠﻟا مﺮﻔﻟ ﺔﺒﺳﺎﻨﻣ
ماﺪﺨﺘﺳﻻا ﻞﺒﻗ
• تاﺮﻔﺸﻟا ﺔﻳﺎﻤﺣ ﻲﻓ ﺪﻋﺎﺴﺘﻟ ﻢﺤﻠﻟا ﻦﻣ ﻒﻳرﺎﻀﻏو ﺔﺠﺴﻧأو مﺎﻈﻋ ﺔﻳأ لزأ
.ﻒﻠﺘﻟا ﻦﻣ
• ءﺎﻋو ﻞﻔﺳأ (8d) قﻻﺰﻧﻼﻟ ﺔﻌﻧﺎﻤﻟا ﺔﻴﻃﺎﻄﻤﻟا ﺔﻘﻠﺤﻟا قﺎﻓرإ ﻦﻣ ﺪﻛﺄﺗ
.ﺔﻣﺮﻔﻤﻟا
ﻞﻴﻐﺸﺘﻟاو ﻊﻴﻤﺠﺘﻟا
•.صﺮﺤﺑ ةﺮﻔﺸﻟا ﻦﻣ ﻲﻗاﻮﻟا ءﺎﻄﻐﻟا لزأ
• ءﺰﺠﻟا ﻦﻣ ﻻإ ةﺮﻔﺸﻟا ﻚﺴﻤﺗ ﻻ !ﺔﻳﺎﻐﻠﻟ ةدﺎﺣ (8b) ةﺮﻔﺸﻟا ﺮﺒﺘﻌ
ﺗ
ُ
•.ﻞﻬﺳأ ﻊﻴﻄﻘﺘﻟ ةﺮﻴﻐﺻ ﻊﻄﻗ ﻰﻟإ ﺎ

(A)
ﻖﻔﺨﻟا ﻖﺤﻠﻣ
ﻚﻴﻜﻟا داﺪﻋإو ﺾﻴﺒﻟا ضﺎﻴﺑ بﺮﺿو ،ةﺪﺸﻘﻟا ﻖﻔﺨﻟ ﻂﻘﻓ قﺎﻔﺨﻟا مﺪﺨﺘﺳا
.ةﺰﻫﺎﺠﻟا ىﻮﻠﺤﻟاو ﻲﺠﻨﻔﺳﻹا
ﻞﻴﻐﺸﺘﻟاو ﻊﻴﻤﺠﺘﻟا
ﻌﻣ ﻊﻄﻘﻟا ﻊﻓداو ﻊّﻤﺠﻤﻟا ﻖﻔﺨﻟا ﻖﺤﻠﻤﺑ رﻮﺗﻮﻤﻟا ﻢﺴﺟ ةاذﺎﺤﻤﺑ ﻢﻗ
ً
.ةﺮﻘﻧ تﻮﺻ ﻊﻤﺴﺗ ﻰﺘﺣ
ﺔﺒﻠﻋ جرﺎﺧ قﺎﻔﺨﻟا ﺐﺤﺳا ﻢﺛ .رﻮﺗﻮﻤﻟا ءﺰﺟ ﻞﺼﻔﻟ
EasyClick Plus
.ﺔﻋﺮﺴﻟا سوﺮﺗ
ﺞﺋﺎﺘﻨﻟا ﻞﻀﻓأ ﻰﻠﻋ لﻮﺼﺤﻠﻟ تاﻮﻄﺧ
.ﺔﻘﻴﻤﻋ ﺔﻴﻋوأ وأ تﺎﻳوﺎﺣ
ِ
ﻐ َﺷ ﻢﺛ ءﺎﻋو ﻲﻓ قﺎﻔﺨﻟا ﻊﺿ
ﻤﺋاد ﺪﻛﺄﺗ
ً
.ﺾﻴﺑ ضﺎﻴﺑ 4 ﻰﻟإ ﻞﺼﻳ ﺎﻣ ﻖﻔﺧا .ﺾﻴﺒﻟا ضﺎﻴﺑ ﻖﻔﺧ
ﺔﻗﻮﻔﺨﻤﻟا ةﺪﺸﻘﻟا :ﺔﻔﺻﻮﻟ لﺎﺜﻣ
،نﻮﻫﺪﻟا ﻦﻣ 30 % ﻰﻠﻋ ﻰﻧدأ ﺪﺤﺑ يﻮﺘﺤﺗ) ةدﺮﺒﻣ ﺔﻤﻳﺮﻛ ﻲﻠﻠﻣ 400
(سﻮﻳﺰﻴﻠﺳ ﺔﺟرد 4 - 8
.ﻖﻔﺨﻟا ءﺎﻨﺛأ (حﺎﺘﻔﻤﻟا ﻰﻠﻋ ﺮﺜﻛأ ﻂﻐﻀﻟﺎﺑ)
ﻤﺋاد مﺪﺨﺘﺳا
ً
.ﻖﻔﺨﻟا ﺪﻨﻋ راﺮﻘﺘﺳﻻا ﻦﻣ ﺪﻳﺰﻣ
(B) سﺮﻬﻟا ﻖﺤﻠﻣ
ﻞﺜﻣ ﺔﺧﻮﺒﻄﻤﻟا ﻪﻛاﻮﻔﻟاو تاوﺮﻀﺨﻟا سﺮﻬﻟ سﺮﻬﻟا ﻖﺤﻠﻣ ماﺪﺨﺘﺳا ﻦﻜﻤﻳ
.حﺎﻔﺘﻟاو خﻮﺨﻟاو ﻢﻃﺎﻤﻄﻟاو ةﻮﻠﺤﻟا ﺎﻃﺎﻄﺒﻟاو ﺎﻃﺎﻄﺒﻟا
ماﺪﺨﺘﺳﻻا ﻞﺒﻗ
.ةﺪﺣﻮﻟا
.ﺎﻬﺳﺮﻫ ﻢﺛ تاوﺮﻀﺨﻟا
ﻞﻴﻐﺸﺘﻟاو ﻊﻴﻤﺠﺘﻟا
.ﻪﻧﺎﻜﻣ ﻲﻓ ﻪﻨﻴﻣﺄﺗ ﻢﺘﻳ ﻰﺘﺣ ﺔﻋﺎﺴﻟا برﺎﻘﻋ هﺎﺠﺗا
ﻢﺘﻳ ﻢﻟ اذإ) .ﻪﺘﻴﺒﺜﺘﻟ ﺔﻋﺎﺴﻟا برﺎﻘﻋ هﺎﺠﺗا ﺲﻜﻋ ﻪﻔﻟو ﺔﻳﺰﻛﺮﻤﻟا ﺔﺤﺘﻔﻟا
اًﺮﻘﺘﺴﻣ نﻮﻜﻳ ﻦﻟ ﺐﻠﻘﻤﻟا نﺈﻓ ،ﺢﻴﺤﺻ ٍﻞﻜﺸﺑ ﺔﻋﺮﺴﻟا سوﺮﺗ ﺔﺒﻠﻋ ﺐﻴﻛﺮﺗ
.(ﻪﻧﺎﻜﻣ ﻲﻓ نﺎﻣﺄﺑ
ﺠُﻤﻟا سﺮﻬﻟا ﻖﺤﻠﻣ ةاذﺎﺤﻤﺑ ﻢﻗ
ّ
.ﺲﺑﺎﻘﻟﺎﺑ زﺎﻬﺠﻟا ﻞﺻو .ﺎًﻌﻣ ﻦﻴﺋﺰﺠﻟا
.بﻮﻠﻄﻤﻟا ﻂﻴﻠﺨﻟا ﻰﻟإ ﻞﺼﺗ ﻰﺘﺣ تﺎﻧﻮﻜﻤﻟا لﻼﺧ
ﻂﻠﺧو مﺮﻓ ﺞﺋﺎﺘﻧ ﻰﻠﻋ ﺖﻠﺼﺣ ﺎﻤﻠﻛ ،ﺔﻋﺮﺴﻟا ﺖﻌﻔﺗرا ﺎﻤﻠﻛو .ﻰﻠﻋأ ﺔﻋﺮﺳ
زﺎﻬﺠﻟا ﻞﻴﻐﺸﺗ (1)ﻲﻛﺬﻟا ﺔﻋﺮﺴﻟا حﺎﺘﻔﻣ ﻚﻟ ﺢﻴﺘﻳ :ةﺪﺣاو ٍﺪﻴﺑ ﻞﻴﻐﺸﺘﻟا
.ةﺪﺣاو ٍﺪﻴﺑ ﺔﻋﺮﺴﻟا ﻲﻓ ﻢﻜﺤﺘﻟاو
•.(6a) ﺔﻋﺮﺴﻟا سوﺮﺗ ﺔﺒﻠﻌﺑ (6b) قﺎﻔﺨﻟا ﺖﺒﺛ
•ﺎ
•ﺮﻳﺮﺤﺘﻟا رارزأ ﻰﻠﻋ ﻂﻐﺿاو ﺔﻗﺎﻄﻟا ﻞﺼﻓا ،ماﺪﺨﺘﺳﻻا ﺪﻌﺑو
دﻮﻤﻌﺑ يوﺪﻴﻟا طﻼﺨﻟا ﺪﻳوﺰﺗ ﻢﺘﻳ ActiveBlade نأ ﻦﻣ ﺔﻨﻴﻜﺴﻟا ﻦّﻜﻤُﻳ
(
A) ActiveBlade
ﻖﻳﺮﻃ ﻦﻋ ﺎًﻴﺋﺎﻘﻠﺗ ﻂﺒﻀﻟا ءاﺮﺟإ ﻢﺘﻳ .ﻞﻜﺸﻟا ﻲﺳﺮﺟ ءﺎﻧﻹا عﺎﻗ ﻰﻟإ ﺪﺘﻤﺗ
ﺔﻤﻌﻃﻷا ﻂﻠﺧ ﻊﻣ ﺐﺳﺎﻨﺘﻳ ﺎﻤﺑ ﺎًﺻﻮﺼﺧ ،ﻂﻠﺨﻟا مﺎﻬﻣ ﻲﻓ بﻮﻠﻄﻤﻟا ﻂﻐﻀﻟا
•.ﺔﻘﻴﻗد 3 ﻦﻣ ﺮﺜﻛﻷ ﺮﻤﺘﺴﻣ ﻞﻜﺸﺑ زﺎﻬﺠﻟا ﻞﻐﺸﺗ ﻻ
•.ﺮﻴﻀﺤﺘﻟا راﺮﻤﺘﺳا ﻞﺒﻗ ﻖﺋﺎﻗد 3 ةﺪﻤﻟ دﺮﺒﻳ زﺎﻬﺠﻟا كﺮﺗا
.تاوﺮﻀﺨﻟاو ﺔﺟزﺎﻄﻟا ﻪﻛاﻮﻔﻟا ﻞﺜﻣ ﺔﺒﻠﺼﻟا
ﺔﻄﻠﺴﻟا تﺎﻓﺎﺿإو قﺮﻤﻟاو تﺎﺴﻤﻐﻤﻟا داﺪﻋﻹ اًﺪﺟ ﺎًﺒﺳﺎﻨﻣ ﺎًﻀﻳأ ﺮﺒﺘﻌﻳ
تﺎﻗﻮﻔﺨﻣو ﺮﺋﺎﺼﻌﻟاو تﺎﺑوﺮﺸﻤﻟا ﻰﻟإ ﺔﻓﺎﺿﻹﺎﺑ لﺎﻔﻃﻷا مﺎﻌﻃو صﻮﺼﻟاو
•.ﻒﻴﻔﻃ ﻞﻴﻤﺑ ﻪﻜﺴﻣ ءﺎﻨﺛأ ﺔﻋﺎﺴﻟا برﺎﻘﻋ هﺎﺠﺗا ﻲﻓ قﺎﻔﺨﻟا ك
ﺮَﺣ
ِ
• ﻲﻓ ﻖﻔﺨﻟا ﻖﺤﻠﻣ مﺪﺨﺘﺳاو ءﻂﺒﺑ ﻞﻴﻐﺸﺘﻟﺎﺑ ﻢﻗ ،تﺎﻧﻮﻜﻤﻟا ﺮﻳﺎﻄﺗ يدﺎﻔﺘﻟ
•.ﻂﻘﻓ زﺎﻬﺠﻟا ﻞ
• ﻞﺒﻗ نﻮﻫﺪﻟا ﻦﻣ ﺎﻤﻫﻮﻠﺧو ﻂﻠﺨﻟا ءﺎﻋوو قﺎﻔﺨﻟا ﺔﻓﺎﻈﻧ ﻦﻣ ﺎ
.ﺔﻋﺮﺴﻟا تﺎﺟرد ﻰﻠﻋأ مﺪﺨﺘﺳا ،ﻂﻠﺨﻠﻟ ﺞﺋﺎﺘﻧ ﻞﻀﻓأ ﻰﻠﻋ لﻮﺼﺤﻠﻟ
ActiveBlade دﻮﻤﻋ ﻰﻠﻋ ﻂﻐﻀﻟا ﻢﺘﻳ فﻮﺳ .ﻞﻔﺳﻷا ﻰﻟإ ﻰﻠﻋﻷا ﻦﻣ
•ﺔﻋﺮﺴﻟا دوز ﻢﺛ (حﺎﺘﻔﻤﻟا ﻰﻠﻋ ﻒﻴﻔﺨﻟا ﻂﻐﻀﻟﺎﺑ) ﺔﻀﻔﺨﻨﻣ ﺔﻋﺮﺴﺑ أﺪﺑا
•ﻰﻠﻋ لﻮﺼﺤﻟاو ﺮﺒﻛأ ﻢﺠﺣ ﻖﻴﻘﺤﺘﻟ ﺔﻴﻘﻧ ةدﺮﺒﻣ ﺔﻤﻳﺮﻛ ﺎ
.ActiveBlade دﻮﻤﻋ ﻞﺼﻔﻟ EasyClick Plus (3)
.ﻖﺒَﻄُﻤﻟا ﻂﻐﻀﻠﻟ ﺎًﻘﻓو ةﺮﻔﺸﻟا دﺪﻤﺘﺘﺳو
نأ ﻦﻣ ﺪﻛﺄﺗو ﻦﺧﺎﺴﻟا رﺪﺼﻤﻟا ﻦﻣ ءﺎﻋﻮﻟا وأ ةﺮﺠﻨﻄﻟا ﺔﻟازﺈﺑ ﻢﻘﻓ ،ءﺎﻋﻮﻟا
ضﺮﻌﺘﻟا ةﺮﻃﺎﺨﻣ ﺐﻨﺠﺘﻟ ًﻼﻴﻠﻗ دﺮﺒﻳ ﻦﺧﺎﺴﻟا مﺎﻌﻄﻟا كﺮﺗا .ﻲﻠﻐﻳ ﻻ ﻞﺋﺎﺴﻟا
• ﻒﻠﺗ ﻲﻓ ﺐﺒﺴﺘﻳ ﺪﻗ اﺬﻫ نﻷ ،ﻮﻬﻄﻤﻟا ﺮﻴﻏ وأ ﺐﻠﺼﻟا مﺎﻌﻄﻟا سﺮﻬﺗ ﻻ
•/ﻪﻛاﻮﻔﻟا ﻒﻴﻔﺠﺗو ﻲﻬﻄﺑ ﻢﻗ ؛ﺔﺒﻠﺻ ءاﺰﺟأ وأ ﺎﻳاﻮﻧ ﺔﻳأ ﺔﻟازإو ﺮﻴﺸﻘﺘﺑ ﻢﻗ
،( ًﻼﺜﻣ ﺲﻤﺸﻟا دﺎﺒﻋ ﺖﻳز) ﺖﻳز ماﺮﺟ 250
• ﻲﻓ ﻪﻔﻟ لﻼﺧ ﻦﻣ (7b) دﻮﻤﻌﻟا ﻲﻓ (7a) ﺔﻋﺮﺴﻟا سوﺮﺗ ﺔﺒﻠﻋ ﺖﺒﺛ
• ﻲﻓ (7c) ﺐﻠﻘﻤﻟا ﺐﻴﻛﺮﺘﺑ ﻢﻗو ﻞﻔﺳأ ﻰﻟإ ﻰﻠﻋأ ﻦﻣ سﺮﻬﻟا ﻖﺤﻠﻣ ﺐﻠﻗا
• ﻰﻠﻋ ﻂﻐﺿاو رﻮﺗﻮﻤﻟا ﻢﺴﺟ ﻊﻣ ﻊﻤ
•.زﺎﻬﺠﻟا ﻞﻴﻐﺸﺘﺑ ﻢﻗو تﺎﻧﻮﻜﻤﻟا ﻞﺧاد سﺮﻬﻟا ﻖﺤﻠﻣ ﺮﻤﻐﺑ ﻢﻗ
• سﺮﻬﻟا ﻖﺤﻠﻣ ﻚﻳﺮﺤﺘﺑ ﻢﻗ ،ﻞﻔﺳﻷا ﻰﻟإ ﻰﻠﻋﻷا ﻦﻣ ﺔﻔﻴﻄﻟ ﺔﻛﺮﺣ لﻼﺧ ﻦﻣ
• ﻒﻗﻮﺗ سﺮﻬﻟا ﻖﺤﻠﻣ نأ ﻦﻣ ﺪﻛﺄﺗو ﻲﻛﺬﻟا ﺔﻋﺮﺴﻟا حﺎﺘﻔﻣ ﺮﻳﺮﺤﺘﺑ ﻢﻗ
ﺔﻘﻴﻗد 1 ﺎًﺒﻳﺮﻘﺗ :ﻂﻠﺨﻟا ﻦﻣز :ﺔﻈﺣﻼﻣ .ﺖﻳﺰﻟا ﻲﻗﺎﺑ ﺞﻣﺪﻟ ىﺮﺧأ ةﺮﻣ
ﻞﺜﻣ) ﻦﺨﺛأ ﺰﻴﻧﻮﻳﺎﻣ ﻰﻠﻋ لﻮﺼﺤﻠﻟ ﻦﻴﺘﻘﻴﻗد ﻰﻟإ ﻞﺼﻳ ﺎﻣو تﺎﻃﻼﺴﻠﻟ
.ﺐﻴﻠﺤﻟا نﻮﻟ ﻰﻟإ لﻮﺤﺘﻟﺎﺑ أﺪﺒﻳ ﻰﺘﺣ
.ﺔﻋﺮﺳو ﺔﻗد ﺮﺜﻛأ
دﻮﻤﻋ
.ﺐﻴﻠﺤﻟا
ﻞﻴﻐﺸﺘﻟاو ﻊﻴﻤﺠﺘﻟا
• تﻮﺻ ﻊﻤﺴﺗ ﻰﺘﺣ رﻮﺗﻮﻤﻟا ءﺰﺠﺑ ActiveBlade (4) دﻮﻤﻋ ﺖﺒﺛ
.ةﺮﻘﻧ
• زﺎﻬﺠﻟا ﻞﻐﺷ ﻢﺛ .ﻪﻄﻠﺧ ﻢﺘﻴﻟ ﻂﻴﻠﺨﻟا ﻞﺧاد ActiveBlade دﻮﻤﻋ ﻊﺿ
.هﻼﻋأ ﺢﺿﻮﻣ ﻮﻫ ﺎﻤﻛ
• ﺔﻔﻴﻄﻟ ﺔﻛﺮﺣ لﻼﺧ ﻦﻣ ﺔﺑﻮﻠﻄﻤﻟا ﺔﻓﺎﺜﻜﻟا ﻰﻟإ ﻞﺼﺗ ﻰﺘﺣ تﺎﻧﻮﻜﻤﻟا ﻂﻠﺧا
•ﺮﻳﺮﺤﺘﻟا رارزأ ﻰﻠﻋ ﻂﻐﺿاو يوﺪﻴﻟا طﻼﺨﻟا ﻞﺼﻓا ،ماﺪﺨﺘﺳﻻا ﺪﻌﺑو
ﺮﻳﺬﺤﺗ
•.ﻂﻠﺨﻟا دﻮﻤﻌﻟ ﺮﻀﺧﻷا ﻂﺨﻟا زوﺎﺠﺘﺗ تﺎﻧﻮﻜﻤﻟا وأ ﻞﺋاﻮﺴﻟا عﺪﺗ ﻻ
• وأ ةﺮﺠﻨﻄﻟا ﻲﻓ ﻦﺧﺎﺴﻟا ﻪﻳرﻮﺒﻟا مﺎﻌﻃ داﺪﻋﻹ زﺎﻬﺠﻟا ماﺪﺨﺘﺳا نﺎﻛ اذإ
.قﺮﺤﻠﻟ
• مﺪﻋ ﺪﻨﻋ ﺪﻗﻮﻤﻟا ﻰﻠﻋ ﻦﺧﺎﺳ ءﺎﻋو ﻲﻓ ﻊﺿﻮﻳ يوﺪﻴﻟا طﻼﺨﻟا كﺮﺘﺗ ﻻ
.ﻪﻣاﺪﺨﺘﺳا
•.ﻲﻧاوﻷاو ﺔﻴﻋوﻷا عﺎﻗ ﻲﻓ ActiveBlade دﻮﻤﻋ شﺪﺨﺗ ﻻ
•.ﺔﻘﻴﻗد 1 ﻦﻣ ﺮﺜﻛﻷ ﺮﻤﺘﺴﻣ ﻞﻜﺸﺑ زﺎﻬﺠﻟا ﻞﻐﺸﺗ ﻻ
•.ﺮﻴﻀﺤﺘﻟا راﺮﻤﺘﺳا ﻞﺒﻗ ﻖﺋﺎﻗد 3 ةﺪﻤﻟ دﺮﺒﻳ زﺎﻬﺠﻟا كﺮﺗا
ﺰﻴﻧﻮﻳﺎﻤﻟا :ﺔﻔﺻﻮﻟ لﺎﺜﻣ
،ىﺮﺧأ ﺔﻀﻴﺑ رﺎﻔﺻو ﺔﻀﻴﺑ
،ﻞﺧ مﺎﻌﻃ ﺔﻘﻌﻠﻣ 1-2
ﻢﻌﻄﻠﻟ ﻞﻔﻠﻓو ﺢﻠﻣ
•ﺐﻴﺗﺮﺘﻟﺎﺑ قروﺪﻟا ﻲﻓ (ﺔﻓﺮﻐﻟا ةراﺮﺣ ﺔﺟرد ﻲﻓ) تﺎﻧﻮﻜﻤﻟا ﻊﻴﻤﺟ ﻊﺿ
.هﻼﻋأ رﻮﻛﺬﻤﻟا
•ﺔﻋﺮﺳ ﻰﺼﻗﺄﺑ ﻂﻠﺨﻟا ءاﺮﺟﺈﺑ ﻢﻗ .قروﺪﻟا عﺎﻗ ﻲﻓ يوﺪﻴﻟا طﻼﺨﻟا ﻊﺿ
•ﻪﻟﺰﻧا ﻢﺛ ﻂﻴﻠﺨﻟا ﻰﻠﻋﻷ ءﻂﺒﺑ دﻮﻤﻌﻟا ﻊﻓرا ،يوﺪﻴﻟا طﻼﺨﻟا ﻞﻴﻐﺸﺗ ءﺎﻨﺛأ
.(تﺎﺴﻤﻐﻤﻟا
15

.ﻒﻳووﺮﻜﻴﻤﻟا
تادﺎﺷرﻹا عﺎﺒﺗا ﻊﻣ ،بﻮﻠﻄﻤﻟا ﻮﺤﻨﻟا ﻰﻠﻋ
.ﻒﻴﻈﻨﺘﻟاو ﺔﻳﺎﻋﺮﻟا ﻢﺴﻗ ﻲﻓ ةدﻮﺟﻮﻤﻟا
• ﻞﺧاد زﺎﻬﺠﻟا اﺬﻫ ﻦﻣ ءﺰﺟ يأ مﺪﺨﺘﺴﺗ ﻻ
• وأ ماﺪﺨﺘﺳا لوأ ﻞﺒﻗ ءاﺰﺟﻷا ﻞﻛ ﻒﻴﻈﻨﺗ ﻰﺟﺮ
ﻳ
ُ
.ﺔﺟرد ﻰﺼﻗﻷ ﻚﺑ صﺎﺨﻟا ﺪﻳﺪﺠﻟا
ﻒﺋﺎﻇﻮﻟا ءادﻷ ﺔﻴﻠﺑﺎﻘﻟاو ةدﻮﺠﻟا ﺮﻴﻳﺎﻌﻣ ﻰﻠﻋأ
ﻲﺒﻠﺘﻟ ﺎﻨﺗﺎﺠﺘﻨﻣ ﻢﻴﻤﺼﺗ ﻢﺗ
نأ ﻲﻓ ﻞﻣﺄﻧو .ﻢﻴﻤﺼﺘﻟاو
Braun زﺎﻬﺠﺑ ﻊﺘﻤﺘﺴﺗ
ﻲﺑﺮﻋ
تﺎﻘﺤﻠﻤﻟاو ءاﺰﺟﻷا
ﺔﻔﻠﺘﺨﻣ تﺎﻋﺮﺳ / ﻲﻛذ ﺔﻋﺮﺳ حﺎﺘﻔﻣ 1
EasyClick Plus
«hc» ﻲﻠﻠﻣ 350 ﺔﻣﺮﻔﻣ ﻖﺤﻠﻣ 8
قﻻﺰﻧﻼﻟ ﺔﻌﻧﺎﻣ ﺔﻴﻃﺎﻄﻣ ﺔﻘﻠﺣ d
«fp» ﻲﻠﻠﻣ 1500 مﺎﻌﻄﻟا ﺮﻴﻀﺤﺗ زﺎﻬﺟ ﻖﺤﻠﻣ 9
مﺎﻌﻄﻟا ﺮﻴﻀﺤﺗ زﺎﻬﺟ ءﺎﻋو f
قﻻﺰﻧﻼﻟ ﺔﻌﻧﺎﻣ ﺔﻴﻃﺎﻄﻣ ﺔﻘﻠﺣ g
(ﺔﻨﺸﺧ) ﺢﺋاﺮﺷ ةادأ (i)
(ﺔﻨﺸﺧو ﺔﻤﻋﺎﻧ) ﻊﻴﻄﻘﺘﻟا تاودأ (ii)
ﺔﻴﻠﻘﻤﻟا ﺎﻃﺎﻄﺒﻟا ﻊﻴﻄﻘﺗ صﺮﻗ k
ﺔﺣﻮﻟ ﺔﻟازﺈﺑ ﻢﻘﺗ ﻻ) ةﺪﺣﻮﻟا ﻰﻠﻋ ﺎﻫدﻮﺟو ﻦﻜﻤﻤﻟا ﻦﻣ تﺎﻴﻤﺴﺗ ﺔﻳأ لزأ
رﻮﺗﻮﻣ ءﺰﺟ 2
ﺮﻳﺮﺤﺗ رارزأ 3
ActiveBlade
ﺔﻋﺮﺴﻟا سوﺮﺗ ﺔﺒﻠﻋ a
ﺔﻋﺮﺴﻟا سوﺮﺗ ﺔﺒﻠﻋ a
(سﺮﺘﺑ دوﺰﻣ) ءﺎﻄﻏ a
رﻮﺗﻮﻤﻟا ءﺰﺟ ﺔﻠﺻو b
.ﺔﻧﻮﺗﺮﻜﻟا ﻦﻣ ةﺪﺣﻮﻟا جﺮﺧأ
.ةﻮﺒﻌﻟا ﻦﻣ ﻊﻄﻘﻟا ﻞﻛ لزأ
دﻮﻤﻋ 4
طﻼﺧ قرود 5
ﻖﻔﺧ ﻖﺤﻠﻣ 6
قﺎﻔﺧ b
سﺮﻫ ﻖﺤﻠﻣ 7
سﺮﻫ دﻮﻤﻋ b
ﺐﻠﻘﻣ c
ءﺎﻄﻏ a
ﻊﻴﻄﻘﺗ ةﺮﻔﺷ b
ﺔﻣﺮﻔﻣ ءﺎﻋو c
ﻊﻓاد c
ﺔﻳﺬﻐﺗ بﻮﺒﻧأ d
ءﺎﻄﻐﻟا جﻻﺰﻣ e
ﻊﻴﻄﻘﺗ ةﺮﻔﺷ h
ﻦﺠﻋ فﺎﻄﺧ i
ةادﻷا ﻞﻣﺎﺣ j
نﺎﻴﻟﻮﺟ ةادأ (iii)
.(ﻢﻴﻴﻘﺘﻟا
زﺎﻬﺠﻟا ماﺪﺨﺘﺳا ﺔﻘﻳﺮﻃ
ﺔﻔﻠﺘﺨﻣ تﺎﻋﺮﺴﻟ ﻲﻛﺬﻟا ﺔﻋﺮﺴﻟا حﺎﺘﻔﻣ
ﻰﻟإ ﻞﺼﺗ ،ﺮﺜﻛأ ﺖﻄﻐﺿ ﺎﻤﻠﻛو .تﺎﻋﺮﺴﻟا ﻊﻴﻤﺟ ﻰﻟإ ﻞﺼﺗ ،ةﺪﺣاو ﺔﻄﻐﻀﺑ
16
ﺢﺘﻔﻟا
ماﺪﺨﺘﺳﻻا ﻞﺒﻗ
زﺎﻬﺠﻟا ماﺪﺨﺘﺳا ﻞﺒﻗ مﺎﺗ ﻞﻜﺸﺑو ﺔﻳﺎﻨﻌﺑ ماﺪﺨﺘﺳﻻا تﺎﻤﻴﻠﻌﺗ ةءاﺮﻗ ﻰﺟﺮُﻳ
ﻒﻴﻠﻐﺘﻟا داﻮﻣ ﻊﻴﻤﺟ لزأ .ﻞﺒﻘﺘﺴﻤﻟا ﻲﻓ ﺎﻬﻴﻟإ عﻮﺟﺮﻠﻟ ﺎﻬﺑ ظﺎﻔﺘﺣﻻاو
.ﺐﺳﺎﻨﻣ ﻞﻜﺸﺑ ﺎﻬﻨﻣ ﺺﻠﺨﺗو تﺎﻘﺼﻠﻤﻟاو
ﻪﻴﺒﻨﺗ
صﺮﺤﺑ تاﺮﻔﺸﻟا ﻊﻣ ﻞﻣﺎﻌﺘﻟا ﻰﺟﺮُﻳ
.ﺪﻳﺪﺷ
.ﻒﻴﻈﻨﺘﻟا ءﺎﻨﺛأ ءﺎﻋﻮﻟا ﻎﻳﺮﻔﺗو ،ةدﺎﺤﻟا ﻊﻄﻘﻟا
وأ ﺔﻴﺴﻔﻨﻟا تارﺪﻘﻟا وأ ﺔﻳﺪﺴﺠﻟا تﺎﻗﺎﻋﻹا يوذ
ﺔﻠﻴﻠﻗ ةﺮﺒﺧ ﻢﻬﻳﺪﻟ ﻦﻤﻣ وأ ةدوﺪﺤﻤﻟا ﺔﻴﻠﻘﻌﻟا
وأ ﻢﻫدﺎﺷرإ ﻢﺗ اذإ ﻚﻟذو ،ةدوﺪﺤﻣ ﺔﻓﺮﻌﻣو
اذإو ،ﺔﻨﻣآ ﺔﻘﻳﺮﻄﺑ زﺎﻬﺠﻟا ماﺪﺨﺘﺳا ﻰﻠﻋ ﻢﻬﺒﻳرﺪﺗ
ﺎﻬﻴﻠﻋ يﻮﻄﻨﻳ ﻲﺘﻟا ﺮﻃﺎﺨﻤﻟﺎﺑ ﺔﻳارد ﻰﻠﻋ اﻮﻧﺎﻛ
.زﺎﻬﺠﻟا ماﺪﺨﺘﺳا
ﺪﻴﻌﺑ لﺎﻔﻃﻷا ءﺎﻘﺑإ ﺐﺠﻳ
ً
.ﻪﺑ صﺎﺨﻟا ﻲﺴﻴﺋﺮﻟا ﻲﺋﺎﺑﺮﻬﻜﻟا رﺎﻴﺘﻟا
ﺔﻣﺪﺨﻟا ﻞﻴﻛو وأ ،ﻊﻨُﺼﻟا ﺔﻬﺟ ﺔﻄﺳاﻮﺑ ﻪﻟاﺪﺒﺘﺳا
ﺔﻴﻨﻓ تاﺮﺒﺨﺑ ﻊﺘﻤﺘﻳ ﺺﺨﺷ ﺔﻄﺳاﻮﺑ وأ ،ﺎﻬﻟ ﻊﺑﺎﺘﻟا
.ﺮﻃﺎﺨﻣ ﺔﻳأ يدﺎﻔﺗ ضﺮﻐﺑ ﻚﻟذو ،ﺔﻠﺛﺎﻤﻣ
ﻤﺋاد ﺐﺠﻳ
ً
ﻚﻔﻟاو ﻊﻴﻤﺠﺘﻟا لﺎﺣو ﺐﻴﻛﺮﺘﻟا ﻞﺒﻗو ﺔﺑﺎﻗر نود
.ﻦﻳﺰﺨﺘﻟاو ﻒﻴﻈﻨﺘﻟاو
ﺔﻤﻴﻗ ﻊﻣ ﻖﻓاﻮﺘﻳ ﻚﻳﺪﻟ رﺎﻴﺘﻠﻟ ﻲﺋﺎﺑﺮﻬﻜﻟا ﺪﻬﺠﻟا
ﻦﻣ ﻲﻠﻔﺴﻟا ءﺰﺠﻟا ﻰﻠﻋ عﻮﺒﻄﻤﻟا ﻲﺋﺎﺑﺮﻬﻜﻟا ﺪﻬﺠﻟا
.زﺎﻬﺠﻟا
.ﺔﻴﻌﻴﺒﻄﻟا ﺔﻴﻟﺰﻨﻤﻟا تﺎﻴﻤﻜﻟا ﺮﻴﻀﺤﺗ ضاﺮﻏﻷو
يأ ﺐﺒﺴﻳ ﺪﻗ .اﺬﻫ مﺪﺨﺘﺴﻤﻟا ﻞﻴﻟد ﻰﻓ ﺢﺿﻮﻤﻟا
.ﺔﻠﻤﺘﺤﻣ ﺔﺑﺎﺻإ ماﺪﺨﺘﺳا ءﻮﺳ
• ،تﺎﺑﺎﺻﻹا ﺐﻨﺠﺘﻟ !ﺔﻳﺎﻐﻠﻟ ةدﺎﺣ تاﺮﻔﺸﻟﻻ
• تاﺮﻔﺷ ﻊﻣ ﻞﻣﺎﻌﺘﻟا ﺪﻨﻋ رﺬﺤﻟا ﻲﺧﻮﺗ ﺐﺠﻳ
• صﺎﺨﺷﻷا ﺔﻄﺳاﻮﺑ زﺎﻬﺠﻟا اﺬﻫ ماﺪﺨﺘﺳا ﻦﻜﻤﻳ
•.زﺎﻬﺠﻟﺎﺑ لﺎﻔﻃﻷا ﺚﺒﻌﻳ ﻻأ ﺐﺠﻳ
•.زﺎﻬﺠﻟا اﺬﻫ لﺎﻔﻃﻷا مﺪﺨﺘﺴﻳ ﻻأ ﺐﺠﻳ
• ﻚﻠﺳ ﻦﻋو زﺎﻬﺠﻟا ﻦﻋ ا
• ﺐﺠﻴﻓ ،ﺎًﻔﻟﺎﺗ ﻲﺋﺎﺑﺮﻬﻜﻟا رﺎﻴﺘﻟا ﻚﻠﺳ نﺎﻛ اذإ
• ﻪﻛﺮﺗ ﺪﻨﻋ زﺎﻬﺠﻟ ﻞﺼﻓو ﻞﻴﻐﺸﺗ فﺎﻘﻳإ ﺎ
• نأ ﻦﻣ ﻖﻘﺤﺘﻟا ﺐﺠﻳ ،ﺬﺧﺄﻤﺑ زﺎﻬﺠﻟا ﻞﻴﺻﻮﺗ ﻞﺒﻗ
• ﻂﻘﻓ ﻲﻟﺰﻨﻤﻟا ماﺪﺨﺘﺳﻼﻟ زﺎﻬﺠﻟا اﺬﻫ ﻢﻴﻤﺼﺗ ﻢﺗ
• ضﺮﻐﻟا ﺮﻴﻏ ﺮﺧآ ضﺮﻏ يﻷ زﺎﻬﺠﻟا مﺪﺨﺘﺴﺗ ﻻ


 Loading...