

Page 1
Troubleshooting Tips
Lifestyle® SA-2 & SA-3 Amplifier
Refer to the Lifestyle® SA-2 & SA-3 Amplifier service manuals, part number 271720 for
schematics, PCB layouts and parts lists.
Preventative Repair Measures
Note: Perform the following on all units returned for repair.
Product Check Action
SA-2 & SA-3 N/A There is no preventative maintenance for this
product.
Troubleshooting Tips
Product Symptom Check Action
SA-2 & SA-3 No Audio Remote
dipswitch
settings
SA-2 & SA-3 No Power AMP IC’s and
fuse
SA-2 & SA-3 No Power U4 The +5V supply voltage may be shorted to
SA-2 & SA-3 No Power R10 Check for open 220 ohm resistor R10.
SA-2 & SA-3 Unit operates at full
volume, unable to
control volume
SA-2 & SA-3 Amp causes media
center display to lock
up and read BOSE
LIFESTYLE
SA-2 & SA-3 Distorted audio /
audio fades after a
few seconds
SA-3 No audio, led blinks
rapidly
SA-3 No Power Q155 and
C14 Capacitor C14 may be defective.
U9 and D14 Check for -8Vdc at regulator U9. If missing
U3 Volume control IC U3 (188941-001) may be
Software The software may need to be updated, Refer to
Q255
The unit will not turn on if the remote dipswitch
settings are incorrect. See pages 2 – 12 of this
document for instructions.
Amplifier IC’s U150 and U250 may be defective.
Check for visible damage or shorts between
pins 7&8 and pins 14&15. AC mains fuse F1
may also be open.
U150,U250 170156 SA2 Only
U150, U250 275177-001 SA3 Only
F1 177311-
03150
ground through U4 pin 1. Replace IC with part #
303687-001.
Part # 181895-2200.
Part # 191470-473.
replace U9 (260688-08). D14 (135247-5231)
may also be shorted.
defective.
pages 13 - 15 for procedure.
To determine if the amp IC’s U150 and U250
are defective, check for shorts on Q155 and
Q255. If they measure a short, remove the amp
IC’s and measure again. If the short is still
present, replace the transistors in addition to the
amp IC’s
SA2 &
SA3
1
Page 2
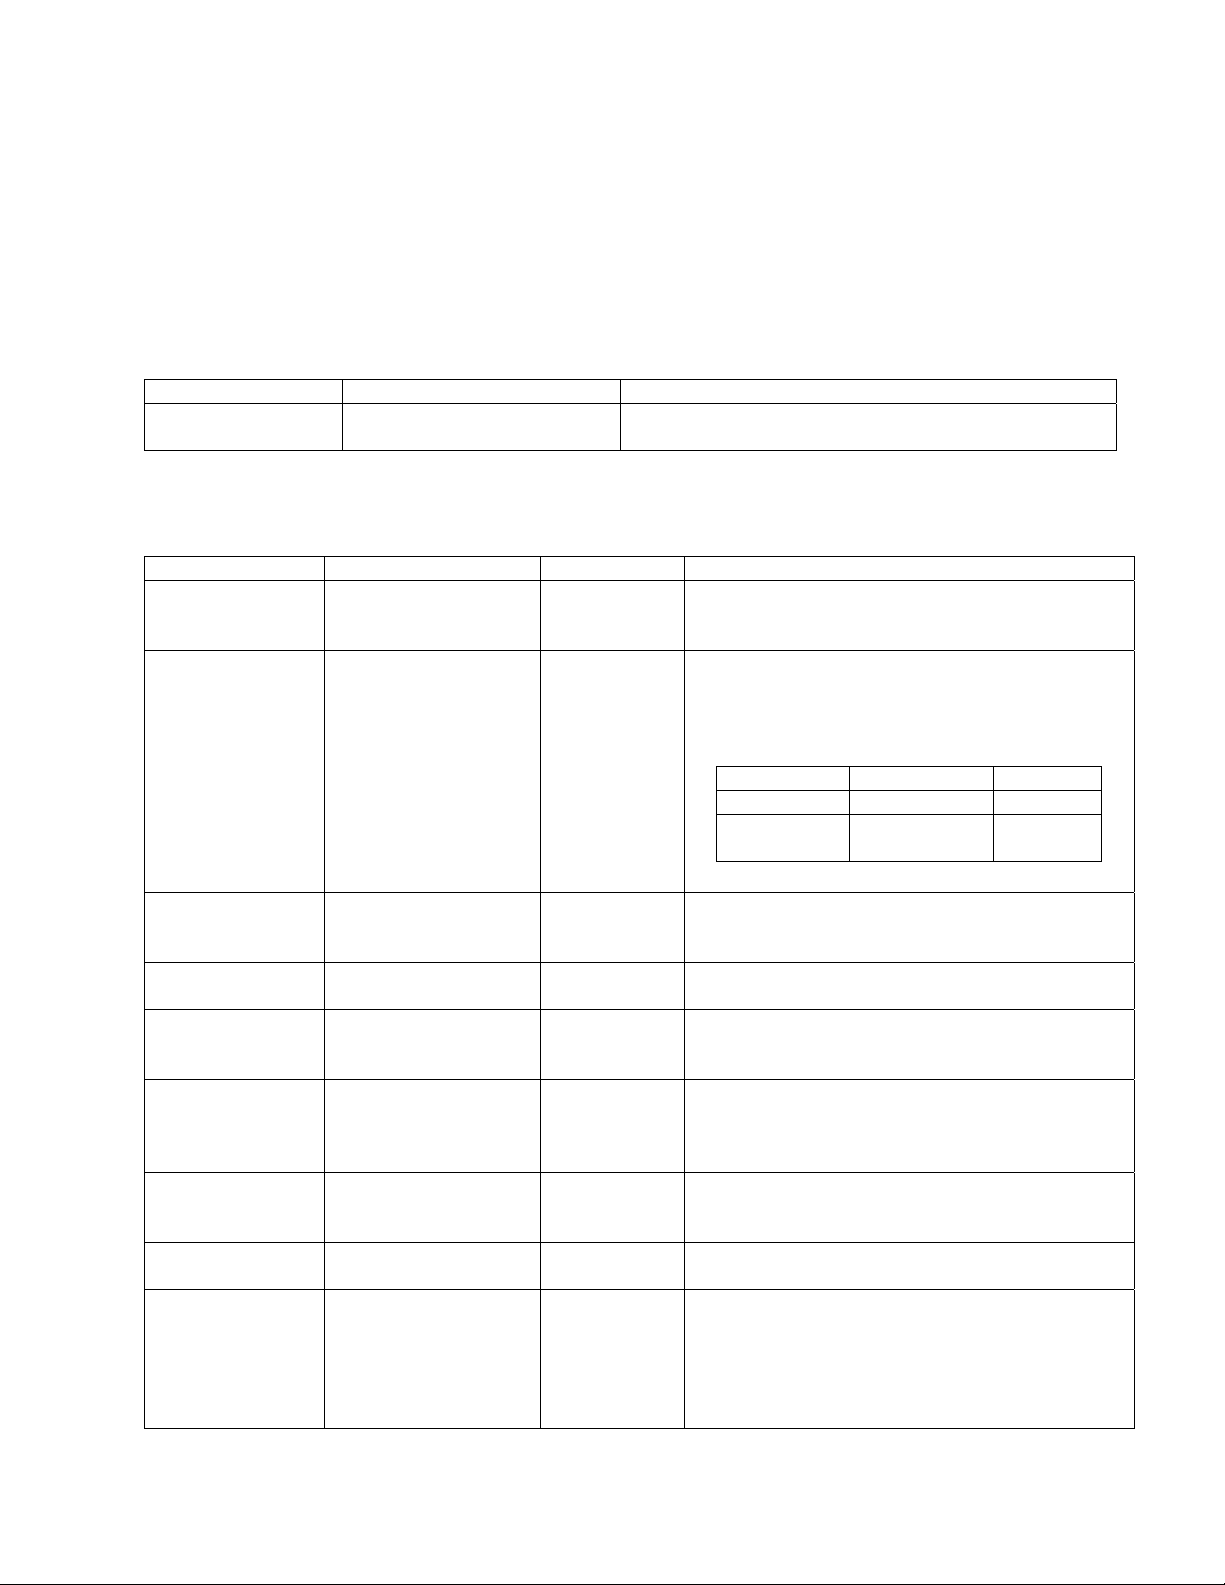
Setting Up Your Lifestyle
Model AV-18/38/48 media center setup
CAUTION: Before making connections, turn the Lifestyle® system o and disconnect the media
center from the AC (mains) power outlet. DO NOT plug the ampli er into an outlet until you have
completed all other connections.
English
Figure 5
Lifestyle®stereo ampli er to
AV-18/38/48 media center
connections
1. Insert one end of the Bose
panel of the media center (Figure 5).
2. Insert the other end of the Bose®link A cable, into the Bose®link input connector on the
rear panel of the Lifestyle®stereo ampli er.
®
Stereo Ampli er
®
link A cable into the Bose®link output connector on the rear
Lifestyle®stereo ampli er rear panel
BoseLink
OUTPUT
BoseLink
INPUT
AV-18/38/48 media center rear panel
20-ft Bose®link A cable
2
Page 3
Setting Up Your Lifestyle
®
Stereo Ampli er
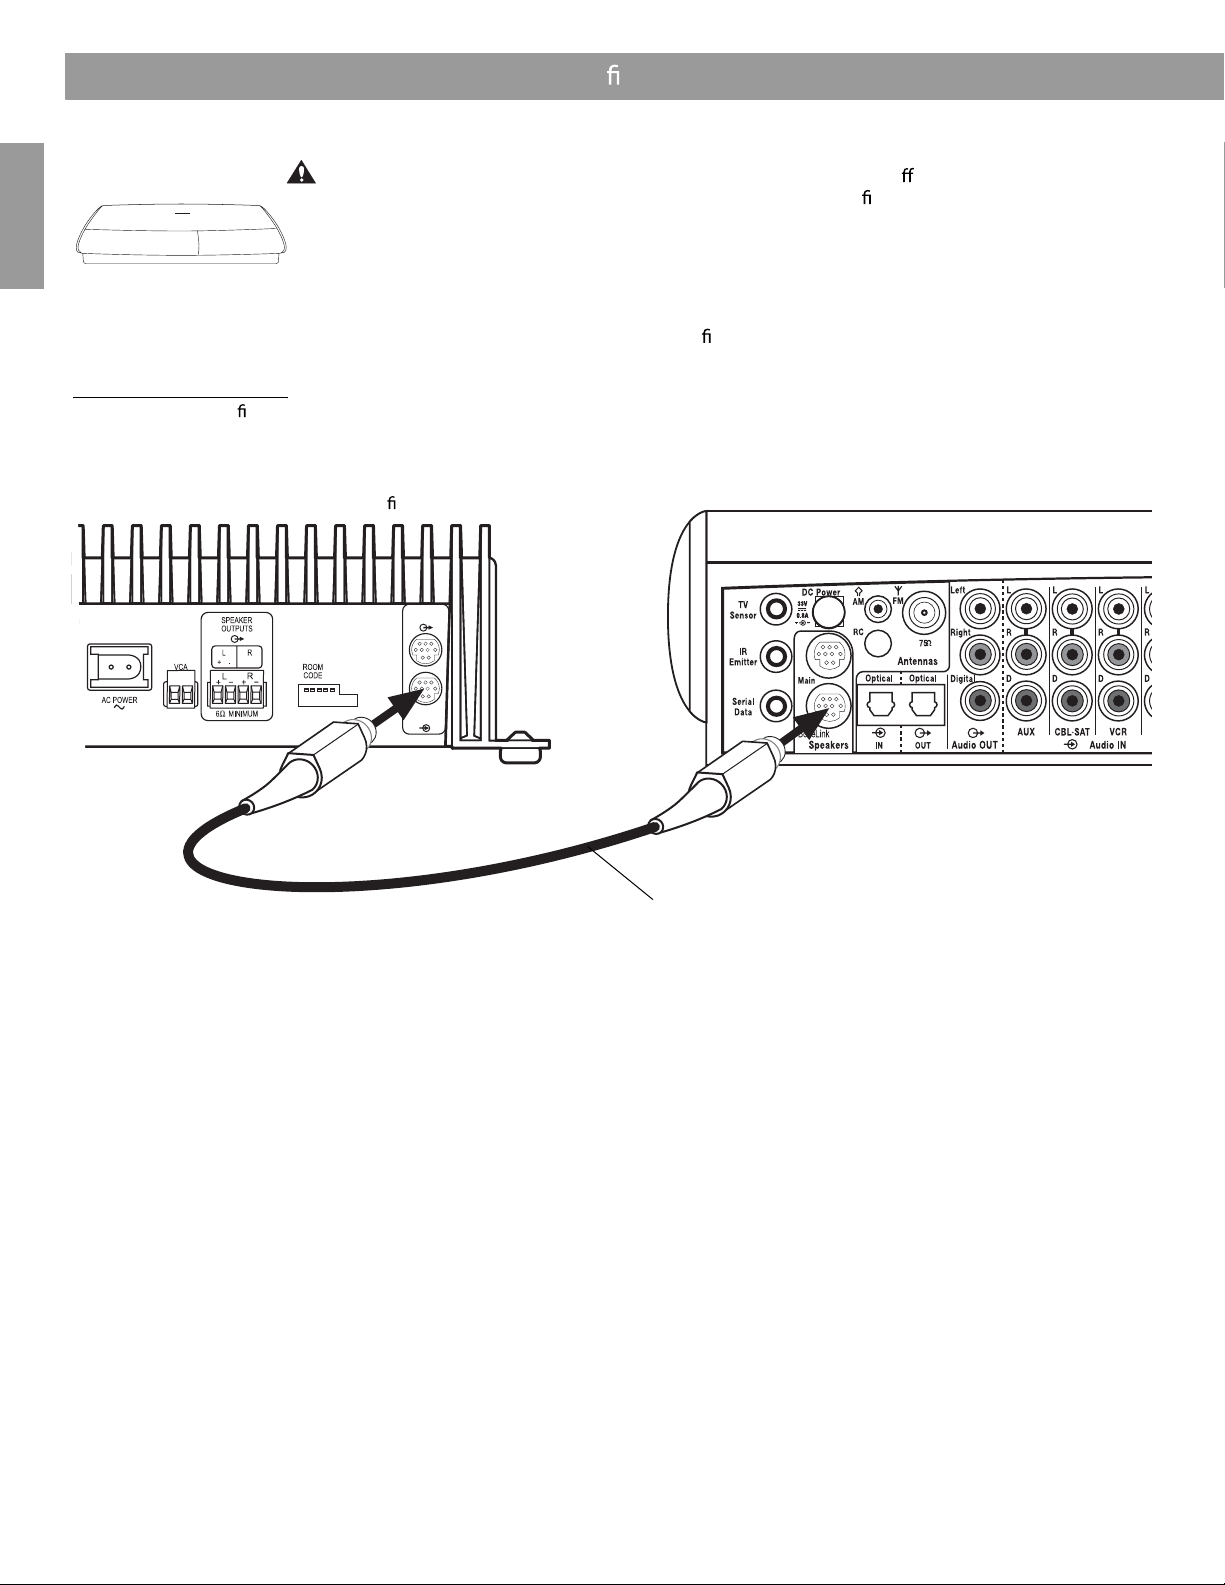
Setting up RC-18S and RC-38S remotes
Your additional remote is shippe d from the factory already set up for a second room (room B).
To make sure that this remote will work with your home entertainment system, do the following to check the house code setting.
1. Remove the remote control battery cover and locate the microswitches (Figure 6).
2. Make sure that the house code settings (switches 1, 2, 3, and 4) match the house code
settings in your main room remote.
Note: If this remote is to be used beyond a second room, other switch settings will need to be
changed. See “Setting Up Additional Rooms For Soun d” on page 22.
Engli
s
h
Figure 6
Remote microswitches
House code switches
must match main room remote
ON
Check the expansion protocol setting in your system
For the Lifestyle®stereo ampli er t o work properly with your home enterta inment system, the
expansion protocol menu item must be set to Bose®link. To verify this:
1. Turn on your Lifestyle®DVD home entertainment system and your TV.
2. Press the System button on your main room remote.
3. Select t h e Audio tab and navigate down to Expansion Protocol.
®
4. Verify that the setting Bos e
5. Press the Exit button on the remote.
link is selected. If not, select Bose®link now.
3
Page 4
Setting Up Your Lifestyle
Model AV-28 media center setup
CAUTION: Before making connections, turn the Lifestyle® system o and disconnect the media
center from the AC (mains) power outlet. DO NOT plug the ampli er into an outlet until you have
completed all other connections.
English
Figure 7
Lifestyle®stereo ampli er
to AV-28 media center
connections
1. Insert the 8-to-9-pin adapter into the SPEAKER ZONES 2 output connector on the rear
2. Insert one end of the Bose
3. Insert the other end of the Bose®link A cable, into the Bose®link input connector on the
®
Stereo Ampli er
panel of the media center (Figure 7).
®
link A cable into the 8- to-9-pin adapter.
rear panel of the Lifestyle®stereo ampli er.
Lifestyle®stereo ampli er rear panel
BoseLink
OUTPUT
BoseLink
INPUT
AV-28 media center rear panel
8-to-9-pin
DIN adapter
20-ft Bose®link A cable
4
Page 5
Setting Up Your Lifestyle
®
Stereo Ampli er
Setting up the RC-28S remote
Your second remote is shipped from the factory already set up for Zone 2. To make sure that
this remote will work with your home entertainment system, do the following to check the
house code setting.
1. Remove the remote control battery cover and locate the microswitches (Figure 8).
2. Make sure that the house code settings (switches 1, 2, 3, and 4) match the house code
settings in your main room remote.
3. Make sure switches 5, 7, and 8 are up, and switches 6 and 9 are down.
Note: Refer to your Lifestyle
system in more than one r oom.
®
system owner’s guide for more information on operating your
Engli
s
h
Figure 8
Remote microswitches
House code switches must
match main room remote
ON
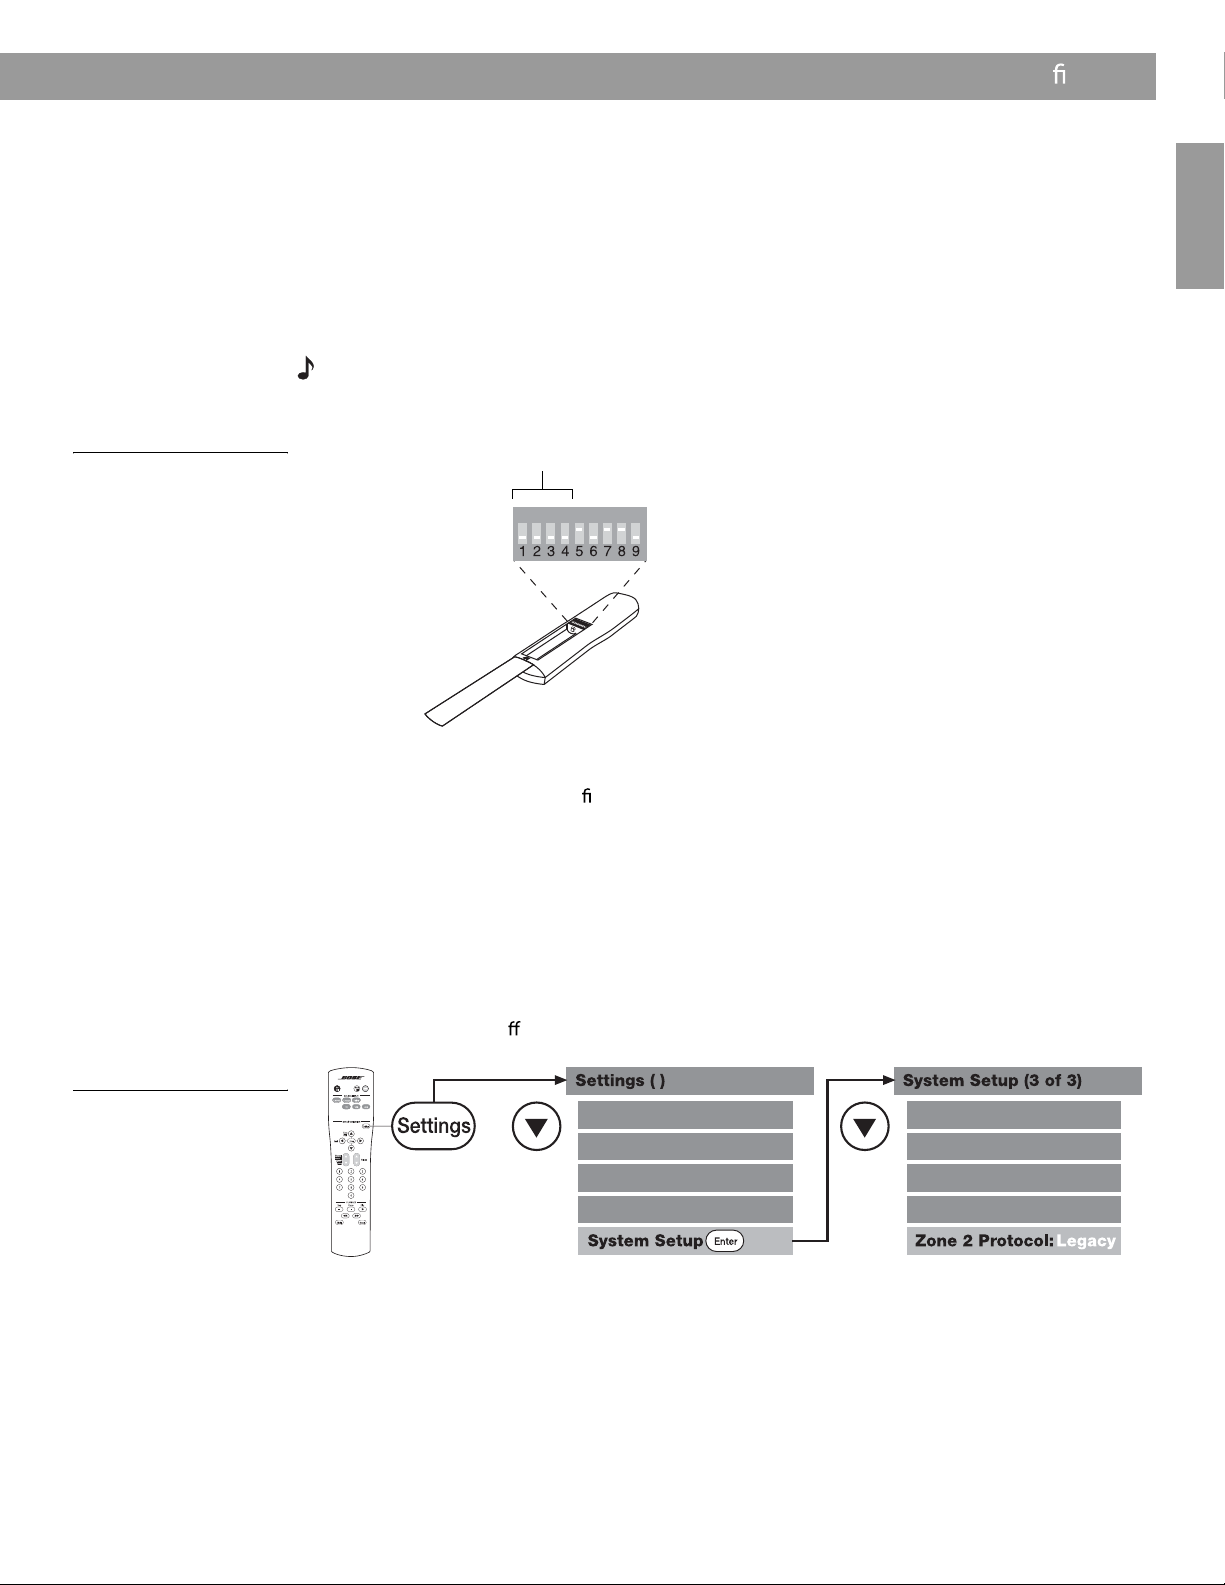
Setting the Zone 2 Protocol in your home entertainment system
For the Lifestyle®stereo ampli er to work properly with a Lifestyle
need to set the Zone 2 Protocol to Legacy mode (Figure 9).
1. Turn on your Lifestyle®DVD system and your TV.
2. Press the Settings button on your main room remote control.
3. Scroll down the menu to System Set up and press the Enter button.
4. Scroll down the menu to the last item, Zone 2 Protocol.
5. Press the right arrow remote button to change the protocol from Normal to Legacy.
®
media center, you will
Figure 9
Setting Zone 2 Protocol
6. Turn the system o and on again to ensure that the Zone 2 Protocol is reset to Legacy.
5
Page 6

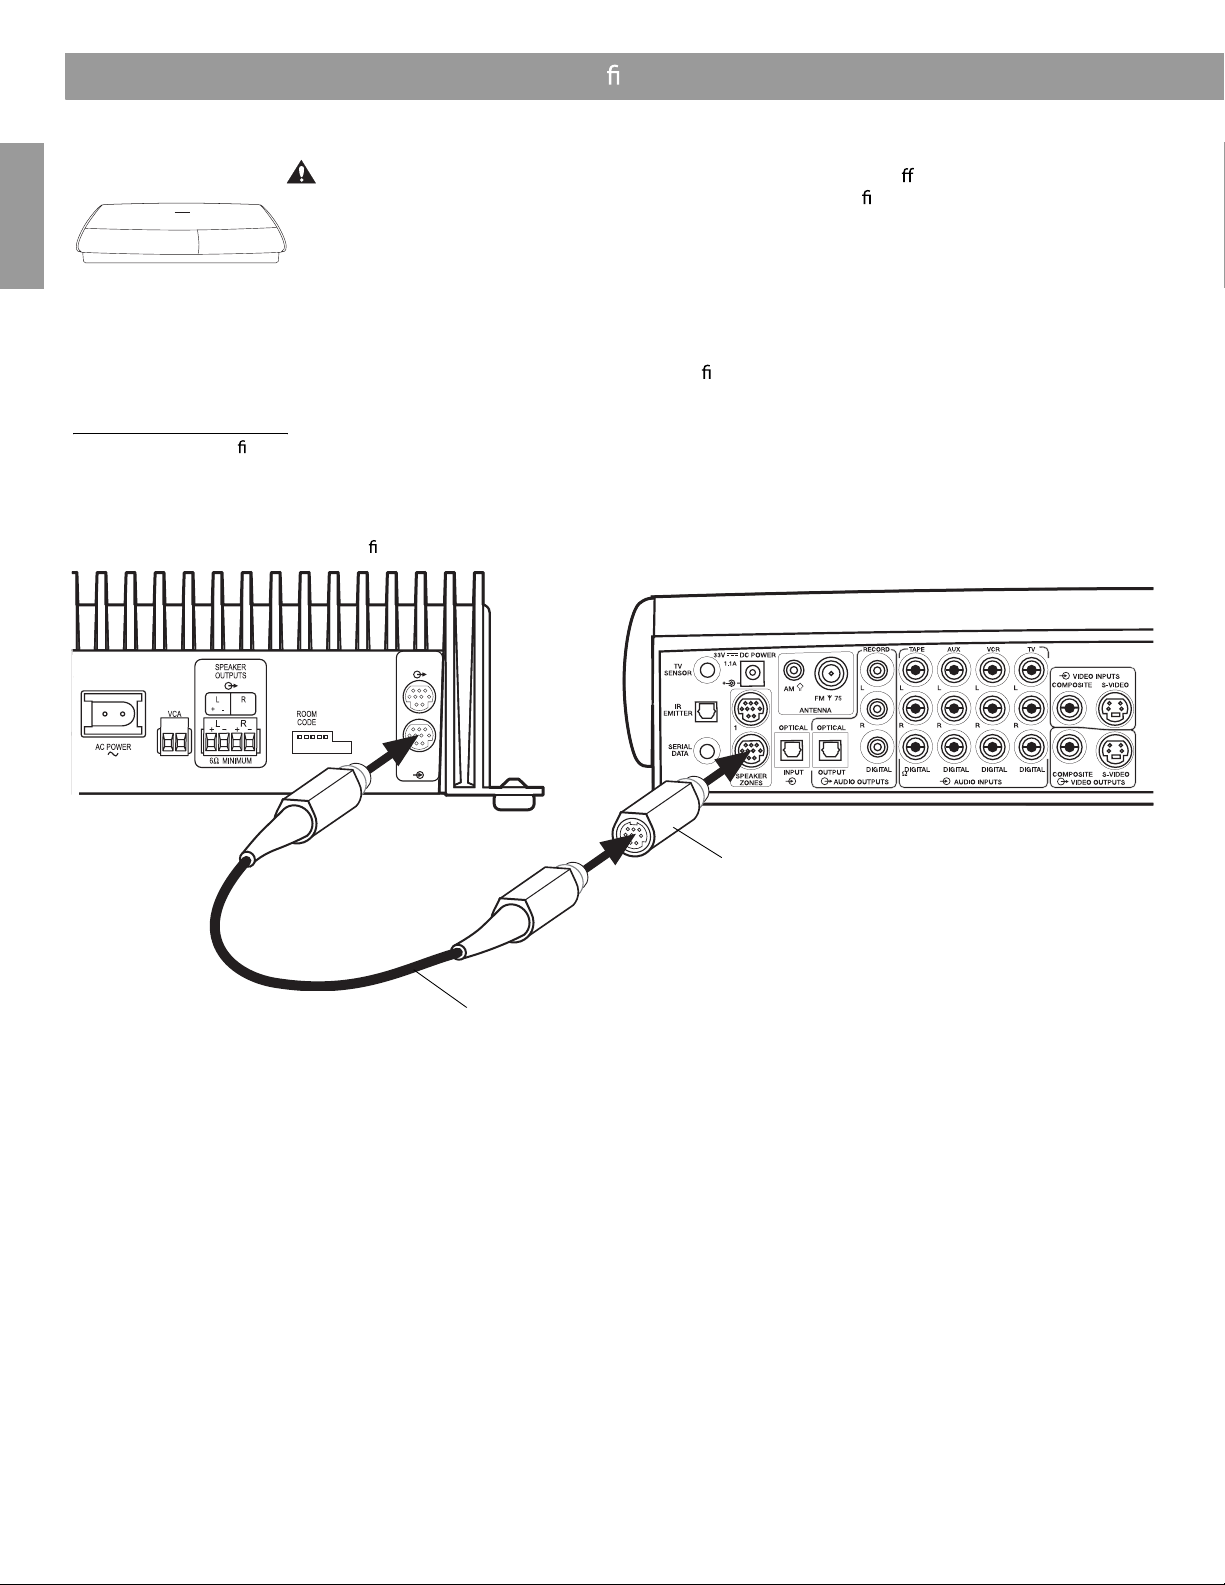
Setting Up Your Lifestyle
Multi-room interface setup
English
Figure 10
Lifestyle®stereo ampli er
to multi-room interface
connections
®
Stereo Ampli er
CAUTION: Before making any connections, turn the Lifestyle® system o and disconnect the
music center from the AC (mains) power outlet. DO NOT plug the ampli er into an outlet until you
have completed all other connections.
1. Insert the 8-to-9-pin adapter into one of the unused ROOM output connectors (B, C, or
D) on the rear of the multi-room interface (Figure 10).
2. Insert one end of the Bose
®
link A cable into the 8- to-9-pin adapter.
3. Insert the other end of the Bose®link A cable, into the Bose®link input connector on the
rear panel of the Lifestyle®stereo ampli er.
Lifestyle®stereo ampli er rear panel
BoseLink
OUTPUT
BoseLink
INPUT
Multi-room interface rear panel
®
20-ft Bose
link A cable
8-to-9-pin
DIN adapter
6
Page 7

Setting Up Your Lifestyle
®
Stereo Ampli er
Figure 11
Sample display for a tworoom system
Setting up the Personal
Systems that have a multi-room interface are controlled by the Personal
requires no inte rnal switch settings before it allows you to control more than one room of
speakers. However, if you purchase a second Personal
®
music center
®
music center which
®
music center, you must follow the
procedure for setting up the Personal®music center for the rst time.
Note: Refer to your Lifestyle
®
system owner’s guide for more information on operating your
system in more than one r oom.
Selecting other rooms with the Personal
The Personal®music center allows you to control up to four sets of Bose
®
music center
®
powered speakers
placed in individual rooms. These rooms are referred to as room A, B, C, and D, with room
A being the primary room (the one used for a one-room system). If two or more rooms are
connected to your system, the Personal
®
music center displays ROOM and HOUSE buttons,
and room indicators (A, B, C, a nd/or D). Figure 11 shows a sam ple display for a two-room
system.
Press the ROOM button to control a single room or two or more rooms that share a source.
Press the HOUSE button to control all connected rooms as one.
The room indicators tell you what w as selected
by the ROOM or HOUSE button.
Engli
s
h
7
Page 8

Setting Up Your Lifestyle
Model 20 music center setup
®
English
Figure 12
Lifestyle®stereo ampli er to
Model 20 music center
connections
®
Stereo Ampli er
CAUTION: Before making connections, turn the Lifestyle® system o and disconnect the music
center from the AC (mains) power outlet. DO NOT plug the ampli er into an outlet until you have
completed all other connections.
1. Insert the 8-to-9-in DIN adapter into the SPEAKER ZONES 2 output connector on the
rear panel of the music center (Figure 12).
2. Insert one end of the Bose
®
link A cable into the 8-to-9-pin adapter.
3. Insert the other end of the Bose®link A cable into the Bose®link input connector on the
rear panel of the Lifestyle®stereo ampli er.
4. Set the ROOM CODE switches of the Lifestyle
®
stereo ampl er to room E
(switch 7 up, switches 6, 8 and 9 down).
See “Setting up the ampli er room code” on page 24.
Lifestyle®stereo ampl er rear panel
BoseLink
OUTPUT
BoseLink
INPUT
Model 20 music center rear panel
8-to-9-pin
DIN adapter
20-ft Bose®link A cable
8
Page 9

Figure 13
RC-20 remote Zone 2
switch settings
Setting Up Your Lifestyle
®
Stereo Ampli er
Setting up the RC-20 remote for Zone 2
If your system uses a Model 20 music center, you need to set up a second RC-20 remote
control to operate the ZONE 2 outputs.
1. Remove the remote control battery cover and locate th e miniature switches (Figure 13).
2. Make sure that the house code settings (switches 1, 2, 3, and 4) match those in your rst
remote.
3. Slide switch 5 down (o ), and switches 6 a nd 8 up (on).
Note: Refer to your Lifestyle
system in more than one r oom.
®
system owner’s guide for more information on operating your
Engli
s
h
9
Page 10

Setting Up Your Lifestyle
Model 5 music center setup
®
English
®
Stereo Ampli er
This setup requires a 3-ft audio input adapter cable. Contact your Bose
®
dealer or Bose
Customer Service. See the list of locations and phone numbers included in the shipping carton.
CAUTION: Before making connections, turn the Lifestyle® system o and disconnect the music
center from the AC (mains) power outlet. DO NOT plug the ampli er into an outlet until you have
completed all other connections.
CAUTION: DO NOT connect the audio input cable for the Lifestyle®stereo ampli er to the
SPEAKERS A or SPEAKERS B outputs. The ampli er is designed to work properly with the xed
output level available from the FIXED OUTPUT connectors.
®
1. Disconnect the Acoustimass
cable from the FIXED L and R outputs on the rear panel of
the music center (Figure 14).
2. Insert the red RCA piggyback connector of the three-foot audio input adapter cable into
the R (right) FIXED OUTPUT connector. Insert the white RCA piggyback connecto r into
the L (left) FIXED OUTPUT connector. Insert the 3.5 mm mini-plug into the S YSTEM
CONTROL 2 connector on the rear panel of the music center.
3. Insert the red RCA connector of the Acoustimass module cable into the red piggyback
connector and the white RCA connector into the white piggyback connector.
Figure 14
Lifestyle®stereo ampli er
to Model 5 music center
connections
Model 5 music center rear panel
4. Plug one end of the 20-foot audio cable (supplied) into the free end of the three-foot
audio input adapter cable. Plug the other end of the 20-foot audio cable into the Bose
link input connector on the rear panel of the Lifestyle
5. Set the ROOM CODE switches of the Lifestyle
®
stereo ampli er.
®
stereo ampl er to room E
(switch 7 up, switches 6, 8 and 9 down).
See “Setting up the ampli er room code” on page 24.
Lifestyle®stereo ampli er rear panel
SYSTEM CONTROL 2
3.5 mm mini-plug
BoseLink
OUTPUT
BoseLink
INPUT
®
Fixed L and
R speaker
outputs
Acoustimass module cable
3-ft audio input adapter
(available from Bose)
10
20-ft Bose
®
link A cable
Page 11

Figure 15
RC-5 remote switch
settings
Setting Up Your Lifestyle
®
Stereo Ampli er
Setting up the RC-5 remote
If your system uses a Model 5 music center, you need to set up a second RC-5 remote control to operate your Lifestyle®stereo ampli er.
1. Remove the remote control battery cover and locate the miniature switches (Figure 15).
2. Make sure that the house code settings (switches 1, 2, 3, and 4) match those in your rst
remote.
3. Slide switch 5 down (o ) and 6 up (on).
Note: Refer to your Lifestyle
system in more than one r oom.
®
system owner’s guide for more information on operating your
Engli
s
h
11
Page 12

Bose®Lifestyle®SA-2 & SA-3 Amplifier Software Upgrade
Steps:
1. Using the schematic shown in FIGURE 1, construct a cable for issuing TAP commands.
Obtain the most recent upgrade software at the following link:
http://intranet.bose.com/tsg/rog_support/cell-process/SA2-SA3%20Cell/SA2_3%20Prog%20Info.htm
2. Start a terminal emulator program on a PC (e.g: Hyper Terminal, Tera Term Pro). Also
found at the link listed above.
Note: The SA-2 or SA-3 should not be plugged in at this time.
3. Open Tera Term and select “serial” as shown below. Click OK.
4. Setup the terminal emulator as shown below. Tera Term terminal emulator is shown.
Set Up:
Baud Rate: 19.2K
Data: 8 Bit
Parity: none
Stop Bit: 2 Bit
Flow Control: None
12
Page 13

Bose®Lifestyle®SA-2 & SA-3 Amplifier Software Upgrade
5. Connect the TAP cable to the Bose Link connector on the SA-2 or SA-3.
6. Set all switches to high.
7. Plug the unit in. The SA-2 or 3 will go into a Pre Flash Load state: The LED will blink
fast, 4 times/second.
8. Within 25 seconds of plugging the unit in press the control key (CTRL) and then the F
key sequentially (may need to do two times) on the keyboard (SA-2 or 3 will go into a Flash
Erase Mode - LED either stops blinking or stays on for about 5 seconds) otherwise the
system times out from the flash loader (if this happens unplug the unit until the LED is
completely out, about 2 minutes, plug back in and continue).
9. At the end of the Flash Erase Mode the SA-2 and 3 goes into a Flash Load State (The
LED will start blinking 2.5 times/second). The code has now been erased.
10. To transfer the new code to the unit select File from the top menu, at that pull down
menu select Send file (the window seen below will pop up). Find the software that was
saved to your desktop in step 1 and double click. (The LED will blink slowly while the file is
loading about 1 time/second).
11. Once the file has finished the transfer the SA-2 or 3 will go back to the Flash Load State
(The LED will blink 2.5 times/second). At this time move switches 6 & 7 (for both the SA2
and 3) in the down position.
12. Unplug then unit and wait until the LED has completely dimmed. Re-plug the unit in.
The unit LED should blink at a normal speed. If this is the case the upgrade is complete, if
the LED does not blink normally please try this upgrade again.
13
Page 14

9-PIN
GEP PORT
MINI-DIN
PLUG
SHIELD
(SHELL)
(receive)
(transmit)
DB-9
FIGURE 1
14
 Loading...