


Bosch NEZ1056 Manual
CONVERSION INSTRUCTIONS
BOSCH NGT 73 (30”) and NGT 93 (36”) COOKTOP CONVERSION KIT FOR TRADITIONAL
MODELS NATURAL GAS (NG) TO PROPANE (LP) GAS
LP KIT (NEZ1056)
This kit is used to convert only NGT 73/93 sealed burner cooktops from natural gas operation to propane gas operation. This kit cannot be used to convert other Bosch model sealed burner cooktops (in particular NGP models), ranges or any other brand of cooktops.
PLEASE READ ENTIRE INSTRUCTIONS BEFORE PROCEEDING. SAVE THE NATURAL GAS PARTS IN CASE CONVERSION FROM LP
BACK TO NATURAL GAS IS DESIRED. AN ADDITIONAL LP TO NATURAL
GAS CONVERSION KIT WILLALSO BE REQUIRED.
!WARNING
This conversion kit shall be installed by a qualified service agency in accordance with the manufacturer’s instructions and all applicable codes and requirements of the athority having jurisdiction. If the information in these instructions is not followed exactly, a fire, explosion or production of carbon monoxide may result causing property damage, personal injury or loss of life. The qualified service agency is responsible for the proper installation of this kit. The installation is not proper and complete until the operation of the converted appliance is checked as specified in the manufacturer’s instructions supplied with the kit.
IMPORTANT: Only a qualified service technician or installer should make this conversion.
INSTALLER: Please leave these Installation Instructions with this unit for the owner.
OWNER: Please retain these instructions for future reference.
1
CAUTION:
(1) When connecting the unit to the propane gas make certain the propane gas tank is equipped with its own high pressure regulator. In addition, a pressure regulator was supplied with the cooktop. This second regulator must be installed with the cooktop. The maximum gas pressure to this appliance is not to exceed 14.0 inches water column from the propane gas tank regulator.
The following must be met when testing supply piping system:
a)The appliance and its individual shut-off valve must be disconnected from the gas supply piping system at test pressures in excess of 1/2 psig (3.5 kPa).
b)The appliance must be isolated from the gas supply piping system by closing its individual manual shut-off valve during any pressure testing of the gas supply piping system at test pressures equal to or less than 1/2 psig (3.5 kPa).
Kit Contents:
Conversion Kit Instructions Conversion Sticker
Foam Tape
5 LP Orifices (1-74/ 2-89/ 2-97) 5 Venturis (10.5 mm)
ORIFICE and VENTURI PACKAGE
TOP
BOTTOM
Tools Required:
7 mm Socket Driver w/ 3” extension
20 mm Socket or Wrench Adjustable Wrench Flat-head Screwdriver (small)
Main Orifices 4 Burner:
#97 - Front Left - 10,500 Btu/h
#89 - Rear Left - 8,500 Btu/h
#74 - Front Right - 5,800 Btu/h
#97 - Rear Right - 10,500 Btu/h
Main Orifices 5 Burner:
#97 - Front Left - 10,500 Btu/h
#89 - Rear Left - 8,500 Btu/h
#74 - Right Center - 5,800 Btu/h
#97 - Rear Center - 10,500 Btu/h
#89 - Rear Right - 8,500 Btu/h
2

CAUTION:
TURN OFF GAS AND ELECTRICITY
Shut off the outside propane tank gas valve to the cooktop, and
Remove cooktop power cord from electrical outlet or turn breaker off at breaker box, and Turn all control knobs to the “OFF” position.
CONVERT PRESSURE REGULATOR FROM
5” W.C. TO 10” W.C.
Remove the hexagon cap from the top of the regulator with an adjustable wrench.
Pop out the plastic stem in the cap and turn it over pressing it firmly in place so that the letters “LP” can now be seen upright in the stem, rather than “NAT”.
Replace the cap and button assembly into the top of the regulator sealing it firmly. Make certain spring is still in place. DO NOT OVER TORQUE.
Install the FOIL CONVERSION STICKER next to the rating plate, located on the bottom corner of the rough-in box.
[Note: arrrow on back part of regulator needs to point in the direction of gas flow to the cooktop.]
REPLACE MAIN ORIFICES and VENTURIS
REMOVE GRATES, BURNER CAPS, VENTURI NUTS (with a 20 mm socket or an adjustable wrench). Maintop does not require removal.
REMOVE MAIN ORIFICES.
Note: The Bosch NGT Cooktop models contain 7mm orifices (4 in the 30” and 5 in the 36”). A method of retaining main orifices in the socket during extraction and insertion is to apply a piece of foam tape to the socket (see Fig.3). Insert the socket driver with 3” minimum extension into the jet holders to remove existing orifices, as shown in Fig 4.
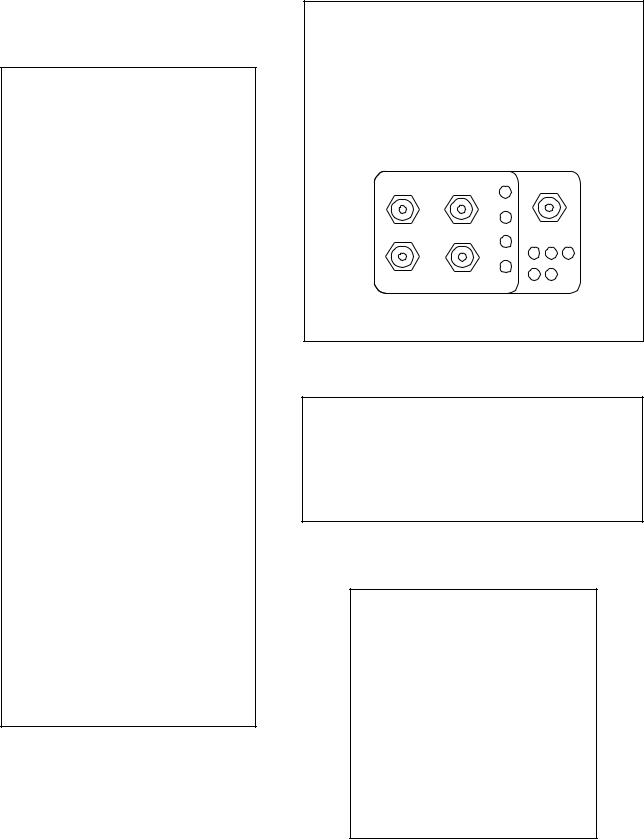
ASSEMBLE NEW ORIFICES in place on the cooktop exactly as layed out in the orifice package card as shown in Figures 5 and 6. Place the new orifices into the socket one at a time (the tape will keep them in place), then insert each orifice into its threaded hole in jet holders. USE LOW TORQUE.
REPLACE OLD VENTURI NUTS (9.0 mm) with NEW venturi nuts (10.5 MM) (with a 20 mm socket or an adjustable wrench). USE LOW TORQUE.
Figure 5 |
|
|
|
Bosch Cooktop Top View |
Figure 6 |
||
(drawing not to scale) |
ORIFICE PACKAGE |
||
|
|
|
|
BACK WALL |
TOP |
||
89 |
97 |
89 |
|
97 |
74 |
|
BOTTOM |
|
|
|
|
30” |
|
36” |
|
|
|
|
3 |
CONVERTING VALVES FOR PROPANE GAS
The bypass jet on each valve must be adjusted as follows: Place all knobs to “Off” position.
Remove KNOBS
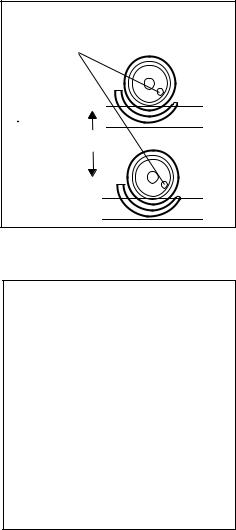
Locate hole with by-pass screw as shown in Fig. 8. Insert flat head screwdriver in hole and turn bypass screw clockwise until “bottomed out”.
USE LOW TORQUE. Replace knobs.
TEST TO ENSURE A SUCCESSFUL CONVERSION
Check for flame characteristics: flame should be blue with no yellow tip.
Figure 7
Models NGT 73 and NGT 93
By-Pass Jet Location |
OFF |
|
|
|
HI |
LO
manifold OFF
HI
LO
Figure 8
Models NGT 73 and NGT 93
4
 Loading...