

Page 1
EURO • Printed in Germany • BA 1 619 929 576 • GSH 4 • Titel (Vorderseite) • OSW 02.03
Bedienungsanleitung
Operating Instructions
Instructions d’emploi
Instrucciones de servicio
Manual de instruções
Istruzioni d’uso
Gebruiksaanwijzing
Betjeningsvejledning
Bruksanvisning
Brukerveiledningen
Käyttöohje
Oδηγία χειρισµού
Kullanım kılavuzu
Deutsch
English
Français
Español
Português
Italiano
Nederlands
Dansk
Svenska
Norsk
Suomi
Eλληνικά
Türkçe
GSH 4
GSH 4 (576) - Buch Seite 1 Montag, 4. März 2002 12:54 12
Page 2
EURO • Printed in Germany • BA 1 619 929 576 • GSH 4 • Titel Seite 2 • OSW 02.03
2 • 1 619 929 576 • 02.03
A
2
B
60°
50°
5°
30°
15°
15°
60°
90°
30°
15
53°
2,5 r
5,0 r
45°
4
60°
ca.60
ca.40
60°60°
20°
C
GSH 4 (576) - Buch Seite 2 Montag, 4. März 2002 12:54 12
Page 3
EURO • Printed in Germany • BA 1 619 929 576 • GSH 4 • Titel Seite 3 • OSW 02.03
3 • 1 619 929 576 • 02.03
1
2
5
3
4
GSH 4
GSH 4 (576) Umschlag S3 Seite 3 Montag, 18. März 2002 3:51 15
Page 4

EURO • Printed in Germany • BA 1 619 929 576 • GSH 4 • D • OSW 02.03
Deutsch - 1
Messwerte ermittelt entsprechend 2000/14/EG
(1,60 m Höhe, 1 m Abstand) und EN 50 144.
Der A-bewertete Geräuschpegel des Gerätes beträgt typischerweise: Schalldruckpegel 88 dB (A);
Schallleistungspegel 101 dB (A).
Gehörschutz tragen!
Die bewertete Beschleunigung beträgt typischerweise 14 m/s
2
.
Das Gerät ist bestimmt für Meißelarbeiten in Beton, Ziegel, Gestein und Asphalt sowie mit entsprechendem Zubehör auch zum Eintreiben und
Verdichten.
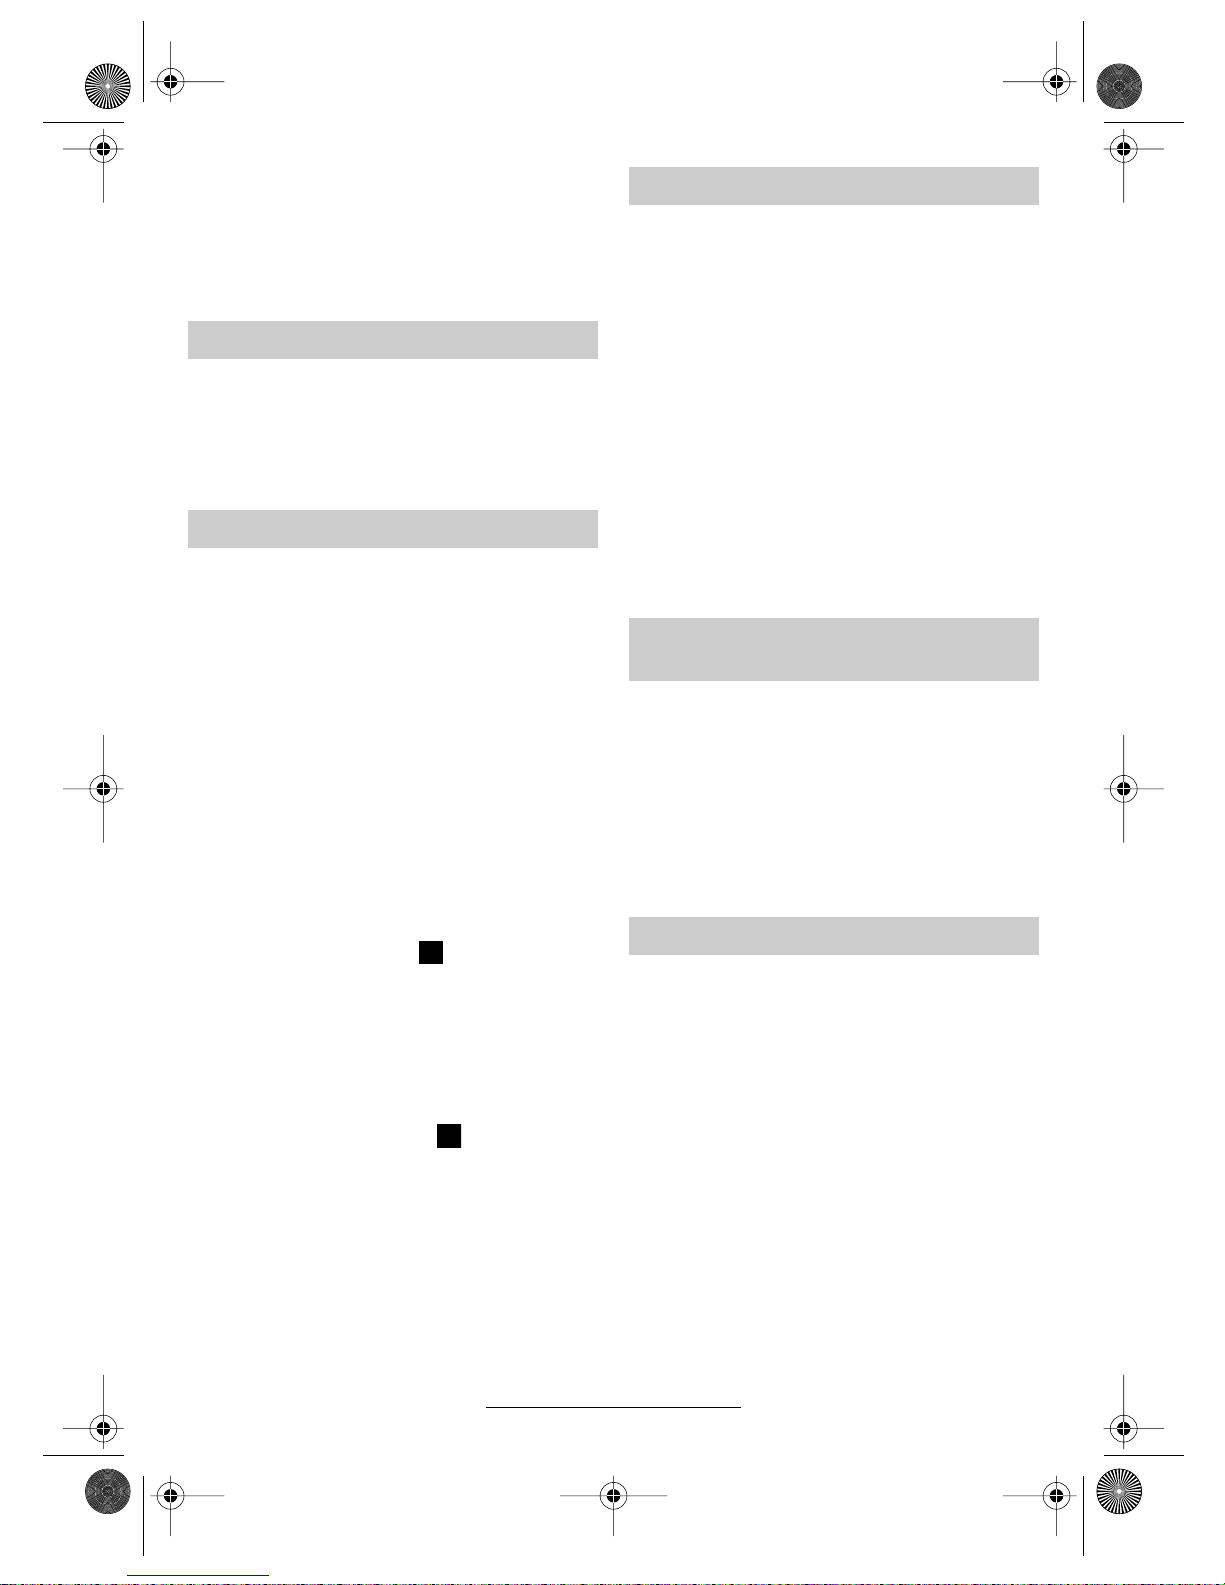
1 Staubschutzkappe
2 Verriegelungshülse
3 Meißelverstellring (Vario-lock)
4 Ein-/Ausschalter
5 Zusatzgriff
Abgebildetes oder beschriebenes Zubehör gehört
teilweise nicht zum Lieferumfang.
Gefahrloses Arbeiten mit dem
Gerät ist nur möglich, wenn Sie
die Bedienungsanleitung und
die Sicherheitshinweise vollständig lesen und die darin ent-
haltenen Anweisungen strikt befolgen. Zusätzlich müssen die allgemeinen
Sicherheitshinweise im beigefügten Heft befolgt werden. Lassen Sie sich vor dem ersten
Gebrauch praktisch einweisen.
■ Gehörschutz tragen.
■ Schutzbrille und festes Schuhwerk tragen.
■ Wird bei der Arbeit das Netzkabel beschädigt
oder durchtrennt, Kabel nicht berühren, sondern sofort den Netzstecker ziehen. Gerät niemals mit beschädigtem Kabel benutzen.
■ Geräte, die im Freien verwendet werden, über
einen Fehlerstrom-Schutzschalter (FI-) mit
maximal 30 mA Auslösestrom anschließen.
Nur ein für den Außenbereich zugelassenes
Verlängerungskabel verwenden.
■ Verwenden Sie geeignete Suchgeräte, um
verborgene Versorgungsleitungen aufzuspüren, oder ziehen Sie die örtliche Versorgungsgesellschaft hinzu.
Kontakt mit Elektroleitungen kann zu Feuer
und elektrischem Schlag führen.
Beschädigung einer Gasleitung kann zur Explosion führen. Eindringen in eine Wasserleitung verursacht Sachbeschädigung oder kann
einen elektrischen Schlag verursachen.
■ Das Elektrowerkzeug nur an isolierten
Handgriffen anfassen, wenn das Einsatzwerkzeug eine verborgene Leitung oder
das eigene Netzkabel treffen kann.
Kontakt mit einer spannungsführenden Leitung kann Metallteile des Gerätes unter Spannung setzen und zu einem elektrischen Schlag
führen.
■ Kabel immer nach hinten vom Gerät wegfüh-
ren.
■ Stecker nur bei ausgeschaltetem Gerät in die
Steckdose einstecken.
■ Gerät nur mit Zusatzgriff 5 verwenden.
■ Beim Arbeiten das Gerät immer fest mit beiden
Händen halten und für einen sicheren Stand
sorgen.
■ Das Gerät vor dem Ablegen immer ausschal-
ten und warten bis das Gerät zum Stillstand
gekommen ist.
Gerätekennwerte
Schlaghammer GSH 4
Bestellnummer 0 611 312 1..
Nennaufnahme [W] 850
Schlagzahl [/min] 2 440
Einzelschlagstärke [J] 7
Meißelstellungen 12
Meißelleistung in
Beton mittlerer Härte
[cm3/
min]
450
Werkzeugaufnahme SDS-max
Schmierung Zentrale Dauer-
schmierung
Gewicht
(ohne Zubehör) ca.
[kg] 4,8
Schutzklasse / II
Bitte die Bestellnummer Ihrer Maschine beachten. Die
Handelsbezeichnungen einzelner Maschinen können
variieren.
Geräusch-/Vibrationsinformation
Bestimmungsgemäßer Gebrauch
Geräteelemente
Zu Ihrer Sicherheit
GSH 4 (576) - Buch Seite 1 Montag, 4. März 2002 12:54 12
4 • 1 619 929 576 • TMS • 28.02.02
Page 5
EURO • Printed in Germany • BA 1 619 929 576 • GSH 4 • D • OSW 02.03
Deutsch - 2
■ Niemals Kindern die Benutzung des Gerätes
gestatten.
■ Bosch kann nur dann eine einwandfreie Funktion des Gerätes zusichern, wenn das für dieses Gerät vorgesehene Original-Zubehör verwendet wird.
■ Gerät nur mit Zusatzgriff 5 verwenden.
Das Griffstück durch Linksdrehen lösen. Den Zusatzgriff 5 schwenken und der Arbeitsstellung
anpassen.
Das Griffstück danach wieder fest anziehen.
■ Vor allen Arbeiten am Gerät Netzstecker
ziehen.
Mit der Werkzeugaufnahme SDS-max ist ein einfacher, bequemer Werkzeugwechsel möglich,
ohne Hilfe zusätzlicher Werkzeuge.
☞
Das Einsteckende der Werkzeuge ist regelmäßig zu fetten.
Die Staubschutzkappe 1 verhindert weitgehend
das Eindringen von Bohrstaub während des Betriebes. Beim Einsetzen des Werkzeuges darauf
achten, dass die Staubschutzkappe 1 nicht
beschädigt wird.
Eine beschädigte Staubschutzkappe ist sofort auszutauschen. Es wird empfohlen, dies
von einem Kundendienst vornehmen zu lassen.
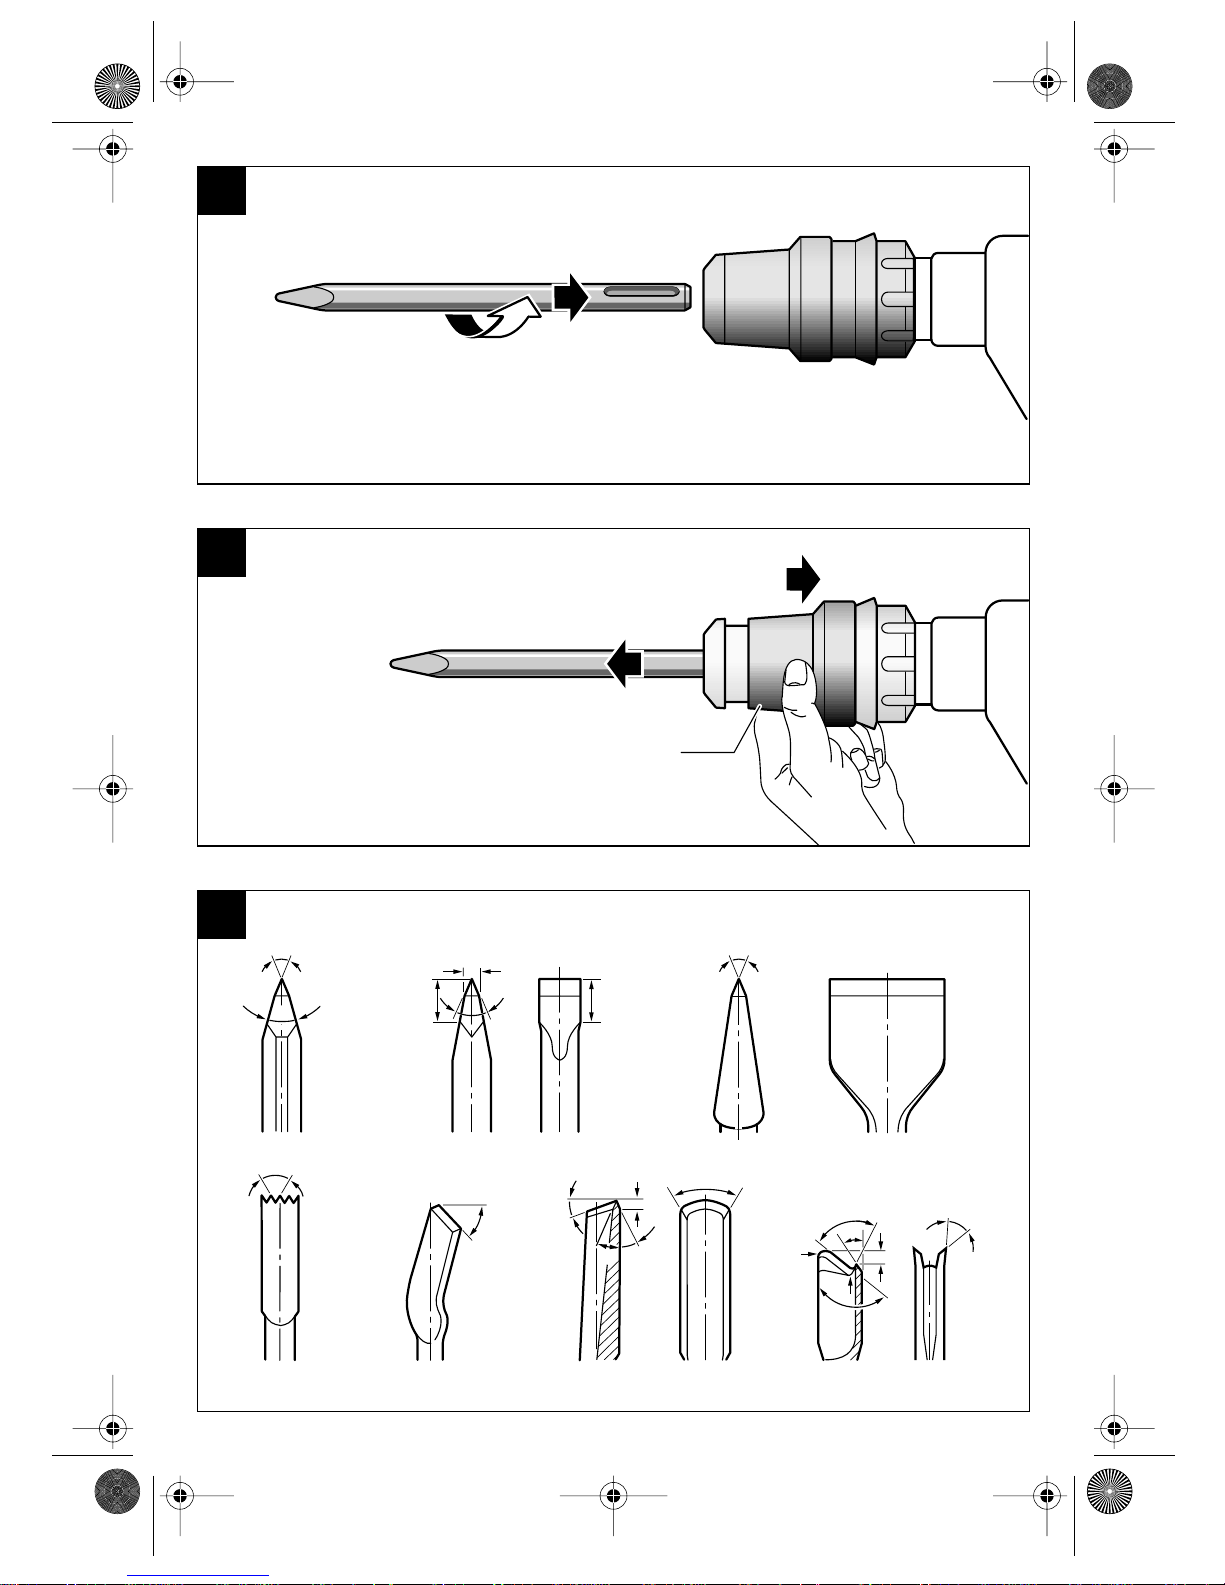
Einsetzen (siehe Bild )
Das Einsteckende des Werkzeuges reinigen
und fetten.
Das Werkzeug drehend in die Werkzeugaufnahme einführen bis es selbsttätig verriegelt
wird. Die Verriegelung durch Ziehen am Werkzeug prüfen.
Entnehmen (siehe Bild )
Die Verriegelungshülse 2 der Werkzeugauf-
nahme nach hinten schieben und das Werkzeug
entnehmen. Die Verriegelungshülse 2 wieder
loslassen.
Netzspannung beachten: Die Spannung der
Stromquelle muss mit den Angaben auf dem
Typschild des Gerätes übereinstimmen. Mit
230 V gekennzeichnete Geräte können auch an
220 V betrieben werden.
Ein-/Ausschalten
Zur Inbetriebnahme des Gerätes den Ein-/Ausschalter 4 nach rechts schieben.
Zum Ausschalten des Gerätes den Ein-/Ausschalter 4 nach links schieben.
☞
Bei niedrigen Temperaturen erreicht das
Gerät erst nach einer gewissen Zeit die
volle Schlagleistung.
Diese Anlaufzeit kann verkürzt werden, indem der Meißel einmal auf den Boden gestoßen wird.
Der Meißel lässt sich in 12 Stellungen arretieren.
Dadurch kann die jeweils optimale Arbeitsstellung eingenommen werden.
Dazu den Meißelverstellring 3 nach vorne schieben und festhalten, dann mit dem Meißelverstellring 3 den Meißel drehen, bis die gewünschte
Position erreicht ist.
Den Meißelverstellring 3 loslassen und den Meißel drehen bis er einrastet.
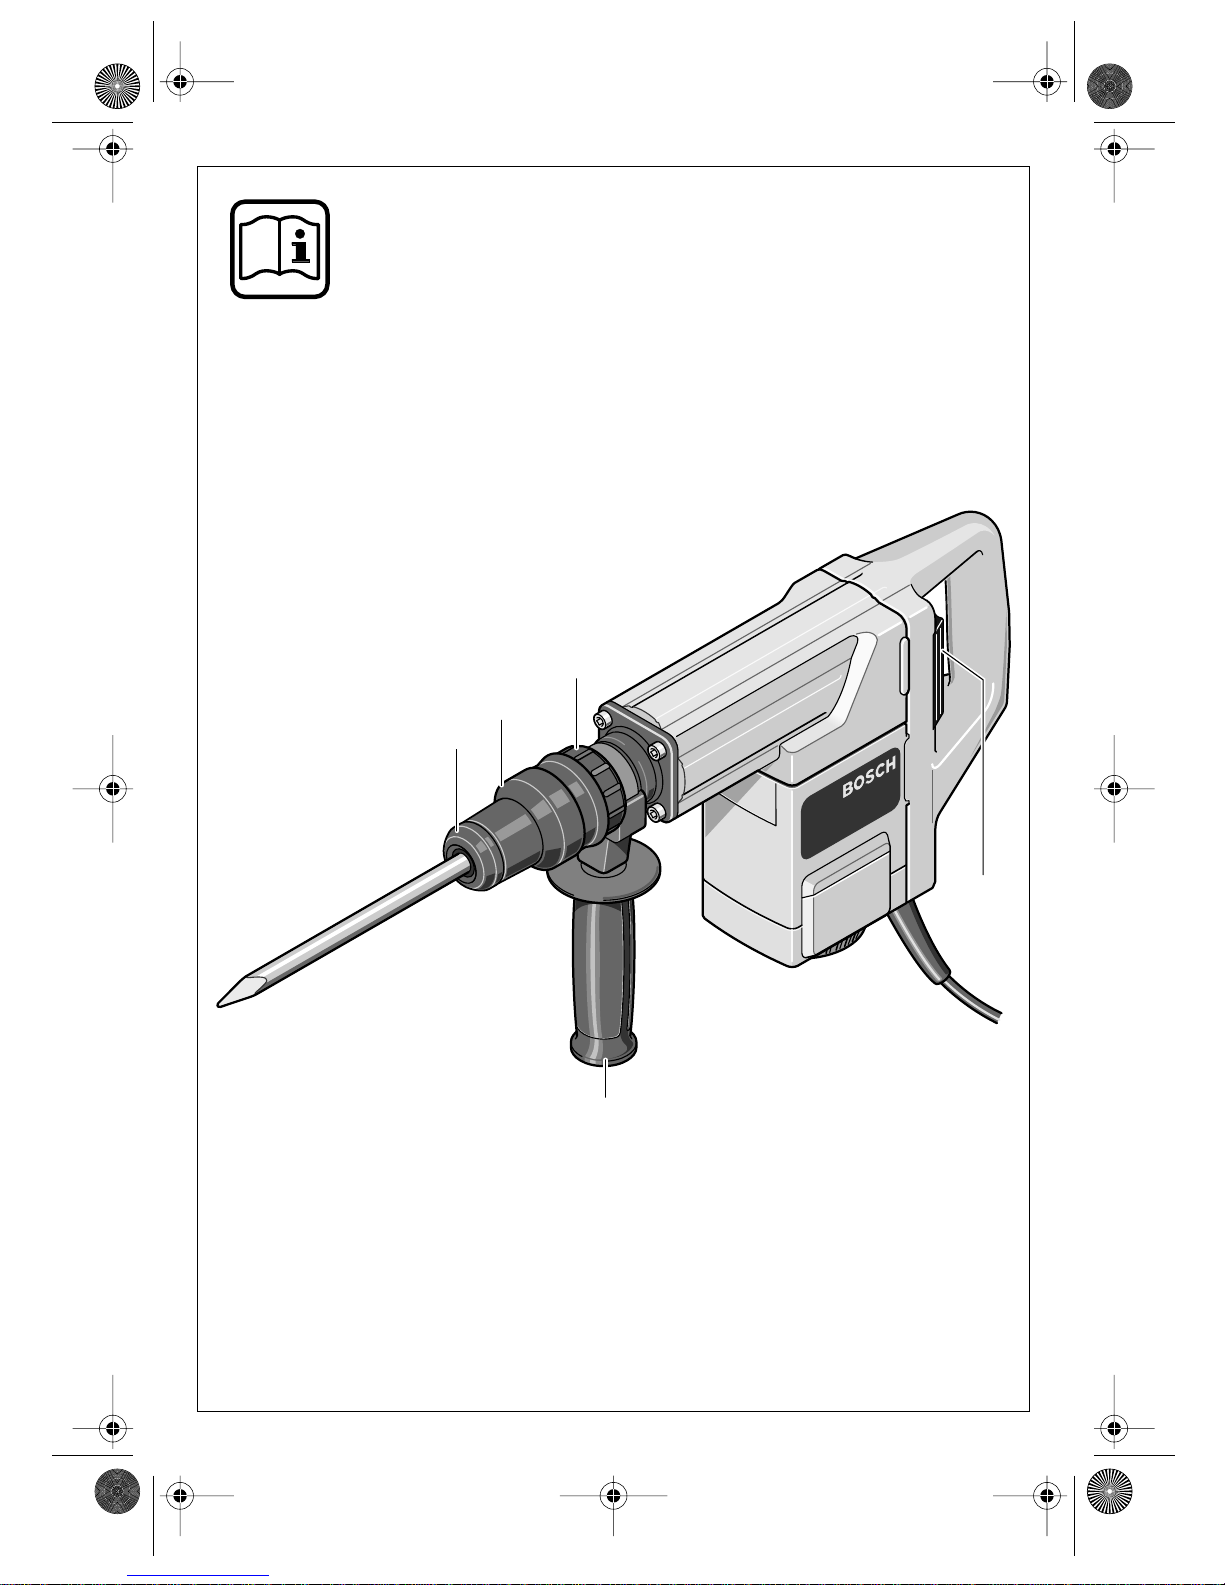
Nur mit scharfen Meißelwerkzeugen erzielt man
gute Ergebnisse, deshalb die Meißelwerkzeuge
rechtzeitig schärfen. Das gewährleistet hohe
Standzeiten der Werkzeuge und gute Arbeitsleistungen.
Nachschleifen
Die Meißelwerkzeuge an Schleifscheiben (zum
Beispiel Edelkorund) unter gleichbleibender
Wasserzufuhr schleifen. Richtwerte hierfür enthält Bild C. Darauf achten, dass sich an den
Schneiden keine Anlassfarben zeigen, das beeinträchtigt die Härte der Meißelwerkzeuge.
Zusatzgriff
Werkzeugwechsel
A
B
Inbetriebnahme
Meißelstellung verändern
(Vario-lock)
Schärfen der Meißelwerkzeuge
GSH 4 (576) - Buch Seite 2 Montag, 4. März 2002 12:54 12
5 • 1 619 929 576 • TMS • 28.02.02
Page 6

EURO • Printed in Germany • BA 1 619 929 576 • GSH 4 • D • OSW 02.03
Deutsch - 3
Schmieden und Härten
Schmieden: Meißel auf 850 bis 1050 °C (hellrot
bis gelb) erhitzen und schmieden.
Härten: Meißel auf 900 °C (hellrot) erhit-
zen und in Öl abschrecken, danach im Ofen ca. eine Stunde bei
320 °C (Anlassfarbe hellblau) anlassen.
■ Vor allen Arbeiten am Gerät Netzstecker
ziehen.
☞
Gerät und Lüftungsschlitze stets sauber
halten, um gut und sicher zu arbeiten.
■ Werkzeugaufnahme immer sauber halten.
Staubschutzkappe wechseln
Eine beschädigte Staubschutzkappe ist sofort
auszutauschen. Es wird empfohlen, dies von einem Kundendienst vornehmen zu lassen.
Sollte das Gerät trotz sorgfältiger Herstellungsund Prüfverfahren einmal ausfallen, ist die Reparatur von einer autorisierten Kundendienststelle
für Bosch-Elektrowerkzeuge ausführen zu lassen.
Bei allen Rückfragen und Ersatzteilbestellungen
bitte unbedingt die 10-stellige Bestellnummer laut
Typenschild des Gerätes angeben.
Rohstoffrückgewinnung statt
Müllentsorgung
Gerät, Zubehör und Verpackung
sollten einer umweltgerechten Wiederverwertung zugeführt werden.
Diese Anleitung ist aus chlorfrei gefertigtem Recycling-Papier hergestellt.
Zum sortenreinen Recycling sind Kunststoffteile
gekennzeichnet.
In Deutschland sind nicht mehr gebrauchsfähige
Geräte zum Recycling beim Handel abzugeben
oder (ausreichend frankiert) direkt einzuschicken
an:
Recyclingzentrum Elektrowerkzeuge
Osteroder Landstraße 3
37589 Kalefeld
www.powertool-portal.de, das Internetportal
für Handwerker und Heimwerker
www.ewbc.de, der Informations-Pool für Handwerk und Ausbildung
Deutschland
Robert Bosch GmbH
Servicezentrum Elektrowerkzeuge
Zur Luhne 2
D-37589 Kalefeld
✆ Service:....................................... 01 80 - 3 35 54 99
Fax
............................................. +49 (0) 55 53 / 20 22 37
✆ Kundenberater: ...................... 01 80 - 3 33 57 99
Österreich
ABE Service GmbH
Jochen-Rindt-Straße 1
A-1232 Wien
✆ Service:..................................... +43 (0)1 / 61 03 80
Fax
................................................. +43 (0)1 / 61 03 84 91
✆ Kundenberater:............ +43 (0)1 / 797 22 3066
E-Mail: abe@abe-service.co.at
Schweiz
Robert Bosch AG
Kundendienst Elektrowerkzeuge
Industriestrasse 31
CH-8112 Otelfingen
✆ Service:................................. +41 (0)1 / 8 47 16 16
✆ Kundenberater:...... Grüne Nr. 0 800 55 11 55
Wir erklären in alleiniger Verantwortung, dass
dieses Produkt mit den folgenden Normen oder
normativen Dokumenten übereinstimmt:
EN 50 144 gemäß den Bestimmungen der Richtlinien 89/336/EWG, 98/37/EG, 2000/14/EG.
2000/14/EG: Der garantierte Schallleistungspegel L
WA
ist niedriger als 107 dB (A). Bewertungs-
verfahren der Konformität gemäß Anhang VI.
Benannte Prüfstelle:
TÜV Hannover/Sachsen-Anhalt e.V.,
D-30519 Hannover CE-DE10-139 670
Leinfelden, 01.03.2002.
Dr. Gerhard Felten Dr. Eckerhard Strötgen
Robert Bosch GmbH, Geschäftsbereich Elektrowerkzeuge
Änderungen vorbehalten
Wartung und Reinigung
Umweltschutz
Service und Kundenberater
Konformitätserklärung
GSH 4 (576) - Buch Seite 3 Montag, 4. März 2002 12:54 12
6 • 1 619 929 576 • TMS • 28.02.02
Page 7
EURO • Printed in Germany • BA 1 619 929 576 • GSH 4 • GB • OSW 02.03
English - 1
Measured values determined according to
2000/14/EC (1.60 m height, 1 m distance away)
and EN 50 144.
Typically the A-weighted noise levels of the product are: sound pressure level: 88 dB (A); sound
power level: 101 dB (A).
Wear hearing protection!
The typical weighted acceleration is 14 m/s
2
.
The machine is intended for chiselling work in
concrete, brick, stone and asphalt as well as for
driving and compacting with appropriate accessories.
1 Dust protection cap
2 Locking sleeve
3 Chisel adjusting ring (Vario-lock)
4 On/Off switch
5 Auxiliary handle
Not all of the accessories illustrated or described are
included as standard delivery.
Working safely with this machine is possible only when the
operating and safety information
are read completely and the instructions contained therein are
strictly followed. In addition, the
general safety notes in the enclosed booklet
must be observed. Before using for the first
time, ask for a practical demonstration.
■ Wear hearing protection.
■ Wear safety glasses and sturdy shoes.
■ If the mains cable is damaged or cut through
while working, do not touch the cable but immediately pull the mains plug. Never use the
machine with a damaged cable.
■ Connect machines that are used in the open
via a residual current device (RCD) with an actuating current of 30 mA maximum. Use only
extension cables that are approved for outdoor
use.
■ Use appropriate detectors to determine if
utility lines are hidden in the work area or
call the local utility company for assistance.
Contact with electric lines can lead to fire and
electric shock. Damaging a gas line can lead
to explosion. Penetrating a water line causes
property damage or may cause an electric
shock.
■ Hold the power tool only by the insulated
gripping surfaces, when performing an operation where the cutting tool may run into
hidden wiring or its own cord.
Contact with a “live” wire will make exposed
metal parts of the tool “live” and shock the operator.
■ Always direct the cable to the rear away from
the machine.
■ Insert the mains plug only when the machine is
switched off.
■ Use the machine only with the auxiliary han-
dle 5.
■ When working with the machine, always hold it
firmly with both hands and provide for a secure
stance.
■ Always switch the machine off and wait until it
has come to a standstill before placing it down.
■ Never allow children to use the machine.
■ Bosch is only able to ensure perfect operation
of the machine if the original accessories intended for it are used.
Tool Specifications
Demolition Hammer GSH 4
Order number 0 611 312 1..
Rated power [W] 850
Impact rate [bpm] 2 440
Impact energy
per stroke
[J] 7
Chisel positions 12
Chiselling perform-
ance in concrete of
medium hardness
[cm3/
min]
450
Tool holder SDS-max
Lubrication Permanent
central lubrication
Weight (without
accessories) approx.
[kg] 4.8
Protection class / II
Please observe the order number of your machine.
The trade names of the individual machines may vary.
Noise/Vibration Information
Intended Use
Machine Elements
For Your Safety
GSH 4 (576) - Buch Seite 1 Montag, 4. März 2002 12:54 12
7 • 1 619 929 576 • TMS • 28.02.02
Page 8
EURO • Printed in Germany • BA 1 619 929 576 • GSH 4 • GB • OSW 02.03
English - 2
■ Use the machine only with the auxiliary
handle 5.
Loosen the handle by turning to the left. Rotate
the auxiliary handle 5 and adapt to the working
position.
Firmly retighten the handle.
■ Before any work on the machine itself, pull
the mains plug.
With the SDS-max tool holder, simpler and easier
tool changing is possible without additional aids.
☞
Grease the shank end of the tool regularly.
The dust protection cap 1 largely prevents the
entry of drilling dust during operation. When inserting the tool, take care that the dust protection
cap 1 is not damaged.
A damaged dust protection cap should be
changed immediately. We recommend having
this carried out by an after-sales service.
Inserting (see figure )
Clean and grease the shank end of the tool.
Insert the tool in a twisting manner into the tool
holder until it locks. Check if it has locked by pulling the tool.
Removing (see figure )
Push back the locking sleeve 2 of the tool holder
and remove the tool. Let go of the locking
sleeve 2 again.
Observe correct mains voltage: The voltage of
the power source must agree with the voltage
specified on the nameplate of the machine.
Equipment marked with 230 V can also be connected to 220 V.
Switching On and Off
For starting operation of the machine, push the
On/Off switch 4 to the right.
For starting operation of the machine, push the
On/Off switch 4 to the left.
☞
At low temperatures, the machine reaches
full impact rate only after a certain time.
This start-up time can be shortened by
striking the chisel against the floor once.
The chisel can be locked in 12 positions. In this
manner, the optimum working position can be set
for each application.
Slide the chisel adjusting ring 3 forward and hold
firmly. Then turn the chisel with the chisel adjusting ring 3 until the desired position is reached.
Release the chisel adjusting ring 3 and turn the
chisel until it locks into place.
Good results are only achieved with sharp chisels, therefore sharpen the chiselling tools regulary. This prolongs the service life of the tools and
ensures good working performance.
Re-sharpening the chiselling tools
Sharpen chiselling tools using grinding wheels
(e. g. ceramic bonded corundum wheel) with a
steady supply of water. Recommended values
are shown in Fig. C. Take care that no annealing
coloration appears on the cutting edges, otherwise the hardness of the chiselling tools will be
impaired.
Forging and hardening
Forging: Heat the chisel to between 850 and
1050 °C (bright red to yellow) and
forge.
Hardening: Heat the chisel to 900 °C (bright red)
and quench in oil, then anneal in an
oven for approx. one hour at 320 °C
(annealing colour = light blue).
■ Before any work on the machine itself, pull
the mains plug.
☞
For safe and proper working, always keep
the machine and the ventilation slots clean.
■ Keep the tool holder clean at all times.
Changing the Dust Protection Cap
A damaged dust protection cap should be
changed immediately. We recommend having
this carried out by an after-sales service.
If the machine should fail despite the care taken
in manufacturing and testing procedures, repair
should be carried out by an after-sales service
centre for Bosch power tools.
Auxiliary Handle
Changing the Tool
Initial Operation
A
B
Changing the chiselling position
(Vario-lock)
Sharpening Chisels
Maintenance and Cleaning
GSH 4 (576) - Buch Seite 2 Montag, 4. März 2002 12:54 12
8 • 1 619 929 576 • TMS • 28.02.02
Page 9
EURO • Printed in Germany • BA 1 619 929 576 • GSH 4 • GB • OSW 02.03
English - 3
In all correspondence and spare parts orders,
please always include the 10-digit order number
given on the nameplate of the machine.
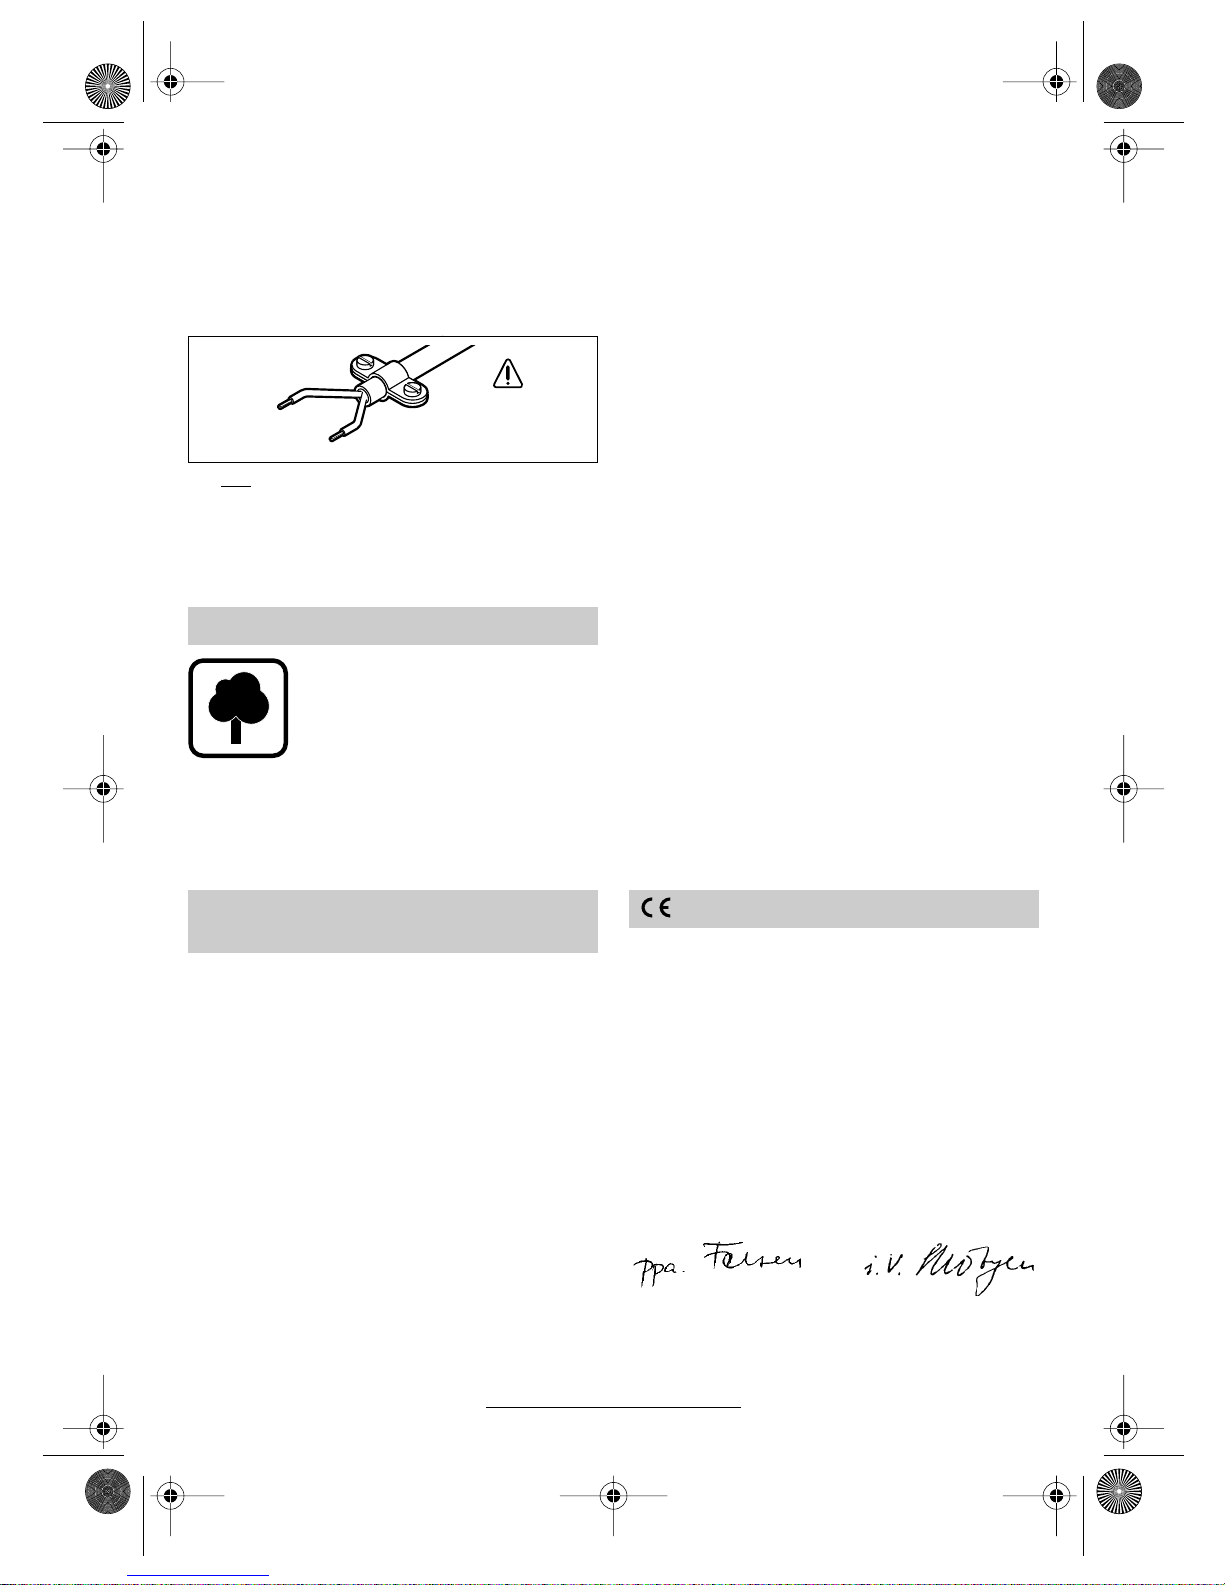
WARNING! Important instructions for connecting a new 3-pin plug to the 2-wire cable.
The wires in the cable are coloured according to
the following code:
Do not
connect the blue or brown wire to the
earth terminal of the plug.
Important: If for any reason the moulded plug is
removed from the cable of this machine it must be
disposed of safely.
Recycle raw materials instead of
disposing as waste.
The machine, accessories and
packaging should be sorted for environmental-friendly recycling.
These instructions are printed on recycled paper
manufactured without chlorine.
The plastic components are labelled for categorized recycling.
Great Britain
Robert Bosch Ltd. (B.S.C.)
P.O. Box 98
Broadwater Park
North Orbital Road
Denham-Uxbridge
GB-Middlesex UB 9 5HJ
✆ Service............................ +44 (0)18 95 / 83 87 82
✆ Advice line.................... +44 (0) 18 95 / 83 87 91
Fax
............................................. +44 (0)18 95 / 83 87 89
Ireland
Beaver Distribution Ltd.
Greenhills Road
IRL-Tallaght-Dublin 24
✆ Service................................... +353 (0)1 / 414 9400
Fax
.................................................... +353 (0)1 / 459 8030
Australia
Robert Bosch Australia L.t.d.
RBAU/SPT2
1555 Centre Road
P.O. Box 66 Clayton
AUS-3168 Clayton/Victoria
✆ ............................................... +61 (0)1 / 800 804 777
Fax
............................................... +61 (0)1 / 800 819 520
www.bosch.com.au
E-Mail: CustomerSupportSPT@au.bosch.com
New Zealand
Robert Bosch Limited
14-16 Constellation Drive
Mairangi Bay
Auckland
New Zealand
✆ ..................................................... +64 (0)9 / 47 86 158
Fax
..................................................... +64 (0)9 / 47 82 914
We declare under our sole responsibility that this
product is in conformity with the following standards or standardization documents: EN 50 144
according to the provisions of the directives
89/336/EEC, 98/37/EC, 2000/14/EC.
2000/14/EC: The guaranteed sound power level
L
WA
is lower than 107 dB (A). Conformity as-
sessment procedure according to Annex VI.
Notified body:
TÜV Hannover/Sachsen-Anhalt e.V.,
D-30519 Hannover CE-DE10-139 670
Leinfelden, 01.03.2002.
Dr. Gerhard Felten Dr. Eckerhard Strötgen
Robert Bosch GmbH, Geschäftsbereich Elektrowerkzeuge
Subject to change without notice
Environmental Protection
Service and
Customer Assistance
strain relief
live = brown
neutral = blue
To be fitted
by qualified
professional only
Declaration of Conformity
GSH 4 (576) - Buch Seite 3 Montag, 4. März 2002 12:54 12
9 • 1 619 929 576 • TMS • 28.02.02
Page 10
EURO • Printed in Germany • BA 1 619 929 576 • GSH 4 • F • OSW 02.03
Français - 1
Valeurs de mesures obtenues conformément à la
2000/14/CE (mesure effectuée à une hauteur de
1,60 m et à 1 m de distance) et EN 50 144.
Les mesures réelles (A) des niveaux sonores de
la machine sont : intensité de bruit 88 dB (A). Niveau de bruit 101 dB (A).
Munissez-vous d’une protection acoustique !
L’accélération réelle mesurée est de 14 m/s
2
.
L’appareil est conçu pour des travaux de burinage dans le béton, la brique, la pierre naturelle
et l’asphalte ainsi que, lorsqu’il est muni d’accessoires adéquats, pour des travaux d’enfoncement et de compactage.
1 Capuchon anti-poussière
2 Douille de verrouillage
3 Bague d’ajustage du burin (Vario-lock)
4 Interrupteur Marche/Arrêt
5 Poignée supplémentaire
Les accessoires reproduits ou décrits ne sont pas
forcément fournis avec la machine.
Pour travailler sans risque avec
cet appareil, lire intégralement
au préalable les instructions
d’utilisation et les remarques
concernant la sécurité. Respec-
ter scrupuleusement les indications et les consignes qui y sont données.
Respecter en plus les indications générales
de sécurité se trouvant dans le cahier ci-joint.
Avant la première mise en service, laisser
quelqu’un connaissant bien cet appareil vous
indiquer la façon de s’en servir.
■ Porter une protection acoustique.
■ Porter des lunettes de protection et une paire
de chaussures solides.
■ Si le câble d’alimentation électrique est en-
dommagé ou se rompt pendant le travail, ne
pas y toucher. Retirer immédiatement la fiche
du câble d’alimentation de la prise de courant.
Ne jamais utiliser un appareil dont le cordon
d’alimentation est endommagé.
■ Monter un disjoncteur différentiel (courant de
déclenchement : 30 mA max.) en amont des
appareils utilisés en plein air. N’utiliser qu’un
câble de rallonge électrique autorisé pour les
travaux à l’extérieur.
■ Utiliser des détecteurs appropriés afin de
déceler des conduites cachées ou consulter les entreprises d’approvisionnement locales.
Un contact avec des conduites d’électricité
peut provoquer un incendie ou un choc électrique. Un endommagement d’une conduite de
gaz peut provoquer une explosion. La perforation d’une conduite d’eau provoque des dégâts
matériels et peut provoquer un choc électrique.
■ Ne tenir l’outil électrique que par les poi-
gnées isolées lorsqu’il y a risque que l’outil
électrique puisse toucher une conduite cachée ou son propre câble d’alimentation.
Le contact avec une conduite sous tension
peut mettre les parties métalliques de l’appareil sous tension et provoquer ainsi un choc
électrique.
■ Toujours ramener les câbles à l’arrière de l’ap-
pareil.
■ Ne brancher l’appareil que si celui-ci est en po-
sition « Arrêt ».
■ N’utiliser l’appareil qu’avec la poignée supplé-
mentaire 5.
Caractéristiques techniques
Marteau piqueur GSH 4
Référence 0 611 312 1..
Puissance absorbée [W] 850
Fréquence de frappe [tr/min] 2 440
Travail par coup [J] 7
Positions du burin 12
Puissance du burin
dans béton de dureté
moyenne
[cm3/
min]
450
Fixation de l’outil SDS-max
Graissage Graissage
central
permanent
Poids (sans
accessoires) env.
[kg] 4,8
Classe de protection / II
Faire attention au numéro de référence de la machine. Les
désignations commerciales des différentes machines peuvent varier.
Bruits et vibrations
Utilisation conformément à la
destination de l’appareil
Eléments de la machine
Pour votre sécurité
GSH 4 (576) - Buch Seite 1 Montag, 4. März 2002 12:54 12
10 • 1 619 929 576 • TMS • 28.02.02
Page 11
EURO • Printed in Germany • BA 1 619 929 576 • GSH 4 • F • OSW 02.03
Français - 2
■ Pendant le travail avec cet appareil, le tenir
toujours fermement avec les deux mains.
Adopter une position stable et sûre.
■ Avant de déposer l’appareil, toujours le mettre
hors fonctionnement et attendre l’arrêt total de
l’appareil.
■ Ne jamais permettre aux enfants d’utiliser cet
appareil.
■ Bosch ne peut garantir un fonctionnement impeccable que si les accessoires Bosch d’origine prévus pour cet appareil sont utilisés.
■ N’utiliser l’appareil qu’avec la poignée supplémentaire 5.
Imprimer au manche de la poignée une rotation
vers la gauche. Faire pivoter la poignée supplémentaire 5 et la régler en fonction de la position
de travail.
Bien resserrer le manche de la poignée supplémentaire.
■ Avant toute intervention sur l’appareil proprement dit, toujours retirer la fiche du câble d’alimentation de la prise de courant.
Grâce au système de fixation SDS-max, le changement de l’outil est facile et rapide et ne nécessite pas d’outils supplémentaires.
☞
Graisser la queue des outils à intervalles réguliers.
Le capuchon anti-poussière 1 empêche dans
une large mesure une pénétration de poussières
durant le travail. Lors du montage de l’outil, veiller
à ce que le capuchon anti-poussière 1 ne soit pas
endommagé.
Remplacer immédiatement un capuchon antipoussière endommagé. Il est recommandé de
faire effectuer ce travail par un service aprèsvente.
Montage (voir figure )
Nettoyer et graisser la queue de l’outil.
Par un mouvement de rotation, introduire l’outil
dans le porte-outil jusqu’à ce qu’il soit verrouillé
automatiquement. Contrôler s’il est bien verrouillé en tirant sur l’outil.
Démontage de l’outil (voir figure )
Pousser en arrière la douille de verrouillage 2 du
porte-outil et retirer l’outil. Relâcher la douille de
verrouillage 2.
Tenir compte de la tension du secteur : La tension de la source de courant doit correspondre
aux indications figurant sur la plaque signalétique
de l’appareil. Les appareils fonctionnant sous
230 V peuvent également être exploités sous
220 V.
Mise en fonctionnement/Arrêt
Afin de mettre l’appareil en fonctionnement,
pousser l’interrupteur Marche/Arrêt 4 vers la
droite.
Afin d’arrêter l’appareil, pousser l’interrupteur
Marche/Arrêt 4 vers la gauche.
☞
Si la température de l’air est très basse,
l’appareil n’atteint sa pleine capacité de
frappe qu’au bout d’un certain temps.
Cette phase de mise en température peut
être écourtée en frappant le burin une fois
contre le sol.
Il est possible de bloquer le burin dans
12 positions différentes, ce qui permet de trouver
la position optimale à chaque opération de travail.
Pousser vers l’avant la bague d’ajustage du burin 3 et la maintenir dans cette position, puis la
faire tourner pour ajuster le burin 3 dans la position de travail souhaitée.
Relâcher la bague d’ajustage du burin 3 et faire
tourner le burin jusqu’au déclic.
Seuls des outils de burinage bien tranchants permettent d’obtenir de bons résultats de travail ;
c’est pourquoi il convient de les affûter avant
qu’ils ne soient émoussés. Leur durée de vie s’en
trouve rallongée et la qualité du travail améliorée.
Affûtage
Affûter les outils de burinage au moyen de meules (par exemple corindon raffiné) sous arrosage
permanent. Vous trouverez des valeurs
recommandées sur la figure C. Veiller à ce que
des couleurs de revenu n’apparaissent pas sur le
tranchant ; la dureté de l’outil de burinage s’en
trouverait affectée.
Poignée supplémentaire
Changement de l’outil
A
B
Mise en service
Modification de la position du
burin (Vario-lock)
Affûtage des outils de burinage
GSH 4 (576) - Buch Seite 2 Montag, 4. März 2002 12:54 12
11 • 1 619 929 576 • TMS • 28.02.02
Page 12
EURO • Printed in Germany • BA 1 619 929 576 • GSH 4 • F • OSW 02.03
Français - 3
Façonnage et trempe
Façonnage : Chauffer le burin à une tempéra-
ture comprise entre 850 et
1050 °C (rouge vif à jaune) et le
façonner.
Trempe : Chauffer le burin à 900 °C (rouge
vif), le tremper dans l’huile puis le
faire revenir pendant 1 heure env.
à 320 °C dans le four (couleur de
revenu = bleu clair).
■ Avant toute intervention sur l’appareil proprement dit, toujours retirer la fiche du câble d’alimentation de la prise de courant.
☞
Pour obtenir un travail sûr et satisfaisant,
nettoyer régulièrement l’appareil ainsi que
ses ouïes de refroidissement.
■ Tenir le porte-outil toujours propre.
Changement du capuchon
anti-poussière
Remplacer immédiatement un capuchon antipoussière endommagé. Il est recommandé de
faire effectuer ce travail par un service aprèsvente.
Si, malgré tous les soins apportés à la fabrication
et au contrôle de l’appareil, celui-ci devait avoir
un défaut, la réparation ne doit être confiée qu’à
une station de service après-vente agréée pour
outillage Bosch.
Pour toute demande de renseignements ou commande de pièces de rechange, nous préciser impérativement le numéro de référence à dix chiffres de la machine.
Récupération des matières premières plutôt qu’élimination des
déchets
Les machines, comme d’ailleurs
leurs accessoires et emballages,
doivent pouvoir suivre chacune une
voie de recyclage appropriée.
Ce manuel d’instructions a été fabriqué à partir
d’un papier recyclé blanchi en l’absence de
chlore.
Nos pièces plastiques ont ainsi été marquées en
vue d’un recyclage sélectif des différents matériaux.
France
Information par Minitel 11
Nom : Bosch Outillage
Loc : Saint Ouen
Dépt : 93
Robert Bosch France S.A.
Service Après-vente/Outillage
B.P. 67-50, Rue Ardoin
F-93402 St. Ouen Cedex
✆ Service conseil client,
Numéro Vert
.................................... 0 800 05 50 51
Belgique
Robert Bosch S.A.
After Sales Service Outillage
Rue Henri Genesse 1
BE-1070 Bruxelles
✆ ..................................................... +32 (0)2 / 525.50.29
Fax
..................................................... +32 (0)2 / 525.54.30
✆ Service conseil client..... +32 (0)2 / 525.53.07
E-Mail : Outillage.Gereedschappen@be.bosch.com
Suisse
Robert Bosch AG
Service après-vente/Outillage
Industriestrasse 31
CH-8112 Otelfingen
✆ .................................................... +41 (0)1 / 8 47 16 16
✆ Service conseil client,
Numéro Vert
.................................... 0 800 55 11 55
Nous déclarons sous notre propre responsabilité
que ce produit est en conformité avec les normes
ou documents normalisés suivants : EN 50 144
conformément aux réglementations 89/336/CEE,
98/37/CE, 2000/14/CE.
2000/14/CE : Le niveau d’intensité acoustique
L
WA
garanti est inférieur à 107 dB (A). Procédures d’évaluation de la conformité conformément à
l’annexe VI.
Office de contrôle désigné :
TÜV Hannover/Sachsen-Anhalt e.V.,
D-30519 Hannover CE-DE10-139 670
Leinfelden, 01.03.2002.
Dr. Gerhard Felten Dr. Eckerhard Strötgen
Robert Bosch GmbH, Geschäftsbereich Elektrowerkzeuge
Sous réserve de modifications
Nettoyage et entretien
Instructions de protection de
l’environnement
Service Après-Vente
Déclaration de conformité
GSH 4 (576) - Buch Seite 3 Montag, 4. März 2002 12:54 12
12 • 1 619 929 576 • TMS • 28.02.02
Page 13
EURO • Printed in Germany • BA 1 619 929 576 • GSH 4 • E • OSW 02.03
Español - 1
Determinación de los valores de medición según
norma 2000/14/CE (a 1,60 m de altura y 1 m de
distancia) y EN 50 144.
El nivel de ruido típico del aparato corresponde a:
nivel de presión de sonido 88 dB (A); nivel de potencia de sonido 101 dB (A).
¡Usar protectores auditivos!
La aceleración se eleva normalmente a 14 m/s
2
.
El aparato ha sido proyectado para efectuar trabajos de cincelado en hormigón, ladrillo, piedra y
asfalto y también para clavar y compactar, utilizando los accesorios especiales respectivos.
1 Caperuza antipolvo
2 Casquillo de enclavamiento
3 Anillo de ajuste de cincel (Vario-lock)
4 Interruptor de conexión/desconexión
5 Empuñadura adicional
¡Los accesorios descritos e ilustrados no corresponden en parte al material que se adjunta!
Solamente puede trabajar sin peligro con el aparato si lee íntegramente las instrucciones de
manejo y las indicaciones de seguridad, ateniéndose estricta-
mente a las recomendaciones
allí comprendidas. Adicionalmente deberán
respetarse las instrucciones de seguridad generales comprendidas en el folleto adjunto.
Déjese instruir prácticamente en el manejo
antes de la primera aplicación.
■ Llevar un protector de oídos.
■ Llevar unas gafas de protección y calzado
fuerte.
■ Si llega a dañarse o cortarse el cable de red
durante el trabajo, no tocar el cable, sino extraer inmediatamente el enchufe de la red. No
usar jamás el aparato con un cable deteriorado.
■ Conectar los aparatos empleados en el exte-
rior a través de un fusible diferencial ajustado
a una corriente de disparo de 30 mA máximo.
Utilizar cables de prolongación autorizados
para su uso en el exterior.
■ Utilice unos instrumentos de exploración
adecuados para detectar tuberías y cables
ocultos, o consulte a su compañía abastecedora local.
El contacto con cables eléctricos puede provocar un incendio o sacudida eléctrica. El deterioro de tuberías de gas puede producir una
explosión. La perforación de una tubería de
agua puede causar daños materiales o una
sacudida eléctrica.
■ Únicamente sujetar la herramienta eléc-
trica por las empuñaduras aisladas en
caso de que el útil pudiera llegar a dañar un
conductor oculto o el propio cable de red
del aparato.
El contacto con un conductor portador de tensión pone bajo tensión las partes metálicas del
aparato pudiendo causar una descarga al
usuario.
■ Mantener el cable siempre detrás del aparato.
■ Conectar la máquina a la red únicamente es-
tando desconectada.
■ Emplear el aparato únicamente con la empu-
ñadura adicional 5.
■ Trabajar siempre con el aparato sujetándolo
firmemente con ambas manos y manteniendo
una posición estable.
■ Siempre desconectar y esperar a que se de-
tenga el aparato, antes de depositarlo.
Características técnicas
Martillo de percusión GSH 4
Número de pedido 0 611 312 1..
Potencia absorbida [W] 850
Frecuencia de
percusión
[min-1] 2 440
Energía por percusión [J] 7
Posiciones de cincel 12
Rendimiento de
cincelado en hormigón
de dureza media
[cm3/
min]
450
Portaútiles SDS-max
Lubricación Lubricación
central
permanente
Peso (sin accesorios)
aprox.
[kg] 4,8
Clase de protección / II
Preste atención al nº de pedido de su máquina. Las denominaciones comerciales en ciertas máquinas puede variar.
Información sobre ruidos y
vibraciones
Utilización reglamentaria
Elementos del aparato
Para su seguridad
1 619 929 576 - E Seite 1 Montag, 18. März 2002 1:54 13
13 • 1 619 929 576 • TMS • 28.02.02
Page 14
EURO • Printed in Germany • BA 1 619 929 576 • GSH 4 • E • OSW 02.03
Español - 2
■ Jamás permita que los niños utilicen el aparato.
■ Bosch solamente puede garantizar el funcio-
namiento correcto del aparato si se utilizan los
accesorios originales previstos.
■ Emplear el aparato únicamente con la em-
puñadura adicional 5.
Aflojar la empuñadura girándola a izquierdas.
Abatir la empuñadura adicional 5, y adaptarla a
la posición de trabajo.
A continuación, apretar fuertemente la empuñadura.
■ Antes de cualquier manipulación en el apa-
rato extraer el enchufe de la red.
Con el portaútiles SDS-max, el cambio de útil es
sencillo y cómodo, y no requiere además de herramientas auxiliares.
☞
Engrasar periódicamente el extremo de
inserción.
La caperuza antipolvo 1 evita en gran medida la
penetración del polvo producido al trabajar. Al insertar el útil prestar atención a no dañar la caperuza antipolvo 1.
Es imprescindible sustituir inmediatamente
una caperuza antipolvo dañada. Se recomienda dejar hacer esto por un servicio técnico.
Inserción (ver figura )
Limpiar y engrasar el extremo de inserción
del útil.
Insertar el útil en el portaútiles, girándolo al
mismo tiempo, hasta que quede enclavado automáticamente. Verificar su enclavamiento correcto tirando del útil.
Extracción (ver figura )
Empujar hacia atrás el casquillo de enclavamiento 2 del portaútiles, y sacar la broca. Soltar
entonces casquillo de enclavamiento 2.
Cerciorarse de que la tensión de la red sea
correcta: La tensión de la fuente de energía
debe coincidir con las indicaciones en la placa de
características del aparato. Los aparatos marcados con 230 V pueden funcionar también a
220 V.
Conexión y desconexión
Para la puesta en marcha del aparato desplazar
hacia la derecha el interruptor de conexión /desconexión 4.
Para la desconexión del aparato desplazar hacia la izquierda el interruptor de conexión /desconexión 4.
☞
Si el aparato ha estado expuesto a temperaturas bajas debe funcionar primeramente cierto tiempo para alcanzar su potencia de impacto plena.
Este tiempo puede reducirse al golpear el
cincel una vez contra el suelo.
El cincel puede enclavarse en 12 posiciones diferentes que permiten adaptarlo a la posición de
trabajo óptima.
Para ello, desplazar hacia delante el anillo de
ajuste del cincel 3, y manteniéndolo sujeto, girar
el cincel 3 hasta alcanzar la posición deseada.
Soltar el anillo de ajuste del cincel 3 y girar el cincel hasta enclavarlo.
Solamente utilizando útiles perfectamente afilados se pueden lograr buenos resultados. Por eso
es importante afilar los cinceles con suficiente
antelación. Así obtendrá una mayor duración de
los útiles y un mejor rendimiento en el trabajo.
Reafilado
Los cinceles deben afilarse con muelas (p. ej. de
corindón noble) bajo la aportación constante de
agua. Valores orientativos al respecto los encuentra en la figura C. El afilado debe realizarse
con precaución para no alcanzar temperaturas
de revenido en los filos, lo que mermaría la dureza de los cinceles.
Forja y templado
Forjado: Calentar el cincel a una tempera-
tura de 850 a 1050 °C (rojo claro
hasta amarillo) y forjarlo.
Templado: Calentar el cincel a 900 °C (rojo
claro) y enfriarlo en baño de
aceite, manteniéndolo después
en un horno durante una hora,
aproximadamente, a una temperatura de 320 °C (color de revenido: azul claro).
Empuñadura adicional
Cambio de útil
Puesta en servicio
A
B
Modificación de la posición para
cincelar (Vario-lock)
Afilado de los cinceles
1 619 929 576 - E Seite 2 Montag, 18. März 2002 1:54 13
14 • 1 619 929 576 • TMS • 28.02.02
Page 15

EURO • Printed in Germany • BA 1 619 929 576 • GSH 4 • E • OSW 02.03
Español - 3
■ Antes de cualquier manipulación en el apa-
rato extraer el enchufe de la red.
☞
Mantener siempre limpios el aparato y las
rejillas de refrigeración para poder trabajar
con seguridad.
■ Mantener el portaútiles siempre limpio.
Cambio de la caperuza antipolvo
Es imprescindible sustituir inmediatamente una
caperuza antipolvo dañada. Se recomienda dejar
hacer esto por un servicio técnico.
Si a pesar de los esmerados procesos de fabricación y control, el aparato llegase a averiarse, la
reparación deberá encargarse a un taller de servicio autorizado para herramientas eléctricas
Bosch.
Al realizar consultas o solicitar piezas de repuesto, es imprescindible indicar siempre el número de pedido de 10 cifras que figura en la
placa de características del aparato.
Recuperación de materias primas en lugar de producir desperdicios.
El aparato, los accesorios y el embalaje debieran someterse a un
proceso de recuperación que respete el medio ambiente.
Estas instrucciones se han impreso sobre papel
reciclado sin la utilización de cloro.
Para efectuar un reciclaje selectivo se han identificado las piezas de plástico.
España
Robert Bosch España, S.A.
Departamento de ventas
Herramientas Eléctricas
C/Hermanos García Noblejas, 19
E-28037 Madrid
✆ Asesoramiento al cliente.... +34 901 11 66 97
Fax
........................................................... +34 91 327 98 63
Venezuela
Robert Bosch S.A.
Final Calle Vargas. Edf. Centro Berimer P.B.
Boleita Norte
Caracas 107
✆ ..................................................... +58 (0)2 / 207 45 11
México
Robert Bosch S.A. de C.V.
✆ Interior:............................ +52 (0)1 / 800 250 3648
✆ D.F.:......................................... +52 (0)1 / 5662 8785
E-Mail: arturo.fernandez@mx.bosch.com
Argentina
Robert Bosch Argentina S.A.
Córdoba 5160
1414 Buenos Aires (Capital Federal)
Atención al Cliente
✆ ................................................. +54 (0)810 / 555 2020
E-Mail: herramientas.bosch@ar.bosch.com
Perú
Autorex Peruana S.A.
República de Panamá 4045,
Lima 34
✆ ...................................................... +51 (0)1 / 475-5453
E-Mail: vhe@autorex.com.pe
Chile
EMASA S.A.
Irarrázaval 259 – Ñuñoa
Santiago
✆ ....................................................... +56 (0)2 / 520 3100
E-Mail: emasa@emasa.cl
Declaramos bajo nuestra sola responsabilidad
que este producto está en conformidad con las
normas o documentos normalizados siguientes:
EN 50 144 de acuerdo con las regulaciones
89/336/CEE, 98/37/CE, 2000/14/CE.
2000/14/CE: El nivel de potencia acústica L
WA
que se garantiza, es inferior a 107 dB (A). Procedimiento para evaluación de la conformidad según apéndice VI.
Servicio de inspección designado:
TÜV Hannover/Sachsen-Anhalt e.V.,
D-30519 Hannover CE-DE10-139 670
Leinfelden, 01.03.2002.
Dr. Gerhard Felten Dr. Eckerhard Strötgen
Robert Bosch GmbH, Geschäftsbereich Elektrowerkzeuge
Reservado el derecho de modificaciones
Mantenimiento y limpieza
Protección del medio ambiente
Servicio técnico y asistencia
al cliente
Declaración de conformidad
GSH 4 (576) - Buch Seite 3 Montag, 4. März 2002 12:54 12
15 • 1 619 929 576 • TMS • 28.02.02
Page 16

EURO • Printed in Germany • BA 1 619 929 576 • GSH 4 • P • OSW 02.03
Português - 1
Valores de medida de acordo com 2000/14/CE
(altura 1,60 m, distância 1 m) e EN 50 144.
O nível de ruído avaliado A do aparelho é tipicamente: Nível de pressão acústica 88 dB (A). Nível de potência acústica 101 dB (A).
Utilize protectores auriculares!
A aceleração avaliada é tipicamente de 14 m/s
2
.
O aparelho é determinado para trabalhos de cinzelamento em betão, tijolos e asfalto, assim
como com respectivos acessórios também para
cravar e compactar.
1 Capa de protecção contra pó
2 Luva de travamento
3 Anel de ajuste do cinzel (Vario-lock)
4 Interruptor de ligar/desligar
5 Punho adicional
Os acessórios ilustrados e descritos nas instruções de
serviço nem sempre são abrangidos pelo conjunto de
fornecimento!
Um trabalho seguro com o aparelho só é possível após ter lido
completamente as instruções de
serviço e as indicações de segurança e após observar rigorosa-
mente as indicações nelas contidas. Adicionalmente deverá seguir as indicações gerais de segurança que se encontram
no caderno em anexo. Uma instrução prática
é vantajosa.
■ Usar protecção acústica.
■ Usar óculos de protecção e sapatos robustos.
■ Caso o cabo de rede for danificado ou cortado
durante o trabalho, não toque no cabo. Tire
imediatamente a ficha da tomada. Jamais utilizar o aparelho com um cabo danificado.
■ Aparelhos que forem utilizados ao ar livre de-
vem ser ligados através de um interruptor de
protecção contra corrente de falha (FI) com no
máximo 30 mA de corrente de activação. Utilizar apenas um cabo de extensão apropriado
para a utilização ao ar livre.
■ Utilize aparelhos detectores apropriados
para detectar cabos de alimentação ou
peça apoio da sua firma de abastecimento.
O contacto com cabos eléctricos pode provocar incêndio e choque eléctrico. O dano de
uma linha de gás pode levar a uma explosão.
Uma perfuração de um tubo de água provoca
um dano material ou pode provocar um choque eléctrico.
■ Apenas segurar a ferramenta eléctrica pe-
las superfícies de manuseio isoladas, caso
a ferramenta de utilização possa entrar em
contacto com uma tubulação escondida no
muramento ou o próprio cabo eléctrico.
O contacto com um cabo que conduz tensão
eléctrica, colocará sob tensão as partes de
metal expostas da ferramenta e pode levar a
um choque eléctrico.
■ Conduzir o cabo sempre por detrás da má-
quina.
■ A ficha só deve ser introduzida na tomada com
a máquina desligada.
■ Apenas utilizar o aparelho com o punho adici-
onal 5.
■ Ao trabalhar com o aparelho, segure-o sempre
com ambas as mãos e mantenha uma posição
firme.
■ Sempre desligar o aparelho antes de depo-
sitá-la e aguardar até que o aparelho páre
completamente.
Dados técnicos do aparelho
Martelo de demolição GSH 4
N° de encomenda 0 611 312 1..
Potência nominal
absorvida
[W] 850
Nº de impactos [/min] 2 440
Força de cada impacto [J] 7
Regulação do cinzel 12
Capacidade de cinzela-
mento em concreto de
dureza média
[cm3/
min]
450
Encabadouro SDS-max
Lubrificação Lubrificação
central
permanente
Peso (sem accessório)
aprox.
[kg] 4,8
Classe de protecção / II
Por favor observar o número de encomenda da sua máquina. A designação comercial de diversas máquinas
pode variar.
Informações sobre ruído e
vibrações
Utilização de acordo com as
disposições
Elementos do aparelho
Para sua segurança
GSH 4 (576) - Buch Seite 1 Montag, 4. März 2002 12:54 12
16 • 1 619 929 576 • TMS • 28.02.02
Page 17

EURO • Printed in Germany • BA 1 619 929 576 • GSH 4 • P • OSW 02.03
Português - 2
■ Jamais deverá permitir que crianças utilizem
este aparelho.
■ A Bosch só pode assegurar um funcionamento perfeito do aparelho, se para este aparelho foram utilizados acessórios originais previstos para tal.
■ Apenas utilizar o aparelho com o punho
adicional 5.
Soltar o punho rodando-o para a esquerda. Girar
a punho adicional 5 e ajustá-la à posição de trabalho.
Em seguida apertar novamente o punho.
■ Tirar a ficha da tomada antes do todos os
trabalhos no aparelho.
Com o encabadouro SDS-max é possível realizar uma simples e confortável substituição de
ferramenta, sem auxílio de ferramentas adicionais.
☞
A extremidade de introdução da ferramenta deve ser lubrificada regularmente.
A capa de protecção contra pó 1 integrada evita
consideravelmente a penetração de pó de perfuração durante o funcionamento. Ao introduzir a
ferramenta, observe que a capa de protecção
contra pó 1 não seja danificada.
Uma capa de protecção contra pó deve ser
substituida imediatamente. É recomendável
que isto seja realizado por uma oficina de serviço técnico.
Introduzir (veja figura )
Limpar e lubrificar a extremidade de introdução da ferramenta.
Introduzir a ferramenta girando no encabadouro,
até que trave automaticamente. Controlar o travamento puxando a ferramenta.
Retirar (veja figura )
Puxar para trás a luva de travamento 2 e retirar a
ferramenta. Soltar novamente a luva de travamento 2.
Tenha em atenção a tensão de rede: A tensão
da fonte de corrente deve coincidir com as indicações no logotipo do aparelho. Aparelhos com
a indicação de 230 V também podem ser operados com 220 V.
Ligar e desligar
Deslocar o interruptor de ligar-desligar 4 para a
direita para colocar em funcionamento o aparelho.
Deslocar o interruptor de ligar-desligar 4 para a
esquerda para desligar o aparelho.
☞
No caso de baixas temperaturas, o aparelho apenas alcança a completa potência de
percussão após um certo período de
tempo.
Batendo a broca de cinzel no chão este período poderá ser diminuído.
O cinzel pode ser travado em 12 posições. Assim
é possível obter sempre a melhor posição de trabalho.
Empurrar o anel de ajuste do cinzel 3 para a
frente e segurá-lo. Em seguida girar o cinzel com
o anel de ajuste do cinzel 3, até que a posição
desejada e mais adequada ao corpo do operador
seja alcançada.
Soltar o anel de ajuste do cinzel 3 e engatar o
cinzel através de um movimento giratório.
As ferramentas de cinzelamento têm de estar
bem afiadas para se atingir bons resultados. Por
isso, afie as ferramentas atempadamente. Ao
fazê-lo, está a assegurar uma longa duração
para as suas ferramentas e um bom rendimento
de trabalho.
Afiação
Afie as ferramentas de cinzelamento nos discos
de lixar (por exemplo corundo fino) sob uma corrente de água sempre igual. Os valores teóricos
para isto encontram-se na figura C. Tenha cuidado para que não surjam quaisquer cores de recozimento nos gumes, porque isso pode prejudicar a dureza das ferramentas de cinzelamento.
Punho adicional
Mudança da ferramenta
A
B
Colocação em funcionamento
Alterar a posição do cinzel
(Vario-lock)
Afiar as ferramentas de
cinzelamento
GSH 4 (576) - Buch Seite 2 Montag, 4. März 2002 12:54 12
17 • 1 619 929 576 • TMS • 28.02.02
Page 18

EURO • Printed in Germany • BA 1 619 929 576 • GSH 4 • P • OSW 02.03
Português - 3
Forjamento e têmpera
Forjamento: Aquecer o cinzel a 850 até
1050 °C (vermelho claro até amarelo) e em seguida forjá-lo.
Têmpera: Aquecer o cinzel a 900 °C (ver-
melho claro) e resfriá-lo bruscamente em óleo. Em seguida recozê-lo no forno por aprox. uma
temperatura de 320 °C (cor de recozimento = azul claro).
■ Tirar a ficha da tomada antes do todos os
trabalhos no aparelho.
☞
Sempre manter o aparelho e as aberturas
de ventilação limpas, para trabalhar bem e
de forma segura.
■ Manter o encabadouro sempre limpo.
Substituir a capa de protecção contra pó
Uma capa de protecção contra pó deve ser substituida imediatamente. É recomendável que isto
seja realizado por uma oficina de serviço técnico.
Caso o aparelho venha a apresentar falhas, apesar de cuidadosos processos de fabricação e de
controlo de qualidade, deve ser reparado em um
serviço técnico autorizado para aparelhos eléctricos Bosch.
No caso de informações e encomendas de
acessórios, indique por favor sem falta o número
de encomenda de 10 algarismos do aparelho!
Reciclagem de matérias primas em vez de eliminação de lixo.
Recomenda-se sujeitar o aparelho, os acessórios e a embalagem à uma reutilização ecológica.
Estas instruções foram manufacturadas com papel reciclável isento de cloro.
Para efeitos de uma reciclagem específica, as
peças de plástico dispõem de uma respectiva
marcação.
Portugal
Robert Bosch LDA
Avenida Infante D. Henrique
Lotes 2E-3E
P-1800 Lisboa
✆ .................................................... +351 21 / 8 50 00 00
Fax
.................................................... +351 21 / 8 51 10 96
Brasil
Robert Bosch Ltda.
Caixa postal 1195
13065-900 Campinas
✆ .............................................................. 0800 / 70 45446
E-Mail: sac@bosch-sac.com.br
Declaramos sob nossa exclusiva responsabilidade que este producto cumpre as seguintes
normas ou documentos normativos: EN 50 144
conforme as disposições das directivas
89/336/CEE, 98/37/CE, 2000/14/CE.
2000/14/CE: O nível garantido de potência acústica L
WA
é inferior a 107 dB (A). Processo de
avaliação da conformidade conforme anexo VI.
Posto de teste mencionado:
TÜV Hannover/Sachsen-Anhalt e.V.,
D-30519 Hannover CE-DE10-139 670
Leinfelden, 01.03.2002.
Dr. Gerhard Felten Dr. Eckerhard Strötgen
Robert Bosch GmbH, Geschäftsbereich Elektrowerkzeuge
Reservado o direito a modificações
Manutenção e conservação
Protecção do meio-ambiente
Serviço
Declaração de conformidade
GSH 4 (576) - Buch Seite 3 Montag, 4. März 2002 12:54 12
18 • 1 619 929 576 • TMS • 28.02.02
Page 19

EURO • Printed in Germany • BA 1 619 929 576 • GSH 4 • I • OSW 02.03
Italiano - 1
Valori misurati conformemente alla norma
CE 2000/14 (1,60 m altezza, 1 m distanza) e
EN 50 144.
La misurazione A del livello di pressione acustica
dell’utensile è di solito di: Livello di rumorosità
88 dB (A). Potenza della rumorosità 101 dB (A).
Utilizzare le cuffie di protezione!
L’accelerazione misurata raggiunge di solito il valore di 14 m/s
2
.
La macchina è idonea per lavori di scalpellatura
nel calcestruzzo, nel mattone, nel materiale pietroso e nell’asfalto. Utilizzando rispettivi accessori, essa può essere impiegata anche per conficcare e costipare.
1 Protezione antipolvere
2 Bussola di bloccaggio
3 Anello di regolazione dello scalpello (Vario-
lock)
4 Interruttore di avvio/arresto
5 Impugnatura supplementare
Gli accessori illustrati o descritti nelle istruzioni per
l’uso non sono sempre compresi nella fornitura!
È possibile lavorare con l’elettroutensile senza incorrere in pericoli soltanto dopo aver letto
completamente le istruzioni per
l’uso e l’opuscolo avvertenze per
la sicurezza e seguendo rigorosamente le istruzioni in essi contenute. Inoltre vanno rispettate anche le generali istruzioni di sicurezza riportate nell’opuscolo allegato. Fatevi istruire praticamente prima di
passare all’operazione pratica.
■ Portare cuffie di protezione.
■ Portare occhiali e scarpe sicure.
■ Se durante un’operazione di lavoro viene dan-
neggiato oppure troncato il cavo dell’alimentazione di rete, non toccare il cavo ma estrarre
immediatamente la spina dalla presa. Mai utilizzare la macchina con un cavo danneggiato.
■ Collegare le macchine che vengono utilizzate
all’esterno attraverso un interruttore di sicurezza per correnti di guasto (FI) con una corrente di disinnesto di massimo 30 mA. Usare
soltanto un cavo di prolunga omologato per
ambienti esterni.
■ Al fine di rilevare linee di alimentazione na-
scoste, utilizzare adatte apparecchiature di
ricerca oppure rivolgersi alla locale società
erogatrice.
Un contatto con linee elettriche può provocare
lo sviluppo di incendi e di scosse elettriche.
Danneggiando linee del gas si può creare il
pericolo di esplosioni. Penetrando una tubazione dell’acqua si provocano seri danni materiali oppure vi è il pericolo di provocare una
scossa elettrica.
■ Quando vi è il pericolo che l’utensile ad inne-
sto possa incontrare una linea nascosta oppure anche il proprio cavo di rete, afferrare
l’elettroutensile tenendolo esclusivamente
con le mani sulle impugnature isolate.
Un contatto con una linea portatrice di tensione
può mettere sotto tensione le parti in metallo
della macchina e provocare quindi una scossa
elettrica.
■ Far passare sempre il cavo sul lato posteriore
della macchina.
■ Inserire la spina nella presa di rete soltanto
quando la macchina è disinserita.
■ Utilizzare la macchina sempre con l’impugna-
tura supplementare 5.
■ Durante le operazioni di lavoro è necessario te-
nere la macchina sempre con entrambe le mani
ed adottare una posizione di lavoro sicura.
Dati tecnici
Martello picconatore GSH 4
Codice di ordinazione 0 611 312 1..
Potenza assorbita
nominale
[W] 850
Numero colpi [c.pi/
min]
2 440
Forza colpo singolo [J] 7
Regolazione scalpello 12
Potenza scalpello in
calcestruzzo di durezza
media
[cm3/
min]
450
Attacco utensile SDS-max
Lubrificazione Lubrificazione
centrale
permanente
Peso
(senza accessori) ca.
[kg] 4,8
Classe protezione / II
Si prega di tenere sempre in considerazione il codice d’ordine della Vostra macchina. Le descrizioni commerciali di
singole macchine possono variare.
Informazioni sulla rumorosità e
sulla vibrazione
Uso conforme alle norme
Elementi della macchina
Per la Vostra sicurezza
GSH 4 (576) - Buch Seite 1 Montag, 4. März 2002 12:54 12
19 • 1 619 929 576 • TMS • 28.02.02
Page 20

EURO • Printed in Germany • BA 1 619 929 576 • GSH 4 • I • OSW 02.03
Italiano - 2
■ Prima di poggiare la macchina, è necessario
spegnerla ed attendere fino a quando la macchina si sarà fermata completamente.
■ Mai permettere a bambini di utilizzare la macchina.
■ La Bosch può garantire un perfetto funzionamento della macchina soltanto se vengono utilizzati accessori originali specificatamente previsti per questa macchina.
■ Utilizzare la macchina sempre con l’impugnatura supplementare 5.
Allentare l’impugnatura ruotandola in senso antiorario. Regolare l’impugnatura supplementare 5
adattandola alla posizione di lavoro.
In seguito stringere di nuovo l’impugnatura.
■ Prima di qualunque intervento alla macchina, estrarre la spina dalla presa di rete.
Tramite il portautensili SDS-max è possibile cambiare gli utensili in maniera facile e comoda
senza necessità di ricorrere ad ulteriori attrezzi.
☞
Lubrificare regolarmente il gambo degli
utensili.
La protezione antipolvere 1 impedisce in buona
parte la penetrazione di polvere da foratura prodotta durante l’esercizio. Applicando l’utensile,
avere cura di non danneggiare la protezione antipolvere 1.
Sostituire immediatamente la protezione antipolvere danneggiata. Si consiglia di affidare
l’operazione ad un Centro di Assistenza Clienti.
Inserire (Vedere figura )
Pulire e lubrificare il gambo dell’utensile.
Inserire l’utensile nel portautensile ruotandolo
fino a farlo bloccare autonomamente. Controllare
il bloccaggio tirando l’utensile.
Estrarre (Vedere figura )
Spostare la bussola di bloccaggio 2 dell’alloggiamento dell’utensile all’indietro ed estrarre l’utensile. Rilasciare la bussola di bloccaggio 2.
Osservare la tensione di rete: La tensione della
rete deve corrispondere a quella riportata sulla
targhetta della macchina. Le macchine con l’indicazione di 230 V possono essere collegate anche alla rete di 220 V.
Avvio/arresto
Per accendere la macchina, spingere l’interruttore avvio/arresto 4 verso destra.
Per spegnere la macchina, spingere l’interruttore avvio/arresto 4 verso sinistra.
☞
In caso di temperature basse la macchina
raggiunge la propria completa potenza del
colpo soltanto dopo un certo periodo di
tempo.
Tale fase di partenza può essere abbreviata battendo una volta lo scalpello sul pavimento.
Lo scalpello può essere impostato su 12 diverse
posizioni di arresto. In questo modo è possibile
determinare con facilità la posizione di lavoro migliore.
Spingere l’anello di regolazione dello scalpello 3
in avanti e tenerlo fermo; ruotare quindi lo scalpello con l’anello 3 fino a raggiungere la posi-
zione desiderata.
Rilasciare l’anello di regolazione dello scalpello 3
e ruotare lo scalpello fino a quando se ne percepisce l’incastro.
Solo con attrezzi di scalpellatura bene affilati si
possono raggiungere buoni risultati. Provvedere
dunque ad affilarli sempre a tempo debito. In
questo modo ci si assicura elevate durate utili degli utensili e buone prestazioni di lavoro.
Riaffilatura
Affilare gli utensili per scalpellare utilizzando
mole (per esempio corindone prezioso) ed adducendo costantemente acqua. Per rispettivi valori
indicativi, vedere la figura C. Avere cura di evitare la formazione di colori di rinvenimento sui taglienti. Ciò potrebbe compromettere la durezza
degli utensili di scalpellatura.
Fucinatura e tempra
Fucinatura: Riscaldare lo scalpello da 850 fino
a 1050 °C (rosso chiaro fino a
giallo) e fucinare.
Tempra: Riscaldare lo scalpello a 900 °C
(rosso chiaro) e temprare in olio.
Successivamente lasciare in
forno per circa 1 ora a 320 °C (colore di rinvenimento = blu chiaro).
Impugnatura supplementare
Cambio degli utensili
Messa in servizio
A
B
Cambiare scalpellatura
(Vario-lock)
Affilare gli scalpelli
GSH 4 (576) - Buch Seite 2 Montag, 4. März 2002 12:54 12
20 • 1 619 929 576 • TMS • 28.02.02
Page 21

EURO • Printed in Germany • BA 1 619 929 576 • GSH 4 • I • OSW 02.03
Italiano - 3
■ Prima di qualunque intervento alla macchina, estrarre la spina dalla presa di rete.
☞
Per poter garantire buone e sicure operazioni di lavoro, tenere sempre pulite la
macchina e le fessure di ventilazione.
■ Avere cura di mantenere sempre pulito l’alloggiamento utensili.
Sostituzione della protezione
antipolvere
Sostituire immediatamente la protezione antipolvere danneggiata. Si consiglia di affidare l’operazione ad un Centro di Assistenza Clienti.
Se nonostante gli accurati procedimenti di produzione e di controllo la macchina dovesse guastarsi, la riparazione va fatta effettuare da un
punto di assistenza autorizzato per gli elettroutensili Bosch.
Comunicare sempre il codice di ordinazione a
10 cifre dell’elettroutensile in caso di richieste o di
ordinazione di pezzi di ricambio!
Recupero di materie prime, piuttosto che
smaltimento di rifiuti.
Macchina, accessori ed imballaggio dovrebbero
essere inviati ad una riutilizzazione ecologica.
Queste istruzioni sono stampate su carta riciclata
sbiancata senza cloro.
I componenti in plastica sono contrassegnati per
il riciclaggio selezionato.
Italia
Robert Bosch S.p.A.
Via Giovanni da Udine 15
I-20156 Milano
✆ ....................................................... +39 02 / 3 69 66 63
Fax
....................................................... +39 02 / 3 69 66 62
✆ Filo diretto con Bosch:.... +39 02 / 3 69 63 14
www.Bosch.it
Svizzera
Robert Bosch AG
Servizio Elettroutensili
Industriestrasse 31
CH-8112 Otelfingen
✆ Servizio.................................. +41 (0)1 / 8 47 16 16
✆ Consulente per la clientela:
Numero verde
................................. 0 800 55 11 55
Assumendone la piena responsabilità, dichiariamo che il prodotto è conforme alle seguenti
normative ed ai relativi documenti: EN 50 144 in
base alle prescrizioni delle direttive CEE 89/336,
CE 98/37, CE 2000/14.
CE 2000/14: Il livello della potenza sonora L
WA
garantito è minore di 107 dB (A). Procedimento
di valutazione della conformità secondo appendice VI.
Ufficio di sorveglianza tecnica:
TÜV Hannover/Sachsen-Anhalt e.V.,
D-30519 Hannover CE-DE10-139 670
Leinfelden, 01.03.2002.
Dr. Gerhard Felten Dr. Eckerhard Strötgen
Robert Bosch GmbH, Geschäftsbereich Elektrowerkzeuge
Con riserva di modifiche
Manutenzione e pulizia
Misure ecologiche
Servizio post-vendita
Dichiarazione di conformità
GSH 4 (576) - Buch Seite 3 Montag, 4. März 2002 12:54 12
21 • 1 619 929 576 • TMS • 28.02.02
Page 22

EURO • Printed in Germany • BA 1 619 929 576 • GSH 4 • NL • OSW 02.03
Nederlands - 1
Meetwaarden vastgesteld volgens 2000/14/EG
(1,60 m hoogte, 1 m afstand) en EN 50 144.
Het A-gewaardeerde geluidsdrukniveau van de
machine bedraagt kenmerkend: geluidsdrukniveau
88 dB (A); geluidsvermogenniveau 101 dB (A).
Draag oorbeschermers.
De gewaardeerde versnelling bedraagt kenmerkend 14 m/s
2
.
De machine is bestemd voor hakwerkzaamheden in beton, baksteen, steen en asfalt en met
het juiste toebehoren ook voor indrijven en verdichten.
1 Stofbeschermkap
2 Vergrendelingshuls
3 Beitelverstelring (Vario-Lock)
4 Aan/uit-schakelaar
5 Extra handgreep
In de gebruiksaanwijzing afgebeeld en beschreven
toebehoren wordt niet altijd standaard meegeleverd.
Met de machine kan uitsluitend
veilig worden gewerkt, wanneer
u de gebruiksaanwijzing en de
veiligheidsvoorschriften volledig leest en u zich strikt aan de
gegeven aanwijzingen houdt.
Houd u bovendien aan de algemene veiligheidsvoorschriften in de bijgevoegde brochure. Laat u voor het eerste gebruik praktisch instrueren.
■ Draag een gehoorbescherming.
■ Draag een veiligheidsbril en stevige schoe-
nen.
■ Raak de stroomkabel niet aan indien deze tij-
dens de werkzaamheden wordt beschadigd of
doorgesneden, maar trek onmiddellijk de stekker uit het stopcontact. Gebruik de machine
nooit met een beschadigde kabel.
■ Machines die buitenshuis worden gebruikt,
moeten worden aangesloten via een aardlekschakelaar met maximaal 30 mA uitschakelstroom. Gebruik alleen een voor gebruik buitenshuis goedgekeurde verlengkabel.
■ Gebruik een geschikt detectieapparaat om
verborgen stroom-, gas- of waterleidingen
op te sporen of raadpleeg het plaatselijke
energie- of waterleidingbedrijf.
Contact met elektrische leidingen kan tot
brand of een elektrische schok leiden. Beschadiging van een gasleiding kan tot een explosie
leiden. Breuk van een waterleiding veroorzaakt materiële schade en kan een elektrische
schok veroorzaken.
■ Pak het elektrische gereedschap alleen
vast aan een geïsoleerd handvat wanneer
het inzetgereedschap een verborgen leiding of het eigen netsnoer kan raken.
Contact met een onder spanning staande leiding kan metalen delen van de machine onder
spanning zetten en tot een elektrische schok
leiden.
■ Voer de kabel altijd achterwaarts van de ma-
chine weg.
■ Steek de stekker alleen in het stopcontact
wanneer de machine uitgeschakeld is.
■ Gebruik de machine alleen met de extra hand-
greep 5.
■ Houd de machine tijdens de werkzaamheden
altijd stevig met beide handen vast en zorg ervoor dat u stevig staat.
■ Schakel de machine voor het neerleggen altijd
uit en wacht tot deze tot stilstand is gekomen.
Technische gegevens
Breekhamer GSH 4
Bestelnummer 0 611 312 1..
Opgenomen vermogen [W] 850
Aantal slagen [/min] 2 440
Slagkracht [J] 7
Beitelverstelling 12
Beitelvermogen in
beton middelhard
[cm3/
min]
450
Gereedschapopname SDS-max
Smering Centrale
continusmering
Gewicht
(zonder toebehoren) ca.
[kg] 4,8
Veiligheidsklasse / II
Let op het bestelnummer van de machine. De handelsbenamingen van sommige machines kunnen afwijken.
Informatie over geluid en
trillingen
Gebruik volgens bestemming
Onderdelen van de machine
Voor uw veiligheid
1 619 929 576 - NL Seite 1 Montag, 18. März 2002 1:55 13
22 • 1 619 929 576 • TMS • 28.02.02
Page 23

EURO • Printed in Germany • BA 1 619 929 576 • GSH 4 • NL • OSW 02.03
Nederlands - 2
■ Laat kinderen de machine nooit gebruiken.
■ Bosch kan een juiste werking van de machine
uitsluitend waarborgen wanneer voor deze
machine bedoeld origineel toebehoren wordt
gebruikt.
■ Gebruik de machine alleen met de extra
handgreep 5.
Draai het greepstuk los door linksom te draaien.
Draai de extra handgreep 5 en pas deze aan de
werkstand aan.
Draai het greepstuk daarna weer stevig vast.
■ Trek altijd voor werkzaamheden aan de ma-
chine de stekker uit het stopcontact.
Met de gereedschapopname SDS-max kan toebehoren zonder hulpgereedschap eenvoudig en
gemakkelijk worden verwisseld.
☞
Het insteekeinde van het toebehoren
moet regelmatig worden ingevet.
De stofbeschermkap 1 voorkomt in grote mate
het binnendringen van boorstof tijdens het gebruik. Let er bij het inzetten van het toebehoren
op dat de stofbeschermkap 1 niet wordt beschadigd.
Een beschadigde stofbeschermkap moet onmiddellijk worden vervangen. Geadviseerd
wordt, dit door een klantenservice te laten
doen.
Aanbrengen (zie afbeelding )
Reinig het insteekeinde van het toebehoren
en smeer het met vet.
Steek het toebehoren draaiend in de gereedschapopname tot het automatisch wordt vergrendeld. Controleer de vergrendeling door aan het
toebehoren te trekken.
Verwijderen (zie afbeelding )
Trek de vergrendelingshuls 2 van de gereed-
schapopname naar achteren en verwijder het
toebehoren. Laat de vergrendelingshuls 2 weer
los.
Let op de netspanning: De spanning van de
stroombron moet overeenkomen met de gegevens op het typeplaatje. Met 230 V aangeduide
machines kunnen ook worden gebruikt met een
spanning van 220 V.
In- en uitschakelen
Wanneer u de machine in gebruik wilt nemen,
duwt u de aan/uit-schakelaar 4 naar rechts.
Wanneer u de machine wilt uitschakelen, duwt
u de aan/uit-schakelaar 4 naar links.
☞
Bij lage temperaturen bereikt de machine
pas na een bepaalde tijd zijn volledige
slagcapaciteit.
Deze aanlooptijd kan worden verkort door
de beitel één keer op de grond te stoten.
De beitel kan in 12 standen worden vergrendeld.
Daardoor kan de optimale werkstand worden ingesteld.
Schuif de beitelverstelring 3 naar voren en houd
deze vast. Draai vervolgens de beitel met de beitelverstelring 3 tot de gewenste stand is bereikt.
Laat de beitelverstelring 3 los en laat de beitel
vastklikken door deze te draaien.
Alleen met scherpe beitels krijgt u een goed resultaat. Daarom moeten de beitels op tijd worden
geslepen. De levensduur van het toebehoren
wordt daardoor langer en u krijgt een goed werkresultaat.
Naslijpen
Slijp de beitels op een slijpsteen (bijvoorbeeld
edelkorund) met een gelijkmatige watertoevoer.
Richtwaarden hiervoor bevat afbeelding C. Let
erop dat op de snijvlakken geen verkleuring optreedt, want dit beïnvloedt de hardheid van de
beitel.
Smeden en harden
Smeden: De beitel van 850 °C tot 1050 °C (fel-
rood tot geel) verhitten en smeden.
Harden: De beitel tot 900 °C (felrood) verhit-
ten, afschrikken in olie en vervolgens
ca. 1 uur in de oven zetten bij 320 °C
(beginkleur is lichtblauw).
Extra handgreep
Gereedschap wisselen
A
B
Ingebruikneming
Hakstand veranderen
(Vario-lock)
Beitels slijpen
GSH 4 (576) - Buch Seite 2 Montag, 4. März 2002 12:54 12
23 • 1 619 929 576 • TMS • 28.02.02
Page 24

EURO • Printed in Germany • BA 1 619 929 576 • GSH 4 • NL • OSW 02.03
Nederlands - 3
■ Trek altijd voor werkzaamheden aan de ma-
chine de stekker uit het stopcontact.
☞
Houd de machine en de ventilatieopeningen altijd schoon om goed en veilig te werken.
■ Houd de gereedschapopname altijd schoon.
Stofbeschermkap vervangen
Een beschadigde stofbeschermkap moet onmiddellijk worden vervangen. Geadviseerd wordt, dit
door een klantenservice te laten doen.
Mocht de machine ondanks zeer zorgvuldige fabricage- en testmethoden toch defect raken,
dient de reparatie door een erkende reparatieservice voor Bosch elektrisch gereedschap te worden uitgevoerd.
Vermeld bij vragen en bestellingen van vervangingsonderdelen altijd het bestelnummer van
10 cijfers van de machine.
Terugwinnen van grondstoffen in plaats van
het weggooien van afval.
Machine, toebehoren en verpakking moeten op
een voor het milieu verantwoorde manier worden
hergebruikt.
Deze gebruiksaanwijzing is vervaardigd van
chloorvrij gebleekt kringlooppapier.
De kunststof delen zijn gekenmerkt om ze per
soort te kunnen recyclen.
Nederland
Robert Bosch B.V.
Postbus 502
NL-2132 AM Hoofddorp
Neptunusstraat 71
NL-2132 JP Hoofddorp
✆ .................................................. +31 (0)23 / 56 56 620
Fax
.................................................. +31 (0)23 / 56 56 611
E-Mail: Gereedschappen@nl.bosch.com
België
Robert Bosch N.V.
After Sales Service Gereedschappen
Henri Genessestraat 1
BE-1070 Brussel
✆ ..................................................... +32 (0)2 / 525.50 29
Fax
..................................................... +32 (0)2 / 525.54.30
✆ Service conseil client..... +32 (0)2 / 525.53.07
E-Mail: Outillage.Gereedschappen@be.bosch.com
Wij verklaren op eigen verantwoording dat dit
product voldoet aan de volgende normen en normatieve documenten: EN 50 144 volgens de bepalingen van de richtlijnen 89/336/EEG,
98/37/EG, 2000/14/EG.
2000/14/EG: het gegarandeerde geluidsvermogenniveau L
WA
is lager dan 107 dB (A). Waarderingsmethode van de conformiteit volgens aanhangsel VI.
Benoemde keuringsinstantie:
TÜV Hannover/Sachsen-Anhalt e.V.,
D-30519 Hannover CE-DE10-139 670
Leinfelden, 01.03.2002.
Dr. Gerhard Felten Dr. Eckerhard Strötgen
Robert Bosch GmbH, Geschäftsbereich Elektrowerkzeuge
Wijzigingen voorbehouden
Onderhoud en reiniging
Milieubescherming
Technische dienst en
klantenservice
Conformiteitsverklaring
GSH 4 (576) - Buch Seite 3 Montag, 4. März 2002 12:54 12
24 • 1 619 929 576 • TMS • 28.02.02
Page 25

EURO • Printed in Germany • BA 1 619 929 576 • GSH 4 • DK • OSW 02.03
Dansk - 1
Måleværdier beregnes iht. 2000/14/EF (1,60 m
højde, 1 m afstand) og EN 50 144.
Maskinens A-vurderede støjniveau er typisk: Lydtrykniveau 88 dB (A), lydeffektniveau 101 dB (A).
Brug høreværn.
Det vægtede accelerationsniveau er typisk 14 m/s
2
.
Værktøjet er beregnet til mejseldrift i beton, tegl,
sten og asfalt samt med tilsvarende tilbehør også
til inddrivning og stampning.
1 Støvbeskyttelseskappe
2 Låsekappe
3 Mejselreguleringsring (Vario-lock)
4 Start-stop-kontakt
5 Ekstrahåndtag
Tilbehør, som er illustreret og beskrevet i brugsvejledningen, er ikke altid indeholdt i leveringen!
Sikkert arbejde med maskinen
forudsætter, at brugsvejledningen og sikkerhedsforskrifterne
læses helt igennem og anvisningerne overholdes, før den tages i
brug. Desuden skal de generelle
sikkerhedsforskrifter i vedlagte hæfte overholdes. Få en sagkyndig person til at vise
Dem, hvordan maskinen fungerer, før den benyttes første gang.
■ Brug høreværn.
■ Bær beskyttelsesbriller og fastsiddende skotøj.
■ Hvis strømkablet beskadiges eller skæres
over under arbejdet, må kablet ikke berøres.
Træk straks netstikket ud. Benyt aldrig maskinen, hvis kablet er beskadiget.
■ Maskiner, som benyttes ude i det frie, tilsluttes
via et HFI-relæ med maks. 30 mA udløsningsstrøm. Der skal benyttes en forlængerledning,
som er godkendt til udendørs brug.
■ Anvend egnede søgeinstrumenter til at
finde frem til skjulte forsyningsledninger,
eller kontakt det lokale forsyningsselskab.
Kontakt med elektriske ledninger kan føre til
brand og elektrisk stød. Beskadigelse af en
gasledning kan føre til eksplosion. Brud på et
vandrør kan føre til materiel skade eller elektrisk stød.
■ Hold altid el-værktøj med isolerede hånd-
greb, hvis der udføres arbejde, hvor indsatsværktøjet kan komme til at ramme en
skjult ledning eller værktøjets eget kabel.
Kontakt med en spændingsførende ledning
kan sætte maskinens metaldele under spænding, hvilket kan føre til elektrisk stød.
■ Ledningen skal altid føres bagud fra maskinen.
■ Maskinen skal være slukket, når stikket sættes
i stikdåsen.
■ Benyt kun maskinen med ekstrahåndtag 5.
■ Hold altid maskinen fast med begge hænder
og sørg for at stå sikkert under arbejdet.
■ Sluk altid for maskinen og vent til maskinen
står helt stille, før den lægges fra.
■ Lad aldrig børn anvende denne maskine.
■ Bosch kan kun sikre en korrekt funktion, hvis
der benyttes originalt tilbehør.
Tekniske data
Slaghammer GSH 4
Bestillingsnummer 0 611 312 1..
Optagen effekt [W] 850
Slagantal ved belastet
omdrejningstal
[/min] 2 440
Enkeltslagstyrke [J] 7
Mejselindstillinger 12
Mejseleffekt i beton af
middelhårdhed
[cm3/
min]
450
Værktøjsholder SDS-max
Smøring Central
permanent
smøring
Vægt
(uden tilbehør) ca.
[kg] 4,8
Isolationsklasse / II
Vær opmærksom på Deres maskines bestillingsnummer.
Handelsbetegnelserne for de enkelte maskiner kan variere.
Støj-/vibrationsinformation
Beregnet anvendelsesområde
Maskinelementer
For Deres egen
sikkerheds skyld
GSH 4 (576) - Buch Seite 1 Montag, 4. März 2002 12:54 12
25 • 1 619 929 576 • TMS • 28.02.02
Page 26

EURO • Printed in Germany • BA 1 619 929 576 • GSH 4 • DK • OSW 02.03
Dansk - 2
■ Benyt kun maskinen med ekstrahåndtag 5.
Grebet løsnes ved at dreje det til venstre. Ekstrahåndtaget 5 svinges i den ønskede position, så
det passer til arbejdspositionen.
Derefter fastspændes grebet igen.
■ Træk stikket ud, før der arbejdes på maski-
nen.
SDS-max værktøjsholderen gør det nemmere og
behagligere at udskifte værktøj, uden brug af
ekstra værktøj.
☞
Værktøjernes istikningsende skal indfedtes med regelmæssige mellemrum.
Støvbeskyttelseskappen 1 forhindrer i stort omfang indtrængning af borestøv under driften.
Sørg for at kappen 1 ikke beskadiges, når
indsatsværktøjet isættes.
En beskadiget støvbeskyttelseskappe skiftes
med det samme. Det anbefales at få kappen
skiftet af en autoriseret servicemontør.
Isætning (se billede )
Værktøjets istikningsende rengøres og fedtes
ind.
Værktøjet føres drejende ind i værktøjsholderen,
til det går i hak. Træk i indsatsværktøjet for at
være sikker på, at det er låst rigtigt fast.
Udtagning (se billede )
Værktøjsholderens låsekappe 2 skubbes bagud,
og indsatsværktøjet tages ud. Låsekappen 2 slippes igen.
Kontrollér netspændingen: Strømkildens
spænding skal svare til angivelserne på maskinens typeskilt. Maskinen til 230 V kan også tilsluttes 220 V.
Start og stop
Maskinen tændes ved at skubbe start-stop-kontakten 4 mod højre.
Maskinen slukkes ved at skubbe start-stop-kontakten 4 mod venstre.
☞
Ved lave temperaturer kan det ske, at
værktøjet først begynder at slå efter et vist
stykke tid.
Denne starttid kan forkortes ved at støde
mejslen en enkelt gang på gulvet.
Mejslen kan fastlåses i 12 forskellige positioner.
Dette gør det muligt at arbejde med borehammeren i den til enhver tid nemmeste og ergonomisk
mest passende position.
Mejselreguleringsringen 3 skubbes frem og holdes fast, så drejes mejslen med mejselreguleringsringen 3 til den ønskede position er indstillet.
Slip mejselreguleringsringen 3 og drej mejslen til
den går i hak.
Man opnår kun gode resultater med skarpt mejselværktøj, derfor skal mejselværktøjet slibes rettidigt. Derved sikres værktøjet en lang levetid
samt gode arbejdsresultater.
Efterslibning
Mejselværktøjet slibes på slibeskiver (f.eks. Edelkorund) under ensartet vandtilførsel. Vejledende
værdier hertil fremgår af fig. C. Hold øje med at
der ikke opstår anløbsfarve på skæret, da mejselværktøjets hårdhed ellers ville være nedsat.
Smedning og hærdning
Smedning: Mejslen varmes op til mellem 850
og 1050 °C (lys rød til gul) og
smedes.
Hærdning: Mejslen varmes op til 900 °C (lys
rød) og afkøles derefter i olie.
Herefter udglødes den i ovnen ca.
1 time ved 320 °C (udglødningsfarve = lyseblå).
Ekstrahåndtag
Udskiftning af værktøj
Ibrugtagning
A
B
Skift mejselstilling (Vario-lock)
Slibning af mejselværktøjer
GSH 4 (576) - Buch Seite 2 Montag, 4. März 2002 12:54 12
26 • 1 619 929 576 • TMS • 28.02.02
Page 27

EURO • Printed in Germany • BA 1 619 929 576 • GSH 4 • DK • OSW 02.03
Dansk - 3
■ Træk stikket ud, før der arbejdes på maski-
nen.
☞
Maskine og ventilationshuller skal altid holdes rene for at sikre et godt og sikkert arbejde.
■ Værktøjsholderen skal altid være ren.
Udskiftning af
støvbeskyttelseskappen
En beskadiget støvbeskyttelseskappe skiftes
med det samme. Det anbefales at få kappen skiftet af en autoriseret servicemontør.
Skulle maskinen trods omhyggelig fabrikation og
kontrol engang holde op med at fungere, skal reparationen udføres af et autoriseret serviceværksted for Bosch elektroværktøj.
Det 10-cifrede bestillingsnummer for maskinen
skal altid angives ved forespørgsler og bestilling
af reservedele!
Genbrug af råstoffer i stedet for bortskaffelse
af affald
Maskine, tilbehør og emballage skal genbruges
på en miljøvenlig måde.
Denne vejledning er skrevet på klorfrit genbrugspapir.
Kunststofdele er markeret for at garantere en
rensorteret recycling.
Bosch Service Center for el-værktøj
Telegrafvej 3
DK-2750 Ballerup
✆ Service: .......................................... +45 44 89 88 55
Fax
............................................................ +45 44 89 87 55
✆ Teknisk vejledning: ................. +45 44 89 88 56
✆ Den direkte line: ........................ +45 44 68 35 60
Vi erklærer under almindeligt ansvar, at dette
produkt er i overensstemmelse med følgende
standarder eller normative dokumenter:
EN 50 144 i henhold til bestemmelserne i direktiverne 89/336/EØF, 98/37/EF og 2000/14/EF.
2000/14/EF: Det garanterede lydeffektniveau
L
WA
er lavere 107 dB (A). Procedendrer for over-
ensstemmelsesvurdering iht. bilag VI.
Bemyndiget prøvelaboratorium:
TÜV Hannover/Sachsen-Anhalt e.V.,
D-30519 Hannover CE-DE10-139 670
Leinfelden, 01.03.2002.
Dr. Gerhard Felten Dr. Eckerhard Strötgen
Robert Bosch GmbH, Geschäftsbereich Elektrowerkzeuge
Ret til ændringer forbeholdes
Vedligeholdelse og rengøring
Miljøbeskyttelse
Service og kunderådgiver
Overensstemmelseserklæring
GSH 4 (576) - Buch Seite 3 Montag, 4. März 2002 12:54 12
27 • 1 619 929 576 • TMS • 28.02.02
Page 28

EURO • Printed in Germany • BA 1 619 929 576 • GSH 4 • S • OSW 02.03
Svenska - 1
Mätvärdena har tagits fram baserande på
2000/14/EG (1,60 m höjd, 1 m avstånd) och
EN 50 144.
Maskinens A-vägda ljudnivå uppnår i typiska fall:
Ljudtrycksnivå 88 dB (A); ljudeffektnivå 101 dB (A).
Använd hörselskydd!
Den beräknade accelerationen är i typiska fall
14 m/s
2
.
Maskinen är avsedd för mejselarbeten i betong,
tegel, sten och asfalt samt med respektive tillbehör även för indrivning och komprimering.
1 Dammskydd
2 Spärrhylsa
3 Mejselställring (Vario-lock)
4 Strömställare Till/Från
5 Stödhandtag
I bruksanvisningen avbildat och beskrivet tillbehör
ingår inte alltid i leveransen!
För att riskfritt kunna använda
maskinen bör du noggrant läsa
igenom bruksanvisningen och
exakt följa de instruktioner som
lämnas i säkerhetsanvisning-
arna. Dessutom ska allmänna
säkerhetsanvisningarna i bifogat häfte följas.
Låt en fackman instruera dig i maskinens
användning.
■ Använd hörselskydd.
■ Använd skyddsglasögon och kraftiga skor.
■ Skadas eller kapas nätsladden under arbetet,
rör inte vid sladden utan dra genast ut stickproppen. Maskinen får absolut inte användas
med defekt sladd.
■ Maskiner som används utomhus ska anslutas
via jordfelsbrytare med max. 30 mA utlösningsström. Använd endast för utomhusbruk
godkänd skarvsladd.
■ Använd lämpliga detektorer för lokalise-
ring av dolda försörjningsledningar eller
konsultera lokalt distributionsföretag.
Kontakt med elledningar kan förorsaka brand
och elektriskt slag. En skadad gasledning kan
leda till explosion. Borrning i vattenledning kan
förorsaka sakskador eller elektriskt slag.
■ Håll tag i elverktyget endast i isolerade
grepp när arbeten utförs på platser där
verktyget kan komma i kontakt med dolda
ledningar eller skada egen nätsladd.
Kontakt med en spänningsförande ledning kan
sätta maskinens metalldelar under spänning
som sedan kan leda till elektriskt slag.
■ Dra alltid kabeln bakåt från maskinen.
■ Maskinen ska vara frånkopplad när stick-
proppen ansluts till vägguttaget.
■ Maskinen får användas endast med stöd-
handtag 5.
■ Håll i maskinen med båda händerna under
arbetet och se till att du står stadigt.
■ Innan maskinen läggs bort ska den vara från-
kopplad och ha stannat helt.
■ Låt aldrig barn hantera maskinen.
■ Bosch kan endast garantera att maskinen
fungerar felfritt om för maskinen avsedda
originaltillbehör används.
Tekniska data
Mejselhammare GSH 4
Artikelnummer 0 611 312 1..
Märkeffekt [W] 850
Slagtal [r/min] 2 440
Slagstyrka [J] 7
Mejsellägen 12
Mejselkapacitet i
medelhård betong
[cm3/
min]
450
Verktygsfäste SDS-max
Smörjsystem Central perma-
nentsmörjning
Vikt
(utan tillbehör) ca.
[kg] 4,8
Skyddsklass / II
Kontrollera din maskins artikelnummer. Handelsbeteckningarna för enskilda maskiner kan variera.
Ljud-/vibrationsdata
Ändamålsenlig användning
Maskinens komponenter
Säkerhetsåtgärder
GSH 4 (576) - Buch Seite 1 Montag, 4. März 2002 12:54 12
28 • 1 619 929 576 • TMS • 28.02.02
Page 29

EURO • Printed in Germany • BA 1 619 929 576 • GSH 4 • S • OSW 02.03
Svenska - 2
■ Maskinen får användas endast med stöd-
handtag 5.
Lossa greppfästet genom motursvridning. Sväng
stödhandtaget 5 och anpassa det till arbetsställningen.
Dra sedan åter fast greppfästet.
■ Dra ut stickproppen innan åtgärder utförs
på maskinen.
Verktygshållaren SDS-max medger enkelt,
bekvämt verktygsbyte utan användning av hjälpverktyg.
☞
Verktygets insticksända ska regelbundet smörjas med fett.
Dammskyddet 1 skyddar maskinen i stor
utsträckning mot inträngande damm under
arbetet. Kontrollera vid insättning av verktyg att
dammskyddet 1 inte skadas.
Ett skadat dammskydd ska omedelbart bytas
ut. Vi rekommenderar att du låter bytet
utföras på en serviceverkstad.
Insättning (se bild )
Rengör och smörj verktygets insticksända
med fett.
Skjut in verktyget med roterande rörelse tills det
automatiskt låser. Kontrollera låsningen genom
att dra i verktyget.
Borttagning (se bild )
Verktygsfästets spärrhylsa 2 dras bakåt varefter
verktyget kan tas bort. Släpp åter spärrhylsan 2.
Kontrollera nätspänningen: Kontrollera att
strömkällans spänning överensstämmer med
uppgifterna på maskinens typskylt. Maskiner
märkta med 230 V kan även anslutas till 220 V.
In-/urkoppling
För start av maskinen skjut strömställaren Till /
Från 4 åt höger.
För frånkoppling av maskinen skjut strömställaren Till/Från 4 åt vänster.
☞
Vid låga temperaturer uppnår maskinen
först efter en viss fördröjning full slageffekt.
Stöt mejseln en gång mot golvet för att
snabbare starta maskinen.
Mejseln kan låsas i 12 lägen. Detta möjliggör
optimal arbetsställning.
Skjut mejselställringen 3 framåt, håll fast den i
läget och vrid mejseln med mejselställringen 3 till
ett för kroppen bekvämt läge.
Släpp därefter mejselställringen 3 och vrid
mejseln tills den låser i läge.
Endast med välskärpta mejselverktyg uppnås
gott resultat; slipa därför mejselverktygen innan
de blivit oskarpa. Detta garanterar lång livslängd
för verktygen och god kapacitet.
Efterslipning
Mejselverktygen ska slipas med slipskivor (tex
ädelkorund) under jämn vattentillförsel. Bild C
anger riktvärden. Beakta att missfärgning inte
uppstår vid eggen, eftersom detta påverkar
mejselverktygens hårdhet.
Smidning och härdning
Smide: Glödga mejseln upp till
850 ... 1050 °C (ljusrött till gult)
och forma till eggen genom
smide.
Härdning: Värm mejseln upp till 900 °C
(ljusrött), störtkyl i olja och
ugnshärda ca 1 timme vid 320 °C
(ljusblå anlöpningsfärg).
■ Dra ut stickproppen innan åtgärder utförs
på maskinen.
☞
Håll maskinen och ventilationsöppningarna
rena för bra och säkert arbete.
■ Se till att verktygsfästet alltid är rent.
Byte av dammskydd
Ett skadat dammskydd ska omedelbart bytas ut.
Vi rekommenderar att du låter bytet utföras på en
serviceverkstad.
Om i produkten trots exakt tillverkning och sträng
kontroll störning skulle uppstå, bör reparation
utföras av auktoriserad serviceverkstad för
Bosch elverktyg.
Var vänlig ange vid förfrågningar och reservdelsbeställningar produktens artikelnummer som
består av 10 siffror.
Stödhandtag
Verktygsbyte
Start
A
B
Så här ändras mejselläget
(Vario-lock)
Slipning av mejselverktygen
Underhåll och rengöring
GSH 4 (576) - Buch Seite 2 Montag, 4. März 2002 12:54 12
29 • 1 619 929 576 • TMS • 28.02.02
Page 30

EURO • Printed in Germany • BA 1 619 929 576 • GSH 4 • S • OSW 02.03
Svenska - 3
Återvinning i stället för avfallshantering
Maskin, tillbehör och förpackning kan återvinnas.
Denna bruksanvisning är tryckt på klorfritt retur-
papper.
För att underlätta sortering vid återvinning är
plastdelarna markerade.
Robert Bosch AB
Isafjordsgatan 15
Box 11 54
S-164 22 Kista
✆ Växel:...................................... +46 (0)8 / 7 50 15 00
✆ Kundtjänst:.......................... +46 (0)8 / 7 50 18 20
Vi försäkrar härmed under exklusivt ansvar att
denna produkt överensstämmer med följande
normer och harmoniserade standarder:
EN 50 144 enligt bestämmelserna i direktiven
89/336/EEG, 98/37/EG, 2000/14/EG.
2000/14/EG: Garanterad ljudeffektnivå L
WA
är
lägre än 107 dB (A). Beräkningsmetod för konformitet enligt bilaga VI.
Nämnd provningsanstalt:
TÜV Hannover/Sachsen-Anhalt e.V.,
D-30519 Hannover CE-DE10-139 670
Leinfelden, 01.03.2002.
Dr. Gerhard Felten Dr. Eckerhard Strötgen
Robert Bosch GmbH, Geschäftsbereich Elektrowerkzeuge
Ändringar förbehålles
Miljöhänsyn Service och kundtjänst
Försäkran om
överensstämmelse
GSH 4 (576) - Buch Seite 3 Montag, 4. März 2002 12:54 12
30 • 1 619 929 576 • TMS • 28.02.02
Page 31

EURO • Printed in Germany • BA 1 619 929 576 • GSH 4 • N • OSW 02.03
Norsk - 1
Måleverdier funnet i samsvar med 2000/14/EF
(1,60 m høyde, 1 m avstand) og EN 50 144.
Det typiske A-bedømte støynivået for maskinen er:
Lydtrykknivå: 88 dB (A). Lydstyrkenivå: 101 dB (A).
Bruk hørselvern!
Den typiske bedømte akselerasjonen er 14 m/s
2
.
Maskinen er beregnet til meiselarbeider i betong,
murstein, stein og asfalt samt til innslåing og tetting med passende tilbehør.
1 Støvkappe
2 Låsehylse
3 Meiselinnstillingsring (Vario-lock)
4 På-/av-bryter
5 Ekstrahåndtak
Tilbehør som er beskrevet og illustrert i
bruksanvisningen inngår ikke alltid i leveransen!
Det er kun mulig å arbeide farefritt med maskinen hvis du leser
bruksanvisningen og sikkerhetshenvisningene komplett på forhånd og følger anvisningene
nøye. I tillegg må de generelle
sikkerhetsinformasjonene i vedlagt hefte følges. Sørg for å få demonstrert maskinen før
førstegangs bruk.
■ Bruk hørselvern.
■ Bruk vernebriller og solide sko.
■ Hvis strømkabelen skades eller kappes under
arbeid må kabelen ikke berøres, men strømstøpselet straks trekkes ut. Bruk aldri maskinen med skadet kabel.
■ Maskiner som brukes utendørs må koples til
en jordfeilbryter (FI) med maksimalt 30 mA utløsningsstrøm. Bruk kun en skjøteledning som
er godkjent for utendørs bruk.
■ Bruk egnede søkeapparater til å finne
skjulte strøm-/gass-/vannledninger, eller
spør hos det lokale el-/gass-/vannverket.
Kontakt med elektriske ledninger kan medføre
brann og elektriske støt. Skader på en gassledning kan føre til eksplosjon. Inntrengning i
en vannledning forårsaker materielle skader
og kan medføre elektriske støt.
■ Ta kun tak i el-verktøyet på isolerte grep,
hvis innsatsverktøyet kan treffe på en
skjult ledning eller sin egen nettkabel.
Kontakt med en spenningsførende ledning
kan sette maskinens metalldeler under spenning og føre til elektriske støt.
■ Ledningen føres alltid bakover bort fra maski-
nen.
■ Maskinen må være slått av når støpselet stik-
kes inn i stikkontakten.
■ Bruk maskinen kun med ekstrahåndtak 5.
■ Under arbeid må du alltid holde maskinen godt
fast med begge hendene og sørge for å stå
stødig.
■ Slå maskinen alltid av før den legges ned og
vent til maskinen er stanset helt.
■ La aldri barn bruke denne maskinen.
■ Bosch kan kun garantere en feilfri funksjon av
maskinen når det brukes original-tilbehør.
Tekniske data
Slaghammer GSH 4
Bestillingsnummer 0 611 312 1..
Opptatt effekt [W] 850
Slagtall [/min] 2 440
Enkeltslagstyrke [J] 7
Meiselinnstilling 12
Meiselytelse i middels
hard betong
[cm3/
min]
450
Verktøyfeste SDS-max
Smøring Sentral
permanent
smøring
Vekt (uten tilbehør) ca. [kg] 4,8
Beskyttelsesklasse / II
Legg merke til bestillingsnummeret for din maskin. Handelsbetegnelsene for de enkelte maskinene kan variere.
Støy-/vibrasjonsinformasjon
Formålsmessig bruk
Maskinelementer
For din sikkerhet
GSH 4 (576) - Buch Seite 1 Montag, 4. März 2002 12:54 12
31 • 1 619 929 576 • TMS • 28.02.02
Page 32

EURO • Printed in Germany • BA 1 619 929 576 • GSH 4 • N • OSW 02.03
Norsk - 2
■ Bruk maskinen kun med ekstrahåndtak 5.
Løs håndtaket ved å dreie det til venstre. Ekstrahåndtak 5 dreies og tilpasses arbeidsstillingen.
Trekk håndtaket deretter godt til igjen.
■ Før alle arbeider på maskinen utføres må
støpselet trekkes ut.
Med verktøyfestet SDS-max er det mulig å skifte
ut verktøy på en enkel, bekvem måte uten ekstra
verktøy.
☞
Innstikkingsenden til verktøyene må
smøres med jevne mellomrom.
Støvkappe 1 forhindrer i stor utstrekning inntrengning av borestøv under drift. Ved innsetting
av verktøyet må det passes på at støvkappe 1
ikke tar skade.
En skadet støvkappe skal straks skiftes ut.
Det anbefales å la et kundeservice-verksted
utføre dette.
Innsetting (se bilde )
Rengjør og smør innstikkingsenden til verktøyet.
Verktøyet føres inn i verktøyfestet til det låses automatisk. Kontrollér låsen ved å trekke i verktøyet.
Demontering (se bilde )
Verktøyfestets låsehylse 2 skyves bakover og
verktøyet fjernes. Slipp låsehylsen 2 igjen.
Vær oppmerksom på nettspenningen: Spenningen til strømkilden må stemme overens med
informasjonene på maskinens typeskilt. Maskiner som er merket med 230 V kan også brukes
på 220 V.
Inn-/utkobling
Til innkobling av maskinen skyves på-/av-bryteren 4 mot høyre.
Til utkobling av maskinen skyves på- / av-bryteren 4 mot venstre.
☞
Ved lave temperaturer når maskinen full
slageffekt først etter en viss tid.
Denne starttiden kan forkortes ved at meiselen støtes en gang mot gulvet.
Meiselen kan låses i 12 stillinger. Slik kan alltid
den beste arbeidsstillingen innstilles.
Meiselinnstillingsring 3 skyves fremover og holdes fast, deretter vris meiselen med meiselinnstillingsringen 3 til ønsket posisjon er nådd.
Meiselinnstillingsring 3 slippes og meiselen låses
fast med en vridning.
Kun med skarpe meiselverktøy oppnår man gode
resultater, derfor må meiselverktøy slipes i rett
tid. Derved sikrer du deg både en lang brukstid
for ditt verktøy og gode arbeidsytelser.
Ettersliping
Meiselverktøyene slipes på slipeskiver (for eksempel edelkorund) ved konstant vanntilførsel.
Standardverdier for dette er vist i bilde C. Vær
oppmerksom på at det ikke vises anløpsfarger på
eggene, fordi meiselverktøyenes hardhet ellers
påvirkes.
Smiing og herding
Smiing: Meiselen varmes opp til 850 til
1050 °C (lyserød til gul) og smies.
Herding: Meiselen varmes opp til 900 °C (ly-
serød) og kjøles i olje, deretter anløpes den i ovnen cirka en time ved
320 °C (anløpsfarge = lyseblå).
■ Før alle arbeider på maskinen utføres må
støpselet trekkes ut.
☞
Maskin og ventilasjonsspalter må alltid holdes rene for å kunne arbeide bra og sikkert.
■ Hold verktøyfestet alltid rent.
Utskifting av støvkappen
En skadet støvkappe skal straks skiftes ut. Det
anbefales å la et kundeservice-verksted utføre
dette.
Skulle maskinen svikte til tross for omhyggelige
produksjons- og kontrollmetoder, må reparasjonen utføres av et autorisert serviceverksted for
Bosch-elektroverktøy.
Ved alle forespørsler og reservedelsbestillinger
må du absolutt oppgi maskinens 10-sifrede bestillingsnummer!
Ekstrahåndtak
Utskifting av verktøy
Start
A
B
Vario-lock, endring av
meiselstillingen
Sliping av meiselverktøy
Vedlikehold og rengjøring
GSH 4 (576) - Buch Seite 2 Montag, 4. März 2002 12:54 12
32 • 1 619 929 576 • TMS • 28.02.02
Page 33

EURO • Printed in Germany • BA 1 619 929 576 • GSH 4 • N • OSW 02.03
Norsk - 3
Råstoffgjenvinning i stedet for avfallsdeponering.
Maskin, tilbehør og forpakning bør resirkuleres.
Denne bruksanvisningen er laget av klorfritt resir-
kulert papir.
For å kunne resirkulere på en skikkelig måte, er
kunststoffdelene markerte.
Robert Bosch A/S
Trollaasveien 8
Postboks 10
N-1414 Trollaasen
✆ Kundekonsulent:........................ +47 66 81 70 00
Fax
.............................................................. +47 66 81 70 97
Vi overtar ansvaret for at dette produktet er i overensstemmelse med følgende standarder eller
standard-dokumenter: EN 50 144 i samsvar med
bestemmelsene i direktivene 89/336/EØF,
98/37/EF, 2000/14/EF.
2000/14/EF: Den garanterte lydstyrken L
WA
er lavere enn 107 dB (A). Bedømmelsesmetode for
samsvar se vedlegg VI.
Angitt kontrollsted:
TÜV Hannover/Sachsen-Anhalt e.V.,
D-30519 Hannover CE-DE10-139 670
Leinfelden, 01.03.2002.
Dr. Gerhard Felten Dr. Eckerhard Strötgen
Robert Bosch GmbH, Geschäftsbereich Elektrowerkzeuge
Rett til endringer forbeholdes
Miljøvern Service og kundekonsulent
Samsvarserklæring
GSH 4 (576) - Buch Seite 3 Montag, 4. März 2002 12:54 12
33 • 1 619 929 576 • TMS • 28.02.02
Page 34

EURO • Printed in Germany • BA 1 619 929 576 • GSH 4 • FIN • OSW 02.03
Suomi - 1
Mitta-arvot annettu 2000/14/EY mukaan (korkeus 1,60 m, etäisyys 1 m) ja EN 50 144.
Työkalun tyypillinen A-arvioitu melutaso: äänen
painetaso 88 dB (A); äänentehotaso 101 dB (A).
Käytä kuulosuojaimia!
Tyypillinen luokitettu kiihtyvyys on 14 m/s
2
.
Laite on tarkoitettu talttaustöihin betoniin, tiileen,
kiveen ja asfalttiin sekä vastaavin lisälaittein varustettuna junttaamiseen ja sullomiseen.
1 Pölynsuojus
2 Lukkoholkki
3 Taltan säädinrengas (Vario-lock)
4 Käynnistyskytkin
5 Lisäkahva
Käyttöohjeissa kuvatut lisätarvikkeet eivät välttämättä
sisälly toimitukseen!
Vaaraton työskentely laitteella
on mahdollinen ainoastaan
luettuasi huolellisesti käyttö- ja
turvaohjeet sekä seuraamalla
ohjeita tarkasti. Lisäksi tulee
noudattaa oheen liitetyn vihkosen yleisiä turvaohjeita. Ennen ensimmäistä
käyttöä sinun tulisi saada käytännön opastusta.
■ Käytä kuulosuojaimia.
■ Käytä suojalaseja ja tukevia jalkineita.
■ Jos verkkojohto vahingoittuu tai katkeaa työn
aikana ei johtoa saa koskettaa, vaan pistotulppa on välittömästi irrotettava pistorasiasta.
Älä koskaan käytä laitetta, jos verkkojohto on
viallinen.
■ Ulkona käytettäviä laitteita varten suositte-
lemme vikavirtasuojakytkimen (FI-) käyttöä,
jonka laukaisuvirta on korkeintaan 30 mA.
Käytä vain ulkokäyttöön tarkoitettua jatkojohtoa.
■ Käytä sopivia etsintälaitteita piilossa ole-
vien syöttöjohtojen paikallistamiseksi, tai
käänny paikallisen jakeluyhtiön puoleen.
Kosketus sähköjohtoon saattaa johtaa tulipaloon ja sähköiskuun. Kaasuputken vahingoittaminen saattaa johtaa räjähdykseen. Vesijohtoon tunkeutuminen aiheuttaa aineellista vahinkoa tai saattaa johtaa sähköiskuun.
■ Tartu sähkötyökaluun ainoastaan eriste-
tyistä kahvoista, jos työkalu saattaa osua
piilossa olevaan johtoon tai omaan verkkojohtoon.
Kosketus jännitteisen johdon kanssa saattaa
tehdä koneen metalliosat jännitteisiksi ja aikaansaada sähköiskun.
■ Tarkista aina, että verkkojohto kulkee ko-
neesta poispäin.
■ Liitä pistotulppa pistorasiaan ainoastaan ko-
neen ollessa poiskytkettynä.
■ Käytä konetta ainoastaan lisäkahvan 5
kanssa.
■ Pidä työskentelyn aikana aina konetta kaksin
käsin ja seiso tukevasti.
■ Pysäytä aina kone ennen kuin asetat sen pois
käsistäsi ja odota, että koneen pyörintä lakkaa.
■ Älä koskaan anna lapsille lupaa käyttää ko-
netta.
■ Bosch takaa laitteen moitteettoman toiminnan
ainoastaan, jos käytetään tälle laitteelle tarkoitettuja alkuperäisiä varaosia.
Tekniset tiedot
Iskuvasara GSH 4
Tilausnumero 0 611 312 1..
Nimellisottoteho [W] 850
Iskuluku [min-1] 2 440
Iskun voimakkuus [J] 7
Taltan asentoja 12
Talttausteho
keskikovaan betoniin
[cm3/
min]
450
Työkalunpidin SDS-max
Voitelu Keskeinen
kestovoitelu
Paino (ilman
tarvikkeita) n.
[kg] 4,8
Suojausluokka / II
Ota huomioon koneesi tilausnumero. Yksittäisten koneiden kauppanimitys saattaa vaihdella.
Melu-/tärinätieto
Asianmukainen käyttö
Koneen osat
Työturvallisuus
GSH 4 (576) - Buch Seite 1 Montag, 4. März 2002 12:54 12
34 • 1 619 929 576 • TMS • 28.02.02
Page 35

EURO • Printed in Germany • BA 1 619 929 576 • GSH 4 • FIN • OSW 02.03
Suomi - 2
■ Käytä konetta ainoastaan lisäkahvan 5
kanssa.
Lisäkahvan 5 kääntämistä varten kahva irrote-
taan ensin kiertämällä sitä vasemmalle ja sitten
sovitetaan se työasennon mukaan.
Kiristä kahva tämän jälkeen hyvin.
■ Irrota pistotulppa pistorasiasta ennen kaik-
kia laitteeseen kohdistuvia töitä.
SDS-max työkalunpidin mahdollistaa helpomman ja mukavamman työkalunvaihdon ilman lisätyökaluja.
☞
Asennettavan työkalun pitimeen tuleva
pää on säännöllisesti rasvattava.
Pölynsuojus 1 estää pitkälti pölyn tunkeutumisen
koneeseen käytön aikana. On varottava vaurioittamasta pölynsuojusta 1 työkalua asennettaessa.
Vioittunut pölynsuojus tulee vaihtaa välittömästi. Suosittelemme, että työ annetaan
Bosch-huollon suoritettavaksi.
Asennus (katso kuvaa )
Puhdista ja rasvaa asennettavan työkalun pitimeen tuleva pää.
Työnnä työkalu kiertämällä työkalunpitimeen
kunnes se lukkiutuu. Tarkista lukkiutuminen vetämällä työkalusta.
Irrotus (katso kuvaa )
Työkalunpitimen lukkoholkki 2 työnnetään
taakse ja työkalu vedetään ulos. Irrota ote lukkoholkista 2.
Tarkista verkkojännite: Virtalähteen jännitteen
täytyy olla sama, kuin mallikilpeen merkitty.
230 V-merkittyjä laitteita voidaan käyttää myös
220 V verkoissa.
Käynnistys ja pysäytys
Käynnistä laite työntämällä käynnistyskytkintä 4
oikealle.
Pysäytä laite työntämällä käynnistyskytkintä 4
vasemmalle.
☞
Alhaisessa lämpötilassa saavuttaa laite
täyden iskutehon vasta määrätyn ajan kuluttua.
Voit lyhentää tämän käynnistysajan,
iskemällä taltta kerran lattiaan.
Taltta voidaan lukita 12:n asentoon. Näin voidaan
aina saavuttaa mahdollisimman hyvä työskentelyasento.
Työnnä taltan säädinrengasta 3 eteenpäin ja
pidä se siinä asennossa. Käännä sitten talttaa
säädinrenkaan 3 avulla, kunnes se on halutussa
asennossa.
Päästä säädinrengas 3 irti ja kierrä talttaa, kun-
nes se lukkiutuu.
Hyvä työtulos saavutetaan vain terävillä talttatyökaluilla, siksi talttatyökalut on teroitettava ajoissa.
Siten takaat työkaluillesi korkean kestoajan ja hyvän työtuloksen.
Hiominen
Talttatyökalut hiotaan hiomalaikalla (esim. jalokorundi) johtamalla hiomakohtaan vettä tasaisesti. Nämä ohjearvot löytyvät kuvasta C. Tarkista, ettei leikkuusärmiin muodostu päästöväriä,
koska muutoin talttaustyökalujen kovuus kärsii.
Taonta ja karkaisu
Taonta: Taltta kuumennetaan 850–1050 °C
asteeseen (vaaleanpunainen - keltainen) ja taotaan teräväksi.
Karkaisu: Taltta kuumennetaan 900 °C as-
teeseen (vaaleanpunainen) ja äkkijäähdytetään karkaisuöljyssä; lopuksi suoritetaan päästäminen uunissa n. 1 tunti 320 °C asteessa,
(päästöväri = vaaleansininen).
Lisäkahva
Työkalunvaihto
Käyttöönotto
A
B
Talttausasennon muuttaminen
(Vario-lock)
Talttatyökalujen teroitus
GSH 4 (576) - Buch Seite 2 Montag, 4. März 2002 12:54 12
35 • 1 619 929 576 • TMS • 28.02.02
Page 36

EURO • Printed in Germany • BA 1 619 929 576 • GSH 4 • FIN • OSW 02.03
Suomi - 3
■ Irrota pistotulppa pistorasiasta ennen kaik-
kia laitteeseen kohdistuvia töitä.
☞
Pidä aina laite ja tuuletusaukot puhtaina
voidaksesi työskennellä hyvin ja turvallisesti.
■ Pidä aina työkalunpidin puhtaana.
Vaihda pölynsuojus
Vioittunut pölynsuojus tulee vaihtaa välittömästi.
Suosittelemme, että työ annetaan Bosch-huollon
suoritettavaksi.
Tämä laite on suunniteltu, valmistettu ja testattu
erittäin huolellisesti. Mikäli siinä siitä huolimatta ilmenee jokin vika, anna vain Bosch-huoltoliikkeen
suorittaa tarvittavat korjaukset.
Ilmoita ehdottomasti laitteen 10-numeroinen
tilausnumero kaikissa kyselyissä ja varaosatilauksissa!
Raaka-aineen uusiokäyttö jätehuollon asemasta
Laite, tarvikkeet ja pakkaus tulisi hävittää ympäristöystävällisesti toimittamalla ne kierrätykseen.
Nämä käyttöohjeet on valmistettu kloorittomasti
valkaistusta uusiopaperista.
Lajipuhdasta kierrättämistä varten muoviosissa
on merkinnät.
Robert Bosch OY
Keskushuolto/Sähkötyökalut
Pakkalantie 21A
FIN-01510 Vantaa
✆ .............................................. +358 (0)9 / 27 05 34 61
✆ .............................................. +358 (0)9 / 27 05 34 62
✆ .............................................. +358 (0)9 / 27 05 34 63
Fax
................................................. +358 (0)9 / 8 70 23 18
Todistamme täten ja vastaamme yksin siitä, että
tämä tuote on alla lueteltujen standardien ja standardoimisasiakirjojen vaatimusten mukainen
EN 50 144 seuraavien direktiivien määräysten
mukaisesti: 89/336/ETY, 98/37/EY, 2000/14/EY.
2000/14/EY: Taattu äänentehotaso L
WA
on alle
107 dB (A). Yhteensopivuuden arvostusmenetelmä liitteen VI mukaan.
Nimetty koestuslaitos:
TÜV Hannover/Sachsen-Anhalt e.V.,
D-30519 Hannover CE-DE10-139 670
Leinfelden, 01.03.2002.
Dr. Gerhard Felten Dr. Eckerhard Strötgen
Robert Bosch GmbH, Geschäftsbereich Elektrowerkzeuge
Pidätämme oikeuden muutoksiin
Huolto ja puhdistus
Ympäristönsuojelu
Huolto ja asiakasneuvonta
Yhdenmukaisuusvakuutus
GSH 4 (576) - Buch Seite 3 Montag, 4. März 2002 12:54 12
36 • 1 619 929 576 • TMS • 28.02.02
Page 37

EURO • Printed in Germany • BA 1 619 929 576 • GSH 4 • GR • OSW 02.03
Eλληνικά - 1
Εξακρίβωση των τιµών µέτρησησ σύµφωνα
µε 2000/14/EK (ύψοσ 1,60 m, απσταση 1 m)
και EN 50 144.
Η σύµφωνα µε την καµπύλη Α εκτιµηθείσα
στάθµη θορύβου του µηχανήµατοσ
ανέρχεται σε: Στάθµη ακουστικήσ πίεσησ
88 dB (Α). Στάθµη ηχητικήσ ισχύοσ
101 dB (Α).
Φοράτε ωτασπίδεσ!
Η εκτιµηθείσα χαρακτηριστική επιτάχυνση
ανέρχεται 14 m/s
2
.
Το µηχάνηµα προορίζεται για
καλεµοδουλειέσ σε σκυρδεµα, τούβλα και
άσφαλτο και, εξοπλισµένο µε τα κατάλληλα
ειδικά εξαρτήµατα, για εµπήξεισ και
συµπιέσεισ.
1 Κάλυµµα προστασίασ απ σκνη
2 ∆ακτύλιοσ µανδάλωσησ
3 ∆ακτύλιοσ ρύθµισησ καλεµιού (Vario-
lock)
4 ∆ιακπτησ ΟΝ/ΟFF
5 Πρσθετη λαβή
Εξαρτήµατα που απεικονίζονται και περιγράφονται
στισ οδηγίεσ χρήσησ δεν συνοδεύουν πάντοτε το
µηχάνηµα!
Ακίνδυνη εργασία µε το
µηχάνηµα είναι µνο δυνατή, αν
διαβάσετε πρώτα καλά λεσ τισ
οδηγίεσ χρήσησ και τισ
υποδείξεισ ασφάλειασ και
εφαρµζετε πάντοτε αυστηρά
τισ οδηγίεσ που περιέχονται σ΄ αυτέσ.
Συµπληρωµατικά πρέπει να τηρούνται και οι
γενικέσ υποδείξεισ ασφαλείασ που
περιέχονται στο συµπαραδιδµενο
φυλλάδιο. Πριν χρησιµοποιήσετε το
µηχάνηµα για πρώτη φορά ζητήστε να σασ
ενηµερώσουν στην πράξη.
■ Φοράτε ωτασπίδεσ.
■ Φοράτε προστατευτικά γυαλιά και
υποδήµατα.
■ Μην αγγίζετε το καλώδιο δικτύου, σε
περίπτωση που κατά την εργασία υποστεί
βλάβη ή κοπεί τελείωσ, αλλά βγάλτε
αµέσωσ το φισ απ την πρίζα. Μη
χρησιµοποιείτε ποτέ το µηχάνηµα µε
φθαρµένο καλώδιο.
■ Μηχανήµατα που χρησιµοποιούνται σε
εξωτερικ χώρο πρέπει να συνδέονται µε
το ηλεκτρικ δίκτυο µέσω ενσ αυτµατου
διακπτη διαρροήσ 30 mΑ. Χρησιµοποιείτε
πάντα καλώδια επιµήκυνσησ ενδεδειγµένα
για χρήση σε εξωτερικ χώρο.
■ Χρησιµοποιήστε κατάλληλεσ συσκευέσ
ανίχνευσησ για τον εντοπισµ τυχν
αφανών αγωγών/γραµµών παροχήσ
ενέργειασ ή συµβουλευτείτε σχετικά τήν
αντίστοιχη τοπική επιχείρηση παροχήσ
ενέργειασ.
Η επαφή µε τισ ηλεκτρικέσ γραµµέσ
µπορεί να οδηγήσει σε πυρκαγιά κι
ηλεκτροπληξία. Ζηµιά σ΄ έναν αγωγ
φωταερίου (γκαζιού) µπορεί να οδηγήσει
σε έκρηξη. Το τρύπηµα/κψιµο ενσ
υδροσωλήνα προκαλεί ζηµιέσ σε
αντικείµενα και πράγµατα και µπορεί να
προκαλέσει ηλεκτροπληξία.
Τεχνικά χαρακτηριστικά
µηχανήµατοσ
Κρουστικ πιστολέτο GSH 4
Κωδικσ αριθµσ 0 611 312 1..
Ονοµαστική ισχύσ [W] 850
Αριθµσ κρούσεων [/min] 2 440
Iσχύσ κάθε κρούσησ [J] 7
Ρύθµιση καλεµιού 12
Ισχύσ καλεµιού σε
µπετν µέτριασ
σκληρτητασ
[cm
3
/
min]
450
Υποδοχή εργαλείου SDS-max
Λίπανση Κεντρική
µνιµη
λίπανση
Βάροσ (χωρίσ
εξαρτήµατα) περ.
[kg] 4,8
Μνωση / II
Παρακαλούµε προσέξτε τον κωδικ αριθµ του
µηχανήµατσ σασ. Ο εµπορικσ χαρακτηρισµσ
ορισµένων µηχανηµάτων µπορεί να διαφέρει.
Πληροφορίεσ για θρυβο και
δονήσεισ
Χρήση σύµφωνα µε τον προορισµ
Μέρη µηχανήµατοσ
Για την ασφάλειά σασ
GSH 4 (576) - Buch Seite 1 Montag, 4. März 2002 12:54 12
37 • 1 619 929 576 • TMS • 28.02.02
Page 38

EURO • Printed in Germany • BA 1 619 929 576 • GSH 4 • GR • OSW 02.03
Eλληνικά - 2
■ ταν υπάρχει κίνδυνοσ να «χτυπήσετε»
µια τυχν αφανή ηλεκτρική γραµµή ή το
ίδιο το ηλεκτρικ καλώδιο του
µηχανήµατοσ, πιάστε το ηλεκτρικ
µηχάνηµα µνο απ τα µονωµένα τµήµατά
/τισ µονωµένεσ λαβέσ του.
Η επαφή µε µια υπ τάση ευρικµενη
ηλεκτρική γραµµή µπορεί να θέσει τα
µεταλλικά τµήµατα του µηχανήµατοσ
επίσησ υπ τάση και να οδηγήσει έτσι σε
ηλεκτροληξία.
■ Αποµακρύνετε το καλώδιο πάντοτε πίσω
απ το µηχάνηµα.
■ Βάζετε το φισ στην πρίζα µνον ταν το
µηχάνηµα βρίσκεται εκτσ λειτουργίασ.
■ Χρησιµοποιείτε το µηχάνηµα πάντα µε την
πρσθετη λαβή 5.
■ Οταν εργάζεσθε κρατάτε το µηχάνηµα και
µε τα δυ σασ χέρια και φροντίζετε για την
ασφαλή θέση του σώµατσ σασ.
■ Πριν αποθέσετε το µηχάνηµα θέστε το
οπωσδήποτε εκτσ λειτουργίασ και
περιµένετε ώσπου αυτ να πάψει εντελώσ
να κινείται.
■ Μην επιτρέπετε ποτέ σε παιδιά τη χρήση
του µηχανήµατοσ.
■ Η Bosch εγγυάται την άψογη λειτουργία
του µηχανήµατοσ µνο ταν για το
µηχάνηµα αυτ χρησιµοποιούνται τα
προβλεπµενα γνήσια εξαρτήµατα.
■ Χρησιµοποιείτε το µηχάνηµα πάντα µε την
πρσθετη λαβή 5.
Λύστε το τµήµα τησ λαβήσ στρέφοντάσ το
προσ τα αριστερά. Γυρίστε την πρσθετη
λαβή 5 και προσαρµστε την στη θέση
εργασίασ.
Στη συνέχεια ξανασφίξτε το χερούλι.
■ Πριν απ κάθε εργασία στο ίδιο το
µηχάνηµα βγάζετε το φισ απ την πρίζα.
Χάρη στην υποδοχή εργαλείου SDS-max
είναι δυνατή η απλή, ξεκούραστη αλλαγή του
εργαλείου, χωρίσ τη βοήθεια
συµπληρωµατικών εργαλείων.
☞
Το εισαγµενο άκρο του εργαλείου
πρέπει να λιπαίνεται τακτικά.
Το κάλυµµα προστασίασ απ σκνη 1
εµποδίζει σηµαντικά τη διείσδυση τησ
σκνησ διάτρησησ κατά τη διάρκεια τησ
λειτουργίασ του µηχανήµατοσ. ∆ίνετε
προσοχή κατά την εκάστοτε τοποθέτηση του
εργαλείου, ώστε να µην υποστεί βλάβη το
κάλυµµα προστασίασ απ σκνη 1.
Ένα χαλασµένο κάλυµµα ασφαλείασ πρέπει
να αντικατασταθεί αµέσωσ. Σασ συνιστούµε
να αναθέσετε την αντικατάσταση σ΄ ένα
κατάστηµα Service.
Τοποθέτηση (Βλέπε εικνα )
Καθαρίζετε και λιπαίνετε το εισαγµενο
άκρο του εργαλείου.
Εισάγετε το εργαλείο στην υποδοχή
εργαλείου περιστρέφοντάσ το µέχρι να
µανδαλώσει απ µνο του. Ελέγξτε τη
µανδάλωση µε τράβηγµα του εργαλείου.
Αφαίρεση (Βλέπε εικνα )
Σπρώξτε το δακτύλιο µανδάλωσησ 2 τησ
εισαγωγήσ του εργαλείου προσ τα πίσω και
αφαιρέστε το εργαλείο. Αφήστε το δακτύλιο
µανδάλωσησ 2 πάλι ελεύθερο.
∆ώστε προσοχή στην τάση του δικτύου:
Η τάση τησ πηγήσ ρεύµατοσ πρέπει να
αντιστοιχεί πλήρωσ στην τάση που
αναγράφεται στην πινακίδα του
κατασκευαστή πάνω στο µηχάνηµα.
Μηχανήµατα µε αναγραµµένη τάση 230 V
λειτουργούν επίσησ και στα 220 V.
Πρσθετη λαβή
Αλλαγή εργαλείου
Θέση σε λειτουργία
A
B
GSH 4 (576) - Buch Seite 2 Montag, 4. März 2002 12:54 12
38 • 1 619 929 576 • TMS • 28.02.02
Page 39

EURO • Printed in Germany • BA 1 619 929 576 • GSH 4 • GR • OSW 02.03
Eλληνικά - 3
Θέση σε λειτουργία και εκτσ
λειτουργίασ
Για να θέσετε το µηχάνηµα σε λειτουργία
ωθήστε το διακπτη ON/OFF 4 προσ τα
δεξιά.
Για να θέσετε το µηχάνηµα εκτσ
λειτουργίασ ωθήστε το διακπτη ON/OFF 4
προσ τα αριστερά.
☞
Υπ χαµηλέσ θερµοκρασίεσ το
µηχάνηµα αναπτύσσει την τελική
απδοσή του µετά απ ένα ορισµένο
χρονικ διάστηµα.
Ο χρνοσ αυτσ µπορεί να συντοµευτεί
αν πιέσετε τον κφτη (το καλέµι) µια
φορά στο έδαφοσ.
Το εργαλείο εκσµίλευσησ (καλέµι) µπορεί να
µανδαλώσει σε συνολικά 12 θέσεισ. Μ΄ αυτν
τον τρπο µπορεί να προσαχτεί στη βέλτιστη
θέση εργασίασ.
Γι΄ αυτ ωθήστε και συγκρατήστε το
δακτύλιο ρύθµισησ 3 προσ τα εµπρσ,
κατπιν στρίψτε το καλέµι µε τον δακτύλιο
ρύθµισησ 3 µέχρι να επιτευχθεί η επιθυµητή
θέση.
Αφήστε το δακτύλιο ρύθµισησ 3 ελεύθερο
και περιστρέψτε το καλέµι µέχρι να
µανδαλώσει.
Μνο µε καλώσ ακονισµένα εργαλεία
εκσµίλευσησ επιτυγχάνονται κατά την
εργασία καλά αποτελέσµατα. Για το λγο
αυτν πρέπει τα εργαλεία εµσµίλευσησ να
ακονίζονται εγκαίρωσ. Ετσι εξασφαλίζεται η
µακροζωία των εργαλείων και η καλή
απδοση τησ εργασίασ σασ.
Συµπληρωµατικ τρχισµα
Τα εργαλεία εκσµίλευσησ πρέπει να
ακονίζονται µε δίσκουσ λείανσησ (π. χ. απ
εκλεκτ κορούνδιο) υπ οµοιµορφη ροή
νερού. Σχετικέσ προσεγγιστικέσ τιµέσ
περιέχει η εικνα C. Προσοχή, στισ κψεισ
δεν πρέπει να παρουσιάζονται χρώµατα
επαναφοράσ, διτι έτσι µπορεί να
προσβληθεί η σκληρτητα των εργαλείων
εκσµίλευσησ.
Σφυρηλάτηση και βαφή
Σφυρηλάτηση: Θερµάντε το καλέµι σε
θερµοκρασία 850 έωσ 1050 °C
(λαµπρ ερυθρ έωσ κίτρινο)
και σφυρηλατήστε το.
Βαφή: Θερµάντε το καλέµι υπ
900 °C (λαµπρ ερυθρ) και
µετά ψήξτε το απτοµα σε
λάδι. Στη συνέχεια
επαναφέρτε το µέσα σε
κλίβανο επί µια ώρα περίπου
στουσ 320 °C (χρώµα
επαναφοράσ = ανοικτ µπλε).
■ Πριν απ κάθε εργασία στο ίδιο το
µηχάνηµα βγάζετε το φισ απ την πρίζα.
☞
∆ιατηρείτε το µηχάνηµα και τισ σχισµέσ
αερισµού πάντα καθαρέσ.
■ ∆ιατηρείτε την υποδοχή εργαλείου πάντα
καθαρή.
Αντικατάσταση καλύµµατοσ
προστασίασ απ σκνη
Ένα χαλασµένο κάλυµµα ασφαλείασ πρέπει
να αντικατασταθεί αµέσωσ. Σασ συνιστούµε
να αναθέσετε την αντικατάσταση σ΄ ένα
κατάστηµα Service.
Αν παρλεσ τισ επιµεληµένεσ µεθδουσ
κατασκευήσ και ελέγχου σταµατήσει κάποτε
το µηχάνηµα, ττε η επισκευή του πρέπει να
ανατεθεί σ΄ ένα εξουσιοδοτηµένο συνεργείο
ηλεκτρικών µηχανηµάτων τησ Bosch.
Οταν ζητάτε πληροφορίεσ και ταν
παραγγέλλετε ανταλλακτικά, παρακαλούµε
να αναφέρετε οπωσδήποτε το 10ψήφιο
κωδικ αριθµ που υπάρχει στην πινακίδα
κατασκευαστή!
Αλλαγή θέσησ του καλεµιού
(Vario-lock)
Ακνισµα των εργαλείων
εκσµίλευσησ
Συντήρηση και καθαρισµσ
GSH 4 (576) - Buch Seite 3 Montag, 4. März 2002 12:54 12
39 • 1 619 929 576 • TMS • 28.02.02
Page 40

EURO • Printed in Germany • BA 1 619 929 576 • GSH 4 • GR • OSW 02.03
Eλληνικά - 4
Ανακύκλωση πρώτων υλών αντί απσυρση
απορριµάτων
Το µηχάνηµα, τα ειδικά εξαρτήµατα και η
συσκευασία θα πρέπει να αποσύρονται για
επανεπεξεργασία µε τρπο φιλικ προσ το
περιβάλλον.
Αυτέσ οι οδηγίεσ χρήσησ έχουν τυπωθεί σε
ανακυκλωµένο χαρτί λευκασµένο χωρίσ
χλώριο.
Για την ανακύκλωση κατά είδοσ τα πλαστικά
µέρη του µηχανήµατοσ φέρουν ένα σχετικ
χαρακτηρισµ.
Robert Bosch A.E.
Κηφισσού 162
12131 Περιστέρι-Αθήνα
✆ ................................................ +30 (0)1 / 57 70 081-3
Fax
..................................................... +30 (0)1 / 57 70 080
ABZ Service A.E.
✆ ............................................. +30 (0)1 / 57 70 081-83
✆ ............................................. +30 (0)1 / 57 01 375-78
Fax
..................................................... +30 (0)1 / 57 73 607
∆ηλούµε υπευθύνωσ τι το προϊν αυτ
εκπληρώνει τουσ εξήσ κανονισµούσ ή
κατασκευαστικέσ συστάσεισ: EN 50 144
σύµφωνα µε τισ διατάξεισ των Οδηγιών
89/336/EΟΚ, 98/37/EΚ, 2000/14/EΚ.
2000/14/EK: Η εγγυηµένη στάθµη ακουστικήσ
πίεσησ L
WA
είναι µικρτερη απ 107 dB (A).
∆ιαδικασία αποτίµησησ τησ συµβατικτητασ
σύµφωνα µε το παράρτηµα VI.
∆ηλωµένη υπηρεσία ελέγχου:
TÜV Hannover/Sachsen-Anhalt e.V.,
D-30519 Hannover CE-DE10-139 670
Leinfelden, 01.03.2002.
Dr. Gerhard Felten Dr. Eckerhard Strötgen
Robert Bosch GmbH, Geschäftsbereich Elektrowerkzeuge
Τηρούµε το δικαίωµα αλλαγών
Προστασία περιβάλλοντοσ Υπηρεσία εξυπηρέτησησ πελατών
∆ήλωση συµβατικτητασ
GSH 4 (576) - Buch Seite 4 Montag, 4. März 2002 12:54 12
40 • 1 619 929 576 • TMS • 28.02.02
Page 41

EURO • Printed in Germany • BA 1 619 929 576 • GSH 4 • TR • OSW 02.03
Türkçe - 1
Ölçüm deπerleri 2000/14/AT’e göre
belirlenmektedir (ölçeme 1,60 m yükseklik ve 1 m
mesafeden) ve EN 50 144.
Aletin, frekansa baπ∂ml∂ uluslararas∂ ses bas∂nc∂
seviyesi deπerlendirme eπrisi A’ya göre tipik
gürültü seviyesi: Ses bas∂nc∂ seviyesi 88 dB (A).
Çal∂µma s∂ras∂ndaki gürültü seviyesi
101 dB (A)’d∂r.
Koruyucu kulakl∂k kullan∂n!
Deπerlendirilen tipik ivme 14 m/s
2
.
Bu alet; beton, tuπla, taµ ve asfalttaki keskileme
iµleri ve uygun aksesuarla çakma ve sıkıµtırma
iµleri için geliµtirilmiµtir.
1 Tozdan koruma kapaπ∂
2 Sürgü kovan∂
3 Keski ayar∂ halkas∂ (Vario-lock)
4 Açma/kapama µalteri
5 ∑lave sap
Kullan∂m k∂lavuzunda tan∂mlanan ve µekilleri gösterilen
akesuar∂n mutlaka teslimat kapsam∂nda bulunmas∂
gerekmez!
Aletle güvenli bir biçimde
çal∂µabilmek için, kullan∂m
k∂lavuzu ve güvenlik talimatlar∂n∂
dikkatlice okuyup, belirtilen
hususlara titizlikle uymal∂s∂n∂z.
Ayr∂ca ekteki kitapç∂kta belirtilen
genel güvenlik talimat∂na da uyulmal∂d∂r. Aleti
ilk kez kullanmadan önce, bu iµi bilen birisinin
gözetiminde bir süre deneme yap∂n.
■ Koruyucu kulakl∂k kullan∂n.
■ Koruyucu gözlük ve saπlam iµ ayakkab∂lar∂
kullan∂n.
■ Çal∂µma s∂ras∂nda µebeke baπlant∂ kablosu
hasar görecek veya ayr∂lacak olursa,
dokunmay∂n ve hemen µebeke fiµini prizden
çekin. Aleti hiçbir zaman hasarl∂ baπlant∂
kablosu ile kullanmay∂n.
■ Aç∂k havada kullan∂lan aletleri, daima hatal∂
ak∂m koruma µalteri (FI-) ve maksimum
30 mA’lik iµletim ak∂m∂ üzerinden baπlay∂n.
Sadece aç∂k havada kullan∂lmaya müsaadeli
uzatma kablosu kullan∂n.
■ Görünmeyen ikmal µebeke hatlar∂n∂
belirlemek üzere uygun tarama cihazlar∂
kullan∂n veya bölgenizdeki ikmal
µirketinden yard∂m al∂n.
Elektrik hatlar∂yla temas yang∂n ç∂kmas∂na
veya elektrik çarpmalar∂na neden olabilir.
Hasarl∂ bir gaz hatt∂ patlamalara neden olabilir.
Bir su borusunun içine girme maddi hasarlara
veya elektrik çarpmalar∂na neden olabilir.
■ Alet ucunun yüzey alt∂nda gizli herhangi bir
elektrik hatt∂na veya aletin kendi µebeke
kablosuna rastlama olas∂l∂π∂
bulunduπundan, aleti sadece izolasyonlu
tutamaπ∂ndan kavray∂n.
Gerilim alt∂ndaki herhangi bir kabloyla temasa
gelindiπinde aletin metal parçalar∂ elektrik
ak∂m∂na maruz kal∂r ve elektrik çarpmalar∂
ortaya ç∂kabilir.
■ Kabloyu her zaman aletin arkas∂nda tutun.
■ Fiµi sadece, alet kapal∂ iken prize sokun.
■ Aleti her zaman ilave sapla 5 kullan∂n.
■ Çal∂µ∂rken aleti daima iki elinizle s∂k∂ca tutun
ve çal∂µma pozisyonunuzun güvenli olmas∂na
özen gösterin.
■ Aleti elinizden b∂rakmadan önce daima
kapat∂n ve aletin tam olarak durmas∂n∂
bekleyin.
Teknik veriler
K∂r∂c∂ GSH 4
Sipariµ no. 0 611 312 1..
Giriµ gücü [W] 850
Darbe say∂s∂ [/dak] 2 440
Tek darbe kuvveti [J] 7
Keski ayar∂ 12
Orta sertlikte betonda
uç verimi
[cm3/dak] 450
Uç giriµi SDS-max
Yaπlama Merkezi
kesintisiz
yaπlama
Aπ∂rl∂π∂
(aksesuars∂z) yak.
[kg] 4,8
Koruma s∂n∂f∂ / II
Lütfen aletinizin sipariµ numaras∂na dikkat edin. Aletlerin
ticari kodlar∂ deπiµik olabilir.
Gürültü ve titreµim önleme
hakk∂nda bilgi
Usulüne uygun kullan∂m
Aletin elemanlar∂
Güvenliπiniz ∑çin
1 619 929 576 - TR Seite 1 Montag, 18. März 2002 1:56 13
41 • 1 619 929 576 • TMS • 28.02.02
Page 42

EURO • Printed in Germany • BA 1 619 929 576 • GSH 4 • TR • OSW 02.03
Türkçe - 2
■ Çocuklar∂n aleti kullanmas∂na asla izin
vermeyin.
■ Bosch ancak, bu alet için öngörülen orijinal
aksesuar kullan∂ld∂π∂ takdirde aletin kusursuz
iµlev göreceπini garanti eder.
■ Aleti her zaman ilave sapla 5 kullan∂n.
Sap∂ sola döndürerek gevµetin. ∑lave sap∂ 5
çevirerek, istediπiniz çal∂µma pozisyonuna
getirin.
Sap∂ tekrar iyice s∂k∂n.
■ Aletin kendinde bir çal∂µma yapmadan
önce µebeke fiµini prizden çekin.
SDS-max uç kovan∂ sayesinde, uçlar yard∂mc∂ bir
anahtar kullanmaya gerek kalmadan basit ve
rahat biçimde deπiµtirilebilir.
☞
Uçlar∂n alete tak∂lan k∂s∂mlar∂n∂ düzenli
olarak yaπlay∂n.
Tozdan koruma kapaπ∂ 1 çal∂µma s∂ras∂nda
ortaya ç∂kan tozun alet içine s∂zmas∂n∂ büyük
ölçüde önler. Ucu takarken, tozdan koruma
kapaπ∂n∂n 1 hasar görmemesine dikkat edin.
Hasar gören tozdan koruma baµl∂π∂n∂ hemen
deπiµtirin. Bu deπiµtirme iµlemini bir müµteri
servisinde yapt∂rman∂z∂ öneririz.
Uçlar∂n tak∂lmas∂ (Ωekil ’ya bak∂n∂z)
Uçlar∂n alete giren k∂sm∂n∂ temizleyin ve
yaπlay∂n.
Ucu, kendiliπinden kilitleninceye kadar,
döndürerek uç kovan∂na itin. Uçtan çekme
suretiyle kilitlenmenin olup olmad∂π∂n∂ kontrol
edin.
Ucun ç∂kar∂lmas∂ (Ωekil ’ye bak∂n∂z)
Uç giriµinin sürgü kovan∂n∂ 2 arkaya itin ve ucu
ç∂kart∂n. Kilitleme kovan∂n∂ 2 tekrar b∂kar∂n.
Sebeke gerilimine dikkat edin: Ak∂m
kaynaπ∂n∂n gerilimi, aletin tip etiketi üzerindeki
verilere uygun olmal∂d∂r. Etiketi üzerinde 230 V
yazan aletler 220 V ile de çal∂µt∂r∂labilir.
Açma/kapama
Aleti çal∂µt∂rmak için açma/kapama µalterini 4
saπa itin.
Aleti kapatmak için açma/kapama µalterini 4
sola itin.
☞
Soπuk ortamlarda çal∂µ∂rken alet ancak
belli bir süre sonra tam darbeleme
performans∂na ulaµ∂r.
Keski bir kez yere çarp∂lmak suretiyle bu
bekleme süresi k∂salt∂labilir.
Keski 12 deπiµik pozisyonda kilitlenebilir. Bu
sayede yap∂lan iµe en uygun pozisyonda
çal∂µ∂labilir.
Keski ayar halkas∂ 3 öne doπru itilir ve sabit bir
µekilde tutulur. Daha sonra, keski, keski ayar
halkas∂ 3 ile birlikte istenilen ve gövdeye uygun
pozisyona getirilir.
Keski ayar halkas∂ 3 b∂rak∂l∂r ve keski
döndürülerek yerine oturtulur.
Çal∂µma veriminin iyi olmas∂ için keskilerin
bilenmiµ olmas∂ gerekir. Bu nedenle uçlar
zaman∂nda bilenmelidir. Böylece aletin ömrü uzar
ve verim de artar.
Bileme
Keskileri bileme aleti ile (örneπin özel korindon)
düzenli su dökerek bileyin. Bu konudaki referans
deπerleri µekil C’de bulabilirsiniz. Keski
yerlerinde tavlama rengi olmamas∂na dikkat edin,
zira keskinin sertliπi bundan etkilenir.
Dövme ve Su Verme
Dövme: Keski 850 ila 1050 °C’ye kadar
∂st∂l∂r (aç∂k k∂rm∂z∂ ile sar∂ aras∂)
ve dövülür.
Su verme: Keski 900 °C’ye kadar (aç∂k
k∂rm∂z∂) ∂s∂t∂l∂r ve yaπda su verilir.
Bu iµlemden sonra f∂r∂n içinde
320 °C’de yaklaµ∂k bir saat
b∂rak∂l∂r (Tav rengi – aç∂k mavi).
∑lave sap
Uç deπiµtirme
A
B
Çal∂µt∂rma
Keskileme pozisyonunun
deπiµtirilmesi (Vario-lock)
Keskilerin bilenmesi
GSH 4 (576) - Buch Seite 2 Montag, 4. März 2002 12:54 12
42 • 1 619 929 576 • TMS • 28.02.02
Page 43

EURO • Printed in Germany • BA 1 619 929 576 • GSH 4 • TR • OSW 02.03
Türkçe - 3
■ Aletin kendinde bir çal∂µma yapmadan
önce µebeke fiµini prizden çekin.
☞
∑yi ve güvenli çal∂µabilmek için aleti ve
havaland∂rma aral∂klar∂n∂ daima temiz
tutun.
■ Uç giriµini sürekli temiz tutun.
Tozdan koruma baµl∂π∂n∂n
deπiµtirilmesi
Hasar gören tozdan koruma baµl∂π∂n∂ hemen
deπiµtirin. Bu deπiµtirme iµlemini bir müµteri
servisinde yapt∂rman∂z∂ öneririz.
Titiz üretim ve test yöntemlerine raπmen alet
ar∂za yapacak olursa, onar∂m, Bosch elektrikli el
aletleri için yetkili bir servise yapt∂r∂lmal∂d∂r.
Bütün baµvuru ve yedek parça sipariµlerinizde
lütfen aletin 10 haneli sipariµ numaras∂n∂ mutlaka
belirtin!
Çöp tasfiyesi yerine hammadde kazan∂m∂
Alet, aksesuar ve ambalaj çevre koruma
hükümlerine uygun bir yeniden deπerlendirme
iµlemine tabi tutulmal∂d∂r.
Bu kullan∂m talimat∂ da, klor kullan∂lmadan
aπart∂lm∂µ, yeniden dönüµümlü kâπ∂da
bas∂lm∂µt∂r.
Deπiµik malzemelerin tam olarak ayr∂l∂p, yeniden
deπerlendirme iµlemine sokulabilmesi için,
plastik parçalar iµaretlenmiµtir.
Bosch San. ve Tic. A.S.
Ahi Evran Cad. No:1 Kat:22
Polaris Plaza
TR-80670 Maslak/Istanbul
✆ ............................................... +90 (0)212 / 335 06 00
Faks
.................................... +90 (0)212 / 346 00 48–49
Tek sorumlu olarak, bu ürünün aµaπ∂daki
standartlara veya standart belgelerine uygun
olduπunu beyan ederiz: 89/336/AET, 98/37/AT,
2000/14/AT yönetmeliπi hükümleri uyar∂nca
EN (avrupa standartlar∂) 50 144.
2000/14/AT: Garanti edilen gürültü emisyonu
seviyesi L
WA
107 dB (A)’dan daha düµüktür.
Uygunluk deπerlendirme yöntemi Ek VI uyar∂nca.
Yetkili test mercii:
TÜV Hannover/Sachsen-Anhalt e.V.,
D-30519 Hannover CE-DE10-139 670
Leinfelden, 01.03.2002.
Dr. Gerhard Felten Dr. Eckerhard Strötgen
Robert Bosch GmbH, Geschäftsbereich Elektrowerkzeuge
Deπiµiklikler mümkündür
Bak∂m ve temizlik
Çevre koruma
Tamir Servisi
Uygunluk beyan∂
1 619 929 576 - TR Seite 3 Montag, 18. März 2002 3:44 15
43 • 1 619 929 576 • TMS • 28.02.02
Page 44

EURO • Printed in Germany • BA 1 619 929 576 • GSH 4 • Zubehör • OSW 02.03
44 • 1 619 929 576 • 02.03
SDS
max
5 x 5
7 x 7
480 x 360 x 110 mm
2 605 438 313
GSH 4 (576) Zubehör Seite 69 Montag, 4. März 2002 1:28 13
Page 45

Robert Bosch GmbH
Geschäftsbereich Elektrowerkzeuge
D-70745 Leinfelden-Echterdingen
www.bosch-pt.com
1 619 929 576
(02.03) O / 48
Printed in Germany - Imprimé en Allemagne
Chlor
EURO • Printed in Germany • BA 1 619 929 576 • GSH 4 • Titel (Rückseite) • OSW 02.02
GSH 4 (576) - Buch Seite 1 Montag, 4. März 2002 12:54 12
 Loading...