


Use and Care Manual
Bosch Gas Ranges
with Mechanical Controls and Standard Convection
Guide d'utilisation et d'entretien
Cuisinière amovible à gaz Bosch
avec convection
Manual de Uso y Cuidado
Estufas autoestables de gas Bosch
con convección

Table of Contents
About This Manual . . . . . . . . . . . . . . . . . . . . . . . . . . . . . . . . . . . . . . . . . . . . . . . 1
How This Manual Is Organized . . . . . . . . . . . . . . . . . . . . . . . . . . . . . . . . . . . . . . . . . . . . . . . . . . . . . . . . . 1
Safety . . . . . . . . . . . . . . . . . . . . . . . . . . . . . . . . . . . . . . . . . . . . . . . . . . . . . . . . . 1
Important Safety Instructions. . . . . . . . . . . . . . . . . . . . . . . . . . . . . . . . . . . . . . . . . . . . . . . . . . . . . . . . . . . . 1
Getting Started . . . . . . . . . . . . . . . . . . . . . . . . . . . . . . . . . . . . . . . . . . . . . . . . . . 5
Parts and Accessories . . . . . . . . . . . . . . . . . . . . . . . . . . . . . . . . . . . . . . . . . . . . . . . . . . . . . . . . . . . . . . . . 5
Control (Panel) . . . . . . . . . . . . . . . . . . . . . . . . . . . . . . . . . . . . . . . . . . . . . . . . . . . . . . . . . . . . . . . . . . . . . . 8
Before Using the Appliance for the First Time . . . . . . . . . . . . . . . . . . . . . . . . . . . . . . . . . . . . . . . . . . . . . 12
Operation - Cooktop . . . . . . . . . . . . . . . . . . . . . . . . . . . . . . . . . . . . . . . . . . . . . 12
About the Cooktop . . . . . . . . . . . . . . . . . . . . . . . . . . . . . . . . . . . . . . . . . . . . . . . . . . . . . . . . . . . . . . . . . . 12
Operation . . . . . . . . . . . . . . . . . . . . . . . . . . . . . . . . . . . . . . . . . . . . . . . . . . . . . . . . . . . . . . . . . . . . . . . . . 13
Operation - Oven . . . . . . . . . . . . . . . . . . . . . . . . . . . . . . . . . . . . . . . . . . . . . . . . 13
About the Oven . . . . . . . . . . . . . . . . . . . . . . . . . . . . . . . . . . . . . . . . . . . . . . . . . . . . . . . . . . . . . . . . . . . . . 14
Operation . . . . . . . . . . . . . . . . . . . . . . . . . . . . . . . . . . . . . . . . . . . . . . . . . . . . . . . . . . . . . . . . . . . . . . . . . 14
Getting the Most Out of Your Appliance . . . . . . . . . . . . . . . . . . . . . . . . . . . . . . 16
Getting the Most Out of Your Cooktop . . . . . . . . . . . . . . . . . . . . . . . . . . . . . . . . . . . . . . . . . . . . . . . . . . . 16
Getting the Most Out of Your Oven . . . . . . . . . . . . . . . . . . . . . . . . . . . . . . . . . . . . . . . . . . . . . . . . . . . . . 18
Cleaning and Maintenance . . . . . . . . . . . . . . . . . . . . . . . . . . . . . . . . . . . . . . . . 22
Cleaning - Cooktop . . . . . . . . . . . . . . . . . . . . . . . . . . . . . . . . . . . . . . . . . . . . . . . . . . . . . . . . . . . . . . . . . . 22
Cleaning - Oven . . . . . . . . . . . . . . . . . . . . . . . . . . . . . . . . . . . . . . . . . . . . . . . . . . . . . . . . . . . . . . . . . . . . 24
Cleaning - Drawer . . . . . . . . . . . . . . . . . . . . . . . . . . . . . . . . . . . . . . . . . . . . . . . . . . . . . . . . . . . . . . . . . . . 27
Maintenance . . . . . . . . . . . . . . . . . . . . . . . . . . . . . . . . . . . . . . . . . . . . . . . . . . . . . . . . . . . . . . . . . . . . . . . 27
Service . . . . . . . . . . . . . . . . . . . . . . . . . . . . . . . . . . . . . . . . . . . . . . . . . . . . . . . 28
Before Calling Service . . . . . . . . . . . . . . . . . . . . . . . . . . . . . . . . . . . . . . . . . . . . . . . . . . . . . . . . . . . . . . . 28
Waranty . . . . . . . . . . . . . . . . . . . . . . . . . . . . . . . . . . . . . . . . . . . . . . . . . . . . . . . . . . . . . . . . . . . . . . . . . . 31
Questions?
1-800-944-2904
www.boschappliances.com
5551 McFadden Ave.
Huntington Beach, CA 92649
We look forward to hearing from you!

About This Manual
How This Manual Is Organized
This manual contains several sections:
•The Getting Started section describes the features and functionality of the
range, including a description of how to set up the range and operate the control panel.
•The Operation sections describe how to operate each range component.
•The Getting the Most out of Your Appliance section includes information
about the modes, cooking charts and tips for improving performance.
•The Cleaning and Maintenance section describes how to clean and maintain
your appliance.
•The Service section includes troubleshooting tips and your Warranty.
Before using your range, be sure to read this manual. Pay special attention to the
Safety Sections located at the beginning of the manual.
Safety
Important Safety Instructions
READ AND SAVE THESE INSTRUCTIONS
Important Safety Instructions
Fire Safety • Do not use aluminum foil or protective liners to line any part of an appliance,
especially surface unit drip bowls or oven bottom. Installation of these liners
may result in a risk of electric shock or fire.
• Set the burner control so that the flame does not extend beyond the bottom of
the pan.
• If materials inside an oven or warming drawer should ignite, keep door closed.
Turn off the appliance and disconnect the circuit at the circuit breaker box.
• Use this appliance only for its intended use as described in this manual. For
example, never use the appliance for warming or heating the room. Never use
the appliance for storage.
• Do not allow aluminum foil, plastic, paper or cloth to come in contact with a
hot burner or grate. Do not allow pans to boil dry.
• If the cooktop is near a window, forced air vent, or fan, be certain that flammable materials such as window coverings do not blow over or near the burners or elements. They could catch on fire.
• Always have a working smoke detector near the kitchen.
• Never leave the cooktop unattended when in use. Boilovers cause smoking
and greasy spillovers may ignite.
• WARNING - TO REDUCE THE RISK OF A RANGE TOP GREASE FIRE:
English 1
Safety
a) Never leave surface units unattended at high settings. Boilovers cause
smoking and greasy spillovers that may ignite. Heat oils slowly on low or
medium settings.
b) Always turn hood ON when cooking at high heat or when flambéing food
(i.e. Crepes Suzette, Cherries Jubilee, Peppercorn Beef Flambe').
c) Clean ventilating fans frequently. Grease should not be allowed to accu-
mulate on fan or filter.
d) d) Use proper pan size. Always use cookware appropriate for the size of
the surface element.
• In the event that personal clothing or hair catches fire, drop and roll immediately to extinguish flames.
• Smother flames from food fires other than grease fires with baking soda.
Never use water on cooking fires.
• Take care that drafts like those from fans or forced air vents do not push the
flames so that they extend beyond the edges of the pan.
• WARNING - TO REDUCE THE RISK OF INJURY TO PERSONS IN THE
EVENT OF A RANGE TOP GREASE FIRE, OBSERVE THE FOLLOWIN G:
a) SMOTHER FLAMES with a close-fitting lid, cookie sheet, or metal tray,
then turn off the burner. BE CAREFUL TO PREVENT BURNS. If the
flames do not go out immediately, EVACUATE AND CALL THE FIRE
DEPARTMENT.
b) NEVER PICK UP A FLAMING PAN - You may be burned.
c) DO NOT USE WATER, including wet dishcloths or towels - a violent
steam explosion will result.
d) Use an extinguisher ONLY if:
1) You know you have a Class ABC extinguisher, and you already know
how to operate it.
2) The fire is small and contained in the area where it started.
3) The fire department is being called.
4) You can fight the fire with your back to an exit.
5) Have an appropriate fire extinguisher available, nearby, highly visible
and easily accessible near the oven.
• Whenever possible, do not operate the ventilation system during a cooktop
fire. However, do not reach through fire to turn it off.
Gas Safety
WARNING: If the information in this manual is not fol-
lowed exactly, a fire or explosion may result causing
property damage, personal injury or death.
Do not store or use combustible materials, gasoline or other flammable vapors and liquids in the vicinity of this or any other appliance.
WHAT TO DO IF YOU SMELL GAS:
• Do not try to light any appliance.
• Do not touch any electrical switch.
• Do not use any phone in your building.
• Immediately call your gas supplier from a neighbor’s phone.
Follow the gas supplier’s instructions.
• If you cannot reach your gas supplier, call fire department.
Installation and service must be performed by a qualified installer,
authorized service agency or the gas supplier.
• Have the installer show you where the gas shut-off valve is located.
English 2

Safety
• If a burner goes out and gas escapes, open windows and doors. Wait until
gas dissipates before using the appliance.
• If you smell gas, your installer has not done a proper job of checking for leaks.
If the connections are not perfectly tight, you can have a small leak and,
therefore, a faint smell. Finding a gas leak is not a "do-it-yourself" procedure.
Some leaks can only be found with the burner control in the ON
• position and this must be done by a qualified service technician. See “WHAT
TO DO IF YOU SMELL GAS:” on page 2.
• During a power failure, only the cooktop burners can be lit manually.
Burn Prevention • DO NOT TOUCH SURFACE UNITS OR AREAS NEAR UNITS - Surface
units may be hot even though they are dark in color. Areas near surface units
may become hot enough to cause burns. During and after use, do not touch,
or let clothing, potholders, or other flammable materials contact surface units
or areas near units until they have had sufficient time to cool. Among these
areas are the cooktop and areas facing the cooktop.
• DO NOT TOUCH HEATING ELEMENTS OR INTERIOR SURFACES OF
OVEN - Heating elements may be hot even though they are dark in color.
Interior surfaces of an oven become hot enough to cause burns. During and
after use, do not touch, or let clothing, potholders, or other flammable materials contact heating elements or interior surfaces of oven until they have had
sufficient time to cool. Other surfaces of the appliance may become hot
enough to cause burns. Among these surfaces are oven vent openings, surfaces near these openings and oven doors.
• Exercise caution when opening the appliance. Standing to the side, open the
door (or drawer) slowly and slightly to let hot air and/or steam escape. Keep
your face clear of the opening and make sure there are no children or pets
near the unit. After the release of hot air and/or steam, proceed with your
cooking. Keep doors shut unless necessary for cooking or cleaning purposes.
Do not leave open doors unattended.
• Do not heat or warm unopened food containers. Build-up of pressure may
cause the container to burst and cause injury.
• Always place oven racks in desired location while oven is cool. If a rack must
be moved while oven is hot, do not let potholder contact the heating elements.
• Always turn hood ON when cooking at high heat or when flambeing food (i.e.
Crepes Suzette, Cherries Jubilee, Peppercorn Beef Flambe').
• Use high heat settings on the cooktop only when necessary. To avoid bubbling and splattering, heat oil slowly on no more than a low-medium setting.
Hot oil is capable of causing extreme burns and injury.
• Never move a pan of hot oil, especially a deep fat fryer. Wait until it is cool.
Child Safety • When children become old enough to use the appliance, it is the legal respon-
sibility of the parents or legal guardians to ensure that they are instructed in
safe practices by qualified persons.
• Do not allow anyone to climb, stand, lean, sit, or hang on any part of an appliance, especially a door, warming drawer, or storage drawer. This can damage
the appliance, and the unit may tip over, potentially causing severe injury.
• Do not allow children to use this appliance unless closely supervised by an
adult. Children and pets should not be left alone or unattended in the area
where the appliance is in use. They should never be allowed to play in its
vicinity, whether or not the appliance is in use.
• CAUTION - Items of interest to children should not be stored in an appliance,
in cabinets above an appliance or on the backsplash. Children climbing on an
appliance to reach items could be seriously injured.
Cleaning Safety • IMPORTANT SAFETY NOTICE: The California Safe Drinking and Toxic
Enforcement Act requires the Governor of California to publish a list of substances known to the state to cause cancer, birth defects or other reproductive harm, and requires businesses to warn customers of potential exposure
to such substances.
English 3

Safety
a) The burning of gas cooking fuel and the elimination of soil during self-
cleaning can generate small amounts of Carbon Monoxide.
b) The fiberglass insulation in self-clean ovens gives off very small amounts
of formaldehyde during the first several cleaning cycles. California lists
formaldehyde as a potential cause of cancer. Carbon Monoxide is a
potential cause of reproductive toxicity.
c) Exposure to these substances can be minimized by:
1) Providing good ventilation when cooking with gas.
2) Providing good ventilation during and immediately after self cleaning
the oven.
3) Operating the unit according to the instructions in this manual.
• Do not clean the appliance while it is still hot. Some cleaners produce noxious
fumes when applied to a hot surface. Wet clothes or sponges can cause
burns from steam.
• When self-cleaning, confirm that the door locks and will not open. If the door
does not lock, do not run Self-Clean. Contact service.
• Birds have very sensitive respiratory systems. Keep pet birds out of the
kitchen or other rooms where kitchen fumes could reach them. During self
clean, fumes are released that may be harmful to birds. Other kitchen fumes
such as overheating margarines and cooking oils may also be harmful.
• After a spill or boilover, turn off the burner and allow the cooktop to cool.
Clean around the burner and burner ports. After cleaning, check for proper
operation.
• Keep oven free from grease build up.
Cookware Safety • Do not place food directly on oven bottom.
• Follow the manufacturer's directions when using cooking or roasting bags.
• Hold the handle of the pan when stirring or turning food. This helps prevent
spills and movement of the pan.
• Use Proper Pan Size. The use of undersized cookware will expose a portion
of the heating element or burner to direct contact and may result in ignition of
clothing. Select cookware having flat bottoms large enough to cover the surface heating unit. This appliance is equipped with one or more surface units of
different size. Proper relationship of cookware to heating element or burner
will also improve efficiency.
• Always position handles of utensils inward so they do not extend over adjacent work areas, burners, or the edge of the cooktop. This reduces the risk of
fires, spills and burns.
• Adjust burner flame size so that it does not extend beyond the edge of the
cookware. Proper relationship of cookware to burner flame reduces safety
risks.
Proper Installation and Maintenance • Have the installer show you the location of the circuit breaker or fuse. Mark it
for easy reference.
• This appliance must be properly installed and grounded by a qualified technician. Connect only to properly grounded outlet. Refer to Installation Instructions for details.
• All ranges can tip. Injury to persons could result. Install anti-tip device packaged with range. Verify that the anti-tip devices are engaged. See installation
instructions.
English 4
Figure 1: Tipping Precautions

Safety
• This appliance is intended for normal family household use only. It is not
approved for outdoor use. See the Warranty. If you have any questions, contact the manufacturer.
• Do not store or use corrosive chemicals, vapors, flammables or nonfood products in or near this appliance. It is specifically designed for use when heating
or cooking food. The use of corrosive chemicals in heating or cleaning will
damage the appliance and could result in injury.
• Do not operate this appliance if it is not working properly, or if it has been
damaged. Contact an authorized servicer.
• Do not obstruct oven vents.
• Do not repair or replace any part of the appliance unless specifically recommended in this manual. Refer all servicing to a factory authorized service center.
• In the event of an error the display flashes and beeps continuously. If this
happens during self-clean, disconnect appliance from the power supply and
call a qualified technician.
• In the event of an error the display flashes and beeps continuously. Disconnect appliance from the power supply and call a qualified technician.
• Do not operate oven without oven bottom in place.
Getting Started
Parts and Accessories
Table 1: Parts and Accessories
1
2
3
10
9
8
# Part
1 Oven Control Panel and Knob
2 Burner Caps (4)
3 Burner Grates (2)
4 Cooktop Control Knob
4
5
6
7
5 Rack Positions/ Rack Guides
6 Oven Racks, Flat (3)
7 Oven Door Gasket
8
9 Model # and Serial # Plate
10 Oven Vent
11 Anti-Tip Bracket (not shown)
12 Cooktop Scraper (glass ceramic models only) (not
13 Broiler Pan (not shown)
14 Oven Door Lock (not visible) (not shown)
15 Literature Package (not shown)
16 Broil Burner (top of oven interior) (not shown)
17 Oven Lights (2) (oven back wall) (not shown)
18 Convection Fan (oven back wall; not shown)
Storage Drawer
shown)
English 5
Getting Started
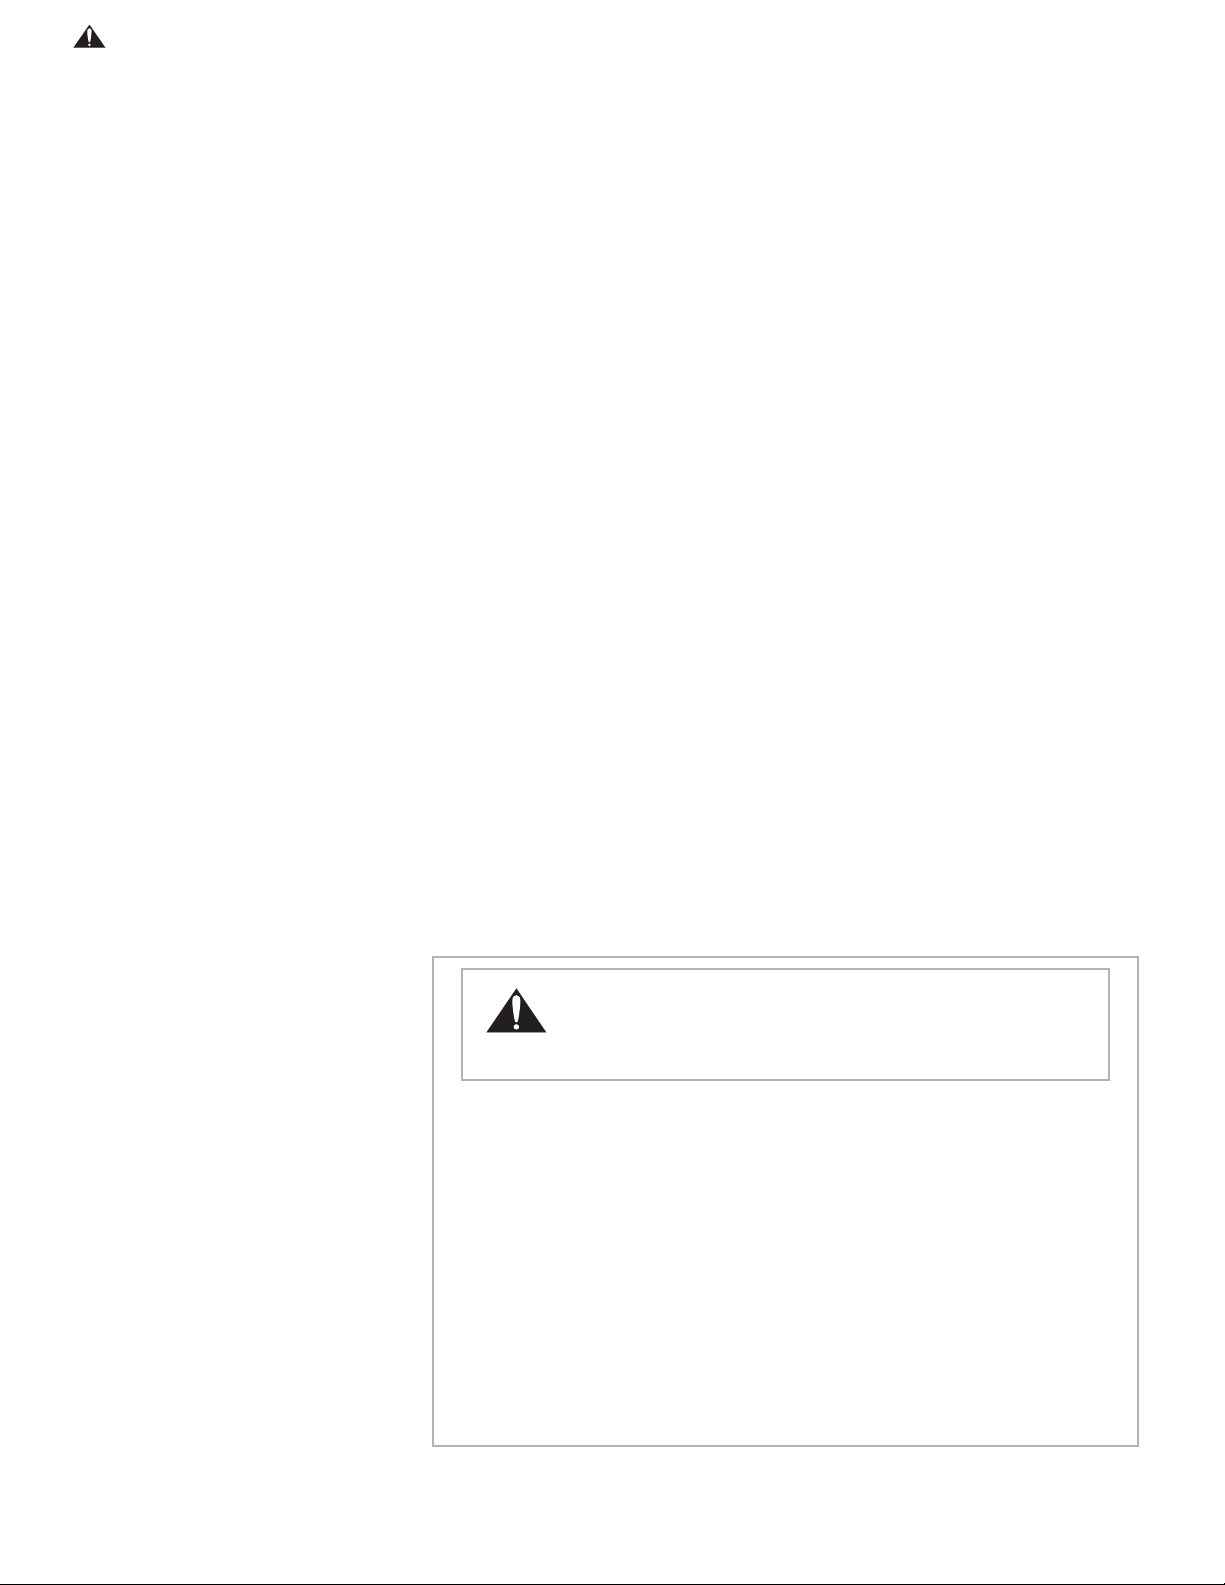
Sealed Gas Burners The cooktop has sealed gas burners. As a result, there are no parts under the
cooktop to clean, disassemble or adjust. Spills stay on top of the cooktop where
they are easier to wipe up.
Burner Grate
Burner Cap
Burner
Cooktop
Ignitor
Figure 2: Right Side Burner - Side View
Burner Caps The cooktop has four burner caps. Match the size of the burner cap to the size of
the burner. Burner caps are not interchangeable.
Make sure the burner cap is completely seated on the burner base before
attempting to light the burner. If the burner cap is not placed correctly, the burner
may not light or the flame may not burn completely or correctly. The appliance is
equipped with two types of burners: standard and diffusion.
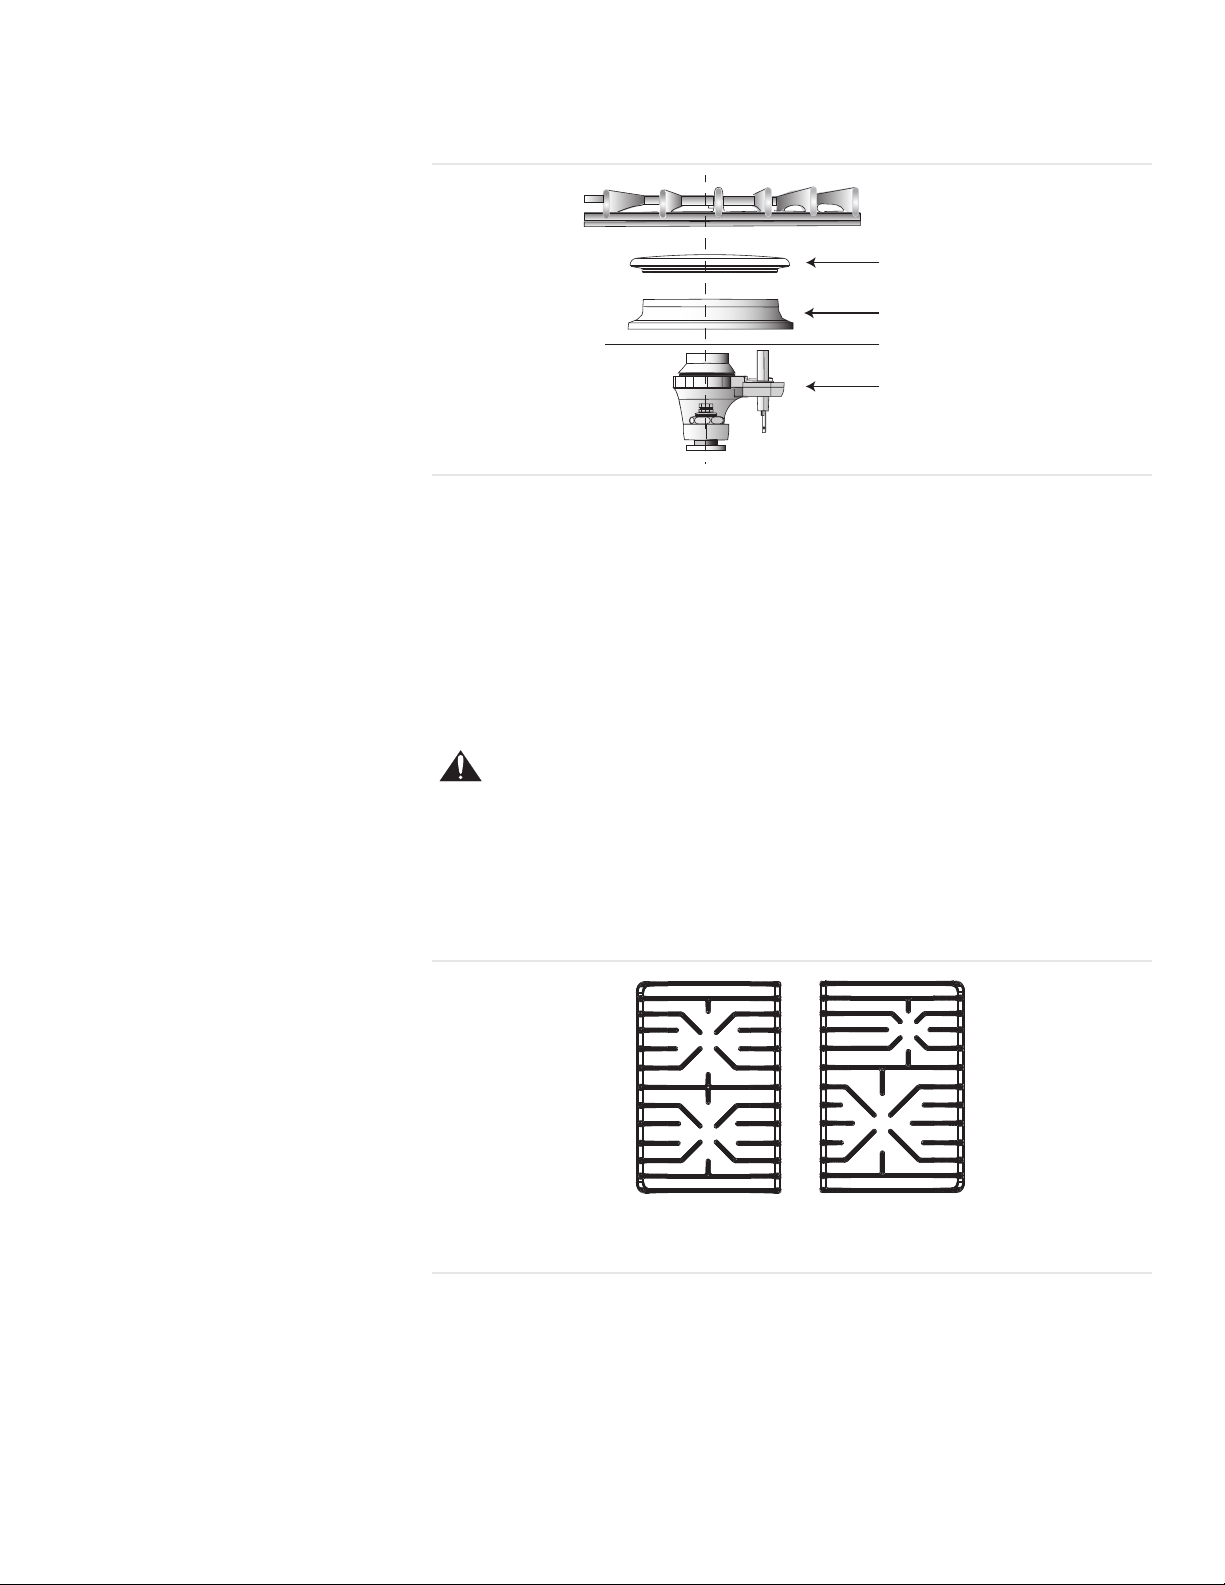
Burner Grates Warning: To prevent flare-ups, do not use the cooktop without all burner
caps and all burner grates properly positions. Do not use a grate if the feet
are missing or damaged.
There are two burner grates: one for the left side of the cooktop and one for the
right side of the cooktop. Position them so that the circular opening is over the
burner cap. Burner grates should rest flat on the cooktop. The rubber feet on the
grates should rest in the indents on the cooktop.
Left Side
Burner Grate
Electronic Ignitor The cooktop uses electronic ignitors to light the burners, There is no pilot light.
Each burner has its own ignitor. For proper operation, keep the ignitor clean and
dry. It is necessary to clean these when there is a boilover or when the burner
does not light even though the ignitor clicks.
English 6
Right Side
Burner Grate
Figure 3: Grates for Free-standing Models
Getting Started
g
Caution: All ignitors spark when any single burner is turned on. Do not
touch any of the burners when the cooktop is in use.
High Power Burner The high power burner is the largest burner. It is the most powerful burner on the
cooktop. It retains heat longer than normal burner caps and, at low settings, prohibits the flame from touching the cookware. This results in a gentle, more predictable heat. Use the low settings on this burner to simmer large amounts of sauces
or soups. Use the high settings to quickly bring large amounts of water to a boil.
Precision Burner The precision burner is the smallest burner on the cooktop. It is well suited for
gentle cooking of small amounts of food. Use the burner to melt butter or chocolate or to prepare delicate sauces.
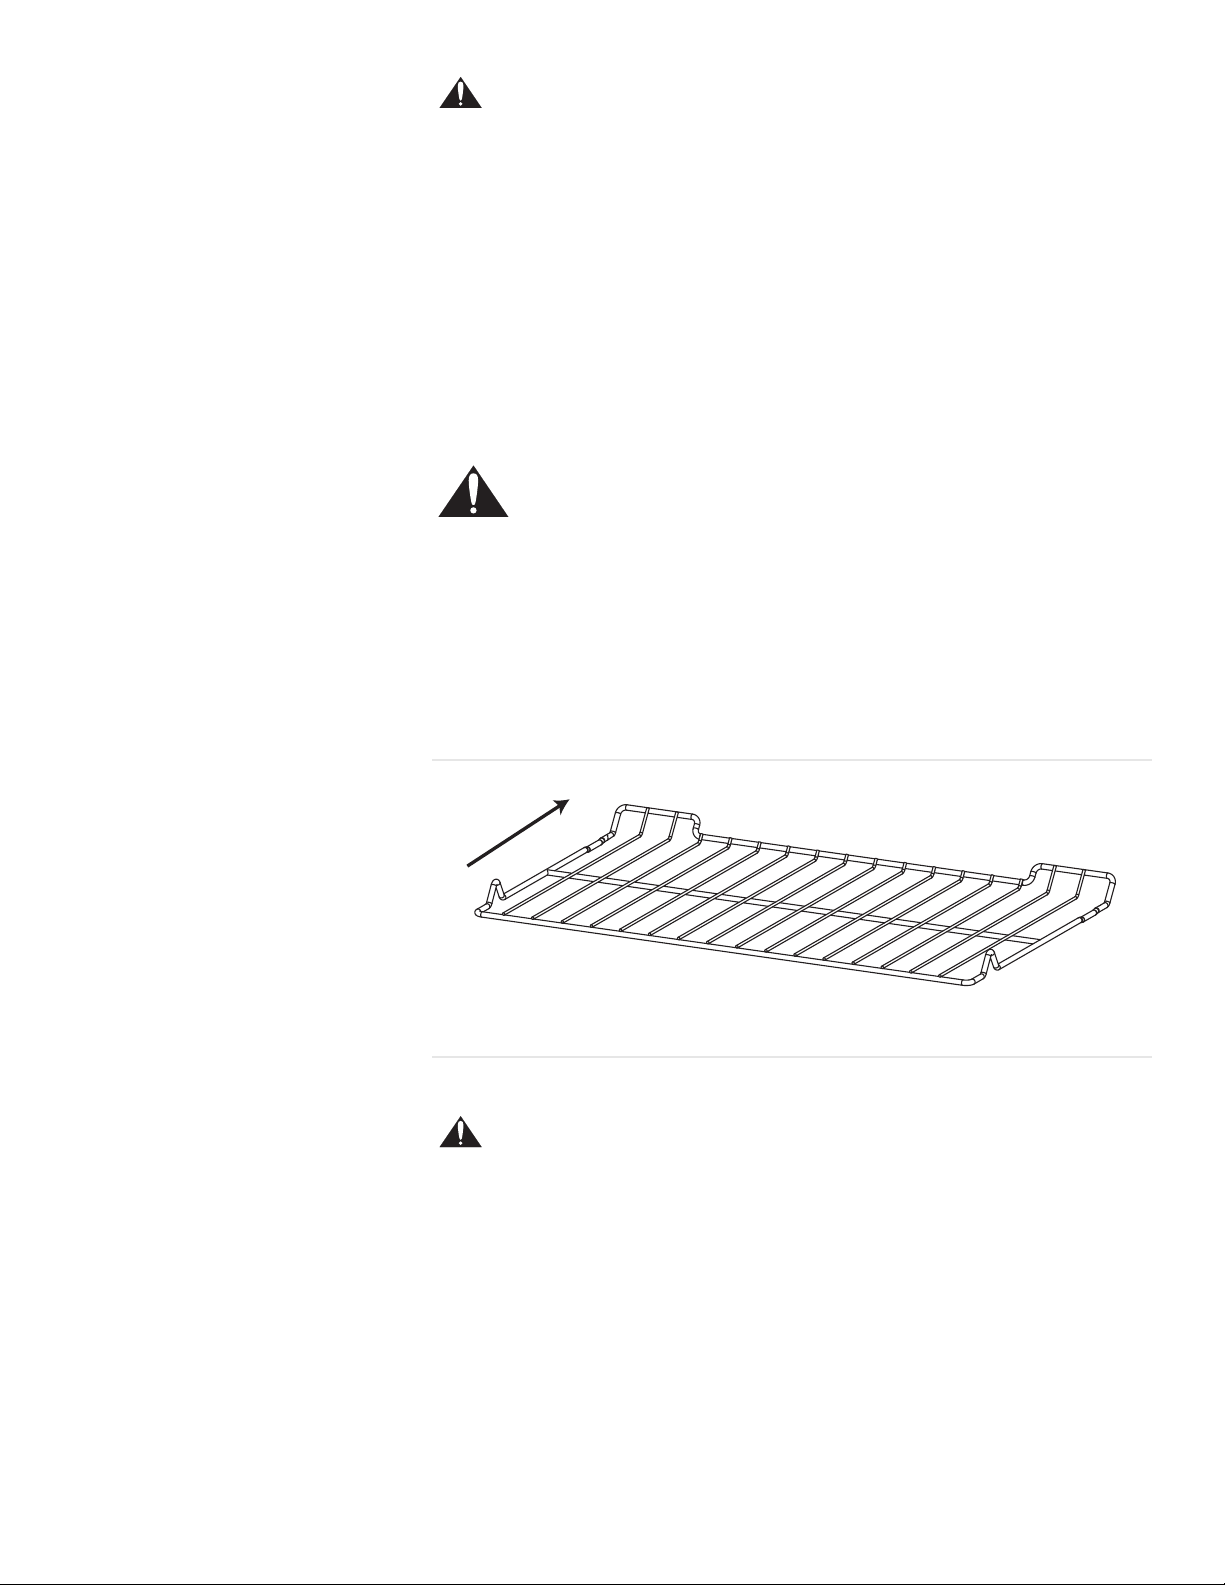
Flat Oven Racks The racks are designed with a stop so they will stop before coming completely out
of the oven and not tilt.
CAUTION
To avoid burns, place oven racks in desired positions before turning
oven on. Always use oven mitts when the oven is warm.If a rack must
be moved while the oven is hot, do not let oven mitts contact hot burners.
Inserting Racks Into Oven
1. Grasp rack firmly on both sides.
2. Tilt rack up to allow stop into rack guide.
3. Bring rack to a horizontal position and press the rest of the way in. Rack should be straight and flat, not crooked.
Back of rack
Front of rack
Insert rack with the back of the rack
toward the back wall of the ran
e.
Figure 4: Inserting a Rack
Oven Bottom Caution: Do not place food directly on oven bottom. Do not use aluminum
foil or protective liners to line any part of an appliance, especially surface
unit drip bowls or oven bottom. Installation of these liners may result in a
risk of electric shock or fire.
Oven Vent The oven vent is located below the display above the rear left cooktop burner. It is
normal to see steam escaping from the vent and condensation may collect on the
backguard and cooktop. This area may become hot when the oven is in use. To
prevent carbon monoxide build-up, do not block the vent. The oven vent is also
important for air circulation.
Automatic Shutoff The oven will automatically shut off after 12 hours (24 hours if the time format is
set for 24 hour in the Select Function section).
Self Cleaning The oven features a self-cleaning function that eliminates the manual labor
involved with cleaning your oven.
English 7
Getting Started
Indicators and Other Features Beep - Signals that more information must be entered or confirms the receipt of
an entry. A Beep also signals the end of a program or an oven error.
End-of-Cycle Indicator - To indicate when a mode is finished, 3 consecutive
beeps will sound.
Default Settings - The cooking modes automatically select the default temperature. These can be changed when a different one is needed.
Flashing Symbol or Number - Signals an incomplete setting and calls for
another step or START to be pressed.
F Number Codes -These codes display when there is a problem with the range.
Convection Fan The convection fan operates during any convection mode. When the oven is oper-
ating in the convection mode, the fan will turn off automatically when the door is
opened. The convection fan does run during self-clean, although not at the beginning of the mode.
Note: On some models, the convection fan also runs during preheat for the bake
mode.
Control (Panel)
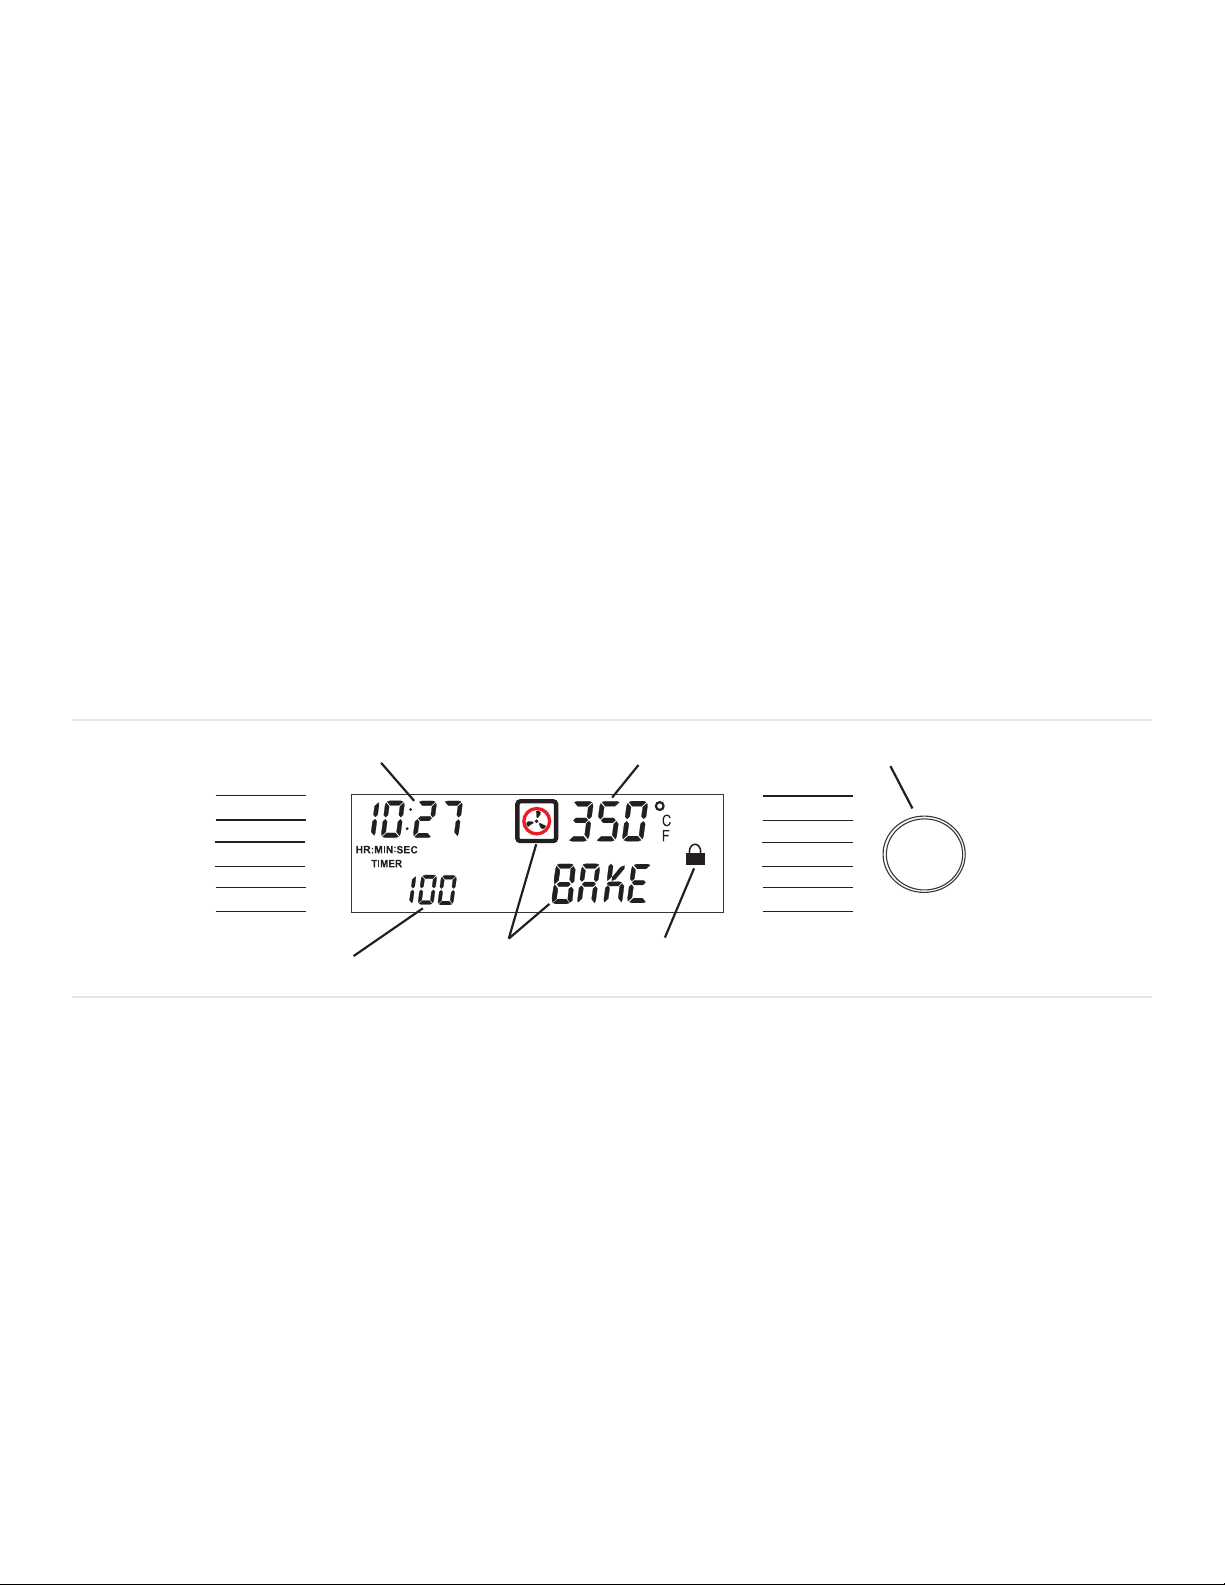
Oven Control Panel
Clock
Light
Time
Off
Preheat Temperature
AM
PM
Cooking
Mode Indicator
Oven Temperature
Lock Indicator
Control Knob
Cooking Mode
Temperature
Start
Figure 5: Oven Control Panel
English 8

Table 2: Oven Control Panel
Getting Started
Clock– Shows the time of day with a 12 or 24 hour option.
Also displays the timer and times associated with delayed
cooking and cleaning modes. Turn the control knob to toggle between timer and clock display. Press Time and turn
the control knob to change the time of day or the
timer.
Cooking Mode - Press pad to display cooking mode.
Cooking Mode Icon – Shows the cooking burners that
are active for the mode that is selected. The icon will also
display a fan if the convection fan is utilized in the selected
mode.
Control Knob - Used to set the clock, timers, select cooking mode and temperature. Turn clockwise to increase and
turn counterclockwise to decrease.
Door Locking Indicator - Icon is displayed during the
self-clean mode when the door is locked. DO NOT attempt
to open the door until the lock symbol is no longer present.
You control the operation of the range by using the touch pads, dial and control
knobs.
The touchpads, in conjunction with the dial, are used to select an oven mode, set
the oven temperature, set the time(s) and to set up your range. To use the touchpad, press the center part of the pad with the flat part of your fingertip. A beep will
sound to indicate that the selection has been made. Turn the dial to the desired
setting and press start.
Light - Press pad to turn oven light on or off.
Off - Press pad to turn off oven and/or warming drawer.
Oven Temperature - Shows the oven temperature.
Preheat Tem perature - Displays temperature of oven dur-
ing preheat mode.
Start - Press pad to complete an entry.
Temperature - Press pad to select cooking temperature.
Time - Press pad to set or change the time of day or the
timer.
Timer – There are two timers - TIMER 1 AND TIMER 2;
Each counts down the time in hours and minutes. With
less than 60 minutes remaining, the timer also displays
seconds. Press Time to access the timers.
The knobs are used to control the heat level of the burners. Push down and turn
to the symbol to light and then to the desired heat setting.
See the sections on Using the Cooktop and Using the Oven for detailed instructions.
The Clock
About the Clock • Always set the clock after installation or after a power failure. Once power
returns to the oven, the clock defaults to 12:00 am.
• The time of day is displayed in hours and minutes.
• The clock time will appear during all oven operations except when the timer is
running.
• The oven is preset to a 12 hour clock and indicates AM and PM. To switch to
a 24 hour clock, see "Select Function” section.
• If you do not complete the operation of setting the clock, the oven will beep
periodically as a reminder to set the clock time. Press OFF to stop the beeping.
Setting the Clock 1. CLOCK will be displayed and the hour digits
will flash. Turn knob to select hour and AM or
PM.
2. Press Time. CLOCK will still be displayed and the minute digits will flash.
3. Turn knob. Set minutes.
12: 00
AM
CLOCK
English 9

Getting Started
4. Press Time and the clock is now set.
Note: If operation is not completed, the oven will beep periodically as a reminder
to set clock time. Press OFF.
Changing the Clock 1. Press Time. TIMER 1 flashes in display.
2. Turn knob to select CLOCK.
3. Press Time and hour digits flash.
4. Turn knob to change hours.
5. Press Time again and minute digits flash.
6. Turn knob to change minutes.
7. Press Time again and the clock is set.
Note: To cancel the TIME selection when setting the clock, press OFF at any time
while in the clock mode.
The Select Functions Menu
SELECT FUNCTIONS is the section of the menu where you can set or change
the range features listed below.
To access the SELECT FUNCTION menu
1. Press and hold COOKING MODE press pad for five (5) seconds. SELECT FUNCTION is displayed.
2. Turn knob slowly to desired feature. There will be a slight delay before each message (or feature) can be seen in the display. Turn knob slowly and wait approximately one second for display to show next feature.
3. Press START to choose the function.
4. Turn knob to desired setting and press START. When all settings for the function are complete, SELECT FUNCTION flashes again.
5. Press OFF to exit the Select Functions Menu.
1
2
Cooking Mode
Temperature
Start
Time
Change the Beep Volume The volume of the control beep can be changed from LOW (softest) to HIGH
(loudest). The control default for beep volume is Medium.
1. Access SELECT FUNCTIONS Menu.
2. Turn knob clockwise until VOLUME is displayed.
3. Press Start.
4. Turn knob to select volume level Low, Medium or High.
5. Press Start.
Change the Temperature Scale
Turn Clock Display ON or OFF
The oven has been preset to the Fahrenheit temperature scale. The feature
allows you to switch between Fahrenheit and Celsius temperature.
1. Access SELECT FUNCTIONS Menu.
2. Turn knob clockwise until SELECT TEMP F-C is displayed.
3. Press Start.
4. Turn knob to select Fahrenheit (F) or Celsius (C).
5. Press Start to accept new selection.
Clock time display can be turned off. The default display is on.
1. Access SELECT FUNCTIONS Menu.
2. Turn knob clockwise until CLOCK DISPLAY is displayed.
3. Press START.
4. Turn knob to select ON or OFF
5. Press START to accept new selection.
English 10
Access Demo Mode The demo mode is for appliance store use only.
Getting Started
Change the Display Language
Lock / Unlock the Oven Control Panel
Change the Oven Temperature Offset
Language choices are English, Spanish, and French. English is the default language. Note: The SELECT FUNCTIONS menu is displayed in English only,
regardless of which language is selected.
1. Access SELECT FUNCTIONS Menu.
2. Turn knob clockwise until desired language is displayed.
3. Press Start.
4. Turn knob clockwise to select a different language.
5. Press Start to accept a language change.
The oven keypad can be locked for safety purposes. This feature can be used to
prevent changes to the oven function. This function DOES NOT lock the oven
door.
1. Access SELECT FUNCTIONS Menu.
2. Turn knob clockwise until LOCK KEYS is flashing.
3. Press Start. KEY PAD LOCKED is displayed. The display will beep if a key is pressed to indicate that the keypad is locked.
4. To unlock keypads, press Cooking Mode and hold for 5 seconds. Display will read UNLOCKING KEY PAD.
5. When unlocked, the clock will again appear in the display.
This feature allows the adjustment of the oven temperature if food is consistently
too brown or too light.
1. Access SELECT FUNCTIONS Menu.
2. Turn knob clockwise until OVEN TEMP OFFSET is displayed.
3. Press START. 0° F is displayed.
4. Turn the knob to increase temperature in 25° F increments.
5. Press START to accept a temperature change.
Reset the Factory Settings
Set the Sabbath Feature About the Sabbath Feature
This feature is used to change all the “Select Functions” settings back to the original factory settings (or defaults).
1. Access SELECT FUNCTIONS Menu.
2. Turn knob clockwise until RESET DEFAULTS is displayed.
3. Press START. Display reads SELECT FUNCTIONS.
The Sabbath Feature is for religious faiths with “no work” requirements on the
Sabbath.
• The oven will bake for 73 hours before automatically turning off.
• While baking in Sabbath mode, the display will show SABBATH and the
BAKE icon will be displayed. The clock will be off and no temperature will
show in the display.
• During the Sabbath mode, only the OFF key will operate. Press OFF at any
time during the Sabbath mode to end the mode and turn off the oven.
• At the end of 73 hours, the oven will turn off automatically and the display will
show SABBATH END. Press Off to return to time of day.
• The probe CANNOT be used during the Sabbath mode.
Setting the Sabbath Feature for the Oven
1. Verify that the oven is turned off.
English 11

2. Access SELECT FUNCTIONS Menu.
3. Turn knob clockwise until SABBATH OPTION appears.
4. Press START. BAKE will show in display and temperature will flash.
5. Turn knob to set oven temperature.
6. Turn oven light on if desired (press LIGHT).
Note: The light cannot be changed after this point. It will stay on or off, as
selected, during the entire Sabbath mode.
7. Press START. Oven starts after 5 seconds.
The oven operates for 73 hours and then turns off automatically.
Change the Time Format The clock can be set to a 12 hour or 24 hour format. The default for clock format is
12 hour.
1. Access SELECT FUNCTIONS Menu.
2. Turn knob clockwise until TIME FORMAT is displayed.
3. Press Start.
4. Turn knob to select 12 hour or 24 hour format.
5. Press Start to accept new selection.
Turn Automatic Convec-
0.0
tion Conversion ON or
OFF
This feature automatically converts package or recipe temperatures for use with
the convection bake mode. The default setting is “on”.
1. Access SELECT FUNCTIONS Menu.
2. Turn knob clockwise until AUTO CONVECT BAKE is displayed.
3. Press Start.
4. Turn knob to select ON or OFF.
5. Press Start to accept new selection.
Before Using the Appliance for the First Time
• Remove all packing materials and labels from range. Remove packing materials from inside the oven and inside the drawer.
• While cool, wipe with a clean, damp sponge and dry.
• For models with a glass ceramic cooktop, apply the glass ceramic cooktop
cleaner. Buff with a clean cloth. See Care and Cleaning Section.
• There may be a slight odor during first uses; this is normal and will disappear.
• Read and understand all safety precautions and Use and Care Manual information prior to operating.
Operation - Cooktop
This section explains how to operate the cooktop. See “Getting the Most Out of
Your Cooktop” on page 16 for guidelines to improve cooktop results.
About the Cooktop
Use the cooktop for surface cooking applications such as boiling, frying, simmering, steaming and sauteing.
English 12
Operation
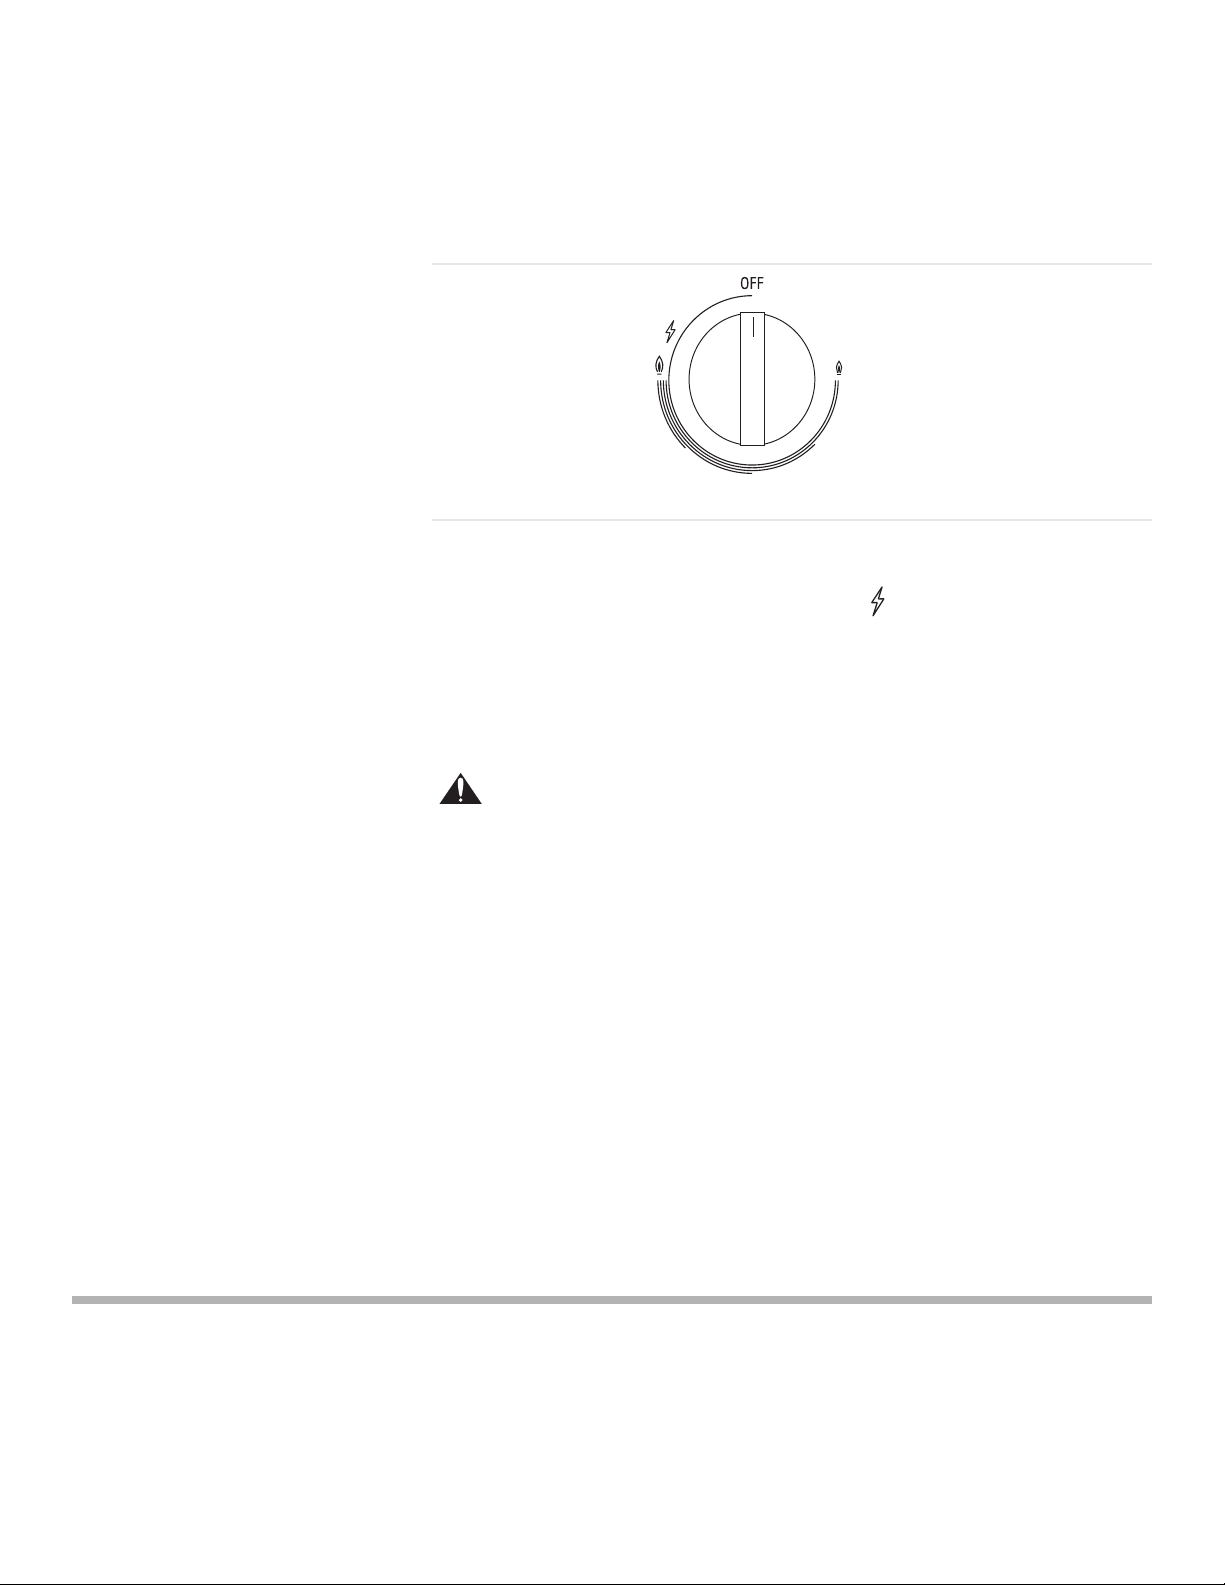
Setting the Burner Heat Level
Burner Control Knob
Figure 6: Burner Control Knob
Lighting the Burner Push in an turn the knob counterclockwise to the symbol.
Note: If the burner does not light within four seconds, turn the burner off. Verify
that the burner cap is positioned correctly on the burner base and that the ignitor
is clean and dry. If the burner still fails to ignite, see “Cooktop Troubleshooting
Chart” on page 28
Caution: All ignitors spark when any single burner is turned on. Do not
touch any of the burners when the cooktop is in use.
Lighting the Burner during a Power Failure
Cooktop burners can be lit manually during a power failure. Hold a match at the
port and turn the knob to the HI position. Wait until the flame is burning all the way
around the burner before adjusting the flame to the desired setting.
Setting the Flame Size After lighting, turn the knob counterclockwise to the desired flame size. See
“Cooking Guide” on page 17 for recommended burner settings.
Caution: To prevent possible burns or possible damage to the pan or the appliance, the flame should not extend beyond the edge of the pan.
Turning the Burner off Turn knob clockwise to the OFF position.
Note: an “pop” may be heard when the burner is turned off. The “pop” may be
louder with LP gas than with natural gas. This is normal.
Operation - Oven
This section explains how to operate the oven. See “Getting the Most Out of Your
Oven” on page 18 for guidelines to improve oven results.
English 13

Operation - Oven
About the Oven
Operation
CAUTION
Do not use aluminum foil or protective liners to line any part of an appliance, especially surface unit drip bowls or oven bottom. Installation of
these liners may result in a risk of electric shock or fire.
Setting the Cooking Mode and Temperature
Automatic Convection Conversion (models with convection bake)
Note: To back out of a current mode, press OFF. (Selecting OFF when not setting
the cooking mode will turn the oven off.)
1. Press COOKING MODE.
2. BAKE will flash in the display.
3. If no change is made within 5 seconds, control will beep and flash. If this occurs, press START.
4. To change the cooking mode, turn knob.
5. Press START.
6. The selected mode will appear in the display, along with the default temperature for that mode, which will be blinking.
7. To select a different temperature, turn knob to the right or left (in 5° increments) to desired temperature.
8. Press START. If not pressed, oven automatically turns on in 5 seconds.
9. The display alternates between the cooking mode and preheat.
The preheated temperature is displayed, starting at 100ºF. The actual temperature increases until set temperature is reached, at which point the oven will beep.
10. To change temperature during cooking, press Temperature. Turn the knob to select new temperature and press START.
11. Once cooking has been completed, press OFF to turn off oven.
In the convection bake mode, the temperature is automatically reduced 25° F
from the package or recipe temperature. Simply enter the package or recipe temperature when setting the mode and the range calculates the correct temperature.
6: 35
PM
380
BAKE100
The Automatic Convection Conversion feature can be turned off to allow for manual temperature adjustment. See “Turn Automatic Convection Conversion ON or
OFF” on page 12 for details.
When the Automatic Convection Conversion feature is activated, the display will
read AUTO CONV BAKE. When the feature is turned off, it will read CONV BAKE.
Hot Oven Indicator After the oven has been turned off, HOT appears in the display where the cooking
mode was to indicate that the oven is off but still hot. When the oven temperature
drops below 176° F, HOT is no longer seen in the display.
Using the Timer Notes:
• If you do not finish setting the timer, the oven will beep periodically as a
reminder to set the time. Press OFF to exit the TIMER mode. (Selecting OFF
when not setting the timer will turn the oven off.)
• Turn the knob to display the time of day or further information about the oven
mode when the timers are in use.
English 14

To set the timer: 1. Press TIME and TIMER 1 will flash in display.
Turn clockwise and TIMER 2 will be displayed.
Select TIMER 1 or 2, then press TIME. SET
TIMER 1 (2) appears in display. Minutes flash.
2. Turn knob to set minutes. If setting only minutes, press START. Otherwise, continue to step 4.
3. Press TIME again and the hours will flash.
4. Turn knob to set hours.
5. Press TIME again. The TIMER is now set.
6. If TIME or START is not pressed, oven will begin beeping and timer display will begin flashing.
Operation - Oven
0: 00
1 : 00
2: 02
Set TIMER 2
Pm
Set TIMER 2
HR:MIN
HR:MIN
TIMER 1
Changing the Timer/s 1. Press TIME. TIMER 1 will appear in display.
Select either TIMER 1 or 2.
2. Press TIME. RESET TIMER 1 (2) appears in the display. Minute digits flash.
3. Turn knob clockwise or counterclockwise to change minutes.
4. Press TIME again and hour digits will flash.
5. Turn knob clockwise or counterclockwise to change hours.
6. Press TIME and new time is set.
Clearing the Timer/s 1. Press TIME once. TIMER 1 flashes.
2. Turn knob to select CLEAR TIMER 1(2). Press TIME.
3. If Time pad is not pressed, range will beep and display will continue flashing.
4. Press TIME to return to the main screen.
Cancelling If operation is not completed, the oven will beep periodically as a reminder to set
time. Press OFF to exit the Timer mode. Selecting OFF when not in a setting
mode will turn off the oven.
Using Timed or Delayed Cook
The TIMED COOK feature sets the oven to a cooking mode for a set period of
time and then turns it off. The TIMED COOK feature is available for each of the
following oven modes: Bake, Convection Bake and Convection Roast.
• Be sure that the time-of-day clock displays the correct time before beginning.
See “Changing the Clock” on page 10 to adjust the time.
• At end of the programmed cooking time, the oven will automatically turn off.
• Delayed cooking is not recommended for foods that need to rise (i.e.; cookies,
cakes, breads, souffles, etc.)
0: 00
AM
0: 00
CLEAR TIMER 1
TIMER 1
Setting a Timed Mode 1. Press COOKING MODE.
2. BAKE will be displayed. To select a different cooking mode, turn the knob.
3. Press START.
4. Turn knob to select desired temperature.
Note: Time required for the oven to reach temperature must be included in
the set cooking time.
5. Press TIME. TIMED BAKE appears.
6. Press TIME. SET BAKE TIME appears in the display and minutes flash.
7. Set minutes. Press TIME.
8. Hours Flash. Set hours. Press START.
9. TIMED BAKE appears in display and the oven begins to preheat.
After cooking is complete, display flashes TIME COOK END and reminder beeps
will sound. Press OFF to clear.
1: 20
HR:MIN
F
350°
TIMED BAKE
English 15

Delaying the Start of a Timed Mode 1. Follow steps 1 through 5 above.
2. Turn knob until DELAYED BAKE appears.
3. Press Time. SET BAKE TIME appears in display and minutes flash.
4. Set minutes and then press TIME. Hours Flash.
5. Set hours and then press TIME. SET BAKE END appears in the display.
6. Press TIME.
7. Use knob to enter the time of day the oven will stop cooking or turn off.
8. Set hours and then press TIME.
9. Set minutes and then press TIME.
Note: The clock automatically calculates time of day at which cooking mode
starts and stops. The displayed cooking time counts down by the minute.
10. At the end of the programmed cooking time, the oven will automatically turn off. Display will show TIME COOK END and reminder beeps will sound. Press OFF to clear.
Note: Remove food from oven immediately after cycle has finished to prevent
overcooking. Food left in the oven will cook even after the cycle is complete.
5: 00
HR:MIN
PM
400
DELAYED BAKE
o
F
To Check the Cooking Time and Stop Time After a Delay Has Been Set
Setting the Sabbath Feature See “Set the Sabbath Feature” on page 11.
1. Press Time.
2. Turn knob to BAKE END or BAKE TIME.
3. Press Time.
Getting the Most Out of Your Appliance
Getting the Most Out of Your Cooktop
Cooktop Cooking Guide
Boiling Water Time to boil can vary greatly depending on environmental conditions. Try the fol-
lowing tips to decrease boil time:
• Use a lid.
• Use a pan that is appropriately sized for the amount of water and the size of
the burner.
• Select a pan with a flat base (See “Cookware Selection Guide” on page 17 for
details).
• Choose a medium-weight pan (rather than a heavy-weight one).
• Start with water that is already warm.
• Boil the smallest amount of water necessary. Smaller volumes will boil faster
than larger volumes.
Recommended Settings Use this chart as a guide for heat settings. A range of heat settings are listed
because the actual setting depends on:
• type and quality of pan (See “Selecting Cookware”),
• type, quantity and temperature of the food,
• burner used and
English 16
Getting the Most Out of Your Appliance
• the cook’s preference.
Table 3: Cooking Guide
Uses Heat Settings
Bringing water to boil 9 - High
Pan frying, sautéing, browning meat, deep fat frying 6-8 - Med-High
Most frying, eggs, pancakes, slow boil 4-5 - Med
Simmering, finish cooking, covered foods, steaming 2-3 - Med Low
Melting butter and chocolate 1 - Low
Cookware Selection Guide
Cookware Characteristics Pan selection directly affects cooking speed and uniformity. For best results select
pans with flat bases. When a pan is hot, the base (pan bottom) should rest evenly
on the surface without wobbling (rocking). Flat, medium-to-heavy-weight pans are
best.
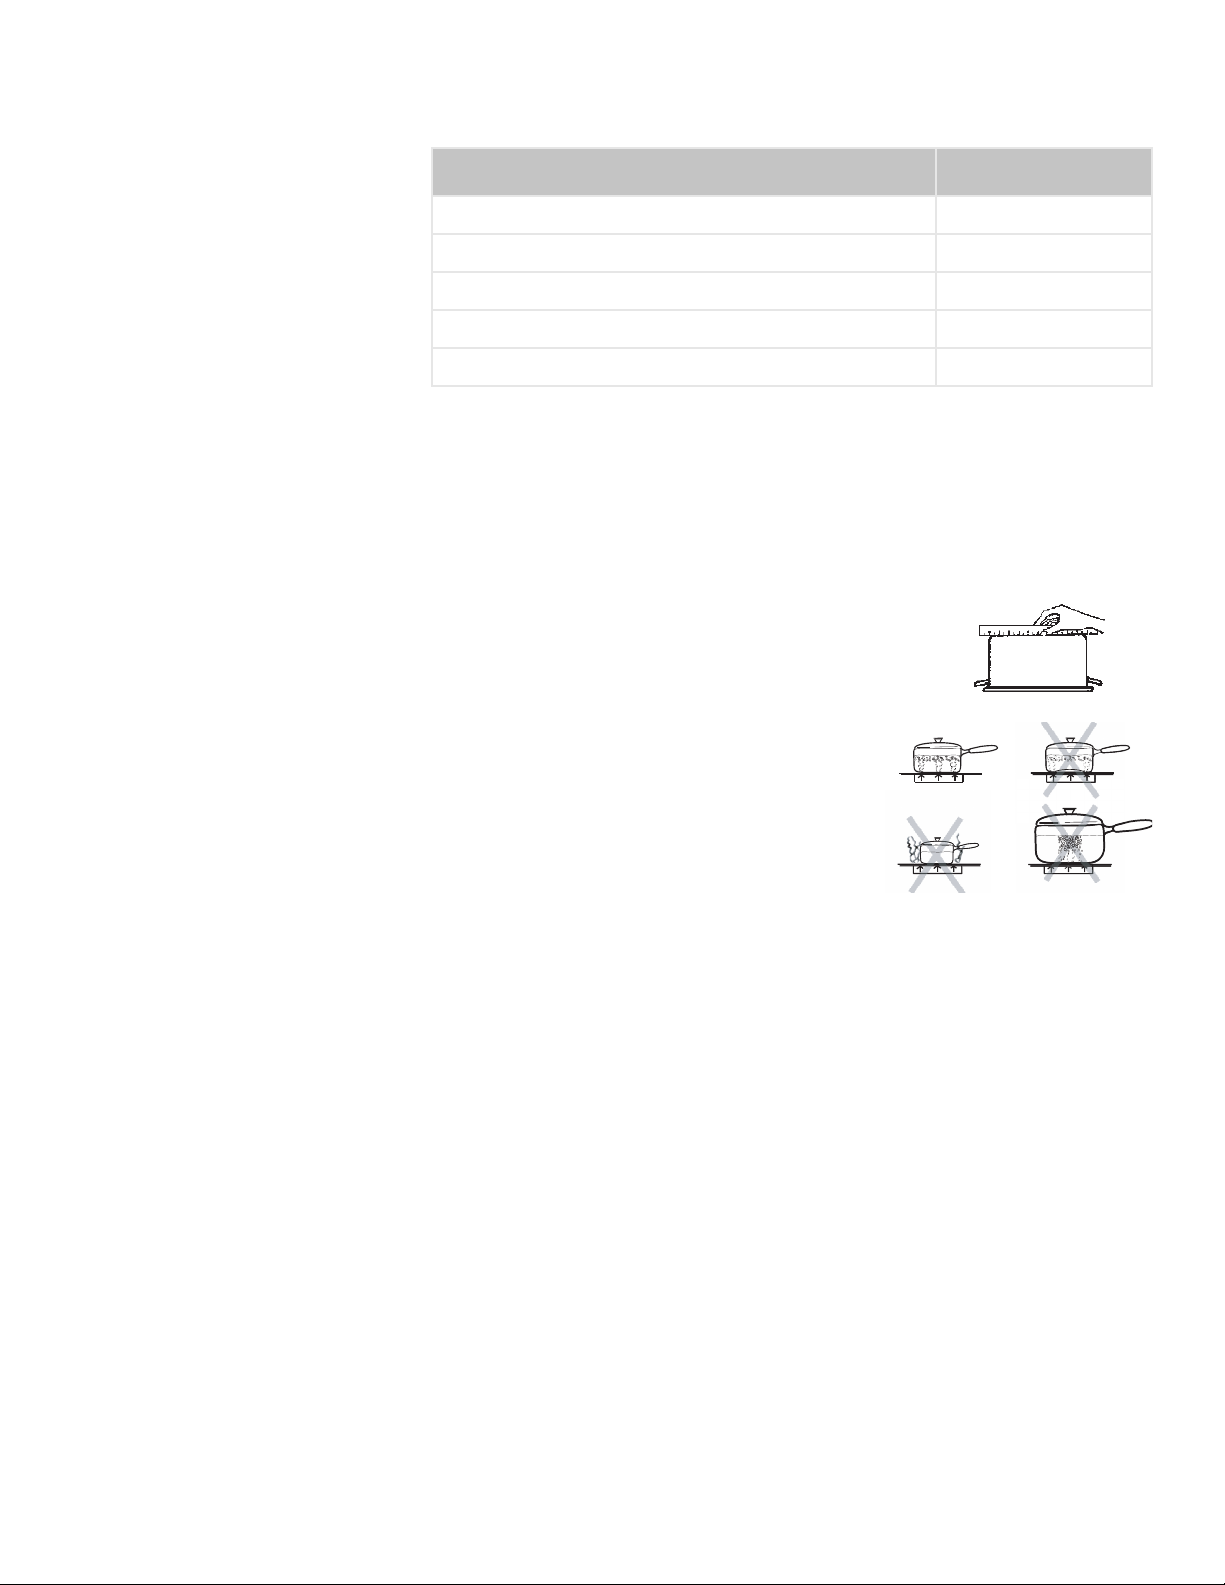
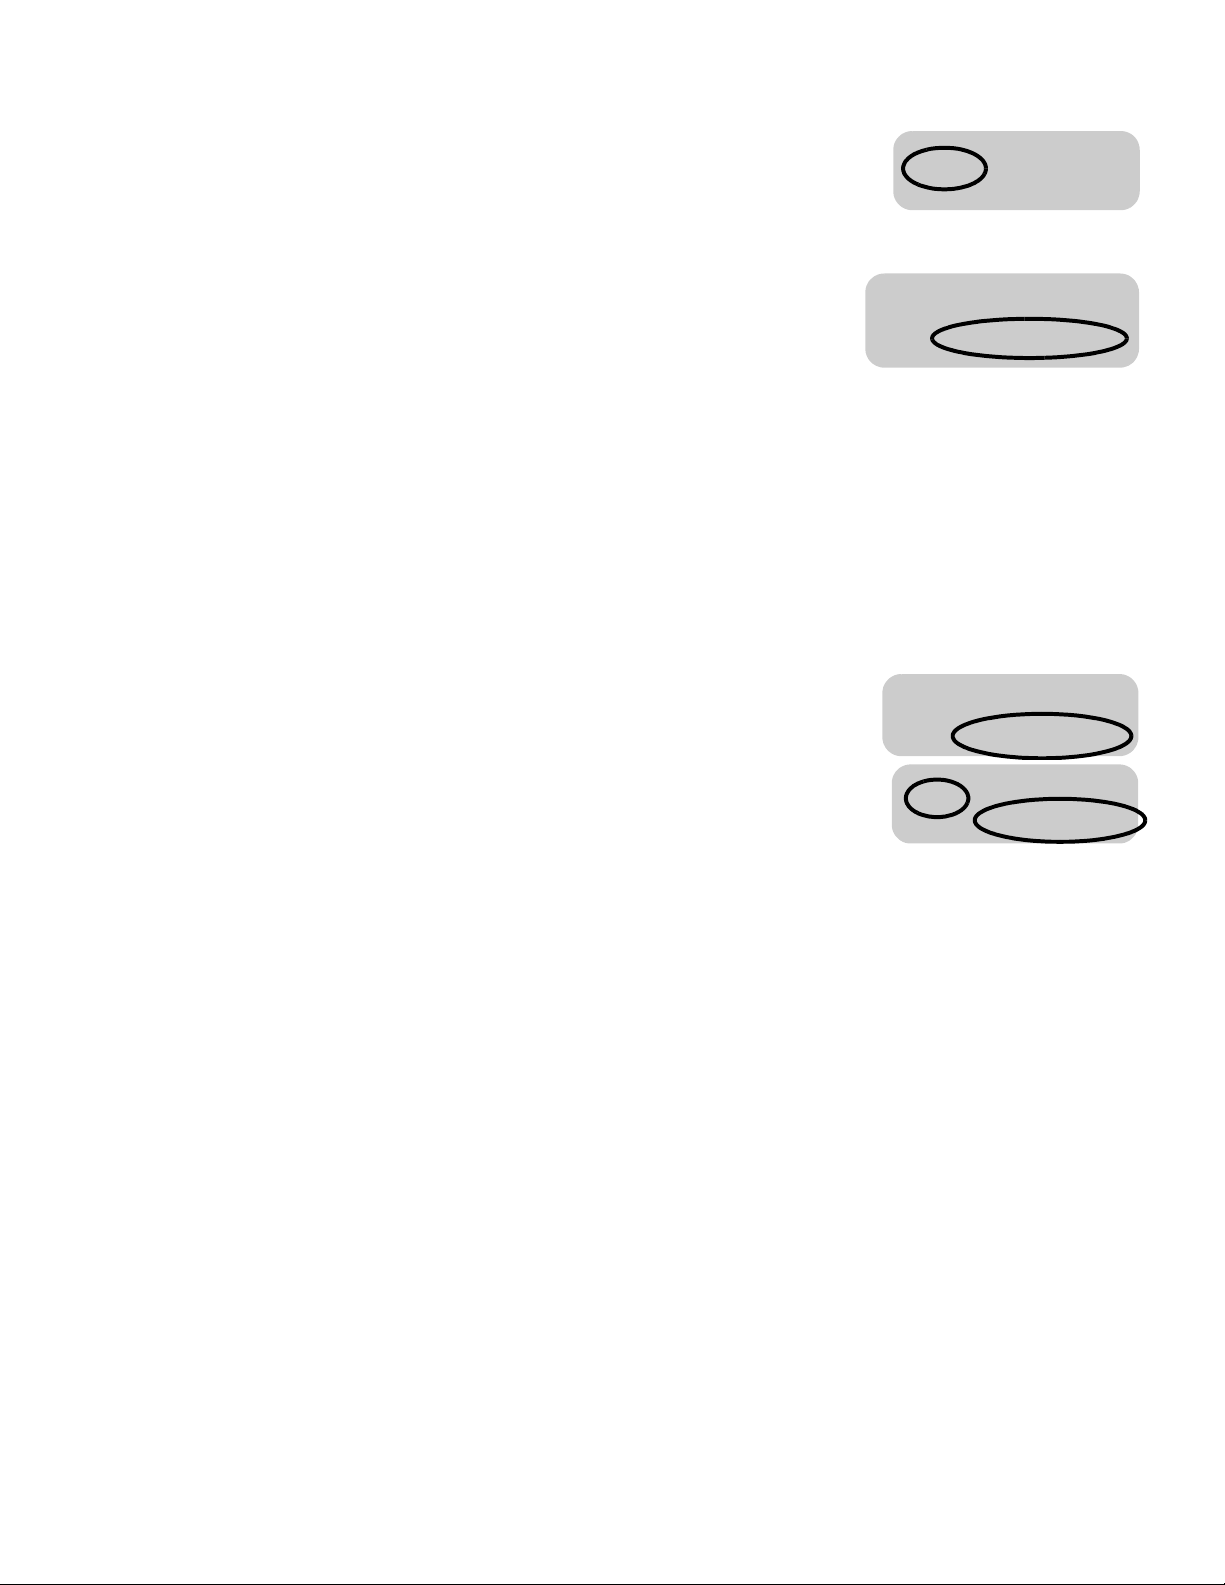
To Test the Flatness of Your Pans Turn the pan upside down on the countertop and place a
ruler flat against the bottom of the pan. The bottom of the
pan and the straight edge of the ruler should be flush
against each other.
Another simple test to determine even heat distribution across the cookware bottom is to place 1”
(25.4 mm) of water in the pan. Bring the water to a
boil and observe the location of the bubbles as the
water starts to boil. Good, flat cookware will have
an even distribution of bubbles over the bottom
surface area.
Match Pan Diameter to Flame Size The flame should be the same size as the bottom of the pan or smaller. Do not
use small pans with high flame settings as the flames can lick up the sides of the
pan.
Place oversized pans that span two burners front to rear, not side to side.
Tight Fitting Lids – A lid shortens cooking/boiling time by holding heat inside the
pot.
Cookware Tips • Use of pots and pans with rounded (either concave or convex) warped or
dented bottoms should be avoided. See drawings.
• Make sure the bottom of the pot or pan being used is clean and dry.
• Use pots and pans with thick, smooth metal bottoms.
Specialty Pans Specialty pans such as griddles, roasters, pressure cookers, woks, water bath
canners and pressure canners must have the same features as described above.
Use only a flat-bottomed wok.
English 17
Getting the Most Out of Your Appliance
Getting the Most Out of Your Oven
Oven Cooking Guide
Rack Position
• RACK POSITION 6 (highest position) – melting cheese, broiling thin foods
• RACK POSITION 5 – broiling most meats, toasting bread
6
5
4
3
2
1
Multiple Rack Cooking When using multiple racks, follow the placement recommendations below.
• RACK POSITION 4 – broiling thicker meats
• RACK POSITION 3 – most baked goods when baking on one rack, such as
on cookie sheet or baking pan, cakes, frozen foods, biscuits, brownies,
muffins
• RACK POSITION 2 – Used for pies, casseroles, breads, bundt or pound
cakes, small roasts or poultry.
• RACK POSITION 1 (lowest position) – Use for angel food cake, large
roasts, turkey.
Figure 7: Rack Positions
• Two rack: Use rack positions 2 and 5.
• Three rack: (for convection bake): Use positions 1, 3 and 6.
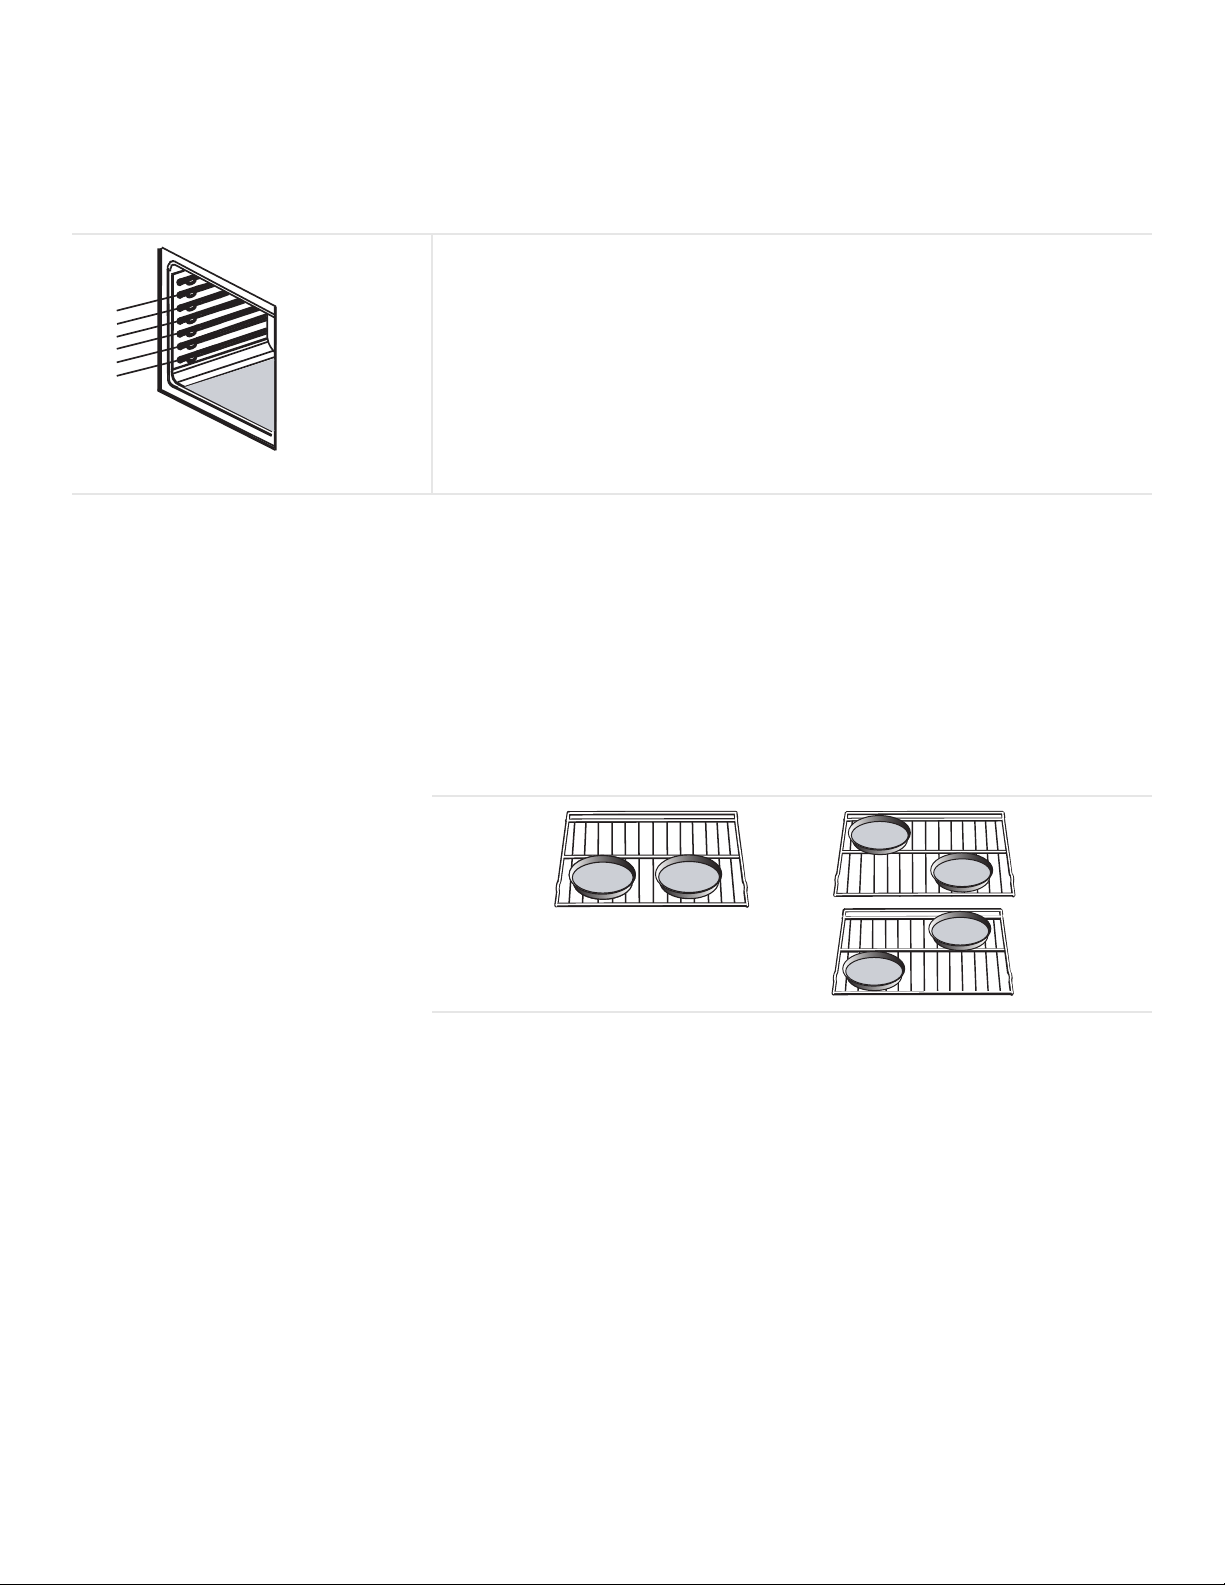
Pan Placement Baking results are better if pans are placed in the center of the oven. If baking
more than one pan on a rack, allow at least 1" to 1 ½” of air space around the pan.
When baking four cake layers at the same time, stagger pans on two racks so that
one pan is not directly above the other. To allow for best baking results stagger
pans as shown in the graphic below.
Figure 8: Pan Placement
Baking Pans Here are some tips for cooking with baking pans:
• Glass baking dishes absorb heat, therefore reduce oven temperature 25°F
when baking in glass.
• Shiny, smooth metal reflects heat resulting in lighter, more delicate browning.
• Dark, rough or dull pans will absorb heat resulting in browner, crisper crust.
Some manufacturers recommend reducing temperature 25° F when using
these pans. Follow manufacturer recommendations.
• Use glass or dark metal pans for pies.
• Insulated baking pans may increase the recommended baking time.
Preheating the Oven Preheat the oven if the recipe recommends it. Preheating is necessary for good
results when baking cakes, cookies, pastry and breads. Setting a higher temperature does not shorten preheat time. Place oven racks in proper position before
preheating. A beep will confirm that oven is preheated and selected oven temperature will be displayed.
English 18
Oven Cooking Modes
Bake, Proof and Warm
Getting the Most Out of Your Appliance
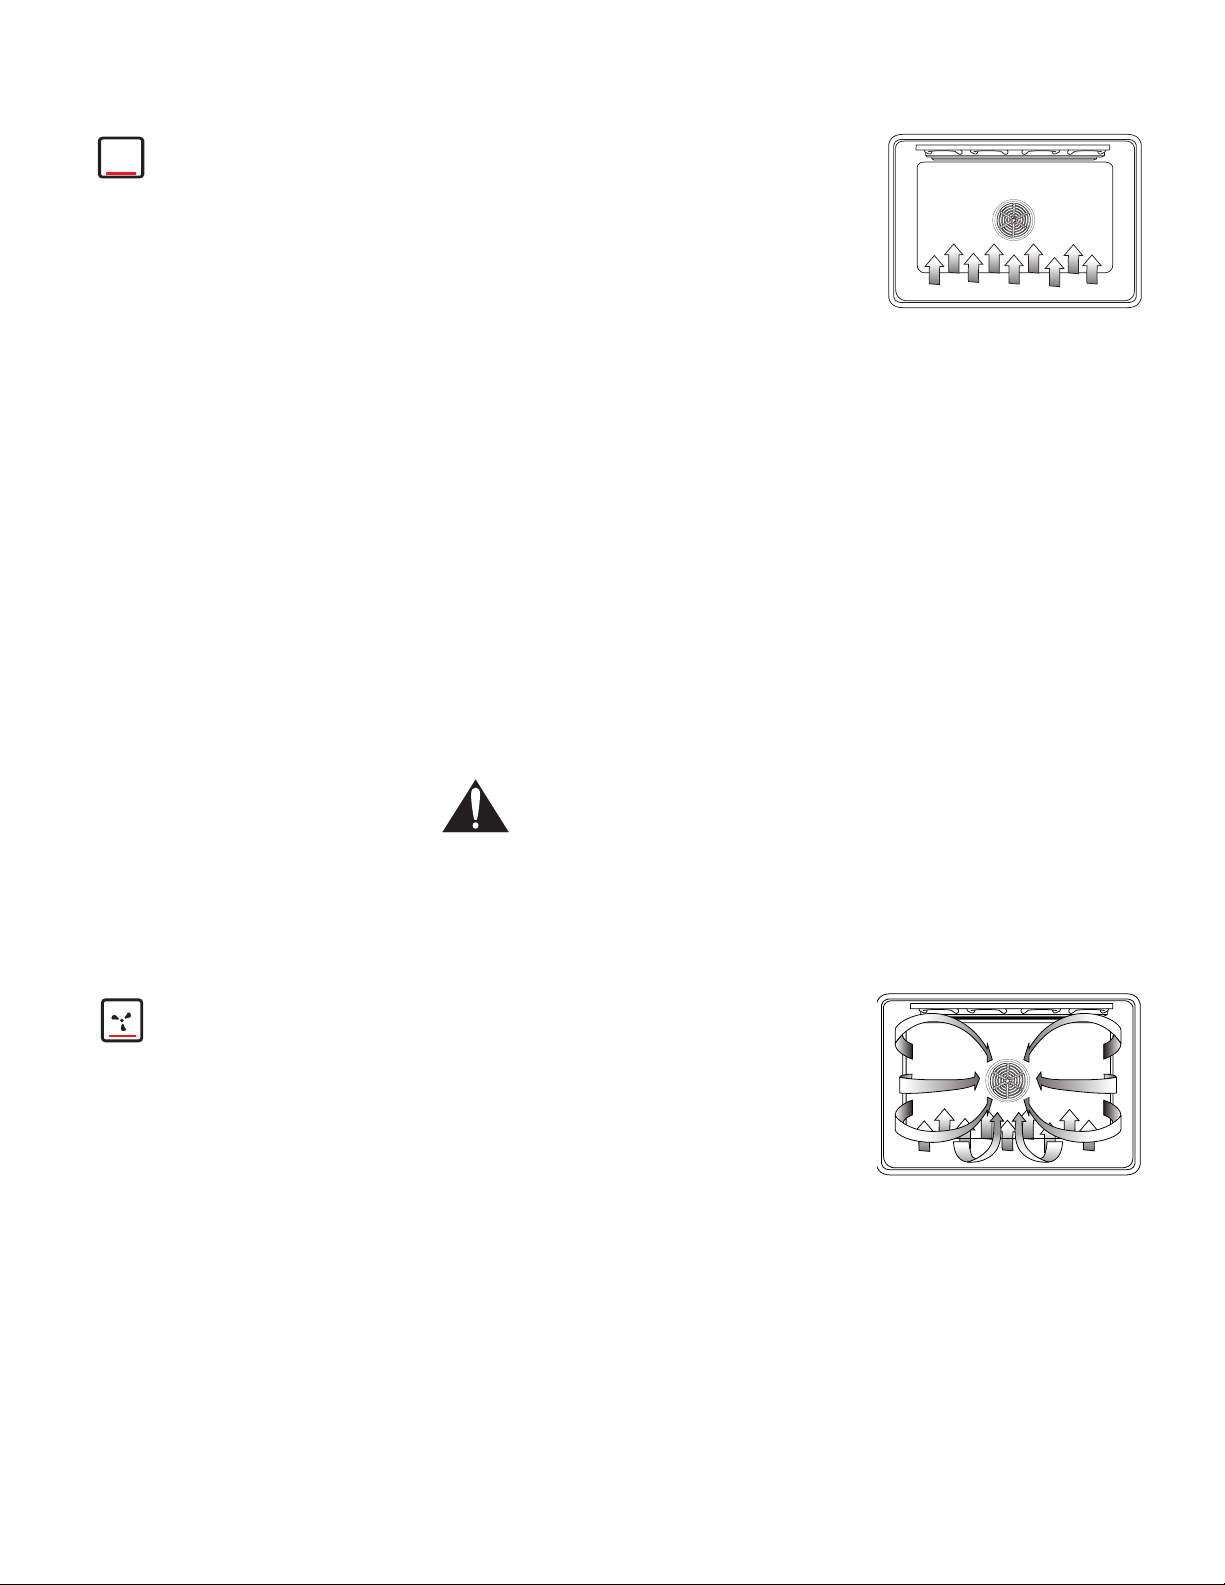
Baking is cooking with dry, heated air. The lower
burner cycles to maintain the oven temperature.
Bake mode can be used to prepare foods like
pastries and casseroles as well as to roast
meats.
Note: Depending on the model, you may hear
the convection fan while the oven is preheating
for the bake mode. This is normal.
In the Proofing mode, the oven will use the lower burner to maintain a low temperature to proof bread.
• Proofing is the rising of a yeast dough.
• The Proofing mode temperatures are 85° to 110° F. The default temperature
is 100° F.
• Loosely cover the bowl or pan and use any rack that accommodates the size
of the container.
• Keep the door closed and use the oven light to check the rising of the dough.
In Warming mode, the lower burner maintain a low temperature in the oven cavity
in order to keep food at serving temperature.
Convection Bake
• Use the Warming setting on the oven to keep foods hot until ready to serve.
• Warming mode temperatures are 140° - 220° F. Default temperature is 170°.
• Foods that must be kept moist should be covered with a lid or aluminum foil.
CAUTION
When using Warm mode, follow these guidelines:
• Do not use the Warm Mode to heat cold food.
• Be sure to maintain proper food temperature. The USDA recommends holding hot food at 140°F or warmer.
• DO NOT warm food for longer than one hour.
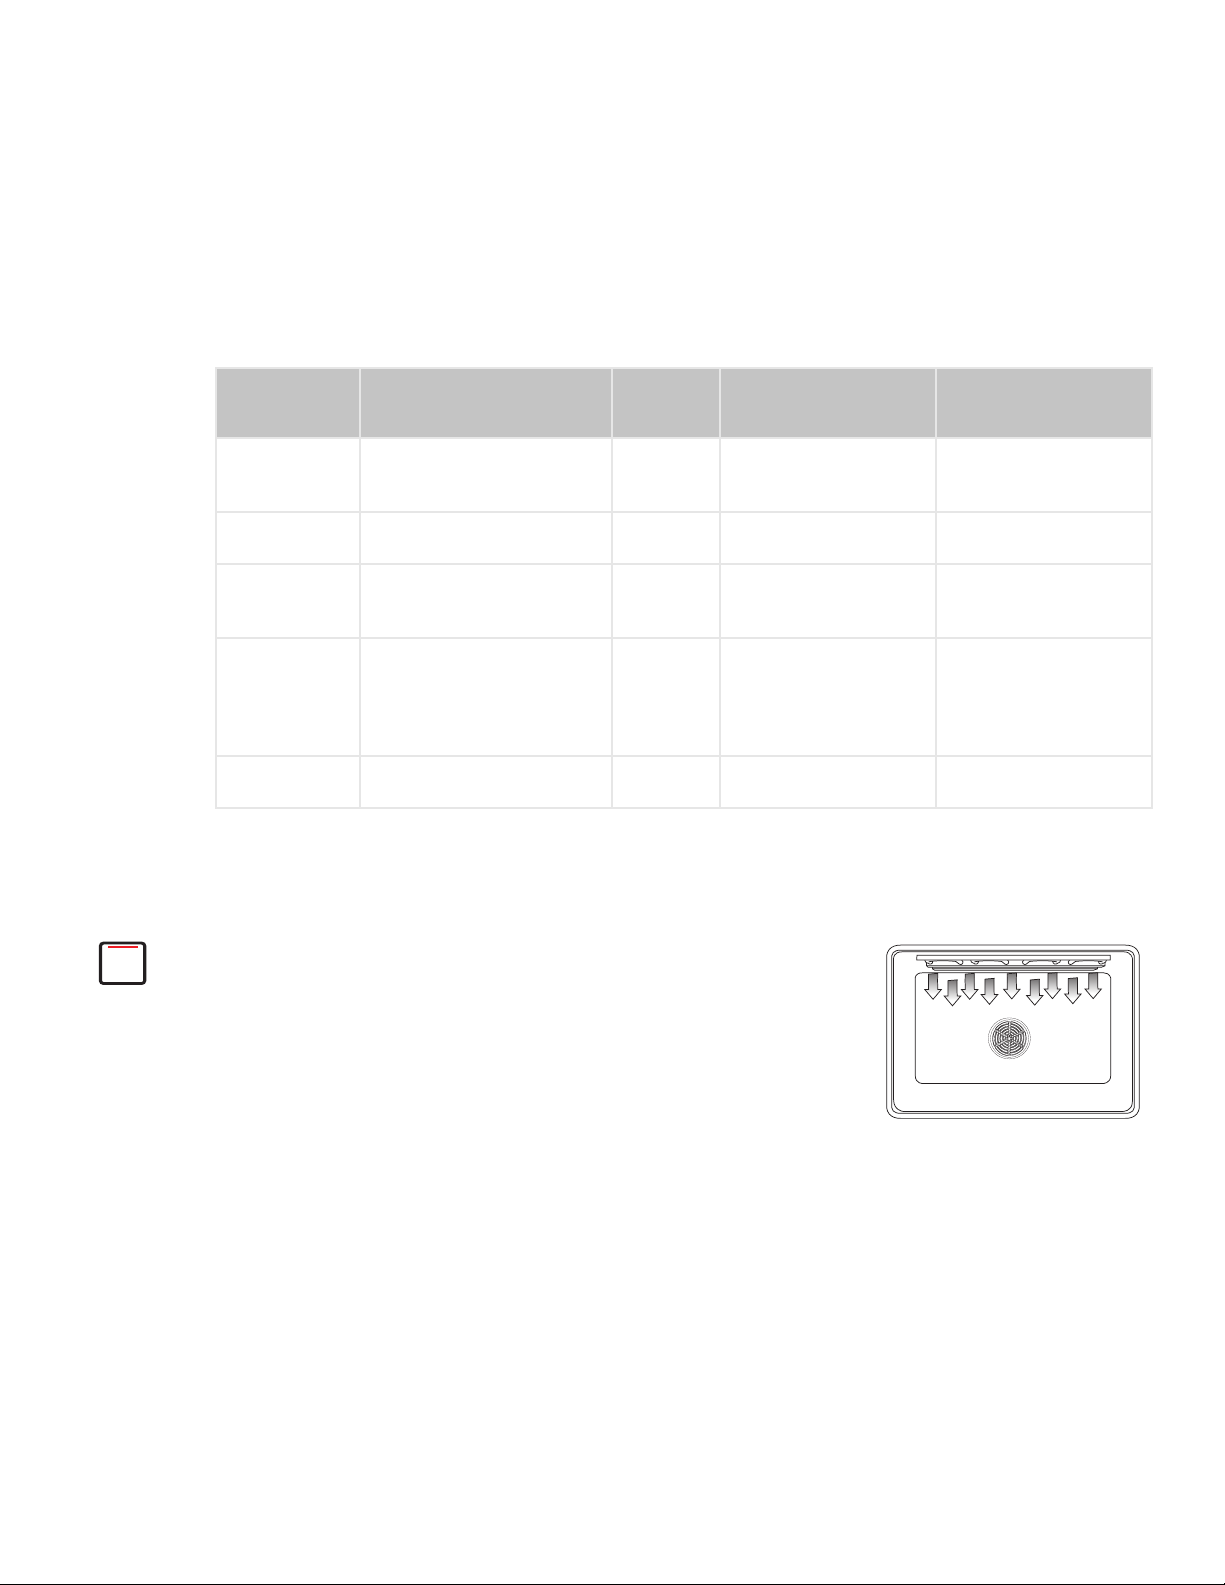
Convection baking is similar to baking. Heat
comes from the lower heating burner. The main
difference in convection baking is that the heat is
circulated throughout the oven by the convection
fan.
The Convection Bake mode is well-suited for
baking large quantities of food on multiple racks.
It can be used to prepare cookies, pies, cupcakes, pastries, breads, snack foods and appetizers among other items. The benefits of Convection Baking include:
• Slight decrease in cooking time
• Three rack cooking (more even browning)
• Higher Volume (yeast items rise higher)
• Ability to cook more items at once
For Best Results:
• Reduce recipe temperature by 25° F. Refer to Convection Baking chart.
• Place food in low-sided, uncovered pans such as cookie sheets without sides.
• Center baking pans side to side on the oven rack
English 19
Getting the Most Out of Your Appliance
Automatic Convection Conversion In the convection bake mode, the temperature is automatically reduced 25° F
from the package or recipe temperature. Simply enter the package or recipe temperature when setting the mode and the range calculates the correct temperature.
The Automatic Convection Conversion feature can be turned off to allow for manual temperature adjustment. See “Turn Automatic Convection Conversion ON or
OFF” on page 12 for details.
When the Automatic Convection Conversion feature is activated, the display will
read AUTO CONV BAKE. When the feature is turned off, it will read CONV BAKE.
Table 4: Convection Baking Chart
Food Item
Cake Cupcakes
Bundt Cake
Angel Food
Pie 2 Crust, fresh, 9”
2 Crust, frozen fruit, 9”
Cookies Sugar
Chocolate Chip
Brownie
Breads Yeast bread, loaf, 9x5
Yeast rolls
Quick bread, loaf, 8x4
Biscuits
Muffins
Pizza Frozen
Fresh
a. This temperature must be manually reduced by 25° F if the Automatic Convection Conversion
feature has been turned off.
b. This chart is a guide. Actual times depend on the mixes or recipes baked. Follow recipe or
package directions.
Broiling uses intense heat radiated from the
Broil
upper burner. The Broil mode is best suited to
cooking thin, tender cuts of meat (1” or less),
poultry and fish. It can also be used to brown
breads and casseroles. Always broil with the
door closed.
Rack
Position
3
2
1
2
2
3
3
3
2
3
2
3
3
3
3
Temp. (oF)
(preheated oven)
350
350
350
400-450
400
375-400
375-400
375
400
400-425
375-400
400-425
450
425-475
450-475
Convection Bake Time
a
18-21
37-43
39-43
45-55
68-78
6-11
10-15
29-36
20-24
14-18
45-55
11-15
16-20
23-26
12-15
(min.)
b
English 20
The benefits of Broiling include:
• Fast and efficient cooking
• Cooking without the addition of fats or liquids
• Browning as the food cooks
For Best Results:
• Preheat oven 3-4 minutes. Do not preheat for more than 5 minutes.
• Steaks and Chops should be at least 3/4” thick
• Brush fish and poultry with butter or oil to prevent sticking
• Use the broil pan and grid included with your range
• Do not cover the broiler grid with foil. It is designed to drain fats and oils away
from the cooking surface to prevent smoking and spattering
• Turn meats once halfway through the recommended cooking time (see Broil
Chart for examples).
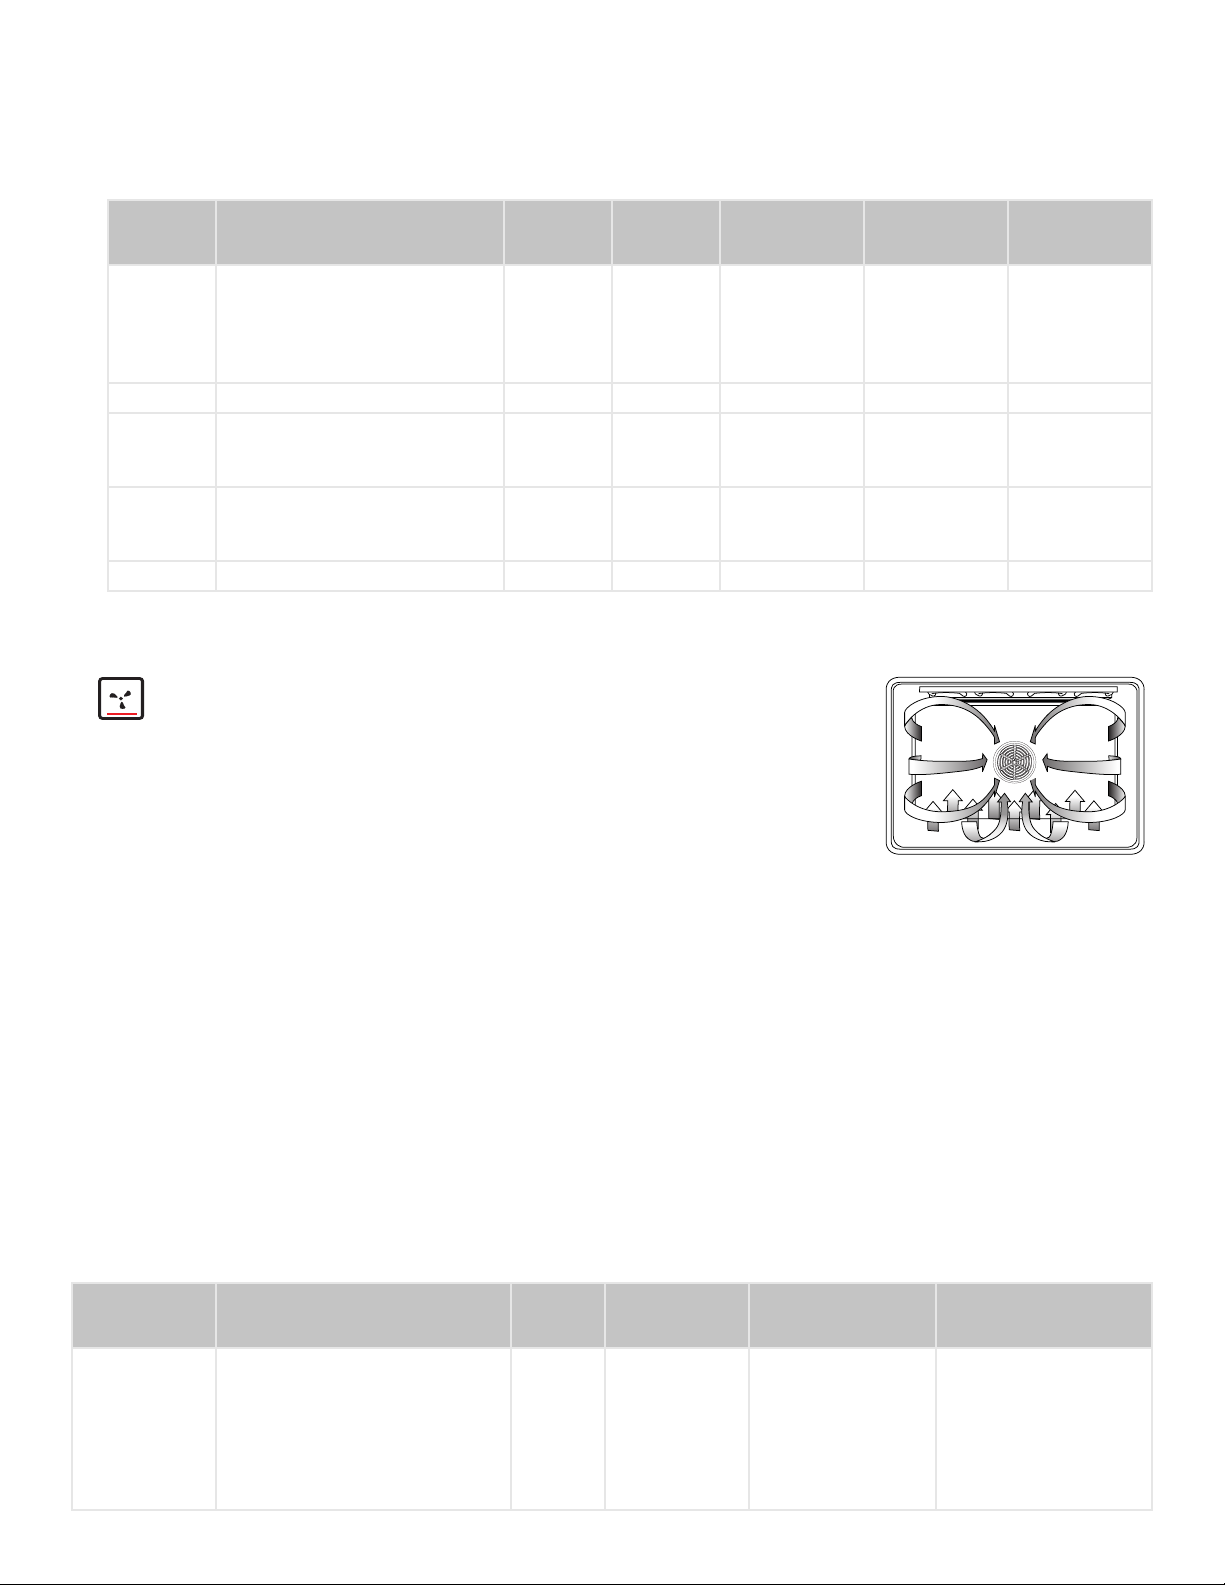
Table 5: Broiling Chart
Getting the Most Out of Your Appliance
• When top browning casseroles, use only metal or glass ceramic dishes such
as Corningware®.
• Never use heat-proof glass (Pyrex®); they can’t tolerate the high temperature.
Food Item / Thickness
Beef Steak (3/4”-1”)
Medium Rare
Medium
Well
Hamburgers (3/4”-1”) - Well
Poultry Breast (bone in) 4 low 170 18-20 18-19
Pork Pork chops (1”)
Sausage - fresh
Ham slice (1/2”)
Seafood Fish filets (3/4”-1”) buttered 5 low Cook until
Bread Garlic bread slices (1”) 5 high N/A 2-4 Do Not Turn
Rack
Position
5
5
5
5
4
3
5
Broil
Setting
high
high
high
high
high
high
high
Internal
Temp. (
145
160
170
160
160
160
160
opaque and
flakes easily
o
F)
Time Side 1
6-7
7-8
8-9
9-11
8-9
7-9
5-6
12-14 Do Not Turn
(min.)
a
Time Side 2
(min.)
5-6
6-7
7-9
8-10
7-8
6-8
5-6
a
a. Broiling times are approximate and may vary slightly, Times are based on cooking with a preheated broil
burner.
Convection Roast uses intense heat from the
Convection Roast
lower burner as well as heat circulated by the
convection fan. The result is a crispier exterior
that seals in juices. The Convection Roast mode
is well suited to preparing tender cuts of meat
and poultry.
Table 6: Convection Roast Chart
Meats Item
Beef Rib roast
Rib eye roast (boneless)
Rump, eye, tip, sirloin (boneless)
Tenderloin roast
The benefits of Convection Roasting, include:
• As much as 25% faster cooking than standard Roasting/ Baking
• Rich, golden browning
For Best Results:
• Use the same temperature as indicated in the recipe.
• Check doneness early as roasting time may decrease by as much as 25%.
Refer to Convection Roast Chart for examples.
• Do not cover meat or use cooking bags.
• Use the broil pan and grid provided with the range for roasting. A low-sided,
uncovered pan can also be used.
• Use a meat thermometer to determine the internal temperature of the meat.
• If the meat is browned to your liking, but is not yet done, a small strip of foil
can be placed over the meat to prevent overbrowning.
• Let meat stand covered with foil 10-15 minutes after removing from the oven.
Weight
(lbs.)
4-6
4-6
3-6
2-3
Oven Temp.*
o
(
F)
325
325
325
425
Roasting Time*
(min. per lb.)
25-32
28-32
24-32
27-32
25-30
28-32
15-25
Internal Temp.
o
(
F)
145 (med. rare)
160 (medium)
145 (med. rare)
160 (medium)
145 (med. rare)
160 (medium)
145 (med. rare)
English 21

Table 6: Convection Roast Chart
Meats Item
Pork Loin roast (boneless or bone in)
Shoulder
Poultry Chicken - whole
Turkey - unstuffed**
Turkey - unstuffed**
Turkey - unstuffed**
Turkey breast
Cornish hen
Weight
(lbs.)
5-8
3-6
3-4
12-15
16-20
21-25
3-8
1-1 1/2
Oven Temp.*
o
F)
(
350
350
375
325
325
325
325
350
Roasting Time*
(min. per lb.)
15-25
20-30
14-20
10-14
9-13
6-10
20-25
45-75 (total time)
Internal Temp.
160
160
180
180
180
180
170
180
o
F)
(
* Roasting times are approximate and may vary depending on shape of the meat.
** Stuffed turkey requires additional roasting time. The minimum safe temperature for stuffing in poultry is 165°F.
Cleaning and Maintenance
Cleaning - Cooktop
Caution:
Do not use any cleaner on the cooktop while the surface is hot; The
resulting fumes can be hazardous to your health. Heated cleaner can
chemically attack and damage surface.
Caution: All ignitors spark when any single burner is turned on. Do not
touch any of the burners when the cooktop is in use.
Daily Cleaning Wipe with a warm soapy water; Rinse and dry. After a spill or boilover, turn off the
burner and allow the cooktop to cool. Clean around the burner and burner ports.
Reassemble burner(s) and check for proper operation.
Cleaning Guidelines
Avoid these Cleaners • Glass cleaners which contain ammonia or chlorine bleach. These ingredients
may permanently etch or stain the cooktop.
• Caustic Cleaners
• Oven cleaners such as Easy Off® may etch the cooktop surface.
• Abrasive Cleaners
• Metal scouring pads and scrub sponges such as Scotch Brite® can scratch
and/ or leave metal marks.
• Soap-filled scouring pads such as SOS
• Powdery cleaners containing chlorine bleach can permanently stain cooktop
Table 7: Cooktop Cleaning Chart
®
can scratch the surface.
Cooktop Part/Material Suggested Technique(s) Important Reminders
Burner Base / Enameled
Steel
English 22
• Detergent and hot water; rinse
and dry.
• detergent-filled steel wool pads
such as Brillo
®
or S.O.S.®. Rinse
and dry.
• Clean ports with a stiff nylon bristle
toothbrush to clean port openings.
• Do not scratch or gouge the port
openings

Table 7: Cooktop Cleaning Chart
Cooktop Part/Material Suggested Technique(s) Important Reminders
Cleaning and Maintenance
Burner Caps and Grates /
Matte Finish on Cast Iron
• Hot water and detergent. Rinse
and dry immediately
• Nonabrasive cleaners such as
Fantastic
®
or Formula 409®.
Rinse and dry immediately.
• Mild abrasive cleaners such as
Bon Ami
®
or Soft Scrub®.
Control Knobs / Plastic • Hot sudsy water; rinse and dry
immediately.
Exterior finish / Porcelain
Enamel
• Hot sudsy water; rinse and dry
thoroughly.
• Nonabrasive cleansers such as
Fantastic
®
or Formula 409®.
• Mild abrasive cleansers such as
Bon Ami
®
, Ajax®, Comet®.
• Liquid cleaners such as Soft
®
Exterior Finish / Stainless
Steel
Scrub
• Hot water and detergent
• Non-abrasive cleaners such as
Fantastic
.
®
or Formula 409®.
Rinse and dry immediately.
• Cleaner polish such as Stainless
Steel Magic
®
to protect the finish
from staining and pitting;
enhances appearance.
• Hard water spots: Household
white vinegar.
• Mild Abrasive Cleaners: Kleen
®
King
stainless steel liquid
cleaner, Cameo
®
aluminum &
stainless steel cleaner, Bon Ami
• Heat discoloration: Bar Keepers
®
Friend
.
• The grates are heavy; use care when
lifting. Place on a protected surface.
• Blisters / crazing / chips are common
due to the extreme temperatures on
grate fingers and rapid temperatures
changes.
• Do not wash in the dishwasher
• Acidic and sugar-laden spills deteriorate the enamel. Remove soil immediately
• Abrasive cleaners, used too vigorously or too often, can eventually mar
the enamel.
• To remove knobs, place in off position
and pull straight out.
• Do not soak knobs.
• Do not force knobs onto valve shaft.
Line up D-shaped opening with the
valve shaft.
• Do not use abrasive scrubbers or
cleansers, such as BonAmi
or Comet
®
. They may permanently
damage the finish.
• Carefully reassemble the burner when
finished. Verify that the burner cap is
properly seated.
• Do not use a toothpick; it may break
off.
• Acidic and sugar-laden spills deteriorate the porcelain enamel. Remove
soil immediately.
• Do not use wet sponge or towel on
hot porcelain.
• Do not soak burner caps.
• Always apply minimal pressure with
abrasive cleaners.
• Never use oven cleaners, caustic
cleaning agents or abrasive cleaning
agents on exterior of range.
• Stainless steel resists most food
stains and pit marks providing the surface is kept clean and protected.
• Use clean, soft cloths, sponges or
paper towels.
• Wipe area dry to avoid water marks.
• Never allow food stains or salt to
remain on stainless steel for any
length of time.
• Rub lightly in the direction of polish
lines.
• Chlorine or chlorine compounds in
some cleaners are corrosive to stain-
®
.
less steel. Check ingredients on label
before using.
®
, Ajax®,
English 23

Cleaning and Maintenance
Table 7: Cooktop Cleaning Chart
Cooktop Part/Material Suggested Technique(s) Important Reminders
Igniters / Ceramics • Carefully wipe with a cotton swab
dampened with water, ammonia
or a non-abrasive cleaner such as
Formula 409
®
.
• Gently scrape soil off with a toothpick.
• Keep the ignitor ports clean for proper
performance. It is necessary to clean
these when there is a boilover or
when the burner does not light even
though the electronic ignitors click.
• A damp igniter will prevent burner
from igniting. For proper burner performance, keep ignitors clean and
dry.
• Remove any lint that may remain after
cleaning.
Cleaning - Oven
Daily Cleaning Daily cleaning of the inside of the oven is not necessary. When soil builds up, use
the self-clean function as explained in “Self Cleaning the Oven” on page 24. See
“Oven Cleaning Chart” on page 24 for instructions for specific surfaces and items.
Cleaning Guidelines
Avoid these cleaners • Do not use caustic cleaners such as Easy Off®. They may etch the surface.
• Flammable cleaners such as lighter fluid or WD-40
Table 8: Oven Cleaning Chart
Part Recommendations
Racks Wash with hot sudsy water. Rinse thoroughly and dry, or gently rub with cleansing powder or soap filled
pads as directed. If racks are cleaned in the oven during the self-clean mode, they will lose their shiny finish and may not glide smoothly. If this happens, wipe the rack edges with a small amount of vegetable oil,
then wipe off excess.
Fiberglass Door Gasket DO NOT HAND CLEAN GASKET.
Glass (other than cooktop)
Painted Surfaces Clean with hot sudsy water or apply Fantastik® or Formula 409® to a clean sponge or paper towel and
Porcelain Surfaces Immediately wipe up acid spills like fruit juice, milk and tomatoes with a dry towel. Do not use a moistened
Stainless Surfaces Always wipe or rub with grain. Clean with a soapy sponge then rinse and dry, or wipe with Fantastik® or
Plastic & Controls When cool, clean with soapy water, rinse and dry.
Wash with soap and water or glass cleaner. Use Fantastik® or Formula 409® to remove grease spatters
and stubborn stains.
wipe clean. Avoid using powdered cleansers, steel wool pads and oven cleaners.
sponge/towel on hot porcelain. When cool, clean with hot sudsy water or apply Bon-Ami® or Soft Scrub®
to a damp sponge. Rinse and dry. For stubborn stains, use soap filled pads. It is normal for porcelain to
show fine lines with age due to exposure to heat and food soil.
Formula 409® sprayed onto a paper towel. Protect and polish with Stainless Steel Magic® and a soft
cloth. Remove water spots with a cloth dampened with white vinegar. Use Bar Keeper’s Friend® to
remove heat discoloration.
Self Cleaning the Oven The oven features a self-cleaning function that eliminates the manual labor
involved with cleaning your oven. During self-cleaning, the oven uses a very high
temperature to burn away food soil and grease.
• Do not clean parts or accessories in the self-clean oven.
English 24

Cleaning and Maintenance
• It is common to see smoke and/or an occasional flame-up during the SelfClean cycle, depending on the content and amount of soil remaining in the
oven. If a flame persists, turn off the oven and allow it to cool before opening
the door to wipe up the excessive food soil.
• The oven door locks at the beginning of the self-clean cycle.
• The oven light does not operate during this mode.
• During Self-Clean, the kitchen should be well ventilated to help eliminate
odors associated with Self-Clean. Odors will lessen with use.
• Four hours is the preset length of cleaning. The range can also be set to clean
for 3 or 5 hours.
• The mode automatically stops at the end of the clean hours.
• When the oven cools after cleaning, the automatic door lock will release and
the door can be opened.
• To cancel or stop while the mode is operating, press OFF.
• The door will not unlock until the oven reaches a safe temperature.
Preparing the Oven for Self Clean
WARNING
A flexible door gasket is necessary for a good seal. Do not clean, rub,
damage or move the gasket.
1. Remove all utensils and bakeware.
2. Remove oven racks. If oven racks are left in the oven during the self-clean
cycle, they will permanently lose the shiny finish and change to a dull dark finish. See Oven Cleaning Chart for proper care.
3. Wipe up excessive soil, spills and grease before self-cleaning the oven.
Excess grease will cause flames and smoke inside the oven during self-cleaning.
Do hand-clean 1 1/2 inches from
rack guides to front of oven cavity.
Do not hand-clean
the gasket.
Do hand-clean frame
area outside the gasket.
Do hand-clean door
area outside the gasket.
Figure 9: Cleaning Guidelines
4. Review illustration above. Some areas of the oven must be cleaned by hand
before the cycle begins. Use a soapy sponge or plastic scrubber or a deter-
gent-filled S.O.S.
®
pad. Hand-clean the oven door edge, oven front frame and
up to 1-1/2 inches inside the frame with detergent and hot water. Do not clean
or rub the gasket on the oven. The gasket is designed to hold in heat during
the self-clean cycle. Rinse all areas thoroughly then dry.
5. Be sure oven light is turned off and the light bulbs and lens covers are in place. Do not operate oven without light bulb and cover in place.
Important: Do not use Commercial Oven Cleaners on the self-clean oven or any
part because they will damage the finish or part.
English 25
Cleaning and Maintenance
Setting the Self-Clean Mode 1. Press COOKING MODE.
2. Turn knob until SELF CLEAN mode appears. Press START.
3. The default cleaning time is 4 hours. To change cleaning time, turn knob to change number of hours. Otherwise, continue to step 4.
4. Press START. SELF CLEAN flashes. Press START.
5. REMOVE RACKS appears in the display as a reminder to remove oven racks.
6. Press START again to begin the selfclean.
Note: The door locks at the beginning of the
cycle; The door lock symbol will appear in the display at this point. If door does not
lock, press OFF and do not self-clean; phone service.
4: 00
3: 00
REMOVE RACKS
SELF CLEAN
3
SELF CLEAN
Delaying the Start of the Self-Clean
Note: The time of day must be correctly set for this option to work properly. See
section “Setting the Clock” in “Setting Up Your Range”.
1. Press COOKING MODE.
2. Turn knob until SELF CLEAN mode appears. Press START.
3. The default cleaning time is 4 hours. To change cleaning time, turn knob to change number of hours. Otherwise, continue to step 4.
4. Press START.
5. Turn knob until DELAYED CLEAN mode appears. Press START.
3: 00
SELF CLEAN
Delayed CLEAN
6. SELF CLEAN END appears in the display.
7. Turn knob to enter the time of day you want the self-clean to end: Set hours, press time, set minutes.
8. Press START. The display will remind you to remove oven racks.
9. Press START. The display shows DELAYED CLEAN. The self-clean will automatically start at the appropriate time.
Note: In the Delayed Self-Clean Mode, the door latch automatically activates at
the beginning of the cycle. The door lock symbol will appear in the display.
Note: The oven lights do not operate in the Self-Clean mode.
5: 45
SELF CLEAN
SELF CLEAN END
After Self-Cleaning 1. At the end of the programmed cleaning time, the oven will automatically turn
off. SELF CLEAN END appears in the display. Press OFF to clear.
Note: The door will not unlock until the oven reaches a safe temperature.
2. The self-clean mode may produce ash which will settle in the bottom of the oven. If this happens, remove ash with a damp cloth before using the oven.
3. Wipe rack edges with cooking oil to allow for proper glide. Wipe off excess.
After self-cleaning, the entire oven can be safely cleaned with a soapy sponge,
rinsed and dried. If stubborn soil remains, follow the guidelines on this page.
• Always use the mildest cleaner that will remove the soil.
• Rub metal finishes in the direction of the grain.
• Use clean, soft cloths, sponges or paper towels.
• Rinse thoroughly with a minimum of water so it does not drip into door slots.
• Dry to avoid water marks.
English 26
Cleaning and Maintenance
Cleaning - Drawer
Daily Cleaning Wash with hot soapy water, rinse and dry.
Maintenance
Cooktop Maintenance
Stainless Steel Cooktop Models No maintenance is required other than daily cleaning as described in “Cleaning
Guidelines” on page 22
Oven Maintenance
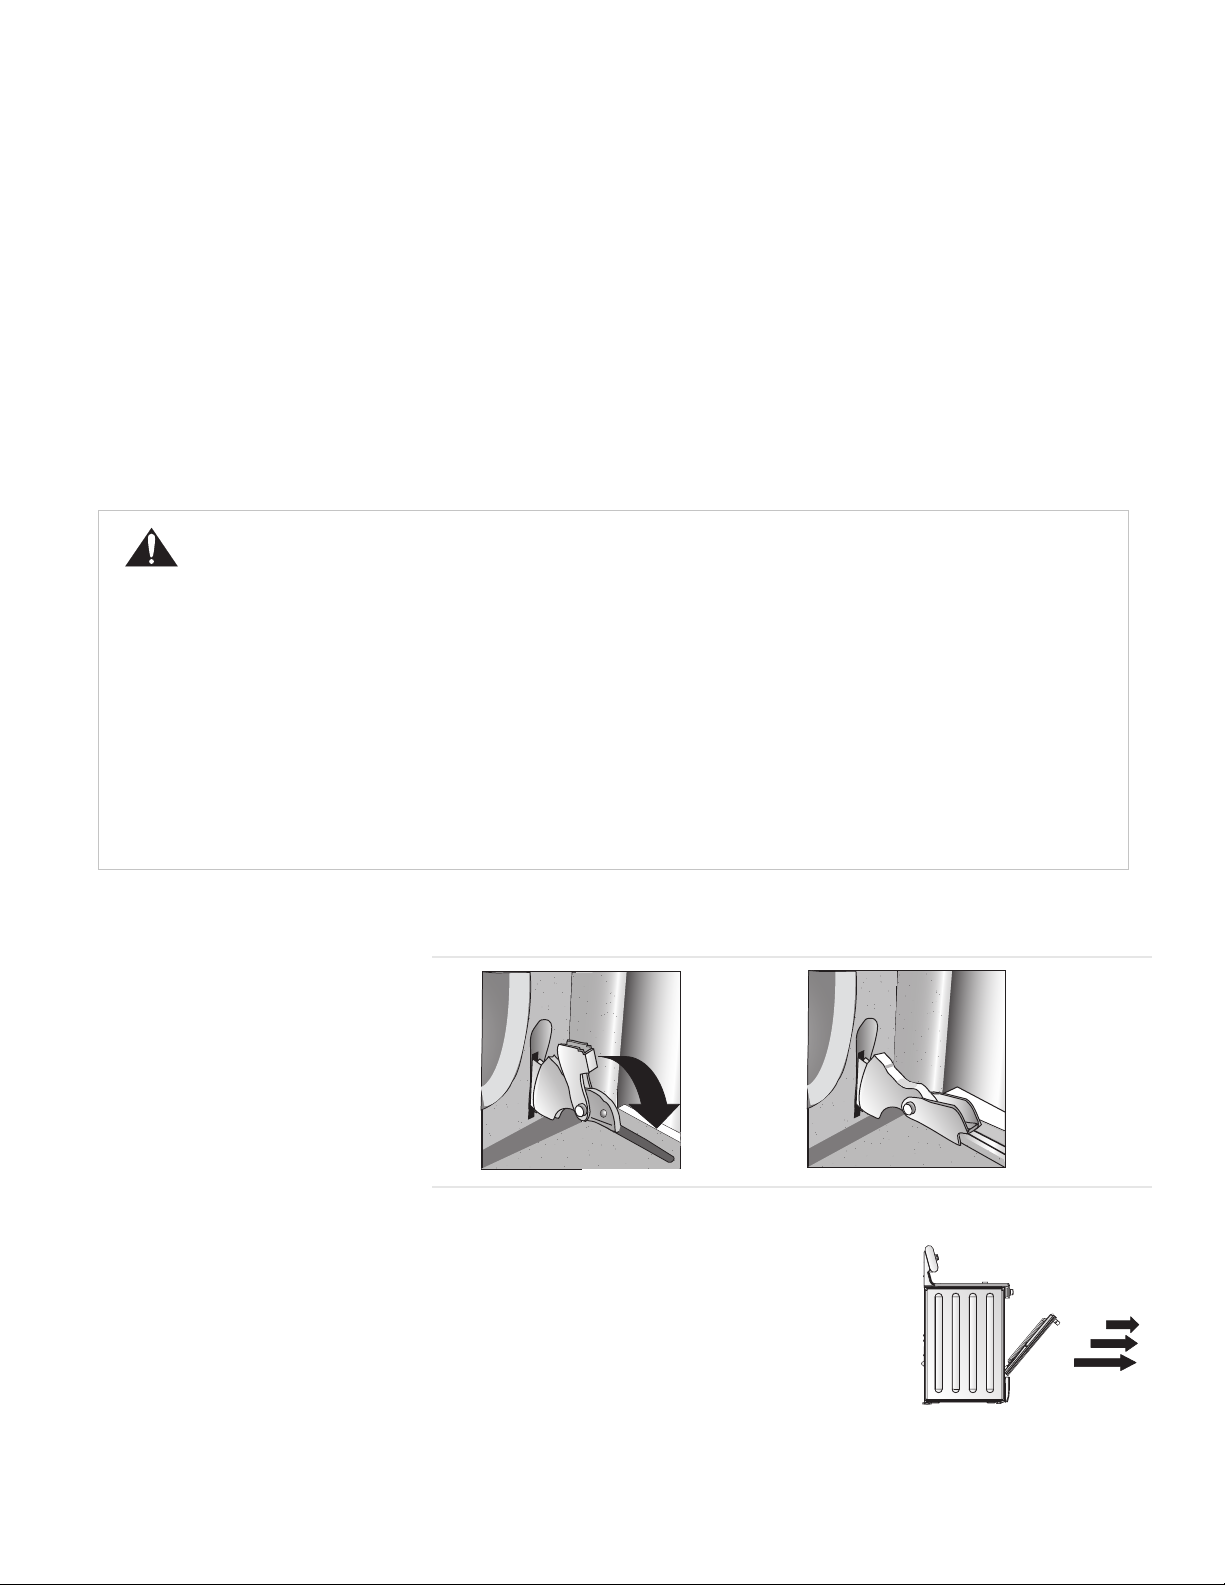
Removing the Door 1. Be sure to read the WARNING below before attempting to remove oven door.
WARNING
When removing the door:
• Make sure oven is cool and power to the oven has been turned off before removing the door. Failure to do so
could result in electrical shock or burns.
• The oven door is heavy and fragile. Use both hands to remove the oven door. The door front is glass. Handle
carefully to avoid breaking.
• Grasp only the sides of the oven door. Do not grasp the handle as it may swing in your hand and cause damage or injury.
• Failure to grasp the oven door firmly and properly could result in personal injury or product damage.
• To avoid injury from hinge bracket snapping closed, be sure that both levers are securely in place before
removing door. Also, do not force door open or closed - the hinge could be damaged and injury could result.
2. Open the door completely.
3. Flip lever on hinge toward you.
Figure 10: Hinge Positions
4. Close the door to approximately halfway open. Stop when you feel resistance from the hinge..
5. Holding the door firmly on both sides using both hands, pull the door straight out of the hinge slots. Hold firmly, the door is heavy.
6. Place the door in a convenient and stable location for cleaning.
Replacing the Oven Door 1. Holding the door firmly in both hands, place hinges in hinge slots.
2. Open door all the way to expose hinges and slots. Push lever (one on each hinge) away from you (back toward range).
English 27

3. After moving the hinge brackets back down into position, be sure to close and open the door slowly to assure that it is correctly and securely in place.
4. Door should be straight, not crooked.
Replacing an Oven Light Each light assembly consists of a removable lens, a light bulb and a light socket
housing that is fixed in place.
WARNING
• Make sure the appliance and lights are cool and power to the appliance
has been turned off before replacing the light bulb(s). Failure to do so
could result in electrical shock or burns.
• The lenses (if equipped) must be in place when using the appliance.
• The lenses (if equipped) serve to protect the light bulb from breaking.
• The lenses (if equipped) are made of glass. Handle carefully to avoid
breaking. Broken glass could cause an injury.
• Light socket is live when door is open
1. Read the WARNING above.
2. Turn off power at the main power supply (fuse or breaker box).
3. Remove the lens by unscrewing it.
4. Remove the light bulb from its socket by unscrewing it.
5. Replace the bulb with a new 40 watt appliance bulb. Avoid touching the bulb with fingers, as oils from hands can damage the bulb when it becomes hot.
6. Screw the lens back on.
7. Turn power back on at the main power supply (fuse or breaker box).
Service
Before Calling Service
Use these suggestions before calling for service to avoid service charges
Troubleshooting Charts
The Cooktop
Table 9: Cooktop Troubleshooting Chart
Cooktop Problem Possible Causes and Suggested Solutions
Cooking results are not what
was expected.
Water takes too long to boil • Time to boil can vary greatly depending on environmental conditions. See “Boiling
Burners click continuously • Knob(s) are in the “light” position. Turn knobs to the ”OFF” position or to desired
• The cooktop is not level. Adjust leveling legs on bottom of range.
• Cooking pan is not the appropriate size or type. See “Cookware Selection Guide”.
Water” on page 16 for tips to decrease time to boil.
flame setting.
Burners click intermittently • Moisture has accumulated insdie the ignitor. Turn both front burners to the highest
setting for 15-20 minutes then turn to OFF.
English 28

Service
Table 9: Cooktop Troubleshooting Chart
Cooktop Problem Possible Causes and Suggested Solutions
Surface burners do not light • Gas is turned off. Make sure the gas shut-off valve is in the ON position and the gas
supply to the house is not shut off.
• Unit is not hooked up to the gas supply. Call gas company.
• Plug is not completely inserted into outlet or the house wiring is incorrect. Check
the power supply, verify that the unit is grounded with the correct polarity, make
sure the unit is plugged in.
• Circuit breaker is tripped. Check circuit breaker and reset if necessary. Check and/
or replace fuse.
• Burner ports are clogged. Turn the cooktop off and allow the burners to cool.
Remove burner caps and use a stiff nylon bristle toothbrush to push debris through
burner ports.
• Misaligned burner cap. Verify that burner caps are properly positioned over burners.
• Ignitor is wet, damaged or dirty. Check ignitor for moisture. If wet, allow to air dry
before using. Check for burned-on food or grease. See cleaning recommendations.
Burner will not light if ignitor is wet, damaged or dirty.
Uneven or too high flame;
burner is hard to light
Uneven flame - LP gas users • Call service
The Oven
Table 10: Oven Troubleshooting Chart
Oven Problem
The oven mode or temperature selected
or the numbers selected do not appear in
the display
Oven door is locked and will not release,
even after cooling
Oven is not heating Check circuit breaker or fuse box to your house. Make sure there is proper
• Burner ports are clogged. Turn the cooktop off and allow the burners to cool.
Remove burner caps and use a stiff nylon bristle toothbrush to push debris through
burner ports.
• Misaligned burner cap. Verify that burner caps are properly positioned over burners.
• Burner cap is wet. Turn off burner and allow to cool. Dry burner cap and base thoroughly.
Possible Causes and
Suggested Solutions
The knob was turned too rapidly. Turn knob slower until correct wording or
temperature appears. Review manual instructions when setting clock,
timer, or Self-Clean.
Turn the oven off at the circuit breaker and wait 5 minutes. Turn breaker
back on. The oven should reset itself and will be operable.
electrical power to the oven. Be sure oven temperature has been selected.
Oven is not cooking evenly Adjust oven calibration if necessary (see “Change the Oven Temperature
Offset” on page 11). Refer to cooking charts for recommended rack position.
Baking results are not as expected Refer to cooking charts for recommended rack position. Check “Getting the
Most Out of Your Oven” on page 18 for tips and suggestions. Adjust oven
calibration if necessary (see “Change the Oven Temperature Offset” on
page 11).
Food takes longer to cook than expected The oven is carefully calibrated to provide accurate results. However, the
temperature can be offset if food is consistently too brown or too light. See
“Change the Oven Temperature Offset” on page 11.
English 29

Service
Table 10: Oven Troubleshooting Chart
Oven Problem
Food is overcooked The oven is carefully calibrated to provide accurate results. However, the
temperature can be offset if food is consistently too brown or too light. See
“Change the Oven Temperature Offset” on page 11.
Convection Bake Results are not as
expected
Oven temperature is too hot or too cold The oven thermostat needs adjustment. See Oven Temperature Offset.
Oven light is not working properly Replace or reinsert the light bulb if loose or defective. Touching the bulb
Oven light will not turn off Check for obstruction in oven door. Check to see if hinge is bent. When the
Cannot remove lens cover on light There may be soil build-up around the lens cover. Wipe lens cover area
If the Automatic Convection Conversion Feature is turned off, the temperature must be manually reduced by 25°F. If the feature is active, the temperature is automatically adjusted. See “Turn Automatic Convection
Conversion ON or OFF” on page 12 for more information. Refer to cooking
charts and tips for rack positions, cooking times and pan selection. Adjust
oven calibration if necessary. See “Change the Oven Temperature Offset”
on page 11.
with fingers may cause the bulb to burn out.
Sabbath feature is activated, the oven light will stay on or off (as selected
during set-up) during the entire Sabbath mode.
with a clean dry towel prior to attempting to remove the lens cover.
Possible Causes and
Suggested Solutions
Oven will not Self-Clean properly Allow the oven to cool before running Self-Clean. Always wipe out loose
soils or heavy spillovers before running Self-Clean. If oven is badly soiled,
set oven for a five-hour Self-Clean. See Preparing the Oven to Self-Clean.
Clock and timer are not working properly Make sure there is electrical power to oven. See Clock and Timer sections.
Porcelain chips When oven racks are removed and replaced, always tilt racks upward and
do not force them to avoid chipping the porcelain.
“F” and a number appears in display and
control beeps
With a new range there is a strong odor
when oven is turned on
Control does not react when the pad is
touched
Fan is not running during a convection
mode
Fan turns off and on during the cycle The convection fan turns off whil the oven door is open. It resumes when
This is a fault code. Press Off to clear the display and stop beeping. Reset
oven if necessary. If fault code remains and beep continues, record fault
code, cancel oven and call authorized service technician.
This is normal with a new range and will disappear after a few uses. Operating the self-clean cycle will also “burn-off” the smell more quickly.
Be sure that pad is clean. Touch the center of the touchpad. Use the flat
part of your finger.
On some modes, the convection fan does not come on at the beginning of
the cyle. This is normal. If the fan is not running at the begining of the cyle,
wait 15 minutes and then check again. If the fan is still not running, call
service.
the door is closed again. .
Fan is running during modes that don’t
use convection
Warm air or steam escapes from oven
vent
English 30
On some models, the convection fan will run while the oven is preheating
for the bake mode. This is normal.
It is normal to see or feel steam or warm air escaping from the oven vent.
Do not block the vent.

Service
How to Obtain Service or Parts
Product Data Plate The data plate shows the model and serial number. Refer to the data plate on the
To reach a service representative, see the contact information at the front of the
manual. Please be prepared with the information printed on your product data
plate when calling.
appliance when requesting service. It is located on the frame near the drawer.
Open the drawer to view it.
Data Plate
Figure 11: Data Plate
Waranty
What this Warranty Covers & Who it Applies to:
The limited warranty provided BSH Home Appliances Bosch in this Statement of
Limited Product Warranty applies only to the Bosch freestanding and slide-in
range, ("Product") sold to you, the first using purchaser, provided that the Product
was purchased: (1) for your normal, household (non-commercial) use, and has in
fact at all times only been used for normal household purposes; (2) new at retail
(not a display, "as is", or previously returned model), and not for resale, or commercial use; and (3) within the United States or Canada, and has at all times
remained within the country of original purchase. The warranties stated herein
apply only to the first purchaser of the Product and are not transferable.
·Please make sure to return your registration card; while not necessary to effectuate warranty coverage, it is the best way for Bosch to notify you in the unlikely
event of a safety notice or product recall.
How Long the Warranty Lasts: Bosch warrants that the Product is free from defects in materials and workman-
ship for a period of three hundred sixty-five days (365) days from the date of purchase. The foregoing timeline begins to run upon the date of purchase, and shall
not be stalled, tolled, extended, or suspended, for any reason whatsoever.
Repair/Replace as Your Exclusive Remedy:
During this warranty period, Bosch or one of its authorized service providers will
repair your Product without charge to you (subject to certain limitations stated
herein) if your Product proves to have been manufactured with a defect in materials or workmanship. If reasonable attempts to repair the Product have been
made without success, then Bosch will replace your Product (upgraded models
may be available to you, in Bosch 's sole discretion, for an additional charge). All
removed parts and components shall become the property of Bosch at its sole
option. All replaced and/or repaired parts shall assume the identity of the original
part for purposes of this warranty and this warranty shall not be extended with
respect to such parts. Bosch 's sole liability and responsibility hereunder is to
repair manufacturer-defective Product only, using a Bosch -authorized service
provider during normal business hours. For safety and property damage concerns, Bosch highly recommends that you do not attempt to repair the Product
yourself, or use an un-authorized servicer; Bosch will have no responsibility or liability for repairs or work performed by a non-authorized servicer. If you choose to
have someone other than an authorized service provider work on your Product,
THIS WARRANTY WILL AUTOMATICALLY BECOME NULL AND VOID. Autho-
English 31

Service
rized service providers are those persons or companies that have been specially
trained on Bosch products, and who possess, in Bosch 's opinion, a superior reputation for customer service and technical ability (note that they are independent
entities and are not agents, partners, affiliates or representatives of Bosch). Notwithstanding the foregoing, Bosch will not incur any liability, or have responsibility,
for the Product if it is located in a remote area (more than 100 miles from an
authorized service provider) or is reasonably inaccessible, hazardous, threatening, or treacherous locale, surroundings, or environment; in any such event, if you
request, Bosch would still pay for labor and parts and ship the parts to the nearest
authorized service provider, but you would still be fully liable and responsible for
any travel time or other special charges by the service company, assuming they
agree to make the service call.
Out of Warranty Product: Bosch is under no obligation, at law or otherwise, to provide you with any conces-
sions, including repairs, pro-rates, or Product replacement, once this warranty has
expired.
Warranty Exclusions: The warranty coverage described herein excludes all defects or damage that are
not the direct fault of Bosch, including without limitation, one or more of the following: (1) use of the Product in anything other than its normal, customary and
intended manner (including without limitation, any form of commercial use, use or
storage of an indoor product outdoors, use of the Product in conjunction with air or
water-going vessels); (2) any party's willful misconduct, negligence, misuse,
abuse, accidents, neglect, improper operation, failure to maintain, improper or
negligent installation, tampering, failure to follow operating instructions, mishandling, unauthorized service (including self-performed "fixing" or exploration of the
appliance's internal workings); (4) adjustment, alteration or modification of any
kind; (5) a failure to comply with any applicable state, local, city, or county electrical, plumbing and/or building codes, regulations, or laws, including failure to install
the product in strict conformity with local fire and building codes and regulations;
(6) ordinary wear and tear, spills of food, liquid, grease accumulations, or other
substances that accumulate on, in, or around the Product; and (7) any external,
elemental and/or environmental forces and factors, including without limitation,
rain, wind, sand, floods, fires, mud slides, freezing temperatures, excessive moisture or extended exposure to humidity, lightning, power surges, structural failures
surrounding the appliance, and acts of God. In no event shall Bosch have any liability or responsibility whatsoever for damage to surrounding property, including
cabinetry, floors, ceilings, and other structures or objects around the Product.
Also excluded from this warranty are scratches, nicks, minor dents, and cosmetic
damages on external surfaces and exposed parts; Products on which the serial
numbers have been altered, defaced, or removed; service visits to teach you how
to use the Product, or visits where there is nothing wrong with the Product; correction of installation problems (you are solely responsible for any structure and setting for the Product, including all electrical, plumbing or other connecting facilities,
for proper foundation/flooring, and for any alterations including without limitation
cabinetry, walls, floors, shelving, etc.); and resetting of breakers or fuses. TO
THE EXTENT ALLOWED BY LAW, THIS WARRANTY SETS OUT YOUR
EXCLUSIVE REMEDIES WITH RESPECT TO PRODUCT, WHETHER THE
CLAIM ARISES IN CONTRACT OR TORT (INCLUDING STRICT LIABILITY, OR
NEGLIGENCE) OR OTHERWISE. THIS WARRANTY IS IN LIEU OF ALL
OTHER WARRANTIES, WHETHER EXPRESS OR IMPLIED. ANY WARRANTY
IMPLIED BY LAW, WHETHER FOR MERCHANTABILITY OR FITNESS FOR A
PARTICULAR PURPOSE, OR OTHERWISE, SHALL BE EFFECTIVE ONLY
FOR THE PERIOD THAT THIS EXPRESS LIMITED WARRANTY IS EFFECTIVE. IN NO EVENT WILL THE MANUFACTURER BE LIABLE FOR CONSEQUENTIAL, SPECIAL, INCIDENTAL, INDIRECT, "BUSINESS LOSS", AND/OR
PUNITIVE DAMAGES, LOSSES, OR EXPENSES, INCLUDING WITHOUT LIMITATION TIME AWAY FROM WORK, HOTELS AND/OR RESTAURANT MEALS,
REMODELLING EXPENSES IN EXCESS OF DIRECT DAMAGES WHICH ARE
DEFINITIVELY CAUSED EXCLUSIVELY BY Bosch, OR OTHERWISE. SOME
English 32

Service
STATES DO NOT ALLOW THE EXCLUSION OR LIMITATION OF INCIDENTAL
OR CONSEQUENTIAL DAMAGES, AND SOME STATES DO NOT ALLOW LIMITATIONS ON HOW LONG IMPLIED WARRANTY LASTS, SO THE ABOVE LIMITATIONS MAY NOT APPLY TO YOU. THIS WARRANTY GIVES YOU
SPECIFIC LEGAL RIGHTS, AND YOU MAY ALSO HAVE OTHER RIGHTS,
WHICH VARY FROM STATE TO STATE. No attempt to alter, modify or amend
this warranty shall be effective unless authorized in writing by an officer of BSH.
How to Obtain Warranty Service: To obtain warranty service for your Product, you should contact the nearest Bosch
authorized service center.
BSH Home Appliances - 5551 McFadden Avenue, Huntington Beach, CA 92649 /
800-944-2904
English 33

Table des matières
Concernant ce guide . . . . . . . . . . . . . . . . . . . . . . . . . . . . . . . . . . . . . . . . . . . . . . 1
Présentation de ce guide . . . . . . . . . . . . . . . . . . . . . . . . . . . . . . . . . . . . . . . . . . . . . . . . . . . . . . . . . . . . . . 1
Sécurité . . . . . . . . . . . . . . . . . . . . . . . . . . . . . . . . . . . . . . . . . . . . . . . . . . . . . . . . 1
Instructions de sécurité importantes . . . . . . . . . . . . . . . . . . . . . . . . . . . . . . . . . . . . . . . . . . . . . . . . . . . . . . 1
Mise en oeuvre . . . . . . . . . . . . . . . . . . . . . . . . . . . . . . . . . . . . . . . . . . . . . . . . . . 6
Pièces et accessoires . . . . . . . . . . . . . . . . . . . . . . . . . . . . . . . . . . . . . . . . . . . . . . . . . . . . . . . . . . . . . . . . . 6
Contrôle (Panneau) . . . . . . . . . . . . . . . . . . . . . . . . . . . . . . . . . . . . . . . . . . . . . . . . . . . . . . . . . . . . . . . . . . 9
Avant la première utilisation . . . . . . . . . . . . . . . . . . . . . . . . . . . . . . . . . . . . . . . . . . . . . . . . . . . . . . . . . . . 12
Fonctionnement – surface de cuisson . . . . . . . . . . . . . . . . . . . . . . . . . . . . . . . 13
Concernant la surface de cuisson . . . . . . . . . . . . . . . . . . . . . . . . . . . . . . . . . . . . . . . . . . . . . . . . . . . . . . 13
Fonctionnement . . . . . . . . . . . . . . . . . . . . . . . . . . . . . . . . . . . . . . . . . . . . . . . . . . . . . . . . . . . . . . . . . . . . 13
Fonctionnement – four . . . . . . . . . . . . . . . . . . . . . . . . . . . . . . . . . . . . . . . . . . . 14
Concernant le four . . . . . . . . . . . . . . . . . . . . . . . . . . . . . . . . . . . . . . . . . . . . . . . . . . . . . . . . . . . . . . . . . . 14
Fonctionnement . . . . . . . . . . . . . . . . . . . . . . . . . . . . . . . . . . . . . . . . . . . . . . . . . . . . . . . . . . . . . . . . . . . . 14
Pour de meilleurs résultats avec le appareil . . . . . . . . . . . . . . . . . . . . . . . . . . . 17
Pour de meilleurs résultats avec le surface de cuisson . . . . . . . . . . . . . . . . . . . . . . . . . . . . . . . . . . . . . . 17
Pour de meilleurs résultats avec du four . . . . . . . . . . . . . . . . . . . . . . . . . . . . . . . . . . . . . . . . . . . . . . . . . 18
Nettoyage et entretien . . . . . . . . . . . . . . . . . . . . . . . . . . . . . . . . . . . . . . . . . . . . 23
Nettoyage - surface de cuisson . . . . . . . . . . . . . . . . . . . . . . . . . . . . . . . . . . . . . . . . . . . . . . . . . . . . . . . . 23
Nettoyage - four . . . . . . . . . . . . . . . . . . . . . . . . . . . . . . . . . . . . . . . . . . . . . . . . . . . . . . . . . . . . . . . . . . . . 25
Nettoyage - tiroir . . . . . . . . . . . . . . . . . . . . . . . . . . . . . . . . . . . . . . . . . . . . . . . . . . . . . . . . . . . . . . . . . . . . 28
Entretien . . . . . . . . . . . . . . . . . . . . . . . . . . . . . . . . . . . . . . . . . . . . . . . . . . . . . . . . . . . . . . . . . . . . . . . . . . 28
Service . . . . . . . . . . . . . . . . . . . . . . . . . . . . . . . . . . . . . . . . . . . . . . . . . . . . . . . 30
Avant d'effectuer un appel de service . . . . . . . . . . . . . . . . . . . . . . . . . . . . . . . . . . . . . . . . . . . . . . . . . . . . 30
Garantie . . . . . . . . . . . . . . . . . . . . . . . . . . . . . . . . . . . . . . . . . . . . . . . . . . . . . . . . . . . . . . . . . . . . . . . . . . 34
Questions?
1-800-944-2904
www.boschappliances.com
5551 McFadden Ave.
Huntington Beach, CA 92649
Nous attendons de vos nouvelles !

Concernant ce guide
Présentation de ce guide
Ce guide comprend plusieurs sections :
• La section Mise en oeuvre décrit les fonctions et les caractéristiques de
l’appareil, ainsi qu’une description sur la façon de le régler et d’actionner le
panneau de contrôle.
• Les sections Fonctionnement décrit comment actionner et obtenir le meilleur
rendement de chaque composant : la surface de cuisson, le four et le tiroir
réchaud.
• Pour tirer avantage de l'appareil comprend de l'information sur les modes,
tableaux de cuisson et des conseils pour améliorer le rendement.
• La section Nettoyage et entretien décrit la façon de nettoyer et d’entretenir
l’appareil.
• La section Service comprend le guide de dépannage et la garantie.
Avant d’utiliser cet appareil, lire ce guide. Porter une attention spéciale à les Sec-
tions Sécurité au début du guide.
Sécurité
Instructions de sécurité importantes
LIRE ET CONSERVER CES INSTRUCTIONS
Instructions de sécurité
importantes
Sécurité pour les incendies • Ne pas utiliser de papier aluminium ou de doublure de protection pour doubler
toute partie de l'appareil, spécialement les bols d'égouttement ou le fond de
l'appareil. Ceci peut causer un risque de choc électrique ou un incendie.
• Régler le contrôle de brûleur afin que la flamme ne dépasse pas le fond de la
casserole.
• Si des matériaux à l'intérieur du four ou du tiroir réchaud s'enflamment, laisser
la porte fermer. Mettre l'appareil hors circuit et débrancher le circuit du coupecircuit.
• Utiliser cet appareil seulement de la façon décrite dans ce guide. Par exemple, ne pas utiliser cet appareil pour chauffer ou réchauffer une pièce. Ne
jamais utiliser pour le rangement.
• Ne pas laisser de l'aluminium, plastique, papier ou chiffon entrer en contact
avec une grille ou un brûleur chaud. Ne pas laisser les casseroles chauffer à
sec.
• Si la surface de cuisson est près d'une fenêtre, d'un évent à air forcé ou d'un
ventilateur, s'assurer que les matériaux inflammables tels tentures/rideaux ne
flottent pas au-dessus ou près des brûleurs ou ; ils peuvent s'enflammer.
Français 1

Sécurité
• Toujours avoir un détecteur de fumée près de la cuisine.
• Ne jamais laisser la surface de cuisson sans surveillance. Les déversements
causent de la fumée et la graisse peut s'enflammer.
• AVERTISSEMENT - POUR RÉDUIRE LE RISQUE D'UN FEU DE GRAISSE
a) Ne jamais laisser l'appareil sans surveillance pendant l'utilisation à des
réglages élevés. Chauffer l'huile lentement à un réglage de bas à moyen.
b) Toujours mettre la hotte en circuit en cuisant à chaleur élevée ou pour
flamber des aliments comme des crêpes Suzette, cerises jubilées, etc.
c) Nettoyer le ventilateur fréquemment. La graisse ne doit pas s'accumuler
sur le ventilateur ou les filtres.
d) Utiliser une casserole appropriée pour le format de l'élément choisi.
• Si les cheveux ou les vêtements s'enflamment, se laisser tomber au sol et
rouler immédiatement pour éteindre les flammes.
• Étouffer les flammes d'un feu l'aliments autre qu'un feu de graisse avec du
bicarbonate de soude. Ne jamais utiliser d'eau.
• Faire attention aux courants d’air des ventilateur ou de l’air forcé par évent
afin que des matériaux ne soient pas soufflés vers les flammes ou pour ne
pas pousser les flammes plus loin que le bord de la casserole.
• AVERTISSEMENT - POUR RÉDUIRE LE RISQUE DE BLESSURES EN
CAS D'UN FEU DE GRAISSE, OBSERVER CE QUI SUIT :
a) ÉTOUFFER LES FLAMMES avec un couvercle hermétique, une tôle à
biscuits ou un plateau en métal. Fermer le brûleur. ATTENTION À NE
PAS SE BRÛLER. Si les flammes ne s'éteignent pas immédiatement,
ÉVACUER ET TÉLÉPHONER AU SERVICE DES INCENDIES.
b) NE JAMAIS PRENDRE UNE CASSEROLE EN FEU ; risque de brûlures.
c) NE PAS UTILISER D'EAU, incluant un chiffon ou serviette humide ; il peut
en résulter une violente explosion de vapeur.
d) Utiliser un extincteur seulement si :
1) L'on possède un extincteur de classe ABC et que l'on sait comment
s'en servir.
2) Le feu est petit et contenu dans la zone où il a commencé
3) Le service des incendies a été appelé.
4) L'on peut combattre le feu en ayant le dos vers la sortie.
5) Avoir un extincteur approprié à proximité, visible et facile d'accès près
du four.
• Lorsque possible, ne pas faire fonctionner le système de ventilation pendant
un feu de surface. Toutefois, ne pas passer par dessus le feu pour mettre hors
circuit le système de ventilation hors circuit.
Français 2

Sécurité pour le gaz
Sécurité
AVERTISSEMENT : L’information fournie dans le
présent manuel doit être rigoureusement suivie, sous risque d’incendie ou d’explosion susceptible d’entraîner des
dommages, des blessures ou la mort.
Ne pas ranager ni utiliser des matéraiux combustibles, essence ou
autres liquides ou vapeurs inflammables près de cet appareil ou tout
autre appareil.
SI VOUS DÉTECTEZ UNE ODEUR DE GAZ:
• Ne pas allumer un appareil.
• Ne pas toucher aux interrupteur électriques.
• Ne pas utiliser le téléphone de l’édifice.
• Télélphoner immédiatement au fournisseur de gaz et suivre
ses instructions.
• Si le fournisseur de gaz ne peut être rejoint, communiquer
avec le service des incendies.
L’installation et le service doivent être effectué par un insallateur
qualifié une agence de service autorisée ou le fournisseur de gaz.
• Demander à l'installateur de montrer où est située la soupape d'arrêt de gaz.
• Si un brûleur s'éteint et que du gaz s'échappe, ouvrir portes et fenêtres. Attendre que le gaz se dissipe avant d'utiliser l'appareil.
• S'il y a une odeur de gaz, l'installateur n'a pas effectué un travail satisfaisant
quant aux fuites de gaz. Si les connexions ne sont pas parfaitement étanches,
il peut y avoir une petite fuite et, par conséquent, une odeur de gaz. Repérer
une fuite de gaz n'est pas à faire soi-même.
• Certaines fuites peuvent être seulement trouvées avec le contrôle du brûleur
en position ON et ceci doit être effectué par un technicien qualifié. Voir “SI
VOUS DÉTECTEZ UNE ODEUR DE GAZ:” à la page 3.
• Pendant une panne de courant, seuls les brûleurs de la surface de cuisson
peuvent être allumés manuellement.
Prévention de brûlures • NE PAS TOUCHER AUX SURFACES OU ZONES ADJACENTES DE
L'APPAREIL - les surfaces peuvent être chaudes même si elles sont foncées.
Les zones peuvent aussi être suffisamment chaudes pour causer des
brûlures. Pendant et après l'utilisation, ne pas toucher, ni laisser vêtements,
tire-plats ou autres matériaux inflammables entrer en contact avec ces surfaces tant qu'elles n'ont pas refroidi ; cela comprend la surface de cuisson et
la zone face à la surface de cuisson.
• NE PAS TOUCHER AUX ÉLÉMENTS OU SURFACES INTÉRIEURES DU
FOUR - les éléments chauffants peuvent être très chauds même s'ils sont de
couleur foncée. Les surfaces intérieures peuvent aussi être suffisamment
chaudes pour causer des brûlures. Pendant et après l'utilisation, ne pas
toucher, ni laisser vêtements, tire-plats ou autres matériaux inflammables
entrer en contact avec ces zones tant qu'elles n'ont pas suffisamment refroidi;
cela comprend les évents, surfaces près des ouvertures et les portes de
fours.
• Faire attention en ouvrant la porte de l'appareil. Se tenir sur le côté, ouvrir la
porte ou le tiroir lentement et légèrement pour laisser l'air chaud et la vapeur
s'échapper. Éloigner le visage et s'assurer que les enfants et animaux sont
loin de l'appareil. Une fois la vapeur et l'air chaud échappés, continuer la cuisson. Garder la porte fermée sauf pour la cuisson ou le nettoyage. Ne pas laisser la porte ouverte sans surveillance.
Français 3

Sécurité
• Ne pas chauffer ou réchauffer des contenants d'aliments non ouverts. L'accumulation de pression peut faire exploser le contenant et causer des
blessures.
• Toujours placer les grilles en position désirée lorsque le four est froid. Si une
grille doit être déplacée pendant que le four est chaud, les moufles de four ne
doivent pas toucher aux éléments chauffants.
• Toujours mette la hotte EN CIRCUIT pour la cuisson à chaleur élevée ou pour
flamber des aliments (ex. : (crêpes Suzette, cerises jubilées, etc.)
• Utiliser les réglages élevés de la surface de cuisson seulement lorsque
nécessaire. Pour éviter le bouillonnement ou les éclaboussures, chauffer
l'huile lentement à un réglage bas à moyen. L'huile chaude peut causer des
blessures sérieuses.
• Ne jamais déplacer une casserole d'huile chaude, surtout une friteuse, attendre qu'elle ait refroidi.
Sécurité pour les enfants • Lorsque les enfants sont assez âgés pour utiliser l'appareil, il incombe aux
parents ou tuteurs légaux d'enseigner les pratiques sécuritaires quant à l'utilisation de l'appareil.
• Ne laisser personne grimper, se tenir debout, s'appuyer, s'asseoir ou se pendre à toute pièce de l'appareil, spécialement la porte, le tiroir ou le tiroir
réchaud. Ceci peut endommager l'appareil, le faire basculer et causer des
blessures sérieuses.
• Ne pas laisser les enfants utiliser cet appareil sans surveillance d'un adulte.
Enfants et animaux ne doivent pas être laissés sans surveillance lorsque
l'appareil est utilisé. Ne pas laisser les enfants jouer à proximité de l'appareil
utilisé ou non.
• ATTENTION - les articles d'intérêt pour les enfants ne doivent pas être rangés
dans l'appareil, dans les armoires au-dessus ou sur le dosseret. Un enfant qui
grimpe sur l'appareil pour prendre ces objets peut se blesser sérieusement.
Sécurité pour le nettoyage • NOTE DE SÉCURITÉ IMPORTANTE : la loi sur les produits toxiques et l'eau
potable de Californie requiert que le gouverneur de la Californie publie une
liste de substances connues de l'état comme pouvant causer le cancer, malformation ou autres problèmes de reproduction et exige que les compagnies
avisent les clients de l'exposition potentielle à de telles substances.
a) La combustion de combustible à cuisson à gaz et l'élimination de résidus
pendant l'autonettoyage peut générer de petites quantités de monoxyde
de carbone.
b) L'isolation en fibre de verre d'un four autonettoyant génère de petites
quantités de formaldéhyde pendant les premiers cycles. La Californie
liste le formaldéhyde comme une cause potentielle du cancer. Le monoxyde de carbone est une cause potentielle de toxicité pour la reproduction.
c) L'exposition à ces substances peut être minimisée en :
1) Assurant une bonne ventilation pendant la cuisson à gaz.
2) Assurant une bonne ventilation pendant et immédiatement après
l'autonettoyage du four.
3) Actionnant l'appareil selon les instructions données dans ce guide.
• Ne pas nettoyer l'appareil pendant qu'il est chaud. Certains nettoyants produisent des émanations nocives lorsqu'ils sont appliqués sur une surface
chaude. Chiffons mouillés ou éponges humides peuvent causer des brûlures
par vapeur.
• Pendant l'autonettoyage, s'assurer que la porte est bien verrouillée. Si elle ne
se verrouille pas, ne pas actionner l'autonettoyage et communiquer avec un
centre de service.
• Les oiseaux ont un système respiratoire sensible. Les éloigner de la cuisine
ou des pièces où la fumée peut les atteindre. Pendant l'autonettoyage, les
émanations sont nocives aux oiseaux. D'autres émanations telles la margarine surchauffée et les huiles de cuisson sont nocives.
Français 4

Sécurité
• Après un déversement, mettre le brûleur hors circuit et laisser refroidir la surface de cuisson. Nettoyer autour du brûleur et des ports. Après le nettoyage,
vérifier le fonctionnement approprié.
• Il ne doit pas y avoir d'accumulation de graisse.
Sécurité pour les casseroles • Ne pas placer les aliments directement au fond du four.
• Observer les instructions du fabricant pour utiliser des sacs de cuisson ou de
rôtissage.
• Tenir la poignée de la casserole pour brasser ou tourner des aliments afin
d'éviter les déversements ou le mouvement de la casserole.
• Utiliser un format approprié de casserole. Si trop petit, cela expose une portion de l'élément ou du brûleur causant ainsi l'ignition des vêtements. Choisir
des casseroles à fond plat assez large pour couvrir la surface. Cet appareil
est doté d'éléments de différents formats. Un bon rapport format de casserole
et d'élément/brûleur améliore l'efficacité.
• Toujours positionner la poignée vers l'intérieur de façon à ne pas dépasser les
zones adjacentes, brûleurs ou bord de l'appareil. Ceci réduit le risque
d'incendie, de déversements et de brûlures.
• Régler la flamme du brûleur afin qu'elle ne dépasse pas le bord de la casserole. Un bon rapport flamme casserole réduit les risques de sécurité.
Installation et entretien • Demander à l'installateur de montrer l'emplacement du coupe-circuit ou fus-
ible. Le noter à des fins de références.
• Cet appareil doit être adéquatement installé et mis à la terre par un électricien
qualifié. Brancher seulement sur une prise adéquatement mise à la terre. Voir
les instructions d'installation pour plus de détails.
• Toutes les cuisinières peuvent basculer et causer des blessures. Installer le
dispositif anti bascule compris avec l'appareil. S'assurer que le dispositif anti
bascule est bien enclenché. Voir les instructions d'installation.
Figure 1: Risque de bascule
• Cet appareil est destiné un usage domestique normal seulement. Non
approuvé pour une utilisation à l'extérieur. Pour toute question, communiquer
avec le fabricant.
• Ne pas ranger ni utiliser de produits chimiques corrosifs, vapeurs, produits
inflammables ou non alimentaires près ou dans cet appareil, lequel est spécifiquement conçu pour cuire et chauffer des aliments. L'utilisation de produits
chimiques corrosifs pour le chauffage ou le nettoyage peut endommager
l'appareil et causer des blessures.
• Ne pas actionner l'appareil s'il ne fonctionne pas adéquatement ou s'il est
endommagé. Communiquer avec un centre de service autorisé.
• Ne pas obstruer les évents du four.
• Ne pas réparer ni remplacer des pièces de l'appareil à moins que cela ne soit
spécifiquement recommandé dans ce guide. Référer tout service à un centre
de service autorisé.
• Dans le cas d'une erreur, l'affichage clignote et il y a une tonalité continuelle.
Si cela se produit pendant l'autonettoyage, débrancher l'appareil de l'alimentation et téléphoner à un technicien qualifié.
• Dans le cas d'une erreur, l'affichage clignote et il y a une tonalité continuelle.
Si cela se produit, débrancher l'appareil de l'alimentation et téléphoner à un
technicien qualifié.
• Ne pas faire fonctionner le four sans le bas du four en place.
Français 5

Sécurité
Mise en oeuvre
Pièces et accessoires
Tableau 1: Pièces et accessoires
# Pièce
1
2
3
4
10
9
8
5
6
7
1 Panneau de contrôle et boutons du four
2 Capuchons de brûleur (4)
3 Grilles de brûleur (2)
4 Bouton de contrôle de surface de cuisson
5 Position de grille/ guide de grille
6 Grilles de four, plates (3)
7 Joint de porte
8
9 Plaque signalétique
10 Évent de four
11 Fixation anti bascule (non illustrée)
12 Grattoir de surface de cuisson (modèle avec céramique
13 Lèchefrite (non illustrée)
14 Verrouillage de porte (non visible) (non illustré)
15 Documentation (non illustrée)
16 Brûleur gril (haut de la cavité du four) (non illustré)
17 Éclairage (2) (paroi arrière) (non illustré)
18 Ventilateur à convection (paroi arrière du four, non illus-
Tiroir de rangement
vitrifiée seulement) (non illustrée)
tré)
Brûleurs à gaz scellés La surface de cuisson est dotée de brûleurs à gaz scellés. Résultat, il n'y a pas de
pièce sous la surface de cuisson à nettoyer, démonter ou régler. Les déversements demeurent sur la surface de cuisson où ils sont plus faciles à nettoyer.
Grille brûleur
Capuchon brûleur
Brûleur
Surface de cuisson
Allumeur
Figure 2: Grille côté droit - vue latérale
Français 6

Mise en oeuvre
A
Capuchons de brûleurs La surface de cuisson est dotée de capuchons de brûleurs. Faire correspondre le
capuchon avec le format du brûleur. Les capuchons ne sont pas interchangeables.
S'assurer que le capuchon de brûleur est bien installé sur la base du brûleur
avant d'allumer le brûleur. Si le capuchon est mal placé, le brûleur peut ne pas
s'allumer ou la flamme peut ne pas brûler complètement ou correctement. Cet
appareil est doté de deux types de brûleurs : standard et à diffusion.
Grilles de brûleurs Avertissement : Pour éviter le flambage, ne pas utiliser la surface de cui-
sson sans les capuchons de brûleurs et les grilles s'ils ne sont pas en
position appropriée. Ne pas utiliser une grille si un pied manque et est
endommagé.
Il y a deux grilles de brûleurs : une pour le côté gauche de la surface de cuisson et
un pour le côté droit. Positionner afin que l'ouverture circulaire soit au-dessus du
capuchon de brûleur. Les grilles doivent être à plat sur la surface de cuisson. Le
pied en caoutchouc des grilles doit reposer dans les encoches de la surface de
cuisson.
rrière gauche
Grille brûleur
MAllumeur électronique La surface de cuisson utilise des allumeurs électroniques pour allumer les
brûleurs. Il n'y a pas de veilleuse. Chaque brûleur est doté de son allumeur. Pour
un fonctionnement adéquat, l'allumeur doit être propre et sec. Il est nécessaire de
les nettoyer lorsqu'il y a déversement ou lorsque le brûleur ne s'allume pas même
si l'allumeur fait un clic.
Attention : tous les allumeurs font une étincelle lorsqu'un brûleur est
allumé. Ne pas toucher aux brûleurs lorsque la surface de cuisson est utilisée.
Brûleur haute puissance Ce brûleur est le plus grand et le plus puissant. Il conserve la chaleur plus
longtemps qu'un capuchon de brûleur normal, empêche la flamme de toucher à la
casserole. Ceci donne une chaleur plus douce et plus facile à prédire. Utiliser
pour les réglages bas afin de faire mijoter de grandes quantités de soupe ou de
sauce. Utiliser les réglages élevés pour amener rapidement à ébullition de l'eau.
Brûleur de précision Il est le plus petit brûleur et est idéal pour une cuisson douce de petites quantités
d'aliments. Utiliser pour fondre le beurre ou le chocolat ou préparer des sauces.
Grilles plates de four Ces grilles sont conçues avec une butée afin qu'elles ne sortent pas complète-
ment du four et ne s'inclinent pas.
Arrière droit
Grille brûleur
Figure 3: Grilles pour modèles amovibles
ATTENTION
Pour éviter les brûlures, placer les grilles en position désirée avant de
mettre le four en circuit. Toujours utiliser des moufles à four si ce dern-
Français 7
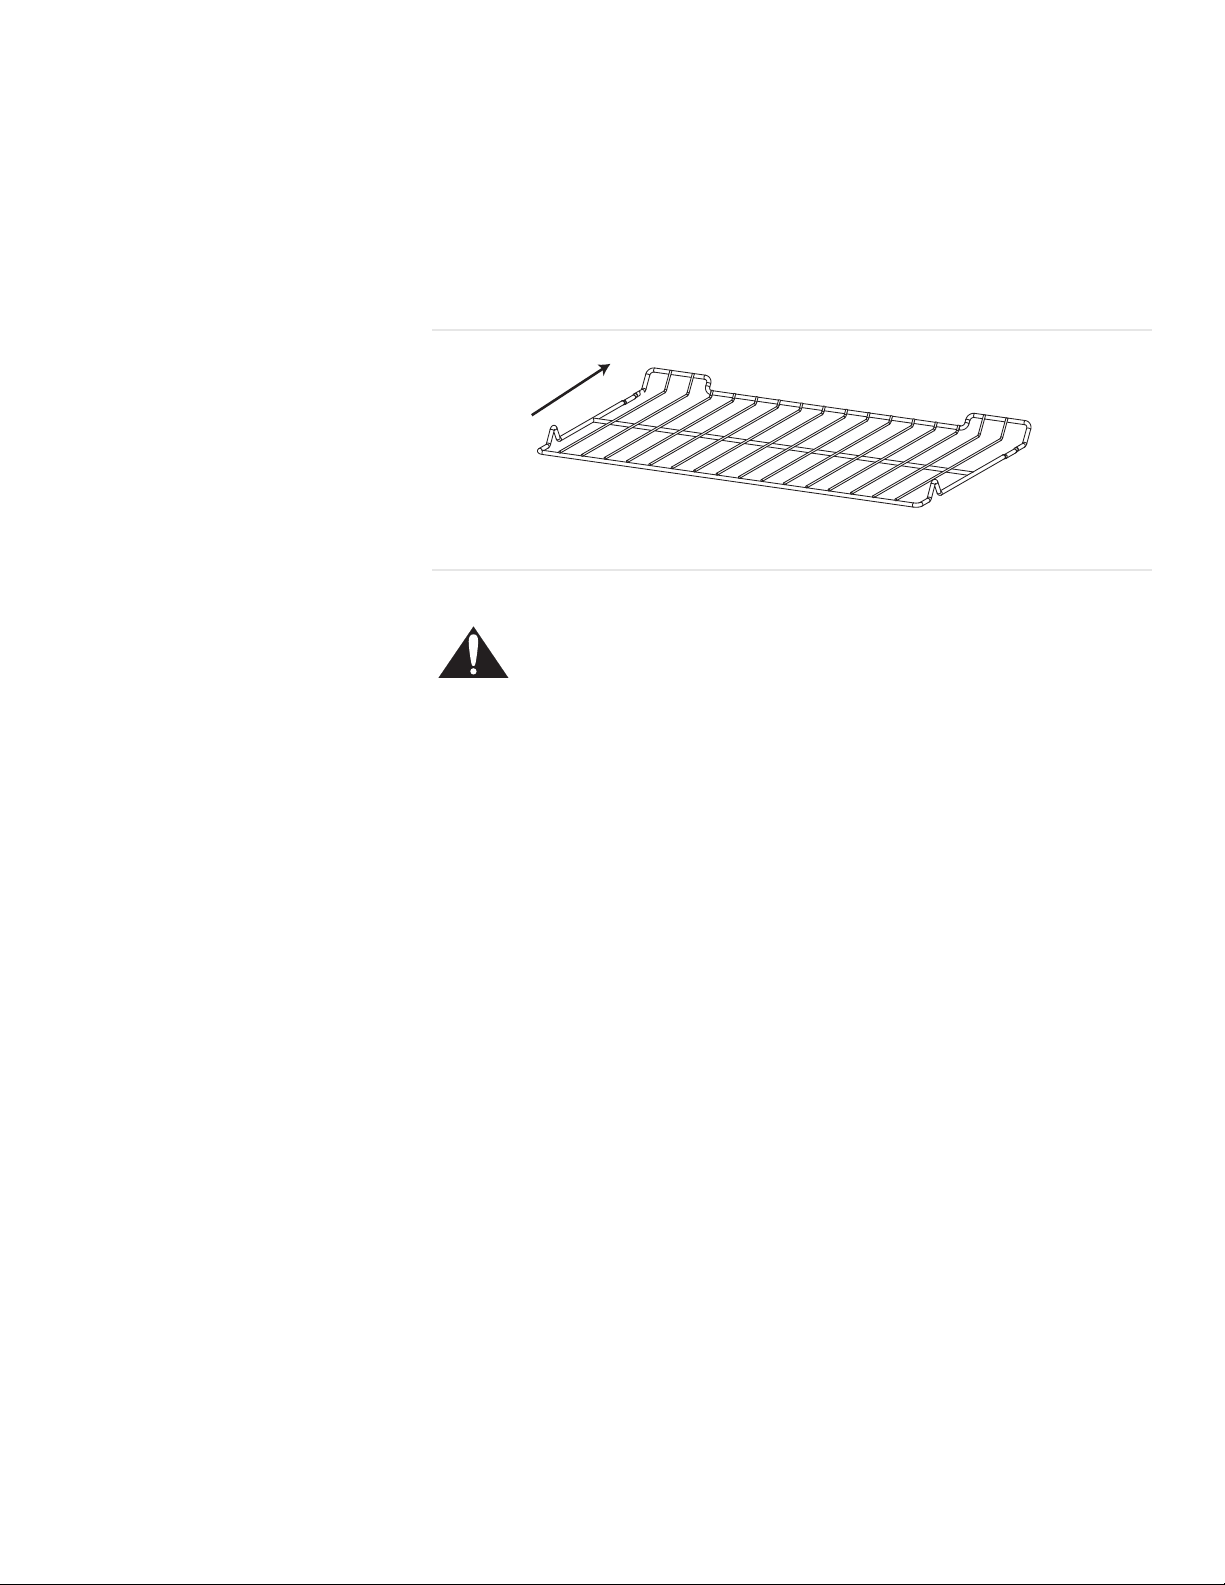
Mise en oeuvre
ier est chaud. Si une grille doit être déplacée pendant que le four est
chaud, les moufles ne doivent pas entrer en contact avec les brûleurs
chauffants.
Mise en place des grilles
1. Saisir fermement la grille par les côtés.
2. Incliner la grille vers le haut pour mettre la butée dans le guide.
3. Amener la grille en position horizontale et pousser au fond. La grille doit être à plat, droite et non croche.
Arrière de la grille
Devant de la grille
Insérer la grille pour que l’arrière
soit vers la paroi arrière du four
Figure 4: Insérer la grille
Fond du four Attention : ne pas placer les aliments directement dans le fond du
four. Ne pas utiliser d'aluminium ou de doublures protectrices pour
doubler toute pièce de l'appareil, surtout les bols d'égouttements ou le
fond du four. Ceci peut causer un risque de choc électrique ou
d'incendie.
Évent du four Cet évent est situé sous l'affichage au-dessus du brûleur arrière gauche. Il est
normal de voir de la vapeur s'échapper de l'évent et de la condensation peut se
former sur le dosseret et la surface de cuisson. Cette zone peut devenir très
chaude pendant l'utilisation du four. Pour éviter l'accumulation de monoxyde de
carbone, ne pas obstruer l'évent ; il est aussi important pour une bonne circulation
d'air.
Arrêt automatique Le four s'arrête automatiquement après 12 h (24 h si le format est réglé à 24 h à la
rubrique Sélection de fonctions).
Autonettoyage Le four est doté de la fonction autonettoyage facilitant le nettoyage du four.
Voyants et autres caractéristiques Bip : Indique qu’il faut entrer plus d’information ou confirme une entrée. Signale
aussi la fin d’un programme ou une erreur du four.
Voyant fin de cycle : Indique la fin d’un mode par 3 bips consécutifs.
Réglages par défaut : Les modes cuisson sélectionnent automatiquement la
température par défaut. Peuvent être modifiés au besoin.
Symbole ou numéro clignotant : Indique un réglage incomplet et requiert une
autre étape ou de presser START.
Codes numéro F : Figurent s’il y a un problème avec l’appareil.
Ventilateur à convection Le ventilateur fonctionne pendant tout mode à convection. Lorsque le four est en
mode à convection, le ventilateur s’arrête automatiquement lorsque la porte est
ouverte. Il fonctionne pendant l’autonettoyage, mais pas au début du mode.
Remarque : sur certains modèles, le ventilateur à convection fonctionne pendant
le préchauffage du mode cuisson.
Français 8

Contrôle (Panneau)
Panneau de contrôle
Mise en oeuvre
Pendule
Light
Time
Off
Température préchauffage
AM
PM
Mode cuisson
Tableau 2: Panneau de contrôle du four
Pendule– indique l’heure en 12 ou 24 h. Affiche également la
minuterie et les heures associées à la cuisson et à l'autonettoyage. Tourner le bouton de contrôle pour alterner entre la minuterie et la pendule. Presser heure et tourner le bouton de contrôle
pour changer l'heure du jour ou la minuterie.
Mode cuisson – presser la touche pour afficher le mode cuisson.
Icone mode cuisson - indique les brûleurs de cuisson actifs
pour le mode choisi. Affiche aussi un ventilateur si le ventilateur à
convection est utilisé pour le mode choisi. Presser heure pour
accéder aux minuteries.
Bouton de contrôle – utiliser pour régler la pendule, minuterie,
choisir le mode cuisson et température. Tourner dans le sens
horaire pour augmenter et contre horaire pour diminuer.
Voyant verrouillage de porte – l’icone figure pendant l’autonettoyage lorsque la porte est verrouillée. NE PAS tenter d’ouvrir la
porte tant que le symbole figure.
Température du four
Voyant verrouillage
Bouton de contrôle
Cooking Mode
Temperature
Start
Figure 5: Panneau de contrôle du four
Éclairage – presser la touche pour marche ou arrêt.
Arrêt – pour arrêter le four et/ou tiroir réchaud.
Température du four – montre la température du four.
Température de préchauffage – affiche la température pendant
le mode préchauffage du four.
Marche – presser pour compléter une entrée.
Température – presser pour choisir la température de cuisson.
Heure – presser pour choisir l’heure.
Minuterie – il y a 2 minuteries : MINUTERIE 1 et MINUTERIE 2.
Chacune compte à rebours en heure et minutes. À moins de 60
minutes, elle affiche les secondes. Presser TIME pour accéder
minuterie.
La cuisinière fonctionne à l'aide de pression des touches et de l'utilisation du
cadran et des boutons de contrôles.
Les touches, avec le cadran, sont utilisées pour sélectionner un mode four, régler
la température du four, régler la ou les minuteries et régler l'appareil. Pour utiliser
les touches, presser le centre avec le plat du doigt. Un bip retentit pour indiquer
que la sélection est faite. Tourner le cadran au réglage désiré et presser marche.
Les boutons sont utilisés pour contrôles le niveau de chaleur des brûleurs.
Presser et tourner jusqu'au symbole qui s'allume, puis au réglage désiré.
Voir les rubriques Utilisation de la surface de cuisson et Utilisation du four pour
plus de détails.
La pendule
Concernant la pendule • Toujours régler la pendule après l’installation ou une panne de courant.
• La pendule affiche les heures et les minutes.
• L’heure figure sauf pendant les fonctions du four et celles de la minuterie.
Français 9

Mise en oeuvre
• Le four est préréglé en format 12 heures (AM et PM). Pour passer en format
24 h, voir la rubrique “Le menu de sélection de fonction” à la page 10.
• Si la pendule n’est pas réglée, le four fera un bip périodiquement pour rappeler de régler la pendule. Presser OFF pour arrêter le bip.
Réglage de la pendule 1. PENDULE figure et 4 chiffres clignotent.
Tourner le bouton pour choisir AM ou PM.
2. Presser Time. PENDULE figure et les minutes clignotent.
3. Tourner le bouton et régler les minutes.
4. Presser Time et la pendule est réglée.
Remarque : si la pendule n’est pas réglée, le four fera un bip périodiquement
pour rappeler de régler la pendule. Presser OFF.
Changer la pendule 1. Presser Time. MINUTERIE 1 clignote.
2. Tourner le bouton pour choisir PENDULE.
3. Presser Time et les heures clignotent.
4. Tourner le bouton pour changer les heures.
5. Presser Time et les minutes clignotent.
6. Tourner le bouton pour changer les minutes.
7. Presser Time et la pendule est réglée.
Remarque : pour annuler la sélection TIME (pendule) en réglant la pendule,
presser OFF en tout temps en mode pendule.
Le menu de sélection de fonction
SÉLECTION FONCTION est la section du menu pour régler et modifier les fonctions données ci-dessous.
1
2
12: 00
Cooking Mode
Temperature
Start
AM
PENDULE
Time
Changer le volume du bip
Changer l’échelle de température
Pour accéder au menu SÉLECTION FONCTION.
1. Presser et maintenir COOKING MODE (mode cuisson) pendant 5 secondes. SÉLECTION FONCTION figure.
2. Tourner lentement le bouton à la fonction désirée. Il y aura un léger décalage avant de voir chaque message ou fonction à l’affichage. Tourner lentement et attendre environ 1 seconde pour que figure la fonction suivante.
3. Presser START pour choisir la fonction.
4. Tourner le bouton au réglage désiré et presser MARCHE. Lorsque tous les réglages sont effectués pour la fonction, SÉLECTION FONCTION clignote de nouveau.
5. Presser ARRÊT pour quitter le menu sélection fonction.
Le volume peut être changé de LOW (faible) à HIGH (élevé). Le contrôle par
défaut est moyen.
1. Accéder au menu SÉLECTION FONCTIONS.
2. Tourner le bouton dans le sens horaire pour afficher VOLUME.
3. Presser START.
4. Tourner le bouton pour choisir faible, moyen ou élevé.
5. Presser START.
Le four est préréglé en Fahrenheit. Il est possible d’alterner entre Fahrenheit et
Celsius.
Français 10
1. Accéder au menu SÉLECTION FONCTIONS.
2. Tourner le bouton dans le sens horaire pour afficher SELECT TEMP F-C.
3. Presser START.
4. Tourner le bouton pour choisir Fahrenheit (F) ou Celsius (C).
5. Presser START pour accepter la sélection.

Mise en oeuvre
Marche-arrêt de l’affichage pendule
Accéder au mode démonstration
Changer la langue de l’affichage
Verrouiller/Déverrouillé le panneau de contrôle
L’affichage pendule peut être mis hors circuit. Réglage par défaut : marche.
1. Accéder au menu SÉLECTION FONCTIONS.
2. Tourner le bouton dans le sens horaire pour afficher AFFICH PENDULE.
3. Presser START.
4. Tourner le bouton et marche ou arrêt figure.
5. Presser START pour accepter la sélection.
Ce mode s’applique aux magasins d’électroménagers seulement.
Choix d’anglais, espagnol ou français. Réglage par défaut : anglais. Remarque :
le menu SÉLECTION FONCTIONS figure en anglais seulement, quelle que soit la
langue choisie.
1. Accéder au menu SÉLECTION FONCTIONS.
2. Tourner le bouton dans le sens horaire jusqu’à la langue désirée.
3. Presser START.
4. Tourner le bouton dans le sens horaire pour une autre langue.
5. Presser START pour accepter le changement.
Le clavier du four peut être verrouillé à des fins de sécurité. Utiliser pour
empêcher le fonctionnement du four. Ceci NE verrouille PAS la porte du four.
Changer le décalage de température du four
Remettre aux réglages en usine
1. Accéder au menu SÉLECTION FONCTIONS.
2. Tourner le bouton dans le sens horaire jusqu’à ce que TOUCHES VERR clignote.
3. Presser START. CLAVIER VERR figure. Il y a un bip si une touche est pressée indiquant le verrouillage.
4. Pour déverrouiller, presser COOKING MODE et tenir 5 secondes. TOUCHE DEVER figure.
5. Lorsque déverrouillé, la pendule figure de nouveau.
Permet de régler la température du four si les aliments sont trop foncés ou trop
pâles.
1. Accéder au menu SÉLECTION FONCTIONS.
2. Tourner le bouton dans le sens horaire jusqu’à ce que DEVIA TEMP FOUR figure.
3. Presser START. 0 °F figure.
4. Tourner le bouton pour augmenter en tranches de 25 °F.
5. Presser START pour accepter le changement.
Cette fonction est utilisée pour remettre tous les réglages de « sélection
fonction » aux réglages d’origine en usine (ou par défaut).
1. Accéder au menu SÉLECTION FONCTIONS.
2. Tourner le bouton dans le sens horaire jusqu’à ce que REMISE DÉFAUT figure.
3. Presser START. SÉLECTION FONCTIONS figure à l’affichage.
Régler la fonction Sabbat
Concernant la fonction Sabbat
La fonction Sabbat destinée pour les croyances religieuses avec exigences
« sans travail » pour le Sabbat.
• Le four cuit pendant 73 h avant de se mettre automatiquement hors circuit.
• Pendant le mode Sabbat, l’affichage indique SABBAT et l’icone cuisson figure. La pendule et la température ne figurent pas à l’affichage.
Français 11

Mise en oeuvre
Changer le format heure La pendule peut être réglée en format 12 h ou 24 h. Réglage par défaut : 12 h.
• Pendant le mode Sabbat, seule la touche OFF fonctionne. Presser OFF en
tout temps pour mettre fin au mode et fermer le four.
• À la fin des 73 h, le four se met hors circuit automatiquement et SABBAT FIN
figure. Presser OFF pour l’heure en cours.
• La sonde NE peut PAS être utilisée pendant le mode Sabbat.
Réglage du mode Sabbat pour le four
1. S'assurer que le four est hors circuit.
2. Accéder au menu sélection fonction.
3. Tourner le bouton dans le sens horaire jusqu'à ce que l'option SABBAT figure.
4. Presser MARCHE. CUISSON figure à l'affichage et la température clignote.
5. Tourner le bouton pour régler la température.
6. Mettre l'éclairage du four en circuit si désiré (presser ÉCLAIRAGE).
Remarque : l'éclairage ne peut être modifié depuis ce point. Il demeure en ou
hors circuit, tel que sélectionné, pendant tout le mode Sabbat.
7. Presser MARCHE. Le four se met en marche après 5 secondes.
Le four fonctionne pendant 73 heures, puis se met automatiquement hors circuit.
1. Accéder au menu SÉLECTION FONCTIONS.
2. Tourner le bouton dans le sens horaire jusqu’à ce que FORMAT HEURE figure.
3. Presser START.
4. Tourner le bouton pour choisir format 12 ou 24 h.
5. Presser START pour accepter le choix.
Marche ou arrêt conver-
0.0
sion convection automatique
Cette fonction convertit automatiquement les températures indiquées dans la recette ou sur l'emballage pour utilisation avec le mode cuisson à convection.
Réglage par défaut : marche.
1. Accéder au menu SELECC FUNCIONES.
2. Tourner le bouton dans le sens horaire jusqu’à ce que AUTO CONVECT BAKE figure.
3. Presser Start.
4. Tourner le bouton pour choisir ON ou OFF.
5. Presser START pour accepter le choix.
Avant la première utilisation
• Retirer tout matériel d’emballage et étiquettes de la surface de cuisson.
Retirer tout matériel d'emballage et étiquettes de l'appareil ainsi qu'à
l'intérieur du four et du tiroir.
• Pendant qu’elle est froide, l’essuyer avec une éponge humide et assécher.
• Pour les modèles à surface en céramique vitrifiée, appliquer le nettoyant pour
surface de cuisson en céramique vitrifiée. Essuyer avec un chiffon propre.
Voir Entretien et nettoyage.
• Il peut y avoir une légère odeur aux premières utilisations ; ceci est normal et
disparaîtra.
• Lire et comprendre toutes les précautions de sécurité et le guide d’Utilisation
et d’entretien avant d’utiliser.
Français 12

Fonctionnement – surface de cuisson
Cette rubrique explique le fonctionnement du four. Voir “Pour de meilleurs résultats avec le surface de cuisson” à la page 17 pour plus de détails sur l'amélioration des résultats.
Concernant la surface de cuisson
Utiliser la surface de cuisson pour faire bouillir, frire, mijoter, cuire à la vapeur ou
sauter.
Fonctionnement
Réglage du niveau de chaleur du brûleur
Bouton de contrôle du brûleur
Figure 6: Bouton de contrôle du brûleur
Allumer le brûleur Pousser et tourner le bouton dans le sens contre horaire jusqu'au symbole.
Remarque : si le brûleur ne s'allume pas en quelques secondes, le fermer. Véri-
fier si le capuchon est en position appropriée sur la base du brûleur et que
l'allumeur est propre et sec. Si le brûleur ne s'allume pas, voir “Guide de dépannage pour la surface de cuisson” à la page 30.
Attention:: tous les allumeurs font des étincelles lorsqu'un brûleur est
mis en circuit. Ne pas toucher aux brûleurs lorsque la surface de cuis-
son est en circuit.
Allumer un brûleur pendant une panne de courant
Les brûleurs de la surface de cuisson peuvent être allumés pendant une panne
de courant. Tenir une allumette au port et tourner le bouton en position HI. Attendre jusqu'à ce que la flamme enveloppe le tour du brûleur avant de régler la
flamme au réglage désiré.
Français 13

Réglage de la flamme Après l'allumage, tourner le bouton dans le sens contre horaire pour la flamme
désirée. Voir “Guide de cuisson” à la page 17 pour les réglages de brûleurs
recommandés.
Attention : pour éviter toute blessure ou dommage à la casserole ou l'appareil, la
flamme ne doit pas excéder le bord de la casserole.
Fermer le brûleur Tourner le bouton dans le sens horaire à la position arrêt.
Remarque : il peut y avoir un " pop " lorsque le brûleur est mis hors circuit. Il est
plus fort avec le gaz LP qu'avec le gaz naturel. Ceci est normal.
Fonctionnement – four
Cette rubrique explique le fonctionnement du four. Voir “Pour de meilleurs résultats avec le surface de cuisson” à la page 17 pour plus de détails sur l'amélioration des résultats.
Concernant le four
Fonctionnement
Régler le mode cuisson et la température
ATTENTION
Ne pas utiliser d'aluminium ou de doublures protectrices pour doubler
toute pièce de l'appareil, surtout les bols d'égouttements ou le fond du
four. Ceci peut causer un risque de choc électrique ou d'incendie.
Remarque : pour sortir du mode en cours, presser OFF. (Si un mode n’est pas
réglé, OFF met le four hors circuit)
1. Presser COOKING MODE.
2. CUISSON figure à l’affichage.
6: 35
3. S’il n’y a pas de changement en moins de
5 secondes, le contrôle fait un bip et clignote. Si tel est le cas, presser START.
4. Pour changer le mode cuisson, tourner le bouton.
5. Presser START.
6. Le mode choisi figure à l’affichage avec la température à défaut qui clignote.
7. Pour choisir une autre température, tourner le bouton à droite ou à gauche
(en tranches de 5°) à la température désirée.
8. Presser START, sinon, le four se met automatiquement en circuit en 5 secondes.
9. L’affichage alterne entre le mode cuisson et préchauffage.
PM
100
380
CUISSON
Français 14
La température de préchauffage figure, débutant à 100 °F. Elle augmente jusqu’à
la température réglée, à ce point le four fait un bip.
10. Pour changer la température pendant la cuisson, presser température. Tourner le bouton pour choisir une autre température et presser START.
11. Une fois la cuisson terminée, presser OFF pour fermer le four.

Fonctionnement – four
Conversion à convection automatique (modèles à cuisson à convection)
Voyant de four chaud Une fois le four hors circuit, CHAUD figure à l’affichage au lieu du mode cuisson
En mode cuisson à convection, la température est automatiquement réduite de
25°F des températures indiquées sur les emballages ou recettes. Simplement
entrer la température de l'emballage ou recette au moment de régler le mode et
l'appareil calcule la température appropriée.
La fonction conversion à convection automatique peut être mise hors circuit pour
un réglage manuel de la température. Voir “Marche ou arrêt conversion convection automatique” à la page 12 pour plus de détails.
Lorsque cette fonction est activée, l'affichage indique CUISSON CONV AUTO.
Lorsqu'elle est hors circuit, l'affichage indique CUISSON CONV.
pour indiquer que le four est hors circuit, mais chaud. Lorsque la température
descend sous 176 °F, CHAUD disparaît.
Utilisation de la minuterie Remarque :
• Si la minuterie n’est pas totalement réglée, le four émet un bip périodiquement comme rappel. Presser OFF pour quitter le mode minuterie. (Si un
mode n’est pas réglé, OFF met le four hors circuit.)
• Tourner le bouton pour afficher l’heure du jour ou autre information sur le
mode four lorsque la minuterie est utilisée.
Pour régler la minuterie: 1. Presser TIME et MINUTERIE 1 clignote.
0: 00
MINUTERIE 1
Tourner dans le sens horaire et minuterie 2 figure.
Choisir minuterie 1 ou 2, presser TIME. REG MINUTERIE 1 ou 2 figure. Les minutes clignotent.
HR:MIN
1
REG MINUT 2
2. Tourner le bouton pour régler les minutes. Si seules les minutes sont réglées, presser START. Autrement, passer à l’étape 4.
3. Presser TIME et les heures clignotent.
4. Tourner le bouton pour régler les heures.
5. Presser TIME de nouveau, la minuterie est réglée.
6. Si TIME ou START n’est pas pressée, le four émet un bip et l’affichage minuterie clignote.
Changer la(les) minuterie(s) 1. Presser TIME. MINUTERIE 1 figure. Choisir
MINUTERIE 1 ou 2.
2. Presser TIME. REMISE MIN 1 (2) figure. Les minutes clignotent.
3. Tourner le bouton dans un sens ou l’autre pour changer les minutes.
4. Presser TIME de nouveau, les heures clignotent.
5. Tourner le bouton dans un sens ou l’autre pour changer les heures.
6. Presser TIME et l’heure est réglée.
Effacer la(les) minuterie(s) 1. Presser TIME une fois. MINUTERIE 1 clignote.
2. Tourner le bouton pour choisir EFF MINUTERIE 1 ou 2. Presser TIME.
3. Si la touche n’est pas pressée, il y a un bip et l’affichage clignote.
4. Presser TIME pour revenir à l’écran principal.
2: 02
PM
HR:MIN
REG MINUT 2
0: 00
AM
0: 00
AM
EFF MINUTERIE 1
MINUTERIE 1
Français 15

Fonctionnement – four
Annulation Si l’action n’est pas complétée, le four fait périodiquement un bip pour rappeler de
régler l’heure. Presser OFF pour quitter le mode minuterie. (Si un mode n’est pas
réglé, OFF met le four hors circuit).
Utilisation de la cuisson différée ou minutée
Régler un mode minuté 1. Presser COOKING MODE.
La CUISSON MINUTÉE règle le four à un mode de cuisson pour une durée
réglée, puis le met hors circuit. Disponible pour les modes suivants : cuisson, cuisson à convection et rôtissage à convection.
• S’assurer que la pendule est réglée à l’heure en cours. Voir “Changer la pendule” à la page 10 pour régler l’heure.
• À la fin de la durée programmée, le four se met hors circuit automatiquement.
• Non recommandée pour les aliments à levure (ex. : biscuits, gâteaux, pains,
soufflés, etc.).
2. CUISSON figure. Tourner le bouton pour choisir un autre mode.
3. Presser START.
4. Tourner le bouton pour choisir la température.
Remarque : La durée requise pour que le four atteigne la température doit
être comprise dans le temps de cuisson.
5. Presser TIME. CUISSON MIN figure.
6. Presser TIME. REG CUISS MIN figure, les minutes clignotent.
7. Régler les minutes. Presser TIME.
8. Les heures clignotent. Les régler. Presser START.
9. CUISSON MIN figure et le four commence à préchauffer.
1: 20
HR:MIN
35
CUISSON MIN
F
Une fois la cuisson complétée, FIN CUISS MIN clignote et un bip retentit. Presser
OFF pour effacer.
Différer le mode minuté 1. Suivre les étapes 1 à 5 ci-dessus.
2. Tourner le bouton pour afficher CUISS DIFFÉRÉE.
3. Presser TIME. REG CUISSON MIN figure, les minutes clignotent.
4. Régler les minutes et presser TIME. Les heures clignotent.
5. Régler les heures et presser TIME. REG FIN CUISS figure.
6. Presser TIME.
7. Utiliser le bouton pour entrer l’heure d’arrêt ou de mise hors circuit du four.
8. Régler les heures et presser TIME.
9. Régler les minutes et presser TIME.
Remarque : la pendule calcule automatiquement les heures marche et arrêt.
L’affichage compte à rebours par minute.
10. À la fin du temps de cuisson programmé, le four se met automatiquement hors circuit. FIN CUISS MIN figure et il y a un bip. Presser OFF pour effacer.
Remarque : retirer les aliments du four immédiatement lorsque le cycle est
terminé pour éviter la surcuisson, car ils continueront à cuire une fois le cycle
complété.
5: 00
HR:MIN
O
PM
400
CUISS DIFFEREE
F
Vérifier le temps de cuisson et l’heure arrêt une fois le différé réglé
Français 16
1. Presser TIME.
2. Tourner le bouton à BAKE END ou BAKE TIME.
3. Presser TIME.

Régler la fonction Sabbat Voir “Régler la fonction Sabbat” à la page 11.
Pour de meilleurs résultats avec le appareil
Pour de meilleurs résultats avec le surface de cuisson
Guide de cuisson du surface de cuisson
Bouillir l'eau La durée peut varier grandement selon les conditions environnementales.
Essayer les conseils suivants pour diminuer la durée :
• Utiliser un couvercle.
• Utiliser une casserole de format approprié pour la quantité d'eau et le format
du brûleur.
• Choisir une casserole à fond plat.
• (Voir “Guide de sélection de casseroles” à la page 17 pour plus de détails.)
• Commencer avec de l'eau déjà chaude.
• Bouillir la plus petite quantité d'eau nécessaire ; cela boue plus rapidement.
Réglages recommandés Utiliser ce tableau comme guide pour les réglages de chaleur ; une gamme de
réglages est donnée car le réglage réel dépend :
• dimension, type et qualité de la casserole (Voir “Guide de sélection de casseroles”),
• type, quantité et température des aliments,
• brûleur utilisé et
• goût du cuisinier.
Tableau 3: Guide de cuisson
Utilisation
Amener l'eau à ébullition 9 - haut
Frire, sauter, brunir la viande, grande friture 6-8 - moyen à élevé
Cuire oeufs, crêpes, bouillir lentement 4-5 - moyen
Mijoter, terminer la cuisson, aliments couverts, étuvée 2-3 - moyen-bas
Fondre le beurre et chocolat 1 - bas
Réglages de
chaleur
Guide de sélection de casseroles
Caractéristiques des casseroles Le choix des casseroles affecte directement la vitesse et l'uniformité de la cuis-
son. Pour de meilleurs résultats, choisir des casseroles à fond plat. Chaud, le fond
devrait reposer uniformément sur la surface sans ballotter. Choisir une casserole
de calibre moyen à lourd.
Français 17

Pour de meilleurs résultats avec le appareil
Vérifier le plat de la casserole Mettre la casserole à l'envers sur le plan de travail et
placer une règle contre le fond; ce dernier et la règle
doivent être un contre l'autre.
Une autre façon de déterminer la distribution uniforme de chaleur et de verser 1 po d'eau (25,4
mm) dans la casserole. Amener à ébullition et
observer l'emplacement des bulles lorsque l'eau
commence à bouillir. Les bulles auront une distribution uniforme sur la surface de l'eau si la casserole est appropriée.
Faire correspondre le diamètre de la casserole au format de la flamme
Conseils sur les casseroles • Ne pas utiliser des casseroles et des plats à fond rond (concave ou convexe,
Casseroles spécialisées Ces types tels rôtissoires, cuiseurs, wok, etc. doivent avoir les mêmes caractéris-
La flamme doit être de même format que le fond de la casserole ou plus petite. Ne
pas utiliser de petites casseroles à un réglage élevé.
Placer les grandes casseroles sur deux brûleurs, devant à derrière et non de côté
à l'autre.
Couvercle hermétique - cela réduit le temps de cuisson en gardant la chaleur à
l'intérieur de la casserole.
voilé, etc.). Voir illustrations.
• S'assurer que le fond est propre et sec.
• Utiliser des plats avec un fond en métal lisse et épais.
tiques que celles décrites ci-dessus. Utiliser des woks à fond plat seulement.
Pour de meilleurs résultats avec du four
Guide de cuisson du four
Position des grilles
• GRILLE POSITION 6 (plus élevée) – fondre fromage, griller aliments
minces
6
5
4
3
2
1
Cuisson sur plusieurs grilles Pour la cuisson sur plusieurs grilles, suivre l’emplacement recommandé.
Français 18
• GRILLE POSITION 5 – griller viande tendre, pain
• GRILLE POSITION 4 – griller viande épaisse
• GRILLE POSITION 3 – la plupart des aliments avec cuisson sur une grille
tels biscuits, gâteaux, aliments surgelés, muffins, etc.
• GRILLE POSITION 2 – utiliser pour tartes, casseroles, pain, quatre quarts,
petits rôtis ou volaille.
• GRILLE POSITION 1 (plus basse) – utiliser pour gâteau des anges, gros
rôtis, dinde.
Figure 7: Positions de grilles
• Deux grilles : utiliser position 2 et 5.
• Trois grilles: (cuisson à convection): positions 1, 3 et 6.

Pour de meilleurs résultats avec le appareil
Emplacement des plats Pour de meilleurs résultats, placer les plats au centre du four, si plus d’un plat sur
une grille, laisser au moins de 1 à 1 1/2 po entre les plats. Pour un gâteau à 4
étages, placer les moules deux par deux en quinconce, comme ci-dessous.
Figure 8: Emplacement des plats
Plats à cuisson Conseils pour la cuisson :
• Les plats en verre absorbent la chaleur, réduire la température du four de
25°F.
• Les plats en métal lisse, brillant réfléchissent la chaleur pour un brunissage
plus délicat.
• Les plats mats, foncés absorbent la chaleur pour une croûte plus brune et
croustillante. Certains fabricants recommandent de réduire la température de
25 °F. Suivre leurs recommandations.
• Utiliser un plat en verre ou en métal foncé pour les tartes.
• Les plats isolés nécessitent une augmentation de la durée de cuisson recommandée.
Préchauffer le four Préchauffer le four si recommandé dans la recette. Cela est nécessaire pour les
gâteaux, biscuits, pâtisseries, pains. Un réglage plus élevé de la température ne
réduit pas le temps de préchauffage. Placer les grilles en position avant de
préchauffer. Un bip confirme que le four est préchauffé et la température choisie
s’affiche.
Modes cuisson du four
Cuisson, levage et réchaud
Il s’agit d’une cuisson avec air chaud et sec. Le
brûleur inférieur effectue un cycle pour maintenir
la température. Utiliser pour préparer des aliments tels pâtisseries et casseroles et rôtir la
viande.
Remarque : selon le modèle, l'on peut entendre
le ventilateur à convection fonctionner pendant
que le four préchauffe pour le mode cuisson.
Ceci est normal.
En mode levage, le four utilise le brûleur inférieur afin de maintenir une basse
température pour lever le pain.
• Le levage est le fait que le pain lève.
• Les températures du levage sont de 85 à 110 °F, par défaut 100 °F.
• Couvrir de façon lâche le bol ou la casserole et utiliser toute grille pour
accommoder le format de la casserole.
• Laisser la porte fermer et utiliser l'éclairage du four pour vérifier le levage de
la pâte.
En mode réchaud, le brûleur inférieur maintient une température basse dans la
cavité du four afin de garder les aliments à une température de service.
Français 19

Pour de meilleurs résultats avec le appareil
• Utiliser le réglage réchaud pour garder les aliments chauds prêts à servir.
• Température de réchaud de 140 à 220 °F ; par défaut 170 °F°.
• Les aliments qui doivent rester humides devraient être couverts.
• Ne pas utiliser ce mode pour chauffer des aliments froids.
• S’assurer de maintenir une température appropriée pour les aliments. La
• NE PAS garder chaud plus d’une heure.
Cuisson à convection La cuisson à convection est semblable à la cuis-
son. La chaleur provient de le brûleur inférieur.
La principale différence est que la chaleur est circulée dans tout le four par le ventilateur à convection.
Ce mode est idéal pour cuire de grande quantité
d’aliments sur plusieurs grilles. Utiliser pour préparer des biscuits, tartes, petits gâteaux, pains,
goûter et hors-d’oeuvre. Avantages :
ATTENTION
Avec le mode réchaud, suivre ces directives :
USDA recommande de garder les aliments chauds à 140 °F ou plus.
Conversion convection automatique
Tableau 4: Cuisson à convection
• Légère diminution du temps de cuisson
• Cuisson sur 3 grilles (brunissage plus uniforme)
• Volume plus élevé (aliments à levure)
• Permet de cuire plus d'articles à la fois
Pour de meilleurs résultats :
• Réduire la température de la recette de 25 °F. Voir le tableau de cuisson à
convection.
• Placer les aliments dans un plat non couvert, bas tel une tôle à biscuits.
• Centrer le plat de gauche à droite sur la grille.
En mode cuisson à convection, la température est automatiquement réduite de
25°F des températures indiquées sur les emballages ou recettes. Simplement
entrer la température de l'emballage ou recette au moment de régler le mode et
l'appareil calcule la température appropriée.
La fonction conversion à convection automatique peut être mise hors circuit pour
un réglage manuel de la température. Voir “Marche ou arrêt conversion convection automatique” à la page 12 pour plus de détails.
Lorsque cette fonction est activée, l'affichage indique CUISSON CONV AUTO.
Lorsqu'elle est hors circuit, l'affichage indique CUISSON CONV.
Français 20
Aliments Produits
Gâteau Petits gâteaux
Bundt
Des anges
Tarte 2 croûtes, fraîches, 9 po
2 croûtes, fruits surgelés 9 po22
Position
grille
3
2
1
Temp.a (oF)
(four préchauffé)
350
350
350
400-450
400
Cuisson à
convection temps
(min)
18-21
37-43
39-43
45-55
68-78
b

Tableau 4: Cuisson à convection
Pour de meilleurs résultats avec le appareil
Aliments Produits
Biscuits Sucre
Brisures de chocolat
Brownie
Pains Pain à la levure 9x5
Petits pains à la levure
Pain rapide, 8x4
Biscuits
Muffins
Pizza Surgelée
Fraîche
Position
grille
3
3
3
2
3
2
3
3
3
3
Temp.a (oF)
(four préchauffé)
375-400
375-400
375
400
400-425
375-400
400-425
450
425-475
450-475
convection temps
6-11
10-15
29-36
20-24
14-18
45-55
11-15
16-20
23-26
12-15
a. La température doit être diminuée manuellement de 25 °F si la fonction conversion convection
automatique est hors circuit.
b. Ce tableau est un guide. La durée réelle dépend des mélanges ou des recettes. Suivre les rec-
ettes ou les directives.
Gril Utilise une chaleur radiée intense de le brûleur
supérieur. Idéal pour cuire des coupes de viande
tendre et mince (1 po ou moins), volaille et poisson, brunir le pain et les casseroles. Toujours
fermer la porte pour le gril.
Cuisson à
(min)
b
Tableau 5: Gril
Avantages :
• Cuisson rapide et efficace
• Cuisson sans ajout de gras ou liquides
• Brunit pendant la cuisson
Pour de meilleurs résultats :
• Préchauffer le four de 3 à 4 minutes. Ne pas préchauffer le four plus de 5 minutes.
• Steaks et côtelettes d’au moins 3/4 po d’épaisseur
• Badigeonner poisson et volaille de beurre ou d’huile pour empêcher de coller.
• Utiliser la lèchefrite et grille fournies avec l’appareil.
• Ne pas couvrir la lèchefrite d’aluminium. Elle est conçue pour drainer le gras
et les jus de la surface de cuisson pour empêcher la fumée et les éclaboussures.
• Tourner la viande à mi cuisson selon la durée de cuisson recommandée (voir
tableau de gril).
• Pour brunir des casseroles, utiliser des plats en métal ou en céramique vitrifiée comme Corningware®.
• Ne jamais utiliser du verre résistant à la chaleur (Pyrex®); ils ne tolèrent pas
les températures élevées.
Aliments Produit / épaisseur
Boeuf Steak (3/4 – 1 po)
Médium saignant
Médium
Bien cuit
Hamburgers (3/4 – 1 po) - Bien
cuit
Position
grille
5
5
5
5
Réglage
gril
high
high
high
high
Temp.
interne. (°F)
145
160
170
160
6-7
7-8
8-9
9-11
Côté 1
(min)
Côté 2
a
5-6
6-7
7-9
8-10
(min)
a
Français 21

Pour de meilleurs résultats avec le appareil
Tableau 5: Gril
Aliments Produit / épaisseur
Volaille Poitrine avec os 4 low 170 18-20 18-19
Porc Côtelette (1 po)
Saucisse - fraîche
Jambon tranché (1/2 po)
Fruits de mer Filet poisson beurré (1 po) 5 Bas Cuire jusqu’à
Pain Tranche pain à l’ail (1 po) 5 Haut N/A 2-4 Ne pas tourner
Position
grille
4
3
5
Réglage
gril
high
high
high
Temp.
interne. (°F)
160
160
160
opacité se
défaisant facilement
Côté 1
a
(min)
8-9
7-9
5-6
12-14 Ne pas tourner
7-8
6-8
5-6
Côté 2
(min)
a
a. *Les durées de gril sont approximatives et peuvent varier. Les durées sont basées sur la cuisson avec un élé-
ment gril préchauffé.
Rôtissage à convection Utilise la chaleur intense des brûleurs inférieurs et
celle circulée par le ventilateur à convection. Le
résultat est un extérieur plus croustillant, scellant
les jus. Idéal pour préparer des coupes de viande
tendres et la volaille.
Les avantages du rôtissage par convection comprennent :
Tableau 6: Rôtissage à convection
Viande Produit
Boeuf Côte de boeuf rôtie
Rosbif faux filet (sans os)
Surlonge, rosbif, pointe, surlonge
(sans os)
Rôti de filet
Porc Longe (avec ou sans os)
Épaule
• Cuisson 25 % plus rapide que la cuisson / rôtissage standard
• Brunissage doré et riche
Pour de meilleurs résultats :
• Utiliser la température indiquée dans la recette.
• Vérifier la cuisson plus tôt car la durée peut être réduite jusqu’à 25 %. Voir le
tableau de rôtissage à convection.
• Ne pas couvrir la viande ni utiliser des sacs à cuisson.
• Utiliser la lèchefrite et la grille fournie avec l’appareil. Un plat peu profond peut
être utilisé.
• Utiliser un thermomètre à viande pour déterminer la température interne de la
viande.
• Si la viande est brunie à point, mais pas assez cuite, une petite bande d’aluminium peut être placée pour couvrir la viande et l’empêcher de trop brunir.
• Laisser reposer la viande couverte d’aluminium de 10 à 15 minutes après le
retrait du four.
Poids
(lb)
4-6
4-6
3-6
2-3
5-8
3-6
325
325
325
425
350
350
Temp.
four.(
o
F)
Temps rôtissagea
(min par lb)
25-32
28-32
24-32
27-32
25-30
28-32
15-25
15-25
20-30
Temp. interne.
o
(
F)
145 (méd/saignant)
160 (médium)
145 (méd/saignant)
160 (médium)
145 (méd/saignant)
160 (médium)
145 (méd/saignant)
160
160
Français 22

Tableau 6: Rôtissage à convection
Viande Produit
Volaille Poulet entier
Dinde – non farcie
Dinde - non farcie
Dinde - non farcie
Dinde - poitrine
Poulet de Cornouailles
375
325
325
325
325
350
Temp.
four.(
o
F)
(min par lb)
14-20
10-14
9-13
6-10
20-25
45-75 (temps total)
Temps rôtissagea
Poids
(lb)
b
b
b
3-4
12-15
16-20
21-25
3-8
1-1 1/2
Temp. interne.
(
180
180
180
180
170
180
a. Le temps de rôtissage à convection est approximatif et peut varier selon la forme de la viande et est en fonction
d’une viande décongelée.
b. La dinde farcie requiert un temps de rôtissage additionnel. La température minimale sécuritaire pour la farce de
la volaille est de 165 °F.
Nettoyage et entretien
Nettoyage - surface de cuisson
o
F)
Attention:
Ne pas utiliser de nettoyant sur la surface de cuisson chaude. Cela
peut causer des émanations et peut être dangereux pour la santé. Les
nettoyants chauffés peuvent attaquer la surface et l'endommager.
Attention: tous les allumeurs font des étincelles lorsqu'un brûleur est
mis en circuit. Ne pas toucher aux brûleurs lorsque la surface de cuisson est en circuit.
Nettoyage quotidien Essuyer avec de l'eau chaude savonneuse, rincer et assécher. Après un déverse-
ment, fermer le brûleur et laisser la surface de cuisson refroidir. Nettoyer le
brûleur et les ports. Réassembler le ou les brûleurs et vérifier le fonctionner
approprié.
Directives de nettoyage
Éviter ces produits • Nettoyant pour vitre contenant de l'ammoniaque ou du javellisant. Ces ingré-
dients peuvent égratigner ou tacher la surface de cuisson.
• Nettoyant caustique
• Nettoyant à four comme Easy Off® égratigne la surface
• Nettoyant abrasif
• Les tampons à récurer en métal et éponges à récurer telles Scotch Brite®
peuvent égratigner et/ou laisser des marques.
•Tampon à récurer savonneux comme SOS® égratigne la surface.
Français 23

Nettoyage et entretien
• Nettoyant en poudre contenant du javellisant peuvent tacher de façon perma-
Tableau 7: Nettoyage de la surface de cuisson
Pièce/matériaux Suggestion Rappels Important
nente la surface de cuisson.
Base brûleur / acier émaillé • Détergent et eau chaude, rincer et
assécher.
• Tampon en laine d'acier avec savon
comme Brillo® ou S.O.S.® Rincer et
assécher.
Capuchon brûleur et grilles/
fini mat sur fonte
Boutons de contrôle / plastique • Eau chaude savonneuse, rincer et
Fini extérieur / porcelaine
émaillée
• Eau chaude et détergent. Rincer et
assécher immédiatement.
• Nettoyant non abrasif tel Fantastic®
ou Formula 409®. Rincer et assécher
immédiatement.
• Nettoyant abrasif doux tel Bon Ami®,
Soft Scrub®.
assécher immédiatement.
• Eau chaude savonneuse, rincer et
assécher complètement.
• Nettoyant non abrasif tel Fantastic®
ou Formula 409®.
• Nettoyant abrasif doux tel Bon Ami®,
Ajax®, Comet®.
• Nettoyant liquide tel Soft Scrub®.
• Nettoyer les ports avec une brosse à
dents en poils de nylon.
• Ne pas égratigner ni forcer les ouvertures
des ports.
• Les grilles sont lourdes, faire attention au
moment de les soulever. Placer sur une
surface protégée.
• Écaillement, éclats, etc. sont dus aux
températures extrêmes et aux changements de température rapides.
• Ne pas laver au lave-vaisselle.
• Les déversements acides ou avec sucre
peuvent détériorer la porcelaine émaillée.
Enlever immédiatement.
• Les nettoyants abrasifs utilisés trop souvent ou avec force peuvent marquer
l'émail.
• Pour enlever les boutons, régler en position arrêt, puis tirer droit.
• Ne pas faire tremper les boutons.
• Ne pas forcer les boutons sur la tige de
soupape.
• Ne pas utiliser de nettoyant abrasifs tels
Bon Ami®, Ajax®, Comet®. Ils peuvent
endommager le fini.
• Réassembler avec soin le brûleur lorsque
terminé. S'assurer que le capuchon est
bien positionné.
• Ne pas utiliser de cure-dents, il peut se
briser.
• Les déversements acides ou avec sucre
peuvent détériorer la porcelaine émaillée.
Enlever immédiatement.
• Ne pas utiliser d'éponge ou essuie-tout
mouillé sur la porcelaine chaude.
• Ne pas faire tremper les capuchons de
brûleurs.
• Toujours utiliser le moins de pression possible en appliquant les nettoyants abrasifs.
• Ne jamais utiliser de nettoyant pour le
four, caustiques ou abrasifs sur l'extérieur
de l'appareil.
Français 24

Tableau 7: Nettoyage de la surface de cuisson
Pièce/matériaux Suggestion Rappels Important
Nettoyage et entretien
Fini extérieur / acier inoxydable • Eau chaude et détergent.
• Nettoyant non abrasif tel Fantastic®
ou Formula 409®. Rincer et assécher
immédiatement.
• Poli tel Stainless Stell Magic® pour
protéger le fini des taches; rehausse
l'apparence.
• Tache d'eau calcaire : vinaigre blanc.
• Nettoyant abrasif doux : nettoyant liquide Kleen King® pour acier inoxydable, nettoyant acier inoxydable et
aluminium Cameo® et Bon Ami®.
• Décoloration par la chaleur : Bar
Keepers Friend®.
Allumeurs / céramique • Essuyer avec soin à l'aide d'un coton
tige humide d'eau, ammoniaque ou
un nettoyant non abrasif tel Formula
409®.
• Gratter les taches avec un curedents.
• L'acier inoxydable résiste à la plupart des
taches d'aliments et autre en autant que la
surface est propre et protégée.
• Utiliser un chiffon, éponge ou essuie-tout
doux.
• Essuyer la surface pour éviter les
marques d'eau.
• Ne jamais laisser les taches ou le sel
demeurer sur l'acier inoxydable pendant
longtemps.
• Frotter légèrement dans le sens des
lignes.
• Les composés au chlore de certains nettoyants sont corrosifs pour l'acier inoxydable. Vérifier les ingrédients avant
d'utiliser.
• Les ports d'allumeurs doivent être propres
pour un fonctionnement approprié. Il est
nécessaire de les nettoyer lorsqu'il y a un
déversement ou lorsque le brûleur ne
s'allume pas même si l'allumeur électronique fait un clic.
• Un allumeur humide empêche le brûleur
de s'allumer. Pour un bon rendement, les
allumeurs doivent être propres et secs.
• Enlever toute charpie après le nettoyage.
Nettoyage - four
Nettoyage quotidien Le nettoyage quotidien à l'intérieur du four n'est pas nécessaire. Lorsqu'il y a
accumulation de résidus, utiliser l'autonettoyage tel qu'il est expliqué à Voir
“Autonettoyage du four” à la page 26 pour des instructions sur les surfaces et articles spécifiques.
Directives de nettoyage
Éviter ces nettoyants • Nettoyant à four comme Easy Off® égratigne la surface.
• Nettoyant inflammable comme du liquide à briquet ou WD-40..
Tableau 8: Nettoyage du four
Pièce Recommandations
Grilles Laver à l’eau chaude savonneuse. Rincer et assécher ou frotter délicatement avec une pou-
dre ou tampon savonneux tel qu’indiqué. Si les grilles sont nettoyées dans le four pendant
l’autonettoyage, elles perdront leur fini et peuvent ne pas glisser en douceur. Si cela se produit, essuyer les bords avec un peut d’huile végétale, enlever l’excès.
Joint de porte en fibre de verre NE PAS NETTOYER À LA MAIN LE JOINT.
Verre (autre que surface de
cuisson)
Laver avec du savon et de l’eau ou nettoyant à vitre. Utiliser Fantastik® ou Formula 409®
pour enlever la graisse et les taches tenaces.
Surfaces peintes Nettoyer avec de l’eau savonneuse chaude ou appliquer Fantastik® ou Formula 409® sur
une éponge ou un essuie-tout propre. Éviter nettoyant en poudre, tampons en laine d’acier
et nettoyants pour four
Français 25

Nettoyage et entretien
Tableau 8: Nettoyage du four
Pièce Recommandations
Surfaces en porcelaine Essuyer immédiatement les déversements acides tels jus de fruits, lait, tomates avec une
serviette sèche. Ne pas utiliser d’éponge/essuie-tout humide sur la porcelaine. Lorsque
refroidie, essuyer avec de l’eau savonneuse chaude ou appliquer Bon-Ami® ou Soft Scrub®
sur une éponge humide. Rincer et assécher. Pour les taches tenaces, utiliser un tampon
savonneux. Il est normal que de fines lignes apparaissent à cause de chaleur et des taches
Surfaces en acier inoxydable Toujours essuyer dans sens du grain. Nettoyer avec éponge savonneuse, rincer et assécher
ou essuyer avec Fantastik® pour acier ou Formula 409® vaporisé sur un essuie-tout. Protéger et polir avec Stainless Steel Magic® et un chiffon propre. Enlever taches d’eau avec un
chiffon humide de vinaigre blanc. Utiliser Bar Keeper’s Friend® pour enlever décoloration.
Plastique et contrôles Lorsque refroidis, nettoyer avec de l’eau savonneuse, rincer et assécher.
Autonettoyage du four Le four est doté d'un autonettoyage qui élimine le labeur manuel. Pendant
l'autonettoyage, le four utilise une température très élevée pour brûler la graisse
et les résidus.
• Ne pas nettoyer les pièces et accessoires à l'autonettoyage du four.
• Il peut y avoir de la fumée et/ou des flamme pendant l'autonettoyage, selon le
contenu et la quantité de résidus dans le four. Si les flammes persistent,
fermer le four et le laisser refroidir avant d'ouvrir la porte et d'essuyer
l'excédant.
• La porte du four se verrouille au début de l'autonettoyage.
• L'éclairage ne fonctionne pas pendant ce mode.
• Pendant l'autonettoyage, bien aérer la cuisine pour aider à éliminer les
odeurs associées à l'autonettoyage. Celles-ci s'amenuiseront à l'usage.
• La durée préréglée est de 4 heures. L'appareil peut être réglé pour 3 ou 5
heures.
• Le mode s'arrête automatiquement à la fin de la durée.
• Lorsque le four est refroidi, le verrouillage de porte se déclenche et la porte
peut être ouverte.
• Pour annuler ou arrêter le mode en cours, presser ARRÊT.
• La porte demeure verrouillée tant qu'une température sécuritaire n'est pas
atteinte.
Préparation du four pour l’autonettoyage
Français 26
AVERTISSEMENT
Le joint flexible de porte est nécessaire à l’étanchéité. Ne pas nettoyer,
frotter, endommager ni enlever le joint
1. Retirer tout ustensile et casserole.
2. Retirer les grilles. Si elles sont laissées dans le four pendant l’autonettoyage,
elles perdront leur fini brillant et deviendront foncées. Voir le tableau nettoyage du four.

Nettoyage et entretien
3. Essuyer tout déversement mou et graisse avec un essuie-tout. L’excès de graisse peut causer des flammes et de la fumée dans le four pendant l’autonettoyage.
Nettoyer à la main 1 1/2 po
depuis les guides de grille vers
l'avant de la cavité du four
Ne pas nettoyer
le joint à la main
Nettoyer à la main le
cadre à l’extérieur du joint
Nettoyer à la main la
porte à l’extérieur du joint
Figure 9: Directives de nettoyage
4. Voir l’illustration ci-dessus. Certaines zones du four doivent être nettoyées à
la main avant le cycle. Utiliser une éponge savonneuse ou un grattoir en plastique ou un tampon savonneux S.O.S.® pad. Nettoyer le bord de la porte,
cadre avant jusqu’à 1 1/2 po à l’intérieur du cadre avec du détergent et de
l’eau chaude. Ne pas nettoyer ni frotter le joint. Il est conçu pour garder la
chaleur pendant l’autonettoyage. Rincer, puis assécher.
5. S’assurer que l’éclairage est hors circuit, que les ampoules et les couvercles sont en place. Ne pas actionner le four sans les ampoules et les couvercles en place.
Important : ne pas utiliser de nettoyants à four de type commerciaux dans le four
autonettoyant et sur toute pièce. Ils endommageront le fini ou les pièces.
Régler le mode autonettoyage 1. Presser COOKING MODE.
2. Tourner le bouton jusqu’à ce que AUTONETTOYANT figure. Presser START.
3. La durée par défaut est 4 heures. Pour changer, tourner le bouton pour changer le nombre d’heures, autrement passer à l’étape 4.
4. Presser START. AUTONETTOYANT clignote. Presser START.
5. ENLEVER GRILLE figure à l’affichage pour rappeler d’enlever les grilles.
6. Presser START de nouveau pour actionner l’autonettoyage.
Remarque : la porte se verrouille pas au
début du cycle. Le symbole de verrouillage figure à ce moment. Si la porte ne se
verrouille pas, presser OFF et ne pas actionner l’autonettoyage. Téléphoner pour
le service.
Mise en marche différée de l’autonettoyage
Remarque : l'heure du jour doit être réglée afin que cette option fonctionne
adéquatement. Voir " Réglage de la pendule " à la rubrique réglage de la cuisinière.
3: 00
4: 00
AUTONETTOYANT
3
AUTONETTOYANT
ENLEVER GRILLE
1. Presser COOKING MODE.
2. Tourner le bouton jusqu’à ce que AUTONETTOYANT figure.
Français 27

Nettoyage et entretien
AUTONETTOYANT
3. Presser START. La durée par défaut est 4 heures. Pour changer, tourner le bouton pour changer le nombre d’heures, autrement passer à l’étape 4.
4. Presser START.
5. Tourner le bouton jusqu’à ce que NETTOYA DIFFERE figure. Presser START.
3: 00
AUTONETTOYAN T
DIFFERE
6. FIN AUTONETTOY figure.
7. Tourner le bouton pour entrer l'heure du jour à laquelle l'autonettoyage s'arrête : régler les heures, presser TIME, régler les minutes.
8. Presser START. L’affichage indique d’enlever les grilles.
9. Presser START. NETTOY DIFFERE figure. L’autonettoyage commence automatiquement à l’heure réglée.
Remarque : en mode autonettoyage différé, la porte se verrouille automatiquement au début du cycle. Le symbole de verrouillage figure à l’affichage.
Remarque : l’éclairage ne fonctionne pas en mode autonettoyage.
Après l’autonettoyage 1. À la fin du temps programmé, le four se met automatiquement hors circuit.
FIN AUTONETTOY figure. Presser OFF pour effacer.
5: 45
AUTONETTOYAN T
AUTONETTOYANT
Remarque : la porte reste verrouillée tant que la température n’est pas sécuritaire.
2. Le mode autonettoyage peut produire de la cendre au fond du four, l’enlever avec un chiffon humide avant d’utiliser le four de nouveau.
3. Essuyer les bords des grilles avec de l’huile à cuisson, enlever l’excès.
Après l’autonettoyage, le four peut être nettoyé de façon sécuritaire avec une
éponge savonneuse, rincer et assécher. Si des taches demeurent, suivre les
directives données.
• Toujours utiliser le nettoyant le plus doux pour enlever la tache.
• Frotter le fini métal dans le sens du grain.
• Utiliser chiffon, éponge ou essuie-tout propres.
• Bien rincer avec un minimum d’eau pour ne pas qu’elle s’égoutte dans les
fentes de la porte.
• Assécher pour éviter les marques d’eau.
Nettoyage - tiroir
Nettoyage quotidien Laver à l’eau chaude savonneuse, rincer et assécher.
Entretien
Entretien du la surface
Modèle avec surface en acier inoxydable
Aucun entretien requis autre qu'un nettoyage quotidien décrit à “Directives de nettoyage” à la page 23.
Entretien du four
Retrait de la porte 1. S’assurer de lire l’AVERTISSEMENT au dessous avant d’enlever la porte.
Français 28

Nettoyage et entretien
2. Ouvrir la porte complètement.
3. Basculer le levier de la charnière vers soi.
AVERTISSEMENT
En enlevant la porte :
• S'assurer que le four est froid et l'alimentation hors circuit au four avant d'enlever la porte. Sinon il peut en
résulter un choc électrique ou des brûlures.
• La porte du four est lourde et fragile. Utiliser les deux mains pour l'enlever. Le devant est en verre.
Manipuler avec soin pour éviter les bris.
• Saisir seulement par les côtés. Ne pas prendre la poignée car la porte peut basculer et causer des dommages ou des blessures.
• Si la porte n'est pas saisie fermement et adéquatement, il y a un risque de dommages au produit ou de
blessures.
• Pour éviter toute blessure de la fixation de charnière qui s'enclenche, s'assurer que les deux leviers sont
en place de façon sécuritaire avant de bouger la porte. Ne pas forcer la porte pour l'ouvrir ou la fermer, la
charnière peut se briser et il peut en résulter des blessures.
Figure 10: Positions de charnière
4. Fermer la porte à environ mi chemin. Arrêter lorsque l'on sent une résistance des charnières.
5. Tenir fermement la porte par les côtés avec les deux mains, tirer la porte droit hors des fentes de charnières. Maintenir fermement, la porte est lourde.
6. Placer la porte dans un endroit stable pour le nettoyage.
Installation de la porte 1. Tenir fermement la porte avec les deux mains. Placer les charnières dans les
fentes.
2. Ouvrir la porte complètement pour exposer charnières et fentes. Pousser le levier (un sur chaque charnière) loin de soi (vers l’appareil).
3. Après avoir placer les fixations de charnières en position, fermer et ouvrir la porte lentement pour s’assurer qu’elle est correcte et bien en place.
4. La porte doit être droite, non croche.
Remplacer les ampoules du four Chaque assemblage comprend une lentille amovible, une ampoule, boîtier de
douille fixe en place.
Français 29

ADVERTISSEMENT
• S'assurer que le four et l'éclairage sont froids et que l'alimentation au
four a été mise hors circuit avant de remplacer les ampoules. Sinon il
peut en résulter un choc électrique ou des blessures.
• Les lentilles doivent être en place pour utiliser le four.
• Les lentilles servent à protéger le bris des ampoules.
• Les lentilles sont fabriquées en verre. Manipuler avec soin pour éviter
les bris. Le verre brisé peut causer des blessures.
• La douille est sous tension lorsque la porte est ouverte.
1. Lire l’AVERTISSEMENT ci-dessus.
2. Mettre hors circuit à l’alimentation principale (fusible ou coupe-circuit).
3. Dévisser la lentille pour l’enlever.
4. Dévisser l’ampoule de la douille.
5. Remplacer l’ampoule par une nouvelle ampoule d’électroménagers 40 watts. Éviter de toucher l’ampoule avec les doigts, car les huiles de la main peuvent l’endommager lorsqu’elle devient chaude.
6. Visser l’ampoule.
7. Remettre en circuit à l’alimentation principale (fusible ou coupe-circuit)
Service
Avant d'effectuer un appel de service
Utiliser ces suggestions avant d’effectuer un appel de service et éviter des frais
de service.
Tableau de dépannage
La surface de cuisson .
Tableau 9: Guide de dépannage pour la surface de cuisson
Probléme de cuisson Causes possibles et solutions suggérées
Résultats de cuisson inattendus • L'appareil n'est pas de niveau. Régler les pieds niveleurs.
• La casserole n'est pas appropriée. Voir “Guide de sélection de casseroles” à la page 17
pour les conseils sur la façon de diminuer la durée d'ébullition.
L'eau prend du temps à bouillir • L'ébullition de l'eau varie selon les conditions environnantes. Voir “Bouillir l'eau” à la
page 17 pour les conseils sur la façon de diminuer la durée d'ébullition.
Les brûleurs font un clic
continuel.
• Le(s) bouton(s) est(sont) en position allumée. Tourner en position OFF ou au réglage
désiré.
Les brûleurs font un clic
intermittemment.
Français 30
• De l'humidité s'est accumulée à l'intérieur de l'allumeur. Mettre les brûelurs au
plus haut réglage pendant 15 à 20 minutes, puis fermer.

Tableau 9: Guide de dépannage pour la surface de cuisson
Probléme de cuisson Causes possibles et solutions suggérées
Service
Les brûleurs de surface ne
s’allument pas.
Flamme non constante ou trop haute
; brûleur difficile à allumer
Flamme non uniforme - utilisateur de
gaz LP
Le four
• Le gaz est fermé. S’assurer que la soupape d’arrêt de gaz est en position ON et que l’alimentation en gaz à la résidence n’est pas fermée.
• L’appareil n’est pas branché sur l’alimentation en gaz. Téléphoner à la compagnie de gaz.
• La fiche est mal insérée dans la prise. Câblage résidentiel incorrect. Vérifier la source
d’alimentation. Vérifier si l’appareil est mis à la terre avec la bonne polarité. S’assurer que
l’appareil est bien branché.
• Le coupe-circuit est déclenché. Le vérifier et le réenclencher au besoin. Vérifier et/ou
remplacer le fusible.
• Les orifices de brûleurs sont obstrués. La surface de cuisson fermée et refroidie, retirer le
capuchon de brûleur. Utiliser une brosse à dent en nylon rigide pour enlever les débris.
• Capuchon mal enligné. S’assurer que les capuchons sont adéquatement positionnés sur
les brûleurs.
• Allumeur mouillé, endommagé ou sale. Si mouillé, laisser sécher à l'air. Vérifier s'il y a
des aliments brûlés ou de la graisse. Voir les recommandations de nettoyage. Les
brûleurs ne s'allument pas si l'allumeur est mouillé, endommagé ou sale.
• Les ports du brûleur sont obstrués. Fermer la surface de cuisson et laisser les brûleurs
refroidir. Enlever les capuchons et utiliser une brosse à poil en nylon rigide pour enlever
tout débris.
• Capuchon mal placé. Il doit être adéquatement positionné sur le brûleur.
• Capuchon mouillé. Fermer le brûleur et laisser refroidir. Assécher le capuchon et la base.
• Faire un appel de service.
Tableau 10: Guide de dépannage du four
Problème Causes possibles et solutions suggérées
Le mode four ou la température choisie ou les
chiffres choisis ne figurent pas à l’affichage
Porte verrouillée et ne se déclenche pas,
même après le refroidissement
Four ne chauffant pas Vérifier le coupe-circuit ou fusible de la résidence. S’assurer que l’alimentation
Four ne cuisant pas uniformément Au besoin, régler la calibration du four (Voir “Changer le décalage de température
Résultats de cuisson non satisfaisants Consulter les tableaux de cuisson pour les positions de grilles recommandées. Voir
Aliments prenant plus de temps à cuire que
prévu
Aliments trop cuits Le four est adéquatement calibré pour offrir des résultats précis. Toutefois, la
Bouton tourné trop rapidement. Le tourner plus lentement jusqu’à ce que la
température ou le mot approprié figure. Revoir les instructions de réglage de la
pendule, minuterie ou autonettoyage.
Mettre le four hors circuit au coupe-circuit et attendre 5 minutes. Remettre en circuit. Le four devrait se réinitialiser et être fonctionnel.
électrique est adéquate. S’assurer que la température du four a été sélectionnée.
du four”). Consulter les tableaux de cuisson pour les positions de grilles.
“Pour de meilleurs résultats avec du four” à la page 18 pour plus de détails. Régler
la calibration du four, au besoin (voir “Changer le décalage de température du four”
à la page 11).
Le four est adéquatement calibré pour offrir des résultats précis. Toutefois, la
température peut être décalée si les aliments sont trop bruns ou pâles. Voir
“Changer le décalage de température du four” à la page 11.
température peut être décalée si les aliments sont trop bruns ou pâles. Voir
“Changer le décalage de température du four” à la page 11.
Français 31

Service
Tableau 10: Guide de dépannage du four
Problème Causes possibles et solutions suggérées
Résultats de cuisson à convection insatisfaisants
Température du four trop froide ou trop chaude Le thermostat nécessite un réglage. Voir “Changer le décalage de température du
Éclairage ne fonctionnant pas adéquatement Remplacer ou réinsérer l’ampoule lâche ou défectueuse. Toucher l’ampoule avec
Éclairage restant en circuit Vérifier s’il y a obstruction de la porte du four. Vérifier si la charnière est pliée. Lor-
Couvercle de lentille d’ampoule ne pouvant
être enlevée
Le four ne s’autonettoie pas adéquatement Laisser le four refroidir avant l’autonettoyage. Toujours essuyer les saletés et les
Pendule et minuterie ne fonctionnant pas
adéquatement
Porcelaine écaillée Lorsque les grilles sont enlevées ou insérées, les incliner vers le haut et ne pas les
Si cette option est hors circuit, la température doit être diminuée manuellement de
25 °F. Si elle est activée, la température est automatiquement réglée. Voir “Conversion à convection automatique (modèles à cuisson à convection)” à la page 15 plur
plus de détails. Voir les tableaux de cuisson pour les positions de grilles, durée de
cuisson et choix de casseroles. Régler la calibration du four au besoin, voir
“Changer le décalage de température du four” à la page 11.
four”.
les doigts peut la faire griller.
sque la fonction Sabbat est activée, l'éclairage du four demeure en ou hors circuit
(selon la sélection) pendant le mode Sabbat.
Il peut y avoir une accumulation de saleté autour du couvercle. Essuyer la zone
avec une serviette propre et sèche avant d’enlever le couvercle.
déversements avant l’autonettoyage. Si le four est très sale, régler l’autonettoyage
à 5 heures. Voir “Préparation du four pour l’autonettoyage” à la page 26.
S’assurer que l’alimentation électrique est fournie au four. Voir “Concernant la pendule” à la page 9.
forcer pour éviter d’écailler la porcelaine.
« F » et un numéro figurent à l’affichage et il y
a un bip
Avec une nouvelle cuisinière, il y a une forte
odeur à la mise en circuit
Le contrôle ne réagit pas lorsque l'on presse la
touche
Le ventilateur fonctionne pendant les modes
qui n'utilisent pas la convection
Le ventilateur se met en et hors circuit pendant
le cycle
Le ventilateur fonctionne pendant les modes
qui n'utilisent pas la convection
Air chaud ou vapeur depuis l'évent du four Il est normal de voir de la vapeur ou sentir de l'air chaud depuis l'évent du four. Ne
Pour obtenir un service ou des pièces
Ceci est un code d’erreur. Presser OFF pour effacer l’affichage et arrêter le bip.
Réinitialiser au besoin. Si le code demeure et le bip continue, noter le code
d’erreur, fermer le four et téléphoner à un technicien qualifié.
Ceci est normal et disparaîtra après quelques utilisations. Actionner le cycle
autonettoyage éliminera l’odeur plus rapidement.
S'assurer que la touche est propre. Presser le centre ; utiliser le plat du doigt.
Sur certains modèles, le ventilateur à convection fonctionne lorsque le four
préchauffe pour le mode cuisson. Ceci est normal. Si le ventilateur ne fonctionne
pas au début du cycle, attendre 15 minutes, puis vérifier de nouveau. S'il ne fonctionne toujours pas, faire un appel de service.
Le ventilateur à convection se met hors circuit pendant que la porte du four est
ouverte. Fermer la porte pour qu'il continue de fonctionner.
Sur certains modèles, le ventilateur à convection fonctionne pendant le préchauffage du mode cuisson. Ceci est normal.
pas obstruer l'évent.
Pour communiquer avec un représentant de service, voir l'information au début du
guide. Avoir l'information imprimée sur la plaque signalétique sous la main avant
de téléphoner.
Français 32

Service
Plaque signalétique La plaque signalétique donne les numéros de modèle et de série. La consulter au
moment de faire un appel de service. Elle est située sur le care près du tiroir.
Ouvrir le tiroir pour la voir.
Plaque signalétique
Figure 11: Plaque signalétique
Garantie
Couverture de la garantie et à qui elle s'applique:
Durée de la garantie : Bosch garantit que le produit ne présente aucun défaut de matériaux et de fabri-
Réparation/remplacement comme solution exclusive :
La garantie limitée fournie par BSH Home Appliances (" Bosch ") dans cet énoncé
de garantie limitée s'applique seulement aux lave-vaisselle Bosch (" produit ")
vendus au client, le premier acheteur utilisateur, en autant que le produit ait été
acheté : (1) pour une utilisation domestique (non commerciale) normale et que
dans les faits, a été utilisé seulement à des fins domestiques normales ; (2) nouveau au détail (non comme modèle en montre, " tel quel " ou modèle retourné) et
non pour la revente ou utilisation commerciale ; et (3) aux États-Unis ou au Canada et est, en tout temps, demeuré dans le pays de l'achat d'origine. Les garanties indiquées ci-après s'appliquent seulement au premier acheteur du produit et
ne sont pas transférables.
S'assurer de retourner la carte d'enregistrement ; quoique non nécessaire pour la
couverture de la garantie, cela est la meilleure façon pour Bosch d'aviser le client
en cas d'avis concernant la sécurité ou pour rappel de produit.
cation pendant une période de trois-cent-soixtante-cinq (365) jours (c.-à-d. 1 an) à
compter de la date d'achat. La durée commence à compter de la date d'achat et
ne sera pas retardée, restreinte, prolongée ni suspendue pour quelle que raison
que ce soit. Les frais de main-d'oeuvre et d'expédition sont compris dans la couverture de base.
Pendant cette période de garantie, Bosch ou un de ces centres de service
autorisés réparera le produit sans frais au client (sujet à certaines limitations
énoncées ci-après) si le produit présente un défaut de matériaux ou de fabrication. Si des tentatives raisonnables de réparer le produit sont veines, alors Bosch
remplacera le produit (des modèles mis à niveau peuvent être disponibles au client, à la seule discrétion de Bosch, pour des frais additionnels). Tout composant
et pièce enlevé devient la propriété de Bosch, à sa seule option. Toute pièce remplacée et/ou réparée doit assumer l'identité de la pièce d'origine à des fins de
cette garantie et cette garantie ne sera pas prolongée en regard à ces pièces. La
seule responsabilité de Bosch est de réparer seulement le produit présentant un
défaut de fabrication, par un centre de service autorisé Bosch aux heures
d'affaires normales. Pour des questions de sécurité et des soucis de dommages à
la propriété, Bosch recommande fortement de ne pas tenter de réparer soi-même
le produit, ni utiliser les services d'un centre de service non autorisé ; Bosch ne
sera aucunement tenu responsable pour les réparations effectuées par un centre
de service non autorisé. Si le client décide qu'une personne autre qu'un centre de
service autorisé effectue la réparation du produit, CETTE GARANTIE DEVIENT
AUTOMATIQUEMENT NULLE ET NON AVENUE. Les centres de service
autorisés sont des personnes ou des compagnies qui ont été spécialement
formées pour les produits Bosch et qui possèdent, à la discrétion de Bosch, une
meilleure réputation pour le service à la clientèle et une habileté technique (il est à
Français 33

Service
noter qu'ils sont des parties indépendantes et ne sont pas des agents, partenaires, affiliés ou représentants de Bosch. Nonobstant ce qui suit, Bosch n'aura
aucune responsabilité ou ne sera tenu responsable d'un produit s'il est situé dans
une région éloignée (plus de 100 milles (160,9 km) d'un centre de service
autorisé) ou s'il est raisonnablement inaccessible, dans un endroit, environnement ou zone dangereux, menaçant ou hasardeux ; dans un tel cas, à la
demande du client, Bosch pourrait payer pour la main-d'oeuvre et les pièces et
expédier les pièces à un centre de service autorisé environnant, mais le client
serait entièrement responsable pour tout déplacement ou autres frais spéciaux
requis par le centre de service si ce dernier convient d'effectuer un appel de service.
Produit hors garantie : Bosch n'est pas tenu, par loi ou autre, d'offrir au client toute concession, incluant
réparations, prorata ou remplacement de produit une fois la garantie expirée.
Exclusions de la garantie : La couverture de garantie décrite dans la présente exclut tout défaut ou dommage
qui n'est pas directement une faute de Bosch, incluant sans limitation, un ou plusieurs de ce qui suit : (1) utilisation du produit d'une façon autre que normale,
habituelle et pour l'usage auquel il est destiné (incluant sans limitation, toute
forme d'utilisation commerciale, utilisation ou rangement d'un produit pour
l'intérieur à l'extérieur, utilisation du produit avec des avions ou bateaux quels
qu'ils soient) ; (2) mauvaise conduite de toute partie, négligence, mauvaise utilisation, abus, accidents, fonctionnement inadéquat, manquement à l'entretien, installation inadéquate ou négligée, manipulation, manquement à observer les
instructions, manipulation sans précaution, service non autorisé (incluant " réparation " soi-même ou exploration du fonctionnement interne de l'appareil ; (4)
réglage, altération ou modification de toute sorte ; (5) manquement à se conformer à tous les codes électriques, de plomberie et/ou de construction de la
province/état, locaux, municipaux ou autres, règlements ou lois, incluant le manquement à installer le produit conformément aux codes et règlement d'incendie et
de construction ; (6) bris et usure ordinaires, déversements d'aliments, liquides,
accumulation de graisse, ou autres substances accumulées sur, dans ou autour
du produit ; (7) et tout facteur ou force environnemental, élémentaire et/ou
externe, incluant sans limitation, pluie, vent, sable, inondation, incendie, glissement de terrain, gel, humidité excessive ou exposition prolongée à l'humidité, foudre, surtension, bris de structure environnante de l'appareil, et actes de Dieu. En
aucun cas, Bosch ne sera tenu responsable des dommages survenus à la propriété environnante, incluant armoires, planchers, plafonds et autres structures ou
objets autour du produit. Également exclus de la garantie sont les égratignures,
éraflures, encoches mineures et dommages esthétiques sur les surfaces externes
et les pièces exposées ; les produits dont les numéros de série ont été modifiés,
effacés ou enlevés ; visites de service pour montrer au client comment utiliser le
produit ou les visites lorsque le produit ne présente aucun problème, correction de
problèmes d'installation (le client est responsable de toute structure et réglage du
produit, incluant électricité, plomberie ou autres services utilitaires, pour un
plancher/fondation approprié et pour toute modification incluant sans limitation
armoires, murs, planchers, tablettes, etc.) ; et remise en fonction des coupe-circuits ou fusible. SELON CE QUI EST PERMIS PAR LA LOI, CETTE GARANTIE
ÉTABLIT DES SOLUTIONS EXCLUSIVES EN REGARD DU PRODUIT, PAR
RÉCLAMATION PAR CONTRAT OU TORT (INCLUANT RESPONSABILITÉ
STRICTE OU NÉGLIGENCE) OU AUTREMENT. CETTE GARANTIE EST EN
LIEU DE TOUTE AUTRE GARANTIE, EXPRESSE OU IMPLICITE. TOUTE
GARANTIE IMPLICITE PAR LOI, SOIT POUR COMMERCIALISATION OU À
DES FINS PARTICULIÈRES, OU AUTRE, SERA EN VIGUEUR SEULEMENT
POUR LA PÉRIODE PENDANT LAQUELLE CETTE GARANTIE LIMITÉE
EXPRESSE EST EN VIGUEUR. EN AUCUN CAS, LE FABRICANT NE SERA
TENU RESPONSABLE DES DOMMAGES ACCESSOIRES, SPÉCIAUX,
INTÉRÊTS, INDIRECTS, " PERTE D'AFFAIRES " ET/OU PUNITIFS, PERTES
OU DÉPENSES, INCLUANT SANS LIMITATION, CONGÉ DE TRAVAIL, REPAS
À L'HÔTEL ET/OU AU RESTAURANT, DÉPENSES POUR RÉNOVATIONS EN
Français 34

Service
EXCÈS DES DOMMAGES DIRECTS QUI SONT DÉFINITIVEMENT CAUSÉS,
EXCLUSIVEMENT, PAR BOSCH OU AUTREMENT. CERTAINS ÉTATS NE
PERMETTENT PAS LA LIMITATION DE LA DURÉE D'UNE GARANTIE IMPLICITE, PAR CONSÉQUENT, LES LIMITATIONS SUSMENTIONNÉES PEUVENT
NE PAS S'APPLIQUER. CETTE GARANTIE DONNE DES DROITS LÉGAUX
SPÉCIFIQUES ET LE CLIENT PEUT EN AVOIR D'AUTRES QUI VARIENT D'UN
ÉTAT/PROVINCE À L'AUTRE. Aucune tentative d'altérer, modifier ou amender
cette garantie ne sera effective sans une autorisation écrite par un responsable
de BSH.
Pour obtenir un service sous garantie :
Pour obtenir un service, communiquer avec un centre de service Bosch autorisé
dans la région.
BSH Home Appliances - 5551 McFadden Avenue, Huntington Beach, CA 92649 -
800.944.2904.
Français 35

Contenidos
Acerca de este manual . . . . . . . . . . . . . . . . . . . . . . . . . . . . . . . . . . . . . . . . . . . . 1
Cómo está organizado este manual . . . . . . . . . . . . . . . . . . . . . . . . . . . . . . . . . . . . . . . . . . . . . . . . . . . . . . 1
Seguridad . . . . . . . . . . . . . . . . . . . . . . . . . . . . . . . . . . . . . . . . . . . . . . . . . . . . . . 1
Instrucciones Importantes de Seguridad . . . . . . . . . . . . . . . . . . . . . . . . . . . . . . . . . . . . . . . . . . . . . . . . . . . 1
Comenzar . . . . . . . . . . . . . . . . . . . . . . . . . . . . . . . . . . . . . . . . . . . . . . . . . . . . . . 6
Partes y accesorios . . . . . . . . . . . . . . . . . . . . . . . . . . . . . . . . . . . . . . . . . . . . . . . . . . . . . . . . . . . . . . . . . . 6
Panel de Control . . . . . . . . . . . . . . . . . . . . . . . . . . . . . . . . . . . . . . . . . . . . . . . . . . . . . . . . . . . . . . . . . . . . . 9
Antes de usar el aparato por primera vez . . . . . . . . . . . . . . . . . . . . . . . . . . . . . . . . . . . . . . . . . . . . . . . . 13
Operación - Parrilla . . . . . . . . . . . . . . . . . . . . . . . . . . . . . . . . . . . . . . . . . . . . . . 13
Acerca de la parrilla . . . . . . . . . . . . . . . . . . . . . . . . . . . . . . . . . . . . . . . . . . . . . . . . . . . . . . . . . . . . . . . . . 13
Operación . . . . . . . . . . . . . . . . . . . . . . . . . . . . . . . . . . . . . . . . . . . . . . . . . . . . . . . . . . . . . . . . . . . . . . . . . 13
Operación - Horno . . . . . . . . . . . . . . . . . . . . . . . . . . . . . . . . . . . . . . . . . . . . . . . 14
Acerca del horno . . . . . . . . . . . . . . . . . . . . . . . . . . . . . . . . . . . . . . . . . . . . . . . . . . . . . . . . . . . . . . . . . . . 14
Operación . . . . . . . . . . . . . . . . . . . . . . . . . . . . . . . . . . . . . . . . . . . . . . . . . . . . . . . . . . . . . . . . . . . . . . . . . 14
Sacar el mayor provecho de su aparato . . . . . . . . . . . . . . . . . . . . . . . . . . . . . . 17
Sacar el mayor provecho de su parilla . . . . . . . . . . . . . . . . . . . . . . . . . . . . . . . . . . . . . . . . . . . . . . . . . . . 17
Sacar el mayor provecho de su horno . . . . . . . . . . . . . . . . . . . . . . . . . . . . . . . . . . . . . . . . . . . . . . . . . . . 19
Limpieza y Mantenimiento . . . . . . . . . . . . . . . . . . . . . . . . . . . . . . . . . . . . . . . . 24
Limpieza - Parilla . . . . . . . . . . . . . . . . . . . . . . . . . . . . . . . . . . . . . . . . . . . . . . . . . . . . . . . . . . . . . . . . . . . 24
Limpieza - Horno . . . . . . . . . . . . . . . . . . . . . . . . . . . . . . . . . . . . . . . . . . . . . . . . . . . . . . . . . . . . . . . . . . . 26
Limpieza - Cajones . . . . . . . . . . . . . . . . . . . . . . . . . . . . . . . . . . . . . . . . . . . . . . . . . . . . . . . . . . . . . . . . . . 29
Mantenimiento . . . . . . . . . . . . . . . . . . . . . . . . . . . . . . . . . . . . . . . . . . . . . . . . . . . . . . . . . . . . . . . . . . . . . 29
Servicio . . . . . . . . . . . . . . . . . . . . . . . . . . . . . . . . . . . . . . . . . . . . . . . . . . . . . . . 31
Antes de llamar a servicio . . . . . . . . . . . . . . . . . . . . . . . . . . . . . . . . . . . . . . . . . . . . . . . . . . . . . . . . . . . . 31
Garantía . . . . . . . . . . . . . . . . . . . . . . . . . . . . . . . . . . . . . . . . . . . . . . . . . . . . . . . . . . . . . . . . . . . . . . . . . . 34
¿Preguntas?
1-800-944-2904
www.boschappliances.com
5551 McFadden Ave.
Huntington Beach, CA 92649
¡Estámos a sus órdenes!

Acerca de este manual
Cómo está organizado este manual
Este manual contiene varias secciones:
• La sección Comenzar describe las características y el funcionamiento de la
estufa, incluyendo una descripción de cómo configurar la estufa y operar el
panel de control.
• La sección de Operación describe cómo operar cada componente de la estufa.
• La sección Sacar el Mayor Provecho de su Aparato incluye información
acerca de los modos de operación, tablas para cocinar y consejos para mejorar el desempeño.
• La sección de Limpieza y Mantenimiento describe cómo limpiar y cuidar su
aparato.
• La sección de Servicio incluye consejos para resolver problemas y su
garantía.
Antes de usar su estufa, asegúrese de leer este manual. Ponga especial atención
a las Instrucciones de Seguridad al principio del manual.
Seguridad
Instrucciones Importantes de Seguridad
LEA Y GUARDE ESTAS INSTRUCCIONES
Instrucciones Importantes
de Seguridad
Seguridad contra inciendos • No use papel de aluminio o forros de protección para forrar ninguna parte de
un aparato, sobre todo bandejas de goteo de las unidades superficiales o los
pisos de los hornos. La instalación de estos forros puede causar una descarga eléctrica o un fuego.
• Ajuste el control del quemador de tal forma que la llama no se extienda más
allá del fondo de la olla.
• Si los materiales adentro de un horno o un cajón calentador llegan a encenderse, mantenga la puerta cerrada. Apague el aparato y desconecte el circuito en la caja de cortacircuitos.
•
Use este aparato sólo para el uso intencionado como se describe en este manual. Por ejemplo, nunca use el aparato para calentar una habitación
el aparato para almacenar cosas.
• No permita que el papel de aluminio, plástico, papel o tela tenga contacto con
un quemador o rejilla caliente. No permita que las ollas hiervan hasta quedar
secas.
. Nunca use
Español 1

Seguridad
• Si la parrilla está cerca de una ventana, conducto de aire a presión o ventilador, asegúrese que los materiales inflamables como cortinas no alcancen los
quemadores o los elementos ya que se podrían encender.
•
Siempre tenga un detector de humo que funcione cerca de la cocina.
•
Nunca deje la estufa sin atención. Los derrames pueden causar humo y grasa
derramada puede encenderse
.
• ADVERTENCIA – PARA REDUCIR EL RIESGO DE UN INCENDIO DE
GRASA EN LA PARRILLA:
a) Nunca deje las parrillas sin atención cuando cocina a temperaturas altas.
Los derrames pueden causar humo y grasa derramada puede encenderse. Caliente aceites lentamente a un calor bajo o mediano.
b) Siempre prenda la campana cuando cocina con alto calor o cuando
flamee alimentos (i.e. Crepas Suzette, Cherries Jubilee, Filete de
Pimienta Flameado).
c) Limpie los ventiladores frecuentemente. No permita que se acumule
grasa en el ventilador o el filtro.
d) Use el tamaño apropiado de ollas. Siempre use utensilios de cocina que
sean apropiados para el tamaño del elemento superficial.
•
En el caso de encenderse la ropa o el cabello, échese al piso y dése vueltas de
inmediato para apagar las llamas
•
Apague las llamas de incendios alimenticios que no sean incendios de grasa con
bicarbonato de sodio
. Nunca use agua con incendios de alimentos.
.
• Tenga cuidado que las corrientes de aire como de ventiladores o de ductos
de aire no soplen materiales inflamables hacia las llamas o que provoquen
que las llamas se extiendan más allá de los bordes de la olla.
• ADVERTENCIA – OBSERVE LO SIGUIENTE PARA REDUCIR EL
RIESGO DE SUFRIR LESIONES EN CASO DE UN INCENDIO DE
GRASA EN LA PARRILLA:
a)
APAGUE LAS LLAMAS con una tapa ajustada, bandeja de horno u otra
bandeja de metal, luego trate de apagar el quemador. TENGA CUIDADO Y
EVITE QUEMADURAS. Si las llamas no se apagan de inmediato, EVACÚE
EL LUGAR Y LLAME A LOS BOMBEROS
b) NUNCA LEVANTE UNA OLLA EN LLAMAS –
.
Se puede quemar usted.
c) NO USE AGUA, incluyendo trapos o toallas húmedas – de lo contrario
podrá causar una explosión fuerte de vapor.
d)
Use un extinguidor de fuego SOLAMENTE cuando:
1) Usted sepa que tiene un extinguidor de fuego de la Clase ABC, y
sabe cómo manejarlo.
2) El incendio es pequeño y está contenido en el área donde comenzó.
3) Se está llamando a los bomberos
4) Usted puede combatir el fuego con su espalda hacia una salida.
5) Tenga disponible un extinguidor de fuego apropiado, a la mano, altamente visible y con fácil acceso cerca del horno.
• Cuando sea posible, no opere el sistema de ventilación durante un incendio
en la parrilla. Sin embargo, nunca meta la mano al fuego para apagarlo.
Español 2

Seguridad con el gas
Seguridad
ADVERTENCIA: La falta de observar la información en este
manual puede causar un fuego o una explosión, y como
resultado daños a la propiedad, lesiones o la muerte.
No guarde o use materiales combustibles, gasolina u otros vapores y
líquidos inflamables cerca de este o cualquier otro aparato
QUÉ HACER CUANDO HUELE A GAS:
• No trate de encender ningún aparato.
• No toque ningún interruptor eléctrico.
• No use ningún teléfono en su edificio.
• Llame de inmediato a su proveedor de gas desde el teléfono de
algún vecino. Siga las instrucciones de su proveedor de gas.
• Cuando no pueda localizar a su proveedor de gas, llame a los
bomberos.
Un instalador calificado, una agencia de servicio autorizada o el proveedor de gas debe realizar la instalación y el servicio.
• Pídale al instalador que le muestre el lugar de la válvula de cierre de gas.
• En caso que se apague un quemador y se salga el gas, abra las ventanas y
puertas. Espere hasta que el gas se disipe antes de usar el aparato.
• Si usted puede oler gas, su instalador no revisó bien si hay fugas. Cuando las
conexiones no quedan perfectamente apretadas, usted puede tener una
pequeña fuga o por lo tanto un ligero olor a gas. Encontrar una fuga de gas
no es un trabajo que lo debe hacer usted mismo.
• Algunas fugas pueden encontrarse solamente con el control del quemador
en la posición ON (Prendida), lo cual debe hacer un técnico de servicio calificado. Vea “QUÉ HACER CUANDO HUELE A GAS:” en la página 3.
• Durante una falla de electricidad los únicos quemadores que se pueden
encender manualmente son los de la parrilla.
Prevención de quemaduras • NO TOQUE LAS UNIDADES SUPERFICIALES O LAS ÁREAS CERCA DE
ESTAS UNIDADES - Las unidades superficiales pueden estar calientes, a
pesar de su color oscuro. Las áreas cercanas a las unidades superficiales
pueden calentarse suficientemente para causar quemaduras. Durante y
después del uso, no toque o permit
materiales inflamables tengan contacto con las unidades superficiales o con
áreas cercas de las unidades hasta que se hayan enfriado
a que la ropa, agarraderas de ollas u otros
. Entre estas superfi-
cies están la parrilla y las áreas encarando la parrilla.
• NO TOQUE LOS ELEMENTOS DE CALENTAMIENTO O LAS SUPERFICIES ADENTRO DEL HORNO - Los elementos de calentamiento pueden
estar calientes, a pesar de su color oscuro. Las superficies internas de un
horno pueden calentarse suficientemente para causar quemaduras. Durante
y después del uso, no toque o permit
materiales inflamables tengan contacto con los elementos de calentamiento o con
las superficies internas del horno hasta que se hayan enfriado
a que la ropa, agarraderas de ollas u otros
. Otras superficies
del aparato pueden calentarse suficientemente para causar quemaduras.
Entre estas superficies están las aberturas de ventilación del horno, superficies cercanas a estas aberturas y las puertas del horno.
•
Tenga cuidado cuando abra la puerta del horno. Estando parado a un lado, abra
la puerta (o el cajón) lenta y ligeramente para dejar escapar el aire caliente y/o
vapor. Aleje su cara de la apertura y asegúrese que no haya niños o mascotas
cerca de la unidad. Después de sacar el aire caliente, siga cocinando. Mantenga
Español 3

Seguridad
las puertas cerradas a menos que sea necesario dejarlas abiertas para los
propósitos de cocinar o limpiar. No deje las puertas abiertas sin atención
•
No caliente o recaliente contenedores de alimentos cerrados. La presión acumulada puede causar la ruptura del contenedor y causar lesiones
•
Siempre coloque las rejillas del horno en el lugar deseado cuando el horno está
frío. Cuando deba mover una rejilla mientras que el horno esté caliente, evite el
contacto de la agarradera de la olla con los elementos calientes
•
Siempre prenda la campana cuando cocina con alto calor o cuando flamee alimentos
•
Cocine con calor alto en la parrilla sólo cuando sea necesario. Caliente aceite lentamente con un calor bajo a mediano para evitar la formación de burbujas y salpicaduras. El aceite caliente puede causar quemaduras y lesiones severas
•
Nunca mueva una olla con aceite caliente, sobre todo un sartén profundo. Espere
hasta que esté frío
(i.e. Crepas Suzette, Cherries Jubilee, Filete de Pimienta Flameado).
.
.
.
.
.
Seguridad para niños • Cuando los niños llegan a una edad suficiente para operar el aparato, es la
responsabilidad legal de los padres o de los tutores legales asegurar que personas calificadas los instruyan sobre prácticas seguras.
•
No permita que alguien se suba, que esté parado, recostado, sentado sobre o
colgado de cualquier parte de un aparato, especialmente una puerta, cajón calentador o cajón de almacenamiento. Esto puede dañar el aparato, causar su volcadura y lesiones severas
•
No permita que niños utilicen este aparato a menos que estén supervisados por
un adulto. Nunca se deben dejar solos a los niños y mascotas en el área donde
se usa el aparato. Nunca se les debe permitir jugar cerca del aparato, sin importar
si se usa el aparato o no
• PRECAUCIÓN -
los gabinetes arriba del aparato o en la parte trasera de éste. Cuando los niños se
suben en un aparato para alcanzar estas cosas, pueden sufrir heridas serias
.
.
No almacene cosas de interés para los niños en el aparato, en
.
Seguridad durante la limpieza • AVISO IMPORTANTE DE SEGURIAD:
Agua Potable y Tóxicos requiere que el Gobernador de California publique una
lista de substancias conocidas que causan cáncer, defectos de nacimiento u
otros daños reproductivos, y requiere que las empresas adviertan a sus clientes
de la exposición potencial ante tales substancias
a)
La combustión de gas como combustible para cocinar y la eliminación de
residuos durante la autolimpieza pueden generar cantidades pequeñas de
Monóxido de Carbono
b)
El aislamiento de fibra de vidrio en los hornos de autolimpieza despide una
pequeña cantidad de Formaldehído durante los primeros ciclos de limpieza
California lista el Formaldehído como una causa potencial del cáncer. El
Monóxido de Carbono es una causa potencial de la toxicidad reproductiva
c)
Se puede minimizar la exposición a estas substancias al:
1)
Proporcionar una buena ventilación al cocinar con gas.
2)
Proporcionar una buena ventilación durante e inmediatamente después
de autolimpiar el horno
3)
Operar la unidad de acuerdo a las instrucciones en este manual.
•
No limpie la estufa cuando esté caliente. Algunos detergentes producen vapores
nocivos cuando son aplicados a una superficie caliente
.
.
jas pueden causar quemaduras de vapor.
•
Confirme que se cierra la puerta y que no se abrirá cuando use el modo de
autolimpieza. Si la puerta no se cierra, no ejecute la autolimpieza. Contacte al
servicio
•
Pájaros tienen sistemas respiratorios muy sensibles. Mantenga los pájaros fuera
de la cocina u otras habitaciones donde los puedan alcanzar los vapores de la
cocina. Durante la autolimpieza, se liberan humos que pueden ser nocivos para
pájaros. Otros vapores de la cocina, como el sobrecalentar margarina y aceites
para cocinar pueden ser nocivos también
.
La Ley del Estado de California para
.
.
.
. Ropa húmeda o espon-
.
Español 4

Seguridad
• Después de un derrame de alimentos, apague el quemador y permita que la
parrilla se enfríe. Limpie alrededor del quemador y los puertos del quemador.
Cuando termine la limpieza, revise el funcionamiento correcto.
• Evite la acumulación de grasa en el horno.
Seguridad de los utensilios de cocinar
Instalación y Mantenimiento correcto
• No coloque los alimentos directamente sobre el piso del horno.
• Siga las instrucciones del fabricante cuando use bolsas para cocinar u hornear.
• Agarre la olla cuando agite o voltee alimentos. Esto ayuda a evitar derrames
y el movimiento de la olla.
• Use ollas de tamaño apropiado. El uso de utensilios demasiado pequeños
expondrá una parte del elemento caliente o del quemador al contacto directo
y puede causar que se encienda la ropa.
planos que cubran toda la unidad superficial. Este aparato incluye una o más
unidades superficiales de tamaños diferentes. La relación correcta entre el utensilio de cocinar y el elemento caliente o el quemador mejora además la eficiencia.
Seleccione utensilios con fondos
• Siempre posicione las agarraderas de ollas hacia adentro de modo que no se
extiendan sobre las áreas de trabajo cercanas, quemadores o borde de la parrilla
Esto reduce el riesgo de incendios, derrames y quemaduras.
• Ajuste el tamaño de la llama del quemador para que no se extienda más allá
del borde de la olla. Una relación correcta de la olla a la llama del quemador
reduce los riesgos de seguridad.
•
Pídale al instalador que le muestre el lugar del cortacircuito o del fusible.
Márquelo para referencias en el futuro
•
Este aparato debe ser instalado y aterrizado correctamente por un técnico calificado. Conecte sólo a una toma de corriente aterrizada. Consulte las instrucciones
de instalación para detalles
•
Se pueden volcar todas las estufas. Esto puede causar lesiones. Instale dispositivo antivolcadura que se incluye con la estufa. Verifique que los dispositivos antivolcadura estén enganchados. Vea instrucciones de instalación
.
.
.
.
Figura 1: Precauciones de volcadura
•
Este aparato es solamente para uso residencial normal. No está aprobada para el
uso en exteriores
. Vea la garantía. Si usted tiene alguna pregunta, contacte al
fabricante.
•
No guarde o use químicos corrosivos, vapores, inflamables o productos no alimenticios en o cerca de este aparato. Está diseñado específicamente para calentar o cocinar alimentos. El uso de químicos corrosivos cuando calienta o limpia el
horno dañará el aparato y podría causar lesiones
•
No opere este aparato si no funciona bien o si fue dañado. Contacte a un
.
proveedor de servicio autorizado.
•
No obstruya las aberturas de ventilación del horno.
•
No repare o reemplace ninguna parte del aparato a menos que fue recomendado
específicamente en este manual
. Consulte a un centro de servicio autorizado
por la fábrica para cualquier servicio que necesite.
• En el caso de un error, la pantalla parpadea y emite pitidos contínuamente. Si
esto sucede durante la autolimpieza, desconecte el aparato de la corriente y
llame a un técnico calificado.
• En el caso de un error, la pantalla parpadea y emite pitidos contínuamente.
Desconecte el aparato de la corriente y llame a un técnico calificado.
• No use el horno sin que la parte inferior del horno esté en su lugar.
Español 5

Seguridad
Comenzar
Partes y accesorios
Tabla 1: Partes y accesorios
1
10
9
8
# Artículos
1 Panel de control y perilla del horno
2 Tapas de quemadores (4)
2
3
4
5
6
7
3 Rejillas de quemadores (2)
4 Perilla de control de la parrilla
5 Posiciones de rejillas/guías para rejillas
6 Rejillas del horno, planas (3)
7 Empaque de la puerta del horno
8 Cajón de almacenamiento
9 Placa con No. de Serie y No. de Modelo
10 Abertura del horno
11 Antivolcadura (no se muestra)
12 Raspador para la parrilla (solo modelos con parilla de
cerámica) (no se muestra)
13 Bandeja del asador (no aparece)
14 Bloqueo de la puerta del horno (no visible) (no aparece)
15 Juego de Literatura (no se muestra)
16 Quemador para asar (parte superior del interior del
horno) (no aparece)
17 Luces del horno (2) (pared trasera del horno) (no se
muestra)
18 Ventilador de convección (pared trasera del horno; no
se muestra)
Quemadores sellados de gas La parrilla tiene quemadores sellados de gas. Como resultados no hay partes
debajo de la parrilla que se deben limpiar, desmontar o ajustar. Los derrames se
quedan encima de la parrilla donde son fáciles de limpiar.
Rejilla del quemador
Tapa del quemador
Quemador
Parilla
Ignitor
Figura 2: Quemador Lado Derecho - Vista Lateral
Español 6

Comenzar
Tapas de quemadores La parrilla tiene cuatro tapas de los quemadores. Empareje el tamaño de la tapa
del quemador con el tamaño del quemador. No se pueden intercambiar las tapas
de los quemadores.
Asegúrese que la tapa del quemador esté completamente asentada sobre la
base del quemador antes de encender el quemador. Si no se coloca bien la tapa
del quemador, éste tal vez no se encienda o la llama no se queme completamente. El aparato viene equipado con dos tipos de quemadores. estándar y
difusión.
Rejillas de quemadores Advertencia: Para evitar destellos de las llamas, no use la parrilla sin
que todas las tapas y rejillas de los quemadores estén posicionadas
correctamente. No use ninguna rejilla si le faltan sus patas o si están
dañadas.
Hay dos tipos de rejilla de quemador: una para el lado izquierdo de la parrilla y
una para el lado derecho. Posiciónelas de tal modo que la abertura circular quede
encima de la tapa del quemador. Las rejillas del quemador deben descansar contra la parrilla. Las patas de hule deben descansar en las muescas en la parrilla.
Lado izquierdo
Rejilla del
quemador
Ignitor electrónico La parrilla tiene ignitores electrónicos para encender los quemadores. No hay una
llama de piloto. Cada quemador tiene su propio ignitor. Mantearlos cuando hay un
derrame de alimentos o cuando el quemador no se enciende a pesar del ruido de
chasquido que se oye al prender el ignitor.
Precaución: Todos los ignitores echan chispas cuando se prende un solo
quemador. No toque ninguno de los quemadores cuando se está usando
la parrilla.
Quemador de alto poder El quemador de alto poder es el quemador más grande. Se trata del quemador
más poderoso de la parrilla. Retiene el calor más tiempo que las tapas de quemadores normales y, a bajas temperaturas, evita que la llama tenga contacto con las
ollas. Esto produce un calor suave, más predecible. Use los ajustes de calor bajo
en este quemador para hervir a fuego lento cantidades grandes de salsas o caldos. Use los ajustes de alto calor para hervir rápidamente cantidades grandes de
agua.
Quemador de precisión El quemador de precisión es el quemador más pequeño en la parrilla. Sirve muy
bien para cocinar cantidades pequeñas de alimentos. Use el quemador para derretir mantequilla o chocolate o para preparar salsas delicadas.
Lado derecho
Rejilla del
quemador
Figura 3: Rejillas para modelos autoestables
Rejillas planas del horno Las rejillas están diseñadas con un tope para detenerse antes de salir completa-
mente y para no caerse.
Español 7

Comenzar
PRECAUCIÓN
Para evitar posibles quemaduras, coloque las rejillas del horno en las
posiciones deseadas antes de prender el horno. Siempre use guantes
cuando el horno está caliente. Si debe sacar la rejilla cuando el horno
esté caliente, no toque los quemadores calentadores con los guantes.
Insertar las rejillas en el horno
1. Agarre la rejilla firmemente en ambos lados.
2. Incline la rejilla hacia arriba para encajar el tope en el portarejillas.
3. Cambie la rejilla a una posición horizontal y empújela completamente. La rejilla debe estar recta y plana, no torcida.
Fonde de la rejilla
Frente de la rejilla
Inserte la rejilla con el fondo de la rejilla
hacia la pared trasera de la estufa.
Figura 4: Insertar una rejilla
Piso del horno Precaución: No coloque los alimentos directamente en el piso del horno.
No use papel de aluminio o forros de protección para forrar ninguna parte
de un aparato, sobre todo bandejas de goteo de las unidades superficiales o los pisos de los hornos. La instalación de estos forros puede
causar una descarga eléctrica o un fuego.
Abertura de ventilación del horno La abertura de ventilación del horno se encuentra debajo de la pantalla arriba del
elemento izquierdo trasero. Es normal ver que se salga vapor de la abertura y
que se acumule condensación en la consola trasera y la parrilla. Esta área se
puede calentar cuando se está usando el horno. No tape la abertura de ventilación para evitar la acumulación de monóxido de carbono. La abertura de ventilación es también importante para circular el aire.
Apagón automático El horno se apaga automáticamente después de 12 horas (24 horas si el formato
de la hora está configurado para 24 horas en la sección Seleccionar Funciones).
Autolimpieza Nuestros hornos incluyen una función de autolimpieza que elimina la labor man-
ual involucrada con la limpieza de su horno.
Indicadores y otras características Pitido - Señala que se debe ingresar más información o confirma la recepción de
una entrada. Un pitido señala además el fin de una función o una falla del horno.
Español 8
Indicador del fin de ciclo - Se escuchan 3 pitidos consecutivos para indicar
cuando termina un modo.
Configuraciones por default - Los modos de cocinar automáticamente seleccionan una temperatura adecuada. Cuando se necesita una temperatura diferente,
se puede cambiar ésta.
Símbolo o Número que Parpadea - Señala una configuración incompleta y
solicita otro paso o que se oprima START.

Comenzar
Códigos de Números F -Estos códigos aparecen cuando existe un problema
con la estufa.
Ventilador de convección El ventilador de convección opera durante cualquier modo de convección.
Cuando el horno opera en el modo de convección, el ventilador se apaga
automáticamente al abrir la puerta. El ventilador de convección sí funciona
durante la autolimpieza, aunque no al comienzo del modo.
Nota: En algunos modelos, el ventilador de convección funciona también durante
el precalentamiento para el modo de hornear.
Panel de Control
Panel de control del horno
Reloj
Luz
Hora
Apagar
Temperatura de
Precalentar
AM
PM
Modo de Cocinar
Tabla 2: Panel de control del horno
Reloj – Muestra la hora del día con opción del reloj para
12 horas o para 24 horas. Indica también el cronómetro
(timer) y los tiempos asociados con los modos retardados
de cocinar y limpiar. Gire la perilla de control para cambiar
entre el cronómetro y el reloj en la pantalla. Oprima Time
y gire la perilla de control para cambiar la hora del día
o el cronómetro.
Temperatura del Horno
Indicador de Puerta
Bloqueada
Perilla de Control
Modo Cocinar
Temperatura
Inicio
Figura 5: Panel de control del horno
Luz - Oprima el botón para prender o apagar la luz del
horno.
Off (Apagar) - Oprima el botón para apagar el horno y/o el
cajón calentador.
Temperatura del horno - Indica la temperatura del horno.
Modo de cocinar - Oprima el botón para indicar el modo
de cocinar.
Icono del modo de cocinar - Indica los quemadores de
cocinar que están activos para el modo seleccionado. El
icono indicará también un ventilador, cuando se usa el
ventilador de convección en el modo seleccionado.
Perilla de control - Se usa para fijar el reloj y los
cronómetros, seleccionar un modo de cocinar y la temperatura. Gire en sentido de las manecillas del reloj para
aumentar y en sentido opuesto para disminuir.
Indicador de puerta bloqueada - El icono aparece
durante el modo de autolimpieza cuando la puerta está
cerrada. NO trate de abrir la puerta hasta que desaparezca el símbolo de bloqueo.
Temperatura de precalentar - Indica la temperatura del
horno durante el modo de precalentar.
Start (Inicio) - Oprima el botón para completar un
comando.
Temperatura - Oprima el botón para seleccionar la temperatura de cocinar.
Hora - Oprima el botón para seleccionar la hora.
Timer (Reloj/Cronómetro) – Hay dos cronómetros -
TIMER 1 Y TIMER 2 (RELOJ 1 y RELOJ 2); Cada uno
cuenta en forma regresiva las horas y minutos. Con
menos de 60 minutos restantes, el cronómetro muestra
también los segundos. Oprima TIME para acceder a los
cronómetros (timers).
Español 9

Comenzar
Usted controla el funcionamiento de la estufa utilizando los botones y la perilla
giratoria y las perillas de control.
Se usan los botones, junto con la perilla giratoria para seleccionar un modo del
horno, fijar la temperatura del horno, poner la hora y para configurar su estufa.
Para usar un botón, oprima la parte central de ésta con la punta plana de su
dedo. Se escuchará un pitido para indicar que se aceptó la selección. Gire la
perilla a la posición deseada y oprima Start.
Se usan las perillas para controlar el nivel de calor de los quemadores. Empuje
hacia abajo y gírela al símbolo para encenderse y luego al ajuste de calor
deseado.
Vea las secciones sobre Usar la Parrilla y Usar el Horno para instrucciones detalladas.
El reloj
Acerca del reloj • Siempre configure el reloj inmediatamente después de la instalación o una
falla de electricidad. Una vez que regresa la corriente, el reloj marca 12:00
am.
• La hora del día aparece en horas y minutos.
• La hora del reloj aparecerá durante todas las operaciones del horno excepto
cuando está funcionando el cronómetro.
• El horno está configurado para un reloj de 12 horas e indica AM y PM. Para
cambiar al reloj a 24 horas, vea “El menú “Select Functions” (Seleccionar
Funciones)” en la página 10.
• Si no se termina la operación de poner la hora, el horno emitirá pitidos
periódicos como recordatorio para poner la hora del reloj. Oprima OFF para
detener el pitido.
Poner el reloj 1. Aparecerá RELOJ y los dígitos de la hora
parpadean. Gire la perilla para seleccionar la
hora y am o pm.
2. Oprima Time (Hora). Aún aparece RELOJ y los dígitos de minutos parpadearán.
3. Gire la perilla. Ajuste los minutos.
4. Oprima Time y el reloj queda configurado.
Nota: Si no se termina la operación, el horno emitirá pitidos periódicos como
recordatorio para poner la hora del reloj. Oprima OFF (Apagar).
Cambiar la hora del reloj 1. Oprima Time (Hora). RELOJ 1 parpadea en
la pantalla.
2. Gire la perilla para seleccionar RELOJ.
3. Oprima Time y parpadean los dígitos de la hora.
4. Gire la perilla para cambiar las horas.
5. Oprima Time nuevamente y parpadearán los dígitos de minutos.
6. Gire la perilla para cambiar los minutos.
7. Oprima Time nuevamente y el reloj quedará configurado. Nota: Para cancelar la selección de la HORA al poner el reloj, oprima OFF
(Apagar) en cualquier momento estando en el modo del reloj.
El menú “Select Functions” (Seleccionar Funciones)
SELECCIONAR FUNCIONES es la sección del menú donde ud. puede configurar
o cambiar las siguientes opciones de su estufa.
Para acceder al menú SELECC FUNCIONES
1
2
12: 00
Cooking Mode
Temperature
Start
AM
RELOJ
Time
Español 10

Comenzar
1. Oprima y mantenga oprimido el botón MODO DE CONCINAR por cinco (5) segundos. SELECC FUNCIONES aparece en la pantalla.
2. Gire la perilla lentamente a la opción deseada. Habrá un ligero retardo antes
de poder ver cada mensaje (u opción) en la pantalla. Gire la perilla lentamente y espere aproximadamente un segundo para ver la siguiente opción
en la pantalla.
3. Oprima START (Inicio) para seleccionar la función.
4. Gire la perilla lentamente a la opción deseada y oprima START.
Cuando se hayan terminado todos los ajustes para la función, vuelve a parpadear SELECC FUNCIONES.
5. Oprima OFF para salirse del menú SELECC FUNCIONES.
Cambiar el volumen del pitido
Cambiar la escala de temperatura
Prender y apagar el reloj
Se puede cambiar el volumen del pitido de control de LOW (Bajo) a HIGH (Alto).
El volumen por default es Mediano.
1. Acceda al menú SELECC FUNCIONES.
2. Gire la perilla en sentido del reloj hasta que aparezca VOLUME (Volumen).
3. Oprima Start.
4. Gire la perilla para seleccionar el nivel de volumen, Bajo, Mediano o Alto.
5. Oprima Start.
El horno ha sido preconfigurado a la escala de temperatura en grados Fahrenheit.
La opción le permite cambiar entre grados Fahrenheit y grados Celsio.
1. Acceda al menú SELECC FUNCIONES.
2. Gire la perilla en sentido del reloj que aparezca SELECC TEMP F-C.
3. Oprima Start.
4. Gire la perilla para seleccionar grados Fahrenheit (F) o Celsio (C).
5. Oprima Start para aceptar la nueva seleción.
Se puede apagar el reloj en la pantalla. Por default el reloj aparece en la pantalla.
1. Acceda al menú SELECC FUNCIONES.
2. Gire la perilla en sentido del reloj hasta que aparezca PANTALLA RELOJ.
3. Oprima START.
4. Gire la perilla para seleccionar ON (Prender) o OFF (Apagar).
5. Oprima START para aceptar la nueva selección.
Acceder al modo de demostración
Cambiar el idioma en la pantalla
Bloquear / desbloquear el panel de control del horno
El modo de demostración es para uso exclusivo de tiendas que venden aparatos
electrodomésticos.
Los idiomas posibles son Inglés, Español y Francés. El idioma por default es el
Inglés. Nota: El menú SELECC FUNCIONES aparece solamente en inglés, sin
importar el idioma seleccionado.
1. Acceda al menú SELECC FUNCIONES.
2. Gire la perilla en sentido del reloj hasta que aparezca el idioma deseado.
3. Oprima START.
4. Gire la perilla en sentido del reloj para seleccionar un idioma diferente.
5. Oprima START para aceptar el idioma nuevo.
Se puede bloquear el teclado por cuestión de seguridad. Se puede usar esta
opción para prevenir cambios a las funciones del horno. Esta función NO bloquea
la puerta del horno.
1. Acceda al menú SELECC FUNCIONES.
2. Gire la perilla en sentido del reloj hasta que parpadee BLOQUEAR TECLAS.
3. Oprima Start. Aparece BLOQUEAR TECLADO. La pantalla emite un pitido cuando se oprime una tecla para indicar que el teclado está bloqueado.
Español 11

Comenzar
4. Para desbloquear los teclados, oprima COOKING MODE (Modo de Cocinar) y mantenga oprimido por 5 segundos. La pantalla indicará ABRIR TECLADO.
5. Cuando está desbloqueado, el reloj volverá a aparecer en la pantalla.
Cambiar la compensación de la
temperatura
Restablecer los ajustes de fábrica
Poner la opción Sabatina
Esta opción permite ajustar la temperatura del horno cuando los alimentos salen
consistentemente muy dorados o muy poco dorados.
1. Acceda al menú SELECC FUNCIONES.
2. Gire la perilla en sentido del reloj hasta que aparezca COMP HORN TEMP.
3. Oprima START. Aparece 0° F.
4. Gire la perilla para aumentar la temperatura en incrementos de +25°F.
5. Oprima START para aceptar el cambio de la temperatura.
Se usa esta opción para regresar todas las opciones modificadas del menú
“Select Functions” a los parámetros originales de fábrica (o de default).
1. Acceda al menú SELECC FUNCIONES.
2. Gire la perilla en sentido del reloj hasta que aparezca RESTABL DEFAULT.
3. Oprima START. La pantalla muestra SELECC FUNCIONES.
Acerca de la opción Sabatina
La opción Sabatina es
los Domingos
.
para religiones que no permiten “trabajar” los Sábados o
• El horno horneará por 73 horas antes de apagarse automáticamente.
• Mientras hornea en el modo Sabatino, la pantalla indicará SABATINO
(Sábado) y el icono de HORNEAR. El reloj estará apagado y no aparece ninguna temperatura en la pantalla.
• Durante el modo Sabatino, sólo el botón OFF (Apagar) funcionará. Oprima
OFF en cualquier momento durante el modo Sabatino para terminar el modo
y apagar el horno.
• Al final de las 73 horas, el horno se apagará automáticamente y la pantalla
indicará FIN SABATINO. Oprima OFF para regresar a la hora de día.
• NO se puede usar el termómetro para carne durante el modo Sabatino.
Cambiar el formato de la hora
Poner la opción sabatina para el horno
1. Verifique que el horno esté apagado.
2. Acceda al menú SELECT FUNCTION.
3. Gire la perilla en sentido del reloj hasta que aparezca SABBATH OPTION.
4. Oprima START. La pantalla indicará BAKE (Hornear) y la temperatura empieza a parpadear.
5. Gire la perilla para fijar la temperatura del horno.
6. Prenda la luz del horno si así lo desea (oprima LIGHT) (Luz).
Nota: No se puede cambiar la luz después de este punto. Se quedará prendida o
apagada durante todo el modo Sabatino, según fue seleccionada.
7. Oprima START. El horno comienza después de 5 segundos.
El horno funciona durante 73 horas y luego se apaga automáticamente.
Se puede configurar el reloj a un formato de 12 horas o de 24 horas. Por default
el reloj del horno tiene el formato de 12 horas.
1. Accesa al menú SELECC FUNCIONES.
2. Gire la perilla en sentido del reloj hasta que aparezca TIME FORMAT.
3. Oprima Start.
4. Gire la perilla para seleccionar formato de 12 horas o 24 horas.
5. Oprima Start para aceptar la nueva seleción.
Español 12

Prender o Apagar la
0.0
conversión automática
al modo de convección
Esta opción convierte automáticamente las temperaturas en empaques o recetas
para el uso con el modo de hornear por convección. Por default está “prendido”.
1. Accesa al menú SELECC FUNCIONES.
2. Gire la perilla en sentido del reloj hasta que aparezca AUTO CONVECT BAKE.
3. Oprima Start.
4. Gire la perilla para seleccionar ON o OFF.
5. Oprima Start para aceptar la nueva seleción.
Antes de usar el aparato por primera vez
• Quite todos los materiales de empaque y la literatura de la estufa. Quite los
materiales de empaque en el interior del horno y del cajón calentador.
• Estando fría, limpie con una esponja limpia, húmeda y seque.
• Aplique la crema de limpieza para parrillas de cerámica. Saque brillo con un
paño limpio. Consulte la sección de Cuidado y Limpieza.
• Durante los primeros usos puede haber un ligero mal olor; esto es normal y
desaparecerá.
• Lea todas las precauciones de seguridad y la información en el Manual de
Uso y Cuidado antes de operar el equipo.
Operación - Parrilla
Esta sección explica cómo operar la parrilla. Vea “Sacar el mayor provecho de su
parilla” en la página 17 para indicaciones de cómo mejorar los resultados con la
parrilla.
Acerca de la parrilla
Use la parrilla para aplicaciones superficiales de cocina como hervir, freir, hervir a
fuego lento, cocer al vapor y sofreir.
Operación
Ajustar la temperatura de los quemadores
Perilla de control de quemador
Figura 6: Perilla de control de quemador
Español 13

Operación - Horno
Encender el quemador Empuje la perilla y gírela en sentido contrario del reloj hasta el símbolo .
Nota: Si no se prende el quemador dentro de cuatro segundos, apague el que-
mador. Verifique que la tapa del quemador esté puesta correctamente y que el
ignitor esté limpio y seco. Si el quemador aún deja de funcionar, vea “Tabla para
resolver problemas de la parrilla” en la página 31.
Precaución: Todos los ignitores echan chispas cuando se prende
cualquiera de los quemadores. No toque ninguno de los quemadores
cuando se está usando la parrilla.
Encender el quemador durante una falla de electricidad
Se pueden encender los quemadores de la parrilla en forma manual durante una
falla de electricidad. Sostenga un cerillo prendido al puerto y gire la perilla a la
posición HI (Alto). Espere hasta que se prenda la llama y envuelva todo el quemador antes de ajustar la llama al calor deseado.
Ajustar el tamaño de la llama Después de prenderlo. gire la perilla en sentido contrario del reloj hasta el tamaño
deseado de la llama. Vea “Guía para cocinar” en la página 18 para los ajustes de
quemadores recomendados.
Precaución: La llama no debe extenderse más allá del borde de la olla para evitar posibles quemaduras o posibles daños a la olla o el aparato.
Apagar el quemador Gire la perilla en sentido del reloj a la posición de OFF (Apagar).
Nota: Se puede escuchar un sonido “pop” cuando se apaga el quemador. Este
sonido “pop” puede ser más fuerte con gas LP que con gas natural. Esto es normal.
Operación - Horno
Esta sección explica cómo operar el horno. Vea “Sacar el mayor provecho de su
parilla” en la página 17 para indicaciones de cómo mejorar los resultados con el
horno.
Acerca del horno
Operación
Ajustar el modo de cocinar y la temperatura
Español 14
PRECAUCIÓN
No use papel de aluminio o forros de protección para forrar ninguna
parte de un aparato, sobre todo bandejas de goteo de las unidades
superficiales o los pisos de los hornos. La instalación de estos forros
puede causar una descarga eléctrica o un fuego.
Nota: Para salirse de un modo actual, oprima OFF. (Seleccionar OFF apagará el
horno cuando no se está configurando el modo de cocinar.)
1. Oprima COOKING MODE (Modo de Cocinar).

Operación - Horno
2. HORNEAR parpadea en la pantalla.
3. Cuando no se realiza otro ajuste dentro de 5 segundos, el control emitirá un pitido y parpadea. Cuando esto sucede, oprima START.
4. Gire la perilla para cambiar el modo de cocinar.
5. Oprima START.
6. El modo seleccionado aparecerá en la pantalla, junto con la temperatura de default para ese modo, la cual estará parpadeando.
7. Para seleccionar una temperatura diferente, gire la perilla hacia la derecha o
izquierda (en incrementos de 5°) hasta llegar a la temperatura deseada.
8. Oprima START. Si no oprime START, el horno se prenderá automáticamente en 5 segundos.
9. La pantalla alterna entre el modo de cocinar y precalentar.
También aparece la temperatura precalentada, comenzando en 100°F. La temperatura verdadera se incrementa hasta alcanzar la temperatura preestablecida,
en cuyo momento el horno emitirá un pitido.
10. Para cambiar la temperatura durante el proceso de cocinar, simplemente oprima temperature. Gire la perilla para seleccionar una temperatura nueva y oprima START.
11. Una vez que haya terminado el horneado, oprima OFF para apagar el horno.
6: 35
100
PM
HORNEAR
380 °F
Conversión automática al modo de convección (modelos con horneado por convección)
Indicador del horno caliente Después de apagar el horno, la pantalla muestra CALIENTE en lugar del modo
En el modo de hornear por convección se reduce la temperatura automáticamente 25° F (4° C) de la temperatura indicada en el paquete o la receta. Simplemente ingrese la temperatura indicada en el paquete o la receta cuando ajusta el
modo y la estufa calcula la temperatura correcta automáticamente.
Se puede apagar la opción de la conversión automática al modo de convección
para poder ajustar la temperatura manualmente. Vea “Prender o Apagar la conversión automática al modo de convección” en la página 13 para más detalles.
Cuando se activa la opción de la conversión automática al modo de convección,
la pantalla indicará AUTO CONV BAKE. Cuando se apaga la opción, aparecerá
CONV BAKE.
de cocinar para indicar que el horno está apagado pero aún está caliente.
Cuando la temperatura del horno cae abajo de 176°F (80°C), desaparece CALIENTE de la pantalla.
Usar el cronómetro Notas:
• Si no termina de configurar el cronómetro, el horno emitirá pitidos en forma
periódica como un recordatorio para poner la hora. Oprima OFF para salirse
del modo de RELOJ (Cronómetro). (Seleccionar OFF apagará el horno
cuando no se está configurando el cronómetro.)
• Gire la perilla para mostrar la hora del día o más información sobre el modo
del horno cuando se usan los cronómetros.
Para configurar el cronómetro: 1. Oprima TIME y RELOJ 1 parpadea en la panta-
lla.
Gire en sentido del reloj y RELOJ 2 aparecerá.
Seleccione RELOJ 1 o 2, luego oprima TIME.
FIJ RELOJ 1 (2) aparece en la pantalla. Los
minutos parpadean.
0: 00
HR:MIN
RELOJ 1
1: 00
FIJ RELOJ 2
Español 15

Operación - Horno
2. Gire la perilla para fijar los minutos. Si ajusta sola-
PM
mente los minutos, oprima a START. De lo contrario, siga con el paso 4.
3. Oprima TIME nuevamente y las horas parpadean.
4. Gire la perilla para fijar las horas.
5. Oprima TIME nuevamente. Ahora el TIMER (Reloj/Cronómetro) está configurado.
6. Si no oprime TIME o START, el horno comenzará a emitir pitidos y la pantalla del reloj comienza a parpadear.
2:00
HR:MIN
FIJ RELOJ 2
Cambiar el cronómetro(s) 1. Oprima TIME. RELOJ 1 aparece en la panta-
lla. Seleccione el RELOJ 1 o 2.
2. Oprima TIME. RESTABL RELOJ 1 (2) aparece en la pantalla. Los dígitos de minutos parpadean.
3. Gire la perilla en sentido del reloj o en sentido contrario del reloj para cambiar los minutos.
4. Oprima TIME nuevamente y parpadean los dígitos de las horas.
5. Gire la perilla en sentido del reloj o en sentido contrario del reloj para cambiar las horas.
6. Oprima TIME y el tiempo nuevo está configurado.
Borrar el cronómetro(s) 1. Oprima TIME una vez. RELOJ 1 parpadea.
2. Gire la perilla para seleccionar BORRAR RELOJ 1(2). Oprima TIME.
3. Si no oprime el botón de hora, el horno emitirá un pitido y la pantalla sigue parpadeando.
4. Oprima TIME para regresar a la pantalla principal.
Cancelar Si no termina la operación, el horno emitirá pitidos periódicamente como recorda-
torio para ajustar el tiempo. Oprima OFF para salir del modo del Timer
(Cronómetro). Seleccionar OFF cuando no está en un modo de configuración
apagará el horno.
0: 00
AM
RELOJ 1
0: 00
BORRAR RELOJ 1
Usar el modo de cocinar cronometrado o retardado
Configurar un modo cronometrado 1. Oprima COOKING MODE (Modo de Cocinar).
La opción CONCINAR CRON (Cocinar Cronometrado) cambia el horno a un
modo de cocinar para un período de tiempo determinado y luego lo apaga. La
opción CONCINAR CRON está disponible para uno de los siguientes modos del
horno: Hornear, Hornear de Convección y Tostar de Convección.
• Asegúrese que el reloj con la hora del día indica la hora correcta antes de
comenzar. Vea “Cambiar la hora del reloj” en la página 10 para ajustar la
hora.
• Al final del tiempo programado de cocinar, el horno se apagará en forma
automática.
• No se recomienda cocinar en modo retardado para alimentos que deben
levantarse (ej., galletas, pasteles, panes, suflés, etc.)
2. HORNEAR aparece en la pantalla. Para seleccionar otro modo de cocinar, gire la perilla.
3. Oprima START.
4. Gire la perilla para seleccionar la temperatura deseada.
Nota: Se debe incluir el tiempo que el horno requiere para alcanzar la temperatura en el tiempo configurado para cocinar.
Español 16

Sacar el mayor provecho de su aparato
Retardar el inicio de un modo cronometrado
5. Oprima TIME. Aparece HORNEADO CRON en la pantalla.
6. Oprima TIME. FIJAR HORA HORN aparece en la pantalla y los minutos parpadean.
7. Fije los minutos. Oprima TIME.
8. Las horas parpadean. Fije las horas. Oprima START.
9. HORNEADO CRON aparece en la pantalla y horno comienza a precalentar.
Después de terminar, parpadea FIJ FIN HORN y la estufa emite pitidos. Oprima
OFF para borrarlo.
1. Siga los pasos 1 hasta 5 de arriba.
2. Gire la perilla hasta que aparezca HORNEADO RETRAS.
3. Oprima TIME. FIJAR HORA HORN aparece en la pantalla y los minutos parpadean.
4. Fije los minutos y luego oprima TIME. Las horas parpadean.
5. Fije las horas y luego oprima TIME. FIJAR FIN HORN aparece en la pantalla.
6. Oprima TIME.
7. Use la perilla para ingresar la hora del día cuando el horno deje de cocinar o cuando se apague.
8. Fije las horas y luego oprima TIME.
9. Fije los minutos y luego oprima TIME.
Nota: El reloj calcula automáticamente la hora del día cuando el modo
comienza y termina. El tiempo de cocinar que aparece cuenta en forma
regresiva por minuto.
1: 20
HR:MIN
HORNEADO CRON
5: 00
PM
HR:MIN
HORNEADO RETRAS
350°
400° F
F
10. Al final del tiempo programado de cocinar, el horno se apaga automáticamente. La pantalla indicará FIJ FIN HORN (Fin del Horneado Cronometrado)
y se escucharán pitidos de recordatorio. Oprima OFF para borrarlo.
Nota: Saque los alimentos del horno de inmediato después del ciclo terminado para evitar que se cuezan demasiado. Los alimentos que se dejan en el
horno seguiran cocinándose aún cuando el ciclo haya terminado.
Para revisar el tiempo de cocinar y el tiempo de detención después de haber fijado un retardo
Poner la opción sabatina Vea “Poner la opción Sabatina” en la página 12.
1. Oprima TIME.
2. Gire la perilla a FIN HORNEAR o TIEMPO HORNEAR.
3. Oprima TIME.
Sacar el mayor provecho de su aparato
Sacar el mayor provecho de su parilla
Guía para cocinar con su parilla
Hervir agua El tiempo para hervir puede variar enormemente dependiendo de las condiciones
ambientales. Trate de seguir los siguientes consejos para reducir el tiempo de
hervir:
Español 17

Sacar el mayor provecho de su aparato
• Use una tapa.
• Use una olla con un tamaño apropiado para la cantidad de agua y el tamaño
del quemador.
• Seleccione una olla con una base plana (Vea “Guía de selección de los utensilios de cocina” en la página 18 para detalles).
• Escoja una olla de peso mediano (en lugar de una olla pesada).
• Comience con agua que ya está caliente.
• Trate de hervir la menor cantidad de agua necesaria. Los volúmenes más
pequeños hierven más rápido que volúmenes grandes.
Ajustes recomendados Use esta tabla como guía para seleccionar el calor. Se lista una gama de ajustes
de calor porque el ajuste real depende de:
• tipo y calidad de la olla. Vea “Seleccionar utensilios de cocina”,
• tipo, cantidad y temperatura de los alimentos,
• quemador que se está usando et
• las preferencias del cocinero.
Tabla 3: Guía para cocinar
Usos Ajustes de calor
Hervir agua 9 - Alto
Freir con sartén, sofreir, dorar carne, freir con mucho aceite 6-8 - Med-Alto
Freido general, huevos, panqués, hervido lento 4-5 - Med
Hervir a fuego lento, cocinar alimentos tapados, vaporizar 2-3 - Med Bajo
Derretir mantequilla y chocolate 1 - Bajo
Guía de selección de los utensilios de cocina
Características de los utensilios La selección de ollas afecta directamente la velocidad y uniformidad del proceso
de cocinar. Para lograr mejores resultados, seleccione ollas con bases planas.
Cuando se calienta una olla, la base (fondo de la olla) debe descansar uniformemente sobre la superficie sin moverse (balancearse). Ollas planas de peso mediano a alto son las mejores.
Comprobar lo plano de sus ollas
Voltee la olla sobre la cubierta y coloque una regla plana
contra el fondo de la olla. El fondo de la olla y el borde
recto de la regla deben estar al ras uno contra el otro
Otra prueba sencilla para determinar la distribución
térmica uniforme sobre el fondo de las ollas es
poner 1” (25.4 mm) de agua en la olla. Hervir el
agua y observar la ubicación de las burbujas a
medida que el agua comienza a hervir. Una buena
olla plana tendrá una distribución homogénea de
burbujas en toda la superficie del fondo
.
.
Emparejar el diámetro de las ollas con el tamaño de las llamas
Español 18
La llama debe tener el mismo tamaño o ser más pequeña que el fondo de la olla.
No use ollas pequeñas con llamas altas ya que éstas pueden subir por los costados de las ollas.
Coloque ollas muy grandes de tal forma que abarquen dos quemadores de frente
al fondo, no de lado a lado.

Sacar el mayor provecho de su aparato
Tapas muy ajustadas – Una tapa acorta el tiempo de cocinar y agua hierve más
rápido al mantener el calor dentro de la olla.
Consejos para los utensilios de cocina
Ollas especiales Ollas especiales como asadores, tostadoras, ollas de presión, woks, enlatadoras
• No use ollas y sartenes con fondos redondos (concavos o convexos), deformados o dentados. Vea los dibujos arriba.
• Asegúrese que el fondo de la olla o del sartén que se está usando esté limpio
y seco.
• Use ollas y sartenes con fondos metálicos gruesos, suaves.
con baño de agua y enlatadoras de presión deben tener las mismas características que se describen arriba. Use sólo un wok con fondo plano.
Sacar el mayor provecho de su horno
Guía para cocinar con su horno
Posición de rejillas
• REJILLA POSICIÓN 6 (posición más alta) – para derretir queso, asar alimentos delgados
6
5
4
3
2
1
• REJILLA POSICIÓN 5 – para asar carnes, tostar pan
• REJILLA POSICIÓN 4 – para asar carnes más gruesas
• REJILLA POSICIÓN 3 – para hornear la mayoría de alimentos en una sola
rejilla, como una bandeja para galletas o moldes para hornear, pasteles,
alimentos congelados, bollos, brownies, molletes
• REJILLA POSICIÓN 2 – para hornear pays, caserolas, panes, pasteles
tipo bundt o pound, ligeros tostados o aves
• REJILLA POSICIÓN 1 (posición más baja) – para pastel tipo bizcocho, tostados grandes, pavo.
Figura 7: Posiciones de rejillas
Cocinar con múltiples rejillas Cuando usa múltiples rejillas, siga las recomendaciones abajo para su colo-
cación.
• Dos rejillas: Use las posiciones de rejilla 2 y 5.
• Tres rejillas: (para horneado de convección): Use las posiciones 1, 3 y 6.
Colocación de moldes Los resultados de hornear son mejores cuando se colocan los moldes en el cen-
tro del horno. Cuando hornea más de un molde en una rejilla, permita al menos 1”
a 1 ½” (2.5 a 4.0 cm) de espacio libre alrededor del molde. Cuando hornea cuatro
capas con pasteles al mismo tiempo, ponga los moldes sobre dos rejillas, de tal
modo que ningún molde quede directamente encima de otro. Vea el dibujo abajo.
Figura 8: Colocación de moldes
Español 19

Sacar el mayor provecho de su aparato
Moldes para hornear Aquí hay algunos consejos para cocinar con moldes para hornear:
• Los moldes de vidrio absorben el calor, por lo tanto debe reducir la temperatura del horno 25°F cuando hornea en moldes de vidrio.
• Metal brilloso, suave refleja el calor, resultando un dorado más ligero y más
delicado.
• Los moldes oscuros, ásperos o sin brillo absorben el calor, produciendo una
costra más dorada y crujiente. Algunos fabricantes recomiendan bajar la temperatura 25° cuando usa este tipo de molde. Siga las recomendaciones del
fabricante.
• Use moldes oscuros de metal o de vidrio para pays.
• Los moldes aislados para hornear pueden aumentar la duración del tiempo
recomendado de horneado.
Precalentar el horno Precaliente el horno si la receta lo recomienda. Es necesario precalentar el horno
para lograr buenos resultados cuando quiere hornear pasteles, galletas, pastelitos y panes. Fijar una temperatura más alta no reduce el tiempo del precalentado. Coloque las rejillas del horno en una posición adecuada antes de
precalentar. Un pitido confirmará que el horno está precalentado y la pantalla indicará la temperatura seleccionada del horno.
Modos de cocinar del horno
Hornear, Fermentado y Calentar
Hornear es cocinar con aire seco, caliente. El
quemador inferior se prende en ciclos para mantener la temperatura del horno. Se puede usar el
modo de Hornear para preparar una variedad de
alimentos, desde pastelitos hasta guisados así
como para asar carnes.
Nota: Dependiendo del modelo, usted puede
escuchar el ventilador de convección mientras el
horno está precalentando para el modo de hornear. Esto es normal.
En el modo de fermentar, el horno utiliza el quemador inferior para mantener una
temperatura baja para levantar pan.
• La fermentación es el levantamiento de una masa de levadura.
• Las temperaturas para el modo de fermentar son 85° a 110° F (29.4 a 43.3°
C). La temperatura por default es 100° F (37.8° C).
• Tape el tazón o la olla ligeramente y use cualquier rejilla que acomode el
tamaño del contenedor.
• Mantenga cerrada la puerta y use la luz del horno para revisar el levantamiento de la masa.
En el modo de Calentar, el horno utilizará el quemador inferior para mantener una
temperatura baja para guardar los alimentos a una temperatura de servir.
Español 20
• Use la opción de calentar en el horno para mantener calientes los alimentos
hasta que sean servidos.
• Las temperaturas del modo de calentar son 140° - 220°F (60° - 104°C). La
temperatura por default es 170°F (77°C).
• Alimentos que deben quedar húmedos, deben taparse con una tapa o papel
aluminio.

Sacar el mayor provecho de su aparato
PRECAUCIÓN
Siga estas pautas cuando usa el modo de calentar:
• No use el modo de calentar para calentar alimentos fríos.
• Asegúrese de mantener una temperatura apropiada para los alimentos. La
USDA recomienda mantener caliente los alimentos a una temperatura de
140°F (60°C) o más.
• NO caliente los alimentos por más de una hora.
Hornear de convección El horneado por convección es similar al hor-
neado. El calor viene del quemador de calentamiento inferior. La principal diferencia en el
horneado por convección es que el calor recircula a través del horno por el ventilador de convección.
El modo de horneado de convección sirve muy
bien para hornear cantidades grandes de alimentos sobre múltiples rejillas. Se puede usar para preparar galletas, pays, pastelitos, panes, y botanas entre otras cosas. Los beneficios del horneado de
convección incluyen:
Conversión automática al modo de convección
• Ligera disminución del tiempo de hornear
• Hornear con 3 rejillas (dorado más uniforme)
• Mayor volumen (la levadura se eleva más)
• Habilidad de concinar más alimentos a la vez
Para lograr mejores resultados:
• Reduzca la temperatura de la receta por 25° F (4°C). Consulte la tabla para
horneado de convección.
• Ponga los alimentos en moldes planos, no tapados, como bandejas para galletas sin costados.
• Centre los moldes lado a lado sobre la rejilla del horno.
En el modo de hornear por convección se reduce la temperatura automáticamente 25° F (4° C) de la temperatura indicada en el paquete o la receta. Simplemente ingrese la temperatura indicada en el paquete o la receta cuando ajusta el
modo y la estufa calcula la temperatura correcta automáticamente.
Se puede apagar la opción de la conversión automática al modo de convección
para poder ajustar la temperatura manualmente. Vea “Prender o Apagar la conversión automática al modo de convección” en la página 13 para detalles.
Cuando se activa la opción de la conversión automática al modo de convección,
la pantalla indicará AUTO CONV BAKE. Cuando se apaga la opción, aparecerá
CONV BAKE.
Tabla 4: Tabla para horneado de convección
Alimento Artículo
Pastel Glaseado
Pastel Bundt
Bizcochos
Pay 2 cortezas, fresco, 9”
2 cortezas, fruta congelada,
9”
Posición
Rejilla
3
2
1
2
2
Temp.a (oF)
(horno precalentado)
350
350
350
400-450
400
Tiempo del Horneado
de Convección
18-21
37-43
39-43
45-55
68-78
b
(min)
Español 21

Sacar el mayor provecho de su aparato
Tabla 4: Tabla para horneado de convección
Alimento Artículo
Galletas Azúcar
Chocolate Chip
Brownie
Panes Pan de levadura, 9x5
Rollos de levadura
Pan rápido, 8x4
Bollos, Panecillos
Molletes
Pizza Congelada
Fresca
Posición
Rejilla
3
3
3
2
3
2
3
3
3
3
Temp.a (oF)
(horno precalentado)
375-400
375-400
375
400
400-425
375-400
400-425
450
425-475
450-475
a. Esta temperatura en esta tabla ha sido reducida por 25°F si la Conversión automática al modo
de convección está apagada.
b. Esta tabla es una guía. Los tiempos verdaderos dependen de las mezclas y recetas horneadas.
Siga las direcciones de la receta o del empaque y reduzca la temperatura de modo apropiado.
Asar El asado usa el calor intenso radiado del quema-
dor superior. El modo de asado sirve mejor para
cocinar cortes delgados, suaves de carne (1” o
menos), pollo y pescado. Se puede usar también
para calentar y dorar carnes, guisados y otros
alimentos. Siempre ase con la puerta cerrada.
Tiempo del Horneado
de Convección
6-11
10-15
29-36
20-24
14-18
45-55
11-15
16-20
23-26
12-15
b
(min)
Tabla 5: Tabla para asado
Alimento Artículo / Grosor
Los beneficios del asado incluyen:
• Asado rápido y eficiente
• Cocinar sin agregar grasas o líquidos
• Los alimentos se doran mientras se cocinan
Para lograr mejores resultados:
• Precaliente el horno 3-4 minutos. No precaliente por más de 5 minutos.
• Los filetes y chuletas deben tener un grosor de al menos 3/4”
• Aplique mantequilla o aceite al pescado o pollo para evitar que se pegue
• Use la bandeja y rejilla de asar incluida con su estufa
• No forre la rejilla del asador con papel de aluminio. Está diseñada para drenar
las grasas y los aceites de la superficie y evitar manchas y humos
• Voltee la carne una vez a mitad del tiempo recomendado para cocinar (“Tabla
para asado”” para ejemplos).
• Al dorar guisados, use sólo platos de metal o vidrio cerámico como Corningware®.
• Nunca use vidrio refractario (Pyrex®); no puede tolerar la temperatura alta.
Posición
Rejilla
Ajustes
del
Asado
Temperatura
Interna (
o
F)
Tiempo Lado
1 (min)
a
Tiempo Lado
2 (min)
a
Res Filete (3/4” - 1”)
Vuelta y Vuelta
Medio
Bien Cocido
Hamburguesas (3/4” - 1”) - Bien
Cocidas
Aves Pechuga (con hueso) 4 low 170 18-20 18-19
5
5
5
5
high
high
high
high
145
160
170
160
6-7
7-8
8-9
9-11
Español 22
5-6
6-7
7-9
8-10
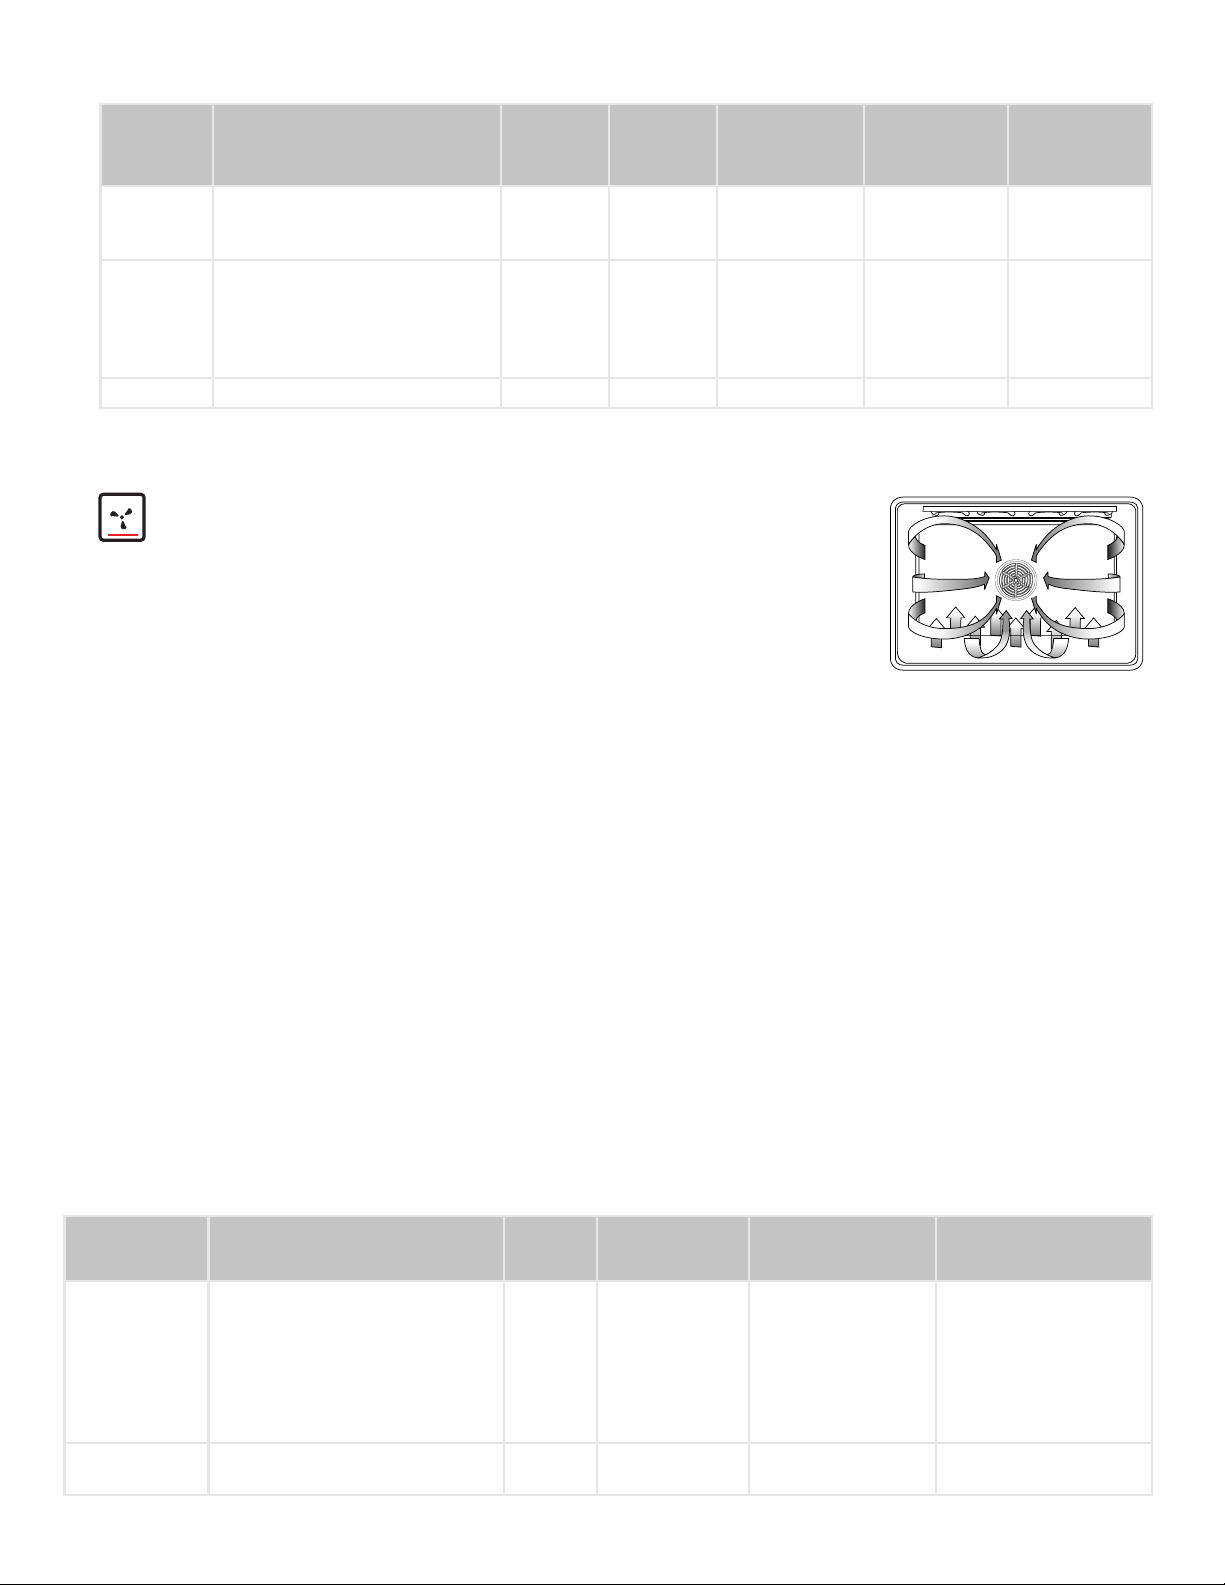
Tabla 5: Tabla para asado
Sacar el mayor provecho de su aparato
Alimento Artículo / Grosor
Puerco Chuletas (1”)
Salchicha - fresca
Rebanadas de jamón (1/2”)
Mariscos Filetes de pescado (1”) con
mantequilla
Pan Pan de ajo (1”) , rebanadas 5 alto N/A 2-4 No voltear
Posición
Rejilla
4
3
5
5 bajo Cocinar hasta
Ajustes
del
Asado
high
high
high
Temperatura
Interna (
160
160
160
que quede
opaco y se
desmenuce
con facilidad
o
Tiempo Lado
F)
8-9
7-9
5-6
12-14 No voltear
1 (min)
a
Tiempo Lado
2 (min)
7-8
6-8
5-6
a. Los tiempos de asado son aproximados y pueden variar. Los tiempos se basan en la cocina con un pre-
calentado asa.
Tostar de convección El tostado de convección usa el calor intenso del
quemador inferior así como el calor circulado por
el ventilador de convección. El resultado es un
término más crujiente en el exterior que atrapa
los jugos. El modo de tostado de convección
sirve muy bien para preparar cortes suaves de
carne y pollo.
Los beneficios del tostado de convección:
a
Tabla 6: Tabla para tostado de convección
Carnes Artículo
Res Costillas
Rib eye (sin hueso)
Rump, eye, tip, sirloin (sin hueso)
Lomo suave
Puerco Lomo (con o sin hueso)
Hombro
• Hasta un 25% más rápido para cocinar que el tostado/horneado normal
• Un dorado uniforme
Para lograr mejores resultados:
• Use la misma temperatura que se indica en la receta.
• Revise el término de la carne oportunamente, ya que se puede disminuir el
tiempo de asado por un 25%. Consulte la tabla para asado de convección
para ejemplos.
• No tape la carne o use bolsas.
• Use la bandeja y rejilla de asado que viene incluida con la estufa. También se
puede usar una olla no tapada y poco profunda.
• Use un termómetro para carne para determinar la temperatura interna de la
carne.
• Cuando la carne ya se doró como le gusta, pero aún no se coció, puede colocar una pequeña tira de papel de aluminio encima del pecho para evitar que
se dore demasiado.
• Después de sacar la carne del horno, cúbrala con papel de aluminio 10 - 15
minutos.
Peso
4-6
4-6
3-6
2-3
5-8
3-6
(lb)
Temperatura
horno (
325
325
325
425
350
350
o
F)
Tiempo Tostado*
(min por lb)
25-32
28-32
24-32
27-32
25-30
28-32
15-25
15-25
20-30
Temperatura Interna
145 (vuelta y vuelta)
160 (medio)
145 (vuelta y vuelta)
160 (medio)
145 (vuelta y vuelta)
160 (medio)
145 (vuelta y vuelta)
160
160
o
F)
(
Español 23

Tabla 6: Tabla para tostado de convección
Carnes Artículo
Aves Pollo - entero
Pavo - sin relleno**
Pavo - sin relleno**
Pavo - sin relleno**
Pechuga de pavo
Codorniz
Peso
(lb)
3-4
12-15
16-20
21-25
3-8
1-1 1/2
Temperatura
horno (
375
325
325
325
325
350
o
Tiempo Tostado*
F)
14-20
10-14
9-13
6-10
20-25
45-75 (tiempo total)
(min por lb)
Temperatura Interna
180
180
180
180
170
180
o
F)
(
*Los tiempos del tostado son aproximados y pueden variar dependiendo de la forma de la carne.
**Pavo relleno requiere de un tiempo adicional de tostado. La mínima temperatura segura para el relleno en pavo es 165°F
(74°C).
Limpieza y Mantenimiento
Limpieza - Parilla
Precaución:
No use ningún limpiador en la parrilla mientras que la superficie esté
caliente; Los humos que se producen pueden ser peligrosos para su
salud. Calentar el detergente puede producir un ataque químico y
dañar la superficie.
Precaución: Todos los ignitores echan chispas cuando se prende
cualquiera de los quemadores. No toque ningún quemador cuando se
está usando la parrilla.
Limpieza diaria Limpie con agua jabonosa, caliente; Enjuague y seque. Después de un derrame
de alimentos, apague el quemador y permita que se enfríe la parrilla. Limpie alrededor del quemador y los puertos del quemador. Vuelva a ensamblar el quemador(es) y compruebe el funcionamiento correcto.
Indicaciones para la limpieza
Evitar estos limpiadores • Limpiadores para vidrio que contienen amoníaco o blanqueador con cloro.
Estos ingredientes pueden atacar o manchar la parrilla permanentemente.
• Limpiadores cáusticos
•
Limpiadores de horno como Easy Off® pueden atacar la superficie de la parrilla
• Limpiadores abrasivos
• Esponjillas metálicas y esponjas para fregadero como Scotch Brite® pueden
rayar y/o dejar marcas metálicas.
• Esponjillas con jabón como SOS® pueden rayar la superficie.
.
Español 24

Tabla 7: Tabla para cuidar la parrilla
Parrilla Parte/Material Técnica(s) sugerida(s) Indicaciones importantes
Limpieza y Mantenimiento
• Limpiadores en polvo que contienen blanqueador con cloro pueden manchar
la parrilla permanentemente.
Base de quemador / Acero
esmaltado
Tapas de quemadores y rejil-
Acabado mate sobre
las/
hierro fundido
Perillas de control / Plástico
Acabado exterior/ Esmalte de
porcelana
• Detergente y agua caliente, enjuagar
y secar.
• Esponjillas de fibra metálica con
jabón como Brillo
®
o S.O.S.®. Enjua-
gar y secar.
• Agua caliente y detergente. enjuagar
y secar de inmediato.
• Detergentes no abrasivos como Fan-
®
o Formula 409®. Enjuagar y
tastic
secar de inmediato.
• Detergentes poco abrasivos como
®
Bon Ami
o Soft Scrub®.
• Agua jabonosa caliente; enjuagar y
secar de inmediato
• Agua jabonosa caliente; enjuagar y
secar bien.
• Detergentes no abrasivos como Fantastic® o Formula 409®.
• Detergentes poco abrasivos como
®
Bon Ami
, Ajax®, Comet®.
• Detergentes líquidos como Soft
®
Scrub
.
• Limpiar los puertos con un cepillo de
dientes duro para limpiar las aberturas de
los puertos.
• No rayar o raspar las aberturas de los
puertos.
• Las rejillas son pesadas; tener cuidado
cuando las levanta. Ponerlas sobre una
superficie protegida.
• Ampollas/grietas/astillas son comunes
debido a las extremas temperaturas en
los dedos de las rejillas y los cambios
rápidos de las temperaturas.
• No lavar en una lavavajillas.
• Derrames ácidos y de azúcar echan a
perder el esmalte. Quitar la suciedad de
inmediato.
• Detergentes abrasivos usados con mucha
frecuencia o con mucha fuerza pueden
dañar el esmalte con el tiempo.
• Para quitar las perillas, ponerlas en la
posición Off (Apagado) y jalarlas.
• No remojar las perillas.
• No forzar las perillas sobre el eje de la válvula.
• No usar cepillo o detergentes abrasivos
®
como BonAmi
, Ajax®, o Comet®. Estos
pueden dañar el acabado permanentemente.
• Volver a ensamblar cuidadosamente el
quemador cuando termine. Verificar que
la tapa del quemador esté sentada correctamente.
• No usar un palillo, se puede romper.
• Derrames ácidos y de azúcar echan a
perder el esmalte. Quitar la suciedad de
inmediato.
• No usar una esponja o toalla húmeda con
porcelana caliente.
• No remojar las tapas de los quemadores.
• Siempre aplicar mínima presión con
detergentes abrasivos.
• Nunca usar detergentes para horno,
agentes de limpieza cáusticos o agentes
de limpieza abrasivos en el exterior de la
estufa.
Español 25

Limpieza y Mantenimiento
Tabla 7: Tabla para cuidar la parrilla
Parrilla Parte/Material Técnica(s) sugerida(s) Indicaciones importantes
Acabado exterior
inoxidable
Ignitores / Cerámica • Limpie bien con un hisopo de algodón
/ Acero
• Agua caliente y detergente
• Detergentes no abrasivos como Fantastic® o Formula 409®. Enjuagar y
secar de inmediato.
• Pulido como Stainless Steel Magic
para proteger el acabado de manchas y picaduras; realza la apariencia.
• Manchas de agua dura: Vinagre
casero.
• Detergentes poco abrasivos: Detergente líquido para acero inoxidable
Kleen King
y acero inoxidable Cameo
Ami
• Decoloración térmica: Bar Keepers
Friend
humedecido con agua, amoniaco o
un limpiador no abrasivo como Formula 409®.
• Quite la mugre cuidadosamente con
un palillo.
®
, limpiador para aluminio
®
.
®
.
®
, Bon
• El acero inoxidable resiste muchas manchas de alimentos y picaduras, siempre y
cuando la superficie se mantiene limpia y
protegida.
• Usar paños limpios, suaves, esponjas o
®
toallas de papel.
• Secar el área para evitar manchas de
agua.
• Nunca permitir que manchas de alimentos
o de sal permanezcan mucho tiempo
sobre acero inoxidable.
• Frotar ligeramente en la dirección de las
líneas de pulido.
• Cloro y compuestos de cloro en algunos
detergentes son corrosivos para el acero
inoxidable. Revisar los ingredientes en la
etiqueta.
• Mantenga limpios los puertos de los ignitores para un desempeño correcto. Es
necesario limpiar estos puertos cuando
hay un derrame de alimentos o cuando el
quemador no se quiere encender a pesar
del clic que se escucha de los ignitores
electrónicos.
• Un ignitor húmedo prevendrá que el quemador se encienda. Mantenga limpios los
puertos de los ignitores para un desempeño correcto de los quemadores.
• Quite cualquier pelusa que quede
después de la limpieza.
Limpieza - Horno
Limpieza diaria No es necesario limpiar el interior del horno todos los días. Cuando se acumulan
suciedades, use la función de autolimpieza como se explica en “Autolimpiar el
horno” en la página 27. Vea “Guía de limpieza del horno” en la página 26 para
instrucciones acerca de superficies y artículos específicos.
Indicaciones para la limpieza
Evitar estos limpiadores • No use limpiadores cáusticos como Easy Off®. Pueden dañar la superficie.
• Limpiadores inflamables como líquido para encendedor o WD-40.
Tabla 8: Guía de limpieza del horno
Parte Recomendaciones
Rejillas Lave con agua jabonosa caliente. Enjuague cuidadosamente y seque o suavemente frote con esponjillas
rellenas de jabón o polvo limpiador (Hornos) según instrucciones. Si se limpian las rejillas en el horno
durante el modo de autolimpieza, perderán su acabado brilloso y tal vez dejen de deslizarse suavemente.
Si esto sucede, limpie los bordes de las rejillas con una cantidad pequeña de aceite vegetal, luego quite el
exceso.
Empaque de fibra de
vidrio de la puerta
NO SE DEBE LIMPIAR EL EMPAQUE A MANO.
Español 26

Limpieza y Mantenimiento
Tabla 8: Guía de limpieza del horno
Parte Recomendaciones
Vidrio (menos parilla) Lave con jabón y agua o un limpiador para vidrio. Use Fantastik® o Formula 409® para quitar salpicadu-
ras grasosas y manchas duras.
Superficies pintadas Limpie con agua jabonosa caliente o aplique Fantastik® o Formula 409® primero a una esponja limpia o
una toalla de papel y limpie. Evite el uso de limpiadores en polvo, esponjillas de fibra metálica y limpiadores para hornos.
Superficies de porcelana
Superficies de acero
inoxidable
Plástico y Controles Cuando están fríos, limpie con agua jabonosa, enjuague y seque.
Limpie de inmediato derrames ácidos como jugos de fruta, leche y jitomate con una toalla seca. No use
una esponja/toalla húmeda sobre porcelana caliente. Cuando ya está frío, limpie con agua jabonosa caliente o aplique Bon-Ami® o Soft Scrub® a una esponja húmeda. Enjuague y seque. Para manchas resistentes, use suavemente esponjillas con jabón. Es normal que la porcelana se agriete (líneas finas) con el
tiempo debido a la exposición al calor y residuos de comida.
Siempre limpie con el grano. Limpie con una esponja jabonosa luego enjuague y seque o limpie con Fantastik® o Formula 409® aplicado a una toalla de papel. Proteja y pula con Stainless Steel Magic® y un
trapo suave. Quite las manchas de agua con un trapo humedecido con vinagre blanco. Use
Friend®
para quitar la decoloración térmica.
Bar Keeper’s
Autolimpiar el horno El horno incluye una función de autolimpieza que elimina el trabajo manual de
limpiar su horno. Durante la autolimpieza, el horno usa una temperatura muy alta
para eliminar restos de comida y grasa.
• No limpie partes o accesorios en el horno de autolimpieza.
• Es algo normal ver humo y/o una llama ocasional durante el ciclo de la
autolimpieza, dependiendo del contenido y de la cantidad de suciedad que
queda en el horno. Cuando persiste una llama, apague el horno y permita
que se enfríe antes de abrir la puerta para limpiar los restos de comida con un
trapo.
• La puerta del horno se bloqueará al comienzo del ciclo.
• La lámpara del horno no funciona durante este modo.
• Durante la autolimpieza, la cocina debe estar bien ventilada para ayudar a
eliminar los olores asociados con la autolimpieza. Con el tiempo disminuyen
los olores.
• El tiempo prefijado de la limpieza son cuatro horas. Se puede ajustar este
tiempo de limpieza para 3 o 5 horas.
• El modo se detiene automáticamente al final de las horas de limpieza.
• Cuando el horno se enfría tras la limpieza, se desbloquea el cierre
automático de la puerta y se puede abrir ésta.
• Para cancelar o parar la autolimpieza mientras opera el modo, oprima OFF.
• No se podrá abrir la puerta hasta que el horno alcance una temperatura
segura.
Preparar el horno para la autolimpieza
ADVERTENCIA
Se necesita un empaque flexible de la puerta para un buen sellado.
No limpie, frote, dañe o quite el empaque.
1. Saque todos los utensilios y moldes.
2. Saque las rejillas del horno. Si se dejan las rejillas en el horno durante el ciclo
de la autolimpieza, perderán su acabado brilloso permanentemente y dejarán
de deslizarse suavemente sobre las guías. Vea “Guía de limpieza del horno”
para el cuidado correcto.
Español 27

Limpieza y Mantenimiento
3. Limpie suciedades muy grandes, restos de alimentos y grasa con toallas de papel antes de iniciar la autolimpieza del horno. Un exceso de grasa causará llamas y humo dentro del horno durante autolimpieza.
Limpie a mano a una distancia de
1 1/2 pulgadas de las guías de rejillas
hasta el frente de la cavidad del horno.
No limpie el empaque
a mano.
Limpie el área del bastidor
fuera del empaque a mano.
Limpie el área de la
puerta fuera del empaque
a mano.
Figura 9: Pautas para la limpieza
4. Revise la ilustración arriba. Algunas áreas del horno deben ser limpiadas a
mano antes de iniciar el ciclo. Use una esponja jabonosa o un raspador de
plástico o una esponjilla S.O.S.® llena de detergente. Debe limpiar a mano el
borde del horno, el bastidor frontal y hasta 1-1/2 pulgadas dentro del bastidor
con detergente y agua caliente. No frote ni limpie el empaque en el horno.
Enjuague todas las áreas cuidadosamente, luego séquelas.
5. Asegúrese que las lámparas interiores del horno estén apagadas y que los focos y las cubiertas de lentes estén en sus lugares. No debe operar el horno sin que los focos y las cubiertas estén en sus lugares.
Importante:
No se deben usar Limpiadores Comerciales para Hornos en el horno
de autolimpieza o en alguna otra parte porque éstos dañarán el acabado o la parte.
Poner el modo de autolimpieza 1. Oprima COOKING MODE (Modo de Cocinar).
2. Gire la perilla hasta que aparezca el modo AUTOLIMPIEZA. Oprima START.
3. El tiempo de limpieza por default es 4 horas. Para cambiar el tiempo de limpieza, gire la perilla para cambiar el número de horas. De otro modo, siga con el paso 4.
4. Oprima START. AUTOLIMPIEZA parpadea. Oprima START.
5. QUITAR REJILLAS aparece en la pantalla como recordatorio para quitar las rejillas del horno.
6. Oprima START nuevamente para iniciar la autolimpieza.
4: 00
3: 00
AUTOLIMPIEZA
AUTOLIMPIEZA
QUITAR REJILLAS
3
Retardar el arranque de la autolimpieza
Español 28
Nota: La puerta se cierra al comienzo del ciclo; El símbolo de la puerta cerrada
aparece en la pantalla en este momento. Si la puerta no se bloquea, oprima OFF
y no use la autolimpieza; llame por teléfono para servicio.
Nota: Para que esta opción funcione bien, se debe configurar la hora del día
correctamente. Vea la sección “Poner el Reloj” en “Preparar su Estufa”.
1. Oprima COOKING MODE (Modo de Cocinar).
2. Gire la perilla hasta que aparezca el modo AUTOLIMPIEZA. Oprima START.
 Loading...