

Bosch DS937 Installation Manual
Installation Guide for DS937
r
Ceiling Mounted, Passive Infrared (PIR)
Intrusion Detectors
1.0 Description
The DS937 is a low-profile, ceiling-mount Passive Infrared Intrusion detector that provides a 360° coverage pattern. The low profile
design provides a recessed-mount look, even when surface mounted. It is easy to install with access to wiring and programming options
available without removing the detector from the ceiling. With a 50 ft. (14 m) diameter coverage pattern, it is an ideal choice for applications
that require ceiling mounting and spot or 360° detection.
2.0 Specifications
• Input Power: 9 to 30 VDC; 7.5 to 24 VAC.
• Current Draw: 17 mA maximum at 12 VDC.
• Standby Current: Intended for connection to DC power
supplies capable of supplying power if
primary power fails.
• Coverage: 50 detection zones.
Mounting Height
8 ft. (2.4 m)
10 ft. (3.0 m)
12 ft. (3.7 m)
Detection Area
Maximum Diamete
38 ft. (11.6 m)
46 ft. (14.0 m)
50 ft. (15.2 m)
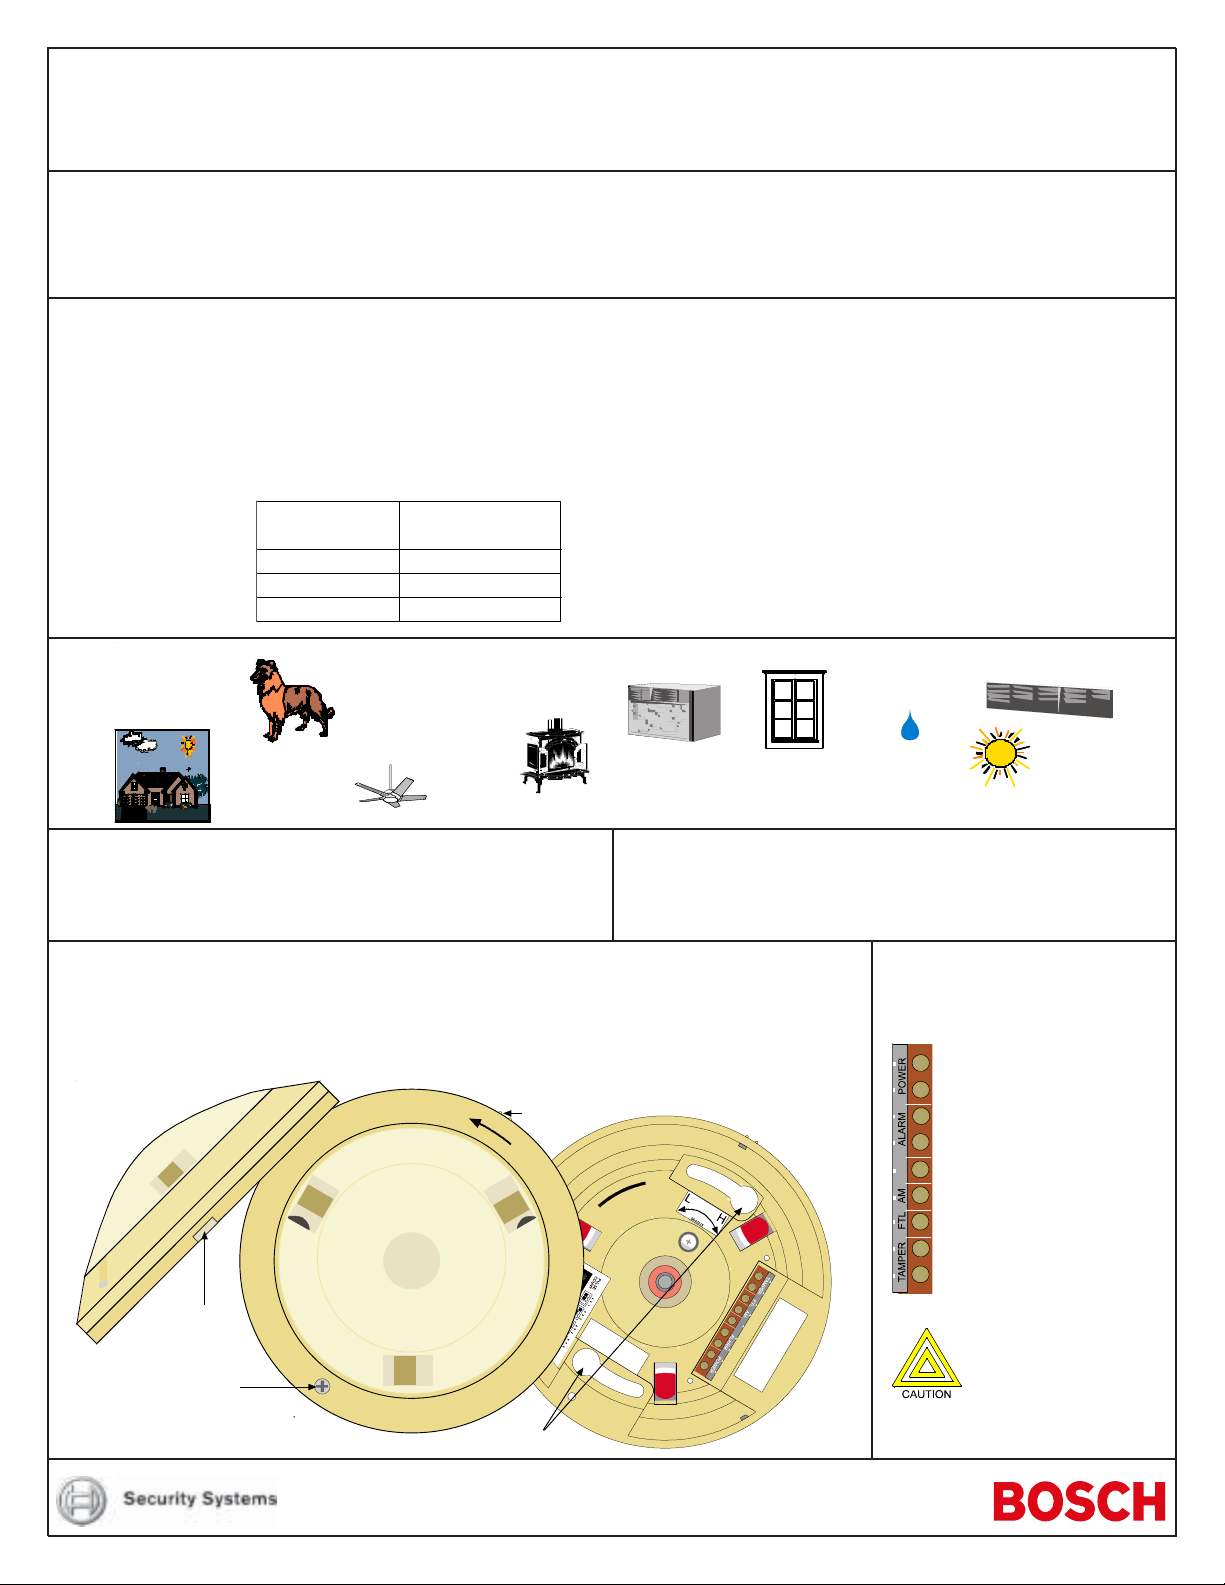
3.0 Avoid:
Direct Hot or
Mounting
Outdoors
Moving
Objects
Pets and
Small Animals
Cold Drafts
Heat Sources
4.0 Mounting
4.1 Use the mounting template to position and drill the wiring
hole and starter holes for the two mounting screws provided with
the detector.
• Detectable Speed: 0.5 to 15 ft./s (0.2 to 5.0 m/s)
• Alarm Contacts: NC (Normally Closed) dry contacts, rated
500 mA, 10 W max. @ 30 VDC.
• Tamper Switch: NC Integral, Cover-Activated
• Sensitivity Selection: Field selectable for 1, 2, 3, or 4 pulse
counts.
• Storage and +14°F to +122°F (-10°C to +50°C).
Operating
Temperature:
• Humidity: 0 to 95% non-condensing
• Dimensions: 5 inches diameter by 1.5 inches high
(125 mm diameter x 38 mm high)
Air Conditioning
Outlets
Windows and
Uninsulated Walls
Water or
Oil Vapor
Direct Exposure
to Sunlight
4.2 Install the provided mounting screws leaving enough
space between the screwhead and the mounting surface to
allow placement of the detector base.
4.3 Mount the detector base
1. Remove the Outer Cover Ring (may be pried
loose with a small flatbladed screwdriver).
2. Loosen the cover screw.
3. Turn the cover dome counterclockwise and lift
it off the detector.
1. Pry here if
necessary
2. Loosen
Cover Screw
4. Slide the detector over the mounting
screws.
5. Rotate the detector clockwise until the slots
firmly engage the mounting screws.
6. Tighten the mounting screws.
3. Rotate Cover
to unlock
Mounting Holes
4.4
Connect wires to the
Terminal Block by passing
them through the Wiring
Passage.
Power Input
(nonpolar)
Alarm Output
(Normally Closed)
Alarm Memory
First To Latch
Tamper Switch
(Normally Closed)
Only apply power
after all connections
have been made and
inspected.
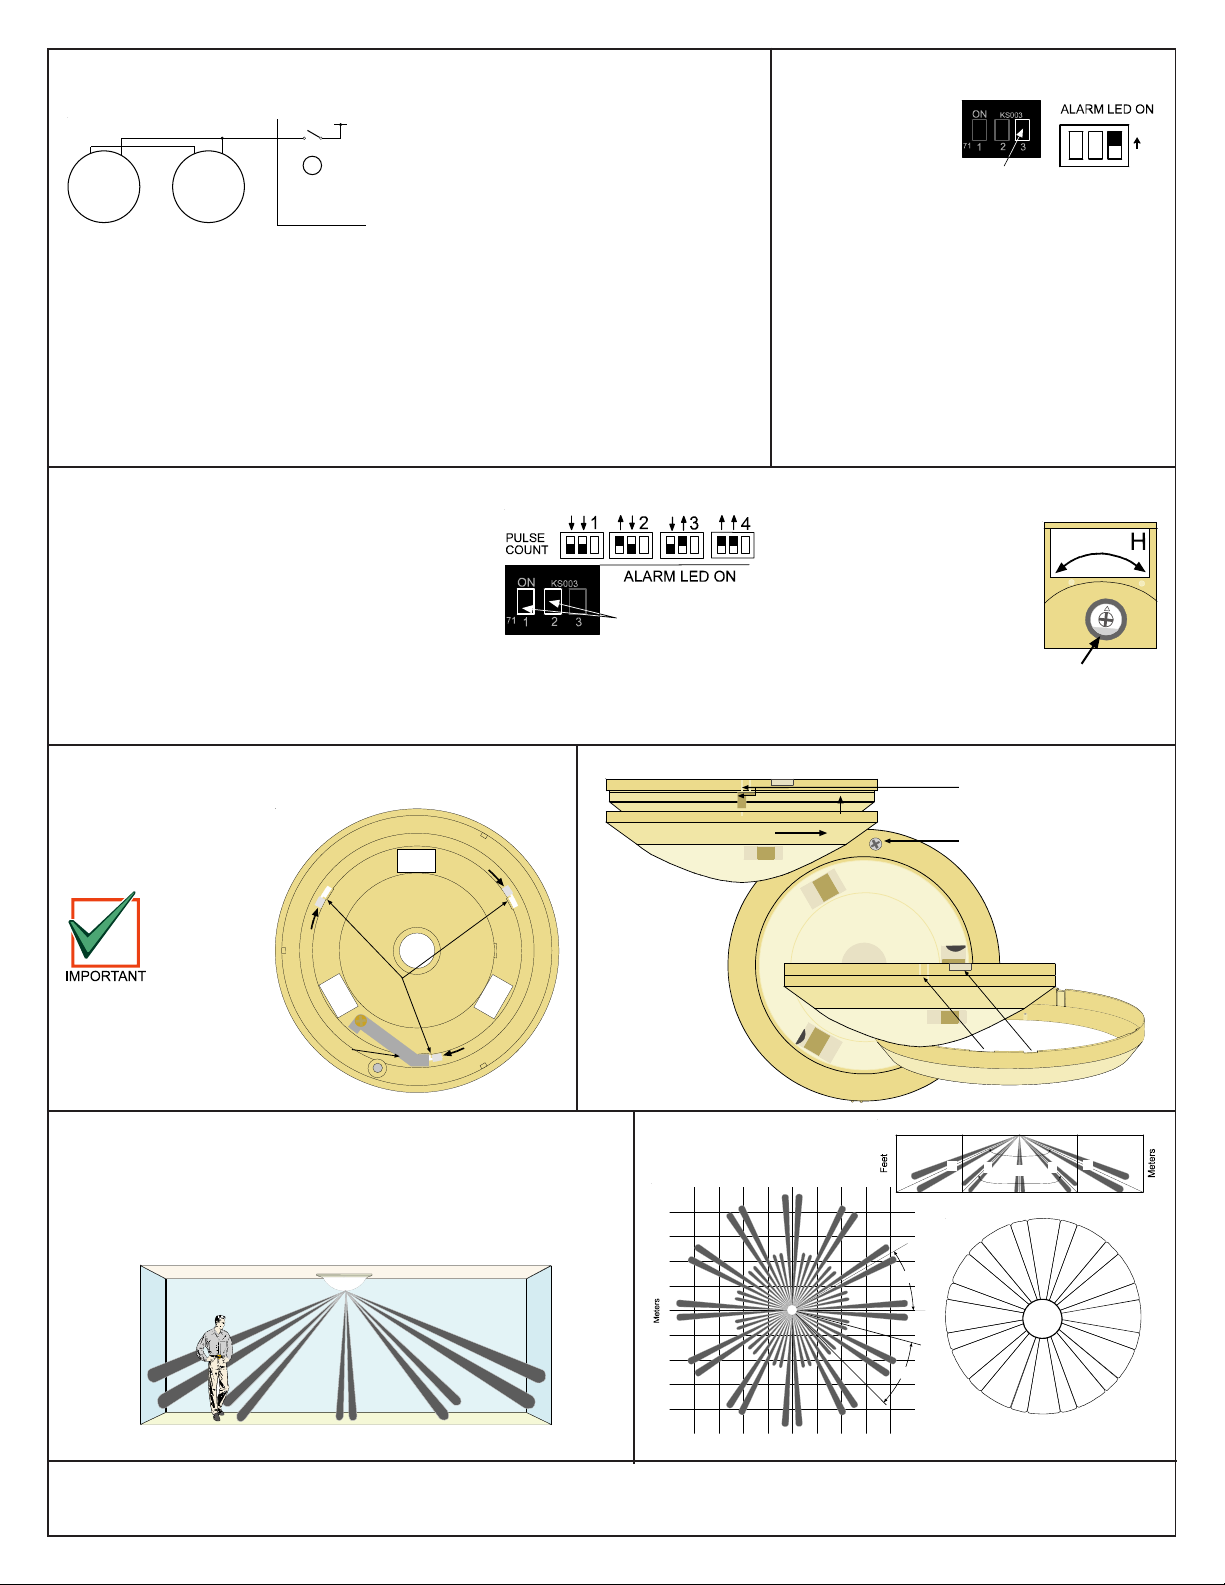
4.5 Wire as shown to use the Alarm Memory and First To Latch functions. 4.6 Set the LED On/Off Select Switch.
0
3
7Meters
010
23
Feet
130°
90°
1023
3
7
0
3
0
10
A
A
C
BB
A
B
01020
Feet
0
3
155
1.5
4.5
6
5101520
1.5
3
4.5
6
A
A
A
A
A
A
A
A
A
A
A
B
B
B
B
B
B
B
B
B
B
B
C
30°
30°
Sensitivity
Switches
Detection
Range
Adjustment
L
4. Tighten Cover Screw
5. Align Outer Cover Ring with
Detector and press until it
locks in place.
3. Rotate Cover to lock
1. Align Ridges
2. Push Cover on
Align with Ridges
Align Notches
Align with Cover Screw
Rotate
DS937
F.T.L. A.MF.T.L. A.M
DS937
DC 12V
SW
A
Control Panel
Notes:
1. If there is no alarm history, the DS937
operates the same as normal when
switch A is opened.
2. If switch A is closed after being opened,
the alarm memory will be cleared after
one second.
During the warm-up
period, the LED
flashes for about 30
seconds and the
relay is kept in
LED On/Off
Select Switch
alarm condition.
If you don’t want the alarm LED to light, it can
be turned off with this switch.
Alarm Memory only:
• Wiring of First To Latch is not needed.
• Run a single wire from the AM terminal
to switch A and then to +12 VDC.
• Switch A should stay in the closed
position for normal operation.
• When alarm history is needed, open
switch A. The LED of the DS937 with
alarm history will flash.
Alarm Memory in Conjunction with First
To Latch:
• First To Latch identifies the first DS937
to alarm.
• Procedure is the same as Alarm Memory
function.
• When alarm history is checked, the
DS937 that alarmed first will have a
flashing LED.
If the LED On/Off Select Switch is in Off mode,
the LED will indicate an alarm history when
using Alarm Memory only or when using Alarm
Memory in conjunction with First To Latch.
If the LED On/Off Select Switch is in On mode,
the LED will not operate in normal conditions
when using the Alarm Memory and First To
Latch functions.
4.7 Set the Sensitivity Switch.
Pulse Count:
4 pulse counts is the recommended setting for
locations where an intruder is expected to cover a
sizable portion of the protection area. The detector
tolerates harsh environments at this setting.
3 pulse counts is for locations where normal
environmental transients are expected.
2 pulse counts is the normal setting for areas where
thermal and illumination transients are minimal.
Detection Range
Adjustment:
The Detection Range
Adjustment may also be
used to fine tune the
sensitivity of the detector.
Adjust the control for the
lowest setting that provides
good catch performance.
1 pulse count is for fast response to intruder signals. It is for use in quiet environments
where thermal and illumination transients are not anticipated.
4.8 Mask unwanted detection zones (see
Patterns
) by lifting the Lens Lock, rotating and removing the
6.0 Coverage
Fresnel Lens, and covering the
unwanted lens areas with the
masking sticker.
Rotate Fresnel
Clean the Fresnel Lens
Lens to remove
with a soft, clean, damp
cloth. Make sure there is no
Lens Lock
dirt or fingerprints on the
lens.
5.0 Walk Test the detector . Wait until the LED stops flashing after
applying power to the detector to start walk tests. Observe the Alarm
LED while walking across the coverage area. It will light as you enter
the coverage area.
exact boundaries. Adjust the detector and continue walk testing until
the desired coverage pattern has been obtained.
© 2004 Bosch Security Systems
130 Perinton Parkway, Fairport, New York, USA 14450-9199
Customer Service: (800) 289-0096; Technical Suppor t: (888) 886-6189
NOTE: Walk testing should be done across the coverage pattern.
Walk test from both directions to determine the
4.9 Reassemble the detector.
6.0 Coverage
Patterns
A
BB
A
B
A
B
A
B
A
B
A
B
A
B
A
B
C
B
A
A
B
A
B
A
Masking Sticker
Showing Zones
03/04
DS937 Installation Instructions
P/N: 44508E Page 2
 Loading...