

Bosch D127 Installation Manual
Reversing Relay D127
Installation Instructions
1.0 Before You Begin
Before installing the D127 Reversing Relay, you should be familiar with the appropriate control panel’s Operation and
Installation Manual.
2.0 Specifications
• Operating Power:
10.5 to 14 VDC supplied by the control panel
• Current Required:
Non-alarm conditions: 5 mA + direct wire loop current
Alarm Condition: 55 mA + direct wire loop current
• Relay Contact Rating:
Maximum 2A at 24 volts, AC or DC
3.0 Description
The D127 Reversing Relay is a dual alarm reporting module. It can report alarms over a direct wire line to meet insurance
and local municipal requirements. When mounted in an enclosure with a Bosch Security Systems control panel, the D127 can
report two separate alarm conditions to the central station. For UL Certified Mercantile Systems applications, the D127
Reversing Relay should be installed in accordance with the UL 681 standard.
The D127 Reversing Relay supplies a contact reversal for one alarm condition and a repeating flip/flop (reversal/normal/
reversal) mode for a second alarm condition. The indicator at the receiving station shows the first alarm condition in the
usual fashion. A pulsed reversing output indicates the second alarm condition. This can be used to make a meter needle
swing back and forth or to make indicator lights flash. The relay output can be dry contact switching or voltage/current
reversing, depending on the requirements of the receiving station.
4.0 Wiring Connections
The following connections supply power to the D127 module. The D127 must be powered at all times to function properly
during the alarm transmission.
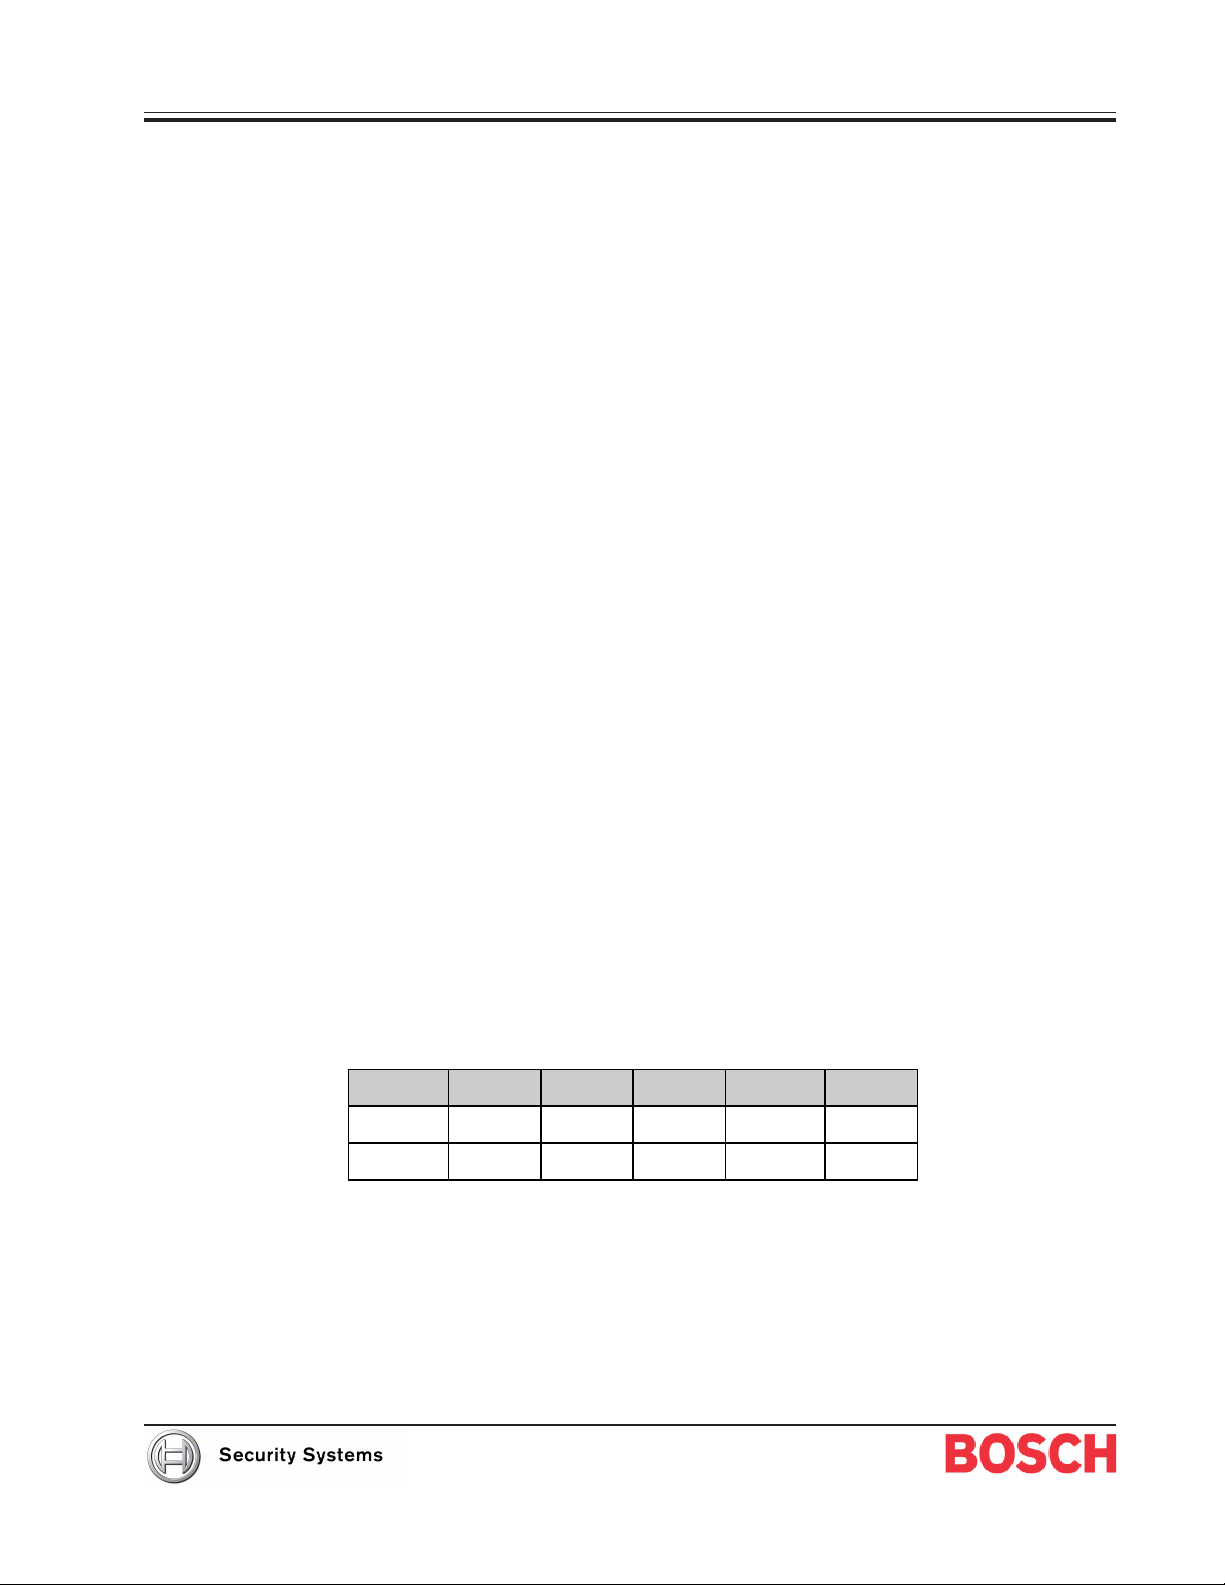
Function D127 D4112 D6112 D7112 D8112
Aux. Power837 5 3
Earth Gnd 1 or 2 4 3 11 4
Table 1: Power Connections between the D127 and Control Panel
Alarm relay output state: Alarm relay output is delayed for ten seconds after an alarm for the purpose of bell tests.

D127
Reversing Relay Direct Connection
5.0 Alarm Input Terminals
5.1 Terminal 9 (Combo Alarm)
When voltage is applied to this terminal, the state of the relay alarm contacts is reversed and stays reversed until the input
voltage is cleared.
A steady bell output causes the relay to reverse; a pulsing bell output creates a reverse/normal/reverse relay condition.
Connect this terminal to the burglar bell output. For D8112 listen-in accounts, see the Operation and Installation Guide for
bell output and programming specifications. The D7112 additional relay outputs (such as point, area in alarm, commands 7
& 9, and summary alarm outputs) can be used with this module.
5.2 Terminal 10 (Alternate alarm)
A steady voltage input on this terminal causes the relay alarm contacts to alternate between reversal and normal in
approximately one second intervals, until the input voltage is cleared. This input terminal requires a steady voltage source to
operate properly.
Simultaneous alarms at terminals 9 and 10: If both terminal 9 and 10 inputs are in alarm at the same time, the output
follows the terminal 10 input.
6.0 Reversing Relay Direct Connection
6.1 Normal Current Output
For most direct wire connections, a voltage/current reversing circuit is required. The Aux Power supply of the control panel
may supply the power necessary for this configuration.
Wire the D127 as shown in Figure 1. In this configuration, the relay output provides positive voltage at terminal 6 and
ground at terminal 5 while the relay is in the normal condition. In an alarm condition, the relay changes state until the alarm
signal disappears.
The current available at terminals 5 and 6 is limited to 60 mA. To adjust the current on the line turn VR-1 (potentiometer)
fully counterclockwise to start. Slowly turn the potentiometer clockwise until the desired current is obtained. If VR-1 is turned
completely clockwise and the current is still too low, use an external power supply (see Section 6.2 Higher Current Output).
6.2 Higher Current Output
If there is a high line resistance on the direct wires you intend to use, you may need a larger power supply. The D127 relay
contacts are rated up to 24 volts at 2 Amps. If you use an external power supply, DO NOT USE JUMPERS between
terminals 7 and 8 and terminals 2 and 4 on the D127.
Wire the D127 as shown in Figure 2. Adjust the potentiometer until you obtain the desired current. All other connections
remain the same.
Power for the D127: The D127 operates on the voltage supplied from the control panel. DO NOT connect D127 terminal 8
to the external power supply, and DO NOT jumper D127 terminal 8 to D127 terminal 7.
6.3 Dry Contact Output
To use the relay contacts for a dry contact (no voltage) interface, the connections to the control panel remain the same. DO
NOT hook up terminal 7 (refer to Figure 3). Remove any jumpers to terminal 4. For a normally open output (closes on
alarm) use terminals 4 and 6 for direct wire connections. For a normally closed output (opens on alarm) use terminals 4 and
5 for direct wire connections.
D127 Installation Instructions
74-03146-000-K Page 2 © 2003 Bosch Security Systems
 Loading...