

Page 1
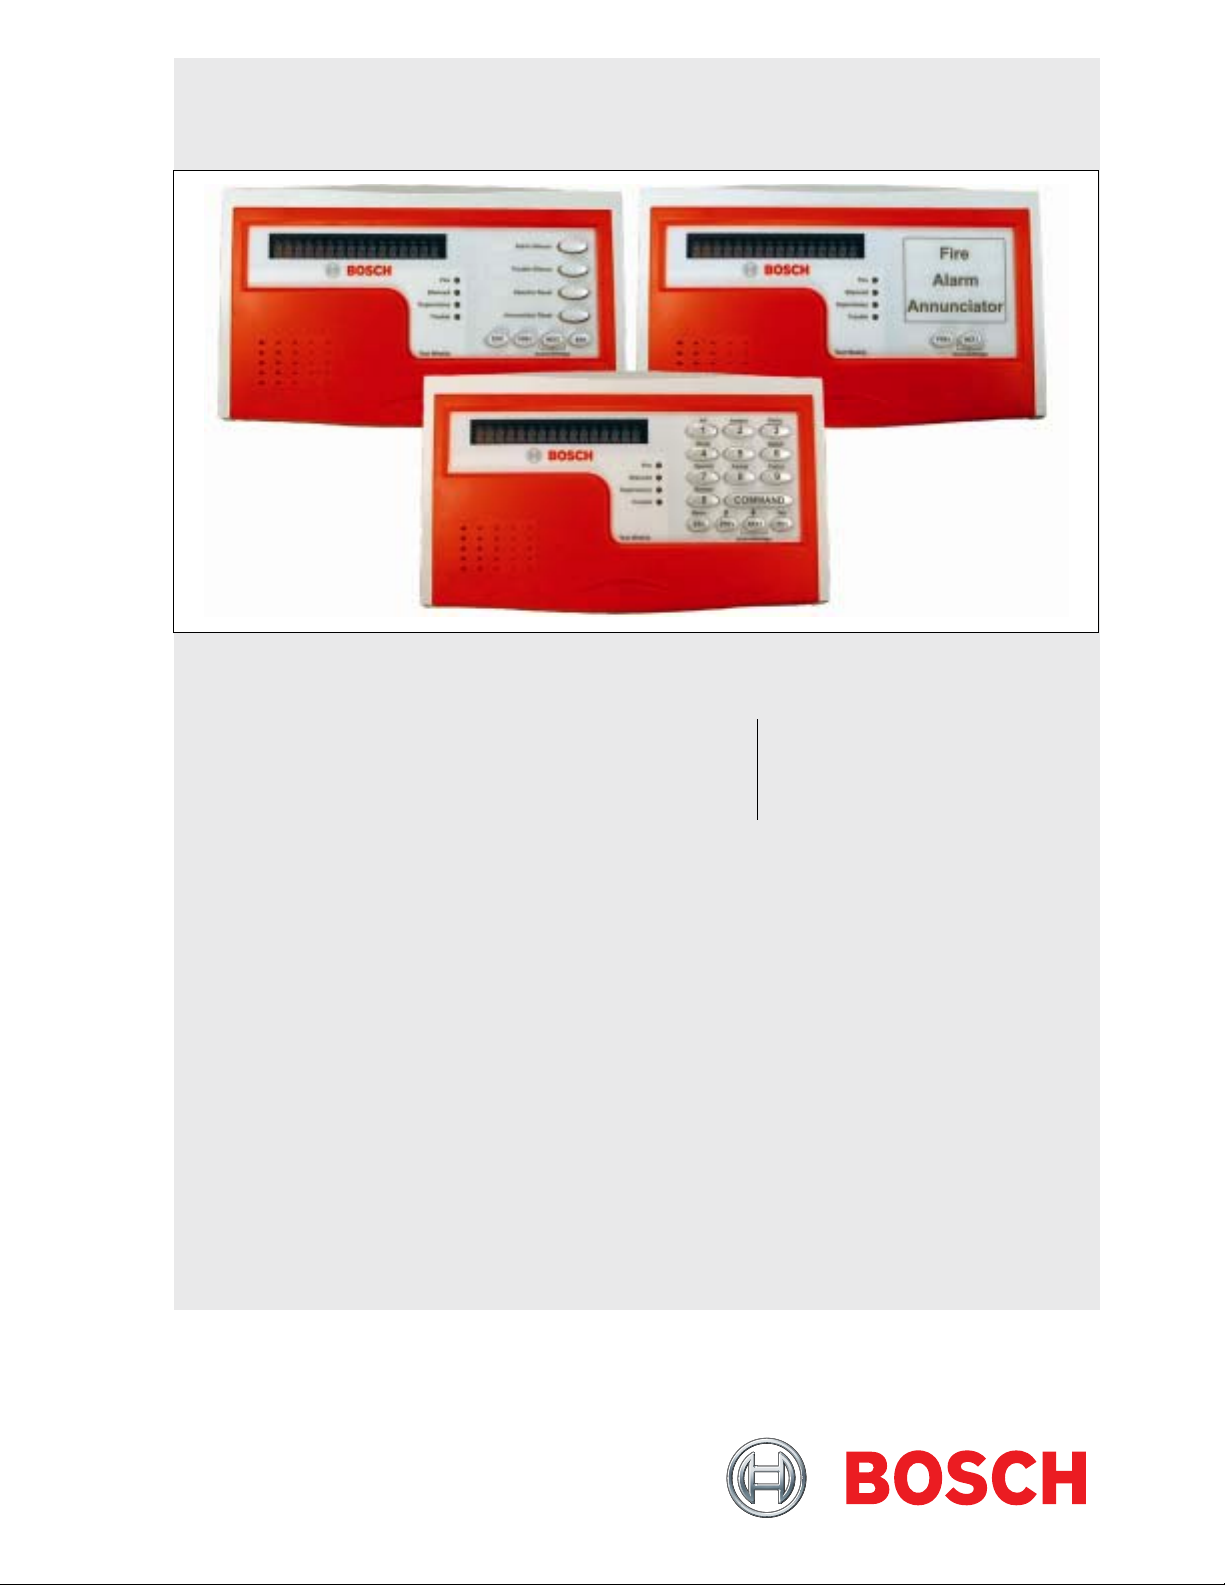
D1255RB/D1256RB/D1257RB
Installation Instructions
Fire Keypads and
EN
Fire Alarm Annunciator
Page 2

D1255RB/D1256RB/D1257RB | Installation Instructions | Listings and Approvals
Listings and Approvals
UL 365
UL 609
UL 864
UL 985
UL 1023
UL 1076
UL 1610
UL 1635
Police Station Burglar Alarm Units and
Systems
Local Burglar Alarm Units and Systems
Control Units for Fire-protective Signaling
Systems
Household Fire Warning System Units
Household Burglar Alarm System Units
Proprietary Alarm Units
Central-station Burglar-alarm Units
Digital Alarm Communicator System
Units
2 Bosch Security Systems, Inc. | 8/06 | F01U011791B
Page 3

D1255RB/D1256RB/D1257RB | Installation Instructions | Contents
.
Contents
1.0 Introduction.......................................................4
2.0 Overview ...........................................................4
2.1 D1255RB/D1256RB/D1257RB Features ........4
2.1.1 D1255RB .............................................................4
2.1.2 D1256RB .............................................................4
2.1.3 D1257RB .............................................................4
2.2 Description ..........................................................4
2.2.1 Display ................................................................. 4
2.2.2 Audible Tones..................................................... 4
2.2.3 Switch Settings ....................................................5
3.0 Installation .........................................................5
3.1 Mounting Information (D1255RB,
D1256RB, and D1257RB) .................................5
3.2 Wiring Information (D1255RB, D1256RB,
and D1257RB) .................................................... 5
3.3 Installation Procedure ........................................6
4.0 D1256RB Programming Requirements.......9
4.1 Keypad (COMMAND CENTER)
Assignments.........................................................9
4.2 Area Text............................................................. 9
4.3 Custom Functions.............................................10
4.4 Function List......................................................10
4.4.1 Menu Item and Function.................................11
4.4.2 CC Address # ...................................................11
4.4.3 Passcode Worksheet.........................................11
4.4.4 Passcode............................................................. 11
4.4.5 Keypad (Command Center) Functions..........12
5.0 Specifications ..................................................13
Figures
Figure 1: D1255RB, D1256RB, and D1257RB
Internal Arrangement................................. 5
Figure 2: Releasing the Enclosure Base .................... 6
Figure 3: Lifting the Keypad from the Enclosure
Base............................................................... 6
Figure 4: Removing the Enclosure Base................... 6
Figure 5: Lifting the Red Cover................................. 6
Figure 6: Removing the Red Cover.......................... 7
Figure 7: Removing the Faceplate............................. 7
Figure 8: Setting the Address Switches ..................... 7
Figure 9: Address DIP Switches ................................ 7
Figure 10: Mounting the Enclosure Base.................... 8
Figure 11: Wiring Harness Connection to Keypad
Figure 12: Installing the Enclosure Base − Top ......... 8
Figure 13: Closing the Enclosure Base – Bottom ...... 8
Figure 14: Example – Area Text for Fire
Figure 15: Example – Custom Functions
Figure 16: Example – Function List.......................... 10
Figure 17: Example – Fire Passcode Worksheet ..... 11
Figure 18: Example – Keypad Functions ................. 12
Figure 19: Custom Functions ..................................... 13
or Annunciator............................................ 8
Applications................................................. 9
Recommended for UL864 9
th
Edition .... 10
Tables
Table 1: DIP Switch Address Settings ..................... 7
Table 2: Keypad or Annunciator Connections....... 8
Table 3: Function List Description......................... 11
Table 4: Specifications for the D1255RB and
D1256RB Keypads and the D1257RB
Annunciator............................................... 13
Bosch Security Systems, Inc. | 8/06 | F01U011791B 3
Page 4
D1255RB/D1256RB/D1257RB | Installation Instructions | 1.0 Introduction
2.1.2 D1256RB
1.0 Introduction
Before installing the D1255RB, D1256RB, or
D1257RB, you should be familiar with the operation
and installation guide and the program entry guide for
the control panel you are using. Before proceeding
with the installation instructions in this manual, be sure
that you are familiar with the programming
recommendations in the Guide to UL 864 9th Edition
Programming Requirements section of the Introduction in
the D9412GV2/D7412GV2 Program Entry Guide
(P/N F01U003636).
2.0 Overview
2.1 D1255RB/D1256RB/D1257RB
Features
The D1255RB and D1256RB Fire Keypads and the
D1257RB Fire Alarm Annunciator are 4-wire serial
devices used with the following Bosch Security Systems
control panels with firmware version 7.04 or higher:
• D9412GV2
• D7412GV2
• D7212GV2
The D7212GV2 is not approved for
commercial fire applications.
Each of these control panels supervises up to eight
keypads or annunciators. You can connect a total of 32
keypads or annunciators to the system. The number of
supervised keypads or annunciators, number of areas,
and the available power affect the total number of
keypads or annunciators you can connect to the
system.
2.1.1 D1255RB
The D1255RB has number keys (0 to 9) and function
or menu keys, including [COMMAND] and [ENTER].
The D1255RB can be used as a system controller and
an annunciator.
Because a passcode is required to use the keypad, it is
usually installed in building entrances and areas with
unrestricted access. Near an exterior door in a hotel or
in a business lobby is an ideal mounting location,
allowing a responding agency or persons evacuating
the building to identify quickly the type and location of
the emergency from outside without being in danger.
The D1256RB provides annunciation and system
control. Four function keys on the D1256RB provide
quick execution of alarm silencing, trouble silencing,
annunciator display reset, and sensor reset functions.
The D1256RB should be mounted in a
secure area or locked inside an approved
2.1.3 D1257RB
The D1257RB provides remote annunciation without
system control capability. It can be mounted in public
access locations.
Two keys on the D1257RB allow the user to select
forward or backward through a list of system events.
clear plastic enclosure.
2.2 Description
2.2.1 Display
The D1255RB, D1256RB and D1257RB use a
16-character display with custom programmable text.
The custom text programmed at the control panel
appears in the vacuum fluorescent display (VFD).
Refer to Figure 1, Item 1.
The keypads and annunciator show the latest status
conditions of the fire system using words, numbers, and
symbols. When an alarm occurs, a message remains in
the display until the user acknowledges the event at a
keypad or annunciator. When a series of events
affecting the system occurs, each event appears in
order of its priority.
2.2.2 Audible Tones
The D1255RB, D1256RB and D1257RB have a builtin speaker that produces several distinct warning tones.
To change the speaker volume, adjust the
potentiometer (Figure 1, Item 3). Turn the potentiometer
clockwise to increase and counterclockwise to decrease
the volume.
You cannot connect external annunciation
devices to the D1255RB, D1256RB, and
• Fire Signal – Pulsed, high pitched bell tone when
• Invalid Key Buzz – Flat buzz tone when an
• Keypad Encoding Tone – Muted beep tone as
D1257RB.
the system is in alarm
invalid key, or sequence of keys, is pressed
each key is pressed to indicate that the entry has
been accepted. To disable the keypad encoding
tone, refer to Section 2.2.3 Switch Settings.
4 Bosch Security Systems, Inc. | 8/06 | F01U011791B
Page 5
D1255RB/D1256RB/D1257RB | Installation Instructions | 3.0 Installation
.
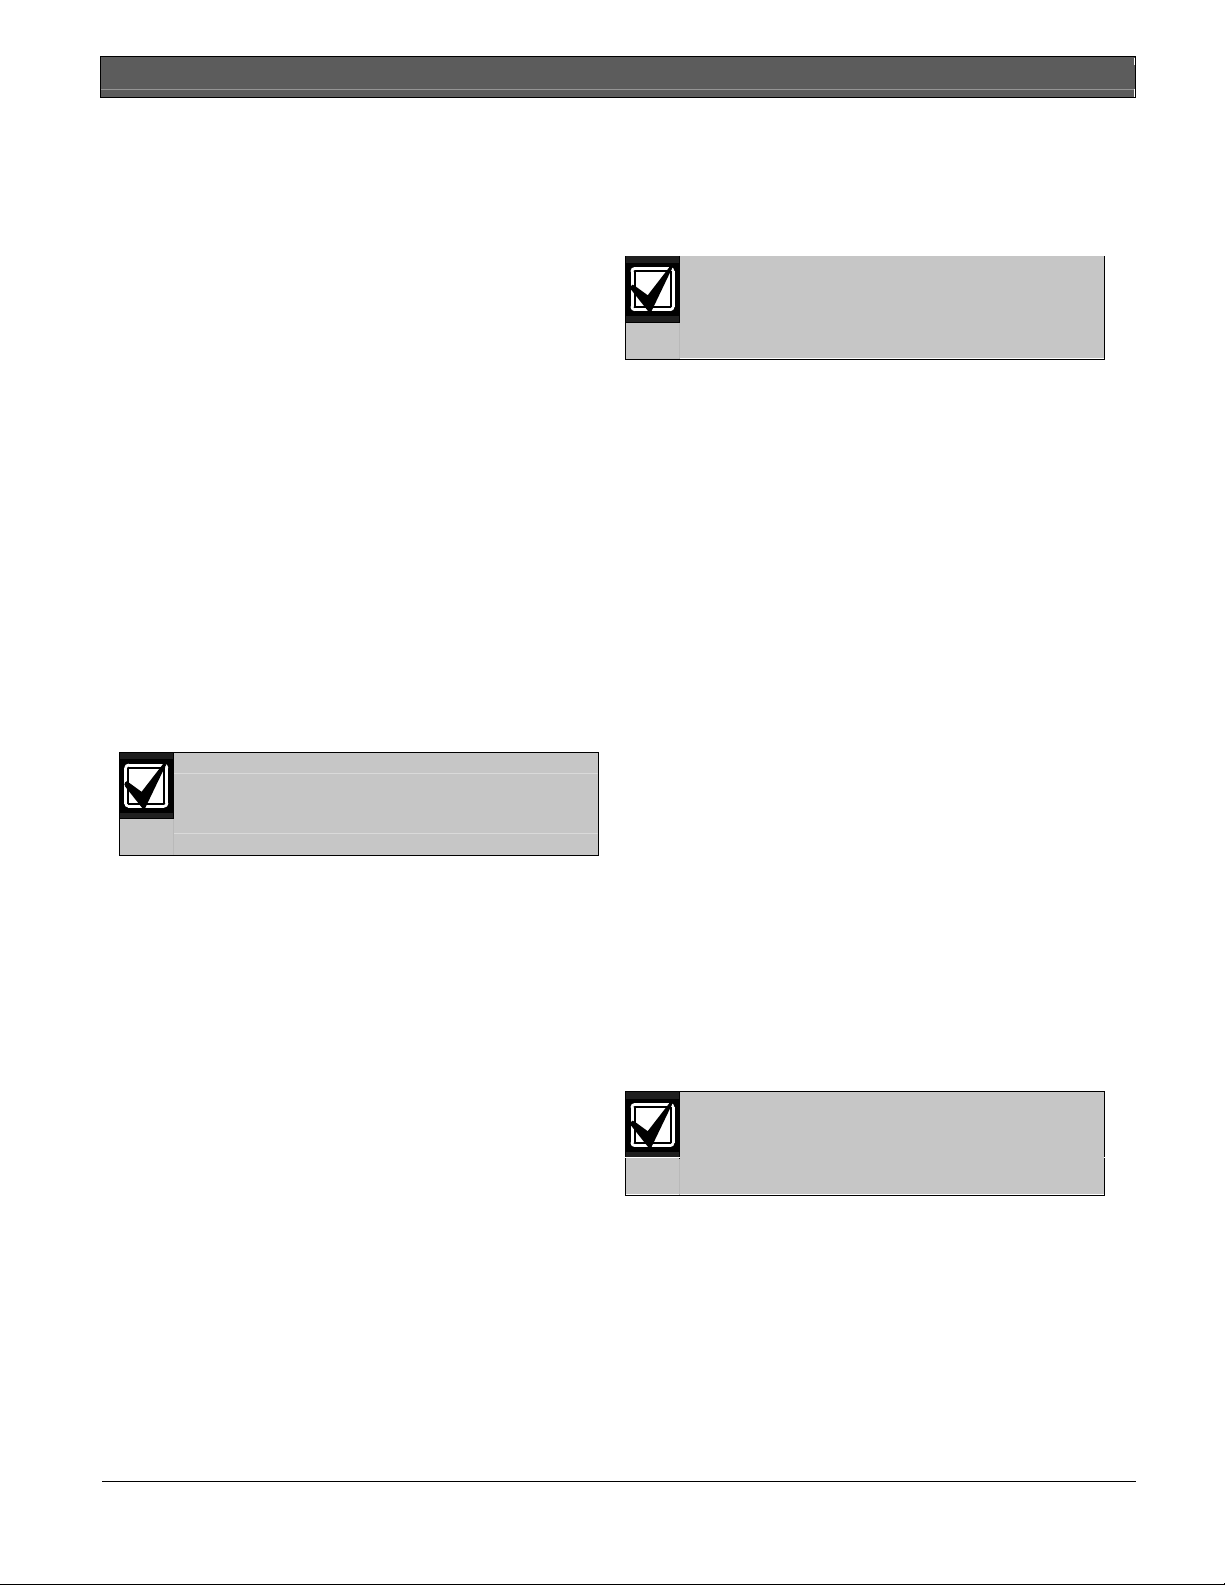
Figure 1: D1255RB, D1256RB, and D1257RB Internal Arrangement
1
7
6
1 - Vacuum fluorescent display (VFD)
2 - Keypad
3 - Speaker volume control (potentiometer)
4- Address DIP switches
• Trouble Buzzer – Two-tone warble when a
trouble event occurs, such as a service alert. To
stop the signal on a D1255RB Keypad, press
[COMMAND][4]. To stop the tone on a D1256RB,
press the [TROUBLE SILENCE] key.
The D1257RB does not have a manual
method of stopping the trouble buzzer.
Refer to the Fire System User’s Guide
(P/N: F01U011793) for information about silencing the
signals.
• Lost Communication – Single trouble tone
followed by a 30-second silence when a keypad or
annunciator loses communication from the control
panel. To stop the tone, restore communication or
remove power from the keypad or annunciator.
2.2.3 Switch Settings
A 6-position DIP switch (Figure 1, Item 4) located under
the cover allows you to select the address of each
keypad or annunciator and silence the keypad
encoding tones.
For information on accessing the switches, refer to
Section 3.3 Installation Procedure on page 6.
For supervised keypads, assign only one
keypad to each address.
5
123456
2
4
3
5 - Status LEDs
6 - Wiring harness connector
7 - Speaker for sounder
3.0 Installation
3.1 Mounting Information (D1255RB,
D1256RB, and D1257RB)
The D1255RB, D1256RB, and D1257RB are lowprofile, surface-mounted units molded in durable red
plastic. Use the D56 Keypad Conduit Box (protected
surface or flush mount) for mounting the units.
Mounting Locations
• Do not mount the keypads and
annunciators in locations where they are
exposed to direct sunlight. Direct
3.2 Wiring Information (D1255RB,
A four-wire flying lead is required for the data and
power connections between the keypad or annunciator
and the control panel. The unit includes a wiring
harness with four color-coded flying leads at one end
and a female four-pin connector at the other end.
Refer to Figure 10 and Figure 11 on page 8 to wire the
D1255RB, D1256RB, or D1257RB.
sunlight can interfere with the display
screen’s visibility and damage internal
components.
• Do not mount the units in wet or moist
locations.
D1256RB, and D1257RB)
Bosch Security Systems, Inc. | 8/06 | F01U011791B 5
Page 6
D1255RB/D1256RB/D1257RB | Installation Instructions | 3.0 Installation
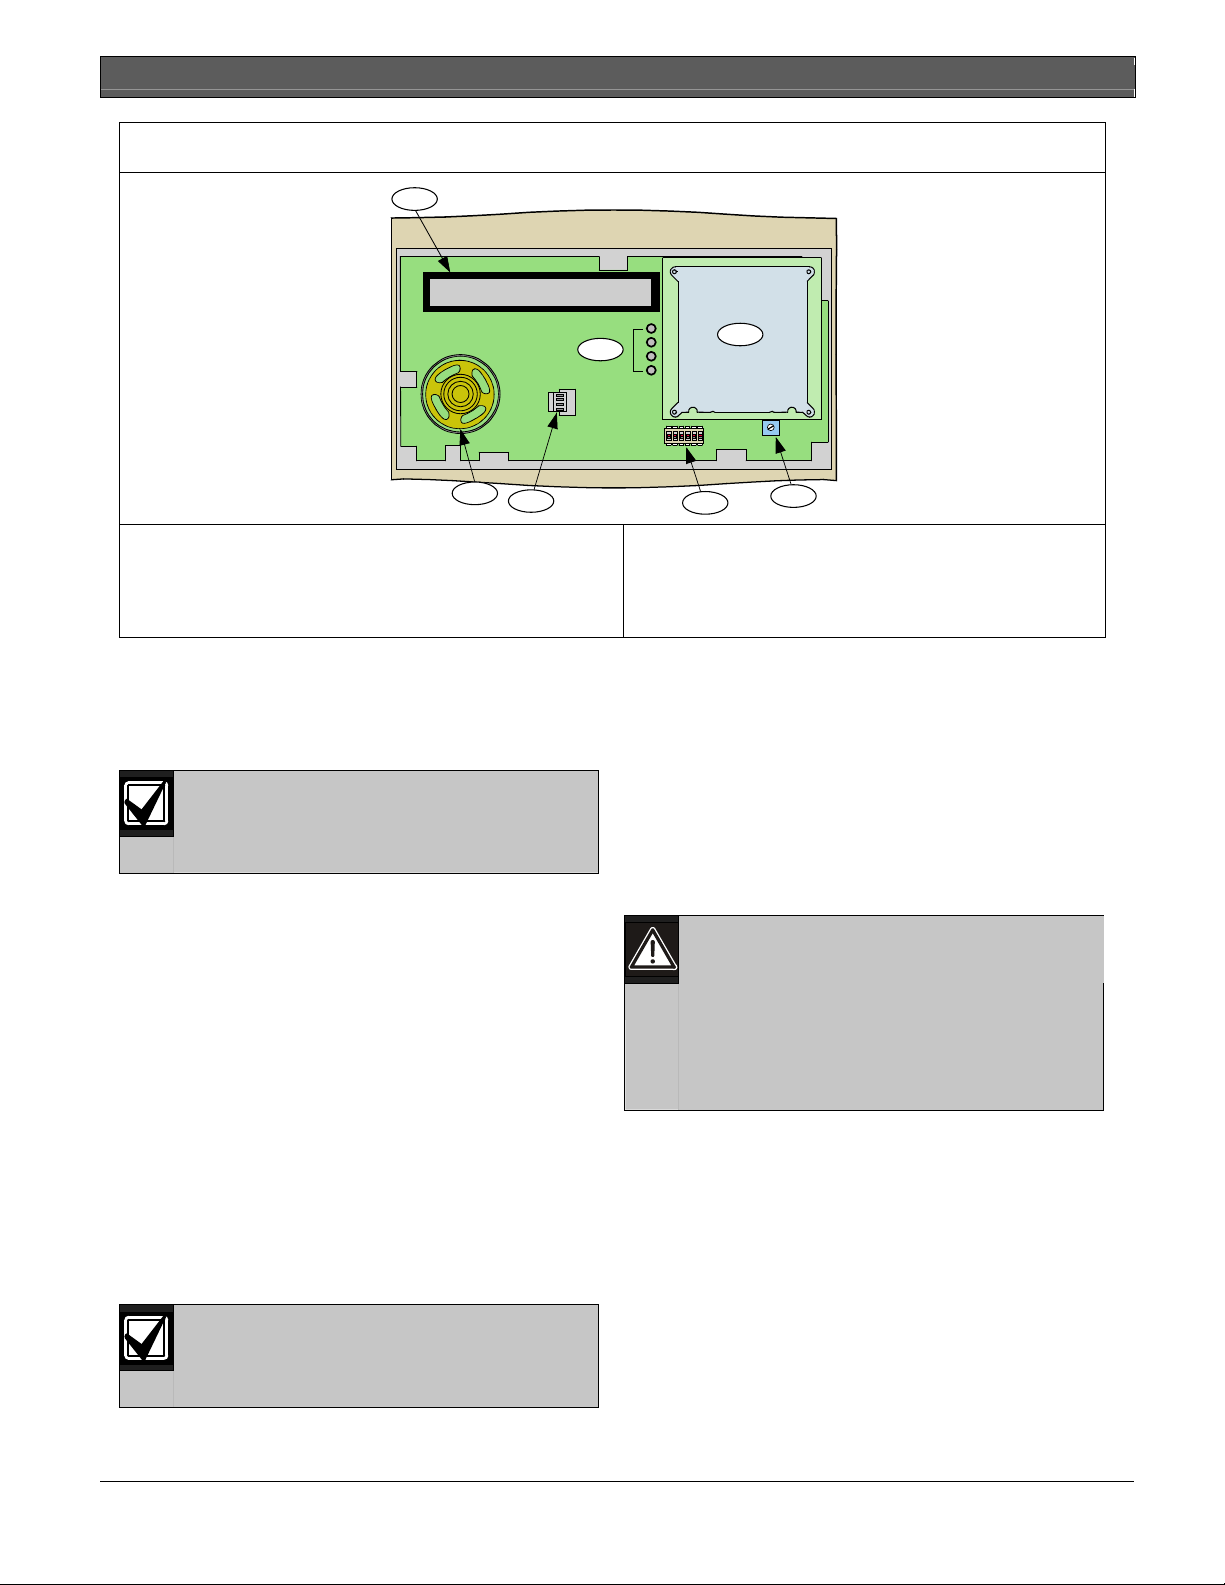
3.3 Installation Procedure
1. Power down the control panel.
2. Using a small flat-bladed screwdriver, gently push
4. Gently pull the keypad apart from the enclosure
base at the top hinges.
Figure 4: Removing the Enclosure Base
the two bottom tabs up and in to release the
enclosure base. Refer to Figure 2.
Use caution to avoid damage to the tabs
and hinges.
Figure 2: Releasing the Enclosure Base
1 - Enclosure base
2- Top hinges
5. Lift and remove the red cover.
1 - Screwdriver
Figure 5: Lifting the Red Cover
2 - Tabs
3 - Enclosure base
3. Gently lift the unit from the enclosure base as the
tabs are pushed in.
Figure 3: Lifting the Keypad from the Enclosure
Base
1 - Enclosure base
2 - Tabs
6 Bosch Security Systems, Inc. | 8/06 | F01U011791B
Page 7

.
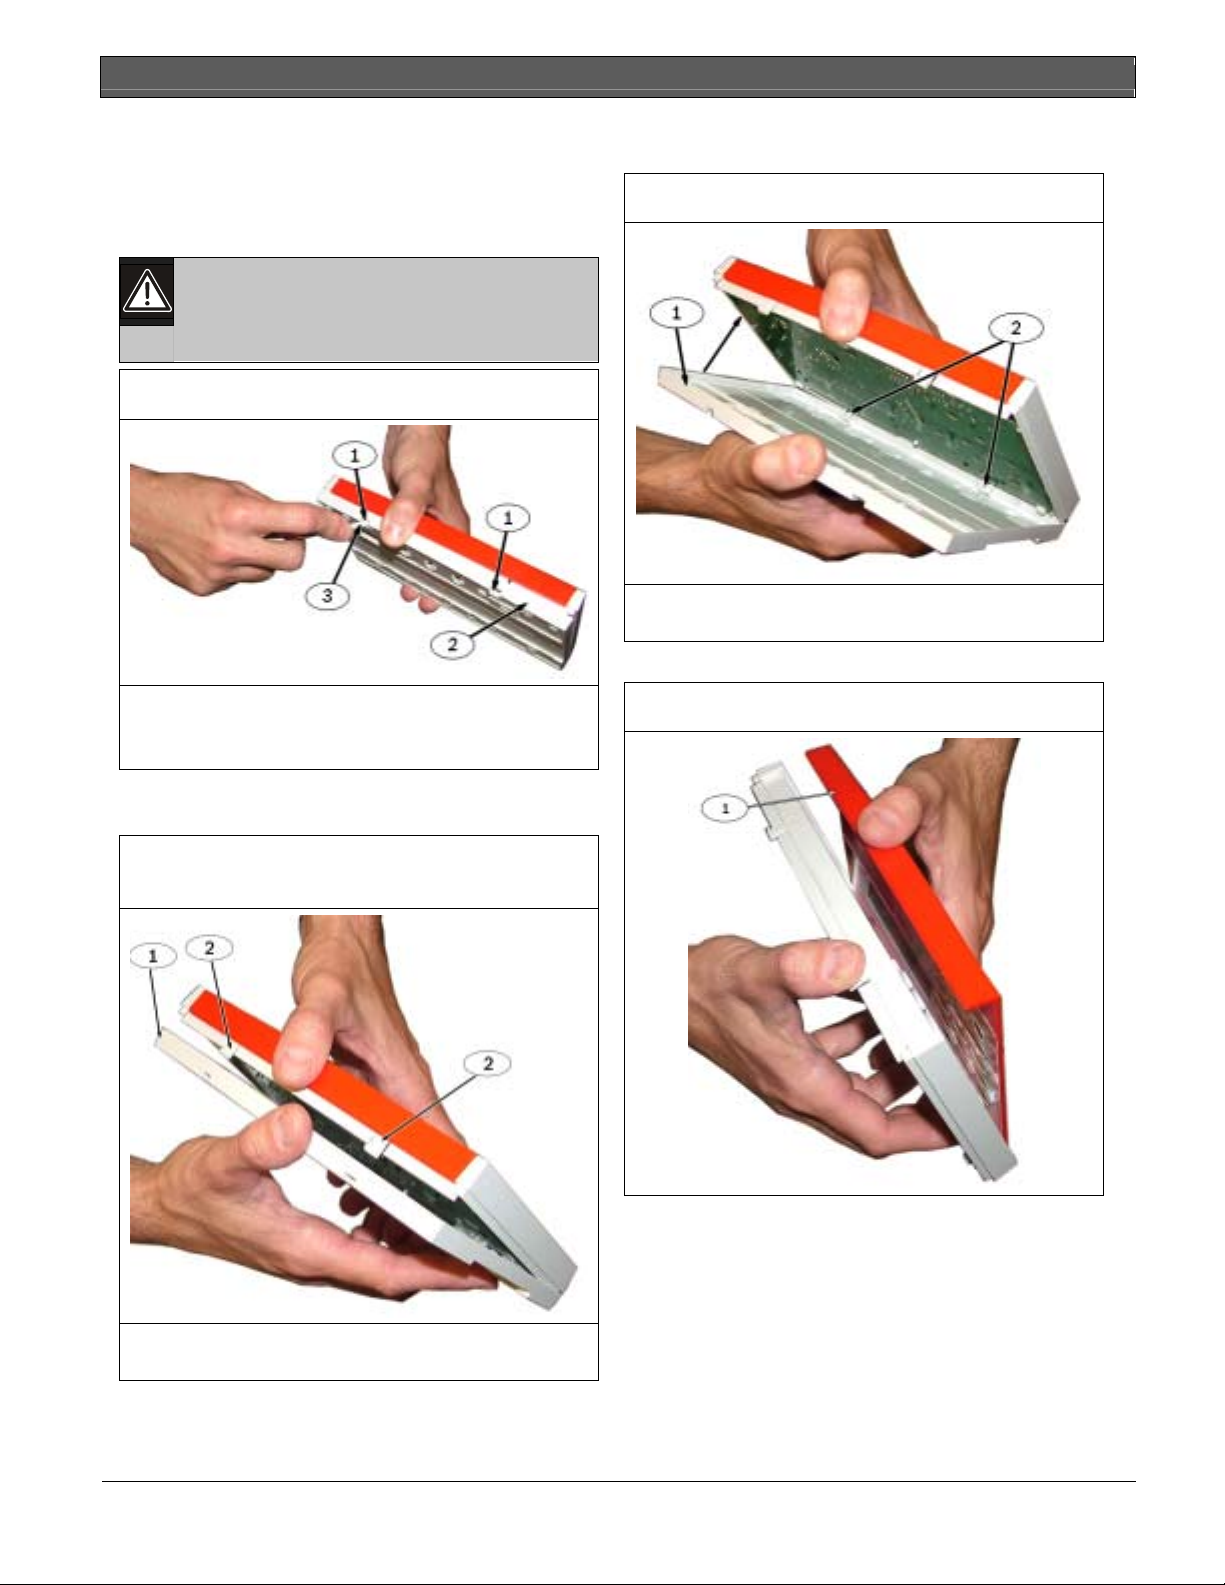
Figure 6: Removing the Red Cover
D1255RB/D1256RB/D1257RB | Installation Instructions | 3.0 Installation
7. Set the address switches. Refer to Figure 8, Figure 9,,
and Table 1.
Figure 8: Setting the Address Switches
1 - Red cover
6. Remove the faceplate.
Figure 7: Removing the Faceplate
1 - Faceplate
1 - Faceplate
2 - Address switches
Figure 9: Address DIP Switches
N
O
123456
Table 1: DIP Switch Address Settings
Switch Number Address
Number
1
2
3
4
5
6
7
8
∗
Switch 5 toggles the encoding tone ON and OFF. With the
encoding tone turned on, the keypad sounds a beep each
time a key is pressed.
1 2 3 4
ON ON ON ON ON
OFF ON ON ON ON
ON OFF ON ON ON
OFF OFF ON ON ON
ON ON OFF ON ON
OFF ON OFF ON ON
ON OFF OFF ON ON
OFF OFF OFF ON
∗
5
ON/OFF
ENCODING TONE
6
ON
Bosch Security Systems, Inc. | 8/06 | F01U011791B 7
Page 8

D1255RB/D1256RB/D1257RB | Installation Instructions | 3.0 Installation
Warning: Avoid injury. Do not wire the
D1255RB, D1256RB, or D1257RB if
power is applied to the control panel.
Figure 11: Wiring Harness Connection to Keypad
or Annunciator
8. Connect the flying leads on the wiring harness
(Figure 10) to the wiring terminals on the control
panel. Refer to Table 2.
Table 2: Keypad or Annunciator Connections
D9412GV2/
D7412GV2
Terminal Function
32*
POWER + Red 12 VDC
31 DATA BUS A Yellow Data
30 DATA BUS B Green Data
29 COMMON Black Common
* Connect with at least 1.5 m (5 ft.) of 0.8 mm (22 AWG) wire
(4.3 m [14 ft.] of 1.2 mm [18 AWG] wire).
9. Feed the connector end of the wiring harness
through the opening in the back of the enclosure
base (Figure 10).
10. Secure the keypad or annunciator to its mounting
Keypad
Wire Color Function
1 - Connector
12. Replace the faceplate.
13. Replace the cover. Align and insert the top two
tabs of the cover into the top two tab slots on the
front of the keypad.
14. Install the enclosure base:
a. Hold the unit at an angle to the enclosure base
and snap the hinges on the top edge of the unit
into place first.
Figure 12: Installing the Enclosure Base − Top
location from inside the enclosure base by inserting
screws through the mounting holes (Figure 10).
1
Figure 10: Mounting the Enclosure Base
1
1
4
5
1
2
3
1
1 - Mounting hole
2 - Flying leads
3 - Wiring harness
4 - Opening
5 - Connector
11. Connect the wiring harness to the connector on the
back of the keypad or annunciator (Figure 11).
1 - Hinges
b. Press the bottom edge of the unit toward the
enclosure base until the tabs snap into the
openings in the base.
Figure 13: Closing the Enclosure Base – Bottom
1 - Enclosure base 2 Tabs
8 Bosch Security Systems, Inc. | 8/06 | F01U011791B
Page 9

D1255RB/D1256RB/D1257RB | Installation Instructions | 4.0 D1256RB Programming Requirements
.
4.0 D1256RB Programming
Requirements
For D1255RB and D1257RB programming
information, refer to the appropriate
Important programming recommendations and
requirements are described in this section. For
information about the displays and functions available
from the D1256RB, refer to Keypad (Command Center),
User Interface, and Function List in the GV2MAIN section,
and User (Passcode) Worksheet in the RADXUSR1 Handler
or RADXUSR1/RADXUSR2 Handlers section of the
program record sheet for the control panel.
4.2 Area Text
Figure 14: Example – Area Text for Fire Applications
program entry guide and program record
sheet for the control panel.
4.1 Keypad (COMMAND CENTER)
Assignments
• Keypad Text: The D1256RB can be assigned to
any one of the eight addresses in the control panel.
Refer to Sections 4.2 Area Text, 4.3 Custom Functions
on page 10, and 4.4 Function List on page 10 for
programming descriptions for one D1256RB
assigned to Keypad 1, Area 1.
• Supervised: Certain local jurisdictions might
require supervision of fire system annunciators. If
your area has that requirement, set the supervision
to YES for the addresses that use fire alarm
annunciators.
• Scope: The D1256RB acknowledges fire alarms
and troubles, not burglar alarms and troubles. Set
the scope to include fire areas only.
• Area: Program the area number of the fire area(s)
as normal.
Area 1 Area 2
Area # is On
Area # Not Ready
Area # is Off
Area # Acct is On
P R E S S A L A R M S I L _ _ _ _ _ _ _ _ _ _ _ _ _ _ _ _
C H E C K F I R E S Y S _ _ _ _ _ _ _ _ _ _ _ _ _ _ _ _
* F I R E S Y S T E M * _ _ _ _ _ _ _ _ _ _ _ _ _ _ _ _
P R E S S A L A R M S I L _ _ _ _ _ _ _ _ _ _ _ _ _ _ _ _
Area # is On − PRESS ALARM SIL
Fire area should remain in the OFF state at all times. If the authority level is not programmed correctly, and the
fire alarm area arms, PRESS ALARM SIL shows on the display. Pressing the [ALARM SILENCE] key silences
any alarms(s) and disarms the area.
The idle text, * FIRE SYSTEM *, appears on the display when the area is disarmed.
Area # Not Ready − CHECK FIRE SYS
Most fire alarm areas consist of all 24-hour points and the Area # Not Ready display is not used. If a controlled
point type is used for some type of fire supervision device, and the device becomes off-normal, CHECK FIRE
SYS appears on the fire keypad.
Area # is Off − * FIRE SYSTEM *
This is the normal idle text for the fire keypad and annunciator.
Area # Acct is On − PRESS ALARM SIL
Fire area should remain in the OFF state at all times. If the authority level is not programmed correctly, and the
fire alarm area arms, PRESS ALARM SIL shows on the display. Pressing the [ALARM SILENCE] key silences
any alarms(s) and disarms the area.
The idle text, * FIRE SYSTEM *, appears on the display when the area is disarmed.
Bosch Security Systems, Inc. | 8/06 | F01U011791B 9
Page 10
D1255RB/D1256RB/D1257RB | Installation Instructions | 4.0 D1256RB Programming Requirements
4.3 Custom Functions
Figure 15: Example – Custom Functions Recommended for UL864 9th Edition
CF 128
CF 129
CF 130
CF 131
Custom Function Text Custom Function Keystrokes
A L A R M S I L E N C E ? 1 2 5 6 0 0 E _ _ _ _ _ _ _ _ _
T R O U B L E S I L E N C E ? A 4 C C _ _ _ _ _ _ _ _ _ _ _ _
D E T E C T O R R E S E T ? A 4 7 _ _ _ _ _ _ _ _ _ _ _ _ _
A N U N C I A T O R R E S E T 1 2 5 6 0 0 C A 4 7 _ _ _ _ _ _
In Figure 15, C = [ESC], E = [ENT], A = [Command].
In the D1256RB, Custom Functions must be programmed as indicated in Figure 15. Refer to Keypad (Command
Center), Custom Functions in the program record sheet for your control panel for information on making the
function keys operational.
The passcode 125600 is used in the following examples. You can use any passcode.
CF 128 − ALARM SILENCE ?
Keystrokes: [1] [2] [5] [6] [0] [0] [ENT]. Program this custom function as the first Menu item in the D1256RB
display. The Alarm Silence function is executed when the [ALARM SILENCE] key is pressed on the D1256RB.
The control panel sees the keystroke entry as a valid passcode having the authority to silence a ringing fire bell in
the area. The [ENT] key has the enter function.
CF 129 − TROUBLE SILENCE ?
Keystrokes: [A] [4] [ESC][ESC]. Program this custom function as the second item in the Menu. The function is
executed whenever the [TROUBLE SILENCE] key is pressed on the D1256RB. This entry is the equivalent to
executing a [COMMAND] [4] on the D1256RB.
CF 130 − DETECTOR RESET ?
Keystrokes: [A] [4] [7]. Program this custom function as the third item in the Menu. The function is executed
whenever the [DETECTOR RESET] key is pressed on the D1256RB. This entry is the equivalent to executing a
[COMMAND] [4][7] on the D1256RB.
CF 131 − ANNUNCIATOR RESET ?
Keystrokes: [1] [2] [5] [6] [0] [0] [ESC] [Command] [4] [7]. Program this custom function as the fourth command
item in the Menu. The function is executed whenever the [ANNUNCIATOR RESET] key is pressed on the
D1256RB. Executing this function clears the “View Memory” buffer, but does not clear the event out of the event
log contained with the control panel.
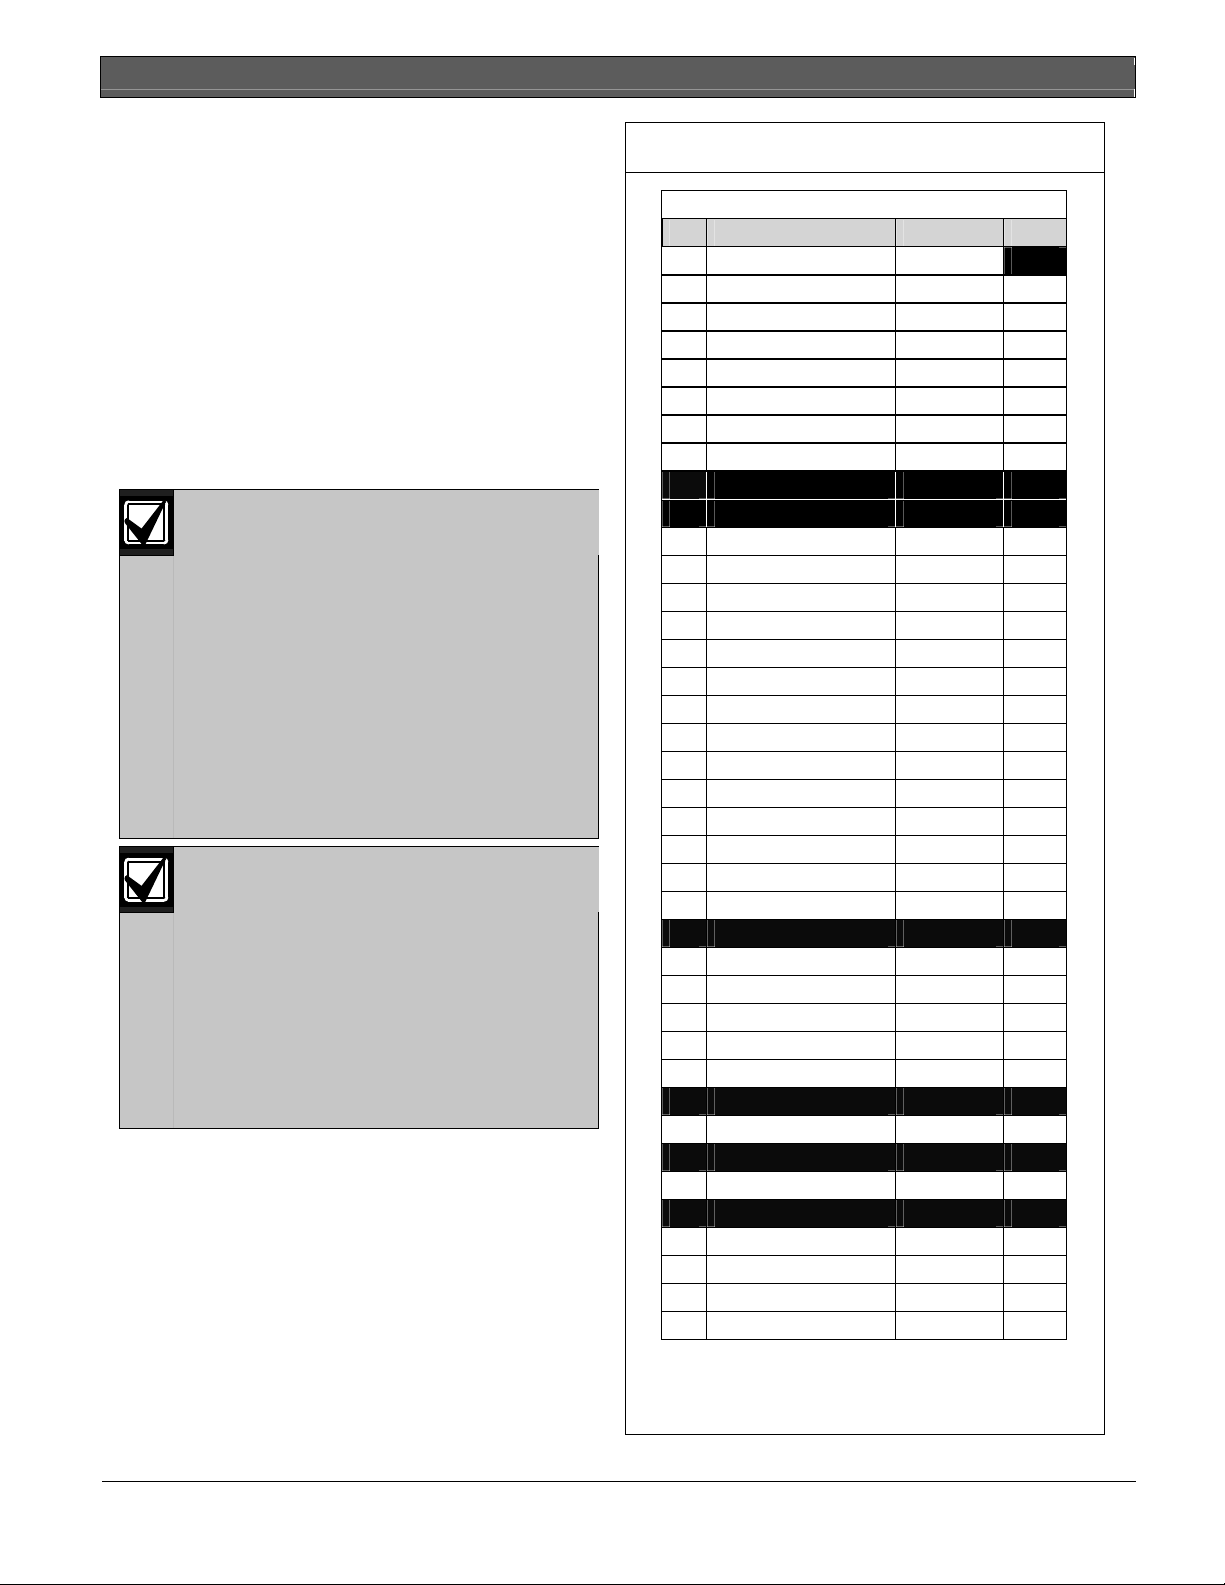
4.4 Function List
Figure 16: Example – Function List
Menu
Item
1 1 2 8
2 1 2 9
3 1 3 0
4 1 3 1
5 _ _ 9
6 _ 1 0
7 _ 1 2
8 _ 2 1
9 _ 2 9
10 _ 3 2
11 _ _ _
Function
Refer to Function List in the program record sheet for the control panel.
CC
Address 1
Yes / No Yes / No
Yes / No Yes / No
Yes / No Yes / No
Yes / No Yes / No
Yes / No Yes / No
Yes / No Yes / No
Yes / No Yes / No
Yes / No Yes / No
Yes / No Yes / No
Yes / No Yes / No
Yes / No Yes / No
CC
Address 2
CC
Address 3
Yes / No Yes / No Yes / No Yes / No Yes / No Yes / No
Yes / No Yes / No Yes / No Yes / No Yes / No Yes / No
Yes / No Yes / No Yes / No Yes / No Yes / No Yes / No
Yes / No Yes / No Yes / No Yes / No Yes / No Yes / No
Yes / No Yes / No Yes / No Yes / No Yes / No Yes / No
Yes / No Yes / No Yes / No Yes / No Yes / No Yes / No
Yes / No Yes / No Yes / No Yes / No Yes / No Yes / No
Yes / No Yes / No Yes / No Yes / No Yes / No Yes / No
Yes / No Yes / No Yes / No Yes / No Yes / No Yes / No
Yes / No Yes / No Yes / No Yes / No Yes / No Yes / No
Yes / No Yes / No Yes / No Yes / No Yes / No Yes / No
CC
Address 4
CC
Address 5
CC
Address 6
CC
Address 7
CC
Address 8
10 Bosch Security Systems, Inc. | 8/06 | F01U011791B
Page 11

D1255RB/D1256RB/D1257RB | Installation Instructions | 4.0 D1256RB Programming Requirements
.
4.4.1 Menu Item and Function
Program the first ten menu items as indicated in
Table 3. This programming is necessary for the
D1256RB to operate properly. The first four keys on
the D1256RB execute the first four menu items
enabled at the keypad address. Menu items five
through ten are optional features that can be
programmed into the D1256RB system. Refer to the
Fire System User’s Guide (P/N: F01U011793) for further
explanation of these optional programmable items.
Ensure that CF 128 through CF 131 are
programmed E (enabled) and not P
(passcode required).
Table 3: Function List Description
Menu Item Function Description
1 128
2 129
3 130
4 131
5 9
6 10
7 12
8 21
9 29
10 32
ALARM SILENCE?
TROUBLE SILENCE?
DETECTOR RESET?
ANNUNCIATOR RESET
VIEW MEMORY?
VIEW PT STATUS?
FIRE TEST?
VIEW LOG?
REMOTE PROGRAM?
DISPLAY REV?
4.4.2 CC Address #
CC = command center = keypad
Program the keypad (command center) addresses as
Yes for the first four menu items and for the optionally
programmed menu items five through ten.
4.4.3 Passcode Worksheet
Figure 17: Example – Fire Passcode Worksheet
User (Passcode) Worksheet (Users 000 to 029)
User
##
#
123 __ __ __ __ __ __
000
001
Passcode
1 2 5 6 0 0
User
Group
____
____
1 2 3 4 5 6 7 8
15 15 15 15 15 15 15 15
14
__ __ __ __ __ __ __
Area Authority
Refer to User (Passcode) Worksheet in the program record sheet for the control panel.
4.4.4 Passcode
A special passcode must be programmed as a valid passcode for the system to work properly. This passcode is
used in Custom Functions 128 through 131. Use any user number to establish this mandatory valid passcode. You
must also create it as a valid passcode in the area to which the D1256RB is assigned. Use Authority Level 14
together with the passcode you select. Ensure that Passcode Arm is disabled (blank) for the Authority Level.
Refer to Authority Level Selections in the program record sheet for the control panel.
SERVICE
PASSCODE
USER 1
User Name
Bosch Security Systems, Inc. | 8/06 | F01U011791B 11
Page 12
D1255RB/D1256RB/D1257RB | Installation Instructions | 4.0 D1256RB Programming Requirements
P
P
P
P
P
P
P
P
P
P
P
P
P
P
P
P
P
P
P
P
P
P
P
P
P
P
4.4.5 Keypad (Command Center) Functions
The following keypad function must be enabled or
passcode required to enable the [DETECTOR RESET]
key.
• #27 Reset Sensors
Include the following items in the menu:
• #9 View Event Memory
• #10 View Point Status
• #12 Fire Test
• #21 View Log
• #29 Remote Program
• #32 Display Rev
Refer to Figure 18.
For the D9412GV2 Control Panel, program
each of the keypad functions with E
(enabled) and not P (passcode required). If
restricting any of the keypad functions with
a passcode is required, those functions
must be executed from a custom function
that includes an authorized passcode.
Example (Refer to Figure 18.): If the
keypad function View Memory is
programmed as P (passcode required), and
the passcode 125600 has authority to
execute it, the keystrokes would be:
[A] [4] [0] [1] [2] [5] [6] [0] [0] [E]
When creating a Menu Function List for a
keypad address, consider that the
D1256RB Keypad does not have numeric
keys. Ensure that:
• no passcode-protected keypad functions
are in a Menu Function List enabled at
an address that coincides with the
installed address for a D1256RB
Keypad.
• the
CC# Menu Key Lock
prompt is set
to No for the D1256RB address.
Figure 18: Example – Keypad Functions
Keypad Functions
# Functions Command
1 Disarm ?
2 Master Arm Delay ? CMD 1
3 Master Arm Instant ? CMD 11
4 Perimeter Instant ? CMD 2
5 Perimeter Delay ? CMD 3
6 Watch Mode ? CMD 6
7 Perimeter Part ? CMD 8
8 View Area Status ?
9 View Memory ? CMD 40
10 View Pt Status ?
11 Walk Test ? CMD 44
12 Fire Test ? CMD 58
13 Send Report ? CMD 41/42
14 Door Control ? CMD 46
Cycle Door ?
Unlock Door ?
Secure Door ?
37 Access Control Level?
15 Change Display ? CMD 49
16 Change Time/Date ? CMD 45
17 Change Passcode ? CMD 55
18 Add User ? CMD 56
19 Del User ? CMD 53
20 Extend Close ? CMD 51
21 View Log ?
22 Print Log ?
23 User Command 7 ? CMD 7
24 User Command 9 ? CMD 9
25 Bypass a Point ? CMD 0
26 Unbypass a Point ? CMD 00
27 Reset Sensors ? CMD 47
28 Change Relays ? CMD 54
29 Remote Program ? CMD 43
30 Move To Area ? CMD 50
32 Display Rev ? CMD 59
33 Service Walk ?
34 Default Text ? CMD 57
35 Change Skeds ? CMD 52
36 Invisible Walk ?
* Keypad Function options: P = Passcode;
E = Enabled (no passcode required);
Blank = Disabled
E/P*
E
E
E
E
E
E
E
E
E
E
E
E
12 Bosch Security Systems, Inc. | 8/06 | F01U011791B
Page 13

.
Ensure that CF 128 through CF 131, and
any other functions you are using in the
menu, are programmed E (enabled), not P
(passcode required). Refer to Figure 19.
Figure 19: Custom Functions
Keypad Functions
#
Custom Functions E/P*
128 Custom Function 128
129 Custom Function 129
130 Custom Function 130
131 Custom Function 131
132 Custom Function 132**
133 Custom Function 133**
134 Custom Function 134**
135 Custom Function 135**
136 Custom Function 136**
137 Custom Function 137**
138 Custom Function 138**
139 Custom Function 139**
140 Custom Function 140**
141 Custom Function 141**
142 Custom Function 142**
143 Custom Function 143**
D1255RB/D1256RB/D1257RB | Installation Instructions | 5.0 Specifications
E
E
E
E
5.0 Specifications
Table 4: Specifications for the D1255RB and D1256RB Keypads and the D1257RB Annunciator
Power
Wiring
Color
Display
Operating Temperature
Relative Humidity
Nominal 12 VDC supplied by the control panel
Idle: 104 mA Current Required
Maximum: 225 mA, with annunciator lit, all 4 Status LEDs on, and warning tone on
4-wire supplies Data In, Data Out, + 12 VDC, and Common.
Maximum data loop resistance is 10 Ω.
Base (HxW): 4.6 in. x 8.2 in. (11.6 cm x 20.7 cm) Dimensions (H x W x D)
Cover : 4.3 in. x 8.12 in. x 0.8 in. (10.9 cm x 20.6 cm x 2.9 cm)
Red
16-character vacuum fluorescent display (VSD).
Each character is a 14-segment unit.
+32°F to +122°F (0° C to +15° C)
5% to 85% at +86°F (+30° C)
Bosch Security Systems, Inc. | 8/06 | F01U011791B 13
Page 14

Bosch Security Systems, Inc.
130 Perinton Parkway
Fairport, NY 14450-9199
Customer Service: (800) 289-0096
Technical Support: (888) 886-6189
© 2006 Bosch Security Systems, Inc.
F01U011791B
 Loading...