

Page 1

Building Integration System
en
Installation Manual
Page 2

Page 3

Building Integration System Table of contents | en 3
Table of contents
1
Legal 5
1.1 Software License Agreement 5
1.1.1 Limited Warranty 5
1.1.2 Remedy 5
2
System Overview 6
2.1 About this manual 6
2.2 Intended audience 6
2.3 BIS single server systems 6
2.4 BIS multi-server systems 7
3
Planning information 10
3.1 System requirements for the BIS server 10
3.2 System requirements for BIS clients 11
3.3 Hardware for special server functions 12
3.4 An overview of the installation process 12
4
Performing a first-time installation 14
4.1 Setting up the network 14
4.1.1 Connecting server computers to the network 14
4.1.2 Installing prerequisite software Internet Information Services (IIS) 15
4.2 Preparing the database server 16
4.2.1 Procedures to set up database server topologies 18
4.2.2 Installing and publishing SQL server databases on database servers 21
4.2.3 Installing and configuring the SQL Server Reporting service 22
4.2.4 Preparing the remote database server for access from BIS 23
4.2.5 (For access control ONLY) Setting up service users for the ACE API 23
4.2.6 Running the remote SQL server setup 24
4.2.7 Securing the Reporting service on a remote database server 25
4.2.8 Final steps before starting the Installation on the login server: 26
4.3 Installing the BIS software on the BIS login server 26
4.4 Firewall setup 31
4.5 Engine-specific post-installation information 31
5
Configuring DCOM and OPC servers 32
5.1 Technical background and introduction 32
6
Performing an upgrade installation 33
6.1 Prerequisites 33
6.2 Running the BIS installation wizard on the BIS server 35
6.3 Updating CA-signed certificates 36
6.3.1 Updating the IIS SSL binding 37
6.3.2 Updating the Reporting service binding 37
6.3.3 Updating the thumbprint of the certificate 37
6.4 Possible further actions 37
7
Configuring BIS clients and tools 38
7.1 Configuring self-signed certificates from the BIS server 38
7.1.1 Trusted sites settings 39
7.2 Configuring a self-signed certificate from the BIS reporting service 39
7.3 Configuring the web browsers for the clients 40
7.3.1 Settings for Internet Explorer (IE) 40
7.4 Using strong passwords 41
7.5 Firewall setup 41
Bosch Security Systems
Installation Manual
2020-12 | 4.8.0.3 | IM
Page 4

4 en | Table of contents Building Integration System
7.6 Installing optional BIS tools 41
7.7 Installing third-party software alongside BIS 42
8
9
Licensing your BIS installation 43
Maintenance and Deinstallation 44
9.1 Maintenance 44
9.2 Backing up and restoring configurations 44
9.3 Deinstallation 44
2020-12 | 4.8.0.3 | IM
Installation Manual
Bosch Security Systems
Page 5

Building Integration System Legal | en 5
i
1 Legal
1.1 Software License Agreement
Notice!
This software relates to security. Limit access to authorized individuals. This software
contains provisions for setting security passwords. Establish appropriate security levels and
set passwords before allowing operating personnel access to this software. Safeguard the
original disk against unauthorized use. Additionally, Bosch Sicherheitssysteme GmbH control
panels contain passwords to prevent unauthorized access. These passwords must also be set
and their identity carefully safeguarded. You may not transfer this program or license to any
other party without the express written approval of Bosch.
1.1.1 Limited Warranty
Bosch Sicherheitssysteme GmbH warrants that the program substantially conforms to the
published specifications and documentation, provided that it is used on the computer
hardware and with the operating system for which it was designed. Bosch also warrants that
the magnetic media on which the program is distributed and the documentation are free of
defects in materials and workmanship. No Bosch dealer, distributor, agent, or employee is
authorized to make any modification or addition to this warranty, oral or written. Except as
specifically provided above, Bosch makes no warranty or representation, either express or
implied, with respect to this program or documentation, including their quality, performance,
merchantability, or fitness for a particular purpose.
1.1.2 Remedy
Bosch will replace defective media or documentation, or correct substantial program errors at
no charge, provided that you return the item with proof of purchase to Bosch within 90 days
of the date of delivery. If Bosch is unable to replace defective media or documentation, or
correct substantial program errors, Bosch will refund the license fee. These are your sole
remedies for any breach of warranty.
Because programs are inherently complex and may not be completely free of errors, you are
advised to verify your work. In no event is Bosch liable for direct, indirect, incidental, or
consequential damages arising out of the use or inability to use the program or
documentation, even if advised of the possibility of such damages. Specifically, Bosch is not
responsible for any costs including, but not limited to, those incurred as a result of lost profits
or revenue, loss of use of the computer programs or data, the cost of any substitute program,
claims by third parties, or for other similar costs. Bosch does not represent that the licensed
programs may not be compromised or circumvented. In no case shall Bosch's liability exceed
the amount of the license.
Some states do not allow the exclusion or limitation of implied warranties, or limitation of
liability for incidental or consequential damages, so the above limitation or exclusion might
not apply to you.
Bosch Sicherheitssysteme GmbH retains all rights not expressly granted. Nothing in this
license constitutes a waiver of Bosch's rights under the U.S. Copyright laws or any other
Federal or state law.
If you have any questions concerning this license, write to Bosch Sicherheitssysteme GmbH,
Postfach 1111, 85626 Grasbrunn, GERMANY.
Bosch Security Systems
Installation Manual
2020-12 | 4.8.0.3 | IM
Page 6
6 en | System Overview Building Integration System
2 System Overview
2.1 About this manual
This guide covers software and hardware installation, initial login and basic maintenance. After
the software installation procedure has run you will also need to complete mandatory postinstallation procedures. These procedures are displayed in a document window immediately
after installation, and can also be found under <installationdrive>:\MgtS\Platform\Mandatory
post installation BIS.pdf
2.2 Intended audience
As the BIS installer, you should understand the following topics:
– Installing the Windows operating system and applications on a server
– Networking
2.3 BIS single server systems
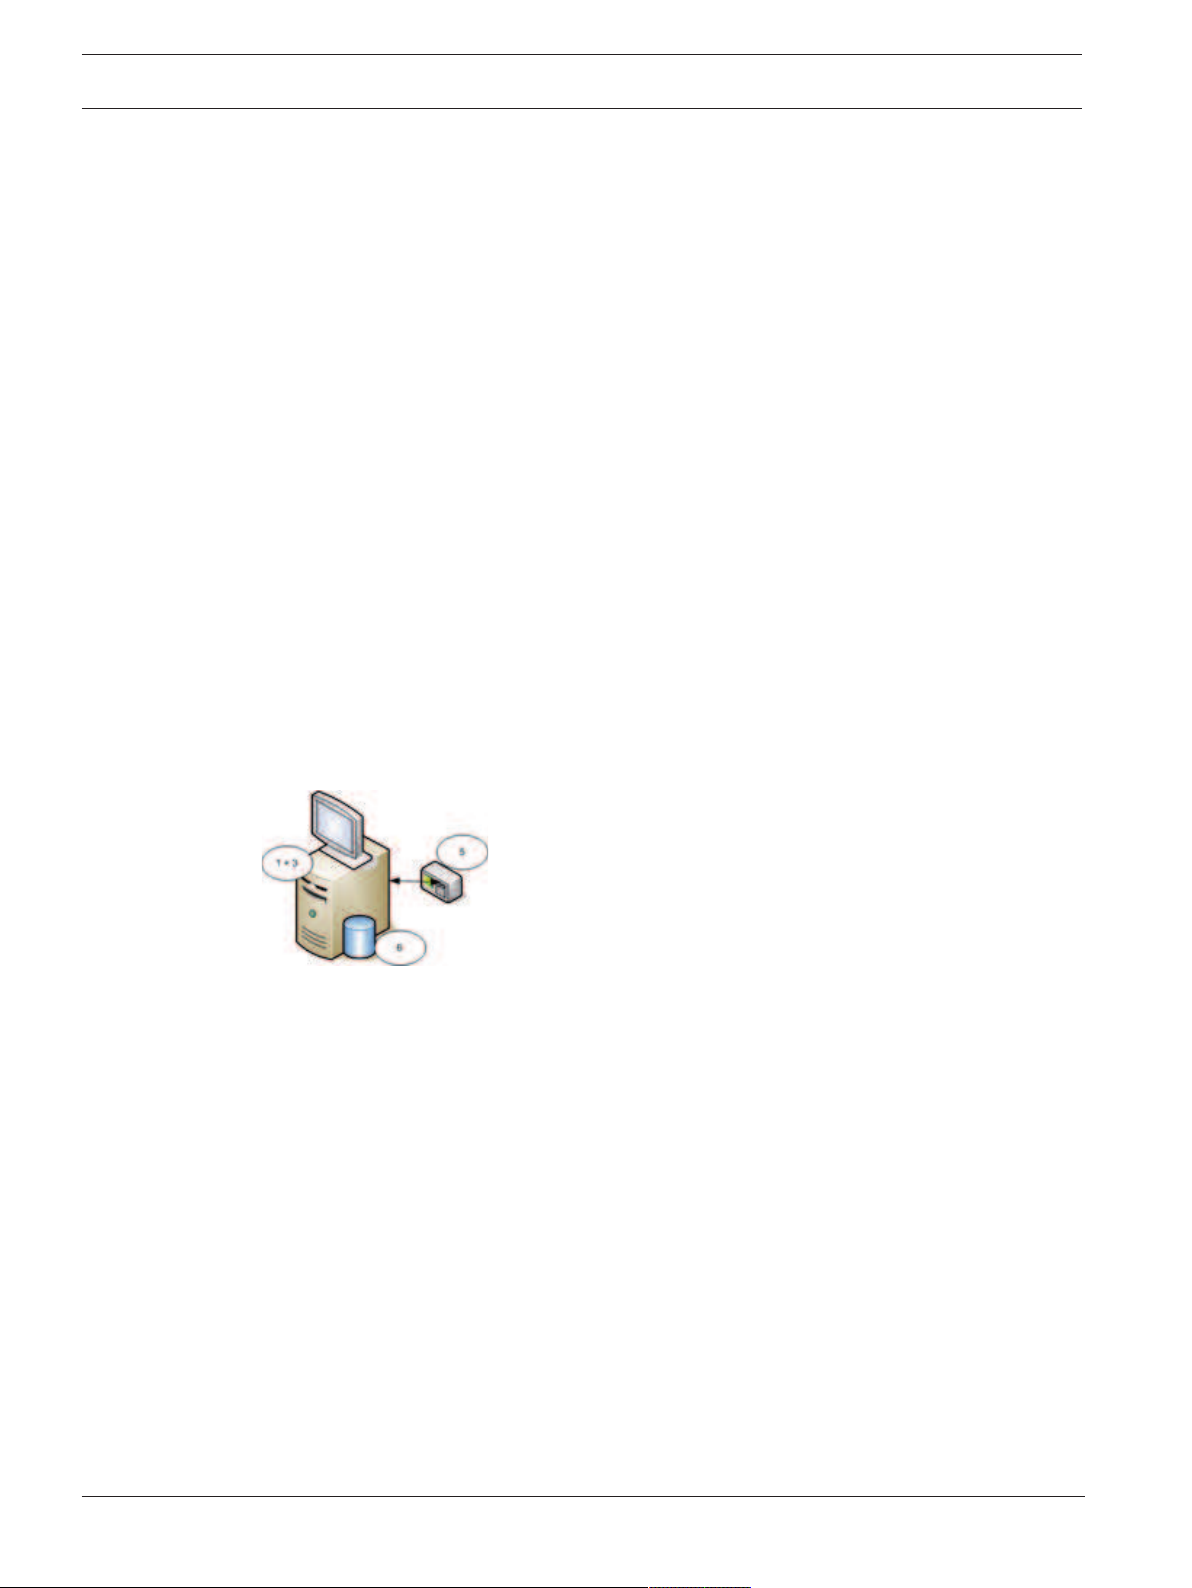
Definition
A single server BIS system contains only one BIS login server (also known as the BIS server). It
may run OPC servers itself, and it may contain zero or more Connection servers and Database
server computers.
Illustration
BIS installations vary enormously in size and complexity. The following illustrates a small and a
complex BIS single-server installation.
Figure2.1: A small single server BIS system
2020-12 | 4.8.0.3 | IM
Installation Manual
Bosch Security Systems
Page 7
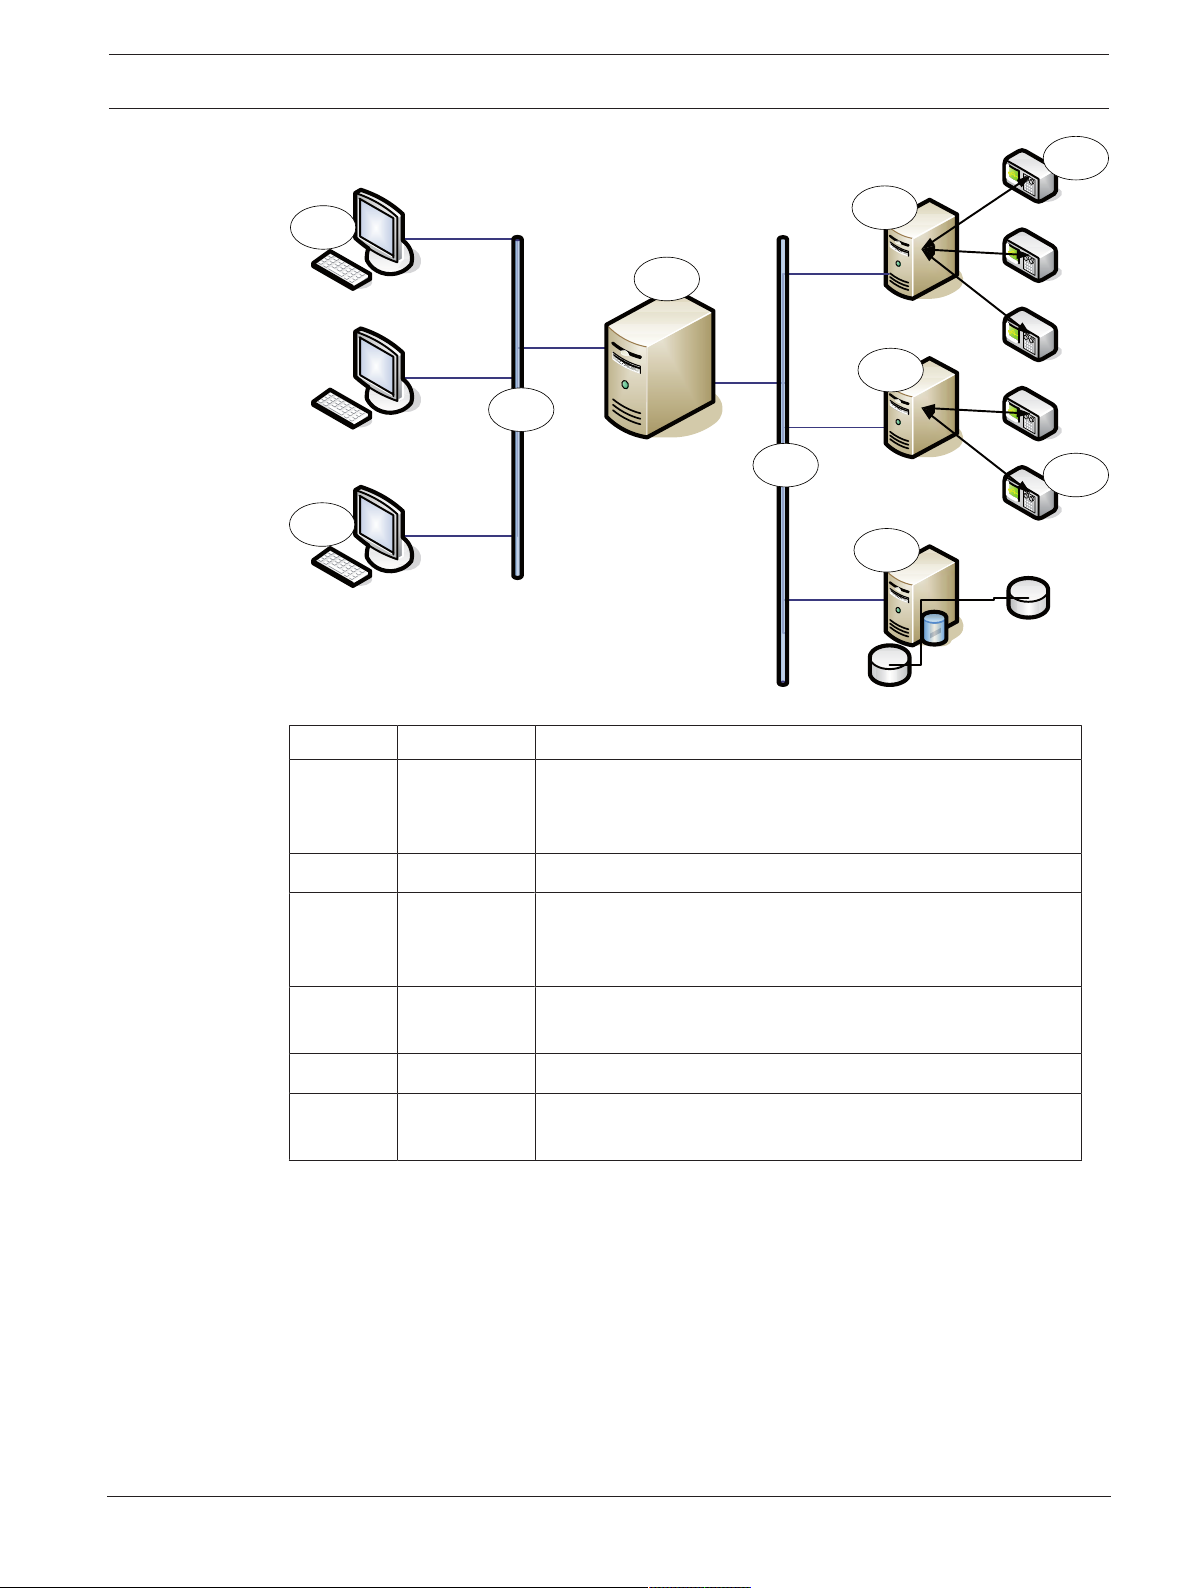
Building Integration System System Overview | en 7
2. 2
3.1
1
2.1
4 .1
5. 1
6 .n
4 .n
5. n
3.n
Figure2.2: A complex single server BIS system
No. Name Function
1 BIS (Login)
server
Runs the BIS application. The BIS server functions as an OPC
client
2.1 to 2.n Network(s) Carries signals
3.1 to 3.n BIS Client
Runs the BIS user interface
Workstation(s
)
4.1 to 4.n Connection
Runs OPC server processes
server(s)
5.1 to 5.n OPC device(s) Interacts with the outside world
6.1 to 6.n Database
server
Hosts BIS data for event log and engines
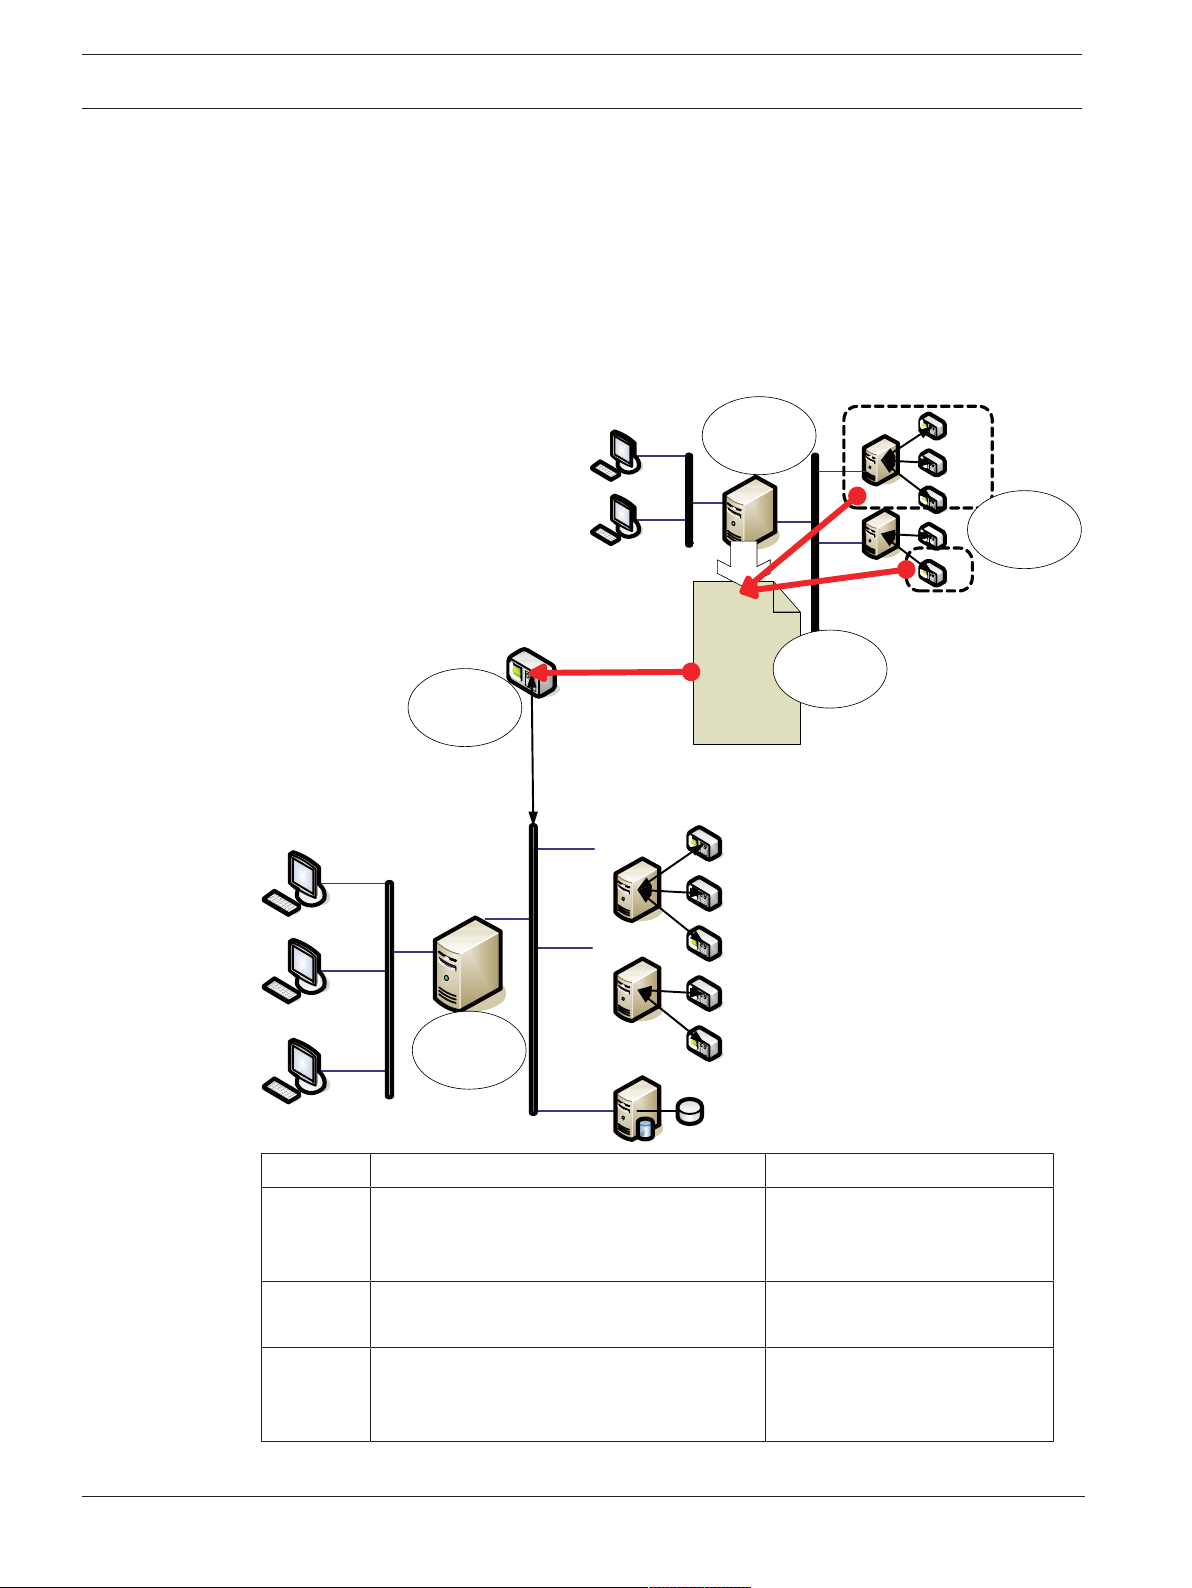
2.4 BIS multi-server systems
Definition
A multi-server BIS system is one in which two or more BIS single server systems share
information. BIS multi-server systems can be organized as hierarchical or peer-to-peer
networks.
Implementation overview
Participating BIS single-server systems can be providers of information, consumers of
information, or both simultaneously.
– The Provider server creates a configuration file that details exactly which information it
should share with others.
Bosch Security Systems
Installation Manual
2020-12 | 4.8.0.3 | IM
Page 8
8 en | System Overview Building Integration System
1
23 fw qrv we rte rt
ed rts e r t6se
rt 45s dxys cydr t3 4
aw rt3 fw34 56 w32q
34 5w e5 46a w4a w
er aw er7zn 8 9o7jo
89 zzu o78 97 94 as
34 tcy
4
3
2
5
– The Consumer server configures and browses the provider server as a remote OPC
server.
Any or all of the information monitored by the provider can be passed to the consumer or
consumers. Typically the information consists of OPC addresses, state-changes, commands
and alarms.
Illustration
For simplicity, the following illustrates the interaction of one provider and one consumer
server. The size and complexity of the multi-server BIS system is limited by the network traffic
and the capacity of the consumer servers to process incoming data.
No. Name Function
1 The provider server A kind of BIS server that
2 The subset of the addresses that the
provider server should share
3 The encrypted configuration file generated
by the provider server
provides information to other
BIS single server systems
Describes the subset of
information that the provider
server should share
2020-12 | 4.8.0.3 | IM
Installation Manual
Bosch Security Systems
Page 9

Building Integration System System Overview | en 9
No. Name Function
4 An OPC server of type BIS Remote System Acts as an interface between
the provider server and the
consumer server. It is
configured on the consumer
server using the encrypted
configuration file, and then
browsed like any other
connection server.
5 The consumer server This BIS server receives and
processes information from its
own devices, and those of
connected provider servers
Bosch Security Systems
Installation Manual
2020-12 | 4.8.0.3 | IM
Page 10

10 en | Planning information Building Integration System
i
3 Planning information
3.1 System requirements for the BIS server
Servers
Supported operating
systems (standalone or
client/server mode).
Installations of BIS on
other operating
systems may succeed,
but are entirely without
warranty.
Other Software Always install the latest drivers and OS updates.
Minimum hardware
requirements
– Windows Server 2016 (64 bit, Standard, Datacenter)
– Windows Server 2019 (64 bit, Standard, Datacenter)
– Windows 10 Enterprise LTSB (64 bit)
– Note: The default database delivered with this BIS Version is
SQLServer2017 Express edition with advanced services
– IIS 10.0 for Windows 10, Windows Server 2016 and Windows Server 2019
Note: IIS is not necessary on BIS connection servers
– Internet Explorer 9, 10 or 11 in compatibility mode
– .NET:
– On Windows 10, Windows Server 2016 and Windows Server 2019:
.NET3.51 and .NET4.8 (includes .NET4.0)
– Intel i5 processor with at least 4 physical cores
– 8 GB RAM (32 GB recommended)
– 200 GB of free hard disk space
– Graphics adapter with
– 256 MB RAM,
– a resolution of 1280x1024
– at least 32 k colors
– OpenGL® 2.1 and DirectX® 11
– 1 Gbit/s Ethernet card
– A free USB port or network share for installation files
2020-12 | 4.8.0.3 | IM
Other general requirements
– A TCP/IP network connecting BIS and database servers
– A unique name for each computer, no longer than 15 Latin characters without diacritic
marks.
– US American or standard European date-time formats: MM/dd/yyyy or dd.MM.yyyy
– A user account with local Windows unrestricted administrator rights and password
– Set a password for the MgtS-Service user in accordance with your password policy.
– Antivirus software should be used, but must not be running during BIS installation.
Notice!
Dedicated servers are required
To guarantee the highest levels of operability, availability and performance at all times, install
each server system (access management, video management, intrusion detection or third
party) on its own dedicated computer.
Installation Manual
Bosch Security Systems
Page 11

Building Integration System Planning information | en 11
i
i
i
General recommendations
– Use US regional settings, even if the language of your operating system is not US English.
– Copy the BIS installation files to a subdirectory of the main disk drive and install from
there, not from the Windows desktop.
Notice!
Hyper-threading
On Systems with I5 / I7 / Xenon Processors BIS performance is improved if Hyper-threading is
disabled.
Notice!
Primary Domain Controllers (PDCs) and Backup Domain Controllers (BDCs) are not
supported as they do not provide the administration of local user accounts necessary for
management systems.
Notice!
The performance of the system components will depend largely on the size of the system, i.e.
the number of objects under BIS’s control. To maximize performance BIS should always be
run as a standalone application on an up-to-date computer in a subnet where there is no
other business-critical traffic. Nevertheless Bosch recommends testing existing network
hardware under projected network conditions, particularly if heavy use is to be made of IP
cameras and image archiving.
3.2 System requirements for BIS clients
Clients
Supported operating
systems (standalone or
client/server mode).
Installations of BIS on
other operating
systems may succeed,
but are entirely without
warranty.
Other Software – ASP.NET
– Windows 8.1 (64 bit, Pro, Enterprise)
– Windows Server 2016 (64 bit, Standard, Datacenter)
– Windows Server 2019 (64 bit, Standard, Datacenter)
– Windows 10 (32 or 64 bit, Pro or Enterprise LTSB)
– Note: with a Pro edition, updates must be deferred until 8 months after
the release of the BIS version. For further information see the Microsoft
technet page at https://technet.microsoft.com/en-us/itpro/windows/
manage/introduction-to-windows-10-servicing
– Internet Explorer 9, 10 or 11 in compatibility mode
(Note: The SEE client requires IE 9.0)
– .NET:
– On Windows 10, Windows Server 2016 and Windows Server 2019: .NET
3.51 and .NET 4.8 (includes .NET 4.0)
Bosch Security Systems
Installation Manual
2020-12 | 4.8.0.3 | IM
Page 12

12 en | Planning information Building Integration System
i
Clients
Minimum hardware
requirements
Additional minimum
requirements for VIE
(Video Engine) clients
– Intel i5 or higher
– 8 GB RAM (16 GB recommended)
– 20 GB free hard disk space
– Graphics adapter with
– 256 MB RAM,
– a resolution of 1280x1024
– at least 32 k colors
– OpenGL® 2.1 and DirectX® 11
– 100 Mbit/s Ethernet card
– No Windows Server operating systems
– Intel i5 processor or higher
– For camera sequencing, virtual matrix or Multiview add 4GB RAM
– Latest video drivers are highly recommended. Use the Windows dxdiag tool
to make sure drivers are no more than 1 year old
Notice!
It is recommended that neither the BIS login server nor connection servers be used as a VIE
client, in order to rule out possible conflicts with other video components.
3.3 Hardware for special server functions
Server Function Required Hardware
System networking (additional
remote computers, network
printers, control computers in the
local network.
Single monitor operation VGA graphics card to support a
Multiple monitor operation (up to
four monitors)
Subsystems and external systems
such as bus couplers (non-network
connections)
Additional log or alarm printers One serial or parallel interface,
External devices e.g. backup storage
device
One Ethernet network card per
network (OPC subsystems and
client workstations may be on
separate networks).
single monitor
VGA graphics card(s) to support the
desired number of monitors
One serial interface COM port per
connection (onboard or on an
interface expansion card)
depending on the printer (onboard
or on an interface expansion card).
Network printing is also possible.
Appropriate controllers
3.4 An overview of the installation process
A BIS installation generally consists of the following stages, which are described in the rest of
this document.
2020-12 | 4.8.0.3 | IM
Installation Manual
Bosch Security Systems
Page 13

Building Integration System Planning information | en 13
1. Setting up the network. Section
2. Setting up the database server. Section
Setting up the network, page 14
Preparing the database server, page 16
3. Installing the BIS software on the BIS server:
– first-time Section
– upgrade Section
4. Installing/configuring the Firewall. Section
Performing a first-time installation, page 14
Performing an upgrade installation, page 33
Firewall setup, page 31
or
).
5. Configuring DCOM and OPC servers on the connection server(s). Section
DCOM and OPC servers, page 32
6. Configuring the web browsers on the clients. Section
Configuring BIS clients and tools,
page 38
7. Installing optional BIS tools as required. Section
8. Licensing. Section
Licensing your BIS installation, page 43
Installing optional BIS tools, page 41
Configuring
Bosch Security Systems
Installation Manual
2020-12 | 4.8.0.3 | IM
Page 14

14 en | Performing a first-time installation Building Integration System
4 Performing a first-time installation
The recommended overall order of a first-time installation (hardware and software) of a BIS
system is as follows, though not all steps will be necessary in all cases:
1. Setting up the network of computers where BIS and its database(s) are to run
2. Preparing the database server
3. Installing the BIS software on the BIS server.
4. Installing/configuring a Firewall
5. Making any engine-specific adjustments to the installation.
The configuration of DCOM settings for any connection server(s) participating in the BIS
installation is handled separately in Section
4.1 Setting up the network
BIS typically runs in a TCP/IP network consisting of
– A BIS login server. The server that runs the main BIS application software is also
commonly referred to as the login server or BIS server.
– Note that in Multi-server BIS systems more than one BIS server may be present.
– Zero or more connection servers which communicate with peripheral devices such as
detectors, alarm annunciators, entrances and video cameras.
– Zero or more operator workstations, also known as BIS clients. These are typically PCs,
which each run the BIS user interface in a web browser.
– Zero or more separate database servers.
Configuring DCOM and OPC servers, page 32
Note that the BIS server can assume the functions of connection server and operator
workstation as well has hosting its own databases, but this simple topology is not suitable for
large systems, as it restricts performance.
4.1.1 Connecting server computers to the network
To manage the many systems of a building, the BIS server is typically connected to a network.
It is not necessary for clients and subsystems to be on the same network, i.e. you can
dedicate one network to the connected subsystems, and another network for BIS client PCs.
Server names
Each computer requires a unique name and a unique IP address. The following restrictions
apply to server names:
– No longer than 15 characters
– No digit as the first character in the name
– No non-Latin characters, and no characters with diacritic marks. The NetBIOS name is
recommended.
Connections to remote servers
Network connections to any database servers (see
need to exist before installing the BIS software, because the installation wizard may need to
browse for them.
Connection servers for running OPC server processes can, by contrast, be set up after
installing the BIS software (refer to the hardware’s own documentation and to
section
Configuring DCOM and OPC servers, page 32
Preparing the database server, page 16
in this document).
)
2020-12 | 4.8.0.3 | IM
Installation Manual
Bosch Security Systems
Page 15

Building Integration System Performing a first-time installation | en 15
i
The Ethernet connections can be 10 or 100 or 1000BaseT (twisted pair). If the connection is
directly from one network adapter to another then use a null-modem “crossover” cable.
Notice!
For the purposes of installation, disable any energy-saving “System standby” or “Hibernation”
options on all computers that are part of the BIS System (BIS Login Server, Database servers,
Connection Servers, BIS Clients).
Refer to
– Configuring DCOM and OPC servers, page 32
4.1.2 Installing prerequisite software Internet Information Services (IIS)
IIS must be installed on the BIS Server before installing the BIS application. IIS is an optional
Windows component for which you may need your Windows installation media.
A new IIS installation script InstallIISForBIS.exe is provided on the BIS installation
medium in the directory Tools\InstallIISForBIS\. This script makes all the required
settings listed in the table below. Note that the script requires .NET 4.0.
IMPORTANT: If you are not using the script to install IIS, omit the CGI feature. Otherwise
ensure that the IIS installation includes the following settings on Windows10, and
Windows2016 or 2019 Server respectively.
Windows 10 Windows 2016 Server and
Windows 2019 Server
Internet Information Services
..Web Management Tools:
....IIS 6 Management Compatibility
– [the settings]
– IIS 6 Management Console
– IIS 6 Scripting Tools
– IIS 6 WMI Compatibility
– IIS 6 Metabase and IIS 6
configuration compatibility
– IIS Management Console
– IIS Management Scripts and Tools
– IIS Management Service
World Wide Web Services:
..Application Development Features:
– [On Windows 10 systems]
– ASP.NET 3.5 and
– ASP.NET 4.6
– .NET Extensibility 3.5 and
– .NET Extensibility 4.6
– ISAPI Extensions
– ISAPI Filters
Web Server
..Common HTTP Features:
– Static Content
– Default Document
– Directory Browsing
– HTTP Errors
..Application Development:
– ISAPI Extensions
– ISAPI Filters
Bosch Security Systems
..Common HTTP Features:
– Default Document
– Directory Browsing
– HTTP Errors
Installation Manual
..Health and Diagnostics:
– HTTP Logging
– Request Monitor
2020-12 | 4.8.0.3 | IM
Page 16

16 en | Performing a first-time installation Building Integration System
Windows 10 Windows 2016 Server and
Windows 2019 Server
– Static Content
..Health and Diagnostics:
– HTTP Logging
– Request Monitor
..Security:
– Windows Authentication
– Request Filtering
– IP and Domain Restrictions
..Performance Features:
– Static Content Compression
..Security:
– IP Security
– Request Filtering
– Windows Authentication
..Performance:
– Static Content Compression
Management Tools:
– IIS Management Console
– IIS Management Scripts and Tools
– Management Service
....Management Compatibility:
–
– IIS 6 Metabase Compatibility
– IIS 6 WMI Compatibility
– IIS 6 Scripting Tools
– IIS 6 Management Console
Windows10 Windows 2016 Server and
Windows 2019 Server only
.NET Framework 3.5
– Windows Communication
Foundation (WCF) HTTP
.NET Framework 3.5 features
– HTTP Activation
– Non-HTTP Activation
Activation
– Windows Communication
Foundation (WCF) Non-HTTP
Activation
.NET Framework 4.5 features, WCF
services
– HTTP Activation
.NET Framework 4.5 (4.6 for Windows
10) Advanced Services, WCF services
– HTTP Activation
Disabling the IIS CGI feature
If IIS is already installed with CGI, disable the feature as follows for Windows10:
– Windows10: Start > Control Panel > Programs > Turn Windows features on or off >
Internet Information Services > World Wide Web Services > Application Development
Features > CGI
4.2 Preparing the database server
Introduction
The BIS system requires a MicrosoftSQLServer database and the Reportingservice.
– You can install the SQLServerdatabase on either the BIS login server or a separate
computer. This separate computer is called a remote database server.
– You can install the Reporting service on either the BIS login server or the remote
database server.
2020-12 | 4.8.0.3 | IM
Installation Manual
Bosch Security Systems
Page 17

Building Integration System Performing a first-time installation | en 17
i
Overview of database server topologies
Because each of these 2 components can be installed remotely or locally (on the BIS login
server), there are 2x2=4 possible database server topologies.
In order to proceed, select one of the 4 database server topologies.
1. Database and reporting service on the BIS
login server machine
This is the simplest installation and is
suitable for small systems.
3. Database and Reporting service on the
remote SQL server
This is the most complex topology to
configure, but allows the best performance of
the BIS login server.
If using self-signed certificates, then two selfsigned certificates need to be distributed:
that of the BIS login server and that of the
Reporting service.
2. Database alone on remote SQL server.
Reporting service with its own database on
the BIS login server.
4. Licensed database alone on the remote
SQL server, reporting service on BIS login
server using the remote database.
If using self-signed certificates, only one
needs to be distributed: namely that of the
BIS login server.
Bosch Security Systems
This chapter describes the following procedures:
– Installing and publishing the SQLserver database
– Installing and configuring SQL server Reporting service
– Preparing the remote database server for access from BIS.
– Securing the remote reporting service
Your choice of database server topology (1-4) determines which of the procedures you need
to perform.
Notice!
Perform the necessary procedures for your chosen topology BEFORE running the BIS setup
on the BIS login server.
Installation Manual
2020-12 | 4.8.0.3 | IM
Page 18

18 en | Performing a first-time installation Building Integration System
4.2.1 Procedures to set up database server topologies
Topology 1: Database and reporting service running on the BIS login server machine
If you wish to use the free Express Edition of the SQL Server, as provided by BIS, then no
extra preparation is required. The BIS installation will create the required SQL server
instances. You may proceed to
If the wish to use a licensed version of SQL Server for greater capacity, then perform the
following procedures, before installing the BIS software:
Procedure 1:
Procedure 2:
Conclude with:
Installing and publishing SQL server databases on database servers, page 21
Installing and configuring the SQL Server Reporting service, page 22
Final steps before starting the Installation on the login server:, page 26
Installing the BIS software on the BIS login server, page 26
During the installation of the BIS software you will need to browse and select the database
instance that you create in these procedures.
Topology 2: Database alone on remote SQL server. Reporting service with its own database
on the BIS login server.
On the remote SQL server machine, you can use either a licensed SQL server or the Express
Edition.
Perform the following procedures, before installing the BIS software:
Procedure 1:
Procedure 2:
Conclude with:
Installing and publishing SQL server databases on database servers, page 21
Preparing the remote database server for access from BIS, page 23
Final steps before starting the Installation on the login server:, page 26
2020-12 | 4.8.0.3 | IM
Installation Manual
Bosch Security Systems
Page 19

Building Integration System Performing a first-time installation | en 19
During the installation of the BIS software, you will need to browse and select the database
instances for BIS and ACE that you created in Procedure 1.
In a later step in the installation, click Create to create a new Reporting service instance on
the BIS login server.
Topology 3: Database and Reporting service on the remote SQL server
On the remote SQL server machine, you can use either a licensed SQL server or the Express
Edition.
Perform the following procedures, before installing the BIS software:
Procedure 1:
Procedure 2:
Procedure 3:
Procedure 4:
Conclude with:
Installing and publishing SQL server databases on database servers, page 21
Installing and configuring the SQL Server Reporting service, page 22
Preparing the remote database server for access from BIS, page 23
Securing the Reporting service on a remote database server, page 25
Final steps before starting the Installation on the login server:, page 26
During the installation of the BIS software, you will need to browse and select the database
instances that you create in these procedures.
– If using Access Engine, enter the name of the remote database server, and click Browse
to select the ACE database instance.
– For Reporting Services, enter the remote SQL server machine by its name, click Browse
and select the required instance for remote Reporting service
IMPORTANT: Do not click Create, as this will create a new Reporting service instance.
Bosch Security Systems
Installation Manual
2020-12 | 4.8.0.3 | IM
Page 20

20 en | Performing a first-time installation Building Integration System
Important note for Topology 3 only:
After BIS successfully installing on the BIS login server machine, you must run the
BISChangePasswordTool (C:\MgtS\Tools\ChangePassword) as Administrator to change
the Mgts-SSRS-Viewer password. You do not require the old password if you run the tool as
Administrator.
Topology 4: Database alone on the remote SQL server, reporting service on BIS login server
using the remote database.
Topology 4 is recommended if you are planning to use the self-signed certificate, created by
BIS, for the remote SQL instance. This is because you will need to download and install on the
clients only one self-signed certificate. This one certificate covers both BIS service and
Reporting service on the login server.
– On the remote database server you must use a licensed version of SQL server.
– On BIS login server machine, use a licensed version of Reporting service
Perform the following procedures, before installing the BIS software:
Procedure 1:
Procedure 2:
Procedure 3: On the BIS login server:
Installing and publishing SQL server databases on database servers, page 21
Preparing the remote database server for access from BIS, page 23
Installing and configuring the SQL Server Reporting
service, page 22
Conclude with:
Final steps before starting the Installation on the login server:, page 26
2020-12 | 4.8.0.3 | IM
During the installation of the BIS software you will need to browse and select the remote
instance for the SQL server, and select the Reporting service that is local (on the BIS login
server).
Installation Manual
Bosch Security Systems
Page 21

Building Integration System Performing a first-time installation | en 21
i
Refer to
– Installing the BIS software on the BIS login server, page 26
– Installing and publishing SQL server databases on database servers, page 21
– Installing and configuring the SQL Server Reporting service, page 22
– Preparing the remote database server for access from BIS, page 23
– Securing the Reporting service on a remote database server, page 25
– Installing and configuring the SQL Server Reporting service, page 22
4.2.2 Installing and publishing SQL server databases on database servers
Remote database servers are used in topologies 2-4.
Preparing the database server computer
The database server computer is:
– In topology 1, the BIS login server.
– In topologies 2-4 a remote database server
Notice!
Always use the latest releases and service packs for your SQL Server version.
1. Ensure that the hostname is no longer than 15 characters (as per Microsoft NETBIOS
rules)
2. Ensure that the user Administrator has a password.
3. Reboot database server computer and log in as Administrator.
4. Ensure that .NET 4.8 (or later) is installed. Do NOT attempt to proceed with an earlier
version.
5. Disable any automatic power-saving standby option.
6. Disable the firewall. The firewall must remain disabled throughout the installation.
Reactivate it after completing the installation, as described in the document
BIS_Firewall_Configuration.pdf
Installing SQL Server on the database server computer
1. Decide whether you wish to use the Express Edition of SQL 2017 (delivered on the BIS
installation media <BISInstallationmedia>\3rd_Party\SQL2017\1033\) or your own
licensed version.
2. Execute the corresponding setup.exe
3. Click OK when prompted to change the core role to newer framework and installer.
Wait until the Installation Center appears
4. Select the “Installation” tab on the left menu bar
5. Click “New SQL Server stand-alone Installation or add features to an existing
installation”
6. Click Next will check for the installation files and setup will install its support files
automatically
7. Select "Perform a new installation of SQL Server 2017"
8. Accept the license terms and click Next
9. Select the "Database Engine Services" under Instance Features
10. Provide the named instance (Example: BIS or BISACE), do not provide the computer
name itself and do not proceed with default instance name "SQLExpress".
11. Click Next to continue
Bosch Security Systems
Installation Manual
2020-12 | 4.8.0.3 | IM
Page 22

22 en | Performing a first-time installation Building Integration System
12. For the "Account Name" for SQL Server Database Engine enter NT AUTHORITY\SYSTEM
and leave the password blank
13. Change the “Startup Type” to Automatic for "SQL Server Database Engine" and "SQL
Server Browser"
14. Select Mixed Mode for "Authentication Mode" and provide a strong password for the
“sa” user in accordance with your password policy.
– Make careful note of the sa password, as it will be required for the installation of BIS.
15. Under Specify SQL Server administrators: add at least one Windows user, or preferably
a user group, that will be authorized to manage the SQL Server, e.g. Administrator or
Administrators
16. Click Next to start the installation
– When installation has completed, make sure “Install successful” message is displayed
Publishing the SQL instance, to make it visible on the network during the installation of BIS
software.
1. Click Start > MicrosoftSQLServer2017 > SQLserver2017configurationmanager
2. Expand, "SQL Server Network Configuration" and select Protocols for <INSTANCE>,
enable "Named Pipes" and "TCP/IP" <INSTANCE> is provided during SQL setup, example:
BIS/BISACE
3. Enable “Named Pipes” and “TCP/IP” for the SQL Native Client, client protocols.
4. Right click “Protocols for <INSTANCE>”, select “Properties” and select “Flags” tab.
Under it set “Force Encryption” to “Yes” to enable encrypted communication between
BIS server and SQL server.
5. Under SQLServerservices > SQLServerBrowser > Properties>Service make sure
“Start Mode” of the service “SQL Server Browser” is automatic.
6. Reboot the computer.
Installing a second instance for ACE
– If required for other engines, for example ACE, repeat the procedures in this chapter to
install more SQL instances.
4.2.3 Installing and configuring the SQL Server Reporting service
On the machine where the Reporting service is to run, perform the following procedures:
Installing the Reporting Service
1. Open the reporting service executable location, either express version delivered with BIS
<BISinstallationmedia>\3rd_Party\SQL2017\” or the location of your separatelylicensed reporting service.
2. From that location, right click SQLServerReportingServices.exe and run as
Administrator
– The setup wizard for the SQL Server Reporting Service opens.
3. Proceed through the setup
4. After installation, restart the computer.
Configuring the Reporting Service
1. Open a DOS command window as Administrator
2. Change directory to one of the following:
– <BISinstallationmedia>\3rd_Party\SQL2017\ or
2020-12 | 4.8.0.3 | IM
Installation Manual
Bosch Security Systems
Page 23

Building Integration System Performing a first-time installation | en 23
– the location of your licensed reporting service.
3. From this location execute the following command, substituting for the machine and
instance names:
DOS> RSConfig.exe -c -s [DBMachineName]\[InstanceName]
-dReportServer$[InstanceName] -a Windows -i SSRS
– DBMachineName - Is the machine where the SQL instance is created
– InstanceName - Is the name provided during the SQL instance creation
– For example:
– If the SQL is installed in the machine “SGPBISSQLSERVER" and Instance Name is "BIS",
then the command will be:
RSConfig.exe -c -s SGPBISSQLSERVER\BIS -d ReportServer$BIS -a Windows -i
SSRS
Completing the installation
1. The wizard displays a confirmation message.
2. Run services.msc and make sure SQLServerReportingServices is running on the
installed machine. If not, start the service manually.
4.2.4 Preparing the remote database server for access from BIS
Creating a user account for backup and restore
On the remote database server create the user MgtS-Service with the following settings:
– Username (case sensitive): MgtS-Service
– Password: Set the password according to your security policies, and note it carefully as it
will be required for the BIS setup on the login server.
– Member of group: Administrators
– Clear the check box User must change password at next logon
– Select the check box User cannot change password
– Select the check box Password never expires
– Clear the check box Account is disabled
The MgtS-Service user also requires permission to log on as a service:
1. Run secpol.msc from the Windows Start menu.
2. In the tool, navigate to Security Settings > Local Policies > User Rights Assignment
3. From the Policy pane, right-click Log on as a service and select Properties
4. In the popup window, click Add user or Group
5. Add <NameOfRemoteDBServer>\MgtS-Service
6. Click OK to confirm and close the program
4.2.5 (For access control ONLY) Setting up service users for the ACE API
Skip this procedure if you are not using Access Engine (ACE)
1. Run as Administrator the following PowerShell script:
<BIS installation media>\AddOns\ACE\Intrusion\Scripts\createServiceUser.ps1
2. On the database server computer, open Windows services (services.msc), and verify
that the script has created a set of services, the names of which begin with Access
Management System and end with API.
Bosch Security Systems
Installation Manual
2020-12 | 4.8.0.3 | IM
Page 24

24 en | Performing a first-time installation Building Integration System
i
Notice!
Starting and stopping ACE API services
Do not use services.msc to start and stop ACE API services. Use only the ACE Process
Control tool, for example, from the desktop icon on the BIS server.
4.2.6 Running the remote SQL server setup
On the remote database server:
1. Install the following packages from the BIS installation medium under
<Installation media>\3rd_Party\SQL2017\SMO\
– SQLSysClrTypes.msi
– Sqlncli.msi
2. Copy the contents from location <Installation media>\3rd_Party\SQLSMO2017\ to C:
\Windows\SysWOW64\
3. Right-click and run as administrator the installation file install.exe under
<Installation medium>:\<Language_ID>\BIS\Tools\BISRemoteSQLServerSetup\
4. During the installation you will need to select one or both of the features "SQL Server"
and "Reporting SQL Server"
2020-12 | 4.8.0.3 | IM
– If you wish to use a Remote SQL Server for Event Log, DB9000, Audit trail and/or Access
Engine, select feature BISRemoteSQLServer
– Additionally, if you wish to use a Remote SQL Server for Reporting Services, select
feature BISRemoteReportingSQLServer
5. Browse and select the Instance for the Reporting service
Installation Manual
Bosch Security Systems
Page 25

Building Integration System Performing a first-time installation | en 25
i
i
6. Use SQL authentication, with username sa and the password you noted during
installation above.
7. Click Next and click Install on next page to perform the installation
8. Upon completion of installation, reboot the remote database server computer.
Notice!
Only one BIS installation per remote database server computer
A remote database computer that is used for Reporting Services can serve only one BIS
installation.
Notice!
Instance name and computer name
Ensure that the name of the database instance is no longer than 15 characters and does not
match the name of the computer.
4.2.7 Securing the Reporting service on a remote database server
When the Reporting service runs on a remote database server, the BIS login server and BIS
clients require a certificate from the Reporting service, in order to access it securely over the
network.
Both self-signed and CA-signed certificates can be used. The following procedures describes
how to create and deploy:
– Self-signed certificates
– CA-signed certificates
Self-signed certificates
1. On the remote database server, execute the following .BAT file from the installation
medium to create a self-signed certificate and bind to the Reporting Service Web URL
_Install\3rd_Party\RemoteReportingService
\create_remote_sql_certificate.bat
2. Export and install this self-signed certificate as a trusted root certificate on the BIS Server
and all Client machines.
– For detailed instructions see
service, page 39
3. Add the HTTPS URL of the remote database server as a trusted site on the BIS login
server and on all clients that will use the Reporting service.
Configuring a self-signed certificate from the BIS reporting
Bosch Security Systems
Installation Manual
2020-12 | 4.8.0.3 | IM
Page 26

26 en | Performing a first-time installation Building Integration System
i
– For example, if your remote database server is called MyRemoteDBServer go to the
Internet Explorer Settings menu > Internet Options > tab:Security > Trusted sites >
button:Sites
and add the site HTTPS://MyRemoteDBServer
CA-signed certificates
If you have a CA signed certificate, it is not required to create a self-signed certificate. Instead,
bind that CA-signed certificate to the Reporting service web URL.
For detailed instructions, see
Updating the Reporting service binding, page 37
4.2.8 Final steps before starting the Installation on the login server:
– In order for BIS to back up and restore its databases, make sure that the BIS login server
has the same Windows user for database administration, with the same password.
– In the BIS installation dialogs, select the appropriate SQL Server instances for Event Log,
DB9000, Audit trail and/or Access Engine.
– Enter the sa password that you set, and carefully noted, when installing SQL server on
the remote database server computer in
on database servers, page 21
– In the dialog where you enter the SQL Server instance for Reporting Services, enter the
name of the remote database server computer and click "Browse" to show all available
SQL Server instances with Reporting Services.
– Select the same instance that you selected during the execution of install.exe in
section
– Note: For Topology 2, enter the BIS login server machine and click Create to create a new
Reporting service on the local machine itself.
, page 24
Installing and publishing SQL server databases
Refer to
– Installing and publishing SQL server databases on database servers, page 21
– Preparing the remote database server for access from BIS, page 23
4.3 Installing the BIS software on the BIS login server
Before you begin
Make sure that one of the following applies:
– You are installing all system components on the BIS login server, with a free MS SQL
Server Express edition.
– You have configured one of the database topologies described in the previous chapter
Preparing the database server, page 16
For the installation, use an account with local administrator permissions, preferably the
Administrator account itself. Verify by typing ipconfig to a command prompt that the server
has an IP address. Ensure that you have your MS Windows installation media to hand, in case
the BIS installation wizard requires extra features.
BIS will not install if a firewall is active. The BIS installation wizard is able to disable the
Windows firewall, however any other firewalls should now be disabled manually before
starting the BIS installation procedure.
Notice!
Installation to local computer only
The BIS installation kit may be on a separate networked computer, but setup.exe will only
install BIS to the computer which invoked it.
2020-12 | 4.8.0.3 | IM
Installation Manual
Bosch Security Systems
Page 27

Building Integration System Performing a first-time installation | en 27
i
Notice!
Avoid special characters
Use no special or non-Latin characters in BIS (e.g. Chinese, Russian, ä, é, ô, /, #, %, $, |, !, ~,
‘ ). Use only non-diacritic (7-bit ASCII), alphanumeric characters [A-z] [0-9] plus underscore.
This applies to any characters typed into the BIS installation wizard or configuration browser,
including passwords.
Step Action Effect(s), Notes, Explanations
1 Right-click
setup.exe and
select Run as
administrator.
2 Select the interface
language of your
new BIS system and
click Next>
3 Click Next> If the installation wizard detects an active Windows firewall then
The language selection dialog opens.
Notes:
– Apart from German and Russian all installations are
currently performed in English.
– To display Russian characters properly on a non-Russian
operating system you must change the system locale to
Russian.
– Once BIS has been installed in a particular language that
language can not be changed by a subsequent update
installation on the same computer.
The BIS installation preparation wizard opens. The wizard
searches the PC for existing software required by BIS and
adapts the installation agenda accordingly. Depending on what
is already available the wizard will mark the following
prerequisite software for installation along with BIS
– Windows Installer
– Required versions of the Microsoft .NET Framework. Note
that you will be prompted to install .NET Framework 3.5
separately from your Operating System’s installation media.
– SQL DMO/SMO support
click Yes, I want to disable the Windows Firewall, then click
Next> to disable it. Other firewalls must be disabled manually
outside of the BIS installation procedure before proceeding.
Bosch Security Systems
4 Use the BIS feature
selection window to
identify which BIS
features you wish to
install.
By default, the installation wizard installs the MgtS directory at
the root level of the local C: drive. If this location is acceptable,
click Next>. If you wish to select a different installation path
(local drives only), click Browse.
The Select Features dialog appears
Select only the engine(s) and connection(s) that you have
purchased from Bosch. Without being licensed other features
will not be usable, and will only take up disk space. The default
installation includes all BIS features. Use the drop-down menus
to exclude features that you do not wish to install.
Installation Manual
2020-12 | 4.8.0.3 | IM
Page 28

28 en | Performing a first-time installation Building Integration System
Step Action Effect(s), Notes, Explanations
5 Click Next> The next stage of the installation process is the setting up of
database instances for those selected engines and features that
require them (Event Log/Security Engine, Access Engine, and, in
the next step, Reporting Services).
If you already own high-capacity SQL Server licenses you can
use these for BIS. Else BIS can install limited-capacity fresh
instances for you (see:
29
below).
SQL Server compatibility issues, page
There are basically 3 possibilities regarding the availability of
suitable SQL Server instances, described as A, B and C below:
Availability of suitable SQL
Server instances
A No suitable (*) SQL Server
instance exists on the login
server or on the network
B A suitable (*) SQL Server
instance can be found by
browsing the login server or the
network.
C A suitable (*) SQL Server
instance exists but can not be
found by browsing the login
server or the network.
Action
> Click the Create button. BIS will set up
separate instances of its current default
version of SQLServer Express Edition with
Advanced Services for:
– Event Log/Security Engine (SEE only if
required)
– Reporting Services
– (if required) Access Engine
> Click the Browse button to select an instance
by browsing the network.
> Enter the instance manually in the text field
for the SQL Server Name using the syntax:
<computername>\<instancename>, e.g.
MYSERVER\MYINSTANCE.
2020-12 | 4.8.0.3 | IM
(*) For an explanation of “suitable” see the cautionary note
issues, page 29
below.
Installation Manual
SQL Server compatibility
Bosch Security Systems
Page 29

Building Integration System Performing a first-time installation | en 29
i
i
SQL Server compatibility issues
Notice!
SQL Server compatibility issues affecting SQL Server options B (Browse) and C (manual
entry) above:
The following combinations are incompatible:
Access Engine (ACE) with the unnamed instance (LOCAL) of any SQL Server
Access Engine (ACE) with Event log/Security Engine together on the same instance of any
SQL Server Express Edition.
BIS Reporting Services with SQL Server versions below 2008.
BIS in general with SQL Server versions below 2005 SP2. Such databases need to be
upgraded manually before they can be used with BIS.
BIS versions below 4.3 with SQL Server versions above SQL Server 2012 (BIS on Windows 10
Enterprise LTSB will only be supported with SQL 2014)
Windows 2016 Server will support the following SQL Server versions:
2012 SP2,
2014 SP1
2016 SP2
2017
Windows 2019 Server will support the following SQL Server versions:
2014 SP1
2016 SP2
2017
Notice!
For BIS SQL Server instances hosting Access Engine (ACE) you must use SQL-Authentication
and not Windows authentication. If you browse or enter existing instances for ACE, then enter
the “sa” password of that instance in the dialog box.
SQL Server Express Edition cannot use more than 1GB of RAM and cannot handle databases
larger than 10 GB.
Step Action Effect(s), Notes, Explanations
6 Using the actions (A,B,C)
described above,
configure the instances
you require for Event
Log/SEE and Access
Engine.
7 Similarly, use the BIS
installation wizard to
locate on the network an
instance of the Microsoft
SQL Server for BIS
Reporting Services.
IMPORTANT - Only when creating a new database instance:
always take the sa user for the administrator account.
The BIS installation wizard stores your choices for the database
installation.
IMPORTANT NOTE: This step only occurs if you chose action B
or C in the step above, because if a new instance was created
for the Event Log in the previous step, then Reporting Services
will automatically be activated on the same instance.
This Reporting Services database can be a separate named
instance, or can share an SQL 2012 SP2 or later instance with
Event log/SEE.
Bosch Security Systems
Installation Manual
2020-12 | 4.8.0.3 | IM
Page 30

30 en | Performing a first-time installation Building Integration System
Step Action Effect(s), Notes, Explanations
– To create a separate instance (e.g. if no name appears in
the text box labeled Report Server Instance) click the
Create button. A pop-up window appears suggesting the
name BISREPORTS. Confirm (recommended) or change
the instance name then click OK to return to the previous
window and continue the installation.
– To search for SQL Server instances on remote nodes, enter
the name of the remote node manually and click the
Browse button.
– To share an instance, select the check box: Use the same
SQL Server as for Event Log
8 Click Next> – SQL Server installs.
– The BIS application installs.
– All requested databases are installed.
– The BIS installation wizard finishes installing the
application.
9 Click Finish. The Mandatory Post Installation file opens.
10 Please read and follow
The file contains important information and instructions.
the directions in this file,
then close the window.
11 You must restart the PC
to complete the BIS
The first-time installation of the BIS application is complete. An
icon for the BIS Manager has appeared on the desktop.
installation. Click Yes to
restart the PC.
12 After completing the
See
Licensing your BIS installation, page 43
installation, use the
License tab in the BIS
Configuration Manager
to initiate the licensing
procedure.
2020-12 | 4.8.0.3 | IM
Installation Manual
Bosch Security Systems
Page 31

Building Integration System Performing a first-time installation | en 31
Step Action Effect(s), Notes, Explanations
13 Create an initial
configuration in the BIS
Manager
See BIS Configuration online help for instructions. Press the F1
key when in the BIS Manager.
4.4 Firewall setup
Windows versions install their own firewalls, which need only be configured. Please install any
other firewalls as per the manufacturer’s instructions. Please configure your firewall (Windows
or third party) for use with BIS as described in the file <installation_drive>:\MgtS\Platform
\BIS_Firewall_Configuration.pdf
4.5 Engine-specific post-installation information
The various BIS engines may require additional settings after the main BIS installation.
Depending on which engines you are using, please consult the engine-specific installation
guides in the respective subdirectories of <installation_drive>:\MgtS\
Bosch Security Systems
Installation Manual
2020-12 | 4.8.0.3 | IM
Page 32

32 en | Configuring DCOM and OPC servers Building Integration System
5 Configuring DCOM and OPC servers
This section is only relevant if you wish to install OPC servers, particularly third-party OPC
servers.
5.1 Technical background and introduction
The main task of the BIS application on the BIS (login) server is to collect information from,
and pass commands to, OPC Server processes. These processes, known as OPC servers, are
themselves standardized interfaces to a wide variety of devices e.g. door controllers, fire
alarms and cameras.
The OPC server processes often run not on the BIS server computer, but on remote
computers known as connection servers. The network communication between a BIS server
and a connection server is handled using DCOM (Distributed Common Object Model) and a
common user account called MgtS-Service. The OPC server in effect assumes the identity and
credentials of the MgtS-Service user account.
For this to function, the following need to be done:
– The MgtS-Service user account must exist on the connection server
– MgtS-Service must have sufficient access rights to launch and activate, both locally and
remotely
– The OPC server installation routine, if available, must be executed. Note: Depending on
the manufacturer these routines can be more or less comprehensive. Many will include
the following tasks, but some tasks may need to be done manually. In all cases, please
consult the documentation of the OPC server concerned:
– Installing the OPC core components.
– Preparing DCOM to support the OPC server.
– Installing the OPC server.
– DCOM configuration of the newly installed OPC server, e.g. its user identity (usually
set to MgtS-Service).
2020-12 | 4.8.0.3 | IM
These procedures are described in a separate document on the BIS installation medium:
DCOMConfiguration.pdf
Connecting OPC servers to a BIS installation
OPC servers vary greatly in their complexity, and consequently in the complexity of the
procedures to connect them to a BIS installation. For details on connecting individual OPC
servers, please consult the BIS Configuration Guide online help.
Installation Manual
Bosch Security Systems
Page 33

Building Integration System Performing an upgrade installation | en 33
i
6 Performing an upgrade installation
Notice!
Compatibility with existing panels
There may be version conflicts between the new BIS version and the OPC servers of any fire
or intrusion panels already in your installation (e.g. Bosch FPA or MAP panels). To avoid such
conflicts Bosch urgently recommends that you upgrade these panels to the latest firmware
before starting the BIS upgrade installation.
The following are the major steps in upgrading a BIS system:
1. Plan your upgrade path depending on your starting version, your target version, and
whether or not you are using the Access Engine. See the tables of upgrade paths below.
2. Ensure that the hardware, prerequisite software and license file have been upgraded to
the specifications in
with your existing databases, see the information panel SQL Server compatibility issues
in the section
3. Stop the BIS system (and ACE, if installed)
4. Carry out any necessary upgrades of SQL server.
5. Run the BIS setup on the BIS server.
Planning information, page 10
Installing the BIS software on the BIS login server, page 26
, and that there is no incompatibility
These steps are described in more detail in the sections below.
6.1 Prerequisites
The following tables describe the supported upgrade paths for BIS versions, both without and
with Access Engine (ACE). Do not proceed unless your proposed upgrade path is supported. It
may be necessary to perform the upgrade in multiple stages, see
Note that an update installation to the latest BIS version will always remove previous versions,
but will provide continuity by preserving the configurations, and converting and preserving the
databases with their contents.
Nevertheless see the Notice panels about MS SQL Server 2000 and WCF customizations
below.
Deinstallation, page 44
Bosch Security Systems
Installation Manual
2020-12 | 4.8.0.3 | IM
Page 34

34 en | Performing an upgrade installation Building Integration System
i
i
2020-12 | 4.8.0.3 | IM
Notice!
*) MS SQL Server 2005
Microsoft SQL Server 2014 SP1 or later can not convert backup databases directly from an
SQL Server version before 2005 SP3. If you still have backup databases from before SQL
Server 2005 SP3 you will need to carry out an interim upgrade to version BIS 2.5 (with its
SQL Server 2008) first, before you can upgrade to BIS versions 4.x (which have SQL Server
2012).
Microsoft SQL Server 2005 SP3 is the minimum version for an upgrade to Microsoft SQL
Server 2014.
Notice!
Multi-Server BIS and customized WCF configurations
If you have made manual changes to the WCF configuration file:
\MgtS\Platform\BisClientProxyWcfServer\BisClientProxyWcfServer.exe.config
in BIS 4.0, these will also be migrated to BIS 4.1 and newer versions. Before customizing this
file refer to the specialist documentation in \MgtS\Platform\WCF Configuration.pdf
Installation Manual
Bosch Security Systems
Page 35

Building Integration System Performing an upgrade installation | en 35
6.2 Running the BIS installation wizard on the BIS server
Perform the following procedure to upgrade an existing BIS installation without losing the
current data and configuration files. For this description of an upgrade installation it is
assumed that a working BIS configuration is being upgraded, and that the network of
computers involved is already up and running.
Step Action Effect(s), Notes, Explanations
1 Back up your BIS installation
files, or create an image of the
hard disk that contains the BIS
installation.
2 Close all BIS windows, and stop
the BIS server.
Bosch Security Systems
Installation Manual
2020-12 | 4.8.0.3 | IM
Page 36

36 en | Performing an upgrade installation Building Integration System
Step Action Effect(s), Notes, Explanations
If and only if upgrading from BIS
4.7 AND using a remote
database server, execute the
following batch file on the
remote database server:
3 Insert the BIS installation
medium into your server and
perform the installation
procedure as described in
Installing the BIS software on the
BIS login server, page 26
4 When you reach the BIS Select
Features screen, select the new
BIS features to install, then finish
the installation as described in
Installing the BIS software on the
BIS login server, page 26
5 The Mandatory post installation
BIS.pdf file opens. Please read
and follow the directions in this
file carefully, as they are
particularly relevant to the new
version.
Notes:
For BIS update installations, and when reusing
database instances, the database administrator
user need no longer have the username sa
A BIS upgrade installation automatically updates
the Event Log database also. Database backups
from previous BIS versions can be updated using
the DB Migration button on the Event Log tab of
the BIS Manager. See the BIS Configuration
online help for details.
6 After completing the installation,
See
use the License tab in the BIS
Configuration Manager to initiate
the licensing procedure.
7 Create or import an existing
configuration in the BIS Manager
See BIS Manager online help for instructions
(press the F1 key when in the BIS Manager).
6.3 Updating CA-signed certificates
Introduction
The following 3 procedures are only necessary if you have purchased an updated CA
certificate.
– Update the Internet Information Services Secure Socket Layer (IIS SSL) binding with the
new CA certificate.
– Update the Reporting service bindings.
– Update the "thumbprint" of the CA-signed certificate in the BISIdservice configuration
file.
All three procedures are described below.
2020-12 | 4.8.0.3 | IM
Installation Manual
Licensing your BIS installation, page 43
Bosch Security Systems
Page 37

Building Integration System Performing an upgrade installation | en 37
6.3.1 Updating the IIS SSL binding
Procedure
1. Start Internet Information Services (IIS) Manager from the Windows Start menu.
2. Under Connections select Default Web Site
3. In the main pane select SSL settings
4. Under Actions, select Bindings…
5. In the Site Bindings popup, select https and click Edit…
6. In the Edit Site Binding popup, under SSL certificate, select your CA-signed certificate
from the list.
7. Click OK to confirm
8. Close the popups and exit IIS Manager.
9. Restart the IIS service for the changes to become effective.
6.3.2 Updating the Reporting service binding
Procedure
1. Start Report Server Configuration Manager from the Windows Start menu.
2. Under Server Name enter the name of the server where Reporting service is running and
click Find.
3. Under Report Server Instance, select the correct instance from the list
4. Click Connect
5. Select the menu Web Service URL
6. On the Web Service URL screen, under HTTPS Certificate, select your CA-signed
certificate and click Apply
7. Restart the Reporting service for the changes to become effective.
6.3.3 Updating the thumbprint of the certificate
Note: You can use either the procedure below, or the BWCCertificateConfigurationtool, as
described in BIS_Data_Security.PDF
Procedure
1. From the Windows Start or Search icons, run certlm.msc
2. Select the CA certificate that was issued to you, and open it
3. Select the Details tab > Thumbprint field
4. Copy the Thumbprint value (only the alphanumeric characters).
5. On the BIS installation drive, open the file \MgtS\SmartClient\BISIdService
\appsettings.json in a text editor.
6. Replace the previous thumbprint value, between the double quotes, with the newly
copied thumbprint value.
7. Open the Internet Information Service and restart the application pool BIS IdService for
the changes to become effective.
6.4 Possible further actions
If in your upgrade you are expanding your system, such as adding new OPC servers, then
further actions may be necessary, see
with
Firewall setup, page 31
32
.
and then proceed to
Performing a first-time installation, page 14
Configuring DCOM and OPC servers, page
starting
Bosch Security Systems
Installation Manual
2020-12 | 4.8.0.3 | IM
Page 38

38 en | Configuring BIS clients and tools Building Integration System
i
7 Configuring BIS clients and tools
After installing the BIS application we proceed with the configuration of the client software
and software tools.
7.1 Configuring self-signed certificates from the BIS server
Introduction
As of BIS 4.7 all communication between BIS clients and BIS server are via HTTPS. The BIS
server creates self-signed certificates both for new installations and for upgrades form earlier
versions that had no HTTPS. Self-signed certificates are valid 30 years.
– You need to download the self-signed BIS certificate from a browser and install it on all
local computers or devices.
– If and only if you are using Access Engine (ACE), you need to locate the certificate file on
the installation drive and install it in the same way on all ACE client computers.
Downloading the self-signed BIS certificate from a browser
1. On the client device, open the certificate's URL in a browser. For example, if the name of
your BIS server is MYBISSERVER, then the URL will be http://MYBISSERVER/
MYCERT.CER
Notice!
HTTPS is not yet configured at this stage, therefore you must download the certificate via
HTTP.
If the BIS server webpage is already being accessed by HTTPS, then you will not be able to
download the certificate. In this case, clear the browser history and reload the URL via HTTP.
2. Save the certificate file in local storage on client device.
Locating the certificate for Access Engine (ACE)
The certificate can be found at the following location:
<installationdrive>:\MgtS\Certificates\
AccessManagementSystemInternalCA.cer.
Installing self-signed certificates on a client computer, or on the BIS login server
1. Double click the certificate's.CER file to open it.
2. On the General tab, click Install Certificate
3. Select Local machine as Store Location and click Next
4. Select Place all certificates in the following store and click Browse
5. Select Trusted Root Certification Authorities and click OK
6. Click Next and click Finish to complete installing certificate.
2020-12 | 4.8.0.3 | IM
Installing self-signed certificates on a client mobile device
1. On the mobile device open the device settings and type certificate to search for the
certificates installation menu.
2. Select Install certificate from storage (or similarly named menu item, depending on your
operating system).
3. Select the imported certificate and install it. Note that some devices will install
certificates automatically when you open the certificate.
Note: Certificates are created for a particular hostname, therefore attempts to log in using
https://localhost will fail. Always use the hostname in the URL, https://<hostname>
Installation Manual
Bosch Security Systems
Page 39

Building Integration System Configuring BIS clients and tools | en 39
7.1.1 Trusted sites settings
As described in the BIS Installation Manual (section Configuring BIS clients and optional
tools) the simplest way to configure the required trusted sites for Internet Explorer on BIS
clients is to use the .REG file that BIS provides.
HTTPS requires additional sites to be added manually.
1. On the client device, open the certificate's URL in a browser. For example, if the name of
your BIS server is MYBISSERVER, then the URL will be http://MYBISSERVER/
MYCERT.CER
2. Save the certificate file in local storage on client device.
3. On the BIS server open this URL in your Internet Explorer: https://localhost/
ClientDeploy/tools.aspx
4. From the aspx page download the following file:
IE_InternetSettings_Zone2_TrustedSites_BIS.zip
5. Extract the.REG file from the .ZIP file
6. Using accounts with administrator privileges, execute the .REG file on each of the BIS
client computers.
The IE settings are made globally via the Windows registry.
7.2 Configuring a self-signed certificate from the BIS reporting service
Bosch Security Systems
Introduction
This section applies only to a server topology where the BIS reporting service is running on the
remote database server, and not on the BISloginserver. In all other topologies the BIS
reporting service does not need its own certificate.
Three steps are necessary:
1. Export the certificate from the certificate manager on the remote database server
2. Copy the .CER file to the BIS login server and BIS clients
3. Install the certificate on BIS login server and BIS clients
Exporting the certificate
1. On the remote database server, where the Reporting service is running, execute the
Windows certificates snap-in Certlm.msc from the Windows Start menu
2. In the Certlm program, navigate to Certificates Local Computer > Personal >
Certificates
3. Right-click the certificate for Reporting service and select AllTasks > Export…
4. Click Next to continue through the wizard, taking only the default values
5. Save the .CER file (the certificate) to a convenient location from which you can copy it
easily to the BISloginserver and BIS clients.
6. When you have saved the file, close Certlm.msc
Installation Manual
2020-12 | 4.8.0.3 | IM
Page 40

40 en | Configuring BIS clients and tools Building Integration System
Copying the certificate
1. Copy the .CER file that you exported to the BIS Login server and all BIS clients.
2. Use the following procedure to install the certificate on each of these computers.
Installing self-signed certificates on a client computer, or on the BIS login server
1. Double click the certificate's.CER file to open it.
2. On the General tab, click Install Certificate
3. Select Local machine as Store Location and click Next
4. Select Place all certificates in the following store and click Browse
5. Select Trusted Root Certification Authorities and click OK
6. Click Next and click Finish to complete installing certificate.
7.3 Configuring the web browsers for the clients
The BIS client runs within an MS Internet Explorer web browser. The URL used is either that
of the BIS Server, or https://<Name_of_BIS_Server> if the client is to run on the BIS server
itself.
To ensure trouble-free communication between the various components of the BIS system the
browser’s security settings need to be modified from the defaults. These changes need to be
made for all browsers that run the BIS Client, regardless of user and operating system.
7.3.1 Settings for Internet Explorer (IE)
Making browser settings with a .REG file
The simplest way to change the browser settings is to use the prepared registry command file.
Proceed as follows after installing the BIS server software.
1. On the BIS server open this URL in your Internet Explorer: https://
<NameofBISserver>/ClientDeploy/tools.aspx
2. From the aspx page download the following file:
IE_InternetSettings_Zone2_TrustedSites_BIS.zip
3. Extract the.REG file from the .ZIP file
4. Using accounts with administrator privileges, execute the .REG file on each of the BIS
client computers.
– Effect: The IE settings are made globally via the Windows registry.
Importing certificates for services
For HTTPS communications between the client and your BIS components, install the relevant
certificates on each client:
– The BIS service (in every caes)
– The Reporting service (in cases where Reporting services are running on a remote
database server)
– The ACE service (in cases where Access Engine is installed).
See the main BIS installation guide for details.
2020-12 | 4.8.0.3 | IM
Installation Manual
Bosch Security Systems
Page 41

Building Integration System Configuring BIS clients and tools | en 41
i
i
Making browser settings manually
It is possible, though more error-prone and therefore not recommended, to make or adjust the
browser settings manually. Proceed as follows.
1. Open Internet Explorer and navigate to the Internet Options page for that browser
version, e.g. Select Tools (or the cog icon) > Internet Options.
2. If you want the BIS operator logon screen to load automatically when the operator
launches Internet Explorer, use the General tab to set the home page address to
https://<Name_of_Bis_Server> (i.e. the URL address of your BIS server).
3. Select tab:Security > icon:Trusted Sites button:Sites
4. Enter https://<Name_of_Bis_Server> (replacing <Name_of_Bis_Server> with the
name of your own BIS server) and click the Add button to add it to the list of trusted
sites.
If you are configuring this client on the BIS server, add https://localhost also.
5. Click button:Close
6. Remaining under tab:Security > icon:Trusted Sites, click button:Custom Level...
7. From the BIS installation medium, locate and open the file
<language folder>\Documents\BIS platform\IE-Settings.xls
8. In IE-Settings.xls, open the tab pertaining to your browser version.
9. Depending on your default security level Medium, High, or Custom, enable or disable the
controls as shown in the respective column in IE-Settings.xls, then click OK.
NOTE: If your security level is none of the above, we recommend that you start from a
default level of Medium.
10. Restart Internet Explorer for the settings to take effect.
Notice!
The Windows setting Update Root Certificates causes the operating system to validate each
certificate via the Microsoft Windows Update Server, generating an entry in the Event Log. To
prevent this, clear the check box Update Root Certificates in the following dialog:
Start > Control Panel > Add or Remove Programs > Add/Remove Windows Components
7.4 Using strong passwords
To enhance security, the system forces all users to set a strong password when they log on to
a Windows client with a default password, which is the same as the username.
Follow the instructions in the Change password dialog to reset the password in accordance
with the password policy.
Notice!
The systems rejects all logons at mobile web clients until you have set a strong password in a
Windows client.
7.5 Firewall setup
To configure a firewall on the clients, proceed as described for the BIS server in
setup, page 31
7.6 Installing optional BIS tools
Firewall
Bosch Security Systems
BIS provides optional tools for the following tasks:
– Limiting the network bandwidth used by BIS
– Checking detailed information about a BIS client PC
– Creating and modifying SQL Server reports for the BIS Event Log
Installation Manual
2020-12 | 4.8.0.3 | IM
Page 42

42 en | Configuring BIS clients and tools Building Integration System
i
– Running applications designed to target the .NET Framework 2.0, 3.5, 4.0 and 4.8
Use of these tools is described in the BIS Configuration online help. They can be installed on
the BIS server and/or on the BIS clients from an active server page on the BIS Server. The
installation procedure is as follows:
1. Start Internet Explorer
2. Enter the following URL: https://<Name_of_Bis_Server>/ClientDeploy/Tools.aspx
(Substitute the name of your own BIS server). Note: if Internet Explorer no longer shows
an address field, the same effect can be achieved by clicking Start > Run and entering
iexplore https://<Name_of_Bis_Server>/ClientDeploy/Tools.aspx
3. The download page appears. Click the Download button for the desired tool.
4. A confirmation dialog appears, click Run.
5. The effect depends on the tool chosen:
– The NetLimiter program installs and requires a reboot.
– The Client Information tool starts immediately
– The Report Builder can be installed directly after pressing Download...
– The .NET Framework (2.0, 3.5 or 4.0) runtime can be installed directly after pressing
Download... Note that on Windows 8.1 and Server 2012 systems Microsoft
installation media will be required.
ChangePassword tool
As of BIS 4.6 a new tool has been added to maintain the passwords of BIS system users, that
is both Windows operating system (OS) and SQL users.
Consult the BIS Configuration help for details.
7.7 Installing third-party software alongside BIS
Background
As a business-critical security system BIS should always be run on dedicated computers. The
addition of third-party software, if unavoidable, requires careful consideration and planning.
Notice!
Bosch urgently recommends you install the third-party software first on an offline test system
before installing on a live production system.
Procedure
Always perform the following steps and keep careful record of them in case technical support
is later required.
1. Before installing third party software on the live system:
– Verify that constraints and requirements of the third-party software do not conflict
with those of BIS
– Create a restore point
– Create a backup of the BIS system
2. After installing third party software on the live system
– Verify that BIS is fully operational.
2020-12 | 4.8.0.3 | IM
Installation Manual
Bosch Security Systems
Page 43

Building Integration System Licensing your BIS installation | en 43
i
i
8 Licensing your BIS installation
Licenses for BIS 4.0 and above are ordered online and delivered electronically. Proceed as
follows:
1. Order the licenses you require from your local Bosch order desk or sales organization.
You will receive an email from them containing your authorization number.
Notice!
Emergency licensing
Licenses are strictly hardware-bound. If due to some emergency you need to change your
server hardware, please call your local Bosch partner or service representative. Bosch may
then either port your licenses to the new hardware IDs, or provide time-limited emergency
licenses.
2. Start the BIS Manager
3. On the License tab, click the Start License Manager button.
– Effect: The License Manager dialog box is displayed.
4. Select the check boxes for the software package, the features, and the expansions that
you have ordered. For the expansions, enter also the number of units required.
5. Click the Activate… button.
– Effect: The License Activation dialog box is displayed containing your computer
signature.
6. Write down the computer signature or copy and paste it into a text file.
7. On a computer with Internet access, enter the following URL into your browser:
https://activation.boschsecurity.com
If you do not have an account to access the Bosch License Activation Center, either
create a new account and log on (recommended), or click the link to activate a new
license without logging on. Note that for SMA (software maintenance agreement) licenses
an account is always required. An account has the further advantage of keeping track of
all your activations for future reference.
Bosch Security Systems
Follow the instructions on the website to obtain the License Activation Key.
8. Return to the software. In the License Activation dialog box, type or paste in the License
Activation Key obtained from the Bosch License Activation Center and click the Activate
button.
– Effect: The software packages are activated for the computer.
9. Click the Refresh button to view the modified set of activated licenses
Notice!
Effects of hardware and software changes
Changes to the hardware of the your server may invalidate your license and cause the
software to stop functioning. Please check with technical support before making changes to
the server.
Installation Manual
2020-12 | 4.8.0.3 | IM
Page 44

44 en | Maintenance and Deinstallation Building Integration System
i
9 Maintenance and Deinstallation
This chapter describes the main tasks you need to perform to keep a BIS installation in
working order, or to deinstall the software cleanly.
9.1 Maintenance
BIS systems are often business-critical both in the data they contain and in their functionality.
Bosch therefore strongly recommends that you use a RAID array or SAN (Storage Area
Network) and that this be properly maintained. Be sure to monitor the system disks regularly
for read/write errors, lack of space and fragmentation.
The BIS Error log (BIS Manager > tab:Error log) provides valuable information on problems
encountered by the system.
Bosch provides technical support through the usual channels, as arranged through your
dealer. If you need to provide detailed information about your configuration then in the BIS
Manager click tab: Error log > button:Start Configuration Collector. The Configuration
Collector tool is part of every BIS installation and has its own online help.
9.2 Backing up and restoring configurations
Your operative BIS configurations should be backed up regularly, and whenever important
changes have been made. This can be done in two ways:
– manually in the BIS Manager: make sure the system is running, then click tab: Backup /
Restore configuration > button: Backup
– automatically as a scheduled job in BIS itself. See the BIS Configuration online help for
instructions.
The default directory for configuration backups is <installation_drive>:\Backup
To restore a configuration backup, first make sure that the BIS application is stopped, then
use the same tab Backup /Restore configuration > button: Restore in the BIS Manager. If you
restore a configuration from an older version of BIS, then any necessary conversions are
carried out automatically when the new BIS version loads the old configuration.
9.3 Deinstallation
Deinstallation may be necessary, for example, when upgrading from one BIS version to
another, if the upgrade path is not supported, see
Notice!
The BIS installation wizard does not remove third party products, such as Microsoft SQL
Server, as they may be required by other applications on your computer. If you subsequently
re-install BIS without deinstalling Microsoft SQL Server manually, then the wizard will install
BIS upon the existing databases.
1. First stop the BIS Server in the BIS manager tab:System Start/stop > Button:Stop Server
component
2. Deinstall the BIS Software via standard Microsoft Windows software administration, e.g.
under Windows 7 click Start > Control Panel > Programs and Features . The computer
lists all installed software packages. From this list select BIS - Building Integration
System, click the Remove button and follow the directions given by the configuration
program
3. In the same way, remove any packages whose names start with “BIS”.
4. Reboot the computer after deinstallation
Prerequisites, page 33
2020-12 | 4.8.0.3 | IM
Installation Manual
Bosch Security Systems
Page 45

Building Integration System Maintenance and Deinstallation | 45
Bosch Security Systems
Installation Manual
2020-12 | 4.8.0.3 | IM
Page 46

46 | Maintenance and Deinstallation Building Integration System
2020-12 | 4.8.0.3 | IM
Installation Manual
Bosch Security Systems
Page 47

Page 48

Bosch Security Systems B.V.
Torenallee 49
5617 BA Eindhoven
Netherlands
www.boschsecurity.com
© Bosch Security Systems B.V., 2020
202012091817
 Loading...