

Bosch B36CT Installation Instructions And Instructions For Use

Fridge-freezer
Réfrigérateur / congélateur combiné
Refrigerador/congelador
B36CT...
en Installation instructions and instructions for use ................ 2
fr Notice de montage et d’utilisation .................................... 34
es Instrucciones de uso y montaje ......................................... 68

en-us
enTable of contents
enInstallation i nstr ucti ons and i nst r uct i ons for use
( Important safety instructions . . . . . . . . . . . . 3
Definitions . . . . . . . . . . . . . . . . . . . . . . . . . . . . . . . .3
About these instructions . . . . . . . . . . . . . . . . . . . . . 3
Introduction . . . . . . . . . . . . . . . . . . . . . . . . . . . . . . . 3
Restriction of user group. . . . . . . . . . . . . . . . . . . . . 3
Risk of explosion. . . . . . . . . . . . . . . . . . . . . . . . . . . 3
Risk of electric shock . . . . . . . . . . . . . . . . . . . . . . . 3
Risk of cold burns . . . . . . . . . . . . . . . . . . . . . . . . . . 4
Risk of Injury . . . . . . . . . . . . . . . . . . . . . . . . . . . . . .4
Fire hazard/Danger due to refrigerants . . . . . . . . . . 4
Risk of fire . . . . . . . . . . . . . . . . . . . . . . . . . . . . . . . . 4
Risk of suffocation. . . . . . . . . . . . . . . . . . . . . . . . . . 4
Damage . . . . . . . . . . . . . . . . . . . . . . . . . . . . . . . . . 4
Weight . . . . . . . . . . . . . . . . . . . . . . . . . . . . . . . . . . . 4
State of California Proposition 65 Warnings . . . . . . 4
8 Intended use . . . . . . . . . . . . . . . . . . . . . . . . . . 5
7 Environmental protection . . . . . . . . . . . . . . . 5
Packaging . . . . . . . . . . . . . . . . . . . . . . . . . . . . . . . . 5
Old appliances . . . . . . . . . . . . . . . . . . . . . . . . . . . . 5
5 Installation and connection . . . . . . . . . . . . . . 5
Contents of package. . . . . . . . . . . . . . . . . . . . . . . . 5
Technical data. . . . . . . . . . . . . . . . . . . . . . . . . . . . . 5
Installing the appliance . . . . . . . . . . . . . . . . . . . . . . 6
Saving energy . . . . . . . . . . . . . . . . . . . . . . . . . . . .12
Before using for the first time . . . . . . . . . . . . . . . . 13
Water connection . . . . . . . . . . . . . . . . . . . . . . . . . 13
Electrical connection . . . . . . . . . . . . . . . . . . . . . . . 13
* Getting to know your appliance . . . . . . . . . 14
Appliance . . . . . . . . . . . . . . . . . . . . . . . . . . . . . . . 14
Operating controls. . . . . . . . . . . . . . . . . . . . . . . . . 15
Equipment . . . . . . . . . . . . . . . . . . . . . . . . . . . . . . . 16
1 Operating the appliance . . . . . . . . . . . . . . . . 20
Switching the appliance on . . . . . . . . . . . . . . . . . .20
Switching off and disconnecting the appliance . . . 20
Setting the temperature unit . . . . . . . . . . . . . . . . .20
Setting the temperature. . . . . . . . . . . . . . . . . . . . . 20
Setting cool-fresh compartment. . . . . . . . . . . . . . . 20
Super cooling . . . . . . . . . . . . . . . . . . . . . . . . . . . .20
Super freezing . . . . . . . . . . . . . . . . . . . . . . . . . . . . 21
Energy saving mode . . . . . . . . . . . . . . . . . . . . . . .21
Freshness mode . . . . . . . . . . . . . . . . . . . . . . . . . .21
Vacation mode . . . . . . . . . . . . . . . . . . . . . . . . . . . 21
Sabbath mode. . . . . . . . . . . . . . . . . . . . . . . . . . . . 21
Setting the light . . . . . . . . . . . . . . . . . . . . . . . . . . .22
Change filter alarm . . . . . . . . . . . . . . . . . . . . . . . . 22
o Home Connect. . . . . . . . . . . . . . . . . . . . . . . . 23
Setting up Home Connect . . . . . . . . . . . . . . . . . . 23
Installing updates for the Home Connect software 24
Information on data protection . . . . . . . . . . . . . . . 24
U Refrigerator compartment. . . . . . . . . . . . . . 25
Note when storing food . . . . . . . . . . . . . . . . . . . . 25
T Cool-fresh compartment . . . . . . . . . . . . . . . 25
Cool-fresh bin . . . . . . . . . . . . . . . . . . . . . . . . . . . . 25
Storage recommendations . . . . . . . . . . . . . . . . . . 25
W Freezer compartment. . . . . . . . . . . . . . . . . . 26
V Water dispenser . . . . . . . . . . . . . . . . . . . . . . 26
Before using the appliance for the first time. . . . . 26
Observing drinking water quality . . . . . . . . . . . . . 26
Dispensing water . . . . . . . . . . . . . . . . . . . . . . . . . 26
; Ice maker. . . . . . . . . . . . . . . . . . . . . . . . . . . . 27
Before using the appliance for the first time. . . . . 27
Switching ice cube production on or off . . . . . . . . 27
= Defrosting . . . . . . . . . . . . . . . . . . . . . . . . . . . 27
D Cleaning . . . . . . . . . . . . . . . . . . . . . . . . . . . . 28
Cleaning the appliance interior. . . . . . . . . . . . . . . 28
Cleaning the fittings . . . . . . . . . . . . . . . . . . . . . . . 28
l Odors. . . . . . . . . . . . . . . . . . . . . . . . . . . . . . . 30
9 Lighting. . . . . . . . . . . . . . . . . . . . . . . . . . . . . 30
> Noises . . . . . . . . . . . . . . . . . . . . . . . . . . . . . . 30
Normal noises . . . . . . . . . . . . . . . . . . . . . . . . . . . 30
Preventing noises . . . . . . . . . . . . . . . . . . . . . . . . . 30
3 Faults – what to do? . . . . . . . . . . . . . . . . . . 31
Appliance . . . . . . . . . . . . . . . . . . . . . . . . . . . . . . . 31
Water dispenser . . . . . . . . . . . . . . . . . . . . . . . . . . 32
Ice maker . . . . . . . . . . . . . . . . . . . . . . . . . . . . . . . 32
4 Customer service. . . . . . . . . . . . . . . . . . . . . 33
Appliance self-test . . . . . . . . . . . . . . . . . . . . . . . . 33
Warranty statement. . . . . . . . . . . . . . . . . . . . . . . . 33
M Alarm . . . . . . . . . . . . . . . . . . . . . . . . . . . . . . . 22
Door alarm . . . . . . . . . . . . . . . . . . . . . . . . . . . . . .22
Temperature alarm . . . . . . . . . . . . . . . . . . . . . . . .22
2

9 Important safety instructions
READ INSTRUCTIONS - DO NOT DISCARD!
(Important safety instructions
Impor t ant safet y i nstr ucti ons
READ INSTRUCTIONS - DO NOT DISCARD!
Important safety instructions en-us
Definitions
9 WARNING
Non-observance of this warning could
result in death or serious injuries.
9 CAUTION
Non-observance of this warning could
result in slight or moderately serious
injuries.
NOTICE: Non-observance of this
information could damage the appliance.
Note: This indicates important information
and/or tips.
About these instructions
■ Read and follow the operating and
installation instructions.They contain
important information on how to install,
use and maintain the appliance.
■ Retain all documents for subsequent use
or for the next owner.
Introduction
■ This appliance complies with the relevant
safety regulations for electrical
appliances.
■ The refrigeration circuit has been
checked for leaks.
Restriction of user group
■ This appliance is not intended for use by
persons (including children) with reduced
physical, sensory or mental capabilities,
or lack of experience and knowledge,
unless they have been given supervision
or instruction concerning use of the
appliance by a person responsible for
their safety.
■ Children should be supervised to ensure
that they do not play with the appliance.
Risk of explosion
■ Never use electric devices inside the
appliance (e.g. heaters or electric ice
makers).
■ Do not store products which contain
flammable propellants (e.g. spray cans)
or explosive substances in the appliance.
■ Only store high-proof alcohol tightly
closed and standing up.
■ Do not use other means to accelerate the
defrosting process other than those
recommended by the manufacturer.
Risk of electric shock
Improper installations or repairs may put the
user at considerable risk.
■ When installing the appliance, make sure
that the power cord does not get jammed
or damaged.
■ In order to avoid danger, if the power
cord is damaged, disconnect the
appliance from the power source
immediately. Have the power cord
replaced by the manufacturer, customer
service or a similarly qualified person.
■ Do not use multiple outlets, extension
cords, or adapters.
■ Before servicing the appliance or
carrying out installation work, disconnect
the appliance from the power source or
switch off the fuse.
Before cleaning the appliance, press the
ÿ power button to turn the appliance off.
Glass shelves and other equipment can
be moved while the appliance is
switched on.
■ Never cut through or remove the power
cord's third conductor (grounding
conductor).
■ Never defrost or clean the appliance
using a steam cleaner. The steam may
penetrate electrical parts and cause a
short circuit.
■ The appliance, cord and accessories
should only be repaired or replaced by
the manufacturer or an authorized
service provider.
3
en-us Important safety instructions
9 Important safety instructions
READ INSTRUCTIONS - DO NOT DISCARD!
■ Only use original parts supplied by the
manufacturer.
These parts come with a warranty from
the manufacturer that they satisfy the
safety requirements.
Risk of cold burns
■ Never put frozen food straight from the
freezer compartment into your mouth.
■ Avoid prolonged contact of skin with
frozen food, ice and the tubes in the
freezer compartment.
Risk of Injury
Containers which contain carbonated drinks
may burst.
Do not store containers which contain
carbonated drinks in the freezer
compartment.
Fire hazard/Danger due to
refrigerants
The tubes of the refrigeration circuit contain
a small quantity of an environmentally
friendly but flammable refrigerant (R600a).
If the refrigerant escapes, it may injure your
eyes or ignite.
■ Do not damage the tubes.
If the tubes are damaged:
■ Keep open flames and ignition sources
away from the appliance.
■ Ventilate the room.
■ Switch off the appliance and unplug the
power plug.
■ Please contact customer service.
Risk of suffocation
■ Keep children away from the packaging
and its parts.
■ To avoid having children climb into the
appliance, never remove the partition
wall of the frozen food bin (large).
Damage
To avoid damage:
■ Do not stand or lean on the base,
runners or doors.
■ Keep plastic parts and door seals free of
oil and grease.
■ Pull the power plug – not the power cord.
Weight
The appliance is very heavy. The appliance
should always be transported and set up by
at least 2 people.
~ "Installation and connection" on page 5
State of California Proposition 65
Warnings
This product may contain a chemical known
to the State of California, which can cause
cancer or reproductive harm. Therefore, the
packaging of your product may bear the
following label as required by California:
Risk of fire
Portable multi-outlet power strips and
portable power supplies may overheat,
causing a fire.
Never leave portable multi-outlet power
strips or portable power supplies behind the
appliance.
4

Intended use en-us
8Intended use
Intended use
Use this appliance
■ only for cooling and freezing food, ice making
and water dispensing.
■ only in the home and in the home environment.
■ only according to these operating instructions.
This appliance is intended for use at an altitude of
max. 13123 ft (4000 meters) above sea level.
7Environmental protection
Env i r o nment al pr ot ect i on
Packaging
All materials are environmentally safe and
recyclable:
■ Dispose of packaging in an environmentally
responsible manner.
■ Please ask your dealer or inquire at your local
authority about current means of disposal.
Old appliances
5 Installation and
connection
Installation and connect i on
Contents of package
After unpacking, check all parts for damage during
transport.
In the event of damage, contact your dealer or our
after-sales service.
The delivery consists of the following parts:
■ Free-standing appliance
■ Installation material
■ Interior fittings (depending on model)
■ Installation instructions and instructions for use
■ Statement of limited product warranty
■ Information on the energy consumption and
noises
Technical data
Refrigerant, cubic capacity and further technical
specifications can be found on the rating plate.
~ "Getting to know your appliance" on page 14
Valuable raw materials can be reclaimed by
recycling old appliances.
9 WARNING
CHILDREN MAY BECOME LOCKED IN THE
APPLIANCE AND SUFFOCATE!
Before disposing of your old appliance:
■ Remove the door.
■ Leave shelves and bins in the appliance to
prevent children from climbing in.
■ Keep children away from the discarded
appliance.
9 CAUTION
REFRIGERANT AND HARMFUL GASES MAY
ESCAPE.
Do not damage the tubes of the refrigeration
circuit and insulation.
1. Pull out the power plug.
2. Cut through the power cord.
3. Have the appliance disposed of properly.
5
en-us Installation and connection
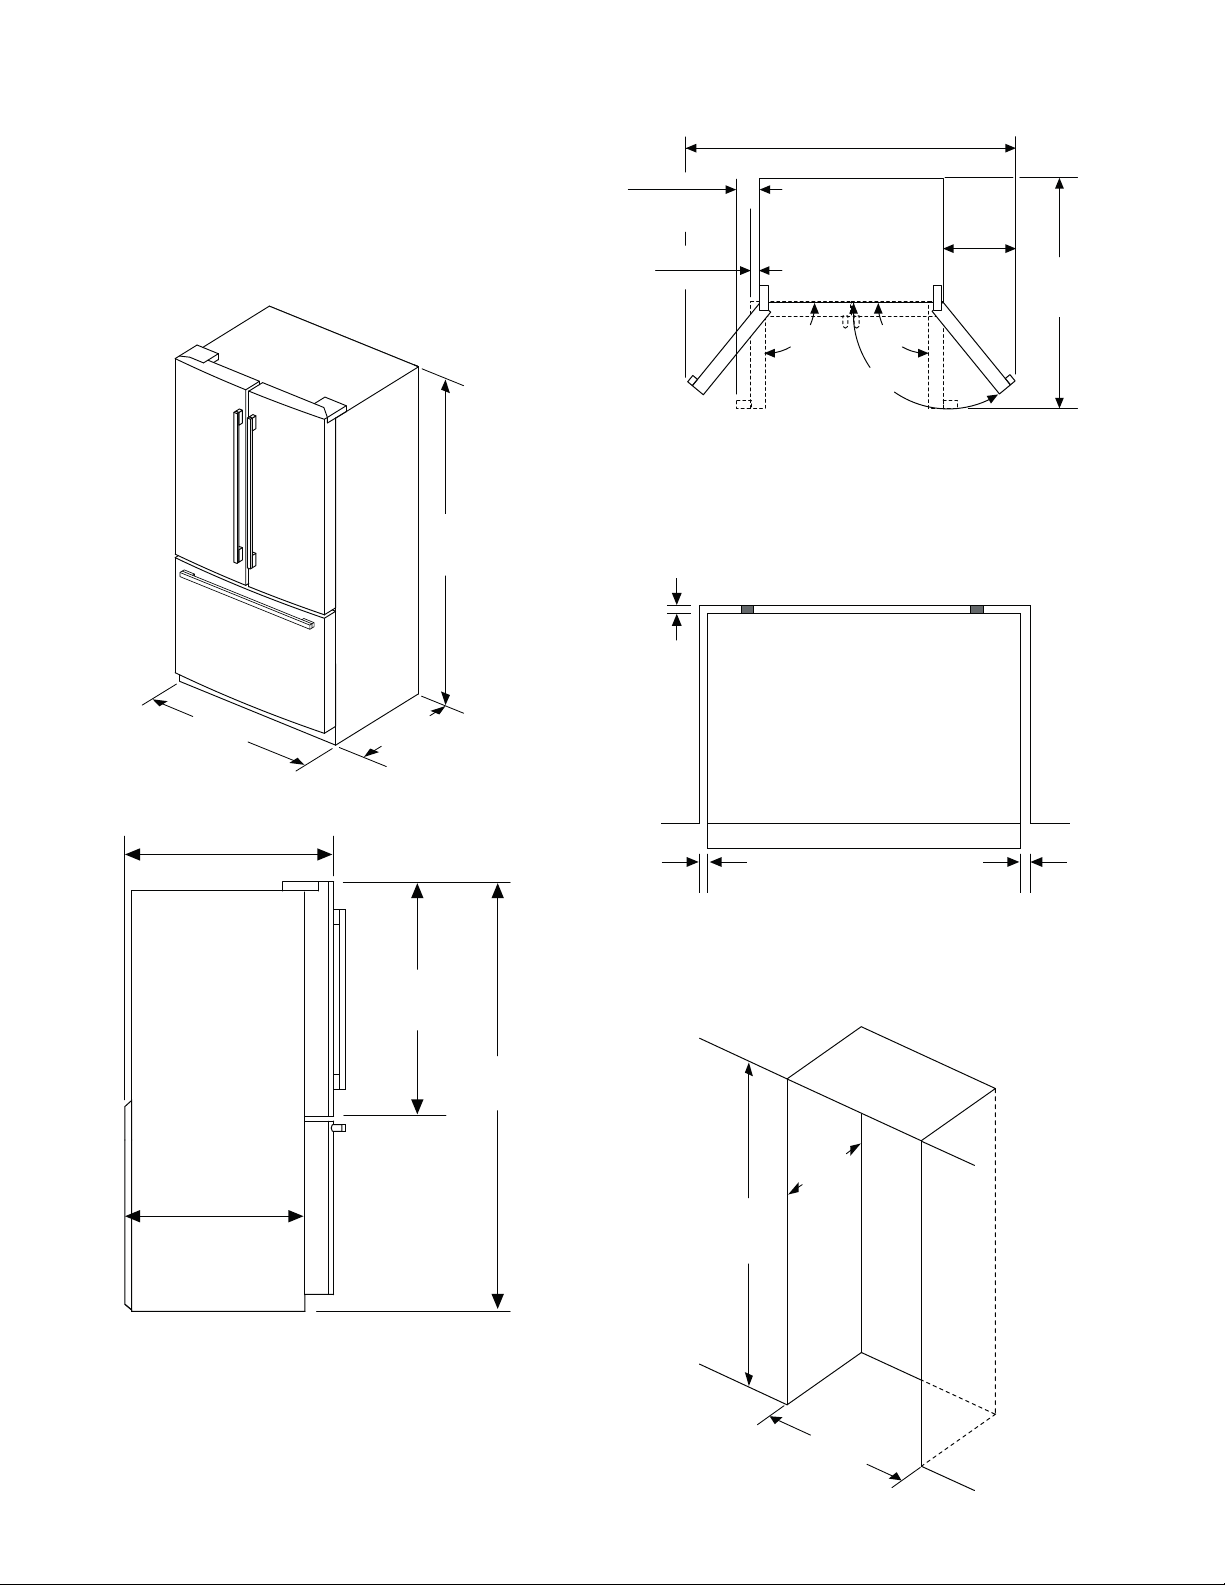
Installing the appliance
Installation location
The weight of the appliance may be up to 419 lb
(190 kg) depending on the model. The base must
be sufficiently stable and should not give. If
necessary, reinforce the floor.
Installation dimensions
71
½
″
(1815 mm)
Door opening angle
57
⁷/
″
4
¹/
″
(103 mm)
Pro 4
(112 mm)
1
¾ ″
(45 mm)
⁷/
(1459 mm)
″
Pro 57 ⅞ ″
(1470 mm)
90°90°
118°
10
¹⁵/
(278 mm)
Pro 11 ⅛ ″
(283 mm)
″
43 ⅜
(1102 mm)
Minimum clearances
Leave a clearance of 1/2 ˝ (12.7 mm) above the
appliance.
Observe minimum clearances as follows:
1 ″
(25 mm)
″
35
⅝
″
(905 mm)
28 ¾ ″
(731 mm)
25 ″
(635 mm)
24 ″
(610 mm)
44
⁹/
″
(1132 mm)
72 ″
(1830 mm)
⅛
″
(3,2 mm)
⅛
″
(3,2 mm)
Niche dimensions
If you install the appliance in a niche, adhere to the
following dimensions:
″
25
(635 mm)
″
72
(1830 mm)
36
″
(914 mm)
6
Installation and connection en-us
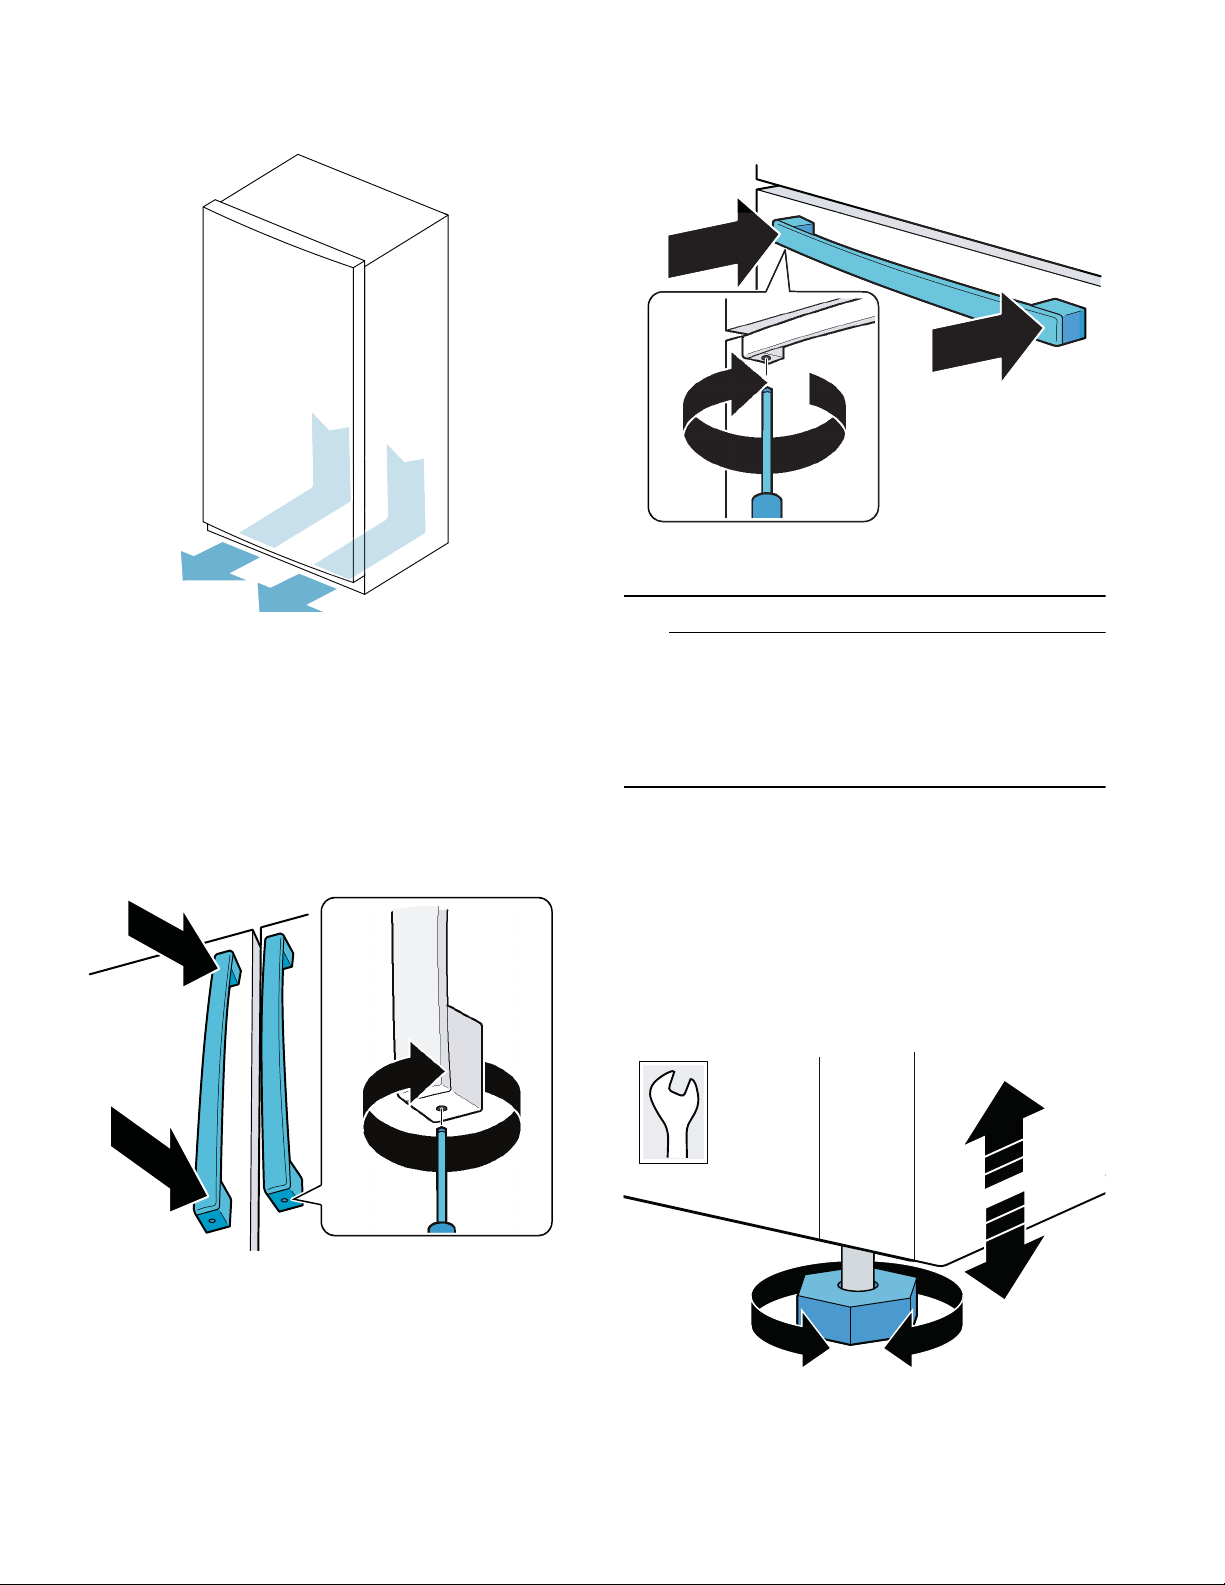
Ventilation
Never cover or block ventilation openings.
Installing the door handle
1. Fit the handle vertically onto the pre-assembled
bolts.
Note: The holes in the handle must face up and
down.
2. Use a 2.5 mm Allen wrench to tighten the pre-
assembled screws in the handle clockwise from
the bottom.
Aligning the appliance
9 CAUTION
■ To avoid damage to the floor, always move the
appliance with the height-adjustable feet
screwed upwards.
■ The two front height-adjustable feet must
always be in contact with the floor to avoid the
appliance from rolling or tipping when the door
is opened.
2. Use a 2.5 mm Allen wrench to tighten the pre-
assembled screws clockwise in the handle from
the top and bottom.
Installing the drawer handle
1. Insert the handle horizontally onto the pre-
assembled bolts.
Note: The holes in the handle must be facing down.
Rollers are located under the appliance for easy
movement and alignment:
1. Place the appliance vertically on a firm, level
floor.
2. Using a wrench, screw down both of the front
height-adjustable feet so that they touch the floor.
3. Compensate for floor unevenness with the front
height-adjustable feet.
Note: To align, use a level.
13
7

en-us Installation and connection
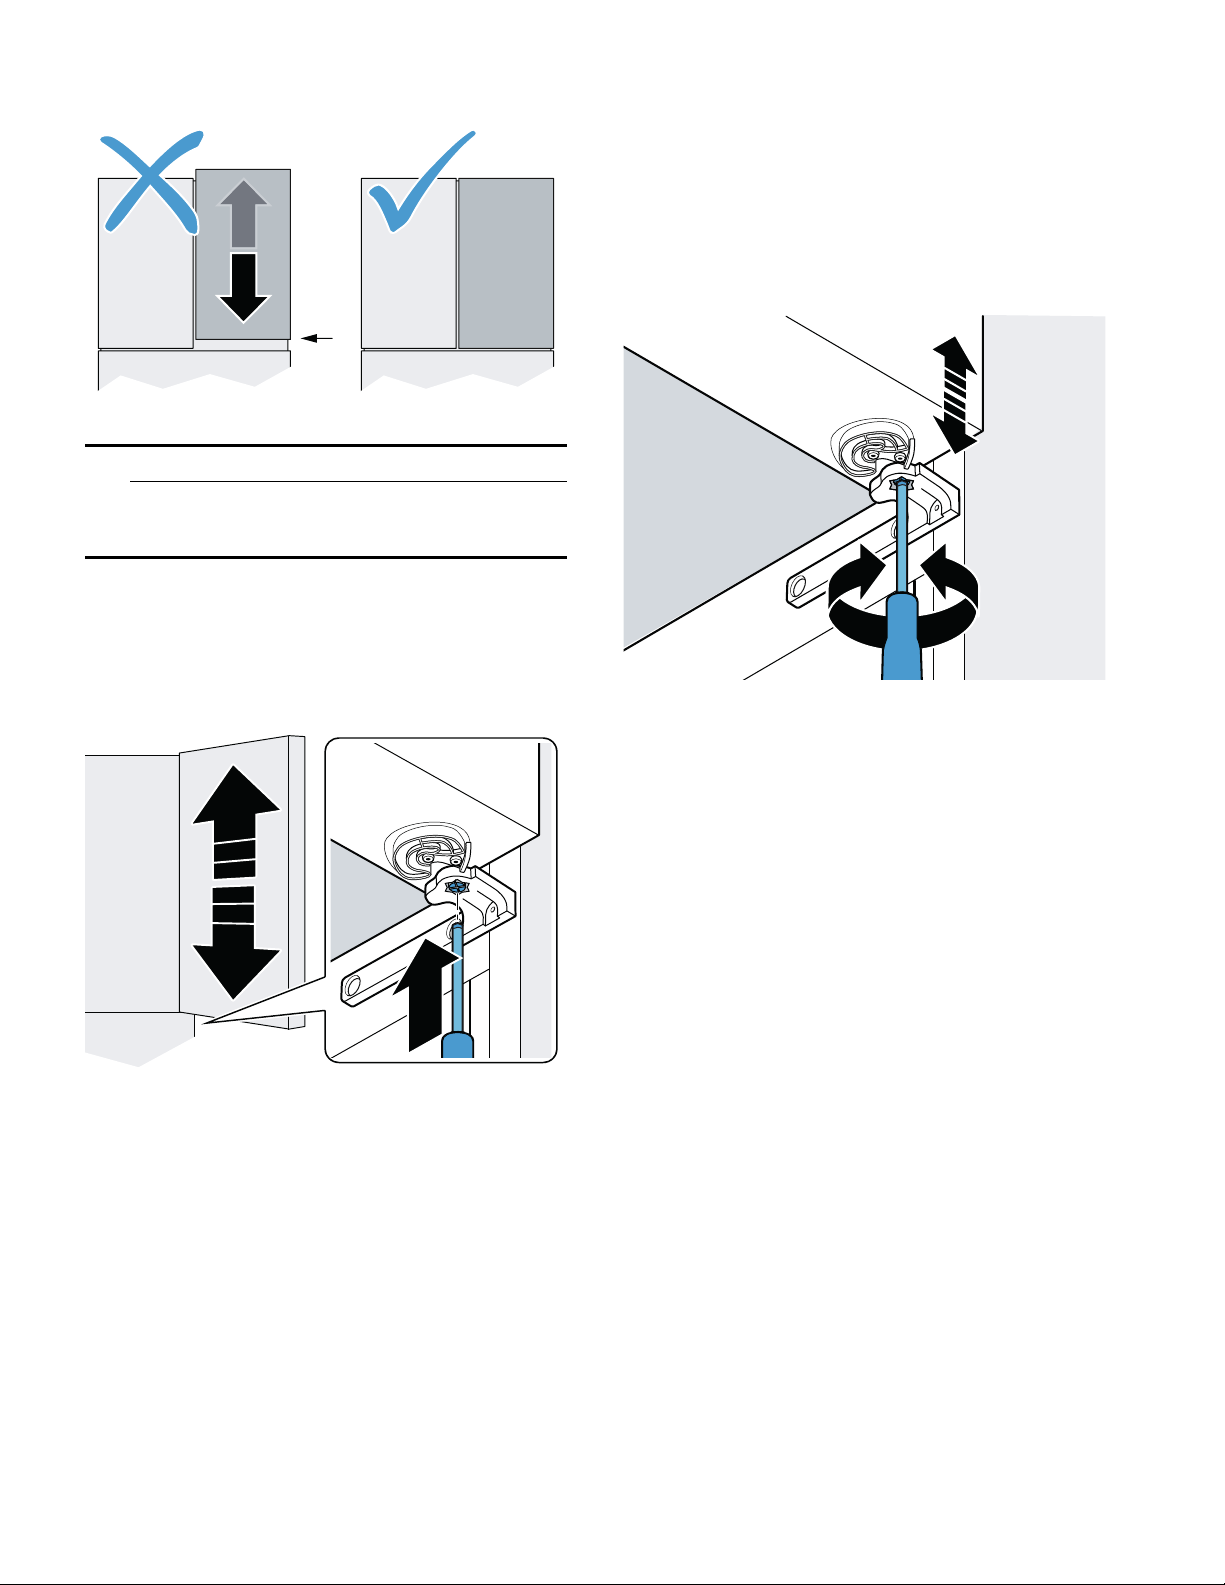
Align refrigerator compartment doors
Align the vertical gap of the doors:
Note: Remove the contents from the doors, if
present.
1. Remove the screw T20 and cover cap on the
door hinge.
2. Loosen the safety screw.
9 CAUTION
Do not remove the safety screw.
3. Turn the adjustment screw until the desired
position is reached when the door is closed.
– To move the upper end of the door outwards,
turn clockwise.
– To move the upper end of the door inwards,
turn counterclockwise.
4. To check the position, close the door and correct
if necessary.
5. Tighten the safety screw again.
6. Fit the cover cap and screw in the screw T20
again.
8
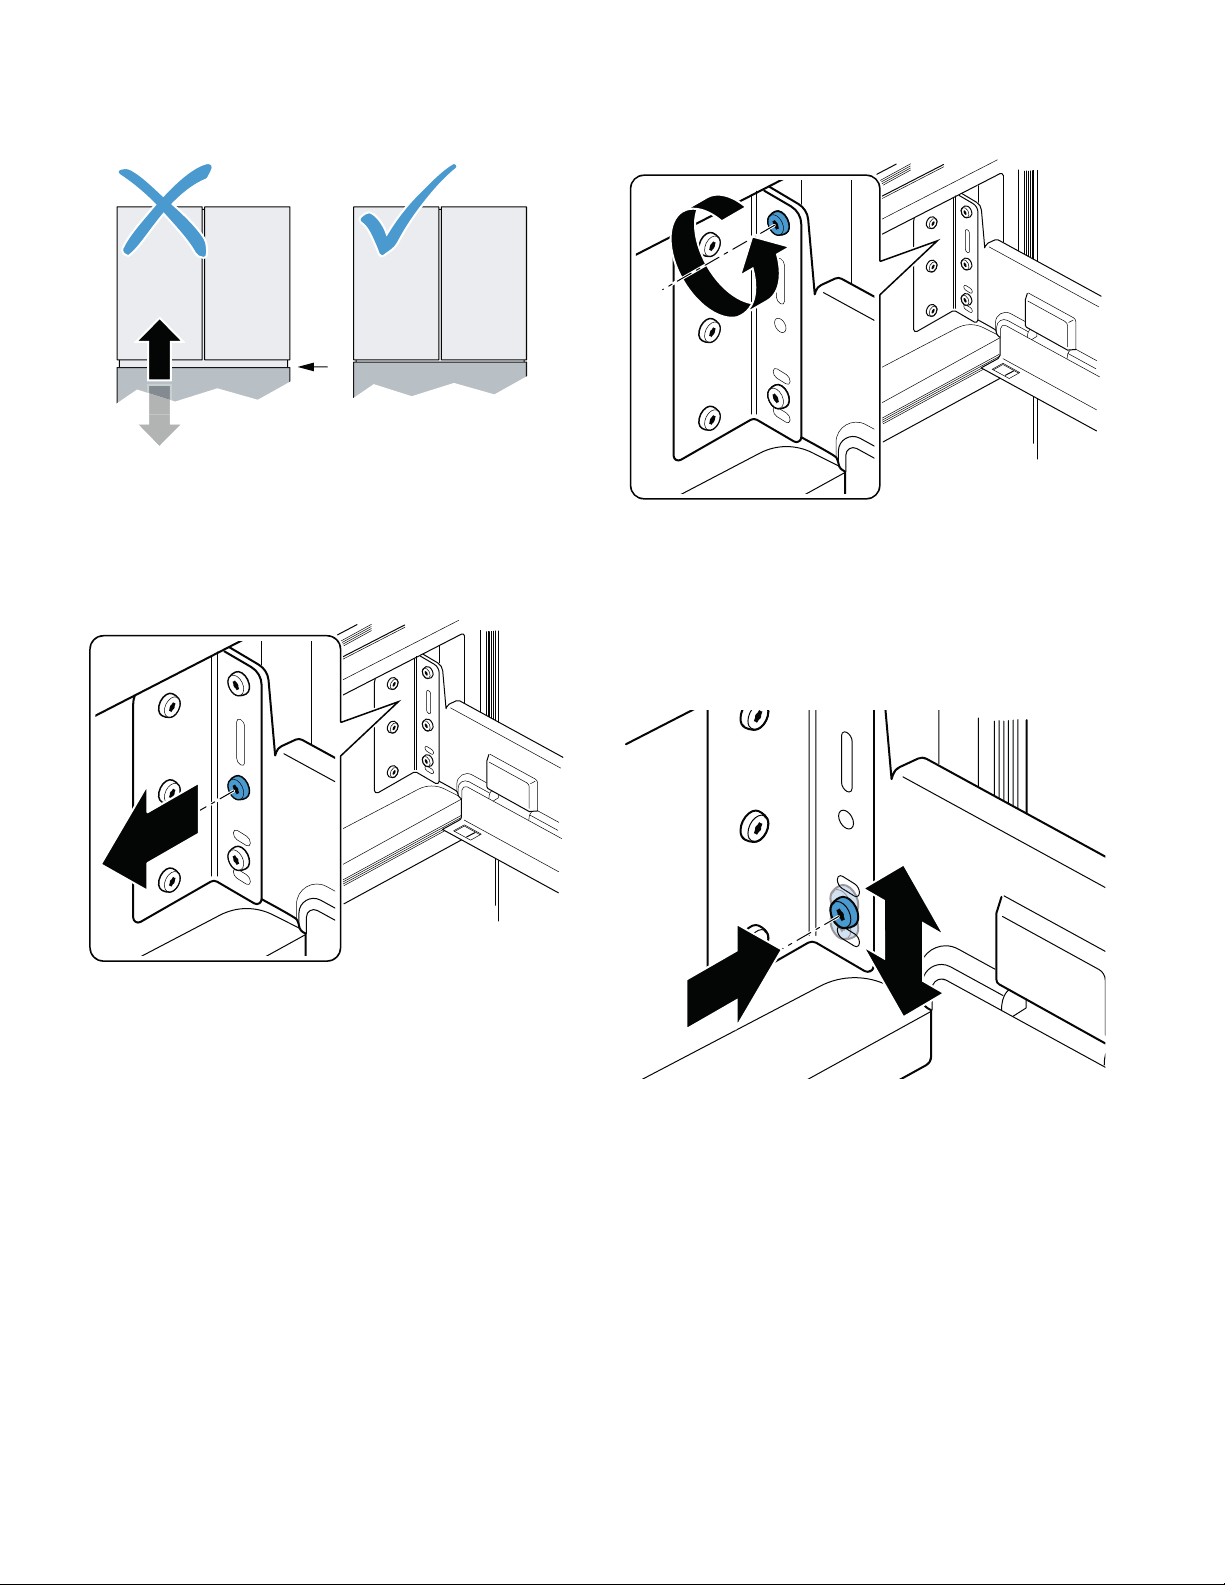
Installation and connection en-us
Align the horizontal gap between the doors:
9 CAUTION
To avoid damage to the appliance, move the
right-hand door down if the door pillar at the top
collides with the housing.
Note: Remove the contents from the doors, if
present.
1. Open the door and drawer.
2. Lift the door and insert a screwdriver into the door
hinge from below.
3. Push up the adjustable part and turn by 60° until
the desired position is reached.
– The door height can be set at 2 levels,
adjusted by 1/16" (1.5 mm) in each case. The
higher level is followed by the lower. The
adjustable part engages as soon as a position
is reached.
– To move the door up, turn clockwise.
– To move the door down, turn
counterclockwise.
4. To check the position, close the door and drawer
and correct if necessary.
9
en-us Installation and connection
Aligning the drawers
You can align the drawer vertically:
1. Open the drawer as far as it will go and remove
the bin.
2. Remove the center screws on both sides.
Note: If you want to reset the drawer to the factory
settings, keep the screws.
3. Loosen the upper screw on both sides.
Note: Do not remove the screws.
4. Lift the drawer and remove the lower screws on
both sides.
5. Move the drawer up or down to the required
position and insert the lower screw in one of the
available holes.
Note: The drawer can be adjusted by 1/16" (2 mm)
up and down.
10
6. Retighten all the screws.
7. To check the position, close the drawer and
correct if necessary.
 Loading...