


5 Series 2004
Owner's Manual
Contents
A to Z
for Vehicle

Online Edition for Part No. 01 41 0 157 647 - © 07/03 BMW AG

525i
Online Edition for Part No. 01 41 0 157 647 - © 07/03 BMW AG
530i 545i
Congratulations, and thank you for choosing a BMW.
Thorough familiarity with your vehicle will provide you with
enhanced control and security when you drive it. We therefore have this request:
Please take the time to read this Owner's Manual and
familiarize yourself with the information that we have compiled for you before starting off in your new vehicle.
It contains important data and instructions intended to
assist you in gaining maximum use and satisfaction from
your BMW's unique range of technical features. The manual also contains information on maintenance designed to
enhance operating safety and contribute to maintaining the
value of your BMW throughout an extended service life.
This Owner's Manual should be considered a permanent
part of this vehicle. It should stay with the vehicle when
sold to provide the next owner with important operating,
safety and maintenance information.
This manual is supplemented by a Service and Warranty
Information Booklet for US models or a Warranty and Service Guide Booklet for Canadian models.
We wish you an enjoyable driving experience.
BMW AG

© 2003 Bayerische Motoren Werke
Online Edition for Part No. 01 41 0 157 647 - © 07/03 BMW AG
Aktiengesellschaft
Munich, Germany
Reprinting, including excerpts, only with the
written consent of BMW AG, Munich.
Order No. 01 41 0 157 647
US English VIII/03 5 10
Printed in Germany
Printed on environmentally friendly paper,
bleached without chlorine, suitable for recycling.

Contents
Online Edition for Part No. 01 41 0 157 647 - © 07/03 BMW AG
The fastest way to find specific topics is to
use the index, refer to page 202.
Using this Owner's Manual
4 Notes
7 Reporting safety defects
At a glance
10 Cockpit
16 Control Center
20 Voice command system
Controls
26 Opening and closing
36 Adjustments
45 Transporting children safely
49 Driving
65 Everything under control
76 Technology for comfort, convenience
and safety
87 Lamps
90 A congenial climate
96 Practical interior accessories
Driving tips
106 Things to remember when driving
Entertainment
130 On/off, tone
134 Radio
141 CD Compact Disc
144 CD changer
Communications
150 Telephoning
161 TeleService, BMW Assist
Mobility
168 Refueling
170 Wheels and tires
177 Under the hood
181 Maintenance
183 Rules and regulations
184 Replacing components
190 Giving and receiving assistance
Reference
198 Technical data
202 Everything from A to Z
Navigation
114 Starting navigation system
116 Destination entry
123 Destination guidance
127 What to do if …
Reference At a glanceControlsDriving tipsCommunications NavigationEntertainmentMobility

Notes
Online Edition for Part No. 01 41 0 157 647 - © 07/03 BMW AG
Using this Owner's Manual
Notes
We have made every effort to ensure that
you are able to find what you need in this
Owner's Manual as quickly as possible.
The fastest way to find specific topics is to
use the detailed index at the back of the
manual. If you wish to gain an initial overview of your vehicle, you will find this in the
first chapter.
Should you want to sell your BMW some
day, please remember to hand over the
Owner's Manual as well; it is an important
component of your vehicle.
Additional sources of information
Should you have any other questions, your
BMW center will be glad to advise you at
any time.
You can find information on BMW, e.g.
technology, on the Internet at
www.bmwusa.com.
Symbols used
Indicates precautions that must be
followed precisely in order to avoid
the possibility of personal injury and serious damage to the vehicle.
<
Marks the end of a specific item of infor-
mation.
Contains information that will assist
you in gaining the optimum benefit
from your vehicle and enable you to care
more effectively for your vehicle.
Refers to measures that can be taken
to help protect the environment.
*
Indicates special equipment, countryspecific equipment and optional extras
when available.
"..." Identifies Control Display texts used to
.
select individual functions
Symbols on vehicle components
Indicates that you should consult the
relevant section of this Owner's Manual for information on a particular part or
assembly.
4

The individual vehicle
Online Edition for Part No. 01 41 0 157 647 - © 07/03 BMW AG
On purchasing your BMW, you have
decided in favor of a model with individualized equipment and features. This Owner's
Manual describes the entire array of
options and equipment available with a
specific BMW model.
Please bear in mind that the manual may
contain information on accessories and
equipment that you have not specified for
your own vehicle. Sections describing
options and special equipment are marked
*
by asterisks
possible differences between the descriptions in this manual and your own vehicle's
equipment.
Should your BMW be equipped with features or accessories not described in this
manual, please consult the enclosed supplementary manual(s).
to assist you in identifying
Editorial notice
BMW pursues a policy of continuous,
ongoing development that is conceived to
ensure that our vehicles continue to
embody the highest quality and safety
standards combined with advanced, stateof-the-art technology. For this reason, the
features described in this Owner's Manual
may differ from those on your vehicle. Nor
can errors and omissions be entirely ruled
out. You are therefore asked to appreciate
that no legal claims can be entertained on
the basis of the data, illustrations or
descriptions in this Owner's Manual.
5
Reference At a glanceControlsDriving tipsCommunications NavigationEntertainmentMobility

For your own safety
Online Edition for Part No. 01 41 0 157 647 - © 07/03 BMW AG
Fuels
Use unleaded gasoline only. Fuels
Notes
containing up to and including
10% ethanol or other oxygenates with up
to 2.8% oxygen by weight – that is,
15% MTBE or 3% methanol plus an equivalent amount of co-solvent – will not void
the applicable warranties with respect to
defects in materials or workmanship. Field
experience has indicated significant differences in fuel quality – volatility, composition, additives, etc. – among gasolines
offered for sale in the United States and
Canada. The use of poor-quality fuels may
result in driveability, starting and stalling
problems, especially under certain environmental conditions such as high ambient
temperature and high altitude.
Should you encounter driveability problems which you suspect could be related to
the fuel you are using, we recommend that
you respond by switching to a recognized
high-quality brand.
Failure to comply with these recommendations may result in unscheduled maintenance.
Follow the relevant safety rules when you
<
are handling gasoline.
Maintenance and repair
Advanced technology, e.g. the use of
modern materials and high-performance electronics, requires specially
adapted maintenance and repair methods.
Therefore, only have corresponding work
on your BMW carried out by a BMW center
or a workshop that works according to
BMW repair procedures with correspondingly trained personnel. If work is carried
out improperly there is a danger of consequential damage and the related safety
<
risks.
Parts and accessories
For your own safety, use genuine
parts and accessories approved by
BMW.
When you purchase accessories tested
and approved by BMW and Genuine BMW
Parts, you simultaneously acquire the
assurance that they have been thoroughly
tested by BMW to ensure optimum performance when installed on your vehicle.
BMW warrants these parts to be free from
defects in material and workmanship.
BMW will not accept any liability for damage resulting from installation of parts and
accessories not approved by BMW.
BMW cannot test every product made by
other manufacturers to verify if it can be
used on a BMW safely and without risk to
either the vehicle, its operation, or its occupants.
Genuine BMW Parts, BMW Accessories
and other products approved by BMW,
together with professional advice on using
these items, are available from all BMW
centers.
Installation and operation of non-BMW
approved accessories such as alarms,
radios, amplifiers, radar detectors, wheels,
suspension components, brake dust
shields, telephones – including operation of
any portable phone from within the vehicle
without using an externally mounted
antenna – or transceiver equipment, for
instance, CBs, walkie-talkie, ham radio or
similar accessories, may cause extensive
damage to the vehicle, compromise its
safety, interfere with the vehicle's electrical
system or affect the validity of the BMW
Limited Warranty. Consult your BMW center for additional information.
Maintenance, replacement, or repair
of the emission control devices and
systems may be performed by any automotive repair establishment or individual using
any certified automotive part.
<
<
6

Service and warranty
Online Edition for Part No. 01 41 0 157 647 - © 07/03 BMW AG
We recommend that you read this publication thoroughly.
Your BMW is covered by the following warranties:
>
New Vehicle Limited Warranty
>
Rust Perforation Limited Warranty
>
Federal Emissions System Defect
Warranty
>
Federal Emissions Performance
Warranty
>
California Emission Control System
Limited Warranty.
Detailed information about these warranties is listed in the Service and Warranty
Information Booklet for US models or in the
Warranty and Service Guide Booklet for
Canadian models.
Reporting safety defects
The following only applies to vehicles
owned and operated in the US.
If you believe that your vehicle has a defect
which could cause a crash or could cause
injury or death, you should immediately
inform the National Highway Traffic Safety
Administration NHTSA in addition to notifying BMW of North America, LLC, P.O. Box
1227, Westwood, New Jersey 076751227, Telephone (800) 831-1117.
If NHTSA receives similar complaints, it
may open an investigation, and if it finds
that a safety defect exists in a group of
vehicles, it may order a recall and remedy
campaign. However, NHTSA cannot
become involved in individual problems
between you, your dealer, or BMW of North
America, LLC.
To contact NHTSA, you may either call the
Auto Safety Hotline toll-free at
1-800-424-9393 (or 366-0123
in Washington, D.C. area) or write to:
NHTSA, U.S. Department of Transportation, Washington, D.C. 20590. You can also
obtain other information about motor vehicle safety from the Hotline.
7
Reference At a glanceControlsDriving tipsCommunications NavigationEntertainmentMobility
Online Edition for Part No. 01 41 0 157 647 - © 07/03 BMW AG

At a glance
Online Edition for Part No. 01 41 0 157 647 - © 07/03 BMW AG
This overview of buttons, switches and
displays is intended to serve as a source
of orientation in your vehicle's operating
environment. The section will also assist
you in becoming acquainted with the
control concepts and options available
for operating the various systems.
Cockpit
Online Edition for Part No. 01 41 0 157 647 - © 07/03 BMW AG
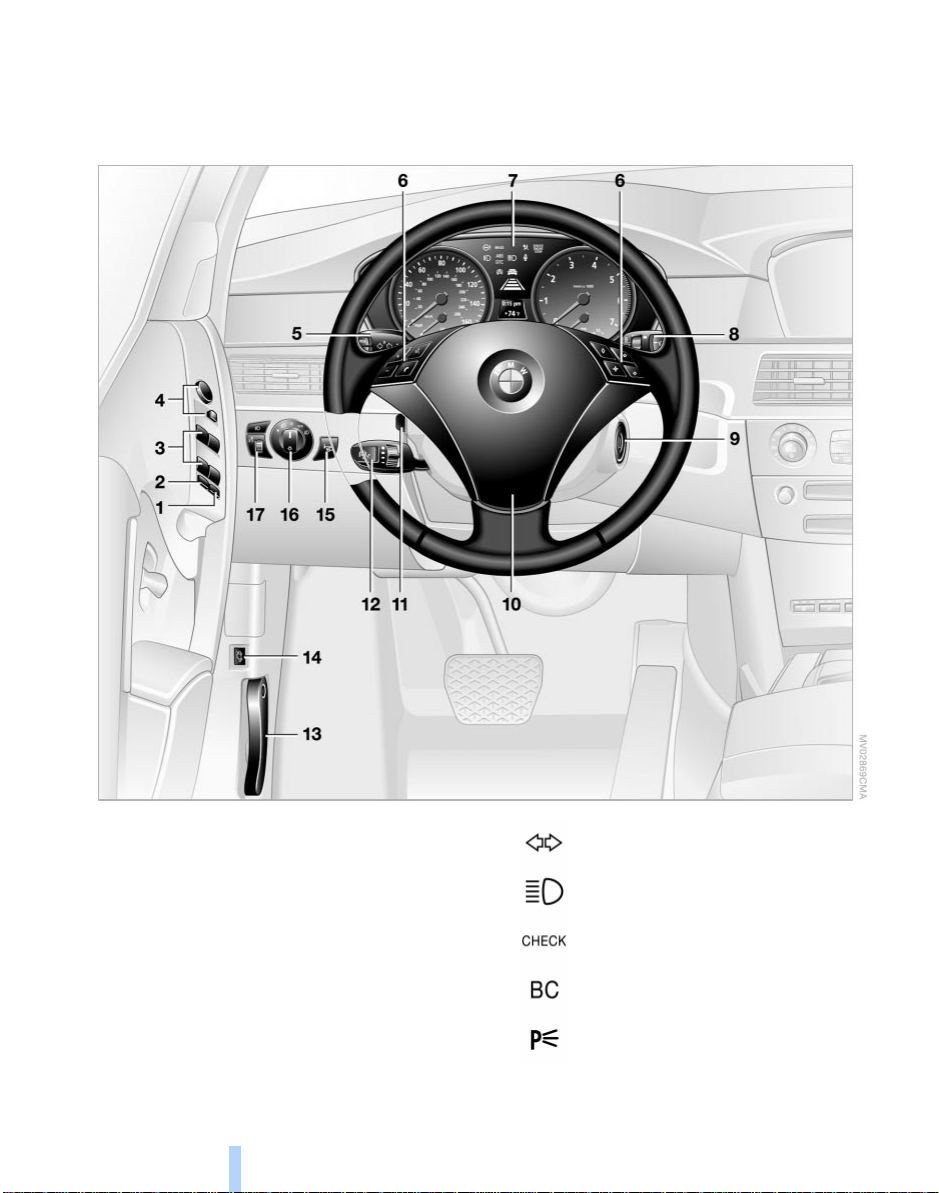
All around the steering wheel: controls and displays
Cockpit
1
Roller sun blind for rear window 97
2
Rear window safety switch 34
3
Electric power windows 33
4
Adjusting exterior mirrors 42
10
5
Turn signal indicators 56
High beams, headlamp
flasher 88
Check Control 68
Computer 70
Standing lamps 88
6
Online Edition for Part No. 01 41 0 157 647 - © 07/03 BMW AG
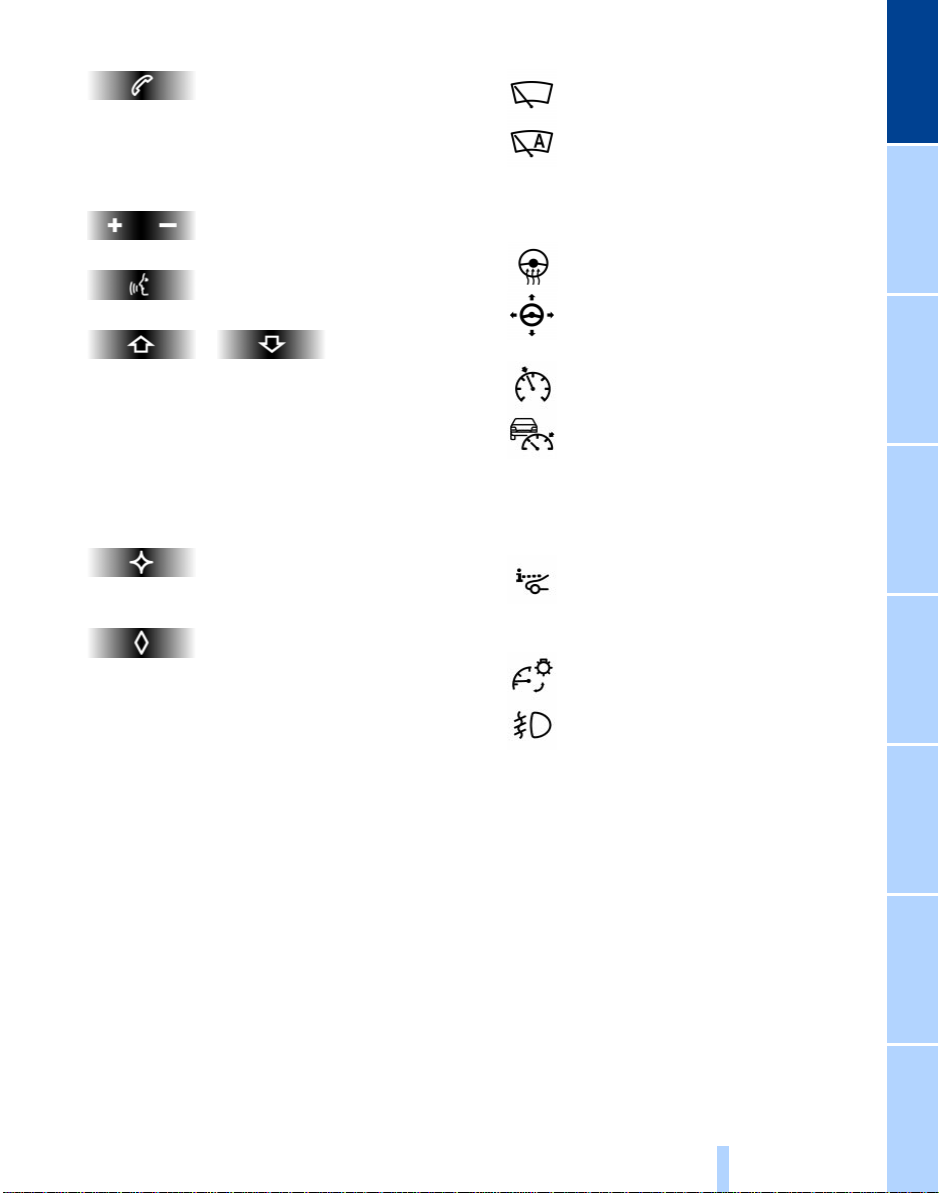
Buttons on steering wheel
*
Portable phone
>
Accepting a call
>
Start calling
>
Ending call.
:
Volume
7
Instrument cluster 12
8
Windshield wipers 57
Rain sensor 57
9
Ignition lock 49
10
Horn: the entire surface
11
Steering wheel heater 44
At a glance
Voice command system.
Fast forward/reverse:
>
Radio
Press briefly: change station
Press longer: manual tuning or automatic search scan
>
CD
Press briefly: select track
Press longer: fast forward/reverse.
Individually programmable, refer to
page 44.
>
Individually programmable, refer to
page 44
>
Voice instructions for navigation.
Steering wheel adjustment 43
12
Cruise control 58
Active cruise control 59
13
Opening the hood 177
14
Opening the luggage compartment
lid 31
15
16
Parking lamps and low beams 87
17
Head-Up Display 85
Instrument lighting 88
Front fog lamps 89
11
Reference ControlsDriving tipsCommunications NavigationEntertainmentMobility
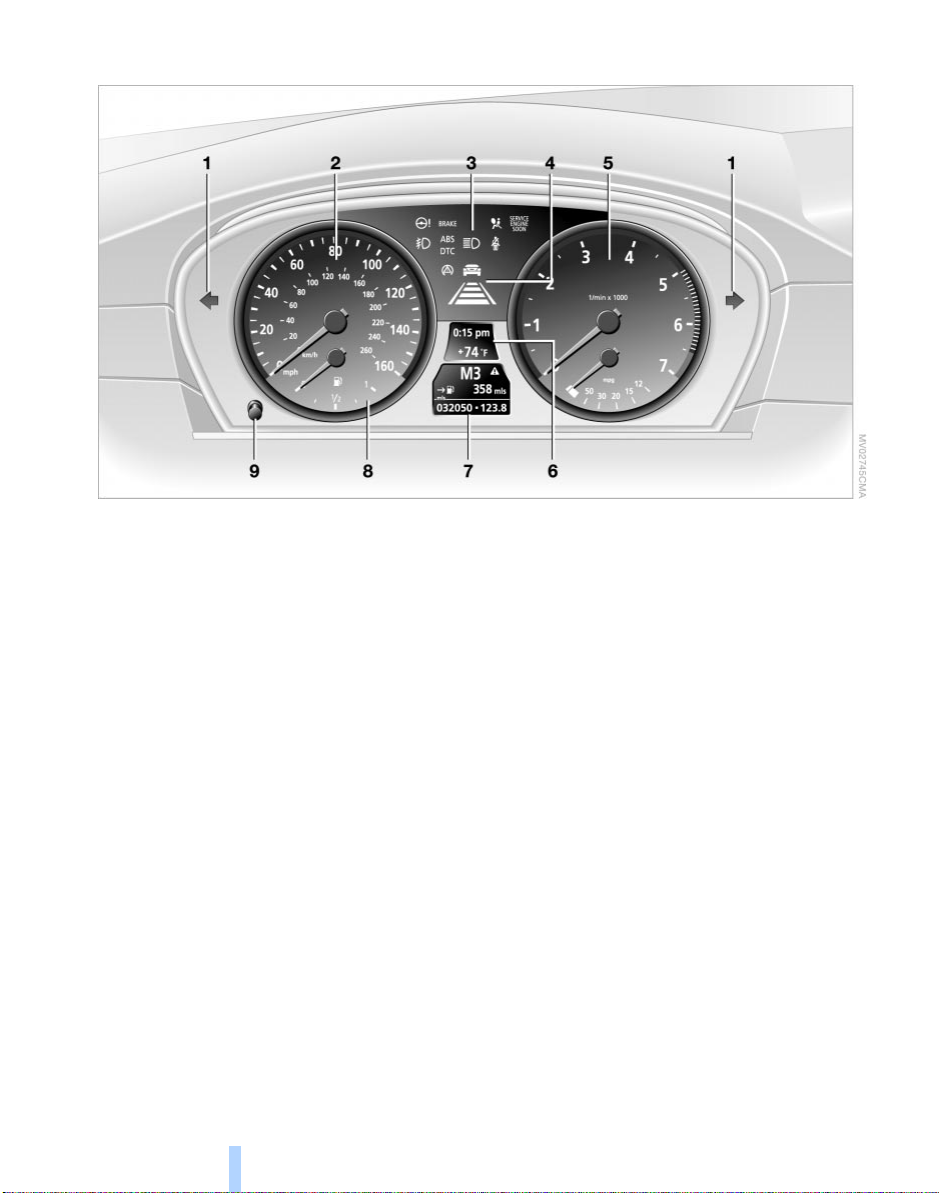
Instrument cluster
Online Edition for Part No. 01 41 0 157 647 - © 07/03 BMW AG
Cockpit
1 Indicator lamps for turn signal
indicators 13
2 Speedometer with display of speed for
> Cruise control 58
or
> Active cruise control 59
3 Indicator and warning lamps 13
4 Display for active cruise control 60
5 Tachometer with variable advance
warning field and Energy Control 65
6 Display for
> Indicator and warning lamps of the
Check Control 68
> Speed of the cruise control 58
> Desired speed for active cruise
control 60
> Clock/date 65
> Outside temperature 65
7 Display for
> Automatic transmission 54
> Sequential manual transmission 53
> Computer 70
> Date and remaining distance for
service requirement 66
> Trip odometer/odometer 65
> Check Control message present 68
8 Fuel gauge 66
9 To set trip odometer to zero
and reset for
service requirement display 65
12
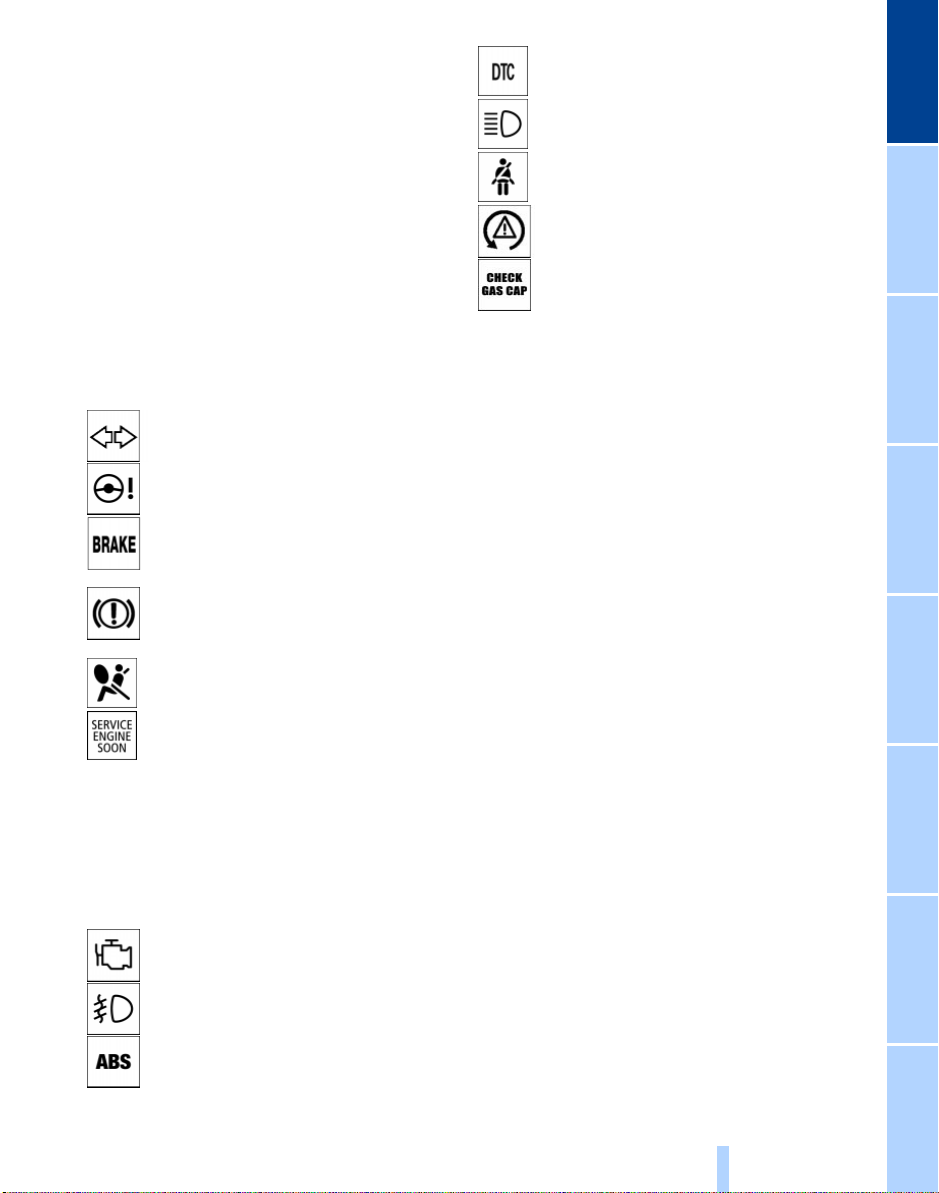
Indicator and warning
Online Edition for Part No. 01 41 0 157 647 - © 07/03 BMW AG
lamps
Technology that monitors itself
The indicator and warning lamps identified
+ symbol are subjected to an oper-
by the
ation check each time you switch on the
ignition or start the engine. They each light
up once for different periods of time.
When a malfunction occurs in a monitored
system, the corresponding lamp will either
fail to go out when the engine is started, or
it will come on again during normal driving.
For information on how you should respond
when this happens, please refer to the
pages indicated.
Turn signal indicators 56
Active steering
Handbrake/brake fluid, brake
hydraulics/DBC Dynamic Brake
Control
+ 50/ 180/ 79
Handbrake/brake fluid, brake
hydraulics/DBC Dynamic Brake
Control for Canadian models
Airbags
+ 83
Service Engine Soon + 183
If the indicator lamp comes on
either continuously or intermittently, this indicates a fault in the
emissions-related electronic systems. Although the vehicle
remains operational, you should
have the systems checked by your
BMW center at the earliest possible opportunity.
Service Engine Soon indicator
lamp for Canadian models.
Front fog lamps 89
+ 82
DTC Dynamic Traction Control 79
High beams/headlamp flasher 88
Please fasten safety belt
+ 40
DSC Dynamic Stability
Control
+ 78
Check Gas Cap 168
lamp for US models
Colors
The indicator and warning lamps can light
up in different colors and combinations.
The following section explains the significance of the individual colors as well as
how you should respond when they
appear.
> Red:
Stop immediately
or
important reminder
> Red and yellow:
Continue driving moderately
> Yellow:
Have checked soon
or
for your information
> Green or blue:
For your information.
Indicator and warning lamps of the
Check Control
Other indicator and warning lamps appear
in display 6 of the instrument cluster as
necessary, accompanied by supplementary text on the Control Display, refer to
Check Control, page 68.
At a glance
ABS Antilock Brake System
+ 77
13
Reference ControlsDriving tipsCommunications NavigationEntertainmentMobility
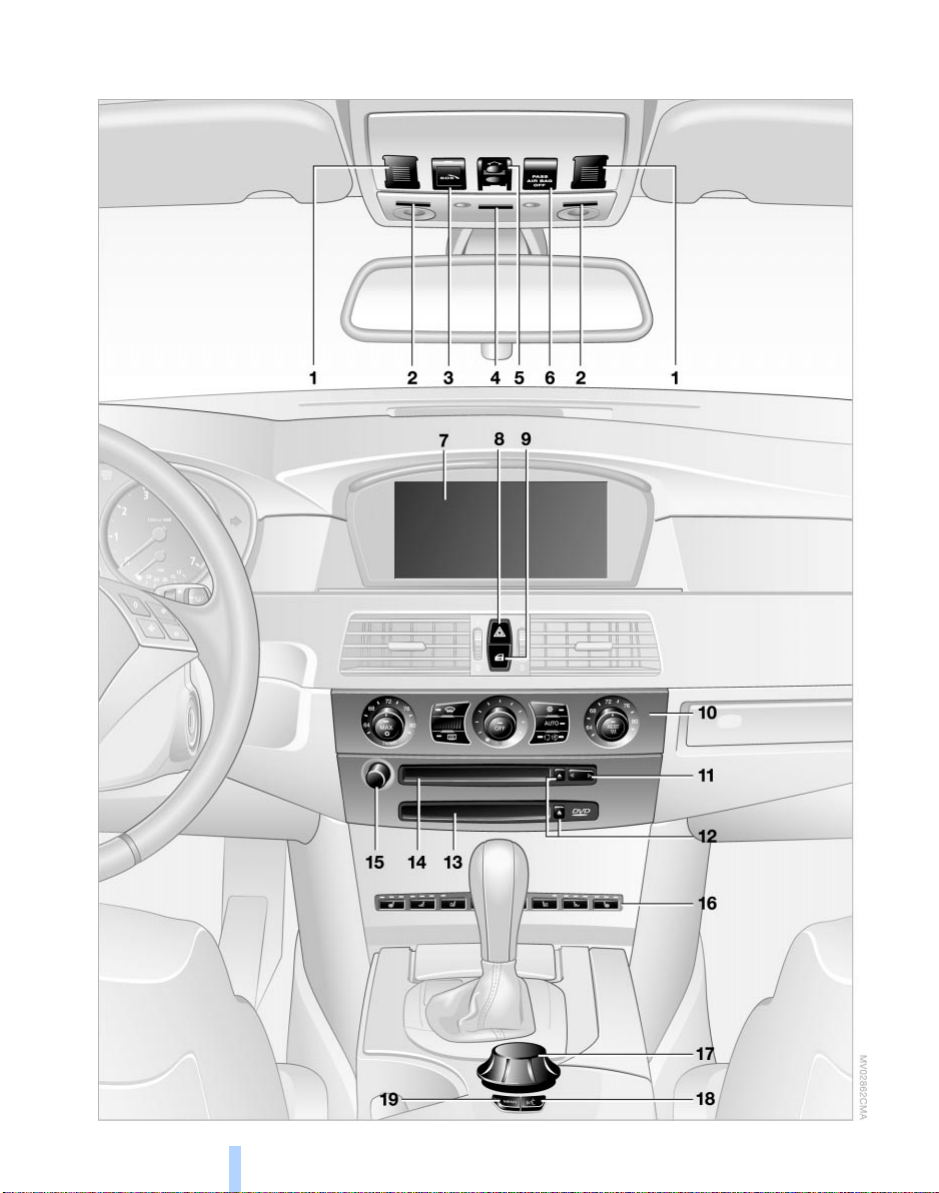
Comfort area: controls and displays
Online Edition for Part No. 01 41 0 157 647 - © 07/03 BMW AG
Cockpit
14
1 Microphone for
Online Edition for Part No. 01 41 0 157 647 - © 07/03 BMW AG
> Telephone/portable phone 151
> Voice command system 20
2 Reading lamps 89
3 Starting emergency call 190
4 Interior lamps 89
5 Glass roof, electric 34
6 Front passenger's airbag indicator
lamp 84
7 Control Display 16
displays for menu guidance
8 Hazard warning flashers
9 Central locking system 30
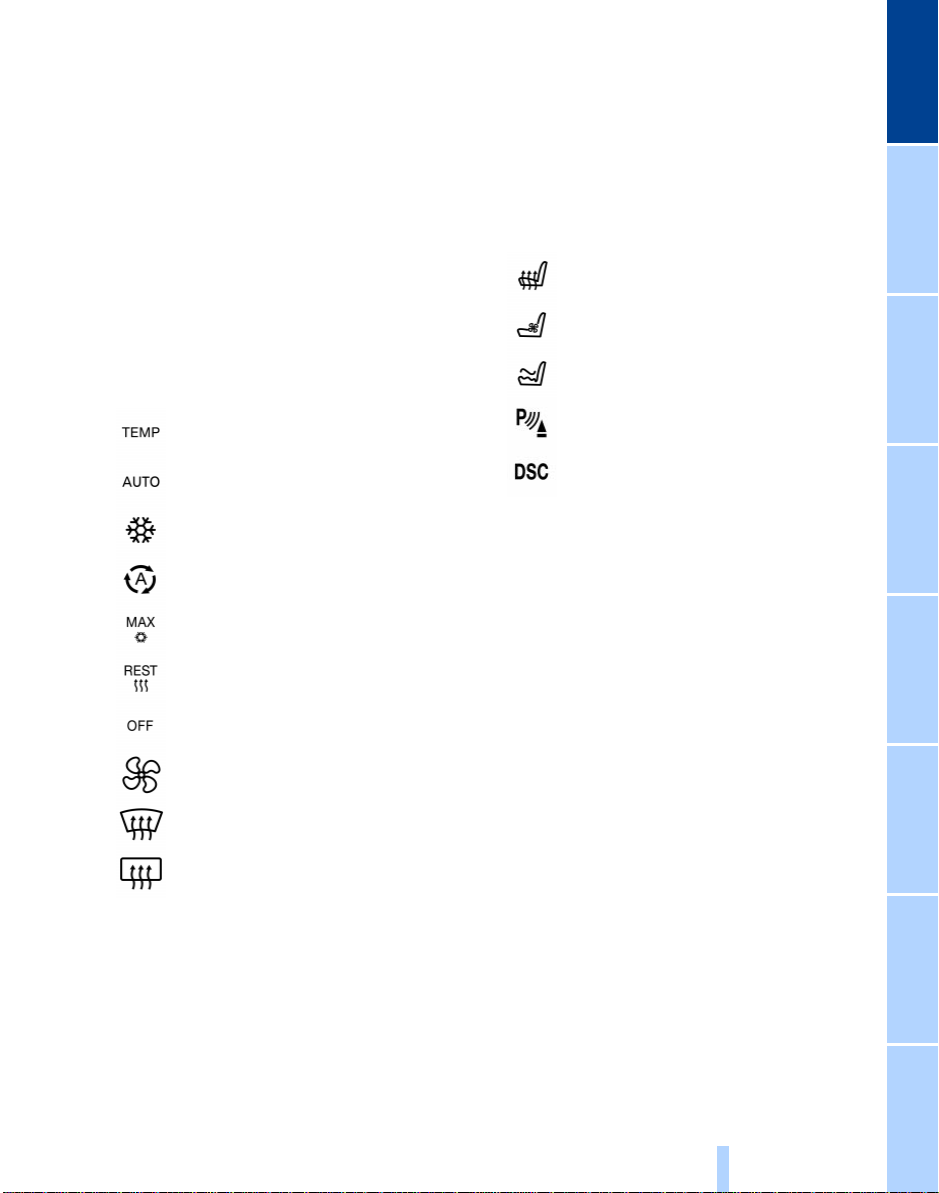
10 Automatic climate control 90
Temperature setting,
left/right 91
Automatic air distribution and
supply 91
12 Ejecting
> Navigation CD/DVD 114
> Audio CD 130
13 Drive for navigation CD/DVD 114
14 Drive for audio CD 130
15 Switching audio sources on/off and
adjusting the volume 130
16 Center console switching center
Heated seats 41
Active seat ventilation 42
Active seat 42
PDC Park Distance Control 76
DSC Dynamic Stability
Control 78
At a glance
Cooling function 91
Automatic recirculated-air
control AUC 91
Maximum cooling 91
Residual heat mode 92
To switch off automatic climate
control 92
Air volume 91
Defrost windows 91
Rear window defroster 90
11 Button for
> Station scan/track search 130
> CD player 141
> CD changer 145
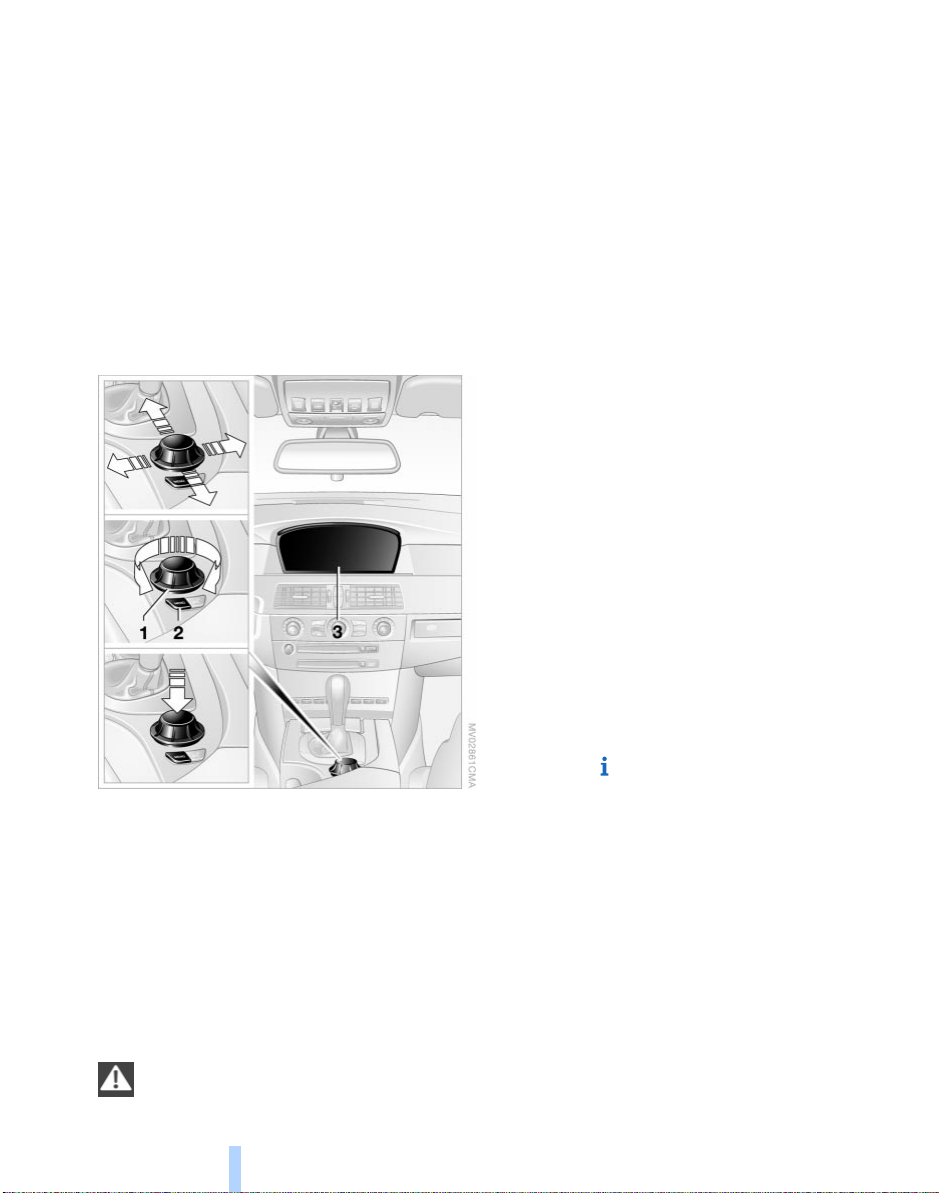
17 Controller 16
Horizontal movement in four directions,
turn or press
18 Activating voice command system 20
19 Open start menu 17
15
Reference ControlsDriving tipsCommunications NavigationEntertainmentMobility
Control Center
Online Edition for Part No. 01 41 0 157 647 - © 07/03 BMW AG
The Control Center groups the functions of
a large number of switches. This means
that these functions can be operated from
a central position. The following section
provides an introduction to the principle of
the menu guidance. How you control the
individual functions is described in the context of the relevant equipment.
Control Center
Controls
users: never attempt to use the controls or
make entries unless traffic and road conditions allow.<
Menu overview
You can call up all the functions in the Control Center using five menu items.
Communication
> Portable phone*
> BMW Assist* or TeleService*.
Navigation or onboard information
> Navigation system*
> Onboard information, e.g. for display of
the average fuel consumption.
Entertainment
> Radio
> CD.
Climate
> Air distribution
> Seat air conditioning
> Independent ventilation
*
*.
1 Controller: you navigate through the
menus of the Control Center and make
adjustments by turning, pressing and
moving it to the left, right, forwards or
backwards
2 Opening the start menu from any menu
item
3 Control Display
When you turn the controller, you feel a
clicking. This helps you to select the
desired menu item.
To avoid posing an unnecessary hazard due to inattention, both to your
own vehicle's occupants and to other road
16
Menu item
> Switching off the Control Display
> Traffic information
> Sound and display settings
> Settings for your vehicle, e.g. Key
Memory
> Display of the maintenance requirement
and dates for statutory emission and
vehicle inspections.

Menu guidance
Online Edition for Part No. 01 41 0 157 647 - © 07/03 BMW AG
As of ignition key position 1, the following
message appears on the Control Display:
Displays on the Control Display
A menu
At a glance
Confirm the message by pressing the controller; the start menu is opened.
Start menu
In ignition key position 2:
Via the start menu, you can open four
menus by moving the controller to the left,
right, forwards or backwards. Pressing the
controller opens the menu.
Calling up the start menu:
Press button.
Opening the start menu from the menu:
1 In menus, you can change fields to
select the menu items they contain or to
make adjustments. The active field is
brighter than the others
2 Menu items are usually grouped in hor-
izontal or vertical lists
3 Arrows indicates that other menu items
can be selected in lists, but these are
not visible at the moment
4 Adjustments are displayed in diagrams
or as numbers
5 A symbol indicates the last selected
menu item of the start menu
Communication
Navigation or
onboard information
Entertainment
Climate
menu
Press the button twice.
17
Reference ControlsDriving tipsCommunications NavigationEntertainmentMobility
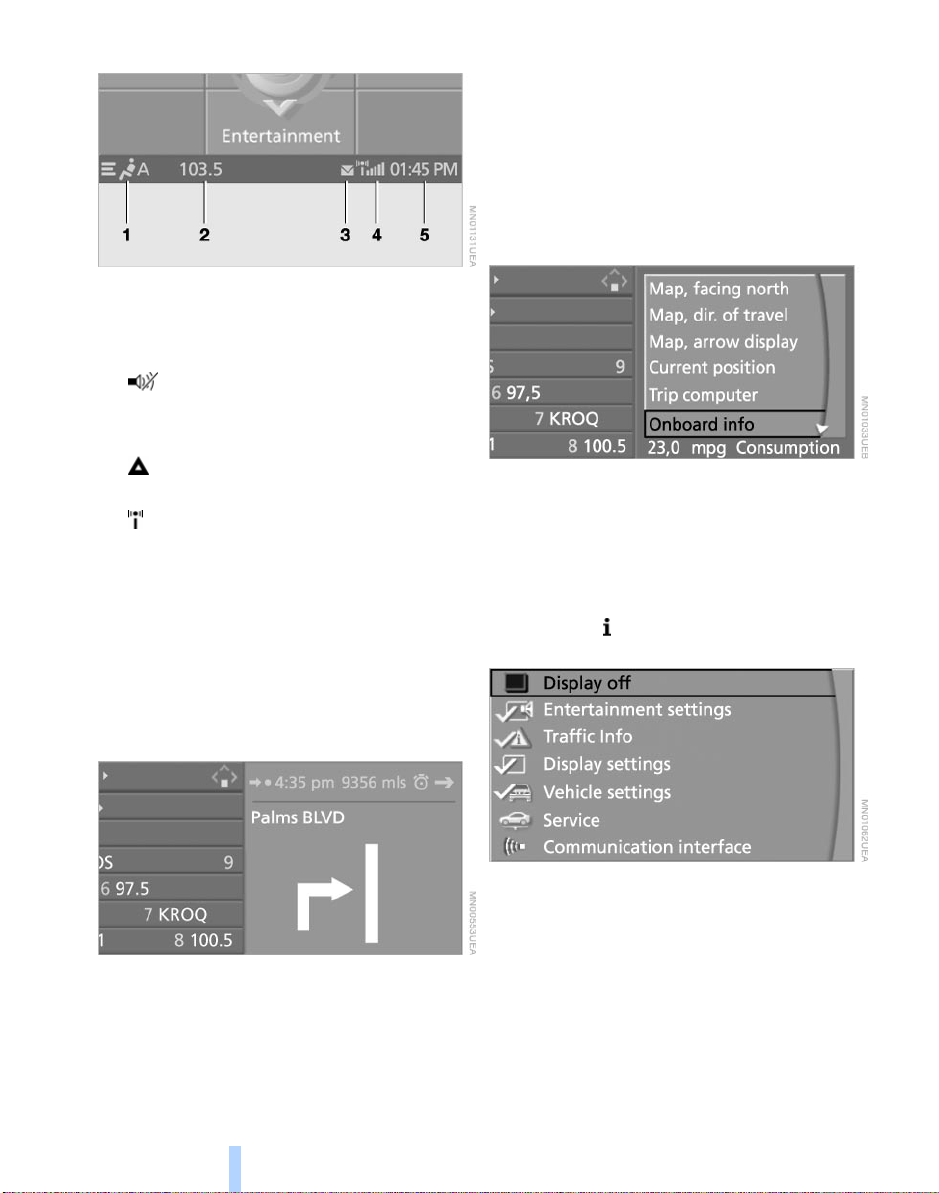
Status information
Online Edition for Part No. 01 41 0 157 647 - © 07/03 BMW AG
1 Manual or automatic air distribution for
Control Center
driver and passenger side
2 Display for Entertainment:
Radio and CD or
Entertainment off
Display for telephone:
Name of network operator with display
for roaming:
Roaming active
3 SMS received
4 Reception of portable phone network
and emergency call possible
SOS: emergency call possible
no display: emergency call not possible
5 Current time
If information is issued by the Check Con-
trol or inputs are made using the voice
command system, a text message appears
here on the Control Display.
> The computer or trip computer
> The travel route in vehicles with naviga-
tion system
> The current position.
To select the display in the assistance window:
1. Move the controller to the right to
switch to the assistance window and
press the controller
2. Select the menu item and press the
controller.
Switching Control Display on/off
To switch off the Control Display:
1. Open the start menu
2. Open the menu by pressing the con-
troller
Assistance window*
While you are operating whatever functions
you like using the Control Center, you can
obtain the following additional information
in the assistance window:
> Short help and supplementary informa-
tion texts for selected menu entries
18
3. Select "Display off" and press the con-
troller.
The status informations continue to be
displayed.
To switch on the Control Display:
Press the controller.

Selecting menu items and making adjustments
Online Edition for Part No. 01 41 0 157 647 - © 07/03 BMW AG
At a glance
1 To select individual menu items: turn
the controller. The marking moves.
Menu items shown in white can be
selected
2 To activate menu items selected with
the marking: press the controller. In the
current field, new menu items are displayed or a function is executed
3 To change the current field: move the
controller to the left, right, forwards or
backwards and let go
If you hold the controller for longer
than approx. 2 seconds in one
position, the menu that lies in that
direction will be opened.<
4 To select menu items, cf. 1: turn the
controller. The marking moves
5 To make adjustments: turn the control-
ler. A graphical display, numerical values or text displays change. The adjustment is adopted if you change the field
or switch into another menu
19
Reference ControlsDriving tipsCommunications NavigationEntertainmentMobility

Voice command system
Online Edition for Part No. 01 41 0 157 647 - © 07/03 BMW AG
*
The concept
The voice command system allows you to
control operation of various vehicle systems without ever removing your hands
from the steering wheel.
The menu items on the Control Display
serve as voice commands for the equipment that can be operated using the voice
command system. This means you can
open these menu items using the voice
command system instead of with the controller.
The voice command system transforms
your oral commands into control signals for
the selected systems and provides support
in the form of instructions or questions.
Voice command system
Precondition
If the language of the voice command and
Control Display do not match, change the
language of the Control Display, refer to
page 74.
Symbols used
{...} Identifies voice commands.
{{...}} Identifies instructions generated
by the voice command system.
Voice commands
Activating voice command system
If voice command is to come from the passenger side:
Press the button in the center console for a
longer period.
This symbol on the Control Display and
an acoustic message indicate that you can
enter voice commands.
The text or numbers that the voice command system has registered will appear at
this position on the Control Display.
This symbol appears on the Control Display when you can enter additional voice
commands.
If there are no other voice commands,
operate the equipment using the Control
Center.
Entertainment
Briefly press the button on the steering
wheel or in the center console.
20
Canceling voice command system
Press the button on the steering wheel or
in the center console
or
{Cancel}.
While notes are being recorded, canceling
is only possible using one of the buttons.
Voice commands
Online Edition for Part No. 01 41 0 157 647 - © 07/03 BMW AG
You can have the system list the possible
voice commands:
{Options}.
In addition to the commands described in
this Owner's Manual, alternative commands are often possible for the same
functions, e.g.:
{Radio on} or {Switch on radio}.
You can use short commands to make it
easier to run certain functions.
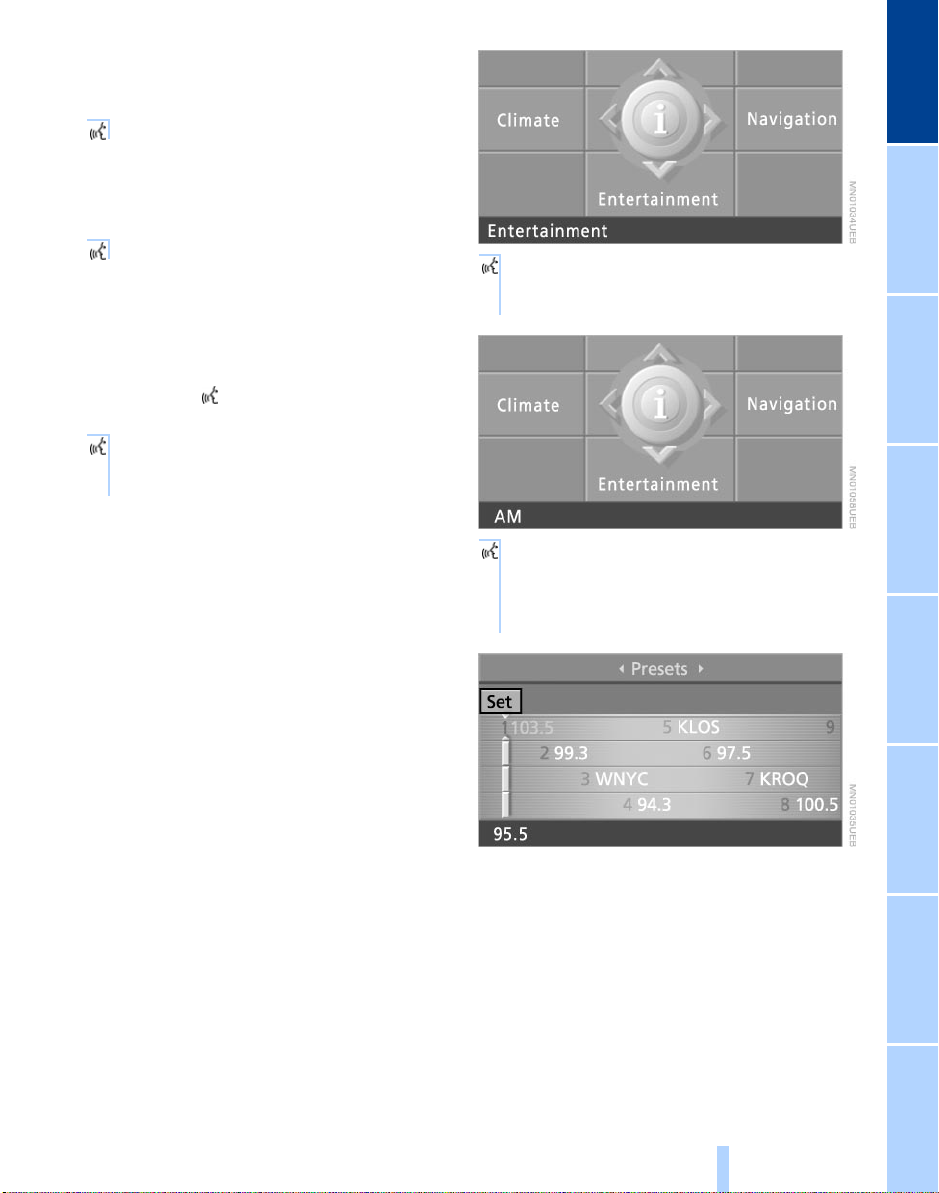
An example: selecting a radio station
1. Switch on radio
2. Press the button on the steering
wheel or in the center console
3. {Entertainment}.
The system issues:
{{Entertainment}}
At a glance
4. {AM}.
The system issues:
{{AM}}
5. Select the station, e.g.:
> {Frequency 95 Point 5}.
The system issues:
{{95.5}}.
21
Reference ControlsDriving tipsCommunications NavigationEntertainmentMobility

Notes
Online Edition for Part No. 01 41 0 157 647 - © 07/03 BMW AG
Do not use the voice command sys-
tem in emergency situations. In stress
situations, voice and pitch can change.
Instead, use the emergency call button
near the interior rearview mirror.<
At the time of going to press, the
voice command system was available
in English. Other languages are currently
not available.
The telephone can also be operated using
voice control, refer to page 157.<
Important for voice commands
Issue the commands fluently and at normal
volume, avoiding excessing emphasis and
pauses.
The voice command system uses a special
hands-free microphone located in the front
Voice command system
of your vehicle's headliner. On vehicles
with telephone, two vehicle microphones
are fitted. Although the system is designed
to filter out ambient noise, you can help
ensure that your commands will be understood by observing the following instructions:
> Keep the doors, windows and glass
roof closed to prevent interference from
ambient noise
> Avoid other sources of noise in the
vehicle while speaking, and ask other
vehicle occupants to refrain from talking while you are using the system
> Without a telephone, the vehicle micro-
phone is directed at the driver. This
means that the system might not be
able to register the voices of other vehicle occupants properly.
22

At a glance
Online Edition for Part No. 01 41 0 157 647 - © 07/03 BMW AG
23
Reference ControlsDriving tipsCommunications NavigationEntertainmentMobility
Online Edition for Part No. 01 41 0 157 647 - © 07/03 BMW AG
Controls
Online Edition for Part No. 01 41 0 157 647 - © 07/03 BMW AG
This chapter is intended to provide
you with information for complete control
of your vehicle. Its extensive array of
features and accessories, both for
driving and for your own safety, comfort
and convenience, are described here.
Opening and closing
Online Edition for Part No. 01 41 0 157 647 - © 07/03 BMW AG
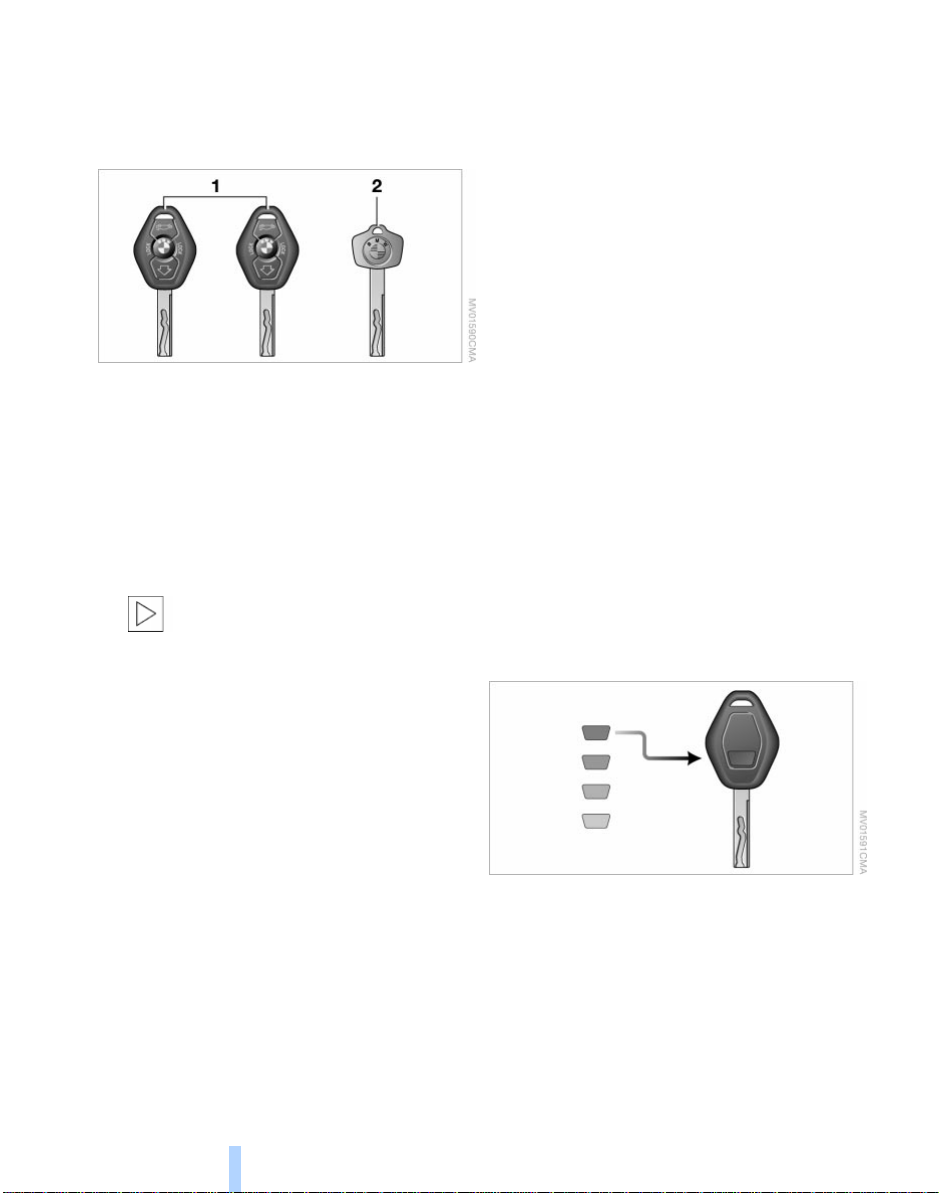
The key set
1 Central keys with remote control. They
Opening and closing
specify the functions of the Key Memory. In the process individual functions
of your vehicle can behave differently
depending on the key used, see further
below.
You can mark the keys with remote
control using the color-coded decals
you received on taking delivery of the
vehicle
Each central key with remote con-
trol is equipped with an extendedlife battery, which is automatically
recharged in the ignition lock each time
you drive the vehicle.
If you have any central keys with remote
control that are not used on a regular
basis, you should therefore remember
to recharge these units by using them
to drive the vehicle for an extended
period at least once a year, refer to
page 29.<
2 Spare key for storage in a safe place,
such as in your wallet.
This key cannot be used to open the
locks for the luggage compartment lid
and glove compartment. This is an
advantage in a hotel, for example. The
key is not intended for constant use
Key Memory
How the system functions
Doubtless you have often reflected on how
great it would be if you could configure
your vehicle's various adjustment settings
to meet your own personal requirements.
BMW has designed several freely selectable options into the vehicle during its
development. You can set these as desired
via the Control Center.
You can have up to four different basic settings adjusted for four different persons for
the specific keys. The only requirement is
that each person uses his or her own central key with remote control.
Additional keys are available at your BMW
center.
When your vehicle is unlocked with the
remote control, the vehicle recognizes the
individual user by means of a data
exchange with the key, and makes adjustments accordingly.
To differentiate
Color-coded decals are provided to help
you distinguish the individual central keys
with remote control with their different settings.
26

Examples of Key Memory functions
Online Edition for Part No. 01 41 0 157 647 - © 07/03 BMW AG
> Automatic adjustment of the electric
driver's seat
> Locking the vehicle after moving off
> When unlocking with the remote con-
trol, either unlock only the driver's door
or the entire vehicle
> Activating optical warning for Park Dis-
tance Control PDC
> Setting the volume.
Central locking system
The concept
The central locking system is ready for
operation whenever the driver's door is
closed. This simultaneously engages and
releases the locks on the following:
> Doors
> Luggage compartment lid
> Fuel filler door.
The central locking system can be operated from the outside
> via the remote control
> via the driver's door lock
and from inside via the button for the central locking system.
When the system is locked from inside, the
fuel filler door remains unlocked, refer to
page 30.
The anti-theft system is automatically activated whenever you operate the central
locking system from outside the vehicle. It
prevents the doors from being unlocked
using the safety lock buttons or door handles. The alarm system is armed/disarmed
at the same time.
In the event of an accident, the central
locking system automatically unlocks the
vehicle. In addition, the hazard warning
flashers and interior lamps come on.
Opening and closing: from outside
Using the remote control
The remote control provides two additional
functions for the central locking system:
> Switching on the interior lamps, refer to
page 28.
You can also use this function to locate
your vehicle in parking garages etc.
> Opening the luggage compartment lid,
refer to page 28.
The luggage compartment lid opens,
regardless of whether it was previously
locked or unlocked.
In addition, the remote control offers you
another function:
> Panic mode
In case of danger, you can trigger an
alarm.
When you lock/unlock the vehicle, you
simultaneously activate/deactivate the
anti-theft system, arm/disarm the alarm
system, and switch the interior lamps on/
off.
Protect the remote control against
unauthorized use by handing over
only the spare key, for example when using
hotel valet parking.<
Because any persons or animals left
unattended in a parked vehicle could
lock the doors from the inside, you should
always keep the remote control with you;
this precaution ensures that you will remain
able to unlock the vehicle from the outside
at all times.<
Unlocking
Press the button.
You can set which doors are to be
unlocked for each specific key:
Control Center, for principle details, refer to
page 16:
1. Open the menu
2. Select "Vehicle settings" and press the
controller
Controls
27
Reference At a glanceDriving tipsCommunications NavigationEntertainmentMobility
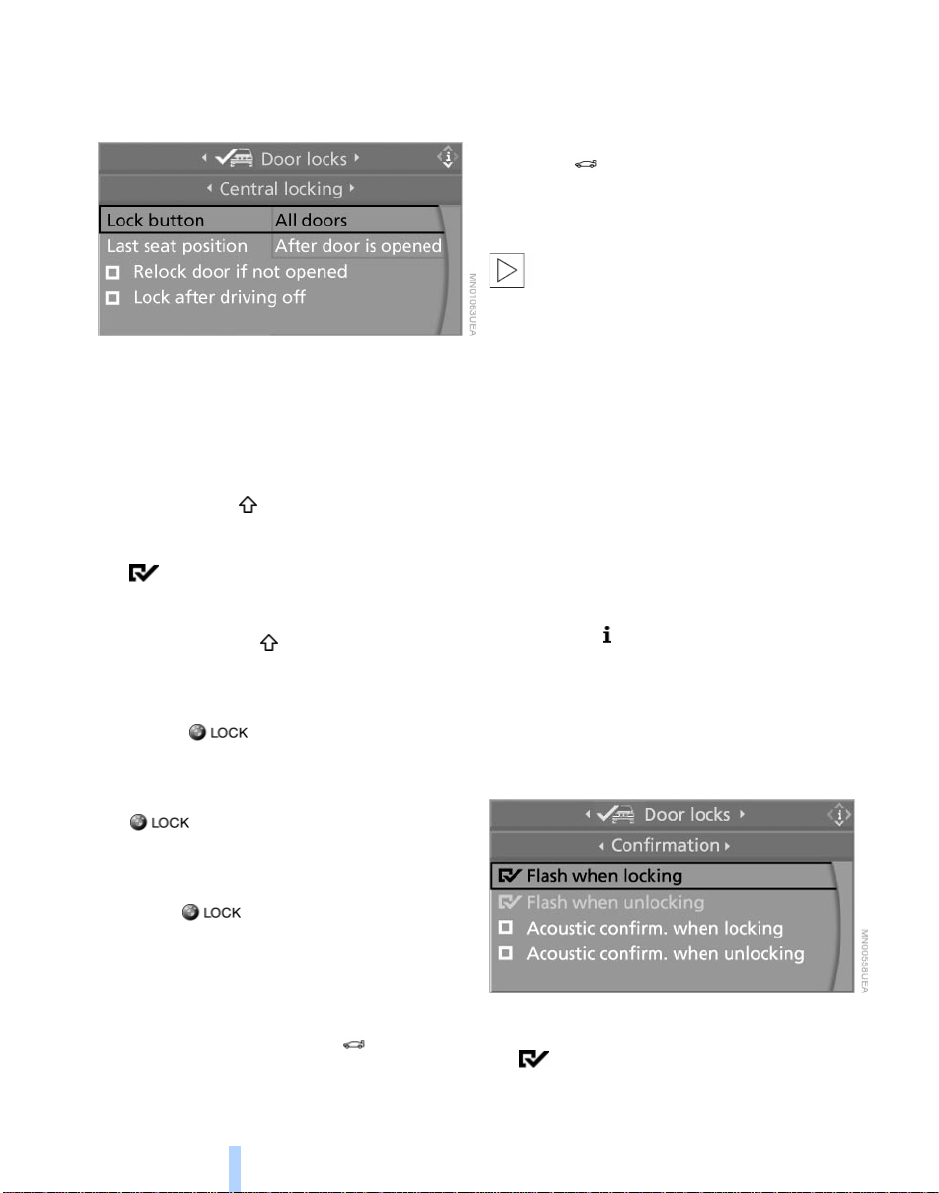
3. Select "Door locks" and press the con-
Online Edition for Part No. 01 41 0 157 647 - © 07/03 BMW AG
troller
4. Select "Central locking" and press the
controller
5. Select "Lock button" and press the con-
troller
6. Select the doors and press the control-
Opening and closing
ler:
> "All doors"
> "Driver's door only"
Press the button twice to unlock
the entire vehicle after the driver's
door.
displays the selected doors.
Convenience opening mode
Press and hold the button. The windows
and the glass roof open.
Locking and securing
Press the button.
Switching on the interior lamps
If the vehicle is locked, press
the button.
To switch off the alarm: press any of the
buttons.
Opening the luggage compartment
lid
Press the button.
The luggage compartment lid opens,
regardless of whether it was previously
locked or unlocked.
During opening, the luggage com-
partment lid pivots upward and to the
rear. Ensure that adequate clearance is
available before opening.
Before and after a trip, ensure that the luggage compartment lid has not been
opened unintentionally.
A locked luggage compartment lid is also
locked again after closing.<
Setting the confirmation signals
You can have various confirmation signals
programmed into the system to verify that
the vehicle has been unlocked or locked
securely.
Control Center, for principle details, refer to
page 16:
1. Open the menu
2. Select "Vehicle settings" and press the
controller
3. Select "Door locks" and press the con-
troller
4. Select "Confirmation" and press the
controller
Switching off the tilt alarm sensor
and interior motion sensor
Press the button once again directly
after locking.
For more detailed information, refer to
page 33.
Panic mode
By pressing and holding the button for
more than approx. two seconds, you can
trigger the alarm system in response to any
impending danger.
28
5. Select the desired signal and press the
controller.
indicates the signals switched on.
 Loading...