

Page 1
Radio/Navigation
TravelPilot
RNS 3
Operating instructions
Page 2
170
2
431 5 87
16 1517 14 11 101213
6
9
Page 3

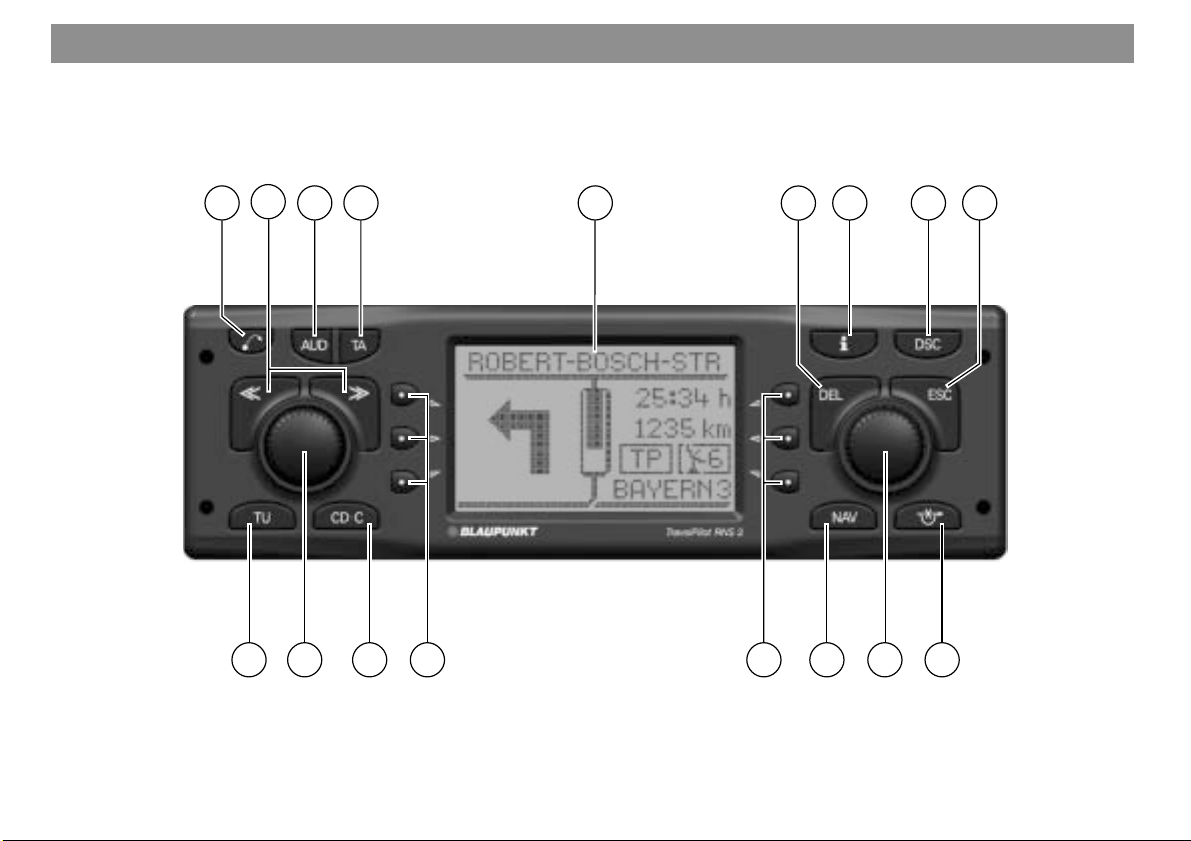
Equipment illustration
1 Open key, opens the operating panel.
2 Rocker switch. The functions performed by the rocker switch depend on the menus or operating modes which are
currently active.
3 AUD key, activates the audio menu.
4 TA key
5 Dot-matrix display.
6 DEL key, deletes entries in the edit menu.
7 Info key.
If you press this button briefly during navigation: the current or next road is displayed fully and the last voice output is
repeated. If you press this button longer during navigation: the active destination is displayed and the last voice output
is repeated.
In lists, entries that are marked with ... are displayed fully.
8 DSC (Direct Software Control) key to activate the DSC menu.
9 ESC key, quits menus without saving any changes made.
: Key to activate a traffic congestion bypass during route guidance.
; Rotary/pushbutton, selects entries from or makes entries in lists and edit menus.
< NAV key, activates navigation.
= Softkeys 4 to 6. The functions performed by the softkeys depend on the contents of the menus.
> Softkeys 1 to 3. The functions performed by the softkeys depend on the contents of the menus.
? CD·C key, activates CD or CD changer operation.
@ Rotary/pushbutton. Volume control and on/off switch.
A TU key, switches to radio operation mode.
171
DANSKSVENSKA ENGLISH
Page 4
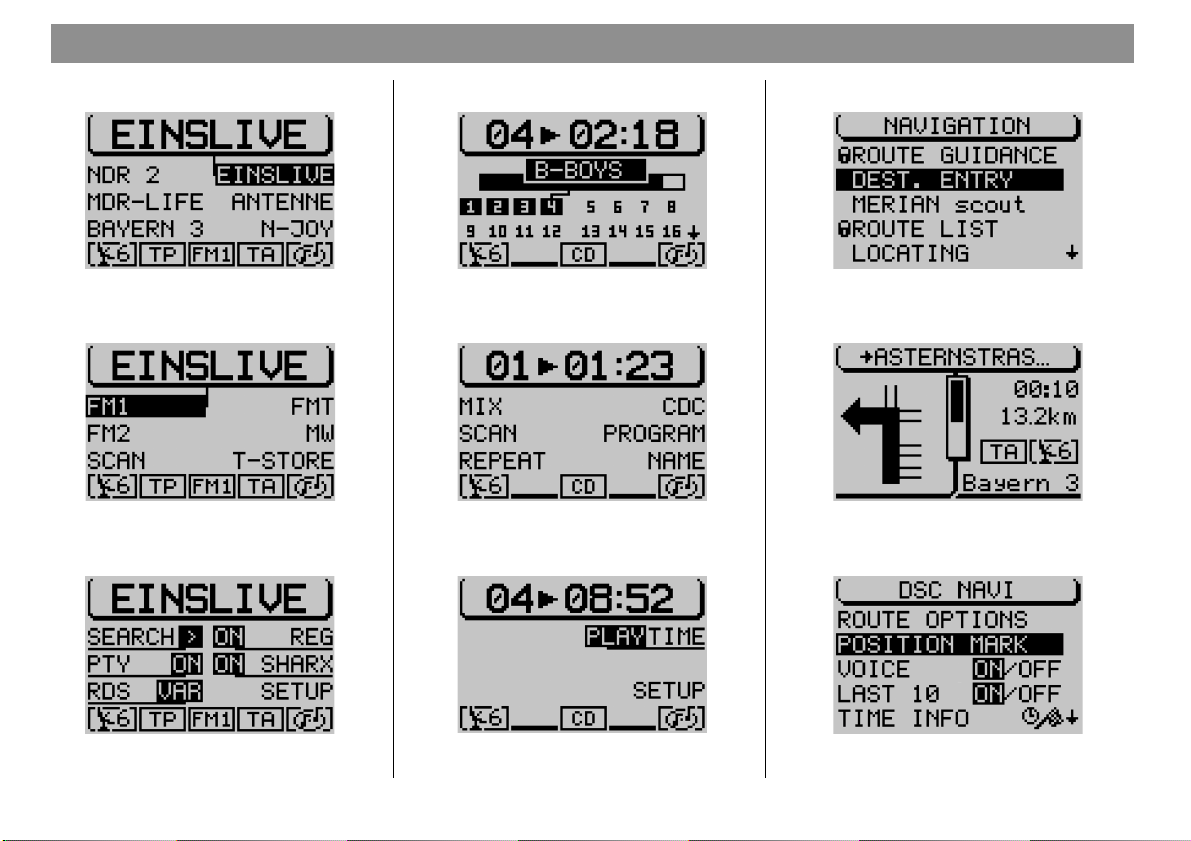
Menu overview
Tuner operation Navigation operationCD, CDC operation
172
Main tuner menu
Tuner functions menu
Main CD menu
CD functions menu
CD DSC menuTuner DSC menu
Main navigation menu
Route guidance menu
Navigation DSC menu
Page 5
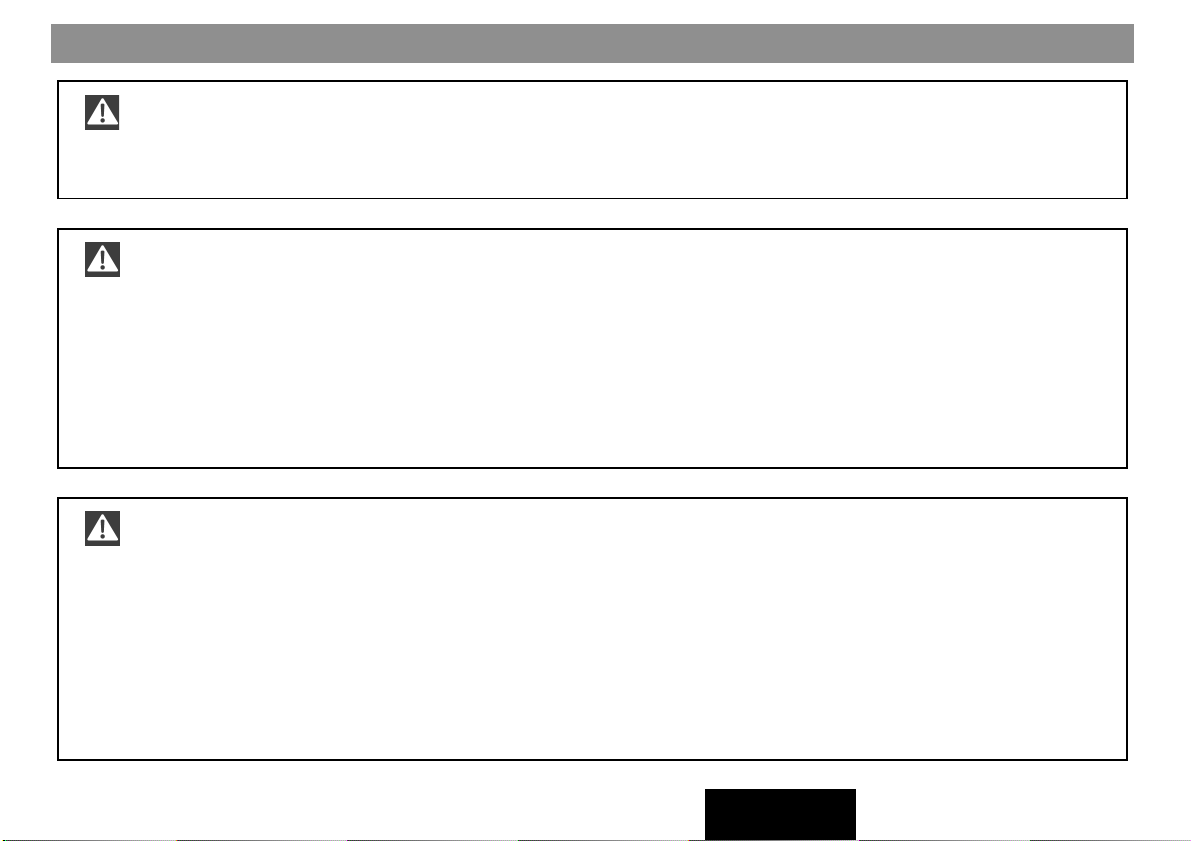
Safety information
The TravelPilot has been specifically designed for use in cars.
The special information required by navigation systems for lorries or busses, such as height restrictions or maximum
permissible loads, is not included on the navigation CDs.
Load a CD into the CD drive.
• For safety’s sake, load or change a CD only when your vehicle is stationary.
• Do not open the operating panel unless you want to load a CD.
• Close the operating panel immediately after you have loaded a CD to ensure that the system is ready for operation
when you resume your trip.
• When the operating panel is open, a red LED will flash as a warning. After 30 seconds you will hear a warning beep
which indicates that you should close the operating panel.
Operating the system while driving
If you do not focus your full attention on the traffic situation at all times, you could cause serious accidents.
To avoid being distracted by the TravelPilot, please observe the following information:
• Before you take your first trip using the TravelPilot, make yourself familiar with the system and its operation.
• Find a suitable area to temporarily park your vehicle if you want to re-program the TravelPilot.
• Do not make any adjustments to the TravelPilot while driving unless the traffic situation allows.
• Do not attempt to enter your destination unless the vehicle is stationary.
173
DANSKSVENSKA ENGLISH
Page 6

Table of contents
174
Equipment illustration.............. 171
Menu overview .......................... 172
Safety information .................... 173
Table of contents ...................... 174
General operating instructions . 178
Switching the system on/off...........178
Switching the system on/off
with the vehicle ignition ..............178
Switching the unit on when the
vehicle ignition is switched off...178
Selecting the operating mode ........ 179
Switching between the main
and the functions menus ............ 179
Switching between the main
and the route guidance menus
for navigation................................ 180
Activating the DSC menu ............ 180
Adjusting t h e v o l u m e ......................1 8 0
Automatic mute during
telephone calls .............................180
Display ..............................................181
Adjusting the tone and the
balance/fader.................................... 182
Switching on coded systems after
they have been disconnected from
the vehicle battery ........................... 183
Radio operation ........................ 184
Starting radio operation.................. 184
Selecting the waveband or
memory bank ................................... 184
Switching RDS (Radio Data
System) on/off.................................. 184
Activating/deactivating RDS-REG . 185
Switching PTY (Program Type)
on/off ................................................. 186
PTY Alarm ..................................... 186
Traffic information TA (Traffic
Announcement) ............................... 187
Activating/deactivating the TA
function for radio operation........ 187
Interrupting traffic announce-
ments ............................................. 187
Selecting a s t a t i o n , F M ................... 188
Automatic station seek tuning.... 188
Paging through the broadcasting
network (with RDS only).............. 188
Manual station tuning .................. 189
Selecting radio stations, AM .......... 189
Automatic station seek tuning.... 189
Manual station tuning .................. 190
Scan seek tuning ............................. 190
Starting Scan seek tuning........... 190
Ending Scan seek tuning ............ 190
Storing radio stations ..................... 191
Storing stations manually ........... 191
Storing stations automatically
with “Travelstore” ........................ 191
Starting Travelstore ..................... 191
How to reduce interference in
FM radio reception .......................... 192
Activating/deactivating SHARX .. 192
CD operation ............................. 193
Starting CD playback ...................... 193
Inserting a CD ............................... 193
Starting CD playback for the
integrated CD player (no CD
changer connected) ..................... 194
Starting CD playback for the integrated CD player (CD changer
connected) .................................... 194
Switching the playing time
indicator o n/off ................................ 194
Traffic announcements during
CD operation .................................... 195
Selecting tracks ............................... 195
Fast forward/reverse ....................... 195
Random play (MIX) .......................... 196
Scanning all of the tracks on a
CD (SCAN) ........................................ 196
Page 7

Table of contents
Repeating tracks (REPEAT) ........... 196
Starting the Repeat function....... 196
Ending the Repeat function ........ 196
Naming CDs ..................................... 197
Entering the name........................ 197
Deleting characters...................... 198
Deleting the current name........... 198
Deleting all of the names............. 198
Track programming......................... 199
Creating the track program......... 199
Deleting tracks from the track
program ......................................... 199
Starting/stopping the track
program ......................................... 200
Deleting individual track
programs ....................................... 200
Deleting all of the track
programs from the memory ........ 200
Navigation.................................. 201
How navigation works..................... 201
Starting navigation .......................... 201
Destination entry ............................. 201
Destinations.................................. 202
Destination entry with the edit
menu ................................................. 202
Selecting l e tters ........................... 203
Deleting letters ............................. 203
Selecting entries from lists ......... 204
Paging in lists ............................... 204
Scrolling through lists page-by-
page ............................................... 204
Destination entry - Town ................ 205
Destination entry - Street, intersec-
tion and house number................... 206
Destination entry - House
number .......................................... 207
Destination entry - Intersection.. 208
Destination entry - Town centre .... 208
Special destinations in the destination
town, surrounding the destination,
surrounding your current position
and supraregional destinations ..... 209
Special destinations - In the
destination town........................... 210
Special destinations - Supra-
regional destinations ................... 211
Special destinations -
Surrounding the destination....... 211
Special destinations Surrounding the current position. 212
Destination entry - From the
destination memory ........................ 213
Destination entry - For a position
mark .................................................. 214
Selecting a position mark as
your destination ........................... 214
Route guidance................................ 215
Starting route guidance............... 215
Switching the audio source ........ 216
Cancelling route guidance .......... 217
NO MAP route guidance ................. 217
Travel guide...................................... 218
Displaying the route list.................. 219
Locating mode ................................. 219
Destination memory ........................ 220
Storing a destination in the
destination memory ..................... 220
Entering and altering short
names ............................................ 220
Sorting destinations manually.... 221
Deleting destinations from the
destination memory ..................... 221
Displaying GPS status and your
position ............................................. 222
175
DANSKSVENSKA ENGLISH
Page 8

Table of contents
176
Bypassing traffic congestion
during route guidance..................... 223
Entering a detour of traffic
congestion .................................... 223
Cancelling a detour of traffic
congestion .................................... 223
Selecting route options .................. 224
Setting a position mark................... 225
Storing the position mark ........... 225
Traffic announcements during
route guidance ................................. 226
Activating/deactivating voice
output................................................ 226
Activating/deactivating the memory
of the last 10 destinations
(LAST 10) .......................................... 226
Selecting t i m e i n f o........................... 227
Setting the position mark
manually............................................ 227
Simulating route guidance ............. 228
CD changer operation .............. 229
Inserting CDs into the CD
changer.......................................... 229
Starting CD changer operation ...... 229
Switching between the main
menu and the functions menu.... 230
Activating the DSC menu ............ 230
Selecting CDs................................... 231
Selecting tracks ............................... 231
Restarting tracks .......................... 231
Fast forward/reverse ....................... 231
Random play (MIX) .......................... 232
Selecting random play MIX for
one CD or all of the CDs in the
magazine ....................................... 232
Scanning tracks (SCAN) ................. 233
Scanning the tracks on one CD.. 233
Scanning the tracks on all of
the CDs .......................................... 233
Repeating tracks or CDs (REPEAT) . 234
Starting the Repeat function....... 234
Ending the Repeat function ........ 234
Activating the Repeat function
for one track.................................. 234
Switching on the Repeat
function for a CD .......................... 234
Track programming......................... 235
Creating the track program......... 235
Deleting tracks from the track
program ......................................... 236
Starting/stopping the track
program ......................................... 236
Deleting individual track
programs ....................................... 236
Deleting all of the track
programs from the memory ........ 236
Naming CDs ..................................... 237
Entering the name ........................ 237
Deleting characters...................... 238
Deleting the current name........... 238
Deleting all of the names............. 238
Switching the playing time
indicator o n/off ................................ 239
Activating/deactivating traffic
announcements (CD changer) ....... 239
Page 9

Table of contents
RC06 remote control unit......... 240
Selecting the audio source............. 240
Activating navigation ...................... 240
Adjusting t h e v o l u m e ...................... 240
Mute................................................... 240
Cancelling the mute function...... 240
Selecting the waveband or
memory bank ................................... 241
Selecting stored stations................ 241
Starting station seek tuning ........... 241
Starting SCAN seek tuning,
Radio operation ............................... 241
Starting Travelstore......................... 241
Selecting tracks, CD-changer
operation .......................................... 242
Selecting tracks, CD operation ...... 242
Fast forward/reverse, CD-changer
operation .......................................... 242
Fast forward/reverse,
CD operation..................................... 242
Set-up/Basic settings ............... 243
Activating the Set-up menu ........ 243
Adjusting the day/night display,
the viewing angle, contrast and
brightness ........................................ 244
Automatic switch to night
display ........................................... 244
Adjusting the viewing angle ....... 244
Altering the display brightness .. 245
Fade effect in the menus............. 245
Adjusting the power-on and
announcement volume and
GALA................................................. 245
Altering th e t i m e .............................. 247
Selecting the time format ............ 247
Selecting the time zone ............... 247
Activating summer time .............. 247
Selecting the language ................... 248
Calibrating the system .................... 248
Calibrating the system after its
installation (New install).............. 248
Calibrating the system after a
tyre change ................................... 250
Calibrating the system
manually ........................................ 250
Performing a system test ............... 251
Displaying the GPS status and
your position .................................... 251
Activating/deactivating the system
coding ............................................... 252
Activating/deactivating the
coding............................................ 252
Reset to factory settings ................ 252
Adjusting seek tuning sensitivity .. 253
DANSKSVENSKA ENGLISH
177
Page 10

General operating instructions
Switching the system on/off
To switch your TravelPilot on press the left-hand rotary/pushbutton @.
The system will begin to play the audio source which was active last at the
power-on volume level. Refer to the section on “Adjusting the power-on/traffic
message volume and GALA” in the chapter on Set-up.
Switching the system on/off with the vehicle ignition
If the system has been installed accordingly, you can switch it on and off with
the vehicle ignition.
Switching the unit on when the vehicle ignition is switched off
If the TravelPilot has been installed accordingly, you can also operate it when
the ignition is switched off.
Press the left-hand rotary/pushbutton @.
The TravelPilot will switch on. After the unit has played for an hour, it will switch
off automatically to prevent the vehicle battery from running down.
Note:
To prevent the TravelPilot from being used after it has been discon-
nected from the vehicle battery, you can activate the security coding.
If the security coding has been activated, you will always be required
to enter the code after the vehicle battery has been disconnected,
after the system has been disconnected from its power supply (e.g.
if stolen) and after a fuse has blown. For information on how to activate/deactivate the coding, please refer to the section on “Activating the equipment coding” in the chapter on Set-up.
178
Page 11

General operating instructions
Selecting the operating mode
To select the operating mode, press:
TU A for radio operation,
CD·C ? to activate CD-player or CD-changer operation (optional) and
NAV < to activate navigation.
When you press one of these keys to switch between the audio sources, you will
access the main menu for the audio source selected.
Each audio source (tuner, CD player and CD changer) has three menus which
are used to make all of the setting adjustments:
- The main menu is used to make the most frequent adjustments, e.g. to
select radio stations or CD tracks.
- The functions menu is used to select special functions such as Travelstore.
- DSC menu. Direct Software Control is used to adjust the options for the
individual audio sources to suit your own personal preferences.
The following menus are available in navigation mode:
- The main menu to activate the main navigation functions,
- The route guidance menu with visual driving recommendations and
- The DSC menu to adjust the options for navigation to suit your own personal preferences.
Switching between the main and the functions menus
To switch between the main and the functions menus for an audio source,
Press the corresponding button TU A or CD·C ? again.
DANSKSVENSKA ENGLISH
179
Page 12
General operating instructions
Switching between the main and the route guidance menus for navigation
If you want to switch between the main and the route guidance menus when
route guidance is active,
Press NAV <.
Activating the DSC menu
To access the DSC menu in the individual operating modes press DSC 8 once
briefly.
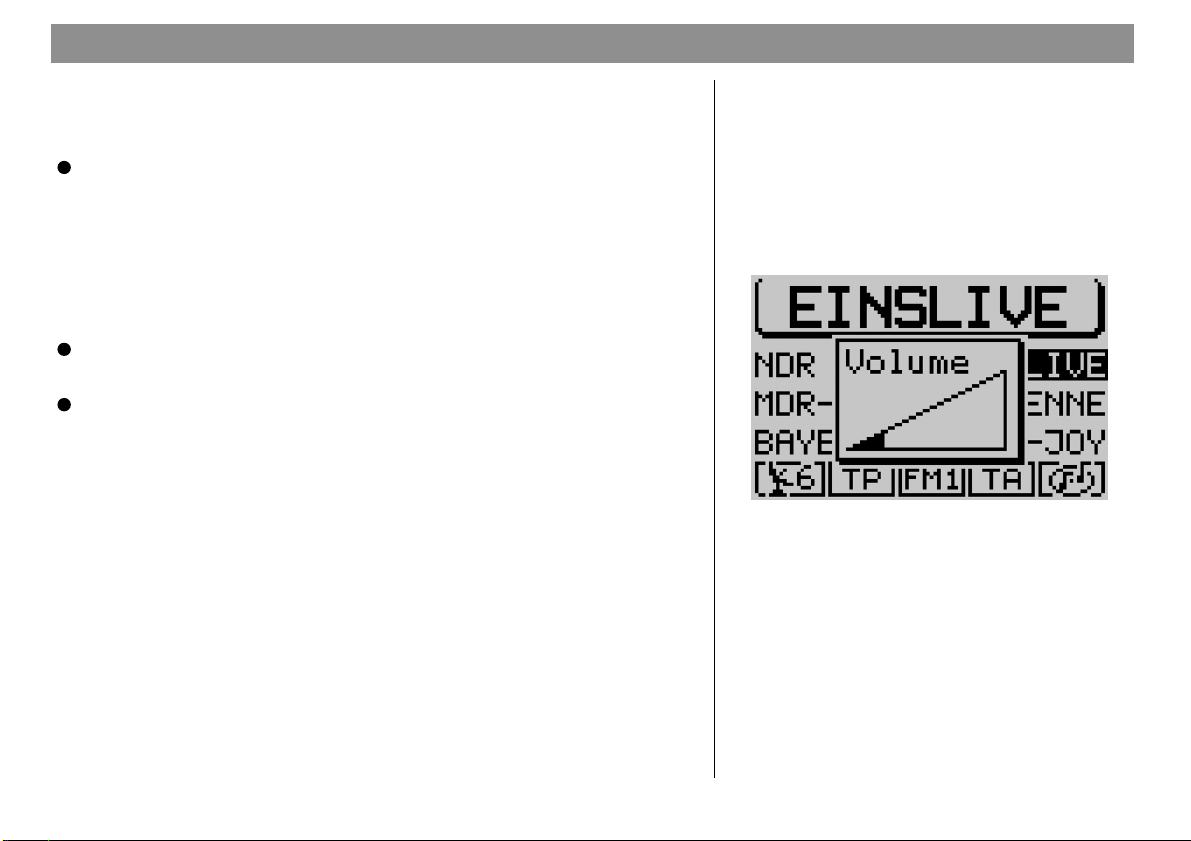
Adjusting the volume
To increase the system volume,
Turn the left-hand rotary/pushbutton @ clockwise.
To decrease the system volume,
Turn the left-hand rotary/pushbutton @ counter-clockwise.
When you make these adjustments you will see symbols in the foreground of
the display to indicate the setting you have selected.
Note: During a spoken driving recommendation for navigation you
can alter the volume without affecting the main volume for the audio source. The difference in volume will be stored automatically.
Automatic mute during telephone calls
If an in-car telephone has been connected to the system, the TravelPilot will
switch to mute during a telephone call.
A telephone symbol will appear in the foreground of the display for the active
audio source.
If you make or receive a telephone call during active route guidance
appear as the message in the display. The visual driving recommendations remain visible.
PHONE
will
180
Main tuner menu with the volume setting display
Page 13
General operating instructions
Display
The TravelPilot display provides you with all of the information required for navigation, such as the visual driving recommendations and the menus and lists for
the radio, CD-player and CD-changer audio sources.
If the system has been installed accordingly, it will automatically switch to night
display when the vehicle headlights are switched on. This means that all of the
dots are displayed in the opposite colour as for the day display. If you drive with
the headlights on during the day, e.g. in Scandinavian countries, you can deactivate this automatic switch. Refer to the information in the chapter on Set-up Display.
It is possible to adjust the viewing angle of the display in your vehicle to obtain
optimum legibility. Refer to the information in the chapter on Set-up - Display.
Note: Always handle the screen with care. Never allow the display
to come into contact with pointed objects as this will result in scratches and damage the screen. To clean the screen, use only a soft, lintfree cloth, moistened with a little rubbing alcohol if necessary. Do
not use any solvents such as turpentine or petrol as they are very
aggressive and will damage the screen.
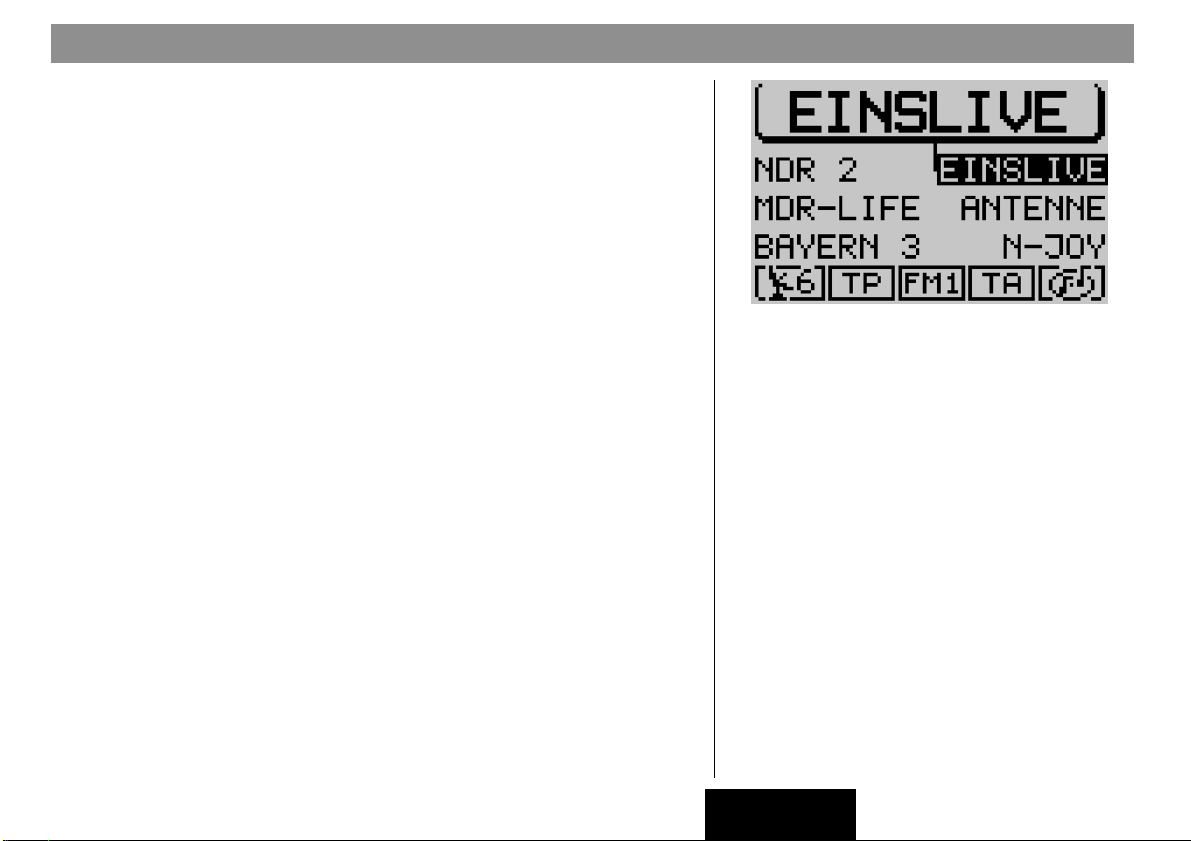
Main tuner menu
DANSKSVENSKA ENGLISH
181
Page 14
General operating instructions
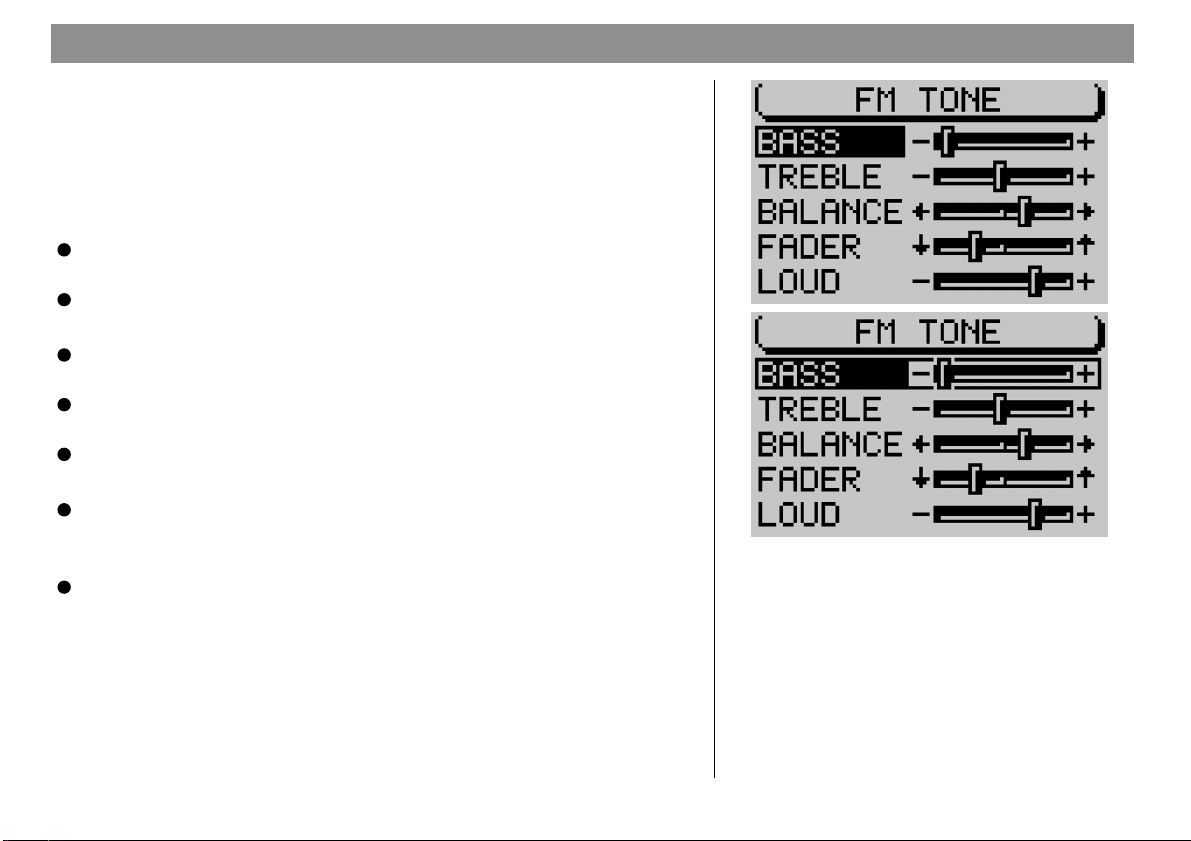
Adjusting the tone and the balance/fader
The TravelPilot allows you to make separate adjustments to the bass and treble
for each audio source.
The settings selected for the balance, the fader and the Loudness are the same
for all of the audio sources.
To adjust the audio settings,
Switch to the audio source (AM, FM, CD player or CD changer) for which
you would like to make the adjustments.
Press AUD 3.
This activates the audio menu which is used to make the tone adjustments.
Use the right-hand rotary/pushbutton ; to move the selector bar to the
menu item you would like to adjust, and
Press the right-hand rotary/pushbutton ;. The control lever will appear
surrounded by a frame.
Use the right-hand rotary/pushbutton ; to make the desired adjustment.
If you would like to save the adjustments made,
Press the right-hand rotary/pushbutton ;.
If you do not want to save the new adjustments and would like to return to the
previous settings,
Press ESC 9.
182
Audio menu for the FM radio audio source
Note: If you do not press any of the keys, the system will automatically switch back to the original menu after 30 seconds (time out).
Page 15
General operating instructions
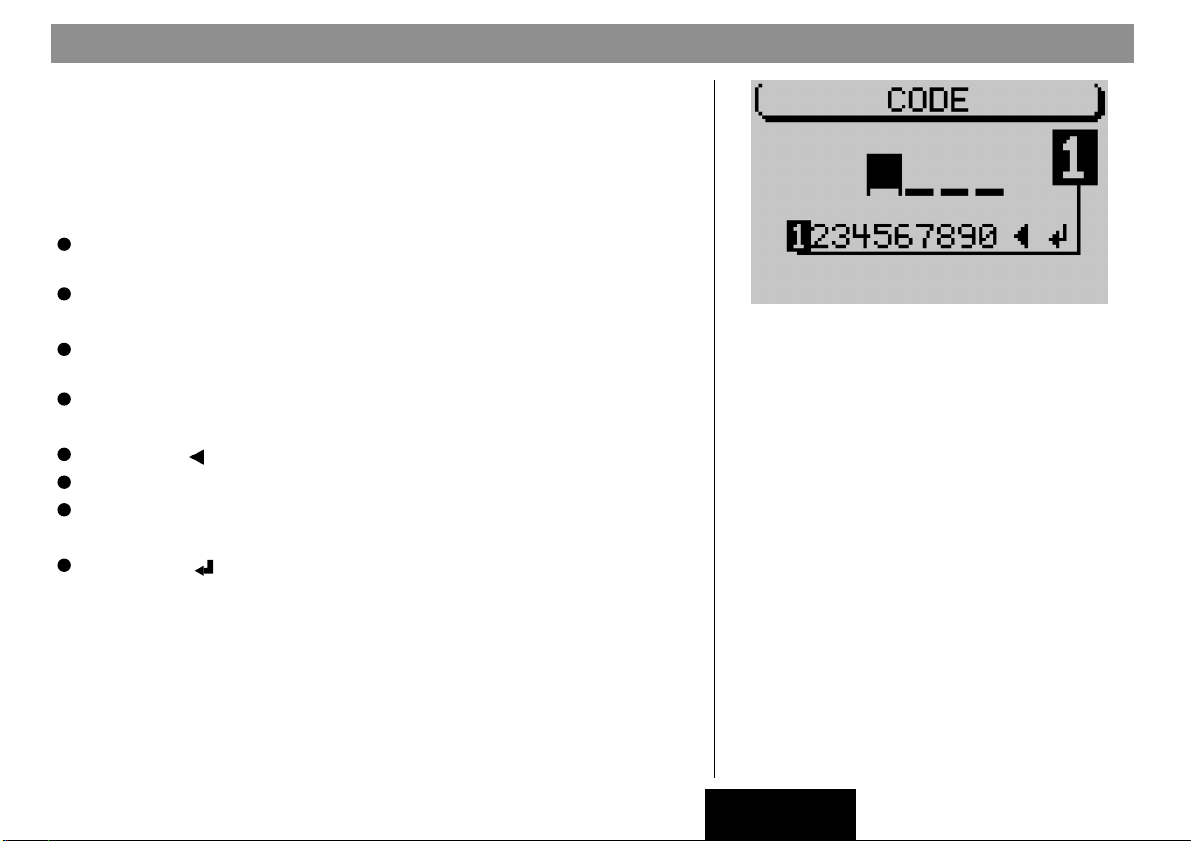
Switching on coded systems after they have been disconnected from the vehicle battery
If you attempt to switch on a coded system after it has been disconnected from
the vehicle battery, e.g. after a repair has been made to the vehicle, an code
inquiry will appear in the display.
Enter the code number as follows:
Use the right-hand rotary/pushbutton ; to mark the first digit of the code
number,
Press the right-hand rotary/pushbutton ;.
The cursor for the code input will move one position to the right.
Now select the second digit of the code number and press the right-hand
rotary/pushbutton ; to confirm your selection.
Enter the remaining digits of the code number in the same way.
If you enter an incorrect digit by mistake,
Mark the symbol and
Press the right-hand rotary/pushbutton ; or
Press DEL 6.
Once you have completed entering the code number,
Mark the symbol and press the right-hand rotary/pushbutton ; to
confirm your selection.
The system will switch on. If you enter and confirm an incorrect code number by
mistake, you can repeat your entry. To prevent thieves from discovering the
code number by trial and error, the system will be blocked for one hour after an
incorrect code is entered for the third time. The system must remain switched on
for this time to count down. If the system is disconnected from the power supply
during this waiting period, the time will be reset to one hour once again.
Code inquiry
DANSKSVENSKA ENGLISH
183
Page 16
Radio operation
Starting radio operation
Press TU A.
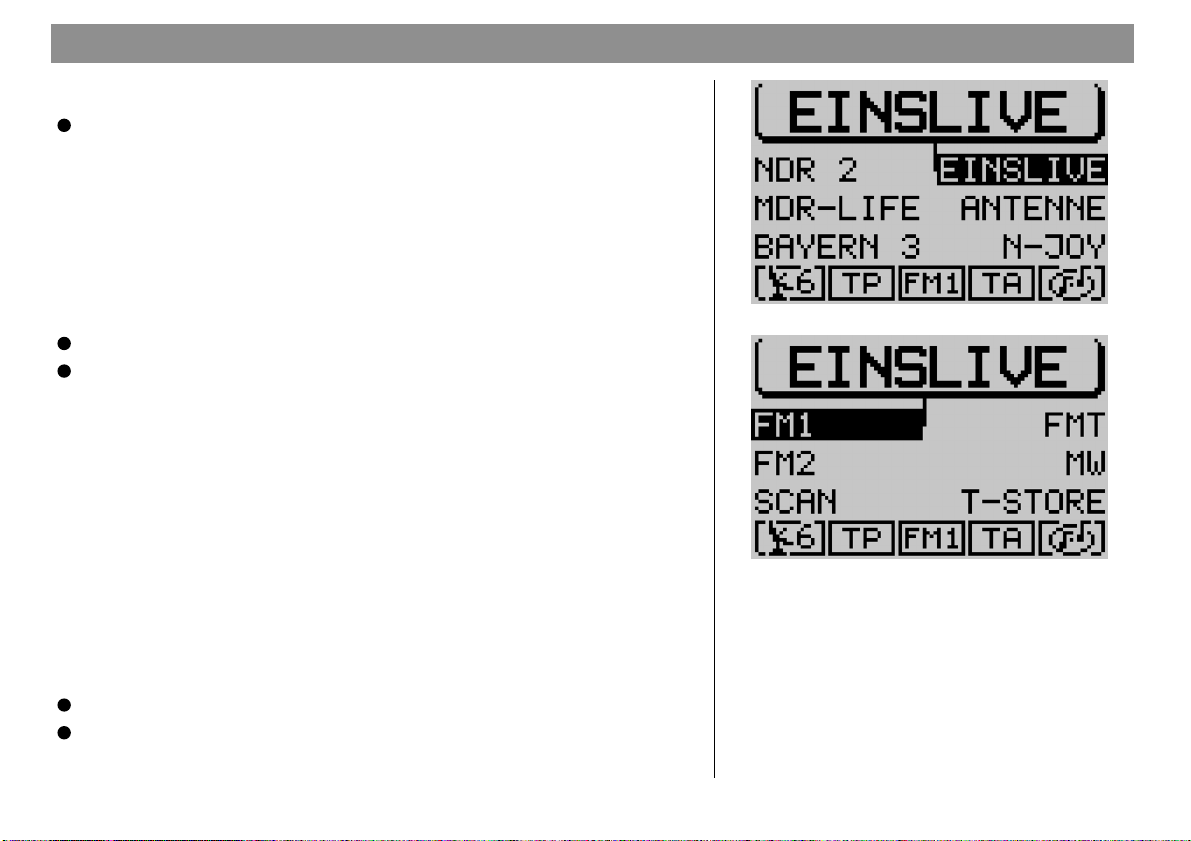
Radio operation will begin and the main menu will appear in the display. The
station you last tuned into will begin to play. The six softkeys located at the sides
of the display are used to recall the radio stations which have been stored and to
store the radio stations.
Selecting the waveband or memory bank
The TravelPilot allows you to tune into FM radio stations and AM radio stations.
To select the FM or AM waveband,
Start radio operation and
Press TU A again.
You will access the functions menu and can now use the corresponding softkeys
to select one of the memory banks.
Switching RDS (Radio Data System) on/off
The Radio Data System is a service offered by radio stations which provides
you with more enjoyment and convenience when listening to FM radio. In addition to their regular programming, the radio stations broadcast such signals as
their station name, consisting of one to a maximum of eight characters and the
traffic information status of the station. The station name will appear in the display as soon as the station is identified. The TravelPilot also automatically searches for the best frequency for the station selected.
To take full advantage of the RDS functions, you must activate this option for
radio operation in the DSC menu.
Start radio operation.
Press DSC 8.
184
Main tuner menu
Tuner functions menu
Page 17
Radio operation
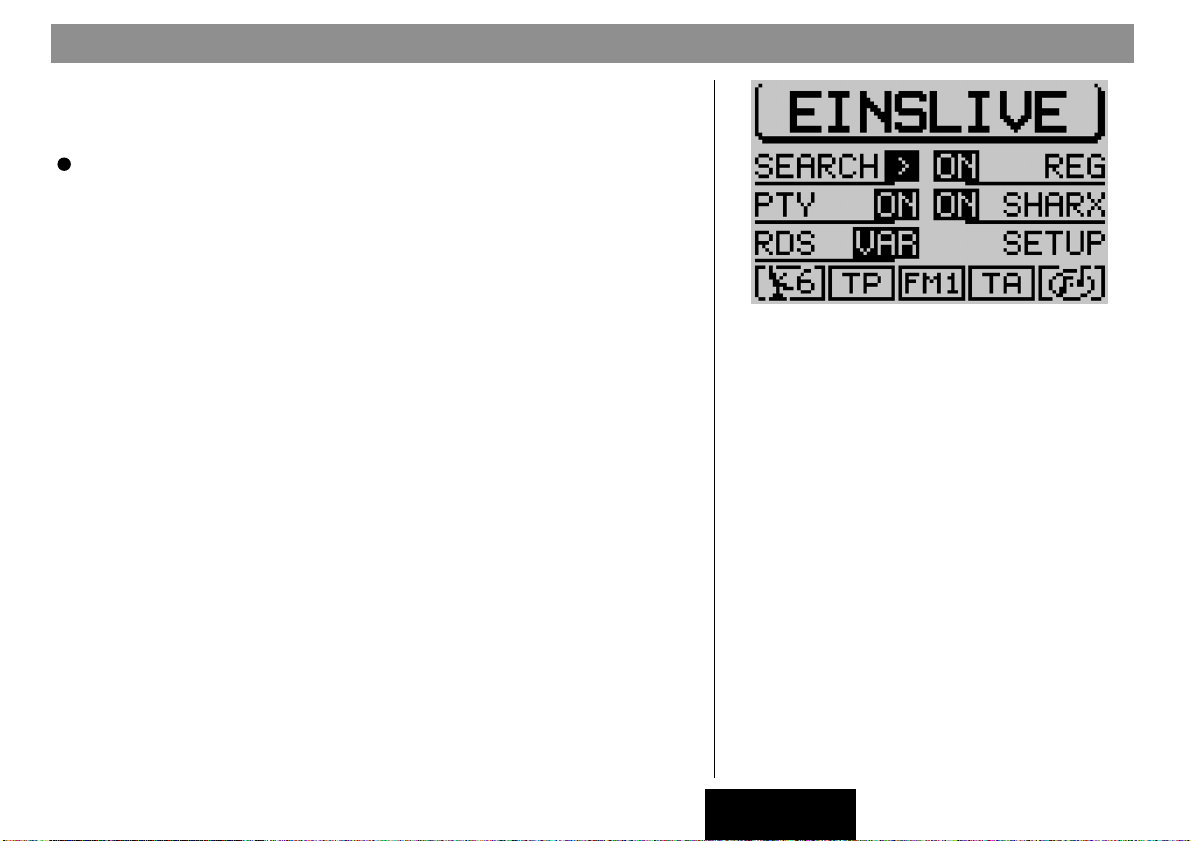
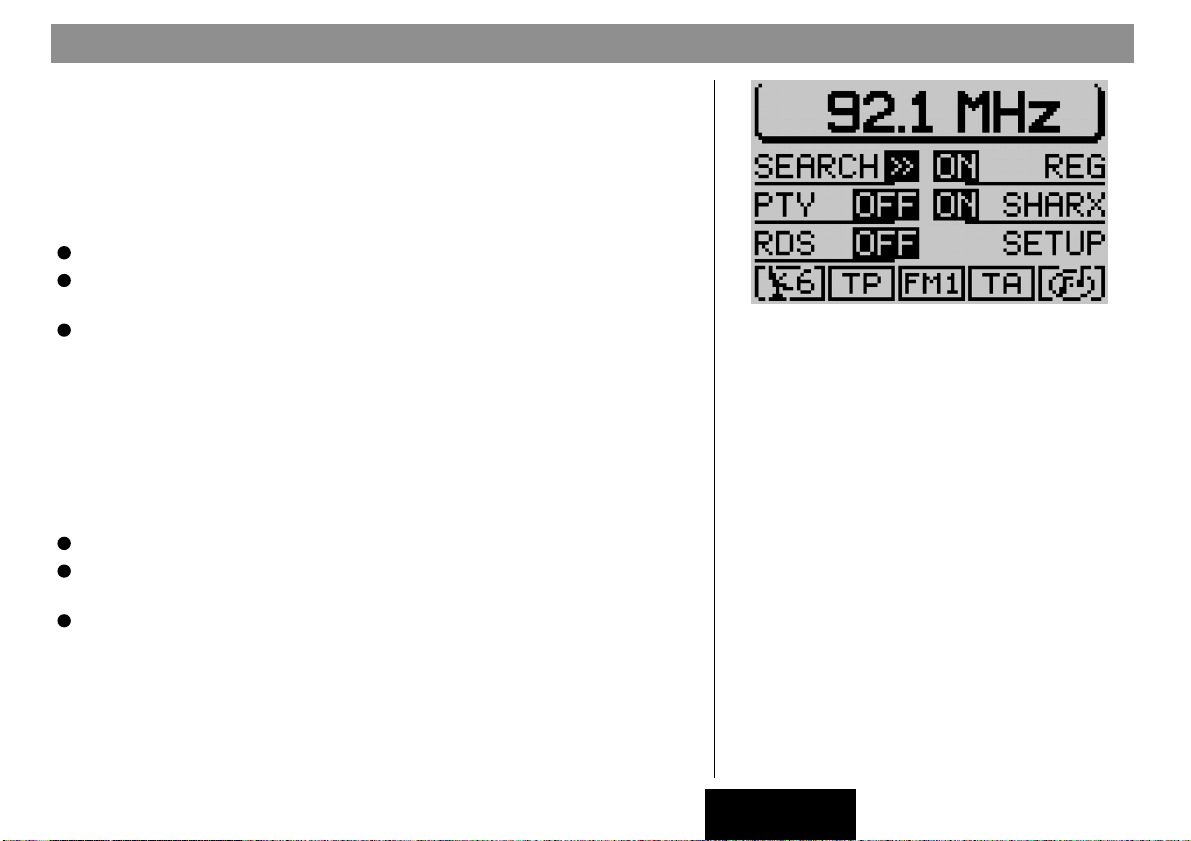
You will access the DSC menu for radio operation and find the menu item for
RDS
in the bottom line on the left. Here you can choose between the following
options:
FIX
VAR
OFF
VAR, FIX
Press the softkey marked
played next to
: RDS radio operation is active. Because a number of radio stations trans-
mit not only their station names, but advertising as well, you can use this
setting to allow only the display of the station name. Alternating display
contents, such as advertising, will not appear on the screen.
: The default setting, RDS radio operation is fully active. Alternating dis-
play contents will also appear on the screen.
: RDS radio operation is deactivated. The radio station selected is identi-
fied in the display by its frequency.
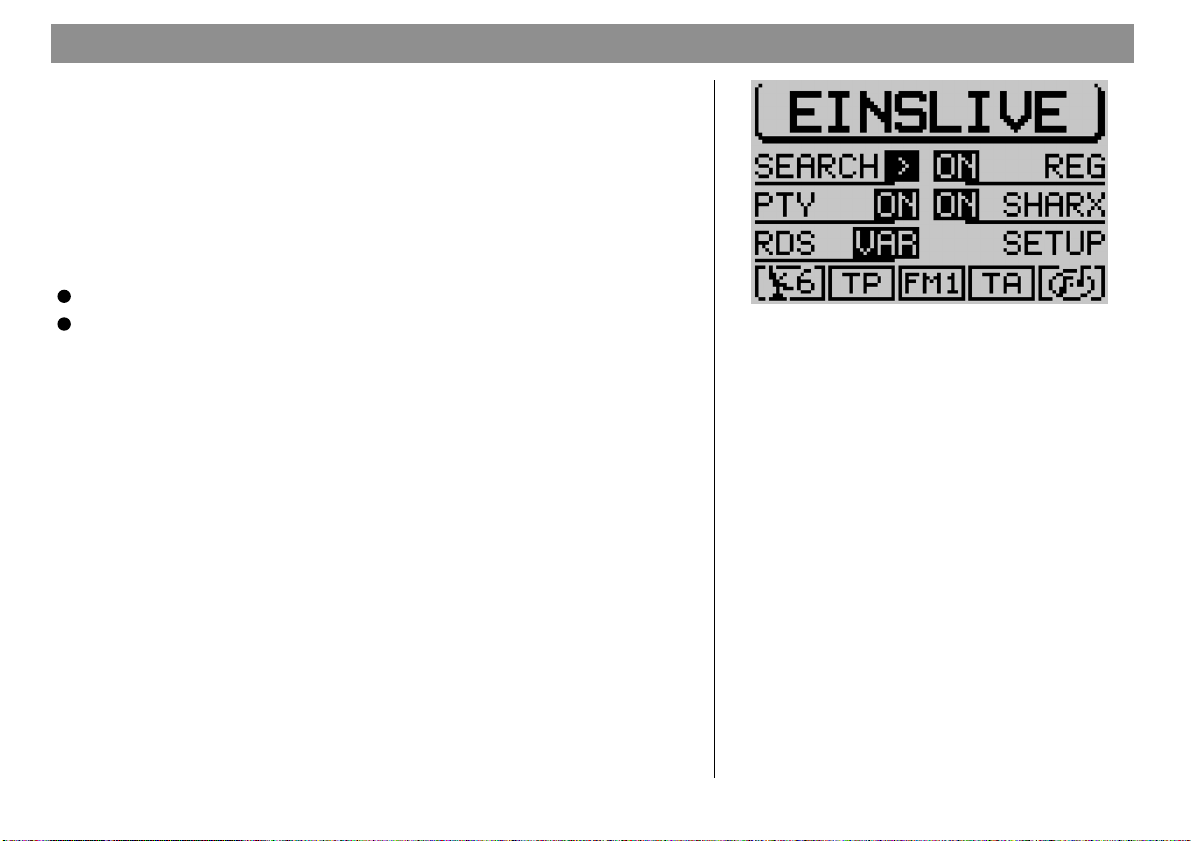
Activating/deactivating RDS-REG
Another attractive RDS option is the “Alternate Frequency” function. The system
constantly searches in the background for frequencies with better reception for
the radio station selected and switches automatically to these frequencies. At
certain times of the day, however, some radio station networks broadcast different programs to serve a particular region. If the alternate frequency option is
activated, this might mean that the radio automatically switches to a stronger
frequency for the same station which is currently broadcasting a different regional program. If you want to continue listening to a particular regional program
and prevent the radio from automatically switching to a different frequency, switch
the menu item
frequencies unless reception deteriorates to the point that it is no longer possible to pick up the frequency selected.
and
OFF. VAR
RDS
.
REG
in the DSC menu to ON. Then the radio will not switch
is the default setting.
RDS
repeatedly until the desired option is dis-
Tuner DSC menu
DANSKSVENSKA ENGLISH
185
Page 18
Radio operation
Press DSC 8 to access the tuner DSC menu.
Press the softkey marked
pears next to
REG. OFF
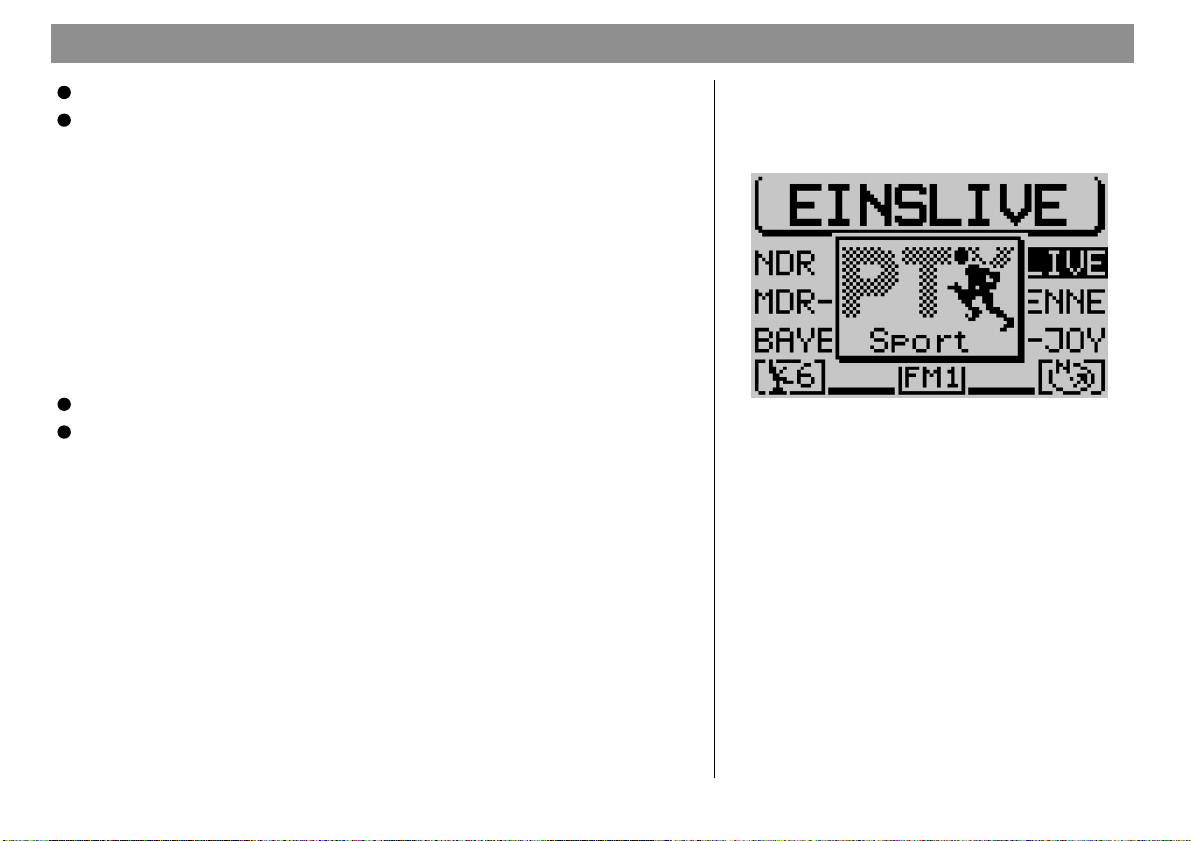
Switching PTY (Program Type) on/off
PTY is also an RDS service. With PTY, the radio stations indicate the contents
of the program they are broadcasting. This allows you to select stations broadcasting the type of program you want to listen to more easily, e.g. POP or CLASSICAL.
If you activate the PTY function in the DSC menu for radio operation, the program type will appear briefly in the display when you select the station by pressing the station preset key, for example. If the station does not support the PTY
function, there will be no indication in the display.
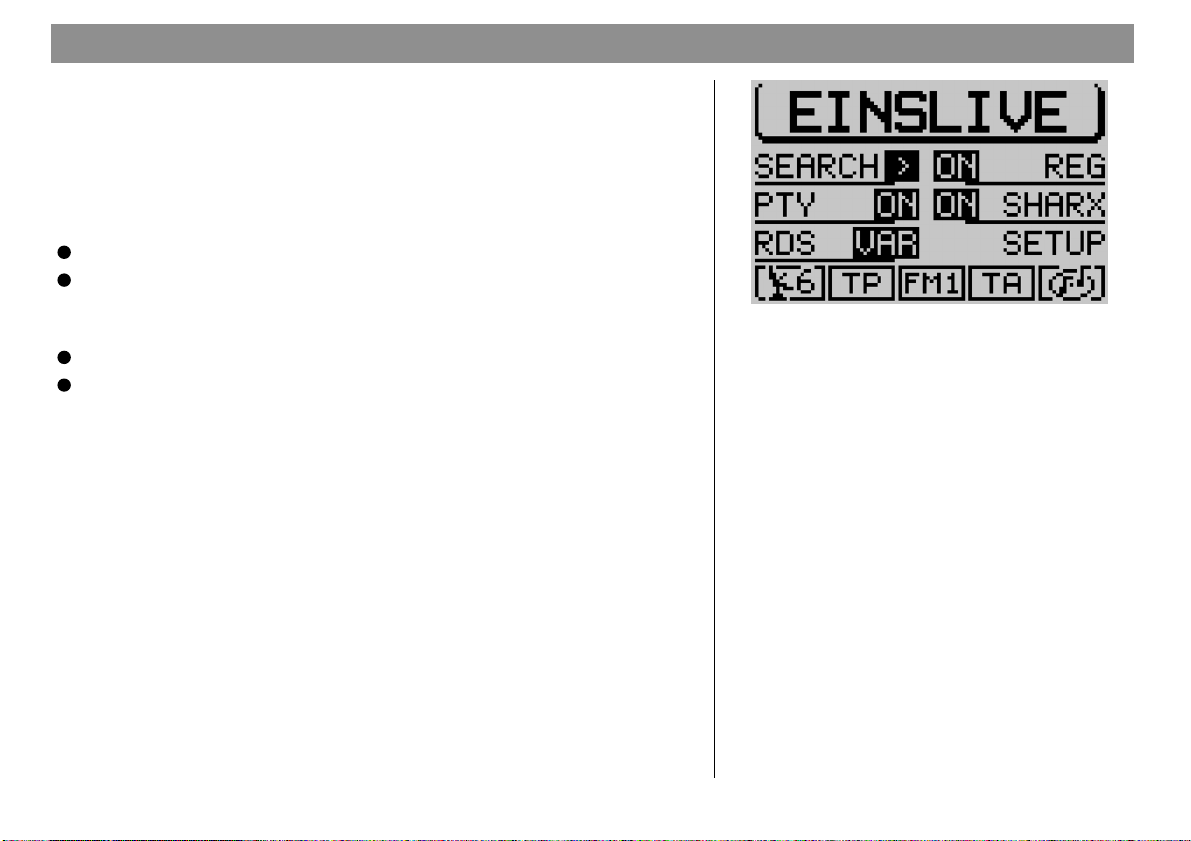
Press DSC 8 to access the tuner DSC menu.
Press the softkey marked
OFF
, appears. The default setting is ON.
PTY Alarm
The Alarm is a special program type. If the TravelPilot detects an alarm message, e.g. a disaster alert, a symbol will appear in the foreground of the display
and the alarm message will be emitted at the volume selected for traffic information messages. The alarm message can be interrupted by pressing DSC 8, TU
A, CD·C ? and by switching to a different radio station.
REG
repeatedly until the desired option ap-
is the default setting.
PTY
repeatedly until the desired option,
ON
or
186
Main tuner menu displaying the PTY symbol
Page 19

Radio operation
Traffic information TA (Traffic Announcement)
Traffic information is a service provided by the radio station networks. They
broadcast traffic announcements at regular intervals. Radio stations offering traffic
information broadcast a special signal to indicate that this service is available. If
the TravelPilot identifies this signal, a TP symbol (TP=Traffic Program) will appear in the status line in the main radio menu.
If the TravelPilot TA function is active, traffic announcements will be broadcast
at the minimum volume selected in the Set-up Volume.
If the TA function is activated for the other sources, (CD player and CD changer
as well as navigation), playback will be interrupted for an incoming traffic announcement and the message will be broadcast. When the traffic announcement is completed, playback will resume.
If the TA function is active and you select a radio station manually which does
not support traffic information, you will hear a warning beep. In this case, the
system will start an automatic search for a TP station after the warning beep has
sounded.
Activating/deactivating the TA function for radio operation
Use TA 4 to activate or deactivate the TA function. A TA symbol in the status
line indicates that the TA function is active.
Interrupting traffic announcements
To interrupt traffic announcements, press TA 4, DSC 8, AUD 3, TU A or
CD·C ? or select a different radio station.
DANSKSVENSKA ENGLISH
187
Page 20
Radio operation
Selecting a station, FM
There are several ways in which you can select radio stations with the TravelPilot.
Automatic station seek tuning
To select radio stations automatically, the > symbol must appear beside the
menu item
Now you can select the station in the main tuner menu.
If the TA function is active, the system will select only those stations which support traffic information (TP symbol in the display).
Paging through the broadcasting network (with RDS only)
One example of an RDS broadcasting network is the NDR, the North German
Radio Broadcasting Network with the following radio stations: NDR1, NDR2,
Radio3 NDR INFO and N-JOY.
You can select RDS stations within reception range directly. If it is possible to
receive several stations which belong to the same broadcasting network, you can
press << >> on the rocker switch 2 to page up or down through these stations.
Note: this function will not operate unless these stations have been
picked up by the radio receiver at least once. You can, for example,
start SCAN seek tuning or the Travelstore function. In addition to
this, the automatic seek tuning function and the RDS function must
be activated.
SEARCH
Press DSC 8 to access the tuner DSC menu.
Press the softkey marked
symbol appears.
Press >> on the rocker switch 2 to start station seek tuning upwards or
<< on the rocker switch 2 to start station seek tuning downwards.
in the tuner DSC menu.
SEARCH
as often as necessary until the >
188
Tuner DSC menu
Page 21
Radio operation
Manual station tuning
If you know a station’s frequency, you can also select it manually. This is useful
if you would like to select a station which is not detected by automatic seek
tuning. Important: the RDS function must be switched off in the DSC menu.
Note: the RDS function must be switched off in the DSC menu and
the >> symbol must appear beside SEARCH.
Press DSC 8 to access the tuner DSC menu.
Press the softkey marked
symbol appears.
Press << or >> on the rocker switch 2 in the main tuner menu.
The frequency will move up or down the waveband in increments of 100 kHz.
Selecting radio stations, AM
In AM radio operation, you can select stations both automatically and manually.
Automatic station seek tuning
To select stations automatically, the > symbol must appear beside
the tuner DSC menu,
Press DSC 8 to access the tuner DSC menu.
Press the softkey marked
symbol appears.
Press << or >> on the rocker switch 2.
The system will tune into the next available station.
SEARCH
SEARCH
as often as necessary until the >>
SEARCH
as often as necessary until the >
Tuner DSC menu
in
DANSKSVENSKA ENGLISH
189
Page 22
Radio operation
Manual station tuning
You can also select AM stations manually if you know their frequency. This is
useful if you would like to select a station which is not detected by automatic
seek tuning. For this to function properly, the >> symbol must appear beside
SEARCH
The frequency will change in 9 kHz increments.
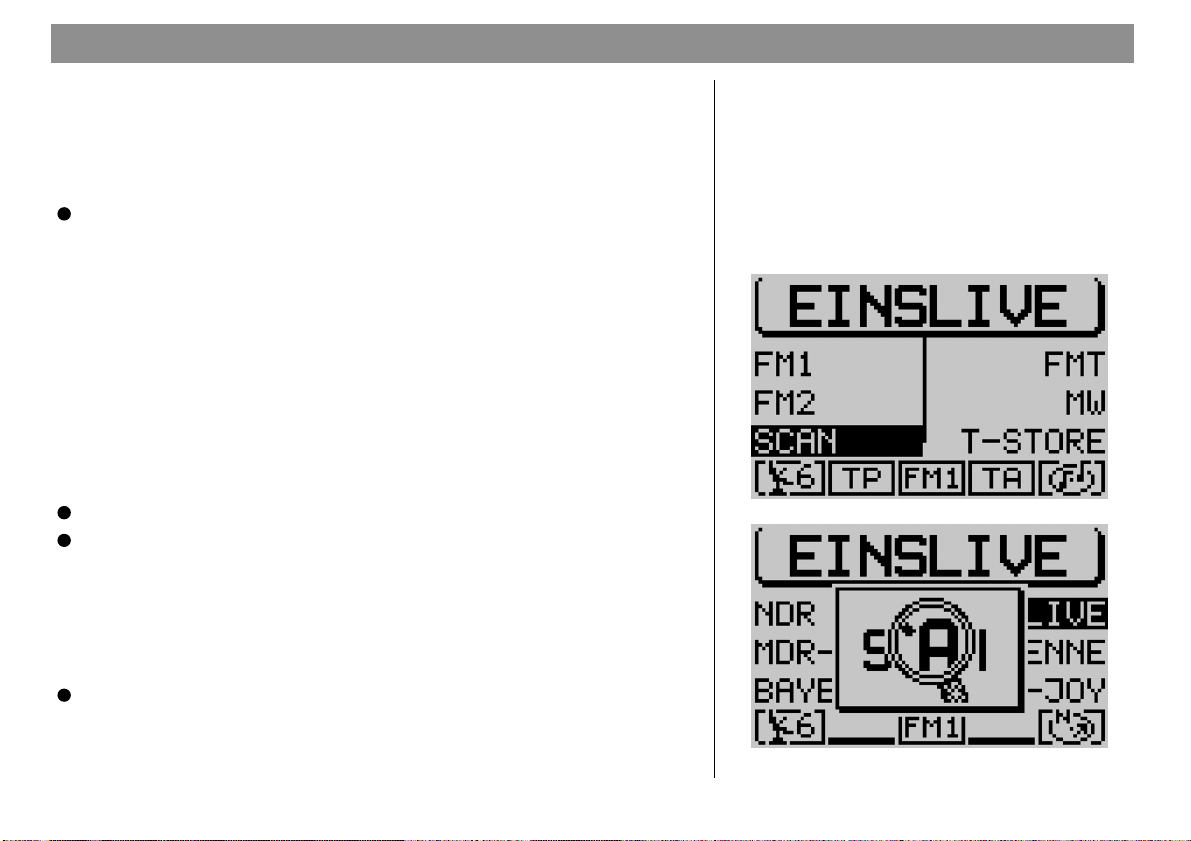
Scan seek tuning
With Scan seek tuning you can search the entire waveband for stations within
your reception range. Each station detected will play for ten seconds. If you do
not interrupt Scan seek tuning, it will end automatically once it has run through
the waveband completely. Press note that, when the TA function is active, only
those stations which support the traffic information function (TP symbol in the
display) will be scanned.
Starting Scan seek tuning
To start Scan seek tuning,
Scan seek tuning will begin. Symbols in the foreground of the display will indicate the progress of Scan seek tuning.
Ending Scan seek tuning
If you want to end Scan seek tuning or continue listening to the station currently
being scanned,
Scan seek tuning will end, the station selected last will continue to play.
in the tuner DSC menu.
Press << or >> on the rocker switch 2.
Press TU A to access the functions menu for radio operation and
Press the softkey marked
Press ESC 9.
SCAN
.
190
Tuner functions menu
Main tuner menu, SCAN function active
Page 23
Radio operation
Storing radio stations
The TravelPilot is able to store 18 FM stations in three memory banks and six
AM stations in one memory bank.
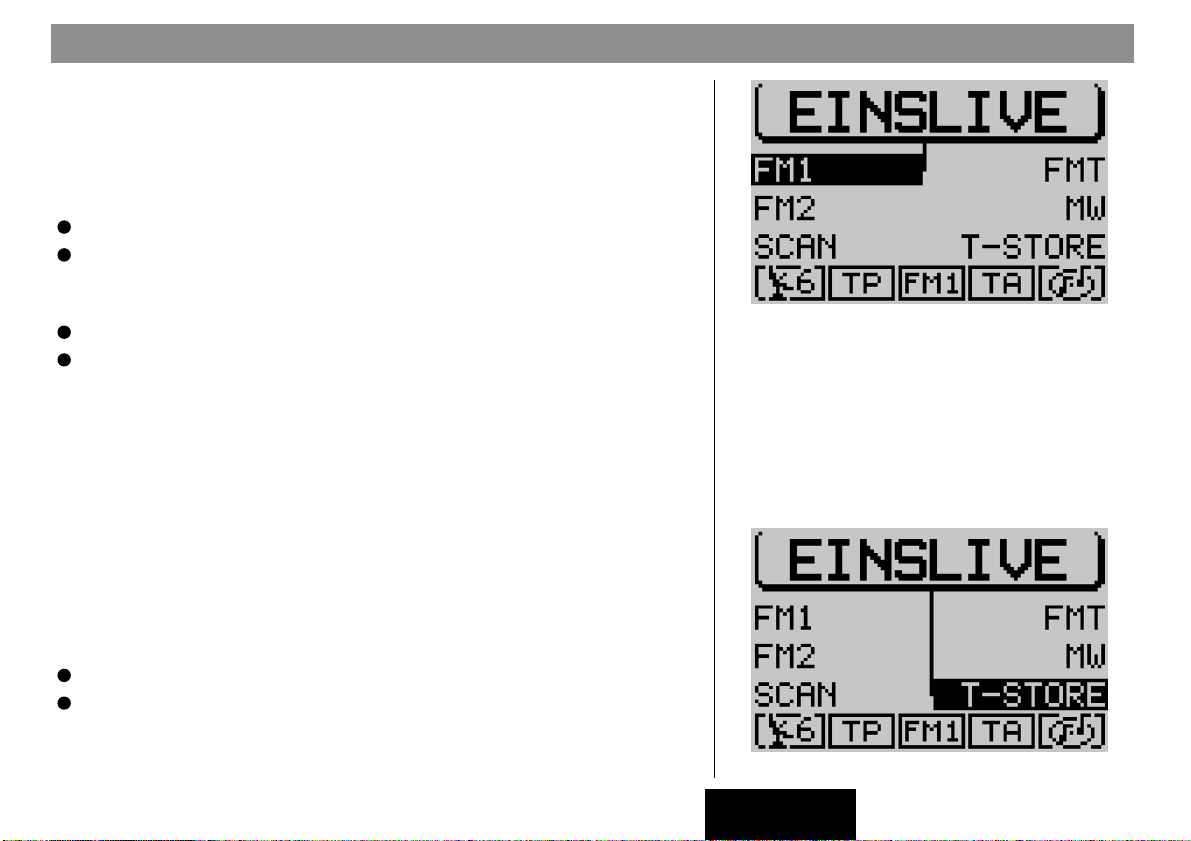
Storing stations manually
To store stations manually,
Press TU A to access the functions menu for radio operation and
Select the desired FM memory bank: FM1, FM2 or FMT or the AM wave-
band.
The system will return to the main radio menu.
Select the radio station and
Press and hold down the softkey on which you want to store the station
until the radio resumes play after muting briefly.
The station is now stored on the softkey selected. The station name or frequency will appear next to the softkey in the display.
Storing stations automatically with “Travelstore”
The system is able to store the six stations within reception range with the strongest reception signals in the FMT memory bank. This function is particularly useful on longer trips.
Note: Please note that all of the stations previously stored in the
FMT memory bank will be replaced by the new stations.
Starting Travelstore
To use the Travelstore function,
Press TU A to access the functions menu for radio operation mode and
Press the softkey marked
Symbols in the foreground of the display will indicate the progress of the Travelstore function. After the Travelstore function is completed, the first station stored
in the FMT memory bank will begin to play.
T-STORE
.
DANSKSVENSKA ENGLISH
Tuner functions menu
Tuner functions menu
191
Page 24
Radio operation
How to reduce interference in FM radio reception
When listening to FM radio stations, you will sometimes experience interference
caused by neighbouring radio stations cutting in. This happens most often when
a large number of stations are close to one another in frequency on the waveband. The TravelPilot has been equipped with the SHARX function to allow you
to virtually eliminate such interference.
Activating/deactivating SHARX
To activate or deactivate the TravelPilot’s SHARX function,
Press DSC 8 to access the tuner DSC menu and
Press the softkey marked
or
OFF
appears.
ON
SHARX
is the default setting.
repeatedly until the desired option
ON
192
Tuner DSC menu
Page 25
CD operation
18
You can use the TravelPilot’s integrated CD drive to play audio CDs. When you
play audio CDs, your access to navigation is limited to NO MAP route guidance.
Use only audio CDs bearing this label:
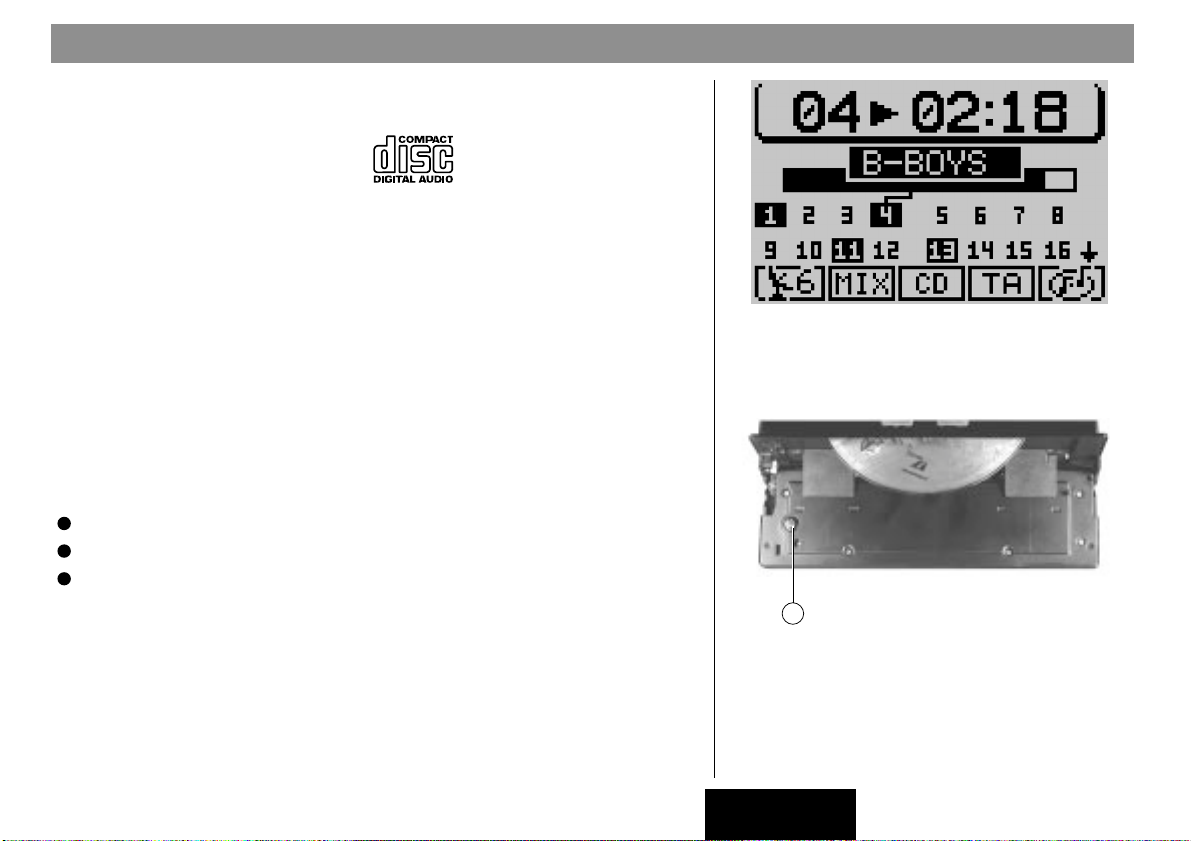
During CD playback, the display will indicate the track number and the playing
time or only the track number in the top line of the main CD menu. All of the track
numbers on the CD will appear in the functional display area. The track currently
playing is marked. The functional display area also includes a symbol which
indicates how much playing time has elapsed on the CD.
The status line also includes symbols to indicate the number of GPS satellites
received, the CD function selected, the currently selected audio source, the status of the TA function and a symbol which indicates whether an audio CD is
currently inserted in the CD drive.
.
Starting CD playback
CD playback will start automatically when you insert an audio CD.
Inserting a CD
Press the Open key 1 to open the operating panel.
Press the Eject button B to eject any CD which might be in the CD drive.
Insert the CD with the label facing upwards gently into the CD slot. Press
the CD inwards until you can feel resistance. At this point, the CD will be
pulled into the CD slot automatically.
Note: If the operation panel remains open, a warning beep will
sound after 30 seconds. Close the operating panel.
CD playback will start automatically after the CD has been checked. The main
CD menu will appear in the display.
Main CD menu
193
DANSKSVENSKA ENGLISH
Page 26
CD operation
Starting CD playback for the integrated CD player (no CD changer connected)
If an audio CD has been inserted and there is no CD changer connected,
Press CD·C ?.
The system will switch to the main CD menu and CD playback will begin. If there
is no audio CD inserted, a corresponding message will appear in the display.
Starting CD playback for the integrated CD player (CD changer connected)
If there is a CD inserted in the integrated CD player and a CD changer is connected, the system will switch to the main CD menu when you press CD·C ?.
The CD source which was active last will begin to play.
If the last CD was played in the CD changer, the main CD changer menu will
appear.
If you want to activate the integrated CD player,
Press CD·C ? again.
The CD functions menu for CD changer operation will appear.
Press the softkey marked CD.
If you have not inserted an audio CD into the integrated CD player, a lock symbol will appear in front of the menu item
menu item.
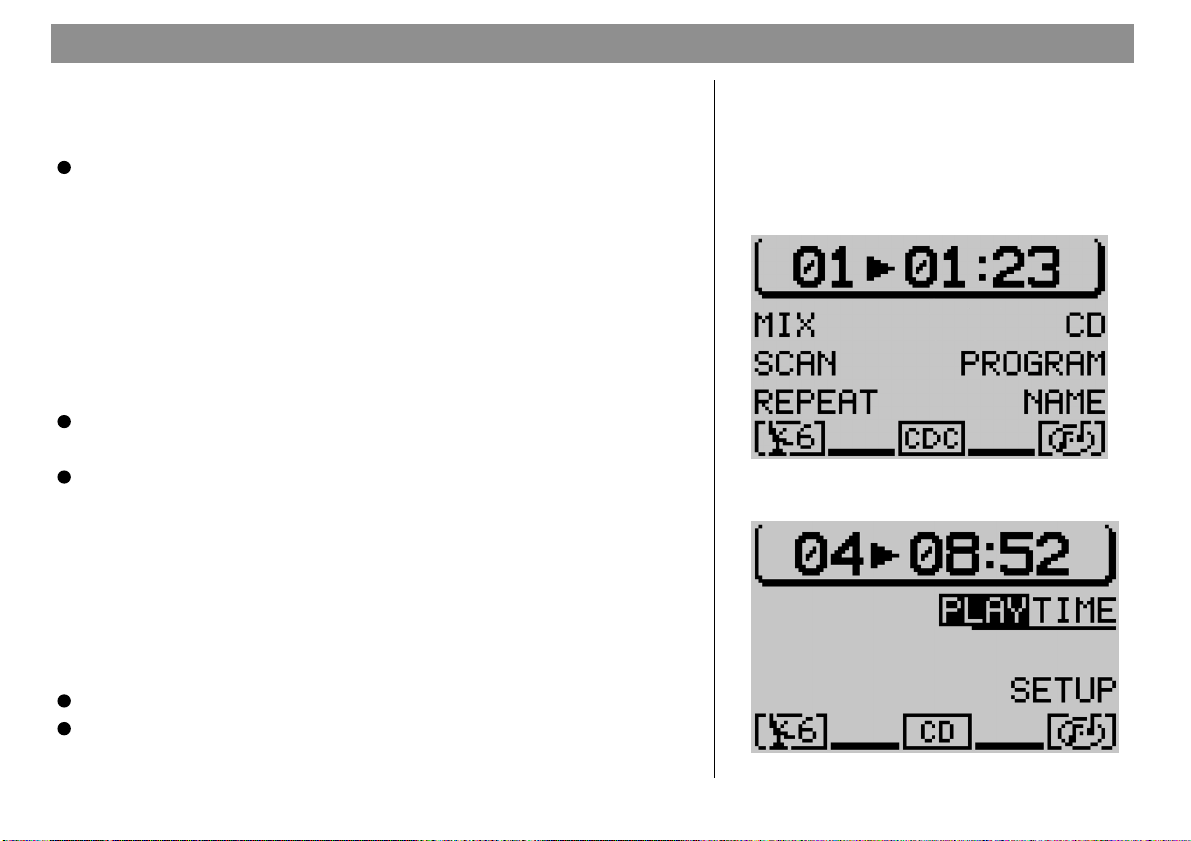
Switching the playing time indicator on/off
During CD playback, either the track number and the playing time or only the
track number will appear in the top line of the main CD menu. If you want to
switch between the playing time indicator and the track number display,
Press DSC 8 to activate the DSC menu for CD operation and
Press the softkey marked
The playing time indicator will be switched on or off. The default setting is
TIME
CD
and you will not be able to select this
.
PLAY
194
CD changer functions menu
.
CD DSC menu
Page 27

CD operation
Traffic announcements during CD operation
To switch the standby function for traffic information (see the chapter on “Traffic
Announcement TA”) on or off during CD operation,
Press TA 4.
The TA symbol will either appear in or disappear from the status line in the main
CD menu.
Selecting tracks
During CD playback you can select tracks directly.
To select the next track,
Press >> on the rocker switch 2.
If the last track on the CD is already playing, pressing >> on the rocker switch
2 will select the first track.
To repeat the track currently playing or to select a previous track,
Press << on the rocker switch 2.
If the first track on the CD is currently playing, pressing << will select the last
track.
Fast forward/reverse
You can use fast forward/reverse to find a particular passage on the track currently playing.
Press << or >> on the rocker switch 2 during playback.
The track will fast forward or reverse audibly.
Main CD menu
DANSKSVENSKA ENGLISH
195
Page 28

CD operation
Random play (MIX)
You can have the tracks on a CD played in random order.
Press CD·C ? to access the functions menu for CD operation and
Press the softkey marked
To end the MIX function, repeat these steps. The MIX function will end automatically if you activate the SCAN function.
Scanning all of the tracks on a CD (SCAN)
If you would like to scan all of the tracks on a CD, proceed as follows:
Press CD·C ? to access the CD functions menu and
Press the softkey marked
To end the SCAN function, repeat these steps. The SCAN function will end
automatically if you activate the MIX function.
Repeating tracks (REPEAT)
To repeat a track, activate the Repeat function.
Starting the Repeat function
Proceed as follows:
Select the desired track,
Press CD·C ? to access the CD functions menu and
Press the softkey marked
The track will repeat until you switch the Repeat function off.
the status line of the main CD menu.
Ending the Repeat function
If you want to end the Repeat function,
Press ESC 9.
MIX
.
SCAN
.
REPEAT
.
RPT
will appear in
196
CD functions menus
Page 29

CD operation
Naming CDs
The TravelPilot also allows you to name your CDs. The name can consist of up
to seven characters. The name you give to the CD will not be deleted when you
remove the CD from the CD player. When it is inserted again at a later date, the
name will appear in the display.
If you would like to name a CD,
Press CD·C ? to access the CD functions menu and
Press the softkey marked
Press the softkey marked
The edit menu will now appear.
Entering the name
Use the right-hand rotary/pushbutton ; to move the cursor to the first
letter in the name.
The letter marked will appear magnified on the right of the display in the “Zoom”
window.
Press the right-hand rotary/pushbutton ;.
The letter will appear in the upper name line.
Select the remaining letters in the same way.
Once you have entered the name completely,
Mark the symbol and
Press the right-hand rotary/pushbutton ;, or
Press down the right-hand rotary/pushbutton ; for longer than two sec-
onds.
After the name has been stored, the system will switch to the CD functions
menu. The name will now appear in the functional display area of the main CD
menu.
NAME
to access the CD Name menu.
EDIT
.
DANSKSVENSKA ENGLISH
CD functions menu
Edit menu
197
Page 30

CD operation
Deleting characters
If you want to delete a letter,
Mark the symbol, and
Press the right-hand rotary/pushbutton ;.
Deleting the current name
To delete the name of the current CD,
Switch to the CD name menu and
Press the softkey marked
The name will be deleted. The name will also be deleted if you activate the Edit
menu again and press the symbol or press and hold the right-hand rotary/
pushbutton ; to exit the menu.
Deleting all of the names
If you want to delete all of the CD names stored in the memory, proceed as
follows:
Activate the CD name menu and
Press the softkey marked
An inquiry in the display will prompt you to confirm this selection. If you really
want to delete all of the CD names,
Press the right-hand rotary/pushbutton ; to select
Press the right-hand rotary/pushbutton ;.
If not,
Press ESC 9.
CLR NAME
CLR ALL
.
.
YES
.
198
CD name menu
Page 31

CD operation
Track programming
You can also program the tracks you would like to listen to on a CD. This allows
you to omit the tracks you do not want to play.
Creating the track program
To create the track program,
Press CD·C ? to switch to the CD functions menu.
Press the softkey marked
This activates the Program menu. If you have not yet selected any tracks, it will
not be possible to select the menu items
marked with a lock symbol.
Use <</>> on the rocker switch 2 to select the track you want played
first.
The tracks can be programmed in ascending order only, i.e. 1, 4, 7, etc., but not
3, 1, 4 etc.
Press the softkey marked
Select the next track in the program and
Press the softkey marked
Repeat these steps to program all of the tracks you want to include. This programming will not be deleted when you remove the CD from the system. When
you insert the CD again at a later date, you will be able to use the track sequence you have programmed.
Deleting tracks from the track program
To delete tracks from the track program,
Activate the program menu,
Use <</>> on the rocker switch 2 to select the track you want to delete,
and
Press the softkey marked
PROGRAM
ADD
.
ADD
.
SKIP
.
.
CLR PRG
and
RUN
. They will be
DANSKSVENSKA ENGLISH
CD functions menu
CD program menu
199
Page 32

CD operation
Starting/stopping the track program
Once you have programmed all of the tracks you want to have played,
Press the softkey marked
The main CD menu will appear in the display. All of the tracks included in the
track program will be marked.
To stop the track program in progress without deleting it,
Press the softkey marked
Deleting individual track programs
To delete the track program, because, for example, you want to program a new
one,
Start the track program you want to delete and
Press the softkey marked
Deleting all of the track programs from the memory
If you want to delete all of the track programs from the memory,
Press the softkey marked
An inquiry in the display will prompt you to confirm this selection. If you really
want to delete all of the track programs,
Use the right-hand rotary/pushbutton ; to select
Press the right-hand rotary/pushbutton ;.
RUN
.
TPM
will appear in the status line.
RUN
again.
CLR PRG
CLR ALL
.
.
YES
.
200
CD program menu
Page 33

Navigation
RNS 3 navigation enables you to find destinations quickly and easily without having to study a lot of road maps. When the navigation function is active, the voice
output from the RNS 3 will guide you along the best route. The system will warn
you well in advance of the place at which you have to make turns. In addition, you
can also look at the display to see the driving recommendations in symbol form as
well as the remaining distance and travelling time to your destination.
Road safety is always of paramount importance. The rules of the
road always have priority over any driving recommendations given
by the navigation system.
How navigation works
The current position of your vehicle is determined by the electronic speedometer signal, the gyroscope and a signal transmitted by GPS satellites (Global
Positioning System). The navigation system compares the data with the map
information stored on the navigation CD and uses this information as a basis on
which to calculate the routes for route guidance.
Starting navigation
After the system has been switched on, press NAV <. The main navigation
menu will appear. Before route guidance can be started, it is necessary to insert
a navigation CD-ROM and enter a destination.
Destination entry
The destination can be entered from the destination memory or by entering a city/
town, a town centre, a street, an intersection and a house number as well as by
entering a number of special destinations (e.g. motorway access, train station,
etc.).
Use the right-hand rotary/pushbutton ; to select
Press the right-hand rotary/pushbutton ; to confirm your selection.
DEST. ENTRY
.
Main navigation menu
201
DANSKSVENSKA ENGLISH
Page 34

Navigation
Destinations
The destinations available include:
• the town centre or a special part of the city in large cities,
• a street,
• an intersection of two or more streets
• a house or a block of houses,
• special destinations such as train stations, airports, restaurants and public institutions. You can activate the special destinations sorted according to the destinations in your final destination town, in the surrounding
area of your destination, on a national basis and in the area surrounding
the current location of the vehicle.
• location marks you have set. This function is useful when you notice an
interesting place during your trip (e.g. a shop or restaurant) and would
like to use route guidance to return there later.
Destination entry with the edit menu
The edit menu is used to enter such information as city and street name in the
navigation system.
The edit menu is divided into five parts:
1 the character set including all letters, blank and special characters and
numbers,
2 the operating symbols,
3 the editing field,
4 the edit list and
5 the zoom which magnifies each character marked.
3
4
1
Edit menu for destination entry
202
5
2
Page 35

Navigation
Selecting letters
If you want to enter a name in the edit menu, proceed as follows:
Use the right-hand rotary pushbutton ; to move the cursor to the character you want to select,
As you move the cursor, the character which it marks will be magnified in the
zoom window.
When you have marked the desired character, press the right-hand rotary/pushbutton ;.
The character will appear in the editing field.
When the first character has been entered, the edit list will appear displaying the
entries which begin with that character. When you enter an H as the first letter
for your destination, for example, the edit list will move down to the names of
places which begin with H (Haader). This allows you to find your destination in
the edit list quickly.
Deleting letters
To delete a letter which you have entered by mistake,
Mark the symbol and press the right-hand rotary/pushbutton ; or
DEL 6.
Once the name of the place you want to enter as your destination appears on
the edit list,
mark the symbol and
press the right-hand rotary/pushbutton ; or
press the right-hand rotary/pushbutton ; for longer than 2 seconds.
The cursor will move to the list (e.g. of destinations). The desired entry will be
marked.
Edit menu for destination entry
DANSKSVENSKA ENGLISH
203
Page 36

Navigation
Selecting entries from lists
Press the right-hand rotary/pushbutton ; to select the entry.
Paging in lists
Because the number of lines in the display is limited to five, lists which have
more than five entries require more than one “page”. Lists with more than five
entries are marked with arrows on the right-hand side. There are two ways to
access the other pages of a list:
For lists with less than ten entries
Press the right-hand rotary/pushbutton ; to move the selection bar to
the second-last entry.
Each time you turn the right-hand rotary/pushbutton, the contents of the list will
move up by one line. The selection bar will remain on the second-last entry and
cannot be moved to the last entry until you have reached the end of the list.
Scrolling through lists page-by-page
To find the entry you are looking for in long lists more quickly, you can also scroll
through the list page-by-page.
Use the right-hand rotary/pushbutton ; to move the selection bar to the
arrow symbol
Press the right-hand rotary/pushbutton ;.
The next or previous page of the list will appear in the display. The selection bar
will remain positioned on the arrow symbol.
Press the right-hand rotary/pushbutton ; repeatedly until you reach the
page you are looking for.
or .
204
List (Route list for navigation) with more than ten
entries
Page 37

Navigation
Destination entry - Town
If you want to drive to a destination in another town, you must first enter the
town.
Select
DEST. ENTRY
The destination entry menu will appear.
Select
TOWN
The editing menu for entering the town name will appear.
Use the right-hand rotary/pushbutton ; to move the cursor to the character you want to select.
When the desired character is marked, press the right-hand rotary/pushbutton ;.
The character will appear in the editing field. The first place name on the list of
towns and cities which begins with the letter selected will appear in the editing
list.
When the name of the town you want to select appears in the editing list,
Mark the symbol and press the right-hand rotary/pushbutton ;, or
Press down the right-hand rotary/pushbutton ; for longer than two sec-
onds.
The display will switch to the list of the place names. The name you want to
select will be marked.
Press the right-hand rotary/pushbutton ; to select this place as your
destination.
If the name of the town or city is listed more than once, a submenu will appear.
You can select the town/city you want from this list.
in the main navigation menu.
Destination entry menu
DANSKSVENSKA ENGLISH
205
Page 38

Navigation
206
Once you have selected the place, you will be prompted to continue with
TINATION ENTRY
STREET
street as your destination depends on the size of the city/town selected
and the data stored on your navigation CD.
TOWN CENTRE
destination
-
DEST. SURROUND
list from such categories as motorway access, train station, shopping
centre, etc. in the area surrounding your destination. For more information, refer to the section on Special destinations, Destination surroundings.
This will not be possible unless the corresponding data is available. If there is no
data available on individual menu items, these will be marked with a lock symbol
and it will not be possible to select them.
If you do not want to select this place as your destination,
Press ESC 9.
You will return to the edit menu.
. Now select from among
, entry of the destination street. Whether or not you can enter a
, selection of the centre of a city or city district as your
, you can select special destinations directly from a
DES-
Destination entry - Street, intersection and house number
If you want to drive to a different street in the town you entered as your destination last, you can also select
To make it easier to find your street, a long street name may be listed more than
once, e.g.:
RAABE-WEG, WILHELM- and
WILHELM-RAABE-WEG.
Enter the street name in the edit menu,
Select the street name you are looking for from the list.
STREET
from the destination entry menu.
Destination entry menu
Destination entry menu
Page 39

Navigation
If the street name is listed more than once for the destination town, a submenu
will appear so that you can select the correct street.
After you have selected the street, you will access the destination entry menu.
Select one of the following options:
-
CONTINUE
navigation menu will appear and you can start route guidance to the street
selected. For more information, refer to the section on Route guidance.
INTERSECTION
an intersecting street for the street selected.
-
HOUSE NUMBER
number.
This will not be possible unless the corresponding data is available on your
navigation CD. If there is no data available for the menu items
and
HOUSE NUMBER
possible to select them.
If you do not want to select this street as your destination,
Press ESC 9.
You will return to the edit menu.
Destination entry - House number
If you select the menu item
numbers will appear.
Select the block of numbers containing the house number.
The main navigation menu will appear. Now you can start route guidance. To
adapt the route to your preferences, e.g. no motorways, you can select route
options before route guidance begins. For more information, refer to the sections on Route options and Route guidance in this chapter.
, you have completed entering your destination. The main
, to make your destination more exact, you can also select
, in large cities it is also possible to enter a house
INTERSECTION
, these will be marked with a lock symbol and it will not be
HOUSE NUMBER
, a list of the available house
Destination entry menu
Destination entry house number
DANSKSVENSKA ENGLISH
207
Page 40

Navigation
Destination entry - Intersection
If you select
ble intersection streets for the destination street will appear. If there are more
than twenty intersections, an editing menu will appear so that you can find the
intersection you are looking for more easily.
The main navigation menu will appear. Now you can select route options in the
DSC menu, if desired, and start route guidance to the selected intersection. For
more information, refer to the sections on Route options and Route guidance.
Destination entry - Town centre
If you select
TOWN CENTRE
centres will appear.
If there are more than 20 town centres available in the destination town, an edit
menu will appear to allow you to select the town centre you are looking for.
INTERSECTION
Enter the name of the intersection street into the edit menu and switch to
the list.
Select the desired intersection street from the list.
TOWN CENTRE
from the destination entry menu, a list of the available town
Select the town centre you are looking for from the list.
Enter the name of the town centre,
Activate the list and
Select the town centre from the list.
in the destination entry menu, a list of the availa-
after you have entered the town or if you select
208
List of street intersections
Destination entry menu
Page 41

Navigation
Special destinations in the destination town, surrounding
the destination, surrounding your current position and supraregional destinations
Special destinations which you can enter as destinations are divided into categories. The categories are stored in alphabetical order. Categories for special
destinations include e.g.
- Car parks,
- Hospitals,
- Mechanics,
- Motorway access points,
- Shopping centres,
- Train stations, etc.
Not all categories are available for all special destinations and places. The selection of categories in the special destinations menu depends on what is available in the destination area.
After you select a category, the list will appear if there are fewer than 20 entries
and the edit menu if there are more than 20 entries.
You can access special destinations for four different areas:
-
AT DESTINATION
destination.
-
SUPRAREG. DEST
gories are available for the entire country and include such destinations
as motorway access points, motorway service points, airports and border crossings.
DEST. SURROUND
lar destination town. This will also include special destinations in the surrounding area, e.g. a stadium outside a city.
, special destinations will be displayed for your current
are not connected with any particular place. Cate-
, here you can find special destinations for a particu-
Special destinations menu
209
DANSKSVENSKA ENGLISH
Page 42

Navigation
-
POS. SURROUND.
current vehicle position (this function is particularly useful if you are looking for such special destinations as petrol stations, for example).
Special destinations - In the destination town
To be able to select special destinations at your destination town, you must first
enter at least a town or town centre as your destination.
Enter a town or town centre as your destination.
After you have entered the town centre, select
dress entry menu.
You will access the main navigation menu.
Switch to the destination entry menu.
Select
SPECIAL DESTS
Select the menu item
A list indicating all of the special destination categories for the destination selected will appear.
Select the desired category.
If there are fewer than 20 entries available in the category selected, a list will
appear. The special destinations available will appear in alphabetical order, indicating the distance to the destination selected.
If there are more than 20 entries available in the category selected, you will first
see an edit menu.
Enter the name of the special destination,
Switch to the list and
Select the destination you are looking for from the list.
Once you have selected and confirmed the desired destination, the main navigation menu will appear. You can start route guidance. For more information,
refer to the section on Route guidance.
, are special destinations in the area surrounding your
in the destination entry menu.
AT DESTINATION
.
CONTINUE
in the ad-
210
Destination entry menu
Special destinations menu
Page 43

Navigation
Special destinations - Supraregional destinations
As special destinations, you can also select motorway access points or service
points, airports or border crossings. Here you are not required to enter a destination
first. All you have to know is the name of the special destination you are looking for.
Switch to the destination entry menu.
Select
SPECIAL DESTS
Select the menu item
A list of national destinations will appear. The national destinations available will
depend on the data stored on your navigation CD.
Select the desired category.
The edit menu will appear.
Enter the name of the special destination,
Switch to the list and
Select the destination you are looking for.
Once you have selected and confirmed the special destination you are looking
for, the main navigation menu will appear. You can now start route guidance.
For more information, refer to the section on Route guidance.
Special destinations - Surrounding the destination
To select special destinations in the area surrounding your destination, you must
first enter a street as your destination.
Enter a town and a street as your destination.
After you have entered the street, select
menu.
You will access the main navigation menu.
Switch to the destination entry menu.
Select
SPECIAL DESTS
Select the menu item
in the destination entry menu.
SUPRAREG. DEST
.
CONTINUE
in the destination entry menu.
DEST. SURROUND
.
in the address entry
DANSKSVENSKA ENGLISH
Special destinations menu
Special destinations menu
211
Page 44

Navigation
A list displaying all of the available special destination categories will appear.
Select the category you are looking for.
If there are fewer than 20 entries available in the category selected, a list will
appear. The special destinations available will appear in alphabetical order, indicating the distance to the destination selected.
If there are more than 20 entries available in the category selected, you will first
see an edit menu.
Enter the name of the special destination,
Switch to the list and
Select the destination you are looking for from the list.
Once you have selected and confirmed the desired destination, the main navigation menu will appear. You can start route guidance. For more information,
refer to the section on Route guidance.
Special destinations - Surrounding the current position
You can select special destinations in the area surrounding your current vehicle
position from categories.
Switch to the destination entry menu.
Select
SPECIAL DESTS
Select the menu item
A list displaying all of the special destinations categories currently available in
the area surrounding your vehicle position will appear.
Select the category you are looking for.
If there are fewer than 20 entries available in the category selected, a list will
appear. The special destinations available will appear in alphabetical order, indicating the distance to the destination selected.
in the destination entry menu.
POS. SURROUND
.
212
Special destinations menu
Page 45

Navigation
If there are more than 20 entries available in the category selected, you will first
see an edit menu.
Enter the name of the special destination,
Switch to the list and
Select the destination you are looking for from the list.
Once you have selected and confirmed the desired destination, the main navigation menu will appear. You can start route guidance. For more information,
refer to the section on Route guidance.
Destination entry - From the destination memory
You can store destinations that you drive to frequently in the destination memory and recall them at a later date for route guidance. For information on how to
store and edit destinations in the destination memory, refer to the chapter entitled Destination memory.
There are three different destination memories to choose from:
LAST 10
The destinations are stored automatically in the LAST 10 memory when
the option LAST 10 has been activated in the DSC menu for navigation.
For more information, refer to the chapter entitled Destination memory.
-
ALPH. SORTING
alphabetical order.
-
MANUAL SORTING
in the order you select.
To recall destinations from the destination memory,
Switch to the destination entry menu.
Select the menu item
Select the memory containing the destination you want to recall.
, stores the last ten destinations driven to using route guidance.
, the destinations stored in the memory are displayed in
, the destinations stored in the memory are displayed
DEST. MEMORY
.
Destination memory menu
213
DANSKSVENSKA ENGLISH
Page 46

Navigation
A list displaying the destinations available will appear.
Select the destination you are looking for.
The main navigation menu will appear. Now you can start route guidance. For
more information, refer to the section on “Route guidance”.
Destination entry - For a position mark
You can also enter the destination in the form of a position mark you have set. A
position mark is the vehicle position you have set as a marker during active
route guidance or locating. To set a position mark, a navigation CD must be
inserted in the system.
Selecting a position mark as your destination
You can enter the last position mark set directly for route guidance.
Switch to the destination entry menu,
Select the menu item
The position mark will be used as your destination for route guidance. The system will switch to the main navigation menu and you can now start route guidance. For more information, refer to the section on “Route guidance”.
POSITION MARK
.
214
Destination entry menu
Page 47

Navigation
Route guidance
Starting route guidance
After you have entered your destination and selected route options, if desired,
you can start route guidance.
Select the menu item
The route guidance menu will appear. The route will be calculated. Depending
on how far you are from your destination, this can take several seconds. After
route calculation is complete, you will hear the first spoken driving recommendation.
The top line of the route guidance menu will display the name of the street you are
currently driving on or the name of the next street into which you must turn off.
If you leave the digitised area,
line.
The visual driving recommendations appear in the symbol field in the left-hand
part of the display. You can switch between 2D and 3D to display the driving
recommendations. To switch back and forth between the display modes,
Press the right-hand rotary/pushbutton ; until the display changes.
In the centre you will see a bar graph which indicates the distance to the next
change in direction.
On the right-hand side of the display, you can choose between a display of the
remaining driving time to your destination or the estimated time of arrival. For
more information, refer to the section on “Selecting time info”. During route calculation,
The remaining distance to your destination appears below the time display.
The status line includes symbols indicating the status of TA, the traffic announce-
ment function, and the number of satellites the system is currently able to receive. For more information on the TA function, read the section on “Traffic
announcements during route guidance”.
CALC
or
RECALC
ROUTE GUIDANCE
OFF ROAD
will appear in the time display.
in the main navigation menu.
or
OFF MAP
will appear in the top
Route guidance menu
Route guidance menu, 3D display
215
DANSKSVENSKA ENGLISH
Page 48

Navigation
The right-hand, bottom line in the display area indicates the active audio source.
If you are listening to the radio, the station name or the frequency of the station
selected (for more information, refer to “Radio operation with RDS”) will appear
in this part of the display. If the CD changer (optional) is active, the number of
the CD currently playing and the track number or the track number and the
elapsed playing time of the track will appear here. To find out how to switch
between the time displays for CD changer operation, read the section on “Selecting time info” in the chapter entitled “CD changer operation”. During a telephone call, the audio source will mute and the display will read
Note: While the route guidance menu is active, the six softkeys have
the same functions as in the main menu of the audio source which
is active in the background. This means that you can activate the
most important main functions of the active audio source at any
time without leaving the route guidance menu.
Switching the audio source
You can switch your audio source at any time during route guidance.
Press TU A or CD·C ? while route guidance is active.
The main menu for radio or CD changer operation will appear. It is not possible
to activate the CD changer operation menu unless a CD changer is connected
and ready to operate. It is not possible to activate CD operation for the integrated CD player during route guidance.
Select a different radio station or a different CD track, for example.
When you want to return to the route guidance menu,
Press NAV <.
PHONE
.
216
Route guidance menu, 3D display
Page 49

Navigation
Cancelling route guidance
To cancel active route guidance,
Press ESC 9 or start new route guidance or activate the locating mode.
When you press ESC 9, you will be prompted to confirm your selection.
If you really want to cancel route guidance,
Select
YES
and
Press the right-hand rotary/pushbutton ;.
If you switch the system off during active route guidance, the data for route
guidance will remain stored for another 30 minutes. During this time you can
continue your trip with route guidance. After 30 minutes have passed, you must
start route guidance again.
NO MAP route guidance
NO MAP route guidance will be in effect if the navigation CD is removed after
the destination has been entered and route guidance has been started. During
NO MAP route guidance, you can use the integrated CD player to play audio
CDs (possible with navigation CDs starting with 1/99 only). When NO MAP route
guidance is active,
distance to your destination as the crow flies will appear in the symbol field on
the left. In addition, the display will also indicate the direction to the destination.
Note: For technical reasons it may take several minutes for route guidance to resume properly with spoken driving recommendations and
the pictograms after the CD-ROM has been re-inserted into the CD drive.
This time is required for the system to clearly identify the current vehicle position. During this time, “OFF ROAD” may appear in the display.
In densely built-up areas with a closely woven network of roadways,
the locating function may not always be accurate until the system is
able to orient itself clearly. If possible, place the CD-ROM back into the
system on the motorway to speed up the locating process.
NO MAP
will appear in the top line of the display and the
Cancelling route guidance
217
DANSKSVENSKA ENGLISH
Page 50

Navigation
Travel guide
If you use a navigation CD with a travel guide, you can access travel information
on the destinations and select destinations for route guidance. As a rule, the
information is divided into categories.
These categories can include:
- Accommodation
- Food and Drink
- Tourist information
- Entertainment
- Histor. buildings
Other information might include addresses and telephone numbers as well as
price lists and descriptions of the facilities provided by hotels and restaurants.
As this information depends on the data stored in the travel guide on your CD, it
is not possible to provide an exact description here.
Select the menu item
If there is only one travel guide on the CD, the name of the travel guide will
appear directly in the main navigation menu, e.g.
If there is more than one travel guide on the CD, a selection menu listing the
travel guides will appear first.
Select a travel guide.
You might be required to enter the name of the town or city for which you
want the information in an edit menu for selecting the town.
Select the category for the information you require.
TRAVEL GUIDE
in the main navigation menu.
MERIAN scout
.
218
Main navigation menu
Page 51

Navigation
Displaying the route list
It is possible to have the route list calculated by the navigation system displayed.
Press NAV < to switch from the route guidance menu to the main navigation menu.
Select the menu item
The route list which has been calculated will appear. When you have finished
with the list,
Press ESC 9 to quit the menu.
ROUTE LIST
from the main navigation menu.
Locating mode
In the locating mode, the name of the street you are currently travelling on will
appear in the top line of the menu.
The symbol field shows a compass symbol indicating due north. Since the locating mode is not route guidance, the distance to the destination is not indicated.
If GPS time is available, the current system time will appear in the right-hand
part of the display.
DANSKSVENSKA ENGLISH
Route list
219
Page 52

Navigation
Destination memory
You can use the destination memory to store destinations and identify them with
short names. You can view the contents of the destination memory sorted either
alphabetically or according to the criteria you have chosen.
Storing a destination in the destination memory
You can store the currently active destination, or after route guidance has ended, the destination last entered for route guidance in the destination memory.
Select
DEST. MEMORY
Select the menu item
An edit menu which allows you to enter a short name will appear.
Enter a short name for the destination and confirm it.
If you do not want to give the destination a short name,
Select the symbol immediately and press the right-hand rotary/pushbutton ;, or
Press the right-hand rotary/pushbutton ; for longer than two seconds.
The destination will be stored with its complete name. You can change the name
for the destination at any time.
Entering and altering short names
To change the short name for a destination in the destination memory or to give
a destination a short name,
Select the menu item
An alphabetical list containing all of the destinations stored in the destination
memory will appear.
Select the destination whose name you want to change.
from the main navigation menu.
STORE DEST.
CHANGE NAME
in the destination memory menu.
in the destination memory menu.
220
Destination memory menu
Destination memory menu
Page 53

Navigation
An edit menu will appear.
Enter a short name for the destination,
Select the symbol and press the right-hand rotary/pushbutton ;, or
Press the right-hand rotary/pushbutton ; for longer than two seconds.
Sorting destinations manually
You can also sort the destinations in the destination memory manually. Then it
is possible to activate this manually sorted list to enter a destination for navigation from the destination memory.
To sort the destinations,
Select
SORT DEST.
Move the selection bar to the entry you want to move and
Press the right-hand rotary/pushbutton ;.
A marker will appear in front of the entry.
Move the destination to its new position on the list and
Press the right-hand rotary/pushbutton ;.
Repeat this process until all of the entries are positioned as you want
them.
Deleting destinations from the destination memory
It is possible to delete the memory containing the last 10 destinations, individual
destinations and all of the destinations in the destination memory. This will not
function unless a navigation CD is inserted in the system.
Select
CLEAR DEST.
A menu containing the following selections will appear:
-
LAST 10
Not possible unless the LAST 10 memory has been activated.
-
SINGLE DEST.
the list of stored destinations.
, the memory containing the last 10 destinations will be deleted.
from the destination memory menu.
from the destination memory menu.
, you can select and delete individual destinations from
Destination memory menu
Destination memory menu
221
DANSKSVENSKA ENGLISH
Page 54

Navigation
-
ALL DESTS.
After you have selected the option you want, you will be prompted to confirm
your selection. Confirm it or return to the previous menu.
Displaying GPS status and your position
To display the number of GPS satellites which the system is currently able to
receive and the geographical location,
Open the main navigation menu.
Use the right-hand rotary/pushbutton ; to select the menu item
STATUS
Press the right-hand rotary/pushbutton ;.
, all of the destinations in the list will be deleted.
GPS
and
222
Page 55

Navigation
Bypassing traffic congestion during route guidance
The TravelPilot allows you to avoid traffic congestion or closed portions of the
road during active route guidance. To detour traffic congestion, proceed as follows:
Entering a detour of traffic congestion
Press :.
Use the right-hand rotary/pushbutton ; to move the selection bar to the
menu item
Press the right-hand rotary/pushbutton ;.
Use the right-hand rotary/pushbutton ; to enter how far from your cur-
rent location the detour should begin.
Press the right-hand rotary/pushbutton ;.
Use the right-hand rotary/pushbutton ; to move the selection bar to the
menu item
Press the right-hand rotary/pushbutton ;.
Use the right-hand rotary/pushbutton ; to enter how far from your cur-
rent location the detour should end.
Select
Press the right-hand rotary/pushbutton ;.
The route guidance menu will be activated once again and the route will be recalculated.
Cancelling a detour of traffic congestion
Access the Tailback ahead menu.
Select
Press the right-hand rotary/pushbutton ;.
The route guidance menu will be activated once again and the route list will be
re-calculated.
FROM
TO
.
OK
and
CANCEL
.
and
Tailback ahead menu
223
DANSKSVENSKA ENGLISH
Page 56

Navigation
Selecting route options
You can adapt the route to your specific needs at any time, even during active
route guidance. The parameters which can be adjusted include:
ROUTE
-
-
MOTORWAY
use motorways.
-
FERRIES
avoid ferries.
-
TOLL
roads.
If you choose
much longer route, the TravelPilot will include the motorway in the route. The
same applies to ferries and toll roads.
To select the route options,
Activate the menu item
The selection menu for the route options will appear.
Select the menu item you wish to alter and
Press the right-hand rotary/pushbutton ;.
When you want to quit the selection menu,
Press ESC 9 (You will return to the DSC menu in navigation), or
Select the menu item
Press the right-hand rotary/pushbutton ;, and the main navigation menu
will appear.
, choose between the quickest and the shortest route.
, here you can determine whether or not route guidance will
, you can determine whether route guidance should allow or
, here you can decide whether or not you want to drive along toll
AVOID MOTORWAY
, but not using a motorway would lead to a
ROUTE OPTIONS
CONTINUE
and
in the DSC menu.
224
Route options menu
Note: If you alter the route options during active route guidance, the
route will be re-calculated. The route options selected will remain
active until you change them.
Page 57

Navigation
Setting a position mark
You can store your current vehicle position at any time, even during active route
guidance.
To store your current vehicle position,
Mark the menu item
Press the right-hand rotary/pushbutton ;.
Storing the position mark
After you have pressed the right-hand rotary/pushbutton ;, a selection menu
will appear. Here you can choose whether you want to enter a name for the
position mark or return to the menu in which you set the position mark.
If you select the option
be stored automatically in the destination memory.
Select the menu item
An edit menu which allows you to enter the short name will appear.
Enter a short name,
Select the symbol and press the right-hand rotary/pushbutton ;, or
Press the right-hand rotary/pushbutton ; for longer than two seconds.
The position mark will be stored in the destination memory under the short name
entered.
If you select
set and the position mark will not be stored.
BACK
, you will return to the menu in which the position mark was
POSITION MARK
SHORT N.
and enter a name for the position mark, it will
SHORT N.
in the DSC menu.
DSC menu for navigation
Edit menu
DANSKSVENSKA ENGLISH
225
Page 58

Navigation
Traffic announcements during route guidance
During route guidance, you can switch traffic information standby on or off, regardless of which audio source is active: radio or CD changer (optional).
Press TA 4,
The TA function will be activated or deactivated.
Activating/deactivating voice output
You can activate route guidance for navigation with or without voice output. The
voice output provides you with information on how far you must travel until it is
time to make a change in your direction and gives spoken driving recommendations.
Access the DSC menu for navigation and
Select the menu item
Press the right-hand rotary/pushbutton ; until the desired option
OFF
is marked. The default setting is ON.
Activating/deactivating the memory of the last 10 destinations (LAST 10)
If the LAST 10 memory is active, all of the destinations used in route guidance
will be stored automatically in the memory. You can also deactivate the LAST
10 memory.
Select the menu item
Press the right-hand rotary/pushbutton ; until the desired setting
OFF
is marked. The default setting is ON.
VOICE
.
LAST 10
in the DSC menu for navigation.
ON
ON
or
or
226
DSC menu for navigation
Page 59

Navigation
Selecting time info
To switch between the display for remaining driving time to your destination and
the arrival time,
Press DSC 8 to access the DSC menu and
Mark the menu item
The option selected will appear in symbol form behind
symbol stands for the display of the remaining driving time and the finish-line
flag for the time of arrival.
To alter the time display,
Press the right-hand rotary/pushbutton ;.
Setting the position mark manually
If there is no GPS reception, you can also enter your location manually.
Press DSC 8 to access the DSC menu and
Mark the menu item
Press the right-hand rotary/pushbutton ;.
Now you can enter your location in the following order: town/city, street, intersection.
TIME INFO
POSITION MAN.
.
TIME INFO
.
. The car
DANSKSVENSKA ENGLISH
227
Page 60

Navigation
Simulating route guidance
The TravelPilot also allows you to simulate route guidance. The system demonstrates route guidance with visual driving recommendations and voice output in
real time.
If you want to start a navigation simulation,
Switch to the DSC menu for navigation, and
Select the menu item
Switch to the DSC menu for navigation again, and
Select the menu item
Now enter a location in the following sequence: city, street, intersection,
Then enter a destination and
Start route guidance.
The navigation system will be activated.
The route guidance menu will appear.
the display below the visual driving instructions.
The demonstration mode will end automatically after route guidance has ended.
NAVI SIMULATION
POSITION MAN.
DEMO
,
will appear in the left-hand part of
.
228
DSC menu for navigation
Page 61

CD changer operation
You can operate the following Blaupunkt CD changers with the TravelPilot:
- CDC - A08
- IDC - A09
For information on how to install the CD changer in your vehicle and connect it
to the TravelPilot, refer to the installation and connection instructions enclosed
with the CD changer.
Inserting CDs into the CD changer
For information on how to fill the magazine with CDs and insert the magazine
into the changer, refer to the instructions enclosed with the CD changer.
Starting CD changer operation
To start CD changer operation,
Press CD·C ?.
If the CD source used last was the integrated CD player and there is still an
audio CD in the drive, it will begin to play. Otherwise, the CD played last or the
first available CD in the CD changer will begin to play.
If there is an audio CD inserted in the integrated CD player,
Press CD·C ? to switch to the functions menu and
Press the softkey marked
The main CD changer menu will appear. The track number and the playing time
will appear in the top line of the display. It is possible to deactivate the playing
time indicator. For more information, read the section on Switching the playing
time indicator on/off.
The numbers or names of the first five CDs in the changer will appear in the
functional display area in the centre of the display.
In addition, there is a menu field
second page of the main menu.
CDC
.
CD6-CD10
which you can use to access the
DANSKSVENSKA ENGLISH
CD functions menu
Main CD changer menu
229
Page 62

CD changer operation
Note: Because the IDC - A09 can accommodate only five CDs, the
main menu will have no second page if an IDC - A09 has been connected.
Along the bottom line, the status line, you will see from left to right
- the number of GPS satellites received,
- symbols for the operating modes SCAN, MIX, REPEAT
- a symbol for the currently active audio source,
- the status of the TA function and
- a symbol, which indicates whether a navigation or an audio-CD is inserted in
the drive.
Switching between the main menu and the functions menu
To switch between the main menu and the functions menu for CD changer operation,
Press CD·C ? again.
The function menu will appear.
Activating the DSC menu
If you want to activate the DSC menu for CD changer operation,
Press DSC 8.
230
CD changer functions menu
CD changer DSC menu
Page 63

CD changer operation
Selecting CDs
To select a CD,
Press the softkey allocated to the CD.
If the CD you want to play is not displayed in the functional area of the display,
switch to the second page of the main menu.
Press the softkey marked
This will access the other page of the menu.
CD6-CD10
or
CD1-CD5
.
Selecting tracks
To select the next track,
Press >> on the rocker switch 2.
When you have reached the last track, pressing >> on the rocker switch 2 will
select the first track on the CD.
Restarting tracks
To restart the track currently playing or to select a previous track,
Press << on the rocker switch 2.
If the first track on the CD is playing, pressing << will select the last track.
Fast forward/reverse
If you want to play a particular passage on the track, you can use fast forward/
reverse to find it.
During playback press << or >> on the rocker switch 2.
The track will fast reverse or fast forward audibly.
DANSKSVENSKA ENGLISH
Main CD changer menu
231
Page 64

CD changer operation
Random play (MIX)
You can have the tracks on a CD or on all of the CDs in the changer played in
random order.
Press CD·C ? to switch to the functions menu for CD changer operation
and
Press the softkey marked
The first, randomly selected track will begin to play. The status line in the main
menu will display
Selecting random play MIX for one CD or all of the CDs in the magazine
For the MIX function you can determine whether only the tracks on the current
CD or whether the tracks on all of the CDs in the changer are to be played in
random order.
Press DSC 8 to switch to the DSC menu.
Press the softkey marked
MIX
CD
- Only the tracks on the current CD will be played back in random order.
MAG
- The tracks on all of the CDs in the magazine will be played back in
random order.
MIX
.
.
MIX
.
MIX
until the desired option appears behind
232
CD changer functions menu
CD changer DSC menu
Page 65

CD changer operation
Scanning tracks (SCAN)
If you would like to scan all of the tracks on a CD or the tracks on all of the CDs
in the changer, proceed as follows:
Press CD·C ? to switch to the functions menu and
Press the softkey marked
Starting with the track currently playing, all of the tracks will be played for 10
seconds.
Scanning the tracks on one CD
If you want to use the SCAN function for the tracks of the current CD only, then
CD
must appear next to the menu item
Scanning the tracks on all of the CDs
To scan the tracks of all of the CDs in the changer, then
SCAN
to
in the DSC menu.
SCAN
.
SCAN
in the DSC menu.
MAG
must appear next
CD changer functions menu
CD changer DSC menu
DANSKSVENSKA ENGLISH
233
Page 66

CD changer operation
Repeating tracks or CDs (REPEAT)
To repeat a track or a CD, activate the Repeat function.
Starting the Repeat function
Proceed as follows:
Select the track or CD you want to repeat,
Press CD·C ? to switch to the functions menu and
Press the softkey marked
The track or the CD will be repeated until you end the Repeat function.
appear in the status line of the main CD menu.
Ending the Repeat function
If you want to end the Repeat function,
Press ESC 9.
Activating the Repeat function for one track
If you want to repeat the current track only, you have to set the Repeat function
to
TRCK
before you select it.
Press DSC 8 to access the DSC menu and
Press the softkey marked
Switching on the Repeat function for a CD
To repeat an entire CD, you must set the Repeat function to CD.
Press the softkey marked
These settings will remain in effect for all of the repeat functions in CD changer
operation until you change them.
REPEAT
RPT
RPT
.
until
TRCK
in the DSC menu until
appears beside it.
CD
appears.
RPT
will
234
CD changer functions menu
CD changer DSC menu
Page 67

CD changer operation
Track programming
You can also program the tracks you would like to listen to on a CD. This allows
you to omit the tracks you do not want to play.
Creating the track program
To create the track program,
Select the CD for which you want to program tracks,
Press CD·C ? to switch to the function menu.
Press the softkey marked
This activates the Program menu. If you have not yet selected any tracks, it will
not be possible to select the menu items
marked with a lock symbol.
Use <</>> on the rocker switch 2 to select the track you want played
first.
The tracks can be programmed in ascending order only, i.e. 1, 4, 7, etc., but not
3, 1, 4 etc.
Press the softkey marked
Select the next track in the program and
Press the softkey marked
Repeat these steps to program all of the tracks you want to include. This programming will not be deleted when you remove the CD from the system. When
you insert the CD again at a later date, you will be able to use the track sequence you have programmed. In the main menu, a star will appear next to the
CD number or name to indicate that you have programmed tracks on it.
PROGRAM
ADD
.
ADD
.
.
CLR PRG
and
RUN
. They will be
CD changer functions menu
Program menu for CD changer operation
DANSKSVENSKA ENGLISH
235
Page 68

CD changer operation
Deleting tracks from the track program
To delete tracks from the track program,
Use <</>> on the rocker switch 2 to select the track you want to delete,
and
Press the softkey marked
Starting/stopping the track program
Once you have programmed all of the tracks you want to have played,
Press the softkey marked
The main CD menu will appear in the display. All of the tracks included in the
track program will be marked.
To stop the track program in progress without deleting it,
Press the softkey marked
Deleting individual track programs
To delete the track program, because, for example, you want to program a new
one,
Start the track program you want to delete and
Press the softkey marked
Deleting all of the track programs from the memory
If you want to delete all of the track programs from the memory,
Press the softkey marked
An inquiry in the display will prompt you to confirm this selection. If you really
want to delete all of the track programs,
Use the right-hand rotary/pushbutton ; to select
Press the right-hand rotary/pushbutton ;.
SKIP
.
RUN
.
TPM
will appear in the status line.
RUN
again.
CLR PRG
CLR ALL
.
.
YES
.
236
Program menu for CD changer operation
Page 69

CD changer operation
Naming CDs
The TravelPilot also allows you to name your CDs. The name can consist of up
to seven characters. The name you give to the CD will not be deleted when you
remove the CD from the CD changer. When it is inserted again at a later date,
the name will appear in the display.
If you would like to name a CD,
Select the CD you want to name in the main menu,
Press CD·C ? to switch to the CD functions menu,
Press the softkey marked
Press the softkey marked
Entering the name
The Edit menu will now appear.
Use the right-hand rotary/pushbutton ; to move the cursor to the first
letter in the name.
The letter marked will appear magnified on the right of the display in the “Zoom”
window.
Press the right-hand rotary/pushbutton ;.
The letter will appear in the upper name line.
Select the remaining letters in the same way.
Once you have entered the name completely,
Mark the symbol and
Press the right-hand rotary/pushbutton ;, or
Press down the right-hand rotary/pushbutton ; for longer than two sec-
onds.
After the name has been stored, the system will switch to the CD functions
menu. The name will now appear in the functional display area of the main CD
menu.
NAME
to access the CD name menu.
EDIT
.
DANSKSVENSKA ENGLISH
CD changer functions menu
Edit menu
237
Page 70

CD changer operation
Deleting characters
If you want to delete a letter,
Mark the symbol, and
Press the right-hand rotary/pushbutton ; or
Press DEL 6.
Deleting the current name
To delete the name of the current CD,
Switch to the CD Name menu and
Press the softkey marked
The name will be deleted.
Deleting all of the names
If you want to delete all of the CD names stored in the memory, proceed as
follows:
Activate the CD name menu and
Press the softkey marked
An inquiry in the display will prompt you to confirm this selection. If you really
want to delete all of the CD names,
Press the right-hand rotary/pushbutton ; to select
Press the right-hand rotary/pushbutton ;.
If not,
Press ESC 9.
CLR NAME
CLR ALL
.
.
YES
.
238
Edit menu
CD name menu for CD changer operation
Page 71

CD changer operation
Switching the playing time indicator on/off
During playback, either the track number and the playing time elapsed for the
track or the number of the CD and the track number will appear in the top line of
the main menu. If you would like to switch between the playing time indicator
and the display of the CD number,
Press DSC 8 to activate the DSC menu for CD changer operation and
Press the softkey marked
Activating/deactivating traffic announcements (CD changer)
To switch traffic information standby (see Traffic Announcements TA) on or off
during CD changer operation,
Press TA 4.
The TA symbol will either appear in or disappear from the status line in the main
CD menu.
TIME
.
CD changer DSC menu
Main CD changer menu
DANSKSVENSKA ENGLISH
239
Page 72

RC06 remote control unit
With the help of the RC06 steering-wheel remote control, you can operate some
of the basic TravelPilot functions conveniently without even taking your hands
from the steering wheel.
Selecting the audio source
Use the RC06 remote control to switch the active audio source.
Press SRC 1 on the remote control.
The next audio source which is ready to operate will begin to play.
240
Activating navigation
Note: It is not possible to select navigation unless route guidance is active.
To activate navigation with the RC06 remote control,
Press down SRC 1 on the remote control until the system switches to
navigation mode.
Adjusting the volume
To adjust the volume with the remote control,
Press V+ or V- 3.
The volume will increase or decrease.
Mute
You can use the remote control to switch the audio to mute.
Press 4.
Cancelling the mute function
If you want to cancel the mute function,
Press 4 again or
Press V+ or V- 3.
3
4
RC06 remote control unit
1
2
Page 73

RC06 remote control unit
Selecting the waveband or memory bank
To select a different waveband or a different memory bank for radio operation,
Press 2 on the remote control.
The FM1, FM2, FMT memory banks and the AM waveband will switch through
in succession.
Selecting stored stations
Use the remote control unit to recall stored radio stations from the memory.
Press 2 on the remote control.
Starting station seek tuning
If the RDS function is switched on, you can use << >> 2 to select RDS stations
within reception range directly.
If the RDS function is switched off, you can use << >> 2 to start the automatic
station seek tuning up or down the waveband.
1
3
Starting SCAN seek tuning, Radio operation
To start SCAN seek tuning for radio operation,
Hold 2 pressed down on the remote control until SCAN seek tuning
begins.
Starting Travelstore
If you want to start Travelstore,
Hold 2 pressed down on the remote control until the Travelstore function begins.
DANSKSVENSKA ENGLISH
4
RC06 remote control unit
2
241
Page 74

RC06 remote control unit
Selecting tracks, CD-changer operation
To select the next or the previous track,
Press or 2 on the remote control.
Selecting tracks, CD operation
To select the next or the previous track,
Press or 2 on the remote control.
242
Fast forward/reverse, CD-changer operation
To activate fast forward or reverse,
Press >> or << 2 on the remote control.
Fast forward/reverse, CD operation
To activate fast forward or reverse,
Press >> or << 2 on the remote control.
3
4
RC06 remote control unit
1
2
Page 75

Set-up/Basic settings
The Set-up menu gives you the opportunity to adapt the basic system functions
of the TravelPilot to your own personal requirements. In addition, you can also
adjust special functions for the individual audio sources and for navigation in the
DSC menus.
Activating the Set-up menu
If you are currently using a main or function menu,
Press DSC 8 twice.
The system will switch to the Set-up menu.
If the DSC menu for an audio source or navigation is active,
Press DSC 8 once,
or
Press the softkey marked
The system will switch to the Set-up menu. The selection bar will mark the first
entry on the list menu.
To alter settings and activate menu items,
Use the right-hand rotary/pushbutton ; to move the selection bar.
Press the right-hand rotary/pushbutton ;.
If you want to exit a menu without making any changes,
Press ESC 9.
SETUP
.
Tuner DSC menu
Set-up menu
DANSKSVENSKA ENGLISH
243
Page 76

Set-up/Basic settings
Adjusting the day/night display, the viewing angle, contrast
and brightness
In the set-up menu for the display you can deactivate the automatic switch to
night display, adjust the brightness separately for the day and night display and
alter the fader effect for menu switching. You can also adjust the viewing angle
for the display.
Automatic switch to night display
If you want to deactivate the automatic switch to night display,
Activate the Set-up menu,
Select the menu item
Select the menu item
Press the right-hand rotary/pushbutton ;.
The setting will switch to
as described above.
Adjusting the viewing angle
Use the menu item
angle for your purposes. To adjust the angle,
Mark the menu item
Press the right-hand rotary/pushbutton ;.
Use the right-hand rotary/pushbutton ; to adjust the angle and
Press the right-hand rotary/pushbutton ; again.
ANGLE
DISPLAY
DAY/NIGHT
OFF
. To reactivate this setting, simply repeat the steps
to adjust the system display to the best viewing
ANGLE
,
and
,
244
Set-up menu Display
Page 77

Set-up/Basic settings
Altering the display brightness
If you want to alter the display brightness,
Use the right-hand rotary/pushbutton ; to select the desired menu item
and
Repeat the steps as described in the section on “Adjusting the viewing
angle”.
Fade effect in the menus
If you would like to alter the fade effect in the menus,
Use the right-hand rotary/pushbutton ; to select the menu item
CIAL
.
Press the right-hand rotary/pushbutton ; to select from 10 different fade
effects. The default setting is
0
.
Adjusting the power-on and announcement volume and
GALA
In the Set-up menu Volume you can adjust the power-on volume for the system,
the minimum volume for traffic announcements (TA-MIN) , the minimum volume
for voice output (NAV-MIN) and the setting for GALA, the speed-dependent volume adjustment.
If the system volume is louder than the minimum volumes set for traffic announcements and voice output for navigation, this information will be emitted at
the system volume.
The power-on volume is a restrictive value, i.e. if the volume is lower than the
power-on volume when the system is switched off, the volume will remain at this
lower level, when the system is switched back on. If the volume is louder than
the power-on volume when the system is switched off, it will be reduced to the
power-on volume when it is switched back on.
SPE-
Set-up menu Display
DANSKSVENSKA ENGLISH
245
Page 78

Set-up/Basic settings
Note: If the power-on volume is set to the maximum, the volume
may be extremely loud when the system is switched on. This can
result in damage to your hearing.
To adjust the volume in Set-up,
Activate the Set-up menu,
Select the menu item
Use the right-hand rotary/pushbutton ; to select the menu item you
want to adjust and
Press the right-hand rotary/pushbutton ;.
The menu item selected will appear in a frame. Now you can adjust the setting.
Use the right-hand rotary/pushbutton ; to adjust the setting.
To help you select the right setting, the volume will increase and decrease as
you make the setting.
Press the right-hand rotary/pushbutton ;.
If you press ESC 9 to exit the menu, the setting will not change and the menu
will close.
VOLUME SETUP
,
246
Set-up menu
Set-up menu Volume
Page 79

Set-up/Basic settings
Altering the time
Use the Set-up menu Time to activate or deactivate summer time as well as the
time format (12/24 hours) and the time zone with respect to Central European
Time (CET). These settings are required so that the TravelPilot is able to determine the system time from the GPS time it receives.
Selecting the time format
Mark the menu item
Press the right-hand rotary/pushbutton ;.
Selecting the time zone
Select
TIME ZONE
Press the right-hand rotary/pushbutton ;.
Now you can select the value for the time zone. The difference to CET for Germany is +1 hour.
Activating summer time
If you activate/deactivate summer time, the system time will be adjusted automatically. To activate/deactivate summer time,
Select
SUMMER TIME
Press the right-hand rotary/pushbutton ;.
The system time will be adjusted. The current setting:
the display behind
SUMMER TIME
TIME FORMAT
in the Set-up menu Time,
from the Set-up menu Time and
.
in the Set-up menu Time.
ON
or
OFF
will appear in
Set-up menu Time
DANSKSVENSKA ENGLISH
247
Page 80

Set-up/Basic settings
Selecting the language
Use this menu to select the language used for the displays and for route guidance by the navigation system. Nine languages are available. For English you
can select between Metric (distances in kilometres) and Imperial (distance in
miles).
Activate the Set-up menu.
Select the menu item
Press the right-hand rotary/pushbutton ;.
A list indicating the languages available will appear.
Select the language you want and
Press the right-hand rotary/pushbutton ; to confirm your selection.
The system will load the new language. When this process has been completed,
you will hear a corresponding spoken message from the navigation system if a
navigation CD is inserted. The system will switch back to the Set-up menu.
Calibrating the system
The Set-up menu Install will provide you with all of the necessary information to
start up the TravelPilot after it has been installed.
Calibrating the system after its installation (New install)
If you have installed the system yourself, it will be necessary to calibrate the
system and adapt it to the vehicle.
Mark the menu item reading
Press the right-hand rotary/pushbutton ;.
The information on the display will guide you through the installation. Follow
these instructions. The TravelPilot will do a system test first.
LANGUAGE
NEW INSTALL
.
in the Set-up menu Install,
248
Set-up menu
Set-up menu Install
Page 81

Set-up/Basic settings
Follow these instructions given by the system and
Press the right-hand rotary/pushbutton ;.
You can cancel the process at any time. If you want to end the installation,
Use the right-hand rotary/pushbutton ; to select
Press the right-hand rotary/pushbutton ;.
The previous menu item in the installation will appear.
Following the system test the system will perform the actual calibration. To do
so, you must drive a distance of 8 to 15 km with good GPS reception.
First select the option you require,
Press the right-hand rotary/pushbutton ;.
Before the process begins, you will be prompted to confirm the deletion of any
old calibration information.
Note: If you select NEW INSTALL, route guidance is not possible
during the first 25% of the calibration process.
The distance you will be required to drive depends on a number of
different factors such as the quality of GPS reception and the route.
The number of kilometres given is only a guideline. The distance
can be much shorter or much longer if conditions are unfavourable.
TYRE CHANGE
CANCEL
or
NEW INSTALL
and
.
DANSKSVENSKA ENGLISH
249
Page 82

Set-up/Basic settings
Calibrating the system after a tyre change
After a tyre change it might be necessary to calibrate the TravelPilot again.
Select
CALIBRATION
Mark and confirm the menu item
Follow the instructions given to you by the system.
Calibrating the system manually
You can also calibrate the system manually. To do so, you have to drive a distance of at least 100 meters at a maximum speed of 30 km/h. Please note that
the distance must be measured out exactly.
Select
CALIBRATION
Mark and confirm the menu item
Now you will be required to enter the distance you intend to drive.
Select the first digit indicating the distance and
Press the right-hand rotary/pushbutton ;.
Enter the remaining digits in the same way.
Press the symbol and the right-hand rotary/pushbutton ; to confirm
your entry or
Press the right-hand rotary/pushbutton ; for a longer time.
You will be instructed to drive this distance.
Use the right-hand rotary/pushbutton ; to select
Press the right-hand rotary/pushbutton ;.
Follow the instructions given to you by the system.
from the Set-up menu Install.
TYRE CHANGE
from the Set-up menu Install.
MANUALLY
.
.
START
.
250
Page 83

Set-up/Basic settings
Performing a system test
You can also perform a system test. This test will check the GPS antenna and
determine whether the back-up signal and the vehicle ignition are connected to
the system correctly.
Select the menu item
Follow the instructions given to you by the system and
Press the right-hand rotary/pushbutton ;.
After the system test has ended, the Set-up menu Install will appear automatically.
Displaying the GPS status and your position
If you want to display the number of GPS satellites the system can current receive and your GPS position,
Select the menu item
or
Activate the menu item
SYSTEM TEST
GPS STATUS
GPS STATUS
in the Set-up menu Install,
in the Set-up menu Install
in the main navigation menu.
Set-up menu Install
DANSKSVENSKA ENGLISH
251
Page 84

Set-up/Basic settings
Activating/deactivating the system coding
Activating/deactivating the coding
In the Set-up menu Security you can activate the coding for your TravelPilot. If
the coding is active, it will not be possible to start the system after it has been
disconnected from the vehicle battery unless the correct code number is entered (refer to “Switching on coded systems after they have been disconnected
from the vehicle battery”).
Note: Because the TravelPilot has not been equipped with any other theft-protection system, we strongly recommend that you activate the coding.
To activate/deactivate the coding,
Mark the menu item
Press the right-hand rotary/pushbutton ;.
The coding will be activated/deactivated. The current setting will be displayed
behind
CODE
. For security reasons, it will now be necessary to enter the code
to confirm this selection.
Reset to factory settings
You can reset the TravelPilot to its original factory settings. This will affect all of
the settings made for navigation and the audio sources.
Select
RESET
Step 1: If a navigation CD is inserted in the system, you will be asked whether or
not you want to reset the settings for navigation. This will affect the entire destination memory and the route options. If there is no navigation CD in the system,
the next inquiry will appear immediately.
If you want to delete the settings, select
To keep the settings made for navigation, select
CODE
in the Set-up menu Security and
OFF
is the default setting, i.e. the code is not activated.
from the Set-up menu.
YES
.
CANCEL
.
252
Set-up menu Security
Set-up menu
Page 85

Set-up/Basic settings
Step 2: This inquiry refers to deleting the name and track program memory for
CD operation.
To reset the settings select,
Select
CANCEL
Step 3: The last step affects all of the options, all of the Set-up settings and all of
the sound settings for the audio sources.
If you want to delete the settings, select
To keep the settings, select
If you answer at least one inquiry with
the system will switch off and on again. If you have selected
the inquiries, the TravelPilot will return to the Set-up menu.
.
Adjusting seek tuning sensitivity
It is possible to adjust the seek tuning sensitivity for the automatic station search
function. The default setting is
Use the right-hand rotary/pushbutton ; to select
Press the right-hand rotary/pushbutton ; repeatedly until the desired
option is highlighted behind
BEST
-
-
: The automatic search function will stop at radio stations with good
reception quality (e.g. no interference).
SENS
: The automatic search function will also stop at radio stations with
weaker reception signals (with interference).
BEST
YES
, otherwise
CANCEL
YES
.
FMSEEK
YES
.
.
, the system will be reset. To do so,
CANCEL
FMSEEK
.
for all of
.
Set-up menu
DANSKSVENSKA ENGLISH
253
Page 86

Blaupunkt-Werke GmbH
Bosch Gruppe
04/00 Kn K7/VKD 8 622 402 424 S/DK/GB
 Loading...