

Page 1

Mobile Navigation
TravelPilot Lucca 3.3 EE
www.blaupunkt.com
Operating and installation instructions
Detailed version
Page 2
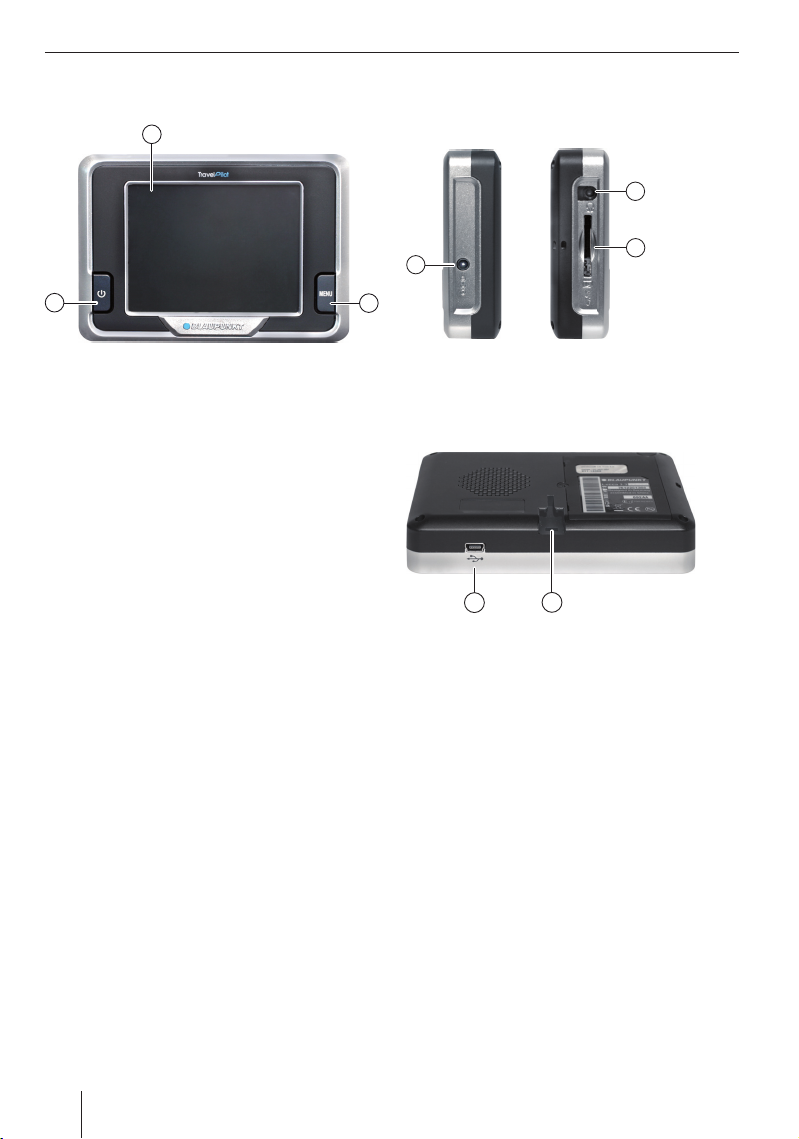
Overview
Overview
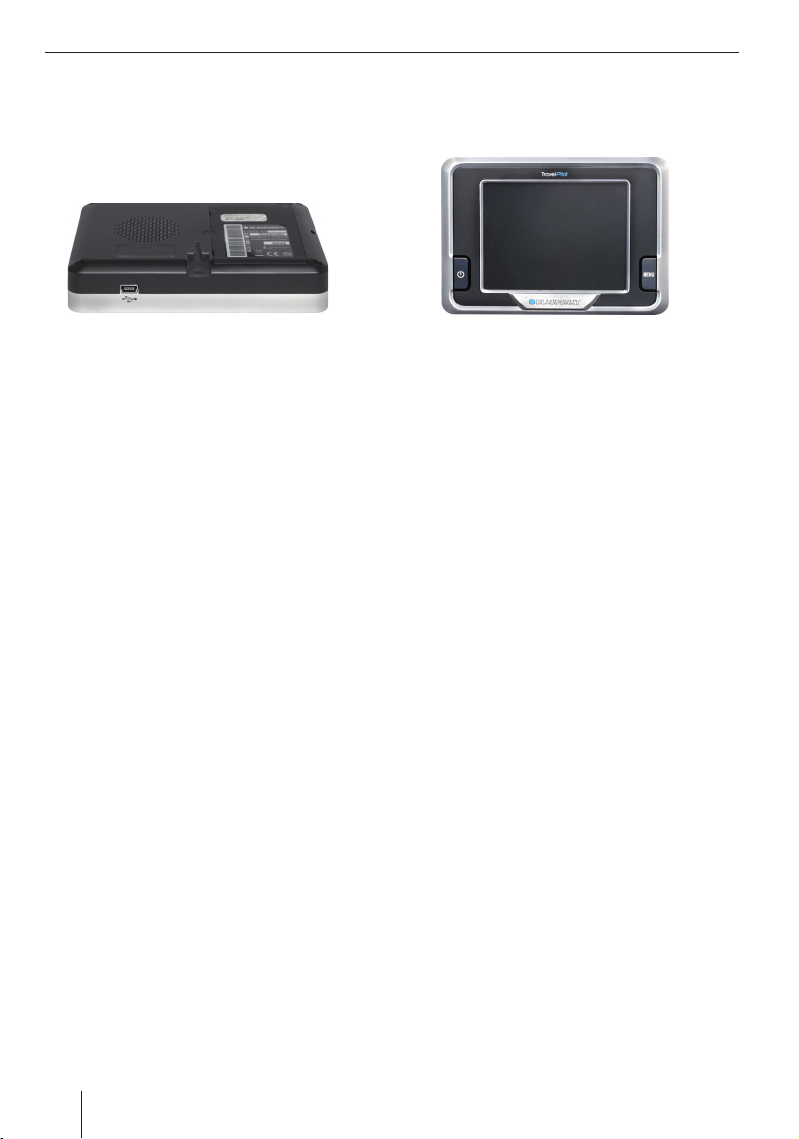
3
1
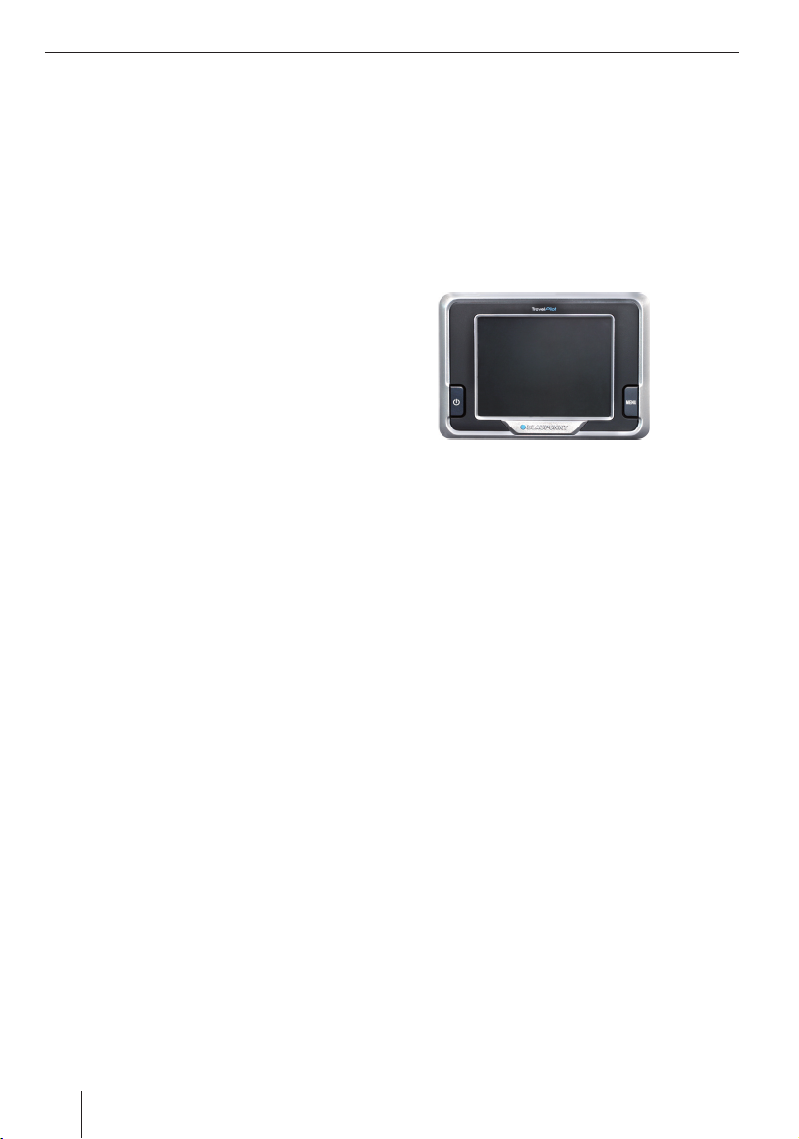
The Lucca features the following buttons
next to its screen:
1 On/Off:
Press for more than 3 seconds to turn
•
the Lucca On or Off
Press briefl y to turn the screen On or Off.
•
(Economy mode)
2 MENU button :
Press for more than 3 seconds to open
•
the main menu.
Press briefl y to open the Quick Settings
•
menu.
2
3 3.5" screen (3.5” LCD touch screen):
Lucca can be operated easily and
intuitively by pressing the buttons
shown on the screen.
5
4
6
4 Power connection
5 Headphone socket
6 SD-/MMC card slot
7
8
The rear of the Lucca features the following
operating elements:
7 USB port
8 Connector for suction cup holder
2
Page 3

Contents
Contents
Overview ........................................... 2
Safety instructions ...........................5
Navigation safety instructions ................... 5
Safety instructions for handling the Lucca 5
Using the CD/DVD .................................... 5
Using the Lucca for the fi rst time ....6
Lucca scope of delivery ............................ 6
Protective touch screen foil ...................... 6
Turning the Lucca on ................................ 6
Selecting your language ............................ 6
Charging the battery .........................7
Installing the Lucca into a car ..........7
Attaching the suction cup holder ........... 7
Removing the suction cup holder .......... 7
Connecting the Lucca to the suction cup
holder .................................................... 8
Removing the Lucca ............................... 8
Turning the Lucca On/Off .................8
Turning the Lucca On/Off ...................... 8
Activating / deactivating sleep mode ..... 8
The MENU button .............................9
Quick Settings ....................................... 9
Additional functions ............................... 9
Using the navigation menus ...........10
Onscreen keyboard ................................. 10
Lists ........................................................ 10
Buttons ................................................... 10
Controller ............................................... 10
Information on GPSs ......................11
View GPS info ......................................... 11
Time synchronisation .............................. 11
Navigation .......................................12
General navigation information .............. 12
Start navigating ...................................... 12
Entering a destination .......................... 12
Home ................................................... 12
Show map ............................................ 12
Route ................................................... 12
Settings................................................ 12
Viewing GPS info ................................. 13
Close menu ......................................... 13
Basic settings ......................................... 13
Selecting your time zone ..................... 13
Entering your home address ................ 13
Entering a destination............................. 14
Selecting a destination
from the History ...................................... 15
Entering coordinates .............................. 15
Selecting a Point Of Interest (POI) ......... 16
Activate/deactivate POIs ...................... 17
Show/hide POIs ................................... 17
Selecting a destination from your
Favourites ............................................... 17
Organise Favourites ............................. 18
Search Favourites ................................ 18
Using your home address as a
destination .............................................. 18
Selecting a destination from the map ..... 18
Moving the map ................................... 18
Minimising/maximising the map .......... 19
Entering Way Points ................................ 19
Editing a route ..................................... 19
Entering a route on the map ................ 19
Deleting a Way Point from the map ..... 20
Administrating destinations ........... 20
Saving a destination (Favourites only) .... 20
Renaming a destination (Favourites only) 20
Deleting a destination (Favourites only) . 21
Deleting the entire destinations list
(History only) .......................................... 21
Pins .................................................21
Placing a pin ........................................... 21
Deleting a pin ......................................... 21
Deleting all pins ...................................... 21
3
Page 4

Contents
Selecting route parameters ............ 22
Route guidance ............................... 23
GPS reception problems ........................ 24
End Route Guidance ............................... 24
Arriving at your destination .................... 24
Starting route planning
without the use of GPS signals ......25
Using the map ................................. 25
Show map ............................................... 25
Operating the map .................................. 25
Moving the map ................................... 25
Minimising/maximising the map .......... 25
Position location .................................. 25
Change the map’s orientation ............. 26
Pressing points on the map ................. 26
Buttons ................................................... 26
Map view during route guidance .... 27
Navigational aids ..................................... 27
Route information ................................... 27
Additional map information .................... 27
Map options (navigational aids) .......... 27
Changing route information ................. 28
Additional navigation functions ..... 29
Adding/Deleting a Way Point .................. 29
Driving a route (Simulation) ................... 29
Itinerary .................................................. 29
Route information ................................... 30
Detours ................................................... 30
Track logs ................................................ 31
Recording routes ................................. 31
Driving a route (Simulation) ................ 31
Route information ................................ 31
Route recording options ...................... 32
Basic settings ..................................33
General settings ..................................... 33
Activating / deactivating night mode ... 33
Activate/deactivate night view ............. 33
Selecting your time zone ..................... 33
Entering your home address ................ 33
Speed limit warning options ................ 33
Map options ............................................ 34
Audio settings ......................................... 34
Route parameters ................................... 34
Languages and units ............................... 35
Advanced Settings .................................. 35
Display options .................................... 35
Brightness ............................................ 35
Smart Zoom ......................................... 36
Route settings ...................................... 36
Data management ................................ 37
Displaying POIs .................................... 37
GPS operating principle ................. 38
Using the SD/MMC card .................38
Preparation ............................................. 38
Inserting the SD/MMC card .................... 38
Removing the SD/MMC card................... 38
Music Player ....................................39
Opening the Music Player ....................... 39
Operating the Music Player .................... 39
MP3 list ................................................ 39
Picture Viewer ................................40
Starting the Picture Viewer..................... 40
Operating the Picture Viewer ................. 40
Slideshow ............................................ 40
Full screen mode ................................. 40
Uploading cartographic material .... 41
Using the cartographic material
stored on a SD- /MMC card .................... 41
Using cartographic material
with the Lucca ........................................ 41
Lucca software ................................41
Reinstalling the navigation software ....... 41
Updating the navigation software ........... 41
Technical data ................................. 42
Disposal of old appliances .............42
Service ............................................42
Warranty .........................................42
Frequently Asked
Questions / FAQ ..............................43
4
Page 5
About these instructions Safety instructions
Safety instructions
Please read the following safety instructions
and warnings carefully before using the
Lucca for the fi rst time.
Navigation safety instructions
Caution:
Never operate the Lucca while driving as this
could lead to accidents affecting yourself
and others!
Only ever look at the screen when there is
absolutely no doubt that it is safe to do so
as regards the traffi c around you!
Any routing, confi guration of streets and
roads and traffi c signs take precedence over
the instructions issued by the navigation
system.
Only follow the instructions issued by the
Lucca if permissible under the relevant
circumstances and traffi c regulations! The
Lucca will also safely guide you to your
destination if you have to take a different
route to the one originally planned.
NB:
It is best to plan routes before starting
•
to drive. Please stop your vehicle, e.g.
at a car park or service station, if you
want to change or enter a new route
while driving!
If you failed to catch or didn't
•
understand the instructions issued by
the Lucca or are not sure where to go
at the next junction, you should be able
to get a bearing on your position and
route by looking at the map and arrows
shown on the Lucca. You can also listen
to the instructions again by pressing the
action arrow shown on the map. (Chap.
“Working with the map”, Using the map”,
“Pressing points on the map”)
Safety instructions for handling
the Lucca
Caution:
The Lucca must not be exposed to water
or damp as it is neither water nor splash
proof.
NB:
Always make sure that the Lucca’s
•
power plug is unplugged when
turning off your vehicle since the GPS
continuously uses power even when
turned off and could thus deplete your
vehicle’s battery.
Always pull at the plug itself rather than
•
the cable when removing the plug, as
this could damage the cable!
Only use a damp, lint-free cloth to
•
clean the Lucca. Do not use caustic
solvents!
Using the CD/DVD
The Lucca is supplied with a CD/DVD
that contains navigation software and
cartographic material. Please follow these
instructions to protect the CD/DVD from
becoming damaged or dirty:
Always store the CD/DVD in a case.
Only touch the CD/DVD at its edge.
Do not expose the CD/DVD and case
to direct sunlight.
Only use the CD/DVD if it is totally
clean. If required, clean the CD/DVD
with a soft, lintfree cloth working
from its inner to its outer edge.
Never clean the CD/DVD using
circular movements.
Do not use any solvents, including
for the printed side of the CD/DVD.
5
Page 6
A
Initial commissioning
Using the Lucca for the fi rst
time
When turning on the Lucca for the fi rst
time, you will be prompted to select your
preferred language. (Please read the section
“Selecting your language” below.) Once you
have selected your language, you will have
to wait a couple of minutes before being
able to start navigating.
Lucca scope of delivery
The Lucca’s scope of delivery comprises the
following items:
•
Lucca
•
Suction cup holder
•
Charger cable for cigarette lighter
•
Operating instructions (short version)
•
CD/DVD with map of Russia and operating
instructions (detailed version)
Optional accessories:
•
Carry case
•
Battery charger for 110 to 230 V
•
USB cable
•
Second car kit
•
Van/SUV suction cup holder
•
Vent mount
NB:
We recommend use of original Blaupunkt
accessories only.
Protective touch screen foil
Remove the protective foil from the screen
before using the Lucca for the fi rst time.
Turning the Lucca on
The Lucca can be turned on/off using the
On/Off button. When supplied to you, the
Lucca will be turned off.
NB:
Please note that the Lucca’s battery
may not be charged when you buy it.
Please charge the battery before using
the device. (Chap. “Recharging the
battery”)
A
➜
Press the On/Off button for more than 3
seconds to turn the Lucca on.
You will now be shown the start screen.
Selecting your language
The standard language for the Lucca’s
menus and voice output is US English. When
turning on the Lucca for the fi rst time, you
will be shown a menu from which you can
select your preferred language:
Select your preferred language from the
➜
menu.
Follow the instructions.
➜
Your preferred language will be loaded
and the main menu be shown again.
6
Page 7
Recharging the battery Installing the Lucca into a car
Charging the battery
The rechargeable battery enables the Lucca
to be operated without requiring an external
source of power. The battery must be fully
charged (by recharging it for approx. 5 to 6
hours) to achieve the maximum battery run
time of up to 3 hours.
The battery charge indicator is always
displayed in the top centre of the screen
no matter whether you are navigating or
using the Music Player or Picture Viewer.
The battery charge indicator will display the
following symbols:
•
: Lucca is connected to an external
power source.
•
: Lucca is running on its internal
battery. The battery has suffi cient
charge.
•
The number of dark blocks shown inside
the battery indicates the charge left (0 to
3 blocks).
➜
: Lucca is running on its internal
battery. The battery is running low.
NB:
Lucca will issue a warning if the battery
is running very low.
The battery can be recharged using
either the supplied charger cable for
the cigarette lighter or the optionally
available charger.
NB:
Only use Blaupunkt-approved chargers.
•
Please contact your Blaupunkt dealer
for more information on Blaupunktapproved chargers.
Never dispose of defective battery
•
chargers as domestic waste!
“designated” collection points.
Installing the Lucca into a
car
The Lucca is equipped with a suction cup
holder, which is designed for fastening to a
windscreen, to enable it to be temporarily
installed into a vehicle.
Caution:
Make sure that the Lucca is not installed
in such a way as to obstruct your view or
distract from the surrounding traffi c.
Do not install the Lucca within range of the
airbags.
Always make sure that the Lucca does not
represent a hazard to vehicle passengers
once installed in the event of emergency
braking.
Attaching the suction cup holder
The supplied suction cup holder enables
you to install the Lucca easily and safely into
your vehicle.
➜
Choose a place suitable for installing the
Lucca on your windscreen.
➜
The windscreen must be free from dust
and grease to ensure optimum adhesion.
If required, clean the windscreen before
installation using a special windscreen
cleaning cloth.
➜
Press the adhesive plate of the suction
cup against the windscreen.
➜
Fold the arm on the adhesive plate
towards the windscreen.
➜
Adjust the suction cup holder. When
doing so, make sure that the bar for
attaching the Lucca is horizontal.
Removing the suction cup holder
The suction cup holder can be removed
easily if you are changing vehicles.
➜
Move the arm on the adhesive plate away
from the windscreen.
➜
Remove the adhesive plate carefully from
the windscreen at its edge so as to allow
air to enter into the space between the
adhesive area and windscreen.
➜
Carefully pull the suction cup off the
windscreen.
7
Page 8
A
A
Installing the Lucca into a car Turning the Lucca On/Off
Connecting the Lucca to the suction cup
holder
The suction cup holder is equipped with a
guide for attaching the Lucca.
Carefully engage the guide on the Lucca
➜
with the bar on the suction cup holder.
A
Removing the Lucca
Carefully pull the Lucca up and off the
➜
suction cup holder.
Turning the Lucca On/Off
The Lucca can be turned on/off using the
On / Off button.
A
The Lucca has two off states:
Sleep mode (screen off for energy saving
purposes) and a state where all functions
are switched off. The Lucca is turned off
when supplied to you.
Turning the Lucca On/Off
Press the On / Off button for more than 3
seconds.
NB:
The Lucca also consumes power, although
only a marginal amount, while turned
off. It may therefore become necessary
to recharge the battery if your Lucca has
not been used for a long period of time.
Activating / deactivating sleep mode
Briefl y press the On / Off button.
8
Page 9

The MENU button
The MENU button
The MENU button can be used to open the
Quick Settings (press briefl y) or to go back
to the Main Menu (press for more than 3
seconds), from where the Navigation, Music
Player or Picture Viewer applications can be
started.
Quick Settings
The Quick Settings menu can be used to
adjust the volume and brightness. The Quick
Settings menu can be opened at any time,
irrespective of the menu in which you are at
the time. To do so:
➜
Press the MENU button.
The Quick Settings menu opens.
➜
➜
Additional functions
➜
•
•
•
Use the arrows to
adjust the volume and brightness.
Press the Back button to return to
the previous menu.
NB:
If the screen has not been touched for
over 5 seconds, Lucca will automatically
switch back to the previous menu.
Press the More button in the Quick
Settings to view additional functions:
Information
–
Press the Information button.
To view product information.
Battery
–
Press the Battery button.
To view the battery status.
Power Saving
–
Press the Power Saving button.
To open the Power Saving menu.
–
Backlight time out : Time the backlight
will remain on after the last button has
been pressed. Press Backlight time
out to change the settings (economy
mode!). Press OK to confi rm.
Battery Warning Time Out : Warning
–
period before battery depletion. The
battery warning will be issued for the
selected period in advance of battery
depletion. Press Battery Warning Time
Out to change the settings. Press OK
to confi rm.
9
Page 10
Using the navigation menus
Using the navigation menus
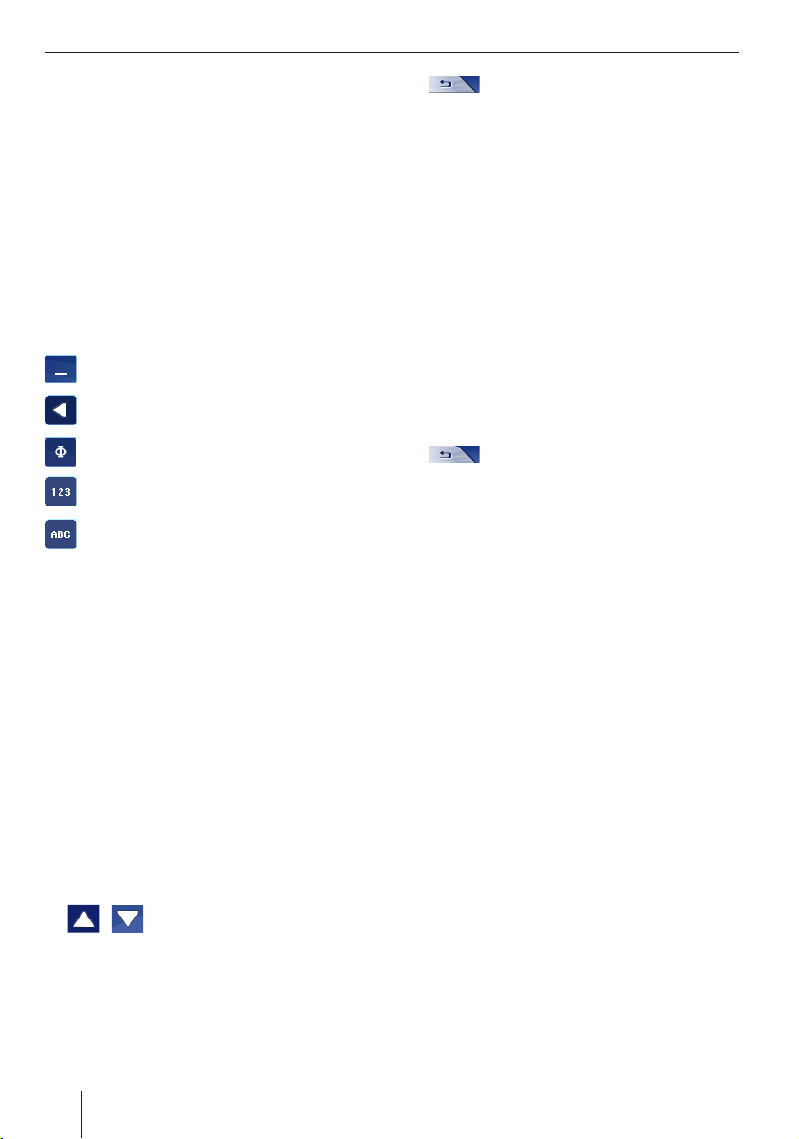
Onscreen keyboard
The Lucca features a soft (onscreen)
keyboard that will be shown on the touch
screen when required to enter text. Using
your fi ngers, tap the relevant keys on this
keyboard to enter text or data.
There is no need to use special characters
or Umlauts when entering town or street
names as the Lucca will automatically enter
these.
The onscreen keyboard furthermore features
the following keys:
Enter space
Delete last character
Switch to alternative lettering/text
types
Open numeric keypad to, e.g. enter
house numbers
Open alphabetic keypad
Lists
The Lucca contains a number of lists from
which you can select entries, such as
destinations. When entering text, Lucca will
show you all of the list entries matching the
new text.
Lucca will display these matching entries as
soon as the fi rst letters of, e.g. the name of a
town, have been entered. If you want to call
up a list with more matching entries, press
the Done button. Please note that the longer
the list, the longer it will take to load.
The lists shown will also feature entries
whose middle or end letters match the
letters entered so far.
One of the entries in the list will always be
highlighted.
➜
to the previous menu without selecting
one of the list entries.
Other options available in the lists:
Search in all street lists: For searching all
•
of the street lists for a particular house
number
Show districts/Hide districts in city/
•
town list: For viewing major cities/towns
and their suburbs and numbered districts
or major cities/towns only
Press the Back button to return
Buttons
Most of the Lucca’s menus feature the
following buttons:
•
Help: Lucca can provide help on the use
of the menus. Press the Help button for
extra information on the relevant menu
and settings.
•
Press the Back button to return to
the previous menu. If you press the Back
button in the Navigation menu, you will
be returned to the main menu. The main
menu can be used to open the Music
Player, Picture Viewer and Navigation
applications.
Controller
Some menus contain controllers that can be
used to adjust some of the settings. To adjust
a controller, e.g. to adjust the volume:
Press the controller and keep your fi nger
➜
on it while sliding it in the required
direction.
In these instructions, this action is referred
to as “sliding”.
➜
Use the arrow buttons to
browse through the list.
➜
Press on an entry to accept it.
-or-
10
Page 11
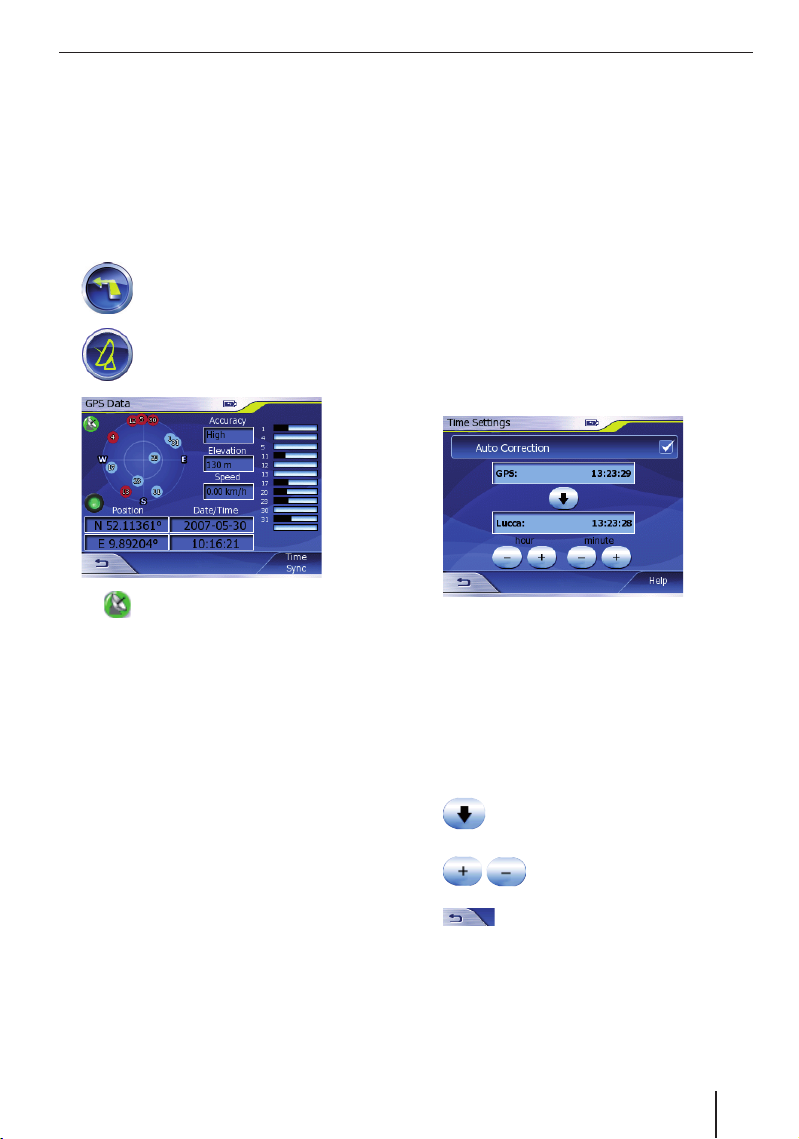
Information on GPSs
You can view the GPS’s status in the GPS
Info menu. This menu can furthermore be
used to view GPS-derived information, such
as your current position and speed.
The GPS Info menu can be opened in the
Navigation menu.
View GPS info
➜
➜
Press the Navigation button in
the main menu.
The Navigation menu opens.
Press the GPS Info button.
➜
The GPS Info menu opens.
–
GPS reception indicator:
green: good GPS reception (3D)
yellow: poor GPS reception inadequate positioning
information (2D)
red: no GPS reception
–
The compass: Shows the position
of visible or potential GPS satellites
based on your current position
–
Bar (on the right): Indicates the
strengths of the signals received
from the potential GPS satellites.
Lucca requires signals from at least 4
different satellites for navigation.
–
Accuracy: Positioning accuracy
–
Elevation: Current height above sea
level (estimate)
–
Speed: Current vehicle speed
–
Position: Current position, stated
in Eastern longitude and Northern
latitude
Information on GPSs
Date/Time: Current date and time
–
The green light will fl ash at the exact
intervals at which the Lucca attempts to
receive information via GPS.
Time synchronisation
Lucca receives the exact time through the
GPS. You can synchronise the Lucca’s time
with the GPS time in the GPS Info menu to
ensure that the correct arrival time will be
displayed.
To do so, you must have:
Selected your time zone (chap.
•
“Navigation”, “Basic settings”)
Press the Time Synchronise button in
➜
the GPS Info menu.
The Time Settings menu opens.
You can synchronise the Lucca’s time
with the GPS automatically or manually.
You will also be able to change the
synchronised time at a later date. You
can also change the time if you selected
automatic synchronisation.
➜
Press the Auto Correction button to
activate (tick) or deactivate (no tick)
automatic time correction.
- or -
➜
➜
➜
Press the arrow button to transfer
the current GPS time to the
Lucca.
Use the Plus/Minus button to
manually change the hours
and minutes.
Press the Back button to close
the menu.
11
Page 12

Navigation
Navigation
General navigation information
Use of the Lucca is at your own risk!
Caution:
Never operate the Lucca while driving as this
could lead to accidents affecting yourself
and others!
Only ever look at the screen when there is
absolutely no doubt that it is safe to do so
as regards the traffi c around you!
Any routing, confi guration of streets and
roads and traffi c signs take precedence over
the instructions issued by the navigation
system.
Only follow the instructions issued by the
Lucca if permissible under the relevant
circumstances and traffi c regulations! The
Lucca will also safely guide you to your
destination even if you have to take a different
route to the one originally planned.
Start navigating
Turn on the Lucca using the On/Off
➜
button.
➜
Press the Navigation button in
the main menu.
You can access all of the Lucca’s navigation
functions from the Navigation menu.
Entering a destination
➜
Please read the section “Entering a
destination”.
Home
➜
Please read the section “Using your home
address as a destination”.
Show map
➜
Press the Destination button to
enter a destination for route
guidance.
Press the Home button if you
want to use your saved home
address as a destination for route
guidance.
Press the Map button to show the
map.
The Navigation menu opens.
12
Please read the section “Working with the
map”.
Route
➜
Please read the section “Entering a route”
in the “Navigation” or “Additional navigation
functions” chapter.
Settings
➜
Press the Route button to open
the Route menu. You can use this
menu to enter a route, call up the
route plan, display route information,
cancel part of a route (Detour) and to
start a simulation of your journey.
Press the Settings button to
change the Lucca’s settings.
Page 13
Please read the chapter “Basic settings” for
more information.
Viewing GPS info
➜
Please read the chapter “GPS” for more
information on this.
Close menu
➜
Press the GPS info button to view
GPS information.
Press the Back button in the
Navigation menu to return to the main
menu.
Basic settings
Before starting route guidance, please:
•
select the time zone relevant to your
location before starting route guidance
to ensure that the correct time of arrival
will be displayed during navigation and
•
enter your home address to enable you to
quickly navigate home no matter where
you are.
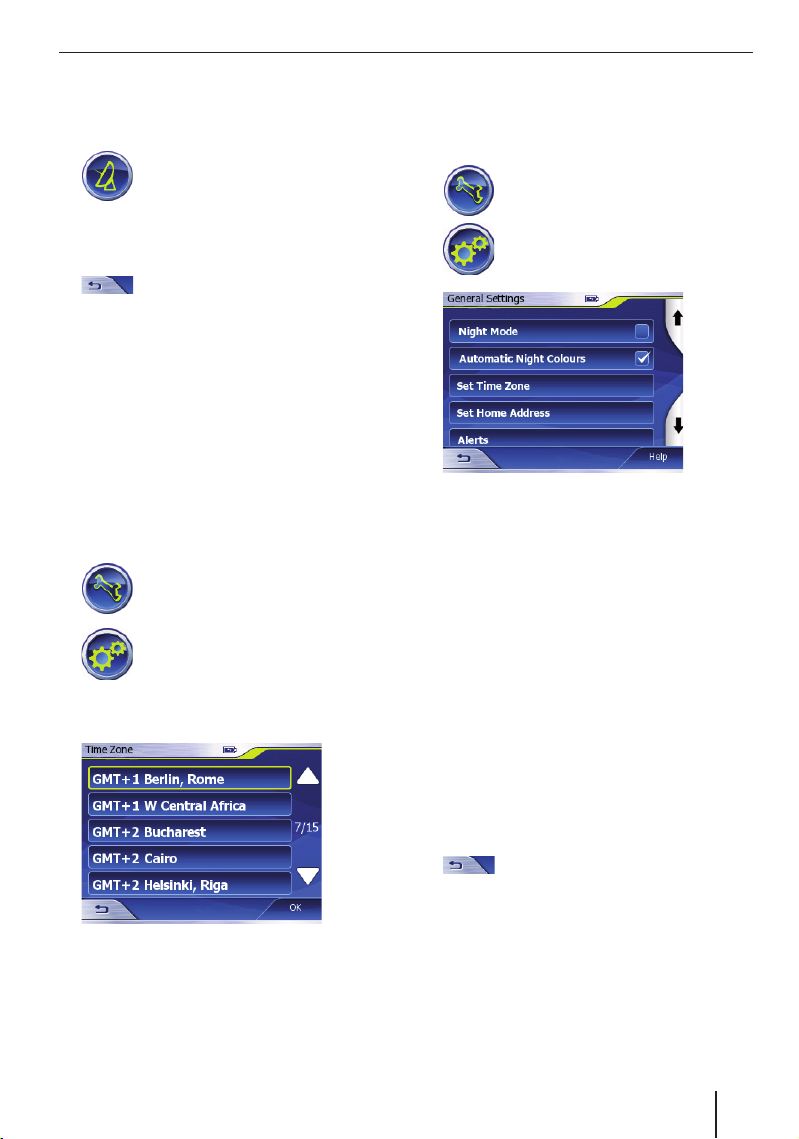
Selecting your time zone
➜
➜
➜
Press the Settings button in the
Navigation menu.
The Settings menu opens.
Press the General settings button.
The General Settings menu
opens.
Press on Set Time Zone.
The Time Zone menu opens.
Navigation
Press on Daylight saving time to activate
➜
(tick) or deactivate (no tick) daylight
saving time.
Entering your home address
➜
➜
➜
➜
➜
➜
➜
➜
➜
Press the Settings button in the
Navigation menu.
The Settings menu opens.
Press the General settings
button.
The General Settings menu opens.
Press Set Home Address.
The Home Address menu opens. The
name of the destination (e.g. “Home”)
will be shown.
Press on Change Address.
The Destination menu opens.
Enter the address as described in the
chapter “Entering a destination”.
You will now be returned to the Home
Address menu. You can rename any of
your destinations at any time. To do so:
Press on the name of the destination.
The onscreen keyboard will come up.
Type in a name of your choice as
described in the chapter “Using the
navigation menus”.
Press Done.
You will now be returned to the Home
Address menu.
Press the Back button to close
the menu.
➜
Select the time zone that is relevant to
your current position and press on it.
➜
Press OK.
You will now be returned to the General
Settings menu.
13
Page 14
Navigation
Entering a destination
Lucca will always guide you through the
destination entering process by: asking
for a destination town, street and house
number.
Once entered, destinations are automatically
saved so that they can be repeatedly and
quickly accessed again at a later time.
NB:
You can only enter destinations (countries,
towns, streets, house numbers) that are
included on the cartographic material.
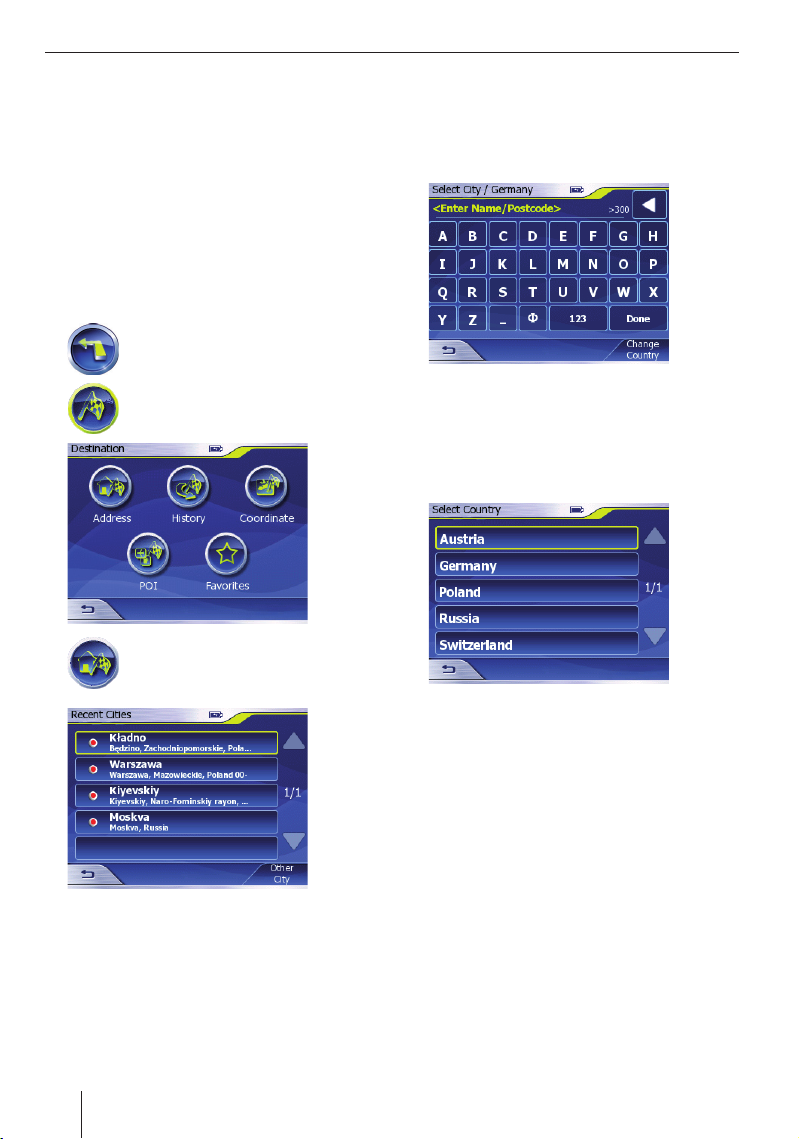
➜
➜
➜
➜
14
Press the Navigation button in
the main menu.
The Navigation menu opens.
Press the Destination button.
The Destination menu opens.
Press the Address button.
A list containing the towns most
recently navigated to is opened.
You can now:
•
Navigate to one of the towns listed in
the list
•
Select a different town
•
Select a different town in a different
country
Select the city or town to which you
would like to navigate from the list.
- or Press the Other City button.
➜
The onscreen keyboard will now come up
to enable you to enter the name of the
city/town.
You can skip the next two steps if you
want to navigate to a town located in the
country currently selected or you can
select a different country:
➜
Press on Change Country.
The country list opens.
➜
Press on the country in which your
destination is located.
You will now be returned to the city/town
input screen.
➜
Enter a town or postcode and press
Done.
The list of cities/towns opens.
➜
Select a city/town of your choice from
the list.
The onscreen keyboard will now come
up to enable you to enter the name of
the street.
You can now enter the name of a street
or navigate to the city/town centre:
Press the City Centre button to navigate
➜
to the city centre.
- or -
Page 15

Navigation
➜
Enter a street name and press Done.
The onscreen keyboard will now come
up to enable you to enter the number of
the house you would like to navigate to.
You can now enter a house number or
navigate to an intersection (junction):
➜
Press on the Find Intersection button.
A list containing the streets intersecting
your target street opens.
- or -
➜
Enter a house number and press OK.
The Lucca will now display the map and
plan the route.
NB:
•
Please refer to the chapter “Selecting
route parameters” for information on
how to change route parameters.
•
All entered destinations are saved
automatically in the History menu.
Selecting a destination from the
History
All entered destinations are saved
automatically in your History menu. You can
select any of the destinations in the History
menu and use them for route guidance.
➜
➜
➜
Press the Navigation button in
the main menu.
The Navigation menu opens.
Press the Destination button.
The Destination menu opens.
Press the History button.
The History menu opens.
The Lucca will now display the map and
plan the route.
Entering coordinates
➜
➜
➜
Press the Navigation button in
the main menu.
The Navigation menu opens.
Press the Destination button.
The Destination menu opens.
Press the Coordinates Input
button.
The Coordinates Input menu
opens.
The onscreen keyboard will come up.
Button Action
to
/ /
To enter numbers
Delete last character
Switch between North
and South latitude
Switch between Eastern
and Western longitude
Enter degree, minute or
second (button changes
automatically after use)
Select the city or town to which you
➜
would like to navigate from the list and
press on it.
One coordinate will already have been
entered. Delete this coordinate and enter
the relevant latitude and longitude:
➜
Press on the latitude or longitude you
want to change.
15
Page 16

Navigation
➜
change between North and South
(latitude) or East and West (longitude).
Now enter the coordinate in its relevant
➜
unit of measure.
The “degree” button will automatically
change to the next unit of measure etc.
once used.
Press Done.
➜
The Lucca will now display the map and
plan the route.
/ Press on either the
N/S or E/W button to
Selecting a Point Of Interest
(POI)
The Lucca can display “POIs” (Points
Of Interest) on the map. POI's include
things such as airports, ferry ports,
restaurants, hotels, petrol stations and
public facilities. POIs are included on the
cartographic material and can also be used
as destinations.
NB:
If you are unable to select a particular
type of POI, it means that there isn’t one
within the target area or there isn’t one
included on the cartographic material.
➜
➜
Press the Navigation button in
the main menu.
The Navigation menu opens.
Press the Destination button.
The Destination menu opens.
You can now look for a POI by:
➜
➜
➜
➜
Pressing the Cursor button to
select a POI from the section of
map currently displayed.
NB:
Please select the section of map in which
you are looking for a POI beforehand.
(Chap. “Working with the map”, “Using
the map”)
- or Press the Nearby button to select
a POI located in close proximity
to your current position.
- or Press the Town button to select a
POI located in a particular city/
town.
The list of cities/towns opens.
Select a city/town as described in the
section “Entering a destination”.
The Find POI menu will be displayed no
matter which of the above options you
choose.
➜
16
Press the POI Location button.
The POI Location menu opens.
NB:
POI’s displayed in grey in the Find POI
menu are not displayed on the map.
POI’s displayed in grey/blue indicate POI
categories that contain POI sub-categories
of which only a few are displayed on the
map. The above illustration shows the
POI category Services shaded in this
way. POI's can be hidden or displayed.
(“Show/hide POIs”)
Use the Up/Down buttons to
➜
the list.
Press on an icon of your choice to select
➜
a POI category, such as Shopping.
browse through the POI’s in
Page 17

Navigation
➜
Press on an icon of your choice to select
a POI sub-category, such as Shopping
Center.
You will now be shown a list of POI’s
matching your search criteria and
information on their distance.
You can now either select one of the POIs
from the list or look for one yourself:
Select the POI to which you would like to
➜
navigate from the list and press on it.
You will now be shown additional
information on the selected POI.
Press Done.
➜
The Lucca will now display the map and
plan the route.
- or -
➜
Press Search.
The onscreen keyboard will come up.
➜
Type in the fi rst few letters or entire name
of the POI you want to navigate to.
➜
Press Done.
You will be shown a list. This list will only
contain POIs that match the letters or
name you typed in.
Select the POI to which you would like to
➜
navigate from the list and press on it.
You will now be shown additional
information on the selected POI.
Press Done.
➜
The Lucca will now display the map and
plan the route.
Activate/deactivate POIs
The Map Options menu under
Advanced Settings can be used to
activate/deactivate the POI display
option.
Please refer to the “Display, language
and volume settings” section in the Basic
Settings chapter.
Show/hide POIs
If the POI display option is activated, you
can choose whether to view/hide certain
POIs on the map:
➜
➜
➜
➜
➜
Press the Settings button in the
Navigation menu.
The Settings menu opens.
Press the Advanced Settings
button.
The Advanced Settings menu
opens.
Press the POI Presentation
button. The POI Presentation
menu opens.
Select the POI category that you want to
show or hide.
Press Show or Hide.
Selecting a destination from your
Favourites
You can select from any of the destinations
saved in your Favourites menu and use them
for route guidance.
Please read the chapter “Administrating
destinations” for more information on
saving, renaming and deleting destinations
in your Favourites menu.
➜
➜
➜
Press the Navigation button in
the main menu.
The Navigation menu opens.
Press the Destination button.
The Destination menu opens.
Press the Favourites button.
The Favourites menu opens.
17
Page 18

Navigation
➜
Select the entry you want to navigate to
from the list and press it.
You will now be shown additional
information on the selected destination.
➜
Press Done.
The Lucca will now display the map and
plan the route.
Organise Favourites
You can organise you Favourites:
•
In alphabetic order
•
By distance
➜
Press the Distance or Abc button in the
Favourites menu to change the order in
which your Favourites are organised.
Search Favourites
You can also search your Favourites for a
particular destination. To do so:
➜
Press the Find button in the Favourites
menu.
The Find Favourites menu opens.
Enter the name of the destination you
➜
are looking for using the onscreen
keyboard.
You will now be shown a list of results.
Press on the POI to which you want
➜
to navigate to. You will now be shown
additional information on the selected
POI.
You will now be shown additional
information on the selected destination.
Press Done.
➜
The Lucca will now display the map and
plan the route.
Using your home address as a
destination
Once you have entered your home address,
you will be able to use it to navigate home
easily and comfortably no matter where
you are. The address saved as your home
address can be viewed under General
Settings and changed at any time. (Section
“Basic settings”, “Entering your home
address”)
➜
Press the Navigation button in
the main menu.
The Navigation menu opens.
➜
Press the Home button.
The Lucca will now display the
map and plan the route.
If you have not yet saved a home
address, the Lucca will now prompt you
to do so.
Selecting a destination from the
map
This function allows you to select a
destination for route guidance directly from
the map. This includes cities/towns, streets
and POIs.
➜
➜
➜
➜
➜
Moving the map
You can move, minimise or maximise the map
to view the area in which your destination is
located.
➜
Press the Navigation button in
the main menu.
The Navigation menu opens.
Press the Map button.
The map opens.
Press the arrow to show
additional buttons.
Select the destination you would like to
navigate to from the map and press on
it.
Press Route to.
The Lucca will now display the map and
plan the route. The destination will now
be highlighted with a fl ag.
Place your fi nger on the map and move it
into the required direction.
The map will now move into the direction
it is being moved by your fi nger.
18
Page 19

Navigation
Minimising/maximising the map
You can minimise or maximise the map to
view the area your destination is located in
on the map.
➜
Use the Plus/Minus buttons to
minimise and maximise the
view of the map.
Entering Way Points
You can use the Edit Way Points menu to
enter Way Points on the map. You can also
use Way Points to directly create a route on
the map. To do so:
➜
➜
➜
Press the Navigation button in
the main menu.
The Navigation menu opens.
Press the Route button.
The Route menu opens.
Press the Edit Route button.
The Edit Route menu opens.
The Lucca will now display the map and
plan the route.
Editing a route
You can use the Edit Route menu to delete
and change the order of selected Way
Points. Way Points are defi ned as starting
points, intermediate destinations and (fi nal)
destinations.
Select a Way Point of your choice from
➜
the Edit Route menu and press on it.
You will now be shown the following
buttons:
Optimise: The Optimise function will
–
automatically arrange the Way Points
into an optimal order.
Up: Move Way Point up: This function
–
will move the Way Point up by one
row
Down: This function will move the
–
Way Point down by one row
Delete: Delete Way Point
–
Entering a route on the map
➜
➜
Press the Navigation button in
the main menu.
The Navigation menu opens.
Press the Map button.
➜
The map opens.
Press Add.
➜
The Destination menu opens.
Enter a destination as described under
➜
“Entering a destination”. (Chap. “Entering
a destination”)
You will now be returned to the Edit
Route menu.
Proceed as above to add more Way
➜
Points.
➜
➜
Press the Back button twice
to close the menu and return to the
Navigation menu.
Press the Map button in the
Navigation menu.
➜
➜
➜
Press the arrow to display
additional buttons.
Press on the place on the map that you
would like to use as a Way Point.
Press on one of the additional buttons,
i.e. either:
Start: To use this place as a starting
–
point (only if you do not have any GPS
reception)
19
Page 20

Navigation Administrating destinations
NB:
If the Lucca is receiving GPS signals, it
will automatically use its current position
as the starting point for any route.
–
Route To: To use this place as a
destination
–
Add Via: To use this place as an
intermediate destination
–
Continue: To use this place as a fi nal
destination.
The Lucca will now display the map and
plan the route.
Deleting a Way Point from the map
Press on the Way Point or on the area
➜
around the Way Point you want to
delete.
You will now be shown the Remove Via
button.
Press Remove Via.
➜
The Way Point will be deleted.
Administrating destinations
All destinations are saved in the History menu
as soon as route planning is completed.
Routes are only planned if you have entered
a destination and:
•
You have GPS reception
•
You do not have GPS reception and
you start planning a route (Chap.
“Planning a route without the use of GPS
information”)
Saving a destination (Favourites
only)
➜
➜
➜
➜
➜
➜
Press the Navigation button in
the main menu.
The Navigation menu opens.
Press the Destination button.
The Destination menu opens.
Press the Favourites button.
The Favourites menu opens.
Press Add.
The Destination menu opens.
Enter a destination as described under
“Entering a destination”. (Chap. “Entering
a destination”)
Press OK.
The destination will now be saved under
Favourites.
20
Renaming a destination
(Favourites only)
➜
➜
➜
➜
➜
Press the Navigation button in
the main menu.
The Navigation menu opens.
Press the Destination button.
The Destination menu opens.
Press the Favourites button.
The Favourites menu opens.
Select a destination and press on it.
You will now be shown additional
information on the selected destination.
Press the Rename button.
Page 21

Administrating destinations Pins
You will now be shown an input mask.
➜
Enter a new name for the destination.
➜
Press OK.
The destination will now be renamed.
Deleting a destination
(Favourites only)
➜
➜
➜
➜
➜
➜
➜
Press the Navigation button in
the main menu.
The Navigation menu opens.
Press the Destination button.
The Destination menu opens.
Press the Favourites button.
The Favourites menu opens.
Press on a destination.
You will now be shown additional
information on the selected destination.
Press the Delete button.
You will be shown a confi rmation
prompt.
Press Yes to delete the destination.
- or Press No if you do not want to delete the
destination.
Deleting the entire destinations
list (History only)
➜
➜
➜
➜
Press the Navigation button in
the main menu.
The Navigation menu opens.
Press the Destination button.
The Destination menu opens.
Press the History button.
The History menu opens
Press the Clear History button.
Pins
Pins can be placed on the map and used to
highlight places you might want to use as a
destination at a later time. Pins are saved in
the History menu. You can place as may pins
onto the map as you like.
Placing a pin
➜
➜
➜
➜
➜
➜
You will now be able select this Pin from
the History menu as a destination for route
guidance.
Deleting a pin
➜
➜
Deleting all pins
➜
➜
Press the Navigation button in
the main menu.
The Navigation menu opens.
Press the Map button.
The map opens.
Press the arrow button to show
all additional buttons.
Press on a place of your choice on the
map.
Press the Pin button.
The map will now show a pin highlighting
the place you chose on the map.
Press on the Pin or on the area around
it.
Press on the Pin you want to delete or on
the area around it.
You will now be shown the Unpin
button.
Press the Unpin button.
Press the Navigation button in
the main menu.
The Navigation menu opens.
Press the Settings button.
The Settings menu opens.
21
Page 22

Pins Selecting route parameters
➜
➜
➜
➜
➜
Press the Advanced Settings
button.
The Advanced Settings menu
opens.
Press the User data management
button.
The User data management menu
opens.
Press Remove Pins to delete all of the
pins shown on the map.
You will now be shown a confi rmation
prompt.
Press No if you do not want to delete the
pins.
- or -
Press Yes to delete the pins.
Selecting route parameters
The Route Parameters menu can be used to
select from a range of options regarding
your preferred route, i.e. route planning
parameters. These options include taking
into account the mode of transport you are
using, preferred type of route and preferred
types of roads.
These route parameters will be saved and
used for all future route guidance.
➜
➜
➜
Press the Navigation button.
The Navigation menu opens.
Press the Settings button.
The Settings menu opens.
Press the Route parameters
button.
The Route parameters menu
opens.
22
➜
Press the Route options button to select
from the following options:
–
Short: For calculating and planning
the shortest route possible in distance
to your choosen destination.
–
Fast: For calculating and planning the
fastest route possible to your choosen
destination.
–
Economical: For calculating and
planning a route that combines
elements from both the shortest and
fastest route. This option takes into
consideration both journey time and
distance.
➜
Press the Profi le button to switch
between different vehicle profi les.
➜
Press the following buttons to permit
(tick) or not permit (no tick) use of the
following types of road when planning
the route:
–
Unpaved Roads, e.g. farm tracks
Page 23

Selecting route parameters Route guidance
–
Ferries
–
Permit needed, e.g. roads accessible
only to permit holders and emergency
vehicles
–
Motorways
–
U-turns (making a U-turn)
–
Toll Roads
Some road types will be automatically
excluded from use in route planning
depending on the vehicle profi le you
selected, i.e. a route planned for a cyclist
will not include motorways.
➜
Press the Back button.
You will now be returned to the Settings
menu. The route parameters will now be
saved.
Route guidance
You can start route guidance at any time,
provided:
•
You have GPS reception.
- and -
•
You have entered a destination as
described in the chapter “Entering a
destination”.
- or -
•
You have selected a destination from the
Favourites as described in the chapter
“Selecting a destination from your
Favourites”.
- or You have selected a destination from
•
the History as described in the chapter
“Selecting a destination from the History
menu”.
The Lucca will now plan the route and
display the map.
If you do not have any GPS reception, you
can still start route planning in order to gain
an overview of the route. (Chap. “Route
planning without GPS signal reception”)
Caution:
Only follow the instructions issued by the
Lucca if permissible under the relevant
circumstances and traffi c regulations! The
Lucca will also safely guide you to your
destination if you have to take a different
route to the one originally planned.
Your current position will be indicated
by a blue cursor. The route will be shown in
colour (in restricted areas or those requiring
a permit it will be shown in red).
➜
/ Press the arrow buttons
to show/hide additional buttons and
information on the places shown on the
map.
23
Page 24

Route guidance
NB:
When planning a route, the Lucca will
always take the route parameters, which
can be viewed and changed in the Route
Parameters menu, into account. (Chap.
“Selecting route parameters”)
GPS reception problems
If the GPS is unable to receive a signal once
the destination has been entered, the cursor
will be shown in grey.
Route guidance will be stopped. Once GPS
reception has been re-established, Lucca
will automatically check whether your
position has changed and plan a different or
new route as required. You can then simply
commence route guidance.
If you are inside an enclosed space and
experience GPS reception problems, it
might help if you go outside. This is because
the Lucca’s reception works best if it has an
unobstructed view of the sky.
End Route Guidance
➜
Press the Back button to close
the map.
The Navigation menu opens.
Arriving at your destination
When arriving at the destination, Lucca will
immediately issue the message “You have
now reached your destination”.
The map will then only show your current
position.
➜
Press the Cancel route guidance
button.
You will now be shown a confi rmation
prompt.
You can now either end or continue route
guidance:
➜
Press Yes to end route guidance.
- or Press No to continue route guidance.
➜
24
Page 25

Starting route planning without the use of GPS signals Using the map
Starting route planning
without the use of GPS
signals
If you do not have any GPS reception, you
can still start route planning in order to gain
an overview of the route.
You can do so provided:
•
You have entered a destination as
described in the chapter “Entering a
destination”.
- or You have selected a destination from
•
the Favourites menu as described in the
chapter “Selecting a destination from
your Favourites”.
- or You have selected a destination from the
•
History menu as described in the chapter
“Selecting a destination from the History
menu”.
NB:
When planning a route, the Lucca will
•
always take the route parameters, which
can be viewed and changed in the Route
Parameters menu, into account. (Chap.
“Selecting route parameters”)
The Lucca will use the specifi ed starting
•
point for planning the route. If you do
not specify a starting point, it will use
the destination you navigated to last as
a starting point.
➜
➜
➜
Press the Map button in the
Navigation menu to open the
map.
Press the arrow button to show
all additional buttons
Press the Route To button.
The Lucca will now display the map and
plan the route.
Using the map
Show map
➜
➜
Operating the map
13
9 Minimize/maximize map
: Change the map’s orientation
; Cockpit (route information)
< Additional buttons
= Action arrow
Moving the map
➜
Minimising/maximising the map
➜
Position location
When moving the map, the lock icon will
be shown on your current position to
indicate that your current position has been
located.
This feature can be used provided:
•
➜
Press the Navigation button. The
Navigation menu opens.
Press the Map button to open the
map.
9
10
11
12
Put a fi nger on the map and keep it
pressed on while moving the map in the
required direction.
Plus/Minus buttons.
You have GPS reception
You can minimize and
maximize the map using the
Press the Lock button to return
to your current position on the
map.
25
Page 26

Using the map
Change the map’s orientation
You can use the following buttons to
➜
change the map’s orientation to:
–
–
–
Pressing points on the map
When in map view, the screen features three
touch-sensitive areas:
Press the action arrow shown on the map
➜
to repeat a navigation instruction.
NB:
This feature is only available during route
guidance.
Press the Cockpit icon on the map to
➜
view route information.
NB:
This feature is only available during route
guidance.
Press on a place on the map.
➜
A window with information on the
selected place will open up.
➜
to show/hide additional buttons and
information on the places shown on the
map.
the direction you are driving in
(default)
North
Overview mode (2D view).
Map is minimised and oriented
North.
/ Press the arrow buttons
Buttons
➜
➜
➜
/ Press the arrow buttons
to show/hide additional buttons and
information on the places shown on the
map.
The map features the following buttons:
–
Start: You can use Start to specify a
place as a starting point (only when
there is no GPS reception)
–
Route To: You can use Route to button
to specify a place as a destination
–
Add Via: You can use Add Via to
specify a place as an intermediate
destination
–
Remove Via : You can use Remove Via to
remove an intermediate destination
–
Continue: You can use Continue to
use a place as a fi nal destination
–
Pin: You can use Pin to add a
destination to your History menu
–
Unpin: You can use Unpin to delete a
pin
–
Add Favorite: You can use Add
Favourite to add a place to your
Favourites menu
Press the Way Point button.
Press on one of the buttons.
26
Page 27

Map view during route guidance
Map view during route
guidance
During route guidance, the map view will
feature a range of navigational aids and
route information.
Caution
Please note that information displayed on
the map might not always be fully up to
date, such as in the case of emergency road
works etc!
The local traffi c situation and signposting
always takes precedence over the
information provided by the Lucca.
Navigational aids
The Lucca will display the following
navigational aids on the left and lower area
of the map:
•
Top street fi eld: Displays the name of the
next street
•
Bottom street fi eld: Displays the name of
the current street.
Your position
Route information
The right of the screen will always
display the following route
information:
–
Remaining distance to destination
–
Estimated remaining journey time
–
Estimated arrival time
NB:
You can also choose to be shown
information such as speed limits as part
of the route information. Please read the
next section for more information.
Press on Route Information.
➜
The Route Information menu opens.
Please read the chapter “Additional
Functions”, “Route Information”.
Additional map information
You can also specify the type of additional
information you want to be shown on the
map. These settings can be adjusted in the
Settings menu.
To open the Settings menu:
➜
➜
Press the Navigation button. The
Navigation menu opens.
Press the Settings button. The
Settings menu opens.
Next manoeuvre and distance yet to
be covered before this manoeuvre
needs to be performed
As you get closer to the place where
the next manoeuvre needs to be
performed, a yellow bar will be
shown on the left: The more blocks are
shown in the bar, the closer you are to the
place where the next manoeuvre needs to
be performed.
Map options (navigational aids)
➜
Press the Map button in the
Settings menu.
The Map Settings menu opens.
27
Page 28

Map view during route guidance
You will now be presented with the
following buttons:
–
Daylight colour profi l: For selecting
the colour settings used when viewing
the map in daylight
–
Night colour profi l: For selecting the
colour settings used when viewing
the map in the night
NB:
The daylight/night time settings can be
changed manually or set to automatic.
(Chap. “General settings”, “Basic
settings”)
–
International Road Names: Some
motorways have international names
or numbers in addition to their
national names. You can choose to
be shown national names or both the
national and international names.
–
Show Street Names And POI: For
displaying street names and POIs on
the map
➜
Simply press the relevant button to
change any of these settings.
Changing route information
➜
➜
➜
➜
➜
Press the Advanced Settings
button in the Settings menu.
The Advanced Settings menu
opens.
Press the Display Settings
button.
The Display Settings menu opens.
Press on 3D in map to activate (tick) or
deactivate (no tick) the 3D map view.
Press the Coordinate display format
button to change the format used for the
coordinates.
Press the buttons shown under Cockpit
screen layout to change the route
information.
The route information includes the
following settings:
–
Distance to destination: Remaining
distance to destination (top fi eld,
default)
–
Time to destination: Estimated
remaining journey time (centre fi eld,
default)
–
Arrival at destination: Estimated
arrival time (bottom fi eld, default)
–
Time to next manoeuvre:
Time to next action
–
Speed: Current vehicle speed
–
Speed Limit:
Current speed
Distance to next via point: Remaining
–
distance to next intermediate
destination
Time to next via point: Estimated
–
remaining journey time to next
intermediate destination
Arrival at next via point: Estimated
–
time of arrival at next intermediate
destination
NB:
Only calibrate the screen if really
necessary and take great care when
doing so as this can cause the points
on the touch screen to be moved in
such a way that they cannot be pressed
anymore, making it impossible to operate
the Lucca.
To calibrate the Lucca’s screen, press the
➜
Screen Calibration button.
You will now be shown a crosshair against
a white background.
Follow the onscreen instructions on how
➜
to calibrate the screen.
28
Page 29

Additional navigation functions
Additional navigation
functions
The features described in this chapter are
only available once a route has been planned
(with or without use of the GPS signals).
(Chap. “Route planning” and chap. “Route
planning without the use of GPS signals”)
Adding/Deleting a Way Point
You use the Edit Way Points menu to add/
delete Way Points. You can also use this
menu to change your route directly on the
map. You can use Way Points to:
Expand your route by an additional
•
destination (destination is added at the
end of the route)
Enter an intermediate destination
•
Please read the section “Entering a route”
in the “Navigation” chapter and the chapter
“Using the map”.
Driving a route (Simulation)
You can use the Lucca to run a simulation
of your journey to get an overview of the
route.
➜
➜
➜
Itinerary
You can also use the Lucca to view a
description of your route and you can use
it to:
•
•
Press the Route button in the
Navigation menu.
The Route menu opens.
Press the Simulation button.
The Lucca will now display the
map start the simulation.
Press the Back button or on a
random point on the map to stop/fi nish
the simulation.
View particular sections of the route on
the map
Block particular sections of the route
NB:
When blocking sections of a route
during route guidance, the route will
be re-planned there and then under
consideration of the blockages and route
guidance is subsequently commenced.
➜
➜
➜
➜
➜
➜
➜
➜
Press the Route button in the
Navigation menu.
The Route menu opens.
Press the Itinerary button.
The Itinerary menu opens.
Press on a road shown in the description
to highlight it.
Press Avoid … to block this particular
section of the route.
The Avoid menu opens.
Press Manoeuvre to skip the selected
manoeuvre, e.g. to circumvent a particular
junction.
- or Press on Road to circumvent the selected
road.
- or Press on a more distant point to block
this particular section of the route
(starting from the selected road).
Press on Show to view this particular
section of the route on the map.
The Lucca will now plan the route anew
and display the map.
NB:
If you want to remove the block placed
on a section of the route, you fi rst have to
end route guidance and then select the
destination again under Edit Way Points
in the History menu to continue route
guidance.
29
Page 30

Additional navigation functions
Route information
The Route Information menu can be used to
choose additional information on the route
to be displayed on the map.
The Route Information menu can also be
used to open the Route Parameters menu.
You can also view the Route Information
menu by pressing on the route information
shown on the map.
➜
➜
Press the Route button in the
Navigation menu.
The Route menu opens.
Press the Route Information
button.
The Route Information menu
opens.
You will now be shown the following
information:
–
A bar showing the route and your
current position
–
Your destination
–
–
Route information (left):
–
–
–
NB: You can press on any of the
items displayed on the screen
to be shown more detailed
information on the route (e.g. “You
are travelling on a motorway for a
distance of 24 km”)
The method and factors used to plan
the route (route options or transport
modes, e.g. pedestrian or bicycle)
Remaining distance to destination
(default)
Estimated remaining journey time
(default)
Estimated arrival time (default)
Press on the route information to view
➜
information on the destination and
intermediate destinations.
Press the Fit To Screen button to view
➜
the route on the map.
Press the Parameters buttons.
➜
The Route Parameters menu opens.
You can use this menu to change route
parameters. (Chap. “Selecting route
parameters”)
Detours
If, for example, you are on a motorway and
hear about serious congestion ahead of
you on the traffi c news, you can block that
particular section of your route manually to
circumvent the congested area. Once a block
has been imposed manually on a particular
section of the route, Lucca will automatically
re-plan the route and circumvent the blocked
section by the selected distance.
Manual blockages only apply to the route
guidance underway. If you start a new route
guidance or restart navigation, the block
will not apply anymore.
This feature can be used provided:
The map is open during route guidance.
•
➜
➜
➜
Press the Back button to close
the map.
Press the Route button in the
Navigation menu.
The Route menu opens.
Press the Detour button.
The Detour menu opens.
30
Page 31

Additional navigation functions
Select the distance for which you want
➜
to block the route (starting from your
current position).
The Lucca will now plan the route anew
and circumvent the blocked section of
the route.
NB:
If you want to remove the block placed
on a section of the route, you have to
end route guidance. To continue route
guidance, select the destination again
under Edit Way Points in the History
menu.
Track logs
You can use the Lucca to record the route
you are currently travelling. This route does
not have to go over roads and can include
footpaths or similar.
Recorded routes can be replicated at a later
time to get an overview of the route. Track
logs or recorded routes are not intended for
use in route guidance.
This feature can be used provided:
•
You have GPS reception
➜
➜
Press the Route button in the
Navigation menu.
The Route menu opens.
Press the Track Logs button.
➜
The Track Logs menu opens.
Recording routes
➜
Press the Record button in the Track
Logs menu.
The Lucca will now display the map and
record the route.
➜
Close the map and press the Stop
Recording button in the Track Logs
menu.
Recording is stopped. Routes are
always saved showing the date and
time. However, you can also give your
routes names. (Chap. “Selecting route
parameters”, “Route information”)
Driving a route (Simulation)
➜
Press the Replay button in the Track
Logs.
The Lucca will now display the map and
simulate driving along the route.
Route information
The Track Information menu can be used to
view additional information on a route and
to change the route settings. To do so:
➜
Press the Info button in the Track Logs
menu.
The Track Information menu opens.
The Track Logs menu shows all recorded
routes and their names as well as, on
the left, the colour in which the route
is shown on the map. If the route is not
shown on the map, the Lucca will display
a horizontal line to the left instead of a
colour.
You will now be shown the following
information on the recorded routes:
–
Starting point
–
Destination
–
Distances
–
Average speed
31
Page 32

Additional navigation functions
You will now be presented with the
following buttons:
–
Colour on the map: To change the
colour used for showing the route on
the map
–
Rename: To name the route
–
Fit To Screen: To show the route on
the map
–
Export: To save the recorded route on
a SD/MMC card
NB:
Route recordings / Track Logs take up a
lot of the Lucca’s internal memory.
➜
Simply press the relevant button to
change any of the above settings.
Route recording options
You can use the Track Log Options menu
to change the route recording / Track Log
settings.
➜
Press the Options button in the Track
Logs menu.
The Track Log Options menu opens.
You will now be presented with the
following buttons:
Update interval: Interval at which
–
information on your current position
is updated. The route is recorded on
the basis of these successive position
lock updates. These position locks are
generally saved once every second.
However, you can increase these
intervals so as to use less memory for
recording the route.
Current autosave track size: Indicator
–
showing the memory taken up by the
recorded route.
Enable Auto-saving: Records the
–
route automatically as soon as you
have GPS reception.
–
Limit Track DB Size: To put a limit
on the permitted maximum size for
recorded routes.
Maximum track database size:
–
Enables you to specify a maximum
permitted size for route recordings.
Create NMEA/SIRF Log: Enables you
–
to save GPS data received during route
guidance on SD-/MMC cards in NMEA/SIRF format. These data can then be
downloaded onto a PC and used for
navigation and map applications.
NB:
Insert an SD-/MMC card to save GPS
data in NMEA-/SIRF format.
Simply press the relevant button to
➜
change any of the above settings.
32
Page 33

Basic settings
Basic settings
The Settings menu can be used to change
the Lucca’s settings and to view product
information.
Press on the Info … button to view
➜
additional information on the Lucca’s
software.
General settings
➜
➜
➜
Activating / deactivating night mode
The General Settings menu can be used to
manually select day/night mode. The Map
Settings menu can be used to select the
colour settings. (Chap. “Using map view
during route guidance”, “Activate additional
map information”)
➜
Activate/deactivate night view
You can activate/deactivate automatic
day/night changeover mode in the General
Settings menu.
When activated, Lucca receives information
on the exact time at your current position via
GPS and uses this information to calculate
sunrise and sunset, at which times it will
automatically switch to day/night mode.
➜
Press the Navigation button.
The Navigation menu opens.
Press the Settings button.
The Settings menu opens.
Press the General Settings
button.
The General Settings menu
opens.
Press the Night Mode button in the
General Settings menu to activate (tick)
or deactivate (no tick) night mode.
Press the Automatic Night Colours
button in the General Settings menu to
activate (tick) or deactivate (no tick)
automatic changeover mode.
Selecting your time zone
You can select the time zone for your current
position in the Time Zone menu.
Lucca is only able to display the correct
arrival time during route guidance and
switch the screen to day/night mode if it is
set to the correct time zone.
Please read the chapter “Navigation”, section
“Basic settings” for more information.
Entering your home address
Entering your home address into the Lucca
will enable you to navigate home easily and
comfortably no matter where you are.
Please read the “Basic Settings” section in
the “Navigation” chapter.
Speed limit warning options
You can use the Speed Warning Options
menu to select whether you would like to be
warned by an audio alert when exceeding
speed limits.
You can also use this menu to specify a
speed limit tolerance value. In this event,
you will only be warned once the tolerance
value has been exceeded as opposed to the
actual speed limit.
➜
Press Alerts in the General Settings
menu.
The Speed Warning Options menu opens.
Press on Warn When Speeding to
➜
activate (tick) or deactivate (no tick) the
audio alert.
Slide the Speeding Tolerance button
➜
along the bar to select the tolerance
value.
33
Page 34

Basic settings
You can select the tolerance either as a
percentage value or kilometres per hour.
➜
Press on Fixed Value/Percentage to
switch between the two settings.
Map options
You can use the Map Settings menu
to adjust the Lucca’s colour
settings.
You can also use this menu to select to
show/hide POIs and international and
national street names on the map.
Please read the chapter “Using map view
during route guidance”, section “Activate
additional map information”.
Audio settings
You can use the Sound Settings menu to
select the volume, navigation voice output
and button sounds for the Lucca. You can
also use this menu to set the voice output
and button sounds to mute and activate the
dynamic volume function.
This dynamic volume function adapts the
Lucca’s volume to the vehicle’s speed,
enabling you to understand the voice output
despite any loud driving noises.
➜
➜
➜
➜
Press the Navigation button.
The Navigation menu opens.
Press the Settings button.
The Settings menu opens.
Press the Sound Settings button.
The Sound Settings menu opens.
Use the controller to adjust the volume
from between mute (left) to max. volume
(right):
–
Volume: Device volume
(for all applications such as, e.g. the
Music Player)
–
Voice: Voice output volume
–
Keys: Button / key sound volume
You can also set the voice output and
button sounds to mute:
Press the Voice button to activate (tick)
➜
or deactivate (no tick) the Voice mute
function.
Press the Keys button to activate (tick)
➜
or deactivate (no tick) the Key/Button
mute function.
You can press the button below the
➜
controllers to switch between the
following settings:
Single Tone: an acoustic signal issued
–
before voice output
Disabled: no acoustic signal before
–
voice output
Double Tone: a double acoustic signal
–
issued before voice output
Press the Dynamic Volume button to
➜
activate (tick) or deactivate (no tick)
automatic adjustment of the volume to
the vehicle’s speed.
If you activate this function, you will be
shown the Dynamic Volume menu:
Slide the Minimum speed controller
➜
in the relevant direction to specify the
speed at which the volume is to be
increased.
Slide the Maximum speed controller
➜
in the relevant direction to specify the
speed at which the volume is to be set
to maximum.
Route parameters
You can use the Route Parameters
menu to specify the following route
planning parameters:
•
Route options: Route speed profi le
(fast/short/economy)
•
Vehicle profi le (vehicle/bicycle/
pedestrian)
•
Types of roads and permitting/not
permitting U-turns
These route parameters will be saved and
used for all future route guidance.
Please read the chapter “Selecting route
parameters”.
34
Page 35

Languages and units
You can use the Language & Units menu
to select your preferred menu and voice
output language.
You can also use this menu to change the
time, date and distance displays.
NB:
When selecting the language for the
menus, the Navigation application will
close and restart to load the new language
settings. We therefore recommend that
you select your language last.
➜
➜
➜
➜
➜
➜
➜
➜
➜
➜
Press the Navigation button.
The Navigation menu opens.
Press the Settings button.
The Settings menu opens.
Press the Language & Units
button.
The Language & Units menu
opens.
Press on Units to change the units for
distances.
Press on Set Date & Time Format to
select the date and time display format.
The Date & Time Format menu opens.
Use the buttons shown below to select
from various Date & Time display
options:
–
Date format
–
Date delimiter
–
Time format
Press OK to accept the settings.
You will now be returned to the Language
& Units menu.
Press the Voice Language button to
select your preferred language for the
navigation voice output:
The Guidance Language menu opens.
Select your preferred language.
Press OK to accept your selection.
You will now be returned to the Language
& Units menu.
Basic settings
Press the Program Language button to
➜
select your preferred language for the
menus.
The Program Language menu opens.
Select your preferred language.
➜
Press OK to accept your selection.
➜
You will now be shown a confi rmation
prompt.
Press No if you do not want to load the
➜
language.
- or Press Yes to load the language.
➜
The Navigation application will now
be closed and the selected language
settings loaded.
The Navigation menu will now be shown
in the selected language.
Advanced Settings
➜
➜
Display options
You can also use this menu to calibrate the
Lucca’s screen.
Please read the chapter “Using map view
during route guidance”, section “Activate
additional map information” for more
information.
Brightness
You can use the Brightness menu to adjust
the brightness of day / night mode.
➜
Press the Settings button.
The Settings menu opens.
Press the Advanced Settings
button.
The Advanced Settings menu
opens.
You can use the Display Settings
menu to:
–
Select 3D or 2D (3D deactivated) map
view
–
Select the format used for the
coordinates on the destination input
screen
–
Change route information
Press the Brightness button in
the Advanced Settings menu.
35
Page 36

Basic settings
The Brightness menu opens.
➜
Slide the Set custom backlight value
for daylight controller along the bar to
adjust the brightness for day mode.
➜
Slide the Set custom backlight value at
night controller along the bar to adjust
the brightness for night mode.
Smart Zoom
You can use the Smart Zoom menu to:
•
Activate/deactivate automatic zoom
•
Activate/deactivate overview mode
•
Reactivate position location
The Smart Zoom function enables the
Lucca to optimally adapt the map’s scale to
the relevant drive situations encountered
during route guidance. When closing in on
a place requiring a manoeuvre, Lucca will,
for example, zoom in on the map and raise
the map’s angle to enable you to get an ideal
view of, e.g. the next junction. If the place
associated with the next manoeuvre is still
some distance away, Lucca will zoom out of
the map and lower its angle to enable you to
get an ideal view of the road ahead.
➜
➜
➜
➜
In Overview mode, the map will be shown
in two dimensions. It will be minimised and
oriented to North. This enables you to clearly
see your location on the map, e.g. during
long journeys travelling on the motorway.
Press the Smart Zoom button in
the Advanced Settings menu
The Smart Zoom menu opens.
Press the Smart Zoom button to activate
(tick) or deactivate (no tick) the Smart
Zoom.
Slide the Zoom-in limit controller along
the bar to select the maximum size to
which the map can be enlarged.
Slide the Zoom-out limit controller along
the bar to select the maximum size to
which the map can be minimised.
You can also select the map view to
automatically switch to overview mode:
➜
Press Enable Overview Mode to activate
(tick) or deactivate (no tick) this
function.
You can also select for Overview mode to be
switched off again before a manoeuvre. In
this case, the map will be zoomed in again
just before a manoeuvre, such as turning off
at a junction:
➜
Slide the Route event distance for
Overview mode controller along the bar
to select the distance before a manoeuvre
at which Overview mode is turned off.
This is the distance at which Overview
mode will now be turned off.
Slide the Overview zoom level controller
➜
along the bar to select the zoom for the
overview map.
When the map is moved, your position on
the map will be located and locked. You
can use the restore Position Lock function
to make the map switch automatically back
to showing your current position after a
certain period of time:
Press the Restore Lock-to-Position to
➜
activate (tick) or deactivate (no tick) this
function.
If you use the Reactivate Smart Zoom
function, Lucca will automatically reactivate
Smart Zoom after you have zoomed in or
moved the map:
Press the Restore Smart Zoom button to
➜
activate (tick) or deactivate (no tick) this
function.
You can also select a time period for the
reactivation of the Position Lock and Smart
Zoom function:
Slide the Delay before restoring button
➜
along the bar to select the time period
for reactivation.
Route settings
You can use the Route Settings menu to
activate/deactivate cross-border route
planning.
36
Page 37

Basic settings
You can also use this menu to select the
cursor on the map to be aligned with the
relevant road you are travelling along or
to show your actual position, e.g. when
walking.
NB:
If you selected “Pedestrian” under
Vehicle Profi le in the route parameters,
the cursor will automatically show your
actual position. (Chap. “Selecting route
parameters”)
➜
The Lucca is confi gured by default to
navigate across borders. If, however, you,
for example, live close to a border and/
or for some other reason want to prevent
the Lucca from including roads located
in another country when navigating and
planning routes, you can deactivate this
function:
➜
The Lucca will always show the cursor on the
road currently travelled while navigating. If,
however, you are travelling as a pedestrian
and want to see your precise position on the
map, you can deactivate this function:
➜
Data management
You can use the User Data Management
menu to save, delete and restore your user
data and settings.
You can also use this menu to restore the
Advanced Settings to their default settings.
Press the Route Settings button
in the Advanced Settings menu.
The Route Settings menu opens.
Press the Cross-border Planning button
to activate (tick) or deactivate (no tick)
this function.
Press the Keep position on road button
to activate (tick) or deactivate (no tick)
this function.
NB:
If you restore the Lucca to its default
settings:
•
all destinations and personal settings
will be deleted.
•
the Navigation application will be
closed and restarted.
➜
➜
➜
➜
Displaying POIs
“Selecting a POI”, “Show/Hide POIs” for
more information.
Press the User Data Management
button in the Advanced Settings
menu.
The User Data Management menu opens.
You will now be presented with the
following options:
Backup Data: For backing-up and
–
saving data (History, Favourites,
Routes, Pins)
Restore Data: To restore user data
–
Remove Pins: To delete all of the pins
–
on the map
Restore Factory Settings: To reset
–
all of the settings to their default
settings
Reset Advanced Settings: To reset
–
all of the Advanced Settings to their
default settings
Simply press the relevant button to
change any of the above settings.
You will now be shown a confi rmation
prompt.
Press No if you do not want to accept
the setting.
- or Press Yes to accept the setting.
The POI Presentation menu can be
used to show/hide POIs.
Please read the chapter “Navigation”,
37
Page 38

GPS operating principle Using the SD/MMC card
GPS operating principle
The Global Positioning System (GPS) was
developed by the American military in the
1970’s.
GPS’s rely on a total of 24 satellites that are
orbiting the earth and transmit signals. The
GPS receiver uses the time delay between
transmission and reception of these signals
to calculate its distance to the individual
satellites. It can then use this information to
calculate its current geographical position.
A GPS receiver needs to receive signals from
at least 3 satellites to be able to determine
its position. When it receives signals from
4 or more satellites, it is also able to
determine its level of elevation above sea
level. A GPS is capable of determining its
position accurately to within 3 metres.
GPS route guidance: The supplied
cartographic material includes the
geographic coordinates of the POIs, streets
and towns shown on the Lucca’s screen.
The navigation system is therefore capable
of planning and calculating a route from
a particular starting point to a particular
destination.
When the Lucca receives signals from at
least 3 satellites, it is able to determine and
show its position on the map. This position
can then be used as the starting point for
planning a route. Since the Lucca checks its
position once every second, you can watch
your progress on the map.
Using the SD/MMC card
You can use SD/MMC cards with the Lucca
for the following:
•
To upload navigation data for other
countries (Chapter (“Uploading
cartographic material”)
•
Play audio fi les
(Chapter “Music Player”)
•
View image fi les
(Chapter “Picture Viewer”)
SD-/MMC cards can have a capacity of up
to 4 GB and must be either formatted to
accept FAT 16 or FAT 32 fi le systems.
Preparation
You can either save fi les in a directory or
subdirectory. You can also save a range of
different format fi les in the same directory.
This is because the Music Player will only
play audio fi les and ignore the image fi les,
and the Picture Viewer will only show image
fi les and ignore the audio fi les.
Audio Files
(Music Player)
MP3 fi les (ID3- Tags
version 1 and 2)
WMA GIF
OGG BMP (max. 13 MB)
Inserting the SD/MMC card
The SD-/MMC card slot is located on the
Lucca’s right side.
Push the SD-/MMC card into the slot as
➜
indicated by the marking shown on the
slot until it engages.
Image Files
(Picture Viewer)
JPG
(max. 2.2 million pixel)
(max. 2.2 million Pixel)
38
Removing the SD/MMC card
Press the Back button to close the MP3
➜
or Picture Viewer .
Carefully press the SD-/MMC card into
➜
the slot until it is released.
The SD/MMC card will now slightly
protrude from the slot. Remove the
card.
Page 39

Music Player
Music Player
You can also use the Lucca to playback
audio fi les from a SD/MMC card. The Lucca
recognises the following audio fi le formats:
MP3, WMA and OGG. Audio content is
played back either over the Lucca’s internal
speaker or a set of headphones.
The chapter “Using the SD/MMC card”
contains information on how to use and
prepare the card.
Opening the Music Player
Turn on the Lucca using the On/Off
➜
button.
If the Lucca is already turned on,
press the MENU button for more than
➜
3 seconds.
The main menu opens.
➜
Press the Music Player button.
The MP3 menu opens.
> Repeat MP3 fi le / close repeat function
? Open MP3 list
@ Mute on/off
A Volume control
B Play previous/next MP3 fi le
C Stop
D Pause/ Play
E Close Music Player and return to the
main menu.
NB:
You can use the MENU button (press
for more than 3 seconds) to open the
Navigation application or the Picture
Viewer without closing the Music Player.
MP3 list
Press the FILE button in the Music Player to
open the MP3 list in the MP3 list menu. This
is the list that contains all of the music fi les
and directories and you can select them
directly from the list.
22
Operating the Music Player
You can use the MP3 menu to operate the
Music Player and to open the MP3 list.
14
15
16
21 20 19 17
18
23
25
F Buttons (arrows) for browsing through
the music fi les in the MP3 list
G To go up one level to the next highest
directory
H Music fi le (or directory) that you can
select directly
I To return to the MP3 (Music Player)
menu
24
39
Page 40

Picture Viewer
Picture Viewer
You can also use the Lucca to view images
stored on a SD-/MMC card. Lucca recognises
JPG, GIF and BMP format image fi les.
The chapter “Using the SD/MMC card”
contains information on how to use and
prepare the card.
Starting the Picture Viewer
➜
Turn on the Lucca using the On/Off
button.
If the Lucca is already turned on,
press the MENU button for more than
➜
3 seconds.
The main menu opens.
➜
Operating the Picture Viewer
You can use the Picture Viewer menu to view
pictures and to start slideshows.
Press the Picture Viewer button.
The Picture Viewer menu opens
and the fi rst image fi les are
shown.
M Start Full Screen mode
N To close the Picture Viewer and return
to the main menu.
Slideshow
You can press the SLIDE button in the
Picture Viewer to start the slideshow. The
pictures will be changed at an interval of
3 seconds.
Once the slideshow is fi nished, you will be
asked whether you want to view the fi rst
picture again.
➜
You can also stop the slideshow at any
time by pressing on the picture currently
being shown.
You will then be returned to the Picture
Viewer menu.
Full screen mode
You can press the FULL button in the
Picture Viewer to view the current picture
in full-screen mode. You can then use the
arrow buttons to view the next or previous
picture.
26
30
J Buttons (arrows) for browsing through
the image fi les
K Image fi les that you can select directly
L Start slideshow
29
28
27
40
Press on the current picture to return to
➜
the Picture Viewer menu.
Page 41

Uploading cartographic material Lucca software
Uploading cartographic
material
The cartographic material of the country
in which you bought your Lucca will
have been pre-installed onto your Lucca.
This cartographic material will also be
provided on the supplied CD/DVD for later
re-installation. Depending on the version
you bought, the supplied CD/DVD might
also contain other cartographic material.
You now have the following options:
•
You can upload cartographic material
from the CD/DVD to the Lucca’smemory
•
You can use cartographic material stored
on the SD-/MMC card
You will also be able to buy SD-/MMC card
map updates.
Using the cartographic material
stored on a SD-/MMC card
➜
Turn on the Lucca using the On/Off
button.
The SD-/MMC card slot is located on the
Lucca right side.
➜
Push the SD-/MMC card into the slot as
indicated by the marking shown on the
slot until it engages.
You can now immediately use the new
data for navigation. Lucca always uses
the cartographic material stored on the
SD-/MMC card and that stored in its
memory to navigate.
Lucca software
Reinstalling the navigation
software
The Lucca’s navigation software, including
instructions, is provided on the supplied
CD/DVD for reinstallation purposes.
Updating the navigation software
Blaupunkt regularly releases software
updates in order to make sure that your
Lucca is always up to date. These updates
can be downloaded from www.blaupunkt.
com.
Please follow the Lucca’s onscreen
instructions for downloading.
Using cartographic material with
the Lucca
Downloading the cartographic material
contained on the supplied CD/DVD into the
Lucca’s memory using a PC:
➜
Connect the Lucca to the PC through the
USB port.
➜
Turn on the Lucca using the On/Off
button.
You will now be shown a dialog box.
➜
Follow the onscreen instructions.
Download the cartographic material
into the memory. The old cartographic
material will not be overwritten.
41
Page 42

Technical data Disposal | Service | Warranty
Technical data
Operating system:
Microsoft Windows
CE 5.0
Processor: Atlas II Dual Core
Processor (300 MHz)
Hard drive / memory:
64 MB DRAM
512 MB NAND Flash
Dimensions (mm):
115 (W) x 80 (L) x 25 (H)
Weight (g): approx. 190
GPS: QuickFind-Technology
Centrality GPS
20 channels
Battery: Rechargeable
(Li-lon 1230 mA)
Audio: Max. 1.5 W integrated
speaker
Operating temperature:
-20°C ... 60°C
Storage temperature:
-30°C ... 70°C
Music Player: MP3 (ID3-Tag Version
1/2), WMA, OGG
Picture-Viewer: JPG (max. 2,2 million
Pixel), GIF (max. 2,2
million Pixel), BMP (max.
13 MB)
SD-/MMC-Card: max. 4 GB
Disposal of old appliances
(only relevant for EU countries)
Do not dispose of your old appliance as
domestic waste!
Please make use of the return and collection
system provided for the disposal of old
appliances.
Service
Blaupunkt offer repair and collection services
in a number of European countries.
In the event that you need to send your
Lucca to Blaupunkt for servicing, you may
be able to request collection using our
online services.
Please visit www.blaupunkt.com to fi nd
out whether this service is available in your
country.
Warranty
We provide a manufacturer’s warranty on
all Blaupunkt products bought within the
European Union. Products bought outside
the European Union are subject to the
warranty conditions of the relevant branch.
The guarantee period of the rechargeable
battery is 1 year.
Blaupunkt’s warranty terms can be viewed
at www.blaupunkt.com or requested from:
Blaupunkt GmbH, Hotline
Robert-Bosch-Str. 200
D-31139 Hildesheim
42
Page 43

FAQ
Frequently Asked Questions
/FAQ
Why does the Lucca need GPS reception?
The Lucca needs GPS reception to determine
its position. It receives information both on
its location and direction of travel from the
GPS satellites. This is what enables the Lucca
to safely guide you to your destination.
Why does the Lucca have diffi culties
receiving GPS signals?
The Lucca needs approx. 1 minute before
it is ready for navigation after having been
turned on. When turned on for the fi rst time,
it will need a little longer as well as a very
strong GPS signal.
Tall buildings, trees and even an awkward
installation location in the vehicle can
obstruct GPS satellite signal reception.
Changing the Lucca’s location while the unit
is turned off (e.g. after having been carried
on a plane or train) can cause the Lucca
to be unable to receive GPS signals for a
longer period of time.
What can I do when the Lucca has problems
receiving GPS signals?
If the Lucca has trouble receiving GPS
signals, go outside, place it onto an elevation
and do not move it. Your Lucca should be
ready to operate again within 2 to 5 minutes.
The Lucca will now also be able to navigate
if conditions are less than ideal.
Lucca’s status can be viewed in the
Navigation menu > GPS Info menu.
Why doesn’t the battery last longer?
The Lucca’s memory and GPS receiver
continue to use power – even though only a
marginal amount – when turned off. This is
why the Lucca’s battery may be discharged
within a couple of days of recharging it.
Short journeys are not suffi cient to fully
recharge the battery. This is why you
should always connect the Lucca to your
vehicle’s battery using the cigarette lighter
charging cable when using it in your vehicle.
The batteries must be fully charged (by
recharging them for approx. 5 to 6 hours)
to achieve the maximum battery run time of
up to 3 hours.
What is the type of data I can store on a
SD-/MMC card for use with the Lucca ?
You can use SD-/MMC cards with a capacity
of up to 4 GB. Lucca will recognise the
following data:
Operating system and cartographic
•
material
MP3-/WMA data for playing music back
•
using the Music Player
JPG data for viewing images using the
•
Picture Viewer
What are the SD-/MMC card fi le format
requirements?
FAT16 or FAT32.
What kind of memory cards are suitable for
use with the Lucca?
The Lucca is designed for use with
conventional SD- or MMC cards. However,
there is always the possibility that a
particular type of SD-/MMC card proves
to be incompatible with the Lucca. In this
event, simply reformat the card to FAT32.
If the Lucca still fails to recognise the SD/MMC card after reformatting, please try a
different brand SD-/MMC card.
Is it also possible to use other cartographic
material with the Lucca?
Yes. Simply put the SD-/MMC card with the
cartographic material into the SD-/MMC card
slot and access the new data for navigation.
Lucca always uses the cartographic material
stored on the SD-/MMC card and the data in
its memory to navigate.
Can I also use cartographic material from
other Lucca models?
No. The Lucca 3.3 EE can only be used with
the cartographic material originally supplied
on the DVD/CD or cartographic material
sold specifi cally for this model/version.
Is it possible to restore the navigation
software in the Lucca’s memory?
Yes. The navigation software is provided
on the supplied DVD/CD. The data can be
transferred to an SD-/MMC card through
the USB connection. The data can then
be downloaded into the Lucca’s memory
from the SD-/MMC card. Please refer to
the instructions on the DVD/CD for more
information.
43
Page 44

FAQ
How long does it take to download data
from the SD-/MMC into the Lucca’s
memory?
Around 15 minutes depending on the size
of the data.
Is it possible to play DRM protected WMA
fi les on the Lucca?
It is not possible to play Digital-RightsManagement protected WMA fi les (WMADRM) since it is not possible to transfer the
license key when downloading the WMA fi le
from a PC.
However, WMA fi les without DRM protection
can of course be played.
Why does the Lucca fail to respond when I
press the buttons?
The operating system is overloaded. Turn
off your Lucca and then turn it on again
(press for more than 3 seconds). The Lucca
will now perform a reset.
If the Lucca fails to start following the reset,
reinstall the navigation software using
the supplied CD/DVD. Please refer to the
instructions provided on the CD/DVD for
more information.
44
Page 45

45
Page 46

Country: Phone: Fax:
Bulgaria (BG) +4 021 405 76 11
Croatia (HR) +385 (1) 3777-333 +385 (1) 3773-159
Czech. Rep. (CZ) 02-6130 0446 02-6130 0514
Estonia (EST) 3726543219 3726543484
Germany (D) 0180-5000225 05121-49 4002
Great Britain (GB) 01-89583 8880 01-89583 8394
Greece (GR) 210 94 27 337 210 94 12 711
Hungary (H) 76 511 803 76 511 809
Latvia (LET) 3717089200 3717828280
Lithuania (LIT) 37037331649 37037331640
Poland (PL) 0800-118922 022-8771260
Romania (RO) 4021 413 97 78 4021 413 97 77
Russia (RU) 70952871036 70952872216
Slovakia (SK) 3676511801 3676511809
Slovenia (SI) 3676511801 3676511809
Turkey (TR) 0212-335 06 71 0212-346 00 40
Ukraine (UA) 380445450897 380445450798
http://www.blaupunkt.com
© 2007 All rights reserved by Blaupunkt. This material may not be reproduced, copied or distributed
for personal use.
Please take also notice of the end user licence agreement for the software and the database on
the enclosed CD/DVD.
Blaupunkt GmbH,
Robert-Bosch-Straße 200, D-31139 Hildesheim
06/07 CM-AS/SCS1 (GB) 8 622 405 539
 Loading...