

Page 1
Mobile Nav
igation
TravelPilot Lucca 3.3
Operating Instructions
(long version)
Page 2
Device Overview
Device Overview
2
Page 3
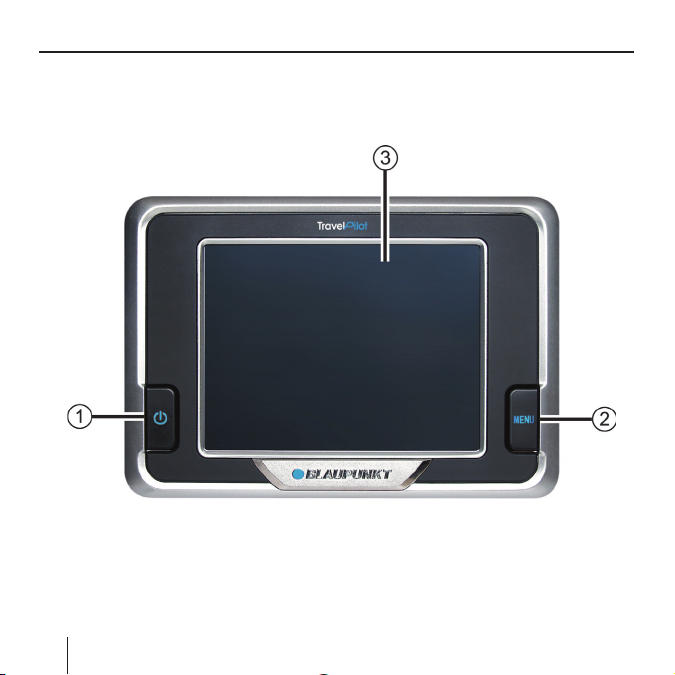
The following button are located beside the display:
Power (Screen ON/OFF):
1.
Long press (longer than three
seconds): Switches the power
on/off.
Short press: Switches the screen
on/off. (battery saving mode)
Menu:
2.
Long press (longer than three
seconds): Opens the main menu
screen of the device.
Short press: Opens the quick settings menu.
3. 3.5" LCD Touchscreen:
All entries and the control of
Lucca are carried out in a simple
and intuitive way by touching the
buttons displayed on the touchscreen.
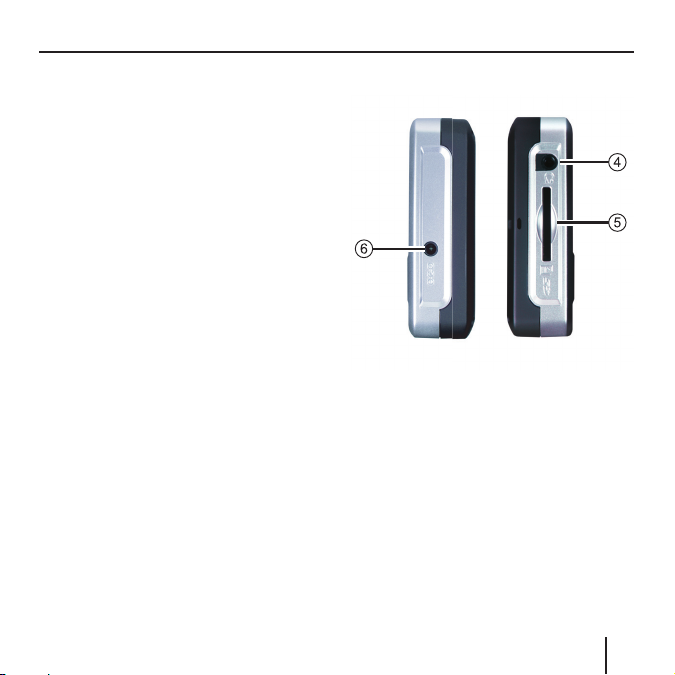
4. Headphone jack
5. SD card slot
DC power input jack
6.
Device Overview
3
Page 4
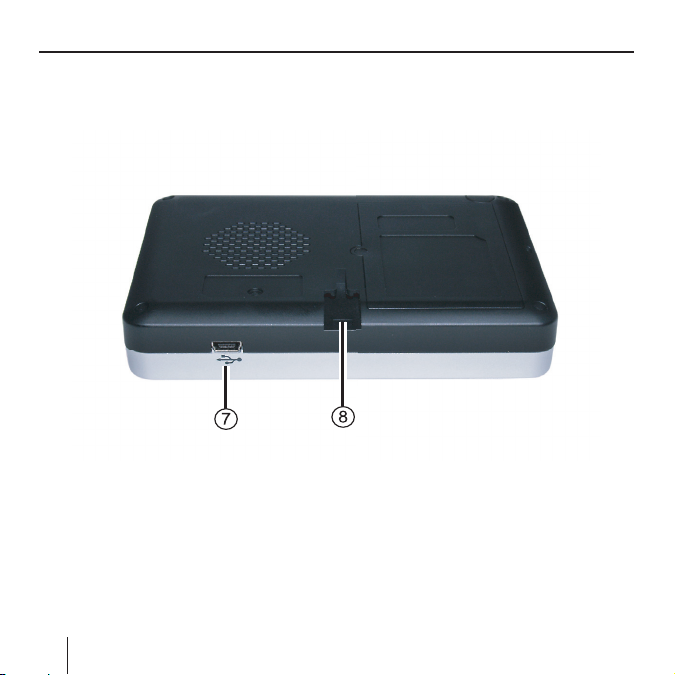
Device Overview
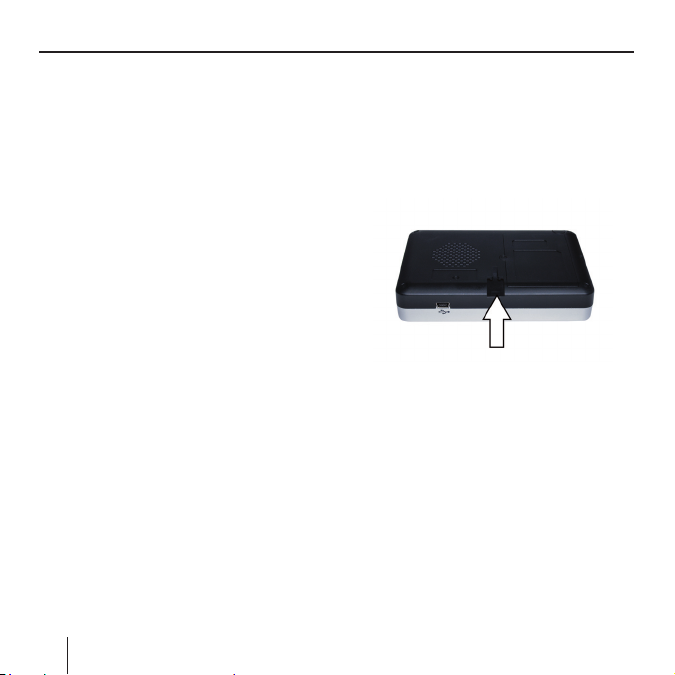
The underside features the following controls:
7. USB Port
8. Connects the Lucca to the suction cup
4
Page 5

Contents
Device Overview ......................2
Safety notes .............................9
Safety Notes for Navigation ............ 9
Safety Notes for Handling the
Lucca .............................................. 9
Initial Startup of Lucca ..........10
Lucca Scope of Delivery ...............10
Protective Films and Covers ......... 11
Power On/Off .........................11
Setting the Language .............12
Charging the Battery .............12
Installation in the Vehicle .....13
Attaching the Suction Cup ......... 13
Removing the Suction Cup ........ 14
Installing Lucca in the Suction
Cup ............................................ 14
Removing the Lucca ................... 14
Power On/Off .........................15
Power-on .................................... 15
Activating the Idle State ............. 15
Power-off ................................... 15
Reactivating ............................... 15
Menu Button ..........................16
Quick Settings ...........................16
Info ............................................ 16
Additional Functions .................. 16
Operating the Navigation
Menus .....................................17
Software Keyboard ....................... 17
Entering Blank Spaces ...............17
Deleting Characters ................... 17
Switching between Number,
Umlaut and Character Input ......18
Lists .............................................. 18
Buttons ......................................... 19
Information ................................... 19
GPS Status ................................ 19
Navigation ..............................21
General Notes about the
Navigation ..................................... 21
Starting the Navigation ................. 21
Entering a Destination ............... 22
Navigating Home ........................ 22
Showing a Map .......................... 22
Settings...................................... 22
5
Page 6

Contents
Exiting the Menu .......................22
Additional Functions .................. 22
GPS Info ..................................... 23
Route Planning ........................... 23
Select Map ................................. 23
Performing Basic Settings ............ 23
Setting the Time Zone ...............23
Entering the Home Address .......24
Specifying a Destination ...............25
Entering a Destination ............... 25
Entering a Destination Country . 25
Entering a Destination Address . 26
Additional Functions ................. 27
Selecting a Point of Interest ......... 28
Point of Interest in the Current
Vicinity ....................................... 28
Additional Functions ................. 30
Point of Interest at a Specifi c
Location ..................................... 30
Special National Destination ..... 32
Copying a Destination from
the Map......................................... 34
Moving the Map Section ............ 34
6
Copying the Destination from the
Favourites ..................................... 37
Copying a Favourite for
Destination Guidance ................ 37
Additional Functions ................. 38
Copying one of the Recent
Destinations .................................. 38
Additional Functions ................. 39
Using Home Address as
Destination ................................... 39
Managing Destinations ..........40
Saving Destinations ...................... 40
Saving one of the Recent
Destinations ............................... 41
Renaming a Destination ............. 41
Deleting a Destination ............... 42
Deleting the Complete List ........42
Route Planning with Stages...43
Entering Destination Points .......43
Editing, Saving and Managing
Routes ........................................ 44
Changing the Order ................... 45
Deleting a Route Point ............... 45
Deleting a Complete Route List .45
Page 7

Contents
Managing Routes .......................... 45
Saving a route ............................45
Loading a route .......................... 46
Calculating a Route ....................... 46
Displaying the Route on the Map . 47
Simulation (demo mode) ...........47
Specifying Route Options ......47
Destination Guidance ............49
Disturbed GPS Reception .......... 50
Quitting the Destination
Guidance.................................... 50
Reaching the Place of
Destination ................................ 50
Working with the Map ...........51
Map Operation .............................. 51
Showing a Map .......................... 51
Touching the Map ...................... 51
Buttons ......................................... 52
With Map View without GPS
Reception................................... 52
With Map View with GPS
Reception................................... 52
Additional Functions .................. 54
Day/Night Mode .........................54
Mute ........................................... 54
Settings...................................... 54
Block Road, Unblocking .............54
Inserting an Interim Destination .. 55
Route Options ............................ 55
Next Destination ........................ 55
Map Display during
Destination Guidance ............56
Navigation Tools .........................56
Route Information ...................... 57
Signpost Information ................. 57
Speed Limit ...............................57
Showing Additional Map
Information ................................... 58
Map Information ........................ 58
Route Information ...................... 59
Signpost Information ................. 59
Speed ........................................ 59
Additional Functions during
Navigation ..............................61
Inserting an Interim Destination ... 61
Approaching the Next Destination .. 62
Blocking route segments .......62
Manual Blocking......................... 62
7
Page 8

Contents
Unblocking ................................. 63
Confi guring Lucca/
Basic Settings ........................64
Settings ........................................ 64
Language ................................... 64
Home Address ........................... 65
Map Information ........................ 65
Route Information ...................... 65
Routing Options ......................... 66
Route Planning ........................... 66
Signpost Information ................. 66
Speed Limit ...............................66
Auto Mode .................................67
Time Zone .................................. 68
Format ....................................... 68
Representation .......................... 69
Voice command .........................69
Factory Settings ......................... 69
Touchscreen ............................... 69
Product Information .................. 70
GPS Mode of Operation ........70
MP3 Mode ..............................71
Preparing the SD Card .................. 71
Inserting the SD Card ................... 71
8
Selecting MP3 Mode ..................... 72
Starting Playback .......................... 72
Selecting a MP3 fi le ...................... 72
Playback the MP3 File ................... 73
Repeated Play (Repeat) ................ 73
Quitting Playback .......................... 73
Removing the SD Card .................. 74
Picture Viewer Mode .............74
Starting the Picture Viewer........... 74
Selecting a Picture fi le ............... 75
Starting the Slide Show ................ 75
Starting the Full Screen ................ 76
Removing the SD Card .................. 77
Installing Street Maps ...........77
Removing the SD Card ............... 78
Technical Data ........................78
Disposal of old unit ...............79
Service ...................................79
Warranty ................................80
Fault Removal / Frequently
Asked Questions FAQ ............80
Page 9
Safety notes
Safety notes
For your personal benefi t, please
carefully read the following safety
notes and warnings before operating
your Lucca for the fi rst time.
Safety Notes for Navigation
Caution:
Do not operate the Lucca while driving to protect yourself and others
against accidents!
View the display only if you are in a
safe travel situation!
The street routing and traffi c signs
have priority over the instructions of
the navigation system.
Follow the instruction of the Lucca
only if circumstances and traffi c regulations allow! Lucca will bring you to
your destination even if you have to
deviate from the planned route.
Notes:
• Routes are best planned before
starting your trip. If you want to
enter a new route while on the
road, please head for the next
parking or rest area!
• If you did not understand the voice
information or if you are not sure
what to do at the next intersection, use the map or arrow display
for quick orientation.
Safety Notes for Handling
the Lucca
Caution:
Protect the device against moisture
since it is not waterproof and not
splashproof.
Notes:
• Remove the power supply connec-
tor of the Lucca if you switch off
9
Page 10

Safety notes Initial Startup
the engine since the GPS receiver
constantly uses electricity and
could discharge the vehicle battery.
• Do not unplug the connector by
pulling on the wire. The wire could
be damaged!
• Do not use harsh solvents to clean
the device; use only a damp, lintfree cloth.
10
Initial Startup of Lucca
If you are starting up the Lucca for
the fi rst time, you must set your preferred language for the menus and
the voice output.
Note:
Upon purchasing the Lucca the
battery maybe empty. Please
charge the battery before using
the device.
When starting up the Lucca for the
fi rst time please allow the unit a
few minutes to enter navigation
mode.
Lucca Scope of Delivery
The scope of delivery contains the
following components:
Lucca Unit
•
Suction Cup
•
Connector charger for connecting
•
to cigarette lighter (Cigar Plug)
User's Manual (short version)
•
Page 11
Initial Startup Power on/off
CD/DVD with european road map
•
and operating instructions (long
versions)
Optional Accessories:
Carrying Case
•
DC Adapter
•
USB Cable
•
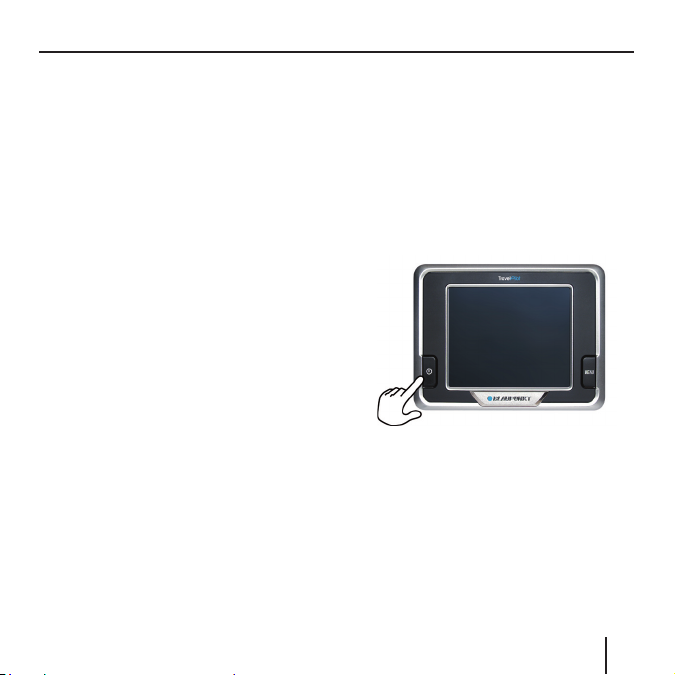
Power On/Off
The Power button allows for turning
the Lucca on or off. In its delivery
state, the Lucca is switched off.
➜
Press the Power button on the
bottom left-hand corner of the
Lucca for longer than three seconds.
• Second car kit
VAN/SUV Suction Cup
•
Holder for air vent opening
•
Protective Films and Covers
Prior to the initial use, remove the
protective fi lms from the display and
front of the housing. Before inserting
an SD card, please remove the dummy card. To protect the contacts, you
can apply the elastic cover and dummy card again after using the Lucca.
11
Page 12

Setting the Language Charging the Battery
Setting the Language
If the Lucca is switched on for the
fi rst time, US English is used as the
standard language. If necessary, you
may have to set the desired language
for the menus and the voice output:
➜
Turn on the Lucca using the
Power button.
A dialogue menu displays. In this
menu you can select your preferred language.
➜ Please follow the instructions.
The language is loaded and the
main menu is displayed.
12
Charging the Battery
The rechargeable battery allows for
operating the Lucca battery-operated
without the external power supply.
The charge indicator of the battery
is located in the top center of the
screen. The symbols have the following meaning:
: The device is supplied by
–
an external power source. The
battery is fully charged.
–
: The device is supplied by
an external power source. The
battery is being charged.
–
: The device is supplied by
its internal battery. The charge
state of the battery is suffi cient.
–
: The device is supplied by
its internal battery. The charge
state of the battery is low.
The number of dark block segments
on the battery indicates the charge
Page 13
Charging the Battery Installation in the Vehicle
state of the battery (0 to 3 segments).
Note:
If the charge state of the battery
is very low, a warning message is
displayed.
➜
To charge the battery, attach the
supplied charger to the charging
socket.
Note:
Use only original chargers for operating and charging the battery.
Note:
Do not discard any batteries in the
household trash; instead, return
them to the corresponding collection sites.
Installation in the
Vehicle
For temporary installation in a vehicle, the Lucca features a suction cup
to attach it to the windshield.
Caution:
Install the Lucca so that it does not
block your view and does not distract
from the traffi c.
Do not install the Lucca in the airbag
deployment area.
Ensure that the Lucca does not pose
a threat to passengers in the vehicle
in case of emergency braking.
Attaching the Suction Cup
The Lucca can be installed in the vehicle in a simple and safe way using
the supplied suction cup.
➜
Locate a suitable place for installing the Lucca.
➜
To ensure a perfect hold, the glass
must be free of dust and oil. If necessary, clean the glass fi rst.
13
Page 14
Installation in the Vehicle
➜
Press the suction plate of the support against the glass.
➜
Push the lever on the suction cup
towards the glass.
➜
The track for mounting the Lucca
must be aligned vertically.
Removing the Suction Cup
If you change vehicles, you can simply
remove the suction cup.
Push the lever on the suction cup
➜
away from the glass.
Carefully loosen the suction plate
➜
at the edge from the glass so that
air can enter between suction cup
and glass.
Carefully pull the suction cup off
➜
of the glass.
14
Installing Lucca in the Suction Cup
The suction cup features a track for
mounting the Lucca on the inside.
➜
Carefully push the guide of the
Lucca over the track of the suction cup.
Removing the Lucca
Pull the Lucca up and out of the
➜
suction cup.
Page 15

Power on/off
Power On/Off
Power-on
To power on the Lucca, push the
➜
Power button.
The device switches on and dis-
plays the logo screen.
Activating the Idle State
To activate the idle state, briefl y
➜
push the Power button.
The Lucca switches to the idle
state (screen off state).
Power-off
To power off the device, press and
➜
hold the Power button for longer
than 4 seconds.
The Lucca is switched off.
Note:
In the power-off mode the Lucca
is still using small amount of energy from the battery. After long
period of time there is a possibility that the battery may need to be
re-charged.
Reactivating
Briefl y push the Power button to
➜
power on the Lucca.
15
Page 16

Menu Button
Menu Button
Quick Settings
In the Quick Settings menu volume
and brightness can be adjusted. The
Quick Settings menu can be entered
at any time independent of the current menu being active.
➜
Touch the Menu button.
The Quick Settings menu displays.
➜
Touch the / buttons to adjust
volume or brightness.
➜
Note:
Info
Prerequisite:
•
➜
The last voice instruction is re-
16
✚ Touch this button to re-
turn to the previous menu.
After 5 seconds without touching
the display Lucca returns automatically to the previous menu.
A Navigation is active.
Touch the Info button in the Quick
Settings menu.
peated.
Additional Functions
Touch the More button in the
➜
Quick Settings menu to gain access to additional functions.
Information
•
– Touch the Information button
to gain access to product information.
Battery
•
– Touch the Battery button.
The battery status displays.
Power Saving
•
– Touch the Power Saving but-
ton. The Power Saving menu
displays.
– Backlight Time Out: Touch the
square on the right side to set
the time until the backlight will
be switched off after the last
operation (for battery saving).
Press the OK button to con-
fi rm.
– Battery Warning Time Out:
Touch the square on the right
side to set the timing for the
battery warning. The battery
warning will be displayed ac-
Page 17

Menu Button Operating the Navigation Menus
cordingly before the battery
runs out. Press the OK button
to confi rm.
Operating the
Navigation Menus
Software Keyboard
If text entries are required, the touchscreen displays a software keyboard.
You can perform all entries using your
fi nger. Only capital letters can be entered.
You do not have to enter any special
characters or umlauts when entering
city or street names. The Lucca completes these characters automatically.
Entering Blank Spaces
➜
To enter a blank space, touch the
button.
Deleting Characters
To delete the last character, touch
➜
the button.
17
Page 18
Operating the Navigation Menus
Switching between Number, Umlaut
and Character Input
To enter numbers, such as postcode,
touch the
➜
To return to the character entry
mode,
touch
➜
To enter an umlaut,
touch the
➜
keyboard is displayed.
As soon as you enter an umlaut,
the character keyboard is automatically displayed again.
Note:
Umlauts do not have to be entered when entering address
information, but they may be
helpful for the description of
stored destinations and routes.
18
button
button. The umlaut
List
In many cases, you can display lists
from which you can select an entry.
This is the case, for example, if you
do not enter the complete name of a
place during the entry. After every entry of a letter, the text fi eld shows the
fi rst entry that starts with the previously entered characters. To display a
list with additional matching entries,
touch the List button.
The end of the list features entries
what contain the sequence of previously entered characters not at the
beginning, but in the middle or at the
end.
One entry of the list is always selected.
The selected entry can be selected
➜
by touching the OK button.
These lists contain the following buttons:
➜
accept the selected entry. Howev-
: Touch the OK button to
Page 19

Operating the Navigation Menus
er, you can also directly touch an
entry to accept it.
: Touch this button to scroll
➜
up in the list by one page (5 elements).
: Touch this button to scroll
➜
down in the list by one page
(5 elements).
To scroll through the list by several
➜
pages, repeatedly touch the corresponding button.
Note:
If the list features more than 5 elements, the scroll bar indicates the
current position in the list.
➜
: Touch this button to return
to the entry without selecting a
list element.
Buttons
Buttons are located on all menus of
the Lucca:
➜
: Touch this button to return
to the previously opened menu.
If you are in the Navigation menu,
this button takes you to the Blau-
punkt start screen. Here, you can
open another application, such
as the MP3 player or the Picture
Viewer, or reopen the navigation.
➜
More: Touch this button to obtain
access to additional functions. Depending on the menu in which this
button is located, different functions are offered.
If this button is deactivated, no additional functions are available.
Information
From the Navigation menu, you can
display the current GPS status at any
time.
GPS Status
The GPS status menu contains infor-
mation about your current position
and your current speed. In addition,
you can also save your current position.
➜
In the Navigation menu, touch the
More button.
The following window displays:
19
Page 20

Operating the Navigation Menus
➜
Touch the GPS Info button.
The GPS Status menu displays.
• GMT: Greenwich Mean Time Lon-
don time without daylight savings
time.
• Longitude/Latitude, current Posi-
tion: Information of the east longitude and north latitude.
• Satellites: Number of satellites
received. The navigation requires
signals from at least three satellites.
• HDOP: Horizontal Dilution of Pre-
cision. Indicates the quality of the
positioning. Theoretically, values
from 0 to 50 are possible, whereby
the following applies: The lower
the value, the more precise the
positioning (value 0 = no deviation
from the actual position). Values
up to 8 are acceptable for navigation.
• Speed: Indicates the current
speed of the vehicle.
• Position: Indicates the address of
the current position (if possible).
• Save current position: Touch this
button to save the current position to the favourites.
• Touch the button to close the
GPS window.
20
Page 21
Navigation
Navigation
General Notes about the
Navigation
The use of the Lucca is at your own
risk.
Caution:
Do not operate the Lucca while driving to protect yourself and others
against accidents!
View the display only if you are in a
safe travel situation!
The street routing and traffi c signs
have priority over the instructions of
the navigation system.
Follow the instruction of the Lucca
only if circumstances and traffi c regulations allow! Lucca will bring you to
your destination even if you have to
deviate from the planned route.
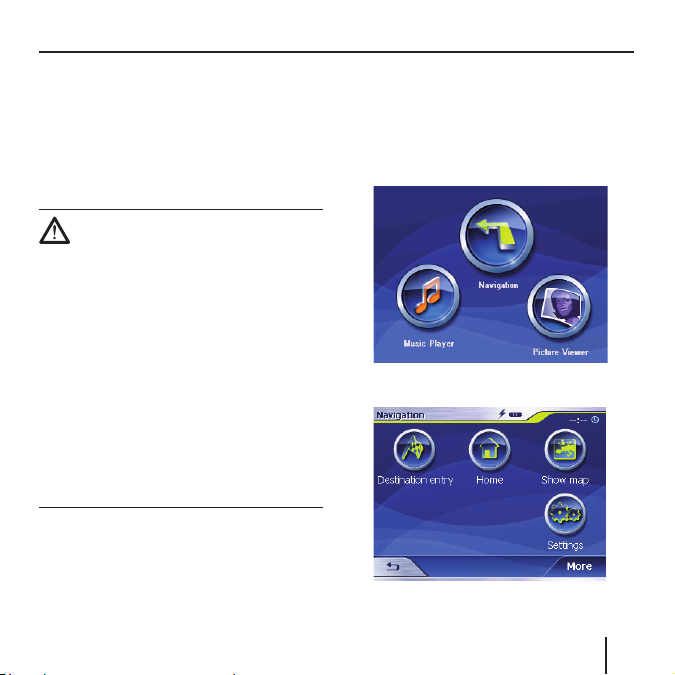
Starting the Navigation
Power on the device using the
➜
Power button.
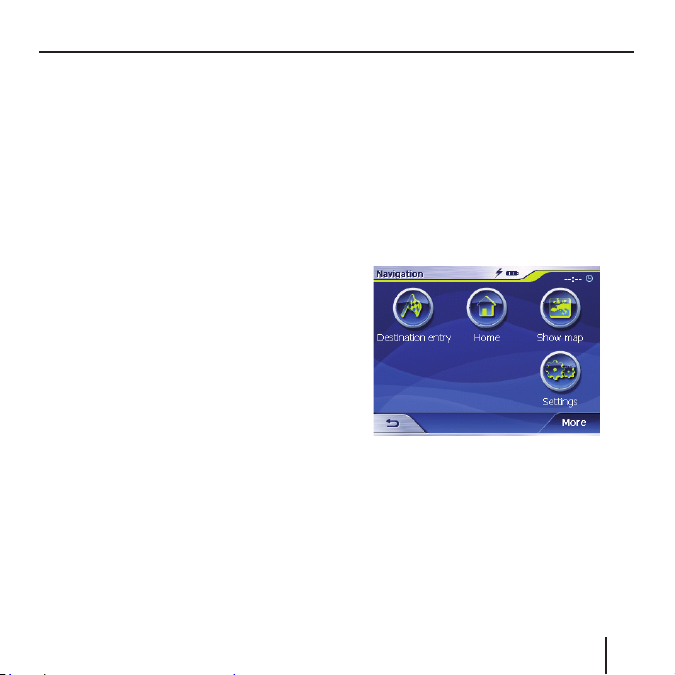
In the start screen, touch the Navi-
➜
gation button.
The Navigation menu displays.
21
Page 22
Navigation
The Navigation menu allows access to
all the functions of the navigation.
Entering a Destination
➜
Touch the Destination entry button to enter a destination for the
navigation.
For further details, please read the
section "Entering a Destination".
Navigating Home
➜
Touch the Home button to use
your stored home address as the
destination for the navigation.
For further details, please read the
section "Using the Home Address as
Destination".
Showing a Map
➜
Touch the Show map button to
display the loaded street map.
For further details, please read the
section "Working with the Map".
Settings
➜
Touch the Settings button to adjust the settings of your Lucca.
22
For further details, please read the
section "Confi guring Lucca/Basic
Settings".
Exiting the Menu
In the Navigation menu, touch
➜
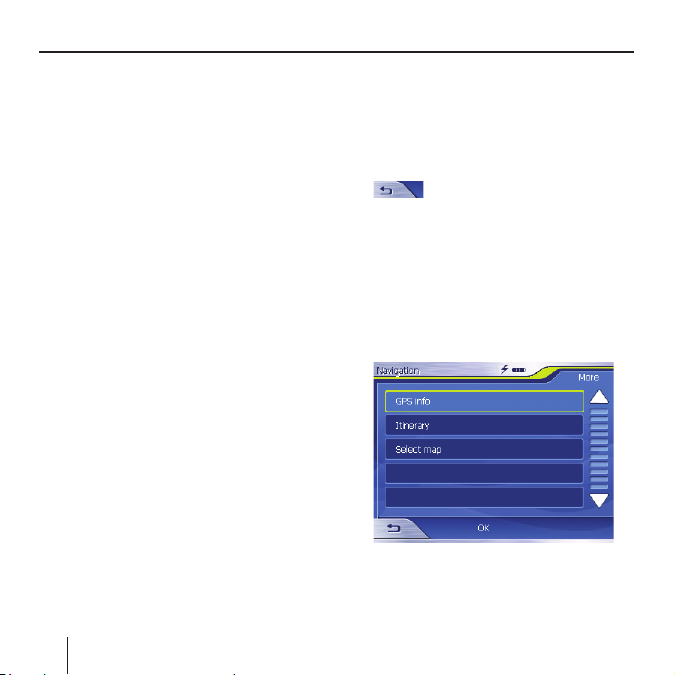
Additional Functions
➜
The list of additional functions displays.
It contains the following functions:
to quit the navigation. The
Lucca start screen displays.
Touch the More button to gain access to additional functions of the
Navigation.
Page 23
Navigation
GPS Info
➜
Touch the GPS Info button to obtain information about the current
GPS status and about your current
position.
Route Planning
➜
Touch the Itinerary button to plan
a route with several stages.
For further details, please read the
section "Route Planning with Stages".
Select Map
Touch the Select Map button to
➜
choose between different available road maps.
Performing Basic Settings
Before you work with the Lucca,
• you should set the time zone of for
your position so that the correct
arrival times are displayed during
the navigation, and
• you should enter your home ad-
dress to quickly navigate home
from any location.
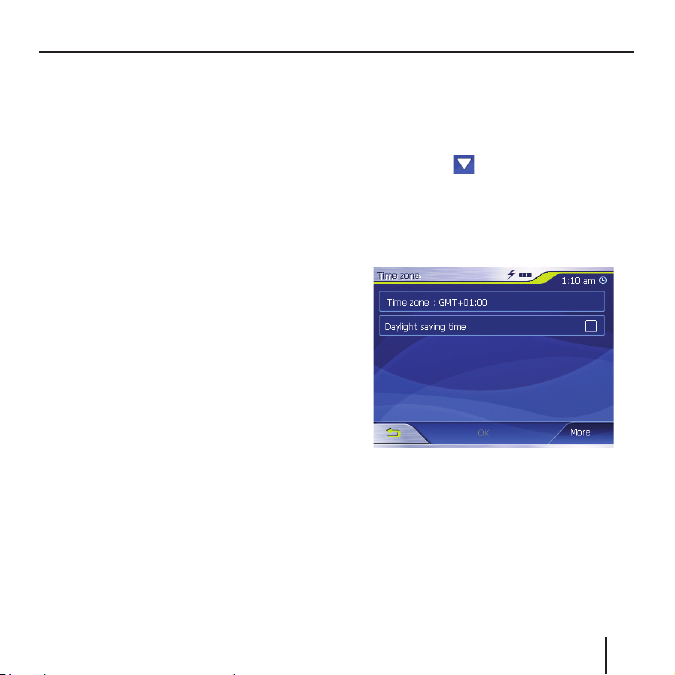
Setting the Time Zone
In the Navigation menu, touch the
➜
Settings button.
The Settings menu displays.
Touch the
➜
screen displays the Time zone
button.
Next, touch Time zone.
➜
The Time zone menu displays.
Touch Time zone.
➜
Touch the time zone in the list
➜
that is valid for your current
position (GMT without daylight
savings time).
button until the
23
Page 24
Navigation
Note:
The selection is facilitated by the
display of the capitols in the respective time zone.
Touch the OK button.
➜
If daylight savings time currently
➜
applies to your position, touch the
Daylight saving time button.
The button displays a check mark.
Note:
If the time is changed at your position or if you drive into a different time zone, you must adjust the
corresponding settings.
Touch the OK button.
➜
The Navigation menu displays.
Entering the Home Address
In the Navigation menu, touch the
➜
Settings button.
The Settings menu displays.
Repeatedly touch the
➜
until the Home address button
displays.
Touch the Home address button.
➜
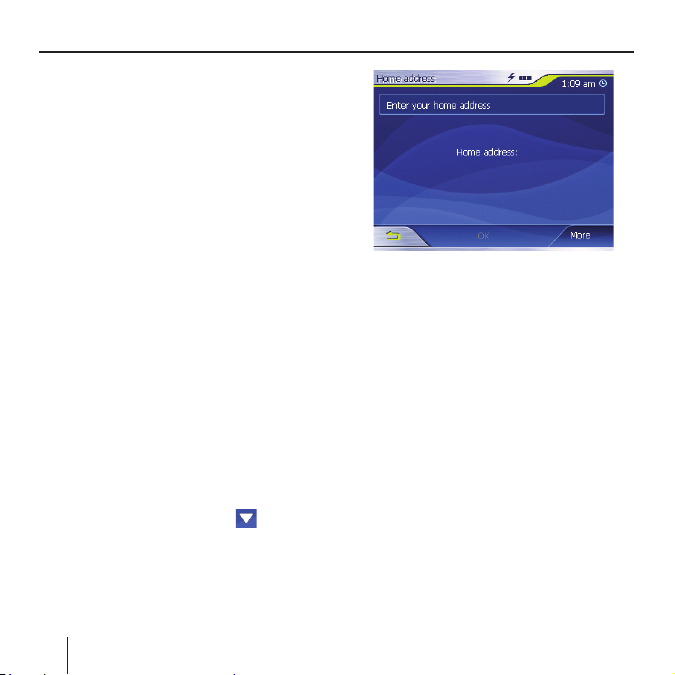
The Home address menu displays.
buttons
➜
Touch the Enter your home address button.
The Destination entry menu dis-
plays.
➜
Touch the Address button and enter your home address. See "Entering a Destination Address".
➜
Touch the Set as home address
button.
The address is copied into the
Home address menu.
➜
Touch the OK button.
The Navigation menu displays
again.
24
Page 25
Navigation
Specifying a Destination
This section contains information
about the different methods for entering, selecting and managing destinations with the Lucca.
How to start the navigation to a destination is described in the chapter
"Destination Guidance".
Entering a Destination
With the Lucca, you can enter or select destinations in different ways:
• Entering a destination address
• Selecting a point of interest
• Copying a destination from the
map
• Copying a destination from the fa-
vourites
• Reusing one of the Last destina-
tions
• Using the home address
Entering a Destination Country
First, enter the country in which your
destination is located.
Note:
This entry does not have to be
repeated. If your destination is in
a different country than the previous one, you must re-enter the
country.
In the main menu touch the Navi-
➜
gation button.
The Navigation menu displays.
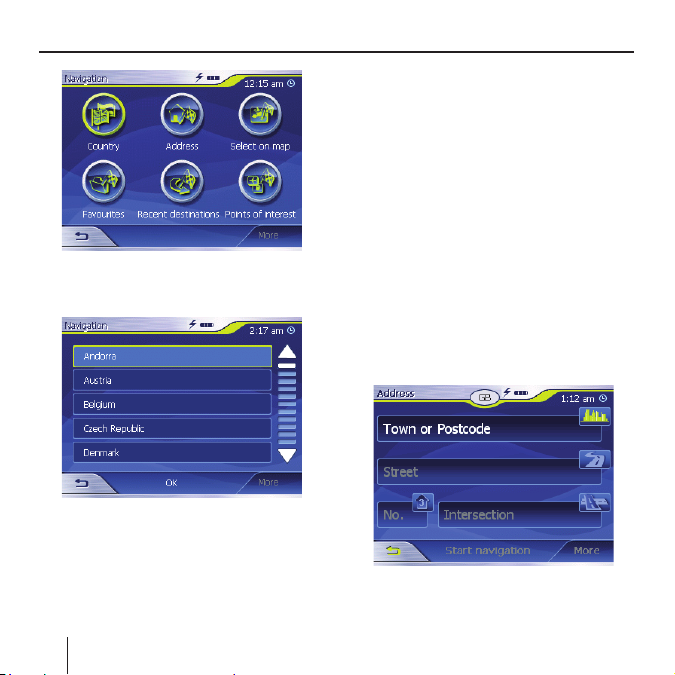
Touch the Destination entry but-
➜
ton.
The Destination entry menu dis-
plays.
25
Page 26
Navigation
Touch the Country button.
➜
The list of countries displays.
Touch the country in which your
➜
destination is located.
The Address menu displays.
Note:
You can only select countries which
are at least partially displayed on
the currently loaded map.
Entering a Destination Address
➜
In the main menu touch the Navigation button.
The Navigation menu displays.
➜
In the Navigation menu, touch the
Destination entry button.
The Destination entry menu dis-
plays.
Touch the Address button.
➜
The Address menu displays.
26
Page 27
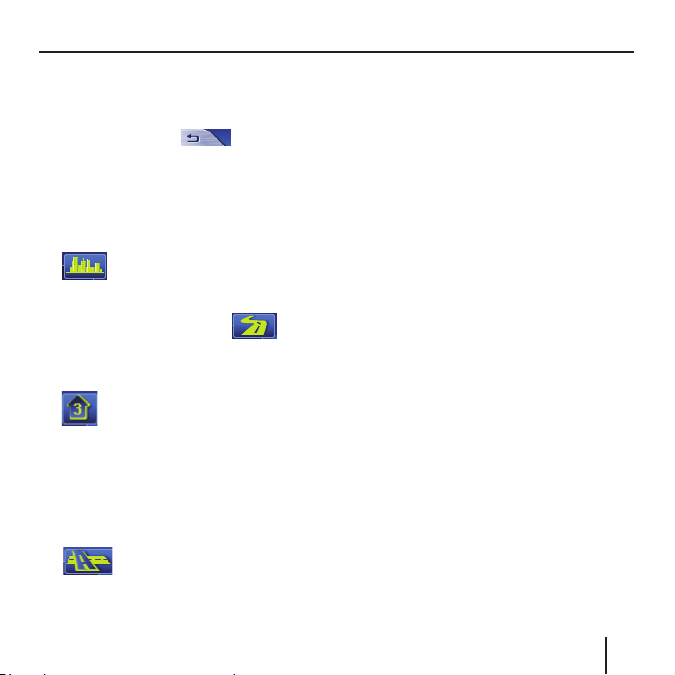
Navigation
Note:
If the country containing your destination is not displayed in the top
line, touch the
select the correct country. How to
select a country is described in
the chapter "Entering a Destination Country".
Touch the Town fi eld and enter
➜
➜
➜
Note:
➜
the target location. You can
enter either the postcode
or the name of the location.
Touch the Street fi eld
enter the street.
If you know the house number of
your destination, touch the House
Number fi eld to enter the
house number.
If no house number is stored for
the specifi ed street in the maps,
the House Number fi eld is deactivated.
If you want to defi ne an intersection as the destination, touch the Intersection
button and
and
fi eld to enter the crossroad to the
defi ned street.
Note:
How to save a defi ned destination
is described in the chapter "Saving
one of the recent destinations".
Additional Functions
Touch the More button to gain ac-
➜
cess to additional functions of the
Address menu.
The list of Additional functions
displays.
The list of Additional functions contains the following functions:
• Route options:
– Here you can set the route op-
tions for the next navigation.
For further details, please read the
chapter "Specifying route options".
• Show:
– Select this button to view the
specifi ed address on the map.
For further details, please read the
chapter "Working with the map".
27
Page 28

Navigation
• Save:
– This function allows you to save
the specifi ed address to your
favourites.
For further details, please read the
chapter "Saving one of the recent
destinations".
Selecting a Point of Interest
Special destinations, also referred to
as POI (Point of interest), are part of
the map and can be displayed on the
map. The points of interest include
airports and ferry harbours, restaurants, hotels, fi lling stations, public
facilities and more. Special destinations can be used as navigation destinations.
Point of Interest in the Current
Vicinity
Note:
Special destinations from the current vicinity can only be selected if
the GPS reception is suffi cient for
determining the position.
In the main menu touch the Navi-
➜
gation button.
The Navigation menu displays.
➜
In the Navigation menu, touch the
Destination entry button.
The Destination entry menu dis-
plays.
➜
Touch the Points of interest button.
The Point of interest menu dis-
plays.
➜
Touch the ... nearby button.
The submenu displays.
28
Page 29

➜
looking for a point of interest.
➜
which you want to look for points
of interest.
Only those categories are available
for selection for which points of interest can be located in the current
vicinity.
➜
Shell, etc. from which you want to
look for points of interest.
Touch the Surrounding Radius fi eld and select the
radius in which you are
Touch the Category fi eld
and select the category
(e.g. petrol station) from
Touch the Subcategory
fi eld and select the subcategory (e.g. Aral, BP,
Navigation
Only those subcategories are available for selection for which points of
interest can be located in the current
vicinity.
➜
The keyboard is displayed. If you
know a part of the description of
the point of interest, it can be entered here to shorten the list.
➜
Touch the List button.
A list with points of interest ap-
pears. The points of interest displayed correspond to the selected
category and subcategory. They
also contain the characters you
entered (if you entered any characters).
➜
Touch the entry of the point of interest to which you want to navigate.
➜
If you desire more detailed information about the point of interest,
touch the More button, followed
by Show details.
➜
Touch the OK button to accept the
selected point of interest.
Touch the Point of interest
fi eld to select a specifi c
target.
29
Page 30

Navigation
Note:
You do not have to fi ll out the
fi elds Category and Subcategory.
They are only intended to restrict
the list of points of interest in the
Point of interest fi eld. This list can
quickly become very extensive,
particularly at larger locations.
How to save a defi ned destination is
described in the chapter "Saving one
of the Recent Destinations".
Additional Functions
➜
Touch the More button to gain access to additional functions of the
Point of interest menu.
The list of Additional functions
displays.
The list of Additional functions contains the following functions:
Route options:
•
– Here you can set the route op-
tions for the next navigation.
For further details, please read the
chapter "Specifying Route Options".
30
Show:
•
– Select this button to view the
specifi ed address on the map.
For further details, please read the
chapter "Working with the Map".
Save:
•
– This function allows you to save
the specifi ed address to your
favourites.
For further details, please read the
chapter "Saving one of the recent
destinations".
Point of Interest at a Specifi c
Location
➜
In the main menu touch the Navigation button.
The Navigation menu displays.
➜
Touch the Destination entry button.
The Destination entry menu dis-
plays.
In the menu, touch the Points of
➜
interest button.
The Point of interest menu dis-
plays.
Page 31

In the Point of interest menu, touch
➜
the ...in a town button.
The submenu displays.
Navigation
Note:
If the country containing your destination is not displayed in the fi rst
line, touch the
and select the correct country.
How to select a country is described
in the chapter "Entering a Destination
Country".
➜
which you are looking for a point
of interest. You can enter either
the postcode or the name of the
location.
➜
you want to look for points of interest.
Only those categories are available
for selection for which points of interest can be located in the specifi ed
town.
➜
Touch the Location fi eld
and enter the location in
Touch the Category fi eld
and select the category
(e.g. culture) from which
Touch the Subcategory
fi eld and select the sub-
button twice
31
Page 32

Navigation
category (e.g. museum, theatre,
...) from which you want to look
for points of interest.
Only those subcategories are available for selection for which points of
interest can be located in the specifi ed town.
➜
If you know a part of the description of the point of interest, it can
be entered here to shorten the
list. However, you may also continue without an entry.
➜
Touch the List button.
A list with points of interest ap-
pears. The points of interest displayed correspond to the selected
category and subcategory. They
also contain the characters you
entered (if you entered any characters).
Touch the Point of Interest
fi eld.
The keyboard is displayed.
Touch the entry of the point of in-
➜
terest to which you want to navigate.
If you desire more detailed infor-
➜
mation about the point of interest,
touch the More button, followed
by Show details.
Touch the OK button to accept the
➜
selected point of interest.
Special National Destination
In the main menu touch the Navi-
➜
gation button.
The Navigation menu displays.
Touch the Destination entry but-
➜
ton.
The Destination entry menu dis-
plays.
In the menu, touch the Points of
➜
interest button.
The Point of interest menu dis-
plays.
32
Page 33

➜
In the Point of interest menu, touch
the ...nationwide button.
The submenu displays.
Navigation
Note:
If the country containing your
destination is not displayed in the
fi rst line, touch the button
twice and select the correct country. How to select a country is described in the chapter "Entering a
Destination Country".
➜
you want to look for points of interest. The selection offers only
categories whose points of interest have a national meaning.
➜
If you know a part of the description of the point of interest, it can
be entered here to shorten the
list. However, you may also continue without an entry.
➜
Touch the List button.
A list with points of interest ap-
pears. The points of interest displayed correspond to the selected
Touch the Category fi eld
and select the category
(e.g. airport) from which
Touch the Point of Interest
fi eld.
The keyboard is displayed.
33
Page 34

Navigation
category. They also contain the
characters you entered (if you entered any characters).
➜
Touch the entry of the point of interest to which you want to navigate.
If you desire more detailed infor-
➜
mation about the point of interest,
touch the More button, followed
by Show details.
➜
Touch the OK button to accept the
selected point of interest.
Copying a Destination from
the Map
This function allows you to select the
destination for a navigation directly
on the map. In addition to towns and
streets, you can also quickly select
points of interest.
In the main menu touch the Navi-
➜
gation button.
The Navigation menu displays.
Touch the Destination entry but-
➜
ton.
The Destination entry menu dis-
plays.
34
➜
In the destination entry, touch the
On map button.
The map is displayed.
Moving the Map Section
To view the desired destination area
on the map, you can move the map
section and zoom in/out.
• Zooming/Moving
– Touch the Zoom/Move
to switch between zoom and
move mode.
– Zoom
In the zoom mode (button not
pressed), you can zoom in and
out on the map. You can zoom
in by plotting a diagonal start-
Page 35

ing in the top left corner. You
can zoom out by plotting a diagonal starting in the bottom
right corner.
Note:
You can also zoom in and out using
/ buttons.
the
– Move
In the move mode (button
pressed), you can move the
map. For this purpose, touch
the map, hold the pen or your
fi nger pressed and move the
map area in the desired direction.
Touch the town (street or point of
➜
interest) to be defi ned as the destination for a few seconds.
The town is identifi ed by an or-
ange-dotted circle.
Navigation
Information about the selected
location is loaded from the data
stock and displayed. Below the
information fi eld are buttons with
which several functions can be
called that are available for the selected route location.
You have the following options:
35
Page 36

Navigation
• Touch the Start navigation but-
ton to use the selected location as
place of destination for the navigation.
Notes:
– This function is only available
with GPS reception.
– If you use this function during
a navigation, all previously defi ned route locations (stages
and destination points) are deleted!
• Touch the Save button to save
the selected destination. You can
select the destination at any time
from the list of favourites.
• Touch the Search nearby button
to search for a point of interest in
the vicinity of the selected destination.
• Touch the Add button to add the
selected destination to the end
of a route (as the last stage). The
route point is subsequently identifi ed on the map by a fl ag and also
entered in the route point list in
the Itinerary menu.
36
Note:
If you use this function during a
navigation, the route is immediately recalculated and the navigation
is subsequently continued.
• Touch the Interim destination
button to add the selected destination to a route (as the next stage
to be approached). The route is
immediately recalculated and the
navigation is subsequently continued.
• Touch the button to return to
the map view without executing a
function.
Page 37

Copying the Destination
from the Favourites
The favourites contain all the destinations you saved using the Save button.
You can perform the following in this
menu:
• Accepting destinations for the
navigation,
• renaming navigation destinations,
and
• deleting saved destinations.
Copying a Favourite for Destination
Guidance
➜
In the main menu touch the Navigation button.
The Navigation menu displays.
Touch the Destination entry but-
➜
ton.
The Destination entry menu dis-
plays.
Touch the Favourites button.
➜
The Favourites menu displays.
Navigation
➜
Touch the desired destination.
Note:
If you want to view the address
of a saved destination, touch this
destination. Touch More, followed
by Show details.
➜
Touch the OK button.
The Address menu displays. The
address of the selected destination is entered in the corresponding fi elds.
How to delete or rename a saved destination is described in the chapter
"Managing Destinations".
37
Page 38

Navigation
Additional Functions
➜
Touch the More button to gain access to additional functions of the
Favourites menu.
The list of Additional functions
displays.
It contains the following functions:
• Show details:
– Touch the Show details button
to show the address of the selected destination.
• Delete entry:
– Touch the Delete entry button
to delete the selected destination.
• Delete all:
– Touch the Delete all button to
delete all the destinations from
the Favourites.
For further details, please read the
chapter "Deleting a Destination".
• Rename entry
– Touch the Rename entry but-
ton to change the designation
of the selected destination.
38
Copying one of the Recent
Destinations
The destinations approached last are
automatically stored in the Last desti-
nations list.
You can perform the following in this
list:
• Accepting a destination for the
navigation,
• saving a navigation destination in
the Favourites, and
• deleting entries from the Last des-
tinations list.
➜
In the main menu touch the Navigation button.
The Navigation menu displays.
➜
Touch the Destination entry button.
The Destination entry menu dis-
plays.
Touch the Last destinations but-
➜
ton.
The Last destinations menu dis-
plays.
Page 39

➜
Select the desired destination.
➜
Touch the OK button.
The destination is copied and the
address is entered in the corresponding fi elds.
Additional Functions
➜
Touch the More button to gain access to additional functions of the
Last destinations menu.
The list of Additional functions
displays.
It contains the following functions:
• Show details:
– Touch the Show details button
to show the address of the selected destination.
Navigation
Delete entry:
•
– Touch the Delete entry button
to delete the selected destina-
tion.
• Delete all:
– Touch the Delete all button to
delete all the entries of the Last
destinations list.
• Save under favourites:
– Touch the Save under favour-
ites button to save the selected
destination in the Favourites.
Using Home Address as
Destination
If your home address is saved, you
can quickly navigate home from any
location.
How to save your home address is
described in the chapter "Home address".
In the main menu touch the Navi-
➜
gation button.
The Navigation menu displays.
Touch the Home button.
➜
The route calculation is performed
and the navigation starts.
39
Page 40

Navigation Managing Destinations
Note:
The route type used for the route
calculation is automatically selected from the setting which you defi ned in the Routing options menu.
40
Managing Destinations
Two lists are available in which individual destinations are saved:
• In the Favourites
• In the Last destinations list
Each destination you specify and the
destinations from the Last destina-
tions list can be saved in the Favourites. This is particularly useful if you
want to approach this destination
repeatedly.
Destinations from the Favourites can
be renamed.
You can delete individual destinations
from both lists.
Saving Destinations
Prerequisite:
• You specifi ed a destination as de-
scribed in the chapter "Entering a
Destination".
Touch the More button.
➜
Touch Save.
➜
Page 41

A menu for entering a name is dis-
played.
➜
Enter a name for the destination.
➜
Touch the OK button.
The destination is saved in the Fa-
vourites.
Saving one of the Recent
Destinations
Prerequisite:
• You opened the Last destinations
list as described in the chapter
"Copying one of the Recent Destinations".
Select the destination which you
➜
want to save in the Favourites.
Managing Destinations
➜
Touch the More button.
➜
Touch Save under favourites.
A menu for entering a name is dis-
played.
➜
Enter a name for the destination.
➜
Touch the OK button.
The destination is saved in the Fa-
vourites.
Renaming a Destination
➜
Open the Favourites menu as de-
scribed in the chapter "Copying
the Destination from the Favourites".
➜
Select the destination to be renamed.
41
Page 42

Managing Destinations
Touch the More button.
➜
Touch Rename entry.
➜
A menu for entering a name is dis-
played.
➜
Enter a new name for the destination.
➜
Touch the OK button.
The destination is renamed.
Deleting a Destination
Prerequisite:
• You opened the Favourites as de-
scribed in the chapter "Copying
the Destination from the Favourites"
- or -
• you opened the Last destinations
list as described in the chapter
"Copying one of the Recent Destinations".
Select the destination to be de-
➜
leted from the list.
Touch the More button.
➜
Touch Delete entry.
➜
A confi rmation menu is displayed.
➜
Touch OK to delete the destination.
The destination is deleted from
the list.
Deleting the Complete List
Prerequisite:
• You opened the Favourites as de-
scribed in the chapter "Copying
the Destination from the Favourites"
- or -
• you opened the Last destinations
list as described in the chapter
"Copying one of the Recent Destinations".
Touch the More button.
➜
42
Page 43

Managing Destinations Route Planning
Touch Delete all.
➜
A confi rmation is displayed.
➜
Touch OK to delete the list
- or -
➜
touch
not to delete the list.
Route Planning with
Stages
You can also perform the route planning without GPS receiver, e.g. in the
comfort of your home. Defi ned routes
can be saved for reuse so that you
can plan any number of routes, e.g.
for your vacation.
Entering Destination Points
A route is planned as follows:
In the Navigation menu, touch the
➜
More button.
Touch Itinerary.
➜
The Itinerary menu displays.
Touch the Add button to defi ne
➜
the fi rst route point.
43
Page 44

Route Planning
The Destination entry menu dis-
plays.
Defi ne the route point similar to
➜
the destination entry. For more information, see the chapter "Entering a Destination".
Touch the Add button.
➜
The Itinerary menu displays. The
defi ned destination is listed as
route point 1.
Repeat the steps for all additional
➜
destinations to be added to the
route.
Editing, Saving and Managing
Routes
You can plan any number of routes,
e.g. for your vacation. They can be
44
saved and used for navigation at a
later time.
You can insert additional route points
in the routes at any time, change the
order of route points or display the
route on the map.
The Itinerary menu provides various
buttons for this purpose:
➜
Touch the route point you want to
select.
If the list features more than 3 entries, use the following buttons:
➜
Touch the
the list by one page (3 elements).
➜
Touch the
down the list by one page (3 elements).
To scroll up or down the list by several pages,
touch the corresponding button
➜
repeatedly.
Note:
If the list features more than 3 elements, the scroll bar indicates the
current position in the list.
button to scroll up
button to scroll
Page 45

Route Planning
Changing the Order
• Move route point up:
Select the route point to be
➜
moved.
Touch the More button.
➜
Touch the Move target up button.
➜
The Itinerary menu is displayed
again, the selected route point is
moved up in the route list by one
position.
Repeat this process until the route
➜
point appears at the correct position in the route list.
Move route point down:
➜
Select the route point to be
➜
moved.
Touch the More button.
➜
Touch the Move target down but-
➜
ton.
The Itinerary menu is displayed
again, the selected route point is
moved down in the route list by
one position.
Repeat this process until the route
➜
point appears at the correct position in the route list.
Deleting a Route Point
➜
Select the route point to be deleted.
➜
Touch the More button.
➜
Touch Delete from route.
The route list is displayed again.
Deleting a Complete Route List
➜
While the route list to be deleted
is displayed, touch the More button.
➜
Touch Delete the complete list.
Managing Routes
Saving a route
➜
Touch the More button.
➜
Touch Save route.
A menu for entering a name is dis-
played.
➜
Enter a name for the route.
➜
Touch OK.
Note:
The route points are saved. If you
load a saved route, it must be recalculated.
45
Page 46

Route Planning
Loading a route
➜
Touch the More button.
➜
Touch Load route.
➜
Select the desired route.
➜
Touch OK.
Calculating a Route
A planned route can also be calculated without GPS reception so that you
can gain an overview of the trip.
In this case, the fi rst defi ned route
point is set as the starting point of
the route.
Note:
For a navigation, the current position is the starting point. The fi rst
stage is the travel to the fi rst defi ned route point.
Touch the Calculate button to cal-
➜
culate the complete distance as
well as the estimated travel time
of the route.
The route is being calculated. A
window displays the progress of
the calculation.
After the calculation is complete,
the Itinerary menu displays the
46
complete trip from the fi rst to the
last route point and the estimated
travel time for this trip instead of
the Calculate button.
In addition, the distance from the
previous route point and the estimated travel time for this stage are
displayed for each route point.
Page 47

Route Planning Specifying Route Options
Displaying the Route on the Map
Touch the Show button to display
➜
the entire route on the map.
The map is displayed.
The route is highlighted in blue.
The specifi ed route points are
identifi ed by fl ags.
Simulation (demo mode)
Touch the map.
➜
A selection menu appears.
Touch "Simulation".
➜
The route is automatically travelled
and driving recommendations are
output.
Touch
➜
tion, otherwise the simulation is
repeated.
Note:
The simulation distance must be
less than 100 kilometres.
to end the simula-
Specifying Route
Options
In the Routing options menu, you can
defi ne the speed profi le of your vehicle, select the type of routing and exclude certain streets from usage. The
route options remain valid for each
destination guidance until the next
change of the route options.
In the Navigation menu, touch the
➜
Settings button.
The Settings menu displays.
Touch the
➜
the list by one page (3 elements).
Touch the
➜
down the list by one page (3 elements).
To scroll up or down the list by several pages,
touch the corresponding button
➜
repeatedly.
In the Settings menu, touch the
➜
Routing options button.
The Routing options menu dis-
plays.
button to scroll up
button to scroll
47
Page 48

Specifying Route Options
➜
Touch the Speed profi le fi eld to
change between the available pro-
fi les.
➜
Touch the Type of routing fi eld
to change between the various
modes:
• Fast route
– This option calculates the
shortest route for the required
time.
• Short route
– This option calculates the
shortest route for the kilometres to be travelled.
Sequentially touch the fi elds Mo-
➜
torways, Ferries and Toll roads
and specify whether they should
be included in the route calculation or avoided.
• Permitted
– This option includes the cor-
responding street type in the
calculation of the route.
• Avoid
– This option avoids the corre-
sponding street type as far as
possible.
• Forbidden
– This option does not include
the corresponding street type
in the calculation of the route.
48
Page 49

Destination Guidance
Prerequisite:
• You specifi ed a place of destina-
tion as described in the chapter
"Entering a Destination"
- or -
• you selected a place of destination
from the Favourites as described in
the chapter "Copying the Destina-
tion from the Favourites"
- or -
• you selected a place of destination
from the Last destinations list as
described in the chapter "Copying
one of the Recent Destinations"
- or -
• you planned or loaded a route (as
described in the chapter "Route
Planning with Stages").
➜
Touch the Start navigation but-
ton.
The route is being calculated.
The map is displayed. Your current
position is represented by a yellow
triangle. The route is highlighted
in blue.
Destination Guidance
Notes:
•
The route is calculated using the
currently valid settings for the
route calculation. The settings for
the route options can be viewed
and changed via the Routing op-
tions menu. For detailed information, please read the chapter
"Specifying route options".
• If the navigation for a route is start-
ed, the starting point is always the
current position. The fi rst stage of
the route is the fi rst defi ned route
point.
49
Page 50

Destination Guidance
Disturbed GPS Reception
A message appears after entering the
destination if no adequate GPS signal
is received.
• If you are in an enclosed room,
move to the outside. The Lucca re-
quires a vertical line towards the
sky.
If the GPS reception is disturbed
during the destination guidance, the
navigation is stopped.
As soon as the reception is re-established, the navigation system automatically recognises whether your
position has changed and, if necessary, recalculates the route. At that
time, you can simply continue your
navigation.
50
Quitting the Destination Guidance
Touch this button
➜
the destination guidance.
A confi rmation dialogue appears.
➜
Touch OK to quit the destination
guidance.
If you quit the destination guidance
before reaching your destination, the
Navigation menu opens. You can now
enter a new destination or continue
the navigation to the original destination by selecting the original destination again from the "Last destinations".
Reaching the Place of Destination
As soon as you have reached the destination point, the message "You have
reached your destination" appears.
At this point, the map displays only
your current position (yellow arrow).
to quit
Page 51

Working with the Map
Working with the Map
Map Operation
In this section you learn which information and which processing options are available in the map view.
Depending on whether you display a
map without or during the navigation,
different options are available for operation.
Showing a Map
You can display the map
• during route planning,
• to display destinations on the
map, or
• to copy destination from the map
for the navigation.
You can open the map view as fol-
lows:
• Via the Show map button in the
Navigation menu.
• Via the On map button in the Des-
tination entry menu.
• Via the Show button in the ad-
ditional functions in the Address
menu after selecting a destination.
Touching the Map
➜
Briefl y touch the map to display
additional functions.
Depending on whether you are currently in an active navigation or only
display the map, only certain functions are available.
Touch the map for a few seconds
➜
to display information about the
location you touched, and you can
also select it as navigation destination.
For further details, please read the
section "Copying a Destination from
the Map".
51
Page 52

Working with the Map
Buttons
Different buttons are available in the
map view with which you can adjust
the display according to your needs.
With Map View without GPS
Reception
• Show/hide buttons
– More
This button allows you to hide
the other buttons to gain a
better overview of the map.
Touching it again redisplays
the auxiliary buttons.
With Map View with GPS Reception
• Auto mode
– More
Touch this button to restore
the standard view of the map
after making changes. In doing
so, the settings for the map
orientation and auto zoom are
applied, the auxiliary buttons are hidden and the map
is centred according to your
position.
52
• The Change button allows
you to display additional options
in map view.
• Fix position/Fix map
– This button is only active dur-
ing a navigation. Touch the Fix
position/Fix map
ton to toggle the map view
between "Position fi xed" and
"Map fi xed".
– Map fi xed
In this mode (button not
pressed), the map is fi xed and
the current position (yellow ar-
row) moves across the map.
– Position fi xed (standard set-
ting)
In this mode (button pressed),
the map is continually moved
so that the current position
(yellow arrow) is always closely
centred in the bottom third of
the map.
Note:
The "Map fi xed" mode is automatically set as soon as you move the
map; otherwise, the map would
but-
Page 53

Working with the Map
constantly jump back to the current position. This mode should
also be set if you want to select
destination points from the map
during the navigation.
• Zooming/Moving
– Touch the Zoom/Move
button to switch between zoom
and move mode.
– Zoom
In the zoom mode (button not
pressed), you can zoom in and
out on the map. You can zoom
in by plotting a diagonal start-
ing in the top left corner. You
can zoom out by plotting a di-
agonal starting in the bottom
right corner.
– Move
In the move mode (button
pressed), you can move the
map. For this purpose, touch
the map, hold the pen or your
fi nger pressed and move the
map area in the desired direc-
tion.
• Showing the complete route
– Touch this button
play the complete route on the
map.
to dis-
• Map in travel direction/Map to
north
– Touch the In travel direction/To
north
map view between travel direc-
tion and aligned to north.
– Align map to north
Touch this button (button not
pressed) to align the map in the
direction north.
– Map in travel direction
Touch this button (button
pressed) to align the map in the
travel direction.
button to toggle the
• 3D-view
– Touch this button to display
the map in a three-dimensional
representation from a bird's
eye view.
• 2D-view
– Touch the More, button to dis-
play the map in two-dimension-
al form again.
53
Page 54

Working with the Map
• Zoom out
– Touch this button
out of the map.
to zoom
• Zooming level bar between the
buttons /
– Touch one of the sections of
the bar to zoom in or zoom out
of the map.
• Zoom in
– Touch this button
on the map.
to zoom in
• Quit navigation
– Touch this button
the navigation.
Additional Functions
Briefl y touch any position on the
➜
map to activate additional functions. Depending on whether you
are currently in a navigation or
only display the map, only certain
functions are available.
The menu with the additional func-
tions displays.
to quit
Day/Night Mode
➜
Touch the Night mode button to
set the map display "Night" or
"Day".
Mute
➜
Touch the Mute button to switch
the voice instructions on or off.
Settings
Touch the Settings button to dis-
➜
play the Settings menu.
For further details, please read the
section "Settings".
Block Road, Unblocking
The Block road button is only available during a navigation. For fur-
54
Page 55

ther details, please read the section
"Blocking Route Segments".
Inserting an Interim Destination
➜
Touch the Interim destination
button to insert a new interim destination during the navigation.
The route is recalculated so that
this interim destination can be approached as the next destination.
Afterwards, all subsequent route
points are selected.
For further details, please read the
section "Inserting an Interim Destination".
Route Options
➜
Touch the Route options button to
change the route options.
For further details, please read the
section "Routing options".
Next Destination
This function is only available during
a navigation on a route with at least
one interim point. Use this function
if you want to skip the next route
point.
Working with the Map
Touch the Next destination but-
➜
ton to approach the next to one
route point.
The route is recalculated so that
the next to one route point can be
approached as the next destination.
For further details, please read the
section "Approaching the Next Destination".
55
Page 56

Map Display during Destination Guidance
Map Display during
Destination Guidance
During a navigation, the map display
shows different navigation tools,
route information and one additional
button:
Navigation Tools
The left and lower area of the map display the following navigation tools:
56
• In case of actions that must be
executed in brief succession, the
next to one action is displayed in
the small upper arrow fi eld.
• The yellow triangle represents
your position on the map. A continually changing map section ensures that the current position is
always closely centred on the map
(so-called moving map).
• The large lower arrow fi eld dis-
plays the next action and the distance to the next action.
- If you come closer to the action
location, a bard is displayed to
the right of the large arrow fi eld
instead of the distance:
– The more yellow bars are dis-
played, the closer you are to
the location of the next action.
• The upper street fi eld displays the
next street name.
Page 57

Map Display during Destination Guidance
• The lower street fi eld displays the
current street name.
Route Information
The right area of the map displays the
following route information:
– : This symbol represents
stages. All information below it
refers to the next destination.
–
–
–
: Estimated time of ar-
rival.
: Estimated remaining
travel time.
: Remaining kilometres/
miles to destination.
Signpost Information
The upper area of the map displays
signpost information you must follow:
Note:
This information can only be displayed if it is part of the map material.
Speed Limit
The right area of the map displays any
speed limit that may apply:
Note:
This information can only be displayed if it is part of the map material.
57
Page 58

Map Display during Destination Guidance
Caution
The information on the digital road
maps may be incorrect due to shortterm changes (construction, etc.)!
The traffi c situation and the local
signpost information have priority
over the information of the Lucca.
Showing Additional Map
Information
You can use the Lucca to defi ne which
additional information is displayed on
the map. All settings are performed
in the Settings menu.
The additional information on the
map is activated as follows:
Open the Settings menu by touch-
➜
ing the Settings button in the Navigation menu or by briefl y touching
any position on the map and then
selecting the Settings entry.
58
Map Information
➜
Touch Map information.
➜
Activate the Info bar entry so that
the compass and your current
speed are displayed on the map in
the lower right border.
Activate the Point of interest en-
➜
try so that all points of interest
are displayed on the map (default
setting).
Activate the Street names 2D en-
➜
try so that the street names are
displayed on the map (only possible in 2-D display).
Page 59

Map Display during Destination Guidance
Touch the button to return
➜
to the Settings menu.
Route Information
Select the Route information set-
➜
ting with the button.
Switch the desired route informa-
➜
tion on or off with the corresponding buttons.
The corresponding information for
the next stage (upper area) and
the complete route (lower area) is
displayed on the map.
Touch the button to return
➜
to the Settings menu.
Signpost Information
Touch Signpost information.
➜
The Signpost information menu dis-
plays.
Touch the Show traffi c signs but-
➜
ton to activate or deactivate the
display of the exit signs.
Touch the
➜
to the Settings menu.
Speed
Touch Speed limit.
➜
The Speed limit menu displays.
button to return
59
Page 60

Map Display during Destination Guidance
In the Speed limit menu you can defi ne whether speed limits should be
displayed during the navigation and
whether you should be warned audibly if you are exceeding the speed
limit.
• Display signs
➜
Touch the Show traffi c signs but-
ton to change between the modes
Show traffi c signs: Always, On
speeding only or Never.
• Warning in a town:
– The Warning in urban areas
button shows the level of the
speed-reading at which you are
audibly warned inside of buildup areas.
➜
Touch the Warning in urban areas
button to change the value or to
set it to Never.
• Warning outside of towns:
– The Warning outside urban ar-
eas button shows the level of
the speed-reading at which you
are audibly warned outside of
build-up areas.
➜
Touch the Warning outside urban
areas button to change the value
or to set it to Never.
Warning
•
– Activate the Warning button to
receive an audible warning.
➜
Touch the OK button to save your
settings.
Your settings are accepted and
displayed on the map.
60
Page 61

Additional Functions
during Navigation
The following functions can be used
during a navigation:
Inserting an interim destination
•
Skipping a stage
•
Blocking route segments
•
Inserting an Interim
Destination
During the navigation, you can insert
a new interim destination at any time.
The route is then recalculated so that
this interim destination can be approached as the next destination. After reaching the interim destination,
all remaining places of destination
are selected.
An interim destination is created as
follows:
Prerequisite:
You are in the map display during
•
a navigation.
Briefl y touch any position on the
➜
map.
Additional Functions during Navigation
Touch the Interim destination
➜
button.
The Destination entry menu dis-
plays.
➜
Enter the place of destination as
described in "Entering a Destination".
➜
Touch the Set as route point button.
The route is recalculated and the
defi ned interim destination is selected as the next route point.
Note:
You can also select the interim
destination directly from the map
as described in the section "Copying a Destination from the Map".
Next, touch Interim destination.
61
Page 62

Additional Functions during Navigation Blocking route segments
Approaching the Next
Destination
This function is only available during
a navigation on a route with at least
one interim point.
Use this function if you want to skip
the next route point.
Touch the Next destination but-
➜
ton to approach the next to one
route point.
The route is recalculated so that
the next to one route point can be
approached as the next destination.
62
Blocking route
segments
Manual Blocking
You have the option of manually
blocking a route segment located on
your route to evade the road section
blocked for navigation. After a manual
blocking, the route is recalculated.
Supposing that you are on the motorways and hear a traffi c announcement on the radio about a traffi c jam
of 5 km on your route. In this case,
you can use a manual blocking of the
section to evade the traffi c jam.
The manual blocking is only applicable to the current navigation and is no
longer available for a new navigation
or after a restart of the program.
Route segments are blocked as follows:
Prerequisite:
You are in the map display during
•
a navigation.
Page 63

Blocking route segments
➜
Briefl y touch any position on the
map.
➜
Select the Block road entry.
The Block road menu displays.
➜
Enter the number of kilometres,
starting with your current position, which you want to block.
The route is recalculated and the
blocked route segment is evaded.
The blocked segment is marked in
red.
Unblocking
Briefl y touch any position on the
➜
map.
Select the Block road entry.
➜
The road blocking is cancelled and
the navigation uses once again the
original calculated route.
63
Page 64

Confi guring Lucca
Confi guring Lucca/
Basic Settings
Settings
You can perform settings in the Lucca
for the following areas:
• Language
• Home address
• Map information
• Route information
• Routing options
• Route planning
• Signpost information
• Speed limit
• Auto mode
• Time zone
• Format
• Representation
• Voice command
• Factory settings
• Touchscreen
• Product information
➜
In the Navigation menu, touch the
Settings menu to confi gure the
Lucca.
➜
If you made changes to the settings, you can touch the OK button
of the Settings menu to accept the
changes you made.
Or
➜
Touch the
Settings menu without saving the
changes.
Language
In the Language menu, you can select
your preferred for the menus and
voice output.
Touch the Language button.
➜
The current language is displayed.
Touch the Set language.
➜
The language list displays.
Touch on your preferred language
➜
to select the language.
button to exit the
64
Page 65

Confi guring Lucca
Home Address
In the Home address menu, you can
store your home address so that you
can quickly navigate home from any
location.
➜
Touch the Enter your home address button.
➜
Touch the Address button and
enter your home address in the
"Entering a destination address"
section.
➜
Touch the Set as home address
button.
The address is copied into the
Home address menu.
Map Information
In the Map information menu, you can
perform the following settings:
• Info bar
– If you activate the entry, the
compass, altitude and current
speed are displayed on the
map in the lower right border.
• Points of interest
– If you activate the entry, the
map displays all the points of
interest.
• Street names 2D
– If you activate the entry, the
map displays all the street
names.
Route Information
In the Route information menu, you
can perform the following settings:
• Dist. to fi nal dest., Time to fi nal
dest., ETA at fi nal dest.
– If you activate the entries, the
map displays the estimated
time of arrival, the estimated
travel time and the remaining
kilometres/miles to the desti-
nation point.
• Dist. to next dest., Time to next
dest., ETA at next dest.
– If you activate the entries, the
map displays the estimated
time of arrival, the estimated
travel time and the remaining
kilometres/miles to the next
stage destination.
65
Page 66

Confi guring Lucca
Note:
This information is only displayed
if you navigate to several locations.
Routing Options
In the Routing options menu, you can
defi ne the speed profi le of your vehicle, select the type of routing and
exclude certain streets from usage.
The route options remain valid for
each destination guidance until the
next change of the route options. For
further details, please read the chapter "Specifying Route Options".
Route Planning
In the Itinerary menu, you can defi ne
whether the calculation for the next
stage should automatically be performed after reaching a stage.
If the automatic calculation is activated, the route to the next stage destination is automatically calculated
upon reaching a stage.
If the automatic calculation is deactivated, you can navigate to the next
66
stage destination by briefl y touching
any position on the map and selecting the Next option.
Signpost Information
In the Signpost information menu,
you can specify whether signpost
information, which you are to follow,
should be displayed during the navigation or not.
➜
Touch the Show traffi c signs but-
ton to activate or deactivate the
display.
Note:
This information can only be displayed if it is part of the map material.
Speed Limit
In the Speed limit menu you can defi ne whether speed limits should be
displayed during the navigation and
whether you should be warned audibly if you are exceeding the speed
limit.
Page 67

Confi guring Lucca
Display signs
•
Touch the Show traffi c signs but-
➜
ton to change between the following modes:
– Show traffi c signs: Always,
– Show traffi c signs: On speed-
ing only or
– Show traffi c signs: Never
• Warning in a town
– The Warning in urban areas
button shows the level of the
speed-reading at which you are
audibly warned inside of buildup areas.
Touch the Warning in urban areas
➜
button to change the value or to
set it to Never.
• Warning outside of towns
– The Warning in rural areas
button shows the level of the
speed-reading at which you
are audibly warned outside of
build-up areas.
➜
Touch the Warning in rural areas
button to change the value or to
set it to Never.
• Warning
➜
Activate the Warning button to receive an audible warning.
Note:
This information can only be displayed if it is part of the map material.
Caution:
The information in the map material
may be incorrect due to short-term
changes (construction, etc.)!
The traffi c situation and the local
signpost information have priority
over the information of the navigation system.
Auto Mode
In the Auto mode menu, you can perform the following settings:
• Begin with
– Select whether the map should
be displayed in 3-D view or in
2-D view by default.
67
Page 68

Confi guring Lucca
• 3D auto zoom
– Select whether you desire auto
zoom or no auto zoom as default in 3-D view during a navigation.
• 2D auto zoom
– Select whether you desire
low auto zoom, standard auto
zoom, high auto zoom or no
auto zoom during a navigation
with 2-D view.
Note:
For 2-D and 3-D auto zoom, the
zoom depth is changed in reference to your speed: If you travel
slowly, the scale becomes smaller.
If you travel faster, the scale becomes larger. The deeper the auto
zoom, the smaller the scale of the
map.
• 2D-view
– Select whether the map should
be oriented to the north or in
driving direction by default during a navigation with 2-D view.
68
Time Zone
In the Time zone menu, you can set
the time zone that is valid for your
position. This setting is important for
the correct calculation of estimated
arrival times.
• Time zone
➜
Touch this fi eld to set the time
zone valid for your position.
• Daylight saving time
Touch this fi eld to toggle between
➜
daylight savings time (button with
check mark) and winter time (button without check mark).
Note:
If the time is changed at your location or if you drive into a different
time zone, you must adjust the
corresponding settings.
Format
In the Format menu you can specify
which units of measure should be
used for times and distances and the
language to be used for the menus
and voice output of the Lucca.
Page 69

Time
•
➜
Touch this fi eld to toggle between
12-hour and 24-hour display.
Distance
•
➜
Touch this fi eld to toggle between
the display in kilometres and
miles.
Representation
In the Representation menu, you can
set the brightness for day and night
mode.
➜
Touch the Representation button.
The Representation menu dis-
plays.
➜
Touch the Brightness Day button
to select the brightness value for
day mode.
➜
Touch the Brightness Night button to select the brightness value
for night mode.
Voice command
In the Voice command menu, you can
mute voice command during navigation.
Confi guring Lucca
Touch the Voice command but-
➜
ton.
The Voice command menu dis-
plays.
Touch the Radio-mute button to
➜
mute the voice commands.
➜
Touch the OK button to confi rm.
Factory Settings
In the Factory settings menu, you can
reset the navigation software to the
factory settings.
Touch the Factory settings but-
➜
ton.
A confi rmation is displayed.
Confi rm the reset to the factory
➜
settings by touching OK.
To avoid resetting the device,
touch the
➜
Touchscreen
In the Touchscreen menu, you can rec-
alibrate (align) the touchscreen if it
responds imprecisely to touches.
Touch the Start calibration button
➜
and follow the instructions on the
display.
button.
69
Page 70

Confi guring Lucca GPS Mode of Operation
Product Information
Touch this fi eld to display the ver-
➜
sion of the map being used and
the version of the navigation software.
70
GPS Mode of Operation
The Global Positioning System (GPS)
was developed in the 70s by the US
military.
GPS is based on a total of 24 satellites that are orbiting the earth and
sending out signals. The GPS receiver
receives these signals and calculates
its distance to the individual satellites using the propagation time of
the signals. This information is then
used to determine its current geographical position.
The positioning requires signals from
at least three satellites, and starting
with the fourth one it is also possible
to determine the altitude above sea
level. The positioning is carried out
with an accuracy to 3 metres.
Navigation with GPS. The provided
maps also contain the geographical
coordinates of the displayed points
of interest, streets and towns. This
allows the navigation system to calculate a route from a starting point to
a place of destination.
Page 71

GPS Mode of Operation MP3 Mode
If the Lucca receives the signals from
at least 3 satellites, it can determine
its position and display it on the map.
This position can then be used as the
starting point for a route calculation.
Since a positioning and position display is carried out once every second,
you can view your movement on the
map.
MP3 Mode
The Lucca can be used to play MP3
audio fi les in MP3 format from SD
cards. The playback utilises either the
internal loudspeaker or headphones
connected via the headphone jack.
Preparing the SD Card
The Lucca can play MP3 fi les from SD
cards. The SD cards should be formatted using either the FAT 32 or FAT
16 format.
The MP3 fi les can be stored either at
the top directory level or in folders
on the SD card. You can also mix MP3
fi les and other fi les (e.g. .jpg fi les) in
one folder. In MP3 mode, all other
data are ignored by the Lucca and
only MP3 fi les are being played.
Inserting the SD Card
The SD card slot is located on the
right side of the Lucca.
71
Page 72

MP3 Mode
Push the SD card into the SD card
➜
slot according to the marking on
the slot until the card engages.
Selecting MP3 Mode
If you are in a different operating
mode,
Press the Menu button longer
➜
than 3 seconds.
The main menu displays.
Touch the Music Player button.
➜
The MP3 menu displays:
Starting Playback
If you selected the MP3 button, the
previously played MP3 will be played
automatically.
Selecting a MP3 fi le
In the MP3 menu, touch the File
➜
button.
The MP3 list menu is displayed.
72
Page 73

➜
Touch the fi le to which you want to
listen by using the arrows to scroll
up and down in the list.
The MP3 menu is displayed again
and the selected MP3 fi le starts
playing.
Playback the MP3 File
➜
To select the next fi le in the MP3
list, touch the button in the
MP3 menu.
➜
To select the previous fi le in the
MP3 list, touch the
the MP3 menu.
The next or previous track starts
playing.
button in
MP3 Mode
Repeated Play (Repeat)
You can repeatedly play the current
played fi le.
In the MP3 menu, touch the Re-
➜
peat button.
The current played MP3 fi le will
repeatedly play.
If you press again the Repeat but-
➜
ton, the repeat function will be
cancelled.
Quitting Playback
To quit the playback, touch the
➜
Stop button in the MP3 menu.
Playback is stopped.
73
Page 74

MP3 Mode Picture Viewer Mode
Removing the SD Card
You quit the MP3 mode by touch-
➜
ing the button in the Mp3
menu.
Carefully push on the SD card in
➜
the slot until it disengages.
The SD card is ejected a little bit
and can be removed.
74
Picture Viewer Mode
The Lucca can also be used to view
pictures that are stored on the inserted SD card. For this purpose,
the pictures must be stored in the
.jpg or .bmp format on the card. You
can also mix JPG fi les and other data
(e.g. MP3 fi les) in one folder. In the
Picture Viewer mode, only the .jpg
(.bmp) fi les in a folder are displayed
and others are ignored.
Starting the Picture Viewer
If you are in a different operating
mode,
Press the Menu button longer
➜
than 3 seconds.
The main menu displays.
Page 75

Touch the Picture Viewer button.
➜
The Pictures viewer menu displays.
The fi rst picture in the picture fi le
recognised by the Lucca is displayed.
Picture Viewer Mode
Selecting a Picture fi le
To select the next picture in the
➜
fi le list, touch the next fi le by using the arrows to scroll down on
the Pictures Viewer menu.
To select the previous picture in
➜
the fi le list, touch the previous fi le
by using the arrows to scroll up
on the Pictures Viewer menu.
The next or previous picture is
displayed.
Starting the Slide Show
Touch the Slide button to
➜
start the slide show with all
the pictures in the fi le list.
The picture silde is converted at 3
seconds intervals.
75
Page 76

Picture Viewer Mode
At the last slide the Question No-
tice where the slide show is fi nished will appear.
Starting the Full Screen
Touch the Full button to view the
➜
full screen with all the pictures in
the fi le list.
On the full screen mode, you can
move to the previous or next fi le
by using the arrow icon.
76
Page 77

Picture Viewer Mode Installing Street Maps
Installing Street Maps
The road map of the country in which
the Lucca was purchased is preinstalled in the memory of the Lucca.
The preinstalled road map is also
contained on the enclosed CD/DVD
for a future restore.
Dependend on the purchase version
the CD/DVD contains also other road
maps.
Removing the SD Card
You quit the Picture Viewer mode
➜
by touching the button in
the Pictures viewer menu.
Carefully push on the SD card in
➜
the slot until it disengages.
The SD card is ejected a little bit
and can be removed.
To install a road map from the CD/
DVD, copy it from the CD/DVD to an
SD card or use the USB-port and install the road map as described below.
Switch on the Lucca by pressing
➜
the Power button for a few seconds.
Insert the new memory card into
➜
the SD card slot according to the
marking on the card slot.
Or
Connect the Lucca via the USB-
➜
port to your PC.
77
Page 78

Installing Street Maps Technical Data
➜
Switch off and on the Lucca again
by pressing the Power button for
a few seconds.
A dialog menu displays. Follow
the instruction to install the street
map.
Determine whether to load the content of the road map into the main
memory of the device or whether the
Lucca should load the data from the
SD card during the navigation.
Note:
If you load the new road map into
the main memory, the previously
installed road map is overwritten.
➜
Touch the OK button.
The selected road map is activated
and the Navigation menu displays.
Removing the SD Card
➜
Carefully push on the SD card in
the slot until it disengages.
The SD card is ejected a little bit
and can be removed.
Technical Data
OS: Microsoft Win CE 5.0
CPU: Atlas II Dual Core Proces-
sor (300MHz)
Main Memory:
RAM(64MB) DRAM
ROM(512MB) NAND Flash
Unit Size(mm):
115(W) x 80(L) x 25(H)
Unit Weight(g):
approx. 190
GPS: QuickFind Technology on
Centrality Dual Core Proc essor 20 channel
Battery: Rechargeable Battery
(Li-lon 1230mA)
Sound: Max 1.5W Speaker built-in
SD Card: SD Card slot for external
storage (max. 2GB)
Operating temperature:
-20°C ... 60°C
Storage temperature:
-30°C ... 70°C
78
Page 79

Disposal of old unit Service
Disposal of old unit
(EU countries only)
Do not dispose of your old unit in
the household trash!
Please use the return and collection
systems available to dispose of the
old unit.
Service
In some countries Blaupunkt offers
a specifi c repair service including a
pick-up service.
In case your Lucca has to be sent to
Blaupunkt for service you can order
a pick-up service for your device on
the internet.
Refer to www.blaupunkt.com to
check if this service is available in
your country.
79
Page 80

Warranty FAQ
Warranty
We provide a manufacturer's warranty for our products purchased within
the European Union. For devices purchased outside the European Union,
the warranty terms issued by our respective responsible domestic agency are valid.
The warranty terms can be called up
under www.blaupunkt.com/de or requested directly from:
Blaupunkt GmbH, Hotline
Robert-Bosch-Str. 200
D-31139 Hildesheim
80
Fault Removal /
Frequently Asked
Questions FAQ
Why does the Lucca require GPS reception?
The system must know where it is located or where it is moving. This is
accomplished with the help of GPS
satellites. Without GPS reception,
navigating is not possible.
How can I listen to MP3 music?
With the help of a PC, the MP3 fi les
are stored on the card which is then
inserted in the SD card slot of the
Lucca. In conjunction with the cradle,
they can also be played over the car
sound system.
Can the navigation software be
changed?
Yes. Simply insert the card in the SD
card slot or use the USB-port and you
can immediately navigate with the
new data.
Page 81

FAQ
The internal navigation software remains intact and you can use either
the internal navigation software or
the one on the SD card for the selection.
Is the old internal navigation software overwritten with a change of
the navigation software?
No, the system can navigate with
the internal as well as the external
data. If the external data (SD card)
are used for navigation, the SD slot
for the MP3 playback for the Lucca is
unavailable during this time.
Can the internal navigation software
be changed?
Yes. The data can be loaded in the
internal memory. For this purpose,
insert the SD card in the SD card slot
or connect the Lucca via the USB-port
with your PC and initiate the loading
process via menu.
How long does the loading take from
the SD card to the internal memory?
The loading process lasts approx. 15
minutes and is dependent upon the
data size. For this reason, the individual countries are delivered as completely manufactured maps.
The data do not have to be loaded
from the SD card into the internal
memory.
Is it possible to play WMA fi les with
DRM protection?
The playback of WMA fi les with Digital Rights Management protection
(WMA-DRM) is not possible since the
license key is not transferred during
the transfer of the WMA fi le from the
PC.
The playback of WMA fi les without
DRM protection is, of course, possible.
Which cards can I use?
Commercial SD or MMC cards.
Which data format is required for an
SD card?
FAT 16/32.
81
Page 82

Country: Phone: Fax:/www:
Germany (D) 0180-5000225 05121-49 4002
www.blaupunkt.com
Austria (A) 01-610 39 0 01-610 39 391
Belgium (B) 02-525 5444 02-525 5263
Denmark (DK) 44-898 360 44-898 644
Finland (FIN) 09-435 991 09-435 99236
France (F) 01-4010 7007 01-4010 7320
Great Britain (GB) 01-89583 8880 01-89583 8394
Greece (GR) 210 94 27 337 210 94 12 711
Ireland (IRL) 01-46 66 700 01-46 66 706
Italy (I) 02-369 62331 02-369 62464
Luxembourg (L) 40 4078 40 2085
Netherlands (NL) 0800 400 1010 0800 400 1040
Norway (N) 66-817 000 66-817 157
Portugal (P) 2185 00144 2185 00165
Spain (E) 902 52 77 70 91 410 4078
Sweden (S) 08-7501850 08-7501810
Switzerland (CH) 01-8471644 01-8471650
Czech. Rep. (CZ) 02-6130 0446 02-6130 0514
Hungary (H) 76 511 803 76 511 809
Poland (PL) 0800-118922 022-8771260
Turkey (TR) 0212-335 06 71 0212-346 00 40
Blaupunkt GmbH,
Robert-Bosch-Straße 200,
D-31139 Hildesheim
10/06 CM-AS/SCS1 (GB)
8 622 405 254
82
Page 83

Mobile Navigation
TravelPilot Lucca 3.3
DE
Die Lucca hat eine neue Ein-/Ausschaltlogik!
Es gibt zwei Ausschaltzustände der Lucca:
Den Ruhestand (Kurzdruck auf die Schaltfl äche Power).
1)
Das vollständige Ausschalten aller Funktionen (Langdruck länger als
2)
3 Sekunden auf die Schaltfl äche Power).
Zum Einschalten drücken Sie die Schaltfl äche Power kurz, wenn Sie die
Lucca aus dem Ruhestand wecken möchten. Wenn das Gerät vollständig
ausgeschaltet ist, drücken Sie die Schaltfl äche Power länger als 4 Sekunden.
Wir wünschen Ihnen allzeit gute Fahrt - Ihr Blaupunkt Service Team
GB
The Lucca features a new switch-on/switch-off logic!
The Lucca features to switch-off states:
The idle state (short press on the Power button).
1)
Complete switch-off of all functions (long press for longer than 3 seconds
2)
on the Power button).
To switch it on, briefl y press the Power button to return the Lucca from the
idle state. If the device is completely switched off, press the Power button
for longer than 4 seconds.
Have a safe trip at all times - Your Blaupunkt Service Team
FR
Le Lucca répond à une nouvelle logique de mise en marche et d'arrêt !
Le Lucca peut prendre deux états d'arrêt différents :
Etat de repos (pression brève sur le bouton Power).
1)
Arrêt complet de toutes les fonctions (pression prolongée, plus de
2)
3 secondes, sur le bouton Power).
Si vous souhaitez sortir le Lucca de l'état de repos et le mettre en marche,
appuyez brièvement sur le bouton Power. Si l'appareil avait été complète-
ment arrêté, appuyez sur le bouton Power pendant plus de 4 secondes.
En vous souhaitant toujours bonne route - votre Service Team Blaupunkt
IT
Il Lucca ha una nuova logica di accensione/spegnimento.
Per il Lucca sono disponibili due modalità di spegnimento:
Stand-by (breve pressione del pulsante Power).
1)
Completa disattivazione di tutte le funzioni (pressione di durata superiore
2)
a 3 secondi del pulsante Power).
Per l'accensione premere brevemente il pulsante Power, se si intende
riattivare il Lucca dallo stato di stand-by. Premere il pulsante Power per
più di 4 secondi, se l'apparecchio è completamente spento.
Vi auguriamo buon viaggio - Il vostro Blaupunkt Service Team
8 622 405 423
Page 84

NL
De Lucca is voorzien van een nieuwe aan-/uitschakellogica!
Er zijn twee uitschakeltoestanden van de Lucca:
De ruststand (de Power knop kort indrukken).
1)
Het volledig uitschakelen van alle functies (langer dan 3 seconden op de
2)
Power knop drukken).
Om het apparaat in te schakelen drukt u kort op de Power knop, wanneer u
de Lucca weer uit de ruststand wilt 'wekken'. Wanneer het apparaat volledig
is uitgeschakeld, druk dan langer dan 4 seconden op de Power knop.
Wij wensen u altijd een goede reis - Uw Blaupunkt Service Team
SW
Lucca har en ny på-/avslagningslogik!
Lucca går att slå av på två olika sätt:
1)
Viloläget (kort tryckning på skärmknappen Power).
2)
Slå av alla funktioner (lång tryckning (mer än 3 sekunder) på
skärmknappen Power).
För att slå på trycker du kort på skärmknappen Power om du vill
väcka Lucca ur viloläget. När apparaten är helt avstängd trycker du
på skärmknappen Power längre än 4 sekunder.
Blaupunkt Service Team - alltid där för dig
ES
¡El Lucca tiene una nueva lógica de conexión y desconexión!
Hay dos tipos de estado de desconexión:
1)
El modo de reposo (pulsación breve del botón Power).
2)
La desconexión completa de todas las funciones (pulsación durante
más de 3 segundos del botón Power).
Pulse brevemente el botón Power si desea que el Lucca abandone el modo
de reposo. Si el equipo está totalmente desconectado, pulse el botón Power
durante más de 4 segundos.
Su equipo de servicio Blaupunkt le desea un buen viaje.
PT
O Lucca possui uma nova lógica de activação/desactivação!
Existem dois estados de desactivação do Lucca:
1)
O estado de repouso (toque breve no botão Power).
2)
A desactivação total de todas as funções (toque longo por mais
de 3 segundos no botão Power).
Para ligar, prima brevemente o botão Power, se pretender reactivar o Lucca
do estado de repouso. Se o aparelho estiver totalmente desligado, prima o
botão Power por mais de 4 segundos.
Desejamos-lhe uma viagem sempre agradável - a sua equipa do serviço
Blaupunkt
Page 85

DK
Lucca-navigationssystemet er udstyret med et logisk tænd/sluk-system!
Lucca-navigationssystemet har to sluktilstande:
Dvaletilstand (kort tryk på skærmknappen Power).
1)
Fuldstændig deaktivering af alle funktioner (langt tryk i mere end
2)
3 sekunder på skærmknappen Power).
Hvis du vil tænde for systemet, skal du trykke kort på skærmknappen Power,
hvis Lucca-navigationssystemet befi nder sig i dvaletilstand. Hvis systemet er
helt slukket, skal du trykke på skærmknappen Power i mere end 4 sekunder.
Vi ønsker dig god rejse. Hilsen dit Blaupunkt-serviceteam
NO
Lucca har nye logiske funksjoner for å slå apparatet på og av!
Det fi nnes to forskjellige tilstander for avslått apparat:
1)
Hvilemodus (kort trykk på knappen Power).
2)
Alle funksjoner fullstendig avslått (langt trykk i mer enn 3 sekunder på
knappen Power).
For å slå på trykker du kort på knappen Power når du vil aktivere Lucca
fra hviletilstand. Når apparatet er fullstendig avslått trykker du på knappen
Power lenger enn 4 sekunder.
Vi ønsker deg en god reise. Hilsen ditt Blaupunkt serviceteam
SF
Lucca-järjestelmässä on uusi kytkentä-/katkaisulogiikka!
Lucca-järjestelmällä on kaksi erilaista katkaisutilaa:
1)
Lepotila (painikkeen Power lyhyt painallus).
2)
Kaikkien toimintojen täydellinen sammuttaminen (painikkeen
Power pitkä, yli 3 sekuntia kestävä painallus).
Kun haluat herättää Lucca-järjestelmän lepotilasta, kytke laite päälle painamalla lyhyesti painiketta Power. Kun laite on kytketty kokonaan pois päältä,
paina painiketta Power yli 4 sekuntia.
Blaupunkt-palvelutiimi toivottaa sinulle hyvää ja turvallista ajomatkaa
TR
Lucca'da yeni bir açma/kapatma sistemi mevcuttur!
Lucca'da iki kapatma durumu mevcuttur:
Hareketsiz durum (Power tuşuna butonuna basma).
1)
Tüm fonksiyonları tamamen kapatma (Power butonuna 3 saniyeden fazla
2)
uzun süre basma).
Lucca'yı hareketsiz durumdayken açmak için Power butonuna kısa süre basınız. Cihaz tamamen kapatılmış durumda ise Power butonuna 4 saniyeden
fazla basınız.
Size iyi sürüşler dileriz - Blaupunkt servis takımınız
Page 86

HU
A Lucca új be-és kikapcsoló logikával rendelkezik!
A Lucca két kikapcsolási állapottal felszerelt:
A nyugalmi állapot (rövid nyomás a Power) kapcsolómezőre.
1)
Az összes funkció teljes kikapcsolása (a Power kapcsolófelületet
2)
hosszabban, mint 3 másodperc lenyomva tartani).
Bekapcsoláskor nyomja meg a Power kapcsolófelületet röviden, ha a Lucca
készüléket a nyugalmi állapotból fel kívánná ébreszteni. Ha a készülék teljesen ki van kapcsolva, nyomja meg a Power kapcsolófelületet és tartsa
4 másodpercnél hosszabb ideig lenyomva.
Minden időben kellemes utazást kíván Önnek - az Ön Blaupunkt szerviz csapata.
PL
Urządzenie Lucca posiada nowy układ logiczny włączania/wyłączania!
Istnieją dwa stany wyłączenia urządzenia Lucca:
Stan spoczynkowy (krótkie naciśnięcie pola wyboru Power).
1)
Całkowite wyłączenie wszystkich funkcji (długie naciśnięcie na
2)
ponad 3 sekundy pola wyboru Power).
Aby włączyć urządzenie Lucca, znajdujące się w stanie spoczynkowym, naciśnij krótko pole wyboru Power. Gdy urządzenie jest całkowicie wyłączone,
naciśnij na ponad 4 sekundy pole wyboru Power.
Życzymy szerokiej drogi - Twój serwis Blaupunkt
CZ
Přístroj Lucca má nový způsob vypínání/zapínání!
Přístroj Lucca nabízí dva režimy vypínání:
1)
klidový režim (krátké stisknutí tlačítka Power).
úplné vypnutí všech funkcí (dlouhé stisknutí tlačítka Power po dobu delší
2)
než 3 sekundy).
Pro návrat přístroje Lucca z klidového režimu stiskněte krátce tlačítko Power. Po-
kud je přístroj zcela vypnutý, stiskněte tlačítko Power po dobu delší než 4 sekundy.
Přejeme vám šťastnou cestu - váš servisní team Blaupunkt
SK
Prístroj Lucca má nový spôsob zapínania/vypínania!
Prístroj Lucca ponúka dva režimy vypínania:
Kľudový režim (krátké stlačenie tlačítka Power).
1)
Úplné vypnutie všetkých funkcií (dlhé stlačenie tlačítka Power na čas
2)
dlhší ako 3 sekundy).
Na návrat prístroja Lucca z kľudového režimu stlačte krátko tlačítko Power. Pokial
je prístroj celkom vypnutý, stlačte tlačítko Power na čas dlhší ako 4 sekundy.
Prajeme vám šťastnú cestu - váš servisný tím Blaupunkt
GR
Το Lucca έχει μια νέα λογική ενεργοποίησης/απενεργοποίησης!
Υπάρχουν δύο καταστάσεις απενεργοποίησης του Lucca:
Η κατάσταση αδρανείας (σύντομο πάτημα στο κουμπί Power).
1)
Η πλήρης απενεργοποίηση όλων των λειτουργιών (παρατεταμένο πάτημα
2)
περισσότερο από 3 δευτερόλεπτα στο κουμπί Power).
Για την ενεργοποίηση πιέστε για λίγο το κουμπί Power, όταν θέλετε να επαναφέρετε το Lucca από την κατάσταση αδρανείας. Εάν η συσκευή είναι πλήρως απενεργοποιημένη, πιέστε το κουμπί Power περισσότερο από 4 δευτερόλεπτα.
Σας ευχόμαστε καλό δρόμο - το επιτελείο της Blaupunkt
Page 87

Mobile Navigation
TravelPilot Lucca 3.3 CC
DE
Beiliegendes Kartenmaterial (Backup CD-ROM)
Ihrer Lucca 3.3 CC liegt detailliertes Kartenmaterial zu den auf der Verpackung genannten Ländern (bzw. dem Land) bei. Entgegen den Angaben in
den Bedienungsanleitungen umfasst dies nicht Gesamt-Europa. Kartenmaterial anderer Länder Europas erhalten Sie im Fachhandel.
GB
Enclosed map material (Backup CD-ROM)
Your Lucca 3.3 CC features detailed map material of the countries (or the
country) listed on the packaging. Contrary to the information in the operating instructions, it does not include all of Europe. Map material of other
countries of Europe is available at specialised dealers.
FR
Données cartographiques jointes (CD-ROM de sauvegarde)
Des données cartographiques détaillées relatives au(x) pays mentionné(s)
sur l'emballage sont jointes à votre Lucca 3.3 CC. Contrairement à ce qui est
indiqué dans la notice d'utilisation, elles ne portent pas sur l'ensemble de
l'Europe. Vous pouvez vous procurer des données cartographiques relatives aux
autres pays d'Europe dans le commerce spécialisé.
IT
Materiale cartografi co accluso (CD-ROM di backup)
Insieme al Lucca 3.3 CC viene fornito materiale cartografi co dettagliato relativo al/i Paese/i riportato/i sulla confezione. Contrariamente a quanto indicato nelle istruzioni d’uso queste mappe non comprendono l'intera Europa.
Il materiale cartografi co relativo agli altri Stati europei può essere acquistato
separatamente presso rivenditori specializzati.
NL
Meegeleverd kaartmateriaal (back-up CD-ROM)
Bij uw Lucca 3.3 CC wordt gedetailleerd kaartmateriaal meegeleverd van de
op de verpakking vermelde landen (resp. het land). In tegenstelling tot de
informatie in de gebruiksaanwijzing omvat dit materiaal niet geheel Europa.
Kaarten van andere Europese landen kunt u verkrijgen bij uw vakhandel.
ES
Material cartográfi co adjunto (copia de seguridad en CD-ROM)
Su Lucca 3.3 CC incorpora material cartográfi co detallado para el/los
país(es) especifi cado(s) en el embalaje. A diferencia de lo indicado en el manual de instrucciones, esto no engloba a toda Europa. El material cartográfi co
de otros países de Europa puede adquirirse en comercios especializados.
8 622 405 545
Page 88

PT
Mapas anexos (CD-ROM de segurança)
Juntamente com o seu Lucca 3.3 CC, recebe mapas pormenorizados dos
países (ou país) mencionados na embalagem. Contrariamente às indicações
nas instruções de serviço, eles não abrangem toda a Europa. Poderá adquirir
mapas de outros países europeus no comércio da especialidade.
TR
Ekteki kart malzemesi (Backup CD-ROM)
Lucca 3.3 CC 'nizin detaylı kart malzemesi, adı geçen ülkelerin (veya ülkenin)
ambalajında ektedir. Kullanım kılavuzlarındaki verilere rağmen, bu bütün
Avrupa'yı kapsamaz. Avrupa'nın başka ülkelerinin kart malzemesini uzman
piyasadan edinebilirsiniz.
 Loading...