

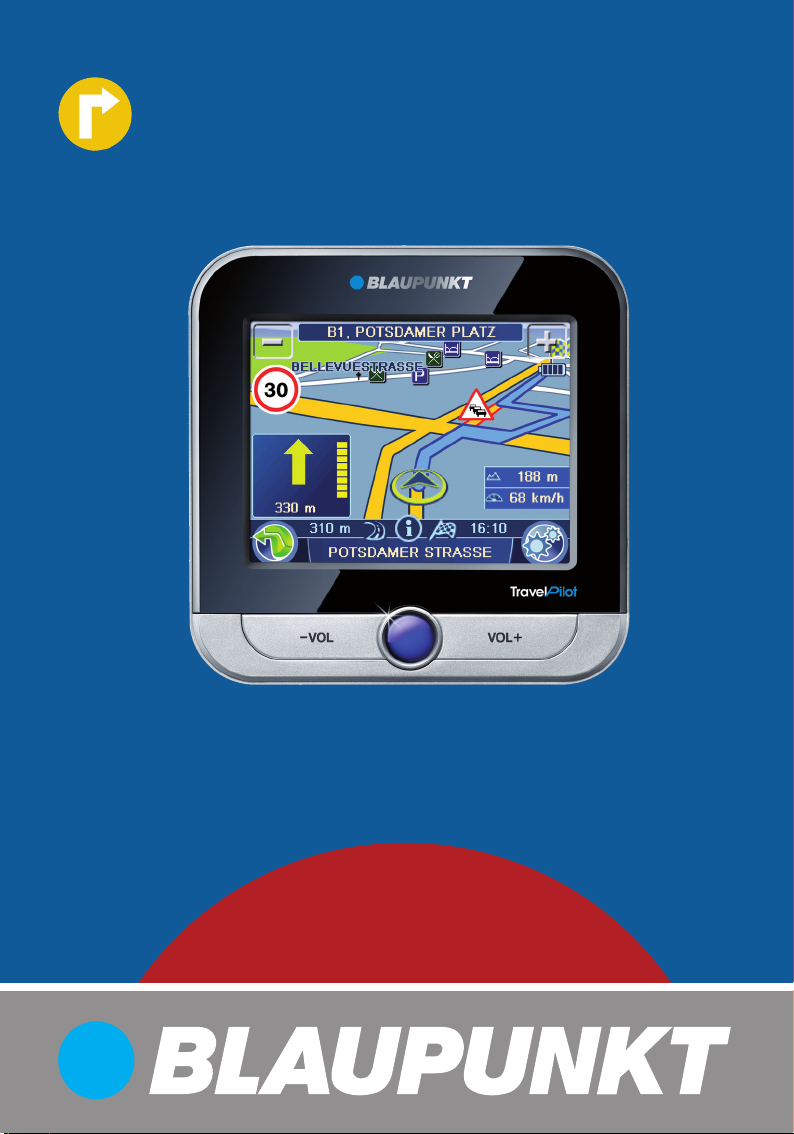
Page 1
Mobile Navigation
TravelPilot 200
www.blaupunkt.com
Operating and installation instructions
(Long version)
Page 2
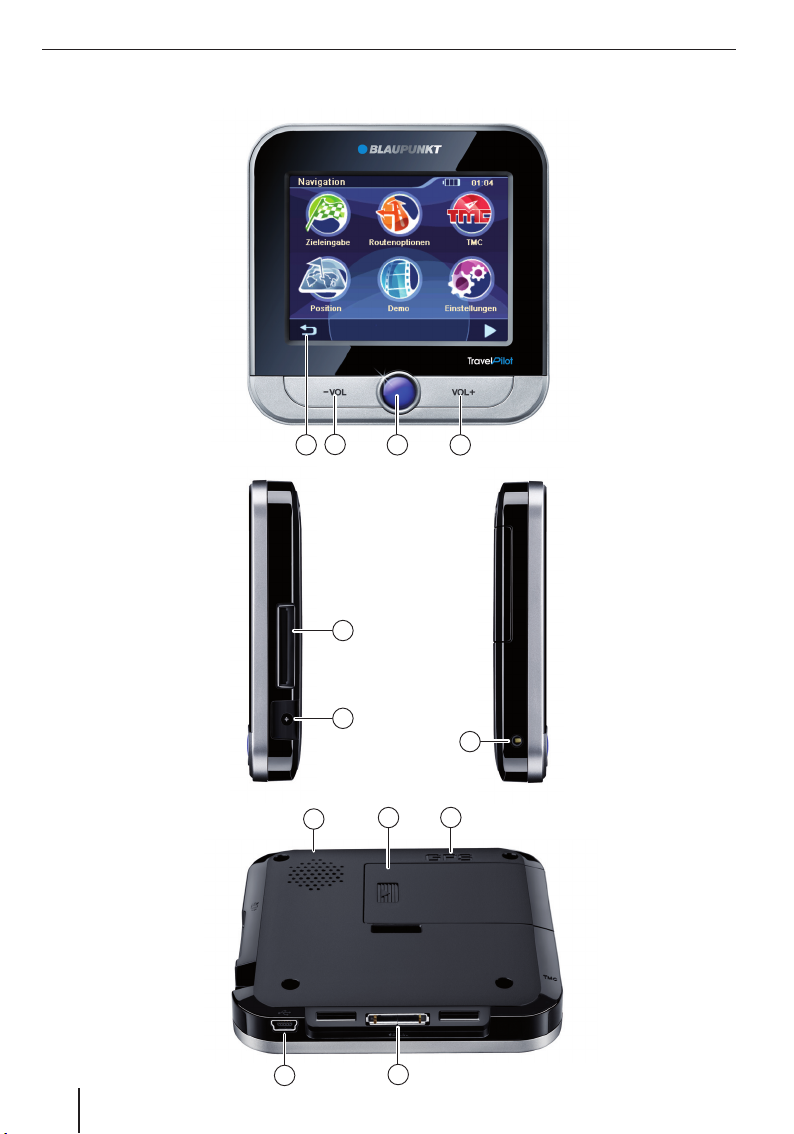
Device overview
Device overview
2
1
10
3
6
7
9
4
5
8
11
12
2
Page 3

1 Display (touchscreen): Simple and intuitive
operation by touching the buttons on the display.
2 VOL -: Decreases the volume
3 On/Off switch:
Long press (longer than 3 seconds):
•
Switches the device on or off.
Short press: Opens the main menu.
•
4 VOL +: Increases the volume
5 Socket for additional external TMC antenna
(internal TMC antenna is present)
6 Memory card slot
7 Socket for power supply (battery charger or
charger cable for the cigarette lighter)
8 Socket for additional external GPS antenna
(internal GPS antenna is present)
9 Battery compartment cover
: Light sensor for automatic switching of day
and night display (top side)
; USB port for data transfer
< Serial port
(for future expansions)
Device overview
3
Page 4

Contents
Device overview ..................................2
Safety notes ........................................6
Warning symbols used ...........................6
Use as directed .....................................6
Road safety ..........................................6
General safety notes ..............................6
Notes about handling the CD/DVD ...........7
Cleaning notes ......................................7
Disposal notes ......................................7
First use ..............................................7
Scope of delivery ..................................7
Protective screen fi lm ............................7
Charging the battery ..............................7
Switching on the device..........................8
Setting the language ..............................8
Installation in the vehicle .....................8
Attaching the suction cup holder .............8
Attaching the mounting cup ....................8
Inserting the device in the mounting cup ...9
Removing the device ..............................9
Removing the suction cup holder .............9
Switching on/off ..................................9
Switch-on ............................................9
Switch-off ............................................9
Reset ...................................................9
Operating the menus .........................10
Main menu .........................................10
Buttons ..............................................10
Keyboard ...........................................10
Intelligent auto-completion function ....10
Error-tolerant entry ..........................10
Lists ..................................................10
Information about GPS .......................11
GPS mode of operation ........................11
Displaying GPS info .............................11
Performing basic settings ..................12
Setting the time zone ..........................12
Entering the home address ...................12
Activating the PIN query .......................12
Confi guring the PIN query ..................13
Locking/unlocking the device .............13
Changing the PIN .............................13
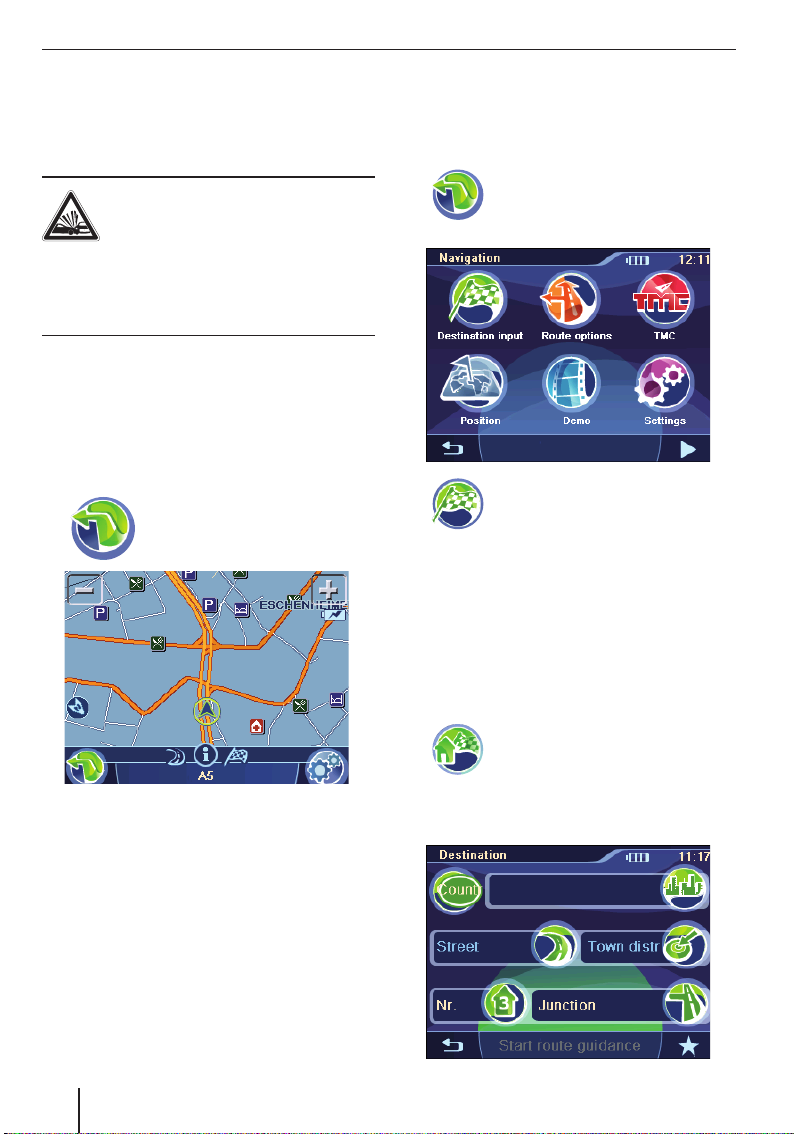
Navigation ........................................14
Starting the navigation .........................14
Destination entry...............................14
Entering an address .............................14
Using the home address as destination ...15
Copying a destination from
the favourites......................................15
Copying one of the last destinations .......15
Entering coordinates ............................15
Copying a destination from the map .......15
Points of interest ...............................16
User-POIs ...........................................16
Selecting a point of interest at
a specifi c location................................16
Selecting a point of interest nearby,
in the destination area or at home ..........16
Selecting a point of interest on the map ..16
Selecting a supraregional
point of interest ..................................17
Tour planning ....................................17
Entering the tour .................................17
Editing a tour ......................................17
Loading a tour from the favourites ..........18
Starting route guidance from here ..........18
Calculating the route from here ..............18
Additional functions
after the tour planning ..........................18
Exiting the tour planning .......................18
Additional functions
after the destination entry .................19
4
Page 5

Contents
Demo ................................................19
Starting the demo ...............................19
Demo settings .....................................19
Storing the position ...........................20
Managing destinations .......................20
Saving destinations .............................20
Storing a destination entered .............20
Saving one of the last destinations ......20
Renaming a destination (favourites only) ..21
Deleting a destination ..........................21
Delete all destinations ..........................21
Calculating a route .............................22
Starting the route calculation ................22
Additional functions
after the route calculation .....................22
Specifying route options ....................22
Route guidance..................................23
Start route guidance ............................23
Reaching the place of destination ..........24
Quitting the route guidance ...................24
Offroad route guidance ........................24
Disturbed GPS reception ......................24
Working with the map ........................25
Showing a Map ...................................25
Moving and scaling the map ..................25
Touching the map ................................25
Buttons ..............................................25
Performing map settings ......................25
Voice output during route guidance.....26
Map display
during destination guidance ...............27
Navigation tools ..................................27
Route information ...............................27
Speed limit .........................................27
Additional functions
during the route guidance ..................28
Entering a blocking ..............................28
Cancelling route guidance .....................28
Skipping the next destination ................28
Display information
about the destination ...........................28
Display route list .................................29
TMC function .....................................29
Establishing TMC reception ..................29
Connecting the TMC antenna .............29
Searching for TMC stations ................29
Showing traffi c reports ........................29
Switch on automatic traffi c jam detours ..30
Traffi c obstructions on the map display ...30
Data transfer .....................................30
Copying data to the memory card ..........30
Using road maps from memory card .......31
Settings ............................................31
Performing settings for the navigation ....31
Home address .................................31
Continuing the tour automatically .......32
Selecting a dataset ...........................32
POI note .........................................32
Voice instructions.............................32
Units ..............................................32
Performing device settings ...................32
Display ...........................................32
Button sound ...................................33
Language ........................................33
Time...............................................33
Product information .........................33
Theft protection ...............................33
Factory settings ...............................33
Calibrating the touchscreen ...............33
Software ...........................................34
Reinstalling navigation software ............34
Updating the navigation software ...........34
Service .............................................34
Warranty ...........................................34
Technical data ...................................34
Troubleshooting table ........................35
FCC Information (USA) ......................37
5
Page 6

Safety notes
Safety notes
For your personal benefi t, carefully read the following safety notes before operating the device
for the fi rst time.
Warning symbols used
In the chapters, warning symbols refer to important notes for you and the device.
DANGER!
Warns about injuries or life-threatening
danger
DANGER!
Warns about accidents
Use as directed
The device is designed for mobile use in vehicles.
Special information about the navigation of trucks,
busses and campers, such as altitude and width
limitations or maximum permissible road load, is
not included in the navigation data!
Navigation off the roads (offroad route guidance)
is not possible with this navigation device.
Road safety
The navigation device does not release you from
your responsibility as a driver for correct and prudent behaviour in traffi c. Always observe the applicable traffi c rules.
Use your device in such a way that you can always
safely control your vehicle. If in doubt, stop and
operate the device while the vehicle is standing.
General safety notes
Observe the following notes to protect the device
against defects and yourself against injuries and
life-threatening dangers from an ignition or explosion:
Protect the device against moisture since it
•
is not waterproof and not splashproof.
Do not modify or open the device. Other-
•
wise, it could be damaged and then ignite or
explode. Or acidic, fl ammable liquid could
run out of the battery.
Do not expose the device to very low (below
•
-20 °C) and very high temperatures (above
60 °C), e.g. close to fi re, heating devices or in
a parked car with direct exposure to the sun.
Moisture could form inside the device or the
device could overheat. The device or battery
could deform and even ignite or explode. Or
acidic, fl ammable liquid could run out of the
battery.
If battery liquid comes into contact with
•
your eyes or skin, immediately fl ush with water and consult a doctor.
Remove the device from the power supply
•
when you park your vehicle since it contin-
ues to use battery power and could deplete
the vehicle battery. Do not unplug the connector of the power supply by pulling on the
wire. The wire could be damaged and cause
electrical shock.
6
Page 7
Safety notes | Before starting
Notes about handling the CD/DVD
The device is supplied with a CD/DVD that contains navigation software and map material. To
protect the CD/DVD against dirt and damage, observe the following notes:
Store the CD/DVD in its case. Hold the
CD/DVD only at the edge.
Do not expose the CD/DVD and the case
to direct sunlight.
Use only a clean CD/DVD. If necessary,
clean the CD/DVD with a soft, lint-free
cloth from inside to outside.
Never clean the CD/DVD in a circular
motion.
Do not use any solvents, including on the
printed side of the CD/DVD.
Cleaning notes
Clean the display with a dry, soft cloth.
Water and other liquids could damage the
display.
Do not use strong detergents for cleaning
the housing. Use only a moistened, lintfree cloth.
Disposal notes
Use the return and collection systems available to dispose of the old device.
Do not discard any batteries in the household trash; instead, return them to the corresponding collection sites.
First use
Scope of delivery
The scope of delivery contains the following components:
Navigation device
•
Suction cup bracket
•
Charger cable for cigarette lighter
•
TMC line antenna
•
Operating instructions (short version)
•
Backup DVD
•
Note:
We recommend the use of original Blaupunkt
accessories (www.blaupunkt.com).
Protective screen fi lm
Prior to the initial use, carefully remove the
protective fi lm from the display.
Charging the battery
Upon purchasing the navigation device, the
battery could be discharged. Please charge the
battery before using the device.
CAUTION!
Unapproved chargers could damage batteries
Use only the original chargers from Blaupunkt for
operating and charging to correctly charge the
battery and protect it against overvoltage.
Depending on the type of use, you can operate the
device up to 3 hours with the built-in battery. The
charging time is 5 to 6 hours. The charge state indicator is located on the top display bar:
•
•
•
The device is supplied by an external
power source.
The device is supplied by its internal
battery. The charge state of the battery
is suffi cient.
The device is supplied by its internal
battery. The charge state of the battery
is low.
7
Page 8
Before starting | Installation in the vehicle
A
If the charge state of the battery becomes weak,
the navigation device warns you about it.
Connect the battery charger or the charger
쏅
cable for the cigarette lighter to the charging
socket.
Note:
The battery is equipped with a protection
against overheating from excessive current
fl ow. The protection prevents charging the
battery starting at an ambient temperature
above 45 °C.
Switching on the device
A
Press and hold the On/Off switch for longer
쏅
than 3 seconds.
Setting the language
The device uses English as the standard language
for the menus and voice output. When you switch
on the device for the fi rst time, a dialogue menu
appears in which you can select another language:
쏅
Select your preferred language in the dialogue menu.
Please follow the instructions.
쏅
The language is loaded and the main menu is
displayed.
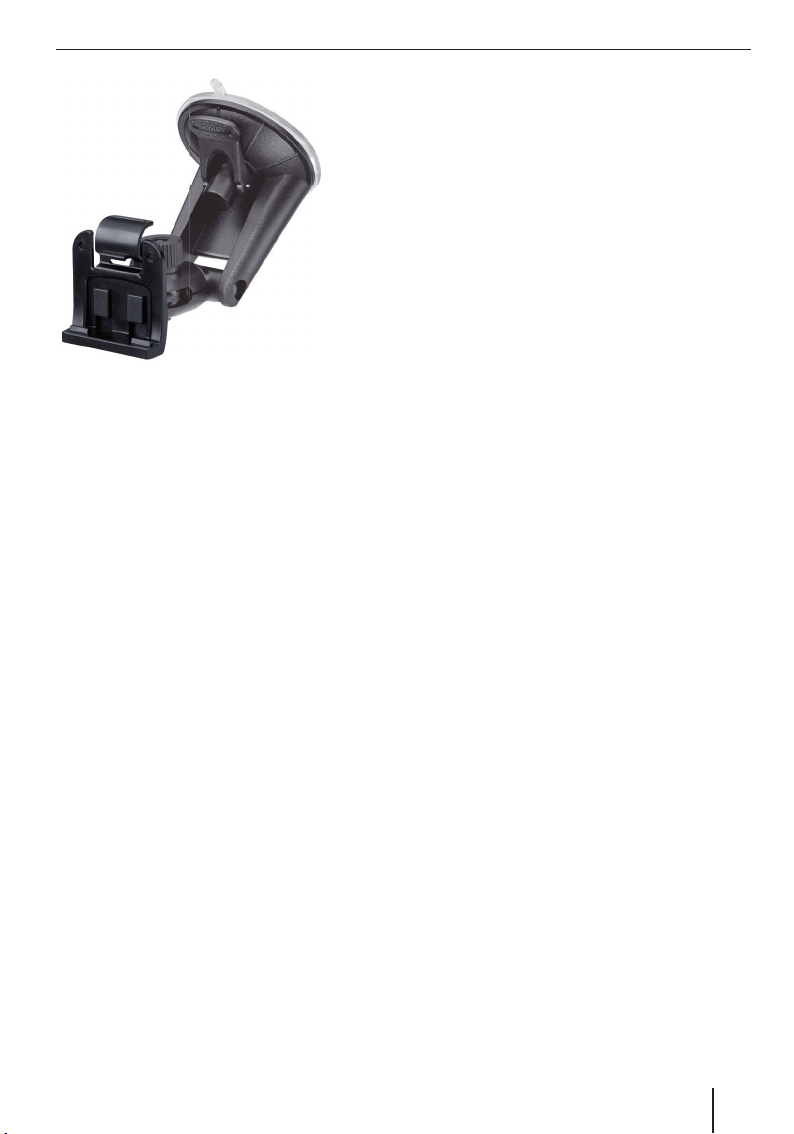
Installation in the vehicle
For temporary installation in a vehicle, the navigation device features a holder to attach it to the
windshield.
DANGER!
The installation at an unsuitable
location can cause accidents
Install the navigation device so that it does not
block your view and does not distract from the
traffi c.
Do not install the device in the airbag deployment
area.
Ensure that the device does not pose a threat to
passengers in the vehicle in case of emergency
braking.
Attaching the suction cup holder
Locate a suitable place inside the vehicle for
쏅
the installation.
To ensure a perfect hold, the glass must be
free of dust and oil. If necessary, clean the
glass using a lens cleaning tissue.
Press the suction cup of the holder against
쏅
the windshield.
Push the lever on the support towards the
쏅
glass.
Attaching the mounting cup
The suction cup holder features two mounts for
the mounting cup.
Push the mounting cup onto the mount until
쏅
it engages.
8
Page 9
Inserting the device in the mounting
cup
The device features 2 recesses on the underside
and one recess on the rear side for the mounting
cup.
Place the device onto mounting cup with the
쏅
underside fi rst and push it to the back.
The clamping holder of the mounting cup
must engage in the rear side of the housing
with a click.
쏅
Align the bracket.
Removing the device
Push the clamping holder down.
쏅
The device disengages from the bracket.
Remove the device.
쏅
Installation in the vehicle | Switching on/off
Switching on/off
The On/Off switch is used to switch the device on
and off and to open the main menu.
Switch-on
Press and hold the On/Off switch for longer
쏅
than 3 seconds.
Switch-off
Press and hold the On/Off switch for longer
쏅
than 3 seconds.
The device is fi rst placed in idle state and
remains ready for operation. All functions will
be completely switched off after 20 minutes.
Note:
The device continues to use a small amount of
energy even if it is switched off. If you use the
device again after an extended period of time,
it may be necessary to recharge the battery.
Reset
If the device does not work properly, a simple
reset may help.
Press and hold the On/Off switch for longer
쏅
than 14 seconds.
The device is switched off and restarted.
Removing the suction cup holder
If you change vehicles, you can simply remove the
support.
Push the lever on the support away from the
쏅
glass.
Carefully loosen the suction cup at the edge
쏅
from the glass so that air can enter between
suction cup and glass.
쏅
Carefully pull the suction cup off of the glass.
9
Page 10
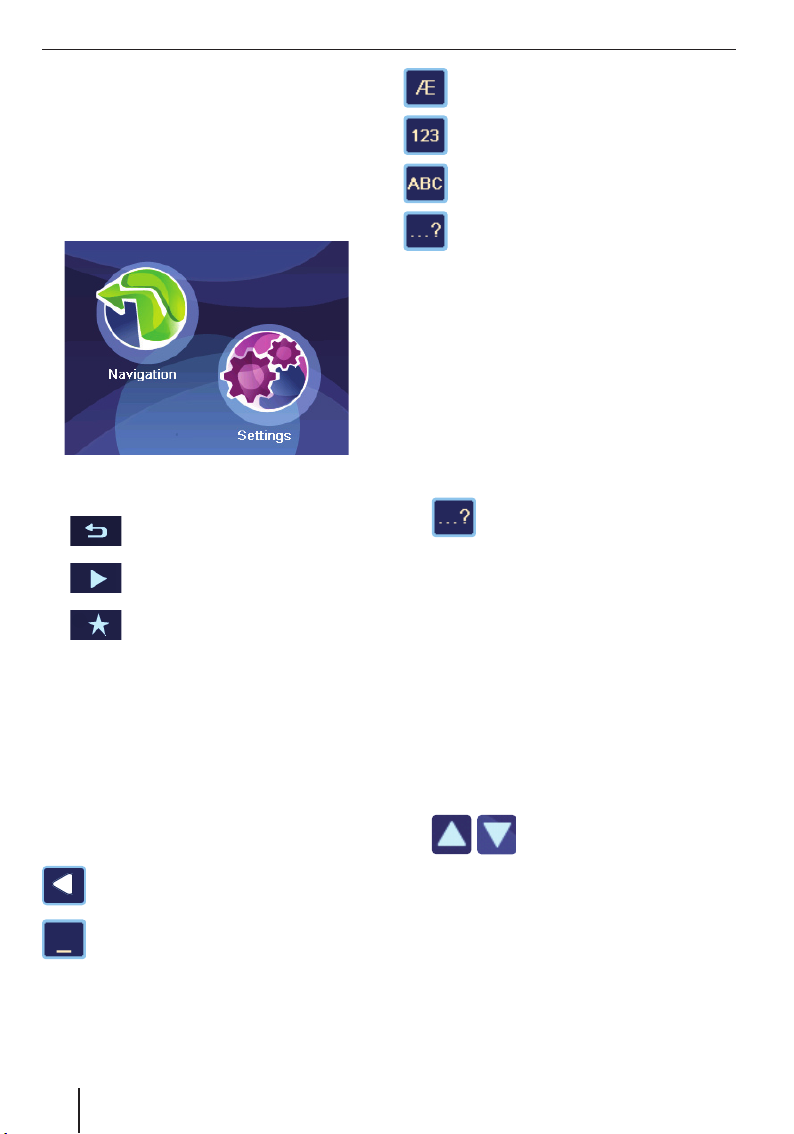
Operating the menus
Operating the menus
Main menu
The main menu provides access to the navigation
and the settings.
쏅
Briefl y press the On/Off switch to reach the
main menu from any other menu.
Buttons
•
•
•
•
Keyboard
If text entries are required (e.g. for the destination
entry), a virtual keyboard appears on the display.
You can perform all entries using your fi nger. Only
capital letters can be entered.
These buttons are located on the keyboard:
Touch this button to return to the
previous menu.
Touch this button to change to the
next page in the menu.
Touch this button to obtain access
to additional functions.
OK: Touch this button to confi rm an entry or
a setting.
Call up alternate character keyboard
(incl. special characters, umlauts)
Call up numeric keypad, e.g. to enter the
house number
Call up character keyboard
Call up error-tolerant entry
Intelligent auto-completion function
During the entry, the device auto-completes characters as far as possible and offers only those
characters on the keyboard that are logically possible.
Error-tolerant entry
The error-tolerant entry helps if you do not know
the exact spelling of a city. After your entry, a list
with city names spelled in a similar way appears.
쏅
쏅
Touch the symbol in the text entry.
The error-tolerant entry is displayed.
Enter a city name and touch OK.
A list with alternate city names is displayed.
Lists
You can frequently display lists form which you can
select an entry (e.g. a destination). For example, if
you do not enter the complete name of a location,
a list with possible results is displayed.
To display a list with additional matching entries,
touch the List button. Longer lists require a longer
loading time.
쏅
Touch one of the buttons to
scroll through the list.
Delete last character
Entering blank spaces
10
Touch an entry directly to accept it.
쏅
Touch the Expand button to display abbrevi-
쏅
ated entries in their entirety.
Page 11
Information about GPS
The GPS (Global Positioning System) allows
worldwide navigation and locating via satellites to
determine a position.
GPS mode of operation
The navigation device measures the current position of your vehicle via GPS and compares these
coordinates with its map material. The map material contains the geographic coordinates of points
of interest, streets and cities that you can view on
the display of the navigation device. The device
uses this information to calculate the route to the
destination you entered.
Displaying GPS info
Information about the GPS reception of the device, your current position and your speed can be
found in the GPS Info menu.
쏅
쏅
쏅
쏅
Touch the symbol in the main
menu.
The map is displayed.
Touch the symbol.
The Navigation menu is displayed.
Touch the button.
The display shows the second page
of the menu.
Touch the symbol.
The GPS Info menu is displayed.
Information about GPS
This menu contains this information:
Latitude/Longitude: Current position in
–
longitude and latitude
Altitude: Current height above mean sea
–
level
Speed: Indicates the current speed of the
–
vehicle
Heading: Driving direction (reliable infor-
–
mation after approx. 5 km/h)
Satellites: Number of GPS satellites
–
received
GPS Signal Quality: Signal strength of
–
the visible GPS satellites. The navigation
requires signals from at least 3 satellites.
Note:
External infl uences can interfere with the view
to the sky and, therefore, the GPS reception
of the navigation device. For this purpose,
please read the chapter "Route guidance",
"Disturbed GPS reception".
11
Page 12
Performing basic settings
Performing basic settings
Before starting a route guidance, perform these
basic settings:
Set the time zone of your position so that the
•
correct arrival times are displayed during the
navigation.
You should enter your home address to quick-
•
ly navigate home from any location.
Activate the PIN query to lock out unauthor-
•
ised persons from using the device.
Setting the time zone
쏅
쏅
쏅
Touch the time zone in the list that applies to
쏅
your location.
Note:
The selection is facilitated by the display
of the capitols in the respective time zone.
"GMT" stands for Greenwich Mean Time, the
mean solar time at the Greenwich meridian
without considering daylight savings time.
쏅
Touch the OK button.
Touch the symbol in the main
menu.
The Settings menu is displayed.
Touch the symbol.
The Time menu is displayed.
Touch the symbol.
A list with available time zones is
displayed.
쏅
쏅
Note:
If the time is changed at your position or if
you drive into a different time zone, you must
adjust the settings.
쏅
Touch the symbol to toggle between
24-hour and 12-hour display.
Touch the symbol to activate (check
mark) or deactivate (no check mark)
daylight savings time.
Touch the button to exit the menu
again.
Entering the home address
쏅
쏅
쏅
쏅
Enter the address as described in the chapter
쏅
"Destination entry", "Entering an address".
Touch the OK button.
쏅
The home address is saved.
Touch the symbol in the main
menu.
The map is displayed.
Touch the symbol.
The Navigation menu is displayed.
Touch the symbol.
The Navigation Settings menu is dis-
played.
Touch the symbol.
The Destination Input menu is dis-
played.
Activating the PIN query
The PIN query allows you to lock out unauthorised
persons from using the device. Hence, every time
you switch on the device, the PIN (Personal Identity Code) you confi gured for yourself is requested.
The PIN can be changed at any time. If you should
forget the PIN, you can unblock the device again
with the PUK (Personal Unblocking Key) which
you defi ne yourself. The PUK cannot be changed.
12
Page 13

Performing basic settings
Note:
During the PIN entry, you have only 3 attempts
to enter the correct PIN or subsequently 3 attempts to enter the correct PUK. If you enter
an incorrect PUK for the 3rd time, your device
is permanently blocked and the device must
be returned via the Blaupunkt service.
Confi guring the PIN query
쏅
Touch the symbol in the main
menu.
The Settings menu is displayed.
쏅
Touch the symbol.
The Anti Theft Protection menu is
displayed.
Touch the Protection Setup button.
쏅
Touch the OK button.
쏅
The PIN query is displayed.
Follow the instructions and enter a self-se-
쏅
lected PIN.
Touch the OK button.
쏅
The initial confi guration of the PIN is followed by a
request to enter a PUK. The PUK is used to unlock
the device if you should forget the PIN.
Follow the instructions and enter a self-se-
쏅
lected PUK.
쏅
Touch the OK button.
To secure your PUK:
Register under http://puk.blaupunkt.com
쏅
and follow the instructions.
Locking/unlocking the device
Prerequisite:
You confi gured the PIN query.
•
In the Anti Theft Protection menu, touch the
쏅
Protection Setup button to lock the device
(check mark) or to unlock it (no check mark).
The PIN query is displayed.
Enter your PIN.
쏅
Touch the OK button.
쏅
Changing the PIN
In the Anti Theft Protection menu, touch
쏅
the Change PIN Code button.
The PIN query is displayed.
Follow the instructions and enter a new self-
쏅
selected PIN.
Touch the OK button.
쏅
13
Page 14
Navigation | Destination entry
Navigation
The navigation device does not release you from
your responsibility as a driver for correct and prudent behaviour in traffi c.
DANGER!
Distraction from the traffi c can cause
accidents
Do not operate the device while driving.
View the display only during safe traffi c situa-
tions.
Notes:
Routes are best planned before starting
•
your trip.
•
Perform the basic settings fi rst.
Starting the navigation
쏅
Touch the symbol in the main
menu.
The map is displayed.
Destination entry
In the destination entry, you can enter an address,
select a destination from memory, or select a
point of interest.
쏅
쏅
Touch the symbol.
The Navigation menu is displayed.
Touch the symbol in the Navigation
menu.
The Destination Input menu is displayed.
Note:
You can only select places of destination
(countries, cities, streets, house numbers,
points of interest) that are contained in the
map material.
From the map, you can directly change to the
navigation menu or to the map settings (Ch.
"Working with the map").
14
Entering an address
쏅
쏅
Touch the symbol.
For the initial destination entry, a list
with countries is displayed.
Select your destination country.
The Destination menu is displayed.
Page 15
Destination entry
Note:
You do not have to repeat entering the country,
city and street information every time. Only if
your destination is at a different location than
the previous one will you have to re-enter the
destination address.
쏅
쏅
쏅
- or -
쏅
쏅
- or -
쏅
Touch the Start Route Guidance button to
쏅
start the route guidance.
The route is calculated and the route guidance
started.
Note:
After the destination entry, you can start the
route guidance or store the destination. For
further details, read the chapter "Additional
functions after the destination entry".
Touch the symbol to select a different country.
Touch the symbol and enter the city
or postal code.
Touch the symbol and enter the part
of town.
Touch the symbol and enter the
street.
Touch the symbol and enter the
house number.
Touch the symbol and enter the
street that intersects the previously
entered street.
Using the home address as
destination
If your home address is saved, you can quickly
navigate home from any location. The stored address can be viewed in the settings and changed,
if necessary (Ch. "Settings").
쏅
Touch the symbol in the Navigation
menu.
Copying a destination from the
favourites
쏅
쏅
Touch the desired destination.
The address of the destination is displayed.
Touch the Start Route Guidance button.
쏅
Touch the symbol.
The Favourites menu is displayed.
Copying one of the last destinations
쏅
쏅
쏅
Touch the symbol.
The Last destinations menu is dis-
played.
Touch the desired destination.
The address of the destination is displayed.
Touch the Start Route Guidance button.
Entering coordinates
쏅
쏅
쏅
쏅
쏅
쏅
Touch the button.
The display shows the second page
of the menu.
Touch the symbol.
The Destination Coordinates menu
displays.
Touch the symbol and enter the latitude.
Touch the symbol and enter the longitude.
Always select the cardinal point fi rst and
then enter the values with the corresponding
units.
Touch the OK button.
Touch the Start Route Guidance button.
Copying a destination from the map
쏅
쏅
Touch the button.
The display shows the second page
of the menu.
Touch the symbol.
The map is displayed.
15
Page 16
Destination entry | Points of interest
쏅
Move and scale the map as described in the
chapter "Working with the map".
쏅
Touch a location of your choice.
The city is selected and its name appears
in the lower display bar.
쏅
Touch the OK button.
The coordinates to the selected location are
displayed.
쏅
Touch the Start Route Guidance button.
Points of interest
Points of interest (POI) are specifi c locations,
such as parking facilities and petrol stations, that
are stored in the map material.
쏅
User-POIs
Besides petrol stations & companies, the points of
interest also provide the User-POIs category. This
allows you to expand the navigation using individual points of interest, e.g. to add the addresses of
friends or your favourite restaurant.
The enclosed CD/DVD contains an installation
programme with instructions to create your own
POI lists at computer or to load existing POI lists.
Selecting a point of interest at a
specifi c location
쏅
쏅
쏅
Touch the OK button.
쏅
The Town District menu is displayed.
For large cities, enter the part of the city.
쏅
Touch the symbol in the Destination
Input menu.
The Points of Interest menu is dis-
played.
In the Points Of Interest menu, touch
the symbol.
The Points Of Interest In Town menu is
displayed.
Touch the symbol to select a different country.
Touch the symbol to enter a different
city.
Touch one of the symbols to select a point of
쏅
interest category.
The keyboard is displayed.
Enter the name of the point of interest.
쏅
- or Touch the List button.
쏅
A result list is displayed.
Touch an entry of your choice.
쏅
The address of the destination is displayed.
Touch the Start Route Guidance button.
쏅
Selecting a point of interest nearby,
in the destination area or at home
쏅
- or -
쏅
쏅
쏅
Select the point of interest category.
쏅
Select the point of interest.
쏅
Touch the Start Route Guidance button.
In the Points Of Interest menu, touch
the symbol to select a point of interest nearby.
In the Points Of Interest menu, touch
the symbol to select a point of interest in the destination area.
Note:
The destination to which you started
a route guidance last is taken as the
destination area.
- or In the Points Of Interest menu, touch
the symbol to select a point of interest at the home address.
Selecting a point of interest on the
map
쏅
Move and scale the map as described in the
쏅
chapter "Working with the map".
Touch a location of your choice.
쏅
Touch the OK button.
쏅
In the Points Of Interest menu, touch
the symbol.
The map is displayed.
The city is selected and its name appears
in the lower display bar.
16
Page 17

쏅
Select the point of interest category.
쏅
Select the point of interest.
쏅
Touch the Start Route Guidance button.
Selecting a supraregional point of
interest
If a point of interest cannot be precisely assigned
to a location, e.g. an airport, a motorways exit
and a mountain pass, you can enter it as a supraregional point of interest.
쏅
쏅
Touch the Select Country button to select a
different country.
쏅
Touch one of the symbols offered to select a
point of interest category.
The keyboard is displayed.
쏅
Enter the name of the point of interest.
- or -
쏅
Touch the List button.
A result list is displayed.
쏅
Touch an entry of your choice.
The address of the destination is displayed.
쏅
Touch the Start Route Guidance button.
In the Points Of Interest menu, touch
the symbol.
The Supra-Regional menu is displayed.
Points of interest | Tour planning
Tour planning
The tour planning allows you to enter a tour with
several interim destinations and to store it, for example, for the demo (Ch. "Demo"). The start position is always the current position.
쏅
Entering the tour
쏅
In the Tour Planning menu, touch the Add
Destination button.
쏅
Enter a destination as described in the chapter "Destination entry".
Note:
You can load already stored tours from Last
destinations or Favourites and add additional
destinations.
쏅
Touch the OK button.
쏅
Repeat the steps to enter additional destinations.
Note:
You can enter a tour with up to 10 destinations.
Editing a tour
쏅
Touch a destination in the tour list.
The address is displayed.
쏅
쏅
쏅
쏅
Touch the OK button.
쏅
Touch the symbol in the Destination
Input menu.
The Tour Planning menu is dis-
played.
Touch the button to call up the add-
on menu.
Touch the symbol to move the destination.
The Move Destination menu dis-
plays.
Touch the buttons to move the
destination up or down in the
tour list.
Touch the symbol to delete the desti-
nation.
17
Page 18

Tour planning
Loading a tour from the favourites
From the favourites, you can copy a destination
for the tour planning or load a stored tour and
then edit it.
Prerequisite:
•
You opened the Favourites menu as described
in the chapter "Destination entry", "Copying a
destination from the favourites".
쏅
In the Favourites menu, select a stored tour or
a destination.
쏅
쏅
쏅
Touch the button to call up the addon menu.
Touch the symbol.
The tour list with the destinations is
displayed.
Touch the Add Destination button to enter
additional destinations.
Starting route guidance from here
Destinations in the tour list can be skipped for the
route guidance. Example: You want to interrupt
the tour and continue it at a later time:
쏅
Touch a destination in the tour list.
The address is displayed.
쏅
쏅
Touch the button to call up the addon menu.
Touch the symbol.
The route is calculated starting with
the current position and the route
guidance starts to the next interim
destination.
Additional functions after the tour
planning
Prerequisite:
You opened the tour list.
•
쏅
Touch the button to call up the addon menu.
You have now the following options:
–
–
–
–
–
Starting the route guidance (Ch.
"Route guidance")
Calculating a route (Ch. "Calculating a route")
Storing the tour in the favourites
(Ch. "Managing destinations")
Delete a tour
Displaying a tour on the map
(Ch. "Working with the map")
Exiting the tour planning
쏅
쏅
Touch this button to exit the menu.
Store the tour in the favourites or delete it.
Calculating the route from here
If you want to calculate the route to a specifi c interim destination in order to learn about distance
and travel time:
쏅
Touch a destination in the tour list.
The address is displayed.
쏅
쏅
18
Touch the button to call up the addon menu.
Touch the symbol.
The route is calculated starting with
the current position.
Page 19

Additional functions after the destination entry | Demo
Additional functions after the
destination entry
Prerequisite:
You entered a destination as described in the
•
chapter "Destination entry".
- or You entered a point of interest as described in
•
the chapter "Points of interest".
- or You planned a tour as described in the chap-
•
ter "Tour planning".
쏅
Touch the button to call up the add-
on menu.
You have now the following options:
–
–
–
–
–
–
Defi ning route options (Ch.
"Specifying route options")
Calculating a route (Ch. "Calculating a route")
Saving a destination as favourite
(Ch. "Managing destinations")
Displaying a destination on the
map (Ch. "Working with the
map")
Favourites only: Deleting a destination (Ch. "Managing destinations")
Favourites only: Renaming a destination (Ch. "Managing destinations")
Demo
Conveniently plan your vacation trip at home
and gain an overview of the route and travel time
– even without GPS reception.
Starting the demo
Entering the demo consists of the start position,
which may be different from your current position, and the destination. If you want to use the
demo to travel a tour with interim destinations,
specify the start position and select a stored tour
as the destination (Ch. "Tour planning").
쏅
쏅
쏅
쏅
Demo settings
You can specify whether the route should be travelled once or endlessly during the demo.
쏅
쏅
Touch the symbol in the Navigation
menu.
The Demo menu is displayed.
Touch the upper fi eld and enter the start position.
Touch the lower fi eld and enter the destination.
Enter the start position and the destination
for the demo as it is done in the destination
entry.
Touch the Start Demo button to travel the
route.
You have access to the same functions as during a route guidance. (Ch. "Additional functions during the route guidance")
Touch the button to call up the addon menu.
Touch the symbol to change between
single demo and endless demo.
–
Note:
The range of functions varies depending on
whether you entered a destination or selected
one from memory.
Favourites only: Planning a tour
with the selected destination
(Ch. "Tour planning")
The endless loop in the symbol indicates that the endless demo
is activated.
19
Page 20

Storing the position | Managing destinations
Storing the position
You can store your current position and later use
it as a destination.
쏅
This menu contains this information:
–
–
–
–
쏅
Touch the Save As Destination button.
The keyboard is displayed.
쏅
Enter a name for the destination and confi rm
with OK.
The destination is stored under the name entered in the Favourites menu.
Touch the symbol in the Navigation
menu.
The Position Information menu is
displayed.
The address of the current location, if it is
contained in the map material
Latitude/Longitude: Current position in
longitude and latitude
Altitude: Current height above mean sea
level
The compass: Driving direction (reliable
information after approx. 5 km/h)
Managing destinations
Two lists are available in which individual destinations are saved:
In the Favourites
•
In the Last Destinations list
•
Destinations from the Favourites can be re-
named.
You can delete individual destinations from both
lists.
Saving destinations
All destinations to which you start a route calculation (Ch. "Calculating a route") are automatically
stored in the Last destinations. The last 100 destinations are stored.
Every destination entered and the destinations
of the Last destinations list can by permanently
stored in the Favourites. This is particularly useful
if you want to approach this destination repeatedly.
Storing a destination entered
Prerequisite:
•
You entered a destination as described in the
chapter "Destination entry".
쏅
쏅
쏅
In the Destination menu, touch the
button to call up the add-on menu.
Touch the symbol.
The keyboard is displayed.
Enter a name for the destination and touch
OK.
The destination is stored in the Favourites
under the name entered.
20
Saving one of the last destinations
Prerequisite:
You opened the Last destinations list as de-
•
scribed in the chapter "Destination entry",
"Copying one of the last destinations".
쏅
Select the destination to be saved in the Last
destinations list.
Page 21

Managing destinations
쏅
쏅
쏅
Touch the button to call up the add-
on menu.
Touch the symbol.
The keyboard is displayed.
Enter a name for the destination and touch
OK.
The destination is stored in the Favourites
under the name entered.
Renaming a destination
(favourites only)
You can rename a stored destination in the
Favourites:
Prerequisite:
You opened the Favourites menu as described
•
in the chapter "Destination entry", "Copying a
destination from the favourites".
In the Favourites menu, select the destination
쏅
to be renamed.
쏅
쏅
쏅
Touch the button to call up the add-
on menu.
Touch the symbol.
The keyboard is displayed.
Enter a new name for the destination and
touch OK.
The destination is stored in the Favourites
under the name entered.
Deleting a destination
You can delete a destination stored in the favourites or a last destination:
Prerequisite:
You opened the Last destinations list as de-
•
scribed in the chapter "Destination entry",
"Copying one of the last destinations".
- or You opened the Favourites menu as described
•
in the chapter "Destination entry", "Copying a
destination from the favourites".
쏅
Select the destination to be deleted.
쏅
쏅
쏅
쏅
Touch the button to call up the addon menu.
Touch the symbol.
A confi rmation is displayed.
Touch Yes to delete the destination.
- or Touch No in order to not delete the destina-
tion.
Delete all destinations
You can delete all the last destinations or all destinations in the Favourites:
쏅
쏅
쏅
쏅
쏅
쏅
쏅
Touch the symbol in the Navigation
menu.
The Destination Input menu is displayed.
Touch the symbol in the Navigation
menu.
The Favourites menu is displayed.
- or Touch the symbol.
The Last destinations menu is dis-
played.
Touch the button to call up the add-
on menu.
Touch the symbol.
A confi rmation is displayed.
Touch Yes to delete the destination.
- or -
Touch No in order to not delete the destination.
21
Page 22

Calculating a route | Specifying route options
Calculating a route
Calculate the route to a destination entered to
learn about distance and travel time: Afterwards,
you have the option to start the route guidance or
to continue optimising the route options.
All destinations, for which a route is calculated,
are stored in the Last destinations.
Starting the route calculation
Prerequisite:
•
You entered a destination as described in the
chapter "Destination entry".
- or -
•
You entered a point of interest as described in
the chapter "Points of interest".
- or -
•
You planned a tour as described in the chapter "Tour planning".
쏅
쏅
Additional functions after the route
calculation
After the route calculation, you have the option to
start the route guidance or to display the route on
the map.
쏅
쏅
Touch the button to call up the addon menu.
Touch the symbol.
The route is being calculated.
Note:
If no GPS reception is available, the last
known position is taken as the starting point
of the route.
Touch the Start Route Guidance button.
The route is calculated and the route guidance
started.
- or Touch the symbol.
The route is shown on the map.
Specifying route options
The route options can be defi ned at any time. If
you change the route options during a route guidance, the route may be recalculated.
쏅
쏅
쏅
쏅
Touch the symbol in the map view.
The Navigation menu is displayed.
Touch the symbol.
The Route Options menu is dis-
played.
Touch the symbol to select the type
of route calculation:
Fas t: The route with the fastest travel
–
time is calculated.
Short: The route with the shortest dis-
–
tance is calculated.
–
Optimal: Combination of shortest and
fastest route at a ratio of 40 to 60 percent. Distance and time are taken into
consideration. This route type is adjustable and described below.
–
Ecological: The route with the lowest
driving expenses (fuel effi cient) is calculated. For this purpose, the shortest and
fastest route are combined at a ratio of
75 to 25 percent.
–
Economic: Combination of fastest and
ecological route. Time and costs are taken
into consideration. For this purpose, the
shortest and fastest route are combined
at a ratio of 40 to 60 percent.
Touch the symbol to change between speed profi les offered.
Note:
You can call up an add-on menu for
the profi les Fas t or Slow: Select the
Adaptive option so that the profi le can be
adapted to your driving style. If necessary, it
can be reset to the factory setting.
22
Page 23

Specifying route options | Route guidance
쏅
쏅
쏅
쏅
쏅
쏅
쏅
Seasonal roads are roads that could be closed
depending on the season, e.g. snowfall.
쏅
쏅
Touch the symbol to activate (check
mark) or deactivate (no check mark)
automatic traffi c jam detours with
TMC.
Touch the symbol to allow (check
mark) or disallow (no check mark)
motorways.
Touch the symbol to allow (check
mark) or disallow (no check mark)
toll roads.
Touch the symbol to allow (check
mark) or disallow (no check mark)
ferries.
Touch the button.
The display shows the second page
of the menu.
Touch the symbol to allow (check
mark) or disallow (no check mark)
tunnels.
Touch the symbol to allow (check
mark) or disallow (no check mark)
seasonal roads.
Touch the symbol to adjust the relationship of short and fast for the
route type Optimal.
Touch this button to exit the menu.
Route guidance
DANGER!
Disregarding traffi c rules can lead to
accidents
Follow the turn-by-turn directions only if the street
routing and traffi c rules allow it. The navigation
device will bring you to your destination even if
you have to deviate from the planned route.
Notes:
Repeat the voice output if you did not un-
•
derstand it. (Ch. "Voice output during the
route guidance")
You can always use the map or arrow dis-
•
play for orientation purposes.
Start route guidance
Touch the Start Route Guidance button.
쏅
The route is calculated and the route guidance
started.
Notes:
•
The route is calculated using the settings
for the route calculation. (Ch. "Specifying
route options")
•
The destinations are automatically stored
in the Last Destinations.
The so-called "carsor" represents your
position.
Compass:
Always points north (for orientation)
23
Page 24

Route guidance
Note:
If you enter an additional destination during
an active route guidance and start the route
guidance, you have two options:
•
You can insert the destination as interim
destination. The route is recalculated and
the interim destination is approached
next.
•
Or you start a new route guidance to the
destination entered.
Reaching the place of destination
As soon as you have reached the destination
point, the message "You have reached your destination" appears. The map now displays only your
current position.
Quitting the route guidance
Touch any position on the map.
쏅
The Route Guidance Options add-on menu is
displayed.
쏅
쏅
쏅
Touch the symbol to quit the route
guidance.
A confi rmation is displayed.
Touch Yes to quit the route guidance.
The map is displayed.
- or Touch No to continue the route guidance.
Offroad route guidance
If you are on a road that is not part of the map material ("off road"), a route cannot be calculated.
The navigation device then supports the route
guidance like a digital compass:
An arrow points to the direction of the desti-
•
nation.
The distance to the destination (straight line)
•
is displayed.
The coordinates of your current position and
•
the destination are displayed.
A prerequisite in this case is suffi cient GPS reception.
Disturbed GPS reception
On the map, the symbol indicates that no
suffi cient GPS signal is being received. If
you start a route guidance at this point, the navigation device calculates the route based on the last
known position.
If the GPS reception is disturbed during route
guidance for an extended period of time, the route
guidance is stopped. As soon as the reception is
re-established, the device automatically recognises whether your position has changed and, if necessary, recalculates the route. At that time, you
can simply continue your destination guidance.
Note:
External infl uences can interfere with the view
to the sky and, therefore, the GPS reception
of the navigation device. For further details,
read the chapter "Troubleshooting table".
24
Page 25

Working with the map
Working with the map
Showing a Map
쏅
To change to the map display from the Navigation
menu:
쏅
To reach the map view after the destination
entry:
쏅
쏅
쏅
Moving and scaling the map
To view the desired destination area on the map,
you can move the map section and scale it (zoom
in and zoom out).
쏅
쏅
Touch the map and move the map in the desired direction.
쏅
Touching the map
Touch a location (the street or the point of in-
쏅
terest) in the map.
Touch the OK button.
쏅
The coordinates to the selected location are
displayed.
쏅
- or -
Touch the symbol in the main
menu.
Touch the button.
Touch the button to call up the addon menu.
Touch the symbol.
Touch the button to close the map
view and return to the destination
entry.
Touch one of the symbols to
zoom in or out of the map.
Touch the button to return to your
current position.
The city is selected and its name appears
in the lower display bar.
Touch the symbol to adopt the city as
the destination.
The route guidance is being started.
쏅
쏅
Touch the symbol to store the location and use it as destination at a lat-
er time.
The keyboard is displayed.
Enter a name for the destination and touch
OK.
The destination is stored in the Favourites
under the name entered. (Ch. "Managing destinations")
Note:
If you touch any place in the map during the
route guidance, an add-on menu with additional functions is displayed. For further details, read the chapter "Additional functions
during the route guidance".
Buttons
In the map view, the following buttons are available:
쏅
쏅
Touch the symbol to reach the Navigation menu.
Touch the symbol to reach the Map
Settings menu.
Performing map settings
쏅
쏅
쏅
쏅
Touch the symbol in the map view.
The Map Settings menu is displayed.
Touch the symbol to toggle between
day and night display or to activate
the automatic function.
If you activate the automatic function, switching between day and night display occurs automatically. In the process, the display brightness is constantly adjusted to the light conditions. (For further details, read the chapter
"Settings", "Performing device settings").
/ Touch the symbol to
change between 2D and
3D view.
/ Touch the symbol to change
the map orientation between driving direction and
direction North.
25
Page 26

Working with the map | Voice output during route guidance
쏅
쏅
쏅
쏅
쏅
쏅
쏅
Touch the symbol to change these
settings for the speed limit:
–
–
–
is perfectly adjusted to the respective driving
situation during route guidance. If you approach an action, the view is enlarged, e.g. so
that you can clearly see the next intersection.
If the next action is farther away, the view is
reduced so that you can easily see the run of
the road.
Note:
The distances are shown exclusively for
points of interest along your route and only at
motorways.
Touch the symbol to show (check
mark) or hide speed warnings
(no check mark) on the map.
Touch the symbol to switch the
warning beep on (check mark)
or off (no check mark).
Touch the symbol to adjust a tolerance value for the speed warning. A warning occurs only if the
tolerance value is exceeded.
Touch the symbol to show (check
mark) or hide (no check mark)
points of interest.
Touch the symbol to switch auto zoom
on (check mark) or off (no check mark).
Auto zoom means that the map scale
Touch the button.
The display shows the second page
of the menu.
Touch the symbol to show (check
mark) or hide altitude and speed (no
check mark) on the map.
For route guidance with several interim destinations, the time and distance to the next interim destination
is shown on the map. Touch the symbol to also show (check mark) or
hide (no check mark) the time and
distance to the last destination.
Touch the symbol to show (check
mark) or hide (no check mark) distances to points of interest.
쏅
/ Touch the symbol to change
between the display of arrival time and remaining
driving time (travel time).
Voice output during route
guidance
Your navigation device supports route guidance
with voice-prompted turn-by-turn directions and
announces turns in advance. In the process, it
also announces the names of major roads and
motorways. In the settings, you can activate and
deactivate the voice instructions of the navigation
(Ch. "Settings", "Settings for navigation").
Note:
The volume can be changed only if the voice
output is currently active.
쏅
During the voice output, press the button
VOL - or VOL + to change the volume for the
voice output.
쏅
Touch the lower fi eld on the display to
repeat the last voice output.
26
Page 27

Map display during destination guidance
Map display during destination
guidance
During the route guidance, the map display shows
you different navigation tools and route information.
DANGER!
Disregarding the street routing can
lead to accidents
The information on the digital road maps may no
longer be current due to short-term changes (construction, etc.).
Additional information, e.g. the speed limit, can
be shown only if they are contained in the map
material.
The signposts and local street routing always have
priority over the information of the navigation device.
Navigation tools
Voice output is activated.
Voice output is deactivated (muted).
Touching the symbol reactivates the voice
output.
Route information
The lower display bar shows the following route
information by default:
•
•
Instead of the arrival time, you can also display the
remaining driving time.
For route guidance with several interim destinations, the route information for the next interim
destination is displayed. In addition, you can show
the distance and time for the last destination.
For settings, please read the chapter "Working
with the map", "Performing map settings".
Remaining distance to destination
Estimated time of arrival
Speed limit
The speed limit is shown in the left area of
the map.
Note:
This information can be displayed only if it
is activated in the navigation settings. (Ch.
"Working with the map", "Performing map
settings")
The so-called "carsor" represents your position.
The compass always points north (for ori-
entation).
Top fi eld: Name of next street
Bottom fi eld: Name of current street
The action arrow shows the next action
and the distance to that action.
When you come closer to the location of the next
action, a bar is shown on the right side: The fewer
yellow segments are displayed, the closer you are
to the location of the next action.
27
Page 28

Additional functions during the route guidance
Additional functions during the
route guidance
Prerequisite:
Route guidance
•
- or Route simulation (demo)
•
Touch any position on the map to display
쏅
additional functions.
The Route Guidance Options add-on menu is
displayed.
The following functions are now available:
Entering a blocking
–
Cancelling route guidance
–
Skipping the next destination
–
Display information about the destina-
–
tion
Display route list
–
Entering a blocking
During the route guidance, you can block the route
segment lying ahead of you. An alternate route is
calculated and the blocked partial route is bypassed.
쏅
쏅
쏅
Touch the symbol in the add-on
menu.
The Traffi c Jam Ahead menu is dis-
played.
In this menu, you can select the length of the
blocking, starting with your current position.
Touch the buttons to enter
the length of the blocking.
Touch the OK button.
The route is recalculated and the blocked
route segment is evaded.
The symbol identifi es the blocking. The
!
blocked segment is marked in red.
To cancel the blocking:
쏅
쏅
쏅
In the add-on menu, touch the symbol again (the check mark indicates
that a blocking has been entered).
A confi rmation is displayed.
Touch Yes to delete the blocking.
The route is being recalculated.
- or Touch No in order to not delete the blocking.
Cancelling route guidance
쏅
쏅
쏅
Touch the symbol in the add-on
menu.
A confi rmation is displayed.
Touch Yes to quit the route guidance.
The map is displayed.
- or Touch No to continue the route guidance.
Skipping the next destination
Prerequisite:
Tour with at least 1 interim destination (tour
•
planning)
쏅
In the add-on menu, touch the sym-
bol to skip the next interim destina-
tion.
The route is recalculated and the next destina-
tion is approached.
Display information about the
destination
쏅
쏅
Touch the symbol in the add-on
menu.
The destination address with infor-
mation about distance and arrival or
remaining driving time is displayed.
For tours, all interim destinations are
listed.
The destination can be displayed on the map:
Touch the Show In Map button.
28
Page 29

Additional functions during the route guidance | TMC function
쏅
Touch the symbol to exit the map
view again.
Display route list
The route list can be displayed to gain an overview
of the route.
쏅
쏅
쏅
Touch the symbol in the add-on
menu.
The route list is displayed.
Touch the buttons to scroll
through the route list.
Touch the symbol to exit the route list
again.
TMC function
The Traffi c Message Channel continuously broad-
casts traffi c announcements. The TMC function in
your device allows you to receive and display the
messages. Or you can use them for route guidance
so that you can avoid traffi c jams.
Establishing TMC reception
TMC is a service of the radio stations and is not
offered in all countries. The troubleshooting table
shows the countries in which TMC is available.
Connecting the TMC antenna
Your navigation device features a built-in TMC antenna. To improve the reception, you can connect
an external TMC dipole antenna to the antenna
input.
Searching for TMC stations
The device automatically sets the next receivable
TMC station. If the reception quality deteriorates,
it immediately searches for a new station. Or you
tune in your preferred TMC station:
쏅
쏅
쏅
Touch the symbol in the Navigation
menu.
The TMC Messages menu is displayed.
Touch the button to display the addon menu.
Touch the symbol.
The TMC station search starts.
Showing traffi c reports
The device also reports traffi c obstructions if you
did not start a route guidance.
쏅
쏅
쏅
Touch the symbol in the Navigation
menu.
The traffi c reports are listed.
Touch the buttons to change
between messages.
Touch the Show Message button to display a
message in its entirety.
29
Page 30

TMC function | Data transfer
Switch on automatic traffi c jam
detours
During the route guidance, the automatic traffi c
jam detours guides you past reported traffi c obstructions.
쏅
쏅
Touch the symbol in the Navigation
menu.
The Routing options menu is dis-
played.
Touch the symbol to activate (check
mark) or deactivate (no check mark)
automatic traffi c jam detours.
Traffi c obstructions on the map
display
On the map, the symbol identifi es all re-
!
ceived traffi c obstructions.
The concerned segments are marked in red or in
gray if they are outside your route.
In addition, a note calls your attention to immediate dangers, such as drivers going in the wrong direction, as soon as the TMC message is received.
Data transfer
Road maps can be copied onto a memory card and
then used with the device.
CAUTION!
Editing data in the internal memory can damage the device
If you connect the navigation device via a USB cable with your computer, you have access to the internal memory of the Lucca and the memory card.
If you change or delete the fi les in the internal
memory, it may render the device inoperable.
Copy or delete fi les on your memory card only
with the of a computer.
Copying data to the memory card
Use the navigation device as a card reader to copy
the desired data onto the memory card. Please
read the technical data to fi nd out which USB cables and which memory cards are compatible with
the device.
As an alternative, you can also transfer the data to
the memory card using a card reader.
Insert your memory card with the contacts
쏅
to the front in the card slot until the card engages.
Note:
Observe the marking at the slot.
Connect the device with a computer using a
쏅
USB cable.
The computer recognises the navigation
device as a card reader. The memory card is
displayed as a drive.
Copy the desired data onto the memory
쏅
card.
30
Page 31

Data transfer | Settings
Note:
Use the installation programme on the CD/
DVD to copy road maps to your memory
card.
Using road maps from memory card
The road map of the country in which the navigation device was purchased is preinstalled in the
memory of the navigation device. The enclosed
CD/DVD offers additional road maps depending
on the device variant as well as an installation
program to copy these road maps to your memory
card.
To use an additional road map:
쏅
Insert the memory card with the contacts to
the front into the card slot.
Note:
Observe the marking at the slot.
쏅
Switch on the navigation device.
The road maps are automatically loaded from
the memory card into the memory.
쏅
쏅
쏅
Touch the symbol in the main
menu.
The map is displayed.
Touch the symbol.
The Navigation menu is displayed.
Touch the symbol.
The Settings menu is displayed.
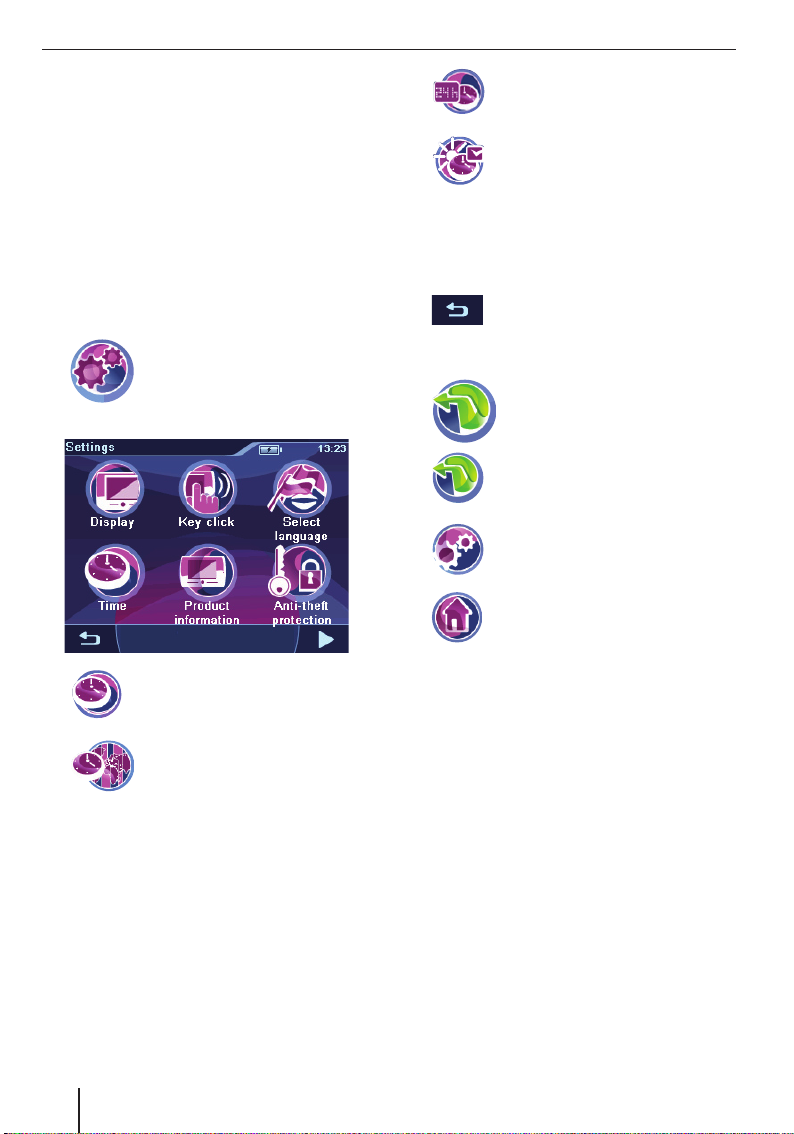
Settings
You can perform these settings:
Map settings (Ch. "Working with the map",
•
"Performing map settings")
•
Setting for the navigation
•
Device settings
Performing settings for the
navigation
Settings in the navigation menu:
Home address
•
Continuing the tour automatically
•
Selecting a dataset
•
POI note
•
Voice instructions
•
Units
•
쏅
쏅
쏅
쏅
Touch the symbol in the main
menu.
The map is displayed.
Touch the symbol.
The Navigation menu is displayed.
Touch the symbol.
The Settings menu is displayed.
If you performed changes to the settings:
Touch the button to exit the menu.
쏅
쏅
Touch the symbol.
A list of the available road maps is
displayed.
Touch the desired road map in the list to select it.
Home address
You should enter your home address to
quickly navigate home from any location.
For further details, read the chapter "Performing basic settings", "Entering the home address".
31
Page 32

Settings
Continuing the tour automatically
For tours with several interim destinations, you
can specify that the next destination is automatically approached after reaching an interim destination.
If the function is deactivated, a confi rmation is
displayed upon reaching an interim destination
whether the route guidance to the next interim
destination should be continued.
쏅
Selecting a dataset
POI note
If you are using your own POIs (points of interest),
the device can bring it to your attention in due
time during a route guidance.
쏅
Voice instructions
You can mute (deactivate) the voice instructions
of the navigation.
쏅
Units
You can defi ne which units of measure should be
used for distances.
쏅
Touch the symbol to activate (check
mark) or deactivate (no check mark)
the function.
In the Choose Dataset menu, you can call
up the list of available road maps and select the desired road map. For further details, read the chapter "Data transfer".
Note:
The enclosed CD/DVD contains an installation
programme with instructions to create your
own POIs.
Touch the symbol to activate (check
mark) or deactivate (no check mark)
notes on the map and the warning
beep.
Touch the symbol to activate (check
mark) or deactivate (no check mark)
the voice instructions.
Touch the symbol to change between
kilometres and miles.
Performing device settings
Settings in the Settings menu:
Display
•
Button sounds (sound of the buttons)
•
Language
•
Time
•
Product information
•
Theft protection
•
The second page of the menu also contains the
following settings:
•
Factory settings
•
Calibrating the touchscreen
쏅
쏅
If you performed changes to the settings:
쏅
Display
In the map settings, you can select between day
and night display or activate automatic switching
(Ch. "Working with the map", "Performing map
settings").
In the Display menu, you can set the display brightness for day and night.
Furthermore, it is possible to adjust the switching
threshold for automatic switching. It allows you to
select when switching between day and night display occurs.
쏅
쏅
Touch the Brightness Day button to adjust
the brightness for day mode.
쏅
Touch the Brightness Night button to adjust
the brightness for night mode.
쏅
Touch the Switch Threshold button to adjust
the automatic switching.
Touch the symbol in the main
menu.
The Settings menu is displayed.
/ Touch the button to scroll
in this menu.
Touch the button to exit the menu.
Touch the symbol.
The Display menu is displayed.
32
Page 33

Settings
A lower value indicates, for example, that
switching to night display already occurs at
dusk. A higher value causes switching to wait
until darkness.
Button sound
In the Key Clicks menu, you can adjust the volume
of the key clicks or mute ("0") them. You can also
select from different key clicks.
쏅
Touch the symbol.
The Key Clicks menu is displayed.
Touch the desired key click.
쏅
Touch the Volume button.
쏅
The Key Click Volume menu is displayed.
쏅
Touch one of the buttons to adjust the volume.
Language
In the Language menu, you can defi ne the language
in which the menus are displayed. The voice outputs also use the defi ned language, if available. If
the selected language is not available for the voice
output, it is output in English.
쏅
Touch the symbol.
A list with available languages is
displayed.
Touch the language in the list that you want to
쏅
use for menus and voice output.
Touch the OK button.
쏅
Time
In the Time menu, you can select the time
zone for your current position, adjust the
daylight savings time and switch between
12-hour and 24-hour display. The navigation can
announce the correct arrival time only if you set
the correct time zone.
For further details, read the chapter "Performing
basic settings", "Setting the time zone".
Theft protection
In the Anti-Theft Protection menu, you
can assign a PIN and a PUK to your navi-
gation device to protect it against unauthorised use. The PIN can be changed at any time.
Register under http://puk.blaupunkt.com to securely store your PUK.
For further details, read the chapter "Performing
basic settings", "Activating the PIN query".
Factory settings
In the Factory settings menu, you can reset the
navigation software to the factory settings.
Note:
If you reset the device to the factory settings,
your personal settings and stored destinations are deleted.
쏅
Touch the symbol on the second
page of the Settings menu.
The Factory Settings menu is dis-
played.
쏅
Touch the symbol to reset the settings for the navigation.
Touch Yes to reset the settings to the factory
쏅
settings.
The map is displayed.
- or Touch No to cancel the procedure.
쏅
Calibrating the touchscreen
You can recalibrate (align) the touchscreen if it
responds imprecisely to touches.
쏅
On the second page of the Settings
menu, touch the symbol to start the
calibration.
Follow the instructions on the display to cali-
쏅
brate the touchscreen.
Product information
쏅
Touch the symbol.
Product information about the de-
vice, such as the version of the map
used and the navigation software,
are displayed.
33
Page 34

Software | Service | Warranty | Technical data
Software
Reinstalling navigation software
For reinstallation purposes, the navigation software for your navigation device and instructions
are located on the enclosed CD/DVD.
Updating the navigation software
To ensure that your navigation device is always state-of-the-art, Blaupunkt offers software updates at regular intervals. They can be
downloaded from the Blaupunkt Internet site
www.blaupunkt.com.
Service
In some countries Blaupunkt offers a specifi c repair service including a pick-up service.
In case your device has to be sent to Blaupunkt for
service you can order a pick-up service for your
device on the internet.
Refer to www.blaupunkt.com to check if this service is available in your country.
Warranty
We provide a manufacturer warranty for our products bought within the European Union. For devices purchased outside the European Union, the
warranty terms issued by our respective responsible domestic agency are valid.
The warranty terms can be called up under www.
blaupunkt.com or requested directly from:
Blaupunkt GmbH, Hotline
Robert-Bosch-Str. 200
D-31139 Hildesheim
Technical data
Dimensions (W x H x D)
99 x 99 x 16.9 mm
Weight
approx. 180 g
Operating temperature
-20 °C ... 60 °C
Storage temperature
-30 °C ... 70 °C
Power supply
Battery: Li-ion, 3.7 V/1150 mAh
Charger cable for cigarette lighter:
Input 12 V
Battery charger: Input 100 to 240 V (50/60 Hz),
output 12 V /max. 1 A
Display
3.5˝ touchscreen TFT LCD color display 4:3,
320 x 240 pixel
Audio
Built-in loudspeaker, min. 1 W
GPS receiver
Integrated, QuickFind technology Centrality GPS,
32 channels
Platform
Dual Core Centrality Atlas III Processor
(400 MHz)
Internal 64 MB SDRAM Memory
1 GB NAND Flash Memory
Memory card slot: SD cards, MMC and SDHC max.
4 GB
USB
USB 2.0
Operating system
Microsoft Windows CE 5.0
34
Subject to changes
Page 35

Troubleshooting table
Problem Cause Measure
The device does not work or
does not work correctly.
The display remains dark if I
switch on the device.
The battery is empty, even
though I did not use the device
for some time.
The device does not respond
when I touch the buttons.
The device does not output any
turn-by-turn directions via voice
output.
The operating system is overloaded.
The display may temporarily
loose its contrast after long and
heavy exposure to the sun and
high temperatures.
At very high temperatures, the
device switches off to protect
against overheating.
The battery is not suffi ciently
charged.
The device continues to use a
small amount of energy if it is
switched off. Hence, the battery could be discharged after
a few days.
During short driving times,
the battery is not completely
charged.
The operating system is overloaded.
The voice instructions are deactivated.
The volume of the voice instructions is too low.
Perform a reset (Ch. "Switching
on/off")
Reset the factory settings (Ch.
"Settings"). All personal set-
tings will be deleted!
Reinstall the navigation software
using the enclosed CD/DVD.
Place the device in the shade for
approximately 10 minutes and
switch it on again.
Fully charge the battery. (Ch.
"Charging the battery")
To obtain battery operation
of up to 3 hours in navigation
mode, completely charge the
battery.
Always operate the device in the
vehicle together with the charger cable via the cigarette lighter.
Perform a reset (Ch. "Switching
on/off")
Activate the voice output in the
settings.
Increase the volume during a
voice output.
Troubleshooting table
35
Page 36

Troubleshooting table
Problem Cause Measure
The device has no or only a very
poor GPS reception.
After switch-on, the device requires approx. 1 minute until it
is ready for navigation. During
the initial switch-on, it requires
a longer time and a strong GPS
signal.
The GPS reception is generally
Move to the outside and place
the device on high ground. Your
device is operational again after
no more than 2 to 5 minutes. At
that time, the navigation is also
possible under less than perfect
conditions.
limited inside of buildings.
Heavily metal-evaporated windshields can interfere with the
GPS reception.
You may attempt to install the
device in a different location in
the vehicle.
Connect an external GPS antenna.
Refl ection and separation,
e.g. due to high-rises, tunnels,
mountains or heavy foliage
Heavy snowfall and (thunder)
storms
The device must have a clear
path to the sky. Wait until the
GPS reception is available again.
The route guidance is then continued automatically.
Transport of the vehicle by carsleeper train or ferry
The device has no or only a very
poor TMC reception.
The internal TMC antenna only
receives a weak TMC.
Connect an external TMC antenna to the device.
No TMC station is receivable. TMC is currently available in
Austria, Belgium, Czech Republic Denmark, Germany, England,
Finland, France, Italy, Netherlands, Norway, Spain, Sweden,
and Switzerland.
The device does not recognise
my memory card.
The memory card is not compatible with this device.
The memory card was formatted using the wrong fi le system.
Use compatible memory cards.
(Ch. "Technical data")
Format the memory card with
the fi le system FAT16 or FAT32.
Due to continued technical developments, Blaupunkt cannot guarantee the correct functioning of memory cards from different manufacturers and different types of cards. Try a memory card from a
different manufacturer or with a different capacity.
36
Page 37

FCC Information (USA)
FCC Information (USA)
This device complies with Part 15 of the FCC Results. Operation is subject to the following two
conditions:
1.
This Device may not cause harmful interface,
and
2.
This device must accept any interference received, including interference that may cause
undesired operation.
Note: This equipment has been tested and
found to comply with the limits for CLASS B digital device, pursuant to Part 15 of FCC Rules.
These limits are designed to provide reasonable
protection against harmful interference when
the equipment is operated in a commercial
environment. This equipment generates, uses
and can radiate radio frequency energy and, if
not installed and used in accordance with the
instructions, may cause harmful interference
to radio communications. However, there is no
guarantee that interference will not occur in a
particular installation. If this equipment does
cause harmful interference to radio or television
reception, which can be determined by turning
the equipment off and on, the user is encouraged to try correct the interference by one or
more of the following measures:
Reorient or relocate the receiving antenna.
1.
Increase the separation between the
2.
equipment and receiver.
Connect the equipment into an outlet on a
3.
circuit different from that to which receiver
is connected.
4.
Consult the dealer or experienced radio/
TV technician for help.
WARNING
Changes or modifi cations not expressly approved
by the manufacturer could void the user‘s authority to operate the equipment.
CAUTION
Exposure to Radio Freqency Radiation.
Antenna schall be mounted in such a manner to
minimize the potential for human contact during
normal operation. The antenna should not be contacted during operation to avoid the possibility
of exceeding the FCC radio frequency exposure
limit. The minimum separation distance of 20 cm
from the antenna to the body of user required.
37
Page 38

Country: Phone: Fax:
Germany (D) 0180-5000225 05121-49 4002
Austria (A) 01-610 39 0 01-610 39 391
Belgium (B) 02-525 5444 02-525 5263
Denmark (DK) 44-898 360 44-898 644
Finland (FIN) 09-435 991 09-435 99236
France (F) 01-4010 7007 01-4010 7320
Great Britain (GB) 01-89583 8880 01-89583 8394
Greece (GR) 210 94 27 337 210 94 12 711
Ireland (IRL) 01-46 66 700 01-46 66 706
Italy (I) 02-369 62331 02-369 62464
Luxembourg (L) 40 4078 40 2085
Netherlands (NL) 00 31 24 35 91 338 00 31 24 35 91 336
Norway (N) +47 64 87 89 60 +47 64 87 89 02
Portugal (P) 2185 00144 2185 00165
Spain (E) 902 52 77 70 91 410 4078
Sweden (S) 08-7501850 08-7501810
Switzerland (CH) 01-8471644 01-8471650
CzeCh. Rep. (CZ) 02-6130 0446 02-6130 0514
Hungary (H) 76 511 803 76 511 809
Poland (PL) 0800-118922 022-8771260
Turkey (TR) 0212-335 07 23 0212-346 00 40
http://www.blaupunkt.com
© 2008 All rights reserved by Blaupunkt. This material may be reproduced, copied or distributed
for personal use only.
This product is protected by certain intellectual property rights of Microsoft. Use or distribution of
such technology outside of this product is prohibited without a license from Microsoft.
Blaupunkt GmbH,
Robert-Bosch-Straße 200, D-31139 Hildesheim
03/08 CM-AS/SCS1 (GB) 8 622 405 957
Page 39

Mobile Navigation
TPAssist
TravelPilot 100
TravelPilot 200
TravelPilot 300
www.blaupunkt.com
Operating instructions
8 622 405 686
Page 40

TPAssist
!
!
The TPAssist PC tool can run on any PC using Windows
or Linux and on any Mac using the Mac OS operating
system.
To be able to use TPAssist, Java SE version 1.5 or later
must be installed (download under: www.java.com).
Introduction
TPAssist provides support for adding you own POIs
(Points Of Interest) to your device. In addition, you
can restore the navigation software and road maps, if
necessary.
Chapter overview
These operating instructions are intended to provide
answers to your questions concerning TPAssist:
Chapter Start: How do I start TPAssist?
Chapter User POIs: How do I edit POIs and how do
I use them with my device?
Chapter Recovery: How do I restore the navigation
software and road maps in my device?
Chapter Memory cards: How do I use memory
cards with the device?
Chapter Special topic – POI lists: How do I use
POI lists without TPAssist?
What prerequisites does my
What prerequisites does my
computer have to have?
computer have to have?
What can I do with TPAssist?What can I do with TPAssist?
Introduction
Symbols used
These operating instructions use the following symbols:
Warnings contain information for safe operation.
Notes must be followed to reach the desired goal.
Tips or recommendations are intended to facilitate
the use of TPAssist.
Links guide you to additional information about the
topic.
End of a chapter.
2
Page 41

Start
Step 1
Insert the supplied backup DVD in the drive.
If TPAssist does not start automatically:
Open My Computer (PC) or the Desktop (Mac).
Open the backup DVD and double-click on the
"TPAssist.jar" file.
TPAssist starts.
Select your preferred language.
The TPAssist main menu is displayed.
Select your device.
Here you can read the license agreement and
change to the selection of options.
Step 2
Click on Next and select one of the options:
Click on Edit your own POI list to load
–
and manage your own POI list or to create
new POI lists.
Click on Recover device to subsequently
–
reinstall the navigation software in your device.
Click on Display operating instructions to
–
call up the instructions for your device.
How do I start
How do I start
TPAssist?
TPAssist?
Start
3
Page 42

User POIs
TPAssist can also be used to create your own POIs and
edit existing POI lists.
To use the POIs with the device:
TravelPilot 100 and TravelPilot 200: The device
•
uses the user POIs from the memory card. For
this purpose, the POI lists must be copied to the
memory card.
TravelPilot 300: The device uses user POIs from
•
its memory. For this purpose, the POI lists must
be loaded directly into the memory.
Step 1 – Connecting the device
Connect the device with your computer using a
USB cable.
Step 2 – Using the memory card
(TravelPilot 100 and TravelPilot 200 only)
Insert the memory card into the device.
Switch on the device with the On/Off switch.
The computer recognises the device as a card
reader.
How do I edit POIs and how do I
How do I edit POIs and how do I
use them with my device?
use them with my device?
Tip:
Tip:
As an alternative, you can also transfer
As an alternative, you can also transfer
the data to the memory card using a card
the data to the memory card using a card
reader.
reader.
User POIs
Step 3 – Loading or creating a POI lists
If you selected the Edit your own POI list option in the
main menu, the following options are available:
Copy POI folder:
•
Copy a folder with existing POI lists directly to
your device (TravelPilot 300) or to the memory
card (TravelPilot 100 and TravelPilot 200).
- or -
Load:
•
Load an existing POI list from your computer to
edit it. For this purpose, you are asked to select
the POI list in the "Open" window.
- or -
New:
•
Create a new POI list with a name of your choice.
- or -
Tip:
Tip:
POI lists can be obtained from exter-
POI lists can be obtained from external sources, e.g. on the Internet under
nal sources, e.g. on the Internet under
www.poicon.com.
www.poicon.com.
4
Page 43

Save all:
!
!
!
!
•
To subsequently save the POI lists.
- or -
Close:
•
To subsequently close the POI lists.
User POIs
You can load several POI lists or create new ones and
edit them subsequently.
Click on one of the options to load a POI list or to
create a new one.
The POI editor is displayed.
Step 4 – Displaying a POI list
The left column of the POI editor displays all the loaded or newly created POI lists.
Click on a POI list to select it.
Step 5 – Selecting a POI icon for the POI list
In the main window, you can select the POI icon for the
POI list:
In the POI icon field, click on the displayed POI
icon to select a different image for the POI list.
The POI icon is displayed on the map for future
devices if it has the same designation as the cor-
responding POI list (currently an optional entry
field).
Note:
Note:
The device can use up to 128 POI lists.
The device can use up to 128 POI lists.
Step 6 – Activating POI hints
When you activate the POI hints, the device can point
to the POIs in time during a route guidance:
Click on the POI hint field to activate the POI hints
(check mark) or to deactivate them (no check
mark).
Note:
Note:
The POI hints must also be activated in
The POI hints must also be activated in
the settings in the device. (long instruc-
the settings in the device. (long instructions "Settings", "Performing settings for
tions "Settings", "Performing settings for
navigation")
navigation")
5
Page 44

Step 7 – Editing a POI list
!
!
In the table, you can add, delete or rename individual
POIs. The positions of the POIs are entered as coordinates:
New entry:
•
Adding a line for an additional POI. The empty line
is attached to the end of the POI list.
- or -
Edit:
•
Editing a POI in the table.
- or -
Delete:
•
Button for deleting individual POIs.
- or -
Delete All:
•
Deleting the entire POI list.
Click on one of the options to edit the POIs in a
list.
Enter the coordinates (degree of latitude and lon-
gitude) for every POI in the table and a description
(information):
Longitude/Latitude: Enter the coordinates in
–
decimal form (e.g. 51,50939 and -0,11832)
or as Degrees, Minutes and Seconds (DMS,
e.g. 51°30‘33.8“N and 0°7‘5.95“W) .
Information:
–
Rename the POIs as follows, if necessary:
CountryCode_Category1_Category2, e.g.
"GB_Leisure_Golf.asc".
Ensure that country code and categories are
separated in the file designation of POI lists.
Use underscores for this purpose. Only then
can the device subsequently sort the POIs by
country code and categories.
User POIs
Tip:
Tip:
You can obtain the coordinates of your fa-
You can obtain the coordinates of your favourite locations by using external Internet
vourite locations by using external Internet
sources, e.g. http://maps.google.com or
sources, e.g. http://maps.google.com or
Google Earth.
Google Earth.
Note:
Note:
The order and number of categories of
The order and number of categories of
POIs must always remain the same within
POIs must always remain the same within
a list:
a list:
Additional prerequisites
Additional prerequisites
6
Page 45

Step 8 – Storing POI lists
!
!
Click on Save All to save the changes and click on
OK.
The POI lists are saved to the location from where
they were opened (e.g. on the hard disk).
Step 9 – Copying POI lists
(TravelPilot 100 and TravelPilot 200 only)
Click on Copy POI list.
A window opens in which you can select the target
drive.
Select the removable media drive and confirm
with OK.
The POI lists are copied to the memory card.
You can now use your own POIs from the memory
card with the device. (For further details, please
read the long instructions, chapter "Navigation",
"Entering a point of interest").
Step 9 – Copying POI lists
(TravelPilot 300 only)
Click on Copy POI list and confirm with OK.
The POI lists are loaded into the memory.
User POIs
Note:
Note:
If you remove the memory card from the
If you remove the memory card from the
device, the POIs are no longer available.
device, the POIs are no longer available.
7
Page 46

Recovery
!
!
!
Recovery
If necessary, the navigation software and road maps
– including the POIs that were preinstalled when the
device was purchased – can be copied with TPAssist
to a memory card and reinstalled in your device.
This requires:
TravelPilot 100 and TravelPilot 200:
•
Memory card with a capacity of at least 1 GB
TravelPilot 300:
•
Memory card with a capacity of at least 4 GB
Caution
Every interruption of the installation may leads to errors in the device. For this reason:
Only remove the memory card after completing the installation.
•
Ensure that the power supply of the device is working (external power source or sufficiently charged
•
battery).
Step 1 – Connecting the device
Connect the device with your computer using a
USB cable.
Step 2 – Using the memory card
Insert the memory card into the device.
Switch on the device with the On/Off switch.
The computer recognises the device as a card
reader.
How do I restore the navigation
How do I restore the navigation
software and road maps in my
software and road maps in my
device?
device?
Tip:
Tip:
As an alternative, you can also transfer
As an alternative, you can also transfer
the data to the memory card using a card
the data to the memory card using a card
reader.
reader.
Step 3 – Copying navigation software and road
maps to the memory card
If you selected the Recover device option in the main
menu, a window opens in which you can select the target drive.
Select the removable media drive and confirm
with OK.
The data are copied to the memory card.
Note:
Note:
To ensure that the program copies the
To ensure that the program copies the
correct data for your device, connect the
correct data for your device, connect the
device with the computer using a USB ca-
device with the computer using a USB ca
ble. If the device cannot be recognised,
ble. If the device cannot be recognised,
you can also continue the process without
you can also continue the process without
checking the device.
checking the device.
-
8
Page 47

Step 4 – Reinstalling the navigation software
and road maps
If you use the device as a card reader, please
remove the memory card and then disconnect the device from your computer.
The device restarts.
The reinstallation can now be started:
Insert the memory card into the device.
Press and hold the On/Off switch for longer
than 14 seconds while pressing and holding
the VOL – button until the first message appears on the display.
The installation is being performed.
After completing the installation, remove the
memory card.
Step 5 – After the installation
Perform the basic settings again. (For further
details, please read the instructions, ch. "Performing basic settings")
Start the navigation.
Touch any point on the map.
The message "No data record available" is displayed.
Touch the OK button.
The list of available road maps is displayed.
Touch the desired road map in the list to se-
lect it.
Recovery
9
Page 48

Memory cards
!
!
!
!
You can use a memory card with the device for the following:
Own POI lists
•
Reinstalling the navigation software and road
•
maps (recovery)
Memory cards
How do I use memory cards with
How do I use memory cards with
the device?
the device?
Step 1 – Preparing the memory card
The device accepts SD/SDHC and MMC cards. The
maximum capacity of the memory cards is 4 GB.
Connect a commercially available card reader or
the device to your computer and insert a memory
card.
Ensure that the memory card was formatted using
the file system FAT 16 or FAT 32:
To do so, select My Computer (PC) or Finder
–
(Mac).
Right-click on the removable media drive
–
or the drive that appears and select Format
> FAT (PC).
or
Click on Programs > Utilities > Hard Disk Utili-
–
ties, select the memory card, and click on the
Delete tab. Select the MS-DOS File System
format, and clock on Delete (Mac).
Follow the instructions on the display.
–
Step 2 – Inserting the memory card in the device
Switch off the device with the On/Off switch.
Insert your memory card with the contacts to the
front in the card slot until the card engages.
You can now switch the device on again and use
it.
Note:
Note:
Always use an empty memory card for
Always use an empty memory card for
applications with TPAssist. For safety
applications with TPAssist. For safety
reasons, you cannot delete any files with
reasons, you cannot delete any files with
TPAssist. If necessary, remove the files on
TPAssist. If necessary, remove the files on
your memory card using Explorer (PC) or
your memory card using Explorer (PC) or
Finder (Mac).
Finder (Mac).
Tip:
Tip:
Name the memory card, e.g. with "POI
Name the memory card, e.g. with "POI
lists", to be able to keep track: For this
lists", to be able to keep track: For this
purpose, you enter a description for the
purpose, you enter a description for the
memory cards in the Format window (PC)
memory cards in the Format window (PC)
or in the "Information" window (Mac: right-
or in the "Information" window (Mac: rightclick on the removable media drive).
click on the removable media drive).
Note:
Note:
Observe the marking on the card slot of
Observe the marking on the card slot of
the device.
the device.
Step 3 – Removing the memory card from the
device
Carefully push on the memory card in the slot until
it disengages.
The memory card is ejected from the slot.
Remove the card.
10
Page 49

Special topic – POI lists
!
!
You can also copy POI lists independent of TPAssist to
a memory card, rename them and create POI icons, so
that they can be used with the device.
POI lists are available from external sources, e.g. via
the Internet from POICON (www.poicon.com). The
device supports Garmin-compatible file formats for
POI lists:
*.csv (comma-separated values)
•
*.asc (ASCII text format)
•
Step 1 – Connecting the device
Connect the device with your computer using a
USB cable.
Step 2 – Using the memory card
(TravelPilot 100 and TravelPilot 200 only)
Insert the memory card into the device.
Switch on the device with the On/Off switch.
The computer recognises the device as a card
reader.
Step 3 – Creating your own POIs
The device can only use POIs with the following format:
Rename the POIs as follows, if necessary:
CountryCode_Category1_Category2, e.g.
"GB Leisure Golf.asc".
Ensure that country code and categories are separated in the file designation of POI lists. Use underscores for this purpose. Only then can the device subsequently sort the POIs by country code
and categories.
Enter the coordinates in decimal form (e.g.
51,50939 and -0,11832) or as Degrees, Minutes and Seconds (DMS, e.g. 51°30‘33.8“N and
0°7‘5.95“W) .
Special topic – POI lists
How do I use POI lists without
How do I use POI lists without
TPAssist?
TPAssist?
Tip:
Tip:
As an alternative, you can also transfer
As an alternative, you can also transfer
the data to the memory card using a card
the data to the memory card using a card
reader.
reader.
Note:
Note:
The order and number of categories of
The order and number of categories of
POIs must always remain the same within
POIs must always remain the same within
a list:
a list:
11
Page 50

Step 4 – Copying POI lists to memory cards
ownPOIs
Hints
GB_Leisure_Golf.asc
GB_Leisure_Golf.bmp
GB_Leisure_GeoCaching.asc
GB_Leisure_GeoCaching.bmp
GB_ElectronicDealer_Blaupunkt.asc
GB_ElectronicDealer_Blaupunkt.bmp
ownPOIs
Hints
GB_Leisure_Golf.asc
GB_Leisure_Golf.bmp
GB_Leisure_GeoCaching.asc
GB_Leisure_GeoCaching.bmp
GB_ElectronicDealer_Blaupunkt.asc
GB_ElectronicDealer_Blaupunkt.bmp
ownPOIs
Hints
GB_Leisure_Golf.asc
GB_Leisure_Golf.bmp
GB_Leisure_GeoCaching.asc
GB_Leisure_GeoCaching.bmp
GB_ElectronicDealer_Blaupunkt.asc
GB_ElectronicDealer_Blaupunkt.bmp
ownPOIs
Hints
GB_Leisure_Golf.asc
GB_Leisure_Golf.bmp
GB_Leisure_GeoCaching.asc
GB_Leisure_GeoCaching.bmp
GB_ElectronicDealer_Blaupunkt.asc
GB_ElectronicDealer_Blaupunkt.bmp
(TravelPilot 100 and TravelPilot 200 only)
Create a folder on the memory card and name it
"ownPOIs".
The device uses only POI lists stored in this folder.
Create a subfolder in the "ownPOIs" folder and
name it "Hints".
Copy the POI lists into this folder to which you
want to be directed during the navigation.
Next, copy the desired POI lists (including POI
icons) to the memory card and into the folder
"ownPOIs" or "Hints".
Step 5 – Copying POI lists
(TravelPilot 300 only)
The device must be connected with your computer using a USB cable.
Create a "ownPOIs" folder in the memory of the
device.
The device uses only POI lists stored in this folder.
Create a subfolder in the "ownPOIs" folder and
name it "Hints".
Copy the POI lists into this folder to which you
want to be directed during the navigation.
Next, copy the desired POI lists (including POI
icons) to the folder "ownPOIs" or "Hints".
Special topic – POI lists
12
Page 51

Country: Phone: Fax:
Germany (D) 0180-5000225 05121-49 4002
Austria (A) 01-610 39 0 01-610 39 391
Belgium (B) 02-525 5444 02-525 5263
Denmark (DK) 44-898 360 44-898 644
Finland (FIN) 09-435 991 09-435 99236
France (F) 01-4010 7007 01-4010 7320
Great Britain (GB) 01-89583 8880 01-89583 8394
Greece (GR) 210 94 27 337 210 94 12 711
Ireland (IRL) 01-46 66 700 01-46 66 706
Italy (I) 02-369 62331 02-369 62464
Luxembourg (L) 40 4078 40 2085
Netherlands (NL) 00 31 24 35 91 338 00 31 24 35 91 336
Norway (N) +47 64 87 89 60 +47 64 87 89 02
Portugal (P) 2185 00144 2185 00165
Spain (E) 902 52 77 70 91 410 4078
Sweden (S) 08-7501850 08-7501810
Switzerland (CH) 01-8471644 01-8471650
Czech. Rep. (CZ) 02-6130 0446 02-6130 0514
Hungary (H) 76 511 803 76 511 809
Poland (PL) 0800-118922 022-8771260
Turkey (TR) 0212-335 07 23 0212-346 00 40
http://www.blaupunkt.com
© 2008 All rights reserved by Blaupunkt. This material may be reproduced, copied or distributed
for personal use only.
This product is protected by certain intellectual property rights of Microsoft. Use or distribution of
such technology outside of this product is prohibited without a license from Microsoft.
Blaupunkt GmbH,
Robert-Bosch-Straße 200, D-31139 Hildesheim
04/08 CM-AS/SCS1 (GB) 8 622 406 032
 Loading...