

Page 1
Travel Entertainment
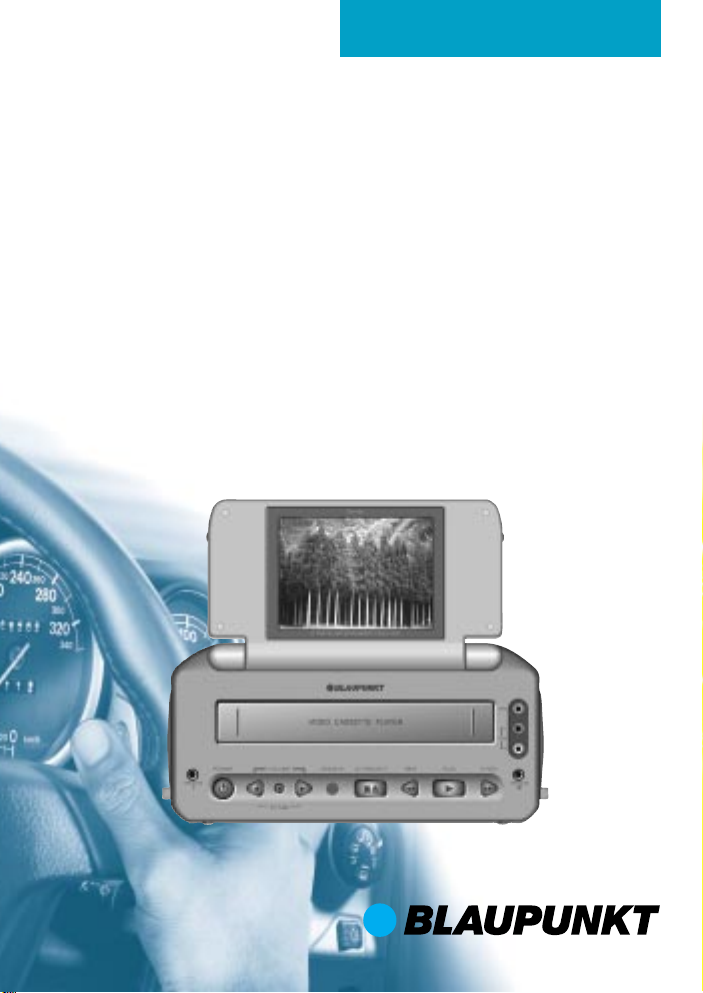
Video unit
TEV-501
Operating and installation instructions
VIDEO
Page 2

Bitte aufklappen
Open here
Ouvrir s.v.p.
Aprite la pagina
Hier openslaan a.u.b.
Öppna här
Por favor, abrir
Favor abrir
2
Page 3
4
ENGLISH DEUTSCHFRANÇAISITALIANO
1
2
3
5
6789:;< =>
NEDERLANDS
D
SVENSKAESPAÑOL
?@ABC
PORTUGUÊS
33
Page 4

1 Video input VIDEO IN
2 Audio input, left channel
AUDIO IN L
3 Audio input, right channel
AUDIO IN R
4 Headphone output 1
HEADPHONE 1
5 Headphone output 2
HEADPHONE 2
6 On/off button POWER
7 Volume control, quieter
VOLUME, picture controls
8 Sequence switch for setting
contrast, brightness, colour and
tint PICTURE
9 Volume control, louder
VOLUME, picture controls
: Infrared receiver for remote
control, optional SENSOR
; Stop button, eject cassette from
the unit STOP/EJECT
< Fast rewind button REWIND
= Playback button PLA Y
> Fast forward button FFWD
? Input for 12-volt direct current
DC 12V
@ Video input VIDEO IN
A Audio input, left channel
AUDIO IN L
B Audio input, right channel
AUDIO IN R
C Output for an external monitor
AV OUT
D Input for an optional television
receiver
CONTROLS
ENGLISH DEUTSCHFRANÇAISITALIANO
NEDERLANDS
SVENSKAESPAÑOL
PORTUGUÊS
1313
Page 5

CONTENTS
Notes ...................................... 15
Securing and installing
the TEV-501............................ 16
Before using for the first time ......... 16
Securing the TEV-501
between the front seats ................. 17
Operating the TEV-501 in buildings . 18
Operating the TEV-501........... 18
Switching the TEV-501 on/off ........ 18
Playing a video cassette ................ 18
Inserting a video cassette ........... 18
Removing a video cassette ......... 18
Playing a video cassette ............. 18
Fast tape winding....................... 19
Connecting external sources
(games consoles, DVD players
and television receivers) ................ 19
Connecting a games console/
DVD player to the TEV-501 ........ 19
Connecting an external monitor .. 19
Connecting a television
receiver to the TEV-501 ................. 19
Headphone connection.................. 19
Adjusting the volume ..................... 20
Adjusting the picture ...................... 20
Adjusting the contrast ................ 20
Adjusting the brightness ............. 20
Adjusting the colour ................... 20
Adjusting the tint ........................ 20
Technical data ........................ 21
14
Page 6

NOTES
Thank you for deciding to use a Blaupunkt product. We wish you a lot of fun
with your new piece of equipment.
Before operating the TEV-501 (Travel
Entertainment Video) unit for the first
time, please read these operating
instructions carefully and keep them in
the TEV -501’s case for future reference.
Please observe the following safety
instructions to ensure you operate the
TEV-501 safely and in a manner that
will not be of danger to anyone.
The TEV-501 must be connected
to a switched power supply (e.g. the
cigarette lighter) and must not be
connected directly to the vehicle
battery. To avoid the battery running
flat, disconnect the TEV-501 from the
power supply when not in use.
The TEV-501 must always be
secured in its case using the Velcro
straps. Fasten the unit to the eyelets
at the side.
Ensure that the unit is attached and
secured in accordance with these
operating instructions.
The S-hooks and all the straps must
be attached and fastened correctly
to avoid the unit causing injury in the
event of an accident.
To ensure that the TEV-501 is well
ventilated, only operate the unit with
the case opened.
Only use the supplied power supply
unit. Always disconnect the power
supply from the socket or cigarette
lighter first, before disconnecting the
cable from the TEV-501.
Never touch the unit with moist
hands.
T o clean the unit, only use a dry , lintfree cloth. Never use harsh cleansing
agents or thinners.
Danger of electric shock. Never open
the unit’s housing. It does not contain
any components that can be
serviced by the user.
Remove the video cassette from the
unit when not in use.
ENGLISH DEUTSCHFRANÇAISITALIANO
NEDERLANDS
SVENSKAESPAÑOL
1515
PORTUGUÊS
Page 7

SECURING AND INSTALLING THE TEV-501
Securing and installing
the TEV-501
Before using for the first time
➮ Open the lower storage
compartment of the TEV -501’ s
case, and remove the cigarette
lighter adapter and the four straps.
➮ Close the lower storage
compartment.
➮ Remove the unit from its case.
➮ Thread the adapter cable through
the opening in the case.
➮ Connect the plug to the DC 12V
input of the TEV -501.
➮ Place the unit back into the case.
➮ Secure the TEV-501 using the
Velcro straps located inside the
case by threading the Velcro straps
through the eyelets on the side of
the unit.
16
DC 12V
Page 8

SECURING AND INSTALLING THE TEV-501
Securing the TEV-501 between
the front seats
ENGLISH DEUTSCHFRANÇAISITALIANO
NEDERLANDS
➮ Take one of the straps that does
not have an S-hook attached.
➮ Place the strap around one of the
headrest supports on the driver
seat.
➮ Fasten the belt around the
headrest support using the two
buckles.
➮ Connect one of the strap’s buckles
to the corresponding buckle on the
side of the bag. You can adjust the
length of the strap to suit the
conditions in the vehicle interior.
➮ Repeat this procedure for the
passenger seat.
➮ Now take one of the straps that
does have an S-hook attached.
➮ Connect the buckle of the S-hook
strap with one of the buckles at the
lower end of the case.
➮ Place the strap around the seat rail
of the driver seat or the lower
safety belt attachment point.
➮ Thread the strap through the S-
hook.
➮ Pull the strap tight.
1717
SVENSKAESPAÑOL
PORTUGUÊS
Page 9

OPERATING THE TEV-501
➮ Repeat this procedure for the
passenger seat.
➮ Open the case’s upper lid.
➮ Flip up the monitor.
➮ Open the zip fasteners at the front
of the case. The unit is angled at
around 15°. Close the zip fasteners
until the unit is set at an angle that
you find convenient.
Operating the TEV-501 in
buildings
➮ Place the unit on a secure and
level surface.
➮ Open the lower storage
compartment in the TEV -501’ s
case, and remove the power
supply unit.
➮ Connect the output of the power
supply unit to the DC 12V input of
the TEV-501.
➮ Connect the mains power cable to
a 220-volt socket.
Operating the TEV-501
Switching the TEV-501 on/off
➮ Press the POWER button to switch
the TEV-501 on/off.
Playing a video cassette
Note
The TEV-501 is designed to play
standard consumer video cassettes of
the VHS variety (Video Home System).
Never try inserting other cassettes other
than VHS cassettes into the TEV-501.
Suitable VHS video cassettes are
labelled with the VHS symbol. Blaupunkt-Werke cannot accept any liability
for damage that may occur from using
other video cassettes in this unit.
Inserting a video cassette
➮ Carefully insert a video cassette
with its printed side uppermost and
its flap side first into the cassette
compartment of the TEV-501.
Removing a video cassette
➮ With playback stopped, press the
STOP/EJECT button.
Playing a video cassette
➮ To begin playback, press the PLA Y
button.
Note
Video cassettes will be played
automatically if their recording protection
mechanism has been activated.
18
Page 10

OPERATING THE TEV-501
Fast tape winding
To fast forward the tape,
➮ Press the FFWD button.
To fast rewind the tape,
➮ Press the REW button.
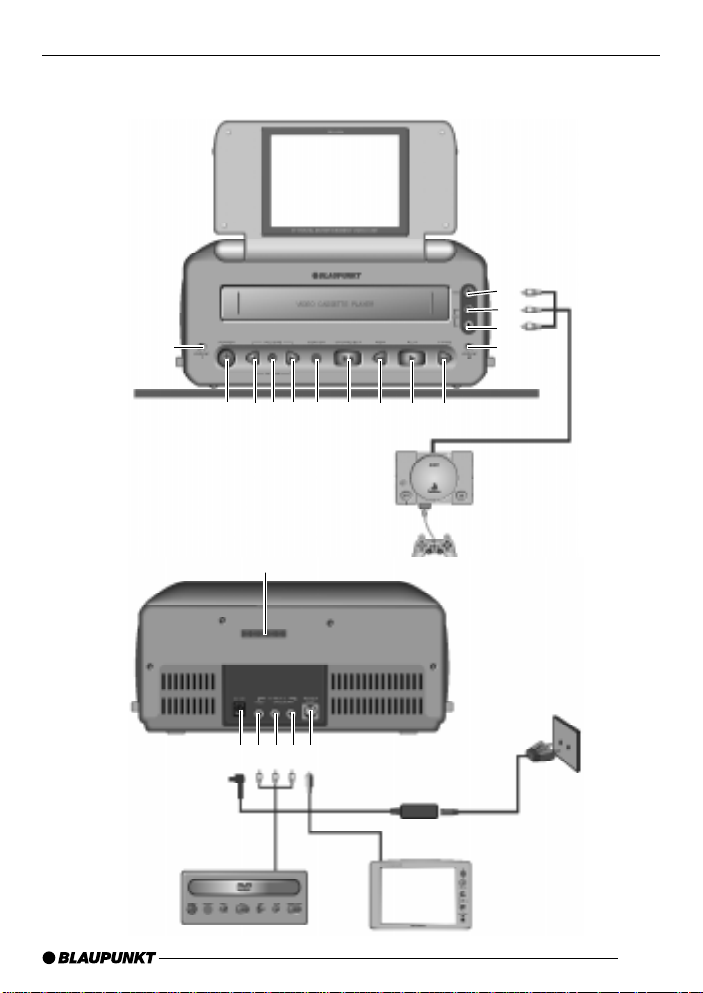
Connecting external sources
(games consoles, DVD players
and television receivers)
You can connect up to two external
video and audio sources to the TEV-501
(e.g. a games console or DVD player),
and use the monitor and loudspeakers
for the output. The TEV-501 has two
separate inputs for video signals and
stereo audio signals. The inputs are
located on the front and back of the TEV -
501. If all the inputs are in use, the TEV 501 gives priority to the inputs at the
front of the unit.
Connecting a games console/DVD
player to the TEV-501
➮ Use a suitable cable to connect a
games console/DVD player to the
VIDEO IN, AUDIO IN L and
AUDIO IN R inputs at the front or
back of the TEV -501.
To avoid damage to the TEV -501
and the games console, make
absolutely certain that the cable
colours match the jack colours on the
units.
➮ First switch on the games console.
➮ Now switch on the TEV-501.
To enable an external source to output
on the TEV -501,
➮ Press the STOP button.
Connecting an external monitor
Y ou can connect a monitor to the TEV501 in order to output to this monitor.
➮ Connect an external monitor or
television to the A V OUT
connection on the TEV -501.
Connecting a television receiver
to the TEV-501
There is a 32-pin connection at the back
of the TEV -501 to allow you to connect
the optionally available TET-01
television receiver. If you want to
purchase a television receiver for the
TEV-501, please contact a Blaupunkt
dealer.
Headphone connection
There are two 3.5 mm headphone
connections at the front of the TEV -501
labelled HEADPHONE 1 and
HEADPHONE 2. You can connect
headphones to either of these jacks. If
you connect a headphone to the
HEADPHONE 1 jack, the unit’s internal
loudspeakers will be deactivated. If you
only connect up the HEADPHONE 2
jack, sound will be outputted
simultaneously over the internal
loudspeakers.
ENGLISH DEUTSCHFRANÇAISITALIANO
NEDERLANDS
SVENSKAESPAÑOL
PORTUGUÊS
1919
Page 11

OPERATING THE TEV-501
Adjusting the volume
To increase the volume,
➮ Press the right VOLUME button.
To decrease the volume,
➮ Press the left VOLUME button.
Whilst you are making your
adjustments, a symbolic representation
of the volume level appears in the
display.
Adjusting the picture
Adjusting the contrast
To adjust the contrast of the monitor,
➮ Press the PICTURE button.
CONTRAST
appears in the display .
➮ Adjust the picture contrast using
the two VOLUME buttons.
Adjusting the brightness
T o adjust the brightness of the monitor,
➮ Repeatedly press the PICTURE
button until
in the display .
BRIGHTNESS
appears
➮ Adjust the brightness using the two
VOLUME buttons.
Adjusting the colour
To adjust the colour of the monitor,
➮ Repeatedly press the PICTURE
button until
display .
COLOR
appears in the
➮ Adjust the colour using the two
VOLUME buttons.
Adjusting the tint
To adjust the tint of the monitor,
➮ Repeatedly press the PICTURE
TINT
button until
display .
appears in the
➮ Adjust the tint using the two
VOLUME buttons.
20
Page 12

Technical data
Television standard
P AL/NTSC/ME
SECAM/SECAM L
Diagonal image size
Approx. 12.4 cm
(5 inches)
Audio tracks 1
Tape width 12.7 mm
Tape speed SP
33.35 mm/s
Fast tape winding
Less than 7 minutes
for a 120-minute
cassette
Video output 1.0 Vp/p, 75 ohms,
unbalanced
Video S/N Better than 40 dB
Audio power 2 x 0.5 W
Audio S/N Better than 40 dB
Electrical power supply
DC 12 V ,
AC 100 - 240 V/
50 - 60 Hz
Power consumption
18 W
Permissible air humidity
10-75%
Permissible temperature range
-20° to +60° Celsius
Dimensions (W x H x D)
275 x 345 x 125 mm
TECHNICAL DATA
ENGLISH DEUTSCHFRANÇAISITALIANO
NEDERLANDS
SVENSKAESPAÑOL
PORTUGUÊS
2121
Page 13

Service-Nummern / Service numbers / Numéros du service aprèsvente / Numeri del servizio di assistenza / Servicenummers /
Telefonnummer för service / Números de servicio / Número de
serviço
Tel.: Fax:
Deutschland 0 18 05 00 02 25 0 51 21 49 40 02
Belgique / België 0 25 25 54 44 0 25 25 54 48
France 014 010 70 07 014 010 73 20
Nederland 023 565 63 48 023 565 63 31
Great Britain 018 958 383 66 018 958 383 94
Danmark 44 89 83 60 44 89 86 44
Sverige 08 750 15 00 08 750 18 10
Norge 66 81 70 00 66 81 71 57
Suomi 094 359 91 094 359 92 36
Österreich 01-6 10 39-0 01-6 10 39-391
EÏÏ¿˜
015 762 241 015 769 473
âeská republika 026 130 04 41 026 130 05 14
USA 800-266 25 28 708-681 71 88
Singapore 006 535 054 47 006 535 053 12
Slovensko 042 175 873 212 042 175 873 229
ENGLISH DEUTSCHFRANÇAISITALIANO
NEDERLANDS
SVENSKAESPAÑOL
Blaupunkt-Werke GmbH
Bosch Gruppe
10/00 K7/VKD 8 622 402 656
PORTUGUÊS
1313
 Loading...