

Blaupunkt SAN FRANCISCO CD70 User Manual
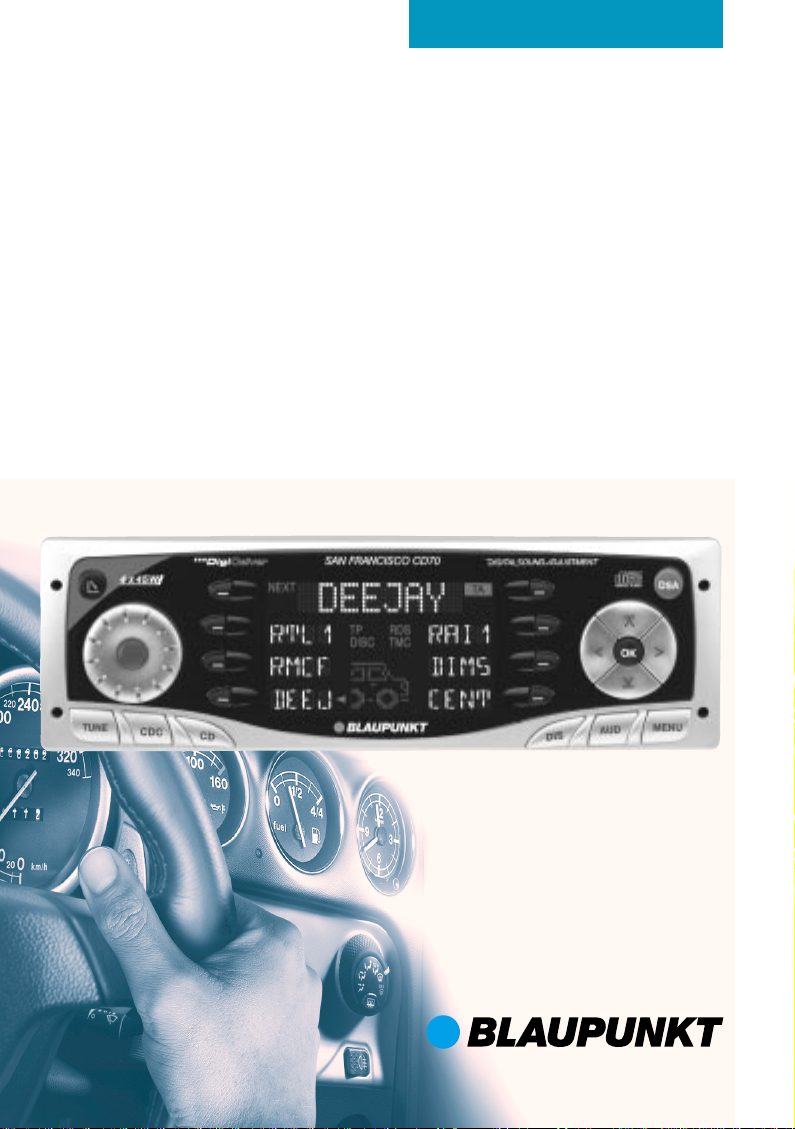
Operating instructions
Radio / CD
San Francisco CD70

Open here
Ouvrir s.v.p.
Por favor, abrir
Favor abrir
2
ENGLISH
FRANÇAIS
ESPAÑOL
2
13
3
12
1
14
4
11
10
5
9
6
PORTUGUÊS
NEDERLANDS
8
7
SVENSKA
3
ESPAÑOL
PORTUGUÊS

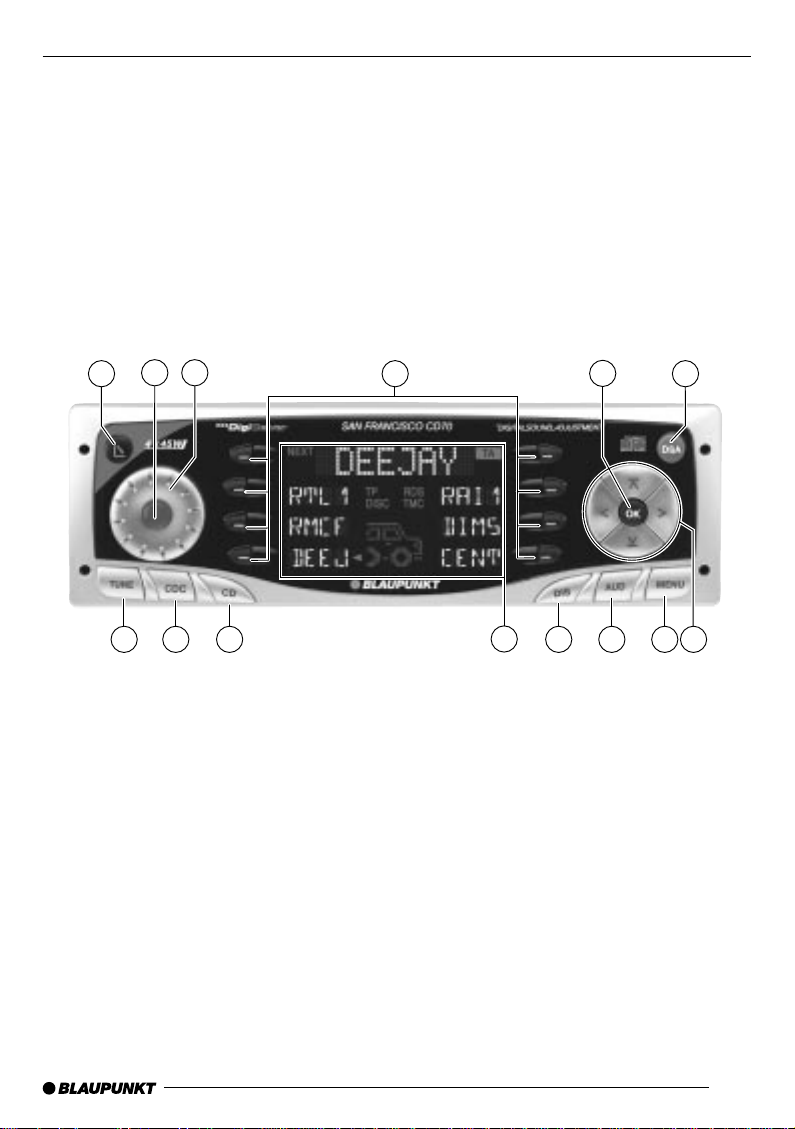
CONTROLS
1 button - opens the operating panel
2 Button - switches the radio and mute
function on/off
3 Volume control
4 Soft keys - the function of the soft
keys depends on the current content
of the display
5 OK button - confirms menu entries
and leaves the menu
6 DSA button - selects the DSA menu
7 Multifunction rocker switch
8 MENU button - selects the menu for
basic settings
9 AUD button - adjusts bass and treble,
balance and fader as well as loudness
: DIS button - changes display contents
; Display
< CD button - starts CD playback
= CDC button - starts CD changer play-
back (only if connected) or
plays an external audio source (only if
connected)
> TUNE button - activates radio mode
Selects the radio function menu (only
possible in radio mode)
4

TABLE OF CONTENTS
Notes ............................................... 6
Road safety ............................................. 6
Installation ............................................... 6
Accessories............................................. 6
Guarantee ............................................... 6
International telephone information......... 6
Theft protection, KeyCard ............. 7
Inserting the KeyCard ............................. 7
Removing the KeyCard ........................... 7
Replacing / “training” KeyCards............... 7
Lost or damaged KeyCards..................... 8
“Training” a new KeyCard / entering the
master code ............................................ 8
Optical theft protection indicator (LED) ... 8
Viewing radio pass data .......................... 9
Caring for your KeyCard.......................... 9
Switching on/off ............................. 9
First use ........................................ 10
Volume adjustment ...................... 11
Audio settings .............................. 12
Setting the display ....................... 13
Radio mode................................... 14
Switching to radio mode........................ 14
Switching the RDS function on and off . 14
Switching the AF function on and off .... 14
Selecting the frequency range /
memory bank ........................................ 14
Tuning to a station................................. 15
Selecting short-/long-range reception ... 15
Setting station scanning sensitivity ....... 16
Storing stations ..................................... 16
Storing stations automatically
(“Travelstore”)........................................ 16
Listening to preset stations ................... 17
Radio scan ............................................ 17
Setting the scan time............................. 17
Programme type (PTY) ......................... 18
Optimising radio reception .................... 19
Switching between stereo and mono .... 20
Changing the display............................. 20
Selecting radio text display.................... 20
Naming a station ................................... 20
CD Mode........................................ 22
Switching to CD mode, inserting a CD.. 22
Removing a CD..................................... 22
Selecting a track.................................... 22
Fast search (audible)............................. 22
Random play (MIX) ............................... 22
Scanning tracks (SCAN) ....................... 22
Repeating a track (REPEAT)................. 23
Changing the display............................. 23
Programming favourite CD tracks ......... 23
Naming CDs.......................................... 24
CD changer mode (optional) ....... 25
Switching to CD changer mode............. 25
Selecting a CD ...................................... 25
Selecting a track.................................... 25
Fast search (audible)............................. 25
Changing the display............................. 25
Repeating individual tracks or whole
CDs (REPEAT)...................................... 25
Random play (MIX) ............................... 26
Scanning all tracks on all CDs (SCAN) . 26
Naming CDs.......................................... 26
Programming favourite CD tracks ......... 27
CLOCK time .................................. 28
Setting the time ..................................... 28
Switching between 12- and
24-hour clock mode............................... 29
Permanent time display when unit is off . 29
DSA - Digital Sound Adjustment 30
Switching DSA on/off ............................ 30
Lining up the equaliser automatically .... 30
Selecting an equaliser........................... 31
Select sound preset .............................. 31
Setting the equalisers manually ............ 31
Setting aid for the equaliser .................. 32
DNC - Dynamic Noise Covering.. 33
Lining up DNC....................................... 33
Switching DNC line-up on/off ................ 33
Setting the DNC increase...................... 33
TMC for dynamic navigation
systems......................................... 34
Pre-amplifiers ............................... 34
Subout/subwoofer........................ 35
High-pass filter ............................. 35
External audio sources................ 36
Tec hnical data .............................. 36
Installation instructions............. 137
ENGLISH
FRANÇAIS
ESPAÑOL
PORTUGUÊS
NEDERLANDS
SVENSKA
ESPAÑOL
PORTUGUÊS
5
NOTES
Thank you for deciding in favour of a Blaupunkt product. We wish you a great deal of
pleasure with your new car radio.
Note
Before using your car radio, please read these
instructions carefully and familiarise yourself
with the unit. Keep these instructions in your
vehicle for later reference.
Road safety
Road safety has priority . Only operate
your car radio if road and traffic conditions
allow. Familiarise yourself with the unit
before setting off on your journey .
Y ou should always be able to hear police,
fire and ambulance sirens in good time.
For this reason, set the volume of your car
radio at a suitable level.
Installation
If you would like to install your car radio yourself, please read the installation and connection instructions at the end of the manual.
Accessories
Please use only Blaupunkt-approved accessories.
Remote controls
The most important functions can be selected safely from the steering wheel using the
optional remote controls RC 08 or RC 10.
The RC 10 H remote control is included.
Amplifiers
All Blaupunkt amplifiers are suitable for use
with the radio.
CD changer
The following Blaupunkt CD changers can be
connected to the radio: CDC A 06, CDC A
08, CDC A 072 and IDC A 09.
The CD changers CDC A 5 and CDC A 071
can also be connected if you use an adapter
cable (Blaupunkt no.: 7 607 889 093).
Guarantee
The scope of the guarantee complies with the
legal provisions applicable in the country in
which the unit was bought.
Such legal provisions notwithstanding, Blaupunkt grants a 12-month guarantee.
If you have any queries regarding the terms
of the guarantee, please consult your authorised Blaupunkt dealer. The purchase receipt
applies in all cases as your guarantee slip.
International telephone
information
Should you have any questions about how to
use the car radio or require any further information, please call us!
The telephone information service numbers
are printed on the last page of this manual.
6
THEFT PROTECTION
Theft protection, KeyCard
Y our radio comes with two KeyCards.
T o replace a lost or damaged KeyCard, con-
tact your Blaupunkt dealer.
If you use two KeyCards, the settings for the
first KeyCard are also used for the second
KeyCard. Y ou can, however , store the following functions individually:
Preset stations, beep volume, equaliser settings.
In addition, the last values set for frequency
range, station, scanning time, and switch-on
volume remain stored.
This way, after you insert your KeyCard, the
unit will always be in the basic configuration
that you have chosen.
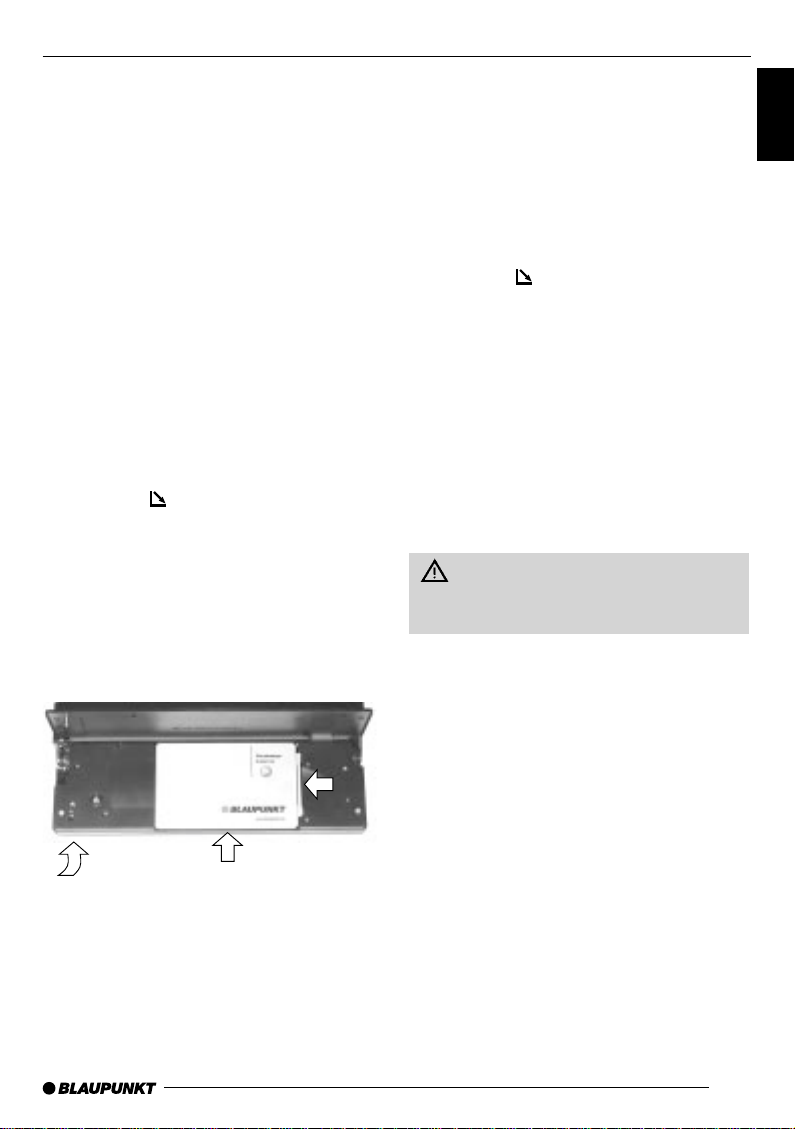
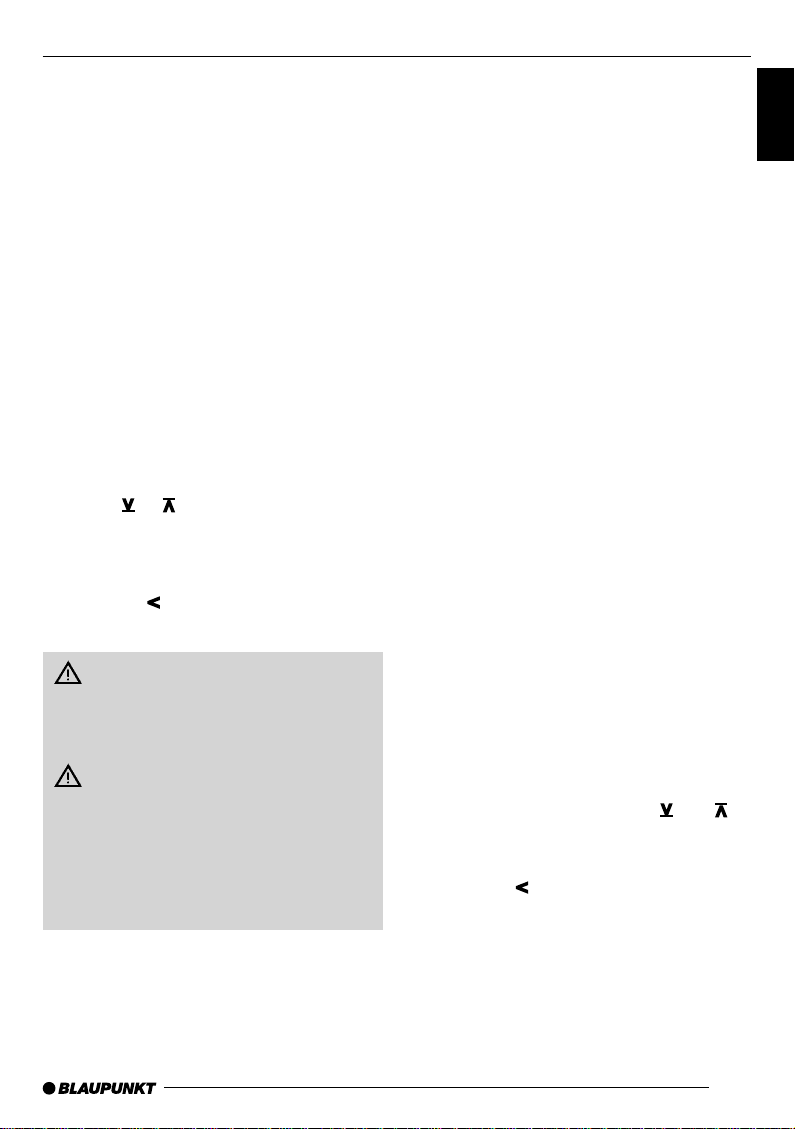
Inserting the KeyCard
➮ Press the button to open the operat-
ing panel 1.
➮ Insert the KeyCard as shown in the pic-
ture (Arrow 1) with the contacts facing
downward.
➮ Use the slide to push the card carefully
in the direction shown by the arrow (2)
as far as it will go.
2
3
➮ Close the operating panel (Arrow 3).
1
Note:
If a card that does not belong to the unit (for
example, a bankcard) is inserted, the display
will read “Wrong KC”.
Remove the incorrect card and insert a card
that the unit is able to recognise.
Removing the KeyCard
To unlock the operating panel,
➮ Press the button 1.
This will open the operating panel.
➮ Use the “slide” to push the card to the
right as far as it will go.
➮ Remove the card from the operating
panel.
➮ Close the operating panel.
Note:
T o discourage theft, always remove your KeyCard before exiting the vehicle and leave the
operating panel open.
For reasons of safety, the operating
panel must be closed whenever the vehicle is in motion.
Replacing / “training” KeyCards
Note:
No more than two KeyCards can be used for
each unit.
If you already have two KeyCards for your unit
and you “train” a third KeyCard, then the unit
can no longer be operated with the KeyCard
that was not used in training.
ENGLISH
FRANÇAIS
ESPAÑOL
PORTUGUÊS
NEDERLANDS
SVENSKA
ESPAÑOL
PORTUGUÊS
7
THEFT PROTECTION
To “train” a new KeyCard as a replacement
for a lost or unusable KeyCard:
➮ Insert the remaining valid KeyCard and
switch on the unit.
➮ Press the MENU button 8.
➮ Press the soft key 4 with the display
allocation “KC”.
➮ Press the soft key 4 with the display
allocation “LRN”.
The display will read “LEARN KC”.
➮ Remove the first KeyCard.
The display will read “INSERT”.
➮ Insert the new KeyCard.
The display will read “LEARN OK”.
T o exit the KeyCard menu
➮ press the MENU button 8 or the OK
button 5.
Now the car radio can be used with two KeyCards again.
Lost or damaged KeyCards
If all of the KeyCards belonging to a unit have
been lost or damaged, first a new KeyCard
with the master code of the unit must be
“trained”. The master code of the unit is contained in the radio pass.
Always keep the radio pass in a safe
place, but never in your vehicle.
To “train” a new KeyCard, follow the instructions given in the section “Training a new KeyCard / entering the master code”.
If necessary , you can use this KeyCard to train
a second KeyCard. For instructions on how
to do this, read the section “Replacing / training KeyCards”.
New KeyCards can be obtained from your
dealer.
“Training” a new KeyCard /
entering the master code
If you no longer have any valid KeyCards for
your unit and want to “train” a new KeyCard:
➮ Insert a new KeyCard that is unknown
to the unit.
➮ Close the operating panel.
➮ Turn off the unit if necessary .
➮ Simultaneously hold down the TUNE
button > and the second soft key 4
from the top on the left side 2.
The display will read “0000”.
Enter the four-digit master code from the ra-
dio pass as follows:
➮ Use the / buttons 7 to enter the
respective digits of the master code.
Press the buttons until the desired num-
ber appears on the display.
➮ Use the buttons 7 to move from
one digit to the next during input.
➮ Once the master code is displayed cor-
rectly, press the OK button 5.
The new KeyCard is accepted when the unit
switches to play.
Optical theft protection indicator
(LED)
The ON/OFF button and the CD bay illumination can be set to blink when the unit is off
and the KeyCard has been removed. To do
this, the menu setting “LED” must be set to
“ON”.
➮ Press the MENU button 8.
➮ Press the soft key 4 with the display
allocation “KC”.
➮ Press the soft key 4 with the display
allocation “LED”.
The display will show the current status “LED
ON” or “LED OFF”.
8

SWITCHING ON/OFFTHEFT PROTECTION
➮ Press the soft key 4 with the display
allocation “LED” to toggle between “LED
ON” and “LED OFF”.
T o exit the KeyCard menu
➮ Press the OK button 5 to go up one
level in the menu or press the MENU
button 8 to exit the menu. The settings
are now stored.
Viewing radio pass data
Using the KeyCard that came with your unit,
you can view the radio pass data, such as
unit name, type number (76 ...) and serial
number, on the display.
➮ Press the MENU button 8.
➮ Press the soft key 4 with the display
allocation “KC”.
➮ Press the soft key 4 with the display
allocation “READ”.
The radio pass data will scroll across the display .
T o exit the KeyCard menu:
➮ Press the MENU button 8 or the OK
button 5.
Caring for your KeyCard
Trouble-free KeyCard function is assured provided that the contacts are free of foreign
particles. Avoid direct skin contact with the
contacts.
If necessary , clean the KeyCard contacts using a lint-free cloth soaked in alcohol.
Switching on/off
There are various ways of switching the car
radio on and off.
Switching on/off using the button
2
➮ To switch the unit on, press the button
2.
The car radio is now switched on.
➮ To switch the unit of f, hold the button 2
down for more than two seconds.
The car radio is now switched off.
Switching on/off using the
ignition
If the car radio is correctly connected to the
ignition and has not been switched off using
the button 2, it is switched on/off simultaneously with the ignition.
You can also switch on your car radio when
the vehicle ignition is off.
➮ To do so, press the button 2.
Note:
T o protect the vehicle battery , the unit switches off automatically after one hour.
Switching on/off using the
KeyCard
You can switch the car radio on or off by inserting and removing the KeyCard if the unit
was previously switched off using the button
2. You can read about inserting/removing
the KeyCard in the chapter “Theft protection,
KeyCard”.
ENGLISH
FRANÇAIS
ESPAÑOL
PORTUGUÊS
NEDERLANDS
SVENSKA
ESPAÑOL
PORTUGUÊS
9
USING YOUR CAR RADIO FOR THE FIRST TIME
First use
If the unit is being connected for the first time
or if the power supply to the unit has been
interrupted, the Install menu will appear. The
following settings are made in the Install
menu:
● Selection of an external audio source
instead of a CD changer
● Time setting
● T uner configuration for US or European
operation
● Reset to factory defaults
● Internal amplifier on/off.
Y ou can reopen the Install menu at any time:
➮ Hold down the MENU button 8 until
the Install menu appears.
Changing settings
Selecting an external audio source
➮ Press the soft key 4 with the display
allocation “AUX” .
If the display reads “AUX”, then the input is
already on.
➮ Press the or button 7 to toggle
“AUX” on or off.
➮ Press the OK button 5.
Note:
If the AUX input is on, it can be selected with
the CDC button =.
Setting the clock
➮ Press the soft key 4 with the display
allocation “CLK”.
➮ Set the hour using the or button
7.
➮ Press the button 7.
➮ Set the minutes using the or button
7.
➮ Press the OK button 5.
Setting the tuner
To ensure proper tuner function in
the US the tuner must be set to “US”.
➮ Press the soft key 4 with the display
allocation “TUNE”.
➮ Select “EUROPE” or “US” using the us-
ing the or button 7.
➮ Press the OK button 5.
Switching the internal amplifier on/off
➮ Press the soft key 4 with the display
allocation “AMP”.
➮ Select “AMP ON” or “AMP OFF” using
the using the or button 7.
➮ Press the OK button 5.
Note:
If you set the internal amplifier to “AMP OFF”,
there will be no playback via the loudspeakers connected directly to the unit. In this case,
playback will be solely via an external amplifier.
Reset (factory defaults)
➮ Press the soft key 4 with the display
allocation “NORM”.
The display will read “NORMSET”.
If you really want to reset the device to the
factory presets,
➮ press the OK button 5.
Exiting the Install menu
To exit the install menu,
➮ press the OK button 5. The settings
are now stored.
10
VOLUME
Volume adjustment
The system volume can be adjusted in steps
from 0 (off) to 50 (maximum).
➮ To raise the system volume, turn the
volume control 3 to the right.
➮ To lower the system volume, turn the
volume control 3 to the left.
Setting the switch-on volume
It is possible to adjust the volume that will play
when you switch the radio on.
➮ Press the MENU button 8.
➮ Press the soft key 4 with the display
allocation “V AR”.
➮ Press the soft key 4 with the display
allocation “VOL”.
➮ Set the volume using volume control 3
or the or buttons 7.
If you wish to set the volume active before
the unit was last switched off as the switchon volume,
➮ press the button 7.
“LAST VOL” appears on the display .
Risk of serious injury! If the switch-on
volume is set at the maximum, the volume
can be very high when you switch on your
car radio.
If the volume was set on maximum
before the unit was last switched off and
the switch-on volume is set at “LAST VOL”,
the volume can be very high when you
switch on your car radio.
In both cases, your hearing may suffer
serious damage!
➮ Press the OK button 5 to go back to
the previous menu level or the MENU
button 8 to leave the menu altogether .
The settings are now stored.
Mute setting
This feature enables you to lower the system
volume instantaneously (mute).
➮ Briefly press the button 2.
“MUTE” appears on the display.
Deactivating the mute setting
➮ Briefly press the button 2
or
➮ turn the volume control 3.
Mute during telephone
If your car radio is connected to a mobile telephone, the volume will be muted as soon as
you “pick up” the telephone. In order for this
to work, the mobile telephone has to be connected to the car radio as described in the
instructions.
Setting the volume for the
warning tone (beep)
If you hold down a button for longer than two
seconds when using certain functions, e.g.
storing a station on a station button, a warning tone (beep) sounds. The volume of this
beep is adjustable.
➮ Press the MENU button 8.
➮ Press the soft key 4 with the display
allocation “VAR”.
➮ Press the soft key 4 with the display
allocation “BEEP”.
➮ Adjust the volume using the and
buttons.
If you wish to deactivate the beep,
➮ press the button 7.
“BEEP OFF” appears on the display .
➮ Press the OK button 5 to return to the
previous menu level or the MENU button 8 to leave the menu altogether .
The settings are now stored.
ENGLISH
FRANÇAIS
ESPAÑOL
PORTUGUÊS
NEDERLANDS
SVENSKA
ESPAÑOL
PORTUGUÊS
11
AUDIO SETTINGS
Audio settings
Note:
Y ou can adjust the bass, treble and loudness
settings separately for each audio source.
Bass settings
➮ Press the AUD button 9.
“AUDIO 1” appears on the display .
➮ Press the soft key 4 with the display
allocation “BASS”.
➮ Press the or button 7 to adjust
the bass.
When the settings have been completed,
➮ press the AUD button 9.
Treble settings
➮ Press the AUD button 9.
“AUDIO 1” appears on the display .
➮ Press the soft key 4 with the display
allocation “TREB”.
➮ Press the or button 7 to adjust
the treble.
When the settings have been completed,
➮ press the AUD button 9.
Loudness
Loudness means the bass levels are aurally
compensated, i.e. they are increased at lower volume levels.
➮ Press the AUD button 9.
“AUDIO 1” appears on the display .
➮ Press the soft key 4 with the display
allocation “LOUD”.
➮ Press the or button 7 to adjust
the loudness.
If you want to deactivate the loudness function,
➮ press the button 7.
“LOUD OFF” appears on the display.
When the settings have been completed,
➮ press the AUD button 9.
Setting the right/left balance
➮ To set the balance, press the AUD but-
ton 9.
“AUDIO 1” appears on the display .
➮ Press the soft key 4 with the display
allocation “BAL”.
➮ Press the or button 7 to adjust the
right/left balance.
When the settings have been completed,
➮ press the AUD button 9.
Fader settings, front/back
➮ To set the fader, press the AUD button
9.
“AUDIO 1” appears on the display .
➮ Press the soft key 4 with the display
allocation “FADE”.
➮ Press the or button 7 to adjust the
front/back fader.
When the settings have been completed,
➮ press the AUD button 9.
12
 Loading...